Embed Size (px)
Citation preview
Spanish (Mexico)
a Inserte la tarjeta SD.
b Conecte el cable de LAN, cable HDMI, cable de audio analógico/digital y fuente de alimentación al panel posterior del iS-1500.
c Ejecute el CD del producto, haga clic en "Install iSignager Software" y siga las instrucciones para instalar del software iSignager.
a Conecte el cable de red antes de encender el dispositivo. El iS-1500 obtiene una dirección IP automáticamente. La dirección IP aparecerá en la pantalla después del encendido del sistema. Si no existe ningún servidor DHCP en la red, el iS-1500 utilizará la dirección IP predeterminada 169.254.100.100. Puede conectar el iS-1500 a una PC a través de un cable de red e ingresar http://169.254.100.100 en un navegador Web para la configuración basada en la Web.
b Ingrese la dirección IP del iS-1500 en un navegador Web e inicie sesión en el reproductor con el nombre de usuario y contraseña predeterminados.
Nombre de usuario: admin Contraseña: signage
c Diríjase a “System administration (Administración del sistema)” > “Basic configuration (Configuración básica)”. Ingrese la dirección IP/nombre de host y puerto del servidor en la pestaña “Player settings (Configuración del reproductor)”. La dirección IP/nombre de host del servidor deberá ser la PC en la que está instalado el software iSignager. El número de puerto deberá coincidir con el número de puerto del software del software durante la instalación; el número de puerto predeterminado es 80.
d Diríjase a “System administration (Administración del sistema)” > “Network settings (Configuración de red)”. Dentro de la pestaña “TCP/IP”, haga clic en para configurar la dirección IP del iS-1500.
e Ejecute el software iSignager desde el servidor. Utilice iCommander para buscar y agregar el reproductor.
f Restablecimiento a los valores predeterminados de fábrica El botón de restablecimiento del iS-1500 está ubicado en el panel posterior, cerca del conector de
alimentación. Presione el botón de restablecimiento durante 5 segundos, se escucharán 3 pitidos y el iS-1500 se restablecerá a los valores predeterminados de fábrica. Se eliminará toda la configuración del sistema y archivos y se formateará la tarjeta SD. El proceso de restablecimiento demorará aproximadamente 5 minutos.
I. Instalación del hardware y del software
II. Configuración del Sistema (Usuarios de Windows)
No apague el dispositivo ni quite la tarjeta SD durante el proceso de restauración. El sistema se dañará si el proceso se interrumpe.
Nederlands
a Plaats een SD-kaart.
b Sluit de LAN-kabel, de HDMI-kabel, de digitale/analoge audiokabel, en de voeding aan op het achterpaneel van de iS-1500.
c Voer de product-cd, klikt u op "Install iSignager Software" en volg de instructies om iSignager software te installeren.
a *Sluit de netwerkkabel eerst aan voordat u het apparaat inschakelt. De iS-1500 krijgt standaard automatisch een IP-adres. Het IP-adres verschijnt na het opstarten van het
systeem op het scherm. Als er geen DHCP-server op het netwerk zit, gebruikt de iS-1500 standaard IP-adres: 169.254.100.100. U kunt de iS-1500 op een PC aansluiten met behulp van een netwerkkabel en door via een webbrowser naar http://169.254.100.100 te gaan om de webconfiguratie in te stellen.
b Voer het IP-adres van de iS-1500 in een webbrowser in, en log in op de speler met de standaard gebruikersnaam en wachtwoord.
Standaard gebruikersnaam: admin Wachtwoord: signage
c Ga naar “System administration” (Systeembeheer) > “Basic configuration” (Basisconfiguratie). Geef het IP-adres van de server/hostnaam en poort op in het tabblad “Player settings” (Instellingen spelers). Het IP-adres van de server/hostnaam moet de PC waar iSignager wordt geïnstalleerd. Het poortnummer moet gelijk zijn aan het poortnummer dat werd gebruikt tijdens het installeren van de software; 80 is het standaard poortnummer.
d Ga naar “System administration” (Systeembeheer) > “Network settings” (Netwerkinstellingen). Klik in het tabblad “TCP/IP” op om het IP-adres van de iS-1500 in te stellen.
e Start iSignager vanuit de server-PC. Gebruik iCommander om een speler te scannen en toe te voegen.
f De resetknop van de iS-1500 bevindt zich op het achterpaneel, vlakbij de aansluiting voor de voeding. Houdt de resetknop 5 seconden ingedrukt. U zult 3 beepjes horen. De iS-1500 is weer terug in de fabrieksstandaard. Alle systeeminstellingen en bestanden zullen worden gewist, en de SD-kaart zal worden geformatteerd. Het resetproces duurt ongeveer 5 minuten.
Schakel tijdens het resetproces het apparaat niet uit en haal ook de SD-kaart er niet uit. Het systeem zal schade oplopen als het proces wordt onderbroken. Non spegnere il dispositivo e non rimuovere la scheda SD durante la procedura di ripristino. Se si interrompe la
procedura, si può danneggiare il sistema.
Не выключайте питание прибора и не удаляйте SD карту в течение процесса перезагрузки. Система будет повреждена, если процесс будет прерван.
I. Installeer de hardware en de software
II. Systeemconfiguratie (Windows-gebruikers)
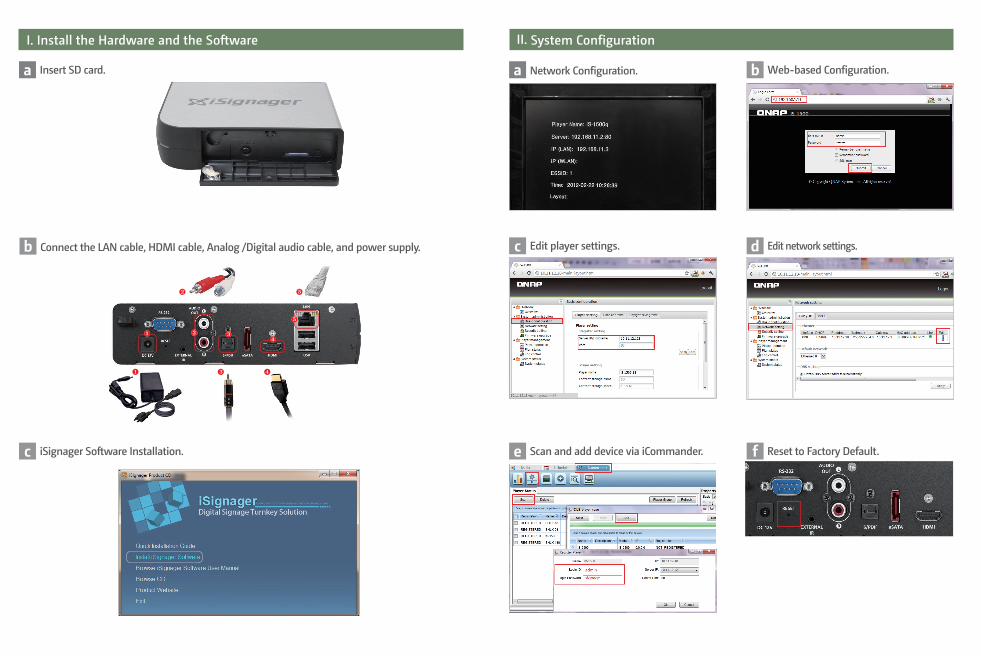
a Insert SD card.
b Connect the LAN cable, HDMI cable, Analog/Digital audio cable, and power supply to the rear panel of the iS-1500.
c Execute the product CD, click “Install iSignager Software” and follow the instructions to install iSignager software.
a Inserire la scheda SD
b Collegare il cavo LAN, il cavo HDMI, il cavo audio analogico/digitale e l'alimentazione al pannello posteriore di iS-1500.
c Eseguire il CD del prodotto, fare clic su "Install iSignager Software" e seguire le istruzioni per installare il software iSignager.
a Вставьте SD-карта
b Подключение кабеля LAN, кабеля HDMI, аудио кабеля Analog/Digital и подача питания к задней панели iS-1500.
c Выполнить компакт-диска, нажмите кнопку "Install iSignager Software" и следуйте инструкциям по установке программного обеспечения iSignager.
a Insert SD card.
b Connect the LAN cable, HDMI cable, Analog/Digital audio cable, and power supply to the rear panel of the iS-1500.
c Execute the product CD, click “Install iSignager Software” and follow the instructions to install iSignager software.
a *Collegare la linea di rete prima di accendere il dispositivo. Per impostazione predefinita, iS-1500 ottiene automaticamente un indirizzo IP. L'IP viene visualizzato
sul display dopo l'avvio del sistema. Se sulla rete non vi è un server DHCP, iS-1500 utilizza l'indirizzo IP 169.254.100.100 predefinito. È possibile collegare iS-1500 ad un PC utilizzando un cavo di rete e andando su http://169.254.100.100 con un browser per una configurazione su base web.
b Inserire l'indirizzo IP di iS-1500 in un browser e accedere al lettore con nome utente e password predefinit.
Nome utente predefinito: admin Password: signage
c Andare su “System administration (Amministrazione di sistema)” > “Basic configuration (Configurazione di base)”. Inserire l'IP del server/il nome dell'host e la porta nella scheda “Player settings” (Impostazioni del lettore). L'IP del server/il nome dell'host devono essere il PC in cui è installato il software iSignager. Il numero della porta deve corrispondere a quello visualizzato durante l'installazione del software del server; il numero di porta predefinito è 80.
d Andare su “System administration (Amministrazione di sistema)” > “Network settings (Impostazioni di rete)”. Nella scheda “TCP/IP”, fare clic su per configurare l'indirizzo IP di iS-1500.
e Avviare il software iSignager dal PC server. Usare iCommander per cercare e aggiungere un lettore.
f Il tasto di ripristino di iS-1500 è situato sul pannello posteriore, accanto alla presa di alimentazione. Premere il tasto di ripristino per 5 secondi. Si avvertiranno 3 segnali acustici e vengono ripristinate le impostazioni predefinite di iS-1500. Tutte le impostazioni e i file di sistema vengono cancellati e la scheda SD viene formattata. La procedura di ripristino richiede circa 5 minuti.
a *Пожалуйста, подключите сетевую линию перед включением прибора. iS-1500 получает IP автоматически по умолчанию. IP будет отображен на дисплее после
запуска системы. Если в сети нет сервера DHCP, iS-1500 использует по умолчанию IP 169.254.100.100. Вы можете подключить iS-1500 к PC, используя сетевой кабель и с помощью поиска по http://169.254.100.100 через веб браузер, или веб базированной конфигурации.
b Введите IP адрес iS-1500 в веб браузер и войдите на плеер с именем пользователя и паролем, данным по умолчанию.
По умолчанию имя пользователя: admin Пароль: signage
c Перейдите по “System administration” (Администрирование системы) > “Basic configuration” (Базовая конфигурация). Введите IP/имя хоста сервера во вкладке “Player settings” (Настройки сервера). IP/имя хоста сервера должно быть PC, где установлено программное обеспечение iSignager. Номер порта должен совпадать с количеством портов во время инсталляции программного обеспечения, по умолчанию номер порта 80.
d Перейдите по “System administration” (Администрирование системы) > “Network settings” (Настройки системы).Во вкладке “TCP/IP”, нажмите для задания IP адреса для iS-1500.
e Выгрузите программное обеспечение iSignager с серверного PC. Используйте iCommander для сканирования и добавления плеера.
f Кнопка аппаратного сброса iS-1500 расположена на задней панели, рядом с разъемом питания. Нажмите и удерживайте кнопку аппаратного сброса в течение 5 секунд, Вы услышите 3 пикающих сигнала и iS-1500 будет сброшен до заводских установок. Все системные настройки и файлы будут удалены и SD карта будет отформатирована. Процесс перезагрузки займет приблизительно 5 минут.
I. Install the Hardware and the Software I. Installare l'hardware e il software I. Установка оборудования и программного обеспечения
I. Install the Hardware and the Software
II. System Configuration (Windows Users) II. Конфигурация системы (пользователей Windows)
English
English
ltaliano Русский
Português (Portugal)Español (España)
a Insira o cartão SD.
b ligue o cabo LAN, o cabo HDMI, o cabo de áudio analógico/digital e a fonte de alimentação ao painel posterior do iS-1500.
c Execute the product CD, click “Install iSignager Software” and follow the instructions to install iSignager software.
a *Ligue o cabo de rede antes de ligar o dispositivo. O iS-1500 obtém automaticamente um endereço de IP. O IP será apresentado no visor após o sistema arrancar.
Se não existir servidor DHCP na rede, o iS-1500 irá utilizar o IP 169.254.100.100 predefinido. Pode ligar o iS-1500 a um PC utilizando um cabo de rede e acedendo ao endereço http://169.254.100.100 a partir de um browser Web para configuração com base na Web.
b Introduza o endereço IP do iS-1500 num browser Web e inicie a sessão no leitor com o nome de utilizador e palavra-passe predefinidos.
Nome de utilizador padrão: admin Palavra-passe: signage
c Aceda a “System administration” (Administração do sistema) > “Basic configuration” (Configuração básica). Introduza o IP do servidor/nome de anfitrião e a porta no separador “Player settings” (Definições do leitor). O IP do servidor/nome de anfitrião deve ser o PC onde o software iSignager está instalado. O número da porta deve corresponder ao número da porta durante a instalação do software de servidor; o número da porta predefinido é 80.
d Aceda a “System administration” (Administração do sistema) > “Network settings” (Definições de rede). No separador “TCP/IP”, clique em para configurar o endereço IP do iS-1500.
e Inicie o software iSignager a partir do PC servidor. Utilize o iCommander para procurar e adicionar o leitor.
f O botão de reposição do iS-1500 está localizado no painel posterior, junta à tomada de alimentação. Prima o botão de reposição durante 5 segundos, irá escutar 3 sinais sonoros e o iS-1500 será reposto de acordo com as predefinições. Todas as definições do sistema serão apagadas e o cartão SD será formatado. O processo de reposição demora cerca de 5 minutos.
Não desligue a alimentação do dispositivo nem remova o cartão SD durante o processo de reposição. O sistema ficará danificado se o processo for interrompido.
I. Instale o hardware eo software
II. Configuração do sistema (usuários do Windows)
a Inserte la tarjeta SD.
b Conecte el cable LAN, el cable HDMI, el cable audio análogo/digital y la alimentación eléctrica al panel posterior del iS-1500.
C Ejecute el CD del producto, haga clic en "Install iSignager Software" y siga las instrucciones para instalar el software iSignager.
a *Conecte el cable de red antes de encender el dispositivo. El iS-1500 obtiene la dirección IP automáticamente de forma predeterminada. La dirección IP se
mostrará en la pantalla después de que el sistema se inicie. Si no hay un servidor DHCP en la red, el iS-1500 usará la dirección IP predeterminada 169.254.100.100. Usted puede conectar el iS-1500 a un PC usando el cable de red y buscar en http://169.254.100.100 por medio de un navegador web para la configuración basada en la red.
b Introduzca la dirección IP del iS-1500 en un navegador web e inicie sesión en el reproductor con el nombre de usuario y la contraseña predeterminados.
Nombre de usuario predeterminado: admin Contraseña: signage
c Vaya a “System administration” (Administración del sistema) > “Basic configuration” (Configuración básica). Introduzca la dirección IP del servidor/nombre de host y el puerto bajo la pestaña “Player settings” (Configuración del reproductor). La dirección IP del servidor/nombre de host debe ser el PC donde está instalado el software iSignager. El número del puerto debe coincidir con el número del puerto durante la instalación del software del servidor; el número predeterminado del puerto es 80.
d Vaya a “System administration” (Administración del sistema) > “Network settings” (Configuración de la red). En la pestaña “TCP/IP”, haga clic en para configurar la dirección IP del iS-1500.
e Ejecute el software iSignager desde el PC servidor. Use iCommander para escanear y añadir el reproductor.
f El botón restaurar del iS-1500 está ubicado en el panel posterior, cerca de la toma de energía. Presione el botón restaurar durante 5 segundos, oirá 3 sonidos bips y el iS-1500 se restaurará con los valores predeterminados de fábrica. Toda la configuración y archivos del sistema se eliminarán y la tarjeta SD se formateará. El proceso de restauración dura cerca de 5 minutos. No apague el dispositivo o extraiga la tarjeta SD durante el proceso de restablecimiento. El sistema podría sufrir daños si
se interrumpe el proceso.
I. Instale del hardware y del software
II. System Configuration (Windows Users)
a Please connect network line before turn on the device. The iS-1500 obtains an IP address automatically by default. The IP will be shown on the display after system startup. If there is no DHCP server on the network, the iS-1500 will use the default IP 169.254.100.100. You can connect the iS-1500 to a PC using a network cable and browse to http://169.254.100.100 by a web browser for web-based configuration.
b Enter the IP address of the iS-1500 in a web browser and login the player with the default user name and password.
Default user name: admin Password: signage
c Go to “System administration” > “Basic configuration”. Enter the server IP/host name and port under the “Player settings” tab. The server IP/host name should be the PC where iSignager software installed. The port number must match with the port number during server software installation; the default port number is 80.
d Go to “System administration” > “Network settings”. Under the “TCP/IP” tab, click to configure the IP address of the iS-1500.
e Launch the iSignager software from server PC. Use iCommander to scan and add player.
f The reset button of the iS-1500 is located on the rear panel, near the power socket. Press the reset button for 5 seconds, you will hear 3 beeps, and the iS-1500 will be reset to factory default. All the system settings and files will be cleared and the SD will be formatted. The reset process is about 5 minutes.
II. System Configuration
Do not power off the device or remove SD card during the reset process. The system will got damaged if the process is interrupted.
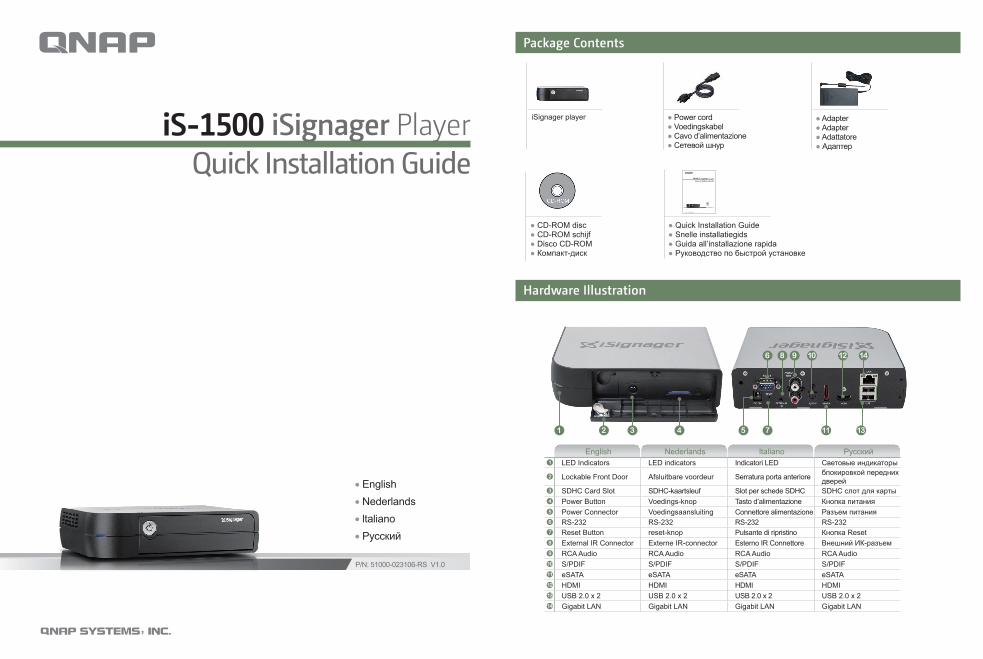
English Nederlands ltaliano Русский1 LED Indicators LED indicators Indicatori LED Световые индикаторы
2 Lockable Front Door Afsluitbare voordeur Serratura porta anteriore блокировкой передних дверей
3 SDHC Card Slot SDHC-kaartsleuf Slot per schede SDHC SDHC слот для карты4 Power Button Voedings-knop Tasto d’alimentazione Кнопка питания5 Power Connector Voedingsaansluiting Connettore alimentazione Разъем питания6 RS-232 RS-232 RS-232 RS-232 7 Reset Button reset-knop Pulsante di ripristino Кнопка Reset8 External IR Connector Externe IR-connector Esterno IR Connettore Внешний ИК-разъем9 RCA Audio RCA Audio RCA Audio RCA Audio10 S/PDIF S/PDIF S/PDIF S/PDIF11 eSATA eSATA eSATA eSATA12 HDMI HDMI HDMI HDMI13 USB 2.0 x 2 USB 2.0 x 2 USB 2.0 x 2 USB 2.0 x 214 Gigabit LAN Gigabit LAN Gigabit LAN Gigabit LAN
Package Contents
Hardware Illustration
iSignager player ● Adapter● Adapter● Adattatore● Адаптер
● Power cord ● Voedingskabel● Cavo d’alimentazione● Сетевой шнур
English Nederlands ltaliano Русский
● Quick Installation Guide ● Snelle installatiegids● Guida all’installazione rapida● Руководство по быстрой установке
Quick Installation Guide
● CD-ROM disc● CD-ROM schijf● Disco CD-ROM● Компакт-диск
a b
e
c
II. System Configuration
Network Configuration. Web-based Configuration.
Edit player settings. d Edit network settings.
Scan and add device via iCommander.
I. Install the Hardware and the Software
a
b
c
Insert SD card.
iSignager Software Installation. f Reset to Factory Default.
English Español (España) Português (Portugal) Spanish (Mexico) 1 LED Indicators Indicadores LED LED de identificação: Indicadores LED
2 Lockable Front Door cerradura puerta delantera Lockable porta da frente cerradura puerta
delantera
3 SDHC Card Slot Ranura para tarjetas SDHC SDHC slot para cartão Ranura para tarjetas
SDHC4 Power Button Botón de Encendido Botão de Energia Botón de Encendido
5 Power Connector Conector de Alimentación Conector do Cabo de Energia Conector de Alimentación
6 RS-232 RS-232 RS-232 RS-232 7 Reset Button El botón de reinicio Botão de reset El botón de reinicio8 External IR Connector IR Externo conector IR externo conector IR Externo conector9 RCA Audio RCA Audio RCA Audio RCA Audio10 S/PDIF S/PDIF S/PDIF S/PDIF11 eSATA eSATA eSATA eSATA12 HDMI HDMI HDMI HDMI13 USB 2.0 x 2 USB 2.0 x 2 USB 2.0 x 2 USB 2.0 x 214 Gigabit LAN Gigabit LAN Gigabit LAN Gigabit LAN
Package Contents
Hardware Illustration
iSignager player ● Adapter● Adaptador● Adaptador● Adaptador
● Power cord● Cable de alimentación● Cabo de Alimentação● Cable de alimentación
English Español (España) Português (Portugal) Spanish (Mexico)
● Quick Installation Guide● Guía de Instalación Rápida● Guia de Instrução Rápida● Guía de Instalación Rápida
Quick Installation Guide
● CD-ROM disc● Disco CD-ROM● Disco CD-ROM● Disco CD-ROM
a b
e
c
II. System Configuration
Network Configuration. Web-based Configuration.
Edit player settings. d Edit network settings.
Scan and add device via iCommander.
I. Install the Hardware and the Software
a
b
c
Insert SD card.
iSignager Software Installation. f Reset to Factory Default.
Connect the LAN cable, HDMI cable, Analog /Digital audio cable, and power supply.
iS-1500 iSignager Player
P/N: 51000-023106-RS V1.0
Connect the LAN cable, HDMI cable, Analog /Digital audio cable, and power supply.
iS-1500 iSignager Player
P/N: 51000-023106-RS V1.0
8 14126 10
131 432 5 7
9
11
8 14126 10
131 432 5 7
9
11
iS-1500 Quick Installation Guide_反面-20120906.indd 1 2012/9/10 下午 12:10:14
Spanish (Mexico)
a Inserte la tarjeta SD.
b Conecte el cable de LAN, cable HDMI, cable de audio analógico/digital y fuente de alimentación al panel posterior del iS-1500.
c Ejecute el CD del producto, haga clic en "Install iSignager Software" y siga las instrucciones para instalar del software iSignager.
a Conecte el cable de red antes de encender el dispositivo. El iS-1500 obtiene una dirección IP automáticamente. La dirección IP aparecerá en la pantalla después del encendido del sistema. Si no existe ningún servidor DHCP en la red, el iS-1500 utilizará la dirección IP predeterminada 169.254.100.100. Puede conectar el iS-1500 a una PC a través de un cable de red e ingresar http://169.254.100.100 en un navegador Web para la configuración basada en la Web.
b Ingrese la dirección IP del iS-1500 en un navegador Web e inicie sesión en el reproductor con el nombre de usuario y contraseña predeterminados.
Nombre de usuario: admin Contraseña: signage
c Diríjase a “System administration (Administración del sistema)” > “Basic configuration (Configuración básica)”. Ingrese la dirección IP/nombre de host y puerto del servidor en la pestaña “Player settings (Configuración del reproductor)”. La dirección IP/nombre de host del servidor deberá ser la PC en la que está instalado el software iSignager. El número de puerto deberá coincidir con el número de puerto del software del software durante la instalación; el número de puerto predeterminado es 80.
d Diríjase a “System administration (Administración del sistema)” > “Network settings (Configuración de red)”. Dentro de la pestaña “TCP/IP”, haga clic en para configurar la dirección IP del iS-1500.
e Ejecute el software iSignager desde el servidor. Utilice iCommander para buscar y agregar el reproductor.
f Restablecimiento a los valores predeterminados de fábrica El botón de restablecimiento del iS-1500 está ubicado en el panel posterior, cerca del conector de
alimentación. Presione el botón de restablecimiento durante 5 segundos, se escucharán 3 pitidos y el iS-1500 se restablecerá a los valores predeterminados de fábrica. Se eliminará toda la configuración del sistema y archivos y se formateará la tarjeta SD. El proceso de restablecimiento demorará aproximadamente 5 minutos.
I. Instalación del hardware y del software
II. Configuración del Sistema (Usuarios de Windows)
No apague el dispositivo ni quite la tarjeta SD durante el proceso de restauración. El sistema se dañará si el proceso se interrumpe.
Nederlands
a Plaats een SD-kaart.
b Sluit de LAN-kabel, de HDMI-kabel, de digitale/analoge audiokabel, en de voeding aan op het achterpaneel van de iS-1500.
c Voer de product-cd, klikt u op "Install iSignager Software" en volg de instructies om iSignager software te installeren.
a *Sluit de netwerkkabel eerst aan voordat u het apparaat inschakelt. De iS-1500 krijgt standaard automatisch een IP-adres. Het IP-adres verschijnt na het opstarten van het
systeem op het scherm. Als er geen DHCP-server op het netwerk zit, gebruikt de iS-1500 standaard IP-adres: 169.254.100.100. U kunt de iS-1500 op een PC aansluiten met behulp van een netwerkkabel en door via een webbrowser naar http://169.254.100.100 te gaan om de webconfiguratie in te stellen.
b Voer het IP-adres van de iS-1500 in een webbrowser in, en log in op de speler met de standaard gebruikersnaam en wachtwoord.
Standaard gebruikersnaam: admin Wachtwoord: signage
c Ga naar “System administration” (Systeembeheer) > “Basic configuration” (Basisconfiguratie). Geef het IP-adres van de server/hostnaam en poort op in het tabblad “Player settings” (Instellingen spelers). Het IP-adres van de server/hostnaam moet de PC waar iSignager wordt geïnstalleerd. Het poortnummer moet gelijk zijn aan het poortnummer dat werd gebruikt tijdens het installeren van de software; 80 is het standaard poortnummer.
d Ga naar “System administration” (Systeembeheer) > “Network settings” (Netwerkinstellingen). Klik in het tabblad “TCP/IP” op om het IP-adres van de iS-1500 in te stellen.
e Start iSignager vanuit de server-PC. Gebruik iCommander om een speler te scannen en toe te voegen.
f De resetknop van de iS-1500 bevindt zich op het achterpaneel, vlakbij de aansluiting voor de voeding. Houdt de resetknop 5 seconden ingedrukt. U zult 3 beepjes horen. De iS-1500 is weer terug in de fabrieksstandaard. Alle systeeminstellingen en bestanden zullen worden gewist, en de SD-kaart zal worden geformatteerd. Het resetproces duurt ongeveer 5 minuten.
Schakel tijdens het resetproces het apparaat niet uit en haal ook de SD-kaart er niet uit. Het systeem zal schade oplopen als het proces wordt onderbroken. Non spegnere il dispositivo e non rimuovere la scheda SD durante la procedura di ripristino. Se si interrompe la
procedura, si può danneggiare il sistema.
Не выключайте питание прибора и не удаляйте SD карту в течение процесса перезагрузки. Система будет повреждена, если процесс будет прерван.
I. Installeer de hardware en de software
II. Systeemconfiguratie (Windows-gebruikers)
a Insert SD card.
b Connect the LAN cable, HDMI cable, Analog/Digital audio cable, and power supply to the rear panel of the iS-1500.
c Execute the product CD, click “Install iSignager Software” and follow the instructions to install iSignager software.
a Inserire la scheda SD
b Collegare il cavo LAN, il cavo HDMI, il cavo audio analogico/digitale e l'alimentazione al pannello posteriore di iS-1500.
c Eseguire il CD del prodotto, fare clic su "Install iSignager Software" e seguire le istruzioni per installare il software iSignager.
a Вставьте SD-карта
b Подключение кабеля LAN, кабеля HDMI, аудио кабеля Analog/Digital и подача питания к задней панели iS-1500.
c Выполнить компакт-диска, нажмите кнопку "Install iSignager Software" и следуйте инструкциям по установке программного обеспечения iSignager.
a Insert SD card.
b Connect the LAN cable, HDMI cable, Analog/Digital audio cable, and power supply to the rear panel of the iS-1500.
c Execute the product CD, click “Install iSignager Software” and follow the instructions to install iSignager software.
a *Collegare la linea di rete prima di accendere il dispositivo. Per impostazione predefinita, iS-1500 ottiene automaticamente un indirizzo IP. L'IP viene visualizzato
sul display dopo l'avvio del sistema. Se sulla rete non vi è un server DHCP, iS-1500 utilizza l'indirizzo IP 169.254.100.100 predefinito. È possibile collegare iS-1500 ad un PC utilizzando un cavo di rete e andando su http://169.254.100.100 con un browser per una configurazione su base web.
b Inserire l'indirizzo IP di iS-1500 in un browser e accedere al lettore con nome utente e password predefinit.
Nome utente predefinito: admin Password: signage
c Andare su “System administration (Amministrazione di sistema)” > “Basic configuration (Configurazione di base)”. Inserire l'IP del server/il nome dell'host e la porta nella scheda “Player settings” (Impostazioni del lettore). L'IP del server/il nome dell'host devono essere il PC in cui è installato il software iSignager. Il numero della porta deve corrispondere a quello visualizzato durante l'installazione del software del server; il numero di porta predefinito è 80.
d Andare su “System administration (Amministrazione di sistema)” > “Network settings (Impostazioni di rete)”. Nella scheda “TCP/IP”, fare clic su per configurare l'indirizzo IP di iS-1500.
e Avviare il software iSignager dal PC server. Usare iCommander per cercare e aggiungere un lettore.
f Il tasto di ripristino di iS-1500 è situato sul pannello posteriore, accanto alla presa di alimentazione. Premere il tasto di ripristino per 5 secondi. Si avvertiranno 3 segnali acustici e vengono ripristinate le impostazioni predefinite di iS-1500. Tutte le impostazioni e i file di sistema vengono cancellati e la scheda SD viene formattata. La procedura di ripristino richiede circa 5 minuti.
a *Пожалуйста, подключите сетевую линию перед включением прибора. iS-1500 получает IP автоматически по умолчанию. IP будет отображен на дисплее после
запуска системы. Если в сети нет сервера DHCP, iS-1500 использует по умолчанию IP 169.254.100.100. Вы можете подключить iS-1500 к PC, используя сетевой кабель и с помощью поиска по http://169.254.100.100 через веб браузер, или веб базированной конфигурации.
b Введите IP адрес iS-1500 в веб браузер и войдите на плеер с именем пользователя и паролем, данным по умолчанию.
По умолчанию имя пользователя: admin Пароль: signage
c Перейдите по “System administration” (Администрирование системы) > “Basic configuration” (Базовая конфигурация). Введите IP/имя хоста сервера во вкладке “Player settings” (Настройки сервера). IP/имя хоста сервера должно быть PC, где установлено программное обеспечение iSignager. Номер порта должен совпадать с количеством портов во время инсталляции программного обеспечения, по умолчанию номер порта 80.
d Перейдите по “System administration” (Администрирование системы) > “Network settings” (Настройки системы).Во вкладке “TCP/IP”, нажмите для задания IP адреса для iS-1500.
e Выгрузите программное обеспечение iSignager с серверного PC. Используйте iCommander для сканирования и добавления плеера.
f Кнопка аппаратного сброса iS-1500 расположена на задней панели, рядом с разъемом питания. Нажмите и удерживайте кнопку аппаратного сброса в течение 5 секунд, Вы услышите 3 пикающих сигнала и iS-1500 будет сброшен до заводских установок. Все системные настройки и файлы будут удалены и SD карта будет отформатирована. Процесс перезагрузки займет приблизительно 5 минут.
I. Install the Hardware and the Software I. Installare l'hardware e il software I. Установка оборудования и программного обеспечения
I. Install the Hardware and the Software
II. System Configuration (Windows Users) II. Конфигурация системы (пользователей Windows)
English
English
ltaliano Русский
Português (Portugal)Español (España)
a Insira o cartão SD.
b ligue o cabo LAN, o cabo HDMI, o cabo de áudio analógico/digital e a fonte de alimentação ao painel posterior do iS-1500.
c Execute the product CD, click “Install iSignager Software” and follow the instructions to install iSignager software.
a *Ligue o cabo de rede antes de ligar o dispositivo. O iS-1500 obtém automaticamente um endereço de IP. O IP será apresentado no visor após o sistema arrancar.
Se não existir servidor DHCP na rede, o iS-1500 irá utilizar o IP 169.254.100.100 predefinido. Pode ligar o iS-1500 a um PC utilizando um cabo de rede e acedendo ao endereço http://169.254.100.100 a partir de um browser Web para configuração com base na Web.
b Introduza o endereço IP do iS-1500 num browser Web e inicie a sessão no leitor com o nome de utilizador e palavra-passe predefinidos.
Nome de utilizador padrão: admin Palavra-passe: signage
c Aceda a “System administration” (Administração do sistema) > “Basic configuration” (Configuração básica). Introduza o IP do servidor/nome de anfitrião e a porta no separador “Player settings” (Definições do leitor). O IP do servidor/nome de anfitrião deve ser o PC onde o software iSignager está instalado. O número da porta deve corresponder ao número da porta durante a instalação do software de servidor; o número da porta predefinido é 80.
d Aceda a “System administration” (Administração do sistema) > “Network settings” (Definições de rede). No separador “TCP/IP”, clique em para configurar o endereço IP do iS-1500.
e Inicie o software iSignager a partir do PC servidor. Utilize o iCommander para procurar e adicionar o leitor.
f O botão de reposição do iS-1500 está localizado no painel posterior, junta à tomada de alimentação. Prima o botão de reposição durante 5 segundos, irá escutar 3 sinais sonoros e o iS-1500 será reposto de acordo com as predefinições. Todas as definições do sistema serão apagadas e o cartão SD será formatado. O processo de reposição demora cerca de 5 minutos.
Não desligue a alimentação do dispositivo nem remova o cartão SD durante o processo de reposição. O sistema ficará danificado se o processo for interrompido.
I. Instale o hardware eo software
II. Configuração do sistema (usuários do Windows)
a Inserte la tarjeta SD.
b Conecte el cable LAN, el cable HDMI, el cable audio análogo/digital y la alimentación eléctrica al panel posterior del iS-1500.
C Ejecute el CD del producto, haga clic en "Install iSignager Software" y siga las instrucciones para instalar el software iSignager.
a *Conecte el cable de red antes de encender el dispositivo. El iS-1500 obtiene la dirección IP automáticamente de forma predeterminada. La dirección IP se
mostrará en la pantalla después de que el sistema se inicie. Si no hay un servidor DHCP en la red, el iS-1500 usará la dirección IP predeterminada 169.254.100.100. Usted puede conectar el iS-1500 a un PC usando el cable de red y buscar en http://169.254.100.100 por medio de un navegador web para la configuración basada en la red.
b Introduzca la dirección IP del iS-1500 en un navegador web e inicie sesión en el reproductor con el nombre de usuario y la contraseña predeterminados.
Nombre de usuario predeterminado: admin Contraseña: signage
c Vaya a “System administration” (Administración del sistema) > “Basic configuration” (Configuración básica). Introduzca la dirección IP del servidor/nombre de host y el puerto bajo la pestaña “Player settings” (Configuración del reproductor). La dirección IP del servidor/nombre de host debe ser el PC donde está instalado el software iSignager. El número del puerto debe coincidir con el número del puerto durante la instalación del software del servidor; el número predeterminado del puerto es 80.
d Vaya a “System administration” (Administración del sistema) > “Network settings” (Configuración de la red). En la pestaña “TCP/IP”, haga clic en para configurar la dirección IP del iS-1500.
e Ejecute el software iSignager desde el PC servidor. Use iCommander para escanear y añadir el reproductor.
f El botón restaurar del iS-1500 está ubicado en el panel posterior, cerca de la toma de energía. Presione el botón restaurar durante 5 segundos, oirá 3 sonidos bips y el iS-1500 se restaurará con los valores predeterminados de fábrica. Toda la configuración y archivos del sistema se eliminarán y la tarjeta SD se formateará. El proceso de restauración dura cerca de 5 minutos. No apague el dispositivo o extraiga la tarjeta SD durante el proceso de restablecimiento. El sistema podría sufrir daños si
se interrumpe el proceso.
I. Instale del hardware y del software
II. System Configuration (Windows Users)
a Please connect network line before turn on the device. The iS-1500 obtains an IP address automatically by default. The IP will be shown on the display after system startup. If there is no DHCP server on the network, the iS-1500 will use the default IP 169.254.100.100. You can connect the iS-1500 to a PC using a network cable and browse to http://169.254.100.100 by a web browser for web-based configuration.
b Enter the IP address of the iS-1500 in a web browser and login the player with the default user name and password.
Default user name: admin Password: signage
c Go to “System administration” > “Basic configuration”. Enter the server IP/host name and port under the “Player settings” tab. The server IP/host name should be the PC where iSignager software installed. The port number must match with the port number during server software installation; the default port number is 80.
d Go to “System administration” > “Network settings”. Under the “TCP/IP” tab, click to configure the IP address of the iS-1500.
e Launch the iSignager software from server PC. Use iCommander to scan and add player.
f The reset button of the iS-1500 is located on the rear panel, near the power socket. Press the reset button for 5 seconds, you will hear 3 beeps, and the iS-1500 will be reset to factory default. All the system settings and files will be cleared and the SD will be formatted. The reset process is about 5 minutes.
II. System Configuration
Do not power off the device or remove SD card during the reset process. The system will got damaged if the process is interrupted.
a Please connect network line before turn on the device. The iS-1500 obtains an IP address automatically by default. The IP will be shown on the display after system startup. If there is no DHCP server on the network, the iS-1500 will use the default IP 169.254.100.100. You can connect the iS-1500 to a PC using a network cable and browse to http://169.254.100.100 by a web browser for web-based configuration.
b Enter the IP address of the iS-1500 in a web browser and login the player with the default user name and password.
Default user name: admin Password: signage
c Go to “System administration” > “Basic configuration”. Enter the server IP/host name and port under the “Player settings” tab. The server IP/host name should be the PC where iSignager software installed. The port number must match with the port number during server software installation; the default port number is 80.
d Go to “System administration” > “Network settings”. Under the “TCP/IP” tab, click to configure the IP address of the iS-1500.
e Launch the iSignager software from server PC. Use iCommander to scan and add player.
f The reset button of the iS-1500 is located on the rear panel, near the power socket. Press the reset button for 5 seconds, you will hear 3 beeps, and the iS-1500 will be reset to factory default. All the system settings and files will be cleared and the SD will be formatted. The reset process is about 5 minutes.
II. System Configuration
Do not power off the device or remove SD card during the reset process. The system will got damaged if the process is interrupted.
English Nederlands ltaliano Русский1 LED Indicators LED indicators Indicatori LED Световые индикаторы
2 Lockable Front Door Afsluitbare voordeur Serratura porta anteriore блокировкой передних дверей
3 SDHC Card Slot SDHC-kaartsleuf Slot per schede SDHC SDHC слот для карты4 Power Button Voedings-knop Tasto d’alimentazione Кнопка питания5 Power Connector Voedingsaansluiting Connettore alimentazione Разъем питания6 RS-232 RS-232 RS-232 RS-232 7 Reset Button reset-knop Pulsante di ripristino Кнопка Reset8 External IR Connector Externe IR-connector Esterno IR Connettore Внешний ИК-разъем9 RCA Audio RCA Audio RCA Audio RCA Audio10 S/PDIF S/PDIF S/PDIF S/PDIF11 eSATA eSATA eSATA eSATA12 HDMI HDMI HDMI HDMI13 USB 2.0 x 2 USB 2.0 x 2 USB 2.0 x 2 USB 2.0 x 214 Gigabit LAN Gigabit LAN Gigabit LAN Gigabit LAN
Package Contents
Hardware Illustration
iSignager player ● Adapter● Adapter● Adattatore● Адаптер
● Power cord ● Voedingskabel● Cavo d’alimentazione● Сетевой шнур
English Nederlands ltaliano Русский
● Quick Installation Guide ● Snelle installatiegids● Guida all’installazione rapida● Руководство по быстрой установке
Quick Installation Guide
● CD-ROM disc● CD-ROM schijf● Disco CD-ROM● Компакт-диск
a b
e
c
II. System Configuration
Network Configuration. Web-based Configuration.
Edit player settings. d Edit network settings.
Scan and add device via iCommander.
I. Install the Hardware and the Software
a
b
c
Insert SD card.
iSignager Software Installation. f Reset to Factory Default.
English Español (España) Português (Portugal) Spanish (Mexico) 1 LED Indicators Indicadores LED LED de identificação: Indicadores LED
2 Lockable Front Door cerradura puerta delantera Lockable porta da frente cerradura puerta
delantera
3 SDHC Card Slot Ranura para tarjetas SDHC SDHC slot para cartão Ranura para tarjetas
SDHC4 Power Button Botón de Encendido Botão de Energia Botón de Encendido
5 Power Connector Conector de Alimentación Conector do Cabo de Energia Conector de Alimentación
6 RS-232 RS-232 RS-232 RS-232 7 Reset Button El botón de reinicio Botão de reset El botón de reinicio8 External IR Connector IR Externo conector IR externo conector IR Externo conector9 RCA Audio RCA Audio RCA Audio RCA Audio10 S/PDIF S/PDIF S/PDIF S/PDIF11 eSATA eSATA eSATA eSATA12 HDMI HDMI HDMI HDMI13 USB 2.0 x 2 USB 2.0 x 2 USB 2.0 x 2 USB 2.0 x 214 Gigabit LAN Gigabit LAN Gigabit LAN Gigabit LAN
Package Contents
Hardware Illustration
iSignager player ● Adapter● Adaptador● Adaptador● Adaptador
● Power cord● Cable de alimentación● Cabo de Alimentação● Cable de alimentación
English Español (España) Português (Portugal) Spanish (Mexico)
● Quick Installation Guide● Guía de Instalación Rápida● Guia de Instrução Rápida● Guía de Instalación Rápida
Quick Installation Guide
● CD-ROM disc● Disco CD-ROM● Disco CD-ROM● Disco CD-ROM
a b
e
c
II. System Configuration
Network Configuration. Web-based Configuration.
Edit player settings. d Edit network settings.
Scan and add device via iCommander.
I. Install the Hardware and the Software
a
b
c
Insert SD card.
iSignager Software Installation. f Reset to Factory Default.
Connect the LAN cable, HDMI cable, Analog /Digital audio cable, and power supply.
iS-1500 iSignager Player
P/N: 51000-023106-RS V1.0
Connect the LAN cable, HDMI cable, Analog /Digital audio cable, and power supply.
iS-1500 iSignager Player
P/N: 51000-023106-RS V1.0
8 14126 10
131 432 5 7
9
11
8 14126 10
131 432 5 7
9
11
iS-1500 Quick Installation Guide_反面-20120906.indd 1 2012/9/10 下午 12:10:14