Embed Size (px)
Citation preview
Cisco SIP IP OL-7890-01
C H A P T E R 3
Initializing Cisco SIP IP PhonesThis chapter describes the initial firmware installation tasks and configuration process for the Cisco IP Phone 7960G/7940G in a Session Initiation Protocol (SIP) network. It provides information on the following:
• Prerequisites, page 3-1
• Overview of the Initialization Process, page 3-2
• Information About Configuration Files, page 3-3
• How to Customize the Default Configuration File, page 3-4
• How to Customize a Phone-Specific Configuration File, page 3-7
• How to Customize the Configuration from the Phone Menu, page 3-9
• How to Set the Date and Time, page 3-16
• How to Create Dial Plans, page 3-20
• How to Verify Initialization, page 3-25
• Where to Go Next, page 3-25
PrerequisitesInstallation Strategy
Choose one of the following installation strategies:
• Download, then customize. Download the firmware image and configuration files to your TFTP server. Connect each phone to power, causing it to automatically download the image and default files. Configure each phone individually as needed.
• Customize, then download. Download the firmware image and configuration files to your TFTP server. Open the configuration files and customize parameters for all the phones at once. Save the customized file to the TFTP server. Connect each phone to power, causing it to automatically download the image and customized files.
Network Functionality
Ensure that your network meets the following requirements:
• A working IP network is established and configured for SIP.
For information on configuring IP, refer to the Cisco IOS IP Configuration Guide.http://www.cisco.com/univercd/cc/td/doc/product/software/ios123/123cgcr/ip_vcg.htm
3-1Phone Administrator Guide, Release 7.5

Chapter 3 Initializing Cisco SIP IP PhonesOverview of the Initialization Process
• VoIP is configured on your Cisco routers.
For information on configuring VoIP, refer to the Cisco IOS Voice Configuration Library.http://www.cisco.com/univercd/cc/td/doc/product/software/ios123/123cgcr/vcl.htm
VoIP gateways are configured for SIP.
• A TFTP server is configured on your network.
When the phone initializes, it requests the following from the TFTP server:
– Latest firmware image
– Dual-boot file (OS79XX.TXT)
– Phone-specific MAC-address configuration file
– Default configuration file
– Ring-list file
– Dial-plan file
For information about configuring your TFTP server, refer to your operating-system documentation.
• A DHCP server is configured on your network.
The phone can use DHCP to obtain IP addresses. Configuration options are as follows:
– dhcp option #1 (IP subnet mask)
– dhcp option #3 (default IP gateway)
– dhcp option #6 (DNS server IP address)
– dhcp option #15 (domain name)
– dhcp option #50 (IP address)
– dhcp option #66 (TFTP server IP address)
If you do not configure DHCP options on the DHCP server, you must manually configure them on the phone. For information on configuring a DHCP server, refer to your operating-system documentation.
• A proxy server is active and configured to receive and forward SIP messages.
Note Refer to the Cisco 7940 and 7960 IP Phones Firmware Upgrade Matrix for additional prerequisites.
Overview of the Initialization ProcessFor an overview of the initialization process, refer to Cisco IP Phone 7960 and 7940 Firmware Upgrade Matrix, which is available at this URL:
http://www.cisco.com/univercd/cc/td/doc/product/voice/c_ipphon/english/ipp7960/addprot/mgcp/frmwrup.htm
3-2Cisco SIP IP Phone Administrator Guide, Release 7.5
OL-7890-01
Chapter 3 Initializing Cisco SIP IP PhonesInformation About Configuration Files
Information About Configuration FilesConfiguration files reside in a TFTP server subdirectory (you specify the location of this subdirectory with the tftp_cfg_dir parameter). For more information, refer to the Cisco 7940 and 7960 IP Phones Firmware Upgrade Matrix.
Note Be sure to customize configuration files before you power up the phone. When powered up, the phone automatically loads parameters stored in flash memory and then requests configuration files from the TFTP server.
When modifying parameters, remember the following:
• Parameters in the configuration file override those stored in the phone’s flash memory.
• Locally changed parameters are used until the next reboot.
• The name of each phone-specific configuration file is unique and is based on the MAC address of the phone.
The format of the filename must be SIPXXXXYYYYZZZZ.cnf, where XXXXYYYYZZZZ is the MAC address of the phone. The MAC address must be in uppercase; the .cnf extension must be in lowercase (for example, SIP00503EFFD842.cnf).
Note You can find the MAC address of a phone on the middle sticker adhered to the base of the phone. You can also view it on the Network Configuration menu.
• Each line in a configuration file must use the following format and must adhere to the following rules:
variable-name : value ; optional comments
– Associate only one value with one variable.
– Separate variable names and values with colons.
– Set only one variable per line.
– Indicate the end of a line with <lf> or <cr><lf>.
– Put the variable and value on the same line, and do not break the line.
– You can include white space before or after a variable or value. You can include any character within them. However, if white spaces are needed within the value, you must enclose the value in single or double quotes. If the value is enclosed in quotes, the end quote must be the same as the start quote.
– You can include comments after the value. Use the semicolon (;) and pound (#) delimiters to distinguish the comments.
– You can include comment lines.
– You can include blank lines.
– You can use any case for variables; they are not case sensitive.
3-3Cisco SIP IP Phone Administrator Guide, Release 7.5
OL-7890-01
Chapter 3 Initializing Cisco SIP IP PhonesHow to Customize the Default Configuration File
How to Customize the Default Configuration FileYou have the following initialization choices:
• Download, then customize. Download the default configuration file to your TFTP server, and then plug each phone into power and the network. The phones automatically download the default configuration file from the TFTP server. You can then customize parameters if required.
• Customize, then download. Download the default configuration file to your TFTP server, open the file, customize parameters for all the phones at once, save the customized file, and then plug the phones into power and the network. The phones automatically download the customized file from the TFTP server.
This section describes how to customize, then download. Maintaining parameters—such as whether phones must register with a proxy server and the codec that phones must use when initiating a call—in the default configuration file allows you to perform global changes, such as upgrading the image version, without having to customize the phone-specific configuration file for each phone.
Note For a complete alphabetical list of configurable parameters, see Appendix D, “Configurable Parameters for the SIP IP Phone.”
Prerequisites
• If you have an existing system from a release earlier than Release 7.x, upgrade your system firmware as described in the “How to Upgrade Your Cisco SIP IP Phone Firmware Image” section on page 4-3 before proceeding.
Procedure
Step 1 Obtain the default configuration file as follows:
a. Go to the Cisco.com SIP IP 7940/7960 phone software-download site at http://www.cisco.com/cgi-bin/tablebuild.pl/sip-ip-phone7960.
b. Download the SIPDefault.cnf file to the root directory of your TFTP server or to a subdirectory in which all phone-specific configuration files are stored.
Step 2 Using an ASCII text editor such as vi, open the file.
Step 3 Modify the following required parameters:
• line1_name—Number or e-mail address for use when registering. Enter a number without dashes. For example, enter 555-0100 as 5550100. Enter an e-mail ID without the host name.
• proxy1_address—IP address of the SIP proxy server that is used by the phones. Enter the address in IP dotted-decimal notation or use the FQDN.
• proxy1_port—Port number of the SIP proxy server that is used by line 1.
Step 4 Modify additional parameters as needed.
Step 5 Save the file to the root directory of your TFTP server or to a subdirectory in which all phone-specific configuration files are stored.
Configuration Example
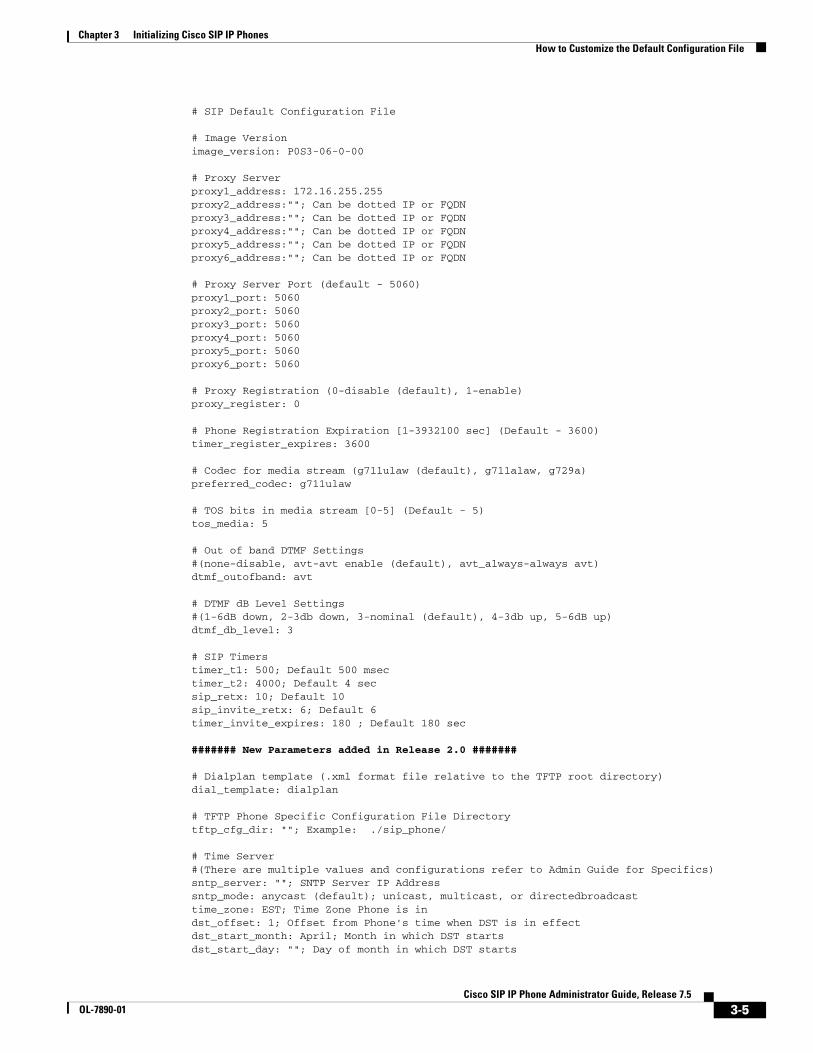
The following is an example of the SIPDefault configuration file that you downloaded from Cisco.com:
3-4Cisco SIP IP Phone Administrator Guide, Release 7.5
OL-7890-01
Chapter 3 Initializing Cisco SIP IP PhonesHow to Customize the Default Configuration File
# SIP Default Configuration File
# Image Versionimage_version: P0S3-06-0-00
# Proxy Serverproxy1_address: 172.16.255.255proxy2_address:""; Can be dotted IP or FQDNproxy3_address:""; Can be dotted IP or FQDNproxy4_address:""; Can be dotted IP or FQDNproxy5_address:""; Can be dotted IP or FQDNproxy6_address:""; Can be dotted IP or FQDN
# Proxy Server Port (default - 5060)proxy1_port: 5060proxy2_port: 5060proxy3_port: 5060proxy4_port: 5060proxy5_port: 5060proxy6_port: 5060
# Proxy Registration (0-disable (default), 1-enable)proxy_register: 0
# Phone Registration Expiration [1-3932100 sec] (Default - 3600)timer_register_expires: 3600
# Codec for media stream (g711ulaw (default), g711alaw, g729a)preferred_codec: g711ulaw
# TOS bits in media stream [0-5] (Default - 5)tos_media: 5
# Out of band DTMF Settings#(none-disable, avt-avt enable (default), avt_always-always avt)dtmf_outofband: avt
# DTMF dB Level Settings#(1-6dB down, 2-3db down, 3-nominal (default), 4-3db up, 5-6dB up)dtmf_db_level: 3
# SIP Timerstimer_t1: 500; Default 500 msectimer_t2: 4000; Default 4 secsip_retx: 10; Default 10sip_invite_retx: 6; Default 6timer_invite_expires: 180 ; Default 180 sec
####### New Parameters added in Release 2.0 #######
# Dialplan template (.xml format file relative to the TFTP root directory)dial_template: dialplan
# TFTP Phone Specific Configuration File Directorytftp_cfg_dir: ""; Example: ./sip_phone/
# Time Server#(There are multiple values and configurations refer to Admin Guide for Specifics)sntp_server: ""; SNTP Server IP Addresssntp_mode: anycast (default); unicast, multicast, or directedbroadcasttime_zone: EST; Time Zone Phone is indst_offset: 1; Offset from Phone's time when DST is in effectdst_start_month: April; Month in which DST startsdst_start_day: ""; Day of month in which DST starts
3-5Cisco SIP IP Phone Administrator Guide, Release 7.5
OL-7890-01
Chapter 3 Initializing Cisco SIP IP PhonesHow to Customize the Default Configuration File
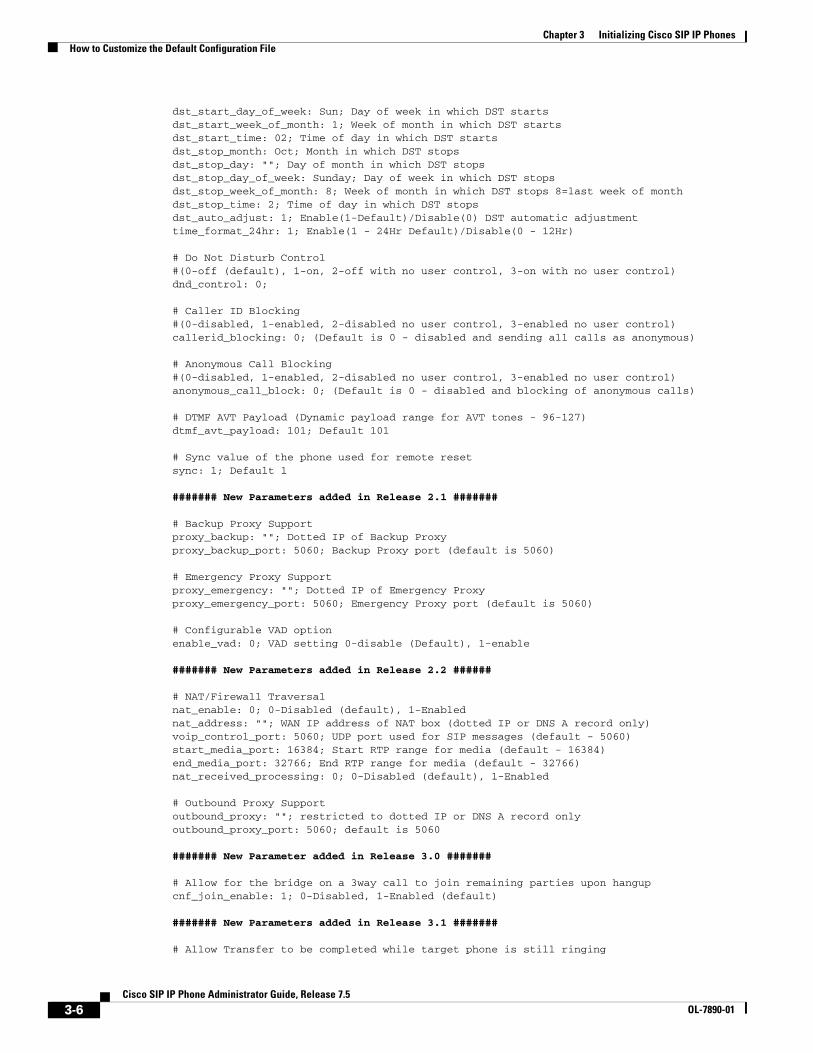
dst_start_day_of_week: Sun; Day of week in which DST startsdst_start_week_of_month: 1; Week of month in which DST startsdst_start_time: 02; Time of day in which DST startsdst_stop_month: Oct; Month in which DST stopsdst_stop_day: ""; Day of month in which DST stopsdst_stop_day_of_week: Sunday; Day of week in which DST stopsdst_stop_week_of_month: 8; Week of month in which DST stops 8=last week of monthdst_stop_time: 2; Time of day in which DST stopsdst_auto_adjust: 1; Enable(1-Default)/Disable(0) DST automatic adjustmenttime_format_24hr: 1; Enable(1 - 24Hr Default)/Disable(0 - 12Hr)
# Do Not Disturb Control#(0-off (default), 1-on, 2-off with no user control, 3-on with no user control)dnd_control: 0;
# Caller ID Blocking#(0-disabled, 1-enabled, 2-disabled no user control, 3-enabled no user control)callerid_blocking: 0; (Default is 0 - disabled and sending all calls as anonymous)
# Anonymous Call Blocking#(0-disabled, 1-enabled, 2-disabled no user control, 3-enabled no user control)anonymous_call_block: 0; (Default is 0 - disabled and blocking of anonymous calls)
# DTMF AVT Payload (Dynamic payload range for AVT tones - 96-127)dtmf_avt_payload: 101; Default 101
# Sync value of the phone used for remote resetsync: 1; Default 1
####### New Parameters added in Release 2.1 #######
# Backup Proxy Supportproxy_backup: ""; Dotted IP of Backup Proxyproxy_backup_port: 5060; Backup Proxy port (default is 5060)
# Emergency Proxy Supportproxy_emergency: ""; Dotted IP of Emergency Proxyproxy_emergency_port: 5060; Emergency Proxy port (default is 5060)
# Configurable VAD optionenable_vad: 0; VAD setting 0-disable (Default), 1-enable
####### New Parameters added in Release 2.2 ######
# NAT/Firewall Traversalnat_enable: 0; 0-Disabled (default), 1-Enablednat_address: ""; WAN IP address of NAT box (dotted IP or DNS A record only)voip_control_port: 5060; UDP port used for SIP messages (default - 5060)start_media_port: 16384; Start RTP range for media (default - 16384)end_media_port: 32766; End RTP range for media (default - 32766)nat_received_processing: 0; 0-Disabled (default), 1-Enabled
# Outbound Proxy Supportoutbound_proxy: ""; restricted to dotted IP or DNS A record onlyoutbound_proxy_port: 5060; default is 5060
####### New Parameter added in Release 3.0 #######
# Allow for the bridge on a 3way call to join remaining parties upon hangupcnf_join_enable: 1; 0-Disabled, 1-Enabled (default)
####### New Parameters added in Release 3.1 #######
# Allow Transfer to be completed while target phone is still ringing
3-6Cisco SIP IP Phone Administrator Guide, Release 7.5
OL-7890-01
Chapter 3 Initializing Cisco SIP IP PhonesHow to Customize a Phone-Specific Configuration File
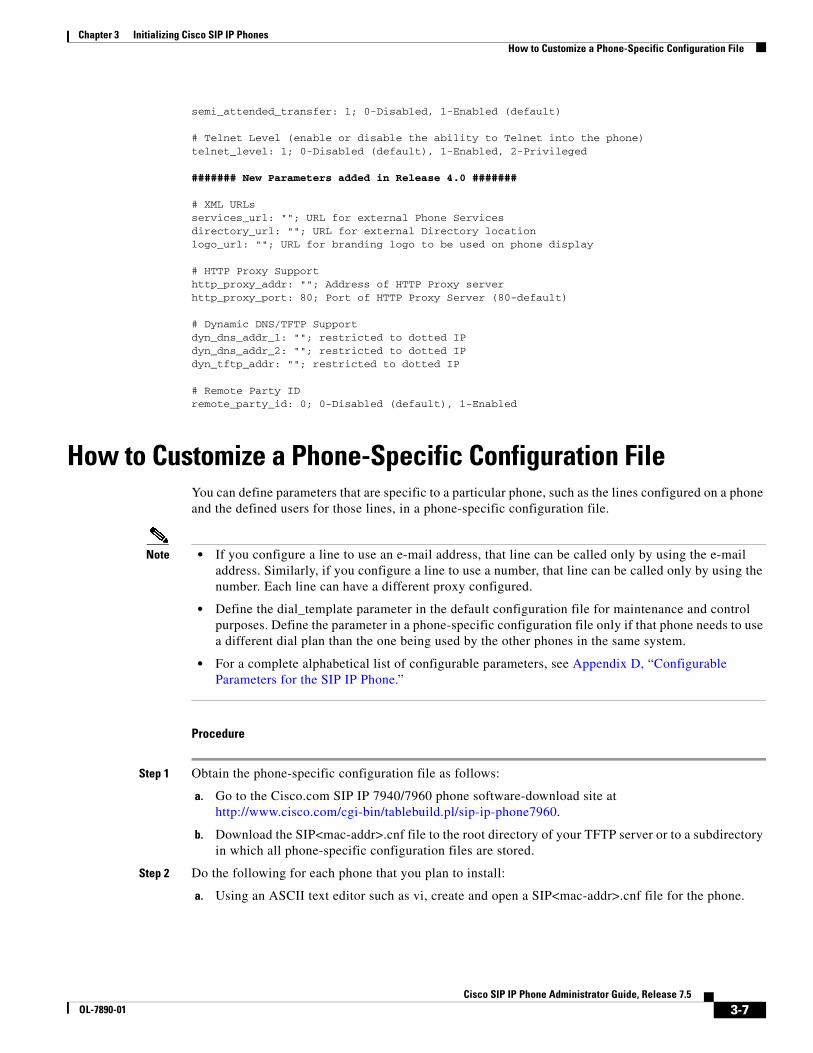
semi_attended_transfer: 1; 0-Disabled, 1-Enabled (default)
# Telnet Level (enable or disable the ability to Telnet into the phone)telnet_level: 1; 0-Disabled (default), 1-Enabled, 2-Privileged
####### New Parameters added in Release 4.0 #######
# XML URLsservices_url: ""; URL for external Phone Servicesdirectory_url: ""; URL for external Directory locationlogo_url: ""; URL for branding logo to be used on phone display
# HTTP Proxy Supporthttp_proxy_addr: ""; Address of HTTP Proxy serverhttp_proxy_port: 80; Port of HTTP Proxy Server (80-default)
# Dynamic DNS/TFTP Supportdyn_dns_addr_1: ""; restricted to dotted IPdyn_dns_addr_2: ""; restricted to dotted IPdyn_tftp_addr: ""; restricted to dotted IP
# Remote Party IDremote_party_id: 0; 0-Disabled (default), 1-Enabled
How to Customize a Phone-Specific Configuration FileYou can define parameters that are specific to a particular phone, such as the lines configured on a phone and the defined users for those lines, in a phone-specific configuration file.
Note • If you configure a line to use an e-mail address, that line can be called only by using the e-mail address. Similarly, if you configure a line to use a number, that line can be called only by using the number. Each line can have a different proxy configured.
• Define the dial_template parameter in the default configuration file for maintenance and control purposes. Define the parameter in a phone-specific configuration file only if that phone needs to use a different dial plan than the one being used by the other phones in the same system.
• For a complete alphabetical list of configurable parameters, see Appendix D, “Configurable Parameters for the SIP IP Phone.”
Procedure
Step 1 Obtain the phone-specific configuration file as follows:
a. Go to the Cisco.com SIP IP 7940/7960 phone software-download site at http://www.cisco.com/cgi-bin/tablebuild.pl/sip-ip-phone7960.
b. Download the SIP<mac-addr>.cnf file to the root directory of your TFTP server or to a subdirectory in which all phone-specific configuration files are stored.
Step 2 Do the following for each phone that you plan to install:
a. Using an ASCII text editor such as vi, create and open a SIP<mac-addr>.cnf file for the phone.
3-7Cisco SIP IP Phone Administrator Guide, Release 7.5
OL-7890-01

Chapter 3 Initializing Cisco SIP IP PhonesHow to Customize a Phone-Specific Configuration File
b. Modify the following end-user call-preference parameters as needed to permit or deny end-user use or customization:
• anonymous_call_block
• autocomplete
• callerid_blocking
• call_hold_ringback
• call_waiting
• dnd_control
c. Modify additional parameters as needed.
d. Save the file to the root directory of your TFTP server or to a subdirectory that contains all the phone-specific configuration files.
Name the file SIP<mac-addr>.cnf. Type the MAC address in uppercase and the extension, cnf, in lowercase (for example, SIP00503EFFD842.cnf).
Configuration Example
The following is an example of the phone-specific configuration file that you downloaded from Cisco.com.
# SIP Configuration Generic File
# Line 1 appearanceline1_name: 1234567
# Line 1 Registration Authenticationline1_authname: "UNPROVISIONED"
# Line 1 Registration Passwordline1_password: "UNPROVISIONED"
# Line 2 appearanceline2_name: football
# Line 2 Registration Authenticationline2_authname: "UNPROVISIONED"
# Line 2 Registration Passwordline2_password: "UNPROVISIONED"
####### New Parameters added in Release 2.0 #######
# Phone Label (Text desired to be displayed in upper right corner)phone_label: ""; Has no effect on SIP messaging
# Line 1 Display Name (Display name to use for SIP messaging)line1_displayname: "User ID"
# Line 2 Display Name (Display name to use for SIP messaging)line2_displayname: ""
####### New Parameters added in Release 3.0 ######
# Phone Prompt (The prompt that will be displayed on console and Telnet)phone_prompt: "SIP Phone"; Limited to 15 characters (Default - SIP Phone)
3-8Cisco SIP IP Phone Administrator Guide, Release 7.5
OL-7890-01
Chapter 3 Initializing Cisco SIP IP PhonesHow to Customize the Configuration from the Phone Menu
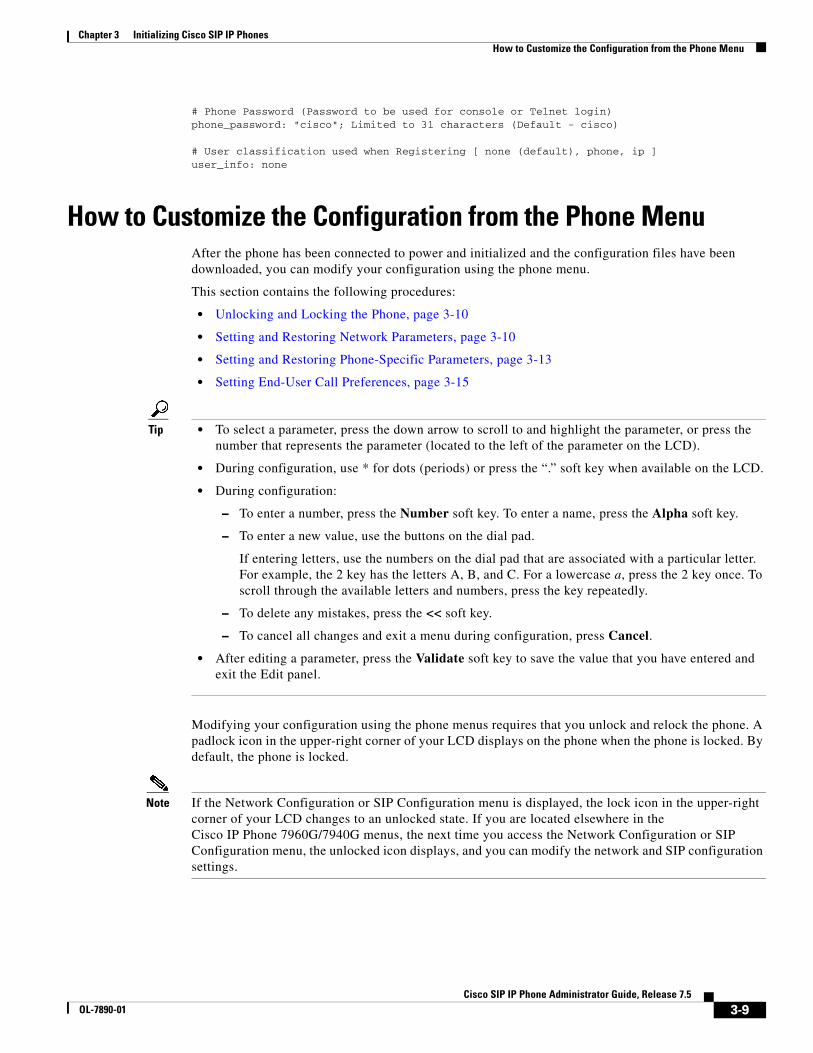
# Phone Password (Password to be used for console or Telnet login)phone_password: "cisco"; Limited to 31 characters (Default - cisco)
# User classification used when Registering [ none (default), phone, ip ]user_info: none
How to Customize the Configuration from the Phone MenuAfter the phone has been connected to power and initialized and the configuration files have been downloaded, you can modify your configuration using the phone menu.
This section contains the following procedures:
• Unlocking and Locking the Phone, page 3-10
• Setting and Restoring Network Parameters, page 3-10
• Setting and Restoring Phone-Specific Parameters, page 3-13
• Setting End-User Call Preferences, page 3-15
Tip • To select a parameter, press the down arrow to scroll to and highlight the parameter, or press the number that represents the parameter (located to the left of the parameter on the LCD).
• During configuration, use * for dots (periods) or press the “.” soft key when available on the LCD.
• During configuration:
– To enter a number, press the Number soft key. To enter a name, press the Alpha soft key.
– To enter a new value, use the buttons on the dial pad.
If entering letters, use the numbers on the dial pad that are associated with a particular letter. For example, the 2 key has the letters A, B, and C. For a lowercase a, press the 2 key once. To scroll through the available letters and numbers, press the key repeatedly.
– To delete any mistakes, press the << soft key.
– To cancel all changes and exit a menu during configuration, press Cancel.
• After editing a parameter, press the Validate soft key to save the value that you have entered and exit the Edit panel.
Modifying your configuration using the phone menus requires that you unlock and relock the phone. A padlock icon in the upper-right corner of your LCD displays on the phone when the phone is locked. By default, the phone is locked.
Note If the Network Configuration or SIP Configuration menu is displayed, the lock icon in the upper-right corner of your LCD changes to an unlocked state. If you are located elsewhere in the Cisco IP Phone 7960G/7940G menus, the next time you access the Network Configuration or SIP Configuration menu, the unlocked icon displays, and you can modify the network and SIP configuration settings.
3-9Cisco SIP IP Phone Administrator Guide, Release 7.5
OL-7890-01
Chapter 3 Initializing Cisco SIP IP PhonesHow to Customize the Configuration from the Phone Menu
Unlocking and Locking the PhoneYou must unlock and relock the phone to modify a configuration using the phone menus. Similarly, phone users must unlock and relock the phone to modify end-user parameters.
A padlock icon in the upper-right corner of your LCD displays on the phone when the phone is locked. By default, the phone is locked.
Prerequisites
• Set the phone password with the phone_password parameter in the phone-specific configuration file.
Procedure
Step 1 To unlock the phone, do the following:
a. Press Settings > Unlock Config. The password prompt displays.
b. Enter a phone password. The phone unlocks, and the unlock icon displays on the LCD.
Note The Unlock Config menu choice changes to Lock Config and the configuration remains unlocked while you work within it. When you exit the configuration menu, the configuration automatically relocks.
Step 2 To relock the phone, select Lock Config or Exit.
Setting and Restoring Network ParametersYou can modify network parameters using the phone menus.
Note • TFTPServer may be a required parameter, depending on how you intend for the phone to locate the TFTP server from which it downloads its configuration file. You can provide the TFTP server IP address in either of two ways:
– Provide it to the DHCP server. (For information, see the “Prerequisites” section on page 3-1.) Using normal Cisco Discovery Protocol (CDP) processes, the phone locates the DHCP server upon connection to the network; the server in turn provides the TFTP server address.
– Provide it directly to the phone by means of the TFTPServer parameter as described in this procedure. If you use this method, first select DHCP Enabled > No.
• Network parameters that can be modified are listed in Table 3-1. Those that cannot be modified are listed in Table 3-2.
• For a complete alphabetical list of configurable parameters, see Appendix D, “Configurable Parameters for the SIP IP Phone.”
Procedure
Step 1 Unlock the phone (see the “Unlocking and Locking the Phone” section on page 3-10).
3-10Cisco SIP IP Phone Administrator Guide, Release 7.5
OL-7890-01
Chapter 3 Initializing Cisco SIP IP PhonesHow to Customize the Configuration from the Phone Menu
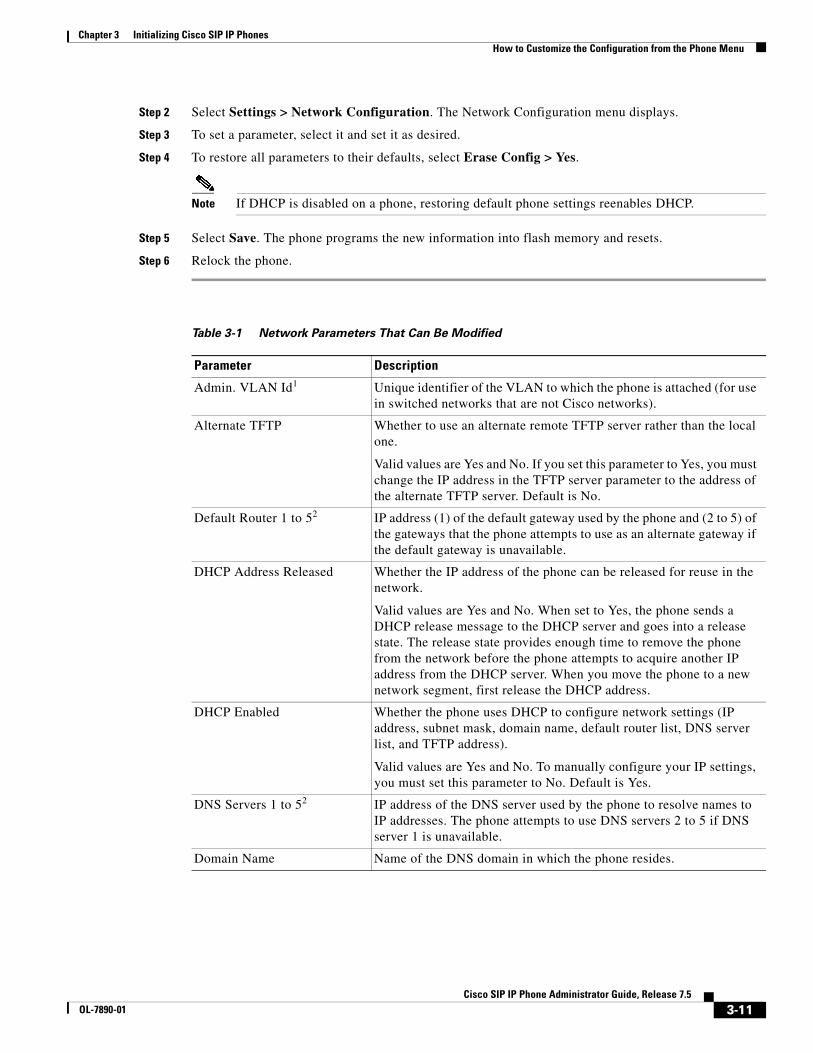
Step 2 Select Settings > Network Configuration. The Network Configuration menu displays.
Step 3 To set a parameter, select it and set it as desired.
Step 4 To restore all parameters to their defaults, select Erase Config > Yes.
Note If DHCP is disabled on a phone, restoring default phone settings reenables DHCP.
Step 5 Select Save. The phone programs the new information into flash memory and resets.
Step 6 Relock the phone.
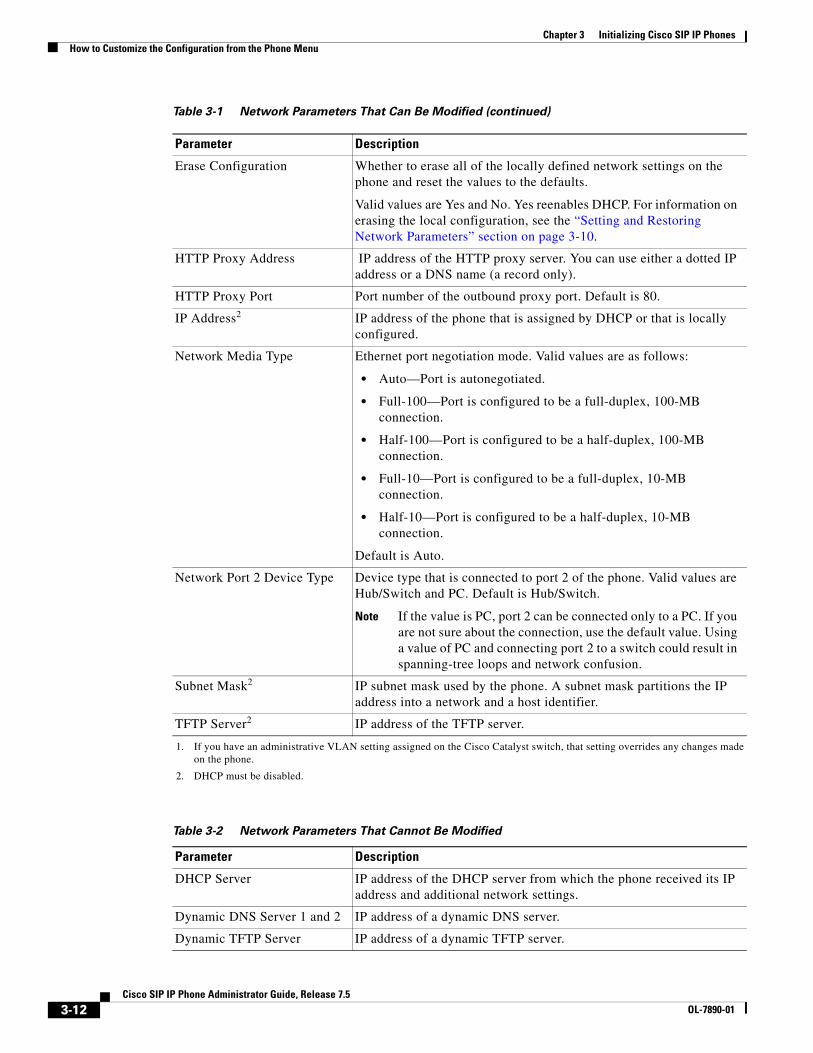
Table 3-1 Network Parameters That Can Be Modified
Parameter Description
Admin. VLAN Id1 Unique identifier of the VLAN to which the phone is attached (for use in switched networks that are not Cisco networks).
Alternate TFTP Whether to use an alternate remote TFTP server rather than the local one.
Valid values are Yes and No. If you set this parameter to Yes, you must change the IP address in the TFTP server parameter to the address of the alternate TFTP server. Default is No.
Default Router 1 to 52 IP address (1) of the default gateway used by the phone and (2 to 5) of the gateways that the phone attempts to use as an alternate gateway if the default gateway is unavailable.
DHCP Address Released Whether the IP address of the phone can be released for reuse in the network.
Valid values are Yes and No. When set to Yes, the phone sends a DHCP release message to the DHCP server and goes into a release state. The release state provides enough time to remove the phone from the network before the phone attempts to acquire another IP address from the DHCP server. When you move the phone to a new network segment, first release the DHCP address.
DHCP Enabled Whether the phone uses DHCP to configure network settings (IP address, subnet mask, domain name, default router list, DNS server list, and TFTP address).
Valid values are Yes and No. To manually configure your IP settings, you must set this parameter to No. Default is Yes.
DNS Servers 1 to 52 IP address of the DNS server used by the phone to resolve names to IP addresses. The phone attempts to use DNS servers 2 to 5 if DNS server 1 is unavailable.
Domain Name Name of the DNS domain in which the phone resides.
3-11Cisco SIP IP Phone Administrator Guide, Release 7.5
OL-7890-01
Chapter 3 Initializing Cisco SIP IP PhonesHow to Customize the Configuration from the Phone Menu
Erase Configuration Whether to erase all of the locally defined network settings on the phone and reset the values to the defaults.
Valid values are Yes and No. Yes reenables DHCP. For information on erasing the local configuration, see the “Setting and Restoring Network Parameters” section on page 3-10.
HTTP Proxy Address IP address of the HTTP proxy server. You can use either a dotted IP address or a DNS name (a record only).
HTTP Proxy Port Port number of the outbound proxy port. Default is 80.
IP Address2 IP address of the phone that is assigned by DHCP or that is locally configured.
Network Media Type Ethernet port negotiation mode. Valid values are as follows:
• Auto—Port is autonegotiated.
• Full-100—Port is configured to be a full-duplex, 100-MB connection.
• Half-100—Port is configured to be a half-duplex, 100-MB connection.
• Full-10—Port is configured to be a full-duplex, 10-MB connection.
• Half-10—Port is configured to be a half-duplex, 10-MB connection.
Default is Auto.
Network Port 2 Device Type Device type that is connected to port 2 of the phone. Valid values are Hub/Switch and PC. Default is Hub/Switch.
Note If the value is PC, port 2 can be connected only to a PC. If you are not sure about the connection, use the default value. Using a value of PC and connecting port 2 to a switch could result in spanning-tree loops and network confusion.
Subnet Mask2 IP subnet mask used by the phone. A subnet mask partitions the IP address into a network and a host identifier.
TFTP Server2 IP address of the TFTP server.
1. If you have an administrative VLAN setting assigned on the Cisco Catalyst switch, that setting overrides any changes made on the phone.
2. DHCP must be disabled.
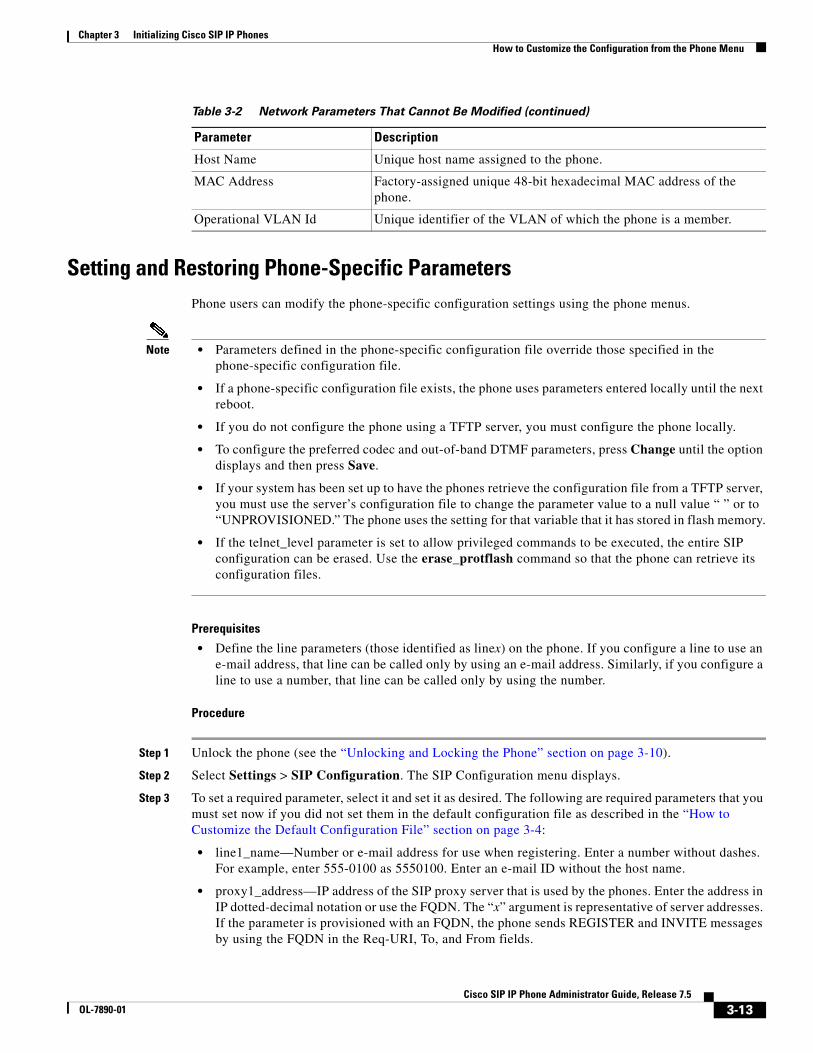
Table 3-2 Network Parameters That Cannot Be Modified
Parameter Description
DHCP Server IP address of the DHCP server from which the phone received its IP address and additional network settings.
Dynamic DNS Server 1 and 2 IP address of a dynamic DNS server.
Dynamic TFTP Server IP address of a dynamic TFTP server.
Table 3-1 Network Parameters That Can Be Modified (continued)
Parameter Description
3-12Cisco SIP IP Phone Administrator Guide, Release 7.5
OL-7890-01
Chapter 3 Initializing Cisco SIP IP PhonesHow to Customize the Configuration from the Phone Menu
Setting and Restoring Phone-Specific ParametersPhone users can modify the phone-specific configuration settings using the phone menus.
Note • Parameters defined in the phone-specific configuration file override those specified in the phone-specific configuration file.
• If a phone-specific configuration file exists, the phone uses parameters entered locally until the next reboot.
• If you do not configure the phone using a TFTP server, you must configure the phone locally.
• To configure the preferred codec and out-of-band DTMF parameters, press Change until the option displays and then press Save.
• If your system has been set up to have the phones retrieve the configuration file from a TFTP server, you must use the server’s configuration file to change the parameter value to a null value “ ” or to “UNPROVISIONED.” The phone uses the setting for that variable that it has stored in flash memory.
• If the telnet_level parameter is set to allow privileged commands to be executed, the entire SIP configuration can be erased. Use the erase_protflash command so that the phone can retrieve its configuration files.
Prerequisites
• Define the line parameters (those identified as linex) on the phone. If you configure a line to use an e-mail address, that line can be called only by using an e-mail address. Similarly, if you configure a line to use a number, that line can be called only by using the number.
Procedure
Step 1 Unlock the phone (see the “Unlocking and Locking the Phone” section on page 3-10).
Step 2 Select Settings > SIP Configuration. The SIP Configuration menu displays.
Step 3 To set a required parameter, select it and set it as desired. The following are required parameters that you must set now if you did not set them in the default configuration file as described in the “How to Customize the Default Configuration File” section on page 3-4:
• line1_name—Number or e-mail address for use when registering. Enter a number without dashes. For example, enter 555-0100 as 5550100. Enter an e-mail ID without the host name.
• proxy1_address—IP address of the SIP proxy server that is used by the phones. Enter the address in IP dotted-decimal notation or use the FQDN. The “x” argument is representative of server addresses. If the parameter is provisioned with an FQDN, the phone sends REGISTER and INVITE messages by using the FQDN in the Req-URI, To, and From fields.
Host Name Unique host name assigned to the phone.
MAC Address Factory-assigned unique 48-bit hexadecimal MAC address of the phone.
Operational VLAN Id Unique identifier of the VLAN of which the phone is a member.
Table 3-2 Network Parameters That Cannot Be Modified (continued)
Parameter Description
3-13Cisco SIP IP Phone Administrator Guide, Release 7.5
OL-7890-01
Chapter 3 Initializing Cisco SIP IP PhonesHow to Customize the Configuration from the Phone Menu
• proxy1_port—Port number of the SIP proxy server that is used by line 1.
• If the proxy server with which the phone communicates has authentication enabled, set the following parameters as well:
– line1_authname—Name used by the phone for authentication if a registration is challenged by the proxy server during initialization. Default is UNPROVISIONED.
– line1_password—Password used by the phone for authentication if a registration is challenged by the proxy server during initialization. Default is UNPROVISIONED.
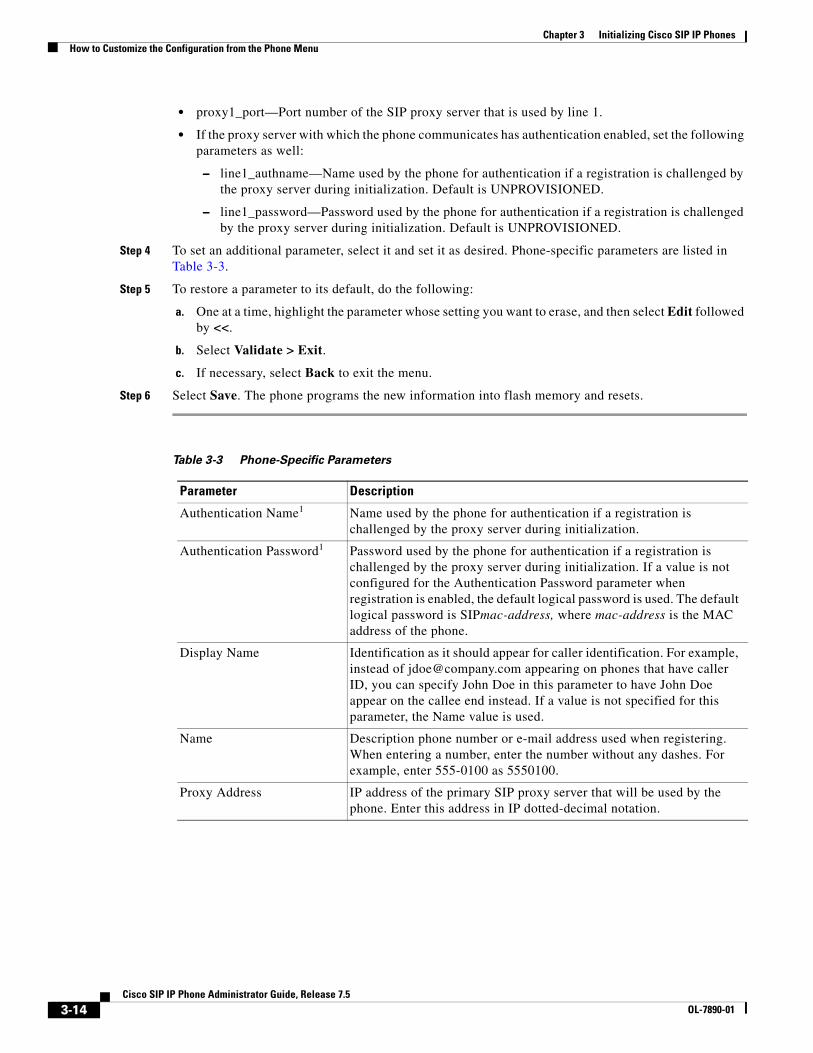
Step 4 To set an additional parameter, select it and set it as desired. Phone-specific parameters are listed in Table 3-3.
Step 5 To restore a parameter to its default, do the following:
a. One at a time, highlight the parameter whose setting you want to erase, and then select Edit followed by <<.
b. Select Validate > Exit.
c. If necessary, select Back to exit the menu.
Step 6 Select Save. The phone programs the new information into flash memory and resets.
Table 3-3 Phone-Specific Parameters
Parameter Description
Authentication Name1 Name used by the phone for authentication if a registration is challenged by the proxy server during initialization.
Authentication Password1 Password used by the phone for authentication if a registration is challenged by the proxy server during initialization. If a value is not configured for the Authentication Password parameter when registration is enabled, the default logical password is used. The default logical password is SIPmac-address, where mac-address is the MAC address of the phone.
Display Name Identification as it should appear for caller identification. For example, instead of [email protected] appearing on phones that have caller ID, you can specify John Doe in this parameter to have John Doe appear on the callee end instead. If a value is not specified for this parameter, the Name value is used.
Name Description phone number or e-mail address used when registering. When entering a number, enter the number without any dashes. For example, enter 555-0100 as 5550100.
Proxy Address IP address of the primary SIP proxy server that will be used by the phone. Enter this address in IP dotted-decimal notation.
3-14Cisco SIP IP Phone Administrator Guide, Release 7.5
OL-7890-01
Chapter 3 Initializing Cisco SIP IP PhonesHow to Customize the Configuration from the Phone Menu
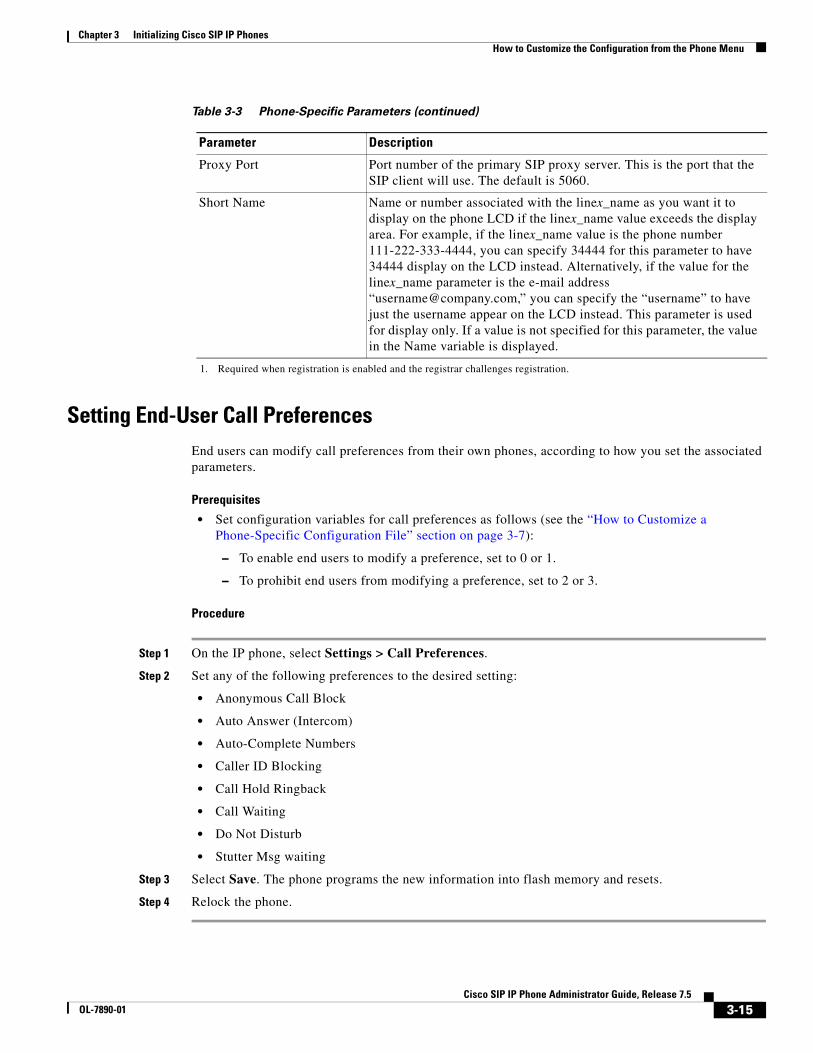
Setting End-User Call PreferencesEnd users can modify call preferences from their own phones, according to how you set the associated parameters.
Prerequisites
• Set configuration variables for call preferences as follows (see the “How to Customize a Phone-Specific Configuration File” section on page 3-7):
– To enable end users to modify a preference, set to 0 or 1.
– To prohibit end users from modifying a preference, set to 2 or 3.
Procedure
Step 1 On the IP phone, select Settings > Call Preferences.
Step 2 Set any of the following preferences to the desired setting:
• Anonymous Call Block
• Auto Answer (Intercom)
• Auto-Complete Numbers
• Caller ID Blocking
• Call Hold Ringback
• Call Waiting
• Do Not Disturb
• Stutter Msg waiting
Step 3 Select Save. The phone programs the new information into flash memory and resets.
Step 4 Relock the phone.
Proxy Port Port number of the primary SIP proxy server. This is the port that the SIP client will use. The default is 5060.
Short Name Name or number associated with the linex_name as you want it to display on the phone LCD if the linex_name value exceeds the display area. For example, if the linex_name value is the phone number 111-222-333-4444, you can specify 34444 for this parameter to have 34444 display on the LCD instead. Alternatively, if the value for the linex_name parameter is the e-mail address “[email protected],” you can specify the “username” to have just the username appear on the LCD instead. This parameter is used for display only. If a value is not specified for this parameter, the value in the Name variable is displayed.
1. Required when registration is enabled and the registrar challenges registration.
Table 3-3 Phone-Specific Parameters (continued)
Parameter Description
3-15Cisco SIP IP Phone Administrator Guide, Release 7.5
OL-7890-01

Chapter 3 Initializing Cisco SIP IP PhonesHow to Set the Date and Time
How to Set the Date and TimeYou can set date, time, and daylight savings time (DST) parameters. The current date and time is supported on the Cisco IP Phone 7960G/7940G using Simple Network Time Protocol (SNTP) and is displayed on the LCD. DST and time-zone settings are also supported.
International time-zone abbreviations are supported and must be in all capital letters.
Note We recommend that you set date- and time-related parameters in the default file for all phones. Alternatively, you can set the time-zone parameter manually on the phone or in the phone-specific configuration files.
Prerequisites
• Determine the type of DST that you want to configure:
– Absolute DST (for example, starts on April 1 and ends on October 1)
– Relative DST (for example, starts on the first Sunday in April and ends on the last Sunday of October)
Review the list of common and absolute DST parameters from Appendix D, “Configurable Parameters for the SIP IP Phone.”
• Review the information on SNTP in Table 3-4 on page 3-17. SNTP parameters specify how the phone obtains the current time from an SNTP server.
• Determine your time zone from Table 3-5 on page 3-18.
Procedure
Step 1 Using an ASCII text editor such as vi, open the SIPDefault.cnf file.
Step 2 Modify the following SNTP parameters as needed:
• sntp_mode
• sntp_server
• time_zone
Step 3 Modify the following common DST parameters as needed:
• dst_offset
• dst_auto_adjust
• dst_start_month
• dst_stop_month
• dst_start_time
• dst_stop_time
3-16Cisco SIP IP Phone Administrator Guide, Release 7.5
OL-7890-01
Chapter 3 Initializing Cisco SIP IP PhonesHow to Set the Date and Time
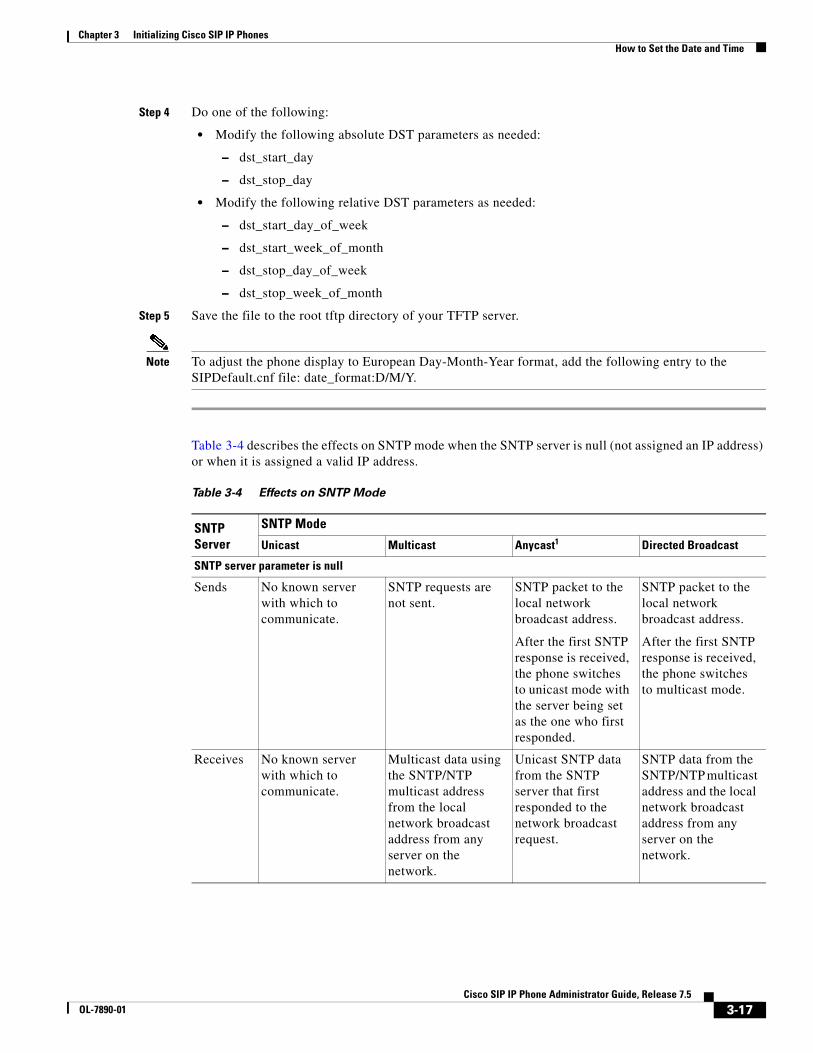
Step 4 Do one of the following:
• Modify the following absolute DST parameters as needed:
– dst_start_day
– dst_stop_day
• Modify the following relative DST parameters as needed:
– dst_start_day_of_week
– dst_start_week_of_month
– dst_stop_day_of_week
– dst_stop_week_of_month
Step 5 Save the file to the root tftp directory of your TFTP server.
Note To adjust the phone display to European Day-Month-Year format, add the following entry to the SIPDefault.cnf file: date_format:D/M/Y.
Table 3-4 describes the effects on SNTP mode when the SNTP server is null (not assigned an IP address) or when it is assigned a valid IP address.
Table 3-4 Effects on SNTP Mode
SNTP Server
SNTP Mode
Unicast Multicast Anycast1 Directed Broadcast
SNTP server parameter is null
Sends No known server with which to communicate.
SNTP requests are not sent.
SNTP packet to the local network broadcast address.
After the first SNTP response is received, the phone switches to unicast mode with the server being set as the one who first responded.
SNTP packet to the local network broadcast address.
After the first SNTP response is received, the phone switches to multicast mode.
Receives No known server with which to communicate.
Multicast data using the SNTP/NTP multicast address from the local network broadcast address from any server on the network.
Unicast SNTP data from the SNTP server that first responded to the network broadcast request.
SNTP data from the SNTP/NTP multicast address and the local network broadcast address from any server on the network.
3-17Cisco SIP IP Phone Administrator Guide, Release 7.5
OL-7890-01
Chapter 3 Initializing Cisco SIP IP PhonesHow to Set the Date and Time
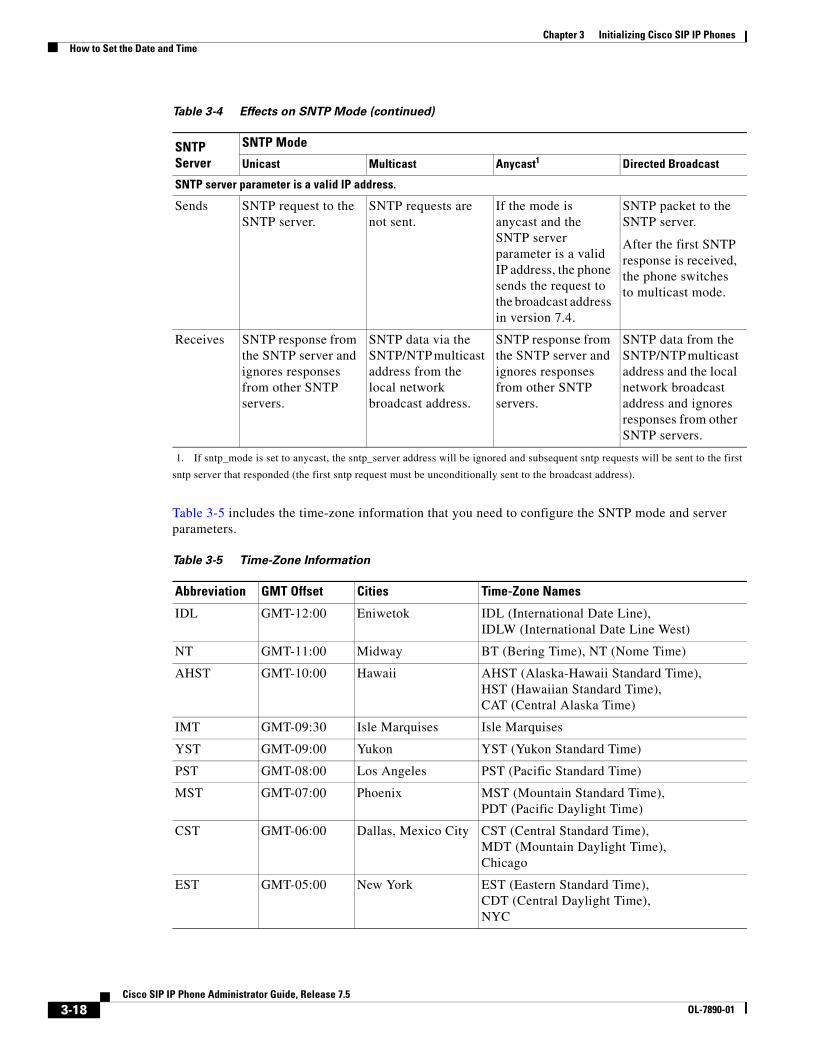
Table 3-5 includes the time-zone information that you need to configure the SNTP mode and server parameters.
SNTP server parameter is a valid IP address.
Sends SNTP request to the SNTP server.
SNTP requests are not sent.
If the mode is anycast and the SNTP server parameter is a valid IP address, the phone sends the request to the broadcast address in version 7.4.
SNTP packet to the SNTP server.
After the first SNTP response is received, the phone switches to multicast mode.
Receives SNTP response from the SNTP server and ignores responses from other SNTP servers.
SNTP data via the SNTP/NTP multicast address from the local network broadcast address.
SNTP response from the SNTP server and ignores responses from other SNTP servers.
SNTP data from the SNTP/NTP multicast address and the local network broadcast address and ignores responses from other SNTP servers.
1. If sntp_mode is set to anycast, the sntp_server address will be ignored and subsequent sntp requests will be sent to the first
sntp server that responded (the first sntp request must be unconditionally sent to the broadcast address).
Table 3-4 Effects on SNTP Mode (continued)
SNTP Server
SNTP Mode
Unicast Multicast Anycast1 Directed Broadcast
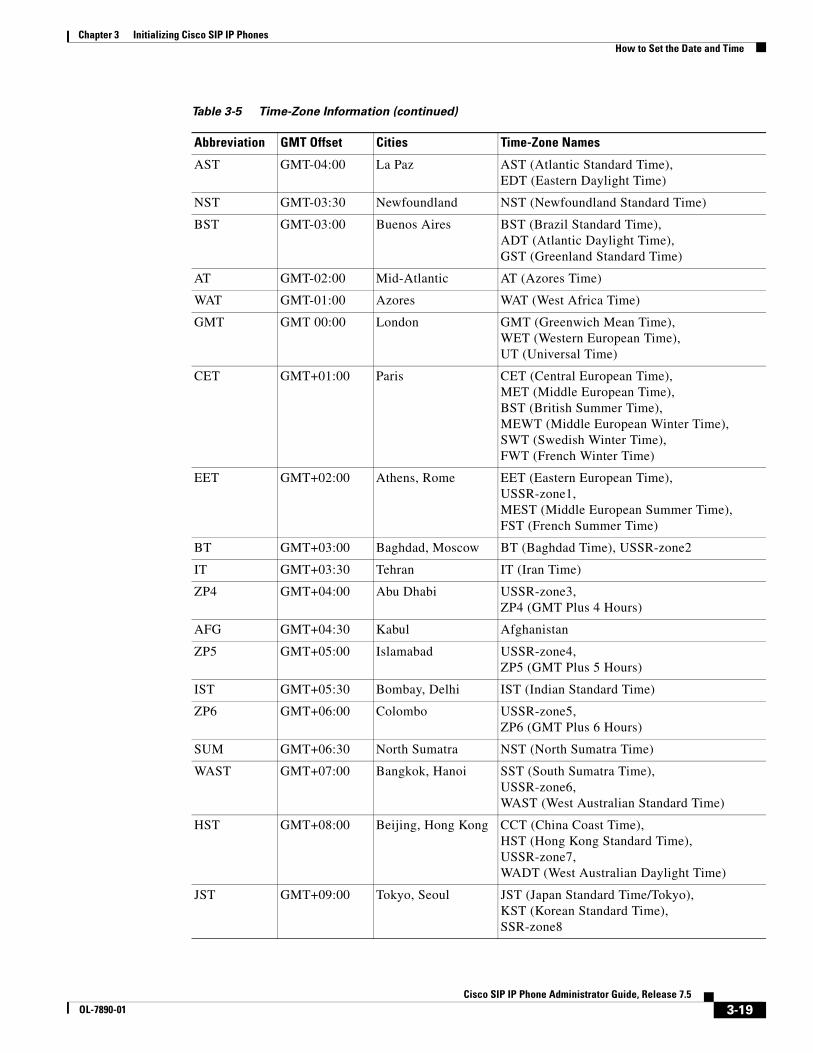
Table 3-5 Time-Zone Information
Abbreviation GMT Offset Cities Time-Zone Names
IDL GMT-12:00 Eniwetok IDL (International Date Line),IDLW (International Date Line West)
NT GMT-11:00 Midway BT (Bering Time), NT (Nome Time)
AHST GMT-10:00 Hawaii AHST (Alaska-Hawaii Standard Time),HST (Hawaiian Standard Time),CAT (Central Alaska Time)
IMT GMT-09:30 Isle Marquises Isle Marquises
YST GMT-09:00 Yukon YST (Yukon Standard Time)
PST GMT-08:00 Los Angeles PST (Pacific Standard Time)
MST GMT-07:00 Phoenix MST (Mountain Standard Time),PDT (Pacific Daylight Time)
CST GMT-06:00 Dallas, Mexico City CST (Central Standard Time),MDT (Mountain Daylight Time),Chicago
EST GMT-05:00 New York EST (Eastern Standard Time),CDT (Central Daylight Time),NYC
3-18Cisco SIP IP Phone Administrator Guide, Release 7.5
OL-7890-01
Chapter 3 Initializing Cisco SIP IP PhonesHow to Set the Date and Time
AST GMT-04:00 La Paz AST (Atlantic Standard Time),EDT (Eastern Daylight Time)
NST GMT-03:30 Newfoundland NST (Newfoundland Standard Time)
BST GMT-03:00 Buenos Aires BST (Brazil Standard Time),ADT (Atlantic Daylight Time),GST (Greenland Standard Time)
AT GMT-02:00 Mid-Atlantic AT (Azores Time)
WAT GMT-01:00 Azores WAT (West Africa Time)
GMT GMT 00:00 London GMT (Greenwich Mean Time),WET (Western European Time),UT (Universal Time)
CET GMT+01:00 Paris CET (Central European Time),MET (Middle European Time),BST (British Summer Time),MEWT (Middle European Winter Time),SWT (Swedish Winter Time),FWT (French Winter Time)
EET GMT+02:00 Athens, Rome EET (Eastern European Time),USSR-zone1,MEST (Middle European Summer Time),FST (French Summer Time)
BT GMT+03:00 Baghdad, Moscow BT (Baghdad Time), USSR-zone2
IT GMT+03:30 Tehran IT (Iran Time)
ZP4 GMT+04:00 Abu Dhabi USSR-zone3,ZP4 (GMT Plus 4 Hours)
AFG GMT+04:30 Kabul Afghanistan
ZP5 GMT+05:00 Islamabad USSR-zone4,ZP5 (GMT Plus 5 Hours)
IST GMT+05:30 Bombay, Delhi IST (Indian Standard Time)
ZP6 GMT+06:00 Colombo USSR-zone5,ZP6 (GMT Plus 6 Hours)
SUM GMT+06:30 North Sumatra NST (North Sumatra Time)
WAST GMT+07:00 Bangkok, Hanoi SST (South Sumatra Time),USSR-zone6, WAST (West Australian Standard Time)
HST GMT+08:00 Beijing, Hong Kong CCT (China Coast Time),HST (Hong Kong Standard Time), USSR-zone7,WADT (West Australian Daylight Time)
JST GMT+09:00 Tokyo, Seoul JST (Japan Standard Time/Tokyo),KST (Korean Standard Time),SSR-zone8
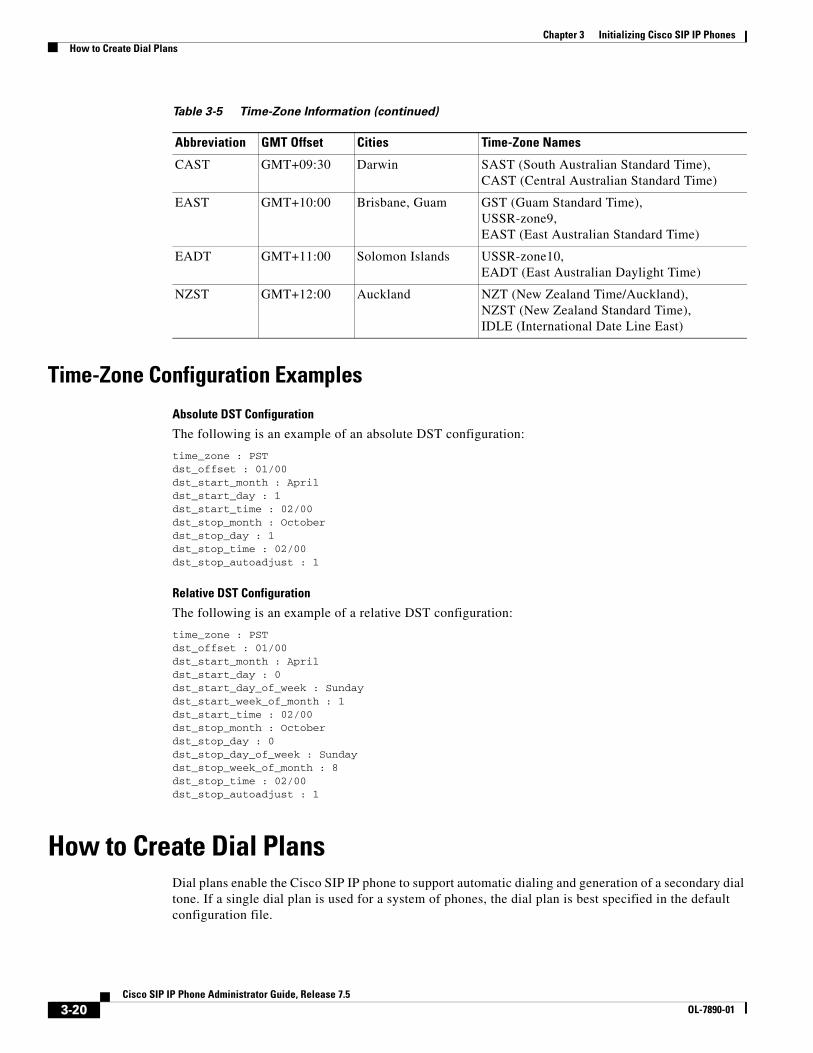
Table 3-5 Time-Zone Information (continued)
Abbreviation GMT Offset Cities Time-Zone Names
3-19Cisco SIP IP Phone Administrator Guide, Release 7.5
OL-7890-01
Chapter 3 Initializing Cisco SIP IP PhonesHow to Create Dial Plans
Time-Zone Configuration Examples
Absolute DST Configuration
The following is an example of an absolute DST configuration:
time_zone : PSTdst_offset : 01/00dst_start_month : Aprildst_start_day : 1dst_start_time : 02/00dst_stop_month : Octoberdst_stop_day : 1dst_stop_time : 02/00dst_stop_autoadjust : 1
Relative DST Configuration
The following is an example of a relative DST configuration:
time_zone : PSTdst_offset : 01/00dst_start_month : Aprildst_start_day : 0dst_start_day_of_week : Sundaydst_start_week_of_month : 1dst_start_time : 02/00dst_stop_month : Octoberdst_stop_day : 0dst_stop_day_of_week : Sundaydst_stop_week_of_month : 8dst_stop_time : 02/00dst_stop_autoadjust : 1
How to Create Dial PlansDial plans enable the Cisco SIP IP phone to support automatic dialing and generation of a secondary dial tone. If a single dial plan is used for a system of phones, the dial plan is best specified in the default configuration file.
CAST GMT+09:30 Darwin SAST (South Australian Standard Time), CAST (Central Australian Standard Time)
EAST GMT+10:00 Brisbane, Guam GST (Guam Standard Time),USSR-zone9,EAST (East Australian Standard Time)
EADT GMT+11:00 Solomon Islands USSR-zone10,EADT (East Australian Daylight Time)
NZST GMT+12:00 Auckland NZT (New Zealand Time/Auckland),NZST (New Zealand Standard Time),IDLE (International Date Line East)
Table 3-5 Time-Zone Information (continued)
Abbreviation GMT Offset Cities Time-Zone Names
3-20Cisco SIP IP Phone Administrator Guide, Release 7.5
OL-7890-01
Chapter 3 Initializing Cisco SIP IP PhonesHow to Create Dial Plans
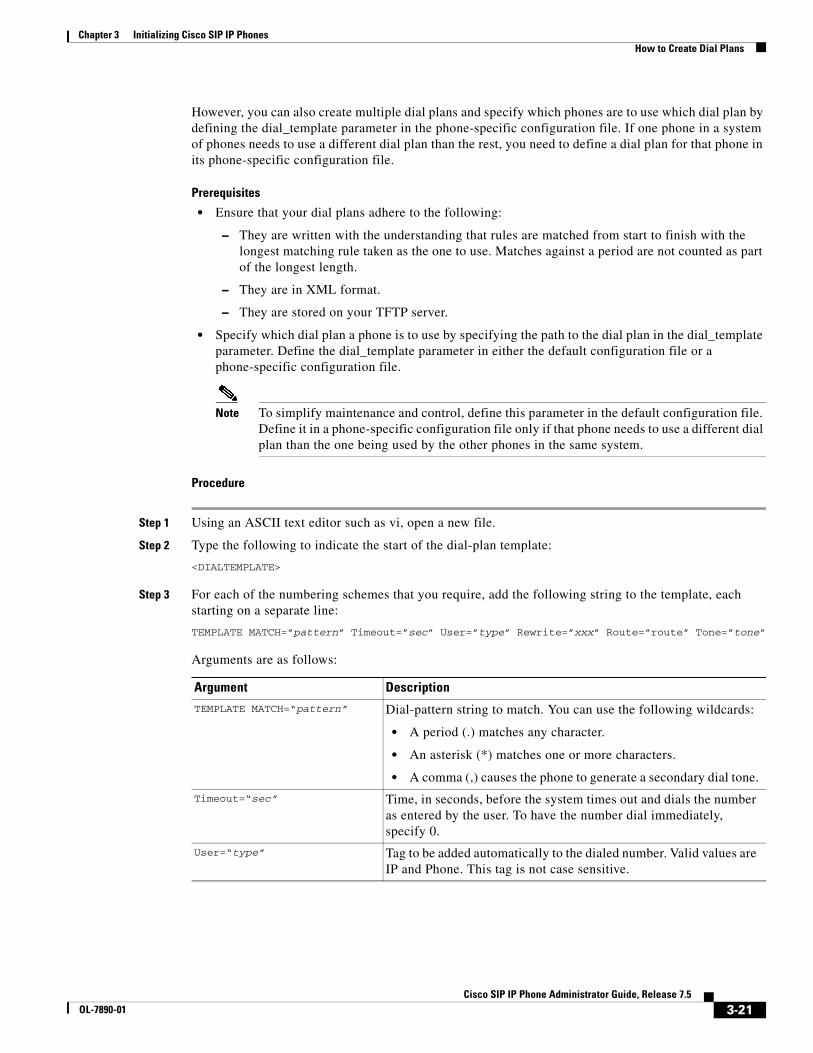
However, you can also create multiple dial plans and specify which phones are to use which dial plan by defining the dial_template parameter in the phone-specific configuration file. If one phone in a system of phones needs to use a different dial plan than the rest, you need to define a dial plan for that phone in its phone-specific configuration file.
Prerequisites
• Ensure that your dial plans adhere to the following:
– They are written with the understanding that rules are matched from start to finish with the longest matching rule taken as the one to use. Matches against a period are not counted as part of the longest length.
– They are in XML format.
– They are stored on your TFTP server.
• Specify which dial plan a phone is to use by specifying the path to the dial plan in the dial_template parameter. Define the dial_template parameter in either the default configuration file or a phone-specific configuration file.
Note To simplify maintenance and control, define this parameter in the default configuration file. Define it in a phone-specific configuration file only if that phone needs to use a different dial plan than the one being used by the other phones in the same system.
Procedure
Step 1 Using an ASCII text editor such as vi, open a new file.
Step 2 Type the following to indicate the start of the dial-plan template:
<DIALTEMPLATE>
Step 3 For each of the numbering schemes that you require, add the following string to the template, each starting on a separate line:
TEMPLATE MATCH=”pattern” Timeout=”sec” User=”type” Rewrite=”xxx” Route=”route” Tone=”tone”
Arguments are as follows:
Argument Description
TEMPLATE MATCH=“pattern” Dial-pattern string to match. You can use the following wildcards:
• A period (.) matches any character.
• An asterisk (*) matches one or more characters.
• A comma (,) causes the phone to generate a secondary dial tone.
Timeout=“sec” Time, in seconds, before the system times out and dials the number as entered by the user. To have the number dial immediately, specify 0.
User=“type” Tag to be added automatically to the dialed number. Valid values are IP and Phone. This tag is not case sensitive.
3-21Cisco SIP IP Phone Administrator Guide, Release 7.5
OL-7890-01

Chapter 3 Initializing Cisco SIP IP PhonesHow to Create Dial Plans
Rewrite=“xxx” Alternate string to be dialed instead of the number that the user dials. The following apply:
• Rewrite rules are matched from start to finish with the longest matching rule taken as the one to use.
• Matches against a period are not counted as part of the length.
• A complete rule is matched only if it has more nonwildcard matches than an incomplete rule.
• Comments are allowed with the following syntax:
<!-- comment -->
• Rules allow for substitution of up to five replacement strings as well as picking off of replaced digits one at a time.
For example, a match string of ab..cd..ef* and an input string of ab12cd34ef5678 result in the following.
Rewrite Output Notes
%s ab12cd34ef5678 —
%0 ab12cd34ef5678 —
%1 12 —
%2 34 —
%3 5678 —
%4 Null output.
%5 Null output.
XYZ.... XYZ1234 —
X.Y.Z... X1Y2Z345 —
919%1%2%3 91912345678 —
AB...X%1X.. AB123X12X45 12 appears twice.
X%1X%1X%1 X12X12X12 You can reuse the string.
X%s%% Xab12cd34ef5678 %% produces a %.
919 919 No need to use the input.
............ 12345678 Nothing goes in for the extra dots.
Argument Description
3-22Cisco SIP IP Phone Administrator Guide, Release 7.5
OL-7890-01

Chapter 3 Initializing Cisco SIP IP PhonesHow to Create Dial Plans
Step 4 Specify the pound sign (#) and asterisk (*) as dialed digits if required.
• The # is processed as a “dial now” event by default. You can override this by specifying # in the dial-plan template, in which case the phone does not dial immediately when the # is pressed but does continue to match the dial-plan template that specifies the #. The # is not matched by the wildcard character * or the period (.).
• The * is processed as a wildcard character. You can override this by preceding the * with the backward slash (\) escape sequence, resulting in the sequence \*. The phone automatically strips the \ so that it does not appear in the outgoing dial string. When * is received as a dialed digit, it is matched by the wildcard characters * and period (.).
Step 5 Specify the comma (,) as a secondary dial tone if required.
In earlier releases, a comma in the dial-plan template caused the phone to play the default secondary dial tone (Bellcore-Outside). With this release, you can specify which tones are played. All tone names should begin with a common prefix. Tone names, which are case insensitive, are as follows:
If desired, specify <!--comment--> at the end of each string to denote the type of plan (for example,
<!-- Long Distance --> or <!-- Corporate Dial Plan -->).
Note For more information on Bellcore tones, refer to Bellcore GR-506-CORE. For more information on tones in BTS 10200 Softswitch features, refer to the Cisco BTS 10200 Softswitch website at http://www.cisco.com/en/US/partner/products/hw/vcallcon/ps531/index.html.
Route=“route” Proxy to which to route the call. Valid values are default, emergency, and FQDN. FQDN is treated the same as default proxy. This entry is not case sensitive.
Tone=“tone” User-specific dial tone. If no tone is specified, the default secondary dial tone plays. If a comma (,) is specified followed by a tone, the phone plays the indicated tone instead of the secondary dial tone. If a tone is specified but there is no comma, the tone is ignored.
You can specify up to three different secondary dial tones in a single dial-plan template. The tones play in the order in which they appear in the template. Multiple tone entries are condensed into a single comma. For example, the phone interprets the match string 9,,,234 as 9,234 and treats the three commas as a single comma.
Argument Description
• Bellcore-Alerting • Bellcore-dr5 • Bellcore-Reorder
• Bellcore-Busy • Bellcore-dr6 • Bellcore-Stutter
• Bellcore-BusyVerify • Bellcore-Hold • CallWaiting-2
• Bellcore-CallWaiting • Bellcore-Inside • CallWaiting-3
• Bellcore-Confirmation • Bellcore-None • CallWaiting-4
• Bellcore-dr1 • Bellcore-Outside (default) • Cisco-BeepBonk
• Bellcore-dr2 • Bellcore-Permanent • Cisco-Zip
• Bellcore-dr3 • Bellcore-Reminder • Cisco-ZipZip
• Bellcore-dr4
3-23Cisco SIP IP Phone Administrator Guide, Release 7.5
OL-7890-01
Chapter 3 Initializing Cisco SIP IP PhonesHow to Create Dial Plans
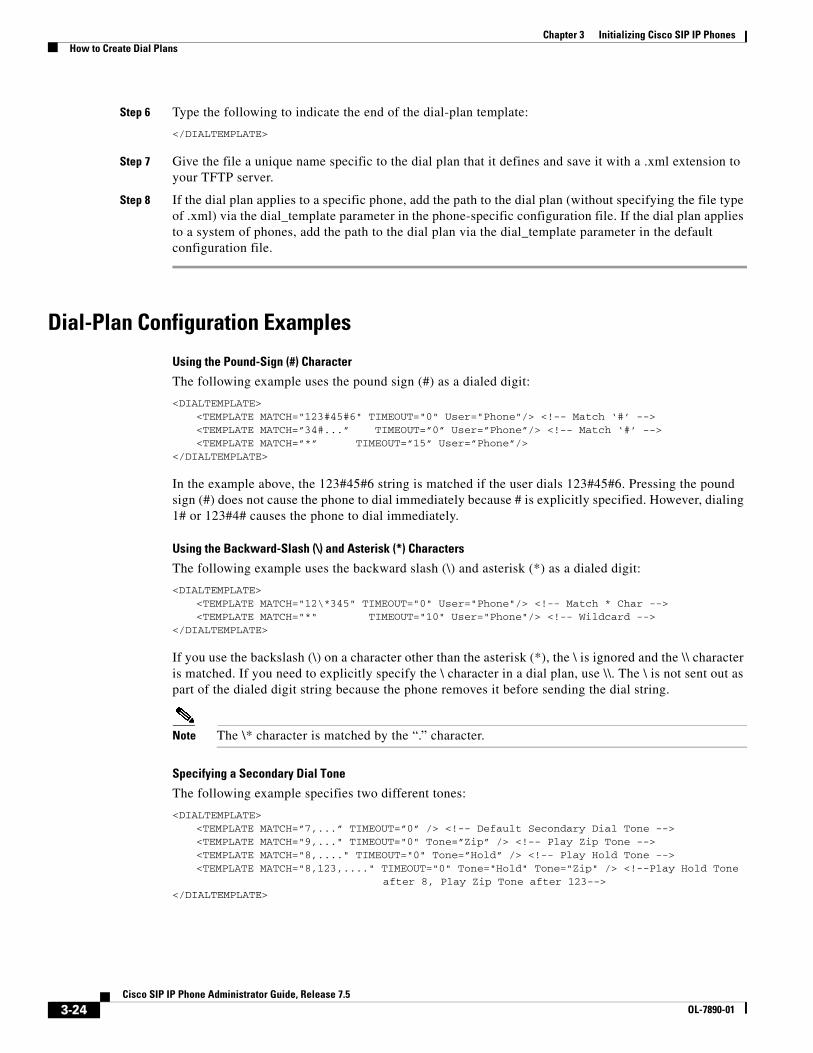
Step 6 Type the following to indicate the end of the dial-plan template:
</DIALTEMPLATE>
Step 7 Give the file a unique name specific to the dial plan that it defines and save it with a .xml extension to your TFTP server.
Step 8 If the dial plan applies to a specific phone, add the path to the dial plan (without specifying the file type of .xml) via the dial_template parameter in the phone-specific configuration file. If the dial plan applies to a system of phones, add the path to the dial plan via the dial_template parameter in the default configuration file.
Dial-Plan Configuration Examples
Using the Pound-Sign (#) Character
The following example uses the pound sign (#) as a dialed digit:
<DIALTEMPLATE><TEMPLATE MATCH="123#45#6" TIMEOUT="0" User="Phone"/> <!-- Match ‘#’ --><TEMPLATE MATCH=”34#...” TIMEOUT=”0” User=”Phone”/> <!-- Match ‘#’ --><TEMPLATE MATCH=”*” TIMEOUT=”15” User=”Phone”/>
</DIALTEMPLATE>
In the example above, the 123#45#6 string is matched if the user dials 123#45#6. Pressing the pound sign (#) does not cause the phone to dial immediately because # is explicitly specified. However, dialing 1# or 123#4# causes the phone to dial immediately.
Using the Backward-Slash (\) and Asterisk (*) Characters
The following example uses the backward slash (\) and asterisk (*) as a dialed digit:
<DIALTEMPLATE><TEMPLATE MATCH="12\*345" TIMEOUT="0" User="Phone"/> <!-- Match * Char --><TEMPLATE MATCH="*" TIMEOUT="10" User="Phone"/> <!-- Wildcard -->
</DIALTEMPLATE>
If you use the backslash (\) on a character other than the asterisk (*), the \ is ignored and the \\ character is matched. If you need to explicitly specify the \ character in a dial plan, use \\. The \ is not sent out as part of the dialed digit string because the phone removes it before sending the dial string.
Note The \* character is matched by the “.” character.
Specifying a Secondary Dial Tone
The following example specifies two different tones:
<DIALTEMPLATE><TEMPLATE MATCH=”7,...” TIMEOUT=”0” /> <!-- Default Secondary Dial Tone --><TEMPLATE MATCH="9,..." TIMEOUT="0" Tone=”Zip” /> <!-- Play Zip Tone --><TEMPLATE MATCH="8,...." TIMEOUT="0" Tone=”Hold” /> <!-- Play Hold Tone --><TEMPLATE MATCH="8,123,...." TIMEOUT="0" Tone="Hold" Tone="Zip" /> <!--Play Hold Tone
after 8, Play Zip Tone after 123--></DIALTEMPLATE>
3-24Cisco SIP IP Phone Administrator Guide, Release 7.5
OL-7890-01
Chapter 3 Initializing Cisco SIP IP PhonesHow to Verify Initialization
How to Verify InitializationThe initialization process establishes network connectivity and makes the phone operational in your IP network.
Procedure
Step 1 After the phone has power connected to it, ensure that the phone cycles through the following steps:
a. The following flash on and off in sequence: Headset button, Mute button, and Speaker button.
b. The Cisco Systems, Inc. copyright appears on the LCD.
c. The following messages appear:
– Configuring VLAN—The phone configures the Ethernet connection.
– Configuring IP—The phone contacts the DHCP server to obtain network parameters and the IP address of the TFTP server.
– Requesting Configuration—The phone contacts the TFTP server to request its configuration files and compares firmware images.
– Upgrading Software—The phone displays this message only if it determines that an image upgrade is required. After upgrading the image, the phone automatically reboots to run the new image.
d. The main LCD displays the following:
– Primary directory number
– Soft keys
If the phone successfully cycles through these steps, it has started up properly.
Where to Go Next• See Chapter 4, “Managing Cisco SIP IP Phones,” for information on upgrading firmware and
performing other management tasks.
• See Chapter 5, “Monitoring Cisco SIP IP Phones,” for information on debugging and on viewing network statistics.
3-25Cisco SIP IP Phone Administrator Guide, Release 7.5
OL-7890-01

Chapter 3 Initializing Cisco SIP IP PhonesWhere to Go Next
3-26Cisco SIP IP Phone Administrator Guide, Release 7.5
OL-7890-01