Embed Size (px)
Citation preview

Information Technology
NVEQ Level 1 ‒ Class IX
IT107-NQ2012-Email Messaging
Student╆s Handbook

1
© PSS Central Institute of Vocational Education, 2012
Copyright protects this publication. Except for purposes permitted by the
Copyright Act, reproduction, adaptation, electronic storage and communication
to the public are prohibited without prior written permission.

2
Student Details
Student Name:___________________________
Student Roll Number:______________________
Batch Start Date:________________________

3
Acknowledgements
The following partners were instrumental in providing the content:
1. Central Board of Secondary Education (CBSE) in conjunction with Pandit
Sunderlal Sharma Central Institute of Vocational Education (PSSCIVE) for
providing text and exercises in Computer and IT Basics. The team involved
included Dr. Om Vikas (Convener), Dr. Vinay Swarup Mehrotra (Co-
Convener), Ms Gurpreet Kaur, Mr. Mukesh Kumar, Ms Nancy Sehgal and Mr.
Yogesh Kumar and Mr. Rituraj Tamrakar.
2. Accenture India’s Corporate Citizenship Program (Skills 4 Life). Accenture has provided the content material they have commissioned and developed
as well as access to their implementing partners (Dr. Reddy’s Foundation and QUEST Alliance) for this material.
3. Microsoft Free Digital Literacy Program eLearning package has been used to
supplement CBSE/ PSSCIVE’s content.
4. The Wadhwani Foundation team involved in designing and building this
curriculum and content include Ms. Darshika Sanghani, Ms. Sonia Kakkar, Mr.
Toral Veecumsee, Ms. Rekha Menon, Mr. Ajay Goel and Mr. Austin Thomas.
5. In addition, various public domain sources have been leveraged to create
material across modules. The contributions of all these sources is gratefully
acknowledged and recognized.

4
TABLE OF CONTENTS
Acknowledgements ................................................................................................. 3
Preface ……………………………………………………………………………………………………………………………5
About Your Workbook ……………………………………………………………………………………………………7
Session 1: Introduction to E-mail .............................................................................................. 8
Session 2: Creating an E-mail Account with Gmail.com .................................................... 11
Session 3: Creating an E-mail Account with Outlook.com ................................................ 14
Session 4: Link Email Address to Email Application ........................................................... 16
Session 5: Writing an Email Message ...................................................................................... 19
Session 6: Receive and Respond to Email Messages ........................................................... 22
Session 7: Using email Ribbon ................................................................................................. 23
Session 8: Format and Spell Check an Email message ....................................................... 24
Session 9: Attach a File to Email Message ............................................................................ 26
Session 10: Using Help ................................................................................................................. 30
Session 11: Print Email Message ................................................................................................ 32
Session 12: Adding and Modifying a Contact .......................................................................... 34

5
Preface
The National Curriculum Framework, 2005, recommends that children’s life at school must be linked to their life outside the school. This principle makes a
departure from the legacy of bookish learning which continues to shape our
system and causes a gap between the school, home, community and the
workplace.
The student workbook on ―Email Messaging (Basic)‖ is a part of the qualification package developed for the implementation of National Vocational
Education Qualification Framework (NVEQF), an initiative of Ministry of Human
Resource Development (MHRD), Government of India to set common principles
and guidelines for a nationally recognized qualification system covering
Schools, Vocational Education and Training Institutions, Technical Education
Institutions, Colleges and Universities. It is envisaged that the NVEQF will
promote transparency of qualifications, cross-sectoral learning, student-
centred learning and facilitate learner’s mobility between different qualifications, thus encouraging lifelong learning.
This student workbook, which forms a part of vocational qualification package
for student’s who have passed Class VIII or equivalent examination, was created
by a group of experts. The IT-ITeS Skill Development Council approved by the
National Skill Development Corporation (NSDC) for the IT/ITeS Industry
developed the National Occupation Standards (NOS). The National Occupation
Standards are a set of competency standards and guidelines endorsed by the
representatives of IT Industry for recognizing and assessing skills and knowledge
needed to perform effectively in the workplace.
The Pandit Sunderlal Sharma Central Institute of Vocational Education
(PSSCIVE), a constituent of National Council of Educational Research and
Training (NCERT) in association with Wadhwani Foundation has developed
modular curricula and learning materials (Units) for the vocational qualification
package in IT/ITes sector for NVEQ levels 1 to 4; level 1 is equivalent to Class
IX. Based on NOS, occupation related core competencies (knowledge, skills, and
abilities) were identified for development of curricula and learning modules
(Units).
This student workbook attempts to discourage rote learning and to bring about
necessary flexibility in offering of courses, necessary for breaking the sharp
boundaries between different subject areas. The workbook attempts to
enhance these endeavour by giving higher priority and space to opportunities
for contemplation and wondering, discussion in small groups and activities
requiring hands-on-experience. We hope these measures will take us

6
significantly further in the direction of a child-centred system of education
outlined in the National Policy of Education (1986). The success of this effort
depends on the steps that school Principals and Teachers will take to encourage
children to reflect their own learning and to pursue imaginative and on-the-job
activities and questions. Participation of learners in skill development exercises
and inculcation of values and creativity is possible if we involve children as
participants in learning, and not as receiver of information. These aims imply
considerable change in school routines and mode of functioning. Flexibility in
the daily time-table would be a necessity to maintain the rigour in
implementing the activities and the required number of teaching days will have
to be increased for teaching and training.

7
About Your Workbook
This workbook is to assist you with completing the Unit of Competency IT107-NQ2012: Email Messaging (Basic). You should work through the workbook in the classroom, at the workplace or in your own time under the guidance and supervision of your teacher or trainer.
This workbook contains sessions which will help you to acquire relevant knowledge and skills (soft and hard) on various aspects of the unit of competency. Each session is small enough to be easily tackled and digested by you before you move on to the next session. Animated pictures and photographs have been included to bring about visual appeal and to make the text lively and interactive for you. You can also try to create your own illustrations using your imagination or taking the help of your teacher. Let us now see what the sections in the sessions have for you.
Section1: Introduction
This section introduces you to the topic of the Unit. It also tells you what you will learn through the various sessions covered in the Unit.
Section 2: Relevant Knowledge
This section provides you with the relevant information on the topic (s) covered in the session. The knowledge developed through this section will enable you to perform certain activities. You should read through the information to develop an understanding on the various aspects of the topic before you complete the exercise (s).
Section 3: Exercise
Each session has exercises, which you should complete on time. You will perform the activities in the classroom, at home or at the workplace. The activities included in this section will help you to develop necessary knowledge, skills and attitude that you need for becoming competent in performing the tasks at workplace. The activities should be done under the supervision of your teacher or trainer who will guide you in completing the tasks and also provide feedback to you for improving your performance. To achieve this, prepare a timetable in consultation with your teacher or trainer and strictly adhere to the stipulated norms or standards. Do not hesitate to ask your teacher or trainer to explain anything that you do not understand.
Section 4: Assessment
The review questions included in this section will help you to check your progress. You must be able to answer all the questions before you proceed to the next session.
At the end of the Unit, there is a list of learning resources which include books, journals, newsletters, websites, etc. to support your further learning.
8
SESSION 1: INTRODUCTION TO E-MAIL
In this session, you will be introduced to the concept of email and the steps to
create an online email account.
RELEVANT KNOWLEDGE
Electronic mail (E-mail) is an electronic message transmitted over
internet/computer network from one user to another. E-mail is a text based
mail consisting of lines of text, and can include file attachments. These
attachments could be pictures, documents, spreadsheets, audio files, video
files etc. The key features of e-mail are as follows:
E-mail can be sent to one person or more than one person at the same time.
The recipient of e-mail can open the e-mail at his/her convenience.
Since messages are transmitted electronically over internet, it is a faster
way to communicate with the people. Persons could be located in the same
office, home, building, or anywhere in the world.
E-mail messages can be sent or received at any time and are typically sent
over a network (office network or more likely internet).
If so desired, a copy of the e-mail message that the sender has sent can be
saved in the sender’s computer e-mail account for later reference.
In addition to sending messages, e-mail is an ideal method for sending
documents as attachments.
E-mail has quite a few similarities as a regular postal service.
o A postal letter is sent to a postal address. An e-mail is sent to an e-mail
address. E-mail address is much shorter.
o Just as in the case of a postal letter, the sender of e-mail composes the
message and sends it to the e-mail address of the recipient.
o The postal letter is normally put by the postman in the letter box outside
the house. Similarly an e-mail is received by the recipient in the inbox of
the e-mail application.
o While postal letter travels from the sender’s post office via a postal bus / train / air / postman, the e-mail message travels electronically over
the internet and computer network.
The recipient of e-mail can read the mail, forward it to another person, or
reply back. The recipient can also store the e-mail of delete it.
E-mail Address:
To use an e-mail, a user must have an e-mail address. The e-mail address
contains all the information required to send or receive a message from
anywhere in the world. An e-mail address consists of two parts separated by @

9
symbol (spelled as at) – the first part is the user_name and the second part is
host computer name. The e-mail address might look like:
E-mail Services:
There are two kinds of e-mail services:
Application based e-mail is installed on the user’s computer. The mail is stored on the user’s computer (as well as a central server, typically for that specific organization). Some of the examples of application based e-mail
program are:
o Microsoft Outlook
o Mozilla Thunderbird
o Opera
o Foxmail etc.
The user must have an e-mail account either from an internet service
provider (ISP) or through one of the free e-mail service providers on the
internet.
Web-based e-mail can be accessed by the user from any Internet-connected
computer anywhere in the world. Web-based email is not stored on the
user’s computer. Many web-based e-mail services are available such as
gmail.com, outlook.com, yahoo.com etc.
E-mail Message Format:
The e-mail message format in any e-mail software, whether application based
or web based, has many common elements. Their arrangement on the user’s computer screen may have a different look and feel, but the purpose of each of
these elements is same.
From: Sender’s email address To: Recipients’ email address Date: When the email was sent
Subject: The topic of the message
Cc: E-mail addresses of other people, who have been sent a copy of the email. The recipients of the email can see all of the e-mail addressed to which the copies have been sent. (Note: The full form of CC is “Carbon Copy”)
Bcc: E-mail addresses of other people, who have been sent blind carbon copies of the email. The recipients of the email (in To and Cc) do not know that the same email has been sent to other e-mail address in Bcc.
10
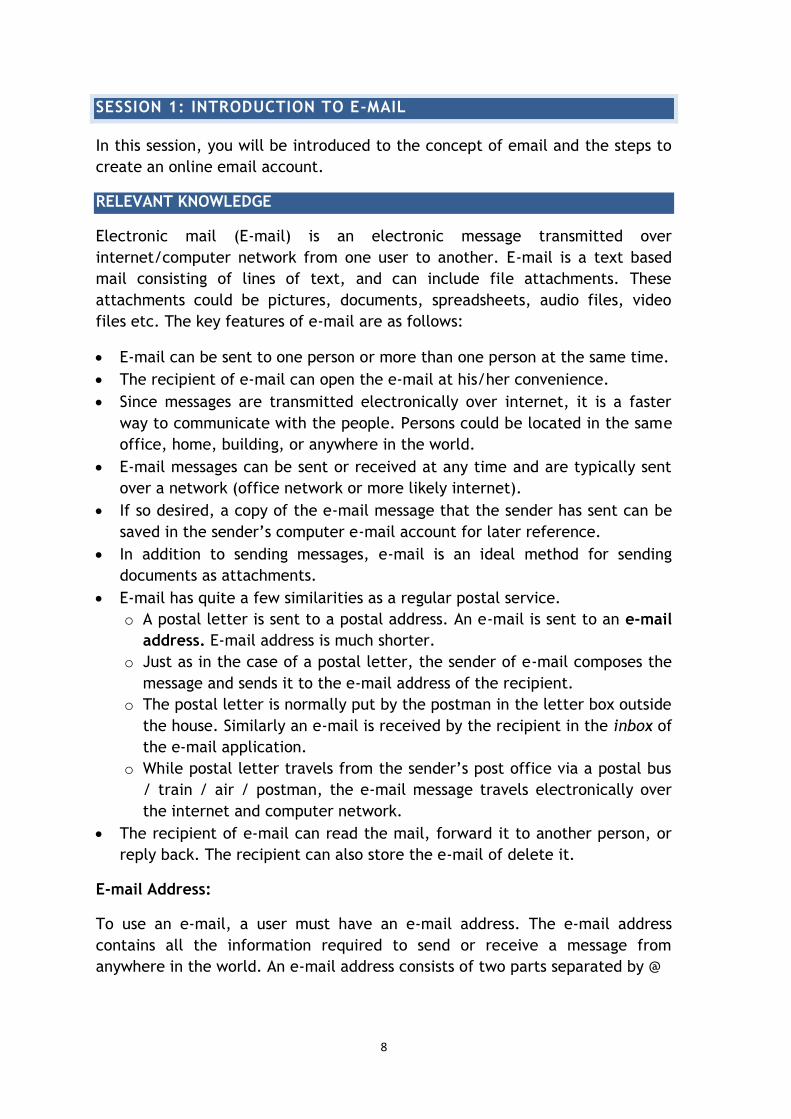
Message body
The body consists of the text of the message and any attachments to be sent.
Some examples of the message format of commonly used email applications are
given in Figure 1.
Figure 1

11
SESSION 2: CREATING AN E-MAIL ACCOUNT WITH GMAIL.COM
Before you start using email, an email address is required. In this session you
will learn to create an email address using Gmail. In the next session, you will
learn to create an email account using Outlook. This would also help you
understand the similarities and minor differences in different e-mail
applications.
RELEVANT KNOWLEDGE
To create your Gmail account you only need a web browser and an internet
connection.
Open the Web Browser.
On the address bar type www.gmail.com. You should now get to a page that
looks something like the one in Figure 1.
Click on Create Account and then proceed to the next step.
After you click on the signup link, you shall be shown a form with several
fields which need inputs. This is shown in Figure 2.
Figure 1
Figure 2

12
Choose a login name or username: Choosing a login name is part art and
part common sense. Since it determines what your email address will be, we
suggest you spend a little time over it. Email addresses need to be unique
which means that no two people in the world can have the same address.
There is no guarantee that your preferred login name would be available.
The following are advice and suggestions on how to choose a login or
username.
o First check if you can get a login name of your name, first name, last
name, or firs tname+last name. E.g. Shalini or dalal or shalinidalal or the
more popular, firstname.lastname (e.g. shalini.dalal or dalal.shalini).
Getting a Gmail email address of your name is indeed very fortunate
because of the sheer number of subscribers to the service. Your login
name needs to be catchy and at the same time describe you so people
are able to recall it without much difficulty and associate it with you.
o You can also opt to choose your first
name and your birth date: for e.g.
vicky15.
o When you move the cursor to the
next input field Password, in case
the username is not available, a
message is displayed. This is shown
in Figure . You can go back to
username field and change it.
Choosing a password for your email: Securing your Gmail email account
with a strong password is important. Think of the password as the key
combination to your safe and give it the same amount of importance. A
combination of uppercase and lowercase letters with some digits would be a
strong enough password. You need to enter the password twice. You can
leave the "Remember me on this computer" box unchecked.
Enter your birthday and gender (Male / Female).
Current email address: In case you already have an existing email address,
you can enter that here, or leave this blank.
Prove you are not a robot: Enter the characters displayed in the picture,
above the field. This is required so that Gmail knows that the inputs are
from a human being and not some automated program.
Now that everything is set, you can go through the Terms of Service and
click on the "I accept. Create my account." button which will create your
very own free Gmail account!
Click Next. You will be asked to Add a profile photo. You can for the time
being skip this and select Next Step.
Your Gmail account is now ready and the inbox will open as shown in Figure
.
Figure 3

13
Note the email address and password in a secure place.
EXERCISE
Perform the following activities till you are confident:
S.No. Activity
1 Open an email account with gmail
Figure 4

14
SESSION 3: CREATING AN E-MAIL ACCOUNT WITH OUTLOOK.COM
In the previous exercise you created an email account using Gmail. In this
exercise you will learn to create an email account with Outlook. The steps are
almost similar and even a little simpler.
RELEVANT KNOWLEDGE
To create your Outlook account you only need a web browser and an
internet connection. On the address bar of your browser type
www.outlook.com. You will see a page that looks like the one shown in
Figure1
Choose the option “Sign up” (refer arrow in Figure1.
After you click on the signup link, a form is displayed. It has several fields
that need to be filled (refer Figure 2). Provide all the inputs and click on ―I
accept”.
Figure 1
Figure 2
15
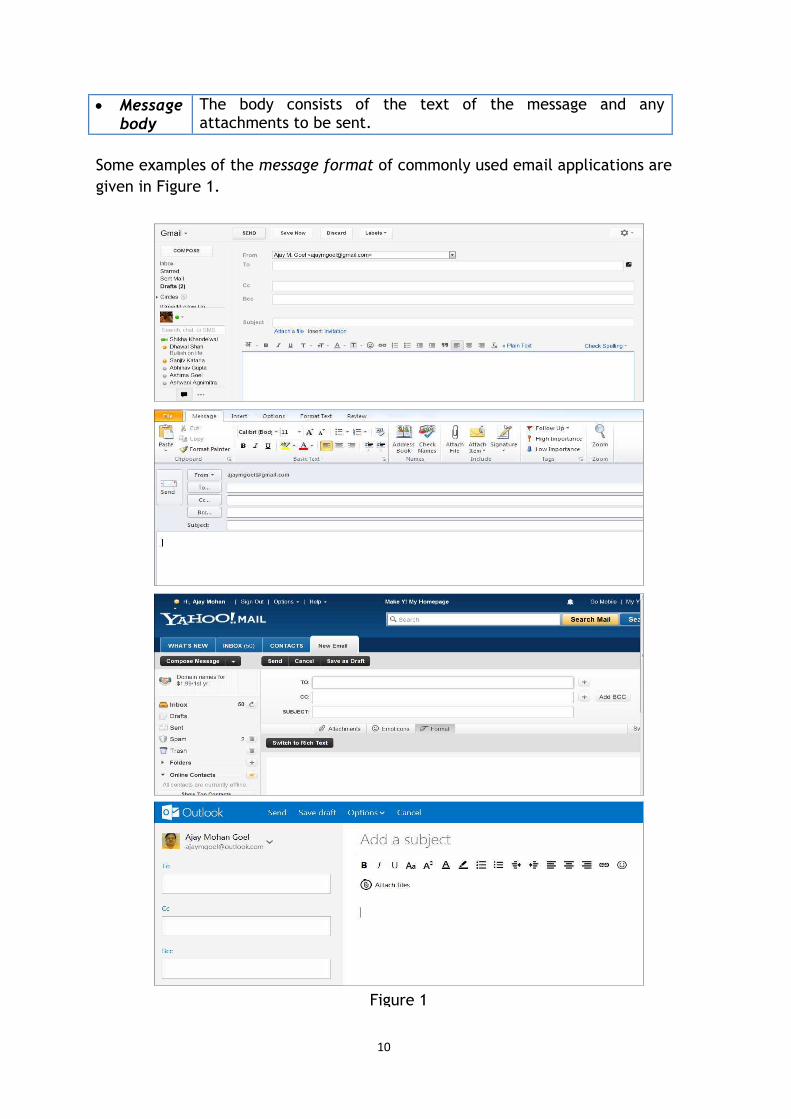
If all the inputs were provided correctly, the inbox of the outlook.com email
will open. It looks like the one in Figure 3
You have learnt to create an email addresses using two different free email
providers on internet. Note that the details requested and the verification too
is more or less the same. You can use any one of these email addresses for the
exercises which follow.
EXERCISE
Perform the following activities till you are confident:
S.No. Activity
1 Open an email account with outlook
Figure 3

16
SESSION 4: LINK EMAIL ADDRESS TO EMAIL APPLICATION
In Figure 1 and 2, you created email address by using two different web based
email applications. When you use web based email applications, you need to be
connected to the internet, as all your emails and related data is stored on the
computers of the email providers. It is not stored on your computer.
In rest of the sessions, you will use an application based email software, just
like the way you used the word processing, spreadsheet and presentation
software.
RELEVANT KNOWLEDGE
There are many email software available such as Microsoft Outlook, Mozilla
Thunderbird, Opera, Foxmail etc. You need to have one of them installed on
your computer. You can use these packages even if you aren’t connected to the network or internet, although the e-mail messages can be received or sent only
when this internet connection is available. As an example this exercise uses MS-
Outlook to help you learn to use email application software.
Getting started with Email software:
To start you can choose any of the above software. We would encourage you to
start learning to email by using either the MS-Outlook or Mozilla Thunderbird.
Make sure that this software is already installed in your computer. You can
start using MS-Outlook software, by performing any one of the following steps:
a) Double Click on a shortcut key of the MS-Outlook icon, if available, on
the desktop; or
b) Click [1] Start [2] All Programs [3] Microsoft office [4]
Microsoft Office Outlook
If you are using any other email application software, the steps to start it
would be almost identical to these.
Once you start MS-Outlook, you will see a screen as shown in Figure 1. Some of
the components of the screen displayed are given below. The look may vary in
different email software or different versions of MS-Outlook.
Figure 1

17
Adding email address to the email software:
To start using email, you need to specify the email address (which you had
created in previous exercises), to
the software. The steps are as
follows:
Select [1] File [2]Add New
Account
The dialogue box shown in
Figure 2 appears. Enter your
name, email address, and
password which you had given
while creating the email
account. Click on Next.
The dialogue box in Figure 3
appears. The email application
connects with your email
service provider. If the details
entered are correct, it adds the
email address to the email
software. (Note: Please note
that the computer needs to be
connected to internet, while
performing this step).
Now you are ready to start
sending and receiving emails using this email software. At this stage the
screen will look like in Figure 4:
Start the email software on your computer. Your screen will look similar to
what is given below.
Figure 2
Figure 3
Figure 4

18
EXERCISE
Perform the following activities till you are confident:
S.No. Activity
1 Add email address to email software
19
SESSION 5: WRITING AN EMAIL MESSAGE
You are now ready to start using email.
RELEVANT KNOWLEDGE
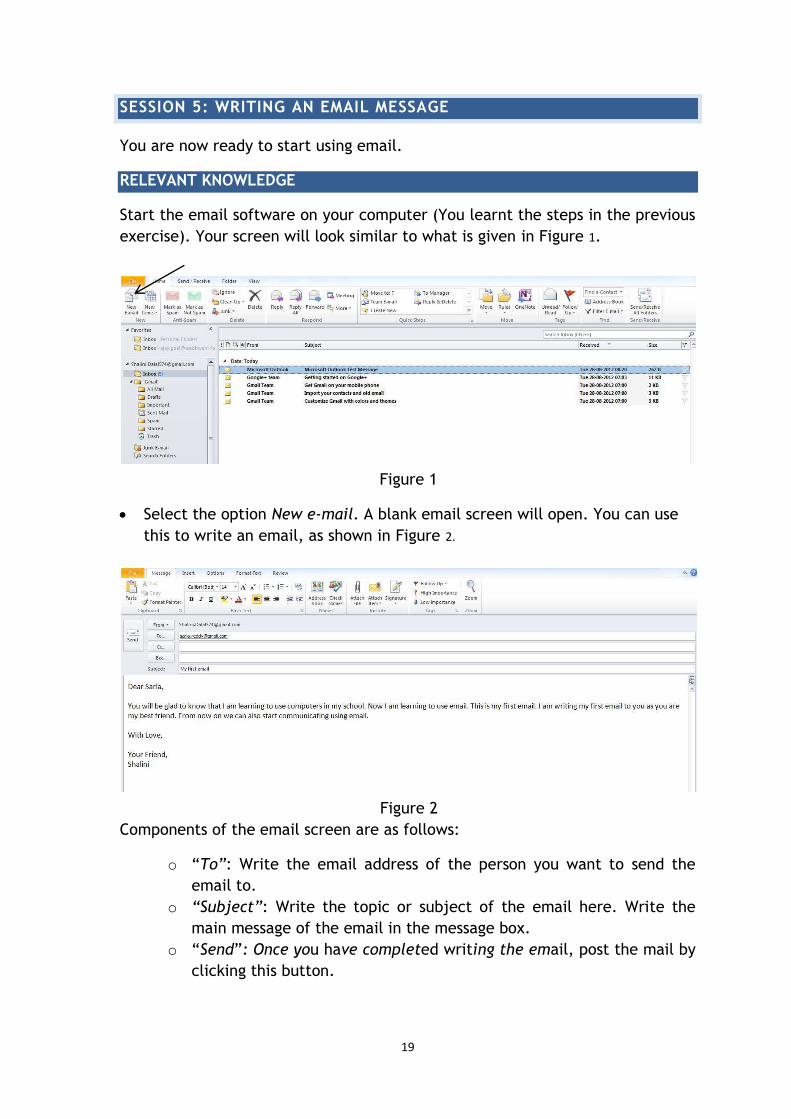
Start the email software on your computer (You learnt the steps in the previous
exercise). Your screen will look similar to what is given in Figure 1.
Select the option New e-mail. A blank email screen will open. You can use
this to write an email, as shown in Figure 2.
Components of the email screen are as follows:
o ―To”: Write the email address of the person you want to send the
email to.
o “Subject”: Write the topic or subject of the email here. Write the
main message of the email in the message box.
o ―Send‖: Once you have completed writing the email, post the mail by
clicking this button.
Figure 1
Figure 2

20
First the mail goes into the Outbox of email software. If you are connected to
internet, the email is sent from the Outbox to the recipient, through the
internet. The recipient would be able to read the email, when she / he opens
the inbox of her email software and downloads all the emails. The recipient
needs to be connected to internet to send / receive emails.
TIPS FOR WRITING AN EFFECTIVE E-MAIL MESSAGE
1. Since most e-mail programs have a ―spam filter‖, make sure that the Subject
of e-mail is not just one word such as ―Thanks‖ or ―Hello‖ as these are likely to find their way in the Spam Folder instead of the Inbox. The subject line should
be meaningful, alerting the receiver of the message contained in the email.
2. Keep the message short, simple, and straightforward. Assume that the
reader will not have the patience to go through a long message. Get to the
point immediately.
3. Do not use short forms or SMS language (plz cud v meet dis Monday) in e-
mail messages. Also, do not use all CAPS — in an e-mail, using all capitals is
equivalent to shouting at someone!
4. For addressing the recipient, use the same formats as suggested in the
sections on formal and informal letters. Dear Sir/Madam is acceptable in formal
e-mails to people whose names are unknown. In informal emails, it is always
better to use the first name of the person in your greeting.
5. Make sure you can be clearly identified by the reader. If you think the reader
may not be able to identify you by your email address (for example, if you have
an e-mail such as [email protected]) make sure that you provide your full
name (and even your location) at the bottom of the e-mail.
6. Proofread! Remember that once you press the ―Send‖ button, the e-mail’s out of your hands! So before you go for this button, make sure that you have
read your mail very carefully and have corrected any errors in it.
7. Distinguish between formal and informal situations. Between friends, it is
okay to take a few liberties such as using ―emoticons‖ or smileys such as or
. But in a formal mail, you have to stick to the rules as we defined in the
section on formal letters.
8. Politeness counts! Using ―please‖, ―thank you‖, and polite expressions such as ―May I please request you…‖ is always helpful.

21
9. Be careful while using ―cc‖. Add cc recipients only when you want your main recipient to know that others will also get a copy of the mail. If you want to
send the same message to more than one person, it is best to put all the e-mail
addresses in the ―To:‖ line rather than in the ―cc‖ line.
10. To end, you can use any of the following:
- Best regards,
- Regards,
- Best wishes,
―Yours sincerely‖ or ―Yours faithfully‖ is not so common in e-mails, though
accepted in letters.
EXERCISE
Perform the following activities till you are confident:
S.No. Activity
1 Write an email message

22
SESSION 6: RECEIVE AND RESPOND TO EMAIL MEESAGES
RELEVANT KNOWLEDGE
When you receive an email, you can take one or more of the following actions:
o Read and close it. The email
remains in the inbox.
o Read and Delete it. The email is
deleted from the inbox and is
moved into a folder called Trash
or Deleted folder.
o Reply to the email, by choosing
the Reply option. In this case, the email address of the sender, will
automatically appear in the “To” field. You can write the email message
and then send the email.
o Reply All: In this case, the reply you send will go to the sender and all
email addresses present in the To and the Cc field of the email received
by you.
o Forward: In this case, no email address will be selected. You can enter
the email address to which you want to forward the email received by
you.
Go ahead and send at least 2-3 emails to your other class mates. Ask 2-3 of
them to send you an email. And then use one or more of the above options.
More you practice, more you will learn. Remember the old proverb,
“Practice makes a man perfect.”
EXERCISE
Perform the following activities till you are confident:
S.No. Activity
1 Open the inbox and read the email messages
Figure 1
23
SESSION 7: USING EMAIL RIBBON
You have already become quite familiar with some of the common options on
the email ribbon by now. This session will cover some commonly used options in
email.
RELEVANT KNOWLEDGE
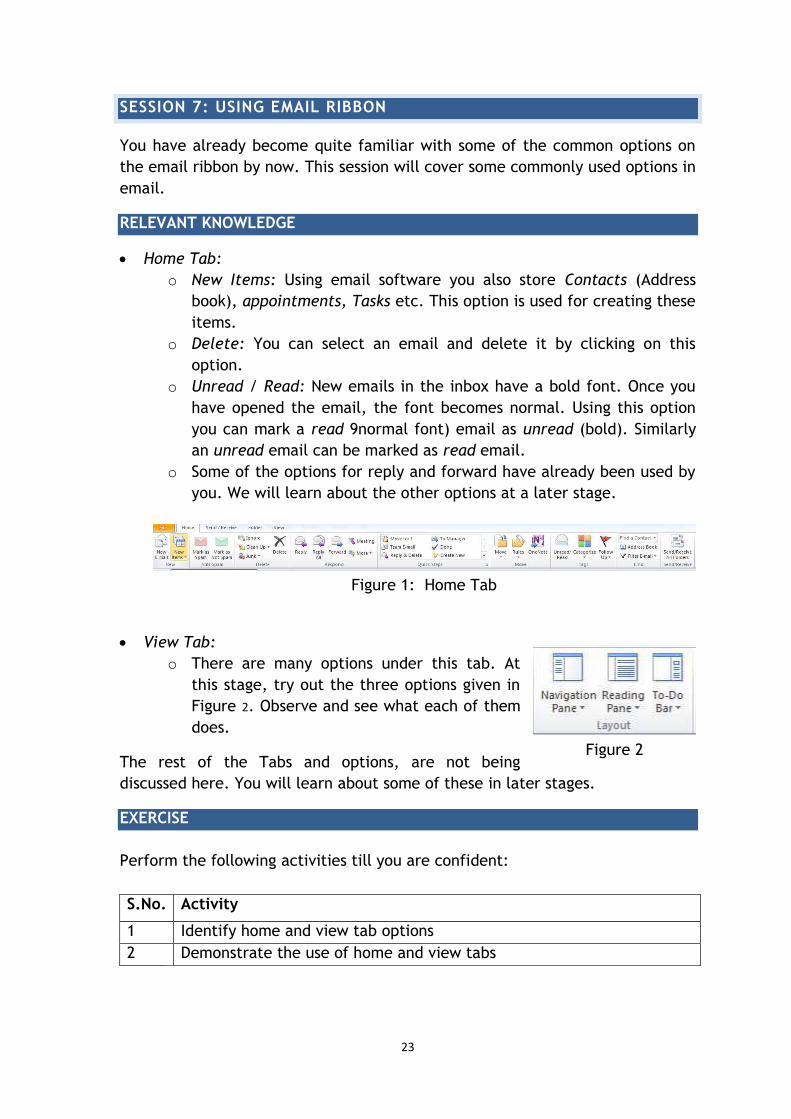
Home Tab:
o New Items: Using email software you also store Contacts (Address
book), appointments, Tasks etc. This option is used for creating these
items.
o Delete: You can select an email and delete it by clicking on this
option.
o Unread / Read: New emails in the inbox have a bold font. Once you
have opened the email, the font becomes normal. Using this option
you can mark a read 9normal font) email as unread (bold). Similarly
an unread email can be marked as read email.
o Some of the options for reply and forward have already been used by
you. We will learn about the other options at a later stage.
View Tab:
o There are many options under this tab. At
this stage, try out the three options given in
Figure 2. Observe and see what each of them
does.
The rest of the Tabs and options, are not being
discussed here. You will learn about some of these in later stages.
EXERCISE
Perform the following activities till you are confident:
S.No. Activity
1 Identify home and view tab options
2 Demonstrate the use of home and view tabs
Figure 1: Home Tab
Figure 2

24
SESSION 8: FORMAT AND SPELL CHECK AN EMAIL MESSAGE
Email software has basic features for text formatting, spelling checks and
grammar checks. You are already familiar with these features, and have used
them while learning word processing and spreadsheets.
RELEVANT KNOWLEDGE
1. Format an e-mail message:
You would find the basic text
formatting options in the ribbon. As
seen in the adjacent figure, the icons
for the format options are almost
similar to that in a word processor.
Compose an email message and then use these options to format the
message. A sample message to use is given below. However, you can create
your own message.
Dear Didi,
Today in our English class, we learnt how to greet a stranger. I am sharing
some of the questions, we can use while greeting a stranger.
Greeting a stranger:
Hello!
Good morning/afternoon/evening!
How do you do?
My name is Aarti. May I know your name? I am going to practice using these greetings with at least two strangers every day. I will do this for a full month. I will also share my experience with you at the end of the month. I hope you get good food in your hostel mess. With love, Shalini
Figure 1: Format Options

25
2. Spell check an e-mail message:
The icon for spell check and grammar check is on the main
ribbon or on Review tab, based on the email software you are
using. The steps to perform this activity are exactly the same as
you used in word processing.
Compose an email message. Make sure that you deliberately
make some spelling errors and some grammatical errors in this message.
Then click on the icon for Spelling & Grammar, to correct the mistakes.
A sample email message is given in Figure 2. You can write a message of
your own also.
In case the grammar check is not done, the email software which you are
using may require you to check the box for Check Grammar. This is shown in
Figure 3 below.
EXERCISE
Perform the following activities till you are confident:
S.No. Activity
1 Align the text in the email message using format options
2 Bold, underline and italicize the text
3 Check and correct the spelling errors using spell check
Figure 3
Figure 2
Figure 2

26
SESSION 9: ATTACH A FILE TO EMAIL MESSAGE
When you send a letter in a postal envelope along with the covering letter,
necessary paper documents can also be stapled or attached with a paper clip.
Similarly, in an electronic mail along with the email message, you can attach
one or many files. When you send the email, the file goes along with it. The
recipient can read the message and also the attached file.
Almost any type of file can be sent via email; videos, music, pictures,
presentations and documents etc. However, some restrictions are placed on
attachments, such as a file size and permissible file extensions.
RELEVANT KNOWLEDGE
1. Sending Attachments
In this exercise you will learn to send a file stored in your computer to a
class mate, using email.
1. Compose a new email message.
2. Write the main message in the email, along with a relevant subject. An
example is given in Figure 1.
Figure 1

27
3. Click on the button Attach, as shown in Figure 2. A dialogue box for
selecting files appears. Browse to the location of the file you want to
attach. This could be any file on your computer; it need not be the one
shown in Figure 2.
4. Double the click on the file name or select the file. You can select more
than one file to be attached by keeping the Ctrl key pressed and clicking
on the files. Click Open. The selected files get attached to the email.
(refer Figure 3)
Figure 3
Figure 2

28
You may have noticed that the design of Ribbon in Figure 1, Figure 2 and 3 is
different from what you are familiar with. These figures are from Mozilla
Thunderbird software. An equivalent of Figure in MS-Outlook is shown in F.
Note: The basic principle on which these two e-mail software operate is the
same. The difference is only in the GUI appearance. Once you have used and
are familiar with a particular software, you can use any of its alternatives
available in the market.
2. Receiving Attachments
The icon in the inbox (generally the sign
of a paperclip) or within the message,
tells you that there is an attachment along
with the message. (Refer Figure 5.)
You can Open the attachment by clicking
on it.
You can Save the attachment by selecting
[1]File [2]Save As. Then select the
appropriate folder location to save the
file.
Figure: 4
Figure 5

29
EXERCISE
Perform the following activities till you are confident:
S.No. Activity
1 Attach a file to email message
2 Download attachment and save file(s) in a file with an appropriate
name
3. View the document

30
SESSION 10: USING HELP
While working on email software, you may want to know, how to perform a
specific task. Most of the GUI software provides a Help feature. So you do not
have to open a book but can find help readily available.
RELEVANT KNOWLEDGE
To start using Help in an email software:
o In MS-Outlook, press F1 or click the
symbol , type your question in the
search box (refer arrow in Figure 1),
and then press Enter.
o In Mozilla Thunderbird, press F1 or
Help icon on the ribbon.
o A dialogue box appears. Enter the key
words related to the task, for which
you need help. For example:
If you want to find, how to attach a
file, you can enter: ―Attach File”
If you want to find, how to delete an
email message, you can enter:
―email delete”.
As an exercise, enter the keywords: ―Attach file‖ in the search box of MS-Outlook (refer
arrow in Figure 1.).
o A list of all online topics that refer to the
keyword you entered is displayed. (Refer
Figure 2.)
o Click on the appropriate topic.
o The topic page will appear and you will
find the step by step instructions for
performing that task. (Refer the help
box in Figure 3.)
Note: Online is a great resource, but
sometimes you are not connected to the
Figure 1
Figure 2

31
Internet and need Help. When you are offline, the software searches
your local Help files and displays the search results that it finds there.
When you search offline Help, additional online content is not available.
o You can use the scroll bar on right to read the entire content in the
window.
o You can also click on the maximise button to increase the size of the
help box.
Now practice the use of Help feature by finding instructions for the following
tasks:
o Sending BCC
o Formatting email
o Print an email message
EXERCISE
Perform the following activities till you are confident:
S.No. Activity
1 Use the various features of help by entering appropriate key word
Figure 3

32
SESSION 11: PRINT EMAIL MESSAGE
You can easily print an email message received by you. The steps to print an
email are similar to those used for printing a document or a spreadsheet.
RELEVANT KNOWLEDGE
You will now print an email message received by you.
1. Open the email message, which you want to print.
2. Click [1]File [2]Print
3. Select the printer, to print the email message.
4. Click Print
The email will be printed on the selected printer. It may look like the following
in Figure 2.
Figure 1
Figure 2

33
In the exercise, we used the default (Standard) settings while printing the
email. Print dialog box (Refer Figure 33) also provides options for print settings.
For example, you can choose to print 5 copies of the same email.
Go ahead and use some of the print options, to become familiar with them.
EXERCISE
Perform the following activities till you are confident:
S.No. Activity
1 Print the email message using different style and options
Figure 3

34
SESSION 12: ADDING AND MODIFYING A CONTACT
You can also maintain an address book of people using email software. The
address book may contain information like name, name of the company,
designation, email address, phone number, mobile number, residential address,
office address, website URL, birthday, marriage anniversary etc. In some email
applications like MS-Outlook, it is called Contact; and in some others it is called
Address.
RELEVANT KNOWLEDGE
1. Add a Contact
The steps to add a Contact in MS-Outlook are as follows:
o Under Home tab, choose the option New items. Then select Contact. A
blank form appears (Figure 1), in which you can input the details. It is
not necessary to fill all the fields.
Figure 1

35
After adding the details, click on to save and close the form. The contact
is saved along with the information added.
Add contacts for one friend and one relative of yours. Do not forget to add one
more contact with your own details.
2. Modify an existing Contact
The steps to modify a Contact in MS-Outlook are as follows:
o Suppose that you have an existing contact of ―Vibha Das‖.
o Under the Home tab, you will see icons as shown in
Figure 2.
o Enter the name ―Vibha Das‖ in the search box, as shown, and click Enter
key. A contact form with the existing details of Vibha Das will appear
(refer figure 3).
o You can change/edit any of the existing information or add information
in the blank fields.
o Save and Close the contact.
Figure 2
Figure 3

36
3. Add and Modify a contact using Mozilla Thunderbird
Adding or modifying a contact using Mozilla Thunderbird follows the same basic
steps. The icons and their names are slightly different.
o To add a new address, click Address Book, as shown in Figure below.
o The Address Book form has a different format, but has similar fields as in
MS-Outlook. (Refer Figure 4)
o To save the entered information, select Ok.
o To search for an existing contact, enter the name in the field shown in
Figure 5.
EXERCISE
Perform the following activities till you are confident:
S.No. Activity
1 Add a contact to the contact list or address book
2 Modify the contact
3 Delete a contact
Figure 4
Figure 5

37
Session 13: Using Folders to Organise Email Messages
In a manual system, people use different files to organise the letters received
or sent by them. In a similar manner, email messages can be arranged for easy
access by using Folders. A Folder is like a file in which related email messages
can be stored.
RELEVANT KNOWLEDGE
In an email application, some default folders are
automatically created, when an email account is linked
to it. In Figure 1, you can see the existing default
folders.
Inbox contains the email messages which you
receive. It is an electronic version of a letter box.
Trash folder stores the email messages which have
been deleted.
Sent Mail folder contains the email messages sent
by you to others.
You can also create a new folder.
1. Create a folder
Suppose you want to create a folder in which you want to keep all the
emails received by you from your father. You may want to give the name
―Father‖ to this folder. 1. On the Folder tab, in the New group, click New Folder.
2. A dialogue box appears (refer Figure 2).
3. Select the folder, under which you want to create this sub-folder.
4. In the Name box, enter a name for the folder.
5. A new folder is created called ―Father‖ (refer Figure ).
Figure 1
Figure 2
Select the
Enter Folder

38
2. Move an email to from Inbox to another folder
You can now move any email message, which you want to file in the folder
―Father‖.
o Select the email (from the Inbox) that you want to move. (4)
o Left Click on it, and drag it to the folder ―Father‖.
o Release the left button of the mouse. The email will move from the
Inbox to the folder Father.
o To verify, click on the folder Father.(Figure 5)
Note: Using the same steps it is possible to move emails from one folder to
another.
Figure 3
Figure 4
Figure 5

39
Additional tasks to manage folders
You can create more than one folder.
You can delete an existing folder, by right clicking it and choosing the
option Delete Folder. It deletes the folder and its contents and moves them
to the ―Deleted Folder‖. Note: You cannot delete any of the Default Folders.
You can rename a folder by right clicking it and modifying the existing
name.
EXERCISE
Perform the following activities till you are confident:
S.No. Activity
1 Create and name a folder for sorting the mails
2 Move the folder
3. Move the messages to the folder
4 Rename the folders
5. Delete the folders