Embed Size (px)
Citation preview
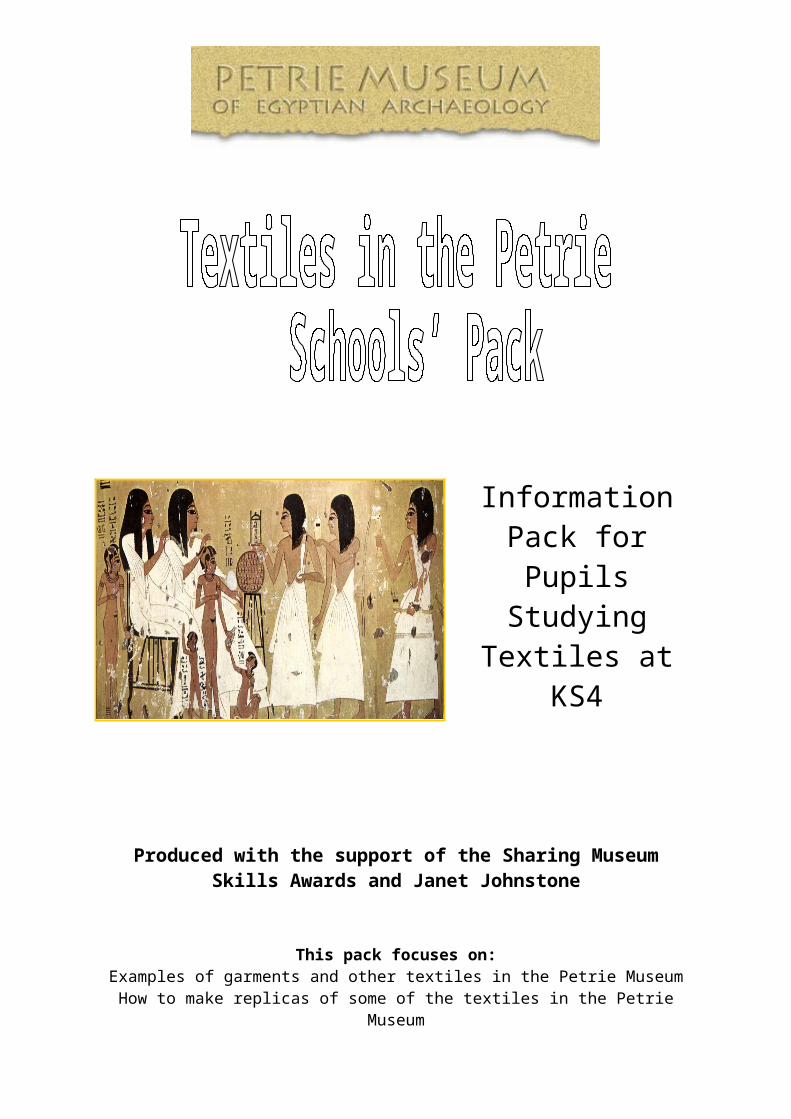
Information Pack for Pupils
Studying Textiles at KS4
Produced with the support of the Sharing Museum
Skills Awards and Janet Johnstone
This pack focuses on:Examples of garments and other textiles in the Petrie Museum
How to make replicas of some of the textiles in the Petrie Museum
It will also give you information on the following:Representations of garments on objects
Sewing and decorative techniquesRaw materials and techniques of Egyptian textile manufacture
C o n t e n t s
Introduction: The Petrie Museum of Egyptian Archaeology and its Textiles
Section 1 Examples of garments and other textiles in the Petrie MuseumTarkhan dress
Deshasheh dresses
Gurob sleeves
Bag-tunics
Bead-net dress
Beaded headband
Sprang-cap
Socks
Household textiles
Soft toys
Painted shrouds and Mummy wrappings
Section 2 Representations of garments on objects in the Petrie Museum
Section 3 Raw materials and methods of manufacture
Section 4 Sewing and decorative techniques
Appendices:
- Map
- Glossary
- Suggestions for further reading
Introduction –
2
The Petrie Museum of Egyptian Archaeology and its Textiles
The Petrie Museum has one of the largest and most inspiring collections of Egyptian
archaeology anywhere in the world. The displays illustrate life in the Nile Valley from
prehistory through Pharaonic to Roman and Islamic times. Most of the objects on display
were excavated or purchased in Egypt by William Flinders Petrie (1853-1942), sometimes
called ‘the father of archaeology’. While other museums contain massive stone sculptures,
monuments and mummies, the Petrie Museum is richest in the personal items that illustrate
life and death in ancient Egypt.
The textiles in the collection include garments, household textiles, mummy-wrappings and
utilitarian textiles such as nets. This pack focuses on the garments and household textiles
and illustrates pieces from the Pharaonic, Roman and Coptic periods.
In addition to the textiles themselves many of the objects in the Museum such as statuettes
or stone reliefs depict garments. We get a very different picture of garments from looking at
these than from the actual examples. There may be several reasons for this. For example,
The garments may be shown in an idealized way rather than as they actually looked.
Artistic conventions may have meant that the artist or craftsman followed certain rules in
depicting textiles just as they did when representing the human form.
For these reasons, this pack uses examples of actual garments from the museum’s
collection where possible. However, when treated with caution, representations of costume
on objects yield a great deal of historical and social information and so a brief outline of the
development of Pharaonic costume has been included as Section III of this resource.
The ‘how to make’ sections are guidelines only (for example, the line drawing patterns are
not to scale), and include such detailed information as the warp and weft count for those
particularly interested in weaving techniques. In general, the garments and techniques
should be viewed as providing inspiration rather than as patterns for direct imitation.
Underlined words are explained in the glossary.
3
Section 1 –
Examples of garments and other textiles in the Petrie Museum
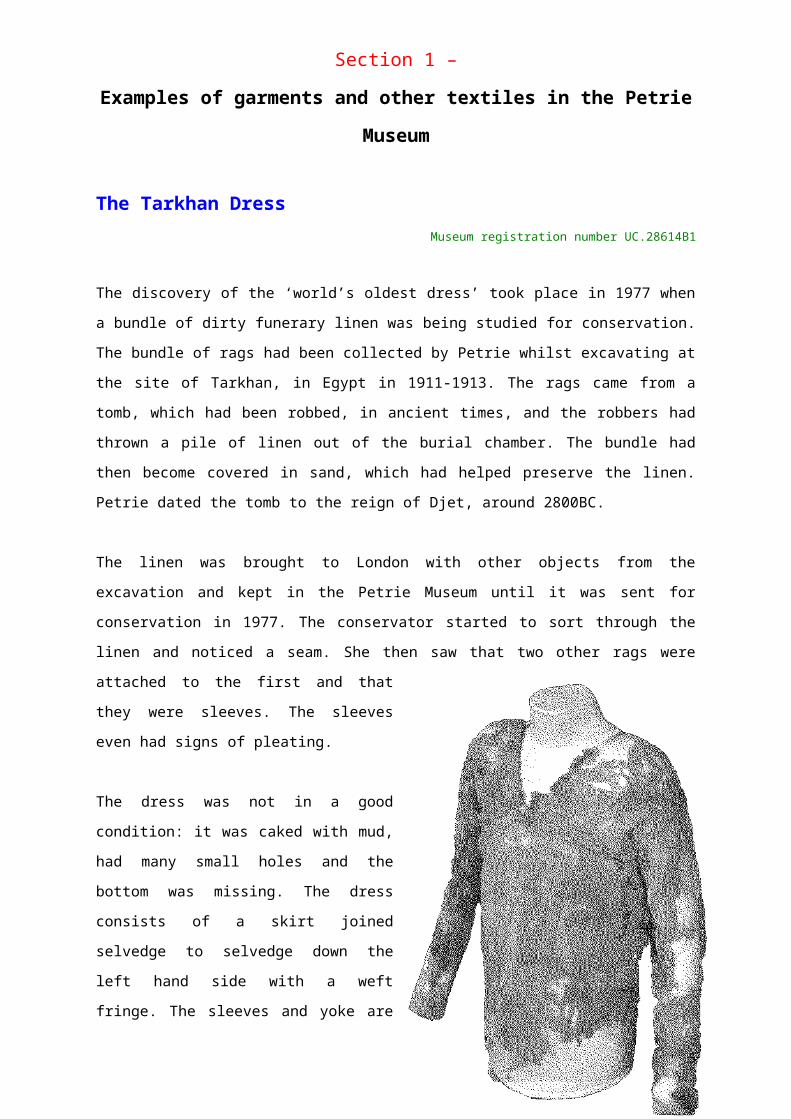
The Tarkhan DressMuseum registration number UC.28614B1
The discovery of the ‘world’s oldest dress’ took place in 1977 when a bundle of dirty funerary
linen was being studied for conservation. The bundle of rags had been collected by Petrie
whilst excavating at the site of Tarkhan, in Egypt in 1911-1913. The rags came from a tomb,
which had been robbed, in ancient times, and the robbers had thrown a pile of linen out of
the burial chamber. The bundle had then become covered in sand, which had helped
preserve the linen. Petrie dated the tomb to the reign of Djet, around 2800BC.
The linen was brought to London with other objects from the excavation and kept in the
Petrie Museum until it was sent for conservation in 1977. The conservator started to sort
through the linen and noticed a seam. She then saw that two other rags were attached to the
first and that they were sleeves. The sleeves even had signs of pleating.
The dress was not in a good condition: it was caked with mud, had many small holes and the
bottom was missing. The dress consists of a skirt joined selvedge to selvedge down the left
hand side with a weft fringe. The sleeves and yoke are made of two pieces of material joined
to the top of the skirt which meet at the centre front and back giving a v-shaped neckline
edged with selvedge. The fabric has an
irregular grey stripe as decoration and the
sleeves have fine pleating.
The tunic was found inside-out as though it
had just been pulled off. It was also creased
around the armpits and elbows, showing that
it had definitely been worn. The size of the
dress suggests a young teenager had worn it.
4
How to make the Tarkhan dress
Fabric100% Linen (only pure linen will hand pleat successfully)
22-23 warp threads per cm (with two threads together in some places), 13-14 weft threads
per cm.
Body: Width 76cm selvedge to selvedge. Length unknown.
Sleeves: Length neck edge (selvedge) to wrist c.58cm. Length over shoulder c.35cm. (The
measurements refer to the size of the material after pleating).
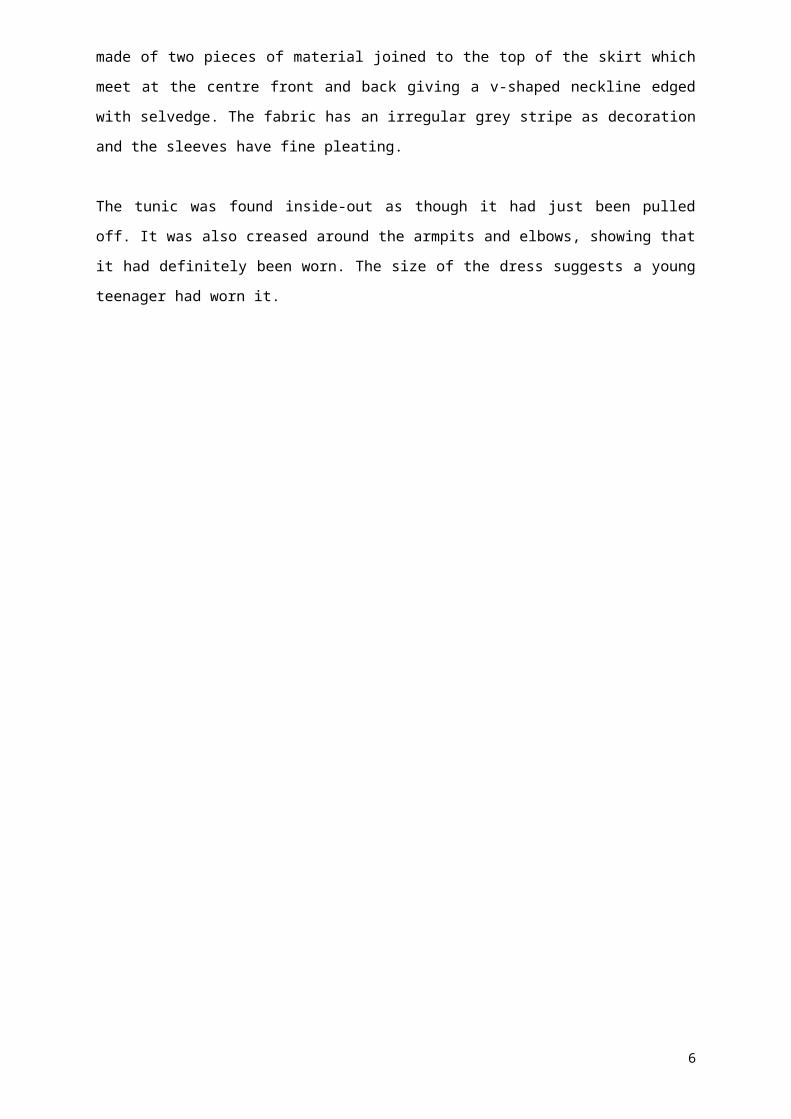
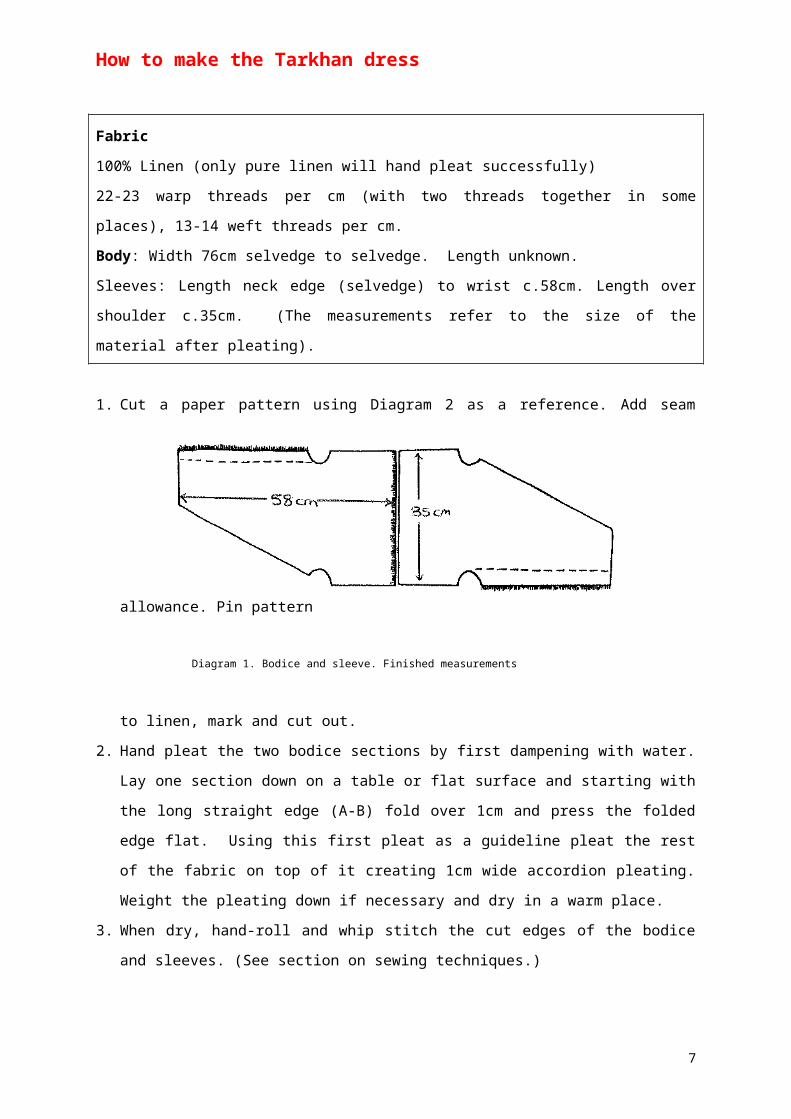
1. Cut a paper pattern using Diagram 2 as a reference. Add seam allowance. Pin pattern
Diagram 1. Bodice and sleeve. Finished measurements
to linen, mark and cut out.
2. Hand pleat the two bodice sections by first dampening with water. Lay one section down
on a table or flat surface and starting with the long straight edge (A-B) fold over 1cm and
press the folded edge flat. Using this first pleat as a guideline pleat the rest of the fabric
on top of it creating 1cm wide accordion pleating. Weight the pleating down if necessary
and dry in a warm place.
3. When dry, hand-roll and whip stitch the cut edges of the bodice and sleeves. (See
section on sewing techniques.)
4. To make the sleeve. Whip stitch the angled edge of the sleeve to a fold 38mm from the
straight edge and fringe the warp threads. Turn inside out. The excess fabric is inside the
finished sleeve.
5. Hand-roll and whip stitch the cut edges of the skirt. Seam the two selvedges together by
overlapping the right selvedge (this can be fringed) over the left and sew as Diagram 3.
This forms the left-hand side seam.
6. Mark the centre front, back and sides on the top edge of the skirt and match the
corresponding points on the bodice. Attach the rolled edge of the bodice to the top of the
skirt with whip-stitching.
5
6
A
47.5cm
58cm
76cm
skirt
Diagram 2. Pattern measurements for pleating bodice.
28cm
B
19cm
Bodice and sleeve
A
Diagram 3. Flat overlapped seam
The Deshasheh DressesMuseum registration numbers UC.31182 & UC.31183
Petrie mentions large quantities of linen in the reports of his excavations at Deshasheh in
Egypt during 1897 - 1898. The linen was found in tombs dating to the Fifth Dynasty (about
2,400BC). One grave, 148b, contained a coffin with, in addition to the remains of a female
body, nine dresses. Two were brought to London by Petrie and they were rediscovered in
1978 during the sorting of linen in the Museum.
Petrie had labelled one of them ‘Galabiyeh’ which is the term used in modern Egypt to
denote the popular garment of this shape. The dresses have skirts from the high waists to
the feet with weft fringes at the left-hand seam. One piece of linen forms the skirt, joined
selvedge to selvedge. There are rolled hems on the bottom and the wrists. Two pieces of
material form the bodice and sleeves. The V-shaped necks formed by the top of the sleeves
were originally closed by 3 pairs of twisted flax ties. Dress UC.31183 has natural crimping: a
solid stripe was woven next to a looser stripe. When the fabric dried after washing this would
force a turn in an ‘S’ direction, giving the impression of a slight pleat.
The dresses are both very long, causing some people to speculate that they may have been
pleated horizontally. But these particular dresses
are also very narrow, and it may be that these
examples were not made to be worn in life but
were spare clothing for the afterlife. Horizontal
pleating is known from other garments, such as a
group of dresses from a Sixth dynasty burial
which is now in the Museum of Fine Arts in
Boston.
Diagram to show the natural crimping in the weave
7
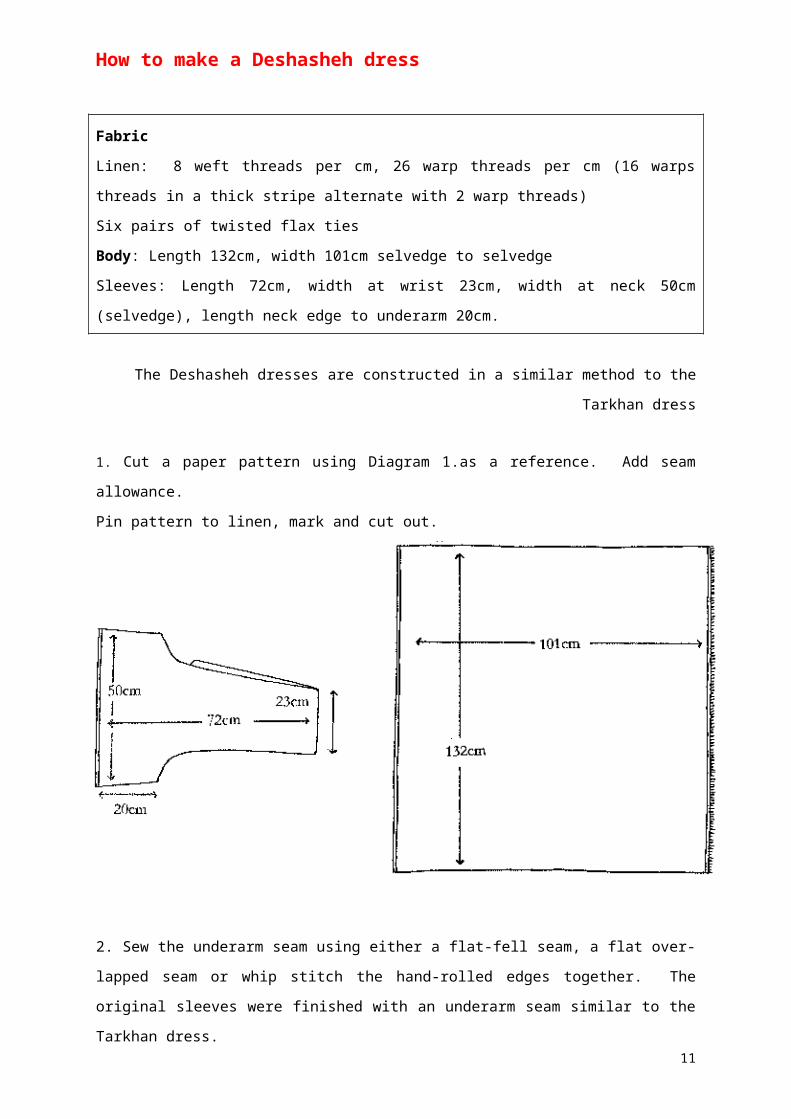
How to make a Deshasheh dress
FabricLinen: 8 weft threads per cm, 26 warp threads per cm (16 warps threads in a thick stripe
alternate with 2 warp threads)
Six pairs of twisted flax ties
Body: Length 132cm, width 101cm selvedge to selvedge
Sleeves: Length 72cm, width at wrist 23cm, width at neck 50cm (selvedge), length neck
edge to underarm 20cm.
The Deshasheh dresses are constructed in a similar method to the Tarkhan dress
1. Cut a paper pattern using Diagram 1.as a reference. Add seam allowance.
Pin pattern to linen, mark and cut out.
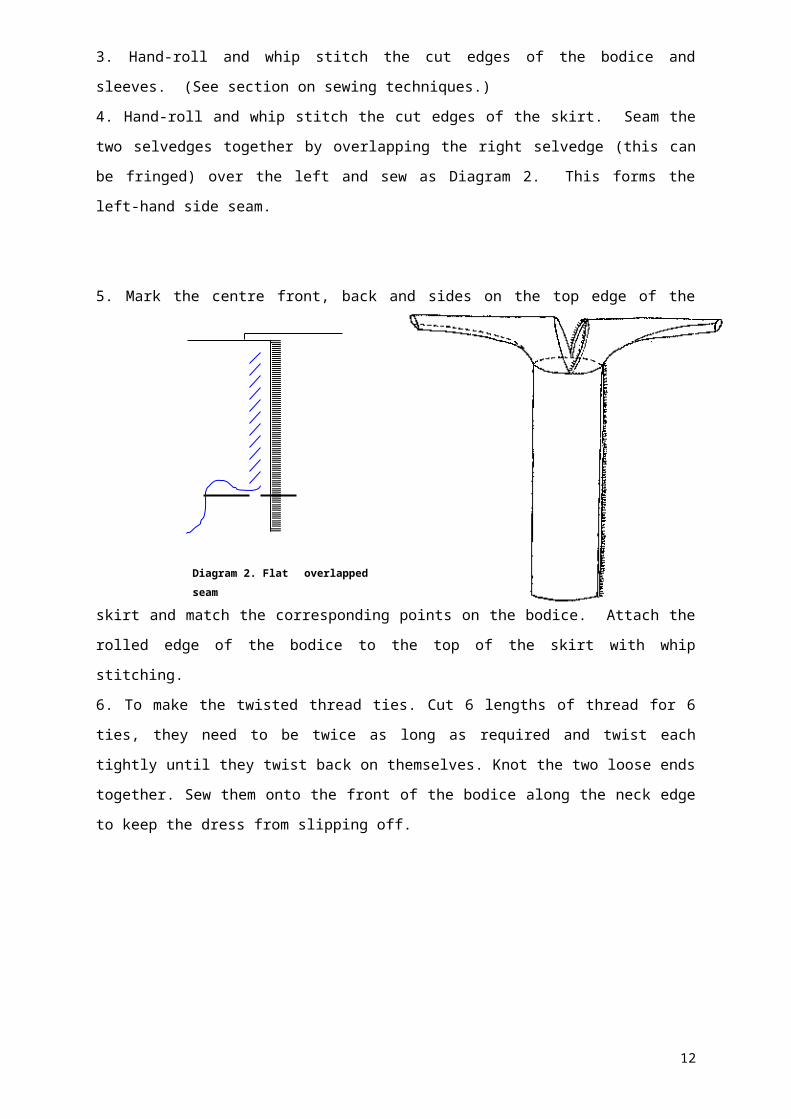
2. Sew the underarm seam using either a flat-fell seam, a flat over-lapped seam or whip
stitch the hand-rolled edges together. The original sleeves were finished with an underarm
seam similar to the Tarkhan dress.
3. Hand-roll and whip stitch the cut edges of the bodice and sleeves. (See section on
sewing techniques.)
4. Hand-roll and whip stitch the cut edges of the skirt. Seam the two selvedges together by
overlapping the right selvedge (this can be fringed) over the left and sew as Diagram 2. This
forms the left-hand side seam.
8
5. Mark the centre front, back and sides on the top edge of the skirt and match the
corresponding points on the bodice. Attach the rolled edge of the bodice to the top of the
skirt with whip stitching.
6. To make the twisted thread ties. Cut 6 lengths of thread for 6 ties, they need to be twice
as long as required and twist each tightly until they twist back on themselves. Knot the two
loose ends together. Sew them onto the front of the bodice along the neck edge to keep the
dress from slipping off.
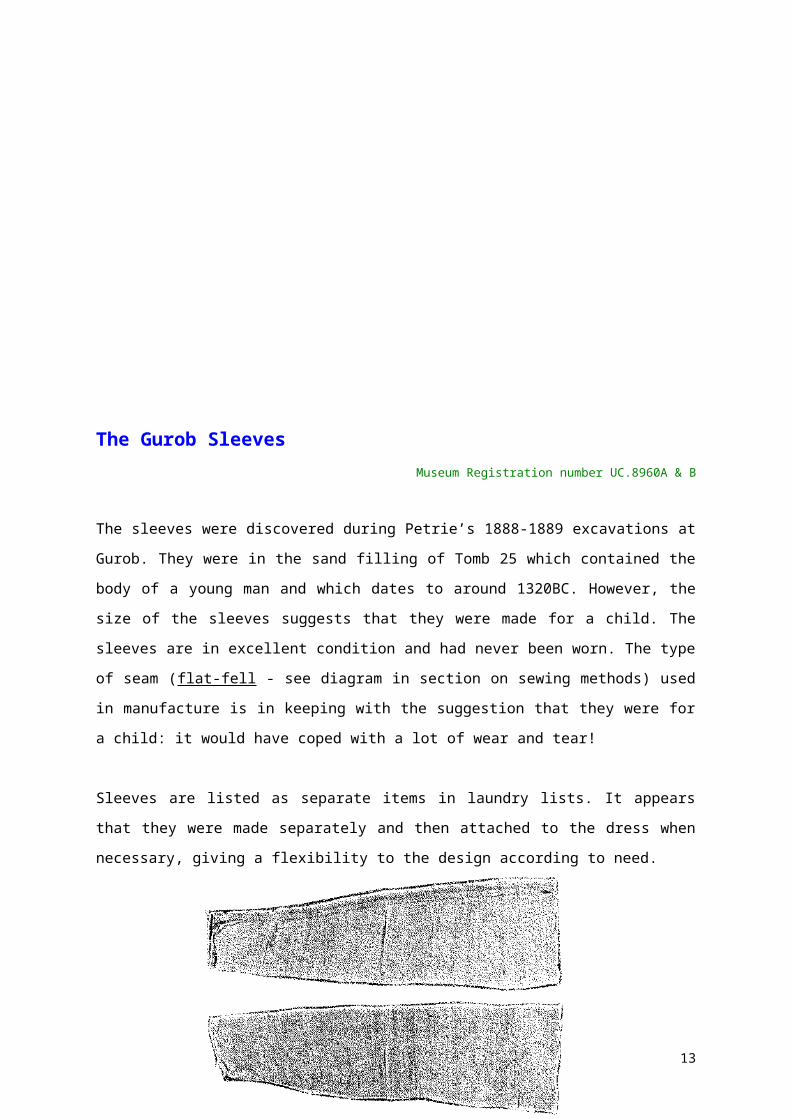
The Gurob SleevesMuseum Registration number UC.8960A & B
9
Diagram 2. Flat overlapped seam

The sleeves were discovered during Petrie’s 1888-1889 excavations at Gurob. They were in
the sand filling of Tomb 25 which contained the body of a young man and which dates to
around 1320BC. However, the size of the sleeves suggests that they were made for a child.
The sleeves are in excellent condition and had never been worn. The type of seam (flat-fell -
see diagram in section on sewing methods) used in manufacture is in keeping with the
suggestion that they were for a child: it would have coped with a lot of wear and tear!
Sleeves are listed as separate items in laundry lists. It appears that they were made
separately and then attached to the dress when necessary, giving a flexibility to the design
according to need.
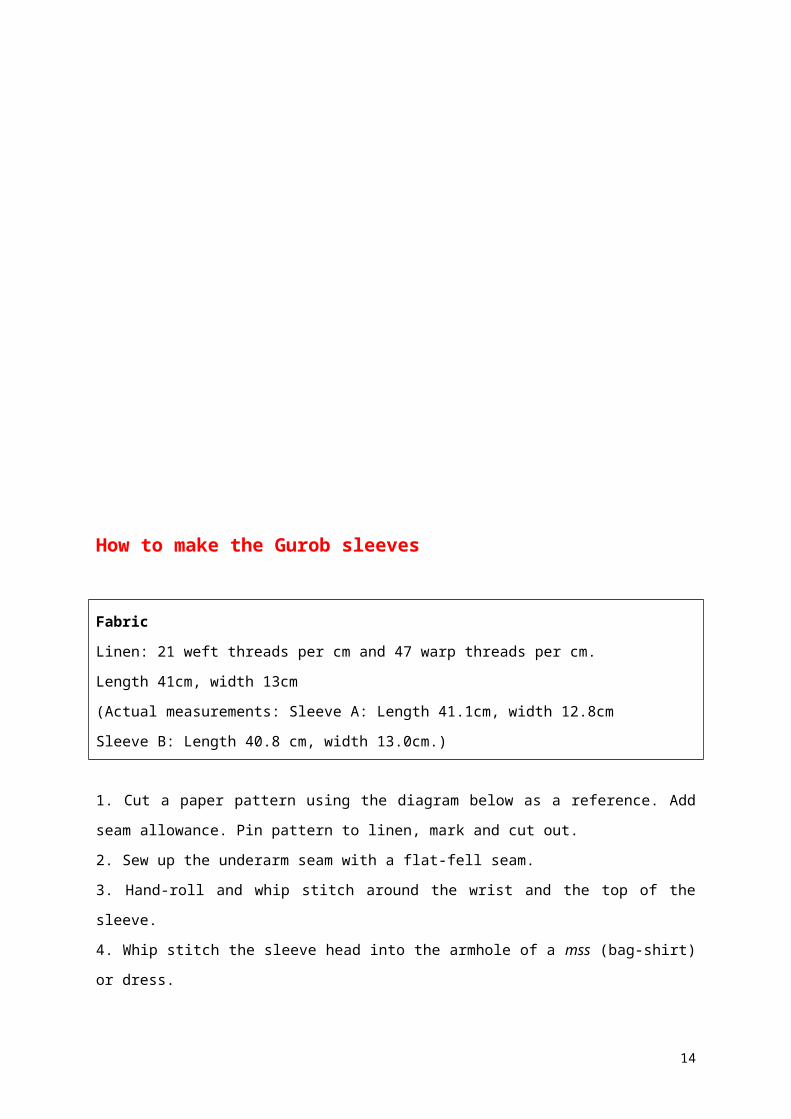
How to make the Gurob sleeves
10
FabricLinen: 21 weft threads per cm and 47 warp threads per cm.
Length 41cm, width 13cm
(Actual measurements: Sleeve A: Length 41.1cm, width 12.8cm
Sleeve B: Length 40.8 cm, width 13.0cm.)
1. Cut a paper pattern using the diagram below as a reference. Add seam allowance. Pin
pattern to linen, mark and cut out.
2. Sew up the underarm seam with a flat-fell seam.
3. Hand-roll and whip stitch around the wrist and the top of the sleeve.
4. Whip stitch the sleeve head into the armhole of a mss (bag-shirt) or dress.
11
41.1cm
12cm25.6cm
Sleeve pattern for the Gurob sleeve.
Bag-tunicsMuseum registration numbers UC.28616C1 and 2
The Petrie Museum contains two mss (bag-shirts) from the cemetery at Tarkhan. They date
from around 800BC.
The word mss is the ancient Egyptian name for this type of garment. It is repeatedly
mentioned in laundry lists and documentation regarding clothing as part payment for
workers. The mss is made by folding a rectangle of cloth in half across the width and
stitching the side seams, leaving a gap big enough for the arms to go through. Sleeves could
be attached if required. Usually a keyhole-shaped neck opening was made for the head and
finished with hand rolling or hemming. The opening was tied with cords. The mss was worn
either short or long finishing at the knee or the ankle.
Mss were worn in the Middle Kingdom but were fully utilized as a universal garment worn by
men, women and children in the New Kingdom. It became the principal garment in Graeco-
Roman Egypt and often had tapestry motifs in linen and wool. Some of the later examples
were woven on a very wide loom (examples exist up to 240 cm wide) where the width of the
mss was the warp and the length was the weft. The bottom hem was selvedge, and the
vertical slit neck opening was often finished with a selvedge on the loom.
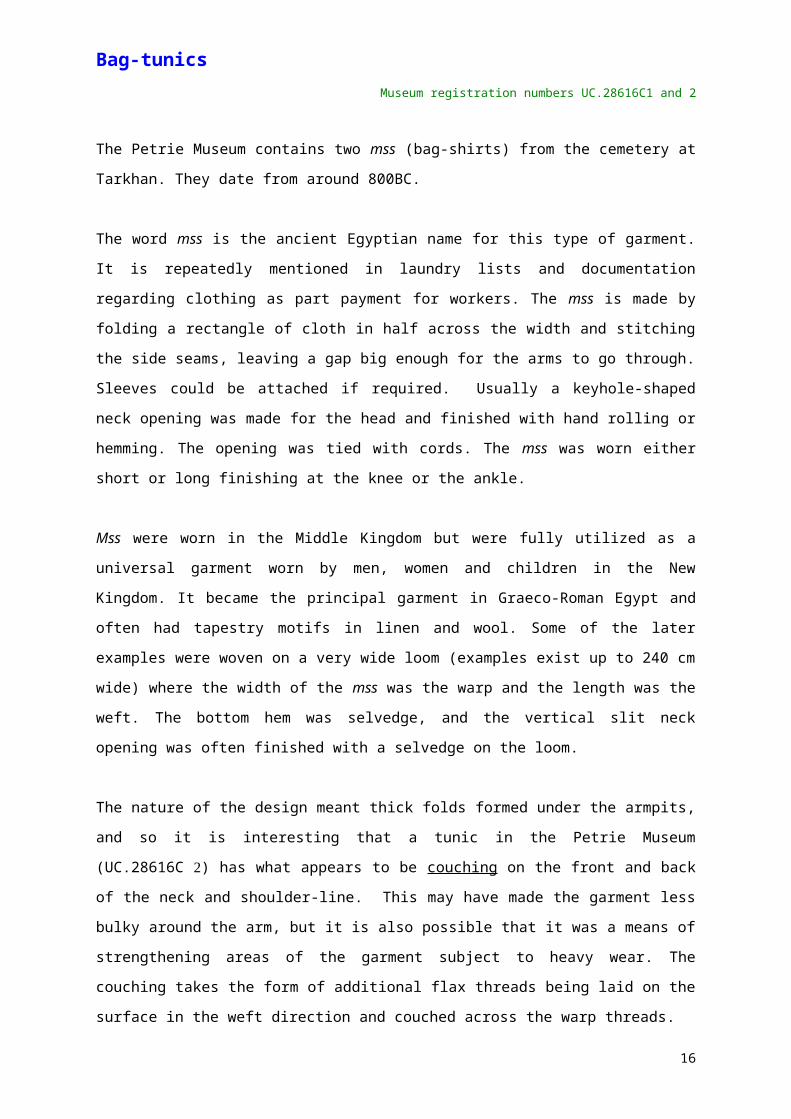
The nature of the design meant thick folds formed under the armpits, and so it is interesting
that a tunic in the Petrie Museum (UC.28616C ) has what appears to be couching on the
front and back of the neck and shoulder-line. This may have made the garment less bulky
around the arm, but it is also possible that it was a means of strengthening areas of the
garment subject to heavy wear. The couching takes the form of additional flax threads being
laid on the surface in the weft direction and couched across the warp threads.
12
UC 28616C2 Detail of the couched yoke.
How to make a bag-tunic
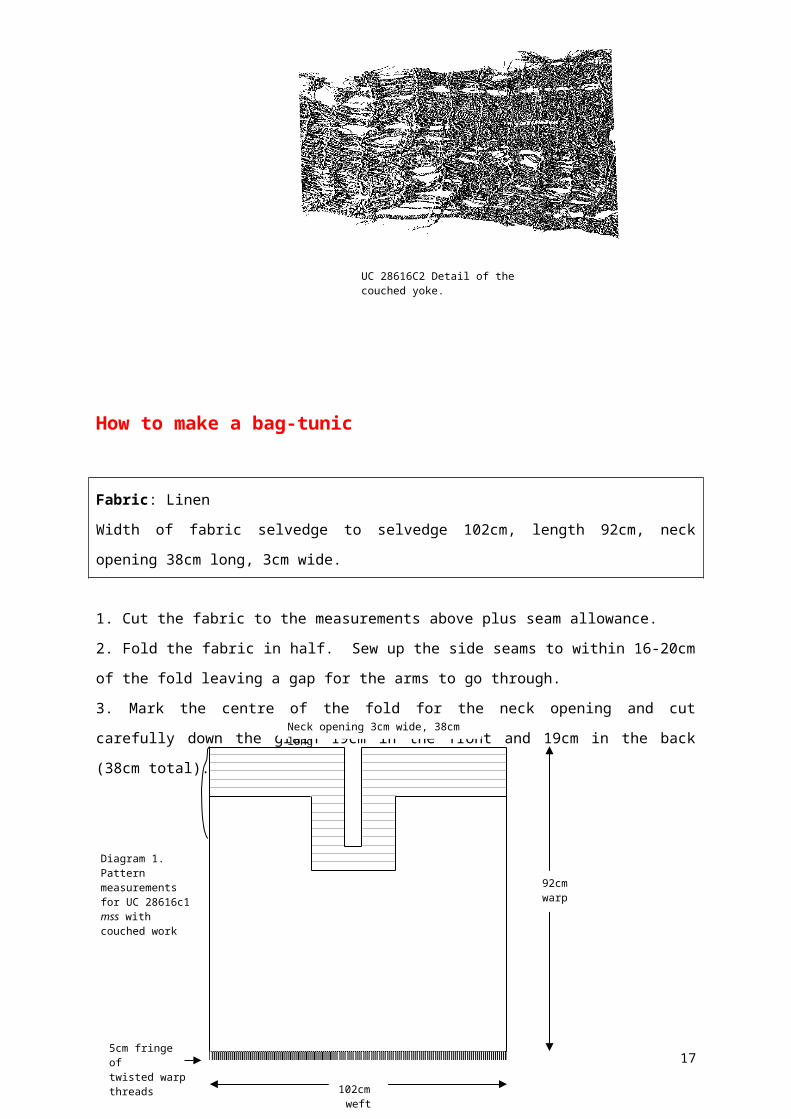
Fabric: Linen
Width of fabric selvedge to selvedge 102cm, length 92cm, neck opening 38cm long, 3cm
wide.
1. Cut the fabric to the measurements above plus seam allowance.
2. Fold the fabric in half. Sew up the side seams to within 16-20cm of the fold leaving a gap
for the arms to go through.
3. Mark the centre of the fold for the neck opening and cut carefully down the grain 19cm in
the front and 19cm in the back (38cm total).
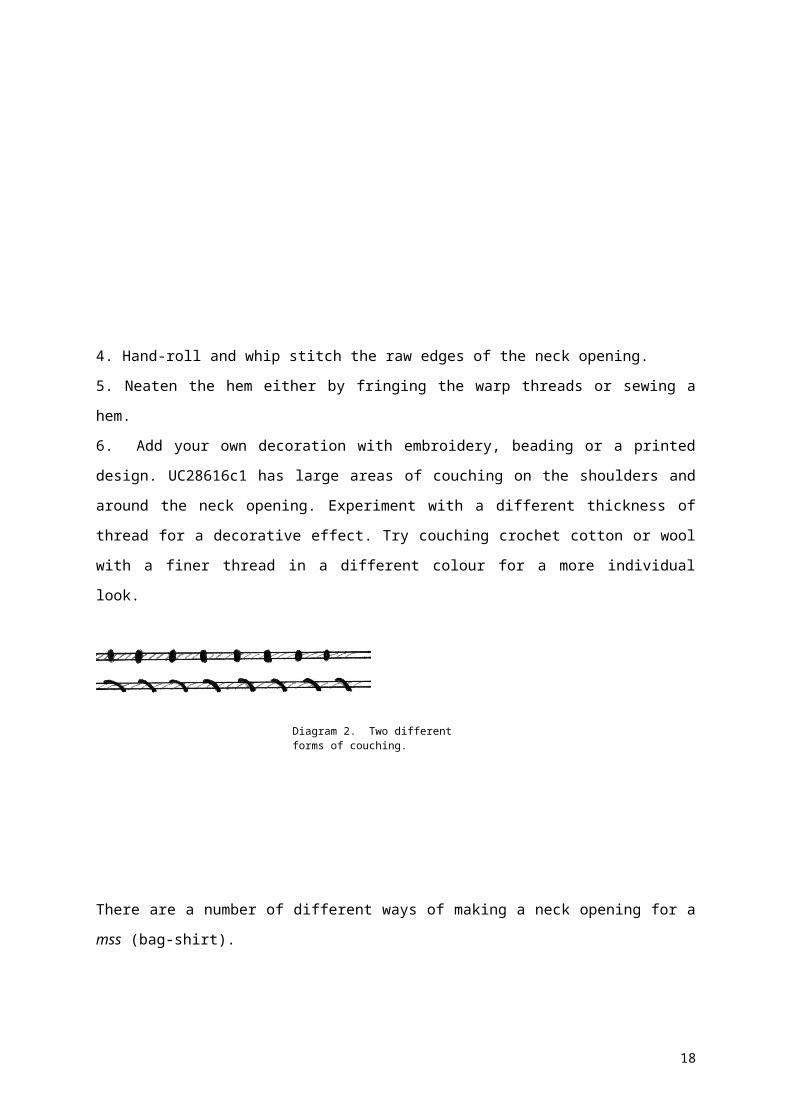
4. Hand-roll and whip stitch the raw edges of the neck opening.
5. Neaten the hem either by fringing the warp threads or sewing a hem.
6. Add your own decoration with embroidery, beading or a printed design. UC28616c1 has
large areas of couching on the shoulders and around the neck opening. Experiment with a
different thickness of thread for a decorative effect. Try couching crochet cotton or wool with
a finer thread in a different colour for a more individual look.
13
102cmweft
92cmwarp
5cm fringe oftwisted warp threads
Neck opening 3cm wide, 38cm long
Diagram 1.Pattern measurements for UC 28616c1 mss with couched work
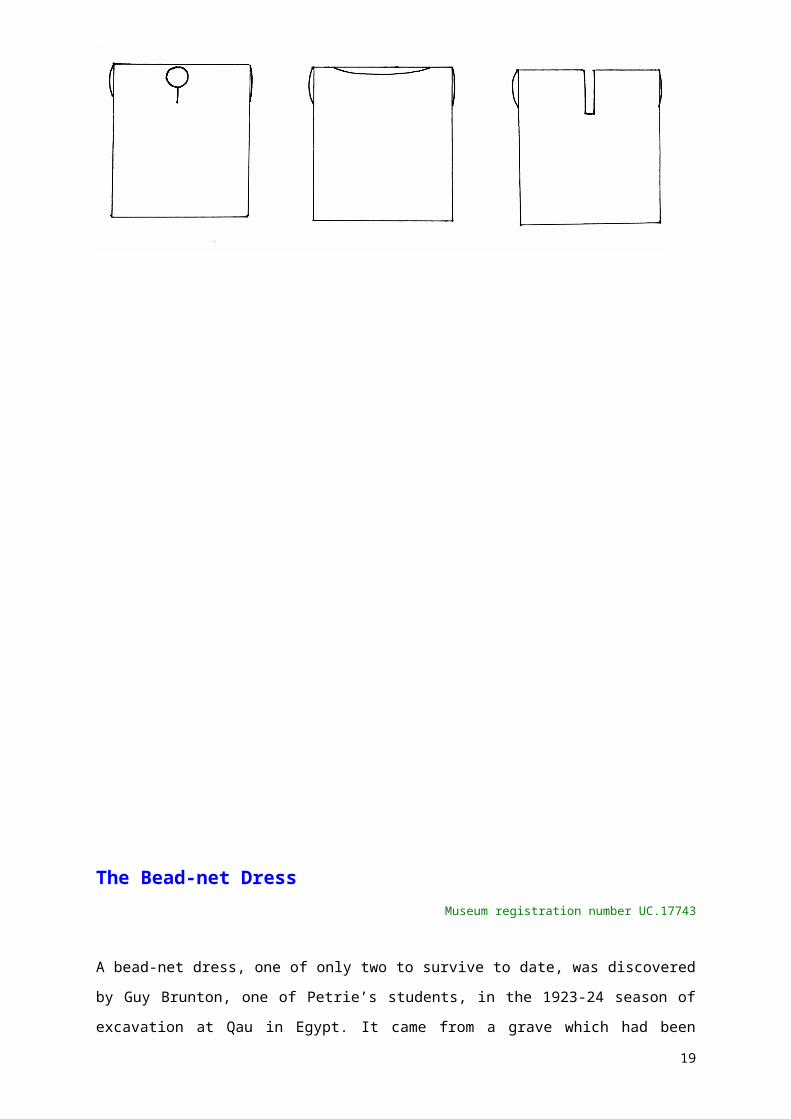
There are a number of different ways of making a neck opening for a mss (bag-shirt).
14
Diagram 2. Two different forms of couching.

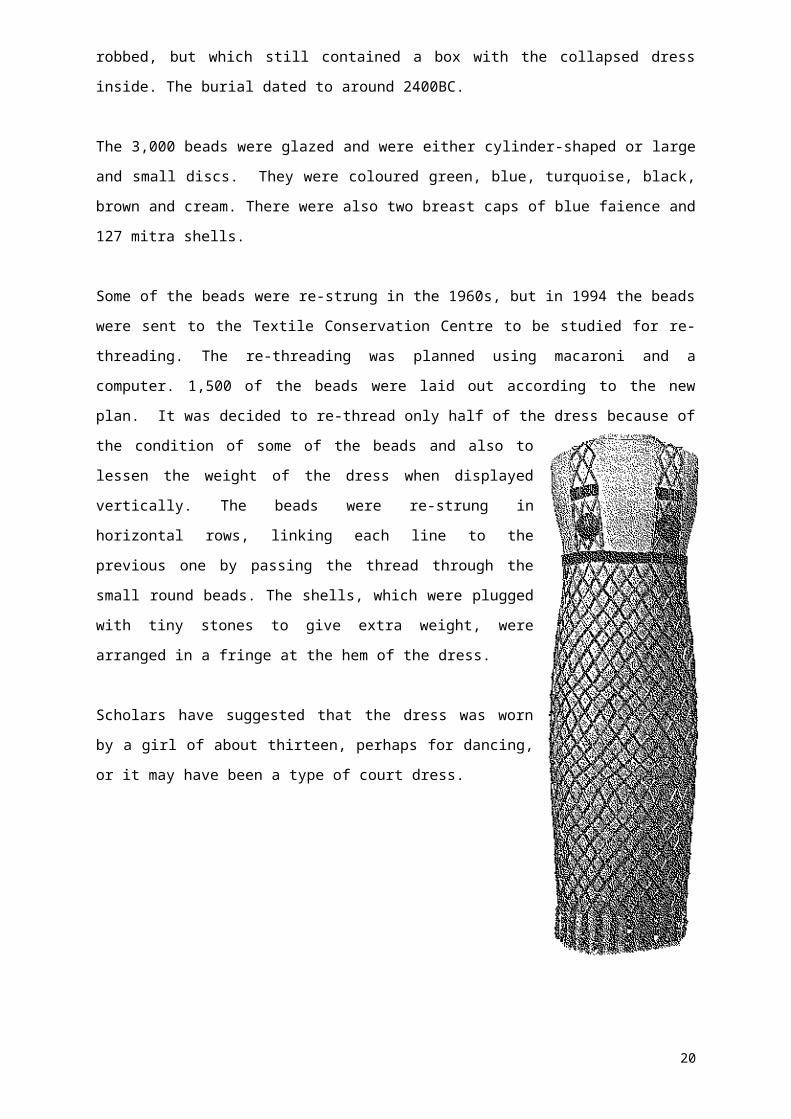
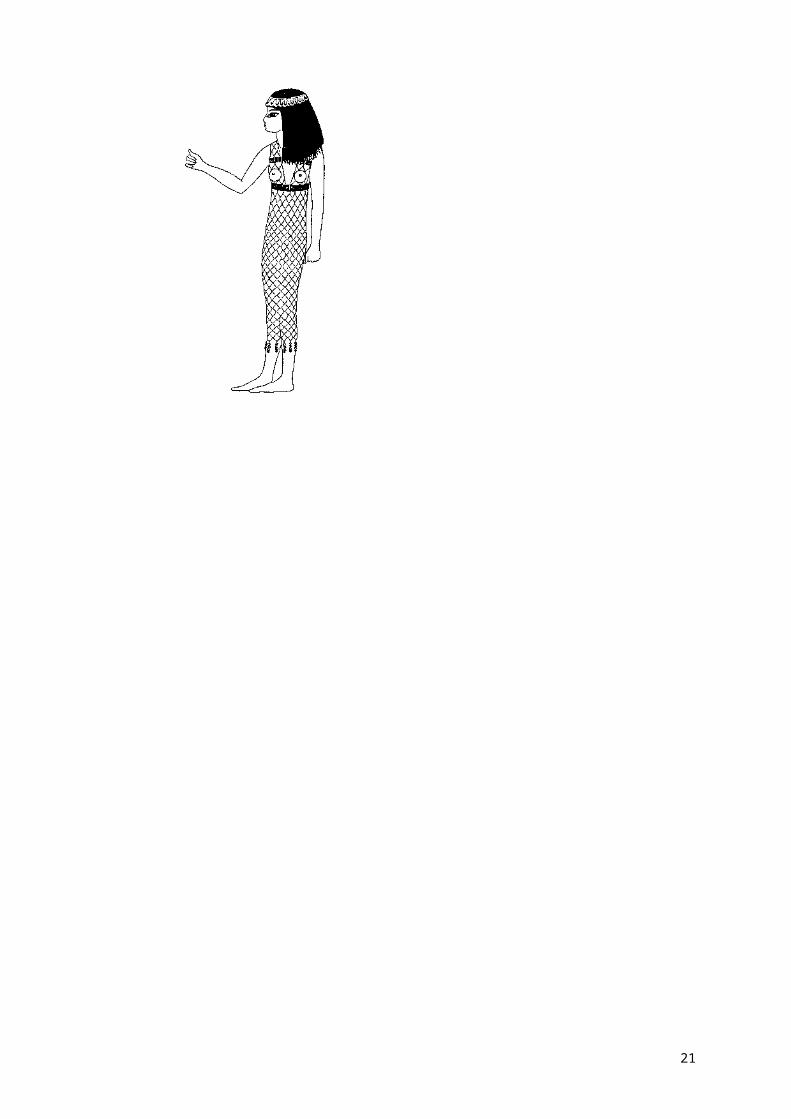
The Bead-net DressMuseum registration number UC.17743
A bead-net dress, one of only two to survive to date, was discovered by Guy Brunton, one of
Petrie’s students, in the 1923-24 season of excavation at Qau in Egypt. It came from a grave
which had been robbed, but which still contained a box with the collapsed dress inside. The
burial dated to around 2400BC.
The 3,000 beads were glazed and were either cylinder-shaped or large and small discs.
They were coloured green, blue, turquoise, black, brown and cream. There were also two
breast caps of blue faience and 127 mitra shells.
Some of the beads were re-strung in the 1960s, but in 1994 the beads were sent to the
Textile Conservation Centre to be studied for re-threading. The re-threading was planned
using macaroni and a computer. 1,500 of the beads were laid out according to the new plan.
It was decided to re-thread only half of the dress because of the condition of some of the
beads and also to lessen the weight of the dress when displayed vertically. The beads were
re-strung in horizontal rows, linking each line to the previous one by passing the thread
through the small round beads. The shells, which were plugged
with tiny stones to give extra weight, were arranged in a fringe at
the hem of the dress.
Scholars have suggested that the dress was worn by a girl of about
thirteen, perhaps for dancing, or it may have been a type of court
dress.
15
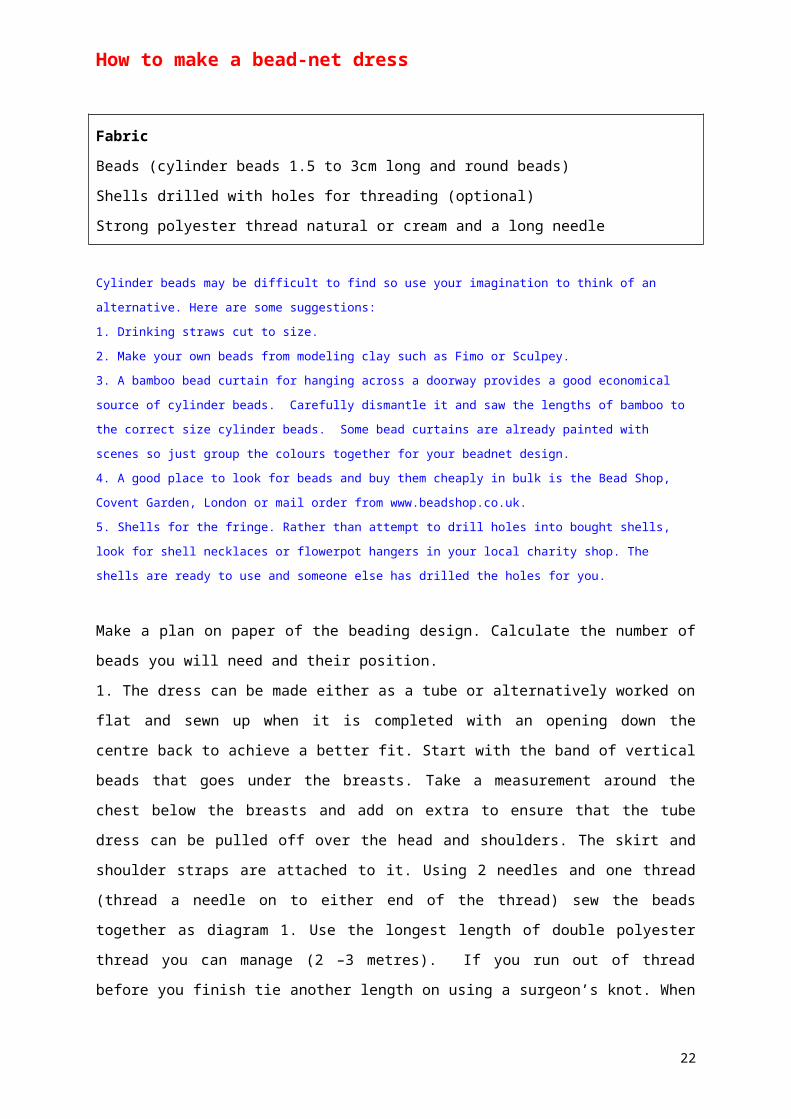
How to make a bead-net dress
FabricBeads (cylinder beads 1.5 to 3cm long and round beads)
Shells drilled with holes for threading (optional)
Strong polyester thread natural or cream and a long needle
Cylinder beads may be difficult to find so use your imagination to think of an alternative. Here are some
suggestions:
1. Drinking straws cut to size.
2. Make your own beads from modeling clay such as Fimo or Sculpey.
3. A bamboo bead curtain for hanging across a doorway provides a good economical source of cylinder beads.
Carefully dismantle it and saw the lengths of bamboo to the correct size cylinder beads. Some bead curtains are
already painted with scenes so just group the colours together for your beadnet design.
4. A good place to look for beads and buy them cheaply in bulk is the Bead Shop, Covent Garden, London or
mail order from www.beadshop.co.uk.
5. Shells for the fringe. Rather than attempt to drill holes into bought shells, look for shell necklaces or flowerpot
hangers in your local charity shop. The shells are ready to use and someone else has drilled the holes for you.
Make a plan on paper of the beading design. Calculate the number of beads you will need
and their position.
1. The dress can be made either as a tube or alternatively worked on flat and sewn up when
it is completed with an opening down the centre back to achieve a better fit. Start with the
band of vertical beads that goes under the breasts. Take a measurement around the chest
below the breasts and add on extra to ensure that the tube dress can be pulled off over the
head and shoulders. The skirt and shoulder straps are attached to it. Using 2 needles and
one thread (thread a needle on to either end of the thread) sew the beads together as
diagram 1. Use the longest length of double polyester thread you can manage (2 –3 metres).
If you run out of thread before you finish tie another length on using a surgeon’s knot. When
you have completed the band knot off the two ends together with a surgeon’s knot.
2. For extra strength sew the beaded band onto a strong petersham band that has been
covered with white fabric (linen preferably).
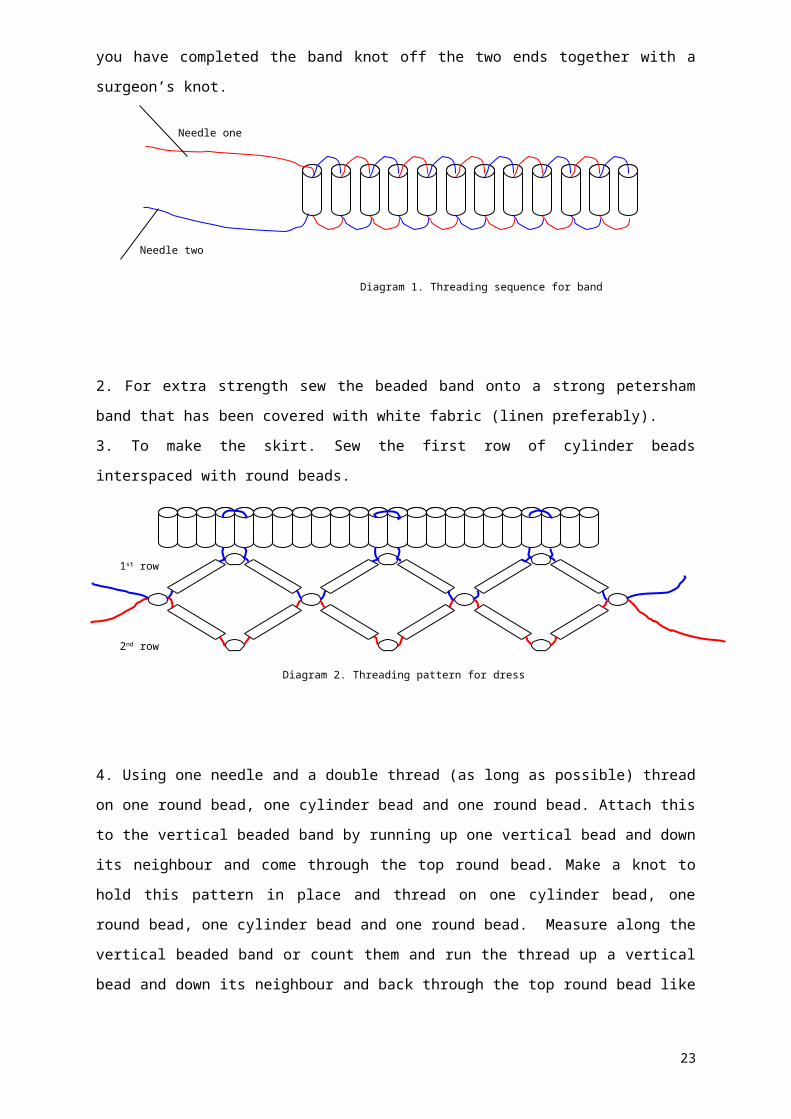
16
Needle one
Needle two
Diagram 1. Threading sequence for band
3. To make the skirt. Sew the first row of cylinder beads interspaced with round beads.
4. Using one needle and a double thread (as long as possible) thread on one round bead,
one cylinder bead and one round bead. Attach this to the vertical beaded band by running
up one vertical bead and down its neighbour and come through the top round bead. Make a
knot to hold this pattern in place and thread on one cylinder bead, one round bead, one
cylinder bead and one round bead. Measure along the vertical beaded band or count them
and run the thread up a vertical bead and down its neighbour and back through the top
round bead like before. Knot the thread to hold this pattern in place and remember to pull the
thread tightly as you go.
5. The second row and subsequent rows are made using the same method as the first but
attach the new row through the bottom row of round beads as shown Diagram 2 and knot as
you go.
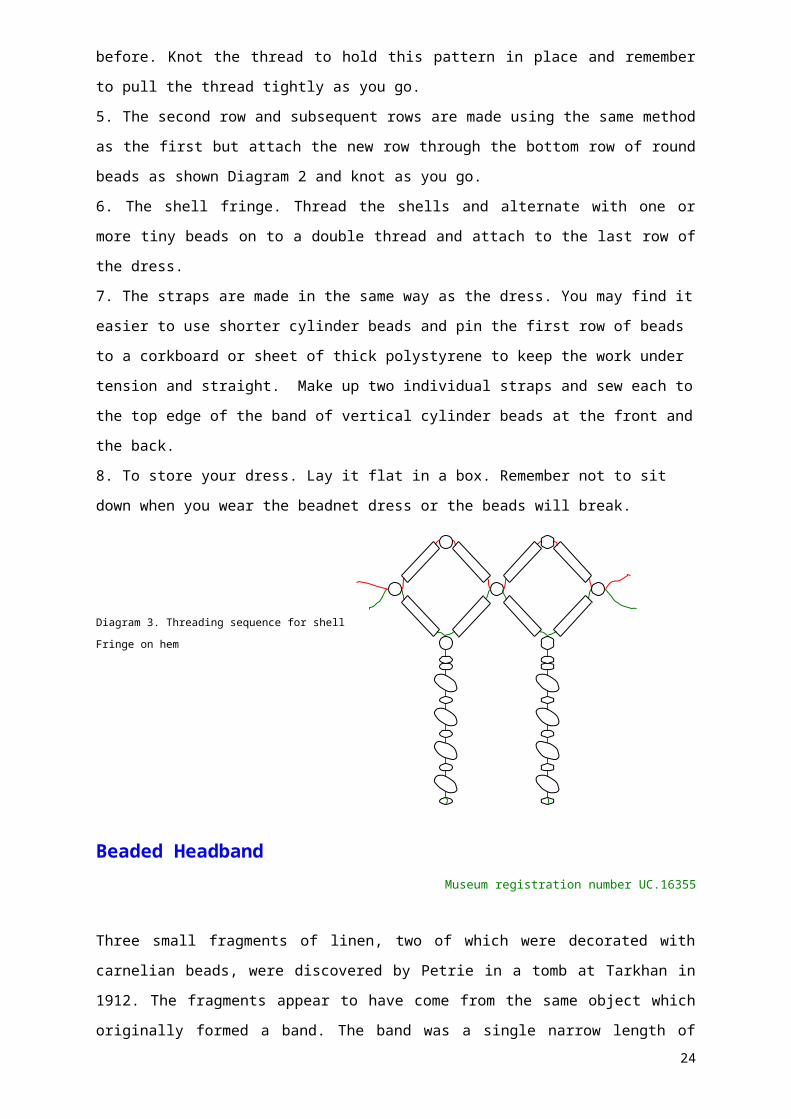
6. The shell fringe. Thread the shells and alternate with one or more tiny beads on to a
double thread and attach to the last row of the dress.
7. The straps are made in the same way as the dress. You may find it easier to use shorter
cylinder beads and pin the first row of beads to a corkboard or sheet of thick polystyrene to
keep the work under tension and straight. Make up two individual straps and sew each to
the top edge of the band of vertical cylinder beads at the front and the back.
8. To store your dress. Lay it flat in a box. Remember not to sit down when you wear the
beadnet dress or the beads will break.
Diagram 3. Threading sequence for shell
Fringe on hem
17
Diagram 2. Threading pattern for dress
1st row
2nd row
Beaded HeadbandMuseum registration number UC.16355
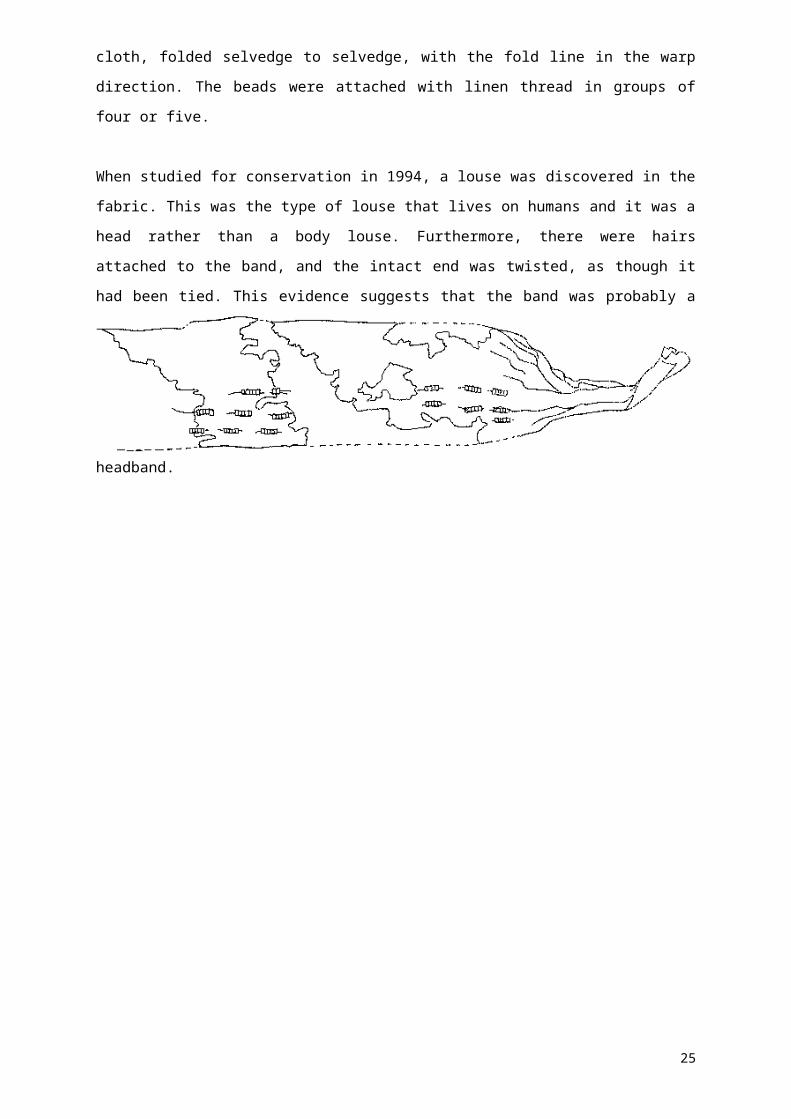
Three small fragments of linen, two of which were decorated with carnelian beads, were
discovered by Petrie in a tomb at Tarkhan in 1912. The fragments appear to have come from
the same object which originally formed a band. The band was a single narrow length of
cloth, folded selvedge to selvedge, with the fold line in the warp direction. The beads were
attached with linen thread in groups of four or five.
When studied for conservation in 1994, a louse was discovered in the fabric. This was the
type of louse that lives on humans and it was a head rather than a body louse. Furthermore,
there were hairs attached to the band, and the intact end was twisted, as though it had been
tied. This evidence suggests that the band was probably a headband.
How to make a beaded headband18
FabricLinen: 17 weft threads per cm, 24 warp threads per cm
Thread
Carnelian beads
Width: 15.5cm selvedge to selvedge
Length: Unknown
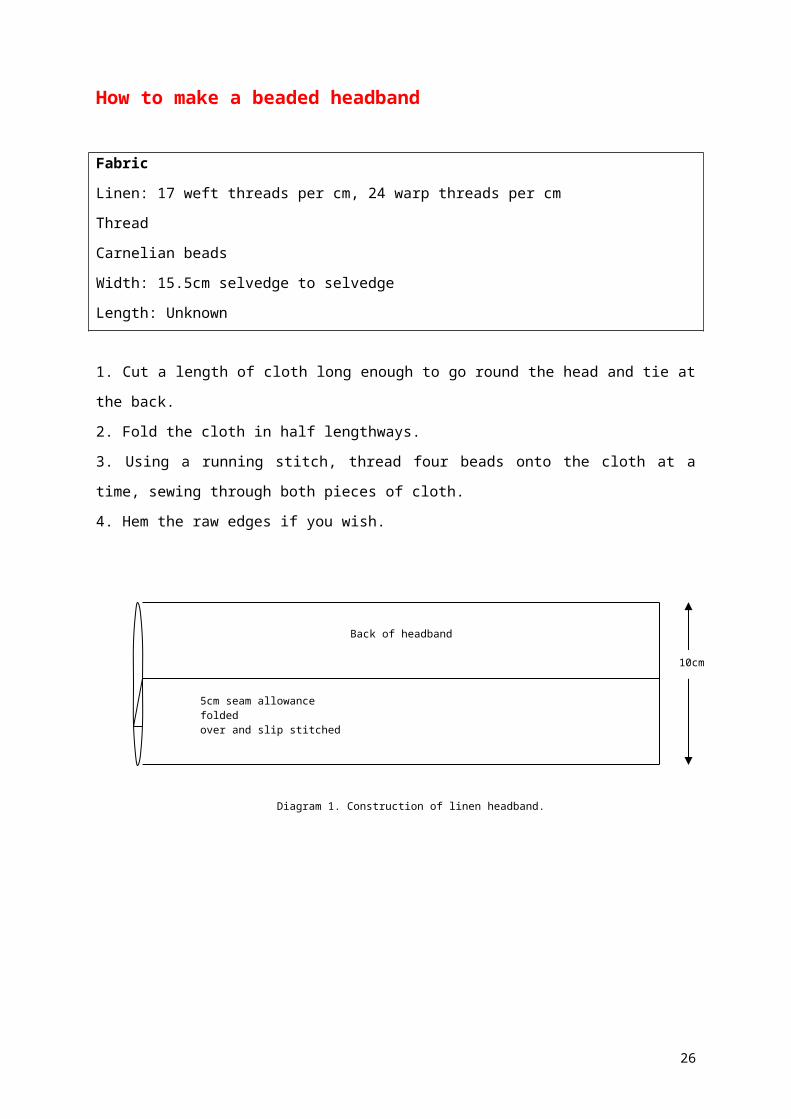
1. Cut a length of cloth long enough to go round the head and tie at the back.
2. Fold the cloth in half lengthways.
3. Using a running stitch, thread four beads onto the cloth at a time, sewing through both
pieces of cloth.
4. Hem the raw edges if you wish.
19
Diagram 1. Construction of linen headband.
Back of headband
10cm
5cm seam allowance foldedover and slip stitched
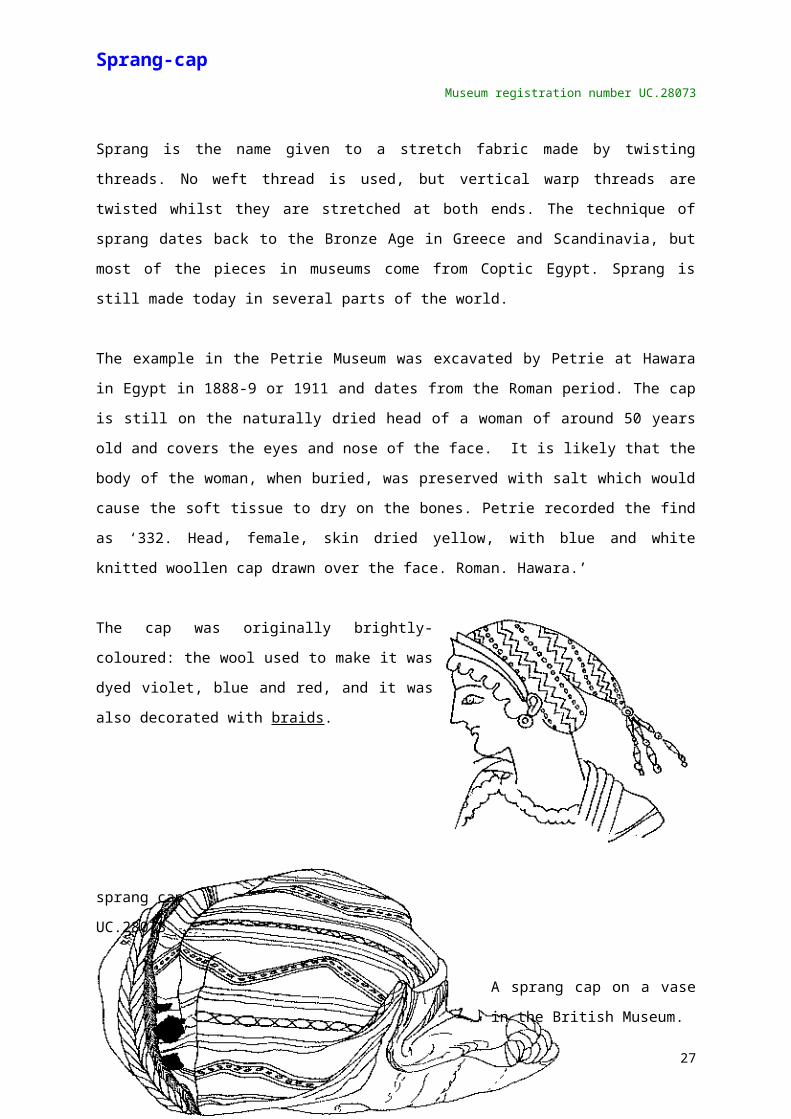
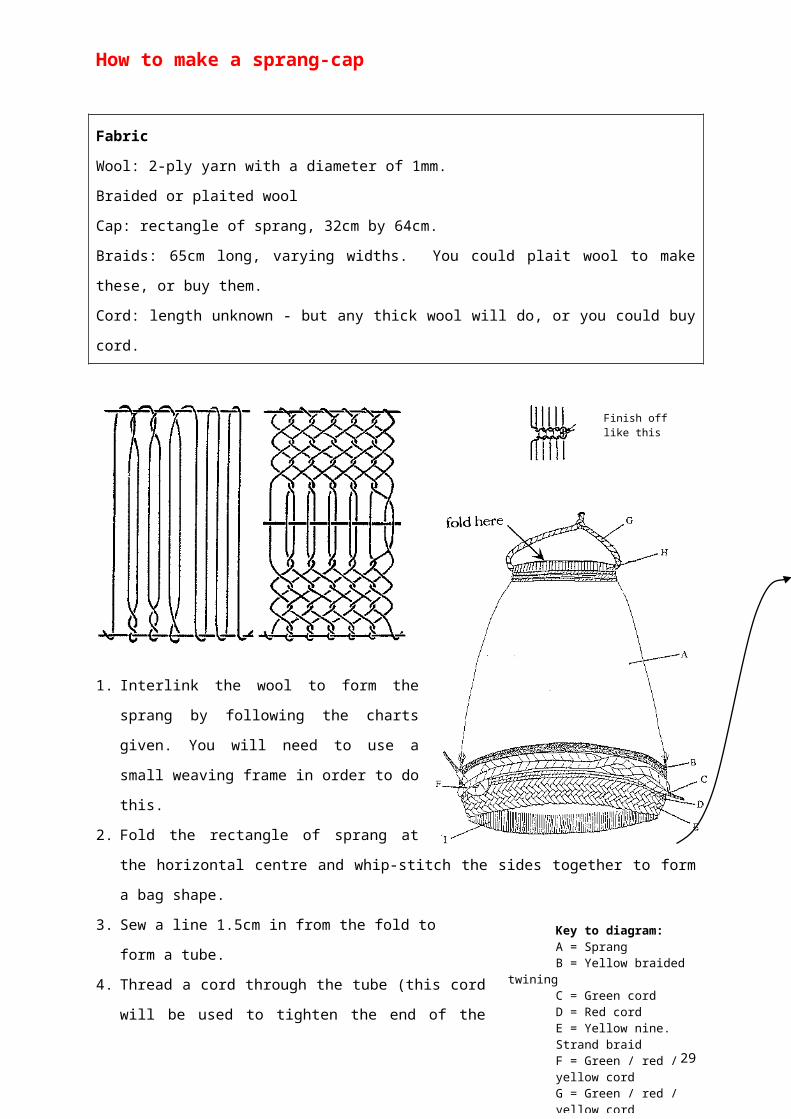
Sprang-capMuseum registration number UC.28073
Sprang is the name given to a stretch fabric made by twisting threads. No weft thread is
used, but vertical warp threads are twisted whilst they are stretched at both ends. The
technique of sprang dates back to the Bronze Age in Greece and Scandinavia, but most of
the pieces in museums come from Coptic Egypt. Sprang is still made today in several parts
of the world.
The example in the Petrie Museum was excavated by Petrie at Hawara in Egypt in 1888-9 or
1911 and dates from the Roman period. The cap is still on the naturally dried head of a
woman of around 50 years old and covers the eyes and nose of the face. It is likely that the
body of the woman, when buried, was preserved with salt which would cause the soft tissue
to dry on the bones. Petrie recorded the find as ‘332. Head, female, skin dried yellow, with
blue and white knitted woollen cap drawn over the face. Roman. Hawara.’
The cap was originally brightly-coloured: the wool
used to make it was dyed violet, blue and red, and it
was also decorated with braids.
sprang cap
UC.28073
A sprang cap on a vase in the
British Museum.
20
Key to diagram: A = Sprang B = Yellow braided twining C = Green cord D = Red cord
E = Yellow nine. Strand braidF = Green / red / yellow cordG = Green / red / yellow cord
H = Meeting pointI = Warp loops
How to make a sprang-cap
FabricWool: 2-ply yarn with a diameter of 1mm.
Braided or plaited wool
Cap: rectangle of sprang, 32cm by 64cm.
Braids: 65cm long, varying widths. You could plait wool to make these, or buy them.
Cord: length unknown - but any thick wool will do, or you could buy cord.
1. Interlink the wool to form the sprang by
following the charts given. You will need to
use a small weaving frame in order to do this.
2. Fold the rectangle of sprang at the horizontal
centre and whip-stitch the sides together to
form a bag shape.
3. Sew a line 1.5cm in from the fold to
form a tube.
4. Thread a cord through the tube (this cord will be used to
tighten the end of the cap and then to secure it to the
head by bringing the cords into the neck and then
passing them around the head, securing them over the
top of the forehead).
5. Stitch the braids and plaits to the cap as shown.
21
Finish off like this
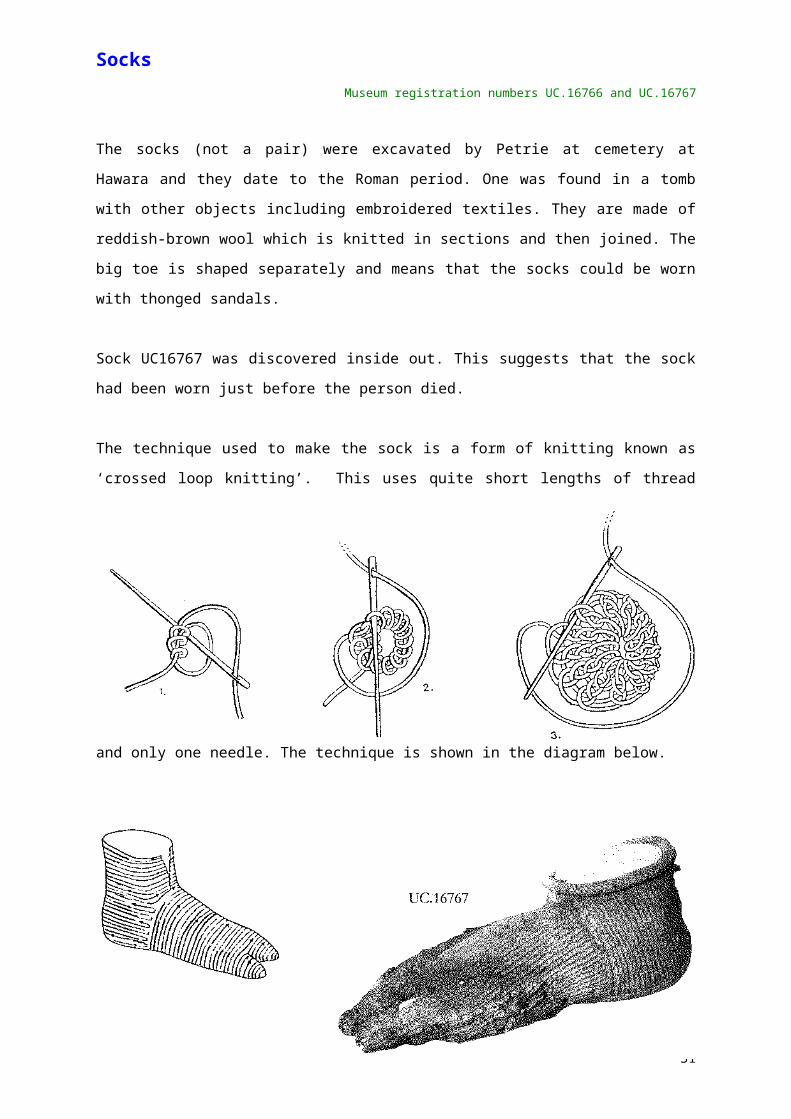
SocksMuseum registration numbers UC.16766 and UC.16767
The socks (not a pair) were excavated by Petrie at cemetery at Hawara and they date to the
Roman period. One was found in a tomb with other objects including embroidered textiles.
They are made of reddish-brown wool which is knitted in sections and then joined. The big
toe is shaped separately and means that the socks could be worn with thonged sandals.
Sock UC16767 was discovered inside out. This suggests that the sock had been worn just
before the person died.
The technique used to make the sock is a form of knitting known as ‘crossed loop knitting’.
This uses quite short lengths of thread and only one needle. The technique is shown in the
diagram below.
22
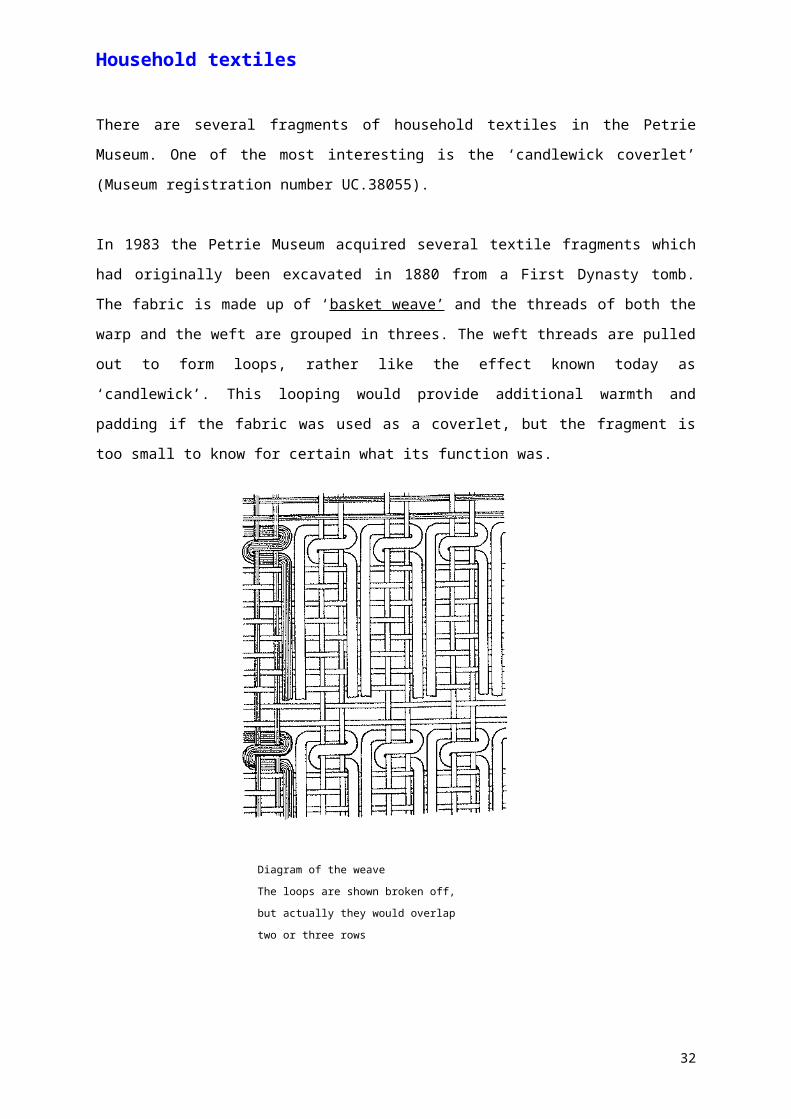
Household textiles
There are several fragments of household textiles in the Petrie Museum. One of the most
interesting is the ‘candlewick coverlet’ (Museum registration number UC.38055).
In 1983 the Petrie Museum acquired several textile fragments which had originally been
excavated in 1880 from a First Dynasty tomb. The fabric is made up of ‘basket weave’ and
the threads of both the warp and the weft are grouped in threes. The weft threads are pulled
out to form loops, rather like the effect known today as ‘candlewick’. This looping would
provide additional warmth and padding if the fabric was used as a coverlet, but the fragment
is too small to know for certain what its function was.
Diagram of the weave
The loops are shown broken off,
but actually they would overlap
two or three rows
23
Soft toys in the Petrie Museum
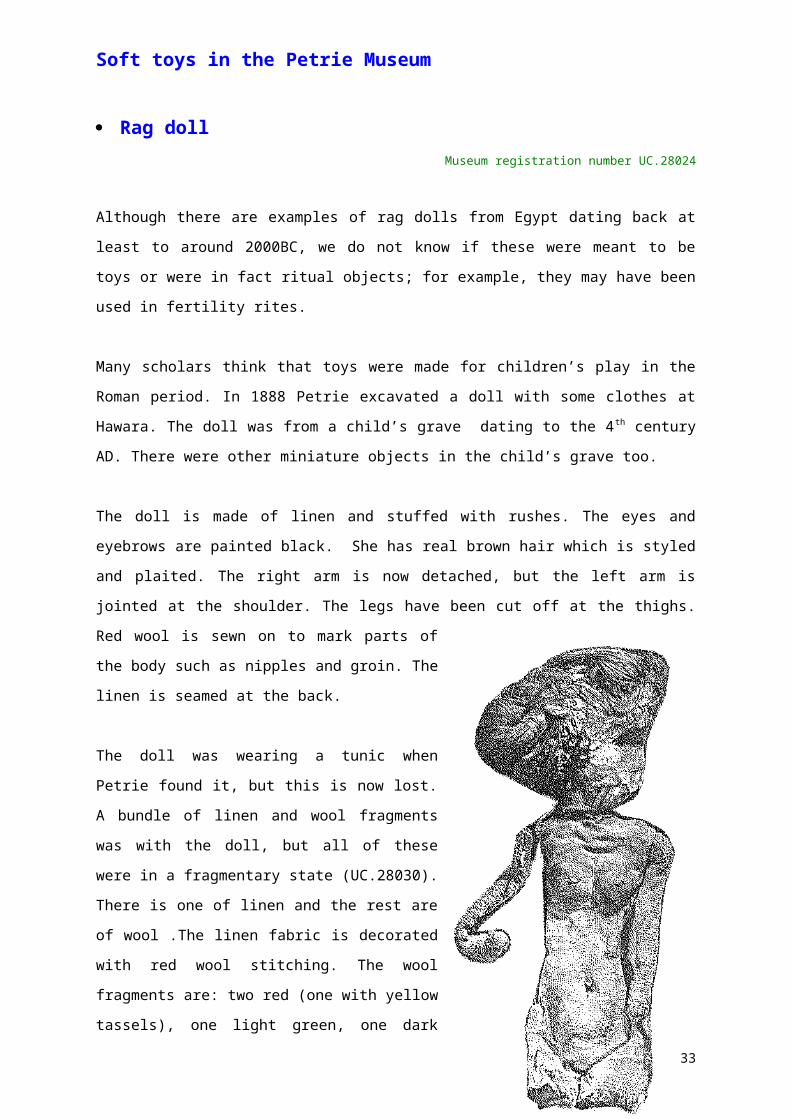
Rag dollMuseum registration number UC.28024
Although there are examples of rag dolls from Egypt dating back at least to around 2000BC,
we do not know if these were meant to be toys or were in fact ritual objects; for example,
they may have been used in fertility rites.
Many scholars think that toys were made for children’s play in the Roman period. In 1888
Petrie excavated a doll with some clothes at Hawara. The doll was from a child’s grave
dating to the 4th century AD. There were other miniature objects in the child’s grave too.
The doll is made of linen and stuffed with rushes. The eyes and eyebrows are painted black.
She has real brown hair which is styled and plaited. The right arm is now detached, but the
left arm is jointed at the shoulder. The legs have been cut off at the thighs. Red wool is sewn
on to mark parts of the body such as nipples and groin. The linen is seamed at the back.
The doll was wearing a tunic when Petrie found it,
but this is now lost. A bundle of linen and wool
fragments was with the doll, but all of these were in
a fragmentary state (UC.28030). There is one of
linen and the rest are of wool .The linen fabric is
decorated with red wool stitching. The wool
fragments are: two red (one with yellow tassels), one
light green, one dark green, and one purple and
blue. On some of the fragments it is possible to
make out rolled hems, whip-stitching and selvedges.
The stitching is quite crude and it is possible that the
child made these clothes for the doll to wear.
24
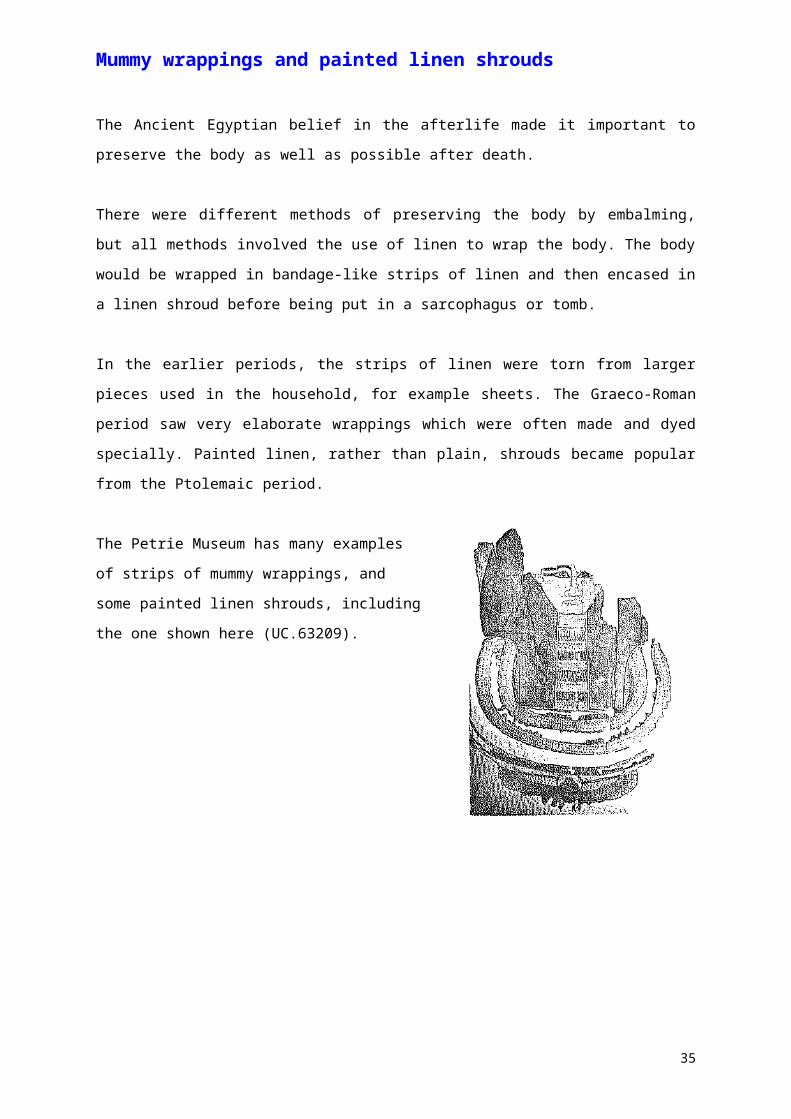
Mummy wrappings and painted linen shrouds
The Ancient Egyptian belief in the afterlife made it important to preserve the body as well as
possible after death.
There were different methods of preserving the body by embalming, but all methods involved
the use of linen to wrap the body. The body would be wrapped in bandage-like strips of linen
and then encased in a linen shroud before being put in a sarcophagus or tomb.
In the earlier periods, the strips of linen were torn from larger pieces used in the household,
for example sheets. The Graeco-Roman period saw very elaborate wrappings which were
often made and dyed specially. Painted linen, rather than plain, shrouds became popular
from the Ptolemaic period.
The Petrie Museum has many examples
of strips of mummy wrappings, and
some painted linen shrouds, including
the one shown here (UC.63209).
25
Section 2 –
Representations of garments on objects in the Petrie Museum
As outlined at the beginning of this pack, there is a massive difference in how costume looks
when it is represented in Egyptian art and the actual surviving examples of textiles. This
section traces the development of Egyptian costume as it appears on objects, and focuses
on those in the Petrie Museum.
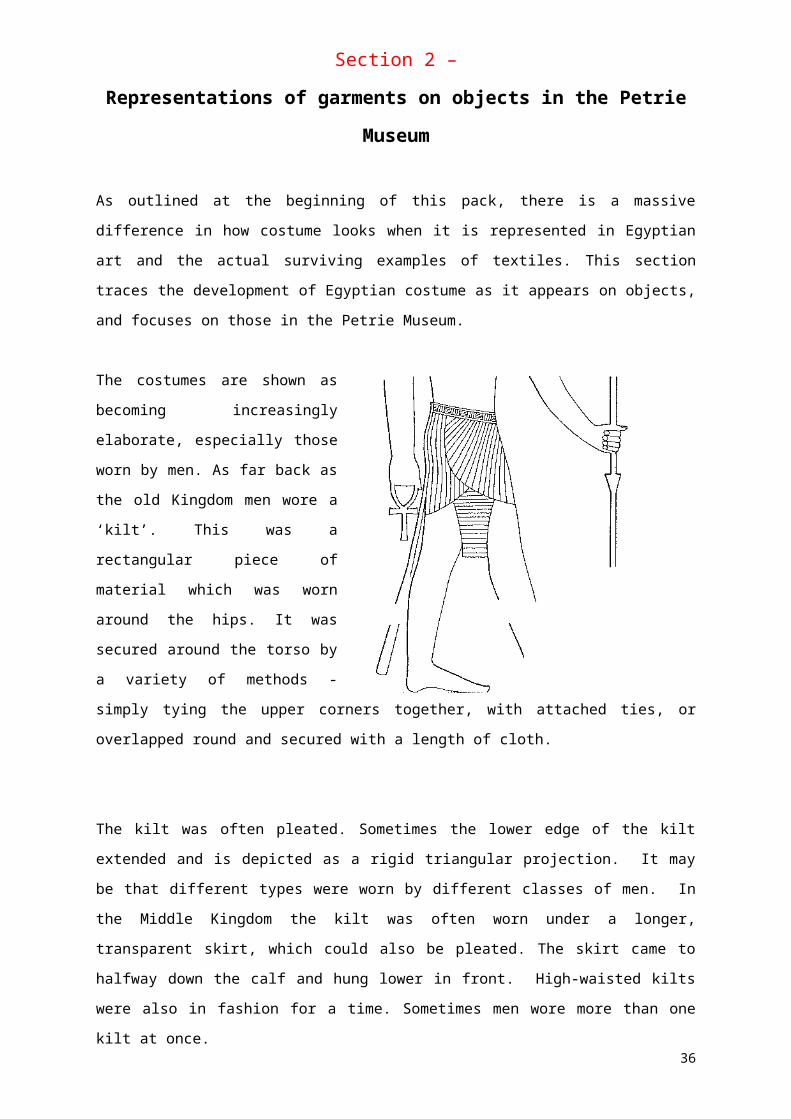
The costumes are shown as
becoming increasingly elaborate,
especially those worn by men. As far
back as the old Kingdom men wore a
‘kilt’. This was a rectangular piece of
material which was worn around the
hips. It was secured around the torso
by a variety of methods - simply tying
the upper corners together, with
attached ties, or overlapped round
and secured with a length of cloth.
The kilt was often pleated.
Sometimes the lower edge of the kilt extended and is depicted as a rigid triangular
projection. It may be that different types were worn by different classes of men. In the
Middle Kingdom the kilt was often worn under a longer, transparent skirt, which could also
be pleated. The skirt came to halfway down the calf and hung lower in front. High-waisted
kilts were also in fashion for a time. Sometimes men wore more than one kilt at once.
26
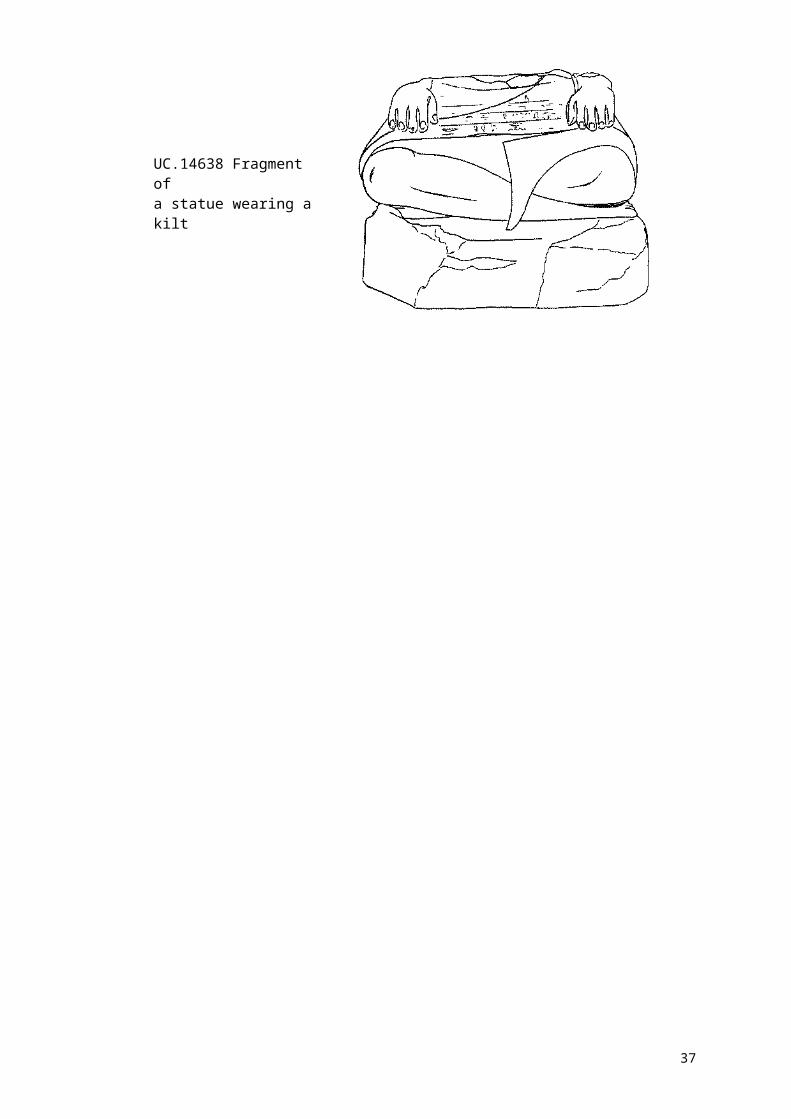
UC.14638 Fragment of a statue wearing a kilt
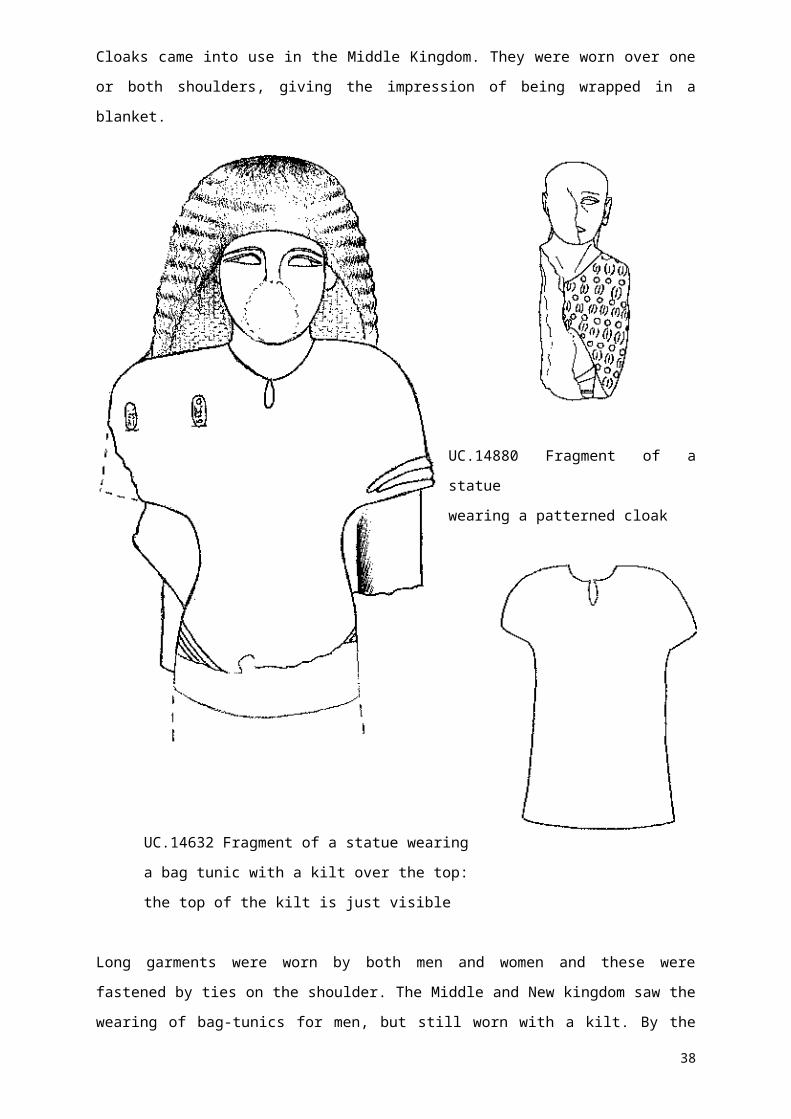
Cloaks came into use in the Middle Kingdom. They were worn over one or both shoulders,
giving the impression of being wrapped in a blanket.
UC.14880 Fragment of a statue
wearing a patterned cloak
UC.14632 Fragment of a statue wearing
a bag tunic with a kilt over the top:
the top of the kilt is just visible
Long garments were worn by both men and women and these were fastened by ties on the
shoulder. The Middle and New kingdom saw the wearing of bag-tunics for men, but still worn
with a kilt. By the later 18th Dynasty the tunic stretched to the ankles and could be worn with
an apron-like sash formed from a second pleated piece of material which was wrapped
around the backside and tied in the front. This piece was often fringed and during the
Ramesside period this was loosely tucked up to reveal the under-skirt.
27

From the Old Kingdom onwards women wore a plain sheath dress which reached from the
breast to the ankles with shoulder straps. Women’s cloaks sometimes have one or both
shoulders starched to a point. In the New Kingdom the bag-tunic was worn, with the possible
addition of a striped transparent shawl at banquets. By the mid-18th dynasty the sheath
dresses and occasional bag-tunics had given way to very elaborate transparent dresses
which were voluminous and nearly always pleated.
A long rectangular piece of cloth was wound round around the body and draped over the
shoulders, with the two weft fringes hanging down the front.
Possible method of wrapping a dress
(drawing after Bruèyre, 1937)
This costume was also worn by priests who are often depicted with a short sash over one
shoulder and with a ceremonial leopardskin garment which was worn over the clothes
draped under one arm and fastened on the opposite shoulder.
As clothing for the priesthood shows, it is possible to differentiate between costumes worn
for different occasions and for various occupations. Royal dress clearly needed to be
different. In the Old Kingdom the Pharaoh wore a corselet, kilt and girdle, but by the
Ramesside period the kilt had become very elaborate with a large apron and decoration.
The corselet was replaced by a short sleeved ‘king’s jacket’ with a falcon motif and narrow
strips which wound around the body. A headcloth was also worn which was coloured - either
dyed or worked in tapestry, and ribbons were attached to wigs and crowns.
The Queen wore a decorated girdle with beadwork or woven decoration. Woven coloured
patterns are rare and it may be that they were reserved for the Royal household.
Male deities are depicted wearing a corselet and kilt whilst females most often wear red or
blue sheath dresses.
Dress for different occupations28
Followers of Rameses II wore a military style uniform.
Overseers and scribes had a long tunic which showed the underskirt.
Labourers wore kilts or loincloths for very dirty work or sometimes only a body sash,
perhaps to catch sweat.
lab
our
e
r
with a kilt and sash
brickmaker in a loincloth
29
overseer in a long tunic and underskirt

Section 3 –
Raw materials and methods of manufacture
There is evidence in Egypt for the production of textiles as far back as the 6 th millennium BC:
flax seeds, bone needles, and stone and pottery whorls have been found. Most of the
textiles found in Ancient Egypt are made of flax, but there are some examples of wool dating
back to the 2nd millennium BC. Flax is used to make linen. Egyptian linen had a wide
reputation: it is mentioned in the Book of Ezekiel in the Bible, and the Greek author
Herodotus writing in the 5thc BC tells us that linen was the principal raw material for cloth.
Herodotus also states that wool was not used because of religious reasons (there was a
concern that some of the wool fibres would fall off and pollute the sacred space of the
temple); however wool was certainly used for cloaks and it did become more popular over
time. Cotton and silk were also introduced at this time. Grass, reed and hemp were also
occasionally used in various periods but were not common. Mohair is found from the 7 th
century AD.
The flax was harvested at different times depending on what it was going to be used for.
The younger green stems were used for very fine thread, the yellow stronger fibres made
good linen cloth, and the ripe flax would make ropes and mats. The flax was harvested by
pulling and was then drawn through a comb-like tool. Next it would be soaked to separate
the woody parts from the bast fibres which were then beaten and scraped to remove bits of
stem and combed out. After this they were ready to be roved. Roving is a process which
involves rolling the fibres along the thigh. The threads were wound onto reels and placed in
‘tension bowls’. Originally spinning and weaving was women’s work but later this was done
by men, women and children. A wooden spindle was used, weighted with a whorl.
Wooden spindles
UC.7306I and UC.7809
and Copper needle
UC.36154
30
Two or more weak threads were often twisted together in the opposite direction to the one in
which they would be spun: this produced plied thread. Egyptian flax was usually plied to the
left.
Wool was at first simply pulled from the sheep’s fleece, but shearing was introduced in the
Roman period. Cotton was plucked from the plant. Wool and cotton were then spun in the
same way as flax.
Usually linen was not dyed, since Egypt did not produce a suitable fixer or mordant to
produce soft colours, but some was certainly painted from predynastic times onwards.
Organic (vegetable) or mineral pigments were used; some dyes are listed here:
Blue was obtained from indigotin (either indigo or woad).
Red was usually from a plant called madder, but some inorganic pigment was also used
(perhaps ochreous earth).
Yellow was from the safflower and iron buff.
Green was obtained from double dyeing indigotin and a yellow in the Coptic period.
Purple was from indigotin and madder. This combination also produced brown.
Dyeing needs both a dye and a fixer. The most common fixer in the ancient world was ‘alum’
which was mined in the Libyan desert, but there are no certain examples of this being used
in Egypt. Fast colours were a problem and this obviously limited the production of patterned
fabric. The Romans introduced new bleaching and dyeing methods.
Three different spinning techniques are known from reliefs: the ‘supported spindle’ which
was held on the thigh; the ‘grasped spindle’ held between the palms of the hands; and the
‘suspended spindle’.
Spinning techniques from a tomb at Beni Hassan
31
The earliest looms were horizontal and pegged to the ground. They were frameless. A
drawing of one is shown on a pottery dish from the predynastic period now in the Petrie
Museum, and this is probably the first representation of a loom to survive.
Vertical framed looms were used from the early New Kingdom. With a vertical loom, an odd
number of threads were tied to the ‘heddle’ rod and raised. This created a space through
which the weft passed. Then a flat rod was turned on edge to make a space for the weft to
return. Then a ‘beater-in’ pushed the wefts close together. The flax was usually woven into
a plain tabby, but with a great variety of thickness and texture.
grasped spindle techniques and vertical looms
(drawing after Davies, 1929)
32
The texture ranged from a gauze (200 threads to one inch) to a canvas-like material. There
were a number of different qualities of linen: ‘royal linen’, ‘fine thin cloth’, thin cloth’ and
‘smooth (or ordinary) cloth’ are all mentioned in the sources. Cloth was woven in small
homes, on large estates, in temples and in royal and state workshops and could be bartered
by professionals.
There is some evidence that the palace for royal women and children trained and supervised
textile workers, and even those employed by the state could work at home. All Egyptian
temples had weaving workshops, and in the Christian period this practice persisted, with
monasteries having workshops too. In the Roman period trade guilds dealt with large
government orders.
The linen was finished by being washed. The finer types were bleached, sun-dried and
polished. In later times saffron was sometimes added as this acted as an insecticide.
Linen was used for bedding, towels, and wall-hangings for the home. It was also used for
costume and mummification. Knitted socks were popular in Roman Egypt. In the Coptic
period tapestries used to decorate the walls of rich people’s homes.
Often the fabric was left plain, but the decoration could be in the weave. Edges and
selvedges could be fringed, or a weave could include a ‘pile’ - this was popular for towels.
Tapestry was used sometimes. Pleating is the most famous Egyptian decorative technique.
two types of selvedge fringes
33

Section 4 –
Sewing and Decorative Techniques
Sewing Equipment: Metal scissors or knives were used to cut the cloth. Needles and
bodkins have been found made from wood, bone, copper, bronze, gold and silver. Most are
larger and thicker than modern types of needle. Metal pins have also been discovered.
Needles could be stored in bone cases. Reels for thread have survived made from wood,
limestone, pottery and faience.
Sewing Methods: Seams and hems were usually rolled and then held by whipping stitches,
but other methods are also used. For instance sleeves which needed to take a lot of wear
and tear (such as the seams down children’s sleeves) could be sewn with the ‘run and fell’
seam. Coptic textiles also used blanket stitch on hems.
whip-stitching flat-fell seam
Pleating: Pleating was done whilst the cloth was damp and inside out. Some surviving
garments show that the pleats could be secured at the side by sewing them into the seam.
The pleats would then be repinched after washing. There is still discussion about pleating
methods - for instance wooden boards with grooves have been discovered which may have
had linen pressed into them whilst wet. Others favour a finger method. Of course, the two
techniques may have existed side by side.
pleating board from Museo Egizio, Turin
(drawing after Pedrini, 1989:84 fig 3)
34
Embroidery: This is a rare technique, though some examples do exist, notably the garments
found in Tutankhamun’s tomb, and it is thought that these may have been worked by non-
Egyptians. Tutankhamun was a pharaoh of the 18th dynasty, the period of maximum luxury
in ancient Egyptian history. During this time contacts with Western Asia were intense and
letters to and from this area mention plenty of textiles.
Embroidery was more common in the Coptic period with the use of a simple satin stitch as
an area-filler. Sometimes laundry marks were embroidered onto garments for identification.
Beading: Beads could be stitched onto cloth, or entire garments were occasionally made
from beads.
35
Map of Egypt with relevant places marked
36
Glossary
basket weave: a weave in which the warp and wefts are threaded in multiples (usually twos
or threes)
bast: the soft fibres of flax which are used for making linen
braids: decorative narrow bands of textiles, sometimes plaited
couching: the sewing down of a thread when it is placed onto a piece of cloth.
corselet: a garment worn over the chest and back
flat-fell: a seam in which the loose edges of cloth are stitched back onto the fabric.
flax: the plant from which linen is made.
galabiyeh: a garment worn in Egypt today. It is a simple tunic with a neck opening and long
sleeves.
headcloth: a textile tied around or worn over the head
pile: woven threads left loose to hang from a fabric
selvedge: the edge of a textile at the sides made by turning the weft back.
spindle: a long thin wooden object using in spinning the fibres into thread
sprang: a stretch fabric made using only warp threads. The threads are twisted to form the
fabric.
warp: the threads which are stretched vertically (or from top to bottom) of the loom
weft: the threads which run horizontally (or from side to side) on the loom.
whip-stitch: overstitching two pieces of material to join a seam.
whorl: a weight usually attached to the body of the spindle to help with spinning
37
Suggestions for Further Reading
If you would like to find out more about ancient Egyptian clothing and textiles, either visit our
website (www.petrie.ucl.uk) or read “Egyptian Textiles”, by Rosalind Hall, available at the
Museum Bookshop.
You can also email Janet Johnstone, the Egyptology Clothing Consultant who helped us
creating this School Pack ([email protected]).
Hall, R. Egyptian Textiles, Shire Egyptology, 1986
Hall, R. Garments in the Petrie Museum of Egyptian Archaeology, 1982
Harris, J. 5000 Years of Textiles, BMP, 1993
Vogelsang-Eastwood, G. Pharaonic Egyptian Clothing, Brill, 1993
38