Embed Size (px)
Citation preview

InformationNOW - Grading Chalkable_0328181144 InformationNOW – Grading •••• 1
InformationNOW – Grading
About this Guide This Quick Reference Guide provides an overview of the traditional grading options available in InformationNOW. For
details regarding skill-based reporting, please refer to the InformationNOW – Standard-Based Reporting Quick
Reference Guide. For details regarding the teacher’s options for Grade Book grading, please refer to the
InformationNOW for Teachers – Classroom Grade Book Quick Reference Guide.
Grades are based on the courses or subjects in which a student is enrolled for a given academic session. Prior to entering
grades:
• Academic Sessions and Terms must be created. See the InformationNOW – Creating an Academic Session
Quick Reference Guide for further details.
• Students must be enrolled in the selected school for the selected academic session. See the InformationNOW –
Student Module Quick Reference Guide for further details.
• Students must be enrolled in courses/subjects for the selected academic session. See the InformationNOW –
Scheduling Quick Reference Guide for further details.
Table of Contents
InformationNOW – Grading 1
About this Guide........................................................................................................................1 Table of Contents.......................................................................................................................1 Setup ..........................................................................................................................................2
Lookups .......................................................................................................................2 Additional Setups ......................................................................................................16
Importing Grades From A Serving School ..............................................................................20 Reporting School Setup.............................................................................................20
Grade Entry..............................................................................................................................24 By Student .................................................................................................................24 By Group ...................................................................................................................26 Synchronizing Grades From Serving School ............................................................28
Reports.....................................................................................................................................29 Class Rank.................................................................................................................29 Failure Listing ...........................................................................................................31 Grade Distribution .....................................................................................................32 Grade Label ...............................................................................................................33 Grade Verification Report .........................................................................................34 Honor Roll.................................................................................................................36
InformationNOW - Grading Chalkable_0328181144 InformationNOW – Grading •••• 2
Missing Grades..........................................................................................................37 Portrait Style Report Card .........................................................................................38 Report Card ...............................................................................................................39 Two Column Report Card .........................................................................................40 Unposted Grades & Grade Book Use........................................................................42 Worksheet Report......................................................................................................43
Setup
Lookups The following Lookups are created under Grades | Setup or under System Preferences | Setup. These Lookups
pertain to grading and must be created before scores may be recorded for graded items. For complete details regarding
adding, viewing and deleting Lookups, please refer to the InformationNOW – Lookups Quick Reference Guide.
Required fields are indicated with an asterisk (*).
GPA Method The GPA Method determines the type of grade point averaging that is to be calculated for students (Ex. Numeric,
Standard). Once GPA Methods are defined, they may be attached to grading scales and then to sections in the Master
Schedule.
To insert a new record, select GPA Method from the drop-list and click Refresh. A list of existing GPA Methods will
display. Click Add.
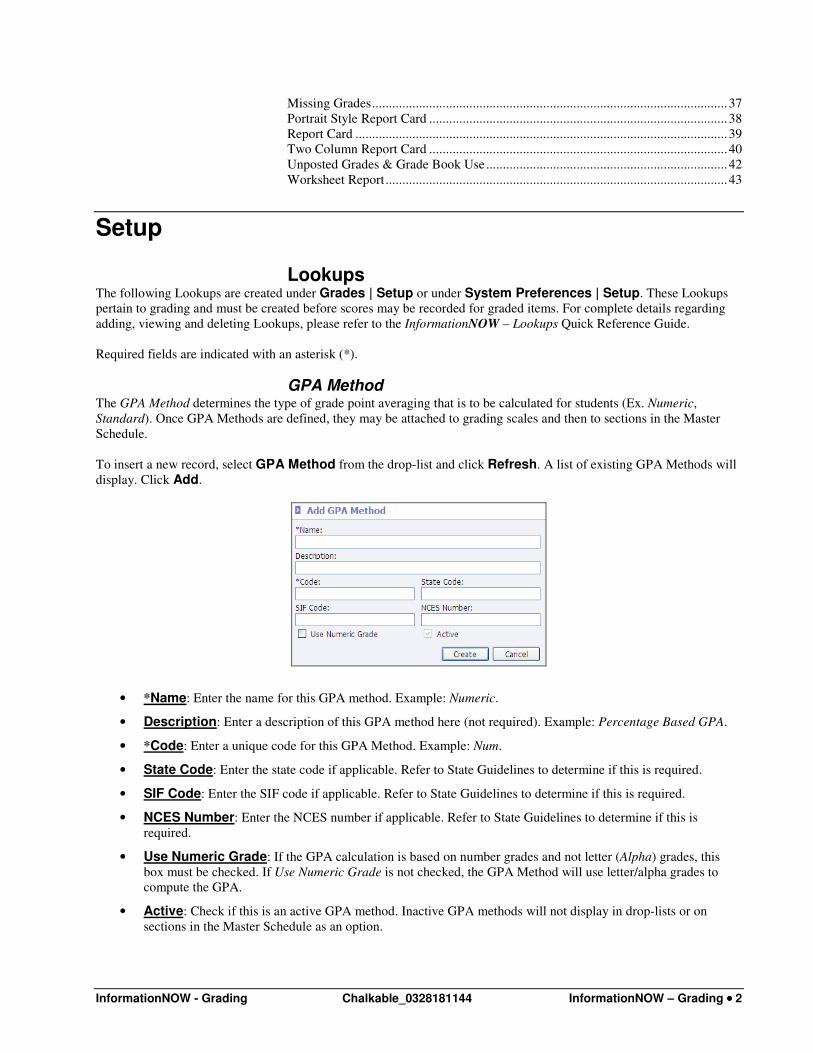
• *Name: Enter the name for this GPA method. Example: Numeric.
• Description: Enter a description of this GPA method here (not required). Example: Percentage Based GPA.
• *Code: Enter a unique code for this GPA Method. Example: Num.
• State Code: Enter the state code if applicable. Refer to State Guidelines to determine if this is required.
• SIF Code: Enter the SIF code if applicable. Refer to State Guidelines to determine if this is required.
• NCES Number: Enter the NCES number if applicable. Refer to State Guidelines to determine if this is
required.
• Use Numeric Grade: If the GPA calculation is based on number grades and not letter (Alpha) grades, this
box must be checked. If Use Numeric Grade is not checked, the GPA Method will use letter/alpha grades to
compute the GPA.
• Active: Check if this is an active GPA method. Inactive GPA methods will not display in drop-lists or on
sections in the Master Schedule as an option.

InformationNOW - Grading Chalkable_0328181144 InformationNOW – Grading •••• 3
Click Create. The record will be saved and a new GPA Method screen will appear.
Continue adding all GPA Methods. Click Cancel when finished.
Grading Comments Grading Comments are typically the observations to be reported at the end of a grading or progress period on the report
card (ex. Works Well With Others, Does Not Turn In Homework On Time).
To insert a new record, select Grading Comments from the drop-list and click Refresh. A list of existing comments will
display. Click Add.
• Code: Enter a unique identifier for this grading comment.
• Comment: Enter the observation (limit 30 characters).
Click Create. The record will be saved and a new Grading Comment screen will appear. Continue adding all Grading
Comments. Click Cancel when finished.
Grading Periods Grading Periods are used to mark the span of school days in the academic calendar for which report cards are given to
students. Report cards typically include grades and/or comments for subjects in which students are enrolled during the
Grading Period.
Before Grading Periods may be created, terms must be established. See the InformationNOW – Attendance Quick
Reference Guide for instructions regarding terms.
To insert a new record, select Grading Periods from the drop-list. Select the appropriate term and click Refresh. A
list of existing grading periods for the selected term will display. Click Add.

InformationNOW - Grading Chalkable_0328181144 InformationNOW – Grading •••• 4
• *Name: Enter a unique name for the grading period. Example: 3rd
Quarter. The name of the grading period will
print on the student’s report card.
• *Code: Enter a code for this grading period. Example: 3Q.
• *Start Date: Enter the date on which this grading period beings in mm/dd/yyyy format, or choose the date by
clicking the button and browsing the popup calendar. Click on the date in the calendar and it will populate
the Start Date field.
• *End Date: Enter the date on which this grading period ends in mm/dd/yyyy format, or choose the date by
clicking the button and browsing the popup calendar.
• Description: Give the grading period a description, if desired (optional).
• Allow Posting?: Check this box when the grades from the Teacher’s Grade Book are ready to post to the
student’s grade screen to be printed on report cards.
Note: Once grades have been posted by teachers, it is recommended that the user uncheck this box so
that grades cannot be modified or re-posted while grades are being verified and report cards are being
printed.
• School Announcement: Enter a message to be printed on each student’s report card for the selected grading
period.
Click Create.
Once the Grading Period is defined, the graded items to be collected for that grading period must be added.
Graded Items While on the Grading Period view screen, click Add.

InformationNOW - Grading Chalkable_0328181144 InformationNOW – Grading •••• 5
Note: To modify the Sequence of graded items, which controls the order in which graded items print
on the report card, place a check next to the graded item and use the Up or Down arrows to move the
item up or down in the list.
The Add Graded Item screen will display.
• *Name: Enter the name of the Graded Item. The name will appear on the Report Card. It is recommended that
this information be different for each grading period. Example: 3rd
Quarter Grade.
• Percentage: Can only be accessed once the graded item has been saved.
• Description: A description of the graded item may be entered here (not required).
• Grade Level(s): Can only be used once a graded item has been saved. If this graded item applies only to one
grade level, select that grade level from the available list. All grade levels are selected by default.
• This Graded Item is used to determine:
o GPA Points: Check this box if this graded item is to be used in the GPA calculation. For example, in
some schools, the 3rd
Grading Period grade is not included in GPA calculations. However, the 4th
Grading
Period will have a graded item for which GPA is calculated for these schools. Generally, this option does
not apply to elementary schools.
o Graduation Credit: Check this box if this graded item is to be used to determine if graduation credit is to
be issued for the student for a given course. For example, in a 2-term/4-quarter school, if graduation credit
is based on the final grade for the year, this box would only be checked for the 4th
Quarter Final graded
item. This option also does not generally apply to elementary schools.
o Final Grade: Check this box if this graded item is to be used in state/federal reporting where a final grade
is reported. Only one graded item can be marked for Final Grade reporting per term.
• Allow Exemptions: Check to allow students to be exempt from the graded item (i.e., a semester final exam
grade). After selecting this option, click the Percentage link to set overriding percentages. In the following
example, for the semester two final average grade, each quarter grade will be worth 40% and the semester exam
will be worth 20%. However, if a student is exempt from the semester exam, each quarter grade will be worth
50% of the semester average. For exemptions by grade level, select the Grade Level from the available list.
Set the Percentage and Exemption % for the selected grade level.

InformationNOW - Grading Chalkable_0328181144 InformationNOW – Grading •••• 6
Note: If no graded item is set to allow exemptions, the Exemption% column will be disabled.
• Display as Avg in Gradebook: Determines the grade item that will be displayed in the Average column
within the Grade Book instead of the grade that is marked as the grade for GPA Points. Only one item may be
set as the Grade Book average. If no graded item is selected, the program will assume the grade that is marked
as the GPA Points grade for the grading period is to display as the average in the Grade Book.
• Include on Yearly Report Card: This option is checked by default. Uncheck if this graded item (ex.
Comments) is not to be printed on a report card for subsequent grading periods. For example, if creating a
comment for Quarter 1, check this box and this comment will not print on report cards for Quarter 2, 3 or 4.
• Post to Transcript: Allows the graded item to be posted to the transcript regardless of graduation credit.
Previously the program would post the item that is marked for Grad Credit to the transcript. This option allows
for one additional grade to be posted to the transcript.
• Post Rounded Average: Indicates that the rounded average should be posted from the Grade Book. For
example, if this option is selected and a student has a Grade Book average of 69.67, a 70 will be posted to the
student’s grade record.
• Report as Alpha Grade (from Scale): Check this box if only an alphabetic (letter) grade is to appear on the
report card even if the graded item is a numeric grade. The corresponding letter grade that is assigned to the
numeric value in the grading scale will print on the report card. If the graded item is set to Report as Alpha Grade and the user has manually entered an alpha score (instead of posting the grade from the grade book),
when grades are posted to the transcript the following will take place:
o The alpha grade entered on the manual grade entry screen will be displayed as the alpha grade on the
student’s transcript.
o The Averaging Equivalent of the alpha grade will display as the numeric value on the student’s
transcript. To determine the averaging equivalent, go to System Preferences | Setup. Select Grading Scales and click Refresh. Click to View the grading scale. The number that appears in the Avg Equivalent column will be the numeric grade that is posted to the student’s transcript.
Click Create.
Continue adding necessary graded items for the selected grading period.

InformationNOW - Grading Chalkable_0328181144 InformationNOW – Grading •••• 7
Graded Item Grade Level Exceptions Once a graded item has been saved, exceptions may be set up for four of the options based on various grade levels. Click
to View a graded item. The grade level All will be selected by default. To set an exception for a different grade level,
select that grade level from the list.
The following four options may be changed for the selected grade level:
• Determines GPA Points
• Determines Graduation Credits
• Determines Final Grade
• Include on Yearly Report Card: The following options have been updated to only include graded items that
are marked as Include on Yearly Report Card for the grade level of the student:
o Report Card
o Standard Report Card
o Student Profile
o Two Column Report Card
o Portrait Style Report Card
o Bahamas Report Card
• Post to Transcript: The post transcript option has been modified to only post graded items that are marked as
post to transcript for the grade level of the student.
Comments Comments may also be added to a graded item. For example, during quarter one the school may collect two comments.
These comments should be added to the graded item.
For example, after clicking Create to add the Quarter 1 Grade item, click to view the graded item. The Comments
section is now activated.
Click Add to insert a comment to be attached to the quarter 1 grade.
InformationNOW - Grading Chalkable_0328181144 InformationNOW – Grading •••• 8
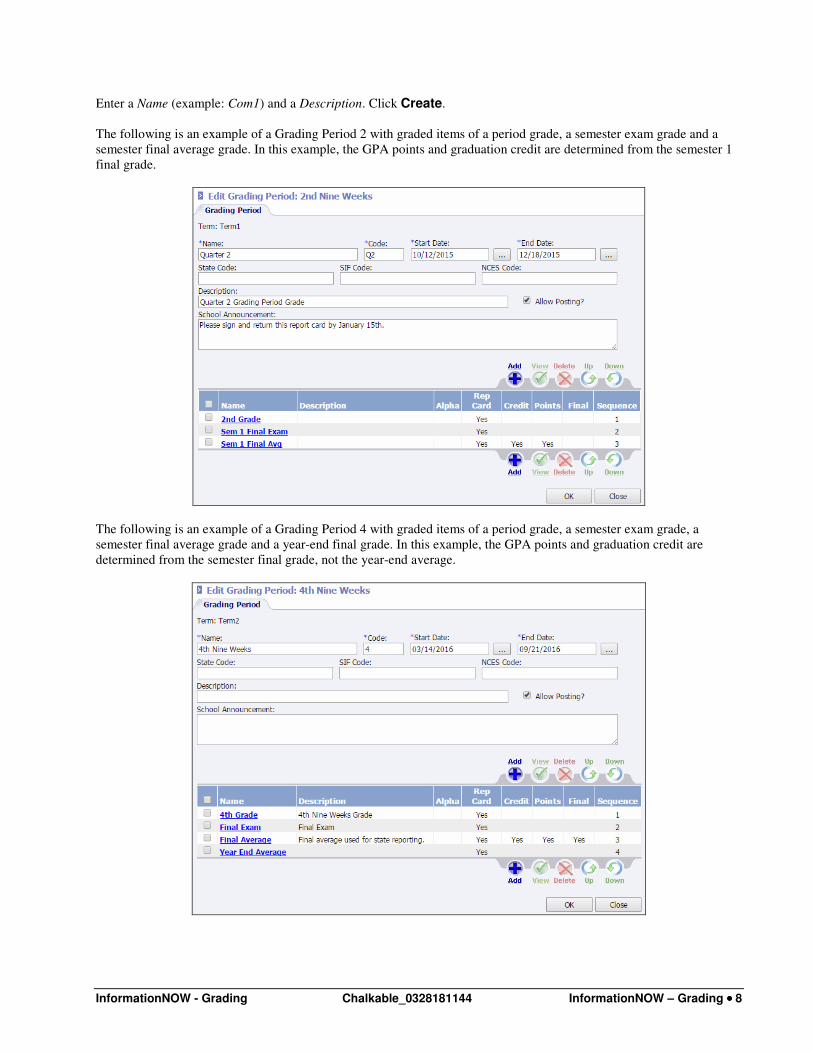
Enter a Name (example: Com1) and a Description. Click Create.
The following is an example of a Grading Period 2 with graded items of a period grade, a semester exam grade and a
semester final average grade. In this example, the GPA points and graduation credit are determined from the semester 1
final grade.
The following is an example of a Grading Period 4 with graded items of a period grade, a semester exam grade, a
semester final average grade and a year-end final grade. In this example, the GPA points and graduation credit are
determined from the semester final grade, not the year-end average.

InformationNOW - Grading Chalkable_0328181144 InformationNOW – Grading •••• 9
Percentages (Averaging Formulas) To compute a semester or year-end average for students, an averaging formula must be created to determine which
grades are to be averaged.
Example 1: To set up an averaging formula for the end of Semester 1 in which Quarter 1, Quarter 2 and the Semester
Exam are averaged together, perform the following steps:
• Go to Grades | Setup. Select to view Grading Periods. Select Term 1. Click Refresh. Select the grading
period to edit. Click to view the graded item to which grades are to be averaged (ex. Semester Final).
• Click the Average Setup link to set up the averaging formula for this item.
InformationNOW - Grading Chalkable_0328181144 InformationNOW – Grading •••• 10
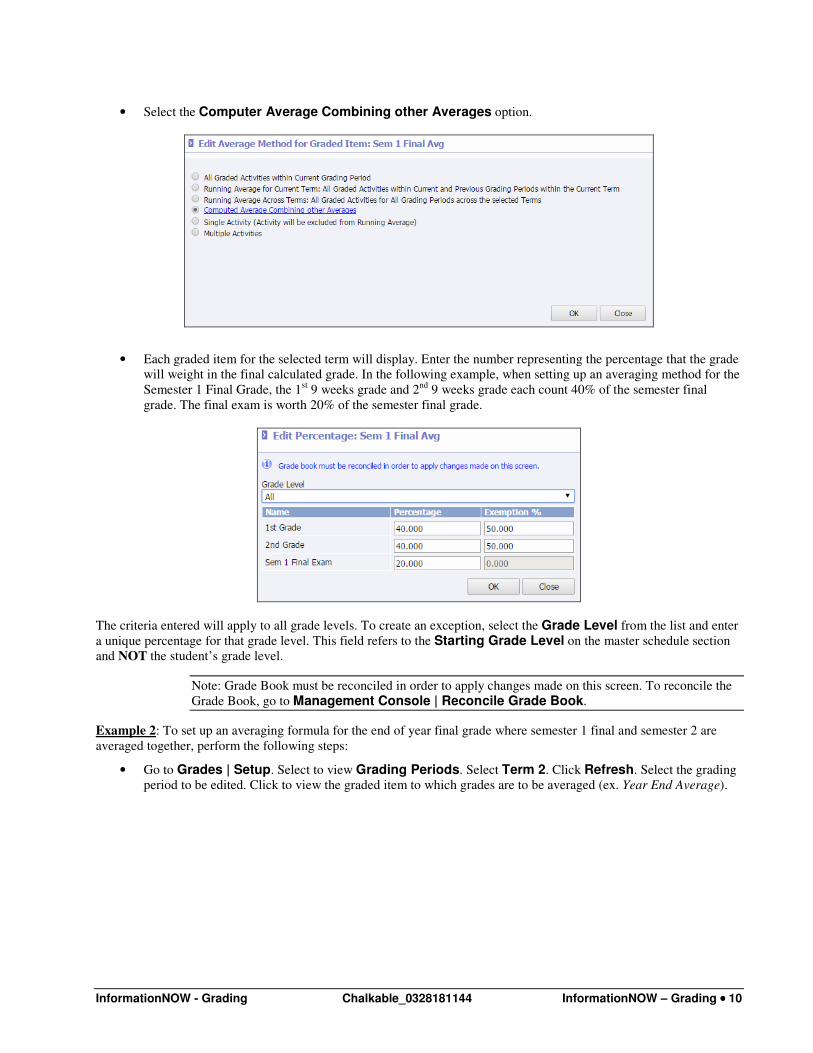
• Select the Computer Average Combining other Averages option.
• Each graded item for the selected term will display. Enter the number representing the percentage that the grade
will weight in the final calculated grade. In the following example, when setting up an averaging method for the
Semester 1 Final Grade, the 1st 9 weeks grade and 2
nd 9 weeks grade each count 40% of the semester final
grade. The final exam is worth 20% of the semester final grade.
The criteria entered will apply to all grade levels. To create an exception, select the Grade Level from the list and enter
a unique percentage for that grade level. This field refers to the Starting Grade Level on the master schedule section
and NOT the student’s grade level.
Note: Grade Book must be reconciled in order to apply changes made on this screen. To reconcile the
Grade Book, go to Management Console | Reconcile Grade Book.
Example 2: To set up an averaging formula for the end of year final grade where semester 1 final and semester 2 are
averaged together, perform the following steps:
• Go to Grades | Setup. Select to view Grading Periods. Select Term 2. Click Refresh. Select the grading
period to be edited. Click to view the graded item to which grades are to be averaged (ex. Year End Average).
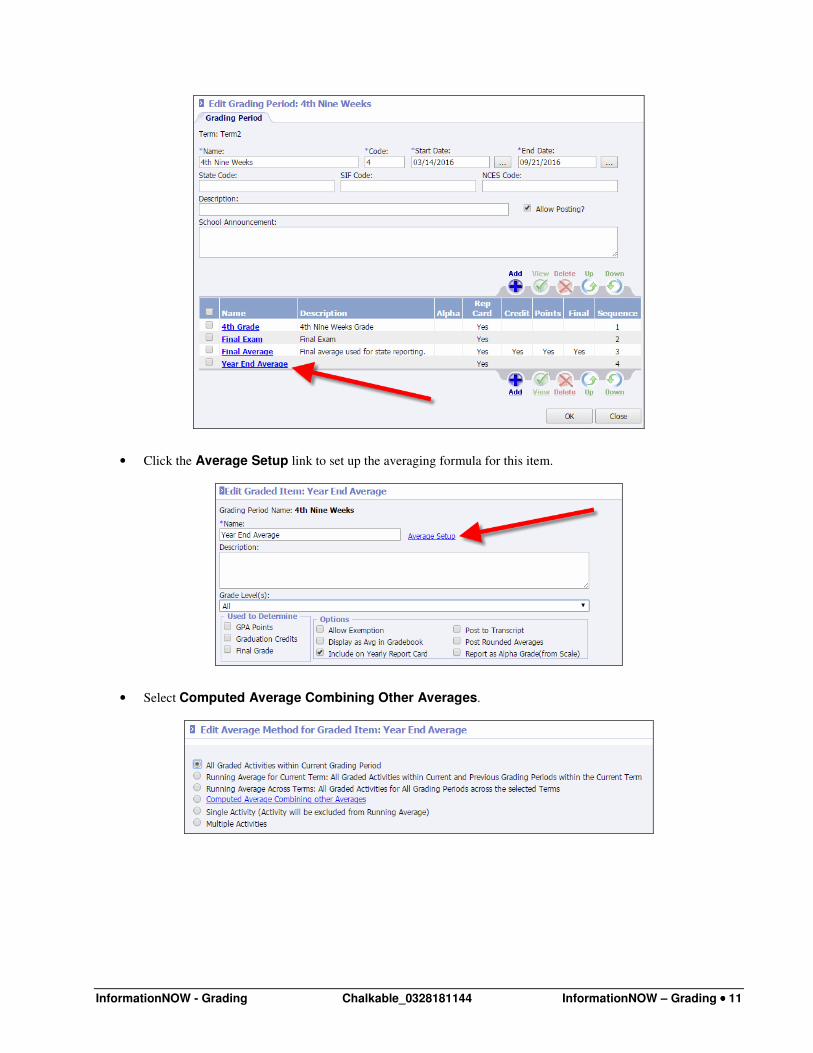
InformationNOW - Grading Chalkable_0328181144 InformationNOW – Grading •••• 11
• Click the Average Setup link to set up the averaging formula for this item.
• Select Computed Average Combining Other Averages.

InformationNOW - Grading Chalkable_0328181144 InformationNOW – Grading •••• 12
• Each graded item for the selected term will display. Enter the number representing the percentage that the grade
will weight in the final calculated grade. In the following example, the semester 1 final average grade and the
semester 2 final average grade would each be worth 50% of the Year End Final Average grade.
Note: The Grade Book must be reconciled in order to apply changes made on this screen. To reconcile
the Grade Book, go to Management Console | Reconcile Grade Book.
Averaging Formulas By Course Averaging formulas may also be assigned to a specific course. If an averaging formula is assigned to a course, it will
override the averaging formula assigned to the graded item/grading period. To assign a formula to a course go to
Scheduling | Valid Courses. Search for and select to View a course. Click the Average Setup tab. Select a Grading
Period in which a formula has been created (ex. Quarter 2). Place a check next to the graded item to be modified (ex.
Sem 1 Final Average) and click View. Edit the Percentages for this specific course.
Hierarchy of Averaging Formulas When considering average percentages, InformationNOW will use the following hierarchy (lowest to highest).
1. Grade Level – Changes to the grade level graded item percentage will overwrite any existing course graded
item percentages and will also overwrite existing classroom average percentages.
2. Course – Any changes to the course graded item percentage will overwrite any existing classroom average
percentages for sections of the course in the academic session of context.
3. Classroom Average Percentage – This is the percentage used by grading calculation. The grade level and course
graded item percentage screens are a way to mass edit this percentage, but teacher will still be able to overwrite
those percentages if they have the Maintain Classroom permission.
Valid Alphabetic Grades All letter grades which may be assigned to a graded item must be entered as a valid alphabetic grade. Users may enter
any value in the name field including alpha, numeric or characters.
Go to Grades | Setup or System Preferences | Setup. Select Valid Alphabetic Grades and click Refresh. All
existing Valid Alphabetic Grades will display.

InformationNOW - Grading Chalkable_0328181144 InformationNOW – Grading •••• 13
To insert a record, click Add.
• *Name: Enter the letter grade. Example: X.
• State Code: If applicable, enter the state code to be reported for this alphabetic grade. Check state guidelines
to determine if this is required.
• Description: Enter a description of the grade. Example: X is the grade entered for Semester Exam when the
student is exempt.
• Honor Roll Equivalent: Select the grade to be considered the equivalent to this grade when calculating honor
roll. If, for example, an A+ is considered the same as an A for honor roll calculation purposes, edit the A+ valid
alphabetic grade record and select an A from the Honor Roll Equivalent drop-list.
Note: Once a valid alpha grade has an honor roll equivalent, the original grade is no longer visible on
the Honor Roll Report parameter screen. In the following example, the valid grades of A+ and A- have
honor roll equivalents, so they no longer show in the grid. B+ and B- do not have honor roll
equivalents, so both still show.
• Click Create.
Grading Scales Grading Scales are used to denote numeric and alphabetical grades along with the corresponding numeric values for
GPA calculations.
Prior to entering Grading Scales, Valid Alphabetic Grades must be created (see “Valid Alphabetic Grades” on page 12).
Also, it is recommended that users create the GPA Method (see “GPA Method” on page 2).
InformationNOW - Grading Chalkable_0328181144 InformationNOW – Grading •••• 14
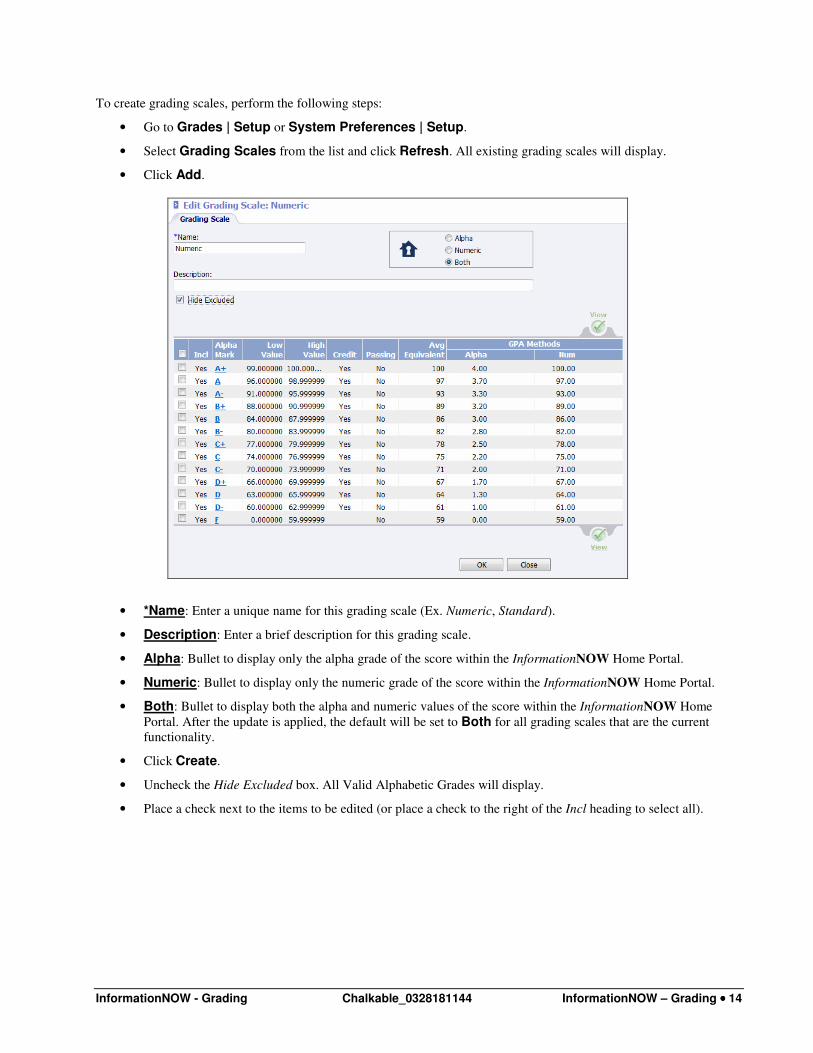
To create grading scales, perform the following steps:
• Go to Grades | Setup or System Preferences | Setup.
• Select Grading Scales from the list and click Refresh. All existing grading scales will display.
• Click Add.
• *Name: Enter a unique name for this grading scale (Ex. Numeric, Standard).
• Description: Enter a brief description for this grading scale.
• Alpha: Bullet to display only the alpha grade of the score within the InformationNOW Home Portal.
• Numeric: Bullet to display only the numeric grade of the score within the InformationNOW Home Portal.
• Both: Bullet to display both the alpha and numeric values of the score within the InformationNOW Home
Portal. After the update is applied, the default will be set to Both for all grading scales that are the current
functionality.
• Click Create.
• Uncheck the Hide Excluded box. All Valid Alphabetic Grades will display.
• Place a check next to the items to be edited (or place a check to the right of the Incl heading to select all).

InformationNOW - Grading Chalkable_0328181144 InformationNOW – Grading •••• 15
• Click View.
o Averaging Equivalent: Enter the numeric value to be used when calculating averages for any grades that
exist within the established range for this grade. For example, if the low is 96 and the high is 100, if 98 is to
be used when averaging semester grades, enter a 98 here.
o Low Value: Enter the lowest numeric value for the selected grade. A value up to 6 decimal places may be
defined. There must be no gaps left between values. For example, if the high value of a B+ is 92.9996, the
low value of the A- must be 92.9997.
o High Value: Enter the highest numeric value for the selected grade. A value up to 6 decimal places may
be defined. There must be no gaps left between values. For example, if the high value of a B+ is 92.9996,
the low value of the A- must be 92.9997.
o Grade Points; Enter the point value to be determined when calculating GPA for grades within the
established range. For example, if A is to be calculated as a 4.0 on a standard GPA, enter a 4.0 here.
� Apply Weighting: Uncheck the Apply Weighting box for any grade that is not to have weighting
applied as defined in the master schedule. If unchecked, weighted grade points will be equal to the
unweighted grade points when posting to transcripts. Check the Apply Weighting box for any grade
that is to have weighting applied as defined in the master schedule. If checked, then weighted grade
points will post to the transcripts as in previous versions.
Note: After transcript information has been posted if the Apply Weighting option is changed, the
system will not automatically recalculate the transcript grade points, class rank, or class rank GPA. The
transcript information must be reposted.
o Award Graduation Credit: If graduation credit is to be awarded to a student for a course in which this
grade has been earned, check the Award Graduation Credit box.
o Is Passing: Indicates if the grade is considered a passing grade. This change will facilitate state reporting
requirements.
• Click OK.
• Continue defining the values for each Valid Grade for the selected scale.
• Grading Scales may be assigned to:
o Students: Students | Student Maintenance | School tab.
o Course Sections: Scheduling | Master Schedule | Main tab.
o Grading Settings: Grades | Setup | Settings tab.
InformationNOW - Grading Chalkable_0328181144 InformationNOW – Grading •••• 16
o School Grade Level: School/District | School | Main tab. Select Grade Scales under the Manage
menu at left to assign grading scales to grade levels.
Additional Setups
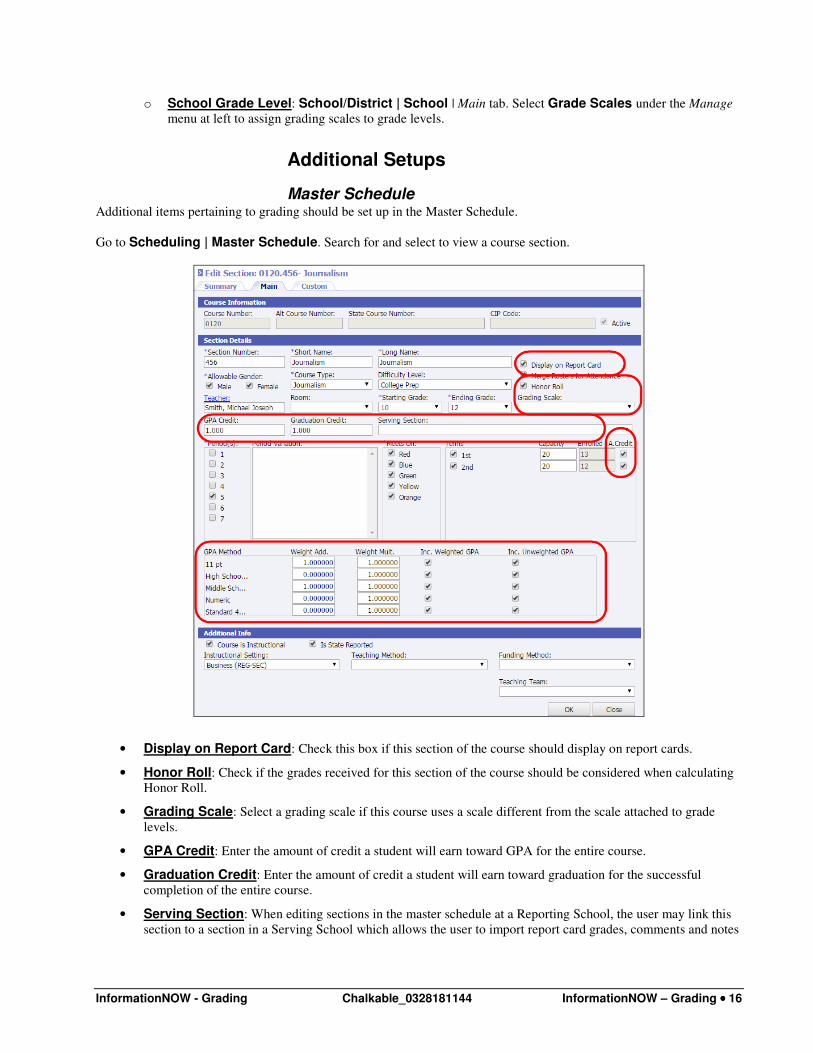
Master Schedule Additional items pertaining to grading should be set up in the Master Schedule.
Go to Scheduling | Master Schedule. Search for and select to view a course section.
• Display on Report Card: Check this box if this section of the course should display on report cards.
• Honor Roll: Check if the grades received for this section of the course should be considered when calculating
Honor Roll.
• Grading Scale: Select a grading scale if this course uses a scale different from the scale attached to grade
levels.
• GPA Credit: Enter the amount of credit a student will earn toward GPA for the entire course.
• Graduation Credit: Enter the amount of credit a student will earn toward graduation for the successful
completion of the entire course.
• Serving Section: When editing sections in the master schedule at a Reporting School, the user may link this
section to a section in a Serving School which allows the user to import report card grades, comments and notes
InformationNOW - Grading Chalkable_0328181144 InformationNOW – Grading •••• 17
from the Serving School to the Reporting School. For more details regarding dual enrolled students, refer to the
section “Importing Grades From A Serving School” starting on page 20.
• A. Credit: Check if attempted (GPA) credit is awarded at the end of the term. The number of check marks here
will be divided into the GPA credit and Graduation credit values entered for the section.
• GPA Method:
o Weight Add: Enter the weight-added value for the various GPA methods. GPA Methods are created under
either Grades | Setup or System Preferences | Setup.
o Weight Mult.: Enter the weight multiplier for the various GPA methods. GPA Methods are created under
either Grades | Setup or System Preferences | Setup.
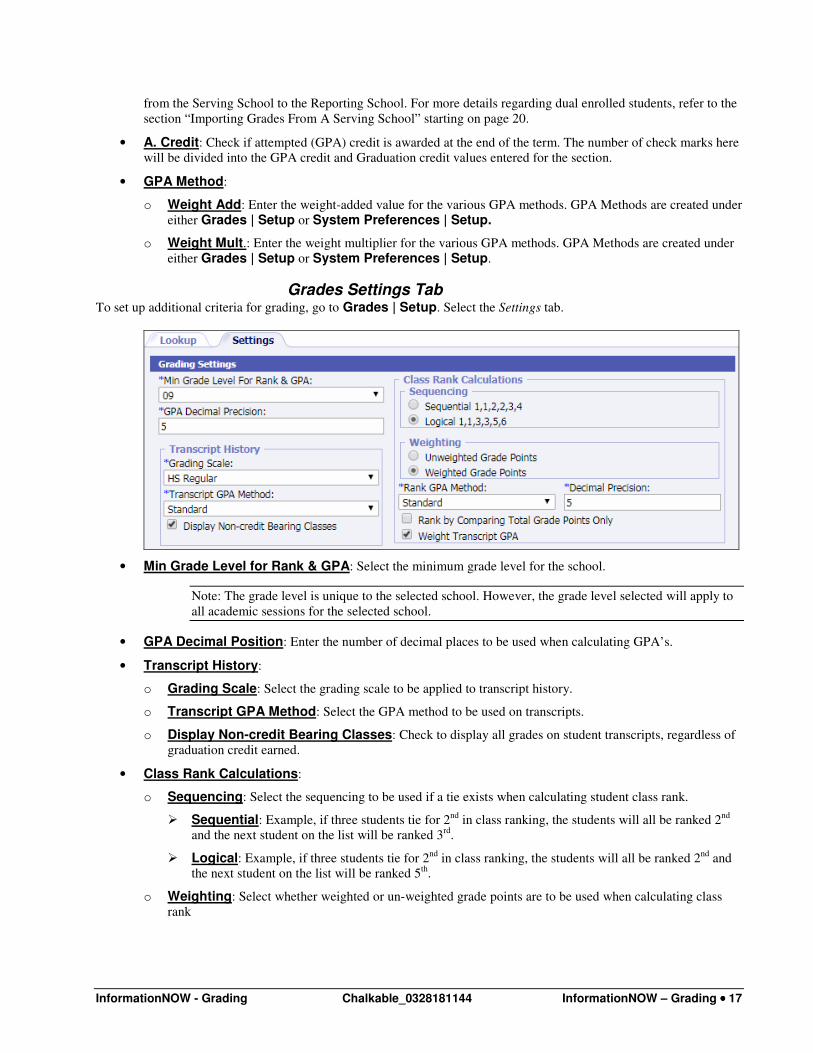
Grades Settings Tab To set up additional criteria for grading, go to Grades | Setup. Select the Settings tab.
• Min Grade Level for Rank & GPA: Select the minimum grade level for the school.
Note: The grade level is unique to the selected school. However, the grade level selected will apply to
all academic sessions for the selected school.
• GPA Decimal Position: Enter the number of decimal places to be used when calculating GPA’s.
• Transcript History:
o Grading Scale: Select the grading scale to be applied to transcript history.
o Transcript GPA Method: Select the GPA method to be used on transcripts.
o Display Non-credit Bearing Classes: Check to display all grades on student transcripts, regardless of
graduation credit earned.
• Class Rank Calculations:
o Sequencing: Select the sequencing to be used if a tie exists when calculating student class rank.
� Sequential: Example, if three students tie for 2nd
in class ranking, the students will all be ranked 2nd
and the next student on the list will be ranked 3rd
.
� Logical: Example, if three students tie for 2nd
in class ranking, the students will all be ranked 2nd
and
the next student on the list will be ranked 5th
.
o Weighting: Select whether weighted or un-weighted grade points are to be used when calculating class
rank

InformationNOW - Grading Chalkable_0328181144 InformationNOW – Grading •••• 18
o Rank GPA Method: Select the method to be used when calculating the GPA to determine class ranking
(alpha or numeric).
o Decimal Precision: Enter the number of decimal places to be used when calculating GPA’s to determine
class rank.
o Rank by Comparing Total Grade Points Only: Check if class rank is to be determined by adding
total grade points earned only. If selected, credit received will not be a determining factor when calculating
class rank.
o Weight Transcript GPA: Check if a transcript GPA is to be weighted.
• Report Card GPA:
o GPA Type: Select the GPA to print on the report card. Select a specific GPA Method, All methods or
None. If selecting None, all other GPA options are disabled.
o GPA Weighted Type: Indicates whether to print Weighted, Unweighted or Both.
o Grading Period GPA: Determines whether to print a grading period GPA for the Current Grading
Period Only, All Grading Periods (cumulative), or None.
o Display Cumulative GPA: Check to display cumulative “career” GPA.
o Include on Report Card: Check to include the GPA on the traditional report card.
o Include on Standards Report Card: Check to include the GPA on the Standards (skills based) Report
Card.
• Report Card Options:
o Course Sort Order: Select Course Name, Course Number or Period.
o Include Period Number: Affects the Portrait Report Card and the Traditional Report Card. Check to
display the period of the day number on the report card.
o Include Class Rank: Includes the student’s latest rank that was last posted to the transcript. Prints below
the counselor name.
o Include Detailed Attendance: Shows a single attendance grid on the report card that includes grading
period and year-to-date attendance.
o Include YTD Credit: Check to include the total year-to-date credits earned along with cumulative credits.

InformationNOW - Grading Chalkable_0328181144 InformationNOW – Grading •••• 19
o Standard Print Option: Select the manner in which standards are to display on report cards – Name,
Description or Both.
o Grading Scale to Display: Select the grading scale to print on the report card.
o Grading Scale Text: Edit the selected grading scale to print. Prints to the right of the announcements
section of the report card.
• Reports And Grade Labels:
o Numeric Grade Decimal Precision: Enter the number of digits to display for a grade after the decimal
point. For example, if a 2 is entered and a student received an 85.4129 grade, an 85.41 would display
because the Numeric Grade Decimal Precision was set to display 2 points after the decimal period on
grade reports and labels.
o Include Withdrawn Sections On Reports: Check to include sections from which students have
withdrawn on grading reports.
Depending on the GPA parameters selected, a table will be generated on the report card similar to below.
• Use Averaging Equivalent: Use the averaging equivalent rather than the actual numeric average calculated
in the Grade Book. For example, the user wishes to use the numeric grade from classroom for the 9 weeks
grades, but calculate the semester average on a different point scale. When this option is selected, the program
will reference the applicable grading scale to find the averaging equivalent when calculating an average. If not
selected, the application will use the actual numeric value of the Grade Book activities.
• Transcript Grade Display: Select to display Alpha, Numeric or Both grades on the individual student’s
transcript screen.
InformationNOW - Grading Chalkable_0328181144 InformationNOW – Grading •••• 20
• Posting Options
o Threshold for Posting: Enter the number of instructional days for which the student can be withdrawn
from the section or from school and still receive a grade.
o Post Specific Maximum Numeric Value: Allows a school to set a cap or maximum numeric grade for
posting grades from the classroom to print on report cards. For example, a student could earn a numeric
grade of 115 but the school wants a numeric maximum of 100 to post for printing on report cards and
transcripts. If the school wants to cap the maximum, check the Post Specific Maximum Numeric Value check box and enter the Maximum Post Value (i.e. 100.0000).
Importing Grades From A Serving School The ability to import report card grades, comments and notes from one school to another in the same district is available.
The most common application of this option is for a Reporting School to import (sync) grades that students have earned
at a Serving School such as a vocational or other type of Serving School. The Reporting School will then be able to print
grades on report cards and other grade reports.
Note: For the remainder of this section, the school where grades have been entered by the teacher such
as a vocational school will be referred to as the “Serving School”. The school where grades are to be
imported to print on report cards, etc. will be referred to as the “Reporting School”.
In order for the import to be successful, the following must take place:
• Reporting and Serving Schools: Students must be enrolled in class sections with the same course number
at both the Reporting School and the Serving School.
• Serving School: Report card grades must be entered/posted.
• Reporting School:
o Serving School(s) must be created.
o Graded items must be linked to items in the Serving School.
o Sections in Reporting School master schedule must be linked to sections in the Serving School.
o Grades must be synced (see “Synchronizing Grades From Serving School” beginning on page 28).
Reporting School Setup The following setup must be performed at the Reporting School (the school that is to receive grades to print on report
cards and other grade reports).
Note: Setup is school and academic session and must be performed each academic session.
Step 1: Add Serving Schools Go to School/District | School. Search for and select to View an existing reporting school. Click the Acad Sessions
tab. Click to View the academic session in which grades are to be imported.
Click the new Serving Schools tab.
Click Add to insert a record for each serving school where students are currently served and, therefore, from which the
Reporting School wishes to import grades.
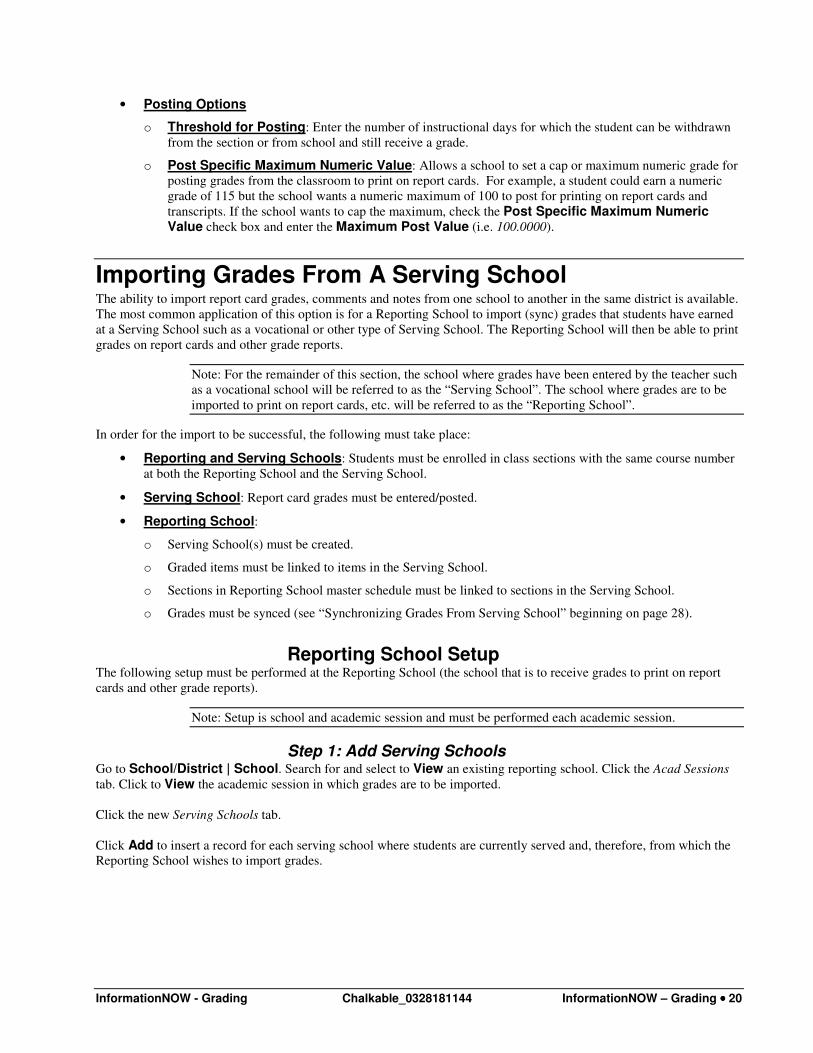
InformationNOW - Grading Chalkable_0328181144 InformationNOW – Grading •••• 21
A screen will display with the Reporting School on the left along with a list of every graded item for the Reporting
School for the selected academic session.
To the right the user may click the Serving School drop list at the top of the column and select the Serving School from
which grades are to be received. In the drop down list:
• Only active academic sessions will display.
• Only non-archived academic sessions will display.
• Only academic sessions in the same academic year as the reporting academic session will display.
• Academic sessions that already have mapped graded items with this academic session will not display.
• The user must have permission to View Academic Session in order to view the list of schools.
Note: The Serving School must be a school within the district and must exist under School/District | School.
Once the school is selected, the drop lists in the right column will be populated with every graded item for the selected
Serving School and academic session.

InformationNOW - Grading Chalkable_0328181144 InformationNOW – Grading •••• 22
For each graded item that is to be imported to the Reporting School, select the corresponding graded item from the
Serving School list across from the graded item in the Reporting School. In the above example, under Reporting School
the 1st item in the list is the Term 1, Quarter 1, Q1 (1
st 9 week) grade. It corresponds to the T1 (Term 1), Q1 (quarter 1),
9Wk1 item in the Serving School.
The following is an example of a completed screen where all graded items at the Reporting School have been mapped to
corresponding graded items in the Serving School. Only the grades that are to be imported need to be mapped. So, if the
Serving School has a grade that is NOT to be imported into the Reporting school (ex. Serving school is tracking a year-
end average that is not tracked in the Reporting School), no mapping is required.
When finished selecting all of the graded items that are to be imported from the Serving School, click Create.
The Serving School record will display with the School name and Academic Session.

InformationNOW - Grading Chalkable_0328181144 InformationNOW – Grading •••• 23
Continue adding a record for every Serving School from which grades are to be imported (synched).
Special Instructions:
• This setup is unique to the academic session and school. Therefore, it must be set up for each academic session
and school from which grades are to be imported.
• To delete a serving school record, the user must have permission to Maintain Academic Session. If the
academic session is closed, the user must have permission to Maintain Closed Academic Session.
• An error message will display if the user attempts to map a single graded item in the Serving School to multiple
graded items in the Reporting School.
• If a graded item in the Reporting School or the Serving School is later deleted, all mappings for the graded item
will be deleted.
Step 2: Linking Sections Once the Serving School is added on the Serving School tab under the Academic Session, the user must link class
sections in the Reporting School to sections in the Serving School.
In the Reporting School, go to Scheduling | Master Schedule. Search for and select to View a section that needs to
be linked to a section in the Serving School.
Click the drop down list and select the section in the Serving School that contains the student(s) who attend the Serving
School. The drop list will show the academic session name, school name and section number.
Note: Students must be enrolled in the class section in the Reporting School and also in a section with
the same course number in the Serving School.
• The Serving School must first be added to School/District | School | Acad Session tab | Serving School tab
to populate the Serving Section drop list on the class section screen.
• Only sections that have the same course number as the reporting section will be displayed.
• If the serving section is later deleted at the Serving School, it will be unlinked from the section at the Reporting
School.

InformationNOW - Grading Chalkable_0328181144 InformationNOW – Grading •••• 24
Grade Entry
Warning! Grades should only be entered using the By Student or By Group methods outlined
below if teachers do not use the InformationNOW Grade Book. If teachers use Grade Book, grades
should be entered via Grade Book and then posted to the individual student grade records. Grades
should not be entered using the By Student or By Group method as described in the following
section when Grade Book is in use because, should a teacher make a change in the Grade Book, that
change will not be made on the individual student record unless the grade is posted. If the grade is
posted, it will overwrite the grade that was entered using the method described in this section.
By Student To enter grading period grades by student, perform the following steps:
• Go to Students | Student Maintenance.
• Search for and select to View a student.
• Click the Grades link under the Manage menu at left.
• The grading period closest to the current date on the server will display automatically. If desired, click the
Grading Period drop-list, select a different grading period and then click Refresh.
• All existing courses from the student’s schedule for the selected grading period will display along with any
grades that were manually entered or posted from the teacher’s Grade Book (See the InformationNOW for
Teachers – Classroom Quick Reference Guide).
• To edit a record, place a check next to the course number and click View.
• Student Number, Name, Homeroom, Grade Level and Gender may not be edited. Section Number, Section
Name, Term, Grading Period, Period and Teacher may not be edited.
• All graded item options for the selected grading period selected will display. Enter all criteria in the fields
provided.
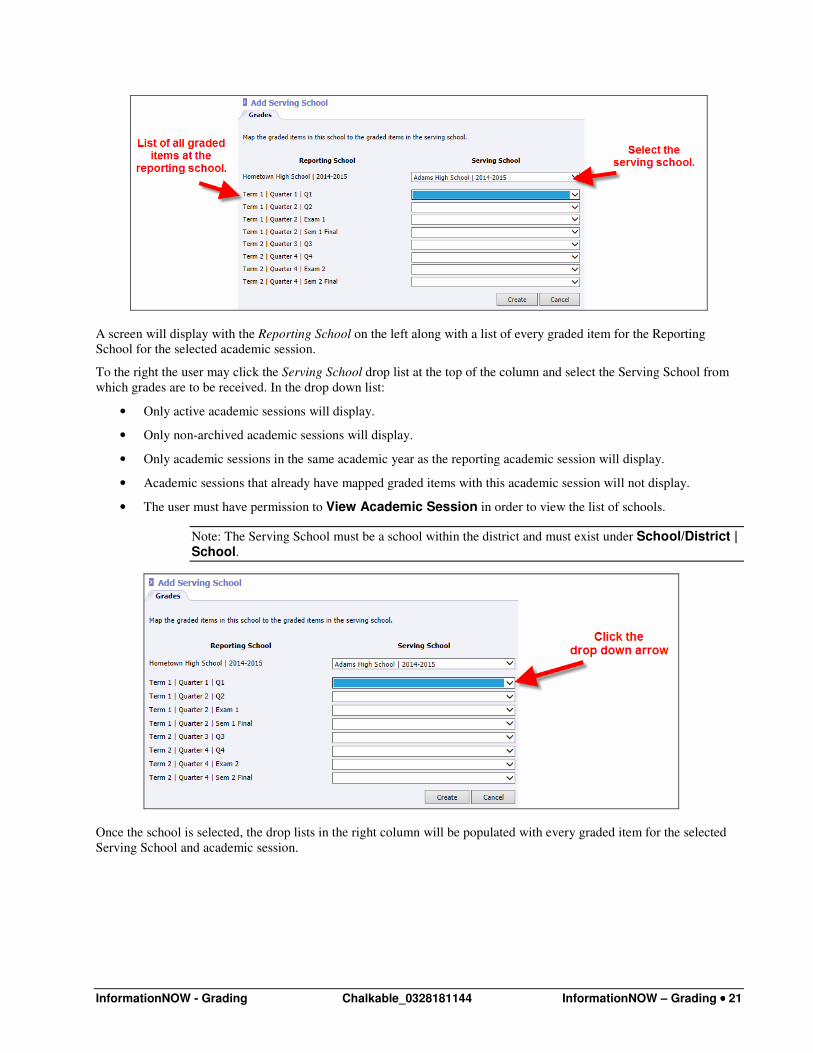
InformationNOW - Grading Chalkable_0328181144 InformationNOW – Grading •••• 25
Note: Comments may be created under Grades | Setup. See “Grading Comments” on page 3 for
more details.
• Display On Transcript: Check if this grade information for the selected course and grading period is to print
on transcript report regardless of whether it is posted to transcripts.
• Repeating Course: If the student previous failed the class and the grade record being entered is to repeat the
course.
• Note: Enter any notes pertaining to this grade record. Notes may be displayed on student report cards.
• Display Attendance: Check to view the student’s current attendance totals.
Click OK to save the record.
Note: An individual student report card may be generated from the student’s grade screen. Click the
Print Report Card option under the Reports menu at left.

InformationNOW - Grading Chalkable_0328181144 InformationNOW – Grading •••• 26
By Group To enter grades for a group of students by course, go to Grades | Grade Entry.
• Enter the search criteria to select the course for which to enter grades.
• Click Search.
• A list of courses matching the search criteria will display. To select a course either place a check next to the
Course Section and click View or click the course section number, which appears as a blue link.

InformationNOW - Grading Chalkable_0328181144 InformationNOW – Grading •••• 27
• All students scheduled into the selected course for the grading period will display, along with any grades that
were manually entered or posted from the teacher’s Grade Book (See the InformationNOW for Teachers –
Classroom Grade Book Quick Reference Guide).
• To modify a student’s grade, either place a check next to the student number and click View or click the student
number, which appears as a blue link.
Student Number, Name, Homeroom, Grade Level and Gender may not be edited. Section Number,
Section Name, Term, Grading Period, Period, and Teacher may not be edited.
• All graded item options for the selected grading period selected will display. Enter all criteria in the fields
provided.
Note: Comments may be created under Grades | Setup. See “Grading Comments” on page 3 for
more details.
• Display On Transcript: Check if this grade information for the selected course and grading period is to print
on transcript report regardless of whether it is posted to transcripts.

InformationNOW - Grading Chalkable_0328181144 InformationNOW – Grading •••• 28
• Repeating Course: Check this box if the student previously failed the class and the grade record being
entered is for the student’s repeat of the course.
• Note: Enter any notes pertaining to this grade record. Notes may be displayed on student report cards.
• Display Attendance: Check to view the student’s current attendance totals.
• Click OK to save the record.
Synchronizing Grades From Serving School Once grades have been entered for the students at the Serving School(s) they may be synced (imported) at the Reporting
School. Go to Mgmt Console | Console. Select the Synchronize Grades option under the Serving Schools section.
Note: It is not necessary to sync grades to be printed on the comprehensive progress report. Grades
from a serving school will automatically be included on the comprehensive progress report if the user
selects the Linked Course Grades option when printing.
Select the grading period for which grades are to synced (imported) into the Reporting School.

InformationNOW - Grading Chalkable_0328181144 InformationNOW – Grading •••• 29
• Click Show Errors to view potential errors without importing grades.
• Click any blue hyperlinks to view details regarding the error(s).
• Click the Sync button to synchronize grades from the Serving School to the Reporting School.
o The total number of sections that are linked to a Serving School will be displayed at the top of the page.
o The total number of synchronized grades and comments will be displayed at the top of the page. Only
affected records will be counted. A record that was previously synchronized will not be counted.
o The user must have permission to Maintain Grading to synchronize grades.
Reports All reports pertaining to grades may be generated under the Grades | Reports menu or under the main Reports menu.
Required fields are indicated with an asterisk (*).
Note: An option is available to the Grades | Setup | Settings tab which allows users to select to
Include Withdrawn Sections on Reports. Sections from which a student has been withdrawn will print
with an asterisk (*). A key will print on the report indicating that an * = Withdrawn. If selected,
sections from which students have been withdrawn will print on the following reports. This is a per
school setting.
Class Rank To calculate GPA’s and generate a list of students by class ranking based on this GPA, go to Grades | Reports | Class Rank.

InformationNOW - Grading Chalkable_0328181144 InformationNOW – Grading •••• 30
• Student Filter: To generate the report for a select group of students, select the filter. For more details
regarding filters, please refer to the InformationNOW – Filters Quick Reference Guide.
• *GPA Method: Select the GPA method to be used when calculating class rank.
• *Decimal Precision. Enter the number of decimal places to be considered when calculating GPA’s for the
purpose of class rank.
• *ID To Print: Select the Student ID to be printed on the report (Student Number, State ID Number, Alt. Student
Number, Soc. Sec. Num., None).
• *Order By: Select the order in which the display the students - Student Display Name or Rank.
• GPA Range: Enter the High and Low GPA Range to be included in class rank. For example, to print a
standard based GPA report for students of GPA’s from 3.5 to 4.0, enter a 4.0 in the high field and a 3.5 in the
low field. All students with a GPA of 3.5 to 4.0 will be included in the class rank report.
• Ranking Type: Logical/Sequential:
o Logical: Example: If three students tie for 2nd
in class ranking, the students will all be ranked 2nd
and the
next student on the list will be ranked 5th
.
o Sequential: Example: If three students tie for 2nd
in class ranking, the students will all be ranked 2nd
and
the next student on the list will be ranked 3rd
.
• Academic Session: Select the academic session(s) for which rank is to be calculated. Use Ctrl+click or
Shift+click to select more than one academic session.
• Classes To Include: Select whether to include All classes, all terms or All classes in terms that award credit.
• Min Grade Level: Select the minimum grade level to be included in the calculation of class rank.
• Add Unearned Grade Points: Check if seeking a cumulative GPA and the current term has not yet been
posted to transcripts, but all grades are to be included in the cumulative GPA calculation/rank.
• Other Options:
o Use Weighted GPA: Check if student’s weighted GPA is to be used instead of the un-weighted GPA.
InformationNOW - Grading Chalkable_0328181144 InformationNOW – Grading •••• 31
o Use Total Grade Points Only: Check if the GPA to determine class rank is to be based on the number
of classes taken regardless of the credit issue for each course. Students will be ranked based on the total
number of quality points only. Credit will not be considered.
o GPA Information: Check to display the student’s GPA that was used to calculate class rank in addition to
the student name on the report.
o Withdrawn Students: Check if students who are currently withdrawn are to be included in the ranking.
o Graduation Credits: Select to include the student’s current graduation credit total.
• Format: Select the format of the report from the available list (Acrobat (PDF file), CSV (comma delimited),
Excel, HTML, TIFF file or XML file with report data).
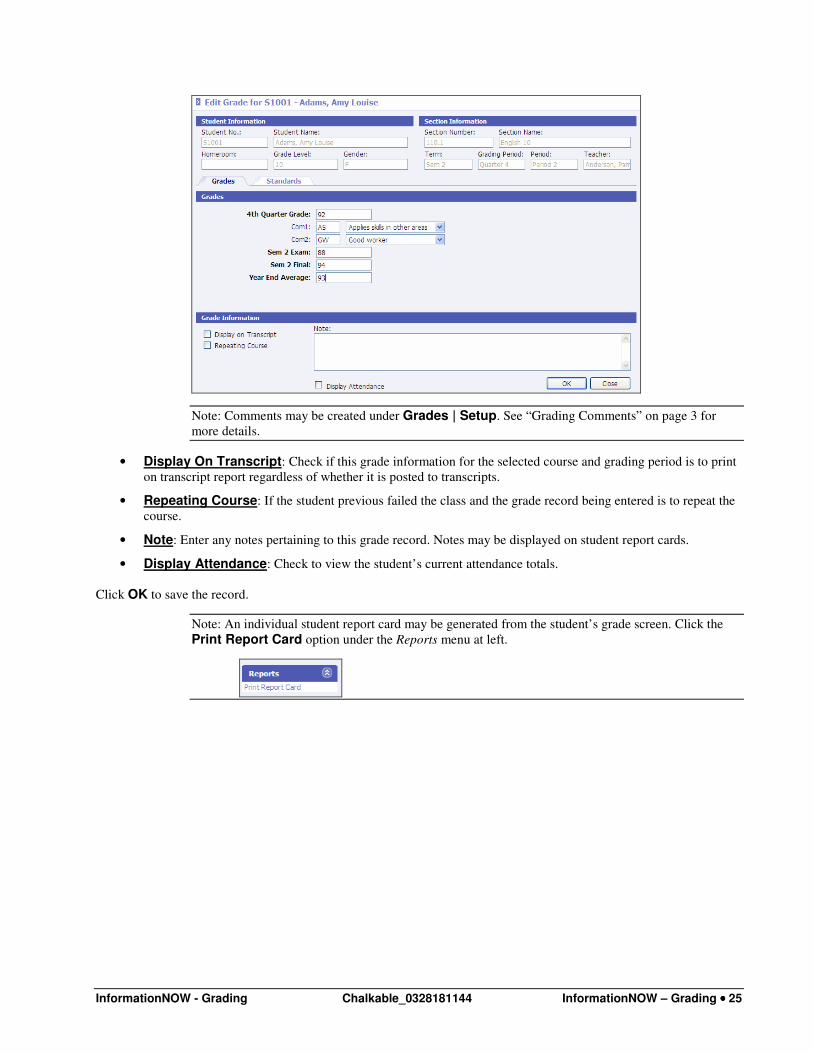
Failure Listing To generate a list of students with one or more failing grades, go to Grades | Reports | Failure Listing.
• Start Section/End Section: To generate a listing of students for a range of course section(s), click the Find
link to search for the beginning section number. Next, click the Find link to search for the ending section
number.
• Start Section Short Name/End Section Short Name: To generate a listing of students for a range of
course names (ex. English 9 to English 10), enter the first section short name in the start field (ex. English 9).
Enter the ending section short name in the field provided.
• Teacher Filter: To generate the report for a select group or individual teacher, select the filter from the
available list. For more details regarding teacher filters, refer to the InformationNOW – Filters Quick Reference
Guide.
• Student Filter: To generate the report for a select group or individual student, select the filter from the
available list. For more details regarding student filters, refer to the InformationNOW – Filters Quick Reference
Guide.

InformationNOW - Grading Chalkable_0328181144 InformationNOW – Grading •••• 32
• *Group By: Select to group students on the report by Primary Teacher Display Name, Course Section, Student
Display Name, Student Grade Level, Student Homeroom or Course Name.
• Minimum Occurrences: Enter the minimum occurrences of the grade that the student must have in order to
be included on the report. For example, to obtain a list of students who have 1 or more failing grades, enter a 1.
• Heading: Enter a unique heading to print at the top of the report (ex. More than 2 F’s – 3rd
Quarter).
• *Grades To Include: Select one failing grade or use Ctrl+click or Shift+click options to select more than one
grade to be considered as failing grades.
• *Grading Period: Select the grading period for which to check for failing grades. Use Ctrl+click or
Shift+click to select multiple grading periods.
• *Graded Items: Select the graded items to be checked for failing grades. Use Ctrl+click or Shift+click to
select multiple graded items.
• Required Courses Only: Select to only check the grades for courses that are marked as required to
determine whether a student qualifies for a failing grade.
• Withdrawn Student: Check to include currently withdrawn students on the report.
• *Course Types: Select the course type(s) to be included when determining if the student has a failing grade.
• *ID To Print: Select Student ID, State Student ID, Alternate Student ID, Social Security Number or None.
• Format: Select the format of the report from the available list (Acrobat (PDF file), CSV (comma delimited),
Excel, HTML, TIFF file or XML file with report data).
Grade Distribution To print a report showing the distribution of grades (ex. how many A’s were issues, how many B’s, etc.), go to Grades | Reports | Grade Distribution.
• Student Filter: To generate the report for a select group or individual student, select the filter from the
available list. For more details regarding student filters, refer to the InformationNOW – Filters Quick Reference
Guide.

InformationNOW - Grading Chalkable_0328181144 InformationNOW – Grading •••• 33
• Teacher Filter; To generate the report for a select group or individual teacher, select the filter from the
available list. For more details regarding teacher filters, refer to the InformationNOW – Filters Quick Reference
Guide.
• Start Section/End Section: To generate a listing of students for a range of course section(s), click the Find
link to search for the beginning section number. Next, click the Find link to search for the ending section
number.
• *Course Types: Select the type(s) to be included.
• *Grading Periods: Select the grading period for which to print from the available list.
• Graded Items: Select the item(s) to be included.
• Start Section Name/End Section Name: To generate a listing of students for a range of course names (ex.
English 9 to English 10), enter the first section short name in the start field (ex. English 9). Enter the ending
section short name in the field provided.
• *Report Type: Select to print summary or detail.
• *Group By: Select the grouping of No Group (alphabetical), Course Type or Teacher.
• Withdrawn Students: Check to include currently withdrawn students even if the selected filter is not set up
to include withdrawn.
• Additional Teachers: Select to include additional teacher information on the report.
• Percentages: Select to include student percentages on the report.
• Breakdowns: Select to include additional grade distribution breakdown by student’s Gender, Economic status
(lunch code), Racial code (race) and/or Grade Level.
• Format: Select the format of the report from the available list (Acrobat (PDF file), CSV (comma delimited),
Excel, HTML, TIFF file or XML file with report data).
Grade Label To print a grade label, go to Reports | School or to Grades | Reports.

InformationNOW - Grading Chalkable_0328181144 InformationNOW – Grading •••• 34
• Grading Period: Select the grading period(s) for which to print.
• Label Size: Select to print the desired size.
• Number To Skip: If printing on a partially used sheet of labels, enter the number of label spaces to skip at the
top.
• Number of Copies: Enter the number of labels to print.
• Graded Items: Select the graded item(s) to be included.
• Name Format: Select the format of the name to print.
• ID To Print: Select the student ID to print.
• Order By: Select the order in which to print the labels.
• Class Graduation Credit: Select to include the potential total graduation credit.
• Cumulative Graduation Credit: Select to include the student’s earned graduation credit.
• Class Rank Information: Select to include student’s class rank.
• Grade Format: Select to print Alpha, Numeric or Both.
• Cumulative GPA: Select to include the student’s total cumulative GPA.
• Withdrawn Students: Select to print for currently withdrawn students.
• Promotion Status: Select to include student’s promotion status (Promoted, Retained).
• Attendance Information: Select to include student’s attendance detail.
Grade Verification Report To print a Grade Verification report, go to Reports | School or to Grades | Reports.

InformationNOW - Grading Chalkable_0328181144 InformationNOW – Grading •••• 35
• Start Section: Click Find to select the starting section number. If no number is selected, all sections will be
included.
• End Section: Click Find to select the ending section number. If no number is selected, all sections will be
included.
• Start Section Name: Enter a beginning short name to be included on the report. For example, type eng to
print for all courses that have a Short Name beginning with the letters eng.
• End Section Name: Enter an ending short name to be included on the report.
• Grading Period: Select the grading period(s) to include on the report or ---All---.
• Graded Item: Select the graded item(s) to include on the report or ---All---. Note: After a grading period has
been selected, this list will be filtered to the graded items for the selected grading period. If the user selects to
print all grading periods, all graded items will display.
• Teacher: To print for one teacher, click Find. Search for and select the teacher for which to print. If no teacher
is selected, the report will print for all teachers.
• Staff Filter: To print for a select group of teachers, click to bullet Staff Filter and then select the filter from the
available list. If blank, the report will print for all teachers.
• Section Order: Select to order sections by:
o Section No.: Sort ascending by full section number.
o Period/Section No.: Sort ascending by period; then full section number.
o Period/Teacher: Sort ascending by period; then teacher Last Name, First Name.
o Teacher/Section No.: Sort ascending by teacher Last Name, First Name, and then full Section Number.
o Teacher/Period: Sort ascending by teacher Last Name, First Name, and then Period.
• Student Order: Select to order students by Display Name, Grade Level or the selected ID To Print.
• Grade Type: Select to print grade types of Alpha, Numeric or Both.
• ID to Print: Select to print Alternate Student Number, Social Security Number, State ID Number or Student
Number.
• Include: Check to include:
o Comments/Legend: If selected, graded item comments will print along with a comment legend at the
bottom of the document. If printing for multiple grading periods, only the comments from the latest grading
period will print.
o Notes: If selected, student grading period note will print.
o Signature: If selected, a signature line will print.
o Withdrawn: If selected, currently withdrawn students will be included. Withdrawn students will be
indicated with an asterisk (*) at the end of the student name.

InformationNOW - Grading Chalkable_0328181144 InformationNOW – Grading •••• 36
Honor Roll To generate an Honor Roll based on the number of grades earned for a selected grading period, go to Grades | Reports | Honor Roll.
• Student Filter: To generate the report for a select group or individual student, select the filter from the
available list. For more details regarding student filters, refer to the InformationNOW – Filters Quick Reference
Guide.
• *Grading Period: Select the grading period for which to determine the Honor Roll.
• Maximum Allowed Absences: If attendance is to be considered when determining if a student makes the
Honor Roll, enter the maximum number of allowable absences.
o *Minimum For Alpha Grade: For each graded item, enter the minimum number of grades the student
may have for each alpha grade. For example, if generating a high honor report and a student may have one
A- and still make the Honor Roll, enter a 1 in the A- field. Students with more than one A- will not make
the Honor Roll. Enter a zero to indicate that the number of a specific grade that a student has should not
affect the report. Leaving a field blank indicates that they student may not have ANY of the specific grade
to be included on the report. For example, for an A/B honor roll, enter 0’s in the A/B fields to indicate that
the students can have any number of A’s and B’s to be included on the report, and leave the rest of the
fields blank to indicate that the student may not have any of the other grades to be included.
• *Order By: Select the order in which to print the students - Grade Level, Homeroom or Student Display Name.
• Include:
o Grades Earned: Check to print the student along with all grades earned for the selected grading period.
o Student Names Only: Check to print only the student’s name, excluding Student Number, Homeroom,
Grade Level, Phone and Guardian names.
o Honor Roll Classes Only: In the Master Schedule, courses may be marked as counting towards Honor
Roll. When generating the Honor Roll report, check this box to only consider these courses marked as
Honor Roll courses. When calculating if a student should be on the Honor Roll, grades they have received
for classes that are not marked as Honor Roll will not be taken into consideration.
o Unlisted Information: Check to include the student’s phone number even if it is marked as unlisted.
InformationNOW - Grading Chalkable_0328181144 InformationNOW – Grading •••• 37
o Header: Enter a unique heading that will print at the top of the report (Ex. High Honor Roll, Honor Roll,
Honorable Mention).
• Format: Select the format of the report from the available list (Acrobat (PDF file), CSV (comma delimited),
Excel, HTML, TIFF file or XML file with report data).
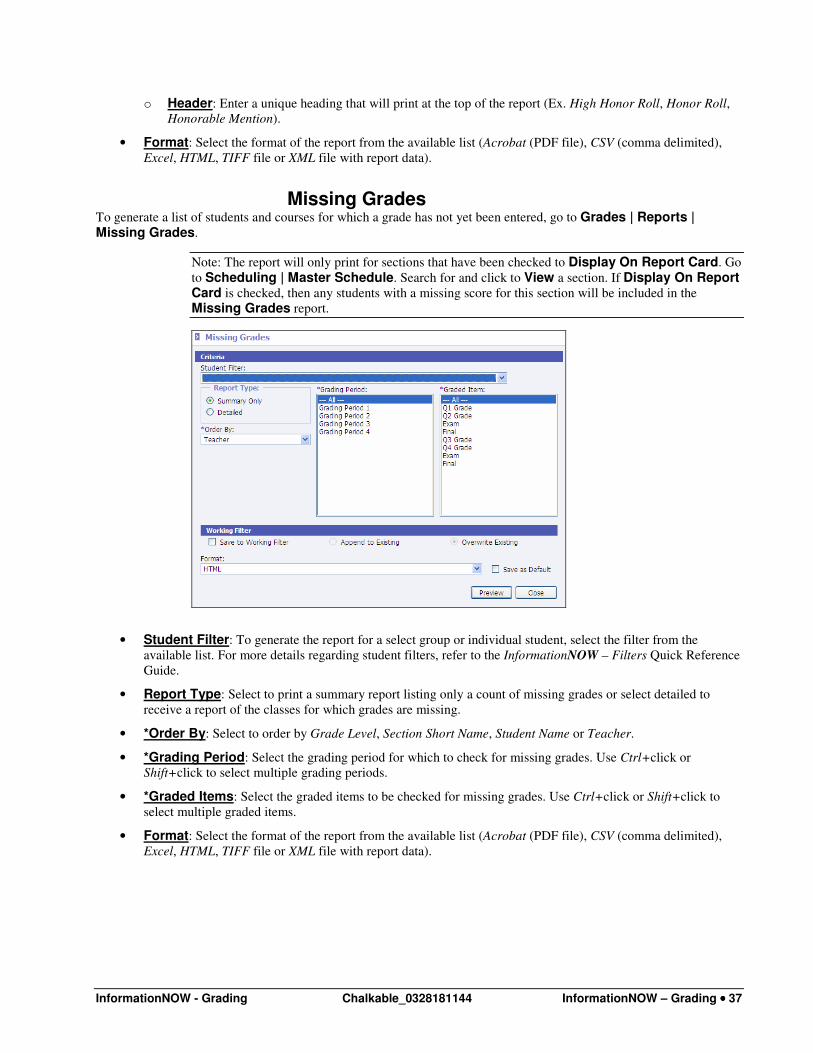
Missing Grades To generate a list of students and courses for which a grade has not yet been entered, go to Grades | Reports | Missing Grades.
Note: The report will only print for sections that have been checked to Display On Report Card. Go
to Scheduling | Master Schedule. Search for and click to View a section. If Display On Report Card is checked, then any students with a missing score for this section will be included in the
Missing Grades report.
• Student Filter: To generate the report for a select group or individual student, select the filter from the
available list. For more details regarding student filters, refer to the InformationNOW – Filters Quick Reference
Guide.
• Report Type: Select to print a summary report listing only a count of missing grades or select detailed to
receive a report of the classes for which grades are missing.
• *Order By: Select to order by Grade Level, Section Short Name, Student Name or Teacher.
• *Grading Period: Select the grading period for which to check for missing grades. Use Ctrl+click or
Shift+click to select multiple grading periods.
• *Graded Items: Select the graded items to be checked for missing grades. Use Ctrl+click or Shift+click to
select multiple graded items.
• Format: Select the format of the report from the available list (Acrobat (PDF file), CSV (comma delimited),
Excel, HTML, TIFF file or XML file with report data).

InformationNOW - Grading Chalkable_0328181144 InformationNOW – Grading •••• 38
Portrait Style Report Card To print a portrait style report card, go to Grades | Reports | Portrait Report Card.
• Grading Period: Select the grading period for which to print.
• Order By: Select the order to print. If printing by distribution period, select the Distribution Period of the day
and Distribution Date to use to determine order of printing.
• Heading: Enter the custom header to print at the top of the report.
• Go Green: Select this option to not print a hard copy of the report card for any student/guardian (contact) who
has elected to Go Green. An alert will be created instead which can be used to generate an e-mail to the
student/contact to let them know the report is available for viewing via the home portal.
• Letterhead: Check to move the printing down on the report card to allow for printing on letterhead.
• ID To Print: Select which ID to include on the report.
• Absence Reasons: Select the code(s) to be included if printing attendance information on the report.
• Address Report To: Select the group for which to print.
• Attendance Summary: Select to include the attendance information on the report.
• Grading Period Notes: Select to include the notes that were entered on the grading period on the report.
• Parent Signature: Select to include a parent signature line.
• Merit/Demerit Summary: Select to include student’s merit and demerit totals.
• Grading Scale Legend: Select to include the grading scale.
• Withdrawn Students: Select to include currently withdrawn students when printing.
• YTD Info: Select to include student’s year-to-date GPA details.
• Standards Grading Scale Legend: Select to include the standards based grading scale.

InformationNOW - Grading Chalkable_0328181144 InformationNOW – Grading •••• 39
• Announcements: Select to include the grading period announcement.
• Promotion Status: Check to include the student’s current promotion status.
• Comment: Select to include the comment entered on the grading period grade.
• Standards: Select to include the student’s standard marks.
Report Card To generate traditional report cards (i.e., non skill-based report cards), go to Grades | Reports | Report Card.
• Student Filter: To generate the report for a select group or individual student, select the filter from the
available list. For student filter details, refer to the InformationNOW – Filters Quick Reference Guide.
• *Grading Period: Select the grading period for which to print report cards.
• Order By: Select to order the printing of report cards by Distribution Period, Grade Level, Postal Code,
Student Homeroom, Student Name or Student Number. If selecting Distribution Period, select the period of day
and enter the date for which to print. Student report cards will be grouped together by course for the selected
period and date. When printing from either the Students | Reports location, the student Maintenance screen
or from the Grade Book, users do not have the option to print in Distribution Period order.
• ID to Print: Select the student identifier to print (Student Number, State ID Number, Alternate Student Number,
Social Security Number or None).
• Show Grades Across The Page: Select to print all grades received for a course in one row.
• Show Grades Down The Page: Select to print all grades together for each grading period.
• Absence Reasons: If including attendance information on the report card, select the absence reasons to be
included in the attendance totals.
• Address Report To: Select to print for students, custodians or all contacts.
• Form: To print on preprinted form purchased from Chalkable, select the form from the available list.

InformationNOW - Grading Chalkable_0328181144 InformationNOW – Grading •••• 40
• Go Green: Select this option to not print a hard copy of the report card for any student/guardian (contact) who
has elected to Go Green. An alert will be created instead which can be used to generate an e-mail to the
student/contact to let them know the report is available for viewing via the home portal.
• Letterhead: If selected, the report will print two inches lower on the page for each student/contact. The report
will also no longer print the School Name and Address, allowing for the school to print on a piece of letterhead
with the preprinted address and school name.
• Heading: Enter the heading to print at the top of each student’s address (Ex. To The Guardian Of:).
• Attendance:
o PTD Daily Att: Check to include all daily records (Tardy, Half-day or All-day) that have been entered to
date for the selected grading period.
o Period Att: Check to include student’s Period Attendance (i.e., how many times the student missed 1st
period of the day, 2nd
period of the day, etc.).
• Options:
o Print Credit: Check to print the credit awarded to the student for the course.
o Promotion Status: Select to include the student’s current promotion status from the selected term on the
label. In order for promotion status to print, grades must be posted to transcripts. The promotion status pulls
from the transcript record for the selected grading period to print. Promotion statuses include:
� D = Demoted
� E = Enrolled
� G = Graduated
� M = Promoted Mid-Year
� P = Promoted
� R = Retained
� W = Withdrawn
o Picture: Check to include student’s picture, if on file.
o Notes: Check to include notes that were entered on the student’s grade record.
o Display YTD Info: Check to include the grades from a previous grading period.
Note: Graded items must be checked to be included in subsequent report cards. See the bulleted item
“Include on Yearly Report Card” on page 6.
o Parent Signature: Check to include a parent signature line.
o Additional Mailing: Check to print additional copies of the student’s report card for the student contacts
who are marked as Receives Mailings.
o Withdrawn Students: Check to print report cards for students who are currently withdrawn.
Two Column Report Card To generate a two-column traditional report cards (i.e., non skill-based report cards), go to Grades | Reports | Two Column Report Card. This report may also be accessed under:
• Students | Reports
• Students | Student Maintenance: Search for and select to View the student. Select the Two Column Report
Card option under the Reports menu on the left.
• Reports | Two Column Report Card
InformationNOW - Grading Chalkable_0328181144 InformationNOW – Grading •••• 41
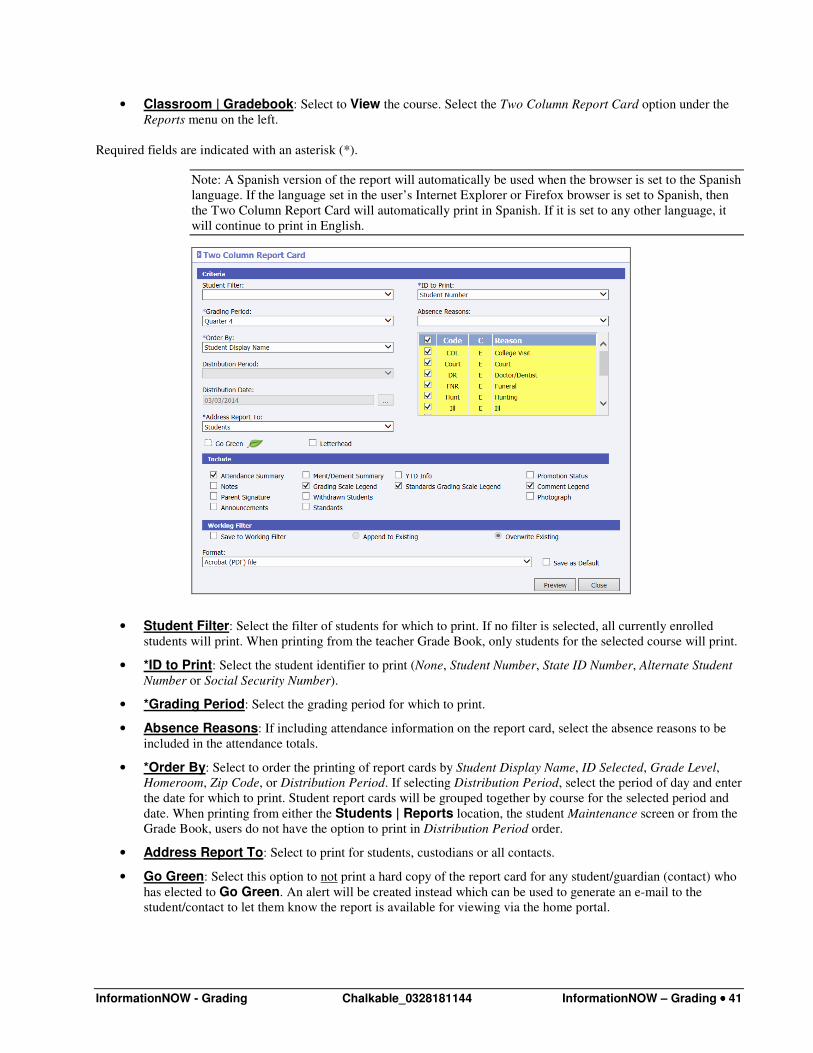
• Classroom | Gradebook: Select to View the course. Select the Two Column Report Card option under the
Reports menu on the left.
Required fields are indicated with an asterisk (*).
Note: A Spanish version of the report will automatically be used when the browser is set to the Spanish
language. If the language set in the user’s Internet Explorer or Firefox browser is set to Spanish, then
the Two Column Report Card will automatically print in Spanish. If it is set to any other language, it
will continue to print in English.
• Student Filter: Select the filter of students for which to print. If no filter is selected, all currently enrolled
students will print. When printing from the teacher Grade Book, only students for the selected course will print.
• *ID to Print: Select the student identifier to print (None, Student Number, State ID Number, Alternate Student
Number or Social Security Number).
• *Grading Period: Select the grading period for which to print.
• Absence Reasons: If including attendance information on the report card, select the absence reasons to be
included in the attendance totals.
• *Order By: Select to order the printing of report cards by Student Display Name, ID Selected, Grade Level,
Homeroom, Zip Code, or Distribution Period. If selecting Distribution Period, select the period of day and enter
the date for which to print. Student report cards will be grouped together by course for the selected period and
date. When printing from either the Students | Reports location, the student Maintenance screen or from the
Grade Book, users do not have the option to print in Distribution Period order.
• Address Report To: Select to print for students, custodians or all contacts.
• Go Green: Select this option to not print a hard copy of the report card for any student/guardian (contact) who
has elected to Go Green. An alert will be created instead which can be used to generate an e-mail to the
student/contact to let them know the report is available for viewing via the home portal.

InformationNOW - Grading Chalkable_0328181144 InformationNOW – Grading •••• 42
• Letterhead: If selected, the report will print two inches lower on the page for each student/contact. The report
will also no longer print the School Name and Address, allowing for the school to print on a piece of letterhead
with the preprinted address and school name.
• Attendance Summary: Check to include an attendance summary. Attendance will be included for the
selected absence reasons. The attendance section will include the following based on the absence reason codes
selected:
o Total Days Enrolled
o Total Days Present
o Days Absent
o Excused Days Absent
o Unexcused Days Absent
o Times Tardy
o Excused Tardies
o Unexcused Tardies
• Notes: Check to include the notes entered on the student posted grades. Only notes for the selected grading
period will print.
• Parent Signature: Check to include a parent signature line on the report card.
• Announcements: Check to include the announcements entered on the selected grading period.
• Merit/Demerit Summary: Select to include a summary of the student’s merits and demerits based on the
student’s discipline and commendation views.
• Grading Scale Legend: Check to include the grading scale legend based on grading scales assigned to the
course. Student’s schedule may contain sections with different grading scales. The report will print all grading
scales for the student in the Grading Scale Legend in descending order by max score/range value.
• Withdrawn Students: Check to include currently withdrawn students when printing.
• Standards: Check to include standard marks on the report card.
• YTD Info: Check to include previous grading period grades along with the selected grading period. The report
will display up to the last four grading periods due to space availability.
• Standards Grading Scale Legend: Check to include a legend for the standard grading scale if selecting to
print Standards. Student’s schedule may contain sections with different standard grading scales The report will
print all standard grading scales for the student in the Standards Grading Scale Legend in descending order by
max score/range value.
• Withdrawn Sections: Check to include marks for course sections from which the student has previously
withdrawn during the selected academic session. An asterisk (*) will appear next to the student name.
• Promotion Status: Check to include the student’s current promotion status.
• Comment Legend: Check to include a legend of descriptions for the comments assigned to the student grade
records.
• Photograph: Check to include the student’s photo if on file.
Unposted Grades & Grade Book Use Generate a report that displays a list of users who have not posted grades for a selected grading period or for any section
that does not have activities in the gradebook for the selected date range with scores will be included in the report.
For the Unposted Grades report, select from the following:

InformationNOW - Grading Chalkable_0328181144 InformationNOW – Grading •••• 43
• Grading Period: The grading period for which to check to see if teachers have yet posted their grades.
• Posted By: The date to check to see if grades were posted by.
• Sort By: Choose to sort by Teacher Display Name, Section Number, Section Name or Period.
For the Grade Book Use report, select from the following:
• Start/End Date: The date range to use when determining grade book use. If left blank, it will use the starting
and ending dates of the current academic session.
• Staff Filter: To filter the report to a subset of staff, select the filter from the list.
• Sort By: Choose to sort by Teacher Display Name, Section Number, Section Name or Period.
Worksheet Report The Worksheet Report allows a teacher, or an administrator with appropriate rights, to print a worksheet for a specific
date range, with specific activities, with or without grades/scores. It also allows the teacher to print either the student
names or student numbers (for example, to print grades on a particular activity). Blank columns may also be added.
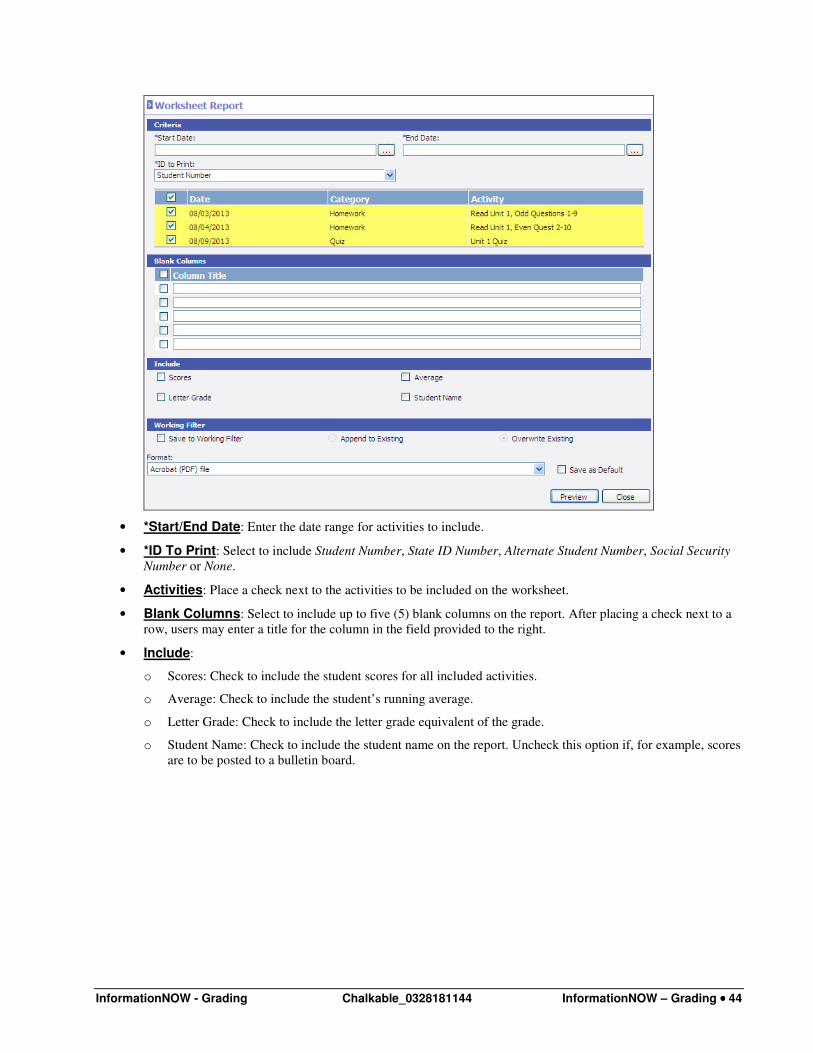
InformationNOW - Grading Chalkable_0328181144 InformationNOW – Grading •••• 44
• *Start/End Date: Enter the date range for activities to include.
• *ID To Print: Select to include Student Number, State ID Number, Alternate Student Number, Social Security
Number or None.
• Activities: Place a check next to the activities to be included on the worksheet.
• Blank Columns: Select to include up to five (5) blank columns on the report. After placing a check next to a
row, users may enter a title for the column in the field provided to the right.
• Include:
o Scores: Check to include the student scores for all included activities.
o Average: Check to include the student’s running average.
o Letter Grade: Check to include the letter grade equivalent of the grade.
o Student Name: Check to include the student name on the report. Uncheck this option if, for example, scores
are to be posted to a bulletin board.