Embed Size (px)
Citation preview
Infinity Connect Web AppCustomization Guide
ContentsIntroduction 1Creating and uploading a branding package 2Editing an existing branding package 4Removing a branding package (revert to default branding) 5Advanced Infinity Connect web app customization 6
IntroductionThe Infinity Connect web app is automatically available as part of all Pexip Infinity deployments. It provides a WebRTC interface to Pexip Infinity conferencing services. Browsers that are not WebRTC-compatible use a Flash-based interface to the legacy version of the app.
The standard Infinity Connect web app uses a range of default graphics and colors. However, you can customize all text, color, and image elements to provide a branded experience. To do this you must create and then upload a branding package to the Management Node.
Branding customizations that are applied via the Management Node will persist over upgrades to subsequent versions of Pexip Infinity software (although you may need to adapt the customization to cater for any new features when upgrading to a new major release).
The procedures described here apply a generic customization for all web app users. If you have specific customization requirements, such as hosting multiple different branding customizations under different URLs on external web servers or reverse proxies, see Advanced Infinity Connect web app customization.
The following instructions describe how to create and upload, edit and remove a branding package.
© 2018 Pexip AS Version 18.a May 2018 Page 1 of 24

Infinity Connect Web App Customization Guide Creating and uploading a branding package
© 2018 Pexip AS Version 18.a May 2018 Page 2 of 24
Creating and uploading a branding packageYou must first create a branding package before you can upload it to the Management Node.
There are two main ways to create a branding package for the Infinity Connect web app:
l via the Pexip branding portal (https://branding.pexip.com)
l manual configuration of the default branding files after downloading them from the Management Node
Note that both methods use the same set of configuration files — you can use the branding portal to apply your basic customization requirements and then make further manual amendments to the configuration files if necessary.
Creating a branding package via the Pexip branding portalYou can use the Pexip branding portal to customize your web app. This web-based tool guides you through the selection of your image files and colors without having to edit individual CSS files etc, and then generates the customized branding package for you. The portal also lets you go back and modify existing branding packages and share your branding with colleagues from your organization.
Currently, the branding portal can only be used to create a branding package for the legacy web app. Support for the next-generation web app will be added soon.
At the time of writing, the branding portal can only be used to create a branding package for the legacy web app. For up-to-date information, see https://docs.pexip.com/admin/customize_webapp.htm.
To use the Pexip branding portal to generate your branding package for the legacy web app:
1. Go to the Pexip branding portal (https://branding.pexip.com/) and sign in.First time users need to register before they can use the portal.
2. From here you can choose to add a new customization (branding package), or edit an existing customization that you or somebody else in your organization has previously created.
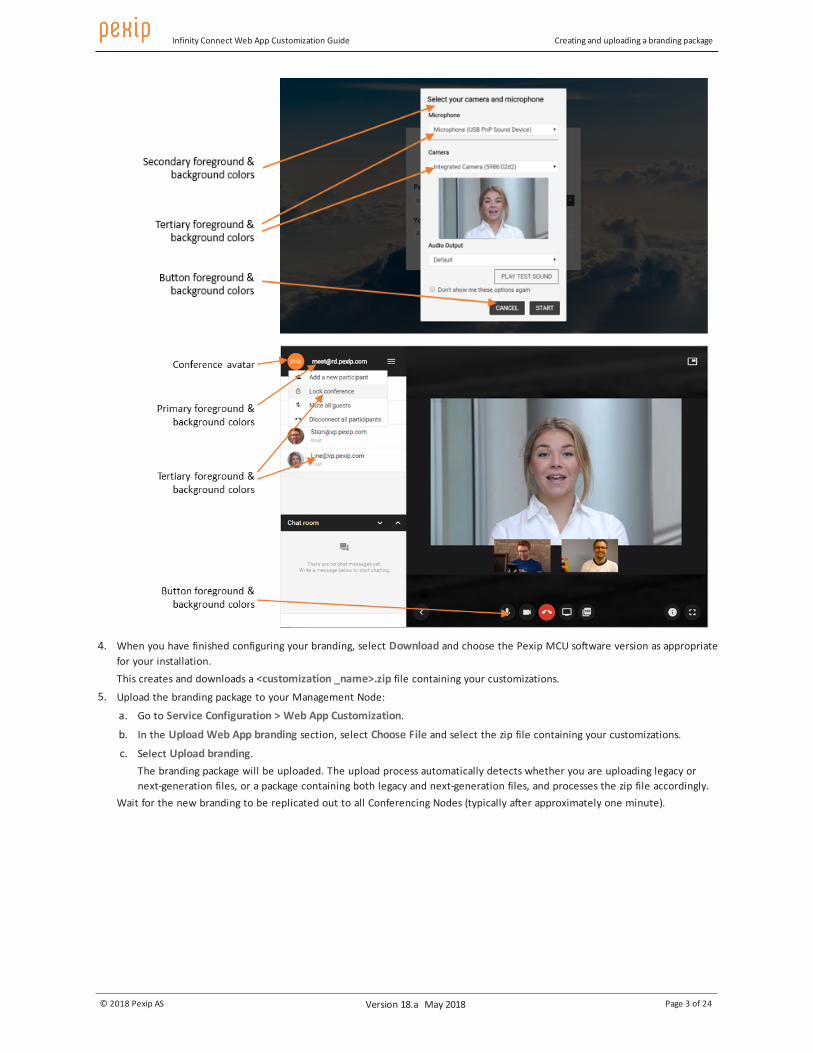
3. Configure your customization as required, selecting the relevant image files, colors and languages.Note that you can use the Preview option to see how the web app home page would look with your branding applied.The following screenshots show the default branding and indicate which elements of the legacy web app are controlled by the various image and color options presented in the branding portal.
Infinity Connect Web App Customization Guide Creating and uploading a branding package
© 2018 Pexip AS Version 18.a May 2018 Page 3 of 24
4. When you have finished configuring your branding, select Download and choose the Pexip MCU software version as appropriate for your installation.This creates and downloads a <customization _name>.zip file containing your customizations.
5. Upload the branding package to your Management Node:
a. Go to Service Configuration > Web App Customization.
b. In the Upload Web App branding section, select Choose File and select the zip file containing your customizations.
c. Select Upload branding.The branding package will be uploaded. The upload process automatically detects whether you are uploading legacy or next-generation files, or a package containing both legacy and next-generation files, and processes the zip file accordingly.
Wait for the new branding to be replicated out to all Conferencing Nodes (typically after approximately one minute).
Infinity Connect Web App Customization Guide Editing an existing branding package
© 2018 Pexip AS Version 18.a May 2018 Page 4 of 24
Manually configuring the branding filesManual configuration is useful if you have very specific modifications that you want to apply to the branding files, or if you want to add a language that is not available on the branding portal. Note that manual configuration requires knowledge of core web-design technologies such as HTML, JavaScript and CSS.
To manually configure the branding files:
1. Download the default web app branding files from the Management Node:
a. Go to Service Configuration > Web App Customization.
b. Select Download (next to the Download default branding label). This downloads a branding_nextgen_and_legacy_default.zip file to your local file system.
Note that if you have existing branding files uploaded, you can choose to download those instead of the default files. 2. Unpack the downloaded file and apply your modifications to the relevant files.
The contents of the branding files and how to modify them is fully described in Advanced Infinity Connect web app customization.
3. Repackage your branding files into a single .ZIP file (<name>.zip).The zip file does not have to contain the complete set of branding files. You can upload a subset of the branding files, but you must retain the original file/folder structure in the rebuilt zip file. For example, if you are only customizing the next-generation web app files you only need to zip up the webapp2 folder.Note that if you are customizing the legacy web app and want to change the background.jpg or logo.png graphics files, you must also include a brand.css file that at least includes the references (brand-logo and brand-background classes) to those customized images.
4. Upload the branding package to your Management Node:
a. Go to Service Configuration > Web App Customization.
b. In the Upload Web App branding section, select Choose File and select the zip file containing your customizations.
c. Select Upload branding.The branding package will be uploaded. The upload process automatically detects whether you are uploading legacy or next-generation files, or a package containing both legacy and next-generation files, and processes the zip file accordingly.
Wait for the new branding to be replicated out to all Conferencing Nodes (typically after approximately one minute).
You can now test the branding by dialing in to one of your Pexip Infinity services via the Infinity Connect web app.
Editing an existing branding packageYou can modify an existing branding package by either returning to the Pexip branding portal, or manually editing the branding files that were uploaded previously to the Management Node.
Note that when you upload to the Management Node a new branding package for the legacy web app, all of the previously uploaded legacy web app branding files are deleted and replaced with the new set of files. Similarly, when uploading a new next-generation web app branding package, it replaces all of the previously uploaded next-generation web app branding files.
Using the branding portalIf you initially created your branding package via the Pexip branding portal, you can return to the portal and change those files:
1. Go to the Pexip branding portal (https://branding.pexip.com/) and sign in. 2. Select the customization (branding package) you want to change.
3. Make your changes, previewing them if necessary, and then download a new zip file.
4. On the Management Node, go to Service Configuration > Web App Customization and upload your new branding zip file.
Wait for the new branding to be replicated out to all Conferencing Nodes (typically after approximately one minute).

Infinity Connect Web App Customization Guide Removing a branding package (revert to default branding)
© 2018 Pexip AS Version 18.a May 2018 Page 5 of 24
Manually changing your existing branding on the Management NodeYou can manually edit the existing branding files that have been uploaded to the Management Node (even if those files were originally created via the Pexip branding portal):
1. On the Management Node, go to Service Configuration > Web App Customization. 2. Download the existing branding files:
o Select the Download option next to the Download current branding label to download the current legacy web app branding.
o Select the Download option next to the Download next gen branding label to download the current next-generation web app branding.
3. Unpack the downloaded file and apply your modifications to the relevant files.The contents of the branding files and how to modify them is fully described in Advanced Infinity Connect web app customization.
4. Repackage your modified branding files into a new .ZIP file.If you are modifying both legacy and next-generation files, you can package them as 2 separate zip files i.e. one zip containing legacy branding and one zip containing next-generation branding, thus matching the zip packages you downloaded. You can also combine them into one zip package, but it must match the file structure that is produced when downloading the default branding files.
5. Upload the new zip file back onto the Management Node (Service Configuration > Web App Customization then Choose File followed by Upload branding).The upload process automatically detects whether you are uploading legacy or next-generation files, or a package containing both legacy and next-generation files, and processes the zip file accordingly.
Wait for the new branding to be replicated out to all Conferencing Nodes (typically after approximately one minute).
Removing a branding package (revert to default branding)If you want to revert to the default Infinity Connect web app branding, you need to remove your customized branding from the Management Node. To do this:
1. On the Management Node, go to Service Configuration > Web App Customization. 2. From the bottom-right corner of the page:
o Select Remove branding to remove any legacy web app branding.
o Select Remove next gen branding to remove any next-generation web app branding.
Wait for the customized branding to be removed from all Conferencing Nodes and for the web app to revert to the default branding (typically after approximately one minute).
Infinity Connect Web App Customization Guide Advanced Infinity Connect web app customization
© 2018 Pexip AS Version 18.a May 2018 Page 6 of 24
Advanced Infinity Connect web app customizationMost customization requirements for the Infinity Connect web app can be implemented by using the Pexip branding portal to generate the branding files and then applying that branding by uploading the branding package to the Management Node (see Creating and uploading a branding package).
However, for advanced customization requirements you may need to make manual changes to the branding files, or you may want to host the customized files on a reverse proxy or external web server instead of on the Pexip Infinity Conferencing Nodes.
This topic covers the alternative methods for hosting the customized web app, and how to manually customize the application.
Note that manual configuration requires knowledge of core web-design technologies such as HTML, JavaScript and CSS.
Hosting the customized web appThere are two methods for hosting the customized Infinity Connect web app, either:
l on the Conferencing Nodes (via an upload on the Management Node), or
l on an external web server or reverse proxy.
Hosting on the Conferencing NodesThis is the standard method for applying branding to the Pexip Infinity platform — it applies a generic customization for all web app users. It involves uploading a branding package to the Management Node which then automatically pushes those changes out to all Conferencing Nodes, from where those customizations are served to all web app users.
Branding customizations that are applied via the Management Node will persist over upgrades to subsequent versions of Pexip Infinity software (although you may need to adapt the customization to cater for any new features when upgrading to a new major release).
For this hosting method, the Pexip branding portal can be used to configure the branding requirements for the Infinity Connect web app and to generate a zip file suitable for uploading to the Management Node.
Currently, the branding portal can only be used to create a branding package for the legacy web app. Support for the next-generation web app will be added soon.
Hosting on an external web server or reverse proxyThis hosting method involves copying the entire web app onto an external web server or reverse proxy (e.g. the Pexip Reverse Proxy) and serving it from that server. This method allows you, for example, to host multiple different branding customizations under different URLs on those external web servers or reverse proxies.
The next-generation and legacy Infinity Connect web app files are stored in different places as described below. Note that files can be copied to or from the Conferencing Nodes using the SCP protocol, for example with a tool such as WinSCP.
Locating the next-generation Infinity Connect web app files
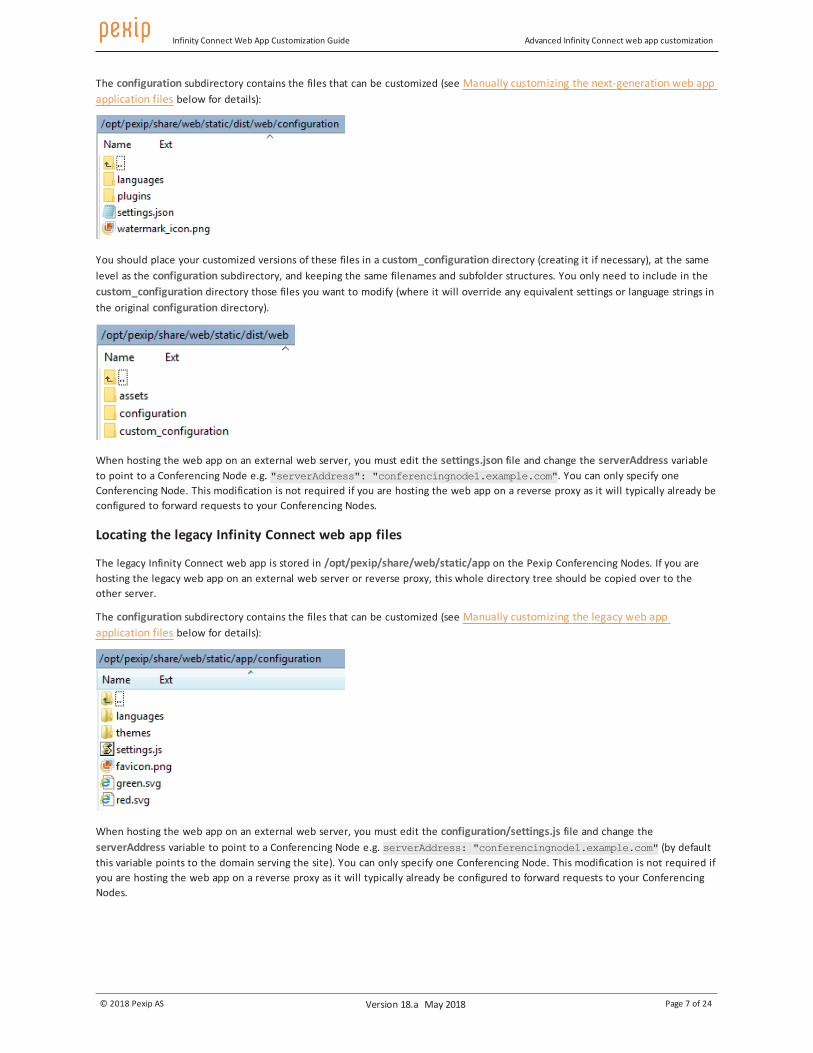
The next-generation Infinity Connect web app is stored in /opt/pexip/share/web/static/dist/web on the Pexip Conferencing Nodes. If you are hosting the next-generation web app on an external web server or reverse proxy, this whole directory tree should be copied over to the other server.
Infinity Connect Web App Customization Guide Advanced Infinity Connect web app customization
© 2018 Pexip AS Version 18.a May 2018 Page 7 of 24
The configuration subdirectory contains the files that can be customized (see Manually customizing the next-generation web app application files below for details):
You should place your customized versions of these files in a custom_configuration directory (creating it if necessary), at the same level as the configuration subdirectory, and keeping the same filenames and subfolder structures. You only need to include in the custom_configuration directory those files you want to modify (where it will override any equivalent settings or language strings in the original configuration directory).
When hosting the web app on an external web server, you must edit the settings.json file and change the serverAddress variable to point to a Conferencing Node e.g. "serverAddress": "conferencingnode1.example.com". You can only specify one Conferencing Node. This modification is not required if you are hosting the web app on a reverse proxy as it will typically already be configured to forward requests to your Conferencing Nodes.
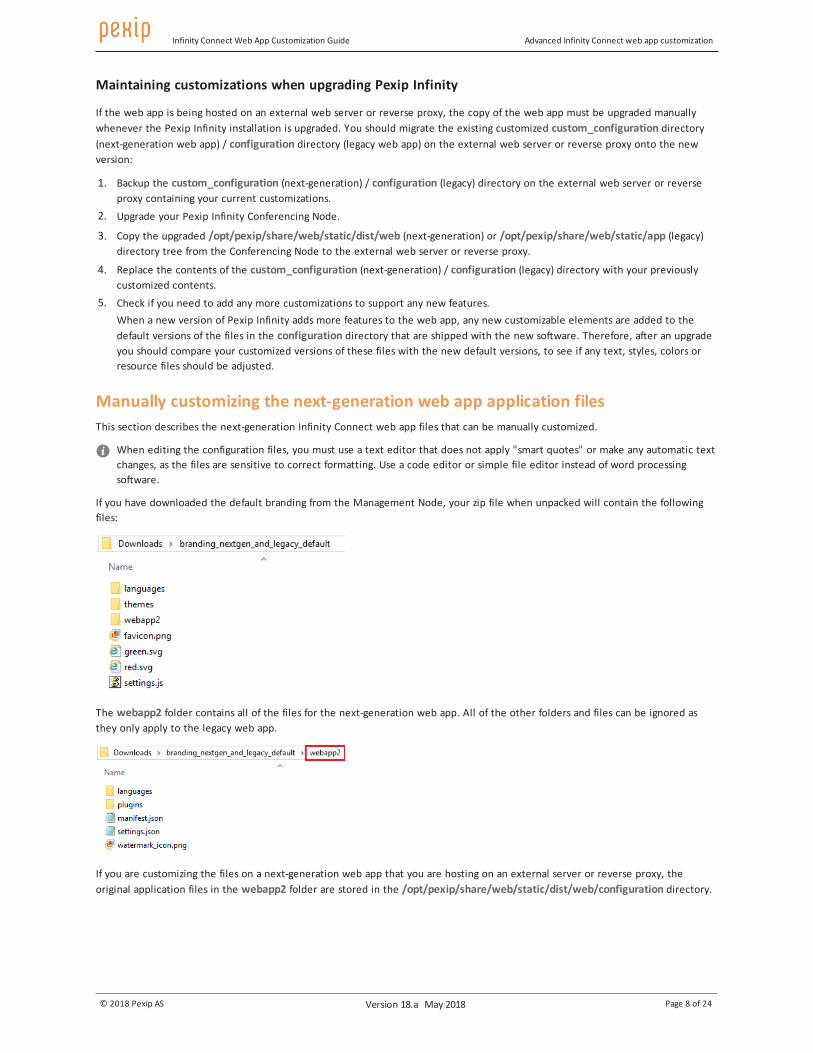
Locating the legacy Infinity Connect web app files
The legacy Infinity Connect web app is stored in /opt/pexip/share/web/static/app on the Pexip Conferencing Nodes. If you are hosting the legacy web app on an external web server or reverse proxy, this whole directory tree should be copied over to the other server.
The configuration subdirectory contains the files that can be customized (see Manually customizing the legacy web app application files below for details):
When hosting the web app on an external web server, you must edit the configuration/settings.js file and change the serverAddress variable to point to a Conferencing Node e.g. serverAddress: "conferencingnode1.example.com" (by default this variable points to the domain serving the site). You can only specify one Conferencing Node. This modification is not required if you are hosting the web app on a reverse proxy as it will typically already be configured to forward requests to your Conferencing Nodes.
Infinity Connect Web App Customization Guide Advanced Infinity Connect web app customization
© 2018 Pexip AS Version 18.a May 2018 Page 8 of 24
Maintaining customizations when upgrading Pexip Infinity
If the web app is being hosted on an external web server or reverse proxy, the copy of the web app must be upgraded manually whenever the Pexip Infinity installation is upgraded. You should migrate the existing customized custom_configuration directory (next-generation web app) / configuration directory (legacy web app) on the external web server or reverse proxy onto the new version:
1. Backup the custom_configuration (next-generation) / configuration (legacy) directory on the external web server or reverse proxy containing your current customizations.
2. Upgrade your Pexip Infinity Conferencing Node.
3. Copy the upgraded /opt/pexip/share/web/static/dist/web (next-generation) or /opt/pexip/share/web/static/app (legacy) directory tree from the Conferencing Node to the external web server or reverse proxy.
4. Replace the contents of the custom_configuration (next-generation) / configuration (legacy) directory with your previously customized contents.
5. Check if you need to add any more customizations to support any new features.When a new version of Pexip Infinity adds more features to the web app, any new customizable elements are added to the default versions of the files in the configuration directory that are shipped with the new software. Therefore, after an upgrade you should compare your customized versions of these files with the new default versions, to see if any text, styles, colors or resource files should be adjusted.
Manually customizing the next-generation web app application filesThis section describes the next-generation Infinity Connect web app files that can be manually customized.
When editing the configuration files, you must use a text editor that does not apply "smart quotes" or make any automatic text changes, as the files are sensitive to correct formatting. Use a code editor or simple file editor instead of word processing software.
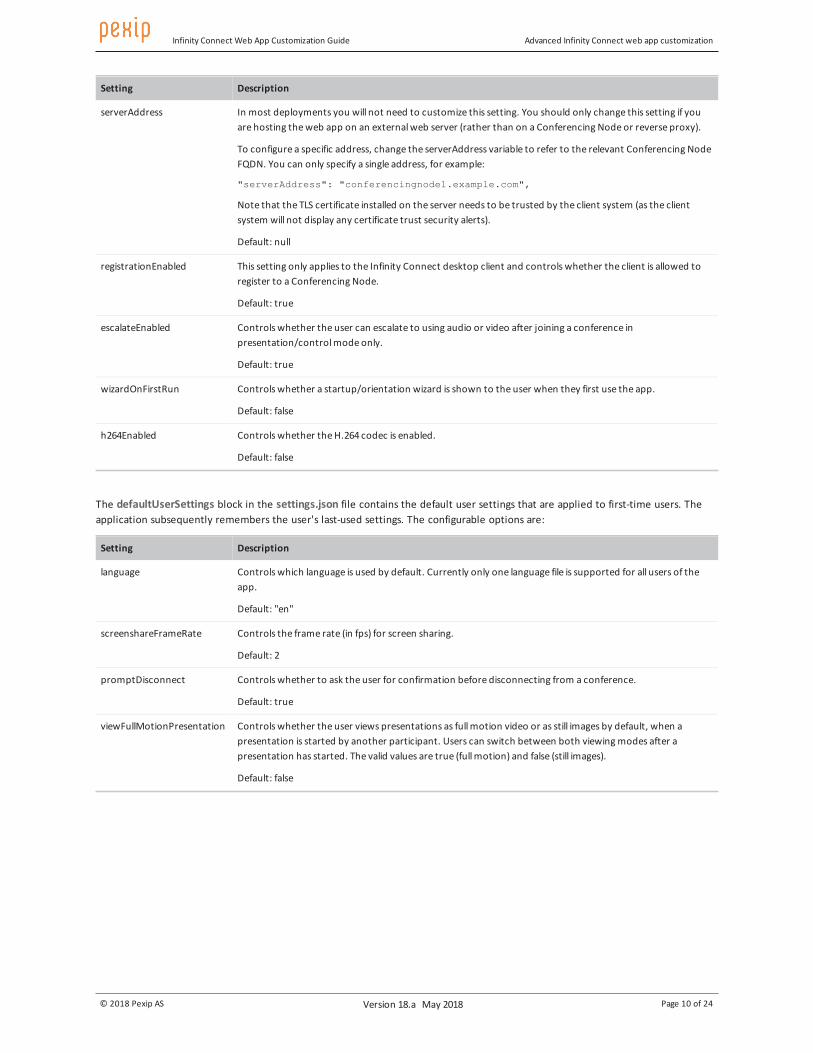
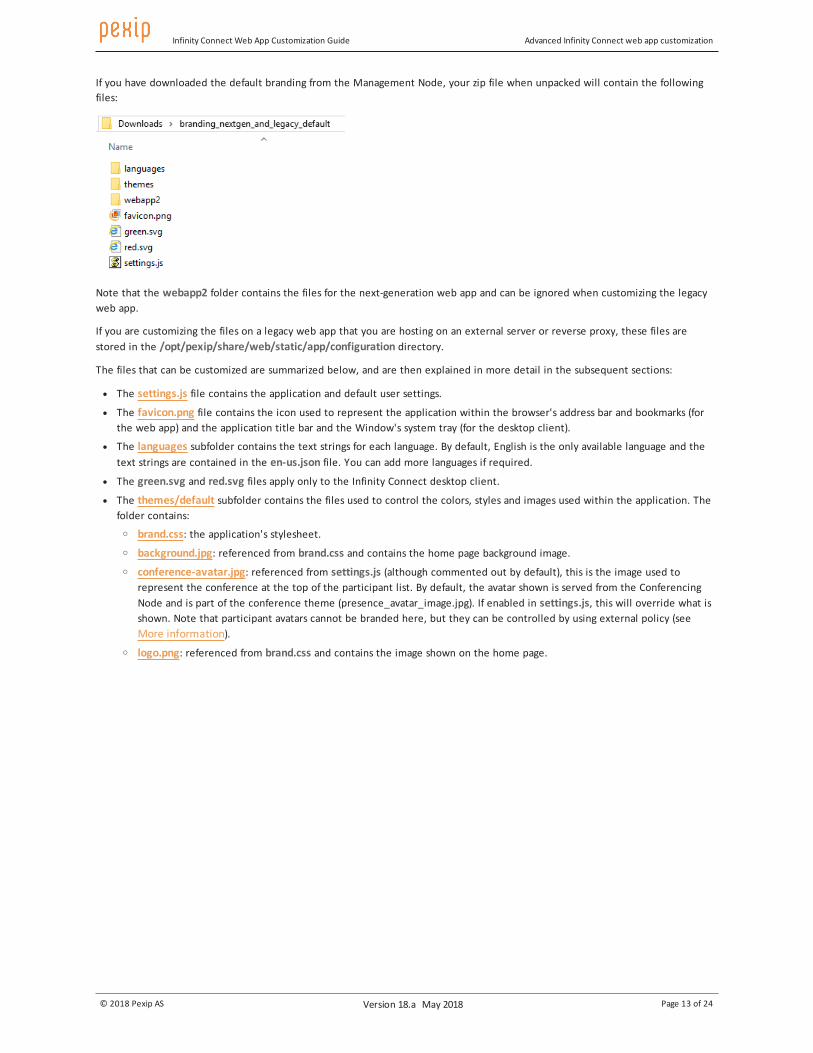
If you have downloaded the default branding from the Management Node, your zip file when unpacked will contain the following files:
The webapp2 folder contains all of the files for the next-generation web app. All of the other folders and files can be ignored as they only apply to the legacy web app.
If you are customizing the files on a next-generation web app that you are hosting on an external server or reverse proxy, the original application files in the webapp2 folder are stored in the /opt/pexip/share/web/static/dist/web/configuration directory.

Infinity Connect Web App Customization Guide Advanced Infinity Connect web app customization
© 2018 Pexip AS Version 18.a May 2018 Page 9 of 24
The files that can be customized are summarized below, and are then explained in more detail in the subsequent sections:
l The manifest.json file (which does not initially exist in the default branding download) controls which customized settings take effect.
l The settings.json file contains the application and default user settings. l The languages subfolder contains the text strings for each language. Currently, English is the only available language and the
text strings are contained in the en.json file. l The plugins subfolder contains extensions to the core client functionality. Information on how to the implement plugins will be
made available soon.
l The watermark_icon.png file is a transparent image used for applying a watermark to the self-view image displayed on the Home page. By default, this image is the same as the base theme's watermark that is applied to the main speaker video in a conference, and is a white Pexip logo with 40% transparency.
Application manifest (manifest.json)The manifest.json file controls which customized settings take effect. This file will not initially exist and is not included in the default branding zip file that you can download from the Management Node.
For your customization changes to take effect, you must create (in the first instance) and include the manifest.json file in the webapp2 folder, and which should look like this, with the settings set to true/false as appropriate:
{"isSettingsBranded":true,"isWatermarkBranded":false}
Set isSettingsBranded to true if you intend to change anything in the settings.json file, and set isWatermarkBranded to true if you are supplying a new watermark_icon.png file.
Application and default user settings (settings.json)The settings.json file contains the application and default user settings. The following items in the applicationSettings block can be configured:
Setting Description
dialOutProtocol Controls the protocol used when adding a participant to the conference.
The default setting is "auto". The alternative options are "sip", "h323", "mssip" and "rtmp".
To successfully place calls via the "auto" protocol option, suitable Call Routing Rules must be configured.
languages Controls the set of languages available to the user. Currently only one language file is supported for all app users.
Default: ["en"]
bandwidths Controls the set of bandwidth options available to the user.
Default: ["256", "576", "1264", "2464"]
turnServer This setting provisions Infinity Connect with a TURN server that it can offer as a relay candidate in ICE negotiations.
Default: null
To configure a TURN server you must specify the TURN server address and credentials (note that these credentials are not encrypted within the settings file), for example:
"turnServer": { "url": "turn:turn.example.com:443?transport=tcp", "username": "user", "credential": "pass" }
Infinity Connect Web App Customization Guide Advanced Infinity Connect web app customization
© 2018 Pexip AS Version 18.a May 2018 Page 10 of 24
Setting Description
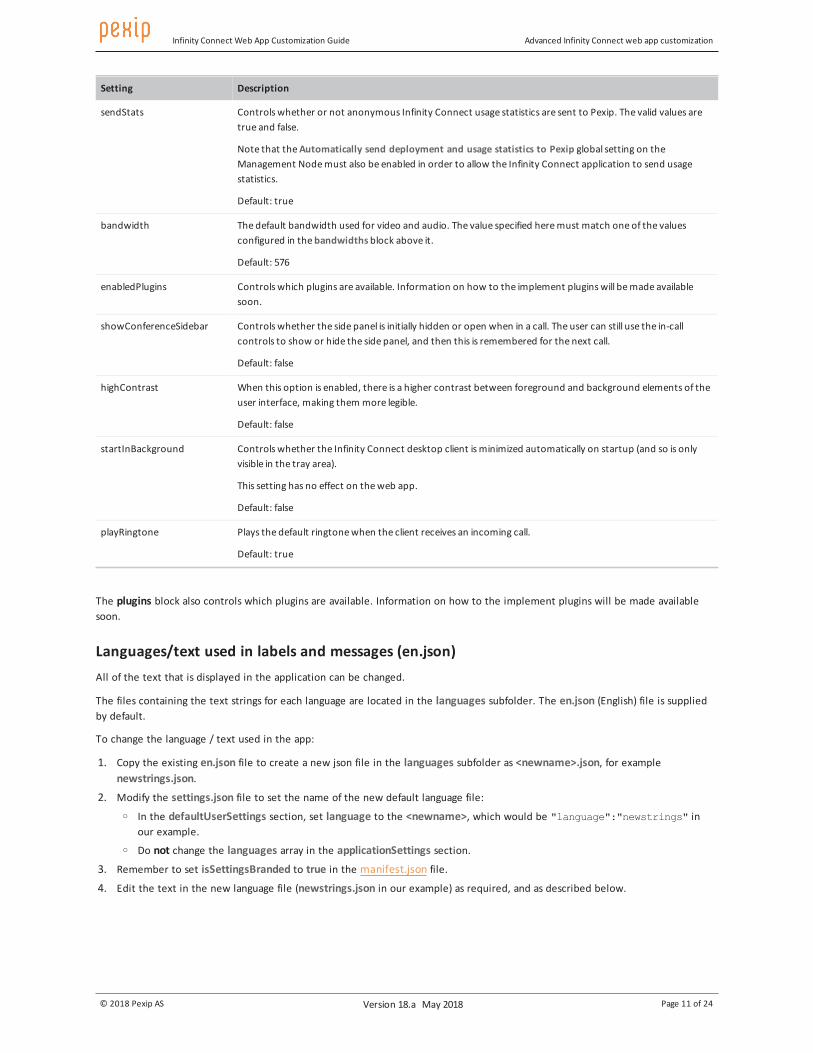
serverAddress In most deployments you will not need to customize this setting. You should only change this setting if you are hosting the web app on an external web server (rather than on a Conferencing Node or reverse proxy).
To configure a specific address, change the serverAddress variable to refer to the relevant Conferencing Node FQDN. You can only specify a single address, for example:
"serverAddress": "conferencingnode1.example.com",
Note that the TLS certificate installed on the server needs to be trusted by the client system (as the client system will not display any certificate trust security alerts).
Default: null
registrationEnabled This setting only applies to the Infinity Connect desktop client and controls whether the client is allowed to register to a Conferencing Node.
Default: true
escalateEnabled Controls whether the user can escalate to using audio or video after joining a conference in presentation/control mode only.
Default: true
wizardOnFirstRun Controls whether a startup/orientation wizard is shown to the user when they first use the app.
Default: false
h264Enabled Controls whether the H.264 codec is enabled.
Default: false
The defaultUserSettings block in the settings.json file contains the default user settings that are applied to first-time users. The application subsequently remembers the user's last-used settings. The configurable options are:
Setting Description
language Controls which language is used by default. Currently only one language file is supported for all users of the app.
Default: "en"
screenshareFrameRate Controls the frame rate (in fps) for screen sharing.
Default: 2
promptDisconnect Controls whether to ask the user for confirmation before disconnecting from a conference.
Default: true
viewFullMotionPresentation Controls whether the user views presentations as full motion video or as still images by default, when a presentation is started by another participant. Users can switch between both viewing modes after a presentation has started. The valid values are true (full motion) and false (still images).
Default: false
Infinity Connect Web App Customization Guide Advanced Infinity Connect web app customization
© 2018 Pexip AS Version 18.a May 2018 Page 11 of 24
Setting Description
sendStats Controls whether or not anonymous Infinity Connect usage statistics are sent to Pexip. The valid values are true and false.
Note that the Automatically send deployment and usage statistics to Pexip global setting on the Management Node must also be enabled in order to allow the Infinity Connect application to send usage statistics.
Default: true
bandwidth The default bandwidth used for video and audio. The value specified here must match one of the values configured in the bandwidths block above it.
Default: 576
enabledPlugins Controls which plugins are available. Information on how to the implement plugins will be made available soon.
showConferenceSidebar Controls whether the side panel is initially hidden or open when in a call. The user can still use the in-call controls to show or hide the side panel, and then this is remembered for the next call.
Default: false
highContrast When this option is enabled, there is a higher contrast between foreground and background elements of the user interface, making them more legible.
Default: false
startInBackground Controls whether the Infinity Connect desktop client is minimized automatically on startup (and so is only visible in the tray area).
This setting has no effect on the web app.
Default: false
playRingtone Plays the default ringtone when the client receives an incoming call.
Default: true
The plugins block also controls which plugins are available. Information on how to the implement plugins will be made available soon.
Languages/text used in labels and messages (en.json)All of the text that is displayed in the application can be changed.
The files containing the text strings for each language are located in the languages subfolder. The en.json (English) file is supplied by default.
To change the language / text used in the app:
1. Copy the existing en.json file to create a new json file in the languages subfolder as <newname>.json, for example newstrings.json.
2. Modify the settings.json file to set the name of the new default language file:
o In the defaultUserSettings section, set language to the <newname>, which would be "language":"newstrings" in our example.
o Do not change the languages array in the applicationSettings section.
3. Remember to set isSettingsBranded to true in the manifest.json file.
4. Edit the text in the new language file (newstrings.json in our example) as required, and as described below.
Infinity Connect Web App Customization Guide Advanced Infinity Connect web app customization
© 2018 Pexip AS Version 18.a May 2018 Page 12 of 24
Editing the language file
Text customizations are simply a matter of changing the text assigned with a token in your language file. To find the token to change, search in the new language file (newstrings.json in our example) for the text that needs to be changed, edit the text, and save your changes back to the same file.
Do not change the text in the existing en.json file. Any changes made to this file will be ignored. You must create a new language file as described above.
For example, the "Type your name here" label can be found towards the top of the language file and is associated with the "PLACEHOLDER" token:
"PLACEHOLDER": "Type your name here"
The strings are grouped together according to where or when they are displayed. For example, all tokens in the "HOME" block refer to strings that appear on the Home page.
Ensure that you do not change or break the structure of the json file.
Variable substitutions
Some strings contain variable substitutions, for example:
"TITLE": "Are you sure you want to disconnect {{name}}?"
This message appears when a user disconnects a participant. In this case, the application automatically substitutes {{name}} with the participant's actual name as shown in the participant list. Do not change the format or content of these variables (although you can completely remove the variable from the string if required). You cannot create your own variables.
Error messages
There is a list of error message in the language file. These messages typically relate to connectivity issues between the Conferencing Node and Infinity Connect, or to conference activities.
The token name is in the format PEX###, which is used as a common reference for the message regardless of the language used in the message string, for example:
"PEX120": "A host ended the meeting."
You can change these messages in the same way as you can change the other messages — edit the display text part only; do not change the PEX### token name part.
Manually customizing the legacy web app application filesThis section describes the legacy Infinity Connect web app files that can be manually customized.
When editing the configuration files, you must use a text editor that does not apply "smart quotes" or make any automatic text changes, as the files are sensitive to correct formatting. Use a code editor or simple file editor instead of word processing software.
Infinity Connect Web App Customization Guide Advanced Infinity Connect web app customization
© 2018 Pexip AS Version 18.a May 2018 Page 13 of 24
If you have downloaded the default branding from the Management Node, your zip file when unpacked will contain the following files:
Note that the webapp2 folder contains the files for the next-generation web app and can be ignored when customizing the legacy web app.
If you are customizing the files on a legacy web app that you are hosting on an external server or reverse proxy, these files are stored in the /opt/pexip/share/web/static/app/configuration directory.
The files that can be customized are summarized below, and are then explained in more detail in the subsequent sections:
l The settings.js file contains the application and default user settings. l The favicon.png file contains the icon used to represent the application within the browser's address bar and bookmarks (for
the web app) and the application title bar and the Window's system tray (for the desktop client).
l The languages subfolder contains the text strings for each language. By default, English is the only available language and the text strings are contained in the en-us.json file. You can add more languages if required.
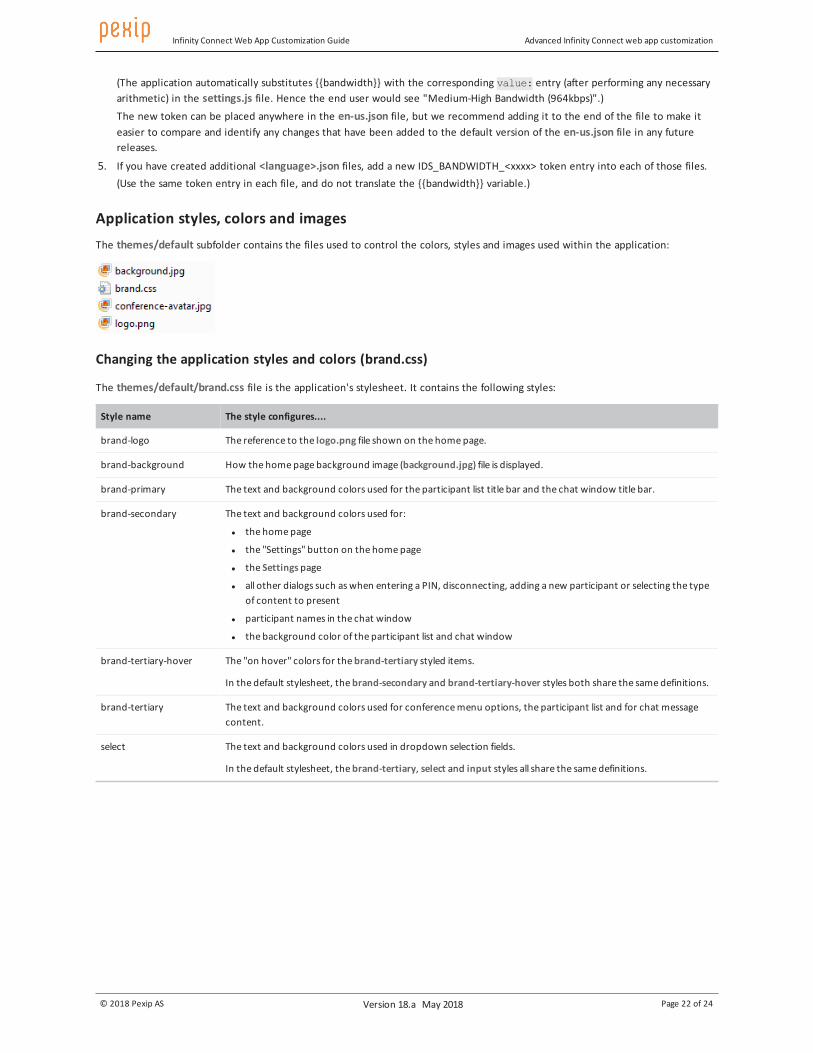
l The green.svg and red.svg files apply only to the Infinity Connect desktop client. l The themes/default subfolder contains the files used to control the colors, styles and images used within the application. The
folder contains:
o brand.css: the application's stylesheet. o background.jpg: referenced from brand.css and contains the home page background image.
o conference-avatar.jpg: referenced from settings.js (although commented out by default), this is the image used to represent the conference at the top of the participant list. By default, the avatar shown is served from the Conferencing Node and is part of the conference theme (presence_avatar_image.jpg). If enabled in settings.js, this will override what is shown. Note that participant avatars cannot be branded here, but they can be controlled by using external policy (see More information).
o logo.png: referenced from brand.css and contains the image shown on the home page.
Infinity Connect Web App Customization Guide Advanced Infinity Connect web app customization
© 2018 Pexip AS Version 18.a May 2018 Page 14 of 24
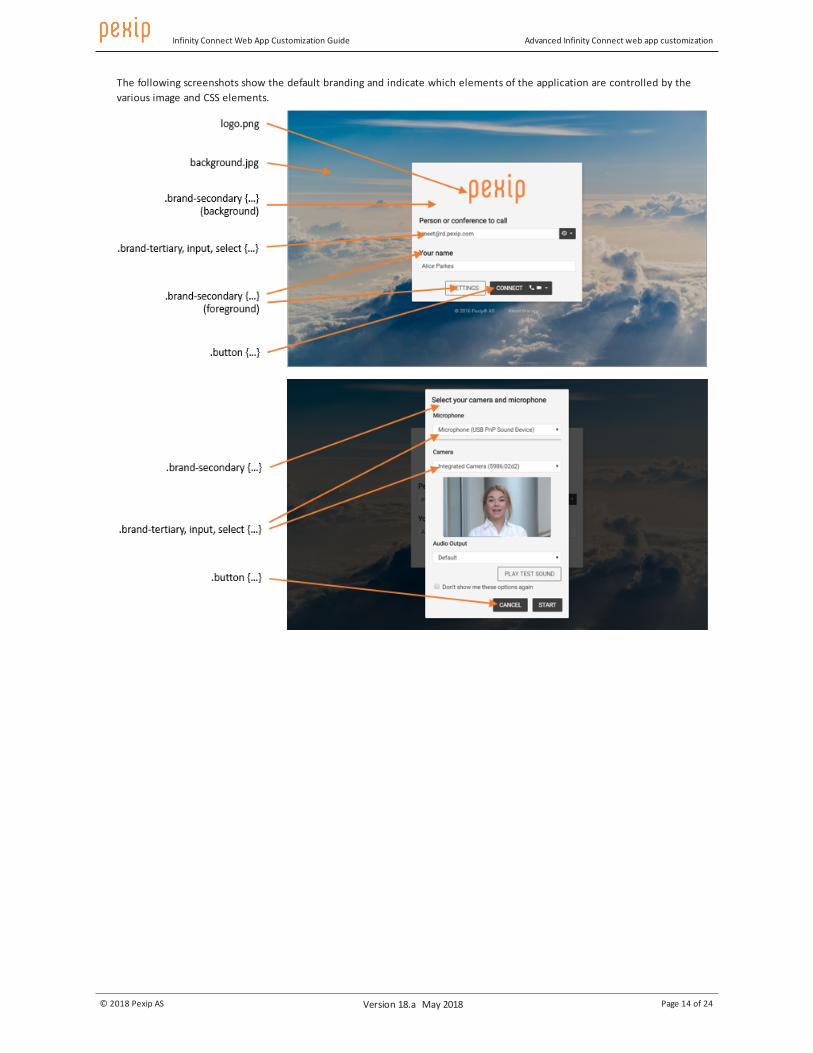
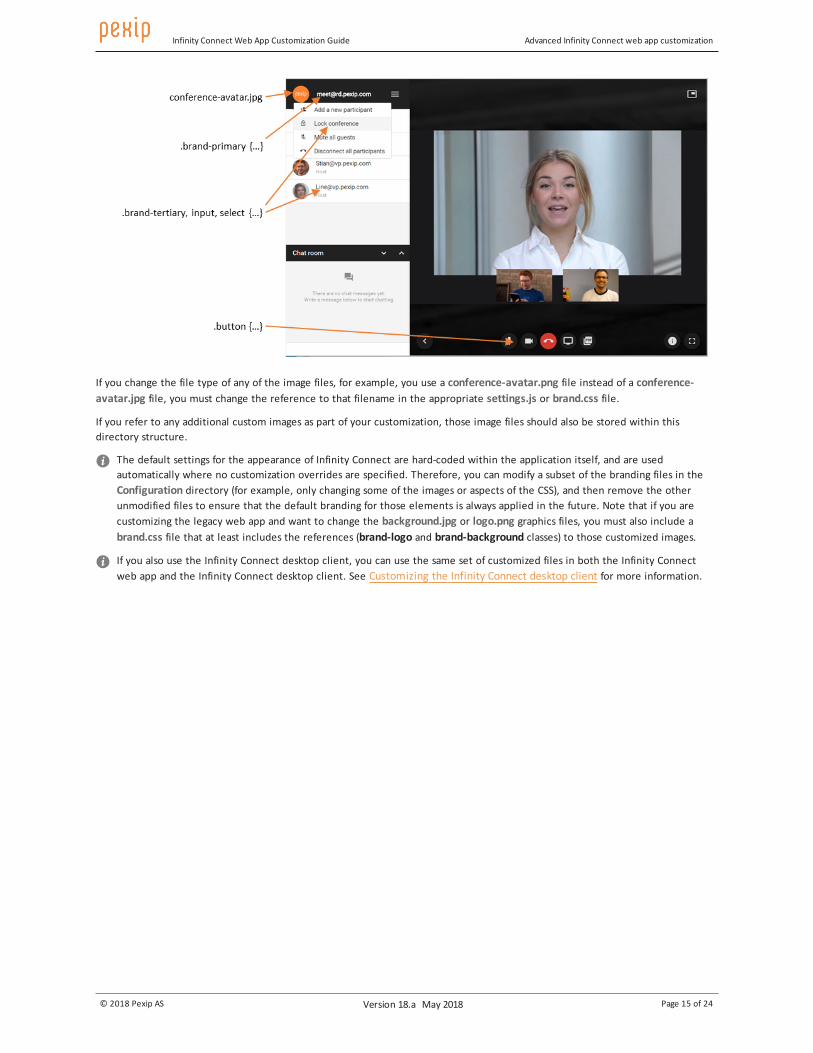
The following screenshots show the default branding and indicate which elements of the application are controlled by the various image and CSS elements.
Infinity Connect Web App Customization Guide Advanced Infinity Connect web app customization
© 2018 Pexip AS Version 18.a May 2018 Page 15 of 24
If you change the file type of any of the image files, for example, you use a conference-avatar.png file instead of a conference-avatar.jpg file, you must change the reference to that filename in the appropriate settings.js or brand.css file.
If you refer to any additional custom images as part of your customization, those image files should also be stored within this directory structure.
The default settings for the appearance of Infinity Connect are hard-coded within the application itself, and are used automatically where no customization overrides are specified. Therefore, you can modify a subset of the branding files in the Configuration directory (for example, only changing some of the images or aspects of the CSS), and then remove the other unmodified files to ensure that the default branding for those elements is always applied in the future. Note that if you are customizing the legacy web app and want to change the background.jpg or logo.png graphics files, you must also include a brand.css file that at least includes the references (brand-logo and brand-background classes) to those customized images.
If you also use the Infinity Connect desktop client, you can use the same set of customized files in both the Infinity Connect web app and the Infinity Connect desktop client. See Customizing the Infinity Connect desktop client for more information.
Infinity Connect Web App Customization Guide Advanced Infinity Connect web app customization
© 2018 Pexip AS Version 18.a May 2018 Page 16 of 24
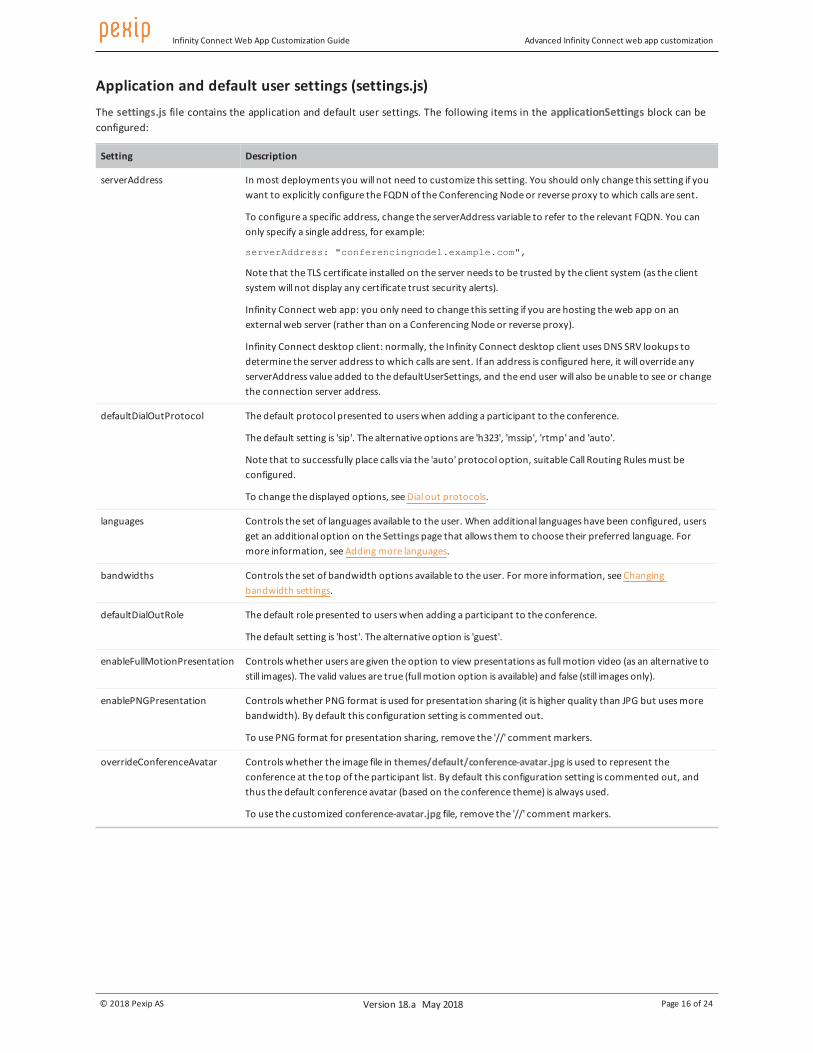
Application and default user settings (settings.js)The settings.js file contains the application and default user settings. The following items in the applicationSettings block can be configured:
Setting Description
serverAddress In most deployments you will not need to customize this setting. You should only change this setting if you want to explicitly configure the FQDN of the Conferencing Node or reverse proxy to which calls are sent.
To configure a specific address, change the serverAddress variable to refer to the relevant FQDN. You can only specify a single address, for example:
serverAddress: "conferencingnode1.example.com",
Note that the TLS certificate installed on the server needs to be trusted by the client system (as the client system will not display any certificate trust security alerts).
Infinity Connect web app: you only need to change this setting if you are hosting the web app on an external web server (rather than on a Conferencing Node or reverse proxy).
Infinity Connect desktop client: normally, the Infinity Connect desktop client uses DNS SRV lookups to determine the server address to which calls are sent. If an address is configured here, it will override any serverAddress value added to the defaultUserSettings, and the end user will also be unable to see or change the connection server address.
defaultDialOutProtocol The default protocol presented to users when adding a participant to the conference.
The default setting is 'sip'. The alternative options are 'h323', 'mssip', 'rtmp' and 'auto'.
Note that to successfully place calls via the 'auto' protocol option, suitable Call Routing Rules must be configured.
To change the displayed options, see Dial out protocols.
languages Controls the set of languages available to the user. When additional languages have been configured, users get an additional option on the Settings page that allows them to choose their preferred language. For more information, see Adding more languages.
bandwidths Controls the set of bandwidth options available to the user. For more information, see Changing bandwidth settings.
defaultDialOutRole The default role presented to users when adding a participant to the conference.
The default setting is 'host'. The alternative option is 'guest'.
enableFullMotionPresentation Controls whether users are given the option to view presentations as full motion video (as an alternative to still images). The valid values are true (full motion option is available) and false (still images only).
enablePNGPresentation Controls whether PNG format is used for presentation sharing (it is higher quality than JPG but uses more bandwidth). By default this configuration setting is commented out.
To use PNG format for presentation sharing, remove the '//' comment markers.
overrideConferenceAvatar Controls whether the image file in themes/default/conference-avatar.jpg is used to represent the conference at the top of the participant list. By default this configuration setting is commented out, and thus the default conference avatar (based on the conference theme) is always used.
To use the customized conference-avatar.jpg file, remove the '//' comment markers.
Infinity Connect Web App Customization Guide Advanced Infinity Connect web app customization
© 2018 Pexip AS Version 18.a May 2018 Page 17 of 24
Setting Description
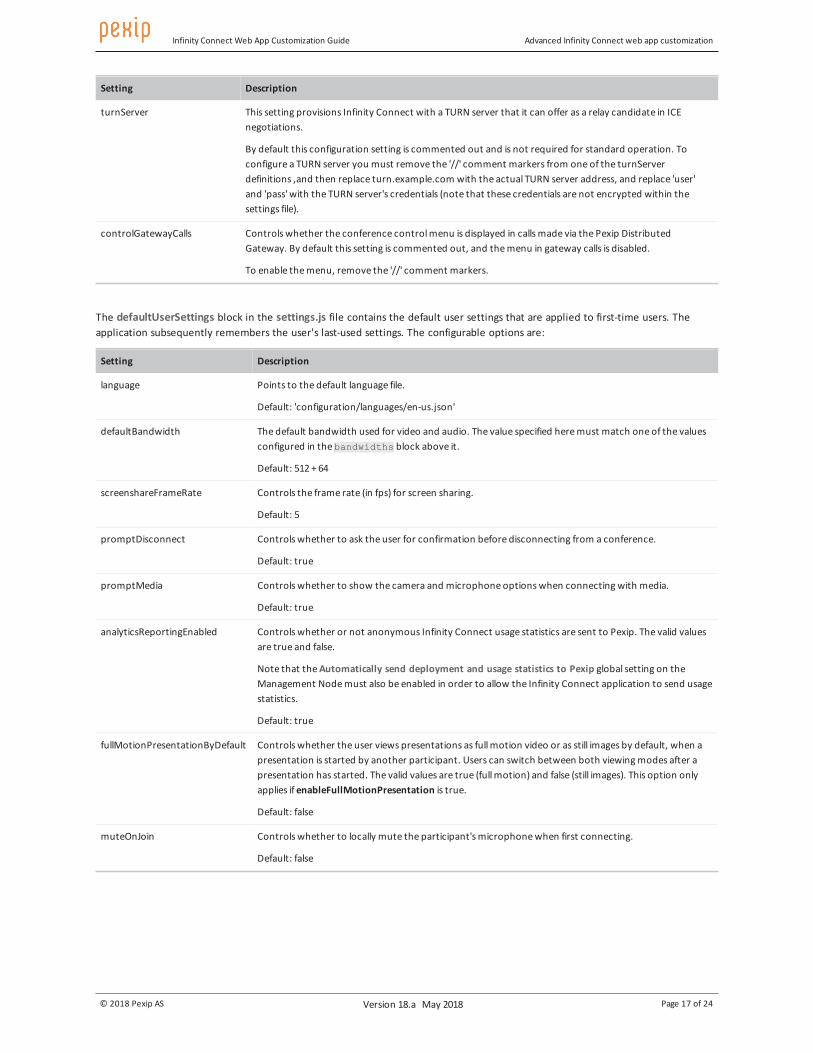
turnServer This setting provisions Infinity Connect with a TURN server that it can offer as a relay candidate in ICE negotiations.
By default this configuration setting is commented out and is not required for standard operation. To configure a TURN server you must remove the '//' comment markers from one of the turnServer definitions ,and then replace turn.example.com with the actual TURN server address, and replace 'user' and 'pass' with the TURN server's credentials (note that these credentials are not encrypted within the settings file).
controlGatewayCalls Controls whether the conference control menu is displayed in calls made via the Pexip Distributed Gateway. By default this setting is commented out, and the menu in gateway calls is disabled.
To enable the menu, remove the '//' comment markers.
The defaultUserSettings block in the settings.js file contains the default user settings that are applied to first-time users. The application subsequently remembers the user's last-used settings. The configurable options are:
Setting Description
language Points to the default language file.
Default: 'configuration/languages/en-us.json'
defaultBandwidth The default bandwidth used for video and audio. The value specified here must match one of the values configured in the bandwidths block above it.
Default: 512 + 64
screenshareFrameRate Controls the frame rate (in fps) for screen sharing.
Default: 5
promptDisconnect Controls whether to ask the user for confirmation before disconnecting from a conference.
Default: true
promptMedia Controls whether to show the camera and microphone options when connecting with media.
Default: true
analyticsReportingEnabled Controls whether or not anonymous Infinity Connect usage statistics are sent to Pexip. The valid values are true and false.
Note that the Automatically send deployment and usage statistics to Pexip global setting on the Management Node must also be enabled in order to allow the Infinity Connect application to send usage statistics.
Default: true
fullMotionPresentationByDefault Controls whether the user views presentations as full motion video or as still images by default, when a presentation is started by another participant. Users can switch between both viewing modes after a presentation has started. The valid values are true (full motion) and false (still images). This option only applies if enableFullMotionPresentation is true.
Default: false
muteOnJoin Controls whether to locally mute the participant's microphone when first connecting.
Default: false

Infinity Connect Web App Customization Guide Advanced Infinity Connect web app customization
© 2018 Pexip AS Version 18.a May 2018 Page 18 of 24
Setting Description
startMinimized Controls whether the Infinity Connect desktop client is minimized automatically on startup (and so is only visible in the tray area).
This setting has no effect on the web app.
Default: false
sideBarHidden Controls whether the sidebar (that contains the participant list and chat window) is initially hidden when making any type of call. If this setting is set to true (to hide the sidebar), the user can still use the in-call controls to show the sidebar.
Default: false
sideBarHiddenInGW Controls whether the sidebar is initially hidden when making a person-to-person gateway call. The user can still use the in-call controls to show the sidebar. This setting only applies if sideBarHidden is false.
Default: true
Application favicon (favicon.png)The favicon.png file contains the icon used to represent the application within the browser's address bar and bookmarks (for the web app) and the application title bar and the Window's system tray (for the desktop client).
The default icon is .
To change the icon, you should replace the existing favicon.png file with a new .PNG file of the same name. The new image file should be 16x16 pixels.
Note that the associated application name that is displayed in the address/title bar can be changed by modifying the IDS_APPLICATION_NAME value in the language json file.
Infinity Connect Web App Customization Guide Advanced Infinity Connect web app customization
© 2018 Pexip AS Version 18.a May 2018 Page 19 of 24
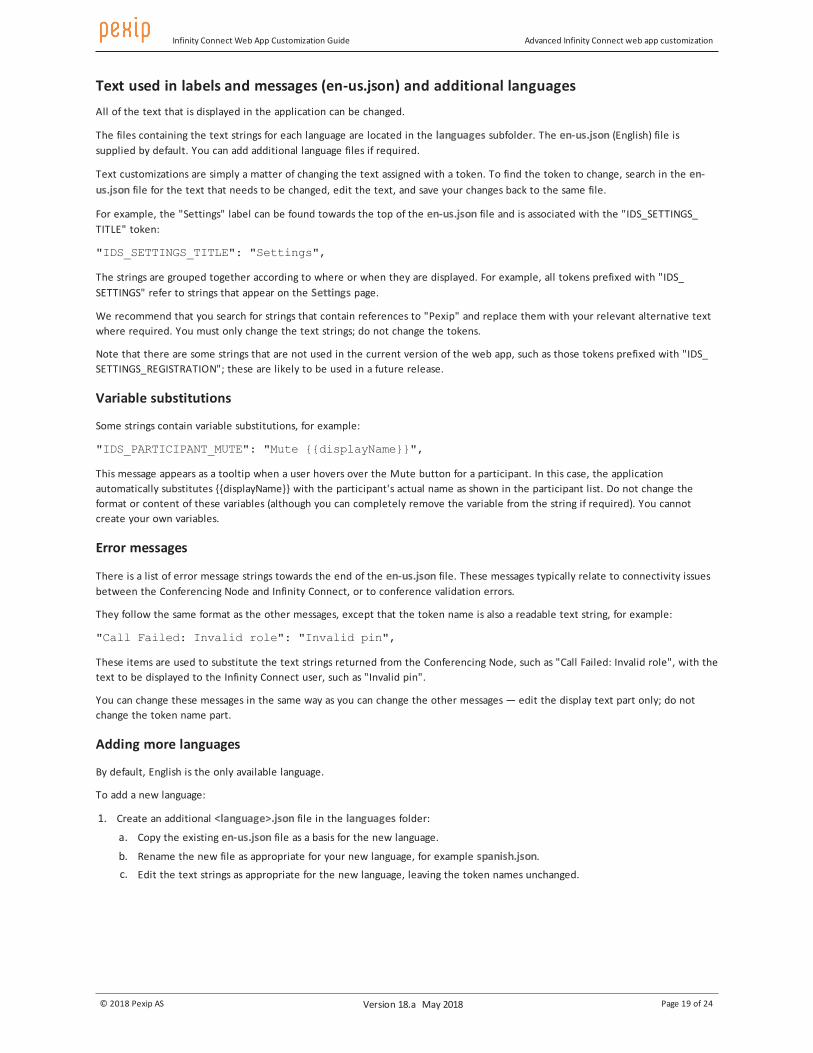
Text used in labels and messages (en-us.json) and additional languagesAll of the text that is displayed in the application can be changed.
The files containing the text strings for each language are located in the languages subfolder. The en-us.json (English) file is supplied by default. You can add additional language files if required.
Text customizations are simply a matter of changing the text assigned with a token. To find the token to change, search in the en-us.json file for the text that needs to be changed, edit the text, and save your changes back to the same file.
For example, the "Settings" label can be found towards the top of the en-us.json file and is associated with the "IDS_SETTINGS_TITLE" token:
"IDS_SETTINGS_TITLE": "Settings",
The strings are grouped together according to where or when they are displayed. For example, all tokens prefixed with "IDS_SETTINGS" refer to strings that appear on the Settings page.
We recommend that you search for strings that contain references to "Pexip" and replace them with your relevant alternative text where required. You must only change the text strings; do not change the tokens.
Note that there are some strings that are not used in the current version of the web app, such as those tokens prefixed with "IDS_SETTINGS_REGISTRATION"; these are likely to be used in a future release.
Variable substitutions
Some strings contain variable substitutions, for example:
"IDS_PARTICIPANT_MUTE": "Mute {{displayName}}",
This message appears as a tooltip when a user hovers over the Mute button for a participant. In this case, the application automatically substitutes {{displayName}} with the participant's actual name as shown in the participant list. Do not change the format or content of these variables (although you can completely remove the variable from the string if required). You cannot create your own variables.
Error messages
There is a list of error message strings towards the end of the en-us.json file. These messages typically relate to connectivity issues between the Conferencing Node and Infinity Connect, or to conference validation errors.
They follow the same format as the other messages, except that the token name is also a readable text string, for example:
"Call Failed: Invalid role": "Invalid pin",
These items are used to substitute the text strings returned from the Conferencing Node, such as "Call Failed: Invalid role", with the text to be displayed to the Infinity Connect user, such as "Invalid pin".
You can change these messages in the same way as you can change the other messages — edit the display text part only; do not change the token name part.
Adding more languages
By default, English is the only available language.
To add a new language:
1. Create an additional <language>.json file in the languages folder:
a. Copy the existing en-us.json file as a basis for the new language.
b. Rename the new file as appropriate for your new language, for example spanish.json. c. Edit the text strings as appropriate for the new language, leaving the token names unchanged.
Infinity Connect Web App Customization Guide Advanced Infinity Connect web app customization
© 2018 Pexip AS Version 18.a May 2018 Page 20 of 24
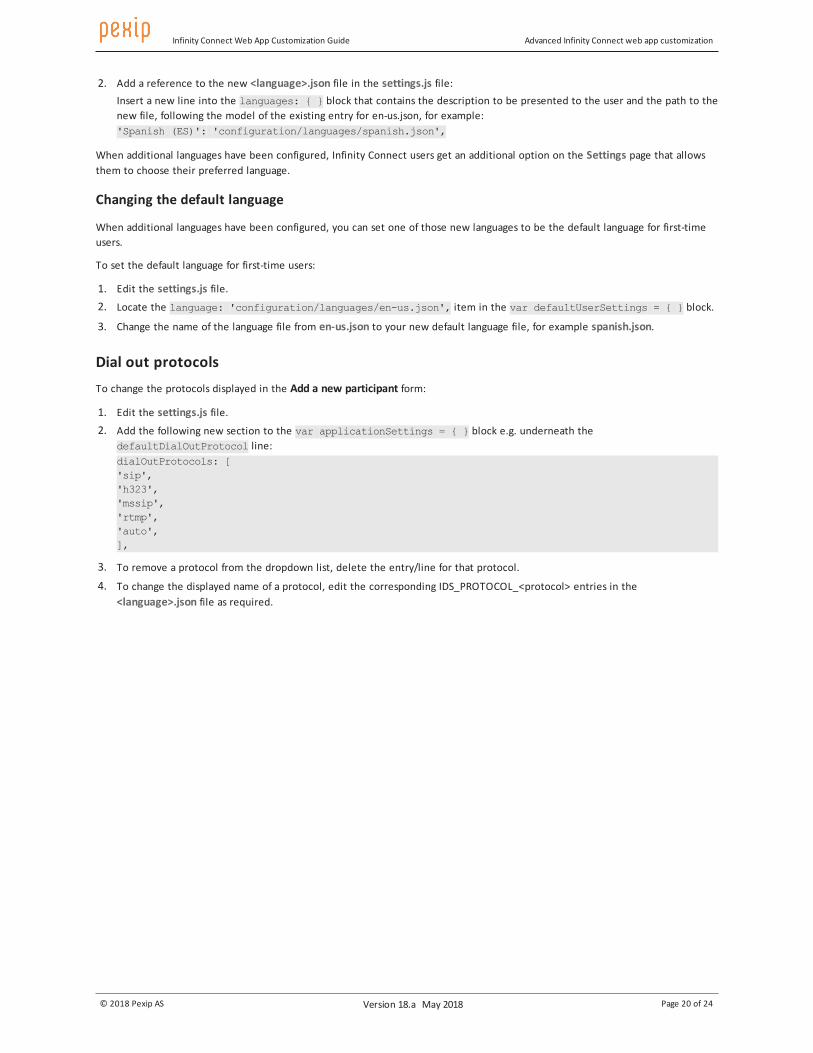
2. Add a reference to the new <language>.json file in the settings.js file:Insert a new line into the languages: { } block that contains the description to be presented to the user and the path to the new file, following the model of the existing entry for en-us.json, for example:'Spanish (ES)': 'configuration/languages/spanish.json',
When additional languages have been configured, Infinity Connect users get an additional option on the Settings page that allows them to choose their preferred language.
Changing the default language
When additional languages have been configured, you can set one of those new languages to be the default language for first-time users.
To set the default language for first-time users:
1. Edit the settings.js file. 2. Locate the language: 'configuration/languages/en-us.json', item in the var defaultUserSettings = { } block.
3. Change the name of the language file from en-us.json to your new default language file, for example spanish.json.
Dial out protocolsTo change the protocols displayed in the Add a new participant form:
1. Edit the settings.js file. 2. Add the following new section to the var applicationSettings = { } block e.g. underneath the
defaultDialOutProtocol line:dialOutProtocols: ['sip','h323','mssip','rtmp','auto',],
3. To remove a protocol from the dropdown list, delete the entry/line for that protocol.
4. To change the displayed name of a protocol, edit the corresponding IDS_PROTOCOL_<protocol> entries in the <language>.json file as required.
Infinity Connect Web App Customization Guide Advanced Infinity Connect web app customization
© 2018 Pexip AS Version 18.a May 2018 Page 21 of 24
Changing bandwidth settingsYou can add, remove or modify the bandwidth options presented to the user.
By default, 4 bandwidth options are provided. These are defined in the settings.js file:
bandwidths: [{ name: 'IDS_BANDWIDTH_LOW', value: 192 + 64 }, { name: 'IDS_BANDWIDTH_MEDIUM', value: 512 + 64 }, { name: 'IDS_BANDWIDTH_HIGH', value: 1200 + 64 }, { name: 'IDS_BANDWIDTH_MAXIMUM', value: 1800 + 64 }],
Each bandwidth option is defined as name-value pairs:
l Each name item must have a corresponding entry in the en-us.json file (and any other <language>.json files you create). l The value item defines the total bandwidth (for video and audio) in kbps that Infinity Connect will use for that selection. The
application always uses 64 kbps for audio, so the amount allocated for video is the total (n + n) value less 64 kbps.So, for example, if IDS_BANDWIDTH_LOW is selected, the application will use 192 kbps for video and 64 kbps for audio. The n + n style is used to make it easier to see how much bandwidth is used for video, but you could, for example, specify the low bandwidth value as just value: 256 which would result in the same allocations for video and audio.
Adding a new bandwidth option
To add new bandwidth options you must add new items to the settings.js file and to the en-us.json file (and any other <language>.json files you have created).
To add a new bandwidth option:
1. Edit the settings.js file. 2. Add a new item into the bandwidth: { } block. Place it in the position, relative to the other entries, in which you want it to
appear in the bandwidth selection dropdown as seen by the user.For example, to add a "Medium high" option that uses 900 kbps for video, that should appear between the existing "Medium" and "High" options, you would insert an entry as follows:
name: 'IDS_BANDWIDTH_MEDIUM', value: 512 + 64 }, { name: 'IDS_BANDWIDTH_MED_HIGH', value: 900 + 64 }, { name: 'IDS_BANDWIDTH_HIGH', value: 1200 + 64
3. Edit the en-us.json file. 4. Add a new IDS_BANDWIDTH_<xxxx> token entry using exactly the same format as the existing tokens.
The token name must match the name: item you created in the settings.js file.For example, the matching token for the new "Medium high" option would be:
"IDS_BANDWIDTH_MED_HIGH": "Medium-High Bandwidth ({{bandwidth}}kbps)",
Infinity Connect Web App Customization Guide Advanced Infinity Connect web app customization
© 2018 Pexip AS Version 18.a May 2018 Page 22 of 24
(The application automatically substitutes {{bandwidth}} with the corresponding value: entry (after performing any necessary arithmetic) in the settings.js file. Hence the end user would see "Medium-High Bandwidth (964kbps)".)
The new token can be placed anywhere in the en-us.json file, but we recommend adding it to the end of the file to make it easier to compare and identify any changes that have been added to the default version of the en-us.json file in any future releases.
5. If you have created additional <language>.json files, add a new IDS_BANDWIDTH_<xxxx> token entry into each of those files.(Use the same token entry in each file, and do not translate the {{bandwidth}} variable.)
Application styles, colors and imagesThe themes/default subfolder contains the files used to control the colors, styles and images used within the application:
Changing the application styles and colors (brand.css)
The themes/default/brand.css file is the application's stylesheet. It contains the following styles:
Style name The style configures....
brand-logo The reference to the logo.png file shown on the home page.
brand-background How the home page background image (background.jpg) file is displayed.
brand-primary The text and background colors used for the participant list title bar and the chat window title bar.
brand-secondary The text and background colors used for:
l the home page
l the "Settings" button on the home page
l the Settings page
l all other dialogs such as when entering a PIN, disconnecting, adding a new participant or selecting the type of content to present
l participant names in the chat window
l the background color of the participant list and chat window
brand-tertiary-hover The "on hover" colors for the brand-tertiary styled items.
In the default stylesheet, the brand-secondary and brand-tertiary-hover styles both share the same definitions.
brand-tertiary The text and background colors used for conference menu options, the participant list and for chat message content.
select The text and background colors used in dropdown selection fields.
In the default stylesheet, the brand-tertiary, select and input styles all share the same definitions.

Infinity Connect Web App Customization Guide Advanced Infinity Connect web app customization
© 2018 Pexip AS Version 18.a May 2018 Page 23 of 24
Style name The style configures....
stage-background The stage-background controls the appearance of the screen background (referred to as the stage) when a conference is in progress. It is a color layer that is applied on top of the brand-background image. By default it is set to a shade of black and with an opacity of .8, which has the effect of providing a dark background to the stage and obscuring any brand-background image.
If you have configured a brand-background image and want this to be displayed as a background on the conference stage, you should adjust the opacity setting accordingly. For example, setting opacity to 0.5 will allow the background image to be seen dimly; setting opacity to 0 will make the color layer completely transparent and the brand-background image will be clearly displayed.
black Currently unused.
button The colors of the text and background used in dialog buttons and the toolbar controls. (An exception is the "Settings" button on the home page which uses the brand-secondary styles; this enables you to deemphasize this button in relation to the "Connect" button.)
white Currently unused.
input.ng-dirty.ng-invalid Error messages shown in input fields.
select.ng-dirty.ng-invalid Currently unused.
red The colors of the text and background used in error messages, such as "Invalid conference" or "Invalid pin".
The background color for the:
l disconnect toolbar button
l waiting room (pause sign), mute and conference lock badges
green The foreground and background colors for the:
l connecting badges (phone ringing)
blue The foreground and background colors for the:
l participant presenting and speaking badges
l unread chat messages (on the show side bar toolbar when the side bar minimized)
l buttons and thumbnails in the share slides dialog
l buttons to escalate the connection to use audio or video
gray Currently unused.
button.outline Styling for the "Settings" button on the home page.
Background image for the home page and conference stage (background.jpg)
The themes/default/background.jpg file is referenced from brand.css and contains the background image shown on the home page and on the conference stage. By default, the background image covers the whole browser window and scales if the browser window resizes. This behavior can be customized in the brand.css file. The default background image is a picture of clouds.
By default the image is obscured from view on the conference stage due to the settings of the stage-background style.
To change the background image, replace the existing background.jpg file with a new file of the same name. We recommend using a JPEG image (for smallest file size) that is approximately 2000x1400 pixels.
Conference avatar (conference-avatar.jpg)
The themes/default/conference-avatar.jpg file is referenced from settings.js and is used to represent the conference at the top of the participant list.
Infinity Connect Web App Customization Guide Advanced Infinity Connect web app customization
© 2018 Pexip AS Version 18.a May 2018 Page 24 of 24
By default, the reference to conference-avatar.jpg in settings.js is commented out. This means that the default conference avatar — which is the presence_avatar_image.jpg file in the conference theme — is always used. (If the default conference theme is in use, then the avatar image will be the white on orange "pexip" logo.)
To change the conference avatar:
1. Replace the existing conference-avatar.jpg file with a new JPG file of the same name.The image is automatically scaled to 40x40 pixels and rounded by the application.
2. Remove the '//' comment markers from the overrideConferenceAvatar entry in the settings.js file.
Home page logo (logo.png)
The logo.png file is referenced from brand.css and contains the image shown on the home page. The default logo is the orange text "pexip" logo.
To change the logo, you should replace the existing logo.png file with a new PNG file of the same name. The logo image is used "as is", so we recommend using a PNG image (for best quality) and that the logo is approximately 200x100 pixels and has a transparent background.
More informationParticipant avatars cannot be branded via the web app, but they can be controlled by using external policy. For full details about how to integrate Pexip Infinity with an external policy server, see Using external and local policy to control Pexip Infinity behavior.
In addition to customizing the appearance of the Infinity Connect web app, you can also:
l Customize the Infinity Connect desktop client. l Use themes to change the voice prompts and images provided to participants when they are accessing a Virtual Meeting Room,
Virtual Auditorium or Virtual Reception. For more information, see Customizing video and voice prompts using themes.
If any further information on customizing Pexip Infinity is required, please contact your Pexip authorized support representative.