Embed Size (px)
Citation preview
Incident Management (NON-APS): Nursing Homes
Louisiana Department of Health (LDH) Training Guide
Incident Management (Non-APS)
Incident Management (Non-APS): Nursing Homes
Copyright © 1997-2015 WellSky
All rights reserved.
The software contains proprietary information of WellSky.; it is provided under a license agreement containing restrictions on use and disclosure and is also protected by copyright law. Reverse engineering of the software is prohibited.
Due to continued product development, this information may change without notice. The information and intellectual property contained herein is confidential between WellSky and the consumer and remains the exclusive property of WellSky If you find any problems in the documentation, please report them to us in writing. WellSky does not warrant that this document is error-free.
No part of this publication may be reproduced, stored in a retrieval system, or transmitted in any form or by any means, electronic, mechanical, photocopying, recording or otherwise without the prior written permission of WellSky.
Microsoft Word, Microsoft Office® and Windows® are trademarks of the Microsoft Corporation.
No PHI was used in the creation of this guide.
111711 West 79th St. Lenexa, KS 66214 |
Incident Management (Non-APS)
Incident Management (Non-APS)Statewide Incident Management System (SIMS) maintains incident records for participants/victims/patients who are served by LDH.
Introduction This training introduces you to the basic functions of adding and maintaining incident records for Nursing Homes.
Importance Your confidence in using SIMS for processing, follow-up/investigation and reporting workflows will increase as you develop proficiency in the software.
Overview To help the Louisiana Department of Health develop the necessary skills and understanding to effectively use SIMS to perform the reporting workflows in a Critical Incident Reporting context.
Objectives Log into and out of SIMS Successfully navigate the program Understanding Ticklers, Dashboards, Workflow Wizards, Alerts, Forms,
Word Merges and Reports Following the steps in the guide, accurately enter an Incident record
Topics Topic Page
Initial Incident Entry workflow 16
211711 West 79th St. Lenexa, KS 66214 |
Incident Management (Non-APS)
Icons Used in this Manual
Icon Description
TipTips provide general recommendations on how to make it easier or more productive to use SIMS.
CautionThe Caution icon highlights areas of note or concern, where failure to use the system properly may cause or exacerbate problems.
NoteNotes provide additional information of general interest about a specific function or process of SIMS.
ExampleExamples are provided to help you develop a better understanding of the subject area and how SIMS may be used in a specific scenario of relevance.
311711 West 79th St. Lenexa, KS 66214 |
Incident Management (Non-APS)
SIMS BasicsSIMS is a web-based system that is accessed from a Web browser, specifically Internet Explorer® (IE). Your workstation will be configured before you “go live” to allow the system and all its functionality to operate properly. If you experience any problems during training or after “go live”, please coordinate with your System Administrator to evaluate the issue.
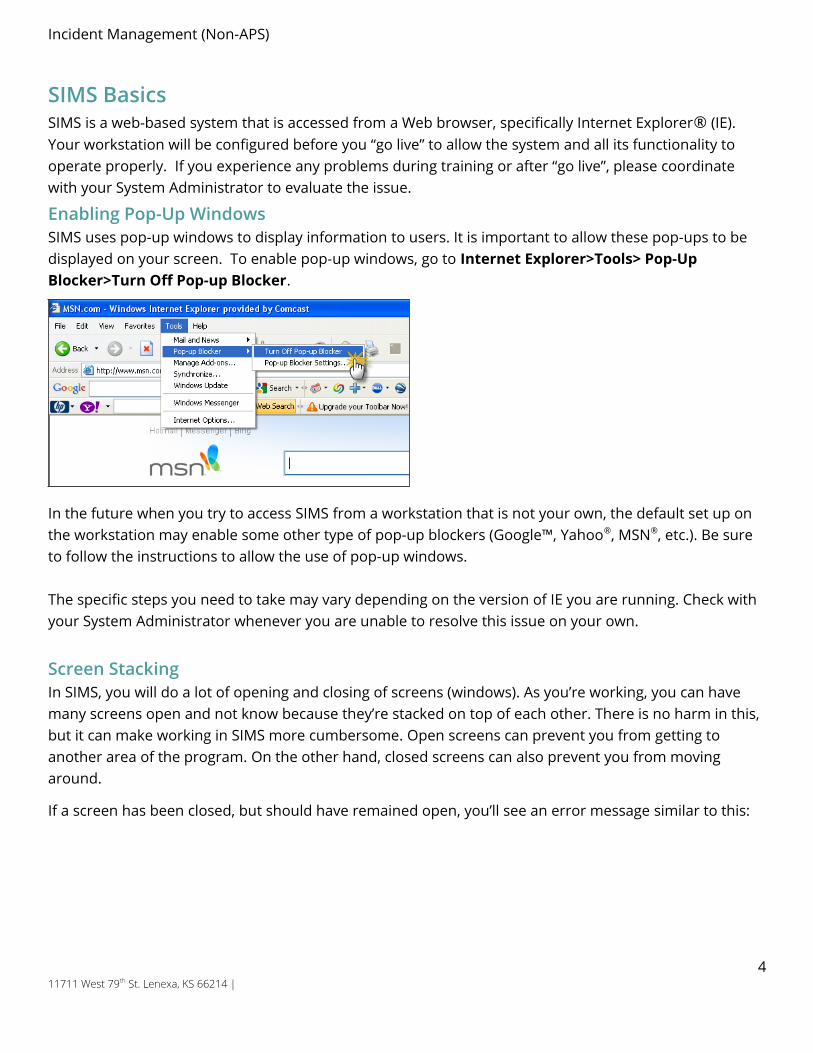
Enabling Pop-Up WindowsSIMS uses pop-up windows to display information to users. It is important to allow these pop-ups to be displayed on your screen. To enable pop-up windows, go to Internet Explorer>Tools> Pop-Up Blocker>Turn Off Pop-up Blocker.
In the future when you try to access SIMS from a workstation that is not your own, the default set up on the workstation may enable some other type of pop-up blockers (Google™, Yahoo®, MSN®, etc.). Be sure to follow the instructions to allow the use of pop-up windows.
The specific steps you need to take may vary depending on the version of IE you are running. Check with your System Administrator whenever you are unable to resolve this issue on your own.
Screen StackingIn SIMS, you will do a lot of opening and closing of screens (windows). As you’re working, you can have many screens open and not know because they’re stacked on top of each other. There is no harm in this, but it can make working in SIMS more cumbersome. Open screens can prevent you from getting to another area of the program. On the other hand, closed screens can also prevent you from moving around.
If a screen has been closed, but should have remained open, you’ll see an error message similar to this:
411711 West 79th St. Lenexa, KS 66214 |
Incident Management (Non-APS)
Best Practices recommend that you click File > Save and Close when you’re saving records. This prevents unnecessary screens from staying open.
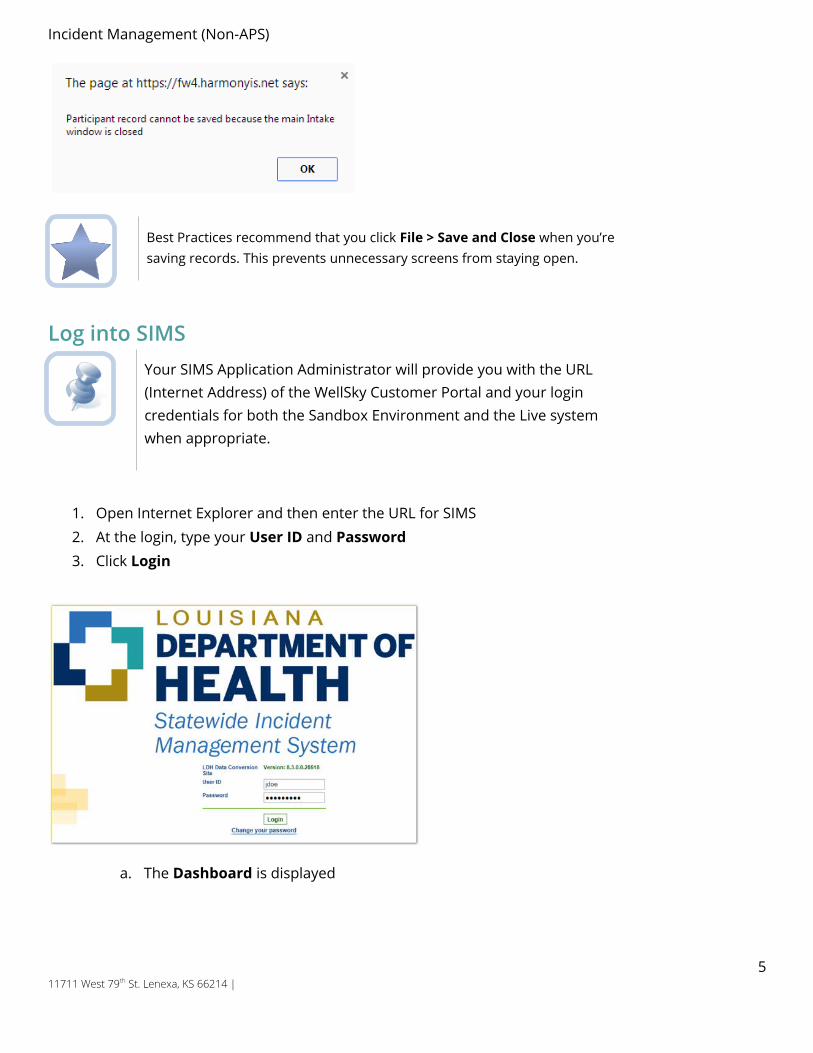
Log into SIMSYour SIMS Application Administrator will provide you with the URL (Internet Address) of the WellSky Customer Portal and your login credentials for both the Sandbox Environment and the Live system when appropriate.
1. Open Internet Explorer and then enter the URL for SIMS2. At the login, type your User ID and Password3. Click Login
a. The Dashboard is displayed
511711 West 79th St. Lenexa, KS 66214 |
Incident Management (Non-APS)
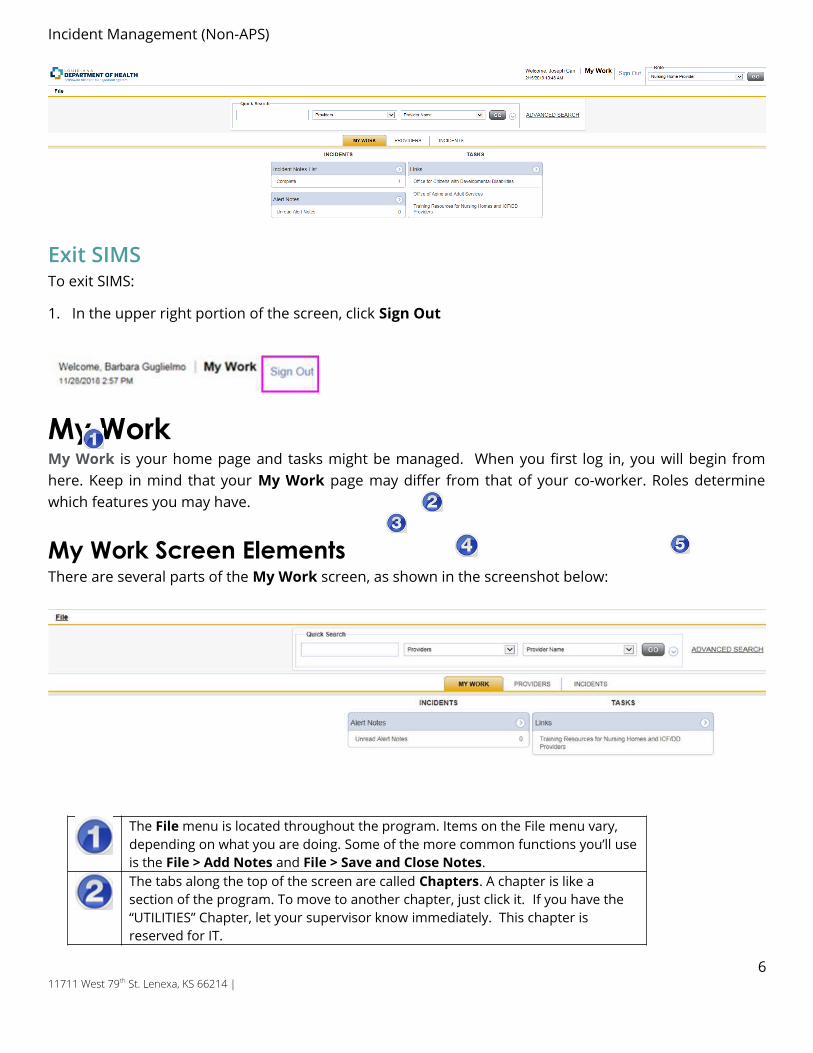
Exit SIMSTo exit SIMS:
1. In the upper right portion of the screen, click Sign Out
My Work My Work is your home page and tasks might be managed. When you first log in, you will begin from here. Keep in mind that your My Work page may differ from that of your co-worker. Roles determine which features you may have.
My Work Screen ElementsThere are several parts of the My Work screen, as shown in the screenshot below:
The File menu is located throughout the program. Items on the File menu vary, depending on what you are doing. Some of the more common functions you’ll use is the File > Add Notes and File > Save and Close Notes.The tabs along the top of the screen are called Chapters. A chapter is like a section of the program. To move to another chapter, just click it. If you have the “UTILITIES” Chapter, let your supervisor know immediately. This chapter is reserved for IT.
611711 West 79th St. Lenexa, KS 66214 |
Incident Management (Non-APS)
My Work is divided into areas for consumers, providers, and tasks. You may see all or just some of these areas.Within each area are boxes that contain information. These are referred to as Panes.Each pane includes a down arrow. When you click the down arrow, items in the pane are collapsed. This is helpful if you need more space on your screen. To expand the items in the pane, click the now right-facing arrow.
Many areas of the program allow you to collapse sections (panels). Click the down
arrow in the circle . When you click it, it becomes a right-facing arrow
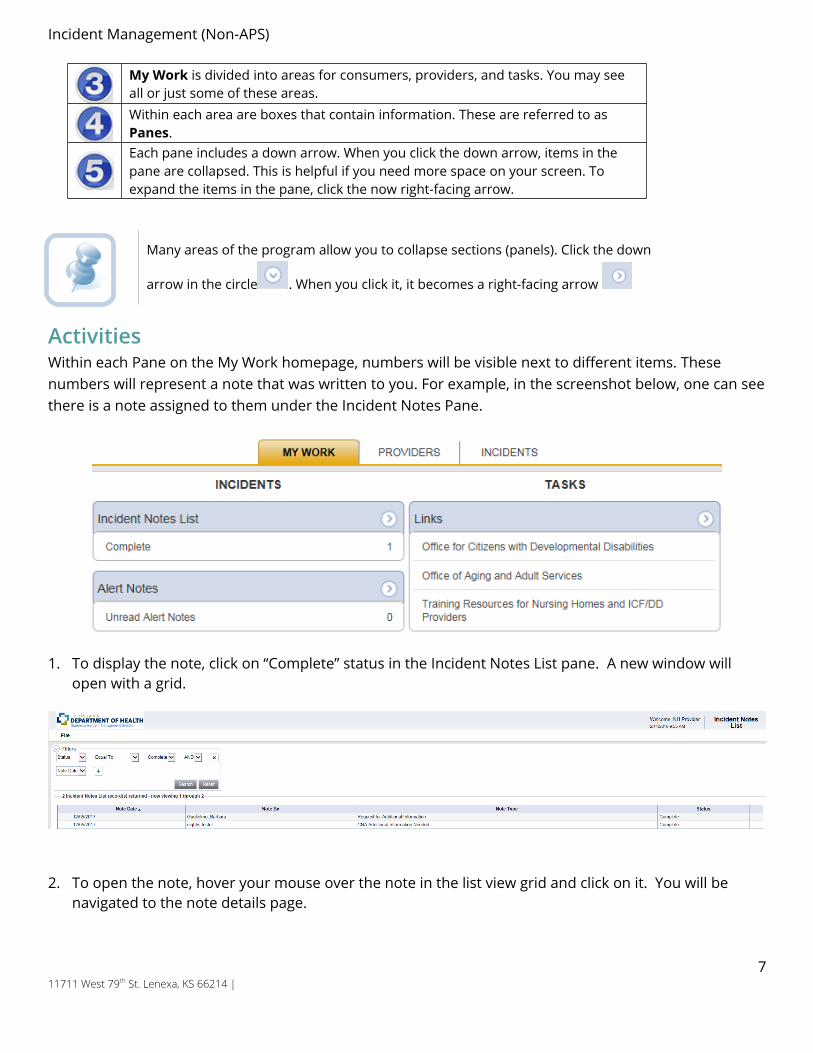
ActivitiesWithin each Pane on the My Work homepage, numbers will be visible next to different items. These numbers will represent a note that was written to you. For example, in the screenshot below, one can see there is a note assigned to them under the Incident Notes Pane.
1. To display the note, click on “Complete” status in the Incident Notes List pane. A new window will open with a grid.
2. To open the note, hover your mouse over the note in the list view grid and click on it. You will be navigated to the note details page.
711711 West 79th St. Lenexa, KS 66214 |
Incident Management (Non-APS)
Navigating the ApplicationThis section provides a brief overview and some tips for working in the application.
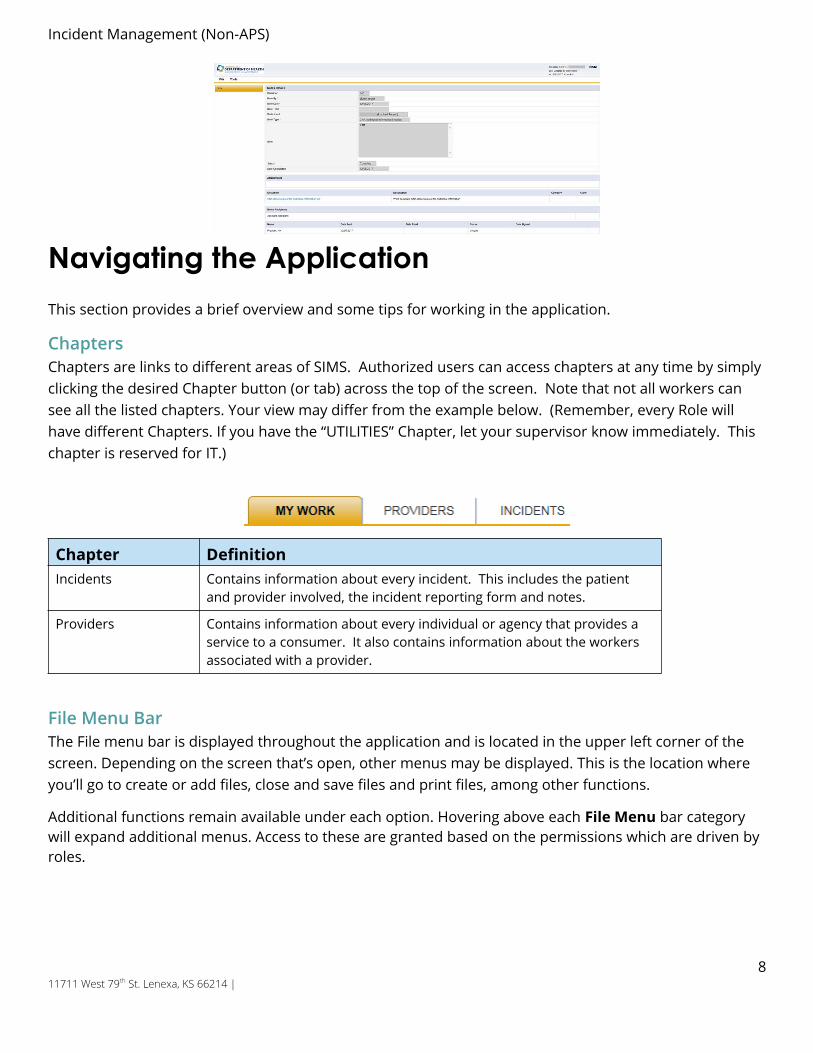
ChaptersChapters are links to different areas of SIMS. Authorized users can access chapters at any time by simply clicking the desired Chapter button (or tab) across the top of the screen. Note that not all workers can see all the listed chapters. Your view may differ from the example below. (Remember, every Role will have different Chapters. If you have the “UTILITIES” Chapter, let your supervisor know immediately. This chapter is reserved for IT.)
Chapter DefinitionIncidents Contains information about every incident. This includes the patient
and provider involved, the incident reporting form and notes.
Providers Contains information about every individual or agency that provides a service to a consumer. It also contains information about the workers associated with a provider.
File Menu BarThe File menu bar is displayed throughout the application and is located in the upper left corner of the screen. Depending on the screen that’s open, other menus may be displayed. This is the location where you’ll go to create or add files, close and save files and print files, among other functions.
Additional functions remain available under each option. Hovering above each File Menu bar category will expand additional menus. Access to these are granted based on the permissions which are driven by roles.
811711 West 79th St. Lenexa, KS 66214 |
Incident Management (Non-APS)
When users scroll through a page in SIMS, the File Menu header is frozen so that users will always be able to access these File Menu functions no matter where the cursor is located on the page.
File – Contains the functions to add a new record or to view history changes to the data in view.
Edit – Provides the ability to make changes to the data included in the record.
Tools - Provides the user with additional functionality based on the page currently in view.
Reports – Lists standard reports built into the WellSky software. Additional reports may be available to certain roles or groups. If a user has access to the Reports Menu, click the menu and select the report and it will open in a new window.
Word Merge - Lists documents that have been uploaded to the application using the Word Merge Utility and are available to certain roles and groups. If a user has access to the Word Merge File menu, to access the document, click the file menu and select the document and it will open a new window.
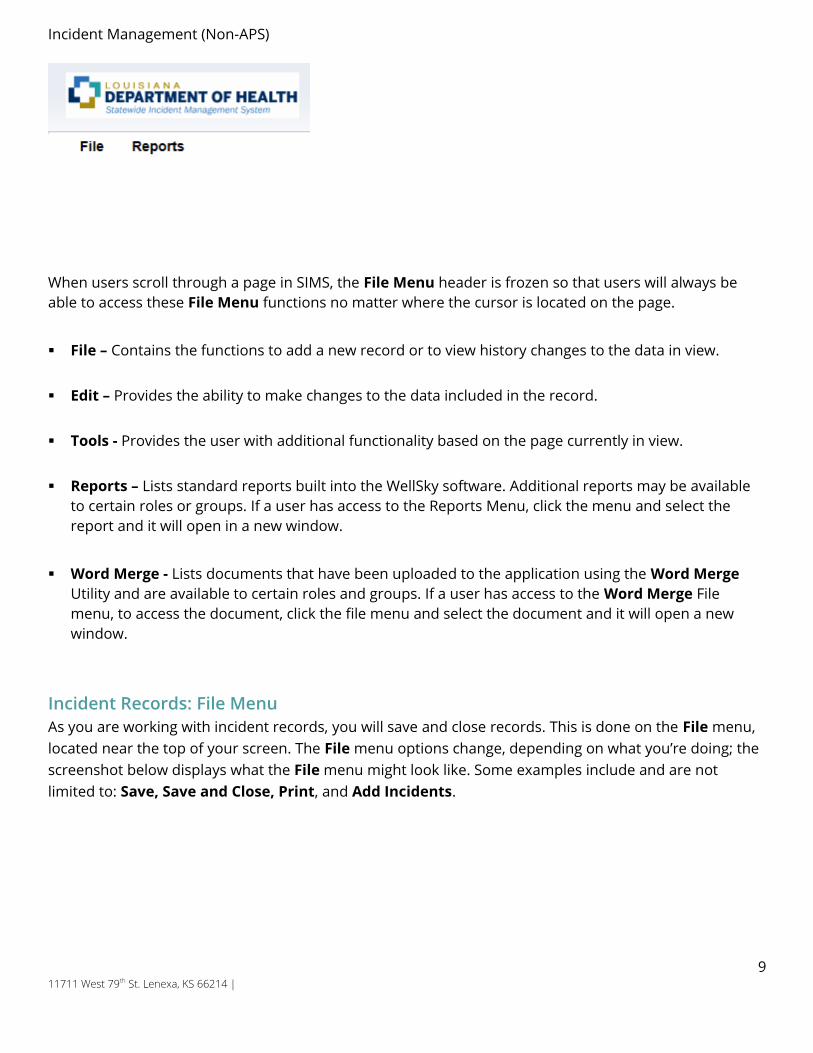
Incident Records: File MenuAs you are working with incident records, you will save and close records. This is done on the File menu, located near the top of your screen. The File menu options change, depending on what you’re doing; the screenshot below displays what the File menu might look like. Some examples include and are not limited to: Save, Save and Close, Print, and Add Incidents.
911711 West 79th St. Lenexa, KS 66214 |
Incident Management (Non-APS)
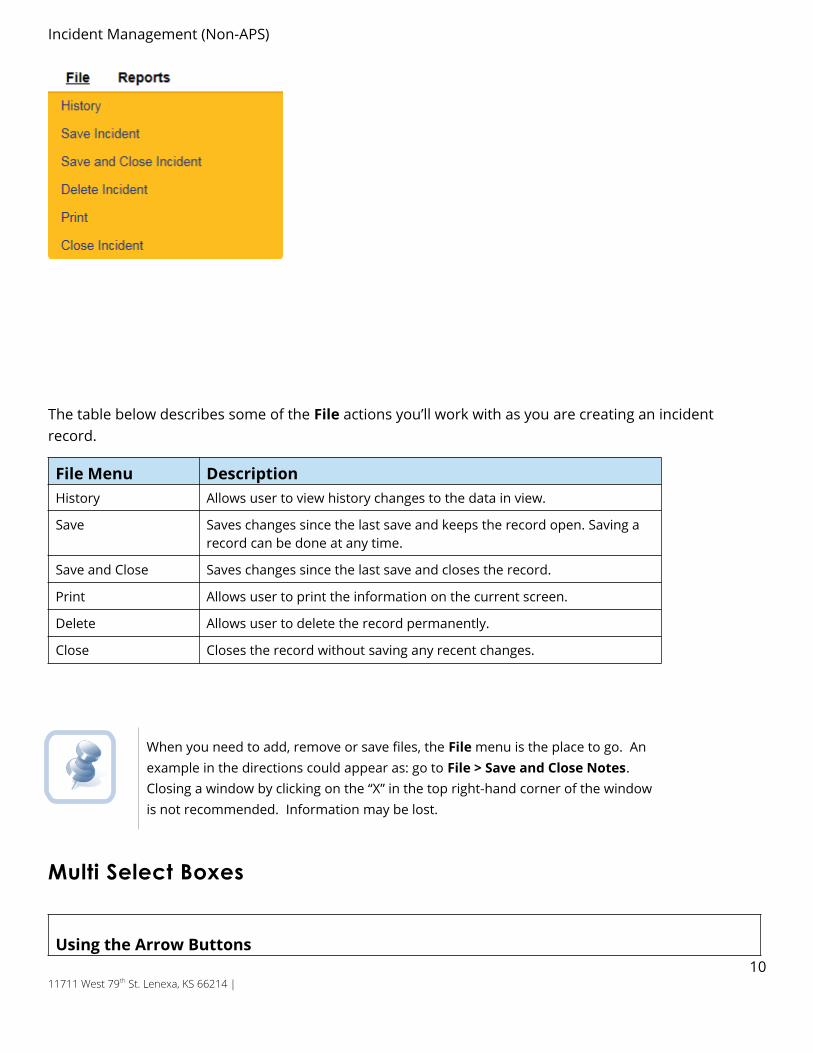
The table below describes some of the File actions you’ll work with as you are creating an incident record.
File Menu DescriptionHistory Allows user to view history changes to the data in view.
Save Saves changes since the last save and keeps the record open. Saving a record can be done at any time.
Save and Close Saves changes since the last save and closes the record.
Print Allows user to print the information on the current screen.
Delete Allows user to delete the record permanently.
Close Closes the record without saving any recent changes.
When you need to add, remove or save files, the File menu is the place to go. An example in the directions could appear as: go to File > Save and Close Notes. Closing a window by clicking on the “X” in the top right-hand corner of the window is not recommended. Information may be lost.
Multi Select Boxes
Using the Arrow Buttons10
11711 West 79th St. Lenexa, KS 66214 |
Incident Management (Non-APS)
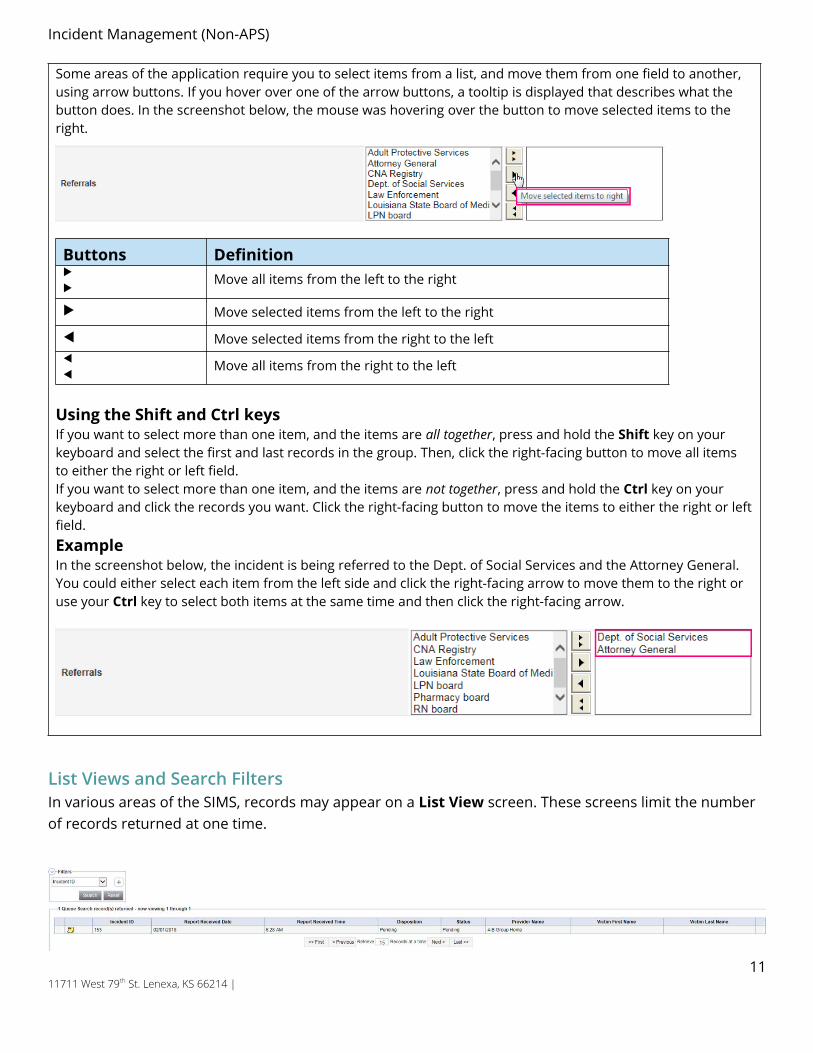
Some areas of the application require you to select items from a list, and move them from one field to another, using arrow buttons. If you hover over one of the arrow buttons, a tooltip is displayed that describes what the button does. In the screenshot below, the mouse was hovering over the button to move selected items to the right.
Buttons Definition
Move all items from the left to the right
Move selected items from the left to the right
Move selected items from the right to the left
Move all items from the right to the left
Using the Shift and Ctrl keysIf you want to select more than one item, and the items are all together, press and hold the Shift key on your keyboard and select the first and last records in the group. Then, click the right-facing button to move all items to either the right or left field.If you want to select more than one item, and the items are not together, press and hold the Ctrl key on your keyboard and click the records you want. Click the right-facing button to move the items to either the right or left field.ExampleIn the screenshot below, the incident is being referred to the Dept. of Social Services and the Attorney General. You could either select each item from the left side and click the right-facing arrow to move them to the right or use your Ctrl key to select both items at the same time and then click the right-facing arrow.
List Views and Search FiltersIn various areas of the SIMS, records may appear on a List View screen. These screens limit the number of records returned at one time.
1111711 West 79th St. Lenexa, KS 66214 |
Incident Management (Non-APS)
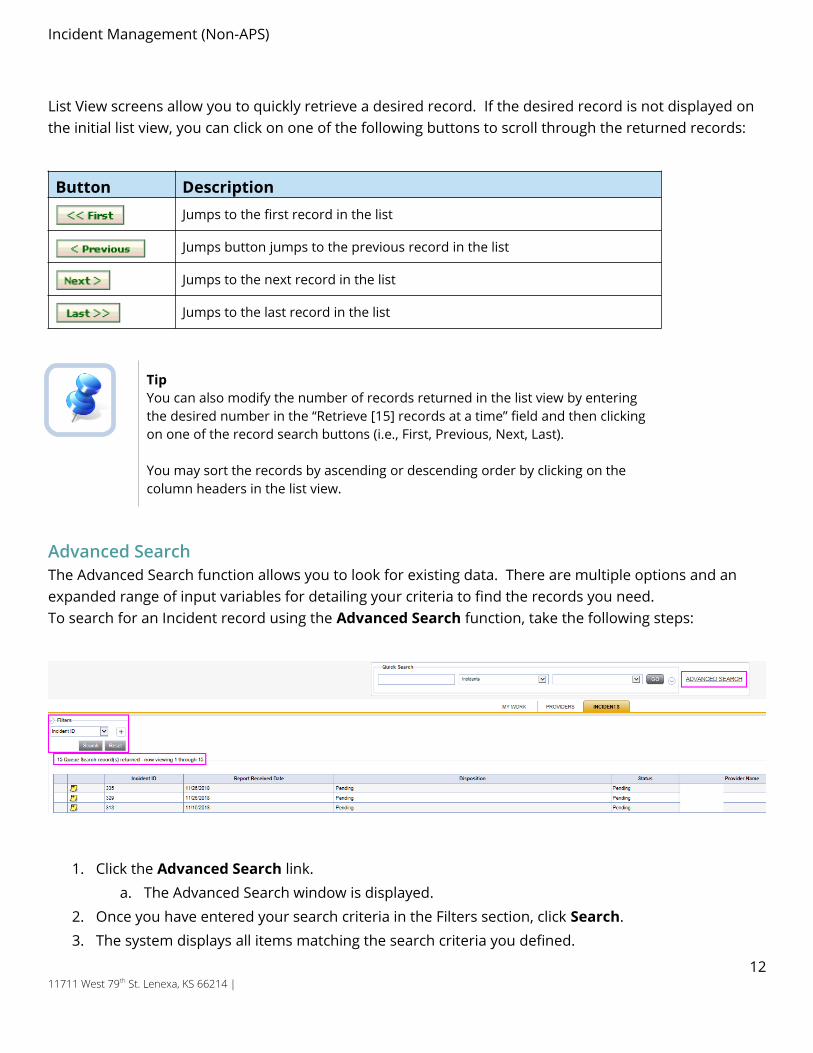
List View screens allow you to quickly retrieve a desired record. If the desired record is not displayed on the initial list view, you can click on one of the following buttons to scroll through the returned records:
Button DescriptionJumps to the first record in the list
Jumps button jumps to the previous record in the list
Jumps to the next record in the list
Jumps to the last record in the list
TipYou can also modify the number of records returned in the list view by entering the desired number in the “Retrieve [15] records at a time” field and then clicking on one of the record search buttons (i.e., First, Previous, Next, Last).
You may sort the records by ascending or descending order by clicking on the column headers in the list view.
Advanced SearchThe Advanced Search function allows you to look for existing data. There are multiple options and an expanded range of input variables for detailing your criteria to find the records you need. To search for an Incident record using the Advanced Search function, take the following steps:
1. Click the Advanced Search link. a. The Advanced Search window is displayed.
2. Once you have entered your search criteria in the Filters section, click Search.3. The system displays all items matching the search criteria you defined.
1211711 West 79th St. Lenexa, KS 66214 |
Incident Management (Non-APS)
NoteYou will only be able to see items that are permitted by security settings for your User ID.
1311711 West 79th St. Lenexa, KS 66214 |
Incident Management (Non-APS)
Advanced Search WindowEach filter allows you to select from the following comparison search criteria:
Term DefinitionEqual To Returns records that match the entered criteria. For example, if <Last Name> is entered
as “equal to” a specific person’s name, the Consumer records assigned to that Worker will be returned.
Begins With Returns records that begin with the entered criteria. For example, if <Last Name> is entered as “begins with” ‘T’ the system will return records assigned to the Worker having last names that start with ‘T’, such as Tester and Thomas.
Ends With Returns records that end with the entered criteria. For example, if you search on <Last Name> “ends with” ‘r’, you can retrieve records where a Consumer’s name ends in ‘r’, such as Tester.
Not Equal To Returns records that do not match the entered criteria. For example, if a particular name is entered for <Last Name>, the system will return a list of records except those records for the name provided in the search criteria.
Greater Than Returns records that are dated later than the entered criteria. For example, if <DOB> is entered as “greater than” ‘03/01/2015’, the system will return all records with a record whose date of births are after March 1, 2015.
Less Than Returns records that are dated earlier than the entered criteria. For example, if <DOB> is entered as “less than” ‘03/31/2015’, the system will return data for all records with a birth date before March 31, 2015.
Contains Returns records that contain the entered criteria. For example, if <Last Name> is entered as “contains” specific values in the person’s name, the Consumer Record(s) assigned to that worker with those values would be returned.
Blank A record is returned where the selected field does not have a value in the field.
Non-Blank Returns records where the selected field does have a value in the field.
Boolean LogicIn addition, you can search on these filters using Boolean (and/or) logic:
AND - Tightens your search: records returned only if meeting ALL criteria.
ExampleFind Consumers where <DOB> is greater than (>) March 1, 2000 and <DOB> is less than (<) June 30, 2015. This returns all reports dated between the two dates entered.
OR - Broadens your search; records returned if meeting EITHER criteria:
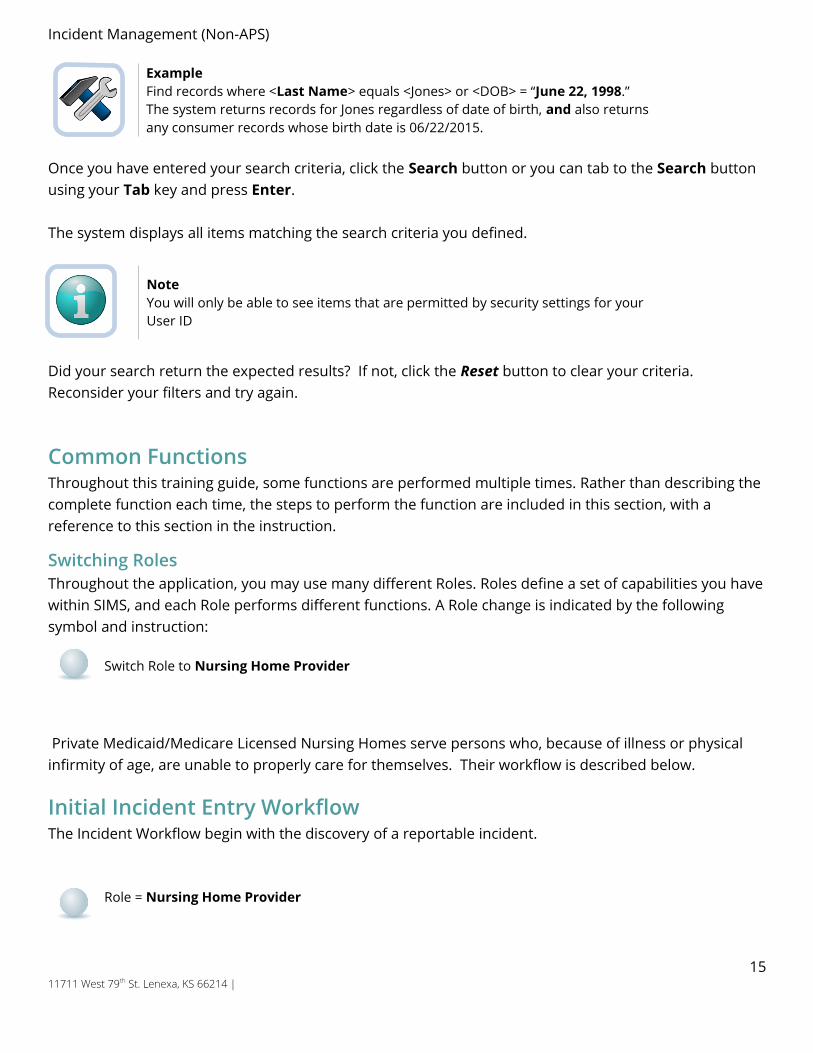
ExampleFind records where <Last Name> equals <Jones> or <DOB> = “June 22, 1998.”
1411711 West 79th St. Lenexa, KS 66214 |
Incident Management (Non-APS)
The system returns records for Jones regardless of date of birth, and also returns any consumer records whose birth date is 06/22/2015.
Once you have entered your search criteria, click the Search button or you can tab to the Search button using your Tab key and press Enter.
The system displays all items matching the search criteria you defined.
NoteYou will only be able to see items that are permitted by security settings for your User ID
Did your search return the expected results? If not, click the Reset button to clear your criteria. Reconsider your filters and try again.
Common FunctionsThroughout this training guide, some functions are performed multiple times. Rather than describing the complete function each time, the steps to perform the function are included in this section, with a reference to this section in the instruction.
Switching RolesThroughout the application, you may use many different Roles. Roles define a set of capabilities you have within SIMS, and each Role performs different functions. A Role change is indicated by the following symbol and instruction:
Switch Role to Nursing Home Provider
Private Medicaid/Medicare Licensed Nursing Homes serve persons who, because of illness or physical infirmity of age, are unable to properly care for themselves. Their workflow is described below.
Initial Incident Entry WorkflowThe Incident Workflow begin with the discovery of a reportable incident.
Role = Nursing Home Provider
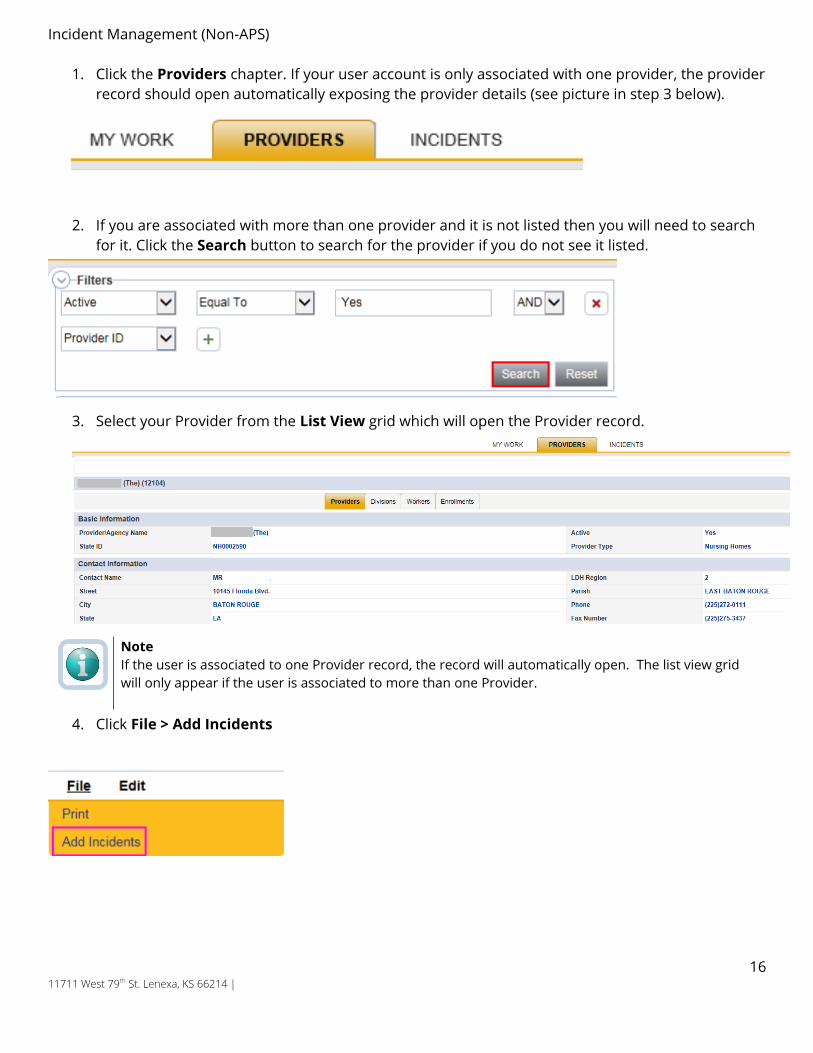
1. Click the Providers chapter. If your user account is only associated with one provider, the provider record should open automatically exposing the provider details (see picture in step 3 below).
1511711 West 79th St. Lenexa, KS 66214 |
Incident Management (Non-APS)
2. If you are associated with more than one provider and it is not listed then you will need to search for it. Click the Search button to search for the provider if you do not see it listed.
3. Select your Provider from the List View grid which will open the Provider record.
NoteIf the user is associated to one Provider record, the record will automatically open. The list view grid will only appear if the user is associated to more than one Provider.
4. Click File > Add Incidents
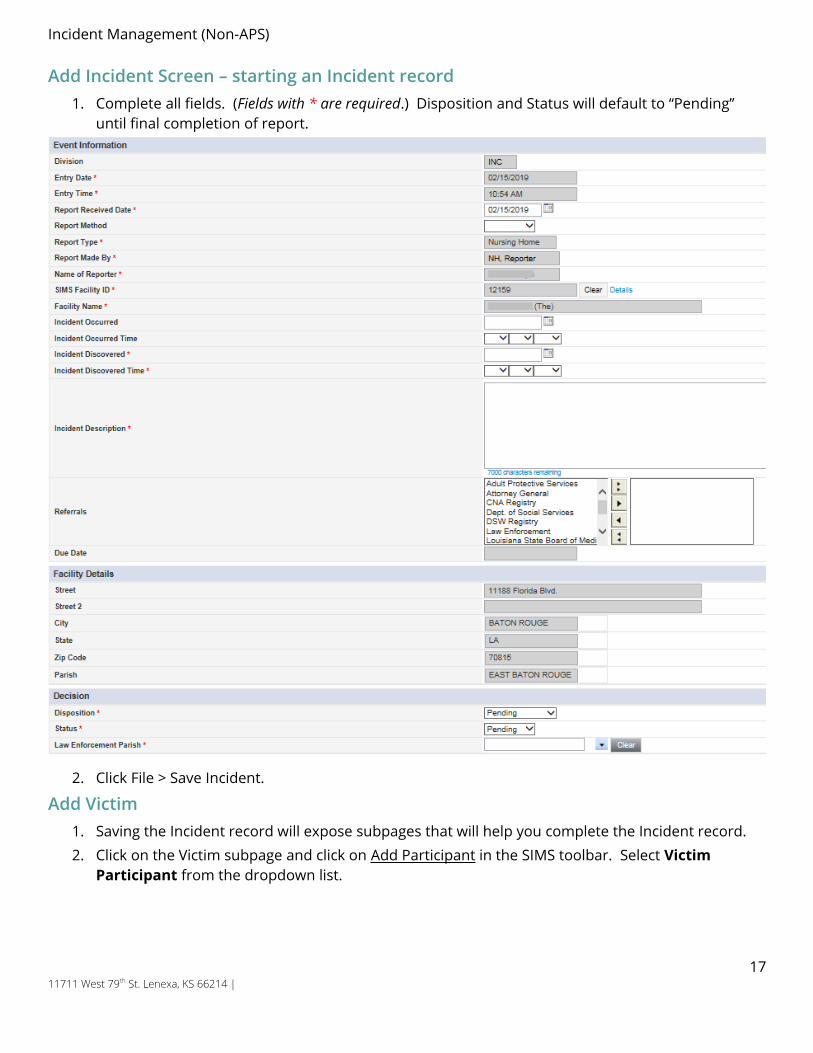
Add Incident Screen – starting an Incident record1. Complete all fields. (Fields with * are required.) Disposition and Status will default to “Pending”
until final completion of report.
1611711 West 79th St. Lenexa, KS 66214 |
Incident Management (Non-APS)
2. Click File > Save Incident.
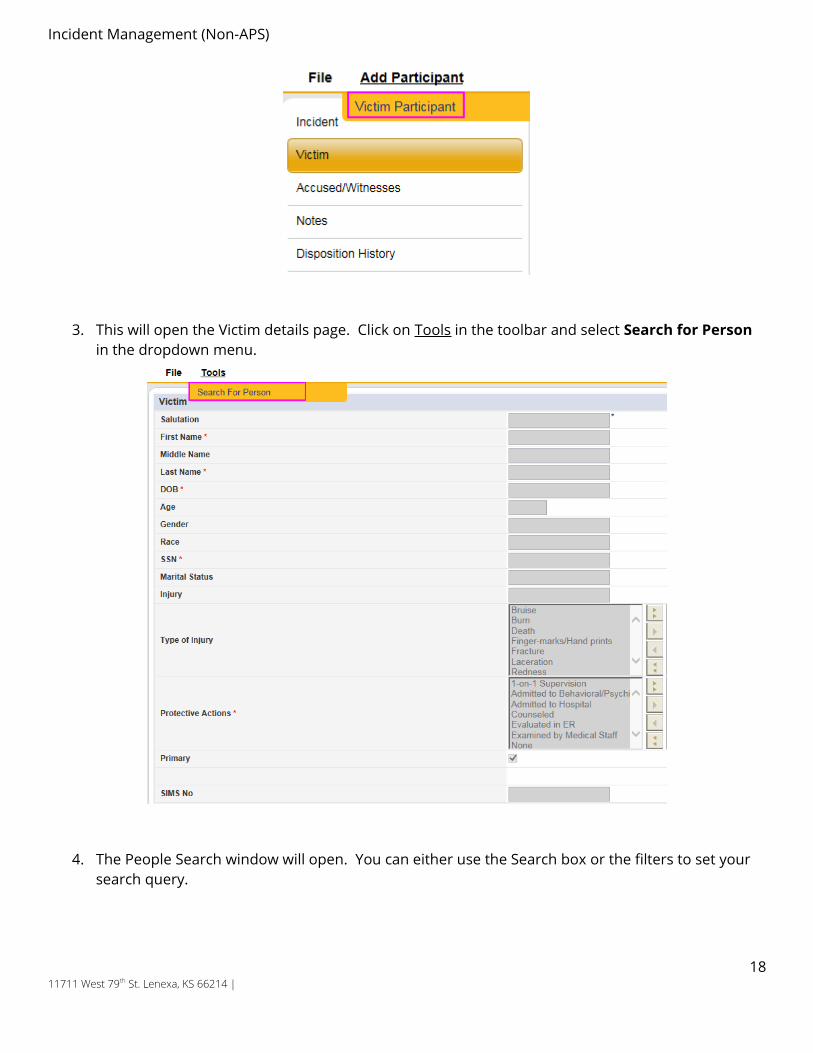
Add Victim1. Saving the Incident record will expose subpages that will help you complete the Incident record. 2. Click on the Victim subpage and click on Add Participant in the SIMS toolbar. Select Victim
Participant from the dropdown list.
1711711 West 79th St. Lenexa, KS 66214 |
Incident Management (Non-APS)
3. This will open the Victim details page. Click on Tools in the toolbar and select Search for Person in the dropdown menu.
4. The People Search window will open. You can either use the Search box or the filters to set your search query.
1811711 West 79th St. Lenexa, KS 66214 |
Incident Management (Non-APS)
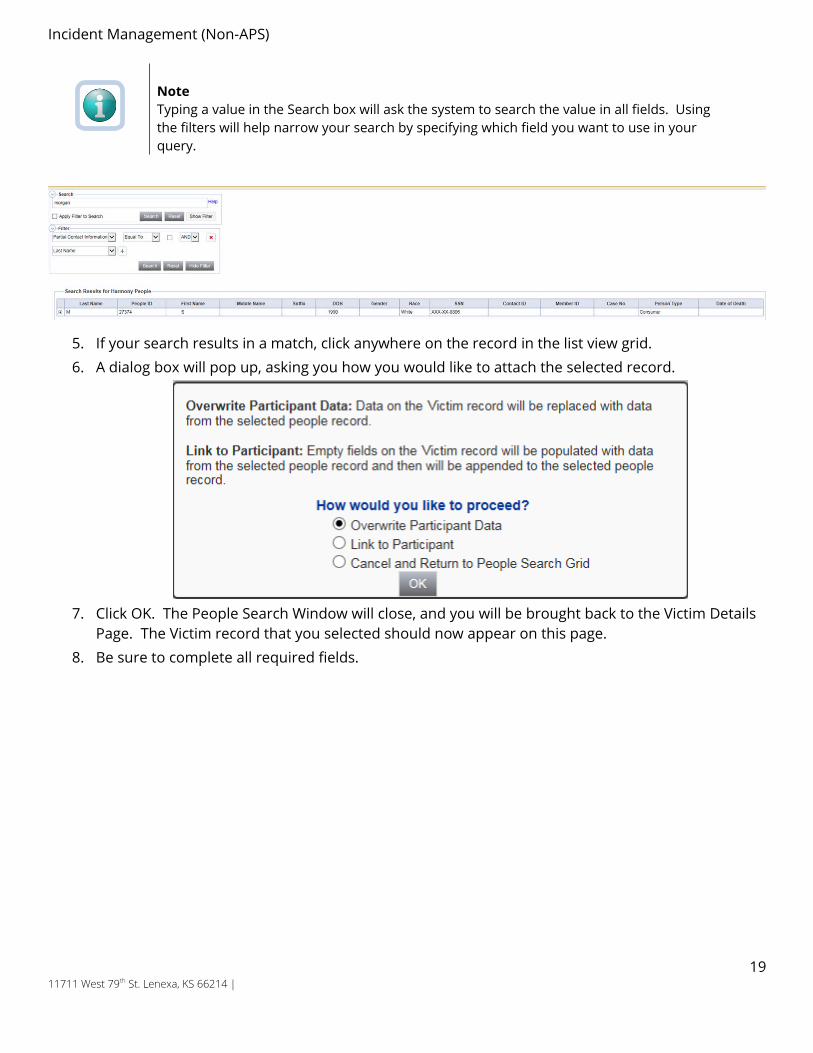
NoteTyping a value in the Search box will ask the system to search the value in all fields. Using the filters will help narrow your search by specifying which field you want to use in yourquery.
5. If your search results in a match, click anywhere on the record in the list view grid.6. A dialog box will pop up, asking you how you would like to attach the selected record.
7. Click OK. The People Search Window will close, and you will be brought back to the Victim Details Page. The Victim record that you selected should now appear on this page.
8. Be sure to complete all required fields.
1911711 West 79th St. Lenexa, KS 66214 |

Incident Management (Non-APS)
9. Click File > Save and Close Victim.10. If your search does not generate any results, click File > Close People Search.
11. You will be brought back to the Victim Details Page. Complete all the relevant information.
2011711 West 79th St. Lenexa, KS 66214 |
Incident Management (Non-APS)
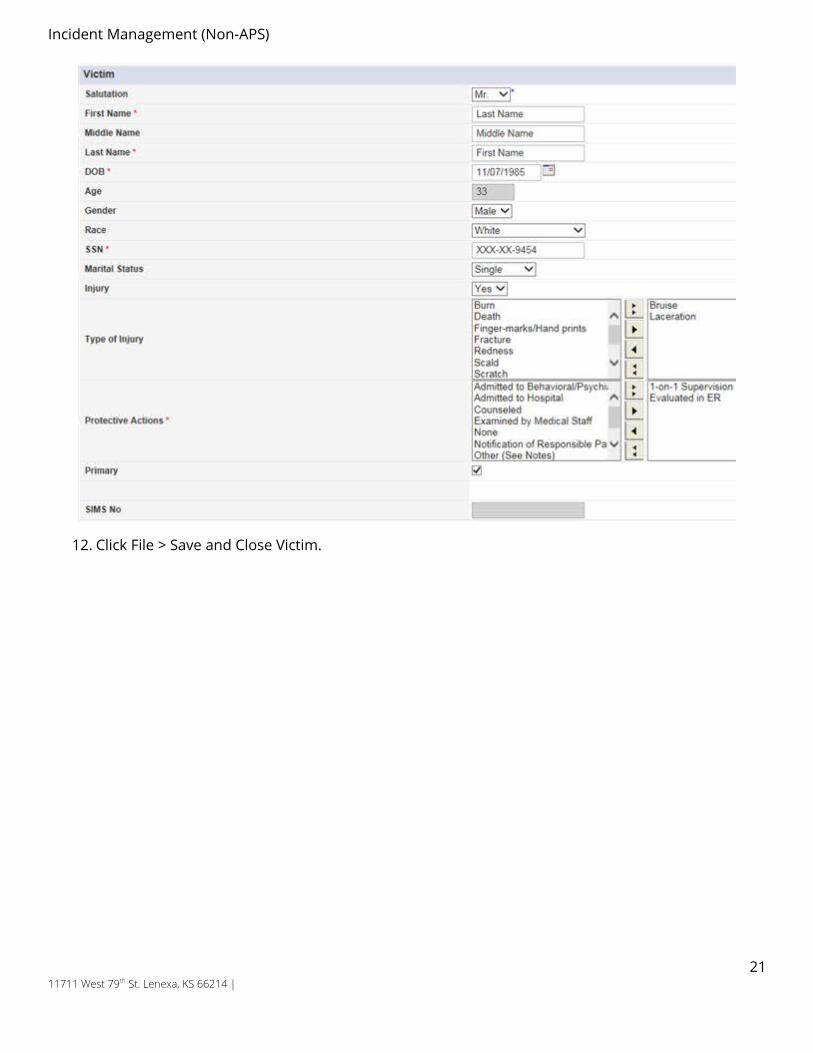
12. Click File > Save and Close Victim.
2111711 West 79th St. Lenexa, KS 66214 |
Incident Management (Non-APS)
Add Incident ReportThe HSS Incident Report captures information on the Incident Category, Accused, and Witnesses.
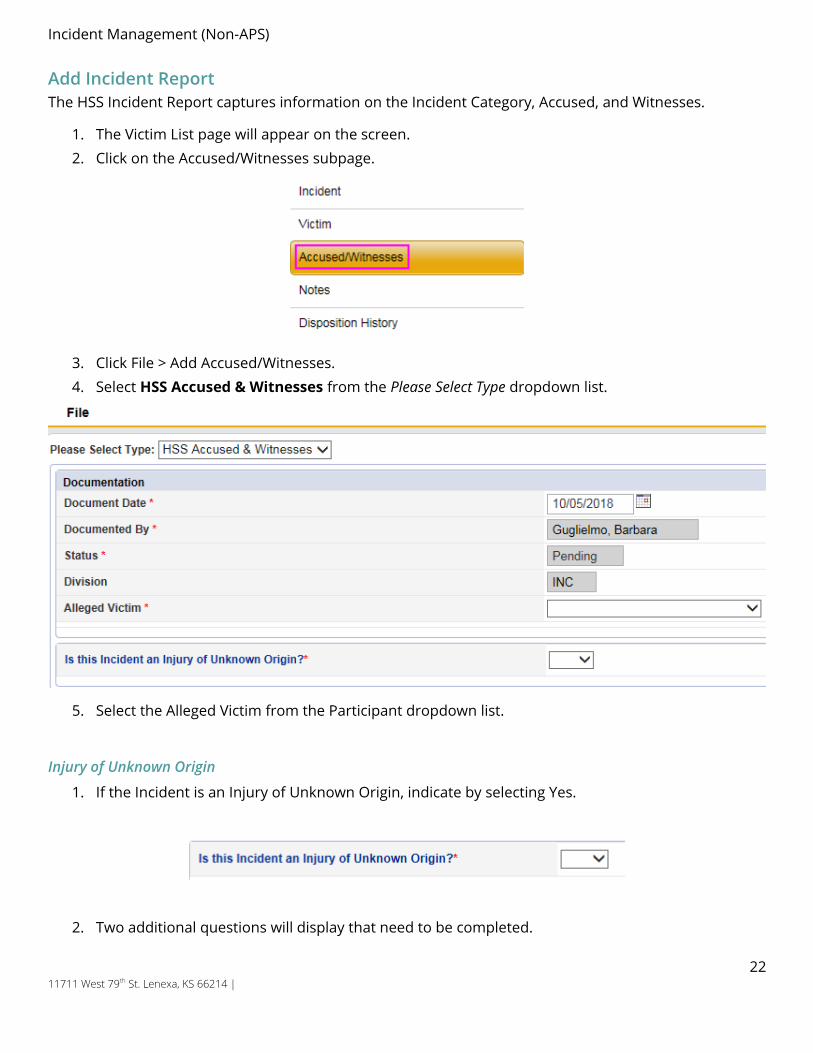
1. The Victim List page will appear on the screen. 2. Click on the Accused/Witnesses subpage.
3. Click File > Add Accused/Witnesses. 4. Select HSS Accused & Witnesses from the Please Select Type dropdown list.
5. Select the Alleged Victim from the Participant dropdown list.
Injury of Unknown Origin
1. If the Incident is an Injury of Unknown Origin, indicate by selecting Yes.
2. Two additional questions will display that need to be completed.
2211711 West 79th St. Lenexa, KS 66214 |
Incident Management (Non-APS)
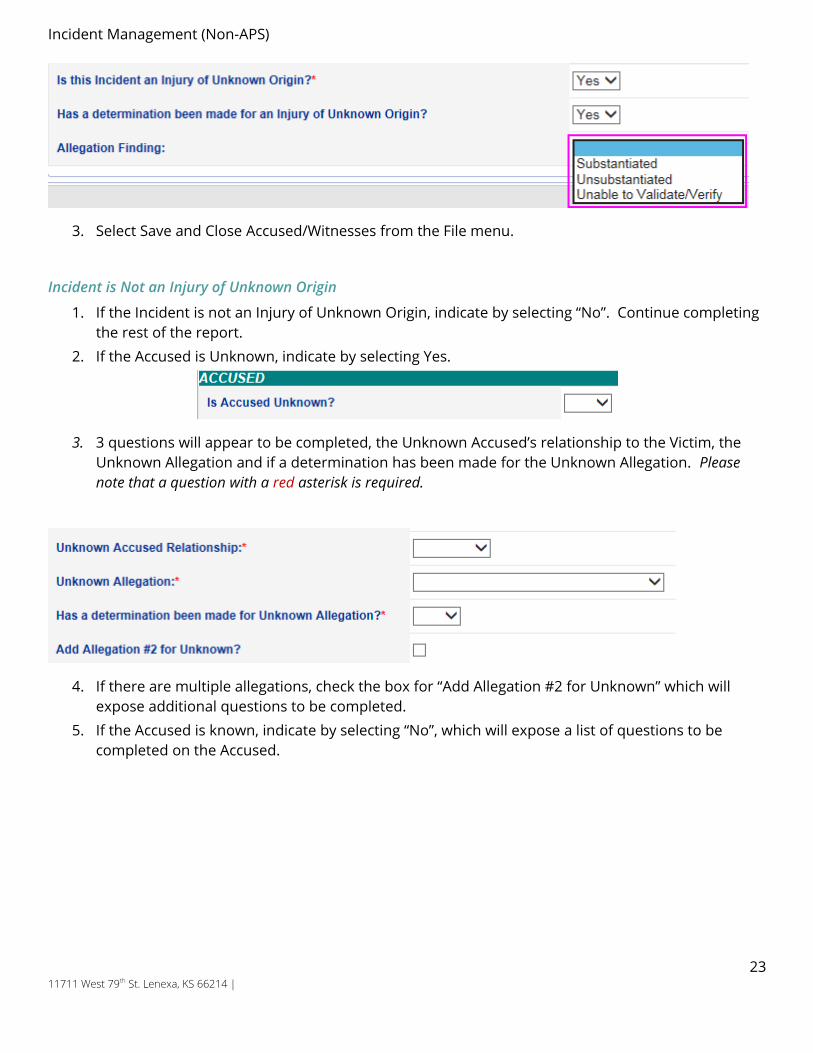
3. Select Save and Close Accused/Witnesses from the File menu.
Incident is Not an Injury of Unknown Origin
1. If the Incident is not an Injury of Unknown Origin, indicate by selecting “No”. Continue completing the rest of the report.
2. If the Accused is Unknown, indicate by selecting Yes.
3. 3 questions will appear to be completed, the Unknown Accused’s relationship to the Victim, the Unknown Allegation and if a determination has been made for the Unknown Allegation. Please note that a question with a red asterisk is required.
4. If there are multiple allegations, check the box for “Add Allegation #2 for Unknown” which will expose additional questions to be completed.
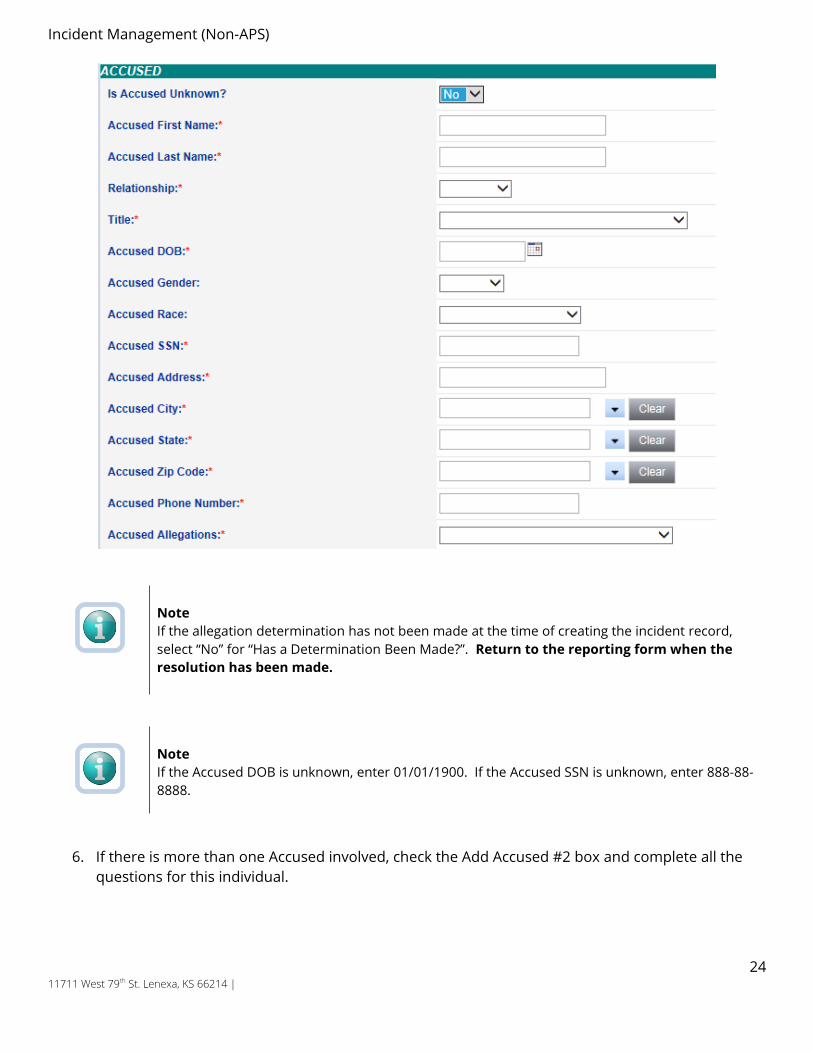
5. If the Accused is known, indicate by selecting “No”, which will expose a list of questions to be completed on the Accused.
2311711 West 79th St. Lenexa, KS 66214 |
Incident Management (Non-APS)
NoteIf the allegation determination has not been made at the time of creating the incident record, select “No” for “Has a Determination Been Made?”. Return to the reporting form when the resolution has been made.
NoteIf the Accused DOB is unknown, enter 01/01/1900. If the Accused SSN is unknown, enter 888-88-8888.
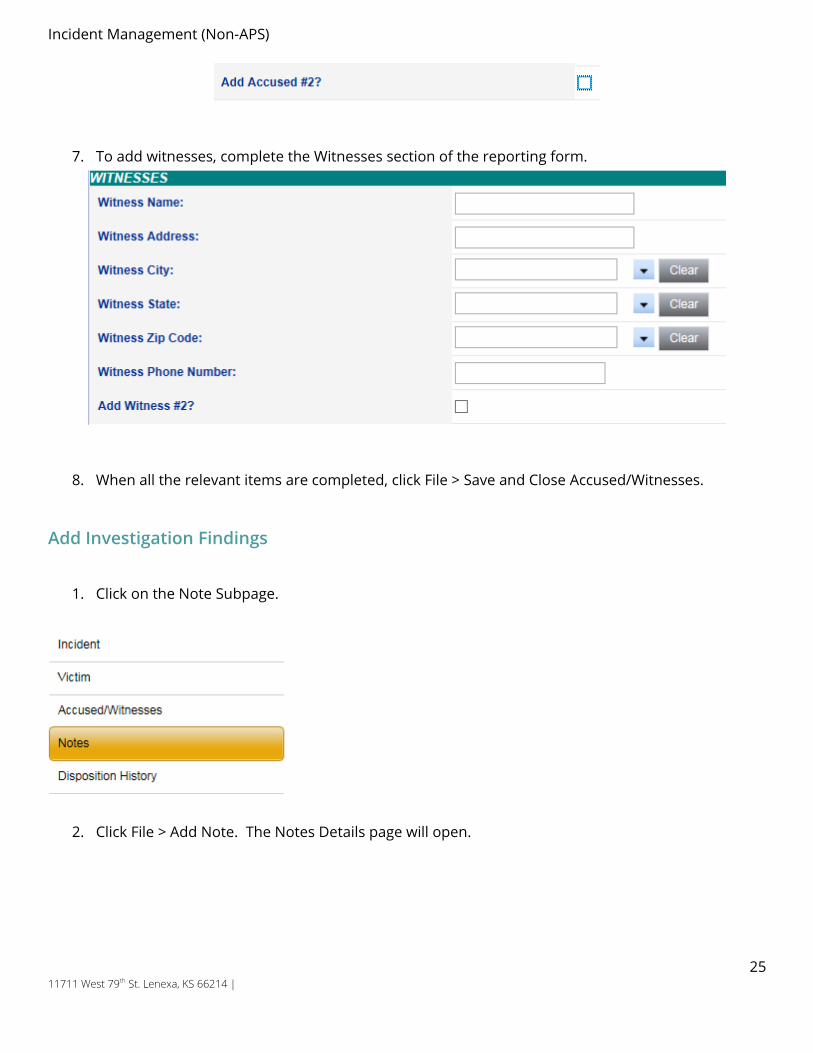
6. If there is more than one Accused involved, check the Add Accused #2 box and complete all the questions for this individual.
2411711 West 79th St. Lenexa, KS 66214 |
Incident Management (Non-APS)
7. To add witnesses, complete the Witnesses section of the reporting form.
8. When all the relevant items are completed, click File > Save and Close Accused/Witnesses.
Add Investigation Findings
1. Click on the Note Subpage.
2. Click File > Add Note. The Notes Details page will open.
2511711 West 79th St. Lenexa, KS 66214 |
Incident Management (Non-APS)
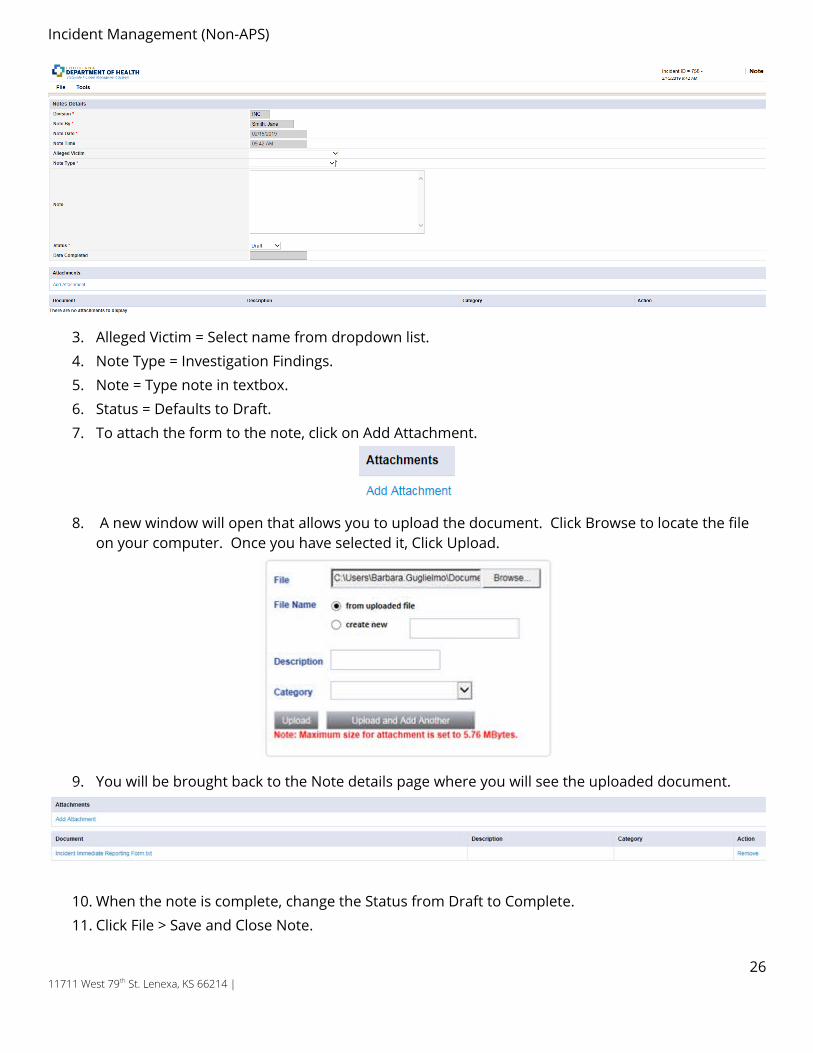
3. Alleged Victim = Select name from dropdown list.4. Note Type = Investigation Findings.5. Note = Type note in textbox.6. Status = Defaults to Draft.7. To attach the form to the note, click on Add Attachment.
8. A new window will open that allows you to upload the document. Click Browse to locate the file on your computer. Once you have selected it, Click Upload.
9. You will be brought back to the Note details page where you will see the uploaded document.
10. When the note is complete, change the Status from Draft to Complete.11. Click File > Save and Close Note.
2611711 West 79th St. Lenexa, KS 66214 |
Incident Management (Non-APS)
Submit Incident RecordWhen the Provider user has completed entering all the Incident information, they will submit the Incident Record to HSS.
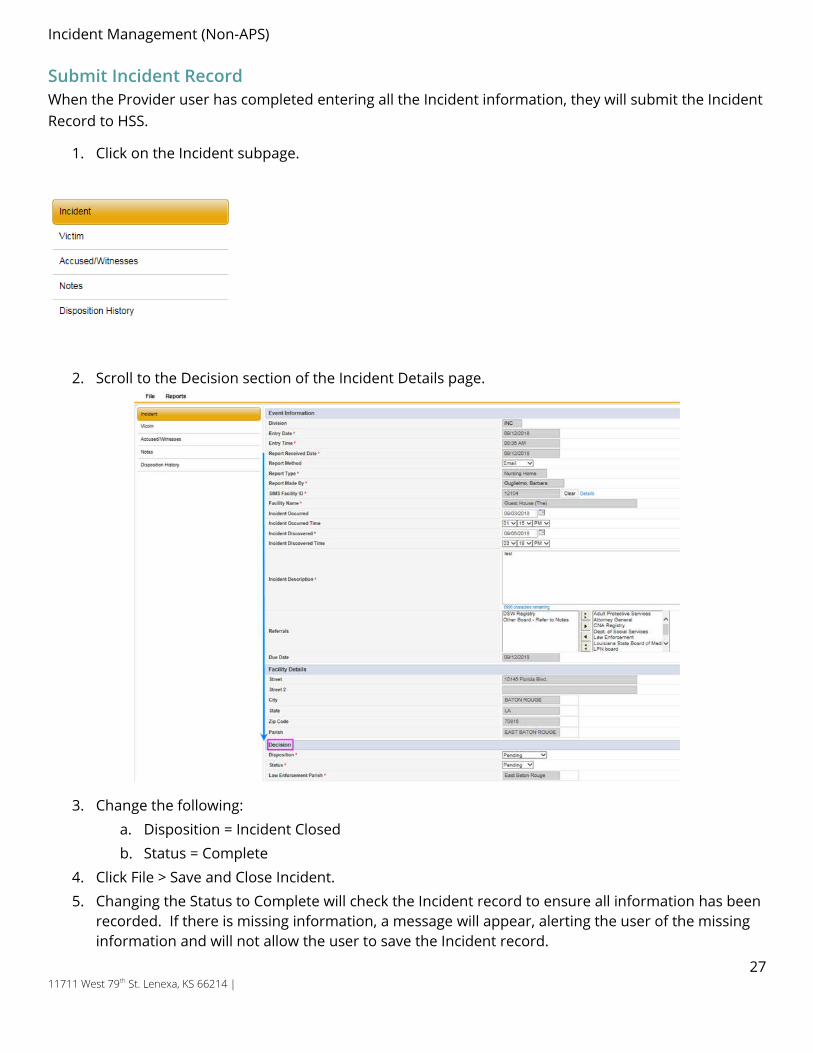
1. Click on the Incident subpage.
2. Scroll to the Decision section of the Incident Details page.
3. Change the following:a. Disposition = Incident Closedb. Status = Complete
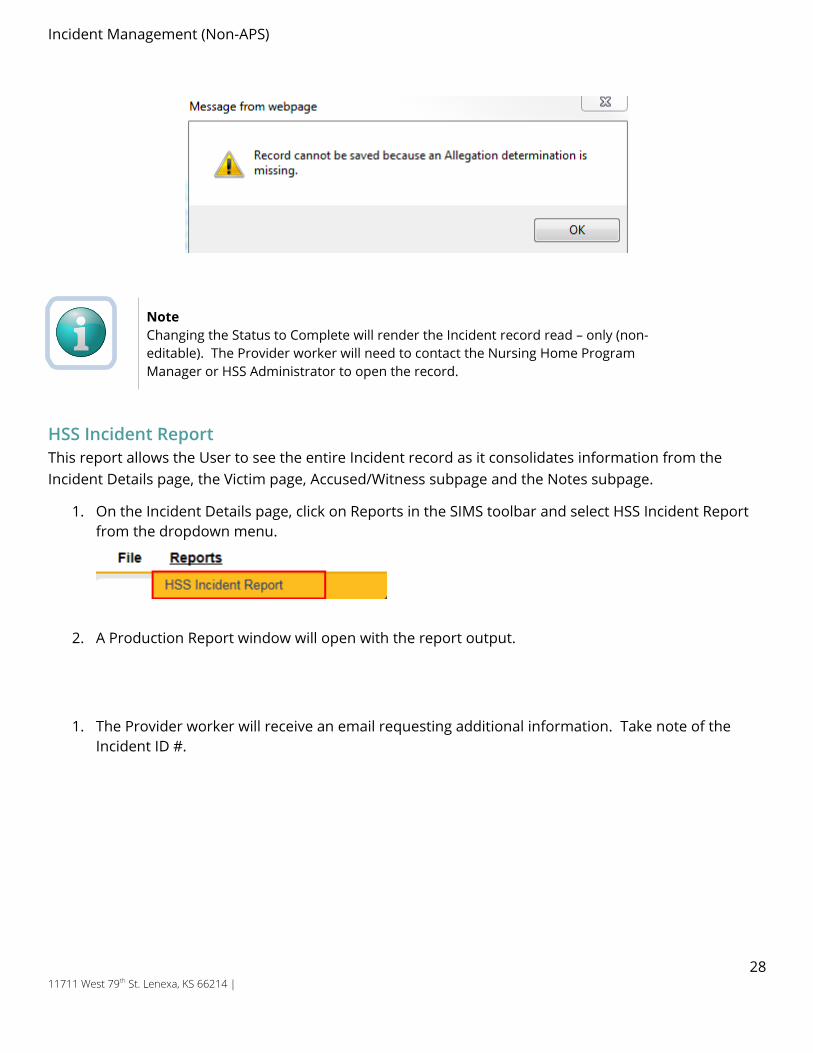
4. Click File > Save and Close Incident.5. Changing the Status to Complete will check the Incident record to ensure all information has been
recorded. If there is missing information, a message will appear, alerting the user of the missing information and will not allow the user to save the Incident record.
2711711 West 79th St. Lenexa, KS 66214 |
Incident Management (Non-APS)
NoteChanging the Status to Complete will render the Incident record read – only (non-editable). The Provider worker will need to contact the Nursing Home Program Manager or HSS Administrator to open the record.
HSS Incident ReportThis report allows the User to see the entire Incident record as it consolidates information from the Incident Details page, the Victim page, Accused/Witness subpage and the Notes subpage.
1. On the Incident Details page, click on Reports in the SIMS toolbar and select HSS Incident Report from the dropdown menu.
2. A Production Report window will open with the report output.
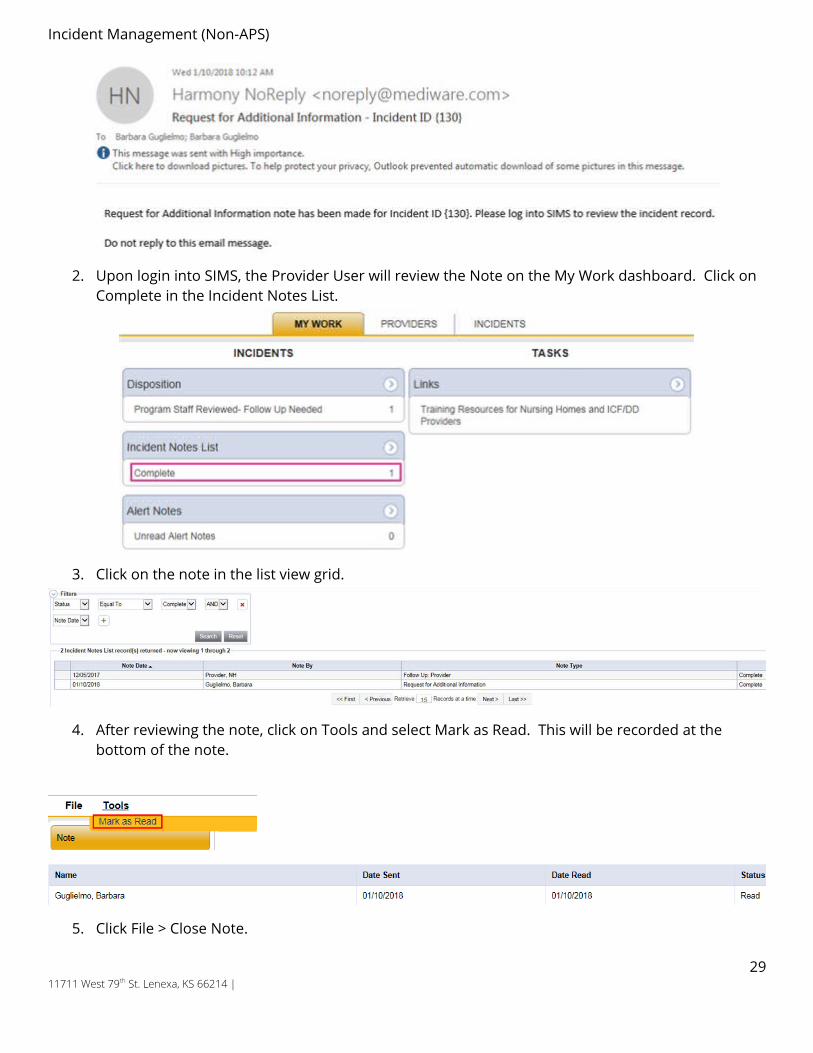
1. The Provider worker will receive an email requesting additional information. Take note of the Incident ID #.
2811711 West 79th St. Lenexa, KS 66214 |
Incident Management (Non-APS)
2. Upon login into SIMS, the Provider User will review the Note on the My Work dashboard. Click on Complete in the Incident Notes List.
3. Click on the note in the list view grid.
4. After reviewing the note, click on Tools and select Mark as Read. This will be recorded at the bottom of the note.
5. Click File > Close Note.
2911711 West 79th St. Lenexa, KS 66214 |

Incident Management (Non-APS)
6. Click File > Close Incident Notes List.7. Click on the Incidents Chapter.
8. After searching for the record, Enter the information requested by HSS.9. After completing the record, click on the Notes subpage.
10. Click File > Add Note.11. Select Note Type = Follow Up: Provider.12. Once the note is completed, change the Status field to equal Complete.13. Click File > Save and Close Note.14. Click on the Incident subpage.15. Scroll down to the Decision section of the page and change the following fields:
a. Disposition = Incident Closedb. Status = Complete.
16. Click File > Save and Close Incident.
Role = Nursing Home Provider
1. The Nursing Home Provider will receive an email notification that an Incident needs additional CNA information. Take note of the Incident ID #.
3011711 West 79th St. Lenexa, KS 66214 |
Incident Management (Non-APS)
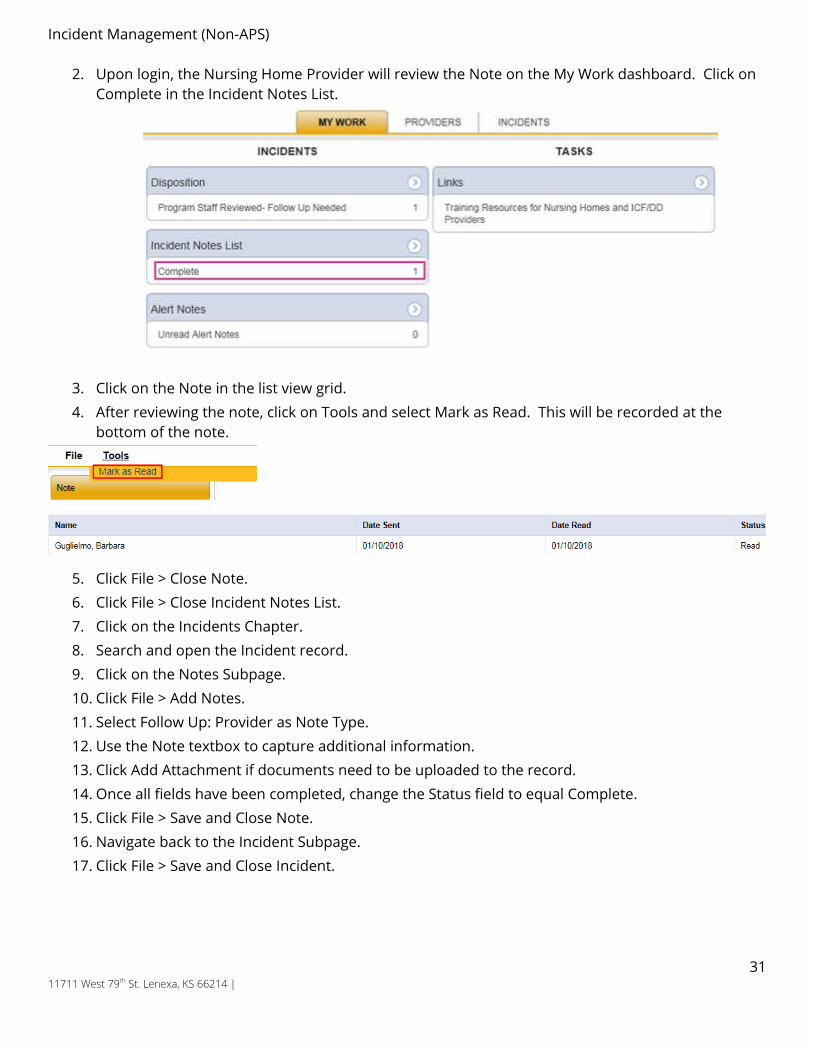
2. Upon login, the Nursing Home Provider will review the Note on the My Work dashboard. Click on Complete in the Incident Notes List.
3. Click on the Note in the list view grid.4. After reviewing the note, click on Tools and select Mark as Read. This will be recorded at the
bottom of the note.
5. Click File > Close Note.6. Click File > Close Incident Notes List.7. Click on the Incidents Chapter.8. Search and open the Incident record.9. Click on the Notes Subpage.10. Click File > Add Notes.11. Select Follow Up: Provider as Note Type.12. Use the Note textbox to capture additional information.13. Click Add Attachment if documents need to be uploaded to the record.14. Once all fields have been completed, change the Status field to equal Complete. 15. Click File > Save and Close Note.16. Navigate back to the Incident Subpage.17. Click File > Save and Close Incident.
3111711 West 79th St. Lenexa, KS 66214 |
Incident Management (Non-APS)
Role = Nursing Home Provider
1. Monitor incidents whose Disposition = Extension Approved on My Work > Incidents Disposition Pane.
fc
Role = Nursing Home Provider
1. Monitor incidents whose Disposition = Extension Denied on My Work > Incidents Disposition Pane.
3211711 West 79th St. Lenexa, KS 66214 |
Incident Management (Non-APS)
Training Notes
3311711 West 79th St. Lenexa, KS 66214 |


![[XLS]openschool.kerala.gov.inopenschool.kerala.gov.in/docs/pdf/2015/orientation 2013... · Web viewGOVT HSS FOR BOYS VAIKOM ST THOMAS HSS ERUMELY PVS HSS PAMPADY GOVT HSS KANAKKARY](https://img.pdfslide.us/doc/110x75/5aa108987f8b9a1f6d8b4dcb/xls-2013web-viewgovt-hss-for-boys-vaikom-st-thomas-hss-erumely-pvs-hss-pampady.jpg)