Embed Size (px)
Citation preview

InBox300 Series
User Manual
InHand Networks
Version 1.2 November 2016

1
Copyright © 2016 InHand Networks and its licensers. All Rights Reserved. Without the
Company’s written permission, any entity or individual shall not extract or copy part of whole of
any content of this book, or spread over such content by any means.
, Inhand, INHAND and Yinghantong are all trademarks of InHand Networks. Those
trademarks, product identifications and product names of other companies in this Manual are
owned by respective right holders.
Because of product version upgrade or other reasons, the content of this Manual may be changed.
The actual product conditions shall prevail. InHand retains the right to modify any content of this
Manual under the circumstance of no any notice or hint. This Manual is for guidance of use only.
InHand will try its best to provide accurate information in this Manual. However, InHand will not
make sure that there is no any false content in this Manual. All statements, information and
suggestions in this Manual will not constitute a guarantee of any explicit instruction or
implication.
2
Preface
Welcome to use InBox300 series products! InBox300 Series User Manual will give detailed
guidance to your use of this product.
The part of preface includes the following contents:
Readers;
Agreement of this Manual;
Mode of data acquisition;
Technical Support Contact Information
Readers
This Manual is mainly applicable to the following engineering personnel:
Network planners;
Onsite technical support and maintenance personnel;
Network configuration and administrative personnel
Agreement of this Manual
1. Agreement on graphical interface format
Format Significance
<> Angle brackets “<>” indicate the name of button, such as “click the <YES> button”.
“” Double quotation marks indicate“” the name of window and menu, such as popping up the “NEW
USER” window.
>> A multilevel menu shall be isolated with “>>”. For instance, the multilevel menu of
“file>>new>>folder” indicates the “folder” menu item under the submenu of “new” under the menu
of “file”.
2. Various signs
In this Manual, different striking signs are used to indicate those places to which special
attention shall be paid in the operating process. The significance of these signs is shown as
follows:

3
Remind those matters needing attention in the operating process; improper operation may lead to
data loss or equipment damage.
Give necessary supplementary descriptions on the operating content.
Mode of data acquisition
You may have access to the latest information about the product specification, user manual,
common tools and quick reference handbook through the website of InHand Networks
(www.inhandnetworks.com).

4
I. Introduction to InBox300
1.1 Overview
By integrating Android OS with Freescale Cortex-A9 double-core 1.0 GHz processor i.MX6,
the InBox300 brings to device manufacturers, especially advertisement & media player
manufacturers who have been relying on X86 based computing platforms a solution of lower
power consumption and less heating. With OpenGLES2.0 and OpenVG™1.1 hardware
accelerators, and full HD 1080P video coding engine, the InBox300 enables media playback
devices to deliver smooth and lively video experiences.
With 1000M Ethernet and 3G/4G cellular network support, the InBox300 is “always online”
for media content update or remote network communication. It has rich peripheral ports including
multiple serial ports, USB ports and HDMI port etc. to connect a wide range of peripherals, from
scanner, printer, ID or traffic card reader, POS device, to infrared touchscreen, video camera,
mouse, LED screen, etc.
The InBox is ruggedized to withstand harsh conditions, supporting 9-24V wide voltage
inputs and wide operating temperatures. It also provides multiple APIs for reading of the hardware
data to enable further development by device manufacturers.
Features and strengths:
Freescale Cortex-A9 double-core 1.0 GHz processor i.MX6, of high computing
capability;
OpenGLES2.0 and OpenVG™1.1 hardware accelerators, supporting 2D and 3D
graphics acceleration;
Full HD 1080P coding engine, enabling superior video experience;
1000M Ethernet and 3G/4G cellular network support allows easy network
connection;
Android OS, with open development resources and abundant applications available;
Optimized hardware base driver enables stable and fast network connection, smooth
user experience and excellent performance of peripherals;
Rich of ports, support connection to a wide range of peripherals
5
1.2 Hardware
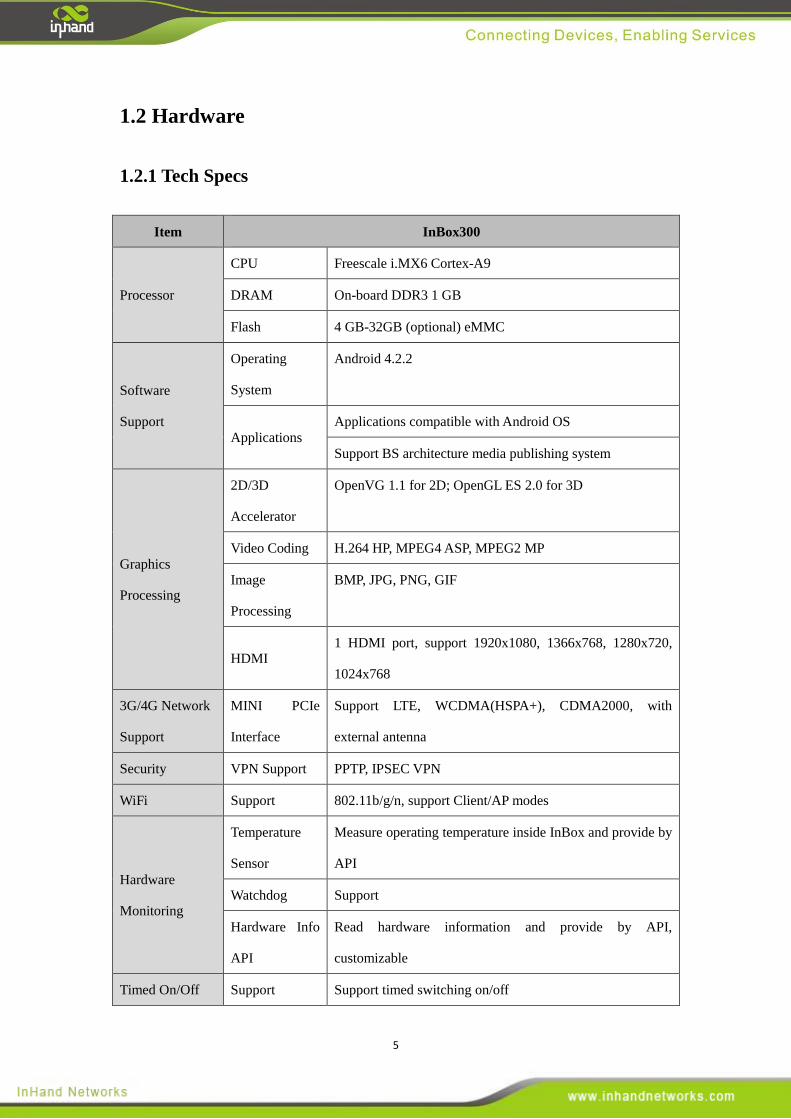
1.2.1 Tech Specs
Item InBox300
Processor
CPU Freescale i.MX6 Cortex-A9
DRAM On-board DDR3 1 GB
Flash 4 GB-32GB (optional) eMMC
Software
Support
Operating
System
Android 4.2.2
Applications
Applications compatible with Android OS
Support BS architecture media publishing system
Graphics
Processing
2D/3D
Accelerator
OpenVG 1.1 for 2D; OpenGL ES 2.0 for 3D
Video Coding H.264 HP, MPEG4 ASP, MPEG2 MP
Image
Processing
BMP, JPG, PNG, GIF
HDMI 1 HDMI port, support 1920x1080, 1366x768, 1280x720,
1024x768
3G/4G Network
Support
MINI PCIe
Interface
Support LTE, WCDMA(HSPA+), CDMA2000, with
external antenna
Security VPN Support PPTP, IPSEC VPN
WiFi Support 802.11b/g/n, support Client/AP modes
Hardware
Monitoring
Temperature
Sensor
Measure operating temperature inside InBox and provide by
API
Watchdog Support
Hardware Info
API
Read hardware information and provide by API,
customizable
Timed On/Off Support Support timed switching on/off
6
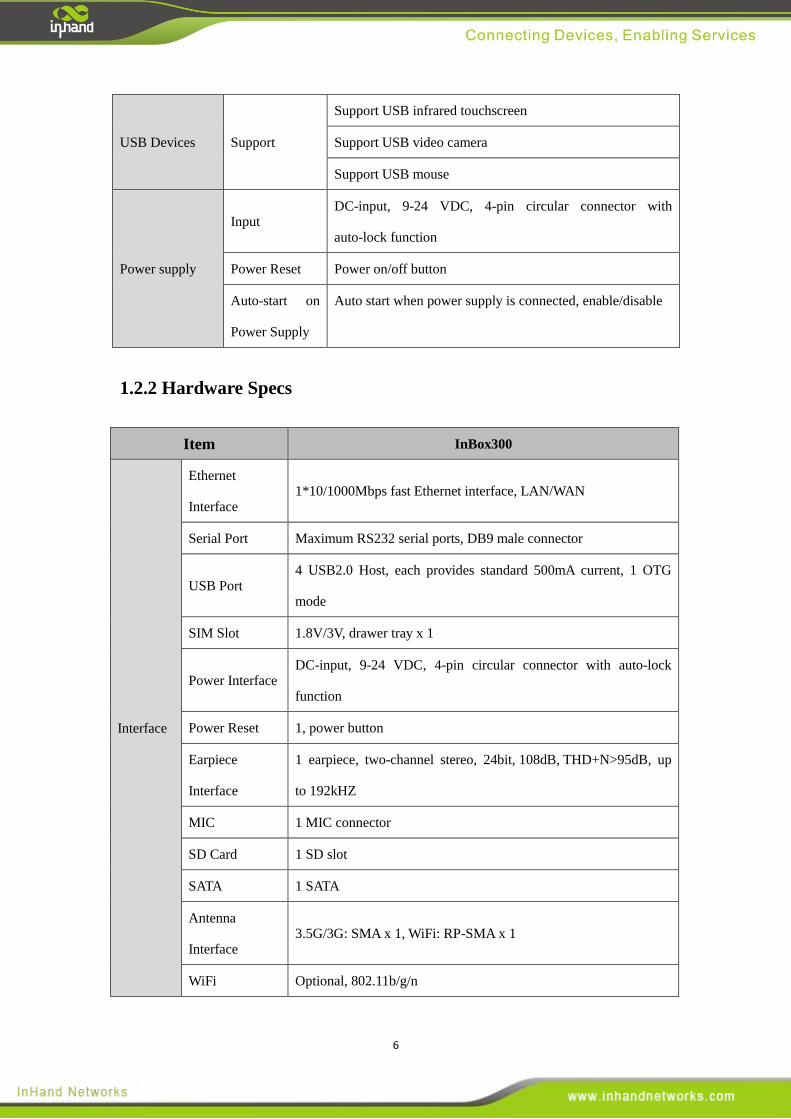
USB Devices Support
Support USB infrared touchscreen
Support USB video camera
Support USB mouse
Power supply
Input DC-input, 9-24 VDC, 4-pin circular connector with
auto-lock function
Power Reset Power on/off button
Auto-start on
Power Supply
Auto start when power supply is connected, enable/disable
1.2.2 Hardware Specs
Item InBox300
Interface
Ethernet
Interface 1*10/1000Mbps fast Ethernet interface, LAN/WAN
Serial Port Maximum RS232 serial ports, DB9 male connector
USB Port 4 USB2.0 Host, each provides standard 500mA current, 1 OTG
mode
SIM Slot 1.8V/3V, drawer tray x 1
Power Interface DC-input, 9-24 VDC, 4-pin circular connector with auto-lock
function
Power Reset 1, power button
Earpiece
Interface
1 earpiece, two-channel stereo, 24bit, 108dB, THD+N>95dB, up
to 192kHZ
MIC 1 MIC connector
SD Card 1 SD slot
SATA 1 SATA
Antenna
Interface 3.5G/3G: SMA x 1, WiFi: RP-SMA x 1
WiFi Optional, 802.11b/g/n
7
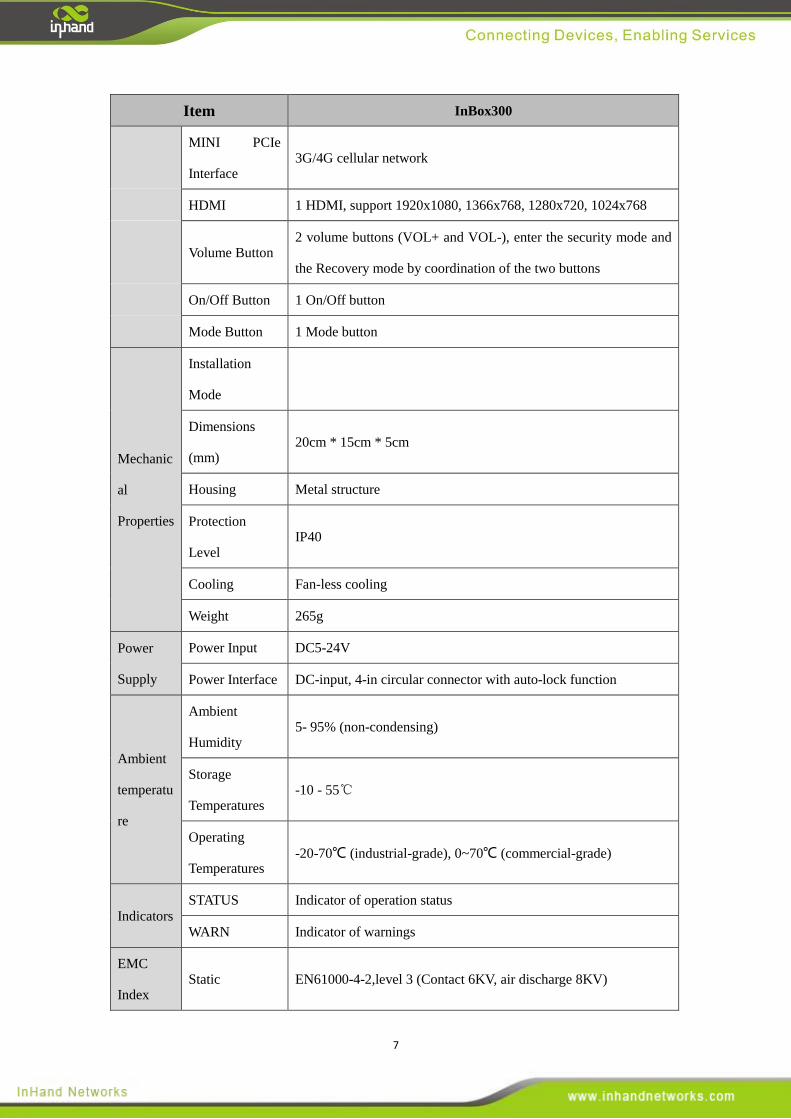
Item InBox300
MINI PCIe
Interface 3G/4G cellular network
HDMI 1 HDMI, support 1920x1080, 1366x768, 1280x720, 1024x768
Volume Button 2 volume buttons (VOL+ and VOL-), enter the security mode and
the Recovery mode by coordination of the two buttons
On/Off Button 1 On/Off button
Mode Button 1 Mode button
Mechanic
al
Properties
Installation
Mode
Dimensions
(mm) 20cm * 15cm * 5cm
Housing Metal structure
Protection
Level IP40
Cooling Fan-less cooling
Weight 265g
Power
Supply
Power Input DC5-24V
Power Interface DC-input, 4-in circular connector with auto-lock function
Ambient
temperatu
re
Ambient
Humidity 5- 95% (non-condensing)
Storage
Temperatures -10 - 55℃
Operating
Temperatures -20-70℃ (industrial-grade), 0~70℃ (commercial-grade)
Indicators
STATUS Indicator of operation status
WARN Indicator of warnings
EMC
Index Static EN61000-4-2,level 3 (Contact 6KV, air discharge 8KV)
8
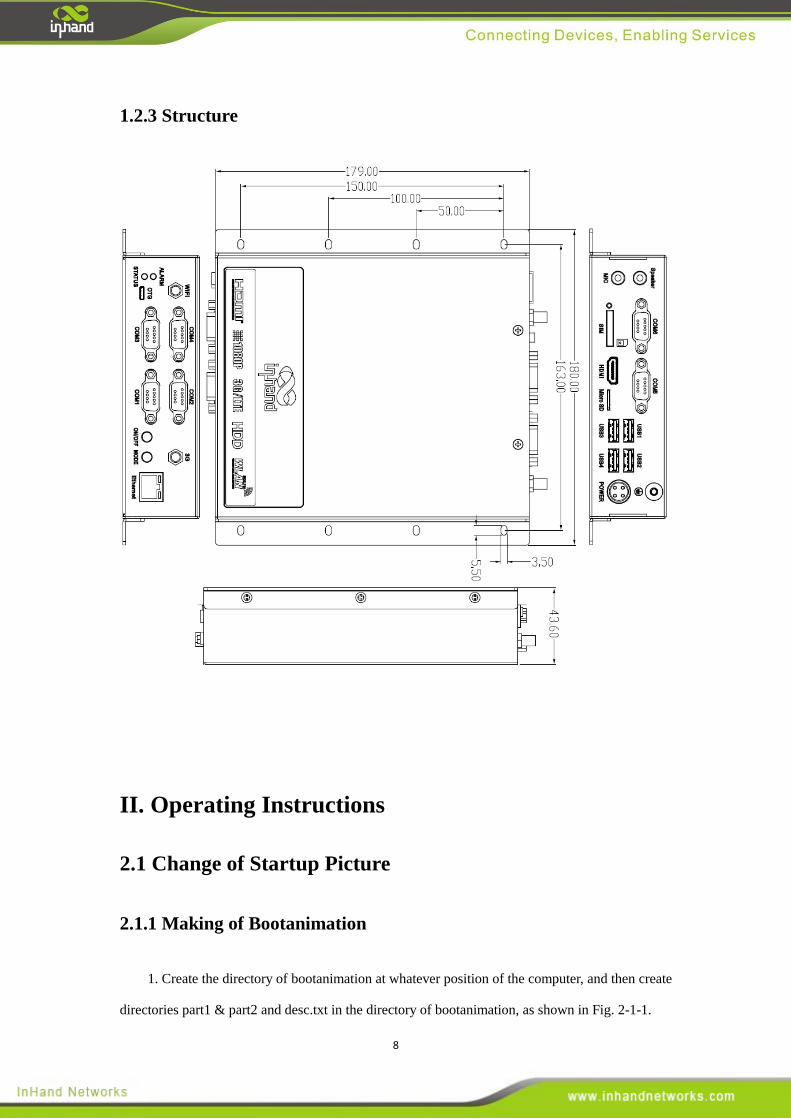
1.2.3 Structure
II. Operating Instructions
2.1 Change of Startup Picture
2.1.1 Making of Bootanimation
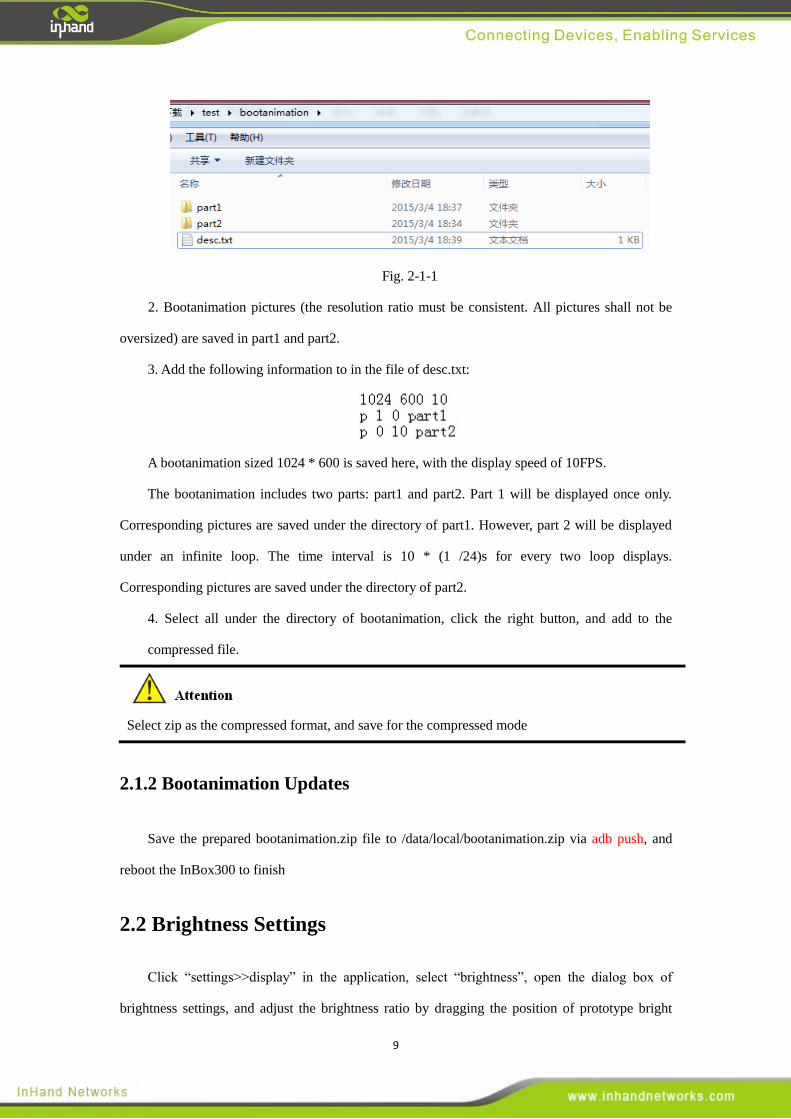
1. Create the directory of bootanimation at whatever position of the computer, and then create
directories part1 & part2 and desc.txt in the directory of bootanimation, as shown in Fig. 2-1-1.
9
Fig. 2-1-1
2. Bootanimation pictures (the resolution ratio must be consistent. All pictures shall not be
oversized) are saved in part1 and part2.
3. Add the following information to in the file of desc.txt:
A bootanimation sized 1024 * 600 is saved here, with the display speed of 10FPS.
The bootanimation includes two parts: part1 and part2. Part 1 will be displayed once only.
Corresponding pictures are saved under the directory of part1. However, part 2 will be displayed
under an infinite loop. The time interval is 10 * (1 /24)s for every two loop displays.
Corresponding pictures are saved under the directory of part2.
4. Select all under the directory of bootanimation, click the right button, and add to the
compressed file.
Select zip as the compressed format, and save for the compressed mode
2.1.2 Bootanimation Updates
Save the prepared bootanimation.zip file to /data/local/bootanimation.zip via adb push, and
reboot the InBox300 to finish
2.2 Brightness Settings
Click “settings>>display” in the application, select “brightness”, open the dialog box of
brightness settings, and adjust the brightness ratio by dragging the position of prototype bright
10
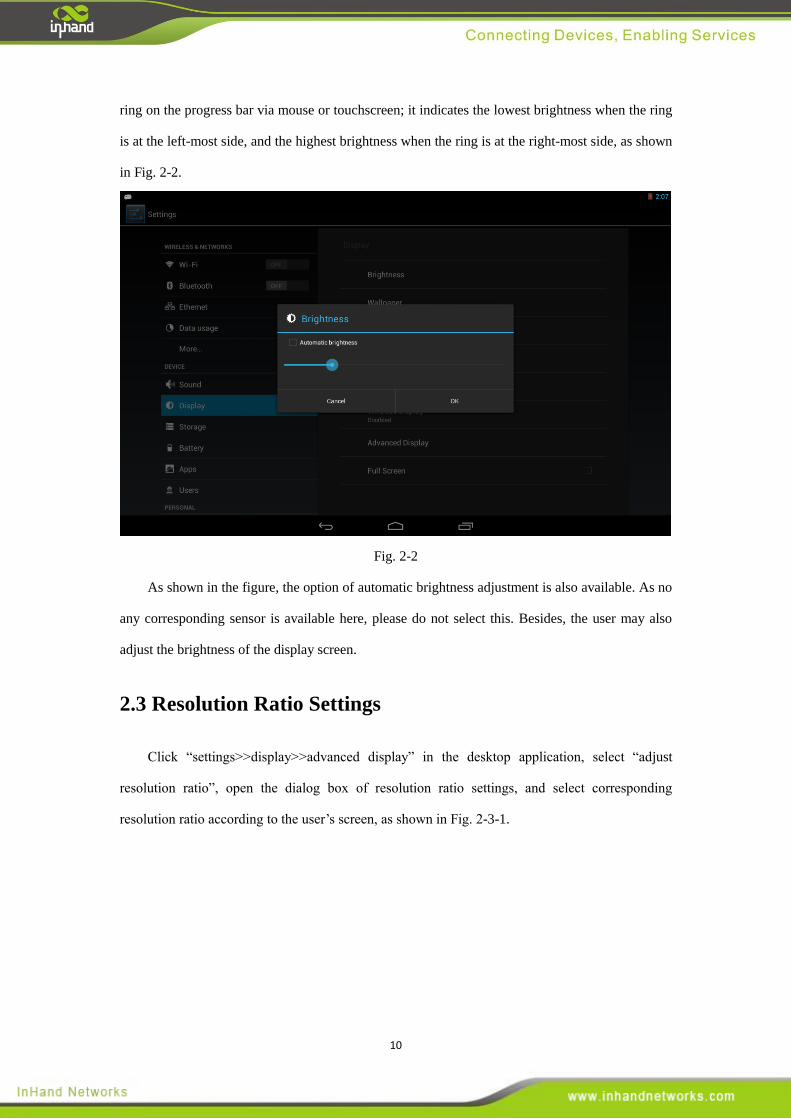
ring on the progress bar via mouse or touchscreen; it indicates the lowest brightness when the ring
is at the left-most side, and the highest brightness when the ring is at the right-most side, as shown
in Fig. 2-2.
Fig. 2-2
As shown in the figure, the option of automatic brightness adjustment is also available. As no
any corresponding sensor is available here, please do not select this. Besides, the user may also
adjust the brightness of the display screen.
2.3 Resolution Ratio Settings
Click “settings>>display>>advanced display” in the desktop application, select “adjust
resolution ratio”, open the dialog box of resolution ratio settings, and select corresponding
resolution ratio according to the user’s screen, as shown in Fig. 2-3-1.
11
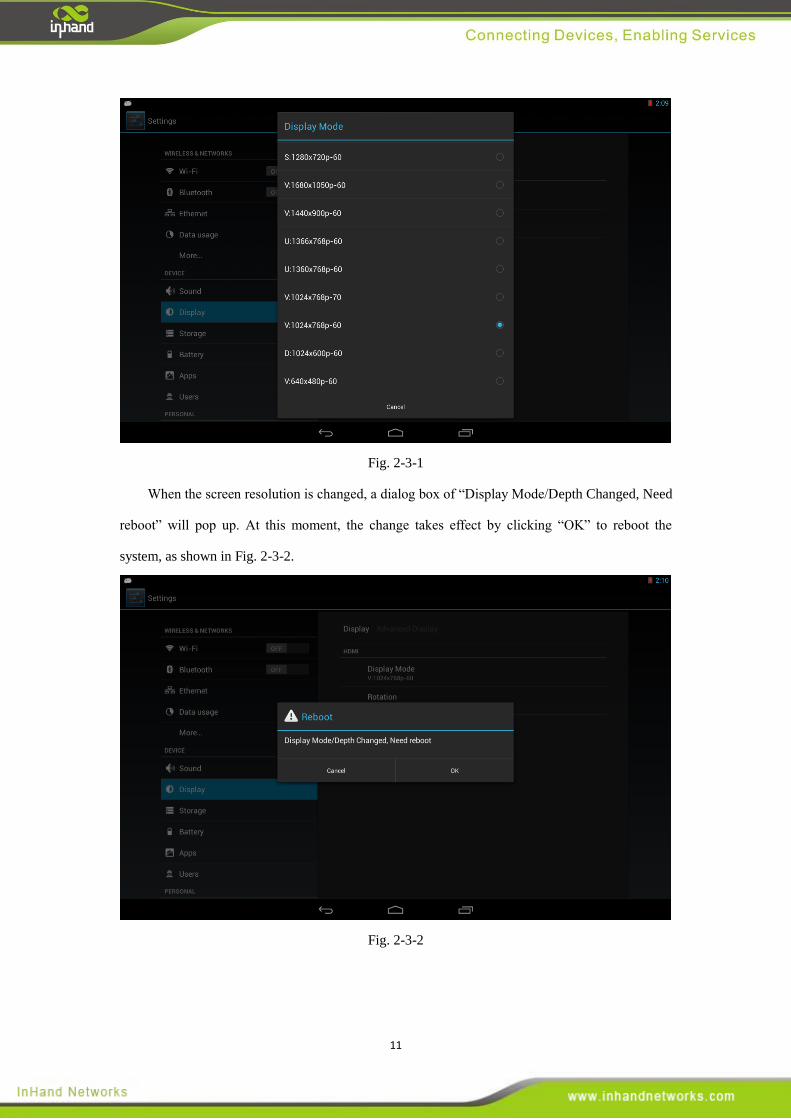
Fig. 2-3-1
When the screen resolution is changed, a dialog box of “Display Mode/Depth Changed, Need
reboot” will pop up. At this moment, the change takes effect by clicking “OK” to reboot the
system, as shown in Fig. 2-3-2.
Fig. 2-3-2

12
2.4 Sound
2.4.1 Volumes
Click “settings>>sound” in the application, and select “volumes” to open the dialog box of
volume settings; three volume settings are available: i) music, video and games & other media; ii)
notifications; and iii) alarms.
Adjust the volumes by sliding the brightness via the mouse or touchscreen; it indicates the
lowest volume when the bright ring is at the left-mode side, and the highest volume when the ring
is at the right-most side, as shown in Fig. 2-4.
Fig. 2-4
2.4.2 Prompt Tone
Set “touch prompt tone” and “screen lock prompt tone” through the optional box; open the
prompt tone when it is selected. Or, the prompt tone is closed.
13
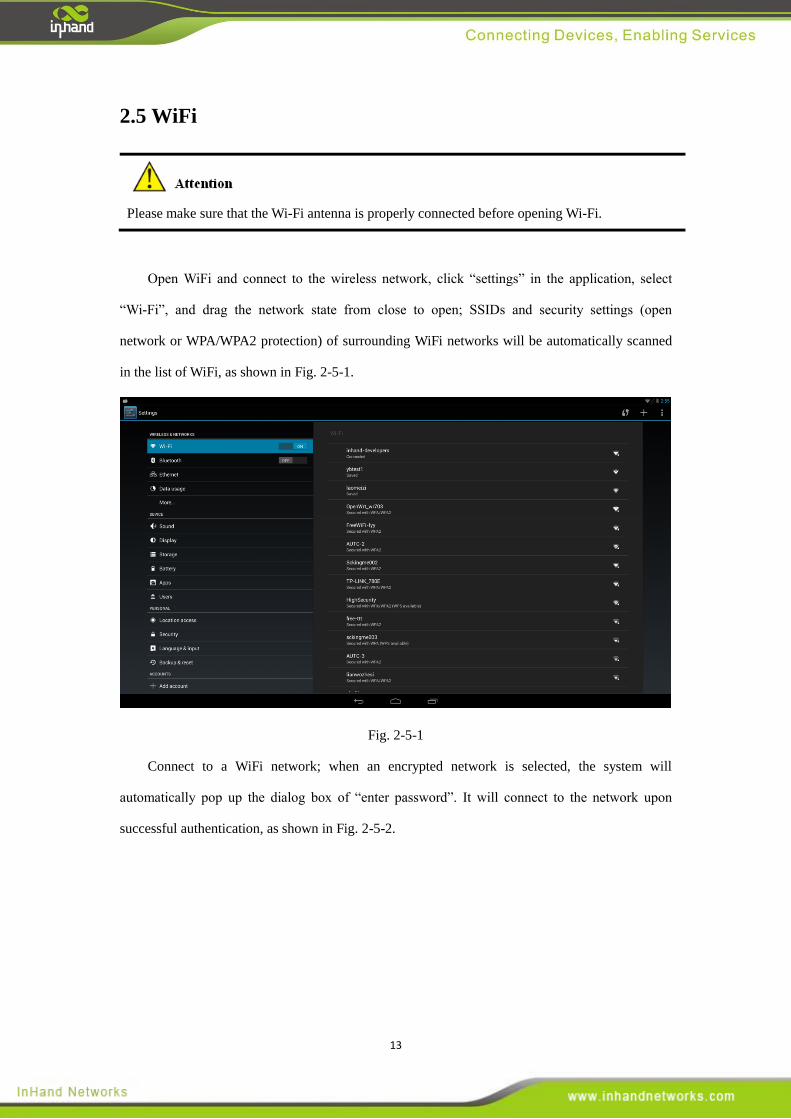
2.5 WiFi
Please make sure that the Wi-Fi antenna is properly connected before opening Wi-Fi.
Open WiFi and connect to the wireless network, click “settings” in the application, select
“Wi-Fi”, and drag the network state from close to open; SSIDs and security settings (open
network or WPA/WPA2 protection) of surrounding WiFi networks will be automatically scanned
in the list of WiFi, as shown in Fig. 2-5-1.
Fig. 2-5-1
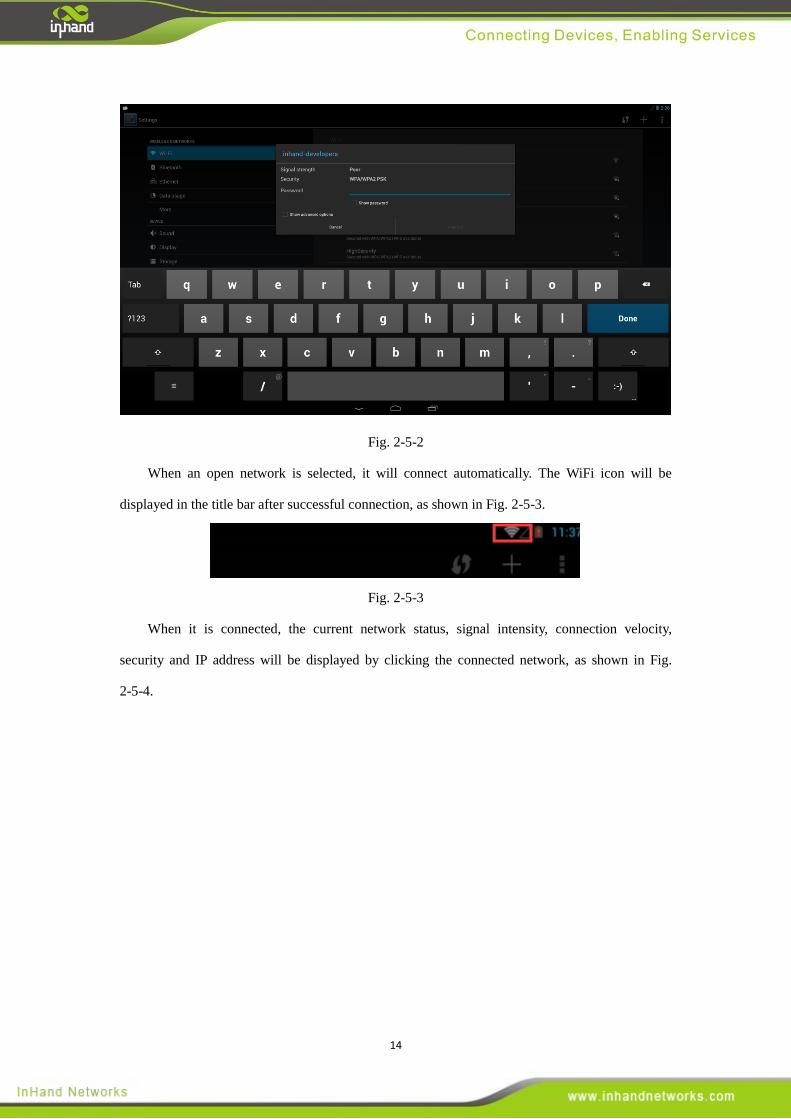
Connect to a WiFi network; when an encrypted network is selected, the system will
automatically pop up the dialog box of “enter password”. It will connect to the network upon
successful authentication, as shown in Fig. 2-5-2.
14
Fig. 2-5-2
When an open network is selected, it will connect automatically. The WiFi icon will be
displayed in the title bar after successful connection, as shown in Fig. 2-5-3.
Fig. 2-5-3
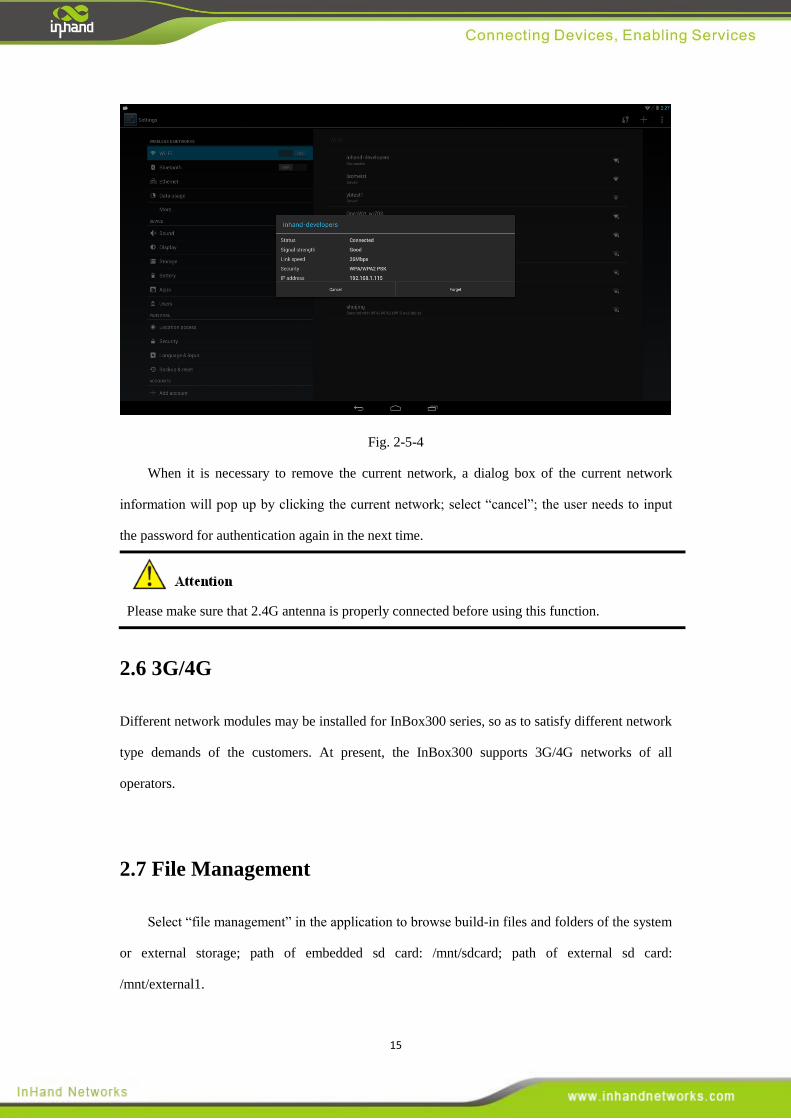
When it is connected, the current network status, signal intensity, connection velocity,
security and IP address will be displayed by clicking the connected network, as shown in Fig.
2-5-4.
15
Fig. 2-5-4
When it is necessary to remove the current network, a dialog box of the current network
information will pop up by clicking the current network; select “cancel”; the user needs to input
the password for authentication again in the next time.
Please make sure that 2.4G antenna is properly connected before using this function.
2.6 3G/4G
Different network modules may be installed for InBox300 series, so as to satisfy different network
type demands of the customers. At present, the InBox300 supports 3G/4G networks of all
operators.
2.7 File Management
Select “file management” in the application to browse build-in files and folders of the system
or external storage; path of embedded sd card: /mnt/sdcard; path of external sd card:
/mnt/external1.
16
2.8 Application Loading and Unloading
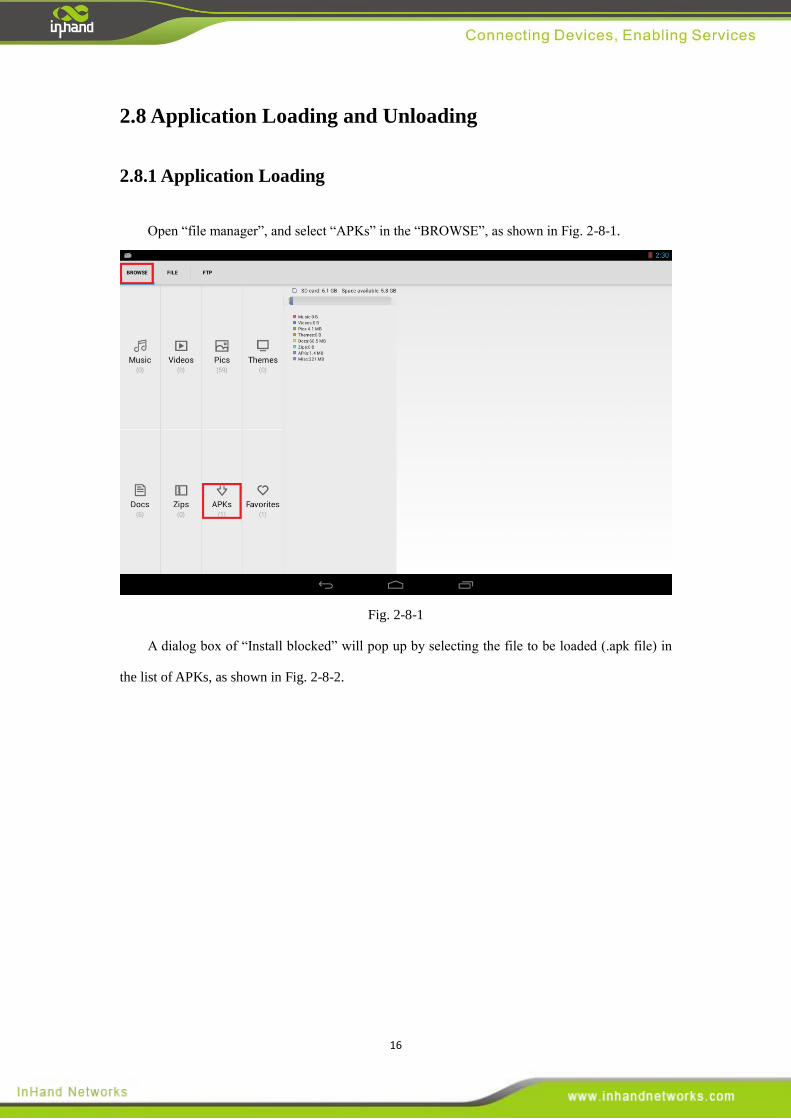
2.8.1 Application Loading
Open “file manager”, and select “APKs” in the “BROWSE”, as shown in Fig. 2-8-1.
Fig. 2-8-1
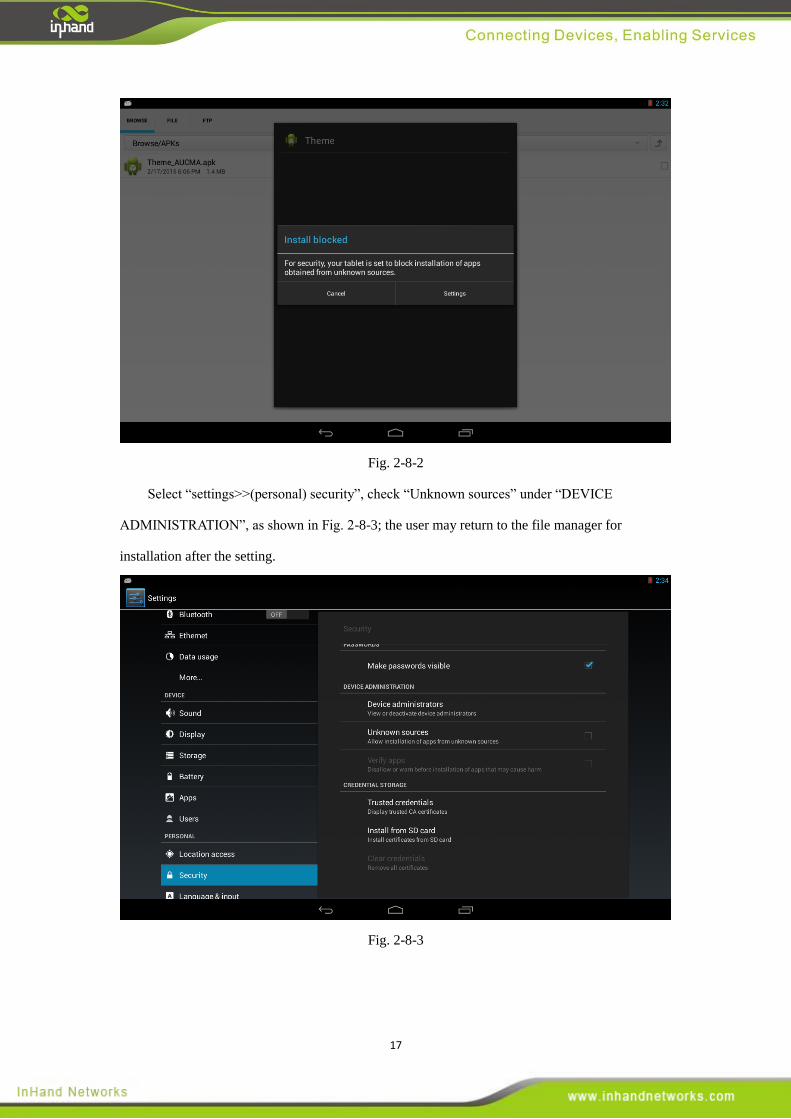
A dialog box of “Install blocked” will pop up by selecting the file to be loaded (.apk file) in
the list of APKs, as shown in Fig. 2-8-2.
17
Fig. 2-8-2
Select “settings>>(personal) security”, check “Unknown sources” under “DEVICE
ADMINISTRATION”, as shown in Fig. 2-8-3; the user may return to the file manager for
installation after the setting.
Fig. 2-8-3
18
2.8.2 Application Unloading
Open “settings” in the application, and click “Apps” in the functional option of “DEVICE”;
the application information dialog box will pop up by selecting the applications to be unloaded in
the list of “unloaded” on the right; select “unload” to unload corresponding apps.
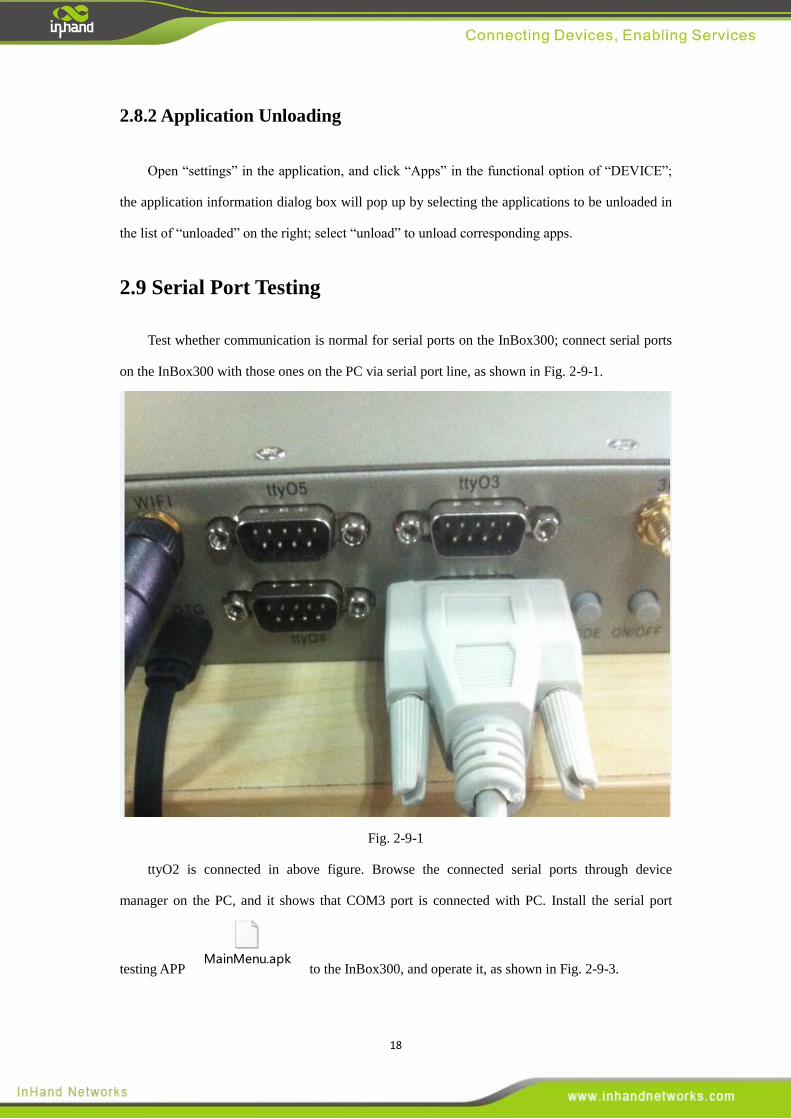
2.9 Serial Port Testing
Test whether communication is normal for serial ports on the InBox300; connect serial ports
on the InBox300 with those ones on the PC via serial port line, as shown in Fig. 2-9-1.
Fig. 2-9-1
ttyO2 is connected in above figure. Browse the connected serial ports through device
manager on the PC, and it shows that COM3 port is connected with PC. Install the serial port
testing APP MainMenu.apk
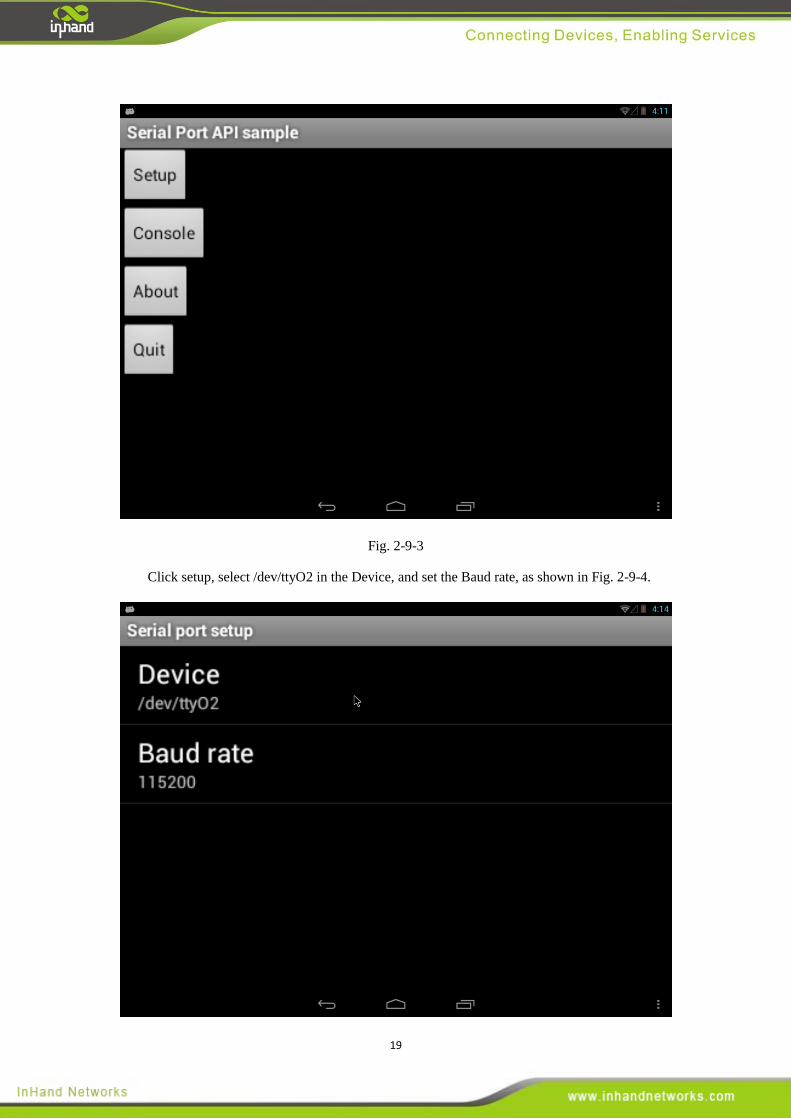
to the InBox300, and operate it, as shown in Fig. 2-9-3.
19
Fig. 2-9-3
Click setup, select /dev/ttyO2 in the Device, and set the Baud rate, as shown in Fig. 2-9-4.
20
Fig. 2-9-4
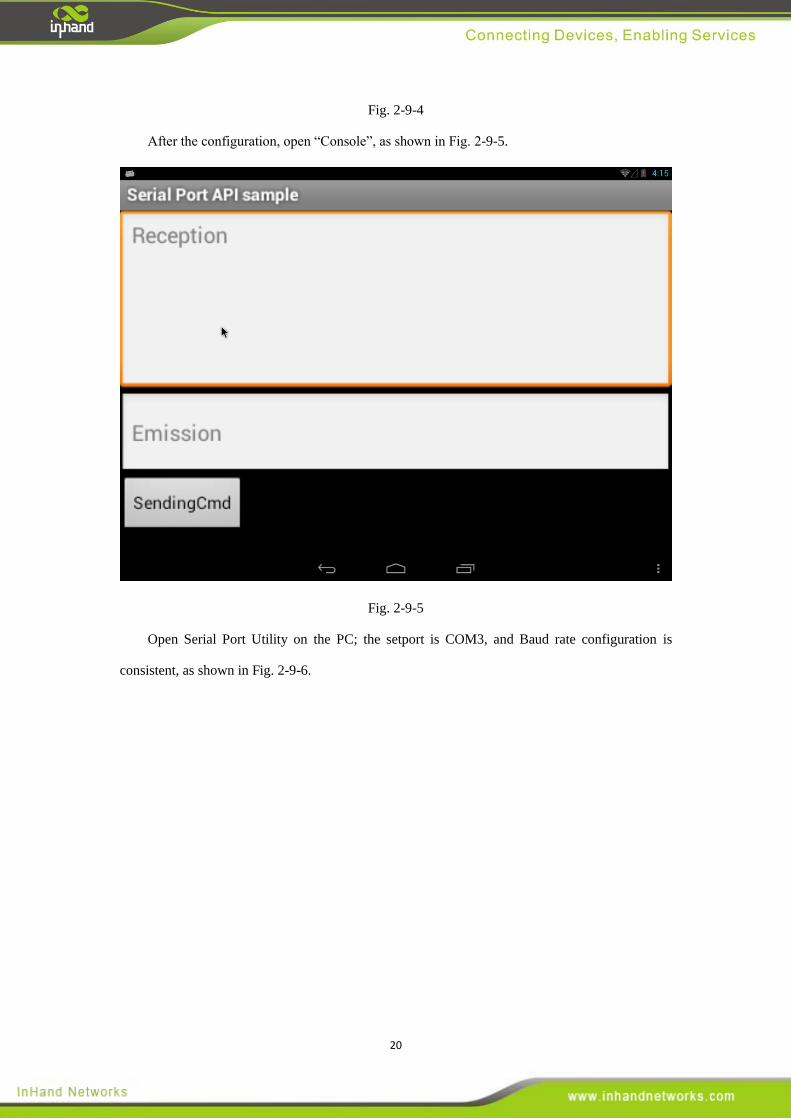
After the configuration, open “Console”, as shown in Fig. 2-9-5.
Fig. 2-9-5
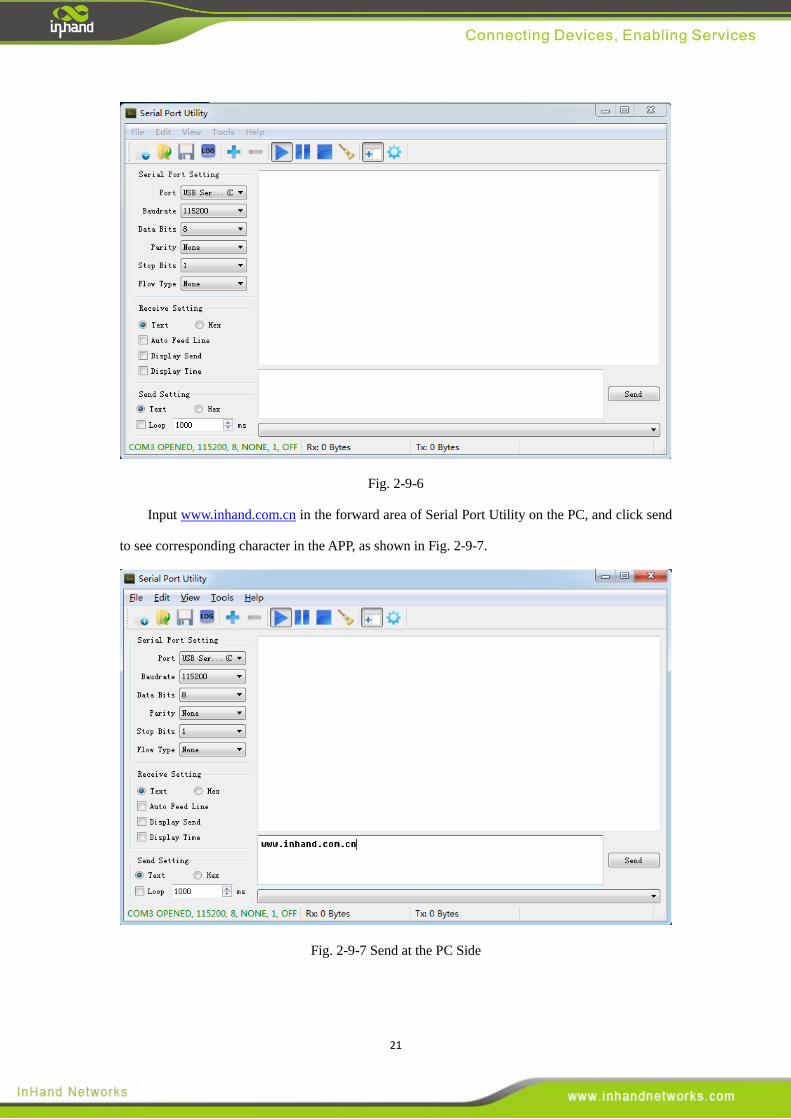
Open Serial Port Utility on the PC; the setport is COM3, and Baud rate configuration is
consistent, as shown in Fig. 2-9-6.
21
Fig. 2-9-6
Input www.inhand.com.cn in the forward area of Serial Port Utility on the PC, and click send
to see corresponding character in the APP, as shown in Fig. 2-9-7.
Fig. 2-9-7 Send at the PC Side
22
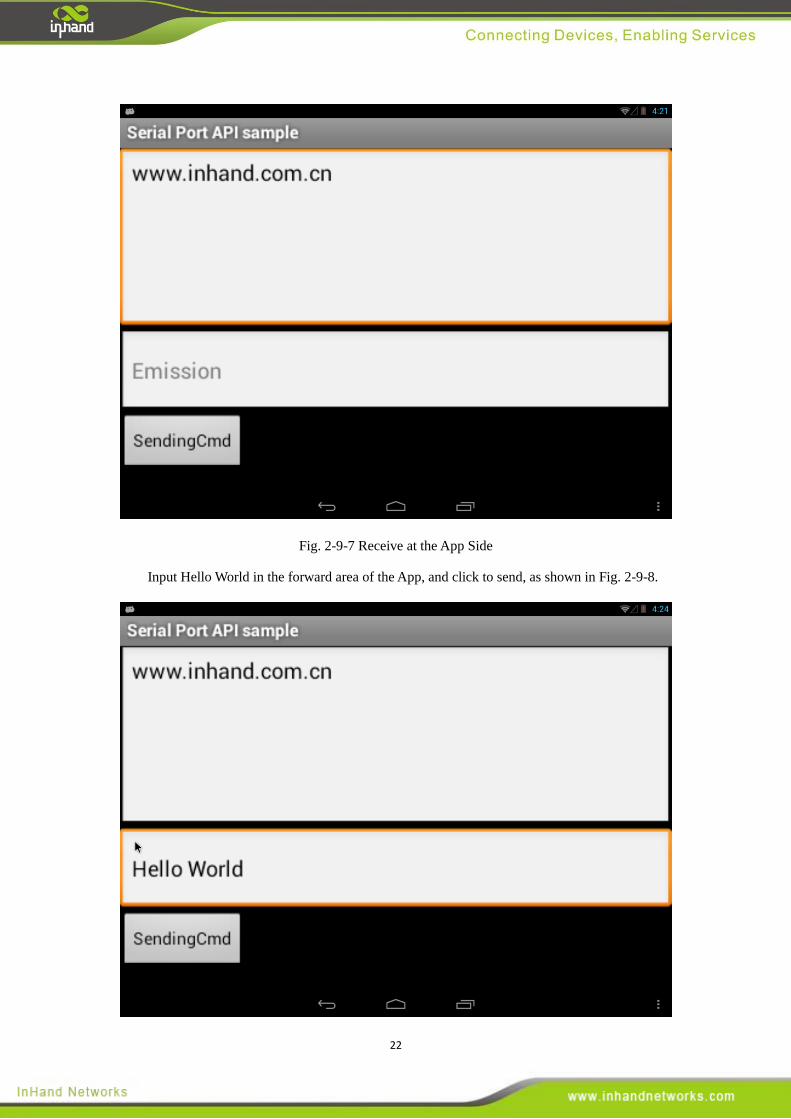
Fig. 2-9-7 Receive at the App Side
Input Hello World in the forward area of the App, and click to send, as shown in Fig. 2-9-8.
23
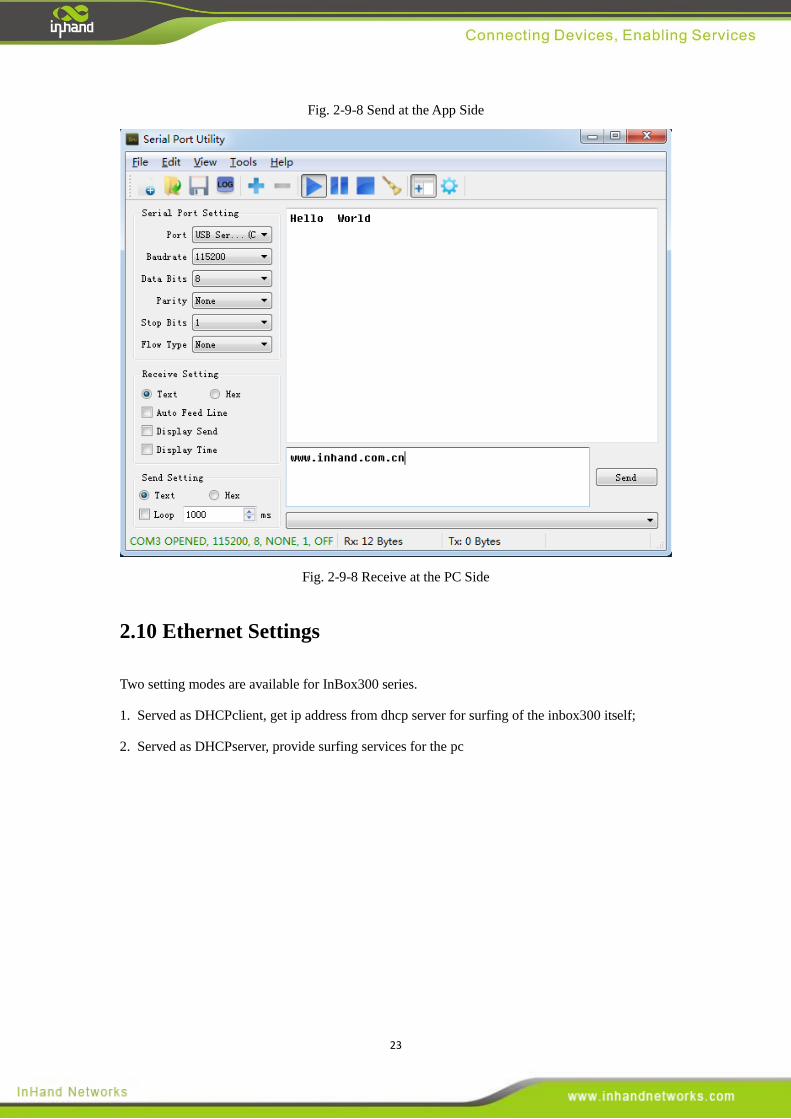
Fig. 2-9-8 Send at the App Side
Fig. 2-9-8 Receive at the PC Side
2.10 Ethernet Settings
Two setting modes are available for InBox300 series.
1. Served as DHCPclient, get ip address from dhcp server for surfing of the inbox300 itself;
2. Served as DHCPserver, provide surfing services for the pc

24
2.12 Security Mode
2.12.1 Description
The security mode of Android system is completely booted in a normal way. It shields all
non-system programs, and will only start the programs of the original system. Under this mode,
the system is booted under the most secure state. All functions are normal, free from any
disturbance from other programs.
2.12.2 Usage Scenario
When the system is made to crash, reboot or close by the user program or a vicious program,
and when the entire device is made to be under circular startup & shutdown
2.12.3 Enter the Security Mode
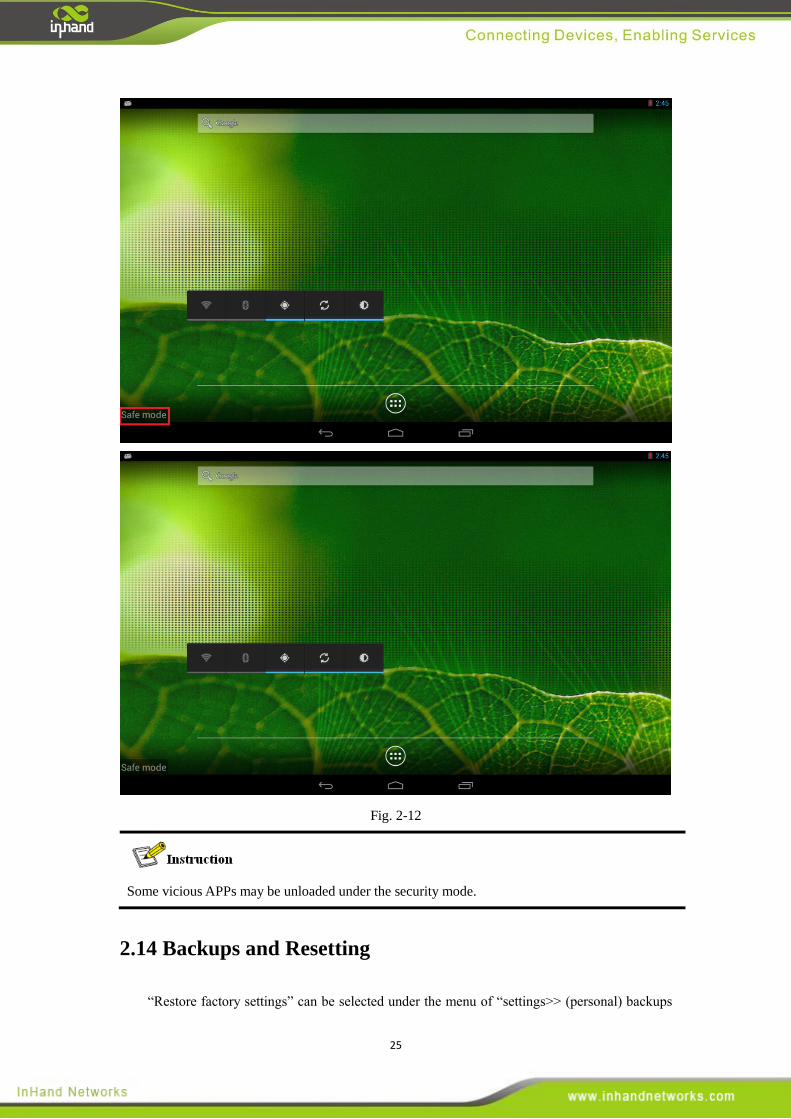
Press on the ON/OFF button till the system is closed, press down the button of “VOL-”
(don’t let go), and then press down the ON/OFF button a few seconds later till the system start is
finished; at this moment, the security mode can be seen on the lower left corner of the screen, as
shown in Fig. 2-12.
25
Fig. 2-12
Some vicious APPs may be unloaded under the security mode.
2.14 Backups and Resetting
“Restore factory settings” can be selected under the menu of “settings>> (personal) backups

26
and resettings”. Please use this function with great care. All product data will be cleared by
selecting the factory settings.
2.15 System Upgrades
Automatic upgrades of Android Recovery mode:
1. Put update.zip under the directory of /cache via adb push;
2. Execute adb shell to enter the command line mode, mkdir /cache/recovery/;
3. echo "--update_package=/cache/update.zip"> /cache/recovery/command;
4. Reboot recovery. The system will upgrade automatically by such reboot.
Broadcast sending command upgrades:
1. Name the file to be upgraded as update.zip, and copy it to sdcard of the InBox300;
2. Open USB debug mode of the Inbox300; if there is no driver in the computer, the driver
of attachment may be used. If the debug mode is not opened, please find this option in the
developer option in settings; if there is no developer option, please click on “About this
device>> version number” for at least five consecutive times. Then, the option will show
up;
3. After the driver is installed, open cmd command line to enter the adb directory in the
attachments, and execute this command: adb shell am broadcast -a com.ubox.upgraderom
--include-stopped-packages;
4. If it is successfully executed, the system will reboot and install updates automatically.
2.20 On/Off Button
On/Off button: short press this button to enter the sleep mode or awaken from the sleep mode;
long press this button by more than 10 seconds, the system will power off automatically.
2.21 Mode Button
Mode button: this button is programmable to realize some special functions.

27
InHand Networks
3900 Jermantown Rd., Suite 150
Fairfax, VA 22030
USA
T: +1-703-348-2988
F:+1-703-348-2988
www.inhandnetworks.com
InHand Networks
InHand Networks provides reliable, secured and intelligent
M2M solution for electric power, industrial automation,
commercial and medical devices. Recognized by world class
customers and partners. Proven by a large install base.
Expanding with intensive investments in research and
development.Enduring for long-term support.
InHand Networks has become leader in industrial grade
network technology by providing industrial cellular routers,
industrial Ethernet switches, wireless sensor network devices
and cloud based M2M platforms.
Connecting devices, enabling services.