Embed Size (px)
Citation preview

I love campaign games. Ever since I was a kid, I've always loved campaign games more than anything. I started with SPI's monster War in the Pacific and then went on to many games of Fire
in the EasUScorched Earth, Avalon Hill 's The Longest Day, and various others. We even started a campaign game that we made up ourselves for Starfleet Battles . So you can imagine what a great day it was when Avalon Hill came out with Red Barricades (RB). Here I finally had my favorite game, ASL, in a campaign game format. It had a production /purchasing system; what you do today matters tomorrow , and every decision affects every other decision . Since RB came out I have pretty much always either been playing an ASL campaign game or planning my next one.
So there I was at Oktoberfest in 2010 and we'd decided we would bring our current Valor of the Guards (VOTG) CG IV Savage Streets of Stalingrad there and play a CG scenario. Guy "Chainsaw" Cheney and I were the righteous sons of the Fatherland liberating Lebensraum from the godless hordes of "The Stanhagi " Neil and Danny Stanhagen (nothing like a little propaganda to keep the troop s motivated) . We were on Day 5 or 6 and the Germans were attacking. During the game I had many people come up to me and tell me how the campaign game was a dog , and the Russians couldn't win. They told stories about the Germans capturing most of the map the first day, and how many Russian players surrendered after one or two days. As I listened to all the stories I'm thinking: "These people have had a seriously different experience than I've had ". They told storie s of the Germans taking the north map edge, and of the Russians being unable to get reinforcements on; of their opponent who bought two rocket OBA modules on Day l; of one Russian who never counterattacked at night; and so forth and so on.
I not only disagree with these assessments of the balance,/ consider the campaign game to be slightly pro -Russian. I decided to write this article to assist other players in enjoying the game. VOTG is my favorite CG of all time . For those who have tried it and discarded it , I hope you'll revisit it . For those who have never tried it because they 've heard some bad things about it, I hope you will consider taking another look .
Tom Morin and Don Petros went above and beyond to make VOTG the best campaign game out there, IMHO. They have taken all the great things about RB and fixed all the thing s that needed improvement. The rules differences from RB , on which VOTG is clearly based, are not that extensive . Regular players of RB will find most of the CG rules similar. Changes include: vehicle platoons that are Recalled can return (Vl2.6162); Infantry RG are spaced out by date (V l 2.6217) ; Sturm and Combat Engineers now come in platoons rather than companies (Vl2.621); destroyed vehicles that did
not get burned out can be recovered and repaired (V 12.6151); buildings that catch fire may end up Gutted rather than rubbled (and after spending 120 PPP in RB to fortify the entire Commissar's House , only to watch it burn down, this may be the best rule change ever; Vl2.6104). The biggest and best change is the Russian Night Counterattack rule (Vl2 .613) . The Russian gets to counterattack when he wants rather than having to get lucky and choose to attack when the German happens to go Idle. If you don ' t like playing night you only have to play a few games as the Russians and you will learn to love it. Some players are daunted by the night rule s but actually they're very simp le, and after one night battle , everybody will be a veteran. The game also has a different feel to it, with the Germans pounding away by day and the Russians counterattacking at night, a real back and forth battle that matches the historical narrative of the battle. Add to that the things that make VOTG special: NKVD units (SSR VotG22), Fanatic Strongpoints (SSR CGll), rolling Stukas (S2; SSR VotG9), German Assault bonus CPP (Vl2.6181) the list goes on. Mr. Morin and Mr. Petros have made VOTG truly a fantastic game.
The Big Picture
Hitler chose to attack across the huge distances of southern Soviet Union in late summer 1942 , aiming for her grain and other natural resources, especially the oil in the Caucasus. The Soviets retreated, trying to avoid a repeat of the encirclements of 1941. As a result, the Germans were never really able to bring them to battle . Army Group South grew so large that it was divided into Army Groups A and B . Army Group A pushed into the Caucasus to take Baku and cut the access to the main Soviet oil supplies . Army Group B covered Army Group A's left flank as it pushed toward the Volga and Stalingrad, which was not only a large population and war material manufacturing center but also Stalin's namesake.
The Soviets finally made a stand fifty miles outside the city, but, in a repeat of 1941, large portions of the 62nd and 64th Soviet Armies were mauled and then encircled. The Germans now drove hard on Stalingrad itself . XIV Panzer Korps punched deep into the Soviet defense, driving to the Volga north of the city, a move that cut off Stalingrad from the north. The Soviets furiously counterat tacked this salient to no avail as the rest of the German 6th Army closed in on Stalingrad. General Vasily Chuikov, commander of the Soviet 62nd Army, desperately threw together a defense from the remnants of his mauled 62nd Army and whatever reinforcement s he could gather as the Germans began to push into the city.
6th Army entrusted LI Korps with attacking downtown Stalingrad and capturing the main ferry landing . This would deny the Soviets

their main river crossing into the city and also cut 62nd Army in half. Entering the city on 14 September, German Infanterie-Divisions 71 and 295 encountered light resistance in the housing settlements, but casualties increased as they approached the business district. Both divisions were understrength and the men tired from the rigorous summer campaign, but confidence was high and they were supported by assault guns, artillery , light FlaK, and Stukas.
General Alexander von Hartmann 's Infanterie-Division 71 led the thrust to the Volga, and at 1200 hours Colonel Roske's InfanterieRegiment 194 reached the Stalingrad-I Railway Station, where it paused to regroup and bring forward heavy weapons. Its rapid progress far outstripped that oflnfanterie-Regiment 191 on the right flank, while Infanterie-Regiment 518 lagged behind on the left. Roske was warned about his exposed flank by von Hartmann but was more concerned with maintaining his forward momentum. Chuikov scrambled to organize a defense to shield the ferry landings until the 13th Guards Rifle Division could arrive that night. All Chuikov had to block the Germans with were two weak regiments and reserves of Colonel Sarayev 's 10th NKVD Division , along with the remnants of Major Khopka's 6th Tank Brigade and the composite regiment of the 399th Rifle Division which were attached to Colonel Batrakov's 42nd Rifle Brigade. The NKVD units were lightly armed , and both the 399th Composite Regiment and the 6th Tank Brigade had been weakened by fighting on the outskirts of the city. 62nd Army would be hard pressed to withstand the German assault, which , after a brief respite, resumed at 1415 hours.
The Map Veterans of RB will initially note the similar style of the VOTG
map to the RB one; upon closer inspection, however, the maps are very different. The RB map is dominated by large factories, and a few large two-level buildings. It has vast areas of relatively open ground covered in debris, rubble, and shellholes with some spreadout single-story houses. Large MG stacks can effectively cover these open areas and there is no real need to put troops there.
The VOTG map, on the other hand , is a warren of bombed-out buildings divided only by streets and a few large plazas . It is a very crowded map and even most of the rubbled hexes have black bars that block upper elevation LOS. Essentially, the map is just one giant area of city blocks and buildings with a few open plazas and a railroad yard on the west edge. The only comparable place on the RB map is the south edge.
However , the biggest differences between the two games (and how they are played) are the German entry conditions, and the fact the map is bombed out. Instead of the Germans entering from the comer of the map as in RB, VOTG starts with the Germans basically entering along the entire length of the west map edge on the first day. The most important difference is that the map area is almost completely bombed out, and almost all the buildings are gutted and roofless. At first glance, this might not seem that important, but it changes the way the entire game is played. In RB, monster MG stacks in high-level buildings pound anything they can see. This is reasonably safe as they are usually placed in fortified stone Locations. These stacks can control large portions of the map. In VOTG, it's very dangerous to put guys in a roofless Location, especially excellent leaders with six half-squads and six HMGs (or some variant
of that). Even if Fortified, units are only in + 2 TEM vs Indirect Fire. Now, instead of a 50mm MTR needing a 2 on either the TH DR or the effects DR to hurt you, it now needs only a hit and!> 4 on the effects DR. With the slew of little Russian mortars and Level A Booby Trap capability (B28.9), being on the 2nd level of almost any building except Pavlov 's House is very, very dangerous.
The other major impact of gutted buildings is that they make Conscripts almost worthless. In RB, you could use Conscripts fairly effectively to defend factories and buildings; in VOTG, they lose most of their value as almost the entire VOTG map consists of 3 MF terrain . Every time Conscripts move without leaders , they lose concealment; and every time they Advance they become CX. The major exception to this is the Rail Yard, which is usually only in play on the first day. This will impact the Russians more in the beginning and the Germans more as the game goes on. In RB, the Russian player wanted to Battle Harden his Conscripts first , as the upgrade is so large , the squad's morale level , movement factors, and range increase, and they become Stealthy vs Lax. The German player faced a more difficult decision. First, he got fewer Battle Hardenings because of the way the tables are designed; but they also really needed 8 ML rifle squads for their MG stacks. The German player could wait to upgrade his Conscripts as they could still be fairly effective on the defense in buildings and factories. In VOTG, he will
" .. . THE OTHER MAJOR IMPACT OF GUTTED BUILDINGS IS THAT THEY MAKE CONSCRIPTS ALMOST WORTHLESS ... "

"The most important block in the game is the Univermag (S38) block . It has great fields of fire in every direction and many multi-hex, multi-level buildings. Without the Univermag block, the Germans really can't attack across the three hexes of open
ground to get to the Z37-GG49 area, which should be the area the Russians want to hold to win."
be tom about which to Battle Harden first. It will make for tough decisions for the German player as the game continues, especially because, unlike RB , he will be starting with quite a few 2nd Line guys who are only one ELR failure away from Conscript status.
As you look at the map, the easiest way to picture it is that basically it 's half of a football stadium and the Germans enter on the 50-yard line. They do so with no high level buildings near them and as they push east they will be surrounded by high ground on three sides. The first thing the Germans will have to do is push through the Rail Yard, which can readily be thought of as a huge block of Level 1 wooden buildings (although the rules for them are not exactly the same). Rail Station Stalingrad-1 (F36) guards the entrance to a plaza on the south and behind that sit the Russians in their big buildings. There is also a small rail station (F22) in the middle of the Rail Yard that may or may nut be a factor on the first day, depending on whether the Russian s decide to defend it.
The south board edge is the most important edge in the game. If the Germans can secure it the Russians can never enter there again unless it is recaptured, so the Germans won't have to defend it. Controlling the north board edge is not as important, as the Russians can always enter their "red dot" groups (Vl2.6217) on/between Ul -AAl even if it is German-Controlled. The north board edge is very hard to defend due to a lack of large buildings, rout paths, and rally points. It is also the most open area on the map (the German assault guns, however, will find this area the best tank country on the map). The Germans can make entering on the north map edge harder by adding some Fortifications after they capture it, but the area will always have to be defended.
The 9th January Square dominates the northern middle of the map and will have a large impact on the game when it has to be crossed. In the north, K8 is the main building on the west side of 9th January
Square while Pavlov's House (RS) and Zabolotnov's House (S7) are the main pieces of terrain on the east side of the square. Buildings X6 and NKVD/GPU House (Y8) will play a major part also because of their Cellar and Level 1 Locations.
The VC requiring the Germans to take all but 70 stone hexes means taking basically 85-90% of the map. As the German always wants a road between him and the Russian during Night Counterattacks, the game tends to be played in blocks. Once the Germans have completely taken one of the large multi -hex , multi-level building blocks in the south, it is very hard for the Russians to get them back.
The most important block in the game is the Univermag (S38) block . It has great fields of fire in every direction and many multihex , multi-level buildings. Without the Univermag block , the Germans really can't attack across the three hexes of open ground to get to the Z37-GG49 area, which should be the area the Russians want to hold to win. This area has 69 of the 71 stone hexes needed for Russian victory and should be heavily fortified.
The next most important block is the K40-P44 block. This is the biggest group of large multi-hex and multi-level stone buildings on the map. Until this block is captured, the Germans will have a very difficult time making any progress on the southern map edge or even attacking the Univermag block. The Nail Factory block (K36-P40) is not as important. If the Germans capture the K40-P44 block and the two rows of houses north of the Nail Factory block (which are hard to defend because of their shape, the LOSs into the block , and a lack of places to rout out of LOS for rally purposes) the Nail Factory block will be isolated. Once an area is isolated you can try to defend it, but it's very difficult. You can defend an isolated building if it's a Fortified Strongpoint, but a large block requires too many units that will in turn become isolated in order to defend it to make it worthwhile. The Russians should prioritize defense of the K40-

" .. . THE FIRST MAJOR DECISION FOR THE GERMANS IS WHETHER TO PLAY THE EARLY GAME OR THE LATE GAME STRATEGY. .. "
P44 block to make sure the Nail Factory block (K36-P40) falls first. The R43-S45 and R45-S49 blocks are hard for the Russians to hold once the K40 block goes down because all the stairwe lls are on the front of the buildin gs or can be easily seen by the Germans. The U44-V44 and U46-V48 blocks are tougher to crack , but if the Germans buy Stukas it 's very hard for the Russians to get troops in and out of them.
A string of roofless two-level buildings is the major terrain feature next to the river bank. The Germans don 't have to take them to win, but if they don 't , they basically need to take the rest of the map. The Russians will use them to rain death from their 50mm MTRs into the "Kill Zone" (see below ). With a 20-hex range, and so many upper level Locations to put them in, virtually no German-occupied hex will be blind to everything until they take some major blocks to the south .
The area in the middle of the map, bordered by the road net Jl5-J21-022-029 -V32-V30-U30-Ul5-Jl5, Ilike to call the "Kill Zone". More units will die there than probably the rest of the map combined. It is a huge area surrounded by Level 2 Locations on three sides ; there are no good defensive positions,j ust a web ofbombedout buildings and rubble hexes. No place to run , no place to hide. It would seem to be a good place to avoid for both players, but if the Russian controls it all , he might be able to get back into the Rail Yard (which would be a disaster for the German), and if the German control s it all he might be able to launch a swift attack against the Russian MLR which should be set up from V 13-V29-W3 l -W34. In practice this means during the day the Germans push the line up to the Russian MLR , and during the night the Russians push the Germans back 4-6 hexes so they can' t start the next day across the road from the MLR. It should also be noted it is very difficult to attack the MLR from the west (rather than from the north or the south) . The terrain the Germans have to start in is horrible , and the Russians are sitting in a string of good buildings with cellars, and right behind them are the big two-level buildings. The large plazas in the game are centerp ieces in their areas and they are much better dealt with by attacking around them rather than over them.
The Attack
So you've drawn the short straw and you're the Germans. How are you going to meet the Victory Conditions? I like to divide the CG up into three phases. Phase One is the initial push to the first Idle Day. Phase Two is between the first and last Idle Days . Phase Three is the finish of the game as the Germans attack out.
The first major decision for the Germans is whether to play the Early Game or the Late Game strategy (I personally prefer the Late Game). In the Early Game, you buy a lot of your infantry early and attack hard across the entire map. The upside is that this is when the Russians are weakest, so you maximize your initial strength advantage. The downside is that you are not buying your infantry in Reserve, so it costs more CPP, and you also aren' t getti ng the best modifiers on the Strength Tables . The Early Game strategy maximizes your strength in Phase One but you are weaker in Phases Two and Three. Executing the Late Game strategy makes you stronger in Phases Two and Three because of the way you buy your units, but you have to give up some of your initial advantages in the first couple of CG Days.
The second decision is to decide if you think the Russian is going to defend the Rail Yard. Typically, the Russian will defend it. I feel this is the best strategy for the Russians. If you ' re confident the Russian is going to defend the Rail Yard, you may want to buy two Bombardment s on the Initial Day and drop them on the Rail Yard; these can wreak havoc with the Rail Yard defen se. As a rule , the Germans should attack as much as possible using method s that won't destroy their ELR . The bonu s 6 Support CPP (V l2 .6181) makes attacking worth it whenever possible . However, when the German ELR falls to 2 or less, the resulting rash of ELR failures will result in lots of Conscripts. The goal should be to keep your ELR at 3 or higher until almost the end of Phase Three.
If you decide on the Early Game strategy, I like buying two "blue dot" (V l2.6217) rifle companie s (14 CPP), an Offboard Observer and Pre-Registered hex for the OB-given 100mm OBA module (2 CPP), and another 80mm OBA module with an Offboard Observer (3 CPP). Save the last CPP. The Support CPP are spent on rolling Stukas (S2; 6 CPP). If you are confident the Russian will defend the Rail Yard, delete the 80mm module and get two Bombardments instead ( 4 CPP) .
If you are playing the Late Game strategy, purchase two StuG IIIG platoons (10 CPP), one StuG IIIB platoon (4 CPP), an Offboard Observer for the 100mm (I CPP) and save the rest. The reason I like this purchase is it gets you into a good cycle of assault gun platoons coming and going . With so many platoons, one bad series of withdrawal rolls won't leave you with a shortage of assault guns the next CG Day. Spend the support CPP on rolling Stukas (S2; 6 CPP). Attacks are planned for CG Days September 14th, 15th, and 16th. If your opponent is smart he will be counterattacking every night so the September 16th and 17th ELR rolls are crucial. If you fail these rolls (try to pad your DRM with purchases from the CG Day), and if you' re executing the Late Game strategy , go Idle as soon as your ELR drops the first time. If you're doing the Early Game strategy, you will have to make that call whether to attack on the 16th and 17th. If you stand to reap big reward s by attacking, do so, but know your ELR will be 1 after the roll on the 18th, if you fail both rolls. After your first Idle Day, the going will be much tougher as the Russian OB catches up . At this point you should continue to attack but take an Idle Day whenever there will be a decent chance your ELR might go down (also at least half of all CPP should be saved for the big -2 days coming up). This will depend a lot on how many of the possible eight Night Counterattacks the Russians bum.
For both strategies, go Idle on either the 21st or 22nd and do your big purchase with all the points you have saved. I prefer going Idle on the 2 1st, buying all my infantr y in Reserve, and then attacking on the 22nd, after buying all my guns and HW platoons for the free on-map setup . The rest of the game is in Phase Three , so just keep attacking until a final result is achieved .
They say no plan survives first contact with the enemy, so keep an open mind about what you try to attack every CG scenario. Since you need to take almost the whole map to win , always take map sections that are under-defended , even if they're not your primary objective for that CG scenario . In the beginning, the Russians have a large OB but have a larger area to defend. They are strong in the south but will be very hard-pressed the first couple of days. The goal by the end of Phase One should be to take half of the map, the north-

em edge, and hopefully the K36-040 or K40-P44 block. If you take both you are really ahead of the curve. Hopefully this can be done with minimal casualties. The Germans have about 265 squads available over the course of the CG and the Russian s about 300, so both players need to be careful to prevent avoidable loses .
If you 're playing the Early Game strategy, the two "blue-dot" rifle companies give you the ability to attack across the entire map length the first day. Use caution on the southern map edge on Day One. If you attack down there, send a full StuG IIIG platoon to support it. The Russians start with a mobile T-34 platoon and-if they get their reinforcements-can also enter two KV-1 platoon s. This force can quickly crush any infantry you have in the orchards or shellholes if you don 't give them a fairly strong AT defense. On Day Two, buy the two "green-dot" rifle companies as they will be able to quickly get into the battle , entering along the northern board edge.
If you are playing the Late Game strategy , attack in the north and the middle , skipping Rail Station Stalingrad- I by going north of it. On Day Two you can bring in two "blue-dot" companies and attack Rail Station Stalingrad-I and the Children's Home (H42). Control of the Children' s Home is the key to controlling Rail Station Stalingrad- I. Even when Fortified, Rail Station Stalingrad- I is too vulnerable to Indirect Fire to hold. One OBA module of any size can usually clean it out in a few turns. If you take Rail Station Stalingrad-I but fail to take the Children's Home , the Russian will just recapture the station that night.
In Phase Two, keep pounding away, protecting your ELR and minimizing casualties. Once the Univermag and U44/U46 blocks fall, you can consider attacking across the W42-W50-Y50-Y43 area. If you do decide to do this , I recommend two 150mm OBA module s using Barrage s hexes in Z44 and AA46. If you can get them both down you should be able to get across the three hexes of open ground. But be advised if the Russian is smart , he will have spent a lot of fortification points to protect this area , and it won't be easy.
If you take the northern edge early, consider using a couple of squads to Set DCs (A23 .7) during the course of a game to rubble Zabolotnov's House (S7) . It should be pretty easy and, if successful, follow by fortifying Pavlov' s entire house. Now you have two Level 2 Fortified Location s with rooftops in which you can put large MG stacks that will have great fields of fire .
The Defense
So you're the Russians. First of all, know that no matter what you do you are going to take a pounding the first couple of days, e:,pe
cially on Day One. You are going to lose half the map , and half of your starting OB. What is important is which half of the map you lose , and which half of your OB you lose . It is what it is. If the Germans didn 't start like this , they could never win. I think a lot of VOTG CGs are decided because the Russian player quits after the beating of the first day or two . Did we give up after the Germans bombed Pearl Harbor? No . Man up and fight! I also recommend vodka. Lots of it. It goes with the flavor of playing the Russians and eases the pain of the beating . I like Grey Goose martinis, straight up, extra dry, dirty, three olives.
As the attacker, the German will drive the pace of the game, but that doesn't mean you have to be passive. With the Night Counter-
attack rules, you can pick your spots. You also get to choose what terrain you defend to the death and what areas you use to slow him down . The goal is to hold 71 stone hexes ; there are 500-600 of them , so he must almo st kick you completely off the map. My favorite area to hold is the big block in the southeast corner; it' s hard to break into and has almost enough Location s to win. This should be your last stand fallback.
As the Russians , you have a lot of tricks up your sleeve. Use them. Keep your SAN and Booby Traps maxed out, defend all the Historical Strongpoints (it's too cheap not to), and spread out. Defend everything at least lightly (and use lots of Dummie s to camouflage your strength) ; don 't give the German s any free ground. Blow up a few German squads with Set DCs and see how much time he spends Searching. Every time he does ,just before the Search Casualty roll, shout "Don't pick up the bunny! "; then if he rolls a ''l'' shout "BOOM!". Focus your defense in the south and on the river bank. The north edge is too hard to hold ; there is no good terrain up there. You would think Pavlov 's House is defen sible, but one German OBA module placed on it makes it a death trap, with no place to rout. After the first day, put a 50mm MTR and a 2-4-8 HS in every Level 2 Location you have (Vl2.6121 and Russian RG Chart Note x; the ability to deploy squads for light mortar crews is a great rule for the Russians). The Germans will cringe every fire phase when you start to shoot them.
Win the SAN battle ; get yours up and keep the German's down . The Germans can 't use their 50mm MTR s with a high Russian SAN; they'll do more damage to themselve s than to you. When I'm the Germans , T don 't even put mine on map unless I'm shooting at a Fortified Gun. And for this reason, never put your guns in Fortified Locations. It 's temptin g, especially for the 76Ls; but the Germans will just line up 10 little mortars and will get a Critical Hit within a few fire phases, and that will be the end of it. Use Spotted Fire for your 82mm mortar s. Keep your MGs in the back to make sure you don 't lose them (especially in the beginnin g of the game, when you have so few). Buy all your infantry in Reserve and try to get your companies when you have a negative Historical DRM (Vl2.6182; this might not always be possible).
In the early date s of the CG , keep counterattacking to increase your OB and force the German to take an Idle Day (or destroy his ELR). This will probably burn up three or four of your eight available counterattacks. Pick your spots for the rest, but save one or two until the last days of the game. In your counterattacks, make sure you continue to defend the entire map; don 't let the Germans take part of it while you are busy someplace else. A smart German leaves a company and most of his O modifier leaders off map to enter them and either reinforce the attacked part of the map, or start a counter attack away from the action.
Pick your objectives carefully; a night counterattack should focus on a small part of the map and not the entire thing. Stay out of LOS on the parts of the map where you aren't counterattacking until tum 3 or 4 so you don 't free up the German units in that area. Before any countera ttack (except the first night , when you really need to spend the points on more infantry) , spend the two Recon point s; they are CPP well spent and will give you a good feel for what is around. The goal of your counterattacks shouldn ' t be to kill 20 German squads and lose 10 of your own in the process. It should be to kill 6
" .. . PICK YOUR OBJE CTIVES CAREFULLY ; A NIGHT C OUNTERATTACK SHOULD FOCUS ON A SMALL PART OF THE MAP ... "

to 8 German squad s, lose nothing , retake the easily capturable terrain , and get a victory for ELR and Battle Hardening purpo ses. Goals should include moving the line back 6 to 8 hexes , especia lly in the "K ill Zone", and putting any Immobile vehicles or wrecks inside your perimeter to turn them into Burnt-Out Wrecks so the Germans can't recover them .
There are two types of counterattacks; call them soft and hard. In a soft attack, you move forward slowly, placing ARs from 70mm OBA and generally just drive the Germans back , killing his HS outliers. Try to get him to use up his OBA if he has any and, if you hit any major resistance , call in Smoke and go into CC. This is very effective as Cloaked units pay daylight costs for movement while everybody else is going CX. Also, Smoke doesn 't affect the APh, so you can actually strip a German unit 's Concealment , then Advance into CC with them with a different Russian unit. They won't be able to take a shot at you or Voluntarily Break because there is no LOS (assuming you're both in Smoke). I like to use a -I leader and two 6-2-8 or 5-2-7s as my kill stack; they'll have a net-5 on the Ambush dr against anybody they meet. Hand-to-Hand, chop chop.
Attack in waves. It is almost impossible to attack at night if you're not Cloaked because of the terrain costs. That 's why it's nice to have severa l waves of Cloaking counters; once the first wave's Cloaking counters get stripped off you can continue the attack with second or third waves. Once all your Cloaking gets stripped, then that should be the end of the attack, so go to ground.
In a hard counterattack, get two 120mm/150mm OBA modules (or rockets) with Pre-Registered hexes and go crazy. This is more of a day attack that just happens at night. Start the fireworks on Tum 1 and don't care who gets freed up. This is usually what you will want to do if you are trying to retake a major position or building . If you 're just moving the line , go with the soft attack .
THE ORDER OF BATTLE
The Germans Sl Stuka I: This is the standard German Stuka mod
*~DB ule. Make sure to never buy Stukas in advance as it
1 ML IN! might be Overcast the next day. I don't get these too often, but when I do I usually spend the extra point
._200 ____ 4_, to get the -2 modifier in the entrance roll. As a side note, I always wondered why the daily max was two since you could only have one Stuka module per scenario . The only thing I could come up with was that if the Russians counterattacked and picked a day scenario (and this is really up there on the stupid level) the Germans could get Stukas to help the defense.
S2 Stuka II: "Rolling " Stukas: these rock, but are expensive. A must-buy for Day One to pin the Russian defen se, and you have them for eight turns. After that , I like them only for major assaults after an Idle Day and a big force build-up. Pray for a long CG scenario.
Al StuG B Pltn: Assault Guns: use them as such . They are not tanks ; and with no MG and almost every hex on the map Street Fighting terrain you can go through these things quickly. If you park beside a squad, it will need a 7 to Immobilize you, and
that's usually fatal at some point. The armor recovery rules help a lot, but the Russian will try to perimeter your wrecks at night to prevent their recovery. I like to buy these later as the StuG IIIG Pltn is affected by the corning Ammo Shortage, and the Russians will have more tanks in the beginning.
A2 StuG G Pltn: See Al above. Get these early for use against Russian tanks and for their use before the Ammo Shortage kicks in.
A3 leichte FlaK Pltn: Worthless , especially for 3 CPP. If they were 1 CPP, you still wouldn't want to buy them. Although it's cool they can FG with infantry, the map is so bad for these vehicles they are almost useless. Find a place where you want a
wreck. The Russian ATRs and light MTRs will make short work of these. If you put them behind a Roadblock they might last a little longer. Be careful with these on Day One; you can actually lose the initial scenario if you lose a lot of vehicles , and these are some prime candidates. Have them sit beside a wall or Roadblock and shoot at any Russians at Level 2. If the rules didn't prevent it , I would have the crews abandon them and just use the crews.
11 Rifle Coy: Try to buy these on negative Historical DRM days to get s 7 on the Depletion DR for Full Strength. Really try to get them on -2 Historical DRM days if you can; it makes your chance of getting them
reinforced (still hard) six times better than on O DRM days. Also, after the first Idle Day, all infantry (except maybe HW Pltns) should be bought in Reserve to save CPP.
12 Stosstruppe Pltn: These are your standard attack units , much better than 4-6-7s on the attack, and you won't want to cry if they get killed crossing a road (unlike your 8-3-8s). All I2 RGs should be bought at mght
in Reserve, which is a 33% savings.
13 Pionier Pltn: These are Assault Engineers and Sappers ; be very careful with them. They attract fire, especially in the open. I like to keep them all together in the buildings in the south, in good strong terrain , and
massed up; they have ENORMOUS FP. They will probably have to carry the day at the end of the CG, and if you 're careful with them , you should have 15+ with a 5 ELR at the end of the game. On a side note, I would like to see a FT RG that replaces all lost flamethrowers for 1 CPP (up to how many flamethrowers they would have started with) and maybe a DC RG too .
14 HW Pltn: Buy these on -2 DRM days . Once Ammo Shortage kicks in , don't shoot the 81 mm MTRs at just anythin g; wait for a good target. The 8lmms are also very handy at night for IR rounds.
•
01-6 OBA: I won't cover these individually , but you don't have enough. You will end up playing 18-20 CG scenarios in CG IV. At two per game, that 's 36-40 modules. You have 21 plus the one you start with. Save the 150mm until after Ammo Shortage
kicks in as they aren't affected by it. Keep two 80mm OBA modules stored for use at night. Get the SRs down , but don 't call it in unless you really need to. Often , the SR alone will cause the Russians to go to ground or scatter.
Bl Bombardment: These are actually very handy. They can do a lot of damage in areas of single story houses and especially the Rail Yard. Later in the game , they are effective at stripping Concealment around your target area for artillery and direct fire purposes.
AT Gl PaK Batterie I: I really don't like this RG; for :~lO the price , the INF Batterie (G3) is much better. All Gun Batteries should be bought on -2 DRM days IL (1&) due to their lower Strength Table and the fact you
.__ ___ __, lose 50% of your guns if they come in Depleted .
Continued on page 36

.-------, G2 PaK Batterie II: I like to buy one of these on AJ the first-2 DRM day. If the Russian still has Dug-In MJ tanks the 75Ls are very effective (except at the front
[II of a Dug-In KV), and all four guns have Smoke and 75L a pretty good ROF. The 75Ls eventually get Ammo
Shortage, so I only usually buy one.
~----, G3 INF Batterie: I really like these. The 150mm is
-~J~ a monster, and the 75mms can do some real damage _ ~ to Russians across the street.
150* Ml Fortifications: Buy these at night. Sometimes a Fortified building at the right spot can seriously slow the Russians down, especially if he is doing the Smoke/CC thing. You can fortify the northern edge but since the Russians should really be buying their
stuff in Reserve, I'm not sure how much it will help.
M2 Sniper: If you can get lucky and flip the SAN battle (yours high and his low), buy this every day. If the Russian is smart, this won't happen, so this is usually a waste ofCPP. It will quickly go to a 2. You might want to buy it up to a "3" on a night attack,
so it's really a 5, but that's about it. Always Sniper Check the Russians if you can, and set up your sniper to shoot his, if possible. A high Russian SAN is the best unit he has on the map .
The Russians
Al T-60 M42 Pltn: These little tankettes, and the A2 (T-70 Pltn), should be saved until later in the game; they can be used to Trail Break Minefields on the north edge if you ever decide to do a counterattack and need to enter from the north. If not used in
this fashion , wait until an opportunity presents itself to buy them Dug-In in a clutch rubble hex or two. Try to find somep lace that you can have infantry behind them that can't be seen, so that they can fire into the Melee if he misses his CC roll. They can actually really frustrate an attack until the Germans can get some AT weapons in position to blow them away. Hero of the Soviet Union will be issued-posthumously-to all crew members.
A2 T-70 Pltn: Same as above, but with a limited AT capability vs the StuG IIIBs.
A3 T-34 M41 Pltn: The T-34s are a marginal buy. With no ROF, they are at a distinct disadvantage against the StuG IIIGs. At 5 CPP they are not cheap either (even at 3 CPP Dug-In they aren't cheap).
A4 KV-1 Pltn: The KVs are great. Buy them DugIn and find a good hex . You'll have to set them up near the south board edge, but it 's worth saving the 2 CPP. Basically the Germans can 't kill them from the front and will have to use CC , flank/rear shots ,
or Stukas to knock them out. The two KV-1 platoons which come in as reinforcements on the first day should be left off map unless it's a true emergency. Dig them in at the first opportunity around the map in good rubble hexes. Put a couple in the back for future use.
11 Guards Rifle Coy: You will fall in love with this RG. The Russians rarely have better troops than the Germans, but with this RG as your primary infantry company , you will soon have mostly Elite infantry on
the map. Leader roll mods , lots of SWs. It also will change your tactics from RB. You no longer have a lot more infantry than the Ger mans, but yours is now better. In RB the Russians jump into CC at every opportunity no matter what the odds. In VOTG these 4-5-8s should only go into CC when they have a distinct advantage in numbers and/or Ambush drm. As with all Russian infantry (except maybe HW Pltn), always buy in Reserve.
12 Guards SMG Pltn: These are your CC guys; always buy them in Reserve on German day attack dates and set them up in such a way that they will get activated early.
13 Rifle Coy: The 13 Rifle Coy provides lots of decent infantry at a cheap price-only 5 CPP. Make them an early buy to help ratchet up your OB as quickly as possible.
14 SMG Coy: The VOTG map is a good map for these guys, since ranges are typically short and there are lots of CC opportunities. Make sure to buy the Company available at start .
IS NKVD Militia Coy: These guys will be most of your starting OB. Try to keep the NKVD 6-2-8s around; you aren't get ting any more of them. They are great at
defending fortified strongpoints . With a 9 morale, in +4 terrain, they are basically immune to DM and are VERY tough to dig out of buildings. Give them all the LMGs you have and enjoy the 16 (+1) at guys in the street in Shellholes. No Cowering here. And try to keep them out of CC. The 4-2-6s they come with will die in droves on the first day; Battle Harden the rest as quickly as possible. After the first day, try to use your Conscripts in the north or around the Children's Home while you can; there are some buildings and factories that aren't bombed out where they can move around without becoming CX and losing their Concealment.
16 Storm Group Pltn: These are Assault Engineers and Sappers; Set their demolition charges for fun surprises, and HIP the flamethrower guys; always fun to pop up a 24 flat.
17 MOL-PPitn: Buy these in Reserve (at a 50% discount); for 1 CPP you get 3 crews and 3 MOL projectors . These are very handy. With such tight terrain, the
Germans often have to get their StuGs in close to shoot at targets. HIP them in cellars , and enjoy the Burnt-Out wrecks he won't be recovering.
18 HW Pltn: Buy one of these platoons when you get the -2 Historical DRM on the first night, then buy the rest later in the game after you get your infantry strength up.
•
01-6 OBA: The Russians have the same problem as the Germans: not enough artillery for the number of scenarios. Conserve when you can. Always use rockets when attacking, but never when defending. When on the attack at night, use the 70mm Lt Arty for
Smoke. Use the 80mm Btln Mortar on defense for their harder hitting power. Your Offboard Observers have huge fields of view and should be used for all 120mm+ modules , along with Pre-Registered hexes. This gives you a 6/2 draw pile (which is excellent) with no Radio Contact rolls to go astray. When the Germans are near the river bank , they can expect a savage pounding from these modules.
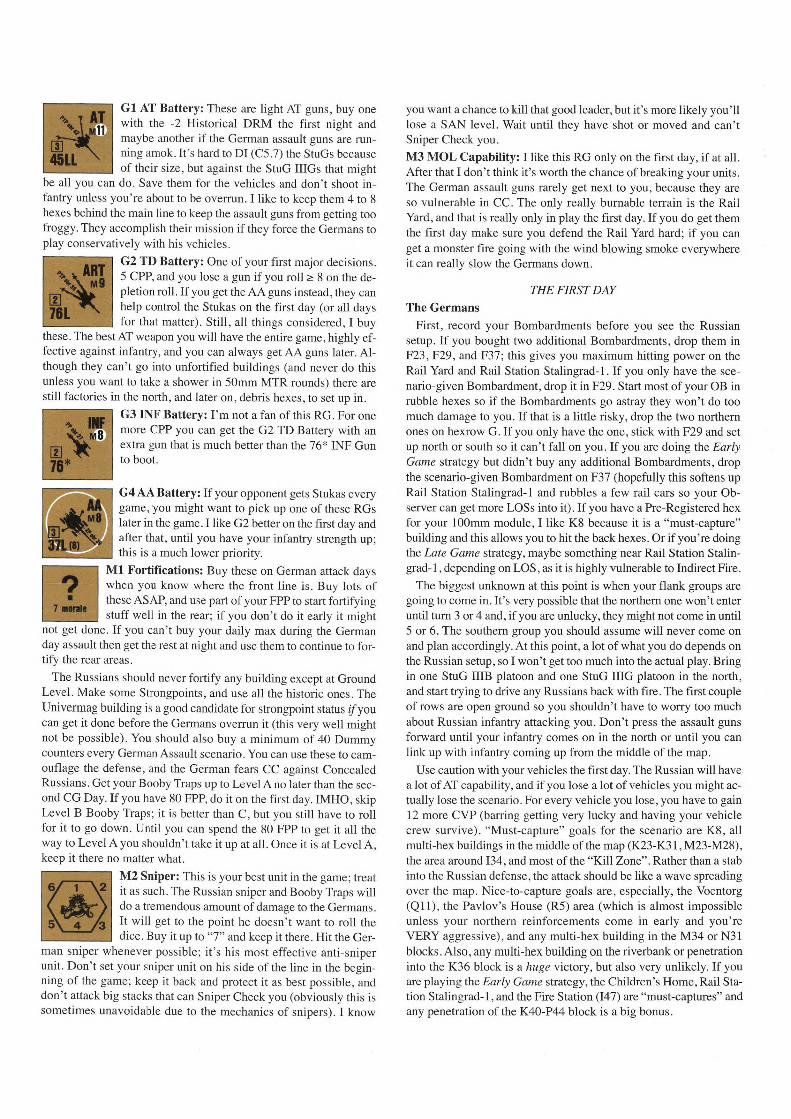
Gl AT Battery: These are light AT guns, buy one with the -2 Historical DRM the first night and maybe another if the German assault guns are running amok. It's hard to DI (C5.7) the StuGs because of their size, but against the StuG IIIGs that might
be all you can do. Save them for the vehicles and don 't shoot infantry unless you ' re about to be overrun. I like to keep them 4 to 8 hexes behind the main line to keep the assault guns from getting too froggy. They accomplish their mission if they force the Germans to play conservatively with his vehicles.
G2 TD Battery: One of your first major decisions. 5 CPP, and you lose a gun if you roll 2 8 on the depletion roll. If you get the AA guns instead , they can help control the Stukas on the first day (or all days for that matter) . Still, all things considered, I buy
these . The best AT weapon you will have the entire game, highly effective against infantry, and you can always get AA guns later. Although they can't go into unfortified buildings (and never do this unless you want to take a shower in 50mm MTR rounds) there are still factories in the north, and later on, debris hexes, to set up in.
G3 INF Battery: I'm not a fan of this RG. For one more CPP you can get the G2 TD Battery with an extra gun that is much better than the 76* INF Gun to boot.
G4 AA Battery: If your opponent gets Stukas every game, you might want to pick up one of these RGs later in the game. I like G2 better on the first day and after that, until you have your infantry strength up; this is a much lower priority.
Ml Fortifications: Buy these on German attack days when you know where the front line is. Buy lots of these ASAP, and use part of your FPP to start fortifying stuff well in the rear; if you don't do it early it might
not get done. If you can't buy your daily max during the German day assault then get the rest at night and use them to continue to fortify the rear areas .
The Russians should never fortify any building except at Ground Level. Make some Strongpoints, and use all the historic ones. The Univermag building is a good candidate for strongpoint status if you can get it done before the Germans overrun it (this very well might not be possible). You should also buy a minimum of 40 Dummy counters every German Assault scenario . You can use these to camouflage the defense, and the German fears CC against Concealed Russians. Get your Booby Traps up to Level A no later than the second CG Day. If you have 80 FPP, do it on the first day. IMHO, skip Level B Booby Traps; it is better than C, but you still have to roll for it to go down. Until you can spend the 80 FPP to get it all the way to Level A you shouldn't take it up at all. Once it is at Level A, keep it there no matter what.
M2 Sniper: This is your best unit in the game; treat it as such. The Russian sniper and Booby Traps will do a tremendous amount of damage to the Germans. It will get to the point he doesn't want to roll the dice. Buy it up to "7" and keep it there. Hit the Ger
man sniper whenever possible ; it 's his most effective anti-sniper unit. Don't set your sniper unit on his side of the line in the beginning of the game; keep it back and protect it as best possible , and don't attack big stacks that can Sniper Check you (obviously this is sometimes unavoidable due to the mechanics of snipers). I know
you want a chance to kill that good leader, but it's more likely you'll lose a SAN level. Wait until they have shot or moved and can't Sniper Check you.
M3 MOL Capability: I like this RG only on the first day, if at all. After that I don't think it's worth the chance of breaking your units. The German assault guns rarely get next to you, because they are so vulnerable in CC . The only really burnable terrain is the Rail Yard, and that is really only in play the first day. If you do get them the first day make sure you defend the Rail Yard hard ; if you can get a monster fire going with the wind blowing smoke everywhere it can really slow the Germans down .
THE FIRST DAY
The Germans
First, record your Bombardments before you see the Russian setup. If you bought two additional Bombardments, drop them in F23, F29, and F37; this gives you maximum hitting power on the Rail Yard and Rail Station Stalingrad- I. If you only have the scenario-given Bombardment, drop it in F29. Start most of your OB in rubble hexes so if the Bombardments go astray they won't do too much damage to you . If that is a little risky, drop the two northern ones on hexrow G. If you only have the one, stick with F29 and set up north or south so it can't fall on you . If you are doing the Early Game strategy but didn 't buy any additional Bombardments, drop the scenario-given Bombardment on F37 (hopefully this softens up Rail Station Stalingrad- I and rubbles a few rail cars so your Observer can get more LOSs into it). If you have a Pre-Registered hex for your 100mm module, I like K8 because it is a "must -capture" building and this allows you to hit the back hexes. Or if you 're doing the Late Game strategy, maybe something near Rail Station Stalingrad-I, depending on LOS, as it is highly vulnerable to Indirect Fire.
The biggest unknown at this point is when your flank groups are going to come in. It's very possible that the northern one won't enter until turn 3 or 4 and, if you are unlucky, they might not come in until 5 or 6. The southern group you should assume will never come on and plan accordingly. At this point, a lot of what you do depends on the Russian setup, so I won't get too much into the actual play. Bring in one StuG IIIB platoon and one StuG IIIG platoon in the north , and start trying to drive any Russians back with fire. The first couple of rows are open ground so you shouldn't have to worry too much about Russian infantry attacking you. Don 't press the assault guns forward until your infantry comes on in the north or until you can link up with infantry coming up from the middle of the map.
Use caution with your vehicles the first day. The Russian will have a lot of AT capability, and if you lose a lot of vehicles you might actually lose the scenario. For every vehicle you lose, you have to gain 12 more CVP (barring getting very lucky and having your vehicle crew survive). "Must-capture" goals for the scenario are K8, all multi-hex buildings in the middle of the map (K23-K31,M23-M28), the area around 134, and most of the "Kill Zone" . Rather than a stab into the Russian defense, the attack should be like a wave spreading over the map. Nice-to-capture goals are, especially, the Voentorg (Qll) , the Pavlov's House (RS) area (which is almost impossib le unless your northern reinforcements come in early and you're VERY aggressive), and any multi-hex building in the M34 or N31 blocks. Also, any multi-hex building on the riverbank or penetration into the K36 block is a huge victory, but also very unlikely . If you arc playing the Early Game strategy, the Children's Home , Rail Station Stalingrad-I, and the Fire Station (147) are "must-captures" and any penetration of the K40-P44 block is a big bonus.

" .. . l!'IRE DISCIPLINE IS KEY - ALMOST NO UNIT SHOULD FIRE UNLESS IT'S POINT BLANK FIRE OR A -2 SHOT ... "
To accomplish this, with either the Early or the Late Game strat egy, dispatch one Rifle Company and one Sturm platoon directly towards K8 at the beginning of the initial CG scenario, under the assumption your nort hern reinforcements will not enter in a timely fashion. This is a "must-capture" building that controls the west side of the plaza, and has a Roof and a Cellar. As soon as you receive your northern reinforcements, they can tum east and push on to Q 11. If your northern reinforcements don't enter in a timely fashion, this group can seize K8 after joining up with the northern assault guns. Another strong group should be dispatched to penetrate the N3 l -S35 and M34-Q37 blocks. The rest of your OB should be doing a general attack to the east , looking for holes in the defense where a possible breakthrough can be achieved.
If you are doing the Early Game strategy, a full Rifle Company, a Sturm platoon, both Pioneer platoons, and a full strength StuG IIIG platoon should be dispatched towards the Children's Home, going east of , then south around , Rail Station Stalingrad-I. Controlling the area south of the Rail Station ensures it can't be recaptured the first night. Use one of your entering reinforcement Rifle Companies to assault the Rail Station. That and a couple of artillery missions will ensure its demise.
Deploy as many 4-6-7 squads as you can at start to capture all the Strategic Locations (for perimeter purposes) and strip Russian Con cealment. Push hard, but avoid casualties as much as possible; the game won't be decided the first day. Make sure you don't end up with any CX guys next to Concealed Russian counters at the beginning of the Russian APh; break and run if necessary. Be wary of HIP units in the south; they will be Stealthy. In the middle and north , until you get to his Reserves , he won't have any Stealthy MMC. He will make short work of you in CC if you're CX and he 's Concealed.
The Russians As a lot of CGs seem to end on the first day or two, I have in
cluded a full sample Russian setup. Your primary goal the first day is to never let the German run a leader and an MMC for 8 MF down a road through the defense. As long as you prevent this, you will be fine. Don't put more than one squad in a hex because the Stukas attack all Locations in the hex. You should also assume you will never move a unit except by Assault Moving, Concealed, in buildings, unless he has no Stukas that tum. Everybody will die in place or rout. This will prevent the Stukas from killing anybody unless he gets lucky . Although it paralyzes the defense, it's worth it.
Also , don't over-defend anything; in one game I played my opponent decided that the K8 building would not fall; he put 7 or 8 6-2-8s, 2 or 3 4-2-6s, and a couple of Commissars in it to defend it. Well it worked, it didn't fall, but it was also like a rock in a river. He had so much in there, it weakened everything else; I just flowed around, it capturing the Voentorg and Pavlov's House. Although he held the K8 building he lost everything around it.
Usually in CG scenarios, you set up Reserves where they will activate ASAP. This is a good strategy except for the first day. Because of the setup restrictions and the Stukas , the Reserves are really reserves. They should be set up so that , no matter how far the German penetrates, there will always be another squad or two in front of him. Fire discipline is key-almost no unit should fire unless it's PBF or a -2 shot. And don't FPF your Conscripts; make the Germans break
them or CC them. Don't bring on reinforcements unless it's an emergency; it just gives the Stukas something to bomb. If you really have to , put Riders on the KVs, drive them 20 hexes, and then pivot the turrets to dismount the infantry. After he has used up his Stukas bombing the KVs, run the rest of your infantry onto the map. Stacked with leaders and with road bonus, they can get pretty far. But there really needs to be an emergency for you to do this.
The setup below is how I like to play it; I will be using the Rail Yard defense with a defense in depth. A wall of 4-2-6s go in the Rail Yard, one hex back so they can't be Prep Fired at on the first tum and he can't get Concealed guys up next to them. The tone for the game will be set the first tum ; will he run guys up against this line and suffer the 16+ 1 attacks, or will he Assault Move into the street and Advance against your units? The idea is to make the Germans take four turns to get through the Rail Yard, so when the defense finally starts to break down, he simply doesn't have enough time to get to any of the really important terrain. Also, I will fight the game from Ground Level and Level l. Not putting anybody on Level 2 makes the German MG , mortar, and assault gun fire worthless for several turns. Dummies go up there to give them something to shoot at just to make sure, although he will be shooting anyway just in case there is an artillery Observer hidden there.
You have 19 CPP to spend; the first day 's buys are:
• A3 T34 Pltn (Dug-In; 3 CPP; 16 remaining)
• 14 SMG Coy (in Reserve; 3 CPP; 13 remaining)
I like this much better than a second NKVD Coy. Spread out behind the front, they will stay in Reserve status until they can go into CC with any Germans. Don't fire them (unless it's an 8 -2 shot at a full squad); just sit there until the APh then pop them out (or Assault Move them , then Advance). After the Germans lose a squad or two as they run through the breaking-down defense they will get a little more cautious; and this will make him careful of the Dummy Reserve counters also.
• 15 NKVD Militia Coy (in Reserve; 3 CPP; 10 remaining)
The 6-2-8s will go into clutch spots for the fina l defense of key buildings. Spread the 4-2-6s out and intermix them with the 14 Reserves .
• 17 MOL-P Pltn (1 CPP; 9 remaining)
This will give me some AT defense in the middle of the map and I want them for future games. At 1 CPP they are a bargain.
• 02 Btln Mortar (x 2) (2 CPP; 7 remaining)
This will mostly be brought down as Harassing Fire to impede German movement; I buy the mortars rather than light artillery in case I get some good targets that I want to hit at full firepower.
• G2 TD Battery (5 CPP; 2 remaining)
Good AT defense , and with the ability to get Critical Hits on infantry moving in the open at long range; 24 -2, messy. They will go in the back to make sure they will probably live to see tomorrow . This is my most important depletion roll; I'm hoping for a 7 or less.
• Ml Fortifications (1 CPP; 1 remaining)
This will be spent almost exclusively on Dummies; there will be fake Russians everywhere to keep the Germans honest.

• M2 Sniper (1 CPP; 0 remaining)
This will take our SAN up to 6 for the battle; hopefully its first shot will take the German's SAN down to 2.
If you really want the M3 MOL Capability (2 CPP) for the Rail Yard defense, then delete the T-34s, spend the extra CPP on Ml Fortifications, and spend 80 FPP to get your Booby Traps to Level A.
This is the setup; tweak it to your liking , and keep in mind your depletion rolls may affect your options. You'll want to change stuff just so the Germans don't know where everything is. I suggest you actually get the units out and set it up . The Russians really do have a pretty good OB: 70+ squads, with lots of tanks , guns, and artillery. It would be really good if so much of it wasn't Conscript, and if it wasn't up against what is an incredible German OB. The setup restrictions and lack of MGs hurt also .
As a rule, don't use Trenches to connect your blocks; they just make it easy for the Germans to get into the next block after they capture the previous one. I make one exception with the Nail Factory because I'm going to try hard to hold this Historical Strongpoint. The Roadblock protects units moving back and forth to the Nail Factory through the Trench so I can reinforce it and units can rout out.
OK, I'm going to start my bitching early: eight infantry companies and I get one at Full Strength, and that one starts where I'm actually fairly strong . Although I roll my TD Battery Full Strength and roll two "snake eyes" on Leader Determination rolls, they are both for the NKVD Companies so I won't be playing this one with a negative modifier leader. Three out of my five NKVD Companies are Moderately Depleted and it especially hurts that my Reserve one is; I could really use the extra 6-2-8 for the final defenses in the back.
The setup is on the following pages; units in the south will gradually move north to defend Rail Station Stalingrad-I and the Nail Factory block (K36-M39). One squad will move up to spot for the 82mm MTR. I leave a couple gaps in the wall of 4-2-6s; if he is running guys into my line to unconceal me when he finds a gap he will
find himself farther forward than he wants to be. I will shoot him, and if he breaks he will die for Failure to Rout since, even if he breaks me, he routs first and I should have at least one unbroken guy adjacent to him that forces him to rout. Depending on what is running up to unconceal me I may or may not fire; if it 's a HS I will wait to see what he piles in there . If he just moves up adjacent I will probably just stay Concealed. I will be falling back so he can never Defensive Fire or Prep Fire at me. Broken 4-2-6s won 't rout to a leader ; they will rout to form another line two hexes back from where they started when broken. Every 4-2-6 in the Rail Yard and "Ki ll Zone" will probably die, mostly in place. I won 't even try to rally these guys.
The NKVD 6-2-8s that start in the rubble hexes in the Rail Yard will fill in where necessary , but will fall back early toward the other side of the J6-J50 road (Communisticheskaya). The NKVD 6-2-8s on each side of the attack area will gradually fall back like a pair of shutters , leaving the middle open so he can run into the "Kill Zone" . We will try to save as many of these guys as we can but I'm sure some will die. Commissars are placed to rally the 6-2-8s. If we don 't get a "no Stuka" turn, then we will set them up to rout with the NKVD 6-2-8s across the 16-150 road at some point and DM rally them on the other side.
Artillery is set up to come down as Harassing Fire to slow his movement. The 4-2-6 behind the Roadblock is there to make sure there is almost no way he can get a Concealed guy into the first row of houses, even if the Bombardment does a Jot of damage. I feel like I'm about 4-5 squads short of being comfortable in the middle of the map. A few more NKVD 6-2-8s would be nice . If you are not defending the Rail Yard, set up the defense in rows K-L with just some 4-2-6s in the Rail Yard in the stone rubble hexes and small rail station (F22) . This will slow him down a little and basically make the Bombardment(s) ineffective . Place some Dummies forward to try to keep him honest, but he will set up to move stacks with leaders and will probably be through the Rail Yard in two turns . So here it is sports fans . Enjoy!
Russian OB-Given & Purchased RGs, and First Day Setup Initial CG Scenario OB-Given At-Start Russian Reinforcement Groups in CG IV
Reinforcement Group (RG#) Depletion DR (Depletion Level)
I Units Received
NKVD Militia Coy (15) 8 (Lightly Depleted) 3 x 6-2-8 NKVD , 5 x 4-2-6, 50mm MTR
NKVD Militia Coy (15) 7 (Lightly Depleted) 9-0, 3 x 6-2-8 NKVD, 5 x 4-2-6, MMG, LMG
NKVD Militia Coy (15) 9 (Moderately Depleted) 10-0, 2 x 6-2-8 NKVD , 5 x 4-2-6, LMG
NKVD Militia Coy (15) 10 (Moderately Depleted) 2 x 9-0, 2 x 6-2-8 NKVD, 5 x 4-2-6, LMG
Rifle Coy (13) I 7(+4) (Heavily Depleted) 8-0, 7-0, 6 x 4-4-7, 3 x 4-2-6, LMG
SMGCoy (14) I 6 (Full Strength) 8-0, 9 x 5-2-7, LMG,ATR
T-34 M41 Pltn (A3) 10 (Depleted) 2 x T-34 M4ls
Initial CG Scenario Purchased Russian Reinforcement Groups in CG IV
Reinforcement Group (RG#) Depletion DR (Depletion Level)
I Units Received
NKVD Militia Coy (15) (Reserve) 9 (Moderately Depleted) 10-0, 2 x 6-2-8 NKVD , 5 x 4-2-6
NKVD Militia Coy (15) (Reserve) 7 (Lightly Depleted) 8+ 1, 7 x 6-2-8 NKVD, 2 x 4-2-6, LMG
MOL-P Pltn (17) (Reserve) 8 (Fu!J Strength) 3 x 1-2-7 crew, 3 x MOL-P
T-34 M41 Pltn (A3) (Dug-In) 4 (Full Strength) 3 x T-34 M41 cupola, 3 x LMG
TD Battery (G2) 6 (Full Strength) 4 x 2-2-8 crew, 4 x 76L ART

I have 80 FPP available (40 that are OB-given and 40 that are purchased); these are spent on:
• one Trench (7 FPP) ; • two Fortified Building Locations (20 FPP) ; • three HIP cupolas ( 15 FPP) ; • two HIP leaders (my artillery Observer s; 2 FPP); • two vehicle Concealment counters (2 FPP) ; and • 34 Dumm y Infantry Concealment counters (34 FPP).
• The Trench goes in L39 so I can use it to get guys in the Nail Factory ; being behind the Roadb lock makes moving safe from everything but the Stukas. • Fortified Locations (14): There are 12 that are OB-given and two that I purcha sed. All six Ground Level Locations of Rail Station Stalingrad-I, both Ground Level Locations of the Nail Factory (L38 ), K36 , L36 (this is the fa llback position for my MMG if needed) , T36, Vl5, V20, and X20 (if you have an extra squad , put it here). I only fortify Location s that I am fair ly confident I will be able to hold except Rail Station Stalingrad-] , which I fortify because it's a Historical Strongpoint we will be defending the first day. • Roadblocks (8) go in: C4I /42 , K26/L26 , J39/J40 , K39/L39, M33/N33 , 031/P31 , Cl7 /Cl8, JlO/Jll . I put the Roadblocks to try to help contro l his assault guns in the middle game, although I do use two to slow him down in the beginning. I don 't put any in the north because I don 't want him getting hull down if he ends up in a gun duel with my tanks or 76L guns. • HIP 76Ls and T-34 M41 Cupolas in: S2 (CA: Q2) , T3 (CA: R3), U5 (CA: S5), GG22 (CA: EE22). Cupolas go in JO (CA: I2), Kl4 (CA: 115), 134 (CA: K34) . • 82mm MTRs in: K38 (CA: J36), L40 (CA: K39) . One mortar will basically use direct fire ; the other will be Spotted for by one of the squads moving up from the south , once he gets in position . The only problem with this is he will end up in the same Location as my artillery Observer. Unfortunate, but I'm hurt by the setup restriction s. If the German gets too much heavy FP with LOS to the mortar Observer Location , the squad wil l abandon ship to try to preserve the artillery Observer 's HIP. • 10-0/Field Phone in K27/Ll ; 9-0/Field Phone in K40/Ll. I use a 10-0 for my northern Observer because he' ll probabl y have to call fire in on himself at some point so I want his higher ML. It's tough on artillery Observer s; you're too far forward and since you have so few Level 2 Locations to set up in , and they are so close to his starti ng area, he will search them by fire pretty quickly. I feel Level I Location s are the best. There are quite a few Location s with decent LOS s into the Rail Yard to bring down Harassing Fire and slow the German s down . I've set up in two of them . The southern one will hit any units massed in Rail Station Stalingrad- I or the H34 area hard. The northern Observer will try to get Harassing Fire down in the middle of the Rail Yard and then onto himself (hopefull y he won't get revealed too soon). I will try to get a 6-2-8 under him at some point to protect him . Harassing Fire is very effec tive at slowing people down and with such a large blast area and so many German units I will get lots of chances to roll "snake eyes" for Critical Hits that wipe out everybody ju st as effective ly as regular FFE Critical Hits . The K8 area also has many good hexes for an Observer; the only thing wrong here is I like to drop artillery on the area when I'm the German s, and I don 't want him accidentally revealed. • 2 x Vehicle Dummies in G50 (CA: F48) These pretend to be the third vehicle of the deplet ed T-34 Pltn. I' m hoping he moves a StuG IIIG up to C44 to duel this Dumm y. I don't
like this hex for a real tank for exact ly this reason. I feel the StuG IIlG has a large advantage in this duel, in spite of the T-34 being in the building , due to its small size, the range , and hitting power of its MA .
• Dummy Cloaking counters in the folJowing hexes: 0 3, S7, S 14, Ql8 , S21 , P22, X20 , V22, V29, and S38.
• Cloaking counters (and their contents) in the following: • 4-2-6 : Sl
• 10-0, 6-2-8: RS • 4-2-6: QlO • 7-0 , 5-2-7, LMG: QI I • 4-2-6: Vl3 • 4-2-6: V 15 • 6-2-8: V20
• 4-2-6: V25 • 1-2-7,M OL-P: SI6 • 5-2-7 : S25 • 1-2-7 , MOL-P: S27 • 1-2-7 ,M OL-P: T30 • 5-2-7: R29 • 4-2-6: T36
• 4-2-6: PIS
• 5-2-7: Q21 • 5-2-7: Nl8 • 5-2-7: N25 • 5-2-7: N3 I Spread out and keep him guessing. I also try to keep him from running down a road by putting Reserve counters on both sides of the road so ifhe ends up broken in the road and both are rea l he will die for Fai lure to Rout.
* All units listed below in Concealment Terrain start Concealed ; all 6-2-Bs are NKVD 6-2-Bs. • 4-2-6s in the following hexes : G5 , K7, K9 , Cl7, D17 , E20, E21, E23,E24,E25,E27,E28,E29,E31,E32 , E33,E34,F30 , F36 , F37, 144 (Cellar) , H43 (Cellar), and 145. Thi s is the wall. They are all dead men walking . The units in the Chi ldren' s Home start in the Cellar in case a Bomb ardment falls on them but will all leave the first turn to at least the Ground Level. Since severa l buildin gs in this area aren' t Gutted they wi ll stay around here while the 4-4-7s and 5-2-7s move north. • 4-4-7s in the following hexes: K43, I43 (Cellar) , F42, G47 , and 148. • 5-2-7s in the following hexes: 142, K44, D42 , and D44 . • 2 x Dummy counters in each of the following hexes: D3 , D5 , El9, E26 , E30, E35, D43, F22, G26, G27 , G31 , G39, K il , K2 3, and K3 1.
• 3 x Dummy counters in each of the following hexes: F38, L38/L2 (the second one is a simulated Lt MTR that, if not revealed in his first PFPh , might keep him from moving big stacks around in the rear, whether part of his initial units or entering reinforcements).
The rest:
• 9-0 , 6-2-8, LMG: E l 8 • 6-2-8: Fl8 • 6-2-8: F21 • 6-2-8, LMG: F26 • 6-2-8 , LMG: G28

• 10-0, 6-2-8, LMG: 029
• 6-2-8, LMG: H33 (Cellar) • 6-2-8, LMG: Kl3 • 9-0, 6-2-8, MMG: K36
• 9-0, 6-2-8, dm50mm MTR: F39 (this MTR is here because I'm so short of 6-2-8s that I don't have one to run the MTR, and don ' t want to give it to a 4-2-6 to break . He will hand it off to one of the squad s moving up from the south ; it won't see action today , but hopefully will survive to start dropping rounds tonight. I would also prefer to not set up the Commissar in Rail Station Stalingrad- I , but have him back a bit, so he could either enter the Rail Station to tum it into a NKVD Stronghold or drop back to the Children's Home to rally guys if the Germans end up doing the Early Game strategy. I feel I just don't have a squad to spare to put back to stack him with). • 8+1, 5-2-7: F44 • 8-0, 2 x 5-2-7, LMG: H42 (Cellar)
• 4-4-7, LMG, T-34 M41: F46 (CA: D46)
• T-34 M41: I45 (CA : 045)
• 8-0, 2 x 5-2-7,ATR: I43
THE FIRST NIGHT
The Russians
Okay , you just got hammered during the day. Have another martini .
Declare you will be doing a Night Counterattack . This is the only -2 modifier you will have the entire CG , so spend your 10 CPP bonus . Between the -2 modifier and all the casualties you suffered, we are going to assume you have 30 CPP to spend. You will have to tweak this if you have less . Your goal for the night should be to push the line back a little and ratchet up your forces. Buys are as follows (all infantry groups should be in Reserve except the HW Pltn):
• Il (8 CPP) Guards Rifle Coy
• I2 (2 CPP) Guards SMG Pltn
• I3 ( 4 CPP) Rifle Coy
• I6 (3 CPP) Storm Group Pltn
• I8 ( 6 CPP) HW Pltn
• Gl (4 CPP) AT Battery
• 01 x 2 (2 CPP) Lt Arty
This might have to be heavily modified depending on the map situation. If the German has taken Rail Station Stalingrad- I , but failed to take the Children's Home, bring in your I3 Rifle Company as reinforcement s, counterattack , and retake the Rail Station . If the Germans have managed to take Pavlov's House (RS) or have gotten into any of the big Level 2 buildings on the riverbank , bring in the Il Guards Rifle Coy as reinforcements and counterattack these positions. Pay for this by getting rid of I6 and getting another I2. If he has a large section of map you need back , get rid of the Storm Group Pltn completely and get a 120mm OBA module. If you do attack Rail Station Stalingrad-I, substitute an 02 for one of your Ois to drop on the Rail Station. If you have suffered a lot of casualties you might want to bring in one or both companies as reinforcements just to make sure the Germans can't attack during the night. It's much easier for the Germans to do this in the north becau se of the more open terrain and the fact there are many non-Gutted buildings and some factories in the north.
Since l have seen people mes s this up so many times, I will mention this: on the first turn of a night scenario, move all your reinforcements and unit s behind the front where he can't possibly see
them beyond NVR before you move anybody that can possibly be in NVR. All it takes is one HIP HS to take a shot and the whole map is going to light up like a Christmas tree, thereby ruining your entering units ' move. Also, remember that units entering can move very rapidly behind the front using a road so you might want to enter some of your reinforcements just Concealed (rather than Cloaked) so you can move farther. You should also set up all your MG stacks and half of your units not in the actual attack area Concealed rather than Cloaked. This allows you to put many more Dummy Cloaking counters in the vicinity of the attack .
The Germans
OK , so you have just delivered a pounding to the Russians, but now it's his tum . The Russians are simply awesome at night. Your LOSs suck. He 's Stealthy, you're Lax. He's Cloaked, you ' re not. You don 't get the free HIP for being a night defender , but he gets to set up 10% of his OB HIP for free. Except for the first night, he is going to spend the 2 CPP Recon points, so before the scenario even starts he is going to get rid of a bunch of your Dummies, check your prime spots for MG stacks, and, if you make it too obvious, find out where you have HIP guys. Every time you move , unle ss stacked with a leader, you're going to lose your Concealment or go CX. What do you do?
Sadly, I have no good options for you. Use your Dummies to make stacks of three counters everywhere. This means the hex could con tain a HS or it could contain a good leader, two squads and a HMG and MMG giving you 20 FP vs an adjacent Concealed unit. These will camouflage the defense when he sees nothing but a forest of stacks of three counters each. Start back several hexes to force him to move to you. Start with a road between you if possible. Put some HS out to take a shot so you can get Starshell s going and never fire until Final Fire so you can affect everybody in the hex . All of your good MG stacks anywhere near the front should be in a Cellar. At least that way , you are in a Fortified Location and if he doe s try the Smoke /CC attack on you, you can shoot at him since he has to be above you to advance on you (assuming he can Breach) . Use your 81mm MTR firing IR rounds after you have shot all your Infantry and vehicle Starshells to fill in any gaps in the illumination. If it gets really ugly , bring down your 80mm OBA as Harassing Fire, which should pretty much stop the attack . Leave at least one company, a good MG stack, and most of your O leaders off map and enter them on Tum 1. They can start freeing up guys if the Russian has left something basically unguarded , or reinforce the attacked area. Trade space for time, and hope for the best. It won't be pretty. Use your assault guns in the north where they have fairly long fields of fire . Mass up your 8-3-8s in a safe spot, with enough density they can just blast their way to safety. Buy your Sturm platoons in Reserve and set them up where they will get activated.
When it's your turn , Assault Move into or Search the Cloaking counters to get rid of them . Once they are gone, the attack will basically be over. You're in for a beating ; just try to minimize the damage and not lose too much terrain, or any really strategic buildings.
Well that's about it ASL fans. I hope you will give VOTG a try ; did I mention that thi s is really a fabulous CG? If you have any thoughts or opinions you would like to share, or want to point out the error of my ways, feel free to send me an email at madmanmc[email protected] and remember-it 's not important whether you win or lose, what's important is you had a great time and drank a lot of vodka.