Embed Size (px)
Citation preview

INFIELDSOILTESTING
GUIDANCE & SUPPORT
DOCUMENT

2
CONTENTS
INTRODUCTION
MATERIALS & SUPPLIES
I. HOW TO USE THIS DOCUMENT
II.
III.
IV. SOIL TEST TIPS & INTERPRETATION1. Soil Compaction
2. Soil Crusting
3. Diversity of Macro-life
4. Ground Cover
5. Ponding
6. Aggregate Stability
7. Soil Smell
8. Soil Colour
9. Root Growth
10. Plant Health
3
4
6
7
7
8
9
10
11
12
13
14
15
16

3
This document was created by PUR Projet with the support of the Regenerative Organic
Alliance and Tradin Organic and builds upon the in-field testing criteria described in the
Regenerative Organic Certified framework.
The purpose of this document is to support farmers to conduct in-field soil tests and
understand the results. For each test outcome, a grade of poor, fair, or good will be
assigned which can highlight areas of concern and warrant further, more robust testing
with the support of a lab.
This document is split into three sections:
1.Introduction: Provides background information on the purpose of these
tests, a description of each indicator, and how they are linked to
management practices.
1.Materials and supplies: A list of the materials you will need to conduct the
tests (includes photos).
1.Soil tests, advice & interpretation: This section is broken down by soil
test and provides a description of how to conduct each test, a video link,
advice for conducting the tests, understanding the results, and how to score
each test results.
Start by reading the introduction and background information for each test. Next, review
the materials and supplies and ensure you have everything required prior to going to the
field to conduct the tests.
Then, we suggest that you review the test protocols to familiarize yourself with how to
conduct each test.
Next, read through the soil test tips and interpretation to get an inside look at how to
complete the tests, photos showing some of the steps, and photos and info on how to
interpret each result. This section also provides guidance on how to interpret results into
poor, fair, and good categories.
We highly recommend printing this document off and having it on hand while in the field
to use as a reference guide.
HOW TOUSE THISDOCUMENT
I.

4
In-field soil tests are simple, cost-effective means to understand soil health, identify problem areas in the field that may
affect yield or be prone to degradation, and better understand the impact of management practices on soil. Below, you
will find a description of ten indicators and how to measure each by following soil test protocols. Producers are
encouraged to submit soil samples to a lab for more detailed analysis to help inform management decisions.
Some of the below tests will require you to choose a specific spot in the field to conduct the test while others are more
observational where the entire field or surrounding area is taken into account. For the tests that require a specific spot,
producers are encouraged to choose representative areas of the field to conduct the test; alternatively, producers may
choose areas of low and/or high productivity to compare results between the areas or identify soil health issues that
warrant further testing.
INTRODUCTION
Test / Indicator Description
Compaction is the compression of soil particles into a smaller
volume, which reduces the size of pore space available for air
and water. Results from a compaction test will tell you how easy
it is for roots to grow in your soil and whether or not air and
water can penetrate the soil profile.
Crusting is a thin layer of hard, dense, and tough material that
sits on the soil surface. A crusting test assesses the extent to
which surface crusts occur on your land and can inform you
about the potential for seedling emergence and water infiltration.
The numbers and kinds of organisms that can be found in and
around your soil tells you something about the ability of the
system to support biodiversity and complex food webs. This
biodiversity is critical, as it helps to drive carbon, nutrient, and
water cycling.
Having your ground covered protects the soil from eroding, it
helps to minimize water loss due to evaporation, and ensures
sufficient food is supplied to soil organisms and ultimately back
to your plants.
Ponding, or standing water on the surface of your land, happens
because of poor water infiltration. Poor infiltration, in turn, can
result from inherent soil properties like soil texture or the
presence of a hardpan layer.
Soil aggregates are groups of soil particles bound together by
roots, fungi, and the glue-like substances that these organisms
produce. They are important for keeping organic matter in the
soil, maintaining good water infiltration, and providing habitat for
plant roots and soil organisms. Aggregate stability refers to how
well these groups of soil particles stay together in the face of
things like tillage, wind, and rain.
Link to Management
Practices
Soil compaction can
result from repeated or
poorly timed use of heavy
machinery, hoof traffic from
livestock, or tillage at a
constant depth.
Surface crusts develop
when soil is left bare, or
when a soil is overworked
through tilling.
Maintaining plant cover
throughout season, adding
fresh organic materials,
reducing tillage, and
increasing crop rotation
diversity support life in the
soil.
Cover cropping, mulching,
or any other practices that
is used to cover bare soil
will increase ground cover.
Management practices that
affect surface crusting, soil
structure and aggregate
stability can lead to ponding.
Incorporating fresh organic
materials, mulching,
composting, using shallow
rooted cover crops, and
reducing tillage can
improve aggregate stability.
COMPACTION
CRUSTING
DIVERSITY OF MACRO-LIFE
GROUND COVER
PONDING
AGGREGATE STABILITY
II.

Test / Indicator Description Test / Indicator
SOIL SMELL
The smell of your soil can tell you if it needs some work. A sour
or rotten scent indicates that a soil has been waterlogged,
allowing different kinds of bacteria - those that love low oxygen
conditions - to thrive.
Cover cropping, compost,
and organic material
additions can support life in
the soil and add organic
matter.
SOIL COLOUR
The color of soil can be an indicator of how much organic matter
is present. Typically, more soil organic matter leads to a darker
brown or black color. The color of your soil can also tell you
whether it has been waterlogged for extended periods of time.
When this occurs, your soil will become gray and may or may
not have red or brown spots throughout (mottling).
Management practices
that add organic materials
(compost, residues,
manure, mulch) and build
soil carbon leading to a
darker soil colour.
ROOT GROWTH
Aside from their role in water and nutrient uptake for plants,
roots also help to feed the soil food web and build soil organic
matter, which in turn can help improve soil fertility, water
retention, and ultimately things like crop resilience to drought.
Root growth can be
impeded by compaction
issues related to
management practices
(see above) and nutrient
deficiencies in soil.
PLANT HEALTH
The symptoms of a healthy or unhealthy plant may depend on
the cropping system you’re working with. A general assessment
of plant health can be done by looking at crop leaf color, signs
of wilting, height, and uniformity.
Plant health can be
affected by any number of
factors - from pests and
diseases to things like
water stress and nutrient
deficiency.
II. INTRODUCTION
5

6
MATERIALS &
SUPPLIES
Before going to the field, collect the following materials and supplies you will need to complete the soil tests (video link):
One medium size (500 mL) clear glass jar or other transparent
container (glass is best)
A notebook and pen to record results
A 30 cm (12 inch) ruler
A spade or shovel for digging 30cm deep soil pits
A small handheld trowel or small shovel
A thin metal wire (like a wire coat hanger) or plastic stick
(approximately 3mm in diameter) for poking the soil
A tape measure or a 12-foot piece of rope marked off every 1
foot
Water for tests (about 2 liters)
1.
2.
3.
4.
5.
6.
7.
8.
III.
7
SOIL TIPS &
INTERPRETATION
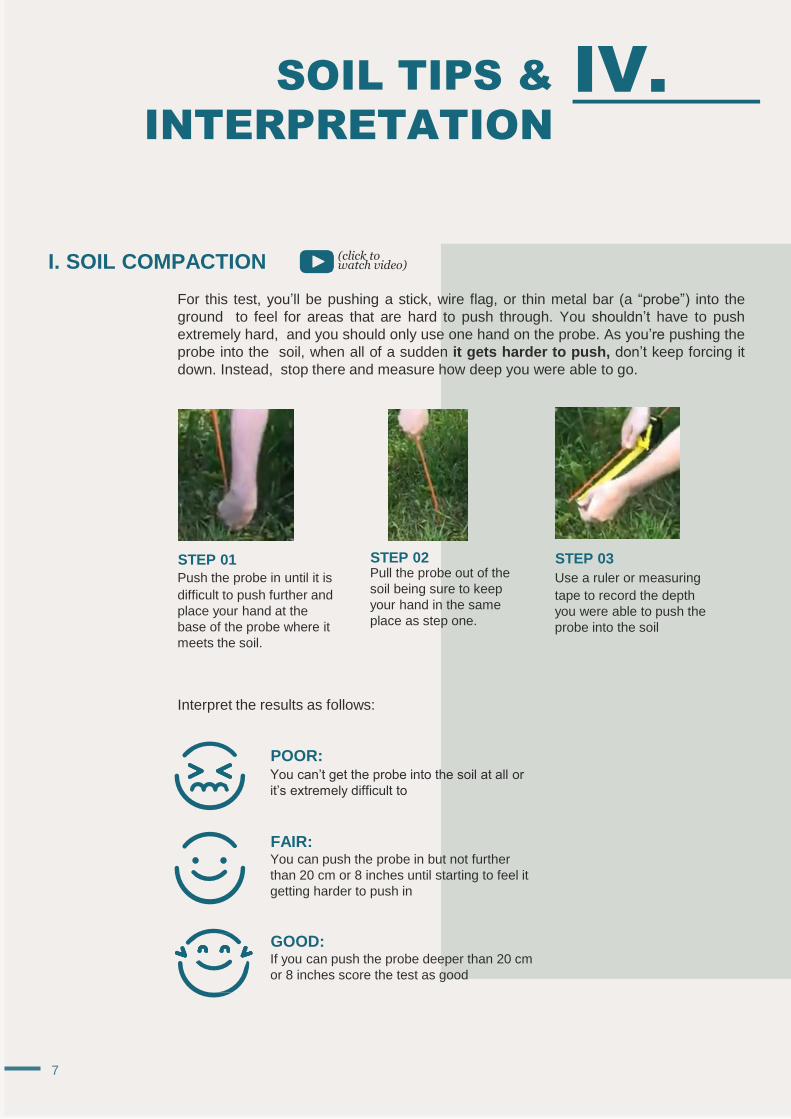
I. SOIL COMPACTION
For this test, you’ll be pushing a stick, wire flag, or thin metal bar (a “probe”) into the
ground to feel for areas that are hard to push through. You shouldn’t have to push
extremely hard, and you should only use one hand on the probe. As you’re pushing the
probe into the soil, when all of a sudden it gets harder to push, don’t keep forcing it
down. Instead, stop there and measure how deep you were able to go.
STEP 02STEP 01
Push the probe in until it is
difficult to push further and
place your hand at the
base of the probe where it
meets the soil.
Pull the probe out of the
soil being sure to keep
your hand in the same
place as step one.
STEP 03
Use a ruler or measuring
tape to record the depth
you were able to push the
probe into the soil
Interpret the results as follows:
POOR:You can’t get the probe into the soil at all or
it’s extremely difficult to
FAIR:You can push the probe in but not further
than 20 cm or 8 inches until starting to feel it
getting harder to push in
GOOD:If you can push the probe deeper than 20 cm
or 8 inches score the test as good
IV.
(click towatch video)

2. SOIL CRUSTING
TIP
This video is best done after a rain, so we suggest doing
in the afternoon after a rain, or early in the morning after
an evening rain
This is a visual test, so you don’t actually need any equipment to do it. For visual tests, it is important
to walk around an area of several meters rather than trying to see everything from one place. Ideally,
you’ll want to conduct this test shortly after a rain - but if that’s not possible no need to worry. You’re
going to be walking around looking for signs of crusting – basically areas where to soil is hard on top,
where soil remains intact when you pick it up, and where plants might not be growing well. Check out
the photos below which show examples of surface crusting.
IV. SOIL TEST TIPS & INTERPRETATION
Interpret the results as follows:
POOR:There’s lots of surface crusting in the parcel and it’s
easy to spot in multiple areas
FAIR:You can see some areas, but not many, where there’s
some surface crusting and there’s evidence of it on at
least 5% of the parcel
GOOD:You either can’t see areas where there’s surface
crusting or there’s a very small amount covering less
than 5% of the parcel
8
(click towatch video)

9
IV. SOIL TEST TIPS & INTERPRETATION
3. DIVERSITY OF MACRO-LIFE
For this test you’re looking for bugs. It’s not so important to be able to identify individual bugs since
for this test you’re just going to count how many different ones you can find. So, if you see 1,000 ants
you’d only mark down that you’ve seen 1 kind of bug. If you see one ant and one beetle, you’d mark
down 2 and so on.
Start by selecting an area where you’ll dig a small hole, but before you dig, walk close by (2 steps in
all directions) to your digging location and see if you can spot any insects and bugs on the surface of
the soil. Mark down how many different kinds you see.
Next, you’ll dig a hole and count how many different bugs you can find in one shovel full of soil. If you
are able to place the soil on a tarp or sheet or other solid surface as you take a scoop full it makes it
easier to spot bugs.
Interpret the results as follows:
POOR:You found less than 2 insects and/or bugs
FAIR:You found between 2 - 5 bugs and/or insects
GOOD:You found more than 5 insects and/or bugs
(click towatch video)

IV. SOIL TEST TIPS & INTERPRETATION
4. GROUND COVER
For this test, you’ll walk along a transect, line, or pulled out tape measure and at every 1 foot
interval record if the soil is covered or not. Do this over at least a 10 foot line so you have 10
measurements (e.g. 10 points of either covered / not covered) which you then calculate
percentage cover from. You can pull out a tape measure and secure both ends or you can use
a piece of rope with tape or marks every 1 foot and lay that across the soil.
POOR:Less than 35%
FAIR:35-50%
GOOD:Above 50%
RESULTS INTERPRETATION
For this test, your results aren’t ranked as poor/fair/good,
instead you’re going to calculate the percent cover (% cover)
as follows:
Number of points recorded as covered / total points along
transect x 100
Example: 7 points recorded as covered, 10 points measured% cover:
% cover:
7 / 10 = 0.7
0.7 x 100 = 70%
10
(click towatch video)

11
IV. SOIL TEST TIPS & INTERPRETATION
TIP
This video is best done after a rain, so we suggest doing
in the afternoon after a rain, or early in the morning after
an evening rain
5. PONDING
This is another test that is visual and doesn’t require any equipment or tools. Ideally, you’ll want
to do this test shortly after it has rained because you’ll be looking for areas where water
collects and “ponds” or remains on the surface. If you can’t do this one after a rainfall event,
but you have lots of water available, you can pour some water on a few different areas of the
field and see if it soaks into the soil or hangs around on top. Note that these areas should not
be natural streams or areas where water is present for the entire year or season.
Check out a few examples below:
POOR
widespread ponding
FAIR
one or two puddles
GOOD
no ponding
RESULTS INTERPRETATION
POOR:Lots of standing water in many places across the field
24 hours after it rains
FAIR:Standing water in a few places but not widespread
across the field 24 hours after it rains
GOOD:No standing water in the field 24 hours after it rains
(click towatch video)

IV. SOIL TEST TIPS & INTERPRETATION
6. AGGREGATE STABILITY
You’ll need a clear glass jar, a stop watch (cell phone will do if it has a timer) and some water
for this test. Fill a jar with some water, about halfway full and pick up a soil clump (aggregate)
from the surface of the soil and drop it in the water. Wait five minutes and then record your
observation based on the results interpretation below. Soil aggregates come in a variety of
sizes so you may find differences depending on where you are. An aggregate about the size of
a fingernail was for this test and shown in the pictures below.
12
Find a soil aggregate Drop it in a jar with water
and wait 5 mins
Clear water and intact
aggregate (good)
Cloudy and broken
down (poor)
RESULTS INTERPRETATION
POOR:After 5 mins, water is very cloudy, and the aggregate
has mostly broken a part
FAIR:After 5 mins, water is somewhat cloudy and less than
80% of the aggregate remains intact
GOOD:After 5 mins, water is clear or fairly clear and more
than 80% of the aggregate remains intact
(click towatch video)

13
7. SOIL SMELL
You just need a shovel for this test (and your nose!). It may sound a bit odd, but you can tell
quite a bit about a soil by the way it smells. Dig a fresh soil pit and stick your head in or grab a
big handful of soil and give it a smell. It should smell fresh and earthy if it’s healthy. If it smells
sour or rotten then you might have a water problem where soil is waterlogged or full of water
for long periods and no oxygen can get in.
RESULTS INTERPRETATION
POOR:Sour, rotten or just an overall bad smell
FAIR:No strong smell, not bad but also not earthy and fresh
smelling
GOOD:Pleasant, sweet, earthy smell
IV. SOIL TEST TIPS & INTERPRETATION
(click towatch video)

IV. SOIL TEST TIPS & INTERPRETATION
8. SOIL COLOUR
Pull some soil out of a hole you’ve dug or dig a new hole and grab a handful of soil. Wet it
slightly and look at the colour. First check if your soil has a grey colour and/or if you can find
red dots or reddish-brown dots/spots (called mottling). This usually occurs when your soil is
waterlogged for long periods of time but if that’s not the case then you shouldn’t see these
spots. They also should be pretty obvious (see below for an example). Otherwise, you’re
looking for dark brown and rich colours or even a black soil colour. Check below for some
examples.
14
< red spots
(mottling)
RESULTS INTERPRETATION
For this test, just record whether your soil is dark brown, medium brown, or light brown and
whether you’ve noticed any gray features. It can be helpful to compare productive areas to
poor performing areas of the parcel to get a sense of how colour can change between the
areas.
LIGHT BROWN /
TAN
BROWN DARK BROWN BLACK
(click towatch video)

15
Roots are lacking (not
many of them), seem
restricted and not well
branched
POOR:
9. ROOT GROWTH
Another visual test. For this test you’ll be digging a hole and looking at crop roots - the way
they grow, their depth, branching, and pattern. If it’s sunny, I find it helpful to have the sun at
my back and shining on the side of the hole I dug in front of me so you can see without
shadows getting in the way. Check out the photos below for some examples of things you’ll be
looking for when you’re looking at the roots.
IV. SOIL TEST TIPS & INTERPRETATION
Abundant roots, well branches Roots lacking
Deep root growth, unrestricted Shallow root growth, restricted, example
of compacted layer restricting deep root
growth
RESULTS INTERPRETATION
FAIR:Roots are somewhat
restricted and there are
some fine roots
GOOD:Roots are abundant,
branched, and
unrestricted
(click towatch video)
IV. SOIL TEST TIPS & INTERPRETATION
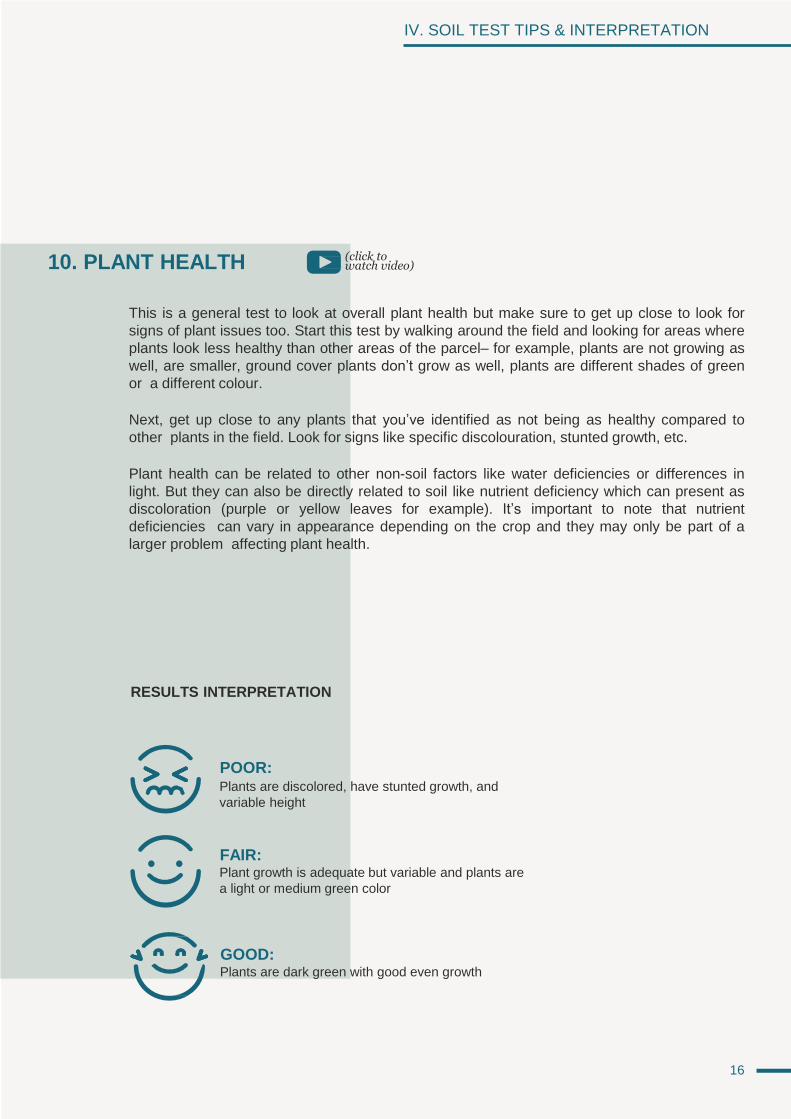
10. PLANT HEALTH
This is a general test to look at overall plant health but make sure to get up close to look for
signs of plant issues too. Start this test by walking around the field and looking for areas where
plants look less healthy than other areas of the parcel– for example, plants are not growing as
well, are smaller, ground cover plants don’t grow as well, plants are different shades of green
or a different colour.
Next, get up close to any plants that you’ve identified as not being as healthy compared to
other plants in the field. Look for signs like specific discolouration, stunted growth, etc.
Plant health can be related to other non-soil factors like water deficiencies or differences in
light. But they can also be directly related to soil like nutrient deficiency which can present as
discoloration (purple or yellow leaves for example). It’s important to note that nutrient
deficiencies can vary in appearance depending on the crop and they may only be part of a
larger problem affecting plant health.
16
RESULTS INTERPRETATION
POOR:Plants are discolored, have stunted growth, and
variable height
FAIR:Plant growth is adequate but variable and plants are
a light or medium green color
GOOD:Plants are dark green with good even growth
(click towatch video)