Embed Size (px)
Citation preview


Imprint
Copyright 2012 Smashing Media GmbH, Freiburg, Germany
Version: October 2012 (Published in November, 2011)
ISBN: 9783943075168
Cover Design: Ricardo Gimenes
PR & Press: Stephan Poppe
eBook Strategy: Andrew Rogerson & Talita Telma Stöckle
Technical Editing: Andrew Rogerson
Proofreading: Andrew Lobo, Iris Ljesnjanin
Idea & Concept: Smashing Media GmbH
Smashing eBook #14│Mastering jQuery │ 2

ABOUT SMASHING MAGAZINE
Smashing Magazine is an online magazine dedicated to Web designers and developers worldwide. Its rigorous quality control and thorough editorial work has gathered a devoted community exceeding half a million subscribers, followers and fans. Each and every published article is carefully prepared, edited, reviewed and curated according to the high quality standards set in Smashing Magazine's own publishing policy. Smashing Magazine publishes articles on a daily basis with topics ranging from business, visual design, typography, front-end as well as back-end development, all the way to usability and user experience design. The magazine is — and always has been — a professional and independent online publication neither controlled nor influenced by any third parties, delivering content in the best interest of its readers. These guidelines are continually revised and updated to assure that the quality of the published content is never compromised.
ABOUT SMASHING MEDIA GMBH
Smashing Media GmbH is one of the world's leading online publishing companies in the field of Web design. Founded in 2009 by Sven Lennartz and Vitaly Friedman, the company's headquarters is situated in southern Germany, in the sunny city of Freiburg im Breisgau. Smashing Media's lead publication, Smashing Magazine, has gained worldwide attention since its emergence back in 2006, and is supported by the vast, global Smashing community and readership. Smashing Magazine had proven to be a trustworthy online source containing high quality articles on progressive design and coding techniques as well as recent developments in the Web design industry.
Smashing eBook #14│Mastering jQuery │ 3
About this eBookThe explosion of JavaScript libraries and frameworks within the front-end development scene has opened up the power of jQuery to a far wider audience than ever before. What began from a necessity of front-end developers to upgrade JavaScript basic API took a new direction of unified implementation between browsers and to make it more compact in its syntax. Thanks to this development, it is possible to actually apply optimized scripts now. A script to find all links of a certain CSS class in a document and bind an event to them requires one single line of code instead of ten. Also, jQuery brings to the party its own API, featuring a host of functions, methods and syntactical peculiarities.
In this Smashing eBook #14: Mastering jQuery, you will learn how to combine JavaScript and jQuery with PHP and, specially, PHP’s GD library to create an image manipulation tool to upload an image, then crop it and finally save the revised version to the server. In addition, you will be able to create your own bookmarklets, which are small JavaScript-powered applications in link form. Typically used to extend the functionality of the browser and to interact with Web services, bookmarklets allow you to post onto your own WordPress or Tumblr blog, submit any selected text to Google's search function, or modify a current CSS code within a browser ― just to cite a few!
Special attention is also given to jQuery plugins, which help save time and streamline development as well as allow programmers to avoid having to build every component from scratch. A good plugin saves countless development hours, whereas a bad plugin leads to bugs that must be fixed and so takes more of of your time than actually building the component from scratch. With the help of this eBook, you will get the best hints on how to choose which plugins are really worth considering for your projects and which ones you should avoid.
Smashing eBook #14│Mastering jQuery │ 4
Table of ContentsCommonly Confused Bits Of jQuery
Image Manipulation With jQuery And PHP GD
Make Your Own Bookmarklets With jQuery
jQuery Plugin Checklist: Should You Use That jQuery Plug-In?
Essential jQuery Plugin Patterns
The Authors
Smashing eBook #14│Mastering jQuery │ 5
Commonly Confused Bits Of jQuery
Andy Croxall
The explosion of JavaScript libraries and frameworks such as jQuery onto the front-end development scene has opened up the power of JavaScript to a far wider audience than ever before. It was born of the need — expressed by a crescendo of screaming by front-end developers who were fast running out of hair to pull out — to improve JavaScript’s somewhat primitive API, to make up for the lack of unified implementation across browsers and to make it more compact in its syntax.
All of which means that, unless you have some odd grudge against jQuery, those days are gone — you can actually get stuff done now. A script to find all links of a certain CSS class in a document and bind an event to them now requires one line of code, not 10. To power this, jQuery brings to the party its own API, featuring a host of functions, methods and syntactical peculiarities. Some are confused or appear similar to each other but actually differ in some way. This article clears up some of these confusions.
1. .parent() vs. .parents() vs. .closest()All three of these methods are concerned with navigating upwards through the DOM, above the element(s) returned by the selector, and matching certain parents or, beyond them, ancestors. But they differ from each other in ways that make them each uniquely useful.
Smashing eBook #14│Mastering jQuery │ 6
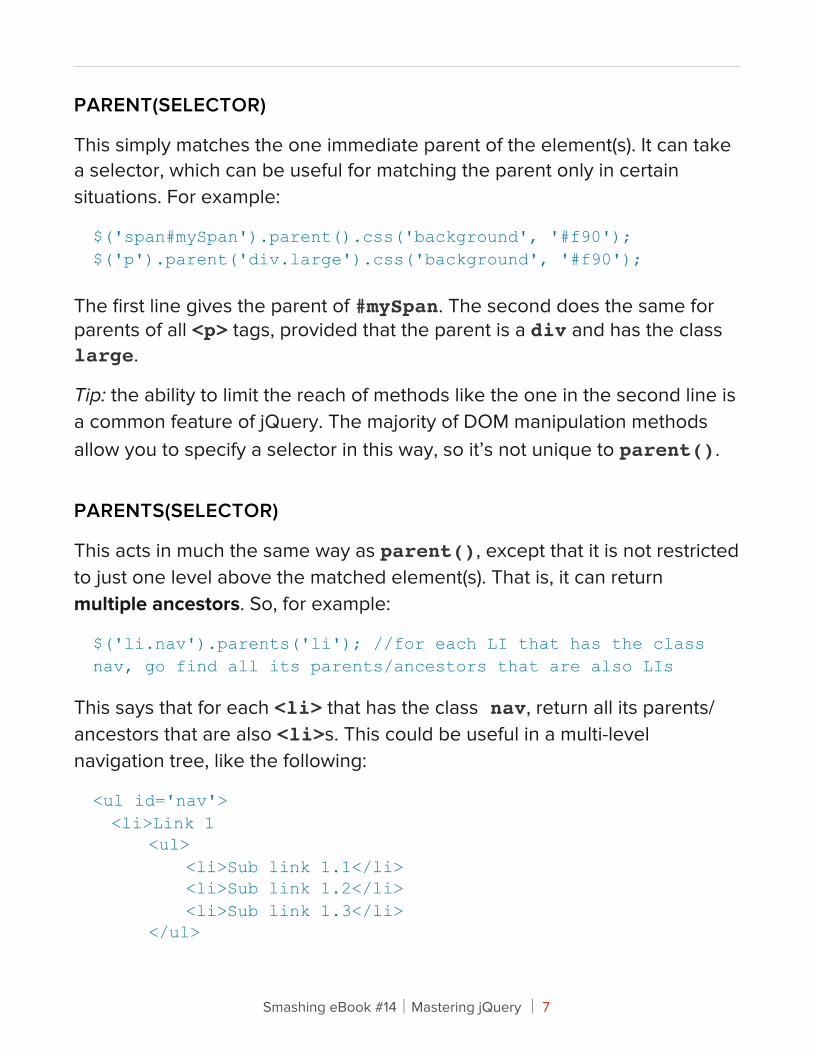
PARENT(SELECTOR)
This simply matches the one immediate parent of the element(s). It can take a selector, which can be useful for matching the parent only in certain situations. For example:
$('span#mySpan').parent().css('background', '#f90');$('p').parent('div.large').css('background', '#f90');
The first line gives the parent of #mySpan. The second does the same for parents of all <p> tags, provided that the parent is a div and has the class large.
Tip: the ability to limit the reach of methods like the one in the second line is a common feature of jQuery. The majority of DOM manipulation methods allow you to specify a selector in this way, so it’s not unique to parent().
PARENTS(SELECTOR)
This acts in much the same way as parent(), except that it is not restricted to just one level above the matched element(s). That is, it can return multiple ancestors. So, for example:
$('li.nav').parents('li'); //for each LI that has the class nav, go find all its parents/ancestors that are also LIs
This says that for each <li> that has the class nav, return all its parents/ancestors that are also <li>s. This could be useful in a multi-level navigation tree, like the following:
<ul id='nav'> <li>Link 1 <ul> <li>Sub link 1.1</li> <li>Sub link 1.2</li> <li>Sub link 1.3</li> </ul>
Smashing eBook #14│Mastering jQuery │ 7
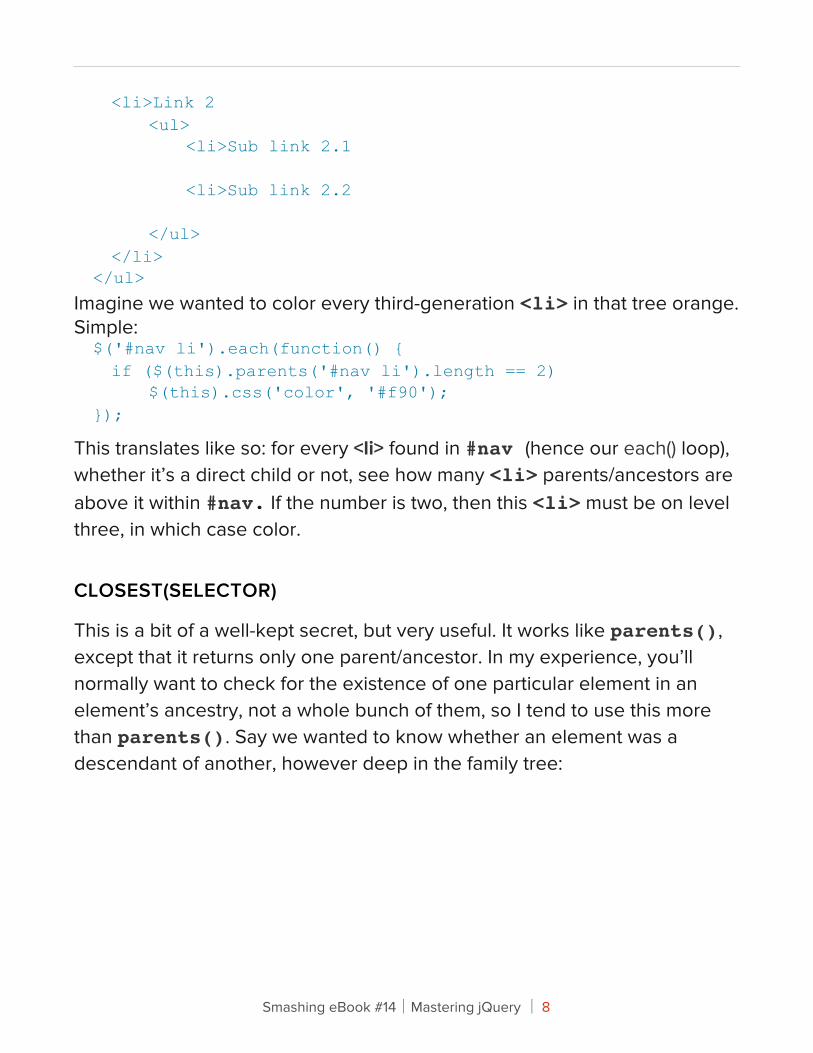
<li>Link 2 <ul> <li>Sub link 2.1
<li>Sub link 2.2
</ul> </li></ul>
Imagine we wanted to color every third-generation <li> in that tree orange. Simple:$('#nav li').each(function() { if ($(this).parents('#nav li').length == 2) $(this).css('color', '#f90');});
This translates like so: for every <li> found in #nav (hence our each() loop), whether it’s a direct child or not, see how many <li> parents/ancestors are above it within #nav. If the number is two, then this <li> must be on level three, in which case color.
CLOSEST(SELECTOR)
This is a bit of a well-kept secret, but very useful. It works like parents(), except that it returns only one parent/ancestor. In my experience, you’ll normally want to check for the existence of one particular element in an element’s ancestry, not a whole bunch of them, so I tend to use this more than parents(). Say we wanted to know whether an element was a descendant of another, however deep in the family tree:
Smashing eBook #14│Mastering jQuery │ 8
if ($('#element1').closest('#element2').length == 1) alert("yes - #element1 is a descendent of #element2!");else alert("No - #element1 is not a descendent of #element2");
Tip: you can simulate closest() by using parents() and limiting it to one returned element.
$($('#element1').parents('#element2').get(0)).css('background', '#f90');
One quirk about closest() is that traversal starts from the element(s) matched by the selector, not from its parent. This means that if the selector that passed inside closest() matches the element(s) it is running on, it will return itself. For example:$('div#div2').closest('div').css('background', '#f90');
This will turn #div2 itself orange, because closest() is looking for a <div>, and the nearest <div> to #div2 is itself.
2. .position() vs. .offset()These two are both concerned with reading the position of an element — namely the first element returned by the selector. They both return an object containing two properties, left and top, but they differ in what the returned position is relative to.
position() calculates positioning relative to the offset parent — or, in more understandable terms, the nearest parent or ancestor of this element that has position: relative. If no such parent or ancestor is found, the position is calculated relative to the document (i.e. the top-left corner of the viewport).
offset(), in contrast, always calculates positioning relative to the document, regardless of the position attribute of the element’s parents and ancestors.
Smashing eBook #14│Mastering jQuery │ 9
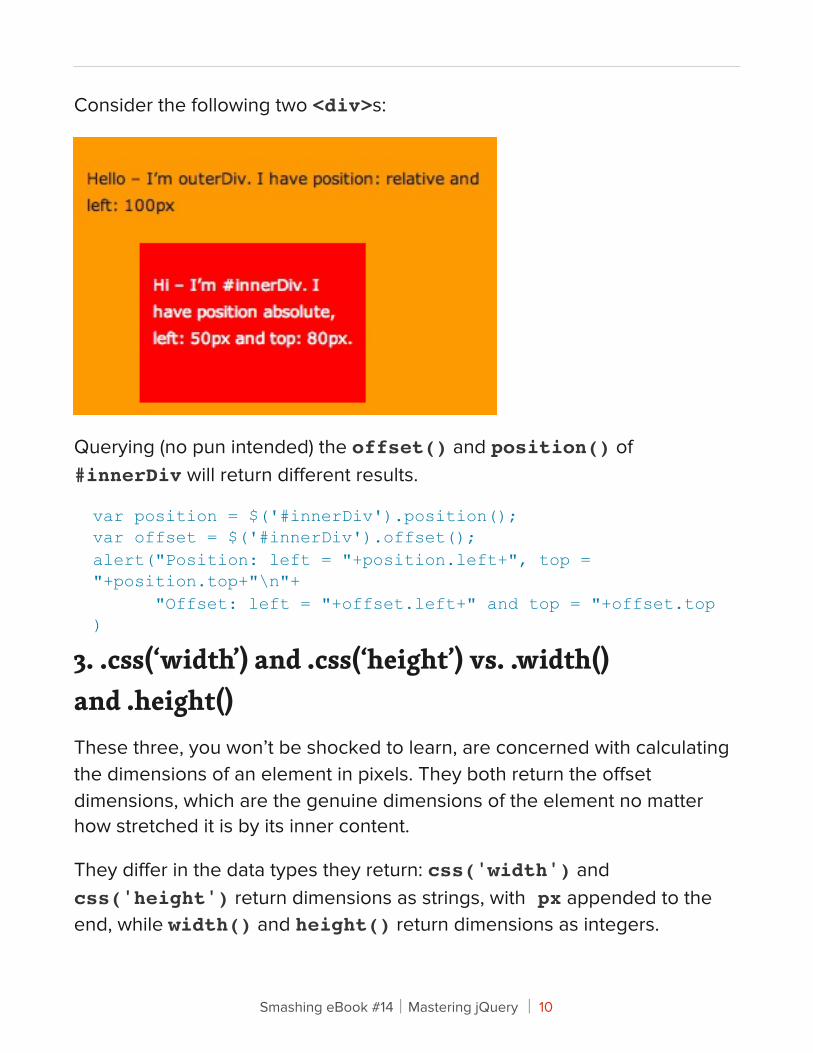
Consider the following two <div>s:
Querying (no pun intended) the offset() and position() of #innerDiv will return different results.
var position = $('#innerDiv').position();var offset = $('#innerDiv').offset();alert("Position: left = "+position.left+", top = "+position.top+"\n"+ "Offset: left = "+offset.left+" and top = "+offset.top)
3. .css(‘width’) and .css(‘height’) vs. .width() and .height()These three, you won’t be shocked to learn, are concerned with calculating the dimensions of an element in pixels. They both return the offset dimensions, which are the genuine dimensions of the element no matter how stretched it is by its inner content.
They differ in the data types they return: css('width') and css('height') return dimensions as strings, with px appended to the end, while width() and height() return dimensions as integers.
Smashing eBook #14│Mastering jQuery │ 10
There’s actually another little-known difference that concerns IE (quelle surprise!), and it’s why you should avoid the css('width') and css('height') route. It has to do with the fact that IE, when asked to read “computed” (i.e. not implicitly set) dimensions, unhelpfully returns auto. In jQuery core, width() and height() are based on the .offsetWidth and .offsetHeight properties resident in every element, which IE does read correctly.
But if you’re working on elements with dimensions implicitly set, you don’t need to worry about that. So, if you wanted to read the width of one element and set it on another element, you’d opt for css('width'), because the value returned comes ready appended with ‘px’.
But if you wanted to read an element’s width() with a view to performing a calculation on it, you’d be interested only in the figure; hence width() is better.
Note that each of these can simulate the other with the help of an extra line of JavaScript, like so:
var width = $('#someElement').width(); //returns integerwidth = width+'px'; //now it's a string like css('width') returnsvar width = $('#someElement').css('width'); //returns stringwidth = parseInt(width); //now it's an integer like width() returns
Lastly, width() and height() actually have another trick up their sleeves: they can return the dimensions of the window and document. If you try this using the css() method, you’ll get an error.
Smashing eBook #14│Mastering jQuery │ 11
4. .click() (etc) vs. .bind() vs. .live() vs. .delegateThese are all concerned with binding events to elements. The differences lie in what elements they bind to and how much we can influence the event handler (or “callback”). If this sounds confusing, don’t worry. I’ll explain.
CLICK() (ETC)
It’s important to understand that bind() is the daddy of jQuery’s event-handling API. Most tutorials deal with events with simple-looking methods, such as click() and mouseover(), but behind the scenes these are just the lieutenants who report back to bind().
These lieutenants, or aliases, give you quick access to bind certain event types to the elements returned by the selector. They all take one argument: a callback function to be executed when the event fires. For example:
$('#table td ').click(function() { alert("The TD you clicked contains '"+$(this).text()+"'");});
This simply says that whenever a <div> inside #table is clicked, alert its text content.
BIND()
We can do the same thing with bind, like so:
$('#table td ').bind('click', function() { alert("The TD you clicked contains '"+$(this).text()+"'");});
Note that this time, the event type is passed as the first argument to bind(), with the callback as the second argument. Why would you use bind() over the simpler alias functions?
Smashing eBook #14│Mastering jQuery │ 12
Very often you wouldn’t. But bind() gives you more control over what happens in the event handler. It also allows you to bind more than one event at a time, by space-separating them as the first argument, like so:
$('#table td').bind('click contextmenu', function() { alert("The TD you clicked contains '"+$(this).text()+"'");});
Now our event fires whether we’ve clicked the <td> with the left or right button. I also mentioned that bind() gives you more control over the event handler. How does that work? It does it by passing three arguments rather than two, with argument two being a data object containing properties readable to the callback, like so:$('#table td').bind('click contextmenu', {message: 'hello!'}, function(e) { alert(e.data.message);});
As you can see, we’re passing into our callback a set of variables for it to have access to, in our case the variable message.
You might wonder why we would do this. Why not just specify any variables we want outside the callback and have our callback read those? The answer has to do with scope and closures. When asked to read a variable, JavaScript starts in the immediate scope and works outwards (this is a fundamentally different behavior to languages such as PHP). Consider the following:
var message = 'you left clicked a TD';$('#table td').bind('click', function(e) { alert(message);});var message = 'you right clicked a TD';$('#table td').bind('contextmenu', function(e) { alert(message);});
Smashing eBook #14│Mastering jQuery │ 13
No matter whether we click the <td> with the left or right mouse button, we will be told it was the right one. This is because the variable message is read by the alert() at the time of the event firing, not at the time the event was bound.
If we give each event its own “version” of message at the time of binding the events, we solve this problem.
$('#table td').bind('click', {message: 'You left clicked a TD'}, function(e) { alert(e.data.message);});$('#table td').bind('contextmenu', {message: 'You right clicked a TD'}, function(e) { alert(e.data.message);});
Events bound with bind() and with the alias methods (.mouseover(), etc) are unbound with the unbind() method.
LIVE()
This works almost exactly the same as bind() but with one crucial difference: events are bound both to current and future elements — that is, any elements that do not currently exist but which may be DOM-scripted after the document is loaded.
Side note: DOM-scripting entails creating and manipulating elements in JavaScript. Ever notice in your Facebook profile that when you “add another employer” a field magically appears? That’s DOM-scripting, and while I won’t get into it here, it looks broadly like this:
var newDiv = document.createElement('div');newDiv.appendChild(document.createTextNode('hello, world!'));$(newDiv).css({width: 100, height: 100, background: '#f90'});document.body.appendChild(newDiv);
Smashing eBook #14│Mastering jQuery │ 14
DELEGATE()
A shortfall of live() is that, unlike the vast majority of jQuery methods, it cannot be used in chaining. That is, it must be used directly on a selector, like so:
$('#myDiv a').live('mouseover', function() { alert('hello');});
But not…
$('#myDiv').children('a').live('mouseover', function() { alert('hello');});
… which will fail, as it will if you pass direct DOM elements, such as $(document.body).
delegate(), which was developed as part of jQuery 1.4.2, goes some way to solving this problem by accepting as its first argument a context within the selector. For example:
$('#myDiv').delegate('a', 'mouseover', function() { alert('hello');});
Like live(), delegate() binds events both to current and future elements. Handlers are unbound via the undelegate() method.
REAL-LIFE EXAMPLE
For a real-life example, I want to stick with DOM-scripting, because this is an important part of any RIA (rich Internet application) built in JavaScript.
Smashing eBook #14│Mastering jQuery │ 15
Let’s imagine a flight-booking application. The user is asked to supply the names of all passengers travelling. Entered passengers appear as new rows in a table, #passengersTable, with two columns: “Name” (containing a text field for the passenger) and “Delete” (containing a button to remove the passenger’s row).
To add a new passenger (i.e. row), the user clicks a button, #addPassenger:
$('#addPassenger').click(function() { var tr = document.createElement('tr'); var td1 = document.createElement('td'); var input = document.createElement('input'); input.type = 'text'; $(td1).append(input); var td2 = document.createElement('td'); var button = document.createElement('button'); button.type = 'button'; $(button).text('delete'); $(td2).append(button); $(tr).append(td1); $(tr).append(td2); $('#passengersTable tbody').append(tr);});
Notice that the event is applied to #addPassenger with click(), not live('click'), because we know this button will exist from the beginning.
What about the event code for the “Delete” buttons to delete a passenger?
$('#passengersTable td button').live('click', function() { if (confirm("Are you sure you want to delete this passenger?")) $(this).closest('tr').remove();});
Smashing eBook #14│Mastering jQuery │ 16
Here, we apply the event with live() because the element to which it is being bound (i.e. the button) did not exist at runtime; it was DOM-scripted later in the code to add a passenger.
Handlers bound with live() are unbound with the die() method.
The convenience of live() comes at a price: one of its drawbacks is that you cannot pass an object of multiple event handlers to it. Only one handler.
5. .children() vs. .find()Remember how the differences between parent(), parents() and closest() really boiled down to a question of reach? So it is here.
CHILDREN()
This returns the immediate children of an element or elements returned by a selector. As with most jQuery DOM-traversal methods, it is optionally filtered with a selector. So, if we wanted to turn all <td>s orange in a table that contained the word “dog”, we could use this:$('#table tr').children('td:contains(dog)').css('background', '#f90');
FIND()
This works very similar to children(), only it looks at both children and more distant descendants. It is also often a safer bet than children().
Say it’s your last day on a project. You need to write some code to hide all <tr>s that have the class hideMe. But some developers omit <tbody> from their table mark-up, so we need to cover all bases for the future. It would be risky to target the <tr>s like this…
$('#table tbody tr.hideMe').hide();
Smashing eBook #14│Mastering jQuery │ 17
… because that would fail if there’s no <tbody>. Instead, we use find():
$('#table').find('tr.hideMe').hide();
This says that wherever you find a <tr> in #table with .hideMe, of whatever descendancy, hide it.
6. .not() vs. !.is() vs. :not()As you’d expect from functions named “not” and “is,” these are opposites. But there’s more to it than that, and these two are not really equivalents.
.NOT()
not() returns elements that do not match its selector. For example:
$('p').not('.someclass').css('color', '#f90');
That turns all paragraphs that do not have the class someclass orange.
.IS()
If, on the other hand, you want to target paragraphs that do have the class someclass, you could be forgiven for thinking that this would do it:
$('p').is('.someclass').css('color', '#f90');
In fact, this would cause an error, because is() does not return elements: it returns a boolean. It’s a testing function to see whether any of the chain elements match the selector.
So when is is useful? Well, it’s useful for querying elements about their properties. See the real-life example below.
Smashing eBook #14│Mastering jQuery │ 18
:NOT()
:not() is the pseudo-selector equivalent of the method .not() It performs the same job; the only difference, as with all pseudo-selectors, is that you can use it in the middle of a selector string, and jQuery’s string parser will pick it up and act on it. The following example is equivalent to our .not() example above:
$('p:not(.someclass)').css('color', '#f90');
REAL-LIFE EXAMPLE
As we’ve seen, .is() is used to test, not filter, elements. Imagine we had the following sign-up form. Required fields have the class required.
<form id='myform' method='post' action='somewhere.htm'> <label>Forename * <input type='text' class='required' /> <br /> <label>Surname * <input type='text' class='required' /> <br /> <label>Phone number <input type='text' /> <br /> <label>Desired username * <input type='text' class='required' /> <br /> <input type='submit' value='GO' /></form>
When submitted, our script should check that no required fields were left blank. If they were, the user should be notified and the submission halted.
Smashing eBook #14│Mastering jQuery │ 19
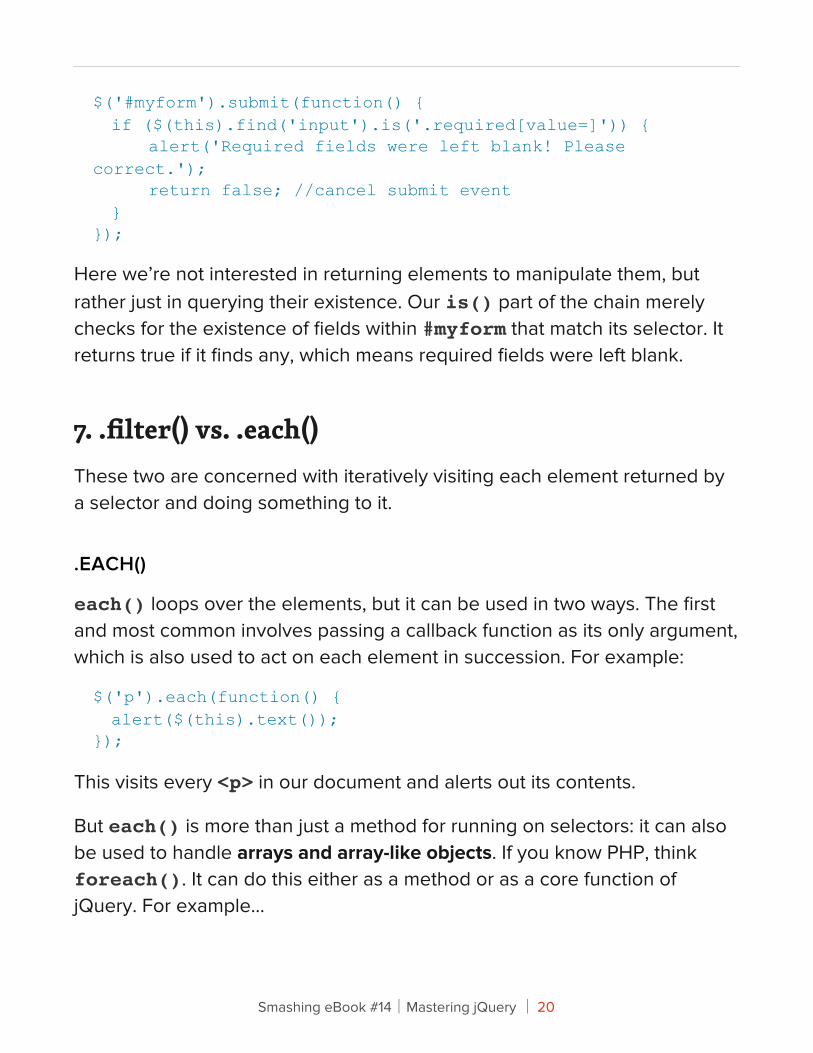
$('#myform').submit(function() { if ($(this).find('input').is('.required[value=]')) { alert('Required fields were left blank! Please correct.'); return false; //cancel submit event }});
Here we’re not interested in returning elements to manipulate them, but rather just in querying their existence. Our is() part of the chain merely checks for the existence of fields within #myform that match its selector. It returns true if it finds any, which means required fields were left blank.
7. .filter() vs. .each()These two are concerned with iteratively visiting each element returned by a selector and doing something to it.
.EACH()
each() loops over the elements, but it can be used in two ways. The first and most common involves passing a callback function as its only argument, which is also used to act on each element in succession. For example:
$('p').each(function() { alert($(this).text());});
This visits every <p> in our document and alerts out its contents.
But each() is more than just a method for running on selectors: it can also be used to handle arrays and array-like objects. If you know PHP, think foreach(). It can do this either as a method or as a core function of jQuery. For example…
Smashing eBook #14│Mastering jQuery │ 20
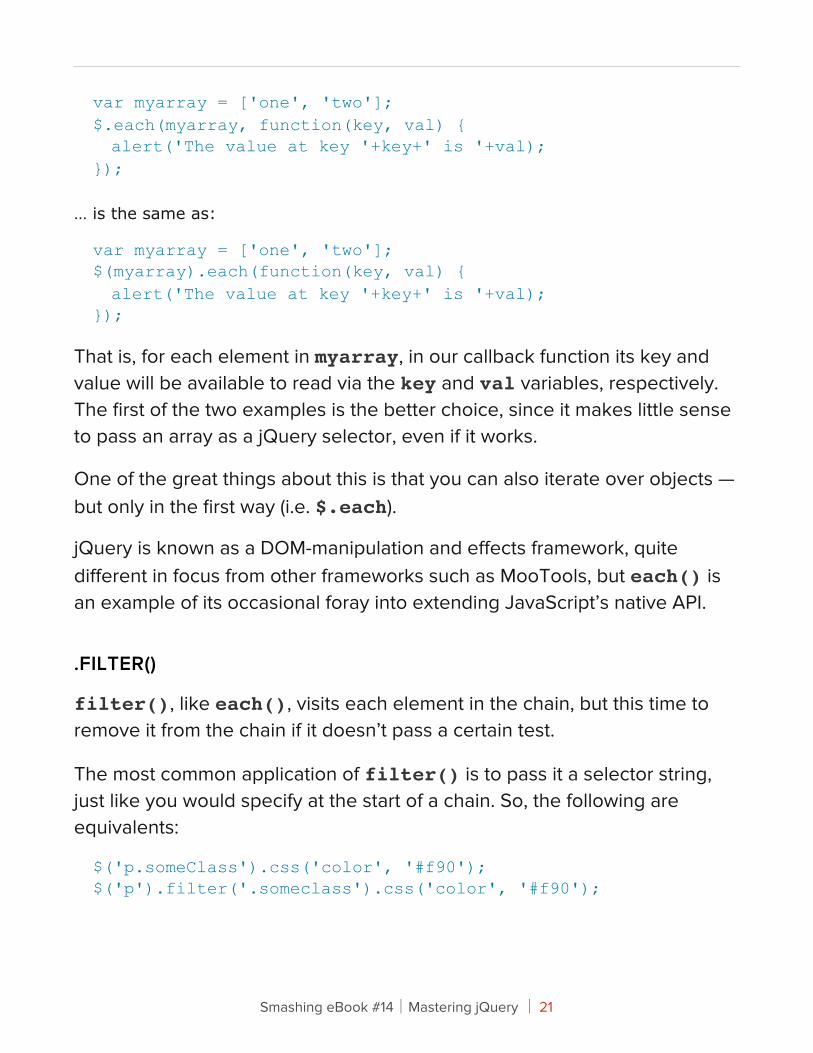
var myarray = ['one', 'two'];$.each(myarray, function(key, val) { alert('The value at key '+key+' is '+val);});
… is the same as:
var myarray = ['one', 'two'];$(myarray).each(function(key, val) { alert('The value at key '+key+' is '+val);});
That is, for each element in myarray, in our callback function its key and value will be available to read via the key and val variables, respectively. The first of the two examples is the better choice, since it makes little sense to pass an array as a jQuery selector, even if it works.
One of the great things about this is that you can also iterate over objects — but only in the first way (i.e. $.each).
jQuery is known as a DOM-manipulation and effects framework, quite different in focus from other frameworks such as MooTools, but each() is an example of its occasional foray into extending JavaScript’s native API.
.FILTER()
filter(), like each(), visits each element in the chain, but this time to remove it from the chain if it doesn’t pass a certain test.
The most common application of filter() is to pass it a selector string, just like you would specify at the start of a chain. So, the following are equivalents:
$('p.someClass').css('color', '#f90');$('p').filter('.someclass').css('color', '#f90');
Smashing eBook #14│Mastering jQuery │ 21
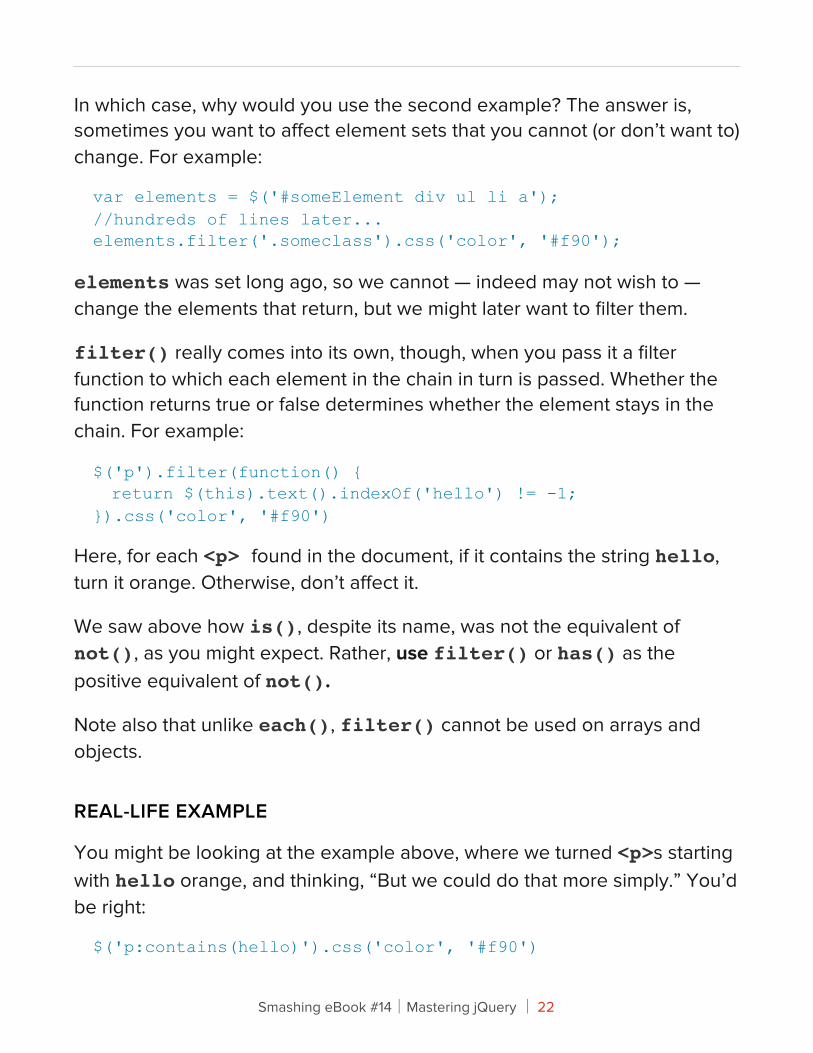
In which case, why would you use the second example? The answer is, sometimes you want to affect element sets that you cannot (or don’t want to) change. For example:
var elements = $('#someElement div ul li a');//hundreds of lines later...elements.filter('.someclass').css('color', '#f90');
elements was set long ago, so we cannot — indeed may not wish to — change the elements that return, but we might later want to filter them.
filter() really comes into its own, though, when you pass it a filter function to which each element in the chain in turn is passed. Whether the function returns true or false determines whether the element stays in the chain. For example:
$('p').filter(function() { return $(this).text().indexOf('hello') != -1;}).css('color', '#f90')
Here, for each <p> found in the document, if it contains the string hello, turn it orange. Otherwise, don’t affect it.
We saw above how is(), despite its name, was not the equivalent of not(), as you might expect. Rather, use filter() or has() as the positive equivalent of not().
Note also that unlike each(), filter() cannot be used on arrays and objects.
REAL-LIFE EXAMPLE
You might be looking at the example above, where we turned <p>s starting with hello orange, and thinking, “But we could do that more simply.” You’d be right:
$('p:contains(hello)').css('color', '#f90')
Smashing eBook #14│Mastering jQuery │ 22
For such a simple condition (i.e. contains hello), that’s fine. But filter() is all about letting us perform more complex or long-winded evaluations before deciding whether an element can stay in our chain.
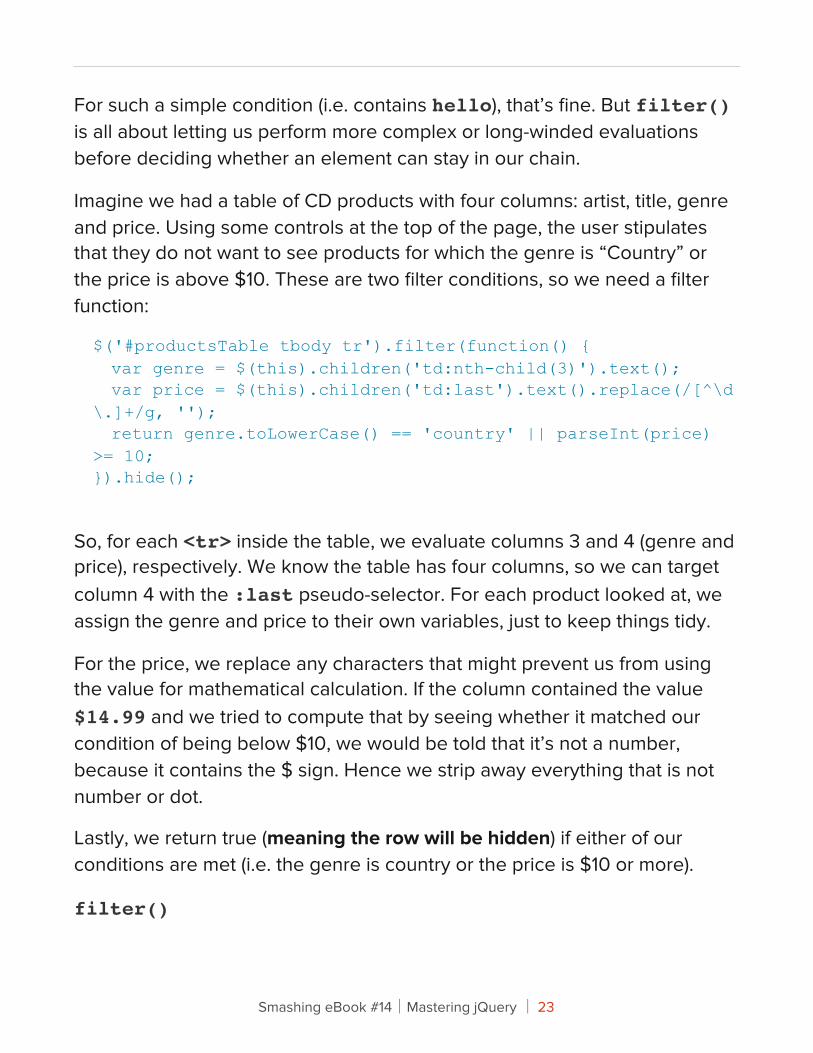
Imagine we had a table of CD products with four columns: artist, title, genre and price. Using some controls at the top of the page, the user stipulates that they do not want to see products for which the genre is “Country” or the price is above $10. These are two filter conditions, so we need a filter function:
$('#productsTable tbody tr').filter(function() { var genre = $(this).children('td:nth-child(3)').text(); var price = $(this).children('td:last').text().replace(/[^\d\.]+/g, ''); return genre.toLowerCase() == 'country' || parseInt(price) >= 10;}).hide();
So, for each <tr> inside the table, we evaluate columns 3 and 4 (genre and price), respectively. We know the table has four columns, so we can target column 4 with the :last pseudo-selector. For each product looked at, we assign the genre and price to their own variables, just to keep things tidy.
For the price, we replace any characters that might prevent us from using the value for mathematical calculation. If the column contained the value $14.99 and we tried to compute that by seeing whether it matched our condition of being below $10, we would be told that it’s not a number, because it contains the $ sign. Hence we strip away everything that is not number or dot.
Lastly, we return true (meaning the row will be hidden) if either of our conditions are met (i.e. the genre is country or the price is $10 or more).
filter()
Smashing eBook #14│Mastering jQuery │ 23
8. .merge() vs. .extend()Let’s finish with a foray into more advanced JavaScript and jQuery. We’ve looked at positioning, DOM manipulation and other common issues, but jQuery also provides some utilities for dealing with the native parts of JavaScript. This is not its main focus, mind you; libraries such as MooTools exist for this purpose.
.MERGE()
merge() allows you to merge the contents of two arrays into the first array. This entails permanent change for the first array. It does not make a new array; values from the second array are appended to the first:
var arr1 = ['one', 'two'];var arr2 = ['three', 'four'];$.merge(arr1, arr2);
After this code runs, the arr1 will contain four elements, namely one, two, three, four. arr2 is unchanged. (If you’re familiar with PHP, this function is equivalent to array_merge().)
.EXTEND()
extend() does a similar thing, but for objects:
var obj1 = {one: 'un', two: 'deux'}var obj2 = {three: 'trois', four: 'quatre'}$.extend(obj1, obj2);
extend() has a little more power to it. For one thing, you can merge more than two objects — you can pass as many as you like. For another, it can merge recursively. That is, if properties of objects are themselves objects, you can ensure that they are merged, too. To do this, pass true as the first argument:
Smashing eBook #14│Mastering jQuery │ 24
var obj1 = {one: 'un', two: 'deux'}var obj2 = {three: 'trois', four: 'quatre', some_others: {five: 'cinq', six: 'six', seven: 'sept'}}$.extend(true, obj1, obj2);
Covering everything about the behaviour of JavaScript objects (and how merge interacts with them) is beyond the scope of this article, but you can read more here.
The difference between merge() and extend() in jQuery is not the same as it is in MooTools. One is used to amend an existing object, the other creates a new copy.
"ere You Have ItWe’ve seen some similarities, but more often than not intricate (and occasionally major) differences. jQuery is not a language, but it deserves to be learned as one, and by learning it you will make better decisions about what methods to use in what situation.
It should also be said that this article does not aim to be an exhaustive guide to all jQuery functions available for every situation. For DOM traversal, for example, there’s also nextUntil() and parentsUntil().
While there are strict rules these days for writing semantic and SEO-compliant mark-up, JavaScript is still very much the playground of the developer. No one will demand that you use click() instead of bind(), but that’s not to say one isn’t a better choice than the other. It’s all about the situation.
Smashing eBook #14│Mastering jQuery │ 25
Image Manipulation With jQuery And PHP GD
Andy Croxall
One of the numerous advantages brought about by the explosion of jQuery and other JavaScript libraries is the ease with which you can create interactive tools for your site. When combined with server-side technologies such as PHP, this puts a serious amount of power at your finger tips.
In this article, I’ll be looking at how to combine JavaScript/jQuery with PHP and, particularly, PHP’s GD library to create an image manipulation tool to upload an image, then crop it and finally save the revised version to the server. Sure, there are plugins out there that you can use to do this; but this article aims to show you what’s behind the process. You can download the source files (updated) for reference.
We’ve all seen this sort of Web application before — Facebook, Flickr, t-shirt-printing sites. The advantages are obvious; by including a functionality like this, you alleviate the need to edit pictures manually from your visitors, which has obvious drawbacks. They may not have access to or have the necessary skills to use Photoshop, and in any case why would you want to make the experience of your visitors more difficult?
Before You StartFor this article, you would ideally have had at least some experience working with PHP. Not necessarily GD — I’ll run you through that part, and GD is very friendly anyway. You should also be at least intermediate level in
Smashing eBook #14│Mastering jQuery │ 26
JavaScript, though if you’re a fast learning beginner, you should be fine as well.
A quick word about the technologies you’ll need to work through this article. You’ll need a PHP test server running the GD library, either on your hosting or, if working locally, through something like XAMPP. GD has come bundled with PHP as standard for some time, but you can confirm this by running the phpinfo() function and verifying that it’s available on your server. Client-side-wise you’ll need a text editor, some pictures and a copy of jQuery.
Se#ing Up "e FilesAnd off we go, then. Set up a working folder and create four files in it: index.php, js.js, image_manipulation.php and css.css. index.php is the actual webpage, js.js and css.css should be obvious, while image_manipulation.php will store the code that handles the uploaded image and then, later, saves the manipulated version.
In index.php, first let’s add a line of PHP to start a PHP session and call in our image_manipulation.php file:<!--?php session_start(); require_once 'image_manipulation.php'; ?-->
After that, add in the DOCTYPE and skeleton-structure of the page (header, body areas etc) and call in jQuery and the CSS sheet via script and link tags respectively.
Add a directory to your folder, called imgs, which will receive the uploaded files. If you’re working on a remote server, ensure you set the permissions on the directory such that the script will be able to save image files in it.
First, let’s set up and apply some basic styling to the upload facility.
Smashing eBook #14│Mastering jQuery │ 27
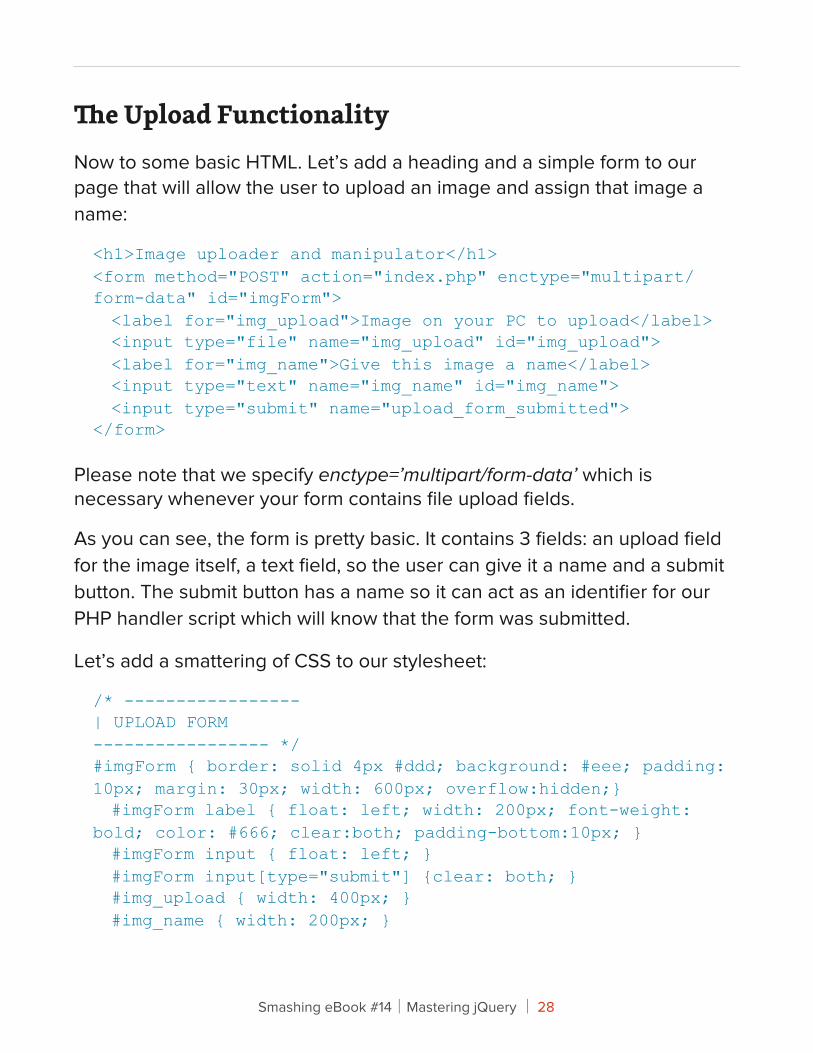
"e Upload FunctionalityNow to some basic HTML. Let’s add a heading and a simple form to our page that will allow the user to upload an image and assign that image a name:
<h1>Image uploader and manipulator</h1><form method="POST" action="index.php" enctype="multipart/form-data" id="imgForm"> <label for="img_upload">Image on your PC to upload</label> <input type="file" name="img_upload" id="img_upload"> <label for="img_name">Give this image a name</label> <input type="text" name="img_name" id="img_name"> <input type="submit" name="upload_form_submitted"></form>
Please note that we specify enctype=’multipart/form-data’ which is necessary whenever your form contains file upload fields.
As you can see, the form is pretty basic. It contains 3 fields: an upload field for the image itself, a text field, so the user can give it a name and a submit button. The submit button has a name so it can act as an identifier for our PHP handler script which will know that the form was submitted.
Let’s add a smattering of CSS to our stylesheet:
/* -----------------| UPLOAD FORM----------------- */#imgForm { border: solid 4px #ddd; background: #eee; padding: 10px; margin: 30px; width: 600px; overflow:hidden;} #imgForm label { float: left; width: 200px; font-weight: bold; color: #666; clear:both; padding-bottom:10px; } #imgForm input { float: left; } #imgForm input[type="submit"] {clear: both; } #img_upload { width: 400px; } #img_name { width: 200px; }
Smashing eBook #14│Mastering jQuery │ 28
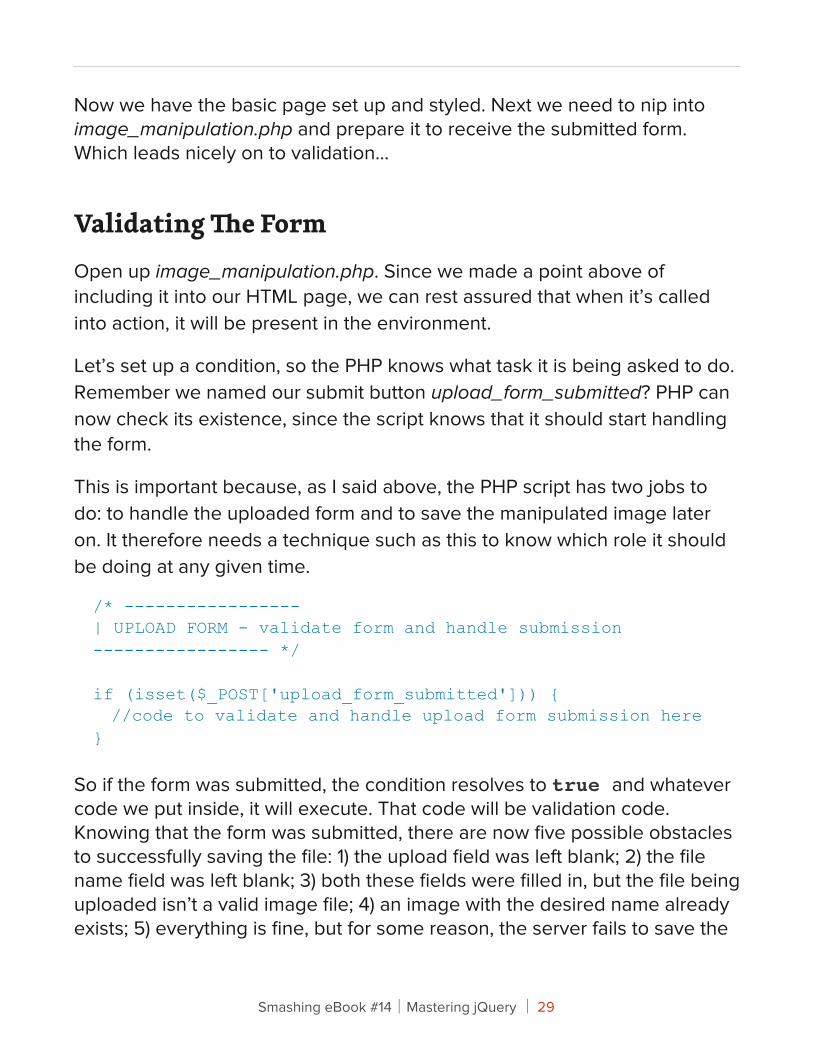
Now we have the basic page set up and styled. Next we need to nip into image_manipulation.php and prepare it to receive the submitted form. Which leads nicely on to validation…
Validating "e FormOpen up image_manipulation.php. Since we made a point above of including it into our HTML page, we can rest assured that when it’s called into action, it will be present in the environment.
Let’s set up a condition, so the PHP knows what task it is being asked to do. Remember we named our submit button upload_form_submitted? PHP can now check its existence, since the script knows that it should start handling the form.
This is important because, as I said above, the PHP script has two jobs to do: to handle the uploaded form and to save the manipulated image later on. It therefore needs a technique such as this to know which role it should be doing at any given time.
/* -----------------| UPLOAD FORM - validate form and handle submission----------------- */
if (isset($_POST['upload_form_submitted'])) { //code to validate and handle upload form submission here}
So if the form was submitted, the condition resolves to true and whatever code we put inside, it will execute. That code will be validation code. Knowing that the form was submitted, there are now five possible obstacles to successfully saving the file: 1) the upload field was left blank; 2) the file name field was left blank; 3) both these fields were filled in, but the file being uploaded isn’t a valid image file; 4) an image with the desired name already exists; 5) everything is fine, but for some reason, the server fails to save the
Smashing eBook #14│Mastering jQuery │ 29
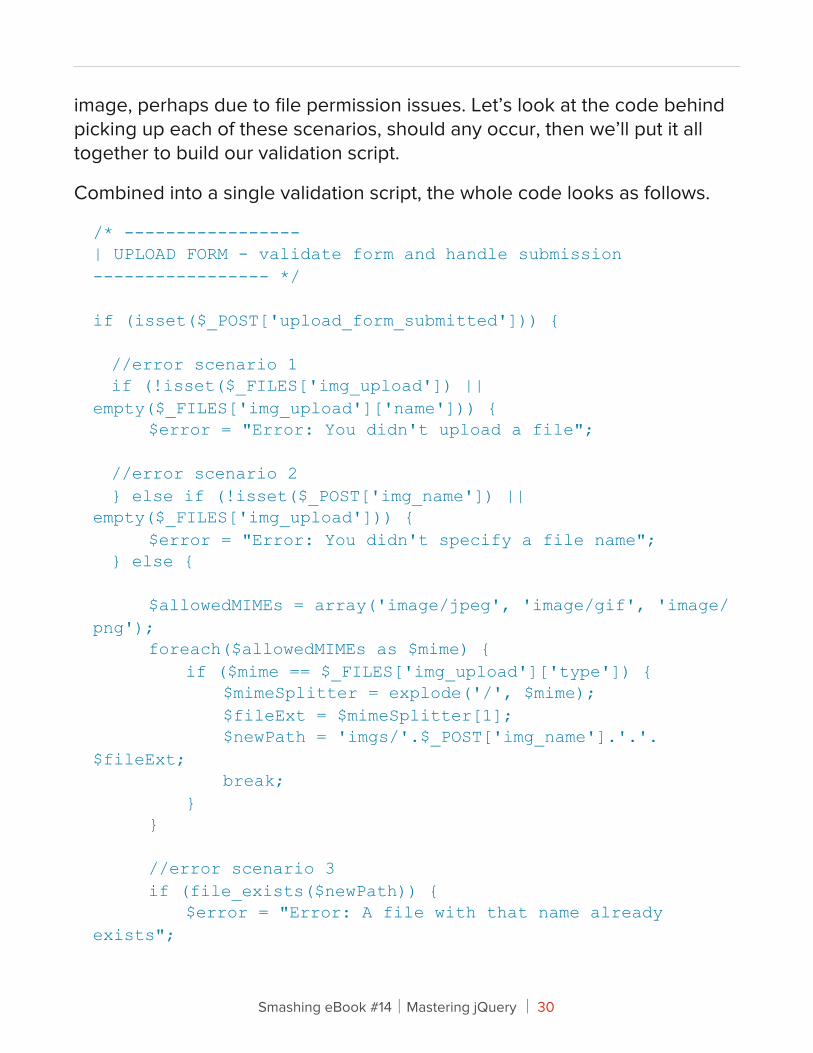
image, perhaps due to file permission issues. Let’s look at the code behind picking up each of these scenarios, should any occur, then we’ll put it all together to build our validation script.
Combined into a single validation script, the whole code looks as follows.
/* -----------------| UPLOAD FORM - validate form and handle submission----------------- */ if (isset($_POST['upload_form_submitted'])) {
//error scenario 1 if (!isset($_FILES['img_upload']) || empty($_FILES['img_upload']['name'])) { $error = "Error: You didn't upload a file";
//error scenario 2 } else if (!isset($_POST['img_name']) || empty($_FILES['img_upload'])) { $error = "Error: You didn't specify a file name"; } else {
$allowedMIMEs = array('image/jpeg', 'image/gif', 'image/png'); foreach($allowedMIMEs as $mime) { if ($mime == $_FILES['img_upload']['type']) { $mimeSplitter = explode('/', $mime); $fileExt = $mimeSplitter[1]; $newPath = 'imgs/'.$_POST['img_name'].'.'.$fileExt; break; } }
//error scenario 3 if (file_exists($newPath)) { $error = "Error: A file with that name already exists";
Smashing eBook #14│Mastering jQuery │ 30

//error scenario 4 } else if (!isset($newPath)) { $error = 'Error: Invalid file format - please upload a picture file';
//error scenario 5 } else if (!copy($_FILES['img_upload']['tmp_name'], $newPath)) { $error = 'Error: Could not save file to server';
//...all OK! } else { $_SESSION['newPath'] = $newPath; $_SESSION['fileExt'] = $fileExt; } }}
There are a couple of things to note here.
$ERROR & $_SESSION['NEWPATH']
Firstly, note that I’m using a variable, $error, to log whether we hit any of the hurdles. If no error occurs and the image is saved, we set a session variable, $_SESSION['new_path'], to store the path to the saved image. This will be helpful in the next step where we need to display the image and, therefore, need to know its SRC.
I’m using a session variable rather than a simple variable, so when the time comes for our PHP script to crop the image, we don’t have to pass it a variable informing the script which image to use — the script will already know the context, because it will remember this session variable. Whilst this article doesn’t concern itself deeply with security, this is a simple precaution. Doing this means that the user can affect only the image he uploaded, rather than, potentially, someone else’s previously-saved image — the user
Smashing eBook #14│Mastering jQuery │ 31
is locked into manipulating only the image referenced in $error and has no ability to enforce the PHP script to affect another image.
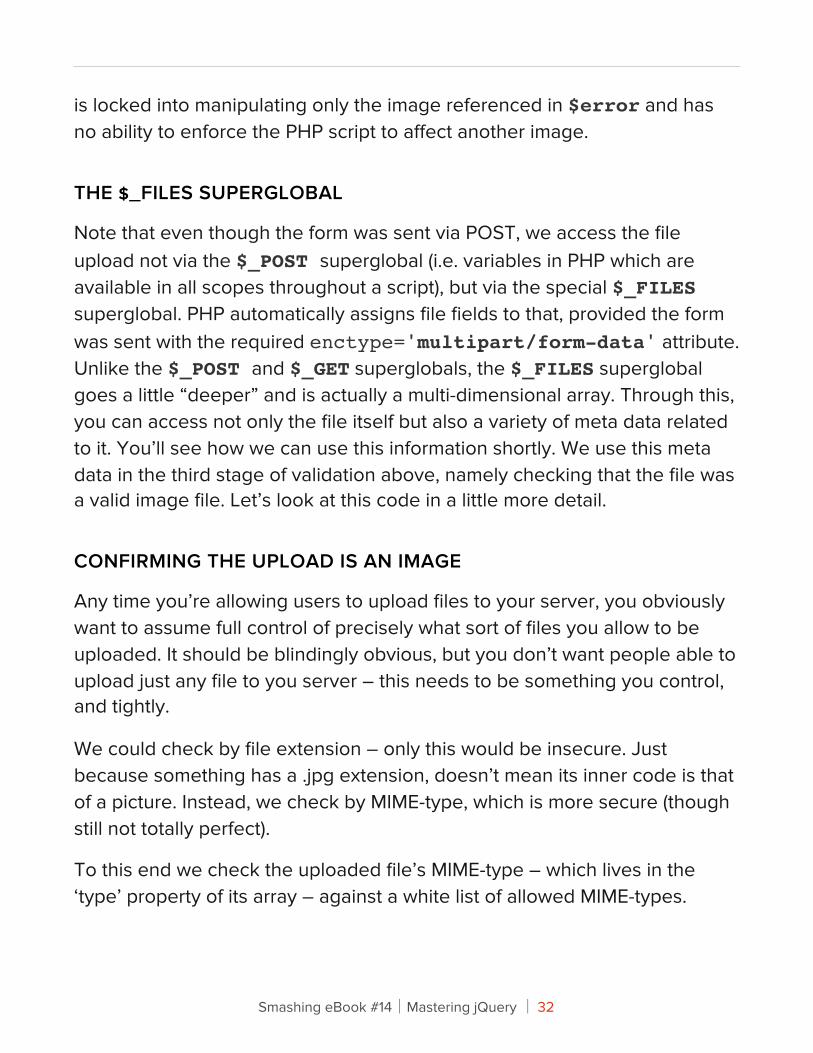
THE $_FILES SUPERGLOBAL
Note that even though the form was sent via POST, we access the file upload not via the $_POST superglobal (i.e. variables in PHP which are available in all scopes throughout a script), but via the special $_FILES superglobal. PHP automatically assigns file fields to that, provided the form was sent with the required enctype='multipart/form-data' attribute. Unlike the $_POST and $_GET superglobals, the $_FILES superglobal goes a little “deeper” and is actually a multi-dimensional array. Through this, you can access not only the file itself but also a variety of meta data related to it. You’ll see how we can use this information shortly. We use this meta data in the third stage of validation above, namely checking that the file was a valid image file. Let’s look at this code in a little more detail.
CONFIRMING THE UPLOAD IS AN IMAGE
Any time you’re allowing users to upload files to your server, you obviously want to assume full control of precisely what sort of files you allow to be uploaded. It should be blindingly obvious, but you don’t want people able to upload just any file to you server – this needs to be something you control, and tightly.
We could check by file extension – only this would be insecure. Just because something has a .jpg extension, doesn’t mean its inner code is that of a picture. Instead, we check by MIME-type, which is more secure (though still not totally perfect).
To this end we check the uploaded file’s MIME-type – which lives in the ‘type’ property of its array – against a white list of allowed MIME-types.
Smashing eBook #14│Mastering jQuery │ 32
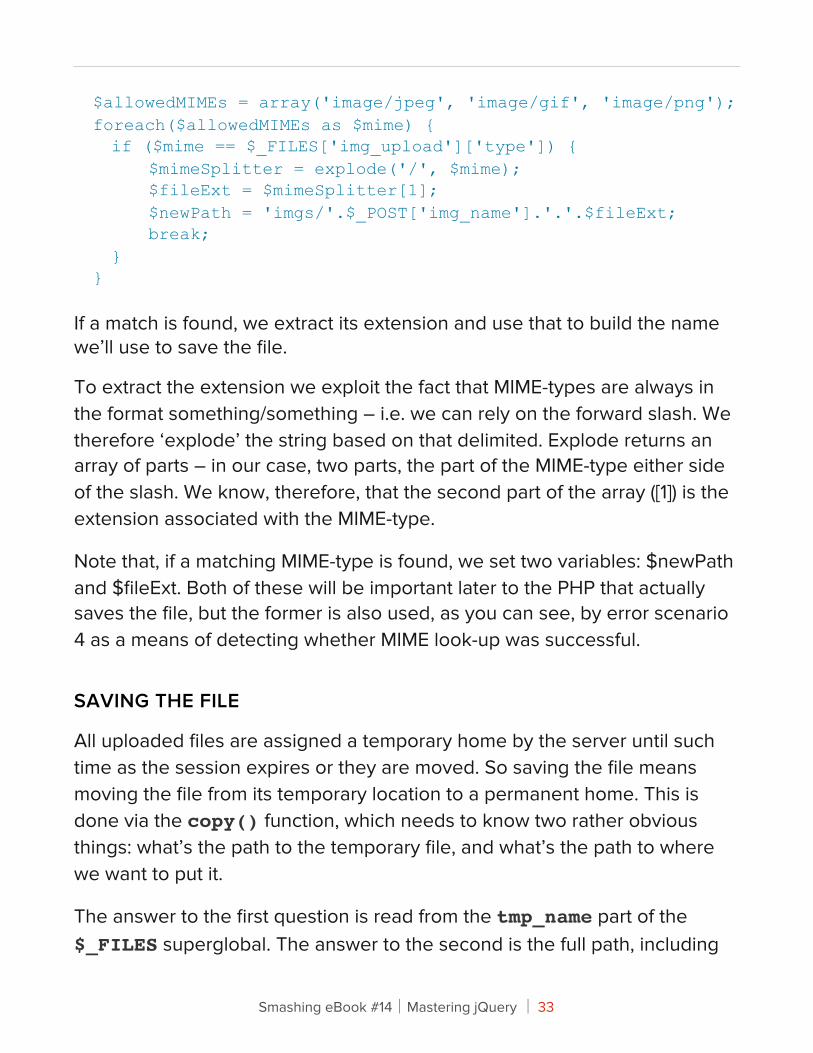
$allowedMIMEs = array('image/jpeg', 'image/gif', 'image/png');foreach($allowedMIMEs as $mime) { if ($mime == $_FILES['img_upload']['type']) { $mimeSplitter = explode('/', $mime); $fileExt = $mimeSplitter[1]; $newPath = 'imgs/'.$_POST['img_name'].'.'.$fileExt; break; }}
If a match is found, we extract its extension and use that to build the name we’ll use to save the file.
To extract the extension we exploit the fact that MIME-types are always in the format something/something – i.e. we can rely on the forward slash. We therefore ‘explode’ the string based on that delimited. Explode returns an array of parts – in our case, two parts, the part of the MIME-type either side of the slash. We know, therefore, that the second part of the array ([1]) is the extension associated with the MIME-type.
Note that, if a matching MIME-type is found, we set two variables: $newPath and $fileExt. Both of these will be important later to the PHP that actually saves the file, but the former is also used, as you can see, by error scenario 4 as a means of detecting whether MIME look-up was successful.
SAVING THE FILE
All uploaded files are assigned a temporary home by the server until such time as the session expires or they are moved. So saving the file means moving the file from its temporary location to a permanent home. This is done via the copy() function, which needs to know two rather obvious things: what’s the path to the temporary file, and what’s the path to where we want to put it.
The answer to the first question is read from the tmp_name part of the $_FILES superglobal. The answer to the second is the full path, including
Smashing eBook #14│Mastering jQuery │ 33
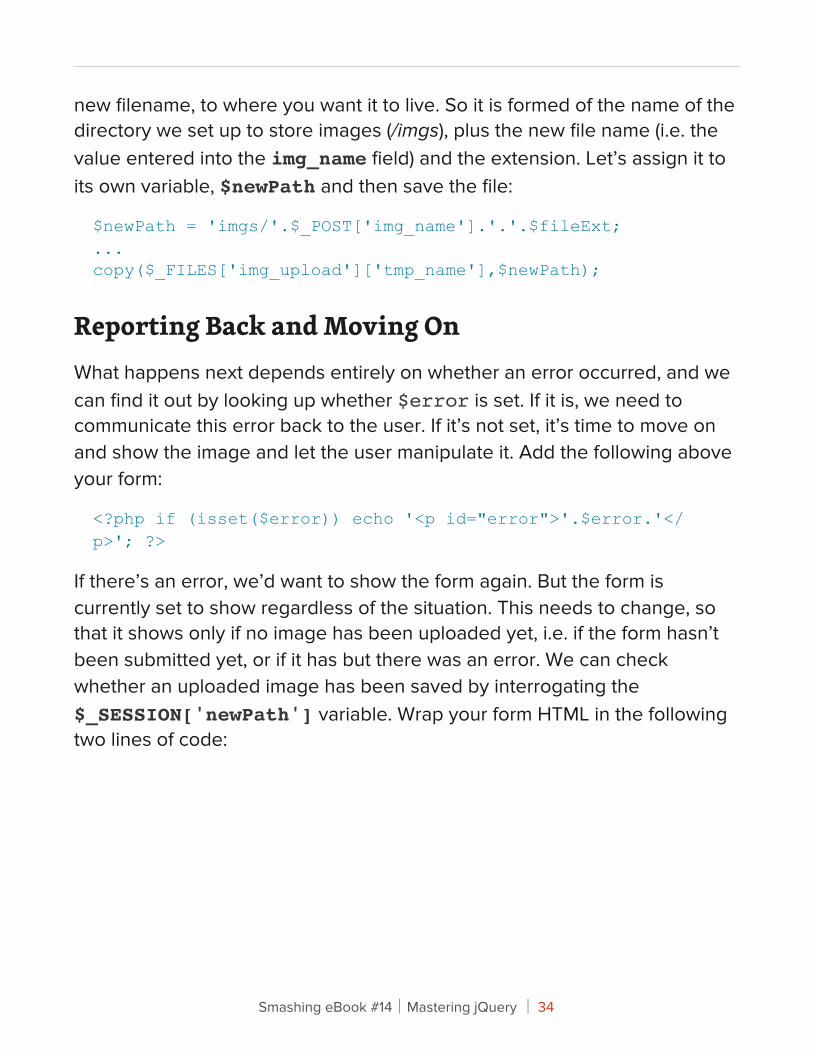
new filename, to where you want it to live. So it is formed of the name of the directory we set up to store images (/imgs), plus the new file name (i.e. the value entered into the img_name field) and the extension. Let’s assign it to its own variable, $newPath and then save the file:
$newPath = 'imgs/'.$_POST['img_name'].'.'.$fileExt;...copy($_FILES['img_upload']['tmp_name'],$newPath);
Reporting Back and Moving OnWhat happens next depends entirely on whether an error occurred, and we can find it out by looking up whether $error is set. If it is, we need to communicate this error back to the user. If it’s not set, it’s time to move on and show the image and let the user manipulate it. Add the following above your form:
<?php if (isset($error)) echo '<p id="error">'.$error.'</p>'; ?>
If there’s an error, we’d want to show the form again. But the form is currently set to show regardless of the situation. This needs to change, so that it shows only if no image has been uploaded yet, i.e. if the form hasn’t been submitted yet, or if it has but there was an error. We can check whether an uploaded image has been saved by interrogating the $_SESSION['newPath'] variable. Wrap your form HTML in the following two lines of code:
Smashing eBook #14│Mastering jQuery │ 34
<?php if (!isset($_SESSION['newPath']) || isset($_GET['true'])) { ?>
<?php } else echo '<img src="'.$_SESSION['newPath'].'" />'; ?>
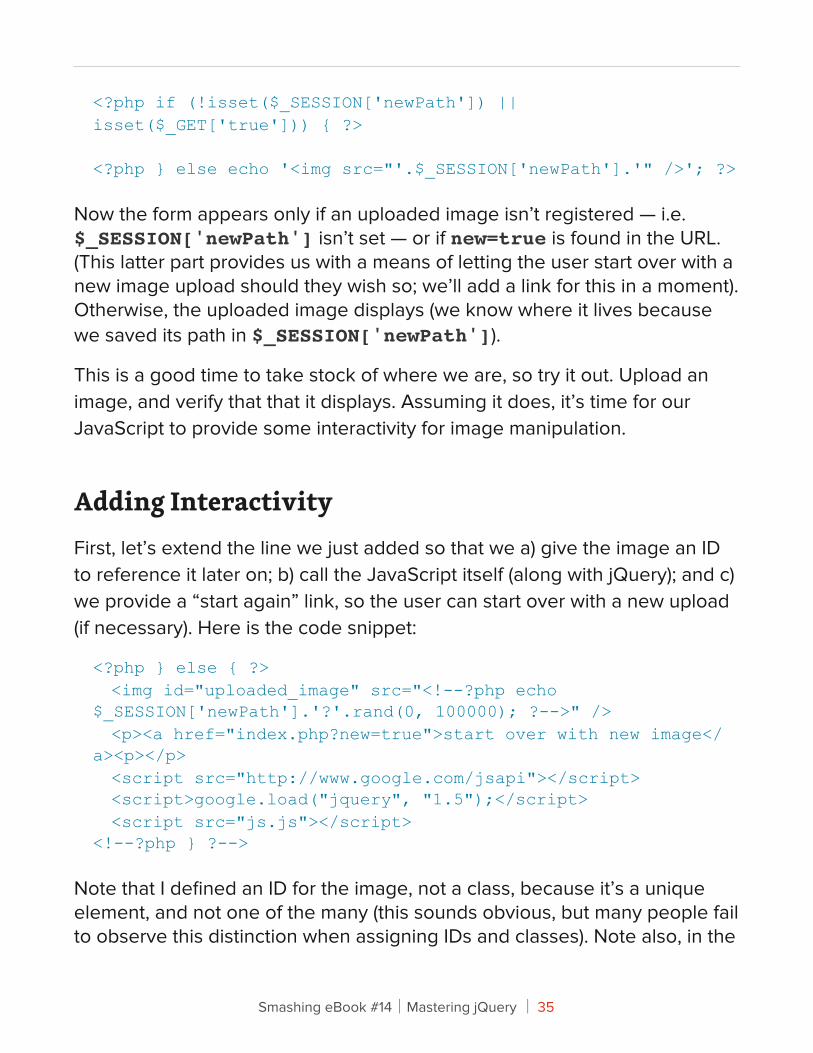
Now the form appears only if an uploaded image isn’t registered — i.e. $_SESSION['newPath'] isn’t set — or if new=true is found in the URL. (This latter part provides us with a means of letting the user start over with a new image upload should they wish so; we’ll add a link for this in a moment). Otherwise, the uploaded image displays (we know where it lives because we saved its path in $_SESSION['newPath']).
This is a good time to take stock of where we are, so try it out. Upload an image, and verify that that it displays. Assuming it does, it’s time for our JavaScript to provide some interactivity for image manipulation.
Adding InteractivityFirst, let’s extend the line we just added so that we a) give the image an ID to reference it later on; b) call the JavaScript itself (along with jQuery); and c) we provide a “start again” link, so the user can start over with a new upload (if necessary). Here is the code snippet:
<?php } else { ?> <img id="uploaded_image" src="<!--?php echo $_SESSION['newPath'].'?'.rand(0, 100000); ?-->" /> <p><a href="index.php?new=true">start over with new image</a><p></p> <script src="http://www.google.com/jsapi"></script> <script>google.load("jquery", "1.5");</script> <script src="js.js"></script><!--?php } ?-->
Note that I defined an ID for the image, not a class, because it’s a unique element, and not one of the many (this sounds obvious, but many people fail to observe this distinction when assigning IDs and classes). Note also, in the
Smashing eBook #14│Mastering jQuery │ 35
image’s SRC, I’m appending a random string. This is done to force the browser not to cache the image once we’ve cropped it (since the SRC doesn’t change).
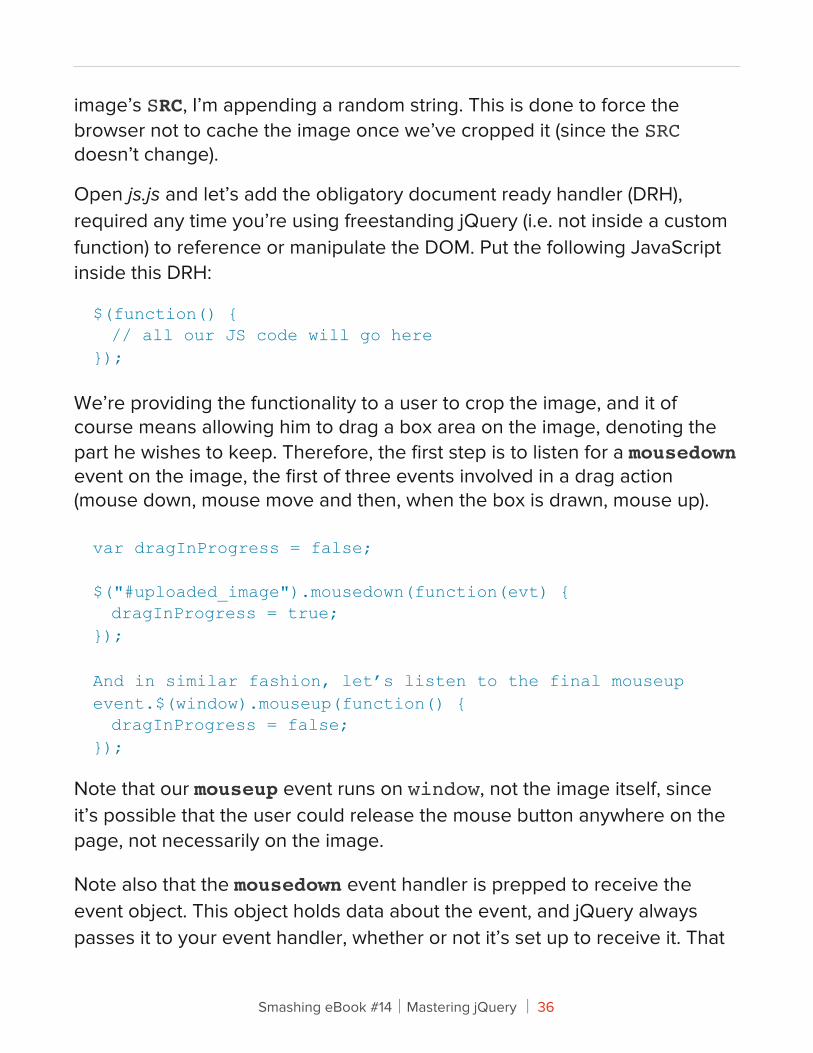
Open js.js and let’s add the obligatory document ready handler (DRH), required any time you’re using freestanding jQuery (i.e. not inside a custom function) to reference or manipulate the DOM. Put the following JavaScript inside this DRH:
$(function() { // all our JS code will go here});
We’re providing the functionality to a user to crop the image, and it of course means allowing him to drag a box area on the image, denoting the part he wishes to keep. Therefore, the first step is to listen for a mousedown event on the image, the first of three events involved in a drag action (mouse down, mouse move and then, when the box is drawn, mouse up).
var dragInProgress = false;
$("#uploaded_image").mousedown(function(evt) { dragInProgress = true;});
And in similar fashion, let’s listen to the final mouseup event.$(window).mouseup(function() { dragInProgress = false;});
Note that our mouseup event runs on window, not the image itself, since it’s possible that the user could release the mouse button anywhere on the page, not necessarily on the image.
Note also that the mousedown event handler is prepped to receive the event object. This object holds data about the event, and jQuery always passes it to your event handler, whether or not it’s set up to receive it. That
Smashing eBook #14│Mastering jQuery │ 36
object will be crucial later on in ascertaining where the mouse was when the event fired. The mouseup event doesn’t need this, because all we care about if is that the drag action is over and it doesn’t really matter where the mouse is.
We’re tracking whether or not the mouse button is currently depressed in a variable, . Why? Because, in a drag action, the middle event of the three (see above) only applies if the first happened. That is, in a drag action, you move the mouse whilst the mouse is down. If it’s not, our mousemove event handler should exit. And here it is:
$("#uploaded_image").mousemove(function(evt) { if (!dragInProgress) return;});
So now our three event handlers are set up. As you can see, the mousemove event handler exits if it discovers that the mouse button is not currently down, as we decided above it should be.
Now let’s extend these event handlers.
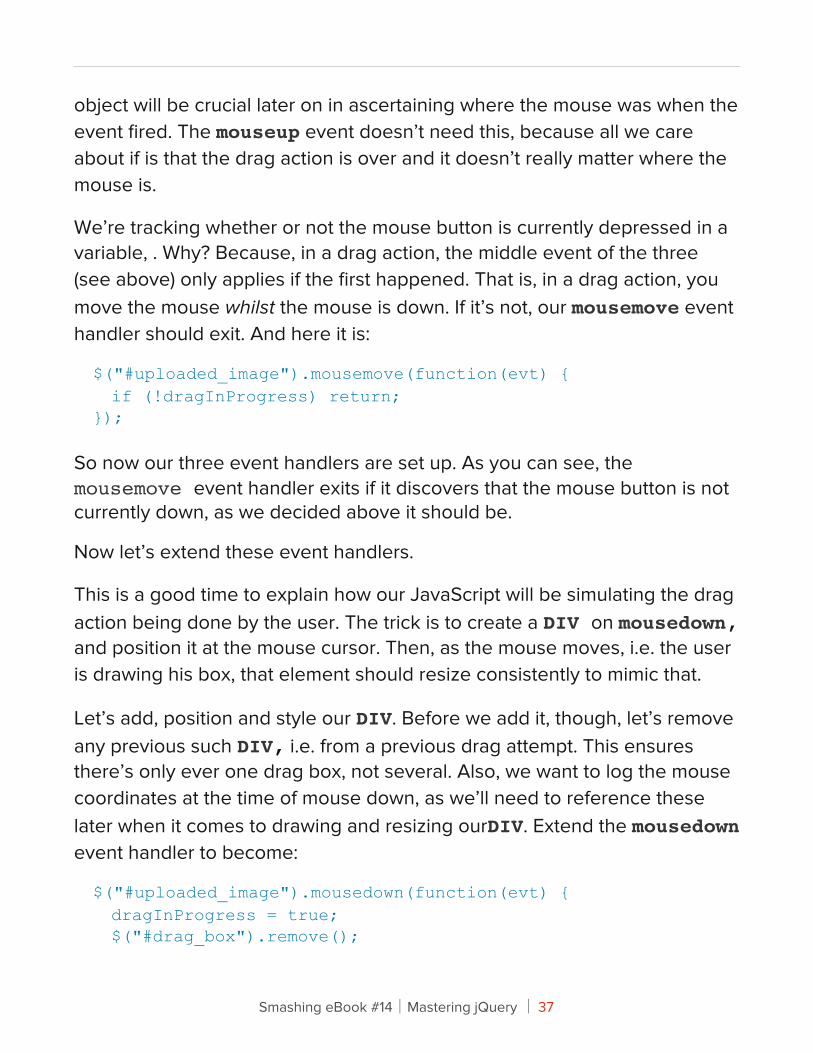
This is a good time to explain how our JavaScript will be simulating the drag action being done by the user. The trick is to create a DIV on mousedown, and position it at the mouse cursor. Then, as the mouse moves, i.e. the user is drawing his box, that element should resize consistently to mimic that.
Let’s add, position and style our DIV. Before we add it, though, let’s remove any previous such DIV, i.e. from a previous drag attempt. This ensures there’s only ever one drag box, not several. Also, we want to log the mouse coordinates at the time of mouse down, as we’ll need to reference these later when it comes to drawing and resizing ourDIV. Extend the mousedown event handler to become:
$("#uploaded_image").mousedown(function(evt) { dragInProgress = true; $("#drag_box").remove();
Smashing eBook #14│Mastering jQuery │ 37
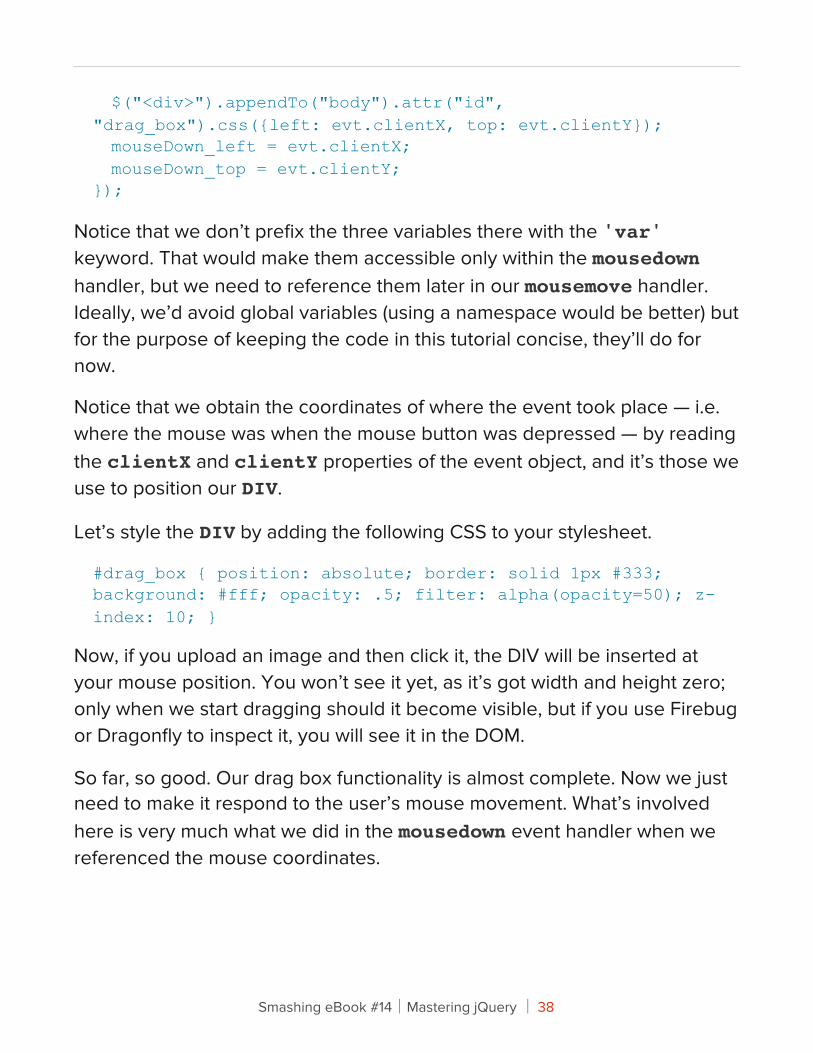
$("<div>").appendTo("body").attr("id", "drag_box").css({left: evt.clientX, top: evt.clientY}); mouseDown_left = evt.clientX; mouseDown_top = evt.clientY;});
Notice that we don’t prefix the three variables there with the 'var' keyword. That would make them accessible only within the mousedown handler, but we need to reference them later in our mousemove handler. Ideally, we’d avoid global variables (using a namespace would be better) but for the purpose of keeping the code in this tutorial concise, they’ll do for now.
Notice that we obtain the coordinates of where the event took place — i.e. where the mouse was when the mouse button was depressed — by reading the clientX and clientY properties of the event object, and it’s those we use to position our DIV.
Let’s style the DIV by adding the following CSS to your stylesheet.
#drag_box { position: absolute; border: solid 1px #333; background: #fff; opacity: .5; filter: alpha(opacity=50); z-index: 10; }
Now, if you upload an image and then click it, the DIV will be inserted at your mouse position. You won’t see it yet, as it’s got width and height zero; only when we start dragging should it become visible, but if you use Firebug or Dragonfly to inspect it, you will see it in the DOM.
So far, so good. Our drag box functionality is almost complete. Now we just need to make it respond to the user’s mouse movement. What’s involved here is very much what we did in the mousedown event handler when we referenced the mouse coordinates.
Smashing eBook #14│Mastering jQuery │ 38
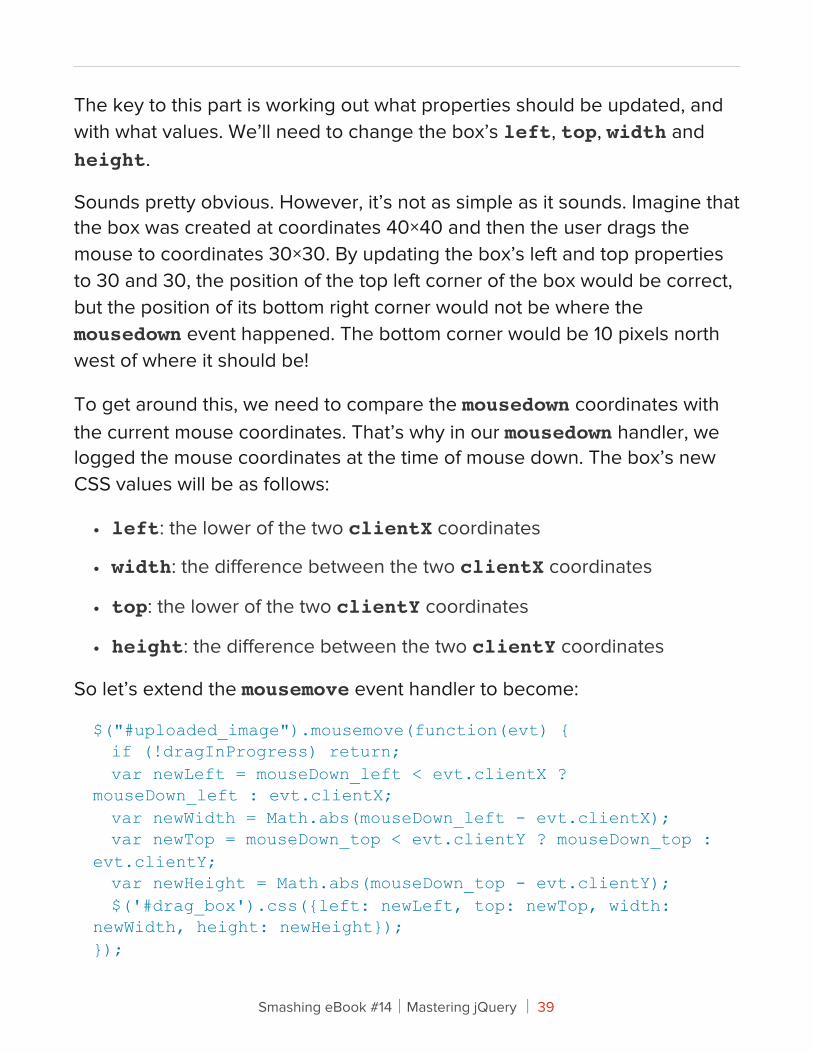
The key to this part is working out what properties should be updated, and with what values. We’ll need to change the box’s left, top, width and height.
Sounds pretty obvious. However, it’s not as simple as it sounds. Imagine that the box was created at coordinates 40×40 and then the user drags the mouse to coordinates 30×30. By updating the box’s left and top properties to 30 and 30, the position of the top left corner of the box would be correct, but the position of its bottom right corner would not be where the mousedown event happened. The bottom corner would be 10 pixels north west of where it should be!
To get around this, we need to compare the mousedown coordinates with the current mouse coordinates. That’s why in our mousedown handler, we logged the mouse coordinates at the time of mouse down. The box’s new CSS values will be as follows:
• left: the lower of the two clientX coordinates
• width: the difference between the two clientX coordinates
• top: the lower of the two clientY coordinates
• height: the difference between the two clientY coordinates
So let’s extend the mousemove event handler to become:
$("#uploaded_image").mousemove(function(evt) { if (!dragInProgress) return; var newLeft = mouseDown_left < evt.clientX ? mouseDown_left : evt.clientX; var newWidth = Math.abs(mouseDown_left - evt.clientX); var newTop = mouseDown_top < evt.clientY ? mouseDown_top : evt.clientY; var newHeight = Math.abs(mouseDown_top - evt.clientY); $('#drag_box').css({left: newLeft, top: newTop, width: newWidth, height: newHeight});});
Smashing eBook #14│Mastering jQuery │ 39
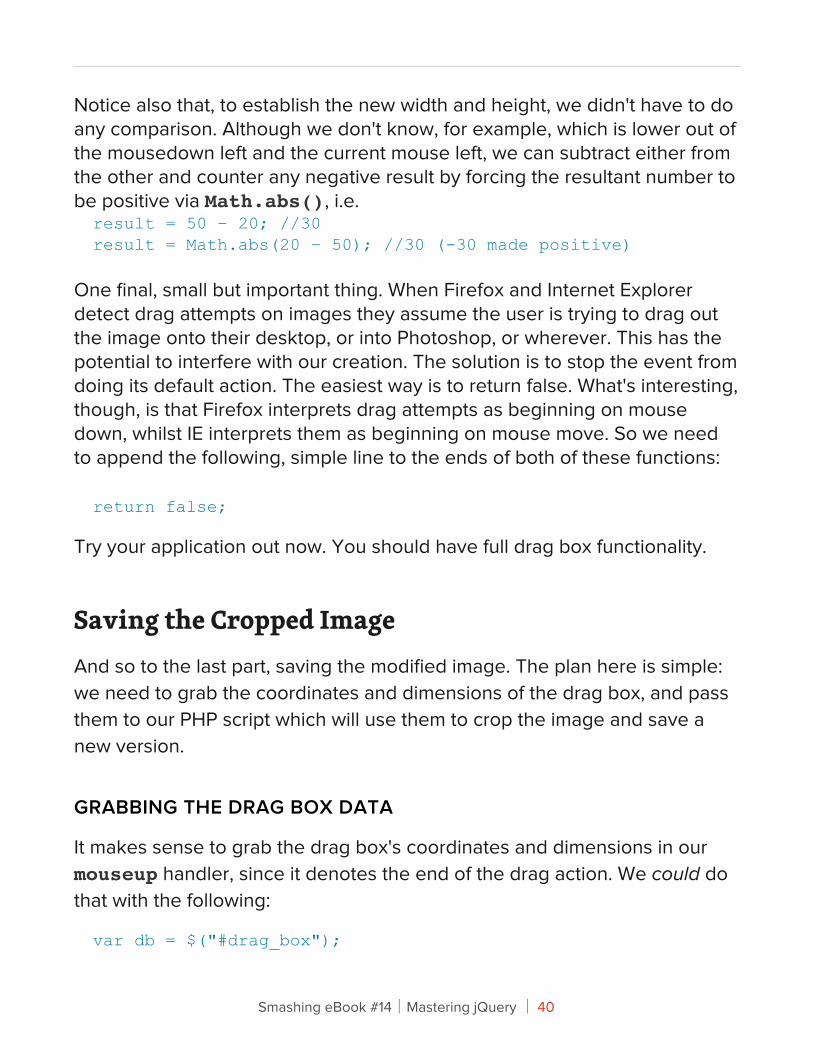
Notice also that, to establish the new width and height, we didn't have to do any comparison. Although we don't know, for example, which is lower out of the mousedown left and the current mouse left, we can subtract either from the other and counter any negative result by forcing the resultant number to be positive via Math.abs(), i.e.result = 50 – 20; //30result = Math.abs(20 – 50); //30 (-30 made positive)
One final, small but important thing. When Firefox and Internet Explorer detect drag attempts on images they assume the user is trying to drag out the image onto their desktop, or into Photoshop, or wherever. This has the potential to interfere with our creation. The solution is to stop the event from doing its default action. The easiest way is to return false. What's interesting, though, is that Firefox interprets drag attempts as beginning on mouse down, whilst IE interprets them as beginning on mouse move. So we need to append the following, simple line to the ends of both of these functions:
return false;
Try your application out now. You should have full drag box functionality.
Saving the Cropped ImageAnd so to the last part, saving the modified image. The plan here is simple: we need to grab the coordinates and dimensions of the drag box, and pass them to our PHP script which will use them to crop the image and save a new version.
GRABBING THE DRAG BOX DATA
It makes sense to grab the drag box's coordinates and dimensions in our mouseup handler, since it denotes the end of the drag action. We could do that with the following:
var db = $("#drag_box");
Smashing eBook #14│Mastering jQuery │ 40
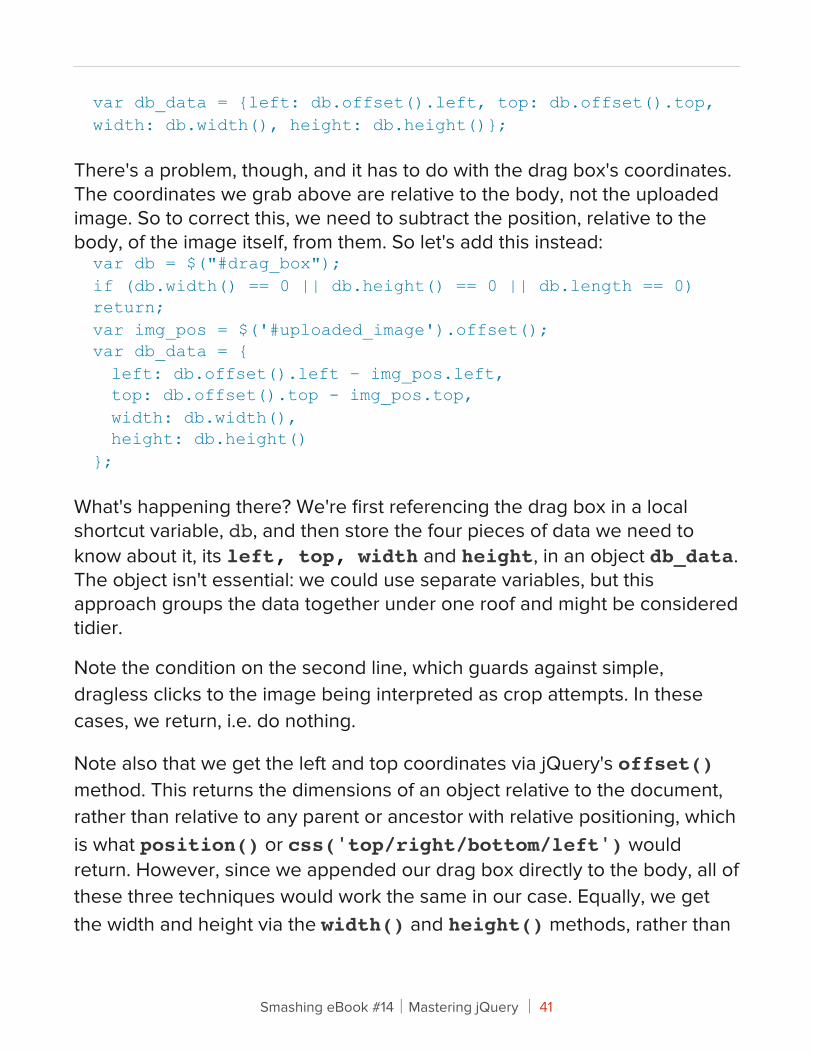
var db_data = {left: db.offset().left, top: db.offset().top, width: db.width(), height: db.height()};
There's a problem, though, and it has to do with the drag box's coordinates. The coordinates we grab above are relative to the body, not the uploaded image. So to correct this, we need to subtract the position, relative to the body, of the image itself, from them. So let's add this instead:var db = $("#drag_box");if (db.width() == 0 || db.height() == 0 || db.length == 0) return;var img_pos = $('#uploaded_image').offset();var db_data = { left: db.offset().left – img_pos.left, top: db.offset().top - img_pos.top, width: db.width(), height: db.height()};
What's happening there? We're first referencing the drag box in a local shortcut variable, db, and then store the four pieces of data we need to know about it, its left, top, width and height, in an object db_data. The object isn't essential: we could use separate variables, but this approach groups the data together under one roof and might be considered tidier.
Note the condition on the second line, which guards against simple, dragless clicks to the image being interpreted as crop attempts. In these cases, we return, i.e. do nothing.
Note also that we get the left and top coordinates via jQuery's offset() method. This returns the dimensions of an object relative to the document, rather than relative to any parent or ancestor with relative positioning, which is what position() or css('top/right/bottom/left') would return. However, since we appended our drag box directly to the body, all of these three techniques would work the same in our case. Equally, we get the width and height via the width() and height() methods, rather than
Smashing eBook #14│Mastering jQuery │ 41
via css('width/height'), as the former omits 'px' from the returned values. Since our PHP script will be using these coordinates in a mathematical fashion, this is the more suitable option.
For more information on the distinction between all these methods, see my previous article on SmashingMag, Commonly Confused Bits of jQuery.
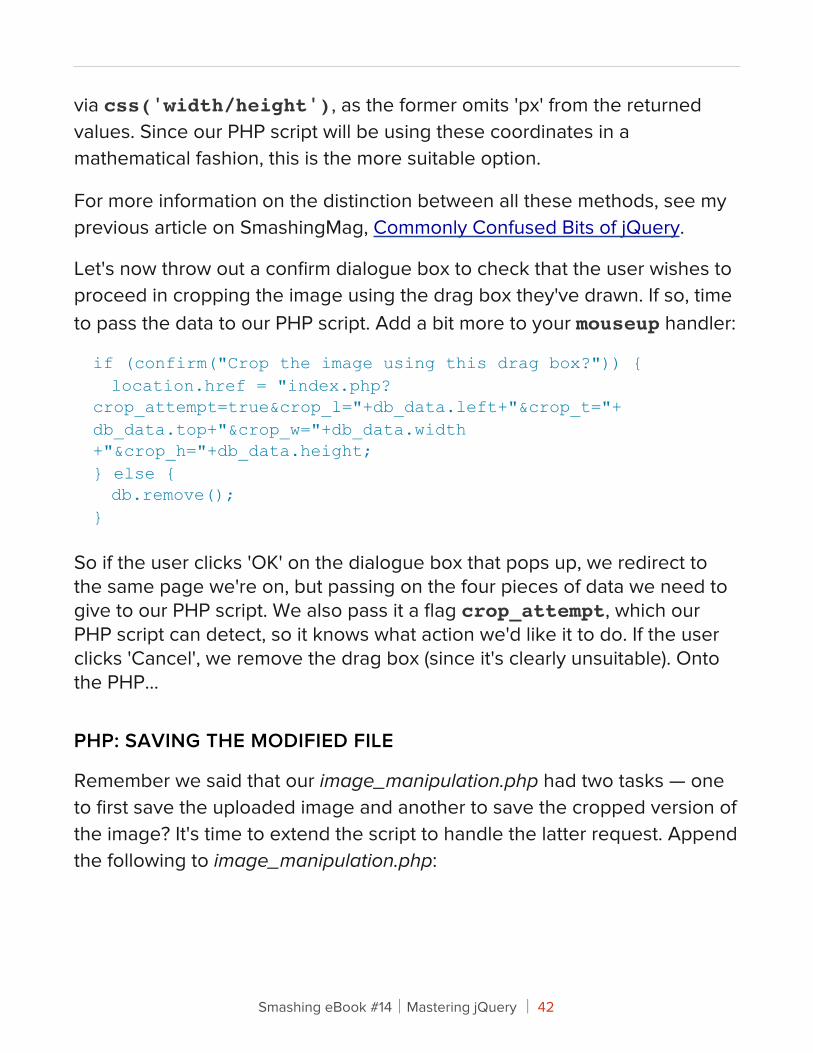
Let's now throw out a confirm dialogue box to check that the user wishes to proceed in cropping the image using the drag box they've drawn. If so, time to pass the data to our PHP script. Add a bit more to your mouseup handler:
if (confirm("Crop the image using this drag box?")) { location.href = "index.php?crop_attempt=true&crop_l="+db_data.left+"&crop_t="+db_data.top+"&crop_w="+db_data.width+"&crop_h="+db_data.height;} else { db.remove();}
So if the user clicks 'OK' on the dialogue box that pops up, we redirect to the same page we're on, but passing on the four pieces of data we need to give to our PHP script. We also pass it a flag crop_attempt, which our PHP script can detect, so it knows what action we'd like it to do. If the user clicks 'Cancel', we remove the drag box (since it's clearly unsuitable). Onto the PHP...
PHP: SAVING THE MODIFIED FILE
Remember we said that our image_manipulation.php had two tasks — one to first save the uploaded image and another to save the cropped version of the image? It's time to extend the script to handle the latter request. Append the following to image_manipulation.php:
Smashing eBook #14│Mastering jQuery │ 42
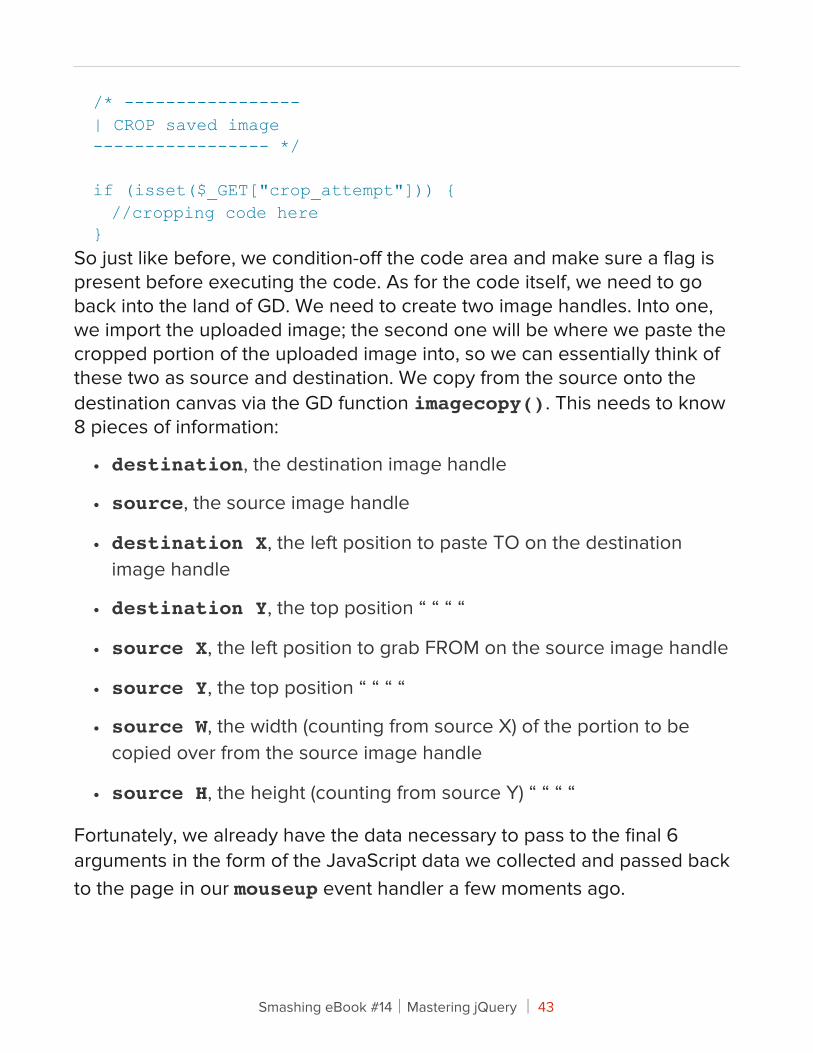
/* -----------------| CROP saved image----------------- */
if (isset($_GET["crop_attempt"])) { //cropping code here}
So just like before, we condition-off the code area and make sure a flag is present before executing the code. As for the code itself, we need to go back into the land of GD. We need to create two image handles. Into one, we import the uploaded image; the second one will be where we paste the cropped portion of the uploaded image into, so we can essentially think of these two as source and destination. We copy from the source onto the destination canvas via the GD function imagecopy(). This needs to know 8 pieces of information:
• destination, the destination image handle
• source, the source image handle
• destination X, the left position to paste TO on the destination image handle
• destination Y, the top position “ “ “ “
• source X, the left position to grab FROM on the source image handle
• source Y, the top position “ “ “ “
• source W, the width (counting from source X) of the portion to be copied over from the source image handle
• source H, the height (counting from source Y) “ “ “ “
Fortunately, we already have the data necessary to pass to the final 6 arguments in the form of the JavaScript data we collected and passed back to the page in our mouseup event handler a few moments ago.
Smashing eBook #14│Mastering jQuery │ 43
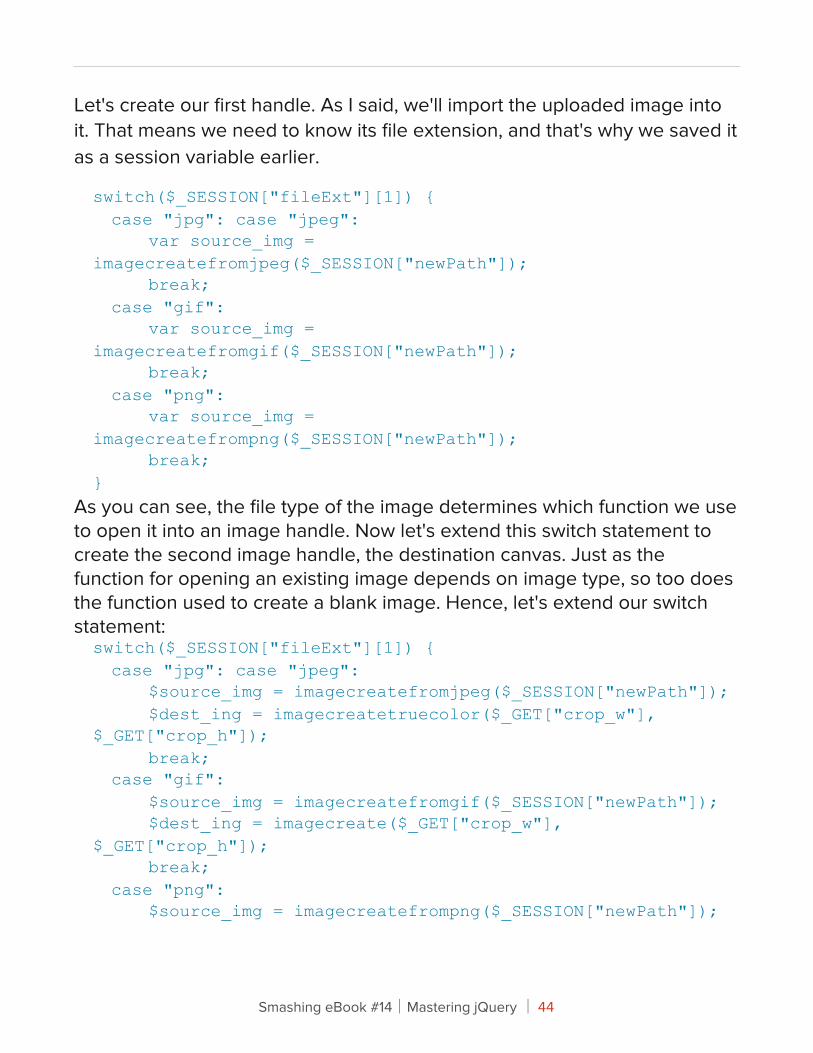
Let's create our first handle. As I said, we'll import the uploaded image into it. That means we need to know its file extension, and that's why we saved it as a session variable earlier.
switch($_SESSION["fileExt"][1]) { case "jpg": case "jpeg": var source_img = imagecreatefromjpeg($_SESSION["newPath"]); break; case "gif": var source_img = imagecreatefromgif($_SESSION["newPath"]); break; case "png": var source_img = imagecreatefrompng($_SESSION["newPath"]); break;}
As you can see, the file type of the image determines which function we use to open it into an image handle. Now let's extend this switch statement to create the second image handle, the destination canvas. Just as the function for opening an existing image depends on image type, so too does the function used to create a blank image. Hence, let's extend our switch statement:switch($_SESSION["fileExt"][1]) { case "jpg": case "jpeg": $source_img = imagecreatefromjpeg($_SESSION["newPath"]); $dest_ing = imagecreatetruecolor($_GET["crop_w"], $_GET["crop_h"]); break; case "gif": $source_img = imagecreatefromgif($_SESSION["newPath"]); $dest_ing = imagecreate($_GET["crop_w"], $_GET["crop_h"]); break; case "png": $source_img = imagecreatefrompng($_SESSION["newPath"]);
Smashing eBook #14│Mastering jQuery │ 44
$dest_ing = imagecreate($_GET["crop_w"], $_GET["crop_h"]); break;}
You'll notice that the difference between opening a blank image and opening one from an existing or uploaded file is that, for the former, you must specify the dimensions. In our case, that's the width and height of the drag box, which we passed into the page via the $_GET['crop_w'] and $_GET['crop_h'] vars respectively.
So now we have our two canvases, it's time to do the copying. The following is one function call, but since it takes 8 arguments, I'm breaking it onto several lines to make it readable. Add it after your switch statement:
imagecopy( $dest_img, $source_img, 0, 0, $_GET["crop_l"], $_GET["crop_t"], $_GET["crop_w"], $_GET["crop_h"]);
The final part is to save the cropped image. For this tutorial, we'll overwrite the original file, but you might like to extend this application, so the user has the option of saving the cropped image as a separate file, rather than losing the original.
Saving the image is easy. We just call a particular function based on (yes, you guessed it) the image's type. We pass in two arguments: the image handle we're saving, and the file name we want to save it as. So let's do that:
switch($_SESSION["fileExt"][1]) { case "jpg": case "jpeg": imagejpeg($dest_img, $_SESSION["newPath"]); break;
Smashing eBook #14│Mastering jQuery │ 45
case "gif": imagegif($dest_img, $_SESSION["newPath"]); break; case "png": imagepng($dest_img, $_SESSION["newPath"]); break;}
It's always good to clean up after ourselves - in PHP terms that means freeing up memory, so let's destroy our image handlers now that we don't need them anymore.
imagedestroy($dest_img);imagedestroy($source_img);
Lastly, we want to redirect to the index page. You might wonder why we'd do this, since we're on it already (and have been the whole time). The trick is that by redirecting, we can lose the arguments we passed in the URL. We don't want these hanging around because, if the user refreshes the page, he'll invoke the PHP crop script again (since it will detect the arguments). The arguments have done their job, so now they have to go, so we redirect to the index page without these arguments. Add the following line to force the redirect:
header("Location: index.php"); //bye bye arguments
Final TouchesSo that's it. We now have a fully-working facility to first upload then crop an image, and save it to the server. Don't forget you can download the source files (updated) for your reference.
There's plenty of ways you could extend this simple application. Explore GD (and perhaps other image libraries for PHP); you can do wonders with images, resizing them, distorting them, changing them to greyscale and much more. Another thing to think about would be security; this tutorial does not aim to cover that here, but if you were working in a user control
Smashing eBook #14│Mastering jQuery │ 46

panel environment, you'd want to make sure the facility was secure and that the user could not edit other user's files.
With this in mind, you might make the saved file's path more complex, e.g. if the user named it pic.jpg, you might actually name it on the server 34iweshfjdshkj4r_pic.jpg. You could then hide this image path, e.g. by specifying the SRC attribute as 'getPic.php' instead of referencing the image directly inside an image's SRC attribute. That PHP script would then open and display the saved file (by reading its path in the session variable), and the user would never be aware of its path.
The possibilities are endless, but hopefully this tutorial has given you a starting point.
Smashing eBook #14│Mastering jQuery │ 47
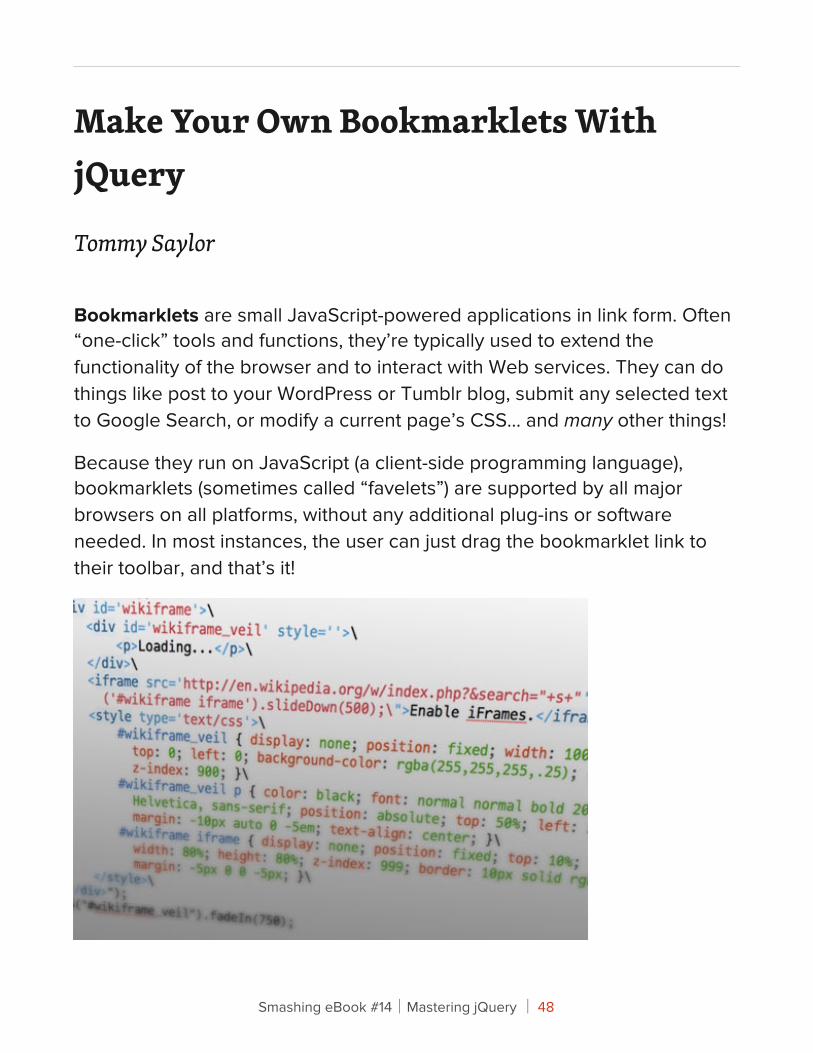
Make Your Own Bookmarklets With jQuery
Tommy Saylor
Bookmarklets are small JavaScript-powered applications in link form. Often “one-click” tools and functions, they’re typically used to extend the functionality of the browser and to interact with Web services. They can do things like post to your WordPress or Tumblr blog, submit any selected text to Google Search, or modify a current page’s CSS… and many other things!
Because they run on JavaScript (a client-side programming language), bookmarklets (sometimes called “favelets”) are supported by all major browsers on all platforms, without any additional plug-ins or software needed. In most instances, the user can just drag the bookmarklet link to their toolbar, and that’s it!
Smashing eBook #14│Mastering jQuery │ 48
In this article, we’ll go through how to make your own bookmarklets, using the jQuery JavaScript framework.
Ge#ing StartedYou can make a faux URI with JavaScript by prefacing the code with javascript:, like so:
<a href="javascript: alert('Arbitrary JS code!');">Alert!</a>
Notice that when we put it in the href attribute, we replaced what would normally be double quotes (“) with single quotes (‘), so the href attribute’s value and JavaScript function don’t get cut off midway. That’s not the only way to circumvent that problem, but it’ll do for now.
We can take this concept as far as we want, adding multiple lines of JavaScript inside these quote marks, with each line separated by a semicolon (;), sans line break. If your bookmarklet won’t need any updating later, this method of “all inclusiveness” will probably be fine. For this tutorial, we’ll be externalizing the JavaScript code and storing it in a .JS file, which we’ll host somewhere else.
A link to an externalized bookmarklet:
<a href="javascript:(function(){document.body.appendChild(document.createElement('script')).src='http://foo.bar/baz.js';})();">Externalized Bookmarklet</a>
This looks for the document’s body and appends a <script> element to it with a src we’ve defined, in this case, “http://foo.bar/baz.js”. Keep in mind that if the user is on an empty tab or a place which, for some reason, has no body, nothing will happen as nothing can be appended to.
You can host that .JS file wherever is convenient, but keep bandwidth in mind if you expect a ton of traffic.
Smashing eBook #14│Mastering jQuery │ 49
Enter jQuery
Since many of you may be familiar with the jQuery framework, we’ll use that to build our bookmarklet.
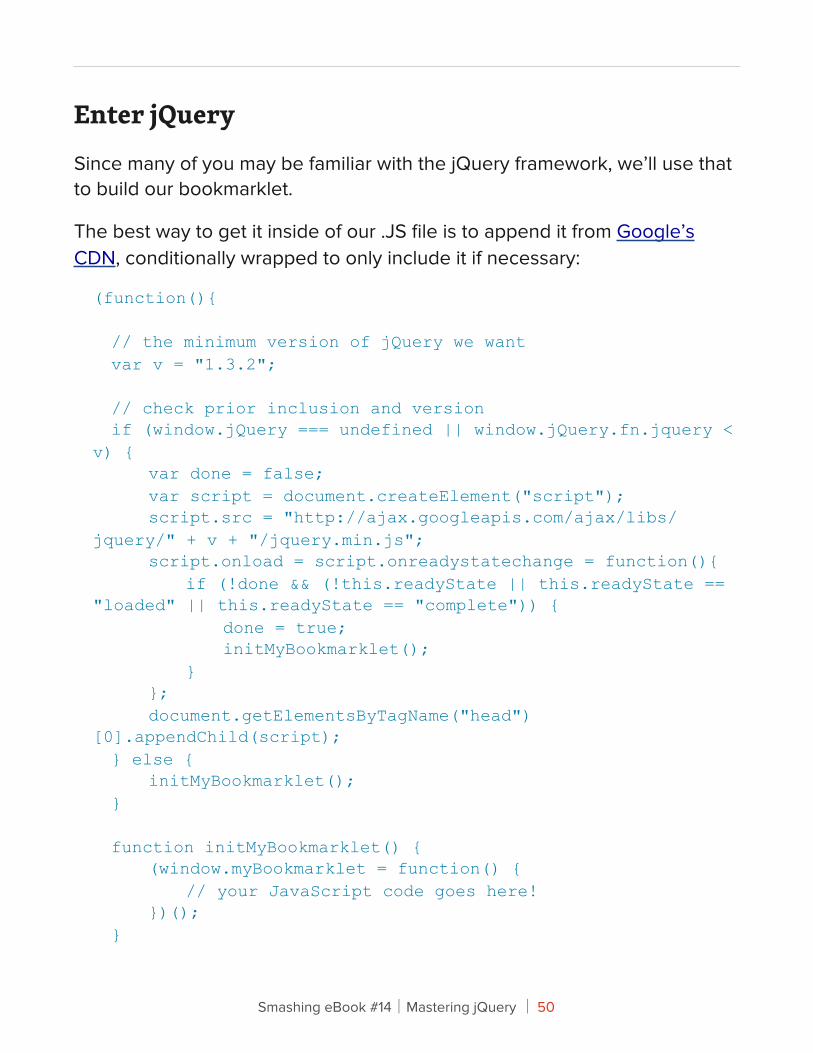
The best way to get it inside of our .JS file is to append it from Google’s CDN, conditionally wrapped to only include it if necessary:
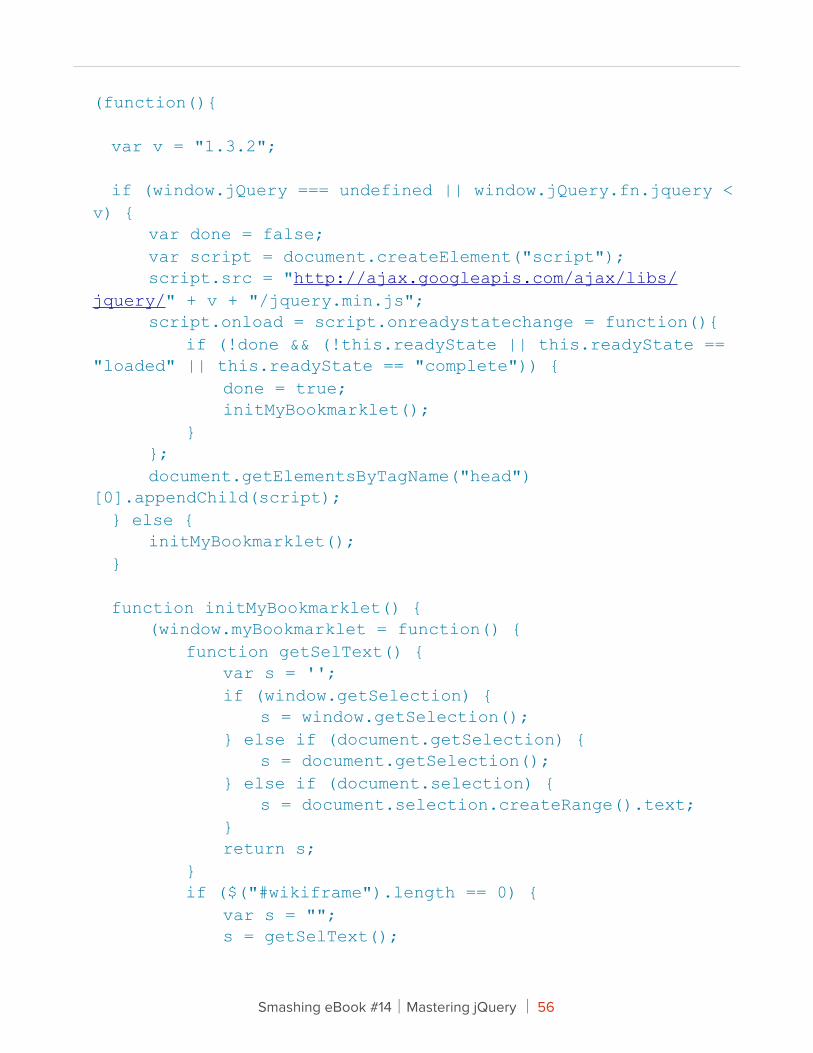
(function(){
// the minimum version of jQuery we want var v = "1.3.2";
// check prior inclusion and version if (window.jQuery === undefined || window.jQuery.fn.jquery < v) { var done = false; var script = document.createElement("script"); script.src = "http://ajax.googleapis.com/ajax/libs/jquery/" + v + "/jquery.min.js"; script.onload = script.onreadystatechange = function(){ if (!done && (!this.readyState || this.readyState == "loaded" || this.readyState == "complete")) { done = true; initMyBookmarklet(); } }; document.getElementsByTagName("head")[0].appendChild(script); } else { initMyBookmarklet(); } function initMyBookmarklet() { (window.myBookmarklet = function() { // your JavaScript code goes here! })(); }
Smashing eBook #14│Mastering jQuery │ 50
})();
(Script appending from jQuery's source code, adapted by Paul Irish: http://pastie.org/462639)
That starts by defining v, the minimum version of jQuery that our code can safely use. Using that, it then checks to see if jQuery needs to be loaded. If so, it adds it to the page with cross-browser event handling support to run initMyBookmarklet when jQuery's ready. If not, it jumps straight to initMyBookmarklet, which adds the myBookmarklet to the global window object.
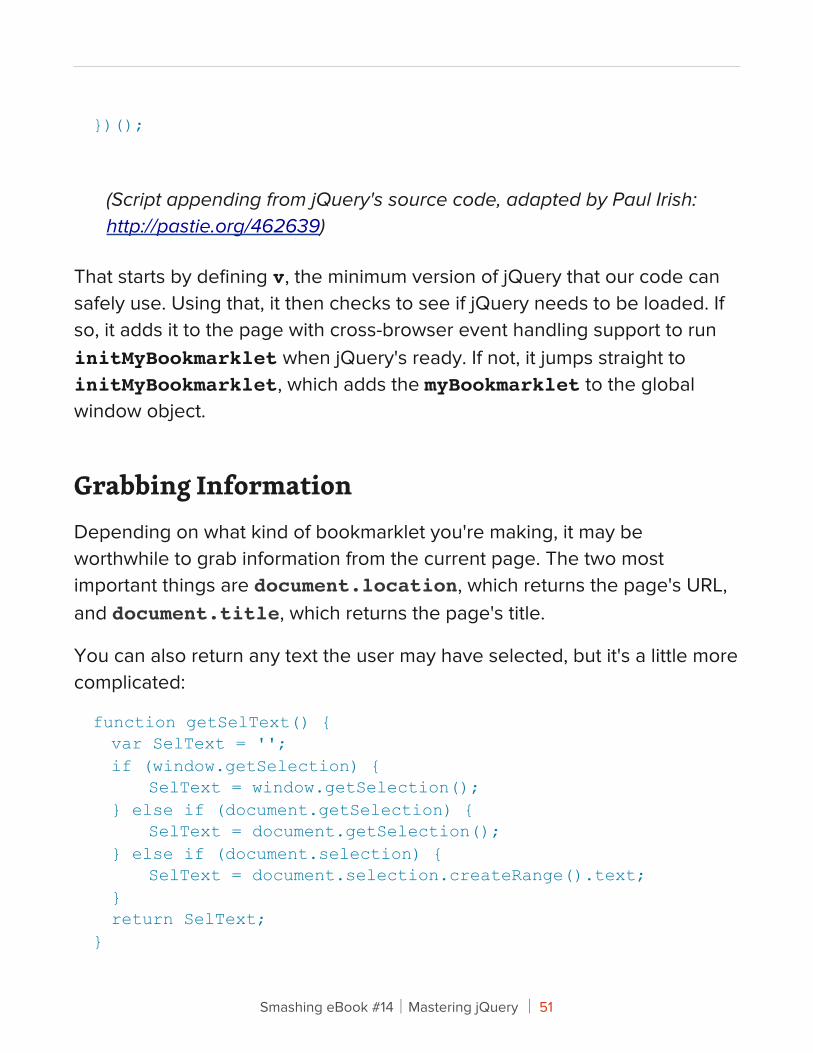
Grabbing InformationDepending on what kind of bookmarklet you're making, it may be worthwhile to grab information from the current page. The two most important things are document.location, which returns the page's URL, and document.title, which returns the page's title.
You can also return any text the user may have selected, but it's a little more complicated:
function getSelText() { var SelText = ''; if (window.getSelection) { SelText = window.getSelection(); } else if (document.getSelection) { SelText = document.getSelection(); } else if (document.selection) { SelText = document.selection.createRange().text; } return SelText;}
Smashing eBook #14│Mastering jQuery │ 51
(Modified from http://www.codetoad.com/javascript_get_selected_text.asp)
Another option is to use JavaScript's input function to query the user with a pop-up:
var yourname = prompt("What's your name?","my name...");
Dealing with CharactersIf you'll be putting all your JavaScript into the link itself rather than an external file, you may want a better way to nest double quotes (as in, "a quote 'within a quote'") than just demoting them into singles. Use " in their place (as in, "a quote "within a quote""):
<ahref="javascript:var%20yourname=prompt("What%20is%20your%20name?");alert%20("Hello,%20"+yourname+"!")">What is your name?</a>
In that example, we also encoded the spaces into %20, which may be beneficial for older browsers or to make sure the link doesn't fall apart in transit somewhere.
Within JavaScript, you may sometimes need to escape quotes. You can do so by prefacing them with a backslash (\):
alert("This is a \"quote\" within a quote.");
Smashing eBook #14│Mastering jQuery │ 52

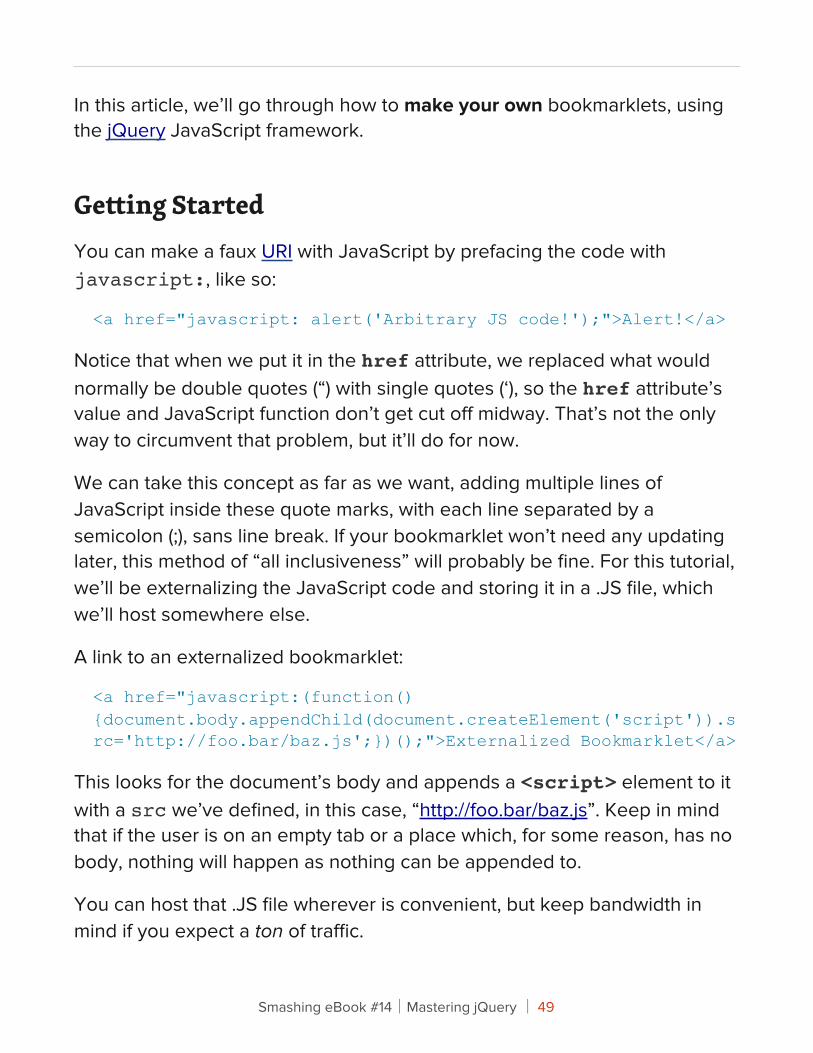
Pu#ing It All TogetherJust for fun, let's make a little bookmarklet that checks to see if there's a selected word on the page, and, if there is, searches Wikipedia and shows the results in a jQuery-animated iFrame.
We'll start by combining the framework from "Enter jQuery" with the text selection function from "Grabbing Information":
(function(){
var v = "1.3.2";
if (window.jQuery === undefined || window.jQuery.fn.jquery < v) { var done = false; var script = document.createElement("script"); script.src = "http://ajax.googleapis.com/ajax/libs/jquery/" + v + "/jquery.min.js"; script.onload = script.onreadystatechange = function(){ if (!done && (!this.readyState || this.readyState == "loaded" || this.readyState == "complete")) { done = true; initMyBookmarklet(); } }; document.getElementsByTagName("head")[0].appendChild(script); } else { initMyBookmarklet(); } function initMyBookmarklet() { (window.myBookmarklet = function() { function getSelText() { var s = ''; if (window.getSelection) { s = window.getSelection();
Smashing eBook #14│Mastering jQuery │ 53
} else if (document.getSelection) { s = document.getSelection(); } else if (document.selection) { s = document.selection.createRange().text; } return s; } // your JavaScript code goes here! })(); }
})();
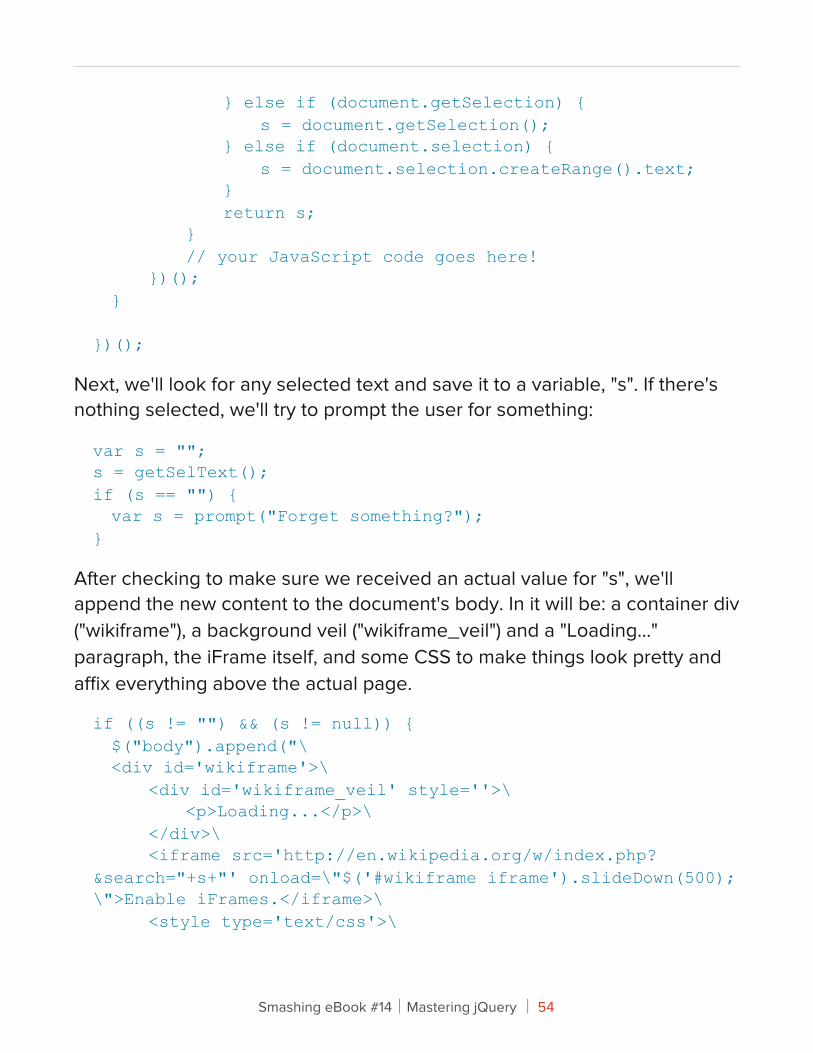
Next, we'll look for any selected text and save it to a variable, "s". If there's nothing selected, we'll try to prompt the user for something:
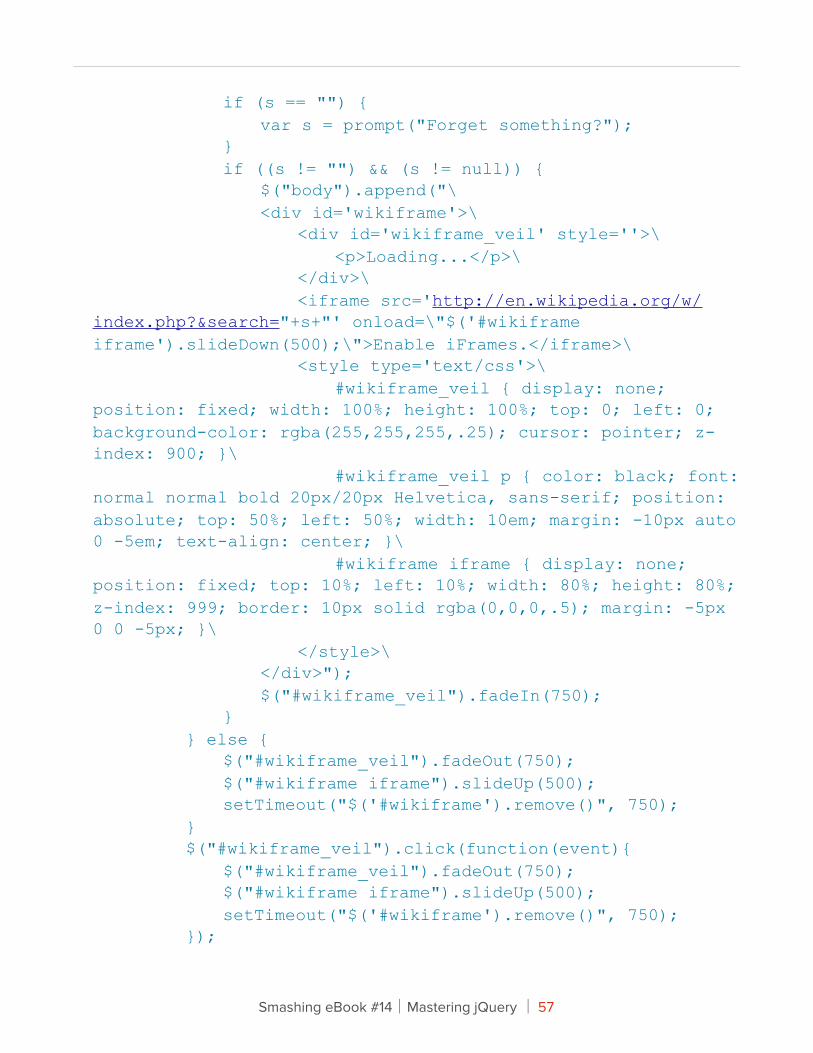
var s = "";s = getSelText();if (s == "") { var s = prompt("Forget something?");}
After checking to make sure we received an actual value for "s", we'll append the new content to the document's body. In it will be: a container div ("wikiframe"), a background veil ("wikiframe_veil") and a "Loading..." paragraph, the iFrame itself, and some CSS to make things look pretty and affix everything above the actual page.
if ((s != "") && (s != null)) { $("body").append("\ <div id='wikiframe'>\ <div id='wikiframe_veil' style=''>\ <p>Loading...</p>\ </div>\ <iframe src='http://en.wikipedia.org/w/index.php?&search="+s+"' onload=\"$('#wikiframe iframe').slideDown(500);\">Enable iFrames.</iframe>\ <style type='text/css'>\
Smashing eBook #14│Mastering jQuery │ 54
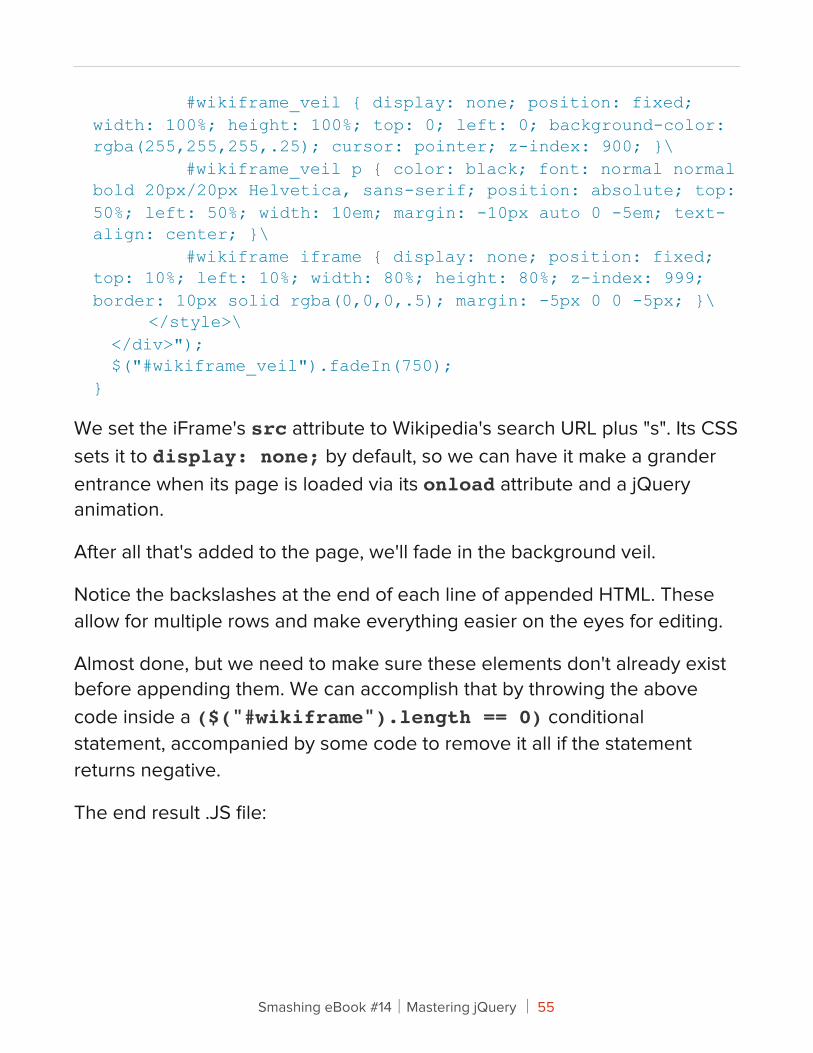
#wikiframe_veil { display: none; position: fixed; width: 100%; height: 100%; top: 0; left: 0; background-color: rgba(255,255,255,.25); cursor: pointer; z-index: 900; }\ #wikiframe_veil p { color: black; font: normal normal bold 20px/20px Helvetica, sans-serif; position: absolute; top: 50%; left: 50%; width: 10em; margin: -10px auto 0 -5em; text-align: center; }\ #wikiframe iframe { display: none; position: fixed; top: 10%; left: 10%; width: 80%; height: 80%; z-index: 999; border: 10px solid rgba(0,0,0,.5); margin: -5px 0 0 -5px; }\ </style>\ </div>"); $("#wikiframe_veil").fadeIn(750);}
We set the iFrame's src attribute to Wikipedia's search URL plus "s". Its CSS sets it to display: none; by default, so we can have it make a grander entrance when its page is loaded via its onload attribute and a jQuery animation.
After all that's added to the page, we'll fade in the background veil.
Notice the backslashes at the end of each line of appended HTML. These allow for multiple rows and make everything easier on the eyes for editing.
Almost done, but we need to make sure these elements don't already exist before appending them. We can accomplish that by throwing the above code inside a ($("#wikiframe").length == 0) conditional statement, accompanied by some code to remove it all if the statement returns negative.
The end result .JS file:
Smashing eBook #14│Mastering jQuery │ 55
(function(){
var v = "1.3.2";
if (window.jQuery === undefined || window.jQuery.fn.jquery < v) { var done = false; var script = document.createElement("script"); script.src = "http://ajax.googleapis.com/ajax/libs/jquery/" + v + "/jquery.min.js"; script.onload = script.onreadystatechange = function(){ if (!done && (!this.readyState || this.readyState == "loaded" || this.readyState == "complete")) { done = true; initMyBookmarklet(); } }; document.getElementsByTagName("head")[0].appendChild(script); } else { initMyBookmarklet(); } function initMyBookmarklet() { (window.myBookmarklet = function() { function getSelText() { var s = ''; if (window.getSelection) { s = window.getSelection(); } else if (document.getSelection) { s = document.getSelection(); } else if (document.selection) { s = document.selection.createRange().text; } return s; } if ($("#wikiframe").length == 0) { var s = ""; s = getSelText();
Smashing eBook #14│Mastering jQuery │ 56
if (s == "") { var s = prompt("Forget something?"); } if ((s != "") && (s != null)) { $("body").append("\ <div id='wikiframe'>\ <div id='wikiframe_veil' style=''>\ <p>Loading...</p>\ </div>\ <iframe src='http://en.wikipedia.org/w/index.php?&search="+s+"' onload=\"$('#wikiframe iframe').slideDown(500);\">Enable iFrames.</iframe>\ <style type='text/css'>\ #wikiframe_veil { display: none; position: fixed; width: 100%; height: 100%; top: 0; left: 0; background-color: rgba(255,255,255,.25); cursor: pointer; z-index: 900; }\ #wikiframe_veil p { color: black; font: normal normal bold 20px/20px Helvetica, sans-serif; position: absolute; top: 50%; left: 50%; width: 10em; margin: -10px auto 0 -5em; text-align: center; }\ #wikiframe iframe { display: none; position: fixed; top: 10%; left: 10%; width: 80%; height: 80%; z-index: 999; border: 10px solid rgba(0,0,0,.5); margin: -5px 0 0 -5px; }\ </style>\ </div>"); $("#wikiframe_veil").fadeIn(750); } } else { $("#wikiframe_veil").fadeOut(750); $("#wikiframe iframe").slideUp(500); setTimeout("$('#wikiframe').remove()", 750); } $("#wikiframe_veil").click(function(event){ $("#wikiframe_veil").fadeOut(750); $("#wikiframe iframe").slideUp(500); setTimeout("$('#wikiframe').remove()", 750); });
Smashing eBook #14│Mastering jQuery │ 57

})(); }
})();
Note that we fade out and remove the "wikiframe" content both if the user re-clicks the bookmarklet after it's loaded and if the user clicks on its background veil.
The HTML bookmarklet to load that script:
<a href="javascript:(function(){if(window.myBookmarklet!==undefined){myBookmarklet();}else{document.body.appendChild(document.createElement('script')).src='http://iamnotagoodartist.com/stuff/wikiframe2.js?';}})();">WikiFrame</a>
See that (window.myBookmarklet!==undefined) conditional? That makes sure the .JS file is only appended once and jumps straight to running the myBookmarklet() function if it already exists.
Make It Be#erThis example was fun, but it definitely could be better.
For starters, it isn't compressed. If your script will be accessed a lot, keeping two versions of your code may be a good idea: one normal working version and one compressed minimized version. Serving the compressed one to your users will save loading time for them and bandwidth for you. Check the resource links below for some good JavaScript compressors.
While the bookmarklet technically works in IE6, its use of static positioning means that it just kind of appends itself to the bottom of the page. Not very user-friendly! With some more time and attention to rendering differences in IE, the bookmarklet could be made to function and look the same (or at least comparable) in different browsers.
Smashing eBook #14│Mastering jQuery │ 58
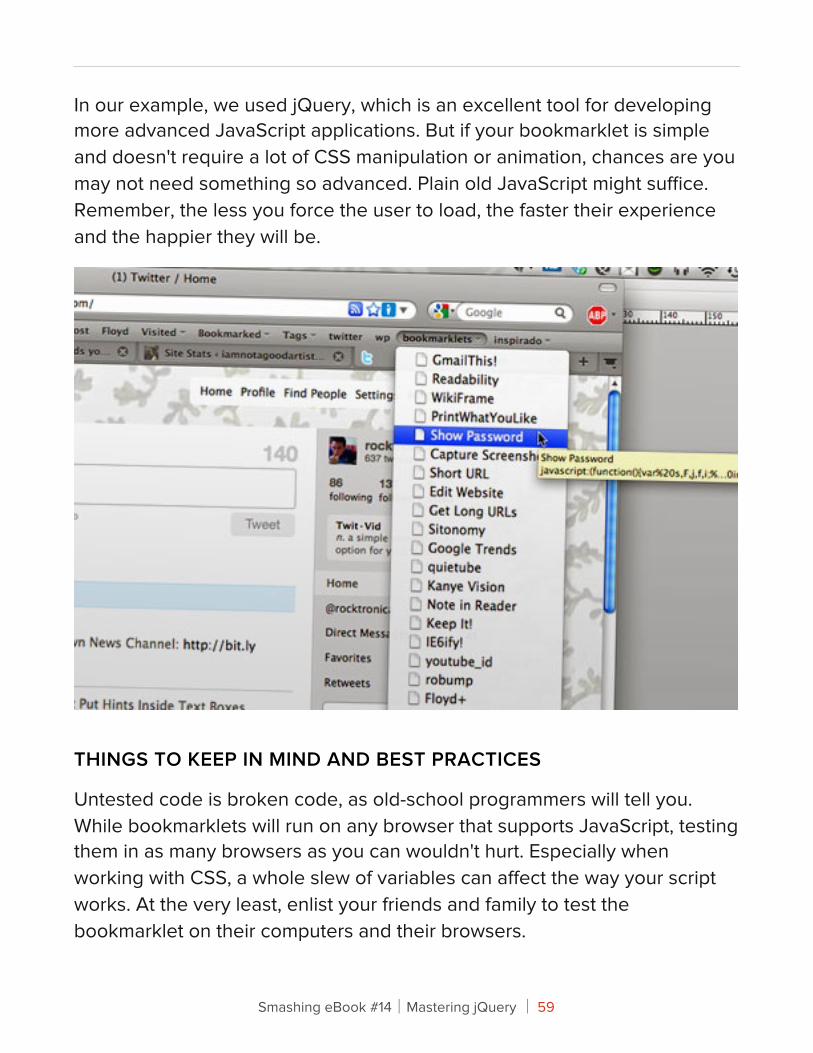
In our example, we used jQuery, which is an excellent tool for developing more advanced JavaScript applications. But if your bookmarklet is simple and doesn't require a lot of CSS manipulation or animation, chances are you may not need something so advanced. Plain old JavaScript might suffice. Remember, the less you force the user to load, the faster their experience and the happier they will be.
THINGS TO KEEP IN MIND AND BEST PRACTICES
Untested code is broken code, as old-school programmers will tell you. While bookmarklets will run on any browser that supports JavaScript, testing them in as many browsers as you can wouldn't hurt. Especially when working with CSS, a whole slew of variables can affect the way your script works. At the very least, enlist your friends and family to test the bookmarklet on their computers and their browsers.
Smashing eBook #14│Mastering jQuery │ 59
Speaking of CSS, remember that any content you add to a page will be affected by that page's CSS. So, applying a reset to your elements to override any potentially inherited margins, paddings or font stylings would be wise.
Because bookmarklets are, by definition, extraneous, many of the guidelines for JavaScript—such as unobtrusiveness and graceful degradation—aren't as sacred as they normally are. For the most part, though, a healthy understanding of best practices for traditional JavaScript and its frameworks will only help you:
• Develop a coding style and stick to it. Keep it consistent, and keep it neat.
• Take it easy on the browser. Don't run processes that you don't need, and don't create unnecessary global variables.
• Use comments where appropriate. They make jumping back into the code later on much easier.
• Avoid shorthand JavaScript. Use plenty of semi-colons, even when your browser would let you get away without them.
Further Resources
HELPFUL JAVASCRIPT TOOLS
• JSLintJavaScript validation tool.
• Bookmarklet BuilderMade way back in 2004, but still useful.
• List of Really Useful Free Tools for JavaScript DevelopersCourtesy of W3Avenue.
Smashing eBook #14│Mastering jQuery │ 60
• JS BinOpen-source collaborative JavaScript debugging tool.
• How to Dynamically Insert Javascript and CSSA well-written examination of JavaScript and CSS appending, and its potential pitfalls.
• Run jQuery Code BookmarkletA pretty cool script that checks for and loads jQuery all within the bookmarklet. Also has a handy generator.
• Google AJAX Libraries APIDo you prefer Prototype or MooTools to jQuery? Load your preference straight from Google and save yourself the bandwidth.
JAVASCRIPT AND CSS COMPRESSORS
• Online Javascript Compression ToolJavaScript compressor, with both Minify and Packer methods.
• Clean CSSCSS formatter and optimizer, based on csstidy, with a nice GUI and plenty of options.
• ScriptalizerCombines and compresses multiple JavaScript and/or CSS files.
• JavaScript Unpacker and BeautifierUseful for translating super-compressed code into something more human-legible (and vice versa).
COLLECTIONS
• myBookmarklets
• Bookmarklets.com
Smashing eBook #14│Mastering jQuery │ 61

• Bookmarklets, Favelets and SnippetsVia Smashing Magazine.
• Quix"Your Bookmarklets, On Steroids."
• Jesse's Bookmarklets
• Marklets
Smashing eBook #14│Mastering jQuery │ 62
Essential jQuery Plugin Pa#erns
Addy Osmani
I occasionally write about implementing design patterns in JavaScript. They’re an excellent way of building upon proven approaches to solving common development problems, and I think there’s a lot of benefit to using them. But while well-known JavaScript patterns are useful, another side of development could benefit from its own set of design patterns: jQuery plugins. The official jQuery plugin authoring guide offers a great starting point for getting into writing plugins and widgets, but let’s take it further.
Plugin development has evolved over the past few years. We no longer have just one way to write plugins, but many. In reality, certain patterns might work better for a particular problem or component than others.
Some developers may wish to use the jQuery UI widget factory; it’s great for complex, flexible UI components. Some may not. Some might like to structure their plugins more like modules (similar to the module pattern) or use a more formal module format such as AMD (asynchronous module definition). Some might want their plugins to harness the power of prototypal inheritance. Some might want to use custom events or pub/sub to communicate from plugins to the rest of their app. And so on.
I began to think about plugin patterns after noticing a number of efforts to create a one-size-fits-all jQuery plugin boilerplate. While such a boilerplate is a great idea in theory, the reality is that we rarely write plugins in one fixed way, using a single pattern all the time.
Let’s assume that you’ve tried your hand at writing your own jQuery plugins at some point and you’re comfortable putting together something that works. It’s functional. It does what it needs to do, but perhaps you feel it
Smashing eBook #14│Mastering jQuery │ 63
could be structured better. Maybe it could be more flexible or could solve more issues. If this sounds familiar and you aren’t sure of the differences between many of the different jQuery plugin patterns, then you might find what I have to say helpful.
My advice won’t provide solutions to every possible pattern, but it will cover popular patterns that developers use in the wild.
Note: This post is targeted at intermediate to advanced developers. If you don’t feel you’re ready for this just yet, I’m happy to recommend the official jQuery Plugins/Authoring guide, Ben Alman’s plugin style guide and Remy Sharp’s “Signs of a Poorly Written jQuery Plugin.”
Pa#ernsjQuery plugins have very few defined rules, which one of the reasons for the incredible diversity in how they’re implemented. At the most basic level, you can write a plugin simply by adding a new function property to jQuery’s $.fn object, as follows:
$.fn.myPluginName = function() { // your plugin logic};
This is great for compactness, but the following would be a better foundation to build on:
(function( $ ){ $.fn.myPluginName = function() { // your plugin logic };})( jQuery );
Here, we’ve wrapped our plugin logic in an anonymous function. To ensure that our use of the $ sign as a shorthand creates no conflicts between jQuery and other JavaScript libraries, we simply pass it to this closure, which
Smashing eBook #14│Mastering jQuery │ 64
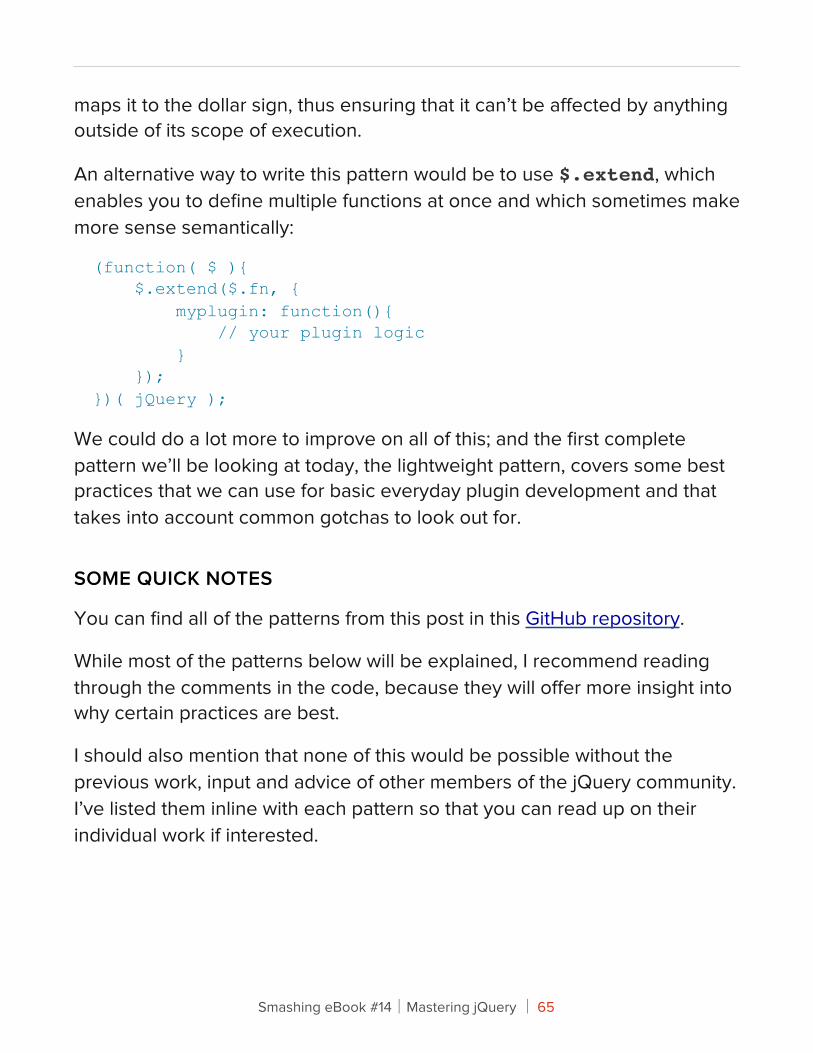
maps it to the dollar sign, thus ensuring that it can’t be affected by anything outside of its scope of execution.
An alternative way to write this pattern would be to use $.extend, which enables you to define multiple functions at once and which sometimes make more sense semantically:
(function( $ ){ $.extend($.fn, { myplugin: function(){ // your plugin logic } });})( jQuery );
We could do a lot more to improve on all of this; and the first complete pattern we’ll be looking at today, the lightweight pattern, covers some best practices that we can use for basic everyday plugin development and that takes into account common gotchas to look out for.
SOME QUICK NOTES
You can find all of the patterns from this post in this GitHub repository.
While most of the patterns below will be explained, I recommend reading through the comments in the code, because they will offer more insight into why certain practices are best.
I should also mention that none of this would be possible without the previous work, input and advice of other members of the jQuery community. I’ve listed them inline with each pattern so that you can read up on their individual work if interested.
Smashing eBook #14│Mastering jQuery │ 65
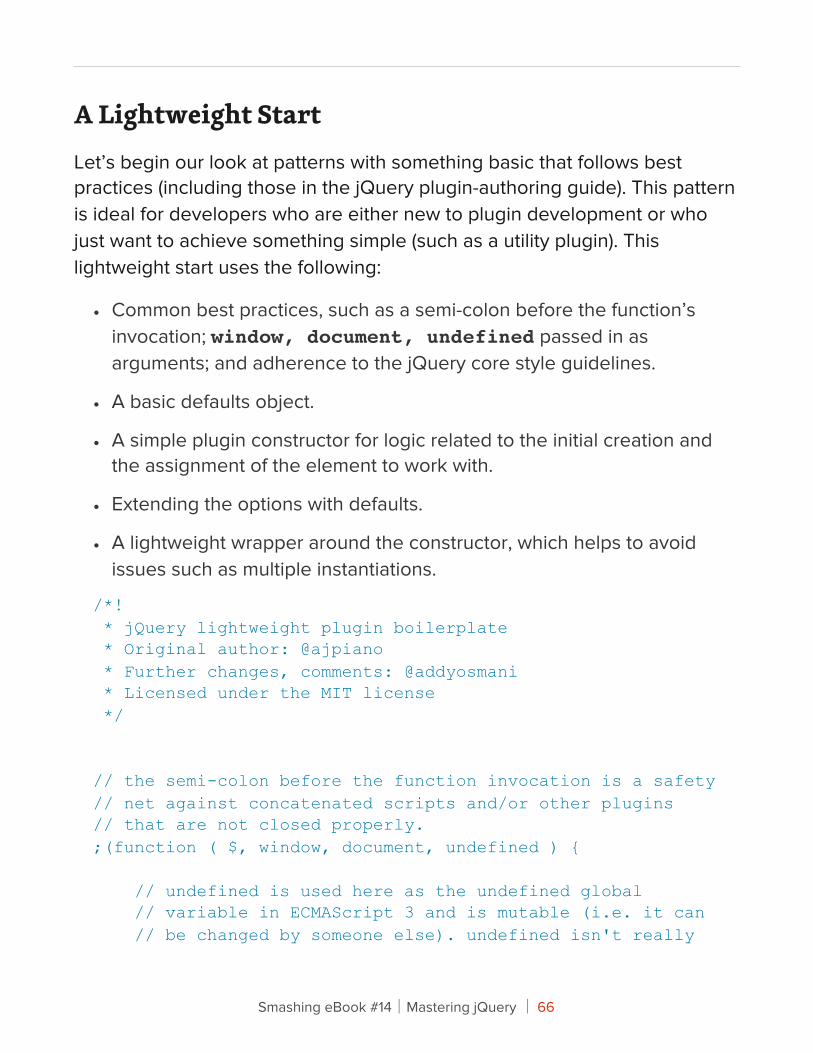
A Lightweight StartLet’s begin our look at patterns with something basic that follows best practices (including those in the jQuery plugin-authoring guide). This pattern is ideal for developers who are either new to plugin development or who just want to achieve something simple (such as a utility plugin). This lightweight start uses the following:
• Common best practices, such as a semi-colon before the function’s invocation; window, document, undefined passed in as arguments; and adherence to the jQuery core style guidelines.
• A basic defaults object.
• A simple plugin constructor for logic related to the initial creation and the assignment of the element to work with.
• Extending the options with defaults.
• A lightweight wrapper around the constructor, which helps to avoid issues such as multiple instantiations.
/*! * jQuery lightweight plugin boilerplate * Original author: @ajpiano * Further changes, comments: @addyosmani * Licensed under the MIT license */
// the semi-colon before the function invocation is a safety // net against concatenated scripts and/or other plugins // that are not closed properly.;(function ( $, window, document, undefined ) { // undefined is used here as the undefined global // variable in ECMAScript 3 and is mutable (i.e. it can // be changed by someone else). undefined isn't really
Smashing eBook #14│Mastering jQuery │ 66
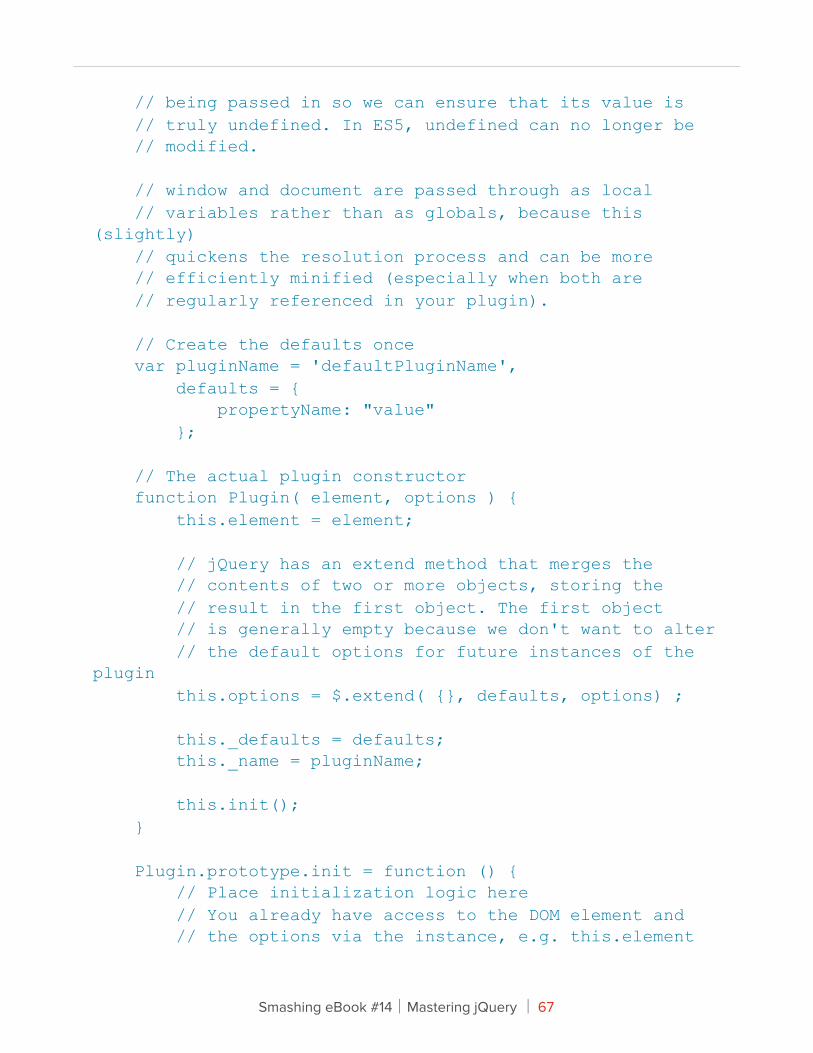
// being passed in so we can ensure that its value is // truly undefined. In ES5, undefined can no longer be // modified. // window and document are passed through as local // variables rather than as globals, because this (slightly) // quickens the resolution process and can be more // efficiently minified (especially when both are // regularly referenced in your plugin).
// Create the defaults once var pluginName = 'defaultPluginName', defaults = { propertyName: "value" };
// The actual plugin constructor function Plugin( element, options ) { this.element = element;
// jQuery has an extend method that merges the // contents of two or more objects, storing the // result in the first object. The first object // is generally empty because we don't want to alter // the default options for future instances of the plugin this.options = $.extend( {}, defaults, options) ; this._defaults = defaults; this._name = pluginName; this.init(); }
Plugin.prototype.init = function () { // Place initialization logic here // You already have access to the DOM element and // the options via the instance, e.g. this.element
Smashing eBook #14│Mastering jQuery │ 67

// and this.options };
// A really lightweight plugin wrapper around the constructor, // preventing against multiple instantiations $.fn[pluginName] = function ( options ) { return this.each(function () { if (!$.data(this, 'plugin_' + pluginName)) { $.data(this, 'plugin_' + pluginName, new Plugin( this, options )); } }); }
})( jQuery, window, document );
FURTHER READING
• Plugins/Authoring, jQuery
• “Signs of a Poorly Written jQuery Plugin,” Remy Sharp
• “How to Create Your Own jQuery Plugin,” Elijah Manor
• “Style in jQuery Plugins and Why It Matters,” Ben Almon
• “Create Your First jQuery Plugin, Part 2,” Andrew Wirick
“Complete” Widget FactoryWhile the authoring guide is a great introduction to plugin development, it doesn’t offer a great number of conveniences for obscuring away from common plumbing tasks that we have to deal with on a regular basis.
The jQuery UI Widget Factory is a solution to this problem that helps you build complex, stateful plugins based on object-oriented principles. It also
Smashing eBook #14│Mastering jQuery │ 68
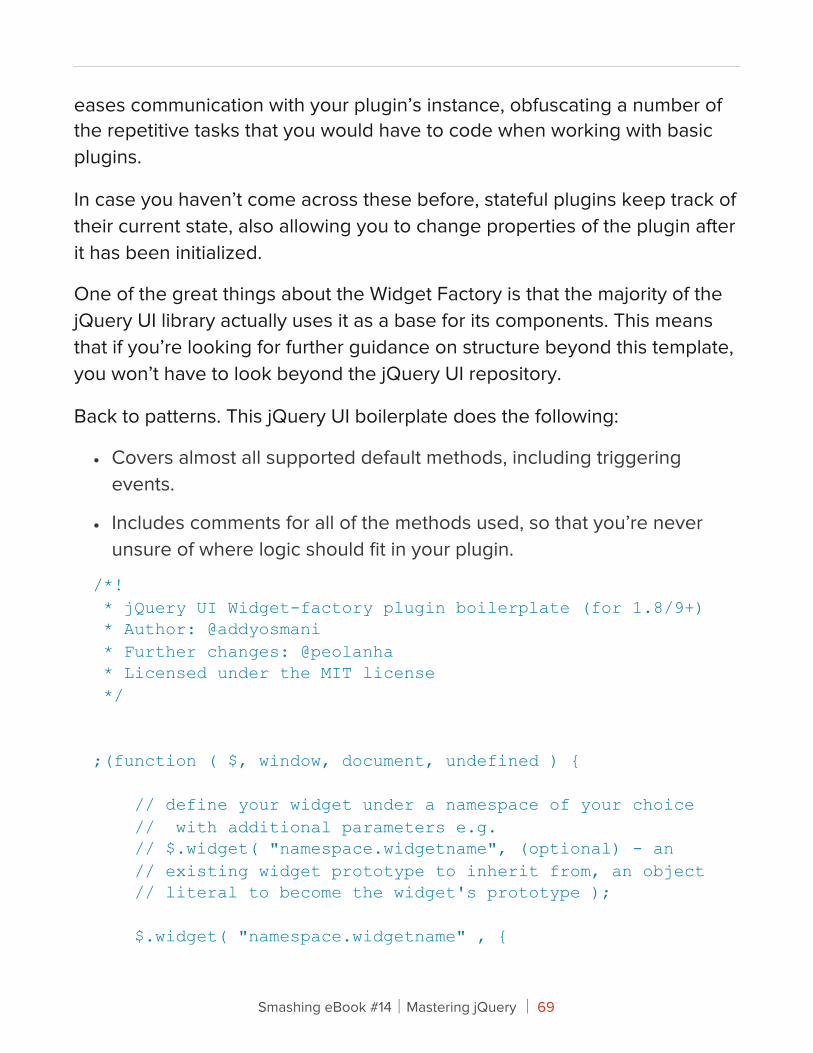
eases communication with your plugin’s instance, obfuscating a number of the repetitive tasks that you would have to code when working with basic plugins.
In case you haven’t come across these before, stateful plugins keep track of their current state, also allowing you to change properties of the plugin after it has been initialized.
One of the great things about the Widget Factory is that the majority of the jQuery UI library actually uses it as a base for its components. This means that if you’re looking for further guidance on structure beyond this template, you won’t have to look beyond the jQuery UI repository.
Back to patterns. This jQuery UI boilerplate does the following:
• Covers almost all supported default methods, including triggering events.
• Includes comments for all of the methods used, so that you’re never unsure of where logic should fit in your plugin.
/*! * jQuery UI Widget-factory plugin boilerplate (for 1.8/9+) * Author: @addyosmani * Further changes: @peolanha * Licensed under the MIT license */
;(function ( $, window, document, undefined ) {
// define your widget under a namespace of your choice // with additional parameters e.g. // $.widget( "namespace.widgetname", (optional) - an // existing widget prototype to inherit from, an object // literal to become the widget's prototype );
$.widget( "namespace.widgetname" , {
Smashing eBook #14│Mastering jQuery │ 69
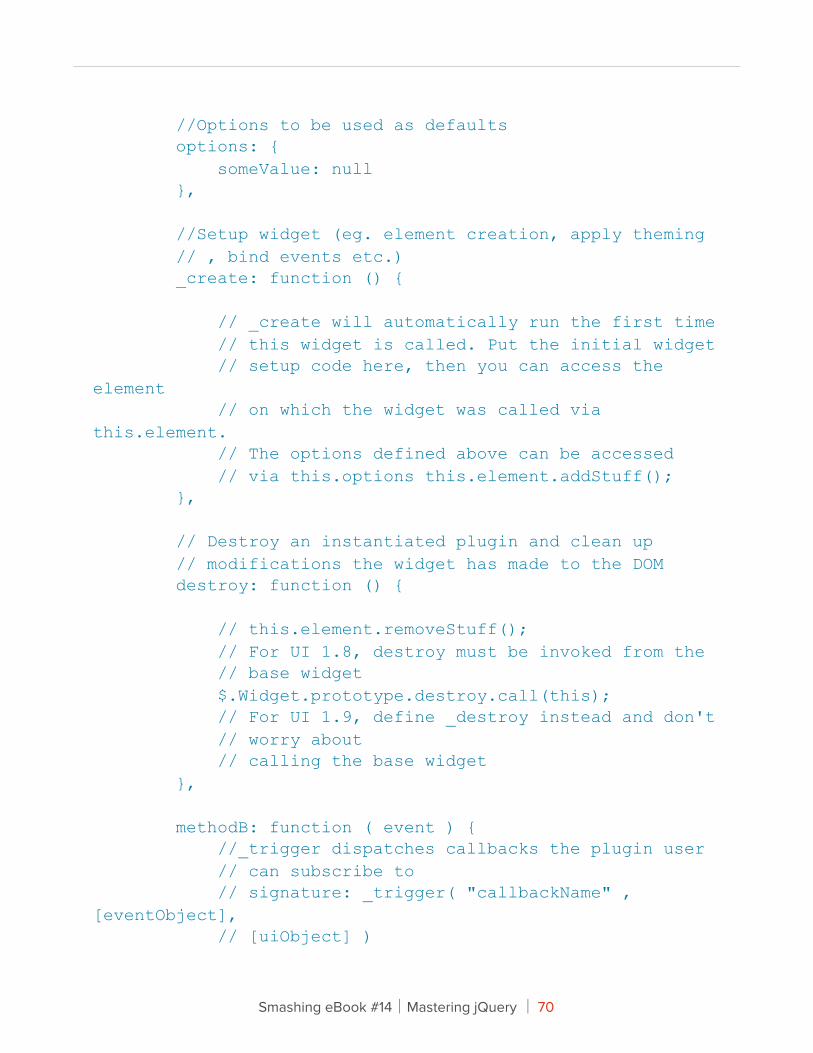
//Options to be used as defaults options: { someValue: null },
//Setup widget (eg. element creation, apply theming // , bind events etc.) _create: function () {
// _create will automatically run the first time // this widget is called. Put the initial widget // setup code here, then you can access the element // on which the widget was called via this.element. // The options defined above can be accessed // via this.options this.element.addStuff(); },
// Destroy an instantiated plugin and clean up // modifications the widget has made to the DOM destroy: function () {
// this.element.removeStuff(); // For UI 1.8, destroy must be invoked from the // base widget $.Widget.prototype.destroy.call(this); // For UI 1.9, define _destroy instead and don't // worry about // calling the base widget },
methodB: function ( event ) { //_trigger dispatches callbacks the plugin user // can subscribe to // signature: _trigger( "callbackName" , [eventObject], // [uiObject] )
Smashing eBook #14│Mastering jQuery │ 70
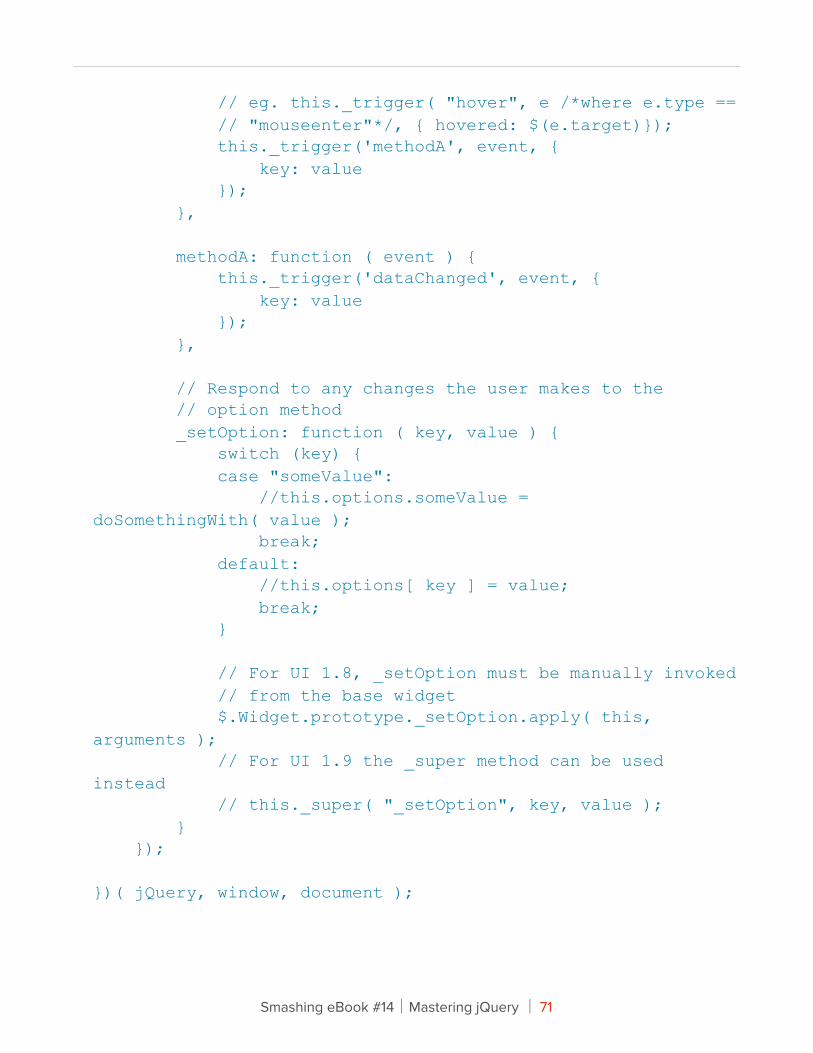
// eg. this._trigger( "hover", e /*where e.type == // "mouseenter"*/, { hovered: $(e.target)}); this._trigger('methodA', event, { key: value }); },
methodA: function ( event ) { this._trigger('dataChanged', event, { key: value }); },
// Respond to any changes the user makes to the // option method _setOption: function ( key, value ) { switch (key) { case "someValue": //this.options.someValue = doSomethingWith( value ); break; default: //this.options[ key ] = value; break; }
// For UI 1.8, _setOption must be manually invoked // from the base widget $.Widget.prototype._setOption.apply( this, arguments ); // For UI 1.9 the _super method can be used instead // this._super( "_setOption", key, value ); } });
})( jQuery, window, document );
Smashing eBook #14│Mastering jQuery │ 71
FURTHER READING
• The jQuery UI Widget Factory
• “Introduction to Stateful Plugins and the Widget Factory,” Doug Neiner
• “Widget Factory” (explained), Scott Gonzalez
• “Understanding jQuery UI Widgets: A Tutorial,” Hacking at 0300
Namespacing And Nested NamespacingNamespacing your code is a way to avoid collisions with other objects and variables in the global namespace. They’re important because you want to safeguard your plugin from breaking in the event that another script on the page uses the same variable or plugin names as yours. As a good citizen of the global namespace, you must also do your best not to prevent other developers’ scripts from executing because of the same issues.
JavaScript doesn’t really have built-in support for namespaces as other languages do, but it does have objects that can be used to achieve a similar effect. Employing a top-level object as the name of your namespace, you can easily check for the existence of another object on the page with the same name. If such an object does not exist, then we define it; if it does exist, then we simply extend it with our plugin.
Objects (or, rather, object literals) can be used to create nested namespaces, such as namespace.subnamespace.pluginName and so on. But to keep things simple, the namespacing boilerplate below should give you everything you need to get started with these concepts.
/*! * jQuery namespaced 'Starter' plugin boilerplate * Author: @dougneiner * Further changes: @addyosmani * Licensed under the MIT license
Smashing eBook #14│Mastering jQuery │ 72

*/
;(function ( $ ) { if (!$.myNamespace) { $.myNamespace = {}; };
$.myNamespace.myPluginName = function ( el, myFunctionParam, options ) { // To avoid scope issues, use 'base' instead of 'this' // to reference this class from internal events and functions. var base = this;
// Access to jQuery and DOM versions of element base.$el = $(el); base.el = el;
// Add a reverse reference to the DOM object base.$el.data( "myNamespace.myPluginName" , base );
base.init = function () { base.myFunctionParam = myFunctionParam;
base.options = $.extend({}, $.myNamespace.myPluginName.defaultOptions, options);
// Put your initialization code here };
// Sample Function, Uncomment to use // base.functionName = function( paramaters ){ // // }; // Run initializer base.init(); };
Smashing eBook #14│Mastering jQuery │ 73
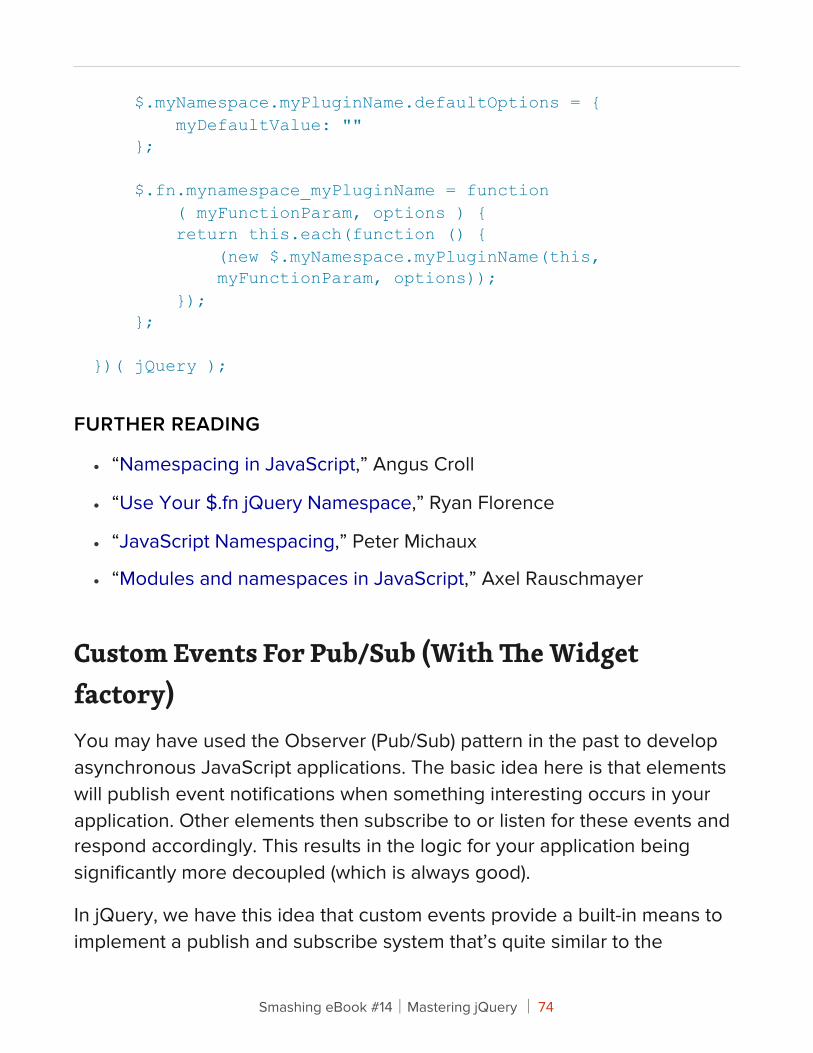
$.myNamespace.myPluginName.defaultOptions = { myDefaultValue: "" };
$.fn.mynamespace_myPluginName = function ( myFunctionParam, options ) { return this.each(function () { (new $.myNamespace.myPluginName(this, myFunctionParam, options)); }); };
})( jQuery );
FURTHER READING
• “Namespacing in JavaScript,” Angus Croll
• “Use Your $.fn jQuery Namespace,” Ryan Florence
• “JavaScript Namespacing,” Peter Michaux
• “Modules and namespaces in JavaScript,” Axel Rauschmayer
Custom Events For Pub/Sub (With "e Widget factory)You may have used the Observer (Pub/Sub) pattern in the past to develop asynchronous JavaScript applications. The basic idea here is that elements will publish event notifications when something interesting occurs in your application. Other elements then subscribe to or listen for these events and respond accordingly. This results in the logic for your application being significantly more decoupled (which is always good).
In jQuery, we have this idea that custom events provide a built-in means to implement a publish and subscribe system that’s quite similar to the
Smashing eBook #14│Mastering jQuery │ 74
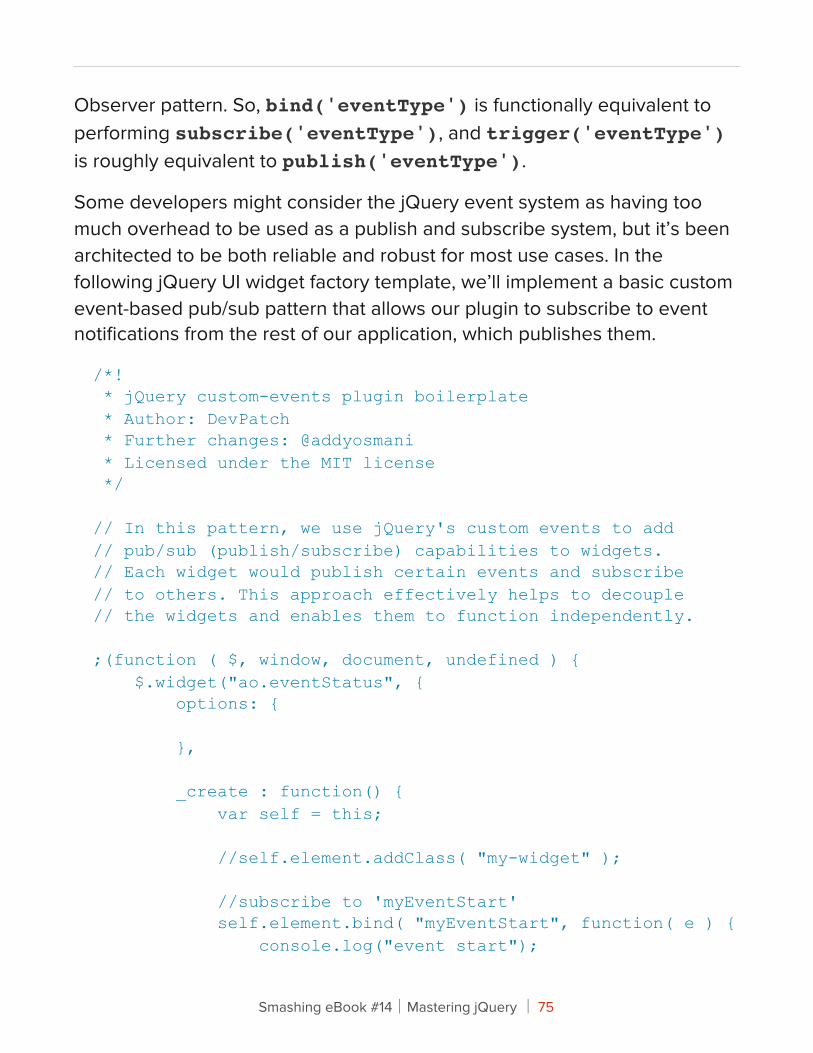
Observer pattern. So, bind('eventType') is functionally equivalent to performing subscribe('eventType'), and trigger('eventType') is roughly equivalent to publish('eventType').
Some developers might consider the jQuery event system as having too much overhead to be used as a publish and subscribe system, but it’s been architected to be both reliable and robust for most use cases. In the following jQuery UI widget factory template, we’ll implement a basic custom event-based pub/sub pattern that allows our plugin to subscribe to event notifications from the rest of our application, which publishes them.
/*! * jQuery custom-events plugin boilerplate * Author: DevPatch * Further changes: @addyosmani * Licensed under the MIT license */
// In this pattern, we use jQuery's custom events to add // pub/sub (publish/subscribe) capabilities to widgets. // Each widget would publish certain events and subscribe // to others. This approach effectively helps to decouple // the widgets and enables them to function independently.
;(function ( $, window, document, undefined ) { $.widget("ao.eventStatus", { options: {
}, _create : function() { var self = this;
//self.element.addClass( "my-widget" );
//subscribe to 'myEventStart' self.element.bind( "myEventStart", function( e ) { console.log("event start");
Smashing eBook #14│Mastering jQuery │ 75

});
//subscribe to 'myEventEnd' self.element.bind( "myEventEnd", function( e ) { console.log("event end"); });
//unsubscribe to 'myEventStart' //self.element.unbind( "myEventStart", function(e){ ///console.log("unsubscribed to this event"); //}); },
destroy: function(){ $.Widget.prototype.destroy.apply( this, arguments ); }, });})( jQuery, window , document );
//Publishing event notifications//usage: // $(".my-widget").trigger("myEventStart");// $(".my-widget").trigger("myEventEnd");
FURTHER READING
• “Communication Between jQuery UI Widgets,” Benjamin Sternthal
• “Understanding the Publish/Subscribe Pattern for Greater JavaScript Scalability,” Addy Osmani
Smashing eBook #14│Mastering jQuery │ 76
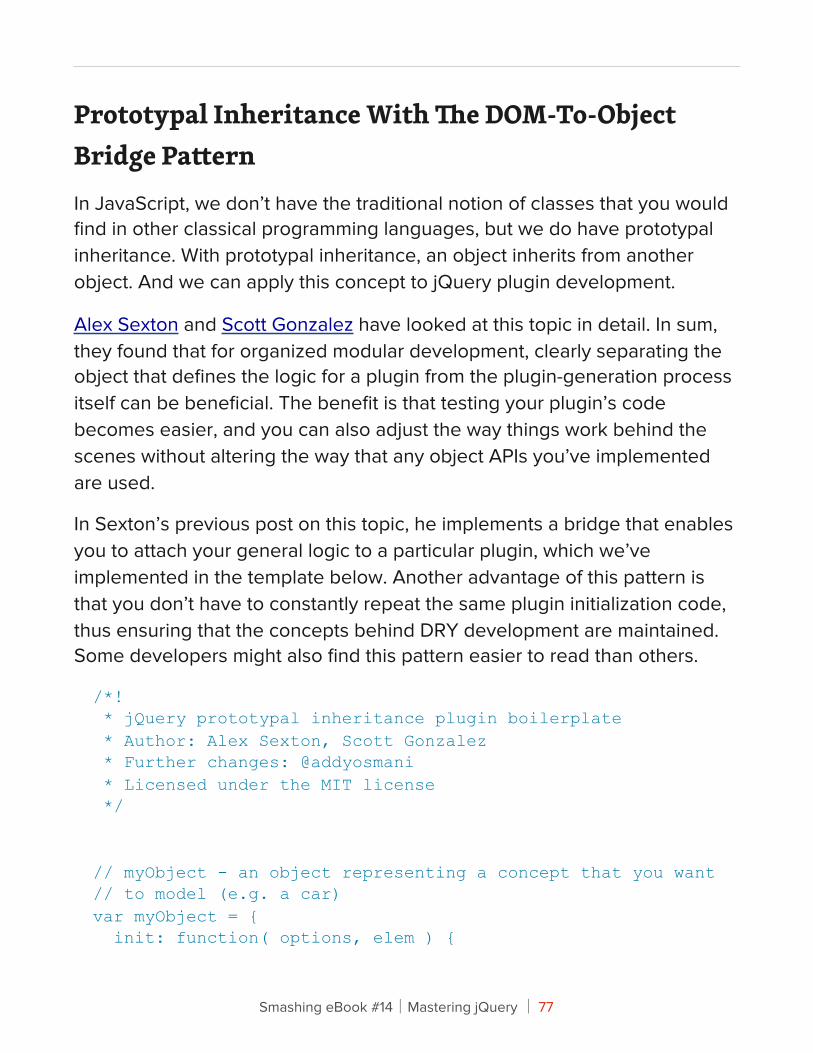
Prototypal Inheritance With "e DOM-To-Object Bridge Pa#ernIn JavaScript, we don’t have the traditional notion of classes that you would find in other classical programming languages, but we do have prototypal inheritance. With prototypal inheritance, an object inherits from another object. And we can apply this concept to jQuery plugin development.
Alex Sexton and Scott Gonzalez have looked at this topic in detail. In sum, they found that for organized modular development, clearly separating the object that defines the logic for a plugin from the plugin-generation process itself can be beneficial. The benefit is that testing your plugin’s code becomes easier, and you can also adjust the way things work behind the scenes without altering the way that any object APIs you’ve implemented are used.
In Sexton’s previous post on this topic, he implements a bridge that enables you to attach your general logic to a particular plugin, which we’ve implemented in the template below. Another advantage of this pattern is that you don’t have to constantly repeat the same plugin initialization code, thus ensuring that the concepts behind DRY development are maintained. Some developers might also find this pattern easier to read than others.
/*! * jQuery prototypal inheritance plugin boilerplate * Author: Alex Sexton, Scott Gonzalez * Further changes: @addyosmani * Licensed under the MIT license */
// myObject - an object representing a concept that you want // to model (e.g. a car)var myObject = { init: function( options, elem ) {
Smashing eBook #14│Mastering jQuery │ 77
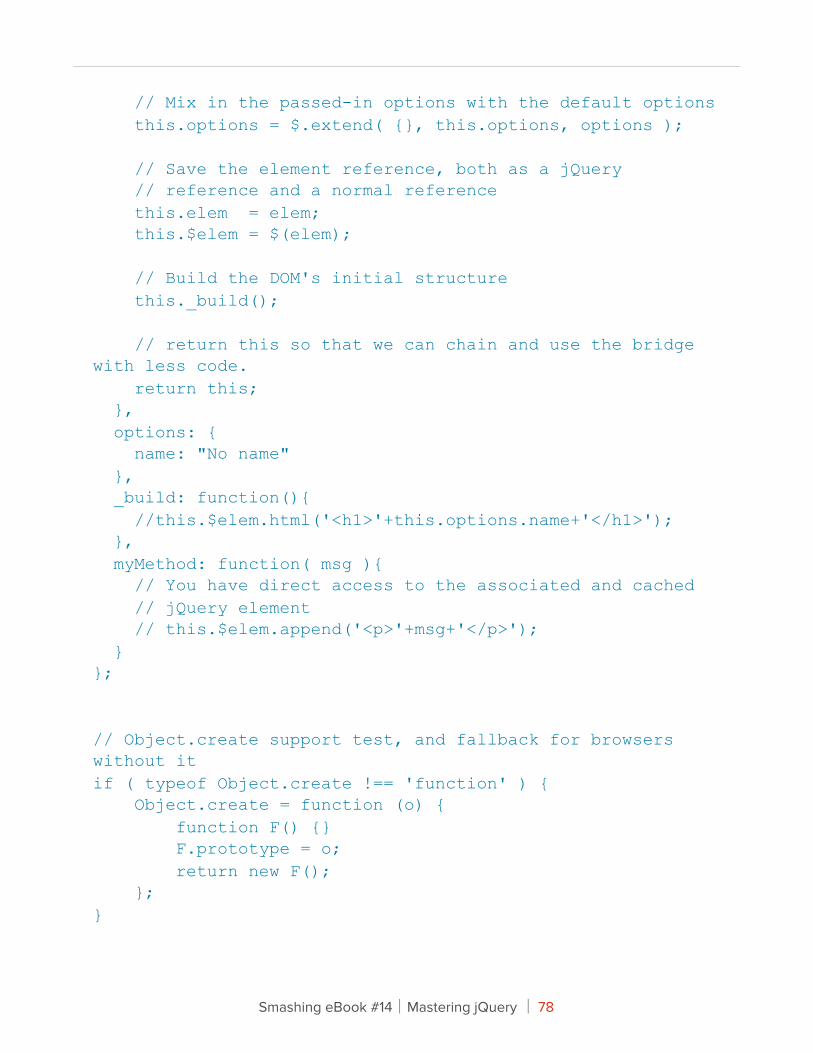
// Mix in the passed-in options with the default options this.options = $.extend( {}, this.options, options );
// Save the element reference, both as a jQuery // reference and a normal reference this.elem = elem; this.$elem = $(elem);
// Build the DOM's initial structure this._build();
// return this so that we can chain and use the bridge with less code. return this; }, options: { name: "No name" }, _build: function(){ //this.$elem.html('<h1>'+this.options.name+'</h1>'); }, myMethod: function( msg ){ // You have direct access to the associated and cached // jQuery element // this.$elem.append('<p>'+msg+'</p>'); }};
// Object.create support test, and fallback for browsers without itif ( typeof Object.create !== 'function' ) { Object.create = function (o) { function F() {} F.prototype = o; return new F(); };}
Smashing eBook #14│Mastering jQuery │ 78
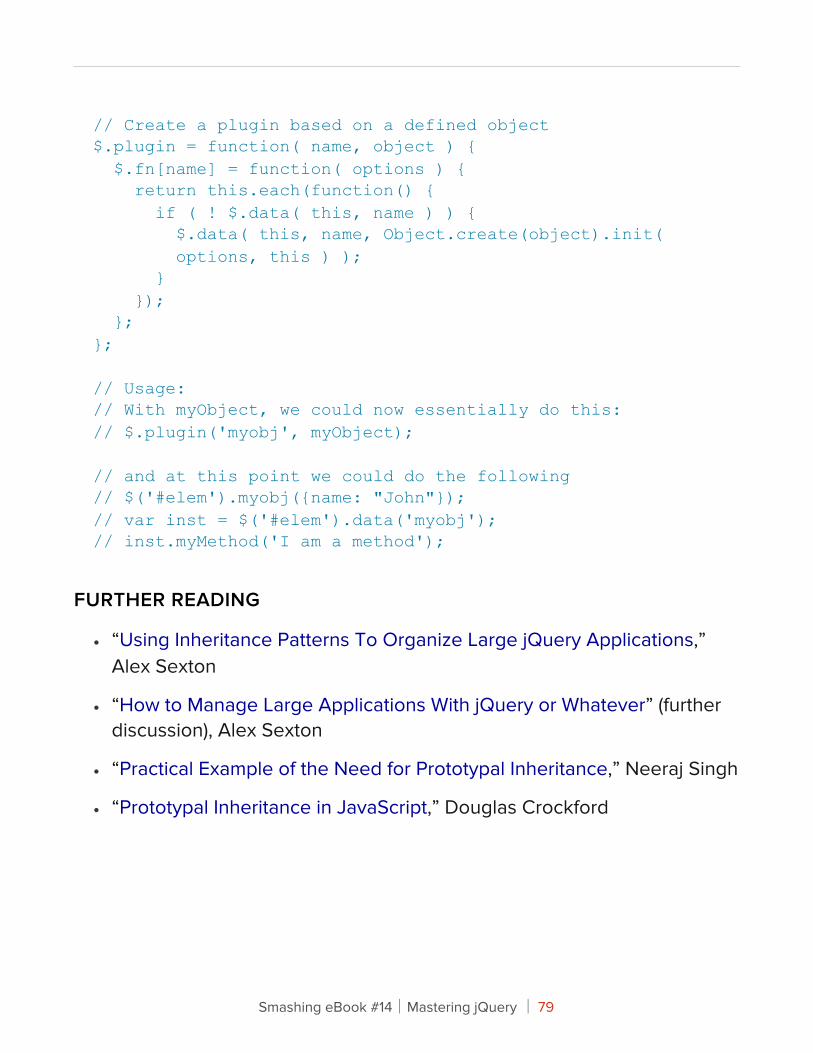
// Create a plugin based on a defined object$.plugin = function( name, object ) { $.fn[name] = function( options ) { return this.each(function() { if ( ! $.data( this, name ) ) { $.data( this, name, Object.create(object).init( options, this ) ); } }); };};
// Usage:// With myObject, we could now essentially do this:// $.plugin('myobj', myObject);
// and at this point we could do the following// $('#elem').myobj({name: "John"});// var inst = $('#elem').data('myobj');// inst.myMethod('I am a method');
FURTHER READING
• “Using Inheritance Patterns To Organize Large jQuery Applications,” Alex Sexton
• “How to Manage Large Applications With jQuery or Whatever” (further discussion), Alex Sexton
• “Practical Example of the Need for Prototypal Inheritance,” Neeraj Singh
• “Prototypal Inheritance in JavaScript,” Douglas Crockford
Smashing eBook #14│Mastering jQuery │ 79

jQuery UI Widget Factory BridgeIf you liked the idea of generating plugins based on objects in the last design pattern, then you might be interested in a method found in the jQuery UI Widget Factory called $.widget.bridge. This bridge basically serves as a middle layer between a JavaScript object that is created using $.widget and jQuery’s API, providing a more built-in solution to achieving object-based plugin definition. Effectively, we’re able to create stateful plugins using a custom constructor.
Moreover, $.widget.bridge provides access to a number of other capabilities, including the following:
• Both public and private methods are handled as one would expect in classical OOP (i.e. public methods are exposed, while calls to private methods are not possible);
• Automatic protection against multiple initializations;
• Automatic generation of instances of a passed object, and storage of them within the selection’s internal $.data cache;
• Options can be altered post-initialization.
For further information on how to use this pattern, look at the comments in the boilerplate below:
/*! * jQuery UI Widget factory "bridge" plugin boilerplate * Author: @erichynds * Further changes, additional comments: @addyosmani * Licensed under the MIT license */
// a "widgetName" object constructor
Smashing eBook #14│Mastering jQuery │ 80
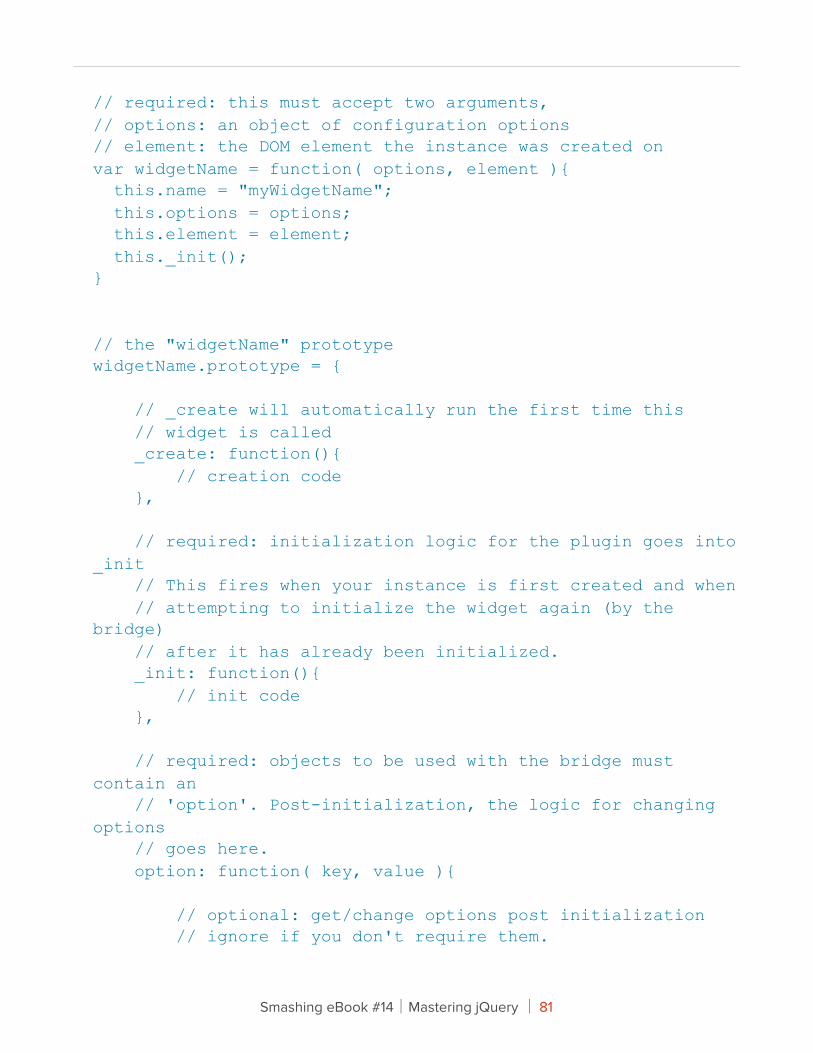
// required: this must accept two arguments,// options: an object of configuration options// element: the DOM element the instance was created onvar widgetName = function( options, element ){ this.name = "myWidgetName"; this.options = options; this.element = element; this._init();}
// the "widgetName" prototypewidgetName.prototype = { // _create will automatically run the first time this // widget is called _create: function(){ // creation code },
// required: initialization logic for the plugin goes into _init // This fires when your instance is first created and when // attempting to initialize the widget again (by the bridge) // after it has already been initialized. _init: function(){ // init code },
// required: objects to be used with the bridge must contain an // 'option'. Post-initialization, the logic for changing options // goes here. option: function( key, value ){ // optional: get/change options post initialization // ignore if you don't require them.
Smashing eBook #14│Mastering jQuery │ 81
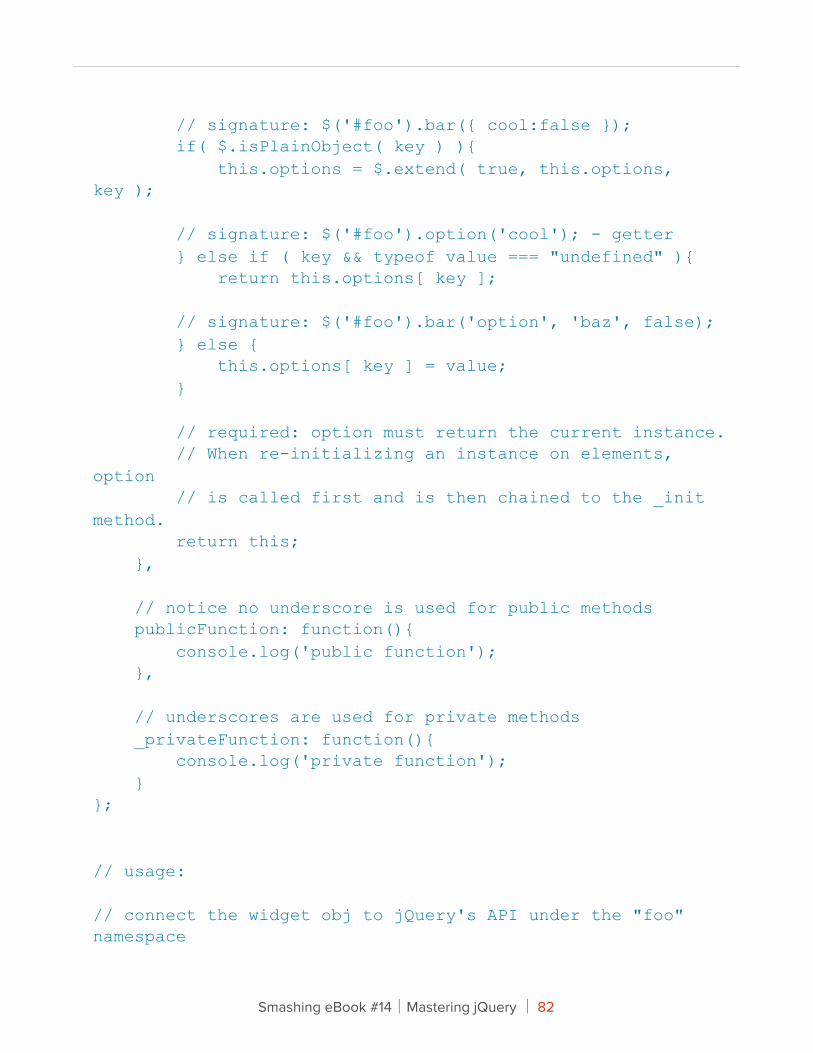
// signature: $('#foo').bar({ cool:false }); if( $.isPlainObject( key ) ){ this.options = $.extend( true, this.options, key ); // signature: $('#foo').option('cool'); - getter } else if ( key && typeof value === "undefined" ){ return this.options[ key ]; // signature: $('#foo').bar('option', 'baz', false); } else { this.options[ key ] = value; } // required: option must return the current instance. // When re-initializing an instance on elements, option // is called first and is then chained to the _init method. return this; },
// notice no underscore is used for public methods publicFunction: function(){ console.log('public function'); },
// underscores are used for private methods _privateFunction: function(){ console.log('private function'); }};
// usage:
// connect the widget obj to jQuery's API under the "foo" namespace
Smashing eBook #14│Mastering jQuery │ 82
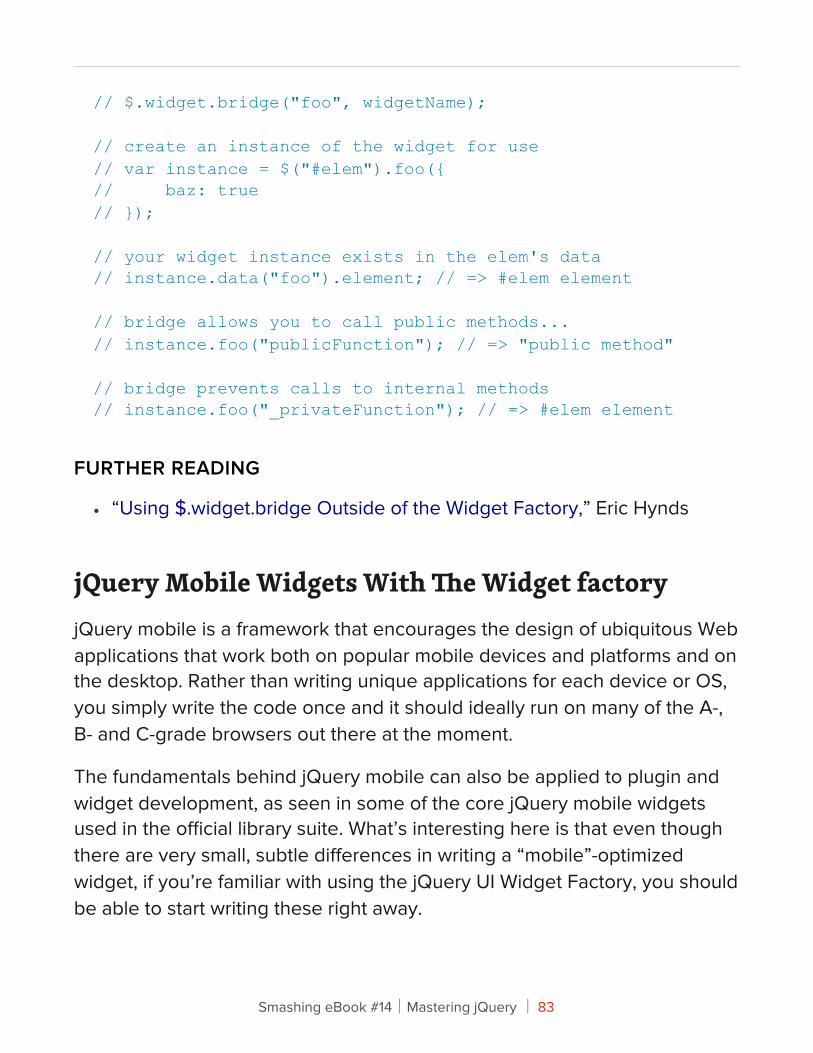
// $.widget.bridge("foo", widgetName);
// create an instance of the widget for use// var instance = $("#elem").foo({// baz: true// });
// your widget instance exists in the elem's data// instance.data("foo").element; // => #elem element
// bridge allows you to call public methods...// instance.foo("publicFunction"); // => "public method"
// bridge prevents calls to internal methods// instance.foo("_privateFunction"); // => #elem element
FURTHER READING
• “Using $.widget.bridge Outside of the Widget Factory,” Eric Hynds
jQuery Mobile Widgets With "e Widget factoryjQuery mobile is a framework that encourages the design of ubiquitous Web applications that work both on popular mobile devices and platforms and on the desktop. Rather than writing unique applications for each device or OS, you simply write the code once and it should ideally run on many of the A-, B- and C-grade browsers out there at the moment.
The fundamentals behind jQuery mobile can also be applied to plugin and widget development, as seen in some of the core jQuery mobile widgets used in the official library suite. What’s interesting here is that even though there are very small, subtle differences in writing a “mobile”-optimized widget, if you’re familiar with using the jQuery UI Widget Factory, you should be able to start writing these right away.
Smashing eBook #14│Mastering jQuery │ 83

The mobile-optimized widget below has a number of interesting differences than the standard UI widget pattern we saw earlier:
• $.mobile.widget is referenced as an existing widget prototype from which to inherit. For standard widgets, passing through any such prototype is unnecessary for basic development, but using this jQuery-mobile specific widget prototype provides internal access to further “options” formatting.
• You’ll notice in _create() a guide on how the official jQuery mobile widgets handle element selection, opting for a role-based approach that better fits the jQM mark-up. This isn’t at all to say that standard selection isn’t recommended, only that this approach might make more sense given the structure of jQM pages.
• Guidelines are also provided in comment form for applying your plugin methods on pagecreate as well as for selecting the plugin application via data roles and data attributes.
/*! * (jQuery mobile) jQuery UI Widget-factory plugin boilerplate (for 1.8/9+) * Author: @scottjehl * Further changes: @addyosmani * Licensed under the MIT license */
;(function ( $, window, document, undefined ) {
//define a widget under a namespace of your choice //here 'mobile' has been used in the first parameter $.widget( "mobile.widgetName", $.mobile.widget, {
//Options to be used as defaults options: { foo: true, bar: false },
Smashing eBook #14│Mastering jQuery │ 84
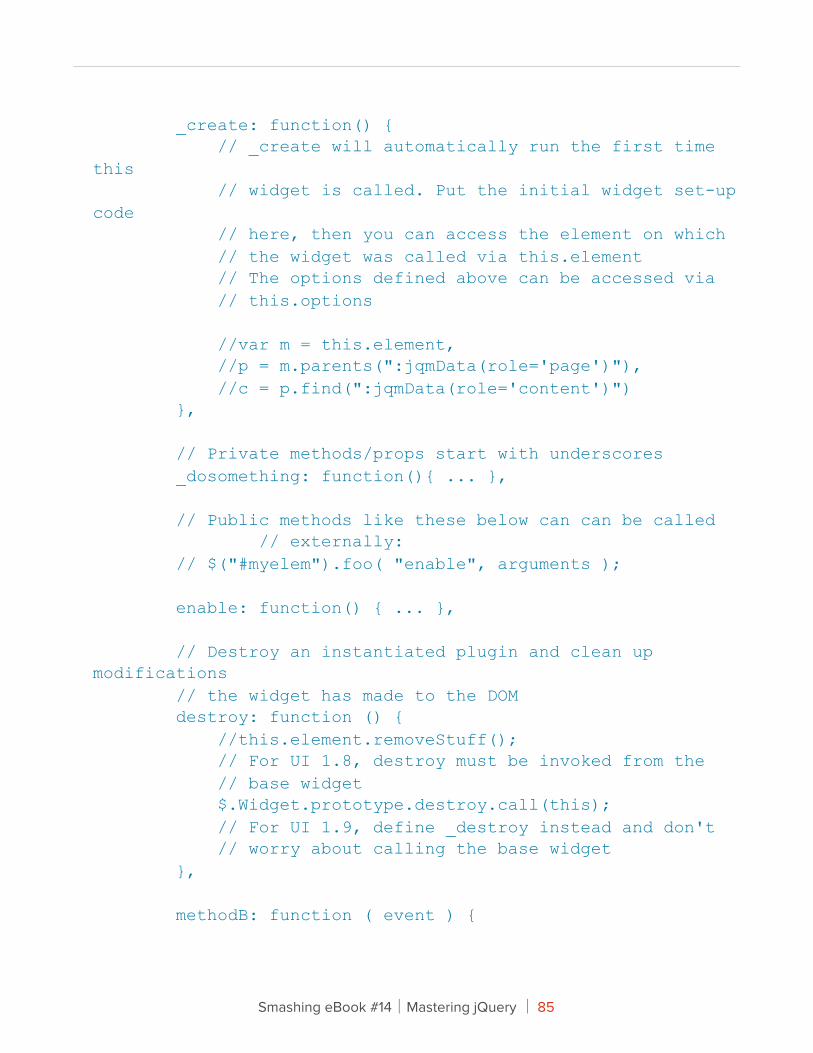
_create: function() { // _create will automatically run the first time this // widget is called. Put the initial widget set-up code // here, then you can access the element on which // the widget was called via this.element // The options defined above can be accessed via // this.options
//var m = this.element, //p = m.parents(":jqmData(role='page')"), //c = p.find(":jqmData(role='content')") },
// Private methods/props start with underscores _dosomething: function(){ ... },
// Public methods like these below can can be called // externally: // $("#myelem").foo( "enable", arguments );
enable: function() { ... },
// Destroy an instantiated plugin and clean up modifications // the widget has made to the DOM destroy: function () { //this.element.removeStuff(); // For UI 1.8, destroy must be invoked from the // base widget $.Widget.prototype.destroy.call(this); // For UI 1.9, define _destroy instead and don't // worry about calling the base widget },
methodB: function ( event ) {
Smashing eBook #14│Mastering jQuery │ 85
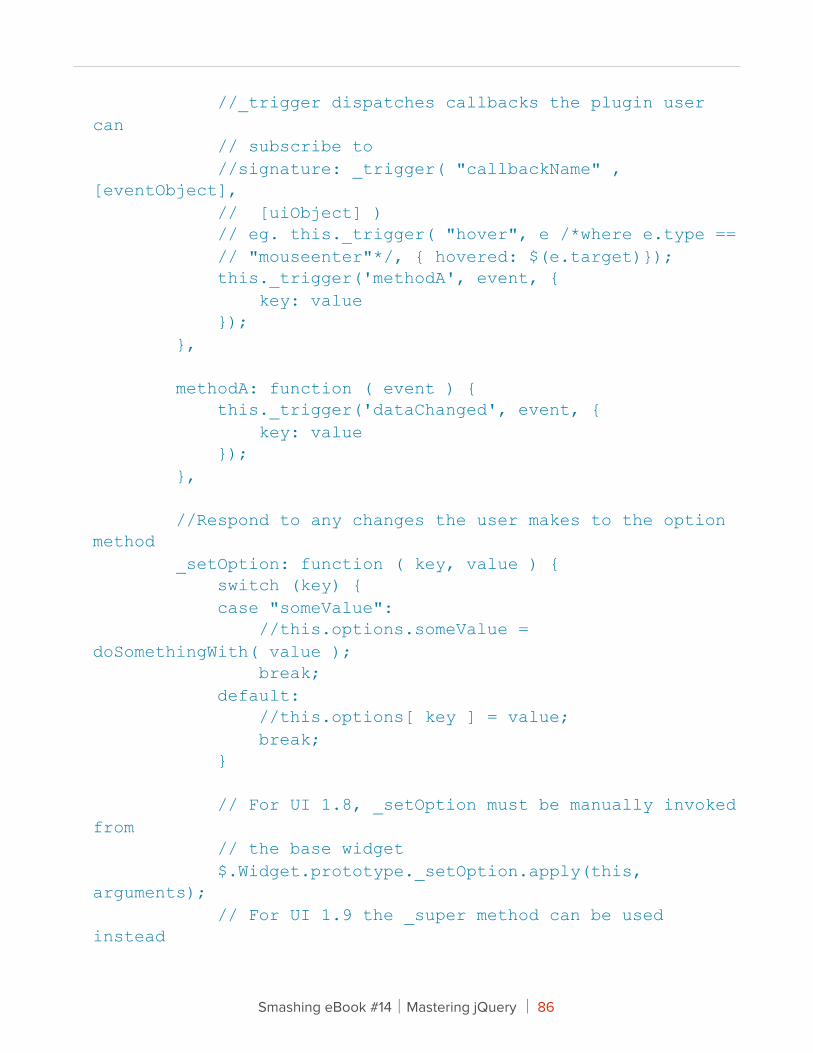
//_trigger dispatches callbacks the plugin user can // subscribe to //signature: _trigger( "callbackName" , [eventObject], // [uiObject] ) // eg. this._trigger( "hover", e /*where e.type == // "mouseenter"*/, { hovered: $(e.target)}); this._trigger('methodA', event, { key: value }); },
methodA: function ( event ) { this._trigger('dataChanged', event, { key: value }); },
//Respond to any changes the user makes to the option method _setOption: function ( key, value ) { switch (key) { case "someValue": //this.options.someValue = doSomethingWith( value ); break; default: //this.options[ key ] = value; break; }
// For UI 1.8, _setOption must be manually invoked from // the base widget $.Widget.prototype._setOption.apply(this, arguments); // For UI 1.9 the _super method can be used instead
Smashing eBook #14│Mastering jQuery │ 86
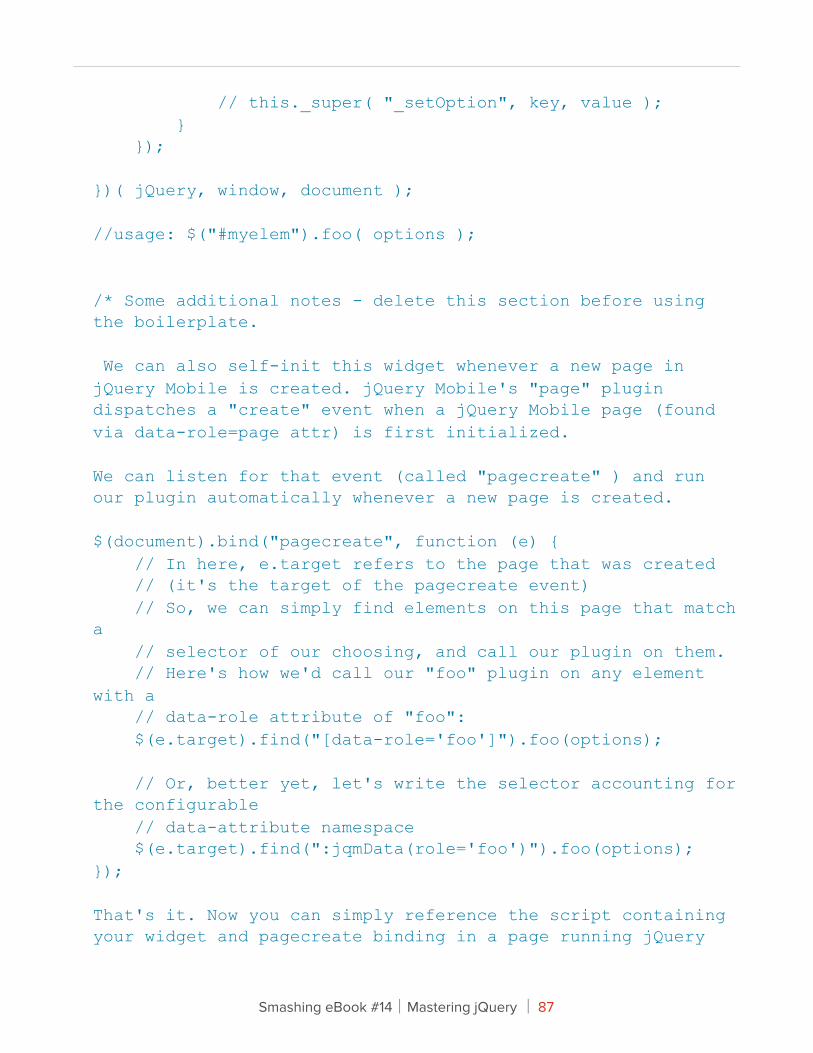
// this._super( "_setOption", key, value ); } });
})( jQuery, window, document );
//usage: $("#myelem").foo( options );
/* Some additional notes - delete this section before using the boilerplate.
We can also self-init this widget whenever a new page in jQuery Mobile is created. jQuery Mobile's "page" plugin dispatches a "create" event when a jQuery Mobile page (found via data-role=page attr) is first initialized.
We can listen for that event (called "pagecreate" ) and run our plugin automatically whenever a new page is created.
$(document).bind("pagecreate", function (e) { // In here, e.target refers to the page that was created // (it's the target of the pagecreate event) // So, we can simply find elements on this page that match a // selector of our choosing, and call our plugin on them. // Here's how we'd call our "foo" plugin on any element with a // data-role attribute of "foo": $(e.target).find("[data-role='foo']").foo(options);
// Or, better yet, let's write the selector accounting for the configurable // data-attribute namespace $(e.target).find(":jqmData(role='foo')").foo(options);});
That's it. Now you can simply reference the script containing your widget and pagecreate binding in a page running jQuery
Smashing eBook #14│Mastering jQuery │ 87
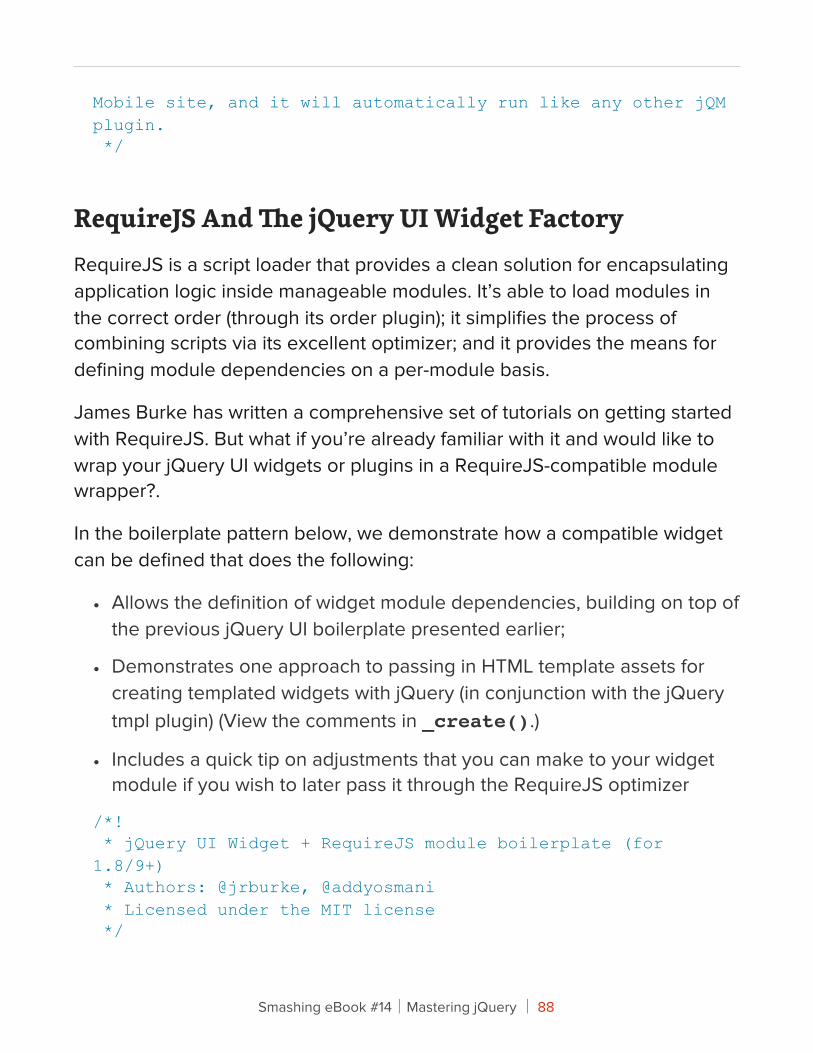
Mobile site, and it will automatically run like any other jQM plugin. */
RequireJS And "e jQuery UI Widget FactoryRequireJS is a script loader that provides a clean solution for encapsulating application logic inside manageable modules. It’s able to load modules in the correct order (through its order plugin); it simplifies the process of combining scripts via its excellent optimizer; and it provides the means for defining module dependencies on a per-module basis.
James Burke has written a comprehensive set of tutorials on getting started with RequireJS. But what if you’re already familiar with it and would like to wrap your jQuery UI widgets or plugins in a RequireJS-compatible module wrapper?.
In the boilerplate pattern below, we demonstrate how a compatible widget can be defined that does the following:
• Allows the definition of widget module dependencies, building on top of the previous jQuery UI boilerplate presented earlier;
• Demonstrates one approach to passing in HTML template assets for creating templated widgets with jQuery (in conjunction with the jQuery tmpl plugin) (View the comments in _create().)
• Includes a quick tip on adjustments that you can make to your widget module if you wish to later pass it through the RequireJS optimizer
/*! * jQuery UI Widget + RequireJS module boilerplate (for 1.8/9+) * Authors: @jrburke, @addyosmani * Licensed under the MIT license */
Smashing eBook #14│Mastering jQuery │ 88
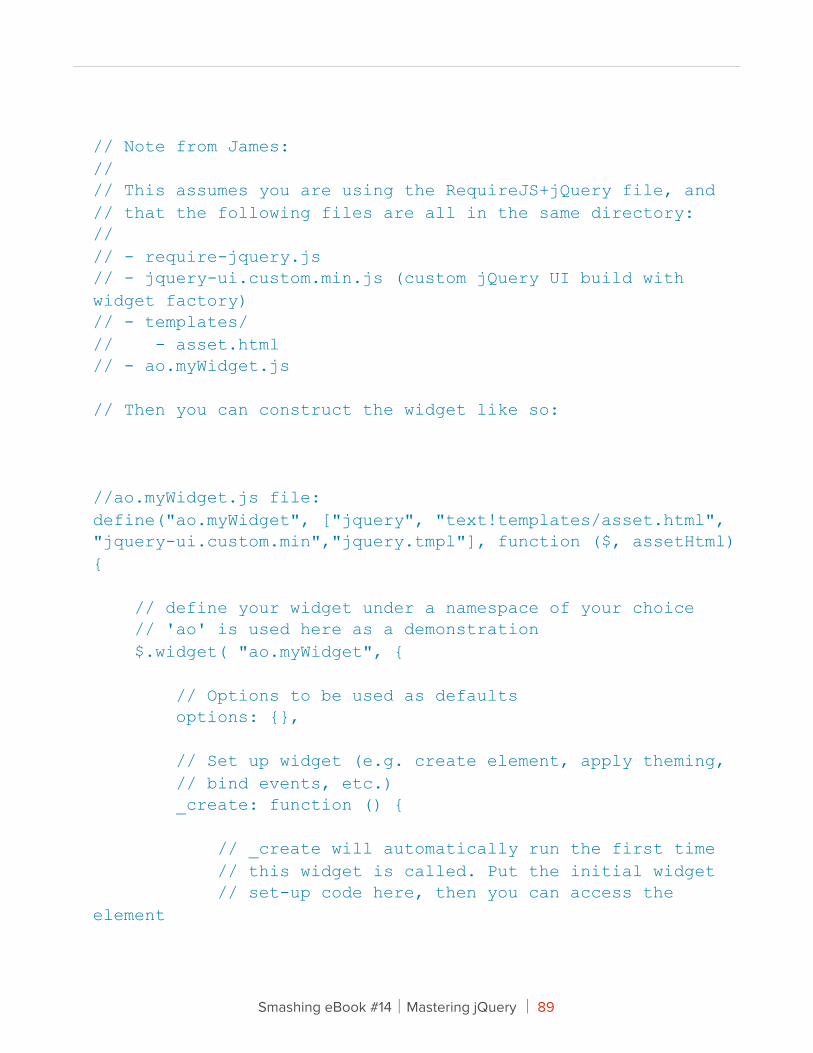
// Note from James:// // This assumes you are using the RequireJS+jQuery file, and // that the following files are all in the same directory: //// - require-jquery.js // - jquery-ui.custom.min.js (custom jQuery UI build with widget factory) // - templates/ // - asset.html // - ao.myWidget.js
// Then you can construct the widget like so:
//ao.myWidget.js file: define("ao.myWidget", ["jquery", "text!templates/asset.html", "jquery-ui.custom.min","jquery.tmpl"], function ($, assetHtml) {
// define your widget under a namespace of your choice // 'ao' is used here as a demonstration $.widget( "ao.myWidget", {
// Options to be used as defaults options: {},
// Set up widget (e.g. create element, apply theming, // bind events, etc.) _create: function () {
// _create will automatically run the first time // this widget is called. Put the initial widget // set-up code here, then you can access the element
Smashing eBook #14│Mastering jQuery │ 89
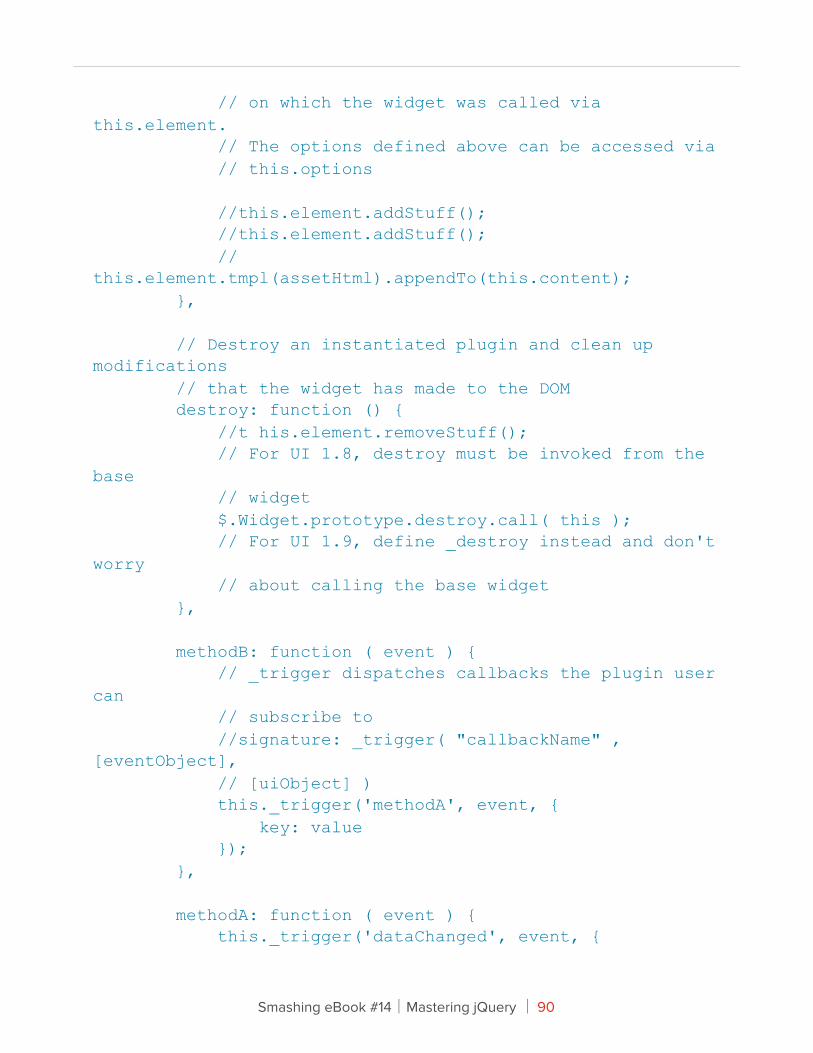
// on which the widget was called via this.element. // The options defined above can be accessed via // this.options
//this.element.addStuff(); //this.element.addStuff(); //this.element.tmpl(assetHtml).appendTo(this.content); },
// Destroy an instantiated plugin and clean up modifications // that the widget has made to the DOM destroy: function () { //t his.element.removeStuff(); // For UI 1.8, destroy must be invoked from the base // widget $.Widget.prototype.destroy.call( this ); // For UI 1.9, define _destroy instead and don't worry // about calling the base widget },
methodB: function ( event ) { // _trigger dispatches callbacks the plugin user can // subscribe to //signature: _trigger( "callbackName" , [eventObject], // [uiObject] ) this._trigger('methodA', event, { key: value }); },
methodA: function ( event ) { this._trigger('dataChanged', event, {
Smashing eBook #14│Mastering jQuery │ 90
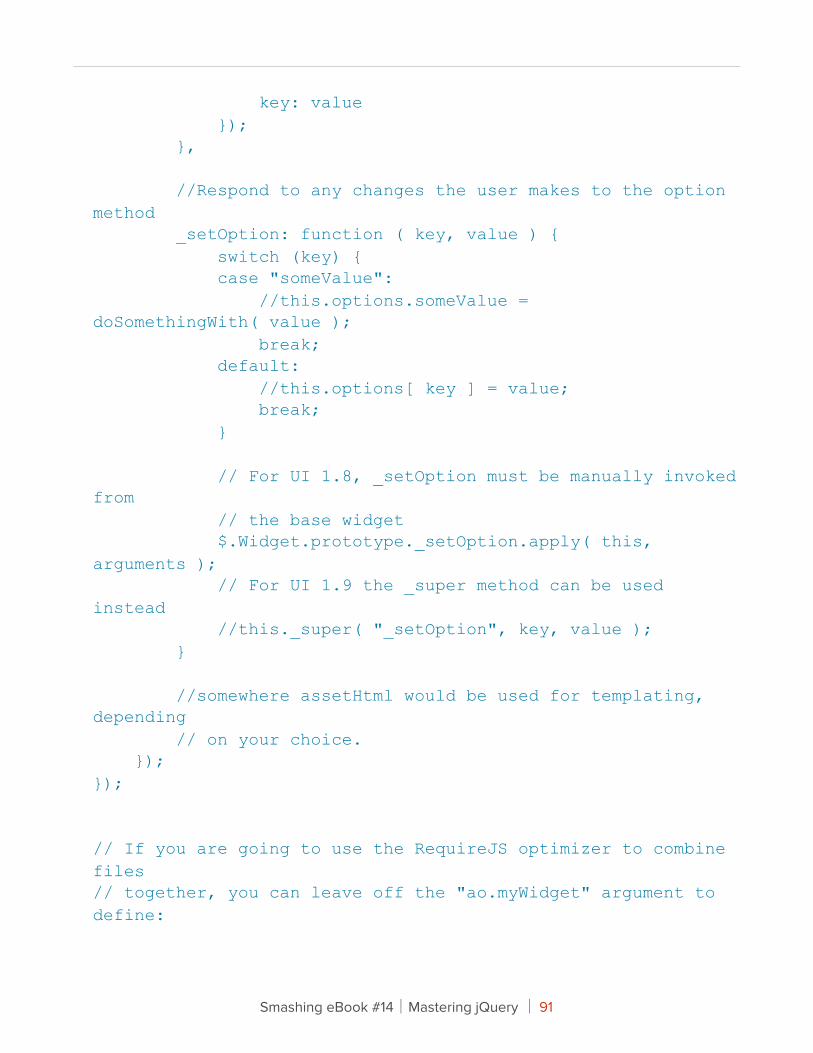
key: value }); },
//Respond to any changes the user makes to the option method _setOption: function ( key, value ) { switch (key) { case "someValue": //this.options.someValue = doSomethingWith( value ); break; default: //this.options[ key ] = value; break; }
// For UI 1.8, _setOption must be manually invoked from // the base widget $.Widget.prototype._setOption.apply( this, arguments ); // For UI 1.9 the _super method can be used instead //this._super( "_setOption", key, value ); }
//somewhere assetHtml would be used for templating, depending // on your choice. }); });
// If you are going to use the RequireJS optimizer to combine files // together, you can leave off the "ao.myWidget" argument to define:
Smashing eBook #14│Mastering jQuery │ 91
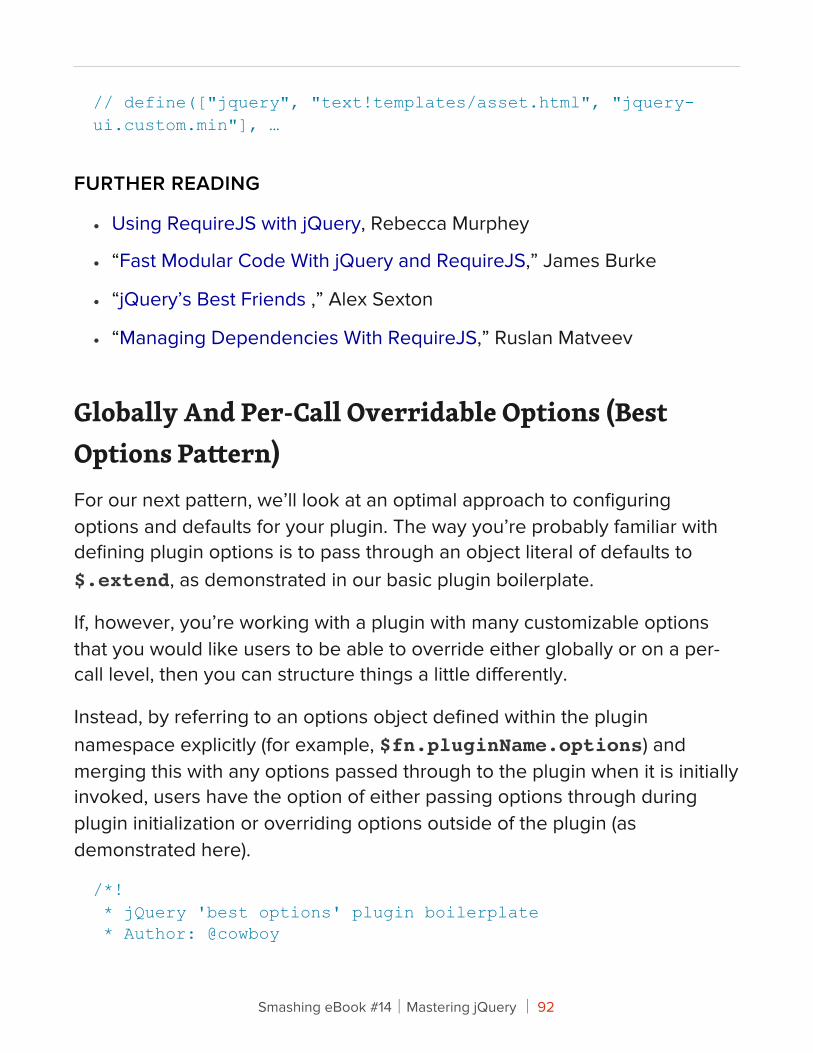
// define(["jquery", "text!templates/asset.html", "jquery-ui.custom.min"], …
FURTHER READING
• Using RequireJS with jQuery, Rebecca Murphey
• “Fast Modular Code With jQuery and RequireJS,” James Burke
• “jQuery’s Best Friends ,” Alex Sexton
• “Managing Dependencies With RequireJS,” Ruslan Matveev
Globally And Per-Call Overridable Options (Best Options Pa#ern)For our next pattern, we’ll look at an optimal approach to configuring options and defaults for your plugin. The way you’re probably familiar with defining plugin options is to pass through an object literal of defaults to $.extend, as demonstrated in our basic plugin boilerplate.
If, however, you’re working with a plugin with many customizable options that you would like users to be able to override either globally or on a per-call level, then you can structure things a little differently.
Instead, by referring to an options object defined within the plugin namespace explicitly (for example, $fn.pluginName.options) and merging this with any options passed through to the plugin when it is initially invoked, users have the option of either passing options through during plugin initialization or overriding options outside of the plugin (as demonstrated here).
/*! * jQuery 'best options' plugin boilerplate * Author: @cowboy
Smashing eBook #14│Mastering jQuery │ 92
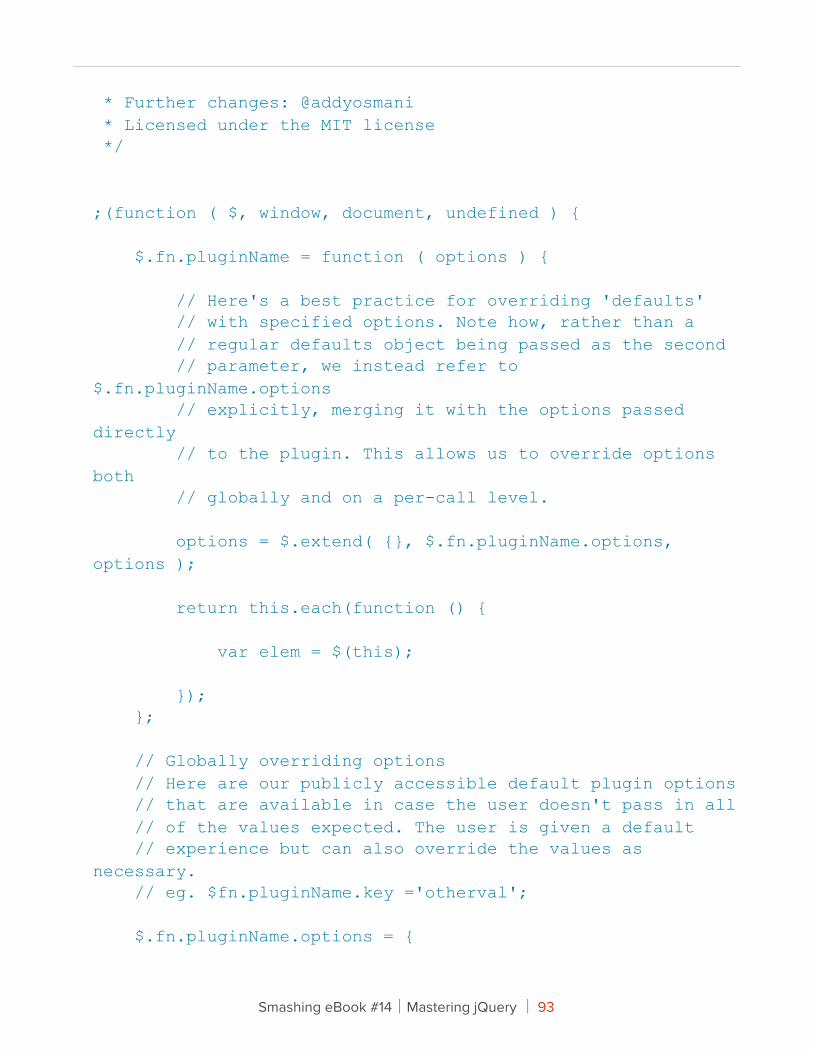
* Further changes: @addyosmani * Licensed under the MIT license */
;(function ( $, window, document, undefined ) {
$.fn.pluginName = function ( options ) {
// Here's a best practice for overriding 'defaults' // with specified options. Note how, rather than a // regular defaults object being passed as the second // parameter, we instead refer to $.fn.pluginName.options // explicitly, merging it with the options passed directly // to the plugin. This allows us to override options both // globally and on a per-call level.
options = $.extend( {}, $.fn.pluginName.options, options );
return this.each(function () {
var elem = $(this);
}); };
// Globally overriding options // Here are our publicly accessible default plugin options // that are available in case the user doesn't pass in all // of the values expected. The user is given a default // experience but can also override the values as necessary. // eg. $fn.pluginName.key ='otherval';
$.fn.pluginName.options = {
Smashing eBook #14│Mastering jQuery │ 93
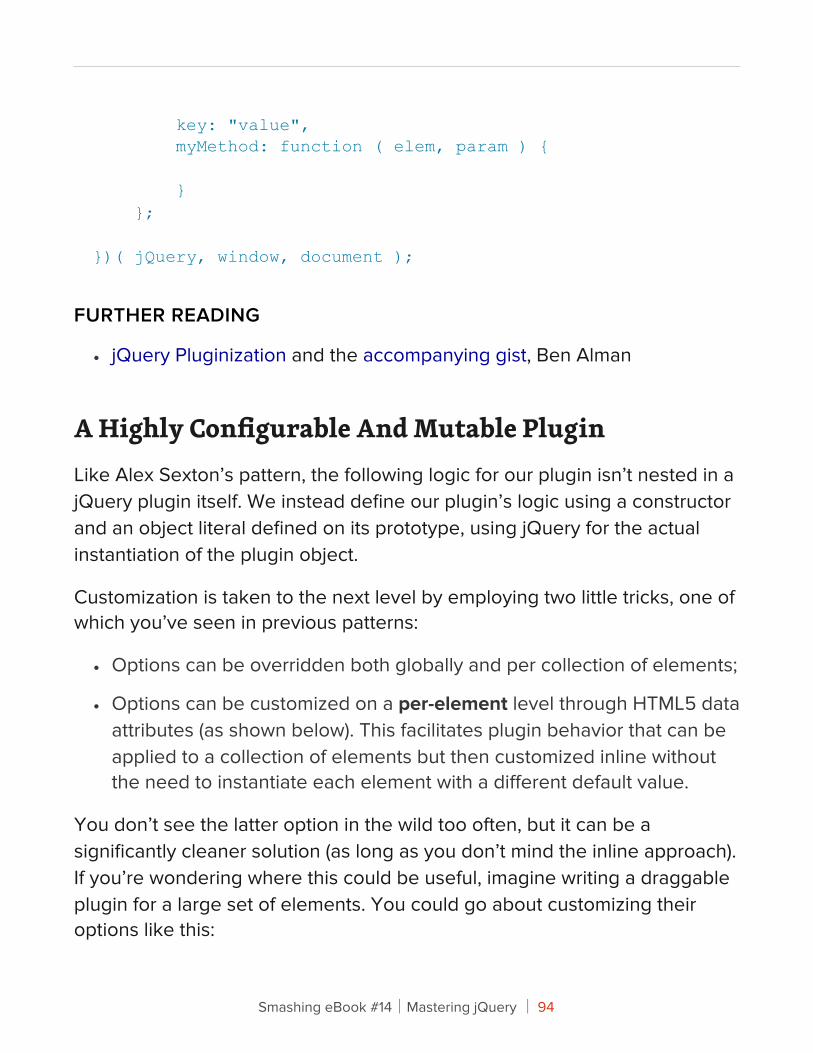
key: "value", myMethod: function ( elem, param ) { } }; })( jQuery, window, document );
FURTHER READING
• jQuery Pluginization and the accompanying gist, Ben Alman
A Highly Configurable And Mutable PluginLike Alex Sexton’s pattern, the following logic for our plugin isn’t nested in a jQuery plugin itself. We instead define our plugin’s logic using a constructor and an object literal defined on its prototype, using jQuery for the actual instantiation of the plugin object.
Customization is taken to the next level by employing two little tricks, one of which you’ve seen in previous patterns:
• Options can be overridden both globally and per collection of elements;
• Options can be customized on a per-element level through HTML5 data attributes (as shown below). This facilitates plugin behavior that can be applied to a collection of elements but then customized inline without the need to instantiate each element with a different default value.
You don’t see the latter option in the wild too often, but it can be a significantly cleaner solution (as long as you don’t mind the inline approach). If you’re wondering where this could be useful, imagine writing a draggable plugin for a large set of elements. You could go about customizing their options like this:
Smashing eBook #14│Mastering jQuery │ 94
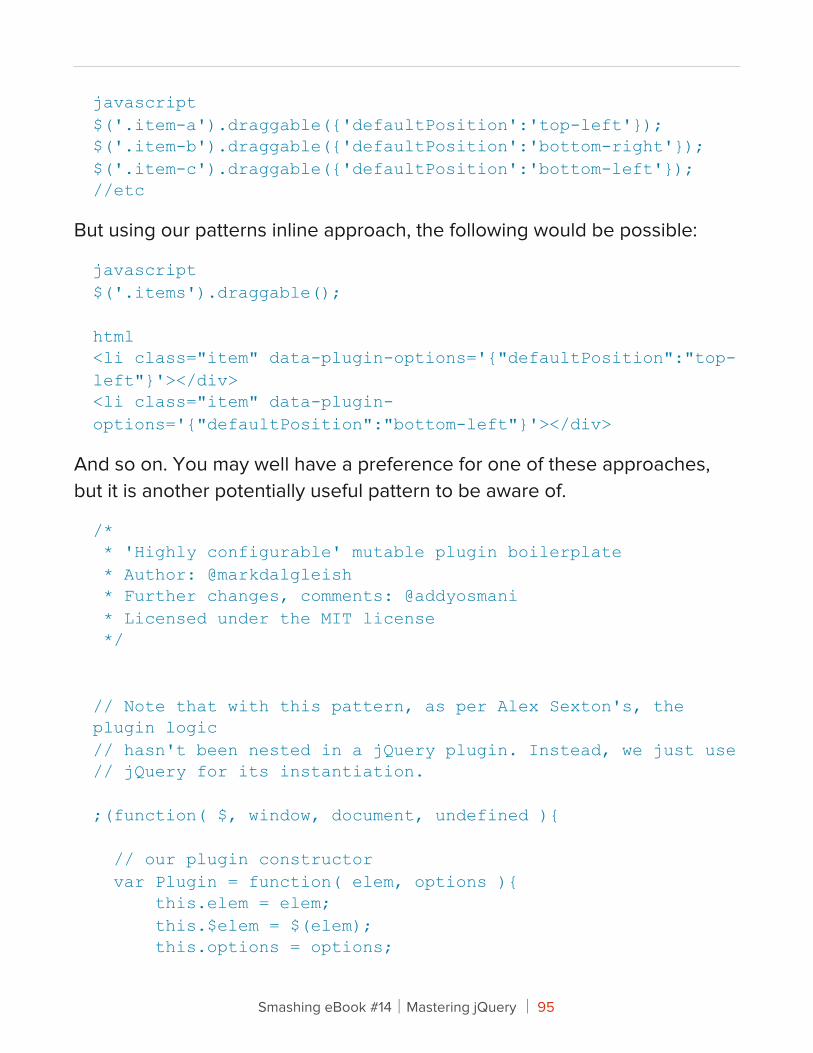
javascript$('.item-a').draggable({'defaultPosition':'top-left'});$('.item-b').draggable({'defaultPosition':'bottom-right'});$('.item-c').draggable({'defaultPosition':'bottom-left'});//etc
But using our patterns inline approach, the following would be possible:
javascript$('.items').draggable();
html<li class="item" data-plugin-options='{"defaultPosition":"top-left"}'></div><li class="item" data-plugin-options='{"defaultPosition":"bottom-left"}'></div>
And so on. You may well have a preference for one of these approaches, but it is another potentially useful pattern to be aware of.
/* * 'Highly configurable' mutable plugin boilerplate * Author: @markdalgleish * Further changes, comments: @addyosmani * Licensed under the MIT license */
// Note that with this pattern, as per Alex Sexton's, the plugin logic// hasn't been nested in a jQuery plugin. Instead, we just use// jQuery for its instantiation.
;(function( $, window, document, undefined ){
// our plugin constructor var Plugin = function( elem, options ){ this.elem = elem; this.$elem = $(elem); this.options = options;
Smashing eBook #14│Mastering jQuery │ 95
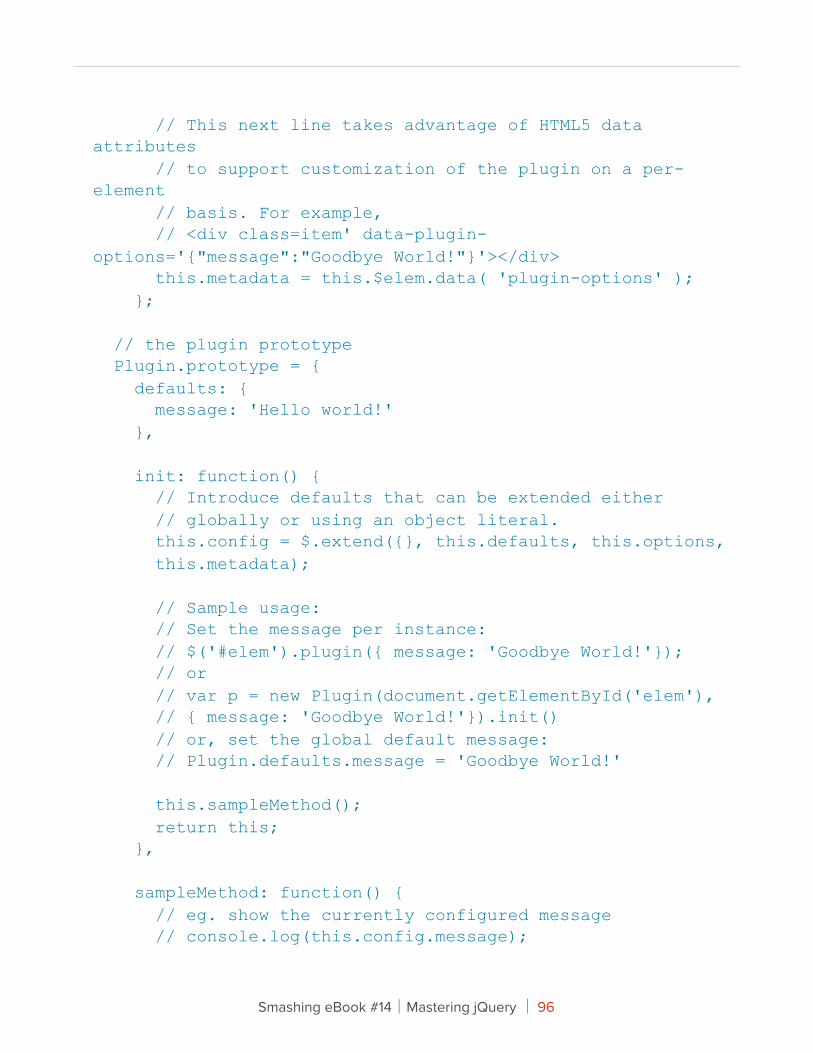
// This next line takes advantage of HTML5 data attributes // to support customization of the plugin on a per-element // basis. For example, // <div class=item' data-plugin-options='{"message":"Goodbye World!"}'></div> this.metadata = this.$elem.data( 'plugin-options' ); };
// the plugin prototype Plugin.prototype = { defaults: { message: 'Hello world!' },
init: function() { // Introduce defaults that can be extended either // globally or using an object literal. this.config = $.extend({}, this.defaults, this.options, this.metadata);
// Sample usage: // Set the message per instance: // $('#elem').plugin({ message: 'Goodbye World!'}); // or // var p = new Plugin(document.getElementById('elem'), // { message: 'Goodbye World!'}).init() // or, set the global default message: // Plugin.defaults.message = 'Goodbye World!'
this.sampleMethod(); return this; },
sampleMethod: function() { // eg. show the currently configured message // console.log(this.config.message);
Smashing eBook #14│Mastering jQuery │ 96
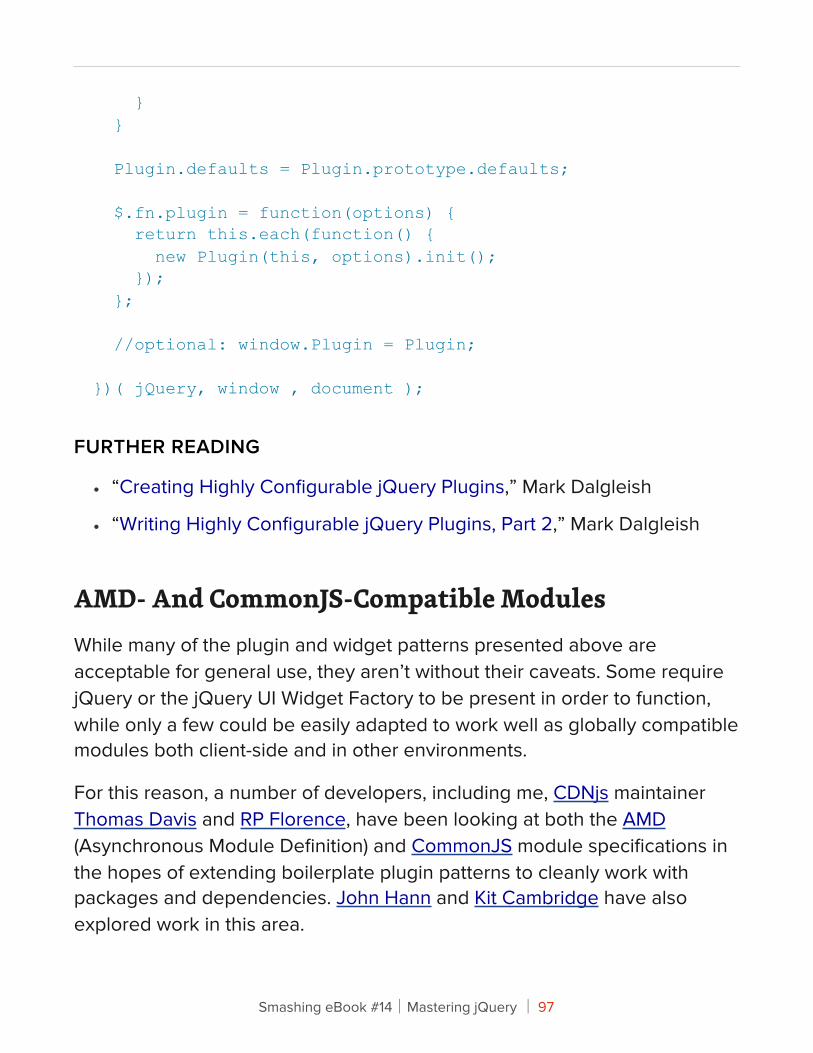
} }
Plugin.defaults = Plugin.prototype.defaults;
$.fn.plugin = function(options) { return this.each(function() { new Plugin(this, options).init(); }); };
//optional: window.Plugin = Plugin;
})( jQuery, window , document );
FURTHER READING
• “Creating Highly Configurable jQuery Plugins,” Mark Dalgleish
• “Writing Highly Configurable jQuery Plugins, Part 2,” Mark Dalgleish
AMD- And CommonJS-Compatible ModulesWhile many of the plugin and widget patterns presented above are acceptable for general use, they aren’t without their caveats. Some require jQuery or the jQuery UI Widget Factory to be present in order to function, while only a few could be easily adapted to work well as globally compatible modules both client-side and in other environments.
For this reason, a number of developers, including me, CDNjs maintainer Thomas Davis and RP Florence, have been looking at both the AMD (Asynchronous Module Definition) and CommonJS module specifications in the hopes of extending boilerplate plugin patterns to cleanly work with packages and dependencies. John Hann and Kit Cambridge have also explored work in this area.
Smashing eBook #14│Mastering jQuery │ 97

AMD
The AMD module format (a specification for defining modules where both the module and dependencies can be asynchronously loaded) has a number of distinct advantages, including being both asynchronous and highly flexible by nature, thus removing the tight coupling one commonly finds between code and module identity. It’s considered a reliable stepping stone to the module system proposed for ES Harmony.
When working with anonymous modules, the idea of a module’s identity is DRY, making it trivial to avoid duplication of file names and code. Because the code is more portable, it can be easily moved to other locations without needing to alter the code itself. Developers can also run the same code in multiple environments just by using an AMD optimizer that works with a CommonJS environment, such as r.js.
With AMD, the two key concepts you need to be aware of are the require method and the define method, which facilitate module definition and dependency loading. The define method is used to define named or unnamed modules based on the specification, using the following signature:
define(module_id /*optional*/, [dependencies], definition function /*function for instantiating the module or object*/);
As you can tell from the inline comments, the module’s ID is an optional argument that is typically required only when non-AMD concatenation tools are being used (it could be useful in other edge cases, too). One of the benefits of opting not to use module IDs is having the flexibility to move your module around the file system without needing to change its ID. The module’s ID is equivalent to folder paths in simple packages and when not used in packages.
The dependencies argument represents an array of dependencies that are required by the module you are defining, and the third argument (factory) is
Smashing eBook #14│Mastering jQuery │ 98
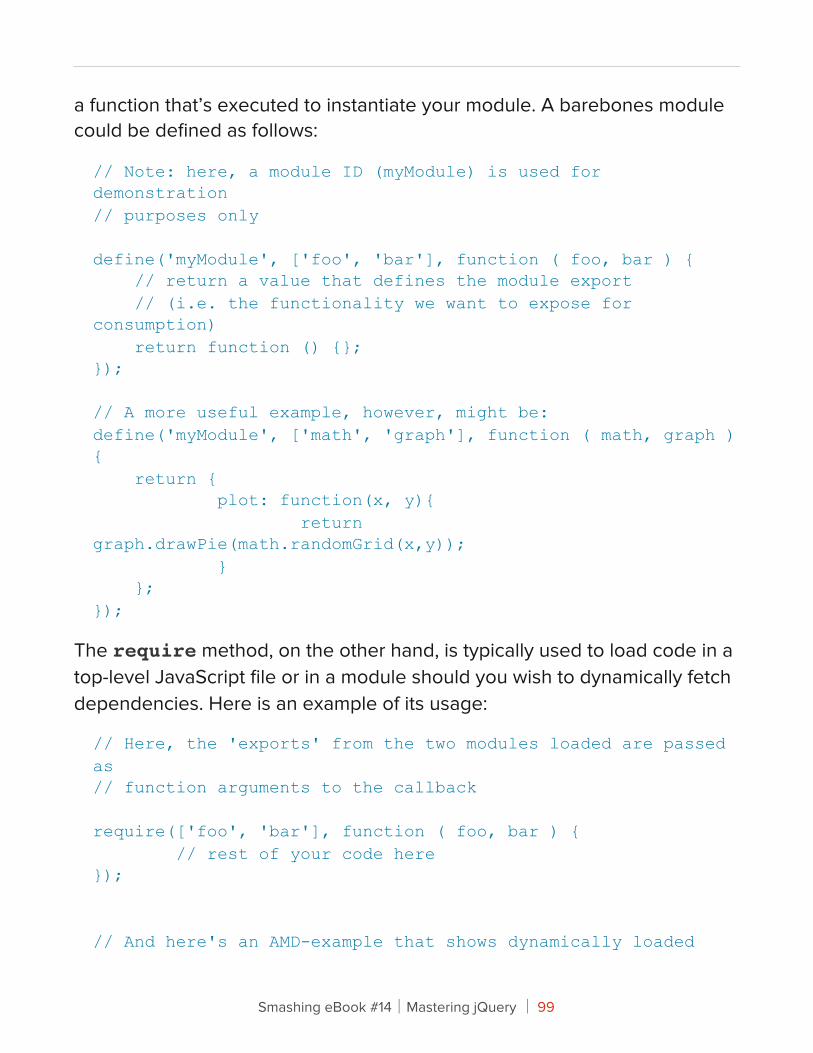
a function that’s executed to instantiate your module. A barebones module could be defined as follows:
// Note: here, a module ID (myModule) is used for demonstration// purposes only
define('myModule', ['foo', 'bar'], function ( foo, bar ) { // return a value that defines the module export // (i.e. the functionality we want to expose for consumption) return function () {};});
// A more useful example, however, might be:define('myModule', ['math', 'graph'], function ( math, graph ) { return { plot: function(x, y){ return graph.drawPie(math.randomGrid(x,y)); } };});
The require method, on the other hand, is typically used to load code in a top-level JavaScript file or in a module should you wish to dynamically fetch dependencies. Here is an example of its usage:
// Here, the 'exports' from the two modules loaded are passed as// function arguments to the callback
require(['foo', 'bar'], function ( foo, bar ) { // rest of your code here});
// And here's an AMD-example that shows dynamically loaded
Smashing eBook #14│Mastering jQuery │ 99
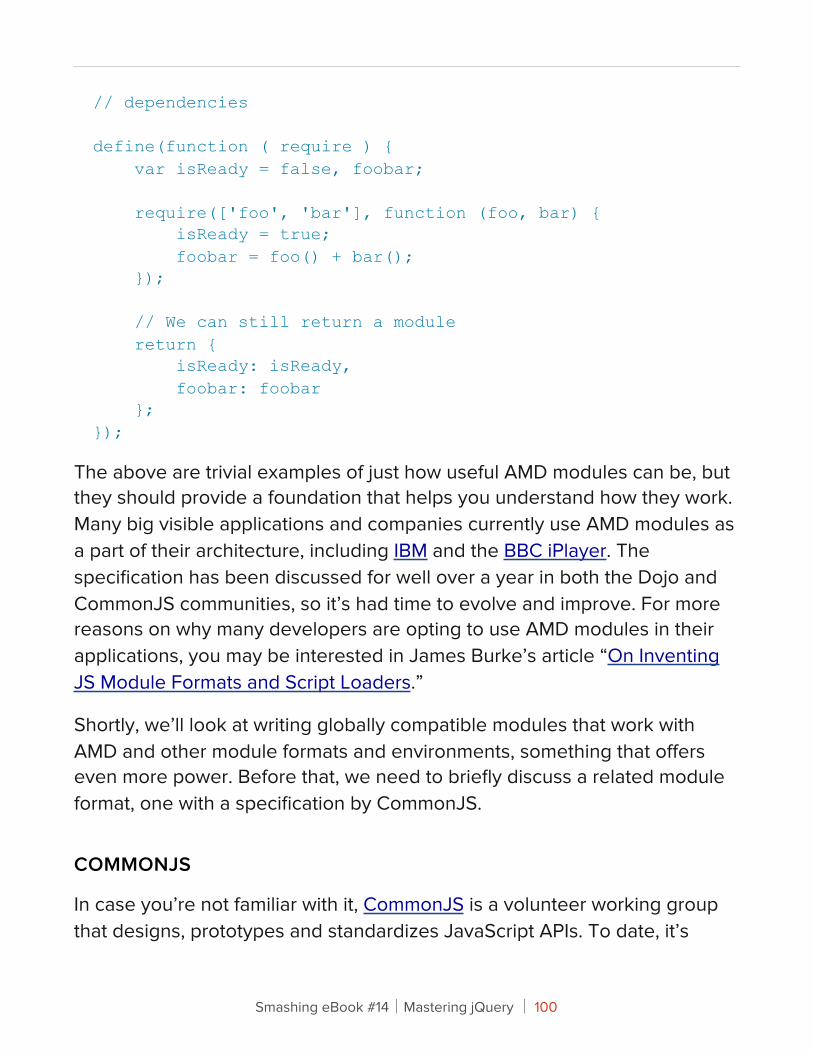
// dependencies
define(function ( require ) { var isReady = false, foobar;
require(['foo', 'bar'], function (foo, bar) { isReady = true; foobar = foo() + bar(); });
// We can still return a module return { isReady: isReady, foobar: foobar };});
The above are trivial examples of just how useful AMD modules can be, but they should provide a foundation that helps you understand how they work. Many big visible applications and companies currently use AMD modules as a part of their architecture, including IBM and the BBC iPlayer. The specification has been discussed for well over a year in both the Dojo and CommonJS communities, so it’s had time to evolve and improve. For more reasons on why many developers are opting to use AMD modules in their applications, you may be interested in James Burke’s article “On Inventing JS Module Formats and Script Loaders.”
Shortly, we’ll look at writing globally compatible modules that work with AMD and other module formats and environments, something that offers even more power. Before that, we need to briefly discuss a related module format, one with a specification by CommonJS.
COMMONJS
In case you’re not familiar with it, CommonJS is a volunteer working group that designs, prototypes and standardizes JavaScript APIs. To date, it’s
Smashing eBook #14│Mastering jQuery │ 100
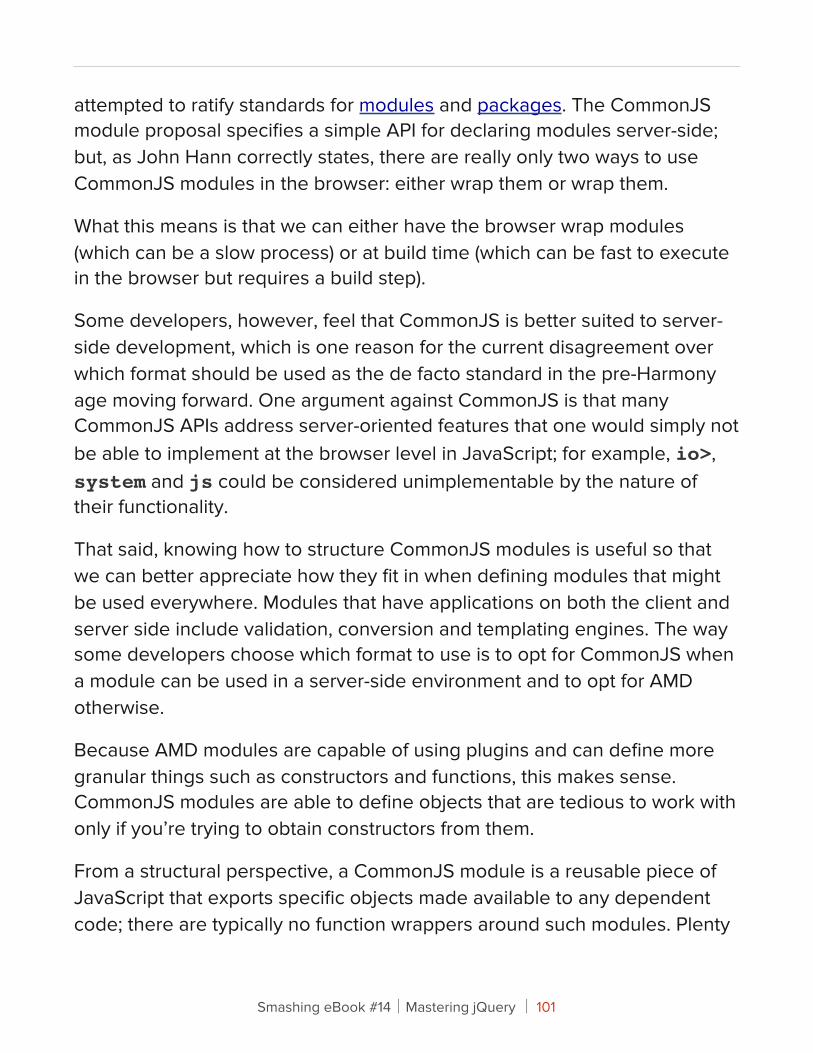
attempted to ratify standards for modules and packages. The CommonJS module proposal specifies a simple API for declaring modules server-side; but, as John Hann correctly states, there are really only two ways to use CommonJS modules in the browser: either wrap them or wrap them.
What this means is that we can either have the browser wrap modules (which can be a slow process) or at build time (which can be fast to execute in the browser but requires a build step).
Some developers, however, feel that CommonJS is better suited to server-side development, which is one reason for the current disagreement over which format should be used as the de facto standard in the pre-Harmony age moving forward. One argument against CommonJS is that many CommonJS APIs address server-oriented features that one would simply not be able to implement at the browser level in JavaScript; for example, io>, system and js could be considered unimplementable by the nature of their functionality.
That said, knowing how to structure CommonJS modules is useful so that we can better appreciate how they fit in when defining modules that might be used everywhere. Modules that have applications on both the client and server side include validation, conversion and templating engines. The way some developers choose which format to use is to opt for CommonJS when a module can be used in a server-side environment and to opt for AMD otherwise.
Because AMD modules are capable of using plugins and can define more granular things such as constructors and functions, this makes sense. CommonJS modules are able to define objects that are tedious to work with only if you’re trying to obtain constructors from them.
From a structural perspective, a CommonJS module is a reusable piece of JavaScript that exports specific objects made available to any dependent code; there are typically no function wrappers around such modules. Plenty
Smashing eBook #14│Mastering jQuery │ 101
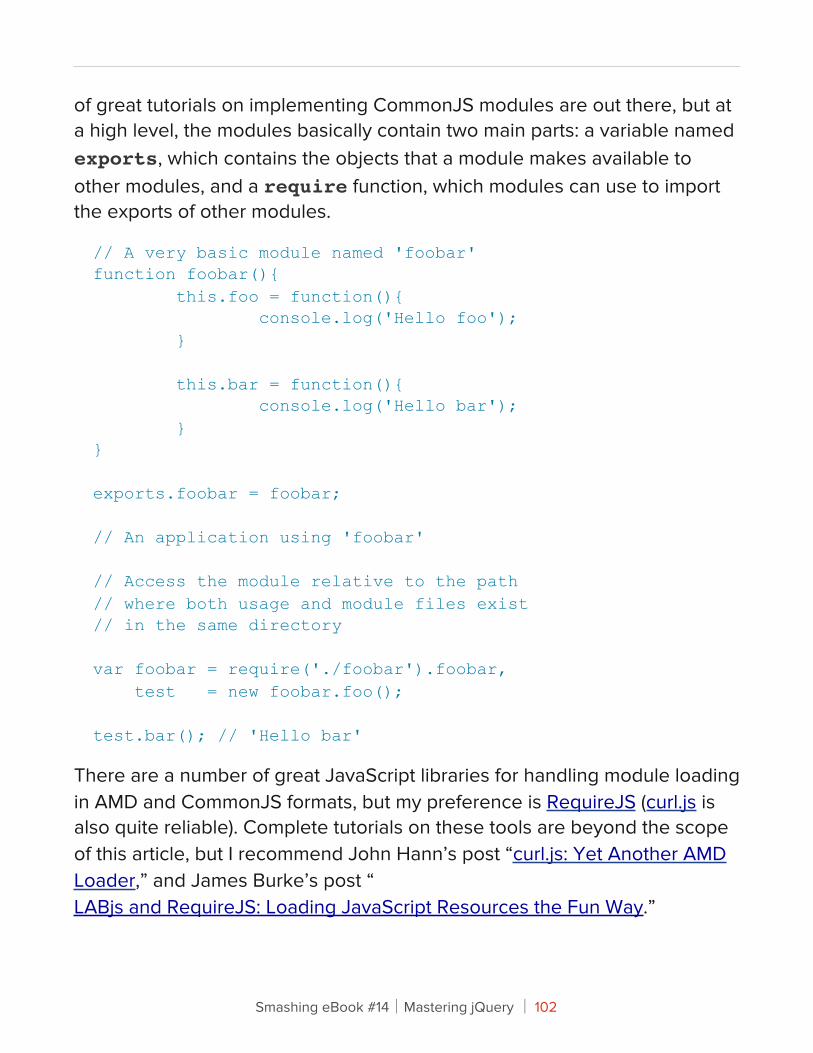
of great tutorials on implementing CommonJS modules are out there, but at a high level, the modules basically contain two main parts: a variable named exports, which contains the objects that a module makes available to other modules, and a require function, which modules can use to import the exports of other modules.
// A very basic module named 'foobar'function foobar(){ this.foo = function(){ console.log('Hello foo'); }
this.bar = function(){ console.log('Hello bar'); }}
exports.foobar = foobar;
// An application using 'foobar'
// Access the module relative to the path// where both usage and module files exist// in the same directory
var foobar = require('./foobar').foobar, test = new foobar.foo();
test.bar(); // 'Hello bar'
There are a number of great JavaScript libraries for handling module loading in AMD and CommonJS formats, but my preference is RequireJS (curl.js is also quite reliable). Complete tutorials on these tools are beyond the scope of this article, but I recommend John Hann’s post “curl.js: Yet Another AMD Loader,” and James Burke’s post “LABjs and RequireJS: Loading JavaScript Resources the Fun Way.”
Smashing eBook #14│Mastering jQuery │ 102
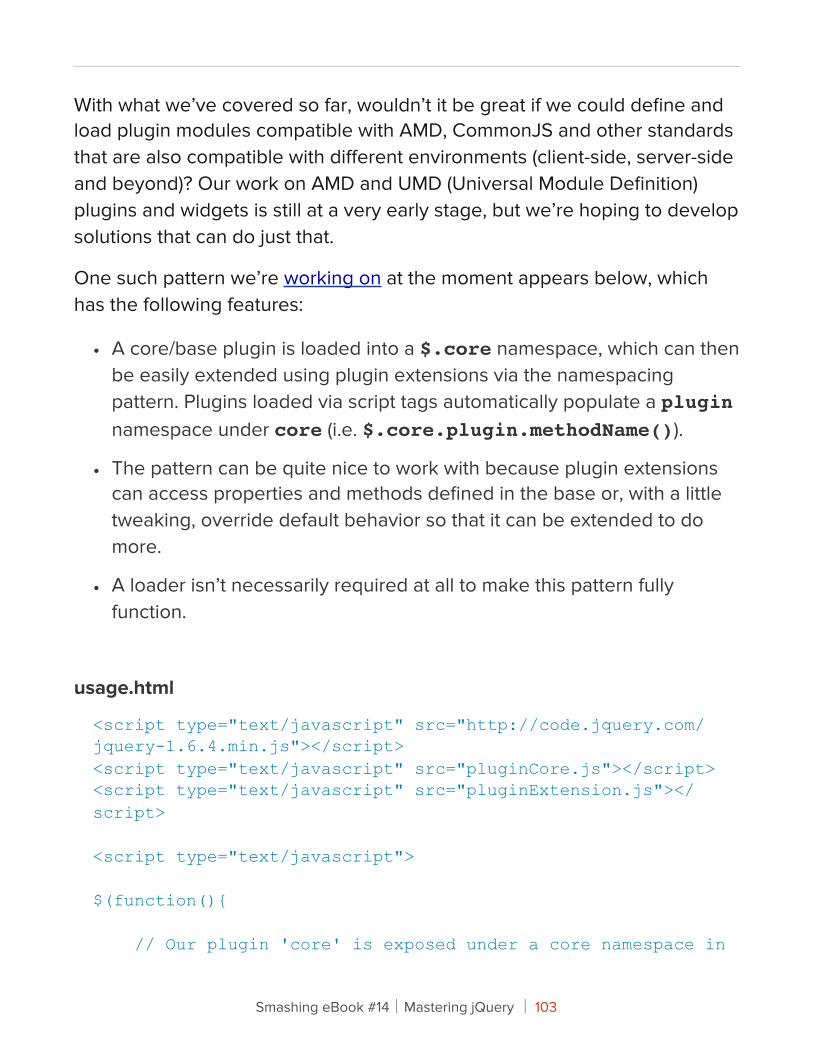
With what we’ve covered so far, wouldn’t it be great if we could define and load plugin modules compatible with AMD, CommonJS and other standards that are also compatible with different environments (client-side, server-side and beyond)? Our work on AMD and UMD (Universal Module Definition) plugins and widgets is still at a very early stage, but we’re hoping to develop solutions that can do just that.
One such pattern we’re working on at the moment appears below, which has the following features:
• A core/base plugin is loaded into a $.core namespace, which can then be easily extended using plugin extensions via the namespacing pattern. Plugins loaded via script tags automatically populate a plugin namespace under core (i.e. $.core.plugin.methodName()).
• The pattern can be quite nice to work with because plugin extensions can access properties and methods defined in the base or, with a little tweaking, override default behavior so that it can be extended to do more.
• A loader isn’t necessarily required at all to make this pattern fully function.
usage.html
<script type="text/javascript" src="http://code.jquery.com/jquery-1.6.4.min.js"></script><script type="text/javascript" src="pluginCore.js"></script><script type="text/javascript" src="pluginExtension.js"></script>
<script type="text/javascript">
$(function(){
// Our plugin 'core' is exposed under a core namespace in
Smashing eBook #14│Mastering jQuery │ 103
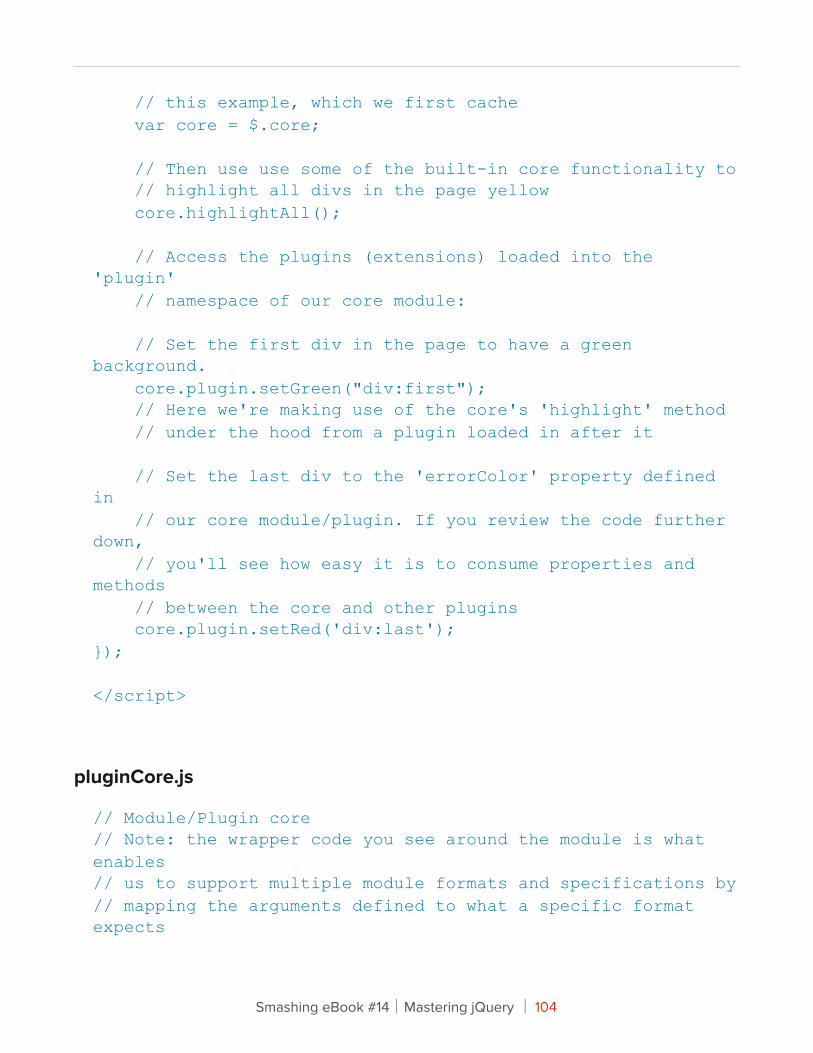
// this example, which we first cache var core = $.core;
// Then use use some of the built-in core functionality to // highlight all divs in the page yellow core.highlightAll();
// Access the plugins (extensions) loaded into the 'plugin' // namespace of our core module:
// Set the first div in the page to have a green background. core.plugin.setGreen("div:first"); // Here we're making use of the core's 'highlight' method // under the hood from a plugin loaded in after it
// Set the last div to the 'errorColor' property defined in // our core module/plugin. If you review the code further down, // you'll see how easy it is to consume properties and methods // between the core and other plugins core.plugin.setRed('div:last');}); </script>
pluginCore.js
// Module/Plugin core// Note: the wrapper code you see around the module is what enables// us to support multiple module formats and specifications by // mapping the arguments defined to what a specific format expects
Smashing eBook #14│Mastering jQuery │ 104
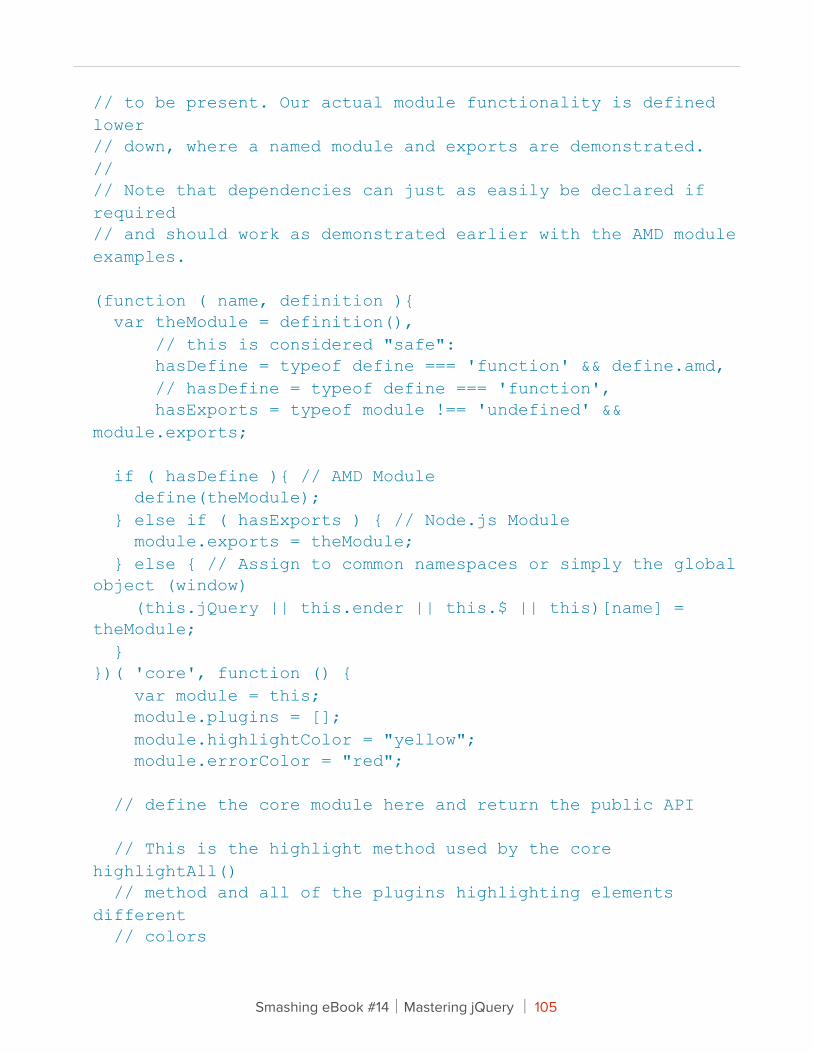
// to be present. Our actual module functionality is defined lower // down, where a named module and exports are demonstrated. // // Note that dependencies can just as easily be declared if required// and should work as demonstrated earlier with the AMD module examples.
(function ( name, definition ){ var theModule = definition(), // this is considered "safe": hasDefine = typeof define === 'function' && define.amd, // hasDefine = typeof define === 'function', hasExports = typeof module !== 'undefined' && module.exports;
if ( hasDefine ){ // AMD Module define(theModule); } else if ( hasExports ) { // Node.js Module module.exports = theModule; } else { // Assign to common namespaces or simply the global object (window) (this.jQuery || this.ender || this.$ || this)[name] = theModule; }})( 'core', function () { var module = this; module.plugins = []; module.highlightColor = "yellow"; module.errorColor = "red";
// define the core module here and return the public API
// This is the highlight method used by the core highlightAll() // method and all of the plugins highlighting elements different // colors
Smashing eBook #14│Mastering jQuery │ 105
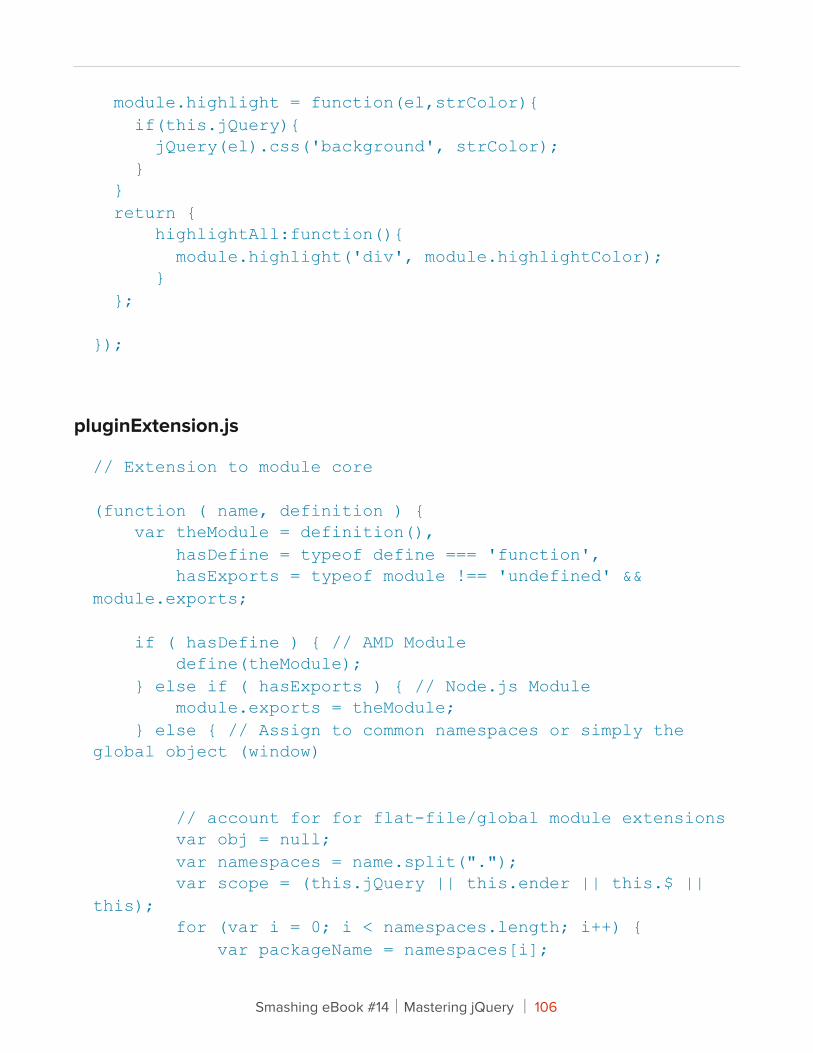
module.highlight = function(el,strColor){ if(this.jQuery){ jQuery(el).css('background', strColor); } } return { highlightAll:function(){ module.highlight('div', module.highlightColor); } };
});
pluginExtension.js
// Extension to module core
(function ( name, definition ) { var theModule = definition(), hasDefine = typeof define === 'function', hasExports = typeof module !== 'undefined' && module.exports;
if ( hasDefine ) { // AMD Module define(theModule); } else if ( hasExports ) { // Node.js Module module.exports = theModule; } else { // Assign to common namespaces or simply the global object (window)
// account for for flat-file/global module extensions var obj = null; var namespaces = name.split("."); var scope = (this.jQuery || this.ender || this.$ || this); for (var i = 0; i < namespaces.length; i++) { var packageName = namespaces[i];
Smashing eBook #14│Mastering jQuery │ 106
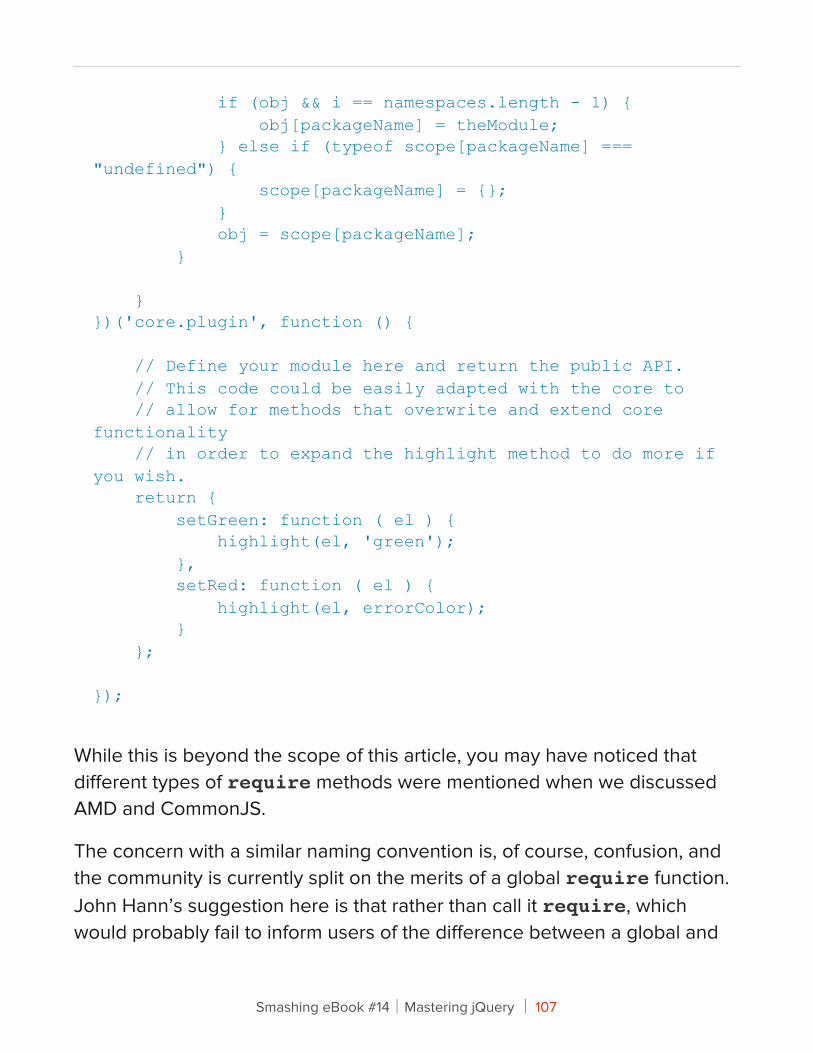
if (obj && i == namespaces.length - 1) { obj[packageName] = theModule; } else if (typeof scope[packageName] === "undefined") { scope[packageName] = {}; } obj = scope[packageName]; }
}})('core.plugin', function () {
// Define your module here and return the public API. // This code could be easily adapted with the core to // allow for methods that overwrite and extend core functionality // in order to expand the highlight method to do more if you wish. return { setGreen: function ( el ) { highlight(el, 'green'); }, setRed: function ( el ) { highlight(el, errorColor); } };
});
While this is beyond the scope of this article, you may have noticed that different types of require methods were mentioned when we discussed AMD and CommonJS.
The concern with a similar naming convention is, of course, confusion, and the community is currently split on the merits of a global require function. John Hann’s suggestion here is that rather than call it require, which would probably fail to inform users of the difference between a global and
Smashing eBook #14│Mastering jQuery │ 107
inner require, renaming the global loader method something else might make more sense (such as the name of the library). For this reason, curl.js uses curl, and RequireJS uses requirejs.
This is probably a bigger discussion for another day, but I hope this brief walkthrough of both module types has increased your awareness of these formats and has encouraged you to further explore and experiment with them in your apps.
FURTHER READING
• “Using AMD Loaders to Write and Manage Modular JavaScript,” John Hann
• “Demystifying CommonJS Modules,” Alex Young
• “AMD Module Patterns: Singleton,” John Hann
• Current discussion thread about AMD- and UMD-style modules for jQuery plugins, GitHub
• “Run-Anywhere JavaScript Modules Boilerplate Code,” Kris Zyp
• “Standards And Proposals for JavaScript Modules And jQuery,” James Burke
What Makes A Good jQuery Plugin?At the end of the day, patterns are just one aspect of plugin development. And before we wrap up, here are my criteria for selecting third-party plugins, which will hopefully help developers write them.
QualityDo your best to adhere to best practices with both the JavaScript and jQuery that you write. Are your solutions optimal? Do they follow the jQuery
Smashing eBook #14│Mastering jQuery │ 108
core style guidelines? If not, is your code at least relatively clean and readable?
CompatibilityWhich versions of jQuery is your plugin compatible with? Have you tested it with the latest builds? If the plugin was written before jQuery 1.6, then it might have issues with attributes, because the way we approach them changed with that release. New versions of jQuery offer improvements and opportunities for the jQuery project to improve on what the core library offers. With this comes occasional breakages (mainly in major releases) as we move towards a better way of doing things. I’d like to see plugin authors update their code when necessary or, at a minimum, test their plugins with new versions to make sure everything works as expected.
ReliabilityYour plugin should come with its own set of unit tests. Not only do these prove your plugin actually works, but they can also improve the design without breaking it for end users. I consider unit tests essential for any serious jQuery plugin that is meant for a production environment, and they’re not that hard to write. For an excellent guide to automated JavaScript testing with QUnit, you may be interested in “Automating JavaScript Testing With QUnit,” by Jorn Zaefferer.
PerformanceIf the plugin needs to perform tasks that require a lot of computing power or that heavily manipulates the DOM, then you should follow best practices that minimize this. Use jsPerf.com to test segments of your code so that you’re aware of how well it performs in different browsers before releasing the plugin.
DocumentationIf you intend for other developers to use your plugin, ensure that it’s well documented. Document your API. What methods and options does the plugin support? Does it have any gotchas that users need to be aware of? If
Smashing eBook #14│Mastering jQuery │ 109
users cannot figure out how to use your plugin, they’ll likely look for an alternative. Also, do your best to comment the code. This is by far the best gift you could give to other developers. If someone feels they can navigate your code base well enough to fork it or improve it, then you’ve done a good job.
Likelihood of maintenanceWhen releasing a plugin, estimate how much time you’ll have to devote to maintenance and support. We all love to share our plugins with the community, but you need to set expectations for your ability to answer questions, address issues and make improvements. This can be done simply by stating your intentions for maintenance in the README file, and let users decide whether to make fixes themselves.
CONCLUSION
We’ve explored several time-saving design patterns and best practices that can be employed to improve your plugin development process. Some are better suited to certain use cases than others, but I hope that the code comments that discuss the ins and outs of these variations on popular plugins and widgets were useful.
Remember, when selecting a pattern, be practical. Don’t use a plugin pattern just for the sake of it; rather, spend some time understanding the underlying structure, and establish how well it solves your problem or fits the component you’re trying to build. Choose the pattern that best suits your needs.
And that’s it. If there's a particular pattern or approach you prefer taking to writing plugins which you feel would benefit others (which hasn't been covered), please feel free to stick it in a gist and share it in the comments below. I'm sure it would be appreciated.
Smashing eBook #14│Mastering jQuery │ 110
jQuery Plugin Checklist: Should You Use "at jQuery Plug-In?
Jon Raasch
jQuery plug-ins provide an excellent way to save time and streamline development, allowing programmers to avoid having to build every component from scratch. But plug-ins are also a wild card that introduce an element of uncertainty into any code base. A good plug-in saves countless development hours; a bad plug-in leads to bug fixes that take longer than actually building the component from scratch.
Fortunately, one usually has a number of different plug-ins to choose from. But even if you have only one, figure out whether it’s worth using at all. The last thing you want to do is introduce bad code into your code base.
Do You Need A Plug-In At All?The first step is to figure out whether you even need a plug-in. If you don’t, you’ll save yourself both file size and time.
1. WOULD WRITING IT YOURSELF BE BETTER?
If the functionality is simple enough, you could consider writing it yourself. jQuery plug-ins often come bundled with a wide variety of features, which might be overkill for your situation. In these cases, writing any simple functionality by hand often makes more sense. Of course, the benefits have to be weighed against the amount of work involved.
Smashing eBook #14│Mastering jQuery │ 111
For example, jQuery UI’s accordion is great if you need advanced functionality, but it might be overkill if you just need panels that open and close. If you don’t already use jQuery UI elsewhere on your website, consider instead the native jQuery slideToggle() or animate().
2. Is It Similar to a Plug-In You’re Already Using?
After discovering that a particular plug-in doesn’t handle everything you need, finding another plug-in to cover loose ends might be tempting. But including two similar plug-ins in the same app is a sure path to bloated JavaScript.
Can you find a single plug-in that covers everything you need? If not, can you extend one of the plug-ins you have to cover everything you need? Again, in deciding whether to extend a plug-in, weigh the benefits against the development time involved.
For example, jQuery lightbox is a nice way to enable pop-up photos in a gallery, and simpleModal is a great way to display modal messages to users. But why would you use both on the same website? You could easily extend one to cover both uses. Better yet, find one plug-in that covers everything, such as Colorbox.
3. DO YOU EVEN NEED JAVASCRIPT?
In some situations, JavaScript isn’t needed at all. CSS pseudo-selectors such as :hover and CSS3 transitions can cover a variety of dynamic functionality much faster than a comparable JavaScript solution. Also, many plug-ins apply only styling; doing this with mark-up and CSS might make more sense.
For example, plug-ins such as jQuery Tooltip are indispensable if you have dynamic content that requires well-placed tooltips. But if you use tooltips in only a few select locations, using pure CSS is better (see this example). You can take static tooltips a step further by animating the effect using a CSS3
Smashing eBook #14│Mastering jQuery │ 112
transition, but bear in mind that the animation will work only in certain browsers.
Avoid Red FlagsWhen reviewing any plug-in, a number of warning signs will indicate poor quality. Here, we’ll look at all aspects of plug-ins, from the JavaScript to the CSS to the mark-up. We’ll even consider how plug-ins are released. None of these red flags alone should eliminate any plug-in from consideration. You get what you pay for, and because you’re probably paying nothing, you should be willing to cut any one a bit of slack.
If you’re fortunate enough to have more than one option, these warning signs could help you narrow down your choice. But even if you have only one option, be prepared to forgo it if you see too many red flags. Save yourself the headache ahead of time.
4. WEIRD OPTION OR ARGUMENT SYNTAX
After using jQuery for a while, developers get a sense of how most functions accept arguments. If a plug-in developer uses unusual syntax, it stands to reason that they don’t have much jQuery or JavaScript experience.
Some plug-ins accept a jQuery object as an argument but don’t allow chaining from that object; for example, $.myPlugin( $('a') ); but not $('a').myPlugin(); This is a big red flag.
A green flag would be a plug-in in this format…
$('.my-selector').myPlugin({ opt1 : 75, opt2 : 'asdf'});
… that also accepts…
Smashing eBook #14│Mastering jQuery │ 113
$.myPlugin({ opt1 : 75, opt2 : 'asdf'}, $('.my-selector'));
5. LITTLE TO NO DOCUMENTATION
Without documentation, a plug-in can be very difficult to use, because that is the first place you look for answers to your questions. Documentation comes in a variety of formats; proper documentation is best, but well-commented code can work just as well. If documentation doesn’t exist or is just a blog post with a quick example, then you might want to consider other options.
Good documentation shows that the plug-in creator cares about users like you. It also shows that they have dug into other plug-ins enough to know the value of good documentation.
6. POOR HISTORY OF SUPPORT
Lack of support indicates that finding help will be difficult when issues arise. More tellingly, it indicates that the plug-in has not been updated in a while. One advantage of open-source software is all of the eye-balls that are debugging and improving it. If the author never speaks to these people, the plug-in won’t grow.
When was the last time the plug-in you’re considering was updated? When was the last time a support request was answered? While not all plug-ins need as robust a support system as the jQuery plug-ins website, be wary of plug-ins that have never been modified.
A documented history of support, in which the author has responded to both bug and enhancement requests, is a green flag. A support forum
Smashing eBook #14│Mastering jQuery │ 114
further indicates that the plug-in is well supported, if not by the author then at least by the community.
7. NO MINIFIED VERSION
Though a fairly minor red flag, if the plug-in’s creator doesn’t provide a minified version along with the source code, then they may not be overly concerned with performance. Sure, you could minify it yourself, but this red flag isn’t about wasted time: it’s about the possibility that the plug-in contains far worse performance issues.
On the other hand, providing a minified, packed and gzipped version in the download package is an indication that the author cares about JavaScript performance.
8. STRANGE MARK-UP REQUIREMENTS
If a plug-in requires mark-up, then the mark-up should be of high quality. It should make semantic sense and be flexible enough for your purposes. Besides indicating poor front-end skills, strange mark-up makes integration more difficult. A good plug-in plugs into just about any mark-up you use; a bad plug-in makes you jump through hoops.
In certain situations, more rigid mark-up is needed, so be prepared to judge this on a sliding scale. Basically, the more specific the functionality, the more specific the mark-up needed. Completely flexible mark-up that descends naturally from any jQuery selector is the easiest to integrate.
9. EXCESSIVE CSS
Many jQuery plug-ins come packaged with CSS, and the quality of the style sheets is just as important as the JavaScript. An excessive number of styles is a sure sign of bad CSS. But what constitutes “excessive” depends on the purpose of the plug-in. Something very display-heavy, such as a lightbox or
Smashing eBook #14│Mastering jQuery │ 115
UI plug-in, will need more CSS than something that drives a simple animation.
Good CSS styles a plug-in’s content effectively while allowing you to easily modify the styles to fit your theme.
10. NO ONE ELSE USES IT
With the sheer volume of jQuery users, most decent plug-ins will probably have something written about them, even if it’s a “50 jQuery [fill in the blank]” post. Do a simple Google search for the plug-in. If you get very few results, you might want to consider another option, unless the plug-in is brand new or you can verifiy that it is written by a professional.
Posts on prominent blogs are great, and posts by prominent jQuery programmers are even better.
Final AssessmentAfter you’ve given the plug-in the third degree, the only thing left to do is plug it in and test how well it performs.
11. PLUG IT IN AND SEE
Probably the best way to test a plug-in is to simply plug it on the development server and see the results. First, does it break anything? Make sure to look at JavaScript in the surrounding areas. If the plug-in includes a style sheet, look for layout and styling errors on any page that applies the style sheet.
Additionally, how does the plug-in perform? If it runs slowly or the page lags considerably when loading, it might be important to consider other options.
Smashing eBook #14│Mastering jQuery │ 116
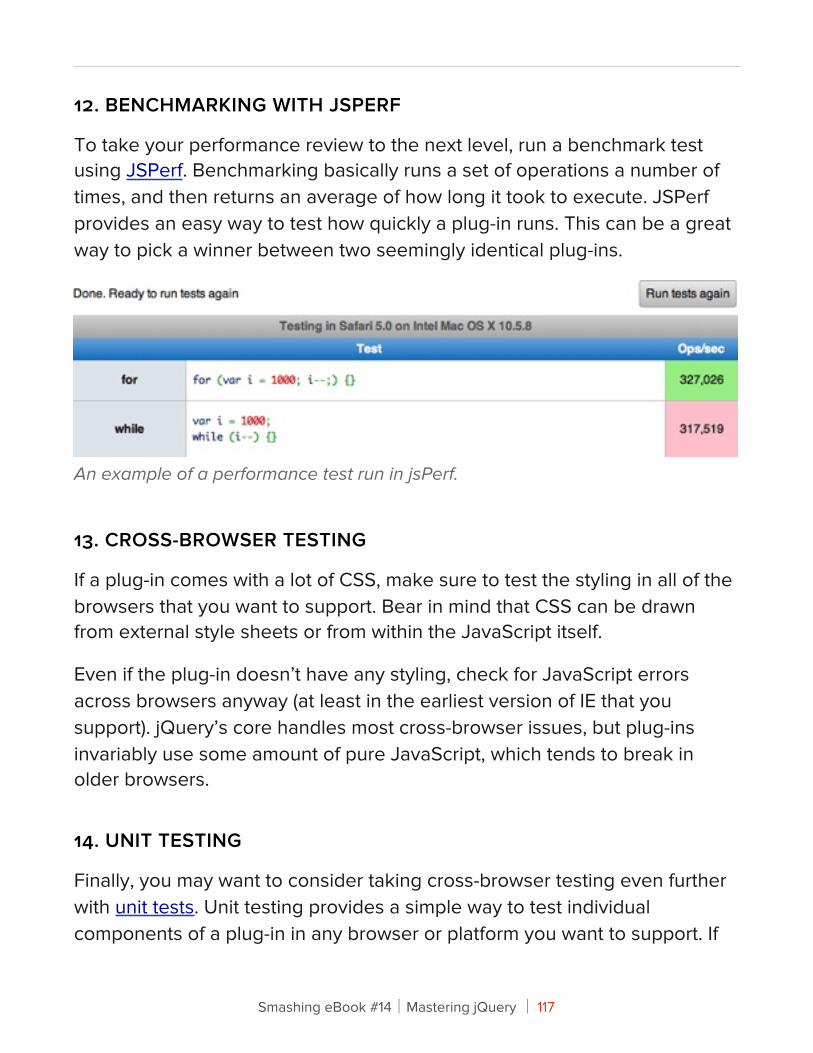
12. BENCHMARKING WITH JSPERF
To take your performance review to the next level, run a benchmark test using JSPerf. Benchmarking basically runs a set of operations a number of times, and then returns an average of how long it took to execute. JSPerf provides an easy way to test how quickly a plug-in runs. This can be a great way to pick a winner between two seemingly identical plug-ins.
An example of a performance test run in jsPerf.
13. CROSS-BROWSER TESTING
If a plug-in comes with a lot of CSS, make sure to test the styling in all of the browsers that you want to support. Bear in mind that CSS can be drawn from external style sheets or from within the JavaScript itself.
Even if the plug-in doesn’t have any styling, check for JavaScript errors across browsers anyway (at least in the earliest version of IE that you support). jQuery’s core handles most cross-browser issues, but plug-ins invariably use some amount of pure JavaScript, which tends to break in older browsers.
14. UNIT TESTING
Finally, you may want to consider taking cross-browser testing even further with unit tests. Unit testing provides a simple way to test individual components of a plug-in in any browser or platform you want to support. If
Smashing eBook #14│Mastering jQuery │ 117
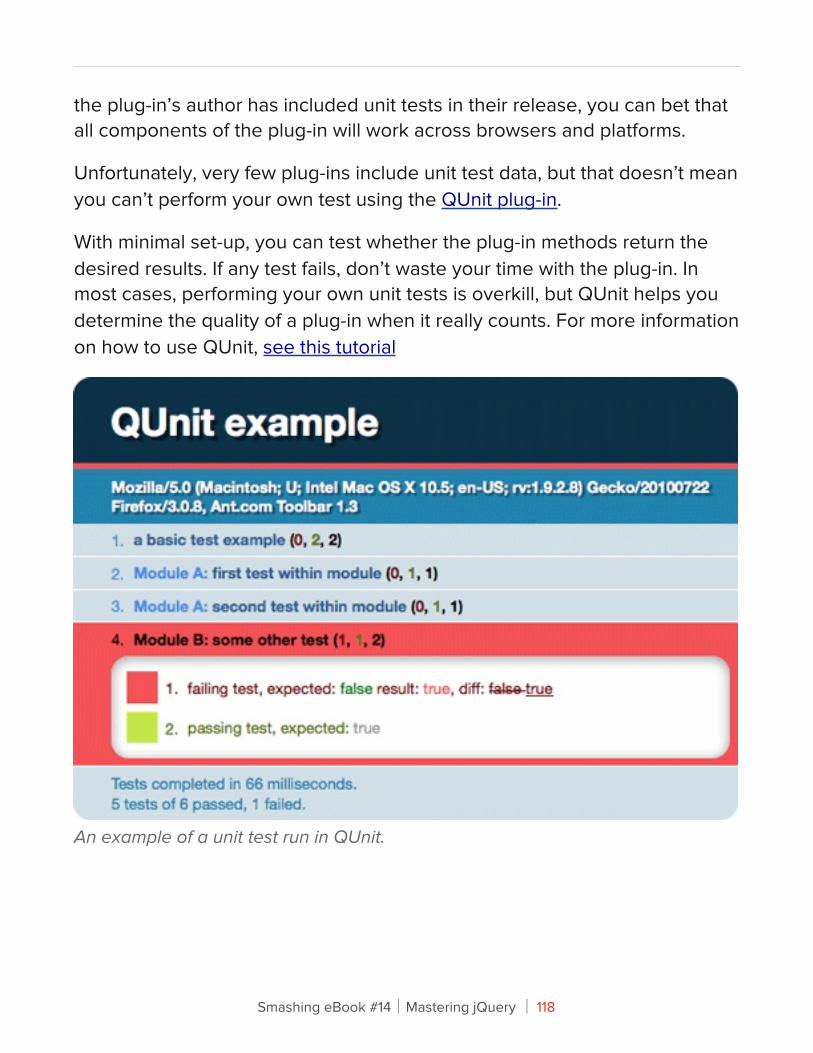
the plug-in’s author has included unit tests in their release, you can bet that all components of the plug-in will work across browsers and platforms.
Unfortunately, very few plug-ins include unit test data, but that doesn’t mean you can’t perform your own test using the QUnit plug-in.
With minimal set-up, you can test whether the plug-in methods return the desired results. If any test fails, don’t waste your time with the plug-in. In most cases, performing your own unit tests is overkill, but QUnit helps you determine the quality of a plug-in when it really counts. For more information on how to use QUnit, see this tutorial
An example of a unit test run in QUnit.
Smashing eBook #14│Mastering jQuery │ 118
ConclusionWhen assessing the quality of a jQuery plug-in, look at all levels of the code. Is the JavaScript optimized and error-free? Is the CSS tuned and effective? Does the mark-up make semantic sense and have the flexibility you need? These questions all lead to the most important question: will this plug-in be easy to use?
jQuery core has been optimized and bug-checked not only by the core team but by the entire jQuery community. While holding jQuery plug-ins to the same standard would be unfair, they should stand up to at least some of that same scrutiny.
Smashing eBook #14│Mastering jQuery │ 119
About the Authors
Addy OsmaniAddy Osmani is a JavaScript blogger & UI Developer for AOL based in London, England. He is also a member of the jQuery [Bug Triage/Docs/Front-end] teams where he assists with bugs, documentation and community updates. Most recently he's been nominated for the .net 'Brilliant Newcomer' award.
Andy CroxallAndy Croxall is a Web developer from Wandsworth, London, England. He is a Javascript specialist and is an active member of the jQuery community, posting plugins and extensions. He has worked for clients ranging from the London Stock Exchange to Durex. You can keep up with him and his projects and creations on his website, mitya.co.uk.
Jon RaaschJon Raasch is the author of the book Smashing Webkit. He's a freelance front-end web developer and UI designer with endless love for jQuery, CSS3, HTML5 and performance tuning. Follow him on Twitter or read his blog.
Smashing eBook #14│Mastering jQuery │ 120

Tommy SaylorTommy is some sort of designer/developer hybrid. He currently lives in Dallas, Texas, USA, and works for BubbleLife Media. His goal in life: Be Creative, Be Happy.
Smashing eBook #14│Mastering jQuery │ 121

![jQuery Fundamentals · jQuery Fundamentals Rebecca Murphey [] jQuery Fundamentals Rebecca Murphey [] Copyright © 2010](https://img.pdfslide.us/doc/110x75/5eb897bf41e49d450f44be28/jquery-fundamentals-jquery-fundamentals-rebecca-murphey-jquery-fundamentals.jpg)


![jQuery, eCSStender & you [jQuery Summit 2010]](https://img.pdfslide.us/doc/110x75/54c70c894a7959e62f8b461d/jquery-ecsstender-you-jquery-summit-2010.jpg)