Embed Size (px)
Citation preview
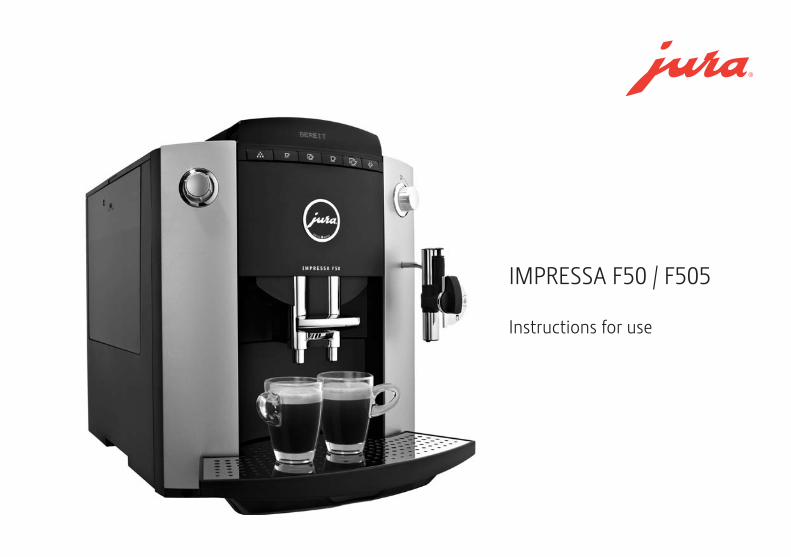
IMIMPRESSA PRESSA F50 / F505F50 / F505
Instructions for useInstructions for use

2
Legend: � DISPLAY: serves as information.
� DISPLAY: please follow the instructions shown. = Note / Tip = Important
3
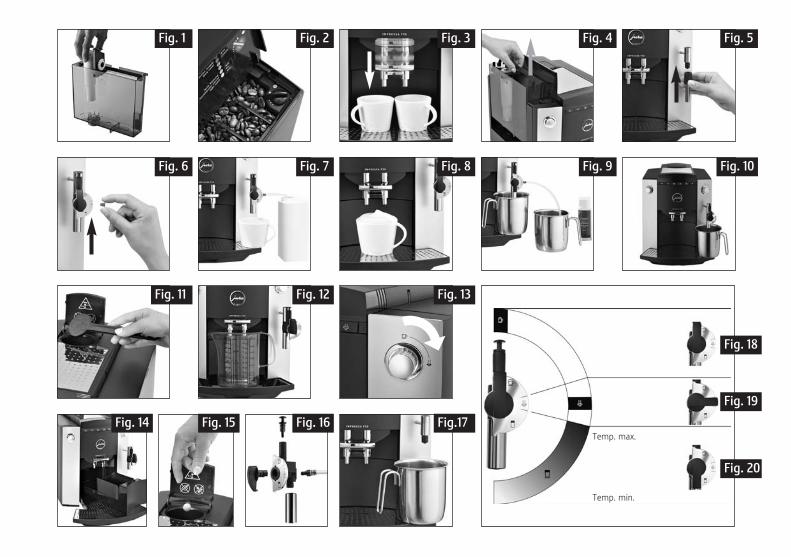
Fig. 1 Fig. 2 Fig. 3 Fig. 4
Fig. 6 Fig. 7 Fig. 8 Fig. 9 Fig. 10
Fig. 11 Fig. 12 Fig. 13
Fig. 14 Fig. 15 Fig.17
Fig. 5
Fig. 16Temp. max.
Temp. min.
Fig. 18
Fig. 19
Fig. 20
10
913
14
1718
11
3
1
2
12
20
4 7 85 6
15/16
19
Rotary Switch
13
21
22
4
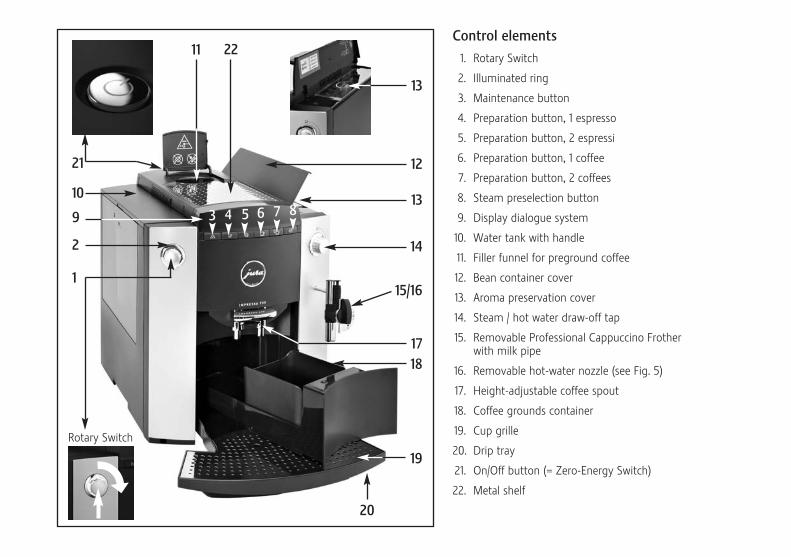
Control elements
1. Rotary Switch
2. Illuminated ring
3. Maintenance button
4. Preparation button, 1 espresso
5. Preparation button, 2 espressi
6. Preparation button, 1 coffee
7. Preparation button, 2 coffees
8. Steam preselection button
9. Display dialogue system
10. Water tank with handle
11. Filler funnel for preground coffee
12. Bean container cover
13. Aroma preservation cover
14. Steam / hot water draw-off tap
15. Removable Professional Cappuccino Frother with milk pipe
16. Removable hot-water nozzle (see Fig. 5)
17. Height-adjustable coffee spout
18. Coffee grounds container
19. Cup grille
20. Drip tray
21. On/Off button (= Zero-Energy Switch)
22. Metal shelf
5
E
Table of contents1. Safety instructions . . . . . . . . . . . . . . . . . . . . . . . . . . . . . . . . . . . . . . . . . . . . . . . page 6
1.1 Proper use . . . . . . . . . . . . . . . . . . . . . . . . . . . . . . . . . . . . . . . . . . . . . . . . . . page 61.2 Warnings. . . . . . . . . . . . . . . . . . . . . . . . . . . . . . . . . . . . . . . . . . . . . . . . . . . . page 61.3 Precautions . . . . . . . . . . . . . . . . . . . . . . . . . . . . . . . . . . . . . . . . . . . . . . . . . page 6
2. Preparing the IMPRESSA . . . . . . . . . . . . . . . . . . . . . . . . . . . . . . . . . . . . . . . . page 72.1 Checking the mains voltage . . . . . . . . . . . . . . . . . . . . . . . . . . . . . page 72.2 Checking the electric fuse . . . . . . . . . . . . . . . . . . . . . . . . . . . . . . . . page 72.3 Filling the water tank. . . . . . . . . . . . . . . . . . . . . . . . . . . . . . . . . . . . . . page 72.4 Filling with coffee beans . . . . . . . . . . . . . . . . . . . . . . . . . . . . . . . . . . page 72.5 Adjusting the grinder . . . . . . . . . . . . . . . . . . . . . . . . . . . . . . . . . . . . . page 7
3. Using for the first time. . . . . . . . . . . . . . . . . . . . . . . . . . . . . . . . . . . . . . . . . . page 84. Adjusting the water hardness . . . . . . . . . . . . . . . . . . . . . . . . . . . . . . . . . . page 85. Using the CLARIS filter cartridge. . . . . . . . . . . . . . . . . . . . . . . . . . . . . . . page 9
5.1 Inserting the filter. . . . . . . . . . . . . . . . . . . . . . . . . . . . . . . . . . . . . . . . . . page 95.2 Changing the filter . . . . . . . . . . . . . . . . . . . . . . . . . . . . . . . . . . . . . . . . page 10
6. Rinsing the IMPRESSA. . . . . . . . . . . . . . . . . . . . . . . . . . . . . . . . . . . . . . . . . . . page 107. Adjusting the amount of water for coffee. . . . . . . . . . . . . . . . . . . . page 118. Preparing 1 cup of coffee . . . . . . . . . . . . . . . . . . . . . . . . . . . . . . . . . . . . . . . page 119. Preparing 2 cups of coffee. . . . . . . . . . . . . . . . . . . . . . . . . . . . . . . . . . . . . . page 12
10. Preparing preground coffee . . . . . . . . . . . . . . . . . . . . . . . . . . . . . . . . . . . . page 1211. Preparing hot water . . . . . . . . . . . . . . . . . . . . . . . . . . . . . . . . . . . . . . . . . . . . . page 1312. Preparing steam. . . . . . . . . . . . . . . . . . . . . . . . . . . . . . . . . . . . . . . . . . . . . . . . . . page 1313. Professional Cappuccino Frother . . . . . . . . . . . . . . . . . . . . . . . . . . . . . . page 14
13.1 Preparing cappuccino with the Professional Cappuccino Frother . . . . . . . . . . . . . . . . . . . . . . . . page 14
13.2 Preparing hot milk with the Professional Cappuccino Frother . . . . . . . . . . . . . . . . . . . . . . . . page 15
13.3 Rinsing the Professional Cappuccino Frother . . . . . . . . . . page 1613.4 Dismantling and rinsing the
Professional Cappuccino Frother . . . . . . . . . . . . . . . . . . . . . . . . page 1613.5 Cleaning the Professional Cappuccino Frother . . . . . . . . page 16
14. Switching off the IMPRESSA. . . . . . . . . . . . . . . . . . . . . . . . . . . . . . . . . . . . page 1715. Programming. . . . . . . . . . . . . . . . . . . . . . . . . . . . . . . . . . . . . . . . . . . . . . . . . . . . . page 17
15.1 Buttons programme item . . . . . . . . . . . . . . . . . . . . . . . . . . . . . . . . page 1915.2 Filter programme item. . . . . . . . . . . . . . . . . . . . . . . . . . . . . . . . . . . . page 2015.3 Water hardness programme item. . . . . . . . . . . . . . . . . . . . . . . page 2015.4 Energy programme item . . . . . . . . . . . . . . . . . . . . . . . . . . . . . . . . . page 2015.5 Automatic switch-off time programme item . . . . . . . . . . page 2015.6 Rinse programme item . . . . . . . . . . . . . . . . . . . . . . . . . . . . . . . . . . . page 2115.7 Reset programme item . . . . . . . . . . . . . . . . . . . . . . . . . . . . . . . . . . . page 2115.8 Information programme item . . . . . . . . . . . . . . . . . . . . . . . . . . . page 2215.9 ML/OZ display programme item . . . . . . . . . . . . . . . . . . . . . . . . page 2315.10 Language programme item . . . . . . . . . . . . . . . . . . . . . . . . . . . . . . page 24
16. Maintenance . . . . . . . . . . . . . . . . . . . . . . . . . . . . . . . . . . . . . . . . . . . . . . . . . . . . . . page 2416.1 Filling with water . . . . . . . . . . . . . . . . . . . . . . . . . . . . . . . . . . . . . . . . . . page 2416.2 Emptying coffee grounds container . . . . . . . . . . . . . . . . . . . . page 2416.3 Drip tray missing . . . . . . . . . . . . . . . . . . . . . . . . . . . . . . . . . . . . . . . . . . page 2516.4 Filling with coffee beans . . . . . . . . . . . . . . . . . . . . . . . . . . . . . . . . . . page 2516.5 Changing the filter . . . . . . . . . . . . . . . . . . . . . . . . . . . . . . . . . . . . . . . . page 2516.6 Cleaning the IMPRESSA. . . . . . . . . . . . . . . . . . . . . . . . . . . . . . . . . . . page 2516.7 IMPRESSA calcification . . . . . . . . . . . . . . . . . . . . . . . . . . . . . . . . . . . . page 2516.8 General cleaning instructions . . . . . . . . . . . . . . . . . . . . . . . . . . . . page 2516.9 Emptying the system . . . . . . . . . . . . . . . . . . . . . . . . . . . . . . . . . . . . . page 26
17. Cleaning . . . . . . . . . . . . . . . . . . . . . . . . . . . . . . . . . . . . . . . . . . . . . . . . . . . . . . . . . . . page 2618. Descaling . . . . . . . . . . . . . . . . . . . . . . . . . . . . . . . . . . . . . . . . . . . . . . . . . . . . . . . . . . page 2719. Disposal . . . . . . . . . . . . . . . . . . . . . . . . . . . . . . . . . . . . . . . . . . . . . . . . . . . . . . . . . . . page 2820. Tips for a perfect coffee . . . . . . . . . . . . . . . . . . . . . . . . . . . . . . . . . . . . . . . . . page 2921. Messages . . . . . . . . . . . . . . . . . . . . . . . . . . . . . . . . . . . . . . . . . . . . . . . . . . . . . . . . . . page 3022. Problems . . . . . . . . . . . . . . . . . . . . . . . . . . . . . . . . . . . . . . . . . . . . . . . . . . . . . . . . . . page 3123. Legal information . . . . . . . . . . . . . . . . . . . . . . . . . . . . . . . . . . . . . . . . . . . . . . . . page 3224. Technical data . . . . . . . . . . . . . . . . . . . . . . . . . . . . . . . . . . . . . . . . . . . . . . . . . . . . page 32
6
Before you get started
Congratulations on purchasing this IMPRESSA. To ensure that yourIMPRESSA works smoothly, please read these instructions for usecarefully and keep them as a future reference. If you need more information or if you experience any problemswhich are not covered in enough detail in these instructions for use,please contact your local stockist or ourselves.
1. Safety instructions
1.1 Proper use
The machine is designed and intended for private domestic use. Itshould only be used for coffee preparation and to heat milk and water. Use for any other purpose will be deemed improper. JURA Elektroapparate AG cannot accept any responsibility for the conse-quences of improper use.
Before using the machine read these instructions for use thoroughlyand completely and comply with the instructions they contain. Keepthese instructions for use close to the machine and pass them on tothe next user.
1.2 Warnings
� Children are not aware of the dangers which may arise when usingelectric appliances, so never leave children unattended near electricappliances.
� The IMPRESSA may only be operated by instructed persons.
� People, including children, who – do not have the physical, sensory or mental capabilities to use
the machine safely or– are inexperienced or lack knowledge in how to use the machine
safelymust be supervised by a responsible person when using it, or mustbe instructed in how to use it correctly.
� Never start up a defective IMPRESSA or an IMPRESSA with a dam-aged supply cable.
� In the event of signs of damage, for example if there is a smell ofburning, unplug the machine immediately from the mains supplyand contact JURA service.
� If the mains cable of this machine is damaged, it must be repairedeither directly by JURA or by an authorised JURA service centre.
� Never repair or open the IMPRESSA yourself. Repairs and modifi -cations to the machine may only be undertaken by authorised JURAservice centres using genuine spare parts and accessories. The machine contains live parts. If opened, there is a danger of poten-tially fatal injury.
� Do not immerse the IMPRESSA in water.
1.3 Precautions
� Never subject the IMPRESSA to environmental influences (rain,snow, frost) and do not operate with wet hands.
� Place the IMPRESSA on a sturdy, horizontal surface resistant to anywater leaks. Never place on hot or warm surfaces (hobs). Select asite out of reach of children.
7
� Be careful to ensure that the mains cable is not trapped and doesnot rub against sharp edges.
� Always remove the mains plug during long periods of absence(holidays etc.).
� Always remove the mains plug before cleaning.
� When removing the mains plug, never tug the supply cable or theIMPRESSA itself.
� The IMPRESSA is connected to the power supply by a supply cable.Make sure people can’t trip over the supply cable, bringing downthe IMPRESSA. Make sure children and pets cannot reach the ma-chine.
� Never put the IMPRESSA or individual parts of it in the dishwasher.
� Install the IMPRESSA in a place where the air can circulate well toprevent it from overheating.
2. Preparing the IMPRESSA
2.1 Checking the mains voltage
The IMPRESSA is set to the right mains voltage by default.Check whether your mains voltage matches that stated on therating plate on the underside of your IMPRESSA.
2.2 Checking the electric fuse
The IMPRESSA is rated for a current of 10 amps. Check whethera fuse for this rating is fitted.
2.3 Filling the water tank
Only top up with fresh, cold water. Never fill with milk, mineralwater or other liquids.
� Remove the water tank and rinse it well with cold mains water (Fig. 4).
� Then fill the water tank and refit in the IMPRESSA. Be careful to ensure that the tank is correctly inserted and properly engaged.
2.4 Filling with coffee beans
To make sure you get lasting enjoyment from your machineand to avoid the need for repairs, please note that the grinder in your JURA coffee machine is not suitable for coffee beansthat have been treated with additives (e.g. sugar) during or after roasting. Using coffee blends of this type may damage thegrinder. Any resulting repair costs will not be covered by thewarranty conditions.
� Fold the bean container cover (12) open and remove the aromapreservation cover (13).
� Remove any dirt or foreign objects from inside the bean container.
� Fill the bean container with coffee beans and close the cover.
2.5 Adjusting the grinder
You can adjust the grinder to the suit the degree of roast of your cof-fee. Our recommendations:
a light roast � a finer setting (the smaller the dots, the finer thegrinding)
a dark roast � a coarser setting (the larger the dots, the coarserthe grinding)
E
8
Only use the switch to adjust the consistency of grind when thegrinder is running.
� Open the bean container cover (12) and remove the aroma preser-vation cover (13).
� To adjust the consistency of grind, turn the switch to the desiredposition during the grinding operation (Fig. 2).
3. Using for the first time
� Fill the bean container with coffee beans (12).
� Switch your IMPRESSA on with the On/Off button (21).
� SPRACHE DEUTSCH
� The illuminated ring (2) is active.
� Turn the Rotary Switch (1) until the desired language appears onthe display.
� Now confirm your selection by pressing the Rotary Switch (1).
� FILLWATER TANK
� Remove the water tank (10) and fill with fresh water. Refit the watertank in your IMPRESSA.
� OPEN TAP
� Place receptacle under the Professional Cappuccino Frother (15)(Fig. 10).
� Now open the steam / hot water draw-off tap (14) (Fig. 13).
� SYSTEM FILLING
� CLOSE TAP
� Close the steam / hot water draw-off tap (14).
� SYSTEM FILLING
� HEATING
� PRESSRINSE
� Press the Maintenance button (3).
� The machine rinses.
� RINSING
� READY
If FILL BEANS appears on the display, again press any coffeepreparation button. The grinder is not yet filled with coffeebeans.
To get a really good crema you can individually adjust theheight-adjustable coffee spout (17) to your cup sizes (Fig. 3).
4. Adjusting the water hardness
Water is heated in the IMPRESSA. Over time this will result incalcification and this is displayed automatically. The IMPRESSA must be set to the hardness of the water used. Use the teststrips provided.
1° German hardness corresponds to 1.79° French hardness.
When the filter is activated, the water hardness programmeitem disappears.
9
The IMPRESSA is set to 16° dH by default. You can change this setting.Proceed as follows:
� READY
� Press and hold the Rotary Switch (1) until RINSE appears on the dis-play.
� The illuminated ring (2) is active.
� Turn the Rotary Switch (1) until the following message appears onthe display:
� HARDNESS
� Now press the Rotary Switch (1) to enter the programme item.
� 16° dH
� Now turn the Rotary Switch (1) until the desired water hardness appears.
� For example 20° dH.
� Confirm the desired water hardness by pressing the Rotary Switch (1).
� OK
� HARDNESS
� Turn the Rotary Switch (1) until the following message appears onthe display:
� EXIT
� Now press the Rotary Switch (1) to exit programming mode.
� READY
5. Using the CLARIS filter cartridge
If you use the CLARIS filter cartridge correctly, your automaticcoffee machine no longer has to be descaled. The DE-SCALEprogramme item no longer appears.
5.1 Inserting the filter
� Press and hold the Rotary Switch (1) until RINSE appears on the dis-play.
� The illuminated ring (2) is active.
� Turn the Rotary Switch (1) until the following message appears onthe display:
� FILTER –
� Press the Rotary Switch (1) again to enter this programme item.
� NO –
� Turn the Rotary Switch (1) until the following message appears onthe display:
� YES �
� Press the Rotary Switch (1) to activate the filter cartridge.
� OK
� INSERTOPEN TAP
� Remove and empty the water tank (10).
� Fold up the filter holder. Insert the filter cartridge in the water tank,exerting slight pressure (Fig. 1).
� Close the filter holder until it audibly snaps into place.
� Fill the water tank with cold, fresh mains water and reinsert thetank.
� Place a sufficiently large receptacle (around 1 litre) under the Pro-fessional Cappuccino Frother (15) (Fig. 10).
� Open the steam / hot water draw-off tap (14) (Fig. 13).
� FILTERRINSING
E
10
You can interrupt rinsing of the filter at any time by closing thesteam / hot water draw-off tap (14). To continue with filter rins-ing, open the steam / hot water draw-off tap (14) again.
� CLOSE TAP
� Close the steam / hot water draw-off tap (14), your IMPRESSA willnow heat up to coffee temperature.
� HEATING
� READY
You have now activated the filter. In programming mode, theWater hardness programme item HARDNESS nolonger appears.
5.2 Changing the filter
After drawing off around 50 litres of water, the filter will ceaseto work. You will be prompted to change the filter. Please use the scale on the filter holder on the water tank to monitor how long the CLARIS filter cartridge has been in use (max. 2 months).
� READYFILTER
� Press the Maintenance button (3) until the following messageappears:
� CHANGEOPEN TAP
� Remove the water tank from the machine and empty it.
� Fold up the filter holder. Take out the old CLARIS filter cartridge andinsert the new filter cartridge into the water tank, exerting slightpressure (Fig. 1).
� Close the filter holder until it audibly snaps into place.
� Fill the water tank with cold, fresh mains water and reinsert in theIMPRESSA.
� Place a sufficiently large receptacle (around 1 litre) under the Pro-fessional Cappuccino Frother (15) (Fig. 10) and open the steam / hotwater draw-off tap (14) (Fig. 13).
� FILTERRINSING
� CLOSE TAP
� Close the steam / hot water draw-off tap (14).
� HEATING
� READY
6. Rinsing the IMPRESSA
If the IMPRESSA is switched off and has already cooled down,you are prompted to perform the rinse operation. A rinse oper-ation is triggered automatically when shutting the coffee ma-chine down.
� Switch your IMPRESSA on with the On/Off button (21).
� HEATING
� PRESS RINSE
� Press the Maintenance button (3).
� RINSING
� READY
11
7. Adjusting the amount of water for coffee
The figure in ML is approximate and may vary from the actualamount.
The machine automatically doubles the amount of water pro-grammed for the 2 espressi / 2 coffees preparation but-tons.
You can also change the amount of water during operation.Turn the Rotary Switch (1) during the brewing operation untilthe desired ML figure appears on the display.
You can stop the drawing off of water prematurely by pressingany button.
It is easy to permanently adjust the amount of water for all spe-ciality coffees, milk specialities and hot water to the cup size. As in the following example, adjust the amount of water or milkonce and then this amount will be used each time you preparethis speciality coffee.
Example: Permanent setting of amount of water for one espresso:
� READY
� Press the 1 ESPRESSO preparation button and hold down until thefollowing message appears on the display.
� 1 ESPRESSO
� ENOUGH COFFEE ?
� Press the button again as soon as there is enough coffee in yourcup.
� OK
� 1 ESPRESSO
� READY
8. Preparing 1 cup of coffee
You can change the strength at any time before or during thegrinding operation by turning the Rotary Switch (1). You can choose from 4 strengths ( MILD / NORMAL /STRONG / XSTRONG).
You can stop preparation at any time by pressing any prepara-tion button.
� READY
� Place 1 cup under the height-adjustable coffee spout (17).
� Press the 1 coffee preparation button (6).
� 1 COFFEE
� The illuminated ring (2) is active.
� You can adjust the desired strength for the current coffee prepara-tion by turning the Rotary Switch (1) during the grinding operation.
� 1 COFFEE
� ����������
� You can adjust the desired amount of water for the current coffeepreparation by again turning the Rotary Switch (1) during the brew-ing operation.
� For example 100 ML.
� Turn the Rotary Switch (1) until the desired amount of water ap-pears on the display.
� For example 110 ML.
E
12
� ����������
� Your speciality coffee is prepared.
� 1 COFFEE
� READY
9. Preparing 2 cups of coffee
The strength cannot be selected when preparing 2 cups of cof-fee. You automatically prepare 2 mild cups.
You can stop preparation prematurely by pressing any prepara-tion button.
� READY
� Place 2 cups under the height-adjustable coffee spout (17).
� Press the 2 coffees preparation button (7).
� 2 COFFEES
� The illuminated ring (2) is active.
� ����������
� You can adjust the desired amount of water for the current coffeepreparation by turning the Rotary Switch (1) during the brewing operation. The modified ML value relates to 1 cup.
� For example 100 ML.
� Turn the Rotary Switch (1) until the desired amount of water ap-pears on the display.
� For example 110 ML.
� ����������
� Your speciality coffee is prepared.
� 2 COFFEES
� READY
10. Preparing preground coffee
Never use water-soluble instant coffee or instant coffee. Wewould recommend always using powder from freshly ground coffee beans or preground, vacuum-packed coffee. Never addmore than 2 portions of powder. The filler shaft is not designedfor storage. Ensure that the preground coffee you are using isnot ground too fine. This may block the system and the coffeewill then only be dispensed in drips.
If you have added too little powder, the NOT ENOUGH PRE-GROUND message appears on the display. The IMPRESSA aborts the operation, ejects the preground coffee and resetsthe machine so that it is ready to brew coffee.
You can interrupt preparation prematurely by pressing anypreparation button.
� READY
� Place 1 or 2 cups under the height-adjustable coffee spout (17).
� Open the cover of the filler funnel for preground coffee (11).
� FILL PRE-GROUND
� Place 1 or 2 level measuring spoons of preground coffee into thefiller funnel for preground coffee (11) (Fig. 11) and close the cover.
� SELECTBUTTON
13
� Select the 1 coffee preparation button (6) or 2 coffees prepara-tion button (7).
� 1 COFFEE
� ����������
� The illuminated ring (2) is active.
� By turning the Rotary Switch (1), you can individually select theamount of water for coffee:
� For example 110 ML.
� ����������
� Your speciality coffee is prepared.
� 1 COFFEE
� READY
11. Preparing hot water
To obtain a perfect water flow, fit the removable hot water noz-zle (Fig. 5). Do not change the removable hot-water nozzle (16) immediately after drawing off water because it will be hot andthere will be a danger of burns.
When drawing off water, sputtering may occur at the start.Avoid direct contact with the skin.
� READY
� Place a cup under the removable hot-water nozzle (16) (Fig. 5).
� Open the steam / hot water draw-off tap (14) (Fig. 13).
� The illuminated ring (2) is active.
� WATER
� ����������
� If necessary adjust the amount of water saved by turning the Ro-tary Switch (1).
� For example 200 ML.
� ����������
� Once the desired amount of water is reached, the following appearson the display:
� CLOSE TAP
� Close the steam / hot water draw-off tap (14).
� READY
Due to the system design, some water may be released beforethe TAP is closed.
12. Preparing steam
The steam function is used to prepare milk foam and hot milkand for cleaning the Professional Cappuccino Frother (15).
If the optional 2-stage frothing nozzle is fitted, the steam func-tion can be used to heat liquids and produce foam.
Make sure that the nozzle is fitted correctly when preparingsteam. If the nozzle becomes blocked with particles of milk residue or is incorrectly assembled, it may disengage and comeoff while the frother is in use.
Due to the system design, some water will escape at first whenstream is drawn off. However, this will not affect the result inany way.
When drawing off , sputtering may occur at the start. The noz-zle gets hot during operation. Avoid direct contact with theskin.
E
14
� READY
� Press the steam preselection button (8).
� HEATING
� READY
� Open the steam / hot water draw-off tap (14) (Fig. 13) to draw offsteam.
� The illuminated ring (2) is active.
� STEAM
� ����������
� You can adjust the steam preparation time individually by turningthe Rotary Switch (1) until the desired number of SEC appear on thedisplay.
� For example 25 SEC.
� ����������
� If you do not change the steam preparation time on the RotarySwitch (1), you prepare the saved amount of steam.
� Once the amount of steam is reached, the following message ap-pears on the display:
� CLOSE TAP
� Close the steam / hot water draw-off tap (14).
� READY
The machine is ready to prepare steam for around 40 sec., thenthe machine is reset so that it is ready to brew coffee.
You can prematurely stop steam preparation at any time byclosing the steam / hot water draw-off tap (13).
Due to the system design, some steam may be released beforethe tap is closed. There is a danger of scalding.
13. Professional Cappuccino Frother
13.1 Preparing cappuccino with the Professional Cappuccino Frother
Cappuccino is made up of one third espresso, one third warmmilk and one third milk foam. The Professional CappuccinoFrother (15) is used for preparing the milk portion.
When steam is drawn off, a negative pressure is created andthis draws milk with the aid of the Professional CappuccinoFrother (15) and produces milk foam.You can also heat up milk by turning the selector switch on theProfessional Cappuccino Frother to the Milk position (Fig. 20).
To avoid malfunctions, the Professional Cappuccino Frother (15)must be cleaned regularly.
Make sure that the nozzle is fitted correctly. If the nozzlebecomes blocked with particles of milk residue or is incorrectly assembled, it may disengage and come off while the frother isin use.
� When using for the first time, remove the protective cover from theProfessional Cappuccino Frother (Fig. 6). The protective cover isused only during transport to protect the nozzle against contami-nant ingress.
� Remove the milk pipe from the Welcome Pack and connect it tothe Professional Cappuccino Frother.
15
� Insert the other end of the milk pipe into a milk carton or connectit to a milk container (Fig. 7).
� Place a cup under the Professional Cappuccino Frother (Fig. 7).
The high-quality stainless steel container is a practical additionfor all lovers of milk specialities. It keeps the milk cool through-out the day and is fully in keeping with the design of your IMPRESSA.All original JURA accessories are available from stockists.
� Turn the selector switch on the Professional Cappuccino Frother tothe Milk Foam position (Fig. 18).
� READY
� Press the steam preselection button (8).
� HEATING
� READY
� Open the steam / hot water draw-off tap (Fig. 13) to draw off steam.The milk foam is prepared.
� The illuminated ring (2) is active.
� STEAM
� ����������
� You can adjust the steam preparation time individually by turningthe Rotary Switch (1) until the desired number of SEC appear on thedisplay.
� For example 25 SEC.
� ����������
� If you do not change the steam preparation time on the RotarySwitch (1), you prepare the saved amount of steam.
Adjust the steam preparation time to suit the size of your cup.
� Once the amount of steam is reached, the following message appears on the display:
� CLOSE TAP
� Close the steam / hot water draw-off tap (14).
� READY
The machine is ready to prepare steam for around 40 sec., thenthe machine is reset so that it is ready to brew coffee.
You can prematurely stop steam preparation at any time byclosing the steam / hot water draw-off tap (14).
Due to the system design, some steam and milk may be re-leased before the tap is closed. There is a danger of scalding.
� Now, move your cup with the milk foam under the coffee spoutand draw off the desired speciality coffee (Fig. 8). Your cappuccinois ready.
13.2 Preparing hot milk with the Professional Cappuccino Frother
Turn the selector switch on the Professional Cappuccino Frotherto the Milk position (Fig. 20).The operation for preparing hot milk is the same as that forpreparing milk foam for a cappuccino (see chapter 13 ‘Preparingcappuccino with the Professional Cappuccino Frother’).
E
16
13.3 Rinsing the Professional Cappuccino Frother
To ensure that the Professional Cappuccino Frother (15) worksperfectly, you should rinse it with water after every milk prepa-ration.
Your IMPRESSA will not prompt you to rinse the ProfessionalCappuccino Frother.
� READY
� Remove the milk pipe from the milk carton or the milk container.
� Fill a receptacle with fresh water and immerse the milk pipe in it.
� Place a receptacle under the Professional Cappuccino Frother andmove the selector switch to the Milk foam or Milk position.
� Press the steam preselection button (8).
� HEATING
� READY
� Open the steam / hot water draw-off tap (14) (Fig. 13) to draw offsteam. The frother and milk pipe are rinsed.
� STEAM
� ����������
� Ignoring the CLOSE TAP display message, draw off steam untilclean water runs out of the frother. Then close the steam / hot waterdraw-off tap (14).
� READY
13.4 Dismantling and rinsing the Professional Cappuccino Frother
� Carefully remove the Professional Cappuccino Frother (15) fromyour IMPRESSA by twisting slightly.
� Dismantle the Professional Cappuccino Frother (15) into its indiv -idual parts (Fig. 16).
� Rinse all frother parts thoroughly under running water.
� Re-assemble the frother and refit it on your IMPRESSA.
13.5 Cleaning the Professional Cappuccino Frother
To ensure that the Professional Cappuccino Frother (15) alwaysworks properly, you should clean it daily when you have beenpreparing milk foam or hot milk.
Your IMPRESSA will not prompt you to clean the ProfessionalCappuccino Frother.
JURA Cappuccino Cleaner is available from stockists.
� Place a receptacle under the Professional Cappuccino Frother (Fig. 9).
� Fill a second receptacle with 2.5 dl of fresh water and add a capfulof JURA Cappuccino Cleaner.
� Immerse the milk pipe in the second receptacle with the JURA Cap-puccino Cleaner (Fig. 9).
� READY
� Press the steam preselection button (8).
� HEATING
� READY
17
� Open the steam / hot water draw-off tap (Fig. 13) to draw off steam.
� STEAM
� ����������
� Ignoring the CLOSE TAP display message, draw off steam until thereceptacle containing JURA Cappuccino Cleaner is empty.The Professional Cappuccino Frother and the milk pipe are cleaned.
� Close the steam / hot water draw-off tap.
� READY
The machine is ready to prepare steam for around 40 sec., thenthe machine is reset so that it is ready to brew coffee.
� Fill the receptacle with 2.5 dl of fresh water.Immerse the milk pipe in the receptacle containing fresh water.
When READY appears on the , press the steam pre-selection button (8) again to ready the machine to preparesteam.
� Open the steam / hot water draw-off tap (Fig. 13) to draw off steam.
� Ignoring the CLOSE TAP display message, draw off steam until the receptacle containing fresh water is empty. Then close thesteam / hot water draw-off tap (14).The Professional Cappuccino Frother (15) and the milk pipe arerinsed with fresh water.
� Cleaning of the Professional Cappuccino Frother is complete, yourIMPRESSA is ready for use.
14. Switching off the IMPRESSA
� READY
� Switch the IMPRESSA off with the On/Off button (21).
� RINSING
� Automatic switch-off rinse is started.
Just one automatic rinse is started if at least 1 speciality coffeehas been prepared. Otherwise the machine switches off with-out a rinse.
15. Programming
The IMPRESSA is configured in the factory such that you canprepare coffee without any additional programming. You can individually program various settings to adapt your beveragesto your personal taste.
You can program the following settings:
� RINSE� BUTTONS� FILTER –� HARDNESS� ENERGY –� OFF AFTER� RINSING� RESET� INFO� DISPLAY� LANGUAGE
E
18
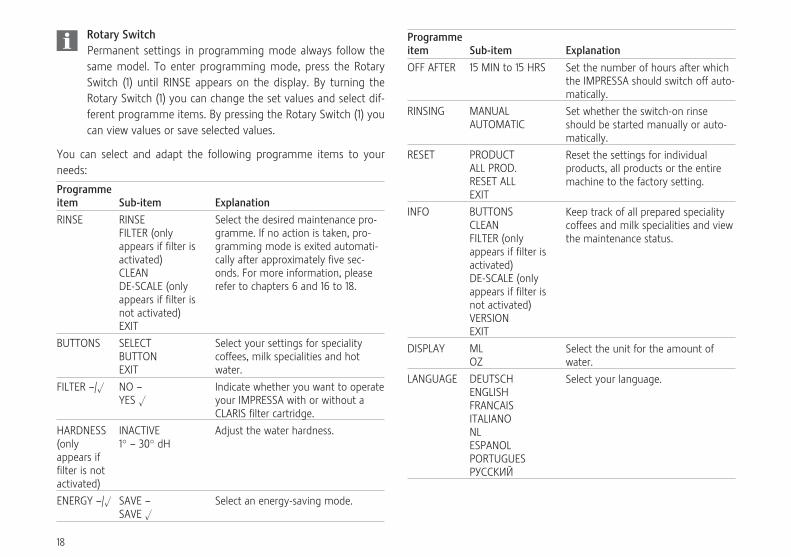
Rotary SwitchPermanent settings in programming mode always follow the same model. To enter programming mode, press the RotarySwitch (1) until RINSE appears on the display. By turning the Rotary Switch (1) you can change the set values and select dif-ferent programme items. By pressing the Rotary Switch (1) youcan view values or save selected values.
You can select and adapt the following programme items to yourneeds:
Programme item Sub-item Explanation
RINSE RINSEFILTER (only appears if filter is activated)CLEANDE-SCALE (only appears if filter is not activated)EXIT
BUTTONS SELECTBUTTONEXIT
FILTER –/� NO –YES �
HARDNESS INACTIVE(only 1° – 30° dHappears if filter is not activated)
ENERGY –/� SAVE –SAVE �
Programme item Sub-item Explanation
OFF AFTER 15 MIN to 15 HRS
RINSING MANUALAUTOMATIC
RESET PRODUCTALL PROD.RESET ALLEXIT
INFO BUTTONSCLEANFILTER (only appears if filter is activated)DE-SCALE (only appears if filter is not activated)VERSIONEXIT
DISPLAY MLOZ
LANGUAGE DEUTSCHENGLISHFRANCAISITALIANONLESPANOLPORTUGUESРУССКИЙ
Select the desired maintenance pro-gramme. If no action is taken, pro-gramming mode is exited automati-cally after approximately five sec-onds. For more information, pleaserefer to chapters 6 and 16 to 18.
Select your settings for speciality coffees, milk specialities and hot water.
Indicate whether you want to operateyour IMPRESSA with or without aCLARIS filter cartridge.
Adjust the water hardness.
Select an energy-saving mode.
Set the number of hours after whichthe IMPRESSA should switch off auto-matically.
Set whether the switch-on rinseshould be started manually or auto-matically.
Reset the settings for individual products, all products or the entiremachine to the factory setting.
Keep track of all prepared specialitycoffees and milk specialities and viewthe maintenance status.
Select the unit for the amount of water.
Select your language.
19
15.1 Buttons programme item
With the BUTTONS programme item you can enterindividual settings for all speciality coffees, milk and hot water.
Permanent settings in programming mode always follow thesame model.
The following permanent settings can be made for speciality coffees,milk and hot water:
Product Amount of water Strength Temperature
1 espresso 25 ML – 240 ML MILD, NORMAL, STRONG, XSTRONG NORMAL, HIGH
2 espressi 25 ML – 240 ML NORMAL, HIGH
1 coffee 25 ML – 240 ML MILD, NORMAL, STRONG, XSTRONG NORMAL, HIGH
2 coffees 25 ML – 240 ML NORMAL, HIGH
Milk 3 – 120 SEC
Hot water 25 ML – 450 ML
For example: Proceed as follows to change the amount of water for a coffee from100 ML to 110 ML, to change the strength from NORMAL to STRONGand the temperature from NORMAL to HIGH.
� Press the Rotary Switch (1) until the following message appears onthe display:
� RINSE
� Turn the Rotary Switch (1) again until the following message ap-pears on the display:
� BUTTONS
� Press the Rotary Switch (1).
� SELECT BUTTON
� Press the preparation button for the speciality coffee for which youwant to adjust the amount of water. For example, 1 COFFEE.
� WATER
� Press the Rotary Switch (1).
� For example 100 ML.
� Turn the Rotary Switch (1) to adjust the amount of water as desired.
� For example 110 ML.
� Press the Rotary Switch (1) to save the new amount of water.
� OK
� WATER
� Turn the Rotary Switch (1) further until the next sub-item appearson the display:
� STRENGTH
� Press the Rotary Switch (1).
� NORMAL
� Turn the Rotary Switch (1) until the following message appears onthe display:
� STRONG
� Press the Rotary Switch (1) to save the change.
� OK
� STRENGTH
� Turn the Rotary Switch (1) further until TEMPERATURE appears onthe display.
� Press the Rotary Switch (1).
� NORMAL
E
20
� Turn the Rotary Switch (1) to adjust the temperature.
� HIGH
� Press the Rotary Switch to confirm your selection.
� OK
� TEMP.
� Turn the Rotary Switch (1) until EXIT appears on the display.
� Press the Rotary Switch (1).
� SELECTBUTTON
� Turn the Rotary Switch (1) again until EXIT appears on the display.
� Press the Rotary Switch (1).
� BUTTONS
� Turn the Rotary Switch (1) again until EXIT appears on the display.
� Press the Rotary Switch (1) to exit programming mode.
� READY
15.2 Filter programme item
For details, please refer to chapter 5.1 ‘Inserting the filter’.
15.3 Water hardness programme item
For details, please refer to chapter 4 ‘Adjusting the water hardness’.
15.4 Energy programme item
The IMPRESSA is equipped with the new On/Off button (21)(= Zero-Energy Switch). This allows the machine to be fully dis-connected from the mains. An Energy Save Mode (E.S.M.©) can also be permanently set.
� READY
� Press and hold the Rotary Switch (1) until RINSE appears on the dis-play.
� The illuminated ring (2) is active.
� Turn the Rotary Switch (1) until ENERGY – appears on the display.
� Press the Rotary Switch (1).
� SAVE –
� Turn the Rotary Switch (1) until the following message appears onthe display:
� SAVE �
� Press the Rotary Switch (1) again to confirm the change.
� OK
� ENERGY �
� Turn the Rotary Switch (1) until EXIT appears on the display.
� Press the Rotary Switch (1) to exit programming mode.
� READY
15.5 Automatic switch-off time programme item
You can program when your IMPRESSA is to switch off. Select atime between 15 min. and 15 hrs.
� READY
21
� Press and hold the Rotary Switch (1) until RINSE appears on the dis-play.
� The illuminated ring (2) is active.
� Press the Rotary Switch (1) until you reach the OFF AFTER pro-gramme item.
� OFF AFTER
� Press the Rotary Switch (1) to enter the OFF AFTER programmeitem.
� 1 HRS
� Turn the Rotary Switch (1) to set the number of hours after whichthe machine is to switch off.
� For example 2 HRS.
� Press the Rotary Switch (1) to save the new automatic switch-offtime.
� OK
� OFF AFTER
� Turn the Rotary Switch (1) until the following message appears onthe display.
� EXIT
� Press the Rotary Switch (1) again to exit programming mode.
� READY
15.6 Rinse programme item
You can set whether the rinse should be started manually orautomatically when switching on.
� READY
� Press and hold the Rotary Switch (1) until RINSE appears on the dis-play.
� The illuminated ring (2) is active.
� Turn the Rotary Switch (1) until RINSING appears on the display.
� Press the Rotary Switch (1).
� MANUAL
� Turn the Rotary Switch (1) until the following message appears onthe display:
� AUTOMATIC
� Press the Rotary Switch (1) again to confirm the change.
� OK
� RINSING
� Turn the Rotary Switch (1) until EXIT appears on the display.
� Press the Rotary Switch (1) to exit programming mode.
� READY
15.7 Reset programme item
In the RESET programme item you can reset various settings totheir factory settings:
� PRODUCTThe settings (amount of water, strength, temperature) for anyproduct can be reset individually to the factory settings. The cor -responding double product is reset to the factory settings at thesame time.
� ALL PROD.The settings (amount of water, strength, temperature) for all prod-ucts are reset to the factory settings.
E
22
� RESET ALLAll customer settings are reset to the factory settings. The IMPRESSA then switches off.
For example you want to reset the values for one product to the fac-tory setting:
� READY
� Press and hold the Rotary Switch (1) until RINSE appears on the dis-play.
� The illuminated ring (2) is active.
� Turn the Rotary Switch (1) until RESET appears on the display.
� Press the Rotary Switch (1).
� PRODUCT
� Press the Rotary Switch (1).
� SELECT BUTTON
� Press any preparation button, e.g. 1 ESPRESSO.
� OK
� SELECT BUTTON
By again pressing the appropriate preparation button, you canreset other speciality coffees to their factory setting.
� SELECT BUTTON
� Press the Rotary Switch (1) to exit the PRODUCT programming item.
� Turn the Rotary Switch (1) until EXIT appears on the display.
� Press the Rotary Switch (1).
� RESET
� Turn the Rotary Switch (1) again until EXIT appears on the display.
� Press the Rotary Switch (1) to exit programming mode.
� READY
15.8 Information programme item
In the INFORMATION programme item you can view the fol-lowing information:
– Total coffee preparations– Number of speciality coffees prepared, number of ‘coffee
powder’, ‘hot water’ and ‘steam’ preparations– Maintenance status and number of maintenance pro-
grammes performed (cleaning, descaling, changing the filter)
– and information relating to the software version
� READY
� Press and hold the Rotary Switch (1) until RINSE appears on the dis-play.
� The illuminated ring (2) is active.
� Turn the Rotary Switch (1) until INFO appears on the display.
� Press the Rotary Switch (1).
� BUTTONS
� Press the Rotary Switch (1) again.
� XXXX (=total number of speciality coffees prepared).
To view the number of product preparations, press the prepa-ration button of the desired speciality coffee. For example, toview the number of ‘1 COFFEE’ preparations.

23
� Press the 1 COFFEE preparation button.
� XXXX (=total number for ‘1 COFFEE’)
� Press the Rotary Switch (1) to exit the programme item.
� BUTTONS
Turn the Rotary Switch (1) for more information about the filter,descaling or the machine version.
� Turn the Rotary Switch (1) until CLEAN appears on the display forexample.
� Press the Rotary Switch (1) to view the number of cleaning opera-tions performed.
� XXXX (=total number of cleaning operations per-formed)
� Turn the Rotary Switch (1) until the following message appears onthe display:
� ����������
In addition to the number of maintenance programmes per-formed, the progress bar also shows you the current mainte-nance status. When the bar is completely filled, your IMPRESSAwill request the respective maintenance programme.
� Press the Rotary Switch (1) to exit the CLEAN programme item.
� CLEAN
� Turn the Rotary Switch (1) until EXIT appears on the display.
� Press the Rotary Switch (1).
� INFO
� Turn the Rotary Switch (1) again until EXIT appears on the display.
� Press the Rotary Switch (1) again.
� Press the Rotary Switch (1) once more.
� READY
15.9 ML/OZ display programme item
� READY
� Press and hold the Rotary Switch (1) until RINSE appears on the dis-play.
� The illuminated ring (2) is active.
� Turn the Rotary Switch (1) until DISPLAY appears on the .
� Press the Rotary Switch (1).
� ML
� Turn the Rotary Switch (1) and select the desired setting.
� For example OZ.
� Press the Rotary Switch (1) to save the desired setting.
� OK
� DISPLAY
� Turn the Rotary Switch (1) until the following message appears onthe display:
� EXIT
� Press the Rotary Switch (1) to exit programming mode.
� READY
E
24
15.10 Language programme item
You can choose from the following languages:
German DutchEnglish SpanishFrench PortugueseItalian Russian
� READY
� Press and hold the Rotary Switch (1) until RINSE appears on the dis-play.
� The illuminated ring (2) is active.
� Turn the Rotary Switch (1) until you reach the LANGUAGE pro-gramme item.
� LANGUAGE
� Press the Rotary Switch (1) to enter the LANGUAGE programmeitem.
� ENGLISH
� Turn the Rotary Switch (1) until the desired language appears onthe display.
� For example DEUTSCH.
� Press the Rotary Switch (1) to save the language selected.
� OK
� SPRACHE
� Turn the Rotary Switch (1) until the following message appears onthe display:
� EXIT
� Press the Rotary Switch (1) to exit programming mode.
� BEREIT
16. Maintenance
16.1 Filling with water
� FILLWATER TANK
When this display lights up, the machine cannot prepare anymore products. Top up with water as described in chapter 2.3.
� READY
The water tank should be rinsed daily and filled with fresh water. Only top up with fresh, cold water. Never fill with milk,mineral water or other liquids.
16.2 Emptying coffee grounds container
� EMPTY GROUNDS
When this display lights up, the machine cannot prepare anymore products and the coffee grounds container must be emp-tied (Fig. 14).
� Remove the drip tray (20) carefully as it will contain water.
� TRAY MISSING
� Fit the empty, clean drip tray back in the IMPRESSA.
� READY
25
16.3 Drip tray missing
� TRAY MISSING
� When this display lights up, the drip tray (20) has not been cor -rectly inserted or has not been inserted at all.
� Insert the drip tray (20).
� READY
16.4 Filling with coffee beans
� FILL BEANS
� Top up the beans as described in chapter 2.4.
The FILL BEANS display only goes out after a coffee has beenprepared.
We recommend that you clean the bean container with a drycloth from time to time before refilling. Switch the IMPRESSAoff to do this.
16.5 Changing the filter
After drawing off 50 litres of water, the filter will cease to work.You will be prompted to change the filter.
For details, please refer to chapter 5.2 ‘Changing the filter’.
16.6 Cleaning the IMPRESSA
After 200 preparations or 160 rinses, the IMPRESSA must be cleaned.The display will indicate this. You can still prepare coffee or hot wa-ter/steam. We do however recommend that you undertake cleaningwithin the next couple of days. For details, please refer to the cleaningchapter (item 17).
� READY CLEAN
16.7 IMPRESSA calcification
Over time the IMPRESSA will build up limescale deposits. The degreeof calcification depends on the hardness of your water. The IMPRESSAdetects when it needs descaling. You can still prepare coffee or hotwater/steam. We do however recommend that you undertake descal-ing within the next couple of days. For details, please refer to thedescaling chapter (item 18).
� READYDE-SCALE
16.8 General cleaning instructions
� When cleaning never use objects, pan cloths or cleaning spongeswhich may scratch the machine or corrosive chemicals.
� Wipe the inside and outside of the housing with a soft, damp cloth.
� Always clean the removable hot-water nozzle after use.
� To ensure that the Professional Cappuccino Frother always worksproperly, you should rinse it with water after every milk prepara-tion.
E
26
� To ensure that the Professional Cappuccino Frother always worksproperly, you should clean it daily when you have been preparingmilk.
� The water tank should be rinsed daily and filled with fresh water.
If you can see scale starting to form in the water tank, you canuse a conventional descaling agent to remove it. Remove thewater tank to do this (Fig. 4).
When using a Claris filter cartridge, remove this before descal-ing the tank.
16.9 Emptying the system
This operation is needed to protect the IMPRESSA from frostdamage during transport.
� READY
� Press the steam preselection button (8).
� HEATING
� READY
� Open the steam / hot water draw-off tap (14) (Fig. 13) to draw offsteam.
� The illuminated ring (2) is active.
� STEAM
� ����������
� Remove and empty the water tank. Allow all the steam to exit thenozzle until the system is empty.
� CLOSE TAP
� Close the steam / hot water draw-off tap (14).
� Press the On/Off button (21) to switch off your IMPRESSA.
17. Cleaning
The IMPRESSA machine comes with an integrated Cappuccino clean-ing programme. The operation lasts about 15 minutes.
Your stockist can supply original JURA cleaning tablets whichare optimised for the cleaning programme of your IMPRESSA. We would like to point out that using unsuitable cleaningtablets may damage your machine and leave traces in the water.
Once started, the cleaning operation must not be interrupted.
The filler funnel for preground coffee must be cleaned afterevery cleaning programme (11).
� READY CLEAN
� Press the Maintenance button (3) until the following messageappears:
� EMPTY TRAY
� Empty the drip tray.
� TRAY MISSING
� Carefully reinsert the drip tray.
� Remove the cup grille (19).
27
� Place a 1 litre receptacle (Fig. 12) under the height-adjustable coffeespout (17).
� PRESSRINSE
� Press the Maintenance button (3).
� CLEANING
� ADDTABLET
� Add the tablet to the powder shaft (Fig. 15). Close the powdershaft.
� PRESS RINSE
� Press the Maintenance button (3).
� CLEANING
� EMPTY TRAY
� Remove and empty the drip tray.
� TRAY MISSING
� Reinsert the drip tray.
� HEATING
� READY
� Once the cleaning operation is complete, use a dry cloth to rubdown the powder shaft.
� Cleaning is complete.
18. Descaling
The IMPRESSA machine comes with an integrated descaling pro-gramme. The operation lasts about 40 minutes.
Your stockist can supply original JURA descaling tablets whichare optimised for the descaling programme of your IMPRESSA. We would like to point out that using unsuitable descalingtablets may damage your machine and leave traces in the water.
The display will indicate when the IMPRESSA needs descaling.You can still prepare coffee or hot water/steam and run the descaling programme later on.Once started, the descaling operation must not be interrupted.
When using the descaling agent, immediately clean up anysplashes or drips on sensitive surfaces, especially natural stone and wooden surfaces. Alternatively take appropriate precau-tions.
Always wait until all the added descaling agent has been usedand the tank is empty. Never top up the descaling agent.
� READY DE-SCALE
� Remove the Professional Cappuccino Frother (15) (Fig. 17).
� Press the Maintenance button (3) until the following messageappears:
� EMPTY TRAY
� Empty the drip tray.
E
28
� TRAY MISSING
� Carefully reinsert the drip tray.
� AGENTIN TANK
Remove and empty the water tank. Completely dissolve the contentsof one blister (3 tablets) in 0.5 litres of water and add the mixture tothe water tank. Reinsert the water tank.
� OPEN TAP AGENTIN TANK
� Place a sufficiently large receptacle under the hot-water spout (Fig. 17).
� Open the steam / hot water draw-off tap (14) (Fig. 13).
� DE-SCALING
� CLOSE TAP
� Close the steam / hot water draw-off tap (14).
� DE-SCALING
� EMPTY TRAY
� Empty the drip tray.
� TRAY MISSING
� Carefully reinsert the drip tray.
� FILLWATER TANK
Rinse the water tank thoroughly and fill it with cold fresh mainswater. Then refit in the IMPRESSA.
� OPENTAP
� Open the steam / hot water draw-off tap (14) (Fig. 13).
� DE-SCALING
� CLOSE TAP
� Once you have closed the steam / hot water draw-off tap (14), thefollowing appears on the display:
� DE-SCALING
� EMPTY TRAY
� Empty the drip tray.
� TRAY MISSING
� Carefully reinsert the drip tray.
� READY
� Descaling is complete.
19. Disposal
Please dispose of old machines in an environmentally-neutral wayOld machines contain valuable, recyclable materials whichshould be recycled. Please therefore dispose of old machinesvia suitable collection systems.
29
20. Tips for a perfect coffee
Height-adjustable coffee spout (17)You can adjust the coffee spout to the size of your cups (Fig. 3).
Consistency of grindFor details, please refer to chapter 2.5 ‘Adjusting the grinder’
Prewarming cupsYou can prewarm the cups with hot water or steam. The smaller theamount of water for coffee, the more important the prewarmingprocess.
Sugar and creamHeat will be lost when you stir the product in your cup. Adding creamor milk from the fridge greatly lowers the temperature of the coffee.
E
30
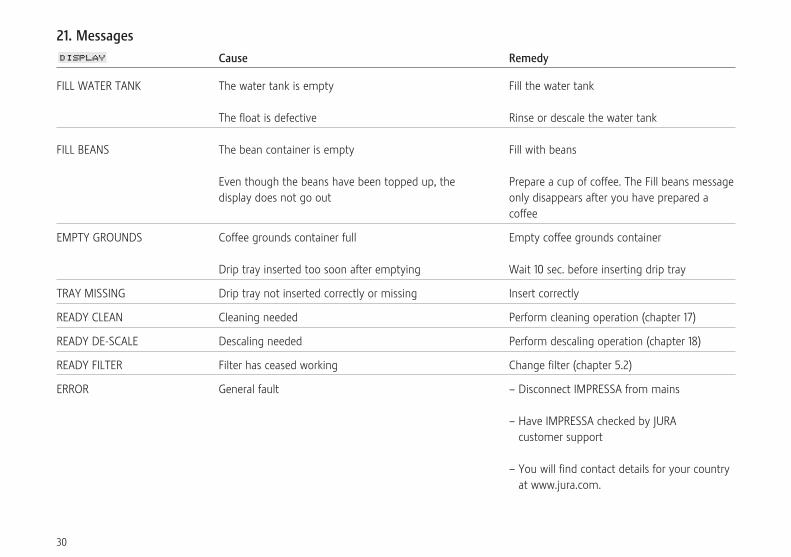
21. Messages
Cause Remedy
FILL WATER TANK The water tank is empty Fill the water tank
The float is defective Rinse or descale the water tank
FILL BEANS The bean container is empty Fill with beans
Even though the beans have been topped up, the Prepare a cup of coffee. The Fill beans messagedisplay does not go out only disappears after you have prepared a
coffee
EMPTY GROUNDS Coffee grounds container full Empty coffee grounds container
Drip tray inserted too soon after emptying Wait 10 sec. before inserting drip tray
TRAY MISSING Drip tray not inserted correctly or missing Insert correctly
READY CLEAN Cleaning needed Perform cleaning operation (chapter 17)
READY DE-SCALE Descaling needed Perform descaling operation (chapter 18)
READY FILTER Filter has ceased working Change filter (chapter 5.2)
ERROR General fault – Disconnect IMPRESSA from mains
– Have IMPRESSA checked by JURA – customer support
– You will find contact details for your country – at www.jura.com.
31
E
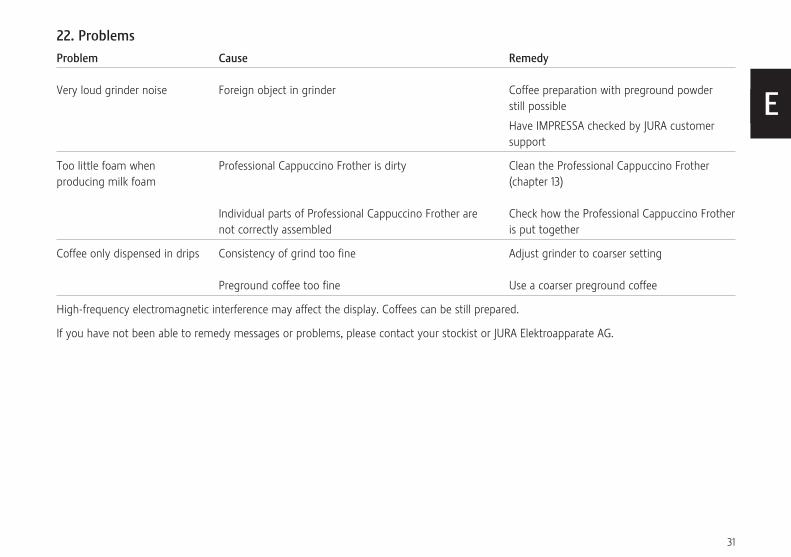
22. Problems
Problem Cause Remedy
Very loud grinder noise Foreign object in grinder Coffee preparation with preground powder still possible
Have IMPRESSA checked by JURA customer support
Too little foam when Professional Cappuccino Frother is dirty Clean the Professional Cappuccino Frother producing milk foam (chapter 13)
Individual parts of Professional Cappuccino Frother are Check how the Professional Cappuccino Frother not correctly assembled is put together
Coffee only dispensed in drips Consistency of grind too fine Adjust grinder to coarser setting
Preground coffee too fine Use a coarser preground coffee
High-frequency electromagnetic interference may affect the display. Coffees can be still prepared.
If you have not been able to remedy messages or problems, please contact your stockist or JURA Elektroapparate AG.
32
23. Legal information
These instructions for use contain the information required to cor-rectly use, operate and maintain the machine. The information in these instructions for use must be read and fol-lowed to ensure safe usage, operation and maintenance.These instructions for use cannot take into account every conceivableform of use. The machine is designed for private use at home.We would also like to inform you that the content of these instruc-tions for use does not form part of a previous or existing agreement,undertaking or legal relationship or change any which do exist. All theobligations of JURA Elektroapparate AG can be found in the respectivepurchase agreement which also contains the complete and only war-ranty agreement. These contractual warranty provisions are neitherextended nor restricted by the details provided in these instructionsfor use.The instructions for use contain information which is protected bycopyright. It is not permitted to photocopy these instructions for useor translate them into another language without the prior writtenconsent of JURA Elektroapparate AG.
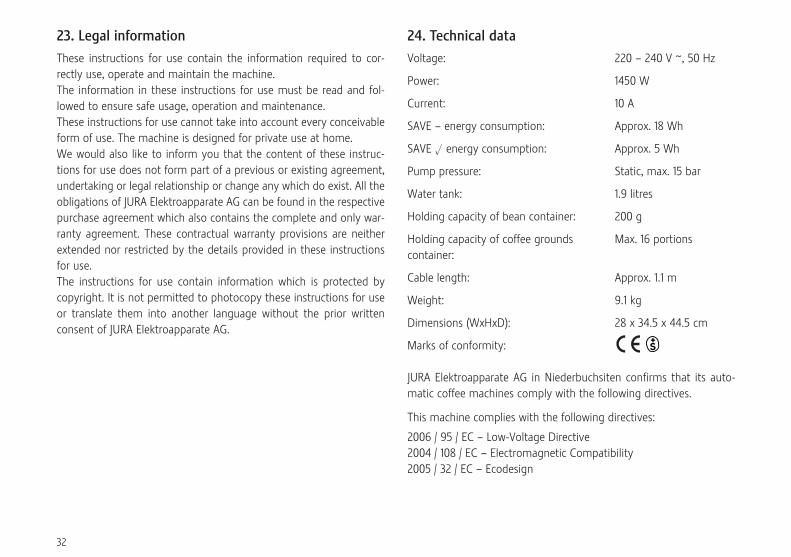
24. Technical data
Voltage: 220 – 240 V ~, 50 Hz
Power: 1450 W
Current: 10 A
SAVE – energy consumption: Approx. 18 Wh
SAVE � energy consumption: Approx. 5 Wh
Pump pressure: Static, max. 15 bar
Water tank: 1.9 litres
Holding capacity of bean container: 200 g
Holding capacity of coffee grounds Max. 16 portionscontainer:
Cable length: Approx. 1.1 m
Weight: 9.1 kg
Dimensions (WxHxD): 28 x 34.5 x 44.5 cm
Marks of conformity:
JURA Elektroapparate AG in Niederbuchsiten confirms that its auto-matic coffee machines comply with the following directives.
This machine complies with the following directives:
2006 / 95 / EC – Low-Voltage Directive 2004 / 108 / EC – Electromagnetic Compatibility2005 / 32 / EC – Ecodesign
Art.
6900
8 –
2010
02
JURA Elektroapparate AG – Kaffeeweltstrasse 10 – CH-4626 NiederbuchsitenPhone +41 62 389 82 33 – Fax +41 62 389 83 94 – www.jura.com