Embed Size (px)
Citation preview

INSTRUCTIONS FOR USEENGLISH
A-360 Wi-Fi CAMERA
Rev 5.1./2016
IMPORTANT SAFETY INSTRUCTIONS1. Keep, read and follow all of these instructions.
2. Heed all warnings in these instructions.
3. The A-360 does not work when it is being charged. It should be charged at least 1.8 m away from the patient.
4. Use only the A-360´s battery charger supplied by the manufacturer.
5. A-360 is portable RF communications equipment. It may cause radio interference or may disrupt the operation of nearby equipment. It may be necessary to take mitigation measures, such as, reorienting or relocating the A-360.
6. To reduce the risk of fire or shock hazard, do not expose this equipment to rain or moisture.
7. Do not charge near any heat source such as radiators, heat registers, stoves or other apparatus that produces heat.
8. Protect the charging cord from being damaged.
9. Do not use this equipment in presence of flammable anaesthetics.
10. ESD (Electrostatic discharge) may cause malfunction of these devices.
11. Unplug this apparatus during lightning storms or when unused for long periods of time.
12. Do not place vessels containing liquids on top of the apparatus. Do not splash liquids on top of the device.
13. Do not attempt to service these devices yourself as opening or removing covers may expose you to hazards. Refer all servicing to qualified service personnel from your Airtraq distributor.
CHECK FOR LATEST SOFTWARE VERSION AVAILABLE AT www.airtraq.com

INDEX Page1. Product code and Description ................................................32. A-360 Basic information .......................................................33. A-360 Components ..............................................................34. A-360 Switches, Indicators and Connectors ...........................45. A-360 Battery charge & charge status checking......................56. Mounting the A-360 onto the Airtraq .....................................77. Turn On/Off. Stand by .........................................................98. Touch Panel & Menus ...........................................................99. Help ....................................................................................1110. Initial Set Up ........................................................................1111. Screen .................................................................................1212. Record & Auto - Record ........................................................1213. Play recorded videos ............................................................1314. Download videos to a PC (Via USB cable or WiFi) ..................1415. Connecting Wi-Fi Live video and recording onto Tablet/Phone 1416. Connecting Wi-Fi Live video to a PC ......................................1517. Delete All Videos ..................................................................1618. View System Information.......................................................1619. Troubleshooting ...................................................................1620. Updating A-360 Internal Software .....................................1721. Cleaning Instructions ............................................................1722. Operating, Storage And Transport ........................................1823. Technical Data ....................................................................1824. Regulatory ...........................................................................1925. Disposal Instructions .............................................................2126. Manufacturer’s Warranty .....................................................21Important Safety Instructions
1. PRODUCT CODE and DESCRIPTIONCode: A-360 Description: Airtraq Wi-Fi Camera2. A-360 BASIC INFORMATIONThe A-360 has been specially designed to work only as an accessory for the Airtraq Video Laryngoscope. The A-360 provides colour and real-time images on its 2.8 inch integrated touch screen. The screen can be flipped and rotated to allow intubations from any position. Image can be rotated upside down when necessary.The A-360 can record and playback videos which are stored only on its internal memory. The A-360 can be connected via Wi-Fi to PC, Tablet and Phone according to IEEE 802.11 Standard. A-360 does not use any existing Wi-Fi network but creates a proprietary one. A password stored in the A-360 must be introduced in any device to be Wi-Fi connected to A-360. It guarantees that only authorized devices are allowed to receive video signal (follow your institution procedures and regulations if using these mobile devices).It is powered by an internal rechargeable 3.7 V Li-Po battery and does not work when connected to a battery charger.3. A-360 COMPONENTS3.1. A-360 Wi-Fi CameraCMOS video camera with integrated touch screen, Wi-Fi emitter and rechargeable Li-Po Battery.3.2. Battery chargerMust be connected to mains supply to charge the 3.7 Volts, Li-Po Battery. It is supplied with a USB/ Micro USB cord that can also be used to connect the A-360 to a PC.
2 3

Battery charger is supplied with different plugs. Install the appropriate one.Always use the battery charger provided with A-360.3.3. Docking Station Accessory to hold A-360 while not in use. It protects the lens of the A-360 from dust.The battery charger can be connected to the Docking Station.
4. A-360 SWITCHES, INDICATORS AND CONNECTORSA. Mounting Lock System: To attach and remove A-360 from Airtraq and from Docking Station. Slide button to place it in open or close position.B. Power Button: Push to turn On and Off.
A
B
C. Battery Charge and Power On Indicators: Turn green when on charge. Left indicator turns orange when the A-360 batteries are below 10% of its capacity.D. Battery charge connector: Micro-USB Female connector to connect to PC, battery charger or Docking Station.
5. A-360 BATTERY CHARGE & CHARGE STATUS CHECKINGTHE A-360 DOES NOT WORK WHEN IT IS BEING CHARGED. IT SHOULD BE CHARGED AT LEAST 1.8 M AWAY FROM THE PATIENT.The A-360 is supplied with its battery discharged. It is recommended to perform a full charge/discharge cycle of the battery before starting to use the A-360 for clinical purposes.After a full charge, the A-360 can operate, under standard conditions, for around 120 minutes. Recharging takes approximately 150 minutes.Without use, the battery will discharge at a rate of 1% per day.If the A-360 can be turned on then a minimum of 10 minutes of operating time is guaranteed.
C
D
4 5

When the A360 is turned off the user can check battery charge status by a short time press of the On/Off switch. The screen will show remaining minutes available. When the A-360 is turned on, an icon and a figure will appear on the header of the screen showing battery charge status.To charge battery:
1. Connect the stand-alone battery charger to mains electrical supply.
2. Insert the micro-USB connector directly into the A-360 or to Docking Station and place A-360 onto it.
Upon starting to charge battery the A-360 will automatically turn Off. When battery is being charged the user can check charge status:
1. By touching the screen which will show minutes of operating time and a battery icon.2. By the LEDs on the back of the screen.
LED´s lights and icon show battery charge status according to:
LED´s / Icon Operating Time
1 Blinking Orange < 10 min. Does not start
1 Steady Orange 10 to 40 min.
1 Steady Green 40 to 80 min.
2 Steady Green 80 to 120 min
3 Steady Green 120 min.
When the A-360 is turned on, an icon and a figure will appear on the header of the screen showing battery charge status. When in use, if the battery falls below 10% of its capacity the Battery Charge Indicator on the header of the screen and the left charge indicator will become blinking orange. The A-360 will continue
to operate for approximately 10 more minutes. The manufacturer recommends recharging the battery of the A-360 frequently.Service life for the rechargeable battery depends upon the number of charge-discharge cycles performed. The A-360´s battery is a service replaceable part, if its capacity falls below the acceptable levels please contact your supplier. The A-360 should never be opened by unauthorized personnel. Internal battery can only be replaced by the manufacturer.6. MOUNTING THE A-360 ONTO THE AIRTRAQTo mount the A-360,
• Remove eyecup from Airtraq.• Place A-360 lock system button in “Open” position. • Slide A-360 onto Airtraq.
6 7
• A-360 will automatically turn on and start in Live Video mode and Wi-Fi enabled.

• Image can be rotated upside down when necessary using the Rotate Icon .
• Press START when using pediatric Airtraq. A message will appear on the screen “Paediatrics Mode On”.
To remove A-360 from the Airtraq once intubation is finished:
• Place lock system button in “Open” position.
• Pull A-360 away from Airtraq.
7. TURN ON/OFF. STAND-BY
A-360 can be started in 2 different ways, in both cases it will log on to “Live Video” function:
• Automatically by sliding A-360 onto an Airtraq.
• Pressing for 2 seconds the orange On/Off button.
A-360 shows images after 15 seconds during which a progress bar is shown on the screen. The full starting process to upload all icons and functions takes around 30 seconds.
A-360 will Turn Off by pressing for 2 seconds the orange On/Off button. The unit will automatically shut down in 5 seconds unless the user cancels the action.
A-360 will enter into Stand-by status only when A-360 is not assembled onto the Airtraq, and there is no action from the user for 5 minutes. To reset from Stand-by, press the On/Off button. A-360 will turn off automatically after 5 minutes in Stand-by.
8. TOUCH PANEL & MENUS
Press the action icons on the screen to select an action (touch panel also works when action icons are pressed using gloves).
Pressing the Back Icon will make A-360 to return to the previous screen or menu.
8 9
• Slide lock system button into “Closed” position. To prepare the A-360 for intubation:
• Flip and rotate the screen as desired depending on how the intubation will be performed. Screen rotates 180o on one axis, plus 270o on the perpendicular axis.

Date and Time
2013 / 05 / 19
16 : 40
airtraq_20 95%
Navigation is shown below:
HEL
PWiFi Camera Quick Start Guide
Full Tutorial
Airtraq Intubation Fundamentals
Best Practices
PEDIATRIC MODE ON
airtraq_20 95%
HEL
PWiFi Camera Quick Start Guide
Full Tutorial
Airtraq Intubation Fundamentals
Best Practices
airtraq_20 95%
9. HELPSelect Help icon in main menu and choose desired topic on help screen. The manufacturer recommends watching all tutorial videos before using the A-360.10. INITIAL SET UP Go to “Main Menu”. Select “Settings”.• Set Device ID: Go to Wi-Fi Settings menu to set Device ID. Any
English
Español
Deustch
Français
Italiano
Language
airtraq_20 95%
Yes No
Delete all videos?
airtraq_20 95%
10 11
Device ID: airtraq_20
WiFi Password: abcde
SW Version: 2.14.6
Free Memory: 5 h 10 m
Date: 05/09/2013
Time: 15:33
System Info
airtraq_20 95%

combination of a maximum of 10 letters/numbers. Navigate using Right and Left navigation icons to select the position to be set. Use “+” and “-“ icons to select the desired value. Use the confirmation icon to save the device ID selected. Device ID is used to name the Wi-Fi Network generated by the A-360.
• Set Wi-Fi Password: Go to Wi-Fi Settings menu to set Wi-Fi Password. Any combination of a maximum of 5 letters/numbers. Navigate using Right and Left navigation icons to select the position to be set. Use “+” and “-“ icons to select the desired value. Use the confirmation icon to save the password. Wi-Fi password is used to block undesired devices from connecting to A-360. Default password from factory is abcde.
• Set Date and Time: Navigate using Right and Left navigation icons to select the parameter to be set. Use “+” and “-“ icons to select the desired value. Use the confirmation icon to save the selection. Date and Time is used to name video files recorded.
• Select Language: Navigate through different pages using Up and Down navigation icons and select the desired language.
• Delete Videos: It deletes all videos from the internal memory. A screen prompting the user to confirm is shown before deletion.
• System Info: Shows basic information about the device and the software version.
11. SCREEN The screen can be positioned to perform intubations from any position. Open the screen and rotate it to place it in the desired position. Depending on intubation and screen position one may want to rotate the image upside down, press the rotate icon to do it.Press START when using pediatric Airtraq.
12. RECORD & AUTO-RECORDING
To start recording when in Live Video press icon REC . While recording, “REC” and a timer will appear on the header of the screen.To stop press the Stop Recording icon
STOPREC . The screen will show a
message informing that recording will stop in 5 seconds and a button
that will allow the user to cancel stopping the recording.The user can set the Auto-Recording feature that will automatically start recording every time the A360 goes into Live Video.
Go to Main Menu/Settings Menu/Rec Settings turn Auto recording On or Off as desired and select the maximum video file size (5 min, 7 min, 10 min, 15 min,20 min, 30 min or unlimited).Video files will be recorded in .avi format and stored in A-360´s internal memory. A-360 is able to store more than 10 hours of video. Maximum duration for a video is 30 minutes.Video Recording is disabled when battery level is below 10 minutes.
13. PLAY RECORDED VIDEOS
HEL
P
WiFi Camera Quick Start Guide
Full Tutorial
Airtraq Intubation Fundamentals
Best Practices
airtraq_20 95%
12 13
Select “Videos”
from Main Menu. • The screen will display a list of the recorded videos showing
starting date/time and duration. Last recorded video will be first on the list.
• Navigate through different pages using Up and Down navigation

icons and select the desired video.• Action icons provide the following functions: play/pause and fast
forward/rewind.
14. DOWNLOAD VIDEOS TO A PC (Via USB cable or WiFi) To download videos turn On A-360 and connect to PC using the USB/Micro USB cable provided (directly or through docking). After a few seconds the PC will recognize the A-360 as an external storage device called “Airtraq Cam”. Videos are stored inside “Airtraq Cam/Airtraq Videos” folder.Copy video files to PC or delete files as wished.Videos can also be downloaded via Wi-Fi to a PC using the “Airtraq Cam App for Windows”. Download application onto PC from downloads section in Airtraq website www.airtraq.com and install it.A-360 will always start with Wi-Fi enabled. If Wi-Fi is disabled go to Settings/WiFi Settings and press Wi-Fi icon , Wi-Fi icon will turn to and an icon will appear on the header of the screen. Start Airtraq Cam Application in PC. A screen will show up with all Cameras that can be connected to the PC. Select the camera that you want to connect and type its WiFi password. Click on Download videos icon and the PC will display the list of videos stored into the A-360. Select the video to be downloaded and press the download icon. The user can change the PC folder where videos are downloaded.
15. CONNECTING WI-FI LIVE VIDEO & RECORDING ON TABLET / PHONE A-360 can connect via Wi-Fi to five different external devices at the same time. Each A-360 creates an ad-hoc Wi-Fi Network named ATQ+Device ID+4 numbers automatically generated.Before starting to use a Tablet / Phone with A-360, download from App StoreSM or Google PlayTM the application “Airtraq Cam” and
install it. Make sure that you have the latest available version installed in your device.A-360 will always start with Wi-Fi enabled. If Wi-Fi is disabled go to Main Menu/Settings/WiFi Settings and press Wi-Fi icon , Wi-Fi icon will turn to and an icon will appear on the header of the screen. If Tablet / Phone is iOS go to Settings and select the Wi-Fi network created by the A-360 (Name = ATQ+Device ID+ 4 numbers automatically generated).If Tablet / Phone is Android open “Airtraq Cam” and select the Wi-Fi network created by the A-360 (Name = ATQ+Device ID).The first time that you connect a Tablet / Phone to an A-360 it will prompt you to type the Wi-Fi password set on the A-360. Factory default password is set to “abcde”.For the best image, increase screen brightness in your Tablet / Phone. To avoid income calls while using the Phone, turn it on “Airplane Mode” and then turn Wi-Fi on.Start Airtraq-Cam Application on Tablet / Phone, it will connect Wi-Fi to A-360 after about 10 seconds. Tap twice on the iPad®/iPhone® to get full screen image.“Airtraq Cam” App for mobile devices allow to record video on the mobile device.It is recommended to disable the A-360 Wi-Fi function when external devices are not used.16. CONNECTING WI-FI LIVE VIDEO TO A PCDownload onto PC application “Airtraq Cam App for Windows ” from downloads section in Airtraq website www.airtraq.com and install it.A-360 will always start with Wi-Fi enabled. If Wi-Fi is disabled go to Settings/WiFi Settings and press Wi-Fi icon , Wi-Fi icon will turn to and an icon will appear on the header of the screen.
14 15
Start Airtraq Cam Application in PC. A screen will show up with all Cameras that can be connected to the PC. Select the camera that you want to connect and type its Wi-Fi password. Click on Live Video and the PC will display real time video captured by A-360. 17. DELETE ALL VIDEOSThis option allows the user to delete all videos recorded and stored on A-360 internal memory. To delete individual videos refer to chapter 14. Select “Settings” from Main Menu. Select “Delete Videos”. A-360 will prompt to confirm if deleting all files is desired.
18. VIEW SYSTEM INFORMATIONSelect “System Info” from Settings Menu.
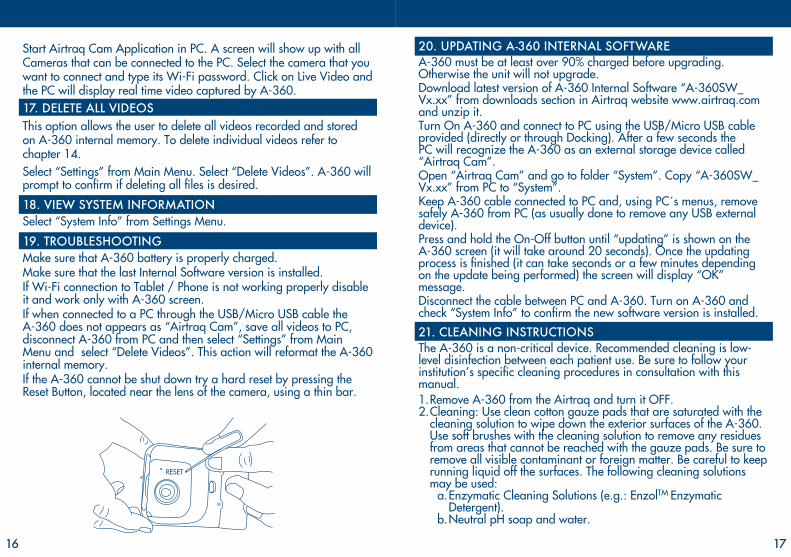
19. TROUBLESHOOTINGMake sure that A-360 battery is properly charged.Make sure that the last Internal Software version is installed.If Wi-Fi connection to Tablet / Phone is not working properly disable it and work only with A-360 screen.If when connected to a PC through the USB/Micro USB cable the A-360 does not appears as “Airtraq Cam”, save all videos to PC, disconnect A-360 from PC and then select “Settings” from Main Menu and select “Delete Videos”. This action will reformat the A-360 internal memory.If the A-360 cannot be shut down try a hard reset by pressing the Reset Button, located near the lens of the camera, using a thin bar.
20. UPDATING A-360 INTERNAL SOFTWAREA-360 must be at least over 90% charged before upgrading. Otherwise the unit will not upgrade.Download latest version of A-360 Internal Software “A-360SW_Vx.xx” from downloads section in Airtraq website www.airtraq.com and unzip it.Turn On A-360 and connect to PC using the USB/Micro USB cable provided (directly or through Docking). After a few seconds the PC will recognize the A-360 as an external storage device called “Airtraq Cam”.Open “Airtraq Cam” and go to folder “System”. Copy “A-360SW_Vx.xx” from PC to “System”.Keep A-360 cable connected to PC and, using PC´s menus, remove safely A-360 from PC (as usually done to remove any USB external device).Press and hold the On-Off button until “updating” is shown on the A-360 screen (it will take around 20 seconds). Once the updating process is finished (it can take seconds or a few minutes depending on the update being performed) the screen will display “OK” message.Disconnect the cable between PC and A-360. Turn on A-360 and check “System Info” to confirm the new software version is installed.
21. CLEANING INSTRUCTIONSThe A-360 is a non-critical device. Recommended cleaning is low-level disinfection between each patient use. Be sure to follow your institution’s specific cleaning procedures in consultation with this manual. 1. Remove A-360 from the Airtraq and turn it OFF. 2. Cleaning: Use clean cotton gauze pads that are saturated with the
cleaning solution to wipe down the exterior surfaces of the A-360. Use soft brushes with the cleaning solution to remove any residues from areas that cannot be reached with the gauze pads. Be sure to remove all visible contaminant or foreign matter. Be careful to keep running liquid off the surfaces. The following cleaning solutions may be used:
a. Enzymatic Cleaning Solutions (e.g.: EnzolTM Enzymatic Detergent).
b. Neutral pH soap and water.
RESET
16 17

c. Sodium bicarbonate solution (8- 10 %).3. The following disinfection agents may be used:
a. Peracetic Acid Solution (0.08%).b. Isopropyl Alcohol (70%).c. Solution containing 70% Isopropyl Alcohol and 2%
chlorhexidine (e.g. Clinell Wipe).d. Solution containing chlorine dioxide (e.g. Tristel Wipe).e. PDI Sani-Cloth® Germicidal Wipes (AF3, Bleach, Plus or Super
Sani-Cloth®).4. Blot dry the A-360 using an individual sterile surgical towel.Caution:
• Do not autoclave.• Do not rinse under running water.• Do not soak in liquids.• Avoid liquid or moisture from going into the A-360.• Avoid touching the lens of the A-360.• Be careful with A-360 touch screen.
22. OPERATING, STORAGE AND TRANSPORTThe A-360 should not be used, stored or transported at temperatures below 0o C/32o F or over 40o C/104o F. The relative humidity must not exceed 95 %. The air pressure must not exceed 500 to 1060 hPa.Please handle with care as with any other electronic device. Use the storage case provided to protect the device between each use.
23. TECHNICAL DATA 24.1. A-360Electrical supply input ratings: 5 V DC, 1.5 ASupply Voltage: Rechargeable Li-Po 3.7 V, 2100mAh.Baseband Modulation – WiFi - 802.11b: DSSSOutput RF Power: +17.5 dBm Typ.Transmission range: 10 m (approx).Screen : 2.8” TFT-LCD, 240 x 320 RGB.Touch Panel : OGS type 2.8” Projected Capacitive Touch Panel.Video Sensor: Digital CMOS video sensor, VGA 640 x 480.Video resolution: 432 x 480.Dimensions: 58 mm x 82 mm x 93 mmWeight: 220 grams.24.2. Stand-alone Battery ChargerElectrical supply input ratings: 100-240 V ~, 50-60 Hz, 0.1-0.2 A
EMC: EN55024, EN55022/B, EN 60601-1-2.UL recognized component. Valid for the USA and Canada.Micro USB type B male connector.USB – Micro USB Cable length: 1 m.
24. REGULATORYThis device meets the requirements of European Medical Devices Directive 93/42/EEC of 14 June 1993.The Declaration of Conformity (DoC) is available from the manufacturer.This wireless emitter is in compliance with the essential requirements and other relevant provisions of Directive 1999/5/EC.This device complies with the Harmonized European Standard EN 301 489-17This device is in compliance with the RoHS European Directive.IEC 60601-1 and IEC 60601-1-2 NOTICES AND WARNINGSThis device is specified as Internally Powered equipment, accessory, type BF Applied Part, IPXO, ordinary equipment, Not intended for use with flammable agents, continuous operation. This product complies with IEC 60601-1 and IEC 60601-1-2 International Standards for Medical Electrical Equipment.According to IEC 60601 Standard A-360 together with Airtraq Laryngoscope comprise a Medical Electrical System. It complies with requirements regarding Electromagnetic Compatibility. Detailed results of Emissions and Immunity Tests are available from the manufacturer.A-360 is a portable RF communications equipment and can affect Medical Electrical Equipment.This equipment is intended for use by healthcare professionals only. This equipment may cause radio interference or may disrupt the operation of nearby equipment. It may be necessary to take mitigation measures, such as, reorienting or relocating the A-360.This device shall only be used with cables and accessories provided by the manufacturer. Using other cables or accessories may result in increased emissions or decreased immunity of the ME System.This device is classified as Internally Powered equipment powered by 3.7 V rechargeable battery for protection against electric shock.The A-360 is classified as BF Applied Part.This device is classified as IPX0, ordinary equipment, for degree of
18 19

protection against ingress of water, as per IEC 60529 International Standard (Degrees of Protection provided by enclosures).No sterile parts.Mode of operation continuous.This device has non-ionizing radiation.FCC AND INDUSTRY CANADA NOTICES AND WARNINGSFCC COMPLIANCE:Statement according to FCC part 15.19.This device complies with part 15 of the FCC Rules. Operation is subject to the following two conditions: (1) This device may not cause harmful interference, and (2) this device must accept any interference received, including interference that may cause undesired operation.Statement according to FCC part 15.21.Changes or modifications not expressly approved by the party responsible for compliance could void the user’s authority to operate the equipment.Statement for Class B digital device according to FCC part 15.105.NOTE: This equipment has been tested and found to comply with the limits for a Class B digital device, pursuant to part 15 of the FCC Rules. These limits are designed to provide reasonable protection against harmful interference in a residential installation. This equipment generates, uses and can radiate radio frequency energy and, if not installed and used in accordance with the instructions, may cause harmful interference to radio communications. However, there is no guarantee that interference will not occur in a particular installation. If this equipment does cause harmful interference to radio or television reception, which can be determined by turning the equipment off and on, the user is encouraged to try to correct the interference by one or more of the following measures:• Reorient or relocate the receiving antenna.• Increase the separation between the equipment and receiver.• Connect the equipment into an outlet on a circuit different from that to which the receiver is connected.• Consult the dealer or an experienced radio/ TV technician for help.INDUSTRY CANADA COMPLIANCE:Statement according to RSS Gen Issue 3, Sect.7.1.3.This device complies with Industry Canada license-exempt RSS
standard(s). Operation is subject to the following two conditions: (1) this device may not cause interference, and (2) this device must accept any interference, including interference that may cause undesired operation of the device.Cet appareil est conforme aux normes CNR exemptes de licence d’Industrie Canada. Le fonctionnement est soumis aux deus conditions suivantes: (1) cet appareil ne doit pas provoquer d’interférences et (2) cet appareil doit accepter toute interférence, y compris celles susceptibles de provoquer un fonctionnement non souhaite de l’appareil.Statement according to ICES.This ISM device complies with Canadian ICES-001. Cet appareil ISM est conforme à la norme NMB-001 du Canada.Caution: Changes or modifications not expressly approved by the party responsible for compliance could void the user’s authority to operate the equipment.Avertissement: Tout changement ou toute modification non expressément approuvée par la partie responsable de la conformité pourrait annuler l’autorité de l’utilisateur pour faire fonctionner l’équipement.
25. DISPOSAL INSTRUCTIONSFollow local governing ordinances and recycling plans regarding disposal or recycling of device components.
26. MANUFACTURER’S WARRANTYWarranty & ServiceThe manufacturer warrants this device against faulty materials or manufacturing defects for a period of one (1) year from the date of purchase, provided that it is used in accordance with the procedures set up in the instructions for use. This warranty is only applicable if the device has been bought from an authorized distributor.The manufacturer disclaims all other warranties, whether expressed or implied, including, without limitation the warranties of merchantability or fitness for a particular purpose.The warranty covers free repair or swap for an equivalent device of a defective device which fault is proven to be consequence of the manufacturing process.If you have any technical problems with the device, please call the
20 21

Airtraq Distributor in your country or send a message through our web site (www.airtraq.com). Before making your call please have the serial number ready. The serial number of the A-360 is located on a sticker near the lens of the camera and also on the original package.In case of a hardware defect confirming the warranty conditions, your device will be collected and you will receive another one within 20 working days after we receive your defective one.Handling Instructions for Defective Devices1. Return units must be packed in original and secured packaging
materials. All accessories of the device (charger, cables, connectors, etc.) have to be sent back. Damaged incurred during transportation from the customer site is solely the responsibility of the sender.
2. Customer must provide a contact name, phone number, shipping address, the serial number of the A-360, description of the problem and proof of purchase.
3. In all cases when the device shows defects which are not covered by the warranty, the customer will remain responsible for all handling costs and transportation fees.
Exclusions from Warranty1. Product, where the serial number has been defaced, modified or
removed.2. Damage, deterioration or malfunction resulting from:
A. Accident.B. Misuse, neglect, fire, water, lightning or other acts of nature.C. Repair or attempted repair by anyone not authorized by
Supplier.D. Modification by anyone not authorized by Supplier.E. Any damage of the product due to shipment.F. Causes external to the product, such as: over powering the
unit, electric power fluctuations or failure, pouring liquids over the device, etc.
G. Normal wear and tear.H. Any other causes which does not relate to a product defect.
Manufactured by: PRODOL MEDITEC LIMITEDNo. 18, 7th Science Ave.,Hi-Tec Coast, Zhuhai, Guangdong519085 P.R. China
40oC/104oF
0oC/32oF %
95%
10% 500 hPa
1060 hPa
Non-ionizingradiation
Temperature limitation
Type BFapplied part
This side up
General symbol forrecovery/recyclable
Humidity limitation
keep dry
Fragile, handle with care
Attention, SeeInstructions
For Use
Atmospheric pressurelimitation
Complies withMDD 93/42/EEC
Wi- Fi
EU Representative:PRODOL MEDITEC, S.A.Muelle Tomás Olavarri 5, 3º48930 Las Arenas (Vizcaya)SPAIN
For further advice on using the A-360 visit: www.airtraq.com or contact:America: [email protected] & Other: [email protected] is a registered trademark.Apple and the Apple logo, iPad and iPhone are trademarks of Apple Inc., registered in the U.S. and other countries. App Store is a service mark of Apple Inc. Android and Google Play are trademarks of Google Inc.Skype and Skype logo are trademarks of Skype, and Prodol Meditec S.A. is not affiliated, sponsored, authorised or otherwise associated by/with Skype group of companies.Wi-Fi and the Wi-Fi logo are registered trademarks of the Wi-Fi Alliance.All other trademarks and copyrights are the property of their respective owners.
Charger: UL recognized
component mark.
22 23


![OdakyuAndroid t Google play] Wi-Fi Android ios t App Store] Wi-Fi [App Store] [iPhone Profile) Wi-Fi # —E Odakyu Odakyu Free Wi-Fi Android [Google play] WI-Fi Android [App Wi-Fi](https://img.pdfslide.us/doc/110x75/5fcc31f69b77e950d81a9828/android-t-google-play-wi-fi-android-ios-t-app-store-wi-fi-app-store-iphone.jpg)


![Adobe Photoshop PDF...Access Point LLIJtJ Dual Band Wi-Fi Access Point Wi-Fi Access Point tin] Wi-Fi 97 Wi-Fi AUDIOPHILE VIDEOPHILE nnsW01wa0QnnIWãlluunnunnvvao ñ00f-h01sQIfiðŠ](https://img.pdfslide.us/doc/110x75/5f13acbb3777f75a635fee7f/adobe-photoshop-pdf-access-point-llijtj-dual-band-wi-fi-access-point-wi-fi-access.jpg)