Embed Size (px)
Citation preview
Elite® Speaker Operating GuideGuide d’utilisation de haut-parleurs Elite®
Guía de funcionamiento de altavoces Elite®
SP-EBS73-LR
SP-EFS73
• Thank you for buying this Pioneer® Elite® product.• To assure maximum performance from your new speakers,
please read through this operating guide before you install or use them. After you have finished reading this operating guide, store it in a safe place for future reference.
• The nominal impedance of this speaker system is 4 ohms. It must be connected only to an amplifier or receiver designed to drive 4-ohm loads. Connect the speaker system to an amplifier with a load impedance rating ranging from 4 to 16 ohms (a model with “4-16Ω” displayed on the speaker output terminals).
• In order to prevent damage to the speaker resulting from input overload, please observe the following precautions:– Do not supply power to the speakers in excess of the
maximum rated power.– When connecting or disconnecting cables, be sure
amplifier power is OFF. – Do not use excessive amplifier volume if using a graphic
equalizer to emphasize high or low frequencies.
IMPORTANT NOTICE: The serial number for the equipment is located on the rear of the product. Please write this serial number on the warranty sheet and keep it in a secure area for future reference.
BEFORE USE
CONNECTING YOUR SPEAKERSIMPORTANT: Make sure all equipment is turned OFF before making any connections. Correct wiring of your speakers is essential for achieving the best sound quality. Be careful to ensure proper polarity ( +/- ) of connection. We recommend a minimum of 18 gauge for runs up to 25 feet, and thicker for longer runs.Most speakers cable is coded to ease this task. Typically the ribbed or striped side, or the side with the connector marked in red or white, is connected to the positive (red) terminal. Make sure that the amplifier positive (red) terminal is connected to the loudspeaker positive (red) terminal, and that the amplifier negative (black) terminal is connected to the loudspeaker negative (black) terminal.If the wires you’re using are not already terminated with banana plugs, spade lugs, etc., strip off ½” of insulation from the ends of the cable, twist the bare strands and insert into the binding posts. Take care that no stray strands of wire short across between the terminals.Connect the cable from the front left or right channel, or the rear left or right surround channel, to the bottom set of binding posts on the speaker.If you are using the height channel drivers in the SP-EFS73 floorstanding speaker or SP-EBS73-LR bookshelf speaker for Dolby Atmos® or another surround sound technology with height channels, connect the cables for the corresponding height channel (left front height channel of the receiver or amp to the left front speaker’s height channel input, right rear height channel of the receiver or amp to the right rear speaker, etc.) as seen to the right.
INSTALLING AND REMOVING THE GRILLESWith both the SP-EFS73 floorstanding speaker and the SP-EBS73-LR bookshelf speaker, the grilles covering the front drivers and the height drivers may be removed if desired, as seen below.To remove either or both grilles, pull gently on the grille near one of its mounting points. You don’t need to pull the grille all the way out of its grommet at first. Work your way around the grille, gently working it loose around each mounting point. Once the grille is completely loosened, you can remove it. To reattach it, align the pegs on the grille with the holes in the speaker and press in slowly around the mounting points until the grill is pushed in all the way.
www.pioneerelectronics.com2 English

INSTALLING THE BASE AND SPIKES FOR THE SP-EFS73 FLOORSTANDING SPEAKERIncluded in the SP-EFS73 carton are (1) base, (4) screws, (4) spikes and (4) nuts. First, carefully lay the speaker on its side supported by a cushion, and attach the base to the bottom of the speaker using (4) screws, as shown below left. (Screwdriver is not included.)
PLACEMENT AND FINE TUNINGCorrect placement of your speakers is the most important thing you can do to get the best possible sound quality from them. Take time to experiment with positioning according to the guidelines below.Whether the speakers are used in the front or rear surround channels, the tweeter (which is in the center of the midrange driver on the front of the speaker) should be positioned near ear level and the loudspeakers separated a distance approximately equal to the listening distance. Angling the loudspeakers inward towards the listener seated in the center will improve the image stability for non-central listeners. Close proximity to a side or rear wall will enhance the bass performance, although too close (particularly a corner location) and the bass may be unnaturally high and image performance may be degraded. Best results will be obtained when the loudspeaker is placed approximately 2 feet from the wall. If a corner location is unavoidable, try to position the loudspeaker so that the distance to the rear wall is not equal to the distance to the side wall.
The included spikes will help stabilize the SP-EFS73 if the speaker is placed on thick carpet. However, we do not recommend using the spikes if you have wood, tile, stone or linoleum floors, because the spikes may damage the floor. To install the spikes, thread one nut on to each spike so the nut is about halfway down on the spike. Now thread one spike into each of the threaded holes in the base, with the spikes pointing upward as shown above on right. (They’ll be pointing downward when you turn the speaker back over.) Adjust the height of the spikes so that all four spikes firmly contact the flooring underneath the carpet, and use the nuts to lock down the height adjustments.
www.pioneerelectronics.com 3English
SETTING UP FOR DOLBY ATMOS®
While your new Pioneer® Elite® speakers will work in any stereo or home theater system, we designed them especially for use in Dolby Atmos surround sound systems. Atmos is an “immersive audio” technology developed by Dolby® to add new realism to movie and music sound. It adds additional channels to the audio system to create a more enveloping effect. In commercial cinemas, Dolby Atmos systems use height speakers mounted on the ceiling. Now with Dolby Atmos
for the home, there exists a choice of mounting speakers in the ceiling, or integrated into the top panels of the speakers. These top mounted driver arrays incorporated into the SP-EFS73 and SP-EBS73-LR, bounce sound off your ceiling to create dramatic surround-sound effects. You can use the top-mounted arrays in the front left/right channels only, or for best effect, in the front left/right and rear surround left/right channels.
GUIDELINES FOR BEST ATMOS SETUPIn order to use the Dolby Atmos-enabled capability of these speakers the listening room ceiling should have a horizontal flat hard surface (for audio reflection) and a height of 8' to 14'. If your room does not meet these requirements standard ceiling or in-ceiling speakers are required. For the best possible audio experience, Pioneer recommends removing the grilles. Please visit www.pioneerelectronics.com/elitespeakers for more details. The most important part of the Atmos speaker setup is making sure that the top-mounted height driver arrays are positioned at your seated ear height or higher, but lower than half the height of the room, as seen below. If you are using the SP-EBS73-LR bookshelf speaker, you can easily optimize the position of the height channel drivers by choosing a stand of the appropriate height. Once your SP-EFS73 or SP-EBS73-LR speakers have been attached to a Dolby Atmos® enabled receiver, follow the included instructions to ensure the most optimal setting for you to enjoy your Dolby Atmos encoded content.
BASS MANAGEMENT SETTINGSIf you are using an A/V receiver or surround sound processor with your speakers, you will need to set the bass management appropriately, particularly with the SP-EBS73-LR bookshelf speaker. The SP-EFS73 floorstanding speaker should be set to LARGE in the receiver’s menu, and the SP-EBS73 should be set to SMALL. This setting will ensure that no deep bass signals get into the SP-EBS73-LR. If your receiver or processor lets you set the crossover frequency for the SP-EBS73-LR, we recommend 80 Hz.We have also included a foam plug for the SP-EFS73 floorstanding speakers. This foam plug will allow you to tailor the bass response to your particular environment.
INSTALLATION PRECAUTIONS• Do not install this speaker system near a stove or other
heating appliance, or put it in a place exposed to the sun. Such locations may cause the cabinet to change color and the speaker system to break down.
• Remember that the SP-EFS73 and SP-EBS73-LR are quite heavy, so it is dangerous to install them in high places such as on walls or pillars or in other unstable locations unless suitably secured in place.
Pioneer will not be responsible for any accidents or damage that may result from improper installation.
CABINET MAINTENANCE• Use a polishing cloth or dry cloth to wipe off dust and dirt.• When the cabinet is very dirty, clean with a soft cloth
dipped in some neutral cleanser diluted with six parts water to one part cleanser, and then wipe again with a dry cloth. Do not use furniture wax or cleaners.
• Never use paint thinner, benzine, insecticide sprays and other chemicals on or near the cabinets, since these will corrode the surfaces
www.pioneerelectronics.com4 English
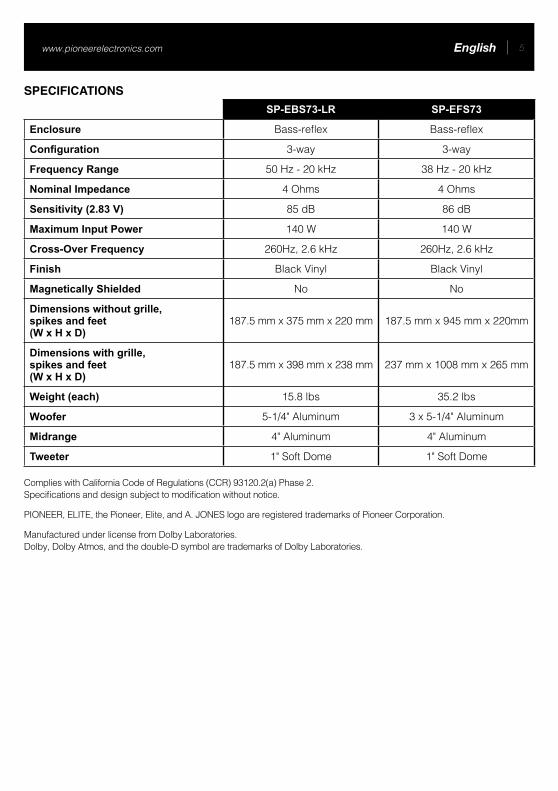
SPECIFICATIONSSP-EBS73-LR SP-EFS73
Enclosure Bass-reflex Bass-reflex
Configuration 3-way 3-way
Frequency Range 50 Hz - 20 kHz 38 Hz - 20 kHz
Nominal Impedance 4 Ohms 4 Ohms
Sensitivity (2.83 V) 85 dB 86 dB
Maximum Input Power 140 W 140 W
Cross-Over Frequency 260Hz, 2.6 kHz 260Hz, 2.6 kHz
Finish Black Vinyl Black Vinyl
Magnetically Shielded No No
Dimensions without grille, spikes and feet(W x H x D)
187.5 mm x 375 mm x 220 mm 187.5 mm x 945 mm x 220mm
Dimensions with grille, spikes and feet(W x H x D)
187.5 mm x 398 mm x 238 mm 237 mm x 1008 mm x 265 mm
Weight (each) 15.8 lbs 35.2 lbs
Woofer 5-1/4" Aluminum 3 x 5-1/4" Aluminum
Midrange 4" Aluminum 4" Aluminum
Tweeter 1" Soft Dome 1" Soft Dome
Complies with California Code of Regulations (CCR) 93120.2(a) Phase 2. Specifications and design subject to modification without notice.
PIONEER, ELITE, the Pioneer, Elite, and A. JONES logo are registered trademarks of Pioneer Corporation.
Manufactured under license from Dolby Laboratories. Dolby, Dolby Atmos, and the double-D symbol are trademarks of Dolby Laboratories.
www.pioneerelectronics.com 5English
WARRANTY VALID ONLY IN COUNTRY OF PRODUCT PURCHASEWARRANTYPioneer Electronics (USA) Inc. (PUSA), and Pioneer Electronics Of Canada, Inc. (POC), warrant that products distributed by PUSA in the U.S.A., and by POC in Canada that fail to function properly under normal use due to a manufacturing defect when installed and operated according to the owner’s manual enclosed with the unit will be repaired or replaced with a unit of comparable value, at the option of PUSA or POC, without charge to you for parts or actual repair work. Parts supplied under this warranty may be new or rebuilt at the option of PUSA or POC.
THIS LIMITED WARRANTY APPLIES TO THE ORIGINAL OR ANY SUBSEQUENT OWNER OF THIS PIONEER PRODUCT DURING THE WARRANTY PERIOD PROVIDED THE PRODUCT WAS PURCHASED FROM AN AUTHORIZED PIONEER DISTRIBUTOR/DEALER IN THE U.S.A. OR CANADA. YOU WILL BE REQUIRED TO PROVIDE A SALES RECEIPT OR OTHER VALID PROOF OF PURCHASE SHOWING THE DATE OF ORIGINAL PURCHASE OR, IF RENTED, YOUR RENTAL CONTRACT SHOWING THE PLACE AND DATE OF FIRST RENTAL. IN THE EVENT SERVICE IS REQUIRED, THE PRODUCT MUST BE DELIVERED WITHIN THE WARRANTY PERIOD, TRANSPORTATION PREPAID, ONLY FROM WITHIN THE COUNTRY OF PURCHASE AS EXPLAINED IN THIS DOCUMENT. YOU WILL BE RESPONSIBLE FOR REMOVAL AND INSTALLATION OF THE PRODUCT. PUSA OR POC, AS APPROPRIATE, WILL PAY TO RETURN THE REPAIRED OR REPLACEMENT PRODUCT TO YOU WITHIN THE COUNTRY OF PURCHASE.
PRODUCT WARRANTY PERIOD Parts LaborHome Audio and Video .................................................................................................................... 2 Year 2 YearMicrophones, Headphones, Phono Cartridges and Styluses ...................................................... 90 Days 90 DaysShorter limited warranty periods apply to some models. Please refer to the limited warranty document enclosed with the product for a definitive statement of the warranty period. The warranty period for retail customers who rent the product commences upon the date product is first put into use (a) during the rental period or (b) retail sale, whichever occurs first.
WHAT IS NOT COVEREDIF THIS PRODUCT WAS PURCHASED FROM AN UNAUTHORIZED DISTRIBUTOR, THERE ARE NO WARRANTIES, EXPRESS OR IMPLIED, INCLUDING THE IMPLIED WARRANTY OF MERCHANTABILITY AND THE IMPLIED WARRANTY OF FITNESS FOR A PARTICULAR PURPOSE AND THIS PRODUCT IS SOLD STRICTLY AS IS AND WITH ALL FAULTS”.PIONEER SHALL NOT BE LIABLE FOR ANY CONSEQUENTIAL AND/OR INCIDENTAL DAMAGES.PIONEER DOES NOT WARRANT ANY PRODUCT LISTED ABOVE WHEN IT IS USED IN A TRADE OR BUSINESS OR IN ANY INDUSTRIAL OR COMMERCIAL APPLICATION.THIS WARRANTY DOES NOT APPLY IF THE PRODUCT HAS BEEN SUBJECTED TO POWER IN EXCESS OF ITS PUBLISHED POWER RATING.THIS WARRANTY DOES NOT COVER TELEVISION OR DISPLAY SCREENS DAMAGED BY STATIC, NON-MOVING, IMAGES APPLIED FOR LENGTHY PERIODS (BURN-IN).THIS WARRANTY DOES NOT COVER THE CABINET OR ANY APPEARANCE ITEM, USER ATTACHED ANTENNA, ANY DAMAGE TO RECORDS OR RECORDING TAPES OR DISCS, ANY DAMAGE TO THE PRODUCT RESULTING FROM ALTERATIONS, MODIFICATIONS NOT AUTHORIZED IN WRITING BY PIONEER, ACCIDENT, MISUSE OR ABUSE, DAMAGE DUE TO LIGHTNING OR TO POWER SURGES, SUBSEQUENT DAMAGE FROM LEAKING, DAMAGE FROM INOPERATIVE BATTERIES, OR THE USE OF BATTERIES NOT CONFORMING TO THOSE SPECIFIED IN THE OWNER’S MANUAL.THIS WARRANTY DOES NOT COVER THE COST OF PARTS OR LABOR WHICH WOULD BE OTHERWISE PROVIDED WITHOUT CHARGE UNDER THIS WARRANTY OBTAINED FROM ANY SOURCE OTHER THAN A PIONEER AUTHORIZED SERVICE COMPANY OR OTHER DESIGNATED LOCATION. THIS WARRANTY DOES NOT COVER DEFECTS OR DAMAGE CAUSED BY THE USE OF UNAUTHORIZED PARTS OR LABOR OR FROM IMPROPER MAINTENANCE.ALTERED, DEFACED, OR REMOVED SERIAL NUMBERS VOID THIS ENTIRE WARRANTY
NO OTHER WARRANTIESIN THE U.S.A. - PIONEER LIMITS ITS OBLIGATIONS UNDER ANY IMPLIED WARRANTIES INCLUDING, BUT NOT LIMITED TO, THE IMPLIED WARRANTIES OF MERCHANTABILITY AND FITNESS FOR A PARTICULAR PURPOSE, TO A PERIOD NOT TO EXCEED THE WARRANTY PERIOD. NO WARRANTIES SHALL APPLY AFTER THE WARRANTY PERIOD. SOME STATES DO NOT ALLOW LIMITATIONS ON HOW LONG AN IMPLIED WARRANTY LASTS AND SOME STATES DO NOT ALLOW THE EXCLUSIONS OR LIMITATIONS OF INCIDENTAL OR CONSEQUENTIAL DAMAGES, SO THE ABOVE LIMITATIONS OR EXCLUSIONS MAY NOT APPLY TO YOU. THIS WARRANTY GIVES YOU SPECIFIC LEGAL RIGHTS AND YOU MAY HAVE OTHER RIGHTS WHICH MAY VARY FROM STATE TO STATE.IN CANADA - EXCEPT AS EXPRESSLY PROVIDED HEREIN, THERE ARE NO REPRESENTATIONS, WARRANTIES, OBLIGATIONS OR CONDITIONS, IMPLIED, STATUTORY OR OTHERWISE, APPLICABLE TO THIS PRODUCT.
TO OBTAIN SERVICEPUSA and POC have appointed a number of Authorized Service Companies throughout the U.S.A. and Canada should your product require service. To receive warranty service you need to present your sales receipt or, if rented, your rental contract showing place and date of original owner’s transaction. If shipping the unit you will need to package it carefully and send it, transportation prepaid by a traceable, insured method, to an Authorized Service Company. Package the product using adequate padding material to prevent damage in transit. The original container is ideal for this purpose. Include your name, address and telephone number where you can be reached during business hours.On all complaints and concerns in the U.S.A. call Customer Support at 1-800-421-1404, or, in Canada, call Customer Satisfaction at 1-877-283-5901.
DISPUTE RESOLUTIONIN THE U.S.A. - Following our response to any initial request to Customer Support, should a dispute arise between you and Pioneer, Pioneer makes available its Complaint Resolution Program to resolve the dispute. The Complaint Resolution Program is available to you without charge. You are required to use the Complaint Resolution Program before you exercise any rights under, or seek any remedies, created by Title I of the Magnuson-Moss Warranty-Federal Trade Commission Improvement Act, 15 U.S.C. 2301 et seq. To use the Complaint Resolution Program call 1-800-421-1404 and explain to the customer service representative the problem you are experiencing, steps you have taken to have the product repaired during the warranty period and the name of the authorized Distributor/Dealer from whom the Pioneer product was purchased. After the complaint has been explained to the representative, a resolution number will be issued. Within 40 days of receiving your complaint, Pioneer will investigate the dispute and will either: (1) respond to your complaint in writing informing you what action Pioneer will take, and in what time period, to resolve the dispute; or (2) respond to your complaint in writing informing you why it will not take any action.IN CANADA - Call the Customer Satisfaction Manager at (905) 946-7446 to discuss your complaint and to obtain a prompt resolution.
RECORD THE PLACE AND DATE OF PURCHASE FOR FUTURE REFERENCE
Model No. ____________________________________________ Serial No. ________________________________________ Purchase Date _______________________
Purchased From _______________________________________________________________________________________________________________________________
KEEP THIS INFORMATION AND YOUR SALES RECEIPT IN A SAFE PLACE
LIMITED WARRANTY
PIONEER ELECTRONICS (USA) INC.
PIONEER ELECTRONIQUES DU CANADA, INC.
IN THE U.S.A.For hook-up and operation of your unit or to locate an
Authorized Service Company, please call or write:SERVICE SUPPORT DIVISION
PIONEER ELECTRONICS (USA), INC.1925 E. Dominguez Street, Long Beach, California 90810
1-800-421-1404 • http://www.pioneerelectronics.com
IN CANADAFor additional information on this warranty,
please call or write:CUSTOMER SATISFACTION GROUP
PIONEER ELECTRONICS OF CANADA, INC.340 Ferrier Street, Unit 2, Markham, Ontario L2R 2Z5 Canada
(905) 479-4411 • 1-877-283-5901 • http://www.pioneerelectronics.ca

Dear Customer,
The Safety of Your Ears is in Your Hands. Get the most out of your equipment by playing it at a safe level – a level that lets the sound come through clearly without annoying blaring or distortion and, most importantly, without affecting your sensitive hearing. Sound can be deceiving. Over time, your hearing “comfort level” adapts to higher volumes of sound, so what sounds “normal” can actually be loud and harmful to your hearing. Guard against this by setting your equipment at a safe level BEFORE your hearing adapts.
ESTABLISH A SAFE LEVEL:• Set your volume control at a low setting.• Slowly increase the sound until you can hear it comfortably and clearly,
without distortion.• Once you have established a comfortable sound level, set the dial and
leave it there.
BE SURE TO OBSERVE THE FOLLOWING GUIDELINES:• Donotturnupthevolumesohighthatyoucan’thearwhat’saroundyou.• Use caution or temporarily discontinue use in potentially hazardous situations.
PIONEER ELECTRONICS [USA] INC. 1925 E. Dominguez Street, Long Beach, California 90810PIONEER ELECTRONICS OF CANADA, INC. 340 Ferrier Street, Unit 2, Markham, Ontario L2R 2Z5 CanadaPIONEER ELECTRONICS OF MEXICO S.A. De C.V. Blvd. Manuel Avila Camacho 138 piso 10 Col. Lomas de Chapultepec 11000 Delegacion Miguel Hidalgo Mexico, D.F.
Published by Pioneer Electronics (USA) Inc. Copyright © 2014 Pioneer Electronics (USA) Inc. All rights reserved Printed in China
www.pioneerelectronics.com 7English
Connexion du haut-parleur de projection vers le haut
Connexion du haut-parleur
principal
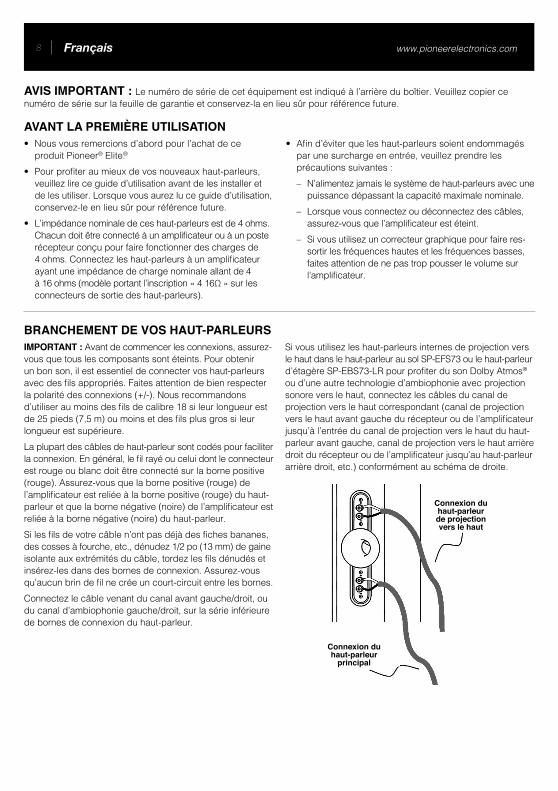
• Nous vous remercions d’abord pour l’achat de ce produit Pioneer® Elite.®
• Pour profiter au mieux de vos nouveaux haut-parleurs, veuillez lire ce guide d’utilisation avant de les installer et de les utiliser. Lorsque vous aurez lu ce guide d’utilisation, conservez-le en lieu sûr pour référence future.
• L’impédance nominale de ces haut-parleurs est de 4 ohms. Chacun doit être connecté à un amplificateur ou à un poste récepteur conçu pour faire fonctionner des charges de 4 ohms. Connectez les haut-parleurs à un amplificateur ayant une impédance de charge nominale allant de 4 à 16 ohms (modèle portant l’inscription « 4 16Ω » sur les connecteurs de sortie des haut-parleurs).
• Afin d’éviter que les haut-parleurs soient endommagés par une surcharge en entrée, veuillez prendre les précautions suivantes :– N’alimentez jamais le système de haut-parleurs avec une
puissance dépassant la capacité maximale nominale.– Lorsque vous connectez ou déconnectez des câbles,
assurez-vous que l’amplificateur est éteint.– Si vous utilisez un correcteur graphique pour faire res-
sortir les fréquences hautes et les fréquences basses, faites attention de ne pas trop pousser le volume sur l’amplificateur.
AVIS IMPORTANT : Le numéro de série de cet équipement est indiqué à l’arrière du boîtier. Veuillez copier ce numéro de série sur la feuille de garantie et conservez-la en lieu sûr pour référence future.
AVANT LA PREMIÈRE UTILISATION
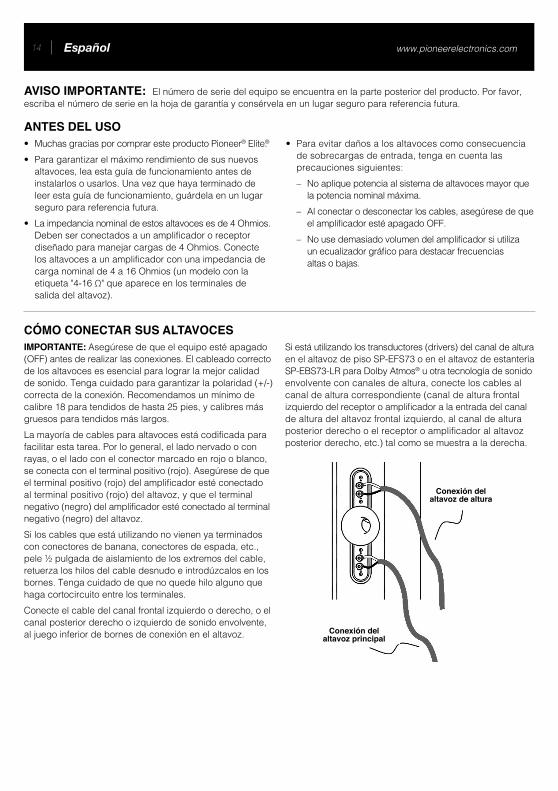
BRANCHEMENT DE VOS HAUT-PARLEURSIMPORTANT : Avant de commencer les connexions, assurez- vous que tous les composants sont éteints. Pour obtenir un bon son, il est essentiel de connecter vos haut-parleurs avec des fils appropriés. Faites attention de bien respecter la polarité des connexions (+/-). Nous recommandons d’utiliser au moins des fils de calibre 18 si leur longueur est de 25 pieds (7,5 m) ou moins et des fils plus gros si leur longueur est supérieure. La plupart des câbles de haut-parleur sont codés pour faciliter la connexion. En général, le fil rayé ou celui dont le connecteur est rouge ou blanc doit être connecté sur la borne positive (rouge). Assurez-vous que la borne positive (rouge) de l’amplificateur est reliée à la borne positive (rouge) du haut-parleur et que la borne négative (noire) de l’amplificateur est reliée à la borne négative (noire) du haut-parleur. Si les fils de votre câble n’ont pas déjà des fiches bananes, des cosses à fourche, etc., dénudez 1/2 po (13 mm) de gaine isolante aux extrémités du câble, tordez les fils dénudés et insérez-les dans des bornes de connexion. Assurez-vous qu’aucun brin de fil ne crée un court-circuit entre les bornes. Connectez le câble venant du canal avant gauche/droit, ou du canal d’ambiophonie gauche/droit, sur la série inférieure de bornes de connexion du haut-parleur.
Si vous utilisez les haut-parleurs internes de projection vers le haut dans le haut-parleur au sol SP-EFS73 ou le haut-parleur d’étagère SP-EBS73-LR pour profiter du son Dolby Atmos® ou d’une autre technologie d’ambiophonie avec projection sonore vers le haut, connectez les câbles du canal de projection vers le haut correspondant (canal de projection vers le haut avant gauche du récepteur ou de l’amplificateur jusqu’à l’entrée du canal de projection vers le haut du haut- parleur avant gauche, canal de projection vers le haut arrière droit du récepteur ou de l’amplificateur jusqu’au haut-parleur arrière droit, etc.) conformément au schéma de droite.
www.pioneerelectronics.com8 Français
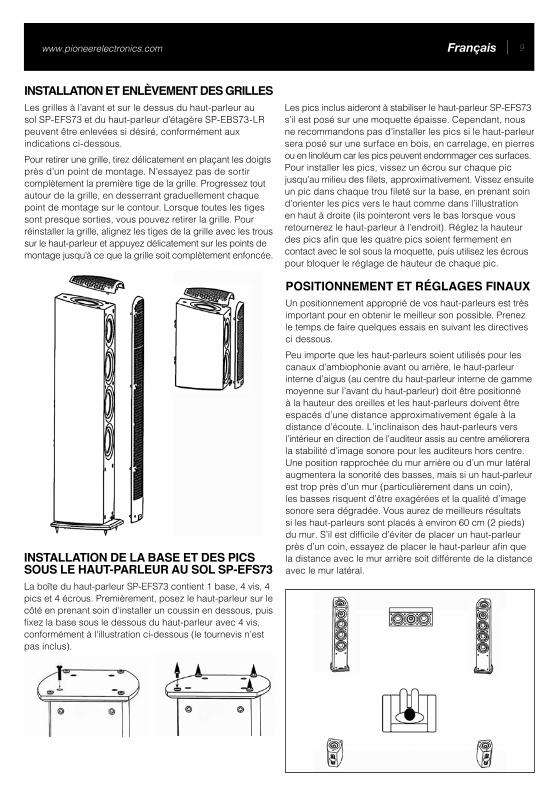
INSTALLATION ET ENLÈVEMENT DES GRILLESLes grilles à l’avant et sur le dessus du haut-parleur au sol SP-EFS73 et du haut-parleur d’étagère SP-EBS73-LR peuvent être enlevées si désiré, conformément aux indications ci-dessous.Pour retirer une grille, tirez délicatement en plaçant les doigts près d’un point de montage. N’essayez pas de sortir complètement la première tige de la grille. Progressez tout autour de la grille, en desserrant graduellement chaque point de montage sur le contour. Lorsque toutes les tiges sont presque sorties, vous pouvez retirer la grille. Pour réinstaller la grille, alignez les tiges de la grille avec les trous sur le haut-parleur et appuyez délicatement sur les points de montage jusqu’à ce que la grille soit complètement enfoncée.
POSITIONNEMENT ET RÉGLAGES FINAUXUn positionnement approprié de vos haut-parleurs est très important pour en obtenir le meilleur son possible. Prenez le temps de faire quelques essais en suivant les directives ci dessous.Peu importe que les haut-parleurs soient utilisés pour les canaux d’ambiophonie avant ou arrière, le haut-parleur interne d’aigus (au centre du haut-parleur interne de gamme moyenne sur l’avant du haut-parleur) doit être positionné à la hauteur des oreilles et les haut-parleurs doivent être espacés d’une distance approximativement égale à la distance d’écoute. L’inclinaison des haut-parleurs vers l’intérieur en direction de l’auditeur assis au centre améliorera la stabilité d’image sonore pour les auditeurs hors centre. Une position rapprochée du mur arrière ou d’un mur latéral augmentera la sonorité des basses, mais si un haut-parleur est trop près d’un mur (particulièrement dans un coin), les basses risquent d’être exagérées et la qualité d’image sonore sera dégradée. Vous aurez de meilleurs résultats si les haut-parleurs sont placés à environ 60 cm (2 pieds) du mur. S’il est difficile d’éviter de placer un haut-parleur près d’un coin, essayez de placer le haut-parleur afin que la distance avec le mur arrière soit différente de la distance avec le mur latéral.
INSTALLATION DE LA BASE ET DES PICS SOUS LE HAUT-PARLEUR AU SOL SP-EFS73La boîte du haut-parleur SP-EFS73 contient 1 base, 4 vis, 4 pics et 4 écrous. Premièrement, posez le haut-parleur sur le côté en prenant soin d'installer un coussin en dessous, puis fixez la base sous le dessous du haut-parleur avec 4 vis, conformément à l'illustration ci-dessous (le tournevis n’est pas inclus).
Les pics inclus aideront à stabiliser le haut-parleur SP-EFS73 s’il est posé sur une moquette épaisse. Cependant, nous ne recommandons pas d’installer les pics si le haut-parleur sera posé sur une surface en bois, en carrelage, en pierres ou en linoléum car les pics peuvent endommager ces surfaces. Pour installer les pics, vissez un écrou sur chaque pic jusqu’au milieu des filets, approximativement. Vissez ensuite un pic dans chaque trou fileté sur la base, en prenant soin d’orienter les pics vers le haut comme dans l’illustration en haut à droite (ils pointeront vers le bas lorsque vous retournerez le haut-parleur à l’endroit). Réglez la hauteur des pics afin que les quatre pics soient fermement en contact avec le sol sous la moquette, puis utilisez les écrous pour bloquer le réglage de hauteur de chaque pic.
www.pioneerelectronics.com 9Français
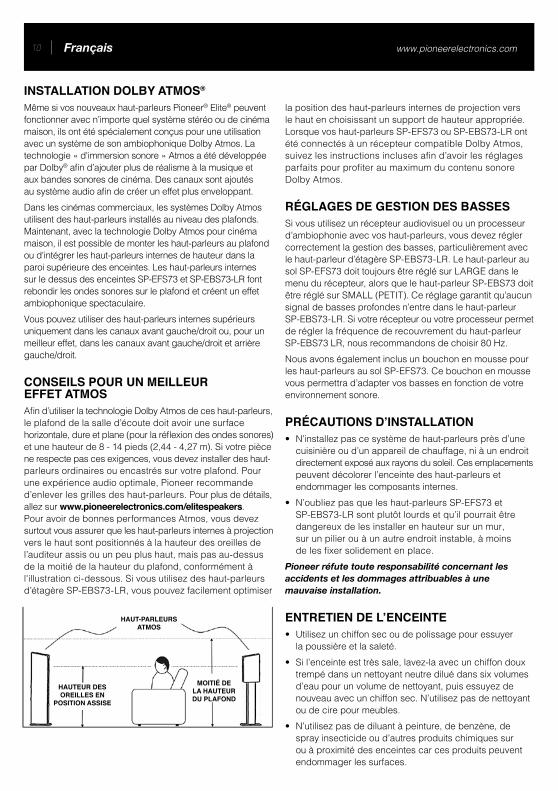
HAUT-PARLEURS ATMOS
HAUTEUR DES OREILLES EN
POSITION ASSISE
MOITIÉ DE LA HAUTEUR DU PLAFOND
INSTALLATION DOLBY ATMOS®
Même si vos nouveaux haut-parleurs Pioneer® Elite® peuvent fonctionner avec n’importe quel système stéréo ou de cinéma maison, ils ont été spécialement conçus pour une utilisation avec un système de son ambiophonique Dolby Atmos. La technologie « d'immersion sonore » Atmos a été développée par Dolby® afin d’ajouter plus de réalisme à la musique et aux bandes sonores de cinéma. Des canaux sont ajoutés au système audio afin de créer un effet plus enveloppant. Dans les cinémas commerciaux, les systèmes Dolby Atmos utilisent des haut-parleurs installés au niveau des plafonds. Maintenant, avec la technologie Dolby Atmos pour cinéma maison, il est possible de monter les haut-parleurs au plafond ou d'intégrer les haut-parleurs internes de hauteur dans la paroi supérieure des enceintes. Les haut-parleurs internes sur le dessus des enceintes SP-EFS73 et SP-EBS73-LR font rebondir les ondes sonores sur le plafond et créent un effet ambiophonique spectaculaire. Vous pouvez utiliser des haut-parleurs internes supérieurs uniquement dans les canaux avant gauche/droit ou, pour un meilleur effet, dans les canaux avant gauche/droit et arrière gauche/droit.
CONSEILS POUR UN MEILLEUR EFFET ATMOSAfin d’utiliser la technologie Dolby Atmos de ces haut-parleurs, le plafond de la salle d’écoute doit avoir une surface horizontale, dure et plane (pour la réflexion des ondes sonores) et une hauteur de 8 - 14 pieds (2,44 - 4,27 m). Si votre pièce ne respecte pas ces exigences, vous devez installer des haut- parleurs ordinaires ou encastrés sur votre plafond. Pour une expérience audio optimale, Pioneer recommande d’enlever les grilles des haut-parleurs. Pour plus de détails, allez sur www.pioneerelectronics.com/elitespeakers. Pour avoir de bonnes performances Atmos, vous devez surtout vous assurer que les haut-parleurs internes à projection vers le haut sont positionnés à la hauteur des oreilles de l’auditeur assis ou un peu plus haut, mais pas au-dessus de la moitié de la hauteur du plafond, conformément à l'illustration ci-dessous. Si vous utilisez des haut-parleurs d’étagère SP-EBS73-LR, vous pouvez facilement optimiser
la position des haut-parleurs internes de projection vers le haut en choisissant un support de hauteur appropriée. Lorsque vos haut-parleurs SP-EFS73 ou SP-EBS73-LR ont été connectés à un récepteur compatible Dolby Atmos, suivez les instructions incluses afin d’avoir les réglages parfaits pour profiter au maximum du contenu sonore Dolby Atmos.
RÉGLAGES DE GESTION DES BASSESSi vous utilisez un récepteur audiovisuel ou un processeur d’ambiophonie avec vos haut-parleurs, vous devez régler correctement la gestion des basses, particulièrement avec le haut-parleur d’étagère SP-EBS73-LR. Le haut-parleur au sol SP-EFS73 doit toujours être réglé sur LARGE dans le menu du récepteur, alors que le haut-parleur SP-EBS73 doit être réglé sur SMALL (PETIT). Ce réglage garantit qu’aucun signal de basses profondes n’entre dans le haut-parleur SP-EBS73-LR. Si votre récepteur ou votre processeur permet de régler la fréquence de recouvrement du haut-parleur SP-EBS73 LR, nous recommandons de choisir 80 Hz.Nous avons également inclus un bouchon en mousse pour les haut-parleurs au sol SP-EFS73. Ce bouchon en mousse vous permettra d’adapter vos basses en fonction de votre environnement sonore.
PRÉCAUTIONS D’INSTALLATION• N’installez pas ce système de haut-parleurs près d’une
cuisinière ou d’un appareil de chauffage, ni à un endroit directement exposé aux rayons du soleil. Ces emplacements peuvent décolorer l’enceinte des haut-parleurs et endommager les composants internes.
• N’oubliez pas que les haut-parleurs SP-EFS73 et SP-EBS73-LR sont plutôt lourds et qu’il pourrait être dangereux de les installer en hauteur sur un mur, sur un pilier ou à un autre endroit instable, à moins de les fixer solidement en place.
Pioneer réfute toute responsabilité concernant les accidents et les dommages attribuables à une mauvaise installation.
ENTRETIEN DE L’ENCEINTE• Utilisez un chiffon sec ou de polissage pour essuyer
la poussière et la saleté.• Si l’enceinte est très sale, lavez-la avec un chiffon doux
trempé dans un nettoyant neutre dilué dans six volumes d’eau pour un volume de nettoyant, puis essuyez de nouveau avec un chiffon sec. N’utilisez pas de nettoyant ou de cire pour meubles.
• N’utilisez pas de diluant à peinture, de benzène, de spray insecticide ou d’autres produits chimiques sur ou à proximité des enceintes car ces produits peuvent endommager les surfaces.
www.pioneerelectronics.com10 Français
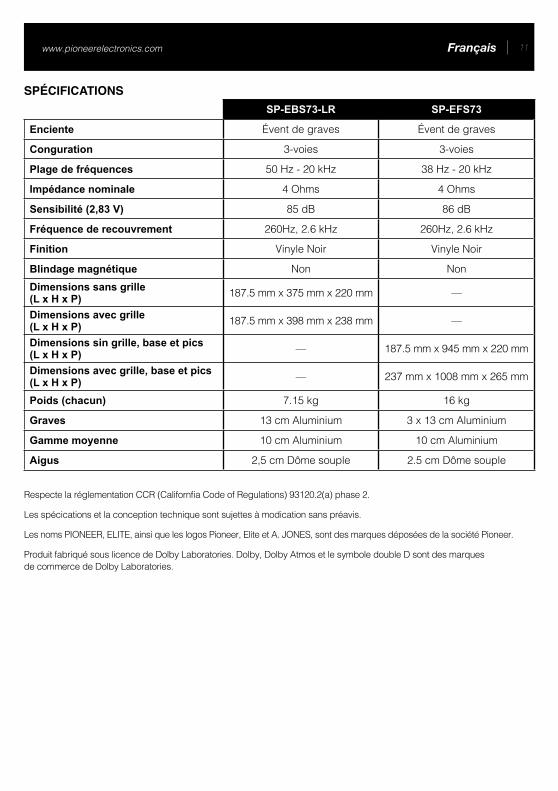
SPÉCIFICATIONSSP-EBS73-LR SP-EFS73
Enciente Évent de graves Évent de graves
Conguration 3-voies 3-voies
Plage de fréquences 50 Hz - 20 kHz 38 Hz - 20 kHz
Impédance nominale 4 Ohms 4 Ohms
Sensibilité (2,83 V) 85 dB 86 dB
Fréquence de recouvrement 260Hz, 2.6 kHz 260Hz, 2.6 kHz
Finition Vinyle Noir Vinyle Noir
Blindage magnétique Non NonDimensions sans grille (L x H x P) 187.5 mm x 375 mm x 220 mm —
Dimensions avec grille (L x H x P) 187.5 mm x 398 mm x 238 mm —
Dimensions sin grille, base et pics (L x H x P) — 187.5 mm x 945 mm x 220 mm
Dimensions avec grille, base et pics (L x H x P) — 237 mm x 1008 mm x 265 mm
Poids (chacun) 7.15 kg 16 kg
Graves 13 cm Aluminium 3 x 13 cm Aluminium
Gamme moyenne 10 cm Aluminium 10 cm Aluminium
Aigus 2,5 cm Dôme souple 2.5 cm Dôme souple
Respecte la réglementation CCR (Californfia Code of Regulations) 93120.2(a) phase 2.
Les spécications et la conception technique sont sujettes à modication sans préavis.
Les noms PIONEER, ELITE, ainsi que les logos Pioneer, Elite et A. JONES, sont des marques déposées de la société Pioneer.
Produit fabriqué sous licence de Dolby Laboratories. Dolby, Dolby Atmos et le symbole double D sont des marques de commerce de Dolby Laboratories.
www.pioneerelectronics.com 11Français

GARANTIEPioneer Electronics (USA) Inc. (PUSA) et Pioneer Électronique du Canada, Inc. (POC) garantissent que les produits distribués par PUSA aux États-Unis et par POC au Canada qui, après avoir été installés et utilisés conformément au manuel de l’utilisateur inclus avec l’unité, ne fonctionnent pas de façon appropriée dans des conditions d’utilisation normales en raison d’un vice de fabrication, seront réparés ou remplacés par une unité de valeur comparable, au choix de PUSA ou de POC, sans que vous deviez payer pour les pièces ou les travaux de réparation. Les pièces incluses en vertu de la présente garantie peuvent être neuves ou remises à neuf, au choix de PUSA ou de POC.
LA PRÉSENTE GARANTIE LIMITÉE S’APPLIQUE AU PROPRIÉTAIRE INITIAL AINSI QU’À TOUT PROPRIÉTAIRE SUBSÉQUENT DU PRÉSENT PRODUIT PIONEER PENDANT LA PÉRIODE DE GARANTIE, À CONDITION QUE LE PRODUIT AIT ÉTÉ ACHETÉ CHEZ UN DISTRIBUTEUR OU DÉTAILLANT PIONEER AUTORISÉ AUX ÉTATS-UNIS OU AU CANADA. VOUS DEVREZ FOURNIR UN RELEVÉ DE CAISSE OU UNE AUTRE PREUVE D’ACHAT VALIDE INDIQUANT LA DATE DE L’ACHAT INITIAL OU, SI VOUS LOUEZ LE PRODUIT, VOTRE CONTRAT DE LOCATION INDIQUANT L’ENDROIT ET LA DATE DE LA PREMIÈRE LOCATION. SI JAMAIS UN SERVICE DE RÉPARATION EST REQUIS, LE PRODUIT DOIT TRE EXPÉDIÉ PENDANT LA PÉRIODE DE GARANTIE, EN PORT PRÉPAYÉ, À L’INTÉRIEUR DU PAYS OÙ L’ACHAT A ÉTÉ EFFECTUÉ SEULEMENT, TEL QU’IL EST EXPLIQUÉ DANS LE PRÉSENT DOCUMENT. VOUS ÊTES RESPONSABLE DU DÉMONTAGE ET DE L’INSTALLATION DU PRODUIT. PUSA OU POC, LE CAS ÉCHÉANT, PAIERA POUR VOUS RETOURNER LE PRODUIT RÉPARÉ OU REMPLACÉ, À L’INTÉRIEUR DU PAYS OÙ L’ACHAT A ÉTÉ EFFECTUÉ.
PÉRIODE DE GARANTIE DES PRODUITS Pièces Main-d’œuvreProduits audio et vidéo pour la maison........................................................................................... 2 an 2 anMicrophones, Headphones, Phono Cartridges and Styluses ...................................................... 90 jours 90 joursDurée des garanties réduites pour certains modèles. Veuillez vous référer au document degarantie limitée inclus avec le produit pour confirmer la durée de la garantie. La période de garantie pour les clients qui louent le produit commence le jour où le produit est utilisé pour la première fois (a) pendant la période de location ou (b) après la vente au détail, selon ce qui se produit en premier.
ÉLÉMENTS NON COUVERTS PAR LA GARANTIEUN PRODUIT ACHETÉ CHEZ UN DISTRIBUTEUR NON AUTORISÉ N’EST COUVERT PAR AUCUNE GARANTIE EXPRESSE OU IMPLICITE, Y COMPRIS QUELQUE GARANTIE IMPLICITE DE QUALITÉ MARCHANDE OU D’ADAPTATION À UN USAGE PARTICULIER QUE CE SOIT. DE PLUS, CE PRODUIT EST STRICTEMENT VENDU « TEL QUEL » ET « AVEC TOUS SES DÉFAUTS ÉVENTUELS ».PIONEER N’EST PAS RESPONSABLE DE QUELQUE DOMMAGE CONSÉCUTIF ET(OU) INDIRECT QUE CE SOIT.PIONEER NE GARANTIT PAS LES PRODUITS ÉNUMÉRÉS CI-DESSUS LORSQU’ILS SONT UTILISÉS À DES FINS COMMERCIALES OU PROFESSIONNELLES, OU AU SEIN DE TOUTE APPLICATION INDUSTRIELLE OU COMMERCIALE QUE CE SOIT.LA PRÉSENTE GARANTIE NE S’APPLIQUE PAS SI LE PRODUIT A ÉTÉ SOUMIS À UNE PUISSANCE NOMINALE EXCÉDANT CELLE QUI A ÉTÉ ÉTABLIE DANS LES DOCUMENTS S’Y APPLIQUANT.LA PRÉSENTE GARANTIE NE COUVRE PAS LES TÉLÉVISEURS OU LES ÉCRANS ENDOMMAGÉS EN RAISON DE L’APPLICATION D’IMAGES STATIQUES ET IMMOBILES PENDANT DE LONGUES PÉRIODES (IMAGES RÉMANENTES).LA PRÉSENTE GARANTIE NE COUVRE PAS LE COFFRAGE OU LES ÉLÉMENTS ESTHÉTIQUES, LES ANTENNES INSTALLÉES PAR L’UTILISATEUR, LES DOMMAGES AUX DISQUES OU AUX RUBANS OU DISQUES D’ENREGISTREMENT, LES DOMMAGES AU PRODUIT DÉCOULANT D’UNE RETOUCHE, D’UNE MODIFICATION NON AUTORISÉE PAR ÉCRIT PAR PIONEER, D’UN ACCIDENT, D’UN USAGE INAPPROPRIÉ OU D’UN USAGE ABUSIF, LES DOMMAGES PRODUITS PAR LA FOUDRE OU LA SURTENSION, LES DOMMAGES SUBSÉQUENTS DÉCOULANT DE FUITES, LES DOMMAGES DÉCOULANT DE PILES DÉFECTUEUSES OU DE L’UTILISATION DE PILES NON CONFORMES À CELLES QUI SONT SPÉCIFIÉES DANS LE MANUEL DE L’UTILISATEUR.LA PRÉSENTE GARANTIE NE COUVRE PAS LE COÛT DES PIÈCES OU DE LA MAIN-D’ŒUVRE QUI SERAIENT AUTREMENT OFFERTES SANS FRAIS EN VERTU DE LA PRÉSENTE GARANTIE, SI ELLES SONT OBTENUES AUPRÈS D’UNE SOURCE AUTRE QU’UNE SOCIÉTÉ DE SERVICE OU AUTRE AUTORISÉE OU DÉSIGNÉE PAR PIONEER. LA PRÉSENTE GARANTIE NE COUVRE PAS LES DÉFECTUOSITÉS OU LES DOMMAGES CAUSÉS PAR L’UTILISATION D’UNE MAIN-D’ŒUVRE OU DE PIÈCES NON AUTORISÉES, NI D’UN ENTRETIEN INADÉQUAT. LES NUMÉROS DE SÉRIE MODIFIÉS, OBLITÉRÉS OU ENLEVÉS ANNULENT LA PRÉSENTE GARANTIE DANS SA TOTALITÉ.
INVALADITÉ DE TOUTE AUTRE GARANTIE AUX ÉTATS-UNIS PIONEER LIMITE SES OBLIGATIONS EN VERTU DE TOUTE GARANTIE IMPLICITE QUE CE SOIT, Y COMPRIS ENTRE AUTRES LES GARANTIES IMPLICITES DE QUALITÉ MARCHANDE OU D’ADAPTATION À UN USAGE PARTICULIER, À UNE PÉRIODE N’EXCÉDANT PAS LA PÉRIODE DE GARANTIE. AUCUNE GARANTIE NE S’APPLIQUE APRÈS LA PÉRIODE DE GARANTIE. CERTAINS ÉTATS NE PERMETTENT PAS LA LIMITATION DE LA DURÉE D’UNE GARANTIE IMPLICITE, ET CERTAINS NE PERMETTENT PAS L’EXCLUSION OU LA LIMITATION DES DOMMAGES CONSÉCUTIFS OU INDIRECTS. LES LIMITATIONS ET EXCLUSIONS ÉTABLIES CI-DESSUS PEUVENT DONC NE PAS S’APPLIQUER À VOUS. LA PRÉSENTE GARANTIE VOUS DONNE DES DROITS LÉGAUX SPÉCIFIQUES. VOUS POUVEZ JOUIR D’AUTRES DROITS, QUI PEUVENT VARIER D’UN ÉTAT À L’AUTRE.
AU CANADA SOUS RÉSERVE DE CE QUI EST EXPRESSÉMENT STIPULÉ DANS LES PRÉSENTES, AUCUNE REPRÉSENTATION, GARANTIE, OBLIGATION OU CONDITION, QU’ELLE SOIT IMPLICITE, OBLIGATOIRE OU AUTRE, NE S’APPLIQUE À CE PRODUIT.
SERVICEPUSA et POC ont désigné un certain nombre de sociétés de service autorisées partout aux États-Unis et au Canada si jamais vous avez besoin de services de réparation pour votre produit. Pour profiter d’un tel service en vertu de la garantie, vous devez présenter votre relevé de caisse ou, si vous louez le produit, votre contrat de location indiquant l’endroit et la date de la transaction par le premier propriétaire. Si vous expédiez l’unité, vous devez l’emballer soigneusement et l’envoyer à une société de service autorisée, en port prépayé et selon une méthode de transport pouvant être suivie et assurée. Emballez le produit au moyen de matériaux coussinés adéquats pour éviter les dommages pendant le transport. La boîte d’origine est idéale à cette fin. Incluez votre nom, votre adresse et un numéro de téléphone où nous pouvons vous rejoindre pendant les heures de bureau. Pour toutes les plaintes et problèmes aux États-Unis, communiquez avec le service de Soutien à la clientèle au 1-800-421-1404. Au Canada, communiquez avec le groupe de Satisfaction de la clientèle au 1-877-283-5901.
POUR LE RACCORDEMENT OU LE FONCTIONNEMENT DE VOTRE UNITÉ, OU POUR TROUVER UNE SOCIÉTÉ DE SERVICE AUTORISÉE, APPELEZ OU ÉCRIVEZ À :
AUX ÉTATS-UNISSERVICE SUPPORT DIVISION
PIONEER ELECTRONICS (USA), INC.1925 E. Dominguez Street, Long Beach, California 90810
1-800-421-1404 • http://www.pioneerelectronics.com
AU CANADADÉPARTÉMENT DE SERVICE AU CONSOMMATEUR
PIONEER ÉLECTRONIQUES DU CANADA, INC.340 Ferrier Street, Unit 2, Markham, Ontario L2R 2Z5 Canada
(905) 479-4411 • 1-877-283-5901 • http://www.pioneerelectronics.ca
RÈGLEMENT DES CONFLITSAUX ÉTATS-UNIS - Si un conflit se produit entre vous et Pioneer après la réponse à une demande initiale faite au service de Soutien à la clientèle, vous pouvez avoir recours au Programme de résolution des plaintes de Pioneer pour résoudre le conflit. Ce programme vous est offert sans frais. Vous devez avoir recours au Programme de résolution des plaintes avant de vous prévaloir de vos droits ou de chercher réparation en vertu du Titre I de la loi Magnuson-Moss Warranty-Federal Trade Commission Improvement Act, 15 U.S.C. 2301 et s.s.Pour avoir recours au Programme de résolution des plaintes, appelez au 1-800-421-1404 et expliquez au représentant du service à la clientèle qui vous répondra le problème auquel vous faites face et les démarches que vous avez entreprises pour faire réparer le produit pendant la période de garantie, puis donnez-lui le nom du distributeur / détaillant autorisé auprès duquel vous vous êtes procuré le produit Pioneer. Une fois que votre plainte a été expliquée au représentant, un numéro de résolution vous sera communiqué. Pioneer étudiera le conflit et, dans un délai de quarante (40) jours après la réception de votre plainte, (1) répondra à votre plainte par écrit pour vous aviser des démarches qu’elle entreprendra pour résoudre le conflit, et indiquera combien de temps ces démarches prendront ; ou (2) répondra à votre plainte par écrit pour vous indiquer les raisons pour lesquelles elle n’entreprendra aucune démarche.AU CANADA - Communiquez avec le directeur de la Satisfaction de la clientèle au (905) 946-7446 pour discuter de votre plainte et résoudre rapidement le problème.
ENREGISTREZ LE LIEU ET LA DATE D’ACHAT POUR RÉFÉRENCE ULTÉRIEURE
No. du modèle : ___________________________________________________ No. deSérte : ________________________________________________________________
Date d’achat : ____________________________________________________ Acheté de : __________________________________________________________________ PRENEZ SOIN DE GARDER CETTE INFORMATION ET VOTRE REÇU D’ACHAT DANS UN ENDROIT SÛR POUR RÉFÉRENCE FUTURE
GARANTIE VALIDE SEULEMENT DANS LE PAYS OU LE PRODUIT A ÉTÉ ACHETÉGARANTIE LIMITÉE
PIONEER ELECTRONICS (USA) INC.
PIONEER ELECTRONIQUES DU CANADA, INC.
PIONEER ELECTRONICS [USA] INC. 1925 E. Dominguez Street, Long Beach, California 90810PIONEER ELECTRONICS OF CANADA, INC. 340 Ferrier Street, Unit 2, Markham, Ontario L2R 2Z5 CanadaPIONEER ELECTRONICS OF MEXICO S.A. De C.V. Blvd. Manuel Avila Camacho 138 piso 10 Col. Lomas de Chapultepec 11000 Delegacion Miguel Hidalgo Mexico, D.F.
Publié par Pioneer Electronics (USA) Inc. Copyright © 2014 Pioneer Electronics (USA) Inc. Tous droits réservés Imprimé en Chine
Cher client,
Lasécuritédevotreouïeestentrevosmains.Profitezaumaximumdevotrematériel sonoreenl’écoutantàunniveaudevolumeapproprié.Choisissezunniveaudevolumeproduisant un son puissant et net sans hurlement ni distorsion dérangeante, mais surtout sans risque de dégradation de votre ouïe. Il arrive que le son de certaines musiques soitdécevant.Avecletemps,votre«niveaud’écouteconfortable»peuts’adapteràunvolumedeplusenplusélevé.Ainsi,cequipeutparaître«normal»estalorstropfort et dommageable pour votre ouïe. Protégez-vous contre ce risque en en réglant votrematérielàunniveaudevolumesécuritaireAVANTquevotreouïes’adapte.
RÉGLAGE D’UN VOLUME SÉCURITAIRE :• Réglezd’abordlevolumerelativementbas.• Augmentezlentementlevolumejusqu’àcequevouspuissiezentendreconfortablement
et clairement, sans aucune distorsion.• Lorsquevousavezidentifiévotreniveaudevolumeconfortable,notezlapositionduboutonderéglageetn’ytouchezplus.
ASSUREZ-VOUS DE RESPECTER LES DIRECTIVES SUIVANTES :• Nemettezpaslevolumeassezfortpourneplusentendrecequisepasseautourdevous.• Dans les situations potentiellement dangereuses, redoublez de prudence ou cessez temporairementl’utilisation.
www.pioneerelectronics.com 13Français
Conexión del altavoz de altura
Conexión del altavoz principal
• Muchas gracias por comprar este producto Pioneer® Elite.®
• Para garantizar el máximo rendimiento de sus nuevos altavoces, lea esta guía de funcionamiento antes de instalarlos o usarlos. Una vez que haya terminado de leer esta guía de funcionamiento, guárdela en un lugar seguro para referencia futura.
• La impedancia nominal de estos altavoces es de 4 Ohmios. Deben ser conectados a un amplificador o receptor diseñado para manejar cargas de 4 Ohmios. Conecte los altavoces a un amplificador con una impedancia de carga nominal de 4 a 16 Ohmios (un modelo con la etiqueta "4-16 Ω" que aparece en los terminales de salida del altavoz).
• Para evitar daños a los altavoces como consecuencia de sobrecargas de entrada, tenga en cuenta las precauciones siguientes:– No aplique potencia al sistema de altavoces mayor que
la potencia nominal máxima.– Al conectar o desconectar los cables, asegúrese de que
el amplificador esté apagado OFF.– No use demasiado volumen del amplificador si utiliza
un ecualizador gráfico para destacar frecuencias altas o bajas.
AVISO IMPORTANTE: El número de serie del equipo se encuentra en la parte posterior del producto. Por favor, escriba el número de serie en la hoja de garantía y consérvela en un lugar seguro para referencia futura.
ANTES DEL USO
CÓMO CONECTAR SUS ALTAVOCESIMPORTANTE: Asegúrese de que el equipo esté apagado (OFF) antes de realizar las conexiones. El cableado correcto de los altavoces es esencial para lograr la mejor calidad de sonido. Tenga cuidado para garantizar la polaridad (+/-) correcta de la conexión. Recomendamos un mínimo de calibre 18 para tendidos de hasta 25 pies, y calibres más gruesos para tendidos más largos. La mayoría de cables para altavoces está codificada para facilitar esta tarea. Por lo general, el lado nervado o con rayas, o el lado con el conector marcado en rojo o blanco, se conecta con el terminal positivo (rojo). Asegúrese de que el terminal positivo (rojo) del amplificador esté conectado al terminal positivo (rojo) del altavoz, y que el terminal negativo (negro) del amplificador esté conectado al terminal negativo (negro) del altavoz.Si los cables que está utilizando no vienen ya terminados con conectores de banana, conectores de espada, etc., pele ½ pulgada de aislamiento de los extremos del cable, retuerza los hilos del cable desnudo e introdúzcalos en los bornes. Tenga cuidado de que no quede hilo alguno que haga cortocircuito entre los terminales. Conecte el cable del canal frontal izquierdo o derecho, o el canal posterior derecho o izquierdo de sonido envolvente, al juego inferior de bornes de conexión en el altavoz.
Si está utilizando los transductores (drivers) del canal de altura en el altavoz de piso SP-EFS73 o en el altavoz de estantería SP-EBS73-LR para Dolby Atmos® u otra tecnología de sonido envolvente con canales de altura, conecte los cables al canal de altura correspondiente (canal de altura frontal izquierdo del receptor o amplificador a la entrada del canal de altura del altavoz frontal izquierdo, al canal de altura posterior derecho o el receptor o amplificador al altavoz posterior derecho, etc.) tal como se muestra a la derecha.
www.pioneerelectronics.com14 Español
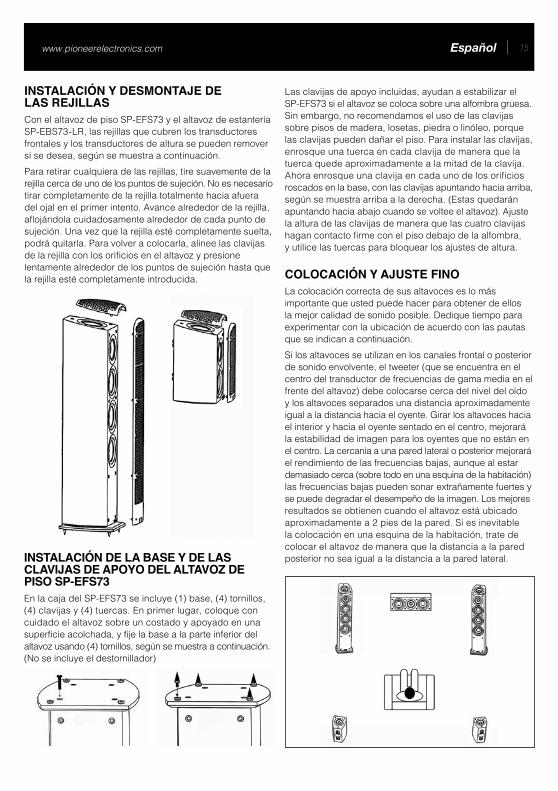
INSTALACIÓN Y DESMONTAJE DE LAS REJILLASCon el altavoz de piso SP-EFS73 y el altavoz de estantería SP-EBS73-LR, las rejillas que cubren los transductores frontales y los transductores de altura se pueden remover si se desea, según se muestra a continuación.Para retirar cualquiera de las rejillas, tire suavemente de la rejilla cerca de uno de los puntos de sujeción. No es necesario tirar completamente de la rejilla totalmente hacia afuera del ojal en el primer intento. Avance alrededor de la rejilla, aflojándola cuidadosamente alrededor de cada punto de sujeción. Una vez que la rejilla esté completamente suelta, podrá quitarla. Para volver a colocarla, alinee las clavijas de la rejilla con los orificios en el altavoz y presione lentamente alrededor de los puntos de sujeción hasta que la rejilla esté completamente introducida.
INSTALACIÓN DE LA BASE Y DE LAS CLAVIJAS DE APOYO DEL ALTAVOZ DE PISO SP-EFS73 En la caja del SP-EFS73 se incluye (1) base, (4) tornillos, (4) clavijas y (4) tuercas. En primer lugar, coloque con cuidado el altavoz sobre un costado y apoyado en una superficie acolchada, y fije la base a la parte inferior del altavoz usando (4) tornillos, según se muestra a continuación. (No se incluye el destornillador)
Las clavijas de apoyo incluidas, ayudan a estabilizar el SP-EFS73 si el altavoz se coloca sobre una alfombra gruesa. Sin embargo, no recomendamos el uso de las clavijas sobre pisos de madera, losetas, piedra o linóleo, porque las clavijas pueden dañar el piso. Para instalar las clavijas, enrosque una tuerca en cada clavija de manera que la tuerca quede aproximadamente a la mitad de la clavija. Ahora enrosque una clavija en cada uno de los orificios roscados en la base, con las clavijas apuntando hacia arriba, según se muestra arriba a la derecha. (Estas quedarán apuntando hacia abajo cuando se voltee el altavoz). Ajuste la altura de las clavijas de manera que las cuatro clavijas hagan contacto firme con el piso debajo de la alfombra, y utilice las tuercas para bloquear los ajustes de altura.
COLOCACIÓN Y AJUSTE FINOLa colocación correcta de sus altavoces es lo más importante que usted puede hacer para obtener de ellos la mejor calidad de sonido posible. Dedique tiempo para experimentar con la ubicación de acuerdo con las pautas que se indican a continuación.Si los altavoces se utilizan en los canales frontal o posterior de sonido envolvente, el tweeter (que se encuentra en el centro del transductor de frecuencias de gama media en el frente del altavoz) debe colocarse cerca del nivel del oído y los altavoces separados una distancia aproximadamente igual a la distancia hacia el oyente. Girar los altavoces hacia el interior y hacia el oyente sentado en el centro, mejorará la estabilidad de imagen para los oyentes que no están en el centro. La cercanía a una pared lateral o posterior mejorará el rendimiento de las frecuencias bajas, aunque al estar demasiado cerca (sobre todo en una esquina de la habitación) las frecuencias bajas pueden sonar extrañamente fuertes y se puede degradar el desempeño de la imagen. Los mejores resultados se obtienen cuando el altavoz está ubicado aproximadamente a 2 pies de la pared. Si es inevitable la colocación en una esquina de la habitación, trate de colocar el altavoz de manera que la distancia a la pared posterior no sea igual a la distancia a la pared lateral.
www.pioneerelectronics.com 15Español

TRANSDUCTORES DE ALTURA ATMOS
ALTURA DEL OÍDO EN POSICIÓN
SENTADO
MEDIA ALTURA DE LA
HABITACIÓN
CONFIGURACIÓN PARA DOLBY ATMOS®
Si bien sus nuevos altavoces Pioneer® Elite® funcionarán con cualquier equipo estéreo o sistema de cine en casa, los hemos diseñado especialmente para su uso con sistemas de sonido envolvente Dolby Atmos. Atmos es una tecnología de "sonido inmerso" desarrollada por Dolby para agregar nuevo realismo a las películas y a la música. Añade canales adicionales al sistema de audio para crear un efecto más envolvente. En las salas de proyección comerciales, los sistemas Dolby Atmos utilizan altavoces de altura instalados en el techo. Ahora con Dolby Atmos para el hogar, existe la opción de montar los altavoces en el techo, o integrarlos en los paneles superiores de los altavoces. Estas matrices de transductores montados en la parte superior incorporadas en los modelos SP-EFS73 y SP-EBS73-LR, hacen rebotar el sonido en el te-cho para crear espectaculares efectos de sonido envolvente. Se puede utilizar las matrices montadas en la parte superior en los canales frontales izquierdo y derecho únicamente, o para lograr el mejor efecto, en los canales frontales izquierdo/derecho y en los canales posteriores izquierdo/derecho de sonido envolvente.
DIRECTRICES PARA UNA MEJOR CONFIGURACIÓN DE ATMOSCon el fin de utilizar la capacidad Dolby Atmos activada en estos altavoces, el techo de la sala de audición debe tener una superficie horizontal plana y maciza (para reflejar el sonido) y una altura de 8 pies a 14 pies. Si su habitación no cumple estos requisitos estándar será necesario instalar altavoces de montaje en el techo o empotrados en el techo. Para la mejor experiencia de audio, Pioneer le recomienda remover la rejilla de los altavoces. Visite www.pioneerelectronics.com/elitespeakers para obtener más detalles. El aspecto más importante de la configuración de los altavoces Atmos es asegurarse de que las matrices de transductores de altura montadas en la parte superior estén colocadas a la altura de su oído al estar sentado o más eleva-das, pero por debajo de la mitad de la altura de la habitación, según se muestra a continuación. Si está usando el altavoz para estantería SP-EBS73-LR, puede optimizar fácilmente la posición de los transductores del canal de altura mediante la selección de un pedestal de la altura apropiada. Una vez que los altavoces SP-EFS73 o SP-EBS73-LR se hayan conect-
ado a un receptor compatible con Dolby Atmos, siga las instrucciones incluidas para garantizar el ajuste óptimo que le permita disfrutar su contenido codificado para Dolby Atmos.
AJUSTES DE GESTIÓN DE BAJOSSi está utilizando un receptor de A/V o un procesador de sonido envolvente con sus altavoces, será necesario establecer adecuadamente la gestión de bajos, particularmente con el altavoz de estantería SP-EBS73-LR. El altavoz SP-EFS73 de piso debe establecerse en LARGE (grande) en el menú del receptor, y el altavoz SP-EBS73 debe establecerse en SMALL (pequeño). Este ajuste garantizará que ninguna señal de bajos profundos pase al SP-EBS73-LR. Si su receptor o procesador le permite configurar la frecuencia de cruce para el SP-EBS73-LR, le recomendamos 80 Hz.También hemos incluido un tapón de espuma para los altavoces SP-EFS73 de piso. Este tapón de espuma le permitirá adaptar la respuesta de bajos a su entorno particular.
PRECAUCIONES PARA LA INSTALACIÓN• No instale este sistema de altavoces cerca de una estufa
o de otro aparato de calefacción, ni en un lugar expuesto a la luz solar. Estos lugares pueden causar cambios de color en el gabinete y deterioro del sistema de altavoces.
• Recuerde que los altavoces SP-EFS73 y SP-EBS73-LR son bastante pesados, por lo que es peligroso instalarlos en lugares elevados, como en paredes o pilares o en otros lugares inestables a menos que se hayan fijado debidamente en su lugar.
Pioneer no será responsable de ningún accidente o daño que pueda resultar de la instalación errónea.
MANTENIMIENTO DEL GABINETE• Use un trapo de pulir o un trapo seco para limpiar el polvo
y la suciedad.• Cuando el gabinete esté muy sucio, límpielo con un paño
suave humedecido con algún limpiador neutro diluido con seis partes de agua por una parte de limpiador y, después, limpie con un paño seco. No use cera ni limpiadores para muebles.
• Nunca use diluyente de pintura, bencina, rociadores de insecticidas ni otros productos químicos en o cerca de los gabinetes, ya que estos son corrosivos para las superficies.
www.pioneerelectronics.com16 Español
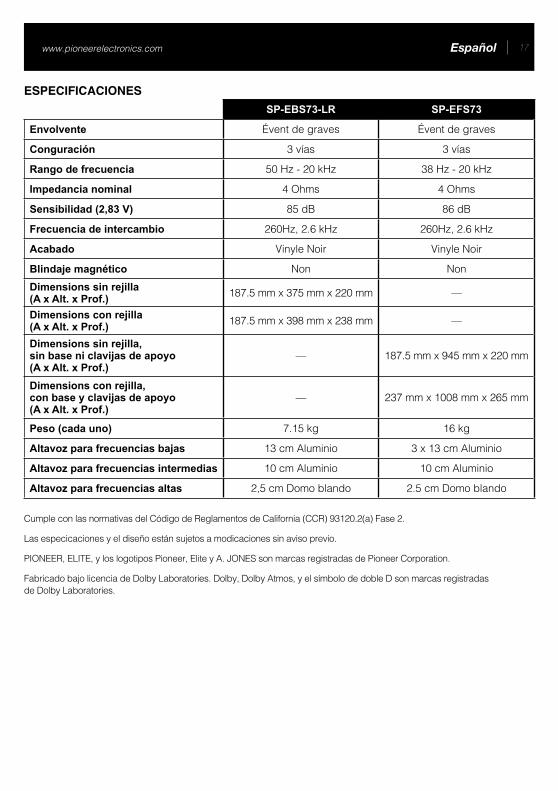
ESPECIFICACIONES
Cumple con las normativas del Código de Reglamentos de California (CCR) 93120.2(a) Fase 2.
Las especicaciones y el diseño están sujetos a modicaciones sin aviso previo.
PIONEER, ELITE, y los logotipos Pioneer, Elite y A. JONES son marcas registradas de Pioneer Corporation.
Fabricado bajo licencia de Dolby Laboratories. Dolby, Dolby Atmos, y el símbolo de doble D son marcas registradas de Dolby Laboratories.
SP-EBS73-LR SP-EFS73
Envolvente Évent de graves Évent de graves
Conguración 3 vías 3 vías
Rango de frecuencia 50 Hz - 20 kHz 38 Hz - 20 kHz
Impedancia nominal 4 Ohms 4 Ohms
Sensibilidad (2,83 V) 85 dB 86 dB
Frecuencia de intercambio 260Hz, 2.6 kHz 260Hz, 2.6 kHz
Acabado Vinyle Noir Vinyle Noir
Blindaje magnético Non NonDimensions sin rejilla (A x Alt. x Prof.) 187.5 mm x 375 mm x 220 mm —
Dimensions con rejilla (A x Alt. x Prof.) 187.5 mm x 398 mm x 238 mm —
Dimensions sin rejilla, sin base ni clavijas de apoyo (A x Alt. x Prof.)
— 187.5 mm x 945 mm x 220 mm
Dimensions con rejilla, con base y clavijas de apoyo (A x Alt. x Prof.)
— 237 mm x 1008 mm x 265 mm
Peso (cada uno) 7.15 kg 16 kg
Altavoz para frecuencias bajas 13 cm Aluminio 3 x 13 cm Aluminio
Altavoz para frecuencias intermedias 10 cm Aluminio 10 cm Aluminio
Altavoz para frecuencias altas 2,5 cm Domo blando 2.5 cm Domo blando
www.pioneerelectronics.com 17Español
GARANTÍAPioneer Electronics (USA) Inc. (PUSA), garantizan que los productos distribuidos por PUSA en los Estados Unidos que no funcionen debidamente bajo uso normal debido a un defecto de fabricación cuando son instalados y operados de conformidad con el manual del propietario adjunto a la unidad, serán reparados o reemplazados por una unidad de valor comparable, a discreción de PUSA, sin cargo para usted en lo referente a piezas o trabajos de reparación. Las piezas suministradas bajo esta garantía pueden ser nuevas o reconstruidas, a discreción de PUSA.
ESTA GARANTÍA LIMITADA SE APLICA AL PROPIETARIO ORIGINAL O A CUALQUIER PROPIETARIO SUBSIGUIENTE DE ESTE PRODUCTO PIONEER DURANTE EL PERÍODO DE GARANTÍA, SIEMPRE Y CUANDO EL PRODUCTO HAYA SIDO ADQUIRIDO EN UN DISTRIBUIDOR/VENDEDOR AUTORIZADO DE PIONEER EN LOS ESTADOS UNIDOS. SE LE PEDIRÁ QUE PRESENTE UN RECIBO DE VENTA U OTRO COMPROBANTE VÁLIDO DE COMPRA, INDICANDO LA FECHA DE LA COMPRA ORIGINAL O, SI ES ALQUILADO, EL CONTRATO DE ALQUILER QUE INDIQUE EL LUGAR Y FECHA DEL PRIMER ALQUILER. SI SE REQUIERE SERVICIO, EL PRODUCTO DEBE SER ENVIADO DURANTE EL PERÍODO DE GARANTÍA, CON EL TRANSPORTE PREPAGADO, SOLAMENTE DENTRO DEL PAÍS DE COMPRA, COMO SE EXPLICA EN ESTE DOCUMENTO. USTED SERÁ RESPONSABLE DEL RETIRO E INSTALACIÓN DEL PRODUCTO. PUSA, SEGÚN CORRESPONDA, PAGARÁ EL RETORNO DEL PRODUCTO REPARADO O DE REEMPLAZO A USTED DENTRO DEL PAÍS DE COMPRA.
PERÍODO DE GARANTÍA DEL PRODUCTO Piezas Mano de obraAudio y video para el hogar ............................................................................................................ 2 Año 2 AñoMicrófonos, auriculares, cartuchos y púas fonográficos............................................................. 90 días 90 díasAlgunos modelos pueden tener períodos de garantía limitada más cortos. Consulte el documento de garantía limitada adjunto al producto para ver una declaración definitiva sobre el período de garantía. Este período de garantía para los clientes al por menor que alquilan el producto comienza en la fecha en que el producto se usa por primera vez (a) durante el período de alquiler o (b) la venta al por menor (la más temprana de estas fechas).
QUÉ ES LO QUE NO ESTÁ CUBIERTOSI ESTE PRODUCTO FUE ADQUIRIDO EN UN DISTRIBUIDOR NO AUTORIZADO, NO HAY GARANTÍAS, EXPRESAS O IMPLÍCITAS, INCLUIDA LA GARANTÍA IMPLÍCITA DE COMERCIABILIDAD Y LA GARANTÍA IMPLÍCITA DE ADECUACIÓN A UN FIN DETERMINADO, Y ESTE PRODUCTO SE VENDE ESTRICTAMENTE “TAL CUAL” Y “CON TODOS SUS DEFECTOS”.PIONEER NO SERÁ RESPONSABLE DE DAÑOS CONSECUENTES Y/O INCIDENTALES.PIONEER NO GARANTIZA NINGÚN PRODUCTO INDICADO ARRIBA CUANDO EL MISMO SE USA EN UNA PROFESIÓN O NEGOCIO O EN CUALQUIER APLICACIÓN INDUSTRIAL O COMERCIAL.ESTA GARANTÍA NO SE APLICA SI EL PRODUCTO HA ESTADO SUJETO A UNA POTENCIA SUPERIOR A LA POTENCIA NOMINAL PUBLICADA.ESTA GARANTÍA NO CUBRE LAS PANTALLAS DE TELEVISIÓN O MONITORES DAÑADAS POR IMÁGENES ESTÁTICAS NO MÓVILES APLICADAS DURANTE PERÍODOS PROLONGADOS (QUEMAZÓN O BURN-IN).ESTA GARANTÍA NO CUBRE EL GABINETE NI NINGÚN ELEMENTO DE APARIENCIA, ANTENA CONECTADA POR EL USUARIO, NINGÚN DAÑO A GRABACIONES O CINTAS O DISCOS, NINGÚN DAÑO AL PRODUCTO RESULTANTE DE ALTERACIONES, MODIFICACIONES NO AUTORIZADAS POR PIONEER, ACCIDENTES, USO INDEBIDO O ABUSO, DAÑOS POR RAYOS O SOBRETENSIONES DE CORRIENTE, DAÑOS SUBSIGUIENTES POR FUGAS DE LÍQUIDOS, DAÑOS DEBIDOS A BATERÍAS NO OPERATIVAS, O EL USO DE BATERÍAS QUE NO CUMPLEN CON LO ESPECIFICADO EN EL MANUAL DEL PROPIETARIO.ESTA GARANTÍA NO CUBRE EL COSTO DE PIEZAS O MANO DE OBRA QUE SERÍA PROVISTA SIN CARGO BAJO ESTA GARANTÍA, OBTENIDA DE CUALQUIER FUENTE EXCEPTO UNA COMPAÑÍA DE SERVICIO AUTORIZADA POR PIONEER U OTRO LUGAR DESIGNADO. ESTA GARANTÍA NO CUBRE DEFECTOS O DAÑOS CAUSADOS POR EL USO DE PIEZAS O MANO DE OBRA NO AUTORIZADAS O DEBIDO A UN MANTENIMIENTO INADECUADO.LOS NÚMEROS DE SERIE ALTERADOS, ESTROPEADOS O RETIRADOS ANULAN ESTA GARANTÍA EN SU TOTALIDAD.
NINGUNA OTRA GARANTÍA EN LOS ESTADOS UNIDOS - PIONEER LIMITA SUS OBLIGACIONES BAJO CUALQUIER GARANTÍA IMPLÍCITA, INCLUYENDO, EN FORMA NO EXHAUSTIVA, LAS GARANTÍAS IMPLÍCITAS DE COMERCIABILIDAD Y ADECUACIÓN A UN FIN DETERMINADO, A UN PERÍODO NO SUPERIOR AL PERÍODO DE GARANTÍA. UNA VEZ TRANSCURRIDO EL PERÍODO DE GARANTÍA, NO SE APLICARÁ NINGUNA GARANTÍA. ALGUNOS ESTADOS NO PERMITEN LIMITACIONES SOBRE LA DURACIÓN DE UNA GARANTÍA IMPLÍCITA, Y ALGUNOS ESTADOS NO PERMITEN EXCLUSIONES O LIMITACIONES DE DAÑOS INCIDENTALES O CONSECUENTES, POR LO QUE LAS LIMITACIONES O EXCLUSIONES MENCIONADAS ANTERIORMENTE PUEDEN NO APLICARSE EN SU CASO. ESTA GARANTÍA LE DA A USTED DERECHOS LEGALES ESPECÍFICOS, Y PUEDE TENER OTROS DERECHOS QUE PUEDEN VARIAR DE UN ESTADO A OTRO.
PARA OBTENER SERVICIOPUSA han nombrado a diversas Compañías de Servicio Autorizadas en los Estados Unidos, en caso de que su producto requiera servicio. Para recibir servicio bajo la garantía, usted tiene que presentar un recibo de venta, o, si ha alquilado el equipo, el contrato de alquiler que indique el lugar y fecha de la transacción con el propietario original. Si va enviar la unidad, tiene que empacarla cuidadosamente y enviarla, con el transporte pago a través de un método rastreable y con seguro, a una Compañía de Servicio Autorizada. Empaque el producto usando materiales de empaque adecuados a fin de evitar que sufra daños en tránsito. El contenedor original es ideal para este fin. Incluya su nombre, dirección y teléfono donde pueden contactarlo durante el horario normal de trabajo.Para cualquier queja o inquietud en los Estados Unidos, llame a Apoyo al Cliente, al 1-800-421-1404.
EN LOS ESTADOS UNIDOSPara la conexión e instalación de su unidad, o para localizar
una Compañía de Servicio Autorizada, llame o escriba a:SERVICE SUPPORT DIVISION
PIONEER ELECTRONICS (USA), INC.1925 E. Dominguez Street, Long Beach, California 90810
1-800-421-1404 • http://www.pioneerelectronics.com
RESOLUCIÓN DE DISPUTASEN LOS ESTADOS UNIDOS - Tras nuestra respuesta a cualquier solicitud inicial a Apoyo al Cliente, si surgiera una disputa entre usted y Pioneer, Pioneer pone a disposición su Programa de Resolución de Quejas a fin de resolver la disputa. El Programa de Resolución de Quejas está disponible para usted sin ningún cargo. Tiene que usar el Programa de Resolución de Quejas antes de ejercer cualquier derecho bajo, o buscar cualquier remedio, creado por el Título I de la ley Magnuson-Moss Warranty-Federal Trade Commission Improvement Act, 15 U.S.C. 2301 et seq. Para usar el Programa de Resolución de Quejas, llame al 1-800-421-1404 y explique al representante de servicio al cliente cuál es el problema que tiene, las medidas que ha tomado para hacer reparar el producto durante el período de garantía, y el nombre del Distribuidor/Vendedor autorizado donde fue comprado el producto Pioneer. Una vez que la queja haya sido explicada al representante, se emitirá un número de resolución. Dentro de un plazo de 40 días del recibo de su queja, Pioneer investigará la disputa y hará una de las dos cosas siguientes: (1) responder a su queja por escrito, informándole de las medidas que Pioneer tomará, y en qué plazo, para resolver la disputa; o (2) responder a su queja por escrito para informarle de por qué no tomará ninguna medida.
ANOTE EL LUGAR Y FECHA DE COMPRA PARA REFERENCIA FUTURA
Modelo No. _______________________________________ No. de serie. ______________________________________ Fecha de compra _______________________
Comprado en _______________________________________________________________________________________________________________________________
GUARDE ESTA INFORMACIÓN Y EL RECIBO DE VENTA EN UN LUGAR SEGURO
GARANTÍA VÁLIDA ÚNICAMENTE EN EL PAÍS DONDE SE COMPRA EL PRODUCTOGARANTÍA LIMITADA
PIONEER ELECTRONICS (USA) INC.
Estimado Cliente,
Laseguridaddesusoídosestáensusmanos.Saqueelmáximoprovechoasuequipo utilizándolo con un volumen seguro, un nivel de volumen que permita escuchar los sonidos con claridad sin una molesta distorsión ensordecedora y, lo que es más importante, sin que le afecte su sensible audición. El sonido puede ser engañoso. Con el tiempo, su "nivel cómodo" de audición se adapta a niveles de sonido más elevados, por consiguiente, lo que parece "normal" puede ser en realidad muy fuerte y perjudicial para el oído. Protéjasecontraestomediantelaconfiguracióndesuequipoconunnivelseguro ANTESdequesuoídoseadapte.
ESTABLEZCA UN NIVEL SEGURO:• Establezca el control de volumen en un valor bajo• Aumente poco a poco el sonido hasta poder oírlo de manera cómoda y clara,
sin distorsión.• Después de establecer un nivel cómodo de sonido, ajuste el cuadrante y déjelo ahí.
ASEGÚRESE DE RESPETAR LAS SIGUIENTES PAUTAS:• Nosubaelvolumenanivelestanelevadosquenopuedaescucharloquelerodea• Tenga precaución o interrumpa temporalmente el uso en situaciones
potencialmente peligrosas.
PIONEER ELECTRONICS [USA] INC.1925 E. Dominguez Street, Long Beach, California 90810PIONEER ELECTRONICS OF CANADA, INC. 340 Ferrier Street, Unit 2, Markham, Ontario L2R 2Z5 CanadaPIONEER ELECTRONICS OF MEXICO S.A. De C.V. Blvd. Manuel Ávila Camacho 138 piso 10 Col. Lomas de Chapultepec 11000 Delegación Miguel Hidalgo México, D.F.
Publicado por Pioneer Electronics (USA) Inc. Copyright © 2014 Pioneer Electronics (USA) Inc. Todos los derechos reservados. Impreso en China
www.pioneerelectronics.com 19Español

This Page Intentionally Left Blank


![THINKPAD® TABLET SERVICES ASSURE TOTAL PEACE OF MIND. · ASSURE TOTAL PEACE OF MIND. 1] Service availability differs by region. 2] Onsite Advanced Exchange is available on ThinkPad](https://img.pdfslide.us/doc/110x75/5f2aacb83d64606fd07499b5/thinkpad-tablet-services-assure-total-peace-of-mind-assure-total-peace-of-mind.jpg)