Embed Size (px)
Citation preview

>
USER GUIDE: MAIN INTERFACE
Welcome to iMPC! The main interface recreates the look, feel, and some ofthe key workflows of the famous MPC line of drum machine samplers.
From this screen, everything you need to play and record sequences andprograms is available at your fingertips. You can also access the other majorareas of the App from here.
Title Bar
Mixer
Tap to open the Mixer panel. The mixer allows you to mix the tracks of eachsequence. For details, see Mixer.
FX
Tap to open the Effects screens. Effects add extra audio variation to thetracks of each sequence. For details, see FX.
Sampler
PROGRAM EDITORTABLE OF CONTENTS

Tap to enter the sampler and create new samples. You can sample from theiPad mic, line-in, or anything in your Music Library! For details, see Sampler.
Share Sequence
Share your beats online — you can upload your current sequence directly tothe iMPC Community if your iPad is connected to the internet. Tapping“Share Sequence” starts the SoundCloud upload process and also creates amixdown wav for iTunes export and AudioCopy.
iMPC Community feed
The feed displays the latest headlines, posts, and activity on beats youʼveshared online. For Details, see iMPC Community
About
Opens the information page and provides access to the user guide.
Settings
The Settings menu provides access to WIST. WIST is a Wireless Sync-StartTechnology that connects two devices with WIST-Compatible Apps. WISTrequires Bluetooth, and if itʼs not currently enabled on your iPad, you will beprompted to turn it on. You can also manually enable Bluetooth in youriPadʼs native Settings app, under General > Bluetooth.
Tap the WIST button to enable WIST. When you enable WIST in iMPC, adialog will then appear as WIST searches for other devices runningcompatible apps. Any secondary device needs to confirm the WISTconnection before the devices will be properly synchronized. Onceconnected, the slaved device will be set to a matching tempo, and will startplayback in sync with the Master.
Main Vol

Adjusts the output volume.
Pads
The heart and soul of the MPC! 16 Pads each with a sound. Tap, hold bangon these to play the sounds of your current Program.

Data Screen
Displays information about the current Sequence, Track and Program.
Each Sequence has four Tracks. Each Track can have a different Program(i.e. a Drum Kit).
Open a the Sequence Menu by tapping the list button to the left of thecurrent Sequence. The Edit button to the right of the current Sequence willopen the Sequence Details screen.
Tap the arrows above and below the Track number to move between tracks.Each track can have a different Program, which you can assign by openingthe Program Menu. The Edit button to the right of the current Program willopen the Program Editor.
PERFORMANCE CONTROLS
The controls in this section all have to do with performing on pads andplaying Sequences

Data wheel
The data wheel is a continuous/jog wheel that scrolls though the sequences.Turn the wheel clockwise to advance the Sequence, counter-clockwise tomove to a previous Sequence. Try this during playback to queue up differentsequences in succession. iMPC will wait to start playing a new sequenceuntil the previous sequence has finished. Use this to string togetherSequences in order for a real-time performance.
Time Correct
Time Correct will automatically fix your recorded patterns to a set timing

interval. As you record, your notes will be fixed to the selected interval of1/8, 1/8T, 1/16, 1/16T, 1/32, or 1/32T notes. If you Set Time Correct toNONE, your notes will be recorded exactly as you played them.
You can also fix notes after recording with the “Fix Track” button. Tappingthis will fix all notes in the current Sequence and Track to the selectedinterval.
Note: While the Time Correct Values are set globally for the App, nochanges are applied until you record something or use “Fix Track”. Thismeans Track and Sequences can have notes fixed to different intervals, etc.You can even record different parts of the same track with different TimeCorrect Settings!
Swing
Swing is a value between 50 and 75%. As you increase it, your Time-Corrected beat will swing more. Experiment with this to create jazzy beatsand hip hip vibes.
Note Repeat
Note Repeat plays whatever pads youʼre holding down at the selectedinterval. Hold the Note Repeat button, and then play pads to try it out.
Tip: You can “latch” the Note Repeat button so you can play pads withouthaving to hold it down: while holding note repeat, move your finger to theright. To release it, simply tap it again.
16 Levels

16 Levels is a famous MPC feature that allows you to use all 16 Pads toalter parameters of one Sound. You can use this to play melodic baselines,create interesting dynamic variations, and more.
To use 16 Levels, play a pad then press the “16 Levels” button. Now all 16Pads will play the selected Sound at one of 16 distinct values for theselected Parameter. Experiment with with all four Parameters:
FilterVelocityLengthTuning
Tip: The “natural” value of the selected Param is always on Pad 4.
Variation Slider

The Variation Slider affects the same four Parameters that 16 levels does,but on a smoothly sliding scale. This lets you create subtle variations whilerecording. Touch the Slider to alter the selected Parameter on the Datascreen.
Experiment with using the variation slider in conjunction with 16 Levels andNote Repeat!
Erase
The Erase button lets you easily remove notes from a Track. Hold downErase and Tap or Hold pads during playback to erase notes. You can alsoerase the entire track: hold down the Erase button, and press “Erase Track”on the Data Screen.
Undo
After recording, the Undo button will light up; tapping it discards the lastrecorded take.
TRANSPORT CONTROLS
<< >>
Tap to rewind or fast-forward by one bar.
< >
Tap to rewind or fast-forward by one beat.
Tap Tempo
Sets the tempo based on the speed at which you tap the button. Tap Twice!
Record
Press and hold this button, and the Play or Play Start button to startrecording. While Recording, any previously recorded notes on the currentTrack will be erased (imagine a tape recorder).

< >
Overdub
Press and hold this button and the Play or Play Start to start Overdubbing.While Overdubbing, any previously recorded notes on the current Track willbe preserved.
Stop
Stops audio playback.
Play
Starts audio playback from the current position.
Play Start
Starts audio playback from the start of the Sequence.
CREDITS PROGRAM EDITORTABLE OF CONTENTS
< >
USER GUIDE: PROGRAM EDITOR
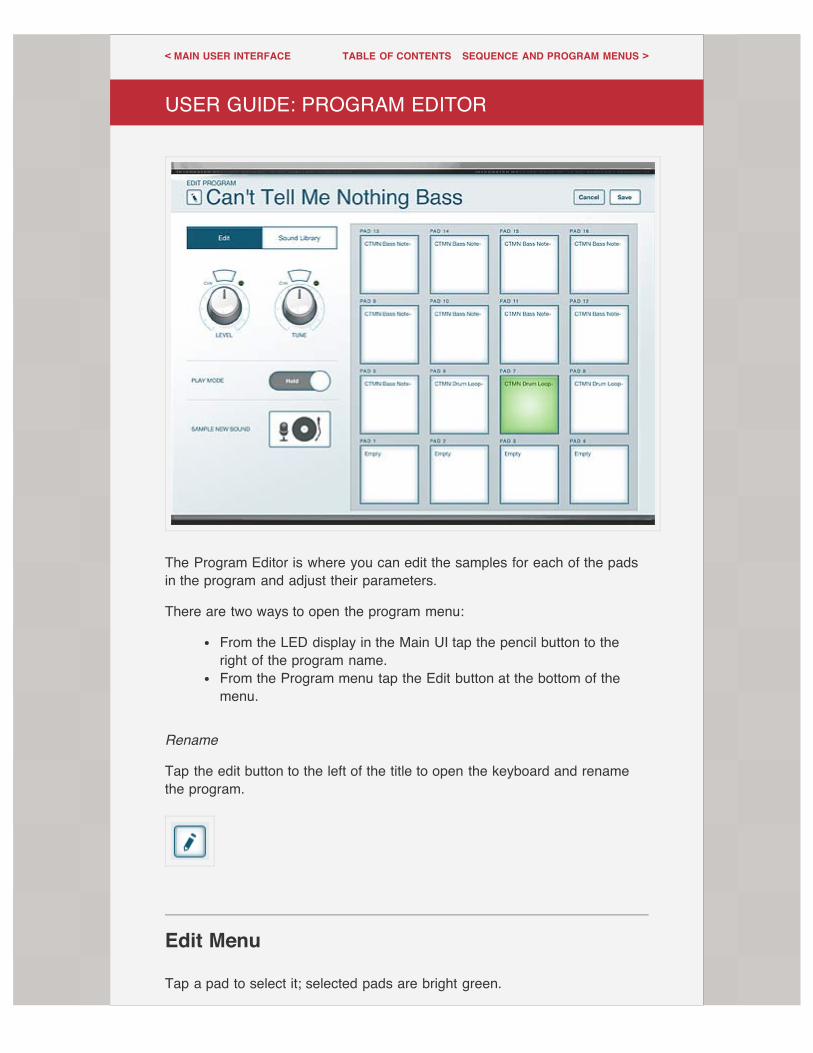
The Program Editor is where you can edit the samples for each of the padsin the program and adjust their parameters.
There are two ways to open the program menu:
From the LED display in the Main UI tap the pencil button to theright of the program name.From the Program menu tap the Edit button at the bottom of themenu.
Rename
Tap the edit button to the left of the title to open the keyboard and renamethe program.
Edit Menu
Tap a pad to select it; selected pads are bright green.
MAIN USER INTERFACE SEQUENCE AND PROGRAM MENUSTABLE OF CONTENTS

Select Edit to adjust the parameters for a selected pad.

Level
Adjusts the volume for the pad.
Tune
Adjusts the pitch of the sample.
Tap the Cntr button on either of these parameters to bring the control backto the default value.
Play Mode
One-Shot plays the entire sample back when you tap the pad.

< >
Hold mode plays the sample only for as long as you hold the pad.
Sample New Sound
Opens the Sampler. If a pad is selected, the sample will save directly to thatpad.
Sound Library
The Sound Library opens the menu providing access to factory sounds andsamples imported via iTunes or created with iMPCʼs sampler. There is alsothe option of viewing sounds according to the Program theyʼre a part of.
To import samples using iTunes file transfer, open iTunes, click your iPadunder Devices in the left-hand menu, and open the Apps tab. At the bottomof the page where it says File Sharing, click on iMPCʼs icon, and click theAdd button at the bottom of the right-hand menu. Select the files you want toimport from your computer, tap Open, and theyʼll automatically be synced tothe app.
Sample Drag Behavior
To add a sample to a pad, simply drag the sound from the menudirectly to a pad.Dragging a sample from one pad to another copies the sample fromthe first pad to any subsequent pad.Drag a sample from the pad off the screen to delete the samplefrom the pad.
MAIN USER INTERFACE SEQUENCE AND PROGRAM MENUSTABLE OF CONTENTS

< >
USER GUIDE: SEQUENCE AND PROGRAM MENUS
The sequence and program menus in the expanded LEDscreen provide the editorial functions. Access both of thesemenus by tapping the menu button under the sequenceand program title text.
Sequence Menu
The Sequence Menu displays a list of all your Sequences. Select asequence during anotherʼs playback to queue that sequence to play next.The queued sequence blinks in the data screen, and once the currentsequence is finished the next starts. Use this feature to create dynamicperformances and string together a song in real time.
PROGRAM EDITOR MIXERTABLE OF CONTENTS

Reorder
Tap Reorder to rearrange the sequence list. Tapping this button causes a setof three parallel lines to appear to the right of sequence title. Press and holdthis button then drag the sequence to its desired position in the list.
New
Creates a new empty sequence.
Tip: New Sequences are created with the properties of the currently selected

Sequence. This is helpful for creating a brand new groove with a favoritesound set.
Clone
Creates a copy of the selected sequence.
Export
Export the current Sequence to a variety of formats. Start a beat on iMPC,and take it to MPC Desktop Software to use with MPC Renaissance orStudio!
Share on SoundCloud Uploads the Sequence to SoundCloud and the iMPCCommunity.
Export .wav to iTunes Creates a mixdown .wav file. You can copy this filefrom your iPad to your Desktop Computer. See iTunes File Sharing.
Export to MPC Desktop Exports the full Sequence, complete with note andparameter data, along with your custom Programs and Samples to use inMPC Desktop software. Exported Sequences appear as folders in iTunes.See iTunes File Sharing.
Edit
Opens the Sequence details screen (see below).
Delete
Deletes the Sequence.
Sequence Details

Rename
Tap the edit button next to the title to rename the sequence.
Cancel
Exits the Sequence Details screen without saving changes.
Save
Saves the sequence settings, closes the screen, and returns to the sequencemenu.
Beats Per Minute
Tap the – or + buttons to decrease or increase the tempo. Tap the TapTempo button at a constant rate to set the tempo.
Bars
Decrease or increase the number of bars by tapping the – and + buttons.Tap the Duplicate Bars button to double the current number of bars, copyingall recorded data in the sequence.
Program Menu
Tap the menu button to the left of the program to open the program menu.

< >
New
Creates a new empty program.
Clone
Creates a copy of the program.
Edit
Opens the Program Editor.
Delete
Deletes the program.
PROGRAM EDITOR MIXERTABLE OF CONTENTS

< >
< >
USER GUIDE: MIXER
This screen displays the controls for all the tracks in thesequence.
Pan
Turn the knob left or right to route the audio through the respective speaker.Tap the Cntr button to bring the audio back to the default L-R balance.
Level
Adjust the slider up or down to increase or decrease the volume for aparticular track.
Mute
Mute turns the track off until you tap the button again.
Solo
Solo causes the track to be the only one played until you tap the buttonagain. Tapping Solo on two tracks causes both tracks to be the only onesplayed.
SEQUENCE AND PROGRAM MENUS EFFECTSTABLE OF CONTENTS
SEQUENCE AND PROGRAM MENUS EFFECTSTABLE OF CONTENTS


< >
USER GUIDE: FX
Add effects to tracks to create new and evolving sounds.Tap the arrow buttons on the left and right, or swipe tomove between effects.
DDT Bit-Crusher
The DDT Bit-Crusher reduces the sampling rate and bit rate of your signal toprovide variable, fun results.
Bits
This control adjusts the bit rate. A higher bit rate has a signal integrity closerto the original sound.
Downsample
This reduces the sampling rate of the signal. The lower the downsampling,the more crude the signal.
Threshold
This control sets the clipping threshold – turn the threshold up to clip thesignal sooner.
Wrap
With wrap enabled, values over the clipping threshold overflow or wrap
MIXER SAMPLERTABLE OF CONTENTS

around themselves instead of clipping. This makes the sound louder andmore distorted. Use the threshold control to set when the wrapping shouldoccur.
Track
These switches turn the effect on and off for a particular track.
ED2 Tempo-Syncable Delay
Feedback
Causes the sound to echo beyond the original signal.
Dampen
Decreases the volume of the delay effect compared to the original signal.
Dry|Wet
Determines the amount of the original signal heard through the effect. Thecloser to Dry, the greater the original sound and the less audible the delay.
Sync
Causes the delay to sound in time with the session tempo.
Rate
Increases or decreases the interval of the delayed sound.
Track
Controls the amount of delay applied to each track.
< >
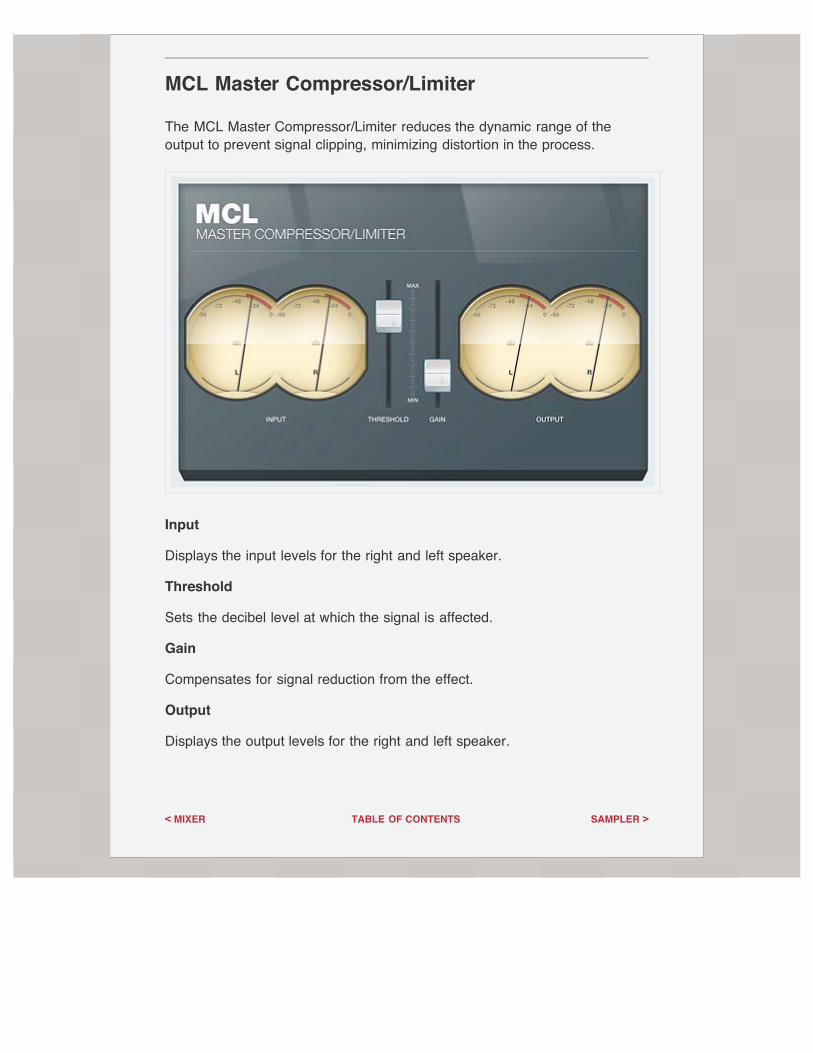
MCL Master Compressor/Limiter
The MCL Master Compressor/Limiter reduces the dynamic range of theoutput to prevent signal clipping, minimizing distortion in the process.
Input
Displays the input levels for the right and left speaker.
Threshold
Sets the decibel level at which the signal is affected.
Gain
Compensates for signal reduction from the effect.
Output
Displays the output levels for the right and left speaker.
MIXER SAMPLERTABLE OF CONTENTS
< >
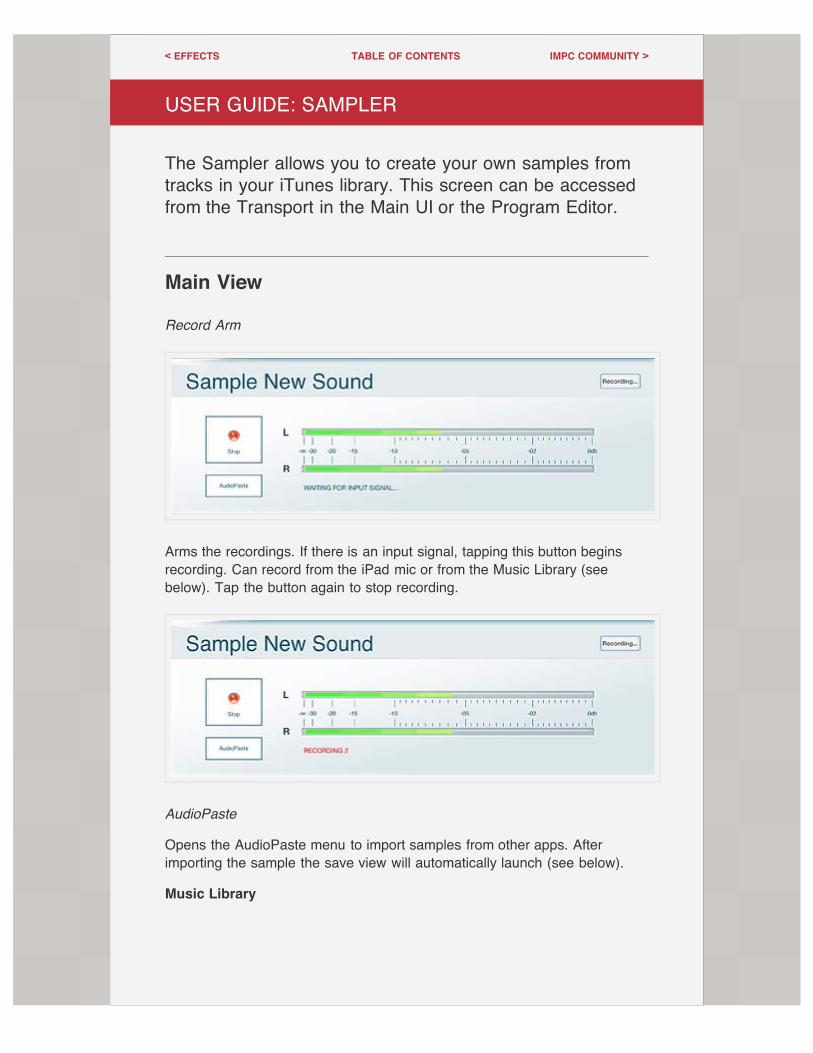
USER GUIDE: SAMPLER
The Sampler allows you to create your own samples fromtracks in your iTunes library. This screen can be accessedfrom the Transport in the Main UI or the Program Editor.
Main View
Record Arm
Arms the recordings. If there is an input signal, tapping this button beginsrecording. Can record from the iPad mic or from the Music Library (seebelow). Tap the button again to stop recording.
AudioPaste
Opens the AudioPaste menu to import samples from other apps. Afterimporting the sample the save view will automatically launch (see below).
Music Library
EFFECTS IMPC COMMUNITYTABLE OF CONTENTS

Opens a turntable and the option to load tracks from the iTunes library.
Load
Opens the iTunes library. Select the track to sample from the standard iOSmusic browser.
Pitch Adj.
Adjusts the pitch of the track on the turntable.
Tonearm
Move the tonearm to changes the playback position of the track.
Play
Plays the track.
To hide the Music Library tap the blue triangle above the base of thetonearm.
Save View

< >
Once a sound has been sampled, the save view screen opens.
Rename
Tap the edit button next to the sample name to rename the file.
Retry
Goes back to the Sample screen to re-record a sample.
Save to [Category]
Saves the sample in the indicated directory. You must select a categorybefore being able to save the sample.
Trim
Slide in the bars at either end of the waveform to trim the sample.
Test Pad
Plays the audio between the trim bars.
Category
Tap a category to file it in that section. A category must be selected for asample before it can be saved.
EFFECTS IMPC COMMUNITYTABLE OF CONTENTS

< >
USER GUIDE: IMPC COMMUNITY
iMPC Community is the place to listen to beats by otheriMPC users, and share your own. Any sequences youshare online appear here. Like, Comment, and follow yourfavorite producers. Itʼs all powered by SoundCloud, so youcan share with anyone online! You can also get the latestnews from Akai Pro and Retronyms.
Featured Songs
Shows a selection of songs from the community featured by Akai Pro andRetronyms.
Popular Songs
Shows a selection of the most liked songs from the iMPC Community.
Latest Songs
Displays the latest tracks uploaded to the iMPC Community.
My Uploads
Displays all your latest uploads to the iMPC Community. Tapping this willprompt you to log in to your SoundCloud account if you have not alreadydone so. If you have not signed up for the service, the option to create anaccount is available at the bottom left of the menu.
SAMPLER IMPORTING EXPORTINGTABLE OF CONTENTS

< >
My Activity
Displays all your activity on other accounts (liking, commenting, etc.).
Following
Displays the activity of all the artists youʼre following.
SAMPLER IMPORTING EXPORTINGTABLE OF CONTENTS

<
USER GUIDE: IMPORTING AND EXPORTING FILES
iTunes File Sharing
Any exported Sequences or custom Samples will appear in “iMPCDocuments” in iTunes. From here, you can drag items to your DesktopComputer. If you export a Sequence to use with MPC Desktop Software, itwill appear here as a Folder. For more information about exportingSequences, see Sequence and Program Menus.
To access iTunes File Sharing:
1. Connect your iPad to your Desktop Computer.2. Open iTunes.3. Click your iPad in the left column under "Devices.4. Click the small “Apps” tab at the top of the window.5. Scroll down to “File Sharing”, and click “iMPC” in the Apps Column.
Import Custom Sounds
Any custom sounds (in .wav format) you drag here will be available whenediting Programs.
IMPC COMMUNITY TABLE OF CONTENTS

< IMPC COMMUNITY TABLE OF CONTENTS