Embed Size (px)
Citation preview
1
IMP020Portable Thermal Printer
User’s Manual
(Ver 1.00)
Guangzhou Issyzone Technology Co. Limitedwww.issyzonepos.com
1

2
Content
NOTICE........................................................................................................................................ 3Notice of Safety.....................................................................................................................3Notice of Using......................................................................................................................3Notice of Storing....................................................................................................................3
Chapter 1 Outer Appearance and Model No......................................................................... 41.1 Outer Appearance..........................................................................................................41.2 Model No......................................................................................................................... 4
Chapter 2 Characteristic Specification....................................................................................42.1 Printing Specification.....................................................................................................52.2 Physical Parameters......................................................................................................52.3 Environment Parameters..............................................................................................52.2 Other Specification.........................................................................................................5
Chapter 3 Operation Method.................................................................................................... 63.1 Using Preparation.......................................................................................................... 6
3.1.1 Battery Installation................................................................................................63.1.2 Paper Roll Installation..........................................................................................7
3.2 Basic function usage..................................................................................................... 73.2.1 Switch On...............................................................................................................73.2.2 Switch Off...............................................................................................................73.2.3 Self-test...................................................................................................................83.2.4 Paper Feeding (Manual Feeding)......................................................................83.2.5 Battery Charging...................................................................................................8
3.3 Printer Setting................................................................................................................. 83.3.1 Enter set mode by button operation..................................................................93.3.2 Set by setting tool................................................................................................. 9
3.4 Printer Interface Connection and Printing..................................................................93.4.1 Serial Port Connection.........................................................................................93.4.2 USB Connection................................................................................................... 93.4.3 Bluetooth Connection........................................................................................ 10
3.5 Indicator and Buzzer....................................................................................................11Chapter 4 Other Information................................................................................................... 11
4.1 Command Programming Manual.............................................................................. 114.2 Description of Pre-printed Black Mark......................................................................11
Appendix.....................................................................................................................................12

3
NOTICE
Please read this manual carefully before using the printer!
Notice of Safety
Be sure to use the specified battery and power supply provided by our company. Otherwise it may cause fire,explosion or damage printer, meanwhile, the battery also may be damaged.If the printer would not be used for a long time, be sure to take off the battery, otherwise the battery may leak liquidwhich is corrosive liquid, if improper operation causes battery leak liquid, and it paste in the skin or clothes, pleaserinse it by clean water, if paste in the eyes, please rinse them thoroughly by clean water and see a doctor. Pleasedo not open the paper case cover when it is printing or just when printing is finished, do not touch the printer headwith hand or body, overheat may cause scald.
Notice of Using
Don’t make the printer print receipt longer than 1m. Otherwise, it might damage the printer.Water or other liquid should not be spilled into the printer, also the printer should not be appeared in the rain, or elsemay cause printer damage.Please do not open the paper case cover when it is printing, otherwise the printer may work improperly.If printer is using serial port connection to work, should not unplug the serial line, otherwise the data will beincomplete. When printer is using Bluetooth connection to work, the distance of communication should be within 10meters, otherwise the printer doesn’t print or prints rubbish codes.Though printer can work properly in the 0℃~50℃ environment, too high(45℃)or too low(5℃) environmenttemperature and too high (85%) or too low (20%) environment humidity both effect the printing quality.The printer paper roll with poor quality or stored for too long time also may reduce the printing quality even damagethe printer.Under the black mark detecting mode, the printer requires that the pre-printed black mark is accordant with theprinting rule of black mark (please refer to details in Chapter 4.2), otherwise the black mark can not be detectedcorrectly.Be sure to use up the power of the battery before charge up it, as it can ensure the using life of the battery. Thecommon working life of printer is:the times of charge/discharge≥300, battery performance will decrease with thecharge/discharge times developed.
Notice of Storing
The printer should be placed in such an environment that the temperature is between-20℃ and 60℃, and therelative humidity is between 5% and 95%.If the printer will be stored for a long time, please be sure to take out the battery, otherwise may damage the batteryand printer.If the printer will be stored for more than three months, battery should be installed and charged on the printer, whichin avoid of battery damage of self discharge.Normal thermal paper receipt can’t be kept too long, if you need to keep the receipt for a long period, please chooselong-term effective thermal paper.The thermal paper should be keep away from high temperature environment and point-blank sunshine, please storeit where is away from light if it have been open.

4
Chapter 1 Outer Appearance and Model No.
1.1 Outer Appearance
1.2 Model No.
IMP020*
BTDM–double mode Bluetooth, USB interface supportedBlank – just USB, RS-232 interface
Chapter 2 Characteristic Specification
2.1 Printing SpecificationPrinting Method: Thermal linePaper Width: 58mmEffective Printing Width: 48mmResolution: 8dots/mm(203dpi)Dots per line: 384dotsPrinting Speed: max 100m/s for thermal paper, max 80mm/s for label paper

5
Paper Thickness: 60~140μmPrintable Content:GB18030, BIG5,GB12345,Shift+JIS, ASCII,
custom character set,figure1DBarcode:UPCA,UPCE,EAN13,EAN8,CODE39,ITF25,CODABAR,
CODE93,CODE1282D Barcode:PDF417,QR CODE,DATA Matrix
2.2 Physical ParametersDimension (W×L×H): 119.6L) X82(W) X50.2(H) mmPhysical Weight:288g (excluding roll paper)Paper Roll Diameter: Max 40.0mmInterface: USB, RS-232,Bluetooth
2.3 Environment ParametersOperating Temp: 0℃~50℃Operating Humidity: 10%~80%Storage Temp: -20℃~60℃Storage Humidity: 10%~90%
2.4 Other Specification
● Paper Loading Method: drop-in easy loading(please refer to details in3.1.2 Paper Roll Installation)● Black Mark Location: available(details please see 4.2 pre-printed blackmark manual).
● Printing Control Command: ESC/POS compatible command set(refer to<T11/L21Printer Developer Manual >).
● Power Supply: 2000mAh rechargeable polymer lithium battery.● Low Power Alarm:When the electric of battery will run out, the power
indicator will be red to alarm if there is still printingdata in printer. After printing, printer will be in sleepingmode and buzzer ‘one high one low’ prompt tone. Orprinter will auto power off after buzzer ‘one high onelow’ prompt tone if in the sleeping mode.
● Auto-sleeping: the printer will fall into sleep after in 2 seconds withoutbutton operation or receiving data , and can be awaken bypressing 【FEED】 button or sending data to it.
● Battery Charging: quick charging, it will be fully charged about 2 hours;● Battery Duration: under 25% printing density, more than 90 meters; the
standby time is over 15days. (These parameters arejust for reference. Long term usage will cause thecapacity decline, and can not ensure the time ofprinting.)

6
Chapter 3 Operation Method
3.1 Using Preparation
3.1.1 Battery Installation

7
3.1.2 Paper Roll Installation
3.2 Basic function usageT11 support two types paper, thermal paper and black mark paper, usethermal paper by default.L21 support three types paper, thermal paper, black mark paper and labelpaper, use label paper by default.3.2.1 Switch On
In the status of power off, press the on/off button for one second, and loosewhen hearing the ‘one low one high’ prompt tone, then the printer will inworking status; the power indicator will be green.
Notice: when the battery is almost exhausted, the power indicator will be red,please charge or change the battery if you continue to use the printer. Themethod of charging the battery, please refer to 3.2.5.
3.2.2 Switch OffIn the status of power on, pressing the on/off button for one second, and loosewhen hearing the ‘one high one low’ prompt tone, then the printer off and allthe indicators off.

8
3.2.3 Self-testAfter receiving the printer, user can check its current setting and status atanytime.The method of self test is as following: Switch off the printer (if theprinter in working mode), holding down the 【FEED】 button, then turn on thepower (press the on/off button) at the same time. Then loosen the【FEED】
button after hearing the power on prompt tone and the current setting andstatus will be printed out.
3.2.4 Paper Feeding (Manual Feeding)When the printer works normally, hold down【FEED】button, the paper feedingbegins, and stops when stopped holding the【FEED】button. When the printerworks in black mark mode or label mode, hold down【FEED】button, the printerbegins to feed paper and stops at the position of black mark or gap. If thepaper is not black mark paper or label paper, the printer stops automaticallyafter feeding paper for 30cm.
3.2.5 Battery Charging
The charging method is as following: connecting the adapter to the powersocket, then plug the power charging plug to the power socket of the printer, sothe power charging begins. During the power charging, the charging indicatorgoes red; while goes green when the charging is full. It takes about 2 hours tocharge up the battery.Using the printer during the charging power period will make the charging timego longer.
3.3 Printer Setting
Users can set some simple parameter according to the button operation, thereare two methods into set mode, and the setting parameters are different.
3.3.1 Enter set mode by button operation
Switch off the printer (if the printer in working mode),holding down the【FEED】button, then turn on the power (press the on/off button) at the same time. Thenloosen the【FEED】button after hearing the power on prompt tone, press the【FEED】button for twice, then loose the on/off button, and the ’parameter setmode’ will be printed out. Please refer to appendix for details.
9
3.3.2 Set by setting toolUsers can set more parameters by using the attached software with printer〈T11/L21 Setting Tools〉 through computer. The setting includes:Printerserial Baudrate and data format, black mark, language、font、printing density、Bluetooth device name and password etc. The setting method please refer tothe < T11/L21 Setting Tools Software Help>, offered with the softwaretogether.
3.4 Printer Interface Connection and Printing
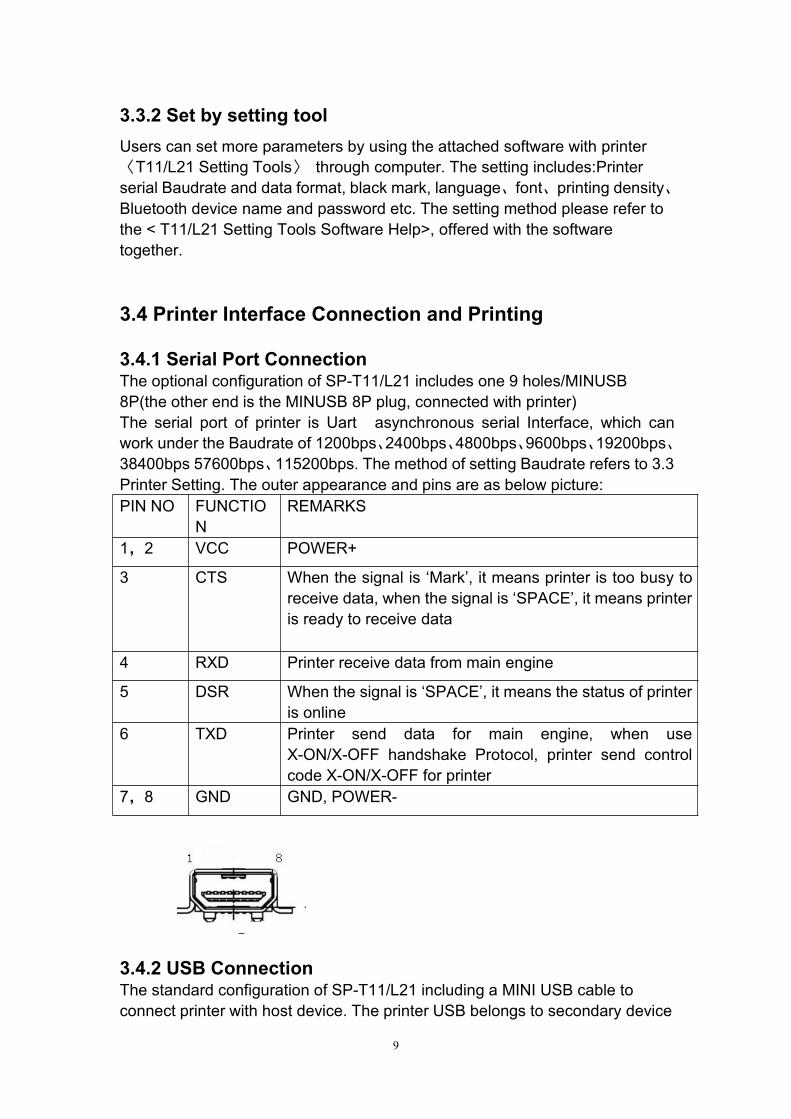
3.4.1 Serial Port ConnectionThe optional configuration of SP-T11/L21 includes one 9 holes/MINUSB8P(the other end is the MINUSB 8P plug, connected with printer)The serial port of printer is Uart asynchronous serial Interface, which canwork under the Baudrate of 1200bps、2400bps、4800bps、9600bps、19200bps、38400bps 57600bps、115200bps. The method of setting Baudrate refers to 3.3Printer Setting. The outer appearance and pins are as below picture:PIN NO FUNCTIO
NREMARKS
1,2 VCC POWER+
3 CTS When the signal is ‘Mark’, it means printer is too busy toreceive data, when the signal is ‘SPACE’, it means printeris ready to receive data
4 RXD Printer receive data from main engine
5 DSR When the signal is ‘SPACE’, it means the status of printeris online
6 TXD Printer send data for main engine, when useX-ON/X-OFF handshake Protocol, printer send controlcode X-ON/X-OFF for printer
7,8 GND GND, POWER-
3.4.2 USB ConnectionThe standard configuration of SP-T11/L21 including a MINI USB cable toconnect printer with host device. The printer USB belongs to secondary device

10
type (DEVICE), the outer appearance and pins are as below picture:
3.4.3 Bluetooth Connection
Hand-held device, laptop and other information terminal devices with Bluetoothcan drive T1BTDM/L21BTDM to print by the Bluetooth interface.T11BTDM/L21BTDM portable printer is compatible with Bluetooth2.0standard(T11BTDM/L21BTDM is compatible with Bluetooth2.0 regulation andBluetooth4.0) and power class is CLASS 2, effective communication distanceis 10meters. The initial name of the printer is T11 Bluetooth Printer/L21Bluetooth Printer, the initial password is ‘1234’. Users can change the printername and password by using< T11/L21 Setting Tools> software. Please seethe details of changing the device name and password in help file of < T11/L21Setting Tools>.
Before working, T11BTDM/L21BTDM Portable Thermal Printer needs to bepaired with host device. Pairing begins with the host device. Usual pairingsteps are as below:
1. Switch on printer;2. Host device searches for the outer Bluetooth device;3. If there are other Bluetooth devices, please select T11BT Printer/L21BTPrinter;4. Enter the password ‘1234’;5. Pairing finished.Please see details in host device Bluetooth function instruction for reference.
Notice:If user doesn’t change the device name, during pairing, pls do not switch onother printers, otherwise, it will be difficult to identify which printer is pairedsuccessfully.

11
3.5 Indicator and BuzzerThere are three indicators - 【POWER】、【BULETOOTH】and 【ERROR】.【POWER】 indicator is red or green,【BLUETOOTH】indicator is blue and【ERROR】 indicators is red. The below are the meanings of indicators:
【ERROR】indicatorConstant on red lighting: printer out of paperRed light flashing (twice): it constants on lighting for 5s after flashing twice, ,
this means over-voltage.Red light flashing (once in 500ms): red light constants 500ms, then turn off
500ms, this means the printing headover-heating.
【BLUETOOTH】indicatorBlue light flashing: Bluetooth has been connectedBlue light off: Bluetooth disconnected
【POWER】indicatorGreen light constant on: printer is power on and in normal statusRed light constant on: power of battery is low
There is also a buzzer to indicate various status of the printer. The meaningsare as below:One low one high: power on;One high one low: power off or under-voltage seriously, printer switches itselfoff in the sleeping mode.Circulation continuous two highs: printer at error status
Chapter 4 Other Information
4.1 Command Programming Manual
<T11/L21 printer developing manual> is the technical manual for engineer todevelop printer Application. If need, pls contact with our company.
This manual includes the hardware interface (Serial interface, Bluetooth, USBinterface) technical description, the technical documentation of printing controlcommand set, and others such as how to print black mark and locate by it.
4.2 Description of Pre-printed Black Mark
If users use pre-printed black mark to locate the receipt, please be sure to
12
abide by the following black mark pre-print regulation when print the blackmark paper, otherwise, it will cause that the printer can not identify the blackmark.
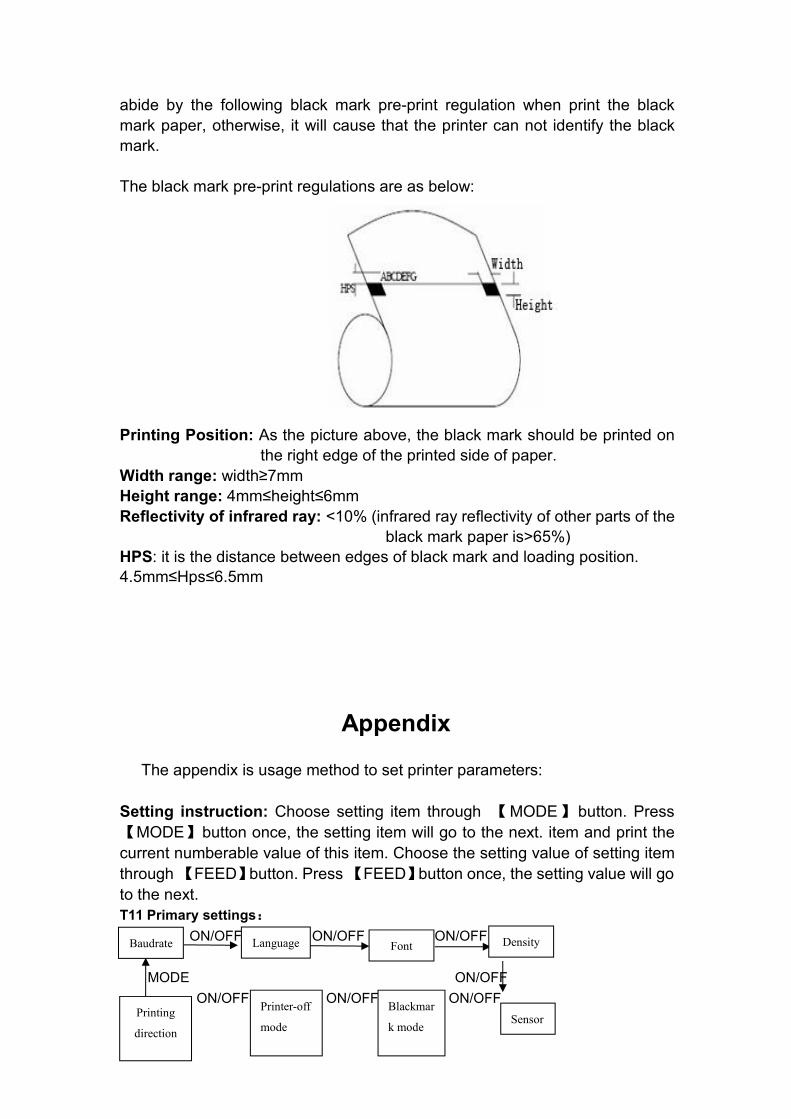
The black mark pre-print regulations are as below:
Printing Position: As the picture above, the black mark should be printed onthe right edge of the printed side of paper.
Width range: width≥7mmHeight range: 4mm≤height≤6mmReflectivity of infrared ray: <10% (infrared ray reflectivity of other parts of the
black mark paper is>65%)HPS: it is the distance between edges of black mark and loading position.4.5mm≤Hps≤6.5mm
Appendix
The appendix is usage method to set printer parameters:
Setting instruction: Choose setting item through 【MODE】button. Press【MODE】button once, the setting item will go to the next. item and print thecurrent numberable value of this item. Choose the setting value of setting itemthrough 【FEED】button. Press【FEED】button once, the setting value will goto the next.T11 Primary settings:
ON/OFF ON/OFF ON/OFF
MODE ON/OFFON/OFF ON/OFF ON/OFF
Baudrate
SensorBlackmar
k modePrinting
direction
Printer-off
mode
Language Font Density

13
Xxx=
L21 Primary settings:ON/OFF ON/OFF ON/OFF
ON/OFF ON/OFF
ON/OFF ON/OFF ON/OFF
Baudrate:FEED FEED FEED
FEED FEED
FEED FEED FEED
Language:FEED FEED
FEED
Font:FEED
FEED
Density:FEED FEED
FEED
Sensor sensibility:FEED FEED
FEED
12×24 9×17
ANK Simplified
ChineseTraditional
Chinese
Low Medium High
Low Medium High
9600 576003840019200
4800 11520012002400
Baudrate Language Font Density
Blackmark
mode
Paper
type
Language Printing
direction
Printer-off
mode
Sensorsensitivity

14
Black mark mode:FEED
FEED
Black mark position:FEED
FEED
Guangzhou Issyzone Technology Co. Limited103A Tairongshangwuzhongxin, No. 63 Xizeng Lu,Liwan District Guangzhou City, Guangdong Province, ChinaTel:0086-20-81536207, Email: [email protected]
Off on
Right Left