Embed Size (px)
Citation preview
1
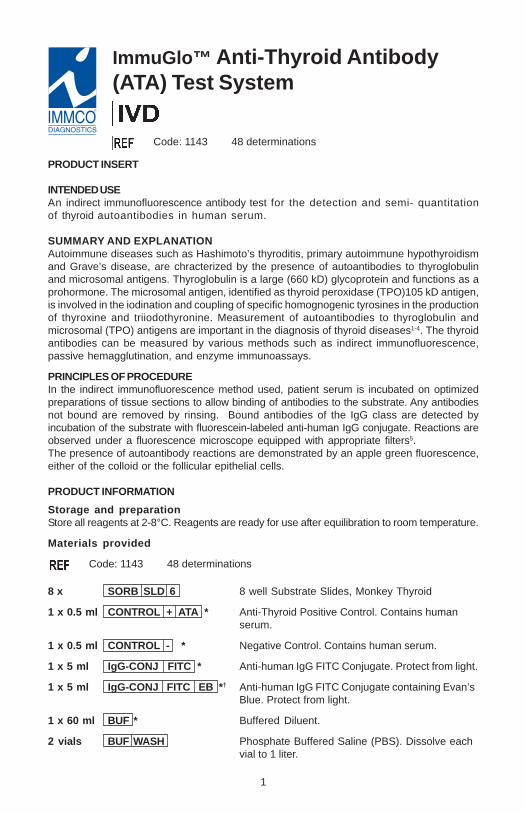
ImmuGlo™ Anti-Thyroid Antibody(ATA) Test System
Code: 1143 48 determinations
PRODUCT INSERT
INTENDED USEAn indirect immunofluorescence antibody test for the detection and semi- quantitationof thyroid autoantibodies in human serum.
SUMMARY AND EXPLANATIONAutoimmune diseases such as Hashimoto’s thyroditis, primary autoimmune hypothyroidismand Grave’s disease, are chracterized by the presence of autoantibodies to thyroglobulinand microsomal antigens. Thyroglobulin is a large (660 kD) glycoprotein and functions as aprohormone. The microsomal antigen, identified as thyroid peroxidase (TPO)105 kD antigen,is involved in the iodination and coupling of specific homognogenic tyrosines in the productionof thyroxine and triiodothyronine. Measurement of autoantibodies to thyroglobulin andmicrosomal (TPO) antigens are important in the diagnosis of thyroid diseases1-4. The thyroidantibodies can be measured by various methods such as indirect immunofluorescence,passive hemagglutination, and enzyme immunoassays.
PRINCIPLES OF PROCEDUREIn the indirect immunofluorescence method used, patient serum is incubated on optimizedpreparations of tissue sections to allow binding of antibodies to the substrate. Any antibodiesnot bound are removed by rinsing. Bound antibodies of the IgG class are detected byincubation of the substrate with fluorescein-labeled anti-human IgG conjugate. Reactions areobserved under a fluorescence microscope equipped with appropriate filters5.The presence of autoantibody reactions are demonstrated by an apple green fluorescence,either of the colloid or the follicular epithelial cells.
PRODUCT INFORMATION
Storage and preparationStore all reagents at 2-8°C. Reagents are ready for use after equilibration to room temperature.
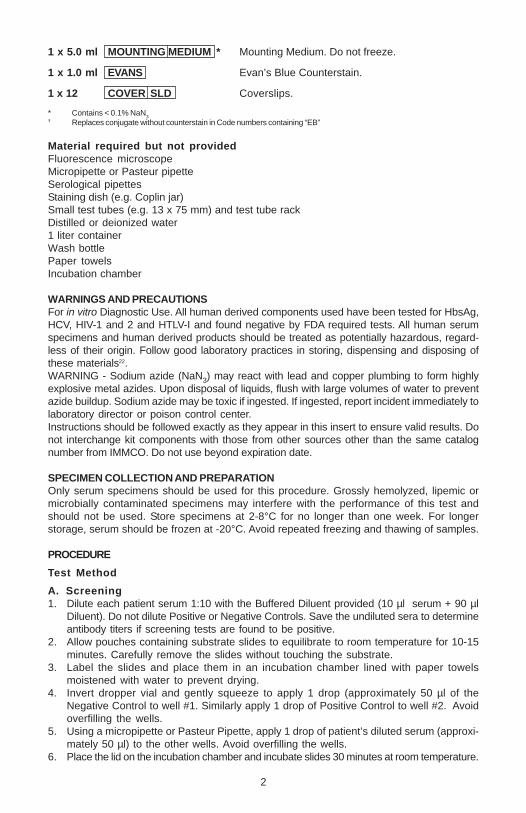
Materials provided
Code: 1143 48 determinations
8 x SORB SLD 6 8 well Substrate Slides, Monkey Thyroid
1 x 0.5 ml CONTROL + ATA * Anti-Thyroid Positive Control. Contains humanserum.
1 x 0.5 ml CONTROL - * Negative Control. Contains human serum.
1 x 5 ml IgG-CONJ FITC * Anti-human IgG FITC Conjugate. Protect from light.
1 x 5 ml IgG-CONJ FITC EB *† Anti-human IgG FITC Conjugate containing Evan’sBlue. Protect from light.
1 x 60 ml BUF * Buffered Diluent.
2 vials BUF WASH Phosphate Buffered Saline (PBS). Dissolve eachvial to 1 liter.
2
1 x 5.0 ml MOUNTING MEDIUM * Mounting Medium. Do not freeze.
1 x 1.0 ml EVANS Evan’s Blue Counterstain.
1 x 12 COVER SLD Coverslips.
* Contains < 0.1% NaN3
† Replaces conjugate without counterstain in Code numbers containing “EB”
Material required but not providedFluorescence microscopeMicropipette or Pasteur pipetteSerological pipettesStaining dish (e.g. Coplin jar)Small test tubes (e.g. 13 x 75 mm) and test tube rackDistilled or deionized water1 liter containerWash bottlePaper towelsIncubation chamber
WARNINGS AND PRECAUTIONSFor in vitro Diagnostic Use. All human derived components used have been tested for HbsAg,HCV, HIV-1 and 2 and HTLV-I and found negative by FDA required tests. All human serumspecimens and human derived products should be treated as potentially hazardous, regard-less of their origin. Follow good laboratory practices in storing, dispensing and disposing ofthese materials22.WARNING - Sodium azide (NaN3) may react with lead and copper plumbing to form highlyexplosive metal azides. Upon disposal of liquids, flush with large volumes of water to preventazide buildup. Sodium azide may be toxic if ingested. If ingested, report incident immediately tolaboratory director or poison control center.Instructions should be followed exactly as they appear in this insert to ensure valid results. Donot interchange kit components with those from other sources other than the same catalognumber from IMMCO. Do not use beyond expiration date.
SPECIMEN COLLECTION AND PREPARATIONOnly serum specimens should be used for this procedure. Grossly hemolyzed, lipemic ormicrobially contaminated specimens may interfere with the performance of this test andshould not be used. Store specimens at 2-8°C for no longer than one week. For longerstorage, serum should be frozen at -20°C. Avoid repeated freezing and thawing of samples.
PROCEDURE
Test Method
A. Screening1. Dilute each patient serum 1:10 with the Buffered Diluent provided (10 µl serum + 90 µl
Diluent). Do not dilute Positive or Negative Controls. Save the undiluted sera to determineantibody titers if screening tests are found to be positive.
2. Allow pouches containing substrate slides to equilibrate to room temperature for 10-15minutes. Carefully remove the slides without touching the substrate.
3. Label the slides and place them in an incubation chamber lined with paper towelsmoistened with water to prevent drying.
4. Invert dropper vial and gently squeeze to apply 1 drop (approximately 50 µl of theNegative Control to well #1. Similarly apply 1 drop of Positive Control to well #2. Avoidoverfilling the wells.
5. Using a micropipette or Pasteur Pipette, apply 1 drop of patient’s diluted serum (approxi-mately 50 µl) to the other wells. Avoid overfilling the wells.
6. Place the lid on the incubation chamber and incubate slides 30 minutes at room temperature.
3
7. Remove a slide from the incubation chamber. Hold slide at tab end and rinse gently withapproximately 10 ml PBS using a pipette, or rinse slide in beaker filled with PBS. Do notuse wash bottle. Transfer slide immediately into Coplin jar and wash 10 minutes. Repeatprocess with all remaining slides.
8. Remove slide(s) from Coplin jar. Blot the edge of the slide on a paper towel to removeexcess PBS. Place the slide in the incubation chamber. Immediately invert the Conjugatedropper vial and gently squeeze to apply 1 drop (approximately 50 µl) to each well.
9. Repeat steps 7 and 8 for each slide.10. Replace the lid on the incubation chamber. Incubate 30 minutes at room temperature.11. Remove a slide from incubator. Hold the slide at the tab end and dip the slide in a beaker
containing PBS to remove excess conjugate. Place slide(s) in a staining dish filled withPBS for 10 minutes. If desired, 2-3 drops of Evans blue counterstain may be added to thefinal wash. Repeat for the remaining slides. NOTE: Improper washing may lead toincreased background fluorescence.
12. Remove a slide from the staining dish. Blot the edge of the slide on a paper towel toremove excess PBS. To prevent slide from drying, proceed immediately withnext step while slide is still wet.
13. Mount the coverslip by applying 3 drops of Mounting Medium evenly on the coverslipand place coverslip over slide. Avoid applying undue pressure and prevent lateralmovement of the coverslip.
14. Repeat steps 12 and 13 for each slide.15. Examine for specific fluorescence under a fluorescence microscope at a magnification
of 200x or greater.Slides may be read as soon as prepared. However, because of the presence of antifadingagent in the mounting medium, no significant loss of staining intensity occurs if reading isdelayed for up to 48 hours. Slides should be stored in the dark at 2-8°C.
B. Endpoint Determination (titration)A serum positive in the screening test may be further tested following steps 5 through 13 todetermine the titer. Each test run should include the Positive and Negative Controls. Makeserial two-fold dilutions starting at 1:10. The reciprocal of the highest dilution producing apositive reaction is the titer.
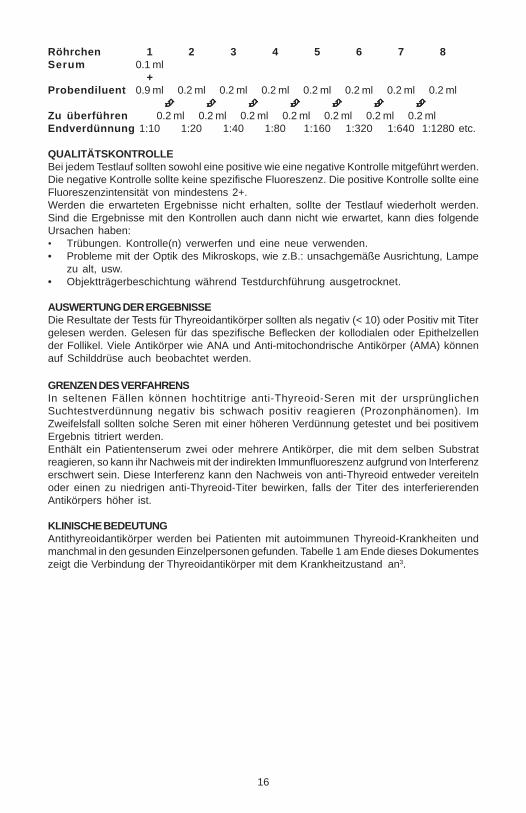
Preparation of Serial DilutionsNumber four tubes 1 through 8. Add 0.9 ml of Sample Diluent to tube 1 and 0.2 ml to tubes 2through 8. Pipette 0.1 ml of undiluted serum to tube 1 and mix thoroughly. Transfer 0.2 ml fromtube 1 to tube 2 and mix thoroughly. Continue transferring 0.2 ml from one tube to the nextafter mixing to yield the dilutions depicted in the following table:
Tubes 1 2 3 4 5 6 7 8Serum 0.1 ml
+Buffered Diluent 0.9 ml 0.2 ml 0.2 ml 0.2 ml 0.2 ml 0.2 ml 0.2 ml 0.2 ml
Transfer 0.2 ml 0.2 ml 0.2 ml 0.2 ml 0.2 ml 0.2 ml 0.2 mlFinal dilution 1:10 1:20 1:40 1:80 1:160 1:320 1:640 1:1280 etc.
QUALITY CONTROLBoth a positive and negative control serum should be included with each test run. Thenegative control should show no specific fluorescence, whereas the positive controlshould have 2+ or greater staining intensity .
If expected results are not obtained, the run should be repeated. If inadequate resultscontinue to occur with the controls, these may be due to:• Gross contamination as a result of improper storage or handling. If signs of contamination
such as turbidity are seen, discard and use another control.
4
• Problems with the optical system of the fluorescence microscope. These may include: improperalignment, use of the bulb beyond the expected performance life, etc.
• Allowing the slide to dry during the procedure.
INTERPRETATION OF RESULTSThe results of the tests for thyroid antibodies should be read as negative (<10) or positivewith titer. Read for specific staining of the colloid or the epithelial cells of the follicles.Various other tissue antibodies such as anti-nuclear antibodies (ANA), and anti-mitochondrialantibodies (AMA) may also be observed on thyroid tissue. Any sera giving nuclear stainingreactions may be tested on Antinuclear Antibody (ANA) Test (HEp-2 Cells), AntinuclearAntibody (ANA) Test (Mouse Liver Sections). Any sera giving smooth muscle or mitochondrialstaining reactions may be tested on Autoantibody Test System (Mouse Kidney/StomachSections).
LIMITATION OF THE PROCEDUREIn some cases, sera positive for thyroid antibodies may either be very weak or negative atthe initial screening dilution (prozone phenomenon). In such doubtful cases the serashould be screened at higher dilutions and, if positive, antibody titers determined.In some cases the presence of two or more autoantibodies in a serum which are reactive withthe same substrate may cause an interference in their detection by immunofluorescence. Thisinterference may cause either a failure to detect anti-thyroid antibodies or a suppression of itstiter if the interfering antibody has a higher titer.
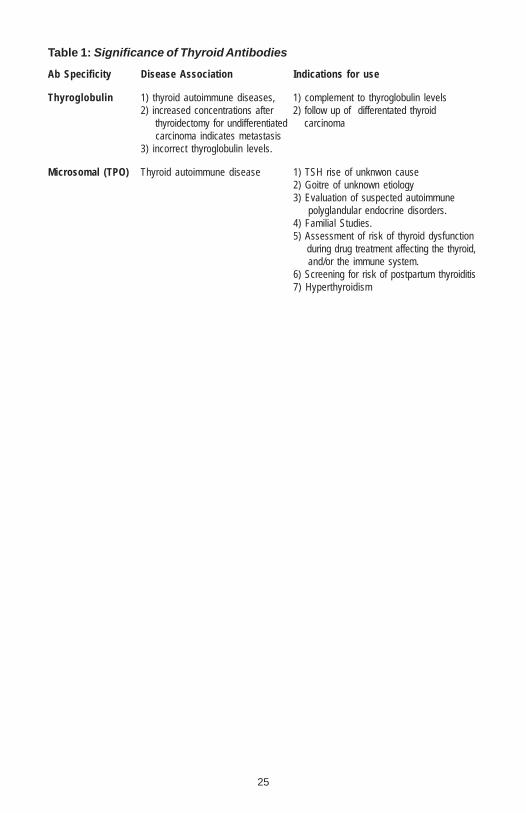
CLINICAL SIGNIFICANCEAnti-thyroid antibodies are found in patients with autoimmune thyroid disorders andoccasionaly in healthy individuals. Table 1 at the end of this document summerizes theassociation of thyroid antibodies to the disease state3.
5
ImmuGlo™ Detection des AnticorpsAnti-Thyroïde (ATA)
Code: 1143 48 determinations
Test par immunofluorescence indirecte pour la recherche et la détermination quantitativedes anticorps anti-thyroïde dans le sérum humain.
GENERALITESLes maladies autoimmunes telles que le Thyroïdite de Hashimoto, l’hypothyroïdisme autoimmunprimaire et la maladie de Grave, sont indiqués par la présence des autoanticorps authyroglobuline et aux antigènes microsomes. Le thyroglobuline est une grande (660kD)glycoprotéine agissant comme un prohormone. L’antigène microsome, identifié commeperoxydase thyroïde (TPO) 105kD, est impliqué dans l’iodination et l’accouplement destyrosines homogeniques spécifiques dans la production de la thyroxine et du triiodothyro-nine. La mesure des autoanticorps au thyroglobuline et les antigènes (TPO) microsomessont importants dans le diagnostic des maladies thyroïde 1-4. Les anticorps thyroïde peuventêtre mesurés par de diverses méthodes telles que l’immunofluorescence indirecte, le he-magglutination passif, et les ELISAs.
PRINCIPE DE LA MÉTHODESelon la méthode immunofluorescence indirecte employée, le sérum patient est incubé surles préparations optimisées des sections de tissu pour permettre lier des anticorps ausubstrat. Tous les anticorps non liés sont éliminés par le rinicage. Des anticorps attachés dela classe IgG sont détectés par l’incubation du substrat avec le conjugé anti-humainfluorescéine-marqué IgG. On observe des réactions sous un microscope de fluorescenceéquipé des filtres appropriés 5.La présence des réactions d’autoanticorps sont démontrées par une fluorescence vertpomme, des cellules épithéliales colloïdales ou folliculaires.
INFORMATION PRODUIT
Conservation et préparation des réactifsConserver tous les réactifs entre 2° et 8° C. Tous les réactifs sont prêts à l’emploi. Avantutilisation, attendre que les réactifs s’équilibrent à la température ambiante du laboratoire.
Matériel fourni Code: 1143 48 determinations
8 x SORB SLD 6 Lames 8puits, thyroïde de singe
1 x 0.5 ml CONTROL + ATA * Contrôle positif anti-thyroïde, sérumhumain
1 x 0.5 ml CONTROL - * Contrôle négatif, sérum humain.
1 x 5 ml IgG-CONJ FITC * Conjugué FITC anti-IgG humaines.Maintenir à l’abri de la lumière
1 x 5 ml IgG-CONJ FITC EB *† Conjugué FITC anti-IgG humaines avec del’Evan’s Blue. Maintenir à l’abri de la lumière.
1 x 60 ml BUF * Diluant sérum.
2 fioles BUF WASH Tampon phosphate salin (PBS). Dissoudrechaque flacon pour obtenir 1 litre.
6
1 x 5.0 ml MOUNTING MEDIUM * Milieu de montage. Ne pas congeler.
1 x 1.0 ml EVANS Contre colorant Bleu d’Evans.
1 x 12 COVER SLD Lamelles couvre-lames.
* Contient < 0.1% NaN3
† Remplace le conjugé sans la ontre colorant Bleu d’Evans dans des numéros contenant ‘“EB”
Matériel nécessaire mais non fourniMicroscope à fluorescenceMicropipette ou pipette PasteurPipette sérologiqueBac à coloration pour le lavage des lamesPetits tubes (ex 13X75 mm) et portoirEau distillée ou déioniséeEprouvette graduée 1lFlacon pour solution de lavageServiettes en papierChambre d’incubation
MISES EN GARDE ET PRÉCAUTIONSUtilisation comme test de diagnostic in vitro. Le matériel d’origine humaine utilisé dans lapréparation des réactifs a été testé en respectant les recommandations de la FDA et trouvénon réactif en antigène de surface du virus de l’hépatite B (Ag HBs), en anticorps dirigéscontre le virus de l’hépatite C (anti HCV) et en anticorps dirigés contre les virus del’immunodéficience humaine (anti VIH1, anti VIH2 et HTLV-I). Du fait qu’aucune méthode detest connue ne peut offrir une garantie absolue de l’absence d’agents infectieux, considérerles réactifs ainsi que tous les échantillons de patients comme potentiellement infectieux etles manipuler avec les précautions d’usage22.Certains réactifs contiennent de l’azide de sodium. Ce composé peut former avec descanalisations de plomb ou de cuivre des azotures métalliques hautement explosifs. Afind’éviter la formation et l’accumulation de tels azotures dans les canalisations, lors del’élimination de ces réactifs dans un évier, rincer l’évier à grande eau.La qualité des résultats est dépendante du respect des instructions figurant dans la présentenotice. Ne pas échanger des réactifs du coffret composants par d’autres provenant d’autresfabricants.
PRÉLÈVEMENT ET PRÉPARATION DES ÉCHANTILLONSSeuls les sérums peuvent être utilisés dans ce test. Il est recommandé de ne pas les utiliserlesles sérums fortement hémolysés, lipémiques ou sujets à une contamination bactérienne pouvantprovoquer des interférences avec les performances du test. Conserver les sérums à 2-8°Cpendant une semaine au maximum. Pour une conservation plus longue, congeler les sérumsà -20°C. Eviter les congélations/décongélations successives des sérums.
MODE OPÉRATOIRE
A. Dépistage1. Diluer chaque sérum de patient au 1:10 dans le diluant échantillon fourni (10µl de sérum +
90µl de diluant). Ne pas diluer les contrôles positifs ou négatifs. Conserver le sérum purpour déterminer le titre des autoanticorps dans le cas où le dépistage sera trouvé positif.
2. Laisser revenir les lames à la température du laboratoire pendant 10-15 minutes dansle sachet scellé. Sortir les lames avec précaution sans toucher le substrat.
3. Numéroter les lames et les placer en chambre humide avec des serviettes papier mouilléespour éviter l’assèchement.
4. Appuyer doucement sur le flacon pour déposer 1 goutte (environ 50µl) de ContrôleNégatif sur le puits #1. De la même façon déposer 1 goutte de Contrôle Positif sur le puits#2. Eviter de déborder des puits.
7
5. Avec une micropipette ou une pipette Pasteur, déposer 1 goutte (environ 50µl) de sérumdilué dans les puits restants. Eviter de déborder les puits.
6. Recouvrir la chambre humide et incuber les lames 30 minutes à température ambiante.7. Sortir une lame de la chambre humide. En la tenant par un bord, rincer doucement avec
une pipette et environ 10 ml de PBS ou rincer la lame dans un bécher rempli de PBS. Nepas utiliser de pissette. Transférer immédiatement la lame dans un bac à coloration etlaver pendant 10 minutes. Répéter les opérations avec toutes les lames.
8. Retirer une lame du bac. Eliminer l’excès de PBS sur une serviette papier. Déposer la lamedans la chambre humide. Déposer immédiatement 1 goutte de conjugué dans chaque puits.
9. Répéter les étapes 7 et 8 avec chaque lame.10. Recouvrir la chambre humide et incuber 30 minutes à température ambiante.11. Sortir une lame de la chambre humide. Plonger la lame dans un bécher rempli de PBS
pour éliminer l’excès de conjugué. Transférer dans un bac à coloration et laver pendant10 minutes. Si une contre-coloration est souhaitée, ajouter 2-3 gouttes de Bleu d’Evansdans le dernier bain de lavage. Répéter les opérations avec toutes les lames.REM: Un lavage incorrect peut altérer la morphologie des neutrophiles et provoquer unbruit de fond de fluorescence.
12. Retirer une lame du bac. Eliminer l’excès de PBS sur une serviette papier. Pour éviter demettre à sec les puits, réaliser immédiatement l’étape 13 pendant que la lame est humide.
13. Déposer doucement 3 gouttes de milieu de montage dans la lamelle couvre-lame égalementet appliquer la lamelle couvre-lame. Ne pas appliquer de pression excessive et éviter lesmouvements latéraux de la lamelle.
14. Répéter les étapes 12 et 13 avec chaque lame.15. Observer la fluorescence spécifique à l’aide d’un microscope au grossissement X200
ou plus.Les lames peuvent être lues immédiatement. Cependant, grâce à la présence d’un agentanti-fading dans le milieu de montage, la lecture peut être retardée jusqu’à 48 heures sansperte significative de l’intensité de fluorescence. Dans ce cas les lames doivent êtreconservées à l’obscurité à 2-8°C.
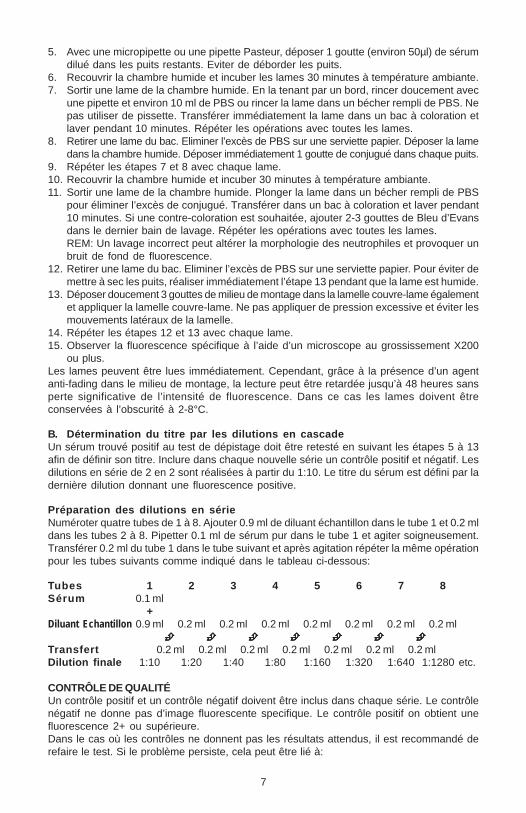
B. Détermination du titre par les dilutions en cascadeUn sérum trouvé positif au test de dépistage doit être retesté en suivant les étapes 5 à 13afin de définir son titre. Inclure dans chaque nouvelle série un contrôle positif et négatif. Lesdilutions en série de 2 en 2 sont réalisées à partir du 1:10. Le titre du sérum est défini par ladernière dilution donnant une fluorescence positive.
Préparation des dilutions en sérieNuméroter quatre tubes de 1 à 8. Ajouter 0.9 ml de diluant échantillon dans le tube 1 et 0.2 mldans les tubes 2 à 8. Pipetter 0.1 ml de sérum pur dans le tube 1 et agiter soigneusement.Transférer 0.2 ml du tube 1 dans le tube suivant et après agitation répéter la même opérationpour les tubes suivants comme indiqué dans le tableau ci-dessous:
Tubes 1 2 3 4 5 6 7 8Sérum 0.1 ml
+Diluant Echantillon 0.9 ml 0.2 ml 0.2 ml 0.2 ml 0.2 ml 0.2 ml 0.2 ml 0.2 ml
Transfert 0.2 ml 0.2 ml 0.2 ml 0.2 ml 0.2 ml 0.2 ml 0.2 mlDilution finale 1:10 1:20 1:40 1:80 1:160 1:320 1:640 1:1280 etc.
CONTRÔLE DE QUALITÉUn contrôle positif et un contrôle négatif doivent être inclus dans chaque série. Le contrôlenégatif ne donne pas d’image fluorescente specifique. Le contrôle positif on obtient unefluorescence 2+ ou supérieure.Dans le cas où les contrôles ne donnent pas les résultats attendus, il est recommandé derefaire le test. Si le problème persiste, cela peut être lié à:
8
• La turbidité. Eliminer le contrôle et en utiliser un nouveau.• Au système optique du microscope. Par exemple: mauvais alignement, lampe ayant dépassé
sa durée de vie, etc.• A un assèchement des lames pendant la manipulation.
INTERPRÉTATION DES RÉSULTATSLes résultats des essais pour des anticorps thyroïde devraient être lus en tant que négatifs(< 10) ou positif avec le titre. Lu pour la souillure spécifique des cellules colloïdales ouépithéliales des follicules. On peut également observer de divers autres anticorps de tissutels que les anticorps antinucléaires (ANA), et anticorps anti-mitochondriques (AMA) sur letissu thyroïde. Tous les sérums donnant des réactions de souillure nucléaires peuvent êtreexaminés sur le test anticorps antinucléaires (ANA) (Cellules HEp-2 et foie de souris). Tousles sérums donnant le muscle lisse ou les réactions de souillure mitochondriques peuventêtre examinés sur les rein/estomac de souris.
LIMITES D’UTILISATIONParfois un sérum thyroïde positif peut donner un résultat faiblement positif ou négatif à ladilution de dépistage (effet de zone). Dans ce cas, préparer les dilutions en série del’échantillon et déterminer le titre de l’anticorps.Parfois la présence de deux ou plus autoanticorps différents dans le sérum peut créer desinterférences en immunofluorescence. Cela peut masquer la détection de l’anticorps anti-thyroïde ou cacher le titre si l’anticorps qui interfère a un titre plus élevé que celui des anti-thyroïde.
SIGNIFICATION CLINIQUEDes anticorps d’antithyroïde sont trouvés dans les patients présentant des désordresautoimmuns thyroïde et dans les individus en bonne santé. Le tableau 1 à la fin de cedocument indique l’association des anticorps thyroïde à l’état de la maladie3.
9
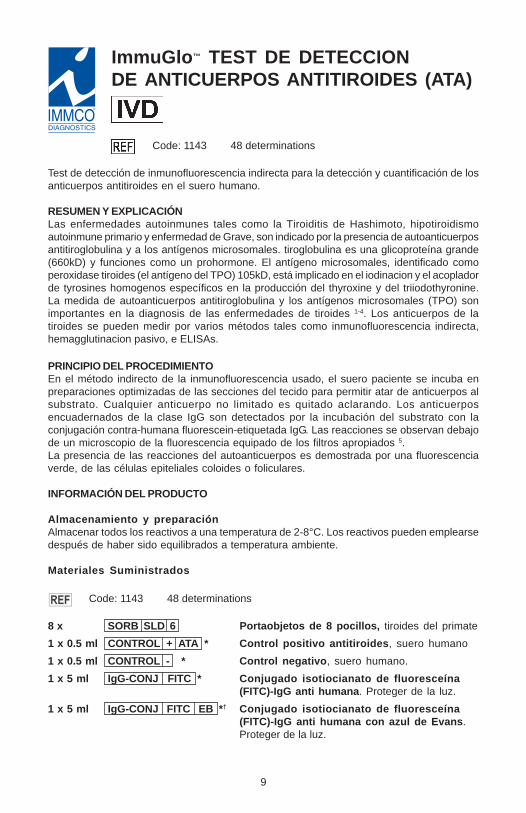
ImmuGlo™ TEST DE DETECCIONDE ANTICUERPOS ANTITIROIDES (ATA)
Code: 1143 48 determinations
Test de detección de inmunofluorescencia indirecta para la detección y cuantificación de losanticuerpos antitiroides en el suero humano.
RESUMEN Y EXPLICACIÓNLas enfermedades autoinmunes tales como la Tiroiditis de Hashimoto, hipotiroidismoautoinmune primario y enfermedad de Grave, son indicado por la presencia de autoanticuerposantitiroglobulina y a los antígenos microsomales. tiroglobulina es una glicoproteína grande(660kD) y funciones como un prohormone. El antígeno microsomales, identificado comoperoxidase tiroides (el antígeno del TPO) 105kD, está implicado en el iodinacion y el acopladorde tyrosines homogenos específicos en la producción del thyroxine y del triiodothyronine.La medida de autoanticuerpos antitiroglobulina y los antígenos microsomales (TPO) sonimportantes en la diagnosis de las enfermedades de tiroides 1-4. Los anticuerpos de latiroides se pueden medir por varios métodos tales como inmunofluorescencia indirecta,hemagglutinacion pasivo, e ELISAs.
PRINCIPIO DEL PROCEDIMIENTOEn el método indirecto de la inmunofluorescencia usado, el suero paciente se incuba enpreparaciones optimizadas de las secciones del tecido para permitir atar de anticuerpos alsubstrato. Cualquier anticuerpo no limitado es quitado aclarando. Los anticuerposencuadernados de la clase IgG son detectados por la incubación del substrato con laconjugación contra-humana fluorescein-etiquetada IgG. Las reacciones se observan debajode un microscopio de la fluorescencia equipado de los filtros apropiados 5.La presencia de las reacciones del autoanticuerpos es demostrada por una fluorescenciaverde, de las células epiteliales coloides o foliculares.
INFORMACIÓN DEL PRODUCTO
Almacenamiento y preparaciónAlmacenar todos los reactivos a una temperatura de 2-8°C. Los reactivos pueden emplearsedespués de haber sido equilibrados a temperatura ambiente.
Materiales Suministrados
Code: 1143 48 determinations
8 x SORB SLD 6 Portaobjetos de 8 pocillos, tiroides del primate
1 x 0.5 ml CONTROL + ATA * Control positivo antitiroides, suero humano
1 x 0.5 ml CONTROL - * Control negativo, suero humano.
1 x 5 ml IgG-CONJ FITC * Conjugado isotiocianato de fluoresceína(FITC)-IgG anti humana. Proteger de la luz.
1 x 5 ml IgG-CONJ FITC EB *† Conjugado isotiocianato de fluoresceína(FITC)-IgG anti humana con azul de Evans.Proteger de la luz.
10
1 x 60 ml BUF * Diluyente de la muestra.
2 frascos BUF WASH Fosfato salino tamponado (PBS). Disolver cadavial en 1 litro.
1 x 5.0 ml MOUNTING MEDIUM * Medio de preparación. No congelar.
1 x 1.0 ml EVANS Colorante de contraste azul de Evans.
1 x 12 COVER SLD Cubreobjetos.
* PRECAUCIÓN - Contiene < 0.1% NaN3
† Substituye Conjugado sin azul de Evans en los números de código que contienen el “EB “
Material necesario, pero no suministradoMicroscopio de fluorescenciaMicropipetas o pipeta PasteurPipetas serológicasPlaca de tinción (por ejemplo, frasco de Coplin)Tubos de ensayo pequeños (por ejemplo, 13 x 75 mm) y gradilla de tubos de ensayoAgua destilada o desionizadaEnvase de 1 litroFrasco de lavadoToallas de papelCámara de incubación
ADVERTENCIAS Y PRECAUCIONESPara uso diagnóstico in vitro. Todos los componentes de derivados sanguíneos humanoshan sido ensayados respecto a la presencia de HbsAg, VHC, VIH-1 y 2 y el virus linfotropode células T humanas (VLTH-I), siendo negativos en los ensayos necesarios según la FDA(Administración de Fármacos y Alimentos de Estados Unidos). Todas las muestras de sueroy los derivados sanguíneos humanos deben tratarse como un material potencialmentepeligroso, independientemente de su origen. En consecuencia, deben seguirse unas prácticasde laboratorio adecuadas durante el almacenamiento, dispensación y eliminación de dichomaterial22.PRECAUCIÓN - La azida sódica (NaN3) puede reaccionar con el plomo y el cobre de lastuberías y formar azidas metálicas muy explosivas. Después y desechar los líquidos, esnecesario lavar con un volumen grande de agua para evitar la acumulación de azida. Laazida sódica puede ser tóxica si se ingiere. En caso de ingestión, notificarlo inmediatamenteal director del laboratorio o al centro toxicológico.Para poder garantizar la obtención de resultados válidos, deben seguirse de forma exactalas instrucciones indicadas en este prospecto. No intercambiar componentes del equipo porotros diferentes que no tengan el mismo número de catálogo de IMMCO. No utilizar esteequipo después de la fecha de caducidad.
OBTENCIÓN Y PREPARACIÓN DE LA MUESTRAPara la realización de esta determinación sólo debe utilizarse suero. Las muestras conhemólisis macroscópica, lipémicas o contaminadas por microorganismos pueden interferiren el funcionamiento del ensayo y, por tanto, no deben ser utilizadas. Almacenar las muestrasa una temperatura de 2-8°C durante un período no superior a una semana. Cuando se deseeun almacenamiento más prolongado, el suero debe congelarse a una temperatura de -20°C.Evitar la congelación y descongelación repetida de las muestras.
PROCEDIMIENTO
Método de ensayoA. Detección sistemática
1. Diluir 1:10 el suero de cada paciente con el diluyente de la muestra suministrado (10 µlde suero + 90µl del diluyente). No diluir los Controles Positivo o Negativo. Guardar el
11
suero no diluido para la determinación del título de anticuerpos si los resultados sonpositivos.
2. Permitir que los pocillos de los portaobjetos que contienen el substrato se equilibren atemperatura ambiente durante 10-15 minutos. Extraer con cuidado los portaobjetos sintocar el substrato.
3. Etiquetar los portaobjetos y colocarlos en una cámara de incubación cubierta contoallas de papel humedecidas con agua para evitar la desecación.
4. Invertir el vial cuentagotas y presionar suavemente para aplicar 1 gota (aproximadamente50 µl) del Control Negativo en el pocillo nº 1. De forma similar, aplicar una gota del ControlPositivo en el pocillo nº 2. Evitar llenar demasiado los pocillos.
5. Con el empleo de una micropipeta o una pipeta Pasteur, colocar 1 gota del suero diluidodel paciente (aproximadamente 50 µl) en los restantes pocillos. Evitar llenar demasiadolos pocillos.
6. Tapar la cámara de incubación e incubar los portaobjetos durante 30 minutos atemperatura ambiente.
7. Quitar la tapa de la cámara de incubación. Coger el portaobjetos por el extremo y lavarsuavemente con 10 ml de PBS mediante el empleo de una pipeta o lavar el portaobjetosen un vaso de precipitado lleno de PBS. No emplear un frasco de lavado. Transferirinmediatamente el portaobjetos al frasco de Coplin y dejarlo durante 10 minutos. Repetirel proceso con todos los portaobjetos restantes.
8. Extraer el portaobjetos del frasco de Coplin. Secar el extremo del portaobjetos con unatoalla de papel para eliminar el exceso de PBS. Colocar el portaobjetos en la cámara deincubación, Invertir inmediatamente el vial cuentagotas del Conjugado y apretarsuavemente para aplicar 1 gota (aproximadamente 50 µl) en cada pocillo.
9. Repetir las etapas 7 y 8 con cada portaobjetos.10. Tapar la cámara de incubación. Incubar durante 30 minutos a temperatura ambiente.11. Extraer el portaobjetos del incubador. Sumergir el portaobjetos en un vaso de precipitado
con PBS para eliminar el exceso de conjugado. Colocar el portaobjetos en una cubeta detinción llena con PBS durante 10 minutos. Al final del lavado puede añadirse, si se desea,2-3 gotas de colorante de contraste azul de Evans. Repetir el proceso con los portaobjetosrestantes. NOTA: un lavado inadecuado puede repercutir en la morfología de los neutrófilosy puede originar un incremento de la fluorescencia de fondo.
12. Extraer el portaobjetos de la cubeta de tinción. Secar el portaobjetos con una toalla depapel para eliminar el exceso de PBS. Para evitar que se seque el portaobjetos, realizarinmediatamente, mientras el portaobjetos todavía está húmedo, el proceso descrito en elapartado 13.
13. Añadir 3 gota del Medio de Preparación uniformemente en cubreobjetos y colocar elcubreobjetos sobre el portaobjetos. Evitar la aplicación de una presión excesiva y elmovimiento lateral del cubreobjetos.
14. Repetir las etapas 12 y 13 con cada portaobjetos.15. Examinar el desarrollo de fluorescencia específica en un microscopio de fluorescencia
a 200x o más aumentos.
Los portaobjetos pueden leerse al terminar su preparación. Sin embargo, debido a que elmedio de preparación contiene un agente antidesteñimiento, puede retrasarse la lecturadurante un período de hasta 48 horas sin que se produzca una pérdida significativa de laintensidad de la tinción. Los portaobjetos deben almacenarse en la oscuridad a unatemperatura de 2-8°C.
B. Determinación del punto de valoración (titulación)Los sueros positivos durante el ensayo pueden valorarse de forma adicional, etapas 6 - 15,para determinar su titulación. Cada ensayo debe incluir un control positivo y negativo. Realizardiluciones seriadas dobles a partir de 1:10. El título es el valor recíproco de la dilución máselevada que produzca una reacción positiva.
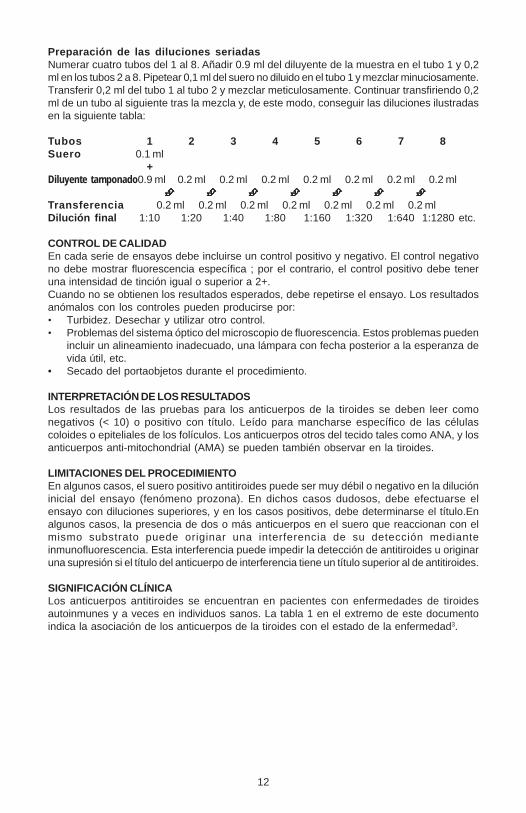
12
Preparación de las diluciones seriadasNumerar cuatro tubos del 1 al 8. Añadir 0.9 ml del diluyente de la muestra en el tubo 1 y 0,2ml en los tubos 2 a 8. Pipetear 0,1 ml del suero no diluido en el tubo 1 y mezclar minuciosamente.Transferir 0,2 ml del tubo 1 al tubo 2 y mezclar meticulosamente. Continuar transfiriendo 0,2ml de un tubo al siguiente tras la mezcla y, de este modo, conseguir las diluciones ilustradasen la siguiente tabla:
Tubos 1 2 3 4 5 6 7 8Suero 0.1 ml
+Diluyente tamponado0.9 ml 0.2 ml 0.2 ml 0.2 ml 0.2 ml 0.2 ml 0.2 ml 0.2 ml
Transferencia 0.2 ml 0.2 ml 0.2 ml 0.2 ml 0.2 ml 0.2 ml 0.2 mlDilución final 1:10 1:20 1:40 1:80 1:160 1:320 1:640 1:1280 etc.
CONTROL DE CALIDADEn cada serie de ensayos debe incluirse un control positivo y negativo. El control negativono debe mostrar fluorescencia específica ; por el contrario, el control positivo debe teneruna intensidad de tinción igual o superior a 2+.Cuando no se obtienen los resultados esperados, debe repetirse el ensayo. Los resultadosanómalos con los controles pueden producirse por:• Turbidez. Desechar y utilizar otro control.• Problemas del sistema óptico del microscopio de fluorescencia. Estos problemas pueden
incluir un alineamiento inadecuado, una lámpara con fecha posterior a la esperanza devida útil, etc.
• Secado del portaobjetos durante el procedimiento.
INTERPRETACIÓN DE LOS RESULTADOSLos resultados de las pruebas para los anticuerpos de la tiroides se deben leer comonegativos (< 10) o positivo con título. Leído para mancharse específico de las célulascoloides o epiteliales de los folículos. Los anticuerpos otros del tecido tales como ANA, y losanticuerpos anti-mitochondrial (AMA) se pueden también observar en la tiroides.
LIMITACIONES DEL PROCEDIMIENTOEn algunos casos, el suero positivo antitiroides puede ser muy débil o negativo en la dilucióninicial del ensayo (fenómeno prozona). En dichos casos dudosos, debe efectuarse elensayo con diluciones superiores, y en los casos positivos, debe determinarse el título.Enalgunos casos, la presencia de dos o más anticuerpos en el suero que reaccionan con elmismo substrato puede originar una interferencia de su detección medianteinmunofluorescencia. Esta interferencia puede impedir la detección de antitiroides u originaruna supresión si el título del anticuerpo de interferencia tiene un título superior al de antitiroides.
SIGNIFICACIÓN CLÍNICALos anticuerpos antitiroides se encuentran en pacientes con enfermedades de tiroidesautoinmunes y a veces en individuos sanos. La tabla 1 en el extremo de este documentoindica la asociación de los anticuerpos de la tiroides con el estado de la enfermedad3.
13
ImmuGlo™ TESTSYSTEM FÜRTHYREOID-ANTIKÖRPER (ATA)
Code: 1143 48 determinations
Für den Nachweis und die quantitative Bestimmung von Anti-Thyreoid-Antikörper (ATA) .
ZUSAMMENFASSUNG UND ERKLÄRUNGAutoimmunkrankheite wie Hashimoto-Thyreoiditis, autoimmune hauptsächlichhypothyreoseund Krankheit Graves, werden durch das Vorhandensein der Antikörper Thyreoglobulinund mikrosomalen Antigenen angezeigt. Thyreoglobulin ist ein großes Glucoproteid (660 kD)und dient als ein prohormone. Das mikrosomale Antigen, gekennzeichnet alsSchilddrüseperoxydase (TPO) 105kD Antigen, wird in das iodination und in die Koppelungder spezifischen tyrosines in der Produktion des Thyroxins und des triiodothyroninemiteinbezogen. Maß der Antikörper zum Thyreoglobulin und mikrosomale Antigene (TPO)sind in der Diagnose der Schilddrüsekrankheiten wichtig1-4. Die Schilddrüseantikörper könnendurch verschiedene Methoden wie indirekte Immunofluoreszenz, passives hemagglutina-tion und ELISAs gemessen werden.
TESTPRINZIPDie indirekte verwendete Immunofluoreszenzmethode, wird geduldiges Serum auf optimiertenVorbereitungen der Gewebeabschnitte ausgebrütet, um das Binden der Antikörper zumSubstrat eintreten zu lassen. Alle mögliche nicht gesprungenen Antikörper werden durchdas Ausspülen entfernt. Verklemmte Antikörper der IgG Kategorie werden durch Ausbrütungdes Substrates mit Fluoreszin-beschriftetem Anti-menschlichem IgG Paronym ermittelt.Reaktionen werden unter einem Fluoreszenzmikroskop beobachtet, das mit passendenFiltern ausgerüstet wird5.Das Vorhandensein der Autoantibodyreaktionen wird durch eine apfelgrüne Fluoreszenz,entweder der kollodialen oder follicular Epithelzellen gezeigt.
PRODUKTINFORMATIONL
agerung und HandhabungAlle Reagenzien sind bei 2-8°C zu lagern. Die Reagenzien sind gebrauchsfertig, nachdemsie auf Raumtemperatur gebracht wurden.
In der Testpackung vorhandenes Material
Code: 1143 48 determinations
8 x SORB SLD 6 Objektträger zu 8 Auftragstellen, Primas-Thyreoid
1 x 0.5 ml CONTROL + ATA * ATA Positive Kontrolle, Humanserum
1 x 0.5 ml CONTROL - * Negative Kontrolle, Humanserum.
1 x 5 ml IgG-CONJ FITC * FITC-Konjugat, Anti-Human-IgG. Lichtgeschütztaufbewahren.
1 x 5 ml IgG-CONJ FITC EB *† FITC-Konjugat, Anti-Human-IgG mit Evans Blau.Lichtgeschützt aufbewahren.
1 x 60 ml BUF * Probendiluent.
14
2 Phiolen BUF WASH Phosphatgepuffertes Kochsalz (PBS). Inhalteines Fläschchens in 1 Liter auflösen.
1 x 5.0 ml MOUNTING MEDIUM * Eindeckmittel. Nicht einfrieren.
1 x 1.0 ml EVANS Evans Blau Färbemittel.
1 x 12 COVER SLD Deckgläschen.
* enthält < 0.1% NaN3
† Ersetzt Konjugat ohne Evans Blau Färbemittel in den Kennziffern, die “EB “ enthalten.
Zusätzlich benötigtes MaterialFluoreszenzmikroskopMikropipetten oder PasteurpipettenKolbenhubpipetteFärbetrog (z.B. nach Coplin)Kleine Reagenzröhrchen (z.B. 12x75 mm) und dazu passende GestelleDestilliertes oder entionisiertes WasserBehälter, 1 LiterPapierhandtücherFeuchte Kammer
WARNHINWEISE UND VORSICHTSMASSNAHMENNur für In-vitro-Diagnostik. Alle Bestandteile menschlichen Ursprungs wurden auf dasVorhandensein von HBsAg, Anti-HCV, Anti-HIV-1/HIV-2 und Anti-HTLV-1 mit FDA-zugelassenenTests untersucht und für negativ befunden. Alle Humanseren und Produkte menschlichenUrsprungs sollten ungeachtet ihrer Herkunft als potentiell gefährlich gehandhabt werden.Diese Materialien und ihre Behältnisse sind nach geltenden Vorschriften und Richtlinien zulagern und zu beseitigen22.ACHTUNG - Natriumazid (NaN3) kann mit Kupfer und Blei in Leitungen und Lötstellen unterBildung hochexplosiver Metallazide reagieren. Um eine Bildung solcher Metallazide zuvermeiden, müssen Ausgüsse nach dem Ausgießen azidhaltiger Lösungen mit reichlichWasser gespült werden. Natriumazid kann beim Verschlucken giftig sein. Fälle vonVerschlucken sofort dem Laborleiter oder der Giftzentrale melden.Um die Zuverlässigkeit der Ergebnisse zu gewährleisten, ist das Testprotokoll unbedingteinzuhalten. Falls Kitreagenzien ersetzt werden müssen, sollten nur Artikel von IMMCO dergleichen Artikelnummer verwendet werden. Keine verfallenen Reagenzien verwenden.
PROBENGEWINNUNG UND HANDHABUNGBei diesem Verfahren sollte nur Serum verwendet werden. Deutlich hämolytische, lipämischeoder mikrobiell kontaminierte Proben können die Leistung dieses Tests beeinträchtigen undsollten daher nicht verwendet werden. Proben sollten nicht länger als eine Woche bei 2-8 °Cgelagert werden. Bei längerer Lagerung sollten sie bei -20°C eingefroren werden.Wiederholtes Einfrieren und Auftauen vermeiden.
TESTDURCHFÜHRUNG
Testmethode
A. Screening
1. Jedes Patientenserum mit dem Probendiluent aus dem Kit 1:10 (10 µl Serum + 90 µlDiluent) verdünnen. Die positiven und negativen Kontrollen nicht verdünnen. Dieunverdünnten Nativseren aufbewahren, um bei positivem Suchtestergebnisgegebenenfalls den Antikörpertiter bestimmen zu können.
2. Beutel mit den beschichteten Objektträgern auf Raumtemperatur bringen (10-15 Minuten).Objektträger vorsichtig entnehmen, ohne die Beschichtung zu berühren.
15
3. Objektträger beschriften und, um ein Austrocknen der Beschichtung zu verhindern, ineine feuchte Kammer legen.
4. Von den Tropffläschchen mit der Negativen und Positiven Kontrolle jeweils 1 Tropfen(etwa 50 ml) auf die Auftragstellen #1 bzw. #2 ausdrücken. Auftragstellen nicht überfüllen.
5. Mit einer Mikro- oder Pasteurpipette 1 Tropfen verdünntes Patientenserum (etwa 50 µl)auf die weiteren Auftragstellen geben. Auftragstellen nicht überfüllen.
6. Die Objektträger in der abgedeckten feuchten Kammer 30 Minuten bei Raumtemperaturinkubieren.
7. Jeweils einen Objektträger aus der feuchten Kammer nehmen. Am beschrifteten Endeanfassen und sorgfältig mit ca. 10 ml PBS aus einer Pipette spülen; alternativ Objektträgerin einem Becher mit PBS spülen. Keine Spritzflasche verwenden. Objektträger sofort ineinen Färbetrog mit PBS für 10 Minuten stellen. Mit den anderen Objektträgern ebensoverfahren.
8. Objektträger einzeln aus dem Färbetrog nehmen. Längsseite des Objektträgers gegen einPapiertuch halten, um Überschuß an PBS zu entfernen. Objektträger in die feuchte Kammerlegen und sofort vom Tropffläschchen mit Konjugat 1 Tropfen (ca. 50 µl) auf jedeAuftragstelle ausdrücken.
9. Die Schritte 7 und 8 mit jedem Objektträger einzeln durchführen.10. Feuchte Kammer abdecken und Objektträger 30 Minuten bei Raumtemperatur inkubieren.11. Jeweils einen Objektträger aus der feuchten Kammer nehmen. Am beschrifteten Ende
anfassen und in einen Becher mit PBS eintauchen, um Überschuß an Konjugat zuentfernen. Objektträger 10 Minuten in einen Färbetrog mit PBS stellen. Falls Gegenfärbunggewünscht ist, können 2-3 Tropfen Evans Blau Färbemittel pro Trog hinzugefügt werden.Mit den anderen Objektträgern ebenso verfahren. HINWEIS: Unsachgemäßes Waschenkann die Morphologie der neutrophilen Zellen beeinträchtigen und eine erhöhteHintergrundfluoreszenz bewirken.
12. Objektträger einzeln aus dem Färbetrog nehmen. Längsseite des Objektträgers gegenein Papiertuch halten, um Überschuß an PBS zu entfernen. Um ein Austrocknen derBeschichtung zu vermeiden, sofort mit Schritt 13 fortfahren.
13. 3 Tropfen des Eindeckmittels sorgfältig auf Deckgläschen gleichmäßig geben und einDeckgläschen auflegen. Leicht andrücken und seitliche Bewegung desDeckgläschens vermeiden.
14. Die Schritte 12 und 13 mit jedem Objektträger einzeln durchführen.15. Auf spezifische Fluoreszenz hin unter einem Fluoreszenzmikroskop bei mindestens
200facher Vergrößerung auswerten.
Die Objektträger können sofort nachdem sie angefertigt wurden ausgewertet werden. Weildas Eindeckmittel einen Stoff enthält, der einem Ausbleichen entgegenwirkt, können dieObjektträger jedoch bis 48 Std. später ausgewertet werden, ohne daß die Intensität derFluoreszenz signifikant abklingt. Die Objektträger sollten im Dunkeln bei 2-8°C gelagert werden.
B. TiterbestimmungBei einem im Suchtest positiven Serum kann nach Durchführung der Schritte 5 bis 13 derTiter bestimmt werden. Zu diesem Zweck ist ausgehend von einer 1:10-Verdünnung eineReihenverdünnung zu erstellen.Bei jedem Testlauf sollten die positive und negative Kontrolle mitgeführt werden. Der Titerergibt sich aus dem reziproken Wert der höchsten Verdünnung, die ein positives Ergebniszeigt.
Herstellung einer ReihenverdünnungVier Röhrchen mit 1 bis 8 beschriften. Vom Probendiluent 0,9 ml in Röhrchen 1 und jeweils0,2 ml in Röhrchen 2 bis 8 geben. 0,1 ml unverdünntes Serum in Röhrchen 1 pipettieren undgründlich durchmischen. Aus Röhrchen 1 0.2 ml ins Röhrchen 2 überführen und gründlichdurchmischen. Die Verdünnungsreihe wie in der folgenden Tabelle dargestellt fortführen,indem nach Durchmischen jeweils 0,2 ml von einem Röhrchen in das nächste überführtwerden.
16
Röhrchen 1 2 3 4 5 6 7 8Serum 0.1 ml
+Probendiluent 0.9 ml 0.2 ml 0.2 ml 0.2 ml 0.2 ml 0.2 ml 0.2 ml 0.2 ml
Zu überführen 0.2 ml 0.2 ml 0.2 ml 0.2 ml 0.2 ml 0.2 ml 0.2 mlEndverdünnung 1:10 1:20 1:40 1:80 1:160 1:320 1:640 1:1280 etc.
QUALITÄTSKONTROLLEBei jedem Testlauf sollten sowohl eine positive wie eine negative Kontrolle mitgeführt werden.Die negative Kontrolle sollte keine spezifische Fluoreszenz. Die positive Kontrolle sollte eineFluoreszenzintensität von mindestens 2+.Werden die erwarteten Ergebnisse nicht erhalten, sollte der Testlauf wiederholt werden.Sind die Ergebnisse mit den Kontrollen auch dann nicht wie erwartet, kann dies folgendeUrsachen haben:• Trübungen. Kontrolle(n) verwerfen und eine neue verwenden.• Probleme mit der Optik des Mikroskops, wie z.B.: unsachgemäße Ausrichtung, Lampe
zu alt, usw.• Objektträgerbeschichtung während Testdurchführung ausgetrocknet.
AUSWERTUNG DER ERGEBNISSEDie Resultate der Tests für Thyreoidantikörper sollten als negativ (< 10) oder Positiv mit Titergelesen werden. Gelesen für das spezifische Beflecken der kollodialen oder Epithelzellender Follikel. Viele Antikörper wie ANA und Anti-mitochondrische Antikörper (AMA) könnenauf Schilddrüse auch beobachtet werden.
GRENZEN DES VERFAHRENSIn seltenen Fällen können hochtitrige anti-Thyreoid-Seren mit der ursprünglichenSuchtestverdünnung negativ bis schwach positiv reagieren (Prozonphänomen). ImZweifelsfall sollten solche Seren mit einer höheren Verdünnung getestet und bei positivemErgebnis titriert werden.Enthält ein Patientenserum zwei oder mehrere Antikörper, die mit dem selben Substratreagieren, so kann ihr Nachweis mit der indirekten Immunfluoreszenz aufgrund von Interferenzerschwert sein. Diese Interferenz kann den Nachweis von anti-Thyreoid entweder vereitelnoder einen zu niedrigen anti-Thyreoid-Titer bewirken, falls der Titer des interferierendenAntikörpers höher ist.
KLINISCHE BEDEUTUNGAntithyreoidantikörper werden bei Patienten mit autoimmunen Thyreoid-Krankheiten undmanchmal in den gesunden Einzelpersonen gefunden. Tabelle 1 am Ende dieses Dokumenteszeigt die Verbindung der Thyreoidantikörper mit dem Krankheitzustand an3.
17
ImmuGlo™ ANALISI DELL’ANTICORPIANTI-TIROIDE (ATA)
Code: 1143 48 determinations
Dosaggio in immunofluorescenza indiretta per l’individuazione e la determinazione quantitativadegli anticorpi anti-tiroide (ATA) nel siero umano.
SUMMARY AND EXPLANATIONLe malattie autoimmuni quali il Tiroidite di Hashimoto, l’ipotiroidismo autoimmune primario e lamalattia del Grave, sono indicato dalla presenza dei autoanticorpi al tireoglobulina ed agliantigeni microsomici. tireoglobulina è una grande glicoproteina (660kD) e funzioni comeprohormone. L’antigene microsomico, identificato come antigene della perossidasi della tiroide(TPO) 105kD, è coinvolto nello iodination e nell’accoppiamento dei tyrosines specifico nellaproduzione di tirossina e del triiodothyronine.La misura dei autoanticorpi al tireoglobulina e gli antigeni microsomici (TPO) sono importantinella diagnosi delle tiroidi 1-4. Gli anticorpi della tiroide possono essere misurati con i varimetodi quali l’immunofluorescenza indiretta, il hemagglutination passivo ed i ELISAs.
PRINCIPIO DEL METODONel metodo indiretto di immunofluorescenza impiegato, il siero paziente è incubato sullepreparazioni ottimizzate delle sezioni del tessuto per permettere legarsi degli anticorpi alsubstrato. Tutti gli anticorpi non limitati sono eliminati risciacquando. Gli anticorpi rilegati delIgG sono rilevati tramite incubazione del substrato con il coniugato anti-umano fluorescina-identificato IgG. Le reazioni sono osservate sotto un microscopio di fluorescenza fornito deifiltri adatti 5.La presenza delle reazioni del autoanticorpi è dimostrata da una fluorescenza verdemela, delle cellule epiteliali coloide o follicular.
CARATTERISTICHE DEL PRODOTTO
Conservazione e preparazioneConservare tutti i reagenti a una temperatura di 2-8°C. I reagenti sono pronti per l’uso dopoaverli portati a temperatura ambiente.
Materiali forniti Code: 1143 48 determinations
8 x SORB SLD 6 Vetrini-substrato con 8 pozzetti, tiroide delprimate
1 x 0.5 ml CONTROL + ATA * Controllo positivo ATA, siero umano.
1 x 0.5 ml CONTROL - * Controllo negativo, siero umano.
1 x 5 ml IgG-CONJ FITC * Coniugato FITC anti-IgG umana. Tenere lontanodalla luce.
1 x 5 ml IgG-CONJ FITC EB *† Coniugato FITC anti-IgG umana con Evan’s Blue.Tenere lontano dalla luce.
1 x 60 ml BUF * Diluente per campioni.
2 flaconcini BUF WASH Tampone fosfato-salino (PBS). Ricostituireciascun flaconcino con 1 litro d’acqua.
1 x 5.0 ml MOUNTING MEDIUM * Tampone fosfato-salino (PBS). Ricostituireciascun flaconcino con 1 litro d’acqua
18
1 x 1.0 ml EVANS Blu di Evans.
1 x 12 COVER SLD Vetrini coprioggetto.* Contiene < 0.1% NaN
3† Sostituisce il coniugato senza Blu di Evans nei numeri di codice che contengono “EB”
Materiali necessari ma non fornitiMicroscopio a fluorescenzaMicropipetta o pipetta PasteurPipette sierologichePiastra di colorazione (ad esempio vaschetta di Coplin)Piccole provette (ad es. 13 x 75 mm) e porta provetteAcqua distillata o deionizzataContenitore da 1 litroBottiglia di lavaggioCarta assorbenteIncubatore
AVVERTENZE E PRECAUZIONIPer uso diagnostico in vitro. Il materiale di origine umana utilizzato nella preparazione deireagenti è stato controllato ed è risultato negativo ai test richiesti dalla FDA per la presenzadell’HBsAg, HCV, HIV-1 e 2 e HTLV-I. Tuttavia, maneggiare tutti i campioni di siero umano ei prodotti di origine umana come fonte potenziale di infezione, indipendentemente dalla loroorigine, seguendo le normali pratiche di laboratorio per la conservazione, la dispensazionee l’eliminazione di questi materiali22. ATTENZIONE - La sodio azide (NaN3) può dar luogo areazioni chimiche pericolose. Per lo smaltimento dei residui delle analisi attenersiscrupolosamente alle norme CDC e alle norme di legge in materia. La sodio azide è tossica,se ingerita; in questo caso, informare immediatamente il responsabile del laboratorio o uncentro per casi di avvelenamento.Al fine di assicurare risultati validi, si raccomanda di attenersi alle istruzioni riportate inquesto inserto. Non scambiare i componenti del kit se non con quelli aventi lo stesso numerodi catalogo della IMMCO. Non utilizzare oltre la data di scadenza.
PRELIEVO E PREPARAZIONE DEL CAMPIONEPer questa procedura utilizzare soltanto campioni di siero. Campioni fortemente emolizzati,lipemici o contaminati possono influenzare i risultati del test e vanno scartati. Conservare icampioni a una temperatura di 2-8°C per non oltre una settimana. Per periodi di conservazionepiù lunghi, congelare il siero a –20°C, evitando di congelare i campioni più volte.
PROCEDURA
Metodica d’analisi
A. Screening
1. Diluire ciascun siero di paziente 1:10 con il Diluente per Campioni fornito (10 µl di siero+ 90 µl di Diluente). Non diluire i Controlli Positivi o Negativi. Conservare i sieri nondiluiti per determinare i titoli anticorpali se i test di screening risultano positivi.
2. Lasciare che i sacchetti contenenti i vetrini-substrato raggiungano la temperatura ambienteper 10-15 minuti, quindi estrarre i vetrini facendo attenzione a non toccare il substrato.
3. Marcare i vetrini e porli in una camera umida.4. Capovolgere il flaconcino contagocce e versare delicatamente 1 goccia (circa 50 µl) del
Controllo Negativo nel pozzetto no. 1. Allo stesso modo versare 1 goccia del ControlloPositivo nel pozzetto no. 2. Evitando di riempire eccessivamente i pozzetti.
5. Con una micropipetta o con la pipetta Pasteur, versare 1 goccia del siero diluito delpaziente (circa 50 µl) negli altri pozzetti, evitando di riempirli eccessivamente.
6. Mettere il coperchio sulla camera umida ed incubare i vetrini per 30 minuti a temperaturaambiente.
7. Togliere un vetrino dalla camera umida. Tenendo il vetrino per l’estremità della linguetta,sciacquarlo delicatamente con circa 10 ml di PBS utilizzando una pipetta o sciacquarlo in

19
un becher pieno di PBS. Non utilizzare la bottiglia di lavaggio. Trasferire il vetrinoimmediatamente nella vaschetta di Coplin e lavare per 10 minuti. Ripetere la proceduraper tutti gli altri vetrini.
8. Togliere il/i vetrino/i dalla vaschetta di Coplin. Asciugare il bordo del vetrino su della cartaassorbente per togliere la PBS in eccesso. Porre il vetrino nella camera umida. Capovolgereimmediatamente il flaconcino contagocce del Coniugato e versarne delicatamente 1goccia (circa 50 µl) in ciascun pozzetto.
9. Ripetere i punti 7 e 8 per ciascun vetrino.10. Riporre il coperchio sulla camera umida ed incubare per 30 minuti a temperatura ambiente.11. Togliere un vetrino dalla camera umida e tenendolo per l’estremità della linguetta, immergerlo
in un becher pieno di PBS per togliere il coniugato in eccesso. Porre il/i vetrino/i in una piastradi colorazione piena di PBS per 10 minuti. Se si desidera, si possono aggiungere 2-3 goccedi Blu di Evans al lavaggio finale. Ripetere per gli altri vetrini. NOTA: Un lavaggio scorretto puòinfluenzare la morfologia dei neutrofili e causare una maggiore fluorescenza di fondo.
12. Togliere un vetrino dalla piastra di colorazione. Asciugare il bordo del vetrino su della cartaassorbente per togliere la PBS in eccesso. Per evitare che il vetrino si secchi, passareimmediatamente al punto 13 mentre è ancora bagnato.
13. Montare il vetrino coprioggetto versando delicatamente 3 goccia uniformemente di Terrenodi allestimento su vetrino coprioggetto, quindi porre il coprioggetto sul vetrino. Nonapplicare eccessiva pressione ed evitare che il coprioggetto si sposti lateralmente.
14. Ripetere i punti 12 e 13 per ciascun vetrino.15. Esaminare la fluorescenza specifica con un microscopio a fluorescenza a un
ingrandimento di almeno 200x. I vetrini si possono leggere appena vengono preparati.Tuttavia, grazie a un agente anti evanescenza presente nel liquido di montaggio, non siverifica alcuna perdita significativa di intensità di colorazione, se la lettura viene posticipatafino a 48 ore. I vetrini devono essere conservati al buio a una temperatura di 2-8°C.
B. Determinazione dell’endpoint (Titolazione)Un siero positivo al test di screening può essere ulteriormente analizzato seguendo i puntida 5 a 13 per determinarne il titolo. Ciascuna sessione analitica deve includere i ControlliPositivi e Negativi. Effettuare diluizioni seriali doppie partendo da 1:10. Il reciproco delladiluizione più elevata che produce una reazione positiva è il titolo.
Preparazione delle Diluizioni SerialiNumerare quattro provette da 1 a 8. Aggiungere 0,9 ml di Diluente per Campioni alla provetta1 e 0,2 ml alle provette da 2 a 8. Pipettare 0,1 ml di siero non diluito nella provetta 1 emescolare accuratamente. Trasferire 0,2 ml dalla provetta 1 alla provetta 2 e mescolareaccuratamente. Continuare a trasferire 0,2 ml da una provetta all’altra dopo aver mescolatoper ottenere le diluizioni indicate nella tabella seguente:
Provette 1 2 3 4 5 6 7 8Siero 0.1 ml
+Diluente tamponato 0.9 ml 0.2 ml 0.2 ml 0.2 ml 0.2 ml 0.2 ml 0.2 ml 0.2 ml
Trasferimento 0.2 ml 0.2 ml 0.2 ml 0.2 ml 0.2 ml 0.2 ml 0.2 mlDiluizione finale 1:10 1:20 1:40 1:80 1:160 1:320 1:640 1:1280 etc.
CONTROLLO DI QUALITA’Ciascuna sessione analitica deve comprendere sia un Controllo Positivo che uno Negativo.Il Controllo Negativo non deve mostrare alcuna fluorescenza specifica, mentre il ControlloPositivo deve avere un’intensità di colorazione di almeno 2+.Se non si ottengono i risultati attesi, bisognerà ripetere l’analisi. Se continuano a verificarsirisultati inadeguati con i controlli, le cause possono essere:• Torbidità. Scartare e utilizzare un altro controllo.• Problemi al sistema ottico del microscopio a fluorescenza, quali allineamento non corretto,
bulbo scaduto, ecc.• Essiccamento del vetrino durante la procedura.
20
INTERPRETAZIONE DEI RISULTATII risultati delle prove per gli anticorpi della tiroide dovrebbero essere letti come negativi (< 10)o positivo con il titolo. Colto per la macchiatura specifica delle cellule coloide o epiteliali deifollicoli. I vari anticorpi del tessuto quale ANA e gli anticorpi anti-mitocondriali (AMA) possonoanche essere osservati sulla tiroide.
LIMITI DELLA PROCEDURAIn alcuni casi, i sieri ATA positivi possono essere o molto deboli o negativi alla diluizione inizialedi screening (fenomeno di prozona). Quando si verificano questi casi dubbi, i sieri dovrannoessere esaminati a diluizioni maggiori e, se positivi, dovranno essere determinati i titoli anticorpali.In alcuni casi la presenza in un siero di due o più anticorpi reattivi con lo stesso substrato puòcausare un’interferenza nella loro individuazione mediante immunofluorescenza. Taleinterferenza può provocare il mancato rilevamento degli ATA o la soppressione del loro titolose gli anticorpi che interferiscono hanno un titolo maggiore degli ATA.
IMPORTANZA CLINICAGli anticorpi di antitiroide sono trovati in pazienti con le tiroidi autoimmuni ed a volte inindividui in buona salute. La tabella 1 all’estremità di questo documento indica chel’associazione degli anticorpi della tiroide con la malattia dichiara3.
21
ImmuGlo™ TESTE DE ANTICORPOSANTI-THYROID (ATA)
Code: 1143 48 determinations
Teste de anticorpos de imunofluorescência indirecta para a detecção e quantificação deanticorpos anti-tiroide (ATA) no soro humano.
RESUMO E EXPLICAÇÃOAs doenças autoimune tais como o thyroditis de Hashimoto, o hypothyroidism autoimunepreliminar e a doença de Grave, são indicado pela presença dos autoanticorpos ao thyro-globulin e aos antígenos microsomal. Thyroglobulin é um glycoprotein grande (660 kD) efunções como um prohormone. O antígeno microsomal, identificado como o antígeno doperoxidase do thyroid (TPO) 105 kD, é envolvido no iodination e no acoplamento de ty-rosines homogeneos específicos na produção do thyroxine e do triiodothyronine. A medidados autoanticorpos ao thyroglobulin e os antígenos microsomal são importantes no diagnósticode doenças de thyroid 1-4. Os anticorpos do thyroid podem ser medidos por vários métodostais como o imunofluorescencia indireto, o hemagglutination passivo, e os ELISAs.
PRINCÍPIOS DO MÉTODONo método indireto do imunofluorescencia usado, o soro paciente unido em preparações deseções do tecido para permitir ligar dos anticorpos à carcaça. Todos os anticorpos nãolimitados são removidos enxaguando. Os anticorpos encadernados da classe IgG sãodetectados pelo incubação da carcaça com o conjugado anti-humano fluorescein-etiquetadode IgG. As reações são observadas sob um microscópio do fluorescencia equipado com osfiltros apropriados.A presença de reações do autoanticorpos é demonstrada por um fluorescencia verdemaçã, das pilhas epithelial colóides ou follicular.
INFORMAÇÃO SOBRE O PRODUTO
Armazenamento e preparaçãoGuardar todos os reagentes a 2-8ºC. Os reagentes estão prontos a usar apósficarem à temperatura ambiente.
Material fornecido
Code: 1143 48 determinations
8 x SORB SLD 6 Lâminas de substrato de 8 poços, thyroid doprimata
1 x 0.5 ml CONTROL + ANA * Controlo positivo ATA, soro humano
1 x 0.5 ml CONTROL - * Controlo negativo, soro humano.
1 x 5 ml IgG-CONJ FITC * Conjugado ITCF IgG anti-humano. Proteger da luz.
1 x 5 ml IgG-CONJ FITC EB *† Conjugado ITCF IgG anti-humano com Evan’sBlue. Proteger da luz.
1 x 60 ml BUF * Diluente de amostras.
2 frascos BUF WASH Tampão fosfato alcalino (PBS). Dissolver cadafrasco num litro.
22
1 x 5.0 ml MOUNTING MEDIUM * Meio de suporte. Não congelar.
1 x 1.0 ml EVANS Contra corante Azul de Evans.
1 x 12 COVER SLD Tampas.
* Contem < 0.1% NaN3
† Os laços do representante Conjugado sem Azul de Evans em jogo números com “EB”
Material necessário mas não fornecidoMicroscópio de fluorescênciaMicropipeta ou pipeta PasteurPipetas serológicasPrato de coloração (ex: Coplin)Tubos pequenos (ex: 13 x 75 mm) e suportes de tubosÁgua destilada ou desionizadaContentor de 1 litroGarrafa de lavagemToalhetesCâmara de incubação
AVISOS E PRECAUÇÕESPara o diagnóstico in vitro. Todos os componentes derivados dos humanos utilizados foramtestados para HbsAg, VHC, HIV-1 e 2 e HTLV-I e deram negativos nos testes FDA. Todos osespécimens de soro humano e produtos derivados dos humanos devem ser tratados comosendo potencialmente perigosos, independentemente da sua origem. Devem-se respistar asboas prácticas laboratoriais na armazenagem, distribuíção e manuseamento destes materiais22.AVISO: A azida sódica (NaN3) pode reagir com as canalizações de cobre ou chumbo eformar azidas metálicas altamente explosivas. Quando eliminar os líquidos deve deitargrandes quantidades de água para evitar a formação de tais azidas. A azida sódica podeser tóxica se ingerida. Se ingerida, contacte imediatamente o director de laboratório ou umcentro de envenenamento.As instruções devem ser seguidas à risca de forma a assegurar resultados válidos. Nãotrocar componentes dos kits com outros de outras origens. Todos devem ser do mesmo nºda IMMCO. Não utilizar se estiverem fora do prazo.
RECOLHA DE AMOSTRAS E PREPARAÇÃOSó os espécimens séricos devem ser utilizados para este teste. Os espéciemens hemolizados,lipémicos ou contaminados microbianamente podem interferir com a performance do teste enão devem ser usados. Armazenar a 2-8ºC durante apenas uma semana. Paraarmazenamento mais longo devem ser congelados a –20ºC. Evitar repetidas congelações edescongelações.
MODO OPERATÓRIO
Método do testeA. Despistagem1. Diluir cada soro 1:10 com o Diluente de amostras fornecido (10 µl soro + 90 µl Diluente).
Não diluir os Controlos Negativo e Positivo. Guardar o soro não diluído para determinara titulação de anticorpos, se os testes de despistagem forem positivos.
2. Deixar as bolsas com as lâminas de substrato à temperatura ambiente 10-15 minutos.Retirar as lâminas sem tocar no substrato.
3. Etiquetar as lâminas e colocar na incubadora com toalhetes húmidos para não secarem.
4. Inverter o frasco conta-gotas e apertar para aplicar 1 gota (cerca de 50 µl) de Controlonegativo no poço #1. Coloque 1 gota de Controlo Positivo no poço #2. Não encherdemais.
5. Com uma micropipeta ou pipeta Pasteur, colocar 1 gota do soro diluído do paciente(cerca de 50 µl) nos outros poços. Evite encher demais os poços.

23
6. Colocar a tampa na incubadora e incubar 30 minutos à temperatura ambiente.
7. Retirar a lâmina da incubadora. Segurar pela extremidade e lavar com 10 ml de PBS comuma pipeta, ou lavar com recipiente cheio de PBS. Não usar a garrafa de lavagem.Colocar a lâmina no recipiente Coplin e lavar 10 minutos. Repetir a operação para todasas lâminas.
8. Retirar a lâmina do recipiente Coplin. Limpar as extremidades da lâmina num toalhete pararetirar o excesso do PBS. Colocar a lâmina na incubadora. Inverter imediatamente o frascoconta-gotas do Conjugado e deitar 1 gota (cerca de 50 µl) em cada poço.
9. Repetir passos 7 e 8 para cada lâmina.
10. Colocar a tampa da incubadora. Incubar 30 minutos à temperatura ambiente.
11. Retirar uma lâmina da incubadora. Segurar na lâmina e mergulhá-la num recipiente comPBS para remover o excesso de conjugado. Colocar a lâmina num disco de coloraçãocom PBS durante 10 minutos. Pode colocar 2-3 gotas de contracorante azul de Evans àlavagem final. NOTA: Uma lavagem deficiente pode alterar a morfologia dos neutrófilose levar a um aumento da fluorescência.
12. Retirar a lâmina do prato de coloração. Limpar o excesso de PBS. Para evitar que alâmina seque deve passar para o ponto 13 enquanto a lâmina ainda está molhada.
13. Colocar a tampa e aplicar 3 gota de Meio de Suporte uniformente em tampas e colocara tampa. Não faça muita pressão e evite deslizamento lateral da tampa.
14. Repetir passos 12 e 13
15. Examinar a fluorescência específica com microscópis fluorescente com aumento de200x ou mais.
As lâminas devem ser lidas quando estão prontas. Contudo, devido à presença de umagente anti-desaparecimento no meio de suporte, não há perdas significativas de intensidadede coloração, se a leitura for adiada até 48 horas. As lâminas devem ser guardadas àsescuras a 2-8ºC.
B. Determinação (titulação)Um soro positivo na despistagem pode ser ainda mais testado com os passos 5 ao 13. Paradeterminara a titulação. Cada teste deve incluir os Controlos Positivo e Negativo. Fazerduas diluíções começando com 1:10. O recíproco da diluíção mais elevada a produzir umareacção positiva é a titulação.
Preparação de diluíções em sérieNumerar 4 tubos de 1 a 8. Juntar 0,9 ml de diluente ao tubo 1 e 0,2 ml aos tubos 2 a 8. Pipetar0,1 ml de soro não diluído para o tubo 1 e mexer bem. Transferir 0,2 ml do tubo 1 para o tubo2 e mexer bem. Continuar a transferir 0,2 ml de um tubo para o outro após mexer.
Tubos 1 2 3 4 5 6 7 8Soro 0.1 ml
+Diluente tamponado 0.9 ml 0.2 ml 0.2 ml 0.2 ml 0.2 ml 0.2 ml 0.2 ml 0.2 ml
Transferência 0.2 ml 0.2 ml 0.2 ml 0.2 ml 0.2 ml 0.2 ml 0.2 mlDiluíção final 1:10 1:20 1:40 1:80 1:160 1:320 1:640 1:1280 etc.
CONTROLO DA QUALIDADEO Controlo Positivo e o Negativo devem ser incluídos em cada teste. O Controlo Negativonão deve ter fluorescência específica , enquanto que o Controlo Positivo deve ter 2+ oumaior intensidade.Se não se obtiverem os resultados esperados, o teste deve ser repetido. Se resultadosinadequados continuarem a ocorrer com os controlos, pode deverse a:• Turbos. Usar outro controlo.• Problemas no sistema óptico do microscópio de fluorescência: alinhamento incorrecto,
24
lâmpada a precisar de ser mudada, etc.• Lâmina seca durante o processo.
INTERPRETAÇÃO DOS RESULTADOSOs resultados dos testes para anticorpos do thyroid devem ser lidos como negativos (< 10)ou o positivo com titulação. Lido para manchar específico das pilhas colóides ou epithelialdos follicles. Vário outros anticorpos do tecido tais como ANA, e os anticorpos anti-anti-mitochondrial (AMA) podem também ser observados no thyroid.
LIMITAÇÕES DO MODO OPERATÓRIOEm alguns casos, o soro positivo para ATA pode ser muito fraco ou negativo na diluíção inicialda despistagem (fenómeno prozona). Em casos tão duvidosos, o soro deve ser despistadocom diluíções mais elevadas e, se positivo, a titulação dos anticorpos deve ser determinada.Em certos casos a presença de dois ou mais anticorpos no soro que são reactivos com omesmo substrato, podem causar interferência na detecção por imunofluorescência. Ainterferência pode causar erro na detecção de ATA ou supressão do seu título, se o anticorpostiver um título mais elevado que o ATA.
SIGNIFICADO CLÍNICOOs anticorpos anti-thyroid são encontrados nos pacientes com doenças de thyroid autoimunee às vezes em indivíduos saudáveis. A tabela 1 na extremidade deste original indica aassociação de anticorpos do thyroid com o estado da doença3.
REFERENCES•REFERENCIAS•LITERATUR•RIFERIMENTI
1. Mooij P, Drexhage HA. Autoimmune thyroid disease. Clinics Lab Med. 13:683-697, 1993.
2. Champion BR, Cooke A, Reyner DC. Thyroid autoimmunity. Curr Opinion Immunol. 4:770-778, 1992.
3. Lindstedt G, Berg G, Jansson S, et al Clinical use of laboratory thyroid tests andinvestigations. J int Fed clin chem 6:136-141, 1994.
4. Pashke R, Vogg M, Swillens S, Usadel KH. Correlation of microsomal antibodies with theintensity of the intrathyroidal autoimmune process in Grave’s disease. J Clin endocrinolMetab. 77:939-943, 1993.
5. Beutner EH, Kumar V, Krasny SA and Chorzelski TP. Defined immunofluorescence inimmunodermatology. In “Immunopathology of the Skin”, Beutner EH, Chorzelski TP andKumar V, Eds, John Wiley and Sons, New York, 3rd Ed, 3-40, 1987.
6. Biosafety in Microbiological and Biomedical Laboratories. Centers for Disease Control,National Institutes of Health, 1988 [HHS Pub. No. (CDC) 88-8395].
25
Table 1: Significance of Thyroid Antibodies
Ab Specificity Disease Association Indications for use
Thyroglobulin 1) thyroid autoimmune diseases, 1) complement to thyroglobulin levels2) increased concentrations after 2) follow up of differentated thyroid thyroidectomy for undifferentiated carcinoma carcinoma indicates metastasis3) incorrect thyroglobulin levels.
Microsomal (TPO) Thyroid autoimmune disease 1) TSH rise of unknwon cause2) Goitre of unknown etiology3) Evaluation of suspected autoimmune polyglandular endocrine disorders.4) Familial Studies.5) Assessment of risk of thyroid dysfunction during drug treatment affecting the thyroid, and/or the immune system.6) Screening for risk of postpartum thyroiditis7) Hyperthyroidism

26
NOTES

27
NOTES
28
EU Authorized Representative/Autorisierter Repräsentant/RappresentanteAutorrizzato/Representante Autorizado/Représentant Autorisé
EMERGO Group, Inc.Molenstraat 15, 2513 BH, The Hague,
The NetherlandsTel (+31) 345 8570, Fax (+31) 346 7299
www.emergogroup.comREV.JUL2004 Document No. PI4143 CE
For technical assistance please contact:
IMMCO Diagnostics, Inc.60 Pineview DriveBuffalo, NY 14228-2120Telephone: (716) 691-0091Fax: (716) 691-0466Toll Free USA/Canada: 1-800-537-TESTE-Mail: [email protected]
or your local product distributor


![Pathology of the Thyroid - WordPress.com · 02.01.2016 · Thyroid 2015 Oct 14. [Epub ahead of print] ATA Guidelines, Thyroid 2015 Oct 14. [Epub ahead of print] ATA Guidelines, Thyroid](https://img.pdfslide.us/doc/110x75/605c59c180d6e97e9d5345f4/pathology-of-the-thyroid-02012016-thyroid-2015-oct-14-epub-ahead-of-print.jpg)