Embed Size (px)
Citation preview
Image/J – graphical userinterface improvement
Image/J – förbättring av användargränssnittet
Maja KizicMuris Borovac
Institutionen för data- och elektroteknikDepartment of electrical and computer engineeringExaminator Alois GollerCHALMERS LINDHOLMEN UNIVERSITY COLLEGEGöteborg, Sweden 2001
Examensarbete 01-41, Datateknik, 10 poäng, 2001-juni
2
Abstract
Image/J is a program aimed to study images. Its functionality differs from other pictureprograms because Image/J is not an image-making program. Image/J treats a picturescientifically, by displaying, editing, analysing, processing, saving and printing images. It canalso calculate area and pixel value statistics of user-defined selections. With Image/J one cancreate density histograms and line profile plots. However, it also supports standard imageprocessing functions such as contrast manipulation, sharpening, smoothing, edge detectionand median filtering.
The usability of Image/J is a key point of this thesis work. We have evaluated Image/Jusability issues according to principles of Human Computer Interaction (HCI), and the resultsof evaluating were used as guidelines in our work to improve Image/J’s usability.
This report illustrates how a usability testing can be applied to an image-processing program,in this case Image/J. The report also includes a description of the implementation of Image/J,the improved Graphical User Interface (GUI), and suggestions for further studies andimprovements. The whole project was performed using Rational Unified Process (RUP) asproject management guidelines.
Image/J is a program that is open for development by everyone. There is a big advantage ofthis kind of development because many people make Image/J growing fast. But it also is adisadvantage because there is no structured development of the GUI of Image/J. The result ofthis project is an improved GUI based on the results from our evaluation as well asrecommendations for further development. Some parts of our evaluation are not implementedyet. They can be used as a guideline for further development of the Image/J GUI.
3
Sammanfattning
Image/J är ett program som används för att studera bilder. Dess funktionalitet skiljer sig frånfunktionaliteten i andra bildbehandlingsprogram eftersom Image/J inte är ett program somskapar bilder. Image/J behandlar bilder på ett vetenskapligt sätt genom att editera, analysera,förändra, spara och skriva ut dem. Programmet kan också räkna ut arean och punkternasintensitet inom ett bestämt område på bilden. Med Image/J kan man skapa densitets diagramoch plotta linjernas profiler. Programmet stödjer de standardmässiga funktioner som kontrastmanipulering, skarpning av bilder, utjämning av bilder, detektering av kanter, och filtrering.
Image/J användarvänlighet är huvudämnet i detta arbete. Vi har utvärderat Image/Janvändarvänlighet enligt principer för Människa Dator Interaktionen och erhållet resultatanvändes som riktlinjer inom vår uppgift att förbättra Image/J användarvänlighet.
Rapporten illustrerar hur ett test av användarvänlighet utförs på ett bildbehandlingsprogram, idetta fall Image/J. Rapporten innehåller också en beskrivning av implementeringen avImage/J förbättrat användargränssnitt samt förslag för framtida studier och förbättringar.Genomförandet av projektet gjordes enligt Rational Unified Process (RUP),projektledningsmetod.
Image/J källkod är tillgängligt för alla och utvecklas av många personer. Det är en fördeleftersom många utvecklare gör att Image/J växer snabbt. Det finns dock en nackdel meddenna typ av utveckling eftersom något strukturerad utveckling av användargränssnittet inteexisterar. Resultat av detta projekt är ett förbättrat användargränssnitt som baseras påutvärderingsmetoder och råd inför en framtid utveckling. Vissa utvärderingsresultat är inteimplementerade och de kan användas som riktlinjer för vidareutveckling av Image/J.
Preface
This project is a bachelor thesis done at Chalmers University of Technology by Maja Kizicand Muris Borovac. The project started in March 2001 and was finished in June 2001. Theproject was initiated by our supervisor Alois Goller, and is part of a corporation betweenChalmers University College Lindholmen and the Center for Image Processing in Education(CIPE).
We would like to thank our supervisor at Chalmers, Ph.D. Alois Goller, for his commitmentand engagement during our project.
We also would like to express our gratitude towards people who helped us with the evaluationof Image/J user interface and for their valuable help and comments.
Gothenburg, June 2001-06-04
Maja Kizic and Muris Borovac
5
Table of Contents
1. Introduction..........................................................................................................61.1 About Image/J...................................................................................................................61.2 About CIPE.......................................................................................................................71.3 Task ..................................................................................................................................71.4 Work process ....................................................................................................................7
2. Usability Engineering .....................................................................................92.1 Background.......................................................................................................................92.2 Usability Inspection Methods.........................................................................................102.3 Usability Testing.............................................................................................................112.4 Image/J usability testing methods and results ................................................................12
2.4.1 Heuristic evaluation.................................................................................................122.4.2.Cognitive Walkthrough ...........................................................................................132.4.3 Paper-and-Pencil Test..............................................................................................142.4.4 Thinking Aloud........................................................................................................152.4.5 The analyses of the evaluations methods ................................................................17
2.5 Recommendation for changes in Image/J.......................................................................17All menu items are active .................................................................................................19
3. Changes in Image/J ........................................................................................213.1 Image/J code structure ....................................................................................................213.2 Result ..............................................................................................................................23
3.2.1 Visibility of the Main Window................................................................................233.2.2 Save and Save As.....................................................................................................243.2.3 Order in menu bar (Scion Image) ............................................................................243.2.4 The function zoom out in toolbar ............................................................................253.2.5 Ask for saving information when crating a new image...........................................253.2.6 Help function ...........................................................................................................25
3.3 AWT versus Swing.........................................................................................................264. Conclusions and Outlook............................................................................28References...........................................................................................................................29Appendix A........................................................................................................................30
Project Plan...........................................................................................................................30Appendix B ........................................................................................................................33
Paper and Pencil test.............................................................................................................33Thinking Aloud test ..............................................................................................................34Thinking Aloud: Comments on the test results ....................................................................36
6
1. Introduction
Many programmers concentrate rather on functionality than on the program’s usability. Onemay think that the program’s functionality is imperative. But what happens when other peopleuse the program? It is hard to guess what other people can or cannot do, so the bitter test ofany program is the usability test. It is a common occurrence that a user underestimates thewhole program because the program is not easy to use.
The key word of this thesis is usability and its application in reality. Our overall task was toevaluate usability of an image processing software (Image/J), and then to improve it.
1.1 About Image/J
Image/J is a program which purpose is to enable picture processing. There are several types ofsoftware aimed to manipulate images. Some programs are made to change an image byadding different features to it. Those programs are widely used by designers and other artists.Image/J on the other hand is a program that can by described as a tool used in scientific areas,e.g. medicine. Researchers want to measure the size of different parts and organs to makevarious conclusions. Image/J allows them to analyse their images in such a way. This is anexample of Image/J’s range of uses but it can be used in many other science fields e.g.physics.
Image/J can display, edit, analyse, process, save and print 8-bit, 16-bit and 32-bit images andcan create Stacks - series of images presented in one window. It can calculate pixels, distanceand angles, area and pixel value. Furthermore, it supports many standard image processingfunctions, including contrast enhancement, density profiling, smoothing, sharpening, edgedetection, and other filtering functions. [1]
Besides the obvious advantages with Image/J as an image processing software there is onegreat concept behind its development worth mentioning. Image/J is open source and manypeople participate in the development. Image/J was designed with an open architecture thatprovides extensibility via Java plugins. The plugins can be developed using Image/J's built ineditor and a Java compiler, which makes it possible to write code that solves almost anyimage processing or analysis problem.
The development of Image/J is orchestrated by its creator Wayne Rasband at the ResearchServices Branch, National Institute of Mental Health, Bethesda, Maryland, USA. [2]
7
1.2 About CIPE
CIPE, the Center for Processing in Education is a non-profit organization formed in 1992. Itsmission is to promote the use of visualization technologies for innovative educational, andother professional, applications. CIPE conducts workshops and develops instructionalmaterials that use image processing and Geographic Information Systems (GIS) technologiesas platforms for teaching about science, mathematics and technology. CIPE is organizationthat uses Image/J in its work to teach. Moreover, CIPE produces instructional materialsdesigned for technological education courses. [3]
1.3 Task
Our task is to evaluate and change the GUI1 of the Image/J program. The main idea behindthis project is to make Image/J easy to use. Our task is roughly divided into two parts: Thefirst part is a research and evaluation of Image/J. This part of the work covers HCI (humancomputer interaction) studies and its practice applications on our problem. Image/J isevaluated against metrics commonly used in HCI. This includes performing several tests andits results are used as a basis for further improvement of the Image/J GUI.
The second part of the project is the implementation of the changes in the program. Thisincludes analysing the source code and identifying GUI classes and afterwards changing theGUI according to the requirements of CIPE and our own findings.
The current implementation is UNIX-like with many windows floating around. CIPE asks fora more Windows-like environment. Furthermore, the menu items should be replaced toconform to other image processing software like NIH image or Scion Image.The task included one additional part. That is to implement another functionality and integrateImage/J into a multimedia HTML structure but this is out of project scope due to the timelimit.
1.4 Work process
We have chosen to use some elements of RUP (Rational Unified Process). RUP is a SoftwareEngineering Process. It provides a disciplined approach to assigning tasks and responsibilitieswithin a development organization. The Rational Unified Process is an iterative andcontrolled process. RUP is an appropriate methodology for realization of large projects but weuse somewhat simplified RUP guidelines for our project.
The project is divided in four phases. We reduced the number of iterations to one for eachphase because it was more appropriate for our ten-week project.
1. Inception PhaseThis is a first phase according to RUP and ran for two weeks. The goal of this phase is tolearn Image/J’s functions and features as well as getting all necessary information abouthuman computer interaction (HCI).
1 GUI graphical user interface
8
2. Elaboration PhaseElaboration is a three weeks long phase. During this time we did Image/J user interfaceevaluation, put together results of the evaluation and made a list for recommendedchanges in Image/J.
3. Construction PhaseDuring this phase we implemented the changes of the user interface. This was a threeweeks long phase.
4. Transition PhaseThis is the last phase of the project. Our supervisor examines the result. The final report isbeing written and we give an oral presentation. According to our project plan this phaseshould last for two weeks, but we had to extend this phase by one week because of delaysin writing the report.
The detailed description of the workflow is presented in the project plan in appendix A.
9
2. Usability Engineering
The first part of the project was evaluation of the user interface. It is done according to HCIprinciples. This chapter gives background information about HCI and evaluation methodsrelevant to this project. The findings of the evaluation are discussed and recommendations forimprovements are given.
2.1 Background
What is HCI?
“Human-computer interaction is a discipline concerned with the design, evaluation andimplementation of interactive computing systems for human use and with the study of majorphenomena surrounding them.” [4]
Computers are now part of almost every aspect of modern life, which means that many peoplewithout extensive computer knowledge are using computers. This requires systems withadvanced GUI. The link between man and computer is what HCI is about, whether onedesigns a new system or evaluates an existing one.
HCI takes some aspects of disciplines like psychology, ergonomics2, cognitive science,computer science and software engineering. In spite of its broad spreading, HCI provides withtheoretical information and a set of practical procedures. More detailed information aboutHCI can be found in [5, 6, 7].
The part of HCI that our project deals with is usability engineering. This includes differentmethods for GUI evaluation, which analyse overall systems characteristics.
The usability is measured against the following attributes (from [8], page 33):
1. Learnability: ease of learning for novice users.2. Efficiency: steady-state performance of expert users.3. Memorability: ease of using system intermittently for casual users.4. Errors: error rate for minor and catastrophic errors.5. Subjective Satisfaction: how pleasant system is to use.
The methods we used can be divided into two method groups:
1. Usability inspection - Inspection of interface design based on analysis and judgementrather than experiment
• Heuristic Evaluation: A small set of evaluators examines the user interface andjudges its compliance with recognised usability principles.
• Cognitive Walkthrough: A task-oriented walkthrough based on a formalcognitive model of user behaviour.
2 Ergonomics – the study of work and working conditions in order to improve people’s efficiency.
10
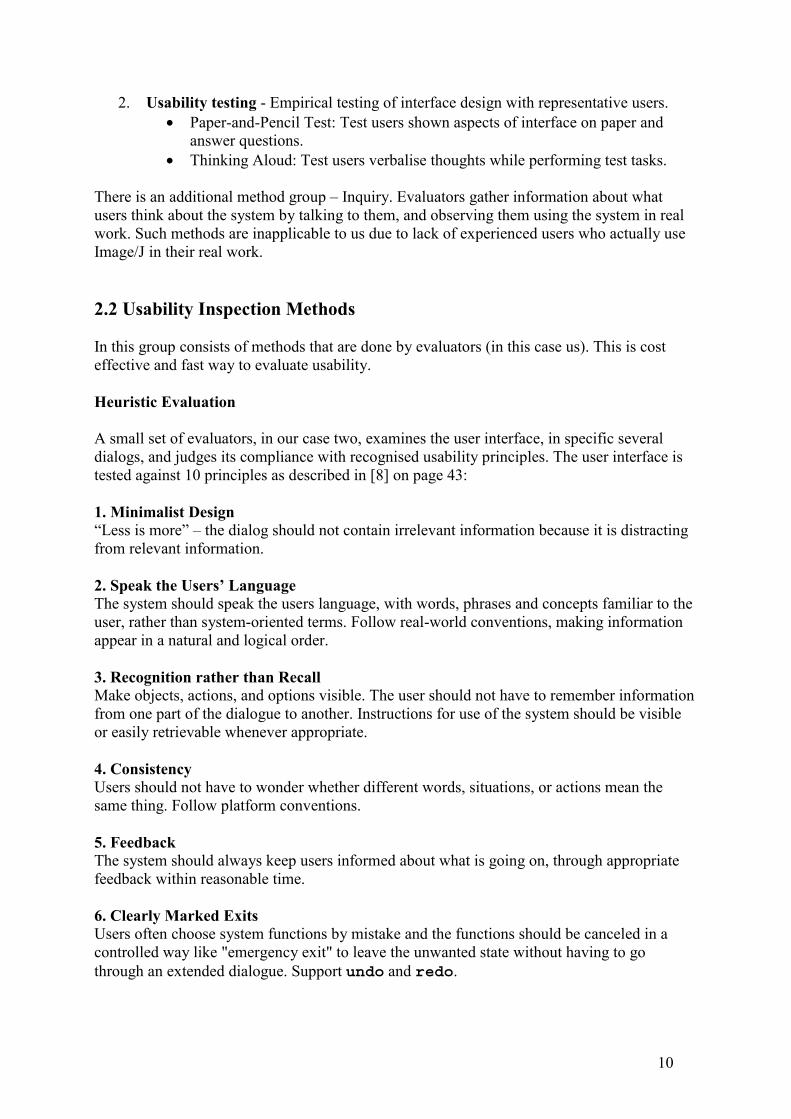
2. Usability testing - Empirical testing of interface design with representative users.• Paper-and-Pencil Test: Test users shown aspects of interface on paper and
answer questions.• Thinking Aloud: Test users verbalise thoughts while performing test tasks.
There is an additional method group – Inquiry. Evaluators gather information about whatusers think about the system by talking to them, and observing them using the system in realwork. Such methods are inapplicable to us due to lack of experienced users who actually useImage/J in their real work.
2.2 Usability Inspection Methods
In this group consists of methods that are done by evaluators (in this case us). This is costeffective and fast way to evaluate usability.
Heuristic Evaluation
A small set of evaluators, in our case two, examines the user interface, in specific severaldialogs, and judges its compliance with recognised usability principles. The user interface istested against 10 principles as described in [8] on page 43:
1. Minimalist Design“Less is more” – the dialog should not contain irrelevant information because it is distractingfrom relevant information.
2. Speak the Users’ LanguageThe system should speak the users language, with words, phrases and concepts familiar to theuser, rather than system-oriented terms. Follow real-world conventions, making informationappear in a natural and logical order.
3. Recognition rather than RecallMake objects, actions, and options visible. The user should not have to remember informationfrom one part of the dialogue to another. Instructions for use of the system should be visibleor easily retrievable whenever appropriate.
4. ConsistencyUsers should not have to wonder whether different words, situations, or actions mean thesame thing. Follow platform conventions.
5. FeedbackThe system should always keep users informed about what is going on, through appropriatefeedback within reasonable time.
6. Clearly Marked ExitsUsers often choose system functions by mistake and the functions should be canceled in acontrolled way like "emergency exit" to leave the unwanted state without having to gothrough an extended dialogue. Support undo and redo.
11
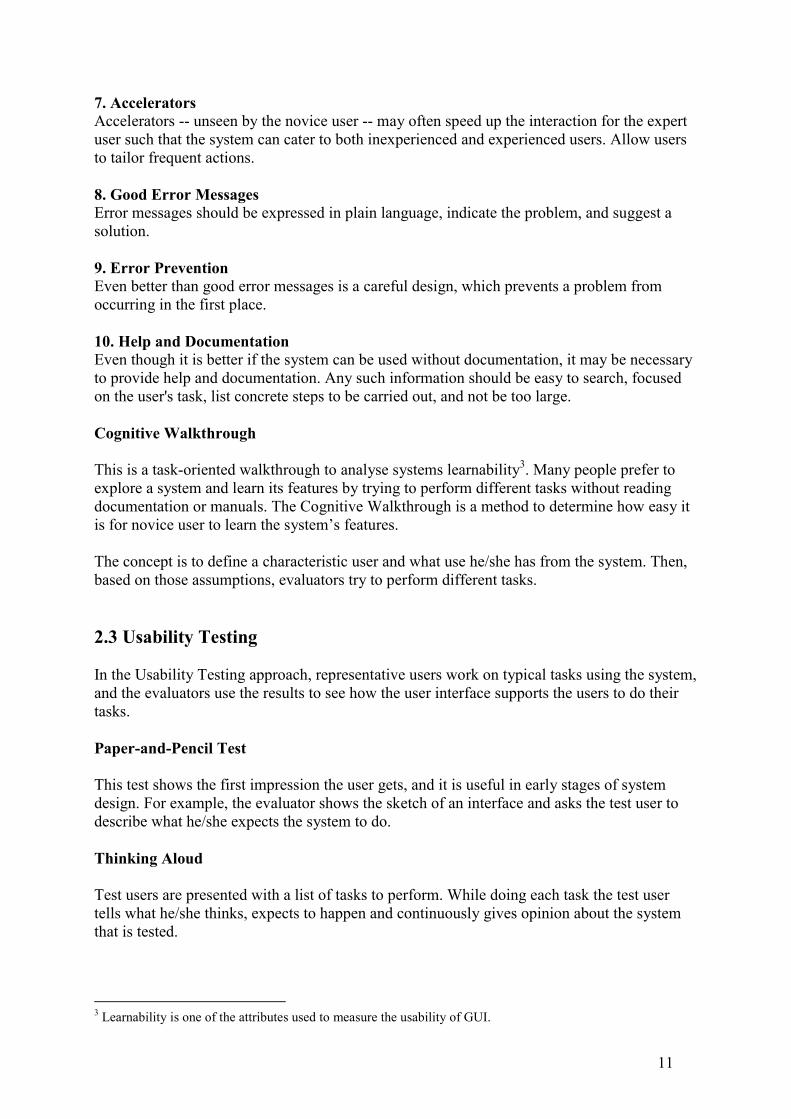
7. AcceleratorsAccelerators -- unseen by the novice user -- may often speed up the interaction for the expertuser such that the system can cater to both inexperienced and experienced users. Allow usersto tailor frequent actions.
8. Good Error MessagesError messages should be expressed in plain language, indicate the problem, and suggest asolution.
9. Error PreventionEven better than good error messages is a careful design, which prevents a problem fromoccurring in the first place.
10. Help and DocumentationEven though it is better if the system can be used without documentation, it may be necessaryto provide help and documentation. Any such information should be easy to search, focusedon the user's task, list concrete steps to be carried out, and not be too large.
Cognitive Walkthrough
This is a task-oriented walkthrough to analyse systems learnability3. Many people prefer toexplore a system and learn its features by trying to perform different tasks without readingdocumentation or manuals. The Cognitive Walkthrough is a method to determine how easy itis for novice user to learn the system’s features.
The concept is to define a characteristic user and what use he/she has from the system. Then,based on those assumptions, evaluators try to perform different tasks.
2.3 Usability Testing
In the Usability Testing approach, representative users work on typical tasks using the system,and the evaluators use the results to see how the user interface supports the users to do theirtasks.
Paper-and-Pencil Test
This test shows the first impression the user gets, and it is useful in early stages of systemdesign. For example, the evaluator shows the sketch of an interface and asks the test user todescribe what he/she expects the system to do.
Thinking Aloud
Test users are presented with a list of tasks to perform. While doing each task the test usertells what he/she thinks, expects to happen and continuously gives opinion about the systemthat is tested.
3 Learnability is one of the attributes used to measure the usability of GUI.
12
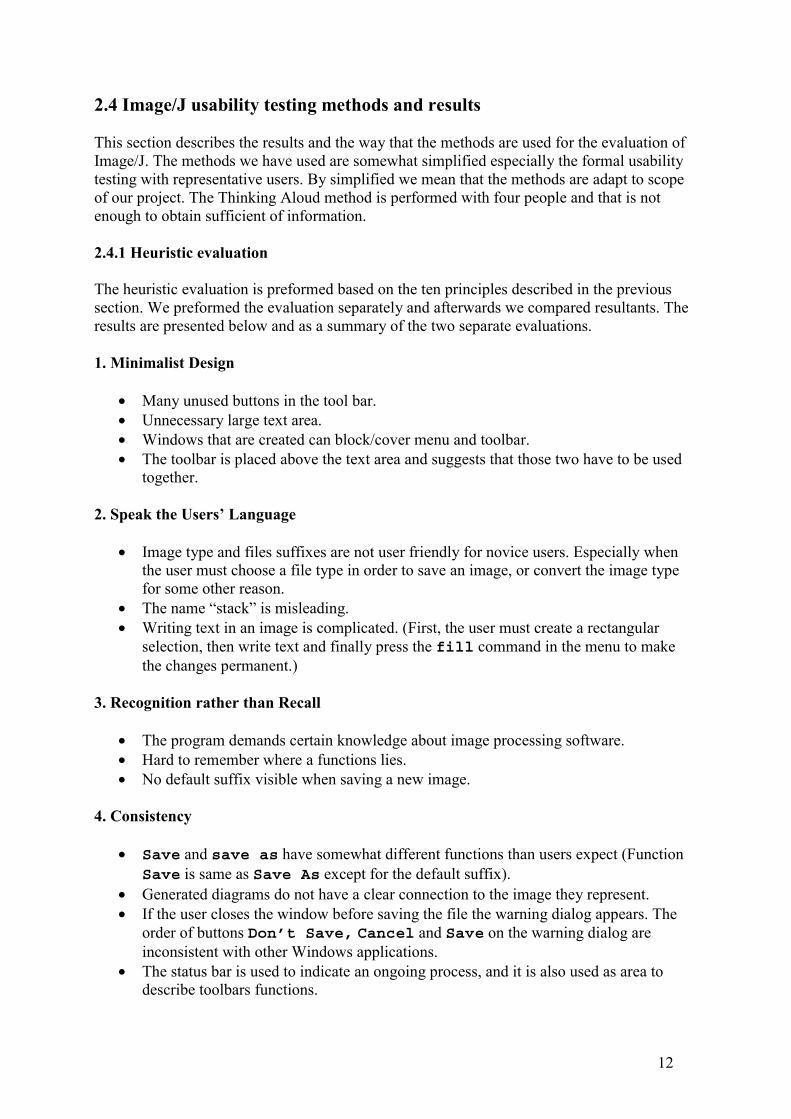
2.4 Image/J usability testing methods and results
This section describes the results and the way that the methods are used for the evaluation ofImage/J. The methods we have used are somewhat simplified especially the formal usabilitytesting with representative users. By simplified we mean that the methods are adapt to scopeof our project. The Thinking Aloud method is performed with four people and that is notenough to obtain sufficient of information.
2.4.1 Heuristic evaluation
The heuristic evaluation is preformed based on the ten principles described in the previoussection. We preformed the evaluation separately and afterwards we compared resultants. Theresults are presented below and as a summary of the two separate evaluations.
1. Minimalist Design
• Many unused buttons in the tool bar.• Unnecessary large text area.• Windows that are created can block/cover menu and toolbar.• The toolbar is placed above the text area and suggests that those two have to be used
together.
2. Speak the Users’ Language
• Image type and files suffixes are not user friendly for novice users. Especially whenthe user must choose a file type in order to save an image, or convert the image typefor some other reason.
• The name “stack” is misleading.• Writing text in an image is complicated. (First, the user must create a rectangular
selection, then write text and finally press the fill command in the menu to makethe changes permanent.)
3. Recognition rather than Recall
• The program demands certain knowledge about image processing software.• Hard to remember where a functions lies.• No default suffix visible when saving a new image.
4. Consistency
• Save and save as have somewhat different functions than users expect (FunctionSave is same as Save As except for the default suffix).
• Generated diagrams do not have a clear connection to the image they represent.• If the user closes the window before saving the file the warning dialog appears. The
order of buttons Don’t Save, Cancel and Save on the warning dialog areinconsistent with other Windows applications.
• The status bar is used to indicate an ongoing process, and it is also used as area todescribe toolbars functions.
13
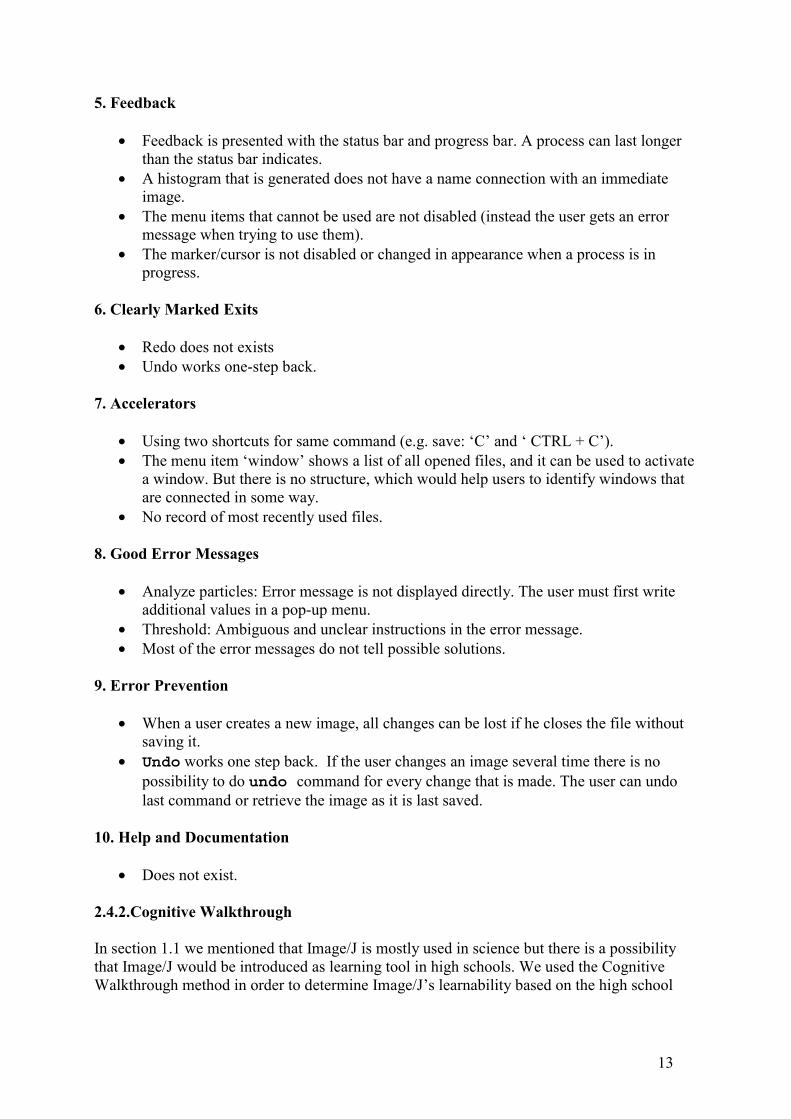
5. Feedback
• Feedback is presented with the status bar and progress bar. A process can last longerthan the status bar indicates.
• A histogram that is generated does not have a name connection with an immediateimage.
• The menu items that cannot be used are not disabled (instead the user gets an errormessage when trying to use them).
• The marker/cursor is not disabled or changed in appearance when a process is inprogress.
6. Clearly Marked Exits
• Redo does not exists• Undo works one-step back.
7. Accelerators
• Using two shortcuts for same command (e.g. save: ‘C’ and ‘ CTRL + C’).• The menu item ‘window’ shows a list of all opened files, and it can be used to activate
a window. But there is no structure, which would help users to identify windows thatare connected in some way.
• No record of most recently used files.
8. Good Error Messages
• Analyze particles: Error message is not displayed directly. The user must first writeadditional values in a pop-up menu.
• Threshold: Ambiguous and unclear instructions in the error message.• Most of the error messages do not tell possible solutions.
9. Error Prevention
• When a user creates a new image, all changes can be lost if he closes the file withoutsaving it.
• Undo works one step back. If the user changes an image several time there is nopossibility to do undo command for every change that is made. The user can undolast command or retrieve the image as it is last saved.
10. Help and Documentation
• Does not exist.
2.4.2.Cognitive Walkthrough
In section 1.1 we mentioned that Image/J is mostly used in science but there is a possibilitythat Image/J would be introduced as learning tool in high schools. We used the CognitiveWalkthrough method in order to determine Image/J’s learnability based on the high school
14
student’s point of view. We started with simple tasks like opening, saving and editing filesand later explored more complex features in Image/J.
We came to the following conclusions:1. It is hard to manage many opened files.2. The user must have knowledge about the image file format to use most of the
functions in the Image, Process and Analyze menus. This is expectable for themost advanced functions in Image/J but this is also true for the some simple functionslike Save As and New in the menu File.
3. The order of the menus in the menu bar is confusing because it was hard to findfunctionalities even though we used them before. It was hard to find well-knownfunctions like Adjust Brightness/Contrast.
4. There is possibility to create a new image, which can be edited, e.g. users can pasteimage or text into it. The problem is if one closes the image. There is no warning thatall information will be lost.
5. The user may need to open several files. The files are placed unorganised on thescreen, which decreases the usability.
As one may notice, there are not many results from the Cognitive Walkthrough method. Thisis because this method was done after Heuristic evaluation and after we had read Image/J’sdocumentation on web page. We as evaluators were influenced by the results from theprevious evaluation and were not able to detect most of the problems that a typical user might.
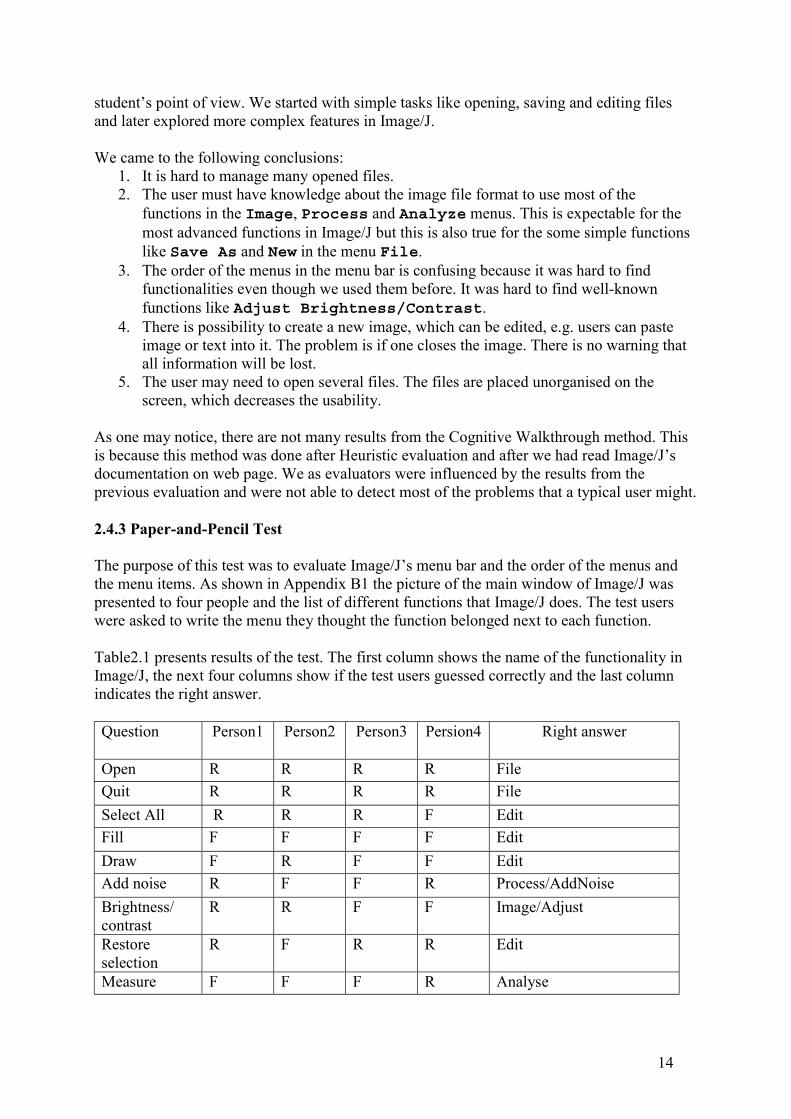
2.4.3 Paper-and-Pencil Test
The purpose of this test was to evaluate Image/J’s menu bar and the order of the menus andthe menu items. As shown in Appendix B1 the picture of the main window of Image/J waspresented to four people and the list of different functions that Image/J does. The test userswere asked to write the menu they thought the function belonged next to each function.
Table2.1 presents results of the test. The first column shows the name of the functionality inImage/J, the next four columns show if the test users guessed correctly and the last columnindicates the right answer.
Question Person1 Person2 Person3 Persion4 Right answer
Open R R R R FileQuit R R R R FileSelect All R R R F EditFill F F F F EditDraw F R F F EditAdd noise R F F R Process/AddNoiseBrightness/contrast
R R F F Image/Adjust
Restoreselection
R F R R Edit
Measure F F F R Analyse
15
Histogram R R R F AnalyseDuplicate F F R F ImageRotate R F R F ImageFind edges F F F F ProcessSave x ycoordinate
F F F F Analyze/Tools
Convolve R Missingdata
R R Process/convolve
Calibrate F R R F AnalyzeAbout ImageJ R R R R HelpShadows F F F F ProcessCompile andrun
F F R F Plugins
Math F F R F ProcessStack/addslice
F F F F Image/Stack/AddSlice
Table 2.1: Results of Paper –and-Pencil test
2.4.4 Thinking Aloud
The problems that are presented here are found during thinking aloud-test. We divided theminto two categories. The first one presents serious problems in the user interface and thesecond category are problems that are not serious but annoying. The result is presented inTable 3.2.
The tasks had different degrees of difficulty; e.g. the user was asked to open a file and tomanipulate image according to given instructions. While doing those assignments we madenotes and afterwards analysed data. A part of notes is presented in Appendix B3 - ThinkingAloud: Comments on the test results.
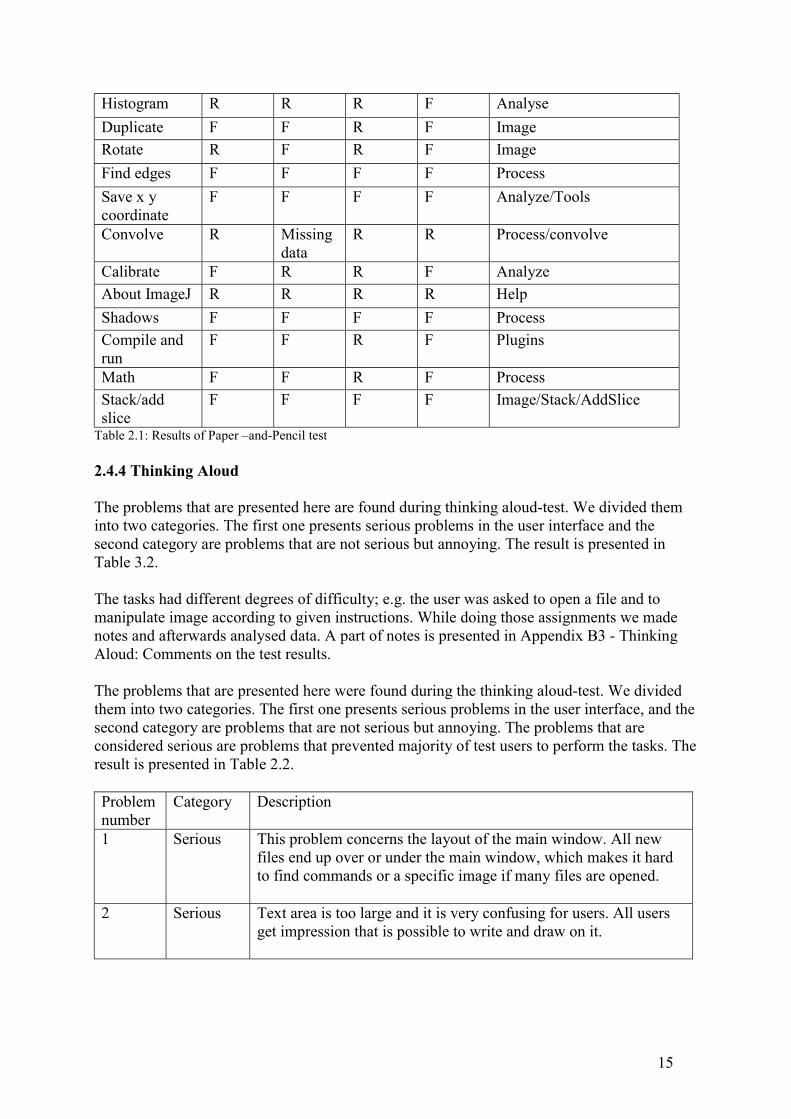
The problems that are presented here were found during the thinking aloud-test. We dividedthem into two categories. The first one presents serious problems in the user interface, and thesecond category are problems that are not serious but annoying. The problems that areconsidered serious are problems that prevented majority of test users to perform the tasks. Theresult is presented in Table 2.2.
Problemnumber
Category Description
1 Serious This problem concerns the layout of the main window. All newfiles end up over or under the main window, which makes it hardto find commands or a specific image if many files are opened.
2 Serious Text area is too large and it is very confusing for users. All usersget impression that is possible to write and draw on it.
16
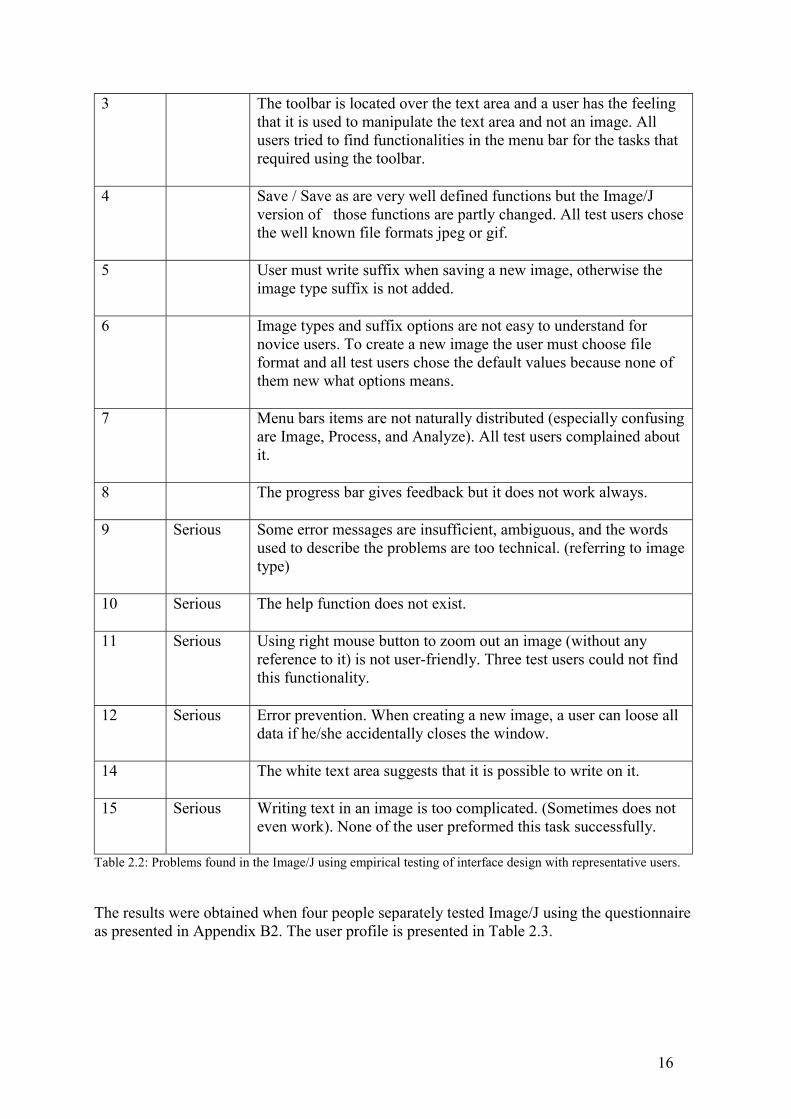
3 The toolbar is located over the text area and a user has the feelingthat it is used to manipulate the text area and not an image. Allusers tried to find functionalities in the menu bar for the tasks thatrequired using the toolbar.
4 Save / Save as are very well defined functions but the Image/Jversion of those functions are partly changed. All test users chosethe well known file formats jpeg or gif.
5 User must write suffix when saving a new image, otherwise theimage type suffix is not added.
6 Image types and suffix options are not easy to understand fornovice users. To create a new image the user must choose fileformat and all test users chose the default values because none ofthem new what options means.
7 Menu bars items are not naturally distributed (especially confusingare Image, Process, and Analyze). All test users complained aboutit.
8 The progress bar gives feedback but it does not work always.
9 Serious Some error messages are insufficient, ambiguous, and the wordsused to describe the problems are too technical. (referring to imagetype)
10 Serious The help function does not exist.
11 Serious Using right mouse button to zoom out an image (without anyreference to it) is not user-friendly. Three test users could not findthis functionality.
12 Serious Error prevention. When creating a new image, a user can loose alldata if he/she accidentally closes the window.
14 The white text area suggests that it is possible to write on it.
15 Serious Writing text in an image is too complicated. (Sometimes does noteven work). None of the user preformed this task successfully.
Table 2.2: Problems found in the Image/J using empirical testing of interface design with representative users.
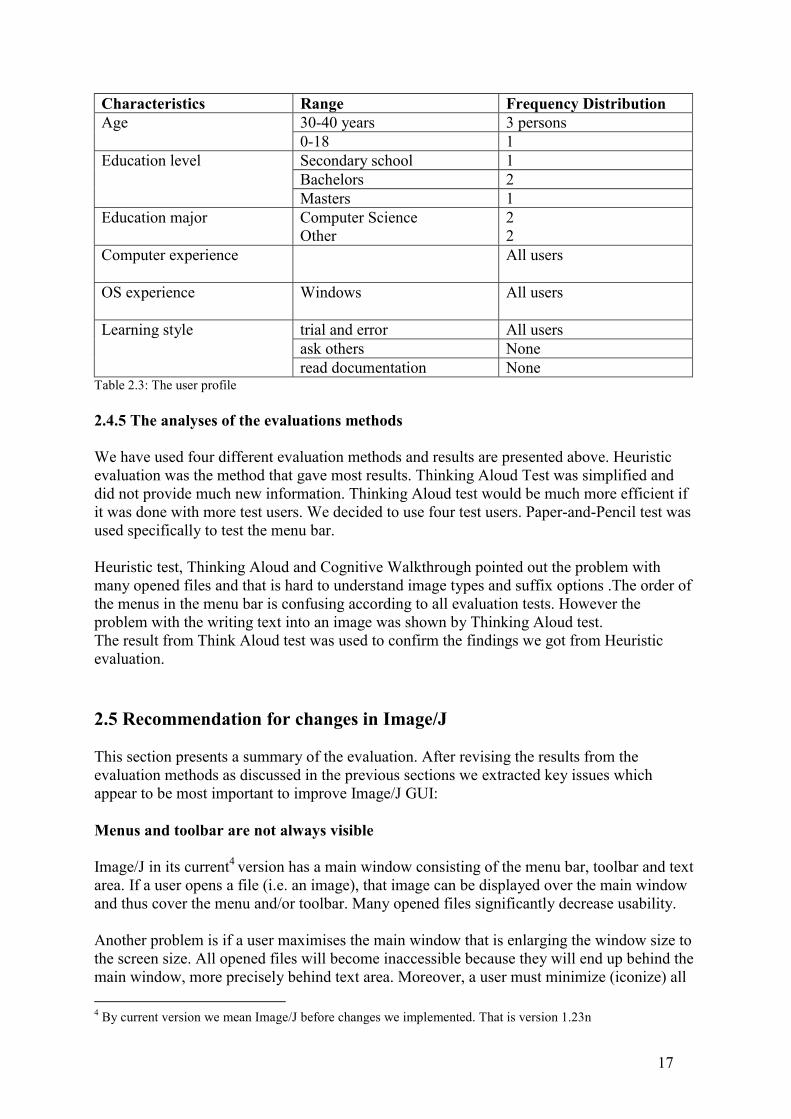
The results were obtained when four people separately tested Image/J using the questionnaireas presented in Appendix B2. The user profile is presented in Table 2.3.
17
Characteristics Range Frequency Distribution30-40 years 3 personsAge0-18 1Secondary school 1Bachelors 2
Education level
Masters 1Education major Computer Science
Other22
Computer experience All users
OS experience Windows All users
trial and error All usersask others None
Learning style
read documentation NoneTable 2.3: The user profile
2.4.5 The analyses of the evaluations methods
We have used four different evaluation methods and results are presented above. Heuristicevaluation was the method that gave most results. Thinking Aloud Test was simplified anddid not provide much new information. Thinking Aloud test would be much more efficient ifit was done with more test users. We decided to use four test users. Paper-and-Pencil test wasused specifically to test the menu bar.
Heuristic test, Thinking Aloud and Cognitive Walkthrough pointed out the problem withmany opened files and that is hard to understand image types and suffix options .The order ofthe menus in the menu bar is confusing according to all evaluation tests. However theproblem with the writing text into an image was shown by Thinking Aloud test.The result from Think Aloud test was used to confirm the findings we got from Heuristicevaluation.
2.5 Recommendation for changes in Image/J
This section presents a summary of the evaluation. After revising the results from theevaluation methods as discussed in the previous sections we extracted key issues whichappear to be most important to improve Image/J GUI:
Menus and toolbar are not always visible
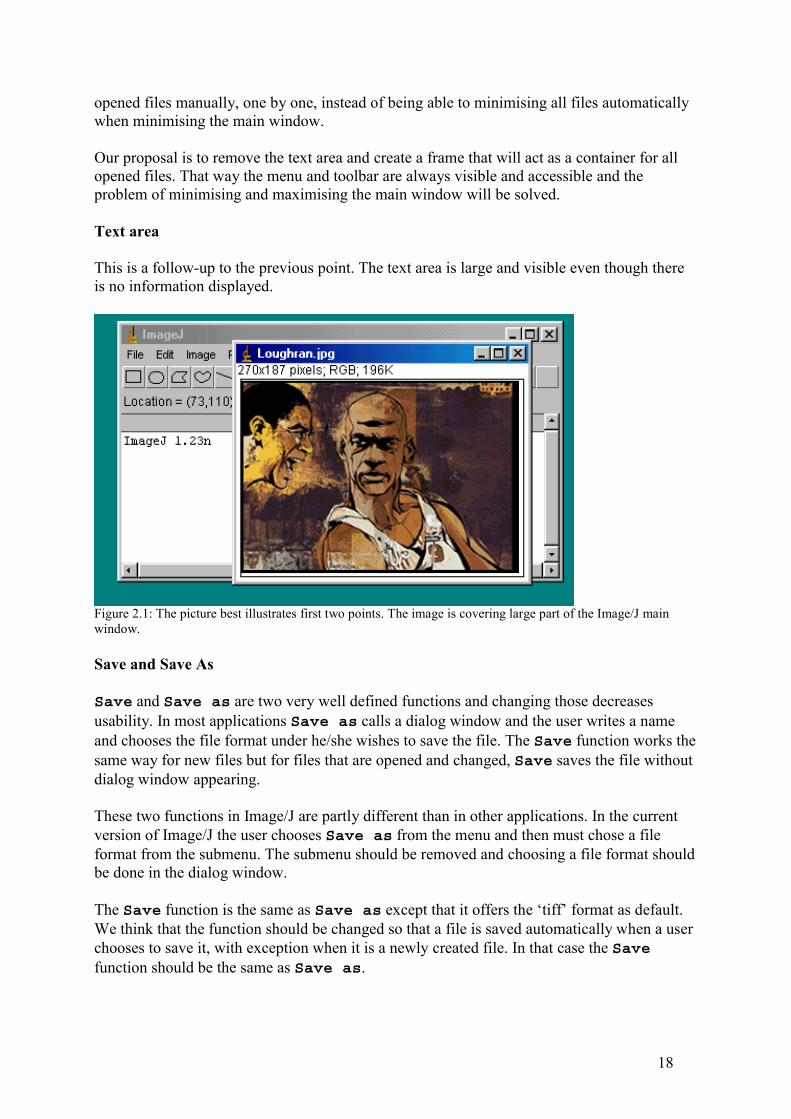
Image/J in its current4 version has a main window consisting of the menu bar, toolbar and textarea. If a user opens a file (i.e. an image), that image can be displayed over the main windowand thus cover the menu and/or toolbar. Many opened files significantly decrease usability.
Another problem is if a user maximises the main window that is enlarging the window size tothe screen size. All opened files will become inaccessible because they will end up behind themain window, more precisely behind text area. Moreover, a user must minimize (iconize) all 4 By current version we mean Image/J before changes we implemented. That is version 1.23n
18
opened files manually, one by one, instead of being able to minimising all files automaticallywhen minimising the main window.
Our proposal is to remove the text area and create a frame that will act as a container for allopened files. That way the menu and toolbar are always visible and accessible and theproblem of minimising and maximising the main window will be solved.
Text area
This is a follow-up to the previous point. The text area is large and visible even though thereis no information displayed.
Figure 2.1: The picture best illustrates first two points. The image is covering large part of the Image/J mainwindow.
Save and Save As
Save and Save as are two very well defined functions and changing those decreasesusability. In most applications Save as calls a dialog window and the user writes a nameand chooses the file format under he/she wishes to save the file. The Save function works thesame way for new files but for files that are opened and changed, Save saves the file withoutdialog window appearing.
These two functions in Image/J are partly different than in other applications. In the currentversion of Image/J the user chooses Save as from the menu and then must chose a fileformat from the submenu. The submenu should be removed and choosing a file format shouldbe done in the dialog window.
The Save function is the same as Save as except that it offers the ‘tiff’ format as default.We think that the function should be changed so that a file is saved automatically when a userchooses to save it, with exception when it is a newly created file. In that case the Savefunction should be the same as Save as.
19
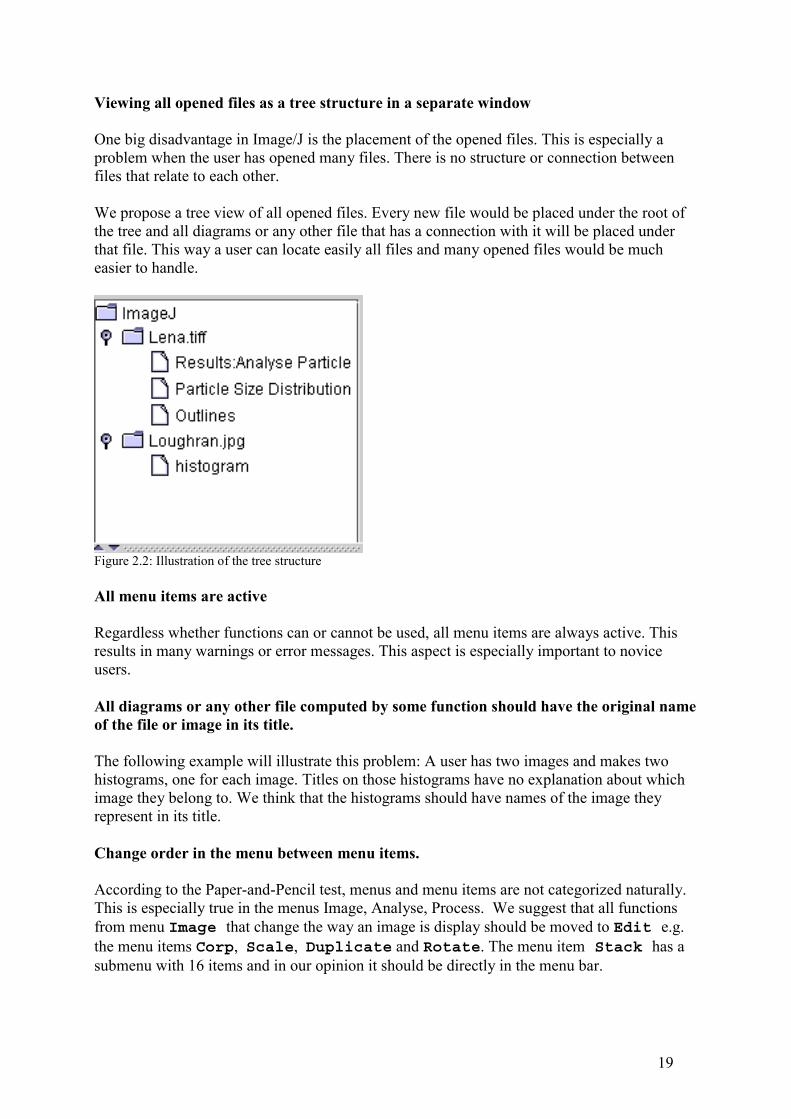
Viewing all opened files as a tree structure in a separate window
One big disadvantage in Image/J is the placement of the opened files. This is especially aproblem when the user has opened many files. There is no structure or connection betweenfiles that relate to each other.
We propose a tree view of all opened files. Every new file would be placed under the root ofthe tree and all diagrams or any other file that has a connection with it will be placed underthat file. This way a user can locate easily all files and many opened files would be mucheasier to handle.
Figure 2.2: Illustration of the tree structure
All menu items are active
Regardless whether functions can or cannot be used, all menu items are always active. Thisresults in many warnings or error messages. This aspect is especially important to noviceusers.
All diagrams or any other file computed by some function should have the original nameof the file or image in its title.
The following example will illustrate this problem: A user has two images and makes twohistograms, one for each image. Titles on those histograms have no explanation about whichimage they belong to. We think that the histograms should have names of the image theyrepresent in its title.
Change order in the menu between menu items.
According to the Paper-and-Pencil test, menus and menu items are not categorized naturally.This is especially true in the menus Image, Analyse, Process. We suggest that all functionsfrom menu Image that change the way an image is display should be moved to Edit e.g.the menu items Corp, Scale, Duplicate and Rotate. The menu item Stack has asubmenu with 16 items and in our opinion it should be directly in the menu bar.
20
The way text is written in an image.
To write text in an image the user presses the text tool from the toolbar. Then the user mustmake a selection on the image, write the text in the selected area and then use the commandfill or draw from the menu edit to make the text remain on the image.
This operation is too complicated and according to the Thinking Aloud test none of the peoplethat tested Image/J have succeeded to perform this task.
When the user makes a selection the text “Replace me” indicates that is possible to write onthe image. The findings from the Thinking Aloud test indicate that a blinking marker is bettersignal for writing.
We propose two alternatives to solve this problem.• When a user chooses the text tool, a white area would be created in the image and a
blinking marker would appear to indicate that it is possible to write. The text wouldremain on the image without using the fill command. If the user changes his/hermind, then the undo command in the menu should be used.
• The second alternative is to create a dialog window. The window has a text area that isused to write on it and two buttons, set and cancel. The text is entered on theimage after the user pushes the set button.
Add the functionality of reducing size of an image in the toolbar.
To zoom into an image a user selects the magnifying glass – tool in the toolbar and tozoom out a user must use the right mouse button. The right mouse button should be used as anaccelerator (short cut) and not as the only access to the zoom-out functionality. A button forreducing an image’s displaying size should be in the toolbar.
Write the help function
A help function does not exist. To write a complete help function is out of the scope of theproject, but we think that a link to the Image/J web page in the program can be a temporarysolution.
21
3. Changes in Image/J
This chapter describes changes we have made to Image/J. First we will discuss Image/J’s codestructure and afterwards we discus and explain our decisions. Finally, we discuss differencesbetween the AWT and Swing classes and illustrate why Image/J should be based on Swing.
3.1 Image/J code structure
This is an overview of the class structure of Image/J and most parts are taken from theImage/J’s tutorial [9]. The classes are grouped into packages and those packages are presentedhere with the classes they contain. This is not a complete documentation. Here, we onlypresent classes that are relevant to Image/J’s GUI, and that are necessary to understand thechanges we made.
Packet ij• Image/Japplet: Image/J can be run as applet or as application. This is the applet class
of Image/J. The advantage of running Image/J as applet is that it can be run (remotely)inside a browser. The biggest disadvantage is the limited access to files on theharddisk because of the Java applet security concept.
• Image/J: The main class of the Image/J application. This class contains the runmethod, which is the program’s main entry point as well as the Image/J main window.
• Executer: A class for executing menu commands in separate threads (withoutblocking the rest of the program).
• IJ: A class containing many utility methods.• ImagePlus: The representation of an image in Image/J.• ImageStack: An ImageStack is an expandable array of images.• WindowManager: This class manages the list of open windows.
Packet ij.gui• ProgressBar: A bar in the Image/J main window that informs graphically about the
progress of a running operation.• GenericDialog: A modal dialog that can be customized and called on the fly, e.g. for
getting user input before running a plugin.• NewImage: A class for creating a new image of a certain type from scratch.• Roi: A class representing a region of interest (ROI) of an image. If supported by a
plugin, it can process just the ROI and not the whole image.• ImageCanvas: A canvas derived from java.awt.Canvas on which an image is painted.• ImageWindow: A frame derived from java.awt.Frame that displays an image.• StackWindow: An ImageWindow designed for displaying stacks.• HistogramWindow: An ImageWindow designed for displaying histograms.• PlotWindow: An ImageWindow designed for displaying plots.
Packet ij.ioThis package contains classes for reading/decoding and writing/encoding image files.
22
Packet ij.measureContains classes for measurements.
Packet ij.plugin• PlugIn: This interface has to be implemented by plugins, that do not require an image
as input
Packet ij.plugin.filter• PlugInFilter: This interface has to be implemented by plugins, that require an image
as input.
Packet ij.plugin.frame• PlugInFrame: A window class that can be subclassed by a plugin.
Packet ij.process:Contains classes that process and convert images and stacs.
.Packet ij.text
This package contains classes for displaying text.
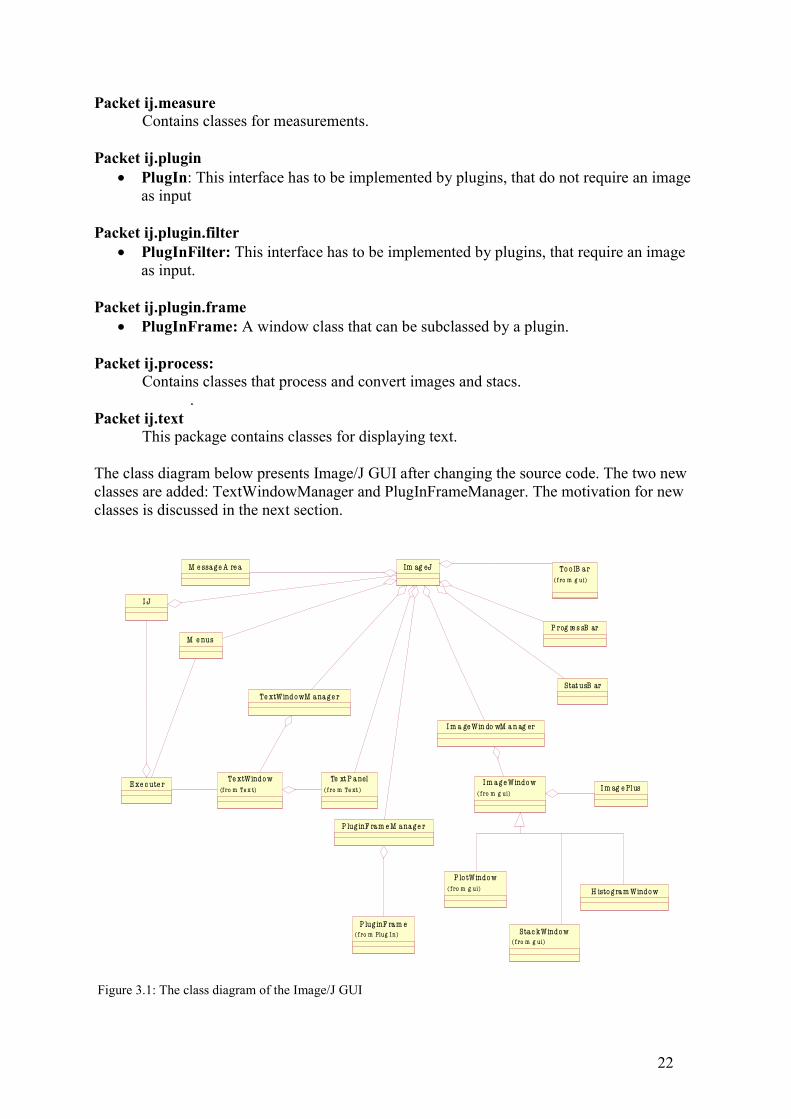
The class diagram below presents Image/J GUI after changing the source code. The two newclasses are added: TextWindowManager and PlugInFrameManager. The motivation for newclasses is discussed in the next section.
P lug inF ram e(fro m Plug In)
H isto g ram Windo w
I m ag e PlusE xe c ute r
P rog re s sB ar
M e nus
Stat usB ar
M e ssag e A re a
Te xt P anel(fro m Te xt)
I J
To o lB ar(fro m g ui)
I m a g e Windo w(fro m g ui)
I m a ge Win do wM a n ag er
P lug inF ram e M anag e r
Te xtWind o w(fro m Te x t)
Te xtWind o wM ana g e r
Stac kWindo w(fro m g ui)
P lo tWindo w(fro m g ui)
Im ag eJ
Figure 3.1: The class diagram of the Image/J GUI
23
3.2 Result
After the evaluation part of the project we decided what would be appropriate to change inImage/J due to the time limit. We decided the following to be primary tasks:
3.2.1 Visibility of the Main Window
This point is one of the major issues regarding the Image/J. As mentioned in the previouschapter, Image/J generates files presented in windows that can end up unorganised on thescreen in relation with the main window that contains the menu and the toolbar. When theuser opens a new file, e.g. an image, this file can cover the main window. There is also anopposite problem: the main window can cover an image.
Our idea was to create a main window of the screen size that would contain all othergenerated files. But this design was abandoned because of the AWT component’s nature. Amore detailed discussion about AWT components and some of our ideas that have beenabandoned comes later in this chapter.
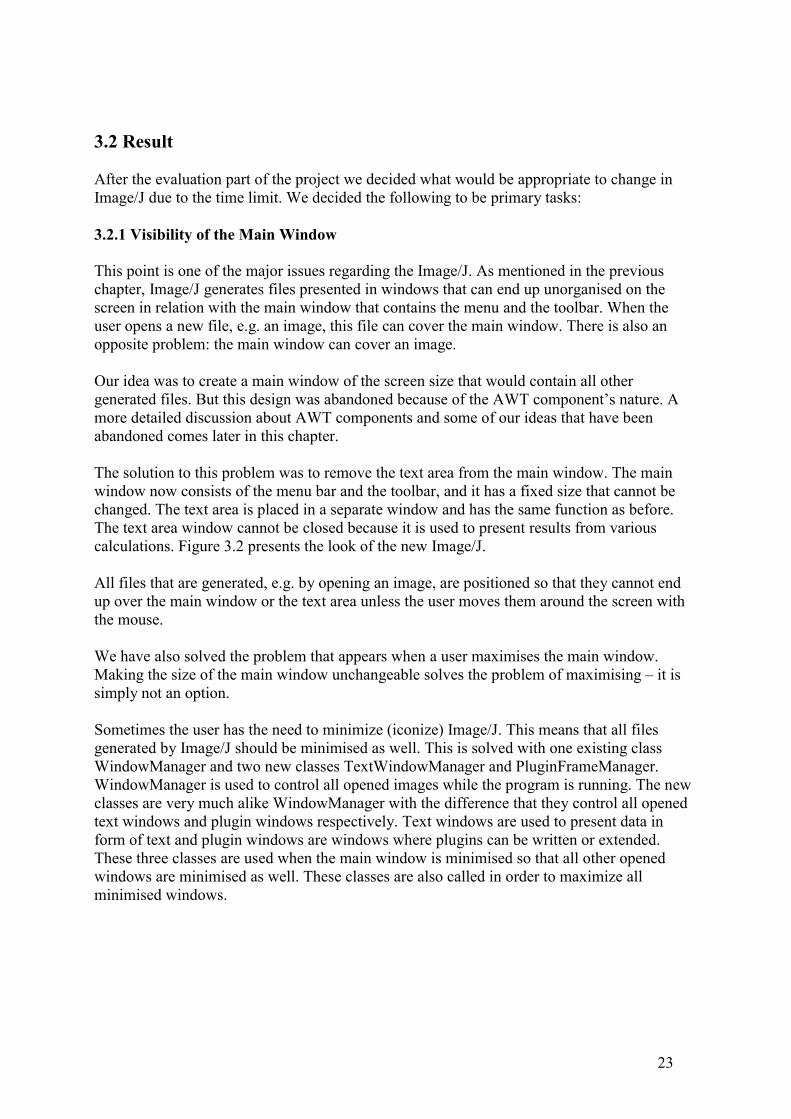
The solution to this problem was to remove the text area from the main window. The mainwindow now consists of the menu bar and the toolbar, and it has a fixed size that cannot bechanged. The text area is placed in a separate window and has the same function as before.The text area window cannot be closed because it is used to present results from variouscalculations. Figure 3.2 presents the look of the new Image/J.
All files that are generated, e.g. by opening an image, are positioned so that they cannot endup over the main window or the text area unless the user moves them around the screen withthe mouse.
We have also solved the problem that appears when a user maximises the main window.Making the size of the main window unchangeable solves the problem of maximising – it issimply not an option.
Sometimes the user has the need to minimize (iconize) Image/J. This means that all filesgenerated by Image/J should be minimised as well. This is solved with one existing classWindowManager and two new classes TextWindowManager and PluginFrameManager.WindowManager is used to control all opened images while the program is running. The newclasses are very much alike WindowManager with the difference that they control all openedtext windows and plugin windows respectively. Text windows are used to present data inform of text and plugin windows are windows where plugins can be written or extended.These three classes are used when the main window is minimised so that all other openedwindows are minimised as well. These classes are also called in order to maximize allminimised windows.
24
Figure 3.2 The new Image/J’s GUI
3.2.2 Save and Save As
When a user chooses the function the Save As a dialog window5 should appear and theuser can write a name under which he/she wishes to save the file and also choose a file type.This functionality exists in Image/J and our task was to implement a file filter so that onlyfiles types that Image/J supports are visible. However, this feature could not be implementedbecause Image/J is implemented with AWT components and the file filter does not work forthe Windows operating system. Therefore the function Save As is the same as before.
The function Save is changed as specified in the previous chapter. If the user opens a file,does some changes in the file and chooses Save, the file will be saved without dialogwindow appearing. This functionality works for tiff, jpg, gif, raw and txt files. If there isanother file format or if this is a new image or if the image was loaded using a URL, theSave function is the same as Save As.
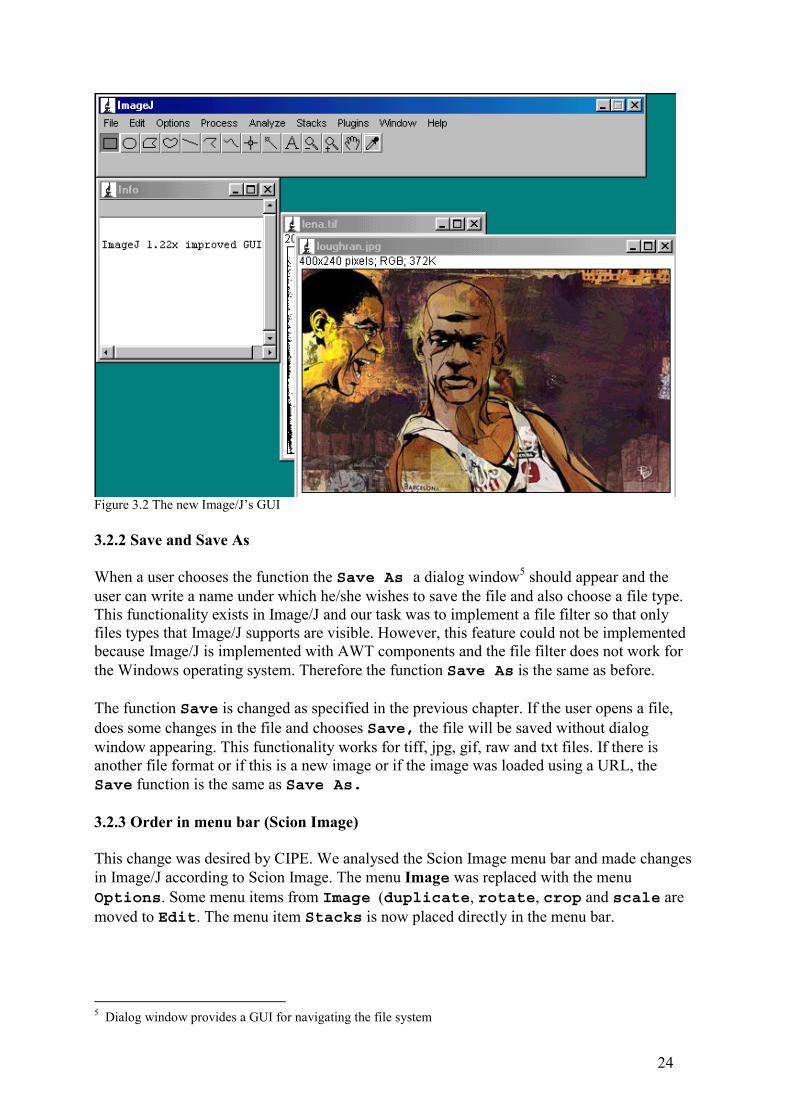
3.2.3 Order in menu bar (Scion Image)
This change was desired by CIPE. We analysed the Scion Image menu bar and made changesin Image/J according to Scion Image. The menu Image was replaced with the menuOptions. Some menu items from Image (duplicate, rotate, crop and scale aremoved to Edit. The menu item Stacks is now placed directly in the menu bar.
5 Dialog window provides a GUI for navigating the file system
25
Figure 3.3: The new menu bar
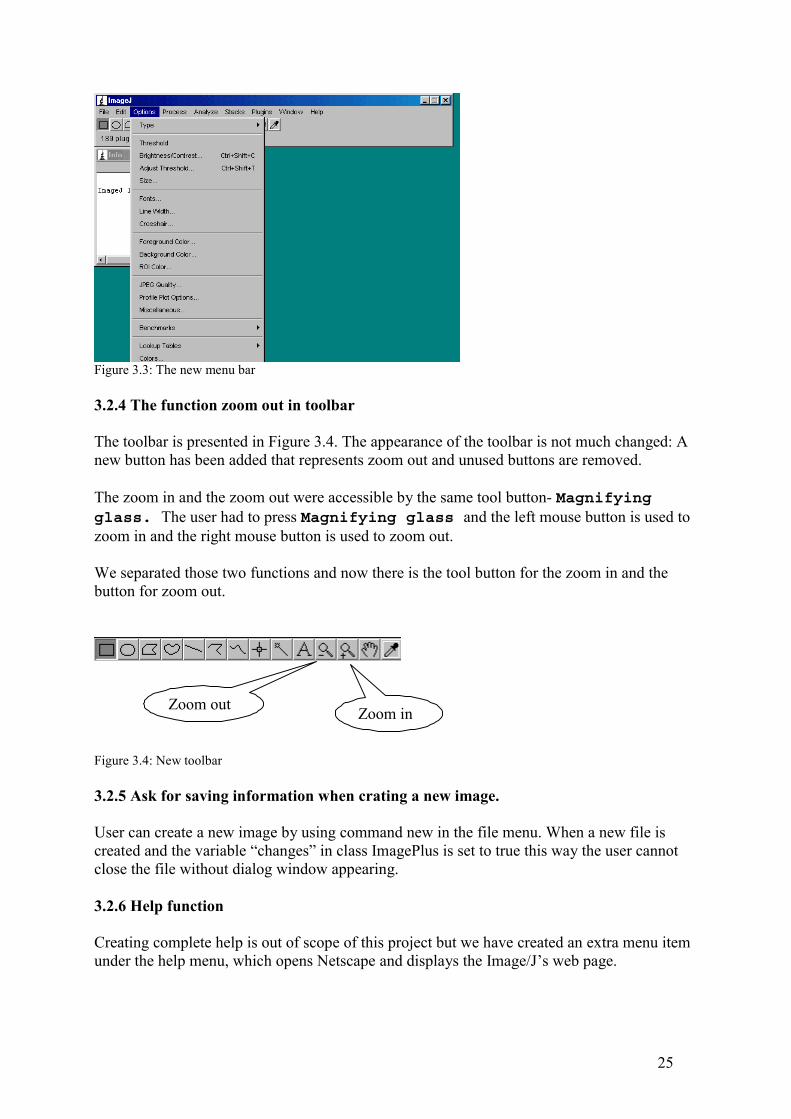
3.2.4 The function zoom out in toolbar
The toolbar is presented in Figure 3.4. The appearance of the toolbar is not much changed: Anew button has been added that represents zoom out and unused buttons are removed.
The zoom in and the zoom out were accessible by the same tool button- Magnifyingglass. The user had to press Magnifying glass and the left mouse button is used tozoom in and the right mouse button is used to zoom out.
We separated those two functions and now there is the tool button for the zoom in and thebutton for zoom out.
Figure 3.4: New toolbar
3.2.5 Ask for saving information when crating a new image.
User can create a new image by using command new in the file menu. When a new file iscreated and the variable “changes” in class ImagePlus is set to true this way the user cannotclose the file without dialog window appearing.
3.2.6 Help function
Creating complete help is out of scope of this project but we have created an extra menu itemunder the help menu, which opens Netscape and displays the Image/J’s web page.
Zoom inZoom out
26
3.3 AWT versus Swing
A comparison between AWT and Swing was not part of our thesis, but we encountered manyproblems with AWT during the implementation phase. Thus we think a comment ondifferences between AWT and Swing is in order.
AWT and Swing are components that provide many standard GUI components such asbuttons, lists, menus, and text areas, which you combine to create your program's GUI. Thebiggest difference between the AWT components and Swing components is that the Swingcomponents are implemented with absolutely no native code6 and therefore they are slower.However, Swing components have more functionality than AWT.
The Image/J GUI is implemented with AWT components. That is one major limitation inimplementing all changes in GUI according to the HCI evaluation. One option is to translateall source code to Swing, but that would be outside of the scope of this project. There wasalso a strong recommendation from the Image/J development co-ordinator Wayne Rasbandnot to move to Swing.
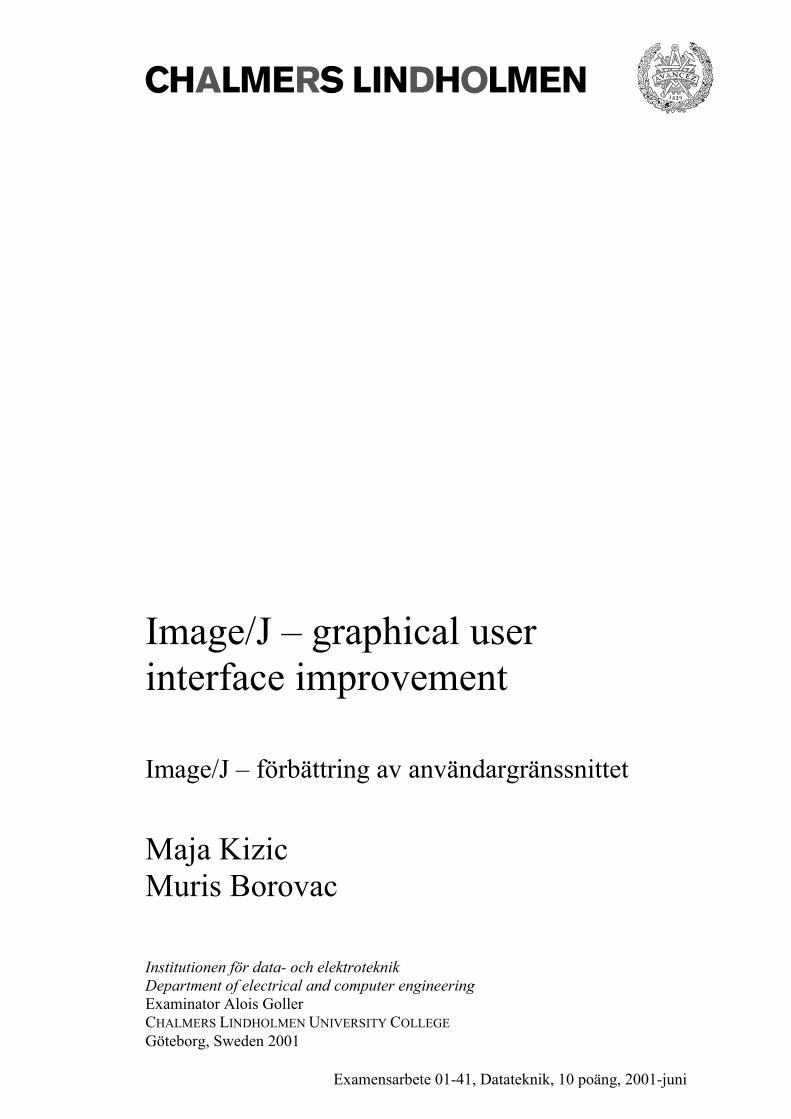
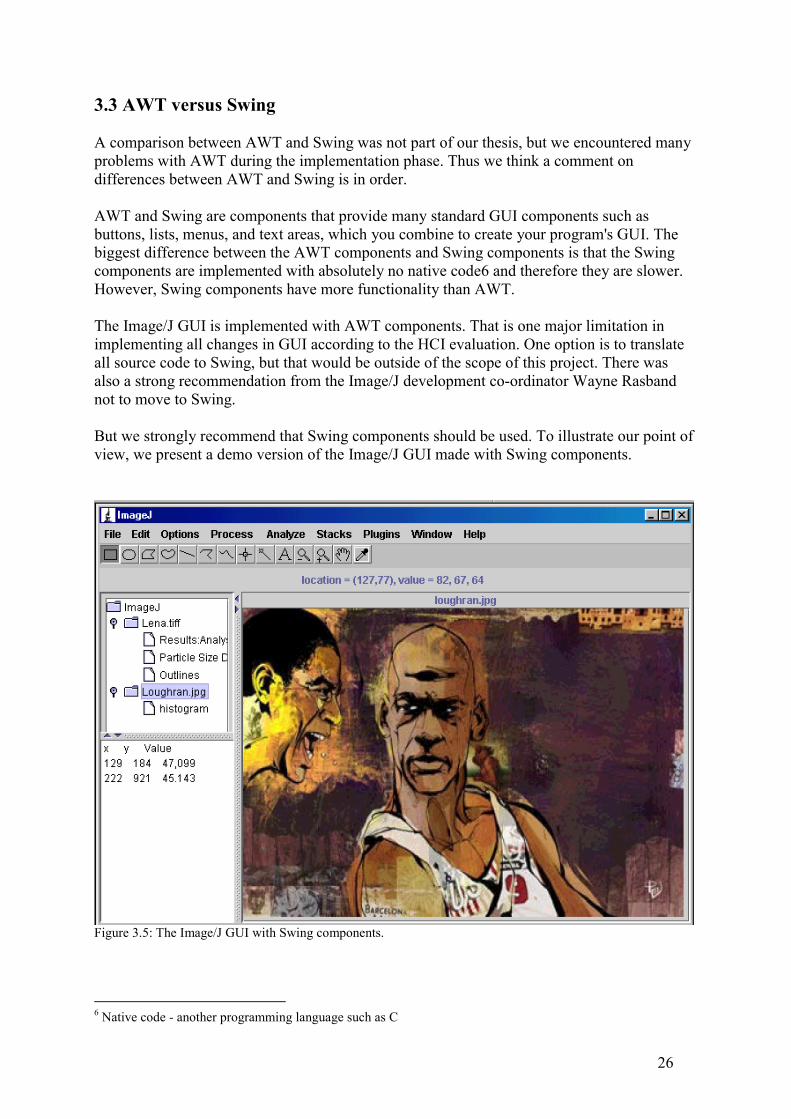
But we strongly recommend that Swing components should be used. To illustrate our point ofview, we present a demo version of the Image/J GUI made with Swing components.
Figure 3.5: The Image/J GUI with Swing components.
6 Native code - another programming language such as C

27
As Figure 3.5 shows, the window is divided into three parts. The first one has a tree structure,which is used as a file sorter. This way all opened files are easily accessible.The second part is a text area. It has mainly the same function as the text area in the currentversion of Image/J. It is used to present coordinates and other results from variouscalculations. Finally, the third part is used to present all opened images and other files.
This is only a proposal for how Image/J can look when using Swing. Swing has many othersuitable components that open many other design alternatives. Swing has multi-layercomponents that make it easier to design a GUI. They also automatically solve the problem ofminimising and maximising windows. Moreover, Swing has a file chooser class that canimplement file filter, which would solve the problem with implementing the function Saveas as discussed in section 3.2.2. For further information about Swing see [10].
28
4. Conclusions and Outlook
The usability is not just the look of the interface or selection of pretty colours; it is quality ofdialog between the user and the application.
Image/J is excellent software with many great features but the lack in the user interfacedecreases its usability.
Based on the HCI guidelines, we have used four methods to evaluate Image/J GUI. These areHeuristic evaluation, Cognitive Walkthrough, Thinking Aloud and Paper-and-Pencil test. Theresult of the evaluations has been used as foundation for recommendation for changes inImage/J. Our recommendations are:
• Menus and toolbar should always be visible.• Change the size of text area.• Implement Save and Save As in the standard way.• Change the order of the items in the menu.• Add the functionality of reducing the size of an image in the toolbar.• Write the help function.• Deactivate all menu items that cannot be used.• All diagrams or any other file computed by some function should have the
original name of the file or image in its title.• Show all opened files as a tree structure in a separate window.• Change the way text is written in an image.
We have – at least partially – implemented the first six points from the list. The rest can beused as a guideline for further improvements.
The overall usability of Image/J could be improved considerably despite the limitations wehad. The major limitation for implementation of all points listed above was time we had. Ourproject was limited to ten weeks. The second limitation was the nature of Image/J’s sourcecode. Image/J is implemented with AWT components, which restricts development of GUI.
Our recommendation is to translate all the AWT components to Swing components, which atthe same time offer more functionality. This change will accommodate the constant growth ofImage/J’s functionality.
29
References
[1] Documentation, http://rsb.info.nih.gov/ij/docs/index.html (Acc 2001-06-17)
[2] ImageJ - Image Processing and Analysis in Java, http://rsb.info.nih.gov/ij/( Acc 2001-06-26)
[3] Welcome to CIPE, http://www.evisual.org/ (Acc 2001-06-04)
[4] Curricula for Human-Computer Interaction, http://www.acm.org/sigchi/cdg/(Acc 2001-06-04)
[5] Human-Computer Interaction, http://www.hcibib.org/ (Acc 2001-06-04)
[6] Martin Helander, Thomas K. Landauer, Prasad V. Prabhu: Handbook of human-computer interaction; Elsevier Amsterdam (1997)
[7] Frank Maddix: Human-computer interaction theory and practice; Horwood New York(1990)
[8] Keith Andrews: Hunam Computer Interaction;Lecture Notes, Graz University ofTechnology, http://www2.iicm.edu/hci (Acc 2001-06-04)
[9] Bailer Werner: Writing ImageJ PlugIns – A Tutorial; Fachhochschule Hagenberg,Austria; http://www.fhs-hagenberg.ac.at/staff/burger/ImageJ/tutorial/
(Acc 2001-06-04)
[10] Creating a GUI with JFC/Swing, http://java.sun.com/docs/books/tutorial/uiswing/(Acc 2001-06-04)
30
Appendix A
Project PlanUser interface - Image/J
ObjectivesThis project is part of a cooperation between Chalmers Lindholmen and CIPE, a non-profitable organization that promotes computer-aided visualization as teaching and learningtool. One of the programs that they use is an image processing software called Image/J. Theproject’s objective is to make changes in Image/J’s user interface in order to make thesoftware more useful to CIPE.The following points are included:
• Evaluating the program against metrics commonly used in human computerinteraction (HCI)
• Studying HCI literature and code analysis• Implementation of user interface• Integrate Image/J into multimedia HTML structure.
ScopeThe project will be done in 10 weeks. It is our final thesis and must be done accordingly to theChalmers Lindholmens rules for final theses.
ReferencesThis project is done according to the Rational Unified Process standard. It is based on arequirement specification made by Alois Goller.
Phase PlanThe project is divided in following way: The first step is to analyse Image/J functions andevaluate the user interface against metrics commonly used in human computer interaction(HCI). This part also requires studying of HCI literature and documentation of many testcases. The second part includes the code analysis, and during the third part we will make thenecessary changes based on our findings. These three parts are the primary objectives of theproject.
The fourth part is to implement an additional functionality. That is to integrate Image/J into amultimedia HTML structure. The fourth part is a secondary objective and will be done if timeallows.
The work consists of four phases in accordance with RUP standard:
• Inception PhaseDuring this phase we will provide a project plan and decide what documents to write.The analysis of Image/J’s functions and features should be done as well as getting allnecessary information about human computer interaction (HCI). We will talk to oursupervisor. The milestone of this phase is to gather enough information about Image/Jand HCI in order to continue with the next phase.
31
• Elaboration PhaseThis phase consists of code analysis, user interface analysis and making decisionsregarding the design model. We will produce Rational Rose documents (use case,class diagrams, sequence diagrams). We will make a proposal for the changes inImage/J that we think are appropriate. The milestone of this phase is a complete modeldesign, which should be approved by our supervisor. We will meet with our supervisorand discus and motivate our design model.
• Construction PhaseDuring this phase we will implement the changes of the user interface. The milestoneof this phase is a functioning program with incorporated changes in the user interface.
• Transition PhaseThis is the last phase of the project. Our supervisor should examine the result and apossible change will be done. The final report will be written. The milestone of thisphase is the complete final report and the approval of our supervisor.
SchedulesThe project begins March 12, 2001 and should be done June 4, 2001.
TimelineWeek 11, 2001 (Inception Phase):
• Project plan and description of what documents to write.• Talk to our project coordinator.• Studying of HCI literature and documentation of tests cases.• Studying of Image/J functions and features.
Week 12, 2001 (Inception Phase, cont):• Analyze Images/J user interface.• Analyze Image/J code structure.
Week 13, 2001 (Elaboration phase)• Identifying and analyzing classes in Image/J that create user interface.• Make decisions for changes based on the HCI principles.
Week 14, 2001 (Elaboration phase, cont)• Define primary use cases.• Define new classes• Make class diagrams
Week 15 and 16, 2001 Easter holidays
Week 17, 2001 (Elaboration phase, cont)• Completing all necessary Rational Rose documents.• Code change startup meeting
Week 18, 2001 (Construction phase)• Coding, testing, and updating of documentation.
32
Week 19, 2001 (Construction phase, cont)• Coding, testing and updating of documentation.• Evaluating design model.
Week 20, 2001 (Construction phase, cont)• Coding and testing.
Week 21, 2001 (Transition Phase)• Evaluation of the whole product.• Time is allocated for possible changes in program.• Writing the final report.
Week 22, 2001 (Transition Phase, cont)• Writing the final report.• Examination (?).
ReleasesThe following documents will be produced:• Project Plan• Use case specification• Use case realization specification• Requirement specification• Test plan• Risk list• Design model• Source code• Final report
Resource planThere are two people working on this project full-time guided by Alois Goller, the projectsupervisor. Window98 is the work platform and JBuilder is used to develop the program code.The development tools are Rational Unified Process (RUP) and Rational Rose.
CostAs this project is done as a part of our final thesis we have no budget. We are doing thisproject for a non-profitable organization and we do not get paid for the work.
33
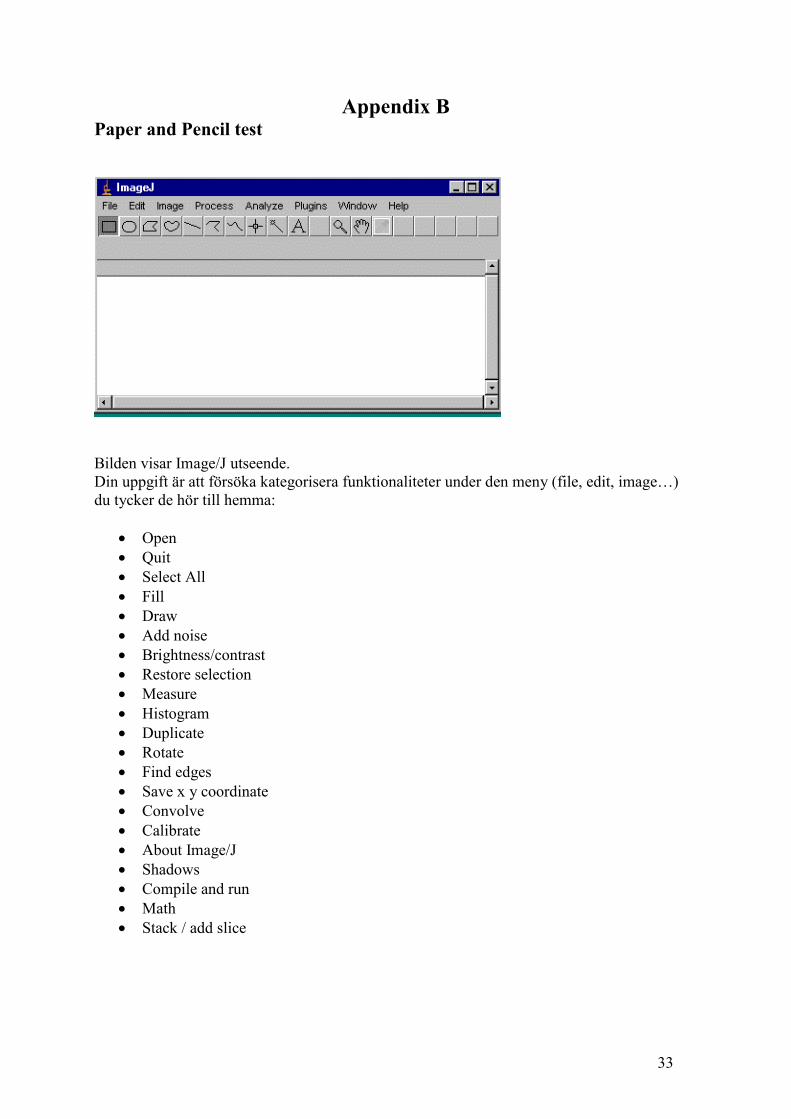
Appendix BPaper and Pencil test
Bilden visar Image/J utseende.Din uppgift är att försöka kategorisera funktionaliteter under den meny (file, edit, image…)du tycker de hör till hemma:
• Open• Quit• Select All• Fill• Draw• Add noise• Brightness/contrast• Restore selection• Measure• Histogram• Duplicate• Rotate• Find edges• Save x y coordinate• Convolve• Calibrate• About Image/J• Shadows• Compile and run• Math• Stack / add slice
34
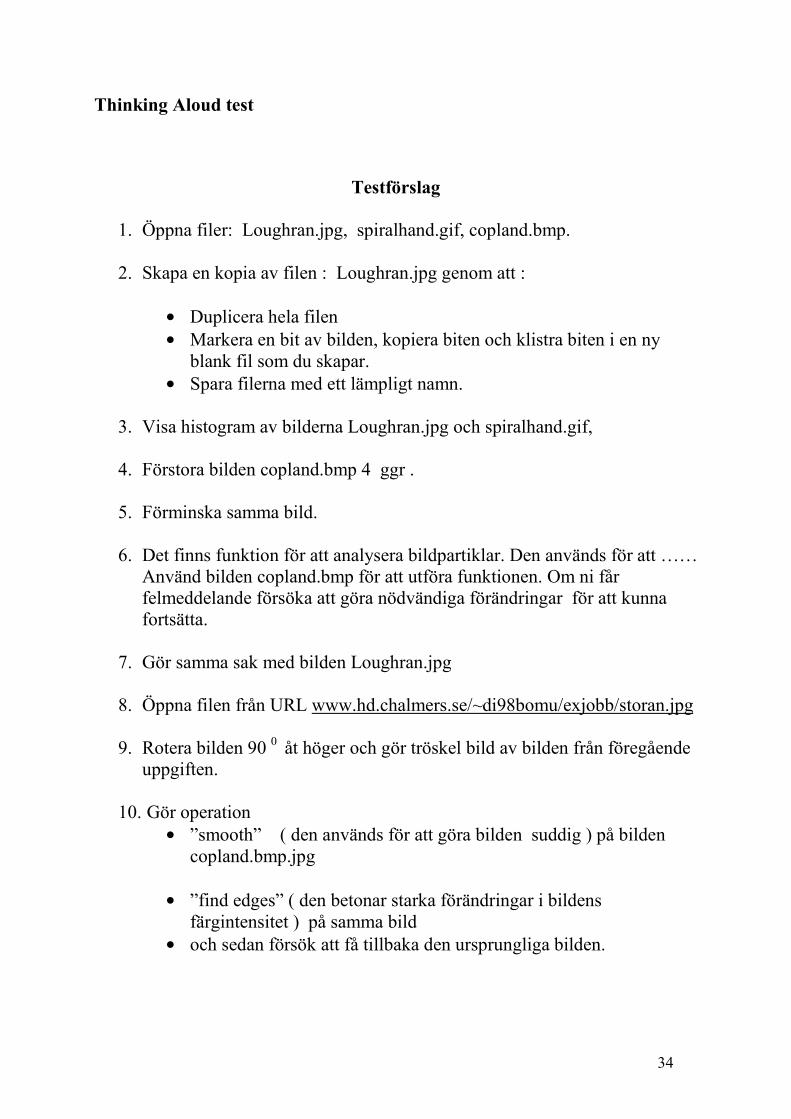
Thinking Aloud test
Testförslag
1. Öppna filer: Loughran.jpg, spiralhand.gif, copland.bmp.
2. Skapa en kopia av filen : Loughran.jpg genom att :
• Duplicera hela filen• Markera en bit av bilden, kopiera biten och klistra biten i en ny
blank fil som du skapar.• Spara filerna med ett lämpligt namn.
3. Visa histogram av bilderna Loughran.jpg och spiralhand.gif,
4. Förstora bilden copland.bmp 4 ggr .
5. Förminska samma bild.
6. Det finns funktion för att analysera bildpartiklar. Den används för att ……Använd bilden copland.bmp för att utföra funktionen. Om ni fårfelmeddelande försöka att göra nödvändiga förändringar för att kunnafortsätta.
7. Gör samma sak med bilden Loughran.jpg
8. Öppna filen från URL www.hd.chalmers.se/~di98bomu/exjobb/storan.jpg
9. Rotera bilden 90 0 åt höger och gör tröskel bild av bilden från föregåendeuppgiften.
10. Gör operation• ”smooth” ( den används för att göra bilden suddig ) på bilden
copland.bmp.jpg
• ”find edges” ( den betonar starka förändringar i bildensfärgintensitet ) på samma bild
• och sedan försök att få tillbaka den ursprungliga bilden.
35
11. Funktionen ”Measure” används för att få information om area, färger ochandra beräkningar av en bild. Använd denna metod och spara resultat i entext fil.
12. Försök att få bildens ”plot profile”. (funktionalitet som analyserarbildens pixlar och presentera resultat i en graf)
13. Försök nu att hitta histogrammet för bilden spiralhand.gif.som du gjorde i uppgiften 3.
14. Skriv en text in i bilden Loughran.jpg och spara ändringar.
15. Det finns en funktion som används för att justera bildens kontrast ochljusstyrka. Den heter Brightness/Contrast.
16. Markera två punkter på en godtycklig bild med hjälp av markören.Försök att läsa av avståndet mellan dem.
36
Thinking Aloud: Comments on the test results
(This is only one part of our notes we made during the Thinking Aloud test. It is considered toillustrate how the technique works rather than to give precisely all annotations we made).
1 Öppna filer: Loughran.jpg, spiralhand.gif, copland.gif , Test.doc.
Person 1Han öppnade huvud konsol över hela skärmen, sen minskade till en mittemellan nivå (ejdefault). Annars bra.
Person 2Förstorade huvud konsol genom att dra i kanten till en mellan storlek. Uppgiften gick bra.
Person 3Öppnar först hela fönstret. Konstigt meddelande.
2 Skapa en kopia av filen Loughran.jpg genom att :
Duplicera hela bilden
Person 1Använder copy/paste från meny och försöker att klistra in i textarea. Använder Edit/SelectAll, försöker göra paste I en ny blank fil som han öppnar. Han har svarigheter att tolkafelmeddelande eftersom bilden han vill kopiera är större än den nya filen. Efter att vi harpåpekat att tita i kanten av bilden gör han de inställningarna för att kunna klistra bilden. Troratt filens suffix ( i vårt exempel jpg) är den inställning han skall ändra istället för RGB. Hanklagar på missledande felmeddelande, behöver mer info om inställningar för en ny fil. Hanmissuppfattade programmets funktion, nämligen trodde han att det huvudsakligen används föratt rita bilder. Han tänkte inte alls att titta efter kommandot ”Duplicate”.
Person 2Försökte kopiera och sen klistra in i textare. Skapade en ny fil, försökte klistra in och fickfelmeddelande. Tittade i File och Edit.Hon ändrade format efter att jag påpekar text i kanten av bilder, men förstår inte riktig RBGmen inte som Person 1, hon tänkte inte på jpg suffixen. (Fick någonting konstigt två bilder ien) Försökte en gång till och lyckades.
Person 3Höger klickar efter copy och paste. Han trycket på copy och försöker att klistra i textarea.Han öppnar en ny fil men har problem att klistra i en mindre format. Han lyckas efter liteinformation från oss. (Vi påpekar information i bildens övre kant.)
Markera en bit av bilden, kopiera biten och klistra biten i en ny blank fil som du skapar.
Person 1Efter att har fått så pass klar beskrivning av uppgiften klarar han det fort och lätt.
37
Person 2Tittade i meny File och Edit. Upptäckte kommandot Duplicate.Hon tittar inte alls i toolbar.Efter ett tag märker hon beskrivning av toolbars enheter. Hon trodde att de används för att ritafigurer. Hon utför uppgiften mha. Rektangulärmarkören från toolbar. Spara filerna med ett lämpligt namn.
Person 1Klagar på att inte finns default värden på filer när man väljer format i meny File/Save as.Han tror att Jpg = RBG
Person 2Använder Save as och undrar över fil förslag. Hon väljer samma som den bild hon kopierade.
Person 3Klagar på save/save as.
3 Visa histogram av bilderna Loughran.jpg och spiralhand.gif,
Kommentarer:Person 1Inga problem att utföra operationen. Han sa att huvud konsolen stör honom inte.
Person 2Stängde alla fönster som hyon inte behövde. Tittar i analyze och utför uppgiften .Vet intevilket är vilket histogram.
Person 3Gör uppgiften och sen stänger alla fönster.
4 Förstora bilden copland.bmp 4 ggr .
Person 1Han använde meny Image/Scale. Bilden förändras i storleken minnesmässigt. Visuellt är denlikadan. Han märkte inte förändring och klagar på feedback. Sen försöker med kommandotResize. Efter att jag har påpekat att det finns toolbar börjar han för första gången utforska den.Han kan inte se samband mellan bilden och toolbar. Till slut lyckades han göra uppgift.Han tittade flera ggr i meny Edit och Image efter förstoring resp. förminskning funktionen.
Person 2Stänger alla fönster som hon inte behöver innan hon börjar.Hon letar i Image/scale. Använder den och märker skillnaden i storleken minnesmässigt mendet är inte det hon vill göra. Hon använder set scale, konstaterar att hon inte fattar den. Vipåpekar att hon kanske skall leta i toolbar. Hon lyckas hitta Magnifying glass.
Person 3Letar i meny . Använder ajustsize och fösrora 4 ggr mer pixlar. Han merker förändring istorleken (minnesmässigt). Fortsätter att leta i meny i Image, Analyze, Process. Hittar med vårhjälp.
38
5 Förminska samma bild.
Person 1Han använde höger musknapp på en gång men sa att det är konstigt att den funktionalitetenligger i höger musknappen.
Person 2Tittar i Edit /Options . Hon försöker använda Resize (Size). Stängde filen och öppnade denigen för ett nytt försök.. Hon fortsatte att leta i menyer men lyckades inte förminska.
6 Det finns funktion för att analysera bildpartiklar.Använd bilden copland.gif för att utföra funktionen. Om du får felmeddelande försökatt göra nödvändiga förändringar för att kunna fortsätta.
Person 1Inga problem att utföra operationen. Han förstår inte funktionen.
Person 2Stängde alla fönster (förutom huvud konsol). Öppnade filen copland.gif. Utförde uppgiften,men hade svårt att avgöra om filen i fråga var aktiv.
7 Gör samma sak med bilden Loughran.jpg
Person 1Han fick felmeddelande och lyckades omvandla bilden till 8-bit greyscale. Han kan inteomvandla till binary/threshold. Han försöker att hitta samma fil som heter samma men i binärtformat(?). han gör tröskelbild efter att han fick förklaring vad detta är.Han kommenterar felmeddelande: Först att man skall omvandla till 8-bit gryscale, sen görman inställningar och därefter felmeddelande att den måste vara thresholded or binary.
Person 2Fick felmeddelande och omvandlade till 8 bit greyscale.Andra felmeddelande (thresholh/binary) -> letade i Image/type men lyckades till slut med litehjälp.
8 Öppna filen från URL www.hd.chalmers.se/~di98bomu/exjobb/storan.jpg
Person 1Inga problem att utföra operationen.
Person 2Började med att öppna Netscape men vi så att hon skulle använda programmet istället. Hontittade i File/Open sen i Samples och sen hittar hon Import. Det gick bra med liteinstructioner.
39
9 Rotera bilden 90 0 åt höger och gör tröskel bild av bilden från föregående uppgiften(storan.jpg).
Person 1Inga problem att utföra operationen. Han gjorde tröskelbild i den gående uppgiften.
Person 2Det gick fort och bra.
Person 3Första del gick bra sen letade han efter tröskel i meny Edit/type
10 Gör operation ”smooth” ( den används för att göra bilden suddig ) på bildencopland.bmp.jpg ”find edges” ( den betonar starka förändringar i bildensfärgintensitet) på samma bild och sedan försök att få tillbaka den ursprungliga bilden.
Person 1Inga problem att utföra de första två uppgifterna. När han skulle få den ursprungliga bildentillbacka kollar först i meny Edit för undo. Han konstaterade att den fungerar bara ett stegtillbaka, tittade i Image och de övriga menyer och ger upp.
Person 2Första uppgift: Tittar i Image och sen Process. Utför uppgiften.Andra: Hittar rätt och utför uppgiftenTredje: Försöker med undo kommandot. Tänker på en Reset funktion som kan finnas i Editmeny.Hon upptäcker förklaring om toolbars funktionaliteter (i statusbar).Tittar i Image/Adjust ochtill sist stänger bilden.
11 Funktionen ”Measure” används för att få information om area, färger och andraberäkningar av en bild. Använd denna metod och spara resultat i en text fil.
Person 1Inga problem att utföra operationen Mesure.För att spara använder save as/ measurments.
Person 2Inga problem att utföra operationen Mesure.För att spara använder save as/textimage. ____fråga Muris !!!!
12 Försök att få bildens ”plot profile”. (funktionalitet som analyserar bildens pixlaroch presentera resultat i en graf)
Person 1Han öppnar Process, sen Analyze , letar efter select (tror att man måste markera bilden ). Hanletar hela tiden efter select kommandot i meny. Lyckades till slut.
40
Person 2Fick meddelande att man måste markera bilden. Hon kollar menyer och sen försöker användamarkören för selektion. Hon gör uppgift.
13 Försök nu att hitta histogrammet för bilden spiralhand.gif. som du gjorde iuppgiften 3.
Person 1Misslyckades totalt.(försökte att höger klicka)
Person 2Vi hoppade över uppgiften iom. att hon stängde histogrammen innan.
14 Skriv en text in i bilden Loughran.jpg och spara ändringar.
Person 1Han öppnar filen på nytt (stängde den någon gång) Kollar meny Edit, Image . Han upptäcktertoolbar A och skriver in text. Försöker spara efteråt. Han märker inte alls att man måsteanvända fill kommandot för att göra skrivning gällande. Han klagar på save och save askommandona. Han vill att save skall spara automatiskt befintlig fil som man förändrar.Han lyckades inte utföra uppgift.
Person 2Stänger fönsterna och tiitar först i meny ( fråga Muris!!!!!!!) Använder toolbar:använder select tool och markerar area i bilden. sen använder hon text tool men vet inte hurskall hon skriva (hon tror att det kommer en markör som visar att man kan skriva )hon upptäcker Replace me text men vet fortfarande inte hur skall man skriva.Vet inte hur man sparar text och tror att text lagras så fort man skriv någonting, (använde intefill kommandot).
15 Det finns en funktion som används för att justera bildens kontrast och ljusstyrka.Den heter Brightness/Contrast.
Person 1Utförde inte uppgiften, för att han inte hittade funktionen. Han tittade i meny först i process ,sen analyze, sen image.
Person 2Efter att hon letat lite hittar hon Brightness/Contrast. Men påpekar att man skall har dentillgängligare. (kollar i Image först)
16 Markera två punkter på en godtycklig bild med hjälp av markören. Försök att läsaav avståndet mellan dem.
Person 1 Gjorde inte uppgiften.
Person 2Tittar i Analyze/tools. Merkera två punkter med markören, trycker på Measure. Flera gångertrycker på SetMeasure