Embed Size (px)
Citation preview

iMac Intel 27" (Late 2009 or Mid 2010) GraphicsCard Replacement
Upgrade the Radeon 4 series video card in your iMac with the latest Radeon 6 series card fromthe 2011 iMac model.
Written By: teut986
iMac Intel 27" (Late 2009 or Mid 2010) Graphics Card Replacement
© iFixit — CC BY-NC-SA www.iFixit.com Page 1 of 15

INTRODUCTION
If you are using the iMac 27" late 2009 or 2010 model for games, you might want to upgrade yourgraphics card to the 6 series of the last 2011 model.
TOOLS:Heavy-Duty Suction Cups (Pair) (1)
T10 Torx Screwdriver (1)
T9 Torx Screwdriver (1)
PARTS:iMac 2011 Radeon 6970 2GB graphics
card (1)
iMac Intel 27" (Late 2009 or Mid 2010) Graphics Card Replacement
© iFixit — CC BY-NC-SA www.iFixit.com Page 2 of 15

Step 1 — Glass Panel
Stick a heavy-duty suction cup near each of the two top corners of the glass panel.
To attach the suction cups, first position the suction cup with the movable handle parallel to theface of the glass panel (as highlighted in the second picture).
While lightly holding the suction cup against the glass, raise the movable handle until it is parallelwith the other handle (as highlighted by the third picture).
If your suction cups refuse to stick, try cleaning both the glass panel and the suction cup with adamp soft, lint-free cloth. (Dampen with distilled water, and if needed, an equal ratio of distilledwater and white vinegar for best results.)
Do not use the suction cups to carry the display glass because if one of them fails to stick, youcould drop the screen and break it.
The original iMac box makes a good place to store the glass panel. Otherwise, a padded horizontalsurface, like a towel on a desk will do nicely.
iMac Intel 27" (Late 2009 or Mid 2010) Graphics Card Replacement
© iFixit — CC BY-NC-SA www.iFixit.com Page 3 of 15
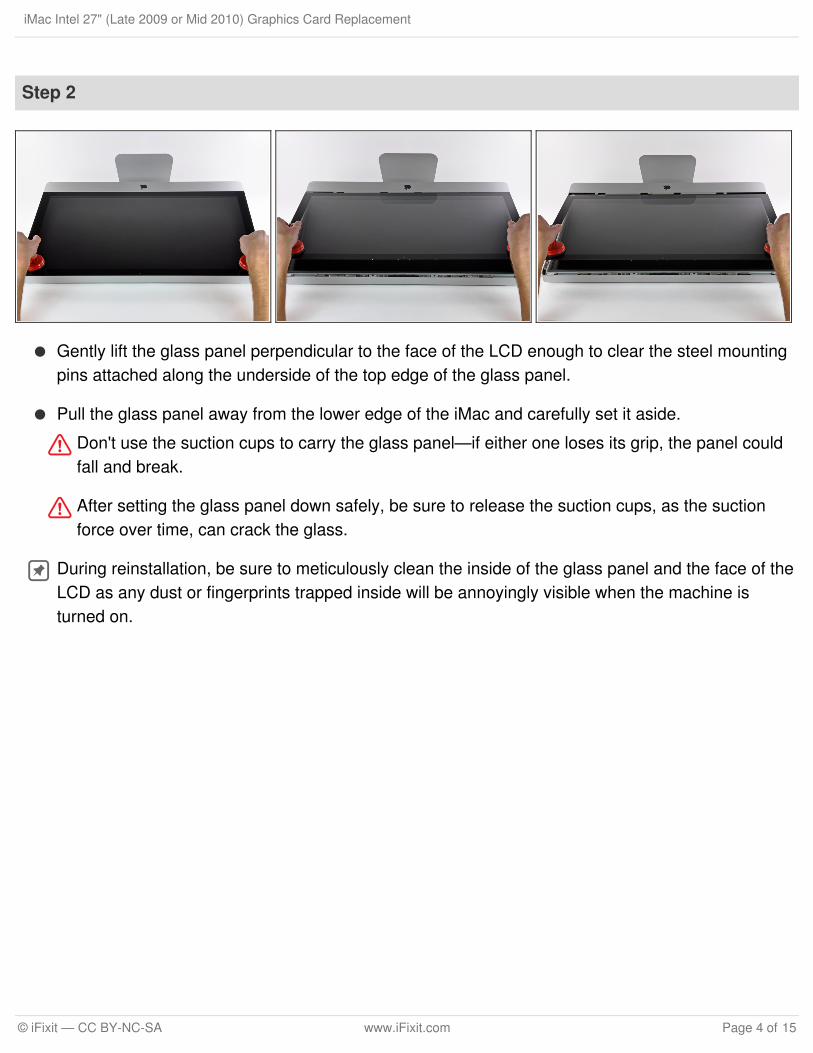
Step 2
Gently lift the glass panel perpendicular to the face of the LCD enough to clear the steel mountingpins attached along the underside of the top edge of the glass panel.
Pull the glass panel away from the lower edge of the iMac and carefully set it aside.
Don't use the suction cups to carry the glass panel—if either one loses its grip, the panel couldfall and break.
After setting the glass panel down safely, be sure to release the suction cups, as the suctionforce over time, can crack the glass.
During reinstallation, be sure to meticulously clean the inside of the glass panel and the face of theLCD as any dust or fingerprints trapped inside will be annoyingly visible when the machine isturned on.
iMac Intel 27" (Late 2009 or Mid 2010) Graphics Card Replacement
© iFixit — CC BY-NC-SA www.iFixit.com Page 4 of 15
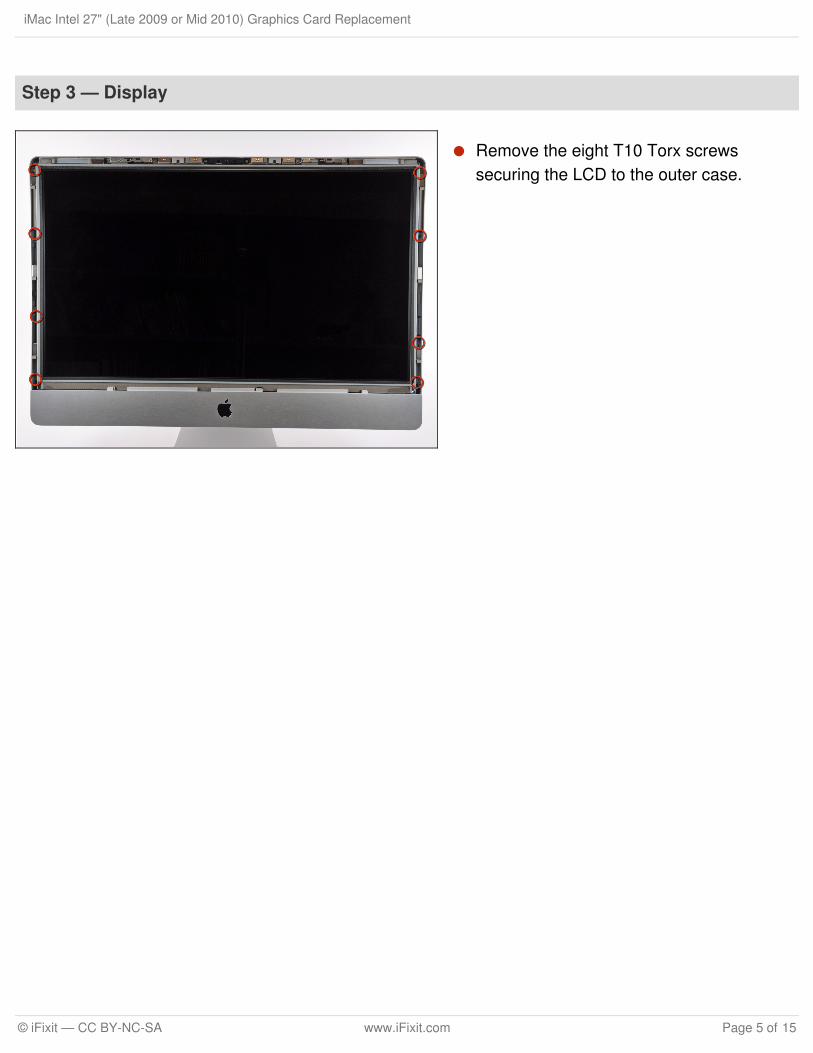
Step 3 — Display
Remove the eight T10 Torx screwssecuring the LCD to the outer case.
iMac Intel 27" (Late 2009 or Mid 2010) Graphics Card Replacement
© iFixit — CC BY-NC-SA www.iFixit.com Page 5 of 15
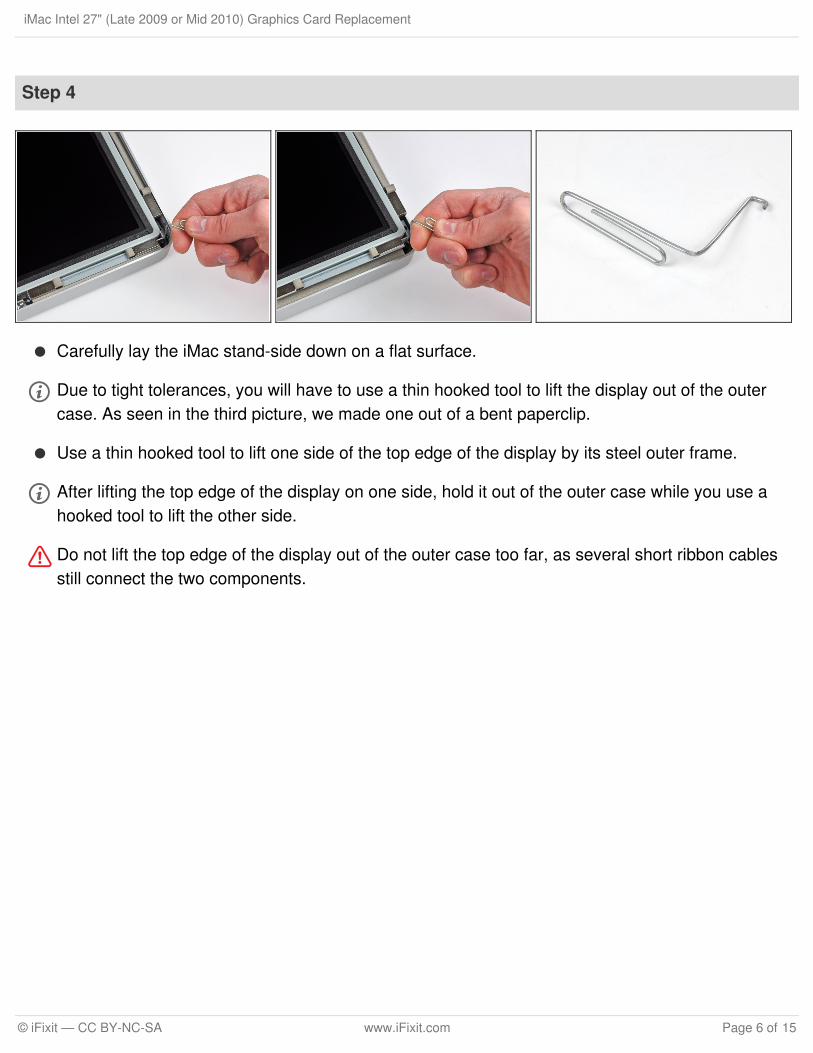
Step 4
Carefully lay the iMac stand-side down on a flat surface.
Due to tight tolerances, you will have to use a thin hooked tool to lift the display out of the outercase. As seen in the third picture, we made one out of a bent paperclip.
Use a thin hooked tool to lift one side of the top edge of the display by its steel outer frame.
After lifting the top edge of the display on one side, hold it out of the outer case while you use ahooked tool to lift the other side.
Do not lift the top edge of the display out of the outer case too far, as several short ribbon cablesstill connect the two components.
iMac Intel 27" (Late 2009 or Mid 2010) Graphics Card Replacement
© iFixit — CC BY-NC-SA www.iFixit.com Page 6 of 15
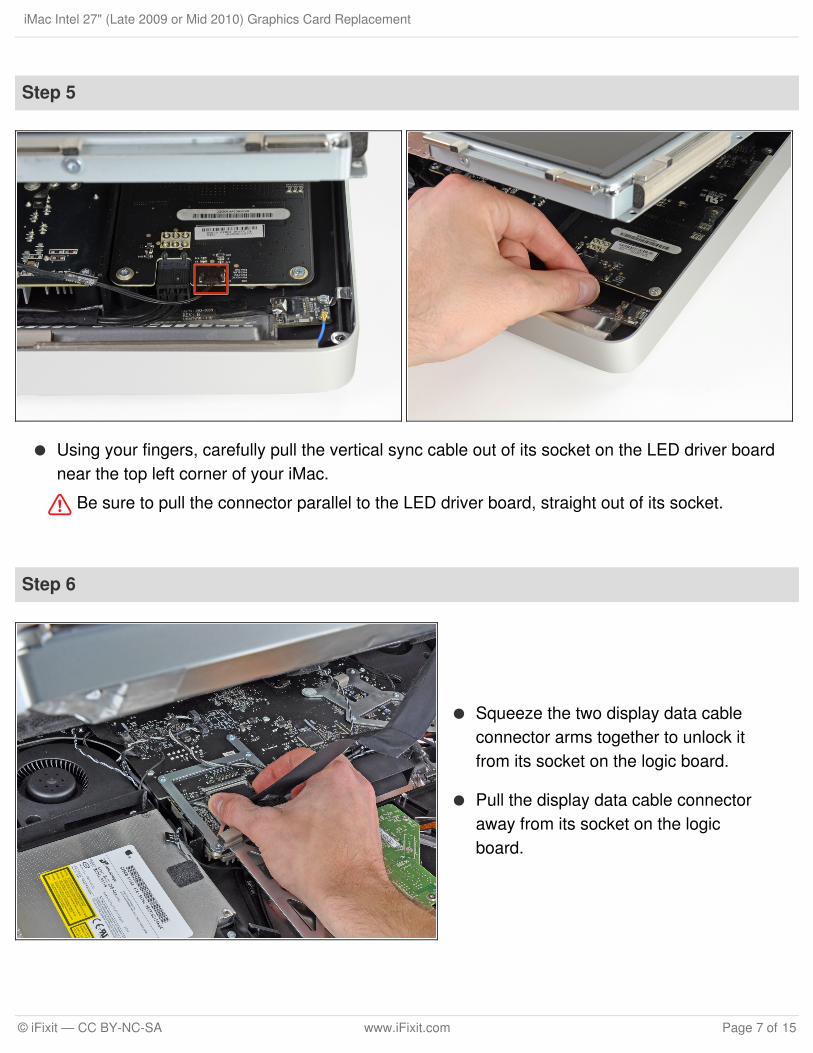
Step 5
Using your fingers, carefully pull the vertical sync cable out of its socket on the LED driver boardnear the top left corner of your iMac.
Be sure to pull the connector parallel to the LED driver board, straight out of its socket.
Step 6
Squeeze the two display data cableconnector arms together to unlock itfrom its socket on the logic board.
Pull the display data cable connectoraway from its socket on the logicboard.
iMac Intel 27" (Late 2009 or Mid 2010) Graphics Card Replacement
© iFixit — CC BY-NC-SA www.iFixit.com Page 7 of 15
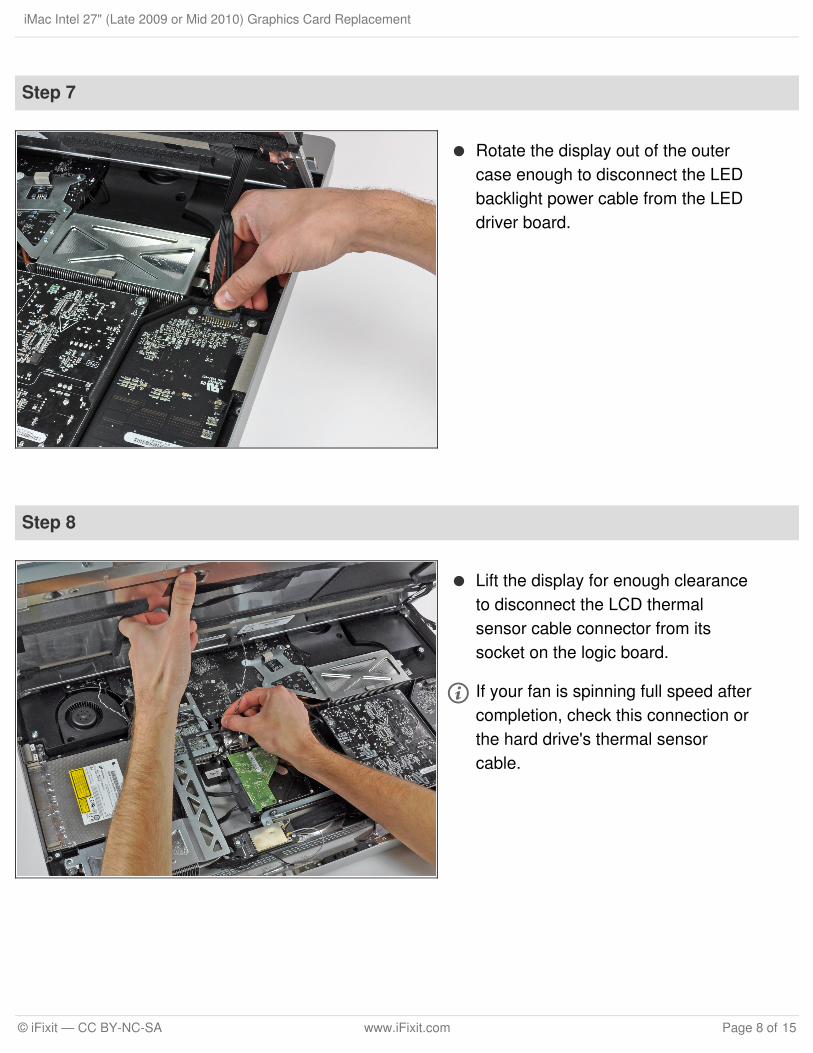
Step 7
Rotate the display out of the outercase enough to disconnect the LEDbacklight power cable from the LEDdriver board.
Step 8
Lift the display for enough clearanceto disconnect the LCD thermalsensor cable connector from itssocket on the logic board.
If your fan is spinning full speed aftercompletion, check this connection orthe hard drive's thermal sensorcable.
iMac Intel 27" (Late 2009 or Mid 2010) Graphics Card Replacement
© iFixit — CC BY-NC-SA www.iFixit.com Page 8 of 15

Step 9
Carefully pull the display toward thetop edge of your iMac and lift it outof the outer case.
Step 10 — Graphics Card
Be extra careful with the displaycables, I broke mine.
You need to remove the temperaturesensor cable from the HDD toremove the card.
Remember the position of this cable!ifixit tip: it must later be reinstalledclosest to the SATA connector andthe black cable need to point up,towards the LCD.
iMac Intel 27" (Late 2009 or Mid 2010) Graphics Card Replacement
© iFixit — CC BY-NC-SA www.iFixit.com Page 9 of 15
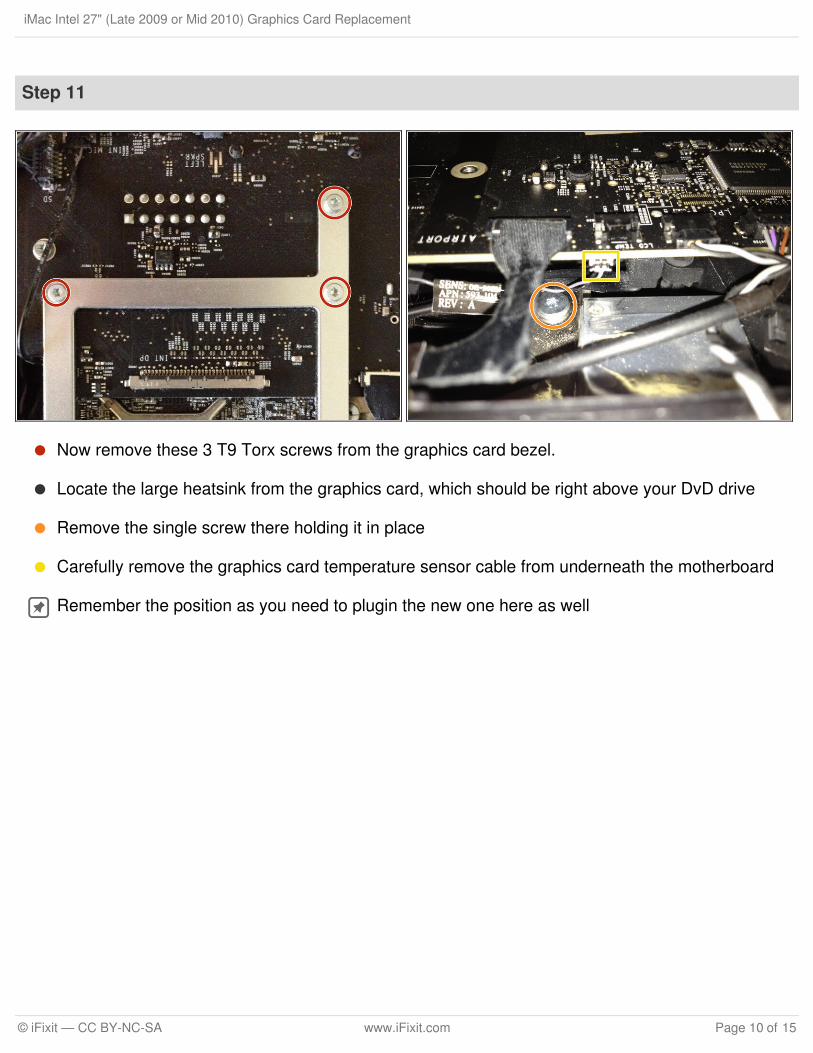
Step 11
Now remove these 3 T9 Torx screws from the graphics card bezel.
Locate the large heatsink from the graphics card, which should be right above your DvD drive
Remove the single screw there holding it in place
Carefully remove the graphics card temperature sensor cable from underneath the motherboard
Remember the position as you need to plugin the new one here as well
iMac Intel 27" (Late 2009 or Mid 2010) Graphics Card Replacement
© iFixit — CC BY-NC-SA www.iFixit.com Page 10 of 15
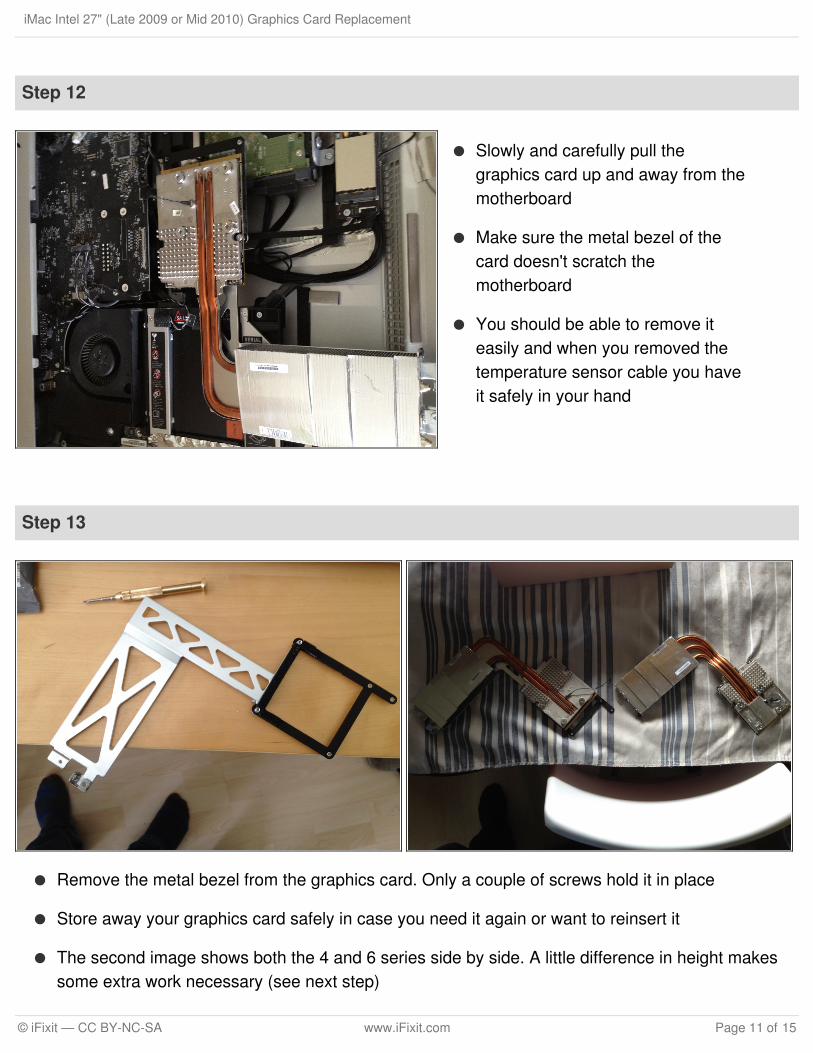
Step 12
Slowly and carefully pull thegraphics card up and away from themotherboard
Make sure the metal bezel of thecard doesn't scratch themotherboard
You should be able to remove iteasily and when you removed thetemperature sensor cable you haveit safely in your hand
Step 13
Remove the metal bezel from the graphics card. Only a couple of screws hold it in place
Store away your graphics card safely in case you need it again or want to reinsert it
The second image shows both the 4 and 6 series side by side. A little difference in height makessome extra work necessary (see next step)
iMac Intel 27" (Late 2009 or Mid 2010) Graphics Card Replacement
© iFixit — CC BY-NC-SA www.iFixit.com Page 11 of 15

Step 14
You will need to remove the DVD drive in order to remove the plastic piece mentioned in the nextstep. The drive is held in by 4 Torx screws, once those are removed, the drive can be lifted andswung out of the way without removing any cables.
iMac Intel 27" (Late 2009 or Mid 2010) Graphics Card Replacement
© iFixit — CC BY-NC-SA www.iFixit.com Page 12 of 15

Step 15
As the 6 series is slightly higher we need to make a little space on the plastic holder which isbeneath the card
Remove the plastic part which is shown on the 2nd picture by removing one screw and carefullypull it from the aluminium case
Its fastended with tape, so don't worry, you can't break anything
Some wiggling and navigating it from the cables and you should have it in your hands
You see the rectangular space where the large cable goes through. Use a saw or other tool tomake it about 5mm wider and 2-3mm deeper
The third image shows the final result we want to achieve
The primary reason for thi step is the heatpipe of the 6 series which takes more space
Note: this is ONLY necessary on the late 2009 model, 2010 models already got enough room!
iMac Intel 27" (Late 2009 or Mid 2010) Graphics Card Replacement
© iFixit — CC BY-NC-SA www.iFixit.com Page 13 of 15
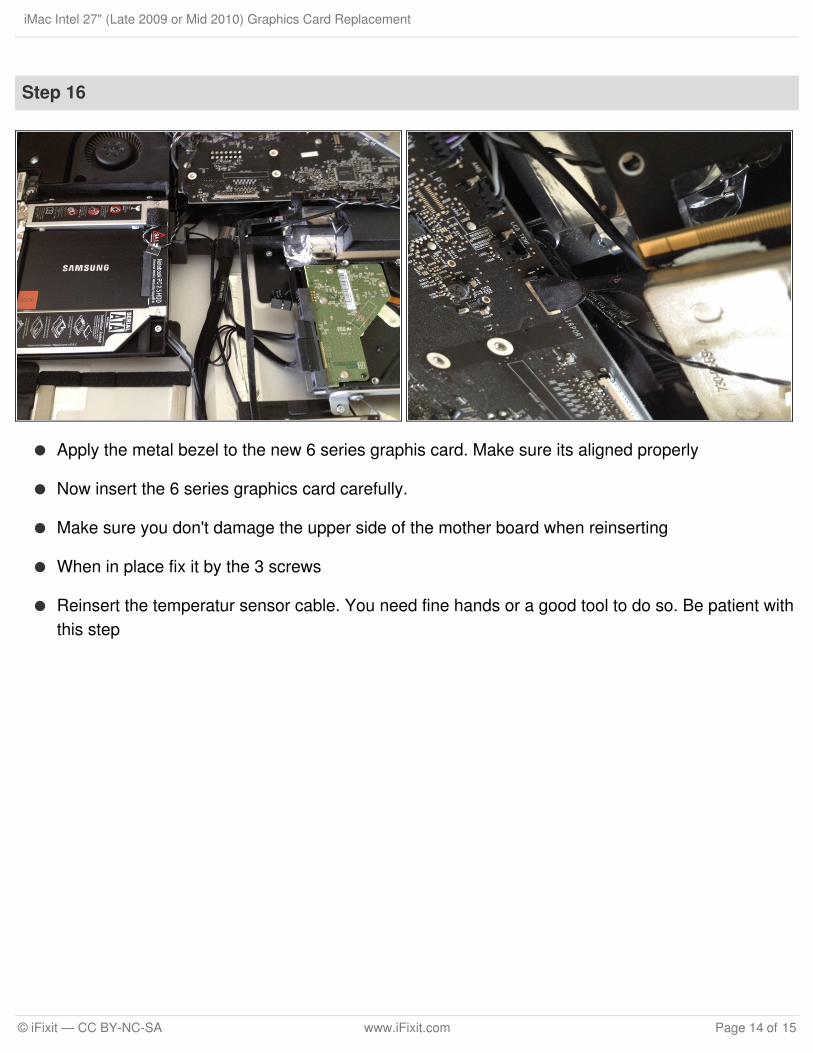
Step 16
Apply the metal bezel to the new 6 series graphis card. Make sure its aligned properly
Now insert the 6 series graphics card carefully.
Make sure you don't damage the upper side of the mother board when reinserting
When in place fix it by the 3 screws
Reinsert the temperatur sensor cable. You need fine hands or a good tool to do so. Be patient withthis step
iMac Intel 27" (Late 2009 or Mid 2010) Graphics Card Replacement
© iFixit — CC BY-NC-SA www.iFixit.com Page 14 of 15
To reassemble your device, follow these instructions in reverse order.
This document was last generated on 2018-05-02 10:37:49 AM.
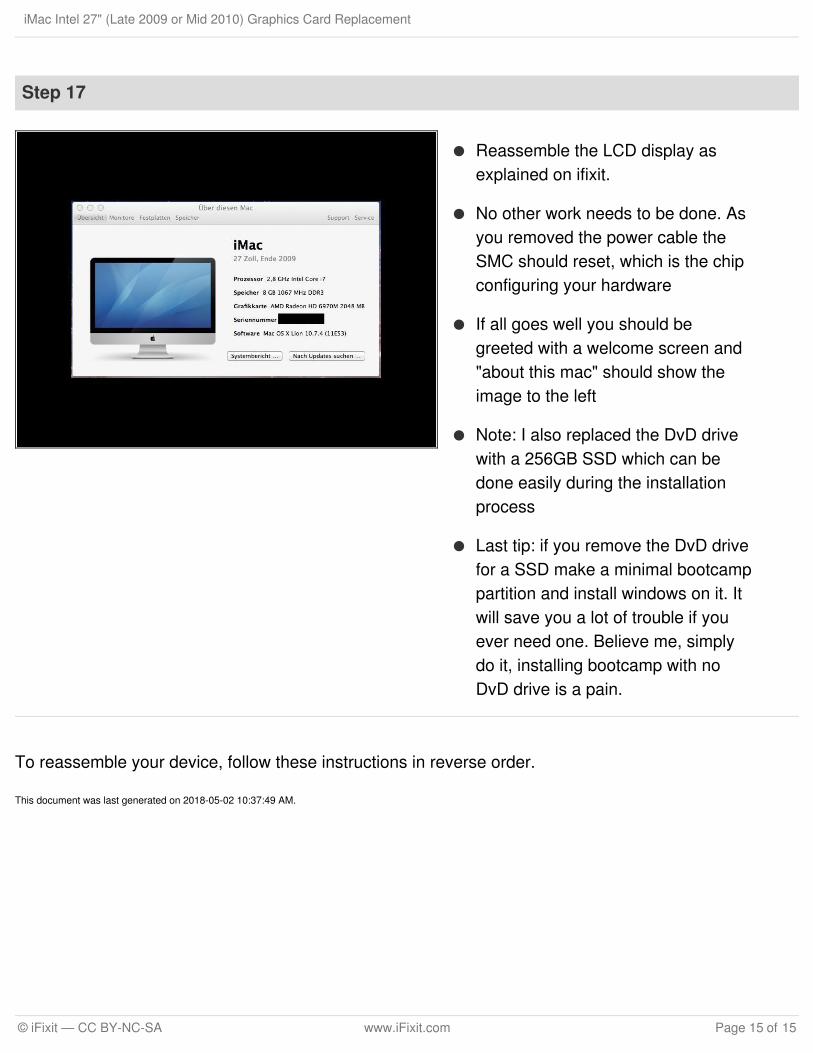
Step 17
Reassemble the LCD display asexplained on ifixit.
No other work needs to be done. Asyou removed the power cable theSMC should reset, which is the chipconfiguring your hardware
If all goes well you should begreeted with a welcome screen and"about this mac" should show theimage to the left
Note: I also replaced the DvD drivewith a 256GB SSD which can bedone easily during the installationprocess
Last tip: if you remove the DvD drivefor a SSD make a minimal bootcamppartition and install windows on it. Itwill save you a lot of trouble if youever need one. Believe me, simplydo it, installing bootcamp with noDvD drive is a pain.
iMac Intel 27" (Late 2009 or Mid 2010) Graphics Card Replacement
© iFixit — CC BY-NC-SA www.iFixit.com Page 15 of 15