Embed Size (px)
Citation preview
1
Using the MRIC Database Effectively
This document is intended to serve as a training and reference manual for the basic elements of the new MRIC database that will be used by Missionaries to manage all data related to their partnering churches, their mailing database (both email and US Postal Service varieties) and their on-going donor base.
Logging In
The WOL MRIC you will use will open up to the screen you see below, called the Missionary Portal. The URL for this site is https://mric.wol.org and requires two bits of information. Here, simply enter your username and your password and sign in.
Things we will be covering in this training.
1. Contact List 2. Newsletter/Mailing List 3. Sending a Newsletter 4. Update Webpage 5. Travel Requests 6. Ordering Prayer Cards
Home Screen
When you log in, your page will automatically load to the screen shown below. Notice that this page includes menus at the top (Support, Expenses, etc.). Take a moment to click through these menus to assure that you can access all your sub menus and working tools. Notice also that a menu is provided next to HOME. Click on CONTACTS to open up your database.

2
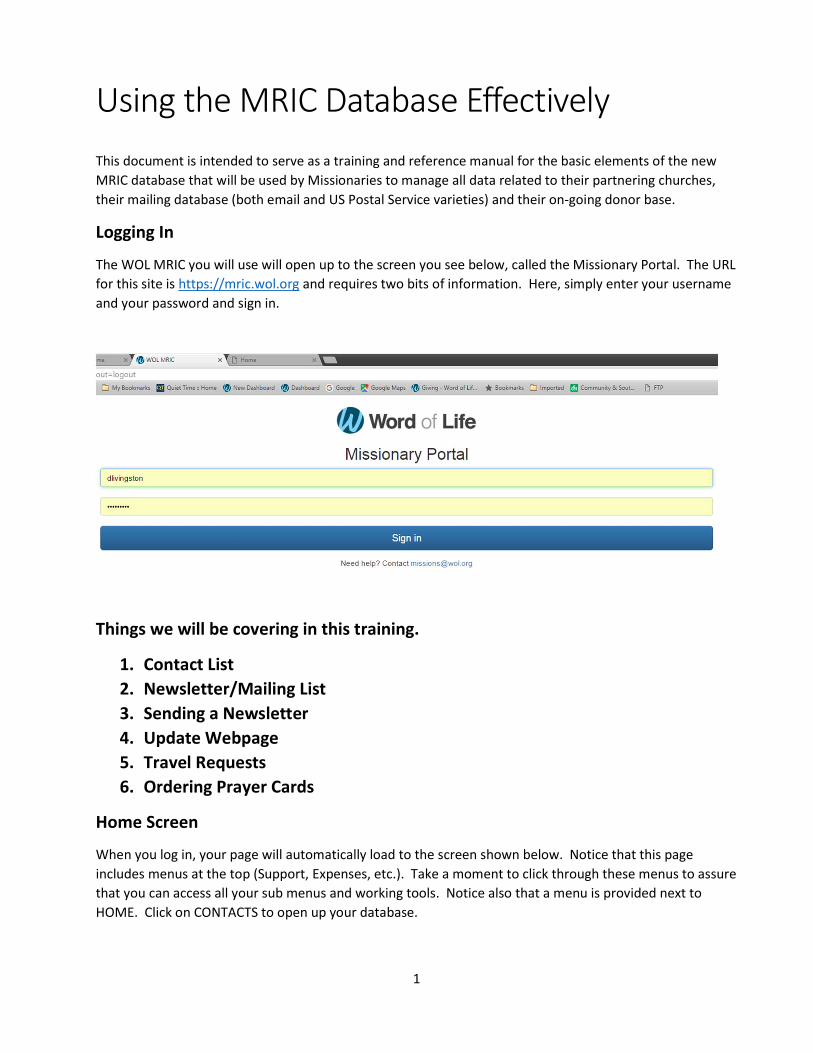
Contacts Menu
When you click on Contacts, your entire set of contacts will appear alphabetically. Please note that there is a difference between your “Contacts” and your “newsletter/mailing list”. Your Contacts are individuals and organizations that you would like to have their contact information for future reference but may or may not be on your mailing list. Your contact list is the basis for any list you may have including your mailing list.
Notice the left margin has two sections (Actions and Tags). Tags are customer-defined and correspond to the associations you assign. Think of Tags as a simple way to create subs-sets of your data. Unless you had been using associations previously, your data may have nothing listed under Tags. We recommend you take time to create meaningful tags so that you can easily generate mailing lists for various portions of your data (using the Download menu on this page).
3
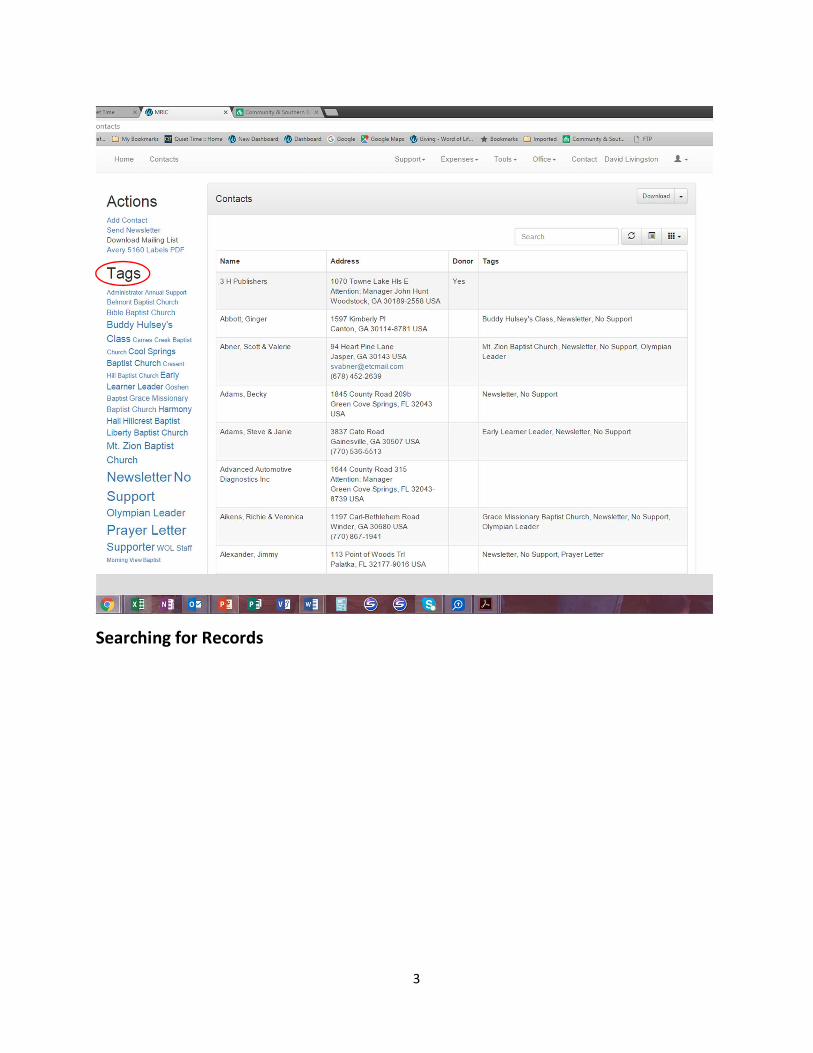
Searching for Records
4
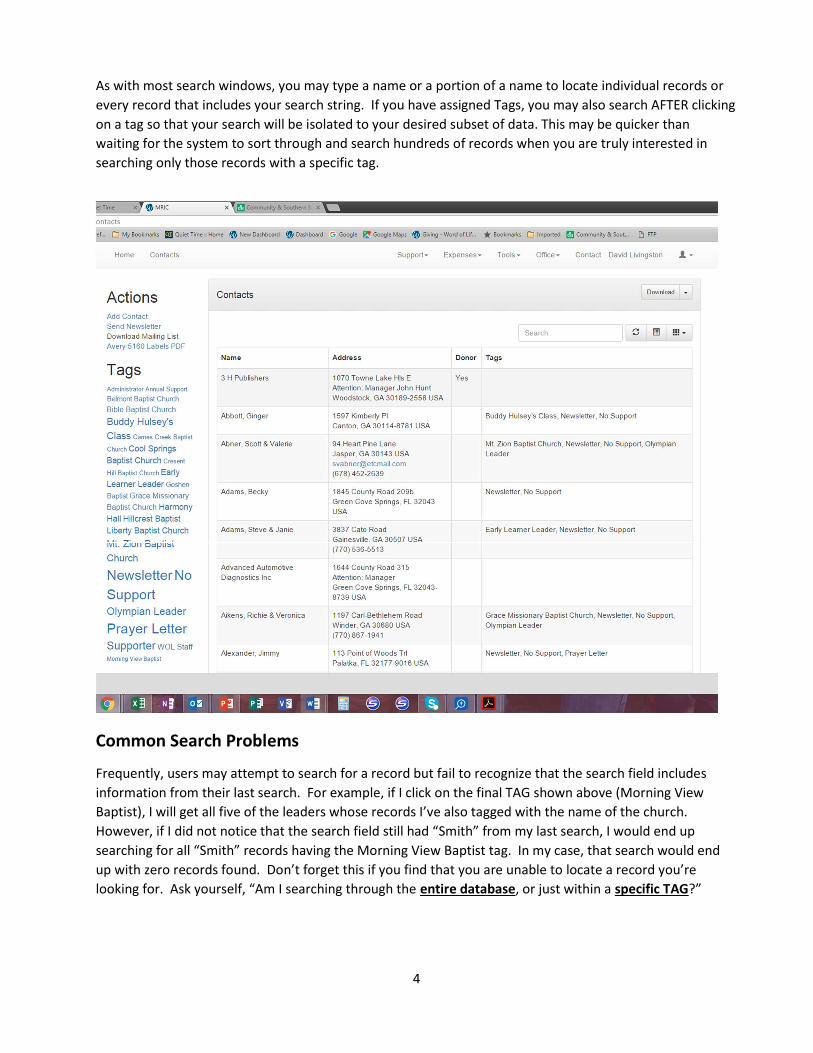
As with most search windows, you may type a name or a portion of a name to locate individual records or every record that includes your search string. If you have assigned Tags, you may also search AFTER clicking on a tag so that your search will be isolated to your desired subset of data. This may be quicker than waiting for the system to sort through and search hundreds of records when you are truly interested in searching only those records with a specific tag.
Common Search Problems
Frequently, users may attempt to search for a record but fail to recognize that the search field includes information from their last search. For example, if I click on the final TAG shown above (Morning View Baptist), I will get all five of the leaders whose records I’ve also tagged with the name of the church. However, if I did not notice that the search field still had “Smith” from my last search, I would end up searching for all “Smith” records having the Morning View Baptist tag. In my case, that search would end up with zero records found. Don’t forget this if you find that you are unable to locate a record you’re looking for. Ask yourself, “Am I searching through the entire database, or just within a specific TAG?”
5
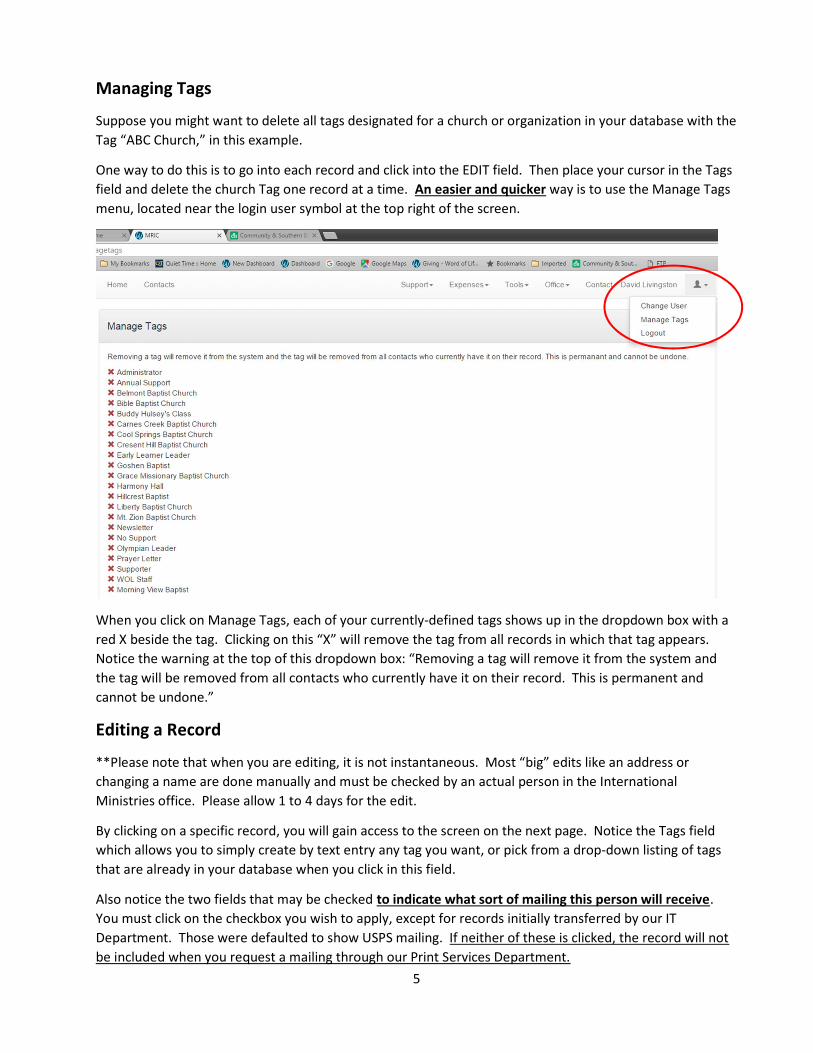
Managing Tags
Suppose you might want to delete all tags designated for a church or organization in your database with the Tag “ABC Church,” in this example.
One way to do this is to go into each record and click into the EDIT field. Then place your cursor in the Tags field and delete the church Tag one record at a time. An easier and quicker way is to use the Manage Tags menu, located near the login user symbol at the top right of the screen.
When you click on Manage Tags, each of your currently-defined tags shows up in the dropdown box with a red X beside the tag. Clicking on this “X” will remove the tag from all records in which that tag appears. Notice the warning at the top of this dropdown box: “Removing a tag will remove it from the system and the tag will be removed from all contacts who currently have it on their record. This is permanent and cannot be undone.”
Editing a Record
**Please note that when you are editing, it is not instantaneous. Most “big” edits like an address or changing a name are done manually and must be checked by an actual person in the International Ministries office. Please allow 1 to 4 days for the edit.
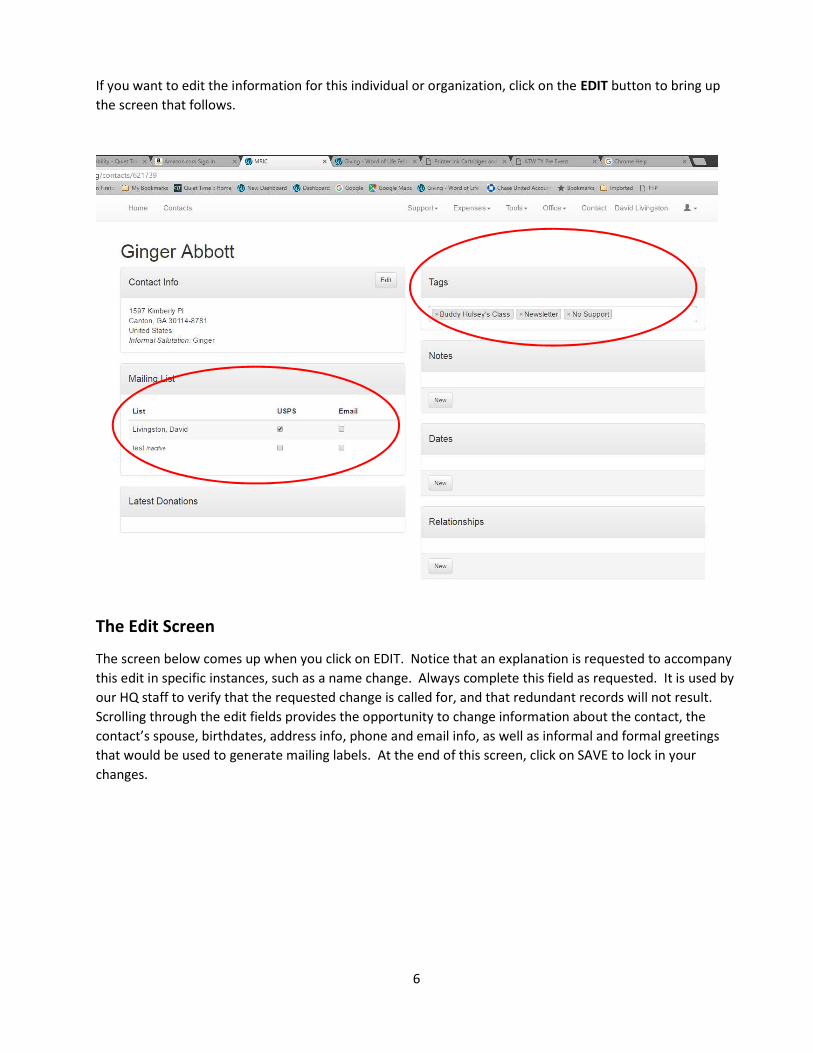
By clicking on a specific record, you will gain access to the screen on the next page. Notice the Tags field which allows you to simply create by text entry any tag you want, or pick from a drop-down listing of tags that are already in your database when you click in this field.
Also notice the two fields that may be checked to indicate what sort of mailing this person will receive. You must click on the checkbox you wish to apply, except for records initially transferred by our IT Department. Those were defaulted to show USPS mailing. If neither of these is clicked, the record will not be included when you request a mailing through our Print Services Department.
6
If you want to edit the information for this individual or organization, click on the EDIT button to bring up the screen that follows.
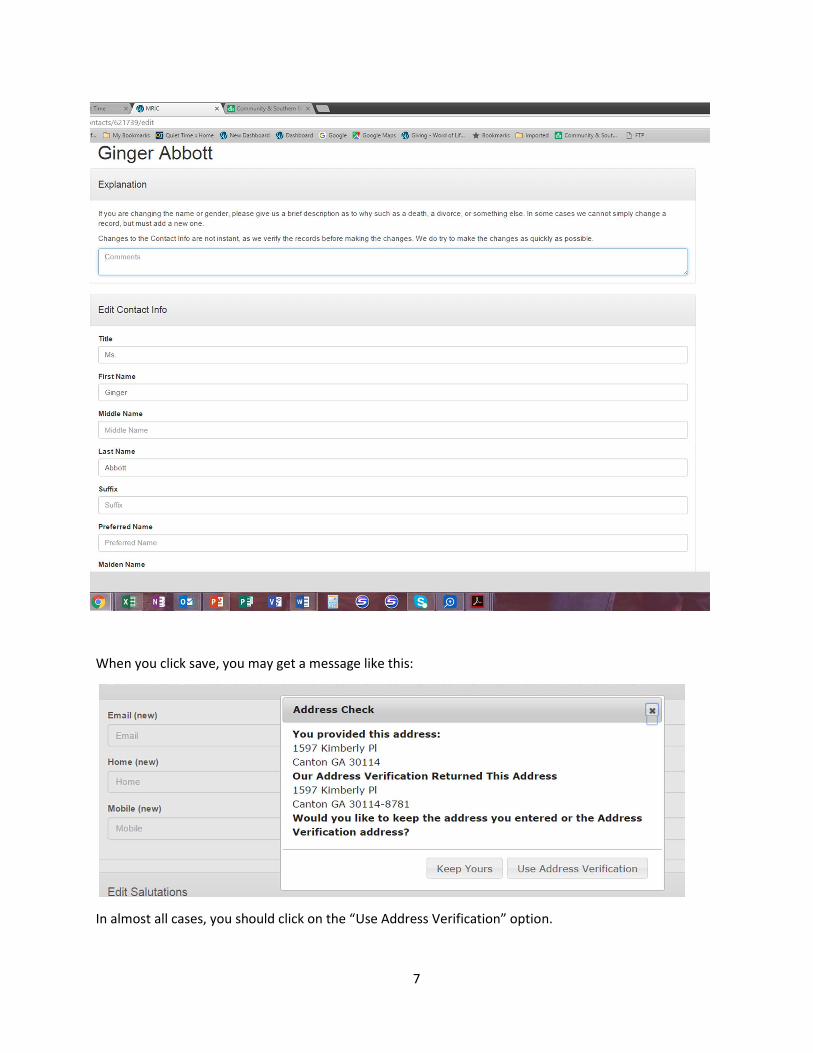
The Edit Screen
The screen below comes up when you click on EDIT. Notice that an explanation is requested to accompany this edit in specific instances, such as a name change. Always complete this field as requested. It is used by our HQ staff to verify that the requested change is called for, and that redundant records will not result. Scrolling through the edit fields provides the opportunity to change information about the contact, the contact’s spouse, birthdates, address info, phone and email info, as well as informal and formal greetings that would be used to generate mailing labels. At the end of this screen, click on SAVE to lock in your changes.
7
When you click save, you may get a message like this:
In almost all cases, you should click on the “Use Address Verification” option.
8
Address Standardization
The data inside WOL’s program that houses all addresses has been cross-matched with the U.S. Postal Service (USPS) standards for addressing. This is a service to you and you should, in almost all cases, take the second option. Though this process has the capability of correcting your errors “on the fly,” even if it did nothing else for you aside from assigning the extra four digits of the ZIP+4 zip code, it will make mailings more efficient. Following your initial correction or acceptance of the Address Verification address, you will most likely not receive this message again for the specific record you are changing.
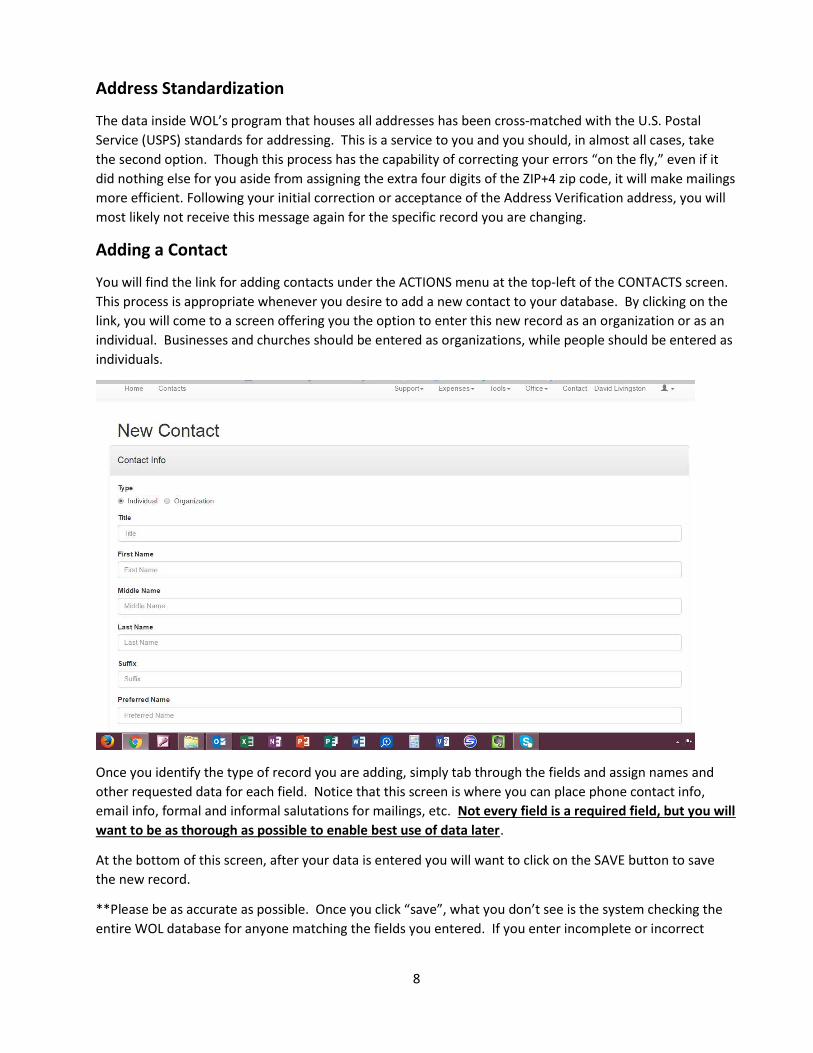
Adding a Contact
You will find the link for adding contacts under the ACTIONS menu at the top-left of the CONTACTS screen. This process is appropriate whenever you desire to add a new contact to your database. By clicking on the link, you will come to a screen offering you the option to enter this new record as an organization or as an individual. Businesses and churches should be entered as organizations, while people should be entered as individuals.
Once you identify the type of record you are adding, simply tab through the fields and assign names and other requested data for each field. Notice that this screen is where you can place phone contact info, email info, formal and informal salutations for mailings, etc. Not every field is a required field, but you will want to be as thorough as possible to enable best use of data later.
At the bottom of this screen, after your data is entered you will want to click on the SAVE button to save the new record.
**Please be as accurate as possible. Once you click “save”, what you don’t see is the system checking the entire WOL database for anyone matching the fields you entered. If you enter incomplete or incorrect
9
information it may cause duplicates in the database and someone in the office will need to manually make the corrections.
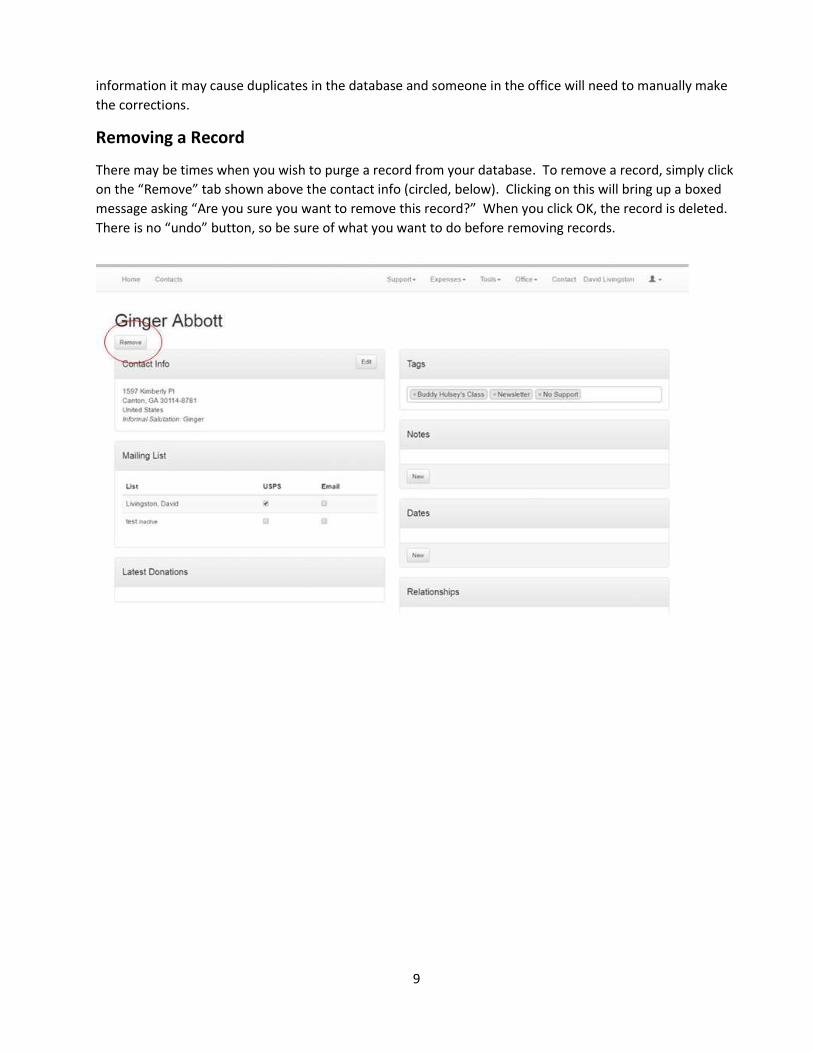
Removing a Record
There may be times when you wish to purge a record from your database. To remove a record, simply click on the “Remove” tab shown above the contact info (circled, below). Clicking on this will bring up a boxed message asking “Are you sure you want to remove this record?” When you click OK, the record is deleted. There is no “undo” button, so be sure of what you want to do before removing records.
10
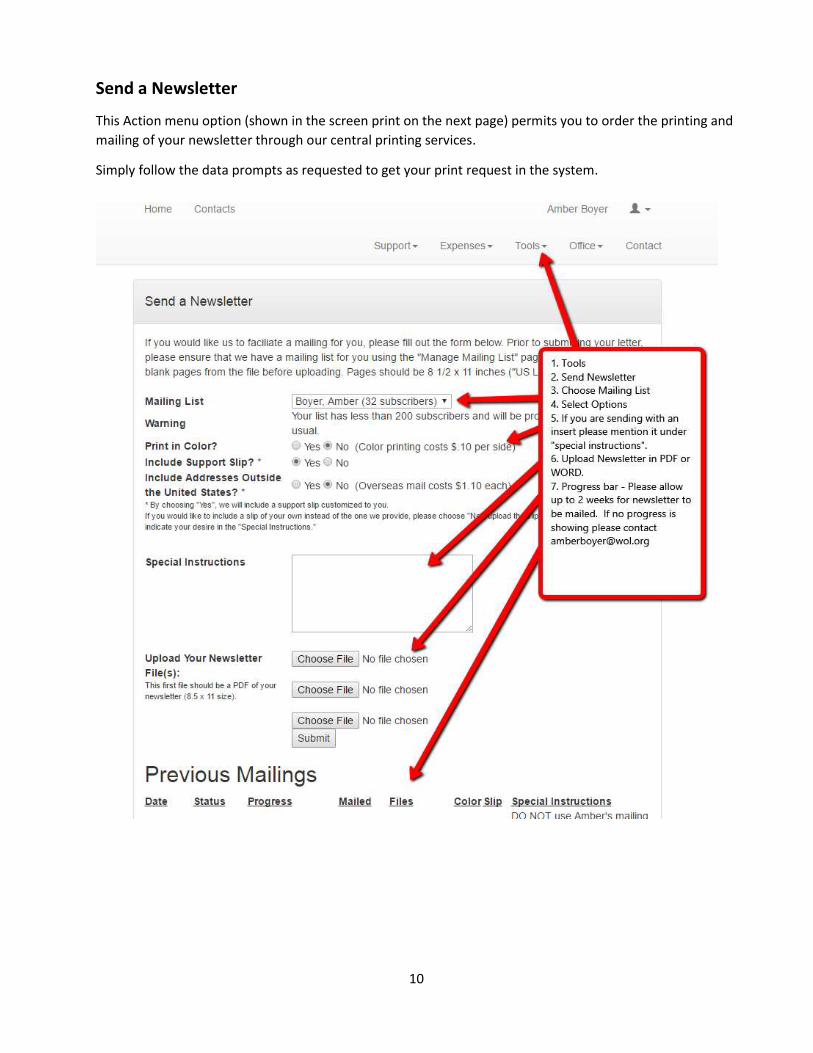
Send a Newsletter
This Action menu option (shown in the screen print on the next page) permits you to order the printing and mailing of your newsletter through our central printing services.
Simply follow the data prompts as requested to get your print request in the system.
11
Known Issues – Duplicate Records
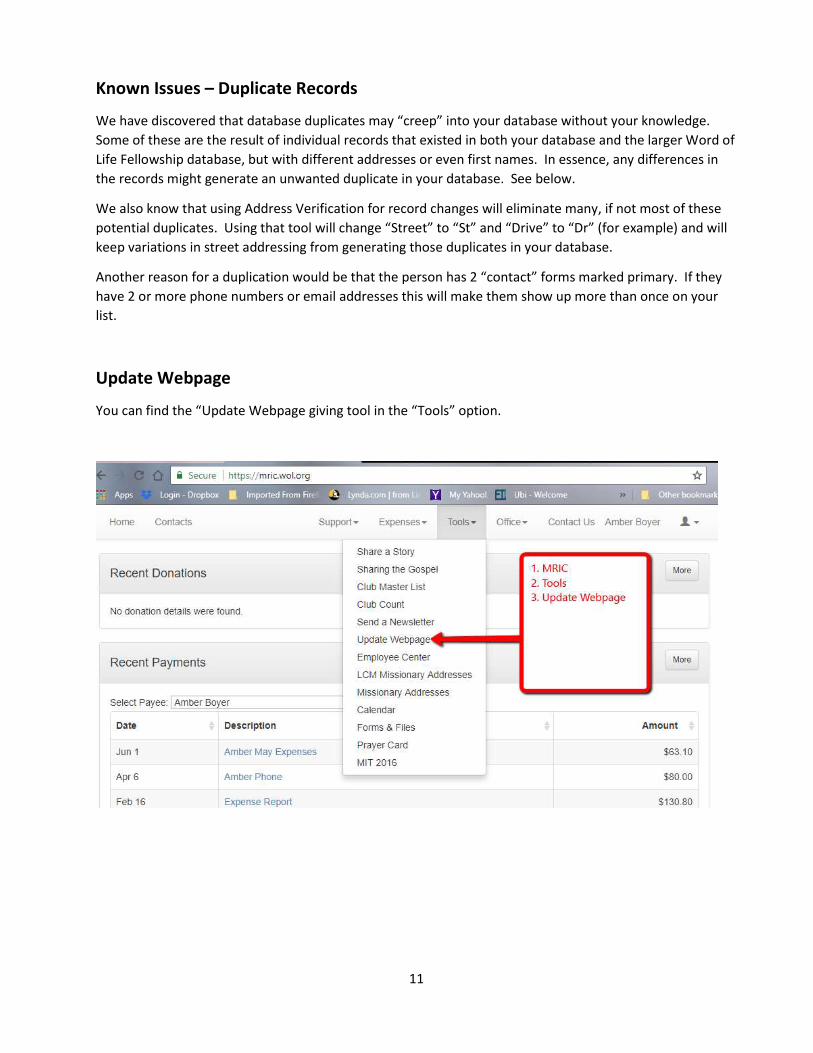
We have discovered that database duplicates may “creep” into your database without your knowledge. Some of these are the result of individual records that existed in both your database and the larger Word of Life Fellowship database, but with different addresses or even first names. In essence, any differences in the records might generate an unwanted duplicate in your database. See below.
We also know that using Address Verification for record changes will eliminate many, if not most of these potential duplicates. Using that tool will change “Street” to “St” and “Drive” to “Dr” (for example) and will keep variations in street addressing from generating those duplicates in your database.
Another reason for a duplication would be that the person has 2 “contact” forms marked primary. If they have 2 or more phone numbers or email addresses this will make them show up more than once on your list.
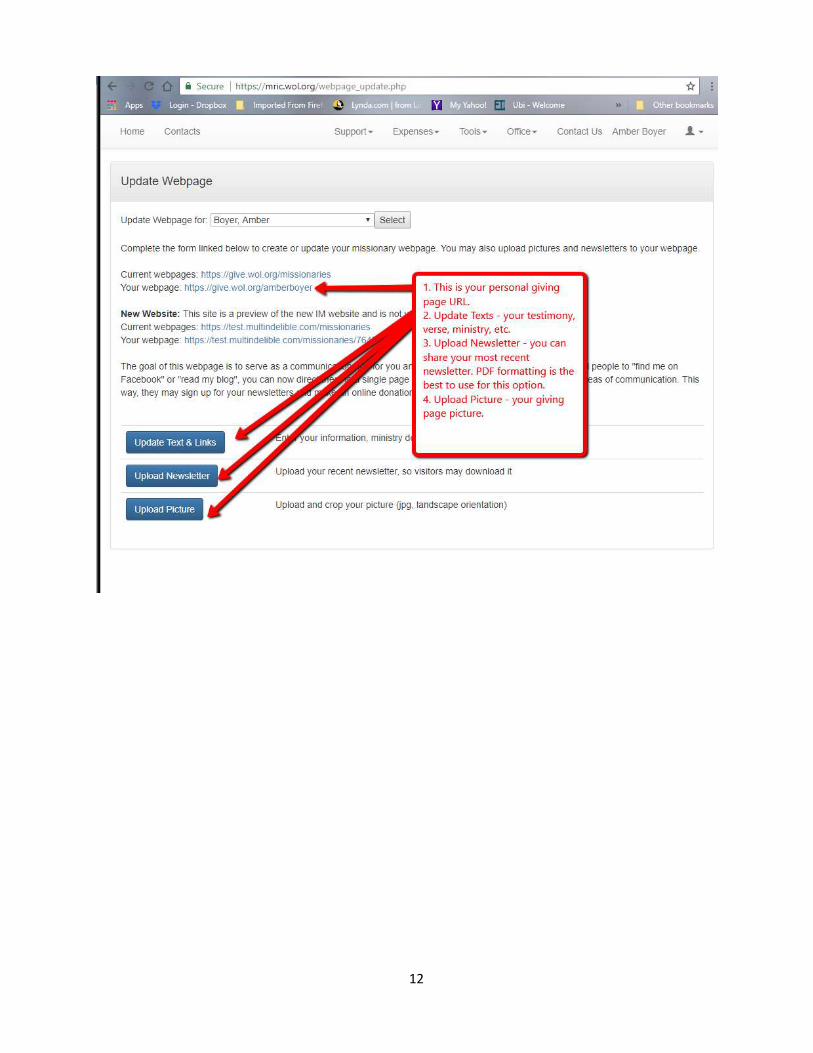
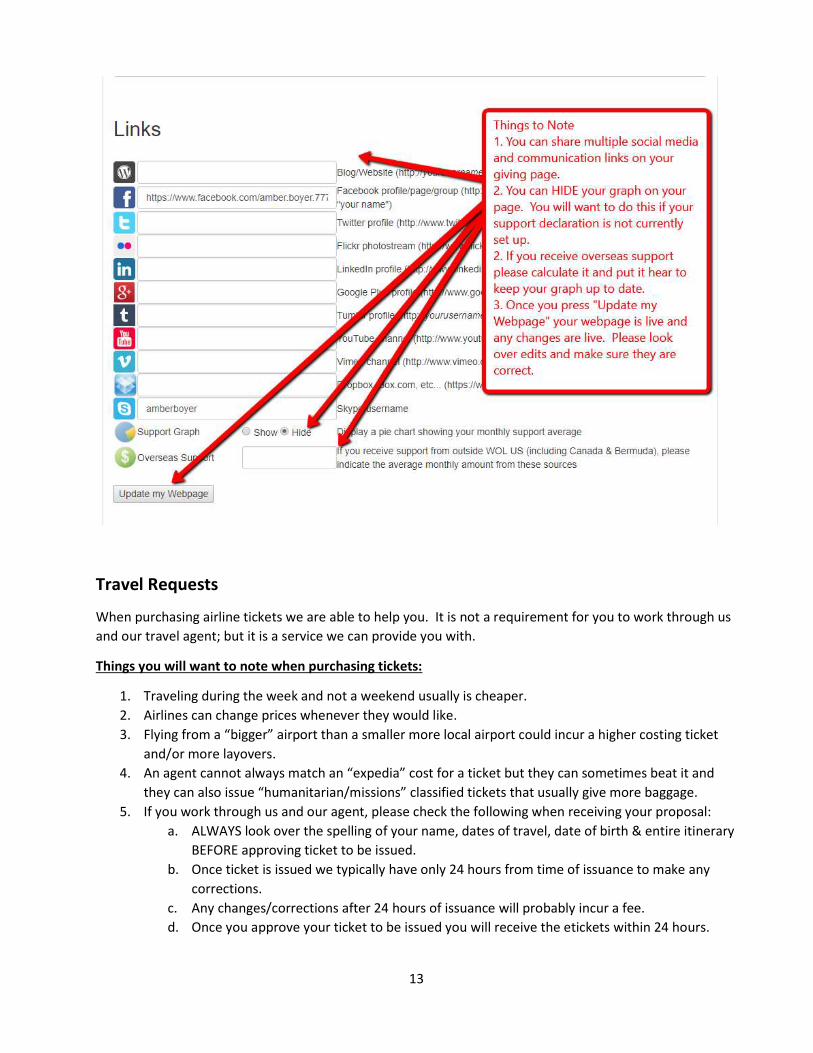
Update Webpage
You can find the “Update Webpage giving tool in the “Tools” option.
12
13
Travel Requests
When purchasing airline tickets we are able to help you. It is not a requirement for you to work through us and our travel agent; but it is a service we can provide you with.
Things you will want to note when purchasing tickets:
1. Traveling during the week and not a weekend usually is cheaper. 2. Airlines can change prices whenever they would like. 3. Flying from a “bigger” airport than a smaller more local airport could incur a higher costing ticket
and/or more layovers. 4. An agent cannot always match an “expedia” cost for a ticket but they can sometimes beat it and
they can also issue “humanitarian/missions” classified tickets that usually give more baggage. 5. If you work through us and our agent, please check the following when receiving your proposal:
a. ALWAYS look over the spelling of your name, dates of travel, date of birth & entire itinerary BEFORE approving ticket to be issued.
b. Once ticket is issued we typically have only 24 hours from time of issuance to make any corrections.
c. Any changes/corrections after 24 hours of issuance will probably incur a fee. d. Once you approve your ticket to be issued you will receive the etickets within 24 hours.
14
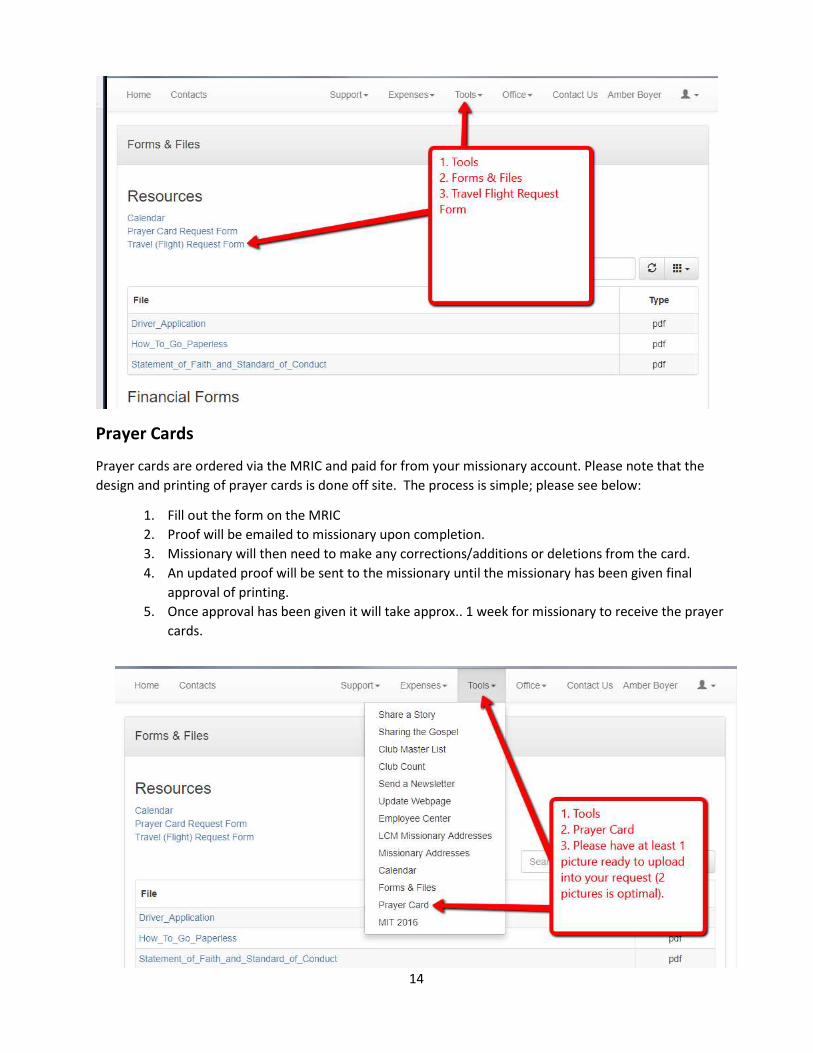
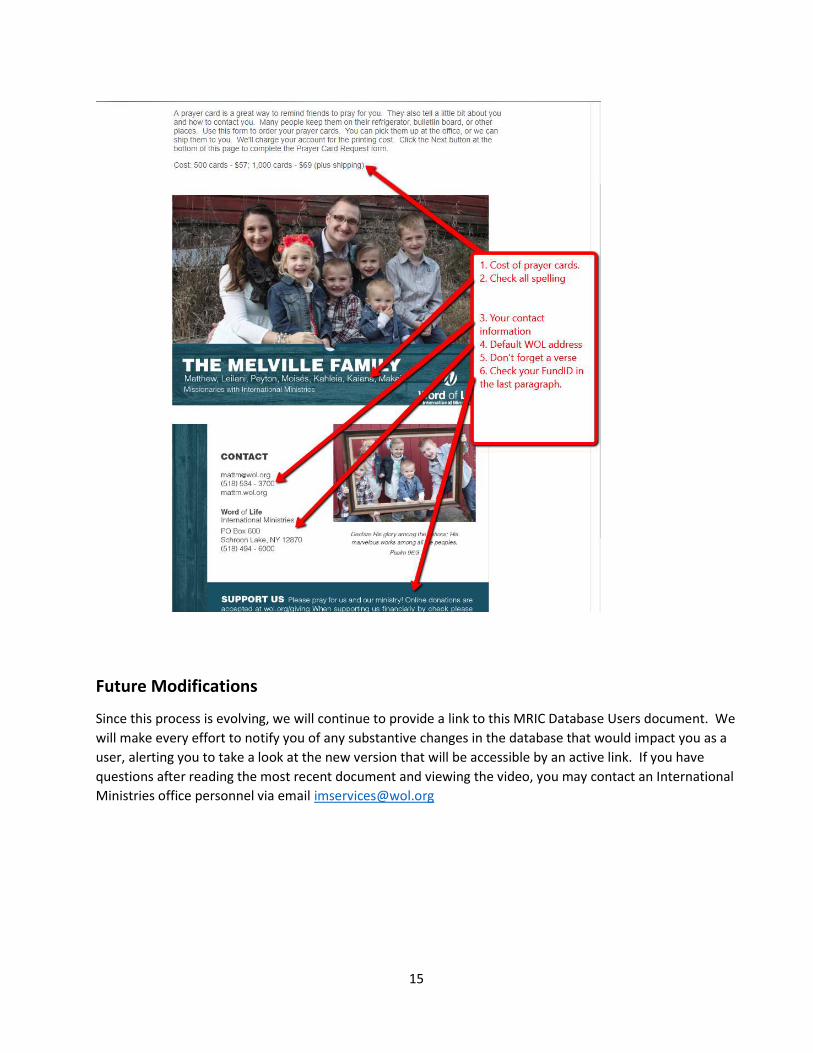
Prayer Cards
Prayer cards are ordered via the MRIC and paid for from your missionary account. Please note that the design and printing of prayer cards is done off site. The process is simple; please see below:
1. Fill out the form on the MRIC 2. Proof will be emailed to missionary upon completion. 3. Missionary will then need to make any corrections/additions or deletions from the card. 4. An updated proof will be sent to the missionary until the missionary has been given final
approval of printing. 5. Once approval has been given it will take approx.. 1 week for missionary to receive the prayer
cards.
15
Future Modifications
Since this process is evolving, we will continue to provide a link to this MRIC Database Users document. We will make every effort to notify you of any substantive changes in the database that would impact you as a user, alerting you to take a look at the new version that will be accessible by an active link. If you have questions after reading the most recent document and viewing the video, you may contact an International Ministries office personnel via email [email protected]