Embed Size (px)
Citation preview

Adobe
Just Show Me What To Do
Illustra
tor

Page 2
www.TrainingBrain.com
Adobe Illustrator – Just Show Me What To Do, Douglas Mitchell, 2008 All Rights Reserved©
About the Trainer
Douglas MitchellADM Enterprises, Inc.8737 Larwin LaneOrlando, FL 32817407.616.0854 virtual407.671.1178 [email protected] www.trainingbrain.com
Adobe Certified Instructor• Photoshop, Illustrator, InDesign
Olympus Training Partner
Seminar Instructor & Professor• Adobe Certified Instructor• Free Paper Associations Eight States• Int’l Student Media Festival• Apple, Olympus• Mac & Windows Academy• Digital Media Academy• Int’l Academy of Design & Technology College – Professor• Professional Photographers of America• NAPP Tour – National Association of Photoshop Professionals• Graphics of America, Print Expo, Printing Association Florida• International Television Association• Thunder Lizard and many more• NASA, Airforce, AAA, Red Lobster, Florida Hospital
Author: Video Training Series, Books• Videos: Photoshop, Illustrator, InDesign, Premiere Director, Quark, Introduction to Multimedia• Book: Digital Cameras & Photo Editing for Teachers & Students using Olympus & Photoshop Elements• Book: Digital Cameras and Photo Editing for Business using Olympus and Adobe Photoshop Elements• Book: Adobe Illustrator CS3, Just Show Me What To Do
Multimedia Production• Books, flyers, brochures, newsletters, postcards, biz cards• Video, Interactive CD & DVD presentations, animation• Digital photography and photo editing• Print management, color correction
AdobeCertified
Instructor
PhotoshopIllustratorInDesignAcrobat

Page 3
www.TrainingBrain.com
Adobe Illustrator – Just Show Me What To Do, Douglas Mitchell, 2008 All Rights Reserved©
Learning Illustrator
Grow Artistically — More Than You Ever ImaginedCreate amazing artwork. Once you understand key commands, menus, palettes, and vector construction, Adobe Illustrator can be mastered. All the tools and commands seem overwhelming at first glance. The heart of Illustrator is simple — it uses lines, curves, strokes fills and anchor points to create all artwork. Discover this digital tool and gain respectable revenue and job security.
Essential Topics for Learning Illustrator (Ai)
1 Determine Key Preferences
2 Setup Application Interface for Ease of Workflow
3 Learn to View, Zoom, Move to Review Artwork
4 Create Artwork using Shape Tools
5 Artwork Construction: Paths, Anchor Points, Stroke, Fill
6 Select All or Parts of Artwork using Selection Tools
7 Pick and Apply Colors to Artwork
8 Create Artwork using Gradients
9 Use Copy & Paste Identical, Stacking Order, Layers
10 Set Type and Create Custom Type
11 Create Artwork using Pen Tool Lines & Curves
12 Create Artwork Automatically using Live Trace
13 Create Artwork using Symbols Library
14 Create Artwork using Graphic Styles Library
15 Create Artwork using Brushes Library
16 Create Artwork using Gradient Mesh tool
17 Create Artwork using Effects Filters
18 Combine Artwork using Illustrator & Photoshop

Page 4
www.TrainingBrain.com
Adobe Illustrator – Just Show Me What To Do, Douglas Mitchell, 2008 All Rights Reserved©
Table of Contents
About the Trainer ................................................................................ 2Learning Illustrator .............................................................................. 3Table of Contents ................................................................................ 4Table of Contents ................................................................................ 5Set Key Preferences ........................................................................... 6Tear Away Tools, Tool Options, Preferences ...................................... 7Palettes, Dock, Nest, Save Workspace .............................................. 8Zoom tool, Hand tool, Views ............................................................... 9Vector vs. Pixels – It’s All About Resolution ........................................ 10Artwork Construction Scheme ............................................................ 11Construction & Selection .................................................................... 12Pen Tool – Drawing Lines ................................................................... 13Color – Pick, Apply, Save Palettes ...................................................... 14Gradient Tool ...................................................................................... 15Add, Subtract, Convert Anchors ......................................................... 16Pencil Tool, Eraser Tool ...................................................................... 17Resize Artwork, Scale Tool, Manual ................................................... 18Move, Rotate, Reflect, Shear .............................................................. 19Using Distort Filters ............................................................................ 20Eyedropper Pick & Apply Color........................................................... 21Paste Identical, Stack, Group ............................................................. 22Build Artwork Using Layers ................................................................ 23Duplicate Elements Quickly ................................................................ 24Essential Typographic Features .......................................................... 25Customized Type – Create Outlines ................................................... 26Pen Tool – Drawing Lines ................................................................... 27Pen Tool – Drawing Curves ................................................................ 28Pen Tool – Drawing Curves ................................................................ 29Pen Tool – Practice Drawing ............................................................... 30Average and Join Paths ...................................................................... 31Symbol Artwork – Default Palette ....................................................... 32Symbol Artwork – Edit & Customize ................................................... 33Symbol Artwork - Libraries Full ........................................................... 34Live Trace Photos, Artwork, Illustrations ............................................. 35Live Trace Photos, Artwork, Illustrations ............................................. 36Live Paint Bucket & Live Selection ...................................................... 37Align Objects Command ..................................................................... 38Illustrator Templates – Quick Start ...................................................... 39Paintbrush Tool – Load Brush Libraries .............................................. 40Paintbrush – Custom Brushes ............................................................ 41Paintbrush Tool Preferences ............................................................... 42

Page 5
www.TrainingBrain.com
Adobe Illustrator – Just Show Me What To Do, Douglas Mitchell, 2008 All Rights Reserved©
Table of Contents
Outlined Type Effect ........................................................................... 43Type Effects ........................................................................................ 44Knife Blade & Simplify ........................................................................ 45Type on Top & Bottom ........................................................................ 46Curve It & Bend It ............................................................................... 47Interlocking Rings ............................................................................... 48Hand Drawn Frames ........................................................................... 49Hand Drawn Artwork – Part I .............................................................. 50Hand Drawn Artwork – Part II ............................................................. 51Dividing Into 3D Shapes ..................................................................... 52Star Bursts .......................................................................................... 53Fill Patterns ......................................................................................... 54Objects to Perspective ........................................................................ 55Brushing Art ........................................................................................ 56Creating the Globe for Web Rails ....................................................... 57Creating Lines & Squares Effects ....................................................... 58Creating Multiple Effects ..................................................................... 59Patterns for Type & Backgrounds ....................................................... 60Scatter Brush Artwork ........................................................................ 61Separate Brush Artwork Into Pieces ................................................... 62Convert Lines to Custom Artwork ....................................................... 63Pattern Brush Frames Building ........................................................... 64Pattern Frames Building ..................................................................... 65Brushing Artwork ................................................................................ 66Hand Drawn Artwork .......................................................................... 67Hand Drawn Artwork .......................................................................... 68Hand Drawn Frames ........................................................................... 69Illustrator Filters .................................................................................. 70
Adobe Illustrator – Just Show Me What To Do, Douglas Mitchell, 2008 All Rights Reserved© Page 6
www.TrainingBrain.com
Set Key Preferences
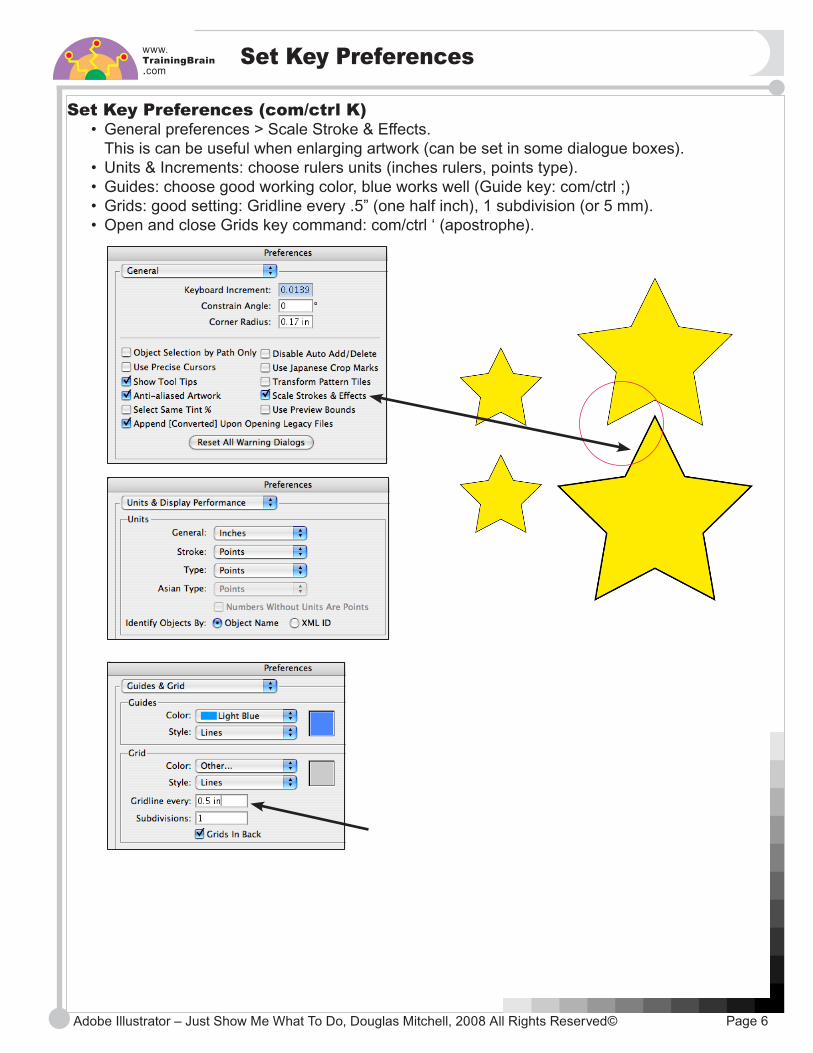
Set Key Preferences (com/ctrl K) • General preferences > Scale Stroke & Effects. This is can be useful when enlarging artwork (can be set in some dialogue boxes). • Units & Increments: choose rulers units (inches rulers, points type). • Guides: choose good working color, blue works well (Guide key: com/ctrl ;) • Grids: good setting: Gridline every .5” (one half inch), 1 subdivision (or 5 mm). • Open and close Grids key command: com/ctrl ‘ (apostrophe).

Adobe Illustrator – Just Show Me What To Do, Douglas Mitchell, 2008 All Rights Reserved© Page 7
www.TrainingBrain.com
Tear Away Tools, Tool Options, Preferences
1 Tear Away Tools • Click and hold on any tool with a triangle icon in the lower right corner, then (do not release mouse button) drag over to the end icon, then release.
2 Tool Preferences > Double Click On Tool • Double click on tool for preferences.
3 Use Tool Dialogue Box Before Drawing TOW Workflow Habit: Tool > Options > Work • Opt/alt click before drawing shapes to automatically bring up dialogue box. • Opt/alt also draws from the center of object at the click point, versus the default upper left.
4 Contact Sensitive Menus Work Well (ctrl click or right mouse) • Remember to use this for easy access.

Adobe Illustrator – Just Show Me What To Do, Douglas Mitchell, 2008 All Rights Reserved© Page 8
www.TrainingBrain.com
Palettes, Dock, Nest, Save Workspace
1 Open Working Palettes All palettes located under Window Menu • Window menu > palettes listed in alphabetical order. • Nest & dock palettes. • See page graphic for recommended palette configuration for easy workflow.
2 Nesting Palettes Nesting – Groups at Top • Palettes grouped together on top. • Drag palette tab to top of any palette. • Watch for the highlight around the entire palette, then release.
3 Docking Palettes Docking – Groups at Bottom • Palettes can be docked at the bottom of another palette. Drag a palette tab to the bottom of another palette • Watch for the highlight line at the bottom of palette only, then release. • Dock palettes in ANY sequence. Drag > see blue line release. • Dock palettes into GROUPS. Drag > see blue line next to another palette release.
4 Easy Hide & Show All Nests & Docks • Click on icon to open and close. • Palettes within a group are appear together.
3 Save Working Palettes as Personal Workspace • Window menu > Workspace > Save Workspace. • Name it with just a few letters to allow easy replacement.

Adobe Illustrator – Just Show Me What To Do, Douglas Mitchell, 2008 All Rights Reserved© Page 9
www.TrainingBrain.com
1 Zoom Tool • Click to Zoom up (see plus icon). • Zoom down, press opt/alt key. • Click hold drag a marquee, then release to zoom a specific area. • Double click on Zoom tool to zoom to 100% view.
2 Hand Tool • Hand tool moves artwork inside window. • Spacebar (hold down) gets hand tool. • Tip: Double click on Hand tool to fit file to screen size.
3 View Artwork – Preview & Outline • Toggle views between artwork and outline > com/ctrl Y.
4 New View • View menu > Window > New View. Allows fixed views on targeted areas.
Zoom Tool, Hand Tool, Views

Adobe Illustrator – Just Show Me What To Do, Douglas Mitchell, 2008 All Rights Reserved© Page 10
www.TrainingBrain.com
Illustrator Artwork is Created Using Vectors with Bezier Curves • Vector artwork uses math calculations and 800 points per inch to draw shapes. • Vector artwork can be scaled to any size without loss of resolution (bill board size). • Vector artwork uses Postscript to define itself and print. • Vector artwork is: resolution independent. • Maps drawn in vector can be sized on screen to any magnification. • Pixel (or raster) photos can be combined with vector artwork (use a separate layer). • Vector based artwork can be converted to pixels, called rasterize (Object menu > Rasterize).
Vector vs. Pixels – It’s All About Resolution
≈ Vectors are resolution independent.
≈ Re-size vectors small to large without loss of image quality.
≈ No image distortion with vectors when printed or displayed on screen.
≈ Pixels are resolution dependent.
≈ Re-size pixel photos stretches pixels larger to create image distortion when printed or displayed on screen.
≈ What happens when you stretch a figure drawn a rubber band.
Bezier Curves – it sounds like Perrier “water”

Adobe Illustrator – Just Show Me What To Do, Douglas Mitchell, 2008 All Rights Reserved© Page 11
www.TrainingBrain.com
Illustrator Artwork Is Constructed with Shapes, Lines, Curves1 Use Shapes Palette To Draw Primitive Shapes • Draw rectangles, squares, ovals, circles, polygons, triangles, stars, flares.
2 Draw Shapes Freehand • Select the desired shape tool, click and drag on the page, then release. • Drawing freehand the object always starts drawing from the upper left corner. • Tip: hold the opt/alt key down first, then draw to start from the center. • Shift to constrain rectangle to square, oval to circle.
3 Draw Shapes to Specific Size Using Dialogue Box • Click the desired shape tool. • Hold the opt/alt key down first, then click on the page and release. • The tool dialogue box will appear and draw from click point.
Artwork Construction Scheme
http://www.uic.edu/cuppa/udv/ai/index.htm
http://www.khulsey.com

Adobe Illustrator – Just Show Me What To Do, Douglas Mitchell, 2008 All Rights Reserved© Page 12
www.TrainingBrain.com
Standard Artwork Construction: Select, Fill, Stroke
1 Construction: Paths, Anchor Points, Center Point, Segments, Lines
2 Selection Tool (Black Arrow) • Selection tool always selects artwork as one unit or group. • Selection tool cannot select Individual anchor points.
3 Direct Selection Tool (White Arrow) • Direct Selection tool selects any one or more anchor points. • Hold down the shift key to select multiple anchors and lines. • Individual segments can to be deleted. Click on one segment, then press delete.
4 Important: Drag a Marquee Area to Select All or Some Parts Drag a marquee area to touch any or all lines and anchors for selection.
5 Lasso Selection Tool • Freehand draw and area to select all or parts of the artwork. Throw a wild west lasso.
Construction & Selection
Path (all sections of lines are called path)
Anchor points• Corner points that support lines or curves.• Anchors can be added or deleted.
Center point• Each objects has a center point for reference. • Use for marking the center with guides.
Segments & Lines•Individual lines between anchor points are segments. •All segments make the line. •Segments can be deleted one by one.

Adobe Illustrator – Just Show Me What To Do, Douglas Mitchell, 2008 All Rights Reserved© Page 13
www.TrainingBrain.com
1 Draw Straight Lines With Pen Tool (Folder > Ex 1: Site Lines.Ai) • Shortest distance between two points is a straight line. • Click first anchor point > release > click second anchor. • Tip: hold shift key to constrain line to 90 or 45 degrees by default, change degrees in preferences > general > constrain angle. • One single path (line) is an open path. • All paths connected by all anchors are called closed paths (like closing the gate of a corral). • Rectangles and squares drawn from respective tools automatically create closed paths.
2 Increase Stroke Weight & Line Caps & Joins in Stroke Palette
3 Apply A Custom Brush To A Line • Choose > Window > Brushes
Pen Tool – Drawing Lines

Adobe Illustrator – Just Show Me What To Do, Douglas Mitchell, 2008 All Rights Reserved© Page 14
www.TrainingBrain.com
Apply Color using Swatches – start with Appearance Palette • Window menu > Swatches and Appearance palettes. • Swatches palette > Open Swatch Library > choose a palette (ex: Beach). • Select a color in a palette, drag it into Swatches palette (or click New button). • Do not use Color palette to arbitrarily pick colors for commercial printing (use Trumatch). • Swatch colors are saved into the current file ONLY. • Apply color: select artwork, apply color as a stroke or fill (use Appearance palette). • Use the eye dropper tool to select colors from any source and apply to artwork (next page). • Tip: Drag a color from swatches onto object or click swatch while selected.
Color — Pick, Apply, Save Palettes
• Save Swatches Library – to keep all new colors appearing in all new and old documents. Otherwise, color appear in the current document ONLY. Remember to put colors into the main Swatches palette from any of the individual specialty color Swatches.

Adobe Illustrator – Just Show Me What To Do, Douglas Mitchell, 2008 All Rights Reserved© Page 15
www.TrainingBrain.com
Gradient Tool Creates Shading • Window menu > Gradient palette. • Draw a shape to be filled with Gradient (open or closed path). • Select a default gradient in Swatches palette. • Change direction of blend, click Gradient tool, click drag over object from different angles. • Select a Gradient swatch makes changes, then click NEW swatch icon. • Select a color break icon, Drag a new color onto slider (Do NOT click color swatch, drag) • Click under the Gradient bar to add a color break.
Gradient Tool

Adobe Illustrator – Just Show Me What To Do, Douglas Mitchell, 2008 All Rights Reserved© Page 16
www.TrainingBrain.com
Add, Subtract, Convert Anchor Points • Rectangle tool. Draw a square. Rulers > drag guides from horizontal and vertical. • Select Pen tool. • Add anchor points > move Pen over segment to see Plus sign icon, then click. Adds one anchor point between each existing anchor point. • Delete anchor points > move pen over an anchor point see Minus icon and click. • Convert an angle to a curve. • Hold option/alt click on an anchor point > see icon drag out (stay on pen tool). Note: Add Anchor Points Command. Object menu > Path > Add Anchor Points.
Add, Subtract, Convert Anchors

Adobe Illustrator – Just Show Me What To Do, Douglas Mitchell, 2008 All Rights Reserved© Page 17
www.TrainingBrain.com
Pencil Tool & Eraser Tool (important) • Select the Pencil tool, then select color and stroke weight first. • Double click on pencil tool to review and set options. • Turn OFF Fill New Pencil Strokes and Edit Select Paths. • Tolerance controls roundness and sharpness of the curve. • Smoothness: drag closely next to the curve to decrease the sharp edges. • Eraser tool: drag Eraser tool over stroke or fill area to erase.
Pencil Tool, Eraser Tool
Keep selectedAFTER RELEASE
Edit selectedALLOWS LINE EXTENSIONON THE FLYWATCH
the ICONS
Tip: Close path automatically while drawing: immediately after starting to draw, hold option/alt, then continue drawing. Upon mouse release, path will automatically close. Release mouse first, then release opt/alt.

Adobe Illustrator – Just Show Me What To Do, Douglas Mitchell, 2008 All Rights Reserved© Page 18
www.TrainingBrain.com
1 Scale One Object Or A Group Using The Scale Tool • Resize objects, type, lines, groups. • Note: cannot resize only one anchor point if selected. • Select object or group to be scaled (Selection tool). • Double click on Scale tool (or use contact menu). • Uniform keeps height/width equal proportions. • Scale always uses center point as preference scale point. • Non-Uniform scales each direction separately. • Scale strokes & effects to keep sizes proportional to new size. • Preview to test results, check Preview off/on. • Copy the selection, click Copy button (very useful).
2 Scale One Object Or A Group Manually • Click the Selection tool (black arrow) and select artwork. • Choose Window menu > Show Bounding Box. • Scale from center, press shift + opt/alt, then drag out. • Shift to constrain to proportion. • Copy artwork while scaling, press opt/alt.
Resize Artwork, Scale Tool, Manual

Adobe Illustrator – Just Show Me What To Do, Douglas Mitchell, 2008 All Rights Reserved© Page 19
www.TrainingBrain.com
Transform Commands • Transform objects, type, lines, groups. • Note: cannot resize only one anchor point if selected. • Select object or group to be transformed. • Object menu > Transform. • Move, Rotate, Reflect, Scale (use scale tool), Shear. • Once a transform has been finished, repeat action again > Transform Again (com/ctrl D).
Move, Rotate, Reflect, Shear
Adobe Illustrator – Just Show Me What To Do, Douglas Mitchell, 2008 All Rights Reserved© Page 20
www.TrainingBrain.com
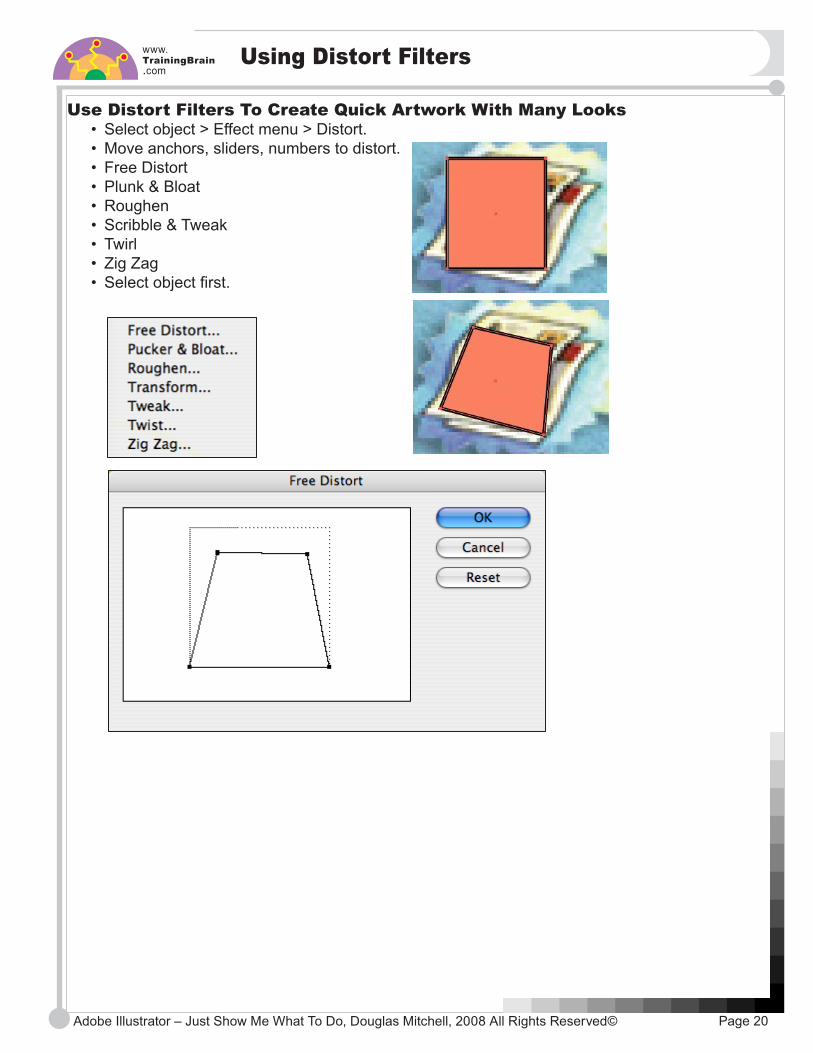
Use Distort Filters To Create Quick Artwork With Many Looks • Select object > Effect menu > Distort. • Move anchors, sliders, numbers to distort. • Free Distort • Plunk & Bloat • Roughen • Scribble & Tweak • Twirl • Zig Zag • Select object first.
Using Distort Filters

Adobe Illustrator – Just Show Me What To Do, Douglas Mitchell, 2008 All Rights Reserved© Page 21
www.TrainingBrain.com
Eye Dropper – Changes Colors without Selection • Click Eyedropper on any artwork (or pixel photo) to sample and load that color. • Opt/alt on any other artwork to apply color and options from Eyedropper. • Set Eyedropper options, double click tool. • Tip: Character and Paragraph Style can be a problem when turned on while working with type and type frames.
Eyedropper Pick & Apply Color

Adobe Illustrator – Just Show Me What To Do, Douglas Mitchell, 2008 All Rights Reserved© Page 22
www.TrainingBrain.com
1 Copy Paste In Front or In Back – Pastes In Identical Location • Copy artwork, then paste in identical location either in front or behind another object. • Default paste command, places artwork over and down. • Select artwork. • Choose File > Copy. • Choose File > Paste in Front or Paste in Back.
2 Arrange Objects in Stacking Order • Objects can be moved to front or back in relation to other objects. • Select the object (objects move based on current staking order). • Choose Object > Arrange > Choose.
3 Group Combines Objects Into One Unit • Group makes it easy to select, copy/paste and move many objects at once. • Use the selection arrow or marquee to select all elements to be grouped. • If you want ALL the objects selected on the page use com/ctrl A. • Group > Choose Object > Group (com/ctrl G). • Ungroup > select the group > choose Object > Ungroup.
Paste Identical, Stack, Group

Adobe Illustrator – Just Show Me What To Do, Douglas Mitchell, 2008 All Rights Reserved© Page 23
www.TrainingBrain.com
Create Artwork Using Shapes And Manage On Layers • Place photos on a layer to use as an artwork template (lock templates). • Hide and show layers to see other parts easily (click on/off eye icon). • Locking layers makes selection easier and other elements aren’t accidentally selected. Click on/off lock icon.
Build Artwork Using Layers

Adobe Illustrator – Just Show Me What To Do, Douglas Mitchell, 2008 All Rights Reserved© Page 24
www.TrainingBrain.com
Duplicate Elements Quickly
Duplicate Several Elements on a Layout Quickly1 Create artwork with the various Ai tools. • Use the transform tools to reposition and resize: rotate, scale, free transform.
2 Duplicate one or a group of elements to form the beginning group. • To duplicate several elements at once, they must be grouped first (or it only duplicates one at a time). • To group elements: select the elements, then choose object menu > group. • To release grouped elements > choose ungroup.
3 Make a copy of starting group to the end position. • Select the group. • Opt/alt drag group to end position to copy (shift to constrain).
4 Select both groups with black selection arrow.
5 Select the blend tool and set the options. • Double click on the blend tool. • Start with specified steps 3; orientation: align to path.
6 Blend the beginning group to the end group. • Click on any one anchor point of the top group. • Click on the EXACT SAME anchor point position of the bottom group.
7 Select all, then copy and paste to Photoshop.

Adobe Illustrator – Just Show Me What To Do, Douglas Mitchell, 2008 All Rights Reserved© Page 25
www.TrainingBrain.com
What You Need To Know
1 Character Palette > Window Menu > Type > Character • Choose the font, point size before typing. • Character key command: com/ctrl T.
2 Tracking • Tracking adjusts spacing between letters and words equally. • Select type. • Select a tracking number in the Characters palette. • + numbers create more space between characters. • – numbers create less space between characters. 3 Kerning • Kerning adjusts spacing between only two letters, characters (pairs) equally. • Click between two pairs. • Select an adjustment number in the Characters palette. • + numbers create more space between characters. • - numbers create less space between characters.
4 Leading (Line Spacing) • Leading adjusts distance (spacing) between lines. • Start with the point size on Auto.
5 Resize Type using Selection Tool > Drag Handles • Click Selection tool. • Select any one of the type frame handles with Selection tool and drag to resize. • Resize type by dragging any one of the handles. • Tip: Duplicate the type layer for possible use later. • Opt/alt drag to duplicate.
Essential Typographic Features
Adobe Illustrator – Just Show Me What To Do, Douglas Mitchell, 2008 All Rights Reserved© Page 26
www.TrainingBrain.com
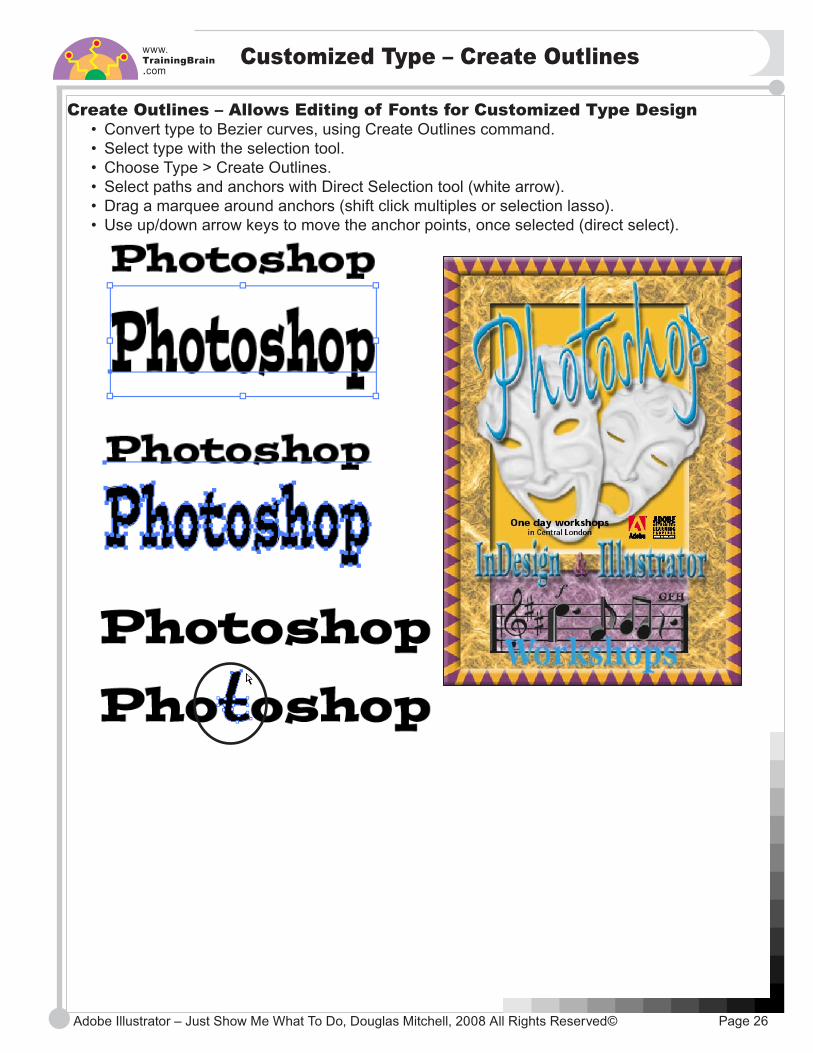
Create Outlines – Allows Editing of Fonts for Customized Type Design • Convert type to Bezier curves, using Create Outlines command. • Select type with the selection tool. • Choose Type > Create Outlines. • Select paths and anchors with Direct Selection tool (white arrow). • Drag a marquee around anchors (shift click multiples or selection lasso). • Use up/down arrow keys to move the anchor points, once selected (direct select).
Customized Type – Create Outlines

Adobe Illustrator – Just Show Me What To Do, Douglas Mitchell, 2008 All Rights Reserved© Page 27
www.TrainingBrain.com
1 Draw Straight Lines With Pen Tool (Folder > Ex 1: Site Lines.Ai) • Shortest distance between two points is a straight line. • Click first anchor point > release > click second anchor. • Tip: hold shift key to constrain line to 90 or 45 degrees by default, change degrees in preferences > general > constrain angle. • One single path (line) is an open path. • All paths connected by all anchors are called closed paths (like closing the gate of a corral). • Rectangles and squares drawn from respective tools automatically create closed paths.
2 Make Lines Larger – Increase Stroke Weight in Stroke Palette
3 Apply A Custom Brush To A Line • Choose > Window > Brushes
Pen Tool – Drawing Lines

Adobe Illustrator – Just Show Me What To Do, Douglas Mitchell, 2008 All Rights Reserved© Page 28
www.TrainingBrain.com
Pen Tool – Drawing Curves
1 Drawing Curves With The Pen Tool (Pen Tool Templates Folder) • Open sign wave template • Rules for drawing curves. • Click, hold, drag the handle in the direction of the curve, drag the handle to top of curve, plus a little more above the curve (1/ 4 inch). • As you finish dragging up, lay handle of the side of the curve (not inside, not outside). • Release the mouse. • Click the second anchor point, opposite (180º the existing point). • Drag in the opposite direction, straight down, to finish the curve. • Rule: one anchor point can support two curves: one on top and one on the bottom.
2 Sign Wave Curve Shows Predictable Behavior

Adobe Illustrator – Just Show Me What To Do, Douglas Mitchell, 2008 All Rights Reserved© Page 29
www.TrainingBrain.com
Pen Tool – Drawing Curves
Change Path Directions from Down Curve to Up Curve • Open corner template. • Change directions > the second curve starts down. • Rule: Option/alt click on the anchor point Drag in the direction of curve (changes direction of handle). • Practice changing directions.
Change Path from Straight Line to Curve • Change from straight line to a curve • Open Corner template. • Rule: Option/alt click changes from curve to straight line. Tip: Do not click hold drag.

Adobe Illustrator – Just Show Me What To Do, Douglas Mitchell, 2008 All Rights Reserved© Page 30
www.TrainingBrain.com
Bezier Curves & Lines Practice • Open Maze template > look for sign waves for points.
Pen Tool – Practice Drawing

Adobe Illustrator – Just Show Me What To Do, Douglas Mitchell, 2008 All Rights Reserved© Page 31
www.TrainingBrain.com
Average And Join Command • Select two anchor points (Tip: use direct selection arrow). • Before joining two open paths > average their distance • Average > Object > Path > Average or Join. • Join permanently closes an open path to become one. • Paths appear to be closed when averaged, they are not until Join command is used. • Choose Object > Path > Join (com/ctrl J).
Average and Join Paths

Adobe Illustrator – Just Show Me What To Do, Douglas Mitchell, 2008 All Rights Reserved© Page 32
www.TrainingBrain.com
Drag And Drop Symbols From Symbols Palette • Window menu > Symbols (opens default palette). • Symbols default palette only has just a few symbols. • Add symbols from the library (shown on next page). • Move mouse over any symbol (while selected on any tool). • Cursor will turn to hand-finger, then click drag and drop icon on page. • Resize symbols > shift key + click on resize handle, then drag out.
Symbol Artwork – Default Palette
Resize symbols > shift key + click on resize handle, then drag out.

Adobe Illustrator – Just Show Me What To Do, Douglas Mitchell, 2008 All Rights Reserved© Page 33
www.TrainingBrain.com
1 Customize Symbols (Change Color, Line Weight, Etc.) • What you see is what you get. Drag a Symbol and resize, transform, that’s it. • Color cannot be changed. Line weights cannot be changed. • Think of Symbols as capsules, ALL attributes are LOCKED, until released. • Symbol attributes are final artwork – Until Expand and Ungroup are applied. • Symbols can be UNLOCKED (expand and ungroup), then selected and completely edited. • See next step for unlock procedures.
2 Unlocking Symbols To Edit And Customize • Select the symbol with Selection tool. • Use this sequence of commands: 1) Click Break Link button on options tool bar (usually expands/ungroups in on click). 2) Expand: Object menu > Expand (both: Object and Fill). 3) Ungroup: Object menu > Ungroup. Note: Sometimes Expand/Ungroup will need to be applied to multiple groups.
3 Edit And Customize Symbols • Choose > Direct Selection tool or Selection Lasso tool (press shift to add, opt/alt to subtract). • Select artwork parts to be changed or customized (resize, stroke size, fill rotate, skew, etc.).
Symbol Artwork – Edit & Customize

Adobe Illustrator – Just Show Me What To Do, Douglas Mitchell, 2008 All Rights Reserved© Page 34
www.TrainingBrain.com
Use Fantastic Built-In Symbols From Symbols Library • Choose Symbols palette options triangle > open Symbol Library. • Drag symbol from the library to document page. • Place a symbol – automatically adds that symbol to default Symbol palette. • Resize symbols > shift key + click on resize proportionally. • Symbols from library ONLY apply to current palette in the current document. • Build a custom library – update items added to library > Save Symbol Library (repeatedly).
Symbol Artwork - Libraries Full

Adobe Illustrator – Just Show Me What To Do, Douglas Mitchell, 2008 All Rights Reserved© Page 35
www.TrainingBrain.com
Live Trace Photos, Artwork, Illustrations
Live Trace – Automatically Traces Photos, Artwork, Illustrations, Screen Captures, Scans, Drawings • Place any image into an Ai file on a separate layer (choose File > Place > Save). • Duplicate image layer, then trace on the duplicated layer (original will be totally modified). • Live Trace follows lines and contrasting areas to render a traced image. • See next page for Live Trace steps.
Original Photo Placed into Ai file
Live Trace Final ArtworkScalable to any size as vectors
Live Trace Outlines View
Continued next page

Adobe Illustrator – Just Show Me What To Do, Douglas Mitchell, 2008 All Rights Reserved© Page 36
www.TrainingBrain.com
Live Trace Photos, Artwork, Illustrations
Live Trace – Automatically Traces Photos, Artwork, Illustrations, Screen Captures, Scans, Drawings
From previous page • Place any image into an Ai file on a separate layer (choose File > Place > Save). • Duplicate image layer, trace on duplicated layer. • Live Trace will follow lines and contrasting areas to render a traced image.
Continued here • Choose Object menu > Live Trace > Tracing Options. • Turn on Preview > Tip: turn Preview off/on to review quickly. • Choose > Mode > Options. • Choose > Palette > Options. • Choose > View > Options. • Click Trace button to finish.

Adobe Illustrator – Just Show Me What To Do, Douglas Mitchell, 2008 All Rights Reserved© Page 37
www.TrainingBrain.com
Live Paint Bucket Fills Paint Attributes Of A Live Paint Group • Live Trace or create artwork. • Select artwork with selection tool. • Choose Object menu > Live Paint > Make (makes Live Paint Group). • Select fill color. • Select Live Paint Bucket and move over areas, then click to fill. • Select the Live Paint Selection tool, move over areas, then click to select. Hold shift to add, click again on a selected area to subtract from the selection. • Deselect artwork, selection tool and click outside the group. • Live Paint must stay a group to retain painted attributes.
Live Paint Bucket & Live Selection

Adobe Illustrator – Just Show Me What To Do, Douglas Mitchell, 2008 All Rights Reserved© Page 38
www.TrainingBrain.com
Align Objects Command
Align & Distribute Artwork Palette Commands • Window menu > Align. • Select two or more items to be aligned. • Click Align and Distribute icons. • Move cursor over Align icon, hold for one second to see description.

Adobe Illustrator – Just Show Me What To Do, Douglas Mitchell, 2008 All Rights Reserved© Page 39
www.TrainingBrain.com
Ai Templates Located In Applications Folder
Illustrator Templates – Quick Start

Adobe Illustrator – Just Show Me What To Do, Douglas Mitchell, 2008 All Rights Reserved© Page 40
www.TrainingBrain.com
Load Onboard Custom Brushes into Brushes Palette • Paintbrush > select a brush from Brushes palette. • Choose Window menu > Brushes (F5). • Choose Brush palette options triangle > Open Brush Libraries.
Paintbrush Tool – Load Brush Libraries

Adobe Illustrator – Just Show Me What To Do, Douglas Mitchell, 2008 All Rights Reserved© Page 41
www.TrainingBrain.com
Create Artwork Using Paintbrush and Brushes Palette • Choose Window menu > Brushes. • Double click Brush tool for Preferences (see next page). Check Keep Selected on. • Click on new brush icon, then choose new Calligraphic Brush. • Important: do not change any settings for the new brush yet. • Choose stroke weight and/or fill color. • Double click on new brush icon in Brush palette for brush options. • Turn Preview on to see live changes. Move angle icon to see brush slant. • Name the brush according to use.
Paintbrush – Custom Brushes

Adobe Illustrator – Just Show Me What To Do, Douglas Mitchell, 2008 All Rights Reserved© Page 42
www.TrainingBrain.com
Create Artwork Using Paintbrush And Brushes Palette • Set Paintbrush preferences. Double click the paintbrush tool. • Fidelity: number of pixels from 0.5 to 20 stroke can stray from the path to produce smooth curves. • Tip: higher value yields smoother stroke or curve. • Smoothness: a value from 0% to 100% for amount of stroke and curve smoothness. • Tip: higher value yields smoother stroke or curve. • Fill new brush strokes: applies the fill color while drawing. • Keep Selected Paths: keeps the path selected upon mouse releaase. • Edit Selected Paths: redraws a paths when the next stroke is started Within 12 (default pixels) of the original. The old line disappears, new one appears. Note: This can be a annoyance, depending on the type of project.
Paintbrush Tool Preferences

Adobe Illustrator – Just Show Me What To Do, Douglas Mitchell, 2008 All Rights Reserved©
Outlined Type – Sandwich1 Create type > Fill > No stroke > drag color onto type from palette. • Pizza > Fun House > 100 pts > Track -50.2 Choose a color.3 Copy type (com/ctrl C).4 Paste In Back to pen register behind copied element (com/ctrl B)..5 No Fill to new pasted type copy.6 Add larger stroke new pasted type copy > squishes out around edges.7 Apply new color (com/ctrl I (for ink). • Repeat the process to create more outlines.8 Copy type > com/ctrl C > Paste In Back > com/ctrl B. • Fill is now turned off from the last changed copy.9 Add larger stroke new pasted copy > new color (com/ctrl I (for ink).
Page 43
www.TrainingBrain.com
Outlined Type Effect

Adobe Illustrator – Just Show Me What To Do, Douglas Mitchell, 2008 All Rights Reserved©
Grunge Type Affect1 Create type (com/ctrl T).2 Scale type as custom size.3 Create Outlines > Type menu > Create Outlines.4 Select type > solid black arrow.5 Filter > Distort > Roughen > 1% - 96 - Corner.
Bend Type Around A Curve (Not On It)1 Create type.2 Create Outlines > Type menu > Create Outlines.3 Make a guide oval to see bend. • Create oval > 1 pt. stroke > View menu > Guides > Make Guides.4 Select one letter at a time.5 Scale tool > click on top of letter form > shift to constrain straight down.6 Direct select tool > marquee anchors > use arrow keys to move up/down.7 Repeat this action for each letter form.
Create Pattern Fill1 Create a star > under the oval tool.2 Create a background > place star on top of background.3 Select both star and background (show bounding box).4 Define as pattern > Edit menu > Define Pattern.5 Select letters as desired > Fill > New Pattern. • Letters with multiple elements, such as the a, must be turned to compound.
Page 44
www.TrainingBrain.com
Type Effects
Adobe Illustrator – Just Show Me What To Do, Douglas Mitchell, 2008 All Rights Reserved©
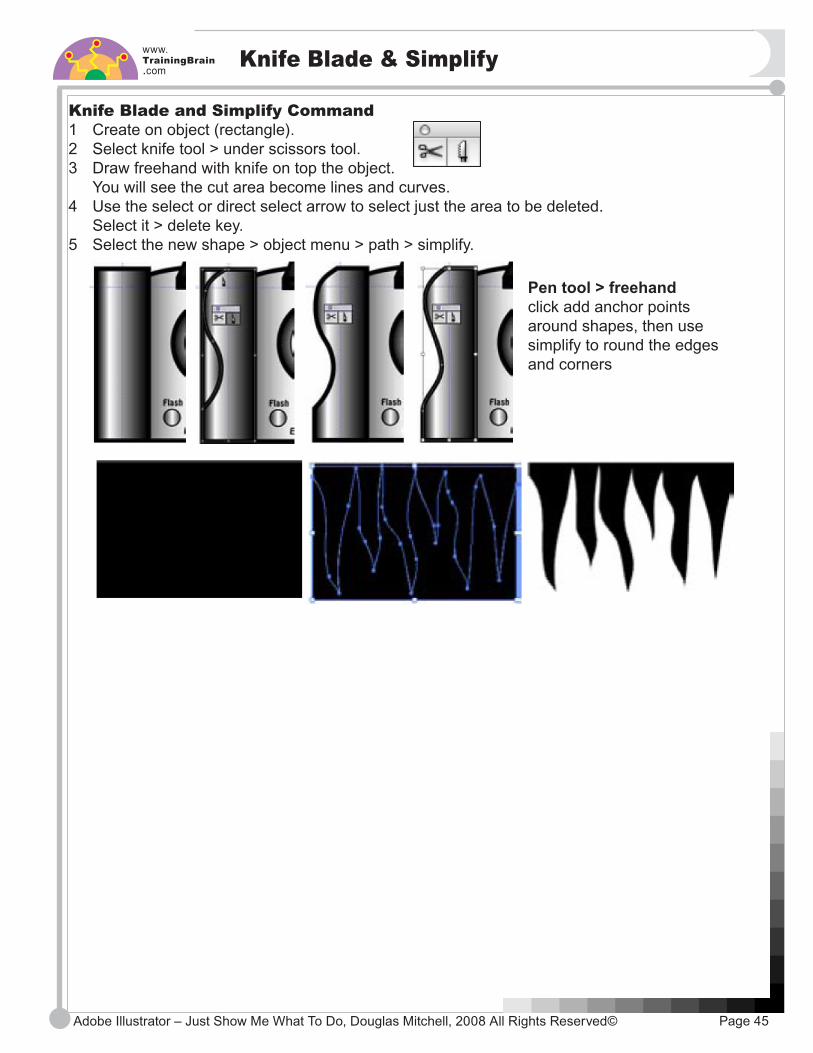
Knife Blade and Simplify Command1 Create on object (rectangle).2 Select knife tool > under scissors tool.3 Draw freehand with knife on top the object. You will see the cut area become lines and curves.4 Use the select or direct select arrow to select just the area to be deleted. Select it > delete key.5 Select the new shape > object menu > path > simplify.
Pen tool > freehand click add anchor points around shapes, then use simplify to round the edges and corners
Page 45
www.TrainingBrain.com
Knife Blade & Simplify

Adobe Illustrator – Just Show Me What To Do, Douglas Mitchell, 2008 All Rights Reserved© Page 46
www.TrainingBrain.com
Type on Top & Bottom
Adobe™ llustrator™—Turn Up the Creative Force© Page 7

Adobe Illustrator – Just Show Me What To Do, Douglas Mitchell, 2008 All Rights Reserved© Page 47
www.TrainingBrain.com
Curve It & Bend It
Adobe™ llustrator™—Turn Up the Creative Force© Page 9

Adobe Illustrator – Just Show Me What To Do, Douglas Mitchell, 2008 All Rights Reserved©
Interlocking Rings1 Create three circles, each on top of each other.2 Select the direct-selection tool (white arrow parts/black arrow whole).3 Marquee select only the top anchor point of the first circle ring.4 Cut this selection, which is the top half > Paste In Front (now it over the other). 5 Repeat the process for the lower half of the third ring.6 Place into Photoshop as desired (add salt) and apply layer effects drop shadow and bevel/emboss (or just get creative).
Page 48
www.TrainingBrain.com
Interlocking Rings

Adobe Illustrator – Just Show Me What To Do, Douglas Mitchell, 2008 All Rights Reserved©
Calligraphy Brush Hand Drawn Frames1 Create frames using a calligraphic brush on separate layer.2 Create a custom brush using “live views.”3 Create a new brush from brushes palette > click on new brush icon. Important: do not set any initial settings for the new brush.4 Select calligraphic brush and select new brush.5 Double click on new brush in brushes palette to see live view. • Move sliders > turn Preview On.
6 Place a photo into the frame • Copy/paste new frame into Photoshop (or place the .eps file). • Magic wand (32 default), then click inside frame on the layer to create selection. • Expand selection > select menu > modify > expand > 2-4 pixels. Keep selection live! • Select and copy the desired image. • Choose File > Paste-Into.
Page 49
www.TrainingBrain.com
Hand Drawn Frames

Adobe Illustrator – Just Show Me What To Do, Douglas Mitchell, 2008 All Rights Reserved©
Create Rays > Objects Around a Circle1 Create a 3 inch circle > opt/alt click with circle tool. • Create guides from ruler through the center horizontal and vertical (com/ctrl R).2 Create rays. • Polygon shape tool > type down arrow while selected to get triangle.
• Pen tool > click anchors to create first ray at top of the circle. Close the path > select the path.3 Reshape triangle creatively> selection arrow> use handles.4 Copy rays around circle. • Select the ray. • Rotate tool > option click on center of circle > rotate dialogue box appears. • Type in needed degrees (30 for this example) > Copy from dialogue box. (360 degrees divided by number of desired elements = 360/12 = 30 degrees.) • Duplicate (11) more around the circle (com/ctrl D). • Select > Group > Copy/paste rays to separate layer > name it. • Tip: Layer elements make for easy change to artwork and apply filters later. when dragging into Photoshop.5 Resize rays for contrast > direct selection arrow > drag out.
Continued next page
Page 50
www.TrainingBrain.com
Hand Drawn Artwork – Part I

Adobe Illustrator – Just Show Me What To Do, Douglas Mitchell, 2008 All Rights Reserved©
Creating the Hand Drawn look1 Create smaller rays using a calligraphic brush on separate layer.2 Create a custom brush using “live views.”3 Create a new brush from brushes palette > click on new brush icon. Important: do not set any initial settings for the new brush.4 Select calligraphic brush and select new brush.5 Double click on new brush in brushes palette to see live view. • Move sliders > turn Preview On.
3 Creative Flare on Large Rays > Filter Magic. • Filter menu > distort > roughen. • Filter menu > distort > zig zag > scribble & tweak.4 Option: Select individual parts of the artwork. • Vary line weights and angles and try other magic filters.5 Create Inner Circle (opt/alt draw from center out). • Draw circle > stroke only. • Double click on calligraphy brush to adjust.
6 Sun Face needs a hand painted look. Use various calligraphy brush sizes. Free Distort filter > select parts of face > Filter menu > Distort > Free Distort. Reshape tool > under scale tool > select artwork first > pull to reshape paths. Tip: Select Stray Points before printing and delete them. Important: Do this before printing to avoid printer imaging errors. Select All and group (com/ctrl G) before copy/paste to Photoshop. Convert all type to outlines before copy/paste (type menu > create outlines).
Page 51
www.TrainingBrain.com
Hand Drawn Artwork – Part II

Adobe Illustrator – Just Show Me What To Do, Douglas Mitchell, 2008 All Rights Reserved©
Slicing Shapes Using Pathfinder Divide1 Star tool > key up/down arrows while still selected (under oval tool ). • Up and down arrows increase/decrease number of sides.
2 Create horizontal/vertical guides from rulers (com/ctrl R>drag guides out).3 Create cross section guides > Pen tool > stroke > no fill.5 Select all lines and object > selection arrow.6 Filter menu > Pathfinder > Divide.7 Direct select every other cell with same color.8 Import to Photoshop > copy/paste.9 Tip: Create colors using Trumatch for CMYK or use RGB mode.
Page 52
www.TrainingBrain.com
Dividing Into 3D Shapes

Adobe Illustrator – Just Show Me What To Do, Douglas Mitchell, 2008 All Rights Reserved©
Circle Bursts1 Create a circle.2 Select circle.3 Add anchor points > object menu > path > add anchor points. • Repeat filter to get more anchor points > allows for more effect.4 Filter menu> distort > punk & bloat.5 Filter variation > stylize > bloat > and try other distort filters.
Object Twists1 Create a Circle.2 Select circle.3 Add anchor points > object menu > path > add anchor points. • Repeat filter to get more anchor points > allows for more effect.4 Filter > distort > zig zag.
Page 53
www.TrainingBrain.com
Star Bursts

Adobe Illustrator – Just Show Me What To Do, Douglas Mitchell, 2008 All Rights Reserved©
Creating Fill Patterns1 Create patterns within a one inch square area.2 Create guides for one inch square area. • Create patterns within one inch square area. • Scale down for smaller sizes. • Tip: Zoom in on the area while working.3 Patterns work best using simple shapes. • Too many anchor points may cause printing problems. • Errors show up as limit check error messages. 4 Gradients and masks may not be defined as patterns.5 Bounding stroked rectangle will show in the pattern. • Add stroke to create blocks, if desired.6 Select all artwork to be part of the pattern.7 Define pattern > Edit menu > Define pattern (or drag artwork to swatches palette).8 Create new artwork and choose fill > select new pattern in Swatches palette.9 Define pattern position within the element > direct selection tool > move element.
Page 54
www.TrainingBrain.com
Fill Patterns

Adobe Illustrator – Just Show Me What To Do, Douglas Mitchell, 2008 All Rights Reserved©
Objects to a Perspective1 Create a perspective grid > draw lines > make guides. • Tip: control+shift double click on grid highlights to delete. • Tip: control+shift click drag on grid highlights to move guide. • Tip: com/ctrl tab toggles between select and direct select arrows.2 Create object inside grid > adjust anchors to grid. • Layer for perspective.3 Copy object to other side (select+shift+option drag).4 Adjust anchors to grid on opposite side.5 Select tiles > group (com/ctrl G).6 Scale tool > option click on vanishing point for scale dialogue box. • Start at 80% click copy button to make first copy to vanish point.7 Maintain selection of elements.8 Duplicate > com/ctrl D > as many times as needed to vanish to point.9 Create drop shadow as a creative option. • Click on perspective layers > select all> copy> paste in back. • Use arrow keys to move as desired > paint accordingly.10 Import to Photoshop. • Save file as file .ai or eps > open in Photoshop > creates layer transparency file. • Com/ctrl C > paste layer into Photoshop (takes on current file resolution). Note: this works well with most files. If artwork is very complex open in Photoshop. • Imported artwork creates a new transparent layer. • Use transform command to scale or distort object (com/ctrl T).
Page 55
www.TrainingBrain.com
Objects to Perspective

Adobe Illustrator – Just Show Me What To Do, Douglas Mitchell, 2008 All Rights Reserved©
Brush Tool & Options1 Place > Sunflower image on ai layer for tracing > lock/hide/show as needed.2 Brush tool > dip your pen in the ink > com/ctrl I > establish a drawing color. • Create new layer for petals (F7). • Brushes palette > open > new. • Calligraphic Brush Library > Window > Brush Library. • Calligraphic Brush for flower petals > 4 pts, 90 degrees, 20% roundness. • Close or overlap petal ends as close as possible.3 Pencil tool > stroke 1 point > no fill > same color > for detail on petal.4 Select > both Calligraphy strokes and Pencil strokes > Group > Copy.5 Paste > to Photoshop > as pixels > keep as separate layer name petals.
6 Open Sunflower image > drag & drop as layer into Photoshop • Shift constrain > before dragging > Pin Register to center of receiving file. • Duplicate petals layer > use arrows to offset slightly. • Motion Blur 11 > add Layer Effects drop shadow.7 History palette > New Snapshot > use pull down > choose from current layer. • Select History brush > go to History palette > choose Snapshot just taken. • History Brush options > double click on History Brush.
8 Create new layer to create Sun flower > place layer UNDER the flowers. • History brush > Sun Flower under the flowers. • Smaller brushes > at ends of flowers.9 Try other filters > Motion Blur > petals > overlay untouched petals for detail.
Page 56
www.TrainingBrain.com
Brushing Art

Adobe Illustrator – Just Show Me What To Do, Douglas Mitchell, 2008 All Rights Reserved©
Creating Globe from Circle1 Create vertical and horizontal guides intersecting at middle page. • Drag guides from ruler > com/ctrl R. • Change guides to dotted lines > prefs > guides > dots pull down > com/ctrl K. 2 Create a 3 inch circle > select ellipse tool > opt/alt click at guides intersection to get dialogue box > type in 3 inches > stroke 3 points. 3 Create 3 horizontal guides 3/8 inch apart on upper globe > com/ctrl R.4 Delete bottom of circle > Direct select bottom half of circle > delete.
5 Create multiple globe transverse lines. • Select upper half of circle > copy > Paste in FRONT. • Drag middle anchor down to form each globe line. • Repeat copy/paste in front then pull down process each globe line.6 Create bottom half of globe from the top half. • Select all globe lines > select reflect tool > select bottom middle reference point > > drag to reflect > shift to constrain > opt/alt to copy while selected.7 Select All (com/ctrl A) > copy/paste into a Photoshop file > creates transparent layer.
Page 57
www.TrainingBrain.com
Creating the Globe for Web Rails

Adobe Illustrator – Just Show Me What To Do, Douglas Mitchell, 2008 All Rights Reserved©
Creating Squares of Various Sizes1 Create one square first > select tool > select > option/alt drag release copy > to make multiple copies. • Fill and/or stroke for creative variations.2 Change square sizes with scale tool. • Select tool > select square > double click on scale tool > vary scaling. • Tip: Toggle between scale and selection > com/ctrl key.
Creating Horizontal Lines1 Create one line with pen tool > 3 points black stroke.2 Select tool > select line > drag with sht+option/alt to make second copy below. 3 Select both lines.4 Blend tool > double click on tool > set number of steps in pull down > click OK.
5 Blend tool > click on one anchor point > choose number > click OK.6 Select upper left corner of line at top and the upper left corner on the bottom. When using the blend tool to create symmetrical objects, always click the object on top and the bottom at the same anchor point location (upper left, upper left).
Page 58
www.TrainingBrain.com
Creating Lines & Squares Effects

Adobe Illustrator – Just Show Me What To Do, Douglas Mitchell, 2008 All Rights Reserved©
Creating Globe Effects – Lines, Squares, Image1 Globe > duplicate layer for more globes. • Add layer effects to pasted globe > drop shadow and bevel & emboss.
2 Computer Artwork Computer is a Font > DF Commercial > shift F (from Agfa). • Any clip art of scan would work.
3 Line & Squares • Copied/pasted from Illustrator. • Creates auto layer transparency. • Lines and square layers are duplicated, blurred with opacities, then placed for effect.
4 Wave Effects • Lines copied to multiple layers. • Wave filter applied to create the wavy effect. • Filter > Distort > Wave.
4. Background Texture is a Filter > Render > Clouds • Tip: Render uses background color to mix up colors. • Magic Wand > select areas > copy to layer (com/ctrl J). • Colorize new areas > Hue & Saturation > click colorize box.
5 Digital Board Image > placed behind globe • Multiple copies > colorize for effect.
Page 59
www.TrainingBrain.com
Creating Multiple Effects

Page 60
www.TrainingBrain.com
Adobe Illustrator – Just Show Me What To Do, Douglas Mitchell, 2008 All Rights Reserved©
Creating Fill Patterns In Illustrator1 Create patterns within a one inch square area.2 Create guides for one inch square area. • Create patterns within one inch square area. • Scale down for smaller sizes. • Tip: Zoom in on the area while working.3 Patterns work best using simple shapes. • Too many anchor points may cause printing problems. • Errors show up as limit check error messages. 4 Gradients and masks may not be defined as patterns.5 Rectangles bounding around pattern artwork will show in the pattern. • Add stroke to create blocks, if desired.6 Select all the artwork that will be in the pattern.7 Define pattern > Edit menu > Define pattern (or drag artwork to the swatches palette).8 Create new artwork and choose fill > select new pattern in Swatches palette.9 Define pattern position within the element > direct selection tool > move element.
Patterns for Type & Backgrounds

Page 61
www.TrainingBrain.com
Adobe Illustrator – Just Show Me What To Do, Douglas Mitchell, 2008 All Rights Reserved©
Scatter Brush Artwork
Create Artwork Immediately Using Default Scatter Brushes1 Draw Artwork With A Scatter Brush • Choose Window menu > Brushes (palette). • Show All brushes under options (this is ON by default). • Select the paintbrush tool (don’t change setting yet). • Select a scatter brush. Double click on the brush to check the type of brush. • Click once to draw only one scatter. • Drag to draw more than one scatter. • Draw a shape or path and select a scatter brush.
2 Modify How The Scatter Brush Draws • Double click on the scatter brush for options. • Turn ON the preview. • Experiment with: size, spacing, scatter, rotation, rotation relative to path or page. • Check the preview OFF/ON to see changes. • Click Apply to Strokes to update the artwork change.
3 Change Colorization. • Select a Method. • None: defaults keeps current color originally assigned. • Tint: alllows stoke and fill. • Stroke paints the brush. • Fill paints a shape.
Open More Brushes
Brushes > Choose Window> Brushes Libraries

Page 62
www.TrainingBrain.com
Adobe Illustrator – Just Show Me What To Do, Douglas Mitchell, 2008 All Rights Reserved©
Separate Brush Artwork Into Pieces
Separate Scatter Brush Artwork Into Individual Pieces1 Draw Artwork With Scatter Brush (More On Cd) • Choose Window menu > Brushes (palette). • Show All brushes under options (this is ON by default). • Select the paintbrush tool (don’t change setting yet). • Select a scatter brush. Double click on the brush to check the type of brush. • Click once to draw only one scatter. • Drag to draw more than one scatter. • Draw a shape or path and select a scatter brush.
2 Separate Scatters Into Individual Pieces • Select the Scatter brush artwork just drawn (keep selected). • Choose Object menu > Expand Appearance (keep selected). • Choose Object menu > Ungroup. (this separates them into individuals) • Choose Object menu > Expand (expand both stroke and fill to further tweak).
Expand AppearanceSelect
Individual Pieces Expand: to tweak artwork

Page 63
www.TrainingBrain.com
Adobe Illustrator – Just Show Me What To Do, Douglas Mitchell, 2008 All Rights Reserved©
Straight Lines Are Drawn With The Pen Tool1 Draw A Straight Line • Shortest distance between two points is a straight line. • Click first anchor point > release > click second anchor. • Tip: hold the shift key to constrain line to 90 or 45 degrees. • One single path (line) is an open path. • All paths connected by all anchors are called closed paths (like closing the gate of a corral). • Rectangles and squares drawn from respective tools automatically contain closed paths.2 Make Lines Larger By Using A Stroke
3 Apply A Custom Brush To A Line • Choose > Window > Brushes (or default brush libraries)
Convert Lines to Custom Artwork
Default
Brushes
Palette

Page 64
www.TrainingBrain.com
Adobe Illustrator – Just Show Me What To Do, Douglas Mitchell, 2008 All Rights Reserved©
Build Striking Frames From (2) Creative Pattern Brush Tiles1 Create a grid: use a 1/2 inch x 1/2 inch grid ONLY • Pull ruler guides out from inside the ruler to create the 1/2 inch grid (lock the guides).
2 Create tile artwork inside the grid square ONLY • Measurement must be exact: use Opt/alt click with the shape tools to set precise dimensions. • Align any overlapping pieces exactly along the sides of tiles; any overlap outside the grid will draw crooked frames. • Create (2) frame tiles: a side tile and an outer corner tile.
Pattern Brush Frames Building
Outer corner tile
Side tile
Visualize what the frame will look like; draw the top (3) tiles and the (2) side tiles.
Continued next page

Page 65
www.TrainingBrain.com
Adobe Illustrator – Just Show Me What To Do, Douglas Mitchell, 2008 All Rights Reserved©
Build Striking Frames From Only (2) Creative Pattern Brush Tiles3 Create A Pattern Swatch For Each Tile Using Define Pattern Command • Select all the artwork within each one tile (not direct select). • Choose Edit menu > Define Pattern (the new pattern will appear in the brushes palette). • Use a naming scheme to define swatches: this helps when creating a new pattern brush: example: BorderTriangleSide and BorderTriangleOuterC
4 Create A New Pattern Brush (New Pattern Brush Swatches) The pattern brush will serve to build a frame when applied to a rectangle. • Open the brushes palette. • Choose > new brush from palette options pop-up.
• Click the side tile box far left, then select the side tile from the swatches list. • Click the outer corner next left box, then select the outer corner from the swatches list. • Size: start with defaults (experiment later). • Flip: start with defaults (experiment later). • Fit: start with stretch to fit (default). • Click OK to create the Pattern Brush. • Draw a rectangle, then select this new pattern brush from the brushes palette.
Pattern Frames Building

Page 66
www.TrainingBrain.com
Adobe Illustrator – Just Show Me What To Do, Douglas Mitchell, 2008 All Rights Reserved©
Brushing Artwork
Brush Tool & Options1 Place > Sunflower image on ai layer for tracing > lock/hide/show as needed.2 Brush tool > dip your pen in the ink > com/ctrl I > establish a drawing color. • Create new layer for petals (F7). • Brushes palette > open > new. • Calligraphic Brush Library > Window > Brush Library. • Calligraphic Brush for flower petals > 4 pts, 90 degrees, 20% roundness. • Close or overlap petal ends as close as possible.3 Pencil tool > stroke 1 point > no fill > same color > for detail on petal.4 Select > both Calligraphy strokes and Pencil strokes > Group > Copy.5 Paste > to Photoshop > as pixels > keep as separate layer name petals.
6 Open Sunflower image > drag & drop as layer into Photoshop • Shift constrain > before dragging > Pin Register to center of receiving file. • Duplicate petals layer > use arrows to offset slightly. • Motion Blur 11 > add Layer Effects drop shadow.7 History palette > New Snapshot > use pull down > choose from current layer. • Select History brush > go to History palette > choose Snapshot just taken. • History Brush options > double click on History Brush.
8 Create new layer to create Sun flower > place layer UNDER the flowers. • History brush > Sun Flower under the flowers. • Smaller brushes > at ends of flowers.9 Try other filters > Motion Blur > petals > overlay untouched petals for detail.
Page 67
www.TrainingBrain.com
Adobe Illustrator – Just Show Me What To Do, Douglas Mitchell, 2008 All Rights Reserved©
Hand Drawn Artwork
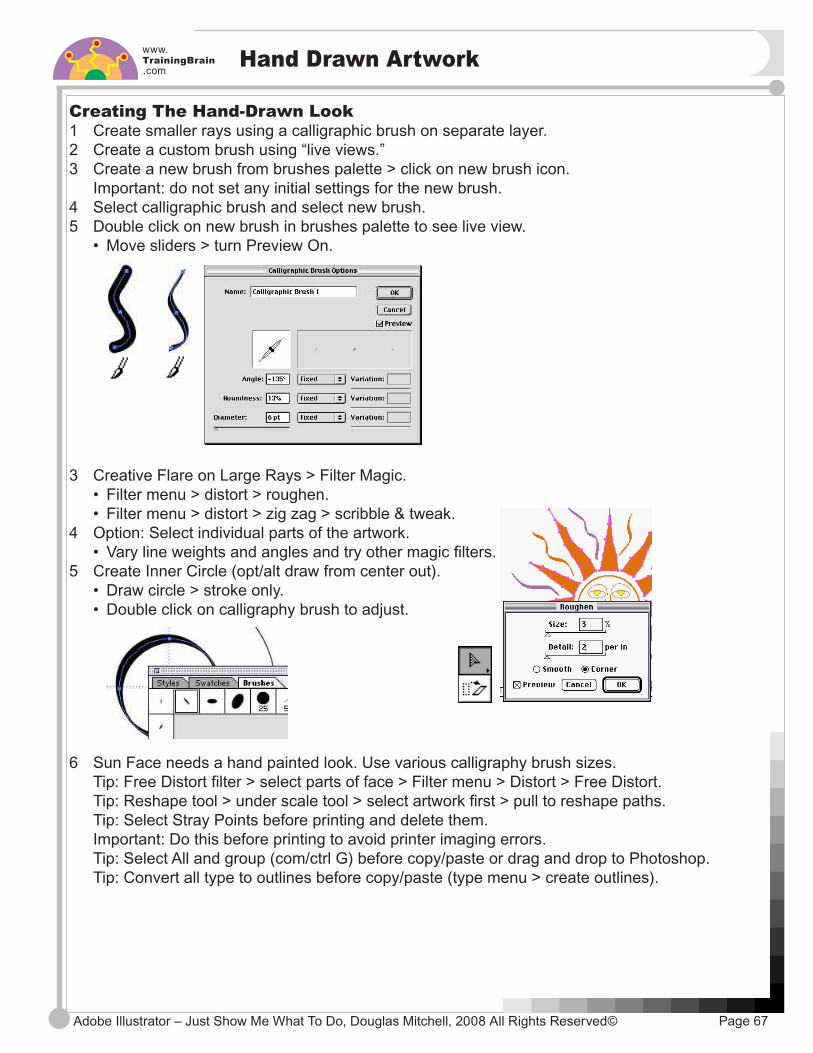
Creating The Hand-Drawn Look1 Create smaller rays using a calligraphic brush on separate layer.2 Create a custom brush using “live views.”3 Create a new brush from brushes palette > click on new brush icon. Important: do not set any initial settings for the new brush.4 Select calligraphic brush and select new brush.5 Double click on new brush in brushes palette to see live view. • Move sliders > turn Preview On.
3 Creative Flare on Large Rays > Filter Magic. • Filter menu > distort > roughen. • Filter menu > distort > zig zag > scribble & tweak.4 Option: Select individual parts of the artwork. • Vary line weights and angles and try other magic filters.5 Create Inner Circle (opt/alt draw from center out). • Draw circle > stroke only. • Double click on calligraphy brush to adjust.
6 Sun Face needs a hand painted look. Use various calligraphy brush sizes. Tip: Free Distort filter > select parts of face > Filter menu > Distort > Free Distort. Tip: Reshape tool > under scale tool > select artwork first > pull to reshape paths. Tip: Select Stray Points before printing and delete them. Important: Do this before printing to avoid printer imaging errors. Tip: Select All and group (com/ctrl G) before copy/paste or drag and drop to Photoshop. Tip: Convert all type to outlines before copy/paste (type menu > create outlines).

Page 68
www.TrainingBrain.com
Adobe Illustrator – Just Show Me What To Do, Douglas Mitchell, 2008 All Rights Reserved©
Hand Drawn Artwork
Create Rays Or Objects Around A Circle1 Create a 3 inch circle > opt/alt click with circle tool. • Create guides from ruler through the center horizontal and vertical (com/ctrl R).2 Create rays. • Polygon shape tool > type down arrow while selected to get triangle.
• Pen tool > click anchors to create first ray at top of the circle. Close the path > select the path.3 Reshape triangle creatively> selection arrow> use handles.4 Copy rays around circle. • Select the ray. • Rotate tool > option click on center of circle > rotate dialogue box appears. • Type in needed degrees (30 for this example) > Copy from dialogue box. (360 degrees divided by number of desired elements = 360/12 = 30 degrees.) • Duplicate (11) more around the circle (com/ctrl D). • Select > Group > Copy/paste rays to separate layer > name it. • Tip: Layer elements make for easy change to artwork and apply filters later. when dragging into Photoshop.5 Resize rays for contrast > direct selection arrow > drag out.
Continued next page

Page 69
www.TrainingBrain.com
Adobe Illustrator – Just Show Me What To Do, Douglas Mitchell, 2008 All Rights Reserved©
Calligraphy Brush Hand-Drawn Frames1 Create frames using a calligraphic brush on separate layer.2 Create a custom brush using “live views.”3 Create a new brush from brushes palette > click on new brush icon. Important: do not set any initial settings for the new brush.4 Select calligraphic brush and select new brush.5 Double click on new brush in brushes palette to see live view. • Move sliders > turn Preview On.
Hand Drawn Frames
6 Place a photo into the frame • Copy/paste new frame into Photoshop (or place the .eps file). • Magic wand (32 default) > click inside frame on the layer to create selection. • Expand selection > select menu > modify > expand > 2-4 pixels. Keep selection live! • Select and copy the desired image. • Choose File > Paste-Into.

Page 70
www.TrainingBrain.com
Adobe Illustrator – Just Show Me What To Do, Douglas Mitchell, 2008 All Rights Reserved©
Illustrator Filters
plugins for design and illustrationAll new for Adobe® Illustrator® CS2!
free demos, online tutorials
and online purchasingat www.hotdoor.com
toll-free 888.236.9540
90-day money-backguarantee
www.hotdoor.com
Student discounts available
CAD + isometric drawing made easyDraw in any scale in 2D or isometric views, view or edit object measurements, pull out smart labels, draw or project art as isometric objects, adjust view angles,and dimension anything - just like Illustrator tools!
$249 full/$149 upgrade (from CT3)
N
Drag & dropSymbols for Architecture, Building Services, Landscaping, Electrical, Mechanical, Fasteners & General
$89 per set or $359 completeSimple!
Multiple page powerfor Illustrator + pdf export
$99
Abracadabra...vanishing linesRealistic drawing tools with adjustablebackground grids and projection toolsthat create 1, 2 or 3 pt perspectiveobjects with complete artistic control
$179
Fill patterns134 swatch patternsin Illustrator format for easy editing. Includeswood grain, stipples,brick, stone, and more!
$89
Shoes
Shoes
Shoes
ShS
hoes
DXF/DWG/IGESConvert files withconfidence. Importand export CAD fileswith enhanced optionsand data preservation.
$199 (Windows only for CS2)
Make an impactTest your box designs with this prototyping plugin. Preview thefold-up animation and adjust artwork to perfection. (CS only)
$379
NEWVERSION
NEWVERSION
Code Zebra Symbols
Hot Door CADtools 4
AppliCraft CADgate 2
Hot Door Perspective 2
Hot Door MultiPage 3
Hot Door CADpatterns
Comnet FoldUP! 3D