Embed Size (px)
Citation preview

1 Services Home
2 Job Status
3 Touch Screen
4 Start
5 Clear All
6 Stop
1
2
3
4
5
6
Control panel
OR
Document feeder option Document glass option
Load your documents face up in the document feeder input tray. Adjust the guide to just touch the documents 1. OR lift up the document
feeder. Place the document face down onto the document glass and register it to the arrow at the top left corner. Close the document feeder.
Press the 2. Clear All (AC) button to cancel any previous screen programming selections.
Press the 3. Services Home button on the Control Panel.
Select the 4. Copy button on the touch screen.
If required, select the 5. Copy tab. This is usually the active tab when the Copy service opens.
Select any options required.6.
Enter the number of prints required using the numeric keypad on the Control Panel.7.
Press the 8. Start button on the Control Panel to scan the original.
©2012 Xerox Corporation. All rights reserved. XEROX®, XEROX and Design® are trademarks of Xerox Corporation in the U.S. and/or other countries.
IG120003
For more informationPlease refer to: user guides - available
via
http://www.support.xerox.com
How to make a copy
Xerox® WorkCentre™ 5845/5855/5865/5875/5890
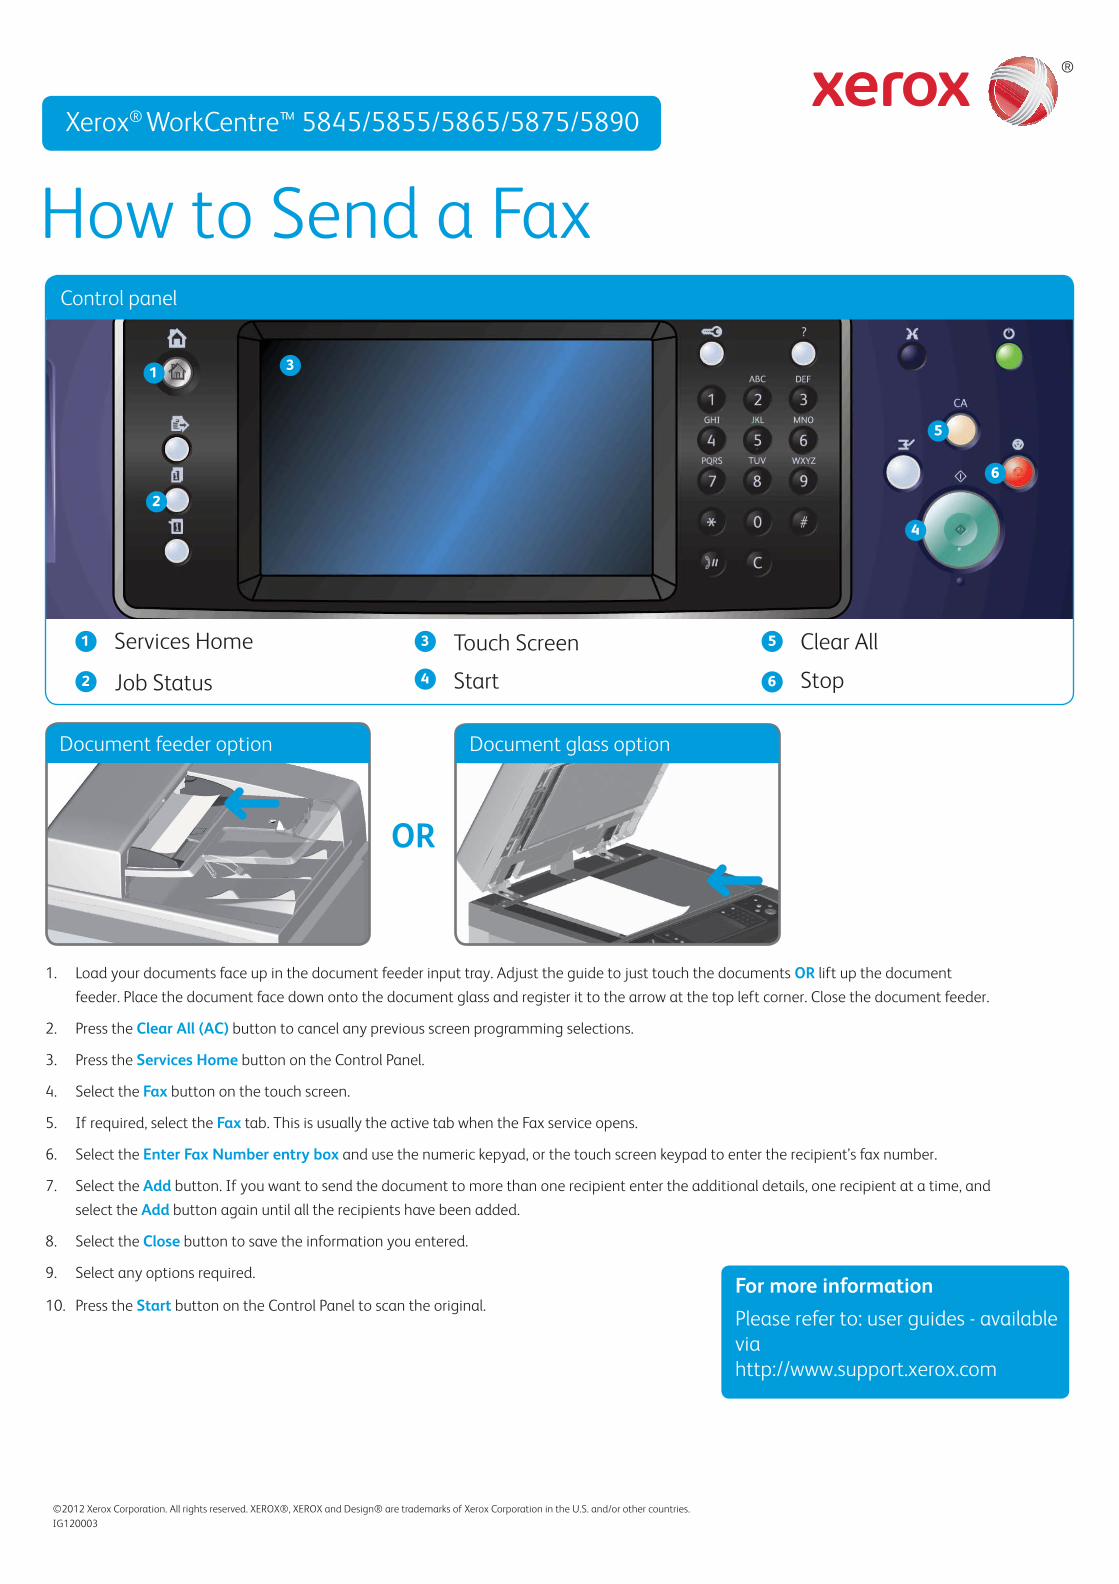
1 Services Home
2 Job Status
3 Touch Screen
4 Start
5 Clear All
6 Stop
1
2
3
4
5
6
Control panel
OR
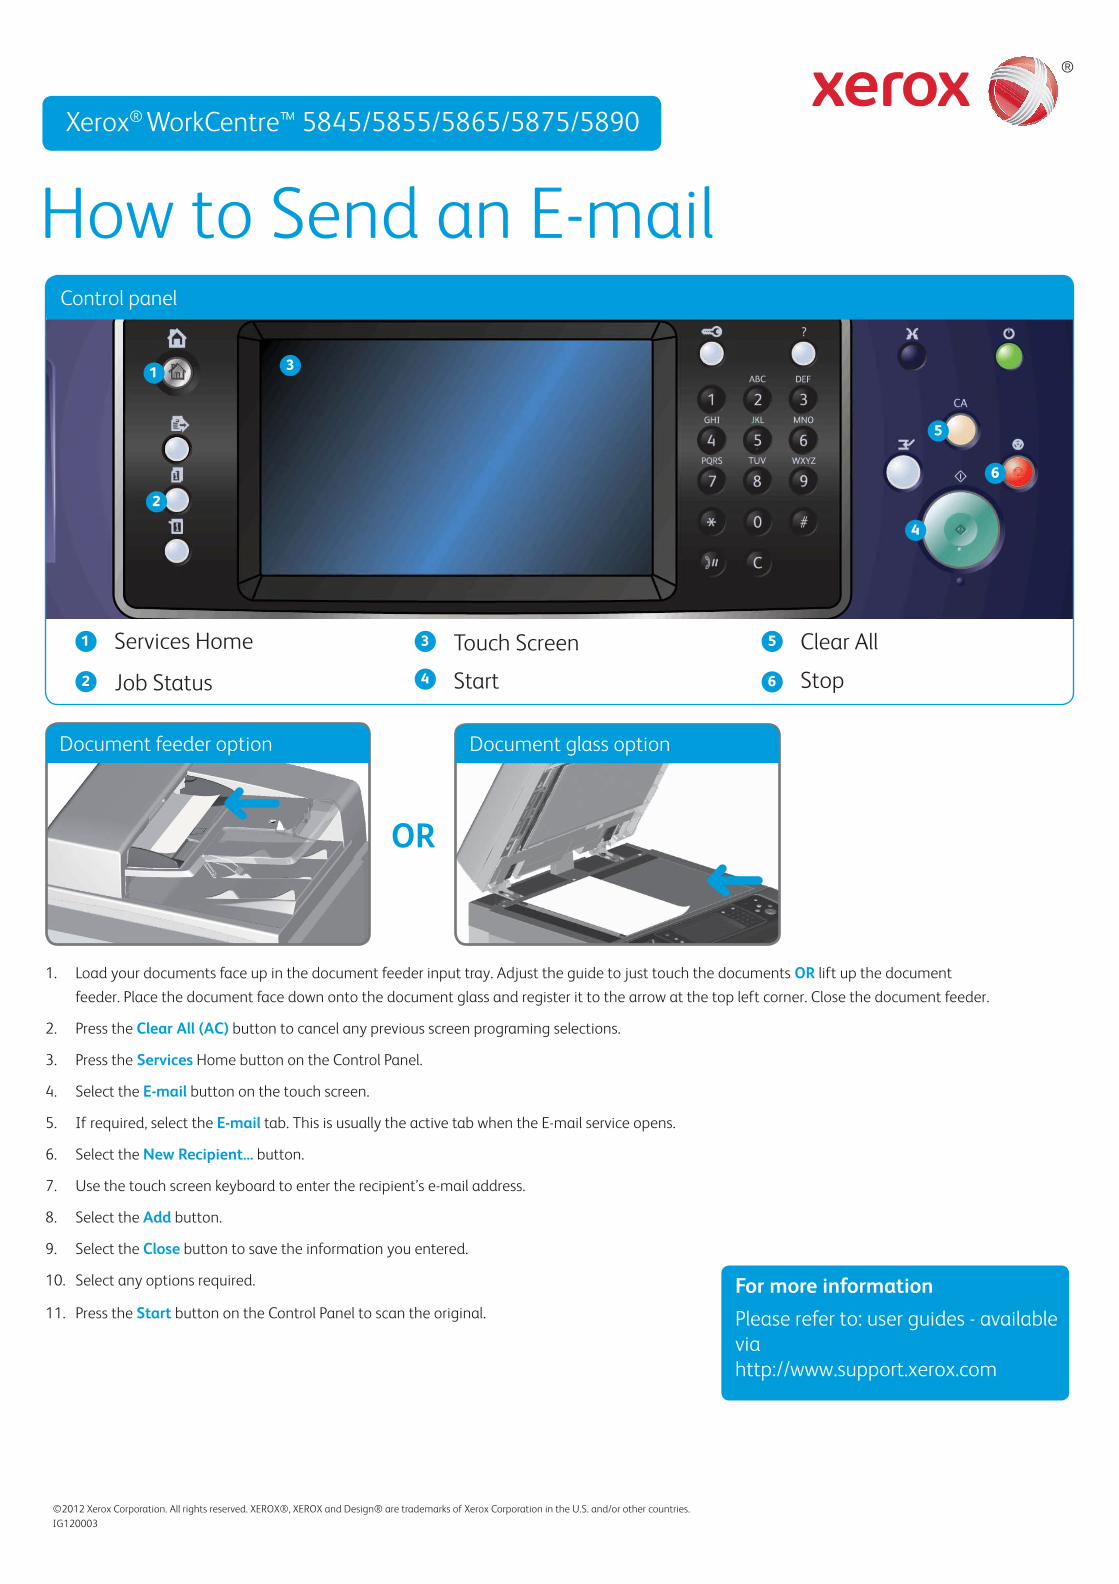
Document feeder option Document glass option
How to Send a Fax
Load your documents face up in the document feeder input tray. Adjust the guide to just touch the documents1. OR lift up the document
feeder. Place the document face down onto the document glass and register it to the arrow at the top left corner. Close the document feeder.
Press the 2. Clear All (AC) button to cancel any previous screen programming selections.
Press the 3. Services Home button on the Control Panel.
Select the 4. Fax button on the touch screen.
If required, select the 5. Fax tab. This is usually the active tab when the Fax service opens.
Select the 6. Enter Fax Number entry box and use the numeric kepyad, or the touch screen keypad to enter the recipient’s fax number.
Select the 7. Add button. If you want to send the document to more than one recipient enter the additional details, one recipient at a time, and
select the Add button again until all the recipients have been added.
Select the 8. Close button to save the information you entered.
Select any options required.9.
Press the 10. Start button on the Control Panel to scan the original.
©2012 Xerox Corporation. All rights reserved. XEROX®, XEROX and Design® are trademarks of Xerox Corporation in the U.S. and/or other countries.
IG120003
For more informationPlease refer to: user guides - available
via
http://www.support.xerox.com
Xerox® WorkCentre™ 5845/5855/5865/5875/5890

1 Services Home
2 Job Status
3 Touch Screen
4 Start
5 Clear All
6 Stop
1
2
3
4
5
6
Control panel
OR
Document feeder option Document glass option
How to Send a Server Fax
Load your documents face up in the document feeder input tray. Adjust the guide to just touch the documents1. OR lift up the document
feeder. Place the document face down onto the document glass and register it to the arrow at the top left corner. Close the document feeder.
Press the 2. Clear All (AC) button to cancel any previous programing selections.
Press the3. Services Home button on the Control Panel.
Select the 4. Server Fax button.
If required, select the 5. Server Fax tab. This is usually the active tab when the Server Fax service opens.
Select the 6. Enter Fax Number entry box and use the numeric kepyad, or the touch screen keypad to enter the recipient’s fax number.
Select the 7. Add button. If you want to send the document to more than one recipient enter the additional details, one recipient at a time, and
select the Add button again until all the recipients have been added.
Select the 8. Close button to save the information you entered.
Select any options required.9.
Press the 10. Start button on the Control Panel to scan the original.For more informationPlease refer to: user guides - available
via
http://www.support.xerox.com
©2012 Xerox Corporation. All rights reserved. XEROX®, XEROX and Design® are trademarks of Xerox Corporation in the U.S. and/or other countries.
IG120003
Xerox® WorkCentre™ 5845/5855/5865/5875/5890

1 Services Home
2 Job Status
3 Touch Screen
4 Start
5 Clear All
6 Stop
1
2
3
4
5
6
Control panel
OR
Document feeder option Document glass option
How to Send an Internet Fax
Load your documents face up in the document feeder input tray. Adjust the guide to just touch the documents1. OR lift up the document
feeder. Place the document face down onto the document glass and register it to the arrow at the top left corner. Close the document feeder.
Press the 2. Clear All (AC) button to cancel any previous screen programing selections.
Press the3. Services Home button on the Control Panel.
Select the 4. Internet Fax button.
If required, select the 5. Internet Fax tab. This is usually the active tab when the Internet Fax service opens.
Select the 6. New Recipient... button.
Use the touch screen keyboard to enter the e-mail address of the recipient.7.
Select the 8. Add button. If you want to send the document to more than one recipient enter the additional details, one recipient at a time, and
select the Add button again until all the recipients have been added.
Select the 9. Close button to save the information you entered.
Select any options required.10.
Press the 11. Start button on the Control Panel to scan the original.
For more informationPlease refer to: user guides - available
via
http://www.support.xerox.com
©2012 Xerox Corporation. All rights reserved. XEROX®, XEROX and Design® are trademarks of Xerox Corporation in the U.S. and/or other countries.
IG120003
Xerox® WorkCentre™ 5845/5855/5865/5875/5890
1 Services Home
2 Job Status
3 Touch Screen
4 Start
5 Clear All
6 Stop
1
2
3
4
5
6
Control panel
OR
Document feeder option Document glass option
How to Send an E-mail
Load your documents face up in the document feeder input tray. Adjust the guide to just touch the documents1. OR lift up the document
feeder. Place the document face down onto the document glass and register it to the arrow at the top left corner. Close the document feeder.
Press the 2. Clear All (AC) button to cancel any previous screen programing selections.
Press the3. Services Home button on the Control Panel.
Select the 4. E-mail button on the touch screen.
If required, select the 5. E-mail tab. This is usually the active tab when the E-mail service opens.
Select the 6. New Recipient... button.
Use the touch screen keyboard to enter the recipient’s e-mail address.7.
Select the 8. Add button.
Select the 9. Close button to save the information you entered.
Select any options required.10.
Press the 11. Start button on the Control Panel to scan the original.
For more informationPlease refer to: user guides - available
via
http://www.support.xerox.com
©2012 Xerox Corporation. All rights reserved. XEROX®, XEROX and Design® are trademarks of Xerox Corporation in the U.S. and/or other countries.
IG120003
Xerox® WorkCentre™ 5845/5855/5865/5875/5890

Press the 1. Services Home button on the Control Panel.
Select the 2. Print From button on the touch screen.
Select the 3. Saved Jobs... button on the touch screen. The saved jobs folders are displayed.
Select the required folder.4.
Select the saved job required. If necessary, use the Up and Down 5. arrows to scroll through the list until the job is displayed.
Select any options required. 6.
Press the 7. Start button on the Control Panel to print the job.
How to Save and Reprint Jobs
Xerox® WorkCentre™ 5845/5855/5865/5875/5890
Open the document to be printed on your computer.1.
Select the Xerox driver from the list of print drivers available.2.
Open the print driver properties window.3.
If required, click the 4. Printing Options tab. This is usually the active tab when the print driver opens.
Select 5. Saved Job from the Job Type dropdown menu.
Select the folder where your job should be saved from the 6. Save To menu.
Click the 7. OK button.
Select the option(s) required.8.
Click the 9. OK button to save your settings.
Select the confi rmation button, the name will vary depending on the 10. application you are printing from. From most applications select the OK or Print button.
For more informationPlease refer to: user guides - available
via
http://www.support.xerox.com
©2012 Xerox Corporation. All rights reserved. XEROX®, XEROX and Design® are trademarks of Xerox Corporation in the U.S. and/or other countries.
IG120003
Reprinting Saved Jobs
1 Services Home
2 Job Status
3 Touch Screen
4 Start
5 Clear All
6 Stop
1
2
3
4
5
6
Control panel
Saving Jobs using the Print Driver

1 Services Home
2 Job Status
3 Touch Screen
4 Start
5 Clear All
6 Stop
1
2
3
4
5
6
Control panel
OR
Document feeder option Document glass option
How to Scan to Your Network
Load your documents face up in the document feeder input tray. Adjust the guide to just touch the documents1. OR lift up the document
feeder. Place the document face down onto the document glass and register it to the arrow at the top left corner. Close the document feeder.
Press the Clear 2. All (AC) button to cancel any previous screen programing selections.
Press the3. Services Home button on the Control Panel.
Select the 4. Workfl ow Scanning button on the touch screen.
If required, select the 5. Workfl ow Scanning tab. This is usually the active tab when the Workfl ow Scanning service opens.
Select a template type from the 6. All Templates dropdown menu.
Select the required template from the list7.
Select any options required.8.
Press the 9. Start button on the Control Panel to scan the original.
For more informationPlease refer to: user guides - available
via
http://www.support.xerox.com
©2012 Xerox Corporation. All rights reserved. XEROX®, XEROX and Design® are trademarks of Xerox Corporation in the U.S. and/or other countries.
IG120003
Xerox® WorkCentre™ 5845/5855/5865/5875/5890

Machine Overview
Depending on the configuration of your
device, it is capable of the following;
For more informationPlease refer to: user guides - available
via
http://www.support.xerox.com
©2012 Xerox Corporation. All rights reserved. XEROX®, XEROX and Design® are trademarks of Xerox Corporation in the U.S. and/or other countries.
IG120003
1 Services Home
2 Services
3 Job Status
4 Machine Status
5 Touch Screen
6 Log In / Out
1
2
3
4
5
6
Control panel
Machine Overview Features
1
2
3
6
7
8
Document Feeder and Document Glass
Control Panel
Paper Trays 1 and 2
Tray 6 (optional)
Inserter tray 7 (optional)
High Volume Finisher (optional)
1
2
3
4
5
6
4 Paper Tray 3 and 4
7
9 Tri-folder (optional)
8
9
5 Bypass Tray
7
8
889
10
11
12
13 14
7 Numeric Keyboard
8 Help
9 Interrupt
10 Start
11 Clear all
12 Stop
13 Language
14 Energy Saver and
power on / off.
Xerox® WorkCentre™ 5845/5855/5865/5875/5890

How to Load Paper
Open the tray. 1.
Place the media in the tray. Media must 2. be positioned against the left side of the tray. Paper must not be loaded above the maximum fi ll line.
Make sure that the guides just touch the 3. paper.
Close the paper tray.4.
If the tray is set to Dedicated this is the end 5. of the loading process.
If the tray is set to Fully Adjustable the 6. paper tray settings will be displayed on the screen. If the settings are correct select the Confi rm button. If the settings are not correct change the settings as required.
For more informationPlease refer to: user guides - available
via
http://www.support.xerox.com
©2012 Xerox Corporation. All rights reserved. XEROX®, XEROX and Design® are trademarks of Xerox Corporation in the U.S. and/or other countries.
IG120003
Machine Overview
Trays 1 and 2
12
3
6
4
Open the tray. 1.
Place the media in the tray. Media must 2. be positioned against the left side of the tray. Paper must not be loaded above the maximum fi ll line.
Close the paper tray.3.
Trays 3 and 4
Press the button to open the door. 1.
Wait for the paper tray to lower.2.
Place the media in the tray. Media must 3. be positioned against the left side of the tray. Paper must not be loaded above the maximum fi ll line.
Close the door.4.
Tray 6
Place the media in the correct orientation 1. for the job. The labels on the top of Tray 7 (Inserter) provide instructions for input and output orientations.
Register the paper to the left edge of the 2. tray. Paper must not be loaded above the maximum fi ll line.
Make sure that the guide just touches the 3. paper.
Tray 7 (Inserter)
Make sure the tray is in the down position. 1. For larger media, use the tray extension.
Place the media in the tray. Media must 2. be positioned against the left side of the tray. Paper must not be loaded above the maximum fi ll line.
Make sure that the paper guides just touch 3. the paper.
If the tray is set to Dedicated this is the end 4. of the loading process.
If the tray is set to Fully Adjustable the 5. paper tray settings will be displayed on the screen. If the settings are correct select the Confi rm button. If the settings are not correct change the settings as required.
Bypass Tray
7
5
1
2
3
4
5
6
7
Tray 1
Tray 2
Tray 3
Tray 4
Bypass Tray
Tray 6 (optional)
Inserter Tray (optional)
Xerox® WorkCentre™ 5845/5855/5865/5875/5890