Embed Size (px)
Citation preview

Case Printing Systems
conotechi Technical Paper number BT-021
1
Using Databases in BarTenderOverview: There are many advantages to using a data base with the BarTender software to simplify and streamline your work flow while eliminating the potential for error. With a single layout linked to a simple database, you can control hundreds of SKU’s and eliminate all the time you might spend formatting individual layouts. This Tutorial will show you how to create and link a data base to a BarTender layout.
1. When you link a layout to a database to manage SKU’s, the layout will always look the same but SKU specific product information will change based on the individual SKU’s.
In order to use this function, there are some constants that must be observed. Layouts must share: a. The same common case size. b. The same layout format meaning that every SKU will use the same bar code type, fonts, font size and positioning of the elements in the same overall general format. SKU specific graphics are possible based on a common container size fitting the largest individual element.
2. Fixed information common to all SKU’s, may be built into a data based layout without being attached to the database. This information will appear in the same place with the same size and look every time it is called up. (Fig. 1)
3. Product information is SKU specific and controlled by the database and will therefore change with every SKU called up to print. (Fig. 1)
4. Batch data can be constructed as a prompt field that requires data entry prior to the imaging of the stencil. This is reserved for data entries outside of the database such as batch codes, lot numbers, best buy dates etc. (Fig. 1)
Fixed information Product information Batch Data
Fig. 1

Case Printing Systems
conotechi
2
Fig. 3
Technical Paper number BT-021
Using Databases in BarTender5. BarTender will work with several types of databases but since the amount of SKU variable information on any given case is so limited, a simple Excel spread sheet, (Fig. 2) can be used to organize the SKU specific data that will populate the linked fields in the database layout. In order to better understand the relational thinking, please compare (Fig. 2) and (Fig. 3) as an example of how this works.
NOTE: Attention must be paid to key entry. Data errors will pass through to your printed cases or bags. Capitalization and spaces are controlled in the database. Appearance is controlled by the BarTender layout.
Product Unit measure Product code
Barcode
Fig. 2
6. All of the fields shown in Fig 3 are linked in the layout to the database and each other, forming a record or SKU. The field format in BarTender controls the font, font size and barcode numeration. The layout design must permit the use of the same font style, font size and barcode type,(i.e. ITF 14, code 39 etc.) Calling up a single record, (i.e. ASST JELLY #11) will bring up all of the data associated with that product SKU and the stencil may then be printed out to the thermal imager.

Case Printing Systems
conotechi
3
Technical Paper number BT-021
Using Databases in BarTender
Fig. 4
6. To begin, create a case specific layout for the case size you want to create as a database layout.This layout will combine common fixed information and SKU/data based information. In our example, (Fig. 4) the manufacturing information will not be attached to the database and therefore will be a fixed element, common to every SKU we print. The variable fields, Product code, Product Name, Product Description, Instructions, and the graphic logo are going to be linked to the database.
7. Because the BarTender layout will never show linked information in the layout until it is in Print or Print Preview, field identifying names are entered as placeholders that will be used to link back to the database. (Fig. 4) Think of them as empty containers for the information that lives in the database. The information only moves into the container when a specific SKU record is called up for printing.
8. The Single Line text object is used to create any element where a single line of text will suffice. In this example, it was used for the Product Code, Produce Name and Product Description. A Multi-line text object needs to be used anywhere you will need more than one single line of text. In this example, it is used in the Instructions field. Click the appropriate tool from the text options, position the field on the layout and enter the name of the object. Right click and structure the properties as you would for a normal layout to set the font type, font size and justification. Multi-line fields will most likely make use of the min/max settings to contain text variation. Be sure you size all text and graphic fields large enough to accommodate your largest text strings.
Case Printing Systems
conotechi
4
Fig. 5
Fig. 6
Technical Paper number BT-021
Using Databases in BarTender
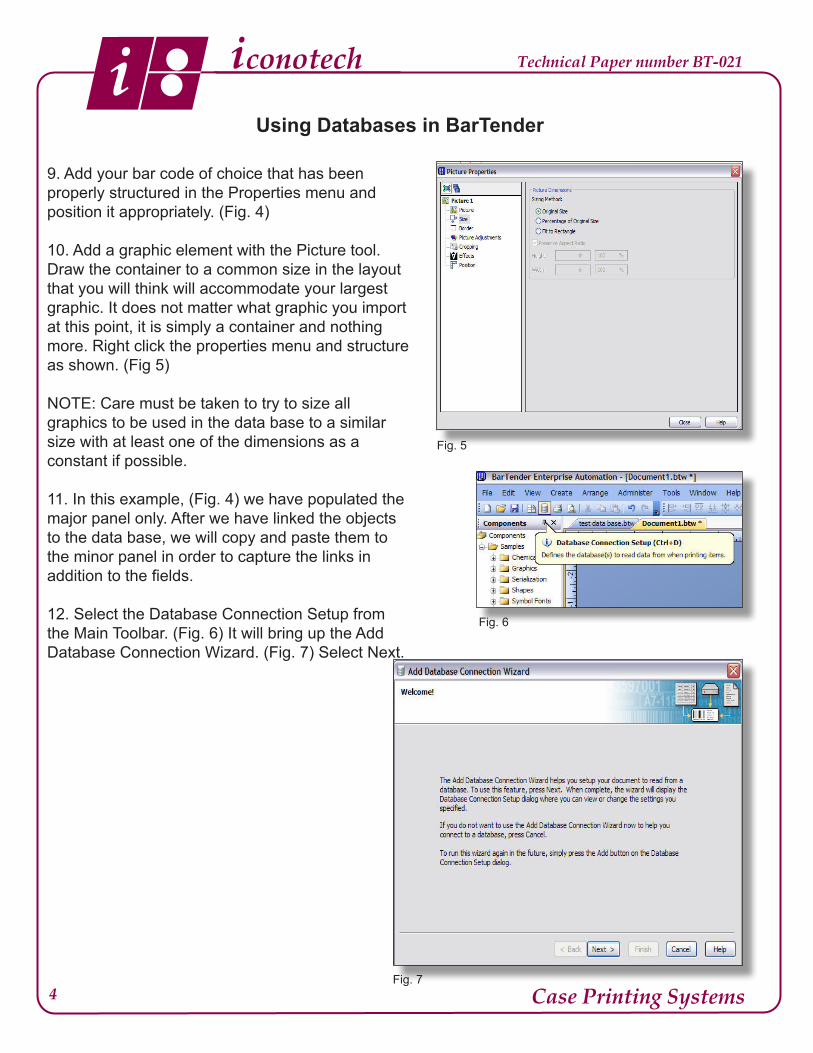
9. Add your bar code of choice that has been properly structured in the Properties menu and position it appropriately. (Fig. 4)
10. Add a graphic element with the Picture tool. Draw the container to a common size in the layout that you will think will accommodate your largest graphic. It does not matter what graphic you import at this point, it is simply a container and nothing more. Right click the properties menu and structure as shown. (Fig 5)
NOTE: Care must be taken to try to size all graphics to be used in the data base to a similar size with at least one of the dimensions as a constant if possible.
11. In this example, (Fig. 4) we have populated the major panel only. After we have linked the objects to the data base, we will copy and paste them to the minor panel in order to capture the links in addition to the fields.
12. Select the Database Connection Setup from the Main Toolbar. (Fig. 6) It will bring up the Add Database Connection Wizard. (Fig. 7) Select Next.
Fig. 7

Case Printing Systems
conotechi
5
Technical Paper number BT-021
Using Databases in BarTender
Fig. 8
13. Select the type of database you wish to use and click Next. (Fig. 8)
14. Click Browse and locate the database you wish to use. Click Open to attach it to BarTender. (Fig. 9) The link will now appear in the browse window. (Fig. 10) Test the connection to verify and select Next.
15. Verify the Sheet and table type are correct and select click the Finish button. (Fig. 11) If the table and sheet is not correct select remove and click the Table Types button to browse to a new sheet.
Fig. 9
Fig. 10
Fig. 11

Case Printing Systems
conotechi
6
Technical Paper number BT-021
Using Databases in BarTender
16. Now that the basic layout is complete and the database has been connected to the layout, we need to link the individual objects back to the database. Begin by clicking on a field to highlight it, right click to get into the Properties menu. (Fig. 12) Click on the hand icon next to Embedded Data change the Data Source Type from Embedded Data to Database Field.
17. On the next screen, select the field name from the drop down menu to match the Sample Field Data. (Fig. 13) Click the Finish Button and repeat the process for all of the single line objects in the layout.
18. Select the bar code to highlight it and right click to get into the Properties menu. (Fig. 14) Change the new type of data source to a Database field.
Fig. 12
Fig. 13
Fig. 14

Case Printing Systems
conotechi
7
Technical Paper number BT-021
Using Databases in BarTender
Fig. 15
Fig. 16
17. On the next screen, select the field name from the drop down menu to match the Sample Field Data. (Fig. 15) Click the Finish Button.
18. Select the graphic file to highlight it and right click to get into the Properties menu. (Fig. 16) In the Picture properties in the left hand pane, select the Get file name from database field setting in the right hand pane and select the name of your graphic files records. In this case we have called it Logos. Select the Size properties from the left hand pane.
19. Set the size options as shown and close. (Fig. 17) You have now completed the database layout application.
20. From the Main toolbar, select print preview. (Fig. 18) This will bring up a previewed view of your database layout with the real data from the database. (Fig. 19)
Fig. 17
Fig. 19Fig. 18

Case Printing Systems
conotechi
8
Technical Paper number BT-021
Using Databases in BarTender
19. You will notice at the top of the menu bar, you can now thumb through all of the entries in the data base by using the next and previous arrows. (Fig. 20) This is very useful as it lets you verify the sizing results of all of your object fields in your layouts. It is a very good idea to page through the database at least once to check the graphic files and make sure you do not need to make adjustments to the files or the size properties in the layout. If you prefer this method of searching the records, you may also leave the layout as is. However, if the database gets large, this could be cumbersome and a search field is a better solution.
20. To install a search query, go to File and select Database Connection Setup. (Fig. 21)
21. Select the name of the database under the All Databases in the left hand pane and select the Query tab in the right hand pane. (Fig. 22) Click on the fields button and choose which field you want to use as the search item for calling up records from the drop down menu. We recommend the lowest common denominator and in our example, we have chosen Product Code. Click on the Criteria button.
22. Select New Prompt from the Criteria drop down menu. (Fig. 23)
Fig. 20
Fig. 21
Fig. 22
Fig. 23

Case Printing Systems
conotechi
9
Technical Paper number BT-021
Using Databases in BarTender
23. This will bring up a Query Prompts menu. (Fig. 24) Enter the name of the search field on the right hand pane. This tells the operator which field they are searching on. Click OK and OK. You are done structuring the search query and setting up the data base.
24. From this point forward, when you click either the Print Preview icon or the Print icon you will call up a Search Query. (Figs. 25-26) Enter your information and select Preview if you want to verify the layout before you print it or Print so skip the preview and just image the stencil.
25. Additions and deletions may be made to the database to add or remove SKU’s, but in order to take effect, the BarTender software must be closed. Similarly, the database must always be closed before opening the BarTender layout or it will not recognise the connections.
Note: If you add or delete categories on the database, you will have to redo the entire database connection process so try to make sure the database is correct from the very start.
Fig. 24
Fig. 25
Fig. 26