Embed Size (px)
Citation preview
To assemble, two 10mm wrenches required. (not included)
iC3 Assembly Instructions
BASKETBALL SHOT TRAINER
Airborne Athletics | 888-887-7453 | airborneathletics.com | [email protected]
X2
DANGER
Install the Product only to a basket- ball system with a break-away rim with proper Pole Support in use. See pole support details on page 7.
You must ensure your basketball net or hoop is properly balanced. If your bas- ketball net or hoop uses a reservoir for balance, use at least 30 lbs of additional weight to counterbalance the weight this product adds to your basketball system.
Do not attempt to move, adjust height or collapse basketball backboard sys- tem while the Product is installed on the rim.
Because this Product hangs down from your basketball backboard and hoop it may create a height hazard for play- ers, spectators, bystanders, or vehicles. Make sure there is adequate clearance on all sides of this Product. Use caution when walking, running, or jumping un- der or around this Product.
Because this Product contains metallic parts, NEVER play basketball, or stand near this Product, during a storm or if you notice thunder or lightning.
WARNING
To reduce the risk of serious injury, read all important precautions and instruc- tions in this manual and all warnings on your Product before use. It is the re- sponsibility of the owner to ensure that all users of this Product are adequately informed of all warnings and precau- tions. Use the product only as described in this manual. Airborne Athletics as- sumes no responsibility for personal in- jury or property damage sustained by or through the use of this Product.
Playing basketball, or training in the sport of basketball, is exercise. How you begin your exercise program depends on your physical condition. Before be- ginning any exercise program, consult your physician. This is especially impor- tant for persons over age 35 or persons with pre-existing health problems. Fre- quent and strenuous exercise should be approved by your doctor first.
Warming up is an important part of your workout, and should begin every session. It prepares your body for more strenuous exercise by heating up and stretching out your muscles, increasing your circulation and pulse rate, and de- livering more oxygen to your muscles. At the end of your workout, repeat the warm up exercises to reduce sore mus- cle problems.
If any discomfort should result from your use of this Product, stop exercis-
ing and consult your doctor. While per- forming any type of exercise routine you must drink plenty of fluids. You must replace the water lost from ex- ercising to avoid dehydration. Avoid drinking large amounts of cold liquids. Fluids should be at room temperature when consumed. It’s important to work at your own pace.
Please keep all children away from the Product when Product is unattended. Adult supervision is required at all times during use of this Product.
Please ensure this product is assem- bled and installed by adults. Do not attempt to move, install, or remove this Product alone. Each adult must be able to safely lift 25 lbs overhead to install and remove the Product.
Properly remove and store this Product when not in use.
Proper maintenance is very important to ensure your Product is always in top working condition. Inspect and prop- erly tighten all parts of the Product regu-larly. Make sure that all bolts and nuts are tightened when the Product is in use. Improper maintenance could cause damage or shorten the life of your Product and exceed the LIMITED WAR-RANTY coverage. LIMITED WARRANTY
Airborne Athletics, Inc. (Airborne) war- rants this Product to be free from de- fects in workmanship and material, un- der normal use and service conditions, for a period of six (6) months from the date of purchase. During this period, Airborne will repair or replace any de- fective part. Airborne’s warranty ap- plies to repaired or replaced Products for the balance of the applicable period of the original warranty or ninety (90) days from the date of shipment of a re- paired or replaced Product, whichever is longer. All repairs for which warranty claims are made must be pre-autho- rized by Airborne. No other warranty beyond that specifically set forth above is authorized by Airborne. EXCLUSIONS and LIMITATIONS
This warranty does not apply to your Airborne product unless it was pur- chased directly from Airborne or an au- thorized Airborne distributor or reseller.
This warranty does not apply to any defects caused by abuse, negligence, misuse, improper assembly or mainte- nance, freight damage, accident, or an “act of god”.
This warranty does not apply to discol- oration of paint, plastics or fabrics.
Airborne Athletics shall not be respon- sible for incidental or consequential damages.
This warranty is nontransferable from the original owner. REGISTRATION
You must register your Airborne prod- uct before a warranty claim can be pro- cessed. To complete your registration, go to airborneathletics.com and fill out the registration online. Product War-ranties are not valid unless properly completed within 30 days of purchase.
INDEMNIFICATION
As a condition of use of this Product, you agree to indemnify, defend, and hold harmless Airborne, its officers, di- rectors, employees, agents, licensors and suppliers (collectively the “Service Providers”) from and against any and all losses, expenses, damages and costs, including reasonable attorneys’ fees, resulting from your use of this Product, including any claims alleging facts that if true would constitute a violation of these terms or any activity related to your Product (including negligent or wrongful conduct) by you or any other person using your Product.
OTHER
These terms shall be governed by and construed in accordance with the laws of the state of Minnesota, U.S.A., without giving effect to any principles of conflicts of law, and expressly not by the United Nations Convention on Contracts for the International Sales of Goods. You agree that any action at law or in equity arising out of or relat- ing to these terms shall be filed only in the state or federal courts located in Hennepin County Minnesota and you hereby consent and submit to the per- sonal jurisdiction of such courts. If any provision of these terms shall be unlaw- ful, void, or for any reason unenforce- able, that provision shall be deemed severable from these terms and shall not affect the validity and enforceability of any remaining provisions. Airborne’s failure to insist upon or enforce strict performance of any provision of these terms shall not be construed as a waiv- er of any provision or right. This is the entire agreement between us relating to the subject matter herein and shall not be modified except as described herein.
SAVE THESE IMPORTANT SAFTEY INSTRUCTIONS
Airborne Athletics Inc.
1-888-887-7453
AirborneAthletics.com
http://www.facebook.com/airborneathletics
3
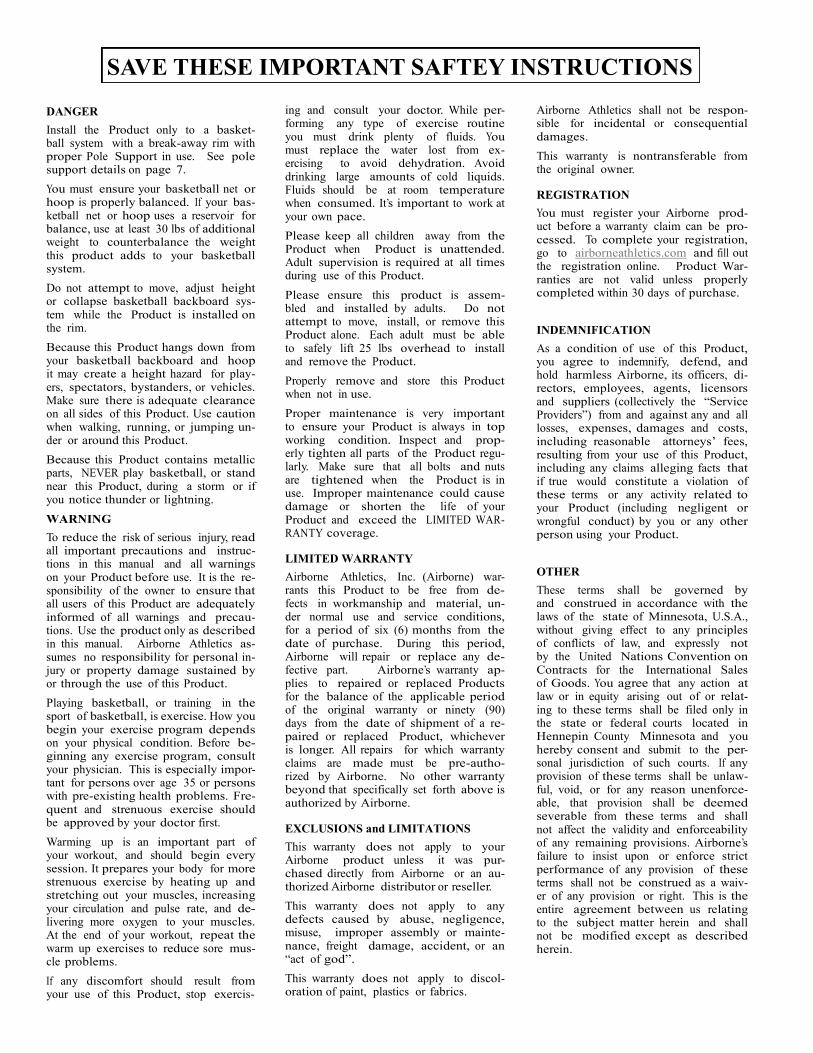
#10 Vertical Frame #12 L-Bracket
#1 Horizontal Frame
#25 Gusset
#26 Lower Frame
#23 Main Pole Support
#7 Ball Detent Pin #21 Rim Rest
#2A
#2B
#2C
Pole Braces
#20 Pop Pin
#4 Rubber Washer
#22 Ball Ramp
#5 Female T-Handle
#17 Inside Net Pole
#6 Male T-Handle
#16 Outside Net Pole
#24 Pole Support Brace
#11 Lower Brace
#18 Carabineer
Part Table and Diagram
(Not Shown)
* Not Shown
(Not Shown)
(Not Shown)
(Not Shown)
(Not Shown)
Part # Description Qty.
1 Horizontal frame 1
2a Short pole brace 1
2b Medium pole brace 1
2c Long pole brace 1
3 Net* 1
4 Rubber washer 1
5 Female T handle 1
6 Male T handle 1
7 Ball detent pin 2
8 M6x1 Lock nut* 23
9 M6x35mm bolt* 7
10 Vertical frame 1
11 Lower brace 1
12 L Bracket 1
13 M6x25mm bolt* 6
14 M6x45mm bolt* 4
15 M6x30mm bolt* 6
16 Outside net poles 4
17 Inside net poles 4
18 Carabineers 4
20 Pop pins 4
21 Rim rest 2
22 Ball ramp 1
23 Main pole support 1
24 Pole support brace 1
25 Gusset 2
26 Lower frame 1
27 Short Velcro* 6
28 Long Velcro* 4
*Items are not to scale
Airborne Athletics Inc.
1-888-887-7453
AirborneAthletics.com
http://www.facebook.com/airborneathletics
4
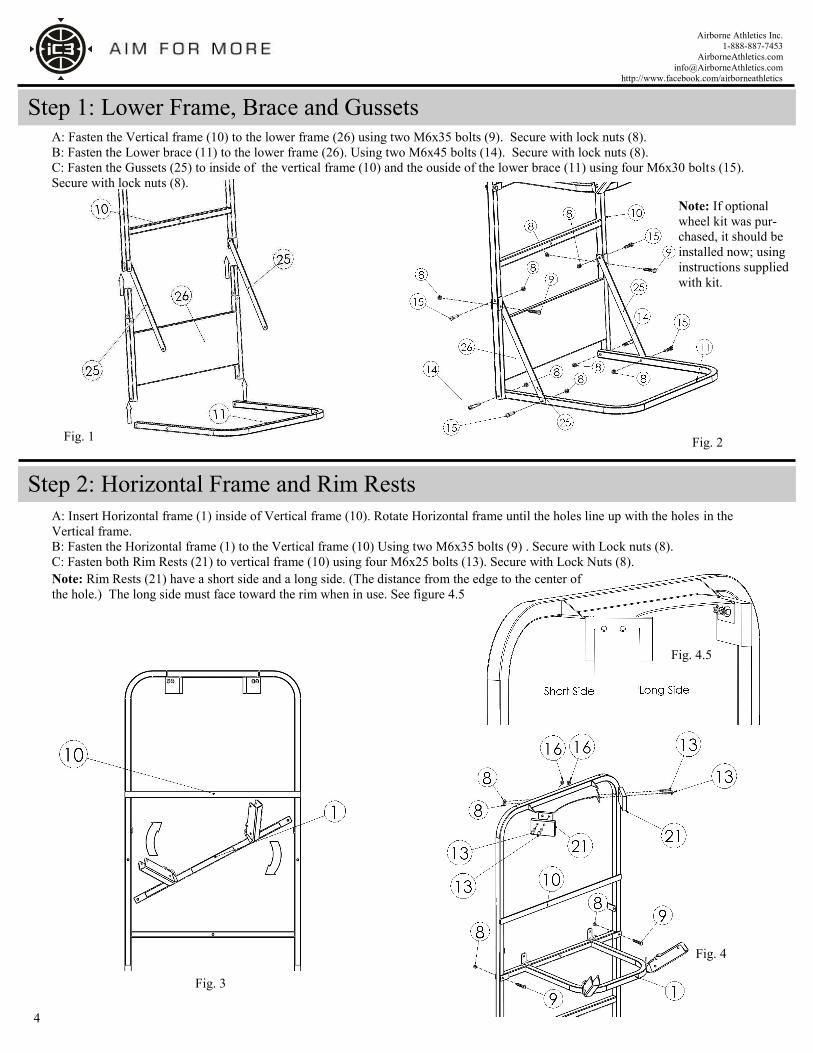
Step 1: Lower Frame, Brace and Gussets A: Fasten the Vertical frame (10) to the lower frame (26) using two M6x35 bolts (9). Secure with lock nuts (8).
B: Fasten the Lower brace (11) to the lower frame (26). Using two M6x45 bolts (14). Secure with lock nuts (8).
C: Fasten the Gussets (25) to inside of the vertical frame (10) and the ouside of the lower brace (11) using four M6x30 bolts (15).
Secure with lock nuts (8).
Step 2: Horizontal Frame and Rim Rests
Note: Rim Rests (21) have a short side and a long side. (The distance from the edge to the center of
the hole.) The long side must face toward the rim when in use. See figure 4.5
A: Insert Horizontal frame (1) inside of Vertical frame (10). Rotate Horizontal frame until the holes line up with the holes in the
Vertical frame.
B: Fasten the Horizontal frame (1) to the Vertical frame (10) Using two M6x35 bolts (9) . Secure with Lock nuts (8).
C: Fasten both Rim Rests (21) to vertical frame (10) using four M6x25 bolts (13). Secure with Lock Nuts (8).
Fig. 1 Fig. 2
Fig. 3
Fig. 4.5
Fig. 4
Note: If optional
wheel kit was pur-
chased, it should be
installed now; using
instructions supplied
with kit.

Airborne Athletics Inc.
1-888-887-7453
AirborneAthletics.com
http://www.facebook.com/airborneathletics
5
Step 3: L-Bracket
A: Fasten the lower hole on the L-
bracket (12) to the vertical frame
(10) using a M6x45 bolt (14).
Fasten the upper hole on the L-
bracket (12) to the Horizontal frame
(1) using a M6x45 bolt (14). Secure
both with lock nuts (8).
Step 4: Installing Net Poles
Front Poles:
A: Fasten Outside net poles (16) to Horizontal frame (1) using M6x35 bolt (9). Secure
with lock nut (8). Do not fasten snug. Net poles must be able to pivot for storage.
B: Insert removable ball detent pin (7) in horizontal frame (1).
Note: Before installing poles make sure
top hole is orientated inward.
Fig. 5
Fig. 6 Fig. 7
Rear Poles: Allow rear poles to rest on pole guides.
Fasten Outside net pole (16) to Horizontal frame (1)
using M6x30 bolt (15). Secure with lock nut (8).
Do not fasten snug. Net poles must be able to pivot
for storage.
Note: Pull Inside net pole (17) out slightly so it
isn’t blocking the holes in the Outside net poles
(16) to insert the bolt through.
Fig. 8
Airborne Athletics Inc.
1-888-887-7453
AirborneAthletics.com
http://www.facebook.com/airborneathletics
6
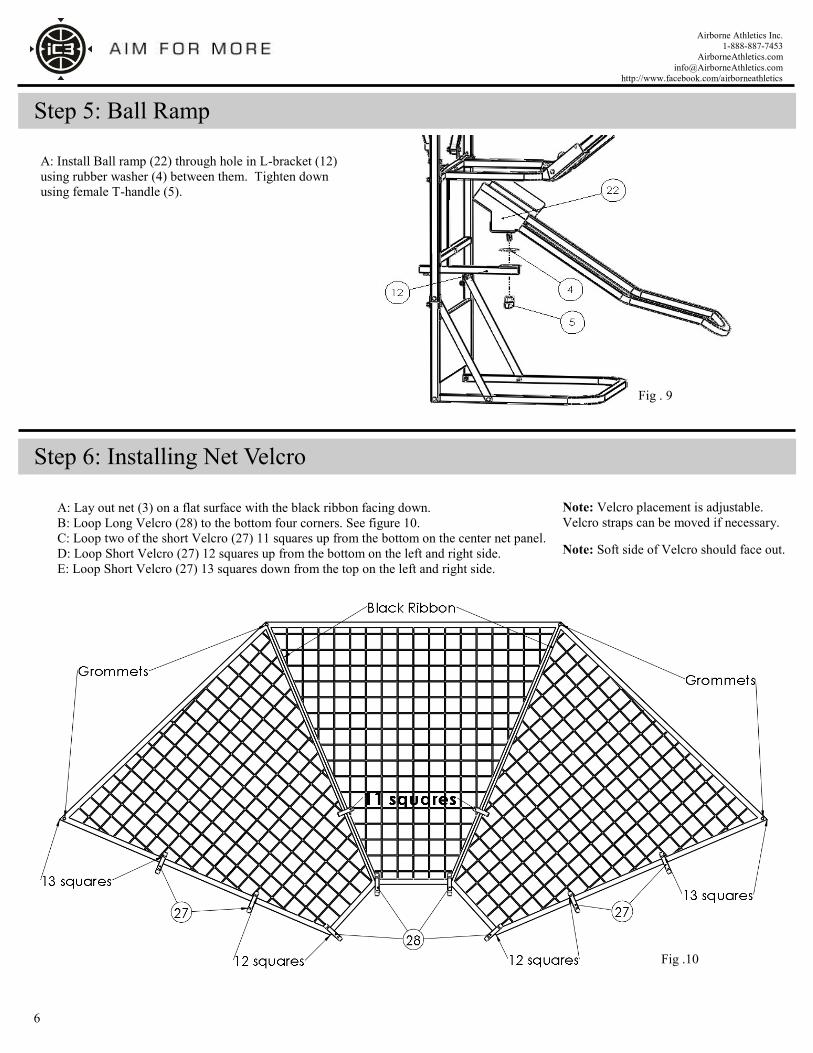
A: Install Ball ramp (22) through hole in L-bracket (12)
using rubber washer (4) between them. Tighten down
using female T-handle (5).
Step 5: Ball Ramp
Step 6: Installing Net Velcro
A: Lay out net (3) on a flat surface with the black ribbon facing down.
B: Loop Long Velcro (28) to the bottom four corners. See figure 10.
C: Loop two of the short Velcro (27) 11 squares up from the bottom on the center net panel.
D: Loop Short Velcro (27) 12 squares up from the bottom on the left and right side.
E: Loop Short Velcro (27) 13 squares down from the top on the left and right side.
Note: Velcro placement is adjustable.
Velcro straps can be moved if necessary.
Fig .10
Fig . 9
Note: Soft side of Velcro should face out.

Airborne Athletics Inc.
1-888-887-7453
AirborneAthletics.com
http://www.facebook.com/airborneathletics
7
Step 7: Attach Net
A: Slide Inside net pole (17) out of Outside net pole (16) until the sil-
ver button on the pop pin (20) securely pops out of the hole in the out-
side net pole (16). Repeat on the other three poles.
B: Attach Carabineer (18) to grommet holes in Net (3) and hole in the
Inside net pole (17). Repeat on other three Inside net poles (17). See
figure 11. Carabineer (18) latch should face up. See figure 11.5
C: Attach Velcro (28) on Net (3) to corresponding D ring on Horizon-
tal frame (1). Repeat on other three D rings. See figure 13.
D: Attach Velcro (27) on Net (3) to Outside net poles (16). Repeat
once on the other front net pole and four times on the two rear net
poles. See figure 12.
Fig. 12
Fig. 13
Fig. 11.5
Note: If using on a regulation 72 inch backboard
with a pad, assembly is complete. If using on a
pole-supported unit continue to step 7.
Note: Make sure black ribbon faces towards net
poles when orienting the net for installation.
Note: Velcro (27) should pull the net (3) tight to
the front Outside net poles (16). The rear net
poles should not pull the net tight to net poles.
RIGHT WRONG
Note: Install Carabineer (18) with latch facing up
Airborne Athletics Inc.
1-888-887-7453
AirborneAthletics.com
http://www.facebook.com/airborneathletics
8
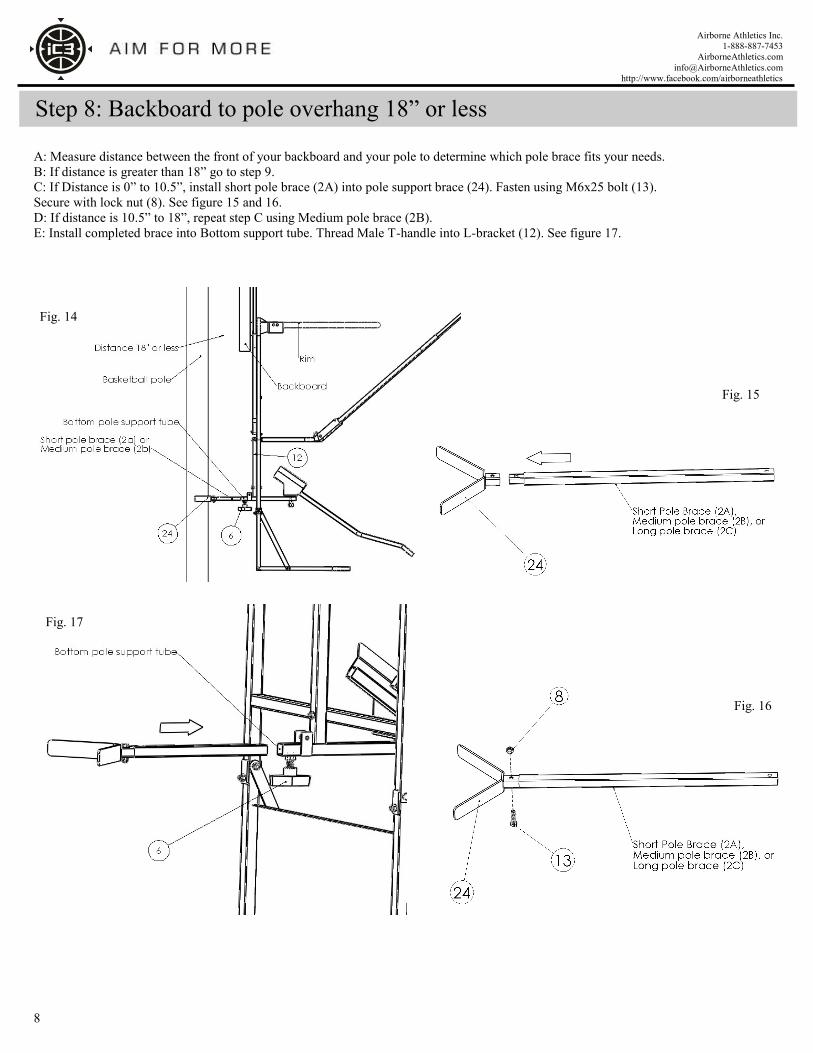
Step 8: Backboard to pole overhang 18” or less
A: Measure distance between the front of your backboard and your pole to determine which pole brace fits your needs.
B: If distance is greater than 18” go to step 9.
C: If Distance is 0” to 10.5”, install short pole brace (2A) into pole support brace (24). Fasten using M6x25 bolt (13).
Secure with lock nut (8). See figure 15 and 16.
D: If distance is 10.5” to 18”, repeat step C using Medium pole brace (2B).
E: Install completed brace into Bottom support tube. Thread Male T-handle into L-bracket (12). See figure 17.
Fig. 16
Fig. 17
Fig. 14
Fig. 15
Airborne Athletics Inc.
1-888-887-7453
AirborneAthletics.com
http://www.facebook.com/airborneathletics
9
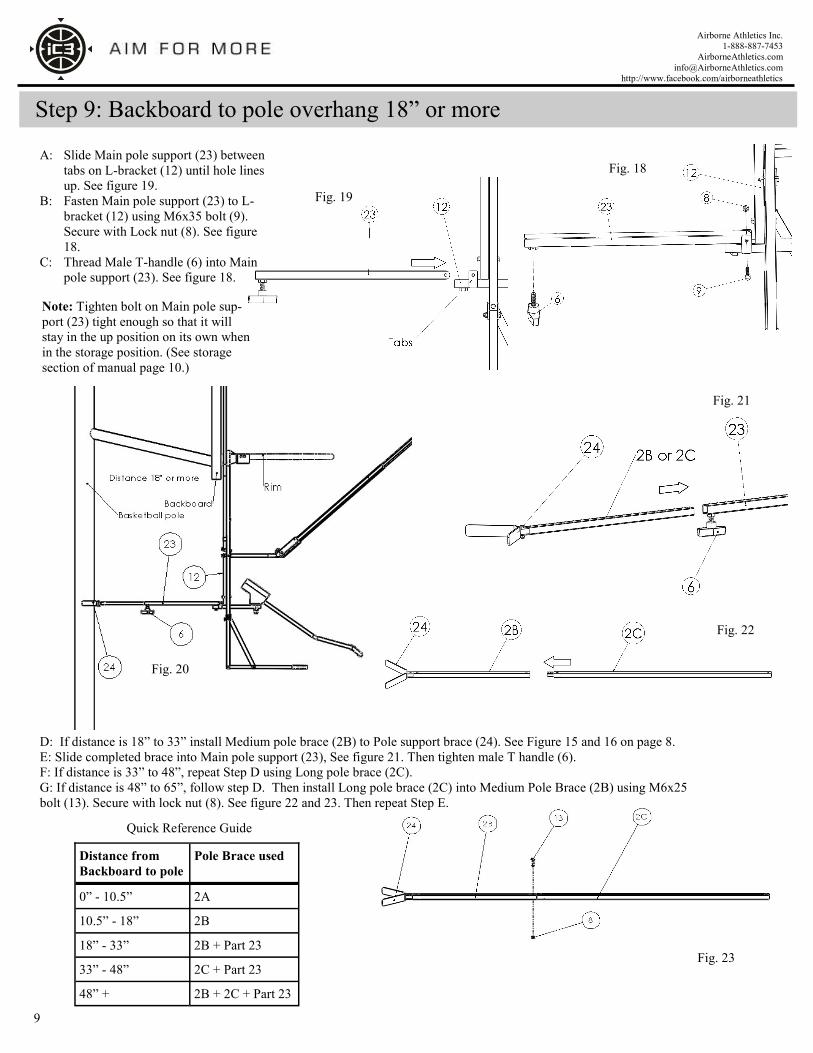
Step 9: Backboard to pole overhang 18” or more
D: If distance is 18” to 33” install Medium pole brace (2B) to Pole support brace (24). See Figure 15 and 16 on page 8.
E: Slide completed brace into Main pole support (23), See figure 21. Then tighten male T handle (6).
F: If distance is 33” to 48”, repeat Step D using Long pole brace (2C).
G: If distance is 48” to 65”, follow step D. Then install Long pole brace (2C) into Medium Pole Brace (2B) using M6x25
bolt (13). Secure with lock nut (8). See figure 22 and 23. Then repeat Step E.
Fig. 21
Fig. 22
Fig. 23
Fig. 18
Fig. 19
Fig. 20
A: Slide Main pole support (23) between
tabs on L-bracket (12) until hole lines
up. See figure 19.
B: Fasten Main pole support (23) to L-
bracket (12) using M6x35 bolt (9).
Secure with Lock nut (8). See figure
18.
C: Thread Male T-handle (6) into Main
pole support (23). See figure 18.
Note: Tighten bolt on Main pole sup-
port (23) tight enough so that it will
stay in the up position on its own when
in the storage position. (See storage
section of manual page 10.)
Distance from
Backboard to pole
Pole Brace used
0” - 10.5” 2A
10.5” - 18” 2B
18” - 33” 2B + Part 23
33” - 48” 2C + Part 23
48” + 2B + 2C + Part 23
Quick Reference Guide
Airborne Athletics Inc.
1-888-887-7453
AirborneAthletics.com
http://www.facebook.com/airborneathletics
10
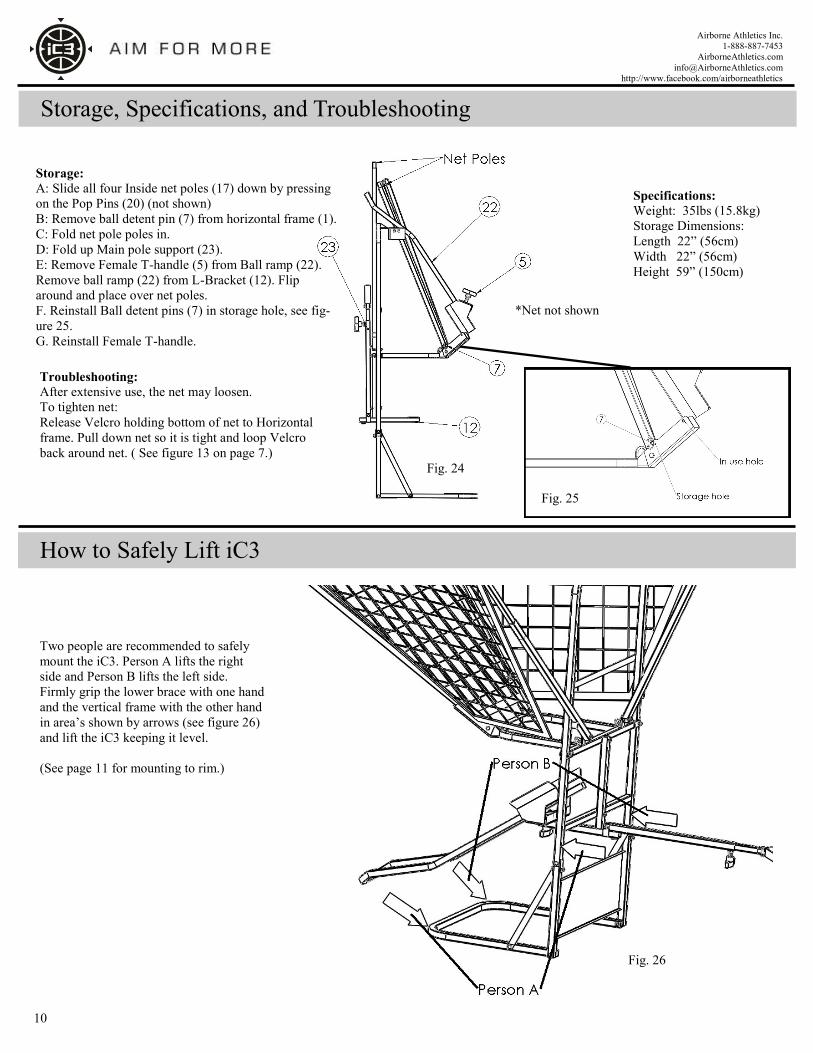
Storage, Specifications, and Troubleshooting
Storage:
A: Slide all four Inside net poles (17) down by pressing
on the Pop Pins (20) (not shown)
B: Remove ball detent pin (7) from horizontal frame (1).
C: Fold net pole poles in.
D: Fold up Main pole support (23).
E: Remove Female T-handle (5) from Ball ramp (22).
Remove ball ramp (22) from L-Bracket (12). Flip
around and place over net poles.
F. Reinstall Ball detent pins (7) in storage hole, see fig-
ure 25.
G. Reinstall Female T-handle.
Specifications:
Weight: 35lbs (15.8kg)
Storage Dimensions:
Length 22” (56cm)
Width 22” (56cm)
Height 59” (150cm)
Troubleshooting:
After extensive use, the net may loosen.
To tighten net:
Release Velcro holding bottom of net to Horizontal
frame. Pull down net so it is tight and loop Velcro
back around net. ( See figure 13 on page 7.)
How to Safely Lift iC3
Two people are recommended to safely
mount the iC3. Person A lifts the right
side and Person B lifts the left side.
Firmly grip the lower brace with one hand
and the vertical frame with the other hand
in area’s shown by arrows (see figure 26)
and lift the iC3 keeping it level.
(See page 11 for mounting to rim.)
Fig. 24
Fig. 26
Fig. 25
*Net not shown

Airborne Athletics Inc.
1-888-887-7453
AirborneAthletics.com
http://www.facebook.com/airborneathletics
11
Mounting for Use
A: Lift the unit high enough so that the top of the Vertical frame (10) goes up and over the
top of the basketball hoop. Set the unit down so that the Rim Rests (21) rest against the rim.
See figure 28.
B: Using the pole brace/support decided upon in steps 8 and 9, level the unit on the rim and
extend the pole brace against the basketball pole. Tighten Male T-handle to secure it in place.
(Omit this step if using on a non-pole supported unit with a regulation 72” backboard.)
Rotating Ramp
Ramp can rotate 180 degrees.
To rotate ramp:
Loosen Female T-Handle (5) by a full turn. Rotate
Ball ramp (22) to desired location and retighten T-
Handle.
Tighten T-handle by hand only.
Fig. 27
Fig. 28
Fig. 29
*Net not shown
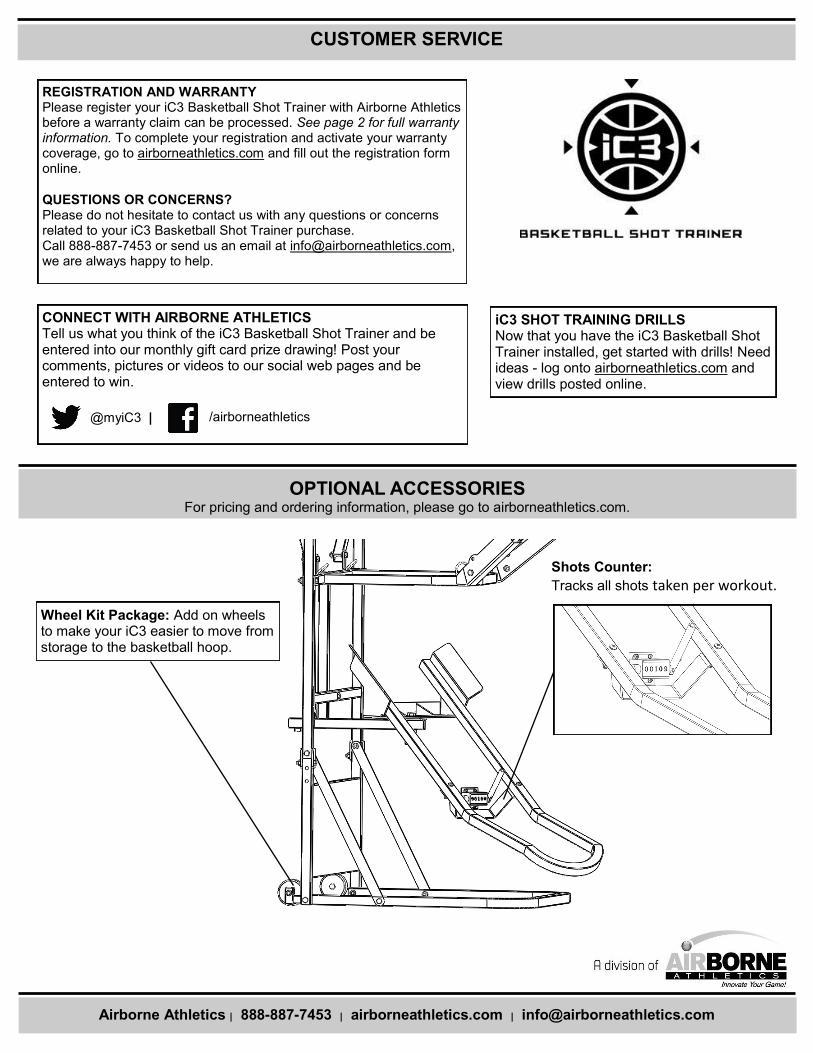
CUSTOMER SERVICE
Airborne Athletics | 888-887-7453 | airborneathletics.com | [email protected]
Wheel Kit Package: Add on wheels to make your iC3 easier to move from storage to the basketball hoop.
Shots Counter:
Tracks all shots taken per workout.
REGISTRATION AND WARRANTY Please register your iC3 Basketball Shot Trainer with Airborne Athletics before a warranty claim can be processed. See page 2 for full warranty information. To complete your registration and activate your warranty coverage, go to airborneathletics.com and fill out the registration form online.
QUESTIONS OR CONCERNS? Please do not hesitate to contact us with any questions or concerns related to your iC3 Basketball Shot Trainer purchase. Call 888-887-7453 or send us an email at [email protected], we are always happy to help.
OPTIONAL ACCESSORIES For pricing and ordering information, please go to airborneathletics.com.
iC3 SHOT TRAINING DRILLS Now that you have the iC3 Basketball Shot Trainer installed, get started with drills! Need ideas - log onto airborneathletics.com and view drills posted online.
CONNECT WITH AIRBORNE ATHLETICS Tell us what you think of the iC3 Basketball Shot Trainer and be entered into our monthly gift card prize drawing! Post your comments, pictures or videos to our social web pages and be entered to win.
/airborneathletics @myiC3 |