Embed Size (px)
Citation preview
IBM Tivoli Service Level Advisor
Getting Started with IBM Tivoli ServiceLevel AdvisorVersion 1.2.1
SC32-0834-02
���


IBM Tivoli Service Level Advisor
Getting Started with IBM Tivoli ServiceLevel AdvisorVersion 1.2.1
SC32-0834-02
���

Third Edition (April 2003)
©This edition applies to Version 1.2.1 of IBM Tivoli Service Level Advisor (product number 5724–C40) and to allsubsequent releases and modifications until otherwise indicated in new editions.
© Copyright International Business Machines Corporation 2003. All rights reserved.US Government Users Restricted Rights – Use, duplication or disclosure restricted by GSA ADP Schedule Contractwith IBM Corp.
Contents
Preface . . . . . . . . . . . . . . viiWho should read this guide . . . . . . . . . viiPublications . . . . . . . . . . . . . . vii
IBM Tivoli Service Level Advisor library . . . viiIBM DB2 Universal Database Enterprise Editionlibrary . . . . . . . . . . . . . . . viiiTivoli Enterprise Data Warehouse library . . . viiiWarehouse Packs. . . . . . . . . . . . ixIBM Console Information . . . . . . . . . ixIBM WebSphere Application Server library . . . ixRelated publications . . . . . . . . . . ix
Accessing Publications Online . . . . . . . . ixOrdering publications . . . . . . . . . . . xAccessibility . . . . . . . . . . . . . . xContacting software support . . . . . . . . . xParticipating in newsgroups . . . . . . . . . xConventions used in this guide . . . . . . . . xi
Typeface conventions . . . . . . . . . . xiOperating system-dependent variables and paths xii
Chapter 1. Introduction . . . . . . . . 1What is IBM Tivoli Service Level Advisor? . . . . 1How IBM Tivoli Service Level Advisor Works . . . 2IBM Tivoli Service Level Advisor in the Enterprise . 3Inside IBM Tivoli Service Level Advisor . . . . . 4
The SLM Server . . . . . . . . . . . . 4SLM Reports . . . . . . . . . . . . . 5SLM Task Drivers. . . . . . . . . . . . 5
IBM Tivoli Service Level Advisor Databases . . . . 5The Central Data Warehouse Database. . . . . 5The SLM Database . . . . . . . . . . . 6The SLM Measurement Data Mart . . . . . . 6
Chapter 2. Planning Decisions . . . . . 7Components of an SLM Deployment . . . . . . 7
Tivoli Enterprise Data Warehouse Components . . 7Warehouse Packs . . . . . . . . . . . . 9IBM Tivoli Service Level Advisor Components . . 9Deploying the SLM Solution in Your Enterprise 10Deployment Options . . . . . . . . . . 15
Selecting Port Numbers . . . . . . . . . . 18Coexistence with Other DB2 Database Applications 20Information to Gather Before Installing . . . . . 21
Information for All Installations . . . . . . 21Additional Information for Single SystemInstallations . . . . . . . . . . . . . 26Additional Information for DistributedInstallations . . . . . . . . . . . . . 27Planning for Warehouse Packs . . . . . . . 29
Chapter 3. Installing SupportingApplications . . . . . . . . . . . . 31Migrating From Previous Versions . . . . . . . 32Installing DB2 . . . . . . . . . . . . . 32
Starting a DB2 Command Prompt . . . . . . 32
Step 1. Read the documentation . . . . . . 32Step 2. Verify the Root User Authority in DB2 . . 33Step 3. Ensure fully qualified host names . . . 33Step 4. On UNIX, mount the CD-ROM . . . . 35Step 5. Check the version of any existing DB2installation . . . . . . . . . . . . . 35Step 6. Install DB2 7.2 with Fix Pack 5 . . . . 36Step 7. Upgrade to DB2 7.2 Fix Pack 6 (or later) 39Step 8. Update the JDBC Level for DB2 . . . . 40Step 9. Configure the Database Manager to useExtended Shared Memory . . . . . . . . 41
Installing Tivoli Enterprise Data Warehouse 1.1 . . 42Before Starting the Install Wizard . . . . . . 42Step 1. Start the install wizard . . . . . . . 43Step 2. Choose Single System or DistributedInstallation . . . . . . . . . . . . . 43Step 3. Select Components to Install . . . . . 44Step 4. Verify Host Name. . . . . . . . . 45Step 5. Specify local DB2 user name andpassword . . . . . . . . . . . . . . 46Step 6. Specify Tivoli Presentation ServicesInformation . . . . . . . . . . . . . 47Step 7. Install additional languages . . . . . 48Step 8. Configure remote access to the controlserver . . . . . . . . . . . . . . . 49Step 9. Configure remote access to the centraldata warehouse . . . . . . . . . . . . 50Step 10. Configure remote access to data marts 51Step 11. Install application packages . . . . . 53Step 12. Completing the install wizard . . . . 53Verifying the Tivoli Presentation ServicesInstallation . . . . . . . . . . . . . 54
Installing Tivoli Enterprise Data Warehouse 1.1 FixPack 2 . . . . . . . . . . . . . . . . 55Installing Source Application Warehouse Packs . . 55Installing IBM WebSphere Application Server . . . 56
Installing WebSphere AES 4.0.1 . . . . . . . 56Upgrading from WebSphere AES or AE 4.0.1 . . 59Configuring the JDBC Driver in WebSphere . . 60Automatically Starting WebSphere After SystemRestart . . . . . . . . . . . . . . . 60Identifying the WebSphere Node Name . . . . 61
Chapter 4. Installing IBM Tivoli ServiceLevel Advisor . . . . . . . . . . . . 63Before Installing IBM Tivoli Service Level Advisor 63Creating the IBM Tivoli Service Level AdvisorApplication Databases . . . . . . . . . . . 64
Modifying Configuration Parameters BeforeCreating Databases . . . . . . . . . . . 65Database and Database Manager ConfigurationParameters . . . . . . . . . . . . . 66Creating the Databases . . . . . . . . . 67Checking Database Creation Logs and Tables . . 68Configuring ODBC Data Sources . . . . . . 68
© Copyright IBM Corp. 2003 iii
Running the Install Wizard . . . . . . . . . 69Step 1. Start the InstallShield Program . . . . 70Step 2. Accept the Software License Agreement 71Step 3. Specify the Tivoli Common Directory . . 72Step 4. Specify the Destination Install Directory 73Step 5. Select SLM Install Options . . . . . . 74Step 6. Specify the Tivoli Presentation ServicesLocation . . . . . . . . . . . . . . 75Step 7. Specify Your WebSphere AES Location . . 76Step 8. Specify the WebSphere Node Name . . . 77Step 9. Specify SLM Database Information . . . 78Step 10. Specify the DB2 Instance HomeDirectory for SLM Databases . . . . . . . 82Step 11. Specify Additional Server Configuration 82Step 12. Specify Event Notification Methods . . 83Step 13. Confirm Your Install Options . . . . 90Step 14. Complete the Installation . . . . . . 90
Chapter 5. Additional Installation Tasks 93Configuring for Event Notification. . . . . . . 93
Configuring for Notification by SNMP . . . . 93Configuring for Notification by Tivoli EnterpriseConsole. . . . . . . . . . . . . . . 93Verifying Notification Methods . . . . . . . 94
Installing the Registration and Process ETLs . . . 94Installing the IBM Tivoli Service Level AdvisorWarehouse Pack . . . . . . . . . . . . 95Configuring the User ID and Password . . . . 96Enabling Data Collection for Source Applications 97Promoting the ETLs to Production Mode . . . 97Running the Registration ETL and Process ETL 98Purging Aged Data from the SLM MeasurementData Mart . . . . . . . . . . . . . . 99Registering Warehouse Data . . . . . . . 100
Integrating SLM Reports into WebSphere . . . . 100Integrating into WebSphere AE . . . . . . 100Integrating into WebSphere AES . . . . . . 103Modifying HTTP Server Ports for WebSphere 103Restarting WebSphere . . . . . . . . . 103Accessing SLM Reports . . . . . . . . . 104
Installing Language Support . . . . . . . . 104
Chapter 6. Startup and ShutdownProcedures . . . . . . . . . . . . 107Starting the IBM Tivoli Service Level AdvisorSolution . . . . . . . . . . . . . . . 107
Starting the Server for IBM Console Service . . 107Starting Web Services for IBM Console . . . . 108Starting the SLM Server . . . . . . . . . 108Starting the IBM Console . . . . . . . . 109Starting IBM WebSphere Application Server . . 110Starting the IBM WebSphere AE 4.0 AdminServer . . . . . . . . . . . . . . . 111Starting the WebSphere Admin Console . . . 111Starting the IBM HTTP Services . . . . . . 111
Shutting Down the IBM Tivoli Service LevelAdvisor Solution . . . . . . . . . . . . 112
Stopping IBM HTTP Services . . . . . . . 112Stopping the IBM WebSphere AE 4.0 AdminServer . . . . . . . . . . . . . . . 112
Stopping IBM WebSphere Application Server forWebSphere AES . . . . . . . . . . . 112Shutting Down the IBM Console . . . . . . 113Shutting Down the SLM Server . . . . . . 113Stopping Web Services for IBM Console . . . 113Stopping the Server for IBM Console Service 114
Chapter 7. Uninstalling IBM TivoliService Level Advisor . . . . . . . . 115Considerations Before Uninstalling . . . . . . 115Uninstalling the SLM Task Drivers . . . . . . 115Uninstalling SLM Reports . . . . . . . . . 116
Removing SLM Reports from the WebSphereEnvironment . . . . . . . . . . . . 116Completely Uninstalling SLM Reports . . . . 117
Uninstalling the SLM Server . . . . . . . . 117Uninstalling WebSphere AES . . . . . . . . 117Uninstalling SLM Databases . . . . . . . . 118
Dropping the Databases . . . . . . . . . 118Removing ODBC Datasources . . . . . . . 118
Uninstalling the Registration and Process ETLs . . 119Uninstalling Language Support . . . . . . . 119
Chapter 8. Troubleshooting . . . . . 121Installing DB2 . . . . . . . . . . . . . 121
Instance Creation Failed During UNIX DB2Installation . . . . . . . . . . . . . 121
Updating the JDBC Level . . . . . . . . . 122Configuring ODBC Data Sources . . . . . . . 122
Verifying Successful ODBC Data SourceCreation . . . . . . . . . . . . . . 122
Creating SLM Databases. . . . . . . . . . 123Database Creation Scripts Fail . . . . . . . 123Database Uncataloged after Error Specifying aLocal Database as Remote . . . . . . . . 124
Installing IBM Tivoli Service Level Advisor . . . 124Blank Install Window or Incomplete Text . . . 124Install Screen Fonts Not Readable . . . . . 124Cleaning up Temporary ISMP Directories . . . 125Receive DYKIN0005E Error Connecting to SLMDatabases . . . . . . . . . . . . . 125DYKIN0028E Error Received at End of InstallWizard . . . . . . . . . . . . . . 125Service Exception in Install Log . . . . . . 126
Installing SLM Task Drivers . . . . . . . . 126Problem Starting IBM Console After Install . . 126
Installing SLM Reports . . . . . . . . . . 127SLM Reports with IIS Service . . . . . . . 127Cleaning Up After Failed SLM ReportsInstallation . . . . . . . . . . . . . 127
Installing and Configuring the Registration andProcess ETLs . . . . . . . . . . . . . 127
Logging in to the Data Warehouse Center . . . 127Installation of SLM ETLs Fails . . . . . . . 127
System Startup . . . . . . . . . . . . . 129Server Host Name is Not Fully Qualified . . . 129SLM Server Startup Cannot Connect to SLMDatabases . . . . . . . . . . . . . 129Signing In to the IBM Console. . . . . . . 130
Accessing SLM Reports . . . . . . . . . . 131
iv IBM Tivoli Service Level Advisor: Getting Started with IBM Tivoli Service Level Advisor

HTTP 500 Internal Server Error or DYKAL3003EError Message . . . . . . . . . . . . 131Accessing SLM Reports in WebSphere AES 4.0 132
Uninstalling IBM Tivoli Service Level Advisor . . 132Uninstalling SLM Install Options . . . . . . 132
Appendix A. A Two-MachineInstallation Example . . . . . . . . 133Installation Assumptions . . . . . . . . . 1331. Planning for Installation . . . . . . . . . 1352. Installing DB2 Universal Enterprise Edition . . 1353. Installing the DB2 Client . . . . . . . . . 1364. Upgrading to DB2 7.2 Fix Pack 6 (or later) . . . 1375. Installing Tivoli Enterprise Data Warehouse . . 1376. Installing Tivoli Enterprise Data Warehouse 1.1Fix Pack 2 . . . . . . . . . . . . . . 1387. Installing WebSphere . . . . . . . . . . 138
Configuring the JDBC Driver for WebSphere 1408. Creating Databases for IBM Tivoli Service LevelAdvisor . . . . . . . . . . . . . . . 1409. Configuring ODBC Data Sources . . . . . . 14110. Installing the SLM Server and SLM Reports . . 14111. Installing SLM Task Drivers . . . . . . . 14312. Installing the SLM Warehouse Pack . . . . . 14413. Configuring the SLM Target ETLs . . . . . 145Populating The Warehouse Database . . . . . 145
Installing Warehouse Enablement Packs . . . 145Installing Sample Data . . . . . . . . . 146
Appendix B. A Three MachineInstallation Example . . . . . . . . 147Installation Assumptions . . . . . . . . . 1471. Planning for Installation . . . . . . . . . 1492. Installing DB2 Server on the UNIX Machines 1503. Installing DB2 Server on the Windows Machine 1514. Upgrading to DB2 7.2 Fix Pack 6 (or later) . . . 1515. Configuring the Database Manager to useExtended Shared Memory . . . . . . . . . 1526. Installing the Central Data Warehouse and DataMart . . . . . . . . . . . . . . . . 153
7. Installing the Control Server and ReportInterface . . . . . . . . . . . . . . . 1548. Installing Tivoli Enterprise Data Warehouse 1.1Fix Pack 2 . . . . . . . . . . . . . . 1559. Installing WebSphere . . . . . . . . . . 155
Configuring the JDBC Driver for WebSphere 15610. Creating Databases for IBM Tivoli Service LevelAdvisor . . . . . . . . . . . . . . . 15711. Configuring ODBC Data Sources. . . . . . 15712. Installing the SLM Server and SLM Reports . . 15813. Installing SLM Task Drivers . . . . . . . 15914. Installing Target ETLs . . . . . . . . . 16015. Configuring SLM ETLs . . . . . . . . . 161Populating The Warehouse Database . . . . . 161
Installing Warehouse Packs . . . . . . . . 162Installing Sample Data . . . . . . . . . 162
Appendix C. Database Creation Tables 163Tables Created with dyk_cat_dbinst . . . . . . 163Tables Created with dyk_dm_dbinst . . . . . . 164
Appendix D. Manually Creating ODBCData Sources . . . . . . . . . . . 167
Appendix E. Migrating From PreviousVersions of IBM Tivoli Service LevelAdvisor . . . . . . . . . . . . . . 169Tasks to Complete Before Migrating IBM TivoliService Level Advisor . . . . . . . . . . 173Running the IBM Tivoli Service Level AdvisorMigration Program . . . . . . . . . . . 175Tasks to Complete After Migrating IBM TivoliService Level Advisor . . . . . . . . . . 176
Appendix F. Notices . . . . . . . . 179Trademarks . . . . . . . . . . . . . . 181
Index . . . . . . . . . . . . . . . 183
Contents v

vi IBM Tivoli Service Level Advisor: Getting Started with IBM Tivoli Service Level Advisor
Preface
Getting Started with IBM® Tivoli® Service Level Advisor provides information aboutTivoli’s service level management (SLM) solution, and provides step-by-stepinstructions for installing and configuring IBM Tivoli Service Level Advisor, as wellas references to the installation procedures for supporting applications.
Who should read this guideThis document is written for systems administrators and Tivoli ProfessionalServices personnel who plan to install, configure, and integrate IBM Tivoli ServiceLevel Advisor and its supporting applications in the enterprise environment. Youshould be familiar with planning, installing, and configuring distributed systemsmanagement software, and be somewhat familiar with the business objectivesassociated with Tivoli’s service level management solution.
You should also have a working knowledge of IBM DB2® Universal DatabaseEnterprise Edition, in the areas of installing and configuring DB2 servers andclients, creating multiple instances of DB2, cataloging databases, and performingbackup and restore operations to protect your database resources.
You should also be familiar with the following:v HTML concepts for customizing Java™ Server Pages (JSP files) to generate
Web-based reportsv Supported Tivoli applications that are enabled for putting data into the Tivoli
Enterprise Data Warehouse (see the IBM Tivoli Service Level Advisor Release Notesfor information on supported Tivoli applications)
v Data warehouse information and design, extract, transform, and load (ETL)processes
v IBM WebSphere® Application Server, in the areas of installing, configuring, andstarting the Application Server and console
PublicationsThis section lists publications in the IBM Tivoli Service Level Advisor library andany other related documents. It also describes how to access Tivoli publicationsonline, how to order Tivoli publications, and how to submit comments on Tivolipublications.
IBM Tivoli Service Level Advisor libraryProduct information for using IBM Tivoli Service Level Advisor is found in the/tsladocs directory on the IBM Tivoli Service Level Advisor Documentation CD, inPDF and HTML format.
The following documents are available in the IBM Tivoli Service Level Advisorlibrary:v Getting Started with IBM Tivoli Service Level Advisor , SC32-0834
This document introduces you to IBM Tivoli Service Level Advisor and providesinformation about planning, installing, and configuring IBM Tivoli Service LevelAdvisor to run in your Tivoli enterprise environment.
© Copyright IBM Corp. 2003 vii
v Administrator’s Guide for IBM Tivoli Service Level Advisor, SC32-0835This document provides information about the administrative tasks you canperform using IBM Tivoli Service Level Advisor to track and manage SLAsbetween your organization and customers who depend on your enterprise foragreed upon levels of service.
v Command Reference for IBM Tivoli Service Level Advisor, SC32-0833This document provides information on command line interface (CLI)commands available for displaying certain conditions and states inside IBMTivoli Service Level Advisor, and for performing various configuration tasksusing the scmd command.
v Messages for IBM Tivoli Service Level Advisor , SC32-1250This document provides information on messages that might be displayed whileusing the IBM Tivoli Service Level Advisor product. It provides additionalexplanations for messages and instructions on what to do to recover from errors.
v IBM Tivoli Service Level Advisor Release Notes, SC09-7777This document provides late-breaking information, such as problems andworkarounds, and patch availability. The most recent version of this file isalways available on the following Web site:http://publib.boulder.ibm.com/tividd/td/tdprodlist.html
Click the Tivoli Service Level Advisor link to display the Tivoli softwareinformation center for this product.
v Online user assistance for IBM Tivoli Service Level AdvisorThe online user assistance provides integrated online help topics for all IBMTivoli Service Level Advisor administrative tasks that are performed using theIBM Console. Online user assistance is displayed in the Task Assistant portion ofthe IBM Console. Specific information about performing IBM Tivoli ServiceLevel Advisor tasks is documented only in this online user assistance. Whennew products are installed that run in the IBM Console, corresponding onlinehelp topics are also installed and integrated into the existing information base.
In addition, refer to the following IBM Tivoli Service Level Advisor Web site forsupport information and software updates on IBM Tivoli Service Level Advisorand supported warehouse packs and downloadable fix software:http://www.ibm.com/software/sysmgmt/products/support
/IBMTivoliServiceLevelAdvisor.html
IBM DB2 Universal Database Enterprise Edition libraryThe publications required to support IBM DB2 are available on the IBM DB2Universal Database Enterprise Edition CD, or from this IBM Web site:http://www.ibm.com/software/data/db2/udb
Tivoli Enterprise Data Warehouse libraryIBM Tivoli Service Level Advisor requires Tivoli Enterprise ™ Data Warehouse tobe installed in your enterprise, to serve as the data repository for Tivoliperformance and availability monitoring applications that provide data for servicelevel management. See the following documentation on the Tivoli Enterprise DataWarehouse Documentation CD included with IBM Tivoli Service Level Advisor:v Installing and Configuring Tivoli Enterprise Data Warehouse
v Enabling an Application for Tivoli Enterprise Data Warehouse
v Tivoli Enterprise Data Warehouse Release Notes
viii IBM Tivoli Service Level Advisor: Getting Started with IBM Tivoli Service Level Advisor
Warehouse PacksWarehouse packs are the interfaces that load and transform data collected bysource applications into Tivoli Enterprise Data Warehouse, and from TivoliEnterprise Data Warehouse to other target applications that use the data togenerate reports and perform analyses. Refer to the IBM Tivoli Service Level AdvisorRelease Notes for the online location of the latest warehouse pack information.
IBM Console InformationIBM Tivoli Service Level Advisor requires Tivoli Presentation Services to beinstalled in your enterprise, for use with the IBM Console, the Web-basedAdministration Server graphical user interface (GUI) portion of IBM Tivoli ServiceLevel Advisor. Information on the IBM Console is available in the Administrator’sGuide for IBM Tivoli Service Level Advisor. User assistance for the IBM Console isavailable online from the IBM Console Task Assistant.
IBM WebSphere Application Server libraryIBM Tivoli Service Level Advisor uses IBM WebSphere Application Server for itsWeb reporting function. See Getting Started with IBM Tivoli Service Level Advisor forinformation on WebSphere for use with IBM Tivoli Service Level Advisor, and seethe official documentation provided on the WebSphere product CD included withIBM Tivoli Service Level Advisor for additional information. You can also find thelatest WebSphere product information online at the following Web site:http://www.ibm.com/software/webservers/appserv/doc/v40/aes/infocenter
Related publicationsThe following documents also provide useful information:
The Tivoli Software Glossary includes definitions for many of the technical termsrelated to Tivoli software. The Tivoli Software Glossary is available, in English only,at the following Web site:http://publib.boulder.ibm.com/tividd/glossary/termsmst04.htm
Accessing Publications OnlineThe document CD contains the publications that are in the product library. Theformat of the publications is PDF, HTML, or both. To access the publications usinga Web browser, open the infocenter.html file. The file is in the appropriatepublications directory on the Documentation CD.
IBM posts publications for this and all other Tivoli products, as they becomeavailable and whenever they are updated, to the Tivoli Software InformationCenter Web site. The Tivoli Software Information Center is located at the followingWeb address:http://www.ibm.com/software/tivoli/library/
Click the IBM Tivoli Service Level Advisor link to access the product library.
Note: If you print PDF documents on other than letter-sized paper, select the Fit topage check box in the Adobe Acrobat Print dialog. This option is availablewhen you click File ” Print. Fit to page ensures that the full dimensions of aletter-sized page print on the paper that you are using.
Preface ix

Ordering publicationsYou can order many Tivoli publications online at the following Web site:www.elink.ibmlink.ibm.com/public/applications/publications/cgibin/pbi.cgi
You can also order by telephone by calling one of these numbers:v In the United States: 800-879-2755v In Canada: 800-426-4968
In other countries, see the following Web site for a list of telephone numbers:http://www.ibm.com/software/tivoli/order-lit/
AccessibilityAccessibility features help users with a physical disability, such as restrictedmobility or limited vision, to use software products successfully. With this product,you can use assistive technologies to hear and navigate the interface.You can alsouse the keyboard instead of the mouse to operate all features of the graphical userinterface.
Contacting software supportIf you have a problem with any Tivoli product, refer to the following IBM SoftwareSupport Web site:http://www.ibm.com/software/sysmgmt/products/support/
If you want to contact software support, see the IBM Software Support Guide at thefollowing Web site:
http://techsupport.services.ibm.com/guides/handbook.html
The guide provides information about how to contact IBM Software Support,depending on the severity of your problem, and the following information:v Registration and eligibilityv Telephone numbers and e-mail addresses, depending on the country in which
you are locatedv Information you must have before contacting IBM Software Support
Participating in newsgroupsUser groups provide software professionals with a forum for communicating ideas,technical expertise, and experiences related to the product. They are located on theInternet, and are available using standard news reader programs. These groups areprimarily intended for user-to-user communication, and are not a replacement forformal support.
To access a newsgroup use the following instructions.
If you use Netscape Navigator as your browser:1. Open a Netscape Navigator browser.2. From the Edit menu, click Preferences. The Preferences window is displayed.3. In the Category view, click Mail & Newsgroups to display the Mail &
Newsgroups settings.
x IBM Tivoli Service Level Advisor: Getting Started with IBM Tivoli Service Level Advisor
4. Select the Use Netscape mail as the default mail application check box.5. Click OK.6. Close your Netscape Navigator browser and then open it again.7. Cut and paste the newsgroup address of a product into the browser Address
field, and press Enter to open the newsgroup.
If you use Microsoft Internet Explorer as your browser:1. Open an Internet Explorer browser.2. From the Tools menu, click Internet Options.3. On the Internet Options window, click the Programs tab.4. In the Newsgroups list, click the Down Arrow and then click Outlook Express.5. Click OK.6. Close your Internet Explorer browser and then open it again.7. Cut and paste the newsgroup address of a product into the browser Address
field, and press Enter to open the newsgroup.
Tivoli Enterprise Data Warehousenews://news.software.ibm.com/ibm.software.tivoli.enterprise-data-warehouse
IBM Tivoli Service Level Advisornews://news.software.ibm.com/ibm.software.tivoli.service-level-advisor
Conventions used in this guideThis guide uses several conventions for special terms and actions, operatingsystem-dependent commands and paths, and margin graphics.
Typeface conventionsThis guide uses the following IBM-style typeface conventions:
Bold
v Lowercase commands and mixed case commands that are otherwisedifficult to distinguish from surrounding text
v Interface controls (check boxes, push buttons, radio buttons, spinbuttons, fields, folders, icons, list boxes, items inside list boxes,multicolumn lists, containers, menu choices, menu names, tabs, propertysheets), labels (such as Tip:, and Operating system considerations:)
v Column headings in a tablev Keywords and parameters in text
Italic
v Citations (titles of books, diskettes, and CDs)v Words defined in textv Emphasis of words (words as words)v Letters as lettersv New terms in text (except in a definition list)v Variables and values you must provide
Monospace
v Examples and code examples
Preface xi
v File names, programming keywords, and other elements that are difficultto distinguish from surrounding text
v Message text and prompts addressed to the userv Text that the user must typev Values for arguments or command options
Operating system-dependent variables and pathsThis guide uses the UNIX convention for specifying environment variables and fordirectory notation.
When using the Windows command line, replace $variable with % variable% forenvironment variables and replace each forward slash (/) with a backslash ( \) indirectory paths.
Note: If you are using the bash shell on a Windows system, you can use the UNIXconventions.
xii IBM Tivoli Service Level Advisor: Getting Started with IBM Tivoli Service Level Advisor

Chapter 1. Introduction
As today’s enterprise marketplace shifts away from custom in-house businessapplication solutions to more off-the-shelf e-business applications, the Internet hasbecome a vehicle for service delivery within the enterprise as well as externally. Atthe same time, more focus is being placed on increasing productivity andmanaging costs in the enterprise, enabling the information technology (IT)infrastructure to contribute more to the overall success of the business.
What is IBM Tivoli Service Level Advisor?IBM Tivoli Service Level Advisor provides service level management (SLM)capabilities for enterprise organizations that need to measure, manage, and reporton availability and performance aspects of their internal IT infrastructure. WithIBM Tivoli Service Level Advisor, you can more quickly and efficiently obtaininformation to help you manage network and application services. This enablesyou to maintain productivity and customer satisfaction, minimize revenue impact,manage costs, and improve planning by assuring offered services.
IBM Tivoli Service Level Advisor offers intuitive, easy to use interfaces, quick andeasy customization of features, and default values where appropriate.
The SLM solution provided by IBM Tivoli Service Level Advisor also involves anumber of additional IBM and Tivoli applications:v IBM DB2 Universal Database Enterprise Edition (DB2), which provides the
database support for long term storage of measurement data used by IBM TivoliService Level Advisor.
v Tivoli Enterprise Data Warehouse, which uses the DB2 warehouse functions toestablish the central data repository used in the Tivoli SLM solution. Tivoliperformance and availability monitoring applications store their measurementdata in Tivoli Enterprise Data Warehouse, and at some later time this data issent to the local databases used by IBM Tivoli Service Level Advisor. The data isthen evaluated and analyzed, with reports and notifications issued to supportingpersonnel to assist in managing agreed upon levels of service.
v Data is moved in and out of the Tivoli Enterprise Data Warehouse central datawarehouse database with specialized routines that extract the data, transform itinto a usable format, and then load it to another database for further processing.These ETL routines are used with each Tivoli application that puts data into, ortakes data out of, the central data warehouse. In the Tivoli Enterprise DataWarehouse documentation, these ETL routines are referred to as warehouseenablement packs (warehouse packs).
v IBM WebSphere Application Server, used by IBM Tivoli Service Level Advisor togenerate reports resulting from the evaluation and trend analysis of the collectedmeasurement data. The reports are generated using customizable Java servletsthat can be integrated directly into a company’s Web site, providing ready accessto service level management data from a Web browser.
Getting Started with IBM Tivoli Service Level Advisor describes how these applicationswork together in support of the Tivoli SLM solution for the enterpriseenvironment, and guides you through the related planning, installation andconfiguration processes.
© Copyright IBM Corp. 2003 1
How IBM Tivoli Service Level Advisor WorksThe service level management capabilities of IBM Tivoli Service Level Advisorcomplement the performance and availability measurement functions of otherTivoli products, such as IBM Tivoli Monitoring for Transaction Performance. IBMTivoli Monitoring for Transaction Performance measures the response time of aWeb site, breaking a service into associated sub-applications that complete ane-business service transaction. IBM Tivoli Service Level Advisor relies on themonitoring and measuring functions of this and other Tivoli applications to gatherdata through their own facilities.
Note: IBM Tivoli Monitoring for Transaction Performance is also known as TivoliWeb Services Manager. Tivoli product names are currently in transition. Seethe IBM Tivoli Service Level Advisor Release Notes for additional informationon Tivoli product name changes.
This performance and availability data is written by the monitoring applications tothe Tivoli Enterprise Data Warehouse database, a centralized repository wherelarge amounts of raw data are summarized and stored. IBM Tivoli Service LevelAdvisor can then use its built in data collector interface to extract and analyze thisdata, determine long term trends, and generate reports of violations or trendstoward violations of guaranteed levels of service. See the Administrator’s Guide forIBM Tivoli Service Level Advisor for information on Tivoli Enterprise DataWarehouse, and refer to the documentation accompanying the Tivoli EnterpriseData Warehouse installation media.
IBM Tivoli Service Level Advisor enables you to manage the information collectedby monitoring applications against service level agreements (SLAs) associated withyour internal enterprise customers, which might be a department or division inyour organization, or some other consumer of services provided by yourenterprise. Analysis of the data collected, identification of trends in service levels,and generated reports can be associated with a specific enterprise customer.
Figure 1. IBM Tivoli Service Level Advisor analyzes performance and availability data from multiple source applicationsthat store their data in Tivoli Enterprise Data Warehouse.
2 IBM Tivoli Service Level Advisor: Getting Started with IBM Tivoli Service Level Advisor
IBM Tivoli Service Level Advisor in the EnterpriseIBM Tivoli Service Level Advisor resides in the firewall protected, secure back officelayer of your enterprise. Other Tivoli applications responsible for performance andavailability monitoring might reside elsewhere in your enterprise environment. Themonitoring data they collect is stored in their local databases, completely separatedfrom IBM Tivoli Service Level Advisor. These applications and their associateddatabases are referred to as source applications and source databases.
At certain scheduled intervals this data is moved from the source databases intothe Tivoli Enterprise Data Warehouse database, a centralized repository alsolocated in the secure back office layer of your environment, that holds all of theperformance and availability monitoring data of interest from the various sourceapplications. IBM Tivoli Service Level Advisor uses Tivoli Enterprise DataWarehouse as the source for all of its data to be analyzed for guaranteeing levels ofservice in your enterprise IT infrastructure.
IBM Tivoli Service Level Advisor supports a Web application server environmentrunning in the back office layer of the enterprise, as shown in Figure 2. Userinterfaces are accessible through a Web browser, such as Internet Explorer orNetscape Communicator, requiring no additional client footprint. This deploymentscheme provides the easiest and most secure model for IBM Tivoli Service LevelAdvisor, and is suitable when integrating with other environments.
����������������������������
����������������������������
Figure 2. IBM Tivoli Service Level Advisor is deployed in the secure back office layer of the enterprise.
Chapter 1. Introduction 3
Placing IBM Tivoli Service Level Advisor in the secure back office layer of theenterprise with Tivoli Enterprise Data Warehouse eliminates the need to define asecurity infrastructure. Communication with less secure layers is done over HTTP.
Inside IBM Tivoli Service Level AdvisorThe main functional units of IBM Tivoli Service Level Advisor, as shown inFigure 3, include the following:v The SLM Server, which provides most of the service level management function
for managing orders, scheduling the frequency and times when data is collectedand evaluated, performing the evaluation and analysis of the data, andnotification if violations or trends toward violations of SLAs are detected
v The SLM Reports, which are standard Java-based report servlets that can beintegrated into a customer’s Web site using JavaServer Pages (JSP files). Thesereport servlets summarize the results of the evaluation and analysis, providinginformation in table and graph form that can be customized as desired.
v The SLM Task Drivers, that integrate with the Web-based version of the IBMConsole, Tivoli’s role-based user interface for administrative and customerservice related tasks
These three functional units of IBM Tivoli Service Level Advisor can all exist onthe same machine, or can reside on three separate machines in your enterprise, andeven in different geographical regions, spanning multiple time zones.
The SLM ServerThe SLM Server performs the main functions necessary for service levelmanagement, including:v Processing of ordersv Scheduling and performing evaluation and trend analysis of measurement data
Figure 3. IBM Tivoli Service Level Advisor includes the SLM Server, user interface task drivers, and Java-based reportservlets.
4 IBM Tivoli Service Level Advisor: Getting Started with IBM Tivoli Service Level Advisor
v Storing the results of the analysisv Notification of violations or trends toward violations of SLAs
SLM ReportsThe report servlets utilize the functions of the IBM WebSphere Application Serverto obtain SLA results data and generate summary reports in the form of tables andgraphs that can be displayed in a Web browser. These servlets can be used by theenterprise to create customized web pages for customers, displaying results ofevaluation and trend analyses, such as:v Actual level of service providedv Number of SLA violationsv Trends toward future violations
See the Administrator’s Guide for IBM Tivoli Service Level Advisor for moreinformation on customizing report servlets to integrate into a Web site, and learnmore about the sample JSP files that come with IBM Tivoli Service Level Advisor.
SLM Task DriversThe SLM Task Drivers integrate with the IBM Console to provide a Web-basedgraphical user interface for:v Creating offerings and ordersv Specifying schedules and defining peak times and other schedule states (such as
standard, prime, off hours, and others) for varying levels of servicev Specifying times for when evaluation and trend analysis should take place, and
defining how often the analysis is performedv Specifying breach values for metrics associated with offeringsv Managing active orders
See the Administrator’s Guide for IBM Tivoli Service Level Advisor for moreinformation on the IBM Console user interface for IBM Tivoli Service LevelAdvisor.
IBM Tivoli Service Level Advisor DatabasesIBM Tivoli Service Level Advisor depends on three main databases for itsoperation:v The central data warehouse database from Tivoli Enterprise Data Warehousev The SLM Databasev The SLM Measurement Data Mart
The Central Data Warehouse DatabaseThe Tivoli Enterprise Data Warehouse central data warehouse serves as the centralrepository for historical data for use by many applications, such as IBM TivoliService Level Advisor. Tivoli Enterprise Data Warehouse is the source for resourcerelated data, and is where the various Tivoli performance and availabilitymonitoring applications send their data for long term storage.
See the Administrator’s Guide for IBM Tivoli Service Level Advisor for moreinformation on this database, and refer to the Tivoli Enterprise Data Warehousedocumentation included with IBM Tivoli Service Level Advisor for specificinstallation and configuration details.
Chapter 1. Introduction 5
The SLM DatabaseThe SLM Database serves several purposes:v The SLM Database contains information from Tivoli Enterprise Data Warehouse
that defines possible combinations of components and metrics that are availableto the customer to be used in SLAs. It contains a list of unique resources,resource types, and metric types that exist in Tivoli Enterprise Data Warehouse.This information is referenced during the creation of offerings. See theAdministrator’s Guide for IBM Tivoli Service Level Advisor for information oncreating offerings and orders.
v The SLM Database also contains information specific to the definition andmanagement of customers and SLAs. Offerings and orders that are created usingIBM Tivoli Service Level Advisor are stored in the SLM Database, and make upthe SLAs that are managed by IBM Tivoli Service Level Advisor.
v The SLM Database stores the results of the analysis and trend evaluationprocesses, when service level objectives (SLOs) are compared to expected results.From this information, the customer can view summarized reports that indicatewhether their SLAs are being maintained.
The SLM Measurement Data MartThe SLM Measurement Data Mart is the database containing a subset of themeasurement data from Tivoli Enterprise Data Warehouse that is of interest to IBMTivoli Service Level Advisor in the evaluation and reporting of SLA conformance.It is updated on a regular basis with the latest metric data from Tivoli EnterpriseData Warehouse.
6 IBM Tivoli Service Level Advisor: Getting Started with IBM Tivoli Service Level Advisor
Chapter 2. Planning Decisions
Before installing IBM Tivoli Service Level Advisor into your enterpriseenvironment, you need to consider the hardware requirements, the physicallocations of where you want to install the various functional pieces of IBM TivoliService Level Advisor, and their dependencies on the other Tivoli and IBMapplications which support the Tivoli service level management (SLM) solution.IBM Tivoli Service Level Advisor and all of its supporting applications can beinstalled on a single machine in your enterprise, or across multiple machines withcertain dependencies.
Components of an SLM DeploymentIBM Tivoli Service Level Advisor is designed to run in a number of differentconfigurations, depending on how the system will be used, and which componentsneed to be scaled or isolated.
Note: For this discussion, the term component is used to describe one of the logicalentities within the IBM Tivoli Service Level Advisor installation that can beinstalled by itself on a physical machine or with one or more other logicalentities on the same physical machine.
You can install all of the components of a IBM Tivoli Service Level Advisorinstallation on a single physical machine, or you can distribute them in variouscombinations across multiple machines in your enterprise. Installing on a singlephysical machine is only recommended for use in an evaluation environment, andis not recommended for use in a normal production environment. See Appendix A,“A Two-Machine Installation Example”, on page 133, and Appendix B, “A ThreeMachine Installation Example”, on page 147 for examples of a minimumrecommended entry level configuration.
Before you can install IBM Tivoli Service Level Advisor, you must have a clearunderstanding of the major components of both Tivoli Enterprise Data Warehouseand IBM Tivoli Service Level Advisor, because the distribution of some of theircomponents is interdependent.
Tivoli Enterprise Data Warehouse ComponentsIf you have not already done so, you should first read and become thoroughlyfamiliar with Installing and Configuring Tivoli Enterprise Data Warehouse, specificallythe information in the Overview and Planning chapters, which discuss the variousmajor components of Tivoli Enterprise Data Warehouse, and information that youneed to know to determine how to distribute the various components of TivoliEnterprise Data Warehouse in your environment. How you deploy TivoliEnterprise Data Warehouse in your environment might affect your decisions ondistributing the components of IBM Tivoli Service Level Advisor. You should alsorefer to the Tivoli Enterprise Data Warehouse Release Notes for additional informationon hardware prerequisites, and specific database and operating system support.
IBM DB2 must be installed on all machines in your enterprise where you plan tolocate one or more components of Tivoli Enterprise Data Warehouse or IBM TivoliService Level Advisor.
© Copyright IBM Corp. 2003 7
In brief, the major components of Tivoli Enterprise Data Warehouse that arediscussed in the documentation include the following:
Tivoli Enterprise Data Warehouse control serverThe control server manages communication between the other maincomponents of Tivoli Enterprise Data Warehouse, and also controls theETL processes that move and transform data between the various sourceapplications and Tivoli Enterprise Data Warehouse, as well as the databetween Tivoli Enterprise Data Warehouse and IBM Tivoli Service LevelAdvisor. The control server must be installed on a Windows platform, anduses the following DB2 components:v DB2 Serverv The Data Warehouse Center, a component that automates data
warehouse processingv The warehouse agent, part of DB2 Warehouse Manager.v The warehouse loggerv The warehouse server
Central data warehouseThis is a DB2 database that acts as the central data repository containingthe historical data for your enterprise. Tivoli and other third partyapplications that are installed throughout your enterprise can store theirdata in the central data warehouse. IBM Tivoli Service Level Advisor thenobtains a subset of that data from the central data warehouse and stores itlocally for evaluation and trend analysis. The system where the centraldata warehouse is installed is called the central data warehouse server.
Data martsThese are separate DB2 databases that contain a subset of the historicaldata from the central data warehouse. Tivoli Enterprise Data Warehousecreates its own data marts for use with its own reporting interface. Themachine where these data marts reside is called the data mart server. IBMTivoli Service Level Advisor does not use these data marts. During theinstallation of IBM Tivoli Service Level Advisor, you will create your owndata marts for use by IBM Tivoli Service Level Advisor.
Report interfaceTivoli Enterprise Data Warehouse includes its own reporting interfacewhich contains tools and a graphical user interface that other Tivoliproducts can use to create and display reports to help analyze data in thewarehouse. IBM Tivoli Service Level Advisor has its own reportinginterface which is used to generate reports from the local evaluation andtrend analysis of metric data obtained from the central data warehouse andstored in the IBM Tivoli Service Level Advisor data marts.
Note: The report interface uses the Web console interface to the IBMConsole, part of Tivoli Presentation Services. The installation ofTivoli Enterprise Data Warehouse includes the installation of TivoliPresentation Services, which is also used by IBM Tivoli Service LevelAdvisor. If you already have a supported version of TivoliPresentation Services installed in your enterprise, you must installthe Tivoli Enterprise Data Warehouse report interface and the SLMTask Drivers component of IBM Tivoli Service Level Advisor on thatsame machine. Though Tivoli Presentation Services is supported onboth UNIX and Windows platforms, it is recommended that youinstall the report interface on a Windows system where possible.
8 IBM Tivoli Service Level Advisor: Getting Started with IBM Tivoli Service Level Advisor

These four main components of Tivoli Enterprise Data Warehouse might bedistributed on from one to four systems in your environment, though a typicalconfiguration might be similar to the following:v The control server on a Windows server machine running DB2 Serverv The central data warehouse and data marts together on a large database server
machine (Windows or UNIX), running DB2 Serverv The report interface on a third system, running DB2 Client or DB2 Server. If this
server is also on a Windows platform, you might consider installing it on thesame system as the control server, reducing the configuration to two machines.
Warehouse PacksA warehouse pack, the part of a Tivoli software product that provides warehousefunctionality, can be provided on the installation media for the product, on aseparate CD, or in a collection of warehouse packs. If a warehouse pack isincluded on a CD with other product install code, the warehouse pack informationis located in a separate subdirectory named tedw_apps.
Warehouse packs provide the ETL functionality between the source applications inthe enterprise and Tivoli Enterprise Data Warehouse, moving and transformingdata from various Tivoli and other third party source applications, and storing it inthe central data warehouse. These source ETLs come with each source application,and you can install them using the install program for Tivoli Enterprise DataWarehouse.
IBM Tivoli Service Level Advisor also installs its own warehouse pack, containingtarget ETLs that move and transform data from the central data warehouse into thelocal data marts used by IBM Tivoli Service Level Advisor to evaluate metric dataand analyze the data for trends and violations of service level agreements. Theinstallation of the IBM Tivoli Service Level Advisor warehouse pack also uses theTivoli Enterprise Data Warehouse install program.
All warehouse packs must be installed on the system containing the control servercomponent of Tivoli Enterprise Data Warehouse.
IBM Tivoli Service Level Advisor ComponentsThe components of IBM Tivoli Service Level Advisor have already been introducedin Chapter 1, “Introduction”, on page 1, and in summary include the following:v SLM Serverv SLM Reportsv SLM Task Driversv SLM Databasev SLM Measurement Data Mart
In addition, the warehouse pack that provides the ETL functionality between thecentral data warehouse and the SLM Database and SLM Measurement Data Martis installed in the Tivoli Enterprise Data Warehouse control server, along with otherwarehouse packs for source applications.
It is possible for all of these components of IBM Tivoli Service Level Advisor to beinstalled on a single machine, or distributed on multiple machines in yourenterprise. Taking advantage of the Tivoli Enterprise Data Warehouse environmentthat will already have been established, you may choose to install various
Chapter 2. Planning Decisions 9

components of IBM Tivoli Service Level Advisor on the same systems where TivoliEnterprise Data Warehouse components have been installed.
Deploying the SLM Solution in Your EnterpriseThe various components of Tivoli Enterprise Data Warehouse and IBM TivoliService Level Advisor, along with supporting applications (DB2, WebSphere, TivoliPresentation Services, and the warehouse packs) combine together to create theoverall SLM solution for your enterprise.
The Tivoli Enterprise Data Warehouse components that are of interest to IBM TivoliService Level Advisor are the central data warehouse server and the control server.For purposes of this discussion, we will ignore the Tivoli Enterprise DataWarehouse data marts and report interface, because they are not an active part ofthe SLM solution. However, you may choose to locate your SLM Database andSLM Measurement Data Mart on the same system as the Tivoli Enterprise DataWarehouse datamarts, and you must install the SLM Task Drivers on the samesystem where Tivoli Presentation Services (and the Tivoli Enterprise DataWarehouse report interface) is located. These components will be present in theoverall solution, but they are not considered in the deployment examples thatfollow.
Combining the various components of Tivoli Enterprise Data Warehouse and IBMTivoli Service Level Advisor, the components that make up the overall SLMsolution include the following:v Tivoli Enterprise Data Warehouse control serverv Central data warehouse serverv IBM Console Server (including both the Tivoli Enterprise Data Warehouse report
interface and the IBM Tivoli Service Level Advisor SLM Task Drivers)v SLM Serverv SLM Report Server (including IBM WebSphere Application Server)v SLM Databasev SLM Measurement Data Mart
Each of the individual components is shown in Figure 4 on page 11, and isdescribed in the following sections.
10 IBM Tivoli Service Level Advisor: Getting Started with IBM Tivoli Service Level Advisor
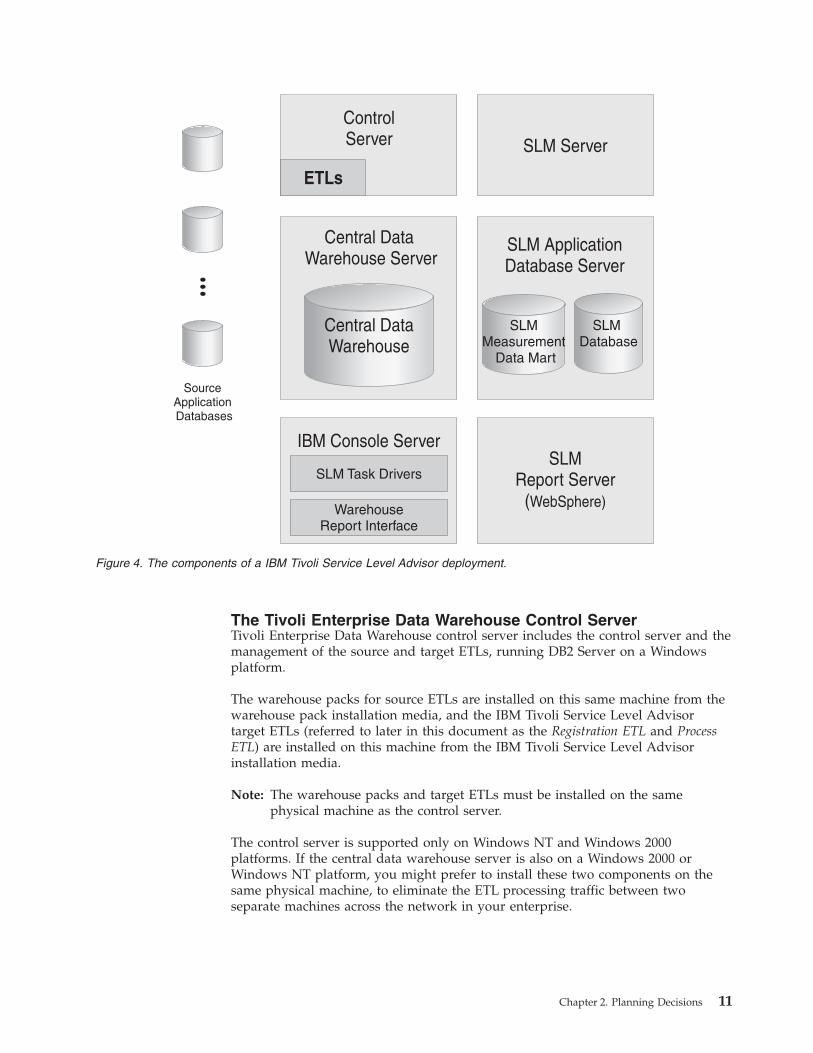
The Tivoli Enterprise Data Warehouse Control ServerTivoli Enterprise Data Warehouse control server includes the control server and themanagement of the source and target ETLs, running DB2 Server on a Windowsplatform.
The warehouse packs for source ETLs are installed on this same machine from thewarehouse pack installation media, and the IBM Tivoli Service Level Advisortarget ETLs (referred to later in this document as the Registration ETL and ProcessETL) are installed on this machine from the IBM Tivoli Service Level Advisorinstallation media.
Note: The warehouse packs and target ETLs must be installed on the samephysical machine as the control server.
The control server is supported only on Windows NT and Windows 2000platforms. If the central data warehouse server is also on a Windows 2000 orWindows NT platform, you might prefer to install these two components on thesame physical machine, to eliminate the ETL processing traffic between twoseparate machines across the network in your enterprise.
Figure 4. The components of a IBM Tivoli Service Level Advisor deployment.
Chapter 2. Planning Decisions 11

The Central Data Warehouse ServerThe central data warehouse server contains the central data warehouse (andtypically the Tivoli Enterprise Data Warehouse data mart server on the samemachine), running DB2 Server on a Windows or UNIX platform.
The Tivoli Enterprise Data Warehouse performance and availability schema, or datamodel, is installed on this DB2 database to personalize the central data warehousefor storing data from the various source applications.
Though other components of Tivoli Enterprise Data Warehouse and IBM TivoliService Level Advisor can reside on this same machine, you might prefer to keepthe central data warehouse on a separate machine to ease its management andmaintenance.
The IBM Console ServerThe IBM Console Server contains Tivoli Presentation Services, the Tivoli EnterpriseData Warehouse report interface, and the SLM Task Driver component of IBMTivoli Service Level Advisor, running DB2 Client or DB2 Server on a Windows orUNIX platform.
Note: It is recommended that you install Tivoli Presentation Services and the IBMConsole Server components on a Windows platform where possible. Sincethe control server is only supported on a Windows platform, you mightconsider installing the IBM Console Server on the same machine, or on adifferent Windows machine.
The IBM Console Server provides support for all task drivers, for both TivoliEnterprise Data Warehouse and IBM Tivoli Service Level Advisor. The IBMConsole is an integral part of the Tivoli user interface architecture. This distributed,device-independent, and platform independent presentation layer provides arole-based user interface for all Tivoli products. It includes both a Java version, anda Web version that can be displayed in a Web browser. IBM Tivoli Service LevelAdvisor uses the Web version for its administrative and customer servicerepresentative tasks, but also takes advantage of functions in the Java version forenabling tracing and viewing logs.
The IBM Console Server is installed as part of the Tivoli Enterprise DataWarehouse installation process, which installs the server function and both Javaand Web versions of the IBM Console, along with an HTTP server forcommunicating with other Web servers and Web browsers.
The IBM Console Server installation includes the following functional units:v Server for IBM Consolev Web Services for IBM Consolev IBM Console
The user interface task drivers for Tivoli Enterprise Data Warehouse reportgeneration (the report interface) are installed here from the Tivoli Enterprise DataWarehouse installation media, and the IBM Tivoli Service Level Advisoradministrative and customer service representative task drivers (the SLM TaskDrivers) are installed here from the IBM Tivoli Service Level Advisor installationmedia. The IBM Console Server can be installed on the same machine as othercomponents, or on a separate machine.
12 IBM Tivoli Service Level Advisor: Getting Started with IBM Tivoli Service Level Advisor
Note: The SLM Task Drivers component of IBM Tivoli Service Level Advisor mustbe installed on the same machine as the IBM Console Server.
The Web services provided by the IBM Console Server installation can support upto 200 simultaneous Web browser connections. This single Web services servershould be sufficient for your enterprise needs.
If the IBM Console Server is installed on a machine different from where the SLMDatabase and SLM Measurement Data Mart are located, then you must install andconfigure a DB2 Client or DB2 Server on the machine containing the IBM ConsoleServer.
Web Browser Requirements: The Web version of the IBM Console requires one ofthe following Web browsers running in your enterprise:v Internet Explorerv Netscape Communicator
Note: While both Internet Explorer and Netscape Communicator are supported,you might experience better performance and reliability using InternetExplorer as your Web browser.
Refer to the Release Notes documentation for Tivoli Enterprise Data Warehouseand IBM Tivoli Service Level Advisor for information on supported Web browserversions.
The SLM ServerThe SLM Server contains the SLM Server component of IBM Tivoli Service LevelAdvisor, running DB2 Server or DB2 Client on a Windows or UNIX platform.
The SLM Server provides the main service level functionality of IBM Tivoli ServiceLevel Advisor. Functions include offering and order creation, scheduling ofevaluation and trend analysis of measurement data from the data warehouse,managing customers and orders, and notifying support personnel and otherapplications when service level agreements are violated or trends indicating apotential violation are detected. The SLM Server is installed from the IBM TivoliService Level Advisor installation media, and can be installed on its own machineor with other components on the same machine.
If the SLM Server is installed on a machine different from the SLM Database andSLM Measurement Data Mart databases, then you must install a DB2 client or DB2Server on the machine with the SLM Server.
See the IBM Tivoli Service Level Advisor Release Notes for recommended hardwarerequirements and supported platforms for the SLM Server.
The SLM Report ServerThe SLM Report Server contains the SLM Reports component of IBM Tivoli ServiceLevel Advisor and is used to support the report servlets that are provided withIBM Tivoli Service Level Advisor. These Java-based report servlets enable acustomer to integrate tables and graphs of service level management reports intotheir company Web sites for viewing by site users using a Web browser.
The SLM Report Server runs within the IBM WebSphere Application Serverenvironment, and supports WebSphere Advanced Edition (AE) and AdvancedEdition Single-Sever (AES) versions. See the IBM Tivoli Service Level Advisor Release
Chapter 2. Planning Decisions 13

Notes for recommended hardware requirements, supported platforms, andsupported versions of WebSphere for the SLM Report Server.
Note: The SLM Reports component of IBM Tivoli Service Level Advisor requiresIBM WebSphere Application Server, and must be installed on the samesystem where WebSphere is located.
Your enterprise can use an existing version of WebSphere if you already have asupported version installed in your enterprise. If not, you can install the version ofWebSphere AES 4.0.1 that is shipped with IBM Tivoli Service Level Advisor andthen upgrade to at least version 4.0.2 or later (you can optionally upgrade to morerecent versions by downloading the installation media from the WebSphere Website, if desired).
If any supported version of WebSphere AES is used, IBM Tivoli Service LevelAdvisor will automatically integrate the SLM Reports into WebSphere when theSLM Reports are installed. If a supported version of WebSphere AE is installed,however, you must manually configure the report servlets to integrate intoWebSphere, following the procedure defined in this document.
Refer to the official documentation for IBM WebSphere Application Server foradditional recommendations on hardware requirements and supported platforms.
If the SLM Reports are installed on a machine different from the SLM Databaseand the SLM Measurement Data Mart databases, then you will need to install aDB2 Client or DB2 Server on the machine with the SLM Reports.
The SLM Application Database ServerThe SLM Application Database Server is the database server that contains the SLMDatabase and the SLM Measurement Data Mart databases used by IBM TivoliService Level Advisor. Depending on your deployment, these databases can becreated on the same machine as the central data warehouse, located in the sameDB2 instance, or they can be created in their own DB2 instance, separate from thecentral data warehouse, on one or more machines, for scalability, availability, andperformance considerations. These DB2 databases run on either a Windows orUNIX DB2 Server machine.
In a DB2 production environment you might prefer to set up a separate instance ofDB2 for both the SLM Database and SLM Measurement Data Mart, to enablestarting and stopping of these databases for setup and configuration, withoutdisrupting another database server instance. By creating the two SLM databases ina DB2 instance separate from other instances on different DB2 managementsystems, the IBM Tivoli Service Level Advisor solution performs better and isbetter protected from data loss.
The installation and configuration procedures for the IBM Tivoli Service LevelAdvisor databases requires starting, stopping, and terminating the instance,thereby bringing down any applications connected to that instance. See the officialDB2 documentation for more information on creating and managing multipleinstances of DB2.
Implementing a distributed environment for the individual databases adds a levelof complexity to the creation and configuration of the databases and the TivoliSLM solution. Consult with your database administrator to determine the bestsolution for IBM Tivoli Service Level Advisor.
14 IBM Tivoli Service Level Advisor: Getting Started with IBM Tivoli Service Level Advisor

For each IBM Tivoli Service Level Advisor database you create, approximately 30to 50 MB of space is initially required to hold the database tables. Approximatelythe same amount of memory is also required.
See the IBM Tivoli Service Level Advisor Release Notes for recommended hardwarerequirements and supported platforms for SLM databases. Refer also to the officialdocumentation for DB2 for additional recommendations on hardwarerequirements.
Deployment OptionsYou can deploy the various components of IBM Tivoli Service Level Advisor indifferent ways according to your enterprise needs and capabilities. Both TivoliEnterprise Data Warehouse and IBM Tivoli Service Level Advisor offer manypossible combinations of deployment options. You should plan your DB2installation and the deployment for Tivoli Enterprise Data Warehouse first, sinceyou will install those first, and then decide how best to fit IBM Tivoli Service LevelAdvisor into the resulting environment.
A Widely Distributed SLM DeploymentA widely distributed SLM solution deployment would consist of all (or nearly all)components existing on different machines in your enterprise. This is essentiallythe deployment suggested in Figure 4 on page 11, with each shaded box in thefigure representing a different physical machine. Note that this configuration couldbe distributed even further by locating the Tivoli Enterprise Data Warehouse datamarts and IBM Tivoli Service Level Advisor databases on separate machines.
When considering a widely distributed deployment, you should be aware of thefollowing:v The source and target ETLs (warehouse packs) must be installed on the same
physical machine as the Tivoli Enterprise Data Warehouse control server, whichmust be on a supported Windows platform.
v The SLM Task Drivers must be installed on the same physical machine as theIBM Console Server, which includes the Web Services for IBM Consolecomponent of Tivoli Presentation Services. Since the Tivoli Enterprise DataWarehouse report interface also uses Tivoli Presentation Services, thesecomponents must all be installed on the same machine.
v The SLM Reports must be installed on the same physical machine as IBMWebSphere Application Server. WebSphere must be installed before SLM Reportsis installed.
v If the control server and the central data warehouse are installed on differentmachines, the measurement data from source applications that is processed bythe source ETLs must travel over the network from the control server to thecentral data warehouse server machine. Your enterprise should have thecapability to handle large amounts of data transfer between these machines.
v Refer to the documentation for Tivoli Enterprise Data Warehouse for anyadditional considerations regarding deployment and operation of the datawarehouse environment.
Minimum SLM DeploymentFor very small production environments, you might prefer to install all three of theIBM Tivoli Service Level Advisor install options on one machine, with all of thedatabases on the same machine, as shown in Figure 5 on page 16.
When considering a minimum deployment, you should be aware of the following:
Chapter 2. Planning Decisions 15
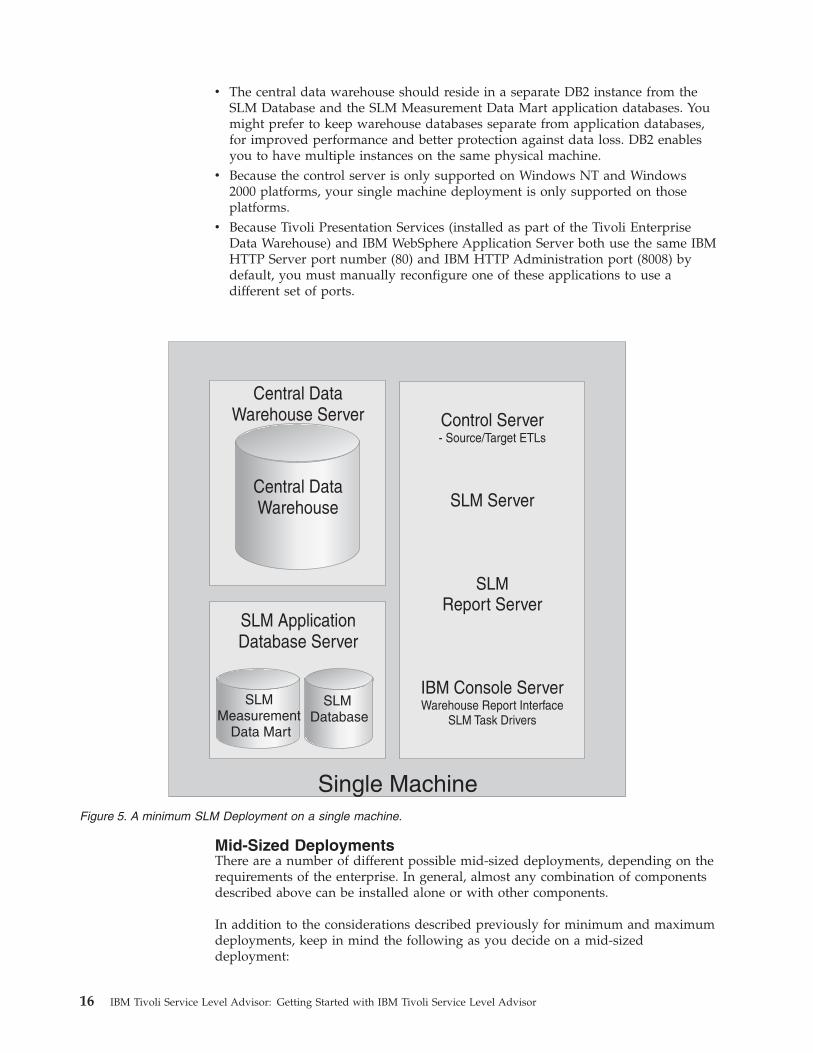
v The central data warehouse should reside in a separate DB2 instance from theSLM Database and the SLM Measurement Data Mart application databases. Youmight prefer to keep warehouse databases separate from application databases,for improved performance and better protection against data loss. DB2 enablesyou to have multiple instances on the same physical machine.
v Because the control server is only supported on Windows NT and Windows2000 platforms, your single machine deployment is only supported on thoseplatforms.
v Because Tivoli Presentation Services (installed as part of the Tivoli EnterpriseData Warehouse) and IBM WebSphere Application Server both use the same IBMHTTP Server port number (80) and IBM HTTP Administration port (8008) bydefault, you must manually reconfigure one of these applications to use adifferent set of ports.
Mid-Sized DeploymentsThere are a number of different possible mid-sized deployments, depending on therequirements of the enterprise. In general, almost any combination of componentsdescribed above can be installed alone or with other components.
In addition to the considerations described previously for minimum and maximumdeployments, keep in mind the following as you decide on a mid-sizeddeployment:
Figure 5. A minimum SLM Deployment on a single machine.
16 IBM Tivoli Service Level Advisor: Getting Started with IBM Tivoli Service Level Advisor
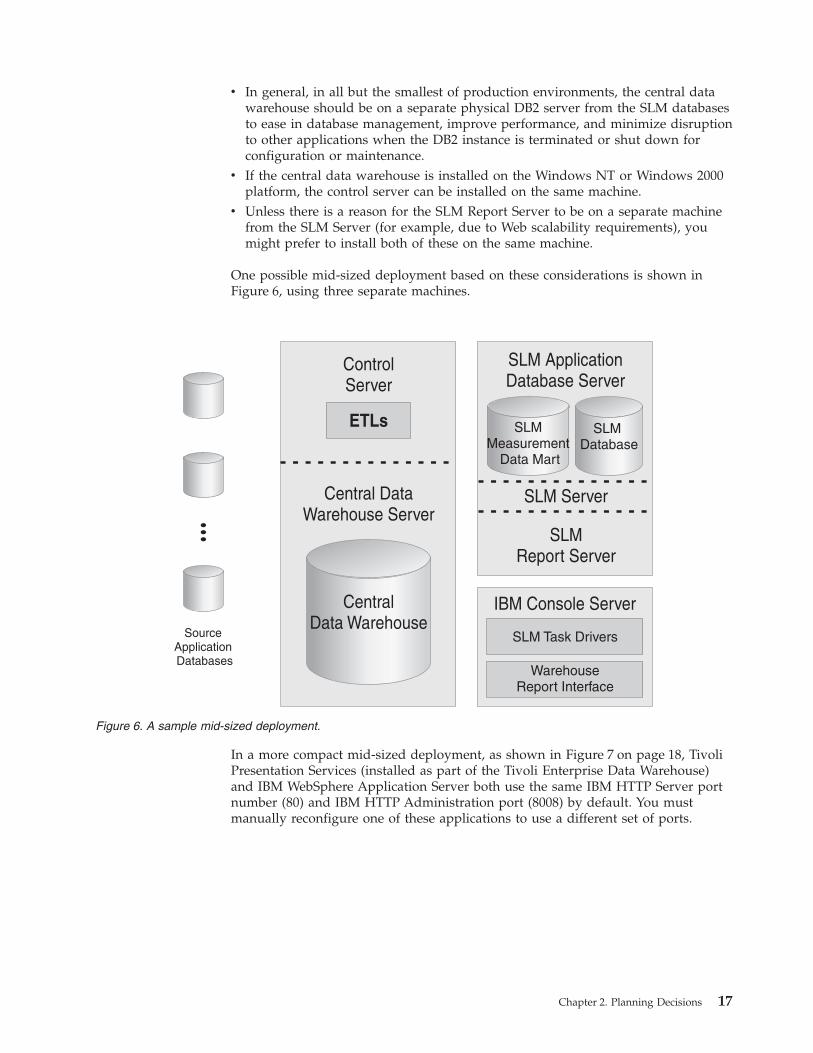
v In general, in all but the smallest of production environments, the central datawarehouse should be on a separate physical DB2 server from the SLM databasesto ease in database management, improve performance, and minimize disruptionto other applications when the DB2 instance is terminated or shut down forconfiguration or maintenance.
v If the central data warehouse is installed on the Windows NT or Windows 2000platform, the control server can be installed on the same machine.
v Unless there is a reason for the SLM Report Server to be on a separate machinefrom the SLM Server (for example, due to Web scalability requirements), youmight prefer to install both of these on the same machine.
One possible mid-sized deployment based on these considerations is shown inFigure 6, using three separate machines.
In a more compact mid-sized deployment, as shown in Figure 7 on page 18, TivoliPresentation Services (installed as part of the Tivoli Enterprise Data Warehouse)and IBM WebSphere Application Server both use the same IBM HTTP Server portnumber (80) and IBM HTTP Administration port (8008) by default. You mustmanually reconfigure one of these applications to use a different set of ports.
Figure 6. A sample mid-sized deployment.
Chapter 2. Planning Decisions 17

Additional Deployment ConsiderationsWhen you install IBM Tivoli Service Level Advisor, you are given the option toinstall the SLM Server, the SLM Task Drivers, and the SLM Reports on the samephysical machine or on multiple machines. In general, installing these options onthe same machine helps to centralize the logging information in one place, andalso shortens the backup and restore processes. If these options are installed onmultiple machines, associated logging information will be located on eachmachine. Backup and restore procedures must be repeated on each machine wherean installed SLM option is located.
Selecting Port NumbersYou must allocate port numbers for Tivoli Enterprise Data Warehouse and for IBMTivoli Service Level Advisor for the following purposes:v Communication between the control server and other components of Tivoli
Enterprise Data Warehouse and IBM Tivoli Service Level Advisor installed ondifferent machines
v Communication with the IBM Consolev Communication between the various components of IBM Tivoli Service Level
Advisor and its SLM databases, if they are distributed on multiple systemsv Communication with IBM WebSphere Application Server in support of the SLM
Reports component of IBM Tivoli Service Level Advisor.
Refer to the Planning chapter of Installing and Configuring Tivoli Enterprise DataWarehouse for specific information on port numbers used by Tivoli Enterprise DataWarehouse. Table 1 on page 19 lists the default port numbers that are used by IBM
Figure 7. Another sample mid-sized deployment.
18 IBM Tivoli Service Level Advisor: Getting Started with IBM Tivoli Service Level Advisor
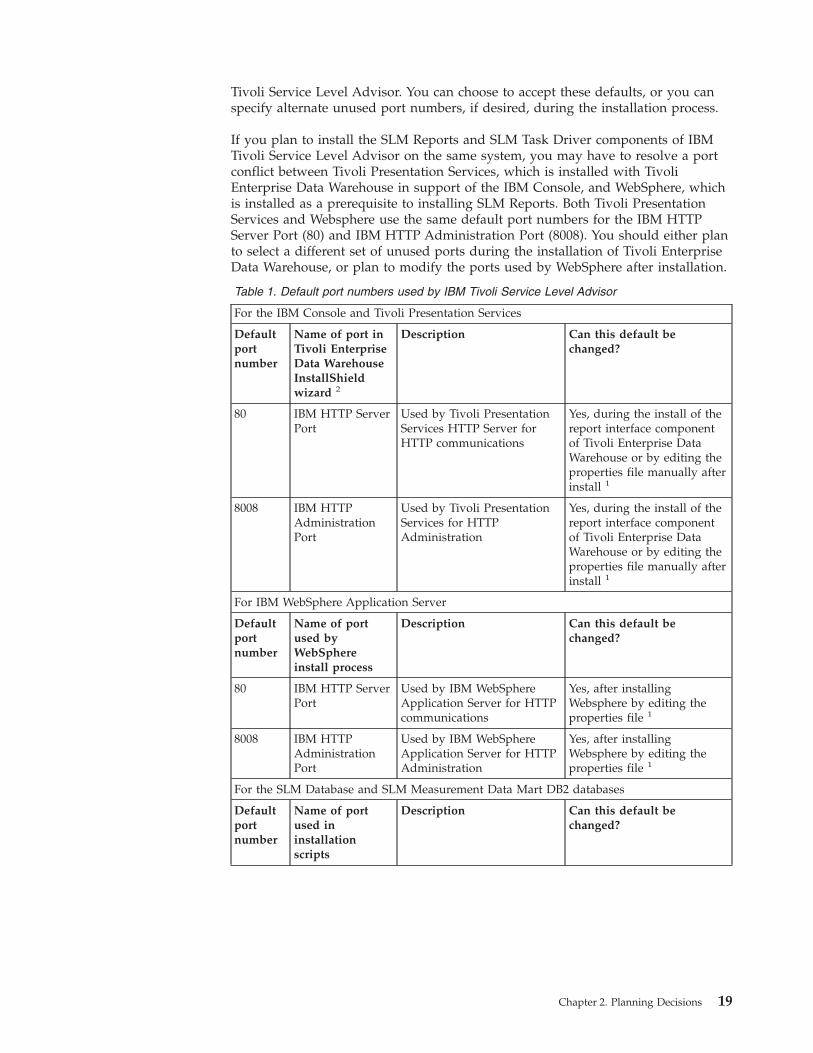
Tivoli Service Level Advisor. You can choose to accept these defaults, or you canspecify alternate unused port numbers, if desired, during the installation process.
If you plan to install the SLM Reports and SLM Task Driver components of IBMTivoli Service Level Advisor on the same system, you may have to resolve a portconflict between Tivoli Presentation Services, which is installed with TivoliEnterprise Data Warehouse in support of the IBM Console, and WebSphere, whichis installed as a prerequisite to installing SLM Reports. Both Tivoli PresentationServices and Websphere use the same default port numbers for the IBM HTTPServer Port (80) and IBM HTTP Administration Port (8008). You should either planto select a different set of unused ports during the installation of Tivoli EnterpriseData Warehouse, or plan to modify the ports used by WebSphere after installation.
Table 1. Default port numbers used by IBM Tivoli Service Level Advisor
For the IBM Console and Tivoli Presentation Services
Defaultportnumber
Name of port inTivoli EnterpriseData WarehouseInstallShieldwizard 2
Description Can this default bechanged?
80 IBM HTTP ServerPort
Used by Tivoli PresentationServices HTTP Server forHTTP communications
Yes, during the install of thereport interface componentof Tivoli Enterprise DataWarehouse or by editing theproperties file manually afterinstall 1
8008 IBM HTTPAdministrationPort
Used by Tivoli PresentationServices for HTTPAdministration
Yes, during the install of thereport interface componentof Tivoli Enterprise DataWarehouse or by editing theproperties file manually afterinstall 1
For IBM WebSphere Application Server
Defaultportnumber
Name of portused byWebSphereinstall process
Description Can this default bechanged?
80 IBM HTTP ServerPort
Used by IBM WebSphereApplication Server for HTTPcommunications
Yes, after installingWebsphere by editing theproperties file 1
8008 IBM HTTPAdministrationPort
Used by IBM WebSphereApplication Server for HTTPAdministration
Yes, after installingWebsphere by editing theproperties file 1
For the SLM Database and SLM Measurement Data Mart DB2 databases
Defaultportnumber
Name of portused ininstallationscripts
Description Can this default bechanged?
Chapter 2. Planning Decisions 19

Table 1. Default port numbers used by IBM Tivoli Service Level Advisor (continued)
50000 DB2Communicationport
Used by DB2 forcommunication with remotedatabases. This value isassumed in the install scriptsand ODBC datasourcecreation scripts, and isspecified during install ofSLM components.
Yes, by editing the installscripts before running tocreate SLM databases andODBC datasources:
v dyk_cat_dbinst
v dyk_dm_dbinst
v dyk_cat_odbc
v dyk_dm_odbc
For the SLM Server, SLM Task Drivers, and SLM Reports components of IBM Tivoli ServiceLevel Advisor
Defaultportnumber
Name of portused inInstallShieldwizard
Description Can this default bechanged?
9980 SLM ServerCommunicationPort
This is the port used forcommunication between theSLM Server, SLM TaskDrivers, and SLM Reportcomponents. This is also theport specified when bringingup the SLM Reports consolein your Web browser to viewreports.
Yes, this port number can beset during IBM Tivoli ServiceLevel Advisor installation.When components of IBMTivoli Service Level Advisorare installed on separatemachines, this port numbermust be the same on allmachines.
9990 Command LineInterface Port
This is the port used forcommunication with theCommand Line Interface.
Yes, this port can be setduring IBM Tivoli ServiceLevel Advisor installation.
For event notification
Defaultportnumber
Name of portused inInstallShieldwizard
Description Can this default bechanged?
162 SNMP TrapDestination Port
This is the SNMP Trapdestination port used by theSNMP Trap option for eventnotification.
Yes, this port number can beset during IBM Tivoli ServiceLevel Advisor installation.
5529 Tivoli EnterpriseConsole EventServer Port
This is the port that theTivoli Enterprise ConsoleEvent Server listens to forevents.
Yes, this port can be setduring IBM Tivoli ServiceLevel Advisor installation.
1 You only need to modify this port number if there is a conflict between TivoliPresentation Services and WebSphere on the same system.
2 Refer to Installing and Configuring Tivoli Enterprise Data Warehouse for additional portsused during installation.
Coexistence with Other DB2 Database ApplicationsTivoli Enterprise Data Warehouse uses the following databases:
TWH_MDThe control database on the control server
TWH_CDWThe central data warehouse database
20 IBM Tivoli Service Level Advisor: Getting Started with IBM Tivoli Service Level Advisor
TWH_MARTThe data mart database
IBM Tivoli Service Level Advisor uses the following databases:
DYK_CATThe SLM Database
DYK_DMThe SLM Measurement Data Mart
If you are installing IBM Tivoli Service Level Advisor in an existing DB2 instance,make sure that databases with these names do not already exist.
Information to Gather Before InstallingThe following tables can be used as a set of worksheets to help you gather theinformation you will need when you install IBM Tivoli Service Level Advisor andthe supporting applications.
Information for All InstallationsFill out Table 2 for all installations of IBM Tivoli Service Level Advisor.
Table 2. Information for all installations
Information needed Why you need to knowRecord your informationhere
Do you want to install to asingle system or to adistributed system?
Determines which checkliststo complete. Aftercompleting this checklist,refer to the following:
v For single system, useTable 3 on page 26
v For distributed, use Table 4on page 27
Do you want to install fromCDs or from CD imagescopied onto local or networkspace?
Copying the media to a localor shared network filesystem can speed up theinstallation and allowportions of it to rununattended. This is especiallyhelpful when performing adistributed installation.
Do you want IBM TivoliService Level Advisor toprovide support forlanguages other thanEnglish?
If so, be sure to complete theinstallation procedure forinstalling language packsupport after installing IBMTivoli Service Level Advisor.
Chapter 2. Planning Decisions 21
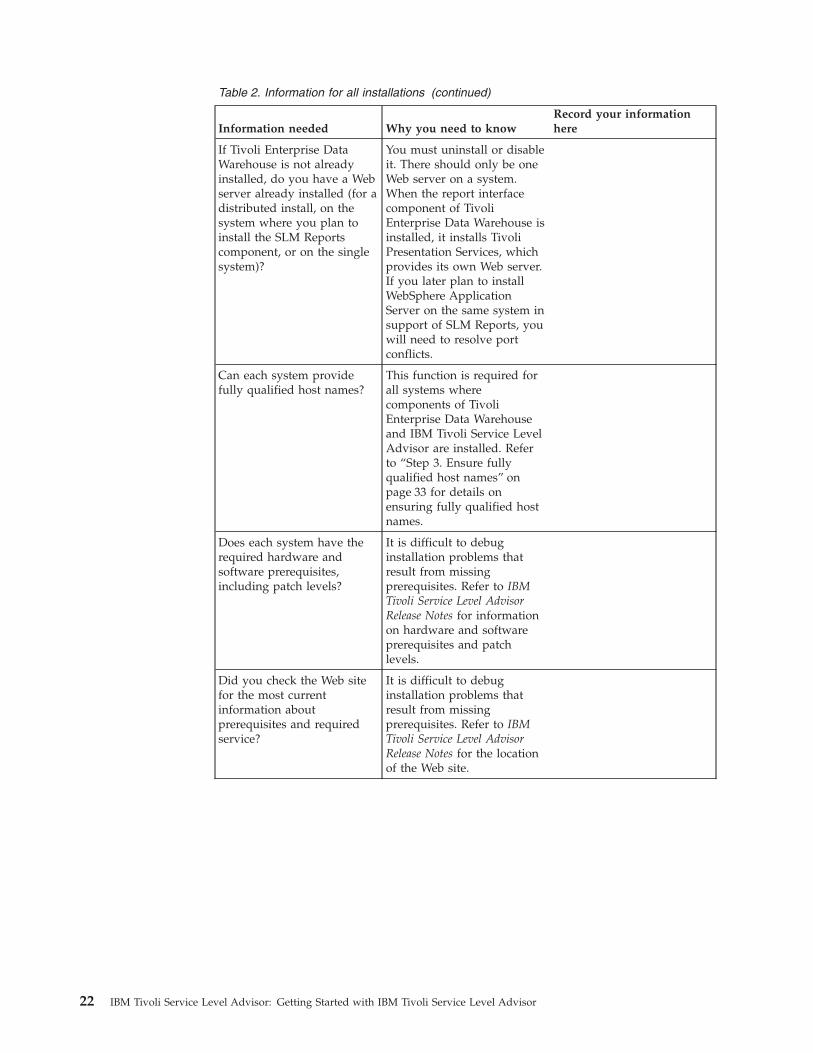
Table 2. Information for all installations (continued)
Information needed Why you need to knowRecord your informationhere
If Tivoli Enterprise DataWarehouse is not alreadyinstalled, do you have a Webserver already installed (for adistributed install, on thesystem where you plan toinstall the SLM Reportscomponent, or on the singlesystem)?
You must uninstall or disableit. There should only be oneWeb server on a system.When the report interfacecomponent of TivoliEnterprise Data Warehouse isinstalled, it installs TivoliPresentation Services, whichprovides its own Web server.If you later plan to installWebSphere ApplicationServer on the same system insupport of SLM Reports, youwill need to resolve portconflicts.
Can each system providefully qualified host names?
This function is required forall systems wherecomponents of TivoliEnterprise Data Warehouseand IBM Tivoli Service LevelAdvisor are installed. Referto “Step 3. Ensure fullyqualified host names” onpage 33 for details onensuring fully qualified hostnames.
Does each system have therequired hardware andsoftware prerequisites,including patch levels?
It is difficult to debuginstallation problems thatresult from missingprerequisites. Refer to IBMTivoli Service Level AdvisorRelease Notes for informationon hardware and softwareprerequisites and patchlevels.
Did you check the Web sitefor the most currentinformation aboutprerequisites and requiredservice?
It is difficult to debuginstallation problems thatresult from missingprerequisites. Refer to IBMTivoli Service Level AdvisorRelease Notes for the locationof the Web site.
22 IBM Tivoli Service Level Advisor: Getting Started with IBM Tivoli Service Level Advisor

Table 2. Information for all installations (continued)
Information needed Why you need to knowRecord your informationhere
Is IBM DB2 installed on alltarget systems?
v If it is, check the versionand configuration of DB2to assure a successfulinstallation of IBM TivoliService Level Advisor, andalso check for databasename conflicts (see“Coexistence with OtherDB2 DatabaseApplications” on page 20
v If not, install it asdescribed in “InstallingDB2” on page 32, referringto specific DB2 installinformation in the TivoliEnterprise Data Warehousedocumentation as needed.
v You may also need toupgrade DB2 to asupported version. See theRelease Notes for specificinformation on supportedupgrade versions.
Is Tivoli Enterprise DataWarehouse already installedin your enterprise?
v If it is, check the versionand configuration toassure a successfulinstallation of IBM TivoliService Level Advisor.
v If not, install it asdescribed in “InstallingTivoli Enterprise DataWarehouse 1.1” onpage 42, referring tospecific install informationin the Tivoli EnterpriseData Warehousedocumentation as needed.
Chapter 2. Planning Decisions 23

Table 2. Information for all installations (continued)
Information needed Why you need to knowRecord your informationhere
Is IBM WebSphereApplication Server alreadyinstalled in your enterprise?
If so, do you know the installdirectory?
If so, do you know the nodename that WebSphereassigned to the system toidentify the machine whereWebSphere is running?
v If it is, check the versionand configuration toassure a successfulinstallation of IBM TivoliService Level Advisor. Youmay need to upgrade to asupported version (AE orAES only). You must be atversion 4.0.2 or later.
v You will be prompted forthe install directory andnode name to tell IBMTivoli Service LevelAdvisor where WebSphereis installed. Typically theinstall directory is in theform of:
– For Windows:
C:\WebSphere\AppServer
– For UNIX:
/usr/WebSphere/AppServer
See “Identifying theWebSphere Node Name”on page 61 for the
procedure to determineyour WebSphere nodename, and record it herefor later use.
v If not, install it AFTERinstalling DB2 and TivoliEnterprise DataWarehouse, as described in“Installing IBM WebSphereApplication Server” onpage 56 and be sure tofollow the additionalinstall procedures in“Integrating SLM Reportsinto WebSphere” onpage 100 after installingIBM Tivoli Service LevelAdvisor
If installing on a UNIXsystem, are you the rootuser?
If installing on a Windowssystem, do you haveAdministrator privileges?
These are required in orderto run the installationprogram.
24 IBM Tivoli Service Level Advisor: Getting Started with IBM Tivoli Service Level Advisor
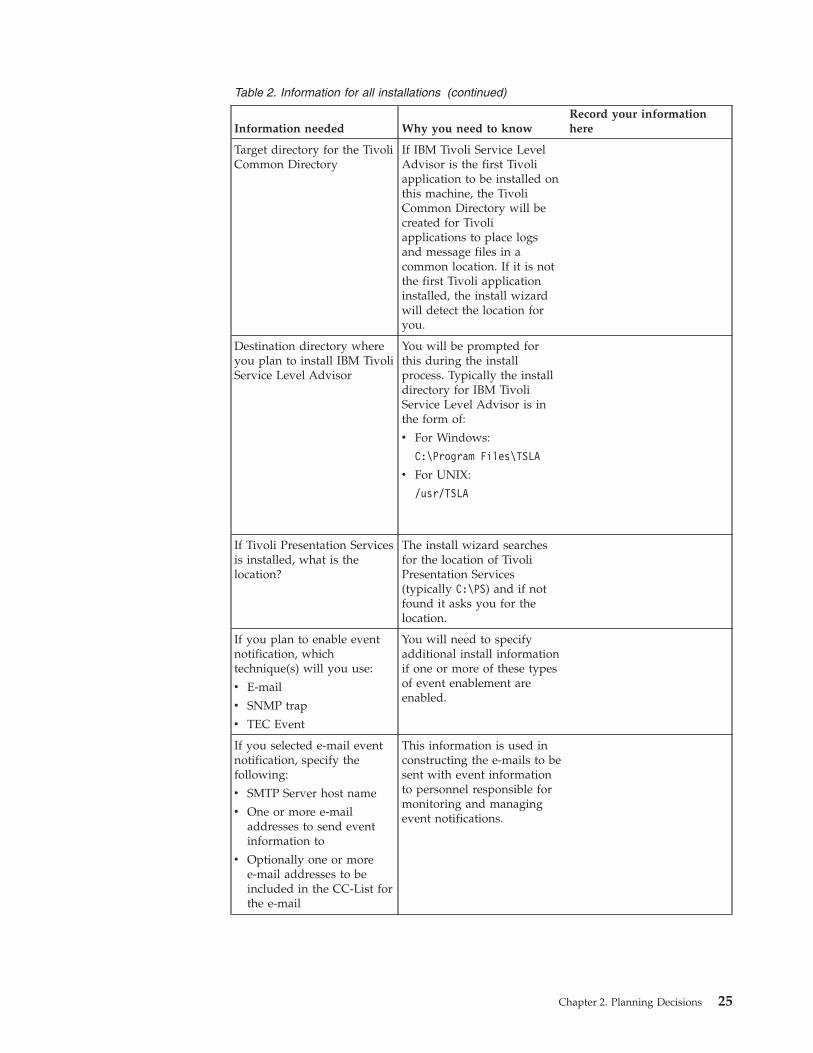
Table 2. Information for all installations (continued)
Information needed Why you need to knowRecord your informationhere
Target directory for the TivoliCommon Directory
If IBM Tivoli Service LevelAdvisor is the first Tivoliapplication to be installed onthis machine, the TivoliCommon Directory will becreated for Tivoliapplications to place logsand message files in acommon location. If it is notthe first Tivoli applicationinstalled, the install wizardwill detect the location foryou.
Destination directory whereyou plan to install IBM TivoliService Level Advisor
You will be prompted forthis during the installprocess. Typically the installdirectory for IBM TivoliService Level Advisor is inthe form of:
v For Windows:
C:\Program Files\TSLA
v For UNIX:
/usr/TSLA
If Tivoli Presentation Servicesis installed, what is thelocation?
The install wizard searchesfor the location of TivoliPresentation Services(typically C:\PS) and if notfound it asks you for thelocation.
If you plan to enable eventnotification, whichtechnique(s) will you use:
v E-mail
v SNMP trap
v TEC Event
You will need to specifyadditional install informationif one or more of these typesof event enablement areenabled.
If you selected e-mail eventnotification, specify thefollowing:
v SMTP Server host name
v One or more e-mailaddresses to send eventinformation to
v Optionally one or moree-mail addresses to beincluded in the CC-List forthe e-mail
This information is used inconstructing the e-mails to besent with event informationto personnel responsible formonitoring and managingevent notifications.
Chapter 2. Planning Decisions 25

Table 2. Information for all installations (continued)
Information needed Why you need to knowRecord your informationhere
If you selected SNMP Trapevent notification, specify thefollowing:
v Fully qualified destinationhost name of the receivingSNMP managementstation
v SNMP Trap destinationport number (default is162)
v Optionally, the communityname of the trap service
This information defineswhere SNMP trap events areto be sent for handling.
If you selected TEC Eventnotification, specify thefollowing:
v Host name where theevent server is installed
v If the event server is on aWindows machine, theport number the systemlistens to for events(default is 5529)
This information defineswhere TEC events are to besent for handling.
Additional Information for Single System InstallationsFill out Table 3 for single system installations of IBM Tivoli Service Level Advisor.
Table 3. Additional information for single-system installations
Information needed Why you need to knowRecord your informationhere
Fully qualified host name ofthe system to install on
Refer to “Step 3. Ensure fullyqualified host names” onpage 33 for information onensuring fully qualified hostnames.
User name and password toaccess the existing DB2instance on the system
Get the DB2 user name andpassword from the personwho installed or administersthe database.
Unique port numbers to beused by Tivoli PresentationServices and WebSphere forIBM HTTP Server. Defaultvalues for both products are:
v IBM HTTP Server: 80
v IBM HTTP Administration:8008
Both products use the sameport numbers by default, andwill cause port conflictswhen installed on the samemachine. You should plan tochange the set of ports foreither of these applications tounused values, for example:
v IBM HTTP Server: 81
v IBM HTTP Administration:8009
26 IBM Tivoli Service Level Advisor: Getting Started with IBM Tivoli Service Level Advisor
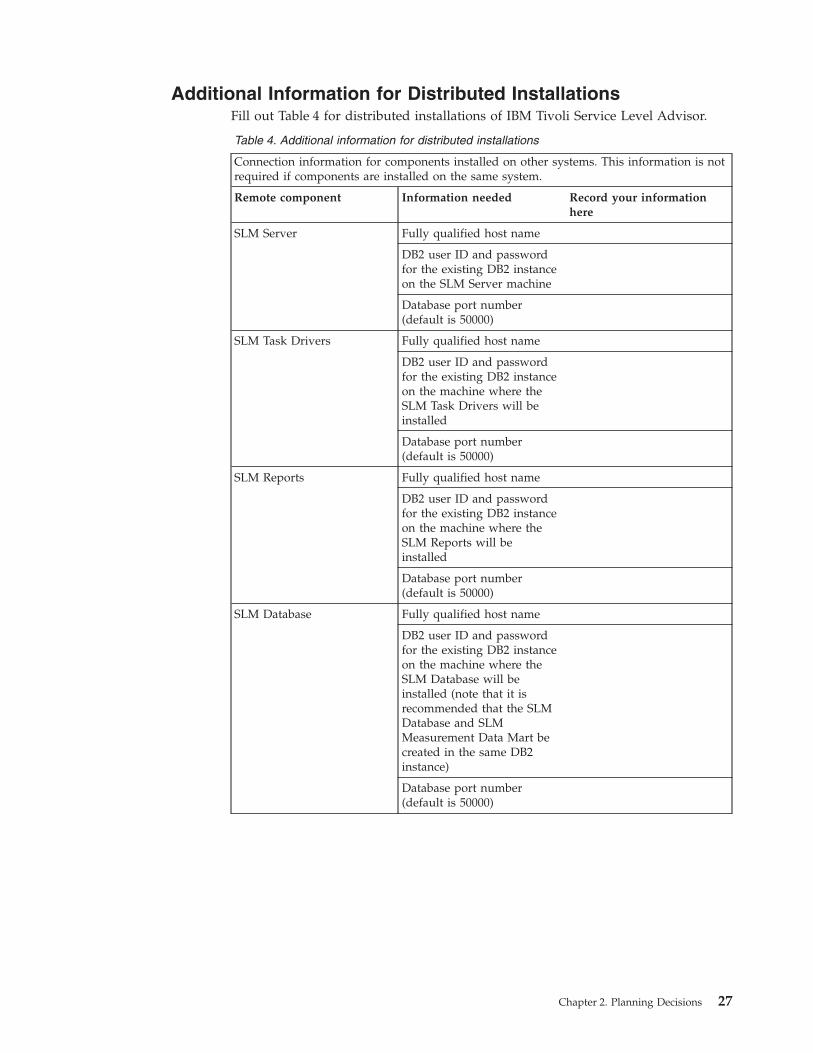
Additional Information for Distributed InstallationsFill out Table 4 for distributed installations of IBM Tivoli Service Level Advisor.
Table 4. Additional information for distributed installations
Connection information for components installed on other systems. This information is notrequired if components are installed on the same system.
Remote component Information needed Record your informationhere
SLM Server Fully qualified host name
DB2 user ID and passwordfor the existing DB2 instanceon the SLM Server machine
Database port number(default is 50000)
SLM Task Drivers Fully qualified host name
DB2 user ID and passwordfor the existing DB2 instanceon the machine where theSLM Task Drivers will beinstalled
Database port number(default is 50000)
SLM Reports Fully qualified host name
DB2 user ID and passwordfor the existing DB2 instanceon the machine where theSLM Reports will beinstalled
Database port number(default is 50000)
SLM Database Fully qualified host name
DB2 user ID and passwordfor the existing DB2 instanceon the machine where theSLM Database will beinstalled (note that it isrecommended that the SLMDatabase and SLMMeasurement Data Mart becreated in the same DB2instance)
Database port number(default is 50000)
Chapter 2. Planning Decisions 27

Table 4. Additional information for distributed installations (continued)
SLM Measurement DataMart
Fully qualified host name
DB2 user ID and passwordfor the existing DB2 instanceon the machine where theSLM Measurement DataMart will be installed (notethat it is recommended thatthe SLM Database and SLMMeasurement Data Mart becreated in the same DB2instance)
Database port number(default is 50000)
For SLM Task Drivers and SLM Reports when installed on systems different from wherethe SLM Server is located
Information needed Why you need to know Record your informationhere
If you are installing the SLMTask Drivers or the SLMReports component on adifferent system from theSLM Server, specify thefollowing:
v Fully qualified host nameof the system where theSLM Server is installed
v The SLM Servercommunication port(default is 9980)
This information is need forthe SLM Task Drivers andSLM Reports components ofIBM Tivoli Service LevelAdvisor to communicatewith the SLM Server when itis installed on a remotesystem.
For SLM Task Drivers and SLM Reports when installed on the same system
Information needed Why you need to know Record your informationhere
If you are installing the SLMTask Drivers (which uses theIBM Console and TivoliPresentation Services) andthe SLM Reports (which usesWebSphere as the applicationserver) on the same system,you must make sure thatport numbers used by TivoliPresentation Services andWebSphere for IBM HTTPServer and IBM HTTPAdministration are unique.Default values for bothproducts are:
v IBM HTTP Server: 80
v IBM HTTP Administration:8008
Both products use the sameport numbers by default, andwill cause port conflictswhen installed on the samemachine. You should plan tochange the set of ports foreither of these applications tounused values, for example:
v IBM HTTP Server: 81
v IBM HTTP Administration:8009
28 IBM Tivoli Service Level Advisor: Getting Started with IBM Tivoli Service Level Advisor
Planning for Warehouse PacksThe warehouse pack for the target ETLs for IBM Tivoli Service Level Advisor isincluded on the installation media for IBM Tivoli Service Level Advisor.
You will use the installation program for Tivoli Enterprise Data Warehouse toinstall the IBM Tivoli Service Level Advisor warehouse pack, after the installationwizard for IBM Tivoli Service Level Advisor has completed successfully.
It is possible to install the IBM Tivoli Service Level Advisor warehouse packduring the installation of Tivoli Enterprise Data Warehouse, but this is notrecommended. The preferred method is to install the core application as describedin “Installing Tivoli Enterprise Data Warehouse 1.1” on page 42, and after installingIBM Tivoli Service Level Advisor, install the IBM Tivoli Service Level Advisorwarehouse pack following the procedure in “Installing the Registration and ProcessETLs” on page 94.
Chapter 2. Planning Decisions 29

30 IBM Tivoli Service Level Advisor: Getting Started with IBM Tivoli Service Level Advisor

Chapter 3. Installing Supporting Applications
The installation of the Tivoli service level management (SLM) solution begins withthe installation of the following supporting applications:v IBM DB2 Universal Database Enterprise Edition (DB2)v Tivoli Enterprise Data Warehousev IBM WebSphere Application Server
IBM Tivoli Service Level Advisor, Version 1.2.1 requires that you install thefollowing versions of these supporting applications:
IBM DB2 7.2 with Fix Pack 5This is the base version of DB2 that is shipped with IBM Tivoli ServiceLevel Advisor
IBM DB2 7.2 Fix Pack 6 (or later)This is a required upgrade that you can download from the TivoliEnterprise Data Warehouse support Web site and use to upgrade DB2 tothe supported version. You must upgrade to at least the Fix Pack 6 level.Refer to the Release Notes for more information about supported DB2versions.
Tivoli Enterprise Data Warehouse 1.1This is the base version of Tivoli Enterprise Data Warehouse that isshipped with IBM Tivoli Service Level Advisor
Tivoli Enterprise Data Warehouse 1.1 Fix Pack 2This is a required upgrade that you can download from the TivoliEnterprise Data Warehouse support Web site and use to upgrade TivoliEnterprise Data Warehouse to the supported version. You do not have toinstall Fix Pack 1 first.
IBM WebSphere Application ServerYou can use an existing installation of WebSphere Application Server if it isone of the following supported versions:v WebSphere Advanced Edition (AE)v WebSphere Advanced Edition, Single-server (AES) version 4.0.2 or later
Note: WebSphere Standard Edition (SE) is no longer supported by thisversion of IBM Tivoli Service Level Advisor.
IBM WebSphere AES 4.0.1 is shipped with this version of IBM TivoliService Level Advisor. If you install this version of IBM WebSphereApplication Server you must also upgrade your installation to at leastversion 4.0.2 or later. You can download supported versions of IBMWebSphere Application Server from the IBM WebSphere support web site.See the IBM Tivoli Service Level Advisor Release Notes for additionalinformation about supported versions of WebSphere.
© Copyright IBM Corp. 2003 31
Migrating From Previous VersionsYou may already have previous versions of DB2, Tivoli Enterprise Data Warehouse,WebSphere, databases, or source and target ETLs installed in your enterprise. Insome cases you may need to upgrade or migrate to a more recent supportedversion for proper operation of IBM Tivoli Service Level Advisor. Refer toAppendix E, “Migrating From Previous Versions of IBM Tivoli Service LevelAdvisor”, on page 169 for information on specific versions of prerequisites needed,and plan to upgrade your existing installation if needed.
Installing DB2Before you install DB2 on any system, you need to have a clear understanding ofthe distribution of systems within your enterprise that will contain the majorcomponents of Tivoli Enterprise Data Warehouse and IBM Tivoli Service LevelAdvisor. Both Tivoli Enterprise Data Warehouse and IBM Tivoli Service LevelAdvisor require DB2 to be installed on all machines where these products will beinstalled, in either single-system or distributed configurations.
Starting a DB2 Command PromptBefore you can issue DB2 commands in a Windows or UNIX environment, youmust first set up the DB2 command session environment. For Windows, you issuethe db2cmd command to begin a DB2 command prompt. For UNIX, you source thedb2profile. You will find many references to this setup procedure throughout thedocumentation.
Starting a Windows DB2 Command PromptTo start a DB2 command prompt in Windows, do the following:1. From your desktop, select Start –> Run
2. In the Run dialog that is displayed, enter the command db2cmd
Sourcing the db2profile on UNIXBefore you can issue DB2 commands on UNIX systems, you must first set up theenvironment by sourcing the db2profile. To set up your environment for issuing DB2commands, do the following:1. While logged in as root, navigate to the DB2 instance owner directory
<DB2_instance_dir>/sqllib
2. Run one of the following scripts:v For bash, Bourne, or Korn shells:
. db2profile
v For C shell:source db2cshrc
Step 1. Read the documentationThe documentation for Tivoli Enterprise Data Warehouse already includes detailedplanning and installation information for installing DB2, and the DB2 requirementsfor supporting IBM Tivoli Service Level Advisor are very similar. For this reason,you should refer to the Tivoli Enterprise Data Warehouse documentation for detailson installing DB2 for both Tivoli Enterprise Data Warehouse and IBM TivoliService Level Advisor, because much of that information is not repeated here.
If you have not already done so, you must first read and become thoroughlyfamiliar with the following documentation:
32 IBM Tivoli Service Level Advisor: Getting Started with IBM Tivoli Service Level Advisor
v Installing and Configuring Tivoli Enterprise Data Warehouse, specifically theinformation in the Overview and Planning chapters, which discuss the variousmajor components of Tivoli Enterprise Data Warehouse, and information thatyou need to know to determine how to distribute the various components ofTivoli Enterprise Data Warehouse in your environment. Also in Installing andConfiguring Tivoli Enterprise Data Warehouse, be sure to read and understandChapter 3, which includes useful information in the following areas:– Ensuring fully qualified host names– Mounting a CD-ROM device on UNIX systems– Installing and configuring a DB2 client or server
v Read the DB2 Quick Beginnings document for the operating system on which youare installing.
v Read Chapter 2, “Planning Decisions”, on page 7 and complete the planningchecklists to make sure you have all of the information you need to perform theinstallation.
For each system where you plan to install one or more components of TivoliEnterprise Data Warehouse or IBM Tivoli Service Level Advisor, install DB2according to the steps detailed in the following sections.
Step 2. Verify the Root User Authority in DB2On UNIX operating systems, you must verify that the root user has the properauthority (SYSADM) in DB2. To verify that root belongs to the proper group, dothe following:1. Source the db2profile2. Enter the following command to see which system group name is defined as
the SYSADM control group:db2 get dbm cfg | grep SYSADM_GROUP
The output of the previous command should be similar to the following:SYSADM group name(SYSADM_GROUP) = DB2GROUP
3. Record the name of the SYSADM_GROUP (DB2GROUP in the previousexample), for reference in the following steps.
4. Issue the command groups root to verify that root is a member of that group.5. If root is not a member of that group, add the root user to the group listed in
step 3 using the user administration tools for your operating system.
Note: If the SYSADM_GROUP field is blank, use the user administration tools foryour operating system to create a system group that includes both theinstance owner and the root user. Log in as the DB2 instance owner and addthis group to the database manager configuration with the followingcommand, where <new_group_name> is the name of the group you created tocontain the instance owner and the root user:db2 update dbm cfg using SYSADM_GROUP <new_group_name>
Step 3. Ensure fully qualified host namesYour operating system must be configured to provide Tivoli Enterprise DataWarehouse, IBM Tivoli Service Level Advisor, and Tivoli Presentation Services witha fully qualified computer name rather than a short name. This is especiallyimportant in environments with many different operating systems. To ensure that asystem is configured to provide a fully qualified computer name, complete thesteps in the following sections.
Chapter 3. Installing Supporting Applications 33
On AIX systemsThe default domain name search order is as follows:1. Domain Name System (DNS) server2. Network Information Service (NIS)3. Local /etc/hosts file
If the /etc/resolv.conf file does not exist, the /etc/hosts file is used. If only the/etc/hosts file is used, the fully qualified computer name must be the first onethat is listed after the IP address.
Verify that the /etc/resolv.conf file exists and contains the appropriateinformation, such as:domain mydivision.mycompany.com
nameserver 123.123.123.123
If NIS is installed, the /etc/irs.conf file overrides the system default. It containsthe following information:hosts = bind, local
If the NSORDER environment variable is set, it overrides all of the preceding files.It contains the following information:export NSORDER=bind, local
On Linux systemsVerify that the /etc/resolv.conf file exists and contains the appropriateinformation, such as:domain mydivision.mycompany.com
nameserver 123.123.123.123
A short name is used if the /etc/nsswitch.conf file contains a line that begins asfollows and if the /etc/hosts file contains the short name for the computer:hosts: files
To correct this, follow these steps:1. Change the line in the /etc/nsswitch.conf file to:
hosts: dns nis files
2. Stop the network service3. Restart the network service
On Solaris systemsVerify that the /etc/resolv.conf file exists and contains the appropriateinformation, such as:domain mydivision.mycompany.com
nameserver 123.123.123.123
A short name is used if the /etc/nsswitch.conf file contains a line that begins asfollows and if the /etc/hosts file contains the short name for the computer:hosts: files
To correct this, follow these steps:1. Change the line in the /etc/nsswitch.conf file to:
hosts: dns nis files
34 IBM Tivoli Service Level Advisor: Getting Started with IBM Tivoli Service Level Advisor

2. Enter the following command to stop the inet service:/etc/init.d/inetsvc stop
3. Enter the following command to restart the inet service:/etc/init.d/inetsvc start
On Microsoft Windows NT systemsTo verify that a primary domain name system (DNS) suffix is set, follow thesesteps:1. From the Windows task bar, click Start –> Settings –> Control Panel
2. In the Control Panel window, double-click Network.3. Click the Protocols tab.4. Select the TCP/IP protocol and then click Properties
5. Click the DNS tab6. Ensure that the field Domain contains a domain suffix. If it does not, type the
suffix, click OK, and restart the computer when prompted.
On Windows 2000 systemsTo verify that a primary domain name system (DNS) suffix is set, follow thesesteps:1. On the desktop, right-click My Computer
2. Click Properties
3. Click the Network Identification tab.4. Ensure that the field Full Computer Name contains a fully qualified domain
name. If it does not, follow these steps:a. Click Properties
b. Click More
c. In the field Primary DNS suffix for this computer, type the primary DNSsuffix, and restart the computer when prompted.
Step 4. On UNIX, mount the CD-ROMMount the CD-ROM device by inserting the DB2 product CD and doing thefollowing:1. Issue the following command:
v For AIX, issue the following command, where <mount_dir> is the mountdirectory:mount -rv cdrfs /dev/cd0 <mount_dir>
v For Solaris, the CD is automatically mounted on /cdrom/cdrom0
v For Linux, issue the following command:mount /mnt/cdrom
2. Change to the mounting directory.
Refer to Installing and Configuring Tivoli Enterprise Data Warehouse for additionaldetails on mounting the CD-ROM for supported UNIX platforms.
Step 5. Check the version of any existing DB2 installationTo use an existing version of DB2 client or server, verify that it is at the DB2 7.2with Fix Pack 6 level (or later). You can determine the level of DB2 you haveinstalled by doing the following:1. Start a DB2 command prompt2. At the command prompt, issue the following command:
Chapter 3. Installing Supporting Applications 35

db2level
The db2level command returns a block of information that includes the levelidentifier and an informational token. For example, the informational token for thebase DB2 product as well as DB2 with various fix pack versions are shown inTable 5.
Table 5. DB2 version information for base DB2 and fix packs.
Informational Token DB2 Version
DB2 v7.1.x.40 Base DB2 7.2
DB2 v7.1.x.51 DB2 7.2 with fix pack 4
DB2 v7.1.x.55 DB2 7.2 with fix pack 5
DB2 v7.1.x.60 DB2 7.2 with fix pack 6
DB2 v7.1.x.nn (where nn = 65, 66, 67, or 68) DB2 7.2 with fix pack 7
DB2 v7.1.x.72 DB2 7.2 with fix pack 8
DB2 v7.1.x.77 DB2 7.2 with fix pack 9
If you have a level prior to DB2 7.2 with Fix Pack 6, you must upgrade it at leastto this level before continuing. Refer to your available DB2 documentation foruninstalling prior versions, or upgrade your existing version to at least DB2 7.2with Fix Pack 6.
Step 6. Install DB2 7.2 with Fix Pack 5If you do not already have an installed version of DB2, you can use the version ofDB2 7.2 with Fix Pack 5 that is shipped with IBM Tivoli Service Level Advisor toinstall DB2 at this minimum required version, and then upgrade to Fix Pack 6 orlater (also required).
You must install DB2 on each system where you plan to install one or morecomponents of Tivoli Enterprise Data Warehouse or IBM Tivoli Service LevelAdvisor. Table 6 specifies which components of Tivoli Enterprise Data Warehouseand IBM Tivoli Service Level Advisor can run on DB2 client or server, andsupported platform types. Refer to the Release Notes for both products for specificsupported operating system versions.
Table 6. Supported platforms and DB2 components for a distributed installation
Component Supported operating system DB2 components required
For Tivoli Enterprise Data Warehouse:
Control server Windows NT, Windows 2000 DB2 Server
Central data warehouse Windows NT, Windows 2000,AIX, Solaris
DB2 Server
Data marts Windows NT, Windows 2000,AIX, Solaris
DB2 Server
Report interface Windows NT, Windows 2000,AIX, Solaris, Linux
DB2 Client or DB2 Server
For IBM Tivoli Service Level Advisor:
SLM Server Windows NT, Windows 2000,AIX, Solaris, Linux
DB2 Client or DB2 Server
SLM Task Drivers Windows NT, Windows 2000,AIX, Solaris, Linux
DB2 Client or DB2 Server
36 IBM Tivoli Service Level Advisor: Getting Started with IBM Tivoli Service Level Advisor
Table 6. Supported platforms and DB2 components for a distributed installation (continued)
Component Supported operating system DB2 components required
SLM Reports Windows NT, Windows 2000,AIX, Solaris, Linux
DB2 Client or DB2 Server
SLM Database Windows NT, Windows 2000,AIX, Solaris
DB2 Server
SLM Measurement DataMart
Windows NT, Windows 2000,AIX, Solaris
DB2 Server
Be sure to read the DB2 Quick Beginnings document for the operating system onwhich you are installing.
Depending on how you want to deploy the IBM Tivoli Service Level Advisor SLMdatabases (the SLM Database and SLM Measurement Data Mart), you may need toinstall DB2 on one or more additional machines, or create multiple DB2 instanceson one or more machines, or set up a server-client configuration betweenmachines. Consult the DB2 documentation for information on installing andconfiguring DB2 in these circumstances. Possible configurations might include thefollowing:v If you plan to locate the SLM Database and SLM Measurement Data Mart
together on a separate machine from the central data warehouse, install DB2 onboth machines.
v If you plan to locate the SLM Database and SLM Measurement Data Mart on thesame machine where the central data warehouse will be installed, but with thetwo SLM databases together in a separate instance of DB2, install DB2 on thatmachine and create two DB2 instances, one for the central data warehouse andthe other for the two SLM databases.
v If you plan to locate the SLM Database and SLM Measurement Data Mart on thecentral data warehouse machine, but each in their own instance of DB2, createthose instances on that machine. (Note that while it is possible to create the twoSLM databases each in their own separate DB2 instance, it is not recommended.The preferred configuration is to have these two databases in the same DB2instance. Consult the DB2 documentation for additional configuration steps ifneeded.)
v If you plan to locate the SLM Database and SLM Measurement Data Mart ontwo separate machines, install DB2 on each of those machines. (Note that it isrecommended that these two databases be created on the same machine in asingle DB2 instance. If you must split them into separate machines, consult theDB2 documentation for additional configuration steps if needed.)
Install DB2 7.2 with Fix Pack 5 on each required Windows machine by doing thefollowing:1. Insert the DB2 product CD to start the DB2 install program, and click Install.2. Using Table 6 on page 36, for a single system installation, or for components
requiring a DB2 Server in a distributed environment, verify that only DB2Enterprise Edition is checked. For components in a distributed environmentthat can run on a DB2 Client, you can select any of the following installoptions, and then click Next to continue:v DB2 Enterprise Editionv DB2 Application Development Clientv DB2 Administration Client (this is the smallest client)
Chapter 3. Installing Supporting Applications 37

3. Verify that the Typical install option is selected and click Next to continue.4. On the Destination Location dialog, accept the defaults, or specify your
desired install location, verify that the target install directory location hasenough required space available, and click Next to continue.
5. On the Control Server dialog, for the user name and password, you mustspecify a user name that has the appropriate user rights authority required byDB2:v If you specify an existing user name, it must have Administrator authority,
and must also have the following user rights assigned:– Act as part of the operating system– Create a token object– Increase quotas– Replace a process level token
On Windows, you can check and modify user rights for the specified username by doing the following:a. Select Start –> Settings –> Control Panel –> Administrative Tools –>
Local Security Policy
b. Expand the Local Policies branch in the tree, and select User RightsAssignment
c. For each of the above user rights, add the Administrator user group tothe user right if it is not already added.
v If you specify a user name that does not already exist on the system, DB2will create the user for you with the correct user rights automatically. Atypical DB2 user name and password is as follows:– User name: db2admin
– Password: db2admin
Note: Remember this DB2 user name and password! You will need it toinstall Tivoli Enterprise Data Warehouse and IBM Tivoli Service LevelAdvisor components on this system. For a distributed installation, youdo not have to use the same user name and password for each DB2installation.
Click Next to continue (if a message is displayed regarding creation of the userID, click Yes to continue).
6. On the Current Settings dialog, click Next to perform the installation.7. You will be asked if you need to install the OLAP starter kit. Select No and
then Continue to continue.8. When the installation completes, click Finish and then click Exit.
To install DB2 on UNIX systems, refer to IBM DB2 Universal Database for UNIXQuick Beginnings, and for a more advanced installation on Windows systems, seeIBM DB2 Universal Database Enterprise - Extended Edition for Windows QuickBeginnings. UNIX operating systems may need to be tuned to run DB2. If theoperating system is not tuned correctly, sporadic connection failures and othermisleading errors may occur. Refer to information about updating configurationparameters in these manuals for more information.
IBM Tivoli Service Level Advisor also requires that all databases be enabled for logroll-forward which is used in the backup recovery procedure.
38 IBM Tivoli Service Level Advisor: Getting Started with IBM Tivoli Service Level Advisor

Verifying your DB2 InstallationAfter installing DB2, perform a connection test by doing the following (either froma DB2 command prompt on Windows or from a UNIX environment where thedb2profile has been sourced):1. Issue the following command to list local databases:
db2 list database directory
2. In most cases, the command lists at least one database, even in newinstallations. If the command does not list any databases, create a dummydatabase by issuing the following command, where <name> is a dummydatabase name of your choosing:db2 create database <name>
3. Issue the following command to test for a local connection, where <name> isyour database name, and <user_name> and <password> are the DB2 user nameand password that you specified during DB2 installation:db2 connect to <name> user <user_name> using <password>
If this command is successful, DB2 is installed and ready for remote connections. Ifyou experience difficulty, refer to the DB2 documentation for troubleshootinginformation.
Ensure that DB2 settings related to LDAP are turned off. Use the db2set -allcommand to list the settings. If these settings are turned on, credential errors aregenerated.
Step 7. Upgrade to DB2 7.2 Fix Pack 6 (or later)Download DB2 7.2 Fix Pack 6 (or later) from the support Web site:http://www.ibm.com/software/sysmgmt/products/support/
TivoliDataWarehouse.html
Be sure to read the readme file included with the fix pack. You should upgrade tothe Fix Pack 6 level or later before creating any databases, otherwise you mustfollow the instructions in the readme to rebind the databases if you install the FixPack after databases are created. (Note that fix packs are cumulative, and you caninstall any level fix pack without first installing a lower level. For example, youmight choose to install Fix Pack 8 without first installing Fix Pack 6 or 7.)
Install the Fix Pack on all DB2 systems to upgrade to the required level for IBMTivoli Service Level Advisor by doing the following:v For Windows:
1. Stop all services associated with DB2 by starting a DB2 command promptand issuing the following commands:db2stop force
db2admin stop
2. Navigate to the Services control panel and stop all services with DB2 in thename, along with Warehouse Server and Warehouse Logger services.
3. Navigate to the directory where you downloaded the DB2 Fix Pack and runsetup.exe.
Note: If you receive the following message, click Yes and continue theinstall:DB2 is currently running and locked by the following process(es):
jservice.exe
Chapter 3. Installing Supporting Applications 39

4. Follow the instructions in the install program to install the fix pack.v For UNIX:
1. While logged in as root, navigate to the DB2 instance owner<db2_instance_directory>/sqllib, where <db2_instance_directory> is thedatabase instance directory, and source the db2profile by issuing thecommand:. db2profile
2. Optionally retrieve a list of DB2 instances by issuing the command:db2ilist
3. For each instance, issue the following commands:db2 force applications all
db2 terminate
db2stop
4. While logged in as root, navigate to the DB2 Administrative Server ownerand source the db2profile
5. Enter the following command:db2admin stop
6. While logged in as root, navigate to the location where you downloaded thefix pack software, and issue the following command:./installFixPak
7. When the installation is completed successfully, update each instance withthe following command:– For Solaris:
/opt/IBMdb2/V7.1/instance/db2iupdt <instance_name>
– For AIX:/usr/lpp/db2_07_01/instance/db2iupdt <instance_name>
– For Linux:/usr/IBMdb2/V7.1/instance/db2iupdt <instance_name>
Step 8. Update the JDBC Level for DB2By default, the DB2 database management system server uses the JDBC 1.1 driversfor JDBC applications. IBM Tivoli Service Level Advisor requires DB2 to use theJDBC 2.0 drivers. If the DB2 server uses different levels of the JDBC driver thanthe clients, unpredictable results occur and IBM Tivoli Service Level Advisor mayencounter database errors.
IBM Tivoli Service Level Advisor automatically updates the JDBC level to JDBC 2.0during the installation procedure. For those machines in a distributed installationthat have Tivoli Enterprise Data Warehouse components but not IBM Tivoli ServiceLevel Advisor, you may need to manually update the JDBC level to 2.0.
Verifying the JDBC LevelTo determine if you are running DB2 at the required JDBC 2.0 level, do thefollowing, depending on your operating system:v For Windows, check the size of the db2java.zip file, located in the
<DB2_DIR>/java directory, where <DB2_DIR> is the location where DB2 isinstalled. If the size is approximately 1,347 KB, then the JDBC level is 2.0. If thesize of the db2java.zip file is approximately 1,132 KB, then the JDBC level is 1.0and you must run the usejdbc2 command to upgrade to JDBC 2.0. See“Updating the JDBC Level Manually” on page 41.
40 IBM Tivoli Service Level Advisor: Getting Started with IBM Tivoli Service Level Advisor

v For UNIX, log in as the instance owner and source the db2profile script, andcheck the CLASSPATH environment variable by issuing the following command:echo $CLASSPATH
If the CLASSPATH includes the string<DB2_Instance_Dir>/sqllib/java12/db2java.zip, where <DB2_Instance_Dir> isthe home of the instance of the SLM databases, then the JDBC level is properlyset to 2.0. If the CLASSPATH includes the string<DB2_Instance_Dir>/sqllib/java/db2java.zip, then the JDBC level is 1.0, andyou must run the usejdbc2 command to upgrade to JDBC 2.0. See “Updatingthe JDBC Level Manually”.
Updating the JDBC Level ManuallyIf the JDBC level was not properly updated, you can manually update the JDBClevel by doing the following, depending on your operating system:v For Windows, navigate to the <DB2_DIR>/java12 directory, where <DB2_DIR> is
the location where DB2 is installed, and issue the following command:usejdbc2
This command will copy the appropriate version of db2java.zip into the<DB2_DIR>/java directory.
v For UNIX, add the following line to the<DB2_Instance_Dir>/sqllib/userprofile script, where <DB2_Instance_Dir> is thehome of the DB2 instance where the SLM databases are located:. <DB2_Instance_Dir>/sqllib/java12/usejdbc2
If the userprofile script does not exist, create it and add the above line to thescript file.
Verify that the JDBC level was correctly updated by following the instructions in“Verifying the JDBC Level” on page 40.
Step 9. Configure the Database Manager to use ExtendedShared Memory
To avoid problems with DB2 exhausting its shared memory segments on AIXsystems, you should configure the database manager to use extended sharedmemory. This is especially important if the SLM databases reside on the samemachine with any of the install options of IBM Tivoli Service Level Advisor (SLMServer, SLM Task Drivers, or SLM Reports).
To enable this support for extended shared memory, do the following:1. Add EXTSHM=ON to the /etc/environment file2. From a DB2 command prompt, run the following command:
db2set DB2ENVLIST=EXTSHM
3. Add the following lines to sqllib/userprofile:EXTSHM=ON
export EXTSHM
4. Reboot the machine to put the changes into effect.
For more information, see the DB2 documentation for configuration of sharedmemory, and consult the WebSphere online documentation for configuring forextended shared memory.
Chapter 3. Installing Supporting Applications 41
Installing Tivoli Enterprise Data Warehouse 1.1The installation and configuration of Tivoli Enterprise Data Warehouse 1.1 is fullydocumented in Chapter 3 of Installing and Configuring Tivoli Enterprise DataWarehouse that accompanies the Tivoli Enterprise Data Warehouse installationmedia. It includes procedures for installing and configuring the variouscomponents of Tivoli Enterprise Data Warehouse, on a single system or distributedacross multiple systems, including the following:v The Tivoli performance and availability schema, or data model, to personalize
the Tivoli Enterprise Data Warehouse database for use by the source applicationsand IBM Tivoli Service Level Advisor
v The control server, the central data warehouse, and the data mart database.v Installation of Tivoli Presentation Services (the three main pieces of Tivoli
Presentation Services including the Server for IBM Console, Web Services forIBM Console, and the IBM Console are referred to collectively in this documentas the IBM Console Server) on the same machine as the central data warehouseor on a separate machine as desired.
Notes:
1. It is recommended that you install Tivoli Presentation Services and the IBMConsole on a Windows machine where possible in your environment.
2. When installing Tivoli Presentation Services as part of the Tivoli EnterpriseData Warehouse installation, be careful to specify a destination directory withno blank spaces, for example, C:\PS. If you install to a directory path thatincludes a blank space, such as C:\Program Files\PS, you may experienceproblems later bringing up the IBM Console, and you will have to performthe installation again.
v Installation of the Tivoli Enterprise Data Warehouse report user interface taskdrivers on the same machine as the IBM Console Server.
The installation wizards are located in the root directory of the Tivoli EnterpriseData Warehouse installation media. Use the program appropriate to the operatingsystem on which you are installing:v For Windows: setup.exev For UNIX: setup_unix.sh
Note: Installing and Configuring Tivoli Enterprise Data Warehouse has detailedprocedures for every step of running the install wizard. If you have anyquestions or encounter any problems in installing, refer to the TivoliEnterprise Data Warehouse documentation for more details.
The following sections summarize the installation steps for Tivoli Enterprise DataWarehouse. If you encounter any problems, consult the detailed procedures andtroubleshooting information in Installing and Configuring Tivoli Enterprise DataWarehouse.
Before Starting the Install WizardBefore starting the install wizard for Tivoli Enterprise Data Warehouse, verify thefollowing for the local machine:v Has DB2 (and any fix pack) already been successfully installed, in either
client or server mode, depending on your planned component needs for thissystem? DB2 must be already installed, along with any DB2 fix pack upgrade,before installing Tivoli Enterprise Data Warehouse. If not, go back to “InstallingDB2” on page 32 and install DB2 on this machine.
42 IBM Tivoli Service Level Advisor: Getting Started with IBM Tivoli Service Level Advisor
v If you plan to install the report interface of Tivoli Enterprise Data Warehouseon this machine, either as a single system install or as part of a distributedinstall, is a Web server or some other application that uses port 80 or port 8008already installed on this machine? If so, you must temporarily stop thatapplication to free up port 80 and 8008 before starting the installation, and thenrestart it after installation is completed. In addition, during the installation, youwill have to specify a different set of port numbers for IBM HTTP Server andIBM HTTP Administration for the installation and configuration of TivoliPresentation Services. Specifying ports that are already in use can cause errors orcause the install program to lock up.
Step 1. Start the install wizardTo start the Tivoli Enterprise Data Warehouse install wizard, insert the product CDand do the following:v For Windows, the installation program should start automatically. If it does not,
do the following:1. From your desktop, select My Computer
2. Open the CD-ROM drive folder3. Double-click setup.exe to start the install wizard
v For UNIX:1. Mount the CD by issuing the following command:
– For AIX, issue the following command, where <mount_dir> is the mountdirectory:mount -rv cdrfs /dev/cd0 <mount_dir>
– For Solaris, the CD is automatically mounted on /cdrom/cdrom0
– For Linux, issue the following command:mount /mnt/cdrom
2. Change to the mount directory3. Run the following command:
./setup_unix.sh
When the Welcome panel is displayed, click Next to continue. At any time, youcan click Back to proceed back through the dialogs and change your selectionsbefore the actual installation takes place, or click Cancel to close the install wizardwithout installing.
Note: For purposes of illustration, install dialog screens displayed in the followingsections are for a Windows platform install. If you are installing in UNIX,you may see slightly different displays.
Step 2. Choose Single System or Distributed InstallationOn the Setup Type dialog, shown in Figure 8 on page 44, select the type ofinstallation you want to perform:v If you are installing all components of Tivoli Enterprise Data Warehouse on a
single machine, verify that the Single machine radio button is selected.
Note: You can only perform a single machine install on a Windows platform,because the control server component of Tivoli Enterprise Data Warehouseis only supported on Windows platforms.
Chapter 3. Installing Supporting Applications 43

v If you are installing one or more components of Tivoli Enterprise DataWarehouse on this machine or on multiple machines, verify that theCustom/Distributed radio button is selected.
The Application installation only radio button is selected when you are using theTivoli Enterprise Data Warehouse install wizard to only install warehouse packsafter Tivoli Enterprise Data Warehouse has been successfully installed. During theSingle machine or Custom/Distributed install process, you can optionally installone or more warehouse packs as part of the Tivoli Enterprise Data Warehouseinstall process. For example, you might have one or more warehouse packs forsource applications putting data into the central data warehouse, in addition to thewarehouse pack for IBM Tivoli Service Level Advisor. You could install one ormore of them during this initial installation of Tivoli Enterprise Data Warehouse. Inthis documented install procedure, however, you will install warehouse packs in aseparate procedure.
The Directory name field specifies the target install directory where the selectedcomponents of Tivoli Enterprise Data Warehouse will be installed on this machine.The default (for Windows) directory, C:\Program Files\TWH, is displayed and youcan accept this default or modify this to a target install directory of your choosing.
When you are ready, click Next to continue.
Step 3. Select Components to Install
Note: If you are performing a single machine installation, you can skip this stepand proceed to step “Step 4. Verify Host Name” on page 45.
If you are performing a Custom/Distributed installation, the next dialog enablesyou to select one or more components of Tivoli Enterprise Data Warehouse toinstall on this machine, as shown in Figure 9 on page 45.
Figure 8. Specifying the type of installation for Tivoli Enterprise Data Warehouse
44 IBM Tivoli Service Level Advisor: Getting Started with IBM Tivoli Service Level Advisor
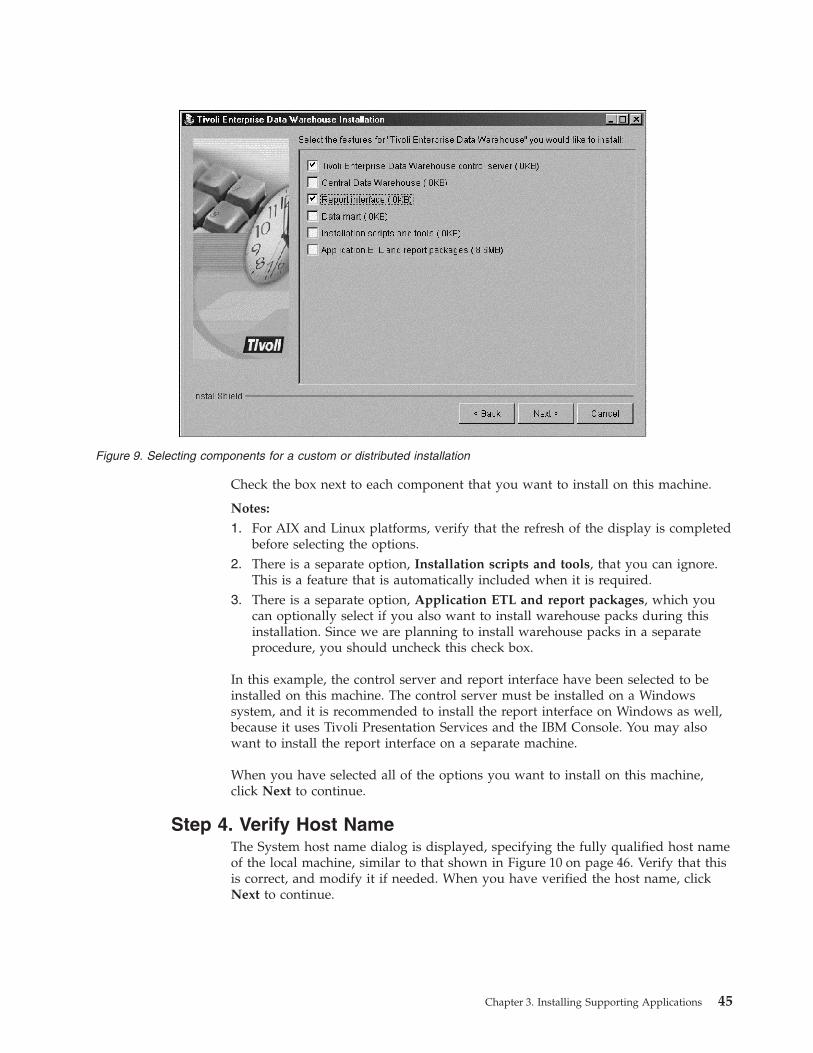
Check the box next to each component that you want to install on this machine.
Notes:
1. For AIX and Linux platforms, verify that the refresh of the display is completedbefore selecting the options.
2. There is a separate option, Installation scripts and tools, that you can ignore.This is a feature that is automatically included when it is required.
3. There is a separate option, Application ETL and report packages, which youcan optionally select if you also want to install warehouse packs during thisinstallation. Since we are planning to install warehouse packs in a separateprocedure, you should uncheck this check box.
In this example, the control server and report interface have been selected to beinstalled on this machine. The control server must be installed on a Windowssystem, and it is recommended to install the report interface on Windows as well,because it uses Tivoli Presentation Services and the IBM Console. You may alsowant to install the report interface on a separate machine.
When you have selected all of the options you want to install on this machine,click Next to continue.
Step 4. Verify Host NameThe System host name dialog is displayed, specifying the fully qualified host nameof the local machine, similar to that shown in Figure 10 on page 46. Verify that thisis correct, and modify it if needed. When you have verified the host name, clickNext to continue.
Figure 9. Selecting components for a custom or distributed installation
Chapter 3. Installing Supporting Applications 45
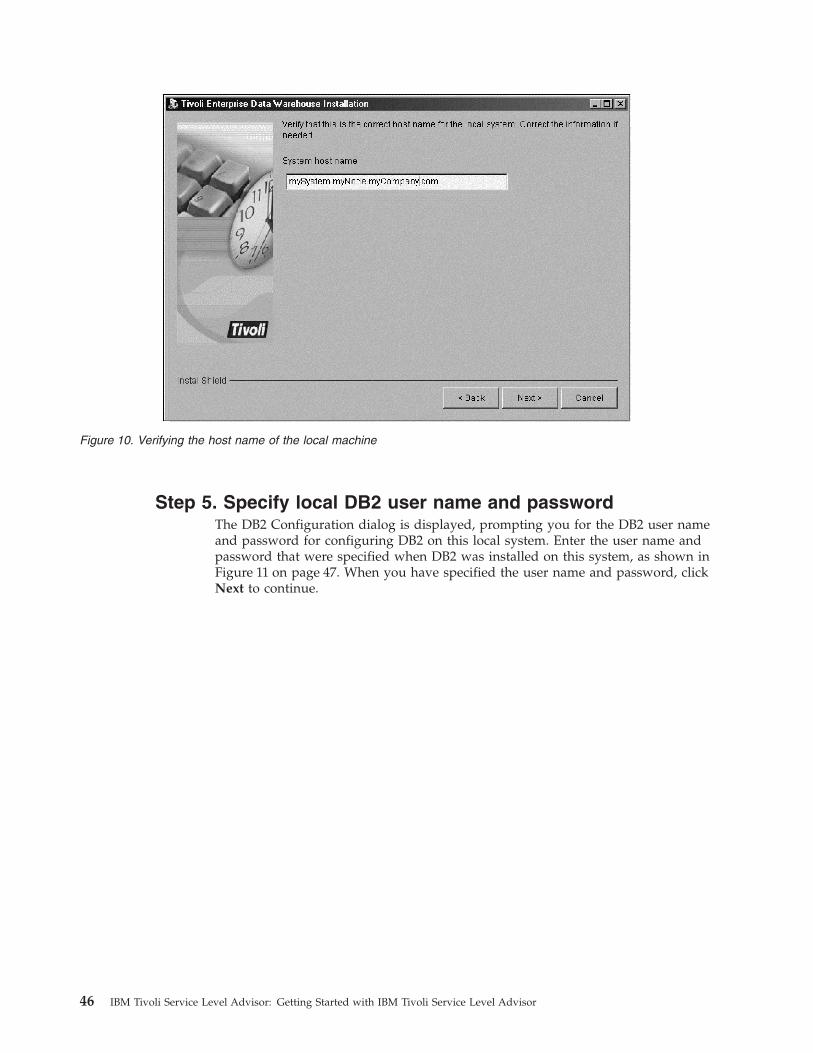
Step 5. Specify local DB2 user name and passwordThe DB2 Configuration dialog is displayed, prompting you for the DB2 user nameand password for configuring DB2 on this local system. Enter the user name andpassword that were specified when DB2 was installed on this system, as shown inFigure 11 on page 47. When you have specified the user name and password, clickNext to continue.
Figure 10. Verifying the host name of the local machine
46 IBM Tivoli Service Level Advisor: Getting Started with IBM Tivoli Service Level Advisor
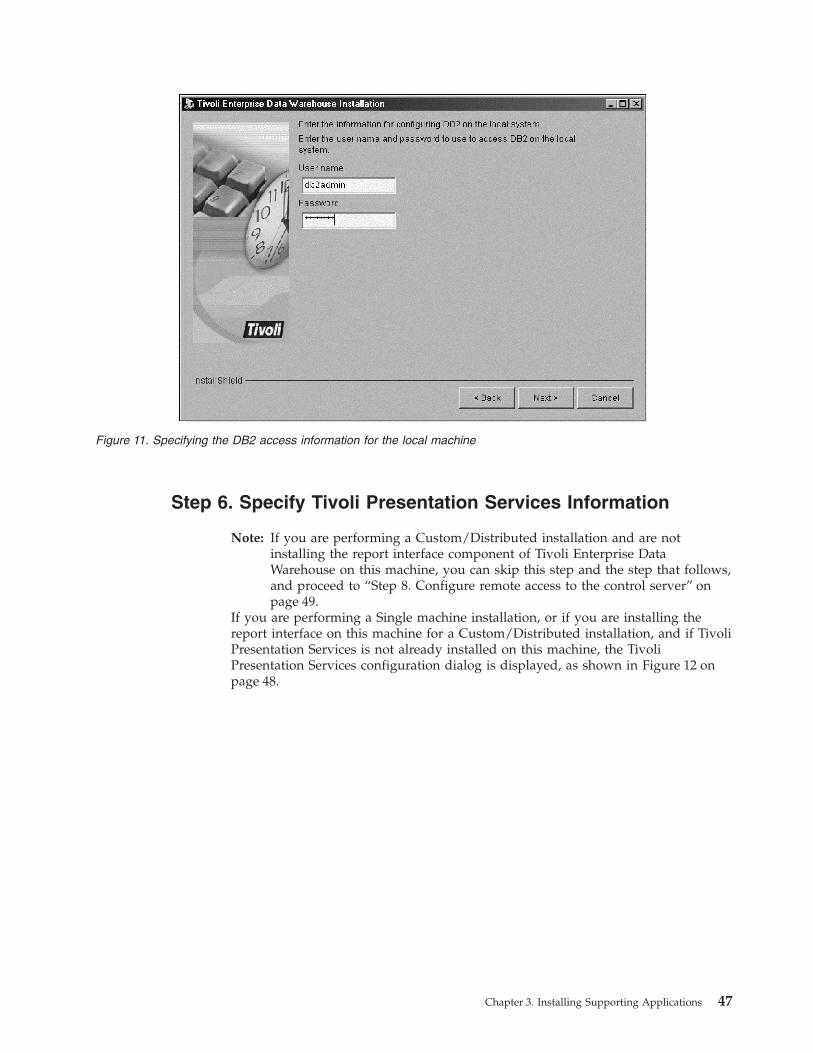
Step 6. Specify Tivoli Presentation Services Information
Note: If you are performing a Custom/Distributed installation and are notinstalling the report interface component of Tivoli Enterprise DataWarehouse on this machine, you can skip this step and the step that follows,and proceed to “Step 8. Configure remote access to the control server” onpage 49.
If you are performing a Single machine installation, or if you are installing thereport interface on this machine for a Custom/Distributed installation, and if TivoliPresentation Services is not already installed on this machine, the TivoliPresentation Services configuration dialog is displayed, as shown in Figure 12 onpage 48.
Figure 11. Specifying the DB2 access information for the local machine
Chapter 3. Installing Supporting Applications 47
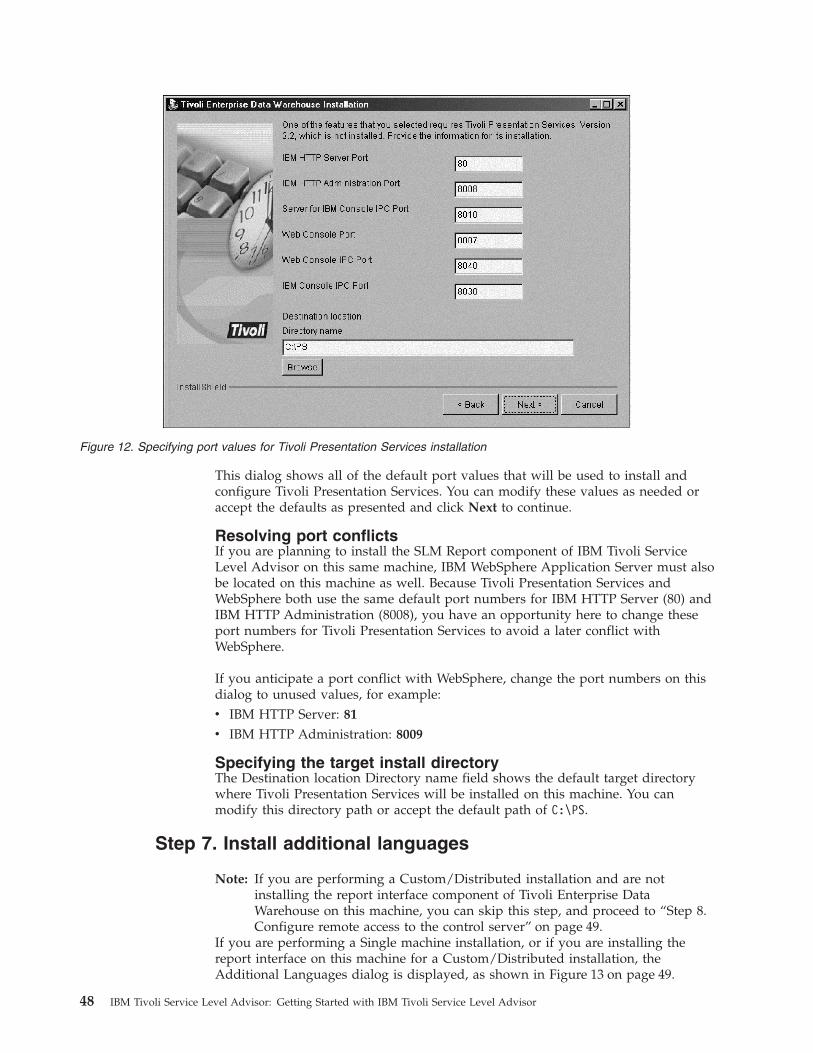
This dialog shows all of the default port values that will be used to install andconfigure Tivoli Presentation Services. You can modify these values as needed oraccept the defaults as presented and click Next to continue.
Resolving port conflictsIf you are planning to install the SLM Report component of IBM Tivoli ServiceLevel Advisor on this same machine, IBM WebSphere Application Server must alsobe located on this machine as well. Because Tivoli Presentation Services andWebSphere both use the same default port numbers for IBM HTTP Server (80) andIBM HTTP Administration (8008), you have an opportunity here to change theseport numbers for Tivoli Presentation Services to avoid a later conflict withWebSphere.
If you anticipate a port conflict with WebSphere, change the port numbers on thisdialog to unused values, for example:v IBM HTTP Server: 81
v IBM HTTP Administration: 8009
Specifying the target install directoryThe Destination location Directory name field shows the default target directorywhere Tivoli Presentation Services will be installed on this machine. You canmodify this directory path or accept the default path of C:\PS.
Step 7. Install additional languages
Note: If you are performing a Custom/Distributed installation and are notinstalling the report interface component of Tivoli Enterprise DataWarehouse on this machine, you can skip this step, and proceed to “Step 8.Configure remote access to the control server” on page 49.
If you are performing a Single machine installation, or if you are installing thereport interface on this machine for a Custom/Distributed installation, theAdditional Languages dialog is displayed, as shown in Figure 13 on page 49.
Figure 12. Specifying port values for Tivoli Presentation Services installation
48 IBM Tivoli Service Level Advisor: Getting Started with IBM Tivoli Service Level Advisor
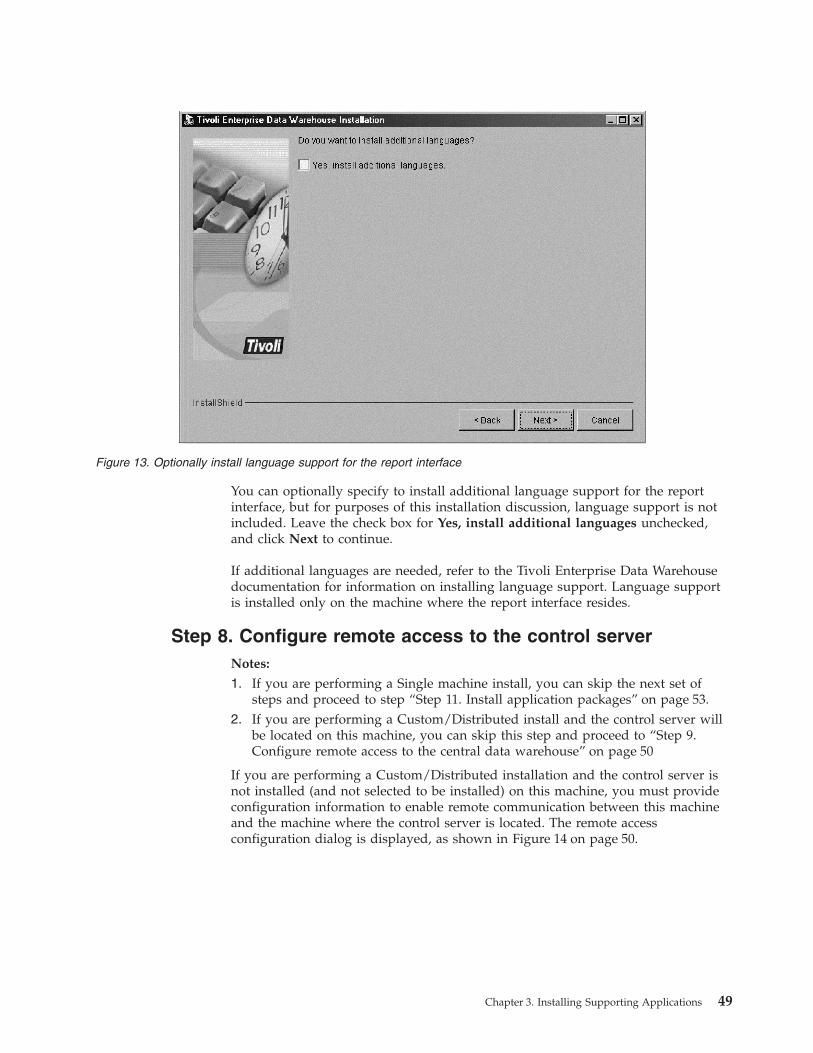
You can optionally specify to install additional language support for the reportinterface, but for purposes of this installation discussion, language support is notincluded. Leave the check box for Yes, install additional languages unchecked,and click Next to continue.
If additional languages are needed, refer to the Tivoli Enterprise Data Warehousedocumentation for information on installing language support. Language supportis installed only on the machine where the report interface resides.
Step 8. Configure remote access to the control serverNotes:
1. If you are performing a Single machine install, you can skip the next set ofsteps and proceed to step “Step 11. Install application packages” on page 53.
2. If you are performing a Custom/Distributed install and the control server willbe located on this machine, you can skip this step and proceed to “Step 9.Configure remote access to the central data warehouse” on page 50
If you are performing a Custom/Distributed installation and the control server isnot installed (and not selected to be installed) on this machine, you must provideconfiguration information to enable remote communication between this machineand the machine where the control server is located. The remote accessconfiguration dialog is displayed, as shown in Figure 14 on page 50.
Figure 13. Optionally install language support for the report interface
Chapter 3. Installing Supporting Applications 49
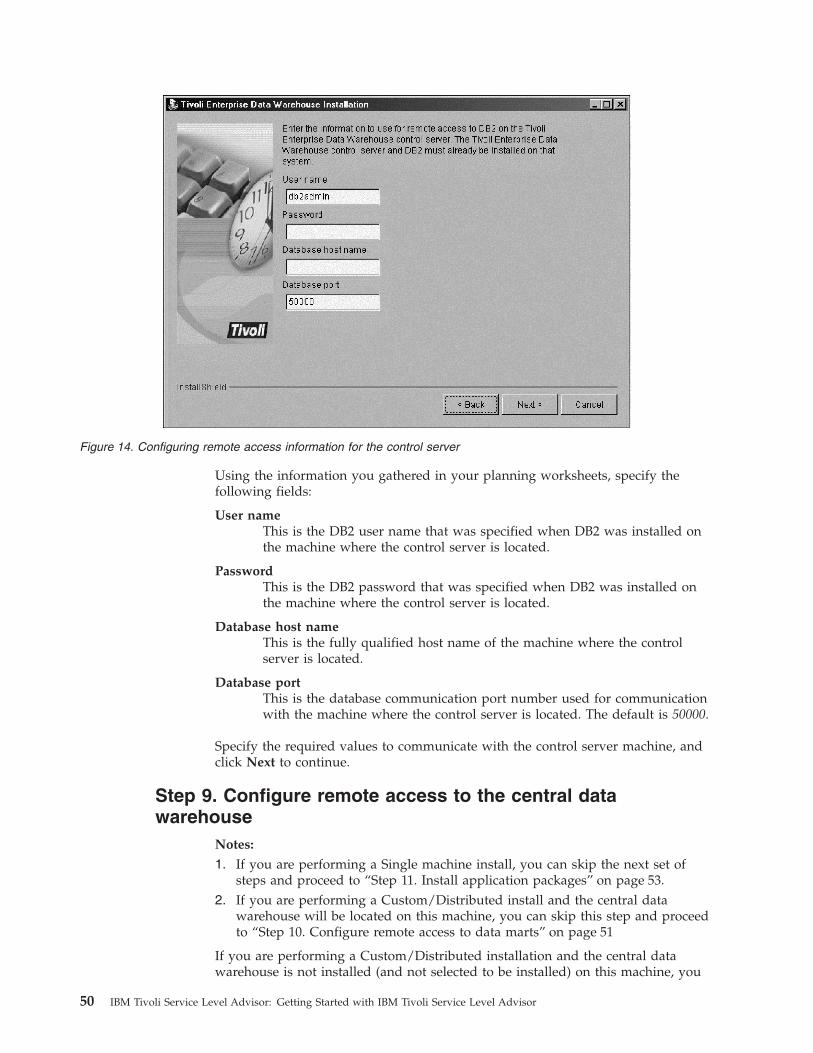
Using the information you gathered in your planning worksheets, specify thefollowing fields:
User nameThis is the DB2 user name that was specified when DB2 was installed onthe machine where the control server is located.
PasswordThis is the DB2 password that was specified when DB2 was installed onthe machine where the control server is located.
Database host nameThis is the fully qualified host name of the machine where the controlserver is located.
Database portThis is the database communication port number used for communicationwith the machine where the control server is located. The default is 50000.
Specify the required values to communicate with the control server machine, andclick Next to continue.
Step 9. Configure remote access to the central datawarehouse
Notes:
1. If you are performing a Single machine install, you can skip the next set ofsteps and proceed to “Step 11. Install application packages” on page 53.
2. If you are performing a Custom/Distributed install and the central datawarehouse will be located on this machine, you can skip this step and proceedto “Step 10. Configure remote access to data marts” on page 51
If you are performing a Custom/Distributed installation and the central datawarehouse is not installed (and not selected to be installed) on this machine, you
Figure 14. Configuring remote access information for the control server
50 IBM Tivoli Service Level Advisor: Getting Started with IBM Tivoli Service Level Advisor

must provide configuration information to enable remote communication betweenthis machine and the machine where the central data warehouse is located. Theremote access configuration dialog is displayed, as shown in Figure 15.
Using the information you gathered in your planning worksheets, specify thefollowing fields:
User nameThis is the DB2 user name that was specified when DB2 was installed onthe machine where the central data warehouse is located.
PasswordThis is the DB2 password that was specified when DB2 was installed onthe machine where the central data warehouse is located.
Database host nameThis is the fully qualified host name of the machine where the central datawarehouse is located.
Database portThis is the database communication port number used for communicationwith the machine where the central data warehouse is located. The defaultis 50000.
Specify the required values to communicate with the central data warehousemachine, and click Next to continue.
Step 10. Configure remote access to data martsNotes:
1. If you are performing a Single machine install, you can skip the next set ofsteps and proceed to “Step 11. Install application packages” on page 53.
Figure 15. Configuring remote access information for the central data warehouse
Chapter 3. Installing Supporting Applications 51
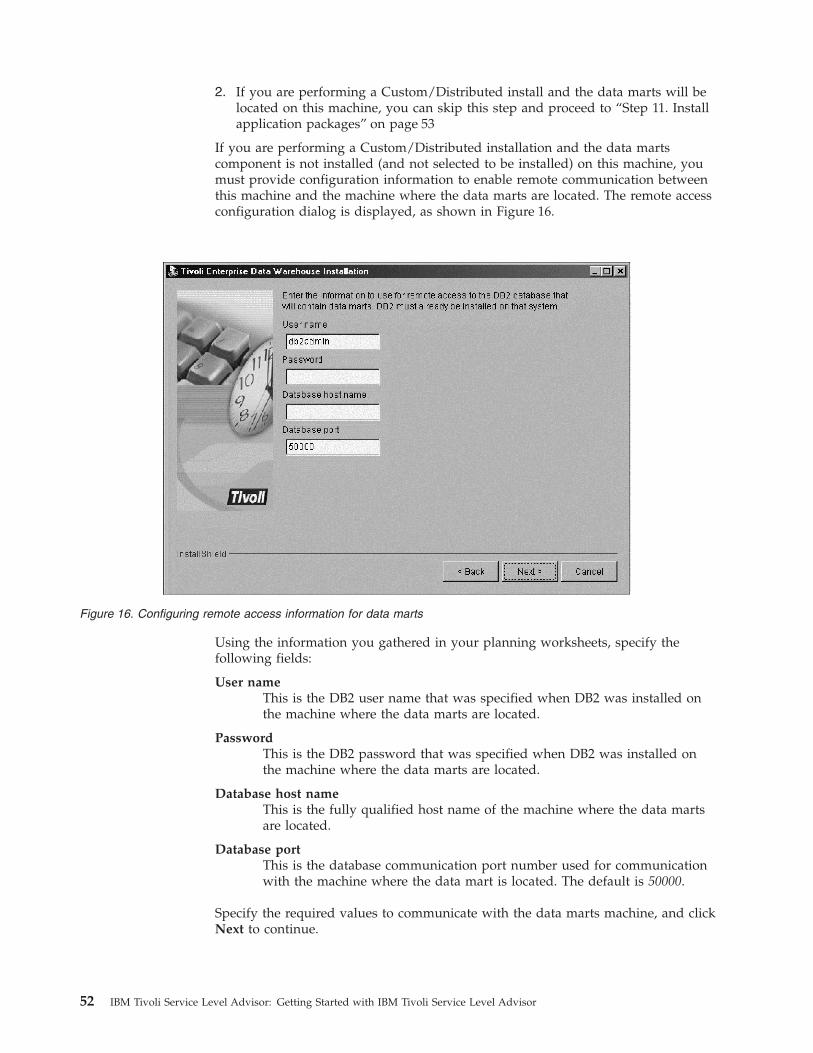
2. If you are performing a Custom/Distributed install and the data marts will belocated on this machine, you can skip this step and proceed to “Step 11. Installapplication packages” on page 53
If you are performing a Custom/Distributed installation and the data martscomponent is not installed (and not selected to be installed) on this machine, youmust provide configuration information to enable remote communication betweenthis machine and the machine where the data marts are located. The remote accessconfiguration dialog is displayed, as shown in Figure 16.
Using the information you gathered in your planning worksheets, specify thefollowing fields:
User nameThis is the DB2 user name that was specified when DB2 was installed onthe machine where the data marts are located.
PasswordThis is the DB2 password that was specified when DB2 was installed onthe machine where the data marts are located.
Database host nameThis is the fully qualified host name of the machine where the data martsare located.
Database portThis is the database communication port number used for communicationwith the machine where the data mart is located. The default is 50000.
Specify the required values to communicate with the data marts machine, and clickNext to continue.
Figure 16. Configuring remote access information for data marts
52 IBM Tivoli Service Level Advisor: Getting Started with IBM Tivoli Service Level Advisor
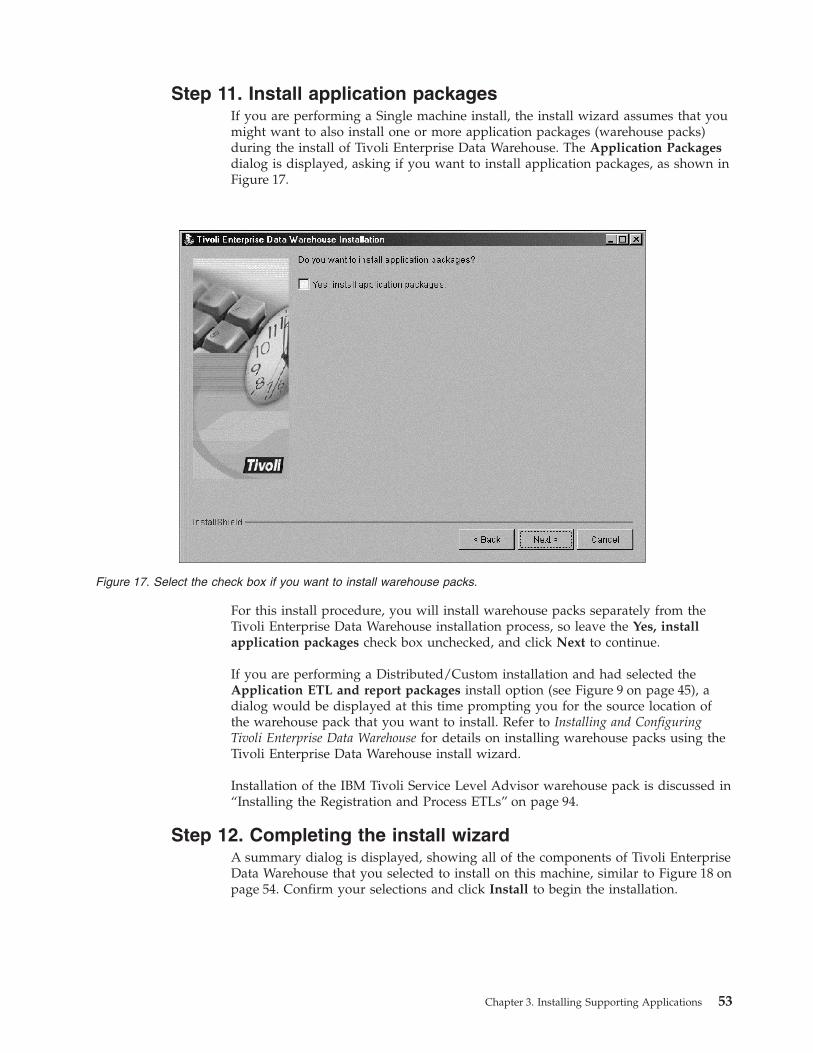
Step 11. Install application packagesIf you are performing a Single machine install, the install wizard assumes that youmight want to also install one or more application packages (warehouse packs)during the install of Tivoli Enterprise Data Warehouse. The Application Packagesdialog is displayed, asking if you want to install application packages, as shown inFigure 17.
For this install procedure, you will install warehouse packs separately from theTivoli Enterprise Data Warehouse installation process, so leave the Yes, installapplication packages check box unchecked, and click Next to continue.
If you are performing a Distributed/Custom installation and had selected theApplication ETL and report packages install option (see Figure 9 on page 45), adialog would be displayed at this time prompting you for the source location ofthe warehouse pack that you want to install. Refer to Installing and ConfiguringTivoli Enterprise Data Warehouse for details on installing warehouse packs using theTivoli Enterprise Data Warehouse install wizard.
Installation of the IBM Tivoli Service Level Advisor warehouse pack is discussed in“Installing the Registration and Process ETLs” on page 94.
Step 12. Completing the install wizardA summary dialog is displayed, showing all of the components of Tivoli EnterpriseData Warehouse that you selected to install on this machine, similar to Figure 18 onpage 54. Confirm your selections and click Install to begin the installation.
Figure 17. Select the check box if you want to install warehouse packs.
Chapter 3. Installing Supporting Applications 53

After the installation program has copied files and configured the environment, theInstallation Summary window is displayed. Click Next to continue.
Note: Do not select the option to restart the system at this time. Click Next andthen click Finish.
Wait for the IBM Console to finish rebuilding the online user assistance help set.You can check for completeness by examining either of the two most recent(highest numbered n) stdoutn log files in the directory<PS_directory>\log\fwp_mcr, where <PS_directory> is the location where TivoliPresentation Services was installed. Look for the following message:FWP1734I The utility that was started by the Management Component
Repository to build the help set has completed successfully.
This help set build process might take over an hour to complete. When the helpsetbuild is complete, reboot the system. If you reboot the system before the help setbuild is complete, refer to the Tivoli Enterprise Data Warehouse Release Notes forinformation on rebuilding the help set.
Verifying the Tivoli Presentation Services InstallationImmediately after installing Tivoli Enterprise Data Warehouse, you should verifythat Tivoli Presentation Services was installed correctly. To verify TivoliPresentation Services installation, do the following:1. From a command prompt, navigate to <PS_Install_Dir>/bin/private/<OS>,
where <PS_Install_Dir> is the directory where Tivoli Presentation Services wasinstalled, and <OS> is your operating system (for example, w32-ix86 forWindows)
2. Issue the following command:wcmd pspersist getApplicationProperty junk junk
Figure 18. Confirm your install selections before starting the install.
54 IBM Tivoli Service Level Advisor: Getting Started with IBM Tivoli Service Level Advisor
If you receive the following message, then the installation was successful:The application property junk in block junk could not be found.
If you receive the following message, Tivoli Presentation Services was not installedcorrectly:FWP4100E The command line bundle for pspersist is not found.
This error might occur if Tivoli Enterprise Data Warehouse had been previouslyuninstalled from this machine, and Tivoli Presentation Services was not completelyremoved from the system.
To resolve this problem you must do the following:1. Uninstall Tivoli Enterprise Data Warehouse2. Completely uninstall Tivoli Presentation Services3. Reinstall Tivoli Enterprise Data Warehouse
Consult the installation documentation for Tivoli Enterprise Data Warehouse fordetails on completely uninstalling Tivoli Presentation Services before attempting toreinstall Tivoli Enterprise Data Warehouse.
Installing Tivoli Enterprise Data Warehouse 1.1 Fix Pack 2IBM Tivoli Service Level Advisor v1.2.1 requires Tivoli Enterprise Data Warehouse1.1 with Fix Pack 2 to be installed. Refer to the Tivoli Enterprise Data WarehouseRelease Notes and the Tivoli Enterprise Data Warehouse support Web site for fixpack information.
Note: If you also plan to upgrade your installation of DB2 to Fix Pack 7 or later,be sure to complete the DB2 upgrade before upgrading Tivoli EnterpriseData Warehouse to Fix Pack 2. If you upgrade DB2 after installing this FixPack, you must manually copy <DB2_Dir>/SQLLIB/bin/java12/db2java.zipinto <TWH_DIR>/tools/bin/ directory, where <DB2_Dir> is the location whereDB2 was installed, and <TWH_DIR> is the directory where Tivoli EnterpriseData Warehouse was installed.
Installing Source Application Warehouse PacksAfter successfully installing Tivoli Enterprise Data Warehouse, you can install thesource ETL (warehouse packs) for each Tivoli performance and availabilityapplication that will be writing measurement data to the central data warehouse.These warehouse packs are installed on the same machine as the control server,which uses the Data Warehouse Center component of DB2. Installation andconfiguration procedures for the warehouse packs are included on the warehousepack installation media.
See Installing and Configuring Tivoli Enterprise Data Warehouse for details oninstalling and configuring warehouse packs for each of the Tivoli applications thatare enabled for Tivoli Enterprise Data Warehouse.
Chapter 3. Installing Supporting Applications 55
Installing IBM WebSphere Application ServerIBM Tivoli Service Level Advisor uses IBM WebSphere Application Server for itsreport servlets that enable a customer to integrate SLA reports into a company Website. IBM Tivoli Service Level Advisor supports WebSphere Advanced Edition (AE)and WebSphere Advanced Edition Single-server (AES). Refer to IBM Tivoli ServiceLevel Advisor Release Notes for specific supported version levels.
You must have a supported version of IBM WebSphere Application Server (eitherAE orAES, at version 4.0.2 or later) installed on the machine where you plan toinstall the SLM Reports component of IBM Tivoli Service Level Advisor. If you donot already have IBM WebSphere Application Server installed in your enterprise,you can install WebSphere AES 4.0.1 from the installation media included withIBM Tivoli Service Level Advisor, but you must also upgrade to at least version4.0.2 or later.
Installing WebSphere AES 4.0.1To install the versionof WebSphere AES 4.0.1 that is shipped with IBM TivoliService Level Advisor, refer to the WebSphere documentation provided with theWebSphere installation media. Additional install information is available online atthe following Web site:http://www.ibm.com/software/webservers/appserv/doc/v40/aes/infocenter
Notes:
1. If you have installed WebSphere on the same machine as the IBM ConsoleServer, you must resolve any HTTP port and HTTP Admin port conflictsbetween the two applications. See “Resolving port conflicts” on page 48, orconsult the WebSphere documentation for information on modifying the HTTPport numbers.
2. You must upgrade to at least WebSphere AES version 4.0.2. Refer to the ReleaseNotes for additional information about supported versions of IBM WebSphereApplication Server.
3. The SLM Reports option of IBM Tivoli Service Level Advisor requires thatWebSphere Application Assembly Tool (AAT) is installed with WebSphere AES.Without AAT, installation of SLM Reports will fail. AAT is one of the selectablecomponents of the WebSphere AES installation that is included automaticallywhen you perform a Typical installation.
Before installing WebSphere, stop the following Tivoli Presentation Services andIBM HTTP services if they are already started:v Server for IBM Consolev Web Services for IBM Consolev Tivoli Presentation Services HTTP Administrationv Tivoli Presentation Services HTTP Server
Install WebSphere AES 4.0.1 using the installation media included with IBM TivoliService Level Advisor, and then upgrade to version 4.0.2 or later, using theprocedures in the following sections.
Installing on WindowsInstall IBM WebSphere Application Server AES 4.0.1 on a Windows system bydoing the following:1. Insert the Windows version of the WebSphere AES 4.0.1 product CD and run
the setup.exe program.
56 IBM Tivoli Service Level Advisor: Getting Started with IBM Tivoli Service Level Advisor
2. On the Language dialog, select the language desired and click OK to continue.3. On the Welcome dialog, click Next to continue.4. On the Installation Options dialog, verify that the Typical Installation radio
button is selected, and click Next to continue.5. On the Security Options panel, enter a valid user ID and password for this
machine and click Next to continue.6. On the dialogs for Product Directory, Program Folder, and Install Options,
accept the defaults as presented, and click Next to continue and perform theinstallation.
7. After the installation completes, reboot the machine.8. After the machine is restarted, the WebSphere Application Server - First Steps
console is displayed. Select Start the Application Server from the availableoptions. After a short time, you should see the following message, indicatingthat the WebSphere Application server is started:WSPL0057I: The server Default Server is open for e-business.
Installing on UNIXInstall IBM WebSphere Application Server AES 4.0.1 on a Windows system bydoing the following:1. Mount the UNIX version of the WebSphere AES 4.0.1 CD:
v For AIX, issue the following command, where <mount_dir> is the mountdirectory:mount -rv cdrfs /dev/cd0 <mount_dir>
v For Solaris, the CD is automatically mounted on /cdrom/cdrom0
v For Linux, issue the following command:mount /mnt/cdrom
2. Change to the mounted directory <mount_dir>/<os version>, where <osversion>is aix for AIX, sun for Solaris, and linux for Linux.
3. Run the following command:./install.sh
4. The Welcome banner is displayed. Click Next to display a window withWebsphere AES operating system prerequisites. If everything is satisfactory,click OK to continue, or update the operating system with the required fixesby downloading them from the corresponding operating system support Website.
5. Select Typical Installation and click Next to continue.6. The Destination Directory window is displayed, showing the default
installation directory of WebSphere and the IBM HTTP Server. Accept thesedefaults and click Next to continue.
7. The Install Options window is displayed, listing the components to beinstalled. Click Install, which starts the installation. At the end, click Finish tocomplete the installation.
8. Unmount the CD as follows:v For AIX, change the directory from the mounted directory and enter umount
<mount_dir>
v For Solaris, change the directory from the mounted directory and entereject cdrom
v For Linux, change the directory from the mounted directory and entereject cdrom
Chapter 3. Installing Supporting Applications 57
9. Verify that db2profile is sourced before starting the WebSphere ApplicationServer by issuing the following command, where <Instance_Dir> is the DB2instance directory:. <Instance_Dir>/sqllib/db2profile
For example,. /home/db2inst1/sqllib/db2profile
10. Completion of the installation launches the First Steps html page if Netscapeis installed. You can use this html page to start and stop the WebsphereApplication Server, or see Chapter 6, “Startup and Shutdown Procedures”, onpage 107 for the procedures to start and stop the Websphere ApplicationServer and the HTTP Server.
Configuring the WebSphere EnvironmentConfigure your WebSphere environment by doing the following:v If you are installing WebSphere Application Server in a non-English
environment, you must configure WebSphere to use UTF-8 encoding by doingthe following:1. Upgrade to at least WebSphere AES or AE version 4.0.2 (see “Upgrading
from WebSphere AES or AE 4.0.1” on page 59), or apply APAR PQ52029 toyour WebSphere 4.0.1 environment. Refer to the Release Notes about foradditional information on supported versions of WebSphere.You can retrieve APAR PQ52029 at:http://www-1.ibm.com/support/docview.wss?rs=0&uid=swg24000790
2. Set the client.encoding.override property by doing the following:– For supported versions of WebSphere AE (4.0.1 and higher):
a. On the WebSphere Administrative Console tree, selectNodes→Application Server→JVM Settings.
b. Scroll to the System Properties section and click Add to create a newrow in the table.
c. Type client.encoding.override in the Name column and UTF-8 in theValue column.
d. Click Apply.e. Stop and restart the WebSphere Application Server.
– For WebSphere AES 4.0.1 or later:a. Open the WebSphere Application Server Administrative Console
(default: http://localhost:9090/admin) and log on.b. On the WebSphere Administrative Console tree, select Nodes.c. Select your NodeName.d. Select Application Servers.e. Select Default Server.f. Select Process Definition.g. Select JVM Settings.h. Scroll to Advanced Settings and click the System Properties link.i. In System Properties, click New.j. Type client.encoding.override in the Name field.k. Type UTF-8 in the Value field.l. Click OK to save the changes.m. Click Exit on the WebSphere Application Server menu bar.
58 IBM Tivoli Service Level Advisor: Getting Started with IBM Tivoli Service Level Advisor
n. In the Exit table, select Save and click OK.o. Stop and restart the WebSphere Application Server.
v Configure the JDBC Driver in WebSphere (see “Configuring the JDBC Driver inWebSphere” on page 60 for the procedure).
v You might want to configure WebSphere to autostart when the system isrestarted. See “Automatically Starting WebSphere After System Restart” onpage 60 for the procedure.
v Obtain the WebSphere node name (see “Identifying the WebSphere Node Name”on page 61) and record it in your planning worksheet for later use.
v If you have installed a supported version of IBM WebSphere Application ServerAE (4.0.2 or later), you must also perform some manual configuration tointegrate the report servlets into the WebSphere environment after you installthe SLM Reports option of IBM Tivoli Service Level Advisor. See “IntegratingSLM Reports into WebSphere” on page 100 for more information aboutintegrating SLM Reports into WebSphere AE.
Upgrading from WebSphere AES or AE 4.0.1With this version of IBM Tivoli Service Level Advisor, you must upgradeWebSphere AES or AE version 4.0.1 to version 4.0.2 or later. See the following Website for upgrade information:http://www.ibm.com/software/webservers/appserv/support/index.html
You can upgrade WebSphere to version 4.0.2 by doing the following:1. On the web page, under Software Downloads, click All Fixes, FixPaks, and
Tools.2. Using the search fields provided on the Web page, find the download for your
desired AES or AE version 4.0.2 (also known as FixPak 2).3. Download the package for your platform to an empty temporary directory on
your system.4. Also obtain the Readme file and other documentation as needed.5. Stop the IBM HTTP Server and IBM HTTP Administration Server (see
“Stopping IBM HTTP Services” on page 112).6. For AES, stop the IBM WebSphere Application Server (see “Stopping IBM
WebSphere Application Server for WebSphere AES” on page 112). For AE, stopthe IBM WebSphere Admin Server (see “Stopping the IBM WebSphere AE 4.0Admin Server” on page 112).
7. Refer to the specific steps in the Readme file and run the installation programby doing the following:v For Windows:
a. Extract the files from the ZIP fileb. Run install.bat
v For UNIX:a. Extract the files from the tar fileb. Run install.sh
8. You will be prompted to enter the name of your WebSphere AppServerdirectory, such as C:\WebSphere\AppServer on Windows, or/usr/WebSphere/AppServer on UNIX.
9. When asked if you want to upgrade your HTTP server, answer Yes. Enter thelocation of your HTTP Server directory, such as C:\IBM HTTP Server.
Chapter 3. Installing Supporting Applications 59
10. Restart the IBM HTTP Server and IBM HTTP Administration Server (see“Starting the IBM HTTP Services” on page 111).
11. For AES, restart the WebSphere Application Server (see “Starting IBMWebSphere Application Server” on page 110). For AE, restart the WebSphereAdmin Server (see “Starting the IBM WebSphere AE 4.0 Admin Server” onpage 111).
See the Readme file that accompanies the fix pack installation for moreinformation.
Configuring the JDBC Driver in WebSphereAfter installing WebSphere AES, configure the DB2 JDBC Driver in WebSphere bydoing the following:1. Start the WebSphere Application Server (see “Starting IBM WebSphere
Application Server” on page 110), and wait for the server to become active (inthe log file <WebSphere_Dir>/AppServer/logs/default_server_stdout.log,where <WebSphere_Dir> is the directory where WebSphere was installed, checkfor the following line:open for e-business
2. Open your Web browser and point to the following site:http://localhost:9090/admin
3. On the login page, click Submit (specifying the user ID is not necessary). TheAdministrator Console is displayed.
4. From the tree view in the left window, select Resources –> JDBC Drivers –>Db2JdbcDriver. Click on Db2JdbcDriver.
5. In the Server Class Path field, enter the path and file name of the location ofthe DB2 driver, similar to the following example, where <DB2_Instance_Dir> isthe location where the DB2 instance is installed (for example, C:\DB2), andthen click OK:<DB2_Instance_Dir>/sqllib/java12/db2java.zip
6. In the upper black menu bar, click Save.7. Verify that the Save Configuration File radio button is selected, and click OK.8. Exit the Administrator Console by selecting Exit from the menu bar.9. Stop the WebSphere Application Server (see “Stopping IBM WebSphere
Application Server for WebSphere AES” on page 112)10. Repeat steps 1 and 2 above. If you do not see any error messages, the server
is ready to connect to the database.
Note: On UNIX, the root environment file must be updated. The WebSphereApplication Server will be run under root and will require access to theDB2 environment. Edit the environment .profile for the root accountand add the following content at the end of the file:#Set up DB2 environment for root user.
if [-f /home/<db2_instance_owner>/sqllib/db2profile ];then
. /home/<db2_instance_owner>/sqllib/db2profile
fi
Automatically Starting WebSphere After System RestartYou can configure the WebSphere AES Application Server to be automaticallyrestarted each time your system is restarted by doing the following:v For Windows:
60 IBM Tivoli Service Level Advisor: Getting Started with IBM Tivoli Service Level Advisor
1. Select Start –> Settings –> Taskbar & Start Menu
2. Select the Advanced tab3. Click Advanced... to display the Start Menu dialog.4. Under the Start Menu branch in the Folders view, expand the Programs
branch and click the Startup folder.5. Right-click in the right pane of the dialog, and select New –> Shortcut from
the context menu.6. Navigate to the <WebSphere_Dir>\bin\startServer.bat file, where
<WebSphere_Dir> is the directory in which WebSphere was installed, forexample, C:\WebSphere\AppServer.
7. Select this file to create a shortcut to the startServer.bat file in the Startupfolder.
v For UNIX:– For AIX: Edit the file /etc/inittab and append the following line to the end
of the file, where <WebSphere_Dir> is the directory where WebSphere wasinstalled:was:2:once:<WebSphere_Dir>/bin/startServer.sh > /dev/console 2>&1
– For Solaris:1. From the IBM Tivoli Service Level Advisor product CD, copy the file
tools/wastemplate/S81was to the directory location /etc/rc3.d on yoursystem.
2. Edit the file /etc/rc3.d/S81was and replace <WebSphere_Dir> with thelocation where Websphere is installed on your system.
– For Linux:1. From the IBM Tivoli Service Level Advisor product CD, copy the file
tools/wastemplate/S81was to the directory location /etc/rc3.d on yoursystem.
2. Edit the file /etc/rc3.d/S81was and replace <WebSphere_Dir> with thelocation where Websphere is installed on your system.
3. Create links to S81was as follows:ln -s /etc/rc3.d/S81was /etc/rc4.d/S81was
ln -s /etc/rc3.d/S81was /etc/rc5.d/S81was
Note: You must ensure that the db2profile has been sourced and that theDISPLAY environment variable has been set before starting WebSphere.
Identifying the WebSphere Node NameDuring the installation of IBM Tivoli Service Level Advisor, if you are installing theSLM Reports option for use with WebSphere AES, you will be asked to specify thename that WebSphere assigned to the node that identifies the machine on whichWebSphere is running.
Note: This name is not necessarily your machine host name. It might be either theshort name or the fully qualified name for the machine that was assignedduring WebSphere installation. Be sure to look this name up using theprocedure provided, and do not assume it is your machine host name. Notealso that this node name is case sensitive and must be specified exactly as itwas assigned by WebSphere.
Chapter 3. Installing Supporting Applications 61
You will use this node name later when you install the SLM Reports option of IBMTivoli Service Level Advisor. See “Step 7. Specify Your WebSphere AES Location”on page 76.
Use WebSphere AES to find the correct node name to specify during IBM TivoliService Level Advisor installation. To find the node name, do the following:1. Start the IBM WebSphere Application Server (see “Starting IBM WebSphere
Application Server” on page 110)2. Start the WebSphere Administrator’s Console (see“Starting the WebSphere
Admin Console” on page 111)3. Login to the WebSphere Administrator’s Console by leaving the User ID field
blank and clicking Submit
4. In the left pane of the WebSphere Administrator’s Console window, expand theNodes node and note the host name (in either short or long form) displayed inthe expanded branch of the node. This is the value that you must enter into theNode Name field on the IBM Tivoli Service Level Advisor installation dialog.
5. Logout of the WebSphere Administrator’s Console by selecting Exit.
Record this information in your planning sheet for later use during IBM TivoliService Level Advisor installation.
62 IBM Tivoli Service Level Advisor: Getting Started with IBM Tivoli Service Level Advisor
Chapter 4. Installing IBM Tivoli Service Level Advisor
This chapter assumes that you have successfully installed all of the supportingapplications discussed in Chapter 3, “Installing Supporting Applications”, onpage 31.
The installation of IBM Tivoli Service Level Advisor includes two main procedures:1. Create the SLM Database and SLM Measurement Data Mart DB2 databases2. Run the IBM Tivoli Service Level Advisor install wizard to perform the
installation.
Before Installing IBM Tivoli Service Level AdvisorBefore installing IBM Tivoli Service Level Advisor, verify the following:v Are you reinstalling IBM Tivoli Service Level Advisor? If so, you must first
uninstall any existing version before performing a reinstall, unless you aremigrating from a previous version or if you are performing a restore of the SLMServer option. See Chapter 7, “Uninstalling IBM Tivoli Service Level Advisor”,on page 115 for more information.
v Are you migrating IBM Tivoli Service Level Advisor from a previous version?If you currently have a previous version of IBM Tivoli Service Level Advisorinstalled in your enterprise environment, refer to Appendix E, “Migrating FromPrevious Versions of IBM Tivoli Service Level Advisor”, on page 169 forinformation on migrating your environment to work with this version of IBMTivoli Service Level Advisor.
v Is the db2java.zip file included in your CLASSPATH system variable? Theinstall program uses this file to set up your DB2 environment (see “Verifying theJDBC Level” on page 40). To verify this, do the following:– On Windows 2000, select Start –> Settings –> Control Panel –> System to
display the System Properties dialog. Select the Advanced tab and selectEnvironment Variables. Under System variables, examine the CLASSPATHvariable and verify that <DB2_instance_directory>/sqllib/java/db2java.zipis included in the path.
– On Windows NT, select Start –> Settings –> Control Panel –> System todisplay the System Properties dialog. Select the Environment tab. UnderSystem Variables, examine the CLASSPATH variable and verify that<DB2_instance_directory>/sqllib/java/db2java.zip is included in the path.
– On UNIX, source the db2profile file locally, by navigating to the<db2_instance_directory>/sqllib directory, where <db2_instance_directory> isthe database instance directory, and issuing the following command:. db2profile
Note: On some Windows systems, you might also have a User variable namedCLASSPATH, in addition to the System variable. The User variable willoverride the System variable settings, so even if you include db2java.zipin the System CLASSPATH variable, it may not be recognized by theinstall program. You can resolve this problem by adding %CLASSPATH%;to the front of the User CLASSPATH variable, to attach the System variablesettings to the front of the User variable settings.
© Copyright IBM Corp. 2003 63

v Are you planning to install the SLM Reports component on this machine? Ifso, one of the supported versions of IBM WebSphere Application Server mustalready be installed on this machine. The WebSphere Application Server can beeither started or stopped, but if started, it will have to be stopped and restartedafter IBM Tivoli Service Level Advisor has been installed for the SLM Reportsoption to be successfully integrated into the WebSphere environment. TheWebSphere Administrative Console should be logged out and its browserwindow closed.
v Are you planning to install the SLM Task Drivers component on thismachine? If so, Tivoli Presentation Services must already be installed on thismachine. This should have already been completed during installation of TivoliEnterprise Data Warehouse. You should install the SLM Task Drivers on thesame machine where the IBM Console Server was installed.
v Are you planning an incremental installation? If you are planning to install theSLM Server, SLM Task Drivers, or SLM Reports component of IBM Tivoli ServiceLevel Advisor into a machine that already has one or more of these componentsinstalled, you must perform the installation to a different directory. You can onlyreinstall an option into the same directory where it was previously installed ifyou are performing a restore of that option. See the Administrator’s Guide for IBMTivoli Service Level Advisor for information on the restore process for IBM TivoliService Level Advisor.
v Is the system configured to return fully qualified host names? The machineson which you install the SLM Server, SLM task drivers, and SLM Reports mustbe configured so that their host names resolve to fully qualified names. See“Step 3. Ensure fully qualified host names” on page 33 for information onconfiguring your machine to resolve to fully qualified host names.
v Do you have sufficient authority to install? On UNIX systems, you must be theroot user to run the installation program. On Windows, you must haveAdministrator’s privileges to run the installation program.
v Are you installing on a Solaris platform? If so, verify that you have installedthe necessary Java patches from the following Web site:http://java.sun.com/products/jdk/1.3/install-solaris-patches.html
v Are you installing remotely? Remote installs are not supported. The installprogram must be run on the machine where the components are to be installed.
v Are you installing on a Linux machine? If so, you should increase the kernelparameter MSGMNI from its default value of 16 to 128, to better handle sharedmemory segments.You can modify this parameter by issuing the following command:echo 128 > /proc/sys/kernel/msgmni
To enable this parameter to remain persistent after rebooting the system, you canadd the following line to the file /etc/sysctl.conf, and then reboot themachine:kernel.msgmni=128
Creating the IBM Tivoli Service Level Advisor Application DatabasesTo create the required databases for IBM Tivoli Service Level Advisor, two scriptsare provided (see Table 10 on page 68 for the location of these files on the installCD):v dyk_cat_dbinst, which creates the SLM Databasev dyk_dm_dbinst, which creates the SLM Measurement Data Mart
64 IBM Tivoli Service Level Advisor: Getting Started with IBM Tivoli Service Level Advisor
Consult your database administrator before using these scripts to ensure that thecreation of the database, placement of the database information, and the defaultvalues for database configuration parameters, as discussed below, are suitable foryour DB2 database server. If you do not have a database administrator, the defaultvalues may be sufficient.
Modifying Configuration Parameters Before CreatingDatabases
You might want to modify one or more configuration parameters before creatingthe database. On a UNIX platform, the script files are interactive, enabling you tomodify parameters as needed. If you are installing on a Windows platform,however, you can modify these parameters after creating the databases, or do thefollowing to modify the parameters before running the scripts:1. Copy the entire database structure (/database) from the IBM Tivoli Service
Level Advisor installation CD to a local or system drive.2. Make the appropriate modifications to the script file as desired.3. Run the modified database creation script from the local or system drive where
you made the modifications.
All database configuration parameters are included near the top of the windowsdatabase creation scripts. You may want to modify one or more of the followingconfiguration parameters:v Database names can be changed, however it is recommended to accept the
default database names unless these names present substantial problems. Thenames of these databases recur in a number of locations, and you must find andchange each instance during installation and configuration. If you select differentnames, bear in mind that database names in DB2 are limited to eight characters.Table 7 describes the default DB2 database names for the IBM Tivoli ServiceLevel Advisor application databases.
Table 7. Default DB2 database names
Database name and descriptionDefault DB2database name
IBM Tivoli Service Level Advisor SLM Database. Stores componenttype data from the Tivoli Enterprise Data Warehouse databasewhich is used by IBM Tivoli Service Level Advisor when creatingofferings and SLAs. Also stores the results of SLA evaluation andtrend analysis, and provides those results to the SLM Reports forgenerating reports.
dyk_cat
IBM Tivoli Service Level Advisor SLM Measurement Data Mart.Stores summarized measurement data from the Tivoli EnterpriseData Warehouse and makes it available to IBM Tivoli Service LevelAdvisor for evaluation and trend analysis.
dyk_dm
If you do change these names, note the new names and keep them handy forwhen you install and configure IBM Tivoli Service Level Advisor.
v The database creation scripts create separate log files to capture all of thedatabase creation messages and a list of tables that are created for each database.You can check these log files and table lists after the scripts complete processing,to verify that the databases were created successfully. If you are running thesescripts on a Windows NT or Windows 2000 platform, the default location ofthese log files is in the system temporary folder (the TEMP environmentvariable). If you would like to change the location of the log files, edit the
Chapter 4. Installing IBM Tivoli Service Level Advisor 65
LOGFILE_NAME and VER_LOGFILE_NAME parameters located at the top ofthe windows database creation scripts. See “Checking Database Creation Logsand Tables” on page 68 for additional information on verifying that thedatabases were created successfully.On UNIX, the interactive scripts will prompt you for the desired log directory,and if the log directory does not already exist, the script will offer to create it foryou before continuing.
Note: If you choose to have the scripts create the log directory for you, the DB2instance owner must have sufficient file permissions to create thedirectory in the desired location.
Additional parameters may be modified if desired. Refer to the comments in thescript files for additional information.
Database and Database Manager Configuration ParametersSome DB2 configuration parameters are changed during the creation of the SLMDatabase and the SLM Measurement Data Mart. These configuration parametersaffect the operation of both the database and the instance to which it belongs. Thefollowing table shows the configuration parameters that are changed along withtheir default values for each SLM database. These values were chosen for thedatabases to run efficiently in a default IBM Tivoli Service Level Advisorenvironment. If you wish to change any of these values, contact your DatabaseAdministrator for values appropriate to your environment.
Table 8. SLM Database Configuration Parameters
Parametername Default value
Configurationtype Parameter description
logfilsiz 2500 for SLMDatabase
2500 for SLMMeasurementData Mart
Database The size of the primary and secondarylog files, which determines the numberof log records that can be written beforea new log file is required.
logprimary 3 for SLMDatabase
10 for SLMMeasurementData Mart
Database The number of primary logs used forrecovery. These logs are allocated whenthe database is created.
logsecond 2 for SLMDatabase
40 for SLMMeasurementData Mart
Database The number of secondary log files usedfor database recovery. These logs areonly allocated as needed when space inthe primary log files runs out.
applheapsz 2048 for SLMDatabase
4096 for SLMMeasurementData Mart
Database The amount of private memory availableto be used for an application agent orsubagent.
66 IBM Tivoli Service Level Advisor: Getting Started with IBM Tivoli Service Level Advisor
Table 8. SLM Database Configuration Parameters (continued)
Parametername Default value
Configurationtype Parameter description
maxappls 200 for SLMDatabase
200 for SLMMeasurementData Mart
Database The maximum number of concurrentapplications allowed to connect to thedatabase.
maxagents 500 for SLMDatabase
500 for SLMMeasurementData Mart
Instance The maximum number of databasemanager agents available forapplications.
numdb 10 for SLMDatabase
10 for SLMMeasurementData Mart
Instance The maximum number of concurrentlyactive databases.
You can configure these parameters after creating the databases, using appropriateDB2 configuration commands. For more information on these and other databaseconfiguration parameters, refer to IBM DB2 Universal Database Administration Guide:Performance, Chapter 13, ″Configuring DB2.″
Creating the DatabasesTo create the IBM Tivoli Service Level Advisor databases, follow this process:1. Start a DB2 command line processor window:
Table 9. Starting a DB2 command line processor window
Operating System Process
UNIX Login as a DB2 instance owner, navigate to the<db2_instance_dir>/sqllib directory, where<db2_instance_dir> is the home directory of the instance, andrun the following startup script:
v For bash, Bourne, or Korn shells:
. db2profile
v For C shells:
source db2cshrc
Microsoft Windows Select Start –> Run, and enter the following command:
db2cmd
2. Insert the IBM Tivoli Service Level Advisor product CD in the CD-ROM drive.3. If you did not modify the parameters by copying the script files to a local
machine and editing the script file, start the database creation script from theappropriate directory on the product CD. The commands in the following tableassume that you made no changes to the script.
Chapter 4. Installing IBM Tivoli Service Level Advisor 67
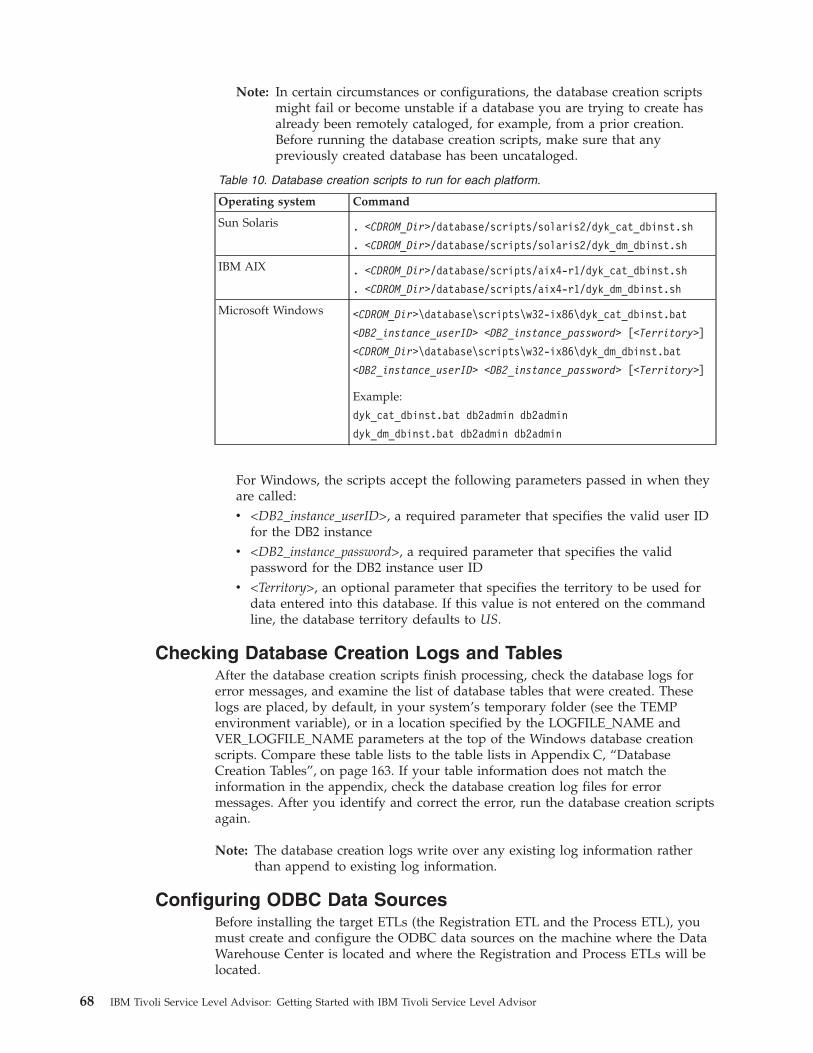
Note: In certain circumstances or configurations, the database creation scriptsmight fail or become unstable if a database you are trying to create hasalready been remotely cataloged, for example, from a prior creation.Before running the database creation scripts, make sure that anypreviously created database has been uncataloged.
Table 10. Database creation scripts to run for each platform.
Operating system Command
Sun Solaris . <CDROM_Dir>/database/scripts/solaris2/dyk_cat_dbinst.sh
. <CDROM_Dir>/database/scripts/solaris2/dyk_dm_dbinst.sh
IBM AIX . <CDROM_Dir>/database/scripts/aix4-r1/dyk_cat_dbinst.sh
. <CDROM_Dir>/database/scripts/aix4-r1/dyk_dm_dbinst.sh
Microsoft Windows <CDROM_Dir>\database\scripts\w32-ix86\dyk_cat_dbinst.bat
<DB2_instance_userID> <DB2_instance_password> [<Territory>]
<CDROM_Dir>\database\scripts\w32-ix86\dyk_dm_dbinst.bat
<DB2_instance_userID> <DB2_instance_password> [<Territory>]
Example:
dyk_cat_dbinst.bat db2admin db2admin
dyk_dm_dbinst.bat db2admin db2admin
For Windows, the scripts accept the following parameters passed in when theyare called:v <DB2_instance_userID>, a required parameter that specifies the valid user ID
for the DB2 instancev <DB2_instance_password>, a required parameter that specifies the valid
password for the DB2 instance user IDv <Territory>, an optional parameter that specifies the territory to be used for
data entered into this database. If this value is not entered on the commandline, the database territory defaults to US.
Checking Database Creation Logs and TablesAfter the database creation scripts finish processing, check the database logs forerror messages, and examine the list of database tables that were created. Theselogs are placed, by default, in your system’s temporary folder (see the TEMPenvironment variable), or in a location specified by the LOGFILE_NAME andVER_LOGFILE_NAME parameters at the top of the Windows database creationscripts. Compare these table lists to the table lists in Appendix C, “DatabaseCreation Tables”, on page 163. If your table information does not match theinformation in the appendix, check the database creation log files for errormessages. After you identify and correct the error, run the database creation scriptsagain.
Note: The database creation logs write over any existing log information ratherthan append to existing log information.
Configuring ODBC Data SourcesBefore installing the target ETLs (the Registration ETL and the Process ETL), youmust create and configure the ODBC data sources on the machine where the DataWarehouse Center is located and where the Registration and Process ETLs will belocated.
68 IBM Tivoli Service Level Advisor: Getting Started with IBM Tivoli Service Level Advisor
This information tells the Data Warehouse Center on which machines the TivoliEnterprise Data Warehouse database, the SLM Database, and SLM MeasurementData Mart are located, to manage data transfer between the warehouse and SLMapplication databases.
Two scripts are provided to automatically create the ODBC data sources for thesetwo databases:v dyk_cat_odbc.bat creates an ODBC data source named DYK_CAT for the SLM
Database.v dyk_dm_odbc.bat creates an ODBC data source named DYK_DM for the SLM
Measurement Data Mart.
These scripts assume the following:v You created the SLM Database with the default name dyk_cat.v You created the SLM Measurement Data Mart with the default name dyk_dm.v The DB2 communication port is 50000.v The ODBC data sources are created with the dyk_cat and dyk_dm aliases by
default.
To change these parameters, copy the \database\scripts\w32-ix86 directory fromthe IBM Tivoli Service Level Advisor product CD to a local or system drive, andmake the appropriate modifications to the script file. You can also refer toAppendix D, “Manually Creating ODBC Data Sources”, on page 167 forinstructions on manually creating ODBC data sources.
To configure ODBC data sources using these scripts, do the following:1. Select Start –>Run and run the db2cmd command to initialize a DB2 command
session.2. Insert the IBM Tivoli Service Level Advisor product CD in the CD-ROM drive.3. To create the ODBC data source named DYK_CAT for the SLM Database,
navigate to the <CD-ROM>\database\scripts\w32-ix86\ directory, where<CD-ROM> is the CD-ROM drive letter, and run the following command,where <host name> is the fully qualified host name of the local or remote DB2server where the database is located:dyk_cat_odbc.bat <host name>
For example:dyk_cat_odbc.bat UserABC.myCompany.com
4. Similarly, to create the ODBC data source named DYK_DM for the SLMMeasurement Data Mart, run the following script:dyk_dm_odbc.bat <host name>
Running the Install WizardYou can install IBM Tivoli Service Level Advisor from the installation product CDusing the following basic steps:1. Run a script from the CD root directory, which starts an InstallShield wizard.2. Specify a location for the Tivoli Common Directory if it does not already exist
on this machine, or confirm the location if it already exists.3. Specify a destination directory for your installation.4. Select one or more of the IBM Tivoli Service Level Advisor installation options
to install on your machine.
Chapter 4. Installing IBM Tivoli Service Level Advisor 69

Note: If you install these IBM Tivoli Service Level Advisor install options onmultiple machines, or for an incremental installation, you must repeatthe install process for each machine.
5. Specify the location of the installed version of WebSphere to be used as theapplication server for SLM Reports, and specify the node name that is used byWebSphere to identify the machine on which WebSphere is running. Thismachine will be known as the SLM Report Server.
6. Specify the names of the DB2 application databases (the SLM Database and theSLM Measurement Data Mart) that were created for IBM Tivoli Service LevelAdvisor.
7. Specify port numbers for server communication and command line interfaceports.
8. Decide how you want to be notified of SLA violations and trends (using SNMPtraps, Tivoli Enterprise Console events, or e-mail), and configure these eventescalation methods.
The InstallShield wizard verifies the database connections, and then installs all theneeded files to your machine in your specified destination. Some initialconfiguration will automatically take place. A log file will be generated to logproblems if they occur.
Note: The log file, traceTSLA1.2.1Install.log, is not created until files are writtento disk. If the installation is canceled early, this log file will not be created.This log file does not include database connection errors. Those messagesare displayed on the console. Error information in this log file should besent to Tivoli customer support to assist in diagnosing problems.
The steps involved in running the install wizard are described in the followingsections.
Step 1. Start the InstallShield ProgramTo run the InstallShield program, perform the following steps:
Note: If you are installing IBM Tivoli Service Level Advisor in a distributedenvironment, install the SLM Server component first.
1. Insert the IBM Tivoli Service Level Advisor product CD into the CD-ROMdrive.v If you are on a UNIX system, source the db2profile, and mount the CD.
2. Start the installation program from the CD mount (or root) directory byentering the following for your machine’s operating system:
Table 11. InstallShield script file names for each supported platform.
Operating system Command
Microsoft Windows install.bat
UNIX (Sun Solaris, IBM AIX, Linux) ./install.sh
Note: On AIX, if you receive the following warning message when you firstlaunch the install program, you can ignore it and proceed with theinstallation:Warning : Cannot convert string
"-jdk-lucida-medium-r-normal--*-120-75-75-p-*-iso8859-1"
70 IBM Tivoli Service Level Advisor: Getting Started with IBM Tivoli Service Level Advisor
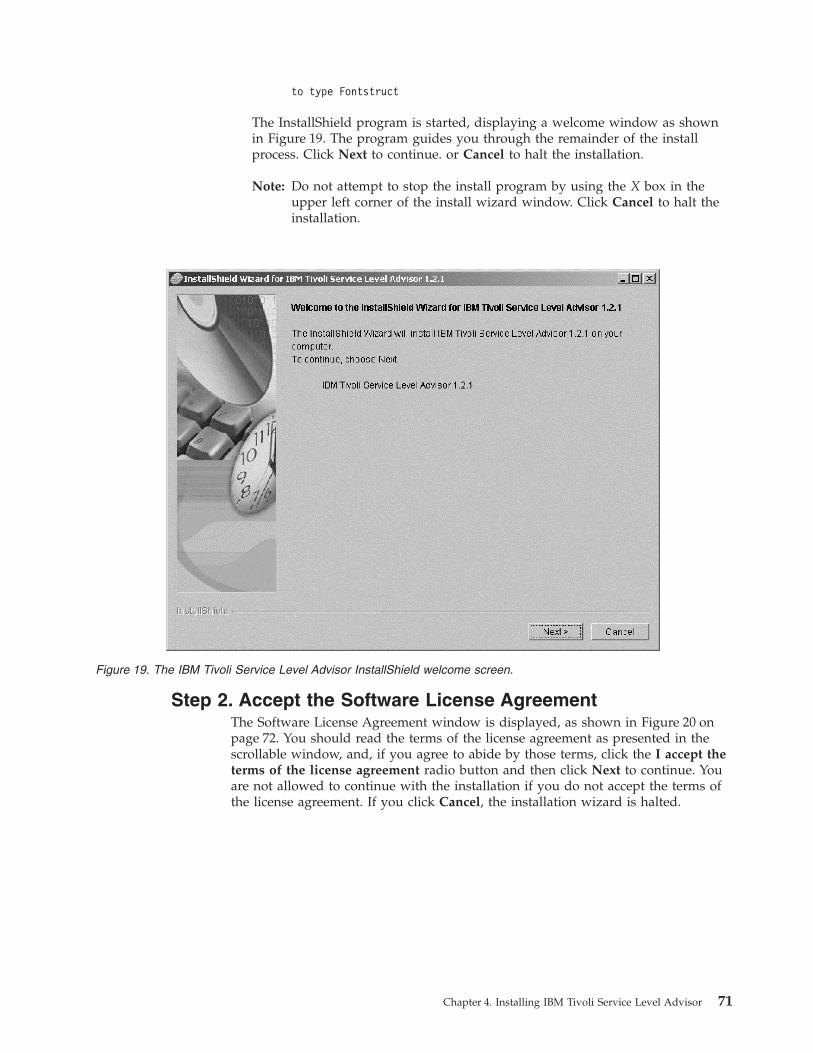
to type Fontstruct
The InstallShield program is started, displaying a welcome window as shownin Figure 19. The program guides you through the remainder of the installprocess. Click Next to continue. or Cancel to halt the installation.
Note: Do not attempt to stop the install program by using the X box in theupper left corner of the install wizard window. Click Cancel to halt theinstallation.
Step 2. Accept the Software License AgreementThe Software License Agreement window is displayed, as shown in Figure 20 onpage 72. You should read the terms of the license agreement as presented in thescrollable window, and, if you agree to abide by those terms, click the I accept theterms of the license agreement radio button and then click Next to continue. Youare not allowed to continue with the installation if you do not accept the terms ofthe license agreement. If you click Cancel, the installation wizard is halted.
Figure 19. The IBM Tivoli Service Level Advisor InstallShield welcome screen.
Chapter 4. Installing IBM Tivoli Service Level Advisor 71
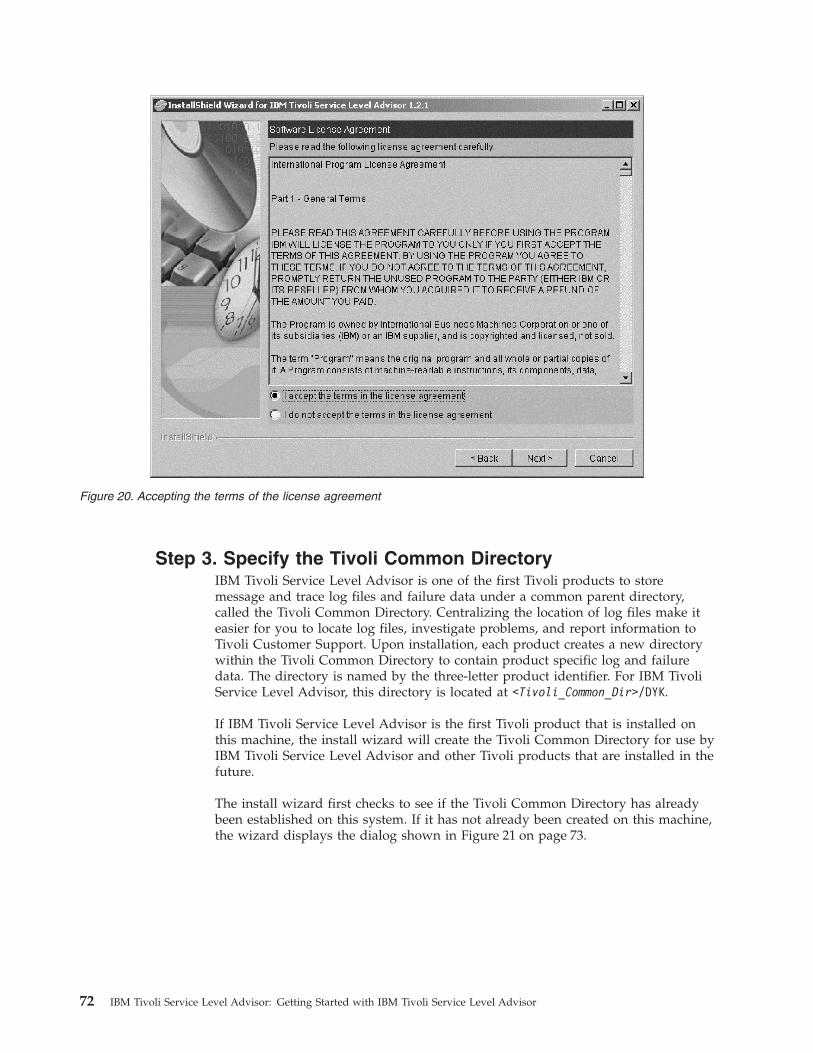
Step 3. Specify the Tivoli Common DirectoryIBM Tivoli Service Level Advisor is one of the first Tivoli products to storemessage and trace log files and failure data under a common parent directory,called the Tivoli Common Directory. Centralizing the location of log files make iteasier for you to locate log files, investigate problems, and report information toTivoli Customer Support. Upon installation, each product creates a new directorywithin the Tivoli Common Directory to contain product specific log and failuredata. The directory is named by the three-letter product identifier. For IBM TivoliService Level Advisor, this directory is located at <Tivoli_Common_Dir>/DYK.
If IBM Tivoli Service Level Advisor is the first Tivoli product that is installed onthis machine, the install wizard will create the Tivoli Common Directory for use byIBM Tivoli Service Level Advisor and other Tivoli products that are installed in thefuture.
The install wizard first checks to see if the Tivoli Common Directory has alreadybeen established on this system. If it has not already been created on this machine,the wizard displays the dialog shown in Figure 21 on page 73.
Figure 20. Accepting the terms of the license agreement
72 IBM Tivoli Service Level Advisor: Getting Started with IBM Tivoli Service Level Advisor
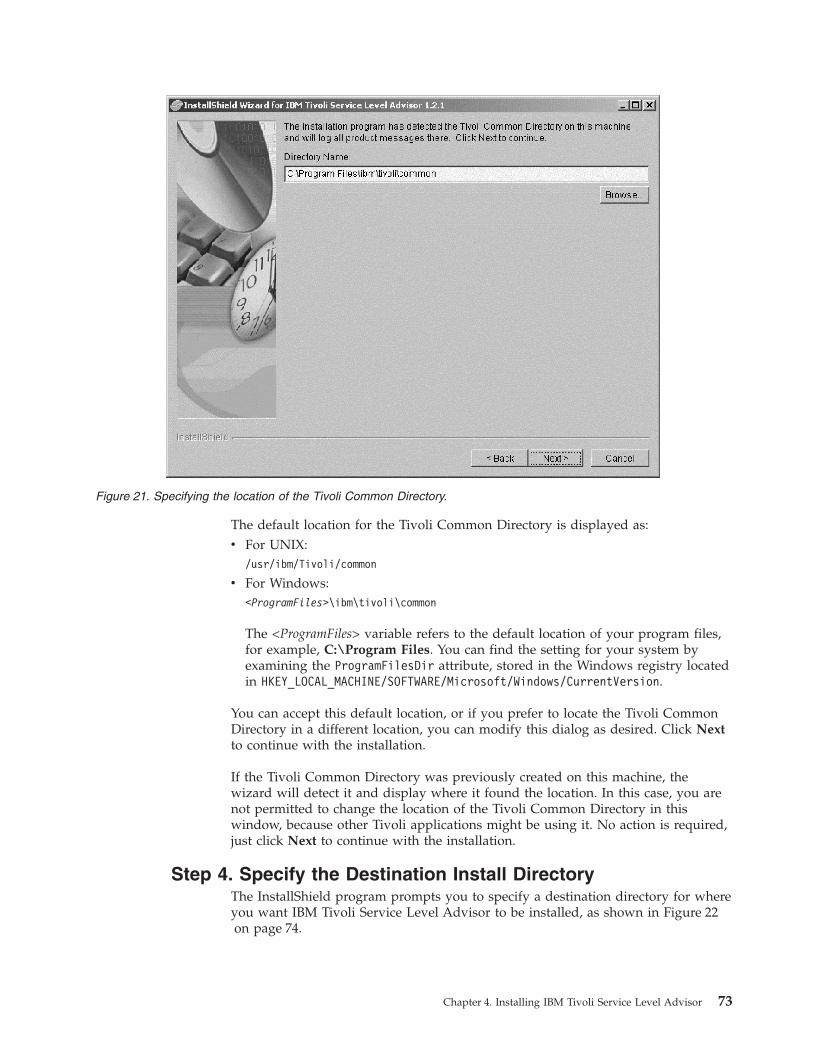
The default location for the Tivoli Common Directory is displayed as:v For UNIX:
/usr/ibm/Tivoli/common
v For Windows:<ProgramFiles>\ibm\tivoli\common
The <ProgramFiles> variable refers to the default location of your program files,for example, C:\Program Files. You can find the setting for your system byexamining the ProgramFilesDir attribute, stored in the Windows registry locatedin HKEY_LOCAL_MACHINE/SOFTWARE/Microsoft/Windows/CurrentVersion.
You can accept this default location, or if you prefer to locate the Tivoli CommonDirectory in a different location, you can modify this dialog as desired. Click Nextto continue with the installation.
If the Tivoli Common Directory was previously created on this machine, thewizard will detect it and display where it found the location. In this case, you arenot permitted to change the location of the Tivoli Common Directory in thiswindow, because other Tivoli applications might be using it. No action is required,just click Next to continue with the installation.
Step 4. Specify the Destination Install DirectoryThe InstallShield program prompts you to specify a destination directory for whereyou want IBM Tivoli Service Level Advisor to be installed, as shown in Figure 22on page 74.
Figure 21. Specifying the location of the Tivoli Common Directory.
Chapter 4. Installing IBM Tivoli Service Level Advisor 73
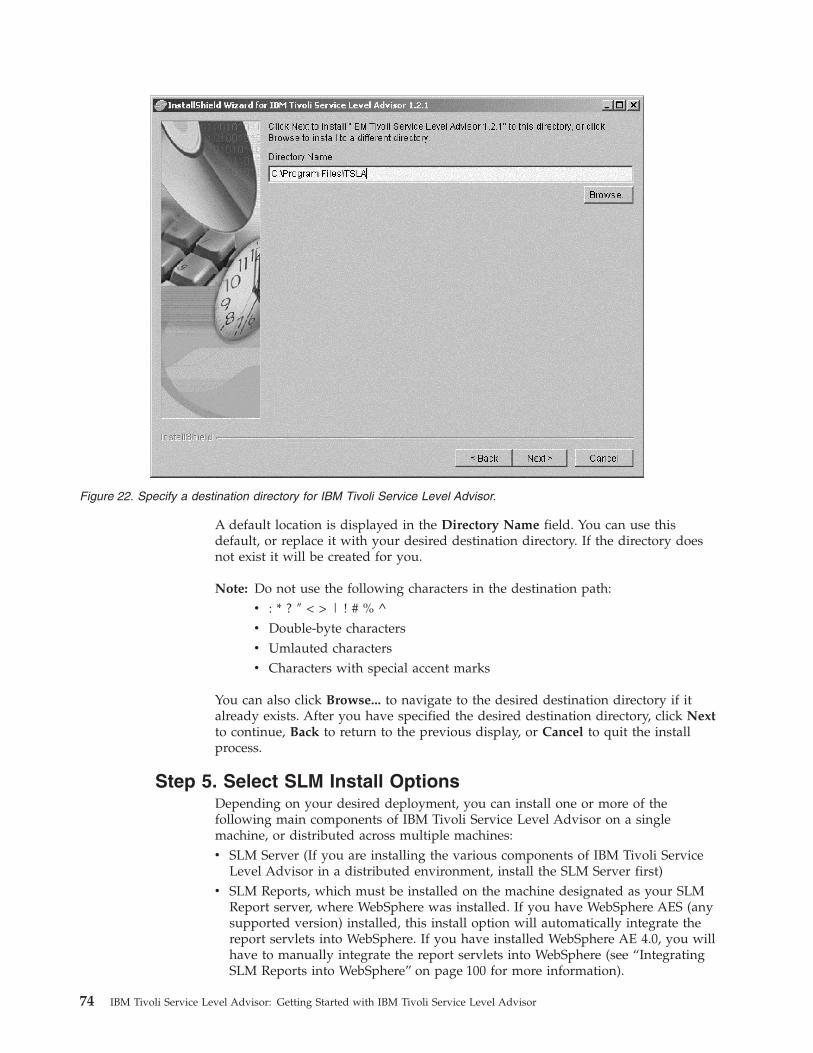
A default location is displayed in the Directory Name field. You can use thisdefault, or replace it with your desired destination directory. If the directory doesnot exist it will be created for you.
Note: Do not use the following characters in the destination path:v : * ? ″ < > | ! # % ^v Double-byte charactersv Umlauted charactersv Characters with special accent marks
You can also click Browse... to navigate to the desired destination directory if italready exists. After you have specified the desired destination directory, click Nextto continue, Back to return to the previous display, or Cancel to quit the installprocess.
Step 5. Select SLM Install OptionsDepending on your desired deployment, you can install one or more of thefollowing main components of IBM Tivoli Service Level Advisor on a singlemachine, or distributed across multiple machines:v SLM Server (If you are installing the various components of IBM Tivoli Service
Level Advisor in a distributed environment, install the SLM Server first)v SLM Reports, which must be installed on the machine designated as your SLM
Report server, where WebSphere was installed. If you have WebSphere AES (anysupported version) installed, this install option will automatically integrate thereport servlets into WebSphere. If you have installed WebSphere AE 4.0, you willhave to manually integrate the report servlets into WebSphere (see “IntegratingSLM Reports into WebSphere” on page 100 for more information).
Figure 22. Specify a destination directory for IBM Tivoli Service Level Advisor.
74 IBM Tivoli Service Level Advisor: Getting Started with IBM Tivoli Service Level Advisor

v SLM Task Drivers, which must be installed on the machine designated as yourIBM Console Server (created during the installation process for Tivoli EnterpriseData Warehouse).
Select one or more check boxes corresponding to the desired IBM Tivoli ServiceLevel Advisor options you wish to install on the current machine, as shown inFigure 23. You can select any combination of the three features to install, takinginto account the following:v If you select the SLM Reports option, you must have already installed a
supported version of WebSphere to act as the report servlet engine on thismachine.
v If you select the SLM Task Drivers option, you must have already installed theIBM Console Server on this machine as part of the install process for the TivoliEnterprise Data Warehouse.
If your application servlet engine or the IBM Console Server is installed on anothermachine, you must repeat this install process on those machines, selecting only thecorresponding options from the window.
When you have selected the desired SLM options to install on this machine, clickNext to continue, Back to return to the previous window, or Cancel to quit theinstall.
Step 6. Specify the Tivoli Presentation Services LocationIf you selected the SLM Task Drivers component of IBM Tivoli Service LevelAdvisor to be installed on this machine, the installation program expects that TivoliPresentation Services has already been installed as part of the Tivoli Enterprise
Figure 23. Select one or more install options for the current machine.
Chapter 4. Installing IBM Tivoli Service Level Advisor 75
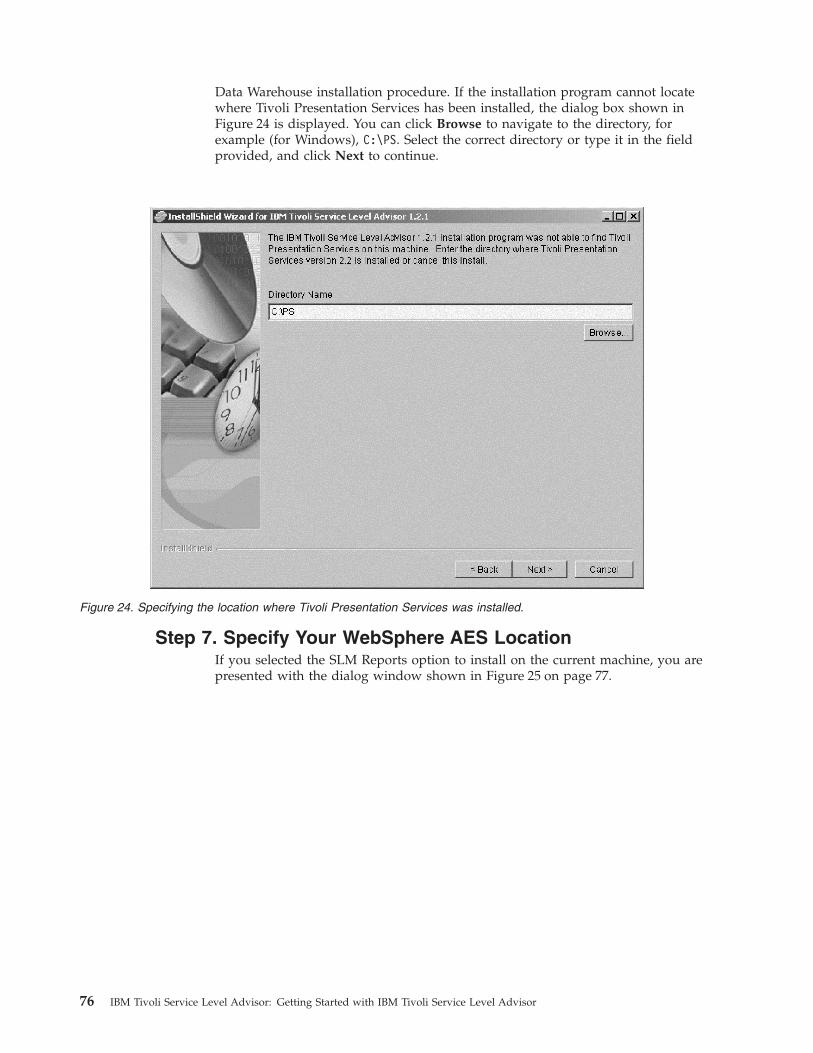
Data Warehouse installation procedure. If the installation program cannot locatewhere Tivoli Presentation Services has been installed, the dialog box shown inFigure 24 is displayed. You can click Browse to navigate to the directory, forexample (for Windows), C:\PS. Select the correct directory or type it in the fieldprovided, and click Next to continue.
Step 7. Specify Your WebSphere AES LocationIf you selected the SLM Reports option to install on the current machine, you arepresented with the dialog window shown in Figure 25 on page 77.
Figure 24. Specifying the location where Tivoli Presentation Services was installed.
76 IBM Tivoli Service Level Advisor: Getting Started with IBM Tivoli Service Level Advisor

On typical Windows systems, this location defaults to C:\WebSphere\AppServer.You can enter the path name in the Directory Name field provided, or clickBrowse... to navigate to the desired location.
When you have specified the location of WebSphere, click Next to continue, orclick Back to return to the previous window, or Cancel to quit the install.
Step 8. Specify the WebSphere Node NameIf you are running WebSphere AES, you are prompted to specify the node name tobe used for your SLM Report Server. This is the name that WebSphere assigned tothe node that identifies the machine on which WebSphere is running. Note thatthis case-sensitive node name might be in short form or long (fully qualified)form, depending on the machine. If you have already found this node name andrecorded it on your planning worksheet, enter that value here. Otherwise, see“Identifying the WebSphere Node Name” on page 61 for the procedure to find thisnode name.
Figure 25. Specifying the location of WebSphere installed on your machine.
Chapter 4. Installing IBM Tivoli Service Level Advisor 77
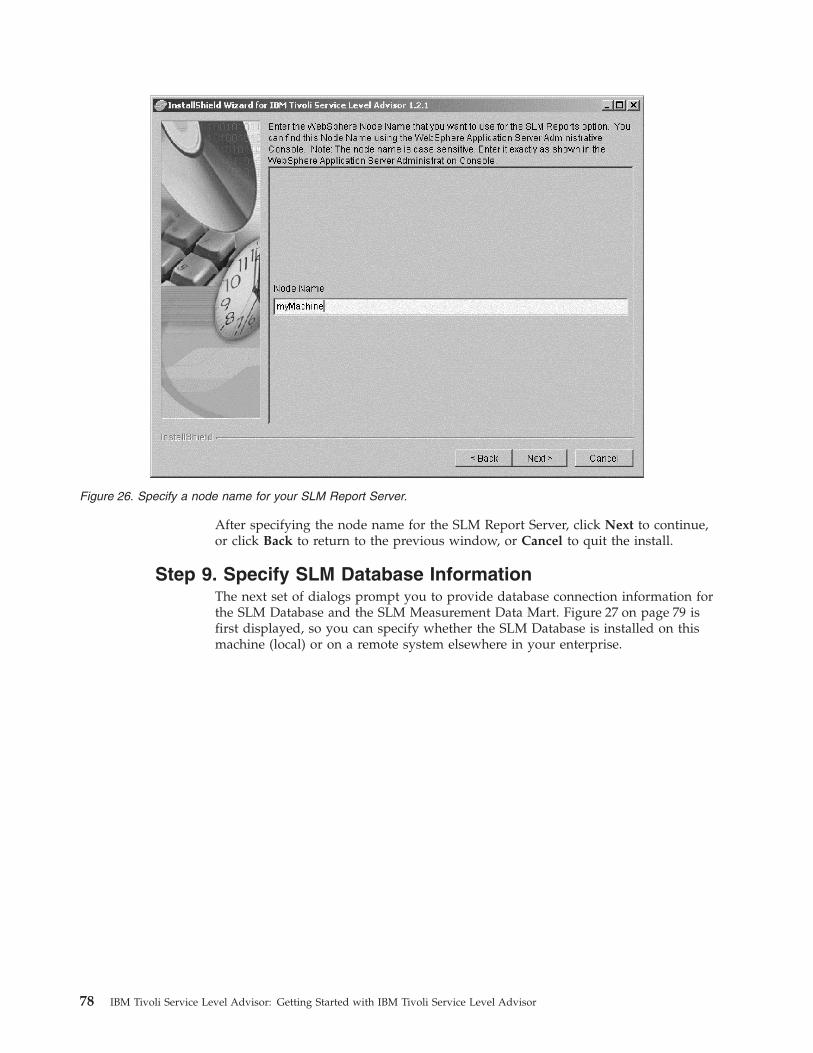
After specifying the node name for the SLM Report Server, click Next to continue,or click Back to return to the previous window, or Cancel to quit the install.
Step 9. Specify SLM Database InformationThe next set of dialogs prompt you to provide database connection information forthe SLM Database and the SLM Measurement Data Mart. Figure 27 on page 79 isfirst displayed, so you can specify whether the SLM Database is installed on thismachine (local) or on a remote system elsewhere in your enterprise.
Figure 26. Specify a node name for your SLM Report Server.
78 IBM Tivoli Service Level Advisor: Getting Started with IBM Tivoli Service Level Advisor
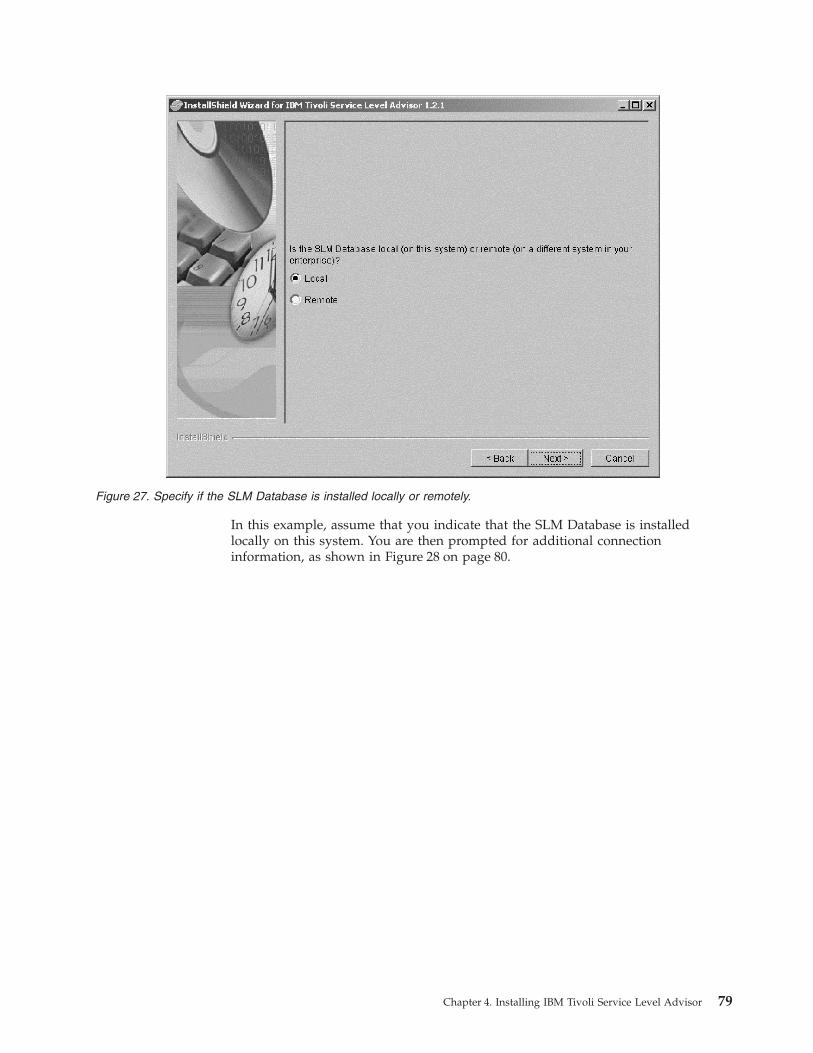
In this example, assume that you indicate that the SLM Database is installedlocally on this system. You are then prompted for additional connectioninformation, as shown in Figure 28 on page 80.
Figure 27. Specify if the SLM Database is installed locally or remotely.
Chapter 4. Installing IBM Tivoli Service Level Advisor 79
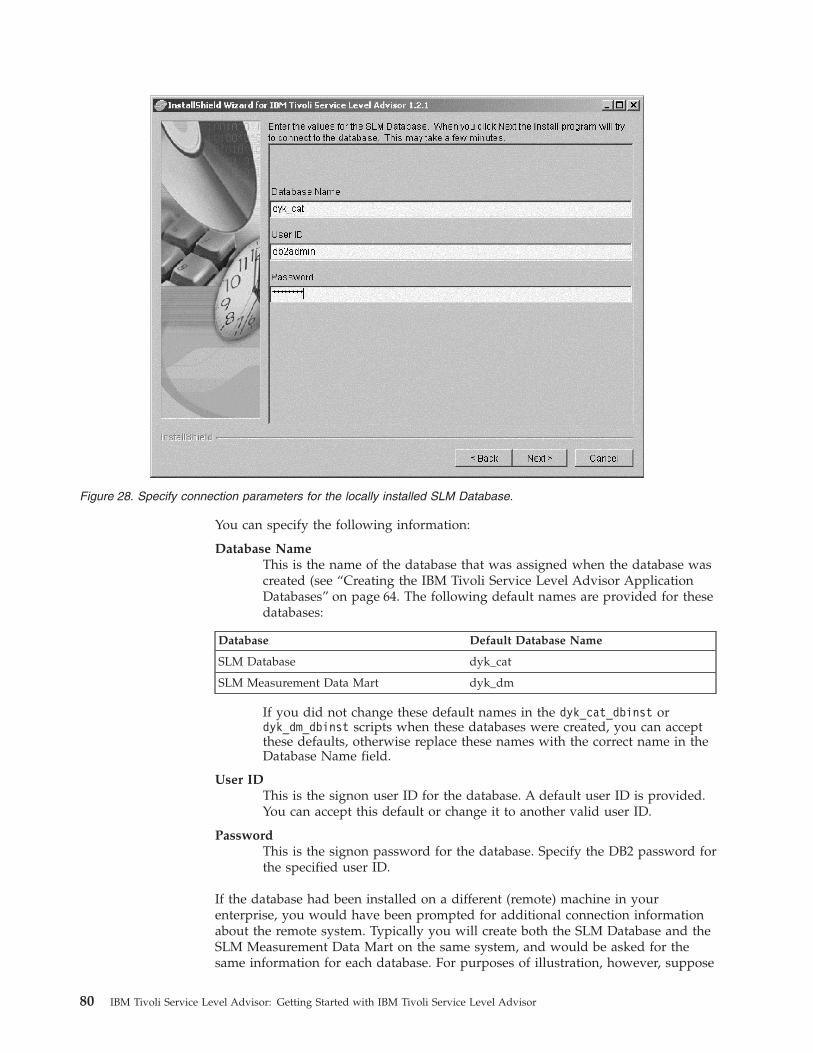
You can specify the following information:
Database NameThis is the name of the database that was assigned when the database wascreated (see “Creating the IBM Tivoli Service Level Advisor ApplicationDatabases” on page 64. The following default names are provided for thesedatabases:
Database Default Database Name
SLM Database dyk_cat
SLM Measurement Data Mart dyk_dm
If you did not change these default names in the dyk_cat_dbinst ordyk_dm_dbinst scripts when these databases were created, you can acceptthese defaults, otherwise replace these names with the correct name in theDatabase Name field.
User IDThis is the signon user ID for the database. A default user ID is provided.You can accept this default or change it to another valid user ID.
PasswordThis is the signon password for the database. Specify the DB2 password forthe specified user ID.
If the database had been installed on a different (remote) machine in yourenterprise, you would have been prompted for additional connection informationabout the remote system. Typically you will create both the SLM Database and theSLM Measurement Data Mart on the same system, and would be asked for thesame information for each database. For purposes of illustration, however, suppose
Figure 28. Specify connection parameters for the locally installed SLM Database.
80 IBM Tivoli Service Level Advisor: Getting Started with IBM Tivoli Service Level Advisor
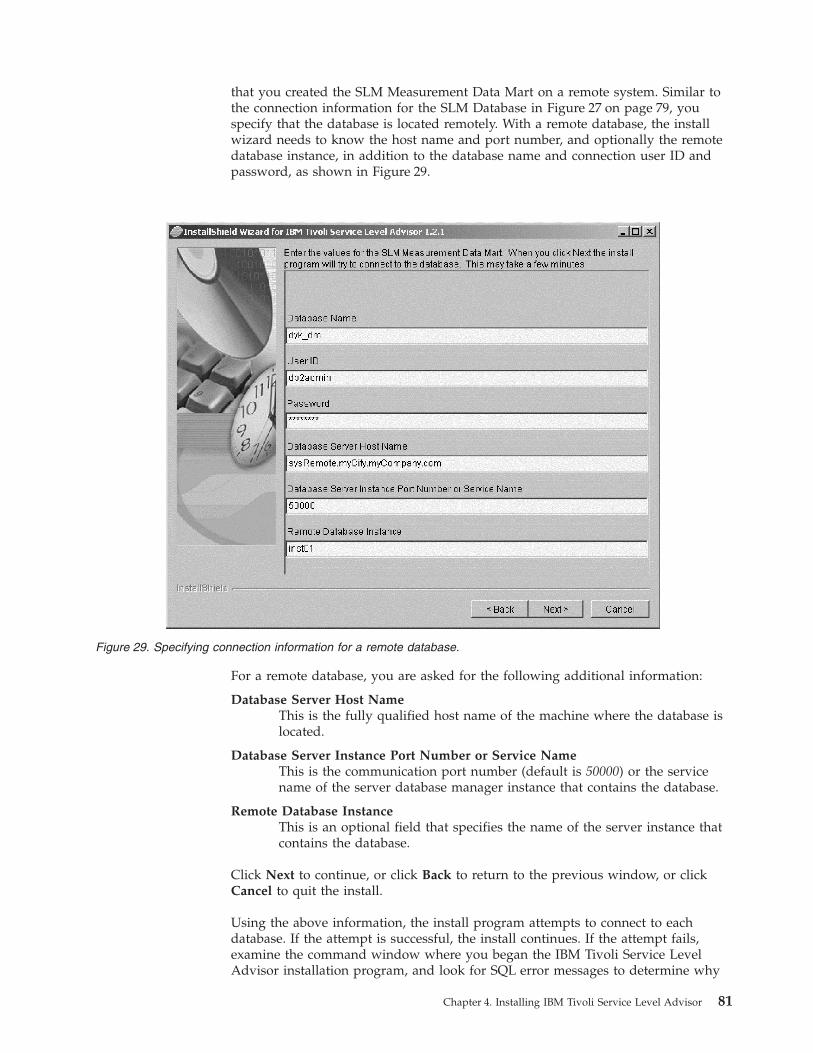
that you created the SLM Measurement Data Mart on a remote system. Similar tothe connection information for the SLM Database in Figure 27 on page 79, youspecify that the database is located remotely. With a remote database, the installwizard needs to know the host name and port number, and optionally the remotedatabase instance, in addition to the database name and connection user ID andpassword, as shown in Figure 29.
For a remote database, you are asked for the following additional information:
Database Server Host NameThis is the fully qualified host name of the machine where the database islocated.
Database Server Instance Port Number or Service NameThis is the communication port number (default is 50000) or the servicename of the server database manager instance that contains the database.
Remote Database InstanceThis is an optional field that specifies the name of the server instance thatcontains the database.
Click Next to continue, or click Back to return to the previous window, or clickCancel to quit the install.
Using the above information, the install program attempts to connect to eachdatabase. If the attempt is successful, the install continues. If the attempt fails,examine the command window where you began the IBM Tivoli Service LevelAdvisor installation program, and look for SQL error messages to determine why
Figure 29. Specifying connection information for a remote database.
Chapter 4. Installing IBM Tivoli Service Level Advisor 81
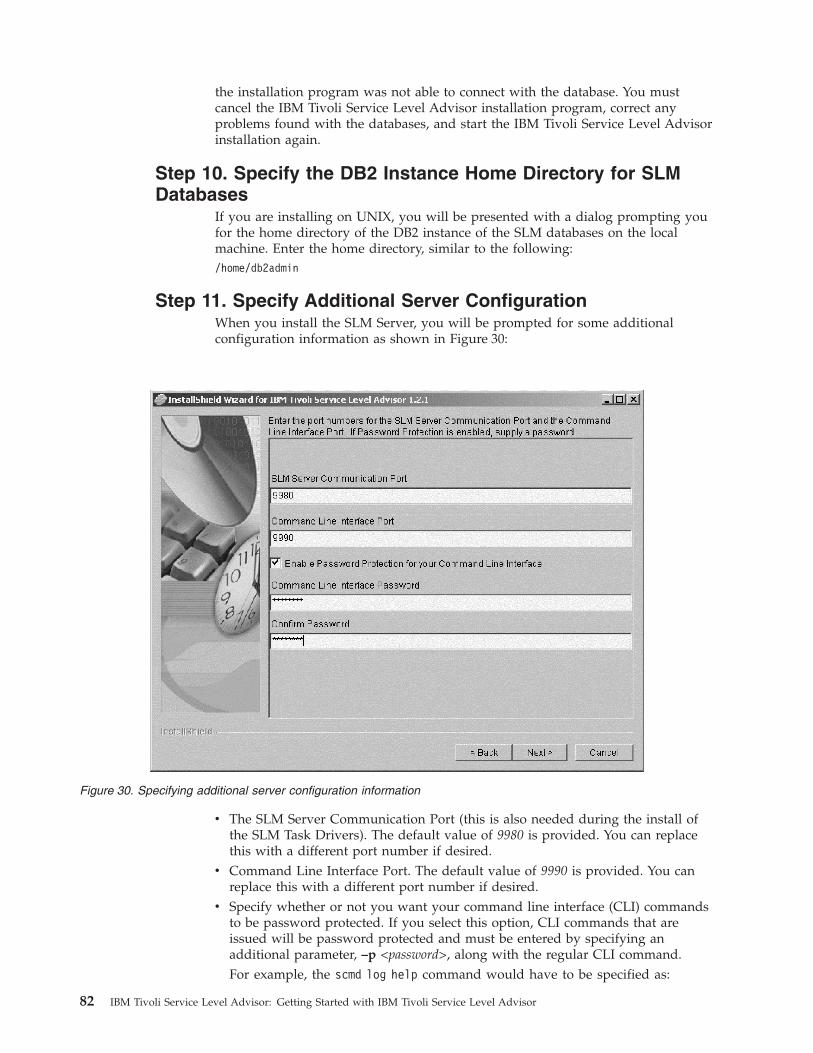
the installation program was not able to connect with the database. You mustcancel the IBM Tivoli Service Level Advisor installation program, correct anyproblems found with the databases, and start the IBM Tivoli Service Level Advisorinstallation again.
Step 10. Specify the DB2 Instance Home Directory for SLMDatabases
If you are installing on UNIX, you will be presented with a dialog prompting youfor the home directory of the DB2 instance of the SLM databases on the localmachine. Enter the home directory, similar to the following:/home/db2admin
Step 11. Specify Additional Server ConfigurationWhen you install the SLM Server, you will be prompted for some additionalconfiguration information as shown in Figure 30:
v The SLM Server Communication Port (this is also needed during the install ofthe SLM Task Drivers). The default value of 9980 is provided. You can replacethis with a different port number if desired.
v Command Line Interface Port. The default value of 9990 is provided. You canreplace this with a different port number if desired.
v Specify whether or not you want your command line interface (CLI) commandsto be password protected. If you select this option, CLI commands that areissued will be password protected and must be entered by specifying anadditional parameter, –p <password>, along with the regular CLI command.For example, the scmd log help command would have to be specified as:
Figure 30. Specifying additional server configuration information
82 IBM Tivoli Service Level Advisor: Getting Started with IBM Tivoli Service Level Advisor

scmd -p <password> log help
This is useful if you want to restrict use of CLI commands to certain personnel.If password protection is desired, select the check box provided and specify theinitial value of <password> that must be given with each CLI command.Passwords must be from 6 to 16 characters in length.
Note: Do not use double-byte characters, umlauted characters, or characterswith special accent marks in the CLI password.
See the Command Reference for IBM Tivoli Service Level Advisor for details aboutpassword protection for CLI commands.
If you are installing the SLM Task Drivers or SLM Reports on a machine differentfrom where the SLM Server is installed, you are prompted to specify the hostname of the machine on which the SLM Server is located, and the SLM ServerCommunication Port, as shown in Figure 31. This must be the same port value thatyou entered when the SLM Server component was installed (the default value of9980, or the port number that was specified if this default was not taken).
Step 12. Specify Event Notification MethodsWhen IBM Tivoli Service Level Advisor evaluates measurement data and detectsviolations or trends toward potential violations of service level agreements, eventnotices can be sent out in several different ways to alert support personnel,enabling them to take immediate corrective action to maintain agreed upon levelsof service. Figure 32 on page 84 shows the notification options that you can select.
If you want event notification to occur, you can select one or more of the followingmethods for sending event information:v SNMP Trapv Tivoli Enterprise Console Eventv E-mail
Figure 31. Specify information for communicating remotely with the SLM Server
Chapter 4. Installing IBM Tivoli Service Level Advisor 83
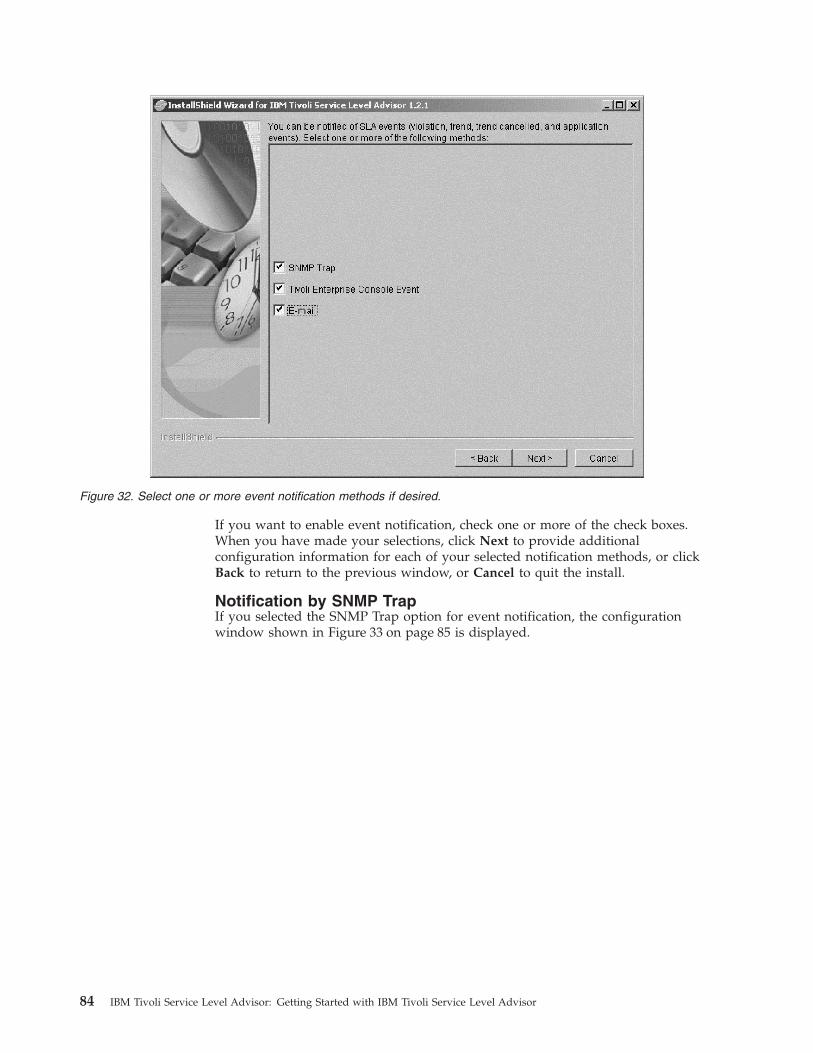
If you want to enable event notification, check one or more of the check boxes.When you have made your selections, click Next to provide additionalconfiguration information for each of your selected notification methods, or clickBack to return to the previous window, or Cancel to quit the install.
Notification by SNMP TrapIf you selected the SNMP Trap option for event notification, the configurationwindow shown in Figure 33 on page 85 is displayed.
Figure 32. Select one or more event notification methods if desired.
84 IBM Tivoli Service Level Advisor: Getting Started with IBM Tivoli Service Level Advisor
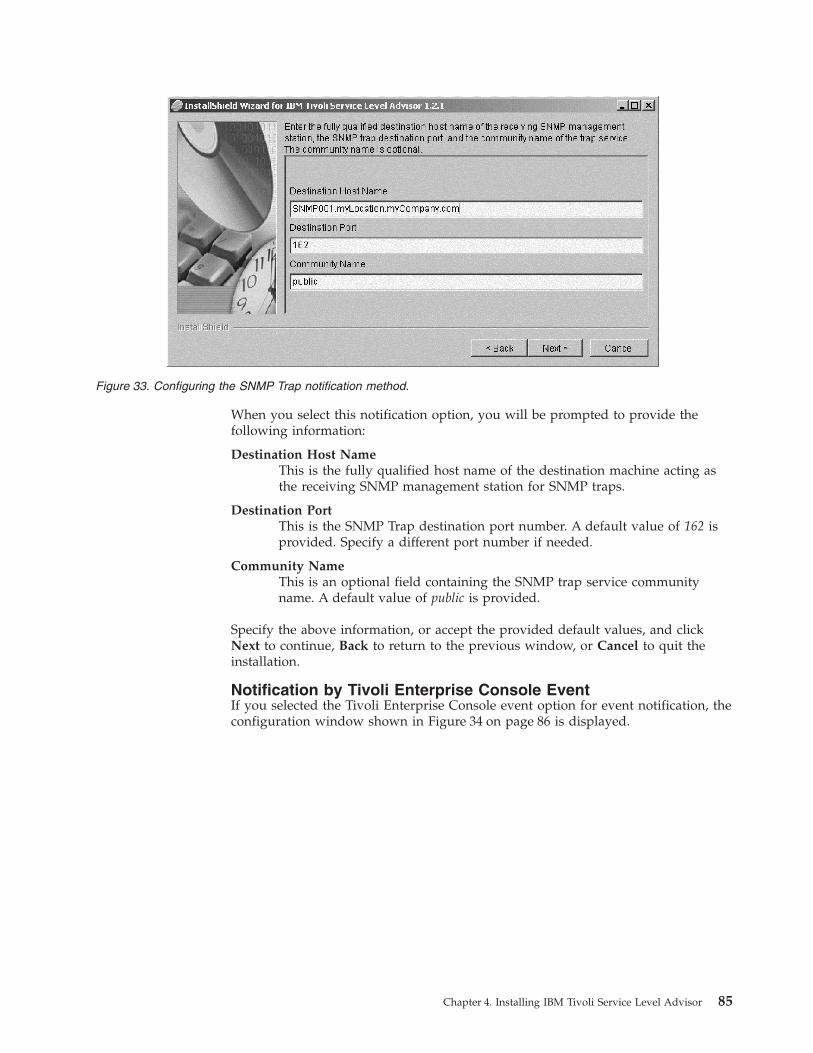
When you select this notification option, you will be prompted to provide thefollowing information:
Destination Host NameThis is the fully qualified host name of the destination machine acting asthe receiving SNMP management station for SNMP traps.
Destination PortThis is the SNMP Trap destination port number. A default value of 162 isprovided. Specify a different port number if needed.
Community NameThis is an optional field containing the SNMP trap service communityname. A default value of public is provided.
Specify the above information, or accept the provided default values, and clickNext to continue, Back to return to the previous window, or Cancel to quit theinstallation.
Notification by Tivoli Enterprise Console EventIf you selected the Tivoli Enterprise Console event option for event notification, theconfiguration window shown in Figure 34 on page 86 is displayed.
Figure 33. Configuring the SNMP Trap notification method.
Chapter 4. Installing IBM Tivoli Service Level Advisor 85

When you select this notification option, you are prompted to provide thefollowing information:
Event Server Host NameThis is the fully qualified host name where the Tivoli Enterprise Consoleevent server is installed.
Event Server PortIf the event server is installed on a Windows machine, enter the portnumber that the event server uses to listen on for events. The typical portvalue is 5529. See the Tivoli Enterprise Console event server configurationfor the correct port number.
When you have entered the required information, click Next to continue, Back toreturn to the previous window, or Cancel to quit the install.
Notification by E-MailYou can select this notification method if you want to send e-mail messages to oneor more addresses when an event occurs. You must specify the SMTP Server hostname to handle the messages, and also a To-List of e-mail addresses to send themessage to, separated by commas. You can also specify an optional CC-List ofadditional e-mail addresses to be copied on the message as desired. You can eitheraccept the default messages that are provided, or you can customize the messages.
When you select this notification option, the dialog window shown in Figure 35 onpage 87 is displayed.
Figure 34. Configuring the Tivoli Enterprise Console event notification method.
86 IBM Tivoli Service Level Advisor: Getting Started with IBM Tivoli Service Level Advisor

Provide the following information:
SMTP Server Host NameThis is the fully qualified host name of the SMTP Server to handle thee-mail messages. This is a required field.
Note: To avoid the possibility of corrupted characters in received e-mails,the e-mail system to which you will be sending notifications mustbe capable of handling characters in the UTF-8 character set.
To-List E-mail AddressesThis is one or more e-mail addresses, separated by commas, for the peopleyou want to notify. This is a required field. No error checking is performedon the e-mail addresses entered.
CC-List E-mail AddressesThis is one or more e-mail addresses, separated by commas, for additionalpeople you want to copy on the message. This might be reserved forsupervisory personnel or other people who may not deal directly with theviolation or trend information but who want to stay informed. No errorchecking is performed on the e-mail addresses entered.
After you have specified the SMTP Server name and the desired e-mail addressesto send notifications, click Next to continue configuring e-mail notification, or clickBack to return to the previous window, or Cancel to quit the install.
Continuing with the configuration of the e-mail notification method, a secondwindow is displayed as shown in Figure 36 on page 88.
Figure 35. Configuring the e-mail event notification method (part 1 of 2)
Chapter 4. Installing IBM Tivoli Service Level Advisor 87
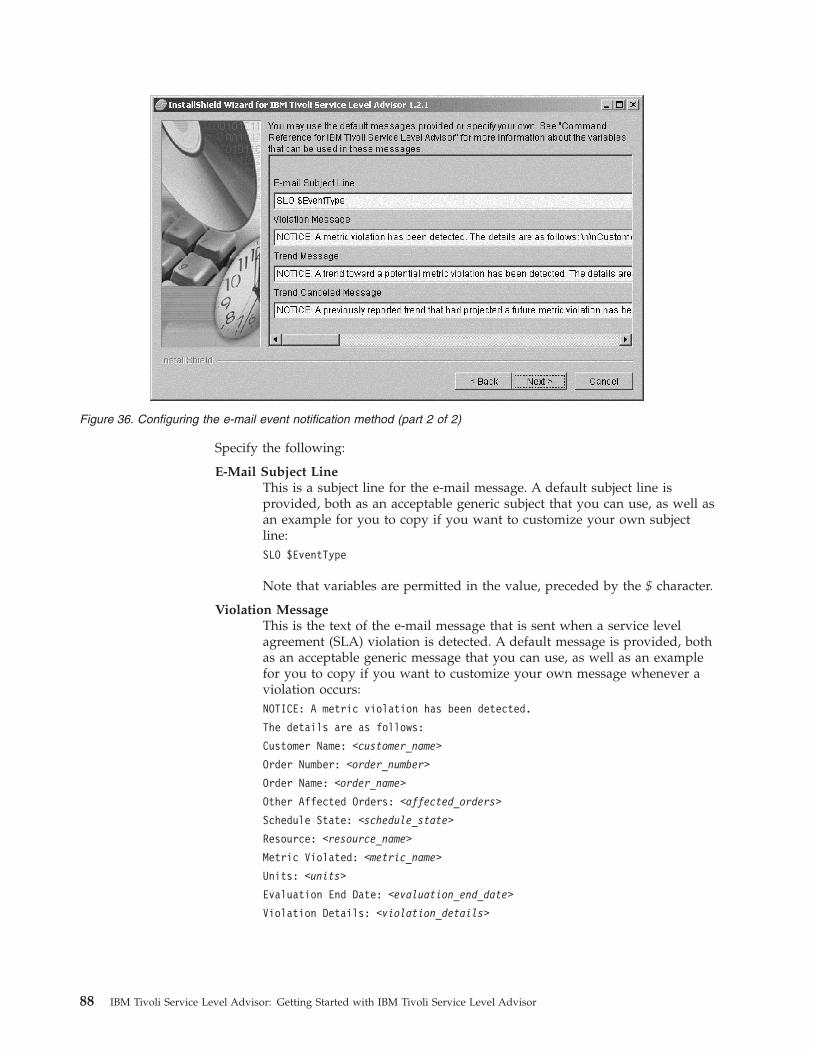
Specify the following:
E-Mail Subject LineThis is a subject line for the e-mail message. A default subject line isprovided, both as an acceptable generic subject that you can use, as well asan example for you to copy if you want to customize your own subjectline:SLO $EventType
Note that variables are permitted in the value, preceded by the $ character.
Violation MessageThis is the text of the e-mail message that is sent when a service levelagreement (SLA) violation is detected. A default message is provided, bothas an acceptable generic message that you can use, as well as an examplefor you to copy if you want to customize your own message whenever aviolation occurs:NOTICE: A metric violation has been detected.
The details are as follows:
Customer Name: <customer_name>
Order Number: <order_number>
Order Name: <order_name>
Other Affected Orders: <affected_orders>
Schedule State: <schedule_state>
Resource: <resource_name>
Metric Violated: <metric_name>
Units: <units>
Evaluation End Date: <evaluation_end_date>
Violation Details: <violation_details>
Figure 36. Configuring the e-mail event notification method (part 2 of 2)
88 IBM Tivoli Service Level Advisor: Getting Started with IBM Tivoli Service Level Advisor
You can use this generic default message or replace it with your ownmessage as desired. Variables are permitted in the text, preceded by a $character.
Trend MessageThis is the text of the message that is sent when a trend toward a potentialviolation has been detected. A default message is provided, both as anacceptable generic message that you can use, as well as an example for youto copy if you want to customize your own message whenever a trendoccurs:NOTICE: A trend toward a potential metric violation has been detected.
The details are as follows:
Customer Name: <customer_name>
Order Number: <order_number>
Order Name: <order_name>
Other Affected Orders: <affected_orders>
Schedule State: <schedule_state>
Resource: <resource_name>
Metric Predicted to be Exceeded: <metric_name>
Units: <units>
Trend Projection: <trend_projection_details>
Analysis Period: <analysis_period>
Total Samples: <total_samples>
You can use this generic default message or replace it with your ownmessage as desired. Variables are permitted in the text, preceded by a $character.
Trend Canceled MessageThis is the text of the message that is sent when a previously identifiedtrend toward a violation no longer exists. A default message is provided,both as an acceptable generic message that you can use, as well as anexample for you to copy if you want to customize your own messagewhenever a trend is canceled:NOTICE: A previously reported trend that had projected a future
metric violation has been CANCELED.
The metric associated with the following information is no longer
trending toward a violation:
Customer Name: <customer_name>
Order Number: <customer_order_ID>
Order Name: <order_name>
Other Affected Orders: <affected_orders>
Schedule State: <schedule_state>
Resource: <component_name>
Metric Name: <metric_name>
You can use this generic default message or replace it with your ownmessage as desired. Variables are permitted in the text, preceded by a $character.
Chapter 4. Installing IBM Tivoli Service Level Advisor 89
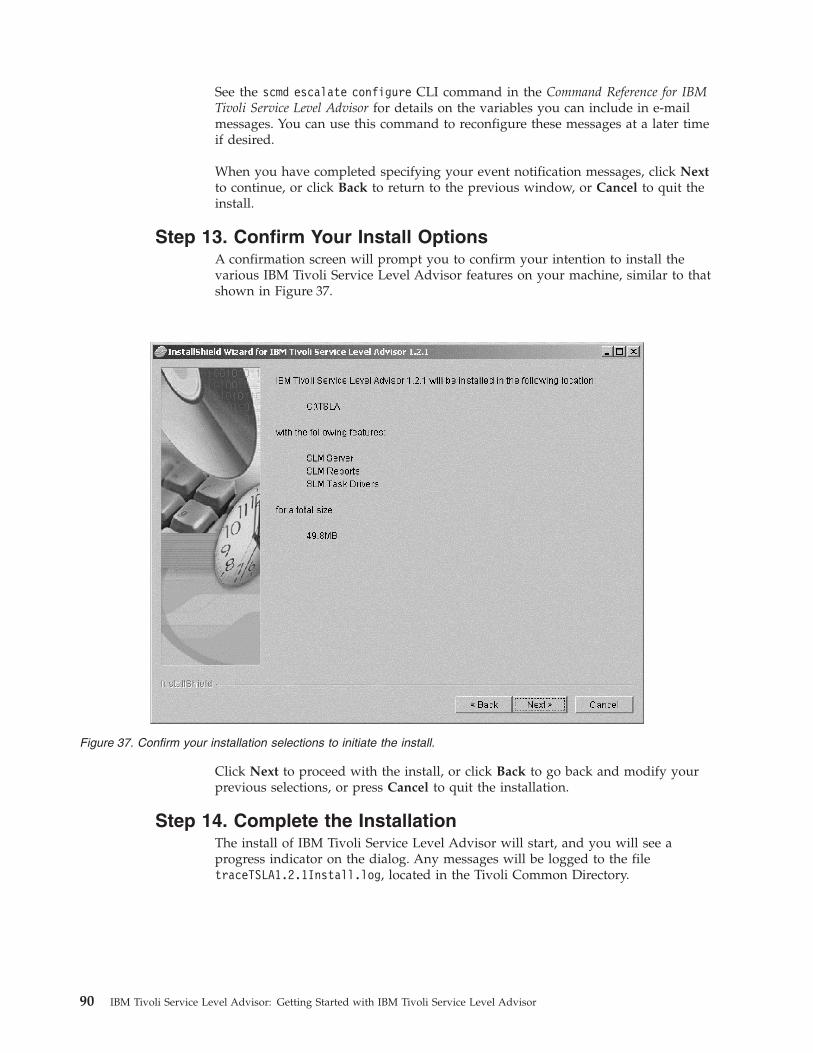
See the scmd escalate configure CLI command in the Command Reference for IBMTivoli Service Level Advisor for details on the variables you can include in e-mailmessages. You can use this command to reconfigure these messages at a later timeif desired.
When you have completed specifying your event notification messages, click Nextto continue, or click Back to return to the previous window, or Cancel to quit theinstall.
Step 13. Confirm Your Install OptionsA confirmation screen will prompt you to confirm your intention to install thevarious IBM Tivoli Service Level Advisor features on your machine, similar to thatshown in Figure 37.
Click Next to proceed with the install, or click Back to go back and modify yourprevious selections, or press Cancel to quit the installation.
Step 14. Complete the InstallationThe install of IBM Tivoli Service Level Advisor will start, and you will see aprogress indicator on the dialog. Any messages will be logged to the filetraceTSLA1.2.1Install.log, located in the Tivoli Common Directory.
Figure 37. Confirm your installation selections to initiate the install.
90 IBM Tivoli Service Level Advisor: Getting Started with IBM Tivoli Service Level Advisor
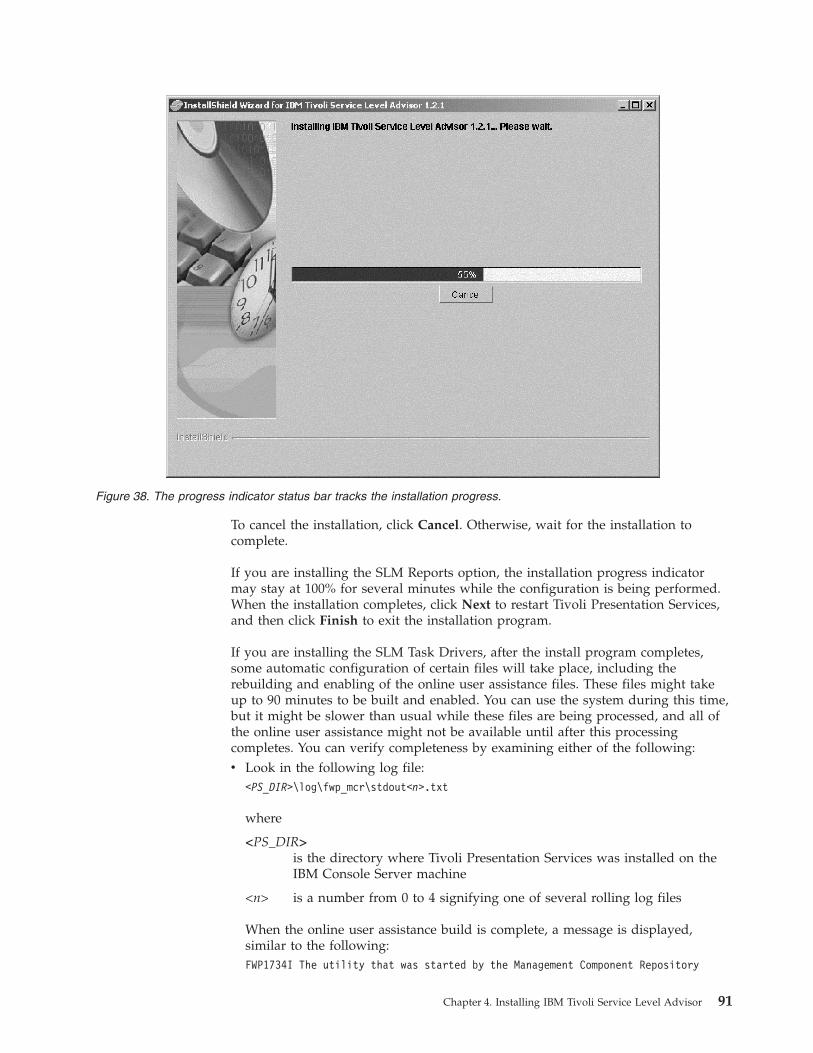
To cancel the installation, click Cancel. Otherwise, wait for the installation tocomplete.
If you are installing the SLM Reports option, the installation progress indicatormay stay at 100% for several minutes while the configuration is being performed.When the installation completes, click Next to restart Tivoli Presentation Services,and then click Finish to exit the installation program.
If you are installing the SLM Task Drivers, after the install program completes,some automatic configuration of certain files will take place, including therebuilding and enabling of the online user assistance files. These files might takeup to 90 minutes to be built and enabled. You can use the system during this time,but it might be slower than usual while these files are being processed, and all ofthe online user assistance might not be available until after this processingcompletes. You can verify completeness by examining either of the following:v Look in the following log file:
<PS_DIR>\log\fwp_mcr\stdout<n>.txt
where
<PS_DIR>is the directory where Tivoli Presentation Services was installed on theIBM Console Server machine
<n> is a number from 0 to 4 signifying one of several rolling log files
When the online user assistance build is complete, a message is displayed,similar to the following:FWP1734I The utility that was started by the Management Component Repository
Figure 38. The progress indicator status bar tracks the installation progress.
Chapter 4. Installing IBM Tivoli Service Level Advisor 91

to build the help set has completed successfully.
v Bring up the Windows Task Manager and wait for CPU usage to drop,signifying the processing of user assistance files has completed.
If you did not install all three IBM Tivoli Service Level Advisor install options onthis machine, you must repeat this install process on the other machines, installingeach of the three options as desired in your enterprise environment. Be sure toselect the correct install option for each machine.
There are a few more steps you need to perform to configure your environment forIBM Tivoli Service Level Advisor. See Chapter 5, “Additional Installation Tasks”, onpage 93 for details.
Note: Do not begin to create offerings and SLAs until you have completed theconfiguration steps in Chapter 5, “Additional Installation Tasks”, on page 93that apply to your environment, including enabling source applications andcompleting the initial running of the Registration ETL. In addition, be awarethat some internal processing will take place to initialize the SLM Server andSLM Database for creating offerings and SLAs, and you should wait at least30 minutes after the Registration ETL is initially run before attempting tocreate offerings and SLAs, otherwise you may receive errors.
92 IBM Tivoli Service Level Advisor: Getting Started with IBM Tivoli Service Level Advisor
Chapter 5. Additional Installation Tasks
After you have completed the installation of IBM Tivoli Service Level Advisor asdescribed in Chapter 4, “Installing IBM Tivoli Service Level Advisor”, on page 63,there are a few additional installation tasks you need to complete to configure yourenvironment for IBM Tivoli Service Level Advisor:v Configure for event notification (e-mail, SNMP trap, TEC Event)v Installing the warehouse pack for IBM Tivoli Service Level Advisorv Integrating SLM Reports into WebSpherev Installing Language Support
These tasks are described in the sections that follow.
Configuring for Event NotificationDuring the install of IBM Tivoli Service Level Advisor, you were given the optionto specify the method by which event notification would occur (see “Step 12.Specify Event Notification Methods” on page 83). Depending on which method youselected, refer to the following sections to configure for event notification.
Configuring for Notification by SNMPIf you specified to be notified by the SNMP Event method for event notification,you can load the MIB definitions file located in the <SLM_Install_Dir>/escalatedirectory, where <SLM_Install_Dir> is the directory where IBM Tivoli Service LevelAdvisor is installed.
Configuring for NetViewTo configure for SNMP traps that will be forwarded to a NetView AIX server, runthe following script file, located in <SLM_Install_Dir>/escalate, in the machinewhere NetView AIX is installed:./slmAddTrapsUnix.sh
To reverse this operation, you can run the following script:./slmRemoveTrapsUnix.sh
To configure for SNMP traps that will be forwarded to a NetView NT server, runthe following script file in the machine where NetView NT is installed:slmAddTrapsWin.bat
To reverse this operation, you can run the following script:slmRemoveTrapsWin.bat
Configuring for Notification by Tivoli Enterprise ConsoleIf you selected the Tivoli Enterprise Console Event method for event notification,you will need to import, load, and compile the SLM Class Definition fileSLM.baroc, and optionally apply the sample rule file, slm.rls, that is provided withthis installation of IBM Tivoli Service Level Advisor.
© Copyright IBM Corp. 2003 93
The rule defined in slm.rls correlates each trend or cancel event request receivedat the server with previous events that have a matching metric name, schedulestate, order element instance, and component name, and closes the correspondingevents.
Both files are located in the <SLM_Install_Dir>/escalate directory, where<SLM_Install_Dir> is the directory where IBM Tivoli Service Level Advisor isinstalled.
You will have to manually delete any previous version from the Tivoli EnterpriseConsole graphical user interface before applying the new versions of these files.See Chapter 3, ″Rules Bases and Rule Base Administration″ in the Tivoli EnterpriseConsole Rule Builder’s Guide to apply these files to your Tivoli Enterprise Consoleenvironment.
Verifying Notification MethodsRegardless of which method of event escalation and notification you selected(e-mail, SNMP trap, or Tivoli Enterprise Console event), the IBM Tivoli ServiceLevel Advisor installation program does not check for configuration errors such asan e-mail address that has been entered incorrectly.
You can perform some basic verification of the notification method by issuing thefollowing CLI command:scmd escalate test
This command sends a test event through each enabled method (e-mail, SNMPtrap, or Tivoli Enterprise Console event), and you must verify that the designatedrecipient successfully received the test event notification.
If the test event is not received, you should check server names, e-mail addresses,and port numbers to verify that the server is working correctly. You can use thescmd escalate enable command to make changes or corrections to the followingescalation parameters after installation:v e-mail addresses and SMTP server namev Tivoli Enterprise Console Server name and port numberv SNMP destination, port, and community name
You can also use the scmd escalate customize command to make changes orcorrections to e-mail subject lines and messages that are sent for event notification.
See the Command Reference for IBM Tivoli Service Level Advisor for information onscmd escalate test, scmd escalate enable, and other CLI commands.
Installing the Registration and Process ETLsIBM Tivoli Service Level Advisor uses two target ETLs to move and transform datafrom the Tivoli Enterprise Data Warehouse central data warehouse database to itsapplication databases:v The Registration ETL moves component type information from the central data
warehouse to the SLM Database, where it is used during offering and ordercreation.
v The Process ETL moves measurement data from the central data warehouse tothe SLM Measurement Data Mart, where it is evaluated for service levelviolations and trends toward violations by IBM Tivoli Service Level Advisor.
94 IBM Tivoli Service Level Advisor: Getting Started with IBM Tivoli Service Level Advisor
These target ETLs are installed on the machine where the control server is located,using the warehouse pack install option in the Tivoli Enterprise Data Warehouseinstall wizard, and then configured for use with Tivoli Enterprise Data Warehouseand IBM Tivoli Service Level Advisor.
Installing the Registration ETL and the Process ETL involves the following steps:1. Use the Application installation only option of the Tivoli Enterprise Data
Warehouse install program to install the IBM Tivoli Service Level Advisorwarehouse pack
2. Configure the user ID and password for the central data warehouse, the SLMDatabase, and the SLM Measurement Data Mart
3. Enable data collection for all desired source applications before running theRegistration ETL
4. Schedule the Registration ETL and Process ETL to run and promote them toproduction mode.
5. Optionally run the Registration and Process ETLs to move data into the SLMDatabase and SLM Measurement Data Mart if you don’t want to wait for thescheduled run time.
Note: This install procedure references files used and databases created during theinstallation of Tivoli Enterprise Data Warehouse. Refer to the TivoliEnterprise Data Warehouse installation documentation for more information.
Installing the IBM Tivoli Service Level Advisor WarehousePack
This step installs the Registration ETL and Process ETL into the Data WarehouseCenter on the DB2 server machine where the control server is installed. Refer tothe installation procedures for Tivoli Enterprise Data Warehouse (see “InstallingTivoli Enterprise Data Warehouse 1.1” on page 42).
To install the Registration ETL and Process ETL, do the following:1. Insert the Tivoli Enterprise Data Warehouse product CD to start the Tivoli
Enterprise Data Warehouse installation program.2. On the Welcome window, click Next to continue.3. Select Application installation only from the install dialog and click Next to
continue.4. You are prompted to verify the fully qualified host name of the local machine.
The input field should contain your local machine host name by default.Verify this information and modify it if needed. Click Next to continue.
5. Enter your local DB2 user name and password. Click Next to continue.6. You are prompted to enter the path to the installation media for the
application packages. The Registration ETL and Process ETL are located on theIBM Tivoli Service Level Advisor product CD. To specify the DYK applicationpackage, do the following:v Remove the Tivoli Enterprise Data Warehouse product CD and insert the
IBM Tivoli Service Level Advisor product CD.v Click Browse and navigate to the following directory, where <Install_CD> is
the drive letter of the CD-ROM drive:<Install_CD>:\tedw_apps\dyk\
v Select this directory.
Chapter 5. Additional Installation Tasks 95

7. On the Application Package Directory Name dialog, verify that the directoryname is specified as <CD_ROM>:\tedw_apps\dyk\, where <CD_ROM> is theCD-ROM drive letter.
8. Leave the Now radio button selected to verify the source directory, and clickNext to continue.
9. On the Additional Applications Packages dialog, verify that the Yes, installapplication packages check box is not checked, and click Next to continue.
10. On the feature summary dialog showing your selections, confirm yourselections and click Install to begin the installation. The install will take a fewminutes. When the install completes, you should receive the followingmessage:CDWIA0000I Installation of the application packages completed successfully.
Configuring the User ID and PasswordTo configure the user ID and password, do the following:1. Bring up the DB2 Control Center by selecting Start –> Programs –> IBM DB2
–> Control Center
2. From the DB2 Control Center, launch the Data Warehouse Center by selectingTools –> Data Warehouse Center.
3. You are prompted to log into the Data Warehouse Center. Before you do, clickAdvanced and verify that the Control Database is set to TWH_MD. If not (it mightbe initially set to DWCTRLDB), set it to TWH_MD.
4. Log into the Data Warehouse Center using your DB2 username and password.
Note: If you cannot log in, you might need to restart the Warehouse Logger andthe Warehouse Server services from the Services control panel to reconnectto the twh_md database.
5. In the left pane of the Data Warehouse Center, expand the Warehouse Sourcesand Warehouse Targets folders. To configure the user ID and password foreach source and target database, complete the following steps:a. Highlight the source or target and select Selected –> Properties or
right-click and select Properties to launch the Properties dialog.
Note: If you have multiple databases that you want to configure the sameuser ID and password, you can select either the Warehouse Sourcesor Warehouse Targets folder, then highlight all of the desireddatabases at once and set the user ID and password for all of them atthe same time.
b. On the Properties dialog, click the Database tab.c. Enter the DB2 user ID and password information for the database (the
database name will match one of the ODBC data sources that youconfigured. See “Configuring ODBC Data Sources” on page 68 for details.)and click OK.
Repeat the above steps for each source and target database for the RegistrationETL and the Process ETL. Table 12 shows the source and target databases toconfigure.
Table 12. Source and target databases for the Registration and Process ETLs
ETL Source Database Target Database
Registration ETL twh_cdw dyk_cat
Process ETL twh_cdw dyk_dm
96 IBM Tivoli Service Level Advisor: Getting Started with IBM Tivoli Service Level Advisor
Enabling Data Collection for Source ApplicationsBy default, the Registration ETL will not collect any data from the Tivoli EnterpriseData Warehouse database until one or more source applications have been enabledfor data collection. Only data types from source applications that are enabled willbe recognized by IBM Tivoli Service Level Advisor during offering and ordercreation.
Use the scmd etl enable command and the scmd etl addApplicationDatacommand to enable source applications for IBM Tivoli Service Level Advisor. Forexample:scmd etl addApplicationData XYZ "XYZ Warehouse Application"
scmd etl enable XYZ
Use the scmd etl getApps command to retrieve and display a list of all of theapplications in the Tivoli Enterprise Data Warehouse database supported by IBMTivoli Service Level Advisor, and to show whether each application is enabled ordisabled for data collection. For example:scmd etl getApps
Use the scmd etl disable command to disable applications for which you do notwant to collect data. For example:scmd etl disable XYZ
Refer to the Command Reference for IBM Tivoli Service Level Advisor for details onthese CLI commands.
Promoting the ETLs to Production ModeTo promote the Registration ETL and Process ETL to production mode, do thefollowing:1. From the left pane of the Data Warehouse Center window, click Subject Areas.
The dialog displays several different subject areas. Of interest to you are theareas with the prefix DYK:v The Registration ETL:
DYK_m05_Populate_Registration_Datamart_Process
v The Process ETL:DYK_m10_Populate_Measurement_Datamart_Process
v The Purge ETL (see “Purging Aged Data from the SLM Measurement DataMart” on page 99):DYK_m15_Purge_Measurement_Datamart_Process
2. In the left pane, underneath the DYK subject area, expand the Processes folder.Individual processes for the subject area are displayed.
3. For each process in the Processes folder, highlight the process and then selectSelected –> Schedule from the options bar at the top of the window, orright-click and select Schedule from the context menu that appears, to launchthe Schedule dialog.
4. In the Schedule dialog, create a schedule by configuring the day and time thatyou want to run the Registration ETL and Process ETL, and add it to the list ofschedules.
Chapter 5. Additional Installation Tasks 97
Notes:
a. As you schedule the Registration and Process ETLs to run, consider thefollowing:v The source applications will be putting their collected data into the
warehouse database according to unique schedules defined for theirenvironment. Be sure to allow enough time for the source applicationETLs to complete before running the Registration and Process ETLs.
v The Registration ETL must be scheduled to run after the last source ETLcompletes processing, and must complete its processing to move datatype information from the warehouse to the SLM Database (dyk_cat)before the Process ETL is run.
v The Process ETL must be scheduled to run after the Registration ETL hascompleted processing.See Chapter 1 of the Administrator’s Guide for IBM Tivoli Service LevelAdvisor for an overview of the source and target ETLs and theirrelationship to each other.
b. If you plan to schedule the ETL to run immediately, configure the start timefor at least several minutes from the current time to enable you to completethese steps and promote the ETLs to production mode. Once a schedule hasbeen defined, however, you can always select it later and run it on demandinstead of waiting for the set time to expire.
5. Click Add> to add the schedule to the list.6. Click OK.7. For each process in the Processes folder, highlight the process in the left pane
and notice, in the right pane of the Data Warehouse Center, all of the steps ofthe process that are displayed with the step number embedded in the stepname in the form *_s<nnn>_*, where <nnn> is the step number.
8. Highlight all of these steps in the right pane, and promote them to productionmode by selecting Selected –> Mode –> Production from the option bar at thetop of the window, or right-click and select Mode –> Production from thecontext menu that appears.
The ETL steps will now be in production mode, and will be run according to thescheduled dates and times that you specified, or you can select and run these ETLsat any time.
Running the Registration ETL and Process ETLDepending on when you set the schedule for running the Registration ETL andProcess ETL, you can either wait for the scheduled time and date to elapse for theETL to be started automatically, or you can run the ETL immediately.
Note: The Registration ETL should not be run until after the SLM Server isinstalled and you have enabled all desired source applications for which youwant data to be collected. See the scmd etl enable and scmd etladdApplicationData commands in the Command Reference for IBM TivoliService Level Advisor for details on enabling source application data.
If you choose to run the ETLs immediately, note that the Registration ETL must berun and all processing completed before running the Process ETL, otherwise errorswill occur in the data collection.
98 IBM Tivoli Service Level Advisor: Getting Started with IBM Tivoli Service Level Advisor
From the Data Warehouse Center, you can monitor the progress of the ETLs byselecting Warehouse –> Work in Progress and examining the Work in Progresswindow.
You can find the ETLs scheduled to be run by looking in the Status column forScheduled. You can run that ETL immediately by right-clicking on it and selectingRun Now. The names of the processes are as follows:v Registration: DYK_m05_Populate_Registration_Datamart_Processv Process: DYK_m10_Populate_Measurement_Datamart_Processv Purge: DYK_m15_Purge_Measurement_Datamart_Process
The Work in Progress window will display each step as it executes, changing thestatus appropriately. When the status for all of the ETL steps is Successful, the ETLhas completed.
Run the Registration and Process ETLs in this order:1. Open the Work In Progress window and select the scheduled entry that
contains DYK_m05_s010_Populate_Stage_Data
2. Right-click on the entry and select Run Now.3. Wait for all steps to complete and verify that all steps were successful before
going to the next step.4. On the Work In Progress window, select the scheduled entry that contains
DYK_m10_s010_Populate_SLM_Msmt_Staging
5. Right-click on the entry and select Run Now.6. Wait for all steps to complete and verify that all steps were successful.
Purging Aged Data from the SLM Measurement Data MartSimilar to the scheduling and promoting of the Registration and Process ETLs toproduction mode, you also need to schedule and promote the Purge Target ETL,DYK_m15_Purge_Measurement_Datamart_Process. This ETL can be thought of as anextension of the Process ETL, as it purges aged data from the SLM MeasurementData Mart (DYK_DM) database (data that was originally loaded by the ProcessETL). This helps prevent the SLM Measurement Data Mart from getting too largeover time.
Use the same procedure as described in “Promoting the ETLs to Production Mode”on page 97 to schedule and promote this ETL.
You can schedule this ETL to run at any time to control the removal of aged data.By default, the data will remain in the SLM Measurement Data Mart for 63 days.You can view the current expiration setting by issuing the scmd etlgetDataExpiration command, and you can modify this value by using the scmd etlsetDataExpiration <number_of_days> command.
When this ETL is run, it reads this value and purges the SLM Measurement DataMart of any measurement data records that are older than the configuredexpiration date.
See the Command Reference for IBM Tivoli Service Level Advisor for details on theseand other scmd commands.
Chapter 5. Additional Installation Tasks 99
Registering Warehouse DataAfter you have added and enabled all of your desired source applications andhave run the Registration ETL at least once, the applications will be automaticallyregistered with IBM Tivoli Service Level Advisor after approximately 10-15 minutesafter the Registration ETL has completed. If desired, you can register theapplications immediately by issuing the following command after the RegistrationETL has completed:scmd sdc registerWarehouseData
Integrating SLM Reports into WebSphereDepending on which version of WebSphere you are using as your applicationserver for SLM reports, you must perform some manual steps to integrate the SLMReports into the WebSphere environment. The following sections assume thefollowing:v The appropriate version of WebSphere was installed successfullyv Any appropriate fix pack needed has also been installed successfully.v the SLM Reports install option of IBM Tivoli Service Level Advisor was installed
successfully on the same machine as WebSphere. This machine is referred to asthe SLM Report Server.
Integrating into WebSphere AETo integrate SLM reports into WebSphere AE 4.0.1, complete the following steps:1. Start the IBM HTTP Server and IBM HTTP Administration services if they
are not already started (see “Starting the IBM HTTP Services” on page 111).2. Start the WebSphere Admin Server (see “Starting the IBM WebSphere AE 4.0
Admin Server” on page 111).3. Open the Administrative Console (see “Starting the WebSphere Admin
Console” on page 111).4. From the menu bar of the Administrative Console, select Console –> Wizards
–> Install Enterprise Application.5. In the Specifying the Application or Module dialog, do the following:
a. Ensure that the Browse for file on node field is set to your current node.b. Click Install stand-alone module (*.war, *.jar).c. Click Browse at the Path field to navigate to the following file, where
<SLM_Reports_Dir> is the directory where SLM Reports was installedduring the IBM Tivoli Service Level Advisor installation process (see “Step5. Select SLM Install Options” on page 74):<SLM_Reports_Dir>/report/SLMReport.war
d. Select the SLMReport.war file.e. Enter the name for Application name. It can be any name of your
choosing.f. Enter SLMReport for the context root for web module.g. Click Next to continue, until the Selecting Virtual Hosts for Web Modules
dialog is displayed.h. Verify that the web modules specified in the Web Module column are
using the virtual host named default_host. If desired, you can change thisvirtual host by selecting a different virtual host that you have created.
i. Continue to click Next until you click Finish to exit the wizard.
100 IBM Tivoli Service Level Advisor: Getting Started with IBM Tivoli Service Level Advisor

6. Open the web.xml file, located in the following directory, where <app_name> isthe name you specified in step 5e on page 100:<WebSphere_Dir>/AppServer/installedApps/<app_name>.ear/SLMReport.war/Web-inf
Edit this file using your preferred XML or text editor. You should find the partof the file that looks like the following example:<init-param id="InitParam_1">
<param-name>tsla.basedir</param-name>
<param-value>install_dir</param-value>
</init-param>
<init-param id="InitParam_2">
<param-name>tsla.programfiles</param-name>
<param-value>program_files_dir</param-value>
</init-param>
For Windows, do the following:v Change the value for install_dir to the directory where you installed IBM
Tivoli Service Level Advisor (for example, C:\TSLA).v Change the value for program_files_dir to the system location specific to
your locale. For example, the English locale would be C:\Program Files,while the German locale would be C:\Programme. You can determine theright value for your locale from the HKEY_LOCAL_MACHINE key in the registry,at SOFTWARE\Microsoft\Windows\CurrentVersion\ProgramFilesDir.
Note: Do not put quotes around the directory path even if it contains ablank space.
The resulting portion of the Windows web.xml file might look like thefollowing:<init-param id="InitParam_1">
<param-name>tsla.basedir</param-name>
<param-value>C:\TSLA</param-value>
</init-param>
<init-param id="InitParam_2">
<param-name>tsla.programfiles</param-name>
<param-value>C:\Program Files</param-value>
</init-param>
For UNIX, do the following:v Change the value for install_dir to the directory where you installed IBM
Tivoli Service Level Advisor (for example, /usr/TSLA).v Leave the value for program_files_dir blank.
The resulting portion of the UNIX web.xml file might look the following:<init-param id="InitParam_1">
<param-name>tsla.basedir</param-name>
<param-value>/usr/TSLA</param-value>
</init-param>
<init-param id="InitParam_2">
<param-name>tsla.programfiles</param-name>
<param-value></param-value>
</init-param>
Chapter 5. Additional Installation Tasks 101

When finished, save and close the file and restart the Web server.7. From the WebSphere Administrative Console, expand the WebSphere
Administrative Domain node in the tree. Select Nodes and then right-click onyour machine host name. From the context menu, select Regen WebserverPlugin.In the bottom section of the WebSphere Administrative Console dialog, watchfor an event message stating that the plugin regeneration has been completed.
8. Verify that the Admin DB Driver points to the correct driver, for example,COM.ibm.db2.jdbc.DB2ConnectionPoolDataSource. To verify this, do thefollowing:a. From the left pane of the WebSphere Administrative Console, select
Resources –> JDBC Providers.b. In the General tab, click the square navigation button to the right of the
Implementation class field. The Implementation Class window isdisplayed.
c. From the Implementation Class window, select the appropriate driver, forexample, COM.ibm.db2.jdbc.DB2ConnectionPoolDataSource, and click OK.
d. Returning to the General tab, click Apply.9. While you are still in the JDBC Providers window, configure your classpath
by doing the following:a. From the Nodes tab, click Install New.... The Install Driver window is
displayed.b. Your machine node name should be displayed. Highlight your node name
and then click Specify Driver.... The Specify the Driver Files window isdisplayed.
c. Click Add Driver... and navigate to the directory where your DB2 driver,db2java.zip, is located:v For Windows, this is typically in the <DB2_Dir>/java directory, where
<DB2_Dir> is the directory where DB2 is installed.v For UNIX, this is typically in the <DB2_Instance_Dir>/sqllib/java12
directory, where <DB2_Instance_Dir> is the directory where the DB2instance is installed.
d. Double-click the db2java.zip file to select it and return to the Specify theDriver Files window.
e. Click Set to close the Specify the Driver Files window and return to theInstall Driver window.
f. From the Install Driver window, click Install to close the Install Driverwindow and return to the Nodes tab in the JDBC Providers window.
g. From the Nodes tab, click Apply.10. Because adding a new application requires a change to the server
configuration, you must stop and restart the server for the change to takeeffect. Stop the application server and restart it again as follows:a. From the console tree, select WebSphere Administrative Domain –>
Nodes –> <your_host_name> –> Application Servers and right-click onDefault Server.
b. From the context menu, select Stop. You should receive a message whenthe default server was stopped successfully.
c. Right-click on Default Server again and select Start from the contextmenu. You should receive a message when the default server was startedsuccessfully.
102 IBM Tivoli Service Level Advisor: Getting Started with IBM Tivoli Service Level Advisor

11. From your Web browser, point to the following Web site:http://<myHost>:<port>/SLMReport
where <myHost> is the host name of the machine where WebSphere isinstalled, and <port> is the port number.
See “Accessing SLM Reports in WebSphere AES 4.0” on page 132 fortroubleshooting information related to integrating SLM Reports with WebSphereAE.
Integrating into WebSphere AESThe integration of SLM reports into WebSphere AES is performed automaticallyduring the installation of IBM Tivoli Service Level Advisor, however if you lateruninstall WebSphere AES and reinstall it again without reinstalling IBM TivoliService Level Advisor, you must manually integrate the SLM Reports intoWebSphere by doing the following:1. From a command prompt, navigate to the <SLM_Install_Dir>/bin directory,
where <SLM_Install_Dir> is the directory where IBM Tivoli Service LevelAdvisor was installed, and run the following command:v For Windows:
aes40installwar
v For UNIX:./aes40installwar.sh
2. Edit the web.xml file as described in step 6 on page 101, to modify the locationof the IBM Tivoli Service Level Advisor install directory and the locale-specificProgram Files directory.
3. Return to the <SLM_Install_Dir>/bin directory and run the followingcommand:v For Windows:
aes40reportgenplugin
v For UNIX:./aes40reportgenplugin.sh
Modifying HTTP Server Ports for WebSphereIf you installed WebSphere on the same machine where the IBM Console isinstalled, there may be a port conflict between WebSphere and Tivoli PresentationServices, which both use the same default port numbers for IBM HTTP Server andIBM HTTP Administration.
If you need to modify the port settings for WebSphere after installing, you can editthe following files:v IBM HTTP Server/conf/httpd.conf, change port 80 to 81 or another unused port
number.v IBM HTTP Server/conf/admin.conf, change port 8008 to 8009 or another unused
port number.
Restarting WebSphereAfter completing the installation and integration of SLM Reports option on themachine where WebSphere is installed, stop and restart WebSphere. See Chapter 6,“Startup and Shutdown Procedures”, on page 107 for information on starting andstopping WebSphere.
Chapter 5. Additional Installation Tasks 103
Note: If, immediately after installing the SLM Reports option, you access theWebSphere AES Web-based Administrator Console and receive the followingmessage:Alert: The changes that were made before your session timed out have been
saved to a temporary configuration file...
Choose Cancel to avoid having the configuration information that wasmodified during the installation overwritten with the last saved temporaryfile. If this configuration information is lost, you must manually install theSLM Report WAR file.
Accessing SLM ReportsTo access SLM Reports, open your Web browser and point to the following Website:http://localhost:9080/SLMReport
The HTTP port used by WebSphere is 9080.
You can log in to the system using any of the following default user names, whichwere created for you automatically during the installation:username: customer, operations, or executive
password: password (same for all three usernames)
Each of these pre-authorized user names enables you to view different versions ofreports with different time ranges. For example, a user signed in with operationsauthority will see a list of offering components with information from the previousseven days. A user with executive authority will see information for a list ofcustomers over the previous month. A user with customer authority will see a listof customer orders over the previous month.
See the Administrator’s Guide for IBM Tivoli Service Level Advisor for information onworking with SLM Reports and customizing them for your use.
Installing Language SupportYou can install additional language support for IBM Tivoli Service Level Advisorafter all of the install options have been successfully installed. If the SLM Server,SLM Task Drivers and SLM Reports are installed on different machines, this installprocedure must be performed on each machine.
Note: On UNIX, you must be the root user to run the installation program. OnWindows, you must have Administrator’s privileges to run the installationprogram.
To install language support, do the following:1. Make sure that all of the IBM Tivoli Service Level Advisor install options were
successfully installed.2. Insert the IBM Tivoli Service Level Advisor Language Support CD into the local
machine.3. From the root directory of the install CD, run the following script:
v For Windows:install.bat
v For UNIX:
104 IBM Tivoli Service Level Advisor: Getting Started with IBM Tivoli Service Level Advisor

./install.sh
Note: In some double byte languages, in particular Korean, if theenvironment variable JAVA2D_USEAWTFONTS is set to 0, the fontsare not displaying properly. If you encounter this problem, edit theinstall.bat (or install.sh) file and change the line that refers to thisvariable to a comment (@REM JAVA2D_USEAWTFONTS=0), and startthe install again.
4. You will have to specify which SLM install options are already installed on thelocal machine. Depending on your selections, the appropriate jar files will beinstalled.
5. You will also be asked to verify and enter the install directories for thefollowing:v The installation location of the IBM Tivoli Service Level Advisor Language
Pack. The default location for these files is:– For Windows: <ProgramFiles>\tslaNLS, where <ProgramFiles> is the value
stored in the Windows registry attribute ProgramFilesDir located inHKEY_LOCAL_MACHINE/SOFTWARE/Microsoft/Windows/CurrentVersion.
– For UNIX: /opt/tslaNLSv The install location of the base directory for IBM Tivoli Service Level Advisor.
This is typically the directory where the SLM Server was installed, but if theSLM Server was not installed on this system, the directory can be determinedfrom the SLM_BASEDIR environment variable (set when the slmenv script isrun).
v The installation location for the Server for IBM Consolev The installation location of the WebSphere Application Server
The two latter directories are detected automatically. The language supportinstallation procedure will stop and restart these applications as necessary.
In addition, you are prompted to enter the WebSphere Application namecreated for the SLM Reports component (for WebSphere AE, see step 5e onpage 100. For WebSphere AES, this would be SLMReport).
The installation procedure installs two jar files for each language, one whichcontains Java Resource Bundles, TSLMResources_<lang>.jar (where <lang>indicates the language) and another, DYKUAHelpPSNls_<lang>@1.3.0.jar whichcontains Helpset files. For these file names, <lang> represents the language:v ja: Japanesev ko: Koreanv de: Germanv fr: Frenchv it: Italianv es: Spanishv zh_CN: Simplified Chinesev zh_TW: Traditional Chinesev pt_BR: Brazilian Portuguese
Install creates a main logfile, traceTSLA1.2LPInstall.log in the Tivoli CommonDirectory, under /DYK/logs/LP/install. This file contains any errors or warningsthat the installation program might encounter during installation. A master copy ofthis log file is placed into the temporary directory for the current user (typically
Chapter 5. Additional Installation Tasks 105
/tmp on UNIX and the value of the %TEMP% environment variable on Windows).This log file will always be generated, as it contains some debug information aswell.
The installation procedure also executes two batch scripts per language as part ofthe install for SLM Task Drivers. These scripts are created by the language packinstall program in the following directory structure:v <LP_Dir>/bin (where <LP_Dir> is the installation location that you specified for
the language pack), for checktcserver.sh, used only for AIX support for SLMTask Drivers
v <LP_Dir>/bin/<lang>, for all language-specific scripts needed for SLM TaskDrivers installation support
These are the wcmd commands used to install IBM Tivoli Presentation Servicescomponents. Do not delete these files after the installation completes, because theuninstall procedure also uses these scripts. Any errors from these commands arewritten to log files under the Tivoli Common Directory, at/DYK/logs/LP/install/LPwcmd*.log. Four such files may be created per language,similar to the following:v LPwcmd<log_lang>1.logv LPwcmd<log_lang>11.logv LPwcmd<log_lang>2.logv LPwmcd<log_lang>22.log
Each supported language is represented in <log_lang> by a one characterabbreviation for each language:v j: Japanesev k: Koreanv d: Germanv f: Frenchv i: Italianv e: Spanishv s: Simplified Chinesev t: Traditional Chinesev p: Brazilian Portuguese
Files, *1.log and *2.log contain the executed commands, and *11.log and *22.logcontain output from the command execution.
Language support must be uninstalled before it is reinstalled.
For SLM Reports, WebSphere needs to be restarted after language support hasbeen installed.
106 IBM Tivoli Service Level Advisor: Getting Started with IBM Tivoli Service Level Advisor
Chapter 6. Startup and Shutdown Procedures
You can use the following procedures for startup and shutdown of IBM TivoliService Level Advisor, the IBM Console, and WebSphere, referred to elsewhere inthis document.
IBM Tivoli Service Level Advisor can be started and stopped as a native service onsupported Windows platforms. On UNIX platforms, shell scripts are available forstartup and shutdown.
Note: IBM Tivoli Service Level Advisor starts automatically on all platforms afterinstallation and each time the system is restarted.
Starting the IBM Tivoli Service Level Advisor SolutionThe following sections describe the startup procedures:v “Starting the Server for IBM Console Service”v “Starting Web Services for IBM Console” on page 108v “Starting the SLM Server” on page 108v “Starting the IBM Console” on page 109v “Starting IBM WebSphere Application Server” on page 110v “Starting the IBM WebSphere AE 4.0 Admin Server” on page 111v “Starting the WebSphere Admin Console” on page 111v “Starting the IBM HTTP Services” on page 111
Starting the Server for IBM Console ServiceStart the Server for IBM Console service, as follows:v For Windows:
1. Select the Services administration tool from the Windows Control Panel:– For Windows 2000, select Start –> Settings –> Control Panel –>
Administrative Tools –> Services
– For Windows NT, select Start –> Settings –> Control Panel –> Services
2. If the Server for IBM Console service is not already started, start the serviceby doing any one of the following:– From the Services administration tool, highlight Server for IBM Console,
right-click and select Start from the context menu box.– At a command prompt, navigate to the <PS_Dir>\bin\w32-ix86 directory,
where <PS_Dir> is the directory where Tivoli Presentation Services isinstalled, and run the following command:mcr.bat
– At a command prompt, run the following command:net start ps_mcr
v For UNIX:1. To determine whether the Server for IBM Console service is already started,
run the following command:ps -efl | grep mcr
© Copyright IBM Corp. 2003 107
(For Solaris, the command is ps -ef)
If you see a process that calls mcr.sh, then this service is already started.Otherwise this service is not started.
2. If the Server for IBM Console service is not already started, start it bynavigating to the <PS_Dir>/bin/generic_unix directory, where <PS_Dir> isthe directory where Tivoli Presentation Services is installed, and running thefollowing command:./mcr.sh
Starting Web Services for IBM ConsoleStart the Web Services for IBM Console service, as follows:v For Windows:
1. Select the Services administration tool from the Windows Control Panel:– For Windows 2000, select Start –> Settings –> Control Panel –>
Administrative Tools –> Services
– For Windows NT, select Start –> Settings –> Control Panel –> Services
2. If the Web Services for IBM Console service is not already started, start theservice by doing any one of the following:– From the Services administration tool, highlight Web Services for IBM
Console, right-click and select Start from the context menu box.– At a command prompt, navigate to the <PS_Dir>\bin\w32-ix86 directory,
where <PS_Dir> is the directory where Tivoli Presentation Services isinstalled, and run the following command:wc.bat
– At a command prompt, run the following command:net start ps_wc
v For UNIX:1. To determine whether the Web Services for IBM Console service is already
started, run the following command:ps -efl | grep wc
(For Solaris, the command is ps -ef)
If you see a process that calls wc.sh, then this service is already started.Otherwise this service is not started.
2. If the Web Services for IBM Console service is not already started, start it bynavigating to the <PS_Dir>/bin/generic_unix directory, where <PS_Dir> isthe directory where Tivoli Presentation Services is installed, and running thefollowing command:./wc.sh
Note: You may need to restart Web Services for IBM Console after rebootingyour UNIX system.
Starting the SLM ServerStart the SLM Server as follows:v For Windows, the SLM Server is automatically started as a service at the end of
the installation process, and when the system is restarted. To manually start theSLM Server, do either of the following:
108 IBM Tivoli Service Level Advisor: Getting Started with IBM Tivoli Service Level Advisor
– From the Services control panel, verify that the IBM Tivoli Service LevelAdvisor service is not already started. If it is not started, highlight IBM TivoliService Level Advisor, right-click and select Start from the context menu box.
– From a command prompt, enter the following command:net start
In the list of applications that are displayed, look for IBM Tivoli ServiceLevel Advisor. If it is not in the list, issue the following command to startIBM Tivoli Service Level Advisor:net start tslm
v For UNIX, the SLM Server is automatically started at the end of the installationprocess, and when the system is restarted. To manually start the SLM Server, dothe following:1. To determine whether the the SLM Server is already started, run the
following command:ps -efl | grep slm_start
(For Solaris, the command is ps -ef)
If you see a process that calls slm_start.sh, then this service is alreadystarted. Otherwise this service is not started.
2. If slm_start.sh is not found, navigate to the <SLM_Server_Install_Dir>/bindirectory, where <SLM_Server_Install_Dir> is the location where the SLMServer was installed, and run the following script (note this is not the sameas slm_start.sh):./slm_service_start.sh
On all platforms, the standard out and standard error logs for the SLM Server arelocated in the Tivoli Common Directory as tslmout.txt and tslmerr.txt,respectively. On AIX platforms, additional log files, tslmsubsysout.txt andtslmsubsyserr.txt are created in the <SLM_Server_Install_Dir>/log directory,when the subsystem is started.
Starting the IBM Console
Note: You may see an icon on your desktop named IBM Console. This is theJava-based version of the IBM Console and is only used by IBM TivoliService Level Advisor for enabling tracing and for viewing message logs.The regular administrative tasks and functions are run from the Web-basedversion of the IBM Console from within your Web browser.
To start the IBM Console, do the following:1. Open your Web browser and point it to the following location:
http://<IBM_Console_Server_machine>:<IBM_HTTP_Port>/IBMConsole
where
IBM_Console_Server_machineis the host name of the machine on which the IBM Console Server wasinstalled
IBM_HTTP_Portis the IBM HTTP port number (default is 80)
Chapter 6. Startup and Shutdown Procedures 109
2. The Sign On screen is displayed, prompting you for your user ID andpassword. You can sign on using the following values:User ID: superadmin
Password: password
From the IBM Console that displays, you can perform tasks such as:v Create schedules, offerings, customers, realms and ordersv Create and manage users and rolesv Backup and restore operations
You can also view Web-based reports on the results of SLA evaluations performedby IBM Tivoli Service Level Advisor from your Web browser. See the AdministratorsGuide for IBM Tivoli Service Level Advisor for more information on performing thesetasks.
You can also run command line interface (CLI) commands from the machine onwhich you installed the SLM Server. See the Command Reference for IBM TivoliService Level Advisor for details on the CLI commands you can run.
Starting IBM WebSphere Application ServerStart the IBM WebSphere Application Server for WebSphere AES by doing any oneof the following:v For Windows, select Start –> Programs –> IBM WebSphere –> Application
Server –> Start Application Server
v For Windows, from a command prompt, navigate to the <WebSphere_Dir>\bindirectory, where <WebSphere_Dir> is the directory where WebSphere wasinstalled, such as C:\WebSphere\Appserver, and run the following command:startServer.bat
v For UNIX, do the following:1. Verify that the DISPLAY environment variable has been set to a valid
XServer display. This is important if you have WebSphere running on aUNIX machine without a dedicated console attached to the system. If theDISPLAY environment variable is not set correctly, reports will not bedisplayed.
2. Source the db2profile file locally, by navigating to the<db2_instance_directory>/sqllib directory, where <db2_instance_directory> isthe home directory of the database administrator who created the DB2instance, and run the following command:. db2profile
3. Navigate to the <WebSphere_Dir>/bin directory, where <WebSphere_Dir> is thedirectory where WebSphere was installed, such as /usr/WebSphere/Appserver,and run the following command:./startServer.sh
Additional methods of starting the IBM WebSphere Application Server AES aredocumented in the WebSphere AES documentation, including the following:v Starting from the First Steps dialog, which is displayed at the end of WebSphere
product installationv Starting from the Servers page of the Administrative Console
v Generating a startup script, possibly modifying its parameters, and running thescript
110 IBM Tivoli Service Level Advisor: Getting Started with IBM Tivoli Service Level Advisor
v Starting using the basic startup script, provided for backward compatibility
See the following Web site for information:www.ibm.com/software/webservers/appserv/doc/v40/aes/infocenter/was/0606a.html
Starting the IBM WebSphere AE 4.0 Admin ServerStart the IBM WebSphere Admin Server for WebSphere AE 4.0 by doing thefollowing:v For Windows, do either of the following:
– Start the WebSphere Admin Server from the Services control panel– Issue the following command from a command prompt:
net start "ibm ws adminserver 4.0"
v For UNIX, do the following:1. Verify that you are running as the root user.2. From a command prompt, navigate to the directory
<WebSphere_Dir>/AppServer/bin, where <WebSphere_Dir> is the directorywhere WebSphere was installed, and run the following command:./startupServer.sh
Starting the WebSphere Admin ConsoleAt a command prompt, start the WebSphere Administrator’s Console by doing thefollowing:v For Windows, select Start –> Programs –> IBM WebSphere –> Application
Server –> Administrator’s Console
v For UNIX, navigate to the directory <WebSphere_Dir>/bin, where<WebSphere_Dir> is the directory where WebSphere was installed, such as/usr/WebSphere/AppServer, and run the following command, where <your_hostname> is your machine host name:./adminclient.sh <your_host name>
Starting the IBM HTTP ServicesStart the IBM HTTP Server and IBM HTTP Administration services if they arenot already started by doing the following:v For Windows, you can start these from the Services control panel or by issuing
the following commands from a command prompt:net start "ibm http server"
net start "ibm http administration"
v For UNIX:1. From a command prompt, navigate to the <HTTP_Dir>/bin directory, where
<HTTP_Dir> is the location where the IBM HTTP Server was installed.Default locations for <HTTP_Dir> are as follows:– For AIX, <HTTP_Dir> = /usr/HTTPServer– For Solaris, <HTTP_Dir> = /opt/IBMHTTPD– For Linux, <HTTP_Dir> = /opt/IBMHTTPServer
2. Run the following commands:./apachectl start
./adminctl start
Chapter 6. Startup and Shutdown Procedures 111
Shutting Down the IBM Tivoli Service Level Advisor SolutionThe following sections describe the shutdown procedures:v “Stopping IBM HTTP Services”v “Stopping the IBM WebSphere AE 4.0 Admin Server”v “Stopping IBM WebSphere Application Server for WebSphere AES”v “Shutting Down the IBM Console” on page 113v “Shutting Down the SLM Server” on page 113v “Stopping Web Services for IBM Console” on page 113v “Stopping the Server for IBM Console Service” on page 114
Stopping IBM HTTP ServicesStop the IBM HTTP Server and IBM HTTP Administration services by doing thefollowing:v For Windows, you can stop these from the Services control panel or by issuing
the following commands from a command prompt:net stop "ibm http server"
net stop "ibm http administration"
v For UNIX:1. From a command prompt, navigate to the <HTTP_Dir>/bin directory, where
<HTTP_Dir> is the location where the IBM HTTP Server was installed.Default locations for <HTTP_Dir> are as follows:– For AIX, <HTTP_Dir> = /usr/HTTPServer– For Solaris, <HTTP_Dir> = /opt/IBMHTTPD– For Linux, <HTTP_Dir> = /opt/IBMHTTPServer
2. Run the following commands:./apachectl stop
./adminctl stop
Stopping the IBM WebSphere AE 4.0 Admin ServerStop the IBM WebSphere Admin Server for WebSphere AE 4.0 by doing thefollowing:v For Windows, do either of the following:
– Stop the WebSphere Admin Server from the Services control panel– Issue the following command from a command prompt:
net stop "ibm ws adminserver 4.0"
v For UNIX, stop the Admin Server using the Administrator’s Console as follows:1. Start the Administrator’s Console (see “Starting the WebSphere Admin
Console” on page 111).2. Select Websphere Administrative Domain –> Nodes –> <your_host_name>,
then right-click and select Stop from the context menu.3. Click OK on the confirmation message.
Stopping IBM WebSphere Application Server for WebSphereAES
Stop IBM WebSphere Application Server for WebSphere AES by doing either of thefollowing:
112 IBM Tivoli Service Level Advisor: Getting Started with IBM Tivoli Service Level Advisor
v For Windows, from a command prompt, navigate to the <WebSphere_Dir>\bindirectory, where <WebSphere_Dir> is the directory where WebSphere AES wasinstalled, such as C:\WebSphere\Appserver, and run the following command:stopServer.bat
v For UNIX, from a command prompt, navigate to the <WebSphere_Dir>/bindirectory, where <WebSphere_Dir> is the directory where WebSphere AES wasinstalled, such as /usr/WebSphere/Appserver, and run the following command:./stopServer.sh
Additional methods of stopping the IBM WebSphere Application Server aredocumented in the WebSphere AES documentation:v Stopping from the First Steps dialog, which is displayed at the end of
WebSphere product installationv Stopping from the Servers page of the Administrative Console
v Using the DrAdmin script
Shutting Down the IBM ConsoleClose your Web browser to shut down the IBM Console.
Shutting Down the SLM ServerShut down the SLM Server by doing the following:v For Windows:
1. Select the Services administration tool from the Windows Control Panel:– For Windows 2000, select Start –> Settings –> Control Panel –>
Administrative Tools –> Services
– For Windows NT, select Start –> Settings –> Control Panel –> Services
2. Stop the SLM Server by doing either of the following:– From the Services administration tool, highlight IBM Tivoli Service Level
Advisor, right-click and select Stop from the context menu box.– At a command prompt, run the following command:
net stop tslm
v For UNIX, navigate to the <SLM_Server_Install_Dir>/bin directory, where<SLM_Server_Install_Dir> is the location where the SLM Server was installed,and run the following script:./slm_service_stop.sh
On all platforms, the standard out and standard error logs for the SLM Server arelocated in the Tivoli Common Directory as tslmout.txt and tslmerr.txt,respectively. On AIX platforms, additional log files, tslmsubsysout.txt andtslmsubsyserr.txt are created in the <SLM_Server_Install_Dir>/log directorywhen the subsystem is started.
Stopping Web Services for IBM ConsoleStop the Web Services for IBM Console service, as follows:v For Windows:
1. Select the Services administration tool from the Windows Control Panel:– For Windows 2000, select Start –> Settings –> Control Panel –>
Administrative Tools –> Services
– For Windows NT, select Start –> Settings –> Control Panel –> Services
Chapter 6. Startup and Shutdown Procedures 113

2. Stop the Web Services for IBM Console service by doing either of thefollowing:– From the Services administration tool, highlight Web Services for IBM
Console, right-click and select Stop from the context menu box.– At a command prompt, navigate to the <PS_Dir>\bin\w32-ix86 directory,
where <PS_Dir> is the directory where Tivoli Presentation Services isinstalled, and run the following command:stopwc.bat
v For UNIX, navigate to the <PS_Dir>/bin/generic_unix/ directory, where<PS_Dir> is the directory where Tivoli Presentation Services is installed, and runthe following command:./stopwc.sh
Stopping the Server for IBM Console ServiceStop the Server for IBM Console service, as follows:v For Windows:
1. Select the Services administration tool from the Windows Control Panel:– For Windows 2000, select Start –> Settings –> Control Panel –>
Administrative Tools –> Services
– For Windows NT, select Start –> Settings –> Control Panel –> Services
2. Stop the Server for IBM Console service by doing either of the following:– From the Services administration tool, highlight Server for IBM Console,
right-click and select Stop from the context menu box.– At a command prompt, navigate to the <PS_Dir>\bin\w32-ix86 directory,
where <PS_Dir> is the directory where Tivoli Presentation Services isinstalled, and run the following command:stopmcr.bat
v For UNIX, from a command prompt, navigate to the <PS_Dir>/bin/generic_unixdirectory, where <PS_Dir> is the directory where Tivoli Presentation Services isinstalled, and running the following command:./stopmcr.sh
114 IBM Tivoli Service Level Advisor: Getting Started with IBM Tivoli Service Level Advisor

Chapter 7. Uninstalling IBM Tivoli Service Level Advisor
The uninstall of IBM Tivoli Service Level Advisor involves the following steps:v Uninstall the SLM Task Drivers, associated graphical user interface (GUI) files
and user assistance files from the IBM Console Server. Note that the SLM TaskDrivers are installed on the same machine as the IBM Console Server, but mightnot be installed on the same system as the SLM Server.
v Uninstall the SLM Reports. If you are running IBM Tivoli Service Level Advisorwith WebSphere AE 4.0.x, there are additional manual steps you must perform.
v Uninstall the SLM Server
Considerations Before UninstallingAs you prepare to uninstall IBM Tivoli Service Level Advisor, keep in mind thefollowing:v You might have these install options all on the same machine, or on different
machines in your enterprise environment. Be sure to run the specific uninstallprocedures for each install option on the appropriate machines.
v If multiple install options are located in the same directory on the same machine,all install options in that directory will be uninstalled at once.
v If multiple install options are located on the same machine but in differentdirectories (which you can do if you run the installation program twice on thesame machine, specifying a different install directory for each install option),then the uninstall process must be run against each directory in turn where theinstall options are located.
v The uninstall program may not be able to remove all of the files in the IBMTivoli Service Level Advisor install directories. You will have to manually deletethese files, and then delete the directories.
This uninstall procedure might not fully address the following additionalcomponents that make up the overall Tivoli Service Level Management (SLM)solution:v Registration ETL, Process ETL, Tivoli Enterprise Data Warehouse, and source
application ETLsSee the Tivoli Enterprise Data Warehouse documentation for information aboutuninstalling these components.
v IBM WebSphere Application ServerSee the documentation that accompanies your installation of WebSphere forinformation on uninstalling IBM WebSphere Application Server.
v IBM DB2See the documentation that accompanies your installation of DB2 for informationon uninstalling DB2.
Uninstalling the SLM Task DriversTo uninstall the SLM Task Drivers from the IBM Console Server, do the following:1. Verify that the Server for IBM Console service is running. For information on
starting the Server for IBM Console service, see “Starting the Server for IBMConsole Service” on page 107.
© Copyright IBM Corp. 2003 115

2. Stop the Web Services for IBM Console service. See “Stopping Web Services forIBM Console” on page 113 for details.
3. From a command prompt, navigate to the directory where IBM Tivoli ServiceLevel Advisor was installed (for example, /usr/TSLA), and issue the followingcommand:v For Windows:
uninstall
v For UNIX:./uninstall.sh
4. The Web Services for IBM Console service is restarted automatically.
Uninstalling SLM ReportsUninstalling SLM Reports includes performing two steps:v Removing SLM Reports from the WebSphere environment.v Removing the installed files from your system
Removing SLM Reports from the WebSphere EnvironmentThis is the reverse activity of integrating SLM Reports into WebSphere afterinstallation (see “Integrating SLM Reports into WebSphere” on page 100).
Removing SLM Reports from WebSphere is useful when you are performing arestore of your system (see the Administrator’s Guide for IBM Tivoli Service LevelAdvisor for information on backup and restore procedures), when you do not needto completely uninstall SLM Reports, but need to re-integrate into WebSphere.
To ONLY remove SLM Reports from the WebSphere environment and leave theinstalled files on the system, do the following:v For WebSphere AES:
1. Stop the IBM WebSphere Application Server (see“Stopping IBM WebSphereApplication Server for WebSphere AES” on page 112 for details).
2. Navigate to <WebSphere_Dir>/bin, where <WebSphere_Dir> is the directorywhere WebSphere was installed (such as /usr/WebSphere/AppServer), and runthe following command, where <node> is the WebSphere node name that wasspecified during installation (see “Identifying the WebSphere Node Name”on page 61):
– For Windows:SEAppInstall -uninstall "SLM Report Application Server" -delete true
-nodeName <node>
– For UNIX:./SEAppInstall.sh -uninstall "SLM Report Application Server" -delete true
-nodeName <node>
v For WebSphere AE:1. Start the WebSphere Admin Server (see “Starting the IBM WebSphere AE 4.0
Admin Server” on page 111)2. Open the Administrator’s Console by selecting Start –> Programs –> IBM
WebSphere –> Application Server V4.0 AE –> Administrator’s Console.3. Verify that the application server is not running (a green arrow beside the
Default Server indicates that the server is running)
116 IBM Tivoli Service Level Advisor: Getting Started with IBM Tivoli Service Level Advisor

4. Highlight the name of the SLM Reports application server (this is the namespecified when SLM Reports was integrated into WebSphere. See step 5e onpage 100), then right-click and select Remove from the context menu.
Completely Uninstalling SLM ReportsTo completely uninstall SLM Reports, including removing from the WebSphereenvironment AND removing installed files from the system, do the following:1. For WebSphere AE, complete the above steps to remove SLM Reports from the
WebSphere environment (this is done automatically by the uninstall programfor WebSphere AES)
2. Navigate to the directory where IBM Tivoli Service Level Advisor was installed(for example, /usr/TSLA)
3. Issue the following script:v For Windows:
uninstall
v For UNIX:./uninstall.sh
Uninstalling the SLM ServerTo uninstall the SLM Server, do the following:1. Shut down the SLM Server (see “Shutting Down the SLM Server” on page 113).
Note: If you use the Services Control Panel to shut down the SLM Server, besure to close the Services control panel window to allow the SLM Serverservice to be completely uninstalled.
2. From a command prompt, navigate to the directory where IBM Tivoli ServiceLevel Advisor was installed (for example, /usr/TSLA), and issue the followingcommand:v For Windows:
uninstall
v For UNIX:./uninstall.sh
3. After the uninstall script has completed, reboot your Windows machine to fullyremove IBM Tivoli Service Level Advisor from the list of system services and toremove files that may have been in use during the uninstall.
Uninstalling WebSphere AESTo uninstall WebSphere Application Server, stop all WebSphere processes, thenexecute the uninstall script located in the root directory of the WebSphereinstallation, where <WebSphere_Dir> is the location where WebSphere is installed,such as C:\WebSphere\AppServer, as follows:v For Windows:
cd <WebSphere_Dir>
uninstWAS40.exe
v For UNIX and Linux:cd <WebSphere_Dir>
./uninstall.sh
Chapter 7. Uninstalling IBM Tivoli Service Level Advisor 117
Note: Uninstalling WebSphere Application Server does not uninstall any of theother components (Web server, database server, and database client). Thesemust be uninstalled separately.
Uninstalling SLM DatabasesTo uninstall the SLM Database and the SLM Measurement Data Mart used by IBMTivoli Service Level Advisor, you need to drop the DB2 databases, and remove therelated ODBC datasources.
Dropping the DatabasesTo drop the DYK_CAT and DYK_DM databases, do the following1. Start up a DB2 command line processor (CLP) window by doing the following:
v For Windows, select Start –> Run and enter the following command:db2cmd
v For UNIX, log in as the DB2 instance owner, navigate to the<db2_instance_dir>/sqllib directory, where <db2_instance_dir> is the DB2instance directory, and run one of the following scripts:– For bash, Bourne, or Korn shells:
. db2profile
– For C shell:source db2cshrc
2. List the database directories by issuing the following command:db2 list database directory
You should see entries for DYK_CAT and DYK_DM databases (unless you hadselected different names for these databases at creation time).
3. Issue the following commands to disconnect all applications using the databaseinstance:db2stop force
db2start
4. Issue the following commands to drop the databases:db2 drop database dyk_cat
db2 drop database dyk_dm
5. If any of the databases fail to drop successfully, you may need to uncatalogthem as well by issuing the command:db2 uncatalog database <name>
Removing ODBC DatasourcesTo remove ODBC datasources related to the DYK_CAT and DYK_DM databases,do the following:1. Select Start –> Settings –> Control Panel and then:
v For Windows NT, select Data Sources (ODBC)
v For Windows 2000, select Administrative Tools –> Data Sources (ODBC)
2. Select the System DSN tab.3. Highlight the DYK_CAT entry in the System Data Sources table and click
Remove.4. Highlight the DYK_DM entry in the System Data Sources table and click
Remove.
118 IBM Tivoli Service Level Advisor: Getting Started with IBM Tivoli Service Level Advisor

Uninstalling the Registration and Process ETLsThere is a detailed procedure for uninstalling warehouse packs from TivoliEnterprise Data Warehouse in ″Uninstalling warehouse packs″ in Installing andConfiguring Tivoli Enterprise Data Warehouse. You should review that procedure asneeded, but in summary, you should be able to uninstall the Registration andProcess ETLs by doing the following:1. Navigate to <TEDW_Dir>/install/bin, where <TEDW_Dir> is the install location
for Tivoli Enterprise Data Warehouse, and use Wordpad or another text editorto edit the twh_app_deinstall.cfg file.
2. Change the following lines in the file:v APPLICATION_TO_DELETE=DYK
v DB2PASS=<db2_password>
v COPT_CTRL_DB2PASS=<db2_password>
v COPT_CDW_DB2PASS=<db2_password>
v COPT_MART_DB2PASS=<db2_password>
Note: The <db2_password> values entered must be applicable to the local DB2administrator for the systems on which the control server, data martserver, and central data warehouse server are located.
3. Save your changes to this file.4. Open a command prompt and navigate to <TEDW_Dir>/install/bin
5. Enter bash to launch a bash shell.6. Run the following command on the control server machine:
./twh_app_deinstall.sh -c "twh_app_deinstall.cfg"
7. Enter exit to leave the bash shell.
Uninstalling Language SupportBefore running the uninstall script, verify that the variable SLM_BASEDIR (whichdefines the location where IBM Tivoli Service Level Advisor was installed, forexample, C:\TSLA) has been set correctly in the script. The uninstall script will usethe JRE provided with the base product by default. Any other JRE like the one thatcomes with the language support CD can be used.
After the language support has been installed, the following uninstall script will becreated in the top directory where the language support was installed:v For Windows:
LPuninstall.bat
v For UNIX:LPuninstall.sh
This script will launch the LPuninstall.jar located in the _uninstlp subdirectory.
Similar to the installation process, the uninstall process creates a main logfile,traceTSLA1.2LPUninstall.log in the Tivoli Common Directory, under/DYK/logs/LP/uninstall. A master copy of this log file also exists in thetemporary directory space for the current user. Other uninstall logs are also createdin this location in the Tivoli Common Directory.
Chapter 7. Uninstalling IBM Tivoli Service Level Advisor 119

120 IBM Tivoli Service Level Advisor: Getting Started with IBM Tivoli Service Level Advisor
Chapter 8. Troubleshooting
This chapter provides some hints or tips on troubleshooting problems you mayencounter during installation and configuration of IBM Tivoli Service LevelAdvisor. Key areas of troubleshooting include the following:v “Installing DB2”v “Updating the JDBC Level” on page 122v “Creating SLM Databases” on page 123v “Installing IBM Tivoli Service Level Advisor” on page 124v “Installing SLM Task Drivers” on page 126v “Installing SLM Reports” on page 127v “Installing and Configuring the Registration and Process ETLs” on page 127v “System Startup” on page 129v “Accessing SLM Reports” on page 131v “Uninstalling IBM Tivoli Service Level Advisor” on page 132
Installing DB2This section includes troubleshooting problems that you may encounter related toinstalling and configuring IBM DB2 Universal Enterprise Edition Server on themachine where you locate the Tivoli Enterprise Data Warehouse database, orrelated to installing and configuring the DB2 client on one or more machinescontaining components of IBM Tivoli Service Level Advisor (SLM Server, SLM TaskDrivers, SLM Reports, or the SLM Databases). For more detailed installationtroubleshooting information, refer to IBM DB2 Universal Database Message Reference,Volume 1, Chapter 6, ″DBI Messages.″
Instance Creation Failed During UNIX DB2 InstallationIf you receive the message that the DB2 instance creation failed during installation,you can create the instance manually after the installation is complete. To create aninstance manually, do the following:1. Ensure that the database administrator account was created and that it belongs
to the proper group.2. Navigate to following directory, depending on your operating system platform:
v For AIX, /usr/lpp/db2_07_01/instancev For Solaris: /opt/IBMdb2/V7.1/instancev For Linux: /usr/IBMdb2/V7.1/instance
3. Run the following command, where <db2admin_name> is the name of thedatabase administrator account, and <new_instance_name> is the name of thenew instance, which should be identical to the <db2admin_name> parameter:db2icrt -a <SERVER | CLIENT> -u <db2admin_name> <new_instance_name>
For further information, consult IBM DB2 Universal Database Command Reference,Version 7.
© Copyright IBM Corp. 2003 121

Updating the JDBC LevelDuring installation of IBM Tivoli Service Level Advisor, the JDBC level isautomatically upgraded to the required 2.0 level. You may need to verify thecurrent level of JDBC to ensure that you are running with JDBC level 2.0, and ifnot set, you need to upgrade this manually. See “Step 8. Update the JDBC Levelfor DB2” on page 40.
Configuring ODBC Data SourcesThis section includes steps to verify ODBC data source creation as well astroubleshooting problems that you may encounter related to configuring ODBCdata sources. Configuring ODBC data sources is a manual step that is performedas a prerequisite to installing IBM Tivoli Service Level Advisor. See “ConfiguringODBC Data Sources” on page 68 for more information.
Verifying Successful ODBC Data Source CreationTo verify creation of ODBC Data Sources for IBM Tivoli Service Level Advisordatabases, from a DB2 command line, issue the following command:db2 list system odbc data sources
The output of the above command should list the ODBC data sources DYK_CATand DYK_DM. If either is missing, run the SLM ODBC data source creation scriptsas described in the section “Configuring ODBC Data Sources” on page 68, or createthe data sources manually as described in Appendix D, “Manually Creating ODBCData Sources”, on page 167.
To verify that the ODBC data sources are created correctly, issue the followingcommands from a DB2 command line, where <datasource_name> is DYK_CAT orDYK_DM, <userid> is a valid DB2 user name and <password> is a valid passwordfor the specified user name:db2 connect to <datasource_name> user <userid> using <password>
If you receive errors when connecting to the ODBC Data Source (such as aSQL30081N DB2 error), verify each of the following:v The port number or service name of the remote database node must be the
correct port number on the database server as well as on the machine creatingthe ODBC Data Source. The SLM ODBC creation scripts have a default portvalue of 50000. If this port number is not correct for your system, you will notbe able to connect to the ODBC data source. Refer to “Configuring ODBC DataSources” on page 68 for information about changing this parameter within theODBC creation script. To configure this value manually, refer to Appendix D,“Manually Creating ODBC Data Sources”, on page 167.
v The remote host name is a valid remote system and can be reached by thesystem containing the ODBC data source. To verify that the remote host can bereached, issue the following command, where <remote_host_name> is the hostname used when creating the ODBC data source:ping <remote_host_name>
To reconfigure the host used by the ODBC data source, issue the followingcommands from a DB2 command line:db2 uncatalog node <ODBC_node>
db2 uncatalog db <database_name>
db2 uncatalog system odbc data source <datasource_name>
122 IBM Tivoli Service Level Advisor: Getting Started with IBM Tivoli Service Level Advisor

db2 terminate
Rerun the SLM ODBC creation scripts as described in “Configuring ODBC DataSources” on page 68, or to configure the ODBC data source manually, refer toAppendix D, “Manually Creating ODBC Data Sources”, on page 167
Note: The above tips assume you did not modify the ODBC node names in theSLM ODBC creation scripts or the database names in the SLM ODBCcreation scripts or the SLM database creation scripts.
Creating SLM DatabasesThis section includes troubleshooting problems that you may encounter related tocreating the SLM Database and the SLM Measurement Data Mart for use by IBMTivoli Service Level Advisor. In the event that the creation of the SLM Database orthe SLM Measurement Data Mart fails, check the log files that were generatedduring the database installation (see “Checking Database Creation Logs andTables” on page 68 for more details on these logs). These logs will contain specificDB2 messages that will indicate the exact nature of the database creation error.
Note: The database creation logs write over any existing log information ratherthan append to existing log information.
Database Creation Scripts FailIf, for some reason, the database creation scripts (dyk_cat_dbinst ordyk_dm_dbinst) fail to complete successfully, the database creation log filesdyk_cat.log or dyk_dm.log might contain errors indicating that the database couldnot be created.
The following errors can occur during database creation:v SQL1005N: The database alias <dbname> already exists in either the local
database directory or system database directory.Before you attempt to re-run the database creation scripts, do the following:1. Initiate a DB2 command session and run the following command to view all
catalogued databases:db2 list db directory
2. Verify that dyk_cat and dyk_dm are included in the listing. For each of theabove databases that do not appear in the listing, do the following:
Note: The above statement assumes the databases scripts have not beenchanged and that the default database names were used.
a. Run the following command, where <missing_db> is the missing databasename and <any_db> is a dummy catalog entry:db2 catalog db <missing_db> as <any_db>
b. Run the following command to see your new catalog entry <any_db>:db2 list db directory
c. Run the following command to drop the database:db2 drop db <any_db>
d. If the db2 drop command fails, then run the following commands:db2 uncatalog db <any_db>
db2 terminate
3. Rerun the database creation script.
Chapter 8. Troubleshooting 123

v SQL1032N: No start database manager command was issued. SQLSTATE=57019This error usually indicates that the database manager is currently stopped. Starta DB2 command line and issue the following command:db2start
Note: If the database creation script failed and the creation log contains theabove message, you must allow the database creation script to drop thedatabase before recreating it again. The script default is set to drop thedatabase before creation.
v SQL1403N: The username and/or password supplied is incorrect.SQLSTATE=08004This error indicates that either the username or the password used in thedatabase creation was incorrect, or the username is not an authorized user onthis system. Check with your database administrator for the properauthorization and group membership.
Database Uncataloged after Error Specifying a Local Databaseas Remote
While installing IBM Tivoli Service Level Advisor, the wizard prompts you forinformation about the SLM Database and the SLM Measurement Data Mart, andthe wizard then attempts to access the database to verify the connection. If youspecify the database as remote when it is actually local, the connection attempt willfail, and the IBM Tivoli Service Level Advisor install program will uncatalog thedatabase. If you restart the install wizard before manually recataloging thedatabase, you will continue to fail the database connection. Before restarting theinstall program, manually catalog the database.
Installing IBM Tivoli Service Level AdvisorThis section includes troubleshooting problems that you may encounter related toinstalling any of the install options of IBM Tivoli Service Level Advisor.
Blank Install Window or Incomplete TextDuring the install of IBM Tivoli Service Level Advisor, if you encounter a blankinstall window or a window that contains incomplete text, resize the window. Thiswill cause the window to refresh itself and display all of the text.
Install Screen Fonts Not ReadableIf you are installing on an AIX machine in the DE_DE language, you may find thatthe fonts displayed in the install dialogs are not readable. To change this, do thefollowing:1. Copy the contents of the IBM Tivoli Service Level Advisor product CD to a
temporary directory on your machine.2. Rename the following file:
java/aix4-r1/jre/lib/font.properties.UTF8
to the following:java/aix4-r1/jre/lib/font.properties.UTF8.bak
3. Run the installation from the temporary directory on your machine.
124 IBM Tivoli Service Level Advisor: Getting Started with IBM Tivoli Service Level Advisor
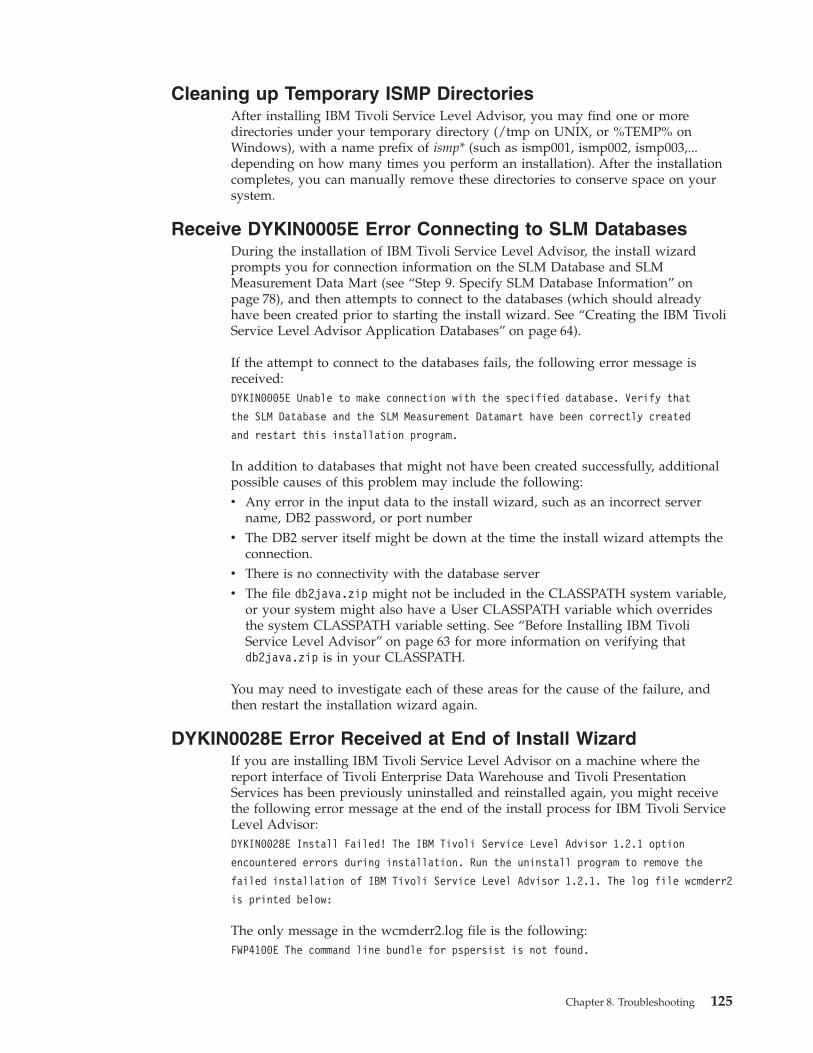
Cleaning up Temporary ISMP DirectoriesAfter installing IBM Tivoli Service Level Advisor, you may find one or moredirectories under your temporary directory (/tmp on UNIX, or %TEMP% onWindows), with a name prefix of ismp* (such as ismp001, ismp002, ismp003,...depending on how many times you perform an installation). After the installationcompletes, you can manually remove these directories to conserve space on yoursystem.
Receive DYKIN0005E Error Connecting to SLM DatabasesDuring the installation of IBM Tivoli Service Level Advisor, the install wizardprompts you for connection information on the SLM Database and SLMMeasurement Data Mart (see “Step 9. Specify SLM Database Information” onpage 78), and then attempts to connect to the databases (which should alreadyhave been created prior to starting the install wizard. See “Creating the IBM TivoliService Level Advisor Application Databases” on page 64).
If the attempt to connect to the databases fails, the following error message isreceived:DYKIN0005E Unable to make connection with the specified database. Verify that
the SLM Database and the SLM Measurement Datamart have been correctly created
and restart this installation program.
In addition to databases that might not have been created successfully, additionalpossible causes of this problem may include the following:v Any error in the input data to the install wizard, such as an incorrect server
name, DB2 password, or port numberv The DB2 server itself might be down at the time the install wizard attempts the
connection.v There is no connectivity with the database serverv The file db2java.zip might not be included in the CLASSPATH system variable,
or your system might also have a User CLASSPATH variable which overridesthe system CLASSPATH variable setting. See “Before Installing IBM TivoliService Level Advisor” on page 63 for more information on verifying thatdb2java.zip is in your CLASSPATH.
You may need to investigate each of these areas for the cause of the failure, andthen restart the installation wizard again.
DYKIN0028E Error Received at End of Install WizardIf you are installing IBM Tivoli Service Level Advisor on a machine where thereport interface of Tivoli Enterprise Data Warehouse and Tivoli PresentationServices has been previously uninstalled and reinstalled again, you might receivethe following error message at the end of the install process for IBM Tivoli ServiceLevel Advisor:DYKIN0028E Install Failed! The IBM Tivoli Service Level Advisor 1.2.1 option
encountered errors during installation. Run the uninstall program to remove the
failed installation of IBM Tivoli Service Level Advisor 1.2.1. The log file wcmderr2
is printed below:
The only message in the wcmderr2.log file is the following:FWP4100E The command line bundle for pspersist is not found.
Chapter 8. Troubleshooting 125

This error can occur if, during the previous uninstall of Tivoli Enterprise DataWarehouse, Tivoli Presentation Services was not completely uninstalled as well.Whenever you uninstall Tivoli Enterprise Data Warehouse, you must alsocompletely uninstall Tivoli Presentation Services manually before reinstalling TivoliEnterprise Data Warehouse.
To recover from this problem, you must do the following:v Uninstall IBM Tivoli Service Level Advisorv Uninstall Tivoli Enterprise Data Warehousev Uninstall Tivoli Presentation Servicesv Reinstall Tivoli Enterprise Data Warehousev Reinstall IBM Tivoli Service Level Advisor
Consult the installation documentation for Tivoli Enterprise Data Warehouse fordetails on completely uninstalling Tivoli Presentation Services before attempting toreinstall Tivoli Enterprise Data Warehouse.
Service Exception in Install LogDuring the installation of IBM Tivoli Service Level Advisor, the wizard detects ifthe Tivoli Common Directory has already been created on this machine. If it hasnot already been created, the wizard creates the directory, and also attempts tocreate the tivoli user group, to which user names are added for access to the logfiles.
If the tivoli group has already been created, however, the following exception willbe written to the install log:ServiceException: (error code = -110001; message = "The specified local
group already exists.
This exception is not harmful and can be ignored.
Installing SLM Task DriversThis section includes troubleshooting problems that you may encounter related toinstalling the SLM Task Drivers option of IBM Tivoli Service Level Advisor andintegrating into the IBM Console.
Problem Starting IBM Console After InstallIf you install the SLM Task Drivers option of IBM Tivoli Service Level Advisor andreceive the following message at the end of the install wizard, there may be aproblem with the operation of the IBM Console:FWP4171E Startup failed for the Tivoli Presentation Services object request broker
(ORB), com.tivoli.pf.cli.CliOrbletApp.
To recover from this error, do the following:1. Click Cancel to cancel the current installation.2. Remove any files that were left over in the IBM Tivoli Service Level Advisor
install directory after the canceled install was rolled back.3. Verify that the Server for IBM Console service is started, and restart it if
necessary (see “Starting the Server for IBM Console Service” on page 107) forprocedures.
126 IBM Tivoli Service Level Advisor: Getting Started with IBM Tivoli Service Level Advisor
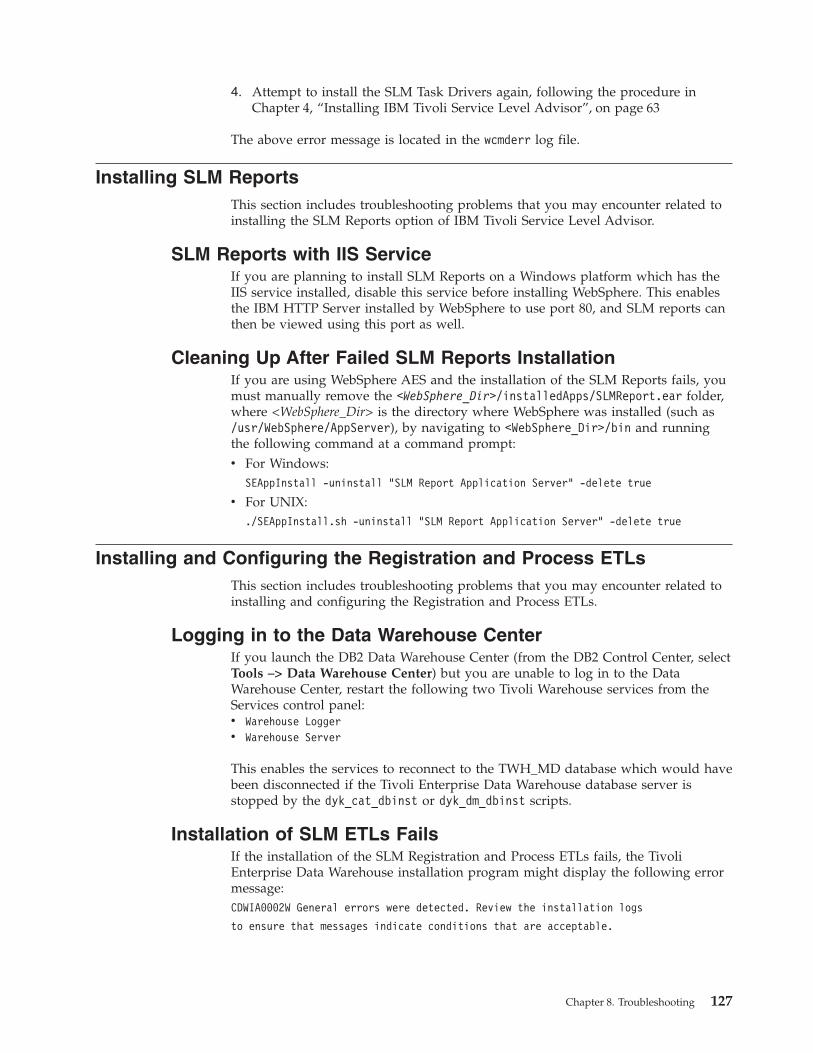
4. Attempt to install the SLM Task Drivers again, following the procedure inChapter 4, “Installing IBM Tivoli Service Level Advisor”, on page 63
The above error message is located in the wcmderr log file.
Installing SLM ReportsThis section includes troubleshooting problems that you may encounter related toinstalling the SLM Reports option of IBM Tivoli Service Level Advisor.
SLM Reports with IIS ServiceIf you are planning to install SLM Reports on a Windows platform which has theIIS service installed, disable this service before installing WebSphere. This enablesthe IBM HTTP Server installed by WebSphere to use port 80, and SLM reports canthen be viewed using this port as well.
Cleaning Up After Failed SLM Reports InstallationIf you are using WebSphere AES and the installation of the SLM Reports fails, youmust manually remove the <WebSphere_Dir>/installedApps/SLMReport.ear folder,where <WebSphere_Dir> is the directory where WebSphere was installed (such as/usr/WebSphere/AppServer), by navigating to <WebSphere_Dir>/bin and runningthe following command at a command prompt:v For Windows:
SEAppInstall -uninstall "SLM Report Application Server" -delete true
v For UNIX:./SEAppInstall.sh -uninstall "SLM Report Application Server" -delete true
Installing and Configuring the Registration and Process ETLsThis section includes troubleshooting problems that you may encounter related toinstalling and configuring the Registration and Process ETLs.
Logging in to the Data Warehouse CenterIf you launch the DB2 Data Warehouse Center (from the DB2 Control Center, selectTools –> Data Warehouse Center) but you are unable to log in to the DataWarehouse Center, restart the following two Tivoli Warehouse services from theServices control panel:v Warehouse Loggerv Warehouse Server
This enables the services to reconnect to the TWH_MD database which would havebeen disconnected if the Tivoli Enterprise Data Warehouse database server isstopped by the dyk_cat_dbinst or dyk_dm_dbinst scripts.
Installation of SLM ETLs FailsIf the installation of the SLM Registration and Process ETLs fails, the TivoliEnterprise Data Warehouse installation program might display the following errormessage:CDWIA0002W General errors were detected. Review the installation logs
to ensure that messages indicate conditions that are acceptable.
Chapter 8. Troubleshooting 127
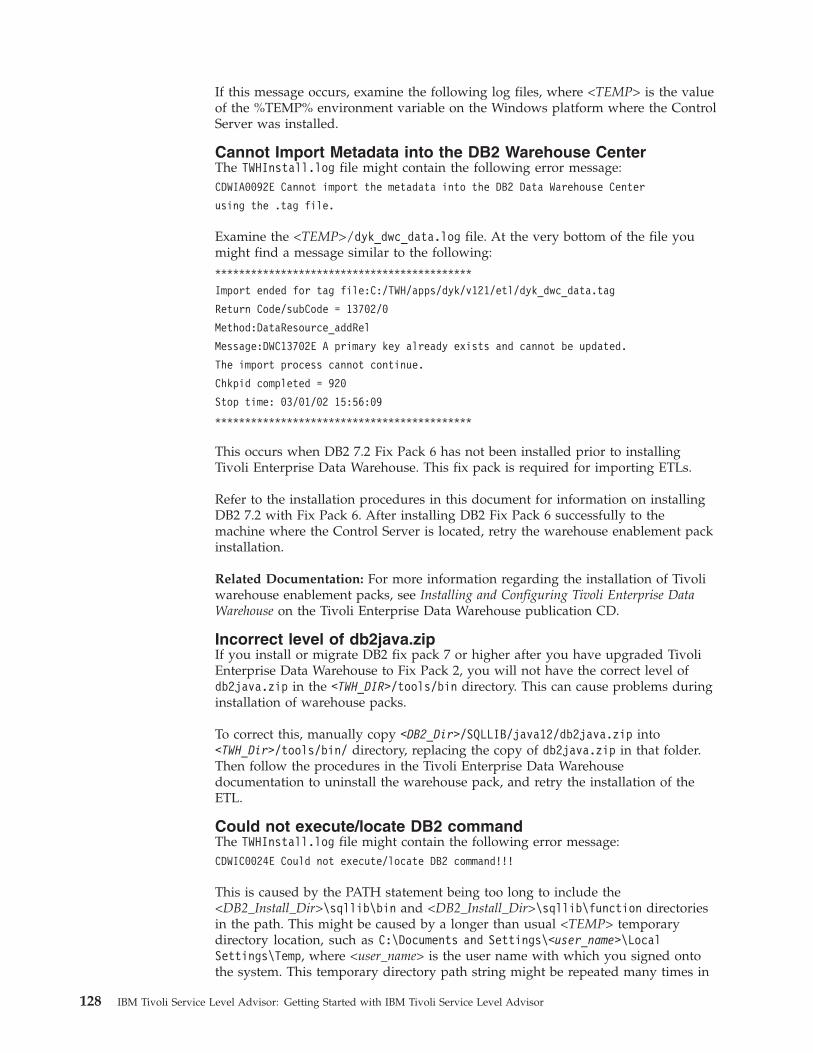
If this message occurs, examine the following log files, where <TEMP> is the valueof the %TEMP% environment variable on the Windows platform where the ControlServer was installed.
Cannot Import Metadata into the DB2 Warehouse CenterThe TWHInstall.log file might contain the following error message:CDWIA0092E Cannot import the metadata into the DB2 Data Warehouse Center
using the .tag file.
Examine the <TEMP>/dyk_dwc_data.log file. At the very bottom of the file youmight find a message similar to the following:*******************************************
Import ended for tag file:C:/TWH/apps/dyk/v121/etl/dyk_dwc_data.tag
Return Code/subCode = 13702/0
Method:DataResource_addRel
Message:DWC13702E A primary key already exists and cannot be updated.
The import process cannot continue.
Chkpid completed = 920
Stop time: 03/01/02 15:56:09
*******************************************
This occurs when DB2 7.2 Fix Pack 6 has not been installed prior to installingTivoli Enterprise Data Warehouse. This fix pack is required for importing ETLs.
Refer to the installation procedures in this document for information on installingDB2 7.2 with Fix Pack 6. After installing DB2 Fix Pack 6 successfully to themachine where the Control Server is located, retry the warehouse enablement packinstallation.
Related Documentation: For more information regarding the installation of Tivoliwarehouse enablement packs, see Installing and Configuring Tivoli Enterprise DataWarehouse on the Tivoli Enterprise Data Warehouse publication CD.
Incorrect level of db2java.zipIf you install or migrate DB2 fix pack 7 or higher after you have upgraded TivoliEnterprise Data Warehouse to Fix Pack 2, you will not have the correct level ofdb2java.zip in the <TWH_DIR>/tools/bin directory. This can cause problems duringinstallation of warehouse packs.
To correct this, manually copy <DB2_Dir>/SQLLIB/java12/db2java.zip into<TWH_Dir>/tools/bin/ directory, replacing the copy of db2java.zip in that folder.Then follow the procedures in the Tivoli Enterprise Data Warehousedocumentation to uninstall the warehouse pack, and retry the installation of theETL.
Could not execute/locate DB2 commandThe TWHInstall.log file might contain the following error message:CDWIC0024E Could not execute/locate DB2 command!!!
This is caused by the PATH statement being too long to include the<DB2_Install_Dir>\sqllib\bin and <DB2_Install_Dir>\sqllib\function directoriesin the path. This might be caused by a longer than usual <TEMP> temporarydirectory location, such as C:\Documents and Settings\<user_name>\LocalSettings\Temp, where <user_name> is the user name with which you signed ontothe system. This temporary directory path string might be repeated many times in
128 IBM Tivoli Service Level Advisor: Getting Started with IBM Tivoli Service Level Advisor
the PATH= statement, and the resulting string is too large to include the\sqllib\function and \sqllib\bin directories. As a result, the test of the DB2command path fails and the install of the DYK application package fails. You canverify this by looking earlier in the log file for the PATH statement.
You can resolve this problem by modifying your PATH statement to include the<DB2_Install_Dir>\sqllib\bin and <DB2_Install_Dir>\sqllib\function directoriesat the front of the PATH statement, as well as modify the %TEMP% systemvariable to a shorter temporary path, such as C:\Temp. Reboot the system for thechanges to take effect, and attempt the install of the DYK application packageagain.
System StartupThis section includes troubleshooting problems that you may encounter related tostarting up the services and components of the SLM solution.
Server Host Name is Not Fully QualifiedIf you receive either of the following messages, you may need to change yoursystem configuration to return fully qualified host names:v As a result of invoking an scmd command:
DYKAL2030E Unable to connect to the Command Line Interface service on port 9990.
v You find the following messages in the msgTSLAn.log:DYKAL0009E The server host name <host name> is not a fully qualified host name.
DYKAL1020I Component startup activities have completed:0 started,
0 timed out, 0 failed.
These errors can occur if the SLM Server configuration data could not be loadedand required SLM Server services are not started. In the Tivoli Common Directory,check the msgTSLAn.log files and verify that you see a message near the bottom ofthe log, telling you that 13 services were started successfully, with no errors.
This situation occurs if the machine that the SLM Server is installed on is no longerknown by the fully qualified host name. In this condition, the server will notproperly read necessary configuration data that is associated with the fullyqualified host name of the machine, and necessary services will not be started.Machines on which you install the SLM Server, SLM Task Drivers, and SLMReports must be configured so that their host names resolve to fully qualifiednames.
Refer to “Step 3. Ensure fully qualified host names” on page 33 for moreinformation on configuring your machine to return fully qualified host names.
SLM Server Startup Cannot Connect to SLM DatabasesIf the startup of the SLM Server is halted, and you receive the following messagein the msgTSLAn.log, you may be having problems with the SLM Server connectingto the SLM Database or SLM Measurement Data Mart:DYKAL1054E Component yourmachine.some.company.com:DS:1 failed startup with
the following error:DYKAL3002E An error occurred for sdc during
DataSource creation.
This error might also occur if you execute the CLI command scmd list, and onlythe rcc, log, and slm bundles are reported as available.
Chapter 8. Troubleshooting 129

This error indicates that connection to one or both of the IBM Tivoli Service LevelAdvisor databases is not possible. Examine the related messages in the log todetermine the root cause of the failure. The most common cause of this type ofproblem is the following:v The db2start command has not been issued on the database server. You may see
the following message in the SLM Server stderr or the msgTSLAn.log files on themachine running the SLM Server:DYKAL3014E Error connecting to the database. Reason: [IBM][CLI Driver]
SQL1032N No start database manager command was issued. SQLSTATE=57019
Verify that a db2start has been issued on the database server. See the DB2documentation for more information on starting DB2.
v The jdbc driver cannot be loaded because the db2java.zip file is not on thesystem CLASSPATH. You may see the following message in the SLM Serverstderr or the msgTSLAn.log files on the machine running the SLM Server:DYKAL3013E Error loading driver COM.ibm.db2.jdbc.app.DB2Driver
Verify that the DB2 client or server option is installed on this machine and verifythe following:– If DB2 is installed and this is a Windows machine, run the following
command from a command prompt:set classpath
Examine the output of this command and ensure that the fully qualified pathto the db2java.zip file is correct. If it is not correct then navigate to theWindows environment variable dialog, correct the value, and restart the SLMServer.
– If DB2 is installed and this is a UNIX machine, then view the contents of<TSLA_Dir>/bin/private/generic_unix/runscripts/slmdbsetup.sh, where<TSLA_Dir> is the directory where IBM Tivoli Service Level Advisor wasinstalled, and verify that the paths to the db2profile and usejdbc2 scriptscontained in this file are correct. If they are not correct, edit this file with thecorrect paths and restart the SLM Server.
v Messages in the log indicate that network connectivity to the database server isnot possible. Verify that network connectivity to the database server exists byusing the ping command.
If none of the previous solutions fixes the problem, consult your databaseadministrator to determine the root cause of the database connectivity errors.
Related messages or problems: See “Accessing SLM Reports” on page 131 forrelated information.
Related documentation: See “Creating the Databases” on page 67 for informationon SLM database installation and configuration, and see the Command Reference forIBM Tivoli Service Level Advisor for information on scmd list.
Signing In to the IBM ConsoleWhen logging into the IBM Web Console, you might receive the following error:FWP9102E Cannot load the task driver GUI due to the exception
PortfolioViewerFUGUI
130 IBM Tivoli Service Level Advisor: Getting Started with IBM Tivoli Service Level Advisor

To resolve this problem, restart the Server for IBM Console and Web Services for IBMConsole services (see “Starting the Server for IBM Console Service” on page 107 and“Starting Web Services for IBM Console” on page 108) and log in to the IBMConsole again.
Accessing SLM ReportsThis section addresses problems you might encounter while attempting to accessSLM reports.
HTTP 500 Internal Server Error or DYKAL3003E Error MessageIf, after signing in, you receive an HTTP 500 Internal server error (The page cannotbe displayed), you may be having problems with the SLM Report Serverconnecting to the SLM Database. You might also have this problem if you receivethe following error message:DYKAL3003E A DataSource for sdc was not found in my SLM Reports message log.
To resolve this problem, do the following:1. Search the SLM Reports stderr and msgTSLAn.log files on the machine running
the SLM Reports server for either of the following messages:v DYKAL1054E Component yourmachine.somecompany.com_servlet:DS:1 failed
startup with the following error:
DYKAL3002E An error occurred for sdc during DataSource creation.
This message can occur if the DB2 Server has not been started. Verify thatthe db2start command has been issued on the database server. See the DB2documentation for information on starting DB2.
v DYKAL3013E Error loading driver COM.ibm.db2.jdbc.app.DB2Driver.
This message can occur if the JDBC driver cannot be loaded because thedb2java.zip file is not in the WebSphere Application Server CLASSPATH.See “Configuring the JDBC Driver in WebSphere” on page 60 for moreinformation.
Upon successful recovery from this error you should be able to log onto theSLM reports and see messages similar to the following in your SLM ReportsmsgTSLAn.log:DYKAL3005I Driver loaded successfully.DYKAL3001I DataSource successfully created for sdc.DYKAL1001I Started component yourcomputer.some.company.com_servlet:DS:1.
2. Open the web.xml file, which is located in the following directory, where<app_name> is the name you specified in step 5e on page 100:<WebSphere_Dir>/AppServer/installedApps/<app_name>.ear/SLMReport.war/Web-inf
Edit this file using your preferred XML or text editor. Verify that the file namesfor tsla.basedir and tsla.programfiles parameters are set correctly, accordingto the procedure outlined in step 6 on page 101 under “Integrating intoWebSphere AE” on page 100.
3. If the web.xml file is correct, examine the following log file for detailed errors:Default_Server_stdout.log
Possible errors include:v Missing tables in the database
Chapter 8. Troubleshooting 131

v Incorrect user name or password used to connect to the database
If you find error DYKAL3014E, specifying the reason as an incorrect user nameor password, use the dsutil utility to verify that the user ID and password arecorrect. See the Command Reference for IBM Tivoli Service Level Advisor for detailson running the dsutil utility.
Related Messages or Problems: See “Server Host Name is Not Fully Qualified” onpage 129.
Related documentation: See Chapter 5, “Additional Installation Tasks”, on page 93for information on integrating and accessing SLM Reports.
Accessing SLM Reports in WebSphere AES 4.0If you are having trouble accessing SLM Reports from your Web browser usingWebSphere AES 4.0, you may have an incorrect node name specified for themachine on which WebSphere is installed. To check for this, open thetraceTSLA1.2.1Install.log file and look for the following message:CommandExecutionException: Unable to select node: the requested node is not
available.
If this message is found, you should correct the node name by doing the following:1. Locate the script file <SLM_Install_Dir>/bin/aes40reportgenplugin, where
<SLM_Install_Dir> is the directory where IBM Tivoli Service Level Advisor wasinstalled on the SLM Report Server machine.
2. Open this script file in a text editor and locate the NODE_NAME parameter.The value for this parameter should be the node name that you found afterinstalling WebSphere AES (see “Identifying the WebSphere Node Name” onpage 61).
3. Edit this value if needed in the script file, save the file, and execute the script.4. Locate the file <WebSphere_Dir>/config/plugin-cfg.xml, where
<WebSphere_Dir> is the directory in which WebSphere was installed.5. Open this XML file in a text or XML editor and verify that it includes the
following entry:<Uri Name="/SLMReport"/>
6. Save and close this file.7. Stop the WebSphere Application Server and restart it again.
SLM Reports should now be accessible from your supported Web browser.
Uninstalling IBM Tivoli Service Level AdvisorThis section includes troubleshooting problems that you may encounter related touninstalling IBM Tivoli Service Level Advisor.
Uninstalling SLM Install OptionsIf the use of the uninstall script in the procedure outlined in Chapter 7,“Uninstalling IBM Tivoli Service Level Advisor”, on page 115 does not work, and ifyou have a Java runtime environment (JRE) installed locally on the machine, tryuninstalling by issuing the following command instead of running the uninstallscript:java -jar _uninst/uninstall.jar
132 IBM Tivoli Service Level Advisor: Getting Started with IBM Tivoli Service Level Advisor
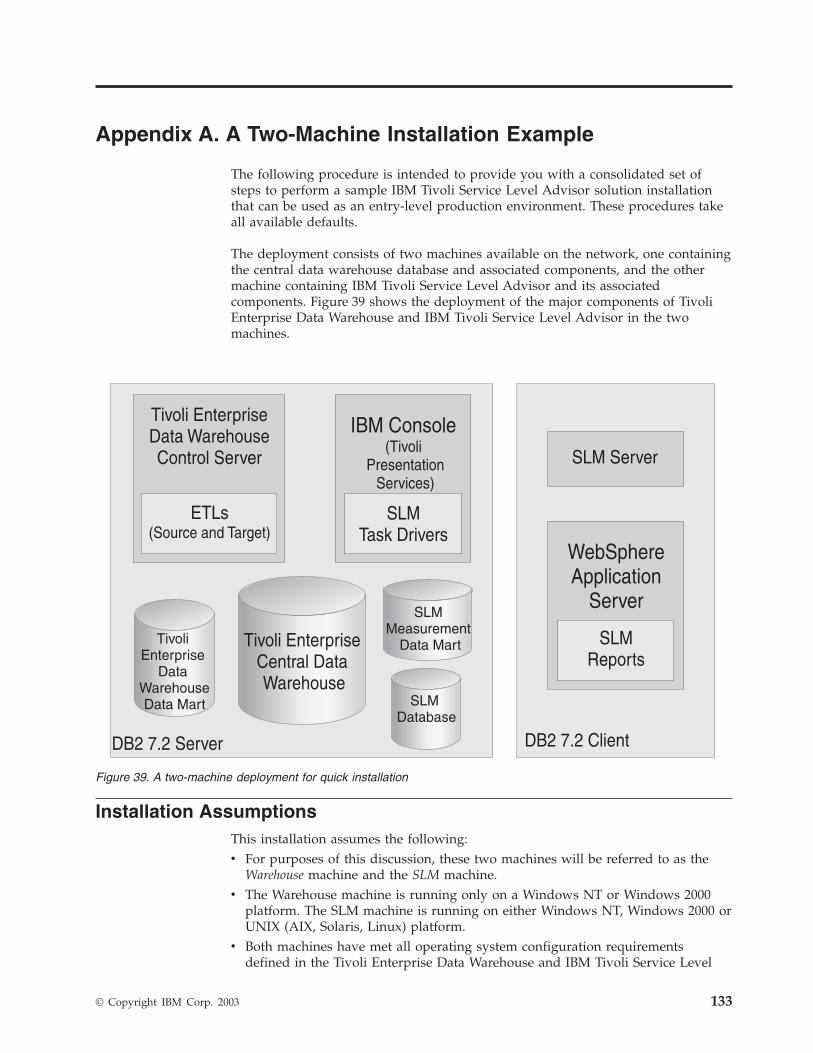
Appendix A. A Two-Machine Installation Example
The following procedure is intended to provide you with a consolidated set ofsteps to perform a sample IBM Tivoli Service Level Advisor solution installationthat can be used as an entry-level production environment. These procedures takeall available defaults.
The deployment consists of two machines available on the network, one containingthe central data warehouse database and associated components, and the othermachine containing IBM Tivoli Service Level Advisor and its associatedcomponents. Figure 39 shows the deployment of the major components of TivoliEnterprise Data Warehouse and IBM Tivoli Service Level Advisor in the twomachines.
Installation AssumptionsThis installation assumes the following:v For purposes of this discussion, these two machines will be referred to as the
Warehouse machine and the SLM machine.v The Warehouse machine is running only on a Windows NT or Windows 2000
platform. The SLM machine is running on either Windows NT, Windows 2000 orUNIX (AIX, Solaris, Linux) platform.
v Both machines have met all operating system configuration requirementsdefined in the Tivoli Enterprise Data Warehouse and IBM Tivoli Service Level
Figure 39. A two-machine deployment for quick installation
© Copyright IBM Corp. 2003 133
Advisor documentation (for example, see “Step 3. Ensure fully qualified hostnames” on page 33 for information on configuring your system to return fullyqualified host names)
v You have adequate authority to perform the install (root user authority onUNIX, Admininstrator authority on Windows)
v Any previous installation of Tivoli Enterprise Data Warehouse or IBM TivoliService Level Advisor has been completely removed from these machines, andthat only the operating systems are installed (no DB2 installed, no HTTP Serverinstalled).
v The machines are configured to automatically start from the product CD.v You have available the required installation media for the SLM solution,
including:– IBM DB2 7.2 with Fix Pack 5– IBM DB2 7.2 Fix Pack 6 (or later)– Tivoli Enterprise Data Warehouse 1.1– Tivoli Enterprise Data Warehouse 1.1 Fix Pack 2– IBM Tivoli Service Level Advisor 1.2.1– WebSphere 4.0.1 AES– WebSphere 4.0.2 or later upgrade
Note: Source application warehouse packs are not included in this list becauseyou will have the option to conclude this quick start procedure and installyour warehouse packs separately if desired, or to use a simulated set ofdata in the warehouse to use in a non-production environment forlearning purposes.
v You have familiarized yourself with the product by reading the overviews andinstallation procedures and completed the planning process suitable for yourentry-level production environment. If you intend to use this installation as aproduction environment, you should read this complete document to ensure thatyou have performed all pertinent configuration steps successfully.
v You have read through this entire appendix before beginning the installation tobe sure you understand all of the steps.
The installation procedure consists of the following major steps, which aredescribed in more detail in the remaining sections of this appendix:1. Complete the planning worksheet for this installation2. Install DB2 server software on the Warehouse machine3. Install Tivoli Enterprise Data Warehouse and the SLM ETLs on the Warehouse
machine4. Create SLM Databases on the Warehouse machine5. Install DB2 client software on the SLM machine6. Install WebSphere on the SLM machine7. Install IBM Tivoli Service Level Advisor SLM Server and SLM Reports on the
SLM machine8. Install IBM Tivoli Service Level Advisor SLM Task Drivers on the Warehouse
machine9. Create ODBC Datasources
10. Configure the IBM Tivoli Service Level Advisor ETLs on the Warehousemachine
134 IBM Tivoli Service Level Advisor: Getting Started with IBM Tivoli Service Level Advisor
Performing the above steps will prepare your two-machine SLM solution forreceiving and processing data from one or more source applications that will writedata into the central data warehouse. You must perform additional steps to installand configure the various source applications and their associated warehousepacks in order to begin putting data into the central data warehouse. You canoptionally install a set of simulated data that may be useful in evaluating yourproduction environment and learning how your SLM solution works. Theseadditional steps are not included in this appendix. See “Warehouse Packs” onpage ix to find information on currently available warehouse packs.
1. Planning for InstallationPlanning worksheets exist for both Tivoli Enterprise Data Warehouse and IBMTivoli Service Level Advisor installation procedures, and should be completedbefore installing these products. For this particular installation, the planninginformation required is a subset of the full planning worksheets. Table 13 specifiesthe planning information you should gather for this installation.
Table 13. Planning sheet for this Quick Start installation
Item to plan for Your response
Fully qualified host name of the Warehousemachine
Fully qualified host name of the SLMmachine
User ID and password for the SLM machine
WebSphere node name (obtained in step 10on page 139)
2. Installing DB2 Universal Enterprise EditionInstall DB2 Universal Enterprise Edition on the Warehouse machine by doing thefollowing:1. Insert the DB2 product CD to start the DB2 install program, and click Install.2. On the DB2 product selection dialog, verify that only DB2 Enterprise Edition is
checked. Click Next to continue.3. Verify that the Typical install option is selected and click Next to continue.4. On the Destination Location dialog, accept the defaults and click Next to
continue.5. On the Control Server dialog, specify the following DB2 user name and
password and click Next to continue (if a message is displayed regardingcreation of the user ID, click Yes to continue):v User name: db2admin
v Password: db2admin
6. On the Current Settings dialog, click Next to perform the installation.7. You will be asked if you need to install the OLAP starter kit. Select No and
then Continue to continue.8. When the installation completes, click Finish and then click Exit.
Appendix A. A Two-Machine Installation Example 135
3. Installing the DB2 ClientInstall the DB2 client software on the SLM machine by doing the following:v For Windows:
1. Insert the DB2 product CD to start the DB2 install program, and click Install.2. On the DB2 product selection dialog, uncheck DB2 Enterprise Edition and
select the DB2 Administration Client install option (this should be the onlyoption checked). Click Next to continue.
3. On the Installation Type and Destination Location dialogs, accept thedefaults and click Next to continue.
4. On the Control Center Server dialog, specify the following DB2 user nameand password and click Next to continue (if a message is displayedregarding creation of the user ID, click Yes to continue):– User name: db2admin
– Password: db2admin
5. On the Current Settings dialog, click Next to perform the installation.6. When the installation completes, click Finish and then click Exit.
v For UNIX:1. Before starting the installation, be sure to check the DB2 ″Quick Beginnings″
document for specific procedures that you need to complete depending onthe UNIX platform on which you are installing DB2.
2. Mount the DB2 CD:– For AIX, issue the following command, where <mount_dir> is the mount
directory:mount -rv cdrfs /dev/cd0 <mount_dir>
– For Solaris, the CD is automatically mounted on /cdrom/cdrom0
– For Linux, issue the following command:mount /mnt/cdrom
3. Change to the mounting directory.4. Run the following command:
./db2setup.sh
5. Using the spacebar, select DB2 Administration Client.6. Using the tab key, navigate to OK and press Enter.7. The Create DB2 Services window is displayed. Select Create DB2 Instance.8. You are prompted to enter the DB2 instance name, its group name, and the
home directory. Do either of the following:– If the db2instance user was not created before this installation, select the
default. Enter the password for both the Password and Verify Passwordfields, then navigate to OK and press Enter.
– If the user name was created before this installation, specify that username as the db2instance user, and specify its group name and homedirectory, but do not specify the password. Navigate to OK and pressEnter.
9. You are returned to the Create DB2 Services window. Navigate to OK andpress Enter.
10. In the DB2 Setup Utility window, select Continue.11. You are given a last chance warning before the installation begins. Navigate
to OK and press Enter. The installation of the DB2 Client is started.
136 IBM Tivoli Service Level Advisor: Getting Started with IBM Tivoli Service Level Advisor
12. The installation is completed, and a successful notice is displayed. Navigateto OK and press Enter.
13. The DB2 Setup Utility window is displayed again. Navigate to OK andpress Enter.
14. Navigate to Close and press Enter. Select OK when asked if you want toexit. This returns you to the command prompt.
15. Unmount the CD as follows:– For AIX, change the directory from the mounted directory and enter
umount <mount_dir>
– For Solaris, change the directory from the mounted directory and entereject cdrom
– For Linux, change the directory from the mounted directory and entereject cdrom
4. Upgrading to DB2 7.2 Fix Pack 6 (or later)Upgrade your installation of DB2 7.2 to Fix Pack 6 (or later) by doing the followingfor both the Warehouse and the SLM machine:1. Download DB2 7.2 Fix Pack 6 (or later) from the support Web site:
http://www.ibm.com/software/sysmgmt/products/support/
TivoliDataWarehouse.html
2. Stop all services associated with DB2 by starting a DB2 command prompt andissuing the following commands:db2stop force
db2admin stop
3. Navigate to the Services control panel and stop all services with DB2 in thename, along with Warehouse Server and Warehouse Logger services.
4. Navigate to the directory where you downloaded DB2 Fix Pack 6 (or later) andrun setup.exe.
Note: If you receive the following message, click Yes and continue the install:DB2 is currently running and locked by the following process(es):
jservice.exe
5. Follow the instructions in the install program to install the fix pack.
Be sure to perform the above procedure on both the Warehouse machine and theSLM machine.
5. Installing Tivoli Enterprise Data WarehouseOn the Warehouse machine, install Tivoli Enterprise Data Warehouse by doing thefollowing:1. Insert the Tivoli Enterprise Data Warehouse product CD. The installation
program will be automatically started.2. On the Welcome panel, click Next to continue.3. On the Setup Type dialog, verify that the Single machine radio button is
selected, and click Next to continue.4. On the Host Name dialog, verify that the fully qualified host name for the
Warehouse machine is correct, and click Next to continue.5. On the DB2 Configuration dialog, specify the following DB2 user name and
password and click Next to continue:
Appendix A. A Two-Machine Installation Example 137
v User name: db2admin
v Password: db2admin
6. On the Tivoli Presentation Services configuration dialog, click Next tocontinue.
7. On the Additional Languages dialog, click Next to continue.
Note: If additional languages are needed, refer to the Tivoli Enterprise DataWarehouse documentation for information on installing language packs.
8. On the Additional Applications Packages dialog, because we are installingthe IBM Tivoli Service Level Advisor warehouse pack in a separate procedure,verify that the check box is not checked and click Next to continue.
9. On the feature summary dialog showing your selections, confirm yourselections and click Install to begin the installation.
10. After the installation program has copied files and configured theenvironment, the Installation Summary window is displayed. Click Next tocontinue.
11. The installation will proceed. When the wizard completes, do not select theoption to restart the system at this time. Click Next and then click Finish.
12. Wait for the IBM Console to finish rebuilding the online user assistance helpset. You can check for completeness by examining the most recent (highestnumbered n) stdoutn log file in the directory <PS_directory>\log\fwp_mcr,where <PS_directory> is the location where Tivoli Presentation Services wasinstalled. Look for the following message:FWP1734I The utility that was started by the Management Component
Repository to build the help set has completed successfully.
13. Reboot the system to complete the installation.
6. Installing Tivoli Enterprise Data Warehouse 1.1 Fix Pack 2IBM Tivoli Service Level Advisor requires Tivoli Enterprise Data Warehouse 1.1with Fix Pack 2 to be installed on the Warehouse machine. Refer to the TivoliEnterprise Data Warehouse Fix Pack 2 Readme and the Tivoli Enterprise DataWarehouse support Web site for fix pack information.
7. Installing WebSphereThis procedure installs WebSphere Advanced Edition Single Server (AES), Version4.0.1, that is shipped with IBM Tivoli Service Level Advisor. When this iscompleted you must also upgrade to at least verion 4.0.2. See “Upgrading fromWebSphere AES or AE 4.0.1” on page 59 for more information. If you have anotherversion of WebSphere, consult the accompanying WebSphere documentation foradditional install information.
To install Websphere AES 4.0.1 on the SLM machine, do the following:v For Windows:
1. Insert the Windows version of the WebSphere AES 4.0.1 product CD and runthe setup.exe program.
2. On the Language dialog, select the language desired and click OK tocontinue.
3. On both the Welcome and Installation Options dialogs, click Next tocontinue.
138 IBM Tivoli Service Level Advisor: Getting Started with IBM Tivoli Service Level Advisor
4. On the Security Options panel, enter a valid user ID and password for thismachine and click Next to continue.
5. On the dialogs for Product Directory, Program Folder, and Install Options,click Next to perform the installation.
6. After the installation completes, reboot the machine and select Start theApplication Server.
7. You might want to configure WebSphere to autostart when the system isrestarted. See “Automatically Starting WebSphere After System Restart” onpage 60 for the procedure.
8. Configure the JDBC Driver in WebSphere (see “Configuring the JDBC Driverin WebSphere” on page 60 for the procedure).
9. If you are installing WebSphere AES 4.0.1 in a non-English environment, youmust upgrade to at least WebSphere AES 4.0.2. See “Upgrading fromWebSphere AES or AE 4.0.1” on page 59 for details.
10. Obtain the WebSphere node name (see “Identifying the WebSphere NodeName” on page 61) and record it in the planning worksheet in Table 13 onpage 135 for later use (step 8 on page 142). You might be able to obtain thenode name quickly by doing the following:a. Open a Web browser and point to http://<host name>:9090/admin,
where <host name> is the host name of your local machine (the SLMmachine)
b. The WebSphere Application Server Login window is displayed. Enterany name in the user ID field, or leave it blank, and click Submit.
c. The WebSphere Administrative Console is displayed. In the left pane,click the plus sign next to Nodes. The WebSphere node name will bedisplayed under Nodes. Write it down for later use.
v For UNIX:1. Mount the UNIX version of the WebSphere AES 4.0.1 CD:
– For AIX, issue the following command, where <mount_dir> is the mountdirectory:mount -rv cdrfs /dev/cd0 <mount_dir>
– For Solaris, the CD is automatically mounted on /cdrom/cdrom0
– For Linux, issue the following command:mount /mnt/cdrom
2. Change to the mounted directory <mount_dir>/<os version>, where<osversion> is aix for AIX, sun for Solaris, and linux for Linux.
3. Run the following command:./install.sh
4. The Welcome banner is displayed. Click Next to display a window withWebsphere AES operating system prerequisites. If everything is satisfactory,click OK to continue, or update the operating system with the requiredfixes by downloading them from the corresponding operating systemsupport Web site.
5. Select Typical Installation and click Next to continue.6. The Destination Directory window is displayed, showing the default
installation directory of WebSphere and the IBM HTTP Server. Accept thesedefaults and click Next to continue.
7. The Install Options window is displayed, listing the components to beinstalled. Click Install, which starts the installation. At the end, click Finishto complete the installation.
Appendix A. A Two-Machine Installation Example 139

8. Unmount the CD as follows:– For AIX, change the directory from the mounted directory and enter
umount <mount_dir>
– For Solaris, change the directory from the mounted directory and entereject cdrom
– For Linux, change the directory from the mounted directory and entereject cdrom
9. Verify that db2profile is sourced before starting the WebSphere ApplicationServer by issuing the following command, where <Instance_Dir> is the DB2instance directory:. <Instance_Dir>/sqllib/db2profile
For example,. /home/db2inst1/sqllib/db2profile
10. Completion of the installation launches the First Steps html page ifNetscape is installed. You can use this html page to start and stop theWebsphere Application Server, or see Chapter 6, “Startup and ShutdownProcedures”, on page 107 for the procedures to start and stop theWebsphere Application Server and the HTTP Server.
Be sure to upgrade your WebSphere installation to version 4.0.2 or later. See“Upgrading from WebSphere AES or AE 4.0.1” on page 59 for more information.
Configuring the JDBC Driver for WebSphereAfter the Websphere and HTTP Server are started, configure the JDBC Driver forWebSphere by doing the following:1. Open your Web browser and point to the following Web site:
http://<host name>:9090/admin
2. Sign on using admin as the user ID.3. The Administrative Console is displayed. Expand Resources in the navigation
tree in the left pane.4. Expand JDBC Drivers and select DB2Jdbc Driver.5. In the Server Class Path field, enter the path and file name of the location of
the DB2 driver, similar to the following example, where<db2_client_install_directory> is the location where the DB2 client is installed,and then click OK:<db2_client_install_directory>\java12\db2java.zip
Note: If you installed DB2 using the defaults, <db2_client_install_directory>should be entered as C:\Program Files\sqllib.
6. A hotspot, Configuration needs to be saved, is displayed. Click this hotspot tosave the configuration, then log off using Exit.
7. Stop the WebSphere Application Server and restart it using the proceduresdefined in Chapter 6, “Startup and Shutdown Procedures”, on page 107.
8. Creating Databases for IBM Tivoli Service Level AdvisorThis installation procedure creates the two databases used by IBM Tivoli ServiceLevel Advisor, the SLM Database and the SLM Measurement Data Mart. In thisinstallation, these databases are created on the Warehouse machine in the sameDB2 instance as the Tivoli Enterprise Data Warehouse database.
140 IBM Tivoli Service Level Advisor: Getting Started with IBM Tivoli Service Level Advisor

Note: The installation of Tivoli Enterprise Data Warehouse must be completedbefore beginning this installation procedure.
To create these two databases on the Warehouse machine, do the following:1. Insert the IBM Tivoli Service Level Advisor product CD in the Warehouse
machine.2. At a command prompt, run the following command to start a DB2 command
prompt session:db2cmd
3. On the IBM Tivoli Service Level Advisor product CD, navigate to thedatabase\scripts\w32-ix86 directory.
4. In the DB2 command prompt session, run the following command to create theSLM Database:dyk_cat_dbinst.bat db2admin db2admin
5. In the DB2 command prompt session, run the following command to create theSLM Measurement Data Mart:dyk_dm_dbinst.bat db2admin db2admin
9. Configuring ODBC Data SourcesTo configure ODBC data sources on the Warehouse machine, do the following:1. Insert the IBM Tivoli Service Level Advisor product CD in the CD-ROM drive
of the Warehouse machine.2. Select Start –>Run and run the db2cmd command to initialize a DB2 command
session. A window titled DB2 CLP will be started. Steps 3-4 should be executedin that window.
3. To create the ODBC datasource named DYK_CAT for the SLM Database,navigate to the <CD-ROM>\database\scripts\w32-ix86\ directory, where<CD-ROM> is the CD-ROM drive letter, and run the following command,where <Warehouse_hostname> is the fully qualified host name of the Warehousemachine (see your planning information in Table 13 on page 135):dyk_cat_odbc.bat <Warehouse_hostname>
4. Similarly, to create the ODBC datasource named DYK_DM for the SLMMeasurement Data Mart, run the following command:dyk_dm_odbc.bat <Warehouse_hostname>
10. Installing the SLM Server and SLM ReportsInstall the SLM Server and SLM Reports options of IBM Tivoli Service LevelAdvisor on the SLM machine by doing the following:v For Windows:
1. Insert the IBM Tivoli Service Level Advisor product CD.2. From the IBM Tivoli Service Level Advisor product CD, run install.bat.3. On the Welcome dialog, Next to continue.4. On the License Agreement dialog, select the I accept the terms in the
license agreement radio button and click Next to continue.5. On the Directory dialogs, accept the default locations for the Tivoli
Common Directory and the location where IBM Tivoli Service LevelAdvisor will be installed, and click Next to continue.
6. On the Product Installation Options dialog, deselect the SLM Task Driverscheck box, leaving the other install options checked. Click Next to continue.
Appendix A. A Two-Machine Installation Example 141
7. On the WebSphere Directory dialog, accept the default location for theWebSphere Application Server, and click Next to continue.
8. On the WebSphere Node Name dialog, enter the WebSphere node name(see your planning sheet, in Table 13 on page 135 above). Click Next tocontinue.
Note: This node name is case-sensitive and must be entered exactly asfound.
9. On the SLM Database dialog, select the Remote radio button (because thedatabase is created on the Warehouse machine), and click Next to continue.
10. On the next dialog, accept the defaults that are presented in the fields, butin the Password field, enter the DB2 password db2admin, and in theDatabase Server Host Name field, enter the fully qualified host name of theWarehouse machine, which is where the SLM Database was created. ClickNext to continue.
11. On the SLM Measurement Data Mart dialog, select the Remote radiobutton (because the database is created on the Warehouse machine), andclick Next to continue.
12. On the next dialog, accept the defaults that are presented in the fields, butin the Password field, enter the DB2 password db2admin, and in theDatabase Server Host Name field, enter the fully qualified host name of theWarehouse machine, which is where the SLM Measurement Data Mart wascreated. Click Next to continue.
13. On the SLM Server port dialog, accept the defaults and click Next tocontinue. Do not enable password protection.
14. On the SLA Notification Selection dialog, if you need to set up SLAnotification, see “Step 12. Specify Event Notification Methods” on page 83,otherwise click Next to continue.
15. On the feature summary dialog, click Next to proceed with the installation.16. After the installation and configuration is complete, click Finish.17. Stop the WebSphere Application Server and restart it using the procedures
defined in Chapter 6, “Startup and Shutdown Procedures”, on page 107.v For UNIX:
1. Mount the IBM Tivoli Service Level Advisor product CD:– For AIX, issue the following command, where <mount_dir> is the mount
directory:mount -rv cdrfs /dev/cd0 <mount_dir>
– For Solaris, the CD is automatically mounted on /cdrom/cdrom0
– For Linux, issue the following command:mount /mnt/cdrom
2. Run the following command:./install.sh
3. On the Welcome dialog, Next to continue.4. On the License Agreement dialog, select the I accept the terms in the
license agreement radio button and click Next to continue.5. On the Directory dialogs, accept the default locations for the Tivoli
Common Directory and the location where IBM Tivoli Service LevelAdvisor will be installed, and click Next to continue.
6. On the Product Installation Options dialog, deselect the SLM Task Driverscheck box, leaving the other install options checked. Click Next to continue.
142 IBM Tivoli Service Level Advisor: Getting Started with IBM Tivoli Service Level Advisor
7. On the WebSphere Directory dialog, click Next to continue.8. On the WebSphere Node Name dialog, enter the WebSphere node name
(see your planning sheet, in Table 13 on page 135 above). Click Next tocontinue.
9. On the SLM Database dialog, select the Remote radio button (because thedatabase is created on the Warehouse machine), and click Next to continue.
10. On the next dialog, accept the defaults that are presented in the fields, butin the Password field, enter the DB2 password db2admin, and in theDatabase Server Host Name field, enter the fully qualified host name of theWarehouse machine, which is where the SLM Database was created. ClickNext to continue.
11. On the SLM Measurement Data Mart dialog, select the Remote radiobutton (because the database is created on the Warehouse machine), andclick Next to continue.
12. On the next dialog, accept the defaults that are presented in the fields, butin the Password field, enter the DB2 password db2admin, and in theDatabase Server Host Name field, enter the fully qualified host name of theWarehouse machine, which is where the SLM Measurement Data Mart wascreated. Click Next to continue.
13. On the DB2 Instance directory dialog, enter the home directory of the DB2instance of the SLM databases on the local machine. If you installed DB2using the default db2admin user name, specify the home directory as/home/db2admin.
14. On the SLM Server port dialog, click Next to continue.15. On the SLA Notification Selection dialog, if you need to set up SLA
notification, see “Step 12. Specify Event Notification Methods” on page 83,otherwise click Next to continue.
16. On the feature summary dialog, click Next to proceed with the installation.17. After the installation and configuration is complete, click Finish.18. Unmount the CD as follows:
– For AIX, change the directory from the mounted directory and enterumount <mount_dir>
– For Solaris, change the directory from the mounted directory and entereject cdrom
– For Linux, change the directory from the mounted directory and entereject cdrom
19. Stop the WebSphere Application Server and restart it using the proceduresdefined in Chapter 6, “Startup and Shutdown Procedures”, on page 107.
11. Installing SLM Task DriversOn the Warehouse machine, install the SLM Task Drivers by doing the following:1. Insert the IBM Tivoli Service Level Advisor product CD and run install.bat.2. On the Welcome dialog, Next to continue.3. On the License Agreement dialog, select the I accept the terms in the license
agreement radio button and click Next to continue.4. On the Directory dialogs, accept the default locations for the Tivoli Common
Directory and the location where IBM Tivoli Service Level Advisor SLM TaskDrivers will be installed, and click Next to continue.
Appendix A. A Two-Machine Installation Example 143
5. On the Product Installation options dialog deselect the SLM Server and SLMReports check boxes, and verify that the IBM Tivoli Service Level Advisorand SLM Task Drivers check boxes are checked. Click Next to continue.
6. On the SLM Database dialog, select the Local radio button, and click Next tocontinue.
7. On the next dialog, accept the defaults that are presented in the fields, but inthe Password field, enter the DB2 password db2admin. Click Next to continue.
8. On the SLM Server Host Name dialog enter the fully qualified host name ofthe SLM machine, and click Next to continue.
9. On the feature summary dialog, click Next to perform the installation.10. After the files have been copied, click Next to restart Tivoli Presentation
Services.11. Wait for the IBM Console to finish rebuilding the online user assistance help
set. You can check for completeness by examining the most recent (check thetimestamp) stdoutn log file in the directory <PS_directory>\log\fwp_mcr. Lookfor the following message:FWP1734I The utility that was started by the Management Component
Repository to build the help set has completed successfully.
12. Installing the SLM Warehouse PackUse the install program for Tivoli Enterprise Data Warehouse to install the DYKwarehouse pack for IBM Tivoli Service Level Advisor target ETLs (the Registrationand Process ETLs):1. Insert the Tivoli Enterprise Data Warehouse product CD into the Warehouse
machine. The installation program will be automatically started.2. On the Welcome panel, click Next to continue.3. On the Setup Type dialog, verify that the Application installation only radio
button is selected, and click Next to continue.4. On the Host Name dialog, verify that the fully qualified host name for the
Warehouse machine is correct, and click Next to continue.5. On the DB2 Configuration dialog, specify the following DB2 user name and
password and click Next to continue:v User name: db2admin
v Password: db2admin
6. On the Application Packages dialog, select the check box to install applicationpackages, and click Next to continue. This will enable you to install theRegistration and Process ETLs for IBM Tivoli Service Level Advisor.
7. Remove the Tivoli Enterprise Data Warehouse product CD and insert the IBMTivoli Service Level Advisor product CD.
8. On the Installation Path dialog, click Browse and select the CD-ROM drive inthe bottom drop-down menu.
9. Double-click tedw_apps, then double-click dyk, then click OK.10. On the Application Package Directory Name dialog, verify that the directory
name is specified as <CD_ROM>:\tedw_apps\dyk\, where <CD_ROM> is theCD-ROM drive letter, and click Next to continue.
11. On the Application Packages dialog, verify that the check box is not selected,and click Next to continue.
12. On the feature summary dialog showing your selections, confirm yourselections and click Install to begin the installation.
144 IBM Tivoli Service Level Advisor: Getting Started with IBM Tivoli Service Level Advisor
13. Configuring the SLM Target ETLsOn the Warehouse machine, do the following:1. Start the DB2 Control Center and select Tools –> Data Warehouse Center.2. Click Advanced and change the control database to TWH_MD.3. Log in to the Data Warehouse Center with the default user name db2admin and
password db2admin.4. For each Warehouse Source and Warehouse Target, right-click and select
Properties from the context menu. On the Database tab, enter the default username db2admin and password db2admin.
Note: Configure multiple databases using the same user ID and password atthe same time by selecting either the Warehouse Sources or WarehouseTargets folder, highlight all desired databases at once, and set the userID and password for all the databases at the same time.
5. You need to enable source applications for which you want to collect andevaluate data in IBM Tivoli Service Level Advisor. Only data from enabledsource applications will be accepted for evaluation and analysis. See “EnablingData Collection for Source Applications” on page 97 for more information onenabling source applications.
6. Continue in the Data Warehouse Center to promote the ETLs to productionmode. See “Promoting the ETLs to Production Mode” on page 97 for theprocedure.
Populating The Warehouse DatabaseAt this point in the Quick Start installation, the base SLM solution has beeninstalled. The central data warehouse is in place, the two databases used by IBMTivoli Service Level Advisor are created, the Registration and Process ETLs areinstalled and configured to move data from the warehouse to the SLM databases,the SLM Server is installed and in communication with the databases, the SLMTask Drivers are integrated into the IBM Console, and the SLM Reports option isintegrated into the WebSphere Application Server environment.
The next steps involve populating the Tivoli Enterprise Data Warehouse databasewith data that can be used by IBM Tivoli Service Level Advisor. Depending onwhat you want to achieve in this environment, you can do either of the following:v Install one or more warehouse enablement packs that enable source applications
to write data into the warehouse database, for use in a production environmentv Install a set of sample data that simulates a production environment, enabling
you to learn more about using IBM Tivoli Service Level Advisor beforeintroducing it into your production environment.
Installing Warehouse Enablement PacksIf you have a source application installed that can store data into the TivoliEnterprise Data Warehouse database, and this source application is supported byIBM Tivoli Service Level Advisor (see “Enabling Data Collection for SourceApplications” on page 97), you can install one or more warehouse packs thatprovide the warehouse functionality for the associated source applications in yourenterprise. See “Installing Source Application Warehouse Packs” on page 55 andrefer to Installing and Configuring Tivoli Enterprise Data Warehouse and thewarehouse pack implementation guide for the source application, for moreinformation on installing and configuring warehouse packs.
Appendix A. A Two-Machine Installation Example 145

Installing Sample DataIf you do not have a source application that can put data into the warehousedatabase, you can load the Tivoli Enterprise Data Warehouse database with a set ofsample data that simulates the execution of a normal ETL putting data into thewarehouse database, and performs the generation of an SLA and the evaluation ofthe SLA data. For more information on installing and working with this sampledata, refer to the IBM Tivoli Service Level Advisor Support Web site (see the IBMTivoli Service Level Advisor Release Notes for information on accessing theSupport Web site).
146 IBM Tivoli Service Level Advisor: Getting Started with IBM Tivoli Service Level Advisor
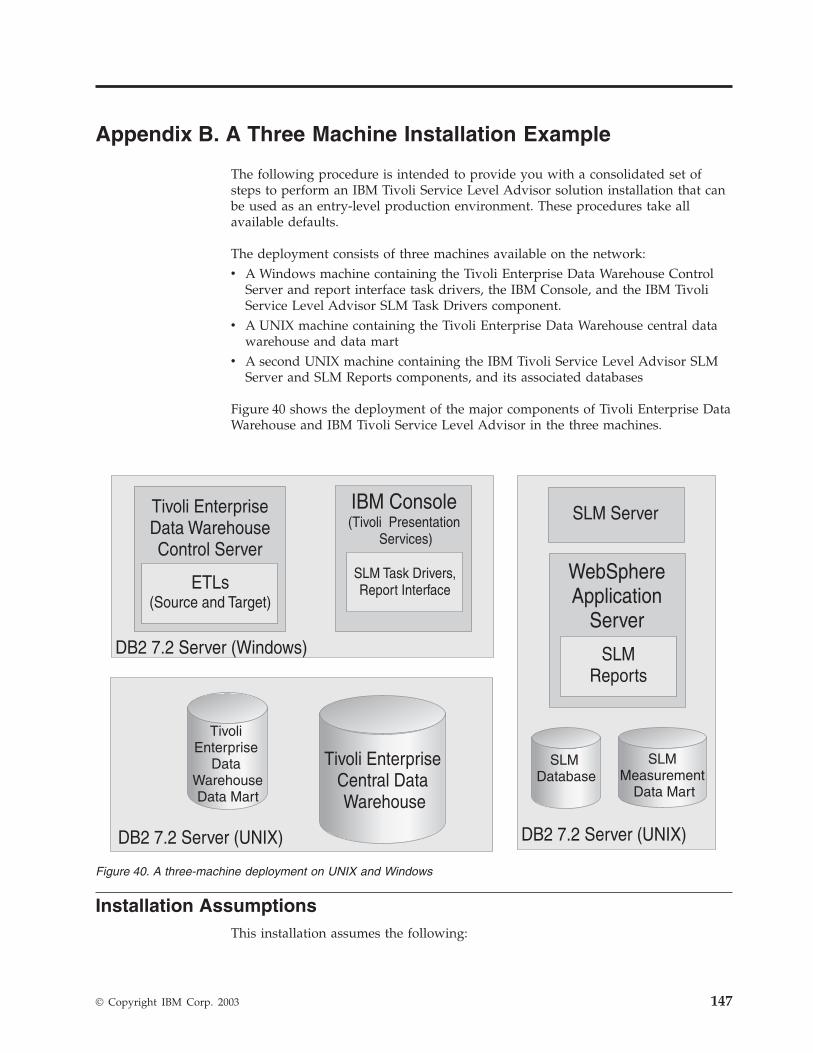
Appendix B. A Three Machine Installation Example
The following procedure is intended to provide you with a consolidated set ofsteps to perform an IBM Tivoli Service Level Advisor solution installation that canbe used as an entry-level production environment. These procedures take allavailable defaults.
The deployment consists of three machines available on the network:v A Windows machine containing the Tivoli Enterprise Data Warehouse Control
Server and report interface task drivers, the IBM Console, and the IBM TivoliService Level Advisor SLM Task Drivers component.
v A UNIX machine containing the Tivoli Enterprise Data Warehouse central datawarehouse and data mart
v A second UNIX machine containing the IBM Tivoli Service Level Advisor SLMServer and SLM Reports components, and its associated databases
Figure 40 shows the deployment of the major components of Tivoli Enterprise DataWarehouse and IBM Tivoli Service Level Advisor in the three machines.
Installation AssumptionsThis installation assumes the following:
Figure 40. A three-machine deployment on UNIX and Windows
© Copyright IBM Corp. 2003 147
v For purposes of this discussion, the two UNIX machines will be referred to asthe Warehouse machine and the SLM machine, and the Windows machine will bereferred to as the Control machine.
v The Warehouse machine and SLM machine are running on a UNIX (AIX, Solaris,Linux) platform. The Control machine is running on a Windows NT or Windows2000 platform.
v All machines have met all operating system configuration requirements definedin the Tivoli Enterprise Data Warehouse and IBM Tivoli Service Level Advisordocumentation (for example, see “Step 3. Ensure fully qualified host names” onpage 33 for information on configuring your system to return fully qualified hostnames)
v Any previous installation of Tivoli Enterprise Data Warehouse or IBM TivoliService Level Advisor has been completely removed from these machines, andthat only the operating systems are installed (no DB2 installed, no HTTP Serverinstalled). For this scenario, migration issues are not included.
v The machines are configured to automatically start from the product CD.v You have available the required installation CDs for the SLM solution, including:
– IBM DB2 7.2 with Fix Pack 5– IBM DB2 7.2 Fix Pack 6 (or later)– Tivoli Enterprise Data Warehouse 1.1– Tivoli Enterprise Data Warehouse 1.1 Fix Pack 2– IBM Tivoli Service Level Advisor 1.2.1– WebSphere 4.0.1 AES– WebSphere 4.0.2 or later upgrade
Note: Source application warehouse packs are not included in this list becauseyou will have the option to conclude this quick start procedure and installyour warehouse packs separately if desired, or to use a simulated set ofdata in the warehouse to use in a non-production environment forlearning purposes.
v You have familiarized yourself with the product by reading the overviews andinstallation procedures and completed the planning process suitable for yourentry-level production environment. If you intend to use this installation as aproduction environment, you should read this complete document to ensure thatyou have performed all pertinent configuration steps to have a successfulproduction environment.
v You have read through this entire appendix before beginning the installation tobe sure you understand all of the steps.
The installation procedure consists of the following major steps, which aredescribed in more detail in the remaining sections of this appendix:v Complete the planning worksheet for this installationv On the Control (Windows) machine:
– Install DB2 7.2 server with Fix Pack 5– Upgrade DB2 to Fix Pack 6 (or later)– Install the Tivoli Enterprise Data Warehouse 1.1 control server– Install the Tivoli Enterprise Data Warehouse 1.1 Report Interface and the IBM
Console (Tivoli Presentation Services)– Install the Tivoli Enterprise Data Warehouse 1.1 Fix Pack 2– Configure ODBC Datasources
148 IBM Tivoli Service Level Advisor: Getting Started with IBM Tivoli Service Level Advisor

– Install the IBM Tivoli Service Level Advisor SLM Task Drivers component– Install the IBM Tivoli Service Level Advisor target ETLs– Configure and schedule the target ETLs
v On the Warehouse (UNIX) machine:– Install DB2 7.2 server with Fix Pack 5– Upgrade DB2 to Fix Pack 6 (or later)– Install the Tivoli Enterprise Data Warehouse 1.1 Central Data Warehouse and
Data Mart– Install the Tivoli Enterprise Data Warehouse 1.1 Fix Pack 2
v On the SLM (UNIX) machine:– Install DB2 7.2 server with Fix Pack 5– Upgrade DB2 to Fix Pack 6 (or later)– Create the SLM Databases– Install WebSphere Application Server 4.0.1– Upgrade to WebSphere 4.0.2 or later– Install the IBM Tivoli Service Level Advisor SLM Server and SLM Reports
components
Performing the above steps will prepare your three-machine SLM solution forreceiving and processing data from one or more source applications that will writedata into the central data warehouse. You must perform additional steps to installand configure the various source applications and their associated warehousepacks in order to begin putting data into the central data warehouse. You canoptionally install a set of simulated data that may be useful in evaluating yourproduction environment and learning how your SLM solution works. Theseadditional steps are not included in this appendix. See “Warehouse Packs” onpage ix to find information on currently available warehouse packs.
1. Planning for InstallationPlanning worksheets exist for both Tivoli Enterprise Data Warehouse and IBMTivoli Service Level Advisor installation procedures, and should be completedbefore installing these products. For this particular installation, the planninginformation required is a subset of the full planning worksheets. Table 14 specifiesthe planning information you should gather for this installation.
Table 14. Planning sheet for this Quick Start installation
Item to plan for Your response
Fully qualified host name of the Warehousemachine
Fully qualified host name of the SLMmachine
Fully qualified host name of the Controlmachine
User ID and password for the SLM machine
WebSphere node name (see step 10 onpage 139)
Appendix B. A Three Machine Installation Example 149
2. Installing DB2 Server on the UNIX MachinesInstall DB2 Universal Enterprise Edition Server software on both the Warehouseand SLM machines by doing the following:1. Before starting the installation, be sure to check the DB2 ″Quick Beginnings″
document for specific procedures that you need to complete depending on theUNIX platform on which you are installing DB2.
2. Insert the DB2 product CD and mount it as follows:v For AIX, issue the following command, where <mount_dir> is the mount
directory:mount -rv cdrfs /dev/cd0 <mount_dir>
v For Solaris, the CD is automatically mounted on /cdrom/cdrom0
v For Linux, issue the following command:mount /mnt/cdrom
3. Change to the mounting directory.4. Run the following command:
./db2setup
5. On the DB2 product selection dialog, use the tab key to navigate to DB2 UDBEnterprise Edition and select it using the space bar.
6. Using the tab key, navigate to OK and press Enter to continue.7. The Create DB2 Services dialog is displayed. This includes entries to create
DB2 Instance and DB2 Administration Server. Using the tab key, navigate toCreate DB2 Instance, and select it using the spacebar.
8. The Authentication dialog for DB2 Instance is displayed. Specify theusername as db2admin, the home directory as /home/db2admin or/export/home/db2admin (depending on the directory where the home file systemis mounted), and the password as db2admin. Verify the password again, andusing the tab key, navigate to OK and press Enter.
9. The Fenced User dialog is displayed. Accept all defaults (except you maywant to change the home directory, similar to the previous step). Specify thepassword as db2fenc1 and specify it again to verify it. Using the tab key,navigate to OK and press Enter.
10. The DB2 Warehouse Control Database dialog is displayed. Choose the optionto not create the Control Database (this is created on the Control machine).Navigate to OK and press Enter.
11. The DB2 Warehouse Control Database setup dialog is displayed. Accept alldefaults, and navigate to OK and press Enter.
12. The Create DB2 Services dialog is displayed again. This time, navigate toCreate Administration Server, and select it using the spacebar. Navigate toOK and press Enter.
13. The Administration Server dialog is displayed. Accept all defaults. Specifythe password as db2as and specify it again to verify it. Navigate to OK andpress Enter.
14. A notice is displayed, informing you that DB2SYSTEM will be set to the hostname. Navigate to OK and press Enter.
15. The Create DB2 Services dialog is displayed once more. Navigate to OK andpress Enter.
16. The DB2 Setup Utility dialog is displayed. Navigate to Continue and pressEnter.
150 IBM Tivoli Service Level Advisor: Getting Started with IBM Tivoli Service Level Advisor
17. A warning is displayed indication that this is your last chance to makecorrections or changes before the installation begins. Navigate to OK andpress Enter to start the installation of the DB2 Server.
18. The installation will take a few minutes to complete. If the installation fails,examine the log at /tmp/db2setup.log for specific error messages, and correctany problems before attempting to install again.
19. You are returned to the command prompt. Unmount the CD as follows:v For AIX, change the directory from the mounted directory and enter umount
<mount_dir>
v For Solaris, change the directory from the mounted directory and entereject cdrom
v For Linux, change the directory from the mounted directory and entereject cdrom
20. Reboot the system to complete the installation.
Be sure to run this install procedure on both the Warehouse and SLM (UNIX)machines.
3. Installing DB2 Server on the Windows MachineInstall the DB2 server software on the Control (Windows) machine by doing thefollowing:1. Insert the DB2 product CD to start the DB2 install program, and click Install.2. On the DB2 product selection dialog, check DB2 Enterprise Edition install
option (this should be the only option checked). Click Next to continue.3. On the Installation Type and Destination Location dialogs, accept the defaults
and click Next to continue.4. On the Control Center Server dialog, specify the following DB2 user name and
password and click Next to continue (if a message is displayed regardingcreation of the user ID, click Yes to continue):v User name: db2admin
v Password: db2admin
5. On the Current Settings dialog, click Next to perform the installation.6. When the installation completes, click Finish and then click Exit.7. Reboot the system to complete the installation
4. Upgrading to DB2 7.2 Fix Pack 6 (or later)You can download DB2 7.2 Fix Pack 6 (or later) from the Tivoli Enterprise DataWarehouse support Web site:http://www.ibm.com/software/sysmgmt/products/support/
TivoliDataWarehouse.html
Upgrade your installation of DB2 7.2 to Fix Pack 6 (or later) by doing the followingfor all three machines:v For Windows:
1. Stop all services associated with DB2 by starting a DB2 command promptand issuing the following commands:db2stop force
db2admin stop
Appendix B. A Three Machine Installation Example 151
2. Navigate to the Services control panel and stop all services with DB2 in thename, along with Warehouse Server and Warehouse Logger services.
3. Navigate to the directory where you downloaded DB2 Fix Pack 6 (or later)and run the following program:setup.exe
Note: If you receive the following message, click Yes and continue theinstall:DB2 is currently running and locked by the following process(es):
jservice.exe
4. Follow the instructions in the install program to install the fix pack.v For UNIX:
1. Verify that the root user is a member of the db2iadm1 group. If not, add theroot user to this group using admintool or a similar tool.
2. While logged in as root, su to the DB2 instance owner and source thedb2profile by starting a db2 command prompt and issuing the command:. ./sqllib/db2profile
3. Enter the following commands for each instance:db2 force applications all
db2 terminate
db2stop
Repeat these steps for each instance.
Note: To retrieve a list of instances, enter the following command:db2ilist
4. While logged in as root, su to the DB2 Administrative Server owner andsource the db2profile
5. While logged in as root, navigate to the location where you unzipped the fixpack image and run the following command:./installFixPak
6. After the installation has completed successfully, update each instance withthe following command:– For Solaris:
/opt/IBMdb2/V7.1/instance/db2iupdt <instance_name>
– For AIX:/usr/lpp/db2_07_01/instance/db2iupdt <instance_name>
– For Linux:/usr/IBMdb2/V7.1/instance/db2iupdt <instance_name>
Be sure to perform the above procedure on the Control, Warehouse, and SLMmachines.
5. Configuring the Database Manager to use Extended Shared MemoryTo enable this support for extended shared memory, do the following on theWarehouse and SLM machines (this may not be required on all UNIX platforms):1. Add EXTSHM=ON to the /etc/environment file2. From a DB2 command prompt, run the following command:
db2set DB2ENVLIST=EXTSHM
152 IBM Tivoli Service Level Advisor: Getting Started with IBM Tivoli Service Level Advisor
3. Add the following lines to sqllib/userprofile:EXTSHM=ON
export EXTSHM
Note: If the userprofile script does not exist, create it and add the above lineto the script file. Also, refer to “Step 8. Update the JDBC Level for DB2”on page 40 to check your JDBC level and modify the userprofile script
if needed.4. Reboot the Warehouse machine to put the changes into effect.
Be sure to perform these steps on both the Warehouse and the SLM machines.
6. Installing the Central Data Warehouse and Data MartOn the Warehouse machine, install the Tivoli Enterprise Data Warehouse CentralData Warehouse and Data Mart by doing the following:1. Insert the Tivoli Enterprise Data Warehouse product CD and mount it as
follows:v For AIX, issue the following command, where <mount_dir> is the mount
directory:mount -rv cdrfs /dev/cd0 <mount_dir>
v For Solaris, the CD is automatically mounted on /cdrom/cdrom0
v For Linux, issue the following command:mount /mnt/cdrom
2. Change to the mounting directory.3. Run the following command:
./setup_unix.sh
4. On the Welcome panel, click Next to continue.5. The Setup Type dialog is displayed. Select the Custom/Distributed radio
button, change the name of the target install directory if desired, and clickNext to continue.
6. The Features dialog is displayed. Select the Central Data Warehouse andData mart options, and click Next to continue.
Note: For AIX and Linux platforms, verify that the refresh of the panel iscompleted before selecting the options.
7. The Host Name dialog is displayed. Enter the fully qualified host name (oraccept the default if it is correct) of the local (Warehouse) machine and clickNext to continue.
8. On the DB2 Configuration dialog, specify the following DB2 user name andpassword and click Next to continue:v User name: db2admin
v Password: db2admin
9. On the Additional Languages dialog, click Next to continue.
Note: If additional languages are needed, refer to the Tivoli Enterprise DataWarehouse documentation for information on installing language packs.
10. A dialog is displayed prompting you for information for remote access to DB2on the Control machine. Specify the values for username, password, host
Appendix B. A Three Machine Installation Example 153
name, and port number of the Control machine (the Windows machine whereyou plan to install the Tivoli Enterprise Data Warehouse control server), andclick Next to continue.
11. On the feature summary dialog showing your selections, confirm yourselections and click Install to begin the installation.
12. Wait for the installation to complete. Click Finish to finish the installation.13. You are returned to the command prompt. Unmount the CD as follows:
v For AIX, change the directory from the mounted directory and enter umount<mount_dir>
v For Solaris, change the directory from the mounted directory and entereject cdrom
v For Linux, change the directory from the mounted directory and entereject cdrom
14. Reboot the system to complete the installation.
7. Installing the Control Server and Report InterfaceOn the Control (Windows) machine, install the Tivoli Enterprise Data Warehousecontrol server and Report Interface, along with Tivoli Presentation Services and theIBM Console by doing the following:1. Insert the Tivoli Enterprise Data Warehouse product CD. The installation
program will be automatically started.2. On the Welcome panel, click Next to continue.3. The Setup Type dialog is displayed. Select the Custom/Distributed radio
button, change the name of the target install directory if desired, and clickNext to continue.
4. The Features dialog is displayed. Select the Tivoli Enterprise Data Warehousecontrol server and Report interface options, and click Next to continue.
Note: For AIX and Linux platforms, verify that the refresh of the panel iscompleted before selecting the options.
5. The Host name dialog is displayed. Verify that the fully qualified host namefor the Control machine is correct, and change it if needed. Click Next tocontinue.
6. On the DB2 Configuration dialog, specify the following DB2 user name andpassword and click Next to continue:v User name: db2admin
v Password: db2admin
7. The wizard checks to see if Tivoli Presentation Services is installed, and if not,a dialog is displayed. For purposes of this install scenario, assume that noother HTTP server is already installed on this machine, and accept all defaultvalues for port numbers and directory name. Click Next to continue.
Note: If another HTTP server exists for this machine, you must change theIBM HTTP Server Port to another port, such as 81, and the IBM HTTPAdministration Port to another port, such as 8009 to avoid conflicts,and verify that the existing HTTP server is stopped for this install.
8. On the Additional Languages dialog, click Next to continue.
Note: If additional languages are needed, refer to the Tivoli Enterprise DataWarehouse documentation for information on installing language packs.
154 IBM Tivoli Service Level Advisor: Getting Started with IBM Tivoli Service Level Advisor
9. A dialog is displayed prompting you for information for remote access to DB2on the Warehouse machine (where the Central Data Warehouse is installed).Specify the values for username, password, host name, and port number ofthe Warehouse machine, and click Next to continue.
10. A dialog is displayed prompting you for information for remote access to DB2databases containing data marts on the Warehouse machine (where the TivoliEnterprise Data Warehouse Data mart is installed). Specify the values forusername, password, host name, and port number of the Warehouse machine,and click Next to continue.
11. On the feature summary dialog showing your selections, confirm yourselections and click Install to begin the installation.
12. After the installation program has copied files and configured theenvironment, the Installation Summary window is displayed. Click Next tocontinue.
13. Do not select the option to restart the system at this time. Click Next and thenclick Finish.
14. Wait for the IBM Console to finish rebuilding the online user assistance helpset. You can check for completeness by examining the most recent (highestnumbered n) stdoutn log file in the directory <PS_directory>\log\fwp_mcr,where <PS_directory> is the location where Tivoli Presentation Services wasinstalled. Look for the following message:FWP1734I The utility that was started by the Management Component
Repository to build the help set has completed successfully.
15. Reboot the system to complete the installation.
8. Installing Tivoli Enterprise Data Warehouse 1.1 Fix Pack 2IBM Tivoli Service Level Advisor requires Tivoli Enterprise Data Warehouse 1.1with Fix Pack 2 to be installed. Refer to the Tivoli Enterprise Data Warehouse Fix Pack2 Readme and the Tivoli Enterprise Data Warehouse support Web site for fix packinformation. Install the fix pack on both the Warehouse and the Control machines.
9. Installing WebSphereThis procedure installs WebSphere Advanced Edition Single Server (AES), Version4.0.1, that is shipped with IBM Tivoli Service Level Advisor. When this iscompleted you must also upgrade to at least verion 4.0.2. See “Upgrading fromWebSphere AES or AE 4.0.1” on page 59 for more information.If you have anotherversion of WebSphere, consult the accompanying WebSphere documentation foradditional install information.
To install Websphere AES 4.0.1 on the SLM machine, do the following:1. Mount the UNIX version of the WebSphere AES 4.0.1 CD:
v For AIX, issue the following command, where <mount_dir> is the mountdirectory:mount -rv cdrfs /dev/cd0 <mount_dir>
v For Solaris, the CD is automatically mounted on /cdrom/cdrom0
v For Linux, issue the following command:mount /mnt/cdrom
2. Change to the mounted directory <mount_dir>/<os version>, where <osversion>is aix for AIX, sun for Solaris, and linux for Linux.
3. Run the following command:
Appendix B. A Three Machine Installation Example 155
./install.sh
4. The Welcome banner is displayed. Click Next to display a window withWebsphere AES operating system prerequisites. If everything is satisfactory,click OK to continue, or update the operating system with the required fixesby downloading them from the corresponding operating system support Website.
5. Select Typical Installation and click Next to continue.6. The Destination Directory window is displayed, showing the default
installation directory of WebSphere and the IBM HTTP Server. Accept thesedefaults and click Next to continue.
7. The Install Options window is displayed, listing the components to beinstalled. Click Install, which starts the installation. At the end, click Finish tocomplete the installation.
8. Unmount the CD as follows:v For AIX, change the directory from the mounted directory and enter umount
<mount_dir>
v For Solaris, change the directory from the mounted directory and entereject cdrom
v For Linux, change the directory from the mounted directory and entereject cdrom
9. Verify that db2profile is sourced before starting the WebSphere ApplicationServer by issuing the following command, where <Instance_Dir> is the DB2instance directory:. <Instance_Dir>/sqllib/db2profile
For example,. /home/db2inst1/sqllib/db2profile
10. Completion of the installation launches the First Steps html page if Netscapeis installed. You can use this html page to start and stop the WebsphereApplication Server, or see Chapter 6, “Startup and Shutdown Procedures”, onpage 107 for the procedures to start and stop the Websphere ApplicationServer and the HTTP Server.
Be sure to upgrade your WebSphere installation to version 4.0.2 or later. See“Upgrading from WebSphere AES or AE 4.0.1” on page 59 for more information.
Configuring the JDBC Driver for WebSphereAfter the Websphere and HTTP Server are started, configure the JDBC Driver forWebSphere by doing the following:1. Open your Web browser and point to the following Web site:
http://<host name>:9090/admin
2. Sign on using admin as the user ID.3. The Administrative Console is displayed. Expand Resources in the navigation
tree in the left pane.4. Expand JDBC Drivers and select DB2Jdbc Driver.5. In the Server Class Path field, enter the path and file name of the location of
the DB2 driver, similar to the following example, where<db2_server_install_directory> is the location where the DB2 server is installed onthis machine, and then click OK:<db2_server_install_directory>\java12\db2java.zip
156 IBM Tivoli Service Level Advisor: Getting Started with IBM Tivoli Service Level Advisor
Note: If you installed DB2 using the defaults, <db2_server_install_directory>should be entered as C:\Program Files\sqllib.
6. A hotspot, Configuration needs to be saved, is displayed. Click this hotspot tosave the configuration, then log off using Exit.
7. Stop the WebSphere Application Server and restart it using the proceduresdefined in Chapter 6, “Startup and Shutdown Procedures”, on page 107.
10. Creating Databases for IBM Tivoli Service Level AdvisorThis installation procedure creates the two databases used by IBM Tivoli ServiceLevel Advisor, the SLM Database and the SLM Measurement Data Mart. In thisinstallation, these databases are created on the SLM (UNIX) machine.
Note: The installation of Tivoli Enterprise Data Warehouse must be completedbefore beginning this installation procedure.
To create these two databases on the SLM machine, source the db2profile and dothe following:1. Insert the IBM Tivoli Service Level Advisor product CD and mount it as
follows:v For AIX, issue the following command, where <mount_dir> is the mount
directory:mount -rv cdrfs /dev/cd0 <mount_dir>
v For Solaris, the CD is automatically mounted on /cdrom/cdrom0
2. Change to the mounting directory.3. Navigate to database/scripts/<OS_type>, where <OS_type> is one of the
following:v For AIX: aix4-r1
v For Solaris: solaris2
4. Run the following command:./dyk_cat_dbinst.sh
5. Specify the db2 user name as db2admin
6. Specify the db2 password as db2admin
7. Accept the default of dyk_cat for the database name8. Specify the home directory for the DB2 user.9. Accept the default territory of US or change this to another if desired.
10. Specify the name and path of the log file11. Specify the name and path of the verification log file12. Enter Y in response to the next two prompts13. Enter Y to enable log retain
The SLM Database (dyk_cat) database is then created. Repeat this procedure tocreate the SLM Measurement Data Mart (dyk_dm) database, running thedyk_dm_dbinst.sh script in step 4 and specifying the database name as dyk_dm instep 7.
11. Configuring ODBC Data SourcesTo configure ODBC data sources on the Control machine, do the following:
Appendix B. A Three Machine Installation Example 157
1. Insert the IBM Tivoli Service Level Advisor product CD in the CD-ROM driveof the Control machine.
2. Select Start –>Run and run the db2cmd command to initialize a DB2 commandsession. A window titled DB2 CLP will be started. Steps 3-4 should be executedin that window.
3. To create the ODBC data source named DYK_CAT for the SLM Database,navigate to the <CD-ROM>\database\scripts\w32-ix86\ directory, where<CD-ROM> is the CD-ROM drive letter, and run the following command,where <SLM_hostname> is the fully qualified host name of the SLM machine,where the database is located:dyk_cat_odbc.bat <SLM_hostname>
4. Similarly, to create the ODBC data source named DYK_DM for the SLMMeasurement Data Mart, run the following script:dyk_dm_odbc.bat <SLM_hostname>
12. Installing the SLM Server and SLM ReportsInstall the SLM Server and SLM Reports options of IBM Tivoli Service LevelAdvisor on the SLM machine by sourcing the db2profile and doing the following:1. Mount the IBM Tivoli Service Level Advisor product CD:
v For AIX, issue the following command, where <mount_dir> is the mountdirectory:mount -rv cdrfs /dev/cd0 <mount_dir>
v For Solaris, the CD is automatically mounted on /cdrom/cdrom0
v For Linux, issue the following command:mount /mnt/cdrom
2. Run the following command:./install.sh
3. On the Welcome dialog, Next to continue.4. On the License Agreement dialog, select the I accept the terms in the license
agreement radio button and click Next to continue.5. On the Directory dialogs, accept the default locations for the Tivoli Common
Directory and the location where IBM Tivoli Service Level Advisor will beinstalled, and click Next to continue.
6. On the Product Installation Options dialog, deselect the SLM Task Driverscheck box, leaving the other install options checked. Click Next to continue.
7. On the WebSphere Directory dialog, click Next to continue.8. Obtain the WebSphere node name (see “Identifying the WebSphere Node
Name” on page 61). You might be able to obtain the node name quickly bydoing the following:a. Open a Web browser and point to http://<host name>:9090/admin, where
<host name> is the host name of your local machine (the SLM machine)b. The WebSphere Application Server Login window is displayed. Enter any
name in the user ID field, or leave it blank, and click Submit.c. The WebSphere Administrative Console is displayed. In the left pane, click
the plus sign next to Nodes. The WebSphere node name will be displayedunder Nodes. Write it down for later use.
9. On the WebSphere Node Name dialog, enter the WebSphere node name youfound in the previous step. Click Next to continue.
158 IBM Tivoli Service Level Advisor: Getting Started with IBM Tivoli Service Level Advisor
Note: This node name is case-sensitive and must be entered exactly as foundin the previous step.
10. On the SLM Database dialog, select the Local radio button (because thedatabase is created on the SLM machine), and click Next to continue.
11. On the next dialog, accept the defaults that are presented in the fields, but inthe Password field, enter the DB2 password db2admin. Click Next to continue.
12. On the SLM Measurement Data Mart dialog, select the Local radio button(because the database is created on the SLM machine), and click Next tocontinue.
13. On the next dialog, accept the defaults that are presented in the fields, but inthe Password field, enter the DB2 password db2admin. Click Next to continue.
14. On the DB2 Instance directory dialog, enter the home directory of the DB2instance of the SLM databases on the local machine. If you installed DB2using the default db2admin user name, specify the home directory as/home/db2admin.
15. On the SLM Server port dialog, click Next to continue.16. On the SLA Notification Selection dialog, if you need to set up SLA
notification, see “Step 12. Specify Event Notification Methods” on page 83,otherwise click Next to continue (for this sample installation, you can justcontinue without specifying any event notification options).
17. On the feature summary dialog, click Next to proceed with the installation.18. After the installation and configuration is complete, click Finish.19. Unmount the CD as follows:
v For AIX, change the directory from the mounted directory and enter umount<mount_dir>
v For Solaris, change the directory from the mounted directory and entereject cdrom
v For Linux, change the directory from the mounted directory and entereject cdrom
20. Stop the WebSphere Application Server and restart it using the proceduresdefined in Chapter 6, “Startup and Shutdown Procedures”, on page 107.
13. Installing SLM Task DriversOn the Control (Windows) machine, install the SLM Task Drivers component ofIBM Tivoli Service Level Advisor by doing the following:1. Insert the IBM Tivoli Service Level Advisor product CD and run install.bat.2. On the Welcome dialog, Next to continue.3. On the License Agreement dialog, select the I accept the terms in the license
agreement radio button and click Next to continue.4. On the Directory dialogs, accept the default locations for the Tivoli Common
Directory and the location where IBM Tivoli Service Level Advisor will beinstalled, and click Next to continue.
5. On the Product Installation options dialog deselect the SLM Server and SLMReports check boxes, and verify that the IBM Tivoli Service Level Advisorand SLM Task Drivers check boxes are checked. Click Next to continue.
6. On the SLM Database dialog, select the Remote radio button (because thedatabase is created on the SLM machine), and click Next to continue.
7. On the next dialog, accept the defaults that are presented in the fields, but inthe Password field, enter the DB2 password db2admin, and in the Database
Appendix B. A Three Machine Installation Example 159
Server Host Name field, enter the fully qualified host name of the SLMmachine, which is where the SLM Database was created. Click Next tocontinue.
8. On the SLM Server Host Name dialog enter the fully qualified host name ofthe SLM machine, and click Next to continue.
9. On the feature summary dialog, click Next to perform the installation.10. After the files have been copied, click Next to restart Tivoli Presentation
Services.11. Wait for the IBM Console to finish rebuilding the online user assistance help
set. You can check for completeness by examining the most recent (highestnumbered n) stdoutn log file in the directory <PS_directory>\log\fwp_mcr.Look for the following message:FWP1734I The utility that was started by the Management Component
Repository to build the help set has completed successfully.
12. Reboot the system to complete the installation.
14. Installing Target ETLsThe Process and Registration ETLs that move data from the Tivoli Enterprise DataWarehouse database into the SLM Database and SLM Measurement Data Martdatabases for use by IBM Tivoli Service Level Advisor are installed on the Controlmachine where the Tivoli Enterprise Data Warehouse control server is installed.This installation assumes that the installation of Tivoli Enterprise Data Warehousewas completed successfully.
On the Control machine, install the Registration and Process ETLs by doing thefollowing:1. Insert the Tivoli Enterprise Data Warehouse product CD. The installation
program will be automatically started.2. On the Welcome panel, click Next to continue.3. On the Setup Type dialog, select the Application installation only radio
button, and click Next to continue.4. On the Host Name dialog, verify that the fully qualified host name for the
Control machine is correct, and click Next to continue.5. On the DB2 Configuration dialog, specify the following DB2 user name and
password and click Next to continue:v User name: db2admin
v Password: db2admin
6. A dialog is displayed prompting you for information for remote access to DB2on the Warehouse machine (where the Central Data Warehouse is installed).Specify the values for username, password, host name, and port number ofthe Warehouse machine, and click Next to continue.
7. A dialog is displayed prompting you for information for remote access to DB2databases containing data marts on the SLM machine (where the SLMDatabase and SLM Measurement Data Mart are installed). Specify the valuesfor username, password, host name, and port number of the SLM machine,and click Next to continue.
8. A dialog is displayed prompting you to enter the path to the installationmedia for the application packages. The target ETLs for IBM Tivoli ServiceLevel Advisor are installed from the IBM Tivoli Service Level Advisor productCD. Remove the Tivoli Enterprise Data Warehouse product CD and insert theIBM Tivoli Service Level Advisor product CD.
160 IBM Tivoli Service Level Advisor: Getting Started with IBM Tivoli Service Level Advisor

9. On the Installation Path dialog, click Browse and select the CD-ROM drive inthe bottom drop-down menu.
10. Double-click tedw_apps, then double-click dyk, then click OK.11. On the Application Package Directory Name dialog, verify that the directory
name is specified as <CD_ROM>:\tedw_apps\dyk\, where <CD_ROM> is theCD-ROM drive letter, and click Next to continue.
12. On the Additional Applications Packages dialog, verify that the check box isnot checked and click Next to continue.
13. On the feature summary dialog showing your selections, confirm yourselections and click Install to begin the installation.
14. Wait for the installation to complete, and click Finish.15. Reboot the system to complete the installation.
15. Configuring SLM ETLsOn the Control machine, do the following:1. Start the DB2 Control Center and select Tools –> Data Warehouse Center.2. Click Advanced and change the control database to TWH_MD.3. Log in to the Data Warehouse Center with the default user name db2admin and
password db2admin.4. For each Warehouse Source and Warehouse Target, right-click and select
Properties from the context menu. On the Database tab, enter the default username db2admin and password db2admin.
Note: Configure multiple databases using the same user ID and password atthe same time by selecting either the Warehouse Sources or WarehouseTargets folder, highlight all desired databases at once, and set the userID and password for all the databases at the same time.
5. You need to enable source applications for which you want to collect andevaluate data in IBM Tivoli Service Level Advisor. Only data from enabledsource applications will be accepted for evaluation and analysis. See “EnablingData Collection for Source Applications” on page 97 for more information onenabling source applications.
6. Continue in the Data Warehouse Center to promote the ETLs to productionmode. See “Promoting the ETLs to Production Mode” on page 97 for theprocedure.
Populating The Warehouse DatabaseAt this point in the Quick Start installation, the base SLM solution has beeninstalled. The central data warehouse is in place, the two databases used by IBMTivoli Service Level Advisor are created, the Registration and Process ETLs areinstalled and configured to move data from the warehouse to the SLM databases,the SLM Server is installed and in communication with the databases, the SLMTask Drivers are integrated into the IBM Console, and the SLM Reports option isintegrated into the WebSphere Application Server environment.
The next steps involve populating the Tivoli Enterprise Data Warehouse databasewith data that can be used by IBM Tivoli Service Level Advisor. Depending onwhat you want to achieve in this environment, you can do either of the following:v Install one or more warehouse enablement packs that enable source applications
to write data into the warehouse database, for use in a production environment
Appendix B. A Three Machine Installation Example 161
v Install a set of sample data that simulates a production environment, enablingyou to learn more about using IBM Tivoli Service Level Advisor beforeintroducing it into your production environment.
Installing Warehouse PacksIf you have a source application installed that can store data into the TivoliEnterprise Data Warehouse database, and this source application is supported byIBM Tivoli Service Level Advisor (see “Enabling Data Collection for SourceApplications” on page 97), you can install one or more warehouse packs thatprovide the warehouse functionality for the assocuated source applications in yourenterprise. See “Installing Source Application Warehouse Packs” on page 55 andrefer to Installing and Configuring Tivoli Enterprise Data Warehouse and thewarehouse pack implementation guide for the source application, for moreinformation on installing and configuring warehouse packs.
Installing Sample DataIf you do not have a source application that can put data into the warehousedatabase, you can load the Tivoli Enterprise Data Warehouse database with a set ofsample data that simulates the execution of a normal ETL putting data into thewarehouse database, and performs the generation of an SLA and the evaluation ofthe SLA data. For more information on installing and working with this sampledata, refer to the IBM Tivoli Service Level Advisor Support Web site (see the IBMTivoli Service Level Advisor Release Notes for information on accessing theSupport Web site).
162 IBM Tivoli Service Level Advisor: Getting Started with IBM Tivoli Service Level Advisor
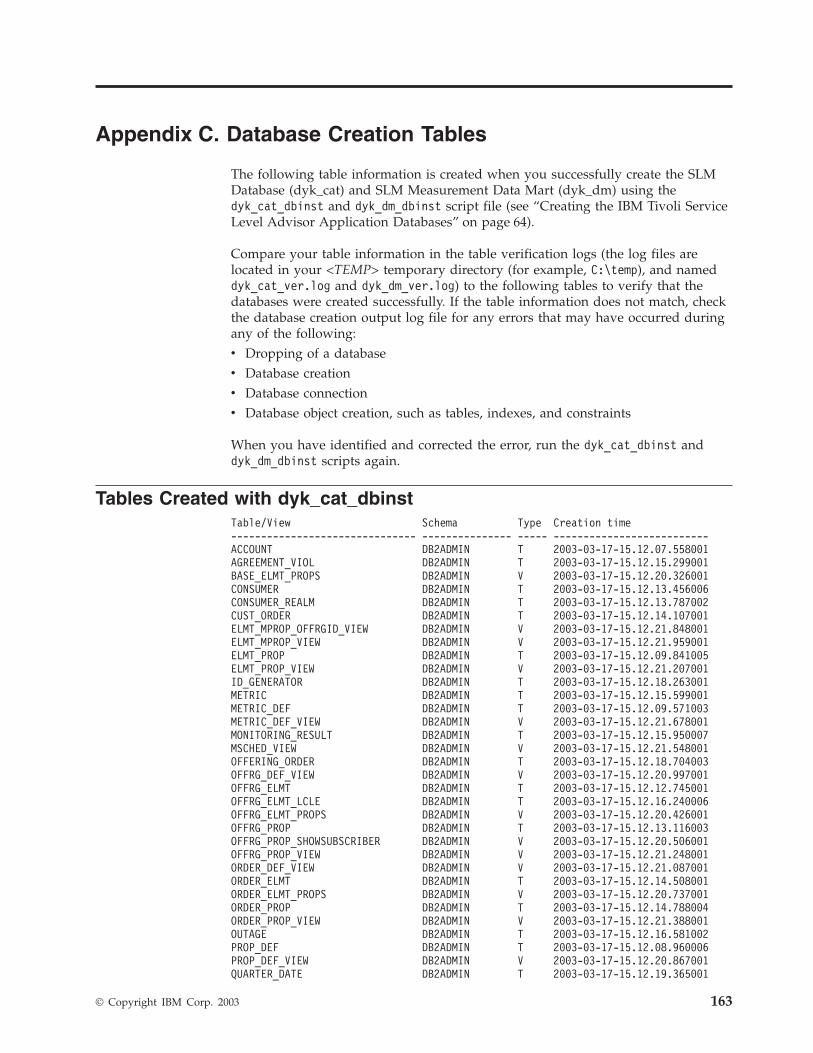
Appendix C. Database Creation Tables
The following table information is created when you successfully create the SLMDatabase (dyk_cat) and SLM Measurement Data Mart (dyk_dm) using thedyk_cat_dbinst and dyk_dm_dbinst script file (see “Creating the IBM Tivoli ServiceLevel Advisor Application Databases” on page 64).
Compare your table information in the table verification logs (the log files arelocated in your <TEMP> temporary directory (for example, C:\temp), and nameddyk_cat_ver.log and dyk_dm_ver.log) to the following tables to verify that thedatabases were created successfully. If the table information does not match, checkthe database creation output log file for any errors that may have occurred duringany of the following:v Dropping of a databasev Database creationv Database connectionv Database object creation, such as tables, indexes, and constraints
When you have identified and corrected the error, run the dyk_cat_dbinst anddyk_dm_dbinst scripts again.
Tables Created with dyk_cat_dbinstTable/View Schema Type Creation time------------------------------- --------------- ----- --------------------------ACCOUNT DB2ADMIN T 2003-03-17-15.12.07.558001AGREEMENT_VIOL DB2ADMIN T 2003-03-17-15.12.15.299001BASE_ELMT_PROPS DB2ADMIN V 2003-03-17-15.12.20.326001CONSUMER DB2ADMIN T 2003-03-17-15.12.13.456006CONSUMER_REALM DB2ADMIN T 2003-03-17-15.12.13.787002CUST_ORDER DB2ADMIN T 2003-03-17-15.12.14.107001ELMT_MPROP_OFFRGID_VIEW DB2ADMIN V 2003-03-17-15.12.21.848001ELMT_MPROP_VIEW DB2ADMIN V 2003-03-17-15.12.21.959001ELMT_PROP DB2ADMIN T 2003-03-17-15.12.09.841005ELMT_PROP_VIEW DB2ADMIN V 2003-03-17-15.12.21.207001ID_GENERATOR DB2ADMIN T 2003-03-17-15.12.18.263001METRIC DB2ADMIN T 2003-03-17-15.12.15.599001METRIC_DEF DB2ADMIN T 2003-03-17-15.12.09.571003METRIC_DEF_VIEW DB2ADMIN V 2003-03-17-15.12.21.678001MONITORING_RESULT DB2ADMIN T 2003-03-17-15.12.15.950007MSCHED_VIEW DB2ADMIN V 2003-03-17-15.12.21.548001OFFERING_ORDER DB2ADMIN T 2003-03-17-15.12.18.704003OFFRG_DEF_VIEW DB2ADMIN V 2003-03-17-15.12.20.997001OFFRG_ELMT DB2ADMIN T 2003-03-17-15.12.12.745001OFFRG_ELMT_LCLE DB2ADMIN T 2003-03-17-15.12.16.240006OFFRG_ELMT_PROPS DB2ADMIN V 2003-03-17-15.12.20.426001OFFRG_PROP DB2ADMIN T 2003-03-17-15.12.13.116003OFFRG_PROP_SHOWSUBSCRIBER DB2ADMIN V 2003-03-17-15.12.20.506001OFFRG_PROP_VIEW DB2ADMIN V 2003-03-17-15.12.21.248001ORDER_DEF_VIEW DB2ADMIN V 2003-03-17-15.12.21.087001ORDER_ELMT DB2ADMIN T 2003-03-17-15.12.14.508001ORDER_ELMT_PROPS DB2ADMIN V 2003-03-17-15.12.20.737001ORDER_PROP DB2ADMIN T 2003-03-17-15.12.14.788004ORDER_PROP_VIEW DB2ADMIN V 2003-03-17-15.12.21.388001OUTAGE DB2ADMIN T 2003-03-17-15.12.16.581002PROP_DEF DB2ADMIN T 2003-03-17-15.12.08.960006PROP_DEF_VIEW DB2ADMIN V 2003-03-17-15.12.20.867001QUARTER_DATE DB2ADMIN T 2003-03-17-15.12.19.365001
© Copyright IBM Corp. 2003 163

REALM DB2ADMIN T 2003-03-17-15.12.11.754003RESULTVIEW DB2ADMIN V 2003-03-17-15.12.22.249001SCHEDULE DB2ADMIN T 2003-03-17-15.12.10.192002SCHEDULE_HIERARCHY DB2ADMIN T 2003-03-17-15.12.19.465001SCHEDULE_LCLE DB2ADMIN T 2003-03-17-15.12.10.582004SCHEDULE_MILESTONE DB2ADMIN T 2003-03-17-15.12.10.873001SCHEDULE_PERIOD DB2ADMIN T 2003-03-17-15.12.11.453007SCHEDULE_STATE DB2ADMIN T 2003-03-17-15.12.19.104001SCHEDULE_STATE_VIEW DB2ADMIN V 2003-03-17-15.12.19.996002SCOPE_PROP_SPEC_VIEW DB2ADMIN V 2003-03-17-15.12.20.156001SCOPE_PROP_VIEW DB2ADMIN V 2003-03-17-15.12.20.086001SCOPE_SE_VIEW DB2ADMIN V 2003-03-17-15.12.22.219001SD_TXN DB2ADMIN T 2003-03-17-15.12.16.831004SO_LISTENER DB2ADMIN T 2003-03-17-15.12.17.452001SPEC_DEF DB2ADMIN T 2003-03-17-15.12.09.250007SVC_ELMT DB2ADMIN T 2003-03-17-15.12.08.619005SVC_ELMT_MANAGER DB2ADMIN T 2003-03-17-15.12.07.838001SVC_OFFRG DB2ADMIN T 2003-03-17-15.12.12.205001SVC_OFFRG_LCLE DB2ADMIN T 2003-03-17-15.12.12.455003SVC_OFFRG_VIEW DB2ADMIN V 2003-03-17-15.12.22.569001SVC_SCOPE DB2ADMIN T 2003-03-17-15.12.08.159005TABLE_LOCK DB2ADMIN T 2003-03-17-15.12.19.635002TREND DB2ADMIN T 2003-03-17-15.12.17.142003TRENDVIEW DB2ADMIN V 2003-03-17-15.12.22.469000USER_INFO DB2ADMIN T 2003-03-17-15.12.17.843001VIOLATIONVIEW DB2ADMIN V 2003-03-17-15.12.22.329001
59 record(s) selected.
Table/View Schema Type Creation time------------------------------- --------------- ----- --------------------------ATTRDOM MM T 2003-03-17-15.12.22.780001ATTRRUL MM T 2003-03-17-15.12.23.120001ATTRTYP MM T 2003-03-17-15.12.23.391001COMP MM T 2003-03-17-15.12.23.721001COMPATTR MM T 2003-03-17-15.12.24.172001COMPPATH MM T 2003-03-17-15.12.24.512001COMPRELN MM T 2003-03-17-15.12.24.672001COMPTYP MM T 2003-03-17-15.12.25.063001EXTRACT_FILTER MM T 2003-03-17-15.12.25.333001HISTORY MM T 2003-03-17-15.12.25.564003MGRP MM T 2003-03-17-15.12.25.904001MGRPMBR MM T 2003-03-17-15.12.26.125001MGRPTYP MM T 2003-03-17-15.12.26.345001MSMTRUL MM T 2003-03-17-15.12.26.565001MSMTTYP MM T 2003-03-17-15.12.26.906001MSRC MM T 2003-03-17-15.12.27.166001MUNIT MM T 2003-03-17-15.12.27.436001MUNITCAT MM T 2003-03-17-15.12.27.677001RELNRUL MM T 2003-03-17-15.12.27.867001RELNTYP MM T 2003-03-17-15.12.28.208001SCHEMA_VER MM T 2003-03-17-15.12.28.458001TRANSLATED_TERM MM T 2003-03-17-15.12.28.558002
22 record(s) selected.
Tables Created with dyk_dm_dbinstTable/View Schema Type Creation time------------------------------- --------------- ----- --------------------------COMPPATH DYK T 2003-03-17-15.10.30.679001DATA_EXP DYK T 2003-03-17-15.10.31.360002EVALUATOR_TABLE DYK T 2003-03-17-15.10.31.139002EXP_LOG DYK T 2003-03-17-15.10.31.480001EXTRACT_LOG DYK T 2003-03-17-15.10.30.979001MSMT_AVL DYK T 2003-03-17-15.10.30.408002
164 IBM Tivoli Service Level Advisor: Getting Started with IBM Tivoli Service Level Advisor
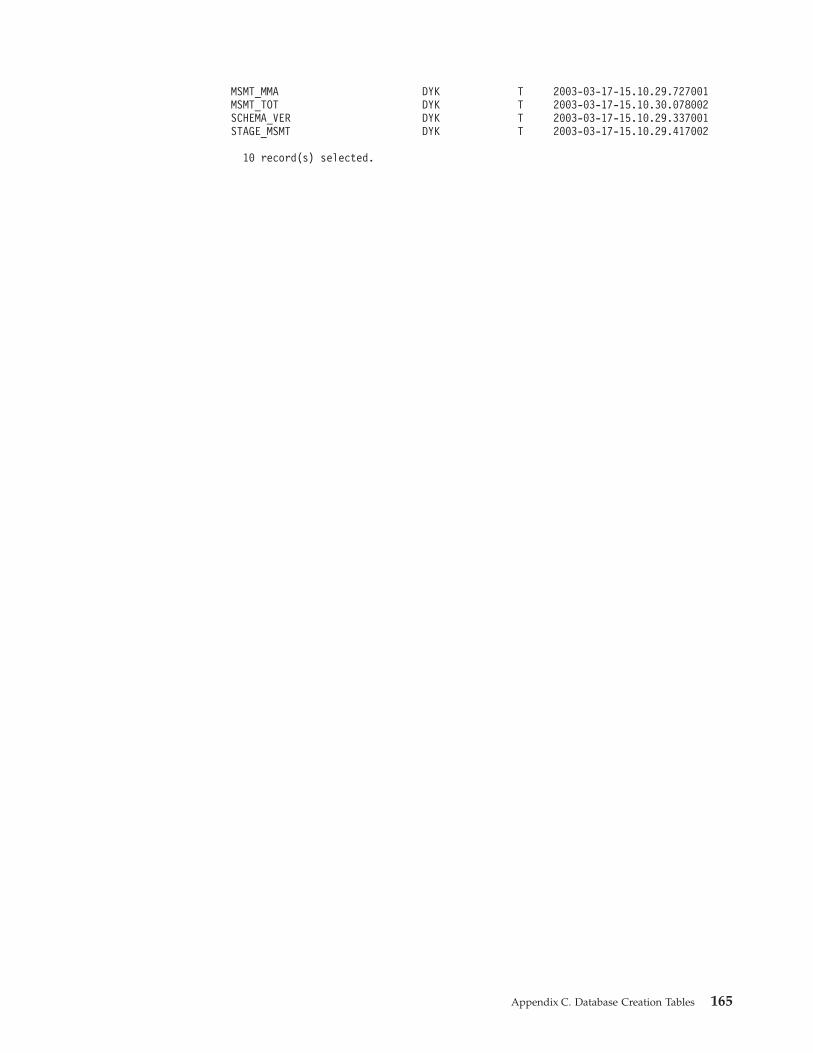
MSMT_MMA DYK T 2003-03-17-15.10.29.727001MSMT_TOT DYK T 2003-03-17-15.10.30.078002SCHEMA_VER DYK T 2003-03-17-15.10.29.337001STAGE_MSMT DYK T 2003-03-17-15.10.29.417002
10 record(s) selected.
Appendix C. Database Creation Tables 165

166 IBM Tivoli Service Level Advisor: Getting Started with IBM Tivoli Service Level Advisor

Appendix D. Manually Creating ODBC Data Sources
IBM Tivoli Service Level Advisor provides scripts to automatically create ODBCdata sources for the SLM Database and the SLM Measurement Data Mart (see“Configuring ODBC Data Sources” on page 68). If you do not want to use theautomated scripts to create ODBC data sources, you can create them manually bydoing the following:1. Select Start –> Settings –> Control Panel and then:
v For Windows NT, select Data Sources (ODBC)
v For Windows 2000, select Administrative Tools –> Data Sources (ODBC)
2. Select the System DSN tab.3. Click Add....4. From the list of drivers, select IBM DB2 ODBC Driver and click Finish.5. Enter the name of the data source that you are defining. Table 15 shows the
data source names for the Tivoli Enterprise Data Warehouse database and theSLM databases.
Note: The installation procedure for Tivoli Enterprise Data Warehouse mayalready have configured the ODBC datasource for Tivoli Enterprise DataWarehouse. If not, then include that database in this procedure.
Table 15. Databases and their data source and alias names
Database Data Source Name Data Source Alias
Tivoli Enterprise DataWarehouse
twh_cdw twh_cdw
SLM Database dyk_cat dyk_cat
SLM Measurement DataMart
dyk_dm dyk_dm
6. If the actual database is on the same machine as the machine on which you areconfiguring the data source, or if it has been defined previously for a differentdata source, then select the alias from the drop-down list and click OK. Youcan use the same name for the alias as the data source name, as shown inTable 15.
7. If the database resides on a machine other than the machine on which you aredefining the ODBC data source, and is not in the drop-down list, do thefollowing:a. Enter the data source name and click Add.... The Add Database Wizard is
launched.b. Select Manually configure a connection to a database and click Next.c. Select TCP/IP as the protocol and click Next.d. Enter the fully qualified host name where the database resides and enter the
port number (typically 50000 for DB2), and click Next.e. Enter the database name (the alias will automatically be filled in) and click
Finish.
The data source is now defined. Repeat this procedure for each data source (seeTable 15) that you are defining.
© Copyright IBM Corp. 2003 167

168 IBM Tivoli Service Level Advisor: Getting Started with IBM Tivoli Service Level Advisor
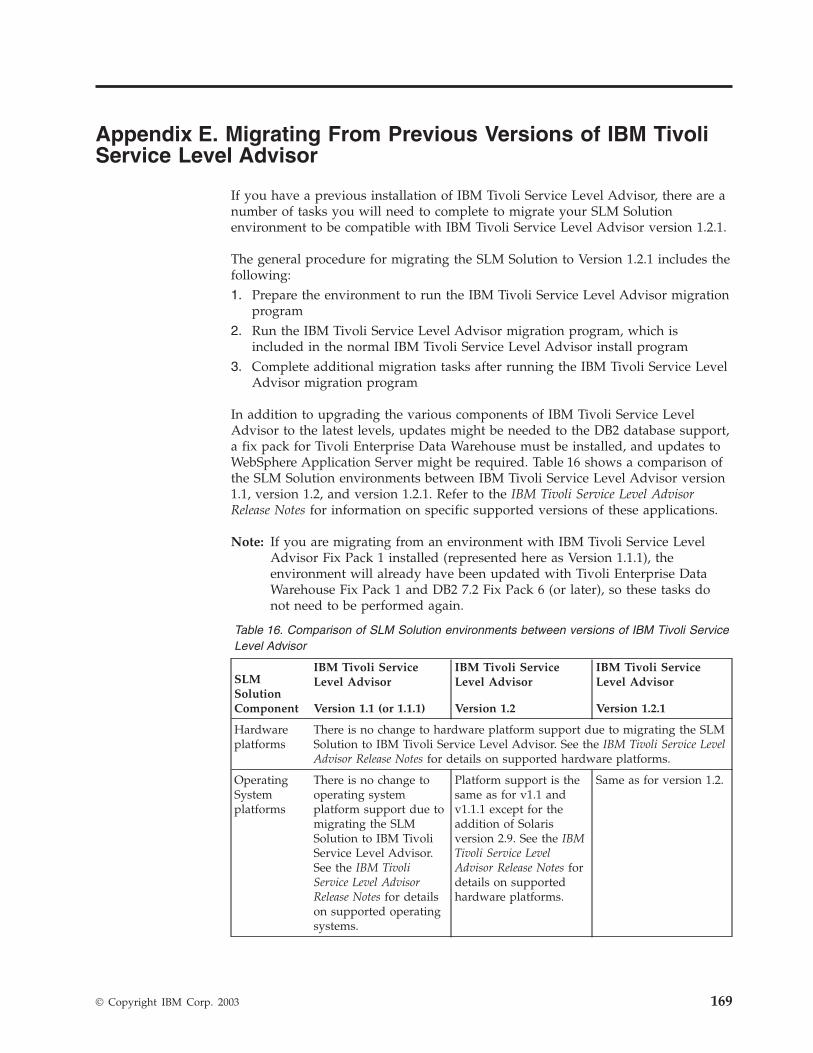
Appendix E. Migrating From Previous Versions of IBM TivoliService Level Advisor
If you have a previous installation of IBM Tivoli Service Level Advisor, there are anumber of tasks you will need to complete to migrate your SLM Solutionenvironment to be compatible with IBM Tivoli Service Level Advisor version 1.2.1.
The general procedure for migrating the SLM Solution to Version 1.2.1 includes thefollowing:1. Prepare the environment to run the IBM Tivoli Service Level Advisor migration
program2. Run the IBM Tivoli Service Level Advisor migration program, which is
included in the normal IBM Tivoli Service Level Advisor install program3. Complete additional migration tasks after running the IBM Tivoli Service Level
Advisor migration program
In addition to upgrading the various components of IBM Tivoli Service LevelAdvisor to the latest levels, updates might be needed to the DB2 database support,a fix pack for Tivoli Enterprise Data Warehouse must be installed, and updates toWebSphere Application Server might be required. Table 16 shows a comparison ofthe SLM Solution environments between IBM Tivoli Service Level Advisor version1.1, version 1.2, and version 1.2.1. Refer to the IBM Tivoli Service Level AdvisorRelease Notes for information on specific supported versions of these applications.
Note: If you are migrating from an environment with IBM Tivoli Service LevelAdvisor Fix Pack 1 installed (represented here as Version 1.1.1), theenvironment will already have been updated with Tivoli Enterprise DataWarehouse Fix Pack 1 and DB2 7.2 Fix Pack 6 (or later), so these tasks donot need to be performed again.
Table 16. Comparison of SLM Solution environments between versions of IBM Tivoli ServiceLevel Advisor
SLMSolutionComponent
IBM Tivoli ServiceLevel Advisor
Version 1.1 (or 1.1.1)
IBM Tivoli ServiceLevel Advisor
Version 1.2
IBM Tivoli ServiceLevel Advisor
Version 1.2.1
Hardwareplatforms
There is no change to hardware platform support due to migrating the SLMSolution to IBM Tivoli Service Level Advisor. See the IBM Tivoli Service LevelAdvisor Release Notes for details on supported hardware platforms.
OperatingSystemplatforms
There is no change tooperating systemplatform support due tomigrating the SLMSolution to IBM TivoliService Level Advisor.See the IBM TivoliService Level AdvisorRelease Notes for detailson supported operatingsystems.
Platform support is thesame as for v1.1 andv1.1.1 except for theaddition of Solarisversion 2.9. See the IBMTivoli Service LevelAdvisor Release Notes fordetails on supportedhardware platforms.
Same as for version 1.2.
© Copyright IBM Corp. 2003 169

Table 16. Comparison of SLM Solution environments between versions of IBM Tivoli ServiceLevel Advisor (continued)
SLMSolutionComponent
IBM Tivoli ServiceLevel Advisor
Version 1.1 (or 1.1.1)
IBM Tivoli ServiceLevel Advisor
Version 1.2
IBM Tivoli ServiceLevel Advisor
Version 1.2.1
IBM DB2UniversalDatabaseEnterpriseEdition
DB2 7.2 with Fix Pack 5Note: Version 1.1.1already includesupgrading to DB2 7.2Fix Pack 6.
DB2 7.2 with Fix Pack 6or later. Note that in adistributedenvironment, allmachines with SLMSolution componentsmust be upgraded tothe same level of DB2and Fix Pack.
DB2 7.2 with Fix Pack 6or later. Note that in adistributedenvironment, allmachines with SLMSolution componentsmust be upgraded tothe same level of DB2and Fix Pack.
TivoliEnterpriseDataWarehouse
Version 1.1.0 baseinstallationNote: Version 1.1.1 ofIBM Tivoli Service LevelAdvisor alreadyincludes upgrading toTivoli Enterprise DataWarehouse Fix Pack 1.
Version 1.1.0 baseinstallation plus FixPack 1
Version 1.1.0 baseinstallation plus FixPack 2. You do not haveto install Fix Pack 1first.
WebSphereApplicationServer
Advanced EditionSingle-server (AES)
Advanced Edition (AE)
Standard Edition (SE)3.5
Advanced EditionSingle-server (AES)
Advanced Edition (AE)
(Standard Edition is nolonger supported forthis release. Users mustupgrade to AE or AESversions.)
Advanced EditionSingle-server (AES) 4.0.2or later
Advanced Edition (AE)4.0.2 or later
(Standard Edition is nolonger supported forthis release. Users mustupgrade to AE or AESversions.)
SourceApplicationWarehousePacks
There is no impact to installed source application warehouse packs whenIBM Tivoli Service Level Advisor is migrated to version 1.2 or 1.2.1
IBM TivoliService LevelAdvisorDYKWarehousePack (TargetETLs)
Version 1.1 DYKRegistration and ProcessETLs
Version 1.2 DYKRegistration and ProcessETLs (will need touninstall previousversion and install thenew version)
Version 1.2.1 DYKRegistration and ProcessETLs (will need touninstall the previousversion and install thenew version)
SLMDatabaseand SLMMeasurementData Mart
Version 1.1 of thesedatabases
Database tables andformats will beautomatically updatedto version 1.2 by theIBM Tivoli Service LevelAdvisor migrationprocess.
Database tables andformats will beautomatically updatedto version 1.2.1 by theIBM Tivoli Service LevelAdvisor migrationprocess.
170 IBM Tivoli Service Level Advisor: Getting Started with IBM Tivoli Service Level Advisor

Table 16. Comparison of SLM Solution environments between versions of IBM Tivoli ServiceLevel Advisor (continued)
SLMSolutionComponent
IBM Tivoli ServiceLevel Advisor
Version 1.1 (or 1.1.1)
IBM Tivoli ServiceLevel Advisor
Version 1.2
IBM Tivoli ServiceLevel Advisor
Version 1.2.1
SLM Server Version 1.1 of thiscomponent
This component isautomatically updatedto version 1.2 by theIBM Tivoli Service LevelAdvisor migrationprocess. For distributedinstallations, thiscomponent must beupgraded before SLMReports and SLM TaskDrivers.
This component isautomatically updatedto version 1.2.1 by theIBM Tivoli Service LevelAdvisor migrationprocess. For distributedinstallations, thiscomponent must beupgraded before SLMReports and SLM TaskDrivers.
SLM Reports Version 1.1 of thiscomponent
This component isautomatically updatedto version 1.2 by theIBM Tivoli Service LevelAdvisor migrationprocess. If usingWebSphere AE, usersmust reintegrate SLMReports manually.
This component isautomatically updatedto version 1.2.1 by theIBM Tivoli Service LevelAdvisor migrationprocess. If usingWebSphere AE, usersmust reintegrate SLMReports manually.
SLM TaskDrivers
Version 1.1 of thiscomponent
This component isautomatically updatedto version 1.2 by theIBM Tivoli Service LevelAdvisor migrationprocess. TivoliPresentation Services forthe IBM Console isupgraded during theinstall of the TivoliEnterprise DataWarehouse Fix Pack 1.
This component isautomatically updatedto version 1.2.1 by theIBM Tivoli Service LevelAdvisor migrationprocess. TivoliPresentation Services forthe IBM Console isupgraded during theinstall of the TivoliEnterprise DataWarehouse Fix Pack 2.
Appendix E. Migrating From Previous Versions of IBM Tivoli Service Level Advisor 171
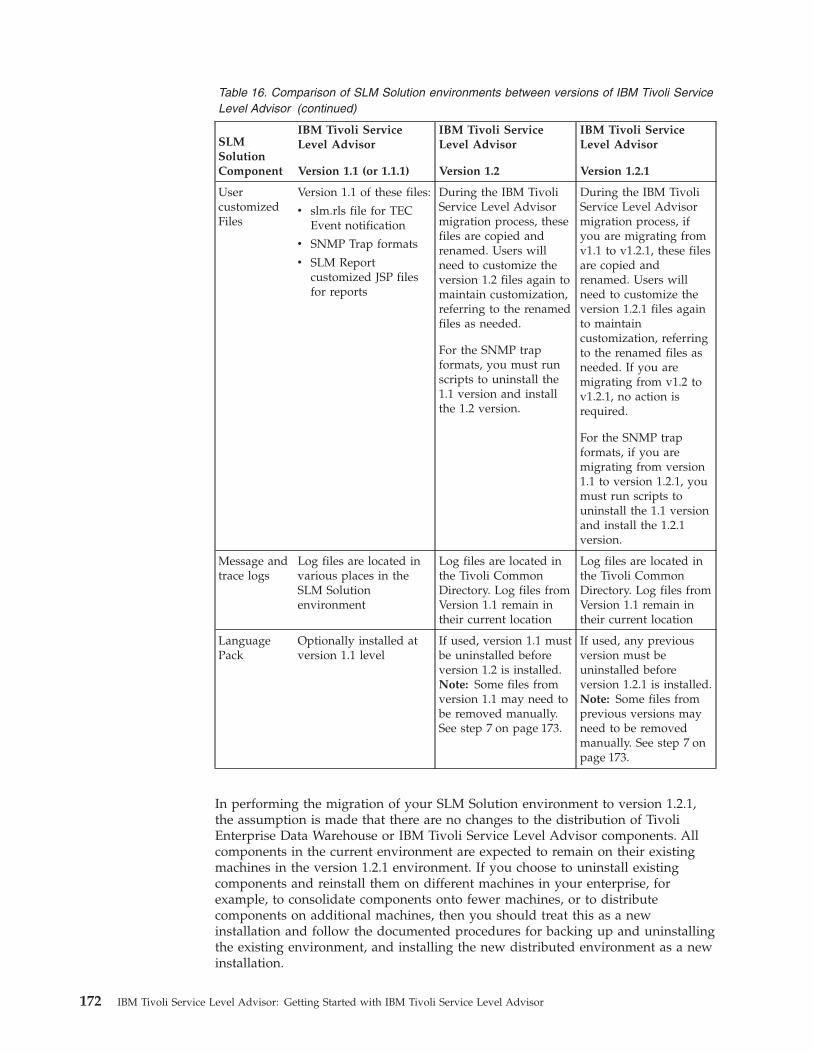
Table 16. Comparison of SLM Solution environments between versions of IBM Tivoli ServiceLevel Advisor (continued)
SLMSolutionComponent
IBM Tivoli ServiceLevel Advisor
Version 1.1 (or 1.1.1)
IBM Tivoli ServiceLevel Advisor
Version 1.2
IBM Tivoli ServiceLevel Advisor
Version 1.2.1
UsercustomizedFiles
Version 1.1 of these files:
v slm.rls file for TECEvent notification
v SNMP Trap formats
v SLM Reportcustomized JSP filesfor reports
During the IBM TivoliService Level Advisormigration process, thesefiles are copied andrenamed. Users willneed to customize theversion 1.2 files again tomaintain customization,referring to the renamedfiles as needed.
For the SNMP trapformats, you must runscripts to uninstall the1.1 version and installthe 1.2 version.
During the IBM TivoliService Level Advisormigration process, ifyou are migrating fromv1.1 to v1.2.1, these filesare copied andrenamed. Users willneed to customize theversion 1.2.1 files againto maintaincustomization, referringto the renamed files asneeded. If you aremigrating from v1.2 tov1.2.1, no action isrequired.
For the SNMP trapformats, if you aremigrating from version1.1 to version 1.2.1, youmust run scripts touninstall the 1.1 versionand install the 1.2.1version.
Message andtrace logs
Log files are located invarious places in theSLM Solutionenvironment
Log files are located inthe Tivoli CommonDirectory. Log files fromVersion 1.1 remain intheir current location
Log files are located inthe Tivoli CommonDirectory. Log files fromVersion 1.1 remain intheir current location
LanguagePack
Optionally installed atversion 1.1 level
If used, version 1.1 mustbe uninstalled beforeversion 1.2 is installed.Note: Some files fromversion 1.1 may need tobe removed manually.See step 7 on page 173.
If used, any previousversion must beuninstalled beforeversion 1.2.1 is installed.Note: Some files fromprevious versions mayneed to be removedmanually. See step 7 onpage 173.
In performing the migration of your SLM Solution environment to version 1.2.1,the assumption is made that there are no changes to the distribution of TivoliEnterprise Data Warehouse or IBM Tivoli Service Level Advisor components. Allcomponents in the current environment are expected to remain on their existingmachines in the version 1.2.1 environment. If you choose to uninstall existingcomponents and reinstall them on different machines in your enterprise, forexample, to consolidate components onto fewer machines, or to distributecomponents on additional machines, then you should treat this as a newinstallation and follow the documented procedures for backing up and uninstallingthe existing environment, and installing the new distributed environment as a newinstallation.
172 IBM Tivoli Service Level Advisor: Getting Started with IBM Tivoli Service Level Advisor
Tasks to Complete Before Migrating IBM Tivoli Service Level AdvisorBefore running the IBM Tivoli Service Level Advisor install program to performthe migration of IBM Tivoli Service Level Advisor components to version 1.2.1,complete the following tasks:1. Backup the entire SLM Solution, using the documented procedures. This
includes backing up and saving any customized files you may have, for eventnotification or SLM Report customization of JSP files. Refer to the backupprocedures in the Administrator’s Guide for IBM Tivoli Service Level Advisor andInstalling and Configuring Tivoli Enterprise Data Warehouse.
2. Verify that you have enough temporary disk space. The IBM Tivoli ServiceLevel Advisor install program uses approximately 300Kb of space under%TEMP% on Windows, or under /tmp on UNIX machines.
3. Shut down the SLM Server and WebSphere Application Server usingdocumented procedures (see “Shutting Down the IBM Tivoli Service LevelAdvisor Solution” on page 112)
4. Install DB2 7.2 Fix Pack 6 (or later) on all DB2 Server and DB2 Clientmachines in the distributed SLM Solution, using the documented procedure in“Step 7. Upgrade to DB2 7.2 Fix Pack 6 (or later)” on page 39.
Note: If you are migrating from IBM Tivoli Service Level Advisor with FixPack 1, this step should have already been completed. You can checkthe version of DB2 installed by starting a DB2 command prompt andissuing the db2level command. See Table 5 on page 36 for versioninformation.
5. Install Tivoli Enterprise Data Warehouse Fix Pack 2. Refer to the TivoliEnterprise Data Warehouse Fix Pack 2 Readme and the Tivoli Enterprise DataWarehouse support Web site for more information.
6. Verify that the existing DYK Target ETLs are taken out of production mode,and uninstall them from the Tivoli Enterprise Data Warehouse control server,following the documented procedure. See “Uninstalling the Registration andProcess ETLs” on page 119 for more information.
7. If you have a language pack installed, it must be uninstalled. See“Uninstalling Language Support” on page 119 for more information.After uninstalling the previous version of the language pack, several files maystill need to be uninstalled manually (note that these should not simply bedeleted), before running the migration program and installing version 1.2.1 ofthe language pack.Examine the <PS_Dir>/cd directory for the following files that may not havebeen uninstalled, where <PS_Dir> is the where the IBM Console Server wasinstalled:TSLMResources_ko.jar
To remove these files from your system, do the following:a. Navigate to the following directory:
v For Windows, navigate to <PS_Dir>\bin\private\w32-ix86
v For UNIX, navigate to <PS_Dir>/bin/private/generic_unix
b. Run the following command, where <filename> is the name of the file to beremoved:wcmd cds uninstall <filename>
Appendix E. Migrating From Previous Versions of IBM Tivoli Service Level Advisor 173
c. Repeat the above command for each file to be removed.d. Stop the Web Services for IBM Consolee. Stop and then restart the Server for IBM Consolef. Restart Web Services for IBM Console
After completing the above steps, check <PS_Dir>/cd again and verify that thefiles have been removed before continuing with the migration process. SeeChapter 6, “Startup and Shutdown Procedures”, on page 107 for informationon starting and stopping IBM Console services.
8. If your environment uses WebSphere Advanced Edition (AE), remove SLMReports from WebSphere, following the documented procedure (see“Removing SLM Reports from the WebSphere Environment” on page 116 formore information). If you are using WebSphere AES, this step is not necessary.
9. If your environment uses WebSphere Application Server Standard Edition(SE), you must remove SLM Reports and then upgrade it to either WebSphereAdvanced Edition (AE) or WebSphere Advanced Edition Single-server (AES).To remove SLM Reports from WebSphere Application Server SE, do thefollowing:a. Start the IBM WebSphere Admin Server:
v For Windows, you can do any one of the following:– Select Start –> Programs –> IBM WebSphere –> Application Server
V3.5 –> Start Admin Server
– From the Services control panel (Start –> Settings –> Control Panel–> Services), right-click on IBM WS AdminServer and select Startfrom the context menu
– From a command prompt, issue the command:net start "IBM WS AdminServer"
v For UNIX, do the following:1) Verify that you are running as the root user2) From a command prompt, navigate to the directory
<WebSphere_Dir>/AppServer/bin, where <WebSphere_Dir> is thedirectory where WebSphere was installed, and run the followingcommand:./startupServer.sh
b. Open the Administrator’s Console by selecting Start –> Programs –> IBMWebSphere –> Application Server V3.5 –> Administrator’s Console
c. Verify that the application server is not running (indicated by a blue circlebeside the Default Server)
d. Highlight the SLMReport application server, then right-click and selectRemove from the context menu.
Note: If you have any customized JSP files for SLM Reports, these filesshould have already been manually backed up during the documentedbackup procedure for IBM Tivoli Service Level Advisor.
10. For this version of IBM Tivoli Service Level Advisor, you must upgrade yourversion of WebSphere to at least AES or AE version 4.0.2 or later. See“Upgrading from WebSphere AES or AE 4.0.1” on page 59 for information onupgrading WebSphere to at least this minimum supported level.
174 IBM Tivoli Service Level Advisor: Getting Started with IBM Tivoli Service Level Advisor
Refer to the official WebSphere support Web site for product downloads,installation and upgrade information for the supported versions of WebSphereApplication Server.
Running the IBM Tivoli Service Level Advisor Migration ProgramAfter you have completed the steps in the previous section, you should be ready torun the IBM Tivoli Service Level Advisor install program to perform the migrationof the components of IBM Tivoli Service Level Advisor to version 1.2.1.
If you have SLM components (the SLM Server, SLM Reports, and SLM TaskDrivers) installed on multiple machines, or in multiple directories, you must runthis install program on each machine and for each directory that contains an SLMcomponent.
Note: For a distributed installation of IBM Tivoli Service Level Advisor, migratethe SLM Server component before migrating the SLM Reports or SLM TaskDrivers components, and verify that migration of the SLM databases wascompleted successfully before you attempt to use the migrated version ofIBM Tivoli Service Level Advisor.
To perform the migration of IBM Tivoli Service Level Advisor components usingthe install program, complete the following steps:1. Start the IBM Tivoli Service Level Advisor install program as if you were
performing a new installation (see “Step 1. Start the InstallShield Program” onpage 70). Only those install dialogs needed for migration will be displayed.
2. When prompted, enter the directory where one or more SLM components areinstalled on this machine. The installation program will then determine whichcomponents are installed in that directory on this machine, and will performthe migration on them.The install program performs the following migration tasks:v Determines which components are installed locally, and automatically
migrates them to version 1.2.1v Creates the Tivoli Common Directory if not already created. Log files for
version 1.2.1 are stored in the Tivoli Common Directory under the \DYKsubdirectory for IBM Tivoli Service Level Advisor.
v The SLM Database and SLM Measurement Data Mart are automaticallymigrated to version 1.2.1 during migration of the SLM Server component
Note: Migration of the SLM databases involves multiple steps. Changes tothe databases are committed after each successful step. If any errorsare encountered during database migration, messages will be writtento log files in the Tivoli Common Directory. The migration of otherSLM components will continue, but you will need to complete themigration of the databases manually.
v If you are using WebSphere AES, the SLM Reports for version 1.2.1 areautomatically integrated into WebSphere. If you are using WebSphere AE,you will need to manually integrate SLM Reports into WebSphere.
v Passwords that were stored in the database for previous versions areencrypted.
v If you are migrating from version 1.1, files that were located in the<SLM_Install_Dir>/tec directory for IBM Tivoli Service Level Advisor aremoved to <SLM_Install_Dir>/escalate for version 1.2.1. These files include
Appendix E. Migrating From Previous Versions of IBM Tivoli Service Level Advisor 175
the slm.baroc file and slm.rls file (which is renamed to slm.rls.bak). Wherepossible, the install program will remove the /tec directory.
v During the migration, the rebuilding of the online help information takesplace, which may cause the SLM Task Drivers component to install slowly.The rebuilding of the help information files might take up to 90 minutes tocomplete. You can use the system during this time, but it might be slowerthan usual while these files are being processed, and all of the online userassistance might not be available until after this processing completes. Youcan verify completeness by examining either of the following:– Look in the following log file:
<PS_DIR>\log\fwp_mcr\stdout<n>.txt
where
<PS_DIR>is the directory where Tivoli Presentation Services was installed onthe IBM Console Server machine
<n> is a number from 0 to 4 signifying one of several rolling log files
When the online user assistance build is complete, a message is displayed,similar to the following:FWP1734I The utility that was started by the Management Component
Repository to build the help set has completed successfully.
– Bring up the Windows Task Manager and wait for CPU usage to drop,signifying the processing of user assistance files has completed.
Follow the rest of the install program prompts and complete the migration of IBMTivoli Service Level Advisor. Repeat this procedure for each machine in yourdistributed environment as needed.
Tasks to Complete After Migrating IBM Tivoli Service Level AdvisorAfter running the IBM Tivoli Service Level Advisor install program to migrateSLM components to version 1.2.1, do the following to complete the migrationprocedure:1. Immediately after running the migration program for the SLM Server
component, you must verify that the migration of the SLM databasescompleted successfully. You can check the status of the database migration byexamining the associated log files, located in the \DYK\logs\installsubdirectory of the Tivoli Common Directory.If you are migrating from version 1.1 or version 1.1.1, check the following logfiles:sladbupdateOut.log
sladbupdateErr.log
sla121dbupdateOut.log
sla121dbupdateErr.log
If you are migrating from version 1.2, check the following log files:sla121dbupdateOut.log
sla121dbupdateErr.log
These log files contain the DB2 output and error messages from the SLMdatabase migration, and there will be many messages in the files. You can
176 IBM Tivoli Service Level Advisor: Getting Started with IBM Tivoli Service Level Advisor
identify error messages by the DB2 message ID in the format of SQLxxxxN,followed by the specific message text, for example:SQL1403N The username and/or password supplied is incorrect. SQLSTATE=08004
Messages with a DB2 message ID in the form of SQLxxxxW indicates normalmigration activity and does not indicate a migration failure.
If the database migration failed, correct any errors that you find in the logs,then do the following:a. Start up a DB2 command prompt (see “Starting a DB2 Command Prompt”
on page 32)b. Navigate to the
<SLM_Install_Dir>/bin
directory, where <SLM_Install_Dir> is the location where IBM Tivoli ServiceLevel Advisor was installed
c. If errors were reported in sladbupdateOut.log or sladbupdateErr.log, run thefollowing script:v For Windows:
sladbupdate.bat
v For UNIX:./sladbupdate.sh
d. If errors were reported in sla121dbupdateOut.log or sla121dbupdateErr.log,run the following script:v For Windows:
sla121dbupdate.bat
v For UNIX:./sla121dbupdate.sh
e. Check the logs again to verify that database migration was successful beforecontinuing.
2. If you upgraded your DB2 7.2 installation by installing Fix Pack 7 or later afterinstalling Tivoli Enterprise Data Warehouse 1.1 Fix Pack 2, you must manuallycopy <DB2_Dir>/SQLLIB/bin/java12/db2java.zip into the <TWH_Dir>/tools/bindirectory, replacing the existing copy of db2java.zip to ensure that you areusing the correct version of this file. You must complete this step beforeinstalling the DYK warehouse pack for IBM Tivoli Service Level Advisorversion 1.2.1.
3. Install the DYK warehouse pack for IBM Tivoli Service Level Advisor version1.2.1, using the Tivoli Enterprise Data Warehouse installation program. Be sureto also configure the user ID and password, and promote the ETLs toproduction mode. These procedures are documented in “Installing theRegistration and Process ETLs” on page 94..
4. If your environment uses WebSphere Advanced Edition (AE), you mustmanually integrate SLM Reports into WebSphere, using the procedure in“Integrating into WebSphere AE” on page 100.
5. If you had customized JSP files, be sure to also re-customize JSP files forversion 1.2.1, referring to the previous version of JSP files that you have backedup as needed. When you complete these steps, restart the WebSphereApplication Server.
6. If you are migrating from version 1.1 and had configured for event notificationusing SNMP traps, you must remove the traps formatted for the previous
Appendix E. Migrating From Previous Versions of IBM Tivoli Service Level Advisor 177
version and install the traps formatted for version 1.2.1. See “Configuring forNotification by SNMP” on page 93 for details.
7. If you are migrating from version 1.1 and had configured for event notificationusing Tivoli Enterprise Console Events, files that were located in the<SLM_Install_Dir>/tec directory for IBM Tivoli Service Level Advisor version1.1 have been moved to <SLM_Install_Dir>/escalate for version 1.2.1. Theseinclude the slm.baroc file and slm.rls file (which is renamed to slm.rls.bak).For version 1.2 (which also applies to version 1.2.1), new slots have been addedto the SLA-Trend-Event and SLA-Trend-Cancel-Event class definition (see theslm.baroc file for information on the events class definition). If you hadcustomized slm.rls for version 1.1, you should refer to slm.rls.bak and theclass definition information in slm.baroc to re-customize your slm.rls file forversion 1.2 or version 1.2.1 before applying it.
8. Install any language packs needed for version 1.2.1, following the documentedinstallation procedure in “Installing Language Support” on page 104
If you experience problems during migration, check the log files located in the\DYK subdirectory of the Tivoli Common Directory, and see Chapter 8,“Troubleshooting”, on page 121 for assistance.
178 IBM Tivoli Service Level Advisor: Getting Started with IBM Tivoli Service Level Advisor
Appendix F. Notices
This information was developed for products and services offered in the U.S.A.IBM may not offer the products, services, or features discussed in this document inother countries. Consult your local IBM representative for information on theproducts and services currently available in your area. Any reference to an IBMproduct, program, or service is not intended to state or imply that only that IBMproduct, program, or service may be used. Any functionally equivalent product,program, or service that does not infringe any IBM intellectual property right maybe used instead. However, it is the user’s responsibility to evaluate and verify theoperation of any non-IBM product, program, or service.
IBM may have patents or pending patent applications covering subject matterdescribed in this document. The furnishing of this document does not give youany license to these patents.You can send license inquiries, in writing, to:
IBM Director of LicensingIBM CorporationNorth Castle DriveArmonk, NY 10504-1785 U.S.A.
For license inquiries regarding double-byte (DBCS) information, contact the IBMIntellectual Property Department in your country or send inquiries, in writing, to:
IBM World Trade Asia CorporationLicensing2-31 Roppongi 3-chome, Minato-kuTokyo 106, Japan
The following paragraph does not apply to the United Kingdom or any othercountry where such provisions are inconsistent with local law:
INTERNATIONAL BUSINESS MACHINES CORPORATION PROVIDES THISPUBLICATION ″AS IS″ WITHOUT WARRANTY OF ANY KIND, EITHEREXPRESS OR IMPLIED, INCLUDING, BUT NOT LIMITED TO, THE IMPLIEDWARRANTIES OF NON-INFRINGEMENT, MERCHANTABILITY OR FITNESSFOR A PARTICULAR PURPOSE.
Some states do not allow disclaimer of express or implied warranties in certaintransactions, therefore, this statement might not apply to you.
This information could include technical inaccuracies or typographical errors.Changes are periodically made to the information herein; these changes will beincorporated in new editions of the publication. IBM may make improvementsand/or changes in the product(s) and/or the program(s) described in thispublication at any time without notice.
Any references in this information to non-IBM Web sites are provided forconvenience only and do not in any manner serve as an endorsement of those Websites. The materials at those Web sites are not part of the materials for this IBMproduct and use of those Web sites is at your own risk.
© Copyright IBM Corp. 2003 179
IBM may use or distribute any of the information you supply in any way itbelieves appropriate without incurring any obligation to you.
Licensees of this program who wish to have information about it for the purposeof enabling: (i) the exchange of information between independently createdprograms and other programs (including this one) and (I) the mutual use of theinformation which has been exchanged, should contact:
IBM Corporation2Z4A/10111400 Burnet RoadAustin, TX 78758 U.S.A.
Such information may be available, subject to appropriate terms and conditions,including in some cases payment of a fee.
The licensed program described in this document and all licensed materialavailable for it are provided by IBM under terms of the IBM Customer Agreement,IBM International Program License Agreement or any equivalent agreementbetween us.
Any performance data contained herein was determined in a controlledenvironment. Therefore, the results obtained in other operating environments mayvary significantly. Some measurements may have been made on development-levelsystems and there is no guarantee that these measurements will be the same ongenerally available systems. Furthermore, some measurement may have beenestimated through extrapolation. Actual results may vary. Users of this documentshould verify the applicable data for their specific environment.
Information concerning non-IBM products was obtained from the suppliers ofthose products, their published announcements or other publicly available sources.IBM has not tested those products and cannot confirm the accuracy ofperformance, compatibility or any other claims related to non-IBM products.Questions on the capabilities of non-IBM products should be addressed to thesuppliers of those products.
All statements regarding IBM’s future direction or intent are subject to change orwithdrawal without notice, and represent goals and objectives only.
This information contains examples of data and reports used in daily businessoperations. To illustrate them as completely as possible, the examples include thenames of individuals, companies, brands, and products. All of these names arefictitious and any similarity to the names and addresses used by an actual businessenterprise is entirely coincidental.
COPYRIGHT LICENSE:
This information contains sample application programs in source language, whichillustrate programming techniques on various operating platforms. You may copy,modify, and distribute these sample programs in any form without payment toIBM, for the purposes of developing, using, marketing or distributing applicationprograms conforming to the application programming interface for the operatingplatform for which the sample programs are written. These examples have notbeen thoroughly tested under all conditions. IBM, therefore, cannot guarantee orimply reliability, serviceability, or function of these programs. You may copy,modify, and distribute these sample programs in any form without payment to
180 IBM Tivoli Service Level Advisor: Getting Started with IBM Tivoli Service Level Advisor
IBM for the purposes of developing, using, marketing, or distributing applicationprograms conforming to IBMs application programming interfaces.
TrademarksThe following terms are trademarks of International Business MachinesCorporation in the United States, other countries, or both: IBM, the IBM logo,Tivoli, the Tivoli logo, AIX, Tivoli Enterprise, Tivoli Enterprise Console, DB2, DB2Universal Database, WebSphere.
Microsoft, Windows, Windows NT, and the Windows logo are trademarks ofMicrosoft Corporation in the United States, other countries, or both.
UNIX is a registered trademark of The Open Group in the United States and othercountries.
Java and all Java-based trademarks and logos are trademarks or registeredtrademarks of Sun Microsystems, Inc. in the United States and other countries.
Other company, product, or service names may be trademarks or service marks ofothers.
Appendix F. Notices 181

182 IBM Tivoli Service Level Advisor: Getting Started with IBM Tivoli Service Level Advisor

Index
Special characters%Program Files% 73
Aapplication package
warehouse pack, installing 53
Bback office layer 3backup and restore
for distribute SLM deployment 18breach value 5
CCD, mounting on UNIX 35CDWIA0092E Cannot import the
metadata 128CDWIC0024E Could not execute/locate
DB2 command 128central data repository 1, 5central data warehouse 8, 12centralized repository 3classpath 63CLI
specifying password protection 82specifying port 82
CLI port numbers 70client.encoding.overide, configure for
WebSphere 58command line interface
password protection 82port, specifying 82
command prompt, starting onWindows 32
communicationCLI port numbers 70server port numbers 70
component 7configuring event notification
methods 90considerations
deployment 15control server 8, 11, 42customers, managing 13
Ddata
measurement from warehouse to SLMDatabase 6
purging aged, from SLMMeasurement Data Mart 99
data collectionenabling 95, 97
data collector 2data mart 8
data model 12, 42data warehouse center 15, 42Data Warehouse Center 7, 8, 42
importing etl 95database
configuration parameters 65, 66connections, verifying 70creating 67creating on Linux 64creating SLM 64creation tables 163default names 80deployment 15log files 65logs and tables 68ODBC datasource, uninstall 118other applications, coexisting with 20script 67SLM Measurement Data Mart 6source and target for etl 96specifying information 78uninstalling 118verifying connection 81verifying creation 163
database parametersapplheapsz 66, 67logfilsiz 66, 67logprimary 66, 67logsecond 66, 67maxagents 66, 67maxappls 66, 67numdb 66, 67
database scripts 64databases 5
planning 14DB2 vii, 1
checking version of 35coexisting with other applications 20command prompt, starting 32extended shared memory,
configuring 41installing 31, 35troubleshooting 121verifying the install 39
DB2 client 37SLM Server 13SLM Task Drivers 13
DB2 ClientSLM Reports 13
DB2 instance 12multiple 37planning 14specifying home directory 82
DB2, installing 32db2java.zip 63db2level 35db2profile
sourcing on UNIX 63db2profile, sourcing 32default database names 80
deploymentmid-sized 16minimum 15options 15SLM options on one machine 15widely distributed 15
destination install directory 73distributed installation
SLM solution 4dyk_cat 20, 80, 163dyk_cat_dbinst 64, 67, 80
tables created with 163dyk_cat_odbc script 68dyk_dm 20, 80, 163dyk_dm_dbinst 64, 67, 80
tables created with 164dyk_dm_odbc script 68
Ee-mail 86e-mail notification 83e-mail notification, verifying 94enabling source application 94environment variables
logflie_name 65ver_logfile_name 65
escalation methods 70etl 1
configuring user ID andpassword 96
importing 95importing into Data Warehouse
Center 95installing source 55installing target 94odbc datasources 68promote to production mode 97promoting to production mode 95running 98scheduling to run 97source and target 15troubleshooting install 127
ETL 9target, installing 94uninstall 119
etl, registration 11etl, source and target 11etl,process 11evaluation 4, 5, 6, 13evaluations 2event escalation 70event notification 83
configuring 90configuring TEC event 93e-mail 86SNMP trap 84TEC event 85verifying 94
extended shared memoryconfigure for DB2 41
© Copyright IBM Corp. 2003 183
Ffix pack 36, 39, 55fix packs 31fully qualified
node name in WebSphere 77fully qualified names
resolving host names 64
Hhelp
online, building after install 54help files
rebuilding after install 91help set
build during install 54home directory
specifying DB2 instance 82host name
fully qualified, ensuring 33host names
resolving to fully qualified 64HTTP 4
port conflict with Websphere 15HTTP server 12HTTP Server
starting 111stopping 112
IIBM Console 4, 5, 42
desktop icon 109Java and Web versions 12Java version 109starting 109stopping 113
IBM Console Server 7IBM DB2 vii, 1IBM HTTP Server
starting 111stopping 112
IBM Tivoli Monitoring for TransactionPerformance 2
IBM Tivoli Service Level Advisorcomponents 7components of 9installing 63overview 2troubleshooting install 124
IBM WebSphere vii, 1install
additional tasks 93, 94configuring for event notification 93
NetView 93SNMP 93
gathering information 21prerequisites 31Tivoli Presentation Services 47Tivoli Presentation Services,
verifying 54verifying DB2 39warehouse pack for target ETLs 94
installationoverview 69planning 7
installingcompleting the install 90DB2 32, 35IBM Tivoli Service Level Advisor 63incrementally 69incrementally, SLM options 64language support 104process etl 94quick start 133, 147
control center 154DB2 client 136, 151etl, configuring 145, 161JDBC driver for WebSphere 140,
156ODBC data sources 141, 157SLM databases 140, 157SLM etl 137, 160SLM Reports 141, 158SLM Server 141, 158SLM Task Drivers 143, 159warehouse 137, 160warehouse report interface 154warehouse, populating 145, 161WebSphere 138, 155
quick start,DB2 135, 150registration etl 94running 70sample warehouse data 146, 162selecting SLM options 74SLM databases 37SLM Reports 64source etl 55specifying destination directory 73specifying SLM database
information 78Tivoli Enterprise Data Warehouse 42Tivoli Enterprise Data
Warehouse,report interface 42Tivoli Presentation Services 42warehouse enablement pack 145, 162WebSphere 56
Interner Explorer 13Internet Explorer 3
JJava resource bundles 105Java Server Pages viiJava servlets 1JavaServer Pages 4JDBC
configuring for WebSphere 60updating level 40
JDBC leveltroubleshooting 122
JSP files vii, 4
Llanguage support
installing 104uninstalling 119
levels of serviceguaranteed 2
license agreement 71
logtraceTSLA1.2.1Install 70, 90, 132traceTSLA1.2LPInstall 105traceTSLA1.2LPUninstall 119tslminstall 70
loggingfor distributed SLM deployment 18
logs 12
Mmemory
extended shared, configure forDB2 41
migration 32, 63, 169
NNetscape 3, 13NetView
event notification, configuringSNMP 93
node nameidentifying in WebSphere 61specified by WebSphere 70specifying in WebSphere 77
Oodbc data source
configuring 68ODBC data source
manually creating 167ODBC data sources 96
troubleshooting 122ODBC datasource
verifying creation 122ODBC datasource, uninstalling 118offering,stored in SLM Database 6offerings
creating 5online help
building 54rebuilding after install 91
order,stored in SLM Database 6orders 13
creating 5
Ppassword protection
CLI commands 82planning
databases 14DB2 instances 14Tivoli Enterprise Data Warehouse 12WebSphere 13worksheets 21
portCLI 82conflict, resolving 47conflicts, resolving 42modifying for WebSphere 103SLM server 82
port conflict 15
184 IBM Tivoli Service Level Advisor: Getting Started with IBM Tivoli Service Level Advisor
port numberscommand line interface 70server communication 70
port numbers, selecting 18Presentation Services 75process etl 11
configuring odbc datasources 68installing 94scheduling 97source and target database 96
production modepromoting etl 95, 97
purging aged data 99
Rregistration etl 11
configuring odbc datasources 68installing 94scheduling 97source and target database 96
reinstalling 63report interface 8report servlets 4reports 2, 5restoring
SLM Reports and WebSphere 116SLM Server 63
role-based user interface 12root
user authority, verifying forinstall 33
user, on UNIX 64
Sschedule 5, 13
data collection 4etl to run 97
schema 12, 42scmd
escalate configure 90escalate testscmd
escalate enable 94etl addApplicationData 95, 97etl disable 97etl enable 95, 97etl getApps 97
Server for IBM Console 12starting 107stopping 114
service level agreement 2service level management 4service level objective 6service transaction 2shutdown 107SLA 2, 4, 6SLA results 5SLA results, stored in SLM Database 6SLM class definition file 93SLM database
troubleshooting 123SLM Database 5, 6, 9, 14
creating 64install 37install information 78
SLM database server 7SLM databases 5
creating 64DB2 instance home directory 82specifying information 78
SLM Measurement Data Mart 5, 6, 9, 14creating 64install 37install information 78purging aged data 99
SLM reports 1SLM Reports 4, 5, 7, 9, 13, 74
accessing 104customer, executive, operations
users 104default user names 104deployment with WebSphere 15installing 64integrating into WebSphere 56, 59,
64, 100integrating into WebSphere AE 100integrating into WebSphere AES 103node name in WebSphere 61removing from WebSphere 116specifying WebSphere location 76troubleshooting 127, 131uninstall,complete 117uninstalling 116
SLM Server 4, 7, 9, 13, 74communication port 82, 83configuring 82home directory on UNIX 82overview 4restoring 63starting 108stopping 113uninstalling 117
SLM solution 1distributed installation 4
SLM solution, deploying 10SLM Task Drivers 4, 5, 9, 12, 74
deployment 15distributed install 83troubleshooting 126
SLM Task Drivers,uninstalling 115slm.baroc 93slm.rls 93slmenv 105SLO 6SNMP
event notification, configuring 93SNMP trap 83, 84SNMP trap notification, verifying 94Solaris
installing Java patches 64source application
enabling 94enabling for data collection 95, 97
source application,installing warehouseenablement pack 55
source applications 2, 3writing data to warehouse 2
source databases 3source ETL 9sourcing the db2profile 32starting
IBM Console 109
starting (continued)IBM HTTP Server 111Server for IBM Console 107SLM Server 108SLM solution 107Web Services for IBM Console 108WebSphere Admin Server 111WebSphere Administrator’s
Console 111WebSphere Application Server 110
startup 107troubleshooting 129
stoppingIBM Console 113IBM HTTP Server 112Server for IBM Console 114SLM Server 113SLM Solution 112Web Services for IBM Console 113WebSphere Admin Server 112WebSphere Application Server 112
Ttarget ETL 9task drivers 12TEC event 83, 85
notification, configuring 93TEC event notification, verifying 94TEC rule file 93Tivoli
source applications 2Tivoli Common Directory 72Tivoli Enterprise Console event 83Tivoli Enterprise Data Warehouse 1, 2,
5, 7central data warehouse 8control server 8, 11data mart 8importing etl 95installing 31report interface 8
Tivoli Presentation Services 75install, verifying 54installing 42, 47
Tivoli Web Services Manager 2traceTSLA1.2.1Install.log 70, 90, 132traceTSLA1.2LPInstall log 105traceTSLA1.2LPUninstall log 119tracing 12trend
event notification 83notifying 70
trend analysis 5, 6, 13trends 2, 4, 5, 13troubleshooting 121
blank install window 124cleanup temporary ISMP
directories 125connecting to SLM Databases 125data warehouse center 127database creation scripts 123DYKAL3003E message 131DYKIN0028E at end of install
wizard 125etl install and configuration 127etl installation 127, 128
Index 185
troubleshooting (continued)fully qualified host name 129HTTP 500 error 131IBM Console, sign in 130IBM Console, starting 126IIS Service, SLM Reports 127incomplete text 124install screen fonts unreadable 124installing DB2 121installing IBM Tivoli Service Level
Advisor 124instance creation 121JDBC level, updating manually 41ODBC data sources 122server host name 129service exception 126SLM Database connection 129SLM database creation 123SLM Reports 127, 131SLM Reports install fail 127SLM Server startup 129SLM Task Drivers 126system startup 129uninstalling 132UNIX DB2 install 121updating JDBC level 122verifying JDBC level 40
tslminstall log 70twh_cdw 20twh_mart 20twh_md 20
Uuninstall
database 118ETL 119ODBC datasource 118
uninstalling 115language support 119SLM Reports 116SLM Reports, complete 117SLM Server 117SLM Task Drivers 115troubleshooting 132WebSphere AES 4.0.1 117
uninstalling previous versions 63UNIX
root user 33sourcing the db2profile 32
updating JDBC level 40user assistance
building after install 54rebuilding files after installation 91
UTF-8, configure for WebSphere 58
Vverifying
event notification method 94version
checking DB2 35violation
event notification 83notifying 70
violations 2, 4, 5, 13
Wwarehouse 3
agent 8configure user IDs for source and
target databases 96logger 8moving data via ETL 1server 8warehouse pack 9
warehouse enablement pack 1, 11installing 55, 95, 145, 162
warehouse pack 9installing (application packages) 53planning for install 29target ETLs, installing 94
warehouse sample data, installing 146,162
Web application server 3web browser 13
Internet Explorer 3Netscape 3
Web browser connections 12Web Services for IBM Console 12
starting 108stopping 113
Websphererestarting 103
WebSphere vii, 1, 5auto starting 60configuring JDBC driver 60environment, configure 58installed version 70installing 31, 56integrating SLM Reports 64, 100integrating SLM Reports into 59node name 61node name, specifying 77planning 13port conflict with HTTP 15ports, modifying 103removing SLM Reports 116specifying install location 76uninstalling, AES 4.0.1 117upgrading to 4.0.2 59
WebSphere Admin Serverstarting 111stopping 112
WebSphere Administrator’s Consolestarting 111
WebSphere AEintegrating SLM Reports 100
WebSphere AESintegrating SLM Reports 103
WebSphere Application Serverstarting 110stopping 112
Windowsadministrator privilege 64command prompt, starting 32
186 IBM Tivoli Service Level Advisor: Getting Started with IBM Tivoli Service Level Advisor

����
Printed in U.S.A.
SC32-0834-02