Embed Size (px)
Citation preview

IBM Tivoli Identity Manager, Version 5.0/5.1
LDAP Adapter Customization Guide
Whitepaper version 2.1 (December 1, 2008)
Copyright Notice

Copyright IBM Corporation 2006, 2007. All rights reserved. May only be used
pursuant to a Tivoli Systems Software License Agreement, an IBM Software License Agreement, or Addendum for Tivoli Products to IBM Customer or License Agreement. No part of this publication may be reproduced, transmitted, transcribed, stored in a retrieval system, or translated into any computer language, in any form or by any means, electronic, mechanical, magnetic, optical, chemical, manual, or otherwise, without prior written permission of IBM Corporation. IBM Corporation grants you limited permission to make hardcopy or other reproductions of any machine-readable documentation for your own use, provided that each such reproduction shall carry the IBM Corporation copyright notice. No other rights under copyright are granted without prior written permission of IBM Corporation. The document is not intended for production and is furnished “as is” without warranty of any kind. All warranties on this document are hereby disclaimed, including the warranties of merchantability and fitness for a particular purpose.
U.S. Government Users Restricted Rights -- Use, duplication or disclosure restricted by GSA ADP Schedule Contract with IBM Corporation.
Trademarks
IBM, the IBM logo, Tivoli, the Tivoli logo, AIX, Cross-Site, NetView, OS/2, Planet Tivoli, RS/6000, Tivoli Certified, Tivoli Enterprise, Tivoli Enterprise Console, Tivoli Ready, and TME are trademarks or registered trademarks of International Business Machines Corporation or Tivoli Systems Inc. in the United States, other countries, or both.
Lotus is a registered trademark of Lotus Development Corporation. Microsoft, Windows, Windows NT, and the Windows logo are trademarks of Microsoft Corporation in the United States, other countries, or both. UNIX is a registered trademark of The Open Group in the United States and other countries. C-bus is a trademark of Corollary, Inc. in the United States, other countries, or both. PC Direct is a trademark of Ziff Communications Company in the United States, other countries, or both and is used by IBM Corporation under license. ActionMedia, LANDesk, MMX, Pentium, and ProShare are trademarks of Intel Corporation in the United States, other countries, or both. For a complete list of Intel trademarks, see http://www.intel.com/sites/corporate/trademarx.htm. SET and the SET Logo are trademarks owned by SET Secure Electronic Transaction LLC. For further information, see http://www.setco.org/aboutmark.html.
Java and all Java-based trademarks and logos are trademarks or registered trademarks of Sun Microsystems, Inc. in the United States and other countries.
Other company, product, and service names may be trademarks or service marks of others.
Notices
References in this publication to Tivoli Systems or IBM products, programs, or services do not imply that they will be available in all countries in which Tivoli Systems or IBM operates. Any reference to these products, programs, or services is not intended to imply that only Tivoli Systems or IBM products, programs, or services can be used. Subject to valid intellectual property or other legally protectable right of Tivoli Systems or IBM, any functionally equivalent product, program, or service can be used instead of the referenced product, program, or service. The evaluation and verification of operation in conjunction with other products, except those expressly designated by Tivoli Systems or IBM, are the responsibility of the user. Tivoli Systems or IBM may have patents or pending patent applications covering subject matter in this
document. The furnishing of this document does not give you any license to these patents. You can send license inquiries, in writing, to the IBM Director of Licensing, IBM Corporation, North Castle Drive, Armonk, New York 10504-1785,
U.S.A.

Revision History
Version Date Created by Short Description
2.1 12/01/2008 Amita Lele
Added – sub section Mapping AssemblyLine attributes in Call/Return tab for TDI version 6.1.0 and above – PMR 19355,101,616
Added – section Handling non UTF-8 characters in Assembly Lines - IZ37468 - PMR 51641,SGC,724
2.2 10/03/2010 Vinay Kulkarni
Added Sub section
-Handling changes to the Adapter Object Class definitions
-Configuring LDAPSearchAL for performance Improvement.
Updated the information present in,
- Rename the assembly line files section
- SCHEMA MODIFICATIONS section


1
Table of Contents
1 LDAP ADAPTER OVERVIEW ............................................................. 2
FEATURES OF THE LDAP ADAPTER .................................................................................. 3
2 CUSTOMIZATION OVERVIEW .......................................................... 4
CUSTOMIZATION SUPPORT NOTICE .................................................................................. 4
REFERENCES .................................................................................................................... 4
3 PROFILE RENAME UTILITY ............................................................... 6
DESCRIPTION ................................................................................................................... 6
PROCEDURE ..................................................................................................................... 6
ASSEMBLY LINES RENAME PROCEDURE ........................................................................... 8
Step 1: Rename the assembly line files ................................................................ 8
Step 2: Update service.def file ........................................................................... 9
4 DEFAULT ADAPTER CONFIGURATION .......................................... 9
SUPPORTED ATTRIBUTES .................................................................................................. 9
EXISTING LDAP ADAPTER CONFIGURATION .................................................................. 10
CUSTOMIZED OPERATIONS BASED ON DIRECTORY SERVERS ........................................... 10
5 PREPARE ASSEMBLYLINES FOR CUSTOMIZATION ................. 12
EXTRACT ASSEMBLYLINE FILES FROM THE LDAPPROFILE.JAR FILE ................................ 12
OPEN ASSEMBLYLINES IN THE TIVOLI DIRECTORY INTEGRATOR GUI ........................... 12
REPACKAGE THE LDAPPROFILE.JAR FILE ....................................................................... 13
RE-IMPORT THE LDAPPROFILE.JAR FILE ......................................................................... 13
6 USER ENTRY NAMING CONTEXT .................................................. 14
SELECTING AN RDN ATTRIBUTE FOR THE USER ENTRY .................................................. 14
ADDING A NEW RDN ATTRIBUTE FOR THE USER ENTRY ................................................. 16
7 ADD SUPPORT FOR NEW USER OBJECT CLASS ......................... 18

2
SCHEMA MODIFICATIONS ............................................................................................... 18
USER ACCOUNT FORM MODIFICATIONS .......................................................................... 19
MAPPING ASSEMBLYLINE ATTRIBUTES ......................................................................... 19
DELETING SUPPORT FOR EXISTING ATTRIBUTES ............................................................. 25
8 CUSTOMIZE GROUP OBJECT ENTRIES ......................................... 26
USE A DIFFERENT OBJECT CLASS FOR GROUP ENTRIES .................................................... 26
USE A DIFFERENT NAMING CONTEXT FOR THE GROUP ENTRY ........................................ 27
USE A DIFFERENT LDAP GROUP MEMBER ATTRIBUTE NAME ......................................... 27
9 CONFIGURE BASE POINTS .............................................................. 28
CONFIGURING THE USER BASE DN ................................................................................. 28
CONFIGURING THE GROUP BASE DN .............................................................................. 28
CONFIGURING THE CONTAINER OBJECT CLASS............................................................... 28
10 ADDITIONAL CUSTOMIZATION INFORMATION .................... 29
FILTER TRANSFORMATION IN THE LDAPSEARCH ASSEMBLYLINE ................................. 29
HANDLING REFERENTIAL INTEGRITY ............................................................................. 30
HANDLING NON UTF-8 CHARACTERS IN ASSEMBLY LINES ........................................... 30
HANDLING CHANGES TO THE ADAPTER OBJECT CLASS DEFINITIONS ............................. 31
CONFIGURING LDAPSEARCHAL FOR PERFORMANCE IMPROVEMENT. .......................... 32
1 LDAP Adapter Overview
An adapter is a program that provides an interface between a managed resource and the IBM Tivoli Identity Manager server. Adapters function as trusted virtual administrators for the target resource. Adapters manipulate identity data for the managed resource, performing such tasks as adding, modifying, and deleting accounts. Adapters can reside on the managed resource or

3
operate remotely. The adapter runs as a service, independent of whether or not a user is logged on to the Tivoli Identity Manager server.
The Tivoli Identity Manager Version 5.0 LDAP adapter is based on a set of IBM Tivoli Directory Integrator assemblylines. The assemblylines use one or more Tivoli Directory Integrator connectors to communicate with some managed resource. The communication between the adapter and the Tivoli Identity Manager server is handled by the Remote Method Invocation (RMI) provider and dispatcher.
The adapter assemblylines are used to remotely perform the functions of a trusted virtual administrator on the target resource. They perform tasks such as creating login IDs, suspending IDs, and other user management related functions that administrators would normally run manually.
The adapter runs on the machine on which Tivoli Directory Integrator is installed. The adapter also needs the RMI dispatcher installed on the same machine as the Tivoli Directory Integrator instance. Tivoli Identity Manager communicates with the dispatcher using RMI calls. The dispatcher uses the installed Tivoli Directory Integrator to run the adapter.
The LDAP adapter consists of a multiple assemblylines invoking the Tivoli Directory Integrator LDAP connectors. It is used to communicate with the directory server (IBM Tivoli Directory Server or SunOne). It needs the login credentials of a user having administration privileges to perform the user management related tasks for the directory server.
Features of the LDAP adapter You can use the LDAP adapter to automate the following administrative tasks:
Add new users on the resource and set their group memberships.
Modify existing users‟ attributes and their group memberships.
Change the user account password.
Suspend, restore, and delete existing users.
Reconcile user and group accounts.

4
2 Customization Overview
The LDAP adapter is a Tivoli Directory Integrator-based adapter used to centrally manage user provisioning on directory servers. The LDAP adapter supports a standard set of attributes and object classes for the Tivoli Directory Server and the SunOne directory server.
Standard user provisioning operations such as add, delete, modify, suspend, restore, change password, search, and test are supported by the adapter. As LDAP requirements often vary, it is often necessary to customize or extend the LDAP schema to support additional attributes or object classes. The LDAP adapter is capable of being easily customized.
This section explains how the adapter can be customized to support new attributes, object classes, and directory servers.
The need for customization arises in the following cases:
Extending existing schema for both users and groups.
Adding new attributes. For example, storing alternate e-mail user IDs.
Modifying existing attributes. For example, using a different attribute such as an RDN attribute for creating a user
DN (for example, using cn in place of uid as the user RDN attribute).
Deleting existing attributes.
Supporting custom object classes for user and group. Some organizations might have custom object classes defined to manage user accounts and corresponding groups in the directory server (for example, using
organizationalPerson for the user account or groupOfUniqueNames for the group
account).
Customizing a container DN.
Providing the base DN for users.
Providing the base DN for groups.
Customization Support Notice Schema extension, custom object classes for user and group, and the integration to the Identity Manager server - the adapter framework - are supported. However, IBM does not support the customizations, scripts, or other modifications. If you experience a problem with a customized adapter, IBM Support may require the problem to be demonstrated on the GA version of the adapter before a PMR is opened.
References The scope of information contained in this customization guide is limited.

5
Throughout this entire guide, please refer to detailed information contained in the appropriate Tivoli Identity Manager product documentation for issues involving testing, troubleshooting, and de-bugging this LDAP adapter.

6
3 Profile Rename Utility
A profile rename utility is available with the compressed file when you download the adapter from the IBM Web site. Contact your IBM account representative for the Web address and download instructions.
IBM recommends that you create your own copy of the LDAP profile for customization.
Description The profile rename utility is available for you to generate your own LDAP profile based on the GA LDAP profile. It preserves the original GA LDAP profile and generates a profile for you to customize. The functionalities are identical; however, the profile name is different.
1. Run the profile rename utility to create a new LDAP profile (i.e. MyLdapProfile).
2. Make all customization on the newly created MyLdapProfile.
3. You can import both GA LdapProfile and MyLdapProfile on the same TIM server.
Locate the “ProfileRename” folder contained within the compressed LDAP Adapter file. The folder contains the following file:
LdapProfile-rename.bat o A DOS batch command to run the utility
LdapProfile-rename.properties o Property file used by the utility to generate the new names. You must
update this file.
ProfileRename-README.txt o Instructions on how to run the utility.
ProfileRename.jar o The Java class files that makes up the utility.
Procedure Assumptions/Pre-requisites: Java run-time should be installed and must be in the path.
1. Copy the following “ProfileRename” utility files to a folder (i.e. MyProfileFolder):
a. ProfileRename.jar b. LdapProfile-rename.properties c. profile-rename.bat
2. Customize the LdapProfile-rename.properties file according to your requirement. For
example, to create a “MyLdapProfile”, you can update the LdapProfile-rename.properties file as follow:

7
Profile.Name.New=MyLdapProfile Profile.Name.Old=LdapProfile AccountProfile.Name.New=MyLdapAccount AccountProfile.Name.Old=LdapAccount GroupProfile.Name.New=MyLdapGroups
GroupProfile.Name.Old=LdapGroupProfile Account.Class.New=erMyLdapAccount Account.Class.Old=erLDAPUserAccount Group.Class.New=erMyLdapGroup Group.Class.Old=erLdapGroupAccount Service.Class.New=erMyLdapService Service.Class.Old=erLDAPRMIService Container.Class.New=erMyLdapContainer
Container.Class.Old=erLdapContainerAccount Account.OID.New=1.3.6.1.4.1.1466.115.121.9.1 Group.OID.New=1.3.6.1.4.1.1466.115.121.9.2 Service.OID.New=1.3.6.1.4.1.1466.115.121.9.3 Container.OID.New=1.3.6.1.4.1.1466.115.121.9.4 ServiceClass.Label.New=My LDAP service AccountClass.Label.New=My LDAP accounts GroupClass.Label.New=My LDAP groups ProfileName.Label.New=My LDAP service profile ProfileDescription.Label.New=My LDAP service profile GroupProfile.Label.New=My LDAP groups profile
All properties ending with “.New” must be supplied. All properties ending with “.Old”
cannot be changed. For all properties that contain “OID”, you must supply a unique LDAP OID. You can
use the string syntax as follow: Account.OID.New= erMyLdapAccount-OID Group.OID.New= erMyLdapGroup-OID Service.OID.New= erMyLdapService-OID Container.OID.New= erMyLdapContainer-OID
3. Open a command prompt. Change directory to the “MyProfileFolder” directory created in step 1 above.
4. Run the following command:
LdapProfile-rename.bat <path to the GA LdapProfile.jar>
5. If the name of the new profile is "MyLdapProfile", a directory $(MyProfileFolder)\MyLdapProfile will be created, containing the new profile files.
6. Rename the assembly lines for your profile (using the files created in the "MyLdapProfile"
directory). Refer to section “Assembly Lines rename procedure” for detailed information on renaming the assembly lines.
7. Create the new profile Jar file as follow: from the " MyProfileFolder" directory issue the following command:

8
jar -cvf MyLdapProfile.jar MyLdapProfile
8. The new profile JAR file, MyLdapProfile.jar, will be created in the MyLdapProfile"
directory. For the remainder of this document, if you created your own copy of the LDAP profile (i.e. MyLdapProfile.jar), replace all references of LdapProfile.jar with your MyLdapProfile.jar.
Assembly Lines rename procedure The TDI assembly lines used by the LDAP adapter are contained in the profile JAR file. When you unjar the LdapProfile.jar, it contains the following assembly line files:
LDAPAdd.xml (LDAPAdd assembly line used for add operation )
LDAPModify.xml (LDAPModify assembly line used for modify, suspend, restore, and password change operations )
LDAPDelete.xml (LDAPDeleted assembly line used for add operation)
LDAPSearch.xml (LDAPSearch assembly line used for add operation)
LDAPTest.xml (LDAPTest assembly line used for add operation)
LdapAL.xml (Contains all the above assembly lines and used during assembly lines customization)
To change the assembly line names for your new profile, perform the following two steps:
Step 1: Rename the assembly line files
LDAPAdd.xml: if the new assembly line name is myLDAPAdd then do the following:
Rename file LDAPAdd.xml to myLDAPAdd.xml.
Edit myLDAPAdd.xml and replace <AssemblyLine name="LDAPAdd"> with <AssemblyLine name="myLDAPAdd">
LDAPModify.xml: if the new assembly line name is myLDAPModify then do the following:
Rename file LDAPModify.xml to myLDAPModify.xml.
Edit myLDAPModify.xml and replace <AssemblyLine name="LDAPModify"> with <AssemblyLine name="myLDAPModify">
LDAPDelete.xml: if the new assembly line name is myLDAPDelete then do the following:
Rename file LDAPDelete.xml to myLDAPDelete.xml.
Edit myLDAPDelete.xml and replace <AssemblyLine name="LDAPDelete"> with <AssemblyLine name="myLDAPDelete">
LDAPSearch.xml: if the new assembly line name is myLDAPSearch then do the following:
Rename file LDAPSearch.xml to myLDAPSearch.xml.
Edit myLDAPSearch.xml and replace <AssemblyLine name="LDAPSearch"> with <AssemblyLine name="myLDAPSearch">
LDAPTest.xml: if the new assembly line name is myLDAPTest then do the following:
Rename file LDAPTest.xml to myLDAPTest.xml.

9
Edit myLDAPTest.xml and replace <AssemblyLine name="LDAPTest"> with <AssemblyLine name="myLDAPTest">
LdapAL.xml file: This file contains all the assembly lines for the LDAP adapter and will be used when assembly lines customization are needed. Follow these steps to create your file:
Rename file LdapAL.xml to myLdapAL.xml
Edit myLdapAL.xml and replace the following: o Replace all occurrences of <AssemblyLine name="LDAPAdd"> with
<AssemblyLine name=" myLDAPAdd "> o Replace all occurrences of <AssemblyLine name="LDAPModify"> with
<AssemblyLine name=" myLDAPModify "> o Replace all occurrences of <AssemblyLine name="LDAPDelete"> with
<AssemblyLine name=" myLDAPDelete "> o Replace all occurrences of <AssemblyLine name="LDAPSearch"> with
<AssemblyLine name=" myLDAPSearch "> o Replace all occurrences of <AssemblyLine name="LDAPTest"> with
<AssemblyLine name=" myLDAPTest ">
Step 2: Update service.def file
Open service.def and change the assembly lines for each operation to reflect the new names: Search for <operation cn="LDAPAdd"> and replace it with <operation cn="LDAPNewAdd"> Search for <assemblyLine>LDAPAdd.xml</assemblyLine> and replace it with <assemblyLine>LDAPNewAdd.xml</assemblyLine> Search for <operation cn="LDAPDelete"> and replace it with <operation cn="LDAPNewDelete"> Search for <assemblyLine>LDAPDelete.xml</assemblyLine> and replace it with <assemblyLine>LDAPNewDelete.xml</assemblyLine> Perform the similar change for other operations in service def (LDAPModify, LDAPSearch, LDAPTest).
4 Default Adapter Configuration
Supported attributes The following shows the standard iNetOrgPerson attributes supported by the LDAP adapter:
businessCategory homePhone postalCode
carLicense homePostalAddress preferredLanguage
cn initials registeredAddress
departmentNumber l roomNumber
Description mail secretary
destinationIndicator manager sn
displayName mobile title
employeeNumber pager st
employeeType physicalDeliveryOfficeName telephoneNumber
facsimileTelephoneNumber postOfficeBox teletexTerminalIdentifier
givenName postalAddress telexNumber

10
userPassword Table-3.1: Default attributes supported by the LDAP adapter
Existing LDAP adapter configuration The default object class used for creating a user entry is iNetOrgPerson and the
supporting object classes are organizationalPerson, person, and top. New users will be created with the same object classes.
The default object class supported for containers is organizationalUnit.
The default object class supported for groups is uniquename.
Customized operations based on directory servers The following operations are customized based on the directory server. If any other directory server is to be used, these operations require customization.
Suspend For SunOne, the nsaccountlock attribute (value “true”) is used for suspending the user account. For Tivoli Directory Server, the value of the userPassword attribute is deleted to disable the user account.
Restore For SunOne, the nsaccountlock attribute (value “false”) is used for restoring the user account. For Tivoli Directory Server, the new user password is set in the userPassword attribute to restore the user.
Search The suspended or active status of the user account is determined based on the directory server being managed.
For SunOne, nsaccountlock is mapped to erAccountStatus.
If nsaccountlock is true, the account is disabled and erAccountStatus is set to “1”.
If nsaccountlock is false or not present, the account is active and erAccountStatus is set to “0”.
For Tivoli Directory Server, userPassword is mapped to erAccountStatus.
If userPassword is present, the account is active and erAccountStatus is set to “0”.
If userPassword is not present, the account is suspended and erAccountStatus is set to “1”.

11
If any other directory server is to be managed, the above operations must be customized. The following sections in this guide explain the customization process.

12
5 Prepare AssemblyLines for Customization
Assemblyline files contain the instructions for the adapter operations. To customize the LDAP adapter, you might need to make the assemblylines available for editing through the Tivoli Directory Integrator GUI. Customizing an assemblyline can involve:
Using the Tivoli Directory Integrator GUI to edit specific lines in the assemblyline .xml file.
Using the Tivoli Directory Integrator GUI to modify attribute mappings for the assemblyline.
Extract assemblyline files from the LdapProfile.jar
file Note: Always back up the .jar file before performing any modifications.
Perform the following steps to extract assemblyline files from the LdapProfile.jar file:
1. Locate the LdapProfile.jar:
a. If you downloaded the adapter online, the LdapProfile.jar
is included in the compressed file.
b. If you are using the bundled LdapProfile.jar, it is located
under $(TIM_HOME)/config/adapters
Create a temporary folder on the Tivoli Directory Integrator server.
2. Unjar the LdapProfile.jar file using the following command: jar -xvf LdapProfile.jar
Open assemblylines in the Tivoli Directory Integrator
GUI The extracted assemblylines will be located in the newly created LdapProfile directory.
Perform the following steps to open assemblyline files in the Tivoli Directory Integrator GUI:
1. Open the Tivoli Directory Integrator: Start->Programs->IBM Tivoli Directory Integrator->Start Config Editor
2. Open the individual assemblylines with: File->Open
3. Navigate to newly created LdapProfile directory

13
4. Open the appropriate assemblyline. For example: LdapAdd.xml
5. Follow the appropriate instructions in subsequent sections of this document to customize the assembly lines.
6. Save each assemblyline by highlighting the assemblyline and selecting Save, then Close.
7. Close the Tivoli Directory Integrator GUI.
Repackage the LdapProfile.jar file Perform the following step to repackage the LdapProfile.jar file:
1. From the command window, run the following command to repackage the assemblylines
into a new.jar file:
jar -cvf LdapProfile.jar LdapProfile
Re-import the LdapProfile.jar file Perform the following steps to re-import the repackaged LdapProfile.jar file, containing the
modified assemblyline files, into the Tivoli Identity Manager server:
1. Copy the LdapProfile.jar file to the workstation where you are running a browser.
Or alternatively, run a browser on the Tivoli Identity Manager server.
2. Log in to Tivoli Identity Manager Express as the ITIM administrator.
3. Go to Configure System and Manage Service Types.
4. Click Import.
5. Browse to find the modified LdapProfile.jar file and click OK.
6. From the Windows Services Control Panel, select the Tivoli Identity Manager Adapter and click Restart. This action will uncache the assemblylines.

14
6 User Entry Naming Context
The user LDAP Entry Naming Context is the attribute that distinguish the entry within a container. This attribute will be part of the relative distinguished name, or RDN, or the user. The LDAP Entry Naming Context is referred to here as the RDN attribute.
Note that within ITIM, the RDN attribute will always be equal to the erUid attribute. When changing the RDN attribute, note the following:
It is recommended, whenever possible, to remove the RDN attribute from the LDAP Adapter account form. Use the ITIM form designer to customize the account form as follow:
o Select the “LDAP account” from the list under “Account”, then remove the attribute in question.
o It is not possible to remove an attribute from the account form if it is a required attribute within the LDAP adapter account object class (i.e. cn).
The LDAP adapter will always set the RDN attribute value to the value entered for erUid (User ID) on the LDAP Adapter account form.
After changing the RDN attribute, you must stop and restart the adapter service in order for the changes to take effect. Refer to the LDAP Adapter Installation and Configuration Guide for more details on how to stop and restart the adapter service.
Selecting an RDN attribute for the user entry This section explains how to use a different RDN attribute (Naming Context) for the user entry. In the following view of the Create a service form, the RDN Attribute selection is one of the fields:

15
Figure 5.1
By default the RDN Attribute field contains values “uid” and “cn”.
Either value can be selected as the RDN attribute.

16
Adding a new RDN attribute for the user entry Perform the following steps to add a new value to the RDN Attribute selection list:
1. From the Tivoli Identity Manager Express GUI, select: Configure System > Design Forms > Service > Select LDAP Profile
Figure 5.2
2. Double-click the $erldapuserrdn attribute. The Select Editor window displays.
Figure 5.3
3. Use the appropriate buttons to add a new attribute (for example, “sn”) to the list.
4. Click OK.

17
5. From the Select LDAP Profile view, save the form template. The new attribute can now be selected from the RDN Attribute list.

18
7 Add Support for New User Object Class
This section describes the customization steps for using a different object class for user entries. This customization could additionally involve adding and deleting attributes from the schema.
This customization is required for cases when additional user account information is to be managed through Tivoli Identity Manager. In such cases, a new object class can be created that is derived from iNetOrgPerson. The new object class contains new attributes to be managed.
The steps in this section assume that a new object class newOrgPerson is derived from iNetOrgPerson. Additional attributes to be managed include newAttrib1 and newAttrib2.
The steps in this section also assume that the two attributes to be managed, newAttrib1 and newAttrib2, are created as optional attributes for newOrgPerson and are added to the directory.
newUserAttrib is part of erLDAPUserAccount and is mapped to the existing attribute newAttrib2 belonging to newOrgPerson.
Schema modifications The following changes are required in schema.dsml.
1. Change the object class used for the erLdapUserAccount class. Add newAttrib2 as an optional attribute for newOrgPerson.
<class superior="iNetOrgPerson">
<name>newOrgPerson</name>
<description>LDAP User Account</description>
<object-identifier>erLdapUserAccount-OID</object-identifier>
<attribute ref = "erUid" required = "true" />
<attribute ref = "newAttrib1" required = "false" />
<attribute ref = "newAttrib2" required = "false" />
- - -
- - -
- - -
</class>
2. Add the attribute label and description in the customlabels.properties file.
A sample is shown below:
newAttrib1=New Attribute 1
newUserAttrib=New User Attribute
3. Modify the service.def file to change the user object class override parameter as
follows:
<dispatcherParameter name="userOClassOverride">
<default>neworgperson inetorgperson organizationalperson person
top</default>
Objectclass to be used for user entries
</dispatcherParameter>

19
Note that this change is required for all assemblylines defined in service.def.
4. Prepare a profile.jar and import it into Tivoli Identity Manager.
User account form modifications The newly added attributes are not visible on the user account form unless explicitly added. Perform the following steps to display these attributes on the user account form:
1. Log in to Tivoli Identity Manager.
2. Go to Configure System -> Design Forms.
3. Expand the Account tree and select LDAP Account.
4. The newly added attributes are shown in the Attribute List. The Attribute List contains the attribute name.
5. Add the attributes (newAttrib1 and newUserAttrib) on the $tag.ldap.other tab by double clicking on them.
6. Save the modified user account form by clicking on .
Mapping AssemblyLine attributes LDAPAdd
1. Click on the Call Return tab . In case of TDI version 6.1.0 and above, the Call/Return tab is not on the main TDI UI. For details on how to map attributes in this case please see the section titled „Mapping AssemblyLine attributes in Call/Return tab for TDI version 6.1.0 and above‟
2. Add newAttrib1 and newUserAttrib to the work entry on the left-hand side panel as shown in Figure-4.14.

20
Figure-6.1: Assembly Line – Call/Return - Initial Work Entry – Add Attribute
3. Select the conLDAPUser connector.
4. Click on the Output Map tab.
5. Add newAttrib1 and newAttrib2 to the connector entry on the left-hand side panel and to
the schema on the right-hand side panel by clicking on the button as shown in Figure-4.14.
6. Ensure that the mapping is automatically performed between the newly added newAttrib1 attributes in the connector entry to work entry. This can be checked by clicking on newAttrib1 in the connector entry, which is mapped to
newAttrib1 in the work entry as shown in the Figure-4.14. Click multiple times to get the appropriate view. Similarly, map newUserAttrib to newAttrib2.

21
Figure-6.2: LDAPAdd – conLDAPUser – Output Attribute Mapping
LDAPDelete
No attribute mapping is required for the LDAPDelete assemblyline.
LDAPModify
1. Select the LDAPModify assemblyline.
2. Select the conLDAPUser connector.
3. Click on the Config tab.
4. Add the newAttrib1 and newAttrib2 attributes to the list of returned attributes as shown in Figure-4.15.

22
Figure-6.3: LDAPModify – conLDAPUser – Connector Configuration
5. Click on the Call Return tab . In case of TDI version 6.1.0 and above, the Call/Return tab is not on the main TDI UI. For details on how to map attributes in this case please see the section titled „Mapping AssemblyLine attributes in Call/Return tab for TDI version 6.1.0 and above‟
6. Add newAttrib1 and newUserAttrib to the work entry on the left-hand side panel by
clicking on the button.
7. Select the conLDAPUser connector.
8. Click on the Output Map tab.
9. Add newAttrib1 and newAttrib2 to the connector entry on the left-hand side panel and to
the schema on the right-hand side panel by clicking on the button.
10. Ensure that the mapping is automatically performed between the newly added newAttrib1 attributes in the connector entry to work entry. This can be checked by clicking on newAttrib1 in the connector entry, which is mapped to newAttrib1 in the work entry. Similarly map newUserAttrib to newAttrib2.
11. Select the conLDAPMembership connector.
12. Click on Input Map tab.
13. Add newAttrib1 and newUserAttrib to the work entry on the left-hand side panel and to the schema on the right-hand side panel, add newAttrib1 and newAttrib2. This can be
done by clicking on button.
14. Ensure that mapping is automatically performed between the newly added attributes in work entry to connector entry. This can be checked by clicking on newAttrib1 in the work entry. This is mapped to newAttrib1 in the connector entry. Similarly, map newUserAttrib to newAttrib2.

23
LDAPSearch
1. Select the conLDAPUser connector.
2. Click on the Config tab.
3. Add the new attributes newAttrib1 and newAttrib2 to the list of returned attributes as shown in Figure-4.16.
Figure-6.4: LDAPSearch – conLDAPUser Connector Configuration
4. Click on the Input Map tab.
5. Click on to add the new attributes newAttrib1 and newUserAttrib to the work entry.
6. Similarly add the newAttrib1 and newAttrib2 attributes to the connector schema on the right-hand side panel.
7. Ensure that the mapping is automatically performed between the newly added attributes in the work entry to connector entry. This can be checked by clicking on the newAttrib1 in the work entry. This is mapped to newAttrib1 in the connector entry. Similarly, map newUserAttrib to newAttrib2.
8. Filter transformation is required and is explained in the section “Filter Transformation in the LDAPSearch Assembly Line”.
This completes the customization for new object class for the user account.
This process explains the case when a customized object class is required (newAttrib1) and the case when no new object class is required. In the later case, the new attribute is made part of erLdapUserAccount and mapped to the appropriate existing attribute of the object class being used.
Mapping AssemblyLine attributes in Call/Return tab for TDI version 6.1.0 and above
In case of TDI versions 6.1.0 and above the call/return tab is not available on the main TDI UI.
1. To access the call/return tab click on the Operations tab and then on Default.
24
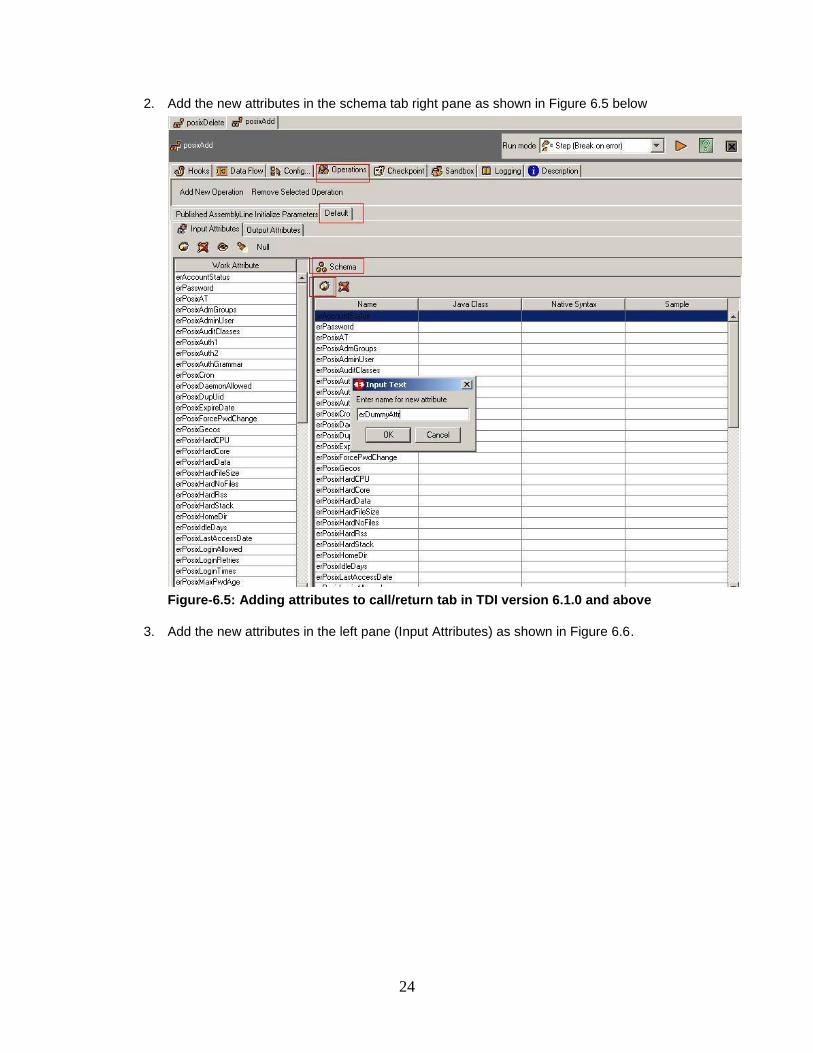
2. Add the new attributes in the schema tab right pane as shown in Figure 6.5 below
Figure-6.5: Adding attributes to call/return tab in TDI version 6.1.0 and above
3. Add the new attributes in the left pane (Input Attributes) as shown in Figure 6.6.

25
Figure-6.6: Adding attributes to call/return tab in TDI version 6.1.0 and above
4. Make sure the new attribute in input attribute list is mapped to the new one in schema.
5. The attribute will be added into the Initial Work Entry on the Data Flow tab.
Deleting support for existing attributes Deleting support for existing attributes is very similar to adding support for new attributes. The steps described in Section 6: Add Support for New User Object Class could be used as guidelines for deleting support for existing attributes.

26
8 Customize Group Object Entries
This section explains how to customize group object entries. The procedures include:
Use a different object class for group entries.
Use a different Naming Context for a group entry.
Use a different LDAP group member attribute name.
The procedures involve making manual edits to the service.def file. To work with the
service.def file, you must:
1. Extract the service.def file from the LDAP adapter jar file: LdapProfile.jar
2. Make appropriate edits to the service.def file.
3. Re-create the LdapProfile.jar file.
4. Import the new LdapProfile.jar file into the Tivoli Identity Manager Server.
For details on the above procedures, refer to the IBM Tivoli Identity Manager LDAP Adapter Installation and Configuration Guide.
Use a different object class for group entries This section describes the customization steps to use a different object class for group entries. This customization could involve adding and deleting attributes from the schema.
This customization is required for cases when additional group account information is required. In such cases, steps similar to that of a new object class can be created that is derived from groupOfNames.
The new object class contains new attributes to be managed. Steps similar to Section 6: Add Support for New User Object Class are also applicable here, but the changes will be in conLdapMembership and conLdapGroup connectors.
Modify the service.def file to change the new group object class related parameter as follows:
<dispatcherParameter name="GroupOClassOverride">
<default>groupofnames</default>
Objectclass to be used for group entries
</dispatcherParameter>
For example, to use the groupofuniquenames object class, the modified lines described above will appear as follows:
<dispatcherParameter name="GroupOClassOverride">
<default>groupofuniquenames</default>
Objectclass to be used for group entries
</dispatcherParameter>

27
Use a different Naming Context for the group entry This section explains how to use a different Naming Context for the group entry. By default, the LDAP adapter uses the “cn” attribute as the RDN attribute for group entries.
Complete the following procedure to use a different attribute as the RDN attribute. This procedure assumes that the new RDN attribute is a part of the object class being used for the group entry.
Modify the service.def file to change the group RDN entry as follows:
<dispatcherParameter name="LdapGroupRDN">
<default>cn</default>
</dispatcherParameter>
For example, to use the “sn” group, the modified lines described above will appear as follows:
<dispatcherParameter name="LdapGroupRDN">
<default>sn</default>
</dispatcherParameter>
Use a different LDAP group member attribute name This section explains how to set a different LDAP group member attribute name.
Modify the service.def file to change the LDAP group member attribute name as follows:
<dispatcherParameter name="LdapMbrshipGrpAttrb">
<default>member</default>
</dispatcherParameter>
For example, to use the “uniquemember” as the new LDAP group member attribute name, the modified lines described above will appear as follows:
<dispatcherParameter name="LdapMbrshipGrpAttrb">
<default>uniquemember</default>
</dispatcherParameter>

28
9 Configure Base Points
Configuring the user base DN Follow these steps to set the base point for the user:
1. Login to ITIM. Go to the Service form for the service, as shown in Figure 5.1.
2. Edit the attribute "User base DN" to point to the appropriate base DN for user.
Configuring the group base DN Follow these steps to set the base point for the group:
1. Login to ITIM. Go to the Service form for the service, as shown in Figure 5.1.
2. Edit the attribute "User base DN" to point to the appropriate base DN for user.
Configuring the Container object class Complete the following steps to use a different object class for the Container attribute.
These steps assume that the domain object class is to replace the organizationalUnit object class.
1. Open the service.def file for the adapter profile.
2. Identify all occurrences of the following lines:
<dispatcherParameter name="ContainerObjClasses">
<default>organizationalUnit</default>
</dispatcherParameter>
3. For this example, replace the organizationalUnit with domain:
<dispatcherParameter name="ContainerObjClasses">
<default>domain</default>
</dispatcherParameter>
4. Close and save the service.def file.
This completes the customization required for using a different Container object class.

29
10 Additional Customization Information
Filter transformation in the LDAPSearch
assemblyline The following manual filter transformations are supported by the LDAPSearch assemblyline:
1. (objectclass=erLdapUserAccount) This filter returns all user accounts. This is transformed to filter (objectclass=inetorgperson). If the user object class is customized to use a different object class other than inetorgperson, then the filter transformation must also be customized to use the new object class.
2. (objectclass=erLdapGroupAccount) This filter returns all group account data. This is transformed to filter (objectclass=groupofnames). If the group object class is customized to use a different object class other than groupofnames, then the filter transformation must also be customized to use the new object class.
All remaining attributes are mapped as is. If any additional mapping is required, the mapping must be customized through scripting as follows:
1. Select the Hooks tab for the LDAPSearch assemblyline.
2. Select the “Prolog – Before Init” hook.
3. Locate the function fTransformFilter.
4. Add any custom transformations in the area marked by:
//***************************************************************
// Add any custom transformations here
//***************************************************************
A sample transformation from preferredLanguage to language appears as follows:
//***************************************************************
// Add any custom transformations here
//***************************************************************
gDoNotFilter=true;
strFilter = strFilter.replace(/\bpreferredLanguage=\b/g, “language=");
return strFilter;
30
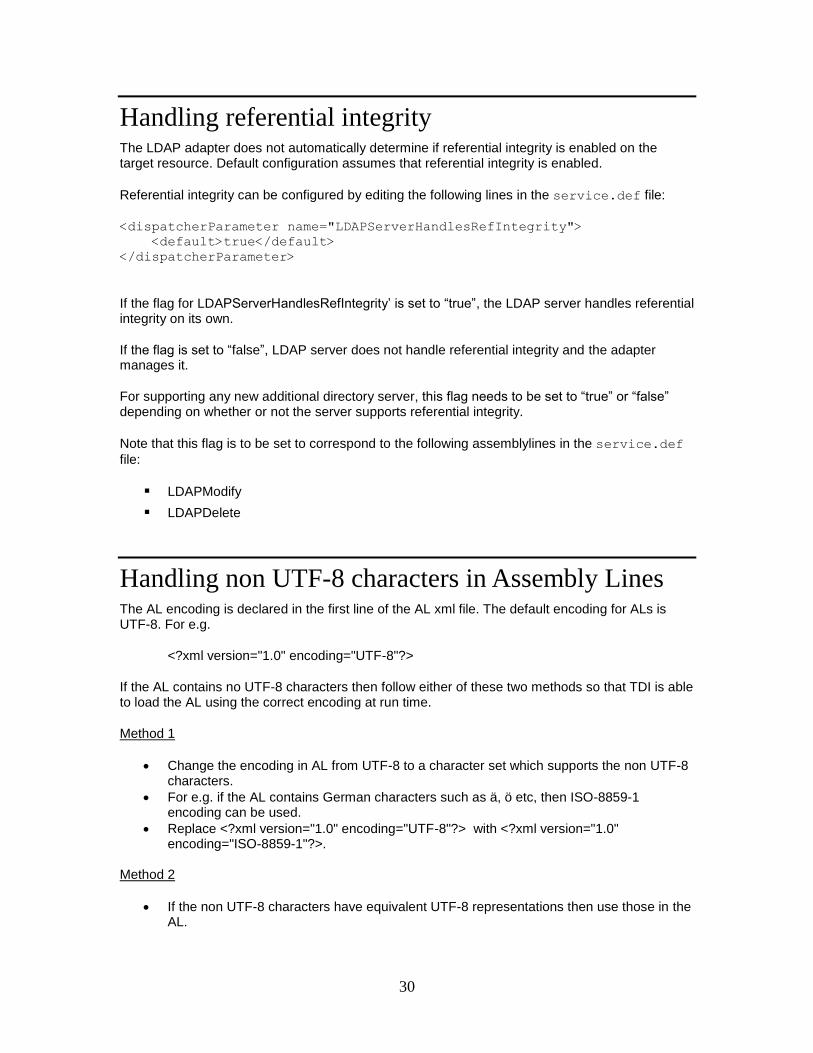
Handling referential integrity The LDAP adapter does not automatically determine if referential integrity is enabled on the target resource. Default configuration assumes that referential integrity is enabled.
Referential integrity can be configured by editing the following lines in the service.def file:
<dispatcherParameter name="LDAPServerHandlesRefIntegrity">
<default>true</default>
</dispatcherParameter>
If the flag for LDAPServerHandlesRefIntegrity‟ is set to “true”, the LDAP server handles referential integrity on its own.
If the flag is set to “false”, LDAP server does not handle referential integrity and the adapter manages it.
For supporting any new additional directory server, this flag needs to be set to “true” or “false” depending on whether or not the server supports referential integrity.
Note that this flag is to be set to correspond to the following assemblylines in the service.def
file:
LDAPModify
LDAPDelete
Handling non UTF-8 characters in Assembly Lines The AL encoding is declared in the first line of the AL xml file. The default encoding for ALs is UTF-8. For e.g.
<?xml version="1.0" encoding="UTF-8"?>
If the AL contains no UTF-8 characters then follow either of these two methods so that TDI is able to load the AL using the correct encoding at run time.
Method 1
Change the encoding in AL from UTF-8 to a character set which supports the non UTF-8 characters.
For e.g. if the AL contains German characters such as ä, ö etc, then ISO-8859-1 encoding can be used.
Replace <?xml version="1.0" encoding="UTF-8"?> with <?xml version="1.0" encoding="ISO-8859-1"?>.
Method 2
If the non UTF-8 characters have equivalent UTF-8 representations then use those in the AL.

31
For e.g. äöüÖÄÜ is the UTF-8 representation of ä;ö;ü;Ö;Ä;Ü.
Replace non UTF-8 chars with equivalent UTF-8 representation
Handling changes to the Adapter Object Class
definitions Currently LDAP adapter Search AL uses a constant “TIM_USER_ACCOUNT” which has value as “erLDAPUserAccount”, the objectclass name on ITIM side where the data should be stored. Now if user wants to change this objectclass value i.e. to use the customized objectclass for the storing the data on ITIM side, then user needs to replace this constant with the customized objectclass name where the data should get stored in ITIM side in attribute mapping. Consider E.g. The Input Map of the conLDAPUser connector in the LDAPSearch AL defines "Packages.com.ibm.di.utils.LDAPAdapterUtils.TIM_USER_ACCOUNT" as the entry ObjectClass value. This returns the hardcoded value of "erLDAPUserAccount" ,Now if user wants to use
customized objectclass (say newOrgPerson) then user needs to map this objectclass name to objectClass attribute defined under work attribute with script as ret.value = “newOrgPerson”;
For adapter to pick the changes made for Adapter Object Class definition follow below mentioned steps,
1) Open LDAPSearchAL in IBM Tivoli Directory Integrator.Click on conLDAPUser connector
present in Feeds . Click on Input Map Tab of the Connector.

32
2) Select ObjectClass Attribute, which will have Advance Mapping as ret.value = Packages.com.ibm.di.utils.LDAPAdapterUtils.TIM_USER_ACCOUNT; 3) Replace “Packages.com.ibm.di.utils.LDAPAdapterUtils.TIM_USER_ACCOUNT;” with new ObjectClass defined. ret.value = Object Class Name that is to be used. (For eg ret.value = inetorgperson) 4) Save LDAPSearchAL.xml
Configuring LDAPSearchAL for performance
Improvement. The LDAP Adapter contains a "hard coded" list of return attributes in the conLDAPUser connector of the LDAPSearchAL. The return attributes are added to LDAPSearchAL for performance benefits in reconciliation operation. Return attribute feature is provided by ITDI. The list should contain those attributes which need not be returned by the connector from the resource. Reducing the number of attributes returned by the connector gives significant performance gains.
Consider a scenario where we want to reconcile the user and the associated group membership data for that particular user. The way LDAP adapter behaves is, after fetching the data for a user, it invokes the membership connector to get its membership association. Now suppose that particular user is a member of group (say groyp1) which is having 10000 users as its members. The membership connector will return all the attributes of that group (containing membership attribute, like MEMBER/UNIQUEMEMBER, having a list of 10000 users) but in adapter we don‟t require to fetch the complete list. We just need its $Dn attribute. This can be done by making use of return attribute feature provided by ITDI to tackle these kinds of scenarios. In GA adapter we have only $DN attribute in the list of RETURN ATTRIBUTES. This will cause membership connector to only return $DN attribute of GROUP. Including the MEMBER attribute in RETURN ATTRIBUTES list results in significantly performance gain.
While customizing the adapter, you need to decide which customized/newly added, attributes should go in this list. For adding the attribute to return attribute list follow the following steps,
1) Open LDAPSearchAL in IBM Tivoli Directory Integrator. Click on conLDAPUser connector
present in Feed. Click on Connection Tab under Config.
2) Return Attribute field by default contains some attributes that will result in performance gain. Go to end and press enter.
3) Add the new attribute to existing list of attributes in return attribute field.
4) Save the LDAPSearchAL

33
End of document.


![Lele - Material habits, identities, semiotics.[1]](https://img.pdfslide.us/doc/110x75/577d2d591a28ab4e1ead8284/lele-material-habits-identities-semiotics1.jpg)