Embed Size (px)
Citation preview

IBM Security Identity ManagerVersion 6.0
UNIX and Linux Adapter Installationand Configuration Guide
SC27-4426-07
���

IBM Security Identity ManagerVersion 6.0
UNIX and Linux Adapter Installationand Configuration Guide
SC27-4426-07
���

NoteBefore using this information and the product it supports, read the information in “Notices” on page 105.
Edition notice
Note: This edition applies to version 6.0 of IBM Security Identity Manager (product number 5724-C34) and to allsubsequent releases and modifications until otherwise indicated in new editions.
© Copyright IBM Corporation 2012, 2014.US Government Users Restricted Rights – Use, duplication or disclosure restricted by GSA ADP Schedule Contractwith IBM Corp.
Contents
Figures . . . . . . . . . . . . . . . v
Tables . . . . . . . . . . . . . . . vii
Preface . . . . . . . . . . . . . . . ixAbout this publication . . . . . . . . . . . ixAccess to publications and terminology . . . . . ixAccessibility . . . . . . . . . . . . . . xTechnical training. . . . . . . . . . . . . xSupport information . . . . . . . . . . . . xStatement of Good Security Practices . . . . . . x
Chapter 1. UNIX and Linux AdapterInstallation and Configuration Guide . . 1Overview of the adapter . . . . . . . . . . 1Features of the adapter . . . . . . . . . . . 1Architecture of the adapter . . . . . . . . . 1Supported configurations . . . . . . . . . . 2
Chapter 2. Adapter installation planning 5Preinstallation roadmap . . . . . . . . . . 5Installation roadmap. . . . . . . . . . . . 5Prerequisites . . . . . . . . . . . . . . 6Installation worksheet for the adapter . . . . . . 8Software download . . . . . . . . . . . . 8
Chapter 3. Adapter installation . . . . . 9Dispatcher installation verification . . . . . . . 9Installing the UNIX and Linux Adapter . . . . . 9Installation verification . . . . . . . . . . 10Adapter service start, stop, and restart . . . . . 11Importing the adapter profile into the IBM SecurityIdentity Manager server . . . . . . . . . . 11Adapter profile installation verification . . . . . 12Communicating with the Secure Shell protocol . . 12Adapter user account creation . . . . . . . . 13Creating a service . . . . . . . . . . . . 14
Chapter 4. Adapter installation anduninstallation in silent mode . . . . . 21Installing the adapter in silent mode . . . . . . 21Uninstalling the adapter in silent mode . . . . . 22
Chapter 5. First steps after installation 23Adapter configuration . . . . . . . . . . . 23
Customizing the adapter profile . . . . . . 23Running user-defined scripts . . . . . . . 25Defining the maximum connection count foradapter operations . . . . . . . . . . . 26User home directory creation . . . . . . . 28Editing adapter profiles on the UNIX or Linuxoperating system . . . . . . . . . . . 28Adapter features customization and extension . . 28
Optional feature configuration . . . . . . . . 29Customizing password prompt attributes . . . 29Adding home directory permissions on theaccount form . . . . . . . . . . . . . 30Adding umask settings on the account form . . 31Setting up locales . . . . . . . . . . . 32Configuring alternative adapter scripts location 32Reconciling with custom scripts . . . . . . 33Ending a user session after suspension . . . . 34Ending user processes to delete a user account 34Configuring last access date support for Solarissystems. . . . . . . . . . . . . . . 35Non-login account (passwd-N) support . . . . 36
Password management for account restoration . . 38Language pack installation . . . . . . . . . 39Verifying that the adapter is working correctly . . 39
Chapter 6. Adapter errortroubleshooting . . . . . . . . . . . 41Techniques for troubleshooting problems . . . . 41Warning and error messages. . . . . . . . . 43Solving adapter installation and operationalproblems . . . . . . . . . . . . . . . 46Known adapter issues . . . . . . . . . . . 48
/tmp directory permissions . . . . . . . . 48Home directory permissions . . . . . . . . 48HP-UX password age issues . . . . . . . . 48No support for adding the primary group of auser to the secondary groupset of the user . . . 49
Chapter 7. Adapter upgrade. . . . . . 51Connector upgrade . . . . . . . . . . . . 51Dispatcher upgrade. . . . . . . . . . . . 51Upgrade of an existing adapter profile . . . . . 51
Chapter 8. Adapter uninstallation . . . 53Uninstalling the adapter from the Tivoli DirectoryIntegrator server. . . . . . . . . . . . . 53Adapter profile removal from the IBM SecurityIdentity Manager server . . . . . . . . . . 53
Chapter 9. Adapter reinstallation . . . 55
Appendix A. Adapter attributes . . . . 57Group form attributes . . . . . . . . . . . 66Attributes by UNIX and Linux Adapter actions . . 66
System Login Add . . . . . . . . . . . 67System Login Change . . . . . . . . . . 67System Login Delete . . . . . . . . . . 67System Login Suspend . . . . . . . . . 67System Login Restore . . . . . . . . . . 68Test . . . . . . . . . . . . . . . . 68Reconciliation . . . . . . . . . . . . 68Group add . . . . . . . . . . . . . 69
© Copyright IBM Corp. 2012, 2014 iii
Group change . . . . . . . . . . . . 69Group delete . . . . . . . . . . . . . 69
Appendix B. Adapter installation on az/OS operating system . . . . . . . . 71IBM Tivoli Directory Integrator POSIX connectorinstallation . . . . . . . . . . . . . . 71
Appendix C. Super user creation on asupported operating system . . . . . 73Creating a super user on an AIX operating system 73Creating a super user on a Linux operating system 74Creating a super user on a Solaris operating system 75Creating a super user on an HP-UX Non-Trustedoperating system . . . . . . . . . . . . 76Creating a super user on an HP-UX Trustedoperating system . . . . . . . . . . . . 77Command setup for sudo . . . . . . . . . 79
Appendix D. Key-based authenticationfor the UNIX and Linux Adapter . . . . 85Enabling RSA key-based authentication on UNIXand Linux operating systems . . . . . . . . 85
Enabling DSA key-based authentication on UNIXand Linux operating systems . . . . . . . . 87Enabling RSA key-based authentication on UNIXand Linux operating systems with Tectia SSH . . . 89Enabling DSA key-based authentication on UNIXand Linux operating systems with Tectia SSH . . . 92
Appendix E. Definitions for ITDI_HOMEand ISIM_HOME directories . . . . . . 97
Appendix F. Support information . . . 99Searching knowledge bases . . . . . . . . . 99Obtaining a product fix . . . . . . . . . . 100Contacting IBM Support. . . . . . . . . . 100
Appendix G. Accessibility features forIBM Security Identity Manager . . . . 103
Notices . . . . . . . . . . . . . . 105
Index . . . . . . . . . . . . . . . 109
iv IBM Security Identity Manager: UNIX and Linux Adapter Installation and Configuration Guide
||||||

Figures
1. The architecture of the UNIX and LinuxAdapter . . . . . . . . . . . . . . 2
2. Example of a single server configuration . . . 23. Example of multiple server configuration 3
© Copyright IBM Corp. 2012, 2014 v

vi IBM Security Identity Manager: UNIX and Linux Adapter Installation and Configuration Guide
Tables
1. Preinstallation roadmap . . . . . . . . . 52. Installation roadmap . . . . . . . . . . 53. Prerequisites to install the adapter . . . . . 64. Required information to install the adapter 85. Adapter components . . . . . . . . . 106. Secure Shell configuration. . . . . . . . 137. silent mode parameters for installing . . . . 218. silent mode parameter for uninstalling . . . 229. No Password Account possible outcomes 37
10. Warning and error messages . . . . . . . 4311. Search strings for software versions . . . . 4612. Reconciliation file names . . . . . . . . 4713. Account form attributes, descriptions,
permissions, and applicable operating systems . 5714. Group form attributes . . . . . . . . . 6615. Add request attributes for AIX, HPUX, Linux,
and Solaris . . . . . . . . . . . . . 6716. Change request attributes for AIX, HPUX,
Linux, and Solaris . . . . . . . . . . 67
17. Delete request attributes for AIX and Solaris 6718. Delete request attributes for HPUX and Linux 6719. Suspend request attributes for AIX and Solaris 6720. Suspend request attributes for HP-UX and
Linux . . . . . . . . . . . . . . 6721. Restore request attributes for AIX . . . . . 6822. Restore request attributes for Solaris . . . . 6823. Test attributes . . . . . . . . . . . . 6824. Reconciliation request attributes for AIX and
Solaris . . . . . . . . . . . . . . 6825. Reconciliation request attributes for HP-UX
and Linux . . . . . . . . . . . . . 6826. Group add request attribute for AIX, HPUX,
Linux, and Solaris . . . . . . . . . . 6927. Group change request attribute for AIX,
HPUX, Linux, and Solaris . . . . . . . . 6928. Sudo access command and file setup . . . . 79
© Copyright IBM Corp. 2012, 2014 vii

viii IBM Security Identity Manager: UNIX and Linux Adapter Installation and Configuration Guide
Preface
About this publicationThe UNIX and Linux Adapter Installation and Configuration Guide provides the basicinformation that you use to install and configure the IBM® Security IdentityManager UNIX and Linux Adapter. The UNIX and Linux Adapter enablesconnectivity between the IBM Security Identity Manager server and a system thatruns a UNIX or Linux operating system.
Access to publications and terminologyThis section provides:v A list of publications in the “IBM Security Identity Manager library.”v Links to “Online publications.”v A link to the “IBM Terminology website.”
IBM Security Identity Manager library
For a complete listing of the IBM Security Identity Manager and IBM SecurityIdentity Manager Adapter documentation, see the online library(http://www-01.ibm.com/support/knowledgecenter/SSRMWJ/welcome).
Online publications
IBM posts product publications when the product is released and when thepublications are updated at the following locations:
IBM Security Identity Manager libraryThe product documentation site (http://www-01.ibm.com/support/knowledgecenter/SSRMWJ/welcome) displays the welcome page andnavigation for the library.
IBM Security Systems Documentation CentralIBM Security Systems Documentation Central provides an alphabetical listof all IBM Security Systems product libraries and links to the onlinedocumentation for specific versions of each product.
IBM Publications CenterThe IBM Publications Center site ( http://www-05.ibm.com/e-business/linkweb/publications/servlet/pbi.wss) offers customized search functionsto help you find all the IBM publications you need.
IBM Terminology website
The IBM Terminology website consolidates terminology for product libraries in onelocation. You can access the Terminology website at http://www.ibm.com/software/globalization/terminology.
© Copyright IBM Corp. 2012, 2014 ix
AccessibilityAccessibility features help users with a physical disability, such as restrictedmobility or limited vision, to use software products successfully. With this product,you can use assistive technologies to hear and navigate the interface. You can alsouse the keyboard instead of the mouse to operate all features of the graphical userinterface.
Technical trainingFor technical training information, see the following IBM Education website athttp://www.ibm.com/software/tivoli/education.
Support informationIBM Support provides assistance with code-related problems and routine, shortduration installation or usage questions. You can directly access the IBM SoftwareSupport site at http://www.ibm.com/software/support/probsub.html.
Appendix F, “Support information,” on page 99 provides details about:v What information to collect before contacting IBM Support.v The various methods for contacting IBM Support.v How to use IBM Support Assistant.v Instructions and problem-determination resources to isolate and fix the problem
yourself.
Note: The Community and Support tab on the product information center canprovide additional support resources.
Statement of Good Security PracticesIT system security involves protecting systems and information throughprevention, detection and response to improper access from within and outsideyour enterprise. Improper access can result in information being altered, destroyed,misappropriated or misused or can result in damage to or misuse of your systems,including for use in attacks on others. No IT system or product should beconsidered completely secure and no single product, service or security measurecan be completely effective in preventing improper use or access. IBM systems,products and services are designed to be part of a comprehensive securityapproach, which will necessarily involve additional operational procedures, andmay require other systems, products or services to be most effective. IBM DOESNOT WARRANT THAT ANY SYSTEMS, PRODUCTS OR SERVICES AREIMMUNE FROM, OR WILL MAKE YOUR ENTERPRISE IMMUNE FROM, THEMALICIOUS OR ILLEGAL CONDUCT OF ANY PARTY.
x IBM Security Identity Manager: UNIX and Linux Adapter Installation and Configuration Guide
Chapter 1. UNIX and Linux Adapter Installation andConfiguration Guide
This installation guide provides the basic information to install and configure theUNIX and Linux Adapter. The adapter enables connectivity between the IBMSecurity Identity Manager server and the managed resource.
Overview of the adapterAn adapter provides an interface between a managed resource and the IBMSecurity Identity Manager server.
Adapters might reside on the managed resource. The IBM Security IdentityManager server manages access to the resource by using your security system.Adapters function as trusted virtual administrators on the target platform. They dotasks, such as creating, suspending, and restoring user accounts, and otheradministrative functions that are done manually. The adapter runs as a service,independently of whether you are logged on to the IBM Security Identity Managerserver.
The UNIX and Linux Adapter enables communication between the IBM SecurityIdentity Manager server and any of the following operating systems:v AIX®
v HPUXv Linuxv Solaris
Features of the adapterThe adapter automates the various user account administrative tasks.
The adapter automates the following user management tasks:v Adding user accountsv Modifying user account attributesv Modifying user account passwordsv Suspending, restoring, and deleting user accountsv Managing groupsv Reconciling user accounts and groups
Architecture of the adapterYou must install various components for the adapter to function correctly.
You install the following components:v The Dispatcherv The IBM Tivoli® Directory Integrator connectorv The IBM Security Identity Manager adapter profile
© Copyright IBM Corp. 2012, 2014 1
You must install the Dispatcher and the adapter profile; however, the TivoliDirectory Integrator connector might already be installed with the base TivoliDirectory Integrator product.
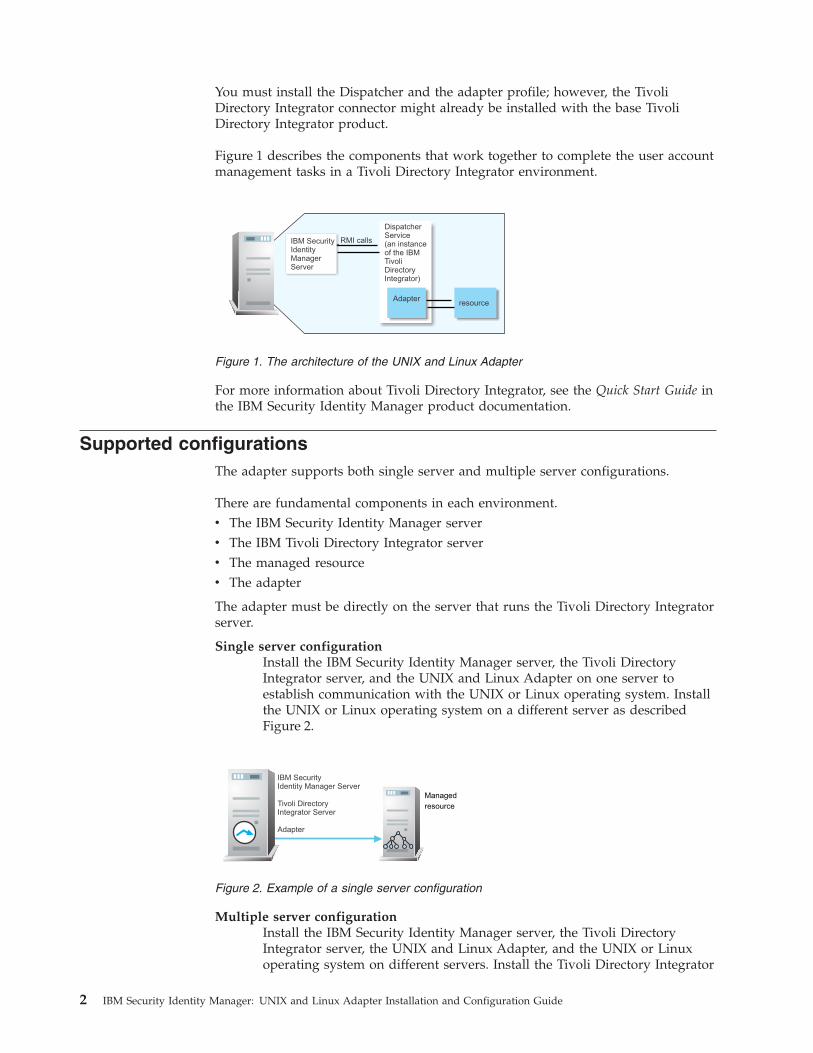
Figure 1 describes the components that work together to complete the user accountmanagement tasks in a Tivoli Directory Integrator environment.
For more information about Tivoli Directory Integrator, see the Quick Start Guide inthe IBM Security Identity Manager product documentation.
Supported configurationsThe adapter supports both single server and multiple server configurations.
There are fundamental components in each environment.v The IBM Security Identity Manager serverv The IBM Tivoli Directory Integrator serverv The managed resourcev The adapter
The adapter must be directly on the server that runs the Tivoli Directory Integratorserver.
Single server configurationInstall the IBM Security Identity Manager server, the Tivoli DirectoryIntegrator server, and the UNIX and Linux Adapter on one server toestablish communication with the UNIX or Linux operating system. Installthe UNIX or Linux operating system on a different server as describedFigure 2.
Multiple server configurationInstall the IBM Security Identity Manager server, the Tivoli DirectoryIntegrator server, the UNIX and Linux Adapter, and the UNIX or Linuxoperating system on different servers. Install the Tivoli Directory Integrator
RMI callsIBM SecurityIdentityManagerServer
DispatcherService(an instanceof the IBMTivoliDirectoryIntegrator)
Adapterresource
Figure 1. The architecture of the UNIX and Linux Adapter
IBM SecurityIdentity Manager Server
Tivoli DirectoryIntegrator Server
Adapter
Managed
resource
Figure 2. Example of a single server configuration
2 IBM Security Identity Manager: UNIX and Linux Adapter Installation and Configuration Guide
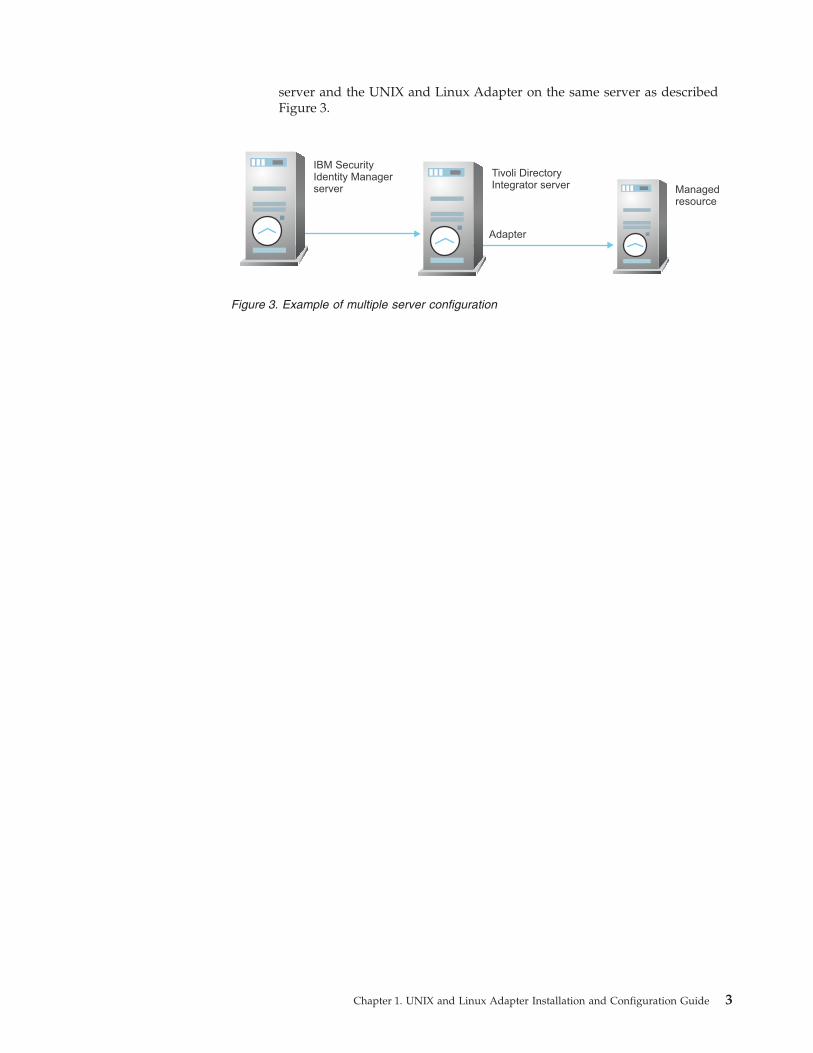
server and the UNIX and Linux Adapter on the same server as describedFigure 3.
IBM SecurityIdentity Managerserver
Tivoli DirectoryIntegrator server Managed
resource
Adapter
Figure 3. Example of multiple server configuration
Chapter 1. UNIX and Linux Adapter Installation and Configuration Guide 3

4 IBM Security Identity Manager: UNIX and Linux Adapter Installation and Configuration Guide

Chapter 2. Adapter installation planning
Installing and configuring the adapter involves several steps that you mustcomplete in an appropriate sequence. Review the roadmaps before you begin theinstallation process.
Preinstallation roadmapBefore you install the adapter, prepare the environment.
Do the tasks that are listed in Table 1.
Table 1. Preinstallation roadmap
Task For more information
Obtain the installation software. Download the software from PassportAdvantage® website. See “Softwaredownload” on page 8.
Verify that your environment meets thesoftware and hardware requirements for theadapter.
See “Prerequisites” on page 6.
Obtain and install the Dispatcher. Download the software from PassportAdvantage website. See “Softwaredownload” on page 8. Follow theinstallation instructions in the dispatcherdownload package.
Obtain the necessary information for theinstallation and configuration.
See “Installation worksheet for the adapter”on page 8.
Installation roadmapInstallation of the adapter requires several sequential tasks. Use this roadmapnavigate through the installation process.
To install the adapter, complete the tasks that are listed in Table 2.
Table 2. Installation roadmap
Task For more information
Install the adapter. See “Installing the UNIX and LinuxAdapter” on page 9.
Verify the installation. See “Installation verification” on page 10.
Import the adapter profile. See “Importing the adapter profile into theIBM Security Identity Manager server” onpage 11.
Verify the profile installation. See “Adapter profile installationverification” on page 12.
Install the Secure Shell protocol. See “Communicating with the Secure Shellprotocol” on page 12.
Create an adapter user account. See “Adapter user account creation” on page13.
© Copyright IBM Corp. 2012, 2014 5
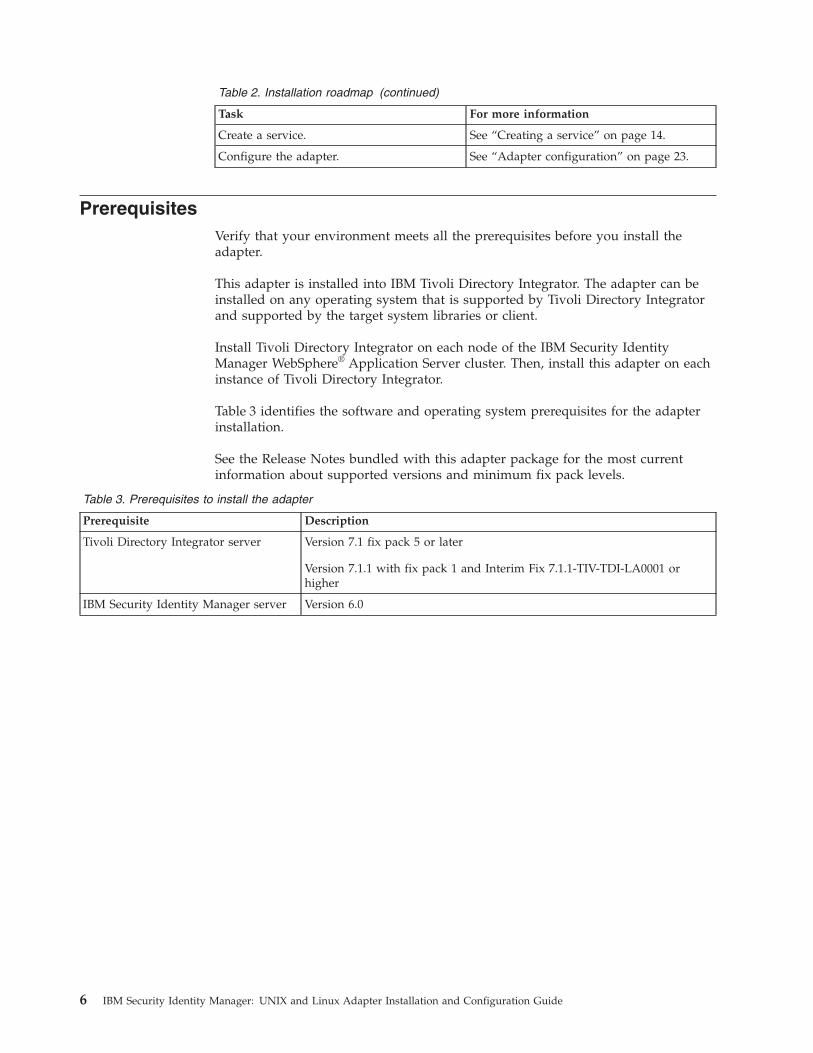
Table 2. Installation roadmap (continued)
Task For more information
Create a service. See “Creating a service” on page 14.
Configure the adapter. See “Adapter configuration” on page 23.
PrerequisitesVerify that your environment meets all the prerequisites before you install theadapter.
This adapter is installed into IBM Tivoli Directory Integrator. The adapter can beinstalled on any operating system that is supported by Tivoli Directory Integratorand supported by the target system libraries or client.
Install Tivoli Directory Integrator on each node of the IBM Security IdentityManager WebSphere® Application Server cluster. Then, install this adapter on eachinstance of Tivoli Directory Integrator.
Table 3 identifies the software and operating system prerequisites for the adapterinstallation.
See the Release Notes bundled with this adapter package for the most currentinformation about supported versions and minimum fix pack levels.
Table 3. Prerequisites to install the adapter
Prerequisite Description
Tivoli Directory Integrator server Version 7.1 fix pack 5 or later
Version 7.1.1 with fix pack 1 and Interim Fix 7.1.1-TIV-TDI-LA0001 orhigher
IBM Security Identity Manager server Version 6.0
6 IBM Security Identity Manager: UNIX and Linux Adapter Installation and Configuration Guide
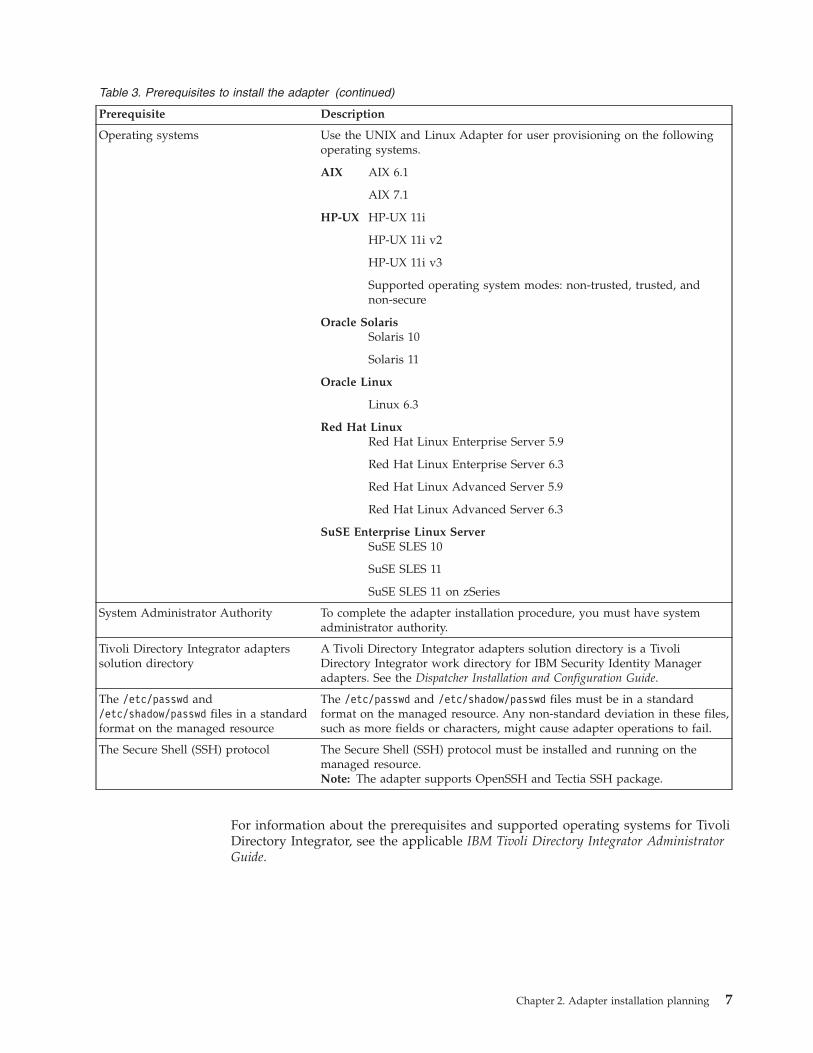
Table 3. Prerequisites to install the adapter (continued)
Prerequisite Description
Operating systems Use the UNIX and Linux Adapter for user provisioning on the followingoperating systems.
AIX AIX 6.1
AIX 7.1
HP-UX HP-UX 11i
HP-UX 11i v2
HP-UX 11i v3
Supported operating system modes: non-trusted, trusted, andnon-secure
Oracle SolarisSolaris 10
Solaris 11
Oracle Linux
Linux 6.3
Red Hat LinuxRed Hat Linux Enterprise Server 5.9
Red Hat Linux Enterprise Server 6.3
Red Hat Linux Advanced Server 5.9
Red Hat Linux Advanced Server 6.3
SuSE Enterprise Linux ServerSuSE SLES 10
SuSE SLES 11
SuSE SLES 11 on zSeries
System Administrator Authority To complete the adapter installation procedure, you must have systemadministrator authority.
Tivoli Directory Integrator adapterssolution directory
A Tivoli Directory Integrator adapters solution directory is a TivoliDirectory Integrator work directory for IBM Security Identity Manageradapters. See the Dispatcher Installation and Configuration Guide.
The /etc/passwd and/etc/shadow/passwd files in a standardformat on the managed resource
The /etc/passwd and /etc/shadow/passwd files must be in a standardformat on the managed resource. Any non-standard deviation in these files,such as more fields or characters, might cause adapter operations to fail.
The Secure Shell (SSH) protocol The Secure Shell (SSH) protocol must be installed and running on themanaged resource.Note: The adapter supports OpenSSH and Tectia SSH package.
For information about the prerequisites and supported operating systems for TivoliDirectory Integrator, see the applicable IBM Tivoli Directory Integrator AdministratorGuide.
Chapter 2. Adapter installation planning 7
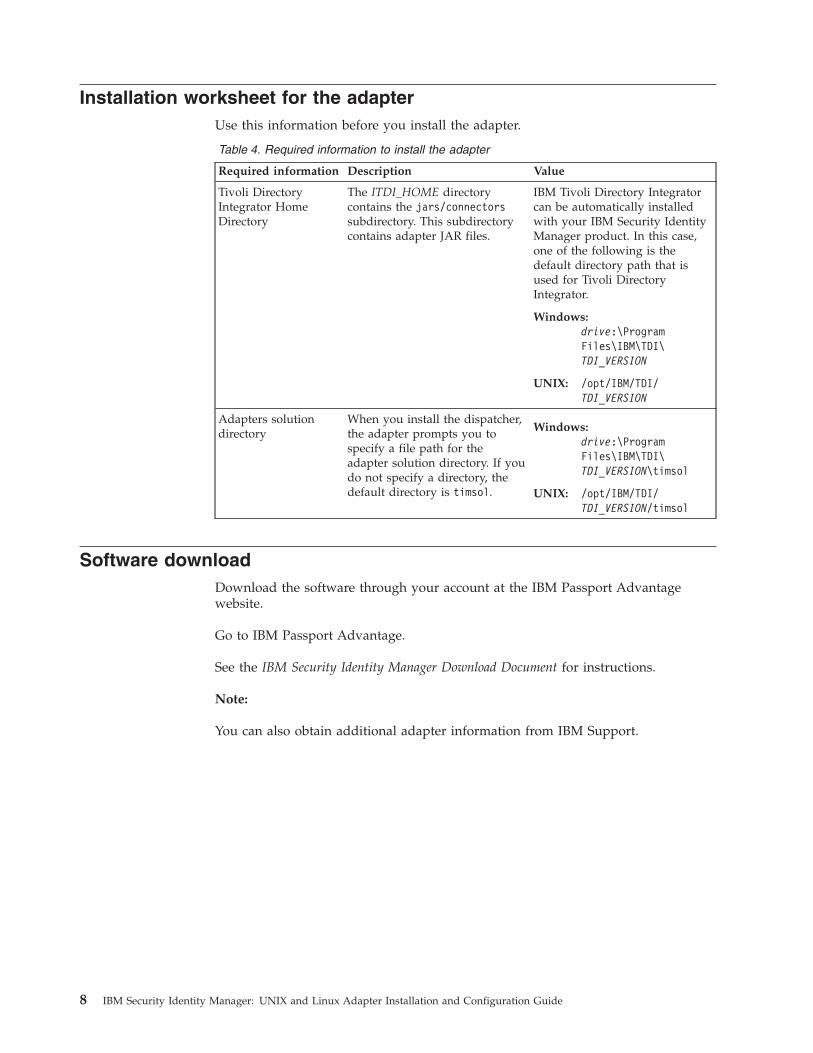
Installation worksheet for the adapterUse this information before you install the adapter.
Table 4. Required information to install the adapter
Required information Description Value
Tivoli DirectoryIntegrator HomeDirectory
The ITDI_HOME directorycontains the jars/connectorssubdirectory. This subdirectorycontains adapter JAR files.
IBM Tivoli Directory Integratorcan be automatically installedwith your IBM Security IdentityManager product. In this case,one of the following is thedefault directory path that isused for Tivoli DirectoryIntegrator.
Windows:drive:\ProgramFiles\IBM\TDI\TDI_VERSION
UNIX: /opt/IBM/TDI/TDI_VERSION
Adapters solutiondirectory
When you install the dispatcher,the adapter prompts you tospecify a file path for theadapter solution directory. If youdo not specify a directory, thedefault directory is timsol.
Windows:drive:\ProgramFiles\IBM\TDI\TDI_VERSION\timsol
UNIX: /opt/IBM/TDI/TDI_VERSION/timsol
Software downloadDownload the software through your account at the IBM Passport Advantagewebsite.
Go to IBM Passport Advantage.
See the IBM Security Identity Manager Download Document for instructions.
Note:
You can also obtain additional adapter information from IBM Support.
8 IBM Security Identity Manager: UNIX and Linux Adapter Installation and Configuration Guide
Chapter 3. Adapter installation
All the adapters that are based on Tivoli Directory Integrator require theDispatcher for the adapters to function correctly.
If the Dispatcher is installed from a previous installation, do not reinstall it unlessthere is an upgrade to the Dispatcher. See the Dispatcher Installation andConfiguration Guide.
After verifying the Dispatcher installation, you might need to install the TivoliDirectory Integrator connector. Depending on your adapter, the connector mightalready be installed as part of the Tivoli Directory Integrator product and nofurther action is required.
Dispatcher installation verificationIf this installation is the first adapter installation that is based on Tivoli DirectoryIntegrator, you must install the Dispatcher before you install the adapter.
Install the Dispatcher on the same Tivoli Directory Integrator server where youwant to install the adapter.
Obtain the dispatcher installer from the IBM Passport Advantage website, IBMPassport Advantage. For information about Dispatcher installation, see theDispatcher Installation and Configuration Guide.
Installing the UNIX and Linux AdapterUse these steps to install the UNIX and Linux Adapter software.
Before you begin
Make sure that you do the following actions:v See the Release Notes bundled with this adapter package for any updates on
installation and configuration steps.v Verify that your site meets all the prerequisite requirements. See “Prerequisites”
on page 6.v Verify that the Dispatcher is installed before you install the UNIX and Linux
Adapter. See “Software download” on page 8. Follow the installationinstructions included in the dispatcher download package.
v Obtain a copy of the installation software. See “Software download” on page 8.v Obtain system administrator authority. See “Prerequisites” on page 6.
About this task
Use the PosixAdapterInstall_70.jar file to install the adapter.
Procedure1. Create a temporary directory on the workstation where you want to install the
adapter.2. Extract the contents of the compressed file in the temporary directory.
© Copyright IBM Corp. 2012, 2014 9
3. Run the adapter installation wizard. Use the Java™ executable file that comeswith Tivoli Directory Integrator to start the installation program. The Javaexecutable file is in the ITDI_HOME/jvm/jre/bin directory. Run the followingcommand to start the installation program:ITDI_HOME/jvm/jre/bin/java –jar PosixAdapterInstall_70.jar
4. On the Welcome page, click Next.5. In the Directory Name field, specify the location of the Tivoli Directory
Integrator home directory.6. Review the installation settings on the Install Summary page and do one of the
following steps:v Click Back to return to a previous page to modify any of the settings.v Click Next when you are ready to begin the installation.
7. Click Finish when the software displays the Install Completed window.
What to do next
After you finish the adapter installation, do the following actions:v Verify that the installation completed successfully. See “Installation verification.”v Import the adapter profile. See “Importing the adapter profile into the IBM
Security Identity Manager server” on page 11.v Create a user account for the adapter on IBM Security Identity Manager. See
“Adapter user account creation” on page 13.
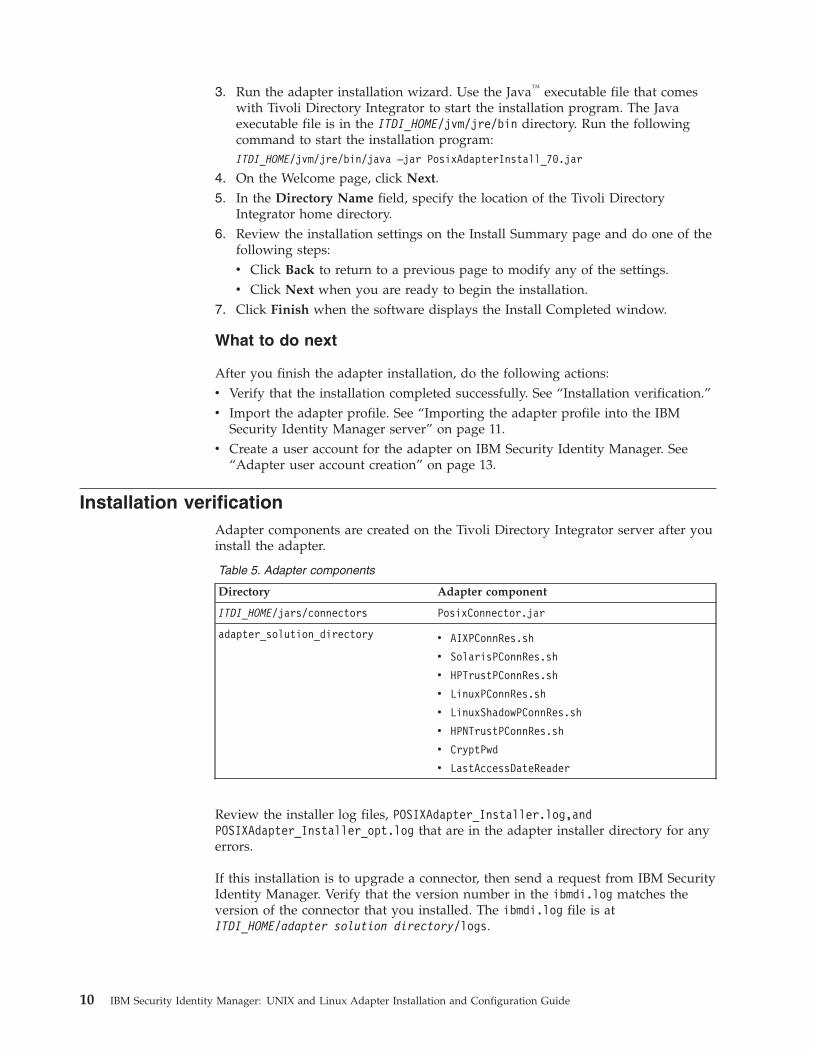
Installation verificationAdapter components are created on the Tivoli Directory Integrator server after youinstall the adapter.
Table 5. Adapter components
Directory Adapter component
ITDI_HOME/jars/connectors PosixConnector.jar
adapter_solution_directory v AIXPConnRes.sh
v SolarisPConnRes.sh
v HPTrustPConnRes.sh
v LinuxPConnRes.sh
v LinuxShadowPConnRes.sh
v HPNTrustPConnRes.sh
v CryptPwd
v LastAccessDateReader
Review the installer log files, POSIXAdapter_Installer.log,andPOSIXAdapter_Installer_opt.log that are in the adapter installer directory for anyerrors.
If this installation is to upgrade a connector, then send a request from IBM SecurityIdentity Manager. Verify that the version number in the ibmdi.log matches theversion of the connector that you installed. The ibmdi.log file is atITDI_HOME/adapter solution directory/logs.
10 IBM Security Identity Manager: UNIX and Linux Adapter Installation and Configuration Guide
Adapter service start, stop, and restartTo start, stop, or restart the adapter, you must start, stop, or restart the Dispatcher.
The adapter does not exist as an independent service or a process. The adapter isadded to the Dispatcher instance, which runs all the adapters that are installed onthe same Tivoli Directory Integrator instance.
See the topic about starting stopping, and restarting the dispatcher service in theDispatcher Installation and Configuration Guide.
Importing the adapter profile into the IBM Security Identity Managerserver
Before you can add an adapter as a service, the IBM Security Identity Managerserver must have an adapter profile to recognize the adapter.
Before you begin
The files that are packaged with the adapter include the adapter profile JAR file.You can import this adapter profile JAR file as a service profile on the server withthe Import feature of IBM Security Identity Manager.
Before you begin to import the adapter profile, verify that the following conditionsare met:v The IBM Security Identity Manager server is installed and running.v You have root or Administrator authority on IBM Security Identity Manager.
About this task
An adapter profile defines the types of resources that the IBM Security IdentityManager server can manage. Use the profile to create an adapter service on IBMSecurity Identity Manager server and establish communication with the adapter.
The JAR file includes all the files that are required to define the adapter schema,account form, service form, and profile properties. If necessary, you can extract thefiles from the JAR file, modify the files, and repackage the JAR file with theupdated files.
Procedure1. Log on to the IBM Security Identity Manager server by using an account that
has the authority to do administrative tasks.2. In the My Work pane, expand Configure System and click Manage Service
Types.3. On the Manage Service Types page, click Import to display the Import Service
Types page.4. Specify the location of the JAR file in the Service Definition File field by doing
one of the following actions:v Type the complete location of where the file is stored.v Use Browse to navigate to the file.
5. Click OK.
Note:
Chapter 3. Adapter installation 11
v When you import the adapter profile and if you receive an error that isrelated to the schema, see the trace.log file for information about the error.The trace.log file location is specified by using the handler.file.fileDirproperty that is defined in the IBM Security Identity ManagerenRoleLogging.properties file. The enRoleLogging.properties file isinstalled in the ITIM_HOME\data directory.
v If you modify any properties in the enRoleLogging.properties file, restartthe IBM Security Identity Manager for the change to take effect.
Adapter profile installation verificationAfter you install the adapter profile, verify that the installation was successful.
An unsuccessful installation:v Might cause the adapter to function incorrectly.v Prevents you from creating a service with the adapter profile.
To verify that the adapter profile is successfully installed, create a service with theadapter profile. For more information about creating a service, see “Creating aservice” on page 14.
If you cannot create a service with the adapter profile or open an account on anexisting service, the adapter profile is not installed correctly. You must import theadapter profile again.
Communicating with the Secure Shell protocolThe adapter uses the Secure Shell (SSH) protocol to communicate with themanaged resource. This protocol must be installed and running before the adapterconnects to the managed resource.
About this task
The adapter supports SSH protocol version 2.0. The SSH configuration file lists theSSH protocol version that is supported by your system.
Note: OpenSSH is the only supported SSH package on HP-UX and Solaris.OpenSSH and Tectia SSH packages are supported on AIX and Linux systems.
The following list provides information to help you ensure that the UNIX basedmanaged resources in your network can operate with the UNIX and LinuxAdapter.
HP-UX, Linux, and Solaris systemsSSH is installed and enabled by default on these operating systems.However, check to ensure that the SSH daemon is running before youattempt to connect a managed resource to the IBM Security IdentityManager server. If SSH is not enabled, the connection fails.
AIX systemsSSH is not installed on AIX operating systems. If a supported version ofSSH is not installed on your system, you might download and install SSHfrom an open source website. You must install OpenSSL if you are going touse OpenSSH because OpenSSH uses functions that are provided byOpenSSL. Install the OpenSSL first and then install OpenSSH. The AIXoperating system requires the OpenSSH product version 4.7 or later. After
12 IBM Security Identity Manager: UNIX and Linux Adapter Installation and Configuration Guide
SSH is installed, check to ensure that the SSH daemon is running. Then,connect the managed resource to the IBM Security Identity Manager server.If SSH is not enabled, the connection fails.
Note: On an IPv6 environment, you might be required to configure SSH to listenon an IPv6 address. See the SSH man page on your workstation for detailedinformation.
Note: The following procedure is applicable to OpenSSH packages only.
Procedure1. Open the sshd_config file. This file can be found in different locations,
depending on the operating system. Common locations are /etc/ssh or/opt/ssh/etc.
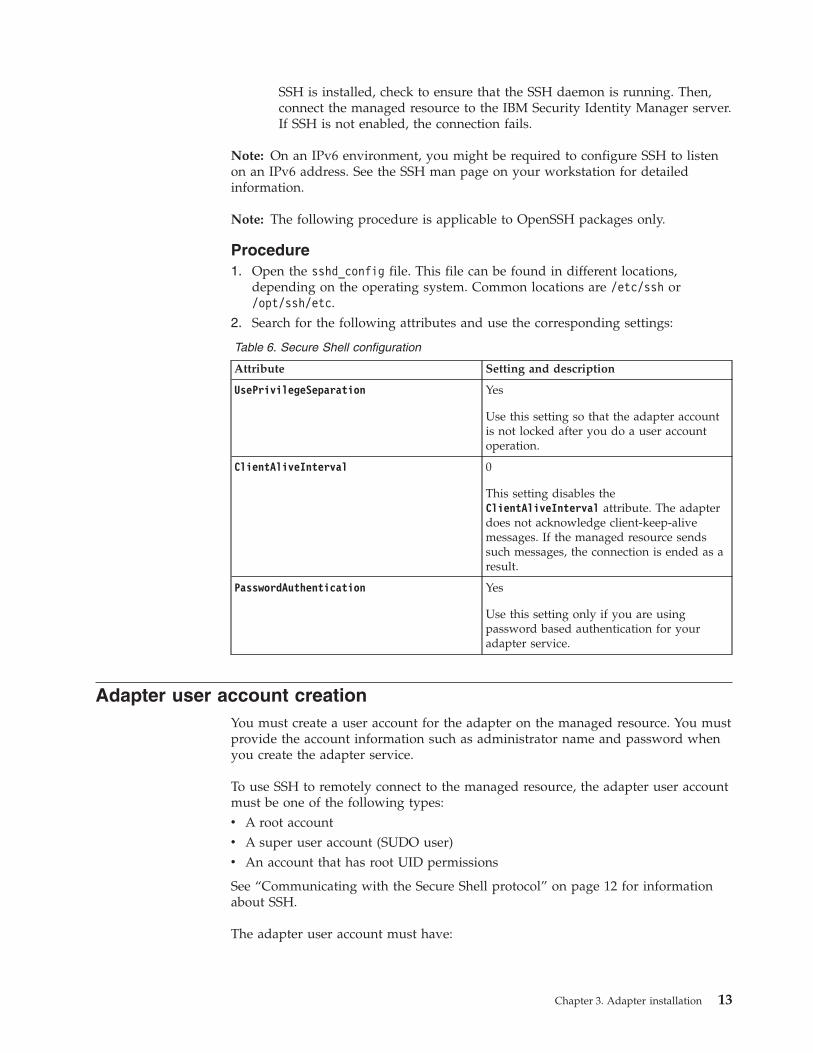
2. Search for the following attributes and use the corresponding settings:
Table 6. Secure Shell configuration
Attribute Setting and description
UsePrivilegeSeparation Yes
Use this setting so that the adapter accountis not locked after you do a user accountoperation.
ClientAliveInterval 0
This setting disables theClientAliveInterval attribute. The adapterdoes not acknowledge client-keep-alivemessages. If the managed resource sendssuch messages, the connection is ended as aresult.
PasswordAuthentication Yes
Use this setting only if you are usingpassword based authentication for youradapter service.
Adapter user account creationYou must create a user account for the adapter on the managed resource. You mustprovide the account information such as administrator name and password whenyou create the adapter service.
To use SSH to remotely connect to the managed resource, the adapter user accountmust be one of the following types:v A root accountv A super user account (SUDO user)v An account that has root UID permissions
See “Communicating with the Secure Shell protocol” on page 12 for informationabout SSH.
The adapter user account must have:
Chapter 3. Adapter installation 13

v Permissions to do user administration tasks, such as add accounts, deleteaccounts, change passwords for accounts, suspend accounts, restore accounts,and retrieve account data.
v Permissions to do group tasks, such as add groups, modify attributes of a group,and delete groups.
For more information about creating a service, see “Creating a service.”
Creating a serviceAfter the adapter profile is imported on IBM Security Identity Manager, you mustcreate a service so that IBM Security Identity Manager can communicate with theadapter.
About this task
To create or change a service, you must use the service form to provideinformation for the service. Service forms might vary depending on the adapter.
Note: If the following fields on the service form are changed for an existingservice, the IBM Security Identity Manager adapter service on the Tivoli DirectoryIntegrator server must be restarted.v User registry
v Use a shadow file?
v Delete home directory when the account is deleted?
v Is sudo user?
v Execute user profile?
v Authentication method
v Passphrase (Required for key-based authentication)
v Private key file (Required for key-based authentication)
v AL FileSystem Path
v Max Connection Count
Procedure1. Log on to the IBM Security Identity Manager server with an account that has
the authority to do administrative tasks.2. In the My Work pane, click Manage Services and click Create.3. On the Select the Type of Service page. Select:
For AIX operating system:Select POSIX AIX Profile.
For HP-UX operating system:Select POSIX HP-UX Profile.
For Solaris operating system:Select POSIX Solaris Profile.
For Linux operating system:Select POSIX Linux Profile.
4. Click Next to display the adapter service form.5. Complete the following fields on the service form.
On the General Information tab:
14 IBM Security Identity Manager: UNIX and Linux Adapter Installation and Configuration Guide
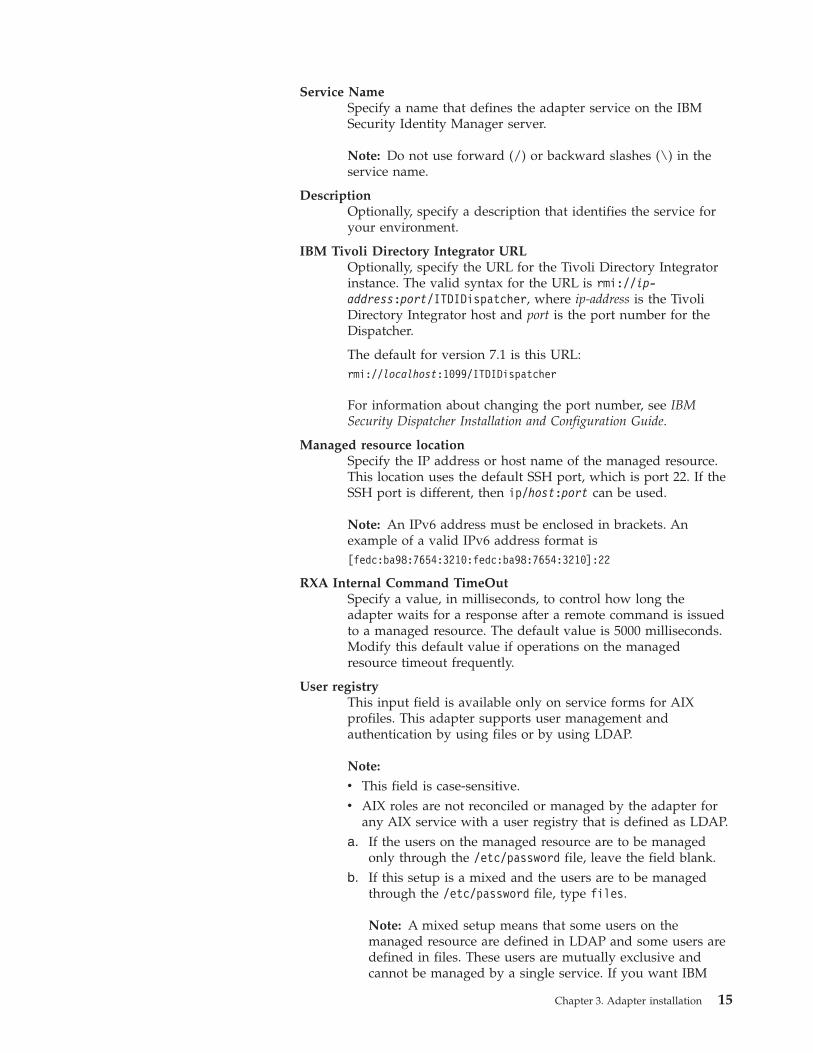
Service NameSpecify a name that defines the adapter service on the IBMSecurity Identity Manager server.
Note: Do not use forward (/) or backward slashes (\) in theservice name.
DescriptionOptionally, specify a description that identifies the service foryour environment.
IBM Tivoli Directory Integrator URLOptionally, specify the URL for the Tivoli Directory Integratorinstance. The valid syntax for the URL is rmi://ip-address:port/ITDIDispatcher, where ip-address is the TivoliDirectory Integrator host and port is the port number for theDispatcher.
The default for version 7.1 is this URL:rmi://localhost:1099/ITDIDispatcher
For information about changing the port number, see IBMSecurity Dispatcher Installation and Configuration Guide.
Managed resource locationSpecify the IP address or host name of the managed resource.This location uses the default SSH port, which is port 22. If theSSH port is different, then ip/host:port can be used.
Note: An IPv6 address must be enclosed in brackets. Anexample of a valid IPv6 address format is[fedc:ba98:7654:3210:fedc:ba98:7654:3210]:22
RXA Internal Command TimeOutSpecify a value, in milliseconds, to control how long theadapter waits for a response after a remote command is issuedto a managed resource. The default value is 5000 milliseconds.Modify this default value if operations on the managedresource timeout frequently.
User registryThis input field is available only on service forms for AIXprofiles. This adapter supports user management andauthentication by using files or by using LDAP.
Note:
v This field is case-sensitive.v AIX roles are not reconciled or managed by the adapter for
any AIX service with a user registry that is defined as LDAP.a. If the users on the managed resource are to be managed
only through the /etc/password file, leave the field blank.b. If this setup is a mixed and the users are to be managed
through the /etc/password file, type files.
Note: A mixed setup means that some users on themanaged resource are defined in LDAP and some users aredefined in files. These users are mutually exclusive andcannot be managed by a single service. If you want IBM
Chapter 3. Adapter installation 15
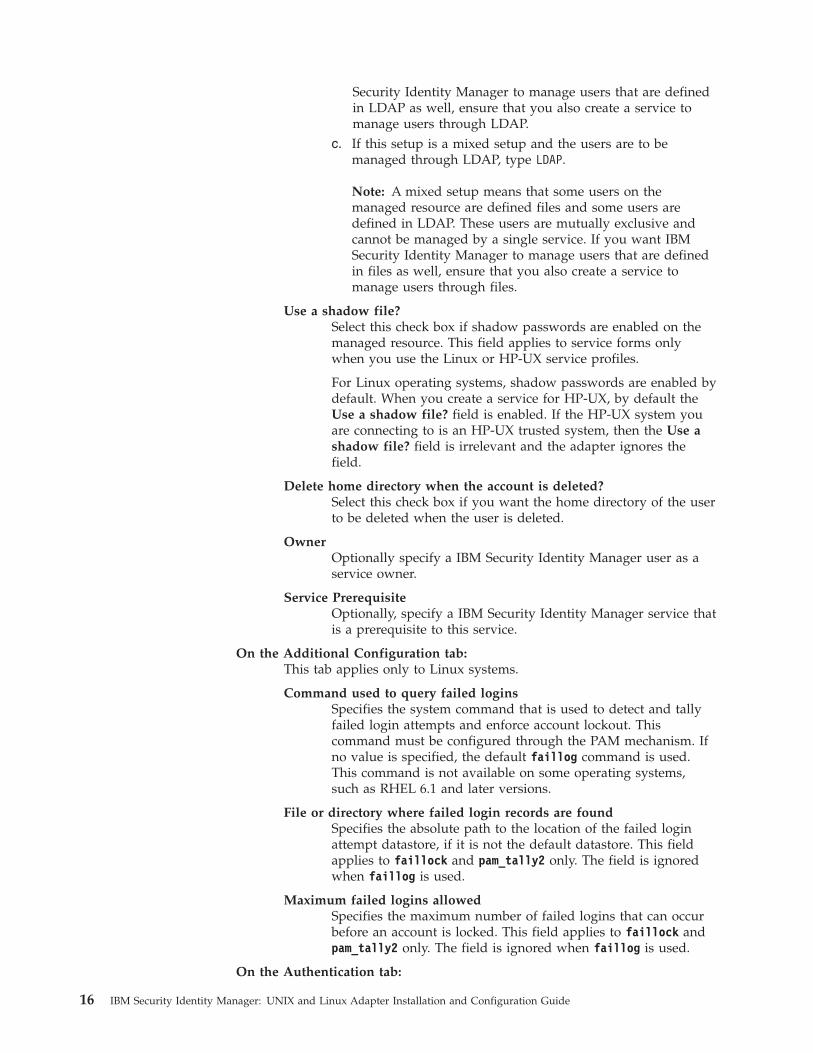
Security Identity Manager to manage users that are definedin LDAP as well, ensure that you also create a service tomanage users through LDAP.
c. If this setup is a mixed setup and the users are to bemanaged through LDAP, type LDAP.
Note: A mixed setup means that some users on themanaged resource are defined files and some users aredefined in LDAP. These users are mutually exclusive andcannot be managed by a single service. If you want IBMSecurity Identity Manager to manage users that are definedin files as well, ensure that you also create a service tomanage users through files.
Use a shadow file?Select this check box if shadow passwords are enabled on themanaged resource. This field applies to service forms onlywhen you use the Linux or HP-UX service profiles.
For Linux operating systems, shadow passwords are enabled bydefault. When you create a service for HP-UX, by default theUse a shadow file? field is enabled. If the HP-UX system youare connecting to is an HP-UX trusted system, then the Use ashadow file? field is irrelevant and the adapter ignores thefield.
Delete home directory when the account is deleted?Select this check box if you want the home directory of the userto be deleted when the user is deleted.
OwnerOptionally specify a IBM Security Identity Manager user as aservice owner.
Service PrerequisiteOptionally, specify a IBM Security Identity Manager service thatis a prerequisite to this service.
On the Additional Configuration tab:This tab applies only to Linux systems.
Command used to query failed loginsSpecifies the system command that is used to detect and tallyfailed login attempts and enforce account lockout. Thiscommand must be configured through the PAM mechanism. Ifno value is specified, the default faillog command is used.This command is not available on some operating systems,such as RHEL 6.1 and later versions.
File or directory where failed login records are foundSpecifies the absolute path to the location of the failed loginattempt datastore, if it is not the default datastore. This fieldapplies to faillock and pam_tally2 only. The field is ignoredwhen faillog is used.
Maximum failed logins allowedSpecifies the maximum number of failed logins that can occurbefore an account is locked. This field applies to faillock andpam_tally2 only. The field is ignored when faillog is used.
On the Authentication tab:
16 IBM Security Identity Manager: UNIX and Linux Adapter Installation and Configuration Guide
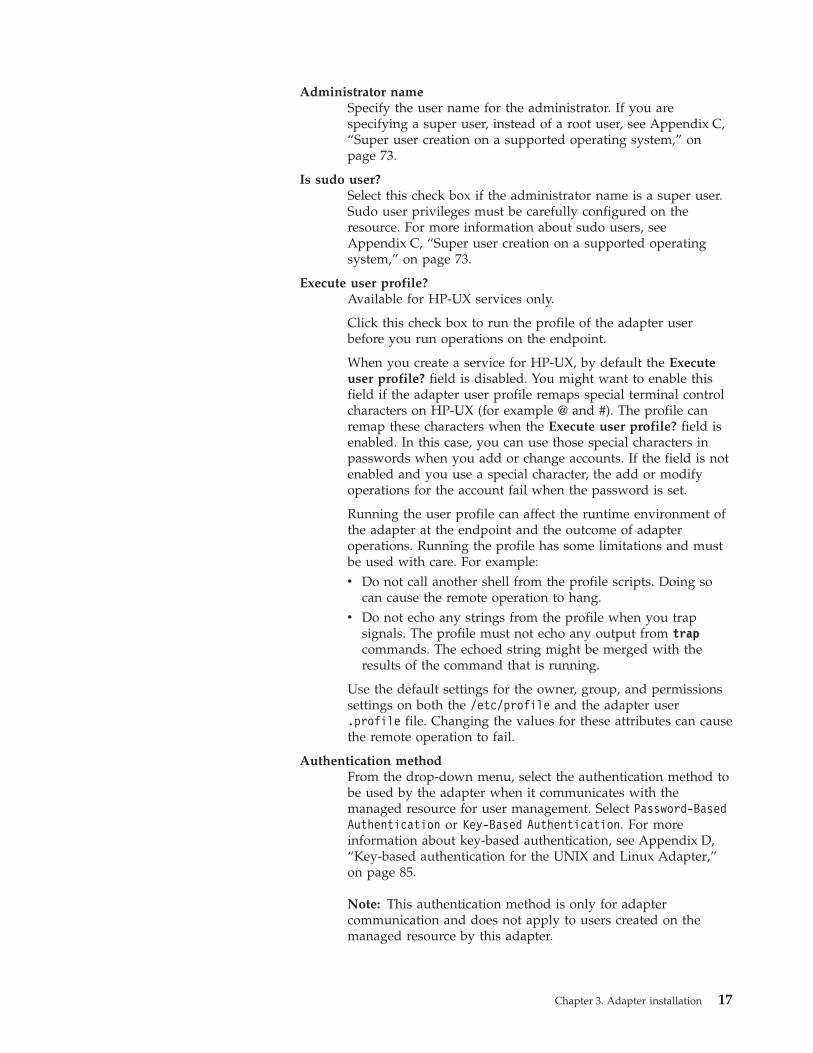
Administrator nameSpecify the user name for the administrator. If you arespecifying a super user, instead of a root user, see Appendix C,“Super user creation on a supported operating system,” onpage 73.
Is sudo user?Select this check box if the administrator name is a super user.Sudo user privileges must be carefully configured on theresource. For more information about sudo users, seeAppendix C, “Super user creation on a supported operatingsystem,” on page 73.
Execute user profile?Available for HP-UX services only.
Click this check box to run the profile of the adapter userbefore you run operations on the endpoint.
When you create a service for HP-UX, by default the Executeuser profile? field is disabled. You might want to enable thisfield if the adapter user profile remaps special terminal controlcharacters on HP-UX (for example @ and #). The profile canremap these characters when the Execute user profile? field isenabled. In this case, you can use those special characters inpasswords when you add or change accounts. If the field is notenabled and you use a special character, the add or modifyoperations for the account fail when the password is set.
Running the user profile can affect the runtime environment ofthe adapter at the endpoint and the outcome of adapteroperations. Running the profile has some limitations and mustbe used with care. For example:v Do not call another shell from the profile scripts. Doing so
can cause the remote operation to hang.v Do not echo any strings from the profile when you trap
signals. The profile must not echo any output from trapcommands. The echoed string might be merged with theresults of the command that is running.
Use the default settings for the owner, group, and permissionssettings on both the /etc/profile and the adapter user.profile file. Changing the values for these attributes can causethe remote operation to fail.
Authentication methodFrom the drop-down menu, select the authentication method tobe used by the adapter when it communicates with themanaged resource for user management. Select Password-BasedAuthentication or Key-Based Authentication. For moreinformation about key-based authentication, see Appendix D,“Key-based authentication for the UNIX and Linux Adapter,”on page 85.
Note: This authentication method is only for adaptercommunication and does not apply to users created on themanaged resource by this adapter.
Chapter 3. Adapter installation 17
PasswordRequired for password-based authentication: Specify thepassword for the administrator.
Passphrase (Required for key-based authentication)Specify the pass-phrase that is associated with the private key.For more information about private keys, see “Enabling RSAkey-based authentication on UNIX and Linux operatingsystems” on page 85.
Private key file (Required for key-based authentication)Specify the full path and file name of the keystore that containsthe private key of the client. This keystore must be on theworkstation that runs the Tivoli Directory Integrator server. Formore information about keystore, see Appendix D, “Key-basedauthentication for the UNIX and Linux Adapter,” on page 85.
On the Dispatcher Attributes tab:
AL FileSystem PathSpecify the file path from where the dispatcher loads theassembly lines. If you do not specify a file path, the dispatcherloads the assembly lines that are received from IBM SecurityIdentity Manager. You can specify the following file path toload the assembly lines from the profiles directory of theWindows operating system: c:\Files\IBM\TDI\TDI_VERSION\profiles or you can specify the following file path to load theassembly lines from the profiles directory of the UNIX andLinux operating systems:system:/opt/IBM/TDI/TDI_VERSION/profiles
Max Connection CountSpecify the maximum number of assembly lines that thedispatcher can run simultaneously for the service. If you enter 0in the Max Connection Count field, the dispatcher does notlimit the number of assembly lines that run simultaneously forthe service.
Disable AL CachingSelect the check box to disable the assembly line caching foradd, modify, and delete operations in the dispatcher for theservice.
On the Status and information tabContains read only information about the adapter and managedresource. These fields are examples. The actual fields vary dependingon the type of adapter and how the service form is configured. Theadapter must be running to obtain the information. Click TestConnection to populate the fields.
Last status update: DateSpecifies the most recent date when the Status and informationtab was updated.
Last status update: TimeSpecifies the most recent time of the date when the Status andinformation tab was updated.
Managed resource statusSpecifies the status of the managed resource that the adapter isconnected to.
18 IBM Security Identity Manager: UNIX and Linux Adapter Installation and Configuration Guide
Adapter versionSpecifies the version of the adapter that the IBM SecurityIdentity Manager service uses to provision request to themanaged resource.
Profile versionSpecifies the version of the profile that is installed in the IBMSecurity Identity Manager server.
TDI versionSpecifies the version of the Tivoli Directory Integrator on whichthe adapter is deployed.
Dispatcher versionSpecifies the version of the Dispatcher.
Installation platformSpecifies summary information about the operating systemwhere the adapter is installed.
Adapter accountSpecifies the account that running the adapter binary file.
Adapter up time: DateSpecifies the date when the adapter started.
Adapter up time: TimeSpecifies the time of the date when the adapter started.
Adapter memory usageSpecifies the memory usage for running the adapter.
If the connection fails, follow the instructions in the error message. Alsov Verify the adapter log to ensure that the IBM Security Identity
Manager test request was successfully sent to the adapter.v Verify the adapter configuration information.v Verify IBM Security Identity Manager service parameters for the
adapter profile. You can verify the work station name or the IPaddress of the managed resource and the port.
6. Click Finish.
Chapter 3. Adapter installation 19

20 IBM Security Identity Manager: UNIX and Linux Adapter Installation and Configuration Guide
Chapter 4. Adapter installation and uninstallation in silentmode
You can use the -i silent option to install or uninstall the adapter in silent mode.
Silent installation suppresses the adapter installation wizard and the LauncherUser Interfaces (UIs). It does not display any information or require interaction.
Installing the adapter in silent modeYou can either use the default settings or override those settings when you installthe adapter in silent mode.
About this task
If you accept the default setting for the silent installation, the adapter is installed ina location that depends on your operating system.
Windows operating systems%SYSTEM_DRIVE_ROOT%\Program Files\IBM\TDI\V7.1
UNIX and Linux operating systems/opt/IBM/TDI/V7.1
You can override the default settings with the -D parameter. The -D must befollowed immediately by an option-value pair. No space exists after -D.
Note: If an argument contains spaces, you must wrap the argument in quotationmarks.
Table 7. silent mode parameters for installing
Parameter Description
-DUSER_INSTALL_DIR This parameter overrides the defaultinstallation path. For example,-DUSER_INSTALL_DIR="D:/security/MyFolder"
-DFORCE_DISPATCHER_SERVICE_START_ONINSTALL
If the dispatcher service is running beforethe installation, the installer stops theservice. It restarts the service after theinstallation is completed. If the dispatcherservice is not running before the installation,use this parameter to start the service afterthe installation. Set the value of theparameter to YES.
Procedure1. Go to a command line.2. Run either of the following commands:
v To install the adapter in silent mode with the default settings, issue thecommand:java -jar PosixAdapterInstall_70.jar -i silent
© Copyright IBM Corp. 2012, 2014 21
v To install the adapter in silent mode and changing one or more defaultsettings, use the -D parameter. For example, this command overrides thedefault installation directory for a Windows operating system.java -jar PosixAdapterInstall_70.jar -i silent-DUSER_INSTALL_DIR="E:\Program Files\IBM\TDI\V7.1"
Results
The adapter is installed in the adapter installation directory.
Uninstalling the adapter in silent modeYou can uninstall the adapter without any prompts for user action.
About this task
Run the command from the PosixAdapterUninstall directory in the installationdirectory of the adapter. If you run the command from a different directory, youmust specify the full file path to the uninstaller.jar file. For example, thiscommand is run from outside the PosixAdapterUninstall directory.java-jar "E:\Program Files\IBM\TDI\V7.1\PosixAdapterUninstall\uninstaller.jar"-i silent
Table 8. silent mode parameter for uninstalling
Parameter Description
-DFORCE_DISPATCHER_SERVICE_START_ONUNINSTALL
If the dispatcher service is running beforethe uninstallation, the installer stops theservice. It restarts the service after theuninstallation is completed. If the dispatcherservice is not running before theuninstallation, use this parameter to start theservice after the uninstallation. Set the valueof the parameter to YES.
Procedure1. Go to a command line.2. Run either of the following commands:
v To uninstall the adapter with the default settings, run the command:java -jar uninstaller.jar -i silent
v To ensure that the dispatcher service is restarted after you uninstall theadapter, run the command:java -jar uninstaller.jar -i silent-DFORCE_DISPATCHER_SERVICE_START_ONUNINSTALL=yes
Results
The adapter is removed without any additional user response or interaction.
22 IBM Security Identity Manager: UNIX and Linux Adapter Installation and Configuration Guide
Chapter 5. First steps after installation
After you install the adapter, you must do several other tasks. The tasks includeconfiguring the adapter, setting up SSL, installing the language pack, and verifyingthat the adapter works correctly.
Adapter configurationYou can use the configuration options for the UNIX and Linux Adapter.v “Customizing the adapter profile”v “Running user-defined scripts” on page 25v “Customizing the adapter profile”v “Running user-defined scripts” on page 25v “Customizing password prompt attributes” on page 29v “User home directory creation” on page 28v “Adding home directory permissions on the account form” on page 30v “Editing adapter profiles on the UNIX or Linux operating system” on page 28v “Adapter features customization and extension” on page 28v “Setting up locales” on page 32
See the IBM Security Dispatcher Installation and Configuration Guide for moreconfiguration options such as:v JVM propertiesv Dispatcher filteringv Dispatcher propertiesv Dispatcher port numberv Logging configurationsv Secure Sockets Layer (SSL) communication
Customizing the adapter profileTo customize the adapter profile, you must change the adapter profile JAR file. Youmight customize the adapter profile to change the account form or the serviceform. You can also change the labels on the forms by using the Form Designer orthe CustomLabels.properties file. Each adapter has a CustomLabels.propertiesfile.
About this task
The adapter profile JAR file is included in the adapter compressed file that youdownloaded from the IBM website. The JAR file and the files that are contained inthe JAR file vary depending on your operating system.
Note: You cannot modify the schemas for this adapter. Attributes cannot be addedto or deleted from the schema.
AIX (PosixAixProfile.jar)The following files are included in the AIX profile JAR file:v CustomLabels.properties
v erPosixAixAccount.xml
© Copyright IBM Corp. 2012, 2014 23
v erPosixAixRMIService.xml
v posixAdd.xml
v posixDelete.xml
v posixModify.xml
v posixSearch.xml
v posixTest.xml
v schema.dsml
v service.def
v posixGroupAdd.xml
v posixGroupDelete.xml
v posixGroupModify.xml
v posixRoleAdd.xml
v posixRoleDelete.xml
v posixRoleModify.xml
HP-UX (PosixHpuxProfile.jar)The following files are included in the HP-UX profile JAR file:v CustomLabels.properties
v erPosixHpuxAccount.xml
v erPosixHpuxRMIService.xml
v posixAdd.xml
v posixDelete.xml
v posixModify.xml
v posixSearch.xml
v posixTest.xml
v schema.dsml
v service.def
v posixGroupAdd.xml
v posixGroupDelete.xml
v posixGroupModify.xml
Solaris (PosixSolarisProfile.jar)The following files are included in the Solaris profile JAR file:v CustomLabels.properties
v erPosixSolarisAccount.xml
v erPosixSolarisRMIService.xml
v posixAdd.xml
v posixDelete.xml
v posixModify.xml
v posixSearch.xml
v posixTest.xml
v schema.dsml
v service.def
v posixGroupAdd.xml
v posixGroupDelete.xml
v posixGroupModify.xml
24 IBM Security Identity Manager: UNIX and Linux Adapter Installation and Configuration Guide
Linux (PosixLinuxProfile.jar)The following files are included in the Linux profile JAR file:v CustomLabels.properties
v erPosixLinuxAccount.xml
v erPosixLinuxRMIService.xml
v posixAdd.xml
v posixDelete.xml
v posixModify.xml
v posixSearch.xml
v posixTest.xml
v schema.dsml
v service.def
v posixGroupAdd.xml
v posixGroupDelete.xml
v posixGroupModify.xml
After you edit the file, you must import the file into the IBM Security IdentityManager server for the changes to take effect.
Procedure1. Edit the profile JAR file.
a. Log in to the system where the UNIX and Linux Adapter is installed.b. Copy the JAR file into a temporary directory.c. Extract the contents of the JAR file into the temporary directory. Run the
following command. The following example applies to the Linux adapterprofile. Type the name of the JAR file for your operating system.#cd /tmp#jar -xvf PosixLinuxProfile.jar
The jar command extracts the files into the PosixLinuxProfile directory.d. Edit the file that you want to change.e. Save the file.
2. Import the file.a. Create a JAR file by using the files in the /tmp directory Run the following
command:#cd /tmp#jar -cvf PosixLinuxProfile.jar PosixLinuxProfile
b. Import the modified profile JAR file into the IBM Security Identity Managerapplication server. For more information about importing the JAR file, see“Importing the adapter profile into the IBM Security Identity Managerserver” on page 11.
c. Stop and start the IBM Security Identity Manager server.d. Stop and start the UNIX and Linux Adapter service. See “Adapter service
start, stop, and restart” on page 11 for information about stopping andstarting the UNIX and Linux Adapter service.
Running user-defined scriptsThe UNIX and Linux Adapter is configured to run user-defined scripts before arequest is processed (preexec), after a request is processed (postexec), or both.
Chapter 5. First steps after installation 25
About this task
Running user-defined scripts can be useful when external activities are required tomanage the resource. Use these attributes that are defined in the relevant Posixaccount form:v Pre-execution options:
erPosixPreExecAlways continue the operation regardless of the pre-execution scriptoutcome (succeed or fail).
erPosixPreExecRunOptionContinue the operation only when the pre-execution script succeeds.
v Post-execution options:
erPosixPostExecAlways continue the operation regardless of the post-execution scriptoutcome (succeed or fail).
erPosixPostExecRunOptionContinue the operation only when the post-execution script succeeds.
Note:
1. The term operation refers to any account management request. For example,user add or user modify.
2. The status or outcome of the preexec and postexec commands are not returnedto the IBM Security Identity Manager server.
3. On a modify request, the IBM Security Identity Manager server sends onlythose attributes whose values are changed. This behavior differs from an addoperation in which all the attributes are always sent. The modify behaviorapplies to the preexec and postexec attributes.
To send these attributes on a modify operation regardless of actual value changes,update the service.def file for the relevant Posix adapter profile.
Procedure1. Extract the adapter profile JAR file. For example, PosixAIXProfile.jar2. Open the service.def file in a text editor.3. Insert the following lines in service.def, under <operation cn="posixModify">
<input name="erPosixPreExec" source="erPosixPreExec"></input><input name="erPosixPostExec" source="erPosixPostExec""></input><input name="erPosixPreExecRunOption" source="erPosixPreExecRunOption"></input><input name="erPosixPostExecRunOption" source="erPosixPostExecRunOption"></input>
4. Save the changes and create another adapter profile JAR file.jar -cvf PosixAixProfile.jar PosixAixProfile
Defining the maximum connection count for adapteroperations
You can limit the number of connections that can be made to a resource based onthe service, service type, and operation. You can modify the service.def file in theservice profile. Alternatively, you can specify a value for the Max ConnectionCount field on the service form of a resource.
26 IBM Security Identity Manager: UNIX and Linux Adapter Installation and Configuration Guide
About this task
Limit the number of concurrent connections to a resource if you see errors that arecaused by contention for files or other objects on the resource. For example, whenmany operations occur at the same time for account add, some might fail becausethey cannot get write access to the /etc/passwd file. To reduce contention, lowerthe maximum connection count for the resource or the add operation.
To set a default or an absolute maximum connection count for a service type,modify the service.def file. A default count can be overridden on a per-resourcebasis; an absolute count cannot be overridden.
To change the service.def file, take these steps:
Procedure1. Extract the adapter profile JAR file. For example, extract PosixAIXProfile.jar
with this command:jar -xvf PosixAixProfile.jar
2. Open the service.def file in a text editor.3. To limit the maximum connections for an operation type, first locate the type. A
maximum connection count is defined for each operation type such as add(posixAdd) or modify (posixModify). Locate the type of operation whosemaximum connection count you want to set. For example, locate theposixModify operation:<operation cn="posixModify">
4. Find the <dispatcherParameter name="MaxConnectionCnt"...> element underthe posixModify operation entry.
5. Edit the dispatcherParameter element to specify a default value or an absolutevalue.v Specify a default value.
Create an entry similar to this example:<dispatcherParameter name="MaxConnectionCnt" source= "erPosixMaxConnectionCnt">
<default>value</default></dispatcherParameter>
For any AIX resource, the maximum number of concurrent operations foraccount modify has a default of value. To override this default, specify adifferent value in the Max Connection Count field on the DispatcherAttributes tab of the service form of the AIX resource.
v Specify an absolute value.Create an entry similar to this example:<dispatcherParameter name="MaxConnectionCnt">
<value>value</value></dispatcherParameter>
For any AIX resource, the maximum number of concurrent operations foraccount modify is value, which cannot be overridden.
Note:
v The maximum number of connections for search (recon) operations is alwaysone, regardless of the settings in the service.def file or on the service form.
v If no maximum connection count is defined in the service.def file or on theservice form, the connection count is unlimited.
6. Save the changes and create another adapter profile JAR file. For example:jar -cvf PosixAixProfile.jar PosixAixProfile
Chapter 5. First steps after installation 27
7. Import the modified profile JAR file into IBM Security Identity Manager.
User home directory creationThe UNIX and Linux Adapter provides a user-selectable option to create a defaulthome directory for a user or an account.
The default home directory is created by concatenating the base directory valuethat is defined on that system with the account name or user name to be created.
Example
The base directory value on the target system is /home. The user name for theaccount that is being created is testuser. The default home directory is/home/testuser.
Note: AIX systems ignore this option. The AIX operating systems create a homedirectory by default for each new account.
Editing adapter profiles on the UNIX or Linux operatingsystem
The adapter profile .jar file might contain ASCII files that are created by using theMS-DOS ASCII format.
About this task
If you edit an MS-DOS ASCII file on the UNIX operating system, you might see acharacter ^M at the end of each line. These characters indicate new lines of text inMS-DOS. The characters can interfere with the running of the file on UNIX orLinux systems. You can use tools, such as dos2unix, to remove the ^M characters.You can also use text editors, such as the vi editor, to remove the charactersmanually.
Example
You can use the vi editor to remove the ^M characters. From the vi commandmode, run the following command and press Enter::%s/^M//g
When you use this command, enter ^M or Ctrl-M by pressing ^v^M or Ctrl V CtrlM sequentially. The ^v instructs the vi editor to use the next keystroke instead ofissuing it as command.
Adapter features customization and extensionThe IBM Security Identity Manager adapters can be customized or extended orboth. The type and method of this customization varies depending on the adapter.
Customizing and extending adapters requires a number of skills. The developermust be familiar with the following concepts and skills:v IBM Security Identity Manager administrationv IBM Tivoli Directory Integrator managementv Tivoli Directory Integrator Assembly Line developmentv LDAP schema managementv Working knowledge of Java scripting language
28 IBM Security Identity Manager: UNIX and Linux Adapter Installation and Configuration Guide
v Working knowledge of LDAP object classes and attributesv Working knowledge of XML document structure
Note: If the customization requires a new Tivoli Directory Integrator connector, thedeveloper must also be familiar with Tivoli Directory Integrator connectordevelopment and working knowledge of Java programming language.
IBM Security Identity Manager resourcesSee the “Learn” section of the IBM Security Identity Manager Supportwebsite for links to training, publications, and demonstrations.
Tivoli Directory Integrator resourcesSee the “Learn” section of the Tivoli Directory Integrator Support websitefor links to training, publications, and demonstrations.
IBM Security Identity Manager adapter development resources
Adapter Development ToolThe Adapter Development Tool (ADT) is a tool that is used by IBMSecurity Identity Manager customers and consultants to createcustom IBM Security Identity Manager adapters. It reduces adapterdelivery time and it helps in the development of custom adapters.The ADT is available from the IBM Open Process AutomationLibrary (OPAL) website.
Support for customized adapters
The integration to the IBM Security Identity Manager server, the adapterframework, is supported. However, IBM does not support the customizations,scripts, or other modifications. You might experience a problem with a customizedadapter. In this case, IBM Support might require the problem to be demonstratedon the GA version of the adapter before a PMR is opened.
Optional feature configurationDepending on your needs, the adapter has attributes that you can optionallyconfigure for the following capabilities.
Customizing password prompt attributesThe UNIX and Linux Adapter does password changes by using an interactiveSecure Shell (SSH) session. The adapter searches for the default password promptson the managed resource to complete the transaction successfully. If the managedresource has customized password prompts, then you can specify the passwordprompts on the service form that the adapter must search for.
About this task
The password prompt attributes are:v erPosixNewRegx - the new password promptv erPosixRetypeRegx - the retype password prompt
To customize these password prompt attributes on the service form, do thefollowing steps from IBM Security Identity Manager. The customized passwordprompt attributes are displayed on the service form. The adapter does acase-insensitive match on these password prompts.
Chapter 5. First steps after installation 29
Procedure1. Log on to IBM Security Identity Manager as an administrator.2. In the My Work pane, expand Configure System and click Design Forms to
display the Design Forms page.3. From the applet, double-click Service to display the service form profiles.4. Double-click the service form profile whose service form you want to
customize. Select one of the following profiles:
POSIX AIX accountSelect this option to customize the erPosixNewRegx anderPosixRetypeRegx attributes on the AIX service form. The defaultvalues of these attributes on this account are:erPosixNewRegx = ".*new password:$"erPosixRetypeRegx = "re-enter .* new password:"
POSIX HP-UX accountSelect this option to customize the erPosixNewRegx anderPosixRetypeRegx attributes on the HP-UX service form.The defaultvalues of these attributes on this account are:erPosixNewRegx = ".*new password:$"erPosixRetypeRegx = ".*re-enter new password:$"
POSIX Linux accountSelect this option to customize the erPosixNewRegx anderPosixRetypeRegx attributes on the Linux service for The defaultvalues of these attributes on this account are:erPosixNewRegx = ".*new password:$"erPosixRetypeRegx = ".*re-enter new password:$"
POSIX Solaris accountSelect this option to customize the erPosixNewRegx anderPosixRetypeRegx attributes on the Solaris service form. The defaultvalues of these attributes on this account are:erPosixNewRegx = ".*new password:$"erPosixRetypeRegx = ".*re-enter new password:$"
5. From the Attributes List window, double-click the erPosixNewRegx attribute toadd it to the service form.
6. From the Attributes List window, double-click the erPosixRetypeRegx attributeto add it to the service form.
7. Click Save Form Template icon. After you customize the password promptattributes, the following attributes are available on the service form:v New Password Regular expressionv Retype Password Regular expression
Adding home directory permissions on the account formYou might want to add or modify the home directory permissions of the user onthe managed resource.
About this task
To modify the home directory permissions, you must customize theerPosixHomeDir attribute on the account form. Do the following steps on IBMSecurity Identity Manager:
30 IBM Security Identity Manager: UNIX and Linux Adapter Installation and Configuration Guide
Procedure1. Log on to IBM Security Identity Manager as an administrator.2. In the My Work pane, expand Configure System and click Design Forms to
display the Design Forms page.3. From the applet, double-click Account to display the account form profiles.4. Double-click the account form profile to add the erPosixHomeDir attribute on
the account form. Select one of the following profiles:
POSIX AIX accountSelect this option to customize the erPosixHomeDir attribute on the AIXaccount form.
POSIX HP-UX accountSelect this option to customize the erPosixHomeDir attribute on theHP-UX account form.
POSIX Linux accountSelect this option to customize the erPosixHomeDir attribute on theLinux account form.
POSIX Solaris accountSelect this option to customize the erPosixHomeDir attribute on theSolaris account form.
5. From the Attributes List window, double-click the erPosixHomeDir attribute toadd it to the $tabemployeeinfo tab.
6. Right-click erposixperhomedir and click Change To>UMask.7. Click the Save Form Template icon. After you customize the attribute, the
Home directory permissions attribute is available on the account form.
Adding umask settings on the account formYou might want to add or modify the umask permissions of the user on themanaged resource. The umask settings control how file permissions are set fornewly created files.
About this task
To modify the umask permissions, you must customize the erPosixUmask attributeon the account form. Do the following steps on IBM Security Identity Manager:
Procedure1. Log on to IBM Security Identity Manager as an administrator.2. In the My Work pane, expand Configure System and click Design Forms to
display the Design Forms page.3. From the applet, double-click Account to display the account form profiles.4. Double-click the account form profile to add the erPosixUmask attribute on the
account form. Select one of the following profiles:
POSIX AIX accountSelect this option to customize the erPosixUmask attribute on the AIXaccount form.
POSIX HP-UX accountSelect this option to customize the erPosixUmask attribute on theHP-UX account form.
Chapter 5. First steps after installation 31
POSIX Linux accountSelect this option to customize the erPosixUmask attribute on the Linuxaccount form.
POSIX Solaris accountSelect this option to customize the erPosixUmask attribute on the Solarisaccount form.
5. From the Attributes List window, double-click the erPosixUmask attribute toadd it to the $tabemployeeinfo tab.
6. Right-click erPosixUmask and click Change To>UMask.7. Click the Save Form Template icon. After you customize the attribute, you can
use it when you create or modify a user account.Locate the attribute that is labeled UNIX umask on the account form and usethe Access Type permission boxes to change or set the read, write and executepermissions for user, group and other access.
Setting up localesYou can specify a particular code page for the adapter to use when encoding anddecoding data. By default, the adapter uses the same locale and code page that arespecified for the administrative user account that the adapter uses on the managedresource. The locale and code page are typically the same as the system locale andcode page. If the locales and code pages are different, use this task to configure theadapter to use the system locale and code page.
About this task
The erPosixEncoding attribute provides enhanced support in the Posix adapter forcharacters sets from user-specified locales.
Procedure1. Open the DESIGN FORMS feature of the IBM Security Identity Manager server.
Click Configure System > Design Forms.2. Click Service and select a POSIX Profile.3. Add the attribute erposixencoding on the Service form from the Attribute List.4. Save the form and close the Design Form window.5. Create a service with following parameter:
Code Page to be used for data encoding(Default to UTF-8) : Code page for data
Code page for data on the service form is the corresponding code page to theLOCALE in use. For example, the code page for the German locale isISO-8859-1.Code Page to be used for data encoding(Default to UTF-8) : ISO-8859-1
Configuring alternative adapter scripts locationYou can specify where the adapter script files are stored on the managed UNIX orLinux system.
Before you begin
The administrator that is defined on the service form for the managed system musthave sufficient permission to access the specified location or directory.
32 IBM Security Identity Manager: UNIX and Linux Adapter Installation and Configuration Guide
About this task
A configurable option, erPosixCopyAdpFilesTo, can be used to store adapter scriptfiles in a location other than the default location /tmp. This option is configurableby service and is not automatically displayed on the service form.
To add this attribute:
Procedure1. Open the DESIGN FORMS feature of the IBM Security Identity Manager server.
Click Configure System > Design Forms.2. Click Service and select any POSIX Profile.3. Add the attribute erPosixCopyAdpFilesTo on the Service form from the
Attribute List.4. Save the form.5. Create a service with following parameter:
Location of temporary files on resource : full path to file location
Reconciling with custom scriptsYou can run reconciliation with either the reconciliation script bundled with theadapter or your own customized reconciliation script that is optimized for yoursetup.
Before you begin
Ensure that these conditions are true:v The customized reconciliation script name is user definable, and must be present
in the timsol folder.v You must have executable permission on reconciliation script. You must have
similar permissions on the specified folder as on the /tmp folder.v The reconciliation script and folder cannot contain double quotation marks or
spaces.v The names of the reconciliation script and folder must follow the naming
conventions of the operating system.
About this task
To use this feature, select the Use recon script from this folder on managedresource attribute on the service form. The adapter uses the reconciliation scriptpresent at that location. If this option is not selected, then the standardreconciliation script that is bundled with the adapter is used.
Note:
1. If a value for both Location of temporary files on resource and Use reconscript from this folder on managed resource are selected, then Use reconscript from this folder on managed resource is used.
2. If a folder is specified on the managed resource without a script file name, theadapter looks for the standard reconciliation script name. The script name isbased on the operating system type in the specified folder. On an AIXoperating system, if the file path given for this attribute is /reconfolder, theadapter looks for the /reconfolder/AixPConnRes.sh file.
Chapter 5. First steps after installation 33
Procedure1. Open the DESIGN FORMS feature of the IBM Security Identity Manager server.
Click Configure System > Design Forms.2. Click Service and select POSIX Solaris Profile.3. Add the attribute erPosixReconScriptLocation on the Service form from the
Attribute List.4. Save the form.
Ending a user session after suspensionThe adapter can be configured to end active user sessions after the user issuspended.
About this task
The default behavior of the adapter is not to end active sessions after the user issuspended. Use this task to configure the adapter to end active sessions after thesuccessful completion of a suspension request.
This option is configurable by service. The option is not displayed automatically onthe Service Form.
Note:
1. This option must not be used on systems that allow duplicate user IDs.2. An error condition or hang occurs if a user attempts to suspend itself when this
option is set.
To add this attribute to the Service Form:
Procedure1. Open the DESIGN FORMS feature of the IBM Security Identity Manager server.
Click Configure System > Design Forms.2. Click Service and select any POSIX Solaris Profile.3. Add the attribute erPosixKillUserProcess on the Service form from the
Attribute List.4. Change display type to CheckBox and save the form.5. Create a service with following parameter:
Kill active user process on suspending an account
6. Restart the Dispatcher.
Ending user processes to delete a user accountOn a Linux operating system, you cannot delete a user if any user processes arerunning. The adapter can be configured for Linux operating systems to end alluser processes when a user is deleted.
About this task
The default behavior of the Linux operating system is to fail a user delete requestif any user processes are running. Use this task to configure the adapter to end anyactive user processes when you submit a delete user request.
This option is configurable by service. The option is not displayed automatically onthe Service Form.
34 IBM Security Identity Manager: UNIX and Linux Adapter Installation and Configuration Guide
Note: This option must not be used on systems that permit duplicate user IDs.
To add this attribute to the Service Form:
Procedure1. Open the DESIGN FORMS feature of the IBM Security Identity Manager server.
Click Configure System > Design Forms.2. Click Service and select any POSIX Linux Profile.3. Add the attribute erPosixDelUserInUse on the Service form from the Attribute
List.4. Change display type to CheckBox and save the form.5. Create a service with following parameter:
Delete user account even when it is in use
6. Restart the Dispatcher.
Configuring last access date support for Solaris systemsYou can configure the UNIX and Linux Adapter to show the date that an accounton a Solaris system was last accessed.
About this task
You can add two fields to the service form:
Retrieve last Access Date?The value for erPosixLastAccessDateBinaryCopy is either TRUE or FALSE.The value of this option determines how the adapter handles "Account lastaccessed on" attribute. This value must be set to TRUE on the service formfor the adapter to retrieve the value for "Account last accessed on". Theadapter copies the LastAccessDateReader binary file to a specified locationor to the /tmp folder (default location) during reconciliation. Afterreconciliation, the adapter deletes the binary file from the resource. Thisbinary file is used to read the contents of the /var/adm/wtmpx file toretrieve the last access date for the user accounts.
Account last accessed onThe value for the erPosixLastAccessDate is retrieved from the/var/adm/wtmpx file that is maintained on the Solaris system. This filecontains history of user access and administrative information. Theminimum permissions that are required to read this file is 0644(rw-r--r--).
Note: The erPosixLastAccessDate attribute that is added to account fromby using the Design Forms editor must be kept as Read-Only on Modify.
The Account last accessed on field has these behaviors for the followingoperations:
Add When a user account is requested with the "Account last accessedon" value on the Account Form, the adapter does not set thisvalue. The adapter returns a message: Not supported during addoperation.
ModifyThe value is read only.
Chapter 5. First steps after installation 35

ReconciliationThe adapter reconciles the value for each account in GMT format(for example 20110102122500Z).
To add these attributes to the Service Form:
Procedure1. Open the Design Forms feature of the IBM Security Identity Manager server.
Click Configure System > Design Forms.2. Click Service and select POSIX Solaris Profile.3. Add the attribute erposixlastaccessdatebinarycopy on the service form from
the Attribute List.4. Change display type to CheckBox and save the form.5. Click Account and select POSIX Solaris Account.6. On the account form, add the attribute erposixlastaccessdate from the
Attribute List.7. Click the Read-Only on Modify check box in the format tab under the
properties section8. Save the form and close the Design Form window
Non-login account (passwd-N) supportThe adapter supports "No Password" accounts. A "No Password" account does nothave a password. Accounts without passwords cannot be used to log in to thesystem interactively with commands such as login, telnet, ftp, or ssh.
The adapter supports "No Password" accounts on Solaris 10 and higher andHP-UX Trusted and Non-Trusted operating systems.
The Is No Password Account? check box on the account form is used to enableand disable the behavior. The possible values for this option are TRUE whenselected and FALSE when not selected. When the option is selected, adapter createsa "No Password" account. The adapter creates a "Password" account when theoption is not selected.
Note:
1. Password aging attributes for "No Password" accounts on HP-UX Trustedoperating systems cannot be set.
2. When run from a sudo-super user account, HP-UX systems require theseconditions.v /usr/sam/lbin and /usr/bin be in the user path.v /usr/sam/lbin/usermod.sam and /usr/bin/test be in the user entry in the
sudoers file.
Attribute usage
The following examples demonstrate the usage of the attribute in variousoperations:
Add A new user account can be requested with the Is No Password Account?option that is selected on the account form. In this case, the adapter createsa "No Password" account on Solaris 10 and higher and HP-UX Trusted andNon-Trusted operating systems.
36 IBM Security Identity Manager: UNIX and Linux Adapter Installation and Configuration Guide
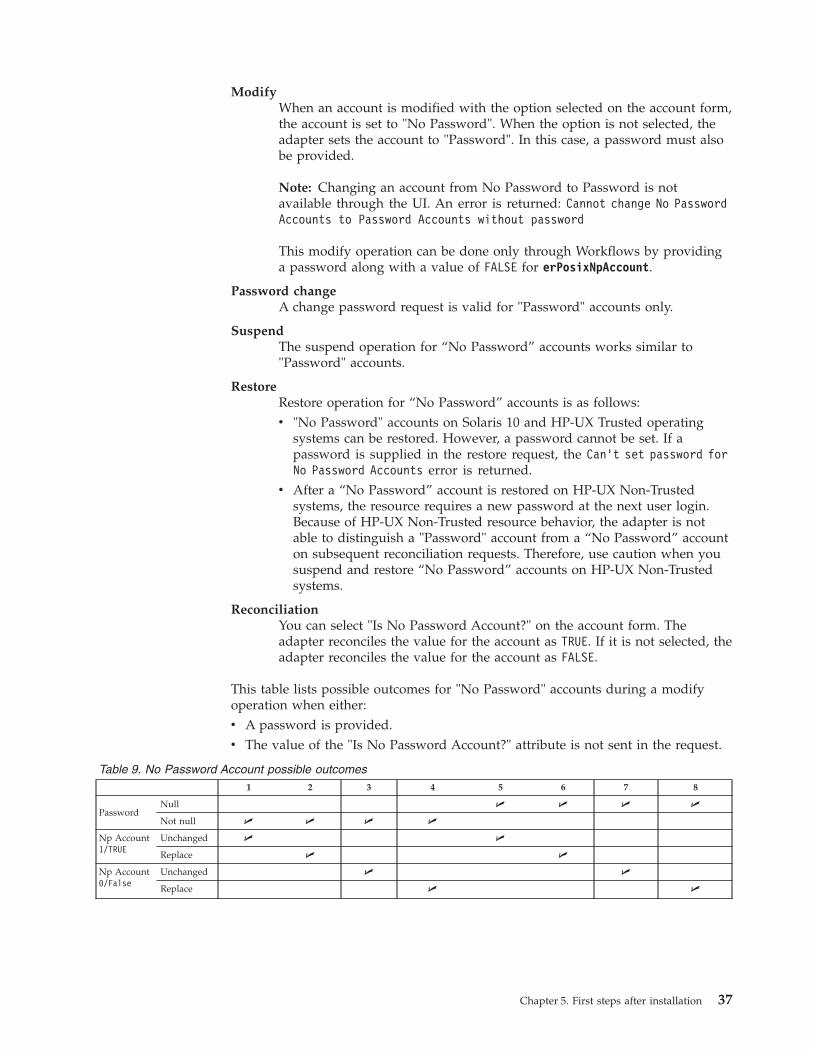
ModifyWhen an account is modified with the option selected on the account form,the account is set to "No Password". When the option is not selected, theadapter sets the account to "Password". In this case, a password must alsobe provided.
Note: Changing an account from No Password to Password is notavailable through the UI. An error is returned: Cannot change No PasswordAccounts to Password Accounts without password
This modify operation can be done only through Workflows by providinga password along with a value of FALSE for erPosixNpAccount.
Password changeA change password request is valid for "Password" accounts only.
SuspendThe suspend operation for “No Password” accounts works similar to"Password" accounts.
RestoreRestore operation for “No Password” accounts is as follows:v "No Password" accounts on Solaris 10 and HP-UX Trusted operating
systems can be restored. However, a password cannot be set. If apassword is supplied in the restore request, the Can't set password forNo Password Accounts error is returned.
v After a “No Password” account is restored on HP-UX Non-Trustedsystems, the resource requires a new password at the next user login.Because of HP-UX Non-Trusted resource behavior, the adapter is notable to distinguish a "Password" account from a “No Password” accounton subsequent reconciliation requests. Therefore, use caution when yoususpend and restore “No Password” accounts on HP-UX Non-Trustedsystems.
ReconciliationYou can select "Is No Password Account?" on the account form. Theadapter reconciles the value for the account as TRUE. If it is not selected, theadapter reconciles the value for the account as FALSE.
This table lists possible outcomes for "No Password" accounts during a modifyoperation when either:v A password is provided.v The value of the "Is No Password Account?" attribute is not sent in the request.
Table 9. No Password Account possible outcomes1 2 3 4 5 6 7 8
PasswordNull U U U U
Not null U U U U
Np Account1/TRUE
Unchanged U U
Replace U U
Np Account0/False
Unchanged U U
Replace U U
Chapter 5. First steps after installation 37
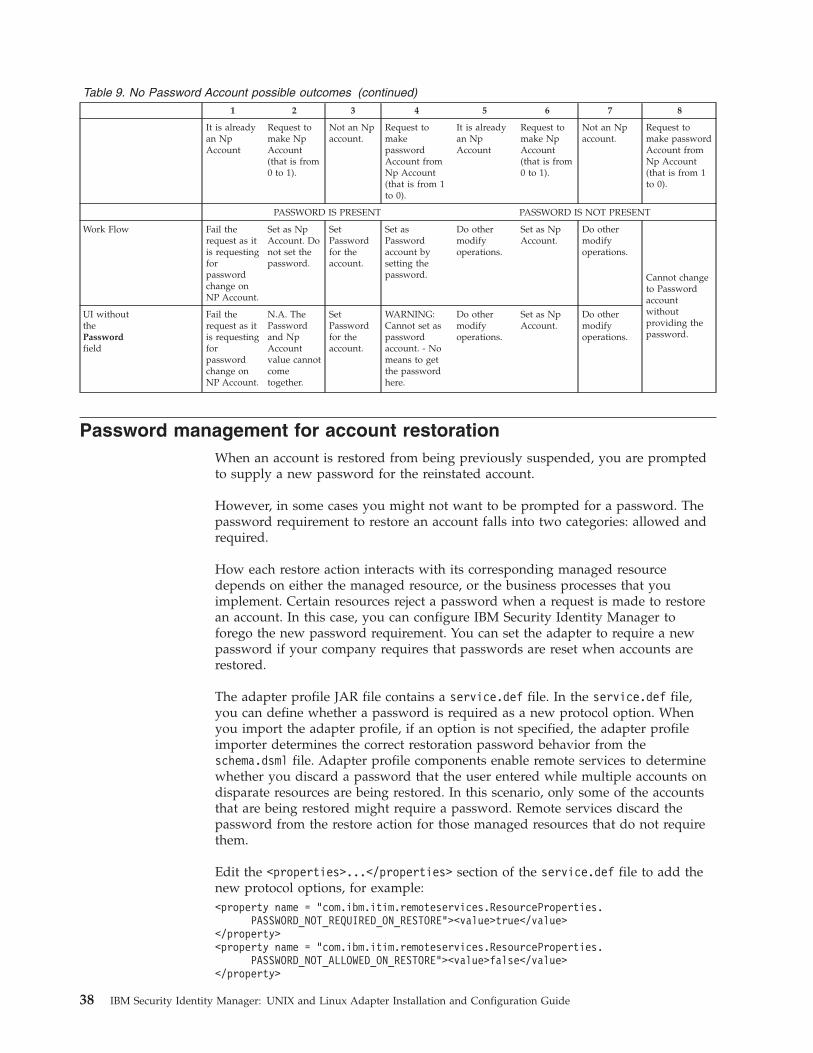
Table 9. No Password Account possible outcomes (continued)1 2 3 4 5 6 7 8
It is alreadyan NpAccount
Request tomake NpAccount(that is from0 to 1).
Not an Npaccount.
Request tomakepasswordAccount fromNp Account(that is from 1to 0).
It is alreadyan NpAccount
Request tomake NpAccount(that is from0 to 1).
Not an Npaccount.
Request tomake passwordAccount fromNp Account(that is from 1to 0).
PASSWORD IS PRESENT PASSWORD IS NOT PRESENT
Work Flow Fail therequest as itis requestingforpasswordchange onNP Account.
Set as NpAccount. Donot set thepassword.
SetPasswordfor theaccount.
Set asPasswordaccount bysetting thepassword.
Do othermodifyoperations.
Set as NpAccount.
Do othermodifyoperations.
Cannot changeto Passwordaccountwithoutproviding thepassword.
UI withoutthePasswordfield
Fail therequest as itis requestingforpasswordchange onNP Account.
N.A. ThePasswordand NpAccountvalue cannotcometogether.
SetPasswordfor theaccount.
WARNING:Cannot set aspasswordaccount. - Nomeans to getthe passwordhere.
Do othermodifyoperations.
Set as NpAccount.
Do othermodifyoperations.
Password management for account restorationWhen an account is restored from being previously suspended, you are promptedto supply a new password for the reinstated account.
However, in some cases you might not want to be prompted for a password. Thepassword requirement to restore an account falls into two categories: allowed andrequired.
How each restore action interacts with its corresponding managed resourcedepends on either the managed resource, or the business processes that youimplement. Certain resources reject a password when a request is made to restorean account. In this case, you can configure IBM Security Identity Manager toforego the new password requirement. You can set the adapter to require a newpassword if your company requires that passwords are reset when accounts arerestored.
The adapter profile JAR file contains a service.def file. In the service.def file,you can define whether a password is required as a new protocol option. Whenyou import the adapter profile, if an option is not specified, the adapter profileimporter determines the correct restoration password behavior from theschema.dsml file. Adapter profile components enable remote services to determinewhether you discard a password that the user entered while multiple accounts ondisparate resources are being restored. In this scenario, only some of the accountsthat are being restored might require a password. Remote services discard thepassword from the restore action for those managed resources that do not requirethem.
Edit the <properties>...</properties> section of the service.def file to add thenew protocol options, for example:<property name = "com.ibm.itim.remoteservices.ResourceProperties.
PASSWORD_NOT_REQUIRED_ON_RESTORE"><value>true</value></property><property name = "com.ibm.itim.remoteservices.ResourceProperties.
PASSWORD_NOT_ALLOWED_ON_RESTORE"><value>false</value></property>
38 IBM Security Identity Manager: UNIX and Linux Adapter Installation and Configuration Guide
By adding the two options in the preceding example, you are ensuring that youare not prompted for a password when an account is restored.
Note: Before you set the property PASSWORD_NOT_REQUIRED_ON_RESTORE to true,ensure that the operating system supports restoring of an account without apassword.
Language pack installationThe adapters use a separate language package from the IBM Security IdentityManager.
See the IBM Security Identity Manager library and search for information aboutinstalling the adapter language pack.
Verifying that the adapter is working correctlyAfter you install and configure the adapter, take steps to verify that the installationand configuration are correct.
Procedure1. Test the connection for the service that you created on IBM Security Identity
Manager.2. Run a full reconciliation from IBM Security Identity Manager.3. Run all supported operations such as add, modify, and delete on one user
account.4. Verify the ibmdi.log file after each operation to ensure that no errors are
reported.5. Verify the IBM Security Identity Manager log file trace.log to ensure that no
errors are reported when you run an adapter operation.
Chapter 5. First steps after installation 39

40 IBM Security Identity Manager: UNIX and Linux Adapter Installation and Configuration Guide
Chapter 6. Adapter error troubleshooting
Troubleshooting can help you determine why a product does not function properly.
Use the following information and techniques to identify and resolve problemswith the adapter. There is also information about troubleshooting errors that mightoccur during the adapter installation.
Techniques for troubleshooting problemsTroubleshooting is a systematic approach to solving a problem. The goal oftroubleshooting is to determine why something does not work as expected andhow to resolve the problem. Certain common techniques can help with the task oftroubleshooting.
The first step in the troubleshooting process is to describe the problem completely.Problem descriptions help you and the IBM technical-support representative knowwhere to start to find the cause of the problem. This step includes asking yourselfbasic questions:v What are the symptoms of the problem?v Where does the problem occur?v When does the problem occur?v Under which conditions does the problem occur?v Can the problem be reproduced?
The answers to these questions typically lead to a good description of the problem,which can then lead you to a problem resolution.
What are the symptoms of the problem?
When you start to describe a problem, the most obvious question is “What is theproblem?” This question might seem straightforward; however, you can break itdown into several more-focused questions that create a more descriptive picture ofthe problem. These questions can include:v Who, or what, is reporting the problem?v What are the error codes and messages?v How does the system fail? For example, is it a loop, hang, crash, performance
degradation, or incorrect result?
Where does the problem occur?
Determining where the problem originates is not always easy, but it is one of themost important steps in resolving a problem. Many layers of technology can existbetween the reporting and failing components. Networks, disks, and drivers areonly a few of the components to consider when you are investigating problems.
The following questions help you to focus on where the problem occurs to isolatethe problem layer:v Is the problem specific to one operating system, or is it common across multiple
operating systems?v Is the current environment and configuration supported?
© Copyright IBM Corp. 2012, 2014 41
v Do all users have the problem?v (For multi-site installations.) Do all sites have the problem?
If one layer reports the problem, the problem does not necessarily originate in thatlayer. Part of identifying where a problem originates is understanding theenvironment in which it exists. Take some time to completely describe the problemenvironment, including the operating system and version, all correspondingsoftware and versions, and hardware information. Confirm that you are runningwithin an environment that is a supported configuration. Many problems can betraced back to incompatible levels of software that are not intended to run togetheror are not fully tested together.
When does the problem occur?
Develop a detailed timeline of events that lead up to a failure, especially for thosecases that are one-time occurrences. You can most easily develop a timeline byworking backward: Start at the time an error was reported (as precisely as possible,even down to the millisecond), and work backward through the available logs andinformation. Typically, you must look only as far as the first suspicious event thatyou find in a diagnostic log.
To develop a detailed timeline of events, answer these questions:v Does the problem happen only at a certain time of day or night?v How often does the problem happen?v What sequence of events leads up to the time that the problem is reported?v Does the problem happen after an environment change, such as upgrading or
installing software or hardware?
Responding to these types of questions can give you a frame of reference in whichto investigate the problem.
Under which conditions does the problem occur?
Knowing which systems and applications are running at the time that a problemoccurs is an important part of troubleshooting. These questions about yourenvironment can help you to identify the root cause of the problem:v Does the problem always occur when the same task is being done?v Does a certain sequence of events happen for the problem to occur?v Do any other applications fail at the same time?
Answering these types of questions can help you explain the environment inwhich the problem occurs and correlate any dependencies. Just because multipleproblems might occur around the same time. However, the problems are notnecessarily related.
Can the problem be reproduced?
From a troubleshooting standpoint, the ideal problem is one that can bereproduced. Typically, when a problem can be reproduced you have a larger set oftools or procedures at your disposal to help you investigate. Problems that you canreproduce are often easier to debug and solve.
However, problems that you can reproduce can have a disadvantage: If theproblem is of significant business impact, you do not want it to recur. If possible,
42 IBM Security Identity Manager: UNIX and Linux Adapter Installation and Configuration Guide
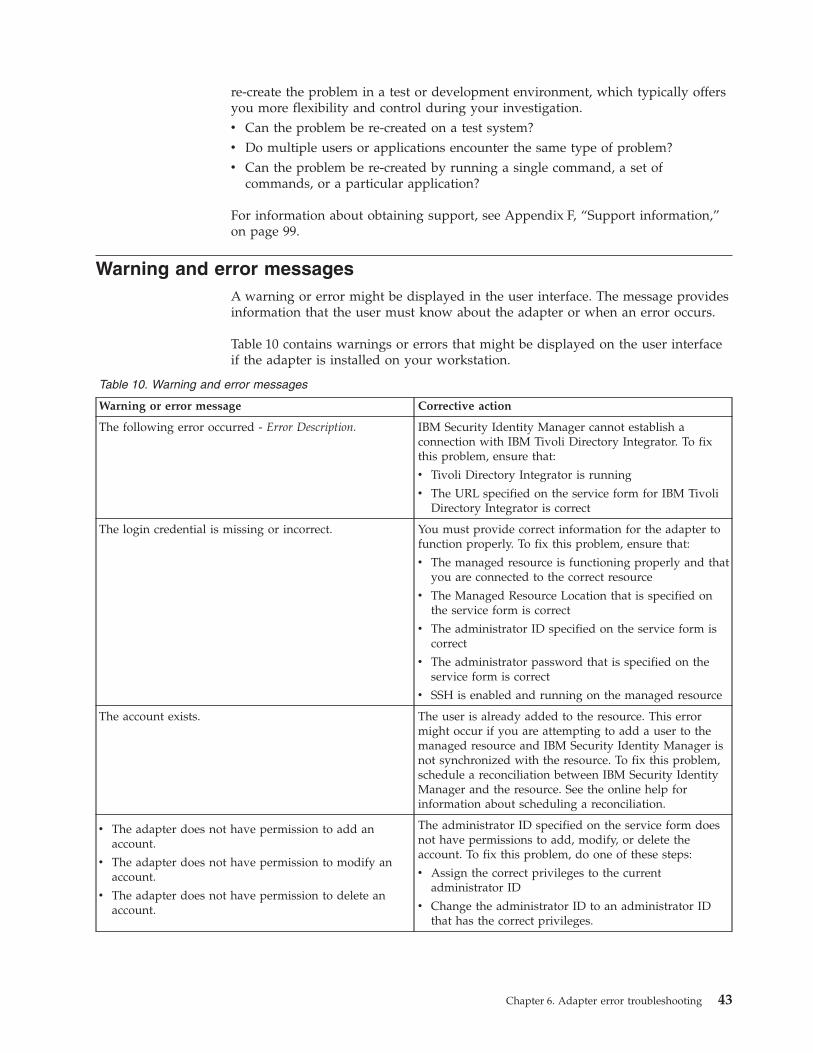
re-create the problem in a test or development environment, which typically offersyou more flexibility and control during your investigation.v Can the problem be re-created on a test system?v Do multiple users or applications encounter the same type of problem?v Can the problem be re-created by running a single command, a set of
commands, or a particular application?
For information about obtaining support, see Appendix F, “Support information,”on page 99.
Warning and error messagesA warning or error might be displayed in the user interface. The message providesinformation that the user must know about the adapter or when an error occurs.
Table 10 contains warnings or errors that might be displayed on the user interfaceif the adapter is installed on your workstation.
Table 10. Warning and error messages
Warning or error message Corrective action
The following error occurred - Error Description. IBM Security Identity Manager cannot establish aconnection with IBM Tivoli Directory Integrator. To fixthis problem, ensure that:
v Tivoli Directory Integrator is running
v The URL specified on the service form for IBM TivoliDirectory Integrator is correct
The login credential is missing or incorrect. You must provide correct information for the adapter tofunction properly. To fix this problem, ensure that:
v The managed resource is functioning properly and thatyou are connected to the correct resource
v The Managed Resource Location that is specified onthe service form is correct
v The administrator ID specified on the service form iscorrect
v The administrator password that is specified on theservice form is correct
v SSH is enabled and running on the managed resource
The account exists. The user is already added to the resource. This errormight occur if you are attempting to add a user to themanaged resource and IBM Security Identity Manager isnot synchronized with the resource. To fix this problem,schedule a reconciliation between IBM Security IdentityManager and the resource. See the online help forinformation about scheduling a reconciliation.
v The adapter does not have permission to add anaccount.
v The adapter does not have permission to modify anaccount.
v The adapter does not have permission to delete anaccount.
The administrator ID specified on the service form doesnot have permissions to add, modify, or delete theaccount. To fix this problem, do one of these steps:
v Assign the correct privileges to the currentadministrator ID
v Change the administrator ID to an administrator IDthat has the correct privileges.
Chapter 6. Adapter error troubleshooting 43
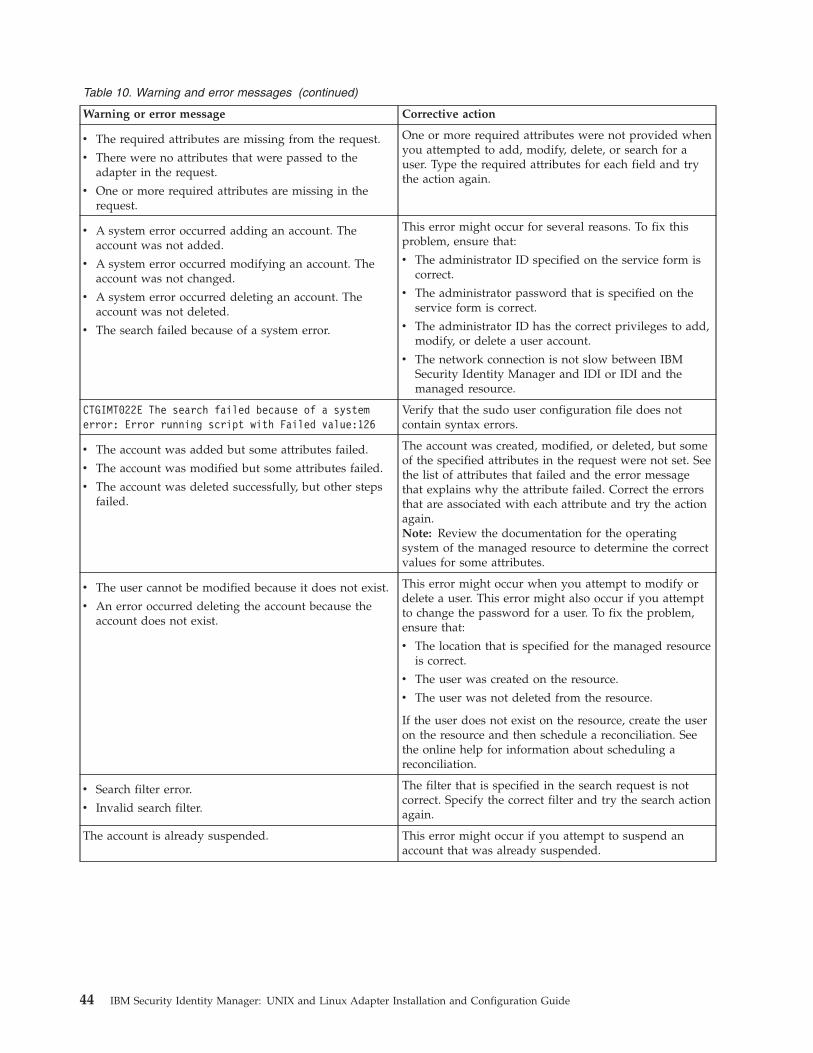
Table 10. Warning and error messages (continued)
Warning or error message Corrective action
v The required attributes are missing from the request.
v There were no attributes that were passed to theadapter in the request.
v One or more required attributes are missing in therequest.
One or more required attributes were not provided whenyou attempted to add, modify, delete, or search for auser. Type the required attributes for each field and trythe action again.
v A system error occurred adding an account. Theaccount was not added.
v A system error occurred modifying an account. Theaccount was not changed.
v A system error occurred deleting an account. Theaccount was not deleted.
v The search failed because of a system error.
This error might occur for several reasons. To fix thisproblem, ensure that:
v The administrator ID specified on the service form iscorrect.
v The administrator password that is specified on theservice form is correct.
v The administrator ID has the correct privileges to add,modify, or delete a user account.
v The network connection is not slow between IBMSecurity Identity Manager and IDI or IDI and themanaged resource.
CTGIMT022E The search failed because of a systemerror: Error running script with Failed value:126
Verify that the sudo user configuration file does notcontain syntax errors.
v The account was added but some attributes failed.
v The account was modified but some attributes failed.
v The account was deleted successfully, but other stepsfailed.
The account was created, modified, or deleted, but someof the specified attributes in the request were not set. Seethe list of attributes that failed and the error messagethat explains why the attribute failed. Correct the errorsthat are associated with each attribute and try the actionagain.Note: Review the documentation for the operatingsystem of the managed resource to determine the correctvalues for some attributes.
v The user cannot be modified because it does not exist.
v An error occurred deleting the account because theaccount does not exist.
This error might occur when you attempt to modify ordelete a user. This error might also occur if you attemptto change the password for a user. To fix the problem,ensure that:
v The location that is specified for the managed resourceis correct.
v The user was created on the resource.
v The user was not deleted from the resource.
If the user does not exist on the resource, create the useron the resource and then schedule a reconciliation. Seethe online help for information about scheduling areconciliation.
v Search filter error.
v Invalid search filter.
The filter that is specified in the search request is notcorrect. Specify the correct filter and try the search actionagain.
The account is already suspended. This error might occur if you attempt to suspend anaccount that was already suspended.
44 IBM Security Identity Manager: UNIX and Linux Adapter Installation and Configuration Guide
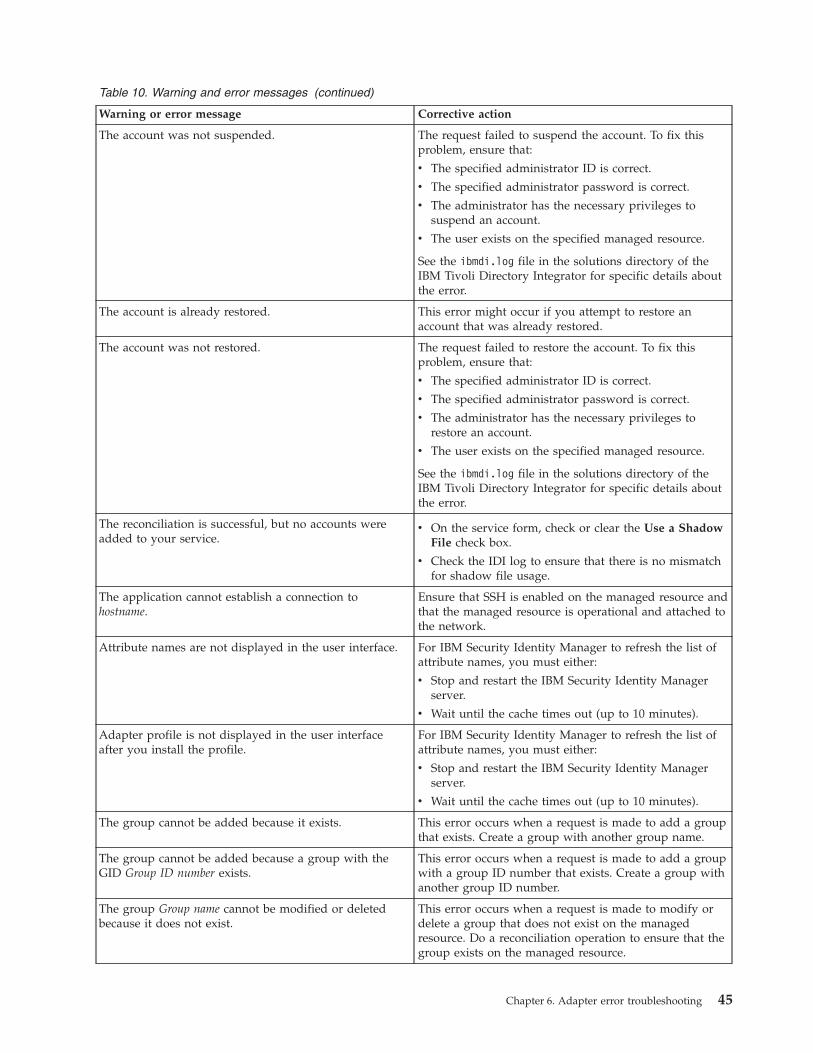
Table 10. Warning and error messages (continued)
Warning or error message Corrective action
The account was not suspended. The request failed to suspend the account. To fix thisproblem, ensure that:
v The specified administrator ID is correct.
v The specified administrator password is correct.
v The administrator has the necessary privileges tosuspend an account.
v The user exists on the specified managed resource.
See the ibmdi.log file in the solutions directory of theIBM Tivoli Directory Integrator for specific details aboutthe error.
The account is already restored. This error might occur if you attempt to restore anaccount that was already restored.
The account was not restored. The request failed to restore the account. To fix thisproblem, ensure that:
v The specified administrator ID is correct.
v The specified administrator password is correct.
v The administrator has the necessary privileges torestore an account.
v The user exists on the specified managed resource.
See the ibmdi.log file in the solutions directory of theIBM Tivoli Directory Integrator for specific details aboutthe error.
The reconciliation is successful, but no accounts wereadded to your service.
v On the service form, check or clear the Use a ShadowFile check box.
v Check the IDI log to ensure that there is no mismatchfor shadow file usage.
The application cannot establish a connection tohostname.
Ensure that SSH is enabled on the managed resource andthat the managed resource is operational and attached tothe network.
Attribute names are not displayed in the user interface. For IBM Security Identity Manager to refresh the list ofattribute names, you must either:
v Stop and restart the IBM Security Identity Managerserver.
v Wait until the cache times out (up to 10 minutes).
Adapter profile is not displayed in the user interfaceafter you install the profile.
For IBM Security Identity Manager to refresh the list ofattribute names, you must either:
v Stop and restart the IBM Security Identity Managerserver.
v Wait until the cache times out (up to 10 minutes).
The group cannot be added because it exists. This error occurs when a request is made to add a groupthat exists. Create a group with another group name.
The group cannot be added because a group with theGID Group ID number exists.
This error occurs when a request is made to add a groupwith a group ID number that exists. Create a group withanother group ID number.
The group Group name cannot be modified or deletedbecause it does not exist.
This error occurs when a request is made to modify ordelete a group that does not exist on the managedresource. Do a reconciliation operation to ensure that thegroup exists on the managed resource.
Chapter 6. Adapter error troubleshooting 45
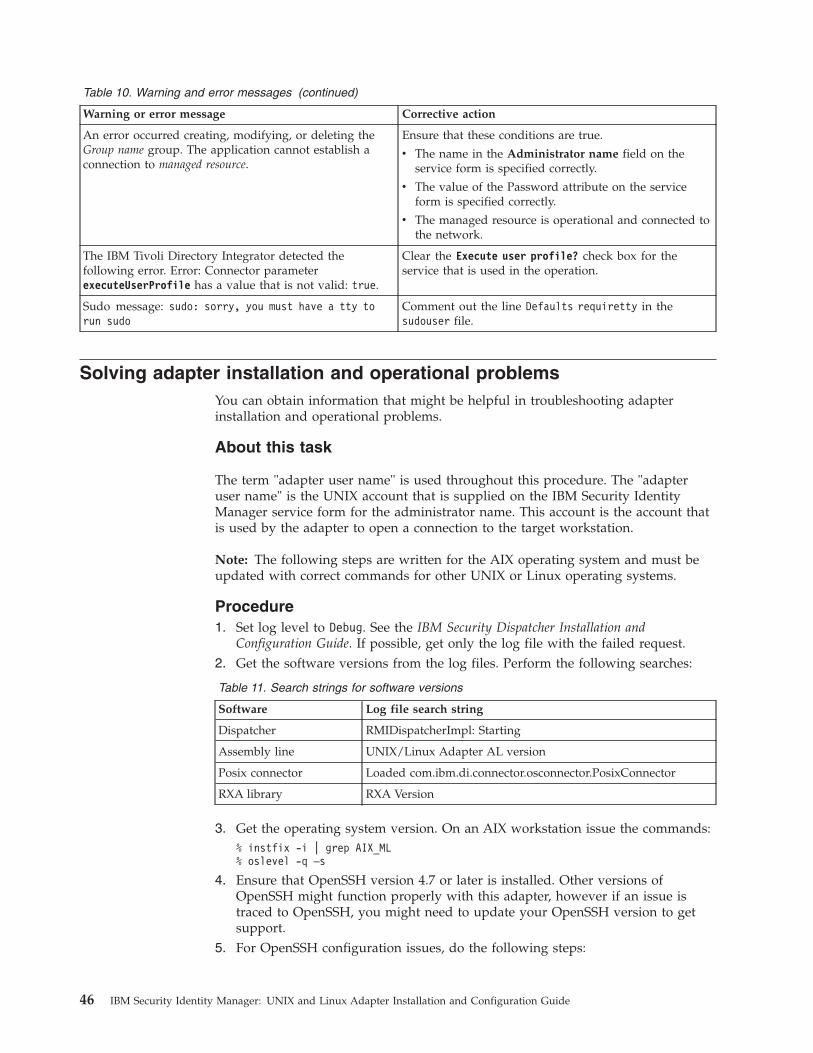
Table 10. Warning and error messages (continued)
Warning or error message Corrective action
An error occurred creating, modifying, or deleting theGroup name group. The application cannot establish aconnection to managed resource.
Ensure that these conditions are true.
v The name in the Administrator name field on theservice form is specified correctly.
v The value of the Password attribute on the serviceform is specified correctly.
v The managed resource is operational and connected tothe network.
The IBM Tivoli Directory Integrator detected thefollowing error. Error: Connector parameterexecuteUserProfile has a value that is not valid: true.
Clear the Execute user profile? check box for theservice that is used in the operation.
Sudo message: sudo: sorry, you must have a tty torun sudo
Comment out the line Defaults requiretty in thesudouser file.
Solving adapter installation and operational problemsYou can obtain information that might be helpful in troubleshooting adapterinstallation and operational problems.
About this task
The term "adapter user name" is used throughout this procedure. The "adapteruser name" is the UNIX account that is supplied on the IBM Security IdentityManager service form for the administrator name. This account is the account thatis used by the adapter to open a connection to the target workstation.
Note: The following steps are written for the AIX operating system and must beupdated with correct commands for other UNIX or Linux operating systems.
Procedure1. Set log level to Debug. See the IBM Security Dispatcher Installation and
Configuration Guide. If possible, get only the log file with the failed request.2. Get the software versions from the log files. Perform the following searches:
Table 11. Search strings for software versions
Software Log file search string
Dispatcher RMIDispatcherImpl: Starting
Assembly line UNIX/Linux Adapter AL version
Posix connector Loaded com.ibm.di.connector.osconnector.PosixConnector
RXA library RXA Version
3. Get the operating system version. On an AIX workstation issue the commands:% instfix -i | grep AIX_ML% oslevel -q –s
4. Ensure that OpenSSH version 4.7 or later is installed. Other versions ofOpenSSH might function properly with this adapter, however if an issue istraced to OpenSSH, you might need to update your OpenSSH version to getsupport.
5. For OpenSSH configuration issues, do the following steps:
46 IBM Security Identity Manager: UNIX and Linux Adapter Installation and Configuration Guide

a. Ensure that the UsePrivilegeSeparation attribute is set to yes in thesshd_config file. The default value of UsePrivilegeSeparation is yes. If setto no the adapter account is locked.
b. Ensure that the ClientAliveInterval attribute in the sshd_config file iseither commented out or set to 0. The default value of ClientAliveIntervalis 0.
6. On a remote workstation, issue the following ssh commands and capture theresults.% ssh username@ip-address "ssh -V"
If sudo is used, issue these commands:% ssh username@ip-address "sudo ls /tmp"% ssh username@ip-address "which sudo"
The username is the adapter user name. The ip-address is the IP address of theUNIX system that is being managed.
7. For reconciliation issues, do the following steps:a. Copy the AIXPConnRes.sh reconciliation file from the adapter solution
directory to the AIX /tmp directory.b. Log in to the AIX system with the "adapter user name".c. Change the directory to the /tmp directory.d. Ensure that you have execute permission on the AIXPConnRes.sh file, chmod
777 AIXPConnRes.sh.e. Run the following command and save the recon.out file:
AIXPConnRes.sh "grep -e :" true > recon.out 2>&1
For Linux systems, depending on the command that is specified on theservice form for the Command used to query failed logins field, use one ofthese commands:LinuxPConnRes.sh "grep -e :" true : "faillog -u %USER%"
LinuxPConnRes.sh "grep -e :" true : "faillock --user %USER%"
LinuxPConnRes.sh "grep -e :" true : "pam_tally2 --user %USER%"
If sudo is not used, replace the value true with false. False is the value forthe root user.All reconciliation files are in the adapter solution directory. The followingtable lists the names of the reconciliation files for various operating systems.
Table 12. Reconciliation file names
Platform Reconciliation file name
AIX file system AIXPConnRes.sh
HPUX not trusted HPNTrustPConnRes.sh
HPUX trusted HPTrustPConnRes.sh
Linux no shadow LinuxPConnRes.sh
Linux with shadow LinuxShadowPConnRes.sh
Solaris SolarisPConnRes.sh
8. For sudo issues, do the following steps:a. Verify sudo setup per installation guide. See Appendix C, “Super user
creation on a supported operating system,” on page 73.
Chapter 6. Adapter error troubleshooting 47
b. Use the adapter user name to log in to the target system.c. Use sudo to do manual commands on the target system. For example,
sudo mkuser test1sudo passwd test1sudo rmuser test1
9. For ssh issues, use ssh and sudo to do manual commands on the target system.For example, log in to a system that has connectivity to the target system andissue the commands:
For sudo usersssh user@target "sudo mkuser test1"ssh user@target "sudo passwd test1"ssh user@target "sudo rmuser test1"
For nonsudo usersssh user@target "mkuser test1"ssh user@target "passwd test1"ssh user@target "rmuser test1"
Known adapter issuesYou can use information about permissions, passwords, and other data to correctknown issues with the adapter.
/tmp directory permissionsThe permissions for the /tmp directory on the managed resource must be set to 777to do the reconciliation operation by using the sudo user.
Home directory permissionsThe adapter requires home directory permissions that are set to 755 to set theumask value.
The sudo user must have permissions on the home directory of the user whoseumask value is added or changed. Otherwise, the adapter might not work asexpected
HP-UX password age issuesThe password age attributes have certain restrictions for HP-UX Trusted andNon-Trusted systems.
The HP-UX Non-Trusted operating system sets password MAX_AGE and MIN_AGE to-1 during account creation if no values are supplied. However, on a modifyoperation, the operating system does not allow -1 for password MIN_AGE. Theadapter account form is modified with a constraint on password MIN_AGE thatprevents the user from entering a value less than 0.
The HP-UX Trusted operating system sets password MAX_AGE and MIN_AGE to 0during account creation if no values are supplied. The operating system does notallow -1 for password MIN_AGE and MAX_AGE. The adapter account form is modifiedwith a constraint on password MIN_AGE that prevents the user from entering avalue less than 0. No constraint exists on password MAX_AGE because it can be -1for HP-UX_Non-Trusted operating systems.
The following attributes cannot be managed on HP-UX Non-Trusted systems:password warning age
48 IBM Security Identity Manager: UNIX and Linux Adapter Installation and Configuration Guide
maximum number of days the account can remain valid after the passwordexpires For AIX systems the duration is specified in weeks.number of days the account can remain idle
allowed number of login retries before locking the account
account expiration date
No support for adding the primary group of a user to thesecondary groupset of the user
SUSE Linux and Solaris operating systems do not support adding the primarygroup of a user to the secondary groupset of the user.
The UNIX and Linux Adapter cannot support a function that is not supported bythe operating system. If you attempt to add the primary group to the secondarygroupset of the user, the operation fails on SUSE Linux and Solaris systems.Although the primary group is not added, no error message is returned. Thecommand that is used for this function does not generate an error message.
Chapter 6. Adapter error troubleshooting 49

50 IBM Security Identity Manager: UNIX and Linux Adapter Installation and Configuration Guide
Chapter 7. Adapter upgrade
Upgrading the adapter involves tasks such as upgrading the connector, dispatcher,and the existing adapter profile.
To verify the required version of these adapter components, see the adapter releasenotes.
Connector upgradeThe new adapter package might require you to upgrade the connector.
Before you upgrade the connector, verify the version of the connector.v If the connector version mentioned in the release notes is later than the existing
version on your workstation, install the connector.v If the connector version mentioned in the release notes is the same or earlier
than the existing version, do not install the connector.
Note: Stop the dispatcher service before the upgrading the connector and start itagain after the upgrade is complete.
Dispatcher upgradeThe new adapter package might require you to upgrade the Dispatcher.
Before you upgrade the dispatcher, verify the version of the dispatcher.v If the dispatcher version mentioned in the release notes is later than the existing
version on your workstation, install the dispatcher.v If the dispatcher version mentioned in the release notes is the same or earlier
than the existing version, do not install the dispatcher.
Note: Stop the dispatcher service before the upgrading the dispatcher and start itagain after the upgrade is complete.
Upgrade of an existing adapter profileRead the adapter release notes for any specific instructions before you import anew adapter profile on IBM Security Identity Manager.
See “Importing the adapter profile into the IBM Security Identity Manager server”on page 11.
Note: Restart the dispatcher service after you import the profile. Restarting thedispatcher clears the assembly lines cache and ensures that the dispatcher runs theassembly lines from the updated adapter profile.
© Copyright IBM Corp. 2012, 2014 51

52 IBM Security Identity Manager: UNIX and Linux Adapter Installation and Configuration Guide
Chapter 8. Adapter uninstallation
You can uninstall the UNIX and Linux Adapter completely.v Uninstall the adapter from the IBM Tivoli Directory Integrator server.v Remove the adapter profile from the IBM Security Identity Manager server.
Uninstalling the adapter from the Tivoli Directory Integrator serverWhen the adapter is installed, the JAR file that is required for uninstalling theadapter is created in the ITDI_HOME/PosixAdapterUninstall directory.
Procedure1. Stop the adapter service. See “Adapter service start, stop, and restart” on page
11.2. Run the PosixAdapterUninstall.jar file from PosixAdapterUninstall directory.
If you run the command from a different directory, you must specify the fullfile path to the uninstaller.jar file.TDI_HOME/jvm/jre/bin/java –jar uninstaller.jar
Adapter profile removal from the IBM Security Identity Manager serverBefore you remove the adapter profile, ensure that no objects exist on your IBMSecurity Identity Manager server that reference the adapter profile.
Examples of objects on the IBM Security Identity Manager server that can referencethe adapter profile are:v Adapter service instancesv Policies referencing an adapter instance or the profilev Accounts
For specific information about removing the adapter profile, see the IBM SecurityIdentity Manager product documentation.
© Copyright IBM Corp. 2012, 2014 53

54 IBM Security Identity Manager: UNIX and Linux Adapter Installation and Configuration Guide

Chapter 9. Adapter reinstallation
There are no special considerations for reinstalling the adapter. You are notrequired to remove the adapter before reinstalling.
For more information, see Chapter 7, “Adapter upgrade,” on page 51.
© Copyright IBM Corp. 2012, 2014 55

56 IBM Security Identity Manager: UNIX and Linux Adapter Installation and Configuration Guide
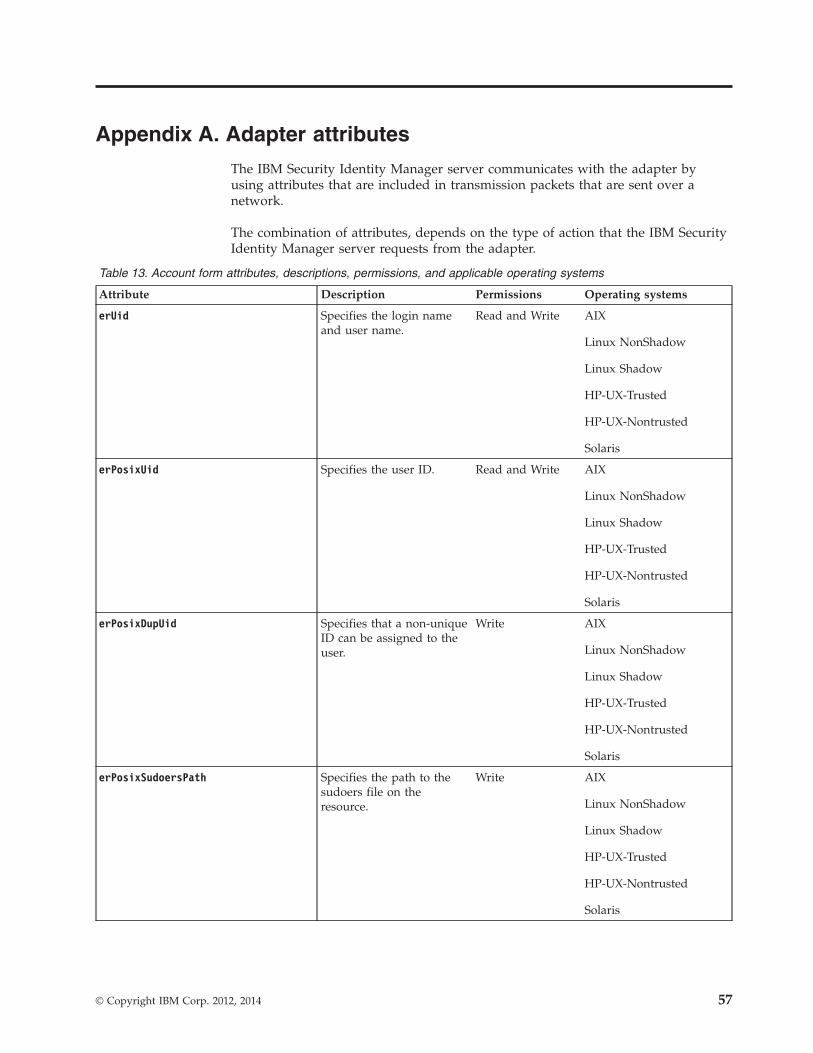
Appendix A. Adapter attributes
The IBM Security Identity Manager server communicates with the adapter byusing attributes that are included in transmission packets that are sent over anetwork.
The combination of attributes, depends on the type of action that the IBM SecurityIdentity Manager server requests from the adapter.
Table 13. Account form attributes, descriptions, permissions, and applicable operating systems
Attribute Description Permissions Operating systems
erUid Specifies the login nameand user name.
Read and Write AIX
Linux NonShadow
Linux Shadow
HP-UX-Trusted
HP-UX-Nontrusted
Solaris
erPosixUid Specifies the user ID. Read and Write AIX
Linux NonShadow
Linux Shadow
HP-UX-Trusted
HP-UX-Nontrusted
Solaris
erPosixDupUid Specifies that a non-uniqueID can be assigned to theuser.
Write AIX
Linux NonShadow
Linux Shadow
HP-UX-Trusted
HP-UX-Nontrusted
Solaris
erPosixSudoersPath Specifies the path to thesudoers file on theresource.
Write AIX
Linux NonShadow
Linux Shadow
HP-UX-Trusted
HP-UX-Nontrusted
Solaris
© Copyright IBM Corp. 2012, 2014 57
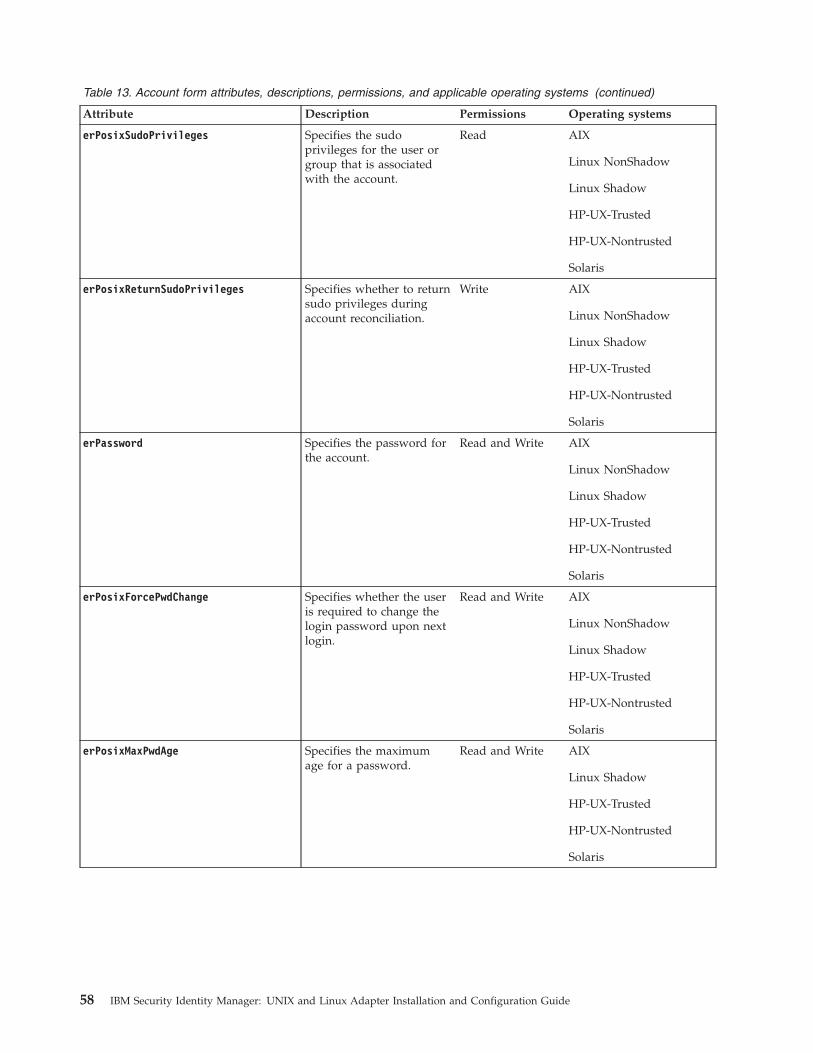
Table 13. Account form attributes, descriptions, permissions, and applicable operating systems (continued)
Attribute Description Permissions Operating systems
erPosixSudoPrivileges Specifies the sudoprivileges for the user orgroup that is associatedwith the account.
Read AIX
Linux NonShadow
Linux Shadow
HP-UX-Trusted
HP-UX-Nontrusted
Solaris
erPosixReturnSudoPrivileges Specifies whether to returnsudo privileges duringaccount reconciliation.
Write AIX
Linux NonShadow
Linux Shadow
HP-UX-Trusted
HP-UX-Nontrusted
Solaris
erPassword Specifies the password forthe account.
Read and Write AIX
Linux NonShadow
Linux Shadow
HP-UX-Trusted
HP-UX-Nontrusted
Solaris
erPosixForcePwdChange Specifies whether the useris required to change thelogin password upon nextlogin.
Read and Write AIX
Linux NonShadow
Linux Shadow
HP-UX-Trusted
HP-UX-Nontrusted
Solaris
erPosixMaxPwdAge Specifies the maximumage for a password.
Read and Write AIX
Linux Shadow
HP-UX-Trusted
HP-UX-Nontrusted
Solaris
58 IBM Security Identity Manager: UNIX and Linux Adapter Installation and Configuration Guide
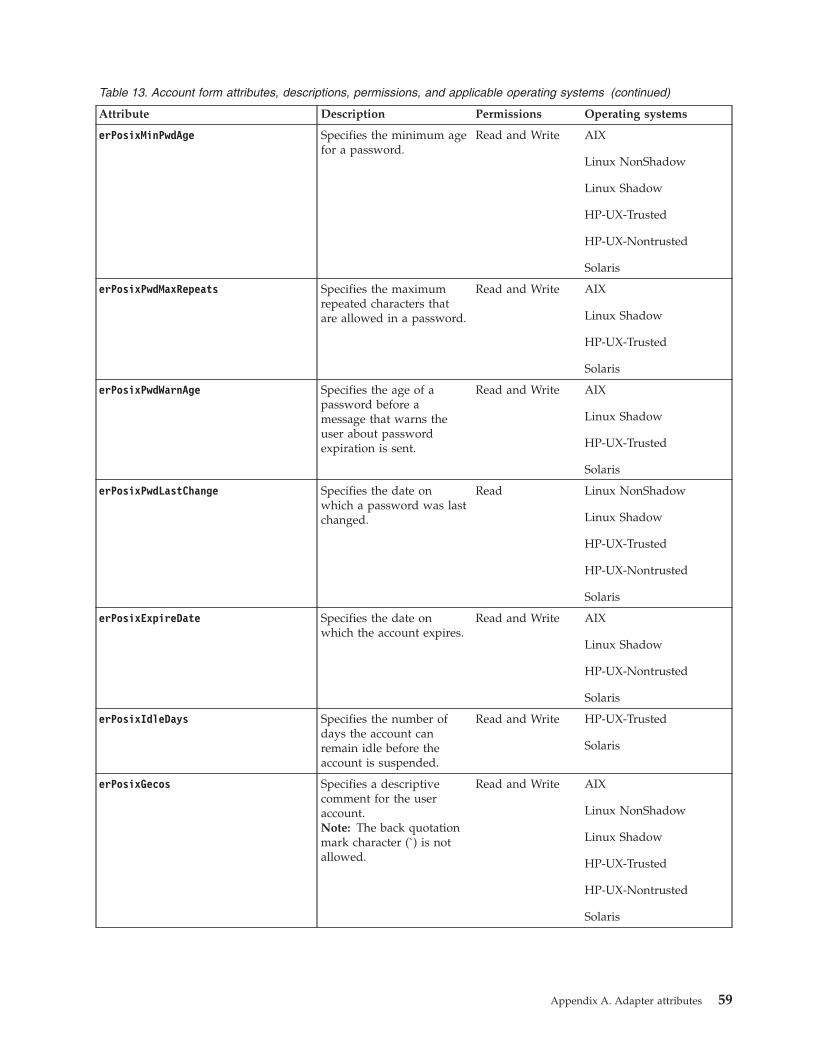
Table 13. Account form attributes, descriptions, permissions, and applicable operating systems (continued)
Attribute Description Permissions Operating systems
erPosixMinPwdAge Specifies the minimum agefor a password.
Read and Write AIX
Linux NonShadow
Linux Shadow
HP-UX-Trusted
HP-UX-Nontrusted
Solaris
erPosixPwdMaxRepeats Specifies the maximumrepeated characters thatare allowed in a password.
Read and Write AIX
Linux Shadow
HP-UX-Trusted
Solaris
erPosixPwdWarnAge Specifies the age of apassword before amessage that warns theuser about passwordexpiration is sent.
Read and Write AIX
Linux Shadow
HP-UX-Trusted
Solaris
erPosixPwdLastChange Specifies the date onwhich a password was lastchanged.
Read Linux NonShadow
Linux Shadow
HP-UX-Trusted
HP-UX-Nontrusted
Solaris
erPosixExpireDate Specifies the date onwhich the account expires.
Read and Write AIX
Linux Shadow
HP-UX-Nontrusted
Solaris
erPosixIdleDays Specifies the number ofdays the account canremain idle before theaccount is suspended.
Read and Write HP-UX-Trusted
Solaris
erPosixGecos Specifies a descriptivecomment for the useraccount.Note: The back quotationmark character (`) is notallowed.
Read and Write AIX
Linux NonShadow
Linux Shadow
HP-UX-Trusted
HP-UX-Nontrusted
Solaris
Appendix A. Adapter attributes 59
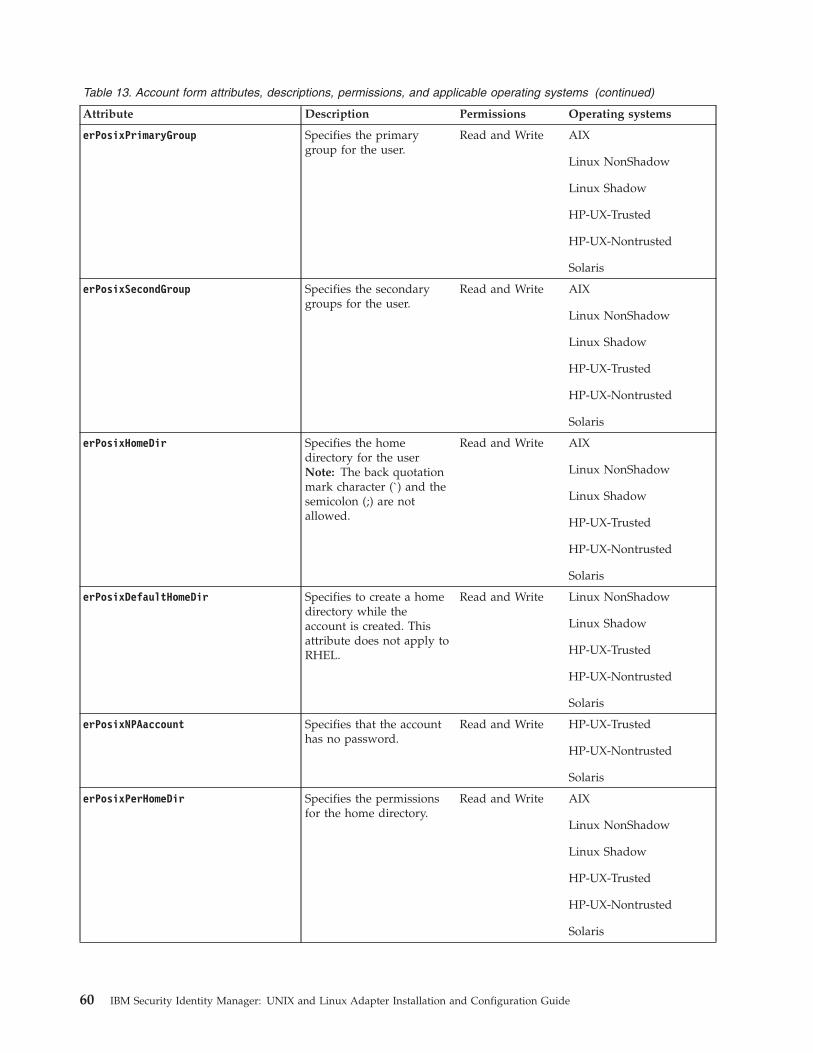
Table 13. Account form attributes, descriptions, permissions, and applicable operating systems (continued)
Attribute Description Permissions Operating systems
erPosixPrimaryGroup Specifies the primarygroup for the user.
Read and Write AIX
Linux NonShadow
Linux Shadow
HP-UX-Trusted
HP-UX-Nontrusted
Solaris
erPosixSecondGroup Specifies the secondarygroups for the user.
Read and Write AIX
Linux NonShadow
Linux Shadow
HP-UX-Trusted
HP-UX-Nontrusted
Solaris
erPosixHomeDir Specifies the homedirectory for the userNote: The back quotationmark character (`) and thesemicolon (;) are notallowed.
Read and Write AIX
Linux NonShadow
Linux Shadow
HP-UX-Trusted
HP-UX-Nontrusted
Solaris
erPosixDefaultHomeDir Specifies to create a homedirectory while theaccount is created. Thisattribute does not apply toRHEL.
Read and Write Linux NonShadow
Linux Shadow
HP-UX-Trusted
HP-UX-Nontrusted
Solaris
erPosixNPAaccount Specifies that the accounthas no password.
Read and Write HP-UX-Trusted
HP-UX-Nontrusted
Solaris
erPosixPerHomeDir Specifies the permissionsfor the home directory.
Read and Write AIX
Linux NonShadow
Linux Shadow
HP-UX-Trusted
HP-UX-Nontrusted
Solaris
60 IBM Security Identity Manager: UNIX and Linux Adapter Installation and Configuration Guide

Table 13. Account form attributes, descriptions, permissions, and applicable operating systems (continued)
Attribute Description Permissions Operating systems
erPosixShell Specifies the login shell ofthe user.
Read and Write AIX
Linux NonShadow
Linux Shadow
HP-UX-Trusted
HP-UX-Nontrusted
Solaris
erPosixUmask Specifies the umask. Read and Write AIX
Linux NonShadow
Linux Shadow
HP-UX-Trusted
HP-UX-Nontrusted
Solaris
erPosixLastAccessDate Specifies the date onwhich the account was lastaccessed.
Read AIX
Linux NonShadow
Linux Shadow
HP-UX-Trusted
HP-UX-Nontrusted
Solaris
erPosixAT Specifies whether AT jobsare allowed.
Read and Write AIX
Linux NonShadow
Linux Shadow
HP-UX-Trusted
HP-UX-Nontrusted
Solaris
erPosixCron Specifies whether CRONjobs are allowed.
Read and Write AIX
Linux NonShadow
Linux Shadow
HP-UX-Trusted
HP-UX-Nontrusted
Solaris
erPosixPwdMaxAge Specifies the maximumamount of time that apassword can be changedafter the maximumpassword age.
Read and Write AIX
Linux Shadow
HP-UX-Trusted
Appendix A. Adapter attributes 61
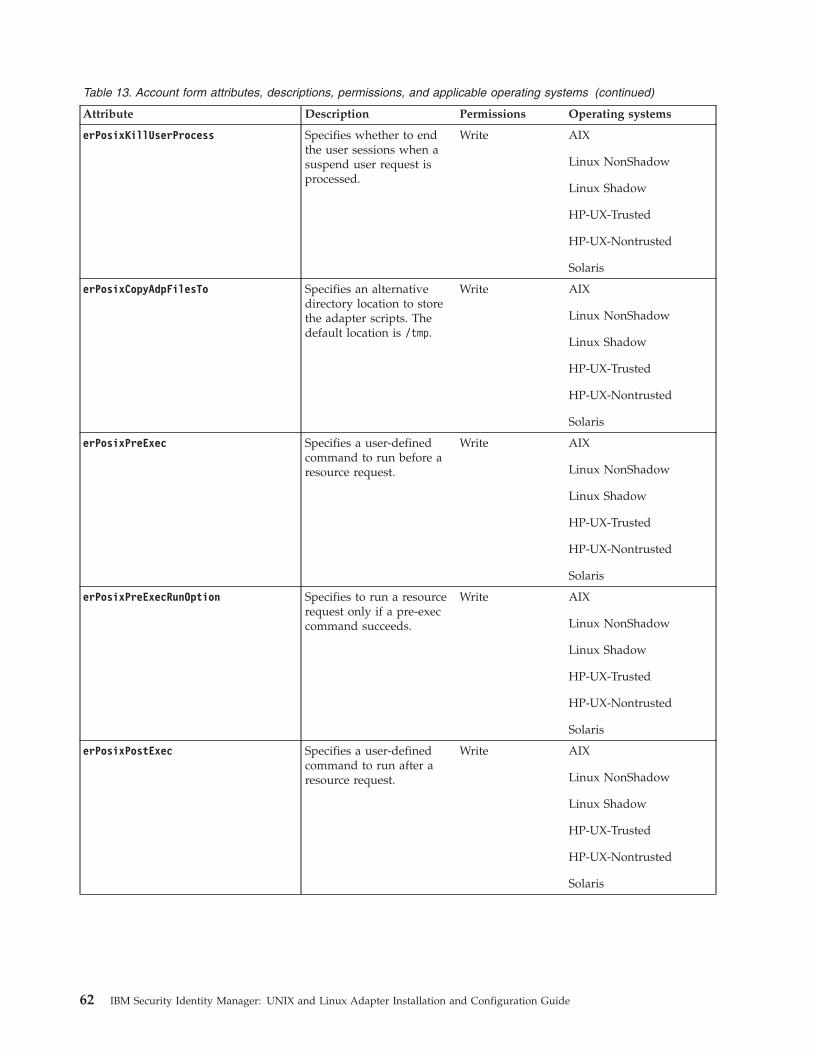
Table 13. Account form attributes, descriptions, permissions, and applicable operating systems (continued)
Attribute Description Permissions Operating systems
erPosixKillUserProcess Specifies whether to endthe user sessions when asuspend user request isprocessed.
Write AIX
Linux NonShadow
Linux Shadow
HP-UX-Trusted
HP-UX-Nontrusted
Solaris
erPosixCopyAdpFilesTo Specifies an alternativedirectory location to storethe adapter scripts. Thedefault location is /tmp.
Write AIX
Linux NonShadow
Linux Shadow
HP-UX-Trusted
HP-UX-Nontrusted
Solaris
erPosixPreExec Specifies a user-definedcommand to run before aresource request.
Write AIX
Linux NonShadow
Linux Shadow
HP-UX-Trusted
HP-UX-Nontrusted
Solaris
erPosixPreExecRunOption Specifies to run a resourcerequest only if a pre-execcommand succeeds.
Write AIX
Linux NonShadow
Linux Shadow
HP-UX-Trusted
HP-UX-Nontrusted
Solaris
erPosixPostExec Specifies a user-definedcommand to run after aresource request.
Write AIX
Linux NonShadow
Linux Shadow
HP-UX-Trusted
HP-UX-Nontrusted
Solaris
62 IBM Security Identity Manager: UNIX and Linux Adapter Installation and Configuration Guide
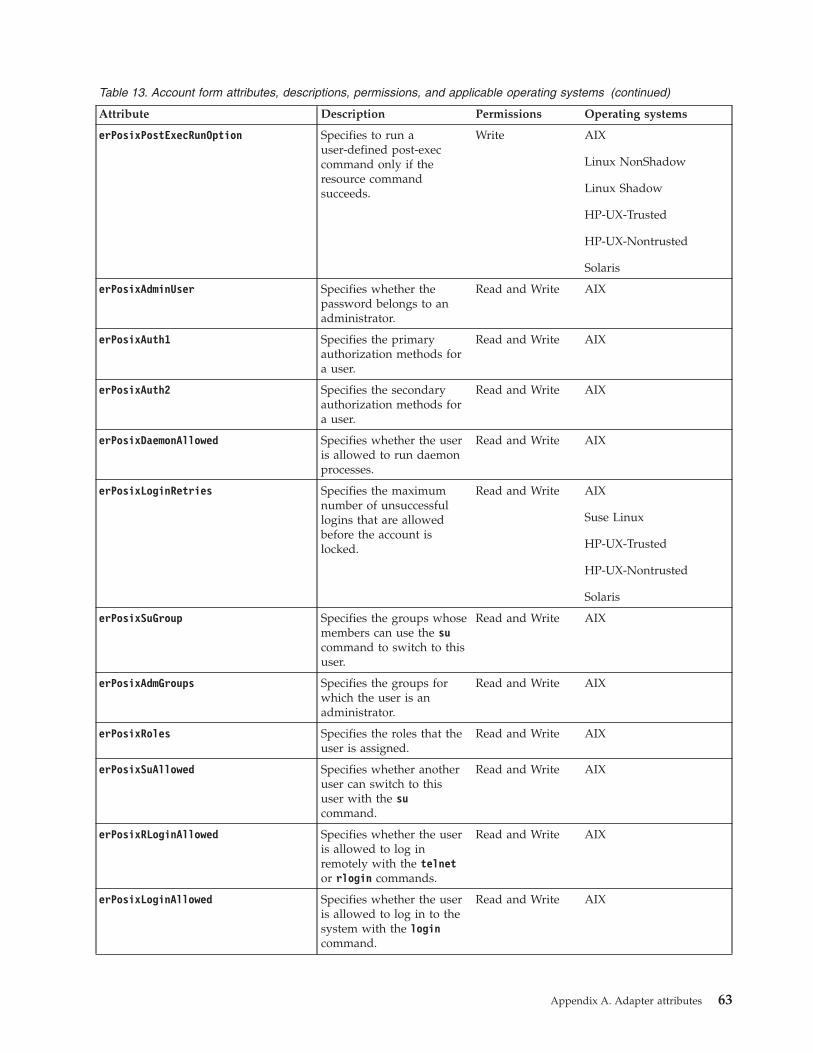
Table 13. Account form attributes, descriptions, permissions, and applicable operating systems (continued)
Attribute Description Permissions Operating systems
erPosixPostExecRunOption Specifies to run auser-defined post-execcommand only if theresource commandsucceeds.
Write AIX
Linux NonShadow
Linux Shadow
HP-UX-Trusted
HP-UX-Nontrusted
Solaris
erPosixAdminUser Specifies whether thepassword belongs to anadministrator.
Read and Write AIX
erPosixAuth1 Specifies the primaryauthorization methods fora user.
Read and Write AIX
erPosixAuth2 Specifies the secondaryauthorization methods fora user.
Read and Write AIX
erPosixDaemonAllowed Specifies whether the useris allowed to run daemonprocesses.
Read and Write AIX
erPosixLoginRetries Specifies the maximumnumber of unsuccessfullogins that are allowedbefore the account islocked.
Read and Write AIX
Suse Linux
HP-UX-Trusted
HP-UX-Nontrusted
Solaris
erPosixSuGroup Specifies the groups whosemembers can use the sucommand to switch to thisuser.
Read and Write AIX
erPosixAdmGroups Specifies the groups forwhich the user is anadministrator.
Read and Write AIX
erPosixRoles Specifies the roles that theuser is assigned.
Read and Write AIX
erPosixSuAllowed Specifies whether anotheruser can switch to thisuser with the sucommand.
Read and Write AIX
erPosixRLoginAllowed Specifies whether the useris allowed to log inremotely with the telnetor rlogin commands.
Read and Write AIX
erPosixLoginAllowed Specifies whether the useris allowed to log in to thesystem with the logincommand.
Read and Write AIX
Appendix A. Adapter attributes 63
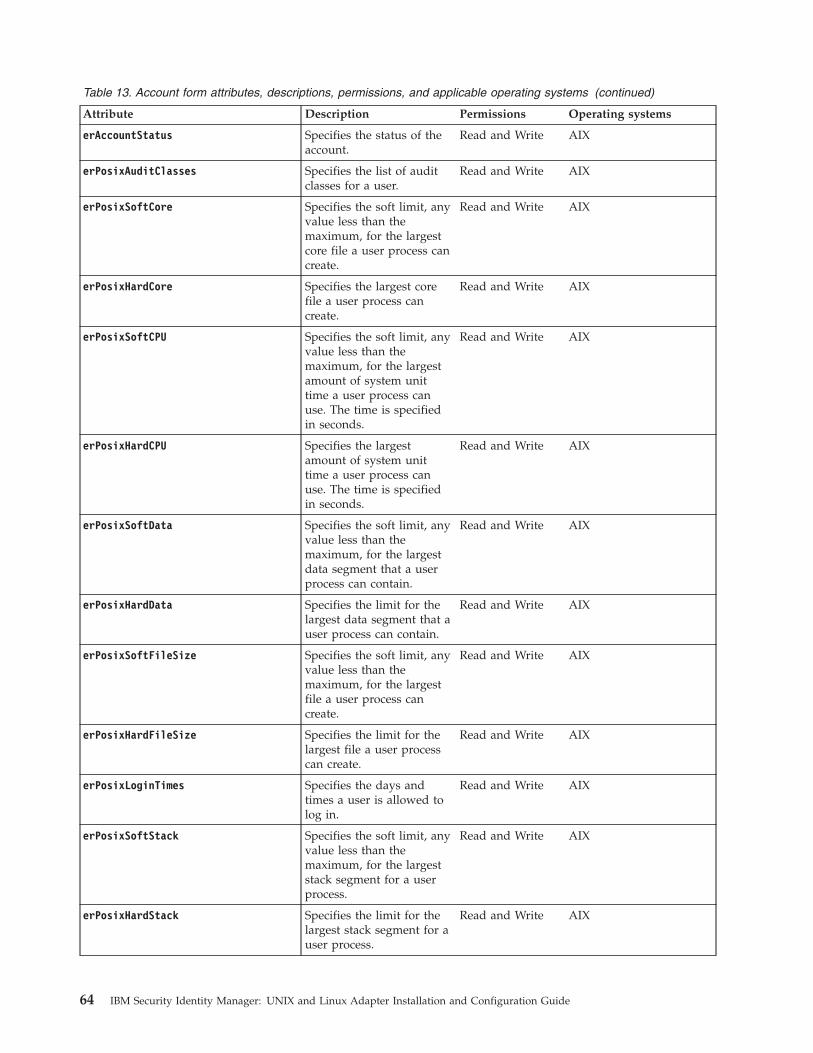
Table 13. Account form attributes, descriptions, permissions, and applicable operating systems (continued)
Attribute Description Permissions Operating systems
erAccountStatus Specifies the status of theaccount.
Read and Write AIX
erPosixAuditClasses Specifies the list of auditclasses for a user.
Read and Write AIX
erPosixSoftCore Specifies the soft limit, anyvalue less than themaximum, for the largestcore file a user process cancreate.
Read and Write AIX
erPosixHardCore Specifies the largest corefile a user process cancreate.
Read and Write AIX
erPosixSoftCPU Specifies the soft limit, anyvalue less than themaximum, for the largestamount of system unittime a user process canuse. The time is specifiedin seconds.
Read and Write AIX
erPosixHardCPU Specifies the largestamount of system unittime a user process canuse. The time is specifiedin seconds.
Read and Write AIX
erPosixSoftData Specifies the soft limit, anyvalue less than themaximum, for the largestdata segment that a userprocess can contain.
Read and Write AIX
erPosixHardData Specifies the limit for thelargest data segment that auser process can contain.
Read and Write AIX
erPosixSoftFileSize Specifies the soft limit, anyvalue less than themaximum, for the largestfile a user process cancreate.
Read and Write AIX
erPosixHardFileSize Specifies the limit for thelargest file a user processcan create.
Read and Write AIX
erPosixLoginTimes Specifies the days andtimes a user is allowed tolog in.
Read and Write AIX
erPosixSoftStack Specifies the soft limit, anyvalue less than themaximum, for the largeststack segment for a userprocess.
Read and Write AIX
erPosixHardStack Specifies the limit for thelargest stack segment for auser process.
Read and Write AIX
64 IBM Security Identity Manager: UNIX and Linux Adapter Installation and Configuration Guide
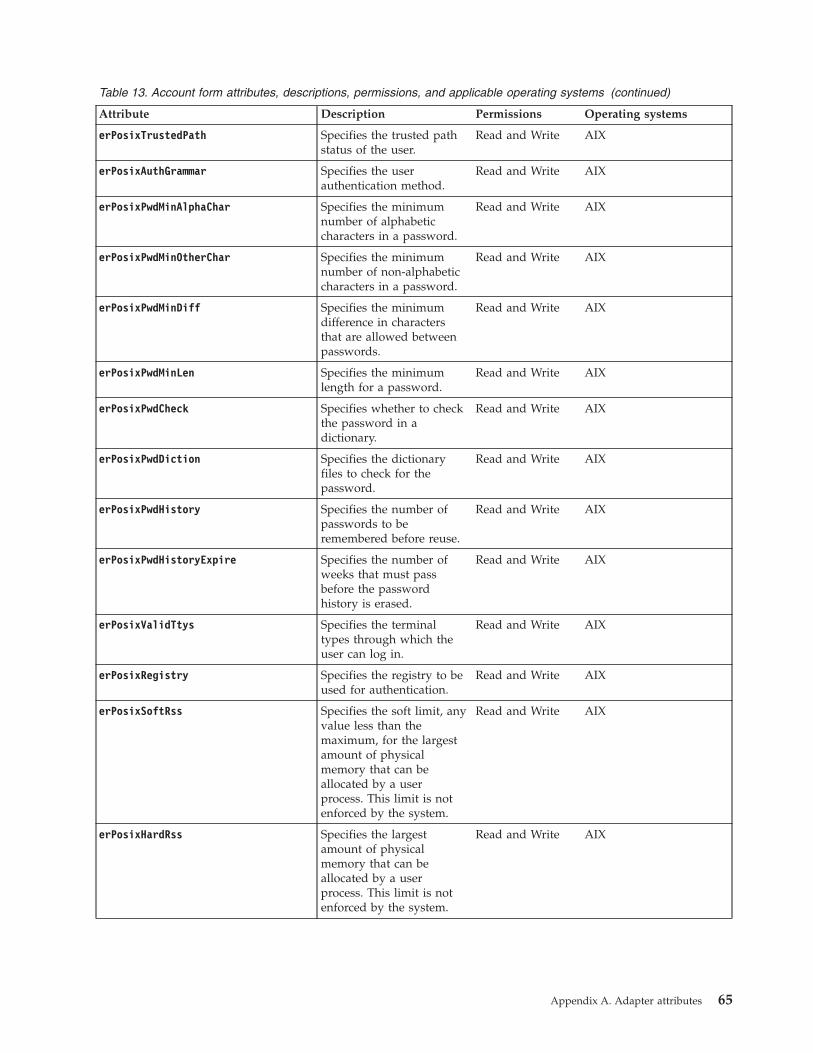
Table 13. Account form attributes, descriptions, permissions, and applicable operating systems (continued)
Attribute Description Permissions Operating systems
erPosixTrustedPath Specifies the trusted pathstatus of the user.
Read and Write AIX
erPosixAuthGrammar Specifies the userauthentication method.
Read and Write AIX
erPosixPwdMinAlphaChar Specifies the minimumnumber of alphabeticcharacters in a password.
Read and Write AIX
erPosixPwdMinOtherChar Specifies the minimumnumber of non-alphabeticcharacters in a password.
Read and Write AIX
erPosixPwdMinDiff Specifies the minimumdifference in charactersthat are allowed betweenpasswords.
Read and Write AIX
erPosixPwdMinLen Specifies the minimumlength for a password.
Read and Write AIX
erPosixPwdCheck Specifies whether to checkthe password in adictionary.
Read and Write AIX
erPosixPwdDiction Specifies the dictionaryfiles to check for thepassword.
Read and Write AIX
erPosixPwdHistory Specifies the number ofpasswords to beremembered before reuse.
Read and Write AIX
erPosixPwdHistoryExpire Specifies the number ofweeks that must passbefore the passwordhistory is erased.
Read and Write AIX
erPosixValidTtys Specifies the terminaltypes through which theuser can log in.
Read and Write AIX
erPosixRegistry Specifies the registry to beused for authentication.
Read and Write AIX
erPosixSoftRss Specifies the soft limit, anyvalue less than themaximum, for the largestamount of physicalmemory that can beallocated by a userprocess. This limit is notenforced by the system.
Read and Write AIX
erPosixHardRss Specifies the largestamount of physicalmemory that can beallocated by a userprocess. This limit is notenforced by the system.
Read and Write AIX
Appendix A. Adapter attributes 65

Table 13. Account form attributes, descriptions, permissions, and applicable operating systems (continued)
Attribute Description Permissions Operating systems
erPosixSoftNoFiles Specifies the soft limit, anyvalue less than themaximum, for the numberof file descriptors a userprocess can have open atone time.
Read and Write AIX
erPosixHardNoFiles Specifies the maximumnumber of file descriptorsa user process can haveopen at one time.
Read and Write AIX
erPosixHostsAllowedLogin Specifies the workstationsto which a user can log in.
Read and Write AIX
erPosixerPosixHostsDeniedLogin Specifies the workstationsto which a user cannot login.
Read and Write AIX
erPosixDelUserInUse Specifies whether to endthe user processes when adelete account request isprocessed.
Read and Write Linux NonShadow
Linux Shadow
Group form attributesThe IBM Security Identity Manager server communicates with the adapter forgroup management by using specific attributes.
Table 14 lists the attributes that are used by the adapter. The table also gives thepermissions that are needed for the attribute.
Table 14. Group form attributes
Attribute name on the UNIXand Linux operating systemsgroup form on IBM SecurityIdentity Manager Permissions
Supported operating system
AIX HP-UX Linux Solaris
Group name Read and Write ' ' ' '
Group ID number Read and Write ' ' ' '
Administrator group Read and Write '
Group administrators Read and Write '
Group projects Read and Write '
Allow duplicate group IDs Write ' ' '
Sudo privileges Read ' ' ' '
Attributes by UNIX and Linux Adapter actionsTypical adapter actions can be listed by their functional transaction group.
The following lists include more information about required and optional attributesthat are sent to the adapter to complete that action.
66 IBM Security Identity Manager: UNIX and Linux Adapter Installation and Configuration Guide
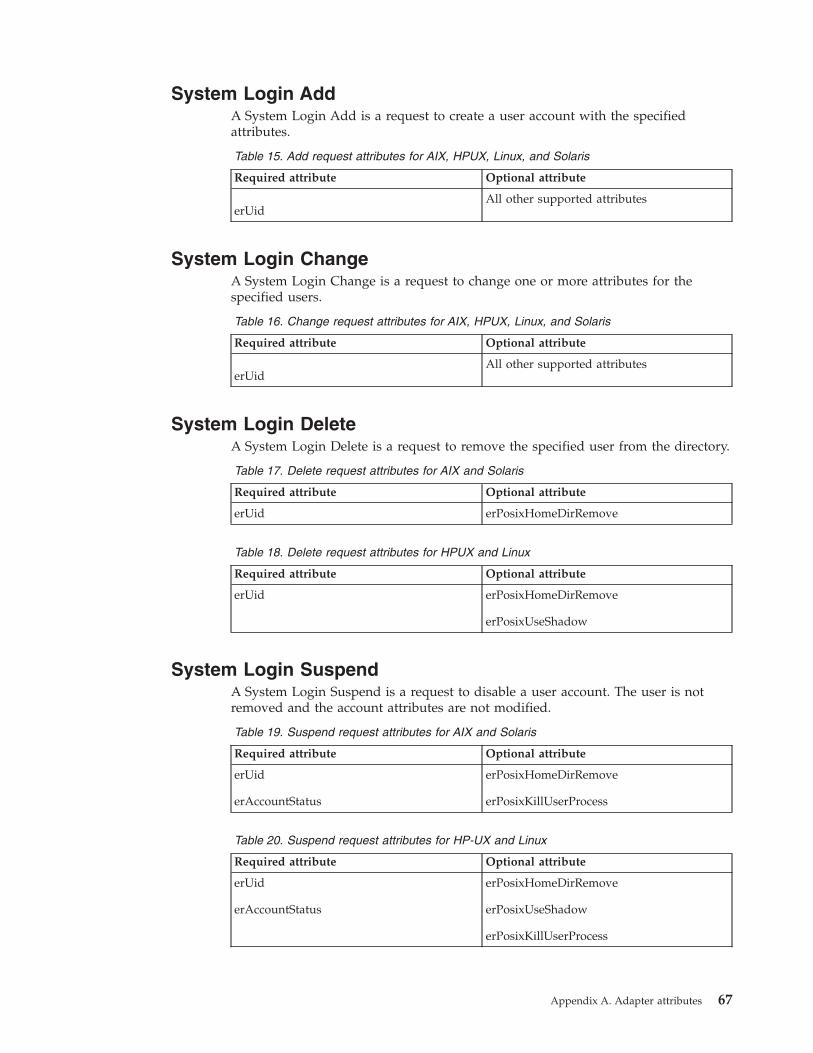
System Login AddA System Login Add is a request to create a user account with the specifiedattributes.
Table 15. Add request attributes for AIX, HPUX, Linux, and Solaris
Required attribute Optional attribute
erUidAll other supported attributes
System Login ChangeA System Login Change is a request to change one or more attributes for thespecified users.
Table 16. Change request attributes for AIX, HPUX, Linux, and Solaris
Required attribute Optional attribute
erUidAll other supported attributes
System Login DeleteA System Login Delete is a request to remove the specified user from the directory.
Table 17. Delete request attributes for AIX and Solaris
Required attribute Optional attribute
erUid erPosixHomeDirRemove
Table 18. Delete request attributes for HPUX and Linux
Required attribute Optional attribute
erUid erPosixHomeDirRemove
erPosixUseShadow
System Login SuspendA System Login Suspend is a request to disable a user account. The user is notremoved and the account attributes are not modified.
Table 19. Suspend request attributes for AIX and Solaris
Required attribute Optional attribute
erUid
erAccountStatus
erPosixHomeDirRemove
erPosixKillUserProcess
Table 20. Suspend request attributes for HP-UX and Linux
Required attribute Optional attribute
erUid
erAccountStatus
erPosixHomeDirRemove
erPosixUseShadow
erPosixKillUserProcess
Appendix A. Adapter attributes 67
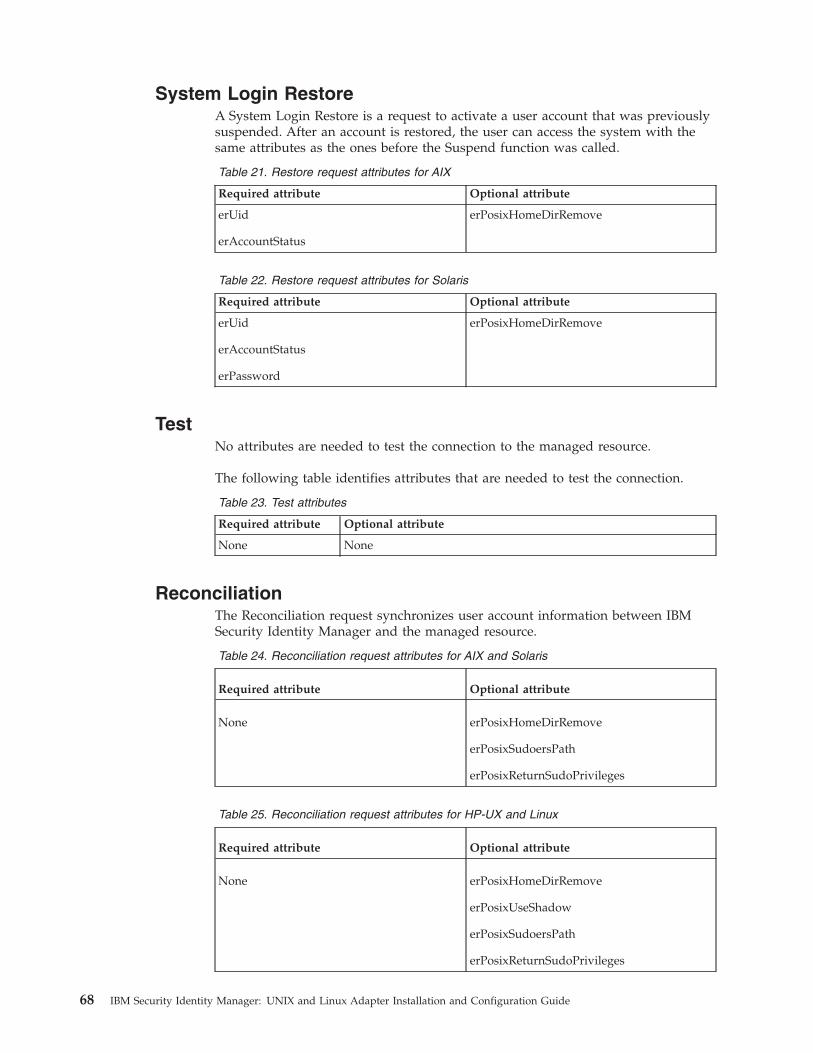
System Login RestoreA System Login Restore is a request to activate a user account that was previouslysuspended. After an account is restored, the user can access the system with thesame attributes as the ones before the Suspend function was called.
Table 21. Restore request attributes for AIX
Required attribute Optional attribute
erUid
erAccountStatus
erPosixHomeDirRemove
Table 22. Restore request attributes for Solaris
Required attribute Optional attribute
erUid
erAccountStatus
erPassword
erPosixHomeDirRemove
TestNo attributes are needed to test the connection to the managed resource.
The following table identifies attributes that are needed to test the connection.
Table 23. Test attributes
Required attribute Optional attribute
None None
ReconciliationThe Reconciliation request synchronizes user account information between IBMSecurity Identity Manager and the managed resource.
Table 24. Reconciliation request attributes for AIX and Solaris
Required attribute Optional attribute
None erPosixHomeDirRemove
erPosixSudoersPath
erPosixReturnSudoPrivileges
Table 25. Reconciliation request attributes for HP-UX and Linux
Required attribute Optional attribute
None erPosixHomeDirRemove
erPosixUseShadow
erPosixSudoersPath
erPosixReturnSudoPrivileges
68 IBM Security Identity Manager: UNIX and Linux Adapter Installation and Configuration Guide
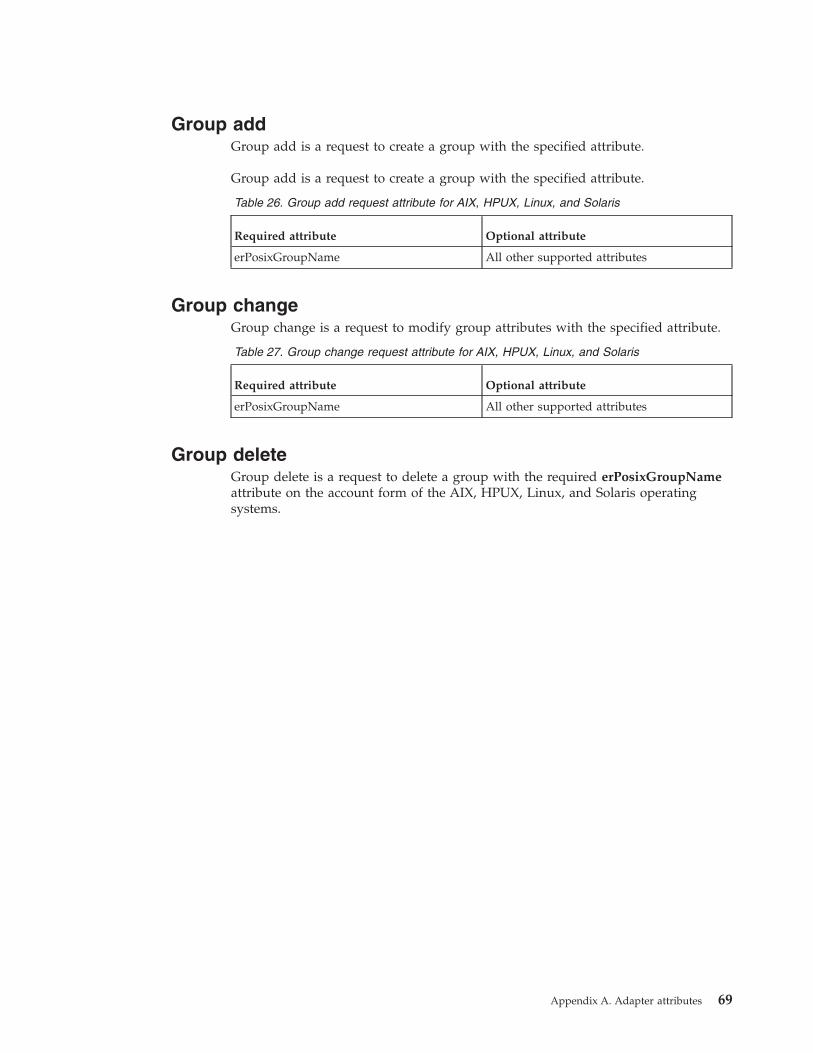
Group addGroup add is a request to create a group with the specified attribute.
Group add is a request to create a group with the specified attribute.
Table 26. Group add request attribute for AIX, HPUX, Linux, and Solaris
Required attribute Optional attribute
erPosixGroupName All other supported attributes
Group changeGroup change is a request to modify group attributes with the specified attribute.
Table 27. Group change request attribute for AIX, HPUX, Linux, and Solaris
Required attribute Optional attribute
erPosixGroupName All other supported attributes
Group deleteGroup delete is a request to delete a group with the required erPosixGroupNameattribute on the account form of the AIX, HPUX, Linux, and Solaris operatingsystems.
Appendix A. Adapter attributes 69

70 IBM Security Identity Manager: UNIX and Linux Adapter Installation and Configuration Guide
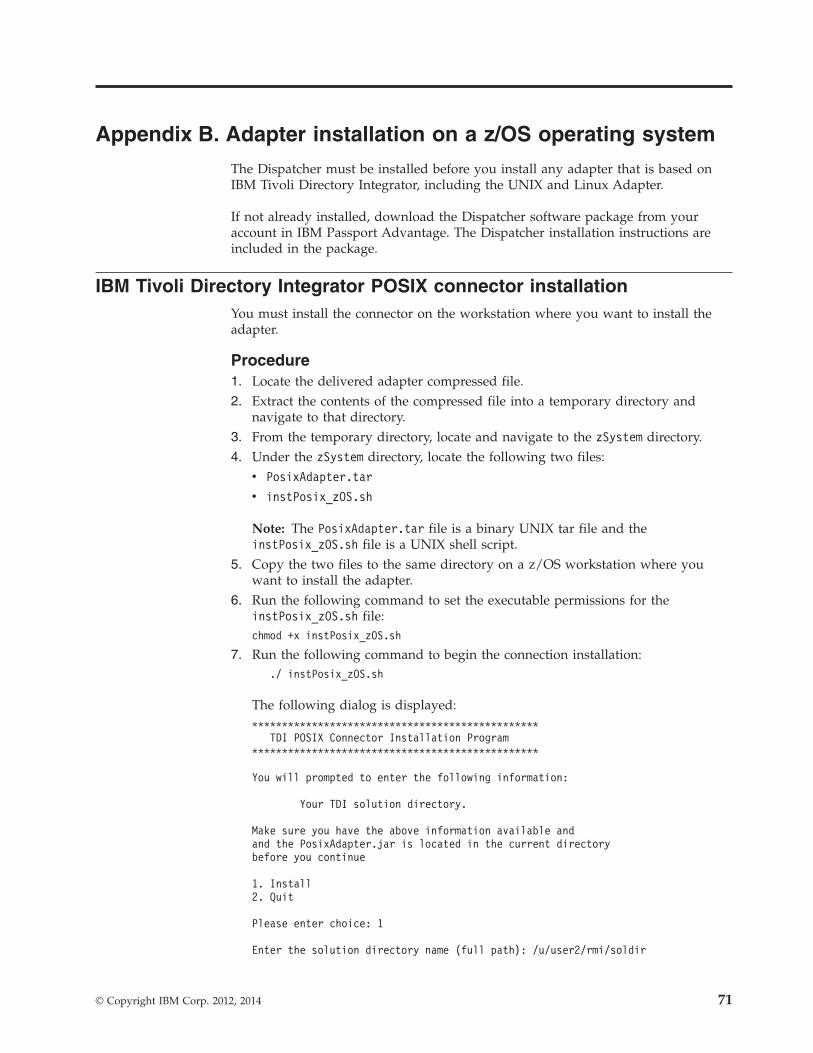
Appendix B. Adapter installation on a z/OS operating system
The Dispatcher must be installed before you install any adapter that is based onIBM Tivoli Directory Integrator, including the UNIX and Linux Adapter.
If not already installed, download the Dispatcher software package from youraccount in IBM Passport Advantage. The Dispatcher installation instructions areincluded in the package.
IBM Tivoli Directory Integrator POSIX connector installationYou must install the connector on the workstation where you want to install theadapter.
Procedure1. Locate the delivered adapter compressed file.2. Extract the contents of the compressed file into a temporary directory and
navigate to that directory.3. From the temporary directory, locate and navigate to the zSystem directory.4. Under the zSystem directory, locate the following two files:
v PosixAdapter.tar
v instPosix_zOS.sh
Note: The PosixAdapter.tar file is a binary UNIX tar file and theinstPosix_zOS.sh file is a UNIX shell script.
5. Copy the two files to the same directory on a z/OS workstation where youwant to install the adapter.
6. Run the following command to set the executable permissions for theinstPosix_zOS.sh file:chmod +x instPosix_zOS.sh
7. Run the following command to begin the connection installation:./ instPosix_zOS.sh
The following dialog is displayed:************************************************
TDI POSIX Connector Installation Program************************************************
You will prompted to enter the following information:
Your TDI solution directory.
Make sure you have the above information available andand the PosixAdapter.jar is located in the current directorybefore you continue
1. Install2. Quit
Please enter choice: 1
Enter the solution directory name (full path): /u/user2/rmi/soldir
© Copyright IBM Corp. 2012, 2014 71

Verifying the solution directory /u/user2/rmi/soldir...Extracting content of PosixAdapter.jar...Getting connector files from /u/user2/rmi/PosixAdapter...
Installation complete, press any key to continue..
Note: The path in the example might be different on your workstation.
72 IBM Security Identity Manager: UNIX and Linux Adapter Installation and Configuration Guide
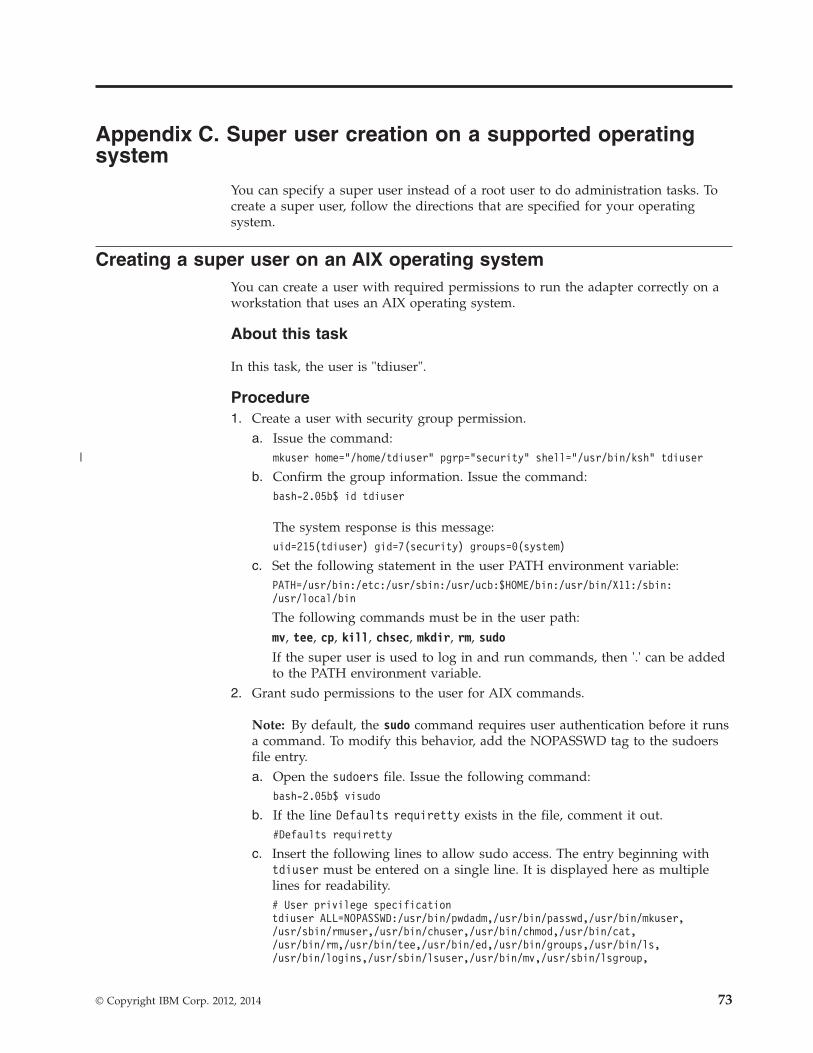
Appendix C. Super user creation on a supported operatingsystem
You can specify a super user instead of a root user to do administration tasks. Tocreate a super user, follow the directions that are specified for your operatingsystem.
Creating a super user on an AIX operating systemYou can create a user with required permissions to run the adapter correctly on aworkstation that uses an AIX operating system.
About this task
In this task, the user is "tdiuser".
Procedure1. Create a user with security group permission.
a. Issue the command:mkuser home="/home/tdiuser" pgrp="security" shell="/usr/bin/ksh" tdiuser
b. Confirm the group information. Issue the command:bash-2.05b$ id tdiuser
The system response is this message:uid=215(tdiuser) gid=7(security) groups=0(system)
c. Set the following statement in the user PATH environment variable:PATH=/usr/bin:/etc:/usr/sbin:/usr/ucb:$HOME/bin:/usr/bin/X11:/sbin:/usr/local/bin
The following commands must be in the user path:mv, tee, cp, kill, chsec, mkdir, rm, sudoIf the super user is used to log in and run commands, then '.' can be addedto the PATH environment variable.
2. Grant sudo permissions to the user for AIX commands.
Note: By default, the sudo command requires user authentication before it runsa command. To modify this behavior, add the NOPASSWD tag to the sudoersfile entry.a. Open the sudoers file. Issue the following command:
bash-2.05b$ visudo
b. If the line Defaults requiretty exists in the file, comment it out.#Defaults requiretty
c. Insert the following lines to allow sudo access. The entry beginning withtdiuser must be entered on a single line. It is displayed here as multiplelines for readability.# User privilege specificationtdiuser ALL=NOPASSWD:/usr/bin/pwdadm,/usr/bin/passwd,/usr/bin/mkuser,/usr/sbin/rmuser,/usr/bin/chuser,/usr/bin/chmod,/usr/bin/cat,/usr/bin/rm,/usr/bin/tee,/usr/bin/ed,/usr/bin/groups,/usr/bin/ls,/usr/bin/logins,/usr/sbin/lsuser,/usr/bin/mv,/usr/sbin/lsgroup,
© Copyright IBM Corp. 2012, 2014 73
|
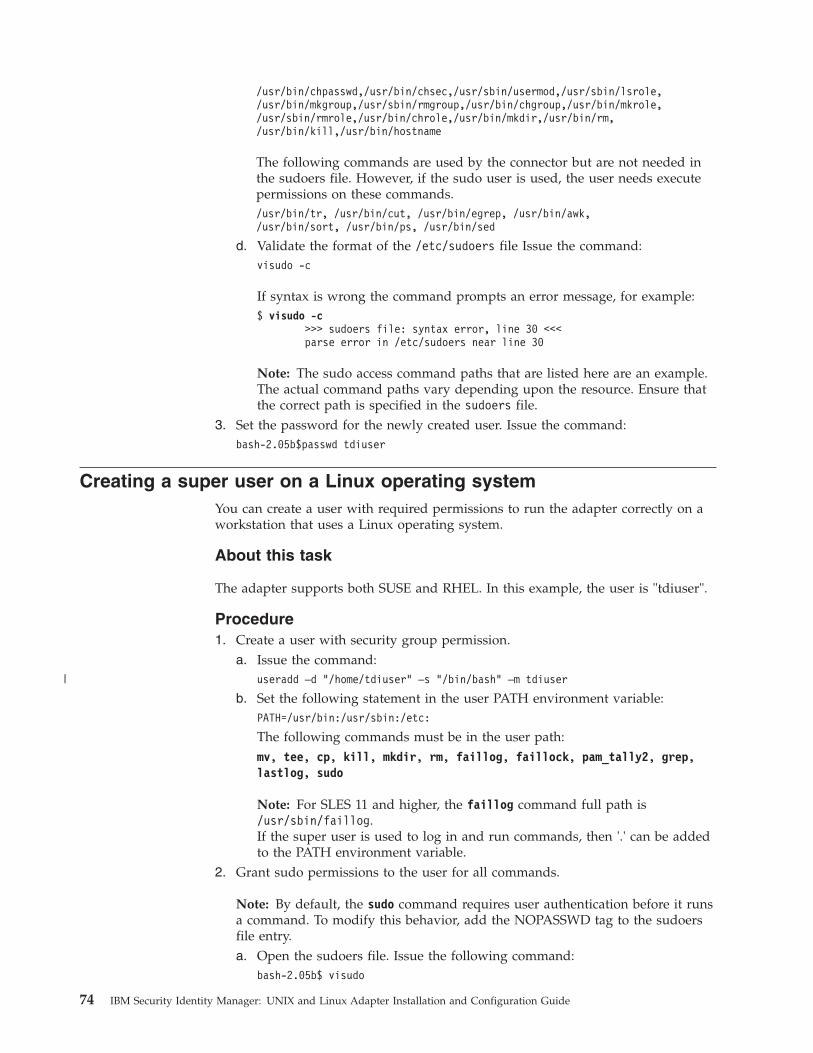
/usr/bin/chpasswd,/usr/bin/chsec,/usr/sbin/usermod,/usr/sbin/lsrole,/usr/bin/mkgroup,/usr/sbin/rmgroup,/usr/bin/chgroup,/usr/bin/mkrole,/usr/sbin/rmrole,/usr/bin/chrole,/usr/bin/mkdir,/usr/bin/rm,/usr/bin/kill,/usr/bin/hostname
The following commands are used by the connector but are not needed inthe sudoers file. However, if the sudo user is used, the user needs executepermissions on these commands./usr/bin/tr, /usr/bin/cut, /usr/bin/egrep, /usr/bin/awk,/usr/bin/sort, /usr/bin/ps, /usr/bin/sed
d. Validate the format of the /etc/sudoers file Issue the command:visudo -c
If syntax is wrong the command prompts an error message, for example:$ visudo -c
>>> sudoers file: syntax error, line 30 <<<parse error in /etc/sudoers near line 30
Note: The sudo access command paths that are listed here are an example.The actual command paths vary depending upon the resource. Ensure thatthe correct path is specified in the sudoers file.
3. Set the password for the newly created user. Issue the command:bash-2.05b$passwd tdiuser
Creating a super user on a Linux operating systemYou can create a user with required permissions to run the adapter correctly on aworkstation that uses a Linux operating system.
About this task
The adapter supports both SUSE and RHEL. In this example, the user is "tdiuser".
Procedure1. Create a user with security group permission.
a. Issue the command:useradd –d "/home/tdiuser" –s "/bin/bash" –m tdiuser
b. Set the following statement in the user PATH environment variable:PATH=/usr/bin:/usr/sbin:/etc:
The following commands must be in the user path:mv, tee, cp, kill, mkdir, rm, faillog, faillock, pam_tally2, grep,lastlog, sudo
Note: For SLES 11 and higher, the faillog command full path is/usr/sbin/faillog.If the super user is used to log in and run commands, then '.' can be addedto the PATH environment variable.
2. Grant sudo permissions to the user for all commands.
Note: By default, the sudo command requires user authentication before it runsa command. To modify this behavior, add the NOPASSWD tag to the sudoersfile entry.a. Open the sudoers file. Issue the following command:
bash-2.05b$ visudo
74 IBM Security Identity Manager: UNIX and Linux Adapter Installation and Configuration Guide
|
b. If the line Defaults requiretty exists in the file, comment it out.#Defaults requiretty
c. Insert the following lines to allow sudo access. The entry beginning withtdiuser must be entered on a single line. It is displayed here as multiplelines for readability.Modify the command paths to match your operating system. Update theuser path if necessary.# User privilege specificationtdiuser ALL=NOPASSWD:/usr/bin/passwd,/usr/sbin/useradd,/usr/sbin/usermod,/usr/sbin/userdel,/usr/bin/tee,/bin/chmod,/bin/cat,/bin/ls,/usr/bin/chage,/usr/bin/groups,/bin/ed,/bin/cp,/usr/bin/faillog,/usr/sbin/groupadd,/usr/sbin/groupmod,/usr/sbin/groupdel,/usr/bin/kill,/bin/hostname,/sbin/faillock,/sbin/pam_tally2,/bin/mkdir,/bin/rm,/usr/bin/lastlog
The following commands are used by the connector but are not needed inthe sudoers file. However, if the sudo user is used, the user needs executepermissions on these commands:tr, cut, awk, sed, sort, grep, ps
d. Validate the format of the /etc/sudoers file Issue the command:visudo -c
If syntax is wrong the command prompts an error message, for example:$ visudo -c
>>> sudoers file: syntax error, line 30 <<<parse error in /etc/sudoers near line 30
Note: The sudo access command paths that are listed here are an example.The actual command paths vary depending upon the resource. Ensure thatthe correct path is specified in the sudoers file.For example, the complete path of ed command is /bin/ed for RHELsystems, /usr/bin/ed for SUSE systems and /bin/ed for Debian systems.
3. Set the password for the newly created user. Issue the command:bash-2.05b$passwd tdiuser
Creating a super user on a Solaris operating systemYou can create a user with the required permissions to run the adapter correctly ona workstation that uses a Solaris operating system.
About this task
In this example, the user is "tdiuser".
Procedure1. Create a user and specify the home directory.
a. Issue the command:useradd –d "/home/tdiuser" –s "/sbin/sh" –m tdiuser
b. Ensure that the /home/tdiuser/.profile file exists. If not, you must createthe .profile file.
c. Set the following statement in the user PATH environment variable:PATH=/usr/bin:/etc:/usr/local/sbin:/usr/local/bin
The following commands must also be in the user path:
Appendix C. Super user creation on a supported operating system 75
|
mv, tee, cp, kill, mkdir, rm, sudoIf the super user is used to log in and run commands, then '.' can be addedto the PATH environment variable.
2. Grant sudo permissions to the user for all commands.
Note: By default, the sudo command requires user authentication before it runsa command. To modify this behavior, add the NOPASSWD tag to the sudoersfile entry.a. Open the sudoers file. Issue the following command:
bash-2.05b$ visudo
b. If the line Defaults requiretty exists in the file, comment it out.#Defaults requiretty
c. Insert the following lines to allow sudo access. The entry beginning withtdiuser must be entered on a single line. It is displayed here as multiplelines for readability.# User privilege specificationtdiuser ALL=NOPASSWD:/usr/bin/passwd,/usr/sbin/useradd,/usr/sbin/usermod,/usr/sbin/userdel,/usr/bin/tee,/usr/bin/chmod,/usr/bin/cat,/usr/bin/logins,/usr/bin/ls,/usr/bin/ed,/usr/bin/cp,/usr/sbin/groupadd,/usr/sbin/groupmod,/usr/sbin/groupdel,/usr/bin/mkdir,/usr/bin/rm,/usr/bin/kill,/usr/bin/hostname
The following commands are used by the connector but are not needed inthe sudoers file. However, if the sudo user is used, the user needs executepermissions on these commands./usr/bin/tr, /usr/bin/cut, /usr/bin/egrep, /usr/bin/awk,/usr/bin/sort, /usr/bin/ps, /usr/bin/sed
d. Validate the format of the /etc/sudoers file Issue the command:visudo -c
If syntax is wrong the command prompts an error message, for example:$ visudo -c
>>> sudoers file: syntax error, line 30 <<<parse error in /etc/sudoers near line 30
Note: The sudo access command paths that are listed here are an example.The actual command paths vary depending upon the resource. Ensure thatthe correct path is specified in the sudoers file.
3. Set the password for the newly created user. Issue the command:bash-2.05b$passwd tdiuser
Creating a super user on an HP-UX Non-Trusted operating systemYou can create a user with required permissions to run the adapter correctly on aworkstation that uses an HP-UX Non-Trusted operating system.
About this task
In this example, the user is "tdiuser".
Procedure1. Create a user and specify the home directory.
a. Issue the command:useradd –d "/home/tdiuser" –s "/sbin/sh" –m tdiuser
76 IBM Security Identity Manager: UNIX and Linux Adapter Installation and Configuration Guide
|

b. Ensure that the /home/tdiuser/.profile file exists. If not, you must createthe .profile file.
c. Set the following statement in the user PATH environment variable:PATH=/usr/bin:/usr/sbin:/etc:/usr/local/bin:/usr/sam/lbin:/usr/sbin/acct:
The following commands must be in the user path:mv, tee, cp, kill, usermod.sam, mkdir, rm, fwtmp, sudoIf the super user is used to log in and run commands, then '.' can be addedto the PATH environment variable.
2. Grant sudo permissions to the user for all commands.
Note: By default, the sudo command requires user authentication before it runsa command. To modify this behavior, add the NOPASSWD tag to the sudoersfile entry.a. Open the sudoers file. Issue the following command:
bash-2.05b$ visudo
b. If the line Defaults requiretty exists in the file, comment it out.#Defaults requiretty
c. Insert the following lines to allow sudo access. The entry beginning withtdiuser must be entered on a single line. It is displayed here as multiplelines for readability.# User privilege specificationtdiuser ALL=NOPASSWD:/usr/bin/chmod,/usr/bin/cat,/usr/sbin/logins,/usr/bin/ls,/usr/bin/passwd,/usr/sbin/useradd,/usr/sbin/usermod,/usr/sbin/userdel,/usr/bin/tee,/usr/bin/ed,/usr/sbin/groupadd,/usr/sbin/groupdel,/usr/sbin/groupmod,/usr/bin/cp,/usr/bin/mkdir,/usr/bin/rm,/usr/bin/kill,/usr/bin/hostname,/usr/sbin/acct/fwtmp,/usr/bin/test
The following commands are used by the connector but are not needed inthe sudoers file. However, if the sudo user is used, the user needs executepermissions on these commands./usr/bin/tr, /usr/bin/cut, /usr/bin/egrep, /usr/bin/awk,/usr/bin/head, /usr/bin/sort, /usr/bin/ps, /usr/bin/sed
d. Validate the format of the /etc/sudoers file Issue the command:visudo -c
If syntax is wrong the command prompts an error message, for example:$ visudo -c
>>> sudoers file: syntax error, line 30 <<<parse error in /etc/sudoers near line 30
Note: The sudo access command paths that are listed here are an example.The actual command paths vary depending upon the resource. Ensure thatthe correct path is specified in the sudoers file.
3. Set the password for the newly created user. Issue the command:bash-2.05b$passwd tdiuser
Creating a super user on an HP-UX Trusted operating systemYou can create a user with required permissions to run the adapter correctly on aworkstation that uses an HP-UX Trusted operating system.
Appendix C. Super user creation on a supported operating system 77
|
About this task
In this example, the user is "tdiuser".
Procedure1. Create a user and specify the home directory.
a. Issue the command:useradd –d "/home/tdiuser" –s "/sbin/sh" –m tdiuser
b. Ensure that the /home/tdiuser/.profile file exists. If not, you must createthe .profile file.
c. Set the following statement in the user PATH environment variable:PATH=/usr/bin:/usr/sbin:/etc:/usr/local/bin:/usr/sam/lbin:/usr/sbin/acct:
The following commands must be in the user path:mv, tee, cp, kill, usermod.sam, mkdir, rm, fwtmp, sudoIf the super user is used to log in and run commands, then '.' can be addedto the PATH environment variable.
2. Grant sudo permissions to the user for all commands.
Note: By default, the sudo command requires user authentication before it runsa command. To modify this behavior, add the NOPASSWD tag to the sudoersfile entry.a. Open the sudoers file. Issue the following command:
bash-2.05b$ visudo
b. If the line Defaults requiretty exists in the file, comment it out.#Defaults requiretty
c. Insert the following lines to allow sudo access. The entry beginning withtdiuser must be entered on a single line. It is displayed here as multiplelines for readability.# User privilege specificationtdiuser ALL=NOPASSWD:/usr/bin/passwd,/usr/sbin/useradd,/usr/sbin/usermod,/usr/sbin/userdel,/usr/bin/cat,/usr/lbin/getprpw,/usr/lbin/modprpw,/usr/bin/chmod,/usr/bin/ls,/usr/bin/tee,/usr/bin/ed,/usr/sbin/logins,/usr/sam/lbin/usermod.sam,/usr/sbin/groupadd,/usr/sbin/groupdel,/usr/sbin/groupmod,/usr/bin/cp,/usr/bin/mkdir,/usr/bin/rm,/usr/bin/kill,/usr/bin/hostname,/usr/sbin/acct/fwtmp
The following commands are used by the connector but are not needed inthe sudoers file. However, if the sudo user is used, the user needs executepermissions on these commands./usr/bin/tr, /usr/bin/cut, /usr/bin/egrep, /usr/bin/awk,/usr/bin/head, /usr/bin/sort, /usr/bin/ps, /usr/bin/sed
d. Validate the format of the /etc/sudoers file Issue the command:visudo -c
If syntax is wrong the command prompts an error message, for example:$ visudo -c
>>> sudoers file: syntax error, line 30 <<<parse error in /etc/sudoers near line 30
Note: The sudo access command paths that are listed here are an example.The actual command paths vary depending upon the resource. Ensure thatthe correct path is specified in the sudoers file.
78 IBM Security Identity Manager: UNIX and Linux Adapter Installation and Configuration Guide
|
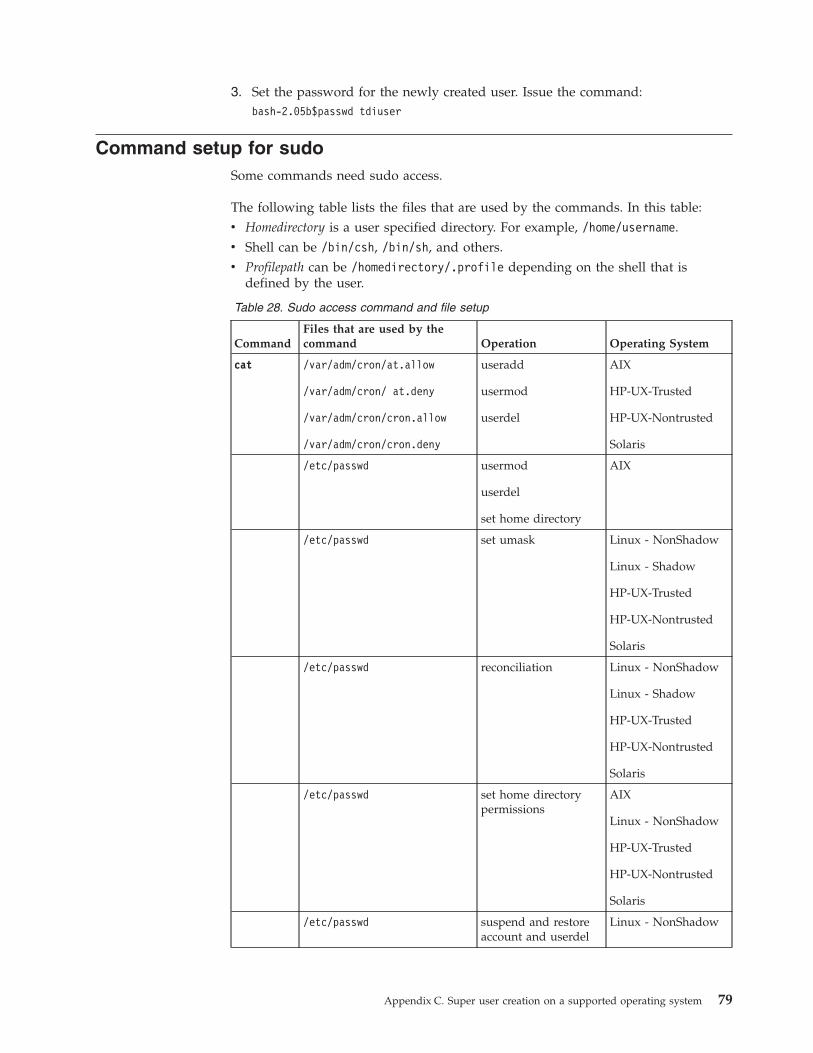
3. Set the password for the newly created user. Issue the command:bash-2.05b$passwd tdiuser
Command setup for sudoSome commands need sudo access.
The following table lists the files that are used by the commands. In this table:v Homedirectory is a user specified directory. For example, /home/username.v Shell can be /bin/csh, /bin/sh, and others.v Profilepath can be /homedirectory/.profile depending on the shell that is
defined by the user.
Table 28. Sudo access command and file setup
CommandFiles that are used by thecommand Operation Operating System
cat /var/adm/cron/at.allow
/var/adm/cron/ at.deny
/var/adm/cron/cron.allow
/var/adm/cron/cron.deny
useradd
usermod
userdel
AIX
HP-UX-Trusted
HP-UX-Nontrusted
Solaris
/etc/passwd usermod
userdel
set home directory
AIX
/etc/passwd set umask Linux - NonShadow
Linux - Shadow
HP-UX-Trusted
HP-UX-Nontrusted
Solaris
/etc/passwd reconciliation Linux - NonShadow
Linux - Shadow
HP-UX-Trusted
HP-UX-Nontrusted
Solaris
/etc/passwd set home directorypermissions
AIX
Linux - NonShadow
HP-UX-Trusted
HP-UX-Nontrusted
Solaris
/etc/passwd suspend and restoreaccount and userdel
Linux - NonShadow
Appendix C. Super user creation on a supported operating system 79
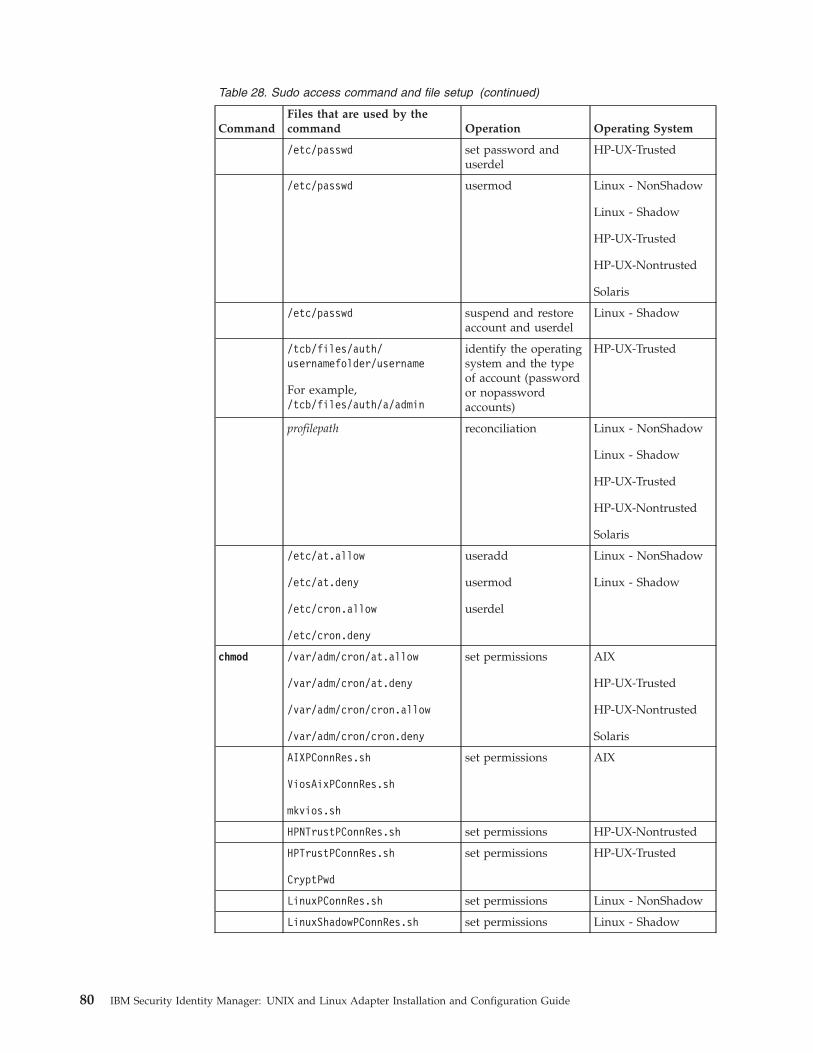
Table 28. Sudo access command and file setup (continued)
CommandFiles that are used by thecommand Operation Operating System
/etc/passwd set password anduserdel
HP-UX-Trusted
/etc/passwd usermod Linux - NonShadow
Linux - Shadow
HP-UX-Trusted
HP-UX-Nontrusted
Solaris
/etc/passwd suspend and restoreaccount and userdel
Linux - Shadow
/tcb/files/auth/usernamefolder/username
For example,/tcb/files/auth/a/admin
identify the operatingsystem and the typeof account (passwordor nopasswordaccounts)
HP-UX-Trusted
profilepath reconciliation Linux - NonShadow
Linux - Shadow
HP-UX-Trusted
HP-UX-Nontrusted
Solaris
/etc/at.allow
/etc/at.deny
/etc/cron.allow
/etc/cron.deny
useradd
usermod
userdel
Linux - NonShadow
Linux - Shadow
chmod /var/adm/cron/at.allow
/var/adm/cron/at.deny
/var/adm/cron/cron.allow
/var/adm/cron/cron.deny
set permissions AIX
HP-UX-Trusted
HP-UX-Nontrusted
Solaris
AIXPConnRes.sh
ViosAixPConnRes.sh
mkvios.sh
set permissions AIX
HPNTrustPConnRes.sh set permissions HP-UX-Nontrusted
HPTrustPConnRes.sh
CryptPwd
set permissions HP-UX-Trusted
LinuxPConnRes.sh set permissions Linux - NonShadow
LinuxShadowPConnRes.sh set permissions Linux - Shadow
80 IBM Security Identity Manager: UNIX and Linux Adapter Installation and Configuration Guide
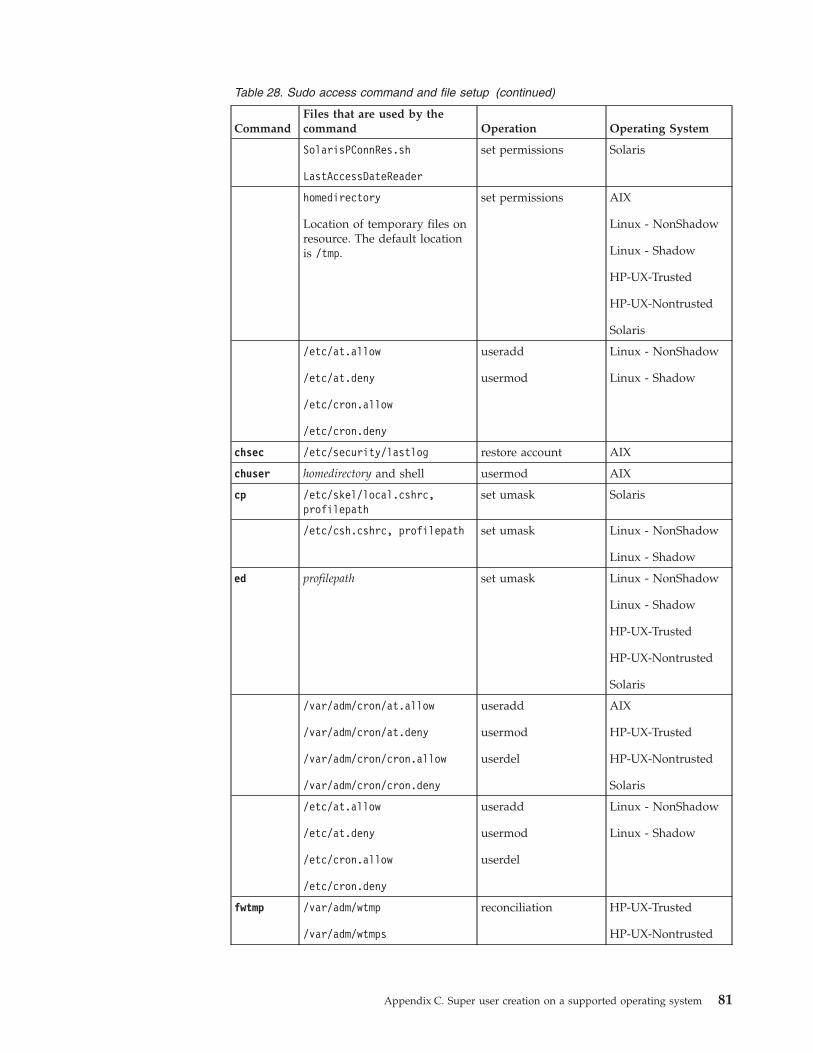
Table 28. Sudo access command and file setup (continued)
CommandFiles that are used by thecommand Operation Operating System
SolarisPConnRes.sh
LastAccessDateReader
set permissions Solaris
homedirectory
Location of temporary files onresource. The default locationis /tmp.
set permissions AIX
Linux - NonShadow
Linux - Shadow
HP-UX-Trusted
HP-UX-Nontrusted
Solaris
/etc/at.allow
/etc/at.deny
/etc/cron.allow
/etc/cron.deny
useradd
usermod
Linux - NonShadow
Linux - Shadow
chsec /etc/security/lastlog restore account AIX
chuser homedirectory and shell usermod AIX
cp /etc/skel/local.cshrc,profilepath
set umask Solaris
/etc/csh.cshrc, profilepath set umask Linux - NonShadow
Linux - Shadow
ed profilepath set umask Linux - NonShadow
Linux - Shadow
HP-UX-Trusted
HP-UX-Nontrusted
Solaris
/var/adm/cron/at.allow
/var/adm/cron/at.deny
/var/adm/cron/cron.allow
/var/adm/cron/cron.deny
useradd
usermod
userdel
AIX
HP-UX-Trusted
HP-UX-Nontrusted
Solaris
/etc/at.allow
/etc/at.deny
/etc/cron.allow
/etc/cron.deny
useradd
usermod
userdel
Linux - NonShadow
Linux - Shadow
fwtmp /var/adm/wtmp
/var/adm/wtmps
reconciliation HP-UX-Trusted
HP-UX-Nontrusted
Appendix C. Super user creation on a supported operating system 81
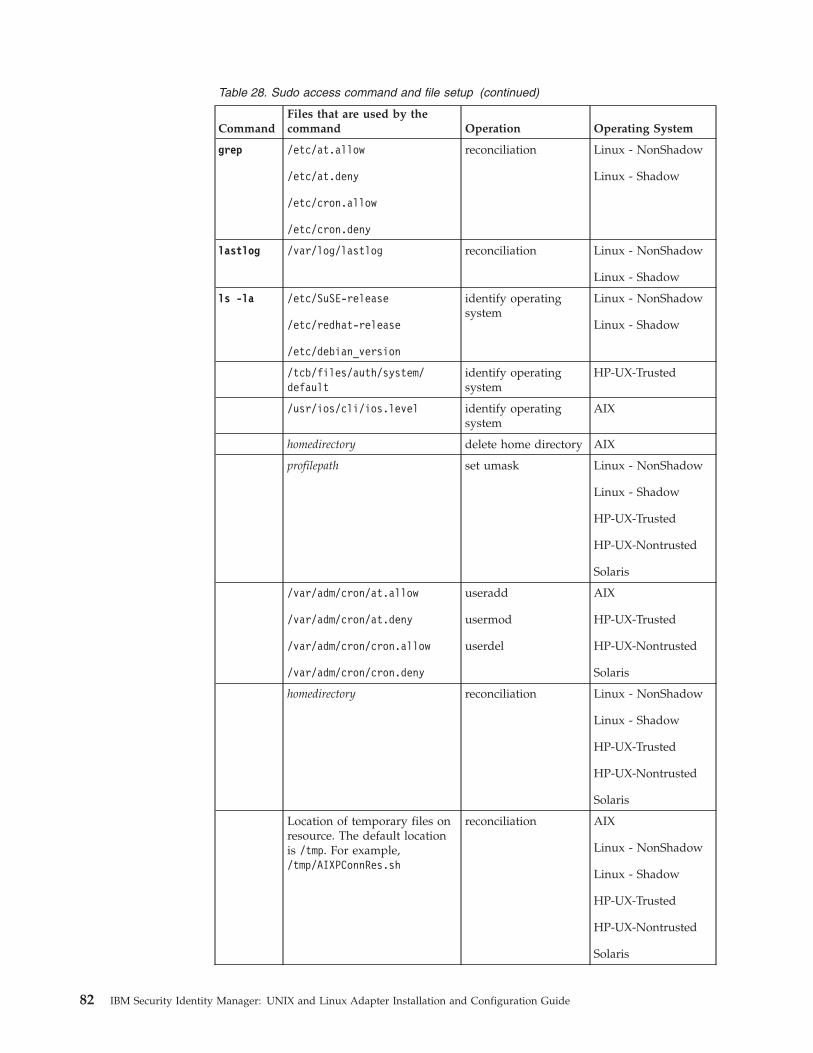
Table 28. Sudo access command and file setup (continued)
CommandFiles that are used by thecommand Operation Operating System
grep /etc/at.allow
/etc/at.deny
/etc/cron.allow
/etc/cron.deny
reconciliation Linux - NonShadow
Linux - Shadow
lastlog /var/log/lastlog reconciliation Linux - NonShadow
Linux - Shadow
ls -la /etc/SuSE-release
/etc/redhat-release
/etc/debian_version
identify operatingsystem
Linux - NonShadow
Linux - Shadow
/tcb/files/auth/system/default
identify operatingsystem
HP-UX-Trusted
/usr/ios/cli/ios.level identify operatingsystem
AIX
homedirectory delete home directory AIX
profilepath set umask Linux - NonShadow
Linux - Shadow
HP-UX-Trusted
HP-UX-Nontrusted
Solaris
/var/adm/cron/at.allow
/var/adm/cron/at.deny
/var/adm/cron/cron.allow
/var/adm/cron/cron.deny
useradd
usermod
userdel
AIX
HP-UX-Trusted
HP-UX-Nontrusted
Solaris
homedirectory reconciliation Linux - NonShadow
Linux - Shadow
HP-UX-Trusted
HP-UX-Nontrusted
Solaris
Location of temporary files onresource. The default locationis /tmp. For example,/tmp/AIXPConnRes.sh
reconciliation AIX
Linux - NonShadow
Linux - Shadow
HP-UX-Trusted
HP-UX-Nontrusted
Solaris
82 IBM Security Identity Manager: UNIX and Linux Adapter Installation and Configuration Guide
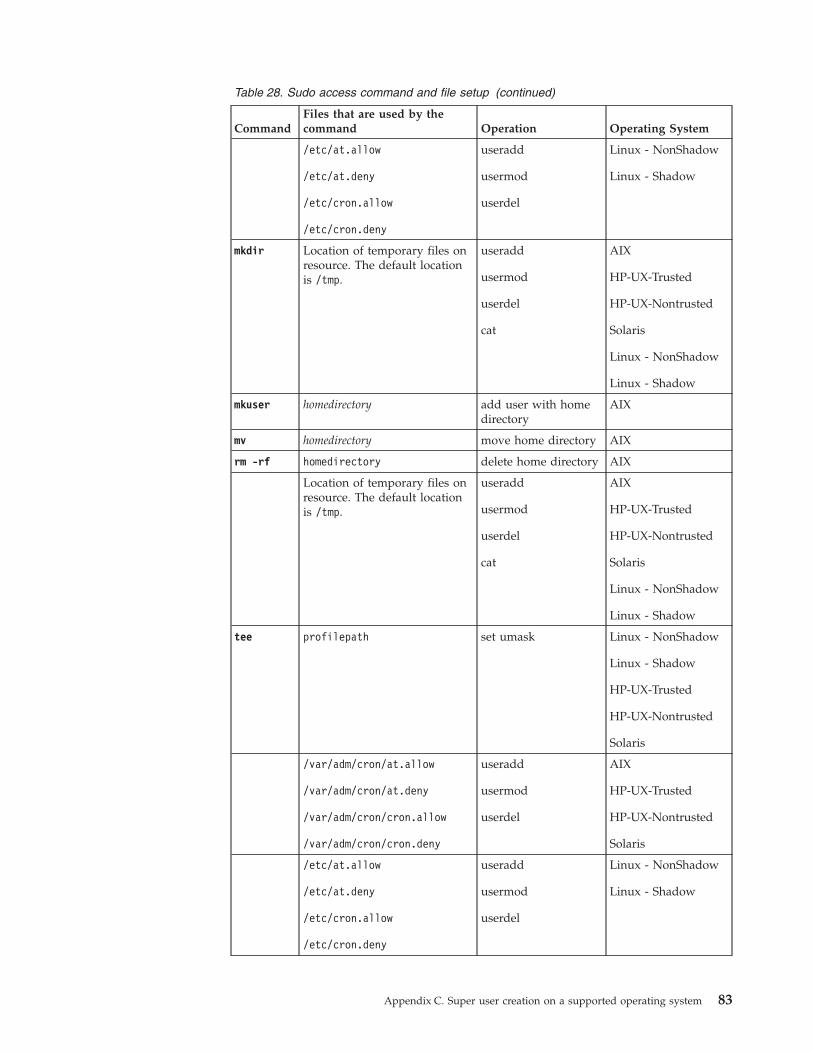
Table 28. Sudo access command and file setup (continued)
CommandFiles that are used by thecommand Operation Operating System
/etc/at.allow
/etc/at.deny
/etc/cron.allow
/etc/cron.deny
useradd
usermod
userdel
Linux - NonShadow
Linux - Shadow
mkdir Location of temporary files onresource. The default locationis /tmp.
useradd
usermod
userdel
cat
AIX
HP-UX-Trusted
HP-UX-Nontrusted
Solaris
Linux - NonShadow
Linux - Shadow
mkuser homedirectory add user with homedirectory
AIX
mv homedirectory move home directory AIX
rm -rf homedirectory delete home directory AIX
Location of temporary files onresource. The default locationis /tmp.
useradd
usermod
userdel
cat
AIX
HP-UX-Trusted
HP-UX-Nontrusted
Solaris
Linux - NonShadow
Linux - Shadow
tee profilepath set umask Linux - NonShadow
Linux - Shadow
HP-UX-Trusted
HP-UX-Nontrusted
Solaris
/var/adm/cron/at.allow
/var/adm/cron/at.deny
/var/adm/cron/cron.allow
/var/adm/cron/cron.deny
useradd
usermod
userdel
AIX
HP-UX-Trusted
HP-UX-Nontrusted
Solaris
/etc/at.allow
/etc/at.deny
/etc/cron.allow
/etc/cron.deny
useradd
usermod
userdel
Linux - NonShadow
Linux - Shadow
Appendix C. Super user creation on a supported operating system 83
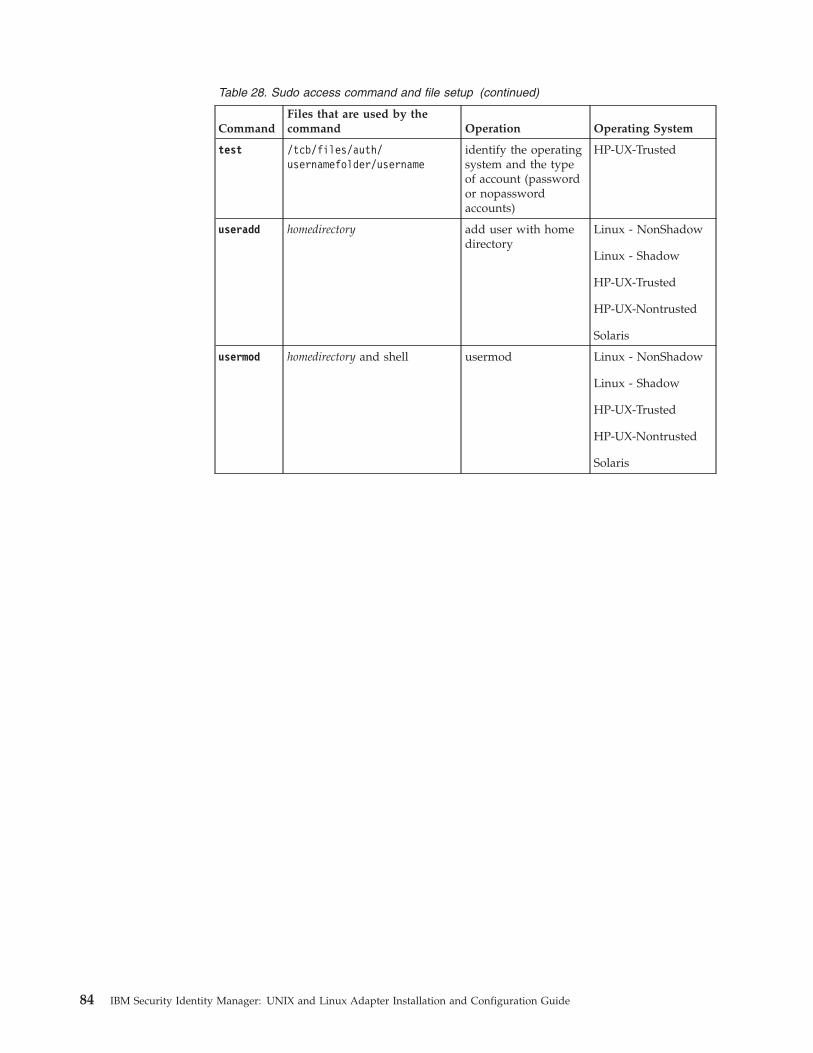
Table 28. Sudo access command and file setup (continued)
CommandFiles that are used by thecommand Operation Operating System
test /tcb/files/auth/usernamefolder/username
identify the operatingsystem and the typeof account (passwordor nopasswordaccounts)
HP-UX-Trusted
useradd homedirectory add user with homedirectory
Linux - NonShadow
Linux - Shadow
HP-UX-Trusted
HP-UX-Nontrusted
Solaris
usermod homedirectory and shell usermod Linux - NonShadow
Linux - Shadow
HP-UX-Trusted
HP-UX-Nontrusted
Solaris
84 IBM Security Identity Manager: UNIX and Linux Adapter Installation and Configuration Guide
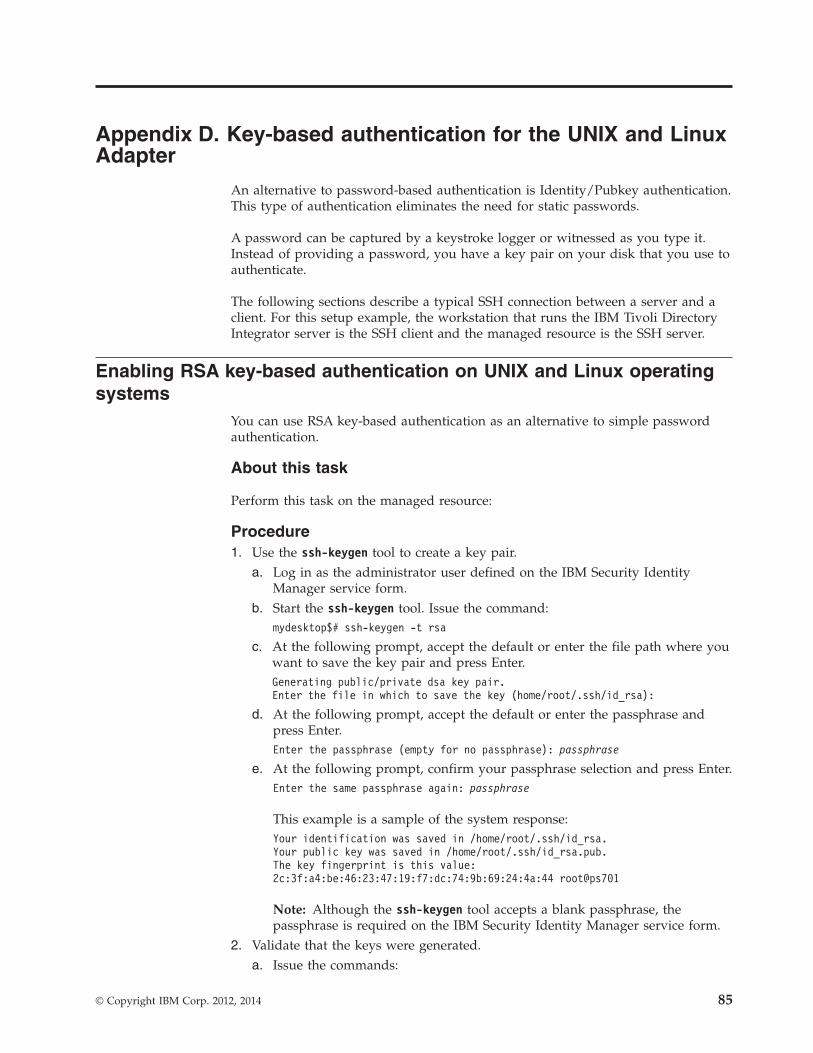
Appendix D. Key-based authentication for the UNIX and LinuxAdapter
An alternative to password-based authentication is Identity/Pubkey authentication.This type of authentication eliminates the need for static passwords.
A password can be captured by a keystroke logger or witnessed as you type it.Instead of providing a password, you have a key pair on your disk that you use toauthenticate.
The following sections describe a typical SSH connection between a server and aclient. For this setup example, the workstation that runs the IBM Tivoli DirectoryIntegrator server is the SSH client and the managed resource is the SSH server.
Enabling RSA key-based authentication on UNIX and Linux operatingsystems
You can use RSA key-based authentication as an alternative to simple passwordauthentication.
About this task
Perform this task on the managed resource:
Procedure1. Use the ssh-keygen tool to create a key pair.
a. Log in as the administrator user defined on the IBM Security IdentityManager service form.
b. Start the ssh-keygen tool. Issue the command:mydesktop$# ssh-keygen -t rsa
c. At the following prompt, accept the default or enter the file path where youwant to save the key pair and press Enter.Generating public/private dsa key pair.Enter the file in which to save the key (home/root/.ssh/id_rsa):
d. At the following prompt, accept the default or enter the passphrase andpress Enter.Enter the passphrase (empty for no passphrase): passphrase
e. At the following prompt, confirm your passphrase selection and press Enter.Enter the same passphrase again: passphrase
This example is a sample of the system response:Your identification was saved in /home/root/.ssh/id_rsa.Your public key was saved in /home/root/.ssh/id_rsa.pub.The key fingerprint is this value:2c:3f:a4:be:46:23:47:19:f7:dc:74:9b:69:24:4a:44 root@ps701
Note: Although the ssh-keygen tool accepts a blank passphrase, thepassphrase is required on the IBM Security Identity Manager service form.
2. Validate that the keys were generated.a. Issue the commands:
© Copyright IBM Corp. 2012, 2014 85
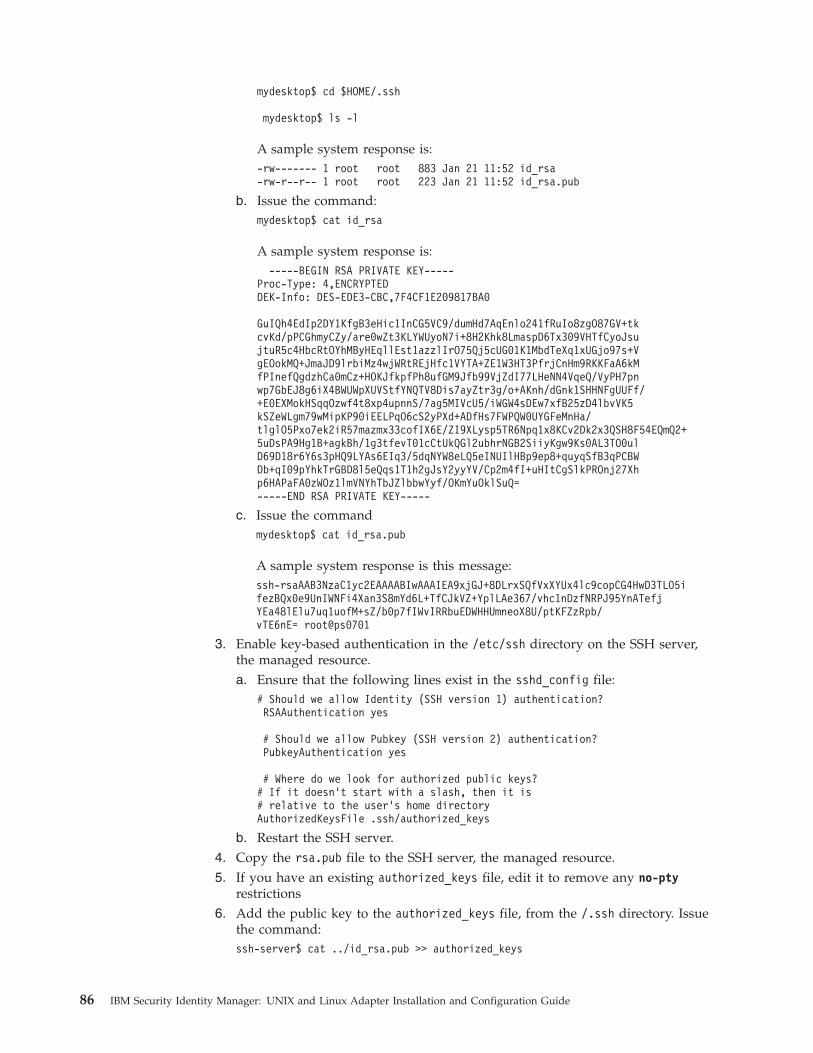
mydesktop$ cd $HOME/.ssh
mydesktop$ ls -l
A sample system response is:-rw------- 1 root root 883 Jan 21 11:52 id_rsa-rw-r--r-- 1 root root 223 Jan 21 11:52 id_rsa.pub
b. Issue the command:mydesktop$ cat id_rsa
A sample system response is:-----BEGIN RSA PRIVATE KEY-----
Proc-Type: 4,ENCRYPTEDDEK-Info: DES-EDE3-CBC,7F4CF1E209817BA0
GuIQh4EdIp2DY1KfgB3eHic1InCG5VC9/dumHd7AqEnlo241fRuIo8zgO87GV+tkcvKd/pPCGhmyCZy/are0wZt3KLYWUyoN7i+8H2Khk8LmaspD6Tx309VHTfCyoJsujtuR5c4HbcRtOYhMByHEqllEst1azzlIrO75Qj5cUG01K1MbdTeXq1xUGjo97s+VgEOokMQ+JmaJD9lrbiMz4wjWRtREjHfc1VYTA+ZE1W3HT3PfrjCnHm9RKKFaA6kMfPInefQgdzhCa0mCz+HOKJfkpfPh8ufGM9Jfb99VjZdI77LHeNN4VqeQ/VyPH7pnwp7GbEJ8g6iX4BWUWpXUVStfYNQTV8Dis7ayZtr3g/o+AKnh/dGnk1SHHNFgUUFf/+E0EXMokHSqqOzwf4t8xp4upnnS/7ag5MIVcU5/iWGW4sDEw7xfB25zD4lbvVK5kSZeWLgm79wMipKP90iEELPqO6cS2yPXd+ADfHs7FWPQW0UYGFeMnHa/tlglO5Pxo7ek2iR57mazmx33cofIX6E/ZI9XLysp5TR6Npq1x8KCv2Dk2x3QSH8F54EQmQ2+5uDsPA9Hg1B+agkBh/1g3tfevT01cCtUkQGl2ubhrNGB2SiiyKgw9Ks0AL3TO0ulD69D18r6Y6s3pHQ9LYAs6EIq3/5dqNYW8eLQ5eINUIlHBp9ep8+quyqSfB3qPCBWDb+qI09pYhkTrGBD8l5eQqs1T1h2gJsY2yyYV/Cp2m4fI+uHItCgSlkPROnj27Xhp6HAPaFA0zWOz1lmVNYhTbJZlbbwYyf/OKmYuOklSuQ=-----END RSA PRIVATE KEY-----
c. Issue the commandmydesktop$ cat id_rsa.pub
A sample system response is this message:ssh-rsaAAB3NzaC1yc2EAAAABIwAAAIEA9xjGJ+8DLrxSQfVxXYUx4lc9copCG4HwD3TLO5ifezBQx0e9UnIWNFi4Xan3S8mYd6L+TfCJkVZ+YplLAe367/vhc1nDzfNRPJ95YnATefjYEa48lElu7uq1uofM+sZ/b0p7fIWvIRRbuEDWHHUmneoX8U/ptKFZzRpb/vTE6nE= root@ps0701
3. Enable key-based authentication in the /etc/ssh directory on the SSH server,the managed resource.a. Ensure that the following lines exist in the sshd_config file:
# Should we allow Identity (SSH version 1) authentication?RSAAuthentication yes
# Should we allow Pubkey (SSH version 2) authentication?PubkeyAuthentication yes
# Where do we look for authorized public keys?# If it doesn’t start with a slash, then it is# relative to the user’s home directoryAuthorizedKeysFile .ssh/authorized_keys
b. Restart the SSH server.4. Copy the rsa.pub file to the SSH server, the managed resource.5. If you have an existing authorized_keys file, edit it to remove any no-pty
restrictions6. Add the public key to the authorized_keys file, from the /.ssh directory. Issue
the command:ssh-server$ cat ../id_rsa.pub >> authorized_keys
86 IBM Security Identity Manager: UNIX and Linux Adapter Installation and Configuration Guide
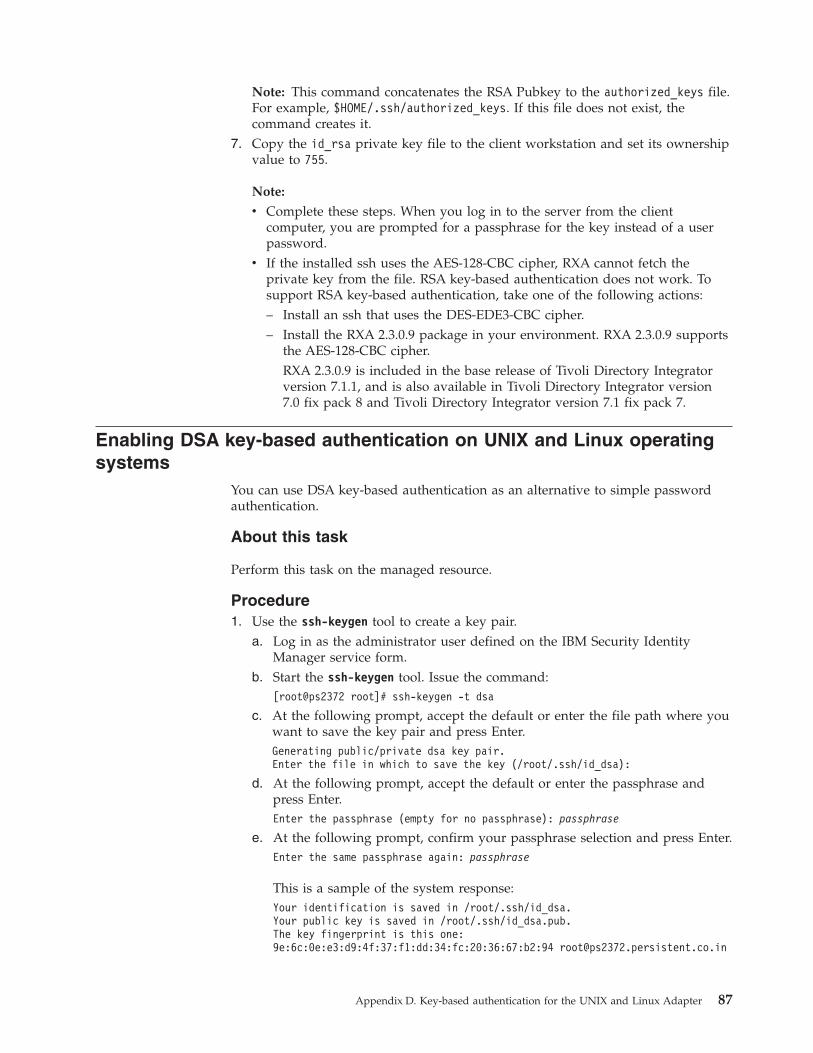
Note: This command concatenates the RSA Pubkey to the authorized_keys file.For example, $HOME/.ssh/authorized_keys. If this file does not exist, thecommand creates it.
7. Copy the id_rsa private key file to the client workstation and set its ownershipvalue to 755.
Note:
v Complete these steps. When you log in to the server from the clientcomputer, you are prompted for a passphrase for the key instead of a userpassword.
v If the installed ssh uses the AES-128-CBC cipher, RXA cannot fetch theprivate key from the file. RSA key-based authentication does not work. Tosupport RSA key-based authentication, take one of the following actions:– Install an ssh that uses the DES-EDE3-CBC cipher.– Install the RXA 2.3.0.9 package in your environment. RXA 2.3.0.9 supports
the AES-128-CBC cipher.RXA 2.3.0.9 is included in the base release of Tivoli Directory Integratorversion 7.1.1, and is also available in Tivoli Directory Integrator version7.0 fix pack 8 and Tivoli Directory Integrator version 7.1 fix pack 7.
Enabling DSA key-based authentication on UNIX and Linux operatingsystems
You can use DSA key-based authentication as an alternative to simple passwordauthentication.
About this task
Perform this task on the managed resource.
Procedure1. Use the ssh-keygen tool to create a key pair.
a. Log in as the administrator user defined on the IBM Security IdentityManager service form.
b. Start the ssh-keygen tool. Issue the command:[root@ps2372 root]# ssh-keygen -t dsa
c. At the following prompt, accept the default or enter the file path where youwant to save the key pair and press Enter.Generating public/private dsa key pair.Enter the file in which to save the key (/root/.ssh/id_dsa):
d. At the following prompt, accept the default or enter the passphrase andpress Enter.Enter the passphrase (empty for no passphrase): passphrase
e. At the following prompt, confirm your passphrase selection and press Enter.Enter the same passphrase again: passphrase
This is a sample of the system response:Your identification is saved in /root/.ssh/id_dsa.Your public key is saved in /root/.ssh/id_dsa.pub.The key fingerprint is this one:9e:6c:0e:e3:d9:4f:37:f1:dd:34:fc:20:36:67:b2:94 [email protected]
Appendix D. Key-based authentication for the UNIX and Linux Adapter 87
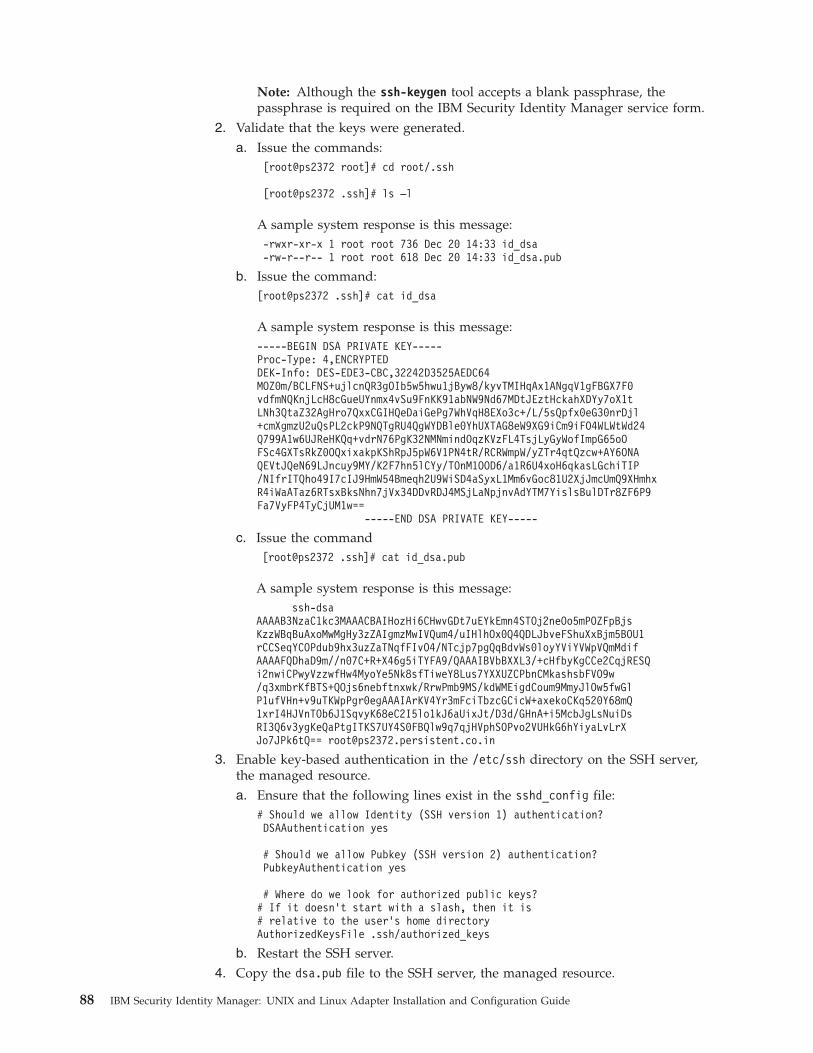
Note: Although the ssh-keygen tool accepts a blank passphrase, thepassphrase is required on the IBM Security Identity Manager service form.
2. Validate that the keys were generated.a. Issue the commands:
[root@ps2372 root]# cd root/.ssh
[root@ps2372 .ssh]# ls –l
A sample system response is this message:-rwxr-xr-x 1 root root 736 Dec 20 14:33 id_dsa-rw-r--r-- 1 root root 618 Dec 20 14:33 id_dsa.pub
b. Issue the command:[root@ps2372 .ssh]# cat id_dsa
A sample system response is this message:-----BEGIN DSA PRIVATE KEY-----Proc-Type: 4,ENCRYPTEDDEK-Info: DES-EDE3-CBC,32242D3525AEDC64MOZ0m/BCLFNS+ujlcnQR3gOIb5w5hwu1jByw8/kyvTMIHqAx1ANgqV1gFBGX7F0vdfmNQKnjLcH8cGueUYnmx4vSu9FnKK91abNW9Nd67MDtJEztHckahXDYy7oX1tLNh3QtaZ32AgHro7QxxCGIHQeDaiGePg7WhVqH8EXo3c+/L/5sQpfx0eG30nrDjl+cmXgmzU2uQsPL2ckP9NQTgRU4QgWYDBle0YhUXTAG8eW9XG9iCm9iFO4WLWtWd24Q799A1w6UJReHKQq+vdrN76PgK32NMNmindOqzKVzFL4TsjLyGyWofImpG65oOFSc4GXTsRkZ0OQxixakpKShRpJ5pW6V1PN4tR/RCRWmpW/yZTr4qtQzcw+AY6ONAQEVtJQeN69LJncuy9MY/K2F7hn5lCYy/TOnM1OOD6/a1R6U4xoH6qkasLGchiTIP/NIfrITQho49I7cIJ9HmW54Bmeqh2U9WiSD4aSyxL1Mm6vGoc81U2XjJmcUmQ9XHmhxR4iWaATaz6RTsxBksNhn7jVx34DDvRDJ4MSjLaNpjnvAdYTM7YislsBulDTr8ZF6P9Fa7VyFP4TyCjUM1w==
-----END DSA PRIVATE KEY-----
c. Issue the command[root@ps2372 .ssh]# cat id_dsa.pub
A sample system response is this message:ssh-dsa
AAAAB3NzaC1kc3MAAACBAIHozHi6CHwvGDt7uEYkEmn4STOj2neOo5mPOZFpBjsKzzWBqBuAxoMwMgHy3zZAIgmzMwIVQum4/uIHlhOx0Q4QDLJbveFShuXxBjm5BOU1rCCSeqYCOPdub9hx3uzZaTNqfFIvO4/NTcjp7pgQqBdvWs0loyYViYVWpVQmMdifAAAAFQDhaD9m//n07C+R+X46g5iTYFA9/QAAAIBVbBXXL3/+cHfbyKgCCe2CqjRESQi2nwiCPwyVzzwfHw4MyoYe5Nk8sfTiweY8Lus7YXXUZCPbnCMkashsbFVO9w/q3xmbrKfBTS+QOjs6nebftnxwk/RrwPmb9MS/kdWMEigdCoum9MmyJlOw5fwGlP1ufVHn+v9uTKWpPgr0egAAAIArKV4Yr3mFciTbzcGCicW+axekoCKq520Y68mQ1xrI4HJVnTOb6J1SqvyK68eC2I5lo1kJ6aUixJt/D3d/GHnA+i5McbJgLsNuiDsRI3Q6v3ygKeQaPtgITKS7UY4S0FBQlw9q7qjHVphSOPvo2VUHkG6hYiyaLvLrXJo7JPk6tQ== [email protected]
3. Enable key-based authentication in the /etc/ssh directory on the SSH server,the managed resource.a. Ensure that the following lines exist in the sshd_config file:
# Should we allow Identity (SSH version 1) authentication?DSAAuthentication yes
# Should we allow Pubkey (SSH version 2) authentication?PubkeyAuthentication yes
# Where do we look for authorized public keys?# If it doesn’t start with a slash, then it is# relative to the user’s home directoryAuthorizedKeysFile .ssh/authorized_keys
b. Restart the SSH server.4. Copy the dsa.pub file to the SSH server, the managed resource.
88 IBM Security Identity Manager: UNIX and Linux Adapter Installation and Configuration Guide
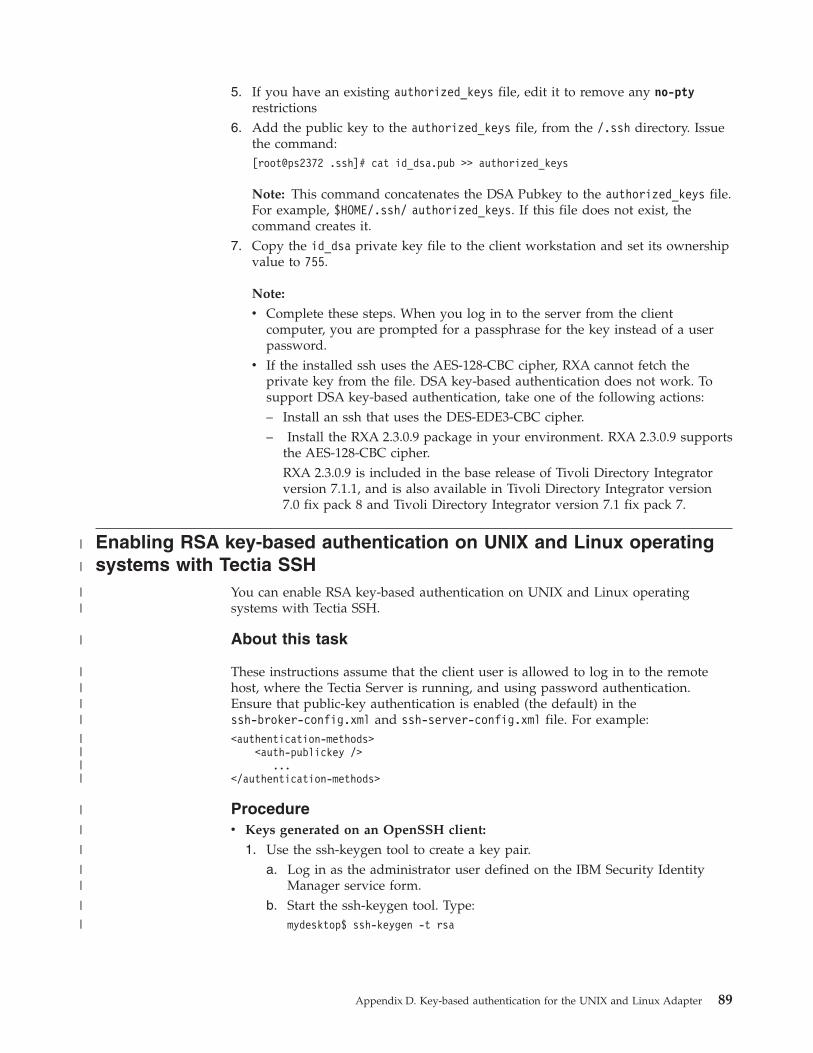
5. If you have an existing authorized_keys file, edit it to remove any no-ptyrestrictions
6. Add the public key to the authorized_keys file, from the /.ssh directory. Issuethe command:[root@ps2372 .ssh]# cat id_dsa.pub >> authorized_keys
Note: This command concatenates the DSA Pubkey to the authorized_keys file.For example, $HOME/.ssh/ authorized_keys. If this file does not exist, thecommand creates it.
7. Copy the id_dsa private key file to the client workstation and set its ownershipvalue to 755.
Note:
v Complete these steps. When you log in to the server from the clientcomputer, you are prompted for a passphrase for the key instead of a userpassword.
v If the installed ssh uses the AES-128-CBC cipher, RXA cannot fetch theprivate key from the file. DSA key-based authentication does not work. Tosupport DSA key-based authentication, take one of the following actions:– Install an ssh that uses the DES-EDE3-CBC cipher.– Install the RXA 2.3.0.9 package in your environment. RXA 2.3.0.9 supports
the AES-128-CBC cipher.RXA 2.3.0.9 is included in the base release of Tivoli Directory Integratorversion 7.1.1, and is also available in Tivoli Directory Integrator version7.0 fix pack 8 and Tivoli Directory Integrator version 7.1 fix pack 7.
Enabling RSA key-based authentication on UNIX and Linux operatingsystems with Tectia SSH
You can enable RSA key-based authentication on UNIX and Linux operatingsystems with Tectia SSH.
About this task
These instructions assume that the client user is allowed to log in to the remotehost, where the Tectia Server is running, and using password authentication.Ensure that public-key authentication is enabled (the default) in thessh-broker-config.xml and ssh-server-config.xml file. For example:<authentication-methods>
<auth-publickey />...
</authentication-methods>
Procedurev Keys generated on an OpenSSH client:
1. Use the ssh-keygen tool to create a key pair.a. Log in as the administrator user defined on the IBM Security Identity
Manager service form.b. Start the ssh-keygen tool. Type:
mydesktop$ ssh-keygen -t rsa
Appendix D. Key-based authentication for the UNIX and Linux Adapter 89
|
|
||
|
||||
||||
|
|
|
||
|
|
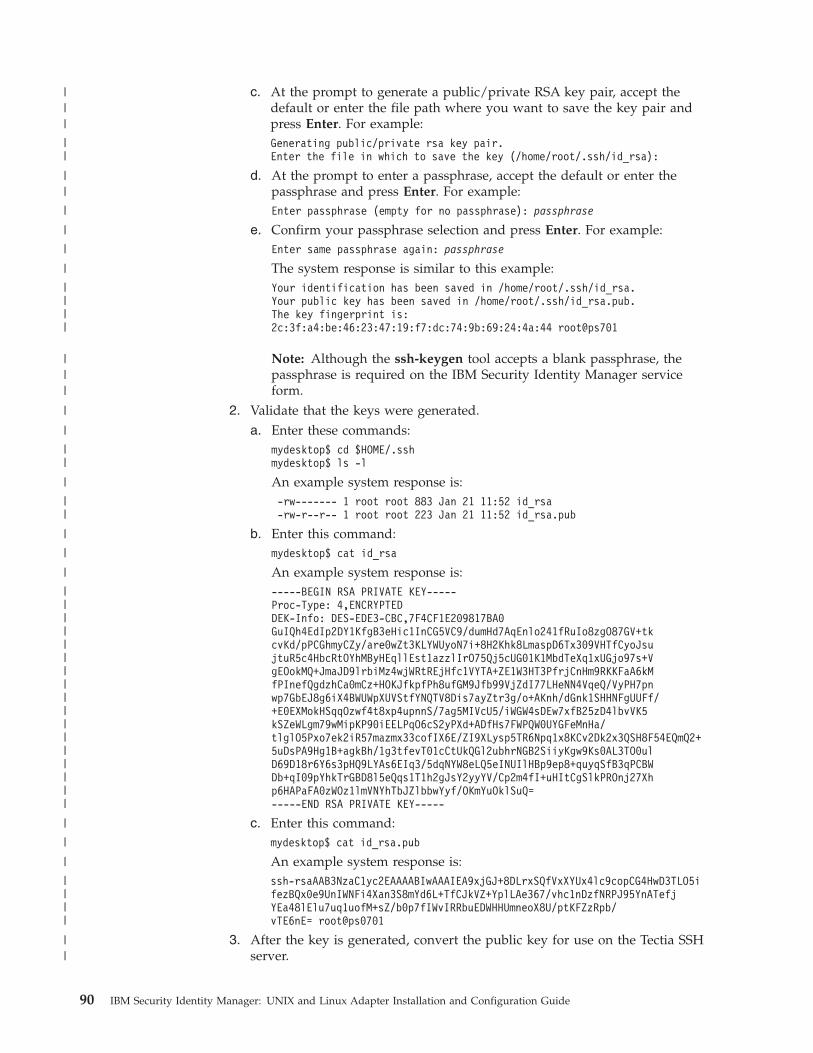
c. At the prompt to generate a public/private RSA key pair, accept thedefault or enter the file path where you want to save the key pair andpress Enter. For example:Generating public/private rsa key pair.Enter the file in which to save the key (/home/root/.ssh/id_rsa):
d. At the prompt to enter a passphrase, accept the default or enter thepassphrase and press Enter. For example:Enter passphrase (empty for no passphrase): passphrase
e. Confirm your passphrase selection and press Enter. For example:Enter same passphrase again: passphrase
The system response is similar to this example:Your identification has been saved in /home/root/.ssh/id_rsa.Your public key has been saved in /home/root/.ssh/id_rsa.pub.The key fingerprint is:2c:3f:a4:be:46:23:47:19:f7:dc:74:9b:69:24:4a:44 root@ps701
Note: Although the ssh-keygen tool accepts a blank passphrase, thepassphrase is required on the IBM Security Identity Manager serviceform.
2. Validate that the keys were generated.a. Enter these commands:
mydesktop$ cd $HOME/.sshmydesktop$ ls -l
An example system response is:-rw------- 1 root root 883 Jan 21 11:52 id_rsa-rw-r--r-- 1 root root 223 Jan 21 11:52 id_rsa.pub
b. Enter this command:mydesktop$ cat id_rsa
An example system response is:-----BEGIN RSA PRIVATE KEY-----Proc-Type: 4,ENCRYPTEDDEK-Info: DES-EDE3-CBC,7F4CF1E209817BA0GuIQh4EdIp2DY1KfgB3eHic1InCG5VC9/dumHd7AqEnlo241fRuIo8zgO87GV+tkcvKd/pPCGhmyCZy/are0wZt3KLYWUyoN7i+8H2Khk8LmaspD6Tx309VHTfCyoJsujtuR5c4HbcRtOYhMByHEqllEst1azzlIrO75Qj5cUG01K1MbdTeXq1xUGjo97s+VgEOokMQ+JmaJD9lrbiMz4wjWRtREjHfc1VYTA+ZE1W3HT3PfrjCnHm9RKKFaA6kMfPInefQgdzhCa0mCz+HOKJfkpfPh8ufGM9Jfb99VjZdI77LHeNN4VqeQ/VyPH7pnwp7GbEJ8g6iX4BWUWpXUVStfYNQTV8Dis7ayZtr3g/o+AKnh/dGnk1SHHNFgUUFf/+E0EXMokHSqqOzwf4t8xp4upnnS/7ag5MIVcU5/iWGW4sDEw7xfB25zD4lbvVK5kSZeWLgm79wMipKP90iEELPqO6cS2yPXd+ADfHs7FWPQW0UYGFeMnHa/tlglO5Pxo7ek2iR57mazmx33cofIX6E/ZI9XLysp5TR6Npq1x8KCv2Dk2x3QSH8F54EQmQ2+5uDsPA9Hg1B+agkBh/1g3tfevT01cCtUkQGl2ubhrNGB2SiiyKgw9Ks0AL3TO0ulD69D18r6Y6s3pHQ9LYAs6EIq3/5dqNYW8eLQ5eINUIlHBp9ep8+quyqSfB3qPCBWDb+qI09pYhkTrGBD8l5eQqs1T1h2gJsY2yyYV/Cp2m4fI+uHItCgSlkPROnj27Xhp6HAPaFA0zWOz1lmVNYhTbJZlbbwYyf/OKmYuOklSuQ=-----END RSA PRIVATE KEY-----
c. Enter this command:mydesktop$ cat id_rsa.pub
An example system response is:ssh-rsaAAB3NzaC1yc2EAAAABIwAAAIEA9xjGJ+8DLrxSQfVxXYUx4lc9copCG4HwD3TLO5ifezBQx0e9UnIWNFi4Xan3S8mYd6L+TfCJkVZ+YplLAe367/vhc1nDzfNRPJ95YnATefjYEa48lElu7uq1uofM+sZ/b0p7fIWvIRRbuEDWHHUmneoX8U/ptKFZzRpb/vTE6nE= root@ps0701
3. After the key is generated, convert the public key for use on the Tectia SSHserver.
90 IBM Security Identity Manager: UNIX and Linux Adapter Installation and Configuration Guide
|||
||
||
|
|
|
|
||||
|||
|
|
||
|
||
|
|
|
|||||||||||||||||
|
|
|
||||
||
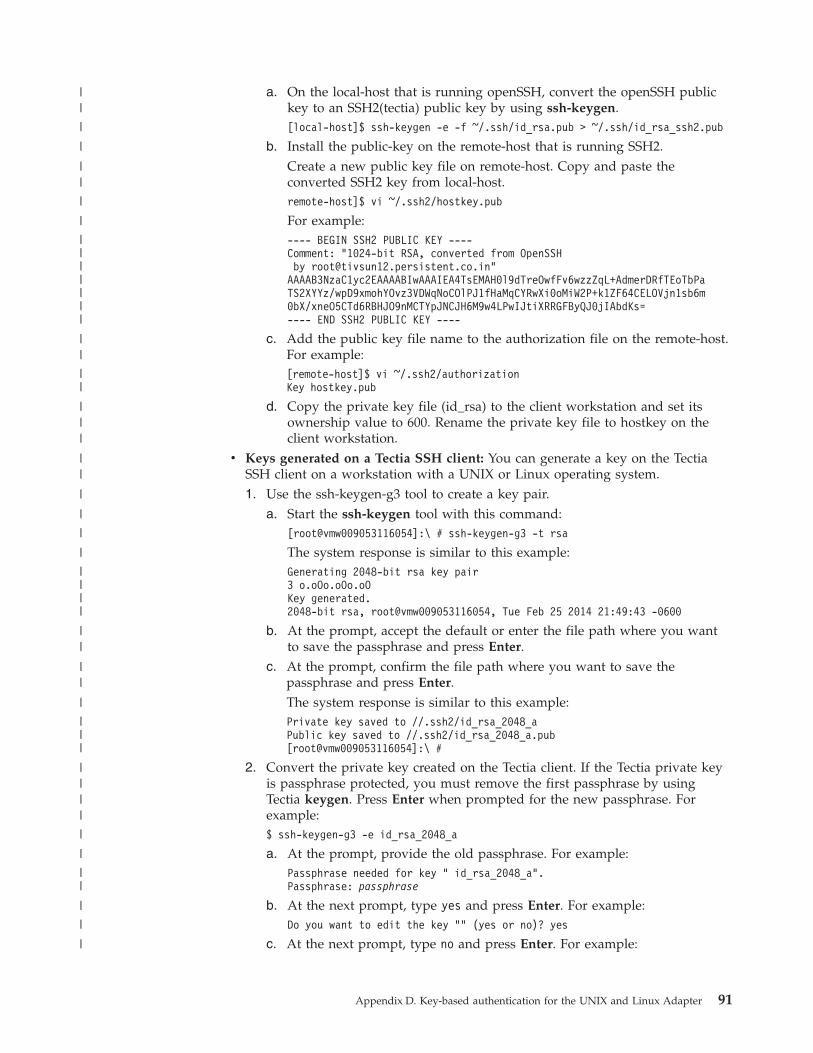
a. On the local-host that is running openSSH, convert the openSSH publickey to an SSH2(tectia) public key by using ssh-keygen.[local-host]$ ssh-keygen -e -f ~/.ssh/id_rsa.pub > ~/.ssh/id_rsa_ssh2.pub
b. Install the public-key on the remote-host that is running SSH2.Create a new public key file on remote-host. Copy and paste theconverted SSH2 key from local-host.remote-host]$ vi ~/.ssh2/hostkey.pub
For example:---- BEGIN SSH2 PUBLIC KEY ----Comment: "1024-bit RSA, converted from OpenSSHby [email protected]"AAAAB3NzaC1yc2EAAAABIwAAAIEA4TsEMAH0l9dTreOwfFv6wzzZqL+AdmerDRfTEoTbPaTS2XYYz/wpD9xmohYOvz3VDWqNoCOlPJ1fHaMqCYRwXi0oMiW2P+k1ZF64CELOVjn1sb6m0bX/xneO5CTd6RBHJO9nMCTYpJNCJH6M9w4LPwIJtiXRRGFByQJ0jIAbdKs=---- END SSH2 PUBLIC KEY ----
c. Add the public key file name to the authorization file on the remote-host.For example:[remote-host]$ vi ~/.ssh2/authorizationKey hostkey.pub
d. Copy the private key file (id_rsa) to the client workstation and set itsownership value to 600. Rename the private key file to hostkey on theclient workstation.
v Keys generated on a Tectia SSH client: You can generate a key on the TectiaSSH client on a workstation with a UNIX or Linux operating system.1. Use the ssh-keygen-g3 tool to create a key pair.
a. Start the ssh-keygen tool with this command:[root@vmw009053116054]:\ # ssh-keygen-g3 -t rsa
The system response is similar to this example:Generating 2048-bit rsa key pair3 o.oOo.oOo.oOKey generated.2048-bit rsa, root@vmw009053116054, Tue Feb 25 2014 21:49:43 -0600
b. At the prompt, accept the default or enter the file path where you wantto save the passphrase and press Enter.
c. At the prompt, confirm the file path where you want to save thepassphrase and press Enter.The system response is similar to this example:Private key saved to //.ssh2/id_rsa_2048_aPublic key saved to //.ssh2/id_rsa_2048_a.pub[root@vmw009053116054]:\ #
2. Convert the private key created on the Tectia client. If the Tectia private keyis passphrase protected, you must remove the first passphrase by usingTectia keygen. Press Enter when prompted for the new passphrase. Forexample:$ ssh-keygen-g3 -e id_rsa_2048_a
a. At the prompt, provide the old passphrase. For example:Passphrase needed for key " id_rsa_2048_a".Passphrase: passphrase
b. At the next prompt, type yes and press Enter. For example:Do you want to edit the key "" (yes or no)? yes
c. At the next prompt, type no and press Enter. For example:
Appendix D. Key-based authentication for the UNIX and Linux Adapter 91
||
|
|
||
|
|
|||||||
||
||
|||
||
|
|
|
|
||||
||
||
|
|||
||||
|
|
||
|
|
|
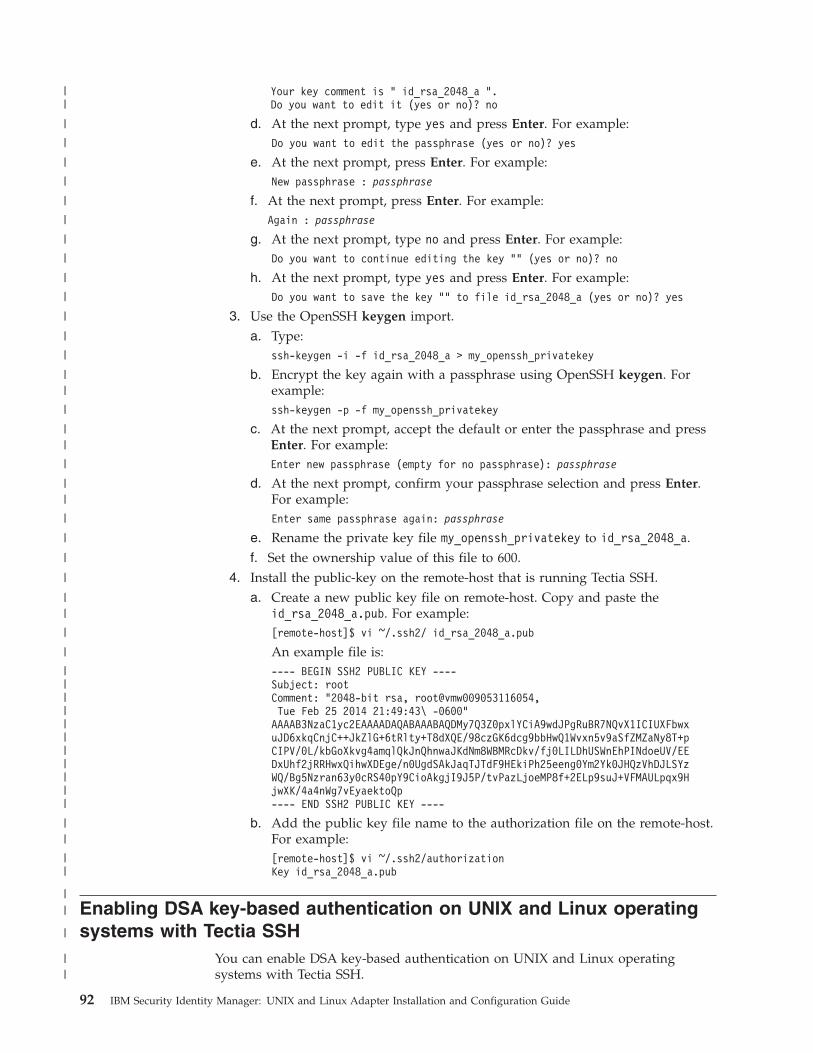
Your key comment is " id_rsa_2048_a ".Do you want to edit it (yes or no)? no
d. At the next prompt, type yes and press Enter. For example:Do you want to edit the passphrase (yes or no)? yes
e. At the next prompt, press Enter. For example:New passphrase : passphrase
f. At the next prompt, press Enter. For example:Again : passphrase
g. At the next prompt, type no and press Enter. For example:Do you want to continue editing the key "" (yes or no)? no
h. At the next prompt, type yes and press Enter. For example:Do you want to save the key "" to file id_rsa_2048_a (yes or no)? yes
3. Use the OpenSSH keygen import.a. Type:
ssh-keygen -i -f id_rsa_2048_a > my_openssh_privatekey
b. Encrypt the key again with a passphrase using OpenSSH keygen. Forexample:ssh-keygen -p -f my_openssh_privatekey
c. At the next prompt, accept the default or enter the passphrase and pressEnter. For example:Enter new passphrase (empty for no passphrase): passphrase
d. At the next prompt, confirm your passphrase selection and press Enter.For example:Enter same passphrase again: passphrase
e. Rename the private key file my_openssh_privatekey to id_rsa_2048_a.f. Set the ownership value of this file to 600.
4. Install the public-key on the remote-host that is running Tectia SSH.a. Create a new public key file on remote-host. Copy and paste the
id_rsa_2048_a.pub. For example:[remote-host]$ vi ~/.ssh2/ id_rsa_2048_a.pub
An example file is:---- BEGIN SSH2 PUBLIC KEY ----Subject: rootComment: "2048-bit rsa, root@vmw009053116054,Tue Feb 25 2014 21:49:43\ -0600"AAAAB3NzaC1yc2EAAAADAQABAAABAQDMy7Q3Z0pxlYCiA9wdJPgRuBR7NQvX1ICIUXFbwxuJD6xkqCnjC++JkZlG+6tRlty+T8dXQE/98czGK6dcg9bbHwQ1Wvxn5v9aSfZMZaNy8T+pCIPV/0L/kbGoXkvg4amqlQkJnQhnwaJKdNm8WBMRcDkv/fj0LILDhUSWnEhPINdoeUV/EEDxUhf2jRRHwxQihwXDEge/n0UgdSAkJaqTJTdF9HEkiPh25eeng0Ym2Yk0JHQzVhDJLSYzWQ/Bg5Nzran63y0cRS40pY9CioAkgjI9J5P/tvPazLjoeMP8f+2ELp9suJ+VFMAULpqx9HjwXK/4a4nWg7vEyaektoQp---- END SSH2 PUBLIC KEY ----
b. Add the public key file name to the authorization file on the remote-host.For example:[remote-host]$ vi ~/.ssh2/authorizationKey id_rsa_2048_a.pub
Enabling DSA key-based authentication on UNIX and Linux operatingsystems with Tectia SSH
You can enable DSA key-based authentication on UNIX and Linux operatingsystems with Tectia SSH.
92 IBM Security Identity Manager: UNIX and Linux Adapter Installation and Configuration Guide
||
|
|
|
|
|
|
|
|
|
|
|
|
|
||
|
||
|
||
|
|
|
|
||
|
|
|||||||||||
||
||
||
|
||

About this task
These instructions assume that the client user is allowed to log in to the remotehost, where the Tectia Server is running, and using password authentication.Ensure that public-key authentication is enabled (the default) in thessh-broker-config.xml and ssh-server-config.xml file. For example:<authentication-methods>
<auth-publickey />...
</authentication-methods>
Keybased authentication can be done using keys generated on an OpenSSH clientor Tectia SSH client.
Procedurev Keys generated on an OpenSSH client:
1. Use the ssh-keygen tool to create a key pair.a. Log in as the administrator user defined on the IBM Security Identity
Manager service form.b. Start the ssh-keygen tool. Type:
mydesktop$ ssh-keygen -t dsa
c. At the prompt to generate a public/private DSA key pair, accept thedefault or enter the file path where you want to save the key pair andpress Enter. For example:Generating public/private dsa key pair.Enter the file in which to save the key (/home/root/.ssh/id_dsa):
d. At the prompt to enter a passphrase, accept the default or enter thepassphrase and press Enter. For example:Enter the passphrase (empty for no passphrase): passphrase
e. Confirm your passphrase selection and press Enter. For example:Enter same passphrase again: passphrase
The system response is similar to this example:Your identification has been saved in /home/root/.ssh/id_dsa.Your public key has been saved in /home/root/.ssh/id_dsa.pub.The key fingerprint is:9e:6c:0e:e3:d9:4f:37:f1:dd:34:fc:20:36:67:b2:[email protected]
Note: Although the ssh-keygen tool accepts a blank passphrase, thepassphrase is required on the IBM Security Identity Manager serviceform.
2. Validate that the keys were generated.a. Enter these commands:
mydesktop$ cd $HOME/.sshmydesktop$ ls -l
An example system response is:-rw------- 1 root root 883 Jan 21 11:52 id_dsa-rw-r--r-- 1 root root 223 Jan 21 11:52 id_dsa.pub
b. Enter this command:mydesktop$ cat id_dsa
An example system response is:
Appendix D. Key-based authentication for the UNIX and Linux Adapter 93
|
||||
||||
||
|
|
|
||
|
|
|||
||
||
|
|
|
|
|||||
|||
|
|
||
|
||
|
|
|
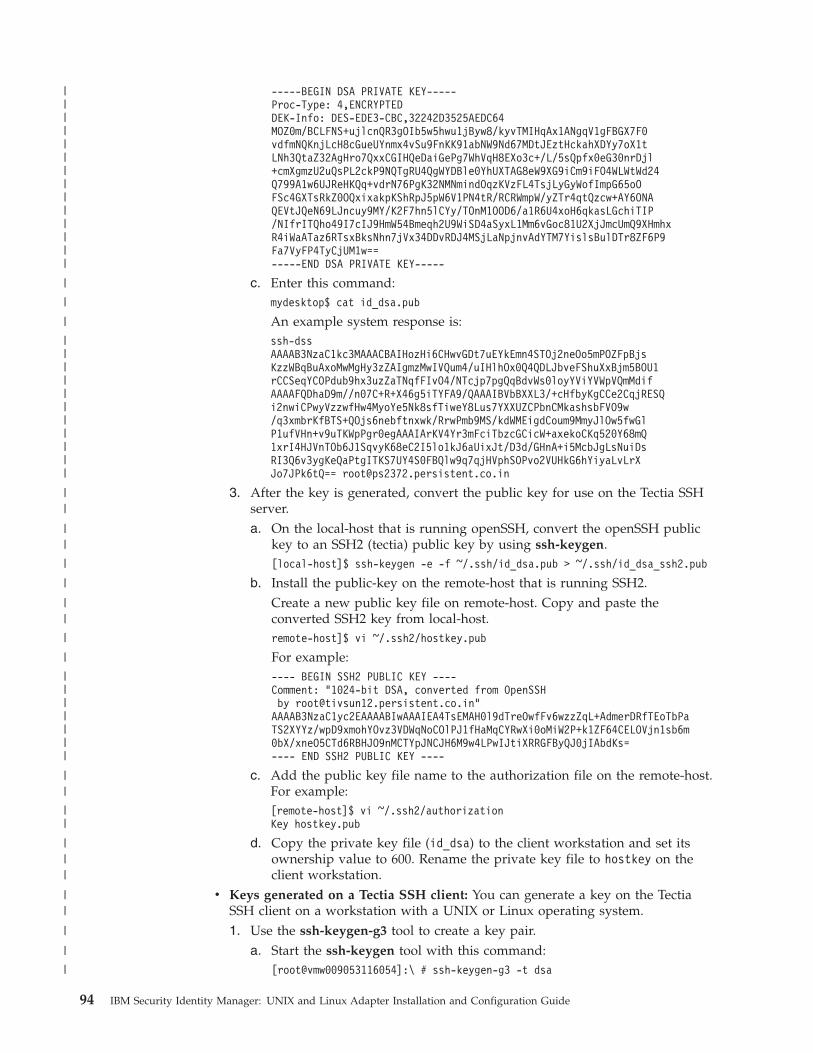
-----BEGIN DSA PRIVATE KEY-----Proc-Type: 4,ENCRYPTEDDEK-Info: DES-EDE3-CBC,32242D3525AEDC64MOZ0m/BCLFNS+ujlcnQR3gOIb5w5hwu1jByw8/kyvTMIHqAx1ANgqV1gFBGX7F0vdfmNQKnjLcH8cGueUYnmx4vSu9FnKK91abNW9Nd67MDtJEztHckahXDYy7oX1tLNh3QtaZ32AgHro7QxxCGIHQeDaiGePg7WhVqH8EXo3c+/L/5sQpfx0eG30nrDjl+cmXgmzU2uQsPL2ckP9NQTgRU4QgWYDBle0YhUXTAG8eW9XG9iCm9iFO4WLWtWd24Q799A1w6UJReHKQq+vdrN76PgK32NMNmindOqzKVzFL4TsjLyGyWofImpG65oOFSc4GXTsRkZ0OQxixakpKShRpJ5pW6V1PN4tR/RCRWmpW/yZTr4qtQzcw+AY6ONAQEVtJQeN69LJncuy9MY/K2F7hn5lCYy/TOnM1OOD6/a1R6U4xoH6qkasLGchiTIP/NIfrITQho49I7cIJ9HmW54Bmeqh2U9WiSD4aSyxL1Mm6vGoc81U2XjJmcUmQ9XHmhxR4iWaATaz6RTsxBksNhn7jVx34DDvRDJ4MSjLaNpjnvAdYTM7YislsBulDTr8ZF6P9Fa7VyFP4TyCjUM1w==-----END DSA PRIVATE KEY-----
c. Enter this command:mydesktop$ cat id_dsa.pub
An example system response is:ssh-dssAAAAB3NzaC1kc3MAAACBAIHozHi6CHwvGDt7uEYkEmn4STOj2neOo5mPOZFpBjsKzzWBqBuAxoMwMgHy3zZAIgmzMwIVQum4/uIHlhOx0Q4QDLJbveFShuXxBjm5BOU1rCCSeqYCOPdub9hx3uzZaTNqfFIvO4/NTcjp7pgQqBdvWs0loyYViYVWpVQmMdifAAAAFQDhaD9m//n07C+R+X46g5iTYFA9/QAAAIBVbBXXL3/+cHfbyKgCCe2CqjRESQi2nwiCPwyVzzwfHw4MyoYe5Nk8sfTiweY8Lus7YXXUZCPbnCMkashsbFVO9w/q3xmbrKfBTS+QOjs6nebftnxwk/RrwPmb9MS/kdWMEigdCoum9MmyJlOw5fwGlP1ufVHn+v9uTKWpPgr0egAAAIArKV4Yr3mFciTbzcGCicW+axekoCKq520Y68mQ1xrI4HJVnTOb6J1SqvyK68eC2I5lo1kJ6aUixJt/D3d/GHnA+i5McbJgLsNuiDsRI3Q6v3ygKeQaPtgITKS7UY4S0FBQlw9q7qjHVphSOPvo2VUHkG6hYiyaLvLrXJo7JPk6tQ== [email protected]
3. After the key is generated, convert the public key for use on the Tectia SSHserver.a. On the local-host that is running openSSH, convert the openSSH public
key to an SSH2 (tectia) public key by using ssh-keygen.[local-host]$ ssh-keygen -e -f ~/.ssh/id_dsa.pub > ~/.ssh/id_dsa_ssh2.pub
b. Install the public-key on the remote-host that is running SSH2.Create a new public key file on remote-host. Copy and paste theconverted SSH2 key from local-host.remote-host]$ vi ~/.ssh2/hostkey.pub
For example:---- BEGIN SSH2 PUBLIC KEY ----Comment: "1024-bit DSA, converted from OpenSSHby [email protected]"AAAAB3NzaC1yc2EAAAABIwAAAIEA4TsEMAH0l9dTreOwfFv6wzzZqL+AdmerDRfTEoTbPaTS2XYYz/wpD9xmohYOvz3VDWqNoCOlPJ1fHaMqCYRwXi0oMiW2P+k1ZF64CELOVjn1sb6m0bX/xneO5CTd6RBHJO9nMCTYpJNCJH6M9w4LPwIJtiXRRGFByQJ0jIAbdKs=---- END SSH2 PUBLIC KEY ----
c. Add the public key file name to the authorization file on the remote-host.For example:[remote-host]$ vi ~/.ssh2/authorizationKey hostkey.pub
d. Copy the private key file (id_dsa) to the client workstation and set itsownership value to 600. Rename the private key file to hostkey on theclient workstation.
v Keys generated on a Tectia SSH client: You can generate a key on the TectiaSSH client on a workstation with a UNIX or Linux operating system.1. Use the ssh-keygen-g3 tool to create a key pair.
a. Start the ssh-keygen tool with this command:[root@vmw009053116054]:\ # ssh-keygen-g3 -t dsa
94 IBM Security Identity Manager: UNIX and Linux Adapter Installation and Configuration Guide
||||||||||||||
|
|
|
|||||||||||
||
||
|
|
||
|
|
|||||||
||
||
|||
||
|
|
|
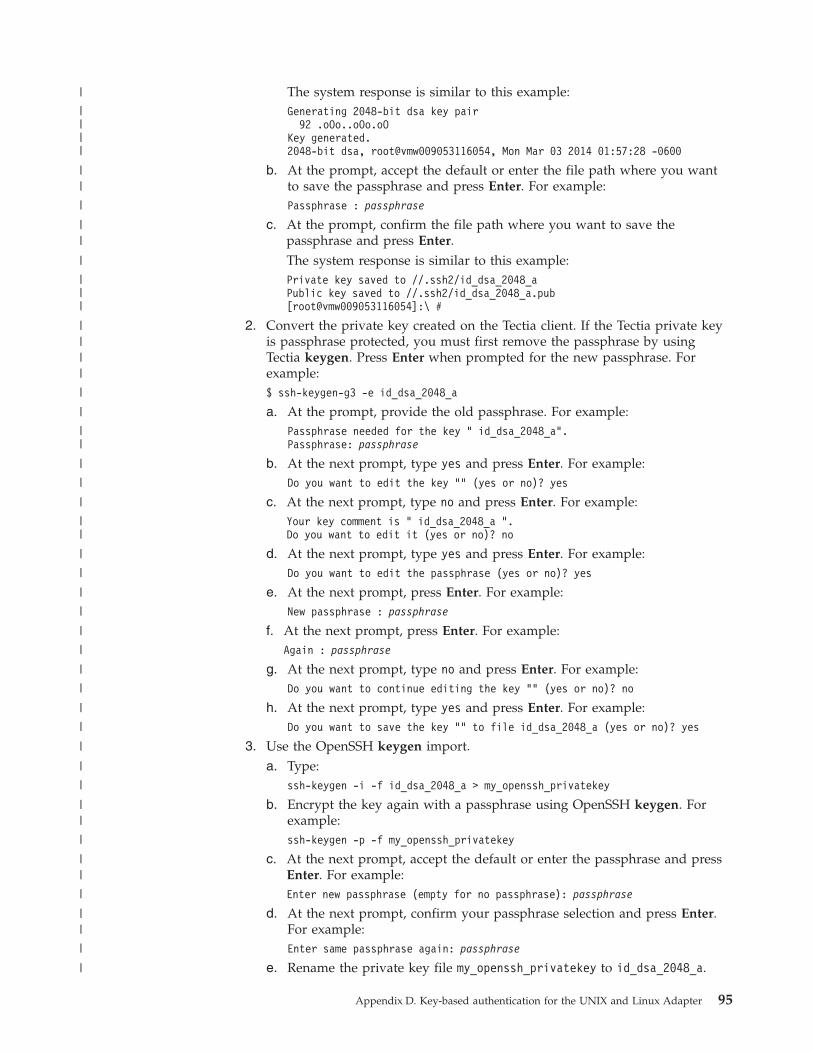
The system response is similar to this example:Generating 2048-bit dsa key pair
92 .oOo..oOo.oOKey generated.2048-bit dsa, root@vmw009053116054, Mon Mar 03 2014 01:57:28 -0600
b. At the prompt, accept the default or enter the file path where you wantto save the passphrase and press Enter. For example:Passphrase : passphrase
c. At the prompt, confirm the file path where you want to save thepassphrase and press Enter.The system response is similar to this example:Private key saved to //.ssh2/id_dsa_2048_aPublic key saved to //.ssh2/id_dsa_2048_a.pub[root@vmw009053116054]:\ #
2. Convert the private key created on the Tectia client. If the Tectia private keyis passphrase protected, you must first remove the passphrase by usingTectia keygen. Press Enter when prompted for the new passphrase. Forexample:$ ssh-keygen-g3 -e id_dsa_2048_a
a. At the prompt, provide the old passphrase. For example:Passphrase needed for the key " id_dsa_2048_a".Passphrase: passphrase
b. At the next prompt, type yes and press Enter. For example:Do you want to edit the key "" (yes or no)? yes
c. At the next prompt, type no and press Enter. For example:Your key comment is " id_dsa_2048_a ".Do you want to edit it (yes or no)? no
d. At the next prompt, type yes and press Enter. For example:Do you want to edit the passphrase (yes or no)? yes
e. At the next prompt, press Enter. For example:New passphrase : passphrase
f. At the next prompt, press Enter. For example:Again : passphrase
g. At the next prompt, type no and press Enter. For example:Do you want to continue editing the key "" (yes or no)? no
h. At the next prompt, type yes and press Enter. For example:Do you want to save the key "" to file id_dsa_2048_a (yes or no)? yes
3. Use the OpenSSH keygen import.a. Type:
ssh-keygen -i -f id_dsa_2048_a > my_openssh_privatekey
b. Encrypt the key again with a passphrase using OpenSSH keygen. Forexample:ssh-keygen -p -f my_openssh_privatekey
c. At the next prompt, accept the default or enter the passphrase and pressEnter. For example:Enter new passphrase (empty for no passphrase): passphrase
d. At the next prompt, confirm your passphrase selection and press Enter.For example:Enter same passphrase again: passphrase
e. Rename the private key file my_openssh_privatekey to id_dsa_2048_a.
Appendix D. Key-based authentication for the UNIX and Linux Adapter 95
|
||||
||
|
||
|
|||
||||
|
|
||
|
|
|
||
|
|
|
|
|
|
|
|
|
|
|
|
|
||
|
||
|
||
|
|
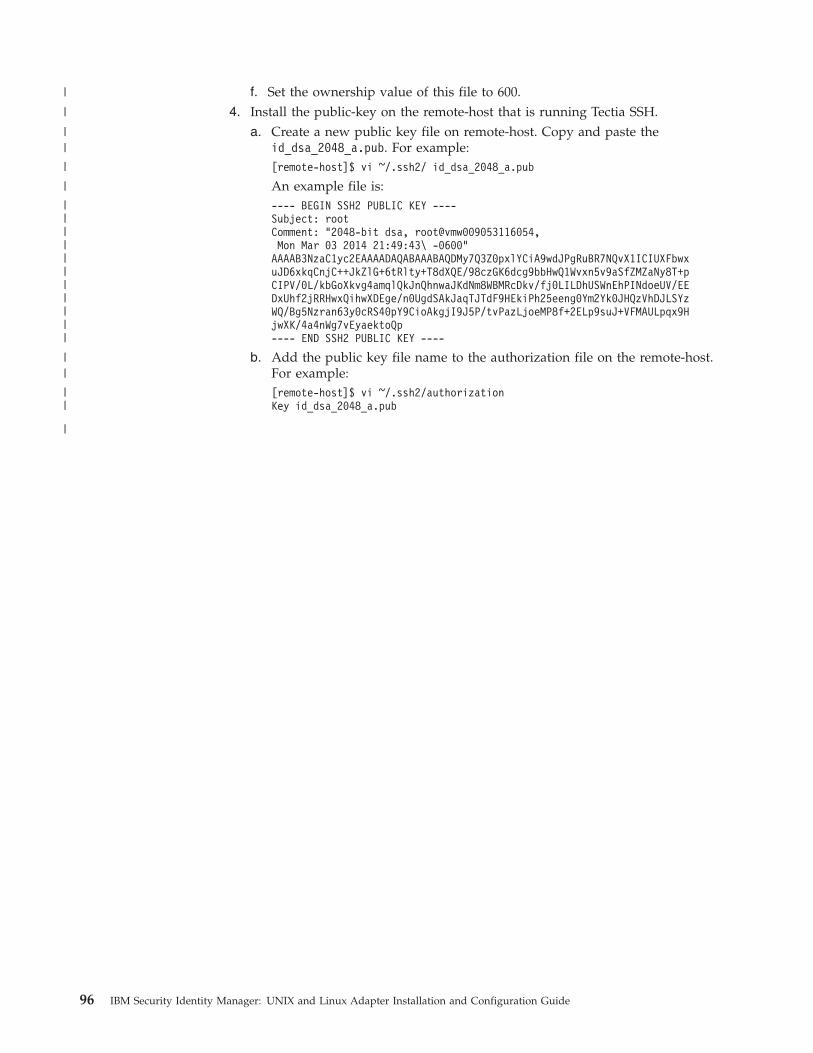
f. Set the ownership value of this file to 600.4. Install the public-key on the remote-host that is running Tectia SSH.
a. Create a new public key file on remote-host. Copy and paste theid_dsa_2048_a.pub. For example:[remote-host]$ vi ~/.ssh2/ id_dsa_2048_a.pub
An example file is:---- BEGIN SSH2 PUBLIC KEY ----Subject: rootComment: "2048-bit dsa, root@vmw009053116054,Mon Mar 03 2014 21:49:43\ -0600"AAAAB3NzaC1yc2EAAAADAQABAAABAQDMy7Q3Z0pxlYCiA9wdJPgRuBR7NQvX1ICIUXFbwxuJD6xkqCnjC++JkZlG+6tRlty+T8dXQE/98czGK6dcg9bbHwQ1Wvxn5v9aSfZMZaNy8T+pCIPV/0L/kbGoXkvg4amqlQkJnQhnwaJKdNm8WBMRcDkv/fj0LILDhUSWnEhPINdoeUV/EEDxUhf2jRRHwxQihwXDEge/n0UgdSAkJaqTJTdF9HEkiPh25eeng0Ym2Yk0JHQzVhDJLSYzWQ/Bg5Nzran63y0cRS40pY9CioAkgjI9J5P/tvPazLjoeMP8f+2ELp9suJ+VFMAULpqx9HjwXK/4a4nWg7vEyaektoQp---- END SSH2 PUBLIC KEY ----
b. Add the public key file name to the authorization file on the remote-host.For example:[remote-host]$ vi ~/.ssh2/authorizationKey id_dsa_2048_a.pub
96 IBM Security Identity Manager: UNIX and Linux Adapter Installation and Configuration Guide
|
|
||
|
|
|||||||||||
||
||
|
Appendix E. Definitions for ITDI_HOME and ISIM_HOMEdirectories
ITDI_HOME is the directory where Tivoli Directory Integrator is installed.ISIM_HOME is the directory where IBM Security Identity Manager is installed.
ITDI_HOMEThis directory contains the jars/connectors subdirectory that contains filesfor the adapters.
Windowsdrive\Program Files\IBM\TDI\ITDI_VERSION
For example the path for version 7.1:C:\Program Files\IBM\TDI\V7.1
UNIX/opt/IBM/TDI/ITDI_VERSION
For example the path for version 7.1:/opt/IBM/TDI/V7.1
ISIM_HOMEThis directory is the base directory that contains the IBM Security IdentityManager code, configuration, and documentation.
Windowspath\IBM\isim
UNIXpath/IBM/isim
© Copyright IBM Corp. 2012, 2014 97

98 IBM Security Identity Manager: UNIX and Linux Adapter Installation and Configuration Guide
Appendix F. Support information
You have several options to obtain support for IBM products.v “Searching knowledge bases”v “Obtaining a product fix” on page 100v “Contacting IBM Support” on page 100
Searching knowledge basesYou can often find solutions to problems by searching IBM knowledge bases. Youcan optimize your results by using available resources, support tools, and searchmethods.
About this task
You can find useful information by searching the product documentation for IBMSecurity Identity Manager. However, sometimes you must look beyond the productdocumentation to answer your questions or resolve problems.
Procedure
To search knowledge bases for information that you need, use one or more of thefollowing approaches:1. Search for content by using the IBM Support Assistant (ISA).
ISA is a no-charge software serviceability workbench that helps you answerquestions and resolve problems with IBM software products. You can findinstructions for downloading and installing ISA on the ISA website.
2. Find the content that you need by using the IBM Support Portal.The IBM Support Portal is a unified, centralized view of all technical supporttools and information for all IBM systems, software, and services. The IBMSupport Portal lets you access the IBM electronic support portfolio from oneplace. You can tailor the pages to focus on the information and resources thatyou need for problem prevention and faster problem resolution. Familiarizeyourself with the IBM Support Portal by viewing the demo videos(https://www.ibm.com/blogs/SPNA/entry/the_ibm_support_portal_videos)about this tool. These videos introduce you to the IBM Support Portal, exploretroubleshooting and other resources, and demonstrate how you can tailor thepage by moving, adding, and deleting portlets.
3. Search for content about IBM Security Identity Manager by using one of thefollowing additional technical resources:v IBM Security Identity Manager version 6.0 technotes and APARs (problem
reports).v IBM Security Identity Manager Support website.v IBM Redbooks®.v IBM support communities (forums and newsgroups).
4. Search for content by using the IBM masthead search. You can use the IBMmasthead search by typing your search string into the Search field at the top ofany ibm.com® page.
5. Search for content by using any external search engine, such as Google, Yahoo,or Bing. If you use an external search engine, your results are more likely to
© Copyright IBM Corp. 2012, 2014 99
include information that is outside the ibm.com domain. However, sometimesyou can find useful problem-solving information about IBM products innewsgroups, forums, and blogs that are not on ibm.com.
Tip: Include “IBM” and the name of the product in your search if you arelooking for information about an IBM product.
Obtaining a product fixA product fix might be available to resolve your problem.
About this task
You can get fixes by following these steps:
Procedure1. Obtain the tools that are required to get the fix. You can obtain product fixes
from the Fix Central Site. See http://www.ibm.com/support/fixcentral/.2. Determine which fix you need.3. Download the fix. Open the download document and follow the link in the
“Download package” section.4. Apply the fix. Follow the instructions in the “Installation Instructions” section
of the download document.
Contacting IBM SupportIBM Support assists you with product defects, answers FAQs, and helps usersresolve problems with the product.
Before you begin
After trying to find your answer or solution by using other self-help options suchas technotes, you can contact IBM Support. Before contacting IBM Support, yourcompany or organization must have an active IBM software subscription andsupport contract, and you must be authorized to submit problems to IBM. Forinformation about the types of available support, see the Support portfolio topic inthe “Software Support Handbook”.
Procedure
To contact IBM Support about a problem:1. Define the problem, gather background information, and determine the severity
of the problem. For more information, see the Getting IBM support topic in theSoftware Support Handbook.
2. Gather diagnostic information.3. Submit the problem to IBM Support in one of the following ways:
v Using IBM Support Assistant (ISA):Any data that has been collected can be attached to the service request.Using ISA in this way can expedite the analysis and reduce the time toresolution.a. Download and install the ISA tool from the ISA website. See
http://www.ibm.com/software/support/isa/.b. Open ISA.
100 IBM Security Identity Manager: UNIX and Linux Adapter Installation and Configuration Guide
c. Click Collection and Send Data.d. Click the Service Requests tab.e. Click Open a New Service Request.
v Online through the IBM Support Portal: You can open, update, and view allof your service requests from the Service Request portlet on the ServiceRequest page.
v By telephone for critical, system down, or severity 1 issues: For the telephonenumber to call in your region, see the Directory of worldwide contacts webpage.
Results
If the problem that you submit is for a software defect or for missing or inaccuratedocumentation, IBM Support creates an Authorized Program Analysis Report(APAR). The APAR describes the problem in detail. Whenever possible, IBMSupport provides a workaround that you can implement until the APAR isresolved and a fix is delivered. IBM publishes resolved APARs on the IBM Supportwebsite daily, so that other users who experience the same problem can benefitfrom the same resolution.
Appendix F. Support information 101

102 IBM Security Identity Manager: UNIX and Linux Adapter Installation and Configuration Guide
Appendix G. Accessibility features for IBM Security IdentityManager
Accessibility features help users who have a disability, such as restricted mobilityor limited vision, to use information technology products successfully.
Accessibility features
The following list includes the major accessibility features in IBM Security IdentityManager.v Support for the Freedom Scientific JAWS screen reader applicationv Keyboard-only operationv Interfaces that are commonly used by screen readersv Keys that are discernible by touch but do not activate just by touching themv Industry-standard devices for ports and connectorsv The attachment of alternative input and output devices
The IBM Security Identity Manager library, and its related publications, areaccessible.
Keyboard navigation
This product uses standard Microsoft Windows navigation keys.
Related accessibility information
The following keyboard navigation and accessibility features are available in theform designer:v You can use the tab keys and arrow keys to move between the user interface
controls.v You can use the Home, End, Page Up, and Page Down keys for more
navigation.v You can launch any applet, such as the form designer applet, in a separate
window to enable the Alt+Tab keystroke to toggle between that applet and theweb interface, and also to use more screen workspace. To launch the window,click Launch as a separate window.
v You can change the appearance of applets such as the form designer by usingthemes, which provide high contrast color schemes that help users with visionimpairments to differentiate between controls.
IBM and accessibility
See the IBM Human Ability and Accessibility Center For more information aboutthe commitment that IBM has to accessibility.
© Copyright IBM Corp. 2012, 2014 103

104 IBM Security Identity Manager: UNIX and Linux Adapter Installation and Configuration Guide
Notices
This information was developed for products and services offered in the U.S.A.
IBM may not offer the products, services, or features discussed in this document inother countries. Consult your local IBM representative for information on theproducts and services currently available in your area. Any reference to an IBMproduct, program, or service is not intended to state or imply that only that IBMproduct, program, or service may be used. Any functionally equivalent product,program, or service that does not infringe any IBM intellectual property right maybe used instead. However, it is the user's responsibility to evaluate and verify theoperation of any non-IBM product, program, or service.
IBM may have patents or pending patent applications covering subject matterdescribed in this document. The furnishing of this document does not give youany license to these patents. You can send license inquiries, in writing, to:
IBM Director of LicensingIBM CorporationNorth Castle DriveArmonk, NY 10504-1785 U.S.A.
For license inquiries regarding double-byte (DBCS) information, contact the IBMIntellectual Property Department in your country or send inquiries, in writing, to:
Intellectual Property LicensingLegal and Intellectual Property LawIBM Japan, Ltd.19-21, Nihonbashi-Hakozakicho, Chuo-kuTokyo 103-8510, Japan
The following paragraph does not apply to the United Kingdom or any othercountry where such provisions are inconsistent with local law :
INTERNATIONAL BUSINESS MACHINES CORPORATION PROVIDES THISPUBLICATION "AS IS" WITHOUT WARRANTY OF ANY KIND, EITHEREXPRESS OR IMPLIED, INCLUDING, BUT NOT LIMITED TO, THE IMPLIEDWARRANTIES OF NON-INFRINGEMENT, MERCHANTABILITY OR FITNESSFOR A PARTICULAR PURPOSE.
Some states do not allow disclaimer of express or implied warranties in certaintransactions, therefore, this statement might not apply to you.
This information could include technical inaccuracies or typographical errors.Changes are periodically made to the information herein; these changes will beincorporated in new editions of the publication. IBM may make improvementsand/or changes in the product(s) and/or the program(s) described in thispublication at any time without notice.
Any references in this information to non-IBM Web sites are provided forconvenience only and do not in any manner serve as an endorsement of those Websites. The materials at those Web sites are not part of the materials for this IBMproduct and use of those Web sites is at your own risk.
© Copyright IBM Corp. 2012, 2014 105

IBM may use or distribute any of the information you supply in any way itbelieves appropriate without incurring any obligation to you.
Licensees of this program who wish to have information about it for the purposeof enabling: (i) the exchange of information between independently createdprograms and other programs (including this one) and (ii) the mutual use of theinformation which has been exchanged, should contact:
IBM Corporation2Z4A/10111400 Burnet RoadAustin, TX 78758 U.S.A.
Such information may be available, subject to appropriate terms and conditions,including in some cases payment of a fee.
The licensed program described in this document and all licensed materialavailable for it are provided by IBM under terms of the IBM Customer Agreement,IBM International Program License Agreement or any equivalent agreementbetween us.
Any performance data contained herein was determined in a controlledenvironment. Therefore, the results obtained in other operating environments mayvary significantly. Some measurements may have been made on development-levelsystems and there is no guarantee that these measurements will be the same ongenerally available systems. Furthermore, some measurement may have beenestimated through extrapolation. Actual results may vary. Users of this documentshould verify the applicable data for their specific environment.
Information concerning non-IBM products was obtained from the suppliers ofthose products, their published announcements or other publicly available sources.IBM has not tested those products and cannot confirm the accuracy ofperformance, compatibility or any other claims related to non-IBM products.Questions on the capabilities of non-IBM products should be addressed to thesuppliers of those products.
All statements regarding IBM's future direction or intent are subject to change orwithdrawal without notice, and represent goals and objectives only.
This information contains examples of data and reports used in daily businessoperations. To illustrate them as completely as possible, the examples include thenames of individuals, companies, brands, and products. All of these names arefictitious and any similarity to the names and addresses used by an actual businessenterprise is entirely coincidental.
COPYRIGHT LICENSE:
This information contains sample application programs in source language, whichillustrate programming techniques on various operating platforms. You may copy,modify, and distribute these sample programs in any form without payment toIBM, for the purposes of developing, using, marketing or distributing applicationprograms conforming to the application programming interface for the operatingplatform for which the sample programs are written. These examples have notbeen thoroughly tested under all conditions. IBM, therefore, cannot guarantee orimply reliability, serviceability, or function of these programs. You may copy,modify, and distribute these sample programs in any form without payment to
106 IBM Security Identity Manager: UNIX and Linux Adapter Installation and Configuration Guide
IBM for the purposes of developing, using, marketing, or distributing applicationprograms conforming to IBM's application programming interfaces.
Each copy or any portion of these sample programs or any derivative work, mustinclude a copyright notice as follows:
If you are viewing this information softcopy, the photographs and colorillustrations might not appear.
© (your company name) (year). Portions of this code are derived from IBM Corp.Sample Programs. © Copyright IBM Corp. _enter the year or years_. All rightsreserved.
If you are viewing this information in softcopy form, the photographs and colorillustrations might not be displayed.
Trademarks
IBM, the IBM logo, and ibm.com are trademarks or registered trademarks ofInternational Business Machines Corp., registered in many jurisdictions worldwide.Other product and service names might be trademarks of IBM or other companies.A current list of IBM trademarks is available on the Web at "Copyright andtrademark information" at http://www.ibm.com/legal/copytrade.shtml.
Adobe, Acrobat, PostScript and all Adobe-based trademarks are either registeredtrademarks or trademarks of Adobe Systems Incorporated in the United States,other countries, or both.
IT Infrastructure Library is a registered trademark of the Central Computer andTelecommunications Agency which is now part of the Office of GovernmentCommerce.
Intel, Intel logo, Intel Inside, Intel Inside logo, Intel Centrino, Intel Centrino logo,Celeron, Intel Xeon, Intel SpeedStep, Itanium, and Pentium are trademarks orregistered trademarks of Intel Corporation or its subsidiaries in the United Statesand other countries.
Linux is a trademark of Linus Torvalds in the United States, other countries, orboth.
Microsoft, Windows, Windows NT, and the Windows logo are trademarks ofMicrosoft Corporation in the United States, other countries, or both.
ITIL is a registered trademark, and a registered community trademark of the Officeof Government Commerce, and is registered in the U.S. Patent and TrademarkOffice.
UNIX is a registered trademark of The Open Group in the United States and othercountries.
Cell Broadband Engine and Cell/B.E. are trademarks of Sony ComputerEntertainment, Inc., in the United States, other countries, or both and is used underlicense therefrom.
Notices 107
Java and all Java-based trademarks and logos are trademarks or registeredtrademarks of Oracle and/or its affiliates.
Privacy Policy Considerations
IBM Software products, including software as a service solutions, ("SoftwareOfferings") may use cookies or other technologies to collect product usageinformation, to help improve the end user experience, and to tailor interactionswith the end user or for other purposes. In many cases, no personally identifiableinformation is collected by the Software Offerings. Some of our Software Offeringscan help enable you to collect personally identifiable information. If this SoftwareOffering uses cookies to collect personally identifiable information, specificinformation about this offering’s use of cookies is set forth below.
This Software Offering does not use cookies or other technologies to collectpersonally identifiable information.
If the configurations deployed for this Software Offering provide you as customerthe ability to collect personally identifiable information from end users via cookiesand other technologies, you should seek your own legal advice about any lawsapplicable to such data collection, including any requirements for notice andconsent.
For more information about the use of various technologies, including cookies, forthese purposes, see IBM's Privacy Policy at http://www.ibm.com/privacy andIBM’s Online Privacy Statement at http://www.ibm.com/privacy/details/us/ensections entitled "Cookies, Web Beacons and Other Technologies and SoftwareProducts and Software-as-a Service".
108 IBM Security Identity Manager: UNIX and Linux Adapter Installation and Configuration Guide
Index
Aaccessibility x, 103account
changing 67creating 67deleting 67for adapters 13last access attribute, Solaris 35no password 36password management 38restoring 68suspending 67
account formattributes 57descriptions 57home directory permissions 30, 31permissions 57
adapter ixattributes 57attributes, by actions 66configuration 23customization steps 23feature customization 28features 1installation 9
verifying 39installation worksheet 8maximum connection count 27overview 1reinstalling 55script locations 32silent installation 21silent uninstallation 22SSH remote connection 13supported configurations 2uninstallation 53user accounts, creating 13user management automation 1
adapter attributesrestoring accounts 38, 68suspend accounts 67
adapter installationDispatcher requirement 9troubleshooting errors 41verifying 10warnings 41
adapter profilecustomization 23importing 11, 51objects that reference 53operating system differences 23password management 38removal 53upgrading 11, 51verifying 12
adaptersupgrade 51
administration tasks, as super user 73AIX operating systems
creating a user 73super user 73
attributesadapter, by action 66erPosixHomeDir 30, 31erPosixReconScriptLocation 33for the adapter 57for the group form
permissions 66supported operating systems 66
password prompt 29permissions, group form 66
authenticationDSA key pairs 87, 93key-based 85OpenSSH options 85RSA key pairs 85, 89
BBASE DIRECTORY 28
Ccharacter support, non-English
locales 32commands
AIX operating systems, creating auser 73
for setting up sudo 79HP-UX NonTrusted operating
systems, creating a user 76HP-UX Trusted operating systems,
creating a user 78Linux operating systems, creating a
user 74Solaris operating systems, creating a
user 75configuration
adapter 23multiple servers 2single server 2supported 2
connectivity between server, resource ixconnector
installation 71upgrades 51
creatingDSA key pairs 87, 93home directory 28RSA key pairs 85, 89services 14
custom scripts, reconciling 33customization
adapter features 28adapter profile 23password prompt attribute 29
Ddefault setting, silent mode 21deleted user, ending user processes 34
directory integrator, uninstalling theadapter 53
dispatcher 1installation 9upgrade 51
download, software 8DSA key pairs, creating 87, 93
Eeducation xending user processes 34erPosixDelUserInUse 34erPosixHomeDir attribute 30, 31erPosixReconScriptLocation 33error messages 43
Ffeatures
adapter 1optional 29
Ggroup
add request 69change request 69delete request 71primary 49
group form attributes 66groupset, secondary 49
Hhome directory
creating 28permissions 30, 31permissions, sudo user 48umask value, sudo user 48
HP-UX NonTrusted operating systemscreating a user 76super user 76
HP-UX Trusted operating systemscreating a user 78super user 78
IIBM
Software Support xSupport Assistant x
IBM Support Assistant 100importing adapter profile 51installation
adapter 9adapter profile 11connector 71Dispatcher requirement 9
© Copyright IBM Corp. 2012, 2014 109

installation (continued)language pack 39on z/OS systems 71planning 5prerequisites 6roadmap 5sequence 5steps after installing adapter 23subsequent tasks 23troubleshooting 46verification
adapter 39verify 10verifying adapter profile 12worksheet 8
installingadapter 9in silent mode 21
internet protocol, IPv6 14IPv6 15ISA 100ISIM_HOME definition 97ITDI_HOME definition 97
Kkey-based authentication 85knowledge bases 99known adapter issues
adding primary group to secondarygroupset 49
Solaris 49SUSE Linux 49
Llanguage pack
installation 39same for adapters and server 39
Linux operating systemscreating a user 74super user 74
locales, non-English 32locations, adapter scripts 32logs
error checking in installer log files 10trace.log file 11
Mmanaged resource, testing connection 68MAX_AGE
HP-UX trusted, non-trusted operatingsystems 48
password restriction 48maximum connection count, adapter 27messages, error and warning 43MIN_AGE
HP-UX trusted, non-trusted operatingsystems 48
password restriction 48MS-DOS ASCII characters 28
Nnotices 105
Oonline
publications ixterminology ix
operating system prerequisites 6optional features 29overriding default settings in silent
mode 21overview ix, 1
Ppassword
age restrictions 48management with adapter profile 38non-login account 36password
MAX_AGE 48MIN_AGE 48
prompt customization 29permissions
/tmp directory 48for the home directory 30, 31reconciliation option for sudo
user 48sudo user 48
posixadapteruninstall.jar file 53preinstallation roadmap 5primary group, addition error for
secondary groupset 49problem-determination xprofile
editing on UNIX or Linux 28publications
accessing online ixlist of ix
Rreconciliation
/tmp directory option for sudouser 48
custom scripts 33restoring accounts 68
reinstallation, adapter 55request
group add 69group change 69group delete 71System Login Add 67System Login Change 67System Login Delete 67System Login Restore 68System Login Suspend 67user account creation 67user account deletion 67user account restore 68user account suspension 67user attribute change 67
restoring accountsattributes for 68
restoring accounts (continued)password requirements 38
roadmapsinstallation 5preinstallation 5
RSA key pairs, creating 85, 89
Sscripts
alternative locations 32custom 33reconciliation 33user-defined 26
searches, customizing passwordprompts 29
secondary groupset, error in addingprimary group 49
servicecreating 14restart 11service form 14start 11stop 11
silent modeadapter installation 21default settings 21installation 21
silent uninstallation, adapter 22software
download 8requirements 6website 8
Solarisaccount, last access attribute 35creating a user 75known adapter issues 49super user 75
sshcommunication with managed
resource 12protocol 12
ssh-keygen 85, 87, 89, 93sudo
adapter user account 13as super user 13commands for setup 79
super user/tmp permissions for reconciliation
option 48administration tasks 73AIX operating systems, creating a
user 73HP-UX NonTrusted operating
systems, creating a user 76HP-UX Trusted operating systems,
creating a user 78Linux operating systems, creating a
user 74Solaris operating systems, creating a
user 75support contact information 100supported configurations
adapter 2overview 2
SUSE Linux, known adapter issues 49
110 IBM Security Identity Manager: UNIX and Linux Adapter Installation and Configuration Guide
suspended user, ending activesessions 34
suspending accounts, attributes for 67System Login Add request 67System Login Change request 67System Login Delete request 67System Login Restore request 68System Login Suspend request 67
Tterminology ixtest connection to managed resource 68Tivoli Directory Integrator connector 1trace.log file 11training xtroubleshooting
contacting support 100default shell 46getting fixes 100identifying problems 41log file searches 46messages 43reconciliation 46searching knowledge bases 99ssh issues 46sudo issues 46support website xtechniques 41
Uuninstalling
adapter from the directoryintegrator 53
in silent mode 22steps 53
upgradingadapter profile 23, 51adapters 51connector 51dispatcher 51
user accountpreviously suspended 68restoring 68
user management automation, adapter 1user session, ending after suspension 34user-defined scripts 26
Vverification
dispatcher installation 9installation 39operating system prerequisites 6operating system requirements 6software prerequisites 6software requirements 6
vi command 28
Wwarning messages 43
Zz/OS systems, installing the adapter 71
Index 111

112 IBM Security Identity Manager: UNIX and Linux Adapter Installation and Configuration Guide


����
Printed in USA
SC27-4426-07