Embed Size (px)
Citation preview
IBM Proventia Network Mail Security System
User GuideVersion 1.5
IBM Internet Security Systems
© Copyright IBM Corporation 2006, 2008.IBM Global ServicesRoute 100Somers, NY 10589U.S.A.
Produced in the United States of America.
All Rights Reserved.
IBM and the IBM logo are trademarks or registered trademarks of International Business Machines Corporation in the United States, other countries, or both. ADDME, Ahead of the threat, BlackICE, Internet Scanner, Proventia, RealSecure, SecurePartner, SecurityFusion, SiteProtector, System Scanner, Virtual Patch, X-Force and X-Press Update are trademarks or registered trademarks of Internet Security Systems, Inc. in the United States, other countries, or both. Internet Security Systems, Inc. is a wholly-owned subsidiary of International Business Machines Corporation.
Microsoft, Windows, and Windows NT are trademarks of Microsoft Corporation in the United States, other countries, or both.
Other company, product and service names may be trademarks or service marks of others.
References in this publication to IBM products or services do not imply that IBM intends to make them available in all countries in which IBM operates.
Disclaimer: The information contained in this document may change without notice, and may have been altered or changed if you have received it from a source other than IBM Internet Security Systems (IBM ISS). Use of this information constitutes acceptance for use in an “AS IS” condition, without warranties of any kind, and any use of this information is at the user’s own risk. IBM Internet Security Systems disclaims all warranties, either expressed or implied, including the warranties of merchantability and fitness for a particular purpose. In no event shall IBM ISS be liable for any damages whatsoever, including direct, indirect, incidental, consequential or special damages, arising from the use or dissemination hereof, even if IBM Internet Security Systems has been advised of the possibility of such damages. Some states do not allow the exclusion or limitation of liability for consequential or incidental damages, so the foregoing limitation may not apply.
Reference herein to any specific commercial products, process, or service by trade name, trademark, manufacturer, or otherwise, does not necessarily constitute or imply its endorsement, recommendation, or favoring by IBM Internet Security Systems. The views and opinions of authors expressed herein do not necessarily state or reflect those of IBM Internet Security Systems, and shall not be used for advertising or product endorsement purposes.
Links and addresses to Internet resources are inspected thoroughly prior to release, but the ever-changing nature of the Internet prevents IBM Internet Security Systems, Inc. from guaranteeing the content or existence of the resource. When possible, the reference contains alternate sites or keywords that could be used to acquire the information by other methods. If you find a broken or inappropriate link, please send an email message with the topic name, link, and its behavior to [email protected].
January 30, 2008
Contents
PrefaceOverview . . . . . . . . . . . . . . . . . . . . . . . . . . . . . . . . . . . . . . . . . . . . . . . . . . . . . . . . . . . . . . . . . . 7How This Guide is Organized . . . . . . . . . . . . . . . . . . . . . . . . . . . . . . . . . . . . . . . . . . . . . . . . . . . . . 8Getting Technical Support . . . . . . . . . . . . . . . . . . . . . . . . . . . . . . . . . . . . . . . . . . . . . . . . . . . . . . . 9
Part I: Getting StartedChapter 1: Introduction to the IBM Proventia Network Mail Security System
Overview . . . . . . . . . . . . . . . . . . . . . . . . . . . . . . . . . . . . . . . . . . . . . . . . . . . . . . . . . . . . . . . . . 13How Mail Security Works (Key Concepts) . . . . . . . . . . . . . . . . . . . . . . . . . . . . . . . . . . . . . . . . . . . 14Configuration Process . . . . . . . . . . . . . . . . . . . . . . . . . . . . . . . . . . . . . . . . . . . . . . . . . . . . . . . . 15Installing License Key Files . . . . . . . . . . . . . . . . . . . . . . . . . . . . . . . . . . . . . . . . . . . . . . . . . . . . . 16
Chapter 2: Initial SetupOverview . . . . . . . . . . . . . . . . . . . . . . . . . . . . . . . . . . . . . . . . . . . . . . . . . . . . . . . . . . . . . . . . . 19Understanding SMTP Mail Routing . . . . . . . . . . . . . . . . . . . . . . . . . . . . . . . . . . . . . . . . . . . . . . . . 20Routing Mode . . . . . . . . . . . . . . . . . . . . . . . . . . . . . . . . . . . . . . . . . . . . . . . . . . . . . . . . . . . . . . 24Connecting to the Appliance for Initial Setup . . . . . . . . . . . . . . . . . . . . . . . . . . . . . . . . . . . . . . . . . 25Running Proventia Setup Assistant . . . . . . . . . . . . . . . . . . . . . . . . . . . . . . . . . . . . . . . . . . . . . . . . 28Connecting Appliances to the Network . . . . . . . . . . . . . . . . . . . . . . . . . . . . . . . . . . . . . . . . . . . . . 31Accessing Proventia Manager . . . . . . . . . . . . . . . . . . . . . . . . . . . . . . . . . . . . . . . . . . . . . . . . . . . 33Verifying Network Connectivity and SMTP Settings . . . . . . . . . . . . . . . . . . . . . . . . . . . . . . . . . . . . . 35Managing Passwords . . . . . . . . . . . . . . . . . . . . . . . . . . . . . . . . . . . . . . . . . . . . . . . . . . . . . . . . . 37
Chapter 3: Configuring SMTP SettingsOverview . . . . . . . . . . . . . . . . . . . . . . . . . . . . . . . . . . . . . . . . . . . . . . . . . . . . . . . . . . . . . . . . . 39Configuring the Firewall to Receive SMTP Traffic. . . . . . . . . . . . . . . . . . . . . . . . . . . . . . . . . . . . . . . 40Configuring SMTP Settings for Incoming Email Messages . . . . . . . . . . . . . . . . . . . . . . . . . . . . . . . . 43Configuring SMTP Settings for Outgoing Email Messages. . . . . . . . . . . . . . . . . . . . . . . . . . . . . . . . . 47Configuring Global Settings for the SMTP Server . . . . . . . . . . . . . . . . . . . . . . . . . . . . . . . . . . . . . . 49Deleting SMTP Log Files . . . . . . . . . . . . . . . . . . . . . . . . . . . . . . . . . . . . . . . . . . . . . . . . . . . . . . . 50Managing Email Messages in the SMTP Store . . . . . . . . . . . . . . . . . . . . . . . . . . . . . . . . . . . . . . . . 51Setting Up Network Clustering. . . . . . . . . . . . . . . . . . . . . . . . . . . . . . . . . . . . . . . . . . . . . . . . . . . 52
Chapter 4: Setting Up Access to End User Accounts for Personal Block/Allow Lists
Overview . . . . . . . . . . . . . . . . . . . . . . . . . . . . . . . . . . . . . . . . . . . . . . . . . . . . . . . . . . . . . . . . . 55Setting Up Access to End User Accounts for Personal Block/Allow Lists . . . . . . . . . . . . . . . . . . . . . . 56Deleting a User from Managing a Personal Block/Allow List . . . . . . . . . . . . . . . . . . . . . . . . . . . . . . 57Deleting a User’s Personal Block/Allow List. . . . . . . . . . . . . . . . . . . . . . . . . . . . . . . . . . . . . . . . . . 58Browsing a Quarantine Store for Blocked Email Messages . . . . . . . . . . . . . . . . . . . . . . . . . . . . . . . . 59Adding Entries to a Personal Block or Allow List . . . . . . . . . . . . . . . . . . . . . . . . . . . . . . . . . . . . . . . 60Deleting an Entry from a Personal Block or Allow List . . . . . . . . . . . . . . . . . . . . . . . . . . . . . . . . . . . 61Changing the Password on a Personal Block/Allow List Account . . . . . . . . . . . . . . . . . . . . . . . . . . . 62Resetting an End User’s Password to Access a Personal Block/Allow List . . . . . . . . . . . . . . . . . . . . . 63Requesting a Quarantine Report on Blocked Email Messages . . . . . . . . . . . . . . . . . . . . . . . . . . . . . . 64Requesting a New Account to Access a Personal Block/Allow List . . . . . . . . . . . . . . . . . . . . . . . . . . 65
3IBM Proventia Network Mail Security System User Guide, Version 1.5
Contents
Part II: ConfigurationChapter 5: Managing Interfaces in Routing Mode
Overview . . . . . . . . . . . . . . . . . . . . . . . . . . . . . . . . . . . . . . . . . . . . . . . . . . . . . . . . . . . . . . . . . 69Configuring Routing Interfaces . . . . . . . . . . . . . . . . . . . . . . . . . . . . . . . . . . . . . . . . . . . . . . . . . . . 70Configuring the External Interface. . . . . . . . . . . . . . . . . . . . . . . . . . . . . . . . . . . . . . . . . . . . . . . . . 72Configuring the Internal Interfaces . . . . . . . . . . . . . . . . . . . . . . . . . . . . . . . . . . . . . . . . . . . . . . . . 74
Chapter 6: Configuring a Mail Security PolicyOverview . . . . . . . . . . . . . . . . . . . . . . . . . . . . . . . . . . . . . . . . . . . . . . . . . . . . . . . . . . . . . . . . . 75About the Mail Security Policy . . . . . . . . . . . . . . . . . . . . . . . . . . . . . . . . . . . . . . . . . . . . . . . . . . . 76Configuring a Mail Security Policy . . . . . . . . . . . . . . . . . . . . . . . . . . . . . . . . . . . . . . . . . . . . . . . . . 79Configuring a Who Object . . . . . . . . . . . . . . . . . . . . . . . . . . . . . . . . . . . . . . . . . . . . . . . . . . . . . . 81Configuring a When Object . . . . . . . . . . . . . . . . . . . . . . . . . . . . . . . . . . . . . . . . . . . . . . . . . . . . . 88Configuring a Condition for a Mail Security Policy . . . . . . . . . . . . . . . . . . . . . . . . . . . . . . . . . . . . . . 89Adding an Analysis Module to a Policy Rule . . . . . . . . . . . . . . . . . . . . . . . . . . . . . . . . . . . . . . . . . . 90Enabling Automated Bayesian Classifier Training. . . . . . . . . . . . . . . . . . . . . . . . . . . . . . . . . . . . . . . 95Setting Up Spam Flow Control . . . . . . . . . . . . . . . . . . . . . . . . . . . . . . . . . . . . . . . . . . . . . . . . . . . 99Configuring an RBL Server . . . . . . . . . . . . . . . . . . . . . . . . . . . . . . . . . . . . . . . . . . . . . . . . . . . . 100About Responses . . . . . . . . . . . . . . . . . . . . . . . . . . . . . . . . . . . . . . . . . . . . . . . . . . . . . . . . . . 101Enabling Alert Logging for System Events . . . . . . . . . . . . . . . . . . . . . . . . . . . . . . . . . . . . . . . . . . 103Configuring Mail Security Policy Advanced Parameters . . . . . . . . . . . . . . . . . . . . . . . . . . . . . . . . . 106
Chapter 7: Managing Email Message StoragesOverview . . . . . . . . . . . . . . . . . . . . . . . . . . . . . . . . . . . . . . . . . . . . . . . . . . . . . . . . . . . . . . . . 109Configuring the Email Message Storages. . . . . . . . . . . . . . . . . . . . . . . . . . . . . . . . . . . . . . . . . . . 110Searching for Email Messages in the Message Store . . . . . . . . . . . . . . . . . . . . . . . . . . . . . . . . . . 112Removing Email Messages from the Email Message Storages . . . . . . . . . . . . . . . . . . . . . . . . . . . . 115Configuring Email Message Tracking. . . . . . . . . . . . . . . . . . . . . . . . . . . . . . . . . . . . . . . . . . . . . . 117
Chapter 8: Activating ReportsOverview . . . . . . . . . . . . . . . . . . . . . . . . . . . . . . . . . . . . . . . . . . . . . . . . . . . . . . . . . . . . . . . . 119Activating Reports from the Appliance . . . . . . . . . . . . . . . . . . . . . . . . . . . . . . . . . . . . . . . . . . . . 120Configuring a Quarantine Report Template . . . . . . . . . . . . . . . . . . . . . . . . . . . . . . . . . . . . . . . . . 121Defining Recipients of a Quarantine Report . . . . . . . . . . . . . . . . . . . . . . . . . . . . . . . . . . . . . . . . . 123Generating Predefined Network Activity Reports . . . . . . . . . . . . . . . . . . . . . . . . . . . . . . . . . . . . . . 124
Chapter 9: Managing and Updating the Appliance with the IBM SiteProtector System
Overview . . . . . . . . . . . . . . . . . . . . . . . . . . . . . . . . . . . . . . . . . . . . . . . . . . . . . . . . . . . . . . . . 125The SiteProtector System Overview . . . . . . . . . . . . . . . . . . . . . . . . . . . . . . . . . . . . . . . . . . . . . . 126Integrating the Appliance with the SiteProtector System . . . . . . . . . . . . . . . . . . . . . . . . . . . . . . . . 128
Part III: MaintenanceChapter 10: Updating the Appliance
Overview . . . . . . . . . . . . . . . . . . . . . . . . . . . . . . . . . . . . . . . . . . . . . . . . . . . . . . . . . . . . . . . . 133Updating the Appliance. . . . . . . . . . . . . . . . . . . . . . . . . . . . . . . . . . . . . . . . . . . . . . . . . . . . . . . 134Configuring Automatic Updates . . . . . . . . . . . . . . . . . . . . . . . . . . . . . . . . . . . . . . . . . . . . . . . . . 136Manually Updating the Appliance . . . . . . . . . . . . . . . . . . . . . . . . . . . . . . . . . . . . . . . . . . . . . . . . 139Rolling Back Updates . . . . . . . . . . . . . . . . . . . . . . . . . . . . . . . . . . . . . . . . . . . . . . . . . . . . . . . . 141Configuring Update Advanced Parameters. . . . . . . . . . . . . . . . . . . . . . . . . . . . . . . . . . . . . . . . . . 142Updating the IBM ISS Filter Database . . . . . . . . . . . . . . . . . . . . . . . . . . . . . . . . . . . . . . . . . . . . . 144Downloading the IBM ISS Filter Database . . . . . . . . . . . . . . . . . . . . . . . . . . . . . . . . . . . . . . . . . . 146
4 IBM Internet Security Systems
Contents
Chapter 11: Backing Up and Restoring the ApplianceOverview . . . . . . . . . . . . . . . . . . . . . . . . . . . . . . . . . . . . . . . . . . . . . . . . . . . . . . . . . . . . . . . . 147Creating and Managing Snapshot Files . . . . . . . . . . . . . . . . . . . . . . . . . . . . . . . . . . . . . . . . . . . . 148Creating or Restoring a System Backup . . . . . . . . . . . . . . . . . . . . . . . . . . . . . . . . . . . . . . . . . . . 150Configuring an FTP Server for Data Backup . . . . . . . . . . . . . . . . . . . . . . . . . . . . . . . . . . . . . . . . . 152Scheduling Administrative Tasks from the Mail Security Policy . . . . . . . . . . . . . . . . . . . . . . . . . . . . 153Backing Up Mail Security Data. . . . . . . . . . . . . . . . . . . . . . . . . . . . . . . . . . . . . . . . . . . . . . . . . . 154Restoring a Backup of Mail Security Data from an FTP Server . . . . . . . . . . . . . . . . . . . . . . . . . . . . 155Reprocessing Failed Database Transactions . . . . . . . . . . . . . . . . . . . . . . . . . . . . . . . . . . . . . . . . 156
Chapter 12: Detecting and Preventing IntrusionsOverview . . . . . . . . . . . . . . . . . . . . . . . . . . . . . . . . . . . . . . . . . . . . . . . . . . . . . . . . . . . . . . . . 157Configuring Intrusion Prevention Protection Settings . . . . . . . . . . . . . . . . . . . . . . . . . . . . . . . . . . . 158Enabling Alerts and Logging for Intrusion Prevention Events . . . . . . . . . . . . . . . . . . . . . . . . . . . . . . 160Managing Quarantine Rules for Intrusions . . . . . . . . . . . . . . . . . . . . . . . . . . . . . . . . . . . . . . . . . . 161Working with the Intrusion Prevention Issue List. . . . . . . . . . . . . . . . . . . . . . . . . . . . . . . . . . . . . . 162
Index . . . . . . . . . . . . . . . . . . . . . . . . . . . . . . . . . . . . . . . . . . . . . . . . . . . . . . . . . . . . . . . . . . . 163
5IBM Proventia Network Mail Security System User Guide, Version 1.5

Contents
6 IBM Internet Security Systems
Preface
Overview
Introduction This guide contains information about configuring and managing the IBM Proventia® Network Mail Security System appliance.
Scope The User Guide for the IBM Proventia® Network Mail Security System appliance helps you configure the appliance and protection features to meet your specific security requirements. It also helps you manage and update the appliance for optimum performance.
Audience This guide is intended for two types of users:
● the Administrator
● the local end user
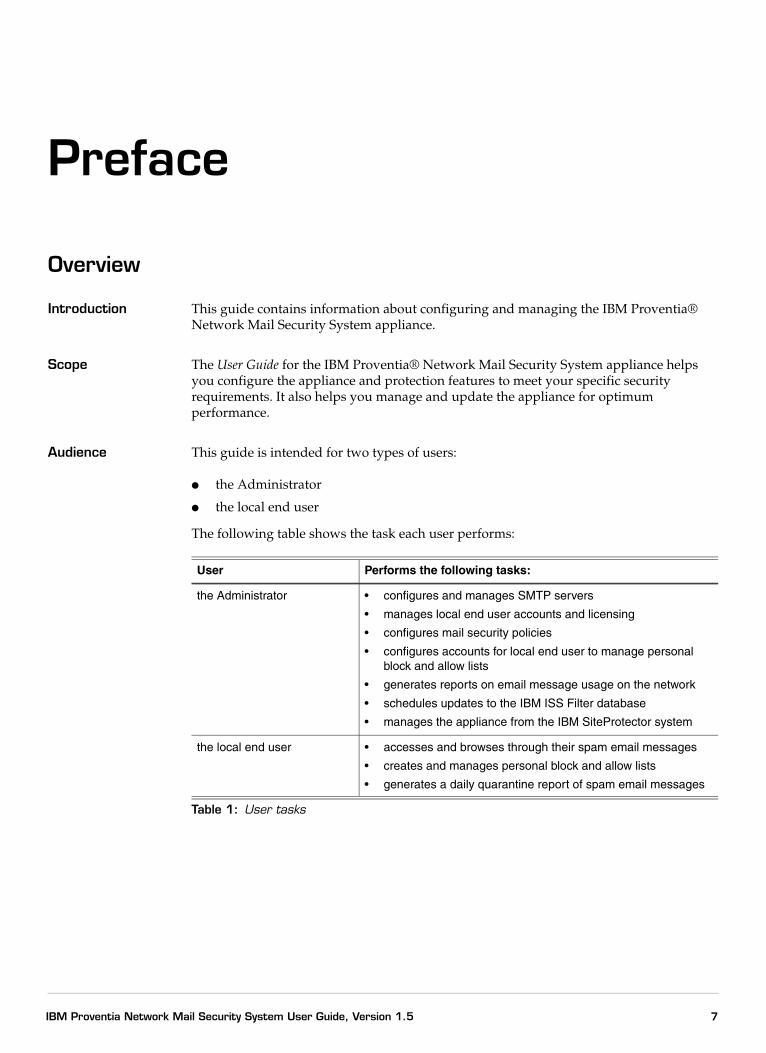
The following table shows the task each user performs:
User Performs the following tasks:
the Administrator • configures and manages SMTP servers
• manages local end user accounts and licensing
• configures mail security policies
• configures accounts for local end user to manage personal block and allow lists
• generates reports on email message usage on the network
• schedules updates to the IBM ISS Filter database
• manages the appliance from the IBM SiteProtector system
the local end user • accesses and browses through their spam email messages
• creates and manages personal block and allow lists
• generates a daily quarantine report of spam email messages
Table 1: User tasks
7IBM Proventia Network Mail Security System User Guide, Version 1.5
How This Guide is Organized
Introduction Documentation for the appliance is available on the IBM ISS Web site at http://www.iss.net/support/documentation/.
Latest information For the latest appliance information, refer to the online help and the readme file for your product.
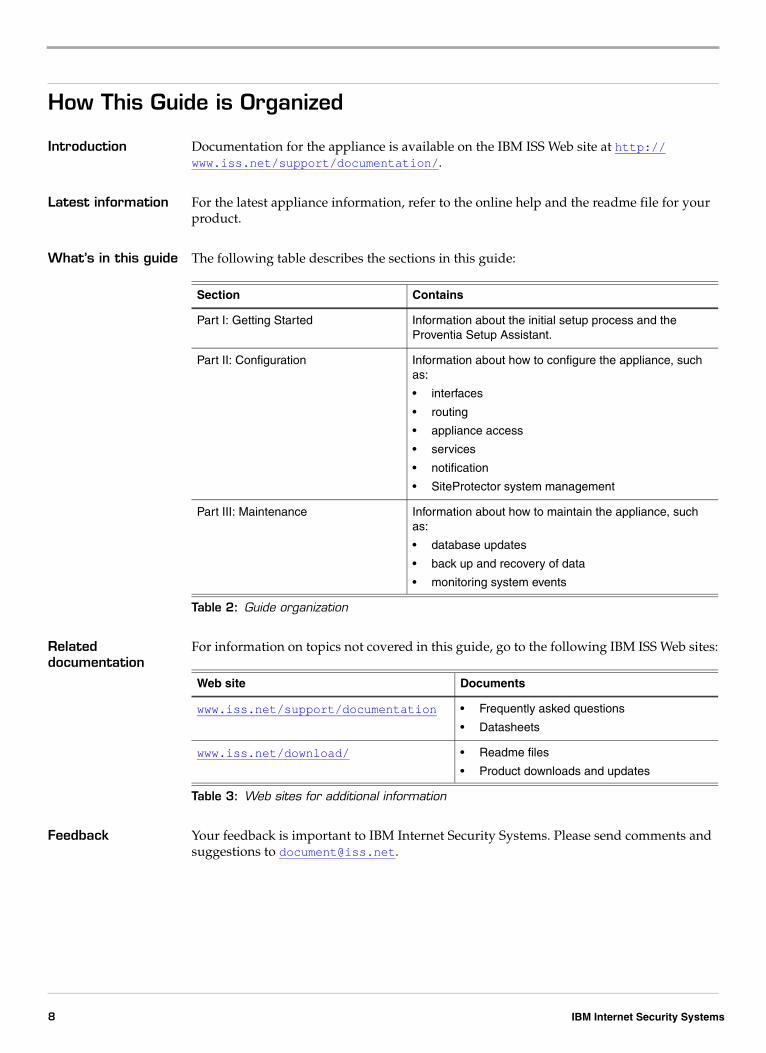
What’s in this guide The following table describes the sections in this guide:
Related documentation
For information on topics not covered in this guide, go to the following IBM ISS Web sites:
Feedback Your feedback is important to IBM Internet Security Systems. Please send comments and suggestions to [email protected].
Section Contains
Part I: Getting Started Information about the initial setup process and the Proventia Setup Assistant.
Part II: Configuration Information about how to configure the appliance, such as:
• interfaces
• routing
• appliance access
• services
• notification
• SiteProtector system management
Part III: Maintenance Information about how to maintain the appliance, such as:
• database updates
• back up and recovery of data
• monitoring system events
Table 2: Guide organization
Web site Documents
www.iss.net/support/documentation • Frequently asked questions
• Datasheets
www.iss.net/download/ • Readme files
• Product downloads and updates
Table 3: Web sites for additional information
8 IBM Internet Security Systems
Getting Technical Support
Getting Technical Support
Introduction IBM ISS provides technical support through its Web site and by email or telephone.
The IBM ISS Web site
The IBM Internet Security Systems (IBM ISS) Resource Center Web site (http://www.iss.net/support/) provides direct access to online user documentation, current versions listings, detailed product literature, white papers, and the Technical Support Knowledgebase.
Support levels IBM ISS offers three levels of support:
● Standard
● Select
● Premium
Each level provides you with 24x7 telephone and electronic support. Select and Premium services provide more features and benefits than the Standard service. Contact Client Services at [email protected] if you do not know the level of support your organization has selected.
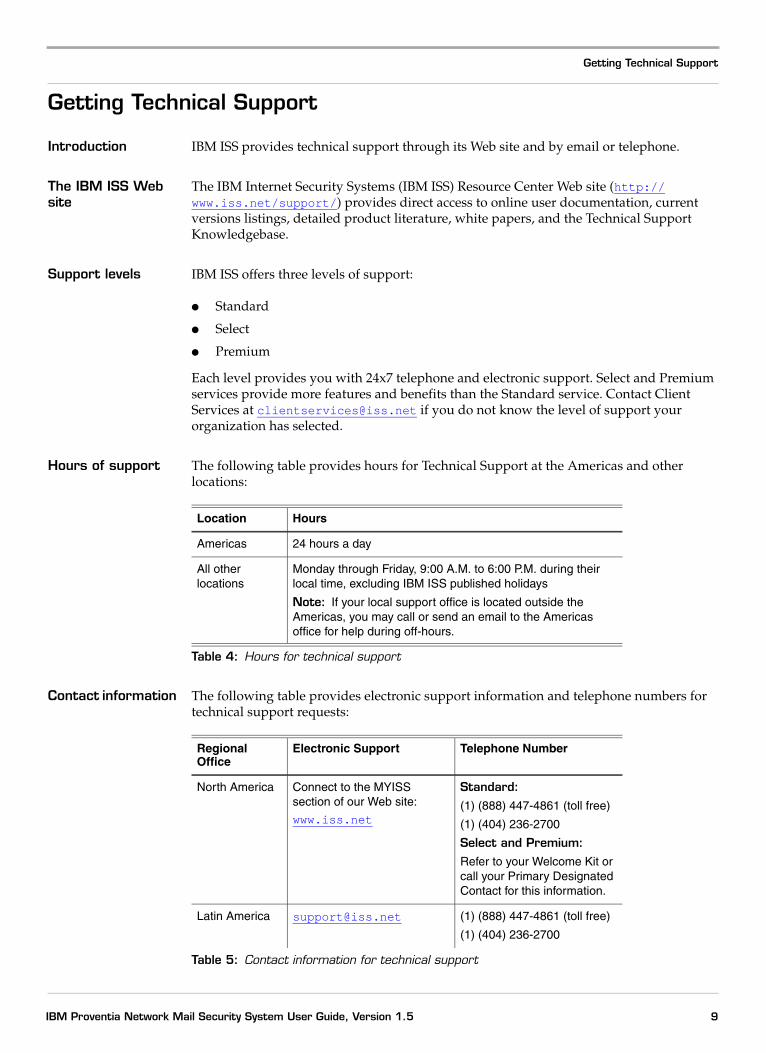
Hours of support The following table provides hours for Technical Support at the Americas and other locations:
Contact information The following table provides electronic support information and telephone numbers for technical support requests:
Location Hours
Americas 24 hours a day
All other locations
Monday through Friday, 9:00 A.M. to 6:00 P.M. during their local time, excluding IBM ISS published holidays
Note: If your local support office is located outside the Americas, you may call or send an email to the Americas office for help during off-hours.
Table 4: Hours for technical support
Regional Office
Electronic Support Telephone Number
North America Connect to the MYISS section of our Web site:
www.iss.net
Standard:(1) (888) 447-4861 (toll free)
(1) (404) 236-2700
Select and Premium:Refer to your Welcome Kit or call your Primary Designated Contact for this information.
Latin America [email protected] (1) (888) 447-4861 (toll free)
(1) (404) 236-2700
Table 5: Contact information for technical support
9IBM Proventia Network Mail Security System User Guide, Version 1.5
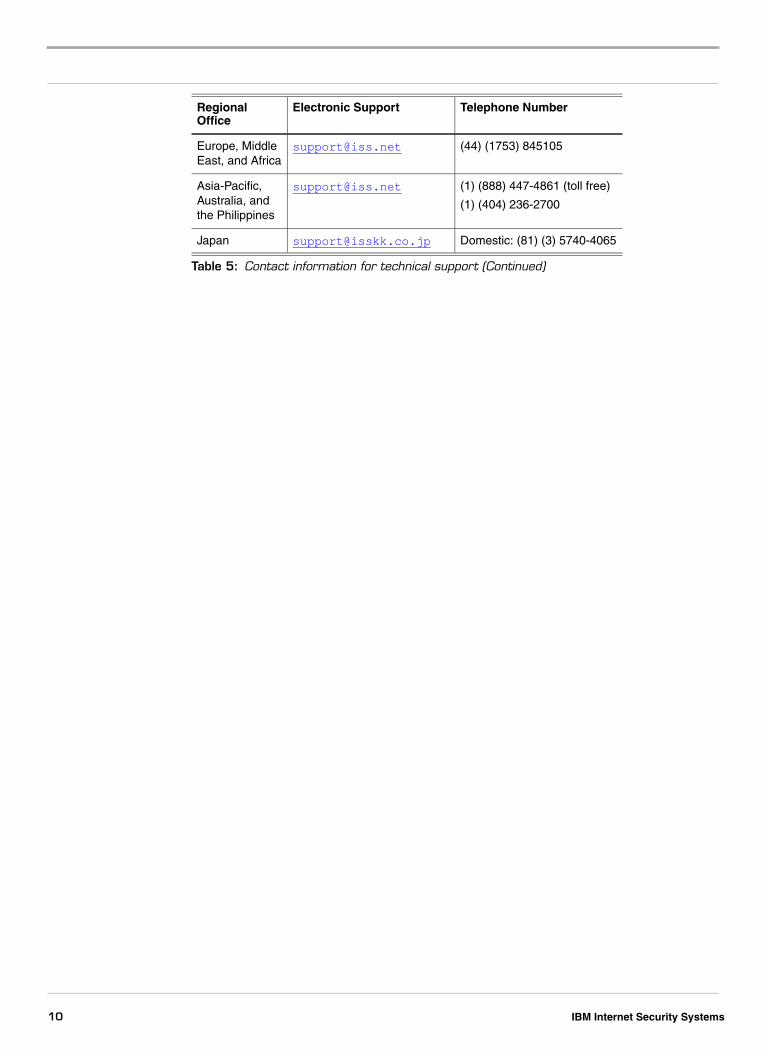
Europe, Middle East, and Africa
[email protected] (44) (1753) 845105
Asia-Pacific, Australia, and the Philippines
[email protected] (1) (888) 447-4861 (toll free)
(1) (404) 236-2700
Japan [email protected] Domestic: (81) (3) 5740-4065
Regional Office
Electronic Support Telephone Number
Table 5: Contact information for technical support (Continued)
10 IBM Internet Security Systems

Part I
Getting Started

Chapter 1
Introduction to the IBM Proventia Network Mail Security System
Overview
Introduction This chapter explains the features of the appliance, the configuration process, and the hardware.
In this chapter This chapter contains the following topics:
Topic Page
How Mail Security Works (Key Concepts) 14
Configuration Process 15
Installing License Key Files 16
13IBM Proventia Network Mail Security System User Guide, Version 1.5
How Mail Security Works (Key Concepts)
Introduction You use the appliance to monitor, manage, and control incoming and outgoing email message traffic.
How the appliance works
The appliance works as a store and forward SMTP server. Unlike known SMTP relays, the appliance does not forward email messages directly. Instead, the appliance stores received email messages in a local directory until they have been processed by the appliance.
You can configure the appliance to do the following:
● detect unwanted or confidential content, such as pornographic images, internal confidential documents, spam and junk email message
● score email messages to determine the likelihood that the email message is spam
● define user-specific actions regarding how to filter incoming and outgoing email messages
● create reports that allow users to see what email messages are being quarantined and, if necessary, release those email messages from quarantine
Configuring a mail security policy
The Administrator configures a mail security policy that contains a set of rules defining how the appliance should inspect and control both incoming and outgoing email message.
Policy objects A policy is a combination of the following objects (or instructions):
At a minimum, a policy should contain the following elements:
● at least two Who objects
● at least one Analysis Module and Action or one Response and Action
Generating quarantine reports
You generate a quarantine report based on a customized template that uses various macros, and on which schedule is in use for the corresponding quarantine store. The appliance delivers the quarantine report directly by email message to any recipient with quarantined email messages.
Object Purpose
Who To whom does this rule apply?
When When is this rule valid?
Preconditions Did any prior rule set a flag for the email message?
Responses What should be done with the email message?
Analysis Modules What content will be handled or inspected in the email message?
Action What action should take place against the email message?
Table 6: Contents of a policy
14 IBM Internet Security Systems
Configuration Process
Configuration Process
Introduction There are different approaches for configuring and deploying the appliance. This topic describes the configuration process.
Required and optional tasks
The required tasks vary depending on your security requirements, the network environment, and the operation mode you choose.
Process overview The following table describes the configuration and deployment process:
Stage Description
1 Initial Setup:
• Unpack the appliance and accessories.
• Physically connect a computer to the appliance for initial setup, and then configure the connection.
• Run the appliance setup wizard, and then complete the guided, initial setup process.
• Disconnect the computer from the appliance, and then connect the appliance to your private network (internal) and the Internet.
2 System Configuration and Updates:
• Configure interfaces for the private networks connected to the appliance.
• Configure routing protocols and static routes for proper traffic routing on the networks connected to the appliance.
• Provide devices on your network with administrative access privileges to the appliance
• Enable the services you plan to run on the appliance:
• remote access service (SSH)
• email relay and authentication service (SMTP)
• Web proxy service (HTTP)
• network management service (SNMP)
• Define names and groups for commonly referenced IP addresses and ports on your network.
• Configure the system to alert you by email message, by network messages (SNMP traps), or in the IBM SiteProtector Console about system errors and warnings.
• Enable centralized, SiteProtector system management for the appliance.
• Update the appliance.
• Back up the appliance.
Table 7: Configuration process
15IBM Proventia Network Mail Security System User Guide, Version 1.5
Installing License Key Files
Introduction You must install a license key file to activate Proventia Manager.
Types of license key file
Each license key file is unique to your product license and may require that you provide IP address range information specific to your network.
IBM ISS is bound by its confidentiality policy to not share your network information with any other organization, except as required by law.
Steps to installing a license key file
To install a license key file, you must first do the following:
● generate the license key file
● install the license key file
Generating a license key file
To generate a license key, you must have the following:
● Registered End User contact information
For security reasons, IBM ISS operations personnel will discuss license key issues only with a Registered End User. If there are multiple, authorized users at your organization that must be eligible to receive support, they must register at: https://www.iss.net/issEn/MYISS/login_help.jhtml
● Μaintenance billing contact information
IBM ISS issues a license key file once for the duration of the license, and makes changes only on an exception basis and at a charge per key file. If you are uncertain about what information is required, contact IBM ISS Technical Support (North America, only) at 1-888-447-4861. If you are uncertain about what IP address ranges define your network, contact your network Administrator.
Prerequisites Before you install your license key files, you must go to the IBM ISS Registration Center to do the following:
● register the license key files
● download the license key files to a temporary directory on your computer
Note: For status or renewal information about your license key files, contact IBM ISS at [email protected].
Procedure Important: You must install the IPM (Intrusion Prevention Module) license key file before you install other license key files.
To install a license key file:
1. On the navigation pane, click System→Licensing.
The Licensing page appears.
2. Click Browse.
3. Locate the license key file that you downloaded.
16 IBM Internet Security Systems
Installing License Key Files
4. Click OK.
The key directory path appears in the field.
5. Click Upload.
The appliance installs the license key file in the appropriate directory.
17IBM Proventia Network Mail Security System User Guide, Version 1.5

18 IBM Internet Security Systems
Chapter 2
Initial Setup
Overview
Introduction This chapter explains how to set up the appliance.
Rack mounting This chapter does not provide instructions for rack mounting the appliance. For instructions, go to www.iss.net/support/documentation/.
In this chapter This chapter contains the following topics:
Topic Page
Understanding SMTP Mail Routing 20
Routing Mode 20
Connecting to the Appliance for Initial Setup 25
Running Proventia Setup Assistant 28
Connecting Appliances to the Network 31
Accessing Proventia Manager 33
Verifying Network Connectivity and SMTP Settings 35
Managing Passwords 37
19IBM Proventia Network Mail Security System User Guide, Version 1.5
Chapter 2: Initial Setup
Understanding SMTP Mail Routing
Introduction Before you set up and configure the appliance, you should understand the basics of using SMTP, which will help you in determining where to place the Mail Security appliance on your network.
Performing a DNS lookup
Every domain has a domain name server (DNS) that handles its requests, and a System Administrator who maintains the records for that DNS. These records are used to determine mail routing to and from the Internet. You can easily check what servers are responsible for your domain by performing an nslookup on the MX DNS records for that domain.
Example of performing a DNS lookup
The following example shows how to check the MX DNS records for the iss.net domain:
Open a command prompt, and then enter the following:
nslookup
The output would look something like the following:
Default Server: dns.serverAddress: x.x.x.x
Now enter the following commands that set the DNS query to look up responsible mail servers for the iss.net domain:
set q=mxiss.net
The output would look something like the following:
Server: dns.serverAddress: x.x.x.x
iss.net MX preference = 5, mail exchanger = atla-mx1.iss.netiss.net MX preference = 10, mail exchanger = colo-mx1.iss.netiss.net MX preference = 10, mail exchanger = sfld-mx1iss.net
The Internet mail servers for the iss.net domain use the servers, atla-mx1.iss.net, colo-mx1.iss.net and sfld-mx1.iss.net to send email messages.
MX preferences MX preferences are used to determine the priority of a mail server. By default, sending servers will use the Internet mail server with the lowest preference number (=lowest cost like metric in IP routes). Servers with the lowest preference number have the highest priority.
For example, if the server atla-mx1.iss.net is unreachable, the sending Internet mail servers will use colo-mx1.iss.net or sfld-mx1.iss.net to deliver email messages for the iss.net domain.
Using the same MX preference automatically load balances the mail traffic beyond the servers with the same priority. If you have multiple mail servers available for redundancy and/or load balancing, the use of multiple DNS MX entries with the same MX preference is the easiest and most common way for SMTP to split mail traffic. You will often find
20 IBM Internet Security Systems
Understanding SMTP Mail Routing
multiple mail servers responsible for one domain due to redundancy and load balancing needs.
Reference: See the following Web sites for more information on MX records: http://www.ietf.org/rfc/rfc974.txt or http://en.wikipedia.org/wiki/MX_record
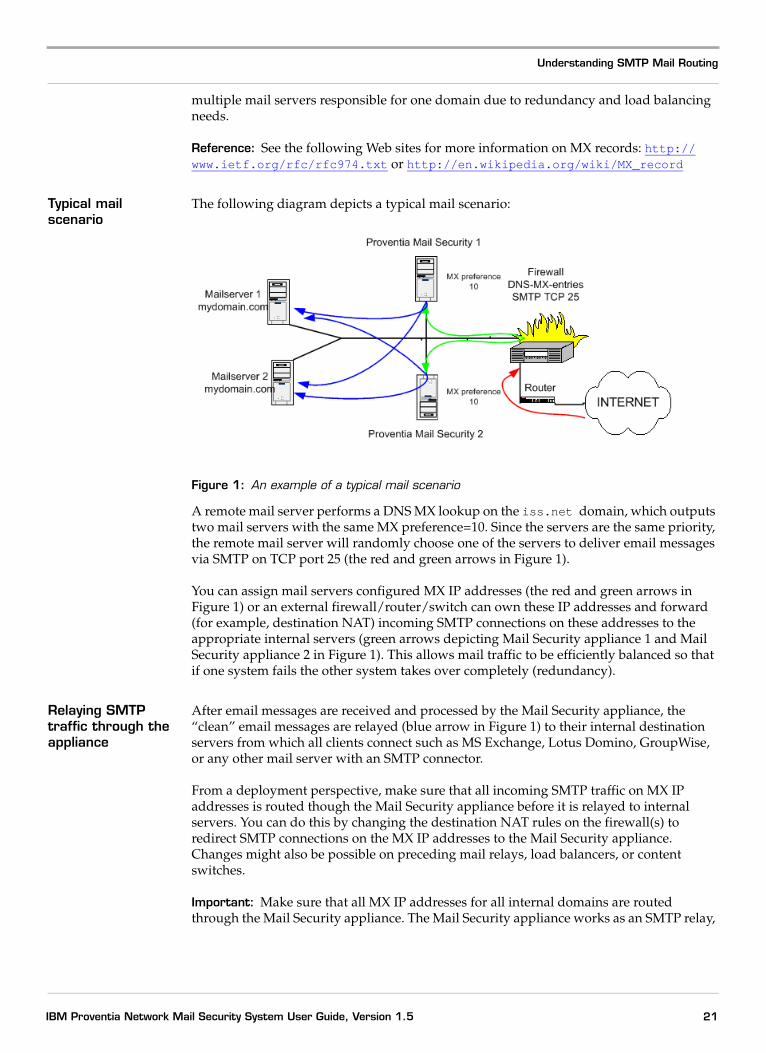
Typical mail scenario
The following diagram depicts a typical mail scenario:
Figure 1: An example of a typical mail scenario
A remote mail server performs a DNS MX lookup on the iss.net domain, which outputs two mail servers with the same MX preference=10. Since the servers are the same priority, the remote mail server will randomly choose one of the servers to deliver email messages via SMTP on TCP port 25 (the red and green arrows in Figure 1).
You can assign mail servers configured MX IP addresses (the red and green arrows in Figure 1) or an external firewall/router/switch can own these IP addresses and forward (for example, destination NAT) incoming SMTP connections on these addresses to the appropriate internal servers (green arrows depicting Mail Security appliance 1 and Mail Security appliance 2 in Figure 1). This allows mail traffic to be efficiently balanced so that if one system fails the other system takes over completely (redundancy).
Relaying SMTP traffic through the appliance
After email messages are received and processed by the Mail Security appliance, the “clean” email messages are relayed (blue arrow in Figure 1) to their internal destination servers from which all clients connect such as MS Exchange, Lotus Domino, GroupWise, or any other mail server with an SMTP connector.
From a deployment perspective, make sure that all incoming SMTP traffic on MX IP addresses is routed though the Mail Security appliance before it is relayed to internal servers. You can do this by changing the destination NAT rules on the firewall(s) to redirect SMTP connections on the MX IP addresses to the Mail Security appliance. Changes might also be possible on preceding mail relays, load balancers, or content switches.
Important: Make sure that all MX IP addresses for all internal domains are routed through the Mail Security appliance. The Mail Security appliance works as an SMTP relay,
21IBM Proventia Network Mail Security System User Guide, Version 1.5
Chapter 2: Initial Setup
which is a Layer 7 device. The appliance does not forward or route IP traffic; inline deployment is not a deployment option for this appliance.
Important: If you need to change DNS MX entries on your DNS servers to new addresses, the DNS population over the Internet can take up to three days (72 hours). Make sure you can re-route SMTP traffic on MX IP addresses before you change any DNS records.
Example of sending Internet mail
You should set up the appliance to inspect outgoing email messages from your network, for example, instructing the appliance to check for confidential content or disclaimers that have been added to outgoing mail.
The System Administrator for the internal mail server should make sure that all outgoing email messages are being relayed through the appliance (by configuring the relay host/smart host for outgoing mail). If the IP addresses for the internal mail servers have not been configured as relay hosts, email messages may be denied by the built-in anti-relay check that protects the mail server from being used by unauthorized users or spammers to send unsolicited junk mail to other Internet users.
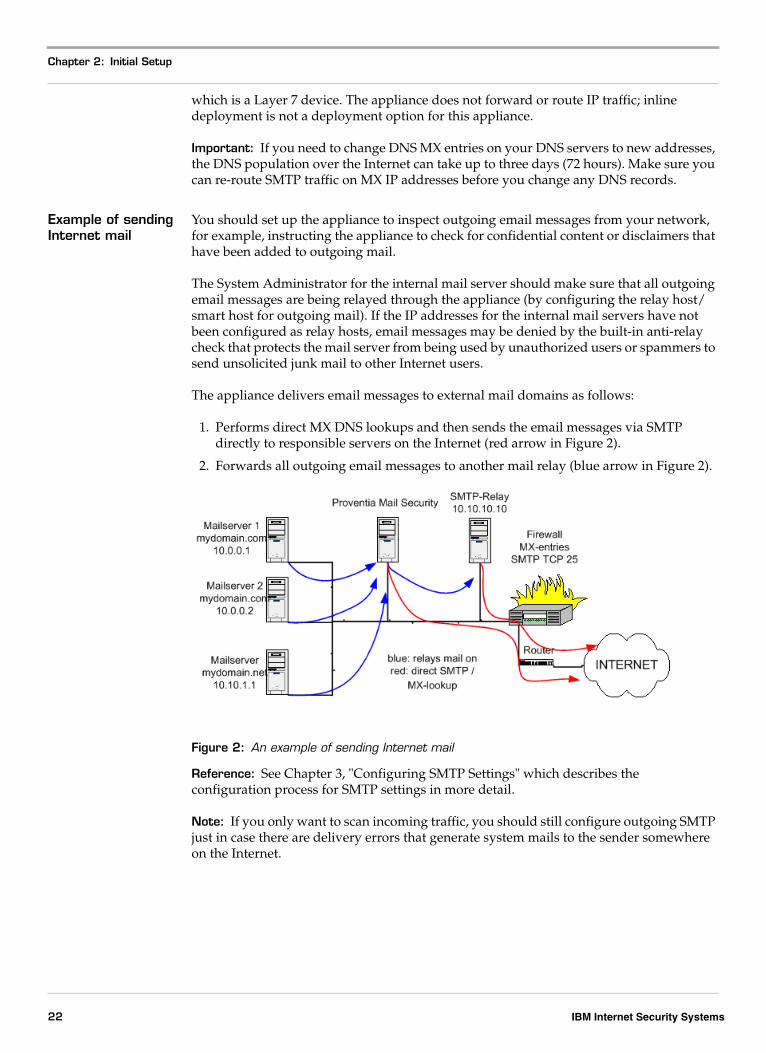
The appliance delivers email messages to external mail domains as follows:
1. Performs direct MX DNS lookups and then sends the email messages via SMTP directly to responsible servers on the Internet (red arrow in Figure 2).
2. Forwards all outgoing email messages to another mail relay (blue arrow in Figure 2).
Figure 2: An example of sending Internet mail
Reference: See Chapter 3, "Configuring SMTP Settings" which describes the configuration process for SMTP settings in more detail.
Note: If you only want to scan incoming traffic, you should still configure outgoing SMTP just in case there are delivery errors that generate system mails to the sender somewhere on the Internet.
22 IBM Internet Security Systems
Understanding SMTP Mail Routing
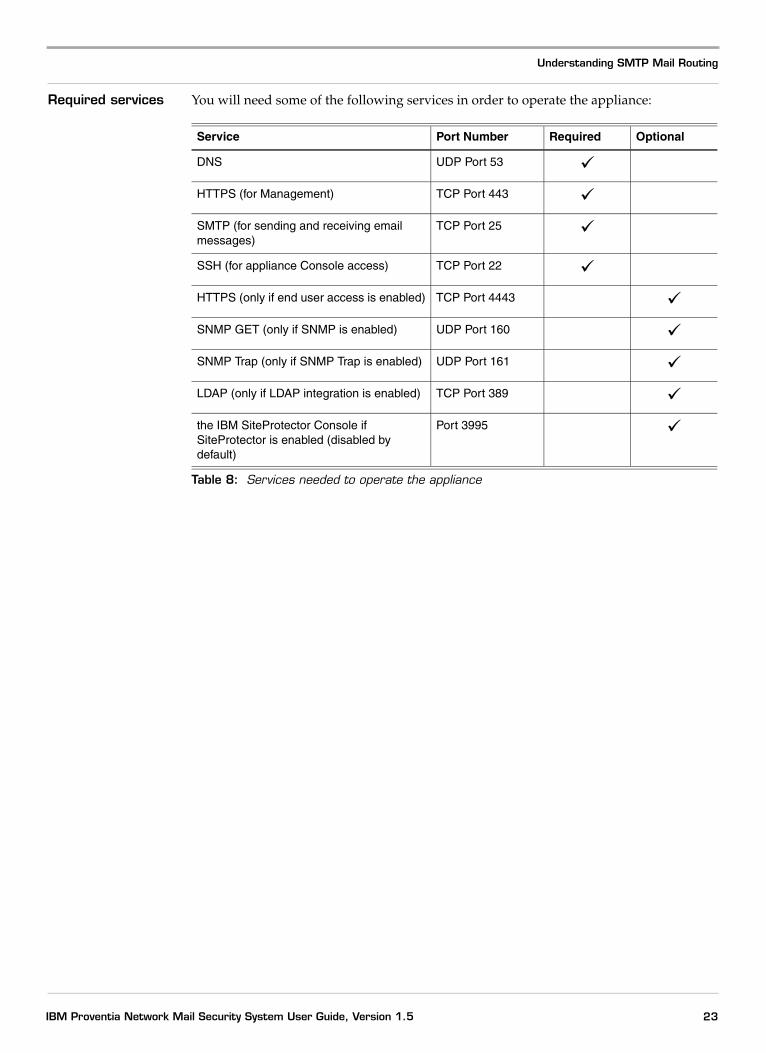
Required services You will need some of the following services in order to operate the appliance:
Service Port Number Required Optional
DNS UDP Port 53
HTTPS (for Management) TCP Port 443
SMTP (for sending and receiving email messages)
TCP Port 25
SSH (for appliance Console access) TCP Port 22
HTTPS (only if end user access is enabled) TCP Port 4443
SNMP GET (only if SNMP is enabled) UDP Port 160
SNMP Trap (only if SNMP Trap is enabled) UDP Port 161
LDAP (only if LDAP integration is enabled) TCP Port 389
the IBM SiteProtector Console if SiteProtector is enabled (disabled by default)
Port 3995
Table 8: Services needed to operate the appliance
23IBM Proventia Network Mail Security System User Guide, Version 1.5
Chapter 2: Initial Setup
Routing Mode
Introduction In routing mode, the appliance can perform complex routing functions and provide full security protection for your network. The routing functions include the following:
● determining the IP addresses on the networks connected to it
● calculating and choosing the best routes to destinations on the networks
Required information
To perform routing functions, the appliance must know the following information:
● which physical interfaces are enabled
● what are the IP addresses of the enabled interfaces
● what IP networks or subnetworks exist on the physical networks connected to the interfaces
Deployment considerations
Routing mode deployments require careful consideration to ensure the following:
● The external and internal interfaces must have IP addresses.
● Routes must exist to each network segment.
● No overlapping subnets exist.
● No routing loops exist.
● Other routers know how to route traffic to networks behind the appliance.
24 IBM Internet Security Systems
Connecting to the Appliance for Initial Setup
Connecting to the Appliance for Initial Setup
Introduction Before you can access the Proventia Setup Assistant and complete the initial setup, you must connect a computer directly to the appliance and establish a connection between the devices. This connection is for initial setup only.
Task overview The following table describes the tasks for connecting a computer to the appliance:
Choosing a cable The box includes two cables that you can use to connect your computer to the appliance:
Connecting the devices
The following table describes how to connect the devices:
Configuring the network interface on the setup computer
The following procedure assumes you are using a computer running the Microsoft Windows XP operating system to connect to the appliance.
Note: You need Java 1.5 installed on the setup computer to run the Proventia Setup wizard.
To configure the setup computer to run on the same network segment as the appliance:
1. On the setup computer, select Start→Settings→Network and Dial-up Connections→ Local Area Connection.
The Local Area Connection Status window appears.
2. Click Properties.
The Local Area Connection Properties window appears.
Task Description
1 Choose a cable for the connection, and then connect the computer to the appliance.
2 Configure the connection.
Table 9: Tasks for connecting a computer to the appliance
Cable Description
Ethernet crossover Provides access to a graphical version of the setup wizard.
Serial null modem Provides access to a text version of the setup wizard.
Table 10: Cable descriptions
If you choose the... Then...
Ethernet crossover cable (red cable)
1. Plug the cable into the port labeled Internal, and then connect it to your computer.
2. Configure the connection between the devices.
Serial null modem cable (blue)
1. Plug the cable into the port labeled Console, and then connect it your computer.
2. Configure the connection between the devices.
Table 11: Connecting the devices
25IBM Proventia Network Mail Security System User Guide, Version 1.5
Chapter 2: Initial Setup
3. Select the General tab, and then select Internet Protocol (TCP/IP).
4. Click Properties.
The Internet Protocol (TCP/IP) Properties window appears.
5. Enter an IP address other than the appliance’s default IP address.
6. Type 255.255.255.0 as the subnet mask.
Note: You do not need to configure the default gateway or DNS server settings for the initial setup.
7. Click OK twice, and then click Close.
Configuring from the LCD panel
You can use the LCD panel to configure the initial network configuration for ETH 0.
To configure from the LCD panel:
1. Press the POWER DOWN button on the LCD panel using the UP and DOWN ARROW buttons.
2. Press ENTER to shut down the appliance.
Important: The appliance will immediately shut down after you press ENTER.
3. Turn on the appliance.
4. Press CONFIGURE NETWORK using the UP and DOWN ARROW button, and then press ENTER.
5. Press ENTER to select the first octet of the IP address. After you press ENTER once more, the number will be highlighted, signifying edit mode.
6. Use the UP and DOWN ARROW buttons to find the appropriate number.
Note: You can use the BACK ARROW button to increase in increments of 16 octets.
7. Press ENTER once to set the number and move the underline cursor to the second octet.
8. Press ENTER again to go into edit mode.
9. Use the UP and DOWN ARROW buttons to find the appropriate number.
10. Press ENTER once to set the number.
11. Repeat this process until you have entered the complete IP address. Once you have configured the last octet of the IP address and have pressed the ENTER button to escape edit mode, press the UP ARROW button to send the configuration information to the appliance.
12. Repeat the same process to configure the netmask address and the default gateway.
26 IBM Internet Security Systems
Connecting to the Appliance for Initial Setup
Configuring serial connections
To configure a serial connection:
Note: The procedures for creating a terminal connection vary depending on the program you use. The procedures shown are for HyperTerminal.
1. On your computer, select Start→Programs→Accessories→Communications→HyperTerminal.
2. Type a name for the connection, and then click OK.
3. In the Connect using list, select COM1, and then click OK.
4. Click Apply, and then click OK.
27IBM Proventia Network Mail Security System User Guide, Version 1.5
Chapter 2: Initial Setup
Running Proventia Setup Assistant
Introduction The Proventia Setup Assistant guides you through the initial setup process. You should run the Proventia Setup Assistant for initial setup only. After you complete this process, use Proventia Manager to change and manage system settings.
Procedure To start the Proventia Setup Assistant:
1. On the computer connected to the appliance, open a Web browser, and then go to the default IP address for the appliance:
https://192.168.123.123
Note: For serial connections, start the HyperTerminal connection to the appliance.
2. At the Proventia Local Management Interface login, type the following login credentials:
■ Username = admin
■ Password = admin
3. Follow the on-screen instructions.
The Proventia Setup Assistant guides you through the initial setup process. It prompts you for the required information. Some options are automatically selected by default.
Note: If you only use one network interface for the appliance, configure the second interface in the Proventia Setup Assistant with an IP address that you do not use on your network (for example: 192.168.168.168). Insert your DNS server(s) and default gateway for the first network interface here.
Important: DHCP is selected by default for the interface ETH 1. If you want to assign a static IP address, you must change the default settings and provide the required information. The Proventia Setup Assistant will prompt you on whether you would like to configure SMTP settings. If you only have a few email domains, you can perform the initial configuration here. If you have more than three email domains, skip this step and configure SMTP integration after the initial setup using the Local Management Interface (LMI).
Next steps After you complete the initial setup, you can do the following:
● Review the settings, exit the wizard, and then close the Web browser.
● Disconnect the computer from the appliance, reset the computer’s TCP/IP settings, and reconnect the computer to the internal network.
● Connect the interfaces on the appliance to the internal and external networks.
● Access Proventia Manager.
● Download the filter database (via Proventia Manager).
● Configure, update, and back up the system.
● Back up the configuration settings.
28 IBM Internet Security Systems
Running Proventia Setup Assistant
Required information
The wizard prompts you for required information based on your selections. The following table provides detailed descriptions of this information:
Task Description
Set the operation mode See “Understanding SMTP Mail Routing” on page 20.
Assigning a host name to the appliance
You must provide a fully qualified domain name for the appliance such as the following example:
appliance.example.com
Set the time and date on the appliance
You must set the time and date for the appliance. To synchronize the appliance time with the time of a network server, you enable the Network Time Protocol (NTP) and provide the IP address of the server.
Assign information to the external interface
There are two methods for assigning IP information to the external interface:
• Static—you manually assign the IP address, subnet mask,
and default gatewaya to the interface.
• DHCP—you assign a DHCP server to the interface, and then the interface leases its IP address, subnet mask, and default gateway from the DHCP server dynamically. This is the default setting.
Note: Keep the default setting to enable the interface when the appliance boots.
Assign information to the internal interface
You must provide the IP address and subnet mask for the internal interface.
Note: Keep the default setting to enable the interface when the appliance boots.
Assign DNS servers The appliance interfaces work with DNS servers to translate host names into IP addresses. To locate its DNS server, the interface must know the IP address of the DNS server. There are two methods for assigning a DNS server to the interface:
• Manual—you manually provide the IP address of the DNS server.
• Dynamic—the interface gets the IP address of its DNS server dynamically without user input.
Optionally, to assign backup or additional DNS servers to the interfaces, you must provide the IP addresses for the secondary or tertiary DNS servers.
Provide a DNS search path
You must provide domain suffix for the network.
Set the passwords for the appliance
You must set the following passwords required for appliance access:
• Root—users must provide this password when they access the appliance from a command-line.
• Administrative—users must provide this password when they access the appliance.
Note: All passwords can be the same as the root password.
Table 12: Required appliance setup information
29IBM Proventia Network Mail Security System User Guide, Version 1.5
Chapter 2: Initial Setup
Configure SMTP settings Note: You have the option to disable the SMTP incoming and SMTP outgoing settings. You can configure these settings from the LMI (System→SMTP) at a later time.
SMTP Incoming: Configure these settings if you only use one inbound domain. The root domain is used by the SMTP relay in the initial answer on the SMTP layer. This is the hostname reported in the Receiver header line.
SMTP Outgoing: If you want outbound email messages to be delivered directly to the Internet, use the DNS setting. You can also configure an outbound mail-relay; for example, *;192.168.75.2 would configure the computer to relay all outbound email messages (*) to the server with the IP address 192.168.75.2.
a. The default gateway is the router where the interface sends packets when the destination of the packet is outside the interface’s subnet.
Task Description
Table 12: Required appliance setup information
30 IBM Internet Security Systems
Connecting Appliances to the Network
Connecting Appliances to the Network
Introduction After you complete the initial setup process, you can connect your appliance to the network.
Important: When you connect the appliance to the network before you configure the firewall or other protection features, you do not expose your network to vulnerabilities. Connecting the appliance to the network allows you to test the configuration settings as you go through the configuration process.
Before you begin Before you connect your appliance to the network, you must disconnect the computer used for the initial setup from the internal interface. This interface is used to connect the appliance to the internal network.
Procedure To connect the appliance to the network:
1. Connect the interfaces to the network as follows:
2. Connect any additional private, internal networks to the internal interfaces.
Note: The number of additional interfaces on the appliance varies depending on the model.
3. Review the lights on the front panel for status information:
Network protocols for the interfaces
You can enable the following protocols for any of the four network interfaces (ETH 0, ETH 1, ETH 2, ETH 3) located on the back of the appliance:
● SMTP
Αll incoming mails from external sources need to be forwarded to your local email servers. To achieve this, you have to define the respective mail server IP address for each internal mail exchange domain.
Ιf several internal servers are used for the same mail exchange domain for redundancy reasons, you need to separate the IP addresses by commas (,).
Domain: mydomain.comMailservers: 10.0.0.1,10.0.0.2
If the mail server 10.0.0.1 is down, XMail will try sending it to 10.0.0.2.
You should enter the actual IP address(es); do not enter a hostname.
● HTTPS (port 443)
The proxy server used for administering end user authentication.
Interface Connection
ETH 0 (Internal) Connect the private network (internal) to this interface.
ETH 1 (External) Connect the public network (Internet) to this interface.
Color Indication
green Successful connection
amber (flickering) Activity on the connection
31IBM Proventia Network Mail Security System User Guide, Version 1.5
Chapter 2: Initial Setup
● SSH (port 22)
Τhe protocol used with an SSH client (for example, PUTTY) to connect to the appliance from the command line.
● Enduser Access (port 4443)
Τhe protocol used for the End User Account Authentication pages, which are Web pages set up by the Administrator to allow end users to access their spam emails, manage their block and allow lists, generate a daily report of spam email, or browse through quarantined email.
● SNMP (port 161)
This protocol is used to configure settings that inform you of the status of the appliance.
● Database Access (port 5432)
Τhe database system used by a cluster of mail servers.
● Cluster Communications (port 4990)
The port used by the appliances in the cluster to communicate within the cluster.
32 IBM Internet Security Systems
Accessing Proventia Manager
Accessing Proventia Manager
Introduction After the initial setup, you are ready to access Proventia Manager for the first time, and then configure, update, and back up the system and the protection features.
Prerequisites Before you try to access Proventia Manager, you must choose a computer, and then complete the following tasks:
Accessing Proventia Manager
To access Proventia Manager for the first time:
1. Open a Web browser, and then go to the DNS name or IP address of the virtual appliance as in the following examples:
■ https://example.com
■ https://192.168.123.123
2. Log on with the username admin and your Proventia Manager password.
Important: If the navigation pane does not appear when you log on, click the following link at the top of the page:
Click here to reload this page with navigation.
3. To use the Getting Started procedures, select Yes and then select Launch Proventia Manager.
Working with Proventia Manager
The following table provides instructions for some common Proventia Manager tasks:
Task
Verify that the computer has Internet Explorer Version 6 or later installed.
Verify that the computer’s TCP/IP settings are properly configured to access the private, internal network.
Connect the computer to the private, internal network to allow you to access the appliance and Proventia Manager from the network.
To... Do this...
Access an item in the pane
Double-click the item.
Expand an item in the pane
Do one of the following:
• Click the corresponding + sign.
• Double-click the item.
Collapse an item in the pane
Do one of the following:
• Click the corresponding + sign.
• Double-click the item.
Minimize or maximize a page
Click the icon in the upper right corner of any page.
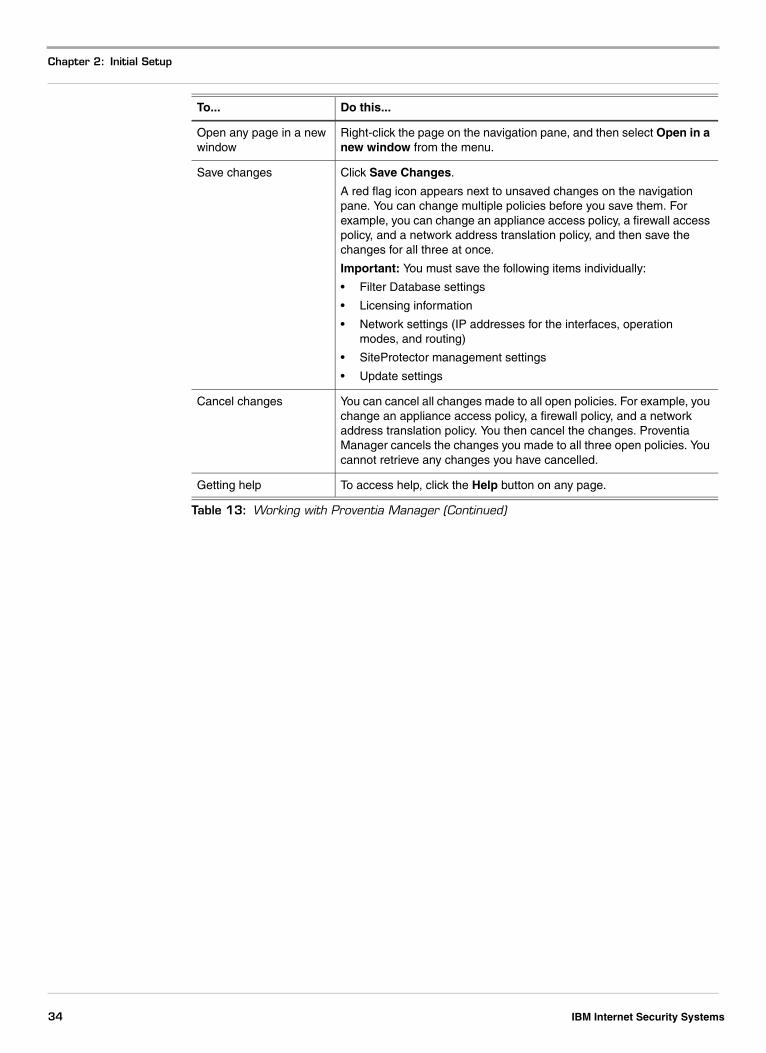
Table 13: Working with Proventia Manager
33IBM Proventia Network Mail Security System User Guide, Version 1.5
Chapter 2: Initial Setup
Open any page in a new window
Right-click the page on the navigation pane, and then select Open in a new window from the menu.
Save changes Click Save Changes.
A red flag icon appears next to unsaved changes on the navigation pane. You can change multiple policies before you save them. For example, you can change an appliance access policy, a firewall access policy, and a network address translation policy, and then save the changes for all three at once.
Important: You must save the following items individually:
• Filter Database settings
• Licensing information
• Network settings (IP addresses for the interfaces, operation modes, and routing)
• SiteProtector management settings
• Update settings
Cancel changes You can cancel all changes made to all open policies. For example, you change an appliance access policy, a firewall policy, and a network address translation policy. You then cancel the changes. Proventia Manager cancels the changes you made to all three open policies. You cannot retrieve any changes you have cancelled.
Getting help To access help, click the Help button on any page.
To... Do this...
Table 13: Working with Proventia Manager (Continued)
34 IBM Internet Security Systems

Verifying Network Connectivity and SMTP Settings
Verifying Network Connectivity and SMTP Settings
Introduction You can send test email messages from the appliance to verify network connectivity and SMTP settings.
Procedure To verify network connectivity:
1. If you did not configure the SMTP relay settings during the network configuration, click System→SMTP to configure the inbound and outbound email server settings.
2. Click System→Licensing to upload the license keys for the appliance.
Note: If you uploaded the license for pattern-based virus scanning first, you will not see that license on the page until you upload the appliance’s license. You will be able to view the name and the expiration date of successfully applied licenses after they have been uploaded to the appliance.
3. Click Updates→Filter DB, and then select Download DB to download a complete antispam database immediately.
Note: If you do not force the database to download, the appliance will download the database automatically within the first hour of you using the appliance. While the database is downloading, the appliance is still functional except for the Spam URL Check analysis module and the Spam Signature Database analysis module.
4. Configure an email client (such as Microsoft Outlook Express or Mozilla Thunderbird) on the host computer to send email messages using the Proventia Network Mail Security System in order to verify network connectivity and the SMTP settings.
5. Send a test email message to your mailbox on the internal mail server and one to an external email account (for example, a webmail account). When both email messages arrive in their respective inboxes, you will be able to send inbound and outbound email messages using the appliance
6. Click Mail Security→Policy to configure a mail security policy. A mail security policy contains a set of rules that define how the appliance should inspect and control both incoming and outgoing email messages.
7. Click the plus sign to open the details of the rule Signature Virus Check (Performs signature based virus check).
8. Right-click the object My Domains, and then select Edit recipients: “My Domains“.
The settings for the object appear.
9. Select the check box to activate the object, and then edit the domains to reflect your environment (replacing *@example.com).
10. Click OK.
11. Enable the last rule in the sample policy (“MyMail (For testing purposes: Check for occurrence of ‘MyMail’ in Subject)).
12. Click Save Changes.
13. Send two new test email messages, as described in Step 5, using “MYMAIL“ as the subject of the test email messages.
If the email message that is sent to your inbox from the internal server displays “Found MYMAIL in MYMAIL“ as its subject, and the email message that is sent to the
35IBM Proventia Network Mail Security System User Guide, Version 1.5
Chapter 2: Initial Setup
external mail server has an unchanged subject, you have configured the object “MyMail“ correctly to your domain and the rule system works correctly.
If the test does not work as expected, verify the following:
■ that the email message was actually sent through the appliance (RECEIVED header)
■ that the rule is active and was sent to a domain in the My Domains Who object
■ that the appliance is able to send email messages to the internal email servers and to email servers on the Internet
36 IBM Internet Security Systems
Managing Passwords
Managing Passwords
Introduction You set system passwords during the initial setup process with Proventia Setup Assistant. You can change the passwords at any time in Proventia Manager.
Passwords The following passwords are user-defined:
● Root—users must provide this password when they access the appliance from a command-line.
● Administrative—users must provide this password when they access the appliance.
Lost or forgotten passwords
Record and protect your passwords in a safe and secure place. If you lose or forget a password, then there is no way to retrieve it or reset it. You must reinstall the appliance.
Changing passwords
To change a system password:
1. On the navigation pane, select System→Access.
2. Type the Current Password in the appropriate section depending on which password you are changing:
■ Root
■ Administrative
3. Click Set Password located next to the New Password.
4. Type the new password, and then type it again to confirm.
5. Click OK, and then save the changes.
37IBM Proventia Network Mail Security System User Guide, Version 1.5

Chapter 2: Initial Setup
38 IBM Internet Security Systems
Chapter 3
Configuring SMTP Settings
Overview
Introduction This chapter explains how to configure SMTP settings that you use to integrate the appliance in to your existing network environment.
In this chapter This chapter contains the following topics:
Topic Page
Configuring the Firewall to Receive SMTP Traffic 40
Configuring SMTP Settings for Incoming Email Messages 43
Configuring SMTP Settings for Outgoing Email Messages 47
Configuring Global Settings for the SMTP Server 49
Deleting SMTP Log Files 50
Managing Email Messages in the SMTP Store 51
Setting Up Network Clustering 52
39IBM Proventia Network Mail Security System User Guide, Version 1.5
Chapter 3: Configuring SMTP Settings
Configuring the Firewall to Receive SMTP Traffic
Introduction You will need to configure the firewall to allow the appliance to receive SMTP traffic from an external source.
Procedure To configure the port used to receive SMTP traffic from an external source:
1. On the navigation pane, click System→Firewall.
The Firewall Settings page appears.
2. Click SMTP Settings.
The SMTP Settings window appears with the Incoming tab enabled.
3. Click the Settings tab.
4. Select the Enable Logging box to write log entries to a log file. The appliance logs two entries per email message (one entry for recipient ok and one entry for sender ok) to the smtp-yyyymmdd0000 log file.
18BD-17E3-479D-8BD2-212A1BE162E8" "RCPT=OK" "" "0" ""
“example.com" "example.com" "192.168.123.1" "2006-07-14 15:13:30" "bob" "example.com" "[email protected]" "[email protected]" "288718BD-17E3-479D-8BD2-212A1BE162E8" "RECV=OK" "" "5465" ""
5. Provide the port number on which the XMail server is listening in the Port field. Default: port 25
6. Set the maximum number of mail recipients in the Max Recipients per Message field. Default: 100 recipients
XMail has a standard filter mechanism called the “pre-data” filter that is invoked when all header information (From, To) is received from the client and before any email data is transmitted. The IBM ISS filter is a “pre-pre-data” filter that is invoked before the “pre-data” filter is evaluated. If the IBM ISS filter allows the email message, XMail will continue and invoke the “pre-data” filters, if present. The IBM ISS filter is called for all recipients of an email message until an allowed recipient is found or the whole list of recipients is processed.
7. Set the maximum number of email messages the XMail server can deliver during each session in the Max Messages per Session field.
8. Set the maximum number of seconds before the sessions times out in the Session Timeout field. Default: The default is 60 seconds after which the server closes the connection if it does not receive a command.
9. Set the maximum message size that is possible to send through the XMail server in the Max Message Size (KB) field.
10. Select the Allow Null Sender box if you want to enable XMail to accept null sender (MAIL FROM:<>) messages.
11. Set the maximum number of SMTP errors the appliance can handle in the Max SMTP Errors per Session field.
12. Select Check Mailer Domain box if you want the SMTP server to perform a DNS/MX lookup on the domain of the email sender SMTP address for validation. The SMTP server will only accept email messages from the sender SMTP addresses whose domains are known by DNS/MX.
13. Set the maximum number of MTA relay steps before the message is looped in the Max MTA Hops field. Default: 20
40 IBM Internet Security Systems
Configuring the Firewall to Receive SMTP Traffic
14. Select Enable Reverse DNS Lookup if you want XMail to determine if the source IP of an incoming SMTP connection resolves to an actual valid domain name. If it does not resolve to a valid domain name, XMail will deny this connection.
15. Provide a response from the XMail server to the appliance in the SMTP Greeting field.
16. Choose an option from the Received Header type to view the email message header information. The following options are available:
17. Add a local domain by clicking Add in the Local Domains area.
All incoming email messages from external sources need to be forwarded to your local mail servers. You need to define the respective mail server IP address for each internal mail exchange domain.
18. If several internal servers are used for the same mail exchange domain for redundancy reasons, you need to separate the IP addresses by commas (,).
Domain: mydomain.comMailservers: 10.0.0.1,10.0.0.2
If the mail server 10.0.0.1 is down, XMail will try sending it to 10.0.0.2.
The Add window appears.
19. Provide the local domain of the mail server in the Domains field.
20. Type the IP address of the mail server in the Mailserver(s) field
21. Click OK.
22. Add a relay server by clicking Add in the Relay Hosts area.
If you have defined local domains, XMail will check if the recipient’s domain actually matches one of the local domains. If not, the email message is recognized as a relay and therefore will be denied.
Outgoing email messages addressed to a different domain name other than the local domains will be accepted if they are being sent from a local mail server.
Apart from the above scenario, all outgoing email messages would be detected as relayed mail. You must enter the IP addresses of the local mail servers. Besides the local mail servers you should keep the default entry 127.0.0.1 or ‘localhost’ for system-generated email messages.
The Add Relay Hosts window appears.
23. Type the IP address of the relay server in the IP Address field.
Received Header Type Description
Standard (client IP shown, server IP not)
The email message header information contains the client IP address, but not the server IP address.
Verbose (client IP shown, server IP shown
The email message header information contains the client IP address and the server IP address.
Strict (no IP shown) The email message header information contains no IP addresses.
Important: If you set the Received Header Type to Strict, the analysis modules in the Sender Policy Framework will not work since these modules rely on information from the received email message header. See “Adding an Analysis Module to a Policy Rule” on page 90 for more information about the Sender Policy Framework.
41IBM Proventia Network Mail Security System User Guide, Version 1.5
Chapter 3: Configuring SMTP Settings
24. Provide the subnet mask of the relay server in the Masks field.
25. Click OK, and then click Close to return to the Firewall Settings Page.
42 IBM Internet Security Systems
Configuring SMTP Settings for Incoming Email Messages
Configuring SMTP Settings for Incoming Email Messages
Introduction The appliance works as a store and forward SMTP server, but does not forward email messages directly to mailboxes. The appliance locks the received messages in a local folder until they have been processed and analyzed by the appliance.
Tasks Complete the following tasks to configure SMTP settings for incoming email message:
Configuring settings on the SMTP server
You can integrate SMTP in to your existing network environment.
To configure settings on the SMTP server:
1. On the navigation pane, click System→SMTP.
The Mail Security SMTP page appears.
2. Click the Incoming tab.
3. Select the Enable box.
4. Click the Settings tab.
5. Select the Enable Logging box to write log entries to a log file. The appliance logs two entries per email message (one entry for recipient ok and one entry for sender ok) to the smtp-yyyymmdd0000 log file.
Example: 18BD-17E3-479D-8BD2-212A1BE162E8" "RCPT=OK" "" "0" ""
"example.com" "example.com" "192.168.123.1" "2006-07-14 15:13:30" "bob" "example.com" "[email protected]" "[email protected]" "288718BD-17E3-479D-8BD2-212A1BE162E8" "RECV=OK" "" "5465" ""
6. Provide the port number on which the XMail server is listening in the Port field. Default: port 25
7. Set the maximum number of mail recipients in the Max Recipients per Message field. Default: 100 recipients.
8. Set the maximum number of messages the XMail server can deliver during each session in the Max Messages per Session field.
9. Set the maximum number of seconds before the sessions times out in the Session Timeout field. Default: The default is 60 seconds after which the server closes the connection if it does not receive a command.
10. Set the maximum message size that is possible to send through the XMail server in the Max Message Size (KB) field.
If you set this value to zero, the server will allow any message size.
11. Select the Allow Null Sender box if you want to enable XMail to accept null sender (MAIL FROM:<>) messages.
Task Description
1 Configuring settings on the SMTP server
2 Configuring RBL settings
3 Configuring Recipient Verification
Table 14: Configuring SMTP settings for incoming email messages
43IBM Proventia Network Mail Security System User Guide, Version 1.5

Chapter 3: Configuring SMTP Settings
12. Set the maximum number of SMTP errors the appliance can handle in the Max SMTP Errors per Session field.
13. Select Check Mailer Domain box if you want the SMTP server to perform a DNS/MX lookup on the domain of the email sender SMTP address for validation. The SMTP server will only accept email messages from the sender SMTP addresses whose domains are known by DNS/MX.
14. Set the maximum number of MTA relay steps before the email message is looped in the Max MTA Hops field. Default: 20
15. Select Enable Reverse DNS Lookup if you want XMail to determine if the source IP of an incoming SMTP connection resolves to an actual valid domain name. If this is not the case, XMail will deny this connection.
16. Provide a response that the XMail server will send to the appliance in the SMTP Greeting field.
17. Choose an option from the Received Header type to view the email message header information. The following options are available:
18. Add a local domain by clicking Add in the Local Domains area.
All incoming mails from external sources need to be forwarded to your local email servers. You need to define the respective mail server IP address for each internal mail exchange domain.
If several internal servers are used for the same mail exchanger domain for redundancy reasons, you need to separate the IP addresses by commas (,).
Domain: mydomain.comMailservers: 10.0.0.1,10.0.0.2
If the mail server 10.0.0.1 is down, XMail will try sending it to 10.0.0.2.
The Add window appears.
19. Provide the local domain of the mail server in the Domains field.
20. Type the IP address of the mail server in the Mailserver(s) field
21. Click OK.
22. Add a relay server by clicking Add in the Relay Hosts area.
If you have defined local domains, XMail checks if the recipient’s domain actually matches one of the local domains. If not, XMail recognizes the email message as a relay and will deny it. The relay server will accept outgoing email messages addressed to a different domain name other than the local domains if they are being sent from a local mail server. Apart from the above scenario, all outgoing email messages are detected as relayed mail. You must enter the IP addresses of the local mail servers, and use the default entry 127.0.0.1 or ‘localhost’ for system-generated email messages.
The Add Relay Hosts window appears.
Received Header Type Description
Standard (client IP shown, server IP not)
The email message header information contains the client IP address, but not the server IP address.
Verbose (client IP shown, server IP shown
The email message header information contains the client IP address and the server IP address.
Strict (no IP shown) The email message header information contains no IP addresses.
44 IBM Internet Security Systems
Configuring SMTP Settings for Incoming Email Messages
23. Type the IP address of the relay server in the IP Address field.
24. Provide the subnet mask of the relay server in the Masks field.
25. Click OK.
Configuring RBL settings
The Realtime Blacklist servers maintain a list of IP addresses that are blacklisted because these addresses allow spam to be sent from them. You can insert the available RBL servers into the list, and set scores for each server.
To configure RBL settings:
1. On the navigation pane, click System→SMTP.
The Mail Security SMTP page appears.
2. Click the RBL Settings tab.
3. Select the Enable (uses RBL servers defined in Policy/Spam Settings) box.
4. Click RBL Settings.
The Mail Security Policy page appears.
5. Click the Spam Settings tab.
6. Enable a RBL Server in the RBL Lists area.
7. Configure the appropriate settings.
8. Click OK, and then click Close to return to the Mail Security SMTP page.
9. Provide an SMTP error code in the Error Code field. Codes between 500 and 599 indicate permanent rejection.
10. Type an SMTP error message in the Error Message field.
11. Click Save Changes.
Configuring Recipient Verification
Recipient verification allows XMail to immediately block email message that was sent to a user who does not exist in the organization.
How the appliance uses XMail
The appliance uses a modified version of XMail that looks in a specific directory for files with the .allowed extension. There can be 0 or more of these files, which are read to construct a list of known email addresses. These files contain a single email address on each line. XMail allows limited support of wildcards in allowed email addresses. To allow all email addresses for a domain, XMail accepts addresses in the following format: *@enter.your.domain. XMail does not recognize invalid wildcards and treats them as normal email addresses.
XMail has a standard filter mechanism called the “pre-data” filter that is invoked when all header information (From, To) is received from the client and before any email message data is transmitted. The IBM ISS filter is a “pre-pre-data” filter that is invoked before the “pre-data” filter is evaluated. If the IBM ISS filter allows the email message, XMail will continue and invoke the “pre-data” filters, if present. The IBM ISS filter is called for all recipients of an email message until an allowed recipient is found or the whole list of recipients is processed.
If at least one recipient is allowed, the email message is accepted. Errors for invalid recipients (if one or more out of many, but not all, are non-allowed recipients) are
45IBM Proventia Network Mail Security System User Guide, Version 1.5
Chapter 3: Configuring SMTP Settings
produced by standard email processing. If zero recipients are allowed, the email message is rejected.
Procedure: To configure recipient verification
1. On the navigation pane, click System→SMTP.
The Mail Security SMTP page appears.
2. Select the Enable Recipient Verification box.
3. Choose how the appliance will handle recipients who are rejected. The following options are available:
If at least one recipient is allowed, the email message is accepted. Errors for invalid recipients (if one or more out of many, but not all, are non-allowed recipients) are produced by standard email message processing. If zero recipients are allowed, the email message is rejected.
4. Provide an SMTP error code in the Error Code field.
5. Type an error message in the Error Message field.
6. Choose an option in the Recipient Definition area. The following options are available:
Option Description
Reject with Error The appliance returns the given Error Code and Error Message to the SMTP client. The sender knows which SMTP addresses are valid, which can be desired or undesired behavior.
Silent Drop The email message is accepted on the SMTP layer but not analyzed or sent to the recipient, but silently dropped. This prevents the sender from gaining knowledge of valid SMTP addresses and can help to prevent address harvesting.
Default Access Type Description
Denied All recipients that are not on the list of recipients are rejected.
Allowed All recipients that are not on the list of recipients are allowed.
The Administrator can either build a list of allowed recipients and reject all others or build a list of rejected recipients and allow all others.
46 IBM Internet Security Systems
Configuring SMTP Settings for Outgoing Email Messages
Configuring SMTP Settings for Outgoing Email Messages
Introduction You can configure how XMail delivers email messages to external domains.
Important: To receive email messages using SMTP, you need to check the Enable check box on the Incoming tab. To send email messages using SMTP, you need to check the Enable check box on the Outgoing tab. You will need to enable both tabs, since “outgoing” relates to “out from the appliance” on the SMTP layer; email messages to an internal mail server are also “outgoing” in the view of the appliance.
If your appliance, for example, only filters inbound traffic, you will need to enable the Outgoing tab, so that the appliance can send email messages to either internal mail servers, external mail servers, or a relay.
Types of email message delivery
There are two types of email message delivery:
● DNS Resolution delivery
With DNS Resolution delivery, XMail looks up the MX record of the recipient’s domain and delivers email message directly using SMTP. You must configure one DNS server in order to look up MX records for domains.
● Forward delivery
With Forward delivery, the SMTP server relays outgoing mail through one or several SMTP relay server(s). If you want XMail to randomly select the order of the specified relays, add an # before the server list (for example, #1.1.1.1,2.2.2.2). To create a default forward entry, enter * for domain (*=wildcard), and the IP address(es) of the SMTP relay(s) to be used within SMTP server list. If there is more than one SMTP relay server, those servers should be used for redundancy reasons.
You may need to use different SMTP relay servers for recipients of a specific domain. You will need to add a new entry with a specific domain name and the IP address of the SMTP relay to be used for the particular domain.
Configuring DNS Resolution delivery
To configure DNS Resolution delivery:
1. On the navigation pane, click System→SMTP.
The Mail Security SMTP page appears.
2. Click the Outgoing tab.
3. Select the Enable box.
4. Select the Enable Logging box if you want to write log entries to a log file.
5. Provide the domain name which you are on (the host to send email messages from) in the HELO Domain field.
6. Enable the Remove Spool Errors box if you want to remove or store email messages in the frozen directory after a failure in delivery or filtering.
7. Set the amount of time the SMTP server should wait after a delivery error before it tries to send an email message in the Timeout field. Default: 480 seconds
8. Set the maximum number of retries before a notification is sent out to the original sender in the Maximum Number of Retries field. Default: 32
9. Set notification to the sender if XMail retries to deliver an email message (Status delivery errors) in the Notify Sender on Retries field.
47IBM Proventia Network Mail Security System User Guide, Version 1.5
Chapter 3: Configuring SMTP Settings
10. Choose DNS Resolution in the Delivery area.
11. Click Add.
The Add DNS resolution window appears.
12. Type the IP address of the DNS server in the DNS Server field, and then click OK.
The DNS server appears in the list.
13. Click Save Changes.
Configuring Forward delivery
To configure Forward delivery:
1. On the navigation pane, click System→SMTP.
The Mail Security SMTP page appears.
2. Click the Outgoing tab.
3. Select the Enable box.
4. Select the Enable Logging box if you want to write log entries to a file.
5. Provide the domain name which you are on (the host to send email message from) in the HELO Domain field.
6. Enable the Remove Spool Errors box if you want to remove or store email messages in the frozen directory after a failure in delivery or filtering.
7. Set the amount of time the SMTP server should wait after a delivery error before it tries to send an email message in the Timeout field. Default: 480 seconds
8. Set the maximum number of retries before a notification is sent out to the original sender in the Maximum Number of Retries field. Default: 32
9. Set notification to the sender if the SMTP server retries to deliver an email message (Status delivery errors) in the Notify Sender on Retries field.
10. Choose Forward in the Delivery area.
11. Click Add.
The Add Forward window appears.
12. Provide a domain for the server in the Domain field.
To create a default forward entry, enter * for domain (*=wildcard), and the IP address(es) of the SMTP relay(s) to be used within SMTP Server list. If there is more than one SMTP relay server, they should be used for redundancy reasons. Separate the IP addresses with commas.
The DNS server appears in the list.
13. Type an IP address for the mail server in the Mailserver(s) field, and then click OK.
The server appears in the list.
14. Click Save Changes.
48 IBM Internet Security Systems
Configuring Global Settings for the SMTP Server
Configuring Global Settings for the SMTP Server
Introduction You can integrate SMTP in to your existing network environment. The appliance uses the connection to an SMTP server to do the following:
● parse XMail’s unchecked queue
● read email messages from this queue
● pass email messages to XMail for delivery
Procedure To configure global settings:
1. On the navigation pane, click System→SMTP.
The Mail Security SMTP page appears.
2. Click the Global tab.
3. Enable the Passthrough box if you want to implement a Passthrough XMail server.
The Passthrough XMail Server lets you set up the appliance to forward all email messages directly to the XMail server without processing or analyzing them. During passthrough mode, you can make changes or tests without interrupting the processing of email messages.
4. Provide the root domain for your email server in the Root Domain field.
5. Provide different email addresses for various accounts in the SMTP Notification Email Addresses area as follows:
6. Click Save Changes.
Directory Description
Postmaster The SMTP address of the Administrator.
Error Admin The path to the SMTP address in which each undelivered email message is sent in addition to the original sender of the email message. If you leave the field blank, only the original sender of the email message receives a notification email message if the email message was not delivered successfully.
Temporary Error Admin The temporary path to the SMTP address in which each undelivered email message is sent in addition to the original sender of the email message.
Send new Email as The email address shown by the appliance as the sender when a new email message is sent.
Send Quarantine Report as
The email address shown by the appliance as the sender when a quarantine report is sent.
49IBM Proventia Network Mail Security System User Guide, Version 1.5
Chapter 3: Configuring SMTP Settings
Deleting SMTP Log Files
Introduction You can remove log files from the appliance’s database that are no longer needed.
Procedure To remove log files:
1. On the navigation pane, click System→SMTP.
The Mail Security SMTP page appears.
2. Click the Maintenance tab.
3. Set the number of days to keep log files in the Days to Keep field.
4. Select Enable Schedule to schedule the removal of unwanted log files, and then click Schedules to configure a schedule for removal.
5. Click Save Changes.
50 IBM Internet Security Systems
Managing Email Messages in the SMTP Store
Managing Email Messages in the SMTP Store
Introduction You can browse the SMTP server queues for email messages or log files (if available) generated by the appliance.
Types of email messages
You can view the following types of email messages:
● unchecked
Unchecked emails are email messages that are waiting to be analyzed by the appliance. Every incoming email message goes to the unchecked queue first. Once the email message has been analyzed by the policy in place, the email message is removed from the unchecked queue. The email messages in the unchecked queue are considered temporary data; a large unchecked queue indicates that the appliance is receiving more email messages then it can process.
● local
Local emails are email messages that were in the unchecked queue, but have been analyzed and then moved from the unchecked queue to the local queue. These email messages are also considered temporary data.
● frozen
Frozen emails are email messages that were sent to the target SMTP server but failed to be processed due to a temporary error, such as the server was not reachable. The receiving mail server (remote server) returns a permanent error, or after the email message is unable to be sent within the configured resend interval.
Τhe email message is moved to the resend queue to be resent by the appliance. A large resend queue indicates that there is an email message delivery problem.
● resend
Resend emails are email messages that were sent to the target SMTP server but failed to be processed due to a temporary error, such as the server was not reachable. The email message is moved to the resend queue to be resent by the appliance. A large resend queue indicates that there is an email message delivery problem.
Procedure To browse an email queue:
1. On the navigation pane, click Mail Security→SMTP Queue Browser.
The Mail Security SMTP Queue Browser page appears.
2. Go to the Foldername area, and then select the queue in which you want to check email messages.
The appliance displays the email messages from the queue.
51IBM Proventia Network Mail Security System User Guide, Version 1.5

Chapter 3: Configuring SMTP Settings
Setting Up Network Clustering
Introduction A cluster is a group of appliances that work together as though they are a single appliance. You usually deploy clusters to improve speed or reliability over what would be provided by a single appliance.
Important: When an appliance is promoted to the primary central appliance in the cluster (a cluster is created), or an appliance joins an existing cluster, the appliance loses all data.
How the appliance uses clustering
A cluster consists of a number of appliances, in which all the appliances in the cluster share the configuration specified on the following LMI pages: Mail Security→Policy or Mail Security→Policy Objects. One of the appliances acts as primary central database server. The appliance that is acting as the central database server can still process email messages like any other appliance, although you should keep normal SMTP traffic low on this appliance by using MX records.
The sender needs an MX record to determine where to send an email message for a specific domain, in which every SMTP server for a specific domain needs an MX Record. To keep SMTP traffic low, you must set the MX priority value greater than those of its cluster clients (which allows the appliances to share data between multiple instances of the product running in a cluster).
Every appliance has a local database that holds all the information about the email messages processed on the specific appliance. Specific data is collected by the central database to support cluster-wide message browsing, quarantine reports, and user-based block and allow lists.
Process The appliances in the cluster follow this process:
1. Email processing data is stored on the local database server first.
2. All appliances in the cluster replicate database changes (such as new data, changed data, or deleted data) from the local database to the primary central database in a configurable interval.
Things to note ● When the appliance is promoted to cluster central host (a cluster is created) or an appliance joins an existing cluster, the appliances loses all data.
● Οpen the firewall on the cluster central host and on a joining appliance to allow communication on ports 5432 (database) and 4990 (cluster communication).
● Μake sure the computers forming a cluster can reach each other on the network level.
● Synchronize the time settings on all cluster members using a time server.
● Some SMTP settings reference the Policy Objects defined under Mail Security. Policy Objects are replicated between cluster members, but SMTP settings are not. You should remove all references to Policy Objects from the following SMTP settings: SMTP→Incoming→Recipient Verification and SMTP→Maintenance.
● When you create a cluster or join appliances in a cluster, all references to Schedule objects and FTP Server objects must be empty and you must disable Data Backup.
● The central server generates quarantine reports. Users will only receive one quarantine report containing all quarantined email messages, regardless of which appliance processed the email messages.
52 IBM Internet Security Systems
Setting Up Network Clustering
Creating a cluster To create a cluster:
1. On the navigation pane, click Mail Security→Cluster→Create.
The Cluster Settings page appears.
2. Go to the Create a New Cluster area, and then select an IP address from the Used Host IP drop-down.
3. Type a passphrase for the cluster in the Passphrase field.
4. Click the Create Cluster button.
Adding an appliance to the cluster
You can add an appliance to the cluster.
Important: When an appliance is promoted to the primary central appliance in the cluster (a cluster is created), or an appliance joins an existing cluster, the appliance loses all data.
When an appliance is added to the cluster, it receives the connection parameters to the central database and the appliance goes through the following process:
1. Stops processing email messages, including the SMTP server.
2. Connects to the central database.
3. Deletes all data from its own database.
4. Replicates all configuration data from the cluster central to the local database.
5. Applies the policy previously read from the central database.
6. Starts processing email messages.
Procedure: To add an appliance to the cluster:
1. On the navigation pane, click Mail Security→Cluster→Join.
The Join Cluster page appears.
2. Go to the Join an existing cluster area, and then type the IP address of the primary central database server in the IP of the Cluster Central field.
3. Select an IP address for the database servers that you would like to add to the cluster from the Used Cluster Client IP drop-down.
4. Type the passphrase for the cluster in the Passphrase field.
5. Click the Join this Cluster button.
Removing an appliance from the cluster
You can remove an appliance from the cluster.
Note: This functionality depends on the state of the appliance in the cluster, and may not be present on the navigation pane at all times.
Important: When an appliance is promoted to the primary central appliance in the cluster (a cluster is created), or an appliance joins an existing cluster, the appliance loses all data.
Procedure: To remove an appliance from the cluster:
1. On the navigation pane, click Mail Security→Cluster→Leave.
The Leave Cluster page appears.
2. Type the passphrase for the cluster in the Passphrase field.
53IBM Proventia Network Mail Security System User Guide, Version 1.5
Chapter 3: Configuring SMTP Settings
3. Click the Leave Cluster button.
The appliance stops processing SMTP traffic and leaves the cluster.
4. Restart the SMTP traffic processing.
Erasing a cluster of appliances
You can return a cluster of appliances back into a standalone appliance.
Important: This functionality depends on the state of the appliances in the cluster, and may not be present on the navigation pane at all times.
To erase a cluster of appliances:
1. On the navigation pane, click Mail Security→Cluster→Erase.
The Erase Cluster page appears.
2. Go to the Erase Cluster area, and then type the passphrase for the cluster in the Passphrase field.
3. Click the Erase Cluster button.
Modifying the settings of an appliance in the cluster
You can change a password for an appliance in the cluster, or change the IP address of the primary central appliance in the cluster.
Important: This functionality depends on the state of the appliance in the cluster, and may not be present on the navigation pane at all times.
Change the password for an appliance in the cluster
To change the password for an appliance in the cluster:
1. On the navigation pane, click Mail Security→Cluster→Modify.
The Modify Cluster page appears.
2. Go to the Change Passphrase area.
3. Type the old passphrase in the Old Passphrase field.
4. Type the new passphrase in the New Passphrase field, and then confirm the new passphrase for the appliance.
5. Click the Change Passphrase button.
Changing the IP address of the primary central appliance in the cluster
To change the IP address of the primary appliance:
1. On the navigation pane, click Mail Security→Cluster→Modify.
The Modify Cluster page appears.
2. Go to the Change Cluster Central IP.
3. Type the new IP address in the New IP field.
4. Type the passphrase for the appliance in the Passphrase field.
5. Click the Change IP button.
54 IBM Internet Security Systems
Chapter 4
Setting Up Access to End User Accounts for Personal Block/Allow Lists
Overview
Introduction This chapter explains how to set up access for end users who want to manage quarantined email messages and receive quarantine reports about those email messages.
In this chapter This chapter contains the following topics:
Topic Page
Setting Up Access to End User Accounts for Personal Block/Allow Lists 56
Deleting a User from Managing a Personal Block/Allow List 57
Deleting a User’s Personal Block/Allow List 58
Browsing a Quarantine Store for Blocked Email Messages 59
Adding Entries to a Personal Block or Allow List 60
Deleting an Entry from a Personal Block or Allow List 61
Changing the Password on a Personal Block/Allow List Account 62
Resetting an End User’s Password to Access a Personal Block/Allow List 63
Requesting a Quarantine Report on Blocked Email Messages 64
Requesting a New Account to Access a Personal Block/Allow List 65
55IBM Proventia Network Mail Security System User Guide, Version 1.5
Chapter 4: Setting Up Access to End User Accounts for Personal Block/Allow Lists
Setting Up Access to End User Accounts for Personal Block/Allow Lists
Introduction The Administrator can set up access for end users who want to do the following:
● access and browse through their quarantined email messages
● create and manage personal block and allow lists
● generate a daily quarantine report of quarantined email messages
Procedure To grant access to specific end user account:
1. On the navigation pane, click Mail Security→Policy.
The Mail Security Policy page appears.
2. Click the User Access List tab.
3. Select Denied from the Default Access drop-down.
4. Type the IP address for the End User site followed by the port number 4443 in the Enduser Accessible URL field. Default: https://192.168.2.1:4443
5. Select a Who object from the Who drop-down.
6. Select the Granted access mode in the Access Type drop-down.
7. Click OK, and then click Save Changes.
The entry appears in the list and also in the user list on the Mail Security User Management page.
56 IBM Internet Security Systems
Deleting a User from Managing a Personal Block/Allow List
Deleting a User from Managing a Personal Block/Allow List
Introduction The Administrator can remove an end user who was previously authorized to manage a personal block or allow list.
Procedure To remove a user from the list:
1. On the navigation pane, click Mail Security→User Management.
The Mail Security User Management page appears.
2. Select a user in the list, and then click Delete User.
The user is removed from the list.
57IBM Proventia Network Mail Security System User Guide, Version 1.5
Chapter 4: Setting Up Access to End User Accounts for Personal Block/Allow Lists
Deleting a User’s Personal Block/Allow List
Introduction The Administrator can remove a user’s personal block or allow list if the list is no longer valid.
Procedure To remove a user’s personal block or allow list:
1. On the navigation pane, click Mail Security→User Management.
The Mail Security User Management page appears.
2. Do one of the following:
If you want to... Do this...
delete a block list click Delete Blocklist
delete an allow list click Delete Allowlist
58 IBM Internet Security Systems
Browsing a Quarantine Store for Blocked Email Messages
Browsing a Quarantine Store for Blocked Email Messages
Introduction You can browse through quarantined email messages to determine if an email message should be added to your personal block list or allow list, or completely removed from the quarantine store.
Procedure To browse a quarantine store for email messages:
1. Open a Web browser.
2. Type the IP address for the End User site followed by the port number 4443 in the Address field. Example: https://192.168.2.1:4443
The Login page appears.
3. Type your email address in the User field.
4. Type your password in the Password field.
5. Provide the directory/domain in the Directory field.
6. Click Login.
The Welcome page appears.
7. Select the Email Quarantine link.
The Quarantine Store page appears.
8. Do one of the following:
If you want to... Do this...
remove an email message from the store
click Delete
deliver the blocked email message to your personal email address
click Deliver
59IBM Proventia Network Mail Security System User Guide, Version 1.5
Chapter 4: Setting Up Access to End User Accounts for Personal Block/Allow Lists
Adding Entries to a Personal Block or Allow List
Introduction The Administrator can grant access to an end user who wants to view quarantined email message. The user can then access their personal account using a Web-based interface to do the following:
● browse quarantined email messages
● manage personal block and allow lists
● generate and receive a quarantine report of quarantined email messages
Important: Before the end user can manage their personal block/allow list, the Administrator must set up access permissions for the end user account on the User Access List tab of the Mail Security Policy page.
Procedure To add entries to a block list or an allow list:
1. Open a Web browser.
2. Type the IP address for the End User site followed by the port number 4443 in the Address field. Example: https://192.168.2.1:4443
The Login page appears.
3. Type your email address in the User field.
4. Type your password in the Password field.
5. Provide the directory/domain in the Directory field.
6. Click Login.
The Welcome page appears.
7. Select the Blocklist/Allowlist Management link.
The Blocklist/Allowlist page appears.
8. Type the email addresses in the field provided, and then click Add to Blocklist or Add to Allowlist.
The entry is added to the list.
60 IBM Internet Security Systems
Deleting an Entry from a Personal Block or Allow List
Deleting an Entry from a Personal Block or Allow List
Introduction You can remove an email address from a block or allow list if it is no longer valid.
Procedure To delete an entry from a personal block or allow list:
1. Open a Web browser.
2. Type the IP address for the End User site followed by the port number 4443 in the Address field. Example: https://192.168.2.1:4443
The Login page appears.
3. Type your email address in the User field.
4. Type your password in the Password field.
5. Provide the directory/domain in the Directory field.
6. Click Login.
The Welcome page appears.
7. Select the Blocklist/Allowlist Management link.
The Blocklist/Allowlist page appears.
8. Select the entry, and then click Delete.
The entry is removed from the list.
61IBM Proventia Network Mail Security System User Guide, Version 1.5
Chapter 4: Setting Up Access to End User Accounts for Personal Block/Allow Lists
Changing the Password on a Personal Block/Allow List Account
Introduction You can change the password that you use to access your personal block/allow list account.
Important: This functionality is only available if the end user is a local user. If the end user is part of a directory, the functionality does not appear in the user interface.
Procedure To change your password:
1. Open a Web browser.
2. Type the IP address for the End User site followed by the port number 4443 in the Address field. Example: https://192.168.2.1:4443
The Login page appears.
3. Type your email address in the User field.
4. Type your password in the Password field.
5. Provide the directory/domain in the Directory field.
6. Click Login.
The Welcome page appears.
7. Select the Change Password link.
8. Type the new password, and then click Change Password.
62 IBM Internet Security Systems
Resetting an End User’s Password to Access a Personal Block/Allow List
Resetting an End User’s Password to Access a Personal Block/Allow List
Introduction The Administrator can reset the password of an end user who is trying to access a private Web page that allows them to do the following:
● access quarantined email messages to determine whether to add the email message to block/allow lists
● view quarantined email messages
● generate daily quarantine reports on quarantined email messages
Important: This functionality is only available if the end user is a local user. If the end user is part of a directory, the credentials for the directory are used at logon.
Procedure To reset an end user’s password:
1. On the navigation pane, click Mail Security→User Management.
The Mail Security User Management page appears.
2. Go to the Username area, and then select a user.
3. Click the Reset Password button to reset the password.
The new password is automatically sent by email message to the user.
63IBM Proventia Network Mail Security System User Guide, Version 1.5
Chapter 4: Setting Up Access to End User Accounts for Personal Block/Allow Lists
Requesting a Quarantine Report on Blocked Email Messages
Introduction You can request a daily report of email messages currently being quarantined for your email address.
Procedure To request a quarantine report:
1. Open a Web browser.
2. Type the IP address for the End User site followed by the port number 4443 in the Address field. Example: https://192.168.2.1:4443
The Login page appears.
3. Type your email address in the User field.
4. Type your password in the Password field.
5. Provide the directory/domain in the Directory field.
6. Click Login.
The Welcome page appears.
7. Select the Quarantine Report link.
The report is sent to your personal email address.
64 IBM Internet Security Systems
Requesting a New Account to Access a Personal Block/Allow List
Requesting a New Account to Access a Personal Block/Allow List
Introduction If the Administrator does not use LDAP to manage the End User site where users can create and manage their personal block/allow lists, then the user must create an account on the End User Login page.
Example: Administrator did not use LDAP
In the User Access List (Mail Security→Policy), the Administrator configures the mail security policy to allow all SMTP addresses *@iss.net. The user [email protected] can create an account, however [email protected] will not be allowed to create an account.
Example: Administrator used LDAP
The Administrator uses LDAP to configure end user access in the User Access List that allows all known users in the admin domain. The user name admin\jdoe will be allowed to access the end user pages (without having to create an account on the End User Login page).
Procedure To request an account:
1. Open a Web browser.
2. Type the IP address for the End User site followed by the port number 4443 in the Address field. Example: https://192.168.2.1:4443
The Login page appears.
3. Type your email address in the User field.
4. Type your password in the Password field.
The appliance checks this information against end user access permissions the Administrator configured in the User Access List allowing end users access to the End User site.
5. Provide the directory/domain in the Directory field.
6. Click the Create a New User link.
The Create New Local User window appears.
65IBM Proventia Network Mail Security System User Guide, Version 1.5

Chapter 4: Setting Up Access to End User Accounts for Personal Block/Allow Lists
66 IBM Internet Security Systems
Part II
Configuration

Chapter 5
Managing Interfaces in Routing Mode
Overview
Introduction This chapter explains how to route network traffic from one physical network to another network.
In this chapter This chapter contains the following topics:
Topic Page
Configuring Routing Interfaces 70
Configuring the External Interface 72
Configuring the Internal Interfaces 74
69IBM Proventia Network Mail Security System User Guide, Version 1.5
Chapter 5: Managing Interfaces in Routing Mode
Configuring Routing Interfaces
Introduction In routing mode, one of the appliance’s basic functions is to route network traffic from one physical network to another. These networks are connected to the appliance’s multiple interfaces. For routing to occur, you must enable the interfaces and physically connect them to their respective networks. You must also assign network information to the interfaces such as IP addresses and subnet masks. The external and internal interfaces are enabled and configured during the initial setup. You can enable additional internal interfaces as needed to connect to appliance to other internal networks.
How the appliance routes traffic
The appliance routes traffic on the networks and subnetworks connected to it. You must assign IP network settings to the interfaces, including IP addresses, subnetwork mask, and gateway router IP addresses.
Route precedence in the Routing table
If there are two or more routes for identical destinations, the most specific route in the Routing table takes precedence.
Example: You configure the routes in the following table:
In this example, a packet destined to the host 10.1.1.1 uses the 192.168.1.2 route.
Adding a route To add a route:
1. On the navigation pane, click System→Routes.
The Route Configuration page appears.
2. Click Add.
The Add Routing window appears.
3. Type the IP address of the destination network in the Destination IP Address box.
4. Provide the mask value of the destination network in the Subnet Mask box.
5. Type the IP address of the gateway router in the Gateway IP Address box.
6. If needed, set a value in the Metric field.
The Metric (or hop count) indicates the number of routes or segments between the source and destination.
7. Click OK.
The route appears in the routing list.
8. Click Save Changes.
Destination Subnet Mask Gateway IP Address
10.0.0.0 255.0.0.0 192.168.1.1
10.1.1.0 255.255.255.0 192.168.1.2
10.1.0.0 255.255.0.0 192.168.1.3
Table 15: Precedence in routing tables
70 IBM Internet Security Systems
Configuring Routing Interfaces
Removing a route To remove a route:
1. On the navigation pane, click System→Routes.
The Route Configuration page appears.
2. Select an IP address, and then click Remove.
3. Click Save Changes.
71IBM Proventia Network Mail Security System User Guide, Version 1.5
Chapter 5: Managing Interfaces in Routing Mode
Configuring the External Interface
Introduction You can configure the external interface in Routing Mode.
Tasks Complete the following tasks to configure the external interface:
Enabling the external interface
To enable the external interface:
1. On the navigation pane, click System→Networking.
The Network Configuration page appears.
2. Select the External Interface tab.
3. Select the Enabled box.
4. Type the hostname of the appliance in the Host Name field.
Use the format myappliance.example.com.
5. Click Save Changes.
Selecting the external IP address type
To select the external interface IP address type:
1. On the navigation pane, click System→Networking.
The Network Configuration page appears.
2. Select an IP address type in the IP Address area, as described in the following table:
3. Click Save Changes.
Task Description
1 Enabling the external interface
2 Selecting the external IP address type
3 Configuring external interface DNS settings
Table 16: Configuring the external interface
IP Type Action
DHCP To use DHCP:
1. Select DHCP.
2. If needed, select Mac Address to Clone, and then type 6 hex pairs, separated by colons. Use the format AA:BB:CC:11:22:33.
Static To use a static IP address:
1. Select Static.
2. Type the IP address of the appliance’s external interface, and then press ENTER.
3. Provide the Subnet Mask (network mask) value.
4. Type the gateway IP address in the Gateway field. If you want this interface to be the Primary Management Interface for the SiteProtector system, then select the Primary Management Interface box.
72 IBM Internet Security Systems
Configuring the External Interface
Configuring external interface DNS settings
To configure the external interface DNS settings:
1. On the navigation pane, click System→Networking.
The Network Configuration page appears.
2. Go to the DNS area. Do you want to use dynamic settings?
■ If yes, select Use Dynamic Settings, and then go to Step 6.
■ If no, go to Step 3.
3. Provide the IP addresses for the primary, secondary, and tertiary DNS servers.
4. (optional) Go to the DNS Search Path area, and then click Add.
The DNS search path appends the domain name to the host name, which enables the computer to easily find the domain location.
5. Provide the domain name to add to the search list, and then click OK.
6. Click Save Changes.
73IBM Proventia Network Mail Security System User Guide, Version 1.5
Chapter 5: Managing Interfaces in Routing Mode
Configuring the Internal Interfaces
Introduction You can configure the internal interfaces for the appliance.
Procedure To add an internal interface:
1. On the navigation pane, click System→Networking.
The Network Configuration page appears.
2. Select the Internal Interfaces tab.
3. Click the Add icon.
4. Select an interface from the Interface list.
5. Select the Enabled box.
6. Type the IP address of the appliance in the IP Address field.
7. Provide the subnet mask for the appliance address in the Subnet Mask field.
8. Select Primary Management Interface if you want this interface to be the primary management interface for the SiteProtector system.
9. Click OK, and then click Save Changes.
74 IBM Internet Security Systems
Chapter 6
Configuring a Mail Security Policy
Overview
Introduction This chapter explains how to configure a mail security policy using the Local Management Interface (LMI) provided by the appliance.
In this chapter This chapter contains the following topics:
Topic Page
About the Mail Security Policy 76
Configuring a Mail Security Policy 79
Configuring a Who Object 81
Configuring a When Object 88
Configuring a Condition for a Mail Security Policy 89
Adding an Analysis Module to a Policy Rule 90
Enabling Automated Bayesian Classifier Training 95
Setting Up Spam Flow Control 99
Configuring an RBL Server 100
About Responses 101
Enabling Alert Logging for System Events 103
Configuring Mail Security Policy Advanced Parameters 106
75IBM Proventia Network Mail Security System User Guide, Version 1.5
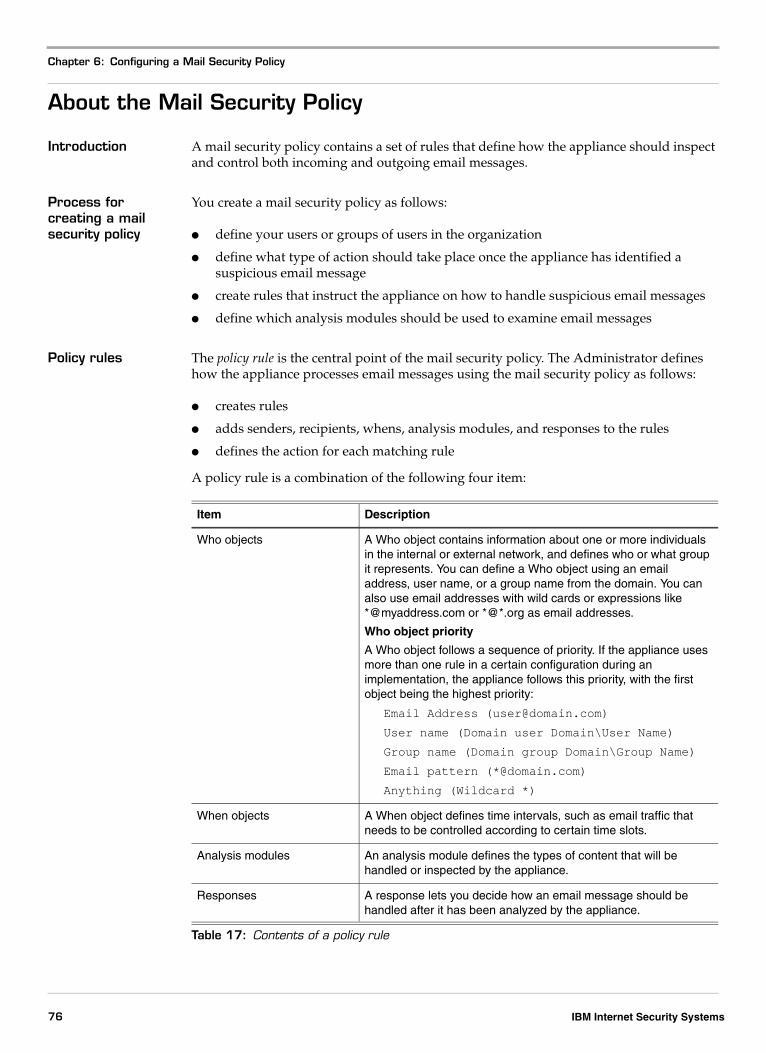
Chapter 6: Configuring a Mail Security Policy
About the Mail Security Policy
Introduction A mail security policy contains a set of rules that define how the appliance should inspect and control both incoming and outgoing email messages.
Process for creating a mail security policy
You create a mail security policy as follows:
● define your users or groups of users in the organization
● define what type of action should take place once the appliance has identified a suspicious email message
● create rules that instruct the appliance on how to handle suspicious email messages
● define which analysis modules should be used to examine email messages
Policy rules The policy rule is the central point of the mail security policy. The Administrator defines how the appliance processes email messages using the mail security policy as follows:
● creates rules
● adds senders, recipients, whens, analysis modules, and responses to the rules
● defines the action for each matching rule
A policy rule is a combination of the following four item:
Item Description
Who objects A Who object contains information about one or more individuals in the internal or external network, and defines who or what group it represents. You can define a Who object using an email address, user name, or a group name from the domain. You can also use email addresses with wild cards or expressions like *@myaddress.com or *@*.org as email addresses.
Who object priority
A Who object follows a sequence of priority. If the appliance uses more than one rule in a certain configuration during an implementation, the appliance follows this priority, with the first object being the highest priority:
Email Address ([email protected])
User name (Domain user Domain\User Name)
Group name (Domain group Domain\Group Name)
Email pattern (*@domain.com)
Anything (Wildcard *)
When objects A When object defines time intervals, such as email traffic that needs to be controlled according to certain time slots.
Analysis modules An analysis module defines the types of content that will be handled or inspected by the appliance.
Responses A response lets you decide how an email message should be handled after it has been analyzed by the appliance.
Table 17: Contents of a policy rule
76 IBM Internet Security Systems
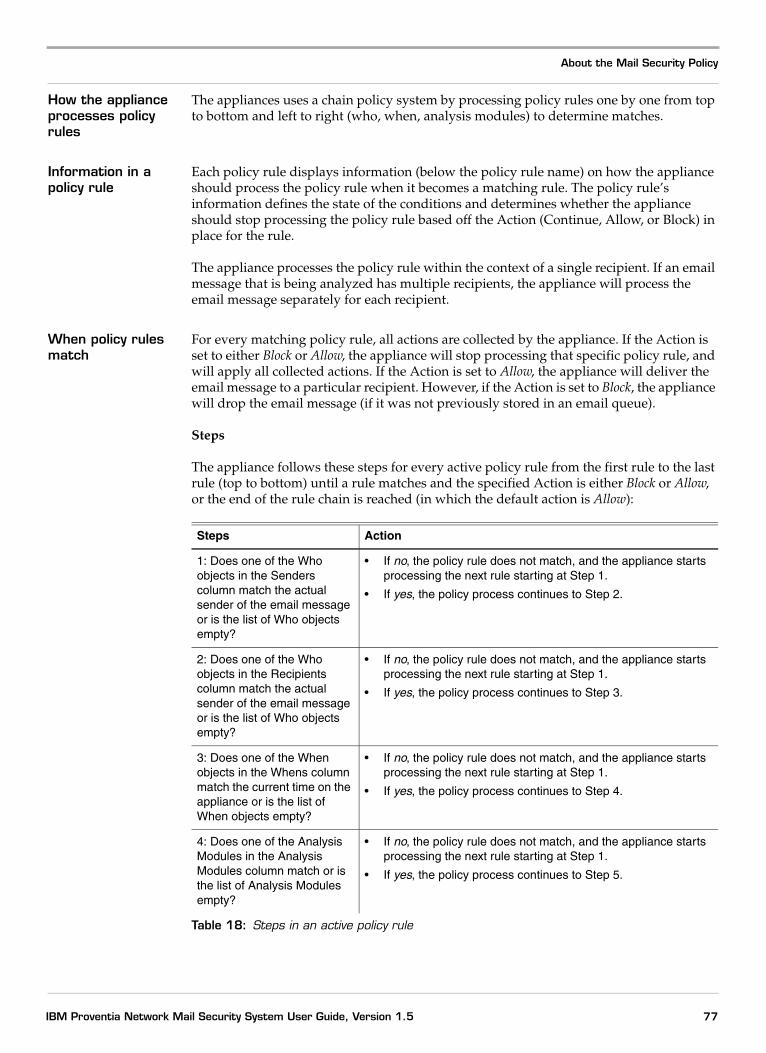
About the Mail Security Policy
How the appliance processes policy rules
The appliances uses a chain policy system by processing policy rules one by one from top to bottom and left to right (who, when, analysis modules) to determine matches.
Information in a policy rule
Each policy rule displays information (below the policy rule name) on how the appliance should process the policy rule when it becomes a matching rule. The policy rule’s information defines the state of the conditions and determines whether the appliance should stop processing the policy rule based off the Action (Continue, Allow, or Block) in place for the rule.
The appliance processes the policy rule within the context of a single recipient. If an email message that is being analyzed has multiple recipients, the appliance will process the email message separately for each recipient.
When policy rules match
For every matching policy rule, all actions are collected by the appliance. If the Action is set to either Block or Allow, the appliance will stop processing that specific policy rule, and will apply all collected actions. If the Action is set to Allow, the appliance will deliver the email message to a particular recipient. However, if the Action is set to Block, the appliance will drop the email message (if it was not previously stored in an email queue).
Steps
The appliance follows these steps for every active policy rule from the first rule to the last rule (top to bottom) until a rule matches and the specified Action is either Block or Allow, or the end of the rule chain is reached (in which the default action is Allow):
Steps Action
1: Does one of the Who objects in the Senders column match the actual sender of the email message or is the list of Who objects empty?
• If no, the policy rule does not match, and the appliance starts processing the next rule starting at Step 1.
• If yes, the policy process continues to Step 2.
2: Does one of the Who objects in the Recipients column match the actual sender of the email message or is the list of Who objects empty?
• If no, the policy rule does not match, and the appliance starts processing the next rule starting at Step 1.
• If yes, the policy process continues to Step 3.
3: Does one of the When objects in the Whens column match the current time on the appliance or is the list of When objects empty?
• If no, the policy rule does not match, and the appliance starts processing the next rule starting at Step 1.
• If yes, the policy process continues to Step 4.
4: Does one of the Analysis Modules in the Analysis Modules column match or is the list of Analysis Modules empty?
• If no, the policy rule does not match, and the appliance starts processing the next rule starting at Step 1.
• If yes, the policy process continues to Step 5.
Table 18: Steps in an active policy rule
77IBM Proventia Network Mail Security System User Guide, Version 1.5
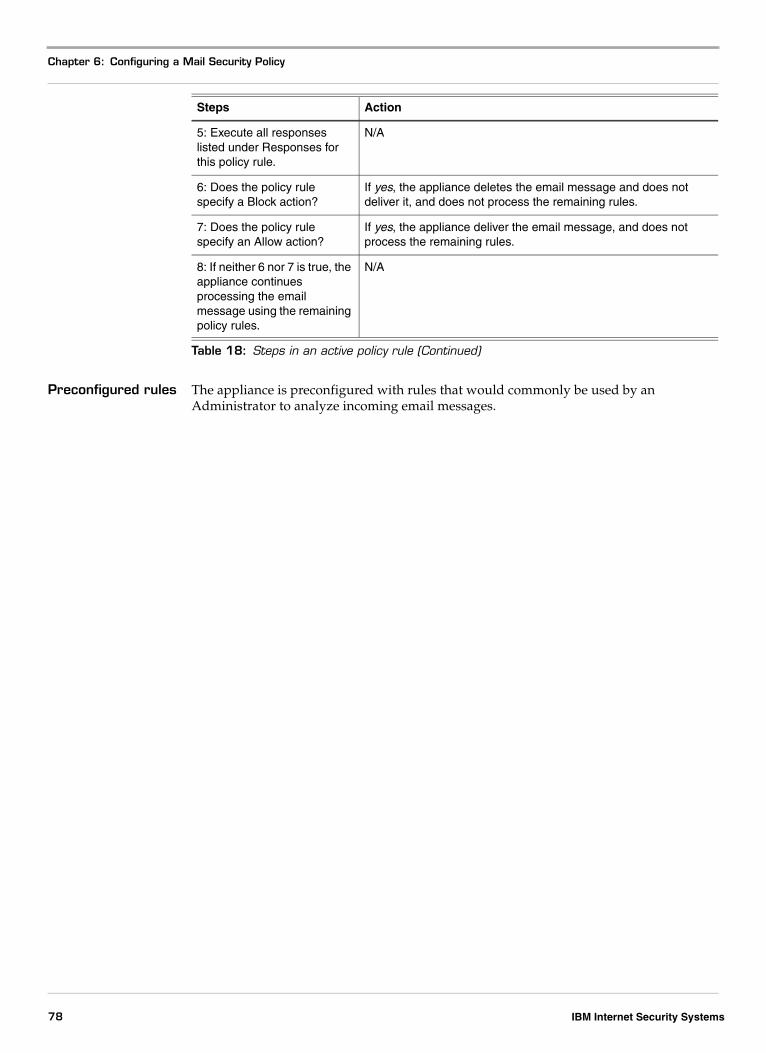
Chapter 6: Configuring a Mail Security Policy
Preconfigured rules The appliance is preconfigured with rules that would commonly be used by an Administrator to analyze incoming email messages.
5: Execute all responses listed under Responses for this policy rule.
N/A
6: Does the policy rule specify a Block action?
If yes, the appliance deletes the email message and does not deliver it, and does not process the remaining rules.
7: Does the policy rule specify an Allow action?
If yes, the appliance deliver the email message, and does not process the remaining rules.
8: If neither 6 nor 7 is true, the appliance continues processing the email message using the remaining policy rules.
N/A
Steps Action
Table 18: Steps in an active policy rule (Continued)
78 IBM Internet Security Systems
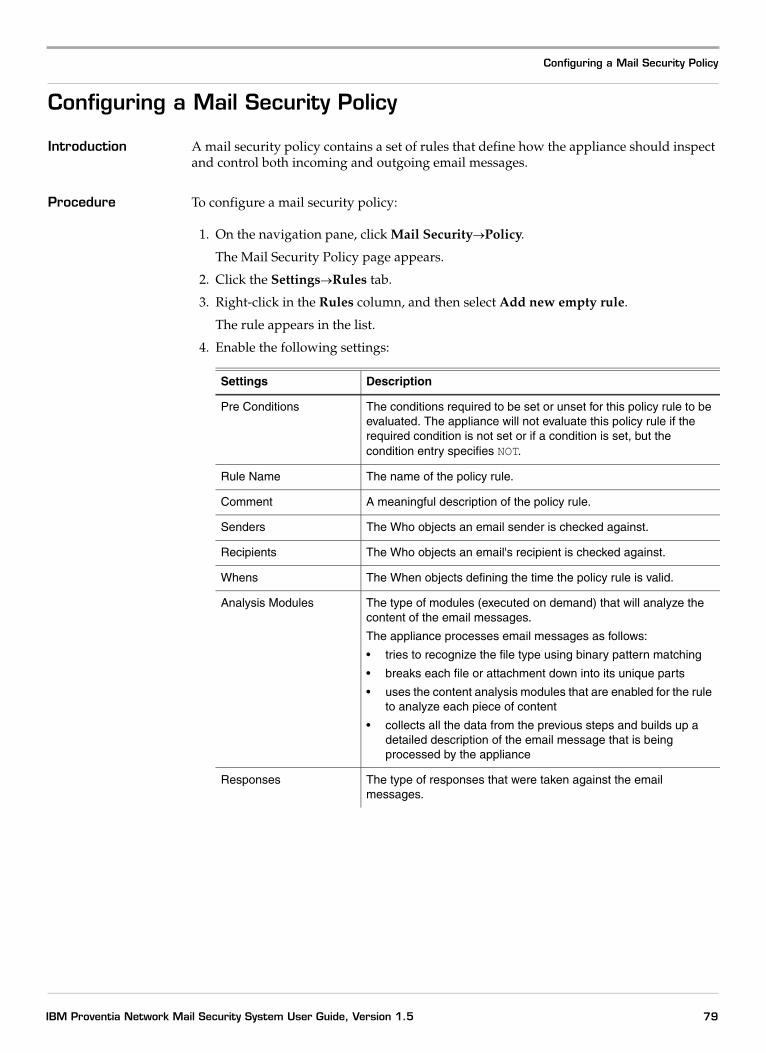
Configuring a Mail Security Policy
Configuring a Mail Security Policy
Introduction A mail security policy contains a set of rules that define how the appliance should inspect and control both incoming and outgoing email messages.
Procedure To configure a mail security policy:
1. On the navigation pane, click Mail Security→Policy.
The Mail Security Policy page appears.
2. Click the Settings→Rules tab.
3. Right-click in the Rules column, and then select Add new empty rule.
The rule appears in the list.
4. Enable the following settings:
Settings Description
Pre Conditions The conditions required to be set or unset for this policy rule to be evaluated. The appliance will not evaluate this policy rule if the required condition is not set or if a condition is set, but the condition entry specifies NOT.
Rule Name The name of the policy rule.
Comment A meaningful description of the policy rule.
Senders The Who objects an email sender is checked against.
Recipients The Who objects an email's recipient is checked against.
Whens The When objects defining the time the policy rule is valid.
Analysis Modules The type of modules (executed on demand) that will analyze the content of the email messages.
The appliance processes email messages as follows:
• tries to recognize the file type using binary pattern matching
• breaks each file or attachment down into its unique parts
• uses the content analysis modules that are enabled for the rule to analyze each piece of content
• collects all the data from the previous steps and builds up a detailed description of the email message that is being processed by the appliance
Responses The type of responses that were taken against the email messages.
79IBM Proventia Network Mail Security System User Guide, Version 1.5

Chapter 6: Configuring a Mail Security Policy
5. Click Save Changes.
Action The following actions are available:
• Continue
The Continue action permits an analyzed email message to continue to the next rule in the policy until it matches a Block or Allow action, or the end of the rule system (where it will then be allowed).
• Allow
The Allow action permits an analyzed email message that is deemed safe to be sent or received by its recipients, which ends the processing of the email message by the appliance.
• Block
The Block action blocks email messages, which ends the processing of email messages by the appliance. Blocked email messages are not delivered to recipients.
Settings Description
80 IBM Internet Security Systems

Configuring a Who Object
Configuring a Who Object
Introduction A Who object contains information about one or more individuals in your internal or external network, and defines who or what group it represents.
How to define a Who object
You can define a Who object using an email address, user name, or a group domain name. You can also use email addresses with wild cards or use expressions like *@myaddress.com or *@*.org as email addresses.
Contents of a Who object
A Who object consists of one of the following items:
Who object priority A Who object follows a sequence of priority. If more than one rule in a certain configuration is invoked during an implementation, the appliances uses the following priority, with the first object being the highest priority:
Email address ([email protected])
User name (Domain user Domain\User Name)
Group name (Domain group Domain\Group Name)
Email pattern (*@domain.com)
Anything (Wildcard *)
Unknown Who object
You can use an unknown Who object in which email messages that have no valid recipients on the internal mail server are marked as unknown. You use this in rules or to block email messages at the SMTP layer using the Recipient Verification feature. Recipient Verification allows XMail to immediately block any email messages that are sent to a user who does not exist in the organization.
Reference: See “Configuring Recipient Verification” on page 45 for more information about Recipient Verification.
Configuring a Who object
To configure a Who object:
1. On the navigation pane, click Mail Security→Policy Objects.
The Mail Security Policy Objects page appears.
2. Click the Who tab, and then click Add.
The Add window appears.
3. Type the name for the Who object in the Name field.
Item Description
email Matches an email address or email pattern (SMTP).
user Matches a user name against a directory.
group Matches a group of users against a directory.
directory Matches a specific directory.
attribute Matches the value of a specific attribute in the directory.
Table 19: Contents of a Who object
81IBM Proventia Network Mail Security System User Guide, Version 1.5
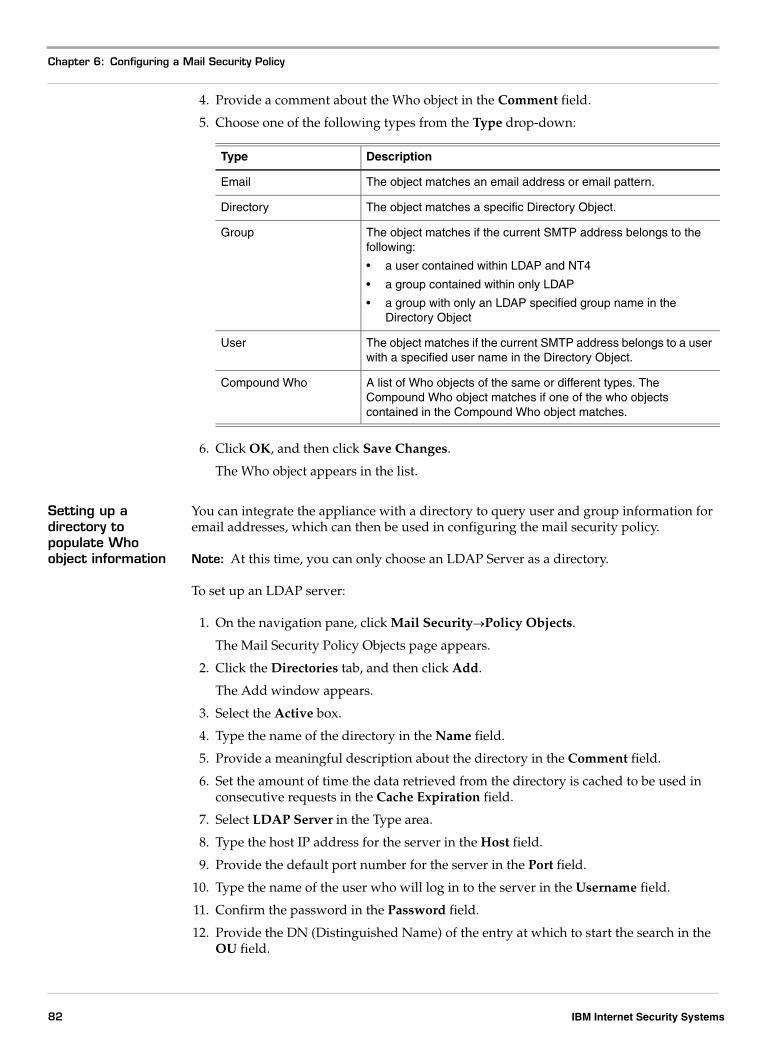
Chapter 6: Configuring a Mail Security Policy
4. Provide a comment about the Who object in the Comment field.
5. Choose one of the following types from the Type drop-down:
6. Click OK, and then click Save Changes.
The Who object appears in the list.
Setting up a directory to populate Who object information
You can integrate the appliance with a directory to query user and group information for email addresses, which can then be used in configuring the mail security policy.
Note: At this time, you can only choose an LDAP Server as a directory.
To set up an LDAP server:
1. On the navigation pane, click Mail Security→Policy Objects.
The Mail Security Policy Objects page appears.
2. Click the Directories tab, and then click Add.
The Add window appears.
3. Select the Active box.
4. Type the name of the directory in the Name field.
5. Provide a meaningful description about the directory in the Comment field.
6. Set the amount of time the data retrieved from the directory is cached to be used in consecutive requests in the Cache Expiration field.
7. Select LDAP Server in the Type area.
8. Type the host IP address for the server in the Host field.
9. Provide the default port number for the server in the Port field.
10. Type the name of the user who will log in to the server in the Username field.
11. Confirm the password in the Password field.
12. Provide the DN (Distinguished Name) of the entry at which to start the search in the OU field.
Type Description
Email The object matches an email address or email pattern.
Directory The object matches a specific Directory Object.
Group The object matches if the current SMTP address belongs to the following:
• a user contained within LDAP and NT4
• a group contained within only LDAP
• a group with only an LDAP specified group name in the Directory Object
User The object matches if the current SMTP address belongs to a user with a specified user name in the Directory Object.
Compound Who A list of Who objects of the same or different types. The Compound Who object matches if one of the who objects contained in the Compound Who object matches.
82 IBM Internet Security Systems
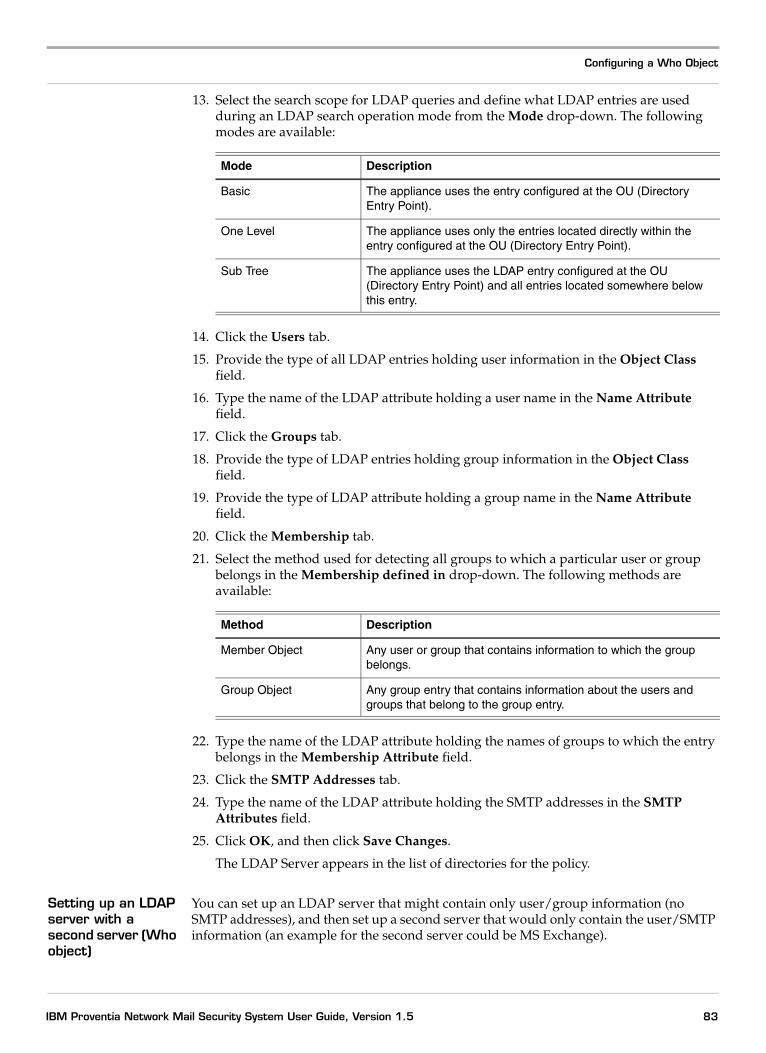
Configuring a Who Object
13. Select the search scope for LDAP queries and define what LDAP entries are used during an LDAP search operation mode from the Mode drop-down. The following modes are available:
14. Click the Users tab.
15. Provide the type of all LDAP entries holding user information in the Object Class field.
16. Type the name of the LDAP attribute holding a user name in the Name Attribute field.
17. Click the Groups tab.
18. Provide the type of LDAP entries holding group information in the Object Class field.
19. Provide the type of LDAP attribute holding a group name in the Name Attribute field.
20. Click the Membership tab.
21. Select the method used for detecting all groups to which a particular user or group belongs in the Membership defined in drop-down. The following methods are available:
22. Type the name of the LDAP attribute holding the names of groups to which the entry belongs in the Membership Attribute field.
23. Click the SMTP Addresses tab.
24. Type the name of the LDAP attribute holding the SMTP addresses in the SMTP Attributes field.
25. Click OK, and then click Save Changes.
The LDAP Server appears in the list of directories for the policy.
Setting up an LDAP server with a second server (Who object)
You can set up an LDAP server that might contain only user/group information (no SMTP addresses), and then set up a second server that would only contain the user/SMTP information (an example for the second server could be MS Exchange).
Mode Description
Basic The appliance uses the entry configured at the OU (Directory Entry Point).
One Level The appliance uses only the entries located directly within the entry configured at the OU (Directory Entry Point).
Sub Tree The appliance uses the LDAP entry configured at the OU (Directory Entry Point) and all entries located somewhere below this entry.
Method Description
Member Object Any user or group that contains information to which the group belongs.
Group Object Any group entry that contains information about the users and groups that belong to the group entry.
83IBM Proventia Network Mail Security System User Guide, Version 1.5
Chapter 6: Configuring a Mail Security Policy
To set up an LDAP server with a second server:
1. On the navigation pane, click Mail Security→Policy Objects.
The Mail Security Policy Objects page appears.
2. Click the Directories tab, and then click Add.
The Add window appears.
3. Select the Active box.
4. Type the name of the directory in the Name field.
5. Provide a meaningful description about the directory in the Comment field.
6. Set the amount of time the data retrieved from the directory is cached to be used in consecutive requests in the Cache Expiration field.
7. Select LDAP Server with 2nd server in the Type area.
8. Click the LDAP Server with User/Group Information tab.
9. Click the LDAP Server tab.
10. Type the host IP address for the server in the Host field.
11. Provide the default port number for the server in the Port field.
12. Type the name of the user who will log in to the server in the Username field.
13. Confirm the password in the Password field.
14. Provide the DN (Distinguished Name) of the entry at which to start the search in the OU field.
15. Select the search scope for LDAP queries and define what LDAP entries are used during an LDAP search operation mode from the Mode drop-down. The following modes are available:
16. Click the Users tab.
17. Provide the type of LDAP entries holding user information in the Object Class field.
18. Type the name of the LDAP attribute holding a user name in the Name Attribute field.
19. Click the Groups tab.
20. Provide the type of LDAP entries holding group information in the Object Class field.
21. Provide the type of LDAP attribute holding a group name in the Name Attribute field.
22. Click the Membership tab.
23. Select the method used for detecting all groups to which a particular user or group belongs in the Membership defined in drop-down. The following methods are available:
Method Description
Member Object Any user or group that contains information to which the group belongs.
Group Object Any group entry that contains information about the users and groups that belong to the group entry.
84 IBM Internet Security Systems
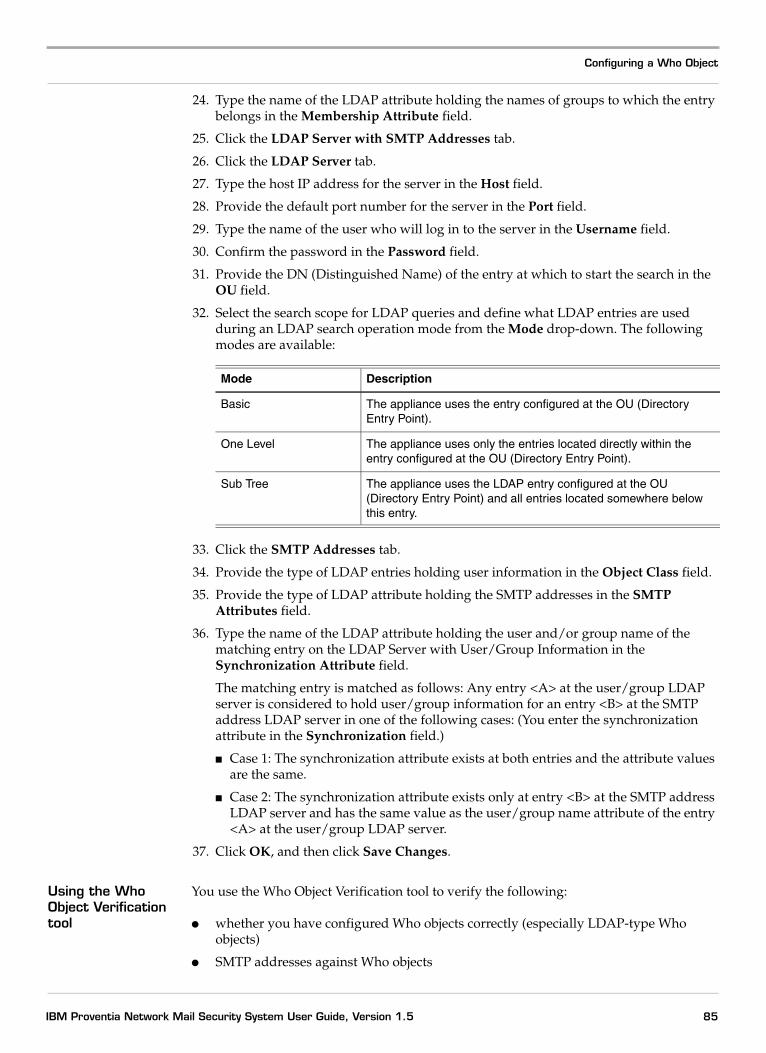
Configuring a Who Object
24. Type the name of the LDAP attribute holding the names of groups to which the entry belongs in the Membership Attribute field.
25. Click the LDAP Server with SMTP Addresses tab.
26. Click the LDAP Server tab.
27. Type the host IP address for the server in the Host field.
28. Provide the default port number for the server in the Port field.
29. Type the name of the user who will log in to the server in the Username field.
30. Confirm the password in the Password field.
31. Provide the DN (Distinguished Name) of the entry at which to start the search in the OU field.
32. Select the search scope for LDAP queries and define what LDAP entries are used during an LDAP search operation mode from the Mode drop-down. The following modes are available:
33. Click the SMTP Addresses tab.
34. Provide the type of LDAP entries holding user information in the Object Class field.
35. Provide the type of LDAP attribute holding the SMTP addresses in the SMTP Attributes field.
36. Type the name of the LDAP attribute holding the user and/or group name of the matching entry on the LDAP Server with User/Group Information in the Synchronization Attribute field.
The matching entry is matched as follows: Any entry <A> at the user/group LDAP server is considered to hold user/group information for an entry <B> at the SMTP address LDAP server in one of the following cases: (You enter the synchronization attribute in the Synchronization field.)
■ Case 1: The synchronization attribute exists at both entries and the attribute values are the same.
■ Case 2: The synchronization attribute exists only at entry <B> at the SMTP address LDAP server and has the same value as the user/group name attribute of the entry <A> at the user/group LDAP server.
37. Click OK, and then click Save Changes.
Using the Who Object Verification tool
You use the Who Object Verification tool to verify the following:
● whether you have configured Who objects correctly (especially LDAP-type Who objects)
● SMTP addresses against Who objects
Mode Description
Basic The appliance uses the entry configured at the OU (Directory Entry Point).
One Level The appliance uses only the entries located directly within the entry configured at the OU (Directory Entry Point).
Sub Tree The appliance uses the LDAP entry configured at the OU (Directory Entry Point) and all entries located somewhere below this entry.
85IBM Proventia Network Mail Security System User Guide, Version 1.5

Chapter 6: Configuring a Mail Security Policy
Procedure: To verify the accuracy of configured Who objects, including inactive Who objects:
1. On the navigation pane, click Mail Security→Who Object Verification.
The Mail Security Who Object Verification page appears.
2. Select All Who Objects from the Verify drop-down, and then click the Submit button.
The appliance displays the following information for each configured Who object:
Procedure: To verify which Who objects match which SMTP address:
1. On the navigation pane, click Mail Security→Who Object Verification.
The Mail Security Who Object Verification page appears.
2. Select SMTP Address from the Verify drop-down, and then provide a valid SMTP address in the Verify field.
3. Click the Submit button.
The appliance displays the following information about the configured Who objects that matched the SMTP address you entered in the Verify field:
Column Description
Who The name of the Who object as configured in Mail Security→Policy Objects (or the Mail Security Policy Objects page).
Status The status of the Who object, either active or inactive (shown in italics against a gray background).
Note: The appliance does not use inactive Who Objects when it processes the mail security policy for an email message.
Type The type of Who object.
Description A description of the Who object.
Result The result from verifying the configuration of the Who object, either OK or a specific error message.
Note: Select underlined text or text displayed as a link to view a detailed description of the specific error.
Column Description
Who The name of the Who object as configured in Mail Security→Policy Objects (or the Mail Security Policy Objects page).
Status The status of the Who object, either active or inactive.
Note: The appliance does not use inactive Who Objects when it processes the mail security policy for an email message.
Type The type of Who object.
Description A description of the Who object.
SMTP-Match Indicates whether or not the SMTP address matches for the given Who object.
86 IBM Internet Security Systems
Configuring a Who Object
Result The result from verifying the configuration of the Who object, either OK or a specific error message.
Note: Select underlined text or text displayed as a link to view a detailed description of the specific error.
Column Description
87IBM Proventia Network Mail Security System User Guide, Version 1.5
Chapter 6: Configuring a Mail Security Policy
Configuring a When Object
Introduction A When object defines time intervals, such as email traffic that needs to be controlled according to certain time slots.
Procedure To configure a When object for the policy:
1. On the navigation pane, click Mail Security→Policy Objects.
The Mail Security Policy Objects page appears.
2. Click the When tab, and then click Add.
The Add window appears.
3. Enable the Active box.
4. Type the name of the When object in the Name field.
5. Click Add in the Timerange area.
The Add window appears.
6. Select a start time for the time range in the Time drop-down.
7. Select how long from the start time you want the time range to last in the Duration drop-down.
8. Select how often you want the time range repeated in the Repeat every drop-down.
Example: Start: 2006-09-01 12:00:00, Duration 6 hours, repeat every 1 day(s) will be every day from September 1st 2006, from 12:00 P.M. to 06:00 P.M.
9. Click OK, and then click OK again to apply the settings.
10. Click Save Changes.
The When object appears in the list.
88 IBM Internet Security Systems
Configuring a Condition for a Mail Security Policy
Configuring a Condition for a Mail Security Policy
Introduction You can configure conditions or ‘switches that can be toggled while an email message is processed. These conditions are evaluated and modified separately for every email message that is processed.
About conditions A condition allows you to dynamically turn specific rules in the policy on and off by assigning a condition to a rule and toggling it using a response object.
Procedure To create a condition object:
1. On the navigation pane, click Mail Security→Policy Objects.
The Mail Security Policy Objects page appears.
2. Click the Conditions tab, and then click Add.
The Add window appears.
3. Type the name of the condition in the Name field.
4. Provide a description about the condition in the Comment field.
5. Click OK, and then click Save Changes.
The condition appears in the list.
89IBM Proventia Network Mail Security System User Guide, Version 1.5
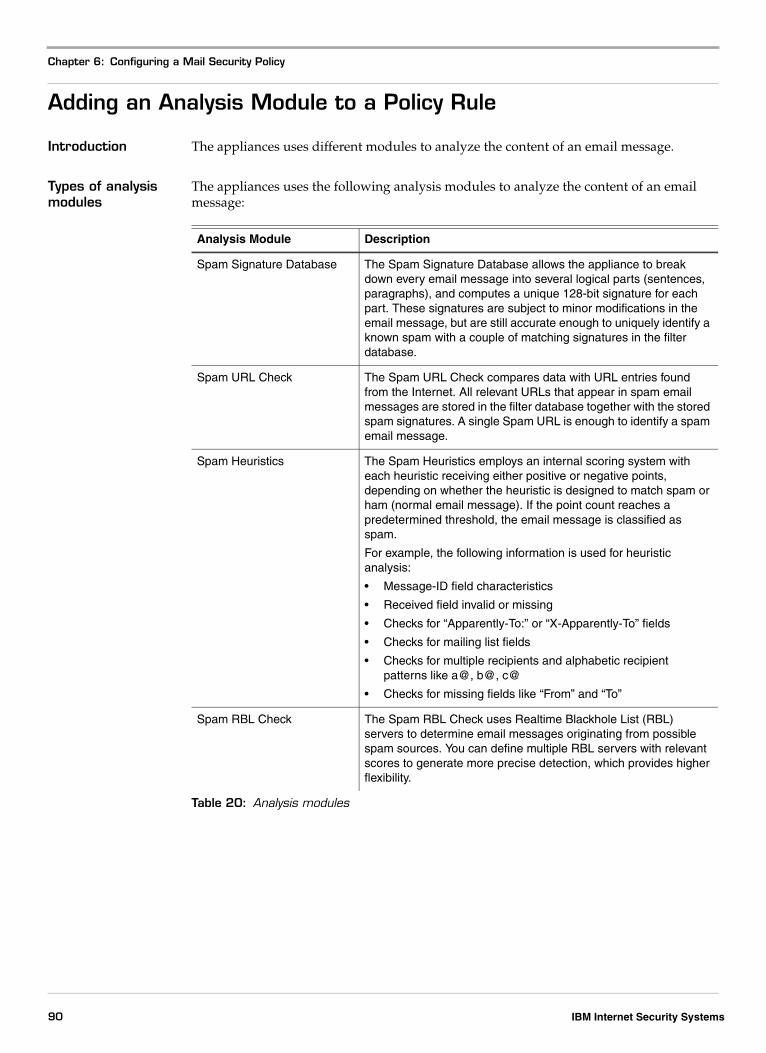
Chapter 6: Configuring a Mail Security Policy
Adding an Analysis Module to a Policy Rule
Introduction The appliances uses different modules to analyze the content of an email message.
Types of analysis modules
The appliances uses the following analysis modules to analyze the content of an email message:
Analysis Module Description
Spam Signature Database The Spam Signature Database allows the appliance to break down every email message into several logical parts (sentences, paragraphs), and computes a unique 128-bit signature for each part. These signatures are subject to minor modifications in the email message, but are still accurate enough to uniquely identify a known spam with a couple of matching signatures in the filter database.
Spam URL Check The Spam URL Check compares data with URL entries found from the Internet. All relevant URLs that appear in spam email messages are stored in the filter database together with the stored spam signatures. A single Spam URL is enough to identify a spam email message.
Spam Heuristics The Spam Heuristics employs an internal scoring system with each heuristic receiving either positive or negative points, depending on whether the heuristic is designed to match spam or ham (normal email message). If the point count reaches a predetermined threshold, the email message is classified as spam.
For example, the following information is used for heuristic analysis:
• Message-ID field characteristics
• Received field invalid or missing
• Checks for “Apparently-To:” or “X-Apparently-To” fields
• Checks for mailing list fields
• Checks for multiple recipients and alphabetic recipient patterns like a@, b@, c@
• Checks for missing fields like “From” and “To”
Spam RBL Check The Spam RBL Check uses Realtime Blackhole List (RBL) servers to determine email messages originating from possible spam sources. You can define multiple RBL servers with relevant scores to generate more precise detection, which provides higher flexibility.
Table 20: Analysis modules
90 IBM Internet Security Systems
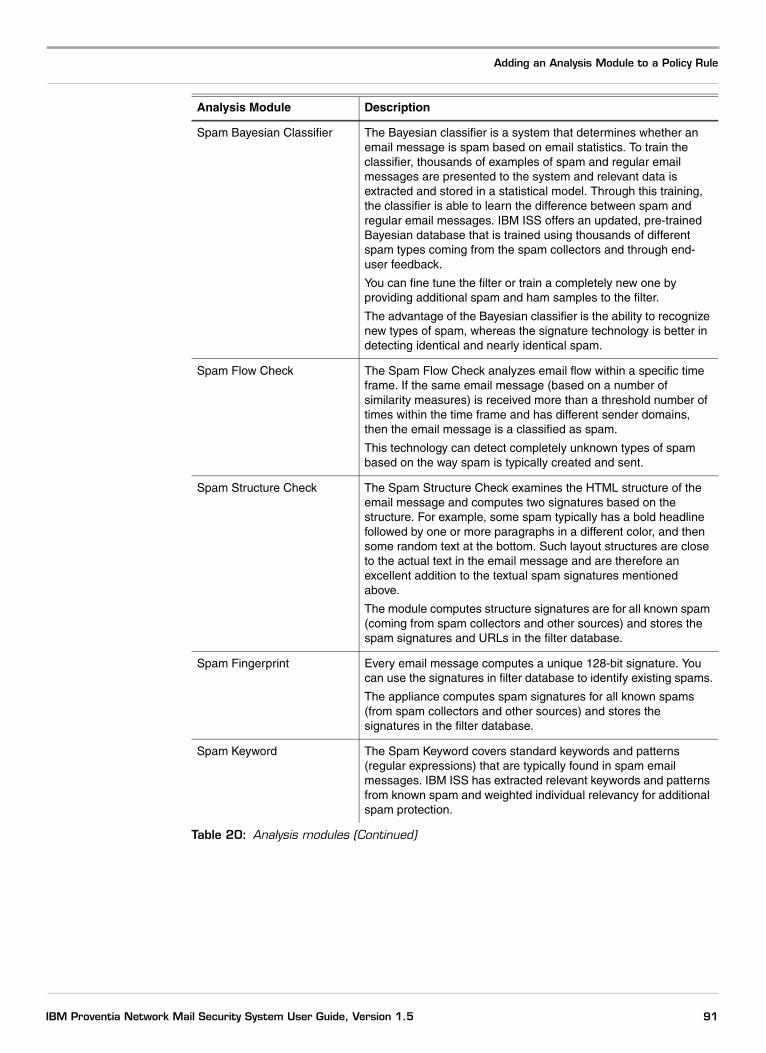
Adding an Analysis Module to a Policy Rule
Spam Bayesian Classifier The Bayesian classifier is a system that determines whether an email message is spam based on email statistics. To train the classifier, thousands of examples of spam and regular email messages are presented to the system and relevant data is extracted and stored in a statistical model. Through this training, the classifier is able to learn the difference between spam and regular email messages. IBM ISS offers an updated, pre-trained Bayesian database that is trained using thousands of different spam types coming from the spam collectors and through end-user feedback.
You can fine tune the filter or train a completely new one by providing additional spam and ham samples to the filter.
The advantage of the Bayesian classifier is the ability to recognize new types of spam, whereas the signature technology is better in detecting identical and nearly identical spam.
Spam Flow Check The Spam Flow Check analyzes email flow within a specific time frame. If the same email message (based on a number of similarity measures) is received more than a threshold number of times within the time frame and has different sender domains, then the email message is a classified as spam.
This technology can detect completely unknown types of spam based on the way spam is typically created and sent.
Spam Structure Check The Spam Structure Check examines the HTML structure of the email message and computes two signatures based on the structure. For example, some spam typically has a bold headline followed by one or more paragraphs in a different color, and then some random text at the bottom. Such layout structures are close to the actual text in the email message and are therefore an excellent addition to the textual spam signatures mentioned above.
The module computes structure signatures are for all known spam (coming from spam collectors and other sources) and stores the spam signatures and URLs in the filter database.
Spam Fingerprint Every email message computes a unique 128-bit signature. You can use the signatures in filter database to identify existing spams.
The appliance computes spam signatures for all known spams (from spam collectors and other sources) and stores the signatures in the filter database.
Spam Keyword The Spam Keyword covers standard keywords and patterns (regular expressions) that are typically found in spam email messages. IBM ISS has extracted relevant keywords and patterns from known spam and weighted individual relevancy for additional spam protection.
Analysis Module Description
Table 20: Analysis modules (Continued)
91IBM Proventia Network Mail Security System User Guide, Version 1.5
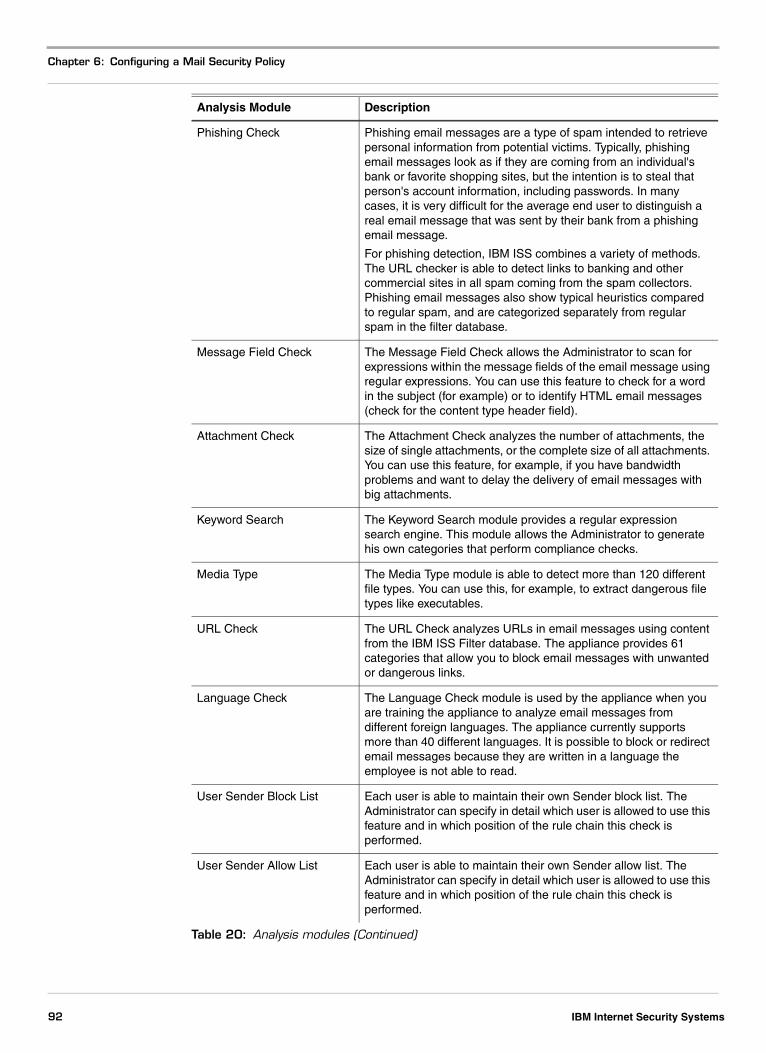
Chapter 6: Configuring a Mail Security Policy
Phishing Check Phishing email messages are a type of spam intended to retrieve personal information from potential victims. Typically, phishing email messages look as if they are coming from an individual's bank or favorite shopping sites, but the intention is to steal that person's account information, including passwords. In many cases, it is very difficult for the average end user to distinguish a real email message that was sent by their bank from a phishing email message.
For phishing detection, IBM ISS combines a variety of methods. The URL checker is able to detect links to banking and other commercial sites in all spam coming from the spam collectors. Phishing email messages also show typical heuristics compared to regular spam, and are categorized separately from regular spam in the filter database.
Message Field Check The Message Field Check allows the Administrator to scan for expressions within the message fields of the email message using regular expressions. You can use this feature to check for a word in the subject (for example) or to identify HTML email messages (check for the content type header field).
Attachment Check The Attachment Check analyzes the number of attachments, the size of single attachments, or the complete size of all attachments. You can use this feature, for example, if you have bandwidth problems and want to delay the delivery of email messages with big attachments.
Keyword Search The Keyword Search module provides a regular expression search engine. This module allows the Administrator to generate his own categories that perform compliance checks.
Media Type The Media Type module is able to detect more than 120 different file types. You can use this, for example, to extract dangerous file types like executables.
URL Check The URL Check analyzes URLs in email messages using content from the IBM ISS Filter database. The appliance provides 61 categories that allow you to block email messages with unwanted or dangerous links.
Language Check The Language Check module is used by the appliance when you are training the appliance to analyze email messages from different foreign languages. The appliance currently supports more than 40 different languages. It is possible to block or redirect email messages because they are written in a language the employee is not able to read.
User Sender Block List Each user is able to maintain their own Sender block list. The Administrator can specify in detail which user is allowed to use this feature and in which position of the rule chain this check is performed.
User Sender Allow List Each user is able to maintain their own Sender allow list. The Administrator can specify in detail which user is allowed to use this feature and in which position of the rule chain this check is performed.
Analysis Module Description
Table 20: Analysis modules (Continued)
92 IBM Internet Security Systems
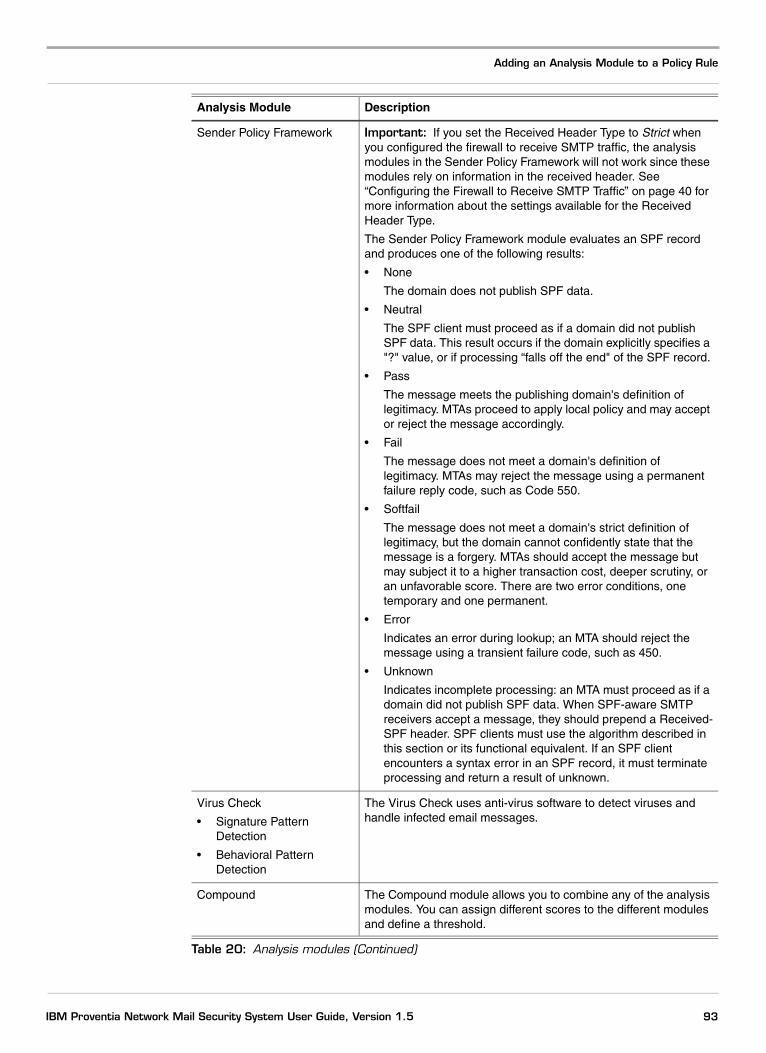
Adding an Analysis Module to a Policy Rule
Sender Policy Framework Important: If you set the Received Header Type to Strict when you configured the firewall to receive SMTP traffic, the analysis modules in the Sender Policy Framework will not work since these modules rely on information in the received header. See “Configuring the Firewall to Receive SMTP Traffic” on page 40 for more information about the settings available for the Received Header Type.
The Sender Policy Framework module evaluates an SPF record and produces one of the following results:
• None
The domain does not publish SPF data.
• Neutral
The SPF client must proceed as if a domain did not publish SPF data. This result occurs if the domain explicitly specifies a "?" value, or if processing “falls off the end" of the SPF record.
• Pass
The message meets the publishing domain's definition of legitimacy. MTAs proceed to apply local policy and may accept or reject the message accordingly.
• Fail
The message does not meet a domain's definition of legitimacy. MTAs may reject the message using a permanent failure reply code, such as Code 550.
• Softfail
The message does not meet a domain's strict definition of legitimacy, but the domain cannot confidently state that the message is a forgery. MTAs should accept the message but may subject it to a higher transaction cost, deeper scrutiny, or an unfavorable score. There are two error conditions, one temporary and one permanent.
• Error
Indicates an error during lookup; an MTA should reject the message using a transient failure code, such as 450.
• Unknown
Indicates incomplete processing: an MTA must proceed as if a domain did not publish SPF data. When SPF-aware SMTP receivers accept a message, they should prepend a Received-SPF header. SPF clients must use the algorithm described in this section or its functional equivalent. If an SPF client encounters a syntax error in an SPF record, it must terminate processing and return a result of unknown.
Virus Check
• Signature Pattern Detection
• Behavioral Pattern Detection
The Virus Check uses anti-virus software to detect viruses and handle infected email messages.
Compound The Compound module allows you to combine any of the analysis modules. You can assign different scores to the different modules and define a threshold.
Analysis Module Description
Table 20: Analysis modules (Continued)
93IBM Proventia Network Mail Security System User Guide, Version 1.5
Chapter 6: Configuring a Mail Security Policy
Procedure To configure an analysis module for a policy rule:
1. On the navigation pane, click Mail Security→Policy Objects.
The Mail Security Policy Objects page appears.
2. Click the Analysis Modules tab.
3. Click Add.
The Add window appears.
4. Select the Enabled box to enable the rule.
5. Type the name of the rule in the Name field.
6. Provide a comment about the rule in the Comment field.
7. Select a module from the Analysis Module drop-down.
8. Click OK, and then click Save Changes.
94 IBM Internet Security Systems
Enabling Automated Bayesian Classifier Training
Enabling Automated Bayesian Classifier Training
Introduction The appliance uses Bayes’s Theorem (a simple mathematical formula) to calculate the probability that elements within an email message indicate that it is spam.
Tokens These elements are called tokens, and may include the following:
● words
● header elements, such as the sender’s name
● embedded HTML and Javascript strings, such as fF0000, which is the HTML notation for the color bright red
● special characters, such as dashes, apostrophes, and dollar signs, where they have been specifically included in the analysis as tokens
● the filter ignores any special characters that are not specifically included in the analysis.
About the Bayesian filter
The Bayesian filter uses a corpus (body) of good email messages (ham), and a corpus of spam email messages to determine how frequently each token appears in each corpus. This trains the filter to identify spam using the words and other tokens that routinely appear in your enterprise’s legitimate email stream. This improves the false positive rate, compared to filters that are not trained in your environment. Proventia’s formula also reduces false positives by weighting the importance of tokens in the legitimate corpus.
The spam filter supports English, French, Italian, German, and Spanish.
Training the appliance
A database merge is when you add token sets from two databases to form a new database. The merge includes all tokens from both databases. If a token occurs in both databases, the merge combines the spam/ham counts for the token. The merge also combines some statistical information from both databases, for example the total number of ham and spam files contained in the respective training sets.
The Bayesian filter is pretrained with a small database by IBM ISS. For the pretrained filter to be useful, you must also use your own custom-trained Bayes database. Since the Bayesian filter only counts words and compares them to the frequency in the training data, results depend on the training data you use. The final spam score is calculated from the word count and the ratio of their occurrence in the training data.
You can train the Bayes database with the following data:
1. Spam: “Your local bank does not want you to know this!!”2. Ham: “Reason for Escalation: CR 28377 has already been created for this”
If you send an email message with the content “Hello Peter, you know you have to go to the bank to get some cache today.”the Bayesian classifier counts the following words as:
“Hello - NOTHINGPeter - NOTHINGyou - SPAMknow - SPAMyou - SPAMhave - NOTHING
95IBM Proventia Network Mail Security System User Guide, Version 1.5
Chapter 6: Configuring a Mail Security Policy
to - SPAMgo - NOTHINGto - SPAMthe - NOTHINGbank - SPAMto - SPAMget - NOTHINGsome - NOTHINGcache - NOTHINGtoday - NOTHING”
Because of the small training set, the email message appears very spammy to the classifier, since it is not correctly trained.
Using foreign languages in training data
If you train the data using different foreign languages, make sure the ham and spam corpus contain the same proportion of foreign languages. For example, you write normal email messages in English, and you receive spam in Korean and German. If you train the foreign language spam email messages, you may inadvertently train the classifier to block Korean and German email messages, since you have no ham email messages of these languages in the training set.
Using a custom-trained classifier
A big advantage to using a custom-trained classifier is that it is trained for exactly the type of email messages you normally receive at work. For example, if you work at a hospital, the names of drugs are not counted as spammy words and so this prevents overblocking from simpler filters (like the predefined keyword lists), but for other companies, drugs that are advertised in spam email messages are considered spammy for the Bayesian classifier.
Token types The tokeniser uses regular expression matching to extract tokens from various parts of the email message. In addition, some meta tokens are also extracted that relate to the email message as a whole. Tokens are extracted from the following areas of an email message:
● Τhe plain text part of the email message, and the text content of the HTML part of the email message
● The “Subject” header field
● Τhe “Received” header fields
● The “From” header field
● All URLs found in the email message
● The HTML structure of the email message
Meta tokens are extracted from the following areas of an email message:
● Εxistence of “Message-ID” field in header
● Εxistence of “X-MsgInfo” field in header
● Εxistence of very small text in the HTML content
● Encoded format of “Message-ID” field in header
96 IBM Internet Security Systems
Enabling Automated Bayesian Classifier Training
Token extraction Tokens are extracted on a per email message basis. If a token is found more than once in an email message, it counts only once in the analysis.
The classifier uses different regular expressions to extract tokens from email text (including subject), header fields, and URLs. The expression for body text and subject allows all alpha-numeric characters (including “foreign” characters like Ã, Ï), with the optional character separators “.”, “,”, “’”, “-“. The monetary symbols “$”, “¥”, and “” are allowed before numbers (for example, $500,00), and a single “?”, “!”, or “%” is allowed at the end of a word. The following are examples of tokens from body and subject text: “$1.99”, “140%”, “only”, “only!”, “opt-in”.
Tokens from other header fields are restricted to plain alpha-numeric [a-zA-Z0-9] sequences that may contain the “.” character. For example, “213.165.64.20”, “pop.gmx.net”.
Tokens from URLs are either IP addresses or alpha-numeric [a-zA-Z0-9] sequences. Hostnames are split into their constituent parts, as the “.” character is not allowed between sequences. This behavior is designed for spam URLS that frequently contain random character sequences as host parts.
All tokens are case insensitive. “porn”, “PorN”, and “PORN” all equate to the same token. Tokens that consist of the numbers [0-9] are ignored if they are less than five characters in length.
Special tokens Tokens are not extracted from the “Message-ID” field directly, since this field contains random character sequences. Sequences of digits and alpha characters are first encoded up to and including the first “@” character, and the entire coded sequence is taken as a token. For example, the message id token “<dsdsd$sd$d@” has a high spam value in the default database, whereas the token “<sdsd.d@” has a high ham value.
The classifier obtains HTML structure tokens from the top-level structure definition created by the Spam Structure Analysis module.
The training program extracts tokens from email messages that lie in pre-sorted spam and ham directories. The email messages must be in a format compliant with [rfc822]1 or [rfc2045]2 (MIME format). Mailbox format is not supported. A mailbox file will, however, be recognized as a valid email message and parsed normally. If it contains more than one email message, the second and subsequent email messages are treated as text belonging to the first email message, and so header tokens in these email messages are treated incorrectly as plain text tokens. All email messages in mailbox files must be first extracted before being presented for database training.
Tokens are extracted from attachment data if the attachment is in plain text or HTML format, and are “inlined” in the email message. All other attachment data is ignored. UU-encoded data inside a text block is treated as an attachment, and is also ignored. If an email message contains email attachments, the entire email message is ignored.
[rfc822]1 and [rfc2045]2 compliant email messages are created and read by Microsoft Outlook Express. Other email clients, for example, Microsoft Outlook or Lotus Notes may create and read different email formats.
Procedure You can train the Bayesian classifier by providing a set of ham (good) email messages and spam (bad) email messages from your Message Stores.
97IBM Proventia Network Mail Security System User Guide, Version 1.5
Chapter 6: Configuring a Mail Security Policy
To enable the Bayesian Classifier:
1. On the navigation pane, click Mail Security→Policy.
The Mail Security Policy page appears.
2. Click the Settings→Bayesian Classifier tab.
3. Select the Enable Bayesian Classifier Learning box.
4. To use the Bayesian database provided by IBM ISS as a basis for the training, in addition to the email messages provided in the ham store and the spam store, select the Include Default Database box. Otherwise, the database from the training will consist of information gathered from your ham store and spam store.
5. Choose one of your Message Stores to be used as the source of the ham email messages.
6. Choose another Message Store to be the source of the spam email messages.
Important: Do not select the same store for both ham email messages and spam email messages, or a store that contains mixed ham email messages and spam email messages. You may render the database ineffective.
7. To schedule the training, select the Enable box, and then choose a schedule from the Schedules drop-down.
8. Click Save Changes.
98 IBM Internet Security Systems
Setting Up Spam Flow Control
Setting Up Spam Flow Control
Introduction The Spam Flow Control setting classifies an email message as spam if the count for a similarity measure over a given time period exceeds a predefined threshold.
How Spam Flow Control works
The Spam Flow Control module consists of a number of different email similarity measures. For a given email message, each similarity measure produces a unique signature. A sender address is stored with each signature, and a measure of how often this signature occurs with different sender addresses over a given time frame.
If, over a given time frame, the signature count exceeds a predetermined threshold, the signature is added to the shared database, and will be then available to all email accounts.
Procedure To configure a Spam Flow Control setting:
1. On the navigation pane, click Mail Security→Policy.
The Mail Security Policy page appears.
2. Click the Settings→Spam Settings tab.
3. Go to the Spam Flow Settings area, and then set the amount of seconds the appliance should monitor the email traffic for similar copies after an email message has been received in the Analysis Window (secs) field.
4. Set the predefined threshold in the Minimum Hits field.
5. Click Save Changes.
99IBM Proventia Network Mail Security System User Guide, Version 1.5
Chapter 6: Configuring a Mail Security Policy
Configuring an RBL Server
Introduction An RBL (Realtime Blackhole List) server maintains a list of IP addresses that are blacklisted because these addresses allow spam to be sent from them. You can insert the available RBL servers into the list, and set scores for each server.
Procedure To add an RBL server:
1. On the navigation pane, click Mail Security→Policy.
The Mail Security Policy page appears.
2. Click the Settings→Spam Settings tab.
3. Go to the RBL Lists area, and then set a value in the Threshold field. Any email message that scores a probability of this value or higher is automatically sent back to the filter and used for learning.
4. Click Add.
The Add window appears.
5. Select the Enabled box.
6. Type the name of the RBL server in the Spam RBL Server field.
7. Set the score for the server in the Match Score field.
8. Click OK.
The RBL server appears in the list of RBL servers.
100 IBM Internet Security Systems
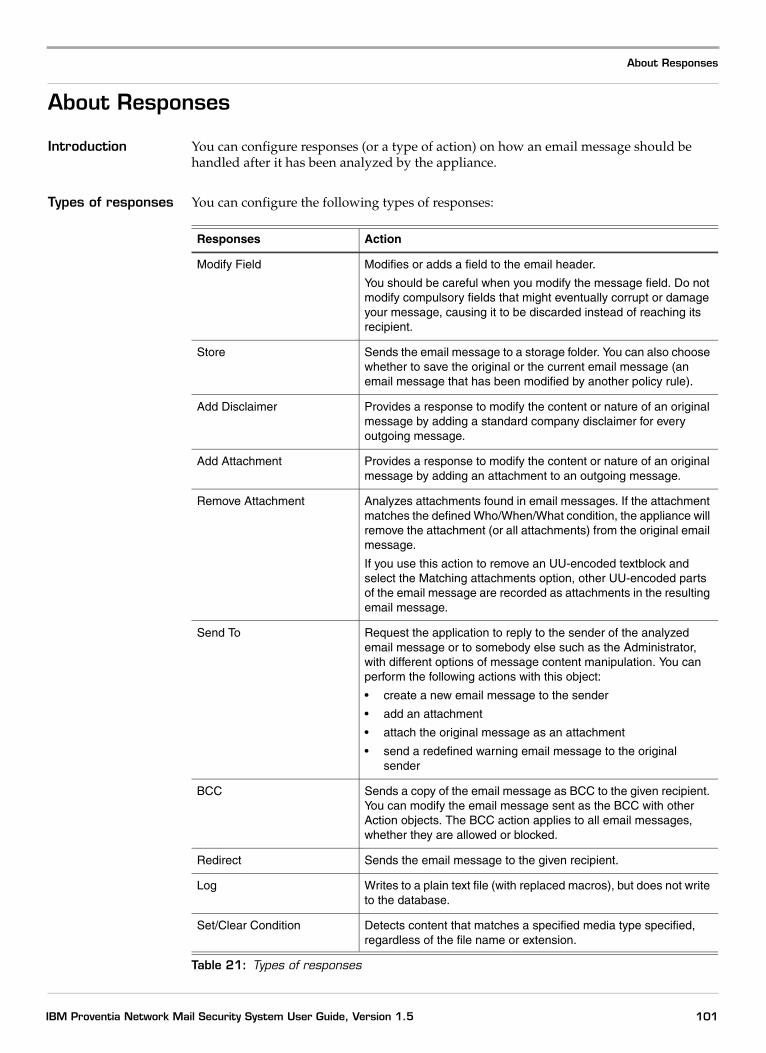
About Responses
About Responses
Introduction You can configure responses (or a type of action) on how an email message should be handled after it has been analyzed by the appliance.
Types of responses You can configure the following types of responses:
Responses Action
Modify Field Modifies or adds a field to the email header.
You should be careful when you modify the message field. Do not modify compulsory fields that might eventually corrupt or damage your message, causing it to be discarded instead of reaching its recipient.
Store Sends the email message to a storage folder. You can also choose whether to save the original or the current email message (an email message that has been modified by another policy rule).
Add Disclaimer Provides a response to modify the content or nature of an original message by adding a standard company disclaimer for every outgoing message.
Add Attachment Provides a response to modify the content or nature of an original message by adding an attachment to an outgoing message.
Remove Attachment Analyzes attachments found in email messages. If the attachment matches the defined Who/When/What condition, the appliance will remove the attachment (or all attachments) from the original email message.
If you use this action to remove an UU-encoded textblock and select the Matching attachments option, other UU-encoded parts of the email message are recorded as attachments in the resulting email message.
Send To Request the application to reply to the sender of the analyzed email message or to somebody else such as the Administrator, with different options of message content manipulation. You can perform the following actions with this object:
• create a new email message to the sender
• add an attachment
• attach the original message as an attachment
• send a redefined warning email message to the original sender
BCC Sends a copy of the email message as BCC to the given recipient. You can modify the email message sent as the BCC with other Action objects. The BCC action applies to all email messages, whether they are allowed or blocked.
Redirect Sends the email message to the given recipient.
Log Writes to a plain text file (with replaced macros), but does not write to the database.
Set/Clear Condition Detects content that matches a specified media type specified, regardless of the file name or extension.
Table 21: Types of responses
101IBM Proventia Network Mail Security System User Guide, Version 1.5
Chapter 6: Configuring a Mail Security Policy
Configuring a response
To configure an action (or response) against a particular type of email message:
1. On the navigation pane, click Mail Security→Policy Objects.
The Mail Security Policy Objects page appears.
2. Click the Responses tab.
3. Click the Add icon.
The Add Responses window appears.
4. Type the name of the response in the Name field.
5. Choose what action you would like to be taken against the email message in the Response drop-down.
6. If necessary, choose macros for the action in the Field field, and then in the Value field.
7. Click OK.
102 IBM Internet Security Systems
Enabling Alert Logging for System Events
Enabling Alert Logging for System Events
Introduction You can enable alert messages to notify you of security-related events. There are three types of alerts for system events:
● error
● warning
● informative
Event priorities You can set the message type to one of the following event priorities:
● low
● medium
● high
Notification responses
You can also set whether the appliance should use one of the following notification responses:
Enabling delivery notification for mail security events
To enable delivery notification for mail security events:
1. On the navigation pane, click System→Notification.
The Event Notification Options page appears.
2. Click the Event Notification tab.
3. Select Alert Logging for Mail Security Events.
4. Select how to be notified in the Mail Security Event Notification Delivery area.
5. Click Save Changes.
Enabling delivery notification for system events
To enable delivery notifications for system events:
1. On the navigation pane, click System→Notification.
The Event Notification Options page appears.
2. Click the Event Notification tab.
3. Select Alert Logging for System Error Events.
4. Select how to be notified in the System Error Notification Delivery area.
5. Select Alert Logging for System Warning Events.
6. Select how to be notified in the System Warning Notification Delivery area.
7. Select Alert Logging for System Informative Events.
Notification response Description
SiteProtector enabled Notifies the console of the alert.
SNMP Trap enabled Sends an SNMP trap in response to the alert.
Email enabled Sends an email in response to the alert
Table 22: Types of notification responses
103IBM Proventia Network Mail Security System User Guide, Version 1.5
Chapter 6: Configuring a Mail Security Policy
8. Select how to be notified in the System Informative Event Notification Delivery area.
9. Click Save Changes.
Enabling email delivery of system events
You can send alerts by email message to an individual address or email group. You can define multiple email notifications for these responses and configure the data sent.
To enable email delivery of system events:
1. On the navigation pane, click System→Notification.
The Event Notification Options page appears.
2. Click the Delivery Setup tab.
3. In the Email Configuration section, click Add.
The Add Email Configuration window appears.
4. Type a meaningful name for the email response entry in the Name field.
5. Provide the credentials for the mail server (as a fully qualified domain name or IP address) in the SMTP Host field.
The SMTP Host must be accessible to the appliance to send email notifications. Do not use the IP address or the hostname of the appliance.
6. Provide an individual recipient or email group in the To field.
7. Click the Subject Format arrow to see a list of message subject fields, and then select one or more subject fields.
You can customize this content by typing your own text and embedding fields from the list.
8. Click the Body Format arrow to see a list of message body fields, and then select one or more body fields.
The Body Format field is blank by default. If you leave this field blank, the email response includes all available fields. You can also customize this content by typing your own text and embedding fields from the list. You should leave this field blank, so that the email response contains all relevant fields.
9. Click OK, and then click Save Changes.
Enabling an SNMP Get
To enable an SNMP Get:
1. On the navigation pane, click System→Notification.
The Event Notifications Option page appears.
2. Click the Event Notification tab.
3. Click the Configure SNMP button.
The Configure SNMP window appears.
4. Select the SNMP Get Enabled box.
5. Provide the system name, the system location, contact information, and the appropriate community name.
6. Click Close.
104 IBM Internet Security Systems
Enabling Alert Logging for System Events
Enabling an SNMP Trap
To enable an SNMP trap:
1. On the navigation pane, click System→Notification.
The Event Notifications Option page appears.
2. Click the Event Notification tab.
3. Click the Configure SNMP button.
The Configure SNMP window appears.
4. Select SNMP Traps Enabled.
5. Type the IP address of the server running the SNMP manager in the Trap Receiver field.
The SNMP host must be accessible to the appliance to send email notifications.
6. Provide the appropriate community name (public or private) in the Trap Community field.
7. Select a trap version from the Trap Version list. The following versions are available:
8. Click Close, and then click Save Changes.
Version Description
V1 Simple Network Management Protocol version 1
V2C Community-Based Simple Network Management Protocol version 2
105IBM Proventia Network Mail Security System User Guide, Version 1.5
Chapter 6: Configuring a Mail Security Policy
Configuring Mail Security Policy Advanced Parameters
Introduction You may need to tune the advanced parameters for the mail security policy.
Important: You should not change these parameters unless you are instructed by IBM ISS Technical Support.
Types of mail security policy advanced parameters
The following table lists the mail security policy advanced parameters:
Parameter Description Default Value
log_level The level for logging information.
4
unchecked.lowwatermark The number of files in the unchecked queue that causes an alert and throttling of XMail.
200
unchecked.highwatermark The number of files in the unchecked queue that causes XMail to reject messages. XMail will return to accept email messages as soon as the number of files is lower than the highwatermark.
1000
smtp.command_delay The number of seconds XMail will wait before handling a SMTP command. This value is used when disk or memory shortage is in level 1 or on unchecked queue overflow.
2
quarantine.deletemsgonrelease.enable
If set to true, the appliance deletes a message from the quarantine store after it has been released.
false
mailthreads.unchecked The number of email processing threads.
8
unprocessable.deliver.enable If set to true, the appliance will deliver unprocessed messages to the recipient(s).
true
small.mailthreads The number of email processing threads that is reserved for processing email messages less than 16KB.
2
unprocessable.store.enable If set to true, the appliance will store unprocessed messages in the filesystem.
true
Table 23: Mail security policy advanced parameters
106 IBM Internet Security Systems
Configuring Mail Security Policy Advanced Parameters
Adding an advanced parameter
To add an advanced parameter:
1. On the navigation pane, click Mail Security→Policy.
The Mail Security Policy page appears.
2. Click the Advanced Parameters tab.
3. Click Add.
The Add Advanced Parameter window appears.
4. Provide the name of the parameter, a meaningful description about the parameter, and then specify the value type and value for the parameter.
5. Click OK, and then click Save Changes.
Editing an advanced parameter
To edit an advanced parameter:
1. On the navigation pane, click Mail Security→Policy.
The Mail Security Policy page appears.
2. Click the Advanced Parameters tab.
3. Select a parameter to edit, and then click Edit.
The Edit Advanced Parameter window appears.
4. Edit the properties of the parameter, and then click OK.
5. Click Save Changes.
Copying and pasting an advanced parameter
To copy and paste an advanced parameter:
1. On the navigation pane, click Mail Security→Policy.
The Mail Security Policy page appears.
2. Click the Advanced Parameters tab.
3. Select the parameter you want to copy.
4. Click the Copy icon.
The appliance copies the parameter to the clipboard.
5. Click the Paste icon.
The appliance copies the parameter to the end of the list.
6. If needed, edit the parameter, and then click OK.
7. Click Save Changes.
Removing an advanced parameter
To remove an advanced parameter:
1. On the navigation pane, click Mail Security→Policy.
The Mail Security Policy page appears.
2. Click the Advanced Parameters tab.
3. Select an advanced parameter, and then click Remove.
4. Click Save Changes.
107IBM Proventia Network Mail Security System User Guide, Version 1.5

Chapter 6: Configuring a Mail Security Policy
108 IBM Internet Security Systems
Chapter 7
Managing Email Message Storages
Overview
Introduction This chapter explains how to manage email message storages using the Local Management Interface (LMI) provided by the appliance.
In this chapter This chapter contains the following topics:
Topic Page
Configuring the Email Message Storages 110
Searching for Email Messages in the Message Store 112
Removing Email Messages from the Email Message Storages 115
Configuring Email Message Tracking 117
109IBM Proventia Network Mail Security System User Guide, Version 1.5
Chapter 7: Managing Email Message Storages
Configuring the Email Message Storages
Introduction You can create Message Stores or Quarantine Stores if you want to archive certain types of email messages or quarantine them.
Types of email storages
The appliance provides two types of email message storages as follows:
● the Message Store
The Message Store stores blocked or delayed email messages, including email messages that are considered bad or problematic.
● the Quarantine Store
A quarantine store is a type of email message storage that stores email messages meeting certain criteria as defined by the Administrator, such as virus-infected email messages, important confidential data, or email messages that contain a company’s logo.
You use the list of email messages to define which recipients are eligible to receive quarantine reports. Being in this list does not automatically result in receiving a quarantine report, since it also requires a quarantine store with an active delivery schedule.
Configuring an email message storage
To configure an email message storage:
1. On the navigation pane, click Mail Security→Policy Objects.
The Mail Security Policy Objects page appears.
2. Click the Email Storages tab.
3. Click Add.
The Add window appears.
4. Select the type of email message storage from the Store Type drop-down.
5. Type the of the email message storage in the Name field.
6. Click the General tab.
7. In the Limits area, enable the Maximum Age (days) box, and then set the number of days you would like the email message storage to store the email messages.
8. Enable the Maximum # of Files box if you want the email message storage to store the amount of email messages entered in the field.
9. In the Delivery area, choose when and how the email messages will be delivered to its recipient.
10. Click the MetaData tab.
11. Provide the macros that represent which part of the email message you want sent to the recipient of the email message.
12. Click OK, and then click Save Changes.
Configuring automated message log cleanup
You use the message log cleanup functionality to remove old and unused email message processing logs.
110 IBM Internet Security Systems
Configuring the Email Message Storages
To configure automated message log cleanup:
1. On the navigation pane, click Mail Security→Policy Objects.
The Mail Security Policy Objects page appears.
2. Click the Email Storages tab.
3. Select the Enable box in the Message Log Cleanup area.
4. Set the number of days to keep the logs in the Days to Keep field. You should set this value to seven days.
5. Select a schedule to define when the appliance will search for old message logs from the Schedules drop-down.
6. Click Save Changes.
Synchronizing with the database
The Synchronize with Database functionality removes files that are no longer connected to email messages stored in the database.
To configure the synchronization with the database:
1. On the navigation pane, click Mail Security→Policy Objects.
The Mail Security Policy Objects page appears.
2. Click the Email Storages tab.
3. Select the Enable box in the Synchronize with Database area.
4. Select a schedule to define when the appliance will execute the synchronization of the database from the Schedules drop-down. You should set this schedule to be executed in times of low traffic such as Saturday evenings because the synchronization will take a heavy toll on the appliance.
5. Click Save Changes.
111IBM Proventia Network Mail Security System User Guide, Version 1.5
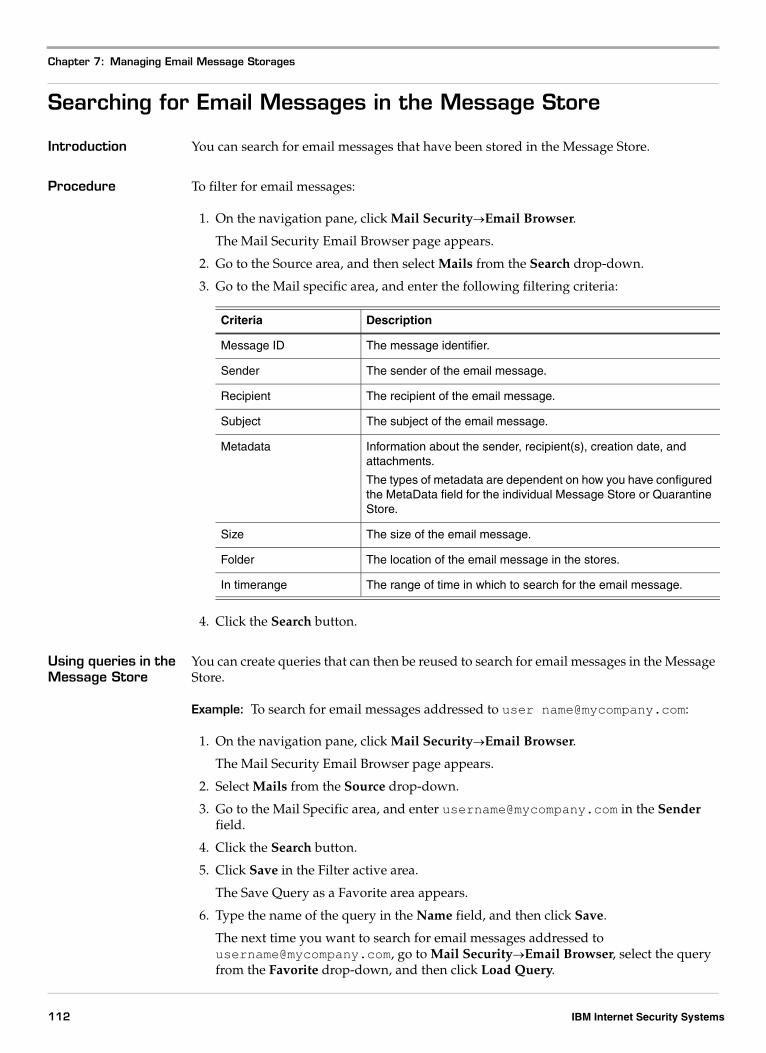
Chapter 7: Managing Email Message Storages
Searching for Email Messages in the Message Store
Introduction You can search for email messages that have been stored in the Message Store.
Procedure To filter for email messages:
1. On the navigation pane, click Mail Security→Email Browser.
The Mail Security Email Browser page appears.
2. Go to the Source area, and then select Mails from the Search drop-down.
3. Go to the Mail specific area, and enter the following filtering criteria:
4. Click the Search button.
Using queries in the Message Store
You can create queries that can then be reused to search for email messages in the Message Store.
Example: To search for email messages addressed to user [email protected]:
1. On the navigation pane, click Mail Security→Email Browser.
The Mail Security Email Browser page appears.
2. Select Mails from the Source drop-down.
3. Go to the Mail Specific area, and enter [email protected] in the Sender field.
4. Click the Search button.
5. Click Save in the Filter active area.
The Save Query as a Favorite area appears.
6. Type the name of the query in the Name field, and then click Save.
The next time you want to search for email messages addressed to [email protected], go to Mail Security→Email Browser, select the query from the Favorite drop-down, and then click Load Query.
Criteria Description
Message ID The message identifier.
Sender The sender of the email message.
Recipient The recipient of the email message.
Subject The subject of the email message.
Metadata Information about the sender, recipient(s), creation date, and attachments.
The types of metadata are dependent on how you have configured the MetaData field for the individual Message Store or Quarantine Store.
Size The size of the email message.
Folder The location of the email message in the stores.
In timerange The range of time in which to search for the email message.
112 IBM Internet Security Systems
Searching for Email Messages in the Message Store
Searching for an often used query
To search for an often used query:
1. On the navigation pane, click Mail Security→Email Browser.
The Mail Security Email Browser page appears.
2. Go to the Source area, and then select Favorites from the Search drop-down.
3. Go to the Favorite specific area, and then select a query from the Favorite drop-down.
4. Click the Load Query button to display the query.
Saving a Search Favorites query
To save a Search Favorites query:
1. On the navigation pane, click Mail Security→Email Browser.
The Mail Security Email Browser page appears.
2. Go to the Source area, and then select Favorites from the Search drop-down.
3. Go to the Favorite specific area, and then select the query that you would like to save from the Favorite drop-down.
4. Select Save in the Filter Active area.
5. Type a meaningful name for your favorite query, and then click Save Query.
Deleting a query from the Search Favorites
To delete a query from the Search Favorites:
1. On the navigation pane, click Mail Security→Email Browser.
The Mail Security Email Browser page appears.
2. Go to the Source area, and then select Favorites from the Search drop-down.
3. Go to the Favorite specific area, and then select the query that you would like to delete from the Favorite drop-down.
4. Click Delete Query.
Searching for folders in the Message Store
You can search for predefined folders containing email messages that have been stored in any of the following email message storages:
● Message Store
The Message Store stores blocked or delayed email messages, and email messages that are considered bad or problematic.
You can also use the Message Store as a backup for certain email messages, such as backing up every email message from technical support.
● Quarantine Store
A quarantine store is a type of email message storage that stores email messages meeting certain criteria as defined by the Administrator, such as virus-infected email messages, important confidential data, or email messages that contain a company’s logo.
You use the list of email messages to define which recipients are eligible to receive quarantine reports. Being in this list does not automatically result in receiving a quarantine report, since it also requires a quarantine store with an active delivery schedule.
113IBM Proventia Network Mail Security System User Guide, Version 1.5
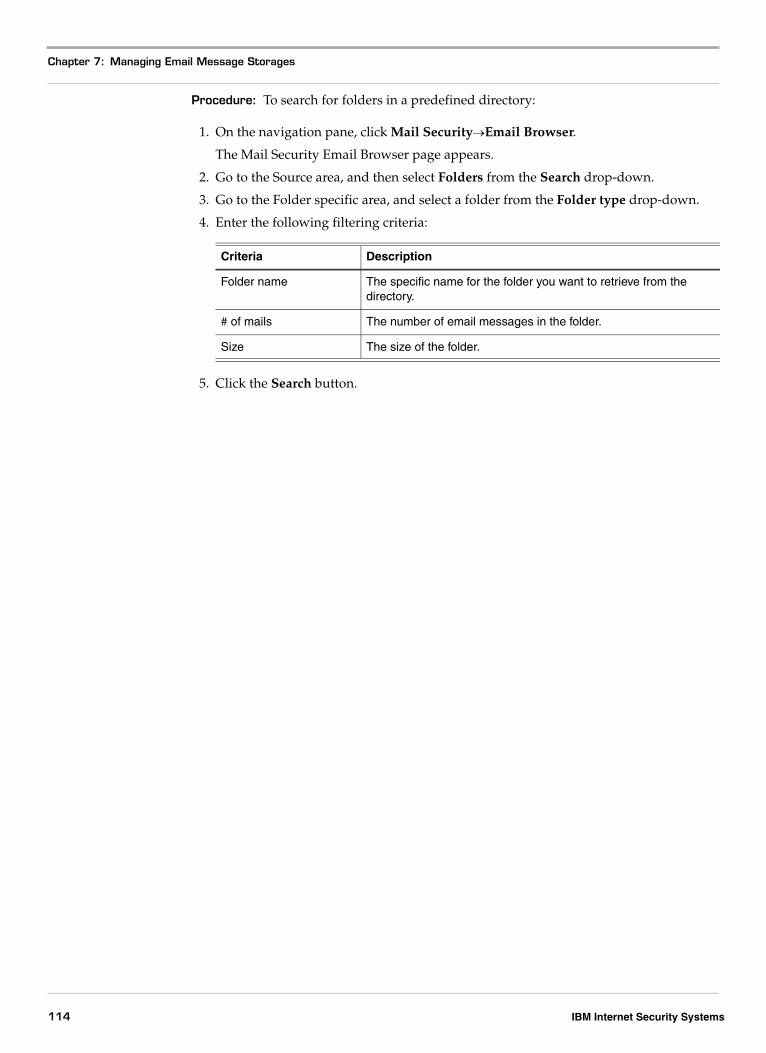
Chapter 7: Managing Email Message Storages
Procedure: To search for folders in a predefined directory:
1. On the navigation pane, click Mail Security→Email Browser.
The Mail Security Email Browser page appears.
2. Go to the Source area, and then select Folders from the Search drop-down.
3. Go to the Folder specific area, and select a folder from the Folder type drop-down.
4. Enter the following filtering criteria:
5. Click the Search button.
Criteria Description
Folder name The specific name for the folder you want to retrieve from the directory.
# of mails The number of email messages in the folder.
Size The size of the folder.
114 IBM Internet Security Systems

Removing Email Messages from the Email Message Storages
Removing Email Messages from the Email Message Storages
Introduction You can remove unnecessary email messages in order to free up space in the email message storages.
Procedure To remove email messages from the email message storages:
1. On the navigation pane, click Mail Security→Policy Objects.
The Mail Security Policy Objects page appears.
2. Click the Email Storages tab.
3. Select the Enable box in the Message Log Cleanup area.
4. Set the duration on how long to keep the email message before deleting it from the appliance.
5. Choose a schedule from the Schedules drop-down.
6. Select the Enable box in the Synchronize with Databases (delete orphaned message files) area.
7. Choose a schedule from the Schedules drop-down.
8. Click Save Changes.
Deleting XMail frozen mails and log files from the Message Store
You can delete the following XMail log files to free up space on the XMail server:
● Frozen emails
Frozen emails are email messages that were sent to the target SMTP server but failed to be processed due to a temporary error, such as the server was not reachable. The receiving mail server (remote server) returns a permanent error, or after the email message is unable to be sent within the configured resend interval.
The email message is moved to the resend queue to be resent by the appliance. A large resend queue indicates that there is an email message delivery problem.
● XMail log files
The XMail log files are files related to the SMTP relay XMail server. SMTP are logs on connection of the XMail SMTP relay. The other two files are log files on outgoing and incoming mail traffic. These logs will inform you about all SMTP processes performed by the SMTP relay.
Procedure: To delete XMail frozen email messages and log files from the Message Store:
1. On the navigation pane, click Mail Security→Maintenance.
The Mail Security System Maintenance page appears.
2. Go to the Cleanup XMail frozen Mails and Log Files area, and then select the number of days in which to delete files.
3. Click the Cleanup button.
Deleting temporary Files
You can remove temporary files that are not user data (but files that were created and not properly deleted) to free up space on the local database.
115IBM Proventia Network Mail Security System User Guide, Version 1.5
Chapter 7: Managing Email Message Storages
To delete temporary files:
1. On the navigation pane, click Mail Security→Maintenance.
The Mail Security System Maintenance page appears.
2. Go to the Cleanup temp folder area, and then select a time in which to delete temporary files.
3. Click the Cleanup button.
Deleting unreferenced email messages from the database
You can remove database entries from the appliance that are not stored in a folder or are older than the given period for storage.
To delete unreferenced email messages from the Message Store:
1. On the navigation pane, click Mail Security→Maintenance.
The Mail Security System Maintenance page appears.
2. Go to the Cleanup Unreferenced Messages area, and then select the number of days in which to delete unreferenced email messages.
3. Click the Cleanup button.
116 IBM Internet Security Systems
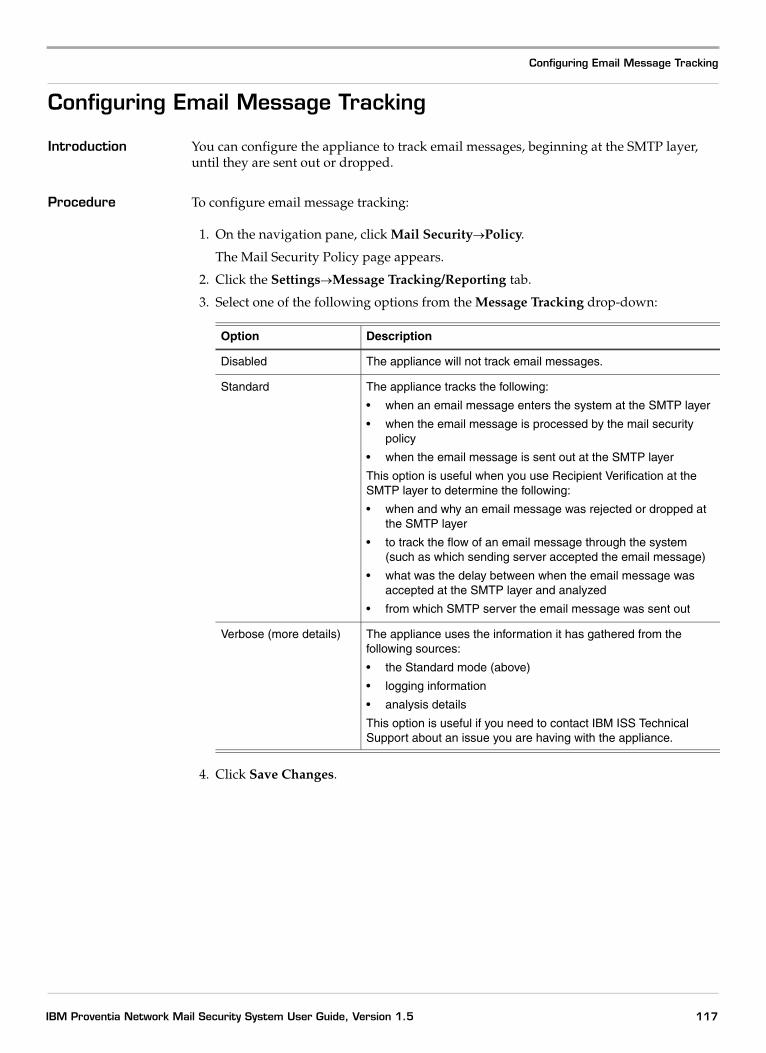
Configuring Email Message Tracking
Configuring Email Message Tracking
Introduction You can configure the appliance to track email messages, beginning at the SMTP layer, until they are sent out or dropped.
Procedure To configure email message tracking:
1. On the navigation pane, click Mail Security→Policy.
The Mail Security Policy page appears.
2. Click the Settings→Message Tracking/Reporting tab.
3. Select one of the following options from the Message Tracking drop-down:
4. Click Save Changes.
Option Description
Disabled The appliance will not track email messages.
Standard The appliance tracks the following:
• when an email message enters the system at the SMTP layer
• when the email message is processed by the mail security policy
• when the email message is sent out at the SMTP layer
This option is useful when you use Recipient Verification at the SMTP layer to determine the following:
• when and why an email message was rejected or dropped at the SMTP layer
• to track the flow of an email message through the system (such as which sending server accepted the email message)
• what was the delay between when the email message was accepted at the SMTP layer and analyzed
• from which SMTP server the email message was sent out
Verbose (more details) The appliance uses the information it has gathered from the following sources:
• the Standard mode (above)
• logging information
• analysis details
This option is useful if you need to contact IBM ISS Technical Support about an issue you are having with the appliance.
117IBM Proventia Network Mail Security System User Guide, Version 1.5

Chapter 7: Managing Email Message Storages
118 IBM Internet Security Systems
Chapter 8
Activating Reports
Overview
Introduction This chapter explains how to activate reports using the Local Management Interface (LMI) provided by the appliance.
In this chapter This chapter contains the following topics:
Topic Page
Activating Reports from the Appliance 120
Configuring a Quarantine Report Template 121
Defining Recipients of a Quarantine Report 123
Generating Predefined Network Activity Reports 124
119IBM Proventia Network Mail Security System User Guide, Version 1.5
Chapter 8: Activating Reports
Activating Reports from the Appliance
Introduction You can specify if the appliance should calculate and store statistical data used for generating graphical reports or publish the reports using SNMP.
Configuring reports To configure reporting:
1. On the navigation pane, click Mail Security→Policy.
The Mail Security Policy page appears.
2. Click the Settings→Message Tracking/Reporting tab.
3. Select the Reporting Enabled box.
4. Select the SNMP Trap Enabled box to publish the collected statistics using SNMP.
5. Use the Configure SNMP button to configure publishing parameters.
6. To use the graphical reports integrated into the SiteProtector system, select the SiteProtector box.
7. To use the appliance’s reporting feature, select the Database Enabled box.
Configuring reports to be delivered automatically
You can schedule specific reports to be automatically delivered.
To configure scheduled reports:
1. On the navigation pane, click Mail Security→Policy.
The Mail Security Policy page appears.
2. Click the Settings→Message Tracking/Reporting tab.
3. In the Configure Scheduled Reports area, click Add.
The Add window appears.
4. If the appliance is part of a cluster, enable the Cluster box.
5. Select the desired report from the Report drop-down.
6. Specify to which email addresses the report should be delivered in the To field.
7. Select the Enable box, and then select a schedule.
8. In the Timerange area, select if you want the report to be calculated from a relative or absolute timerange.
9. Click OK, and then click Apply Settings.
120 IBM Internet Security Systems
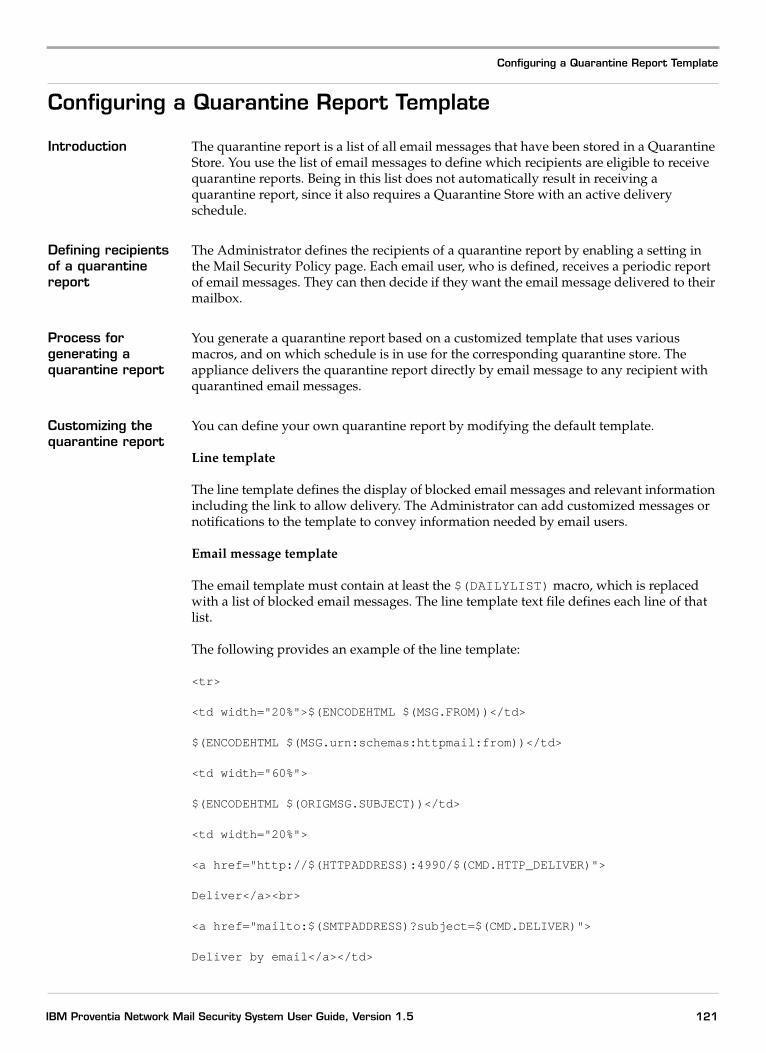
Configuring a Quarantine Report Template
Configuring a Quarantine Report Template
Introduction The quarantine report is a list of all email messages that have been stored in a Quarantine Store. You use the list of email messages to define which recipients are eligible to receive quarantine reports. Being in this list does not automatically result in receiving a quarantine report, since it also requires a Quarantine Store with an active delivery schedule.
Defining recipients of a quarantine report
The Administrator defines the recipients of a quarantine report by enabling a setting in the Mail Security Policy page. Each email user, who is defined, receives a periodic report of email messages. They can then decide if they want the email message delivered to their mailbox.
Process for generating a quarantine report
You generate a quarantine report based on a customized template that uses various macros, and on which schedule is in use for the corresponding quarantine store. The appliance delivers the quarantine report directly by email message to any recipient with quarantined email messages.
Customizing the quarantine report
You can define your own quarantine report by modifying the default template.
Line template
The line template defines the display of blocked email messages and relevant information including the link to allow delivery. The Administrator can add customized messages or notifications to the template to convey information needed by email users.
Email message template
The email template must contain at least the $(DAILYLIST) macro, which is replaced with a list of blocked email messages. The line template text file defines each line of that list.
The following provides an example of the line template:
<tr>
<td width="20%">$(ENCODEHTML $(MSG.FROM))</td>
$(ENCODEHTML $(MSG.urn:schemas:httpmail:from))</td>
<td width="60%">
$(ENCODEHTML $(ORIGMSG.SUBJECT))</td>
<td width="20%">
<a href="http://$(HTTPADDRESS):4990/$(CMD.HTTP_DELIVER)">
Deliver</a><br>
<a href="mailto:$(SMTPADDRESS)?subject=$(CMD.DELIVER)">
Deliver by email</a></td>
121IBM Proventia Network Mail Security System User Guide, Version 1.5
Chapter 8: Activating Reports
</tr>
The example above is a mixture of HTML code and the template macros. This example displays a row in a table, and includes information such as Sender, Original Message Subject, and the respective delivery links. You can customize the formatting and usage of macros. You can also make a test email message to trigger the rule to test the output of the quarantine report.
In the template email message, you can only use a few macros that are not specific to a current email message, for example, $(RECIPIENTNAME). If the appliance contains information about the domain or LDAP user name, it will be replaced with the respective user name. Otherwise, the appliance displays the email address of the user.
Do not use special characters such as umlauts in defining the folder names. The use of white may cause problems with email delivery through an http: link.
Procedure To configure a quarantine report:
1. On the navigation pane, click Mail Security→Policy Objects.
The Mail Security Policy Objects page appears.
2. Click the Quarantine Report Templates tab, and then click Add.
The Add window appears.
3. Type the name of the report in the Name field.
4. Click the Email Template tab.
5. Click the arrow to the right of the Body tab to display a list of macros.
6. Provide the macro that you want to use for the template.
7. Click the Line Template tab.
8. Provide the macros that you want to use for each line in the Line area.
9. Click OK, and then click Save Changes.
The template is saved in the list.
122 IBM Internet Security Systems
Defining Recipients of a Quarantine Report
Defining Recipients of a Quarantine Report
Introduction The quarantine report is a list of all email messages that have been stored in a Quarantine Store. You use the list of email messages to define which recipients are eligible to receive quarantine reports. Being in this list does not automatically result in receiving a quarantine report, since it also requires a Quarantine Store with an active delivery schedule.
How are quarantine reports generated
You generate a quarantine report based on a customized template that uses various macros, and on which schedule is in use for the corresponding quarantine store. The appliance delivers the quarantine report directly by email message to any recipient with quarantined email messages.
Procedure To define a recipient of the quarantine report:
1. On the navigation pane, click Mail Security→Policy.
The Mail Security Policy page appears.
2. Click the Settings→Quarantine Report Recipients tab.
3. Click Add.
The Add window appears.
4. From the Who drop-down, select a Who object containing the recipients you want to receive quarantine reports when email messages addressed to them are stored in a Quarantine Store.
5. Click OK, and then click Save Changes.
123IBM Proventia Network Mail Security System User Guide, Version 1.5
Chapter 8: Activating Reports
Generating Predefined Network Activity Reports
Introduction You can generate predefined reports from the database that provide details on the risks to mail security.
Type of reports You can generate the following predefined reports from the appliance:
Procedure To generate a report:
1. On the navigation pane, click Mail Security→Reporting.
The Reporting page appears.
2. If applicable, choose a data source, a start time for the report, and an end time for the report.
3. Select a report, and then click the Generate button.
Report Description
Executive Summary Displays the overall throughput of the appliance versus the email messages that where taken action on, as well as quarantined versus email messages released from quarantine.
Traffic Monitoring Provides information about network traffic over a given period of time.
Important: If there is no data available for the times you selected, the database will not generate this report.
Policy Configuration Provides information about the mail security policy currently in place.
Top 10 Responses Provides information about the top 10 responses that were executed by the mail security policy over a given period of time.
Top 10 Analysis Modules Provides information about the top 10 analysis modules that have matched Analysis modules enabled in the mail security policy.
Top 10 Recipients Provides information on the top 10 recipients by number of received email messages.
Top 10 Senders Provides information on the top 10 senders by number of email messages sent.
Top 10 Viruses Provides information on the top 10 viruses by number of infected email messages.
Table 24: Types of reports
124 IBM Internet Security Systems
Chapter 9
Managing and Updating the Appliance with the IBM SiteProtector System
Overview
Introduction This chapter explains how to set up the appliance to work with the SiteProtector system.
In this chapter This chapter contains the following topics:
Topic Page
The SiteProtector System Overview 126
Integrating the Appliance with the SiteProtector System 128
125IBM Proventia Network Mail Security System User Guide, Version 1.5
Chapter 9: Managing and Updating the Appliance with the IBM SiteProtector System
The SiteProtector System Overview
Introduction The SiteProtector system is a centralized management system that provides command, control, and monitoring capabilities over all of your IBM ISS products, including the appliance.
Architecture The SiteProtector system consists of the following:
● Components—The SiteProtector system components provide the core SiteProtector system functionality and use specific channels to communicate with each other and other IBM ISS products such as the appliance. For a complete list of the components and ports, see the IBM SiteProtector System Installation Guide.
● Additional Modules—these provide added SiteProtector system functionality.
● Agents—agents are IBM ISS products that work with the SiteProtector system to detect and prevent security events; the appliance is considered an agent in the IBM SiteProtector Console.
Components that work with the appliance
The SiteProtector system consists of different components, each with a very specific function in the SiteProtector system. The following table describes some of the SiteProtector system components that work with the appliance:
Component Description
Agent Manger
The Agent Manager provides you with the ability to configure, update, and manage the appliance in the SiteProtector system. It also provides management for the alternate update server for the appliance called the IBM SiteProtector X-Press Update Server.
As the appliance generates security data, the Agent Manager facilitates the data processing required for you to view the data in the IBM SiteProtector Console.
The appliance sends a heartbeat signal to its agent manager on a routine basis to indicate that it is active and to receive policies and updates from the agent manager. The amount of time between heartbeats is user defined.
Central Responses
Central Responses are alerts, log entries, and responses from the SiteProtector system. For example, when a security event enters the SiteProtector system from the appliance, the SiteProtector system can alert you by email message, by network message (SNMP trap), or in the IBM SiteProtector Console. You can also log the events to a central location in the SiteProtector system for analysis and monitoring. You can request alerts about changes in the appliance’s status.
Console The Console is the interface where you perform all the SiteProtector system tasks, including the following:
• configure and manage the appliance(s)
• create and manage security policies
• enable alerts and logging
• set up users and user permissions
• monitor security events and vulnerabilities on your network
• generate reports
Table 25: The SiteProtector system component descriptions
126 IBM Internet Security Systems
The SiteProtector System Overview
Site Database
The Site Database stores the following information:
• security data generated by your IBM ISS products
• statistics for security events
• the update status of all products
• the SiteProtector system user accounts and permissions
X-Press Update Server
The X-Press Update Server is the primary tool for updating the SiteProtector system and the other IBM ISS products that are set up to work with it. The X-Press Update Server does the following:
• connects to the IBM ISS Download Center
• downloads firmware and security content updates for the appliance
• applies firmware and security content updates for the appliance
Important: The X-Press Update Server does not download or apply database updates for the appliance. The appliance must have Internet access to download and apply database updates.
Component Description
Table 25: The SiteProtector system component descriptions (Continued)
127IBM Proventia Network Mail Security System User Guide, Version 1.5
Chapter 9: Managing and Updating the Appliance with the IBM SiteProtector System
Integrating the Appliance with the SiteProtector System
Introduction You can integrate the appliance with the SiteProtector system.
Related documentation
For information about how to install, configure, and update the SiteProtector system, including information about how to configure and apply policies in the SiteProtector system, see the following:
● IBM SiteProtector System Installation Guide
● IBM SiteProtector System User Guide for Security Managers
● the IBM SiteProtector system online help
Before you begin Before you register the appliance with the SiteProtector system, you complete the following tasks:
● Install, configure, and update the SiteProtector system.
● Set up a license for the appliance in the IBM SiteProtector Console. This license is required for the appliance to receive updates from the SiteProtector system.
● Verify that you are running IBM SiteProtector 2.0, Service Pack 5 or later.
● Create a group in the IBM SiteProtector Console for the appliance and define the group settings. The group can only contain appliances of the same type.
● Verify the name of the SiteProtector system group to which you want to assign the appliance.
● Verify the IP address and port for each SiteProtector system agent manager that will communicate with the appliance. To verify this information, go to the IBM SiteProtector Console and view the properties for the agent manager on the Agent View.
● Verify the IP address of the appliance’s primary management interface. This interface is user-defined when you configure the appliance interfaces. To verify the information, go to System→Networking.
● Update the appliance to the latest firmware.
Procedure To configure the SiteProtector system management of your appliance:
1. On the navigation pane, click System→Management.
The Management page appears.
2. Select Register with SiteProtector.
3. Do one of the following:
If you want... Then...
The appliance to keep its own configuration settings and policies
Select the Local Settings Override SiteProtector Group Settings option.
You should use this option if you have not defined settings for the appliance in the SiteProtector system, and it prevents the appliance from inheriting the default policies included with the SiteProtector system.
128 IBM Internet Security Systems
Integrating the Appliance with the SiteProtector System
4. Complete the following:
5. In the SiteProtector Management Level section, select the level of the SiteProtector system management you want:
The appliance to obtain its configuration settings and policies from the SiteProtector system
Clear the Local Settings Override SiteProtector Group Settings option.
You should use this option if you have defined all appliance settings and policies in the SiteProtector system.
Option Description
Desired SiteProtector Group for Appliance
The IBM SiteProtector Console organizes network devices into groups for management and configuration purposes. Type the name of the group where you want to register the appliance.
Important: You should create the group in the SiteProtector system before you register the appliance. Otherwise, the SiteProtector system creates the group for you when you register the appliance.
Heartbeat Interval The appliance sends periodic signals to the SiteProtector system to initiate a communication session with the SiteProtector system. Type the number of seconds between these signals.
Allowed Values = 60 to 86,400 seconds
Level Description
Policy Control and Events
Select this option if you want to manage the appliance in the IBM SiteProtector Console.
Events Only Select this option if you want to manage the appliance in Proventia Manager and only send alerts to the IBM SiteProtector Console.
Note: The appliance still registers with the SiteProtector system regardless of this setting. The appliance appears as an agent in the group you specified, and its status appears as Unmanaged.
If you want... Then...
129IBM Proventia Network Mail Security System User Guide, Version 1.5
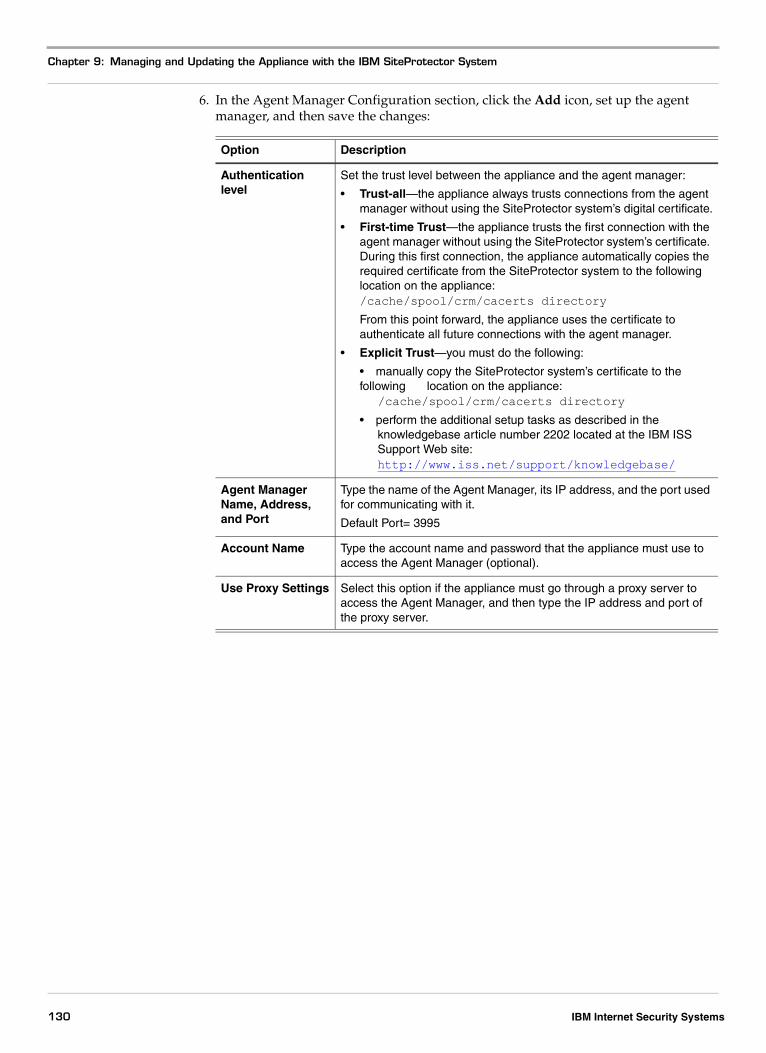
Chapter 9: Managing and Updating the Appliance with the IBM SiteProtector System
6. In the Agent Manager Configuration section, click the Add icon, set up the agent manager, and then save the changes:
Option Description
Authentication level
Set the trust level between the appliance and the agent manager:
• Trust-all—the appliance always trusts connections from the agent manager without using the SiteProtector system’s digital certificate.
• First-time Trust—the appliance trusts the first connection with the agent manager without using the SiteProtector system’s certificate. During this first connection, the appliance automatically copies the required certificate from the SiteProtector system to the following location on the appliance: /cache/spool/crm/cacerts directory
From this point forward, the appliance uses the certificate to authenticate all future connections with the agent manager.
• Explicit Trust—you must do the following:
• manually copy the SiteProtector system’s certificate to the following location on the appliance:
/cache/spool/crm/cacerts directory
• perform the additional setup tasks as described in the knowledgebase article number 2202 located at the IBM ISS Support Web site:http://www.iss.net/support/knowledgebase/
Agent Manager Name, Address, and Port
Type the name of the Agent Manager, its IP address, and the port used for communicating with it.
Default Port= 3995
Account Name Type the account name and password that the appliance must use to access the Agent Manager (optional).
Use Proxy Settings Select this option if the appliance must go through a proxy server to access the Agent Manager, and then type the IP address and port of the proxy server.
130 IBM Internet Security Systems
Part III
Maintenance

Chapter 10
Updating the Appliance
Overview
Introduction This chapter explains how to configure your appliance for automatic and manual updates.
Attention: You should update your appliance as soon as possible after the initial setup to ensure the latest protection capabilities. Updates ensure that the appliance has the latest fixes, features, security content, and database updates.
Updating with the SiteProtector system
For information about downloading and applying updates with the SiteProtector system, see “Managing and Updating the Appliance with the IBM SiteProtector System” on page 125.
In this chapter This chapter contains the following topics:
Topic Page
Updating the Appliance 134
Configuring Automatic Updates 136
Manually Updating the Appliance 139
Rolling Back Updates 141
Configuring Update Advanced Parameters 142
Updating the IBM ISS Filter Database 144
Downloading the IBM ISS Filter Database 146
133IBM Proventia Network Mail Security System User Guide, Version 1.5
Chapter 10: Updating the Appliance
Updating the Appliance
Introduction You should always make sure your appliance is running the latest firmware, security content, and database updates. Your appliance retrieves updates from the IBM ISS Download Center, accessible over the Internet.
How to update the appliance
You can update the firmware in two ways:
● configure automatic updates
● find, download, and install updates manually
Important: If you do not have automatic updates configured for the appliance or you want to install an available update off schedule, you can find and manually install updates.
Types of updates you can install
You can install the following updates:
● firmware updates
● intrusion prevention updates
Note: You can find updates from the Updates to Download page, and you can schedule automatic update downloads and installations from the Automatic Update Settings page.
Finding available updates
When you click the Find Updates button on the Update Status page, the appliance checks for the following:
● updates that are already downloaded to the appliance and ready to be installed
● updates that are available for download from the IBM ISS Download Center
Note: If the appliance finds updates to download or install, an alert message displays a link to the appropriate page (the Download Updates or Install Updates page).
Update packages and rollbacks
A rollback removes the last update that was installed on the appliance. You cannot rollback firmware updates.
Attention: You should perform a full system backup before you install a firmware update. If you enable automatic firmware updates, you can enable the Perform Full System Backup Before Installation option.
After an update is installed, the appliance deletes the update package and the downloaded package is no longer on your appliance. If you roll back the update, then the appliance finds the update available for download and installation the next time you find updates or at the next scheduled automatic update.
The SiteProtector system management
If you manage your appliance with the SiteProtector system, you can install an update while the appliance is registered with the SiteProtector system’s agent manager.
Creating a system backup
Attention: You should create a system backup prior to installing any firmware updates. To ensure that you have a system backup before each automatic firmware update
134 IBM Internet Security Systems

Updating the Appliance
installation, you can enable the Perform Full System Backup Before Installation option on the Automatic Update Settings page.
Troubleshooting download problems
If you experience problems in Proventia Manager after you apply a firmware update, try the following steps:
1. Close your Web browser.
2. Clear your Java cache.
3. Restart your Web browser, and log on to Proventia Manager.
Reference: For more information about how to clear your Java cache, refer to your operating system documentation.
135IBM Proventia Network Mail Security System User Guide, Version 1.5
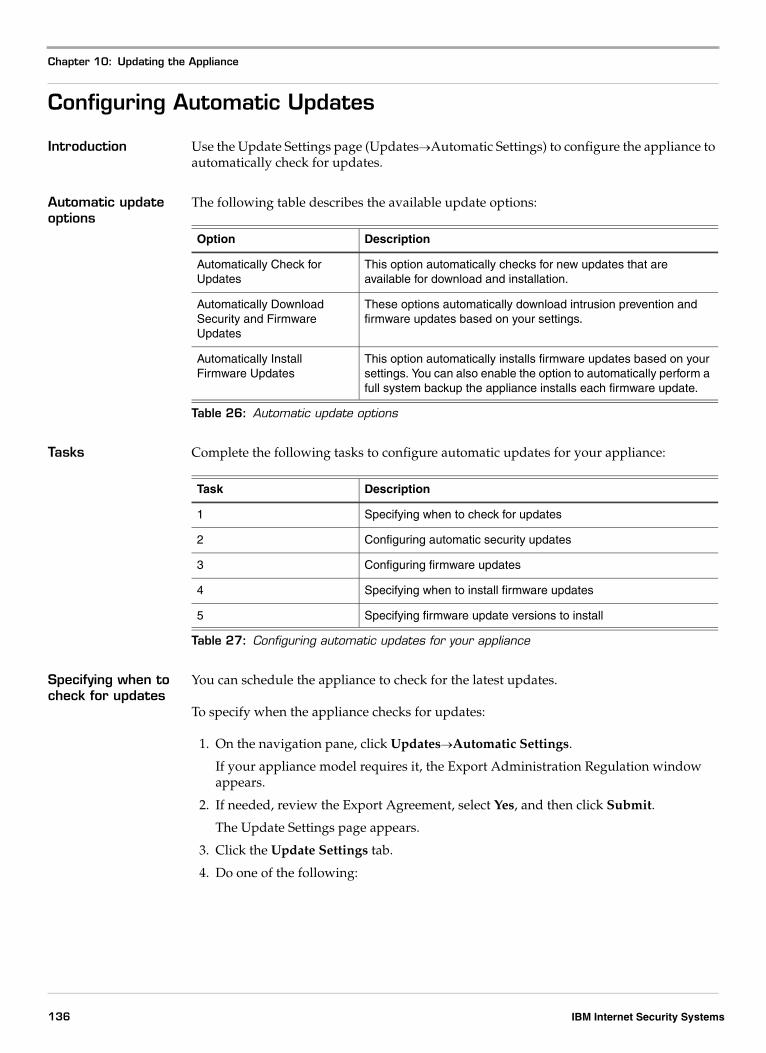
Chapter 10: Updating the Appliance
Configuring Automatic Updates
Introduction Use the Update Settings page (Updates→Automatic Settings) to configure the appliance to automatically check for updates.
Automatic update options
The following table describes the available update options:
Tasks Complete the following tasks to configure automatic updates for your appliance:
Specifying when to check for updates
You can schedule the appliance to check for the latest updates.
To specify when the appliance checks for updates:
1. On the navigation pane, click Updates→Automatic Settings.
If your appliance model requires it, the Export Administration Regulation window appears.
2. If needed, review the Export Agreement, select Yes, and then click Submit.
The Update Settings page appears.
3. Click the Update Settings tab.
4. Do one of the following:
Option Description
Automatically Check for Updates
This option automatically checks for new updates that are available for download and installation.
Automatically Download Security and Firmware Updates
These options automatically download intrusion prevention and firmware updates based on your settings.
Automatically Install Firmware Updates
This option automatically installs firmware updates based on your settings. You can also enable the option to automatically perform a full system backup the appliance installs each firmware update.
Table 26: Automatic update options
Task Description
1 Specifying when to check for updates
2 Configuring automatic security updates
3 Configuring firmware updates
4 Specifying when to install firmware updates
5 Specifying firmware update versions to install
Table 27: Configuring automatic updates for your appliance
136 IBM Internet Security Systems
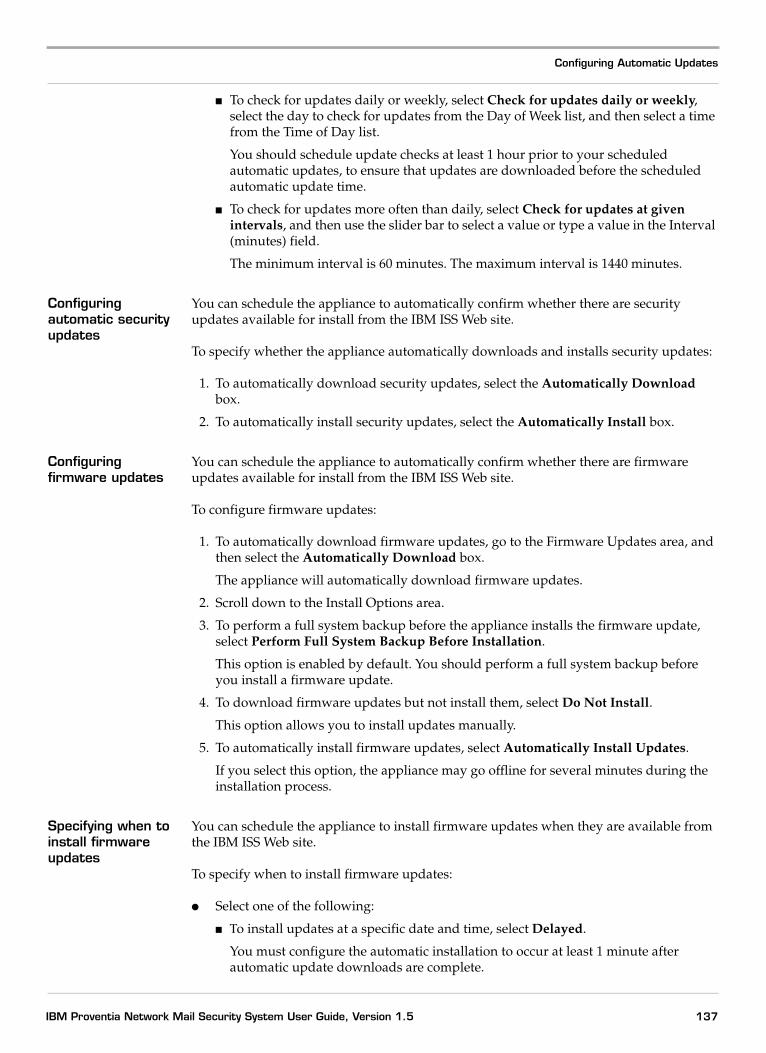
Configuring Automatic Updates
■ To check for updates daily or weekly, select Check for updates daily or weekly, select the day to check for updates from the Day of Week list, and then select a time from the Time of Day list.
You should schedule update checks at least 1 hour prior to your scheduled automatic updates, to ensure that updates are downloaded before the scheduled automatic update time.
■ To check for updates more often than daily, select Check for updates at given intervals, and then use the slider bar to select a value or type a value in the Interval (minutes) field.
The minimum interval is 60 minutes. The maximum interval is 1440 minutes.
Configuring automatic security updates
You can schedule the appliance to automatically confirm whether there are security updates available for install from the IBM ISS Web site.
To specify whether the appliance automatically downloads and installs security updates:
1. To automatically download security updates, select the Automatically Download box.
2. To automatically install security updates, select the Automatically Install box.
Configuring firmware updates
You can schedule the appliance to automatically confirm whether there are firmware updates available for install from the IBM ISS Web site.
To configure firmware updates:
1. To automatically download firmware updates, go to the Firmware Updates area, and then select the Automatically Download box.
The appliance will automatically download firmware updates.
2. Scroll down to the Install Options area.
3. To perform a full system backup before the appliance installs the firmware update, select Perform Full System Backup Before Installation.
This option is enabled by default. You should perform a full system backup before you install a firmware update.
4. To download firmware updates but not install them, select Do Not Install.
This option allows you to install updates manually.
5. To automatically install firmware updates, select Automatically Install Updates.
If you select this option, the appliance may go offline for several minutes during the installation process.
Specifying when to install firmware updates
You can schedule the appliance to install firmware updates when they are available from the IBM ISS Web site.
To specify when to install firmware updates:
● Select one of the following:
■ Τo install updates at a specific date and time, select Delayed.
You must configure the automatic installation to occur at least 1 minute after automatic update downloads are complete.
137IBM Proventia Network Mail Security System User Guide, Version 1.5
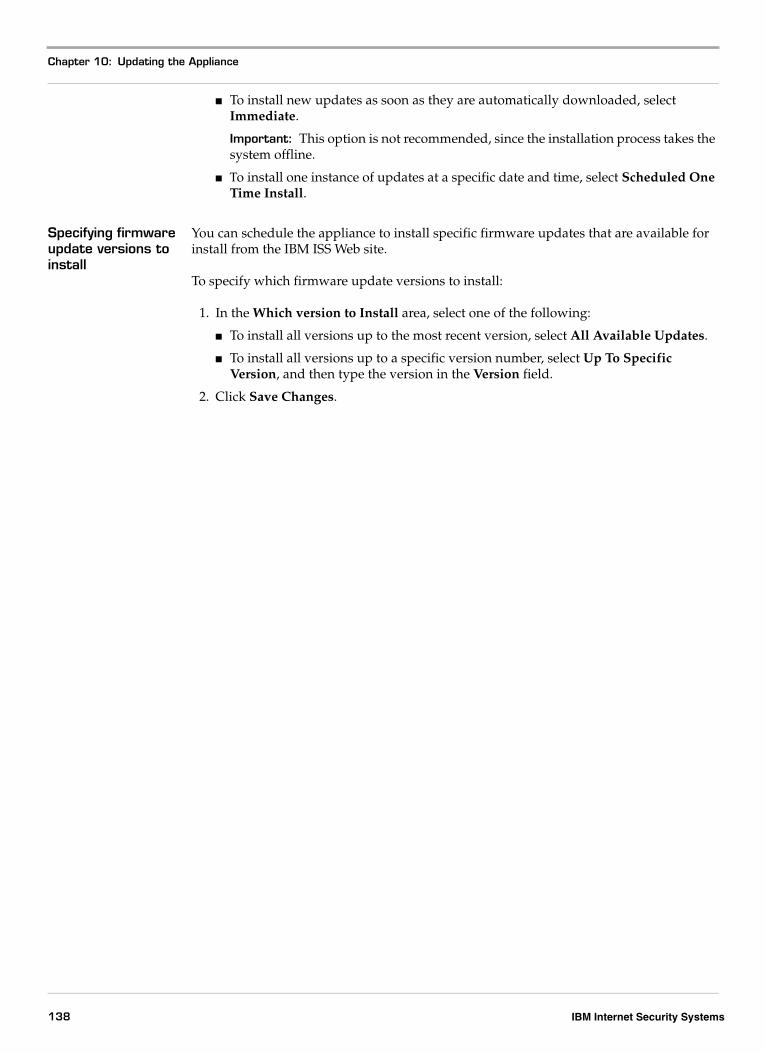
Chapter 10: Updating the Appliance
■ To install new updates as soon as they are automatically downloaded, select Immediate.
Important: This option is not recommended, since the installation process takes the system offline.
■ Τo install one instance of updates at a specific date and time, select Scheduled One Time Install.
Specifying firmware update versions to install
You can schedule the appliance to install specific firmware updates that are available for install from the IBM ISS Web site.
To specify which firmware update versions to install:
1. In the Which version to Install area, select one of the following:
■ To install all versions up to the most recent version, select All Available Updates.
■ To install all versions up to a specific version number, select Up To Specific Version, and then type the version in the Version field.
2. Click Save Changes.
138 IBM Internet Security Systems
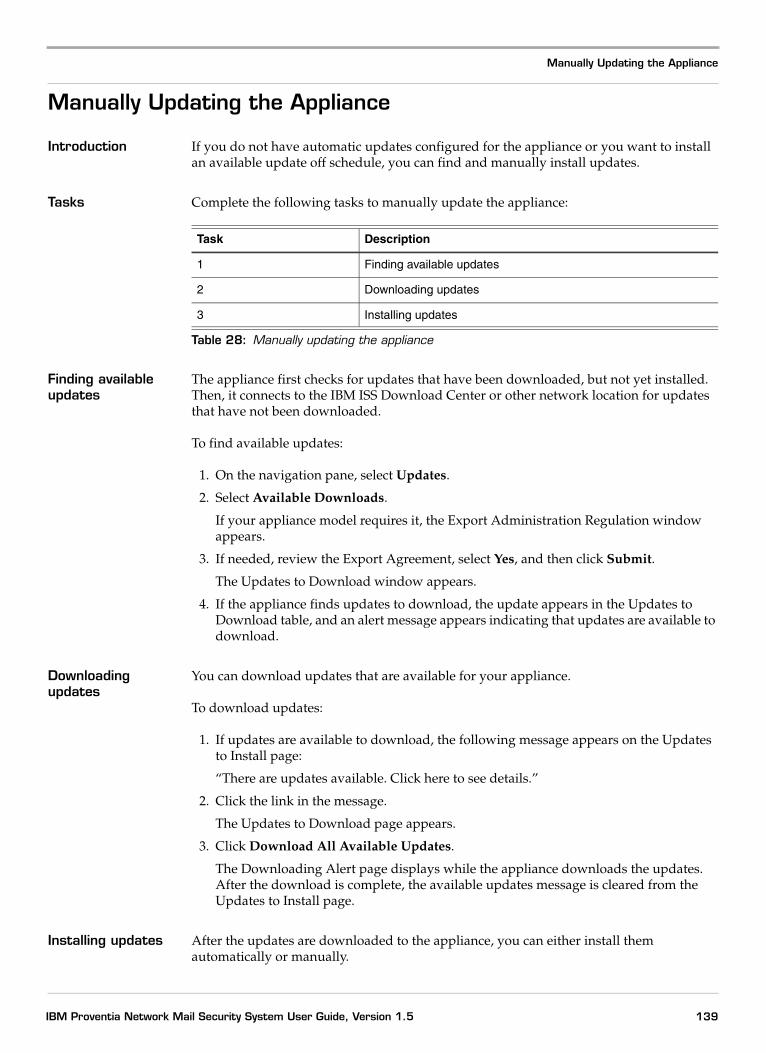
Manually Updating the Appliance
Manually Updating the Appliance
Introduction If you do not have automatic updates configured for the appliance or you want to install an available update off schedule, you can find and manually install updates.
Tasks Complete the following tasks to manually update the appliance:
Finding available updates
The appliance first checks for updates that have been downloaded, but not yet installed. Then, it connects to the IBM ISS Download Center or other network location for updates that have not been downloaded.
To find available updates:
1. On the navigation pane, select Updates.
2. Select Available Downloads.
If your appliance model requires it, the Export Administration Regulation window appears.
3. If needed, review the Export Agreement, select Yes, and then click Submit.
The Updates to Download window appears.
4. If the appliance finds updates to download, the update appears in the Updates to Download table, and an alert message appears indicating that updates are available to download.
Downloading updates
You can download updates that are available for your appliance.
To download updates:
1. If updates are available to download, the following message appears on the Updates to Install page:
“There are updates available. Click here to see details.”
2. Click the link in the message.
The Updates to Download page appears.
3. Click Download All Available Updates.
The Downloading Alert page displays while the appliance downloads the updates. After the download is complete, the available updates message is cleared from the Updates to Install page.
Installing updates After the updates are downloaded to the appliance, you can either install them automatically or manually.
Task Description
1 Finding available updates
2 Downloading updates
3 Installing updates
Table 28: Manually updating the appliance
139IBM Proventia Network Mail Security System User Guide, Version 1.5
Chapter 10: Updating the Appliance
To install updates manually:
1. On the navigation pane, click Updates.
2. Select Available Installs.
If your appliance model requires it, the Export Administration Regulation window appears.
3. If needed, review the Export Agreement, select Yes, and then click Submit.
The Available Installs page appears, and available updates to install are displayed in the Updates to Install table.
4. Select the updates you want to install, and then click Install Updates.
Some firmware updates require that you reboot your appliance. You can view the status of the installation in the Update History table on the Update Status page.
140 IBM Internet Security Systems
Rolling Back Updates
Rolling Back Updates
Introduction A rollback removes the last intrusion prevention or antivirus update that was installed on the appliance. You cannot roll back firmware updates or database updates.
Cumulative updates and rollbacks
Updates are cumulative. Refer to the following example for a description of the appliance behavior during rollback of cumulative updates.
Example: If you install version 1.1, do not install version 1.2, and then install version 1.3, version 1.2 is installed with version 1.3. However, the appliance does not roll back to version 1.2. A rollback to the last update takes the appliance back to version 1.1.
Update packages and rollbacks
After an update is installed, the appliance deletes the update package. Therefore, the downloaded package is no longer on your appliance. If you roll back the update, then the update will be found as available for download and installation the next time you find updates or at the next scheduled automatic update.
Procedure To roll back an update:
1. On the navigation pane, click Updates.
The Update Status page displays the status of Intrusion Prevention, Antivirus, and Firmware updates.
2. To roll back an antivirus update, click the corresponding Rollback Last Update link, and then click OK.
3. To roll back a intrusion prevention update, click the corresponding Rollback Last Update link, and then click OK.
The Update Status page appears, and displays the status of the rollback.
141IBM Proventia Network Mail Security System User Guide, Version 1.5
Chapter 10: Updating the Appliance
Configuring Update Advanced Parameters
Introduction You may need to tune the update settings.
Adding an update advanced parameter
To add an update advanced parameter:
1. On the navigation pane, click Updates→Settings.
If your appliance model requires it, the Export Administration Regulation window appears.
2. If needed, review the Export Agreement, select Yes, and then click Submit.
The Update Settings page appears.
3. Click the Advanced Parameters tab.
4. Click Add.
The Add Advanced Parameter window appears.
5. Provide the name of the parameter, a meaningful description about the parameter, and then specify the value type and value of the parameter.
6. Click OK, and then click Save Changes.
Editing an update advanced parameter
To edit an update advanced parameter:
1. On the navigation pane, click Updates→Settings.
If your appliance model requires it, the Export Administration Regulation window appears.
2. If needed, review the Export Agreement, select Yes, and then click Submit.
The Update Settings page appears.
3. Click the Advanced Parameters tab.
4. Select a parameter to edit, and then click Edit.
The Edit Advanced Parameter window appears.
5. Edit the properties of the parameter, and then click OK.
6. Click Save Changes.
Copying and pasting an update advanced parameter
To copy and paste an automatic update advanced parameter:
1. On the navigation pane, click Updates→Settings.
If your appliance model requires it, the Export Administration Regulation window appears.
2. If needed, review the Export Agreement, select Yes, and then click Submit.
The Update Settings page appears.
3. Click the Advanced Parameters tab.
4. Select the parameter you want to copy.
5. Click the Copy icon.
The appliance copies the parameter to the clipboard.
142 IBM Internet Security Systems
Configuring Update Advanced Parameters
6. Click the Paste icon.
The appliance copies the parameter to the end of the list.
7. If needed, edit the parameter, and then click OK.
8. Click Save Changes.
Removing an update advanced parameter
To remove an update advanced parameter:
1. On the navigation pane, click Updates→Settings.
If your appliance model requires it, the Export Administration Regulation window appears.
2. If needed, review the Export Agreement, select Yes, and then click Submit.
The Update Settings page appears.
3. Click the Advanced Parameters tab.
4. Select an advanced parameter, and then click Remove.
5. Click Save Changes.
143IBM Proventia Network Mail Security System User Guide, Version 1.5
Chapter 10: Updating the Appliance
Updating the IBM ISS Filter Database
Introduction You should update your local IBM ISS Filter Database automatically at least once daily to keep it up to date.
Important: The procedure for scheduling automatic database updates is similar to the procedure for scheduling automatic security and firmware updates. Use the Automatic Update Settings page to schedule all automatic updates for the appliance.
Manual or automatic updates
You can choose how and when to update the database on your appliance. You can do the following:
● manually update the database
● schedule automatic database updates from the Automatic Update Settings page
The update schedule you set for database updates is the same schedule that applies to other updates. See Updating the Appliance for more information.
When to update You can keep your database fresh by downloading updates frequently. If you enable automatic updates for the appliance, then the updates are automatically downloaded and installed. IBM ISS updates the database six times daily, and you should schedule automatic database updates that occur no less than once daily.
Important: Database updates can be large. You should schedule automatic database updates during off hours.
Firmware update reboot and database update considerations
If you enable database updates and select the option to automatically install updates daily or weekly, then the appliance will normally install both firmware and database updates. However, if the appliance must reboot during the update process, then the appliance does not process the database update at that time.
The appliance must reboot before creating a system backup, and some firmware updates require the appliance to reboot after installation.
Consider the following when you schedule firmware and database updates:
● Schedule automatic update checks at least one hour before installing firmware updates or performing a system backup, to allow time for the updates to download.
● If the appliance installs both a database update and a firmware update at the same time, and the appliance must reboot after the firmware update, then the appliance will not update the database until the next scheduled update.
● If you schedule a one-time-only installation for the firmware update, you should schedule the installation for at least one hour after the appliance automatically checks for updates. The appliance will install the database update immediately at the automatic check, and then complete the one-time installation.
Reference: For more information, see Updating the Appliance.
Manually updating the Filter Database
To manually update the Filter Database:
1. On the navigation pane, click Updates→Filter DB.
The Content Filters Database Update page appears.
144 IBM Internet Security Systems

Updating the IBM ISS Filter Database
2. Click the Update Now button.
The appliance updates the database.
Scheduling automatic database updates
To schedule automatic database updates:
1. On the navigation pane, click Updates→Automatic Settings.
If your appliance model requires it, the Export Administration Regulation page appears.
2. If needed, review the Export Agreement, select Yes, and then click Submit.
The Automatic Update Settings page appears.
3. Click the Update Settings tab.
4. Go to the Web Filter and Antispam Database Updates area, and then select Automatically Update Web Filter and Antispam Database.
5. Go to the Automatically Check for Updates area at the top of the page, and do one of the following:
■ To check for updates daily or weekly, select Check for updates daily or weekly, select the day to check for updates from the Day of Week list, and then select a time from the Time of Day list.
Schedule update checks at least 1 hour prior to your scheduled automatic updates. This ensures that the appliance can download updates before the scheduled automatic update time.
■ To check for updates more often than daily, select Check for updates at given intervals, and then use the slider bar to set a value in the Interval (minutes) field.
The minimum interval is 60 minutes. The maximum interval is 1440 minutes.
6. Click Save Changes.
145IBM Proventia Network Mail Security System User Guide, Version 1.5
Chapter 10: Updating the Appliance
Downloading the IBM ISS Filter Database
Introduction You can download a new IBM ISS Filter Database from the IBM ISS database server to your appliance.
Important: You must unregister the appliance from the SiteProtector system before you can download or overwrite the database.
Procedure To download the IBM ISS Filter Database from the IBM ISS Web site:
1. On the navigation pane, click Updates→Filter DB.
The Content Filter Database Updates page appears.
2. Click the Download DB button.
The appliance begins downloading the database, and displays information about the download status in the Database Information area.
3. Press F5 to refresh the page and check the progress of the installation in the Database Information area.
After the installation is complete, the appliance displays the status of the database as Installed.
146 IBM Internet Security Systems
Chapter 11
Backing Up and Restoring the Appliance
Overview
Introduction This chapter explains how to create a settings “snapshot” backup and a full system backup, and how to back up mail security data.
In this chapter This chapter contains the following topics:
Topic Page
Creating and Managing Snapshot Files 148
Creating or Restoring a System Backup 150
Configuring an FTP Server for Data Backup 152
Scheduling Administrative Tasks from the Mail Security Policy 153
Backing Up Mail Security Data 154
Restoring a Backup of Mail Security Data from an FTP Server 155
Reprocessing Failed Database Transactions 156
147IBM Proventia Network Mail Security System User Guide, Version 1.5
Chapter 11: Backing Up and Restoring the Appliance
Creating and Managing Snapshot Files
Introduction When you create a snapshot file, the appliance creates a file that stores the configuration settings, policy files, and log in accounts. This includes the two accounts used to access the Proventia Manager.
Creating a snapshot file
To create a snapshot file:
1. On the navigation pane, click Backup and Recovery.
The Backup and Recovery page appears.
2. Click the Settings Backup tab.
3. Click Add.
4. Type the snapshot name for the snapshot file in the Define a name for the snapshot file field.
5. Click Create.
The new snapshot file appears in the Settings Backup table.
Managing a snapshot file
To manage a snapshot file:
1. On the navigation pane, select Backup and Recovery.
The Backup and Recovery page appears.
2. Click the Settings Backup tab.
3. In the Settings Backup table, select the snapshot file you want to manage.
4. Do one of the following:
Uploading a snapshot file
You can upload a snapshot file from an external source so that is available on the appliance.
To upload a snapshot file:
1. On the navigation pane, click Backup and Recovery.
The Backup and Recovery page appears.
2. Click the Settings Backup tab.
3. Click Add.
4. Do one of the following:
■ Type the name of the file you want to upload in the Snapshot file to Upload field.
If you want to... Do this...
apply the snapshot file click Apply
delete the selected file click Delete
open or save the file to your local computer
click Download
delete multiple selected files
press the CTRL key, select each file, and then click Delete All
148 IBM Internet Security Systems
Creating and Managing Snapshot Files
■ Click Browse to locate the file name and add it from an external source.
5. Click Upload.
The snapshot file appears in the Settings Backup table.
149IBM Proventia Network Mail Security System User Guide, Version 1.5
Chapter 11: Backing Up and Restoring the Appliance
Creating or Restoring a System Backup
Introduction You can manage your system settings by doing the following:
● creating snapshots
A snapshot is a file that stores your appliance’s configuration settings. You can use the file to restore the appliance’s settings or to configure the settings on another appliance.
● applying system backups
A system backup stores the operating system and configuration of the appliance. When you restore from a system backup, you restore the appliance to a previous state.
Important: You should create a system backup before you apply a firmware update, and download snapshot files to a local computer.
Default snapshot file
FactoryDefault.settings is the default snapshot file and includes the original appliance settings.
Important: If you configure the appliance and then apply the default snapshot file before you create a system backup, the appliance applies the default settings. You cannot log into the Proventia Manager interface until you reconfigure the appliance using the Proventia Setup utility (the command line interface).
Backup file restrictions
The following restrictions apply to creating backups:
● You can have only one system backup. Creating a system backup overwrites the previous backup.
● Creating a system backup takes the appliance offline and disrupts connectivity for several minutes.
● If you configure the appliance and then click Restore from Backup before you create a system backup, the appliance is restored from the default system backup. This default backup does not contain your system configuration. You cannot log into the Proventia Manager interface until you reconfigure the appliance using the Proventia Setup utility (the command line interface).
Clearing the Java cache
After you restore the system from backup, make sure you do the following:
● close all browser windows
● clear the Java cache before you log back into the Proventia Manager
Important: If you do not close all of the browser windows and clear the Java cache, the Proventia Manager may behave unpredictably after the system restore is completed. For more information about how to clear your Java cache, refer to your operating system documentation.
Why you should create a backup
The Backup Description field on the Home page includes the date of the last system backup. Review the Home page to determine whether a new backup is needed. You should create a full system backup for the following situations:
● before you apply firmware updates
150 IBM Internet Security Systems
Creating or Restoring a System Backup
● when you need to save your configuration
Note: You can enable the automatic update settings option to automatically create a system update each time the appliance automatically installs a firmware update. For more information, see Configuring Automatic Updates.
Creating or restoring a system backup
To create or restore a system backup:
1. On the navigation pane, click Backup and Recovery.
The Backup and Recovery page appears.
2. Click the Full Backup tab.
3. Click Create System Backup.
The system creates a full system backup. The IP address for the appliance is unavailable during the backup process, and you cannot access the Proventia Manager in the browser window.
Restoring a full system backup
To restore a full system backup:
1. On the navigation pane, click Backup and Recovery.
2. Click the Full Backup tab.
3. Click Restore from Backup.
A message prompts you to continue the backup.
4. Click OK.
The system restores the backup. The IP address for the appliance is unavailable during the backup process, and you cannot access the Proventia Manager in the browser window.
5. Close all Web browser windows.
6. Clear your Java cache.
Reference: For instructions about clearing the Java cache, refer to your operating system documentation.
151IBM Proventia Network Mail Security System User Guide, Version 1.5
Chapter 11: Backing Up and Restoring the Appliance
Configuring an FTP Server for Data Backup
Introduction You may need to configure an FTP server to store mail security information that you need to back up, such as the local database, the email message storages, or log files.
Procedure To configure an FTP server:
1. On the navigation pane, click Mail Security→Policy Objects.
The Mail Security Policy Objects page appears.
2. Click the FTP Servers tab.
3. Click Add.
The Add window appears.
4. Type the name of the FTP server in the Name field.
5. Type the hostname of the FTP server in the Host field.
6. Provide the port number for the FTP server in the Port field. Default: The default is 21.
7. Provide the path to the root directory on the FTP server in the Root Directory field.
8. Type the name of the user who has access to log in to the server in the User field.
9. Confirm the password.
10. Click OK, and then click Save Changes.
The FTP server appears in the list.
152 IBM Internet Security Systems
Scheduling Administrative Tasks from the Mail Security Policy
Scheduling Administrative Tasks from the Mail Security Policy
Introduction The Administrator can schedule when to run administrative tasks such as:
● backing up mail security data
● cleaning up the SMTP log
Procedure To add a schedule:
1. On the navigation pane, click Mail Security→Policy Objects.
The Mail Security Policy Objects page appears.
2. Click the Schedules tab, and then click Add.
The Add window appears.
3. Type the name of the schedule in the Name field.
Example: Enter Daily 7:00 to schedule the policy to run every day at 7:00 A.M.
4. Configure the schedule times in the Timerange area.
The time ranges display as YYYY-MM-DD and use a 24 hour clock. For example, 7:00 P.M. displays as 19:00.
5. Click OK to save your changes.
153IBM Proventia Network Mail Security System User Guide, Version 1.5
Chapter 11: Backing Up and Restoring the Appliance
Backing Up Mail Security Data
Introduction You can back up email security data (such as the local database, email message storages, or log files).
Procedure To back up email security data:
1. On the navigation pane, click Backup and Restore.
The Mail Security Data Backup page appears.
2. Select Enable Backup.
3. Set a time to schedule the backup in the Schedules drop-down.
4. Select which items to back up in the Select Items to Include in Backup area.
5. Select a directory or add an FTP server (see Configuring an FTP Server for Data Backup) from the Backup Destination FTP Server drop-down.
6. Click Save Changes.
154 IBM Internet Security Systems
Restoring a Backup of Mail Security Data from an FTP Server
Restoring a Backup of Mail Security Data from an FTP Server
Introduction You can restore a back up of email security data (such as the local database, email message storages, or log files).
Procedure To restore a backup of data from an FTP server:
1. On the navigation pane, click Backup and Recovery→Data Restore.
The Mail Security Data Restore page appears.
2. Type the name of the FTP server in the FTP Server field.
3. Provide the port number of the FTP server in the FTP Port field.
4. Type the name of the user who has access to log in to the FTP server in the FTP User field.
5. Type the password for the user who has access to log in to the FTP server in the FTP Password field.
6. Provide the path to the directory on the FTP server where a backup has been previously stored in the FTP Directory field.
7. If you need to restore a cluster client or cluster central host, select an IP address that has been used for cluster communication in the Used Host IP drop-down.
8. Click Restore.
155IBM Proventia Network Mail Security System User Guide, Version 1.5
Chapter 11: Backing Up and Restoring the Appliance
Reprocessing Failed Database Transactions
Introduction Failed database transactions are database operations that have encountered a fatal error that prevented the appliance from processing them correctly. The transactions may result from failed normal database operations or problems with the replication (if the appliance is part of a cluster).
Important: You should try to order the reprocessing of any failed database transaction before you take any other steps.
Procedure Important: You may lose data if you delete a failed database transaction without first consulting IBM ISS Technical Support for assistance in locating the cause of these failures.
To reprocess failed database transactions:
1. On the navigation pane, click Mail Security→Maintenance.
The Mail Security System Maintenance page appears.
2. Choose on which host to reprocess transactions from the Reprocess on which hosts drop-down.
3. Enable the Stop on Error box if you want the appliance to stop reprocessing the remaining transactions if it encounters an error.
4. Click Reprocess.
156 IBM Internet Security Systems
Chapter 12
Detecting and Preventing Intrusions
Overview
Introduction This chapter explains how to detect and prevent intrusions on your network with the Intrusion Prevention feature.
License resources You need a license to use this feature. The following table describes license resources:
In this chapter This chapter contains the following topics:
Resource Description
www.iss.net/issEn/MYISS/login_help.jhtml Go to this link to register a licensed user.
www1.iss.net/cgi-bin/lrc Go to this link to register and download licenses.
https://[email protected] Go to this link for license renewal information.
IBM ISS sales representative Contact your representative to obtain a license.
Licensing Page in Proventia Manager at System→Licensing.
Go to this page to upload licenses to the appliance.
Table 29: License resources
Topic Page
Configuring Intrusion Prevention Protection Settings 158
Enabling Alerts and Logging for Intrusion Prevention Events 160
Managing Quarantine Rules for Intrusions 161
Working with the Intrusion Prevention Issue List 162
157IBM Proventia Network Mail Security System User Guide, Version 1.5
Chapter 12: Detecting and Preventing Intrusions
Configuring Intrusion Prevention Protection Settings
Introduction Intrusions occur when a device attempts to exploit a vulnerability in your network or when a device attempts to scan your network for information that can be used in an attack at a later time. The Intrusion Prevention feature does the following:
● detects and block attacks in progress
● detects and blocks audits such as unauthorized port scans or network surveillance
● alerts you by email message, by network message (SNMP traps), or in the IBM SiteProtector Console about attacks, audits, and blocking activity
● logs attacks, audits, and blocking activity in the system log
● filters events
Event filters Event filters control the events that the appliance generates. Set up event filters when you want the appliance to ignore events on specific hosts or traffic.
Procedure To configure intrusion prevention protection settings:
1. On the navigation pane, click System→Intrusion Prevention→Intrusion Prevention Settings.
2. Click the Protection Settings tab, and then select the following:
3. Click the Event Filters tab.
4. Do one of the following, and then save the changes:
Option Description
Intrusion Prevention Module Enabled
Select this option to enable intrusion prevention.
X-Force Protection Responses, featuring Virtual Patch Technology, enabled
Select this option to enable all the default protection responses that X-Force assigns to all signatures, including the blocking response.
You must enable this option if you want the appliance to block intrusions. Otherwise, the appliance will only detect the intrusions and alert you about the intrusions.
If you want to... Then...
Add an event filter 1. Click the Add icon.
2. Type a Description for the filter, and then select Enabled.
3. Select an issue from the Issue Id list.
4. Click OK.
Add an event filter rule 1. Select an event filter entry, and then double-click it.
2. Select an issue from the Issue Id list.
3. In the Event Filter section, click Add.
4. Click OK.
158 IBM Internet Security Systems
Configuring Intrusion Prevention Protection Settings
Editing an event filter rule
1. In the Event Filters section, double-click the entry.
2. Click Not.
3. Double-click the Addresses field.
4. In the Intruder or Victim Addresses sections, click Edit or Add.
5. Select one of the following options, and then type the IP addresses as appropriate:
• Any Address
• Single IP Address
• IP Address Range
• IP Address/Mask
6. Click OK.
7. Double-click the Datagram field.
8. Click the Protocol arrow to see a list of protocols, and then select a protocol.
9. In the Intruder Ports or Victim Ports sections, click Edit or Add.
10. Select one of the following options, and then type the port number as appropriate:
• Any Port
• Single Port
• Port Range
11. Select or clear Not.
12. Click OK to close the Port Expression Editor window, and then click OK again.
Remove an event filter Select the event filter, and then click the Remove icon.
If you want to... Then...
159IBM Proventia Network Mail Security System User Guide, Version 1.5
Chapter 12: Detecting and Preventing Intrusions
Enabling Alerts and Logging for Intrusion Prevention Events
Introduction The system can alert you by email message, by network message (SNMP traps), or in the IBM SiteProtector Console when an event occurs.
Guidelines If you expect a high volume of events, then you should carefully consider the type of alerts and logging you choose. A large number of alerts and log entries can require a significant amount of storage space and processing power.
Intrusion prevention events
You can enable alerts and logging for the following intrusion prevention events:
● When the feature blocks an attack
● When the feature detects but does not block an attack
● When the feature detects but does not block an audit
● When the feature updates its status and generates statistics
● When a quarantine rule is added, removed, expired, or matched
● When the feature detects an invalid checksum or protocol in a packet
● When the feature detects a resource error
● When the feature blocks a TCP connection
Procedure To enable alerts and logging for intrusion prevention events:
1. On the navigation pane, click System→Intrusion Prevention→Intrusion Prevention Settings.
2. Click the Event Notification tab.
3. For each type of event, select the alert and logging options, and then save the changes:
If you want to... Then...
Log the events Select Alert Logging for Event Name.
Receive alerts by email message Select Email Enabled.
Receive network alerts (SNMP traps)
Select SNMP Trap Enabled.
Send alerts to the IBM SiteProtector Console
Select SiteProtector Enabled.
Receive alerts about status and statistics
Select Status Summary Enabled, and then select the alert method:
• Email Enabled
• SNMP Trap Enabled
• SiteProtector Enabled
By default, the system sends these alerts once daily at 8:00 A.M.
160 IBM Internet Security Systems
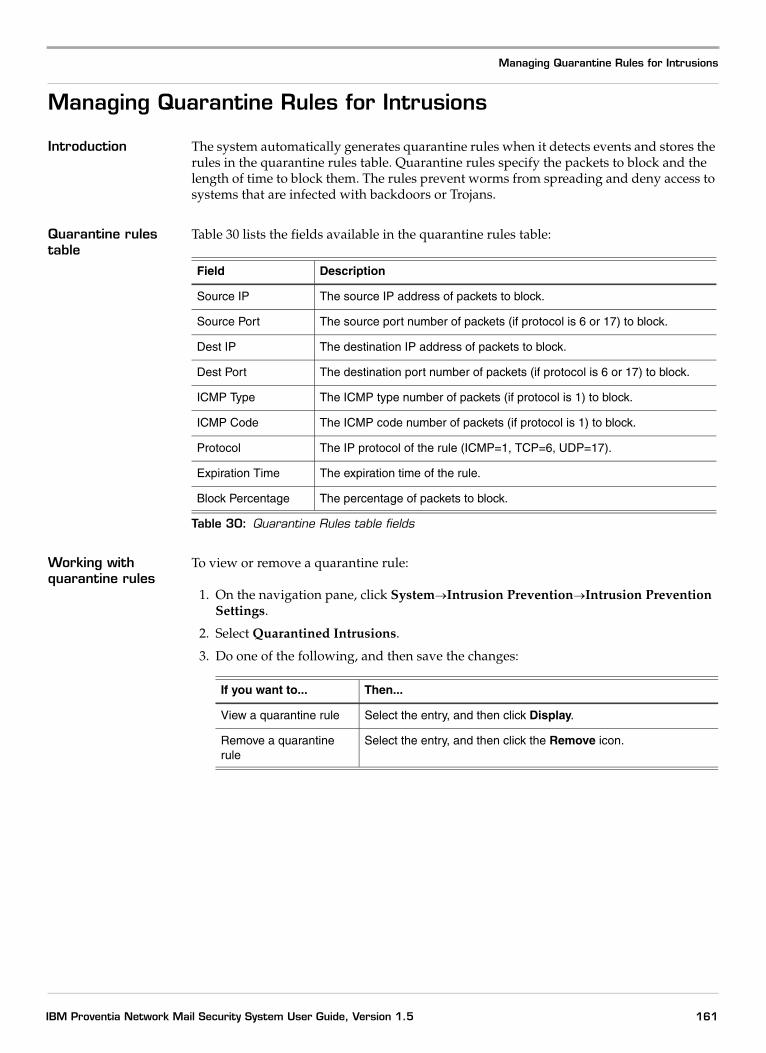
Managing Quarantine Rules for Intrusions
Managing Quarantine Rules for Intrusions
Introduction The system automatically generates quarantine rules when it detects events and stores the rules in the quarantine rules table. Quarantine rules specify the packets to block and the length of time to block them. The rules prevent worms from spreading and deny access to systems that are infected with backdoors or Trojans.
Quarantine rules table
Table 30 lists the fields available in the quarantine rules table:
Working with quarantine rules
To view or remove a quarantine rule:
1. On the navigation pane, click System→Intrusion Prevention→Intrusion Prevention Settings.
2. Select Quarantined Intrusions.
3. Do one of the following, and then save the changes:
Field Description
Source IP The source IP address of packets to block.
Source Port The source port number of packets (if protocol is 6 or 17) to block.
Dest IP The destination IP address of packets to block.
Dest Port The destination port number of packets (if protocol is 6 or 17) to block.
ICMP Type The ICMP type number of packets (if protocol is 1) to block.
ICMP Code The ICMP code number of packets (if protocol is 1) to block.
Protocol The IP protocol of the rule (ICMP=1, TCP=6, UDP=17).
Expiration Time The expiration time of the rule.
Block Percentage The percentage of packets to block.
Table 30: Quarantine Rules table fields
If you want to... Then...
View a quarantine rule Select the entry, and then click Display.
Remove a quarantine rule
Select the entry, and then click the Remove icon.
161IBM Proventia Network Mail Security System User Guide, Version 1.5
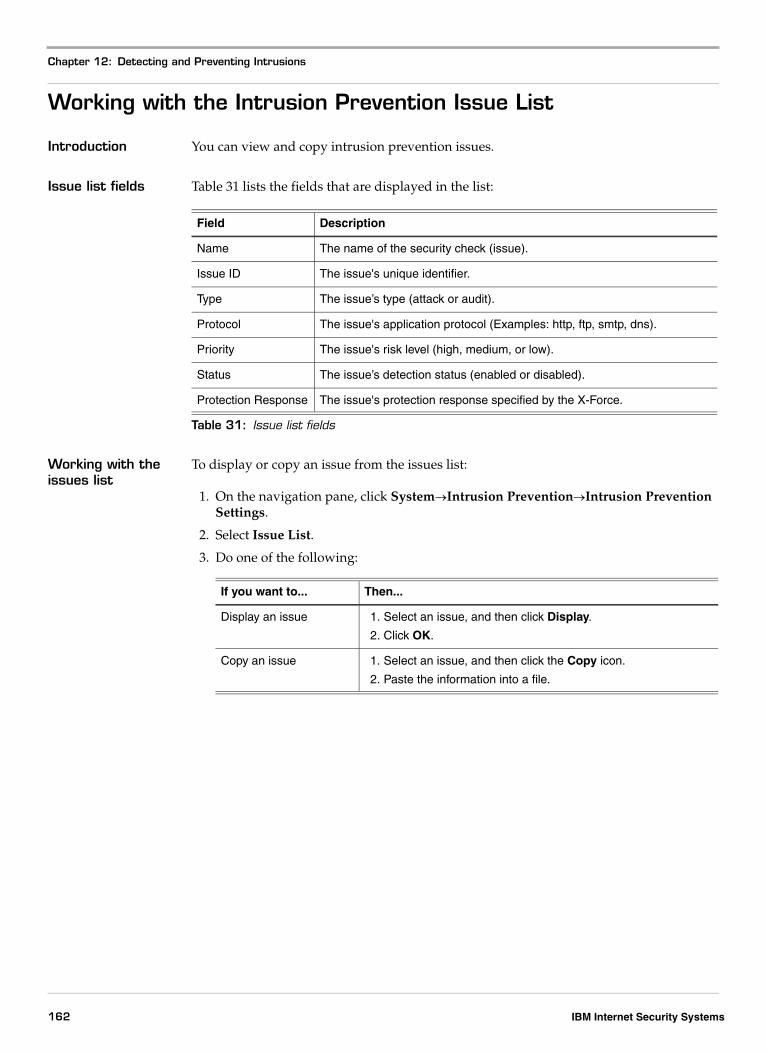
Chapter 12: Detecting and Preventing Intrusions
Working with the Intrusion Prevention Issue List
Introduction You can view and copy intrusion prevention issues.
Issue list fields Table 31 lists the fields that are displayed in the list:
Working with the issues list
To display or copy an issue from the issues list:
1. On the navigation pane, click System→Intrusion Prevention→Intrusion Prevention Settings.
2. Select Issue List.
3. Do one of the following:
Field Description
Name The name of the security check (issue).
Issue ID The issue's unique identifier.
Type The issue’s type (attack or audit).
Protocol The issue's application protocol (Examples: http, ftp, smtp, dns).
Priority The issue's risk level (high, medium, or low).
Status The issue’s detection status (enabled or disabled).
Protection Response The issue's protection response specified by the X-Force.
Table 31: Issue list fields
If you want to... Then...
Display an issue 1. Select an issue, and then click Display.
2. Click OK.
Copy an issue 1. Select an issue, and then click the Copy icon.
2. Paste the information into a file.
162 IBM Internet Security Systems
Index
symbols.allowed extension 45
aAction 80Add Attachment 101Add Disclaimer 101adding a route 70adding an appliance to cluster 53adding entries to personal block/allow list 60administrative password 29
initial setup 29Agent Manger 126alert logging 103alerting 103alerts
for intrusion detection and prevention events 160Allow action 80analysis module
configuring 94Analysis modules 76analysis modules 90appliance
adding a route 70as router 24configuration process 15configuring internal interface 74connecting to computer 25connecting to network 31how route traffics 70lights on hardware 31manually updating 139removing route 71routing mode 24updates 133
applying system backups 150Attachment Check 92automated message log cleanup 111automatic updates 136
IBM Proventia Network Mail Security System User Guide, Versio
bbacking up email security data 154backing up mail security data 153Backup and Recovery page 148Bayes’s Theorem 95Bayesian filter 95BCC response 101Block action 80block/allow lists
setting up access 56Blocklist/Allowlist page 60–61browsing a quarantine store for blocked email
messages 59browsing an email message queue 51
ccables
connecting for initial setup 25Central Responses 126chain policy system 77changing password of cluster 54changing passwords 37changing the password to access personal block/allow
list 62cleaning up the SMTP log 153cluster 52
adding an appliance to 53changing IP address 54changing password 54creating 53definition 52erasing 54modifying settings 54process 52removing an appliance from 53
Cluster Settings page 53condition
163n 1.5
Index
defining 89Configure SNMP window 104Configuring 72configuring a mail security policy 35, 79configuring a quarantine report 122configuring a response 102configuring a When object 88configuring a Who object 81configuring an analysis module 94configuring an email message storage 110configuring an LDAP server 82configuring an RBL server 100configuring appliance to track email messages 117configuring automated message log cleanup 111configuring automatic security update 137configuring automatic updates 136configuring DNS Resolution delivery 47configuring firmware updates 137configuring Forward delivery 48configuring from the LCD panel 26configuring FTP server for data backup 152configuring global settings for the SMTP server 49configuring how XMail delivers email messages to
external domains 47configuring intrusion prevention protection
settings 158configuring RBL settings 45configuring Recipient Verification 45configuring reports 120configuring responses 101configuring settings on the SMTP server 43configuring SMTP settings for incoming email
messages 43configuring Spam Flow Control 99configuring the external interface 72configuring the firewall to receive SMTP traffic 40configuring the internal interfaces 74configuring the SiteProtector system management 128configuring update advanced parameters 142Content Filters Database Update page 144Continue action 80Create New Local User window 65creating a cluster 53creating a mail security policy 76creating new accounts to access personal block/allow
lists 65creating system backup 151customizing quarantine report 121
164
ddefault snapshot file 150defining a Who object 81defining conditions 89defining recipients of quarantine report 121deleting a query from the Search Favorites 113deleting a user from managing a personal block/allow
list 57deleting a user’s personal block/allow list 58deleting entry from personal block/allow list 61deleting SMTP log files 50deleting temporary files from Message Store 115deleting unreferenced emails from the Message
Store 116deleting XMail log files 115deployment considerations
routing mode 24DNS
DNS search path, initial setup 29DNS Resolution delivery 47documentation, locating 8downloading IBM ISS Filter Database 146downloading updates 139
eemail message notification 104email message storage
configuring 110email message storages
types 110email message tracking 117enable alerting 103enabling an SNMP Get 104enabling an SNMP trap 105enabling email message notification 104enabling the external interface 72End User Login page 65Erase Cluster page 54erasing a cluster 54ETH 0 26ETH 1 28Ethernet crossover cable 25event filters 158event notification
for intrusion detection and prevention events 160Event Notifications Option page 104event priorities 103events
IBM Internet Security Systems
Index
intrusion detection and prevention 160Executive Summary report 124external interface 72
enabling 72initial setup 29
fFactoryDefault.settings 150failed database transaction 156finding available updates 134, 139firewall
SMTP traffic configuration 40firmware 134firmware updates 134Forward delivery 47frozen emails 51, 115FTP server 152
ggenerate a license key file 157generating a predefined report 124generating predefined reports 124generating quarantine report 121
hham 97host name
initial setup 29HyperTerminal connection
configuring for initial setup 27
iIBM Internet Security Systems
technical support 9Web site 9
IBM ISS Filter Database 144downloading 146manually updating 144
IBM SiteProtector console 126initial setup
after initial setup 28connecting a computer for 25interfaces 28Proventia Setup Assistant 28
IBM Proventia Network Mail Security System User Guide, Versio
required information 29installing updates 139interfaces
initial setup 28managing in routing mode 69
internal interfacesinitial setup 29
intrusion detectionlist of events 160
intrusion detection and prevention eventsalerts and notifications 160logging 160
intrusion preventionlist of events 160
Intrusion Prevention Module Enabled option 158intrusion prevention settings 158intrusion prevention updates 134IP addresses
default for initial setup 28
jJoin Cluster page 53
kKeyword Search 92
lLanguage Check 92LCD panel 26LDAP server 82
setting up second server 83LDAP-type Who objects 85Leave Cluster page 53local area connection
configuring for initial setup 25local emails 51Log response 101logging
for intrusion detection and prevention events 160login credentials
Proventia Setup Assistant 28lost or forgotten passwords 37
165n 1.5
Index
mMail Security Data Backup page 154Mail Security Data Restore page 155Mail Security Email Browser page 112, 114mail security policy 76
configuring 35, 79mail security policy advanced parameters 106
adding 107Mail Security Policy Objects page 81Mail Security Policy page 79Mail Security SMTP page 48Mail Security System Maintenance page 116, 156Mail Security User Management page 57, 63Mail Security Who Object Verification page 86Management page 128managing a snapshot file 148managing email messages in the SMTP Store 51managing passwords 37manually updating the appliance 139matching SMTP addresses 86Media Type 92Message Field Check 92Message Store 110
deleting a Search Favorites query 113deleting temporary files 115deleting unreferenced emails 116remove email messages from 115saving Search Favorites query 113searching for email messages 112searching predefined folders 113using queries 112
Modify Cluster page 54Modify Field 101modifying settings of appliance in cluster 54MX records 52MYMAIL 35
nnetwork cable connections 31Network Configuration page 72, 74network connectivity
verifying 35network protocols for the interfaces 31notification responses 103notifications
for intrusion detection and prevention events 160
166
ooperation modes
initial setup 29routing mode 24
ppanel lights 31Passthrough XMail Server 49passwords
changing 37initial setup 29
personal block/allow listadding entries 60changing password 62deleting 58deleting a user from 57deleting entry 61resetting password 63
personal block/allow lists 56creating new accounts to access 65
Phishing Check 92Policy Configuration report 124policy rule 76
content of 77how appliance processes 77
Pre Conditions 79predefined report
generating 124predefined reports 124Proventia Manager 33
instructions for common procedures 33requirements 33
Proventia Setup Assistant 28login credentials 28
qquarantine report 64, 121
configuring 122customizing 121defining recipients 121
quarantine report template 121quarantine rules, administration 161Quarantine Store 110quarantine store 59Quarantine Store page 59
IBM Internet Security Systems
Index
rRBL server 100RBL servers 45Recipient Verification 45Redirect response 101Remove Attachment 101removing a route 71removing an appliance from cluster 53removing email messages from Message Store 115reports 120
predefined 124schedule delivery 120
reprocessing failed database transactions 156requesting a quarantine report 64resend emails 51resetting the password to access personal block/allow
list 63response
configuring 102Responses 76responses
configuring 101types 101
restoring a backup of data from an FTP server 155restoring system backup 151rollback 134rolling back updates 134, 141root password 37
initial setup 29Route Configuration page 70routing mode
deployment considerations 24description 24
routing preferences 70Routing table 70routing traffic 70Rule Name 79
ssaving a Search Favorites query 113scheduling appliance for automatic updates 136scheduling delivery of reports 120searching for email messages in Message Store 112searching for predefined folders 113selecting the external interface IP address type 72Send To 101Sender Policy Framework 93serial connection
IBM Proventia Network Mail Security System User Guide, Versio
configuring for initial setup 27serial null modem cable 25Set/Clear Condition response 101setting up a directory to populate Who object
information 82setting up access to end user accounts for personal
block/allow lists 56setting up an LDAP server with second server 83setting up analysis modules 90setting up network clustering 52setting up Spam Flow Control 99Site Database 127SMTP
configure for incoming email messages 43configure RBL servers 45configure Recipient Verification 45
SMTP Incoming 30SMTP Outgoing 30SMTP relay servers 47SMTP settings 35SMTP Store 51snapshot file 148
managing 148uploading 148
SNMP Getenabling 104
SNMP trap 105enabling 105
Spam Bayesian Classifier 91Spam Fingerprint 91Spam Flow Check 91Spam Flow Control 99
configure 99Spam Heuristics 90Spam Keyword 91Spam RBL Check 90Spam Signature Database 90Spam Structure Check 91Spam URL Check 90specifying firmware update versions to install 138specifying when to install firmware updates 137Store 101switches 89synchronizing with the database 111system backup 150
creating 151restoring 151
tTCP/IP settings
167n 1.5
Index
configuring for initial setup 25resetting after initial setup 33
technical support, IBM Internet Security Systems 9terminal connection
configuring for initial setup 27the SiteProtector system
architecture 126component descriptions 126configuring management of 128integrating appliance with 128
the SiteProtector system management 134time and date
initial setup 29tokeniser 96tokens 95Top 10 Analysis Modules report 124Top 10 Responses report 124Top 10 Senders report 124Top 10 Viruses report 124tracking email messages 117Traffic Monitoring report 124training the appliance 95training the Bayesian classifier 97
uunchecked emails 51Unknown Who object 81Update Settings page 136updates
rolling back 141updating firmware 134updating IBM ISS Filter Database 144uploading a snapshot file 148URL Check 92User Sender Allow List 92User Sender Block List 92using queries in the Message Store 112
wWeb site, IBM Internet Security Systems 9When object
configuring 88When objects 76Who object
configuring 81defining 81
Who object priority 76, 81Who Object Verification tool 85Who objects 76
168
xXMAIL
Forward delivery 47XMail 45
configure types of email message delivery 47DNS Resolution delivery 47
XMail log files 115deleting 115
X-Press Update Server 127
IBM Internet Security Systems
Internet Security Systems, Inc., an IBM Company Software License AgreementBY INSTALLING, ACTIVATING, COPYING OR OTHERWISE USING THIS SOFTWARE PRODUCT, YOU AGREE TO ALL OF THE PROVI-SIONS OF THIS ISS SOFTWARE LICENSE AGREEMENT ("LICENSE"). EXCEPT AS MAY BE MODIFIED BY AN APPLICABLE LICENSE NOTIFICATION THAT ACCOMPANIES, PRECEDES, OR FOLLOWS THIS LICENSE, AND AS MAY FURTHER BE DEFINED IN THE USER DOCUMENTATION ACCOMPANYING THE SOFTWARE PRODUCT, YOUR RIGHTS AND OBLIGATIONS WITH RESPECT TO THE USE OF THIS SOFTWARE PRODUCT ARE AS SET FORTH BELOW. IF YOU ARE NOT WILLING TO BE BOUND BY THIS LICENSE, RETURN ALL COPIES OF THE SOFTWARE PRODUCT, INCLUDING ANY LICENSE KEYS, TO ISS WITHIN FIFTEEN (15) DAYS OF RECEIPT FOR A FULL REFUND OF ANY PAID LICENSE FEE. IF THE SOFTWARE PRODUCT WAS OBTAINED BY DOWNLOAD, YOU MAY CERTIFY DESTRUCTION OF ALL COPIES AND ANY LICENSE KEYS IN LIEU OF RETURN. "ISS" is Internet Security Systems, Inc., an IBM Company."Software" is the following, including the original and all whole or partial copies: 1) machine-readable instructions and data, 2) components, 3) audio-visual content (such as images, text, recordings, or pictures), 4) related license materials, and 5) license use documents or keys, and documentation.1. License - The Software is provided in object code and is licensed, not sold. Upon your payment of the applicable fees and ISS' delivery to you of the applicable
license notification, Internet Security Systems, Inc., an IBM Company ("ISS") grants to you as the only end user ("Licensee") a nonexclusive and nontransferable, limited license for the accompanying Software, for use only on the specific network configuration, for the number and type of devices, and for the time period ("Term") that are specified in ISS' quotation and Licensee's purchase order, as accepted by ISS. If no Term is specified in the applicable ISS quotation or Lic-ensee purchase order, the license shall be deemed perpetual. ISS limits use of Software based upon the number of nodes, users and/or the number and type of devices upon which it may be installed, used, gather data from, or report on, depending upon the specific Software licensed. A device includes any network addressable device connected to Licensee's network, including remotely, including but not limited to personal computers, workstations, servers, routers, hubs and printers. A device may also include ISS hardware (each an "Appliance") delivered with pre-installed Software and the license associated with such shall be a non-exclusive, nontransferable, perpetual (unless otherwise specified in the applicable ISS quotation or Licensee purchase order), limited license to use such pre-installed Software only in conjunction with the ISS hardware with which it is originally supplied. Except as provided in the immediately preceding sentence, Licensee may reproduce, install and use the Software on multiple devices, provided that the total number and type are authorized by ISS. Licensee may make a reasonable number of backup copies of the Software solely for archival and disaster recovery purposes. In connection with certain Software products, ISS licenses security content on a subscription basis for a Term. Content subscriptions are licensed pursuant to this License based upon the number of protected nodes or number of users. Security content is regularly updated and includes, but is not limited to, Internet content (URLs) and spam signatures that ISS classifies, security algorithms, checks, decodes, and ISS' related analysis of such information, all of which is owned and copyrighted by ISS and considered ISS confidential information and intellectual property. Security content may only be used in conjunction with the applicable Software in accordance with this License. The use or re-use of such content for commercial purposes is prohibited. Licensee's access to the security content is through an Internet update using the Software. In addition, unknown URLs may be automatically forwarded to ISS through the Software, analyzed, classified, entered into ISS' URL database and provided to Licensee as security content updates at regular intervals. ISS' URL database is located at an ISS facility or as a mirrored version on Licensee's premises. Any access by Licensee to the URL database that is not in conformance with this License is prohibited. Upon expiration of the security content subscription Term, unless Licensee renews such content subscription, Licensee shall implement appropriate system configuration modifications to terminate its use of the content subscription. Except for a perpetual license, upon expiration of the license Term, Licensee shall cease using the Software and certify return or destruction of it upon request.
2. Migration Utilities - For Software ISS markets or sells as a Migration Utility, the following shall apply. Provided Licensee holds a valid license to the Software to which the Migration Utility relates (the "Original Software"), ISS grants to Licensee as the only end user a nonexclusive and nontransferable, limited license to the Migration Utility and the related documentation ("Migration Utility") for use only in connection with Licensee's migration of the Original Software to the replace-ment software, as recommended by ISS in the related documentation. The Term of this License is for as long as Licensee holds a valid license to the applicable Original Software. Licensee may reproduce, install and use the Migration Utility on multiple devices in connection with its migration from the Original Software to the replacement software. Licensee shall implement appropriate safeguards and controls to prevent unlicensed use of the Migration Utility. Licensee may make a reasonable number of backup copies of the Migration Utility solely for archival and disaster recovery purposes.
3. Third-Party Products - Use of third party product(s) supplied hereunder, if any, will be subject solely to the manufacturer's terms and conditions that will be pro-vided to Licensee upon delivery. ISS will pass any third party product warranties through to Licensee to the extent ISS is authorized to do so. If ISS supplies Lic-ensee with Crystal Decisions Runtime Software, then the following additional terms apply:Licensee agrees not to alter, disassemble, decompile, translate, adapt or reverse-engineer the Runtime Software or the report file (.RPT) format, or to use, distribute or integrate the Runtime Software with any general-purpose report writing, data analysis or report delivery product or any other product that performs the same or similar functions as Crystal Decisions' product offerings;
Licensee agrees not to use the Runtime Software to create for distribution a product that converts the report file (.RPT) format to an alternative report file format used by any general-purpose report writing, data analysis or report delivery product that is not the property of Crystal Decisions;Licensee agrees not to use the Runtime Software on a rental or timesharing basis or to operate a service bureau facility for the benefit of third-parties unless Licensee first acquires an Application Service Provider License from Crystal Decisions;CRYSTAL DECISIONS AND ITS SUPPLIERS DISCLAIM ALL WARRANTIES, EXPRESS, OR IMPLIED, INCLUDING WITHOUT LIMITATION THE WARRANTIES OF MERCHANTABILITY, FITNESS FOR A PARTICULAR PURPOSE, AND NONINFRINGEMENT OF THIRD PARTY RIGHTS. CRYSTAL DECISIONS AND ITS SUPPLIERS SHALL HAVE NO LIABILITY WHATSOEVER UNDER THIS AGREEMENT OR IN CONNECTION WITH THE RUNTIME SOFTWARE.
In this Section 3 "Runtime Software" means the Crystal Reports software and associated documentation supplied by ISS and any updates, additional modules, or additional software provided by Crystal Decisions in connection therewith; it includes Crystal Decisions' Design Tools, Report Application Server and Runtime Software, but does not include any promotional software or other software products provided in the same package, which shall be governed by the online software license agreements included with such promotional software or software product.
4. Beta License - If ISS is providing Licensee with the Software, security content and related documentation, and/or an Appliance as a part of an alpha or beta test, the following terms of this Section 4 additionally apply and supersede any conflicting provisions herein or any other license agreement accompanying, contained or embedded in the subject prototype product or any associated documentation. ISS grants to Licensee a nonexclusive, nontransferable, limited license to use the ISS alpha/beta software program, security content, if any, Appliance and any related documentation furnished by ISS ("Beta Products") for Licensee's evalu-ation and comment (the "Beta License") during the Test Period. ISS' standard test cycle, which may be extended at ISS' discretion, extends for sixty (60) days, commencing on the date of delivery of the Beta Products (the "Test Period"). Upon expiration of the Test Period or termination of the Beta License, Licensee shall, within thirty (30) days, return to ISS or destroy all copies of the beta Software, and shall furnish ISS written confirmation of such return or destruction upon request. If ISS provides Licensee a beta Appliance, Licensee agrees to discontinue use of and return such Appliance to ISS upon ISS' request and direction. If Licensee does not promptly comply with this request, ISS may, in its sole discretion, invoice Licensee in accordance with ISS' current policies.Licensee will provide ISS information reasonably requested by ISS regarding Licensee's experiences with the installation and operation of the Beta Products. Licensee agrees that ISS shall have the right to use, in any manner and for any purpose, any information gained as a result of Licensee's use and evaluation of the Beta Products. Such information shall include but not be limited to changes, modifications and corrections to the Beta Products. Licensee grants to ISS a perpetual, royalty-free, non-exclusive, transferable, sublicensable right and license to use, copy, display, perform, make derivative works of and distribute any report, test result, suggestion or other item resulting from Licensee's evaluation of its installation and operation of the Beta Products. LICENSEE AGREES NOT TO EXPORT BETA PRODUCTS DESIGNATED BY ISS IN ITS BETA PRODUCT DOCUMENTATION AS NOT YET CLASSIFIED FOR EXPORT TO ANY DESTINATION OTHER THAN THE U.S. AND THOSE COUNTRIES ELIGIBLE FOR EXPORT UNDER THE PROVISIONS OF 15 CFR § 740.17(A) (SUPPLEMENT 3), CURRENTLY CANADA, THE EUROPEAN UNION, AUSTRALIA, JAPAN, NEW ZEALAND, NORWAY, AND SWITZERLAND.If Licensee is ever held or deemed to be the owner of any copyright rights in the Beta Products or any changes, modifications or corrections to the Beta Products, then Licensee hereby irrevocably assigns to ISS all such rights, title and interest and agrees to execute all documents necessary to implement and confirm the letter and intent of this Section. Licensee acknowledges and agrees that the Beta Products (including its existence, nature and specific features) constitute Confidential Information as defined in Section 18. Licensee further agrees to treat as Confidential Information all feedback, reports, test results, suggestions, and other items resulting from Licensee's evaluation and testing of the Beta Products as contemplated in this License. With regard to the Beta Products, ISS has no obligation to provide support, maintenance, upgrades, modifications, or new releases. However, ISS agrees to use commercially reasonable efforts to correct errors in the Beta Products and related documentation within a reasonable time, and will provide Licensee with any corrections it makes available to other evaluation participants. The documentation relating to the Beta Products may be in draft form and will, in many cases, be incomplete. Owing to the experimental nature of the Beta Products, Licensee is advised not to rely exclusively on the Beta Products for any reason. LICENSEE AGREES THAT THE BETA PRODUCTS AND RELATED DOCUMENTATION ARE BEING DELIVERED "AS IS" FOR TEST AND EVALUATION PURPOSES ONLY WITHOUT WARRANTIES OR INDEMNITIES OF ANY KIND, INCLUDING WITHOUT LIMITATION ANY IMPLIED WARRANTIES OF NONINFRINGEMENT, MERCHANTABILITY OR FITNESS FOR A PARTICULAR PURPOSE. LICENSEE ACKNOWLEDGES AND AGREES THAT THE BETA PRODUCT MAY CONTAIN DEFECTS, PRODUCE ERRONEOUS AND UNINTENDED RESULTS AND MAY AFFECT DATA NETWORK SERVICES AND OTHER MATERIALS OF LICENSEE. LICENSEE'S USE OF THE BETA PRODUCT IS AT THE SOLE RISK OF LICENSEE. IN NO EVENT WILL ISS BE LIABLE TO LICENSEE OR
ANY OTHER PERSON FOR DAMAGES, DIRECT OR INDIRECT, OF ANY NATURE, OR EXPENSES INCURRED BY LICENSEE. LICENSEE'S SOLE AND EXCLUSIVE REMEDY SHALL BE TO TERMINATE THE BETA PRODUCT LICENSE BY WRITTEN NOTICE TO ISS.
5. Evaluation License - If ISS is providing Licensee with the Software, security content and related documentation on an evaluation trial basis at no cost, such license Term is 30 days from installation, unless a longer period is agreed to in writing by ISS. ISS recommends using Software and security content for evalua-tion in a non-production, test environment. The following terms of this Section 5 additionally apply and supersede any conflicting provisions herein. Licensee agrees to remove or disable the Software and security content from the authorized platform and return the Software, security content and documentation to ISS upon expiration of the evaluation Term unless otherwise agreed by the parties in writing. ISS has no obligation to provide support, maintenance, upgrades, mod-ifications, or new releases to the Software or security content under evaluation. LICENSEE AGREES THAT THE SOFTWARE, SECURITY CONTENT AND RELATED DOCUMENTATION ARE BEING DELIVERED "AS IS" FOR TEST AND EVALUATION PURPOSES ONLY WITHOUT WARRANTIES OR INDEMNI-TIES OF ANY KIND, INCLUDING WITHOUT LIMITATION ANY IMPLIED WARRANTIES OF NONINFRINGEMENT, MERCHANTABILITY OR FITNESS FOR A PARTICULAR PURPOSE. IN NO EVENT WILL ISS BE LIABLE TO LICENSEE OR ANY OTHER PERSON FOR DAMAGES, DIRECT OR INDIRECT, OF ANY NATURE, OR EXPENSES INCURRED BY LICENSEE. LICENSEE'S SOLE AND EXCLUSIVE REMEDY SHALL BE TO TERMINATE THE EVALUATION LICENSE BY WRITTEN NOTICE TO ISS.
6. Covenants - ISS reserves all intellectual property rights in the Software, security content and Beta Products. Licensee agrees: (i) the Software, security content and/or Beta Products is owned by ISS and/or its licensors, and is protected by copyright laws and international treaty provisions; (ii) to take all reasonable pre-cautions to protect the Software, security content or Beta Product from unauthorized access, disclosure, copying or use; (iii) not to modify, adapt, translate, reverse engineer, decompile, disassemble, or otherwise attempt to discover the source code of the Software, security content or Beta Product; (iv) not to use ISS trade names or trademarks; (v) to reproduce all of ISS' and its licensors' copyright notices on any copies of the Software, security content or Beta Product; and (vi) not to transfer, lease, assign, sublicense, or distribute the Software, security content or Beta Product or make it available for timesharing, service bureau, managed services offering, or on-line use.
7. Support and Maintenance - Depending upon what maintenance programs Licensee has purchased, ISS will provide maintenance, during the period for which Licensee has paid the applicable maintenance fees, in accordance with its prevailing Maintenance and Support Policy that is available at http://documents.iss.net/maintenance_policy.pdf. Any supplemental Software code or related materials that ISS provides to Licensee as part of any support and maintenance service are to be considered part of the Software and are subject to the terms and conditions of this License, unless oth-erwise specified.
8. Limited Warranty - The commencement date of this limited warranty is the date on which ISS provides Licensee with access to the Software. For a period of ninety (90) days after the commencement date or for the Term (whichever is less), ISS warrants that the Software or security content will conform to material operational specifications described in its then current documentation. However, this limited warranty shall not apply unless (i) the Software or security content is installed, implemented, and operated in accordance with all written instructions and documentation supplied by ISS, (ii) Licensee notifies ISS in writing of any nonconformity within the warranty period, and (iii) Licensee has promptly and properly installed all corrections, new versions, and updates made available by ISS to Licensee. Furthermore, this limited warranty shall not apply to nonconformities arising from any of the following: (i) misuse of the Software or security content, (ii) modification of the Software or security content, (iii) failure by Licensee to utilize compatible computer and networking hardware and software, or (iv) interac-tion with software or firmware not provided by ISS. If Licensee timely notifies ISS in writing of any such nonconformity, then ISS shall repair or replace the Soft-ware or security content or, if ISS determines that repair or replacement is impractical, ISS may terminate the applicable licenses and refund the applicable license fees, as the sole and exclusive remedies of Licensee for such nonconformity. THIS WARRANTY GIVES LICENSEE SPECIFIC LEGAL RIGHTS, AND LICENSEE MAY ALSO HAVE OTHER RIGHTS THAT VARY FROM JURISDICTION TO JURISDICTION. ISS DOES NOT WARRANT THAT THE SOFTWARE OR THE SECURITY CONTENT WILL MEET LICENSEE'S REQUIREMENTS, THAT THE OPERATION OF THE SOFTWARE OR SECURITY CONTENT WILL BE UNINTERRUPTED OR ERROR-FREE, OR THAT ALL SOFTWARE OR SECURITY CONTENT ERRORS WILL BE CORRECTED. LICENSEE UNDER-STANDS AND AGREES THAT THE SOFTWARE AND THE SECURITY CONTENT ARE NO GUARANTEE AGAINST UNSOLICITED E-MAILS, UNDESIR-ABLE INTERNET CONTENT, INTRUSIONS, VIRUSES, TROJAN HORSES, WORMS, TIME BOMBS, CANCELBOTS OR OTHER SIMILAR HARMFUL OR DELETERIOUS PROGRAMMING ROUTINES AFFECTING LICENSEE'S NETWORK, OR THAT ALL SECURITY THREATS AND VULNERABILITIES, UNSO-LICITED E-MAILS OR UNDESIRABLE INTERNET CONTENT WILL BE DETECTED OR THAT THE PERFORMANCE OF THE SOFTWARE AND SECURITY CONTENT WILL RENDER LICENSEE'S SYSTEMS INVULNERABLE TO SECURITY BREACHES. THE REMEDIES SET OUT IN THIS SECTION 8 ARE THE SOLE AND EXCLUSIVE REMEDIES FOR BREACH OF THIS LIMITED WARRANTY.
9. Warranty Disclaimer - EXCEPT FOR THE LIMITED WARRANTY PROVIDED ABOVE, THE SOFTWARE AND SECURITY CONTENT ARE EACH PROVIDED "AS IS" AND ISS HEREBY DISCLAIMS ALL WARRANTIES AND INDEMNITIES, BOTH EXPRESS AND IMPLIED, INCLUDING IMPLIED WARRANTIES RESPECTING MERCHANTABILITY, TITLE, NONINFRINGEMENT, AND FITNESS FOR A PARTICULAR PURPOSE. LICENSEE EXPRESSLY ACKNOWL-EDGES THAT NO REPRESENTATIONS OTHER THAN THOSE CONTAINED IN THIS LICENSE HAVE BEEN MADE REGARDING THE GOODS OR SER-VICES TO BE PROVIDED HEREUNDER, AND THAT LICENSEE HAS NOT RELIED ON ANY REPRESENTATION NOT EXPRESSLY SET OUT IN THIS LICENSE.
10. Limitation of Liability - Circumstances may arise where, because of a default on ISS' part or other liability, Licensee is entitled to recover damages from ISS. In each such instance, regardless of the basis on which Licensee may be entitled to claim damages from ISS, (including fundamental breach, negligence, misrep-resentation, or other contract or tort claim), ISS is liable for no more than 1) damages for bodily injury (including death) and damage to real property and tangible personal property and 2) the amount of any other actual direct damages up to the charges for the Software or security content that is the subject of the claim.This limitation of liability also applies to ISS' licensors and suppliers. It is the maximum for which they and ISS are collectively responsible.UNDER NO CIRCUMSTANCES IS ISS, ITS LICENSORS OR SUPPLIERS LIABLE FOR ANY OF THE FOLLOWING, EVEN IF INFORMED OF THEIR POSSIBILITY: LOSS OF, OR DAMAGE TO, DATA; SPECIAL, INCIDENTAL, OR INDIRECT DAMAGES, OR FOR ANY ECONOMIC CONSEQUENTIAL DAMAGES; OR LOST PROFITS, BUSINESS, REVENUE, GOODWILL, OR ANTICIPATED SAVINGS. SOME JURISDICTIONS DO NOT ALLOW THE EXCLUSION OR LIMITATION OF INCIDENTAL OR CONSEQUENTIAL DAMAGES, SO THE ABOVE LIMITATION OR EXCLUSION MAY NOT APPLY TO LICENSEE.
11. Termination - Licensee may terminate this License at any time by notifying ISS in writing. All rights granted under this License will terminate immediately, with-out prior written notice from ISS, at the end of the Term of the License, if not perpetual. If Licensee fails to comply with any provisions of this License, ISS may immediately terminate this License if such default has not been cured within ten (10) days following written notice of default to Licensee. Upon termination or expiration of a license for Software, Licensee shall cease all use of such Software, including Software pre-installed on ISS hardware, and destroy all copies of the Software and associated documentation. Termination of this License shall not relieve Licensee of its obligation to pay all fees incurred prior to such termination and shall not limit either party from pursuing any other remedies available to it.
12. General Provisions - This License, together with the identification of the Software and/or security content, pricing and payment terms stated in the applicable ISS quotation and Licensee purchase order (if applicable) as accepted by ISS, constitute the entire agreement between the parties respecting its subject matter. Standard and other additional terms or conditions contained in any purchase order or similar document are hereby expressly rejected and shall have no force or effect. If Licensee has not already downloaded the Software, security content and documentation, then it is available for download at http://www.iss.net/download/. All ISS hardware with pre-installed Software and any other products not delivered by download are delivered f.o.b. origin. Both Licensee and ISS consent to the application of the laws of the State of New York to govern, interpret, and enforce all of Licensee's and ISS' rights, duties, and obligations arising from, or relating in any manner to, the subject matter of this License, without regard to conflict of law principles. The United Nations Convention on Contracts for the International Sale of Goods does not apply. Both Licensee and ISS irrevocably waive any right to a jury trial. If any part of this License is found void or unenforceable, it will not affect the validity of the balance of the License, which shall remain valid and enforceable according to its terms. This License may only be modified in writing signed by an authorized officer of ISS.
13. Notice to United States Government End Users - Licensee acknowledges that any Software and security content furnished under this License is commercial computer software and any documentation is commercial technical data developed at private expense and is provided with RESTRICTED RIGHTS. Any use, modification, reproduction, display, release, duplication or disclosure of this commercial computer software by the United States Government or its agencies is subject to the terms, conditions and restrictions of this License in accordance with the United States Federal Acquisition Regulations at 48 C.F.R. Section 12.212 and DFAR Subsection 227.7202-3 and Clause 252.227-7015 or applicable subsequent regulations. Contractor/manufacturer is Internet Security Systems, Inc., 6303 Barfield Road, Atlanta, GA 30328, USA.
14. Export and Import Compliance - Each party will comply with applicable import and export control laws and regulations, including those of the United States that prohibit or limit export for certain uses or to certain end users. Many ISS Software products include encryption and export outside of the United States or Canada is strictly controlled by U.S. laws and regulations. ISS makes its current export classification information available at http://www.iss.net/export. Please contact ISS' Sourcing and Fulfillment for export questions relating to the Software or security content ([email protected]). Licensee understands that the foregoing obli-gations are U.S. legal requirements and agrees that they shall survive any term or termination of this License.
15. Authority - Because the Software is designed to test or monitor the security of computer network systems and may disclose or create problems in the operation of the systems tested, Licensee and the persons acting for Licensee represent and warrant that: (a) they are fully authorized by the Licensee and the owners of the computer network for which the Software is licensed to enter into this License and to obtain and operate the Software in order to test and monitor that com-puter network; (b) the Licensee and the owners of that computer network understand and accept the risks involved; and (c) the Licensee shall procure and use the Software in accordance with all applicable laws, regulations and rules.
16. Disclaimers - Licensee acknowledges that some of the Software and security content is designed to test the security of computer networks and may disclose or create problems in the operation of the systems tested. Licensee further acknowledges that neither the Software nor security content is fault tolerant or designed or intended for use in hazardous environments requiring fail-safe operation, including, but not limited to, aircraft navigation, air traffic control systems, weapon systems, life-support systems, nuclear facilities, or any other applications in which the failure of the Software and security content could lead to death or personal
injury, or severe physical or property damage. ISS disclaims any implied warranty of fitness for High Risk Use. Licensee accepts the risk associated with the foregoing disclaimers and hereby waives all rights, remedies, and causes of action against ISS and releases ISS from all liabilities arising therefrom.
17. Confidentiality - "Confidential Information" means all information proprietary to a party or its suppliers that is marked as confidential. Each party acknowledges that during the term of this Agreement, it will be exposed to Confidential Information of the other party. The obligations of the party ("Receiving Party") which receives Confidential Information of the other party ("Disclosing Party") with respect to any particular portion of the Disclosing Party's Confidential Information shall not attach or shall terminate when any of the following occurs: (i) it was in the public domain or generally available to the public at the time of disclosure to the Receiving Party, (ii) it entered the public domain or became generally available to the public through no fault of the Receiving Party subsequent to the time of disclosure to the Receiving Party, (iii) it was or is furnished to the Receiving Party by a third party having the right to furnish it with no obligation of confidentiality to the Disclosing Party, or (iv) it was independently developed by the Receiving Party by individuals not having access to the Confidential Information of the Dis-closing Party. The Receiving Party agrees not to disclose or use any Confidential Information of the Disclosing Party in violation of this License and to use Con-fidential Information of the Disclosing Party solely for the purposes of this License. Upon demand by the Disclosing Party and, in any event, upon expiration or termination of this License, the Receiving Party shall return to the Disclosing Party all copies of the Disclosing Party's Confidential Information in the Receiving Party's possession or control and destroy all derivatives and other vestiges of the Disclosing Party's Confidential Information obtained or created by the Disclos-ing Party. All Confidential Information of the Disclosing Party shall remain the exclusive property of the Disclosing Party, provided however that the Receiving Party may use in its business activities the ideas, concepts and know-how contained in the Disclosing Party's Confidential Information which are retained in the memories of the Receiving Party's employees who have had access to the Confidential Information under this License.
18. Compliance - From time to time, ISS may request Licensee to provide a certification that the Software and security content is being used in accordance with the terms of this License. If so requested, Licensee shall verify its compliance and deliver its certification within forty-five (45) days of the request. The certification shall state Licensee's compliance or non-compliance, including the extent of any non-compliance. ISS may also, at any time, upon thirty (30) days prior written notice, at its own expense appoint a nationally recognized software use auditor, to whom Licensee has no reasonable objection, to audit and examine use and records at Licensee offices during normal business hours, solely for the purpose of confirming that Licensee's use of the Software and security content is in com-pliance with the terms of this License. ISS will use commercially reasonable efforts to have such audit conducted in a manner such that it will not unreasonably interfere with the normal business operations of Licensee. If such audit should reveal that use of the Software or security content has been expanded beyond the scope of use and/or the number of authorized devices or Licensee certifies such non-compliance, ISS shall have the right to charge Licensee the applicable current list prices required to bring Licensee in compliance with its obligations hereunder with respect to its current use of the Software and security content. In addition to the foregoing, ISS may pursue any other rights and remedies it may have at law, in equity or under this License.
19. Data Protection - Licensee confirms that it is solely responsible for ensuring that any processing and security obligations comply with applicable data protection laws. Licensee contact information shall not be considered personal information processed on Licensee's behalf.
20. Miscellaneous - Except for any payment obligations, neither Licensee nor ISS is responsible for failure to fulfill any obligations due to causes beyond its control. This License will not create any right or cause of action for any third party, nor will ISS be responsible for any third party claims against Licensee except, as per-mitted by the Limitation of Liability section above, for bodily injury (including death) or damage to real or tangible personal property for which ISS is legally liable. Nothing in this License affects any statutory rights of consumers that cannot be waived or limited by contract. Licensee agrees to allow ISS to store and use Lic-ensee's contact information, including names, phone numbers, and e-mail addresses, anywhere they do business. Such information will be processed and used in connection with our business relationship, and may be provided to contractors, Business Partners, and assignees of ISS for uses consistent with their collec-tive business activities, including communicating with Licensee (for example, for processing orders, for promotions, and for market research). Neither Licensee nor ISS will bring a legal action under this License more than two years after the cause of action arose unless otherwise provided by local law without the possi-bility of contractual waiver or limitation.
Revised: February 14, 2007