Embed Size (px)
Citation preview
IBM Netezza Plug-in for Eclipse Framework User's GuideRevised: August 21, 2012
Part Number 00J2352-01 Rev. 3
IBM® Netezza® Plug-in for Eclipse FrameworkRelease 1.4.0
Note: Before using this information and the product that it supports, read the information in “Notices and Trademarks” on page 69.
© Copyright IBM Corporation 2012.US Government Users Restricted Rights – Use, duplication or disclosure restricted by GSA ADP Schedule Contract with IBM Corp.
Contents
Preface........................................................................................................ 5Audience for This Guide................................................................................................ 5
Purpose of This Guide.................................................................................................. 5
Symbols and Conventions............................................................................................ 5
If You Have Questions or Comments............................................................................ 6
Comments on the Documentation.................................................................................6
Introduction................................................................................................ 7
Eclipse Plug-in Installation....................................................................... 9
Working with Eclipse............................................................................... 15Working with the IBM Netezza Plug-in for Eclipse Framework.........................................15
Working with Remote Systems........................................................................................ 16
Creating a Remove Server Connection...................................................................... 16
Working with the Terminal........................................................................................... 18
Managing Projects................................................................................... 21Creating a New NZ Project.............................................................................................. 21
Completing the NZ Project Setup................................................................................24
Opening an Existing Project............................................................................................. 26
IBM Netezza Plug-in for Eclipse Framework Wizards...................................................... 27
Netezza Project Structure....................................................................... 29The NZ Project................................................................................................................. 29
The build Folder.......................................................................................................... 29
The data Folder........................................................................................................... 29
The docs Folder.......................................................................................................... 30
The example Folder.................................................................................................... 30
The src Folder............................................................................................................. 30
The Main Directory...................................................................................................... 31
Developer Tools....................................................................................... 35Getting Started................................................................................................................. 35
Remote Server Commands Console................................................................................36
Servers Editor.................................................................................................................. 36
3
Selecting A Host and System Status........................................................................... 36
Running User Scripts.................................................................................................. 37
Viewing Sessions........................................................................................................ 38
System Operations..................................................................................................... 39
User Scripts Editor........................................................................................................... 40
Editing User Scripts.................................................................................................... 40
Editing the .scripts File................................................................................................ 42
NZ Cartridge Manager..................................................................................................... 43
Installation Manager.................................................................................................... 43
Registration Manager.................................................................................................. 47
Installation/Registration History...................................................................................51
NZCM Search............................................................................................................. 51
NPS Logs Browser........................................................................................................... 54
Viewing a Standard Log File....................................................................................... 54
Log File Display Contents........................................................................................... 55
Filtering the Contents.................................................................................................. 55
Autorefresh................................................................................................................. 55
Viewing Other Log Files.............................................................................................. 55
Building a Project.....................................................................................61Building a Project Remotely............................................................................................. 61
Remote Hosts............................................................................................................. 61
Local Hosts................................................................................................................. 62
The Build Process............................................................................................................ 62
Installed Cartridges..................................................................................................... 62
Project Targets............................................................................................................ 62
Makefile Options......................................................................................................... 63
Defining a User Action...................................................................................................... 63
Valid Database Definition................................................................................................. 65
Notices and Trademarks......................................................................... 69Notices........................................................................................................................ 69
Trademarks................................................................................................................. 71
Regulatory and Compliance........................................................................................ 71
4
Preface
Audience for This GuideThe IBM Netezza Plug-in for Eclipse Framework User's Guide is designed for users inter-ested in using the IBM Netezza Plug-in for Eclipse Framework, a specially modified ver-sion of Eclipse that is extended to support code development on the IBM Netezza appli-ance.
This document assumes that you are familiar with the Eclipse IDE and describes actions related to using the IBM Netezza Plug-in for Eclipse Framework.
Purpose of This GuideThis guide describes the IBM Netezza Plug-in for Eclipse Framework, which delivers a set of tools supporting code development for the Netezza appliance. It provides a refer-ence to the functionality delivered by the IBM Netezza Plug-in for Eclipse Framework.
Symbols and ConventionsThe following conventions apply:
Note on Terminology: The terms User-Defined Analytic Process (UDAP) and Analytic Ex-ecutable (AE) are synonymous.
The following conventions apply:
Italics for emphasis on terms and user-defined values, such as user input.
Upper case for SQL commands, for example, INSERT or DELETE.
Bold for command line input, for example, nzsystem stop.
Bold to denote parameter names, argument names, or other named references.
Angle brackets ( < > ) to indicate a placeholder (variable) that should be replaced with actual text, for example, nzmat <- nz.matrix("<matrix_name>")
A single backslash (“\”) at the end of a line of code to denote a line continuation. Omit the backslash when using the code at the command line, in a SQL command, or in a file.
When referencing a sequence of menu and submenu selections, the “>” character de-notes the different menu options, for example, Menu Name > Submenu Name > Se-lection.
Note that not all commands use sub-menus, while some selections may utilize a num-ber of nested sub-menus.
5

If You Have Questions or CommentsSend your questions or comments on using the IBM Netezza Plug-in for Eclipse Framework to [email protected].
In your email, please include:
The version of the Eclipse IDE you are using
The version of the IBM Netezza Plug-in for Eclipse Framework
The version of IBM Netezza Analytics you are using
Any associated messages or data you would like us to see
Comments on the DocumentationWe welcome any questions, comments, or suggestions that you have for the IBM Netezza documentation. Please send us an e-mail message at [email protected] and include the following information:
The name and version of the manual that you are using
Any comments that you have about the manual
Your name, address, and phone number
We appreciate your comments.
6
IntroductionThe IBM Netezza Plug-in for Eclipse Framework is a special, dedicated extension to the Eclipse IDE for developers working with IBM Netezza appliances.
The IBM Netezza Plug-in for Eclipse Framework functionality contains:
Template wizards for use with Netezza-specific projects (NZ projects), UDXs, UDTFs, Stored procedures and makefiles.
Support for code development and deployment via Remote Systems (RSE), directly on remote systems, and in folders shared with IBM Netezza Software Emulators For Developers.
A set of tools, called Developer Tools, that supports simultaneous work on multiple Netezza appliances and Netezza Software Emulators For Developers:
Servers Editor—basic database administration tools
NZ Cartridge Manager—graphical interface for the Netezza Cartridge Manager (nzcm)
NPS Logs Browser—a tool for viewing log files with autorefresh, filtering, and an option of simultaneous tracking of multiple log files
User Scripts Editor—a tool for for defining, storing, and running user's commands/scripts
The user guide of the product in the Eclipse Help format
7
Eclipse Plug-in InstallationBefore you can use the IBM Netezza Plug-in for Eclipse Framework, you must install the package in the Eclipse interface. This document assumes that the Eclipse IDE is already running. It is recommended to use the plug-in with Eclipse Indigo for C/C++.
Warning: IBM Netezza strongly recommends using the plug-in with Eclipse Indigo for C/C++. If you use another version of Eclipse, the plug-in might not fully install due to a dependency on Remote Systems Explorer (RSE).
Using a different version of Eclipse (e.g., for Java) requires manual installation of RSE. To install RSE, follow the steps below:
1. In the Eclipse main menu, choose Help > Install New Software... to launch the In-stall wizard.
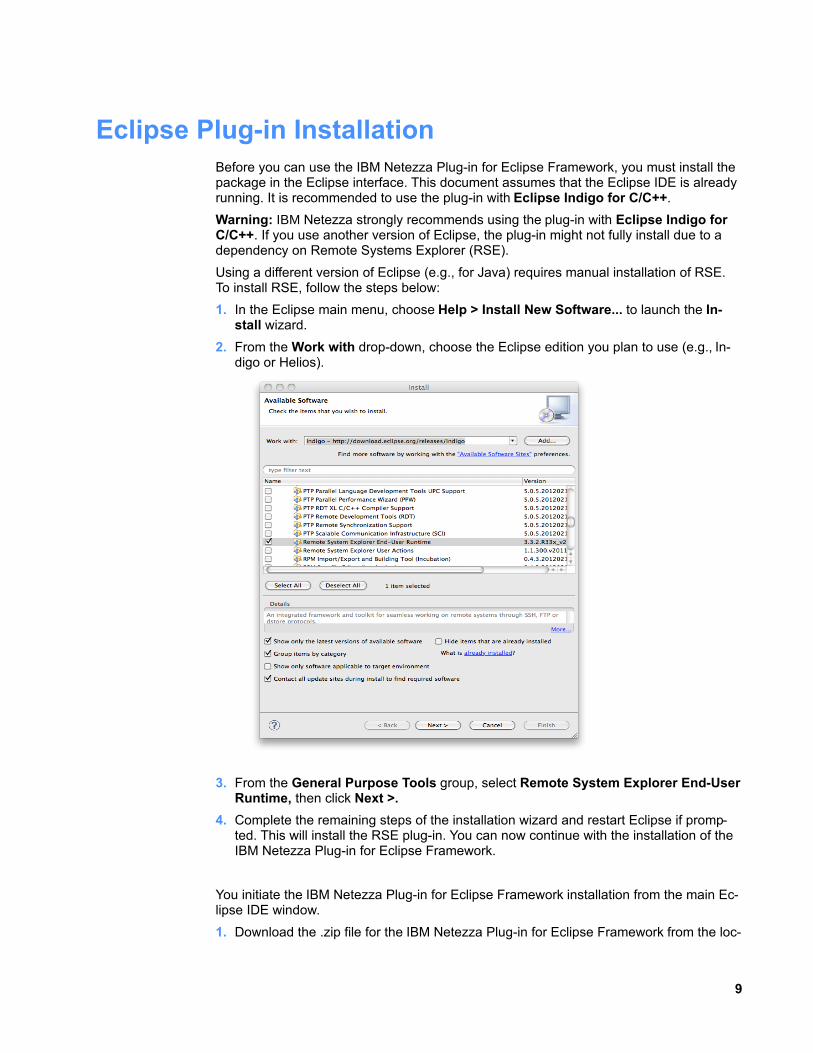
2. From the Work with drop-down, choose the Eclipse edition you plan to use (e.g., In-digo or Helios).
3. From the General Purpose Tools group, select Remote System Explorer End-User Runtime, then click Next >.
4. Complete the remaining steps of the installation wizard and restart Eclipse if promp-ted. This will install the RSE plug-in. You can now continue with the installation of the IBM Netezza Plug-in for Eclipse Framework.
You initiate the IBM Netezza Plug-in for Eclipse Framework installation from the main Ec-lipse IDE window.
1. Download the .zip file for the IBM Netezza Plug-in for Eclipse Framework from the loc-
9

Installing the Netezza Eclipse Plug-In
ation specified in the Release Notes and extract the files to the desired directory.
2. From the Eclipse IDE, select Help > Install New Software...
The Install wizard launches, as shown in Figure 1.
3. Leave the content of the Work With field as it displays (“type or select a site”) and click Add.
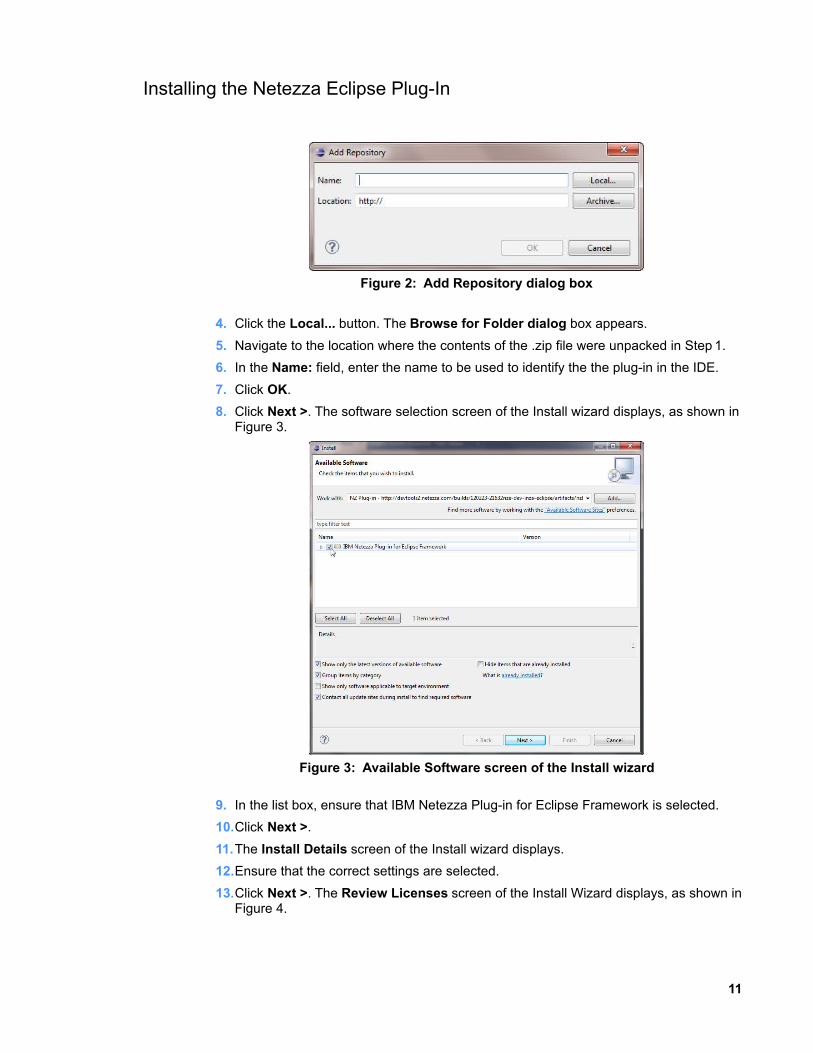
The Add Repository dialog box displays, as shown in Figure 2.
10
Figure 1: Install wizard launch screen
Installing the Netezza Eclipse Plug-In
4. Click the Local... button. The Browse for Folder dialog box appears.
5. Navigate to the location where the contents of the .zip file were unpacked in Step 1.
6. In the Name: field, enter the name to be used to identify the the plug-in in the IDE.
7. Click OK.
8. Click Next >. The software selection screen of the Install wizard displays, as shown in Figure 3.
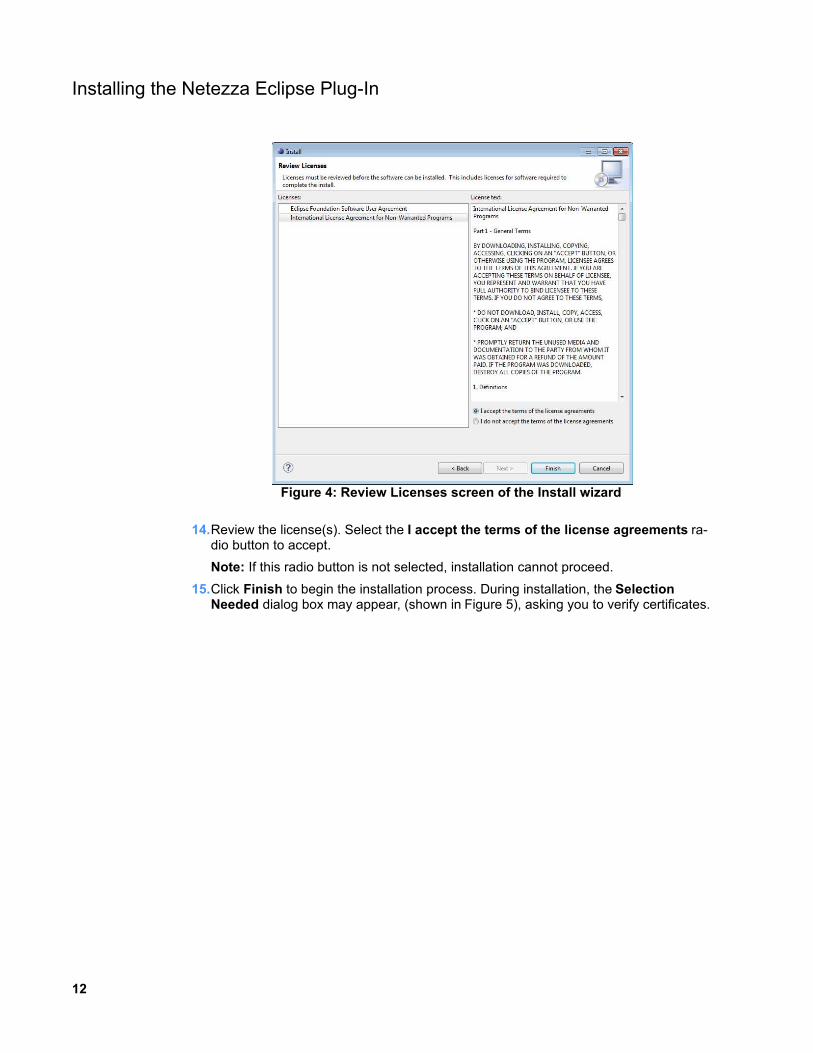
9. In the list box, ensure that IBM Netezza Plug-in for Eclipse Framework is selected.
10.Click Next >.
11.The Install Details screen of the Install wizard displays.
12.Ensure that the correct settings are selected.
13.Click Next >. The Review Licenses screen of the Install Wizard displays, as shown in Figure 4.
11
Figure 2: Add Repository dialog box
Figure 3: Available Software screen of the Install wizard
Installing the Netezza Eclipse Plug-In
14.Review the license(s). Select the I accept the terms of the license agreements ra-dio button to accept.
Note: If this radio button is not selected, installation cannot proceed.
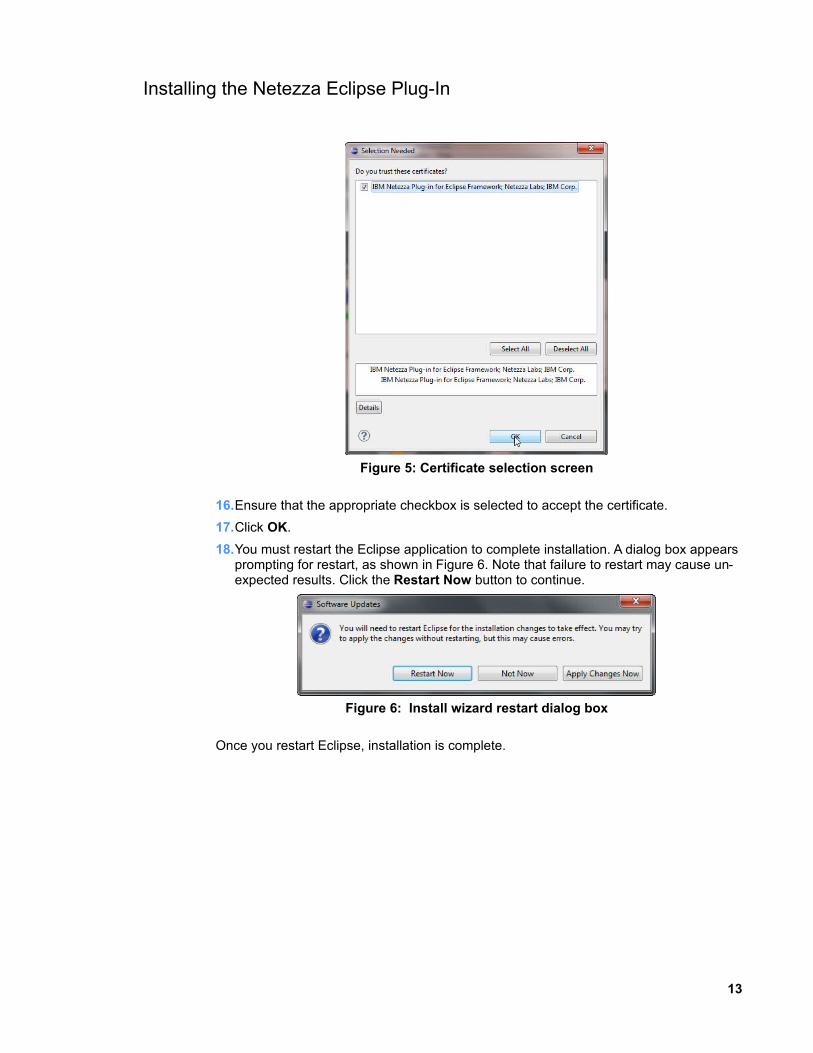
15.Click Finish to begin the installation process. During installation, the Selection Needed dialog box may appear, (shown in Figure 5), asking you to verify certificates.
12
Figure 4: Review Licenses screen of the Install wizard
Installing the Netezza Eclipse Plug-In
16.Ensure that the appropriate checkbox is selected to accept the certificate.
17.Click OK.
18.You must restart the Eclipse application to complete installation. A dialog box appears prompting for restart, as shown in Figure 6. Note that failure to restart may cause un-expected results. Click the Restart Now button to continue.
Once you restart Eclipse, installation is complete.
13
Figure 5: Certificate selection screen
Figure 6: Install wizard restart dialog box
Working with Eclipse
Working with the IBM Netezza Plug-in for Eclipse Framework
When you open Eclipse, by default it displays the view—referred to as the perspective— that was active when it was last closed. After the plug-in is installed, Eclipse opens with its default perspective. To get access to all features of the Netezza Eclipse plug-in, you must change the active perspective to IBM Netezza Plug-in for Eclipse Framework.
To change the active perspective, perform the following steps:
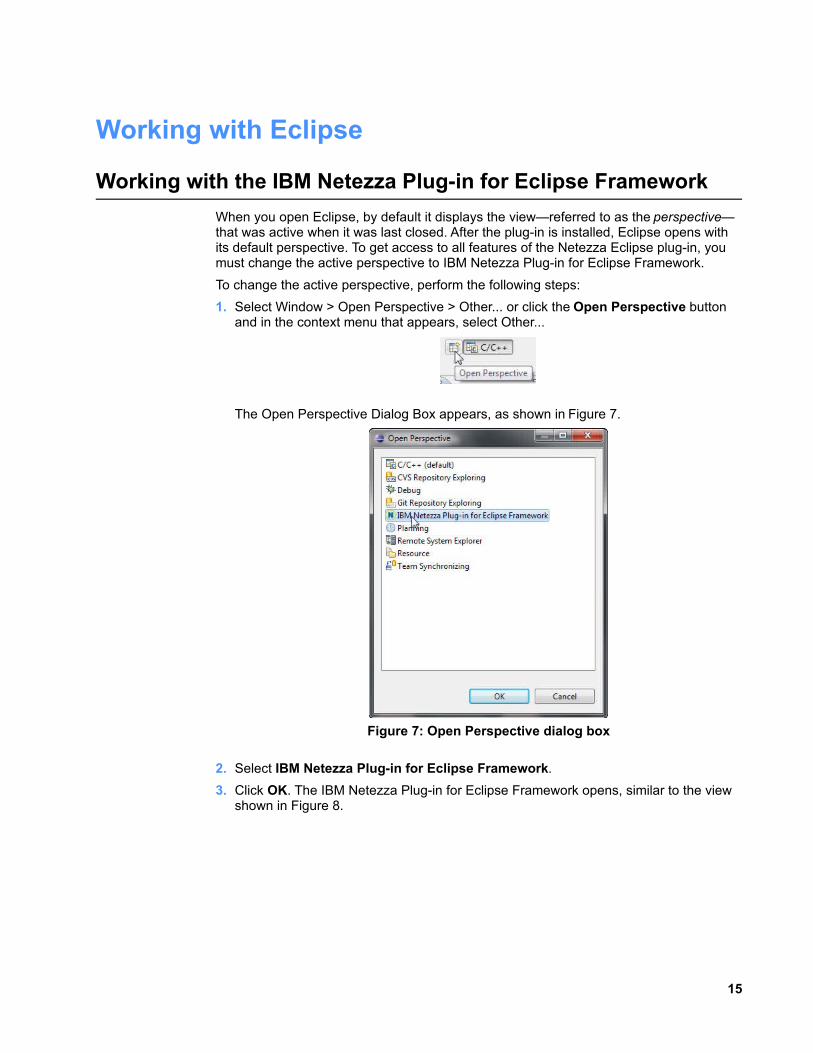
1. Select Window > Open Perspective > Other... or click the Open Perspective button and in the context menu that appears, select Other...
The Open Perspective Dialog Box appears, as shown in Figure 7.
2. Select IBM Netezza Plug-in for Eclipse Framework.
3. Click OK. The IBM Netezza Plug-in for Eclipse Framework opens, similar to the view shown in Figure 8.
15
Figure 7: Open Perspective dialog box
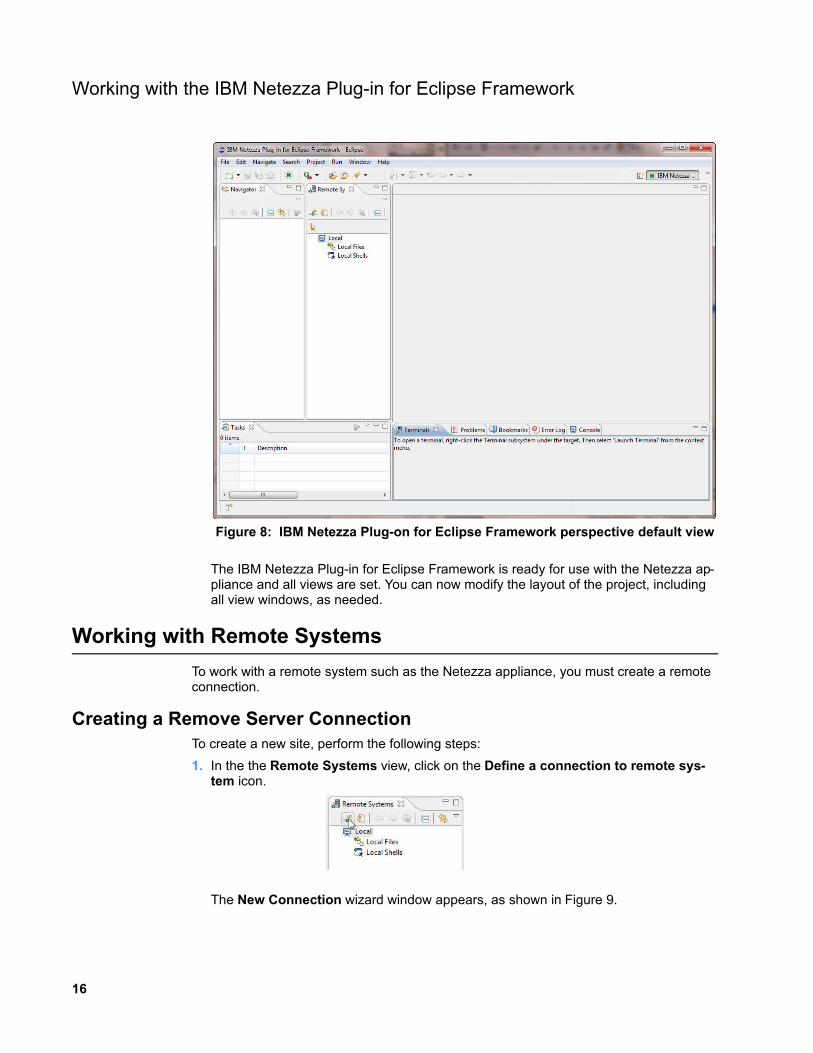
Working with the IBM Netezza Plug-in for Eclipse Framework
The IBM Netezza Plug-in for Eclipse Framework is ready for use with the Netezza ap-pliance and all views are set. You can now modify the layout of the project, including all view windows, as needed.
Working with Remote Systems
To work with a remote system such as the Netezza appliance, you must create a remote connection.
Creating a Remove Server ConnectionTo create a new site, perform the following steps:
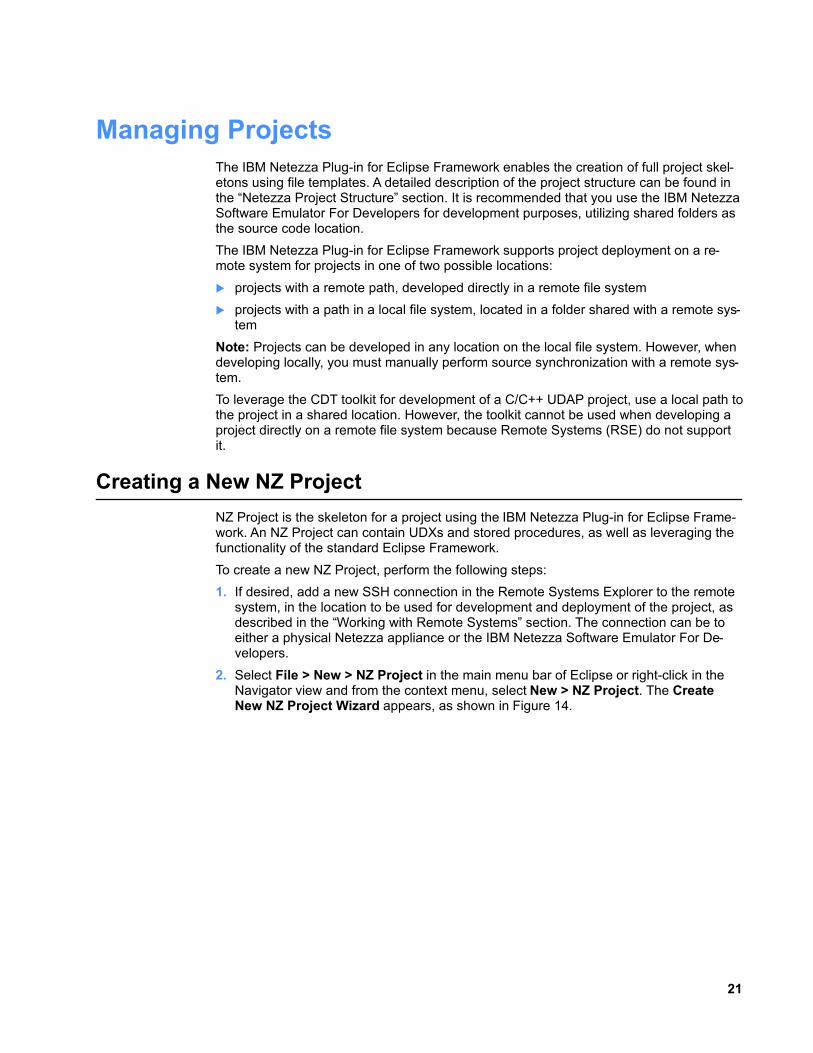
1. In the the Remote Systems view, click on the Define a connection to remote sys-tem icon.
The New Connection wizard window appears, as shown in Figure 9.
16
Figure 8: IBM Netezza Plug-on for Eclipse Framework perspective default view

Working with Remote Systems
2. In the System Type window, select SSH Only in the selection box.
Note: If the selection box is blank, please consult the Installing Remote Systems Ex-plorer (RSE) section of this guide for instructions on how to fully install the RSE plug-in.
3. Click Next >. The Remote SSH Only System Connection window of the wizard ap-pears, as shown in Figure 10.
4. Enter valid host and connection names in each of the appropriate fields.
17
Figure 9: New Connection wizard – Select Remote System Type window
Figure 10: Remote SSH Only System Connection window

Working with Remote Systems
Note: The values shown in Figure 10 are for example purposes only.
5. Click Finish.
You are now connected to the remote system.
Working with the TerminalOnce connected, you can access the machine specified in the Remote Systems view using an Eclipse-based terminal.
To run a terminal for your defined connection:
1. In the Remote Systems window, right-click on the SshTerminals entry.
2. In the context menu that appears, select Launch Terminal, as shown in Figure 11.
Once selected, a terminal connected to the chosen machine opens in the Terminal view in the bottom-right corner of the Eclipse environment. See Figure 12.
18
Figure 11: Launching a terminal

Working with Remote Systems
Multiple terminals can be launched in the Terminal view. See Figure 13.
19
Figure 12: Eclipse environment with terminal window
Figure 13: Eclipse environment with multiple terminal sessions
Managing ProjectsThe IBM Netezza Plug-in for Eclipse Framework enables the creation of full project skel-etons using file templates. A detailed description of the project structure can be found in the “Netezza Project Structure” section. It is recommended that you use the IBM Netezza Software Emulator For Developers for development purposes, utilizing shared folders as the source code location.
The IBM Netezza Plug-in for Eclipse Framework supports project deployment on a re-mote system for projects in one of two possible locations:
projects with a remote path, developed directly in a remote file system
projects with a path in a local file system, located in a folder shared with a remote sys-tem
Note: Projects can be developed in any location on the local file system. However, when developing locally, you must manually perform source synchronization with a remote sys-tem.
To leverage the CDT toolkit for development of a C/C++ UDAP project, use a local path to the project in a shared location. However, the toolkit cannot be used when developing a project directly on a remote file system because Remote Systems (RSE) do not support it.
Creating a New NZ Project
NZ Project is the skeleton for a project using the IBM Netezza Plug-in for Eclipse Frame-work. An NZ Project can contain UDXs and stored procedures, as well as leveraging the functionality of the standard Eclipse Framework.
To create a new NZ Project, perform the following steps:
1. If desired, add a new SSH connection in the Remote Systems Explorer to the remote system, in the location to be used for development and deployment of the project, as described in the “Working with Remote Systems” section. The connection can be to either a physical Netezza appliance or the IBM Netezza Software Emulator For De-velopers.
2. Select File > New > NZ Project in the main menu bar of Eclipse or right-click in the Navigator view and from the context menu, select New > NZ Project. The Create New NZ Project Wizard appears, as shown in Figure 14.
21
Creating a New NZ Project
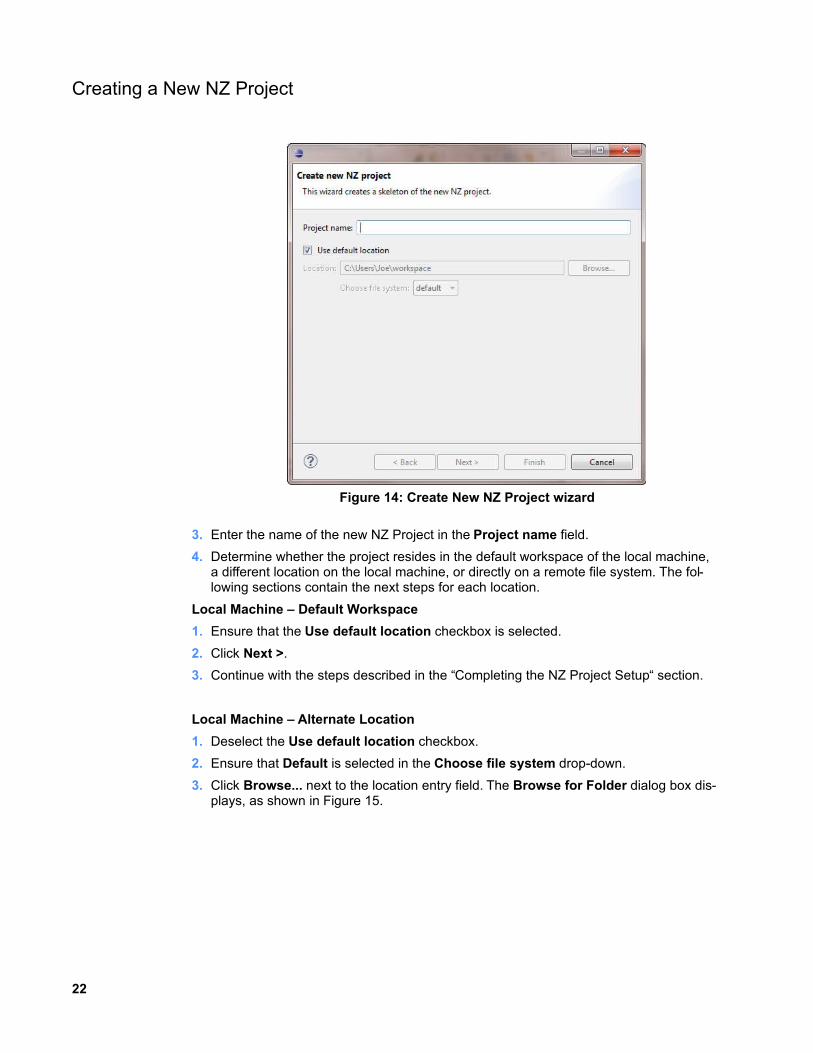
3. Enter the name of the new NZ Project in the Project name field.
4. Determine whether the project resides in the default workspace of the local machine, a different location on the local machine, or directly on a remote file system. The fol-lowing sections contain the next steps for each location.
Local Machine – Default Workspace
1. Ensure that the Use default location checkbox is selected.
2. Click Next >.
3. Continue with the steps described in the “Completing the NZ Project Setup“ section.
Local Machine – Alternate Location
1. Deselect the Use default location checkbox.
2. Ensure that Default is selected in the Choose file system drop-down.
3. Click Browse... next to the location entry field. The Browse for Folder dialog box dis-plays, as shown in Figure 15.
22
Figure 14: Create New NZ Project wizard
Creating a New NZ Project
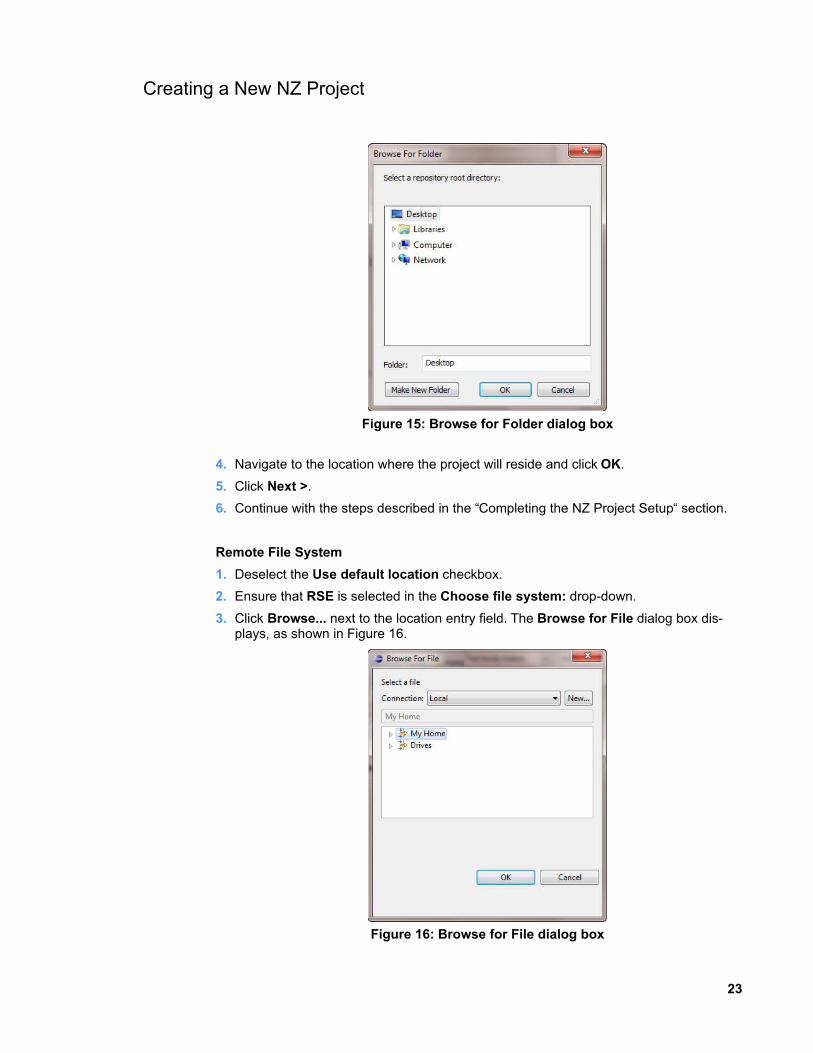
4. Navigate to the location where the project will reside and click OK.
5. Click Next >.
6. Continue with the steps described in the “Completing the NZ Project Setup“ section.
Remote File System
1. Deselect the Use default location checkbox.
2. Ensure that RSE is selected in the Choose file system: drop-down.
3. Click Browse... next to the location entry field. The Browse for File dialog box dis-plays, as shown in Figure 16.
23
Figure 15: Browse for Folder dialog box
Figure 16: Browse for File dialog box
Creating a New NZ Project
4. Select the appropriate remote file system from the Connection drop-down.
Note: Clicking on the New... button allows you to establish a new SSH connection if necessary.
5. Navigate to the location where the project will reside and click OK.
6. Click Next >.
7. Continue with the steps described in the “Completing the NZ Project Setup“ section.
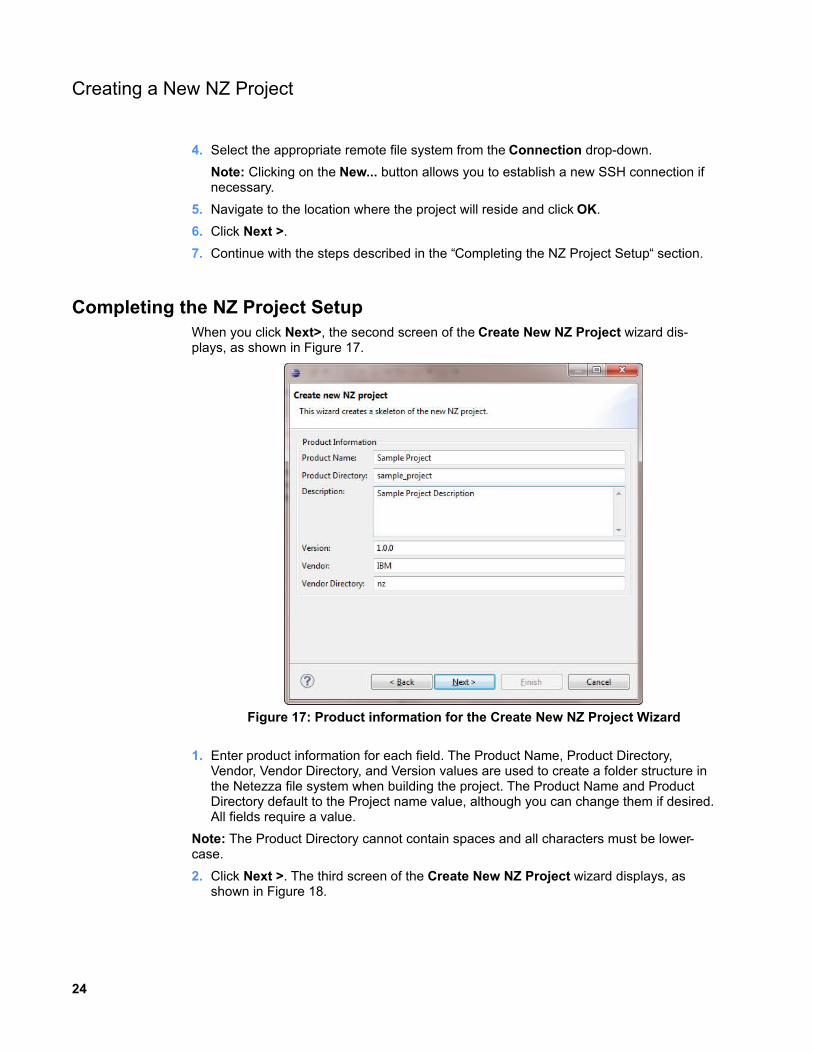
Completing the NZ Project SetupWhen you click Next>, the second screen of the Create New NZ Project wizard dis-plays, as shown in Figure 17.
1. Enter product information for each field. The Product Name, Product Directory, Vendor, Vendor Directory, and Version values are used to create a folder structure in the Netezza file system when building the project. The Product Name and Product Directory default to the Project name value, although you can change them if desired. All fields require a value.
Note: The Product Directory cannot contain spaces and all characters must be lower-case.
2. Click Next >. The third screen of the Create New NZ Project wizard displays, as shown in Figure 18.
24
Figure 17: Product information for the Create New NZ Project Wizard
Creating a New NZ Project
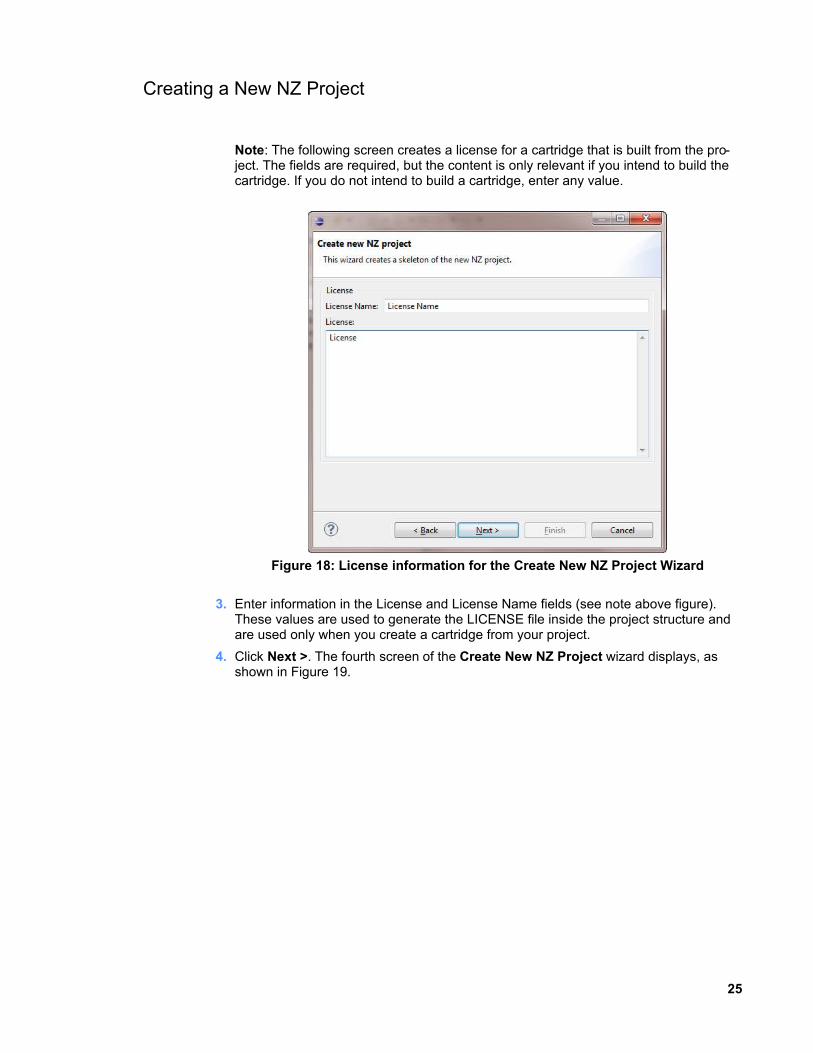
Note: The following screen creates a license for a cartridge that is built from the pro-ject. The fields are required, but the content is only relevant if you intend to build the cartridge. If you do not intend to build a cartridge, enter any value.
3. Enter information in the License and License Name fields (see note above figure). These values are used to generate the LICENSE file inside the project structure and are used only when you create a cartridge from your project.
4. Click Next >. The fourth screen of the Create New NZ Project wizard displays, as shown in Figure 19.
25
Figure 18: License information for the Create New NZ Project Wizard
Creating a New NZ Project
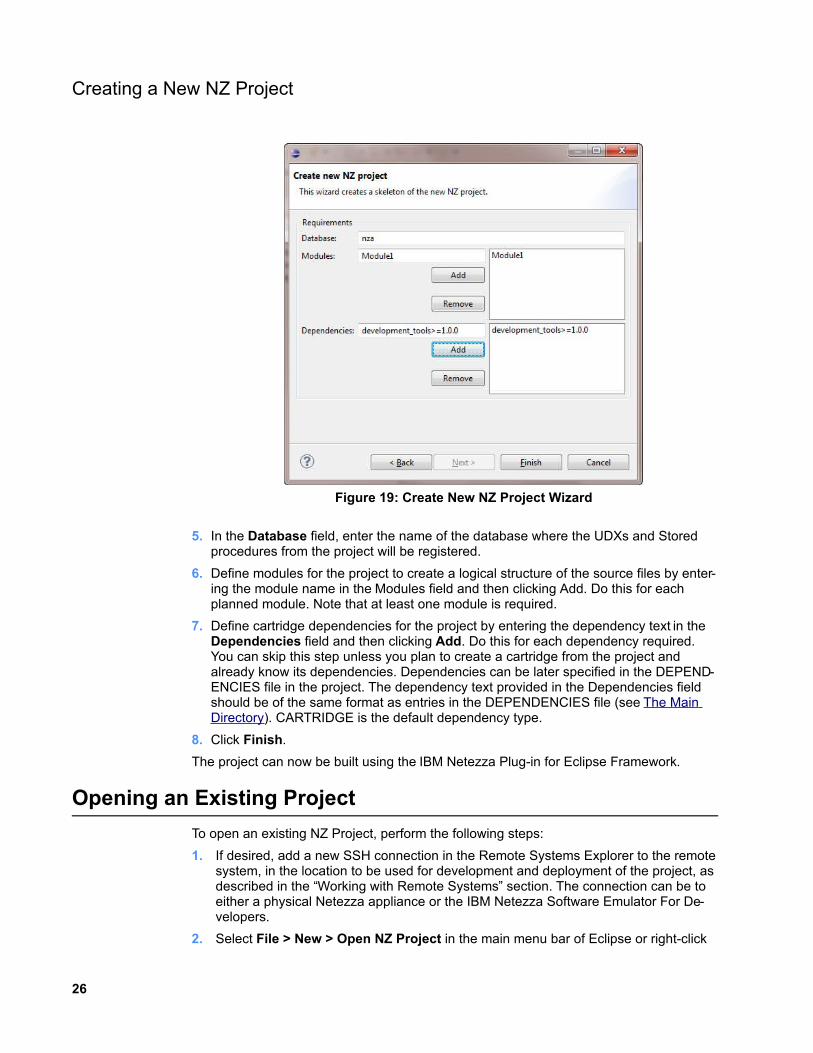
5. In the Database field, enter the name of the database where the UDXs and Stored procedures from the project will be registered.
6. Define modules for the project to create a logical structure of the source files by enter-ing the module name in the Modules field and then clicking Add. Do this for each planned module. Note that at least one module is required.
7. Define cartridge dependencies for the project by entering the dependency text in the Dependencies field and then clicking Add. Do this for each dependency required. You can skip this step unless you plan to create a cartridge from the project and already know its dependencies. Dependencies can be later specified in the DEPEND-ENCIES file in the project. The dependency text provided in the Dependencies field should be of the same format as entries in the DEPENDENCIES file (see The Main Directory). CARTRIDGE is the default dependency type.
8. Click Finish.
The project can now be built using the IBM Netezza Plug-in for Eclipse Framework.
Opening an Existing Project
To open an existing NZ Project, perform the following steps:
1. If desired, add a new SSH connection in the Remote Systems Explorer to the remote system, in the location to be used for development and deployment of the project, as described in the “Working with Remote Systems” section. The connection can be to either a physical Netezza appliance or the IBM Netezza Software Emulator For De-velopers.
2. Select File > New > Open NZ Project in the main menu bar of Eclipse or right-click
26
Figure 19: Create New NZ Project Wizard
Opening an Existing Project
in the Navigator view and from the context menu, select New > Open NZ Project.
3. Enter the Project Name and:
If the file is located in the default workspace, go to the next step.
If the file is located in a different location on the local machine, deselect the Use default location checkbox. Then, select Default from the Choose file system drop-down, and click Browse. In the dialog box, navigate to the location of the pro-ject, then go to the next step.
If the file is located on a remote file system, deselect the Use default location checkbox. Select RSE from the Choose file system drop-down and click Browse. In the dialog box, in the Connection drop-down, select the remote file system and navigate to the location of the project, then go to the next step.
4. Click Finish.
The project can now be modified using the IBM Netezza Plug-in for Eclipse Framework.
IBM Netezza Plug-in for Eclipse Framework Wizards
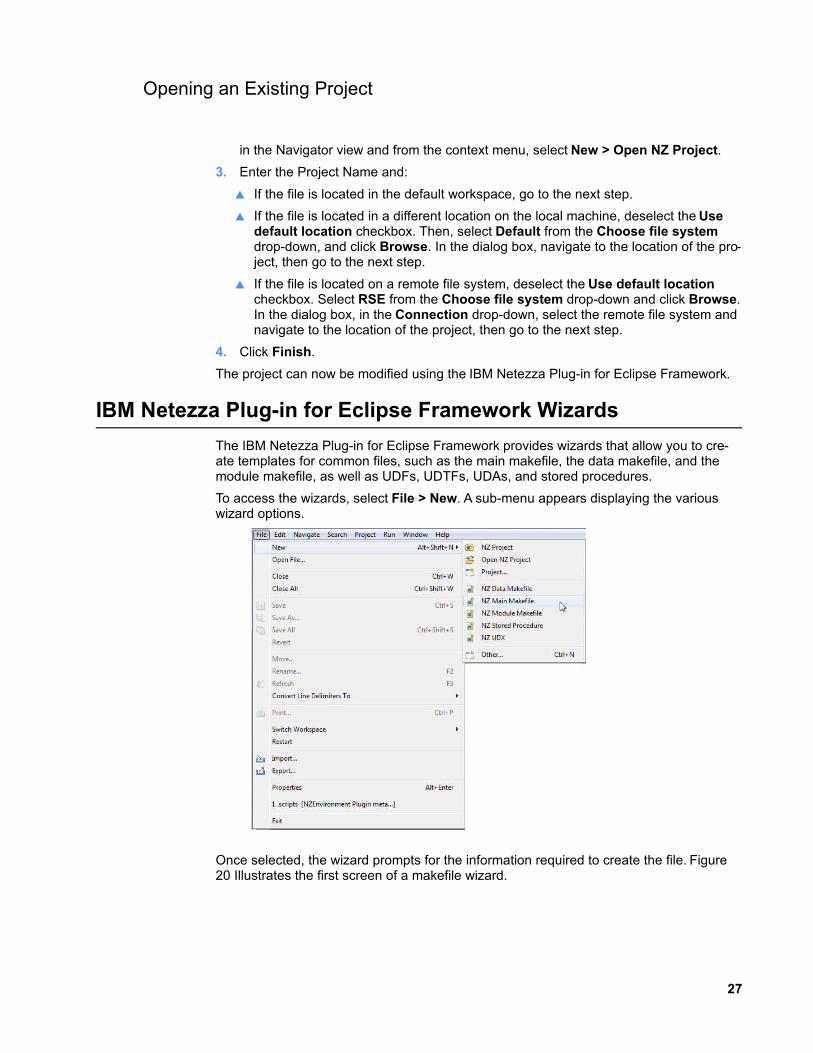
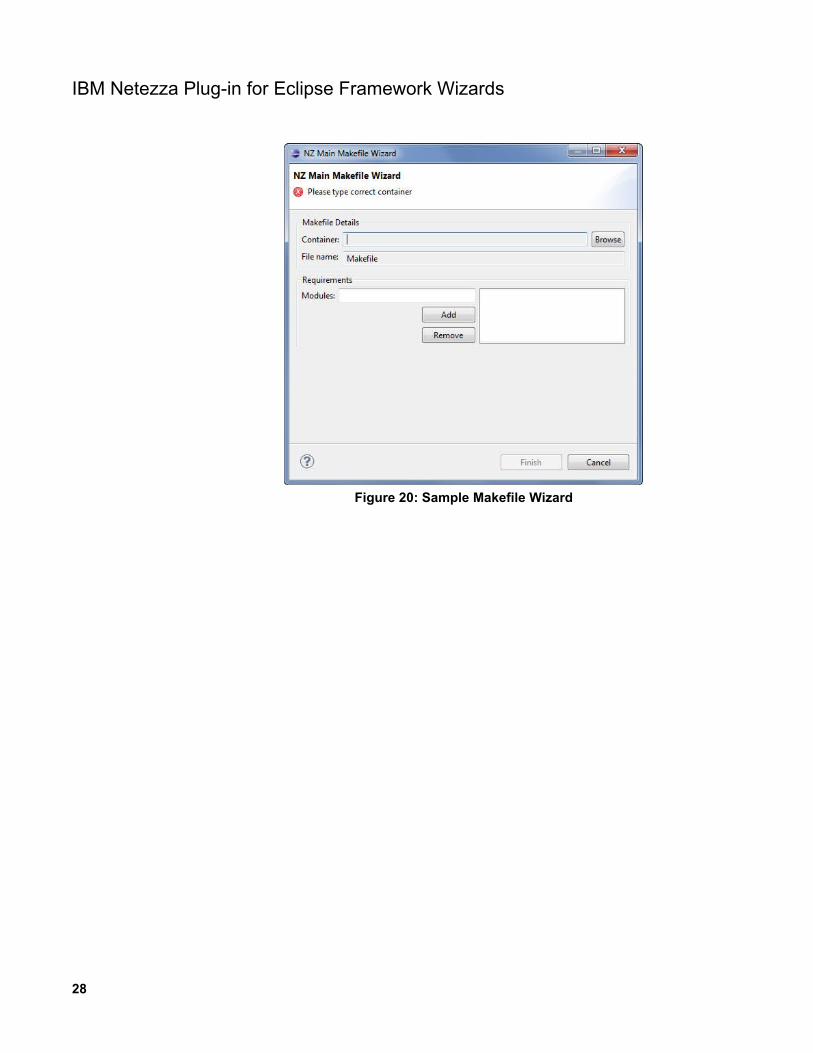
The IBM Netezza Plug-in for Eclipse Framework provides wizards that allow you to cre-ate templates for common files, such as the main makefile, the data makefile, and the module makefile, as well as UDFs, UDTFs, UDAs, and stored procedures.
To access the wizards, select File > New. A sub-menu appears displaying the various wizard options.
Once selected, the wizard prompts for the information required to create the file. Figure20 Illustrates the first screen of a makefile wizard.
27
IBM Netezza Plug-in for Eclipse Framework Wizards
28
Figure 20: Sample Makefile Wizard

Netezza Project StructureNetezza projects can be organized in a variety of ways. However, using conventions can simplify identification of the typical parts of a project. The main goal of the project struc-ture is to define the standards to follow during the development process. These include code standards, documentation standards, and change control procedure standards. This section describes the fundamentals of the project organization with the IBM Netezza Plug-in for Eclipse Framework, as well as recommended conventions.
The NZ Project
A typical NZ Project is represented by a directory under the workspace. By default, the contents of a project are of the structure shown in Figure 21.
This section details the typical project structure.
The build FolderThe build folder is created in the project's structure when the project is built for the first time. This directory contains binaries such as object files, documentation, and cartridges.
The data FolderThe data folder contains any data files used for demonstration purposes. It is important to specify appropriate targets in the Makefile file located in the data directory.
There are three types of targets for data:
NZSQL—SQL scripts that create tables or perform other database operations. The name of the target must correspond with the SQL file name, as Makefile is looking for the file <target_name>.sql.
29
Figure 21: NZ Project project structure
The NZ Project
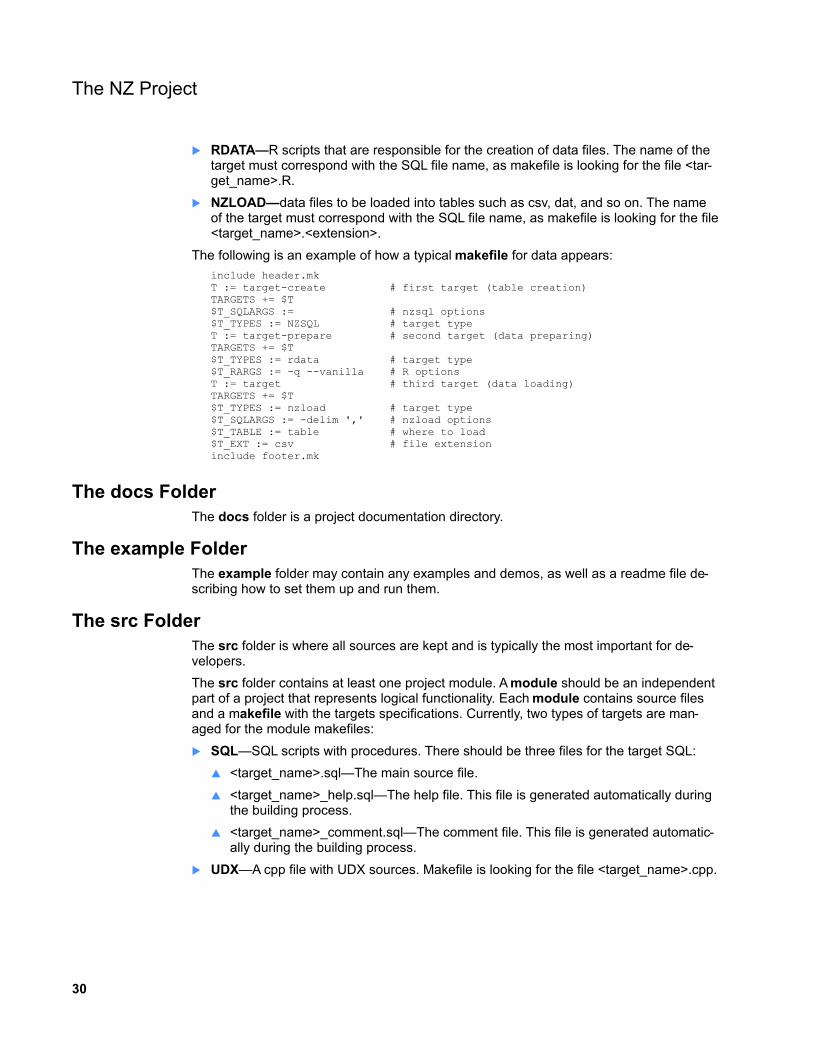
RDATA—R scripts that are responsible for the creation of data files. The name of the target must correspond with the SQL file name, as makefile is looking for the file <tar-get_name>.R.
NZLOAD—data files to be loaded into tables such as csv, dat, and so on. The name of the target must correspond with the SQL file name, as makefile is looking for the file <target_name>.<extension>.
The following is an example of how a typical makefile for data appears:
include header.mkT := target-create # first target (table creation)TARGETS += $T$T_SQLARGS := # nzsql options$T_TYPES := NZSQL # target typeT := target-prepare # second target (data preparing)TARGETS += $T$T_TYPES := rdata # target type$T_RARGS := -q --vanilla # R optionsT := target # third target (data loading)TARGETS += $T$T_TYPES := nzload # target type$T_SQLARGS := -delim ',' # nzload options$T_TABLE := table # where to load$T_EXT := csv # file extensioninclude footer.mk
The docs FolderThe docs folder is a project documentation directory.
The example FolderThe example folder may contain any examples and demos, as well as a readme file de-scribing how to set them up and run them.
The src FolderThe src folder is where all sources are kept and is typically the most important for de-velopers.
The src folder contains at least one project module. A module should be an independent part of a project that represents logical functionality. Each module contains source files and a makefile with the targets specifications. Currently, two types of targets are man-aged for the module makefiles:
SQL—SQL scripts with procedures. There should be three files for the target SQL:
<target_name>.sql—The main source file.
<target_name>_help.sql—The help file. This file is generated automatically during the building process.
<target_name>_comment.sql—The comment file. This file is generated automatic-ally during the building process.
UDX—A cpp file with UDX sources. Makefile is looking for the file <target_name>.cpp.
30
The NZ Project
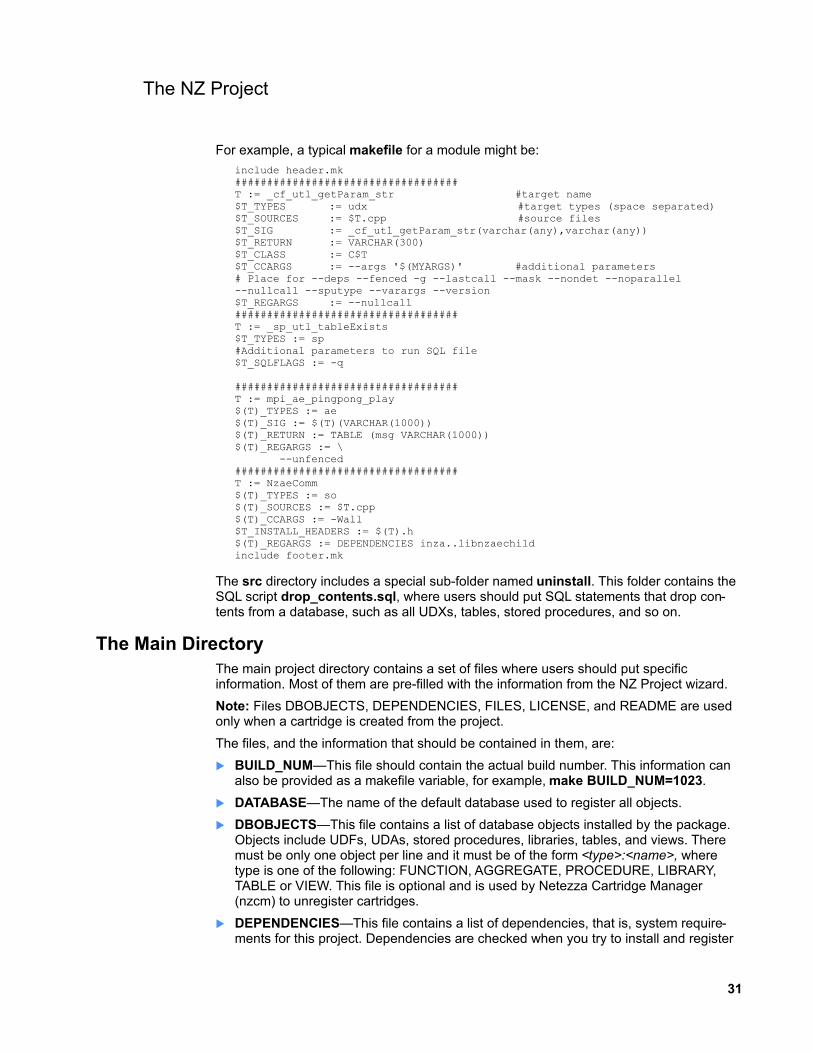
For example, a typical makefile for a module might be:
include header.mk###################################T := _cf_utl_getParam_str #target name$T_TYPES := udx #target types (space separated)$T_SOURCES := $T.cpp #source files$T_SIG := _cf_utl_getParam_str(varchar(any),varchar(any))$T_RETURN := VARCHAR(300)$T_CLASS := C$T$T_CCARGS := --args '$(MYARGS)' #additional parameters# Place for --deps --fenced -g --lastcall --mask --nondet --noparallel --nullcall --sputype --varargs --version$T_REGARGS := --nullcall ###################################T := _sp_utl_tableExists$T_TYPES := sp#Additional parameters to run SQL file$T_SQLFLAGS := -q
###################################T := mpi_ae_pingpong_play$(T)_TYPES := ae$(T)_SIG := $(T)(VARCHAR(1000))$(T)_RETURN := TABLE (msg VARCHAR(1000))$(T)_REGARGS := \ --unfenced###################################T := NzaeComm$(T)_TYPES := so$(T)_SOURCES := $T.cpp$(T)_CCARGS := -Wall$T_INSTALL_HEADERS := $(T).h$(T)_REGARGS := DEPENDENCIES inza..libnzaechildinclude footer.mk
The src directory includes a special sub-folder named uninstall. This folder contains the SQL script drop_contents.sql, where users should put SQL statements that drop con-tents from a database, such as all UDXs, tables, stored procedures, and so on.
The Main DirectoryThe main project directory contains a set of files where users should put specific information. Most of them are pre-filled with the information from the NZ Project wizard.
Note: Files DBOBJECTS, DEPENDENCIES, FILES, LICENSE, and README are used only when a cartridge is created from the project.
The files, and the information that should be contained in them, are:
BUILD_NUM—This file should contain the actual build number. This information can also be provided as a makefile variable, for example, make BUILD_NUM=1023.
DATABASE—The name of the default database used to register all objects.
DBOBJECTS—This file contains a list of database objects installed by the package. Objects include UDFs, UDAs, stored procedures, libraries, tables, and views. There must be only one object per line and it must be of the form <type>:<name>, where type is one of the following: FUNCTION, AGGREGATE, PROCEDURE, LIBRARY, TABLE or VIEW. This file is optional and is used by Netezza Cartridge Manager (nzcm) to unregister cartridges.
DEPENDENCIES—This file contains a list of dependencies, that is, system require-ments for this project. Dependencies are checked when you try to install and register
31
The NZ Project
the cartridge created from the project. There must be only one dependency per line. A dependency line must be of the form <type>:<dependency>, where type is CART-RIDGE, DATABASE, REGISTER, KIT, or EXT.
Available types of dependencies are:
CARTRIDGE – You can add dependencies to cartridges, indicating that the cart-ridge requires that other cartridges be installed in the Netezza system. Some ex-amples:
CARTRIDGE:adapter_utilities >= 1.0.0.6
CARTRIDGE:adapter_utilities = 1.0
CARTRIDGE:adapter_utilities >= 1.0.0.0, adapter_utilities <= 2.0.0.0
CARTRIDGE:adapter_utilities
DATABASE – Database dependency informs that the cartridge needs a particular database to exist. For example:
DATABASE:nzm
REGISTER – Register dependency means your cartridge needs a particular cart-ridge to be registered in the system. The syntax is as follows:
'REGISTER : cartridge_name : database_name'
or
'REGISTER : cartridge_name'
KIT – Kit dependency is used to check the NPS kit version. For example:
KIT: --min 6.0.0-0.B-2
EXT - External dependency is used to run regular shell commands. When the command result is not '0,' the dependency is not met. The EXT dependency can check virtually anything on the target system. For example:
EXT:${NZ_EXPORT_DIR}/ae/utilities/bin/verifyNpsVersion --min 6.0.0-0.B-2.P- 0.Bld-128
FILES—This file contains the list of files in the cartridge. This file is optional and is used by Netezza Cartridge Manager (nzcm) search mechanism.
LICENSE—This file includes the cartridge license contents.
PRODUCT—This file contains the name of the product, excluding the version number. If the PRODUCT_DIR file (see below) does not exist, this value is used for directory creation. Note that when creating the directory names, any white space is removed.
PRODUCT_DIR—This file should contain the desired directory name to be used for the product.
README— This file contains description of the functionality delivered by the cartridge and any other important information about the cartridge.
VENDOR—This file contains the name of the vendor. If the VENDOR_DIR file (see below) does not exist, this value is used for directory creation. Note that when creating the directory names, any white space is removed.
VENDOR_DIR—This file contains the desired directory name to be used for the vendor.
VERSION—This file contains the product version.
32
The NZ Project
The main Makefile is where users can define modules for compilation. Advanced pro-grammers can also add custom targets here, if applicable.
33
Developer ToolsThe Developer Tools is a set of tools supporting simultaneous work on multiple IBM Netezza appliances and IBM Netezza Software Emulators for Developers.
Getting Started
The Developer Tools allow:
basic information checking for the machines.
running start/stop operations on the machine's system.
defining, storing, and running any commands or scripts on the machines.
using the NZ Cartridge Manager GUI to install and register cartridges.
browsing log files on the machines and automating project debugging.
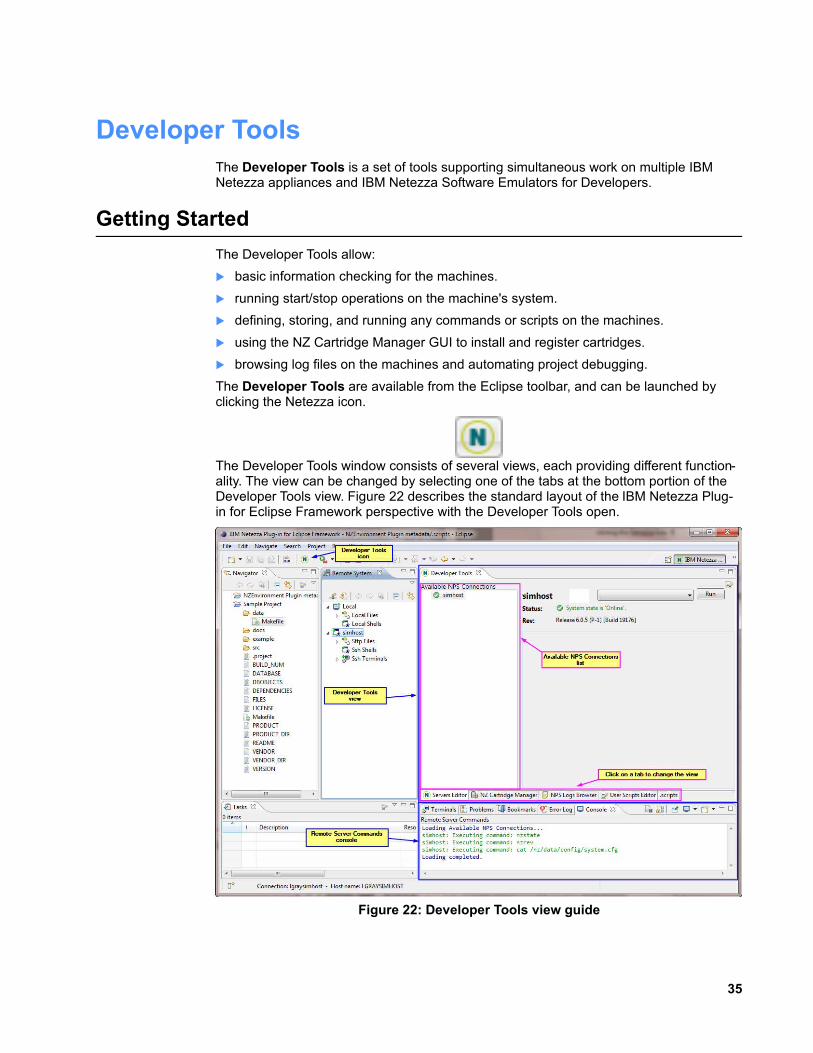
The Developer Tools are available from the Eclipse toolbar, and can be launched by clicking the Netezza icon.
The Developer Tools window consists of several views, each providing different function-ality. The view can be changed by selecting one of the tabs at the bottom portion of the Developer Tools view. Figure 22 describes the standard layout of the IBM Netezza Plug-in for Eclipse Framework perspective with the Developer Tools open.
35
Figure 22: Developer Tools view guide
Getting Started
Note: For clarity, the remaining figures display only the Developer Tools view and/or the Remote Server Commands console view as needed. All other views are minimized.
Remote Server Commands Console
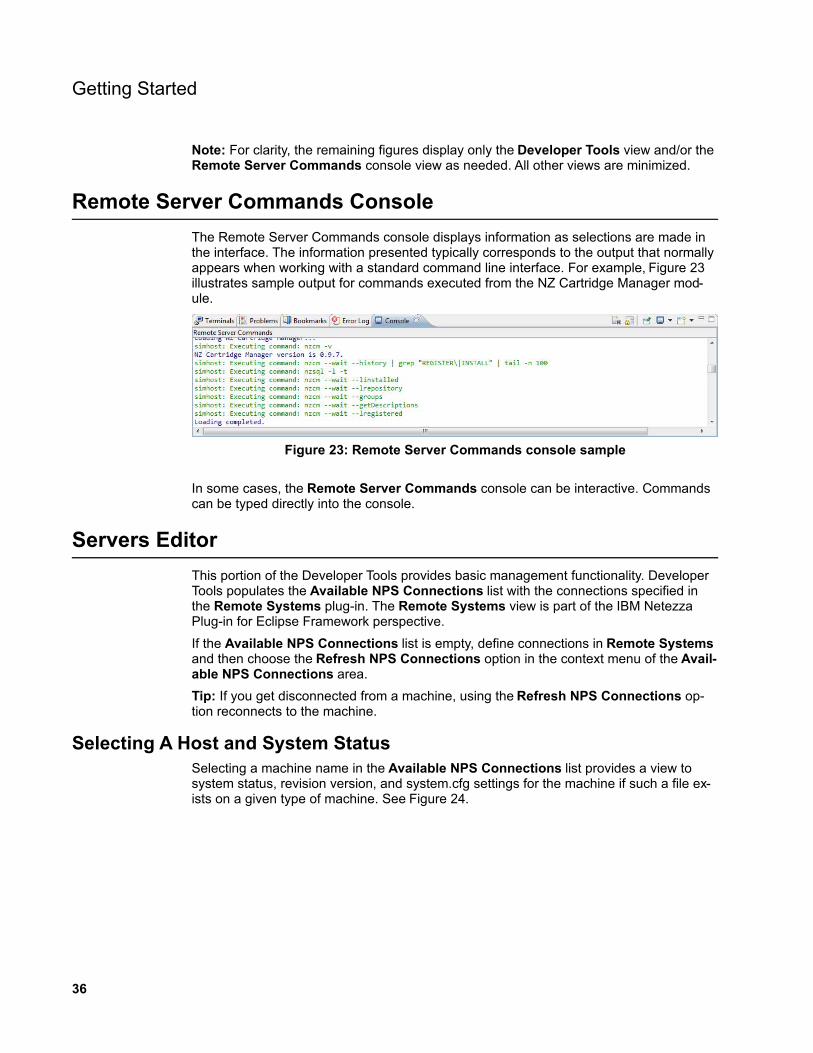
The Remote Server Commands console displays information as selections are made in the interface. The information presented typically corresponds to the output that normally appears when working with a standard command line interface. For example, Figure 23 illustrates sample output for commands executed from the NZ Cartridge Manager mod-ule.
In some cases, the Remote Server Commands console can be interactive. Commands can be typed directly into the console.
Servers Editor
This portion of the Developer Tools provides basic management functionality. Developer Tools populates the Available NPS Connections list with the connections specified in the Remote Systems plug-in. The Remote Systems view is part of the IBM Netezza Plug-in for Eclipse Framework perspective.
If the Available NPS Connections list is empty, define connections in Remote Systems and then choose the Refresh NPS Connections option in the context menu of the Avail-able NPS Connections area.
Tip: If you get disconnected from a machine, using the Refresh NPS Connections op-tion reconnects to the machine.
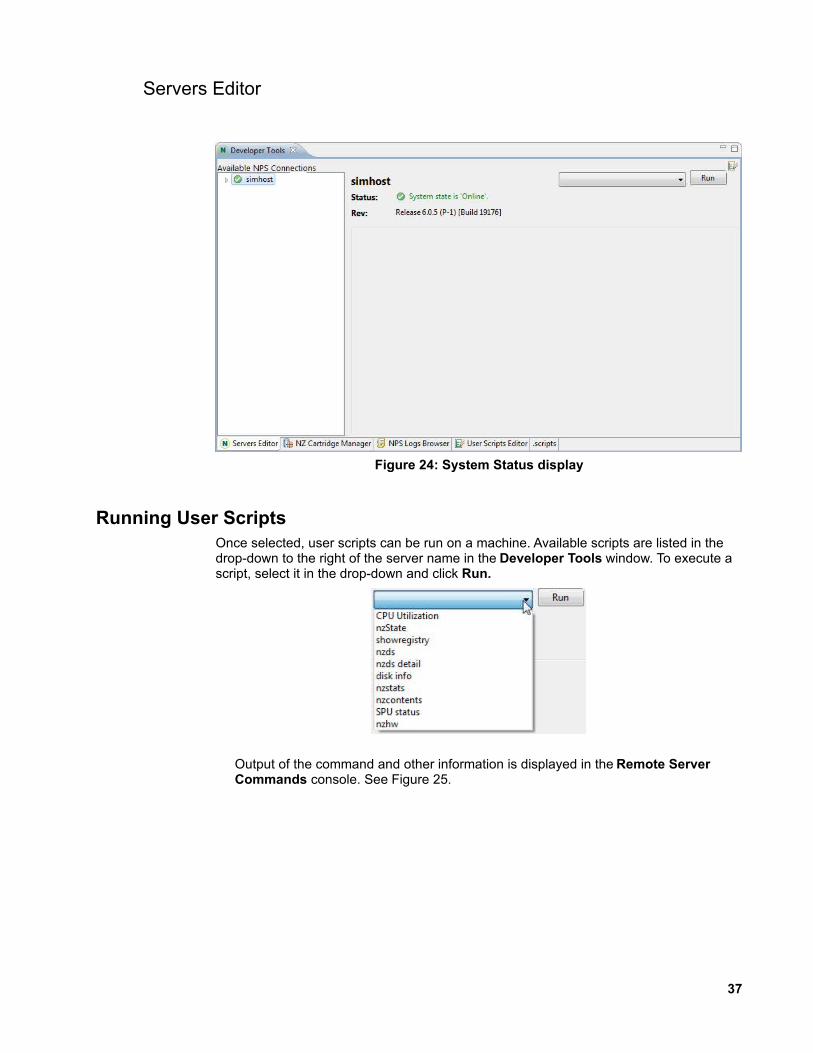
Selecting A Host and System StatusSelecting a machine name in the Available NPS Connections list provides a view to system status, revision version, and system.cfg settings for the machine if such a file ex-ists on a given type of machine. See Figure 24.
36
Figure 23: Remote Server Commands console sample
Servers Editor
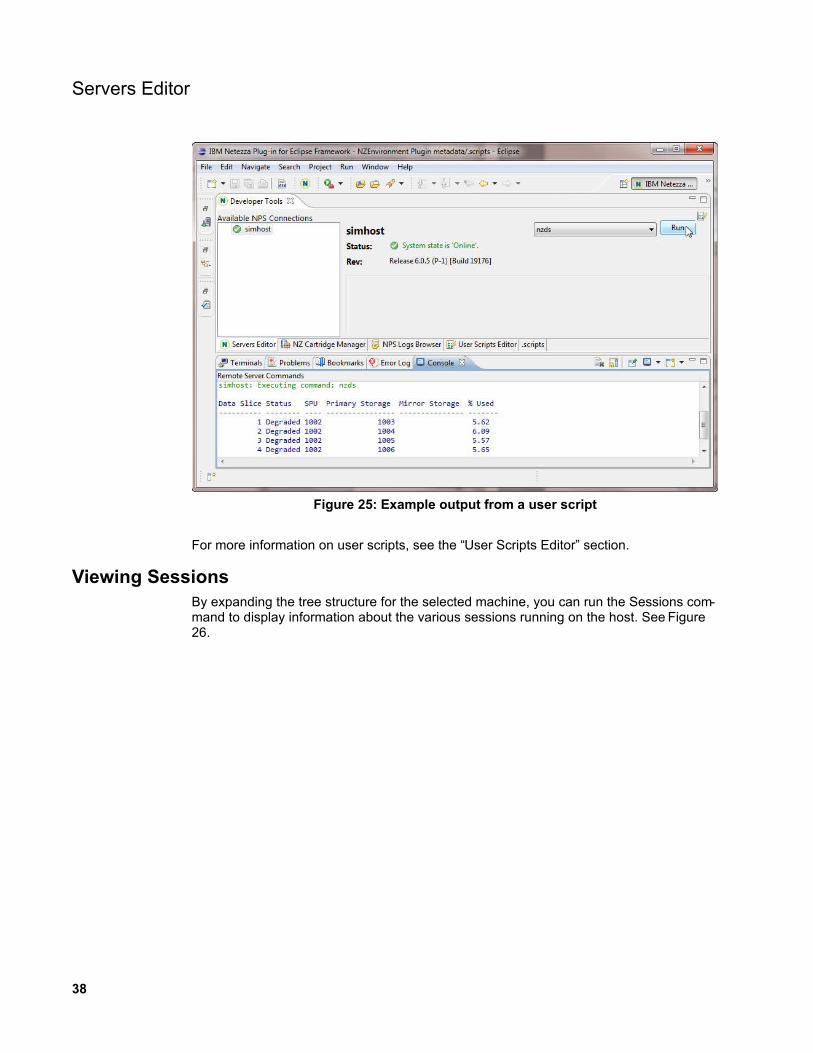
Running User ScriptsOnce selected, user scripts can be run on a machine. Available scripts are listed in the drop-down to the right of the server name in the Developer Tools window. To execute a script, select it in the drop-down and click Run.
Output of the command and other information is displayed in the Remote Server Commands console. See Figure 25.
37
Figure 24: System Status display
Servers Editor
For more information on user scripts, see the “User Scripts Editor” section.
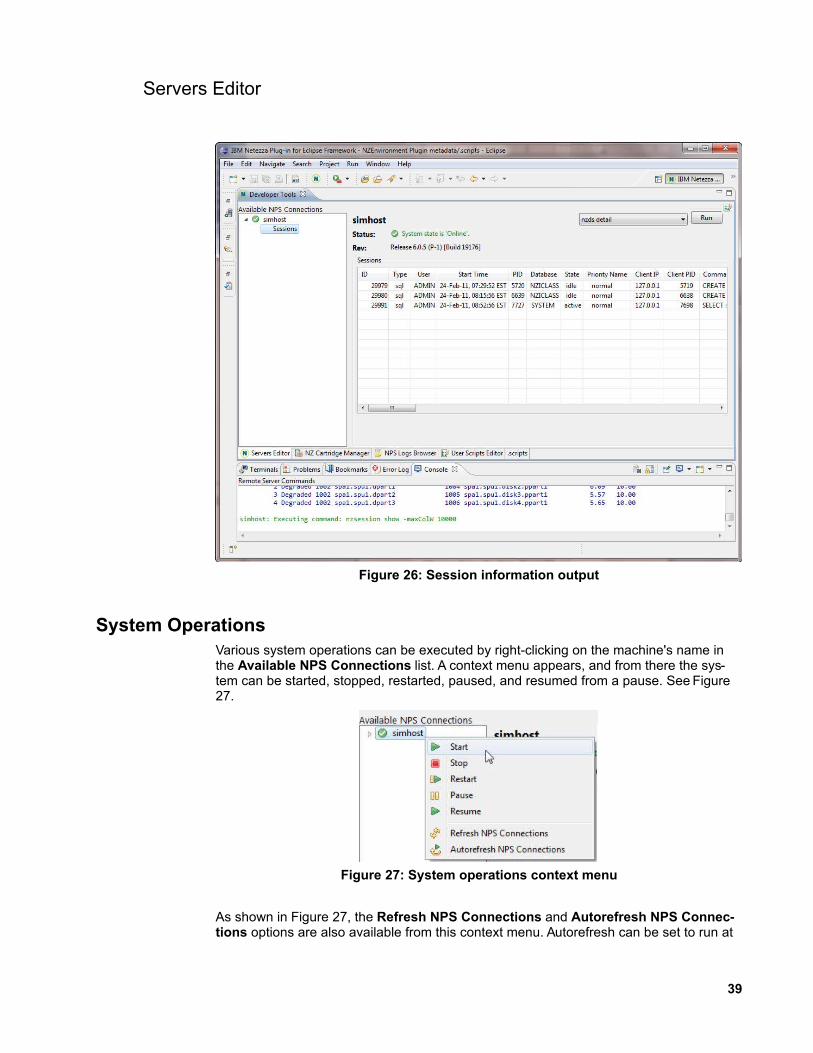
Viewing SessionsBy expanding the tree structure for the selected machine, you can run the Sessions com-mand to display information about the various sessions running on the host. See Figure26.
38
Figure 25: Example output from a user script
Servers Editor
System OperationsVarious system operations can be executed by right-clicking on the machine's name in the Available NPS Connections list. A context menu appears, and from there the sys-tem can be started, stopped, restarted, paused, and resumed from a pause. See Figure27.
As shown in Figure 27, the Refresh NPS Connections and Autorefresh NPS Connec-tions options are also available from this context menu. Autorefresh can be set to run at
39
Figure 26: Session information output
Figure 27: System operations context menu
Servers Editor
a specified interval. Once activated, the autorefresh option can be turned off by selecting the Autorefresh NPS Connections option in the context menu again.
User Scripts Editor
The User Scripts Editor allows creation and modification of scripts that can be run on machines using the Developer Tools.
The first time it is run, Developer Tools creates a .scripts file in the /.metadata directory of the Eclipse workspace. The newly-created file contains predefined scripts for some of the most common operations, such as CPU Utilization. All defined scripts are available at any time in Developer Tools.
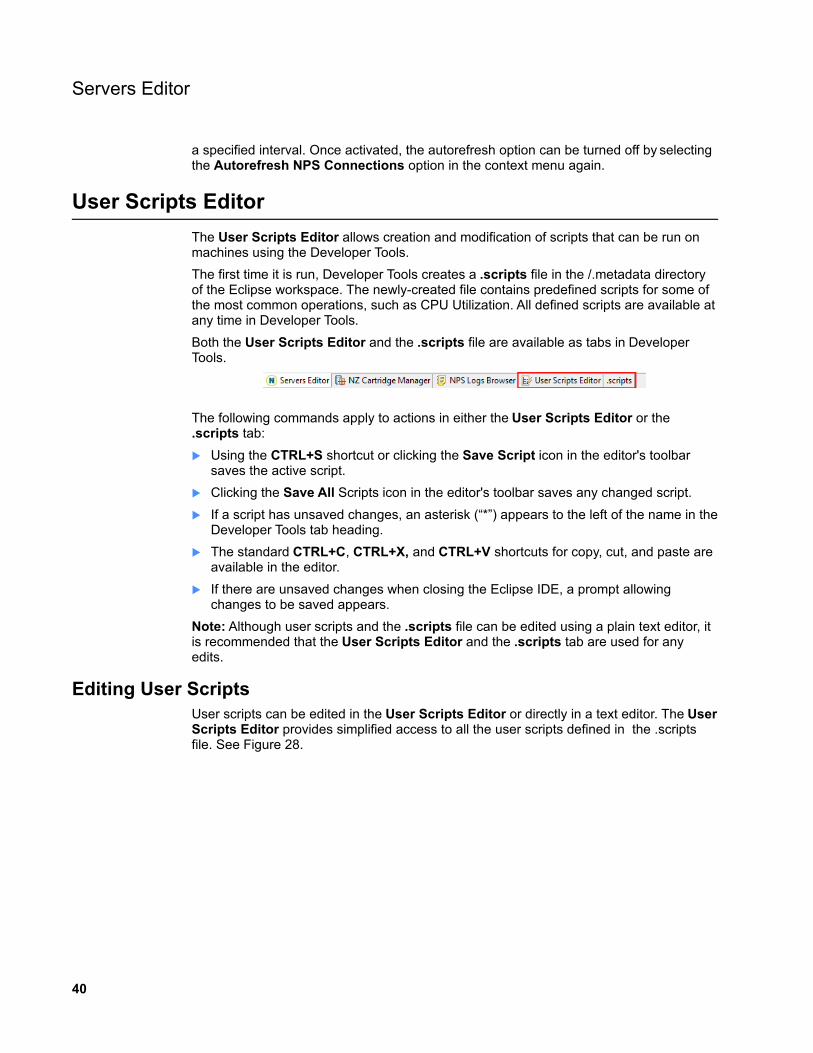
Both the User Scripts Editor and the .scripts file are available as tabs in Developer Tools.
The following commands apply to actions in either the User Scripts Editor or the .scripts tab:
Using the CTRL+S shortcut or clicking the Save Script icon in the editor's toolbar saves the active script.
Clicking the Save All Scripts icon in the editor's toolbar saves any changed script.
If a script has unsaved changes, an asterisk (“*”) appears to the left of the name in the Developer Tools tab heading.
The standard CTRL+C, CTRL+X, and CTRL+V shortcuts for copy, cut, and paste are available in the editor.
If there are unsaved changes when closing the Eclipse IDE, a prompt allowing changes to be saved appears.
Note: Although user scripts and the .scripts file can be edited using a plain text editor, it is recommended that the User Scripts Editor and the .scripts tab are used for any edits.
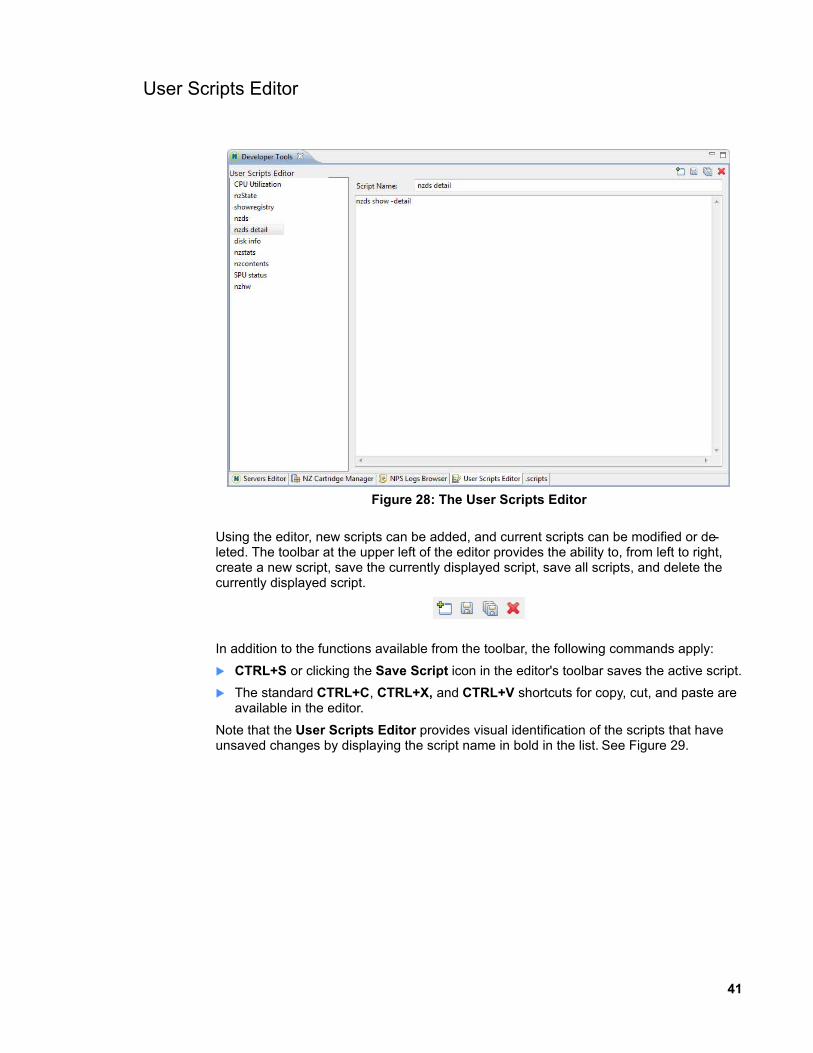
Editing User ScriptsUser scripts can be edited in the User Scripts Editor or directly in a text editor. The User Scripts Editor provides simplified access to all the user scripts defined in the .scripts file. See Figure 28.
40
User Scripts Editor
Using the editor, new scripts can be added, and current scripts can be modified or de-leted. The toolbar at the upper left of the editor provides the ability to, from left to right, create a new script, save the currently displayed script, save all scripts, and delete the currently displayed script.
In addition to the functions available from the toolbar, the following commands apply:
CTRL+S or clicking the Save Script icon in the editor's toolbar saves the active script.
The standard CTRL+C, CTRL+X, and CTRL+V shortcuts for copy, cut, and paste are available in the editor.
Note that the User Scripts Editor provides visual identification of the scripts that have unsaved changes by displaying the script name in bold in the list. See Figure 29.
41
Figure 28: The User Scripts Editor

User Scripts Editor
Editing the .scripts FileYou can edit the .scripts file to define new scripts by clicking the .scripts tab in the Developer Tools window. See Figure 30.
In Figure 30, note the asterisk next to the Developer Tools heading in the tab. This indicates that unsaved changes are present in the file.
42
Figure 30: Editing the .scripts file in the tab
Figure 29: The User Scripts Editor
NZ Cartridge Manager
NZ Cartridge Manager
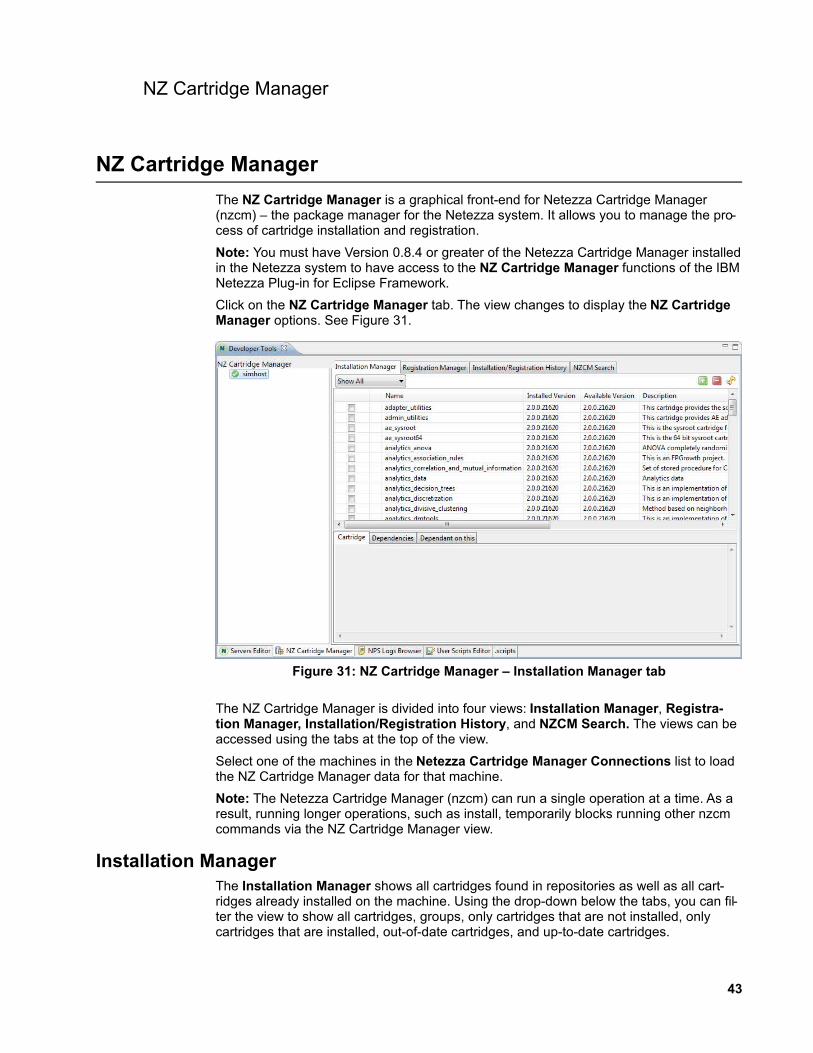
The NZ Cartridge Manager is a graphical front-end for Netezza Cartridge Manager (nzcm) – the package manager for the Netezza system. It allows you to manage the pro-cess of cartridge installation and registration.
Note: You must have Version 0.8.4 or greater of the Netezza Cartridge Manager installed in the Netezza system to have access to the NZ Cartridge Manager functions of the IBM Netezza Plug-in for Eclipse Framework.
Click on the NZ Cartridge Manager tab. The view changes to display the NZ Cartridge Manager options. See Figure 31.
The NZ Cartridge Manager is divided into four views: Installation Manager, Registra-tion Manager, Installation/Registration History, and NZCM Search. The views can be accessed using the tabs at the top of the view.
Select one of the machines in the Netezza Cartridge Manager Connections list to load the NZ Cartridge Manager data for that machine.
Note: The Netezza Cartridge Manager (nzcm) can run a single operation at a time. As a result, running longer operations, such as install, temporarily blocks running other nzcm commands via the NZ Cartridge Manager view.
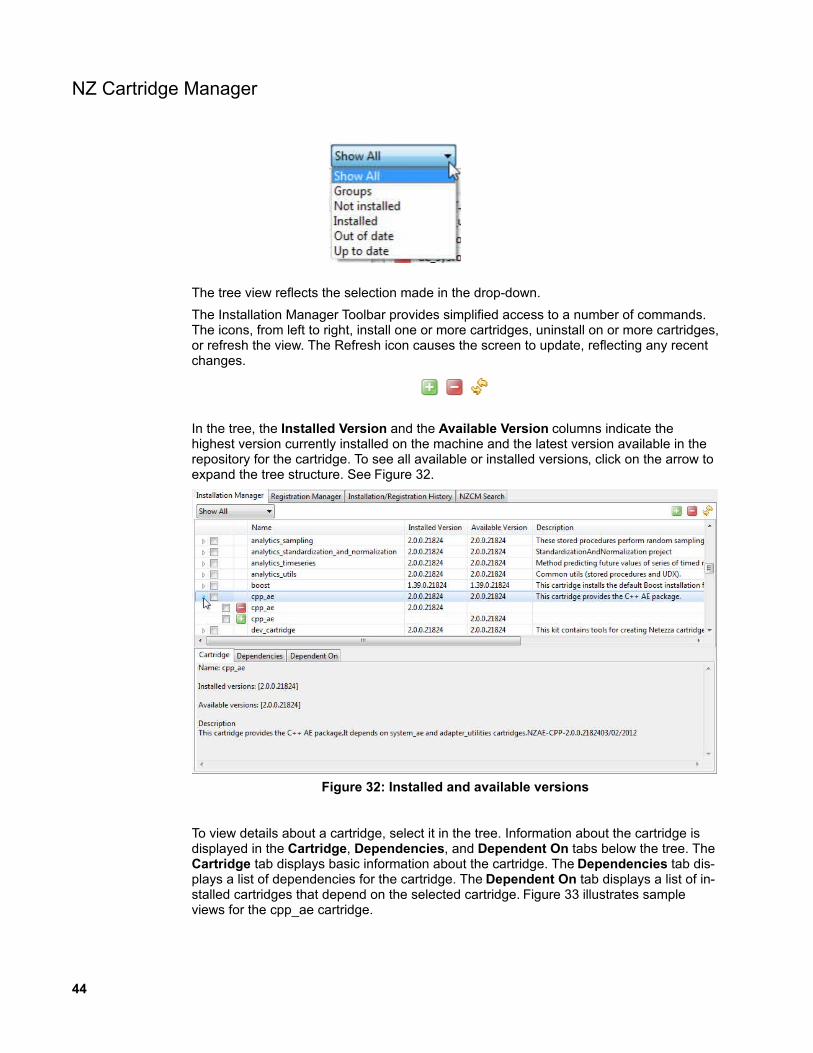
Installation ManagerThe Installation Manager shows all cartridges found in repositories as well as all cart-ridges already installed on the machine. Using the drop-down below the tabs, you can fil-ter the view to show all cartridges, groups, only cartridges that are not installed, only cartridges that are installed, out-of-date cartridges, and up-to-date cartridges.
43
Figure 31: NZ Cartridge Manager – Installation Manager tab
NZ Cartridge Manager
The tree view reflects the selection made in the drop-down.
The Installation Manager Toolbar provides simplified access to a number of commands. The icons, from left to right, install one or more cartridges, uninstall on or more cartridges, or refresh the view. The Refresh icon causes the screen to update, reflecting any recent changes.
In the tree, the Installed Version and the Available Version columns indicate the highest version currently installed on the machine and the latest version available in the repository for the cartridge. To see all available or installed versions, click on the arrow to expand the tree structure. See Figure 32.
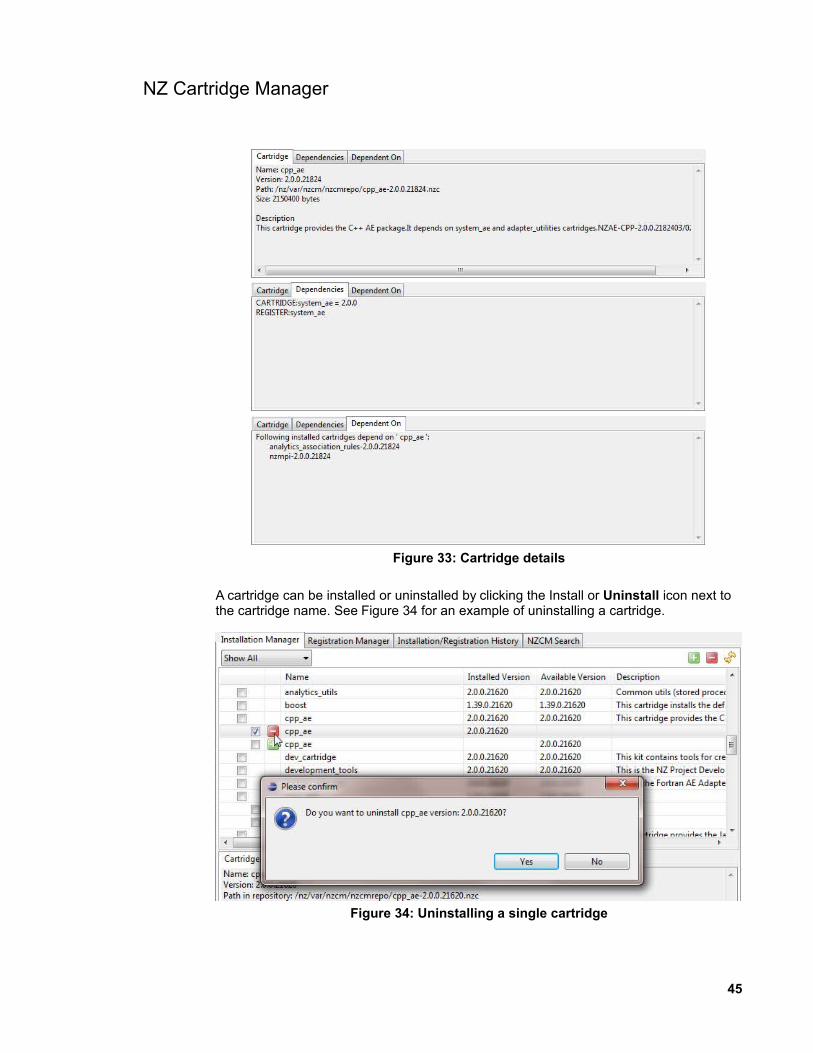
To view details about a cartridge, select it in the tree. Information about the cartridge is displayed in the Cartridge, Dependencies, and Dependent On tabs below the tree. The Cartridge tab displays basic information about the cartridge. The Dependencies tab dis-plays a list of dependencies for the cartridge. The Dependent On tab displays a list of in-stalled cartridges that depend on the selected cartridge. Figure 33 illustrates sample views for the cpp_ae cartridge.
44
Figure 32: Installed and available versions
NZ Cartridge Manager
A cartridge can be installed or uninstalled by clicking the Install or Uninstall icon next to the cartridge name. See Figure 34 for an example of uninstalling a cartridge.
45
Figure 33: Cartridge details
Figure 34: Uninstalling a single cartridge

NZ Cartridge Manager
Multiple cartridges can be installed or uninstalled by selecting the check boxes next to the cartridge names and then clicking the appropriate icon in the Installation Manager tool-bar. See Figure 35 for an example of uninstalling multiple cartridges.
Note: The process of installation and uninstallation may require interaction with the user. Follow the instructions that appear in the NZ Cartridge Manager Interactive Console. If prompted, input should be typed directly into the console. In the sample shown in Figure36, the user is asked to verify if the unregister process should continue. The response is shown in black text, highlighted in the figure with a red circle.
46
Figure 35: Uninstalling multiple cartridges

NZ Cartridge Manager
Registration ManagerThe Registration Manager manages the process of registering and unregistering in-stalled cartridges in available databases. The Registration Manager has two views: Cartridge View and Database View.
Cartridge View
Cartridge View provides a list of all installed cartridges. Using the drop-down below the tabs, the view can be filtered to show all cartridges, only cartridges that are registered, only cartridges that are not registered, or groups.
The tree view reflects the selection made in the drop-down.
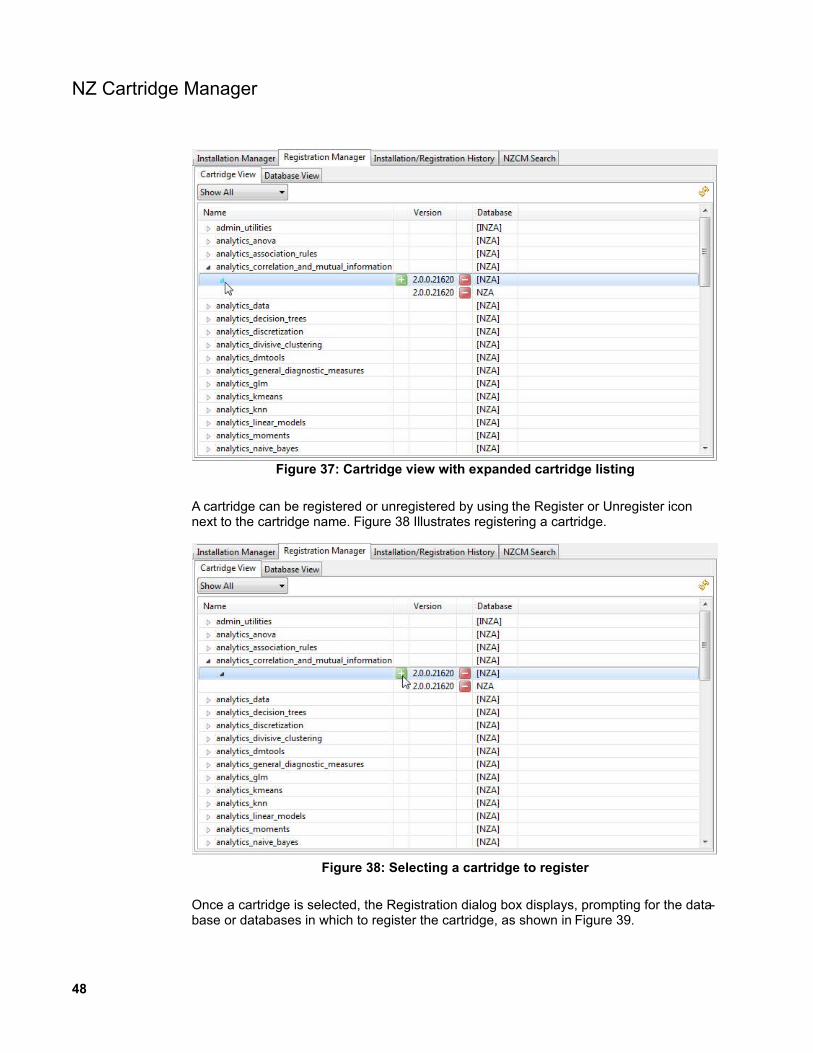
In the tree view, view specific versions of cartridges by selecting the arrow next to the cartridge name to expand it. See Figure 37.
47
Figure 36: Uninstalling multiple cartridges
NZ Cartridge Manager
A cartridge can be registered or unregistered by using the Register or Unregister icon next to the cartridge name. Figure 38 Illustrates registering a cartridge.
Once a cartridge is selected, the Registration dialog box displays, prompting for the data-base or databases in which to register the cartridge, as shown in Figure 39.
48
Figure 37: Cartridge view with expanded cartridge listing
Figure 38: Selecting a cartridge to register

NZ Cartridge Manager
Select the appropriate database(s) and click OK.
Note: In most cases only one database is suitable.
Cartridges can be unregistered from the database using a similar process.
Database View
The Database View provides a list of all available databases and provides access to re-gistering and unregistering cartridges from the perspective of a specific database. Click-ing on the Database View tab displays a view of each database on the host, the owner of the database, and a summary of the number of cartridges installed on each database, as shown in Figure 40.
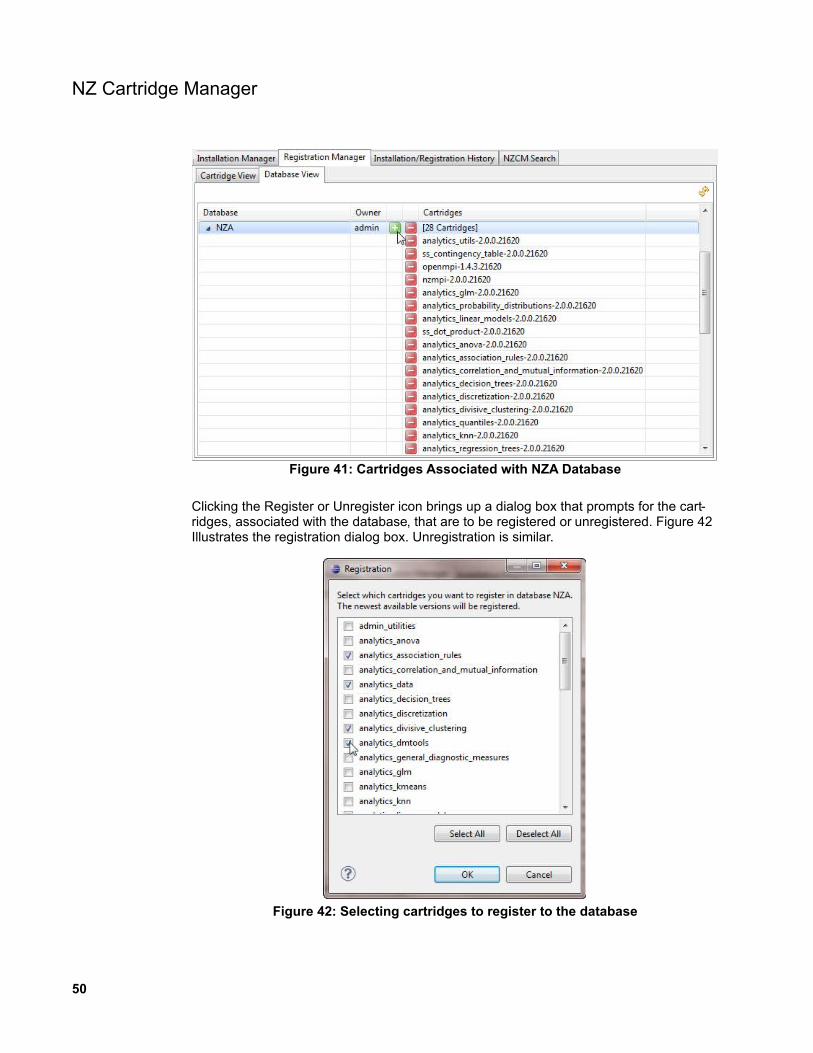
If one or more cartridges are installed on the database, an expansion arrow appears next to the database name. Clicking on this arrow expands the listing to show all of the associ-ated cartridges. See Figure 41.
49
Figure 39: Database selection for cartridge registration
Figure 40: Registration Manager database view
NZ Cartridge Manager
Clicking the Register or Unregister icon brings up a dialog box that prompts for the cart-ridges, associated with the database, that are to be registered or unregistered. Figure 42 Illustrates the registration dialog box. Unregistration is similar.
50
Figure 41: Cartridges Associated with NZA Database
Figure 42: Selecting cartridges to register to the database
NZ Cartridge Manager
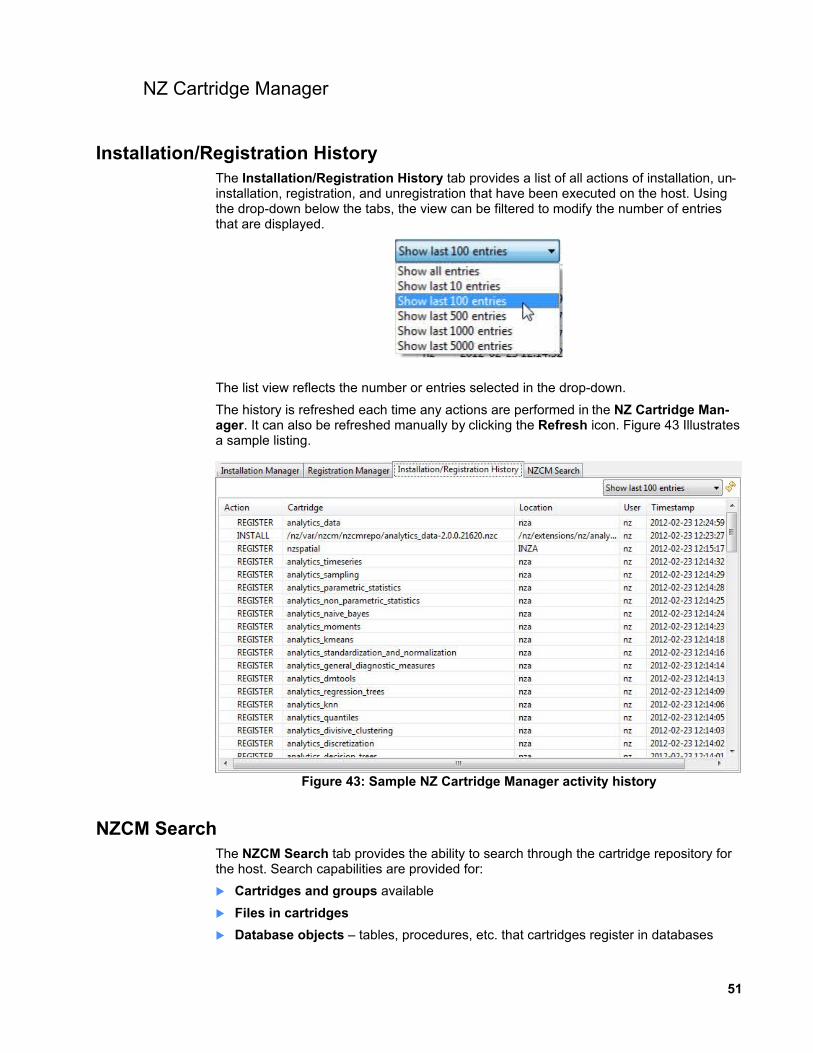
Installation/Registration HistoryThe Installation/Registration History tab provides a list of all actions of installation, un-installation, registration, and unregistration that have been executed on the host. Using the drop-down below the tabs, the view can be filtered to modify the number of entries that are displayed.
The list view reflects the number or entries selected in the drop-down.
The history is refreshed each time any actions are performed in the NZ Cartridge Man-ager. It can also be refreshed manually by clicking the Refresh icon. Figure 43 Illustrates a sample listing.
NZCM SearchThe NZCM Search tab provides the ability to search through the cartridge repository for the host. Search capabilities are provided for:
Cartridges and groups available
Files in cartridges
Database objects – tables, procedures, etc. that cartridges register in databases
51
Figure 43: Sample NZ Cartridge Manager activity history
NZ Cartridge Manager
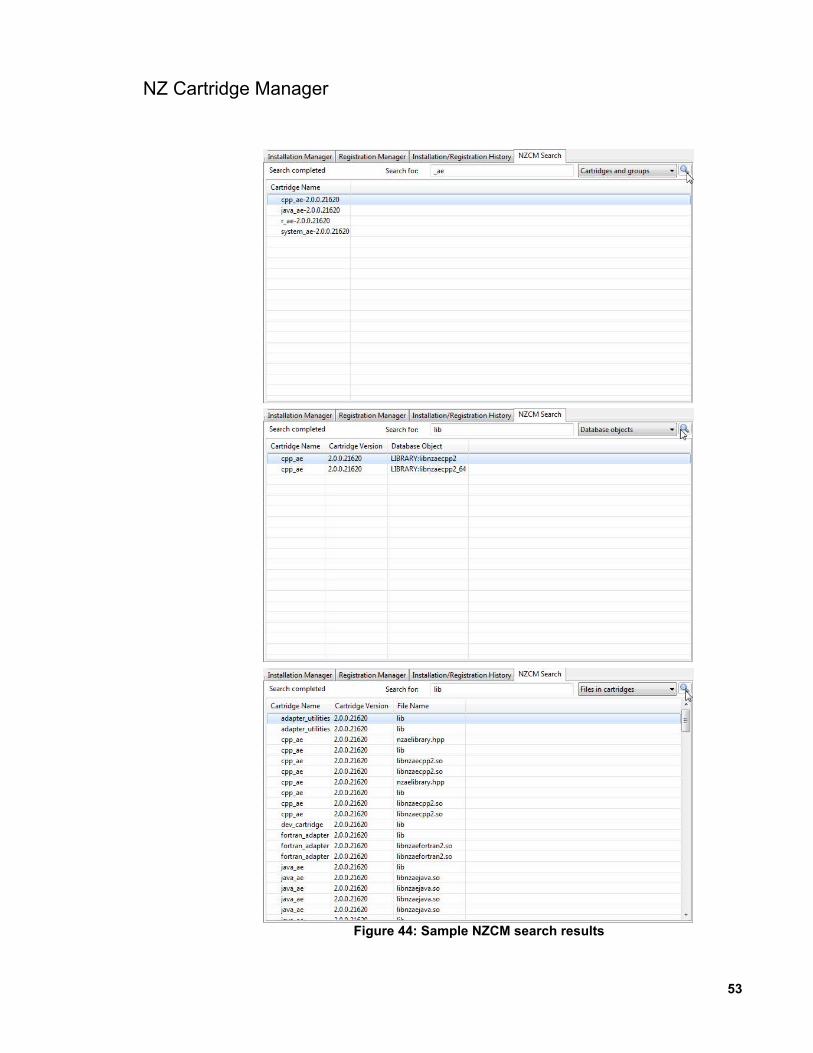
In each case, you enter a search string in the search field; clicking on the search icon re-turns the matching entries. Search for .* to see all results. Figure 44 illustrates sample listings for each search type.
52
NZ Cartridge Manager
53
Figure 44: Sample NZCM search results
NPS Logs Browser
NPS Logs Browser
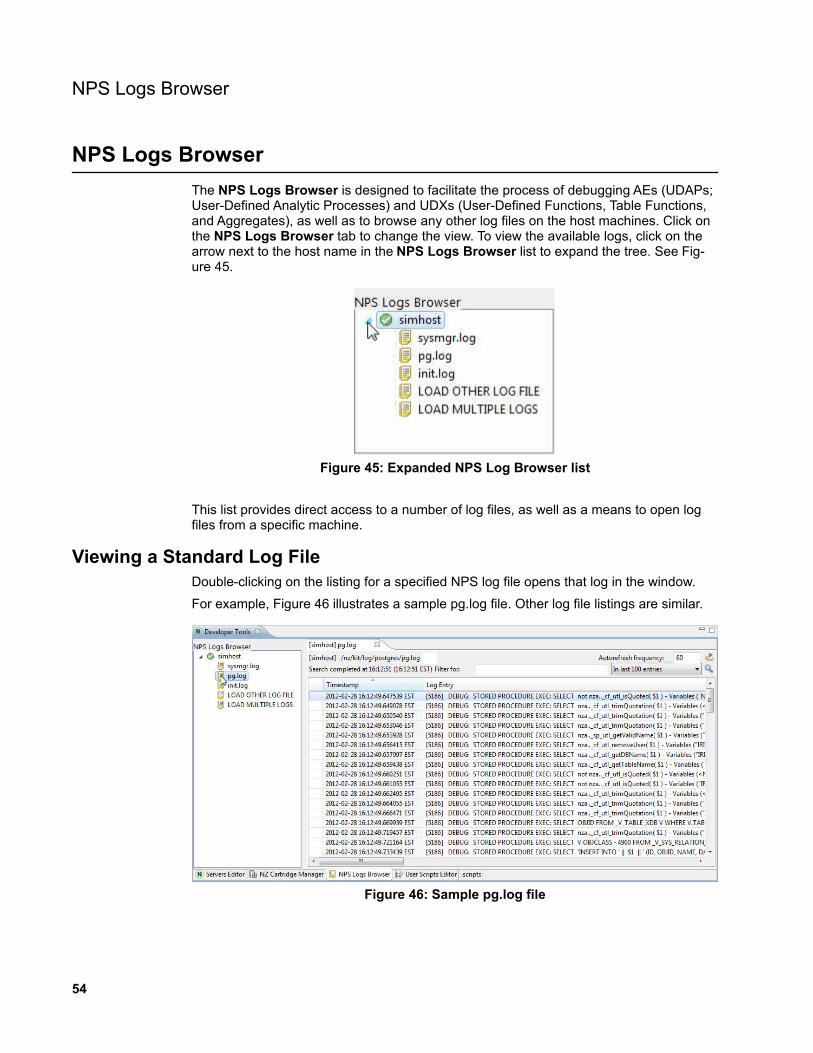
The NPS Logs Browser is designed to facilitate the process of debugging AEs (UDAPs; User-Defined Analytic Processes) and UDXs (User-Defined Functions, Table Functions, and Aggregates), as well as to browse any other log files on the host machines. Click on the NPS Logs Browser tab to change the view. To view the available logs, click on the arrow next to the host name in the NPS Logs Browser list to expand the tree. See Fig-ure 45.
This list provides direct access to a number of log files, as well as a means to open log files from a specific machine.
Viewing a Standard Log FileDouble-clicking on the listing for a specified NPS log file opens that log in the window.
For example, Figure 46 illustrates a sample pg.log file. Other log file listings are similar.
54
Figure 45: Expanded NPS Log Browser list
Figure 46: Sample pg.log file

NPS Logs Browser
Log File Display ContentsFor each log file, the NPS Logs Browser displays:
The machine name
The full file path and file name of the log file
The time of the last search.
The entries can be sorted by time stamp or log entry by clicking on the heading. Clicking again reverses the order.
Filtering the ContentsBy default, the NPS Logs Browser loads the last 100 entries from a log. However, this can be modified by using the entry drop-down.
The drop-down works in conjunction with the Filter for field. You can specify any regular expression for the search, which is useful for debugging, allowing you to locate specific tags in log entries. To activate the search, click the Search icon.
Note: If the Filter for field is left empty, all entries are shown.
AutorefreshAn Autorefresh capability is included in the log file listing. By entering a value in the Autorefresh Frequency field and clicking the Autorefresh icon, the log file automatically updates at the specified interval. The default interval is 60 seconds. To turn off the autore-fresh capability, click on the icon again.
Viewing Other Log FilesIn addition to viewing standard log files, you can open single and multiple log files from other locations. Double-clicking the Load Other Log File and Load Multiple Logs entries opens dialog boxes to perform those tasks.
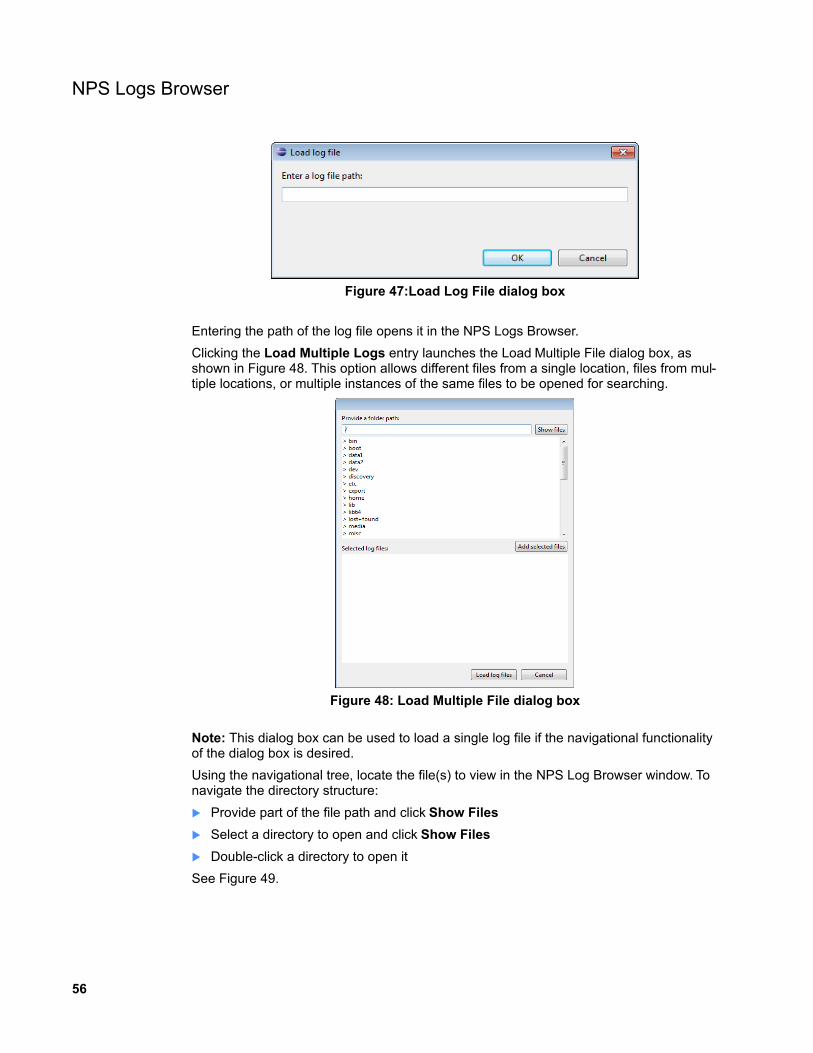
Clicking the Load Other Log File entry launches the Load Log File dialog box, as shown in Figure 47.
55
NPS Logs Browser
Entering the path of the log file opens it in the NPS Logs Browser.
Clicking the Load Multiple Logs entry launches the Load Multiple File dialog box, as shown in Figure 48. This option allows different files from a single location, files from mul-tiple locations, or multiple instances of the same files to be opened for searching.
Note: This dialog box can be used to load a single log file if the navigational functionality of the dialog box is desired.
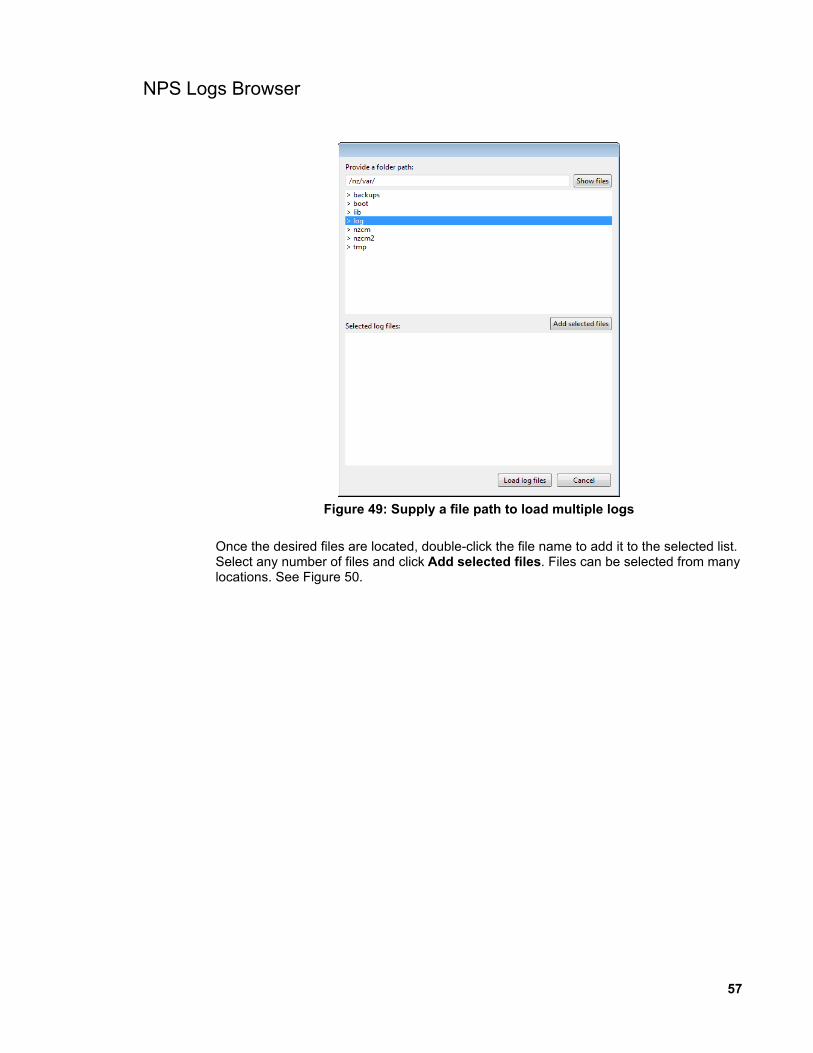
Using the navigational tree, locate the file(s) to view in the NPS Log Browser window. To navigate the directory structure:
Provide part of the file path and click Show Files
Select a directory to open and click Show Files
Double-click a directory to open it
See Figure 49.
56
Figure 48: Load Multiple File dialog box
Figure 47:Load Log File dialog box
NPS Logs Browser
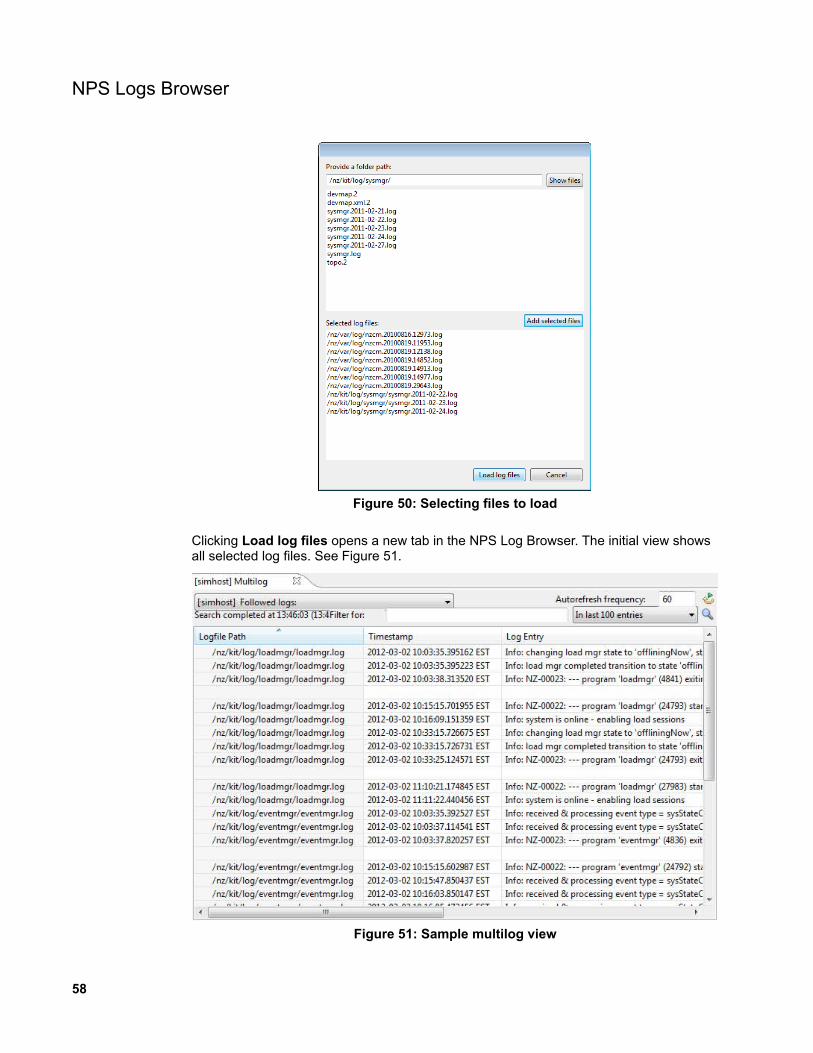
Once the desired files are located, double-click the file name to add it to the selected list. Select any number of files and click Add selected files. Files can be selected from many locations. See Figure 50.
57
Figure 49: Supply a file path to load multiple logs
NPS Logs Browser
Clicking Load log files opens a new tab in the NPS Log Browser. The initial view shows all selected log files. See Figure 51.
58
Figure 50: Selecting files to load
Figure 51: Sample multilog view

NPS Logs Browser
Note: The Followed logs list is not a filter. It is only a way to check what logs are in-cluded in the Multilog.
Multiple logs can be used in the same way as logs from a single file.
59
Building a Project
Building a Project Remotely
The IBM Netezza Plug-in for Eclipse Framework supports deploying makefile-based pro-jects on Netezza appliances as well as on the IBM Netezza Software Emulator For De-velopers.
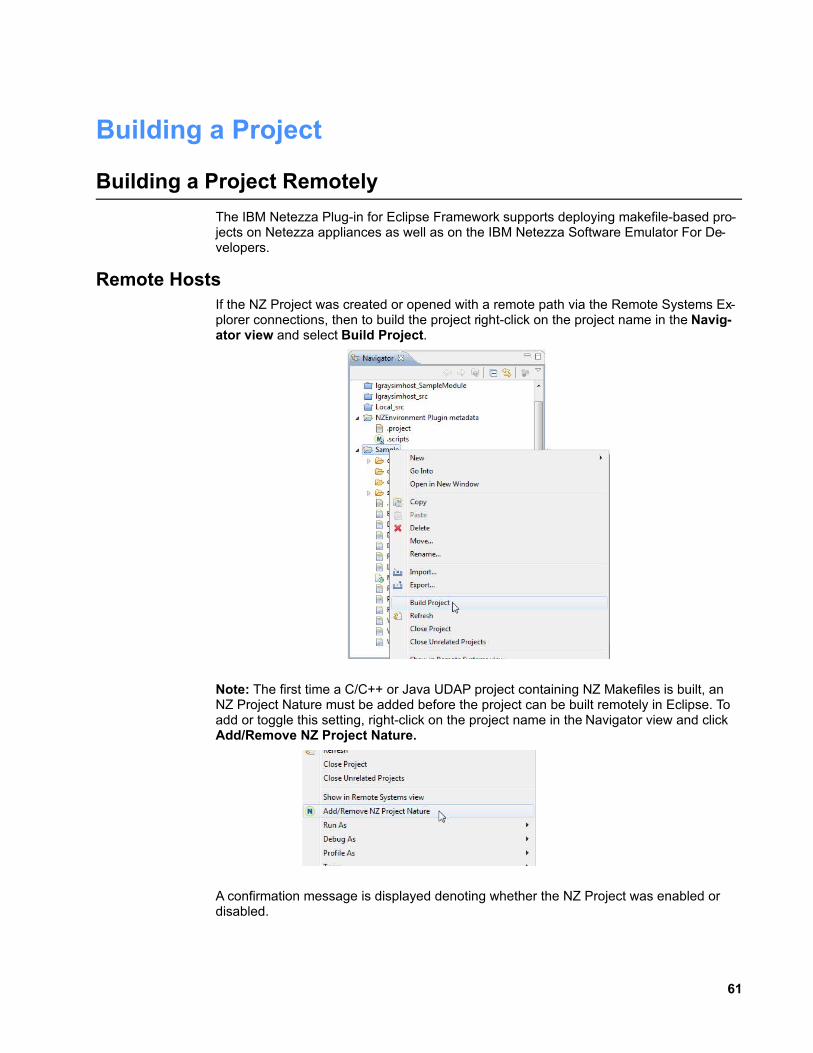
Remote HostsIf the NZ Project was created or opened with a remote path via the Remote Systems Ex-plorer connections, then to build the project right-click on the project name in the Navig-ator view and select Build Project.
Note: The first time a C/C++ or Java UDAP project containing NZ Makefiles is built, an NZ Project Nature must be added before the project can be built remotely in Eclipse. To add or toggle this setting, right-click on the project name in the Navigator view and click Add/Remove NZ Project Nature.
A confirmation message is displayed denoting whether the NZ Project was enabled or disabled.
61
Building a Project Remotely
Notes:
A C/C++ project can be prevented from building with the CDT make while still keeping the CDT project nature of the project. In order to do so, remove the following entries from the .project file of the project:
<nature>org.eclipse.cdt.managedbuilder.core.managedBuildNature</nature><nature>org.eclipse.cdt.managedbuilder.core.ScannerConfigNature</nature>
Output from other building processes, for example CDT make, may obscure the out-put of the NZ Make in the Console view. You can switch views of the Console view in its toolbar.
Local HostsIf the project was created with a path in a local (default) file system, then when you first try to click on Build Project you will be asked to provide the remote path to the shared directory of the project’s location in the remote file system. The remote location is saved in the .nzProjectSharedRemoteLocation configuration file. The remote path can be changed at any time by editing or removing the file.
Note: If the selected location is not a shared folder, no source synchronization is per-formed for a remote location.
The Build Process
The process of compiling and building algorithms is complex, however default settings are included in the general NZ Makefile delivered as a part of the project structure.
While working with a single project, all requirements and dependencies are taken from the system, for example, /nz/export. This requires installation of all project prerequisites.
Installed CartridgesTo build a project, the following IBM Netezza Analytics cartridges must be installed:
development_tools-x.x.x.x.nzc—Required if NZ Makefiles are used to build the pro-ject, or to build a cartridge.
nzdoc-x.x.x.x.nzc—Required to use nzdoc to generate comments and help or to build documentation based on nzdoc tags. This cartridge is also required if NZ Make-files are used.
Project TargetsEvery project has the following targets:
all—Performs the tasks found in the clean, compile, install, and register targets.
clean—Clears all files for the projects in the build folder.
compile—The default action, which compiles the project in the build folder.
install—Installs the project as if it was installed from the cartridge.
register—Registers the project as if it was registered from the cartridge.
data—Installs data specific for the project, for example data used in examples or data included in comments.
62

The Build Process
verify—Allows some basic tests, such as queries, to be run that check if the compon-ent was installed successfully and is working correctly; it is assumed that the verify.sh script exists as part of the project.
nzc—Builds a cartridge.
docs—Builds documentation for the project; it is assumed that there is a docs folder that contains the Makefile with docs target.
Makefile OptionsThe following Makefile options are available:
BUILD_NUM—The build number, which should be incremented with every build. For example, make nzc BUILD_NUM=13456.
NODATA—Specifies whether the data folder should be included in the cartridge. A TRUE value results in not including the data folder within the cartridge. For example, make NODATA=TRUE nzc.
GENERATE_DOCS—Specifies whether the help is generated from the comments during compilation. For example, make GENERATE_DOCS=TRUE compile.
HIDE—Specifies whether running commands are shown in the console output. For example, make HIDE="" compile.
Defining a User Action
While commands such as make can be executed from the User Scripts Editor or from a terminal, frequently used commands can also be defined using User Actions in the Re-mote Systems Explorer.
To define a custom make command that will build a module:
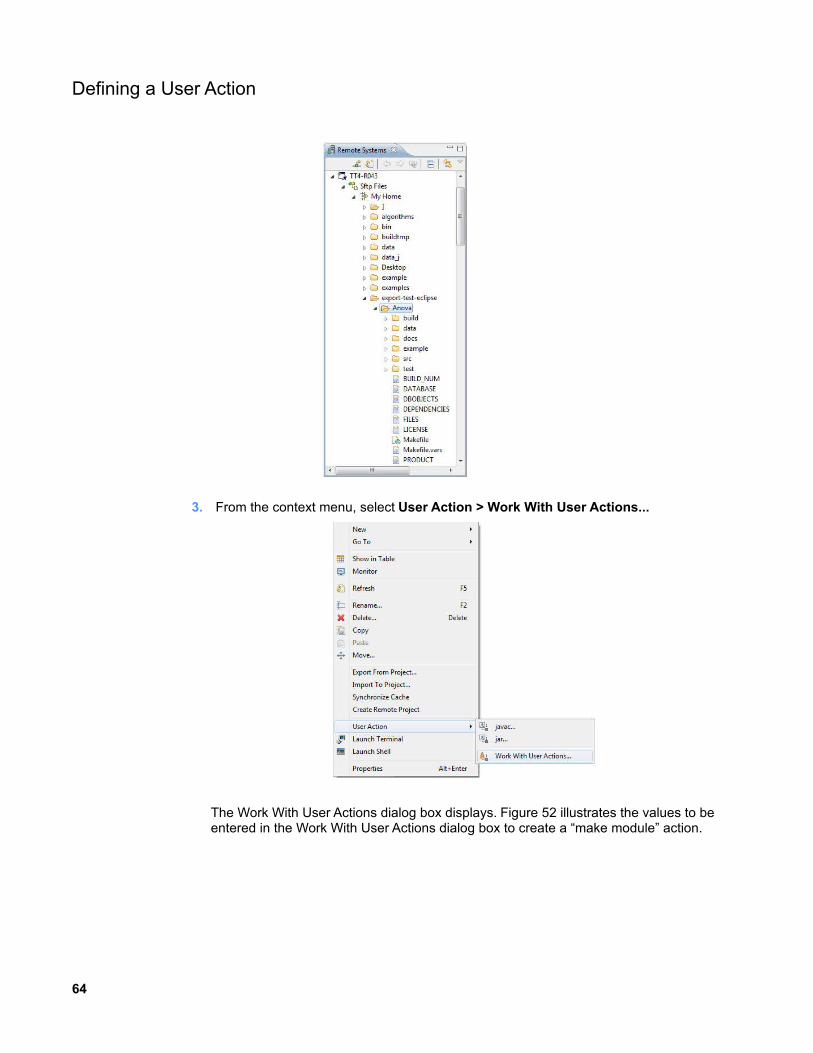
1. Open the Remote Systems view.
2. Right-click on a folder or file to open the context menu.
63
Defining a User Action
3. From the context menu, select User Action > Work With User Actions...
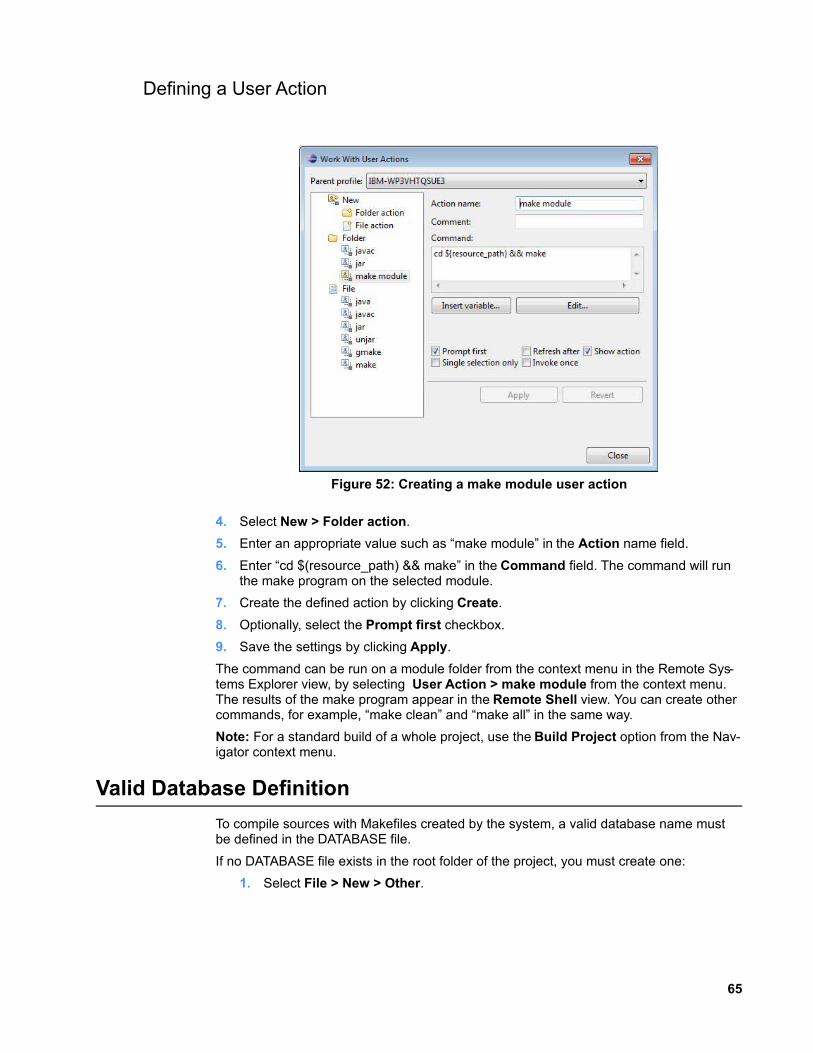
The Work With User Actions dialog box displays. Figure 52 illustrates the values to be entered in the Work With User Actions dialog box to create a “make module” action.
64
Defining a User Action
4. Select New > Folder action.
5. Enter an appropriate value such as “make module” in the Action name field.
6. Enter “cd $(resource_path) && make” in the Command field. The command will run the make program on the selected module.
7. Create the defined action by clicking Create.
8. Optionally, select the Prompt first checkbox.
9. Save the settings by clicking Apply.
The command can be run on a module folder from the context menu in the Remote Sys-tems Explorer view, by selecting User Action > make module from the context menu. The results of the make program appear in the Remote Shell view. You can create other commands, for example, “make clean” and “make all” in the same way.
Note: For a standard build of a whole project, use the Build Project option from the Nav-igator context menu.
Valid Database Definition
To compile sources with Makefiles created by the system, a valid database name must be defined in the DATABASE file.
If no DATABASE file exists in the root folder of the project, you must create one:
1. Select File > New > Other.
65
Figure 52: Creating a make module user action

Valid Database Definition
2. In the dialog box, select General > File and click Next >. See Figure 53.
3. Select the main folder of the project..
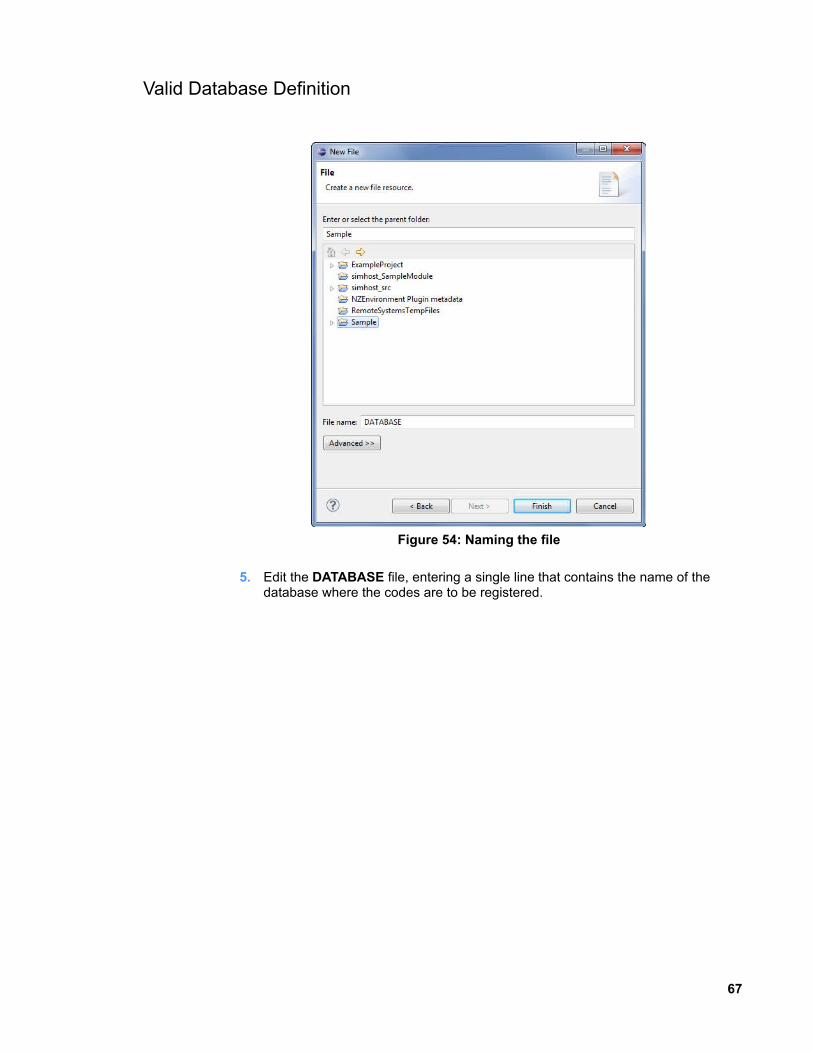
4. Enter DATABASE in the File Name field and click Finish. See Figure 54.
66
Figure 53: Creating a new file
Valid Database Definition
5. Edit the DATABASE file, entering a single line that contains the name of the database where the codes are to be registered.
67
Figure 54: Naming the file
Notices and Trademarks
NoticesThis information was developed for products and services offered in the U.S.A. IBM may not offer the products, services, or features discussed in this document in other countries. Consult your local IBM representative for information on the products and services cur-rently available in your area. Any reference to an IBM product, program, or service is not intended to state or imply that only that IBM product, program, or service may be used. Any functionally equivalent product, program, or service that does not infringe any IBM in-tellectual property right may be used instead. However, it is the user's responsibility to evaluate and verify the operation of any non-IBM product, program, or service.
IBM may have patents or pending patent applications covering subject matter described in this document. The furnishing of this document does not grant you any license to these patents. You can send license inquiries, in writing, to:
IBM Director of LicensingIBM CorporationNorth Castle DriveArmonk, NY 10504-1785 U.S.A.
For license inquiries regarding double-byte character set (DBCS) information, contact the IBM Intellectual Property Department in your country or send inquiries, in writing, to:
Intellectual Property LicensingLegal and Intellectual Property LawIBM Japan Ltd.1623-14, Shimotsuruma, Yamato-shiKanagawa 242-8502 Japan
The following paragraph does not apply to the United Kingdom or any other country where such provisions are inconsistent with local law: INTERNATIONAL BUSINESS MA-CHINES CORPORATION PROVIDES THIS PUBLICATION "AS IS" WITHOUT WAR-RANTY OF ANY KIND, EITHER EXPRESS OR IMPLIED, INCLUDING, BUT NOT LIM-ITED TO, THE IMPLIED WARRANTIES OF NON-INFRINGEMENT, MERCHANTABILITY OR FITNESS FOR A PARTICULAR PURPOSE. Some states do not allow disclaimer of express or implied warranties in certain transactions, therefore, this statement may not apply to you.
This information could include technical inaccuracies or typographical errors. Changes are periodically made to the information herein; these changes will be incorporated in new editions of the publication. IBM may make improvements and/or changes in the product(s) and/or the program(s) described in this publication at any time without notice.
Any references in this information to non-IBM Web sites are provided for convenience only and do not in any manner serve as an endorsement of those Web sites. The materi-als at those Web sites are not part of the materials for this IBM product and use of those Web sites is at your own risk.
IBM may use or distribute any of the information you supply in any way it believes appro-priate without incurring any obligation to you.
69
Notices and Trademarks
Licensees of this program who wish to have information about it for the purpose of en-abling: (i) the exchange of information between independently created programs and oth-er programs (including this one) and (ii) the mutual use of the information which has been exchanged, should contact: IBM Corporation26 Forest StreetMarlborough, MA 01752 U.S.A.
Such information may be available, subject to appropriate terms and conditions, including in some cases, payment of a fee.
The licensed program described in this document and all licensed material available for it are provided by IBM under terms of the IBM Customer Agreement, IBM International Pro-gram License Agreement or any equivalent agreement between us.
Any performance data contained herein was determined in a controlled environment. Therefore, the results obtained in other operating environments may vary significantly. Some measurements may have been made on development-level systems and there is no guarantee that these measurements will be the same on generally available systems. Furthermore, some measurements may have been estimated through extrapolation. Ac-tual results may vary. Users of this document should verify the applicable data for their specific environment.
Information concerning non-IBM products was obtained from the suppliers of those products, their published announcements or other publicly available sources. IBM has not tested those products and cannot confirm the accuracy of performance, compatibility or any other claims related to non-IBM products. Questions on the capabilities of non-IBM products should be addressed to the suppliers of those products.
All statements regarding IBM's future direction or intent are subject to change or with-drawal without notice, and represent goals and objectives only. This information is for planning purposes only. The information herein is subject to change before the products described become available.
This information contains examples of data and reports used in daily business opera-tions. To illustrate them as completely as possible, the examples include the names of in-dividuals, companies, brands, and products. All of these names are fictitious and any sim-ilarity to the names and addresses used by an actual business enterprise is entirely coin-cidental.
COPYRIGHT LICENSE:
This information contains sample application programs in source language, which illus-trate programming techniques on various operating platforms. You may copy, modify, and distribute these sample programs in any form without payment to IBM, for the purposes of developing, using, marketing or distributing application programs conforming to the ap-plication programming interface for the operating platform for which the sample programs are written. These examples have not been thoroughly tested under all conditions. IBM, therefore, cannot guarantee or imply reliability, serviceability, or function of these pro-grams. The sample programs are provided "AS IS", without warranty of any kind. IBM shall not be liable for any damages arising out of your use of the sample programs.
Each copy or any portion of these sample programs or any derivative work, must include a copyright notice as follows:
© (your company name) (year). Portions of this code are derived from IBM Corp. Sample Programs. © Copyright IBM Corp. (enter the year or years). All rights reserved.
70
Notices and Trademarks
TrademarksIBM, the IBM logo, ibm.com and Netezza are trademarks or registered trademarks of In-ternational Business Machines Corporation in the United States, other countries, or both. If these and other IBM trademarked terms are marked on their first occurrence in this in-formation with a trademark symbol (® or ™), these symbols indicate U.S. registered or common law trademarks owned by IBM at the time this information was published. Such trademarks may also be registered or common law trademarks in other countries. A cur-rent list of IBM trademarks is available on the Web at “Copyright and trademark informa-tion” at ibm.com/legal/copytrade.shtml.
The following terms are trademarks or registered trademarks of other companies:
Adobe is a registered trademark of Adobe Systems Incorporated in the United States, and/or other countries.
Linux is a registered trademark of Linus Torvalds in the United States, other countries, or both.
Microsoft, Windows, Windows NT, and the Windows logo are trademarks of Microsoft Corporation in the United States, other countries, or both.
NEC is a registered trademark of NEC Corporation.
UNIX is a registered trademark of The Open Group in the United States and other coun-tries.
Java and all Java-based trademarks are trademarks of Sun Microsystems, Inc. in the United States, other countries, or both.
Red Hat is a trademark or registered trademark of Red Hat, Inc. in the United States and/or other countries.
D-CC, D-C++, Diab+, FastJ, pSOS+, SingleStep, Tornado, VxWorks, Wind River, and the Wind River logo are trademarks, registered trademarks, or service marks of Wind River Systems, Inc. Tornado patent pending.
APC and the APC logo are trademarks or registered trademarks of American Power Con-version Corporation.
Other company, product or service names may be trademarks or service marks of others.
Regulatory and Compliance
Regulatory Notices
Install the NPS system in a restricted-access location. Ensure that only those trained to operate or service the equipment have physical access to it. Install each AC power outlet near the NPS rack that plugs into it, and keep it freely accessible. Provide approved cir-cuit breakers on all power sources.
Product may be powered by redundant power sources. Disconnect ALL power sources before servicing. High leakage current. Earth connection essential before connecting sup-ply. Courant de fuite élevé. Raccordement à la terre indispensable avant le raccordement au réseau.
Homologation Statement
Attention: This product is not intended to be connected directly or indirectly by any means whatsoever to interfaces of public telecommunications networks, neither to be used in a
71
Notices and Trademarks
Public Services Network.
FCC - Industry Canada Statement
This equipment has been tested and found to comply with the limits for a Class A digital device, pursuant to part 15 of the FCC rules. These limits are designed to provide reas-onable protection against harmful interference when the equipment is operated in a com-mercial environment. This equipment generates, uses, and can radiate radio-frequency energy and, if not installed and used in accordance with the instruction manual, may cause harmful interference to radio communications. Operation of this equipment in a residential area is likely to cause harmful interference, in which case users will be re-quired to correct the interference at their own expense.
This Class A digital apparatus meets all requirements of the Canadian Interference-Caus-ing Equipment Regulations.
Cet appareil numérique de la classe A respecte toutes les exigences du Règlement sur le matériel brouilleur du Canada.
WEEE
Netezza Corporation is committed to meeting the requirements of the European Union (EU) Waste Electrical and Electronic Equipment (WEEE) Directive. This Directive re-quires producers of electrical and electronic equipment to finance the takeback, for reuse or recycling, of their products placed on the EU market after August 13, 2005.
CE Statement (Europe)
This product complies with the European Low Voltage Directive 73/23/EEC and EMC Dir-ective 89/336/EEC as amended by European Directive 93/68/EEC.
Warning: This is a class A product. In a domestic environment this product may cause ra-dio interference in which case the user may be required to take adequate measures.
VCCI Statement
72