Embed Size (px)
Citation preview
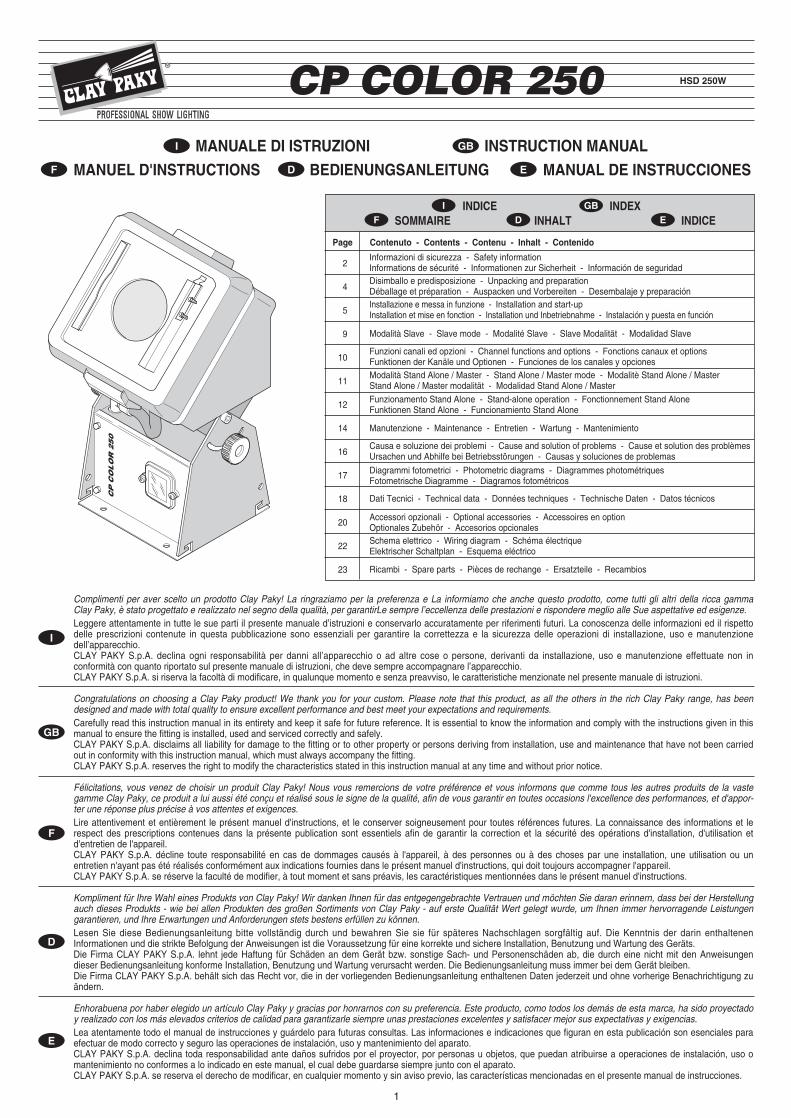
CP COLOR 250 HSD 250W
®
1
CP
CO
LO
R 2
50
MANUALE DI ISTRUZIONI INSTRUCTION MANUAL
MANUEL D'INSTRUCTIONS BEDIENUNGSANLEITUNG MANUAL DE INSTRUCCIONES
I
F
GB
D E
INDICE INDEXSOMMAIRE INHALT INDICE
I GB
D EF
2
4
5
9
10
11
12
14
16
17
18
20
22
23
Informazioni di sicurezza - Safety informationInformations de sécurité - Informationen zur Sicherheit - Información de seguridadDisimballo e predisposizione - Unpacking and preparationDéballage et préparation - Auspacken und Vorbereiten - Desembalaje y preparaciónInstallazione e messa in funzione - Installation and start-upInstallation et mise en fonction - Installation und Inbetriebnahme - Instalación y puesta en función
Funzioni canali ed opzioni - Channel functions and options - Fonctions canaux et optionsFunktionen der Kanäle und Optionen - Funciones de los canales y opciones
Funzionamento Stand Alone - Stand-alone operation - Fonctionnement Stand AloneFunktionen Stand Alone - Funcionamiento Stand Alone
Manutenzione - Maintenance - Entretien - Wartung - Mantenimiento
Modalità Slave - Slave mode - Modalité Slave - Slave Modalität - Modalidad Slave
Modalità Stand Alone / Master - Stand Alone / Master mode - Modalitè Stand Alone / MasterStand Alone / Master modalität - Modalidad Stand Alone / Master
Causa e soluzione dei problemi - Cause and solution of problems - Cause et solution des problèmesUrsachen und Abhilfe bei Betriebsstörungen - Causas y soluciones de problemas
Dati Tecnici - Technical data - Données techniques - Technische Daten - Datos técnicos
Diagrammi fotometrici - Photometric diagrams - Diagrammes photométriquesFotometrische Diagramme - Diagramos fotométricos
Accessori opzionali - Optional accessories - Accessoires en optionOptionales Zubehör - Accesorios opcionalesSchema elettrico - Wiring diagram - Schéma électriqueElektrischer Schaltplan - Esquema eléctrico
Ricambi - Spare parts - Pièces de rechange - Ersatzteile - Recambios
Page Contenuto - Contents - Contenu - Inhalt - Contenido
GB
I
D
E
F
Complimenti per aver scelto un prodotto Clay Paky! La ringraziamo per la preferenza e La informiamo che anche questo prodotto, come tutti gli altri della ricca gamma Clay Paky, è stato progettato e realizzato nel segno della qualità, per garantirLe sempre l’eccellenza delle prestazioni e rispondere meglio alle Sue aspettative ed esigenze.Leggere attentamente in tutte le sue parti il presente manuale d’istruzioni e conservarlo accuratamente per riferimenti futuri. La conoscenza delle informazioni ed il rispettodelle prescrizioni contenute in questa pubblicazione sono essenziali per garantire la correttezza e la sicurezza delle operazioni di installazione, uso e manutenzionedell’apparecchio.CLAY PAKY S.p.A. declina ogni responsabilità per danni all’apparecchio o ad altre cose o persone, derivanti da installazione, uso e manutenzione effettuate non in conformità con quanto riportato sul presente manuale di istruzioni, che deve sempre accompagnare l’apparecchio. CLAY PAKY S.p.A. si riserva la facoltà di modificare, in qualunque momento e senza preavviso, le caratteristiche menzionate nel presente manuale di istruzioni.
Congratulations on choosing a Clay Paky product! We thank you for your custom. Please note that this product, as all the others in the rich Clay Paky range, has been designed and made with total quality to ensure excellent performance and best meet your expectations and requirements.Carefully read this instruction manual in its entirety and keep it safe for future reference. It is essential to know the information and comply with the instructions given in thismanual to ensure the fitting is installed, used and serviced correctly and safely.CLAY PAKY S.p.A. disclaims all liability for damage to the fitting or to other property or persons deriving from installation, use and maintenance that have not been carriedout in conformity with this instruction manual, which must always accompany the fitting.CLAY PAKY S.p.A. reserves the right to modify the characteristics stated in this instruction manual at any time and without prior notice.
Félicitations, vous venez de choisir un produit Clay Paky! Nous vous remercions de votre préférence et vous informons que comme tous les autres produits de la vastegamme Clay Paky, ce produit a lui aussi été conçu et réalisé sous le signe de la qualité, afin de vous garantir en toutes occasions l'excellence des performances, et d'appor-ter une réponse plus précise à vos attentes et exigences.Lire attentivement et entièrement le présent manuel d'instructions, et le conserver soigneusement pour toutes références futures. La connaissance des informations et lerespect des prescriptions contenues dans la présente publication sont essentiels afin de garantir la correction et la sécurité des opérations d'installation, d'utilisation et d'entretien de l'appareil.CLAY PAKY S.p.A. décline toute responsabilité en cas de dommages causés à l'appareil, à des personnes ou à des choses par une installation, une utilisation ou un entretien n'ayant pas été réalisés conformément aux indications fournies dans le présent manuel d'instructions, qui doit toujours accompagner l'appareil.CLAY PAKY S.p.A. se réserve la faculté de modifier, à tout moment et sans préavis, les caractéristiques mentionnées dans le présent manuel d'instructions.
Kompliment für Ihre Wahl eines Produkts von Clay Paky! Wir danken Ihnen für das entgegengebrachte Vertrauen und möchten Sie daran erinnern, dass bei der Herstellungauch dieses Produkts - wie bei allen Produkten des großen Sortiments von Clay Paky - auf erste Qualität Wert gelegt wurde, um Ihnen immer hervorragende Leistungengarantieren, und Ihre Erwartungen und Anforderungen stets bestens erfüllen zu können.Lesen Sie diese Bedienungsanleitung bitte vollständig durch und bewahren Sie sie für späteres Nachschlagen sorgfältig auf. Die Kenntnis der darin enthaltenenInformationen und die strikte Befolgung der Anweisungen ist die Voraussetzung für eine korrekte und sichere Installation, Benutzung und Wartung des Geräts.Die Firma CLAY PAKY S.p.A. lehnt jede Haftung für Schäden an dem Gerät bzw. sonstige Sach- und Personenschäden ab, die durch eine nicht mit den Anweisungen dieser Bedienungsanleitung konforme Installation, Benutzung und Wartung verursacht werden. Die Bedienungsanleitung muss immer bei dem Gerät bleiben.Die Firma CLAY PAKY S.p.A. behält sich das Recht vor, die in der vorliegenden Bedienungsanleitung enthaltenen Daten jederzeit und ohne vorherige Benachrichtigung zuändern.
Enhorabuena por haber elegido un artículo Clay Paky y gracias por honrarnos con su preferencia. Este producto, como todos los demás de esta marca, ha sido proyectadoy realizado con los más elevados criterios de calidad para garantizarle siempre unas prestaciones excelentes y satisfacer mejor sus expectativas y exigencias.Lea atentamente todo el manual de instrucciones y guárdelo para futuras consultas. Las informaciones e indicaciones que figuran en esta publicación son esenciales paraefectuar de modo correcto y seguro las operaciones de instalación, uso y mantenimiento del aparato.CLAY PAKY S.p.A. declina toda responsabilidad ante daños sufridos por el proyector, por personas u objetos, que puedan atribuirse a operaciones de instalación, uso omantenimiento no conformes a lo indicado en este manual, el cual debe guardarse siempre junto con el aparato.CLAY PAKY S.p.A. se reserva el derecho de modificar, en cualquier momento y sin aviso previo, las características mencionadas en el presente manual de instrucciones.
• InstallazioneAssicurarsi che tutte le parti per il fissaggio del proiettore sianoin buona condizione.Assicurarsi della stabilità del punto di ancoraggio prima diposizionare il proiettore. La fune di sicurezza, debitamente agganciata all’apparecchio efissata alla struttura di sostegno, deve essere installata in modoche, in caso di cedimento del sistema di supporto primario, siabbia la minor caduta possibile dell’apparecchio. Dopo uneventuale intervento la fune di sicurezza deve essere sostituitacon il ricambio originale.
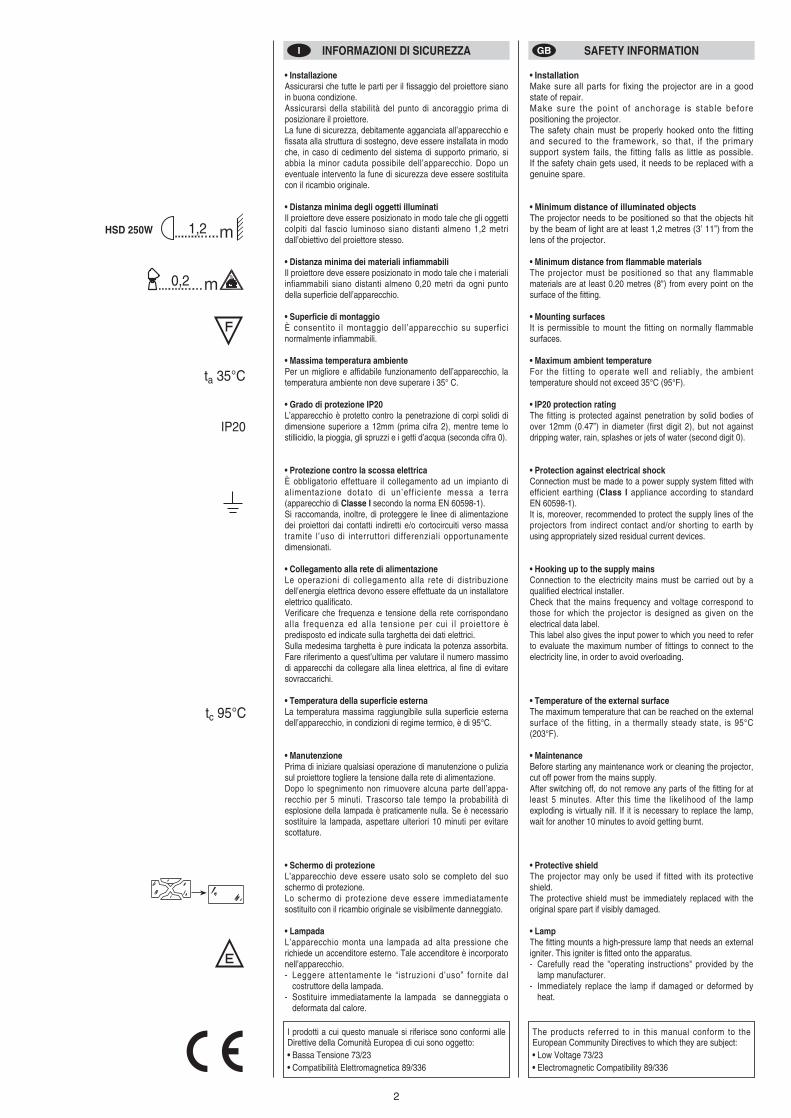
• Distanza minima degli oggetti illuminatiIl proiettore deve essere posizionato in modo tale che gli oggetticolpiti dal fascio luminoso siano distanti almeno 1,2 metridall’obiettivo del proiettore stesso.
• Distanza minima dei materiali infiammabiliIl proiettore deve essere posizionato in modo tale che i materialiinfiammabili siano distanti almeno 0,20 metri da ogni puntodella superficie dell’apparecchio.
• Superficie di montaggioÈ consentito il montaggio dell’apparecchio su superficinormalmente infiammabili.
• Massima temperatura ambientePer un migliore e affidabile funzionamento dell’apparecchio, latemperatura ambiente non deve superare i 35° C.
• Grado di protezione IP20L’apparecchio è protetto contro la penetrazione di corpi solidi didimensione superiore a 12mm (prima cifra 2), mentre teme lostillicidio, la pioggia, gli spruzzi e i getti d’acqua (seconda cifra 0).
• Protezione contro la scossa elettricaÈ obbligatorio effettuare il collegamento ad un impianto dialimentazione dotato di un’eff iciente messa a terra(apparecchio di Classe I secondo la norma EN 60598-1).Si raccomanda, inoltre, di proteggere le linee di alimentazionedei proiettori dai contatti indiretti e/o cortocircuiti verso massatramite l’uso di interruttori differenziali opportunamentedimensionati.
• Collegamento alla rete di alimentazioneLe operazioni di collegamento alla rete di distribuzionedell’energia elettrica devono essere effettuate da un installatoreelettrico qualificato.Verificare che frequenza e tensione della rete corrispondanoalla frequenza ed alla tensione per cui i l proiettore èpredisposto ed indicate sulla targhetta dei dati elettrici.Sulla medesima targhetta è pure indicata la potenza assorbita.Fare riferimento a quest’ultima per valutare il numero massimodi apparecchi da collegare alla linea elettrica, al fine di evitaresovraccarichi.
• Temperatura della superficie esternaLa temperatura massima raggiungibile sulla superficie esternadell’apparecchio, in condizioni di regime termico, è di 95°C.
• ManutenzionePrima di iniziare qualsiasi operazione di manutenzione o puliziasul proiettore togliere la tensione dalla rete di alimentazione.Dopo lo spegnimento non rimuovere alcuna parte dell’appa-recchio per 5 minuti. Trascorso tale tempo la probabilità diesplosione della lampada è praticamente nulla. Se è necessariosostituire la lampada, aspettare ulteriori 10 minuti per evitarescottature.
• Schermo di protezioneL’apparecchio deve essere usato solo se completo del suoschermo di protezione. Lo schermo di protezione deve essere immediatamentesostituito con il ricambio originale se visibilmente danneggiato.
• LampadaL’apparecchio monta una lampada ad alta pressione cherichiede un accenditore esterno. Tale accenditore è incorporatonell’apparecchio.- Leggere attentamente le “istruzioni d’uso” fornite dal
costruttore della lampada.- Sostituire immediatamente la lampada se danneggiata o
deformata dal calore.
• InstallationMake sure all parts for fixing the projector are in a goodstate of repair.Make sure the point of anchorage is stable beforepositioning the projector.The safety chain must be properly hooked onto the fittingand secured to the framework, so that, if the primarysupport system fails, the fitting falls as little as possible. If the safety chain gets used, it needs to be replaced with agenuine spare.
• Minimum distance of illuminated objectsThe projector needs to be positioned so that the objects hitby the beam of light are at least 1,2 metres (3’ 11”) from thelens of the projector.
• Minimum distance from flammable materialsThe projector must be positioned so that any flammablematerials are at least 0.20 metres (8") from every point on thesurface of the fitting.
• Mounting surfacesIt is permissible to mount the fitting on normally flammablesurfaces.
• Maximum ambient temperatureFor the fitting to operate well and reliably, the ambienttemperature should not exceed 35°C (95°F).
• IP20 protection ratingThe fitting is protected against penetration by solid bodies ofover 12mm (0.47”) in diameter (first digit 2), but not againstdripping water, rain, splashes or jets of water (second digit 0).
• Protection against electrical shockConnection must be made to a power supply system fitted withefficient earthing (Class I appliance according to standard EN 60598-1).It is, moreover, recommended to protect the supply lines of theprojectors from indirect contact and/or shorting to earth byusing appropriately sized residual current devices.
• Hooking up to the supply mainsConnection to the electricity mains must be carried out by aqualified electrical installer.Check that the mains frequency and voltage correspond tothose for which the projector is designed as given on theelectrical data label.This label also gives the input power to which you need to referto evaluate the maximum number of fittings to connect to theelectricity line, in order to avoid overloading.
• Temperature of the external surfaceThe maximum temperature that can be reached on the externalsurface of the fitting, in a thermally steady state, is 95°C(203°F).
• MaintenanceBefore starting any maintenance work or cleaning the projector,cut off power from the mains supply.After switching off, do not remove any parts of the fitting for atleast 5 minutes. After this time the likelihood of the lampexploding is virtually nill. If it is necessary to replace the lamp,wait for another 10 minutes to avoid getting burnt.
• Protective shieldThe projector may only be used if fitted with its protectiveshield. The protective shield must be immediately replaced with theoriginal spare part if visibly damaged.
• LampThe fitting mounts a high-pressure lamp that needs an externaligniter. This igniter is fitted onto the apparatus.- Carefully read the "operating instructions" provided by the
lamp manufacturer.- Immediately replace the lamp if damaged or deformed by
heat.
2
INFORMAZIONI DI SICUREZZA SAFETY INFORMATION
I prodotti a cui questo manuale si riferisce sono conformi alleDirettive della Comunità Europea di cui sono oggetto:• Bassa Tensione 73/23 • Compatibilità Elettromagnetica 89/336
The products referred to in this manual conform to theEuropean Community Directives to which they are subject:• Low Voltage 73/23• Electromagnetic Compatibility 89/336
1,2HSD 250W
I GB
0,2
ta 35°C
tc 95°C
IP20
3
• InstallationSicherstellen, dass alle Teile für die Befestigung des Projektorsin einwandfreiem Zustand sind.Vor der Installation des Projektors die Stabil i tät derVerankerungsstelle überprüfen. Das korrekt am Gerät eingehakte und an der Haltestrukturbefestigte Fangseil muss so installiert werden, dass bei einemNachgeben der Haupthalterung die Fallhöhe des Gerätes sogering wie möglich ist. Nach einem eventuellen Einsatz mussdas Sicherheitsseil durch ein Originalersatzteil ersetzt werden.
• Mindestabstand zu beleuchteten ObjektenDer Projektor muss so installiert werden dass der Abstandzwischen den vom Lichtstrahl beleuchteten Objekten und demObjektiv des Projektors mindestens 1,2 Meter beträgt.
• Mindestabstand zu entzündbaren MaterialienDer Projektor muss so installiert werden, dass entzündbareMaterialien mindestens 0,20 Meter von jedem Punkt derGeräteoberfläche entfernt sind.
• MontageoberflächeDie Montage des Geräts auf normal entzündbaren Oberflächenist zulässig.
• Max. RaumtemperaturFür einen optimalen und zuverlässigen Betrieb des Geräts darfdie Raumtemperatur 35°C nicht überschreiten.
• Schutzklasse IP20Das Gerät ist gegen das Eindringen von festen Fremdkörpernmit Durchmesser über 12 mm (erste Kennziffer 2) geschützt,während es gegen Tropf,- Regen- und Spritzwasser sowieWasserstrahlen (zweite Kennziffer 0) empfindlich ist.
• Schutz gegen StromschlagEs ist Pflicht, das Gerät an eine Stromversorgungsanlageanzuschließen, die mit einer leistungsfähigen Erdung ausgestattetist (Gerät der Klasse I gemäß Richtlinie EN 60598-1).Darüber hinaus wird empfohlen, die Zuleitungen der Projektoren mit korrekt bemessenen Fehlerstromschutzschalternvor indirekten Kontakten und/oder Erdschlüssen zu schützen.
• NetzanschlussDer Anschluss an das Stromnetz muss von einem kompetentenElektroinstallateur ausgeführt werden.Vergewissern Sie sich, dass Spannung und Frequenz derNetzversorgung mit den Werten übereinstimmen, für die derProjektor ausgelegt ist, und die auf dem Typenschildangegeben sind.Ebenfalls auf dem Typenschild ist die Leistungsaufnahmeangegeben. Um zu beurteilen, wie viele Geräte maximal an dieStromleitung angeschlossen werden können, ist auf dieseAngaben Bezug zu nehmen, um Überlastungen zu vermeiden.
• Temperatur der AußenflächeDie Außenfläche des Geräts kann im Wärmebetrieb eineHöchsttemperatur von 95°C erreichen.
• WartungVor Beginn von Wartungs- oder Reinigungsarbeiten amProjektor stets die Stromversorgung abschalten.Nach dem Abschalten 5 Minuten lang keine Geräteteileabnehmen. Nach Ablauf dieser Zeit besteht praktisch keineGefahr mehr, dass die Lampe birst. Falls die Lampe ersetztwerden muss, weitere 10 Minuten warten, umVerbrennungsgefahr zu vermeiden.
• SchutzglasDas Gerät darf nur mit Schutzglas verwendet werden. Dieser muss sofort durch ein Originalersatzteil ersetzt werden,wenn er sichtbar beschädigt ist.
• LampeDas Gerät ist mit einer Hochdrucklampe bestückt, die eineexterne Zündeinheit verlangt. Diese Zündeinheit ist in dasGerät eingebaut.- Lesen Sie die vom Lampenhersteller gelieferte
"Bedienungsanleitung" aufmerksam durch.- Eine beschädigte oder von der Hitze verformte Lampe muss
sofort ersetzt werden.
• InstalaciónControle que todos los elementos de fijación del proyectorestén en buenas condiciones.Compruebe la estabilidad del punto de anclaje antes de instalarel proyector. La cuerda de seguridad, correctamente enganchada al aparatoy fijada a la estructura de soporte, debe colocarse de modoque, si el soporte principal cede, el aparato sufra la menorcaída posible. En caso de desgaste de la cuerda de seguridad,sustitúyala con el recambio original.
• Distancia mínima de los objetos iluminadosEl proyector debe ubicarse de modo tal que ningún punto de susuperficie quede a menos de 1,2 metros del objetivo.
• Distancia mínima de materiales inflamablesEl proyector debe ubicarse de manera que ningún punto de susuperficie quede a menos de 0,20 metros de cualquier materialinflamable.
• Superficie de montajeEl aparato puede montarse sobre superficies normalmenteinflamables.
• Temperatura ambiente máximaPara asegurar un funcionamiento óptimo y fiable del aparato, latemperatura ambiente no debe superar los 35°C.
• Grado de protección IP20El aparato está protegido contra la penetración de objetossólidos de dimensiones superiores a 12mm (primer dígito "2"),mientras que debe ser resguardado de goteo, l luvia,salpicaduras y chorros de agua (segundo dígito "0").
• Protección contra descargas eléctricasEs obligatorio efectuar la conexión a una instalación eléctricadotada de eficiente puesta a tierra (aparato de Clase I segúnla norma EN 60598-1).Además es aconsejable proteger las líneas de alimentación delos proyectores contra contactos indirectos y cortocircuitoshacia masa, mediante el uso de interruptores diferencialescorrectamente dimensionados.
• Conexión a la red de alimentaciónEl conexionado a la red de distribución de la energía eléctricadebe ser efectuado por un instalador electricista cualificado.Constate que los valores de frecuencia y tensión de la red seaniguales a los que figuran en la etiqueta de datos eléctricos delproyector.En la misma etiqueta se indica la potencia absorbida. Tenga encuenta este dato para calcular el número máximo de aparatosque puede conectar a la línea sin provocar sobrecargas.
• Temperatura de la superficie exteriorLa temperatura máxima que puede alcanzar la superficie exterior del aparato, en condiciones de régimen térmico, es de95° C.
• MantenimientoAntes de comenzar cualquier operación de mantenimiento olimpieza, desconecte el aparato de la alimentación eléctrica.Después del apagado, no quite ninguna parte del aparatodurante 5 minutos. Transcurrido dicho tiempo, la probabilidadde que la lámpara explote es prácticamente nula. Si debesustituir la lámpara, espere 10 minutos más para evitarquemarse.
• Pantalla de protecciónEl aparato se debe utilizar sólo provisto de su pantalla deprotección. La pantalla de protección se debe cambiar inmediatamente conel recambio original si está visiblemente dañada.
• LámparaEl aparato utiliza una lámpara de alta presión que requiere unarrancador externo, incorporado en el aparato.- Lea atentamente las instrucciones suministradas por el
fabricante de la lámpara.- Sustituya inmediatamente la lámpara si está dañada o
deformada por el calor.
INFORMATIONEN ZUR SICHERHEIT INFORMACIONES DE SEGURIDAD
Die Produkte dieser Bedienungsanleitung entsprechenfolgenden EU-Richtlinien:• Niederspannungsrichtlinie 73/23 • EMV 89/336
• InstallationS'assurer que tous les éléments concernés par la fixation duprojecteur sont en bon état.Avant d'installer le projecteur, s'assurer de la stabilité du pointd'ancrage. Le câble de sécurité, dûment fixé à l'appareil et à la structurede soutien, doit être installé de façon à limiter au maximum lachute de l'appareil si le système de support principal devaitcéder. Après tout incident éventuel, remplacer le câble desécurité en utilisant une pièce d'origine.
• Distance minimum des objets éclairésInstaller le projecteur de façon à ce que son objectif se trouve àau moins 1,2 des objets que devra atteindre le faisceaulumineux.
• Distance minimum des matériaux inflammablesInstaller le projecteur de façon à ce que les matériauxinflammables se trouvent à une distance d'au moins 0,20 parrapport à un point quelconque de la surface de l'appareil.
• Surface de montageIl est permis de monter l'appareil sur des surfaces normalementinflammables.
• Température ambiante maximalePour assurer le fonctionnement et la fiabilité de l'appareil, latempérature ambiante ne doit pas dépasser 35°C.
• Degré de protection IP20L'appareil est protégé contre la pénétration de corps solides deplus de 12 mm de diamètre (premier chiffre 2), il craint enrevanche les suintements, la pluie, les éclaboussures et les jetsd'eau (deuxième chiffre 0).
• Protection contre les décharges électriquesIl est obligatoire d’effectuer le branchement à une installationd’alimentation équipée d’une mise à la terre efficace (appareilde Classe I, conformément à la norme EN 60598-1).De plus, i l est recommandé de protéger les l ignesd’alimentation des projecteurs contre les contacts indirectset/ou les courts-circuits vers la masse au moyen dedisjoncteurs différentiels correctement dimensionnés.
• Branchement au réseau d'alimentationLes opérations de branchement au réseau de distribution del'énergie électrique doivent être effectuées par un installateurélectricien qualifié.Vérifier que la fréquence et la tension du réseau correspondent àla fréquence et à la tension pour lesquelles le projecteur est prévuet qui sont indiquées sur la plaquette des données électriques.Cette même plaquette reporte également la puissanceabsorbée. Faire référence à cette indication pour évaluer lenombre maximum d'appareils à brancher sur la ligne électrique,afin d'éviter les surcharges.
• Température de la surface externeLa température maximale de la surface externe de l'appareil,en conditions de régime thermique, est de 95°C.
• EntretienAvant toute opération d'entretien ou de nettoyage sur leprojecteur, couper la tension du réseau.Après avoir éteint le projecteur, ne démonter aucun élément del'appareil pendant les 5 minutes qui suivent. Au-delà de ce lapsde temps, la probabil i té d'explosion de la lampe estpratiquement nulle. S'il s'avère nécessaire de remplacer lalampe, attendre encore 10 minutes pour éviter tout risque debrûlures.
• Écran de protectionL’appareil doit être utilisé uniquement s’il est équipé de sonécran de protection. Si l’écran de protection est visiblement endommagé, il doit êtreimmédiatement remplacé par la pièce de rechange d’origine.
• LampeL'appareil fonctionne avec une lampe haute pression avecallumeur externe. Ce dernier est incorporé dans l’appareil.- Lire attentivement les "instructions d'utilisation" fournies par
le fabricant de la lampe.- Remplacer la lampe dès qu'elle est endommagée ou
déformée par la chaleur.
INFORMATIONS RELATIVES A LA SECURITE
Les produits mentionnés dans ce manuel sont conformes auxDirectives de la Communauté Européenne:• Basse Tension 73/23 • Compatibilité Électromagnétique 89/336
Los productos a los cuales se refiere este manual cumplenlas directivas pertinentes de la Comunidad Europea:• Baja tension 73/23 •Compatibilidad electromagnética 89/336
D EF
4
2
2
31TOP
CP
CO
LO
R 2
50
105041/001
099426/001
INDICEINDEX
SOMMAIREINHALT
INDICE
I
GB
D
E
F
CP COLOR 250 HSD 250W
®
1
CP
CO
LO
R 2
50
I
GB
D
E
F
Complimenti per aver scelto un prodotto Clay Paky! La ringraziamo per la preferenza e La informiamo che anche questo prodotto, come tutti gli altri della ricca gamma
Clay Paky, è stato progettato e realizzato nel segno della qualità, per garantirLe sempre l’eccellenza delle prestazioni e rispondere meglio alle Sue aspettative ed esigenze.
Leggere attentamente in tutte le sue parti il presente manuale d’istruzioni e conservarlo accuratamente per riferimenti futuri. La conoscenza delle informazioni ed il rispetto
delle prescrizioni contenute in questa pubblicazione sono essenziali per garantire la correttezza e la sicurezza delle operazioni di installazione, uso e manutenzione
dell’apparecchio.
CLAY PAKY S.p.A. declina ogni responsabilità per danni all’apparecchio o ad altre cose o persone, derivanti da installazione, uso e manutenzione effettuate non in
conformità con quanto riportato sul presente manuale di istruzioni, che deve sempre accompagnare l’apparecchio.
CLAY PAKY S.p.A. si riserva la facoltà di modificare, in qualunque momento e senza preavviso, le caratteristiche menzionate nel presente manuale di istruzioni.
Congratulations on choosing a Clay Paky product! We thank you for your custom. Please note that this product, as all the others in the rich Clay Paky range, has been
designed and made with total quality to ensure excellent performance and best meet your expectations and requirements.
Carefully read this instructions manual in its entirety and keep it safe for future reference. It is essential to know the information and comply with the instructions given in this
manual in order to ensure the fitting is installed, used and serviced correctly and safely.
CLAY PAKY S.p.A. disclaims all liability for damage to the fitting or to other property or persons deriving from installation, use and maintenance that have not been carried
out in conformity with this instructions manual, which must always accompany the fitting.
CLAY PAKY S.p.A. reserves the right to modify the characteristics stated in this instructions manual at any time and without prior notice.
Félicitations, vous venez de choisir un produit Clay Paky! Nous vous remercions de votre préférence et vous informons que comme tous les autres produits de la vaste
gamme Clay Paky, ce produit a lui aussi été conçu et réalisé sous le signe de la qualité, afin de vous garantir en toutes occasions l'excellence des performances, et d'appor-
ter une réponse plus précise à vos attentes et exigences.
Lire attentivement et entièrement le présent manuel d'instructions, et le conserver soigneusement pour toutes références futures. La connaissance des informations et le
respect des prescriptions contenues dans la présente publication sont essentiels afin de garantir la correction et la sécurité des opérations d'installation, d'utilisation et
d'entretien de l'appareil.
CLAY PAKY S.p.A. décline toute responsabilité en cas de dommages causés à l'appareil, à des personnes ou à des choses par une installation, une utilisation ou un
entretien n'ayant pas été réalisés conformément aux indications fournies dans le présent manuel d'instructions, qui doit toujours accompagner l'appareil.
CLAY PAKY S.p.A. se réserve la faculté de modifier, à tout moment et sans préavis, les caractéristiques mentionnées dans le présent manuel d'instructions.
Kompliment für Ihre Wahl eines Produkts von Clay Paky! Wir danken Ihnen für das entgegengebrachte Vertrauen und möchten Sie daran erinnern, dass bei der Herstellung
auch dieses Produkts - wie bei allen Produkten des großen Sortiments von Clay Paky - auf erste Qualität Wert gelegt wurde, um Ihnen immer hervorragende Leistungen
garantieren, und Ihre Erwartungen und Anforderungen stets bestens erfüllen zu können.
Lesen Sie diese Bedienungsanleitung bitte vollständig durch und bewahren Sie sie für späteres Nachschlagen sorgfältig auf. Die Kenntnis der darin enthaltenen
Informationen und die strikte Befolgung der Anweisungen ist die Voraussetzung für eine korrekte und sichere Installation, Benutzung und Wartung des Geräts.
Die Firma CLAY PAKY S.p.A. lehnt jede Haftung für Schäden an dem Gerät bzw. sonstige Sach- und Personenschäden ab, die durch eine nicht mit den Anweisungen
dieser Bedienungsanleitung konforme Installation, Benutzung und Wartung verursacht werden. Die Bedienungsanleitung muss immer bei dem Gerät bleiben.
Die Firma CLAY PAKY S.p.A. behält sich das Recht vor, die in der vorliegenden Bedienungsanleitung enthaltenen Daten jederzeit und ohne vorherige Benachrichtigung zu
ändern.
Enhorabuena por haber elegido un artículo Clay Paky y gracias por honrarnos con su preferencia. Este producto, como todos los demás de esta marca, ha sido proyectado
y realizado con los más elevados criterios de calidad para garantizarle siempre unas prestaciones excelentes y satisfacer mejor sus expectativas y exigencias.
Lea atentamente todo el manual de instrucciones y guárdelo para futuras consultas. Las informaciones e indicaciones que figuran en esta publicación son esenciales para
efectuar de modo correcto y seguro las operaciones de instalación, uso y mantenimiento del aparato.
CLAY PAKY S.p.A. declina toda responsabilidad ante daños sufridos por el proyector, por personas u objetos, que puedan atribuirse a operaciones de instalación, uso o
mantenimiento no conformes a lo indicado en este manual, el cual debe guardarse siempre junto con el aparato.
CLAY PAKY S.p.A. se reserva el derecho de modificar, en cualquier momento y sin aviso previo, las características mencionadas en el presente manual de instrucciones.
2
4
5
8
10
12
15
16
18
19
20
21
Informazioni di sicurezza - Safety information
Informations de sécurité - Informationen zur Sicherheit - Información de seguridad
Disimballo e predisposizione - Unpacking and preparation
Déballage et préparation - Auspacken und Vorbereiten - Desembalaje y preparación
Installazione e messa in funzione - Installation and start-up
Installation et mise en fonction - Installation und Inbetriebnahme - Instalación y puesta en función
Funzioni canali ed opzioni - Channel functions and options - Fonctions canaux et options
Funktionen der Kanäle und Optionen - Funciones de los canales y opciones
Funzionamento Stand Alone - Stand-alone operation - Fonctionnement Stand Alone
Funktionen Stand Alone - Funcionamiento Stand Alone
Manutenzione - Maintenance - Entretien - Wartung - Mantenimiento
Causa e soluzione dei problemi - Cause and solution of problems - Cause et solution des
problèmes Ursachen und Abhilfe bei Betriebsstörungen - Causas y soluciones de problemas
Dati Tecnici - Technical data - Données techniques - Technische Daten - Datos técnicos
Diagrammi fotometrici - Photometric diagrams - Diagrammes photométriques
Fotometrische Diagramme - Diagramos fotométricos
Accessori opzionali - Optional accessories - Accessoires en option
Optionales Zubehör - Accesorios opcionales
Schema elettrico - Wiring diagram - Schéma électrique
Elektrischer Schaltplan - Esquema eléctrico
Ricambi - Spare parts - Pièces de rechange - Ersatzteile - Recambios
Pagina Contenuto - Contents - Contenu - Inhalt - Contenido
MANUALE ISTRUZIONIINSTRUCTIONS MANUAL
MANUEL D'INSTRUCTIONS BEDIENUNGSANLEITUNG MANUAL DE INSTRUCCIONES
I
F
GB
D
E
12
3
1
1
2!
I
GB
D
E
F
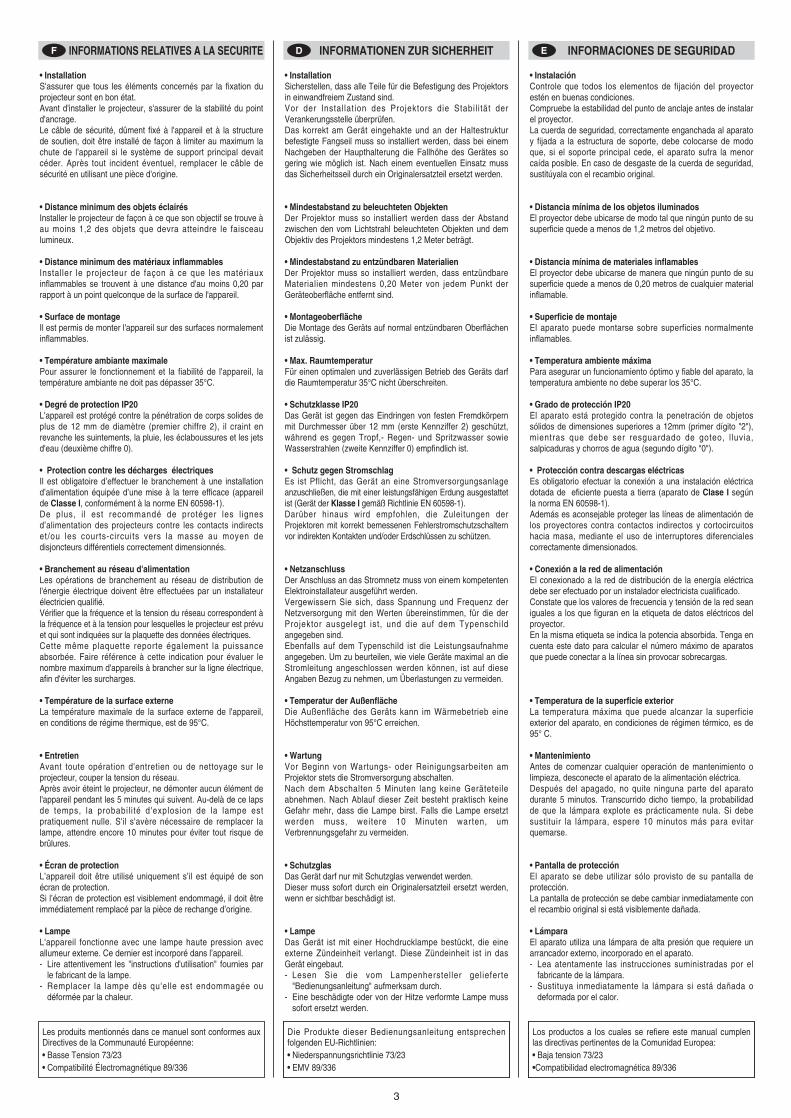
Disimballo - Figura 1Aprire la scatola di cartone, sfilare l’involucro di polistirolo e separarlo liberando il proiettore. Sfilare il sacchetto in plastica dal proiettore e posizionare quest’ultimo su un piano diappoggio orizzontale.Contenuto dell’imballo - Figura 2Oltre al proiettore, nel quale è già inserita la lampada, nell’imballo sono contenuti gli accessori illustrati.Apertura chiusura coperchio cambio lampada - Figura 3Rimozione cilindro di fermo interno - Figura 4ATTENZIONE: Prima di accendere il proiettore, togliere il cilindro ferma-filtri in spugna, premendolo verso l’interno per evitare di danneggiare i filtri colore. Da questo momento il cilindronon sarà più necessario.IMPORTANTE: Verificare la centratura della lampada rispetto al foro nel riflettore.
Unpacking - Fig. 1Open the cardboard box, take out and remove the polystyrene wrapping to free the projector. Remove the plastic bag and position the projector on a horizontal surface.Packing contents - Fig. 2As well as the projector, to which the lamp is already fitted, the pack contains the accessories illustrated.Opening / closing lamp change cover - Fig. 3Removing the internal locking cylinder - Fig. 4WARNING: Before switching on the projector, remove the sponge locking cylinder by pressing it inwards to avoid damaging the colour filters. From now on, the cylinder is no longer needed.IMPORTANT: check that the lamp is centered over the hole in the reflector.
Déballage - Figure 1Ouvrir la boîte en carton, retirer l'enveloppe de polystyrène pour dégager le projecteur. Extraire le projecteur du sachet en plastique et le poser sur un support horizontal.Contenu de l'emballage - Figure 2En plus du projecteur, sur lequel la lampe est déjà montée, l’emballage contient les accessoires illustrés.Ouverture / fermeture couvercle remplacement lampe - Figure 3Démontage du cylindre d’arrêt interne - Figure 4ATTENTION: Avant d’allumer le projecteur, enlever le cylindre d’arrêt des filtres en éponge, en appuyant dessus vers l’intérieur afin d’éviter d’endommager les filtres couleur. À partir dece moment, le cylindre n’est plus nécessaire.IMPORTANT: assurez-vous que la lampe est bien centrée par rapport à l’orifice du réflecteur.
Auspacken - Abb. 1Die Schachtel öffnen, die Styropor-Schutzhülle herausziehen, abnehmen und den Projektor freilegen. Den Projektor aus dem Kunststoffsack herausnehmen und auf einer ebenenAblagefläche abstellen.Packungsinhalt - Abb. 2Außer dem Projektor, in den die Lampe bereits eingesetzt ist, sind in der Verpackung die abgebildeten Zubehörteile enthalten.Öffnen des Deckels zum Lampenwechsel - Abb. 3Entfernen des zylindrischen Blockierschutzes - Abb. 4ACHTUNG: Vor dem Einschalten des Projektors muss man den Zylinder aus Schaumstoff zum Sperren der Filter herausnehmen. Dabei den Zylinder nach Innen drücken, um eineBeschädigung der Farbfilter zu vermeiden. Von diesem Augenblick an ist der Zylinder nicht mehr erforderlich.WICHTIG: Die Zentrierung der Lampen in Bezug auf die Bohrung im Reflektor überprüfen.
Desembalaje - Figura 1Abra la caja de cartón y extraiga la envoltura de poliestireno para soltar el proyector. Extraiga el proyector de la bolsa de plástico y apóyelo en una superficie horizontal.Contenido del embalaje - Figura 2Además del proyector, en el cual se ha instalado ya la lámpara, el embalaje contiene los accesorios ilustrados.Apertura / cierre de la tapa cambio lámpara - Figura 3Desmontaje del cilindro de bloqueo interior - Figura 4ATENCIÓN: Antes de encender el proyector, quite el cilindro de bloqueo filtros de esponja, presionándolo hacia adentro para evitar que se dañen los filtros de color. A partir de estemomento, el cilindro no será más necesario.IMPORTANTE: compruebe el centrado de las lámparas respecto al orificio presente en el reflector.
1
3
2
4
DISIMBALLO E PREDISPOSIZIONE UNPACKING AND PREPARATION
DEBALLAGE ET PREPARATION AUSPACKEN UND VORBEREITEN DESEMBALAJE Y PREPARACION
I GB
D EF
5
CP
CO
LO
R 2
50
CP
CO
LO
R 2
50
CP COLOR 250
CP
CO
LO
R 2
50
CP
CO
LO
R 2
50
1
2
I
GB
D
E
F
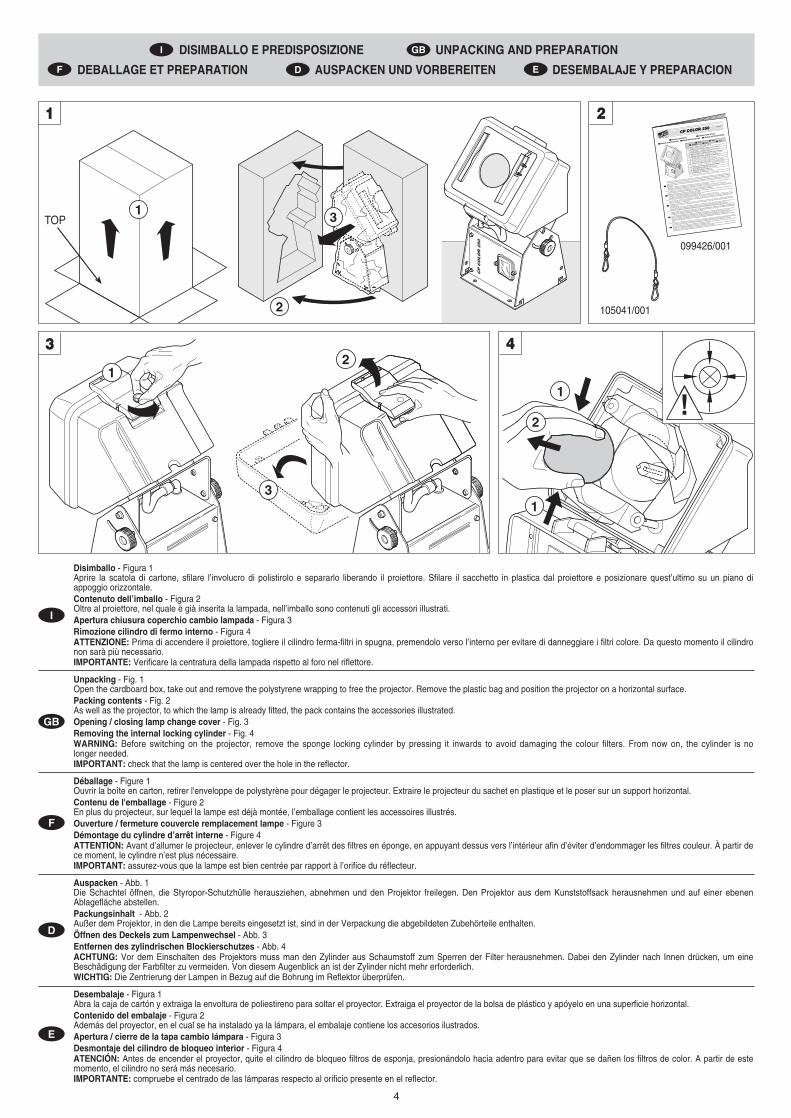
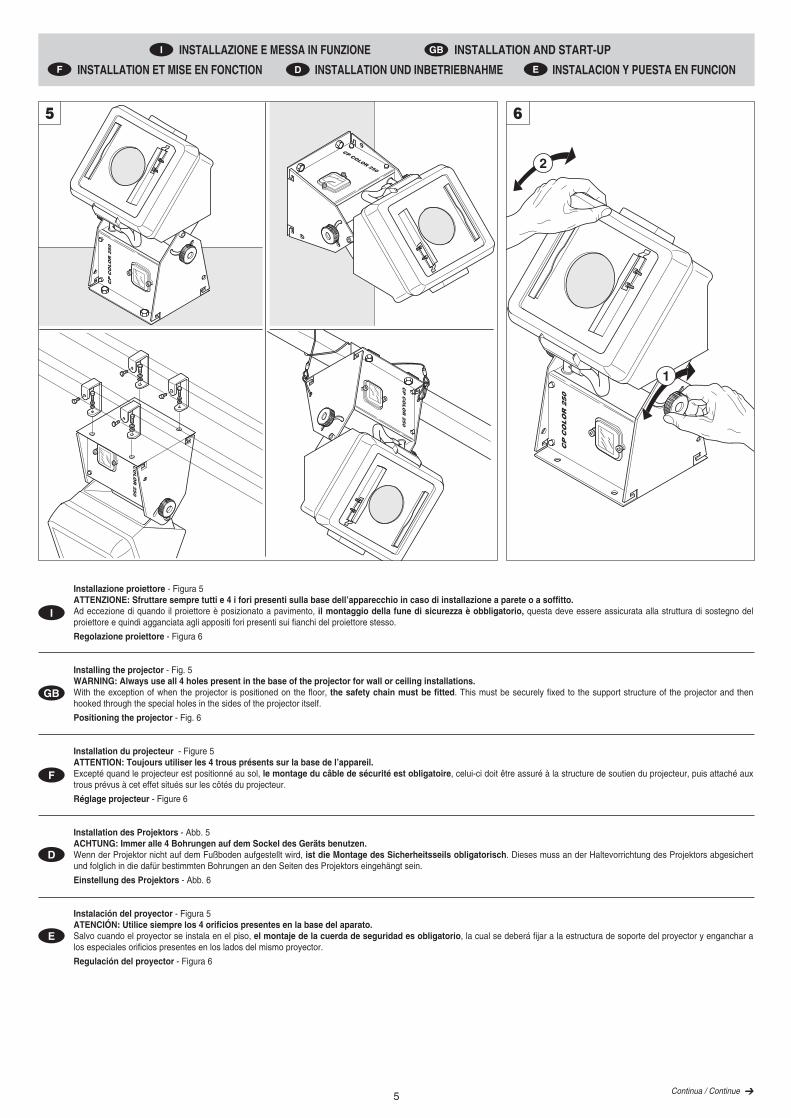
Installazione proiettore - Figura 5ATTENZIONE: Sfruttare sempre tutti e 4 i fori presenti sulla base dell’apparecchio in caso di installazione a parete o a soffitto.Ad eccezione di quando il proiettore è posizionato a pavimento, il montaggio della fune di sicurezza è obbligatorio, questa deve essere assicurata alla struttura di sostegno delproiettore e quindi agganciata agli appositi fori presenti sui fianchi del proiettore stesso.
Regolazione proiettore - Figura 6
Installing the projector - Fig. 5WARNING: Always use all 4 holes present in the base of the projector for wall or ceiling installations.With the exception of when the projector is positioned on the floor, the safety chain must be fitted. This must be securely fixed to the support structure of the projector and thenhooked through the special holes in the sides of the projector itself.
Positioning the projector - Fig. 6
Installation du projecteur - Figure 5ATTENTION: Toujours utiliser les 4 trous présents sur la base de l’appareil.Excepté quand le projecteur est positionné au sol, le montage du câble de sécurité est obligatoire, celui-ci doit être assuré à la structure de soutien du projecteur, puis attaché auxtrous prévus à cet effet situés sur les côtés du projecteur.
Réglage projecteur - Figure 6
Installation des Projektors - Abb. 5ACHTUNG: Immer alle 4 Bohrungen auf dem Sockel des Geräts benutzen.Wenn der Projektor nicht auf dem Fußboden aufgestellt wird, ist die Montage des Sicherheitsseils obligatorisch. Dieses muss an der Haltevorrichtung des Projektors abgesichertund folglich in die dafür bestimmten Bohrungen an den Seiten des Projektors eingehängt sein.
Einstellung des Projektors - Abb. 6
Instalación del proyector - Figura 5ATENCIÓN: Utilice siempre los 4 orificios presentes en la base del aparato.Salvo cuando el proyector se instala en el piso, el montaje de la cuerda de seguridad es obligatorio, la cual se deberá fijar a la estructura de soporte del proyector y enganchar alos especiales orificios presentes en los lados del mismo proyector.
Regulación del proyector - Figura 6
Continua / Continue
5 6
INSTALLAZIONE E MESSA IN FUNZIONE INSTALLATION AND START-UP
INSTALLATION ET MISE EN FONCTION INSTALLATION UND INBETRIEBNAHME INSTALACION Y PUESTA EN FUNCION
I GB
D EF
6 Continua / Continue
I
GB
D
E
F
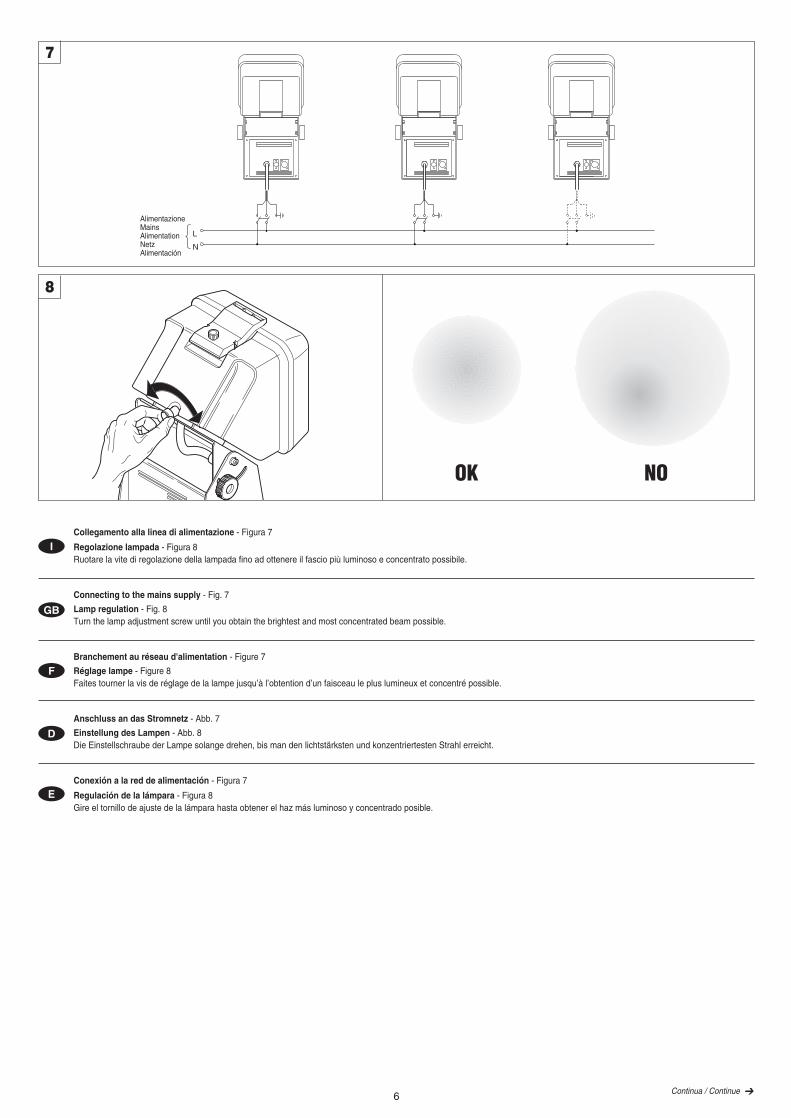
Collegamento alla linea di alimentazione - Figura 7
Regolazione lampada - Figura 8Ruotare la vite di regolazione della lampada fino ad ottenere il fascio più luminoso e concentrato possibile.
Connecting to the mains supply - Fig. 7
Lamp regulation - Fig. 8Turn the lamp adjustment screw until you obtain the brightest and most concentrated beam possible.
Branchement au réseau d'alimentation - Figure 7
Réglage lampe - Figure 8Faites tourner la vis de réglage de la lampe jusqu’à l’obtention d’un faisceau le plus lumineux et concentré possible.
Anschluss an das Stromnetz - Abb. 7
Einstellung des Lampen - Abb. 8Die Einstellschraube der Lampe solange drehen, bis man den lichtstärksten und konzentriertesten Strahl erreicht.
Conexión a la red de alimentación - Figura 7
Regulación de la lámpara - Figura 8Gire el tornillo de ajuste de la lámpara hasta obtener el haz más luminoso y concentrado posible.
L
N
AlimentazioneMainsAlimentationNetzAlimentación
7
8
OK NO
7
DMX 512
54 3 2
1
DMX 512
SCREEN
SIGNALSIGNAL
9
CP
CO
LO
R 2
50
1
2
10
CP
CO
LO
R 2
50
2
31
Continua / Continue
I
GB
D
E
F
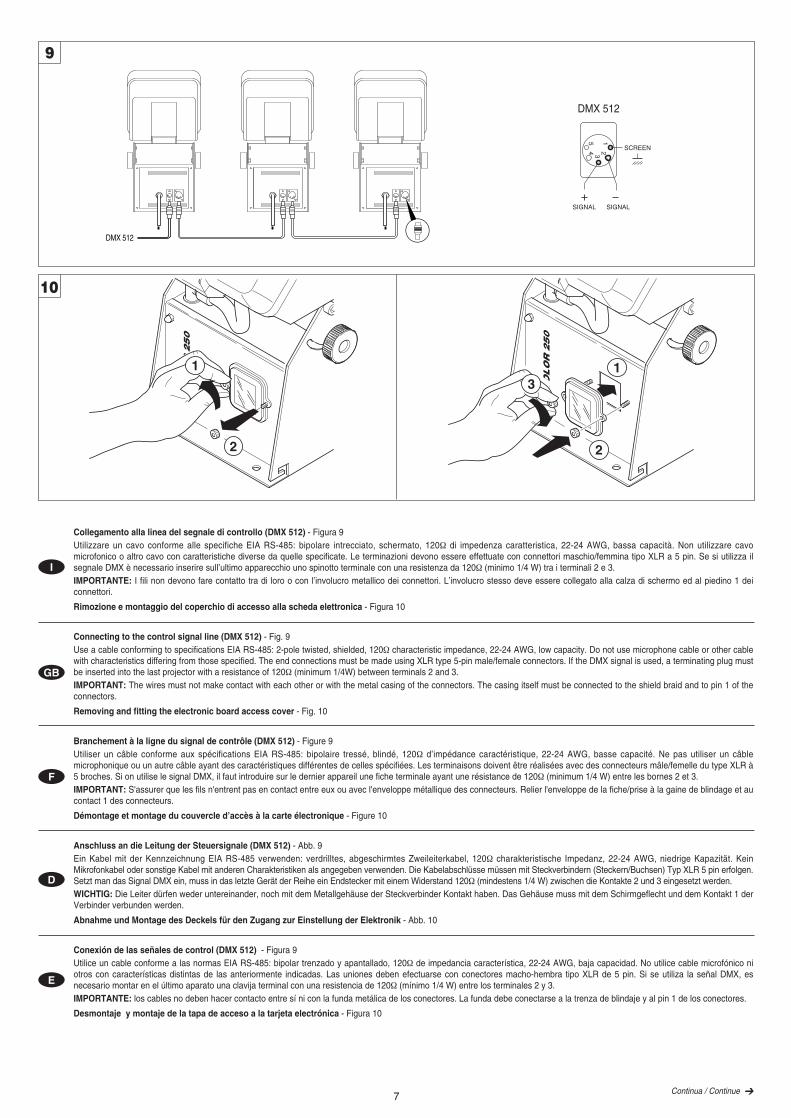
Collegamento alla linea del segnale di controllo (DMX 512) - Figura 9Utilizzare un cavo conforme alle specifiche EIA RS-485: bipolare intrecciato, schermato, 120Ω di impedenza caratteristica, 22-24 AWG, bassa capacità. Non utilizzare cavomicrofonico o altro cavo con caratteristiche diverse da quelle specificate. Le terminazioni devono essere effettuate con connettori maschio/femmina tipo XLR a 5 pin. Se si utilizza ilsegnale DMX è necessario inserire sull’ultimo apparecchio uno spinotto terminale con una resistenza da 120Ω (minimo 1/4 W) tra i terminali 2 e 3. IMPORTANTE: I fili non devono fare contatto tra di loro o con l’involucro metallico dei connettori. L’involucro stesso deve essere collegato alla calza di schermo ed al piedino 1 deiconnettori.
Rimozione e montaggio del coperchio di accesso alla scheda elettronica - Figura 10
Connecting to the control signal line (DMX 512) - Fig. 9Use a cable conforming to specifications EIA RS-485: 2-pole twisted, shielded, 120Ω characteristic impedance, 22-24 AWG, low capacity. Do not use microphone cable or other cablewith characteristics differing from those specified. The end connections must be made using XLR type 5-pin male/female connectors. If the DMX signal is used, a terminating plug mustbe inserted into the last projector with a resistance of 120Ω (minimum 1/4W) between terminals 2 and 3.IMPORTANT: The wires must not make contact with each other or with the metal casing of the connectors. The casing itself must be connected to the shield braid and to pin 1 of theconnectors.
Removing and fitting the electronic board access cover - Fig. 10
Branchement à la ligne du signal de contrôle (DMX 512) - Figure 9Utiliser un câble conforme aux spécifications EIA RS-485: bipolaire tressé, blindé, 120Ω d’impédance caractéristique, 22-24 AWG, basse capacité. Ne pas utiliser un câblemicrophonique ou un autre câble ayant des caractéristiques différentes de celles spécifiées. Les terminaisons doivent être réalisées avec des connecteurs mâle/femelle du type XLR à5 broches. Si on utilise le signal DMX, il faut introduire sur le dernier appareil une fiche terminale ayant une résistance de 120Ω (minimum 1/4 W) entre les bornes 2 et 3.IMPORTANT: S'assurer que les fils n'entrent pas en contact entre eux ou avec l'enveloppe métallique des connecteurs. Relier l'enveloppe de la fiche/prise à la gaine de blindage et aucontact 1 des connecteurs.
Démontage et montage du couvercle d’accès à la carte électronique - Figure 10
Anschluss an die Leitung der Steuersignale (DMX 512) - Abb. 9Ein Kabel mit der Kennzeichnung EIA RS-485 verwenden: verdrilltes, abgeschirmtes Zweileiterkabel, 120Ω charakteristische Impedanz, 22-24 AWG, niedrige Kapazität. KeinMikrofonkabel oder sonstige Kabel mit anderen Charakteristiken als angegeben verwenden. Die Kabelabschlüsse müssen mit Steckverbindern (Steckern/Buchsen) Typ XLR 5 pin erfolgen.Setzt man das Signal DMX ein, muss in das letzte Gerät der Reihe ein Endstecker mit einem Widerstand 120Ω (mindestens 1/4 W) zwischen die Kontakte 2 und 3 eingesetzt werden.WICHTIG: Die Leiter dürfen weder untereinander, noch mit dem Metallgehäuse der Steckverbinder Kontakt haben. Das Gehäuse muss mit dem Schirmgeflecht und dem Kontakt 1 derVerbinder verbunden werden.
Abnahme und Montage des Deckels für den Zugang zur Einstellung der Elektronik - Abb. 10
Conexión de las señales de control (DMX 512) - Figura 9Utilice un cable conforme a las normas EIA RS-485: bipolar trenzado y apantallado, 120Ω de impedancia característica, 22-24 AWG, baja capacidad. No utilice cable microfónico niotros con características distintas de las anteriormente indicadas. Las uniones deben efectuarse con conectores macho-hembra tipo XLR de 5 pin. Si se utiliza la señal DMX, esnecesario montar en el último aparato una clavija terminal con una resistencia de 120Ω (mínimo 1/4 W) entre los terminales 2 y 3.IMPORTANTE: los cables no deben hacer contacto entre sí ni con la funda metálica de los conectores. La funda debe conectarse a la trenza de blindaje y al pin 1 de los conectores.
Desmontaje y montaje de la tapa de acceso a la tarjeta electrónica - Figura 10
8
11
I
GB
D
E
F
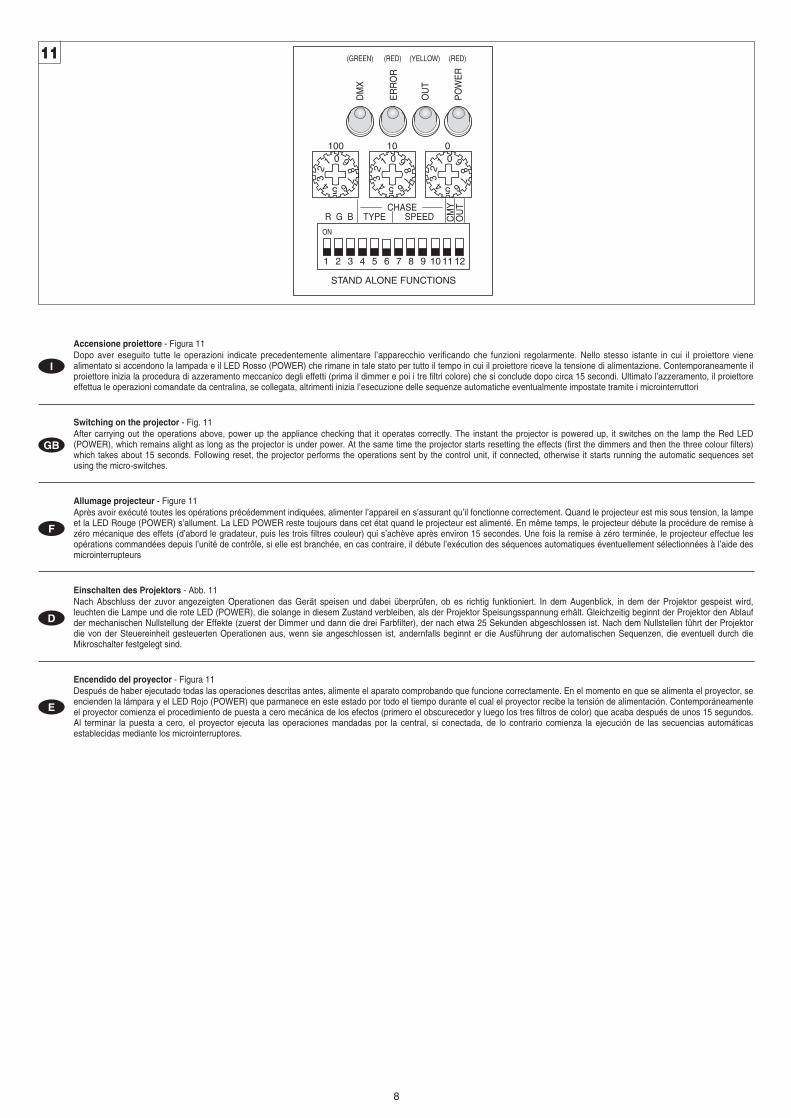
Accensione proiettore - Figura 11Dopo aver eseguito tutte le operazioni indicate precedentemente alimentare l’apparecchio verificando che funzioni regolarmente. Nello stesso istante in cui il proiettore vienealimentato si accendono la lampada e il LED Rosso (POWER) che rimane in tale stato per tutto il tempo in cui il proiettore riceve la tensione di alimentazione. Contemporaneamente ilproiettore inizia la procedura di azzeramento meccanico degli effetti (prima il dimmer e poi i tre filtri colore) che si conclude dopo circa 15 secondi. Ultimato l’azzeramento, il proiettoreeffettua le operazioni comandate da centralina, se collegata, altrimenti inizia l’esecuzione delle sequenze automatiche eventualmente impostate tramite i microinterruttori
Switching on the projector - Fig. 11After carrying out the operations above, power up the appliance checking that it operates correctly. The instant the projector is powered up, it switches on the lamp the Red LED(POWER), which remains alight as long as the projector is under power. At the same time the projector starts resetting the effects (first the dimmers and then the three colour filters)which takes about 15 seconds. Following reset, the projector performs the operations sent by the control unit, if connected, otherwise it starts running the automatic sequences setusing the micro-switches.
Allumage projecteur - Figure 11Après avoir exécuté toutes les opérations précédemment indiquées, alimenter l’appareil en s’assurant qu’il fonctionne correctement. Quand le projecteur est mis sous tension, la lampeet la LED Rouge (POWER) s’allument. La LED POWER reste toujours dans cet état quand le projecteur est alimenté. En même temps, le projecteur débute la procédure de remise àzéro mécanique des effets (d’abord le gradateur, puis les trois filtres couleur) qui s’achève après environ 15 secondes. Une fois la remise à zéro terminée, le projecteur effectue lesopérations commandées depuis l’unité de contrôle, si elle est branchée, en cas contraire, il débute l’exécution des séquences automatiques éventuellement sélectionnées à l’aide desmicrointerrupteurs
Einschalten des Projektors - Abb. 11Nach Abschluss der zuvor angezeigten Operationen das Gerät speisen und dabei überprüfen, ob es richtig funktioniert. In dem Augenblick, in dem der Projektor gespeist wird,leuchten die Lampe und die rote LED (POWER), die solange in diesem Zustand verbleiben, als der Projektor Speisungsspannung erhält. Gleichzeitig beginnt der Projektor den Ablaufder mechanischen Nullstellung der Effekte (zuerst der Dimmer und dann die drei Farbfilter), der nach etwa 25 Sekunden abgeschlossen ist. Nach dem Nullstellen führt der Projektordie von der Steuereinheit gesteuerten Operationen aus, wenn sie angeschlossen ist, andernfalls beginnt er die Ausführung der automatischen Sequenzen, die eventuell durch dieMikroschalter festgelegt sind.
Encendido del proyector - Figura 11Después de haber ejecutado todas las operaciones descritas antes, alimente el aparato comprobando que funcione correctamente. En el momento en que se alimenta el proyector, seencienden la lámpara y el LED Rojo (POWER) que parmanece en este estado por todo el tiempo durante el cual el proyector recibe la tensión de alimentación. Contemporáneamenteel proyector comienza el procedimiento de puesta a cero mecánica de los efectos (primero el obscurecedor y luego los tres filtros de color) que acaba después de unos 15 segundos.Al terminar la puesta a cero, el proyector ejecuta las operaciones mandadas por la central, si conectada, de lo contrario comienza la ejecución de las secuencias automáticasestablecidas mediante los microinterruptores.
01
23
4 5 6
78
9
100 10 0
R G B TYPE SPEED
STAND ALONE FUNCTIONS
PO
WE
R
OU
T
ER
RO
R
1 2 3 4 5 6 7 8 9 10 11 12
OU
TCHASE
01
23
4 5 6
78
9 01
23
4 5 6
78
9
DM
X
CM
Y
(GREEN) (RED) (YELLOW) (RED)
ON
9
MODALITÀ SLAVE SLAVE MODE
MODALITÈ SLAVE SLAVE MODALITÄT MODALIDAD SLAVE
I GB
D EF
I
GB
D
E
F
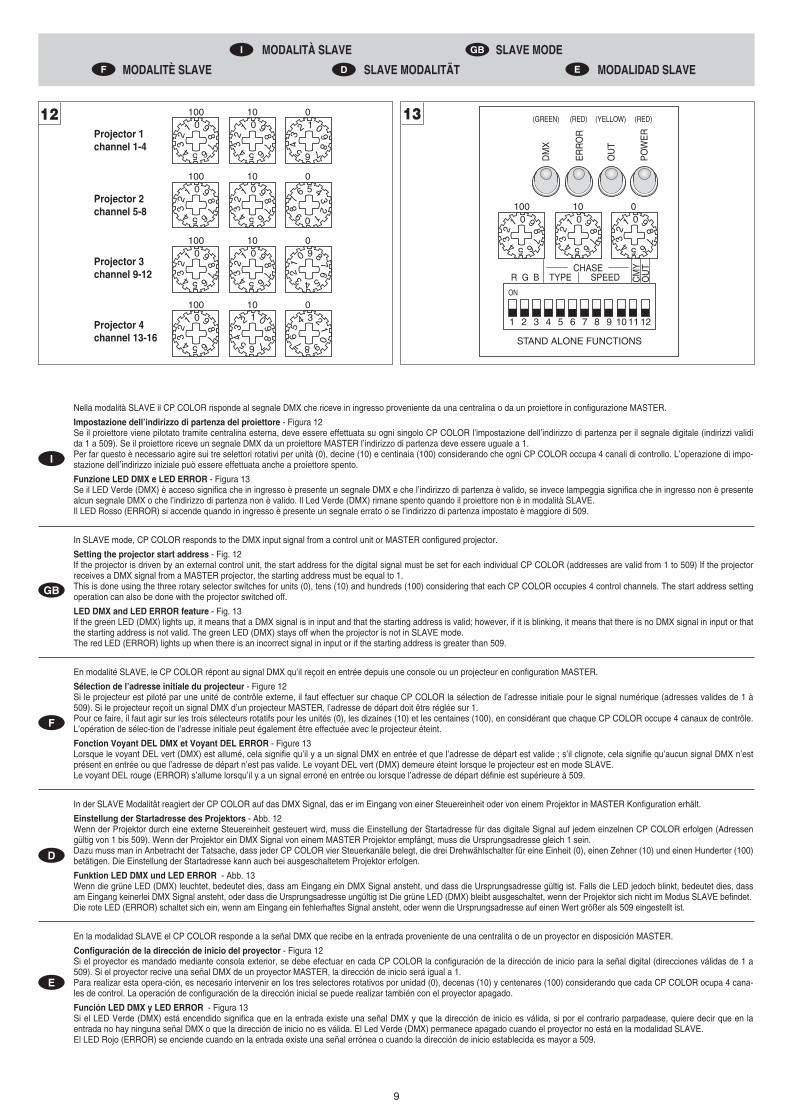
Nella modalità SLAVE il CP COLOR risponde al segnale DMX che riceve in ingresso proveniente da una centralina o da un proiettore in configurazione MASTER.
Impostazione dell’indirizzo di partenza del proiettore - Figura 12Se il proiettore viene pilotato tramite centralina esterna, deve essere effettuata su ogni singolo CP COLOR l’impostazione dell’indirizzo di partenza per il segnale digitale (indirizzi validida 1 a 509). Se il proiettore riceve un segnale DMX da un proiettore MASTER l’indirizzo di partenza deve essere uguale a 1.Per far questo è necessario agire sui tre selettori rotativi per unità (0), decine (10) e centinaia (100) considerando che ogni CP COLOR occupa 4 canali di controllo. L’operazione di impo-stazione dell’indirizzo iniziale può essere effettuata anche a proiettore spento.
Funzione LED DMX e LED ERROR - Figura 13Se il LED Verde (DMX) è acceso significa che in ingresso è presente un segnale DMX e che l’indirizzo di partenza è valido, se invece lampeggia significa che in ingresso non è presentealcun segnale DMX o che l’indirizzo di partenza non è valido. Il Led Verde (DMX) rimane spento quando il proiettore non è in modalità SLAVE.Il LED Rosso (ERROR) si accende quando in ingresso è presente un segnale errato o se l’indirizzo di partenza impostato è maggiore di 509.
In SLAVE mode, CP COLOR responds to the DMX input signal from a control unit or MASTER configured projector.
Setting the projector start address - Fig. 12If the projector is driven by an external control unit, the start address for the digital signal must be set for each individual CP COLOR (addresses are valid from 1 to 509) If the projectorreceives a DMX signal from a MASTER projector, the starting address must be equal to 1.This is done using the three rotary selector switches for units (0), tens (10) and hundreds (100) considering that each CP COLOR occupies 4 control channels. The start address settingoperation can also be done with the projector switched off.
LED DMX and LED ERROR feature - Fig. 13If the green LED (DMX) lights up, it means that a DMX signal is in input and that the starting address is valid; however, if it is blinking, it means that there is no DMX signal in input or thatthe starting address is not valid. The green LED (DMX) stays off when the projector is not in SLAVE mode.The red LED (ERROR) lights up when there is an incorrect signal in input or if the starting address is greater than 509.
En modalité SLAVE, le CP COLOR répont au signal DMX qu’il reçoit en entrée depuis une console ou un projecteur en configuration MASTER.
Sélection de l’adresse initiale du projecteur - Figure 12Si le projecteur est piloté par une unité de contrôle externe, il faut effectuer sur chaque CP COLOR la sélection de l’adresse initiale pour le signal numérique (adresses valides de 1 à509). Si le projecteur reçoit un signal DMX d’un projecteur MASTER, l’adresse de départ doit être réglée sur 1.Pour ce faire, il faut agir sur les trois sélecteurs rotatifs pour les unités (0), les dizaines (10) et les centaines (100), en considérant que chaque CP COLOR occupe 4 canaux de contrôle.L’opération de sélec-tion de l’adresse initiale peut également être effectuée avec le projecteur éteint.
Fonction Voyant DEL DMX et Voyant DEL ERROR - Figure 13Lorsque le voyant DEL vert (DMX) est allumé, cela signifie qu’il y a un signal DMX en entrée et que l’adresse de départ est valide ; s’il clignote, cela signifie qu’aucun signal DMX n’estprésent en entrée ou que l’adresse de départ n’est pas valide. Le voyant DEL vert (DMX) demeure éteint lorsque le projecteur est en mode SLAVE.Le voyant DEL rouge (ERROR) s’allume lorsqu’il y a un signal erroné en entrée ou lorsque l’adresse de départ définie est supérieure à 509.
In der SLAVE Modalität reagiert der CP COLOR auf das DMX Signal, das er im Eingang von einer Steuereinheit oder von einem Projektor in MASTER Konfiguration erhält.
Einstellung der Startadresse des Projektors - Abb. 12Wenn der Projektor durch eine externe Steuereinheit gesteuert wird, muss die Einstellung der Startadresse für das digitale Signal auf jedem einzelnen CP COLOR erfolgen (Adressengültig von 1 bis 509). Wenn der Projektor ein DMX Signal von einem MASTER Projektor empfängt, muss die Ursprungsadresse gleich 1 sein.Dazu muss man in Anbetracht der Tatsache, dass jeder CP COLOR vier Steuerkanäle belegt, die drei Drehwählschalter für eine Einheit (0), einen Zehner (10) und einen Hunderter (100)betätigen. Die Einstellung der Startadresse kann auch bei ausgeschaltetem Projektor erfolgen.
Funktion LED DMX und LED ERROR - Abb. 13Wenn die grüne LED (DMX) leuchtet, bedeutet dies, dass am Eingang ein DMX Signal ansteht, und dass die Ursprungsadresse gültig ist. Falls die LED jedoch blinkt, bedeutet dies, dassam Eingang keinerlei DMX Signal ansteht, oder dass die Ursprungsadresse ungültig ist Die grüne LED (DMX) bleibt ausgeschaltet, wenn der Projektor sich nicht im Modus SLAVE befindet.Die rote LED (ERROR) schaltet sich ein, wenn am Eingang ein fehlerhaftes Signal ansteht, oder wenn die Ursprungsadresse auf einen Wert größer als 509 eingestellt ist.
En la modalidad SLAVE el CP COLOR responde a la señal DMX que recibe en la entrada proveniente de una centralita o de un proyector en disposición MASTER.
Configuración de la dirección de inicio del proyector - Figura 12Si el proyector es mandado mediante consola exterior, se debe efectuar en cada CP COLOR la configuración de la dirección de inicio para la señal digital (direcciones válidas de 1 a509). Si el proyector recive una señal DMX de un proyector MASTER, la dirección de inicio será igual a 1.Para realizar esta opera-ción, es necesario intervenir en los tres selectores rotativos por unidad (0), decenas (10) y centenares (100) considerando que cada CP COLOR ocupa 4 cana-les de control. La operación de configuración de la dirección inicial se puede realizar también con el proyector apagado.
Función LED DMX y LED ERROR - Figura 13Si el LED Verde (DMX) está encendido significa que en la entrada existe una señal DMX y que la dirección de inicio es válida, si por el contrario parpadease, quiere decir que en laentrada no hay ninguna señal DMX o que la dirección de inicio no es válida. El Led Verde (DMX) permanece apagado cuando el proyector no está en la modalidad SLAVE.El LED Rojo (ERROR) se enciende cuando en la entrada existe una señal errónea o cuando la dirección de inicio establecida es mayor a 509.
01
23
4 5 6
78
9
100 10 001
23
4 5 6
78
9 012
34
5 6 7
89
01
23
4 5 6
78
9
100 10 001
23
4 5 6
78
9
0 1
23
456
78
9
01
23
4 5 6
78
9
100 10 001
23
4 5 6
78
9 0
12
3 4 5
67
89
012
34
5 6 7
89
100 10 001
23
4 5 6
78
9
01
234
56
7 8 9
01
23
4 5 6
78
9
100 10 0
R G B TYPE SPEED
STAND ALONE FUNCTIONS
PO
WE
R
OU
T
ER
RO
R
1 2 3 4 5 6 7 8 9 10 11 12
OU
TCHASE
01
23
4 5 6
78
9 01
23
4 5 6
78
9
DM
X
CM
Y
(GREEN) (RED) (YELLOW) (RED)
ON
12 13Projector 1channel 1-4
Projector 2channel 5-8
Projector 3channel 9-12
Projector 4channel 13-16
10
FUNZIONE CANALI ED OPZIONI CHANNEL FUNCTION AND OPTIONS
FONCTION DES CANAUX ET OPTIONS KANALFUNKTIONEN UND-OPTIONEN FUNCION DE LOS CANALES Y OPCIONES
I GB
D EF
R G B TYPE SPEED C M
Y
STAND ALONE FUNCTIONS
1 2 3 4 5 6 7 8 9 10 1112
OU
TCHASE
ON
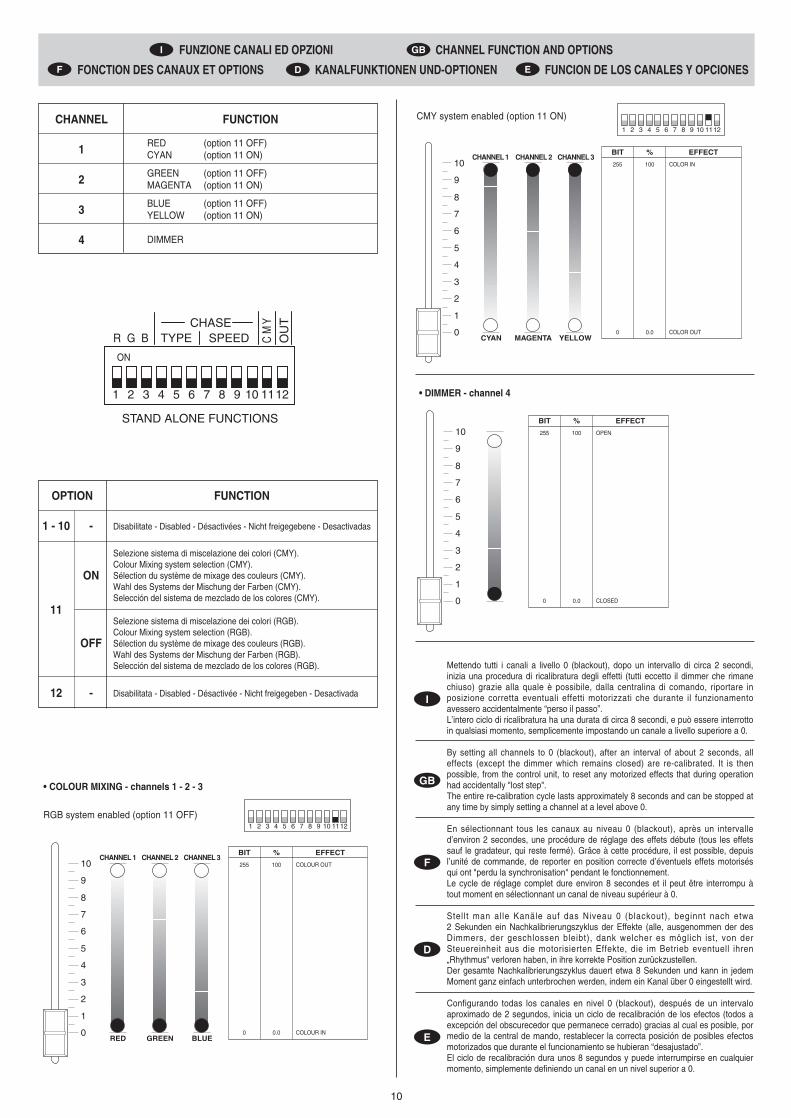
CHANNEL FUNCTION
1 RED (option 11 OFF)CYAN (option 11 ON)
2 GREEN (option 11 OFF)MAGENTA (option 11 ON)
3 BLUE (option 11 OFF)YELLOW (option 11 ON)
4 DIMMER
OPTION FUNCTION
1 - 10 Disabilitate - Disabled - Désactivées - Nicht freigegebene - Desactivadas
Selezione sistema di miscelazione dei colori (CMY).Colour Mixing system selection (CMY).Sélection du système de mixage des couleurs (CMY).Wahl des Systems der Mischung der Farben (CMY).Selección del sistema de mezclado de los colores (CMY).
Selezione sistema di miscelazione dei colori (RGB).Colour Mixing system selection (RGB).Sélection du système de mixage des couleurs (RGB).Wahl des Systems der Mischung der Farben (RGB).Selección del sistema de mezclado de los colores (RGB).
11
OFF
ON
-
12 Disabilitata - Disabled - Désactivée - Nicht freigegeben - Desactivada-
• COLOUR MIXING - channels 1 - 2 - 3
0
1
2
3
4
5
6
7
8
9
10BIT % EFFECT
255 100 COLOUR OUT
0 0.0 COLOUR IN
CHANNEL 1
RED
CHANNEL 2
GREEN
CHANNEL 3
BLUE
RGB system enabled (option 11 OFF)1 2 3 4 5 6 7 8 9 10 1112
CMY system enabled (option 11 ON)
0
1
2
3
4
5
6
7
8
9
10BIT % EFFECT
255 100 COLOR IN
0 0.0 COLOR OUT
CHANNEL 1
CYAN
CHANNEL 2
MAGENTA
CHANNEL 3
YELLOW
• DIMMER - channel 4
0
1
2
3
4
5
6
7
8
9
10BIT % EFFECT
255 100 OPEN
0 0.0 CLOSED
1 2 3 4 5 6 7 8 9 10 1112
Mettendo tutti i canali a livello 0 (blackout), dopo un intervallo di circa 2 secondi,inizia una procedura di ricalibratura degli effetti (tutti eccetto il dimmer che rimanechiuso) grazie alla quale è possibile, dalla centralina di comando, riportare inposizione corretta eventuali effetti motorizzati che durante il funzionamentoavessero accidentalmente “perso il passo”.L’intero ciclo di ricalibratura ha una durata di circa 8 secondi, e può essere interrottoin qualsiasi momento, semplicemente impostando un canale a livello superiore a 0.
By setting all channels to 0 (blackout), after an interval of about 2 seconds, alleffects (except the dimmer which remains closed) are re-calibrated. It is thenpossible, from the control unit, to reset any motorized effects that during operationhad accidentally "lost step".The entire re-calibration cycle lasts approximately 8 seconds and can be stopped atany time by simply setting a channel at a level above 0.
En sélectionnant tous les canaux au niveau 0 (blackout), après un intervalled’environ 2 secondes, une procédure de réglage des effets débute (tous les effetssauf le gradateur, qui reste fermé). Grâce à cette procédure, il est possible, depuisl’unité de commande, de reporter en position correcte d’éventuels effets motorisésqui ont "perdu la synchronisation" pendant le fonctionnement.Le cycle de réglage complet dure environ 8 secondes et il peut être interrompu àtout moment en sélectionnant un canal de niveau supérieur à 0.
Stellt man alle Kanäle auf das Niveau 0 (blackout), beginnt nach etwa 2 Sekunden ein Nachkalibrierungszyklus der Effekte (alle, ausgenommen der desDimmers, der geschlossen bleibt), dank welcher es möglich ist, von derSteuereinheit aus die motorisierten Effekte, die im Betrieb eventuell ihren„Rhythmus“ verloren haben, in ihre korrekte Position zurückzustellen.Der gesamte Nachkalibrierungszyklus dauert etwa 8 Sekunden und kann in jedemMoment ganz einfach unterbrochen werden, indem ein Kanal über 0 eingestellt wird.
Configurando todas los canales en nivel 0 (blackout), después de un intervaloaproximado de 2 segundos, inicia un ciclo de recalibración de los efectos (todos aexcepción del obscurecedor que permanece cerrado) gracias al cual es posible, pormedio de la central de mando, restablecer la correcta posición de posibles efectosmotorizados que durante el funcionamiento se hubieran “desajustado”.El ciclo de recalibración dura unos 8 segundos y puede interrumpirse en cualquiermomento, simplemente definiendo un canal en un nivel superior a 0.
I
GB
D
E
F
11
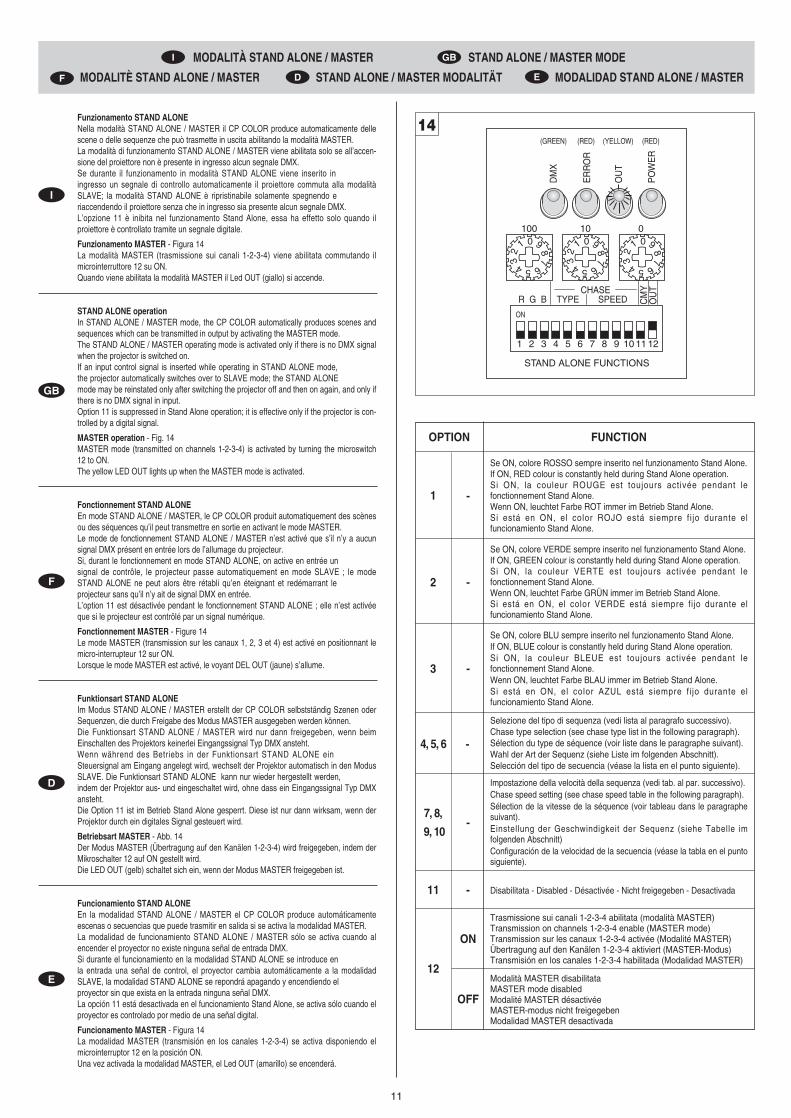
Funzionamento STAND ALONENella modalità STAND ALONE / MASTER il CP COLOR produce automaticamente dellescene o delle sequenze che può trasmette in uscita abilitando la modalità MASTER.La modalità di funzionamento STAND ALONE / MASTER viene abilitata solo se all’accen-sione del proiettore non è presente in ingresso alcun segnale DMX.Se durante il funzionamento in modalità STAND ALONE viene inserito iningresso un segnale di controllo automaticamente il proiettore commuta alla modalitàSLAVE; la modalità STAND ALONE è ripristinabile solamente spegnendo eriaccendendo il proiettore senza che in ingresso sia presente alcun segnale DMX.L’opzione 11 è inibita nel funzionamento Stand Alone, essa ha effetto solo quando ilproiettore è controllato tramite un segnale digitale.
Funzionamento MASTER - Figura 14La modalità MASTER (trasmissione sui canali 1-2-3-4) viene abilitata commutando ilmicrointerruttore 12 su ON.Quando viene abilitata la modalità MASTER il Led OUT (giallo) si accende.
STAND ALONE operationIn STAND ALONE / MASTER mode, the CP COLOR automatically produces scenes andsequences which can be transmitted in output by activating the MASTER mode.The STAND ALONE / MASTER operating mode is activated only if there is no DMX signalwhen the projector is switched on. If an input control signal is inserted while operating in STAND ALONE mode,the projector automatically switches over to SLAVE mode; the STAND ALONE mode may be reinstated only after switching the projector off and then on again, and only ifthere is no DMX signal in input.Option 11 is suppressed in Stand Alone operation; it is effective only if the projector is con-trolled by a digital signal.
MASTER operation - Fig. 14MASTER mode (transmitted on channels 1-2-3-4) is activated by turning the microswitch12 to ON.The yellow LED OUT lights up when the MASTER mode is activated.
Fonctionnement STAND ALONEEn mode STAND ALONE / MASTER, le CP COLOR produit automatiquement des scènesou des séquences qu’il peut transmettre en sortie en activant le mode MASTER.Le mode de fonctionnement STAND ALONE / MASTER n’est activé que s’il n’y a aucunsignal DMX présent en entrée lors de l’allumage du projecteur.Si, durant le fonctionnement en mode STAND ALONE, on active en entrée unsignal de contrôle, le projecteur passe automatiquement en mode SLAVE ; le modeSTAND ALONE ne peut alors être rétabli qu’en éteignant et redémarrant leprojecteur sans qu’il n’y ait de signal DMX en entrée.L’option 11 est désactivée pendant le fonctionnement STAND ALONE ; elle n’est activéeque si le projecteur est contrôlé par un signal numérique.
Fonctionnement MASTER - Figure 14Le mode MASTER (transmission sur les canaux 1, 2, 3 et 4) est activé en positionnant lemicro-interrupteur 12 sur ON.Lorsque le mode MASTER est activé, le voyant DEL OUT (jaune) s’allume.
Funktionsart STAND ALONEIm Modus STAND ALONE / MASTER erstellt der CP COLOR selbstständig Szenen oderSequenzen, die durch Freigabe des Modus MASTER ausgegeben werden können.Die Funktionsart STAND ALONE / MASTER wird nur dann freigegeben, wenn beimEinschalten des Projektors keinerlei Eingangssignal Typ DMX ansteht.Wenn während des Betriebs in der Funktionsart STAND ALONE einSteuersignal am Eingang angelegt wird, wechselt der Projektor automatisch in den ModusSLAVE. Die Funktionsart STAND ALONE kann nur wieder hergestellt werden,indem der Projektor aus- und eingeschaltet wird, ohne dass ein Eingangssignal Typ DMXansteht.Die Option 11 ist im Betrieb Stand Alone gesperrt. Diese ist nur dann wirksam, wenn derProjektor durch ein digitales Signal gesteuert wird.
Betriebsart MASTER - Abb. 14Der Modus MASTER (Übertragung auf den Kanälen 1-2-3-4) wird freigegeben, indem derMikroschalter 12 auf ON gestellt wird.Die LED OUT (gelb) schaltet sich ein, wenn der Modus MASTER freigegeben ist.
Funcionamiento STAND ALONEEn la modalidad STAND ALONE / MASTER el CP COLOR produce automáticamenteescenas o secuencias que puede trasmitir en salida si se activa la modalidad MASTER.La modalidad de funcionamiento STAND ALONE / MASTER sólo se activa cuando alencender el proyector no existe ninguna señal de entrada DMX.Si durante el funcionamiento en la modalidad STAND ALONE se introduce enla entrada una señal de control, el proyector cambia automáticamente a la modalidadSLAVE, la modalidad STAND ALONE se repondrá apagando y encendiendo elproyector sin que exista en la entrada ninguna señal DMX.La opción 11 está desactivada en el funcionamiento Stand Alone, se activa sólo cuando elproyector es controlado por medio de una señal digital.
Funcionamento MASTER - Figura 14La modalidad MASTER (transmisión en los canales 1-2-3-4) se activa disponiendo elmicrointerruptor 12 en la posición ON.Una vez activada la modalidad MASTER, el Led OUT (amarillo) se encenderá.
I
GB
D
E
F
MODALITÀ STAND ALONE / MASTER STAND ALONE / MASTER MODE
MODALITÈ STAND ALONE / MASTER STAND ALONE / MASTER MODALITÄT MODALIDAD STAND ALONE / MASTER
I GB
D EF
01
23
4 5 6
78
9
100 10 0
R G B TYPE SPEED
STAND ALONE FUNCTIONS
PO
WE
R
OU
T
ER
RO
R
1 2 3 4 5 6 7 8 9 10 11 12
OU
TCHASE
01
23
4 5 6
78
9 01
23
4 5 6
78
9
DM
X
CM
Y
(GREEN) (RED) (YELLOW) (RED)
ON
14
OPTION FUNCTION
1
Se ON, colore ROSSO sempre inserito nel funzionamento Stand Alone.If ON, RED colour is constantly held during Stand Alone operation.Si ON, la couleur ROUGE est toujours activée pendant lefonctionnement Stand Alone.Wenn ON, leuchtet Farbe ROT immer im Betrieb Stand Alone.Si está en ON, el color ROJO está siempre fi jo durante elfuncionamiento Stand Alone.
Se ON, colore VERDE sempre inserito nel funzionamento Stand Alone.If ON, GREEN colour is constantly held during Stand Alone operation.Si ON, la couleur VERTE est toujours activée pendant lefonctionnement Stand Alone.Wenn ON, leuchtet Farbe GRÜN immer im Betrieb Stand Alone.Si está en ON, el color VERDE está siempre fijo durante elfuncionamiento Stand Alone.
Se ON, colore BLU sempre inserito nel funzionamento Stand Alone.If ON, BLUE colour is constantly held during Stand Alone operation.Si ON, la couleur BLEUE est toujours activée pendant lefonctionnement Stand Alone.Wenn ON, leuchtet Farbe BLAU immer im Betrieb Stand Alone.Si está en ON, el color AZUL está siempre fi jo durante elfuncionamiento Stand Alone.
Selezione del tipo di sequenza (vedi lista al paragrafo successivo).Chase type selection (see chase type list in the following paragraph).Sélection du type de séquence (voir liste dans le paragraphe suivant).Wahl der Art der Sequenz (siehe Liste im folgenden Abschnitt).Selección del tipo de secuencia (véase la lista en el punto siguiente).
Impostazione della velocità della sequenza (vedi tab. al par. successivo).Chase speed setting (see chase speed table in the following paragraph).Sélection de la vitesse de la séquence (voir tableau dans le paragraphesuivant).Einstellung der Geschwindigkeit der Sequenz (siehe Tabelle imfolgenden Abschnitt)Configuración de la velocidad de la secuencia (véase la tabla en el puntosiguiente).
2
3
4, 5, 6
7, 8,
9, 10-
-
-
-
-
Trasmissione sui canali 1-2-3-4 abilitata (modalità MASTER)Transmission on channels 1-2-3-4 enable (MASTER mode)Transmission sur les canaux 1-2-3-4 activée (Modalité MASTER)Übertragung auf den Kanälen 1-2-3-4 aktiviert (MASTER-Modus)Transmisión en los canales 1-2-3-4 habilitada (Modalidad MASTER)
Modalità MASTER disabilitataMASTER mode disabledModalité MASTER désactivéeMASTER-modus nicht freigegebenModalidad MASTER desactivada
12
ON
OFF
11 Disabilitata - Disabled - Désactivée - Nicht freigegeben - Desactivada-
12
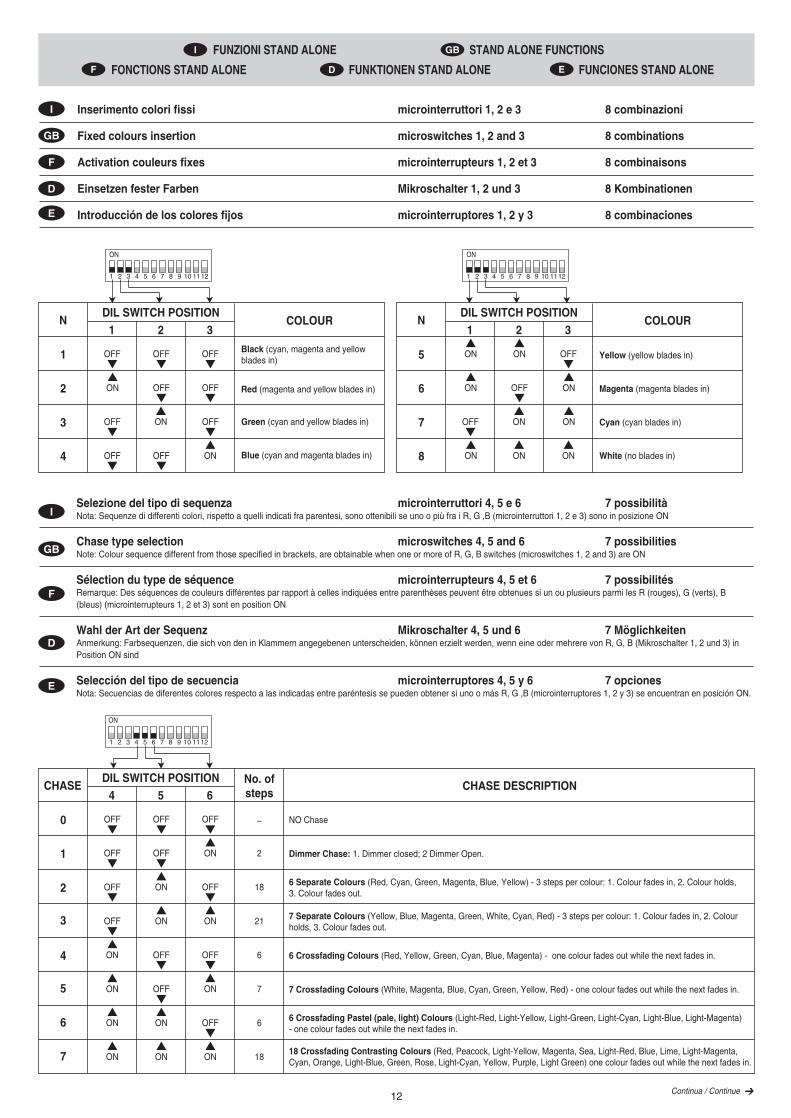
CHASE No. ofsteps
DIL SWITCH POSITIONCHASE DESCRIPTION
4 5 6
0
1
2
3
4
5
6
7
OFF OFF OFF –
OFF OFF ON 2
OFF ON OFF 18
OFF ON ON 21
ON OFF OFF 6
ON OFF ON 7
ON ON OFF 6
ON ON ON 18
NO Chase
Dimmer Chase: 1. Dimmer closed; 2 Dimmer Open.
6 Separate Colours (Red, Cyan, Green, Magenta, Blue, Yellow) - 3 steps per colour: 1. Colour fades in, 2. Colour holds, 3. Colour fades out.
7 Separate Colours (Yellow, Blue, Magenta, Green, White, Cyan, Red) - 3 steps per colour: 1. Colour fades in, 2. Colourholds, 3. Colour fades out.
6 Crossfading Colours (Red, Yellow, Green, Cyan, Blue, Magenta) - one colour fades out while the next fades in.
7 Crossfading Colours (White, Magenta, Blue, Cyan, Green, Yellow, Red) - one colour fades out while the next fades in.
6 Crossfading Pastel (pale, light) Colours (Light-Red, Light-Yellow, Light-Green, Light-Cyan, Light-Blue, Light-Magenta)- one colour fades out while the next fades in.
18 Crossfading Contrasting Colours (Red, Peacock, Light-Yellow, Magenta, Sea, Light-Red, Blue, Lime, Light-Magenta,Cyan, Orange, Light-Blue, Green, Rose, Light-Cyan, Yellow, Purple, Light Green) one colour fades out while the next fades in.
N COLOURDIL SWITCH POSITION
1 2 3
1
2
3
4
OFF OFF OFF
OFF
OFF
OFF
OFFON
OFF
OFF ON
ON
Black (cyan, magenta and yellow blades in)
Red (magenta and yellow blades in)
Green (cyan and yellow blades in)
Blue (cyan and magenta blades in)
N COLOURDIL SWITCH POSITION
1 2 3
5
6
7
8
OFF
OFF
OFFON
ON
ONON
ON
ON
ON
ON
ON Yellow (yellow blades in)
Magenta (magenta blades in)
Cyan (cyan blades in)
White (no blades in)
1 2 3 4 5 6 7 8 9 10 1112
ON
1 2 3 4 5 6 7 8 9 10 1112
ON
1 2 3 4 5 6 7 8 9 10 1112
ON
Continua / Continue
Inserimento colori fissi microinterruttori 1, 2 e 3 8 combinazioni
Fixed colours insertion microswitches 1, 2 and 3 8 combinations
Activation couleurs fixes microinterrupteurs 1, 2 et 3 8 combinaisons
Einsetzen fester Farben Mikroschalter 1, 2 und 3 8 Kombinationen
Introducción de los colores fijos microinterruptores 1, 2 y 3 8 combinaciones
I
GB
D
E
F
Selezione del tipo di sequenza microinterruttori 4, 5 e 6 7 possibilitàNota: Sequenze di differenti colori, rispetto a quelli indicati fra parentesi, sono ottenibili se uno o più fra i R, G ,B (microinterruttori 1, 2 e 3) sono in posizione ON
Chase type selection microswitches 4, 5 and 6 7 possibilitiesNote: Colour sequence different from those specified in brackets, are obtainable when one or more of R, G, B switches (microswitches 1, 2 and 3) are ON
Sélection du type de séquence microinterrupteurs 4, 5 et 6 7 possibilitésRemarque: Des séquences de couleurs différentes par rapport à celles indiquées entre parenthèses peuvent être obtenues si un ou plusieurs parmi les R (rouges), G (verts), B (bleus) (microinterrupteurs 1, 2 et 3) sont en position ON
Wahl der Art der Sequenz Mikroschalter 4, 5 und 6 7 MöglichkeitenAnmerkung: Farbsequenzen, die sich von den in Klammern angegebenen unterscheiden, können erzielt werden, wenn eine oder mehrere von R, G, B (Mikroschalter 1, 2 und 3) in Position ON sind
Selección del tipo de secuencia microinterruptores 4, 5 y 6 7 opcionesNota: Secuencias de diferentes colores respecto a las indicadas entre paréntesis se pueden obtener si uno o más R, G ,B (microinterruptores 1, 2 y 3) se encuentran en posición ON.
I
GB
D
E
F
FUNZIONI STAND ALONE STAND ALONE FUNCTIONS
FONCTIONS STAND ALONE FUNKTIONEN STAND ALONE FUNCIONES STAND ALONE
I GB
D EF
13
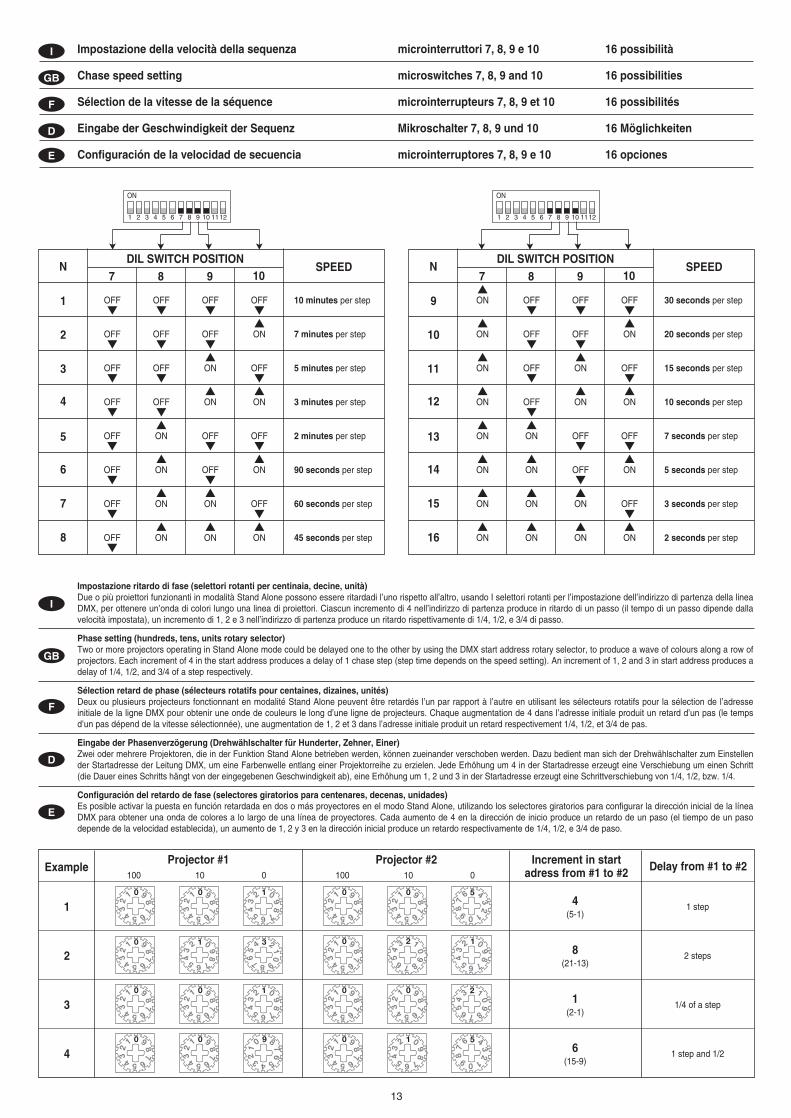
ExampleProjector #1 Projector #2 Increment in start
adress from #1 to #2 Delay from #1 to #2
1
2
3
4
4(5-1)
8(21-13)
1(2-1)
6(15-9)
100 10 0 100 10 0
1 step
2 steps
1/4 of a step
1 step and 1/2
01
23
4 5 6
78
901
23
4 5 6
78
9 012
34 5 6 7
89
012
34 5 6 7
89
01
23 4 5 6
789
01234
56 7 8 9
01
23
4 5 6
78
901
23
4 5 6
78
9 012
34 5 6 7
89
01
23
4 5 6
78
901
23
4 5 6
78
9 0
12 3 4 5
6789
01
23
4 5 6
78
901
23
4 5 6
78
9
0 1
23
456
78
9
0
123
45
6 7 8
9
01
23
4 5 6
78
9 012
34 5 6 7
89
01
23
4 5 6
78
901
23
4 5 6
78
9 0123
45 6 7 8
9
012
34 5 6 7
89
01
23
4 5 6
78
9
0 1
23
456
78
9
N SPEEDDIL SWITCH POSITION
7 8 9 10
1
2
3
4
5
6
7
8
OFF OFF OFF
OFF OFF
OFF
OFFON
OFF
OFF
OFF ON
ONOFF OFF
ONOFF
OFF
OFF
OFF
ONON
ON ON
OFF
ON
OFF
ON
OFF
ON
OFF
ON
10 minutes per step
7 minutes per step
5 minutes per step
3 minutes per step
2 minutes per step
90 seconds per step
60 seconds per step
45 seconds per step
N SPEEDDIL SWITCH POSITION
7 8 9 10
9
10
11
12
13
14
15
16
OFF OFF
OFF
OFF
ON
OFF
OFF ON
ON OFF
ON OFF
ONON
ONON
ON
ON
ON
ON
ON
ON
ON
ON
OFF
ON
OFF
ON
OFF
OFF
ON
ON
30 seconds per step
20 seconds per step
15 seconds per step
10 seconds per step
7 seconds per step
5 seconds per step
3 seconds per step
2 seconds per step
1 2 3 4 5 6 7 8 9 10 1112
ON
1 2 3 4 5 6 7 8 9 10 1112
ON
Impostazione della velocità della sequenza microinterruttori 7, 8, 9 e 10 16 possibilità
Chase speed setting microswitches 7, 8, 9 and 10 16 possibilities
Sélection de la vitesse de la séquence microinterrupteurs 7, 8, 9 et 10 16 possibilités
Eingabe der Geschwindigkeit der Sequenz Mikroschalter 7, 8, 9 und 10 16 Möglichkeiten
Configuración de la velocidad de secuencia microinterruptores 7, 8, 9 e 10 16 opciones
I
GB
D
E
F
Impostazione ritardo di fase (selettori rotanti per centinaia, decine, unità)Due o più proiettori funzionanti in modalità Stand Alone possono essere ritardadi l’uno rispetto all’altro, usando I selettori rotanti per l’impostazione dell’indirizzo di partenza della lineaDMX, per ottenere un’onda di colori lungo una linea di proiettori. Ciascun incremento di 4 nell’indirizzo di partenza produce in ritardo di un passo (il tempo di un passo dipende dallavelocità impostata), un incremento di 1, 2 e 3 nell’indirizzo di partenza produce un ritardo rispettivamente di 1/4, 1/2, e 3/4 di passo.
Phase setting (hundreds, tens, units rotary selector)Two or more projectors operating in Stand Alone mode could be delayed one to the other by using the DMX start address rotary selector, to produce a wave of colours along a row ofprojectors. Each increment of 4 in the start address produces a delay of 1 chase step (step time depends on the speed setting). An increment of 1, 2 and 3 in start address produces adelay of 1/4, 1/2, and 3/4 of a step respectively.
Sélection retard de phase (sélecteurs rotatifs pour centaines, dizaines, unités)Deux ou plusieurs projecteurs fonctionnant en modalité Stand Alone peuvent être retardés l’un par rapport à l’autre en utilisant les sélecteurs rotatifs pour la sélection de l’adresseinitiale de la ligne DMX pour obtenir une onde de couleurs le long d’une ligne de projecteurs. Chaque augmentation de 4 dans l’adresse initiale produit un retard d’un pas (le tempsd’un pas dépend de la vitesse sélectionnée), une augmentation de 1, 2 et 3 dans l’adresse initiale produit un retard respectivement 1/4, 1/2, et 3/4 de pas.
Eingabe der Phasenverzögerung (Drehwählschalter für Hunderter, Zehner, Einer)Zwei oder mehrere Projektoren, die in der Funktion Stand Alone betrieben werden, können zueinander verschoben werden. Dazu bedient man sich der Drehwählschalter zum Einstellender Startadresse der Leitung DMX, um eine Farbenwelle entlang einer Projektorreihe zu erzielen. Jede Erhöhung um 4 in der Startadresse erzeugt eine Verschiebung um einen Schritt(die Dauer eines Schritts hängt von der eingegebenen Geschwindigkeit ab), eine Erhöhung um 1, 2 und 3 in der Startadresse erzeugt eine Schrittverschiebung von 1/4, 1/2, bzw. 1/4.
Configuración del retardo de fase (selectores giratorios para centenares, decenas, unidades)Es posible activar la puesta en función retardada en dos o más proyectores en el modo Stand Alone, utilizando los selectores giratorios para configurar la dirección inicial de la líneaDMX para obtener una onda de colores a lo largo de una línea de proyectores. Cada aumento de 4 en la dirección de inicio produce un retardo de un paso (el tiempo de un pasodepende de la velocidad establecida), un aumento de 1, 2 y 3 en la dirección inicial produce un retardo respectivamente de 1/4, 1/2, e 3/4 de paso.
I
GB
D
E
F
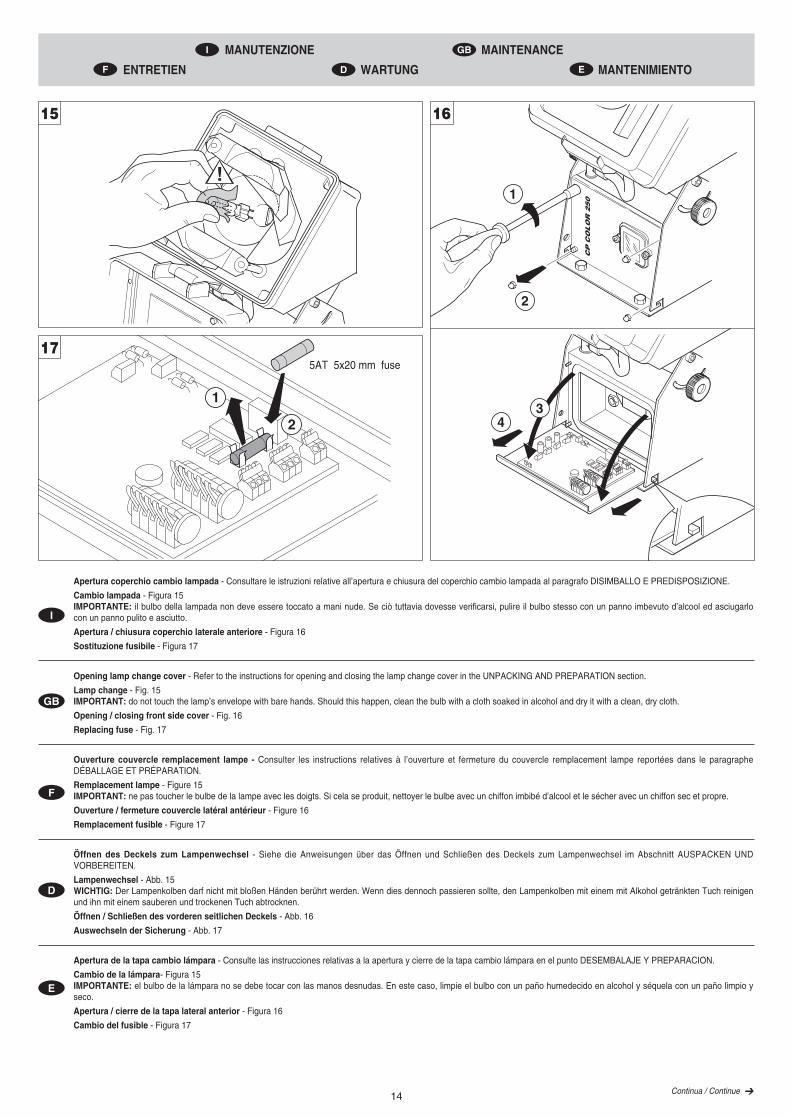
14 Continua / Continue
MANUTENZIONE MAINTENANCE
ENTRETIEN WARTUNG MANTENIMIENTO
I GB
D EF
I
GB
D
E
F
Apertura coperchio cambio lampada - Consultare le istruzioni relative all’apertura e chiusura del coperchio cambio lampada al paragrafo DISIMBALLO E PREDISPOSIZIONE.
Cambio lampada - Figura 15IMPORTANTE: il bulbo della lampada non deve essere toccato a mani nude. Se ciò tuttavia dovesse verificarsi, pulire il bulbo stesso con un panno imbevuto d’alcool ed asciugarlocon un panno pulito e asciutto.
Apertura / chiusura coperchio laterale anteriore - Figura 16
Sostituzione fusibile - Figura 17
Opening lamp change cover - Refer to the instructions for opening and closing the lamp change cover in the UNPACKING AND PREPARATION section.
Lamp change - Fig. 15IMPORTANT: do not touch the lamp’s envelope with bare hands. Should this happen, clean the bulb with a cloth soaked in alcohol and dry it with a clean, dry cloth.
Opening / closing front side cover - Fig. 16
Replacing fuse - Fig. 17
Ouverture couvercle remplacement lampe - Consulter les instructions relatives à l’ouverture et fermeture du couvercle remplacement lampe reportées dans le paragrapheDÉBALLAGE ET PRÉPARATION.
Remplacement lampe - Figure 15IMPORTANT: ne pas toucher le bulbe de la lampe avec les doigts. Si cela se produit, nettoyer le bulbe avec un chiffon imbibé d’alcool et le sécher avec un chiffon sec et propre.
Ouverture / fermeture couvercle latéral antérieur - Figure 16
Remplacement fusible - Figure 17
Öffnen des Deckels zum Lampenwechsel - Siehe die Anweisungen über das Öffnen und Schließen des Deckels zum Lampenwechsel im Abschnitt AUSPACKEN UNDVORBEREITEN.
Lampenwechsel - Abb. 15WICHTIG: Der Lampenkolben darf nicht mit bloßen Händen berührt werden. Wenn dies dennoch passieren sollte, den Lampenkolben mit einem mit Alkohol getränkten Tuch reinigenund ihn mit einem sauberen und trockenen Tuch abtrocknen.
Öffnen / Schließen des vorderen seitlichen Deckels - Abb. 16
Auswechseln der Sicherung - Abb. 17
Apertura de la tapa cambio lámpara - Consulte las instrucciones relativas a la apertura y cierre de la tapa cambio lámpara en el punto DESEMBALAJE Y PREPARACION.
Cambio de la lámpara- Figura 15IMPORTANTE: el bulbo de la lámpara no se debe tocar con las manos desnudas. En este caso, limpie el bulbo con un paño humedecido en alcohol y séquela con un paño limpio yseco.
Apertura / cierre de la tapa lateral anterior - Figura 16
Cambio del fusible - Figura 17
43
CP
CO
LO
R 2
501
2
!
1
2
15
17
16
5AT 5x20 mm fuse
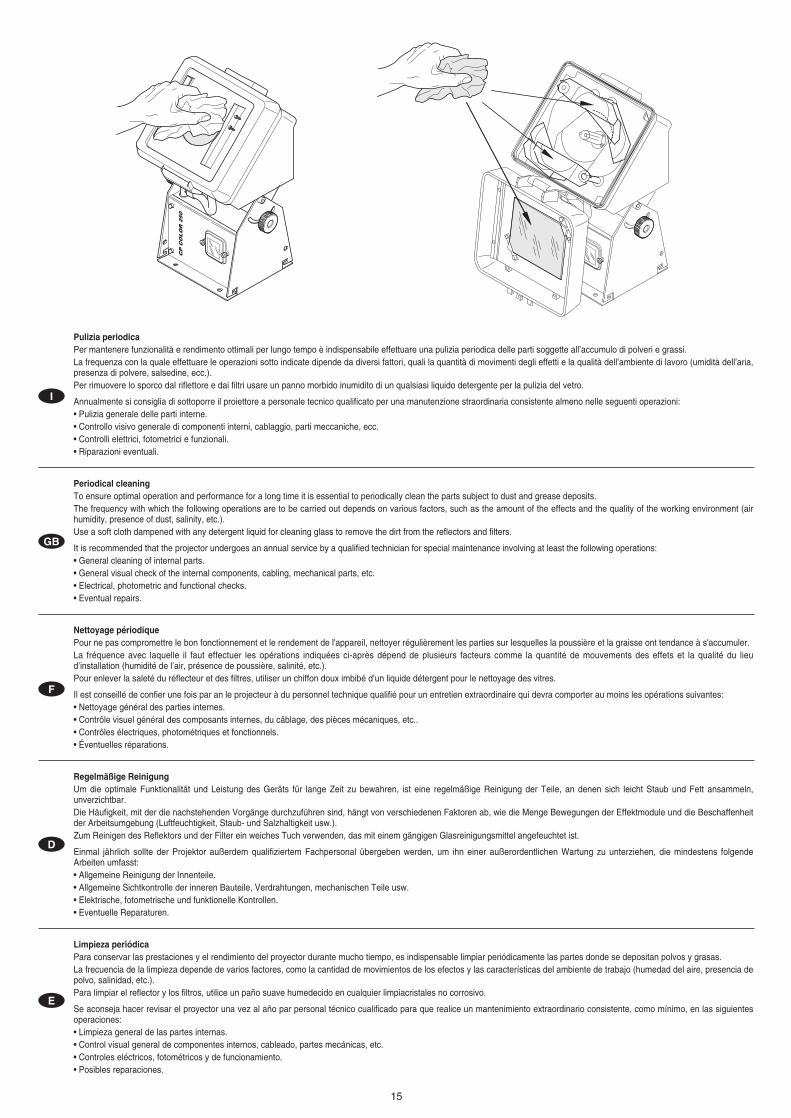
15
CP
CO
LO
R 2
50
I
GB
D
E
F
Pulizia periodicaPer mantenere funzionalità e rendimento ottimali per lungo tempo è indispensabile effettuare una pulizia periodica delle parti soggette all’accumulo di polveri e grassi.La frequenza con la quale effettuare le operazioni sotto indicate dipende da diversi fattori, quali la quantità di movimenti degli effetti e la qualità dell’ambiente di lavoro (umidità dell’aria,presenza di polvere, salsedine, ecc.).Per rimuovere lo sporco dal riflettore e dai filtri usare un panno morbido inumidito di un qualsiasi liquido detergente per la pulizia del vetro.
Annualmente si consiglia di sottoporre il proiettore a personale tecnico qualificato per una manutenzione straordinaria consistente almeno nelle seguenti operazioni:• Pulizia generale delle parti interne.• Controllo visivo generale di componenti interni, cablaggio, parti meccaniche, ecc.• Controlli elettrici, fotometrici e funzionali.• Riparazioni eventuali.
Periodical cleaningTo ensure optimal operation and performance for a long time it is essential to periodically clean the parts subject to dust and grease deposits.The frequency with which the following operations are to be carried out depends on various factors, such as the amount of the effects and the quality of the working environment (airhumidity, presence of dust, salinity, etc.).Use a soft cloth dampened with any detergent liquid for cleaning glass to remove the dirt from the reflectors and filters.
It is recommended that the projector undergoes an annual service by a qualified technician for special maintenance involving at least the following operations:• General cleaning of internal parts.• General visual check of the internal components, cabling, mechanical parts, etc.• Electrical, photometric and functional checks.• Eventual repairs.
Nettoyage périodiquePour ne pas compromettre le bon fonctionnement et le rendement de l'appareil, nettoyer régulièrement les parties sur lesquelles la poussière et la graisse ont tendance à s'accumuler.La fréquence avec laquelle il faut effectuer les opérations indiquées ci-après dépend de plusieurs facteurs comme la quantité de mouvements des effets et la qualité du lieud’installation (humidité de l’air, présence de poussière, salinité, etc.).Pour enlever la saleté du réflecteur et des filtres, utiliser un chiffon doux imbibé d’un liquide détergent pour le nettoyage des vitres.
Il est conseillé de confier une fois par an le projecteur à du personnel technique qualifié pour un entretien extraordinaire qui devra comporter au moins les opérations suivantes:• Nettoyage général des parties internes.• Contrôle visuel général des composants internes, du câblage, des pièces mécaniques, etc..• Contrôles électriques, photométriques et fonctionnels.• Éventuelles réparations.
Regelmäßige ReinigungUm die optimale Funktionalität und Leistung des Geräts für lange Zeit zu bewahren, ist eine regelmäßige Reinigung der Teile, an denen sich leicht Staub und Fett ansammeln,unverzichtbar.Die Häufigkeit, mit der die nachstehenden Vorgänge durchzuführen sind, hängt von verschiedenen Faktoren ab, wie die Menge Bewegungen der Effektmodule und die Beschaffenheitder Arbeitsumgebung (Luftfeuchtigkeit, Staub- und Salzhaltigkeit usw.).Zum Reinigen des Reflektors und der Filter ein weiches Tuch verwenden, das mit einem gängigen Glasreinigungsmittel angefeuchtet ist.
Einmal jährlich sollte der Projektor außerdem qualifiziertem Fachpersonal übergeben werden, um ihn einer außerordentlichen Wartung zu unterziehen, die mindestens folgendeArbeiten umfasst:• Allgemeine Reinigung der Innenteile.• Allgemeine Sichtkontrolle der inneren Bauteile, Verdrahtungen, mechanischen Teile usw.• Elektrische, fotometrische und funktionelle Kontrollen.• Eventuelle Reparaturen.
Limpieza periódicaPara conservar las prestaciones y el rendimiento del proyector durante mucho tiempo, es indispensable limpiar periódicamente las partes donde se depositan polvos y grasas.La frecuencia de la limpieza depende de varios factores, como la cantidad de movimientos de los efectos y las características del ambiente de trabajo (humedad del aire, presencia depolvo, salinidad, etc.).Para limpiar el reflector y los filtros, utilice un paño suave humedecido en cualquier limpiacristales no corrosivo.
Se aconseja hacer revisar el proyector una vez al año par personal técnico cualificado para que realice un mantenimiento extraordinario consistente, como mínimo, en las siguientesoperaciones:• Limpieza general de las partes internas.• Control visual general de componentes internos, cableado, partes mecánicas, etc.• Controles eléctricos, fotométricos y de funcionamiento.• Posibles reparaciones.
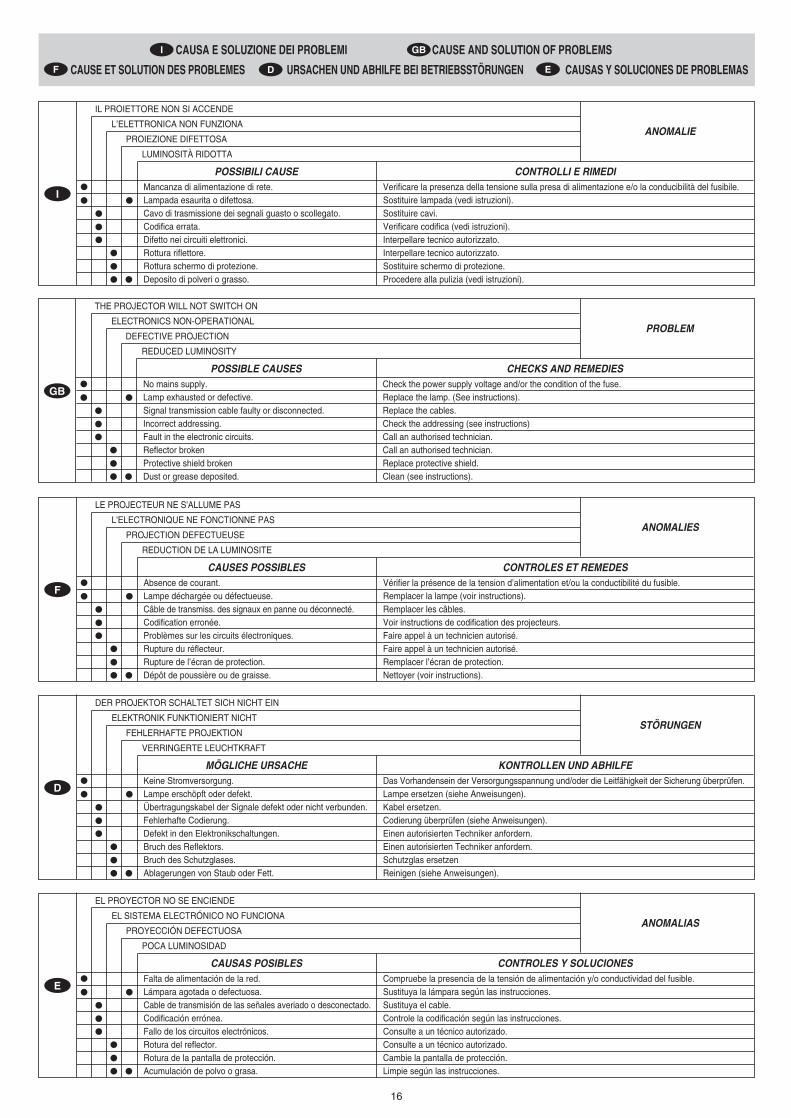
16
IL PROIETTORE NON SI ACCENDE
ANOMALIEL’ELETTRONICA NON FUNZIONA
PROIEZIONE DIFETTOSA
LUMINOSITÀ RIDOTTA
POSSIBILI CAUSE CONTROLLI E RIMEDIMancanza di alimentazione di rete.Lampada esaurita o difettosa.Cavo di trasmissione dei segnali guasto o scollegato.Codifica errata.Difetto nei circuiti elettronici.Rottura riflettore.Rottura schermo di protezione.Deposito di polveri o grasso.
Verificare la presenza della tensione sulla presa di alimentazione e/o la conducibilità del fusibile. Sostituire lampada (vedi istruzioni).Sostituire cavi.Verificare codifica (vedi istruzioni).Interpellare tecnico autorizzato.Interpellare tecnico autorizzato.Sostituire schermo di protezione.Procedere alla pulizia (vedi istruzioni).
I
LE PROJECTEUR NE S'ALLUME PAS
ANOMALIESL'ELECTRONIQUE NE FONCTIONNE PAS
PROJECTION DEFECTUEUSE
REDUCTION DE LA LUMINOSITE
CAUSES POSSIBLES CONTROLES ET REMEDESAbsence de courant.Lampe déchargée ou défectueuse.Câble de transmiss. des signaux en panne ou déconnecté.Codification erronée.Problèmes sur les circuits électroniques.Rupture du réflecteur.Rupture de l’écran de protection.Dépôt de poussière ou de graisse.
Vérifier la présence de la tension d’alimentation et/ou la conductibilité du fusible.Remplacer la lampe (voir instructions).Remplacer les câbles.Voir instructions de codification des projecteurs.Faire appel à un technicien autorisé.Faire appel à un technicien autorisé.Remplacer l’écran de protection.Nettoyer (voir instructions).
F
DER PROJEKTOR SCHALTET SICH NICHT EIN
STÖRUNGENELEKTRONIK FUNKTIONIERT NICHT
FEHLERHAFTE PROJEKTION
VERRINGERTE LEUCHTKRAFT
MÖGLICHE URSACHE KONTROLLEN UND ABHILFEKeine Stromversorgung.Lampe erschöpft oder defekt.Übertragungskabel der Signale defekt oder nicht verbunden.Fehlerhafte Codierung.Defekt in den Elektronikschaltungen.Bruch des Reflektors.Bruch des Schutzglases.Ablagerungen von Staub oder Fett.
Das Vorhandensein der Versorgungsspannung und/oder die Leitfähigkeit der Sicherung überprüfen.Lampe ersetzen (siehe Anweisungen).Kabel ersetzen.Codierung überprüfen (siehe Anweisungen).Einen autorisierten Techniker anfordern.Einen autorisierten Techniker anfordern.Schutzglas ersetzenReinigen (siehe Anweisungen).
D
EL PROYECTOR NO SE ENCIENDE
ANOMALIASEL SISTEMA ELECTRÓNICO NO FUNCIONA
PROYECCIÓN DEFECTUOSA
POCA LUMINOSIDAD
CAUSAS POSIBLES CONTROLES Y SOLUCIONESFalta de alimentación de la red.Lámpara agotada o defectuosa.Cable de transmisión de las señales averiado o desconectado.Codificación errónea.Fallo de los circuitos electrónicos.Rotura del reflector.Rotura de la pantalla de protección.Acumulación de polvo o grasa.
Compruebe la presencia de la tensión de alimentación y/o conductividad del fusible.Sustituya la lámpara según las instrucciones.Sustituya el cable.Controle la codificación según las instrucciones.Consulte a un técnico autorizado.Consulte a un técnico autorizado.Cambie la pantalla de protección.Limpie según las instrucciones.
E
CAUSA E SOLUZIONE DEI PROBLEMI CAUSE AND SOLUTION OF PROBLEMS
CAUSE ET SOLUTION DES PROBLEMES URSACHEN UND ABHILFE BEI BETRIEBSSTÖRUNGEN CAUSAS Y SOLUCIONES DE PROBLEMAS
I GB
D EF
THE PROJECTOR WILL NOT SWITCH ON
PROBLEMELECTRONICS NON-OPERATIONAL
DEFECTIVE PROJECTION
REDUCED LUMINOSITY
POSSIBLE CAUSES CHECKS AND REMEDIESNo mains supply.Lamp exhausted or defective.Signal transmission cable faulty or disconnected.Incorrect addressing.Fault in the electronic circuits.Reflector brokenProtective shield brokenDust or grease deposited.
Check the power supply voltage and/or the condition of the fuse.Replace the lamp. (See instructions).Replace the cables.Check the addressing (see instructions)Call an authorised technician.Call an authorised technician.Replace protective shield.Clean (see instructions).
GB
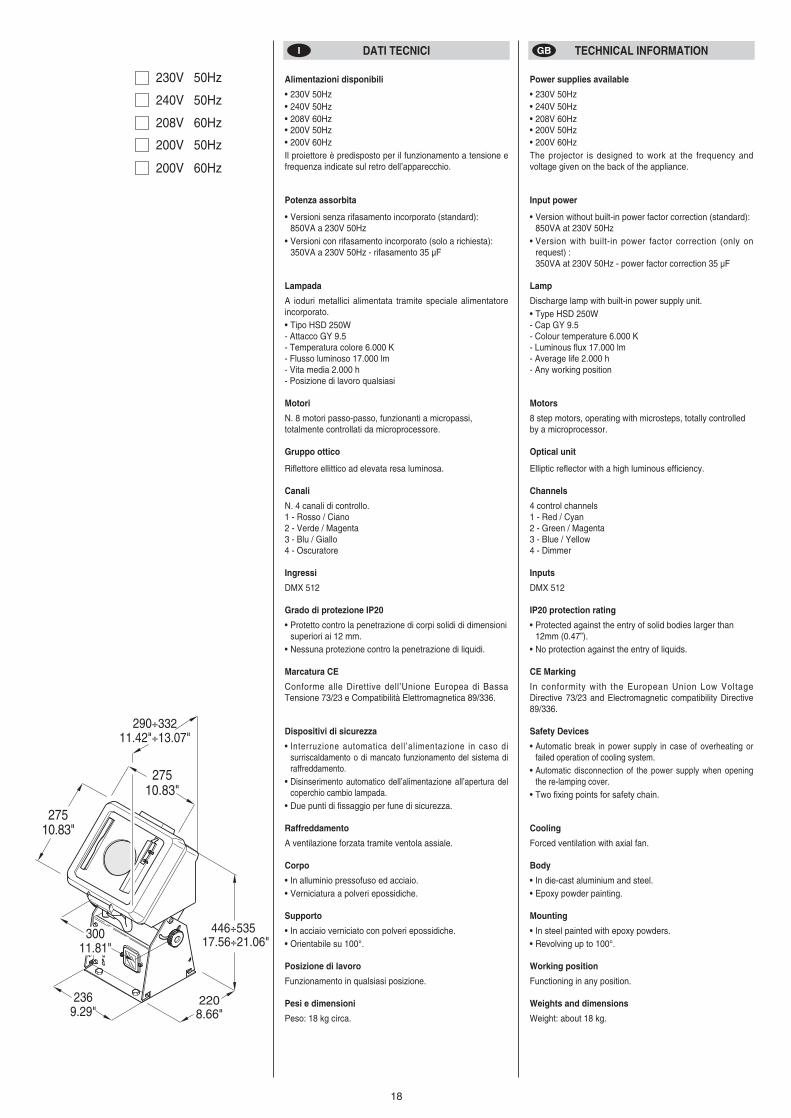
18
230V 50Hz
240V 50Hz
200V 60Hz
200V 50Hz
208V 60Hz
CP
CO
LO
R 1
50
290÷33211.42"÷13.07"
27510.83"
446÷53517.56÷21.06"
2208.66"
2369.29"
27510.83"
30011.81"
Alimentazioni disponibili
• 230V 50Hz• 240V 50Hz• 208V 60Hz• 200V 50Hz• 200V 60HzIl proiettore è predisposto per il funzionamento a tensione efrequenza indicate sul retro dell’apparecchio.
Potenza assorbita
• Versioni senza rifasamento incorporato (standard):850VA a 230V 50Hz
• Versioni con rifasamento incorporato (solo a richiesta):350VA a 230V 50Hz - rifasamento 35 µF
Lampada
A ioduri metallici alimentata tramite speciale alimentatoreincorporato.• Tipo HSD 250W- Attacco GY 9.5- Temperatura colore 6.000 K- Flusso luminoso 17.000 lm- Vita media 2.000 h- Posizione di lavoro qualsiasi
Motori
N. 8 motori passo-passo, funzionanti a micropassi,totalmente controllati da microprocessore.
Gruppo ottico
Riflettore ellittico ad elevata resa luminosa.
Canali
N. 4 canali di controllo.1 - Rosso / Ciano2 - Verde / Magenta3 - Blu / Giallo4 - Oscuratore
Ingressi
DMX 512
Grado di protezione IP20
• Protetto contro la penetrazione di corpi solidi di dimensionisuperiori ai 12 mm.
• Nessuna protezione contro la penetrazione di liquidi.
Marcatura CE
Conforme alle Direttive dell’Unione Europea di BassaTensione 73/23 e Compatibilità Elettromagnetica 89/336.
Dispositivi di sicurezza
• Interruzione automatica dell ’alimentazione in caso disurriscaldamento o di mancato funzionamento del sistema diraffreddamento.
• Disinserimento automatico dell’alimentazione all’apertura delcoperchio cambio lampada.
• Due punti di fissaggio per fune di sicurezza.
Raffreddamento
A ventilazione forzata tramite ventola assiale.
Corpo
• In alluminio pressofuso ed acciaio.• Verniciatura a polveri epossidiche.
Supporto
• In acciaio verniciato con polveri epossidiche.• Orientabile su 100°.
Posizione di lavoro
Funzionamento in qualsiasi posizione.
Pesi e dimensioni
Peso: 18 kg circa.
Power supplies available
• 230V 50Hz• 240V 50Hz• 208V 60Hz• 200V 50Hz• 200V 60HzThe projector is designed to work at the frequency andvoltage given on the back of the appliance.
Input power
• Version without built-in power factor correction (standard):850VA at 230V 50Hz
• Version with built-in power factor correction (only onrequest) :350VA at 230V 50Hz - power factor correction 35 µF
Lamp
Discharge lamp with built-in power supply unit.• Type HSD 250W- Cap GY 9.5- Colour temperature 6.000 K- Luminous flux 17.000 lm- Average life 2.000 h- Any working position
Motors
8 step motors, operating with microsteps, totally controlledby a microprocessor.
Optical unit
Elliptic reflector with a high luminous efficiency.
Channels
4 control channels1 - Red / Cyan2 - Green / Magenta3 - Blue / Yellow4 - Dimmer
Inputs
DMX 512
IP20 protection rating
• Protected against the entry of solid bodies larger than12mm (0.47”).
• No protection against the entry of liquids.
CE Marking
In conformity with the European Union Low VoltageDirective 73/23 and Electromagnetic compatibility Directive89/336.
Safety Devices
• Automatic break in power supply in case of overheating orfailed operation of cooling system.
• Automatic disconnection of the power supply when openingthe re-lamping cover.
• Two fixing points for safety chain.
Cooling
Forced ventilation with axial fan.
Body
• In die-cast aluminium and steel.• Epoxy powder painting.
Mounting
• In steel painted with epoxy powders.• Revolving up to 100°.
Working position
Functioning in any position.
Weights and dimensions
Weight: about 18 kg.
DATI TECNICI TECHNICAL INFORMATIONI GB
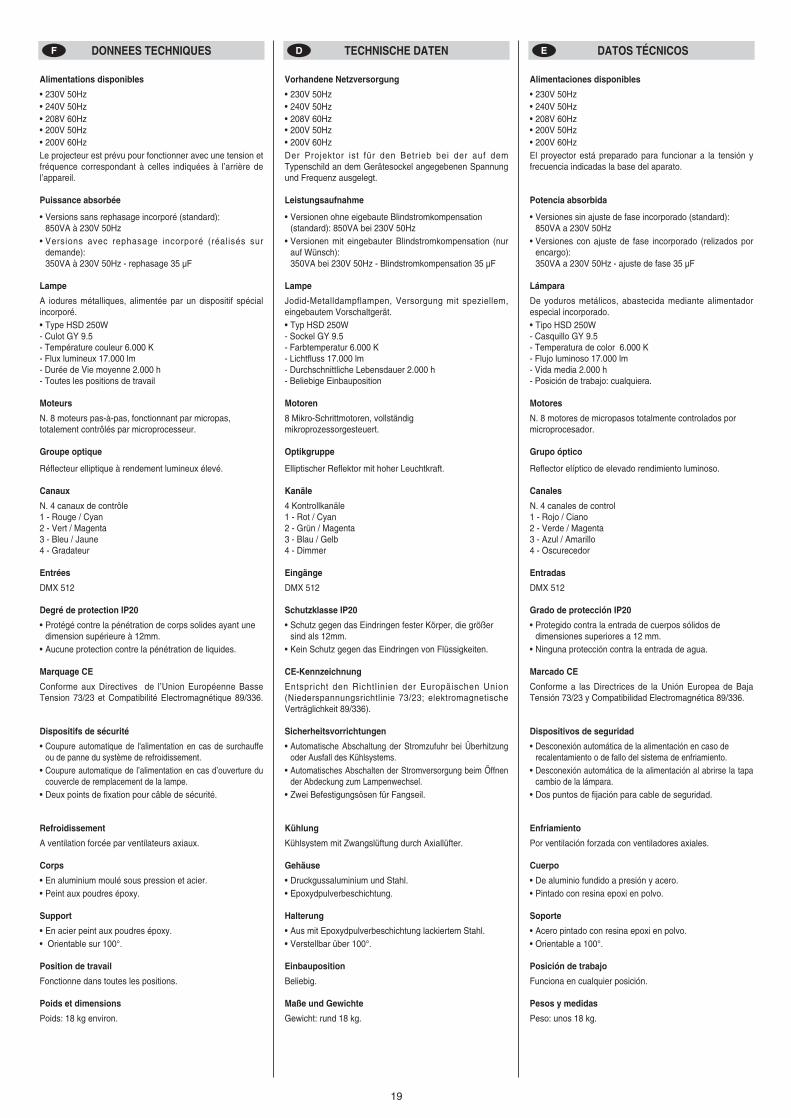
19
Vorhandene Netzversorgung
• 230V 50Hz• 240V 50Hz• 208V 60Hz• 200V 50Hz• 200V 60HzDer Projektor ist für den Betrieb bei der auf demTypenschild an dem Gerätesockel angegebenen Spannungund Frequenz ausgelegt.
Leistungsaufnahme
• Versionen ohne eigebaute Blindstromkompensation(standard): 850VA bei 230V 50Hz
• Versionen mit eingebauter Blindstromkompensation (nurauf Wünsch):350VA bei 230V 50Hz - Blindstromkompensation 35 µF
Lampe
Jodid-Metalldampflampen, Versorgung mit speziellem,eingebautem Vorschaltgerät.• Typ HSD 250W- Sockel GY 9.5- Farbtemperatur 6.000 K- Lichtfluss 17.000 lm- Durchschnittliche Lebensdauer 2.000 h- Beliebige Einbauposition
Motoren
8 Mikro-Schrittmotoren, vollständigmikroprozessorgesteuert.
Optikgruppe
Elliptischer Reflektor mit hoher Leuchtkraft.
Kanäle
4 Kontrollkanäle1 - Rot / Cyan2 - Grün / Magenta3 - Blau / Gelb4 - Dimmer
Eingänge
DMX 512
Schutzklasse IP20
• Schutz gegen das Eindringen fester Körper, die größersind als 12mm.
• Kein Schutz gegen das Eindringen von Flüssigkeiten.
CE-Kennzeichnung
Entspricht den Richtl inien der Europäischen Union(Niederspannungsrichtlinie 73/23; elektromagnetischeVerträglichkeit 89/336).
Sicherheitsvorrichtungen
• Automatische Abschaltung der Stromzufuhr bei Überhitzungoder Ausfall des Kühlsystems.
• Automatisches Abschalten der Stromversorgung beim Öffnender Abdeckung zum Lampenwechsel.
• Zwei Befestigungsösen für Fangseil.
Kühlung
Kühlsystem mit Zwangslüftung durch Axiallüfter.
Gehäuse
• Druckgussaluminium und Stahl. • Epoxydpulverbeschichtung.
Halterung
• Aus mit Epoxydpulverbeschichtung lackiertem Stahl.• Verstellbar über 100°.
Einbauposition
Beliebig.
Maße und Gewichte
Gewicht: rund 18 kg.
Alimentaciones disponibles
• 230V 50Hz• 240V 50Hz• 208V 60Hz• 200V 50Hz• 200V 60HzEl proyector está preparado para funcionar a la tensión yfrecuencia indicadas la base del aparato.
Potencia absorbida
• Versiones sin ajuste de fase incorporado (standard):850VA a 230V 50Hz
• Versiones con ajuste de fase incorporado (relizados porencargo):350VA a 230V 50Hz - ajuste de fase 35 µF
Lámpara
De yoduros metálicos, abastecida mediante alimentadorespecial incorporado.• Tipo HSD 250W- Casquillo GY 9.5- Temperatura de color 6.000 K- Flujo luminoso 17.000 lm- Vida media 2.000 h- Posición de trabajo: cualquiera.
Motores
N. 8 motores de micropasos totalmente controlados pormicroprocesador.
Grupo óptico
Reflector elíptico de elevado rendimiento luminoso.
Canales
N. 4 canales de control1 - Rojo / Ciano2 - Verde / Magenta3 - Azul / Amarillo4 - Oscurecedor
Entradas
DMX 512
Grado de protección IP20
• Protegido contra la entrada de cuerpos sólidos dedimensiones superiores a 12 mm.
• Ninguna protección contra la entrada de agua.
Marcado CE
Conforme a las Directrices de la Unión Europea de BajaTensión 73/23 y Compatibilidad Electromagnética 89/336.
Dispositivos de seguridad
• Desconexión automática de la alimentación en caso derecalentamiento o de fallo del sistema de enfriamiento.
• Desconexión automática de la alimentación al abrirse la tapacambio de la lámpara.
• Dos puntos de fijación para cable de seguridad.
Enfriamiento
Por ventilación forzada con ventiladores axiales.
Cuerpo
• De aluminio fundido a presión y acero.• Pintado con resina epoxi en polvo.
Soporte
• Acero pintado con resina epoxi en polvo.• Orientable a 100°.
Posición de trabajo
Funciona en cualquier posición.
Pesos y medidas
Peso: unos 18 kg.
TECHNISCHE DATEN DATOS TÉCNICOS
Alimentations disponibles
• 230V 50Hz• 240V 50Hz• 208V 60Hz• 200V 50Hz• 200V 60HzLe projecteur est prévu pour fonctionner avec une tension etfréquence correspondant à celles indiquées à l’arrière del’appareil.
Puissance absorbée
• Versions sans rephasage incorporé (standard):850VA à 230V 50Hz
• Versions avec rephasage incorporé (réalisés surdemande):350VA à 230V 50Hz - rephasage 35 µF
Lampe
A iodures métalliques, alimentée par un dispositif spécialincorporé.• Type HSD 250W- Culot GY 9.5- Température couleur 6.000 K- Flux lumineux 17.000 lm- Durée de Vie moyenne 2.000 h- Toutes les positions de travail
Moteurs
N. 8 moteurs pas-à-pas, fonctionnant par micropas,totalement contrôlés par microprocesseur.
Groupe optique
Réflecteur elliptique à rendement lumineux élevé.
Canaux
N. 4 canaux de contrôle1 - Rouge / Cyan2 - Vert / Magenta3 - Bleu / Jaune4 - Gradateur
Entrées
DMX 512
Degré de protection IP20
• Protégé contre la pénétration de corps solides ayant unedimension supérieure à 12mm.
• Aucune protection contre la pénétration de liquides.
Marquage CE
Conforme aux Directives de l’Union Européenne BasseTension 73/23 et Compatibilité Electromagnétique 89/336.
Dispositifs de sécurité
• Coupure automatique de l'alimentation en cas de surchauffeou de panne du système de refroidissement.
• Coupure automatique de l’alimentation en cas d’ouverture ducouvercle de remplacement de la lampe.
• Deux points de fixation pour câble de sécurité.
Refroidissement
A ventilation forcée par ventilateurs axiaux.
Corps
• En aluminium moulé sous pression et acier.• Peint aux poudres époxy.
Support
• En acier peint aux poudres époxy.• Orientable sur 100°.
Position de travail
Fonctionne dans toutes les positions.
Poids et dimensions
Poids: 18 kg environ.
DONNEES TECHNIQUES D EF