Embed Size (px)
Citation preview

I Expense
Online Expense submissions
For fulltime Faculty & Staff Revised: Sept 2013
Page ii
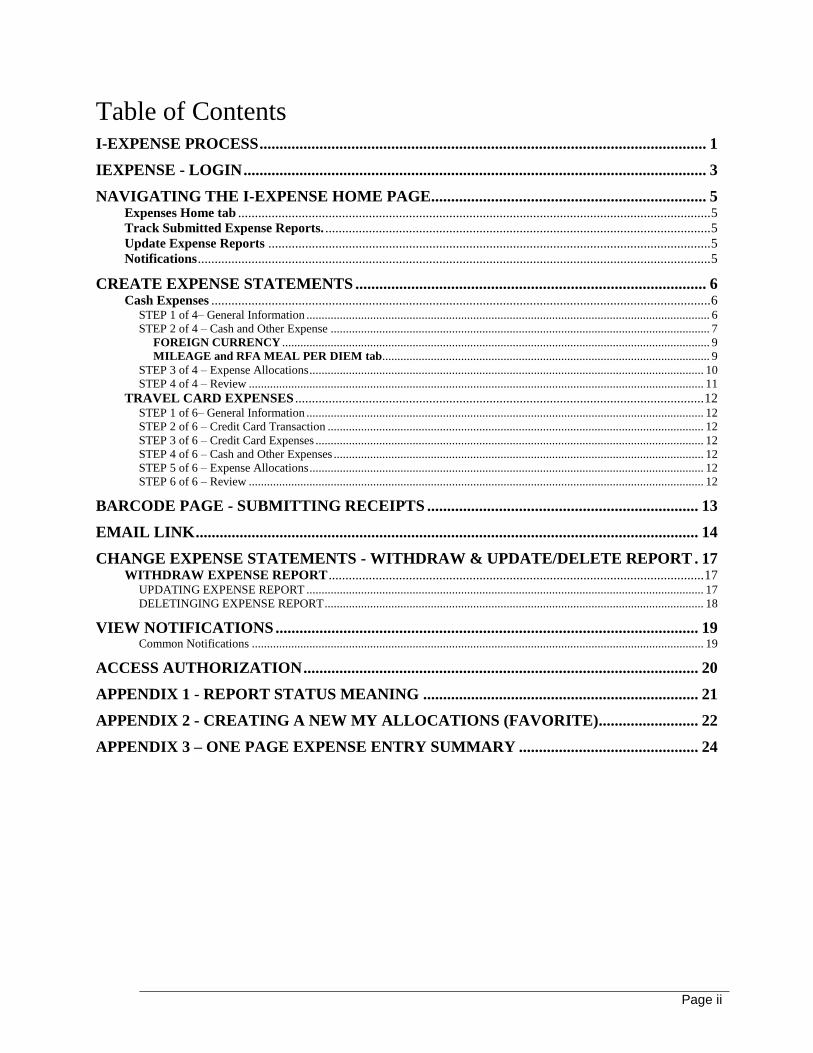
Table of Contents I-EXPENSE PROCESS ................................................................................................................ 1
IEXPENSE - LOGIN .................................................................................................................... 3
NAVIGATING THE I-EXPENSE HOME PAGE..................................................................... 5 Expenses Home tab ............................................................................................................................................. 5 Track Submitted Expense Reports. ................................................................................................................... 5 Update Expense Reports .................................................................................................................................... 5 Notifications ......................................................................................................................................................... 5
CREATE EXPENSE STATEMENTS ........................................................................................ 6 Cash Expenses ..................................................................................................................................................... 6
STEP 1 of 4– General Information ..................................................................................................................................... 6 STEP 2 of 4 – Cash and Other Expense ............................................................................................................................. 7
FOREIGN CURRENCY ............................................................................................................................................. 9 MILEAGE and RFA MEAL PER DIEM tab ............................................................................................................ 9
STEP 3 of 4 – Expense Allocations .................................................................................................................................. 10 STEP 4 of 4 – Review ...................................................................................................................................................... 11
TRAVEL CARD EXPENSES .......................................................................................................................... 12 STEP 1 of 6– General Information ................................................................................................................................... 12 STEP 2 of 6 – Credit Card Transaction ............................................................................................................................ 12 STEP 3 of 6 – Credit Card Expenses ................................................................................................................................ 12 STEP 4 of 6 – Cash and Other Expenses .......................................................................................................................... 12 STEP 5 of 6 – Expense Allocations .................................................................................................................................. 12 STEP 6 of 6 – Review ...................................................................................................................................................... 12
BARCODE PAGE - SUBMITTING RECEIPTS .................................................................... 13
EMAIL LINK .............................................................................................................................. 14
CHANGE EXPENSE STATEMENTS - WITHDRAW & UPDATE/DELETE REPORT . 17 WITHDRAW EXPENSE REPORT ................................................................................................................ 17
UPDATING EXPENSE REPORT ................................................................................................................................... 17 DELETINGING EXPENSE REPORT ............................................................................................................................. 18
VIEW NOTIFICATIONS .......................................................................................................... 19 Common Notifications ..................................................................................................................................................... 19
ACCESS AUTHORIZATION ................................................................................................... 20
APPENDIX 1 - REPORT STATUS MEANING ..................................................................... 21
APPENDIX 2 - CREATING A NEW MY ALLOCATIONS (FAVORITE)......................... 22
APPENDIX 3 – ONE PAGE EXPENSE ENTRY SUMMARY ............................................. 24
Ryerson University Training Guide – Internet Expenses Page 1
I-EXPENSE PROCESS
The use of I-Expense is the process for claiming personal reimbursements of expenses by
Ryerson full time faculty and staff
NOTE: For details on allowable per diem expenses please refer to the Ryerson
University Travel Policy.
When processing a travel advance please use the Travel Advance form found
on the financial services website, advances cannot be claimed through i-
Expense.
The application of outstanding advances is completed automatically. When
an advance is applied it is reviewed by Financial Services Expense
Administrator to ensure that the expense and advance are related.
When repayment of the advance is required please submit the repayment to
Financial Services via a cheque payable to Ryerson University. This cheque
must be submitted with the original receipts and should be attached to the
FRONT of the expense report bar code summary page.
By default all expense statements are forwarded to an employee’s supervisor. To select an
alternate approver select the Approver name from the List of Values in the General Expense
Report Information section. Note: The approver must be someone who’s above you and it must
be someone who uses the Oracle system for approval.
1. Third party pre-payments, for example Travel Agency Payments, Registration etc.,
must be requested on a purchase requisition.
2. When claiming expenses that is in a foreign current, and the currency is not listed on
the drop down list for iexpense, convert it to Canadian dollar first using an foreign
exchange website and enter it as Canadian dollar. All expenses will be reimbursed in
Canadian dollars.
3. The Purpose field should include Destination, reason for Travel and dates of Travel to
a maximum of 75 characters. If you have a travel advance, you should mention it
here too.
4. Total for meal per diem can be entered on one line (Per Diems currently only for
RFA)
5. Amounts for meals exceeding the per diem must be entered as separate lines and
require justifications to be entered.
6. Receipts must be faxed or emailed as per the instructions on the bar code summary
page within 96 hours of submission of the expenses Receipts that are illegible -
attempt to copy the receipt and fax in the copied document or complete a Declaration
of missing or illegible receipts.
Ryerson University Training Guide – Internet Expenses Page 2
7. Modifications to an employees default cost centre can you done at the header and line
level of the expense statement. NOTE: the expense statement must be approved by
an individual with the approval limits for ALL cost centres being charged.
8. When the expenses are being covered by multiple departments the expense
statement should be submitted with all expenses going against one departments cost
centres and then a journal entry should be created & authorized to transfer the funds
amongst the remaining cost centres. E.g. A $ 5000.00 expense report is being
covered by the Department of Chemical Engineering and ABC research grant. When
submitting the expense report all expenditures should be charged to the research
project and a journal entry will be completed to charge the department (Department
of Chemical Engineering)for their portion
9. All original receipts are to be sent to Financial Services through internal mail the
same business day that they are submitted. Attach the bar code form to the front of
the receipts or clearly write the full name and expense number on the receipts.
Receipts can be sent to ACCOUNTS PAYABLE - EXPENSE RECEIPTS. If no
have no paper receipts, you do not have to send anything to financial services.
Remember to include a cheque for any outstanding advance.
Ryerson University Training Guide – Internet Expenses Page 3
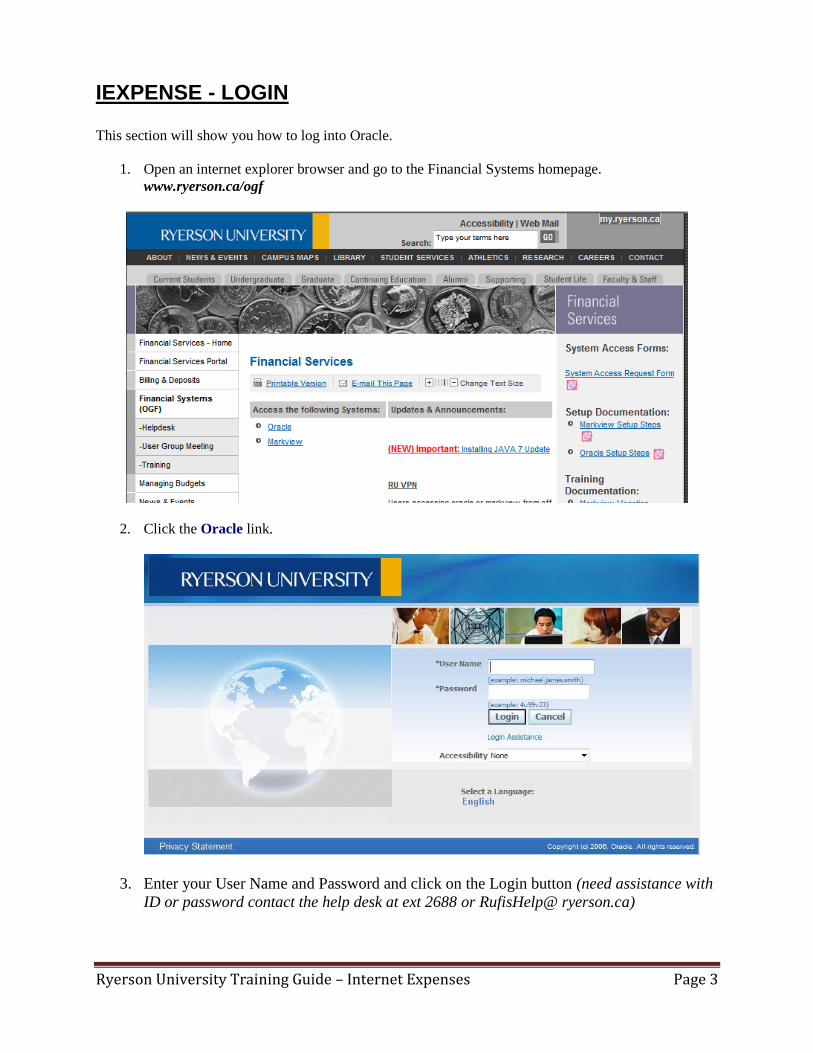
IEXPENSE - LOGIN This section will show you how to log into Oracle.
1. Open an internet explorer browser and go to the Financial Systems homepage.
www.ryerson.ca/ogf
2. Click the Oracle link.
3. Enter your User Name and Password and click on the Login button (need assistance with
ID or password contact the help desk at ext 2688 or RufisHelp@ ryerson.ca)
Ryerson University Training Guide – Internet Expenses Page 4
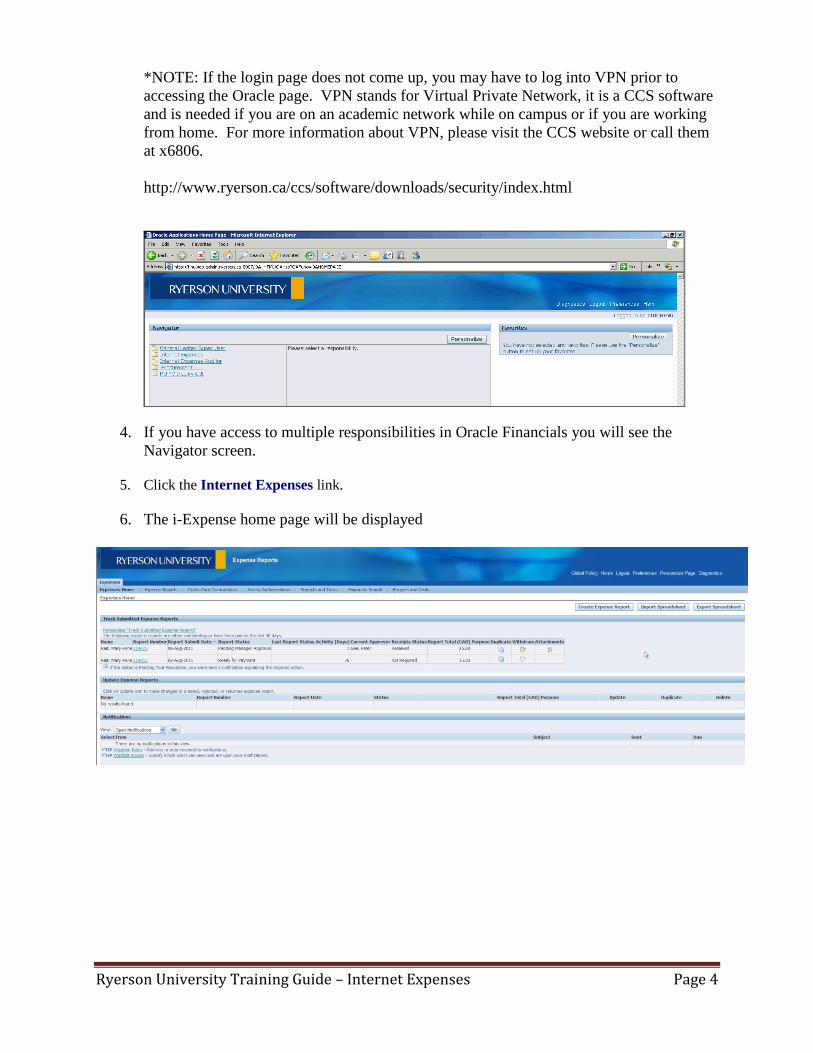
*NOTE: If the login page does not come up, you may have to log into VPN prior to
accessing the Oracle page. VPN stands for Virtual Private Network, it is a CCS software
and is needed if you are on an academic network while on campus or if you are working
from home. For more information about VPN, please visit the CCS website or call them
at x6806.
http://www.ryerson.ca/ccs/software/downloads/security/index.html
4. If you have access to multiple responsibilities in Oracle Financials you will see the
Navigator screen.
5. Click the Internet Expenses link.
6. The i-Expense home page will be displayed
Ryerson University Training Guide – Internet Expenses Page 5
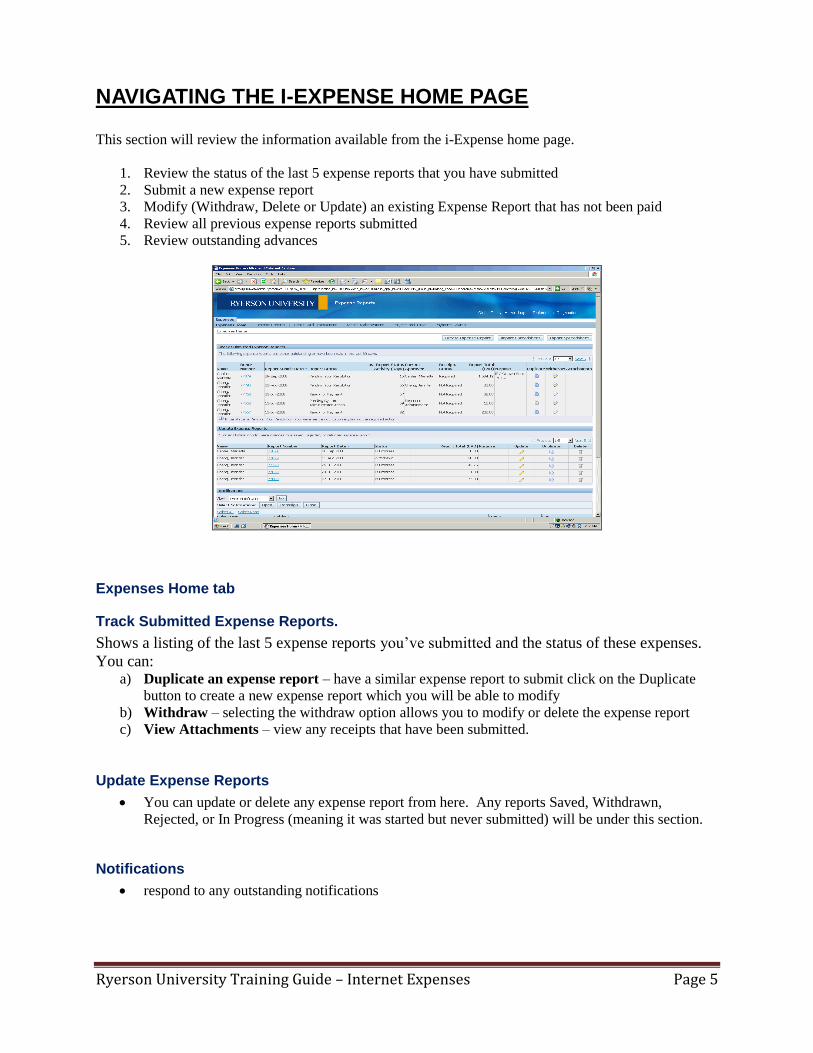
NAVIGATING THE I-EXPENSE HOME PAGE This section will review the information available from the i-Expense home page.
1. Review the status of the last 5 expense reports that you have submitted
2. Submit a new expense report
3. Modify (Withdraw, Delete or Update) an existing Expense Report that has not been paid
4. Review all previous expense reports submitted
5. Review outstanding advances
Expenses Home tab
Track Submitted Expense Reports.
Shows a listing of the last 5 expense reports you’ve submitted and the status of these expenses.
You can: a) Duplicate an expense report – have a similar expense report to submit click on the Duplicate
button to create a new expense report which you will be able to modify
b) Withdraw – selecting the withdraw option allows you to modify or delete the expense report
c) View Attachments – view any receipts that have been submitted.
Update Expense Reports
You can update or delete any expense report from here. Any reports Saved, Withdrawn,
Rejected, or In Progress (meaning it was started but never submitted) will be under this section.
Notifications
respond to any outstanding notifications
Ryerson University Training Guide – Internet Expenses Page 6
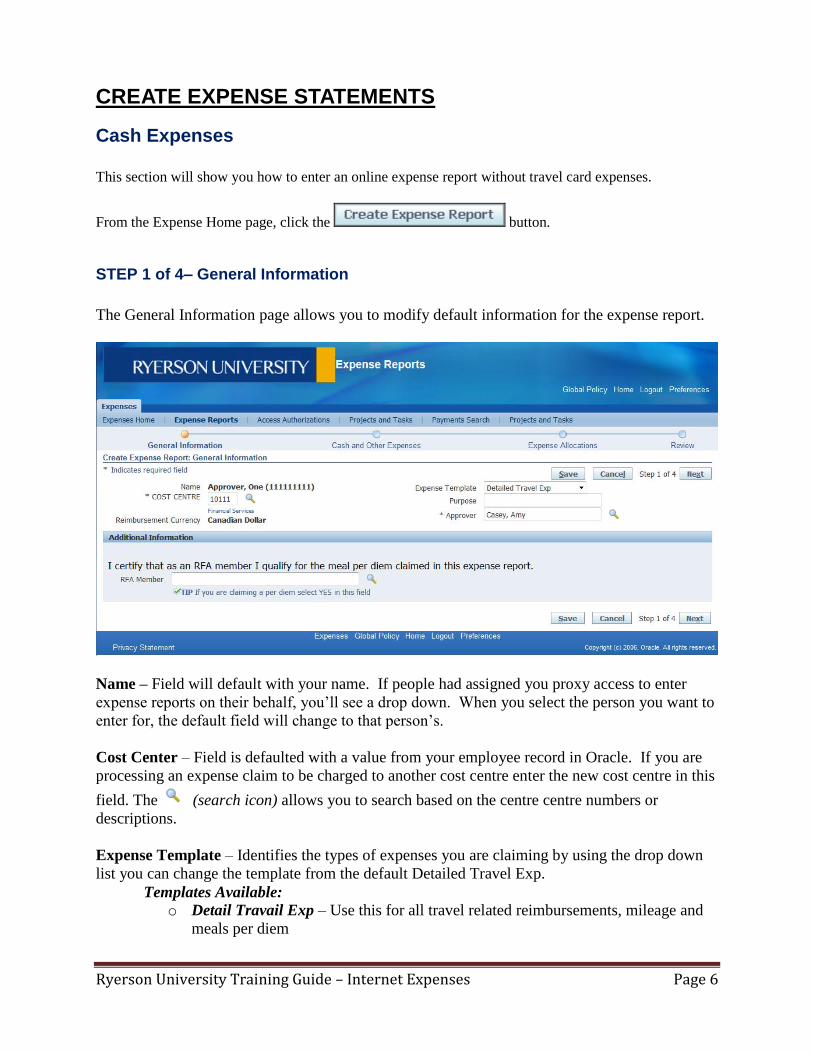
CREATE EXPENSE STATEMENTS
Cash Expenses
This section will show you how to enter an online expense report without travel card expenses.
From the Expense Home page, click the button.
STEP 1 of 4– General Information
The General Information page allows you to modify default information for the expense report.
Name – Field will default with your name. If people had assigned you proxy access to enter
expense reports on their behalf, you’ll see a drop down. When you select the person you want to
enter for, the default field will change to that person’s.
Cost Center – Field is defaulted with a value from your employee record in Oracle. If you are
processing an expense claim to be charged to another cost centre enter the new cost centre in this
field. The (search icon) allows you to search based on the centre centre numbers or
descriptions.
Expense Template – Identifies the types of expenses you are claiming by using the drop down
list you can change the template from the default Detailed Travel Exp.
Templates Available:
o Detail Travail Exp – Use this for all travel related reimbursements, mileage and
meals per diem
Ryerson University Training Guide – Internet Expenses Page 7
o P.D. Reimbursement – Use this for all items being charged to your professional
development account
o Reimbursement CAD – Use this for reimbursement of any items charged in
Canadian dollar
o Reimbursement US/Int – Use this for reimbursement of any items bought
outside of Canada
o Team Expense – Use this for team travel expenses
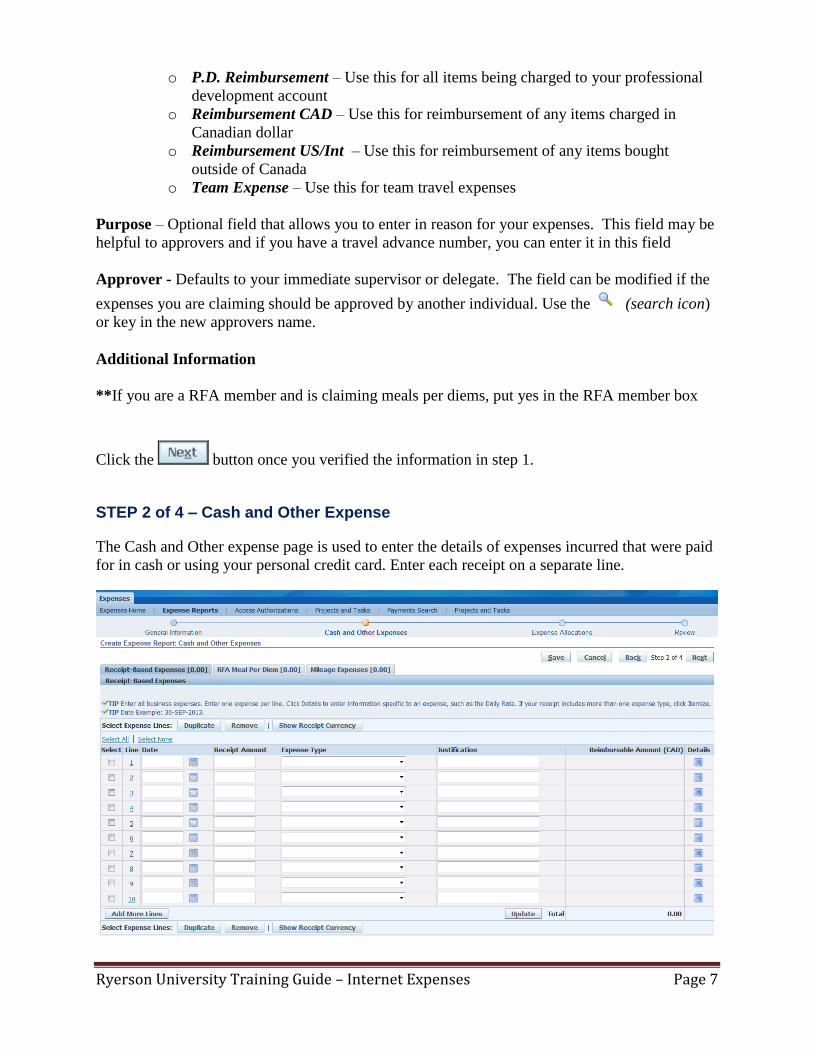
Purpose – Optional field that allows you to enter in reason for your expenses. This field may be
helpful to approvers and if you have a travel advance number, you can enter it in this field
Approver - Defaults to your immediate supervisor or delegate. The field can be modified if the
expenses you are claiming should be approved by another individual. Use the (search icon)
or key in the new approvers name.
Additional Information
**If you are a RFA member and is claiming meals per diems, put yes in the RFA member box
Click the button once you verified the information in step 1.
STEP 2 of 4 – Cash and Other Expense
The Cash and Other expense page is used to enter the details of expenses incurred that were paid
for in cash or using your personal credit card. Enter each receipt on a separate line.
Ryerson University Training Guide – Internet Expenses Page 8
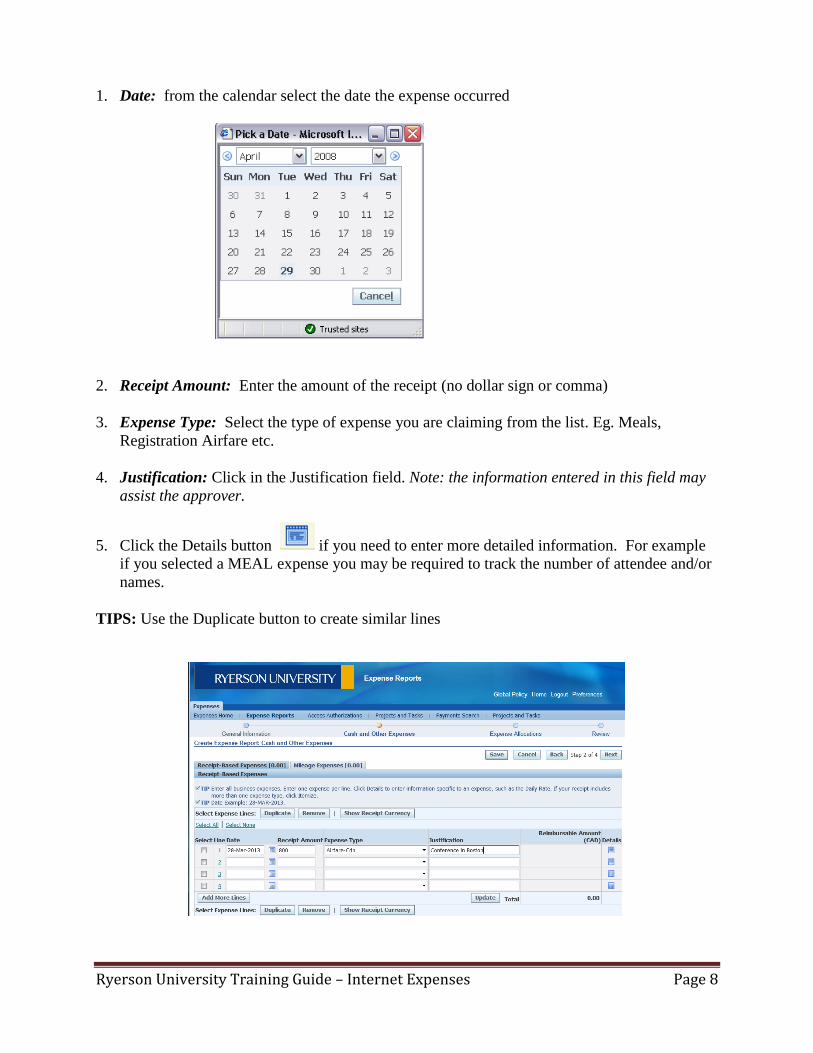
1. Date: from the calendar select the date the expense occurred
2. Receipt Amount: Enter the amount of the receipt (no dollar sign or comma)
3. Expense Type: Select the type of expense you are claiming from the list. Eg. Meals,
Registration Airfare etc.
4. Justification: Click in the Justification field. Note: the information entered in this field may
assist the approver.
5. Click the Details button if you need to enter more detailed information. For example
if you selected a MEAL expense you may be required to track the number of attendee and/or
names.
TIPS: Use the Duplicate button to create similar lines
Ryerson University Training Guide – Internet Expenses Page 9
FOREIGN CURRENCY
1. To enter a different currency, click the button
2. Receipt Amount - enter the amount in for the foreign currency indicated on your receipt
3. Receipt Currency – Select the respective currency
4. Exchange Rate – Enter in the exchange rate for the date the expense occurred or click on
update to use the Ryerson rate.
Note: If you have used your personal credit card, you will want to use the exchange rate that
appears on your credit card statement (attach statement as part of your receipts). If you want to
use the converted Canadian amount from your credit card statement, keep the currency as CAD
and leave the exchange rate empty. For all other currencies that are not defined in Oracle, use
http://www.oanda.com/currency/converter/ to convert to CAD and enter the line in as CAD,
exchange rate field empty. In the justification field, make a note (ie. Japanese Yen converted to
CAD @ 0.01) and attach a copy of the Oanda page as part of your receipts.
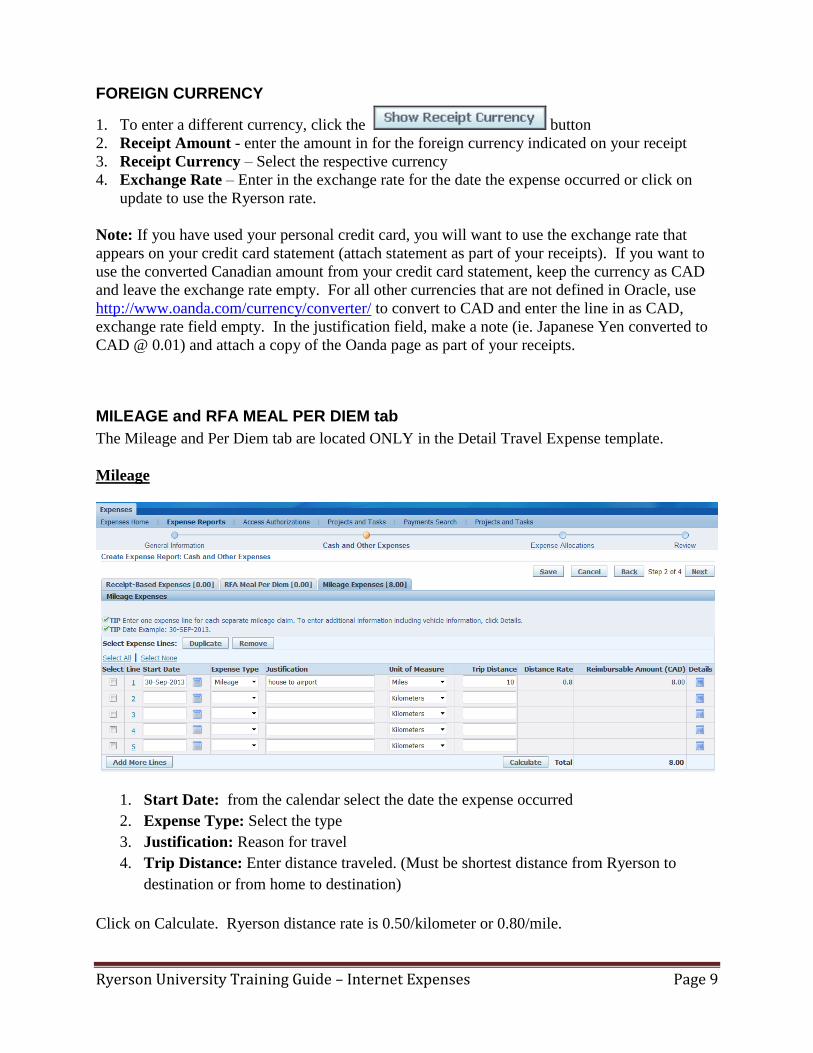
MILEAGE and RFA MEAL PER DIEM tab
The Mileage and Per Diem tab are located ONLY in the Detail Travel Expense template.
Mileage
1. Start Date: from the calendar select the date the expense occurred
2. Expense Type: Select the type
3. Justification: Reason for travel
4. Trip Distance: Enter distance traveled. (Must be shortest distance from Ryerson to
destination or from home to destination)
Click on Calculate. Ryerson distance rate is 0.50/kilometer or 0.80/mile.
Ryerson University Training Guide – Internet Expenses Page 10
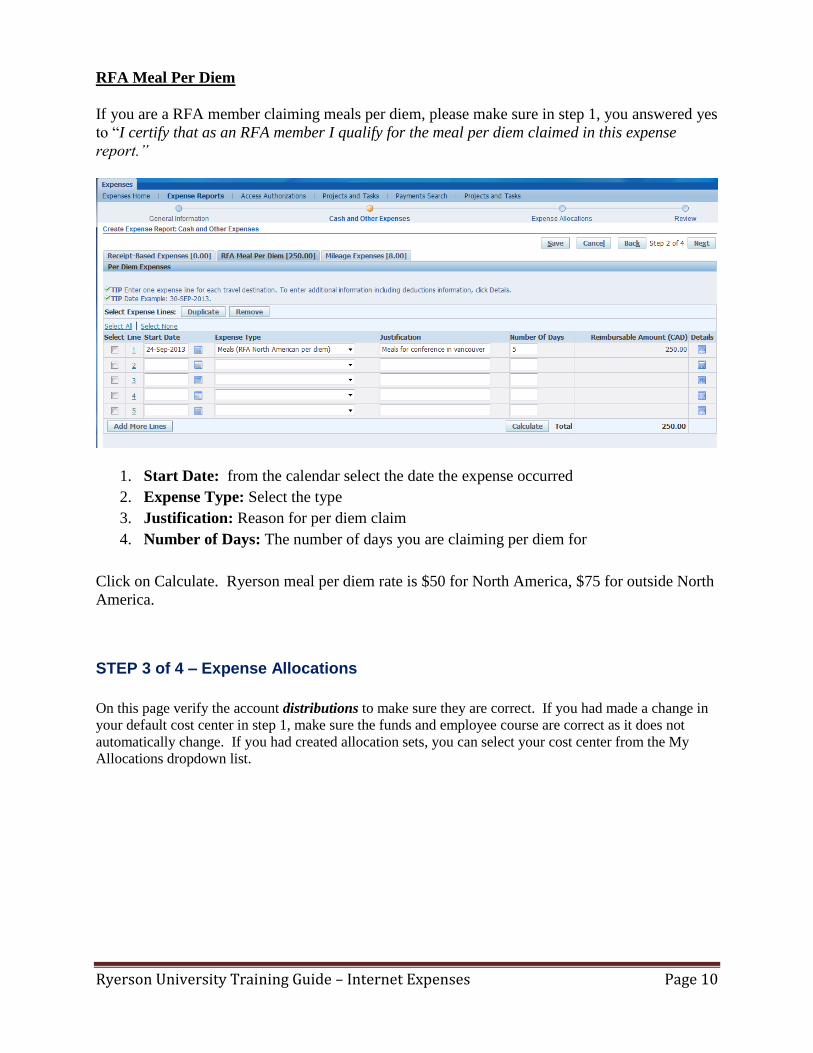
RFA Meal Per Diem
If you are a RFA member claiming meals per diem, please make sure in step 1, you answered yes
to “I certify that as an RFA member I qualify for the meal per diem claimed in this expense
report.”
1. Start Date: from the calendar select the date the expense occurred
2. Expense Type: Select the type
3. Justification: Reason for per diem claim
4. Number of Days: The number of days you are claiming per diem for
Click on Calculate. Ryerson meal per diem rate is $50 for North America, $75 for outside North
America.
STEP 3 of 4 – Expense Allocations
On this page verify the account distributions to make sure they are correct. If you had made a change in
your default cost center in step 1, make sure the funds and employee course are correct as it does not
automatically change. If you had created allocation sets, you can select your cost center from the My
Allocations dropdown list.
Ryerson University Training Guide – Internet Expenses Page 11
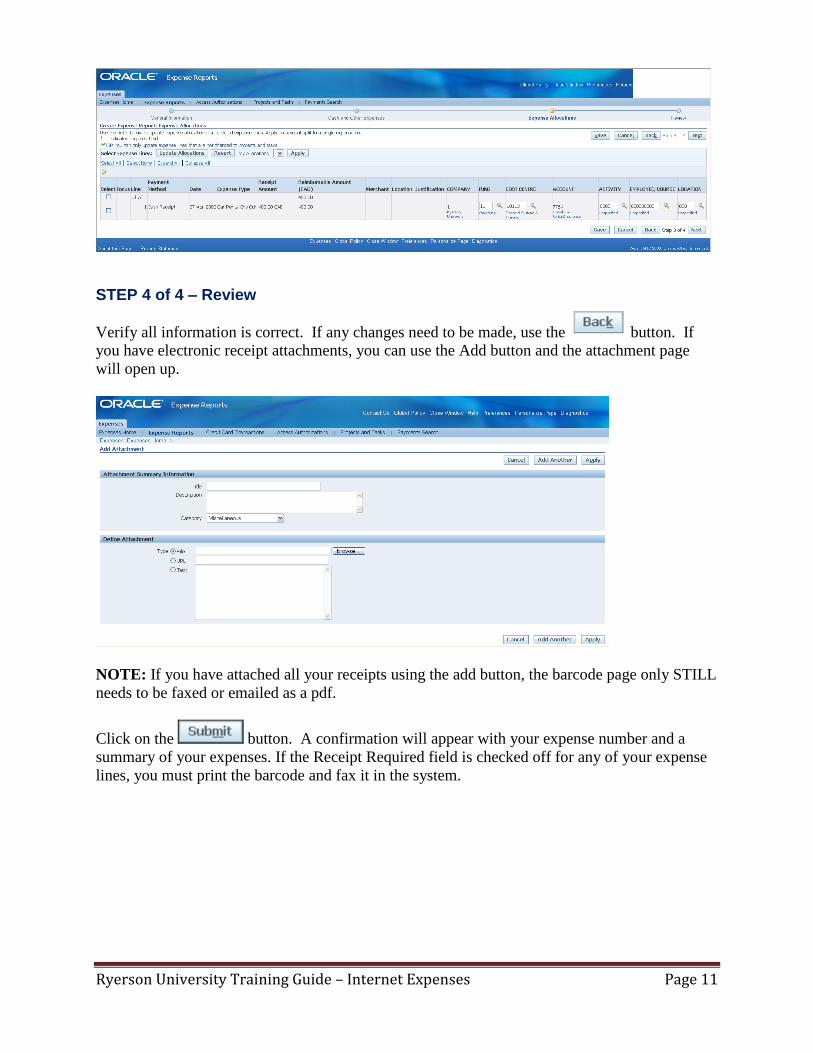
STEP 4 of 4 – Review
Verify all information is correct. If any changes need to be made, use the button. If
you have electronic receipt attachments, you can use the Add button and the attachment page
will open up.
NOTE: If you have attached all your receipts using the add button, the barcode page only STILL
needs to be faxed or emailed as a pdf.
Click on the button. A confirmation will appear with your expense number and a
summary of your expenses. If the Receipt Required field is checked off for any of your expense
lines, you must print the barcode and fax it in the system.
Ryerson University Training Guide – Internet Expenses Page 12
TRAVEL CARD EXPENSES
Ryerson uses the Amex travel card. When the travel card is used, the transactions will be uploaded into
the user’s internet expense. There are only two extra steps (steps 2 and 3) when creating expense reports
with a travel card. Everything else is the same as cash expense.
STEP 1 of 6– General Information
Same as above but you’ll see an information note will appear above if you have any
travel card transactions pending action. It will state how many transactions are to be
processed
STEP 2 of 6 – Credit Card Transaction
Use the to select the credit card transactions you want to process in this expense report or
click on SELECT ALL if you want to process all the transactions on this report
STEP 3 of 6 – Credit Card Expenses
You will see all the transactions you just selected. If the transaction line is personal this is where
you would indicate that. Select the line and click on the Categorize as Personal button.
If all the expenses are business related, you can click just click on next to proceed.
STEP 4 of 6 – Cash and Other Expenses
Same as cash expense (step 2), if you have purchased anything with cash or your own
personal credit card, enter it here
STEP 5 of 6 – Expense Allocations
Same as cash expense (step 3)
STEP 6 of 6 – Review
Same as cash expense (step 4)
Send all original receipts with the barcode page to Financial Services.
Ryerson University Training Guide – Internet Expenses Page 13
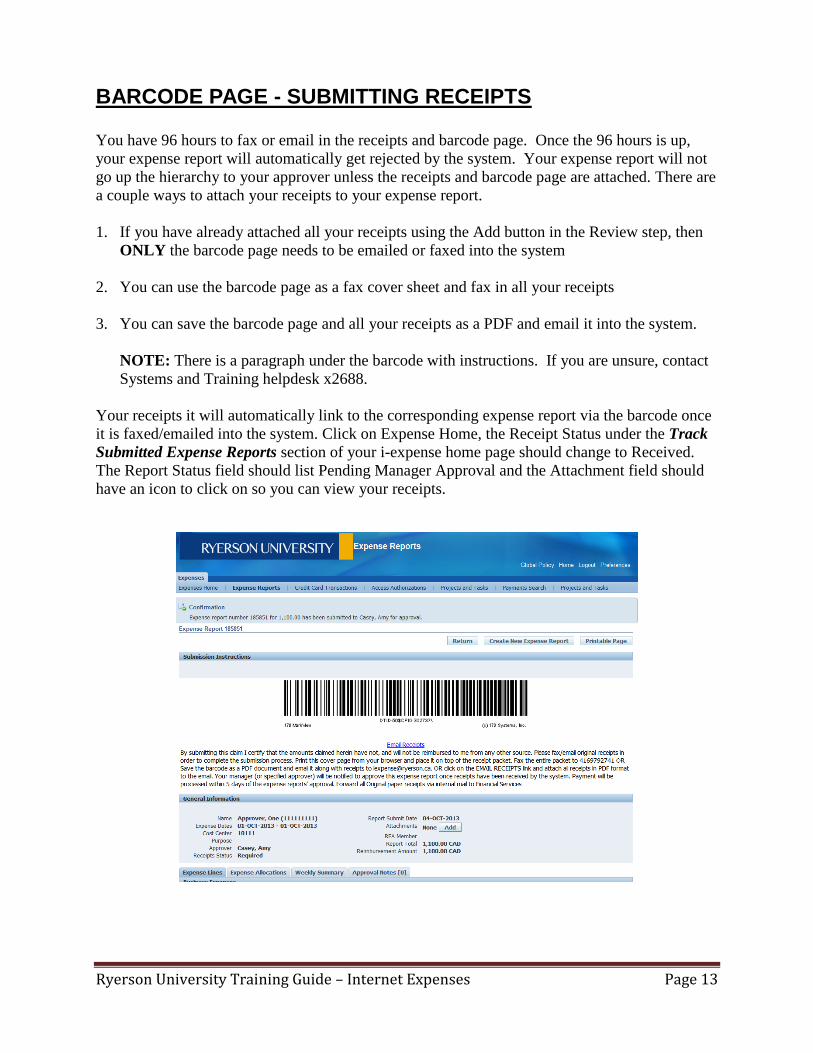
BARCODE PAGE - SUBMITTING RECEIPTS
You have 96 hours to fax or email in the receipts and barcode page. Once the 96 hours is up,
your expense report will automatically get rejected by the system. Your expense report will not
go up the hierarchy to your approver unless the receipts and barcode page are attached. There are
a couple ways to attach your receipts to your expense report.
1. If you have already attached all your receipts using the Add button in the Review step, then
ONLY the barcode page needs to be emailed or faxed into the system
2. You can use the barcode page as a fax cover sheet and fax in all your receipts
3. You can save the barcode page and all your receipts as a PDF and email it into the system.
NOTE: There is a paragraph under the barcode with instructions. If you are unsure, contact
Systems and Training helpdesk x2688.
Your receipts it will automatically link to the corresponding expense report via the barcode once
it is faxed/emailed into the system. Click on Expense Home, the Receipt Status under the Track
Submitted Expense Reports section of your i-expense home page should change to Received.
The Report Status field should list Pending Manager Approval and the Attachment field should
have an icon to click on so you can view your receipts.
Ryerson University Training Guide – Internet Expenses Page 14
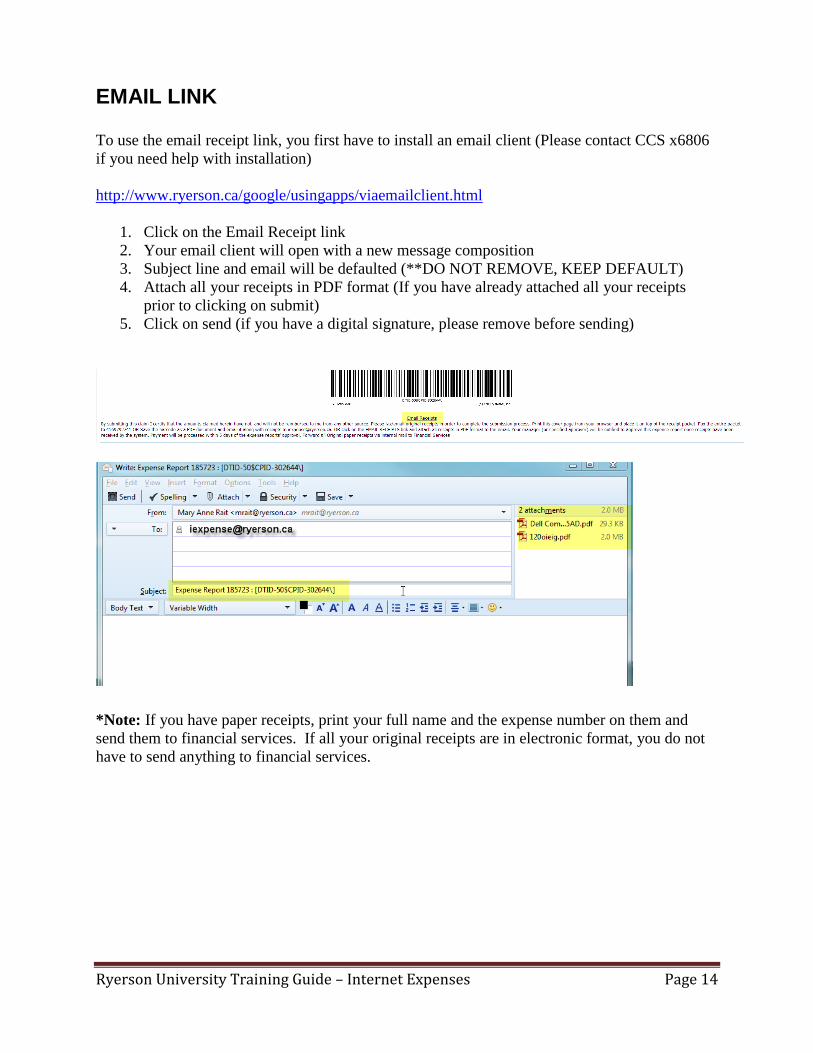
EMAIL LINK
To use the email receipt link, you first have to install an email client (Please contact CCS x6806
if you need help with installation)
http://www.ryerson.ca/google/usingapps/viaemailclient.html
1. Click on the Email Receipt link
2. Your email client will open with a new message composition
3. Subject line and email will be defaulted (**DO NOT REMOVE, KEEP DEFAULT)
4. Attach all your receipts in PDF format (If you have already attached all your receipts
prior to clicking on submit)
5. Click on send (if you have a digital signature, please remove before sending)
*Note: If you have paper receipts, print your full name and the expense number on them and
send them to financial services. If all your original receipts are in electronic format, you do not
have to send anything to financial services.
Ryerson University Training Guide – Internet Expenses Page 15
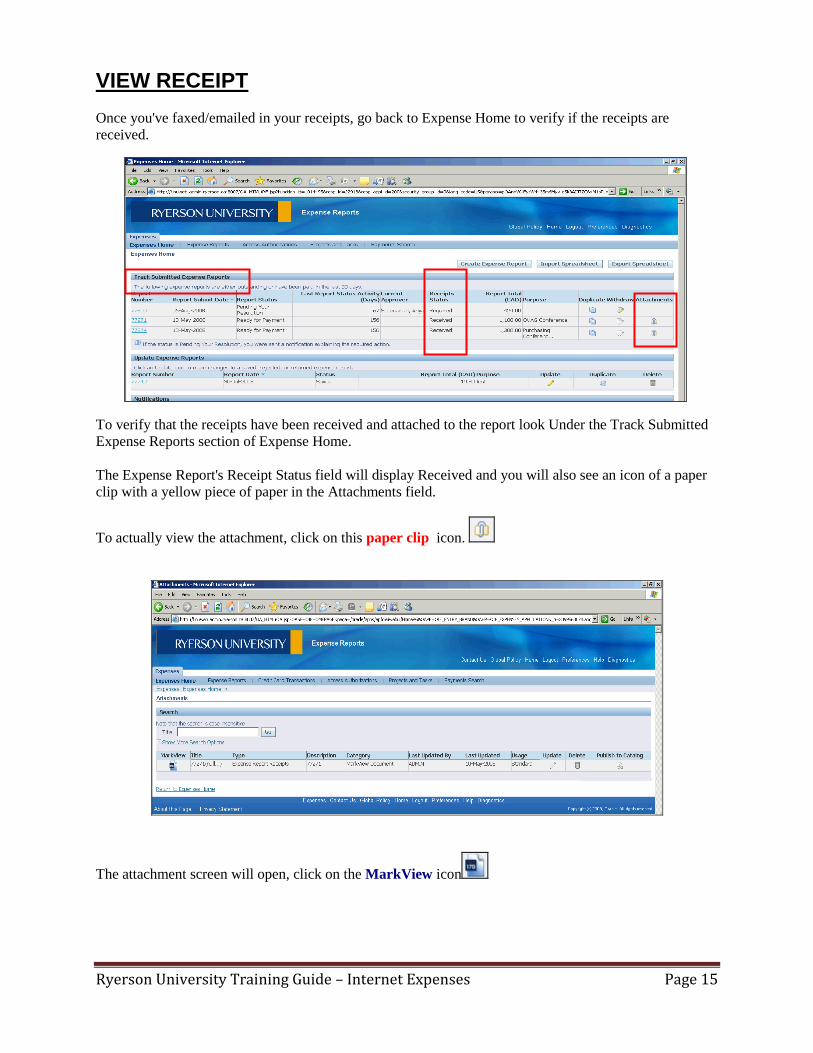
VIEW RECEIPT
Once you've faxed/emailed in your receipts, go back to Expense Home to verify if the receipts are
received.
To verify that the receipts have been received and attached to the report look Under the Track Submitted
Expense Reports section of Expense Home.
The Expense Report's Receipt Status field will display Received and you will also see an icon of a paper
clip with a yellow piece of paper in the Attachments field.
To actually view the attachment, click on this paper clip icon.
The attachment screen will open, click on the MarkView icon
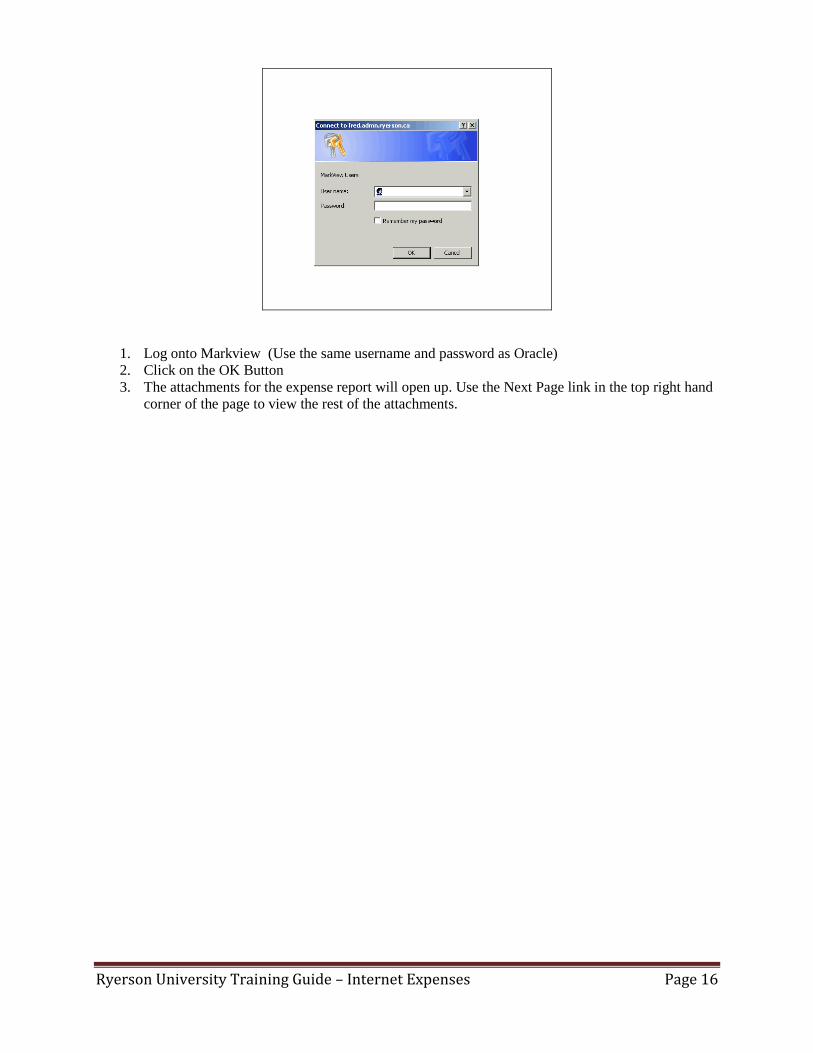
Ryerson University Training Guide – Internet Expenses Page 16
1. Log onto Markview (Use the same username and password as Oracle)
2. Click on the OK Button
3. The attachments for the expense report will open up. Use the Next Page link in the top right hand
corner of the page to view the rest of the attachments.
Ryerson University Training Guide – Internet Expenses Page 17
CHANGE EXPENSE STATEMENTS - WITHDRAW & UPDATE/DELETE REPORT
You can make changes to an expense report as long as the status does not say “Ready for Payment” or
“Paid”. Any changes will require you to resubmit your expense report for reapproval. If the status says
“Ready for Payment” and a change needs to be done, contact the Expense Administrator x4274.
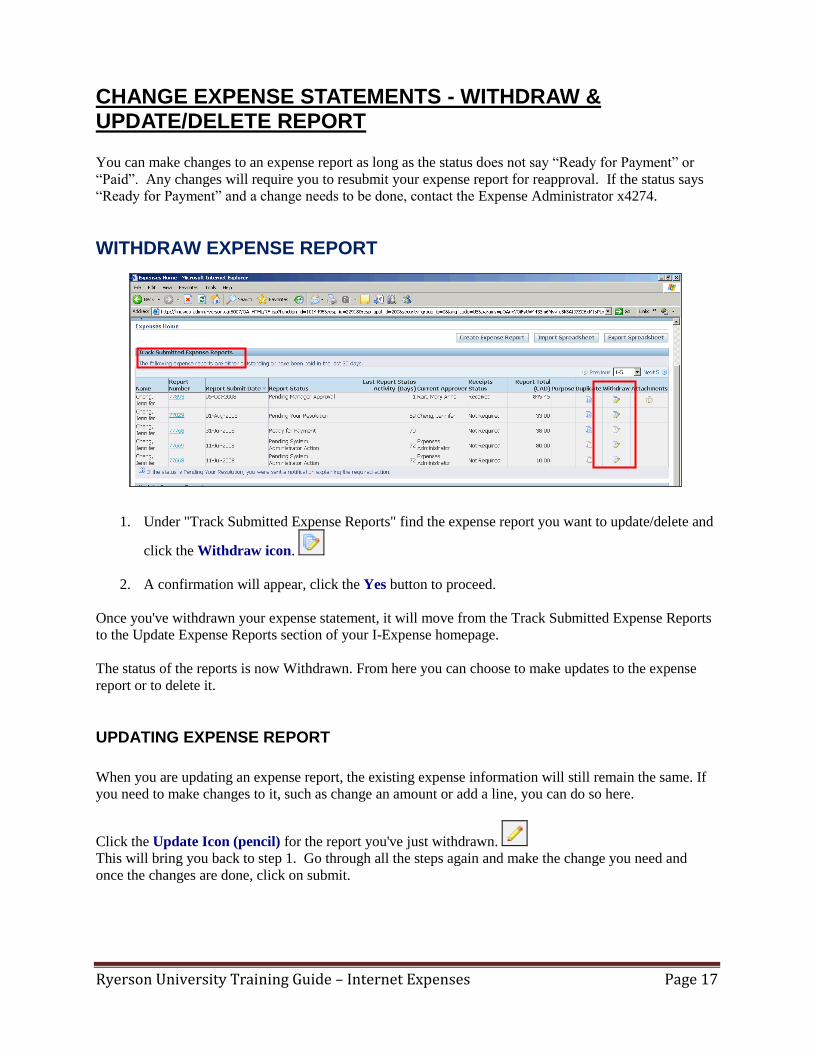
WITHDRAW EXPENSE REPORT
1. Under "Track Submitted Expense Reports" find the expense report you want to update/delete and
click the Withdraw icon.
2. A confirmation will appear, click the Yes button to proceed.
Once you've withdrawn your expense statement, it will move from the Track Submitted Expense Reports
to the Update Expense Reports section of your I-Expense homepage.
The status of the reports is now Withdrawn. From here you can choose to make updates to the expense
report or to delete it.
UPDATING EXPENSE REPORT
When you are updating an expense report, the existing expense information will still remain the same. If
you need to make changes to it, such as change an amount or add a line, you can do so here.
Click the Update Icon (pencil) for the report you've just withdrawn.
This will bring you back to step 1. Go through all the steps again and make the change you need and
once the changes are done, click on submit.
Ryerson University Training Guide – Internet Expenses Page 18
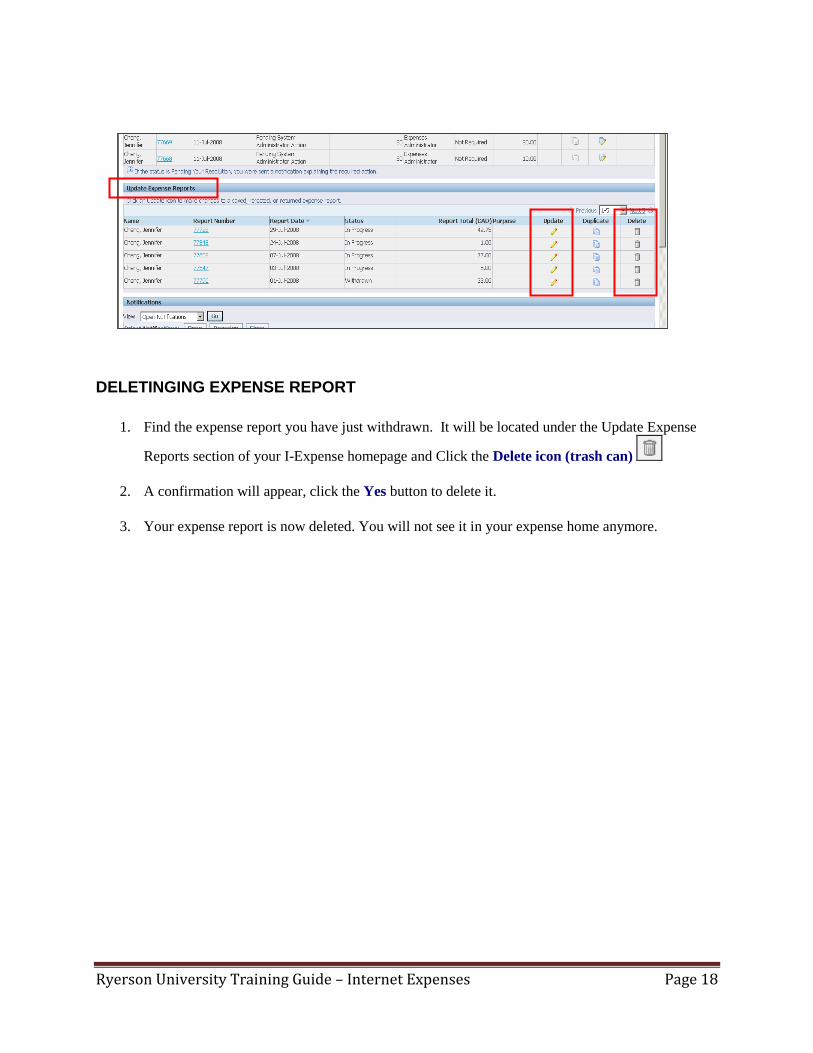
DELETINGING EXPENSE REPORT
1. Find the expense report you have just withdrawn. It will be located under the Update Expense
Reports section of your I-Expense homepage and Click the Delete icon (trash can)
2. A confirmation will appear, click the Yes button to delete it.
3. Your expense report is now deleted. You will not see it in your expense home anymore.
Ryerson University Training Guide – Internet Expenses Page 19
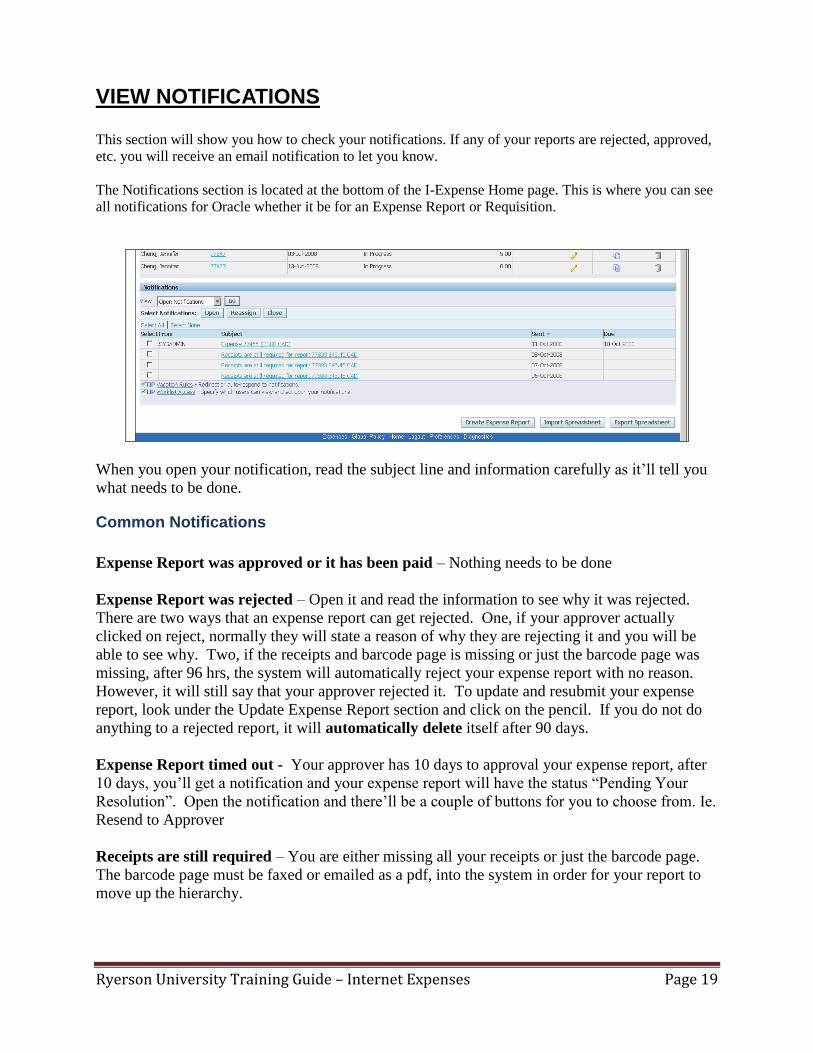
VIEW NOTIFICATIONS This section will show you how to check your notifications. If any of your reports are rejected, approved,
etc. you will receive an email notification to let you know.
The Notifications section is located at the bottom of the I-Expense Home page. This is where you can see
all notifications for Oracle whether it be for an Expense Report or Requisition.
When you open your notification, read the subject line and information carefully as it’ll tell you
what needs to be done.
Common Notifications
Expense Report was approved or it has been paid – Nothing needs to be done
Expense Report was rejected – Open it and read the information to see why it was rejected.
There are two ways that an expense report can get rejected. One, if your approver actually
clicked on reject, normally they will state a reason of why they are rejecting it and you will be
able to see why. Two, if the receipts and barcode page is missing or just the barcode page was
missing, after 96 hrs, the system will automatically reject your expense report with no reason.
However, it will still say that your approver rejected it. To update and resubmit your expense
report, look under the Update Expense Report section and click on the pencil. If you do not do
anything to a rejected report, it will automatically delete itself after 90 days.
Expense Report timed out - Your approver has 10 days to approval your expense report, after
10 days, you’ll get a notification and your expense report will have the status “Pending Your
Resolution”. Open the notification and there’ll be a couple of buttons for you to choose from. Ie.
Resend to Approver
Receipts are still required – You are either missing all your receipts or just the barcode page.
The barcode page must be faxed or emailed as a pdf, into the system in order for your report to
move up the hierarchy.
Ryerson University Training Guide – Internet Expenses Page 20
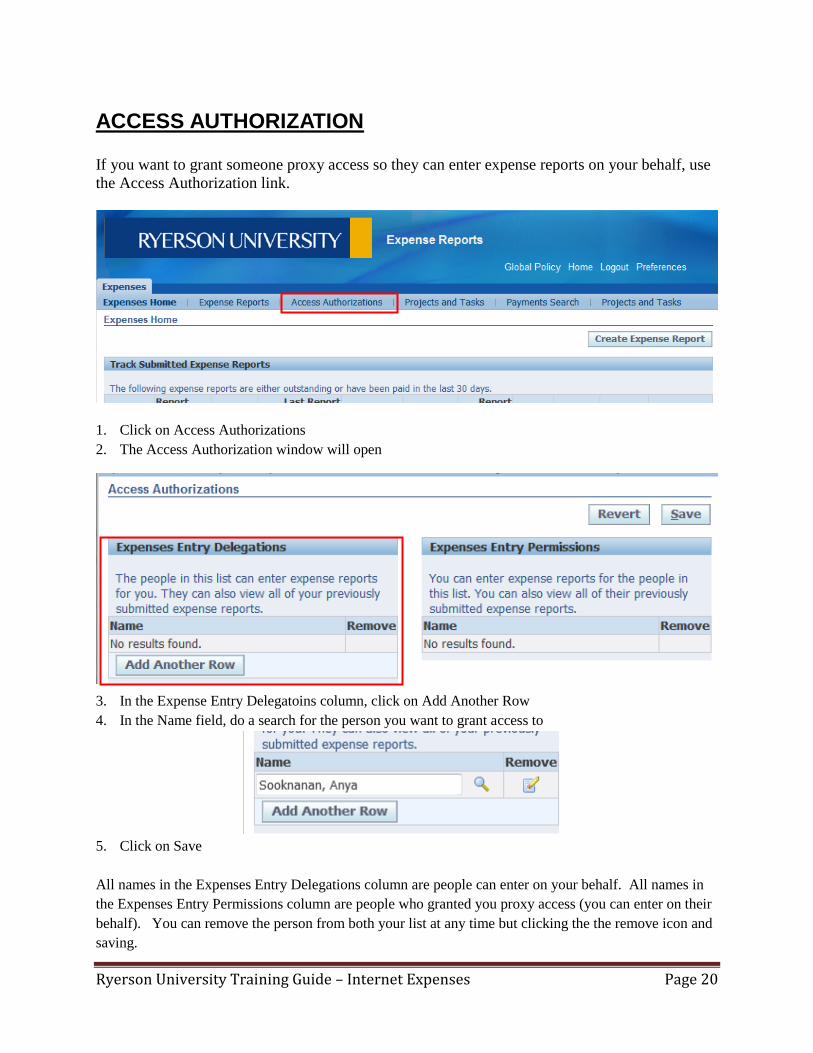
ACCESS AUTHORIZATION
If you want to grant someone proxy access so they can enter expense reports on your behalf, use
the Access Authorization link.
1. Click on Access Authorizations
2. The Access Authorization window will open
3. In the Expense Entry Delegatoins column, click on Add Another Row
4. In the Name field, do a search for the person you want to grant access to
5. Click on Save
All names in the Expenses Entry Delegations column are people can enter on your behalf. All names in
the Expenses Entry Permissions column are people who granted you proxy access (you can enter on their
behalf). You can remove the person from both your list at any time but clicking the the remove icon and
saving.
Ryerson University Training Guide – Internet Expenses Page 21
APPENDIX 1 - REPORT STATUS MEANING
Under Track Submitted Expense Reports, you may see the Report Status of:
Hold Pending Receipts - The person did not fax or email in the barcode page and receipts in the
system. Expense report will not go to approver unless the barcode page and receipts are fax or
emailed in. If the receipts are done as an attachment, then only the barcode page needs to be
emailed or faxed in.
Pending Your Resolution - The expense statement is waiting for you to do something. Check
your notification to see what it’s waiting for.
Pending Manger Approval - It's waiting for your manger to approve it
Pending Payable Approval - Waiting for accounts payable to verify everything's ok
Pending System Administrator Action - Contact RUFIShelp x2688 with your expense number
Ready for Payment - A cheque will be cut in the next cheque run
Paid - Cheque was issued.
Under Update Expense Reports section, you may see Report Status of:
In Progress - Report was not completed
Withdrawn - Report was submitted and then withdrawn
Rejected – Report was rejected by your approver or automatically by the system if the barcode
page and receipts were not faxed or emailed into the system.
Ryerson University Training Guide – Internet Expenses Page 22
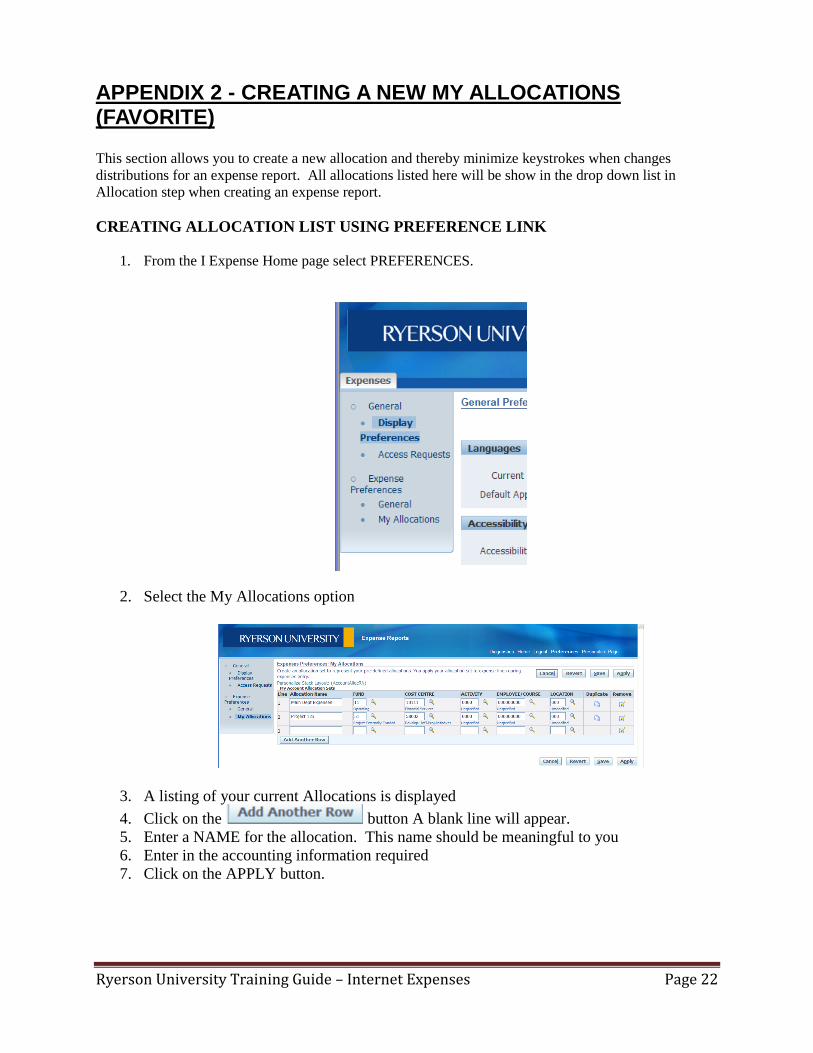
APPENDIX 2 - CREATING A NEW MY ALLOCATIONS (FAVORITE)
This section allows you to create a new allocation and thereby minimize keystrokes when changes
distributions for an expense report. All allocations listed here will be show in the drop down list in
Allocation step when creating an expense report.
CREATING ALLOCATION LIST USING PREFERENCE LINK
1. From the I Expense Home page select PREFERENCES.
2. Select the My Allocations option
3. A listing of your current Allocations is displayed
4. Click on the button A blank line will appear.
5. Enter a NAME for the allocation. This name should be meaningful to you
6. Enter in the accounting information required
7. Click on the APPLY button.
Ryerson University Training Guide – Internet Expenses Page 23
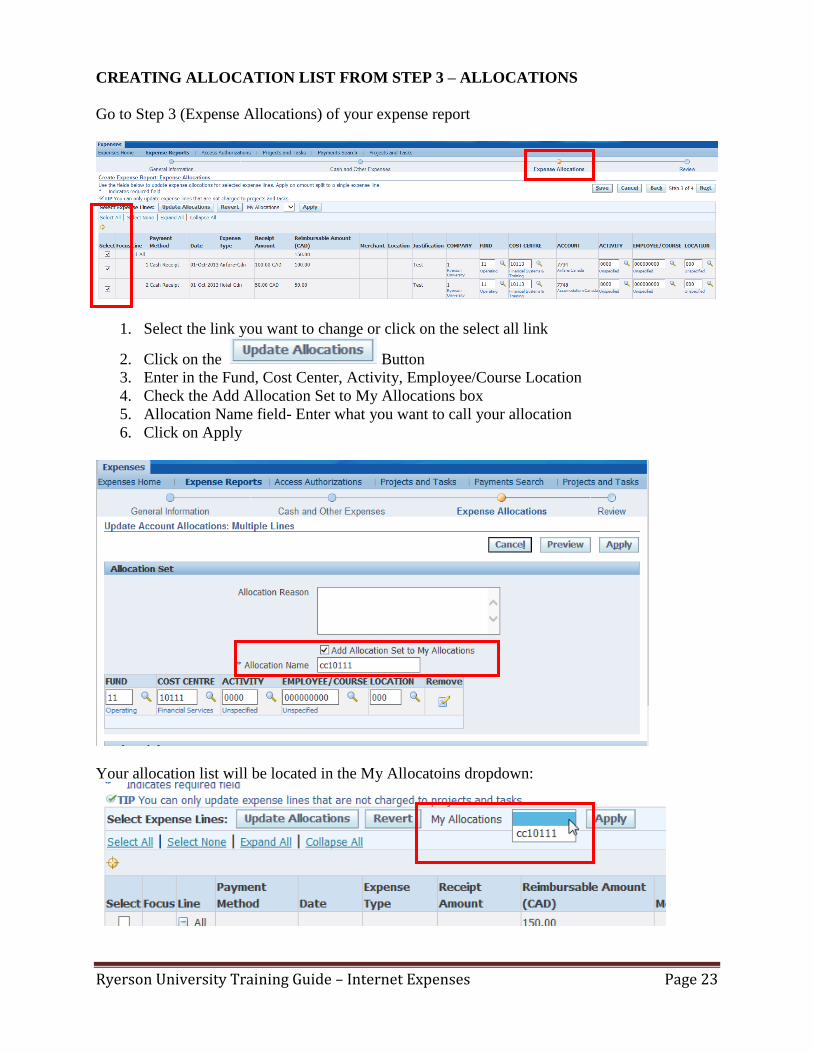
CREATING ALLOCATION LIST FROM STEP 3 – ALLOCATIONS
Go to Step 3 (Expense Allocations) of your expense report
1. Select the link you want to change or click on the select all link
2. Click on the Button
3. Enter in the Fund, Cost Center, Activity, Employee/Course Location
4. Check the Add Allocation Set to My Allocations box
5. Allocation Name field- Enter what you want to call your allocation
6. Click on Apply
Your allocation list will be located in the My Allocatoins dropdown:
Ryerson University Training Guide – Internet Expenses Page 24
APPENDIX 3 – ONE PAGE EXPENSE ENTRY SUMMARY
CASH EXPENSE
1. Log onto Oracle (www.ryerson.ca/ogf click on Oracle)
2. Click on Internet Expense
3. Click on Create Expense Report Button
4. Step 1 – General information
a. Verify all default information is correct. If you are using a different cost center, you
replace the current cost center with the one you want to use and make sure that the
approver is correct as well.
5. Step 2 – Cash and Other Expense
a. Enter in each receipts on a different line
Date: from the calendar select the date the expense occurred
Receipt Amount: Enter the amount of the receipt (no dollar sign or comma)
Expense Type: Select the type of expense you are claiming from the list.
Justification: Enter a justification
6. Step 3 – Expense Allocation
a. Make sure allocation is correct. If you changed the cost center in step 1, make sure the
fund and employee course is correct.
7. Step 4 – Review
a. Make sure all lines are there. If you have electronic receipts, use the add button to add
your attachments.
b. Click on Submit
8. Barcode Page – VERY IMPORTANT
a. If you had attached everything in step 4, then only the barcode page needs to be faxed or
emailed as a PDF into the system
b. If no receipts were attached in step 4, use the barcode page as a cover sheet and fax in all
your receipts or convert all your receipts and the barcode page to a PDF and email it into
the system
**If the barcode page is not emailed or faxed into the system within 96hrs, it will
automatically be reject by the system NOT YOUR APPROVER as stated.
9. Send all original receipts along with barcode to financial services
TRAVEL CARD EXPENSE
1. Follow steps 1-4 from above
2. Step 2 – Travel Card Transaction
a. Selection all the transactions you want reimbursement for on this expense report
3. Step 3 – Credit Card Expenses
a. Anything that was a personal purchase, categorize it as personal. Anything that’s missing
an expense type, enter in an expense type
4. Follow Steps 5-9 from above
CONTACTS
Rufishelp x2688 - System issues or need help entering an expense report
Expense Administrator x4274 - All other expense related issues ie. Setting up direct deposit,
what expense template to use, arrange for cheque pick up, etc.


![· Gift]Awards/MemoriaIs Expense Legal Services Food/Beverage Expense Polling Expense Printing Expense Salaries/Wages/Contract Labor Solicitation/Fundraising Expense](https://img.pdfslide.us/doc/110x75/5c5ef74209d3f2515c8cf3a9/-giftawardsmemoriais-expense-legal-services-foodbeverage-expense-polling-expense.jpg)