Embed Size (px)
Citation preview

IBM Maximo PQI SaaS Visual Insights
User Guide
IBM


IBM Maximo PQI SaaS Visual Insights
User Guide
IBM

ii User Guide

Note
Before using this information and the product it supports, read the information in“Notices” on page 119.
© Copyright IBM Corp. 2017, 2019 iii

iv User Guide

First edition (January 2019)
© Copyright IBM Corp. 2017, 2019 v

vi User Guide
Contents
Chapter 1. Product overview . . . . . . 1Roles . . . . . . . . . . . . . . . . . 1How is data backed up and restored? . . . . . . 1What's new in this release . . . . . . . . . . 2Accessibility features . . . . . . . . . . . 4
Chapter 2. Creating edge systems . . . 5Edge system requirements . . . . . . . . . . 5Opening edge ports . . . . . . . . . . . . 5Installing NVIDIA GPU packages for Ubuntu . . . 6Installing NVIDIA GPU packages for Linux on PowerSystems Servers . . . . . . . . . . . . . 7Installing Caffe for Ubuntu . . . . . . . . . 7Installing Caffe for Linux on Power Systems Servers 9Troubleshooting the Caffe installation. . . . . . 10Installing Open CV . . . . . . . . . . . . 12Installing object detection libraries . . . . . . . 13
Troubleshooting the Faster-RCNN Python libraryinstallation . . . . . . . . . . . . . 15
Configuring the image server . . . . . . . . 15Configuring the model store . . . . . . . . . 16Installing Python modules . . . . . . . . . 17
Installing Paramiko for Linux on Power SystemsServers . . . . . . . . . . . . . . . 17
Registering the edge to the center application . . . 18Registering a connected edge to the centerapplication . . . . . . . . . . . . . 18Registering a stand-alone edge to the centerapplication . . . . . . . . . . . . . 18Installing a stand-alone edge . . . . . . . 19Checking the status of services on the edgesystems. . . . . . . . . . . . . . . 23
Upgrading edge systems . . . . . . . . . . 24
Chapter 3. Creating and using models 27Structure of compressed image files . . . . . . 27Adding historical images for image groups . . . . 28Image labeling tool . . . . . . . . . . . . 29
Creating an unlabeled image group . . . . . 29Manually labeling sample images . . . . . . 29Automatically labeling sample images . . . . 30
Model creation . . . . . . . . . . . . . 30Creating models . . . . . . . . . . . . . 31Using the model catalog . . . . . . . . . . 32
Testing models in the model catalog . . . . . 32Creating models by using the model catalog . . 33
Training models . . . . . . . . . . . . . 33Trained models . . . . . . . . . . . . . 34
Structure of model files . . . . . . . . . 34Validated models . . . . . . . . . . . . 39Distributing trained models to edges . . . . . . 39Retraining models . . . . . . . . . . . . 40Using models with a stand-alone edge . . . . . 40
Publishing models . . . . . . . . . . . 40Deploying one model instance . . . . . . . 40
Undeploying models . . . . . . . . . . 41
Chapter 4. Checking inspection results 43Images . . . . . . . . . . . . . . . . 43Filtering defects . . . . . . . . . . . . . 43Checking defects . . . . . . . . . . . . 43Uploading images by using the simulator . . . . 44
Chapter 5. KPI dashboard . . . . . . 45
Chapter 6. Integration with PrescriptiveQuality . . . . . . . . . . . . . . . 47
Chapter 7. Application programminginterface . . . . . . . . . . . . . . 49API workflows . . . . . . . . . . . . . 49Preparing to use the API calls . . . . . . . . 50Service responses . . . . . . . . . . . . 50Data group services . . . . . . . . . . . 51
Get all data groups . . . . . . . . . . . 51Get all data groups with data files . . . . . . 52Get one data group . . . . . . . . . . . 54Create a data group . . . . . . . . . . 55Update a data group . . . . . . . . . . 56Delete data groups . . . . . . . . . . . 57
Data file services . . . . . . . . . . . . 58Get all data files that belong to a data group . . 58Get one data file. . . . . . . . . . . . 60Download the binary content of the data file . . 61Upload data files to a data group . . . . . . 61Delete one data file . . . . . . . . . . . 63
Model services . . . . . . . . . . . . . 63Get all models . . . . . . . . . . . . 63Get one model . . . . . . . . . . . . 65Create a model . . . . . . . . . . . . 67Update a model . . . . . . . . . . . . 70Delete one model . . . . . . . . . . . 71Get all shared models . . . . . . . . . . 72
Model instance services . . . . . . . . . . 73Create a model instance . . . . . . . . . 73Get the model instance that belongs to the model 76Get one model instance . . . . . . . . . 77Get the model instance validation result . . . . 78
Inspection result services . . . . . . . . . . 80Get the inspection result list . . . . . . . . 80Get the inspection result details . . . . . . 81Get the inspection result cell overview . . . . 83Confirm inspection results . . . . . . . . 84Delete inspection results . . . . . . . . . 85
Model instance action services . . . . . . . . 86Train model instance . . . . . . . . . . 86Download a training log file . . . . . . . . 87Validate model instance . . . . . . . . . 88Reject model instance . . . . . . . . . . 89
© Copyright IBM Corp. 2017, 2019 vii
Deploy model instance . . . . . . . . . 90Retrain model instance . . . . . . . . . 91Undeploy model instance. . . . . . . . . 93
Edge services . . . . . . . . . . . . . . 94Create edge . . . . . . . . . . . . . 94Get edge . . . . . . . . . . . . . . 95Delete edge . . . . . . . . . . . . . 96Upgrade edge . . . . . . . . . . . . 97
Score service . . . . . . . . . . . . . . 97Score image . . . . . . . . . . . . . 97
QEWS integration service. . . . . . . . . . 99Get defect image rate file . . . . . . . . . 99
Composite service . . . . . . . . . . . . 100Register model . . . . . . . . . . . . 100
Stand-alone edge services . . . . . . . . . 101
Get available models . . . . . . . . . . 102Deploy a model . . . . . . . . . . . 103Undeploy model . . . . . . . . . . . 104Upload and score image on the edge . . . . 104Sync inspection result from the edge to thecenter application . . . . . . . . . . . 106Clean up inspection result that you have syncedto the center application . . . . . . . . . 107
Chapter 8. Registering, deploying, andtesting a model by using the API . . . 109
Chapter 9. Troubleshooting . . . . . 111Messages . . . . . . . . . . . . . . . 111
viii User Guide
Chapter 1. Product overview
IBM® Maximo® PQI SaaS Visual Insights is a quality monitoring and alertingsolution that can take in images of in-process and finished products andassemblies, and classify them into defect categories.
RolesTo understand Maximo PQI SaaS Visual Insights, it is helpful to understand howthe different roles interact with the product.
Table 1. Maximo PQI SaaS Visual Insights roles
Role Description
Model Manager Manages defect types and models, uploadsimage sets for specific defect types, trainsmodels, and distributes executable models toedges.
Inspector Verifies the inspection results that areproduced by the product, changes defecttypes if necessary, marks unknown defecttypes and passes them to the InspectorSupervisor for further evaluation.
Inspector Supervisor Double-checks the Inspector's inspectionresults. Reviews and classifies unknowndefect types. Reviews the KPI dashboard,which includes defect per unit and defectrate.
How is data backed up and restored?IBM Open Platform redundancy is used to protect customer data in a big dataenvironment. In addition, Tivoli® Storage Manager is used to back up data in theproduction environment, which includes Linux files. Linux files include customeruploaded files and middleware/application configuration/log files.
The following table shows the backup schedule for various aspects of the solution.
Table 2. Backup schedule for solution data
Data Backup type FrequencyTime (CentralTime)
Retentionperiod
Files Full Bi-weekly 00:00 - 03:00 onthe 1st and 16thday of eachmonth
5 weeks
Files Incremental Twice daily 00:00 - 03:00 and12:00 - 15:00
14 days
During the backup window, the solution is accessible. However, performance maybe impacted.
© Copyright IBM Corp. 2017, 2019 1
In the event of a system failure that causes data damage or loss, IBM will help torestore the data to the recovery time points, according to its backup policy.
What's new in this releaseThe following new features are available in IBM Maximo PQI SaaS Visual Insights.
New in this release
January 2019
v The product name was changed to IBM Maximo PQI SaaS VisualInsights.
v Fixed training curve issue when training classification models in parallel.v Fixed model training issue when retraining YOLO models.v Fixed issue when validating and scoring FRCNN-VGG16 models.v Updated connection properties to improve scoring concurrency.
New in previous releases
November 2018
v Support for multiple edge clusters in one tenant. Models can bedeployed to multiple edge clusters.
v Support for classification training clusters to scale during multipletraining job submissions and reduce wait time.
v Support for edge version management. Version information ismaintained when you register or upgrade an edge. You can check theversion of the edge when you deploy a model.
v Added an image archiving policy to specify what kinds of images arearchived and used to retrain a model.
v The product returns error details when scoring fails.v Resolved a security issue of session hijacking.v Updated pricing rules to count training file number, scoring file number,
and used storage.
September 2018
v Support for the epoch as a unit when training classification models. Thismakes it easier to define hyper parameters.
v Enabled training server clusters when training object detection models.This clustering supports scaling if one training server cannot handlemany parallel requests.
v Support for the edge running on the Linux on Power Systems™ Serversplatform.
v Support for zip files packaged on MacOS when uploading image zipfiles and model zip files.
v Improved automatic labeling tool.
June 2018
v Ability to automatically label training images through a small annotateddata set, which reduces the cost and time required to annotate the data.
v Edge enhancements based on field feedback, including removing NFSaccess from the center, supporting master edge high availability, andsupport for running a model on a specific edge and specific GPU.
2 User Guide
v Model training improvements by our data scientist experts based on apretrained network to support small iterations with high accuracy.
March 2018
v Support for browsing models in a model catalog and testing your ownimages with shared models.
v Support for using shared models in a model catalog and training yourown model with specific images.
v Support for choosing different model types, algorithms, networks, andhyper parameters when you create a new model.
v Support for online model training. Model files are generatedautomatically without the need for other training tools.
v Training dashboard that shows a live chart of model loss and accuracyvalues with iterations and detailed log files.
v List of available snapshots during the training process. Support for usingone snapshot as a trained model.
v Three-step API guidance to help service integration for modelregistration, deployment, and testing.
v A simulator that can be used to send images to the server and reviewinspection results.
December 2017
v User interface to enable a Data Scientist to download datasets and attachtrained models.
v Support for retraining of an object detection model.v User interface to enable a model manager to monitor the retraining
queue.v Support for offline mode for edges. In offline mode, edges store
inspections results locally and send the results to the center applicationin batches.
v Support for an edge cluster to handle score requests with load balancing.v Support for sampling datasets to retrain classification models.v Ability to export CSV files for integration with IBM Prescriptive Quality.v Public REST API that enables you to perform such functions as getting
all existing data groups, getting all data files that belong to a data group,and getting all existing models.
September 2017
v You can now use image groups to represent the same type of images byusing one or more compressed image files.
v Added support for multiple model versions that share the same imagegroups, but use different image files to train the model.
v The model retrain process was added. You can automatically ormanually retrain a new model version by using different image files.
v Added support for model validation. The validation process calculatesand shows a model accuracy report based on validation image files.
v You can now use defect boxes and defect types on an image to mark thedefect location for the inspector.
v You can now show multiple defect locations on one image. You can nowadd, adjust, and delete defect boxes on an image.
v Updated the KPI dashboard to include defect per unit and defect rate forthe inspector supervisor.
Chapter 1. Product overview 3
v Added support for the object detection model to detect multiple defectsin one image with the CNN model.
Accessibility featuresAccessibility features help users who have a physical disability, such as restrictedmobility or limited vision, to use information technology products.
For information about the commitment that IBM has to accessibility, see the IBMAccessibility Center (www.ibm.com/able).
HTML documentation has accessibility features. PDF documents are supplementaland, as such, include no added accessibility features.
4 User Guide
Chapter 2. Creating edge systems
Maximo PQI SaaS Visual Insights consists of the center application and the edges.Edges are Linux systems that are used to perform runtime defect detection.
Edge systems use the Caffe deep-learning framework. Caffe is a dedicated artificialneural network (ANN) training environment. Deep learning requires significantprocessing resources. Deep learning can be performed efficiently by using agraphics processing unit (GPU). Although most deep learning frameworks alsosupport CPU processing, GPU processing provides reasonable performance forproduction environments.
Edges are clustered for load balancing. A cluster consists of one master edge andmultiple slave edges. When a cell sends an image for processing, the master edgereceives the image and then sends it to a slave edge that has GPU resourcesavailable.
The edge clustering architecture is scalable. If you need more processing resources,you can add more edges.
When you create an edge, you specify whether the edge is the master edge or aslave edge. The first edge that you create must be the master edge. After an edge iscreated, you cannot change the edge type. You can create only one master edge pertenant. The master edge cannot be deleted until all the slave edges are deleted.
Master edges can be connected or standalone. Connected means when an image isscored on an edge, the inspection result is sent to the center applicationimmediately. Standalone means the inspection result is stored on the edge untilyou select Pull results from the Preview Edge dialog box or call the service that isdeployed on the edge.
Edge system requirementsBefore creating an edge system, ensure that your system meets the requirements.v One of the following operating systems:
– Ubuntu 16.04 on x86_64– Red Hat Enterprise Linux 7.5 on x86_64– Red Hat Enterprise Linux 7.5 on IBM Power System
v CPU architecture: x86_64 or IBM Power Systemv 4-core processorv 64GB memoryv 2TB hard disk drivev One or more NVIDIA GPU cards
Opening edge portsBefore using edges, you must open the firewall ports that are used by the edgesystems.
© Copyright IBM Corp. 2017, 2019 5
About this task
If uncomplicated firewall (UFW) is enabled and active on the edges, use thefollowing commands to open UFW for network file system (NFS) service and openthe following firewall ports on the edges:sudo ufw enablesudo ufw allow nfssudo ufw allow 22sudo ufw allow 5005sudo ufw allow 5070:5090/tcpsudo ufw allow 6005sudo ufw allow 8449
Installing NVIDIA GPU packages for UbuntuUse this task to install NVIDIA GPU packages for Ubuntu systems. To enable GPUprocessing, you must install the required NVIDIA GPU packages.
Procedure1. Download and install the drivers for your NVIDIA GPU. The NVIDIA driver
list for Ubuntu is available at the following link: Binary Driver How to -Nvidia. The following command is an example:sudo apt-get install ubuntu-drivers-commonsudo ubuntu-drivers devicessudo apt-get install nvidia-384
2. Use the following command to check if your NVIDIA driver installed correctly:sudo nvidia-smi
3. Download and install the NVIDIA CUDA toolkit and corresponding CUDNNlibrary. CUDA 8.0, CUDA 9.0 and CUDA 10.0 are supported. The followingcommand is an example for CUDA 8.0.wgethttp://developer.download.nvidia.com/compute/cuda/repos/ubuntu1604/x86_64/cuda-repo-ubuntu1604_8.0.61-1_amd64.deb
4. Install the CUDA file on the target server using the following commands:sudo dpkg -i cuda-repo-ubuntu1604_8.0.61-1_amd64.debsudo apt-get updatesudo apt-get install cudaAs NVIDIA upgrades the toolkit, you may get a newer version of the toolkit byusing this command. It is recommended that you install CUDA 8.0 since that isthe tested version. If you find that a newer version has been installed you candowngrade to CUDA 8.0 by using the following commands:sudo apt-get remove cudasudo apt-get install cuda-8-0sudo ln -s /usr/local/cuda-8.0 /usr/local/cuda
5. Download the NVIDIA CUDA Deep Neural Network librarycudnn-8.0-linux-x64-v6.0.tgz from the following link: https://developer.nvidia.com/compute/machine-learning/cudnn/secure/v6/prod/8.0_20170307/cudnn-8.0-linux-x64-v6.0-tgz. You may need to create an accountand log in before downloading the file.
6. Unpack the cudnn-8.0-linux-x64-v6.0.tgz file to the cuda installationdirectory using the following command:sudo tar -xvf cudnn-8.0-linux-x64-v6.0.tgz -C /usr/local
7. Set the environment variable using the following commands:export LD_LIBRARY_PATH=/usr/local/cuda/lib64:$LD_LIBRARY_PATH
6 User Guide

export PATH=/usr/local/cuda/bin:$PATHAlso add these commands to the ~/.bashrc script.
8. Install the NVIDIA NCCL package using the following commands:git clone https://github.com/NVIDIA/nccl.gitcd ncclsudo make install -j4
Installing NVIDIA GPU packages for Linux on Power Systems ServersUse this task to install NVIDIA GPU packages for Linux on Power SystemsServers. To enable GPU processing, you must install the required NVIDIA GPUpackages.
About this task
For Power8 systems, use CUDA 8 as described in the following task. For Power9systems, substitute CUDA 10 for CUDA 8 in the following task.
Procedure1. Download and install the drivers for your NVIDIA GPU. The NVIDIA driver
list for Linux on Power Systems Servers is available at the following link:NVIDIA Driver Downloads. Follow the installation instructions on thedownload page.
2. Download the CUDA repository file and install CUDA 8 by using the followingcommands:wget https://developer.download.nvidia.com/compute/cuda/repos/rhel7/ppc64le/cuda-repo-rhel7-8.0.61-1.ppc64le.rpmrpm -i cuda-repo-rhel7-8.0.61-1.ppc64le.rpmyum clean allyum install cuda
3. For CUDA 8, download the NVIDIA CUDA Deep Neural Network librarycudnn-8.0-linux-ppc64le-v6.0-tgz from the following URL:https://developer.nvidia.com/compute/machine-learning/cudnn/secure/v6/prod/8.0_20170307/cudnn-8.0-linux-ppc64le-v6.0-tgz. For CUDA 10, downloadthe NVIDIA CUDA Deep Neural Network library cudnn-10.0-linux-ppc64le-v7.3.1.20.tgz from the following URL: https://developer.download.nvidia.com/compute/cuda/repos/rhel7/ppc64le/cuda-10.0.130-1.ppc64le.rpm. You might need to create an account and log in beforedownloading the file.
4. Unpack the cudnn-8.0-linux-ppc64le-v6.0.tgz file to the cuda installationdirectory by using the following command:sudo tar -xvf cudnn-8.0-linux-ppc64le-v6.0.tgz -C /usr/local
5. Set the environment variable by using the following command:export LD_LIBRARY_PATH=/usr/local/cuda/lib64:$LD_LIBRARY_PATHAlso add this command to the ~/.bashrc script.
6. Install the NVIDIA NCCL package using the following commands:git clone https://github.com/NVIDIA/nccl.gitcd ncclsudo make install -j4
Installing Caffe for UbuntuYou must install the Caffe deep-learning framework and related packages. Caffe isused for model training and defect classification.
Chapter 2. Creating edge systems 7

Procedure1. Install the packages that are required for Caffe by using the following
commands:sudo apt-get updatesudo apt-get upgradesudo apt-get install -y build-essential cmake git pkg-configsudo apt-get install -y libprotobuf-dev libleveldb-dev libsnappy-devlibhdf5-serial-dev protobuf-compilersudo apt-get install -y libatlas-base-dev libjasper-devsudo apt-get install -y --no-install-recommends libboost-all-devsudo apt-get install -y libgflags-dev libgoogle-glog-dev liblmdb-devsudo apt-get install -y python-pipsudo apt-get install -y python-devsudo apt-get install -y python-numpy python-scipysudo apt-get install -y libopencv-devsudo pip install opencv-pythonsudo pip install flask_httpauthsudo pip install geventsudo pip install pyinotifysudo pip install tornado
2. Download the Caffe source code by using the following command:wget https://github.com/BVLC/caffe/archive/1.0.zip
3. Unpack the package and enter the package directory by using the followingcommands:unzip 1.0.zipcd ./caffe-1.0
4. Make a copy of the make configuration file by using the following command:cp Makefile.config.example Makefile.config
5. Add the following variables in the Makefile.config file:USE_CUDNN := 1CUDA_DIR := /usr/local/cudaPYTHON_INCLUDE := /usr/include/python2.7 \/usr/lib/python2.7/dist-packages/numpy/core/includePYTHON_LIB := /usr/lib/x86_64-linux-gnuWITH_PYTHON_LAYER := 1INCLUDE_DIRS := $(PYTHON_INCLUDE) /usr/local/include \/usr/include/hdf5/serialLIBRARY_DIRS := $(PYTHON_LIB) /usr/local/lib /usr/lib \/usr/lib/x86_64-linux-gnu /usr/lib/x86_64-linux-gnu/hdf5/serial
6. In the caffe-1.0 directory, run the following command:find . -type f -exec sed -i -e 's^"hdf5.h"^"hdf5/serial/hdf5.h"^g' -e's^"hdf5_hl.h"^"hdf5/serial/hdf5_hl.h"^g' '{}' \;
7. Run the following commands:cd /usr/lib/x86_64-linux-gnusudo ln -s libhdf5_serial.so.10.1.0 libhdf5.sosudo ln -s libhdf5_serial_hl.so.10.0.2 libhdf5_hl.so
8. Install the required Python packages in the caffe-1.0/python directory byusing the following commands:cd {caffe-installation-path}/caffe-1.0/pythonfor req in $(cat requirements.txt); do sudo -H pip install $req--upgrade; donewhere {caffe-installation-path} is the Caffe deployment path.
8 User Guide
9. Open the makefile in the {caffe-installation-path} directory and change theparameter NVCCFLAGS to the following setting:NVCCFLAGS += -D_FORCE_INLINES -ccbin=$(CXX) -Xcompiler -fPIC$(COMMON_FLAGS)
10. In the main Caffe directory caffe-1.0, begin the Caffe build and installationby using the following commands:make allmake testmake runtestmake pycaffemake distribute
11. Add the following line to the ~/.bashrc script:export PYTHONPATH="/usr/lib/python2.7:{caffe-installation-path}/caffe-1.0/python:$PYTHONPATH"where {caffe-installation-path} is the Caffe deployment path.
Installing Caffe for Linux on Power Systems ServersUse this task to install Caffe for Linux on Power Systems Servers systems. Youmust install the Caffe deep-learning framework and related packages. Caffe is usedfor model training and defect classification.
Procedure1. Install the packages that are required for Caffe by using the following
commands:sudo yum clean allsudo yum updatesudo yum install upgradesudo yum install -y libboost-*sudo yum install -y gflags-devel glog-devel lmdb-develsudo yum install -y python-pipsudo yum install -y python-develsudo yum install -y opencv-develsudo yum makecachesudo yum install -y protobuf-devel leveldb-devel lmdb-develsnappy-devel opencv-devel boost-devel hdf5-devel atlas-devel glog-develgflags-develsudo yum install libpng-develsudo yum install freetype-develsudo yum install libjpeg-turbo-develsudo yum install opencv-pythonsudo rpm -e --nodeps numpysudo pip install numpypip install --upgrade pipsudo pip install flask_httpauthsudo pip install geventsudo pip install pyinotifyln -s /usr/local/cuda-10.0 /usr/local/cudapip install scikit-imagesudo pip install tornado
2. Link the Atlas library by using the following commands:ln -fs /usr/lib64/atlas/libsatlas.so /usr/lib64/libatlas.soln -fs /usr/lib64/atlas/libsatlas.so /usr/lib64/libcblas.so
3. Download the Caffe source code by using the following command:wget https://github.com/BVLC/caffe/archive/1.0.zip
Chapter 2. Creating edge systems 9
4. Unpack the package and enter the package directory by using the followingcommands:unzip 1.0.zipcd ./caffe-1.0
5. Make a copy of the make configuration file by using the following command:cp Makefile.config.example Makefile.config
6. Add the following variables in the Makefile.config file:USE_CUDNN := 1CUDA_DIR := /usr/local/cudaPYTHON_INCLUDE := /usr/include/python2.7 \
/usr/lib64/python2.7/site-packages/numpy/core/include/PYTHON_LIB := /usr/lib/gcc/ppc64le-redhat-linux/4.8.5/WITH_PYTHON_LAYER := 1INCLUDE_DIRS := $(PYTHON_INCLUDE) /usr/local/include/usr/local/cuda-10.0/targets/ppc64le-linux/include/LIBRARY_DIRS := $(PYTHON_LIB) /usr/local/lib /usr/lib \
/usr/lib64 /usr/local/lib64
Change CUDA_ARCH to the following text:CUDA_ARCH := -gencode arch=compute_30,code=sm_30-gencode arch=compute_35,code=sm_35-gencode arch=compute_50,code=sm_50-gencode arch=compute_52,code=sm_52-gencode arch=compute_60,code=sm_60-gencode arch=compute_61,code=sm_61-gencode arch=compute_61,code=compute_61
7. Install the required Python packages in the caffe-1.0/python directory byusing the following commands:cd caffe-installation-path/caffe-1.0/pythonfor req in $(cat requirements.txt); do sudo -H pip install $req--upgrade; donewhere caffe-installation-path is the Caffe deployment path.
8. Open the Makefile in the caffe-installation-path directory and change theparameter NVCCFLAGS to the following setting:NVCCFLAGS += -D_FORCE_INLINES -ccbin=$(CXX) -Xcompiler -fPIC$(COMMON_FLAGS)
9. In the main Caffe directory caffe-1.0, begin the Caffe build and installationby using the following commands:make allmake testmake runtestmake pycaffemake distribute
10. Add the following line to the ~/.bashrc script:export PYTHONPATH="/usr/lib/python2.7:caffe-installation-path/caffe-1.0/python:$PYTHONPATH"where caffe-installation-path is the Caffe deployment path.
Troubleshooting the Caffe installationIf an error message displays in the log when you begin the Caffe build andinstallation, you can take steps to try to resolve the problem.
Symptoms 1
When you began the Caffe build and installation, the following message displays:
10 User Guide
1. In file included from ./include/caffe/util/device_alternate.hpp:40:0,2. from ./include/caffe/common.hpp:19,3. from src/caffe/common.cpp:7:4. ./include/caffe/util/cudnn.hpp: In function 'void caffe::cudnn::createPoolingDesc(cudnnPoolingStruct**,caffe::PoolingParameter_PoolMethod, cudnnPoolingMode_t*, int, int, int, int, int, int)':5. ./include/caffe/util/cudnn.hpp:127:41: error: too few arguments to function 'cudnnStatus_tcudnnSetPooling2dDescriptor(cudnnPoolingDescriptor_t, cudnnPoolingMode_t, cudnnNanPropagation_t, int,int, int, int, int, int)'6. pad_h, pad_w, stride_h, stride_w));7. ^8. ./include/caffe/util/cudnn.hpp:15:28: note: in definition of macro 'CUDNN_CHECK'9. cudnnStatus_t status = condition; \10. ^11. In file included from ./include/caffe/util/cudnn.hpp:5:0,12. from ./include/caffe/util/device_alternate.hpp:40,13. from ./include/caffe/common.hpp:19,14. from src/caffe/common.cpp:7:15. /usr/local/cuda-7.5//include/cudnn.h:803:27: note: declared here16. cudnnStatus_t CUDNNWINAPI cudnnSetPooling2dDescriptor(17. ^18. make: *** [.build_release/src/caffe/common.o] Error 119.
Resolving the problem 1
To fix the error, refer to the following steps:1. In the /include/caffe/util/cudnn.hpp directory, replace the cudnn.hpp file with
the newest cudnn.hpp file that is in the Caffe repository on GitHub.2. In the /src/caffe/layers folder, replace all of the cudnn files that are in the
/src/caffe/layers folder with the newest cudnn files that are in the Cafferepository on GitHub.
Symptoms 2
When you install the required Python packages in the caffe-1.0/python directory,the following message displays:Traceback (most recent call last):
File "/usr/bin/pip", line 11, in <module>sys.exit(main())
File "/usr/lib/python2.7/dist-packages/pip/__init__.py", line 215, in mainlocale.setlocale(locale.LC_ALL, ’’)
File "/usr/lib/python2.7/locale.py", line 581, in setlocalereturn _setlocale(category, locale)
locale.Error: unsupported locale settingTraceback (most recent call last):
File "/usr/bin/pip", line 11, in <module>sys.exit(main())
File "/usr/lib/python2.7/dist-packages/pip/__init__.py", line 215, in mainlocale.setlocale(locale.LC_ALL, ’’)
File "/usr/lib/python2.7/locale.py", line 581, in setlocalereturn _setlocale(category, locale)
locale.Error: unsupported locale setting
Resolving the problem 2
To resolve this error, run the following command:export LC_ALL=C
Symptoms 3
When you begin the Caffe build and installation, the following message displays:nvcc fatal : Unsupported gpu architecture ’compute_20’Makefile:595: recipe for target ’.build_release/cuda/src/caffe/layers/prelu_layer.o’ failedmake: *** [.build_release/cuda/src/caffe/layers/prelu_layer.o] Error 1
Chapter 2. Creating edge systems 11
Resolving the problem 3
Comment out -gencode arch=compute_20 in Makefile.config.
Symptoms 4
When you begin the Caffe build and installation, the following message displays:PROTOC src/caffe/proto/caffe.protomake: protoc: Command not foundMakefile:639: recipe for target ’.build_release/src/caffe/proto/caffe.pb.cc’ failedmake: *** [.build_release/src/caffe/proto/caffe.pb.cc] Error 127
Resolving the problem 4
Run the following command to install the protoc program:
sudo apt install protobuf-compiler
Symptoms 5
When you begin the Caffe build and installation, the following message displays:src/caffe/layers/hdf5_data_layer.cpp:13:30: fatal error: hdf5/serial/hdf5.h: No such file or directorycompilation terminated.Makefile:582: recipe for target ’.build_release/src/caffe/layers/hdf5_data_layer.o’ failedmake: *** [.build_release/src/caffe/layers/hdf5_data_layer.o] Error 1
Resolving the problem 5
You might need to install a Caffe dependency package using the followingcommands:
sudo apt-get install libprotobuf-dev libleveldb-dev libsnappy-devlibopencv-dev libhdf5-serial-dev protobuf-compilersudo apt-get install --no-install-recommends libboost-all-devsudo apt-get install libopenblas-dev liblapack-dev libatlas-base-devsudo apt-get install libgflags-dev libgoogle-glog-dev liblmdb-dev
Installing Open CVYou can install the Open Source Computer Vision (OpenCV) 3.2 library if you needto customize models with the features of OpenCV 3.2.
Procedure1. Get the OpenCV source code from Github:
wget https://github.com/opencv/opencv/archive/3.2.0.zip
2. Unpack the downloaded package and change to the package directory:unzip 3.2.0.zipcd opencv-3.2.0
3. Create a building subdirectory and change to the directory:mkdir buildcd build
4. Prepare and generate the building configuration:cmake -D CMAKE_BUILD_TYPE=RELEASE -D CMAKE_INSTALL_PREFIX=/usr/local -DWITH_TBB=ON -D WITH_V4L=ON ..
12 User Guide
5. Compile and build the package:make -j $(($(nproc) + 1))
6. Install the package:sudo make install
7. Register the libraries and modules to the system:sudo /bin/bash -c 'echo "/usr/local/lib" > /etc/ld.so.conf.d/opencv.conf'sudo ldconfig
8. If required, uninstall the old opencv version to avoid version collision:sudo apt-get autoremove libopencv-dev
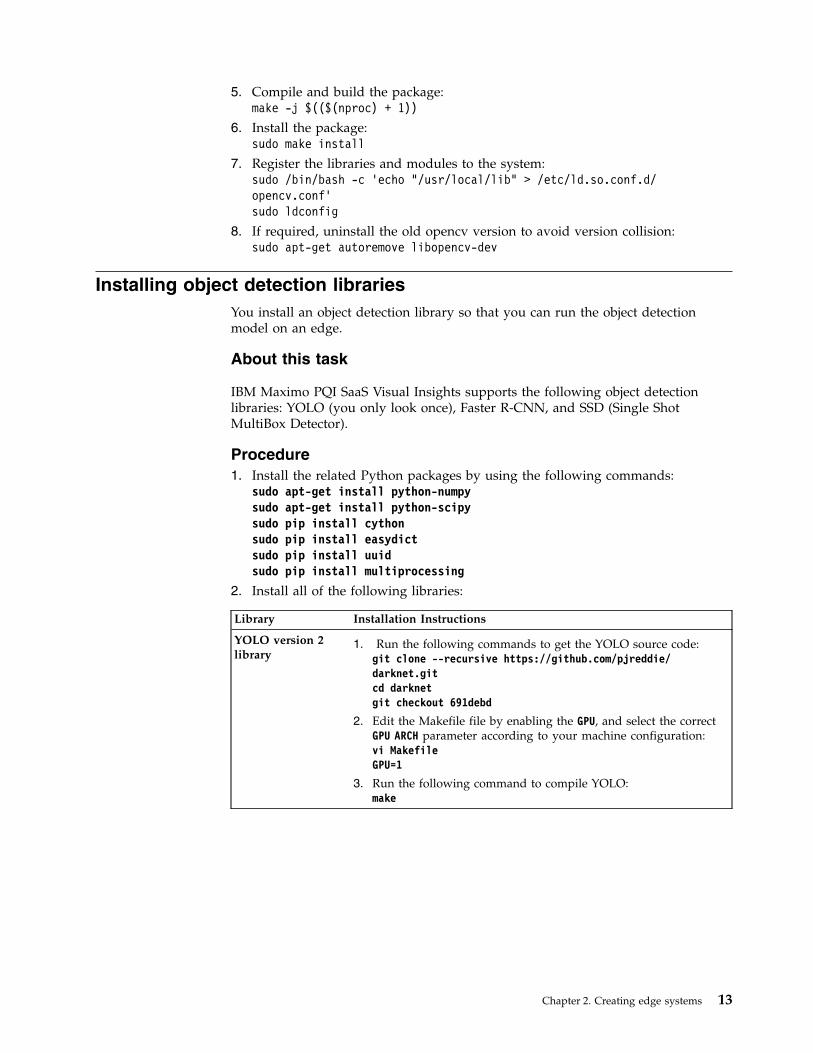
Installing object detection librariesYou install an object detection library so that you can run the object detectionmodel on an edge.
About this task
IBM Maximo PQI SaaS Visual Insights supports the following object detectionlibraries: YOLO (you only look once), Faster R-CNN, and SSD (Single ShotMultiBox Detector).
Procedure1. Install the related Python packages by using the following commands:
sudo apt-get install python-numpysudo apt-get install python-scipysudo pip install cythonsudo pip install easydictsudo pip install uuidsudo pip install multiprocessing
2. Install all of the following libraries:
Library Installation Instructions
YOLO version 2library
1. Run the following commands to get the YOLO source code:git clone --recursive https://github.com/pjreddie/darknet.gitcd darknetgit checkout 691debd
2. Edit the Makefile file by enabling the GPU, and select the correctGPU ARCH parameter according to your machine configuration:vi MakefileGPU=1
3. Run the following command to compile YOLO:make
Chapter 2. Creating edge systems 13
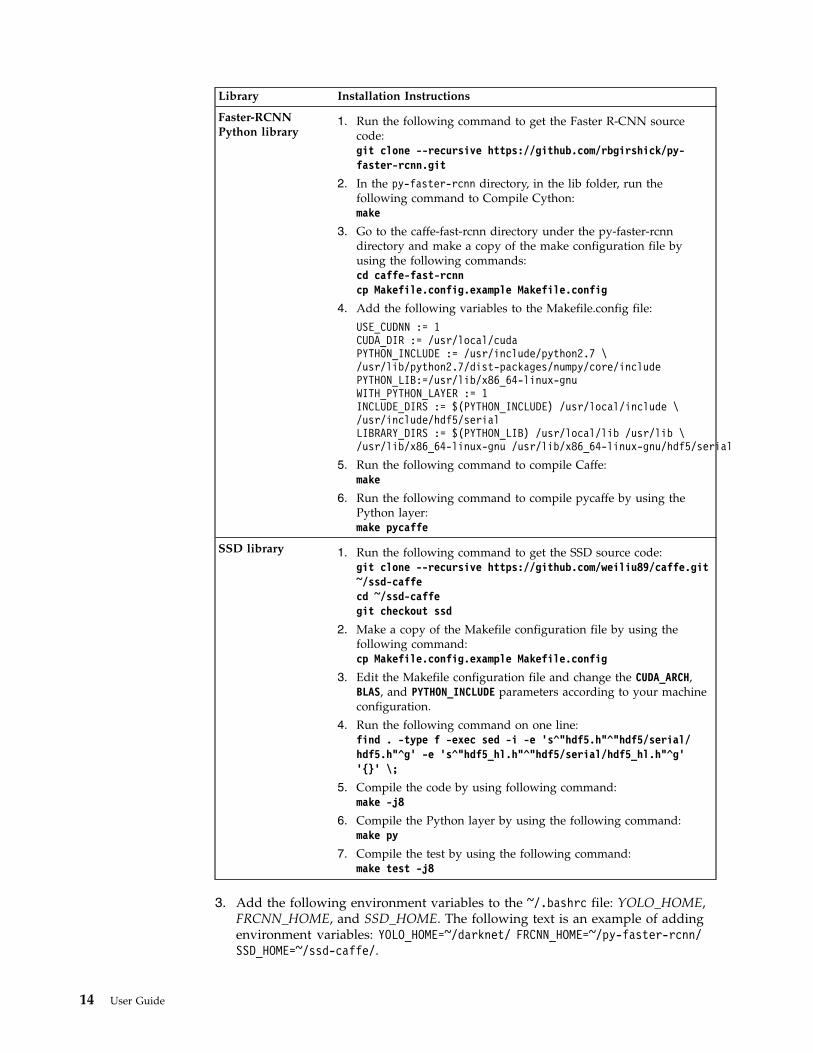
Library Installation Instructions
Faster-RCNNPython library
1. Run the following command to get the Faster R-CNN sourcecode:git clone --recursive https://github.com/rbgirshick/py-faster-rcnn.git
2. In the py-faster-rcnn directory, in the lib folder, run thefollowing command to Compile Cython:make
3. Go to the caffe-fast-rcnn directory under the py-faster-rcnndirectory and make a copy of the make configuration file byusing the following commands:cd caffe-fast-rcnncp Makefile.config.example Makefile.config
4. Add the following variables to the Makefile.config file:
USE_CUDNN := 1CUDA_DIR := /usr/local/cudaPYTHON_INCLUDE := /usr/include/python2.7 \/usr/lib/python2.7/dist-packages/numpy/core/includePYTHON_LIB:=/usr/lib/x86_64-linux-gnuWITH_PYTHON_LAYER := 1INCLUDE_DIRS := $(PYTHON_INCLUDE) /usr/local/include \/usr/include/hdf5/serialLIBRARY_DIRS := $(PYTHON_LIB) /usr/local/lib /usr/lib \/usr/lib/x86_64-linux-gnu /usr/lib/x86_64-linux-gnu/hdf5/serial
5. Run the following command to compile Caffe:make
6. Run the following command to compile pycaffe by using thePython layer:make pycaffe
SSD library 1. Run the following command to get the SSD source code:git clone --recursive https://github.com/weiliu89/caffe.git~/ssd-caffecd ~/ssd-caffegit checkout ssd
2. Make a copy of the Makefile configuration file by using thefollowing command:cp Makefile.config.example Makefile.config
3. Edit the Makefile configuration file and change the CUDA_ARCH,BLAS, and PYTHON_INCLUDE parameters according to your machineconfiguration.
4. Run the following command on one line:find . -type f -exec sed -i -e 's^"hdf5.h"^"hdf5/serial/hdf5.h"^g' -e 's^"hdf5_hl.h"^"hdf5/serial/hdf5_hl.h"^g''{}' \;
5. Compile the code by using following command:make -j8
6. Compile the Python layer by using the following command:make py
7. Compile the test by using the following command:make test -j8
3. Add the following environment variables to the ~/.bashrc file: YOLO_HOME,FRCNN_HOME, and SSD_HOME. The following text is an example of addingenvironment variables: YOLO_HOME=~/darknet/ FRCNN_HOME=~/py-faster-rcnn/SSD_HOME=~/ssd-caffe/.
14 User Guide

Troubleshooting the Faster-RCNN Python library installationIf an error message displays when you install the Faster-RCNN Python library, youcan take steps to try to resolve the problem.
Symptoms
When you install the Faster-RCNN Python library, the following cudnn compileerror displays:CXX src/caffe/layers/hdf5_data_layer.cpp./include/caffe/util/cudnn.hpp: In function ’const char* cudnnGetErrorString(cudnnStatus_t)’:./include/caffe/util/cudnn.hpp:21:10: warning: enumeration value ’CUDNN_STATUS_RUNTIME_PREREQUISITE_MISSING’ not handled in switch./include/caffe/util/cudnn.hpp:15:28: note: in definition of macro ’CUDNN_CHECK’
cudnnStatus_t status = condition;Makefile:563: recipe for target ’.build_release/src/caffe/layers/hdf5_data_layer.o’ failedmake: *** [.build_release/src/caffe/layers/hdf5_data_layer.o] Error 1
On Power9 systems with CUDA 10, the following cudnn compile error displays:./include/caffe/util/cudnn.hpp:127:41: error: too few arguments to function’cudnnStatus_t cudnnSetPooling2dDescriptor(cudnnPoolingDescriptor_t, cudnnPoolingMode_t,cudnnNanPropagation_t, int, int, int, int, int, int)’ pad_h, pad_w, stride_h, stride_w));^./include/caffe/util/cudnn.hpp:15:28: note: in definition of macro ’CUDNN_CHECK’cudnnStatus_t status = condition; \ ^In file included from ./include/caffe/util/cudnn.hpp:5:0, from ./include/caffe/util/device_alternate.hpp:40, from ./include/caffe/common.hpp:19, from ./include/caffe/blob.hpp:8, from src/caffe/blob.cpp:4:/usr/local/cuda/include/cudnn.h:991:1: note: declared here cudnnSetPooling2dDescriptor(cudnnPoolingDescriptor_t poolingDesc, ^
Resolving the problem
To fix the error, find your Caffe installation and run the following commands:cp -rf ~/caffe-1.0/include/caffe/util/cudnn.hpp ~/py-faster-rcnn/caffe-fast-rcnn/include/caffe/util/cp -rf ~/caffe-1.0/src/caffe/layers/cudnn_* ~/py-faster-rcnn/caffe-fast-rcnn/src/caffe/layers/cp -rf ~/caffe-1.0/include/caffe/layers/cudnn_* ~/py-faster-rcnn/caffe-fast-rcnn/include/caffe/layers/
For Power9 systems with CUDA 10, edit the Makefile.config file by using thefollowing command:vim ~/py-faster-rcnn/caffe-fast-rcnn/Makefile.configChange the CUDA_ARCH value as follows:CUDA_ARCH := -gencode arch=compute_30,code=sm_30 \
-gencode arch=compute_35,code=sm_35 \-gencode arch=compute_50,code=sm_50 \-gencode arch=compute_50,code=compute_50
Configuring the image serverYou configure the image server on the master edge machine so that the masteredge machine can store images that are captured by an industrial camera. Theimage server is monitored by the edge controller. When a new image is added, it isscored and the inspection result is sent to the center application so that aninspector can evaluate the image and the inspection results.
Procedure1. Install and start the NFS service on the master edge system by using the
following command:
Chapter 2. Creating edge systems 15
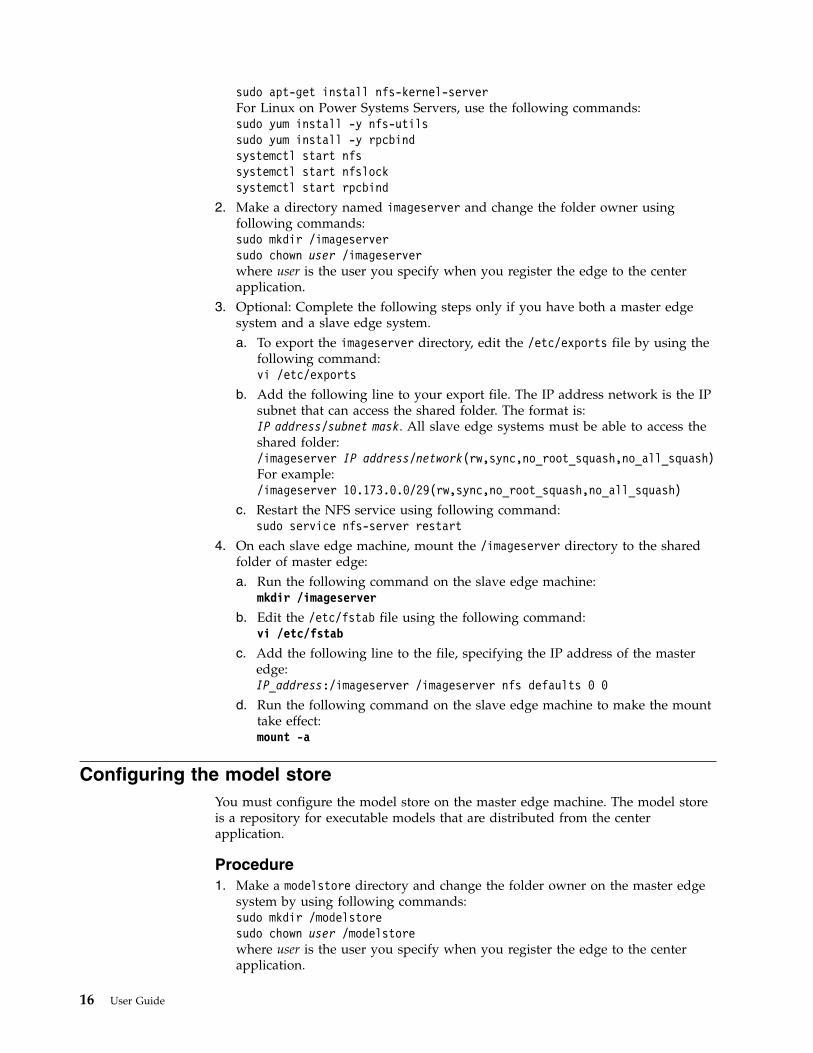
sudo apt-get install nfs-kernel-serverFor Linux on Power Systems Servers, use the following commands:sudo yum install -y nfs-utilssudo yum install -y rpcbindsystemctl start nfssystemctl start nfslocksystemctl start rpcbind
2. Make a directory named imageserver and change the folder owner usingfollowing commands:sudo mkdir /imageserversudo chown user /imageserverwhere user is the user you specify when you register the edge to the centerapplication.
3. Optional: Complete the following steps only if you have both a master edgesystem and a slave edge system.a. To export the imageserver directory, edit the /etc/exports file by using the
following command:vi /etc/exports
b. Add the following line to your export file. The IP address network is the IPsubnet that can access the shared folder. The format is:IP address/subnet mask. All slave edge systems must be able to access theshared folder:/imageserver IP address/network(rw,sync,no_root_squash,no_all_squash)For example:/imageserver 10.173.0.0/29(rw,sync,no_root_squash,no_all_squash)
c. Restart the NFS service using following command:sudo service nfs-server restart
4. On each slave edge machine, mount the /imageserver directory to the sharedfolder of master edge:a. Run the following command on the slave edge machine:
mkdir /imageserver
b. Edit the /etc/fstab file using the following command:vi /etc/fstab
c. Add the following line to the file, specifying the IP address of the masteredge:IP_address:/imageserver /imageserver nfs defaults 0 0
d. Run the following command on the slave edge machine to make the mounttake effect:mount -a
Configuring the model storeYou must configure the model store on the master edge machine. The model storeis a repository for executable models that are distributed from the centerapplication.
Procedure1. Make a modelstore directory and change the folder owner on the master edge
system by using following commands:sudo mkdir /modelstoresudo chown user /modelstorewhere user is the user you specify when you register the edge to the centerapplication.
16 User Guide
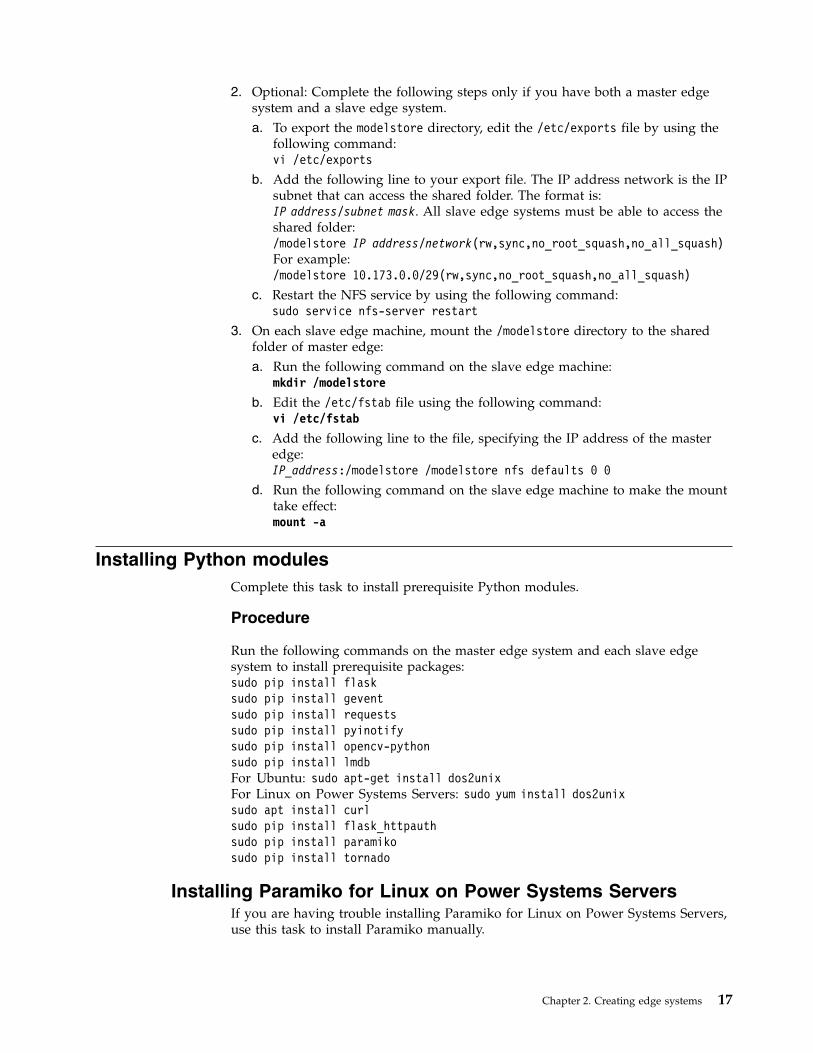
2. Optional: Complete the following steps only if you have both a master edgesystem and a slave edge system.a. To export the modelstore directory, edit the /etc/exports file by using the
following command:vi /etc/exports
b. Add the following line to your export file. The IP address network is the IPsubnet that can access the shared folder. The format is:IP address/subnet mask. All slave edge systems must be able to access theshared folder:/modelstore IP address/network(rw,sync,no_root_squash,no_all_squash)For example:/modelstore 10.173.0.0/29(rw,sync,no_root_squash,no_all_squash)
c. Restart the NFS service by using the following command:sudo service nfs-server restart
3. On each slave edge machine, mount the /modelstore directory to the sharedfolder of master edge:a. Run the following command on the slave edge machine:
mkdir /modelstore
b. Edit the /etc/fstab file using the following command:vi /etc/fstab
c. Add the following line to the file, specifying the IP address of the masteredge:IP_address:/modelstore /modelstore nfs defaults 0 0
d. Run the following command on the slave edge machine to make the mounttake effect:mount -a
Installing Python modulesComplete this task to install prerequisite Python modules.
Procedure
Run the following commands on the master edge system and each slave edgesystem to install prerequisite packages:sudo pip install flasksudo pip install geventsudo pip install requestssudo pip install pyinotifysudo pip install opencv-pythonsudo pip install lmdbFor Ubuntu: sudo apt-get install dos2unixFor Linux on Power Systems Servers: sudo yum install dos2unixsudo apt install curlsudo pip install flask_httpauthsudo pip install paramikosudo pip install tornado
Installing Paramiko for Linux on Power Systems ServersIf you are having trouble installing Paramiko for Linux on Power Systems Servers,use this task to install Paramiko manually.
Chapter 2. Creating edge systems 17

Procedure1. Put the rhel-75-server.repo to /etc/yum.repos.d2. Run the following command:
sudo yum install redhat-rpm-config gcc libffi-devel python-developenssl-devel
3. Run the following command:pip install cryptography --no-binary cryptography
4. Run the following command:sudo pip install bcrypt
5. Run the following command:sudo pip install pynacl
6. Run the following command:sudo pip install paramiko
Registering the edge to the center applicationYou must register edges to the center application. The procedure is different forconnected and stand-alone edges.
There are two types of edges: connected edge and stand-alone edge. The connectededge has a public IP address that enables the center application to connect with theedge directly. The edge sends inspection results to the center application in realtime. The stand-alone edge has no public IP, and sometimes it cannot connect tothe center application. The inspection result must be stored locally on thestand-alone edge, and the edge administrator must call the edge service explicitlyto communicate with the center application when the edge connects to the internet.
Registering a connected edge to the center applicationAfter you configure the connected edge system, you must register it in the centerapplication. You can create an edge or edit an existing one. Edges are used to run ascoring model.
Procedure1. In the Model Manager, select Data > Edges.2. Select Create new edge and input the edge name.3. Input the IP address, the SSH user name, and the password of the edge system,
and specify the edge type as Master or Slave. The IP address must beaccessible to the center application. The SSH user name and password are usedto log in the edge system to deploy the edge controller.
4. If you are creating a master edge, specify connected for connection mode. Ifyou are creating a slave edge, specify the corresponding master edge.
5. If you selected connection mode, select Next and specify the delete policy.6. Select Create to create the edge. The edge controller and score engine deploy to
the edge system, and the edge is added into the registered list.
Registering a stand-alone edge to the center applicationAfter you configure a stand-alone edge system, you must register it in the centerapplication. You can create an edge or edit an existing one. Edges are used to run ascoring model.
18 User Guide
About this task
A stand-alone edge enables you to perform some functions of the product whenyou are disconnected from the center application, such as scoring images in theproduction line, syncing data to the center, and cleaning uploaded data. To install astand-alone edge, you must install PostgreSQL and the required Python modules.You must also install the edge on the edge system manually.
Procedure1. In the Model Manager, select Data > Edges.2. Select Create new edge and input the edge name.3. Input the IP address, the SSH user name, and the password of the edge system,
and specify the edge type as Master or Slave. The IP address must beaccessible to the center application. The SSH user name and password are usedto log in the edge system to deploy the edge controller.
4. If you are creating a master edge, specify standalone for connection mode.5. If you selected connection mode, select Next and specify the delete policy.6. Select Create to create the edge. For a stand-alone edge, the edge administrator
must perform an SSH login to the edge system and install the edge manually.For more information, refer to the Installing a stand-alone edge topic.
Installing a stand-alone edgeA stand-alone edge enables you to perform some functions of the product whenyou are disconnected from the center, such as scoring images in the productionline, syncing data to the center, and cleaning uploaded data. To install astand-alone edge, you must install PostgreSQL and the required python module.You must also install the edge onto the edge machine manually.
To create a stand-alone edge, you must choose the stand-alone connection modewhen creating the edge.
You must create the stand-alone edge on the same system as the master edge.
Installing PostgreSQL for UbuntuUse this task to install PostgreSQL for Ubuntu systems. The stand-alone edge usesa PostgreSQL database.
Procedure1. Install PostgreSQL, PHPPgadmin and Apache2 by using the following
command:sudo apt-get -y install postgresql postgresql-contrib phppgadmin
2. Configure the PostgreSQL user.a. Log in as the PostgreSQL user by using the following commands:
sudo susu - postgrespsql
b. Configure the password for user postgres by using the followingcommands:password postgrespassword\q
3. Configure Apache2 by editing the nano phppgadmin.conf file:cd /etc/apache2/conf-available/
Chapter 2. Creating edge systems 19
nano phppgadmin.confDelete the following line: Require local. Add the following line to the file:Require all granted
4. Configure the PHPPgadmin by editing the config.inc.php file:cd /etc/phppgadmin/nano config.inc.phpFind the following line in the file:$conf[’extra_login_security’] = trueChange true to false.
5. Restart PostreSQL and Apache2 by using the following commands:systemctl restart postgresqlsystemctl restart apache2
6. Verify that you can access the user interface on the stand-alone edge byaccessing the following URL:http://standalone_edge_IP/phppgadminwhere standalone_edge_IP is the IP address of the stand-alone edge.
7. Create the database schema in PostgreSQL.a. Run the following command on the SQL console on PHPPgadmin:
create database edge with owner postgres encoding='UTF-8'lc_collate='en_US.utf8' lc_ctype='en_US.utf8' template template0;
b. In the database, create the following tables:CREATE TABLE vi_tenant_inspectionresult(id text, info jsonb);CREATE TABLE vi_tenant_notification(id text, info jsonb);CREATE TABLE vi_tenant_defectsummary(id text, info jsonb);CREATE TABLE vi_tenant_uploaddataset(id text, info jsonb);CREATE TABLE vi_tenant_syncprocess(id text, info jsonb);CREATE TABLE vi_tenant_model(id text, info jsonb);CREATE TABLE vi_tenant_datagroup(id text, info jsonb);where tenant is the tenant for the operation user in the Maximo PQI SaaSVisual Insights center. Get the tenant value from the user profile in the userinterface for the center application.
Installing PostgreSQL for Linux on Power Systems ServersUse this task to install PostgreSQL for Linux on Power Systems Servers. Thestand-alone edge uses a PostgreSQL database.
Procedure1. su to root by using the following command:
sudo su
2. Download the source for PostgreSQL:wget https://ftp.postgresql.org/pub/source/v9.5.13/postgresql-9.5.13.tar.gz
3. Install PostgreSQL by using the following commands:tar -zxvf postgresql-9.5.13.tar.gzcd postgresql-9.5.13/yum -y install readline-devel./configure --prefix=/usr/local/postgresqlmakemake install
4. Create user postgres and change owner for the postgres directory:useradd postgreschown -R postgres:postgres /usr/local/postgresql/
20 User Guide
5. Change to user postgres:su postgres
6. Configure the system path for postgres:vi ~/.bashrcPGHOME=/usr/local/postgresqlexport PGHOMEPGDATA=/usr/local/postgresql/dataexport PGDATAPATH=$PATH:$HOME/.local/bin:$HOME/bin:$PGHOME/binexport PATH
7. Source the configuration:source ~/.bashrc
8. Initialize the PostgreSQL database:initdb
9. Configure the database. Open postgresql.conf in vi:vi /usr/local/postgresql/data/postgresql.confChange:#listen_address=’localhost’#port = 5432
to:listen_address=’*’port = 5432
Open the pg_hba.conf file in vi:vi /usr/local/postgresql/data/pg_hba.confAdd the following line to the file:host all all 0.0.0.0/0 trust
10. Restart postgresql:pg_ctl -D /usr/local/postgresql/data -l logfile restart
11. Change the password for user postgres in the PostgreSQL database:psqlALTER USER postgres WITH PASSWORD 'password';\qIf the postgresql service is not started, run the following commands:su postgresvi ~/.bashrcAdd /usr/local/pgsql/bin/ to the file:export PATH=/usr/local/cuda-8.0/bin:$PATH:/usr/local/pgsql/bin/Run the following command:source ~/.bashrc
12. Create the database schema in PostgreSQL. Run the following command onthe psql console:create database edge with owner postgres encoding='UTF-8'lc_collate='en_US.utf8' lc_ctype='en_US.utf8' template template0;In the database, create the following tables:CREATE TABLE vi_tenant_inspectionresult(id text, info jsonb);CREATE TABLE vi_tenant_notification(id text, info jsonb);CREATE TABLE vi_tenant_defectsummary(id text, info jsonb);CREATE TABLE vi_tenant_uploaddataset(id text, info jsonb);CREATE TABLE vi_tenant_syncprocess(id text, info jsonb);CREATE TABLE vi_tenant_model(id text, info jsonb);CREATE TABLE vi_tenant_datagroup(id text, info jsonb);
Chapter 2. Creating edge systems 21
where tenant is the tenant for the operation user in the Maximo PQI SaaSVisual Insights center. You can get the tenant value from the user profile in theuser interface for the center application.
Installing Python modulesTo create a stand-alone edge, you must install the required Python module.
Procedure
Install the Python module by using the following commands:sudo apt-get updatesudo apt -y install postgresqlsudo apt -y install libpq-devsudo pip install PyGreSQLsudo pip install DBUtils
Installing the stand-alone edgeFor the stand-alone edge, you must install the edge onto the edge machinemanually.
Downloading the build file and installation script:
You must download the stand-alone edge build file and installation script to installa stand-alone edge.
Procedure
1. In the Maximo PQI SaaS Visual Insights application, select Data > Edges. Selectthe master edge and view the edge details.
2. Select and download the build file for the required operating system. Thefollowing operating systems are supported: Ubuntu, Red Hat Enterprise Linux,and IBM Power System.
3. Select and download the installation shell script file.
Installing the build file on the stand-alone edge:
To install the edge system on the edge machine, you must use an SSH user nameand perform an SSH login to the edge machine.
Procedure
1. After the SSH login, switch the working directory to the deployment path ofthe edge creation dialog.
2. Add with execution permission to the shell script file using the followingcommand:chmod +x ./edgeDeployed.sh
3. Run the shell script file to install the stand-alone edge. Use the followingcommand:./edgeDeployed.sh
4. Update the deploy_path/vi_edge-bin_vi/vi_edge/postgres/DBConfig.json filewith your PostgreSQL information to correct the database connection. Then runthe following commands to restart the edge:cd deploy-path/vi_edge-bin_vi/vi_edge/./restartController.sh
22 User Guide
Checking the status of services on the edge systemsAfter you register the edge to the center application, verify that the correct Pythonprocesses are running on the edge systems.
Procedure1. After the edge is installed on the edge system, perform an SSH login to the
edge system.2. On the master edge system, run the following command to look for the Python
process for the master engine:ps aux | grep pythonThe result should include the following Python process:python deployment_folder/vi_edge-bin_vi/vi_task_manager/run.py.If you do not find the Python process on the master edge system, check the logfiles at deployment_folder/vi_edge-bin_vi/vi_task_manager/master.log.Try to start the master engine by running the following command:deployment_folder/vi_edge-bin_vi/vi_task_manager/restartMaster.shIP_of_master_node
3. On the master edge system, run the following command to look for the Pythonprocess for the edge controller:ps aux | grep pythonThe result should include the following Python processes:python deployment_folder/vi_edge-bin_vi/vi_edge/runMonitor.pypython deployment_folder/vi_edge-bin_vi/vi_edge/runService.py.If you do not find the runMonitor Python process on the master edge system,check the log files at deployment_folder/vi_edge-bin_vi/vi_edge/Event.log.If you do not find the runService Python process on the master edge system,check the log files at deployment_folder/vi_edge-bin_vi/vi_edge/Service.log.Try to start the edge controller by running the following command:deployment_folder/vi_edge-bin_vi/vi_edge/restartController.sh
4. Run the following command on the master edge system and the slave edgesystems to look for Python processes for the score engine of the classificationmodel:ps aux | grep pythonThe result should include the following Python processes:python deployment_folder/vi_edge-bin_vi/vi_score_engine_restful/front_run.py 5005 6005python deployment_folder/vi_edge-bin_vi/vi_score_engine_restful/back_run.py 6005If you do not find the Python process on the edge systems, check the log files:deployment_folder/vi_edge-bin_vi/vi_score_engine_restful/front_log.txtdeployment_folder/vi_edge-bin_vi/vi_score_engine_restful/back_log.txtAfter you resolve any issues, the master engine should start the score engineautomatically. To start the score engine manually, run the following commands:source ~/.bashrcdeployment_folder/vi_edge-bin_vi/vi_score_engine_restful/restartEngine.sh
5. Run the following command on the master edge system and the slave edgesystems to look for the Python process for the score engine of the objectdetection model:ps aux | grep pythonThe result should include the following Python processes:python deployment_folder/vi_edge-bin_vi/vi_obj_detection/RESTAPI/model/run.py port gpuid FRCNNpython deployment_folder/vi_edge-bin_vi/vi_obj_detection/RESTAPI/model/
Chapter 2. Creating edge systems 23
run.py port gpuid SSDIf you do not find the Python processes on the edge systems, check thefollowing log files:deployment_folder/vi_edge-bin_vi/vi_obj_detection/RESTAPI/model/FRCNN_gpuid.logdeployment_folder/vi_edge-bin_vi/vi_obj_detection/RESTAPI/model/SSD_gpuid.logIf you see a "No module named iotmyolo" error message, copy the iotmyolo.soor iotmyolo.py file from the /home/user/vi_edge-bin_vi/vi_obj_detection/model_library/yolo directory to the YOLO_HOME directory.After you resolve any issues, the master engine should start the score engineautomatically.
6. Rebuild the YOLO library with the edge component:a. Go to the /home/user/vi_edge-bin_vi/vi_obj_detection/model_library/
yolo directory.b. Add the detectorobj.c file to the darknet/examples folder.c. Edit the darknet/Makefile file and indicate that EXECOBJA=detectorobj.o.
The following code is an example of the code in the Makefile file:EXECOBJA=detectorobj.o captcha.o lsd.o super.o voxel.o art.o tag.o cifar.o go.o rnn.ornn_vid.o compare.o segmenter.o regressor.o classifier.o coco.o dice.o yolo.odetector.o writing.o nightmare.o swag.o darknet.o
d. In the Makefile file, add $(EXECOBJ) for the $(SLIB) and $(ALIB) objects.The following code is an example of the code in the Makefile file:$(ALIB): $(EXECOBJ) $(OBJS)
$(AR) $(ARFLAGS) $@ $^$(SLIB): $(EXECOBJ) $(OBJS)
$(CC) $(CFLAGS) -shared $^ -o $@ $(LDFLAGS)
e. Run the following command:make
Upgrading edge systemsUpgrade your edges if they are at an older version. You can download the edgebuild file and installation script to upgrade the edge.
About this task
If you upgrade the Maximo PQI SaaS Visual Insights center application but do notupgrade the edge, this causes an inconsistency between the center and edge, andmodels might fail to deploy. You might see an error message similar to thefollowing: "The edge needs to be upgraded before deploying new model."
Procedure1. Run the following command to get the ID of the edge:
/ibm/iotm/vi/service/edge?user=xxx&solution=vi
2. For the installation shell script, call the following service:/ibm/iotm/vi/service/edgeFile?edgeId=xxx&version=shell&user=xxx&solution=viReplace edgeId=xxx with the edge ID you got from the previous step. Save thefile as edgeDeployed.sh. Here is a sample command:curl -k -H "apikey:yourapikey" "https://iotm.predictivesolutionsapps.ibmcloud.com/ibm/iotm/vi/service/edgeFile?edgeId=1508123458000&version=shell&user=youruser&solution=vi" > edgeDeployed.sh
24 User Guide
3. Check the edgeDeployed.sh file. Check the values for username, which is theSSH user that is used to start the edge services, password, which is thepassword of the SSH user, and basefolder, which is the deployment path ofedge services. Input the value for <to edit>.
4. For the edge build file, call the following service:/ibm/iotm/vi/service/edgeFile?edgeId=xxx&version=xxx&user=xxx&solution=viwhere version is ubuntu, redhat, or power depending on the system. Save thefile as vi_edge-bin_vi.zip. Here is a sample command:curl -k -H "apikey:yourapikey" -o vi_edge-bin_vi.zip"https://iotm.predictivesolutionsapps.ibmcloud.com/ibm/iotm/vi/service/edgeFile?edgeId=1508123458000&version=ubuntu&user=youruser&solution=vi"
5. Put the edgeDeployed.sh and vi_edge-bin_vi.zip files on the edge system.6. Log in to the edge as the SSH user that was used when creating the edge in
the center application.7. Put the edgeDeployed.sh and vi_edge-bin_vi.zip files in the deployPath
directory.8. Shut down the current edge service.9. Run the following commands:
dos2unix edgeDeployed.shchmod +x edgeDeployed.sh./edgeDeployed.sh
10. Check to see whether the Python service for the edge has started.Related tasks:“Checking the status of services on the edge systems” on page 23After you register the edge to the center application, verify that the correct Pythonprocesses are running on the edge systems.
Chapter 2. Creating edge systems 25

26 User Guide
Chapter 3. Creating and using models
You create models to collect historical images and defect information. Theinformation is used to train the model. After the model is trained, it must bevalidated before it is deployed to an edge. Validating the model provides modelaccuracy information. There can be multiple versions of a model. Models can sharedefect information but have different image files from different product lines. Youcan retrain a model to attempt to get a higher model accuracy so that the modelversion can be replaced with a newer model version. There are two types ofmodels implementations: the classification model and the object detection model.
Structure of compressed image filesBefore you add historical images for image groups, you must have files thatcontain the image files that you need for either the classification model or theobject detection model.
Classification model
Add the images into compressed files. One compressed file must contain all of theimages that belong to the same image group. You must put all of the images in aflat structure with no subfolders in the compressed file. The following image typesare supported: PNG, JPEG, and JPG. Image files must all have uppercase fileextensions, for example, PNG, JPEG, JPG, or they all must have lowercase fileextensions, for example, png, jpeg, jpg.
Object detection model
The structure for the object detection model must contain two folders in onecompressed file. One folder must be named JPEGImages and the other must benamed Annotations. In addition to the two folders, the compressed file must alsocontain a labels.txt file.
Add all of the image files to the JPEGImages folder. The following image types aresupported: PNG, JPEG, and JPG. Image files must all have uppercase fileextensions, for example, PNG, JPEG, JPG, or they all must have lowercase fileextensions, for example, png, jpeg, jpg. Add all of the annotations files to theAnnotations folder. An annotation file must have the same file name as its imagefile. The files must be in XML format. If you use the image labeling tool inMaximo PQI SaaS Visual Insights, the output is a compressed image file thatcontains the images file and the annotation file. If you use an external imagelabeling tool, you must make sure that the images file and the annotation file arein the expected structure. The following information is an example of anannotation file:<annotation>
<folder>JPEGImages</folder><filename>000001.jpg</filename><source><database>Unknown</database>
</source><size><width>864</width><height>1296</height><depth>3</depth>
© Copyright IBM Corp. 2017, 2019 27

</size><segmented>0</segmented><object><name>defect1</name><pose>Unspecified</pose><truncated>0</truncated><difficult>0</difficult><bndbox>
<xmin>474</xmin><ymin>368</ymin><xmax>540</xmax><ymax>448</ymax>
</bndbox></object><object><name>defect2</name><pose>Unspecified</pose><truncated>0</truncated><difficult>0</difficult><bndbox>
<xmin>303</xmin><ymin>387</ymin><xmax>369</xmax><ymax>452</ymax>
</bndbox></object>
</annotation>
The labels.txt file contains the names of all of the defects types that are in theannotation folder. Each defect must be on a separate line, as shown in thefollowing example:defect1defect2defect3
Adding historical images for image groupsThe model manager uses historical images to train the model.
Procedure1. Select Data > Image groups > New Image Group. Select New unlabeled
image group if you want to use the image labeling tool in Maximo PQI SaaSVisual Insights to label the images. Select New labeled image group if theimages were already labeled by an external tool.
2. Add a unique image group name and description, select the image group type,and select Next.For the image group type:v Single characteristics means that the images in the group belong to one
defect type. Single characteristic uses the classification model.v Not a defect means single characteristics where the images in the group do
not have a defect. Not a defect uses the classification model.v Multiple characteristics means that the images each contain one or more
defects that can belong to the same or different defect types. Multiplecharacteristic uses the object detection model.
Note: After the image set is uploaded, the image group type that you selectcannot be changed.
3. In the Image sets pane, add images and select Add Image Group.
28 User Guide
Results
In the Image groups pane, you can select an image group and select edit. You canadd or delete the image sets, update the image group name or description, orchange the image group type.
Note: If the image set is cited in a model instance, the image set cannot be deleted.
Image labeling tool
The image labeling tool can be used to semi-automatically label images. You canupload unlabeled image files, manually label some of the images, and then triggerthe automatic labeling to label the unlabeled images. You can check the result ofthe automatic labeling. Based on the summary information, you can accept thelabeling result. Images are labeled and packaged to corresponding image zip filesand automatically attached to image groups so that they can be used in the modeltraining process.
Creating an unlabeled image groupYou can upload a file that contains unlabeled images to create a new unlabeledimage group.
About this task
When creating an unlabeled image group, you can use a compressed (.zip) file thatcontains no labeled images or a compressed file that contains both labeled andunlabeled images. For single characteristics files, any labeled images need to becontained in a subfolder where the name of the folder is the defect name. Formultiple characteristics files, the labeled image file must have a correspondingannotation XML file in the same folder.
Procedure1. Select Data > New Image Group > New Unlabeled Image Group.2. In the New Unlabeled Image Group dialog box, specify a name for the image
group.3. Specify the image group type:v Single characteristics means the images in the group have only one defect
type.v Multiple characteristics means the images in the group contain one or more
defect types.4. Click the upload link to upload a compressed file that contains unlabeled
images.5. Click Add Image Group to create the new unlabeled image group.6. In the Sampling rules dialog box, set the ratio of images to be manually labeled
and then click Confirm.
Results
After you complete this task, you can begin to manually label the sample images.
Manually labeling sample imagesYou can manually label images that are contained in an unlabeled image group.
Chapter 3. Creating and using models 29
Procedure1. In the All Unlabeled Image Groups window, click View next to the group that
contains the images that you want to label.2. Click the sampling rules icon to set the sampling rate, which indicates the
number of images that you want to manually label. Click Confirm.3. For each sample image, manually label the image by selecting the
corresponding label and then save the image. You can choose existing labels orcreate new labels. For single characteristics groups, one label corresponds toone data group. For multiple characteristics groups, one data group with samegroup name is created. All labels used in the images in the unlabeled group aresaved as tags in the corresponding data group.
4. After all sample images are labeled, you can click Run auto-label to start theautomatic labeling process.
Automatically labeling sample imagesMaximo PQI SaaS Visual Insights uses convolutional neural network-based deeplearning techniques to automatically label images.
Procedure1. In the All Unlabeled Image Groups window, click View next to the group that
contains the images that you want to label.2. Click Run auto-label to start the automatic labeling process. You can click
Running in the background to run the automatic labeling process in thebackground.
3. After the automatic labeling process completes, click View to review the results.4. For each automatically labeled image, confirm or modify the label.5. If necessary, re-run the automatic labeling process.6. Click View summary to view label and model accuracy information.7. When you are satisfied with the model accuracy, click Accept. All labeled
images are saved as a labeled compressed file. You can find the file in the Datapane.
Model creationTo get good model accuracy, you need to set hyper parameters carefully based onyour image sets and selected model type.
When you create a model, you can choose the recommended model settings orchoose to customize them. The recommended model settings are not appropriatefor all scenarios. They are just one reference. You might need to customize themodel settings.
When you train a model, you need to choose the required image sets. Some imagesare used as training data sets and others are used as validation data sets. The ratiodepends on the training and validation sampling rule. By default, 80% of imagesare used for training and 20% of images are used for validation.
It is helpful to understand the following neural network terminology:
Epoch One epoch equals one full training cycle on all training images.
Batch sizeThe number of training examples in one pass. The higher the batch size,the more memory space you need.
30 User Guide
IterationThe number of iterations equals the number of passes, each pass usingbatch_size number of images.
For example, if you have 1000 training images and your batch size is 50, then ittakes 20 iterations to complete 1 epoch. If you set epoch to 10, then it takes 200iterations to complete the training.
If you select the classification model type, the batch size is predefined in thenetwork definition. For GoogLeNet, the train batch size is 32 and the test batchsize is 16. For AlexNet, the train batch size is 128 and the test batch size is 32. ForLeNet, the train batch size is 64 and the test batch size is 32. You can adjust hyperparameters based on the batch size, total image number, and sampling rule.
Creating modelsAfter the defect types are added, the model manager creates a model. The modelcan be saved as a draft or trained immediately.
About this task
You view the details of a model on the All Models tab. The model details includethe versions of the model. Different model versions are built by different imagesets.
Model names must be unique.
Procedure1. Select Create New Model > Create New Model.2. On the General tab, update the information.
The product type is used to map the model. You choose the product typeoutside of Maximo PQI SaaS Visual Insights based on your own companystandards. The product type is the link between the model and the productionline. The edge controller selects the model based on the product typeinformation that is on the image.
3. On the Model type tab, update the model type information. For Model type,you can specify classification or multi-object detection, or you can choose toupload an existing trained model. If you select classification or multi-objectdetection, you can select the recommended model settings or choose tocustomize them.If you choose to customize the model settings, specify the detection method,hyper parameters, and sampling rules. Each hyper parameter has a valid valuescope. If you enter a value outside of that scope, an error message displays.Due to resource limitations, there is a maximum value for epoch, iteration andbatch size. The maximum value of iteration is related to the payment type ofthe tenant. For paid users, the maximum value of iteration is 40,000 forFRCNN, 20,000 for YOLO, or 5,000 for SSD. For trial users, the maximum valueof iteration is 3,000 for FRCNN, 2,000 for YOLO, or 500 for SSD. The batch sizeof YOLO and SSD is 32. For CNN, the maximum epoch value is 30,000 for paidusers and 5,000 for trial users.If you upload an existing trained model compressed file, the model settingvalues are read from the file and displayed in the dialog box. If the epoch oriteration value and batch size exceed the maximum value, the values arereplaced with the maximum values.
Chapter 3. Creating and using models 31
4. On the Images sets tab, select the image sets that you want to use to train themodel.
5. On the Global Policies tab, set the retrain policy, sampling policy, and manualinspection policy settings.
6. On the Summary tab, select Save as draft to save the model, or Train to trainthe model.
7. In the All models pane, view the model. If the model version is set to Draft,you can click View to view the model instance details. You can edit the imagegroups before you train the model.
Using the model catalogThe model catalog is a library of shared models that can be reused for industrysolutions and shared by tenants.
The model catalog contains the following models.
Domain Model Name Description
Electronics - HardwareManufacturing
Server Hardware DefectInspection
This object detection modeldetects missing parts for IBMservers. It supports sevenmajor defects includingmissingChinLabel,missingPowerLabel,missingIBMLogo,missingDASD,incorrectDASD,missingCover, andmissingPowerButton.
Automotive - Car Wearout Car Wearout DefectInspection
This object detection modeldetects car wear outsituations. Automobilemanufacturers test tens ofthousands of open and closeactivities and detect whenwear out is at unacceptablelevel. This model is focusedon detecting paint scratches.
Automotive - Car Seat Car Seat Defect Inspection This object detection modeldetects wrinkle defects in carseats. The inspection resultidentifies whether there iswrinkle defect on a car seatand localizes the defect onthe image.
Testing models in the model catalogYou can test models in the model catalog by uploading your own image andchecking the scoring result. You can upload multiple images and check the scoringresult one by one.
Procedure1. Select Create New Model > Browse Model Catalog.2. On the Model Catalog page, select the shared model that you want to use.
32 User Guide
3. Click Upload more to upload an image. The model scores the image anddisplays the result.
Creating models by using the model catalogYou can create new models by using shared models in the model catalog. To use ashared model, import the model definition and use your own data sets to trainyour model.
Procedure1. Select Create New Model > Browse Model Catalog.2. On the Shared Models page, select the shared model that you want to use.3. Click Use Model.4. On the General tab, update the information. The product type is used to map
the model.5. On the Model type tab, update the model type and model setting information.6. On the Image sets tab, select the image sets that you want to use to train the
model.7. On the Global Policies tab, update the retrain policy and manual inspection
policy if needed.8. On the Summary tab, click Save as draft. The model status is set to Draft.
Training modelsMaximo PQI SaaS Visual Insights uses convolutional neural network-based deeplearning techniques to train models. When you train a model, the model learns thefeatures of labeled images and builds an executable model that embeds thisknowledge. A trained model is able to perform classification or object detection onimages from the product line.
About this task
You can train a newly created model or a model that was created using an existingmodel in the model catalog. You can train models in draft, failed, or rejected status.During training, you can inspect the training status and log files. After training iscompleted, you can check the training curve including the train loss, test loss, andtest accuracy values.
Procedure1. In the All Models pane, select a model.2. Click View to view the model instance details.3. Optional: Change the image groups that are used by the model.4. Click Train to start the training. The training status changes to Waiting as the
data is prepared and the training job is queued on the server. When trainingbegins, the status changes to Training. When training completes, the statuschanges to Trained.
5. After training is completed, review the training results in the Train dashboard.If the model supports snapshots, the snapshots are displayed in the dashboard.You can check the information for each snapshot. You can use a snapshot byselecting the snapshot and then clicking Use. You can select an intermediatesnapshot to use as the final model file. You can also view and download thetraining log files.
Chapter 3. Creating and using models 33
Trained modelsAfter a model is created or edited, the model manager can train the model. Afterthe model is trained, the model status changes to Trained. The model managervalidates the trained model and either accepts or rejects the model. The modelmanager validates the model by using validation image sets.
If the model manager chooses to upload the trained model when creating a newmodel, the model status changes to Accepted after the upload process.
Structure of model filesMaximo PQI SaaS Visual Insights supports the convolutional neural network(CNN) classification and object detection model types.
CNN classification modelsThe CNN classification model must be a single compressed file and contain thecorrect directory structure and files.
The compressed model file
The compressed model file must contain the following directories and files.v model.config (file, required)v sink.config (file, required)v parameter.config (file, optional)v cnet1 (directory). The cnet1 directory must contain the following files:
– labels.txt (file, required)– deploy.prototxt (file, required)– mean.binaryproto (file, required)– info.json (file, optional)– snapshot.caffemodel (file, required)– solver.prototxt (file, required)– train_val.prototxt (file, required)
Each file must have the correct structure and keywords. The files are described inthe following sections.
model.config
The following text is an example of the contents of the model.config file.Keywords are shown in bold text.submodel{
module {type:"ChipROIExtractor"ref_file:"parameter.config"
}module {
type:"ClassificationNet"net_name:"cnet1"
}}sink{
type:"SinkFilter"ref_file:"sink.config"
}
34 User Guide
This file must have at least one module that has the ClassificationNet type in thesubmodel. The ref_file keyword points to the other configuration files within theCNN classification model compressed file. The net_name keyword refers to thefolder name that contains the CNN model. You do not need to change the sinkinformation unless you have a different name for the sink.config file.
sink.config
The contents of the sink.config file are as follows. You do not need to edit thecontents.keyword:"position"keyword:"probableTypes"
labels.txt
The labels.txt file contains all the class names with which this classificationmodel is classified. Each class name must be on a separate line, as shown in thefollowing example.defect1defect2defect3
Other files
All filename.prototxt files are model definition files that are required when youtrain a CNN model.
The snapshot.caffemodel and mean.binaryproto files are output files that arecreated after the model training is complete.
Object detection modelThe object detection model must be a single compressed file and contain thecorrect directory structure and files. The following object detection algorithms aresupported: faster region-based convolutional neural network (Faster R-CNN), YouOnly Look Once (YOLO) V2, and single shot multibox detector (SSD).
Faster R-CNN:
The Faster R-CNN object detection model must be a single compressed file andcontain the correct directory structure and files.
Compressed model file
The compressed model file must contain all of the following files:v labels.txt
v faster_rcnn_final.caffemodel
v model.config
v stage1_fast_rcnn_solver30k40k.pt
v stage1_fast_rcnn_train.pt
v stage1_rpn_solver60k80k.pt
v stage1_rpn_train.pt
v stage2_fast_rcnn_solver30k40k.pt
v stage2_fast_rcnn_train.pt
v stage2_rpn_solver60k80k.pt
Chapter 3. Creating and using models 35
v stage2_rpn_train.pt
v faster_rcnn_test.pt
v rpn_test.pt
Each file must have the correct structure and keywords. The files are described inthe following sections.
labels.txt
The labels.txt file contains the names of all of the objects that this objectdetection model detects. Each object must be on a separate line, as shown in thefollowing example.defect1defect2defect3
faster_rcnn_final.caffemodel
This file contains the output after the Faster R-CNN model is trained. The filename must match the definition of model in model.config. Currently, two networksare supported for Faster R-CNN: ZF and VGG16. For ZF-net, the name shouldstart with ZF, for example ZF_mobile_final.caffemodel. For VGG16-net, the nameshould start with VGG16, for example, VGG16_mobile_final.caffemodel.
model.config
Keywords in the following example are shown in bold text:{
"modelType": "FRCNN","model": "faster_rcnn_final.caffemodel","solvers": "stage1_rpn_solver60k80k.pt,stage1_fast_rcnn_solver30k40k.pt,stage2_rpn_solver60k80k.pt,stage2_fast_rcnn_solver30k40k.pt","net_file": "stage1_rpn_train.pt,stage1_fast_rcnn_train.pt,stage2_rpn_train.pt,stage2_fast_rcnn_train.pt","deploy_net": "faster_rcnn_test.pt","parameters": {
"iteration": "40000,80000,40000,80000","learningRate": 0.001,"stepsize": "10000","gamma": "0.1"
}}
The value of modelType is always FRCNN. The value of model is the name of themodel file. The value of solvers is the list of solver files that are used during modeltraining. The value of net_file is the list of network definition files. The value ofdeploy_net is the name of the scoring network definition. The values in parametersare all hyper-parameters of the Faster R-CNN model. Iteration is a string valuecomposed of four numbers separated by commas, presenting the iteration numberof four phases in the training process.
*.pt files
The files with the .pt extension are model definition files. The pascol_voc modelthat is provided by Faster R-CNN is supported. The template file can be found inthe models/pascal_voc/netname/faster_rcnn_alt_opt/ Faster R-CNN installationdirectory, where netname is ZF or VGG16.
36 User Guide
YOLO V2:
The YOLO V2 object detection model must be a single compressed file and containthe correct directory structure and files.
Compressed model file
The compressed model file must contain the following files:v labels.txt
v model.config
v yolo_final.weights
v Yolo.cfg
Each file must have the correct structure and keywords. The files are described inthe following sections.
labels.txt
The labels.txt file contains the names of all of the objects that this objectdetection model detects. Each object must be on a separate line, as shown in thefollowing example.defect1defect2defect3
model.config
Keywords in the following example are shown in bold text:{
"modelType": "YOLO","modelCfg": "Yolo.cfg","model": "yolo_final.weights","parameters": {"iteration": "40000","batchSize": 16,"learningRate": 0.001,"subBatchSize": 2,"steps": "100,15000,25000,35000","scales": "1,10,0.1,0.1"}
}
The value of modelType is always YOLO. The value of modelCfg is the name ofthe deep learning network definition file. The value of model is the name of theactual model file. The values in parameters are hyper-parameters of the YOLO V2model. The value of batchSize in parameters cannot be larger than 32.
yolo_final.weights
This file contains the output after the YOLO model is trained. The file name mustmatch the definition of model in model.config.
Yolo.cfg
This model definition file includes network definitions, hyper-parameters, andanchor settings. A template of this file can be found in the darknet/cfg/ YOLOinstallation directory. This file must match the weights file.
Chapter 3. Creating and using models 37
SSD:
The SSD (Single Shot MultiBox Detector) object detection model must be a singlecompressed file and contain the correct directory structure and files.
Compressed model file
The compressed model file must contain all of the following files:v labels.txt
v solver.prototxt
v deploy.prototxt
v model.config
v SSD.caffemodel
Each file must have the correct structure and keywords. The files are described inthe following sections.
labels.txt
The labels.txt file contains the names of all of the objects that this objectdetection model detects. Each object must be on a separate line, as shown in thefollowing example.defect1defect2defect3
solver.prototxt
This file contains all hyper-parameters for the SSD model.
deploy.prototxt
This file contains the network definition of the trained model.
model.config
Keywords in the following example are shown in bold text:{"modelType": "SSD","parameters": {
"learningRate": 0.01,"iteration": 10000,"steps": "6000,8000","batchSize": 16,"learningRatePolicy": "multistep","display": 10,"snapshot": 1000
}}
The value of modelType is always SSD. The values in parameters arehyper-parameters of the SSD model.
SSD.caffemodel
This file contains the output after the SSD model is trained.
38 User Guide
Validated modelsAfter a model is trained, the status of the model changes to Trained. The modelmanager can validate the model version and either accept or reject the trainedmodel. The model manager validates the model by using validation image sets.After a model is validated, it can be used and deployed.
You can validate a model version that has a status of Trained. A trained orretrained model version can trigger the validation process. When you validate areport, you must manage the image sets. Every image group must have at leastone validation image set to validate the model. You must use different image setsand training image sets to validate the model version. To begin the validationprocess, select Validate.
After the validation process is finished, a report is generated that shows the modelaccuracy. You can create the following types of reports:
Classification model reportIn the classification model report, one image has one defect at most. Theconfusion matrix is used to generate the report where each columnrepresents one real image group type in the validation data sets. Each rowrepresents the predicted image group type. The last row in the chartrepresents the aggregate results.
Object detection model reportIn the object detection model report, one image has multiple defects. Inthis report, the mean average precision and the recall are calculated toindicate the model accuracy.
To view the report, select Show Report. From the Validation Report window, youcan revalidate, reject, or accept and deploy the model.
If the first model version is rejected, you can change the training parameters andthen retrain the model. If a model version that is not the first version is rejected,you can retrain a new model version by using new image sets.
Distributing trained models to edgesAfter the model manager accepts the trained model version, the model isdistributed to edges so that it can be inspected.
Procedure1. Select a model version with a status of Validated. The first time you deploy a
model, click View Report to view the validation report.2. Click Accept and Publish on the Validation Report page.3. A Publish and deploy dialog box displays. Select the edges you want to deploy
the model to, and then click Publish and deploy to deploy the model.4. If the model has been deployed on some edges, click Manage deployment to
open the deployment dialog box. Select the edges that you want to deploy onor undeploy on, and then click Deploy or Undeploy.
Chapter 3. Creating and using models 39
Retraining modelsWhen you retrain a model, a new model version is created. When you create amodel request, you define the retrain policy. The retrain policy is the condition thattriggers auto-retrain. If there is concern about the current model accuracy, themodel manager can manually select the image files to trigger the retrain process.
Procedure1. Select a model version that has a status of Deployed and select Retrain.2. Manage the image sets. Every image group must have at least one retrain
image set to retrain the model.
Note: To retrain the model version, it is best to use different image sets thatcontain more images.
3. Select Retrain to begin the retrain process.
What to do next
The model manager validates if the retrained model is accepted. The modelmanager can deploy the new version, and the old model version is no longerdeployed.
Using models with a stand-alone edgeYou use models with a stand-alone edge to score images in the production line,sync data to the center, and to clean uploaded data. To use models with astand-alone edge, you must publish the models and deploy the models to thestand-alone edge.
Publishing modelsBefore you manually deploy a stand-alone edge, you must publish the model onthe center application.
About this task
To publish a model, it must already be validated.
Procedure1. Log in to the user interface for the center application, and select a model
instance.2. Select View Report to view the validation report.3. Select Accept and publish to publish the model instance.
Results
After you publish the model, the status of the model will change to Ready fordeploy.
Deploying one model instanceUse the API to deploy one model instance on the stand-alone edge.
40 User Guide
Procedure1. Get all published models on the center application by using the following
command:GET https://<edge machine host>:8449/api/getAvailableModels
2. Deploy one model instance on the stand-alone edge by using the followingcommand:POST https://<edge machine host>:8449/api/deployModelUse the body that is returned from the getAvailableModels API.
What to do next
For more information about API details, go to the Stand-alone edge services topics.
Undeploying modelsUse the API to undeploy models on the stand-alone edge.
Procedure
Undeploy models by using the following command:POST https://<edge machine host>:8449/api/undeployModelUse the following body:{"model_id":"model_id","model_instance_id":"model_instance_id"}
What to do next
For more information about API details, go to the Stand-alone edge services topics.
Chapter 3. Creating and using models 41

42 User Guide
Chapter 4. Checking inspection results
After the inspection results are sent to the center application, the inspector and theinspector supervisor can go to the Defect Check tab to view and filter theinspection results and make any necessary changes.
ImagesThe inspector and the inspector supervisor can view images to see if they areclassified as existing defects or not, and to find out if someone else checked theimages. Viewing the images determines what the inspector or supervisor must dowhen they check the defects.
The inspector views unchecked and checked images. Unchecked images mean thatthe image was only scored by the model and was not checked by an inspector.Checked images mean that the image was scored by the model and was alreadychecked by an inspector.
The inspector views unconfirmed and confirmed images. Unconfirmed imagesmean that the image was only scored by the model and was not confirmed by aninspector. Confirmed images mean that the image was scored by the model andwas confirmed by an inspector.
The inspector supervisor can view objects and unknown objects. Unknown objectsmean that the image was marked by an inspector as an unknown defect becausethe inspector did not classify the image as an existing defect. These images arehighlighted on the inspector supervisor’s list.
Filtering defectsThe inspector and the inspector supervisor can apply filters to the cell overviewand the defect list.
Procedure1. On the All Workstations window, select a workstation to view the list of
unconfirmed, confirmed, and unknown objects.2. Select the filter icon.3. Input a value for a condition to set the filter and then select the add icon. The
filter applies to the list immediately.
Checking defectsThe inspector and inspector supervisor review the inspection results and make anynecessary changes.
About this task
When you select an image, the defect candidate and corresponding confidencedisplay. The first defect is selected by default. The inspector can select unknownfor a defect type if the defect type is unknown.
© Copyright IBM Corp. 2017, 2019 43
Procedure1. Select an image to view the image details and inspection results.2. Select Edit Zoom to zoom in and out of the image or drag the image to locate a
position.3. Select Set Zoom to change back to edit mode. You can add, resize, move, and
view the details of a defect box.4. Select the defect box that you want to confirm and view the details of the
defect type and confidence level. You can change the defect type or delete theposition.
5. Select Confirm.6. If the image does not belong to any existing defects, the inspector supervisor
can create a new image group. The new defect is added into the candidate listfor images that are under the same model.
Uploading images by using the simulatorYou can use the simulator to manually send images to an edge. This processsimulates sending images from the product line to the edge. You can send yourown images or use predefined images on the server.
About this task
Procedure1. Select Simulator from the main menu.2. Specify a product type and cell.3. To upload your own image, select Use my own image and browse to your
image. Or, to use images from the server, clear Use my own image and specifythe total image number and sending frequency.
4. Click Start.5. Click View analysis result.
44 User Guide
Chapter 5. KPI dashboard
The inspector supervisor uses the KPI dashboard to check the image level defectrate and the location level defect rate. These metrics can help provide informationso that you can ask the IT team to retrain the model or adjust the manufacturingprocedure.
The KPI dashboard is on the KPI tab. You can select all workstations or a specificworkstation. This selection impacts the scope that you are working on. You canalso switch between real-time and historical views. In the real-time view, KPI datais refreshed every 5 seconds. The KPI values include defect per unit and defectrate. The defect per unit is calculated as a specific defect number divided by thetotal image number. The defect per unit value represents the occurrence rate of adefect type. The defect rate is calculated as the number of images with one ormore defects divided by the total image number. The defect rate represents theproduct defect rate. Each line in the chart represents the KPI value in the current5-second interval. The historical view shows historical KPI data. You can edit thestart date and end date to determine the time range. KPIs in the historical viewinclude defect per unit and defect rate.
The historical view has three granularities: hourly, daily, and monthly. In thehourly chart, each point represents 1 hour. For example, a KPI value that is 24points represents 24 hours. In the daily chart, each point represents one day. Forexample, a KPI value that is 30 points represents 30 days. In the monthly chart,each point represents one month. For example, a KPI value that is 12 pointsrepresents 12 months. There are relationships between the selected time range andgranularity. If there are too many points in a granularity for a selected time range,then that granularity is disabled until you shorten the time range. If you want torefresh the chart, you can change time range or click Refresh. The historical KPIdata is calculated periodically by the server, so there is some time delay based onthe configuration. The default period to calculate historical KPI is 1 hour.
By default, only the top five defects types are displayed in the Defect Per Unitchart. If you want to check other defect types, you can select one or more defecttypes under the chart and then click Show trend. A new KPI chart displays theselected defect types. If the KPI value of a defect type is 0, it cannot be selected toshow a trend.
© Copyright IBM Corp. 2017, 2019 45

46 User Guide
Chapter 6. Integration with Prescriptive Quality
You can export historical defect rate data from Maximo PQI SaaS Visual Insights inCSV format and import the data in Prescriptive Quality.
You can export the data from the KPI dashboard when you view historical defectrates. To view this data, select Historical on the KPI dashboard and then selectDefect Rate. When you select Export, the data is exported based on the selectedcell, time range, and time granularity.
The following columns are contained in the CSV file.
Table 3. Columns in CSV file
Column Description
ATTRIBUTE_NAME This value is alwaysVI_DEFECT_IMAGE_RATE.
DATE The date in yyyy-MM-dd format when theinterval is daily or monthly, or yyyy-MM-ddHH:mm:ss format when the interval ishourly.
CELL_NAME The name of the cell where the defecthappened. It is one of the dimensions inPrescriptive Quality.
PRODUCED_QTY The total number of images in the selectedcell and time range.
TESTED_QTY The total number of images that were tested.
FAILED_QTY The number of images that show defects
© Copyright IBM Corp. 2017, 2019 47

48 User Guide
Chapter 7. Application programming interface
The application programming interface enables you to perform actions such asmanaging data groups, data files, models, inspection results, and edges.
API workflowsMany of the Maximo PQI SaaS Visual Insights API calls have prerequisites, orcorrelations with other API calls. Also, only certain user roles are given access toeach API call. Therefore, it is important to understand the API workflow for eachrole.
Model manager
The model manager generally uses the API calls in the following sequence:v Create a data group. Refer to Create a data group in Data group services.v Upload a data file to a data group. Refer to Upload data files to a data group in
Data file services.v Create a model. Refer to Create a model in Model services.v Create a model instance. Refer to Create a model instance in Model instance
services.v Train the model. Refer to Train model instance. The training process takes
several minutes to hours depending on the number of images and the trainingparameters. To check the status of the model instance, refer to Get one modelinstance.
v After the online training is completed, the model manager can validate themodel. Refer to Validate model instance.
v Create an edge. Refer to Create edge in Edge services.v Deploy the model to the edge or reject the model. Refer to Deploy model
instance or Reject model instance in Model instance action services.v Retrain or undeploy the deployed model. Refer to Retrain model instance or
Undeploy model instance in Model instance action services.
Inspector
The inspector generally uses the API calls in the following sequence:v Score an image. Refer to Score an image in Score service.v Get the inspection result cell overview. Refer to Get the inspection result cell
overview in Inspection result services.v Get the inspection result list. Refer to Get the inspection result list in Inspection
result services.v Confirm inspection results. Refer to Confirm inspection results in Inspection
result services.
Supervisor
The supervisor generally uses the API calls in the following sequence:v Score an image. Refer to Score image in Score service.
© Copyright IBM Corp. 2017, 2019 49
v Get the inspection result cell overview. Refer to Get the inspection result celloverview in Inspection result services.
v Get the inspection result list. Refer to Get the inspection result list in Inspectionresult services.
v Confirm inspection results. Refer to Confirm inspection results in Inspectionresult services.
v Get defect image rate file. Refer to Get defect image rate file in QEWSintegration service.
Stand-alone edge administrator
The stand-alone edge administrator must have credentials for the stand-alone edgemachine. The stand-alone edge administrator generally uses the API calls in thefollowing sequence:v Get available models. Refer to Get available models in Stand-alone edge services.v Deploy a model. Refer to Deploy a model in Stand-alone edge services.v Deploy all models. Refer to Deploy all models in Stand-alone edge services.v Upload and score an image on the edge. Refer to Upload and score image on the
edge in Stand-alone edge services. The production line or external servicestypically use this API.
v Sync the inspection result from the edge to the center application. Refer to Syncinspection result from the edge to the center application in Stand-alone edgeservices.
v Clean up the inspection result that you have synced to the center application.Refer to Clean up inspection result that you have synced to the centerapplication in Stand-alone edge services.
v Undeploy a model. Refer to Undeploy a model in Stand-alone edge services.
Preparing to use the API callsBefore you use any of the API calls, ensure that you have prepared the user andthe solution and obtained an API key.
Perform the following tasks to prepare the user and the solution:v Ensure that the user that is logged in has access to the wanted API calls.v For API calls that require a solution ID, specify vi as the solution.v Ensure that the user has the API key that IBM created for the user.
Service responsesAfter an API call completes, it provides a success or error response.
The API services provide the following responses.v Success responses:
– Status code 201 for create services– Status code 200 for other services
v Database error responses:– Status code 500– Error messages, for example, "The parameters are missing or have invalid
format when creating a new data group."v Authorization errors
50 User Guide

– Status code 401– Error messages, for example, "Either authorization or APIKEY need to be set
in header."
Data group servicesThe data group services enable you to perform such tasks as getting all datagroups, getting one data group, and creating a new data group.
Get all data groupsGets all existing data groups. The model manager has authority to use this API.
URL
/ibm/iotm/service/dataGroup
Method
The request type GET
URL parameters
user: String. Used to identify the user. Mandatory.
solution: String. Used to identify the solution. Mandatory.
tenant: String. Used to identify the tenant. Optional.
HeadersAPIKEY: encrypted key. The API key, which is used for authentication.Mandatory.
Data parameters
None
Sample body
None
Success response200[
{"id": "892d05cd-84e5-4bae-b57f-edbbc3f8c598","groupName": "MisT","createdBy": "auto_mm","description": "test_description","dataFormat": "jpg","parameters": {"isHybrid": "false","isDefect": "true"
},"updatedTime": "2017-11-29T16:47:54.039+08:00"
},{
"id": "9bebc890-0237-4a3b-8908-9f5f53fdb3a2","groupName": "NoDefect","createdBy": "auto_mm","description": "test_description","dataFormat": "jpg","parameters": {"isHybrid": "false","isDefect": "true"
},"updatedTime": "2017-11-29T16:47:54.463+08:00"
Chapter 7. Application programming interface 51
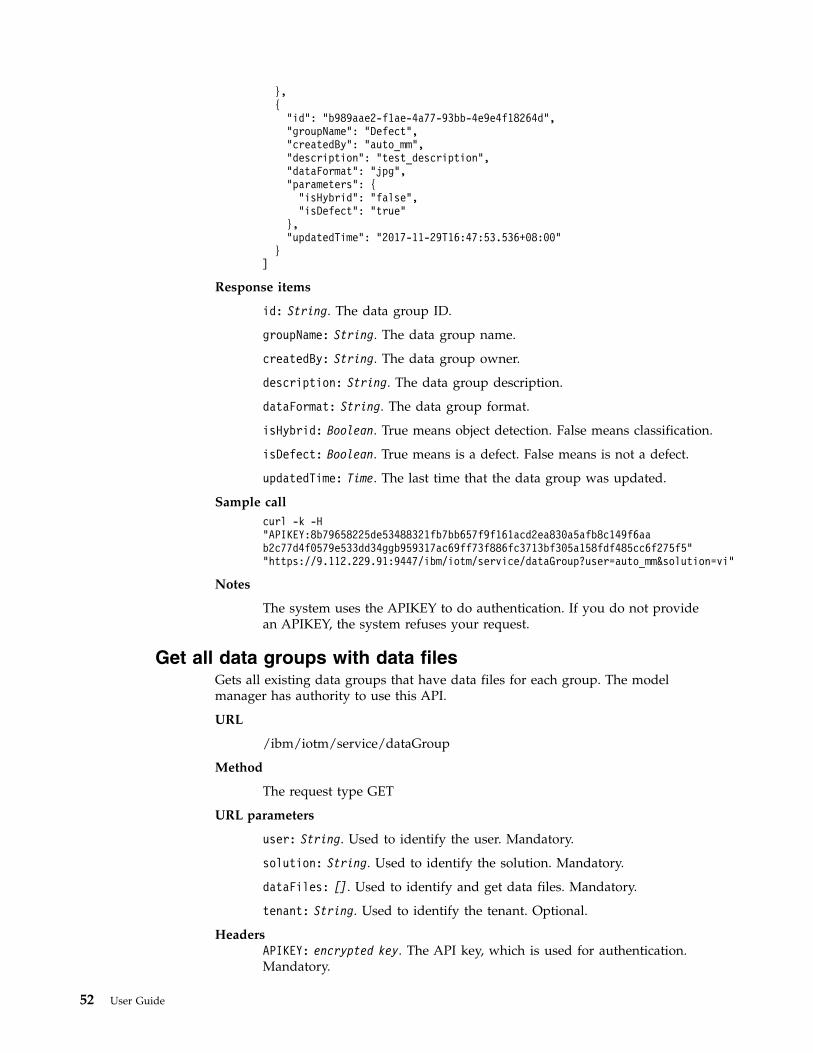
},{"id": "b989aae2-f1ae-4a77-93bb-4e9e4f18264d","groupName": "Defect","createdBy": "auto_mm","description": "test_description","dataFormat": "jpg","parameters": {"isHybrid": "false","isDefect": "true"
},"updatedTime": "2017-11-29T16:47:53.536+08:00"
}]
Response items
id: String. The data group ID.
groupName: String. The data group name.
createdBy: String. The data group owner.
description: String. The data group description.
dataFormat: String. The data group format.
isHybrid: Boolean. True means object detection. False means classification.
isDefect: Boolean. True means is a defect. False means is not a defect.
updatedTime: Time. The last time that the data group was updated.
Sample callcurl -k -H"APIKEY:8b79658225de53488321fb7bb657f9f161acd2ea830a5afb8c149f6aab2c77d4f0579e533dd34ggb959317ac69ff73f886fc3713bf305a158fdf485cc6f275f5""https://9.112.229.91:9447/ibm/iotm/service/dataGroup?user=auto_mm&solution=vi"
Notes
The system uses the APIKEY to do authentication. If you do not providean APIKEY, the system refuses your request.
Get all data groups with data filesGets all existing data groups that have data files for each group. The modelmanager has authority to use this API.
URL
/ibm/iotm/service/dataGroup
Method
The request type GET
URL parameters
user: String. Used to identify the user. Mandatory.
solution: String. Used to identify the solution. Mandatory.
dataFiles: []. Used to identify and get data files. Mandatory.
tenant: String. Used to identify the tenant. Optional.
HeadersAPIKEY: encrypted key. The API key, which is used for authentication.Mandatory.
52 User Guide
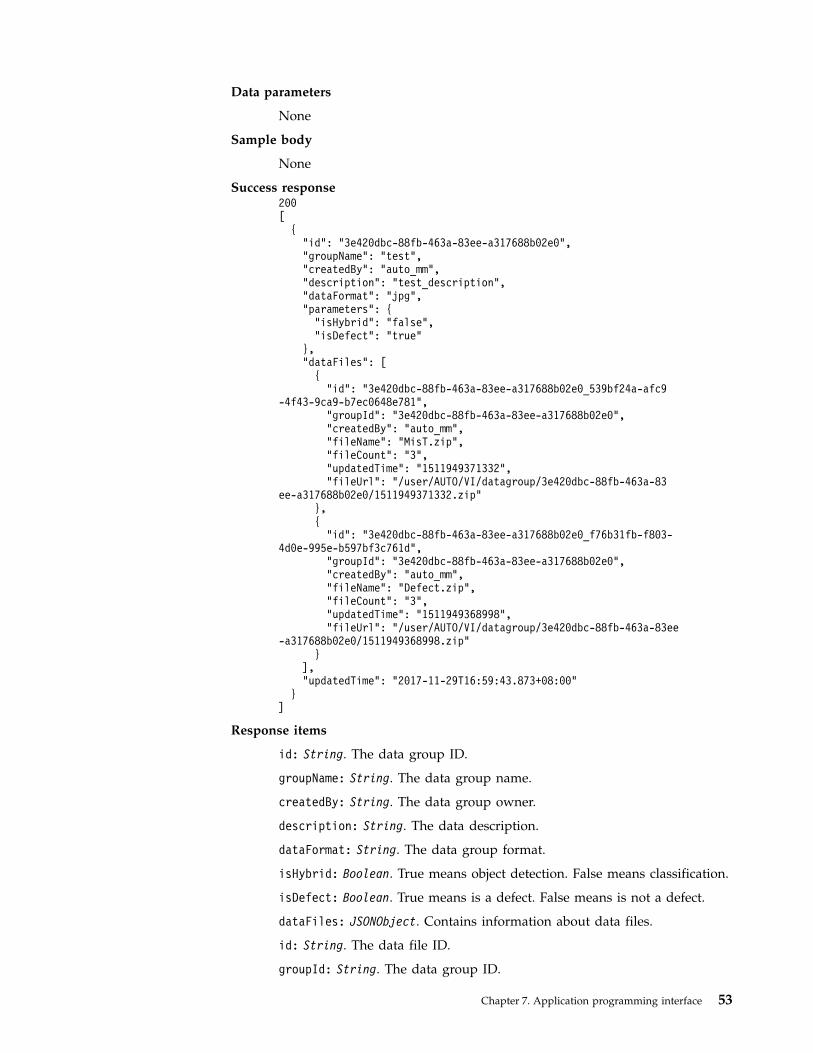
Data parameters
None
Sample body
None
Success response200[
{"id": "3e420dbc-88fb-463a-83ee-a317688b02e0","groupName": "test","createdBy": "auto_mm","description": "test_description","dataFormat": "jpg","parameters": {"isHybrid": "false","isDefect": "true"
},"dataFiles": [{
"id": "3e420dbc-88fb-463a-83ee-a317688b02e0_539bf24a-afc9-4f43-9ca9-b7ec0648e781",
"groupId": "3e420dbc-88fb-463a-83ee-a317688b02e0","createdBy": "auto_mm","fileName": "MisT.zip","fileCount": "3","updatedTime": "1511949371332","fileUrl": "/user/AUTO/VI/datagroup/3e420dbc-88fb-463a-83
ee-a317688b02e0/1511949371332.zip"},{
"id": "3e420dbc-88fb-463a-83ee-a317688b02e0_f76b31fb-f803-4d0e-995e-b597bf3c761d",
"groupId": "3e420dbc-88fb-463a-83ee-a317688b02e0","createdBy": "auto_mm","fileName": "Defect.zip","fileCount": "3","updatedTime": "1511949368998","fileUrl": "/user/AUTO/VI/datagroup/3e420dbc-88fb-463a-83ee
-a317688b02e0/1511949368998.zip"}
],"updatedTime": "2017-11-29T16:59:43.873+08:00"
}]
Response items
id: String. The data group ID.
groupName: String. The data group name.
createdBy: String. The data group owner.
description: String. The data description.
dataFormat: String. The data group format.
isHybrid: Boolean. True means object detection. False means classification.
isDefect: Boolean. True means is a defect. False means is not a defect.
dataFiles: JSONObject. Contains information about data files.
id: String. The data file ID.
groupId: String. The data group ID.
Chapter 7. Application programming interface 53

createdBy: String. The data file owner.
fileName: String. The file name.
fileCount: String. The file count.
updatedTime: <Time>. The last time that the data file was updated.
fileUrl:. The file path that is stored in the server.
updatedTime: Time The last time the data group was updated.
Sample callcurl -k -H"APIKEY:8b79658225de53488321fb7bb657f9f161acd2ea830a5afb8c149f6aab2c77d4f0579e533dd34ggb959317ac69ff73f886fc3713bf305a158fdf485cc6f275f5" "https://9.112.229.91:9447/ibm/iotm/service/dataGroup?user=auto_mm&solution=vi &dataFiles=[]"
Notes The system uses the APIKEY to do authentication. If you do not providean APIKEY, the system refuses your request.
Get one data groupGets one data group. The model manager has authority to use this API.
URL
/ibm/iotm/service/dataGroup/groupId
Method
The request type GET
URL parameters
groupId: String. The data group ID.
user: String. Used to identify the user. Mandatory.
solution: String. Used to identify the solution. Mandatory.
tenant: String. Used to identify the tenant. Optional.
HeadersAPIKEY: encrypted key. The API key, which is used for authentication.Mandatory.
Data parameters
None
Sample body
None
Success response200[
{"tags": "","id": "3e420dbc-88fb-463a-83ee-a317688b02e0","groupName": "test","createdBy": "auto_mm","description": "test_description","dataFormat": "jpg","parameters": {"isHybrid": "false","isDefect": "true"
54 User Guide
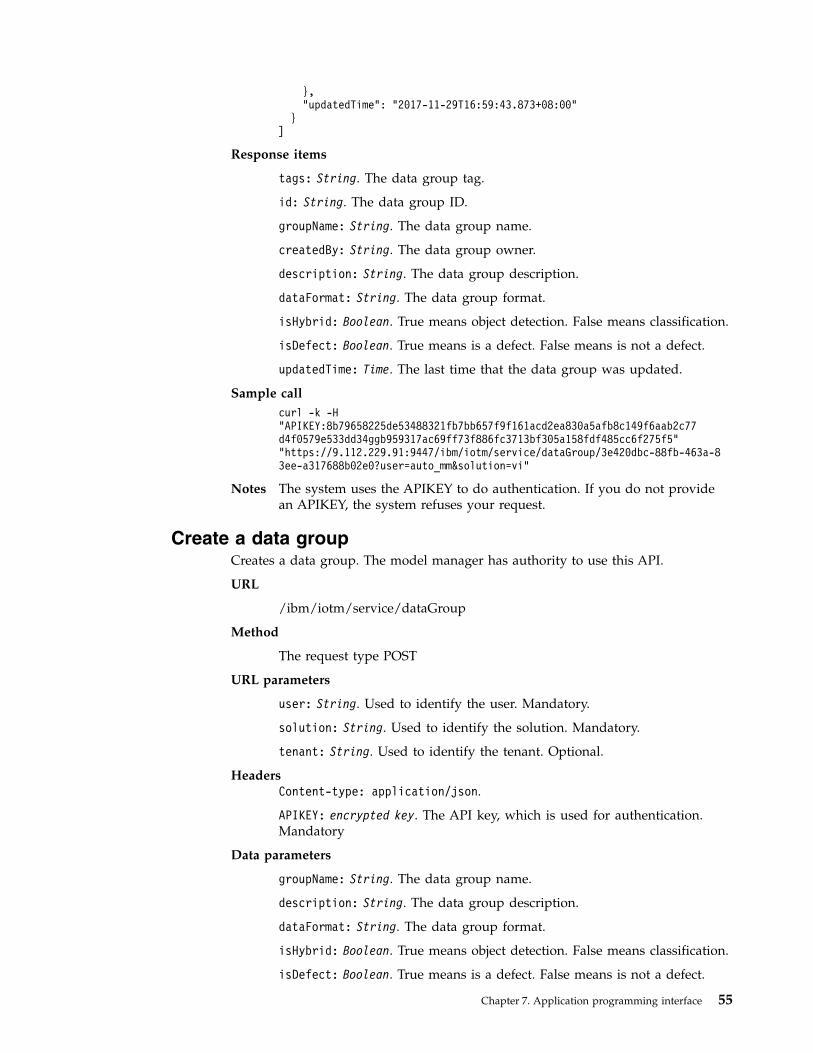
},"updatedTime": "2017-11-29T16:59:43.873+08:00"
}]
Response items
tags: String. The data group tag.
id: String. The data group ID.
groupName: String. The data group name.
createdBy: String. The data group owner.
description: String. The data group description.
dataFormat: String. The data group format.
isHybrid: Boolean. True means object detection. False means classification.
isDefect: Boolean. True means is a defect. False means is not a defect.
updatedTime: Time. The last time that the data group was updated.
Sample callcurl -k -H"APIKEY:8b79658225de53488321fb7bb657f9f161acd2ea830a5afb8c149f6aab2c77d4f0579e533dd34ggb959317ac69ff73f886fc3713bf305a158fdf485cc6f275f5""https://9.112.229.91:9447/ibm/iotm/service/dataGroup/3e420dbc-88fb-463a-83ee-a317688b02e0?user=auto_mm&solution=vi"
Notes The system uses the APIKEY to do authentication. If you do not providean APIKEY, the system refuses your request.
Create a data groupCreates a data group. The model manager has authority to use this API.
URL
/ibm/iotm/service/dataGroup
Method
The request type POST
URL parameters
user: String. Used to identify the user. Mandatory.
solution: String. Used to identify the solution. Mandatory.
tenant: String. Used to identify the tenant. Optional.
HeadersContent-type: application/json.
APIKEY: encrypted key. The API key, which is used for authentication.Mandatory
Data parameters
groupName: String. The data group name.
description: String. The data group description.
dataFormat: String. The data group format.
isHybrid: Boolean. True means object detection. False means classification.
isDefect: Boolean. True means is a defect. False means is not a defect.
Chapter 7. Application programming interface 55
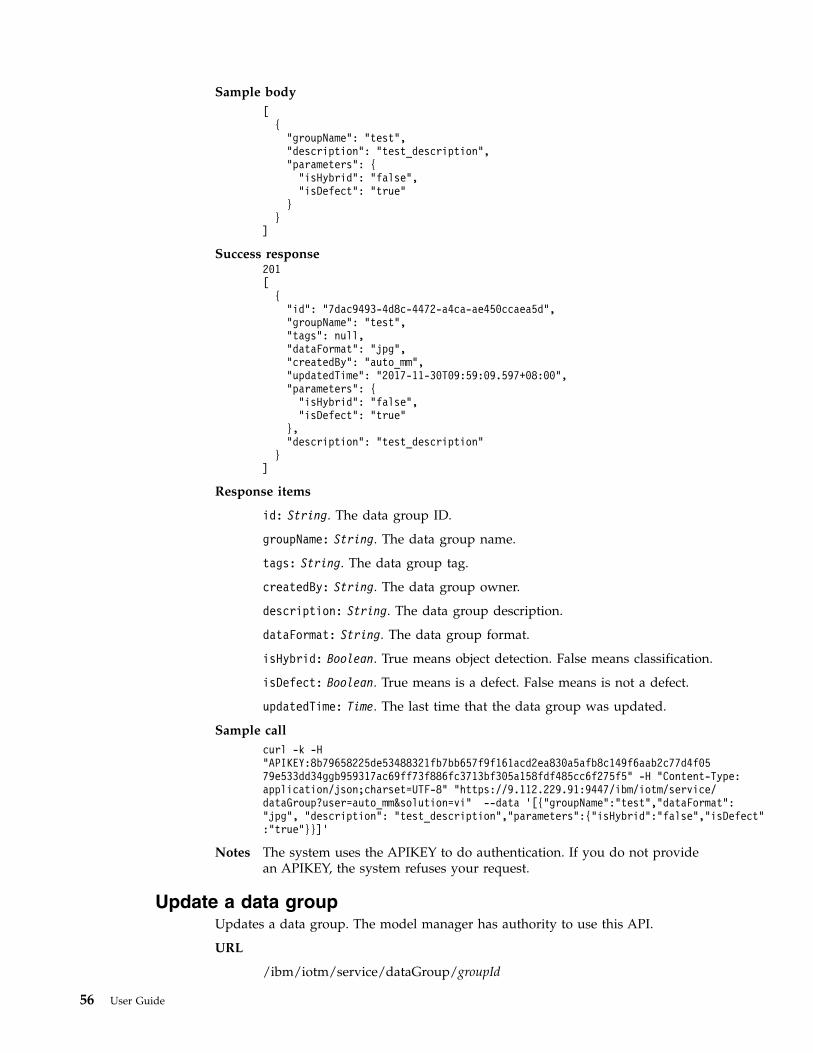
Sample body[
{"groupName": "test","description": "test_description","parameters": {"isHybrid": "false","isDefect": "true"
}}
]
Success response201[
{"id": "7dac9493-4d8c-4472-a4ca-ae450ccaea5d","groupName": "test","tags": null,"dataFormat": "jpg","createdBy": "auto_mm","updatedTime": "2017-11-30T09:59:09.597+08:00","parameters": {"isHybrid": "false","isDefect": "true"
},"description": "test_description"
}]
Response items
id: String. The data group ID.
groupName: String. The data group name.
tags: String. The data group tag.
createdBy: String. The data group owner.
description: String. The data group description.
dataFormat: String. The data group format.
isHybrid: Boolean. True means object detection. False means classification.
isDefect: Boolean. True means is a defect. False means is not a defect.
updatedTime: Time. The last time that the data group was updated.
Sample callcurl -k -H"APIKEY:8b79658225de53488321fb7bb657f9f161acd2ea830a5afb8c149f6aab2c77d4f0579e533dd34ggb959317ac69ff73f886fc3713bf305a158fdf485cc6f275f5" -H "Content-Type:application/json;charset=UTF-8" "https://9.112.229.91:9447/ibm/iotm/service/dataGroup?user=auto_mm&solution=vi" --data ’[{"groupName":"test","dataFormat":"jpg", "description": "test_description","parameters":{"isHybrid":"false","isDefect":"true"}}]’
Notes The system uses the APIKEY to do authentication. If you do not providean APIKEY, the system refuses your request.
Update a data groupUpdates a data group. The model manager has authority to use this API.
URL
/ibm/iotm/service/dataGroup/groupId
56 User Guide
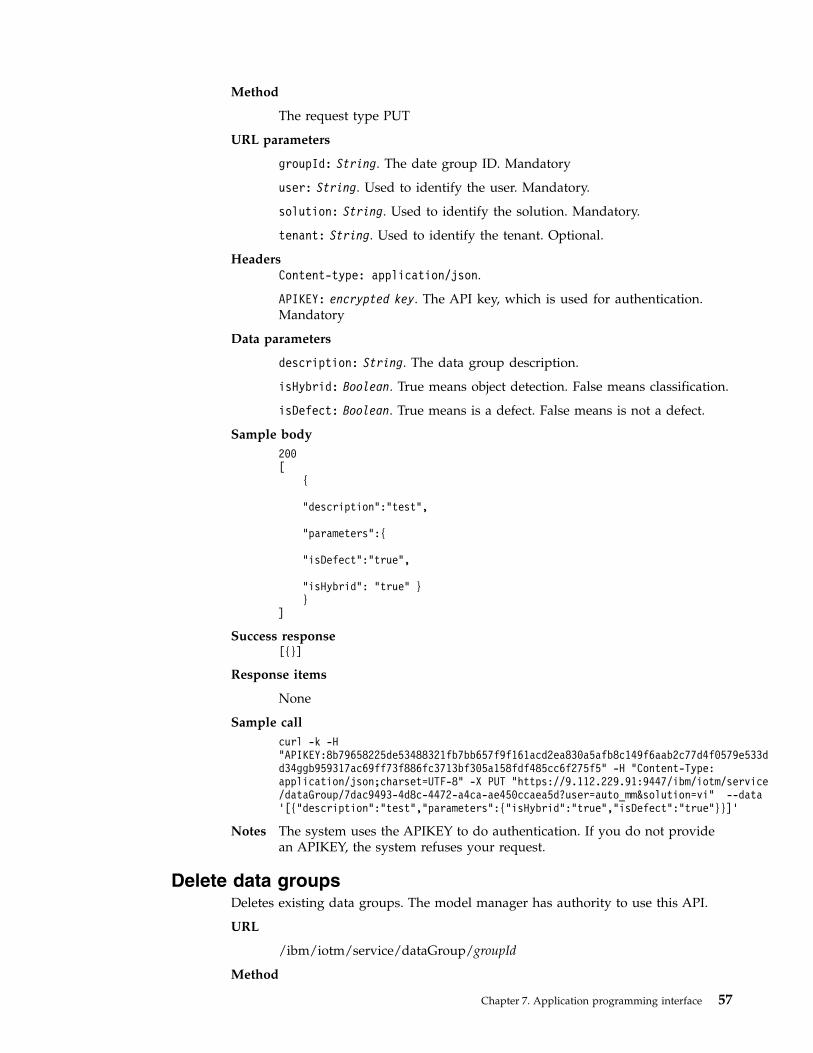
Method
The request type PUT
URL parameters
groupId: String. The date group ID. Mandatory
user: String. Used to identify the user. Mandatory.
solution: String. Used to identify the solution. Mandatory.
tenant: String. Used to identify the tenant. Optional.
HeadersContent-type: application/json.
APIKEY: encrypted key. The API key, which is used for authentication.Mandatory
Data parameters
description: String. The data group description.
isHybrid: Boolean. True means object detection. False means classification.
isDefect: Boolean. True means is a defect. False means is not a defect.
Sample body200[
{
"description":"test",
"parameters":{
"isDefect":"true",
"isHybrid": "true" }}
]
Success response[{}]
Response items
None
Sample callcurl -k -H"APIKEY:8b79658225de53488321fb7bb657f9f161acd2ea830a5afb8c149f6aab2c77d4f0579e533dd34ggb959317ac69ff73f886fc3713bf305a158fdf485cc6f275f5" -H "Content-Type:application/json;charset=UTF-8" -X PUT "https://9.112.229.91:9447/ibm/iotm/service/dataGroup/7dac9493-4d8c-4472-a4ca-ae450ccaea5d?user=auto_mm&solution=vi" --data’[{"description":"test","parameters":{"isHybrid":"true","isDefect":"true"}}]’
Notes The system uses the APIKEY to do authentication. If you do not providean APIKEY, the system refuses your request.
Delete data groupsDeletes existing data groups. The model manager has authority to use this API.
URL
/ibm/iotm/service/dataGroup/groupId
Method
Chapter 7. Application programming interface 57
The request type DELETE
URL parameters
groupId: String. The data group ID. Mandatory
user: String. Used to identify the user. Mandatory.
solution: String. Used to identify the solution. Mandatory.
tenant: String. Used to identify the tenant. Optional.
HeadersAPIKEY: encrypted key. The API key, which is used for authentication.Mandatory.
Data parameters
None
Sample body[{}]
Success response200[{}]
Response items
None
Sample callcurl -k -X DELETE -H "APIKEY:8b79658225de53488321fb7bb657f9f161acd2ea830a5afb8c149f6aab2c77d4f0579e533dd34ggb959317ac69ff73f886fc3713bf305a158fdf485cc6f275f5""https://9.112.229.91:9447/ibm/iotm/service/dataGroup/ed568556-1462-45e9-9319-4bfa8186d2cd?user=auto_mm&solution=vi” -d '[{}]'
Notes The system uses the APIKEY to do authentication. If you do not providean APIKEY, the system refuses your request.
Data file servicesThe data file services enable you to perform such tasks as getting all data filesbelonging to one data group, getting one data file, and downloading a binary file.
Get all data files that belong to a data groupGets all data files that belong to a data group. The model manager has authority touse this API.
URL
/ibm/iotm/service/dataFile
Method
The request type GET
URL parameters
groupId: String. The data group ID. Mandatory.
user: String. Used to identify the user. Mandatory.
solution: String. Used to identify the solution. Mandatory.
tenant: String. Used to identify the tenant. Optional.
58 User Guide
HeadersAPIKEY: encrypted key. The API key, which is used for authentication.Mandatory.
Data parameters
None
Sample body
None
Success response200[
{"id": "06c870e5-1701-419a-8a84-0f40ee82fe33_a7f1772f-07a0-4d33-9efe
-f2e45a2dc904","groupId": "06c870e5-1701-419a-8a84-0f40ee82fe33","createdBy": "modelmanager1","fileName": "NG.zip","updatedTime": "1502185276752","fileCount": "52","fileUrl": "/user/T1/VIQ/datagroup/06c870e5-1701-419a-8a84
-0f40ee82fe33/1502185276752.zip"},{
"id": "06c870e5-1701-419a-8a84-0f40ee82fe33_b3af214c-b603-43f4-944d-40277b9a6fd9",
"groupId": "06c870e5-1701-419a-8a84-0f40ee82fe33","createdBy": "modelmanager1","fileName": "IoT4M_March2017_VI_Source.zip","updatedTime": "1502184389077","fileCount": "52","fileUrl": "/user/T1/VIQ/datagroup/06c870e5-1701-419a-8a84-0f40ee82fe
33/1502184389077.zip"},{
"id": "06c870e5-1701-419a-8a84-0f40ee82fe33_c901e409-d9db-4f02-8d9c-fa6002929701",
"groupId": "06c870e5-1701-419a-8a84-0f40ee82fe33","createdBy": "modelmanager1","fileName": "NG.zip","updatedTime": "1502185248433","fileCount": "52","fileUrl": "/user/T1/VIQ/datagroup/06c870e5-1701-419a-8a84-0f40ee82fe
33/1502185248433.zip"}
]
Response items
id: String. The data file ID.
groupId: String. The data group ID.
createdBy: String. The data file owner.
fileName: String. The file name.
fileCount: String. The file count.
updatedTime: Time. The last time that the data file was updated.
fileUrl:. The file path that is stored in the server.
Sample call
Chapter 7. Application programming interface 59
curl -k -H"APIKEY:8b79658225de53488321fb7bb657f9f161acd2ea830a5afb8c149f6aab2c77d4f0579e533dd34ggb959317ac69ff73f886fc3713bf305a158fdf485cc6f275f5""https://9.112.229.91:9447/ibm/iotm/service/dataFile?user=auto_mm&solution=vi&groupId=ed568556-1462-45e9-9319-4bfa8186d2cd"
Notes The system uses the APIKEY to do authentication. If you do not providean APIKEY, the system refuses your request.
Get one data fileGets one data file. The model manager has authority to use this API.
URL
/ibm/iotm/service/dataFile
Method
The request type GET
URL parameters
fileId: String. The data file ID. Mandatory.
user: String. Used to identify the user. Mandatory.
solution: String. Used to identify the solution. Mandatory.
tenant: String. Used to identify the tenant. Optional.
HeadersAPIKEY: encrypted key. The API key, which is used for authentication.Mandatory.
Data parameters
None
Sample body
None
Success response200[
{"id": "06c870e5-1701-419a-8a84-0f40ee82fe33_c901e409-d9db-4f02-8d9c
-fa6002929701","groupId": "c901e409-d9db-4f02-8d9c-fa6002929701","createdBy": "modelmanager1","fileName": "NG.zip","updatedTime": "1502185248433","fileCount": "52","fileUrl": "/user/T1/VIQ/datagroup/06c870e5-1701-419a-8a84
-0f40ee82fe33/1502185248433.zip"}
]
Response items
id: String. The data file ID.
groupId: String. The data group ID.
createdBy: String. The data file owner.
fileName: String. The file name.
updatedTime: Time. The last time that the data file was updated.
60 User Guide

fileUrl:. The file path that is stored in the server.
Sample callcurl -k -H"APIKEY:8b79658225de53488321fb7bb657f9f161acd2ea830a5afb8c149f6aab2c77d4f0579e533dd34ggb959317ac69ff73f886fc3713bf305a158fdf485cc6f275f5" "https://9.112.229.91:9447/ibm/iotm/service/dataFile/06c870e5-1701-419a-8a84-0f40ee82fe33_c901e409-d9db-4f02-8d9c-fa6002929701?user=auto_mm&solution=vi"
Notes The system uses the APIKEY to do authentication. If you do not providean APIKEY, the system refuses your request.
Download the binary content of the data fileDownloads the binary content of a data file. The model manager and the datascientist have authority to use this API.
URL
/ibm/iotm/service/dataFileBinary
Method
The request type GET
URL parameters
fileId: String. The data file ID. Mandatory.
user: String. Used to identify the user. Mandatory.
solution: String. Used to identify the solution. Mandatory.
tenant: String. Used to identify the tenant. Optional.
HeadersAPIKEY: encrypted key. The API key, which is used for authentication.Mandatory.
Data parameters
None
Sample body
None
Success responseThe Binary content of the data file.
Response items
None
Sample callcurl -k -H"APIKEY:8b79658225de53488321fb7bb657f9f161acd2ea830a5afb8c149f6aab2c77d4f0579e533dd34ggb959317ac69ff73f886fc3713bf305a158fdf485cc6f275f5" "https://9.112.229.91:9447/ibm/iotm/service/ dataFileBinary ?fileId=06c870e5-1701-419a-8a84-0f40ee82fe33_c901e409-d9db-4f02-8d9c-fa6002929701&user=auto_mm&solution=vi"
Notes The system uses the APIKEY to do authentication. If you do not providean APIKEY, the system refuses your request.
Upload data files to a data groupUploads one or more data files to a data group. The model manager has authorityto use this API.
Chapter 7. Application programming interface 61
URL
/ibm/iotm/service/dataFileBinary
Method
The request type POST
URL parameters
groupId: String. The data group ID. Mandatory.
user: String. Used to identify the user. Mandatory.
solution: String. Used to identify the solution. Mandatory.
tenant: String. Used to identify the tenant. Optional.
Headers
Content-type: multipart/form-data.
Content-Disposition: form-data; name="files[]"; filename=your filename.
APIKEY: encrypted key. The API key, which is used for authentication.Mandatory.
Data parameters
None
Sample body
The Binary content of the data file.
Success response200{"result":{"Defect.zip":{"id":"9f7aa9d6-24d6-4611-8d4d-79a52d2bab02_76e8b2cb-057a-4904-8fad-bbca93abd80b","count":"3","name":"Defect.zip","errorMsg":"","updatedTime":"1512021663498","url":"\/user\/AUTO\/VI\/datagroup\/9f7aa9d6-24d6-4611-8d4d-79a52d2bab02\/1512021663498.zip"}},"error_message":{}}
Response items
id: String. The data file ID.
name: String. The file name.
count: String. The image count.
updatedTime: Time. The last time that the data file was updated.
fileUrl:. The file path that is stored in the server.
error_message:. The error message of an upload response.
Sample callcurl -k -X POST -H"APIKEY:8b79658225de53488321fb7bb657f9f161acd2ea830a5afb8c149f6aab2c77d4f0579e533dd34ggb959317ac69ff73f886fc3713bf305a158fdf485cc6f275f5"-H "Content-Type:multipart/form-data" -H "Content-Disposition:form-data; name=\"files[]\"; filename=\"Defect.zip\"" "https://9.112.229.91:9447/ibm/iotm/service/dataFileBinary?user=auto_mm&solution=vi&groupId=9f7aa9d6-24d6-4611-8d4d-79a52d2bab02" --connect-timeout 600 -F file=@C:\\code\\Automation_98\\API\\vi\\VI_API\\file\\Defect.zip
Notes The system uses the APIKEY to do authentication. If you do not providean APIKEY, the system refuses your request.
62 User Guide
Delete one data fileDeletes one data file. The model manager has authority to use this API.
URL
/ibm/iotm/service/dataFile/fileId
Method
The request type DELETE
URL parameters
fileId: String. The data file ID. Mandatory.
user: String. Used to identify the user. Mandatory.
solution: String. Used to identify the solution. Mandatory.
tenant: String. Used to identify the tenant. Optional.
HeadersAPIKEY: encrypted key. The API key, which is used for authentication.Mandatory.
Data parameters
None
Sample body[{}]
Success response200[{}]
Response items
None
Sample callcurl -k -X DELETE -H "APIKEY:8b79658225de53488321fb7bb657f9f161acd2ea830a5afb8c149f6aab2c77d4f0579e533dd34ggb959317ac69ff73f886fc3713bf305a158fdf485cc6f275f5""https://9.112.229.91:9447/ibm/iotm/service/dataFile/9f7aa9d6-24d6-4611-8d4d-79a52d2bab02_e2cc3d4a-bae9-4600-9dff-d80fa3ee8832?user=auto_mm&solution=vi” -d '[{}]'
Notes The system uses the APIKEY to do authentication. If you do not providean APIKEY, the system refuses your request.
Model servicesThe model services enable you to perform such tasks as getting all models, gettingone model, and creating a model.
Get all modelsGets all existing models. The model manager has authority to use this API.
URL
/ibm/iotm/service/model
Method
The request type GET
Chapter 7. Application programming interface 63
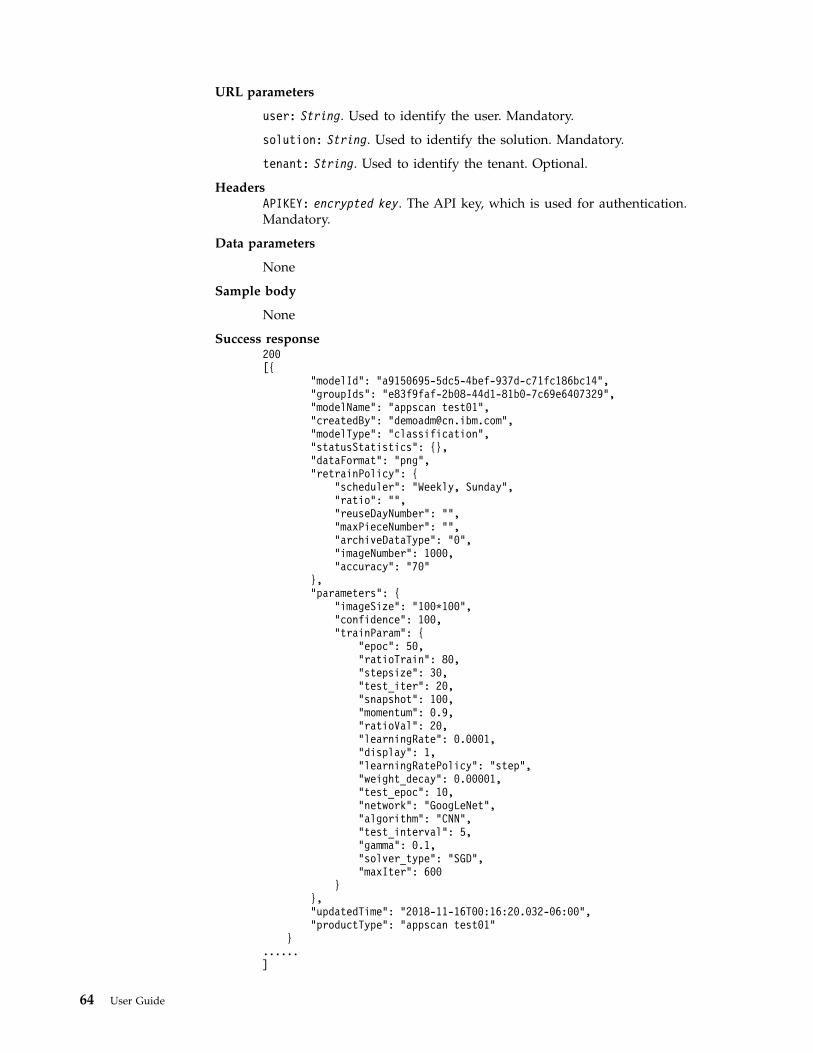
URL parameters
user: String. Used to identify the user. Mandatory.
solution: String. Used to identify the solution. Mandatory.
tenant: String. Used to identify the tenant. Optional.
HeadersAPIKEY: encrypted key. The API key, which is used for authentication.Mandatory.
Data parameters
None
Sample body
None
Success response200[{
"modelId": "a9150695-5dc5-4bef-937d-c71fc186bc14","groupIds": "e83f9faf-2b08-44d1-81b0-7c69e6407329","modelName": "appscan test01","createdBy": "[email protected]","modelType": "classification","statusStatistics": {},"dataFormat": "png","retrainPolicy": {
"scheduler": "Weekly, Sunday","ratio": "","reuseDayNumber": "","maxPieceNumber": "","archiveDataType": "0","imageNumber": 1000,"accuracy": "70"
},"parameters": {
"imageSize": "100*100","confidence": 100,"trainParam": {
"epoc": 50,"ratioTrain": 80,"stepsize": 30,"test_iter": 20,"snapshot": 100,"momentum": 0.9,"ratioVal": 20,"learningRate": 0.0001,"display": 1,"learningRatePolicy": "step","weight_decay": 0.00001,"test_epoc": 10,"network": "GoogLeNet","algorithm": "CNN","test_interval": 5,"gamma": 0.1,"solver_type": "SGD","maxIter": 600
}},"updatedTime": "2018-11-16T00:16:20.032-06:00","productType": "appscan test01"
}......]
64 User Guide
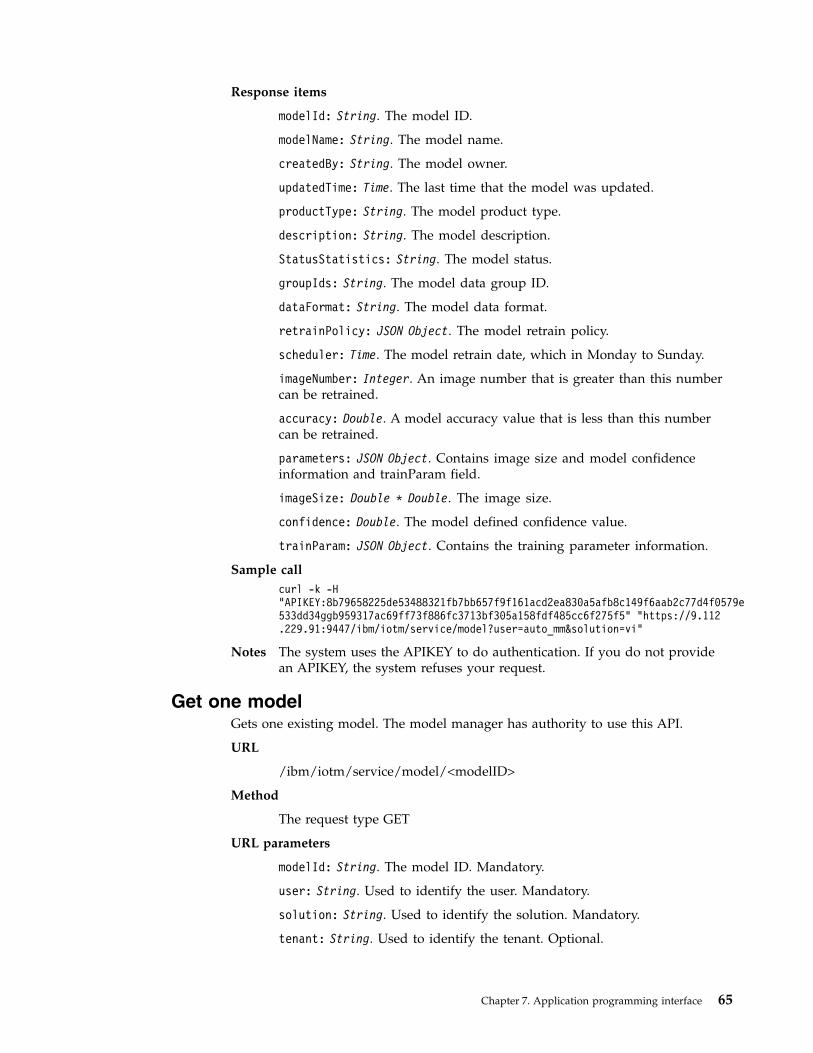
Response items
modelId: String. The model ID.
modelName: String. The model name.
createdBy: String. The model owner.
updatedTime: Time. The last time that the model was updated.
productType: String. The model product type.
description: String. The model description.
StatusStatistics: String. The model status.
groupIds: String. The model data group ID.
dataFormat: String. The model data format.
retrainPolicy: JSON Object. The model retrain policy.
scheduler: Time. The model retrain date, which in Monday to Sunday.
imageNumber: Integer. An image number that is greater than this numbercan be retrained.
accuracy: Double. A model accuracy value that is less than this numbercan be retrained.
parameters: JSON Object. Contains image size and model confidenceinformation and trainParam field.
imageSize: Double * Double. The image size.
confidence: Double. The model defined confidence value.
trainParam: JSON Object. Contains the training parameter information.
Sample callcurl -k -H"APIKEY:8b79658225de53488321fb7bb657f9f161acd2ea830a5afb8c149f6aab2c77d4f0579e533dd34ggb959317ac69ff73f886fc3713bf305a158fdf485cc6f275f5" "https://9.112.229.91:9447/ibm/iotm/service/model?user=auto_mm&solution=vi"
Notes The system uses the APIKEY to do authentication. If you do not providean APIKEY, the system refuses your request.
Get one modelGets one existing model. The model manager has authority to use this API.
URL
/ibm/iotm/service/model/<modelID>
Method
The request type GET
URL parameters
modelId: String. The model ID. Mandatory.
user: String. Used to identify the user. Mandatory.
solution: String. Used to identify the solution. Mandatory.
tenant: String. Used to identify the tenant. Optional.
Chapter 7. Application programming interface 65
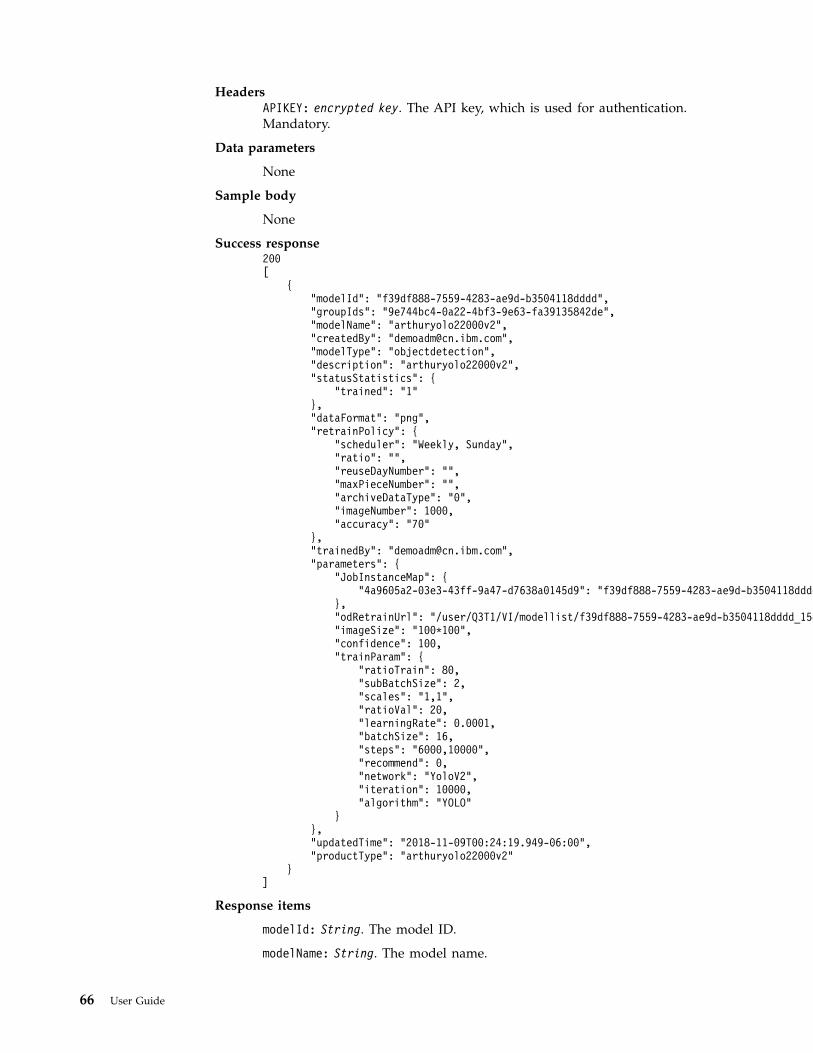
HeadersAPIKEY: encrypted key. The API key, which is used for authentication.Mandatory.
Data parameters
None
Sample body
None
Success response200[
{"modelId": "f39df888-7559-4283-ae9d-b3504118dddd","groupIds": "9e744bc4-0a22-4bf3-9e63-fa39135842de","modelName": "arthuryolo22000v2","createdBy": "[email protected]","modelType": "objectdetection","description": "arthuryolo22000v2","statusStatistics": {
"trained": "1"},"dataFormat": "png","retrainPolicy": {
"scheduler": "Weekly, Sunday","ratio": "","reuseDayNumber": "","maxPieceNumber": "","archiveDataType": "0","imageNumber": 1000,"accuracy": "70"
},"trainedBy": "[email protected]","parameters": {
"JobInstanceMap": {"4a9605a2-03e3-43ff-9a47-d7638a0145d9": "f39df888-7559-4283-ae9d-b3504118dddd_1541744213466"
},"odRetrainUrl": "/user/Q3T1/VI/modellist/f39df888-7559-4283-ae9d-b3504118dddd_1541761094044.zip","imageSize": "100*100","confidence": 100,"trainParam": {
"ratioTrain": 80,"subBatchSize": 2,"scales": "1,1","ratioVal": 20,"learningRate": 0.0001,"batchSize": 16,"steps": "6000,10000","recommend": 0,"network": "YoloV2","iteration": 10000,"algorithm": "YOLO"
}},"updatedTime": "2018-11-09T00:24:19.949-06:00","productType": "arthuryolo22000v2"
}]
Response items
modelId: String. The model ID.
modelName: String. The model name.
66 User Guide

createdBy: String. The model owner.
updatedTime: Time. The last time that the model was updated.
productType: String. The model product type.
description: String. The model description.
StatusStatistics: String. The model status.
groupIds: String. The model data group ID.
dataFormat: String. The model data format.
retrainPolicy: JSON Object. The model retrain policy.
scheduler: Time. The model retrain date, which in Monday to Sunday.
imageNumber: Integer. An image number that is greater than this numbercan be retrained.
accuracy: Double. A model accuracy value that is less than this numbercan be retrained.
parameters: JSON Object. Contains image size and model confidenceinformation and the odRetrainUrl, JobInstanceMap and trainParam fields.
imageSize: Double * Double. The image size.
confidence: Double. The model defined confidence value.
trainParam: JSON Object. Includes the algorithm and network and hyperparameter information.
Sample callcurl -k -H"APIKEY:8b79658225de53488321fb7bb657f9f161acd2ea830a5afb8c149f6aab2c77d4f0579e533dd34ggb959317ac69ff73f886fc3713bf305a158fdf485cc6f275f5" "https://9.112.229.91:9447/ibm/iotm/service/model/ab219b13-16c0-4c7b-ae74-721f4719e314?user=auto_mm&solution=vi"
Notes The system uses the APIKEY to do authentication. If you do not providean APIKEY, the system refuses your request.
Create a modelCreates a model. The model manager has authority to use this API.
URL
/ibm/iotm/service/model
Method
The request type POST
URL parameters
user: String. Used to identify the user. Mandatory.
solution: String. Used to identify the solution. Mandatory.
tenant: String. Used to identify the tenant. Optional.
Headers
Content-type: application/json.
APIKEY: encrypted key. The API key, which is used for authentication.Mandatory.
Chapter 7. Application programming interface 67
Data parameters
modelName: String. The model name.
modelType: String. The model type. Options are "classification" and"objectdetection".
createdBy: String. The model owner.
description: String. The model description.
groupIds: String. The model data group ID.
dataFormat: String. The model data format.
retrainPolicy: JSON Object. The model retrain policy.
scheduler: Time. The model retrain date, which in Monday to Sunday.
imageNumber: Integer. An image number that is greater than this numbercan be retrained.
accuracy: Double. A model accuracy value that is less than this numbercan be retrained.
parameters: JSON Object. Contains image size, model confidenceinformation, and properties of training parameters including algorithm andnetwork and hyper parameter information.
The training parameters, hyper parameters, and model type values havecorresponding relationships. If the model type value is: "classification", the"algorithm" value is "CNN", and the corresponding "network" has 3options: "GoogleNet", "LeNet", or "AlexNet". The corresponding hyperparameters include: "learningRate", which is a real number between 0 and1; "maxIter" or "epoch" which is a positive integer; "stepsize" which is apositive integer; "gamma" which is a real number between 0 and 1;"learningRatePolicy" which has a value of "step"; "test_iter" or"test_epoch"which is a positive integer; "test_interval" which is a positiveinteger; "snapshot", which is an integer equal to or greater thanmaxIter/20; "ratioTrain", the ratio of images used for training which areintegers between 0 and 100; and "ratioVal", the ratio of images used forvalidation which is an integer between 0 and 100.
If the model type value is "objectdetection", "algorithm" values include:"FRCNN", "YOLO", "SSD". If "algorithm" value is "FRCNN", thecorresponding "network" has two options: "ZfNet" and "VGG16". Thecorresponding hyper parameters include: "learningRate", which is a realnumber between 0 and 1; "iteration", which consists of comma-separatedpositive integers, for example: 10000, 10000, 10000, 10000; "stepsize", whichis a positive integer; "gamma", which is a real number between 0 and 1;"ratioTrain", which is an integer between 0 and 100; and "ratioVal", whichis an integer between 0 and 100.
If the "algorithm" value is "YOLO", the corresponding "network" value has3 options: "YoloV2", "TinyYolo", and "YoloV1". The corresponding hyperparameters include: "learningRate", which is a real number between 0 and1; "iteration", which is a positive integer; "steps", which iscomma-separated positive integers, for example: 100, 1000, 5000, 8000;"batchSize", which is a positive integer; "scales", which is comma-separatedreal numbers, for example: 0.1, 0.1, 0.1, 0.1; "subBatchSize", which is apositive integer; "ratioTrain", which is an integer between 0 and 100;"ratioVal", which is an integer between 0 and 100.
68 User Guide

If the "algorithm" value is "SSD", the corresponding "network" is "SSD300".Corresponding hyper parameters include "learningRate", which is a realnumber between 0 and 1; "iteration", which is a positive integer; "steps",which is comma-separated positive integers, for example: 100, 1000, 5000,8000; "batchSize", which value is a positive integer; "learningRatePolicy",which has a value of "multistep"; "snapshot" which is an integer equal orgreater than iteration/20; "ratioTrain", which is an integer between 0 and100; and "ratioVal", which is an integer between 0 and 100.
confidence: Double. The model defined confidence value.
productType: String. The model product type.
Sample body[{"modelName":"walkermodel1","productType":"walkermodel1","dataFormat":"png","modelType":"classification","retrainPolicy":{"imageNumber":"1000","accuracy":"70","scheduler":"Weekly, Sunday","reuseDayNumber":"","maxPieceNumber":"","ratio":""},"description":"this is a test","groupIds":"b5164942-370c-418d-9fc2-f6ffd860b79d","parameters":{"imageSize":"100*100","confidence":100,"trainParam":{"ratioTrain":80,"ratioVal":20,"gamma":0.1,"stepsize":33,"maxIter":100,"learningRate":0.01,"learningRatePolicy":"step","test_iter":1,"test_interval":2,"snapshot":10,"network":"GoogLeNet","algorithm":"CNN"}}}]
Success response201
[{"modelId":"4d0dfe01-7a26-4071-92fb-ec597e7863ce","modelName":"walkermodel1","description":"this is a test","productType":"walkermodel1","groupIds":"b5164942-370c-418d-9fc2-f6ffd860b79d","dataFormat":"png","createdBy":"[email protected]","updatedTime":"2018-02-13T00:44:31.288-06:00","parameters":{"imageSize":"100*100","confidence":100,"trainParam":{"ratioTrain":80,"stepsize":33,"test_iter":1,"snapshot":10,"momentum":0.9,"ratioVal":20,"learningRate":0.01,"display":1,"learningRatePolicy":"step","weight_decay":1.0E-5,"network":"GoogLeNet","test_interval":2,"algorithm":"CNN","gamma":0.1,"solver_type":"SGD","maxIter":100}},"retrainPolicy":{"ratio":"","scheduler":"Weekly, Sunday","maxPieceNumber":"","reuseDayNumber":"","imageNumber":"1000","accuracy":"70"}}]
Response items
modelId: String. The model ID.
modelName: String. The model name.
productType: String. The product type.
createdBy: String. The model owner.
updatedTime: Time. The last time that the model was updated.
productType: String. The model product type.
description: String. The model description.
groupIds: String. The model data group ID.
dataFormat: String. The model data format.
retrainPolicy: JSON Object. The model retrain policy.
scheduler: Time. The model retrain date, which in Monday to Sunday.
imageNumber: Integer. An image number that is greater than this numbercan be retrained.
Chapter 7. Application programming interface 69
accuracy: Double. A model accuracy value that is less than this numbercan be retrained.
parameters: JSON Object. Contains image size and model confidenceinformation.
confidence: Double. The model defined confidence value.
Sample callcurl -k -H"APIKEY:8b79658225de53488321fb7bb657f9f161acd2ea830a5afb8c149f6aab2c77d4f0579e533dd34ggb959317ac69ff73f886fc3713bf305a158fdf485cc6f275f5"-H "Content-Type:application/json;charset=UTF-8" "https://9.112.229.91/ibm/iotm/service/model?&tenant=VITest&solution=vi&user=auto_mm"--data ’ [{"modelName":"testcreatemodel11","imagegroupList":"[{\"id\":\"b5164942-370c-418d-9fc2-f6ffd860b79d\",\"dataFiles\":[{\"id\":\"b5164942-370c-418d-9fc2-f6ffd860b79d--b5164942-370c-418d-9fc2-f6ffd860b79d_74674410-06df-4a9e-a9e9-12f5038efc22\",\"name\":\"Good_val.zip\",\"count\":5,\"updatedTime\":\"12/27/2017,10:38:13 AM\"}],\"name\":\"Good\",\"updatedTime\":\"12/27/2017,10:36:10 AM\"}]","productType":"testcreatemodel11","dataFormat":"png","modelType":"classification","retrainPolicy":{"imageNumber":"1000","accuracy":"70","scheduler":"Weekly, Sunday","reuseDayNumber":"","maxPieceNumber":"","ratio":""},"description":"this is a test","groupIds":"b5164942-370c-418d-9fc2-f6ffd860b79d","parameters":{"imageSize":"100*100","confidence":100,"trainParam":{"ratioTrain":80,"ratioVal":20,"gamma":0.1,"stepsize":33,"maxIter":100,"learningRate":0.01,"learningRatePolicy":"step","test_iter":1,"test_interval":2,"snapshot":10,"network":"GoogLeNet","algorithm":"CNN"}}}]’
Notes The system uses the APIKEY to do authentication. If you do not providean APIKEY, the system refuses your request.
Update a modelUpdates one existing model. The model manager has authority to use this API.
URL
/ibm/iotm/service/model/modelId
Method
The request type PUT
URL parameters
modelId: String. The model ID. Mandatory.
user: String. Used to identify the user. Mandatory.
solution: String. Used to identify the solution. Mandatory.
tenant: String. Used to identify the tenant. Optional.
Headers
Content-type: application/json.
APIKEY: encrypted key. The API key, which is used for authentication.Mandatory.
Data parameters
groupIds: String. The data group ID.
Sample body[{"groupIds":"45805b3c-f234-4f18-a55e-61ce203a7db4,678a3f42-f9d4-48a2-bb29-c226d61a08ea"}]
70 User Guide
Success response200[{}]
Response items
None
Sample callcurl -k -H"APIKEY:8b79658225de53488321fb7bb657f9f161acd2ea830a5afb8c149f6aab2c77d4f0579e533dd34ggb959317ac69ff73f886fc3713bf305a158fdf485cc6f275f5" -H "Content-Type:application/json;charset=UTF-8" -X PUT "https://9.112.229.91:9447/ibm/iotm/service/model/106efcb7-1338-4ed2-b8ca-27b45e11e865?user=auto_mm&solution=vi" --data ’[{"groupIds":"9f7aa9d6-24d6-4611-8d4d-79a52d2bab02"}]’
Notes The system uses the APIKEY to do authentication. If you do not providean APIKEY, the system refuses your request.
Delete one modelDeletes one existing model and all related model instances. The model managerhas authority to use this API.
URL
/ibm/iotm/service/model/modelId
Method
The request type DELETE
URL parameters
modelId: String. The model ID. Mandatory.
user: String. Used to identify the user. Mandatory.
solution: String. Used to identify the solution. Mandatory.
tenant: String. Used to identify the tenant. Optional.
Headers
APIKEY: encrypted key. The API key, which is used for authentication.Mandatory.
Data parameters
None
Sample body[{}]
Success response200[{}]
Response items
None
Sample callcurl -k -X DELETE -H "APIKEY:8b79658225de53488321fb7bb657f9f161acd2ea830a5afb8c149f6aab2c77d4f0579e533dd34ggb959317ac69ff73f886fc3713bf305a158fdf485cc6f275f5""https://9.112.229.91:9447/ibm/iotm/service/model/106efcb7-1338-4ed2-b8ca-27b45e11e865?user=auto_mm&solution=vi” -d '[{}]'
Chapter 7. Application programming interface 71

Notes The system uses the APIKEY to do authentication. If you do not providean APIKEY, the system refuses your request.
Get all shared modelsGets all shared models. The model manager has authority to use this API.
URL
/ibm/iotm/service/model/
Method
The request type GET
URL parameters
category:’shared’. Used to identify the model catalog. Mandatory.
user: String. Used to identify the user. Mandatory.
solution: String. Used to identify the solution. Mandatory.
tenant: String. Used to identify the tenant. Optional.
HeadersAPIKEY: encrypted key. The API key, which is used for authentication.Mandatory.
Data parameters
None
Sample body
None
Success response[{"modelId":"0f9c8d47-5ccc-4e52-8e0d-0596e792a2cd","groupIds":"e5e83a2d-5814-45b3-af40-74096198cd39","modelName":"Car Seat Defect Inspection","createdBy":"[email protected]","modelType":"objectdetection","description":"This is the objectdetection model we build to detect the wrinkle defect for car seat.The inspection result will identify whether there is wrinkle defecton the car and localize the defect on the image.","statusStatistics":{"deployed":"1"},"dataFormat":"jpg","retrainPolicy":{"scheduler":"Weekly, Sunday","ratio":"","reuseDayNumber":"","maxPieceNumber":"","imageNumber":"1000","accuracy":"70"},"trainedBy":"[email protected]","parameters":{"odRetrainUrl":"\/user\/VI\/VI\/modellist\/carseatfrcnn_1516957839865.zip","lastRetrainData":"[{\"groupId\":\"e5e83a2d-5814-45b3-af40-74096198cd39\"}]","imageSize":"100*100","confidence":"100"},"updatedTime":"2018-01-26T03:11:05.804-06:00","productType":"carseat"}]
Response items
modelId: String. The model ID.
groupIds: String. The model data group ID.
modelName: String. The model name.
createdBy: String. The model owner.
modelType: String. The model type.
description: String. The model description.
updatedTime: Time. The last time that the model was updated.
72 User Guide
productType: String. The model product type.
StatusStatistics: String. The model status.
dataFormat: String. The model data format.
retrainPolicy: JSON Object. The model retrain policy.
scheduler: Time. The model retrain date, which in Monday to Sunday.
imageNumber: Integer. An image number that is greater than this numbercan be retrained.
accuracy: Double. A model accuracy value that is less than this numbercan be retrained.
parameters: JSON Object. Contains image size and model confidenceinformation.
imageSize: Double * Double. The image size.
confidence: Double. The model defined confidence value.
Sample callcurl -k -H"APIKEY:8b79658225de53488321fb7bb657f9f161acd2ea830a5afb8c149f6aab2c77d4f0579e533dd34ggb959317ac69ff73f886fc3713bf305a158fdf485cc6f275f5" " https://9.112.229.91:9447/ibm/iotm/service/model?category=shared&tenant=Q3T1&solution=vi&user=testuser"
Notes The system uses the APIKEY to do authentication. If you do not providean APIKEY, the system refuses your request.
Model instance servicesThe model instance services enable you to perform such tasks as creating a modelinstance, returning a model instance belonging to a model, and returning onemodel instance.
Create a model instanceCreates a model instance. The model manager has authority to use this API.
URL
/ibm/iotm/service/modelInstance
Method
The request type POST
URL parameters
user: String. Used to identify the user. Mandatory.
solution: String. Used to identify the solution. Mandatory.
tenant: String. Used to identify the tenant. Optional.
Headers
Content-type: application/json.
APIKEY: encrypted key. The API key, which is used for authentication.Mandatory.
Data parameters
Chapter 7. Application programming interface 73
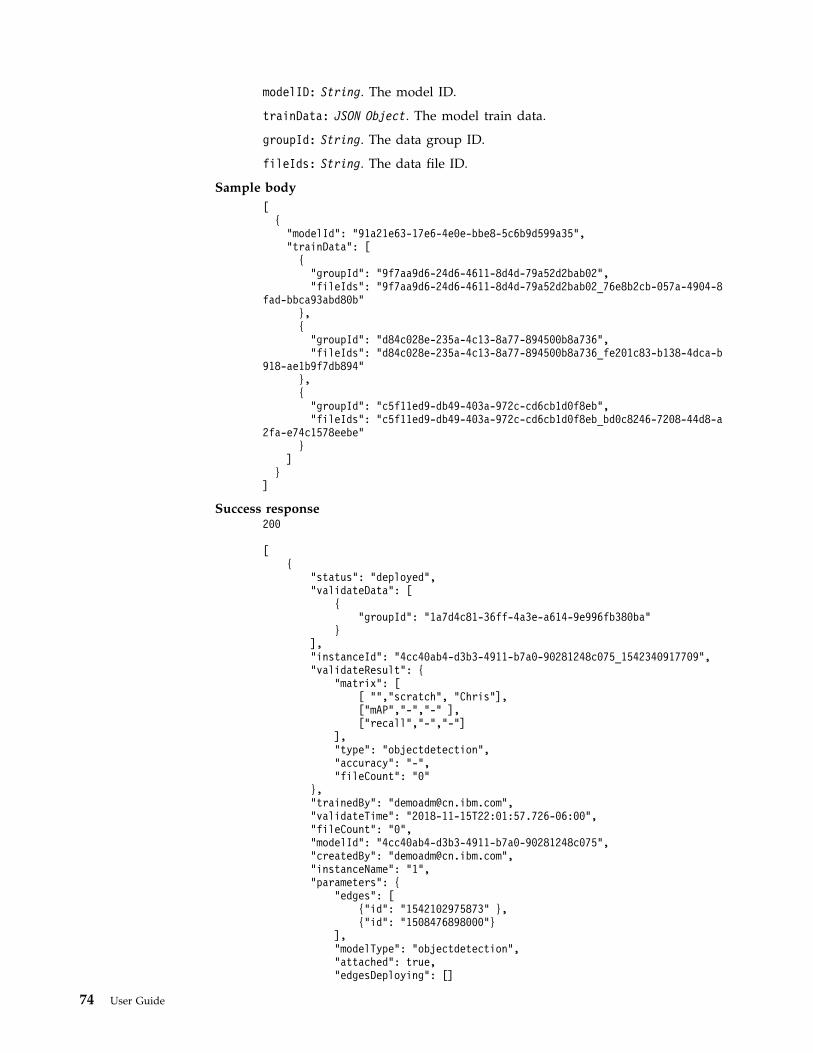
modelID: String. The model ID.
trainData: JSON Object. The model train data.
groupId: String. The data group ID.
fileIds: String. The data file ID.
Sample body[
{"modelId": "91a21e63-17e6-4e0e-bbe8-5c6b9d599a35","trainData": [{
"groupId": "9f7aa9d6-24d6-4611-8d4d-79a52d2bab02","fileIds": "9f7aa9d6-24d6-4611-8d4d-79a52d2bab02_76e8b2cb-057a-4904-8
fad-bbca93abd80b"},{
"groupId": "d84c028e-235a-4c13-8a77-894500b8a736","fileIds": "d84c028e-235a-4c13-8a77-894500b8a736_fe201c83-b138-4dca-b
918-ae1b9f7db894"},{
"groupId": "c5f11ed9-db49-403a-972c-cd6cb1d0f8eb","fileIds": "c5f11ed9-db49-403a-972c-cd6cb1d0f8eb_bd0c8246-7208-44d8-a
2fa-e74c1578eebe"}
]}
]
Success response200
[{
"status": "deployed","validateData": [
{"groupId": "1a7d4c81-36ff-4a3e-a614-9e996fb380ba"
}],"instanceId": "4cc40ab4-d3b3-4911-b7a0-90281248c075_1542340917709","validateResult": {
"matrix": [[ "","scratch", "Chris"],["mAP","-","-" ],["recall","-","-"]
],"type": "objectdetection","accuracy": "-","fileCount": "0"
},"trainedBy": "[email protected]","validateTime": "2018-11-15T22:01:57.726-06:00","fileCount": "0","modelId": "4cc40ab4-d3b3-4911-b7a0-90281248c075","createdBy": "[email protected]","instanceName": "1","parameters": {
"edges": [{"id": "1542102975873" },{"id": "1508476898000"}
],"modelType": "objectdetection","attached": true,"edgesDeploying": []
74 User Guide
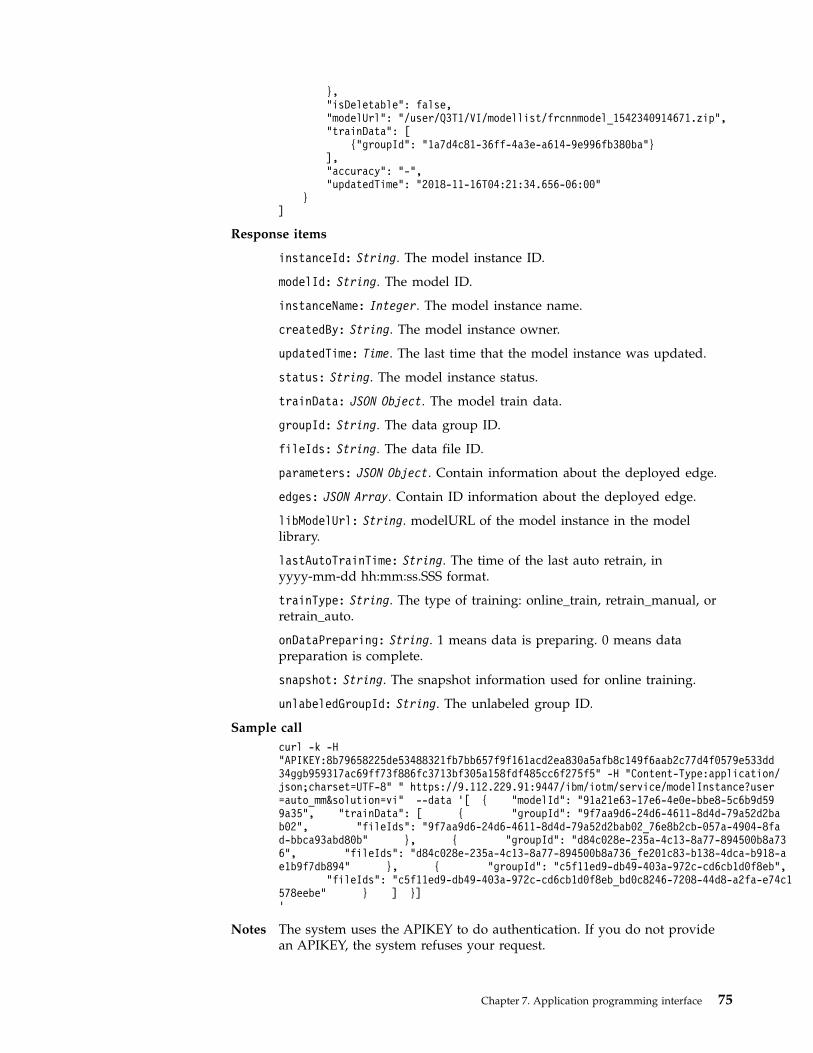
},"isDeletable": false,"modelUrl": "/user/Q3T1/VI/modellist/frcnnmodel_1542340914671.zip","trainData": [
{"groupId": "1a7d4c81-36ff-4a3e-a614-9e996fb380ba"}],"accuracy": "-","updatedTime": "2018-11-16T04:21:34.656-06:00"
}]
Response items
instanceId: String. The model instance ID.
modelId: String. The model ID.
instanceName: Integer. The model instance name.
createdBy: String. The model instance owner.
updatedTime: Time. The last time that the model instance was updated.
status: String. The model instance status.
trainData: JSON Object. The model train data.
groupId: String. The data group ID.
fileIds: String. The data file ID.
parameters: JSON Object. Contain information about the deployed edge.
edges: JSON Array. Contain ID information about the deployed edge.
libModelUrl: String. modelURL of the model instance in the modellibrary.
lastAutoTrainTime: String. The time of the last auto retrain, inyyyy-mm-dd hh:mm:ss.SSS format.
trainType: String. The type of training: online_train, retrain_manual, orretrain_auto.
onDataPreparing: String. 1 means data is preparing. 0 means datapreparation is complete.
snapshot: String. The snapshot information used for online training.
unlabeledGroupId: String. The unlabeled group ID.
Sample callcurl -k -H"APIKEY:8b79658225de53488321fb7bb657f9f161acd2ea830a5afb8c149f6aab2c77d4f0579e533dd34ggb959317ac69ff73f886fc3713bf305a158fdf485cc6f275f5" -H "Content-Type:application/json;charset=UTF-8" " https://9.112.229.91:9447/ibm/iotm/service/modelInstance?user=auto_mm&solution=vi" --data ’[ { "modelId": "91a21e63-17e6-4e0e-bbe8-5c6b9d599a35", "trainData": [ { "groupId": "9f7aa9d6-24d6-4611-8d4d-79a52d2bab02", "fileIds": "9f7aa9d6-24d6-4611-8d4d-79a52d2bab02_76e8b2cb-057a-4904-8fad-bbca93abd80b" }, { "groupId": "d84c028e-235a-4c13-8a77-894500b8a736", "fileIds": "d84c028e-235a-4c13-8a77-894500b8a736_fe201c83-b138-4dca-b918-ae1b9f7db894" }, { "groupId": "c5f11ed9-db49-403a-972c-cd6cb1d0f8eb",
"fileIds": "c5f11ed9-db49-403a-972c-cd6cb1d0f8eb_bd0c8246-7208-44d8-a2fa-e74c1578eebe" } ] }]’
Notes The system uses the APIKEY to do authentication. If you do not providean APIKEY, the system refuses your request.
Chapter 7. Application programming interface 75
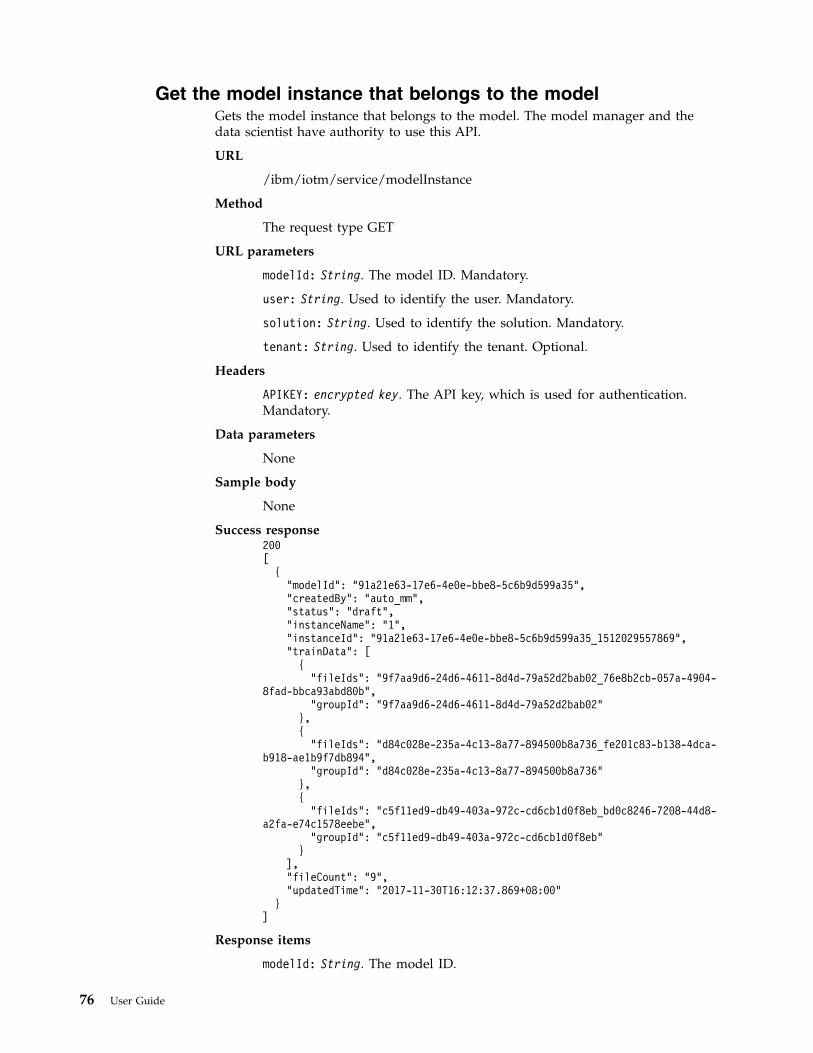
Get the model instance that belongs to the modelGets the model instance that belongs to the model. The model manager and thedata scientist have authority to use this API.
URL
/ibm/iotm/service/modelInstance
Method
The request type GET
URL parameters
modelId: String. The model ID. Mandatory.
user: String. Used to identify the user. Mandatory.
solution: String. Used to identify the solution. Mandatory.
tenant: String. Used to identify the tenant. Optional.
Headers
APIKEY: encrypted key. The API key, which is used for authentication.Mandatory.
Data parameters
None
Sample body
None
Success response200[
{"modelId": "91a21e63-17e6-4e0e-bbe8-5c6b9d599a35","createdBy": "auto_mm","status": "draft","instanceName": "1","instanceId": "91a21e63-17e6-4e0e-bbe8-5c6b9d599a35_1512029557869","trainData": [{
"fileIds": "9f7aa9d6-24d6-4611-8d4d-79a52d2bab02_76e8b2cb-057a-4904-8fad-bbca93abd80b",
"groupId": "9f7aa9d6-24d6-4611-8d4d-79a52d2bab02"},{
"fileIds": "d84c028e-235a-4c13-8a77-894500b8a736_fe201c83-b138-4dca-b918-ae1b9f7db894",
"groupId": "d84c028e-235a-4c13-8a77-894500b8a736"},{
"fileIds": "c5f11ed9-db49-403a-972c-cd6cb1d0f8eb_bd0c8246-7208-44d8-a2fa-e74c1578eebe",
"groupId": "c5f11ed9-db49-403a-972c-cd6cb1d0f8eb"}
],"fileCount": "9","updatedTime": "2017-11-30T16:12:37.869+08:00"
}]
Response items
modelId: String. The model ID.
76 User Guide
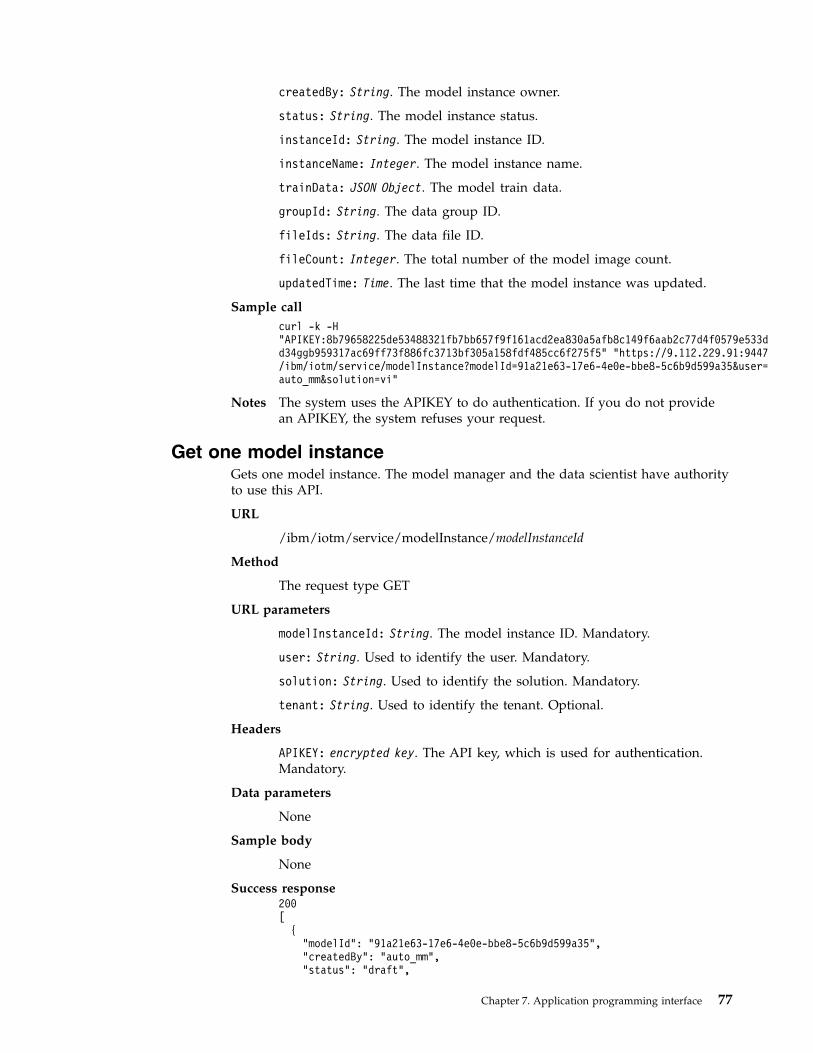
createdBy: String. The model instance owner.
status: String. The model instance status.
instanceId: String. The model instance ID.
instanceName: Integer. The model instance name.
trainData: JSON Object. The model train data.
groupId: String. The data group ID.
fileIds: String. The data file ID.
fileCount: Integer. The total number of the model image count.
updatedTime: Time. The last time that the model instance was updated.
Sample callcurl -k -H"APIKEY:8b79658225de53488321fb7bb657f9f161acd2ea830a5afb8c149f6aab2c77d4f0579e533dd34ggb959317ac69ff73f886fc3713bf305a158fdf485cc6f275f5" "https://9.112.229.91:9447/ibm/iotm/service/modelInstance?modelId=91a21e63-17e6-4e0e-bbe8-5c6b9d599a35&user=auto_mm&solution=vi"
Notes The system uses the APIKEY to do authentication. If you do not providean APIKEY, the system refuses your request.
Get one model instanceGets one model instance. The model manager and the data scientist have authorityto use this API.
URL
/ibm/iotm/service/modelInstance/modelInstanceId
Method
The request type GET
URL parameters
modelInstanceId: String. The model instance ID. Mandatory.
user: String. Used to identify the user. Mandatory.
solution: String. Used to identify the solution. Mandatory.
tenant: String. Used to identify the tenant. Optional.
Headers
APIKEY: encrypted key. The API key, which is used for authentication.Mandatory.
Data parameters
None
Sample body
None
Success response200[
{"modelId": "91a21e63-17e6-4e0e-bbe8-5c6b9d599a35","createdBy": "auto_mm","status": "draft",
Chapter 7. Application programming interface 77
"instanceName": "1","instanceId": "91a21e63-17e6-4e0e-bbe8-5c6b9d599a35_1512029557869","trainData": [{
"fileIds": "9f7aa9d6-24d6-4611-8d4d-79a52d2bab02_76e8b2cb-057a-4904-8fad-bbca93abd80b",
"groupId": "9f7aa9d6-24d6-4611-8d4d-79a52d2bab02"},{
"fileIds": "d84c028e-235a-4c13-8a77-894500b8a736_fe201c83-b138-4dca-b918-ae1b9f7db894",
"groupId": "d84c028e-235a-4c13-8a77-894500b8a736"},{
"fileIds": "c5f11ed9-db49-403a-972c-cd6cb1d0f8eb_bd0c8246-7208-44d8-a2fa-e74c1578eebe",
"groupId": "c5f11ed9-db49-403a-972c-cd6cb1d0f8eb"}
],"updatedTime": "2017-11-30T16:12:37.869+08:00"
}]
Response items
instanceId: String. The model instance ID.
modelId: String. The model ID.
instanceName: Integer. The model instance name.
createdBy: String. The model instance owner.
updatedTime: Time. The last time that the model instance was updated.
status: String. The model instance status.
trainData: JSON Object. The model train data.
groupId: String. The data group ID.
fileIds: String. The data file ID.
Sample callcurl -k -H"APIKEY:8b79658225de53488321fb7bb657f9f161acd2ea830a5afb8c149f6aab2c77d4f0579e533dd34ggb959317ac69ff73f886fc3713bf305a158fdf485cc6f275f5""https://9.112.229.91:9447/ibm/iotm/service/modelInstance/91a21e63-17e6-4e0e-bbe8-5c6b9d599a35_1512029557869?user=auto_mm&solution=vi"
Notes The system uses the APIKEY to do authentication. If you do not providean APIKEY, the system refuses your request.
Get the model instance validation resultGets the model instance validation result for the report. The model manager andthe data scientist have authority to use this API.
URL
/ibm/iotm/service/modelInstance/modelInstanceId/validateResult
Method
The request type GET
URL parameters
modelInstanceId: String. The model instance ID. Mandatory.
78 User Guide
user: String. Used to identify the user. Mandatory.
solution: String. Used to identify the solution. Mandatory.
tenant: String. Used to identify the tenant. Optional.
Headers
APIKEY: encrypted key. The API key, which is used for authentication.Mandatory.
Data parameters
None
Sample body
None
Success response200[
{"instanceName": "FirstBlood_2017-08-08 19:21:53.888","validateResult": {
"matrix": [[
"","type1","type2","type3"
],[
"type1","77,35,45","0,0,40","6,3,50"
],[
"type2","17,8,45","100,40,40","4,2,50"
],[
"type3","4,2,45","0,0,40","90,45,50"
],[
"Total","45","40","50"
]],"accuracy": "84.56"
},"validateTime": "2017-08-09T22:58:46.416+08:00","fileCount": "200"
}]
Response items
instanceName: Integer. The model instance name.
validateResults: JSON Object. The model instance validation result.
Chapter 7. Application programming interface 79
validateTime: Time. The model instance validation time.
fileCount: Integer. The model instance image number.
accuracy: Double. The model instance accuracy value.
Sample callcurl -k -H"APIKEY:8b79658225de53488321fb7bb657f9f161acd2ea830a5afb8c149f6aab2c77d4f0579e533dd34ggb959317ac69ff73f886fc3713bf305a158fdf485cc6f275f5" "https://9.112.229.91:9447/ibm/iotm/service/modelInstance/91a21e63-17e6-4e0e-bbe8-5c6b9d599a35_1512029557869/validateResult?user=auto_mm&solution=vi"
Notes The system uses the APIKEY to do authentication. If you do not providean APIKEY, the system refuses your request.
Inspection result servicesThe inspection result services enable you to perform such tasks as getting aninspection result list, getting inspection result details, and getting an inspectionresult cell overview.
Get the inspection result listGets the inspection result list. The inspector and the supervisor have authority touse this API.
URL
/ibm/iotm/service/inspectResult
Method
The request type GET
URL parameters
user: String. Used to identify the user. Mandatory.
solution: String. Used to identify the solution. Mandatory.
tenant: String. Used to identify the tenant. Optional.
isConfirmed: Integer. A 0 means that the inspection result is unconfirmed.A 1 means that the inspection result is confirmed. A 2 means that theinspection result is unknown. Optional.
cell: String. Used to identify the cell. Optional.
inspectTime: Time. Used to identify the time of the inspection.
reverse: Boolean. Used to identify the order of the inspection result list.
pageCount: Integer. The page count.
sampleRate: Integer. The sample check rate.
Headers
APIKEY: encrypted key. The API key, which is used for authentication.Mandatory.
Data parameters
None
Sample body
None
80 User Guide
Success response200[{"id":"plant1,line1,cell1_1511768220935_AUTO|auto_1511768206483.jpg","isConfirmed":"0","inspectFileUrl":"imageserver\/911222954\/\/AUTO|auto_plant1_line1_cell1_1511768206483.jpg","isUpdated":"0","defectTypeCount":"1","cell":"plant1,line1,cell1","instanceId":"ebf94e98-958c-48b0-8377-826241ffccd8_1511765289053","defectCount":"1","confidence":"99.87","inspectId":"auto_1511768206483.jpg","inspectTime":"1511768220935"},{"id":"plant1,line1,cell1_1511761780903_AUTO|auto_1511761766470.jpg","isConfirmed":"0","inspectFileUrl":"imageserver\/911222954\/\/AUTO|auto_plant1_line1_cell1_1511761766470.jpg","isUpdated":"0","defectTypeCount":"1","cell":"plant1,line1,cell1","instanceId":"9ab990d6-465a-48b0-838c-416c8e4a9879_1511761328538","defectCount":"1","confidence":"99.79","inspectId":"auto_1511761766470.jpg","inspectTime":"1511761780903"},{"id":"plant1,line1,cell1_1511761559536_AUTO|auto_1511761541254.jpg","isConfirmed":"0","inspectFileUrl":"imageserver\/911222954\/\/AUTO|auto_plant1_line1_cell1_1511761541254.jpg","isUpdated":"0","defectTypeCount":"1","cell":"plant1,line1,cell1","instanceId":"9ab990d6-465a-48b0-838c-416c8e4a9879_1511761328538","defectCount":"1","confidence":"99.87","inspectId":"auto_1511761541254.jpg","inspectTime":"1511761559536"},{"id":"plant1,line1,cell1_1511421414687_AUTO|auto_1511421410914.jpg","isConfirmed":"0","inspectFileUrl":"imageserver\/911222954\/\/AUTO|auto_plant1_line1_cell1_1511421410914.jpg","isUpdated":"0","defectTypeCount":"1","cell":"plant1,line1,cell1","instanceId":"ae509ec0-e1d6-4827-afd1-a8af598eb28c_1511419442550","defectCount":"1","confidence":"99.99","inspectId":"auto_1511421410914.jpg","inspectTime":"1511421414687"}]
Response items
id: String. The inspection ID.
isConfirmed: Integer. A 0 means that the inspection result is unconfirmed.A 1 means that the inspection result is confirmed. A 2 means that theinspection result is unknown.
cell: String. The cell information.
inspectFileUrl: String. The inspection file URL.
defectTypeCount: Integer. The number of defect types.
defectCount: Integer. The defect number.
confidence: Double. The confidence level of the defect.
inspectId: String. The inspection ID.
inspectTime: Time. The time of inspection.
Sample callcurl -k -H"APIKEY: 8b79658225de53488321fb7bb657f9f161acd2ea830a5afb8c149f6aab2c77d4f0579e533dd34ggb959317ac69ff73f886fc3713bf305a158fdf485cc6f275f5" "https://9.112.229.91:9447/ibm/iotm/service/inspectResult?user=auto_inspector&solution=vi&isConfirmed=0&cell=plant1,line1,cell1&sampleRate=10&pageCount=1&reverse=true"
Notes The system uses the APIKEY to do authentication. If you do not providean APIKEY, the system refuses your request.
Get the inspection result detailsGets the inspection result details. The inspector and the supervisor have authorityto use this API.
Chapter 7. Application programming interface 81
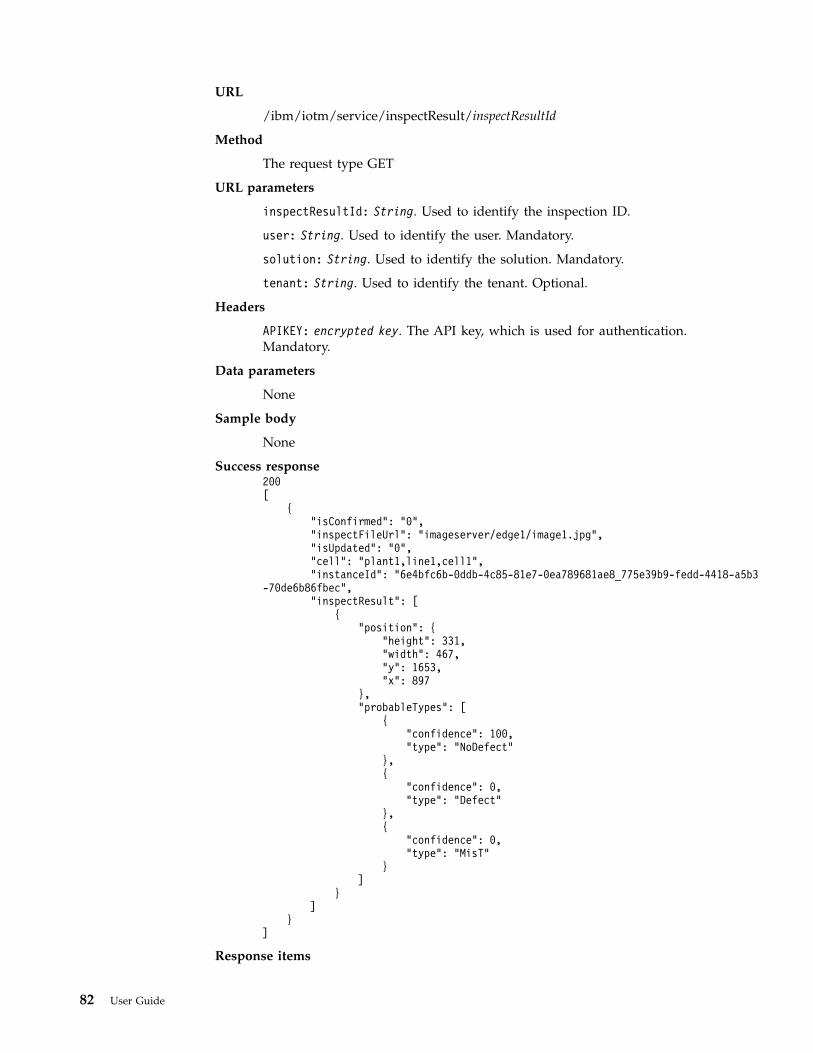
URL
/ibm/iotm/service/inspectResult/inspectResultId
Method
The request type GET
URL parameters
inspectResultId: String. Used to identify the inspection ID.
user: String. Used to identify the user. Mandatory.
solution: String. Used to identify the solution. Mandatory.
tenant: String. Used to identify the tenant. Optional.
Headers
APIKEY: encrypted key. The API key, which is used for authentication.Mandatory.
Data parameters
None
Sample body
None
Success response200[
{"isConfirmed": "0","inspectFileUrl": "imageserver/edge1/image1.jpg","isUpdated": "0","cell": "plant1,line1,cell1","instanceId": "6e4bfc6b-0ddb-4c85-81e7-0ea789681ae8_775e39b9-fedd-4418-a5b3
-70de6b86fbec","inspectResult": [
{"position": {
"height": 331,"width": 467,"y": 1653,"x": 897
},"probableTypes": [
{"confidence": 100,"type": "NoDefect"
},{
"confidence": 0,"type": "Defect"
},{
"confidence": 0,"type": "MisT"
}]
}]
}]
Response items
82 User Guide
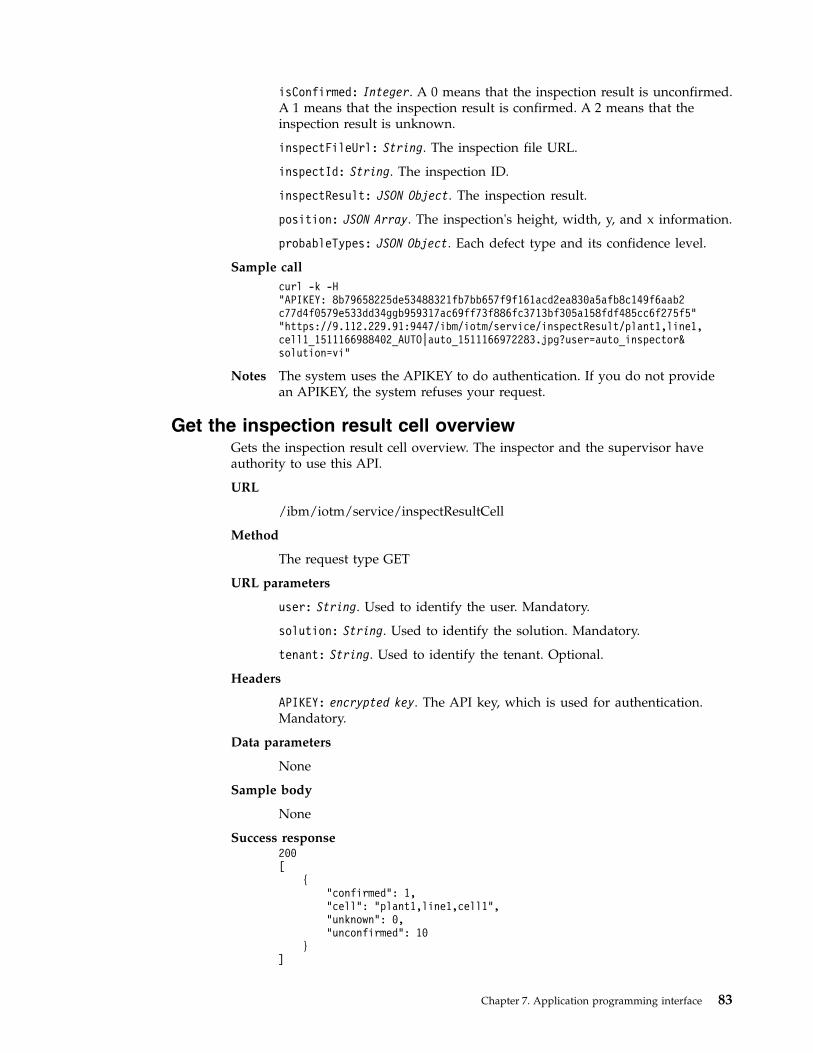
isConfirmed: Integer. A 0 means that the inspection result is unconfirmed.A 1 means that the inspection result is confirmed. A 2 means that theinspection result is unknown.
inspectFileUrl: String. The inspection file URL.
inspectId: String. The inspection ID.
inspectResult: JSON Object. The inspection result.
position: JSON Array. The inspection's height, width, y, and x information.
probableTypes: JSON Object. Each defect type and its confidence level.
Sample callcurl -k -H"APIKEY: 8b79658225de53488321fb7bb657f9f161acd2ea830a5afb8c149f6aab2c77d4f0579e533dd34ggb959317ac69ff73f886fc3713bf305a158fdf485cc6f275f5""https://9.112.229.91:9447/ibm/iotm/service/inspectResult/plant1,line1,cell1_1511166988402_AUTO|auto_1511166972283.jpg?user=auto_inspector&solution=vi"
Notes The system uses the APIKEY to do authentication. If you do not providean APIKEY, the system refuses your request.
Get the inspection result cell overviewGets the inspection result cell overview. The inspector and the supervisor haveauthority to use this API.
URL
/ibm/iotm/service/inspectResultCell
Method
The request type GET
URL parameters
user: String. Used to identify the user. Mandatory.
solution: String. Used to identify the solution. Mandatory.
tenant: String. Used to identify the tenant. Optional.
Headers
APIKEY: encrypted key. The API key, which is used for authentication.Mandatory.
Data parameters
None
Sample body
None
Success response200[
{"confirmed": 1,"cell": "plant1,line1,cell1","unknown": 0,"unconfirmed": 10
}]
Chapter 7. Application programming interface 83
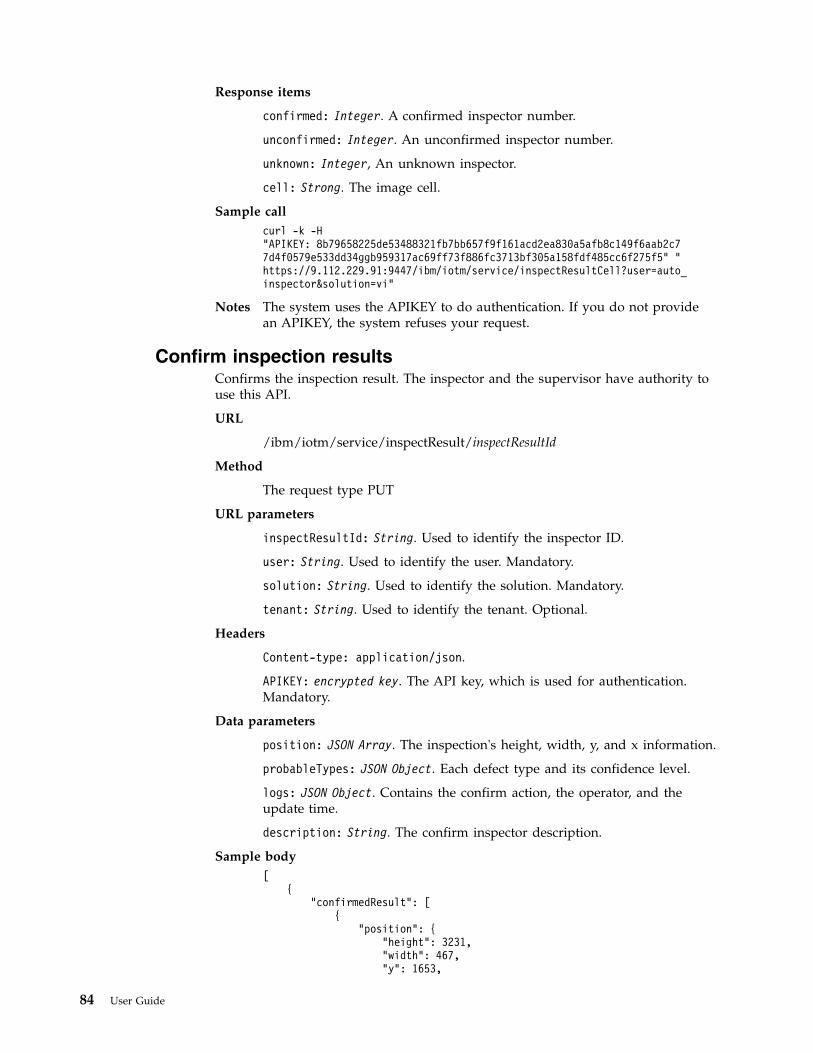
Response items
confirmed: Integer. A confirmed inspector number.
unconfirmed: Integer. An unconfirmed inspector number.
unknown: Integer, An unknown inspector.
cell: Strong. The image cell.
Sample callcurl -k -H"APIKEY: 8b79658225de53488321fb7bb657f9f161acd2ea830a5afb8c149f6aab2c77d4f0579e533dd34ggb959317ac69ff73f886fc3713bf305a158fdf485cc6f275f5" "https://9.112.229.91:9447/ibm/iotm/service/inspectResultCell?user=auto_inspector&solution=vi"
Notes The system uses the APIKEY to do authentication. If you do not providean APIKEY, the system refuses your request.
Confirm inspection resultsConfirms the inspection result. The inspector and the supervisor have authority touse this API.
URL
/ibm/iotm/service/inspectResult/inspectResultId
Method
The request type PUT
URL parameters
inspectResultId: String. Used to identify the inspector ID.
user: String. Used to identify the user. Mandatory.
solution: String. Used to identify the solution. Mandatory.
tenant: String. Used to identify the tenant. Optional.
Headers
Content-type: application/json.
APIKEY: encrypted key. The API key, which is used for authentication.Mandatory.
Data parameters
position: JSON Array. The inspection's height, width, y, and x information.
probableTypes: JSON Object. Each defect type and its confidence level.
logs: JSON Object. Contains the confirm action, the operator, and theupdate time.
description: String. The confirm inspector description.
Sample body[
{"confirmedResult": [
{"position": {
"height": 3231,"width": 467,"y": 1653,
84 User Guide
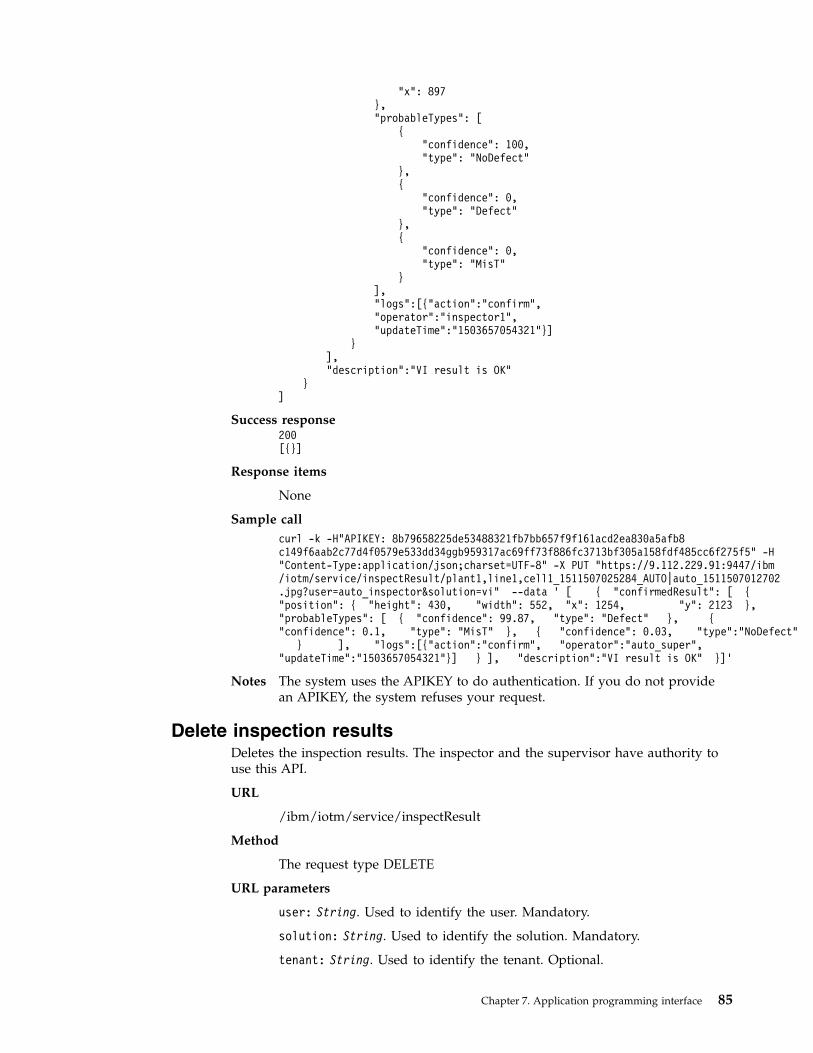
"x": 897},"probableTypes": [
{"confidence": 100,"type": "NoDefect"
},{
"confidence": 0,"type": "Defect"
},{
"confidence": 0,"type": "MisT"
}],"logs":[{"action":"confirm","operator":"inspector1","updateTime":"1503657054321"}]
}],"description":"VI result is OK"
}]
Success response200[{}]
Response items
None
Sample callcurl -k -H"APIKEY: 8b79658225de53488321fb7bb657f9f161acd2ea830a5afb8c149f6aab2c77d4f0579e533dd34ggb959317ac69ff73f886fc3713bf305a158fdf485cc6f275f5" -H"Content-Type:application/json;charset=UTF-8" -X PUT "https://9.112.229.91:9447/ibm/iotm/service/inspectResult/plant1,line1,cell1_1511507025284_AUTO|auto_1511507012702.jpg?user=auto_inspector&solution=vi" --data ’ [ { "confirmedResult": [ {"position": { "height": 430, "width": 552, "x": 1254, "y": 2123 },"probableTypes": [ { "confidence": 99.87, "type": "Defect" }, {"confidence": 0.1, "type": "MisT" }, { "confidence": 0.03, "type":"NoDefect"
} ], "logs":[{"action":"confirm", "operator":"auto_super","updateTime":"1503657054321"}] } ], "description":"VI result is OK" }]’
Notes The system uses the APIKEY to do authentication. If you do not providean APIKEY, the system refuses your request.
Delete inspection resultsDeletes the inspection results. The inspector and the supervisor have authority touse this API.
URL
/ibm/iotm/service/inspectResult
Method
The request type DELETE
URL parameters
user: String. Used to identify the user. Mandatory.
solution: String. Used to identify the solution. Mandatory.
tenant: String. Used to identify the tenant. Optional.
Chapter 7. Application programming interface 85
cell: String. Used to identify the cell. Mandatory.
inspectTime: Time. Used to identify the time of the inspection. Theinspection results that occur before this time are deleted. Optional.
instanceId: String. Used to identify the instance ID. The inspectionresults that are produced by this instance ID are deleted. Optional.
Headers
APIKEY: encrypted key. The API key, which is used for authentication.Mandatory.
Data parametersNone.
Sample bodyNone.
Success response200[{}]
Response items
None.
Sample callcurl -k -H "APIKEY: 8b79658225de53488321fb7bb657f9f161acd2ea830a5afb8c149f6aab2c77d4f0579e533dd34ggb959317ac69ff73f886fc3713bf305a158fdf485cc6f275f5"-H "Content-Type:application/json;charset=UTF-8" -X DELETE"https:// 9.112.229.91:9447/ibm/iotm/service/inspectResult?instanceId=04b61494-99ec-49f4-9a0f-0125650c40dd_1520316716077&tenant=Q3T1&solution=vi&[email protected]&cell=plant2,line2,cell2&inspectTime=1520324778324"
Notes The system uses the APIKEY to do authentication. If you do not providean APIKEY, the system refuses your request.
Model instance action servicesThe model instance action services enable you to perform such tasks as submittinga model instance, attaching a model file, and validating a model instance.
Train model instanceTrain a model instance by using a deep learning model. The model manager hasauthority to use this API.
URL
/ibm/iotm/service/modelInstance/modelInstanceId
Method
The request type PUT
URL parameters
modelInstanceId:String. The model instance ID. Mandatory.
action:String. The action. Set as train. Mandatory.
user:String. Identifies the user. Mandatory.
solution:String. Used to identify the solution. Mandatory.
86 User Guide

tenant:String. Used to identify the tenant. Optional.
Headers
Content-Type: application/json.
APIKEY: encrypted key. The API key, which is used for authentication.Mandatory.
Data parametersNone.
Sample body[{}]
Success response200
[{"status":"waiting","instanceId":"1e760614-ab0e-4c2a-be2e-435505087fe4_1518060853002","parameters":{"modelType":"classification","trainType":"online_train"}}]
Response items
status: String. The status of the retraining of the model instance.
instanceId: String. Model instance ID.
updatedTime: Time. The last time the model instance was updated.
parameters: JSON object. Information about the model type and trainingtype.
Sample callcurl -k -X PUT -H"APIKEY:8b79658225de53488321fb7bb657f9f161acd2ea830a5afb8c149f6aab2c77d4f0579e533dd34ggb959317ac69ff73f886fc3713bf305a158fdf485cc6f275f5" -H "Content-Type:application/json;charset=UTF-8""https://int_iotm.predictivesolutionsapps.ibmcloud.com/ibm/iotm/service/modelInstance/1e760614-ab0e-4c2a-be2e-435505087fe4_1518060853002?action=train&tenant=Q3T1&solution=vi&[email protected]" --data ’ [{}]’
Notes
This service prepares images and performs online training. You can checkthe status of the model instance by using the "Get one model instance" APIcall.
The system uses the APIKEY to do authentication. If you do not providean APIKEY, the system refuses your request.
Download a training log fileDownload a log file for the training of a model. The model manager has authorityto use this API.
URL
/ibm/iotm/vi/service/logFile
Method
The request type GET
URL parameters
Chapter 7. Application programming interface 87
instanceId:String. The model instance ID. Mandatory.
user:String. Identifies the user. Mandatory.
solution:String. Used to identify the solution. Mandatory.
tenant:String. Used to identify the tenant. Optional.
Headers
APIKEY: encrypted key. The API key, which is used for authentication.Mandatory.
Data parametersNone.
Sample bodyNone.
Success responseBinary content of the log file.
Response itemsNone.
Sample callcurl -k -H"APIKEY:8b79658225de53488321fb7bb657f9f161acd2ea830a5afb8c149f6aab2c77d4f0579e533dd34ggb959317ac69ff73f886fc3713bf305a158fdf485cc6f275f5""https://9.112.229.91:9447/ibm/iotm/vi/service/logFile?instanceId=06c870e5-1701-419a-8a84-0f40ee82fe33_11260029297&user=auto_mm&solution=vi"
Notes The system uses the APIKEY to do authentication. If you do not providean APIKEY, the system refuses your request.
Validate model instanceValidate a trained model instance. The model manager has authority to use thisAPI.
URL
/ibm/iotm/service/modelInstance/modelInstanceId
Method
The request type PUT
URL parameters
modelInstanceId:String. The model instance ID. Mandatory.
action:String. The action. Set as validate. Mandatory.
user:String. Identifies the user. Mandatory.
solution:String. Used to identify the solution. Mandatory.
tenant:String. Used to identify the tenant. Optional.
Headers
Content-type: application/json.
Content-Disposition: form-data; name="files[]";filename="model.zip".
APIKEY: encrypted key. The API key, which is used for authentication.Mandatory.
88 User Guide
Data parameters
validateData: JSON object. Model validation data.
groupId: String. The data group ID.
fileIds: String. The data file ID.
Sample body[{"validateData": [ {"fileIds": "9f7aa9d6-24d6-4611-8d4d-79a52d2bab02_76e8b2cb-057a-4904-8fad-bbca93abd80b", "groupId":"9f7aa9d6-24d6-4611-8d4d-79a52d2bab02" }, { "fileIds":"d84c028e-235a-4c13-8a77-894500b8a736_fe201c83-b138-4dca-b918-ae1b9f7db894","groupId": "d84c028e-235a-4c13-8a77-894500b8a736" },{ "fileIds": "c5f11ed9-db49-403a-972c-cd6cb1d0f8eb_bd0c8246-7208-44d8-a2fa-e74c1578eebe", "groupId": "c5f11ed9-db49-403a-972c-cd6cb1d0f8eb" } ] }]
Success response200[{"validateData":[{"fileIds":"9f7aa9d6-24d6-4611-8d4d-79a52d2bab02_76e8b2cb-057a-4904-8fad-bbca93abd80b","groupId":"9f7aa9d6-24d6-4611-8d4d-79a52d2bab02"},{"fileIds":"d84c028e-235a-4c13-8a77-894500b8a736_fe201c83-b138-4dca-b918-ae1b9f7db894","groupId":"d84c028e-235a-4c13-8a77-894500b8a736"},{"fileIds":"c5f11ed9-db49-403a-972c-cd6cb1d0f8eb_bd0c8246-7208-44d8-a2fa-e74c1578eebe","groupId":"c5f11ed9-db49-403a-972c-cd6cb1d0f8eb"}],"status":"validating","instanceId":"ef12294e-2d09-4acd-9946-00a09bdeeba2_1512092239371"}]
Response items
validateData: JSON Object. Model validation data.
groupId: String. Data group ID.
fileIds: String. Data file ID.
Sample callcurl -k -H "APIKEY:8b79658225de53488321fb7bb657f9f161acd2ea830a5afb8c149f6aab2c77d4f0579e533dd34ggb959317ac69ff73f886fc3713bf305a158fdf485cc6f275f5" -H "Content-Type:application/json;charset=UTF-8" -X PUT"https://9.112.229.91:9447/ibm/iotm/service/modelInstance/ef12294e-2d09-4acd-9946-00a09bdeeba2_1512092239371?action=validate&user=auto_mm&solution=vi"--data ’ [{"validateData": [ {"fileIds": "9f7aa9d6-24d6-4611-8d4d-79a52d2bab02_76e8b2cb-057a-4904-8fad-bbca93abd80b", "groupId":"9f7aa9d6-24d6-4611-8d4d-79a52d2bab02" }, { "fileIds":"d84c028e-235a-4c13-8a77-894500b8a736_fe201c83-b138-4dca-b918-ae1b9f7db894","groupId": "d84c028e-235a-4c13-8a77-894500b8a736" },{ "fileIds": "c5f11ed9-db49-403a-972c-cd6cb1d0f8eb_bd0c8246-7208-44d8-a2fa-e74c1578eebe","groupId": "c5f11ed9-db49-403a-972c-cd6cb1d0f8eb" } ] }]’
Notes The system uses the APIKEY to do authentication. If you do not providean APIKEY, the system refuses your request.
Reject model instanceReject a validated model instance. The model manager has authority to use thisAPI.
URL
/ibm/iotm/service/modelInstance/modelInstanceId
Method
The request type PUT
URL parameters
modelInstanceId:String. The model instance ID. Mandatory.
Chapter 7. Application programming interface 89
action:String. The action. Set as reject. Mandatory.
user:String. Identifies the user. Mandatory.
solution:String. Used to identify the solution. Mandatory.
tenant:String. Used to identify the tenant. Optional.
Headers
Content-type: application/json.
APIKEY: encrypted key. The API key, which is used for authentication.Mandatory.
Data parameters
None.
Sample body[{}]
Success response200[{"status": "rejected","instanceId": "e23b6796-4f4a-4c5d-8fb7-fa3f729f591c_1510812725969"}]
Response items
status: String. Model instance status.
instanceId: String. Model instance ID.
Sample callcurl -k -H "APIKEY:8b79658225de53488321fb7bb657f9f161acd2ea830a5afb8c149f6aab2c77d4f0579e533dd34ggb959317ac69ff73f886fc3713bf305a158fdf485cc6f275f5" -H "Content-Type:application/json;charset=UTF-8" -X PUT "https://9.112.229.91:9447/ibm/iotm/service/modelInstance/ef12294e-2d09-4acd-9946-00a09bdeeba2_1512092239371?action=reject&user=auto_mm&solution=vi" --data ’ [{}]’
Notes The system uses the APIKEY to do authentication. If you do not providean APIKEY, the system refuses your request.
Deploy model instanceDeploy an accepted model instance. The model manager has authority to use thisAPI.
URL
/ibm/iotm/service/modelInstance/modelInstanceId
Method
The request type PUT
URL parameters
modelInstanceId:String. The model instance ID. Mandatory.
action:String. The action. Set as publish. Mandatory.
user:String. Identifies the user. Mandatory.
solution:String. Used to identify the solution. Mandatory.
90 User Guide
tenant:String. Used to identify the tenant. Optional.
Parameters:JSON Object. The ID of the edges the model will be deployedon.
Headers
Content-type: application/json.
APIKEY: encrypted key. The API key, which is used for authentication.Mandatory.
Data parametersNone
Sample body[{"parameters": {"edges":[{"id":"1508476898000"},{"id":"1542102975873"},...]}}]
Success response[{"status":"deployed","instanceId":"96b651a9-2ba0-4392-aca4-1463320a19c2_1542354262146"}]
Response items
status: String. Model instance status.
instanceId: String. Model instance ID.
parameters: JSON Object. The name and the IP address of the edge.
modelType: String. The model type.
Sample callcurl -k -H"APIKEY:8b79658225de53488321fb7bb657f9f161acd2ea830a5afb8c149f6aab2c77d4f0579e533dd34ggb959317ac69ff73f886fc3713bf305a158fdf485cc6f275f5"-H "Content-Type:application/json;charset=UTF-8" -X PUT"https://9.112.229.91:9447/ibm/iotm/service/modelInstance/ef12294e-2d09-4acd-9946-00a09bdeeba2_1512092239371?action=publish&user=auto_mm&solution=vi" --data ’[{“parameters": {"edges":[{"id":"1508476898000"},{"id":"1542102975873"},...]}}]’
Notes The system uses the APIKEY to do authentication. If you do not providean APIKEY, the system refuses your request.
Retrain model instanceRetrain a deployed model instance. The model manager has authority to use thisAPI.
URL
/ibm/iotm/service/modelInstance/modelInstanceId
Method
The request type PUT
URL parameters
modelInstanceId:String. The model instance ID. Mandatory.
action:String. The action. Set as retrain. Mandatory.
user:String. Identifies the user. Mandatory.
solution:String. Used to identify the solution. Mandatory.
tenant:String. Used to identify the tenant. Optional.
Chapter 7. Application programming interface 91
Headers
Content-Type: application/json.
APIKEY: encrypted key. The API key, which is used for authentication.Mandatory.
Data parameters
retrainData:JSON_object. The retraining data for the model.
groupId:String. The data group ID.
fileIds:String. The data file ID.
Sample body[{"trainData": [ {"fileIds": "9f7aa9d6-24d6-4611-8d4d-79a52d2bab02_76e8b2cb-057a-4904-8fad-bbca93abd80b","groupId": "9f7aa9d6-24d6-4611-8d4d-79a52d2bab02" },{ "fileIds": "d84c028e-235a-4c13-8a77-894500b8a736_fe201c83-b138-4dca-b918-ae1b9f7db894","groupId": "d84c028e-235a-4c13-8a77-894500b8a736" },{ "fileIds": "c5f11ed9-db49-403a-972c-cd6cb1d0f8eb_bd0c8246-7208-44d8-a2fa-e74c1578eebe","groupId": "c5f11ed9-db49-403a-972c-cd6cb1d0f8eb"
} ] }]
Success response200[{"modelId":"ef12294e-2d09-4acd-9946-00a09bdeeba2","status":"waiting","instanceId":"ef12294e-2d09-4acd-9946-00a09bdeeba2_1512095854903","trainData":[{"fileIds":"9f7aa9d6-24d6-4611-8d4d-79a52d2bab02_76e8b2cb-057a-4904-8fad-bbca93abd80b","groupId":"9f7aa9d6-24d6-4611-8d4d-79a52d2bab02"},{"fileIds":"d84c028e-235a-4c13-8a77-894500b8a736_fe201c83-b138-4dca-b918-ae1b9f7db894","groupId":"d84c028e-235a-4c13-8a77-894500b8a736"},{"fileIds":"c5f11ed9-db49-403a-972c-cd6cb1d0f8eb_bd0c8246-7208-44d8-a2fa-e74c1578eebe","groupId":"c5f11ed9-db49-403a-972c-cd6cb1d0f8eb"}]}]
Response items
modelId: String. Model ID.
status: String. The status of the retraining of the model instance.
instanceId: String. Model instance ID.
trainData: JSON Object. Model training data.
groupId: String. The ID of the data group.
fileIds: String. The ID of the data file.
Sample callcurl -k -H "APIKEY:8b79658225de53488321fb7bb657f9f161acd2ea830a5afb8c149f6aab2c77d4f0579e533dd34ggb959317ac69ff73f886fc3713bf305a158fdf485cc6f275f5" -H"Content-Type:application/json;charset=UTF-8" -X PUT"https://9.112.229.91:9447/ibm/iotm/service/modelInstance/ef12294e-2d09-4acd-9946-00a09bdeeba2_1512092239371?action=retrain&user=auto_mm&solution=vi" --data’[{"trainData": [ {"fileIds": "9f7aa9d6-24d6-4611-8d4d-79a52d2bab02_76e8b2cb-057a-4904-8fad-bbca93abd80b", "groupId": "9f7aa9d6-24d6-4611-8d4d-79a52d2bab02" }, { "fileIds": "d84c028e-235a-4c13-8a77-894500b8a736_fe201c83-b138-4dca-b918-ae1b9f7db894", "groupId": "d84c028e-235a-4c13-
92 User Guide
8a77-894500b8a736" }, { "fileIds": "c5f11ed9-db49-403a-972c-cd6cb1d0f8eb_bd0c8246-7208-44d8-a2fa-e74c1578eebe", "groupId": "c5f11ed9-db49-403a-972c-cd6cb1d0f8eb" } ] }]’
Notes The system uses the APIKEY to do authentication. If you do not providean APIKEY, the system refuses your request.
Undeploy model instanceUndeploy a deployed model instance. The model manager has authority to usethis API.
URL
/ibm/iotm/service/modelInstance/modelInstanceId
Method
The request type PUT
URL parameters
modelInstanceId:String. The model instance ID. Mandatory.
action:String. The action. Set as undeploy. Mandatory.
user:String. Identifies the user. Mandatory.
solution:String. Used to identify the solution. Mandatory.
tenant:String. Used to identify the tenant. Optional.
Parameters:JSON Object. The ID of the edge from which the modelinstance will be undeployed.
Headers
Content-Type: application/json.
APIKEY: encrypted key. The API key, which is used for authentication.Mandatory.
Data parametersNone.
Sample body[{"parameters": {"edges":[{"id":"1508476898000"}]}}]
Success response200[{"status":"undeployed","instanceId":"ef12294e-2d09-4acd-9946-00a09bdeeba2_1512092239371"}]
Response items
status: String. The status of the retraining of the model instance.
instanceId: String. Model instance ID.
Sample callcurl -k -H "APIKEY:8b79658225de53488321fb7bb657f9f161acd2ea830a5afb8c149f6aab2c77d4f0579e533dd34ggb959317ac69ff73f886fc3713bf305a158fdf485cc6f275f5" -H "Content-Type:application/json;charset=UTF-8"-X PUT "https://9.112.229.91:9447/ibm/iotm/service/modelInstance/ef12294e-2d09-4acd-9946-00a09bdeeba2_1512092239371?action=undeploy&user=auto_mm&solution=vi"--data ’[{“parameters": {"edges":[{"id":"1508476898000"}]}}]’
Notes The system uses the APIKEY to do authentication. If you do not providean APIKEY, the system refuses your request.
Chapter 7. Application programming interface 93
Edge servicesThe edge services enable you to perform such tasks as creating an edge, getting anedge, and updating an edge.
Create edgeCreate an edge. The model manager has authority to use this API.
URL
/ibm/iotm/vi/service/edge
Method
The request type POST
URL parameters
user:String. Identifies the user. Mandatory.
solution:String. Used to identify the solution. Mandatory.
tenant:String. Used to identify the tenant. Optional.
Headers
Content-Type: application/json.
APIKEY: encrypted key. The API key, which is used for authentication.Mandatory.
Data parameters
name:String. The name of the edge. Mandatory.
ip:IP. The IP address of the edge. Mandatory.
port:integer. The port of the edge. Mandatory.
userName:String. The user name for the edge virtual machine. Mandatory.
passWord:String. The password for the edge virtual machine. Mandatory.
clusterType:String. The cluster type of the edge. Specify slave or master.Mandatory.
online:String. Indicates whether the edge is online. Specify true if theedge is online or false if the edge is offline. Mandatory.
Sample body[{"name":"edge_auto","ip":"9.112.229.54","port":"22","userName":"root","passWord":"U2FtcGxlQDY2NiE=","clusterType":"mater","online":"true"}]
Success response[{"port":"22","clusterType":"master","deployPath":"\/home\/pmqopsadmin","hierarchyList":["plant1,line1,cell1","plant2,line2,cell2"],"servicePass":"passw0rd@","deletePolicy":{"schedule":false,"rate":0.2,"onDay":7,"afterDay":"1","frequency":"weekly"},"version":"2018Q4.01","ip":"viedge1","online":"true","id":"1508476898000","upgradeFlag":"false","createdBy":"[email protected]","serviceUser":"admin","name":"master","sshUser":"pmqopsadmin","updatedTime":"2018-11-16T03:54:13.382-06:00"}]
Response items
id:String. The ID of the edge.
deletePolicy:JSON Object. The policy to delete the inspection result on theedge.
version:String. The edge version information.
94 User Guide
upgradeFlag:String. Indicates whether the edge needs an upgrade.
Sample callcurl -k -H "APIKEY:8b79658225de53488321fb7bb657f9f161acd2ea830a5afb8c149f6aab2c77d4f0579e533dd34ggb959317ac69ff73f886fc3713bf305a158fdf485cc6f275f5" -H"Content-Type:application/json;charset=UTF-8""https://9.112.229.91:9447/ibm/iotm/vi/service/edge?user=auto_mm&solution=vi " --data ’[{"name":"edge_auto","ip":"9.112.229.54","port":"22","userName":"root","passWord":"U2FtcGxlQDY2NiE=","clusterType":"master","online":"true"}]’
Notes The system uses the APIKEY to do authentication. If you do not providean APIKEY, the system refuses your request.
Get edgeGet an edge. The model manager has authority to use this API.
URL
/ibm/iotm/vi/service/edge
Method
The request type GET
URL parameters
user:String. Identifies the user. Mandatory.
solution:String. Used to identify the solution. Mandatory.
tenant:String. Used to identify the tenant. Optional.
hierarchyList:. The cell hierarchy information, for example plant1,line1, cell1. Optional.
Headers
APIKEY: encrypted key. The API key, which is used for authentication.Mandatory.
Data parametersNone.
Sample bodyNone.
Success response200[{"port":"22","id":"1512098793912","clusterType":"slave","hierarchyList":["plant1, line1, cell1"],"createdBy":"auto_mm","description":"test edge","name":"edge_auto","updatedTime":"2017-12-01T10:58:26.559+08:00","online":"false","ip":"9.112.229.54"}]
Response items
name:String. The name of the edge.
ip:IP. The IP address of the edge.
port:Integer. The port of the edge.
clusterType:String. The cluster type of the edge. Specify slave or master.
online:String. The online status of the edge: true means the edge isonline, and false means the edge is offline.
Chapter 7. Application programming interface 95
hierarchyList:String. The hierarchy of the edge.
description:String. A description of the edge.
createdBy:String. The owner of the edge.
updatedTime:Time. The last time that the edge was updated.
Sample callcurl -k -H "APIKEY:8b79658225de53488321fb7bb657f9f161acd2ea830a5afb8c149f6aab2c77d4f0579e533dd34ggb959317ac69ff73f886fc3713bf305a158fdf485cc6f275f5" "https://9.112.229.91:9447/ibm/iotm/vi/service/edge?user=auto_mm&solution=vi"
Notes The system uses the APIKEY to do authentication. If you do not providean APIKEY, the system refuses your request.
Delete edgeDelete an edge. The model manager has authority to use this API.
URL
/ibm/iotm/vi/service/edge/edgeId
Method
The request type DELETE
URL parameters
edgeId:. The edge ID. Mandatory.
user:String. Identifies the user. Mandatory.
solution:String. Used to identify the solution. Mandatory.
tenant:String. Used to identify the tenant. Optional.
Headers
APIKEY: encrypted key. The API key, which is used for authentication.Mandatory.
Data parametersNone.
Sample body[{}]
Success response200[{}]
Response itemsNone.
Sample callcurl -k -X DELETE -H "APIKEY:8b79658225de53488321fb7bb657f9f161acd2ea830a5afb8c149f6aab2c77d4f0579e533dd34ggb959317ac69ff73f886fc3713bf305a158fdf485cc6f275f5" "https://9.112.229.91:9447/ibm/iotm/vi/service/edge/1512098793912?user=auto_mm&solution=vi” -d '[{}]'
Notes The system uses the APIKEY to do authentication. If you do not providean APIKEY, the system refuses your request.
96 User Guide

Upgrade edgeUpgrade an edge. Users with the authority to create an edge have authority to usethis API.
To upgrade an edge, you must use an API call get the needed edge files, includingedgeDeployed.sh and edge-vi.zip.
To upgrade an edge on the edge side, the SSH user specified when creating theedge must execute the shell script on the edge system.
URL
/ibm/iotm/vi/service/edgeFile
Method
The request type GET
URL parameters
edgeID: The ID of the edge. Mandatory.
user:String. Identifies the user. Mandatory.
solution:String. Used to identify the solution. Mandatory.
tenant:String. Used to identify the tenant. Optional.
Version:String. The value can be shell for a shell script download, orubuntu, redhat, or power for the type of Linux on the edge system.
Headers
APIKEY: encrypted key. The API key, which is used for authentication.Mandatory.
Data parametersNone
Success response200
The edgeDeployed.sh file or the vi_edge-bin_vi.zip file.
Response itemsNone
Sample callcurl -k -X GET -H "APIKEY:8b79658225de53488321fb7bb657f9f161acd2ea830a5afb8c149f6aab2c77d4f0579e533dd34ggb959317ac69ff73f886fc3713bf305a158fdf485cc6f275f5""https://int_iotm.predictivesolutionsapps.ibmcloud.com/ibm/iotm/vi/service/edgeFile?tenant=Q3T1&solution=vi&user=modelmanager1&version=shell&edgeId=1508476898000”
Notes The system uses the APIKEY to do authentication. If you do not providean APIKEY, the system refuses your request.
Score serviceThe score service enables you to score an image.
Score imageScore an image. The inspector and supervisor have authority to use this API.
URL
Chapter 7. Application programming interface 97

/ibm/iotm/vi/service/uploadScoreImage
Method
The request type POST
URL parameters
productType:String. The product type of the model. Mandatory.
cell:String. The cell of the image. Mandatory.
user:String. Identifies the user. Mandatory.
solution:String. Used to identify the solution. Mandatory.
tenant:String. Used to identify the tenant. Optional.
Headers
Content-Type: application/binary
APIKEY: encrypted key. The API key, which is used for authentication.Mandatory.
Data parametersNone.
Sample bodyBinary content of the image file.
Success response200//for object detection example:{
"detections": [{"position": {
"height": 60,"width": 253,"x": 1594,"y": 773
},"probableTypes": [
{"confidence": 99.798703193664551,"type": "scratch"
}],"properties": []
}],"timestamp": "2017-09-28 10:32:13.528415"
}
//for classification example:{
"Timestamp": "2017-09-12 18:43:52","detections": [{"position": {
"height": 436,"width": 537,"x": 1574,"y": 1588
},"probableTypes": [
{"confidence": 100.0,
98 User Guide
"type": "Defect"},{
"confidence": 0.0,"type": "MisT"
},{
"confidence": 0.0,"type": "NoDefect"
}]
}]
}
Response items
position:JSON Array. The inspection height, width, x, and y information.
probableTypes:JSON Object. The type and confidence level of each defect.
Timestamp:Time. The time that the image is scored.
Sample callcurl -k -X POST -H "APIKEY:8b79658225de53488321fb7bb657f9f161acd2ea830a5afb8c149f6aab2c77d4f0579e533dd34ggb959317ac69ff73f886fc3713bf305a158fdf485cc6f275f5" -H"Content-Type: application/binary" "https://9.112.229.91:9447/ibm/iotm/vi/service/uploadScoreImage?user=auto_super&productType=auto&cell=plant1_line1_cell1&solution=vi" --connect-timeout 600--data-binary @C:\\code\\Automation_98\\API\\vi\\VI_API\\file\\test.JPG
Notes The system uses the APIKEY to do authentication. If you do not providean APIKEY, the system refuses your request.
QEWS integration serviceThe QEWS integration service enables you to get a defect image rate file.
Get defect image rate fileGet a file that contains data about the defect image rate. The supervisor hasauthority to use this API.
URL
/ibm/iotm/service/defectImageRateFile
Method
The request type GET
URL parameters
user:String. Identifies the user. Mandatory.
solution:String. Used to identify the solution. Mandatory.
tenant:String. Used to identify the tenant. Optional.
date from. The start date in yyyy-MM-dd or yyyy-MM-dd HH:mm:ssformat. Optional.
date to. The end date in yyyy-MM-dd or yyyy-MM-dd HH:mm:ss format.Optional.
cell name. The name of the cell. Optional.
Chapter 7. Application programming interface 99
interval. The interval of the defect image rate. Specify daily, hourly, ormonthly. Optional.
Headers
APIKEY: encrypted key. The API key, which is used for authentication.Mandatory.
Data parametersNone.
Sample bodyNone.
Success response200. The binary content of the data file. The data file is a comma-separatedvalue (CSV) file.
Response items
ATTRIBUTE_NAME: VI_DEFECT_IMAGE_RATE, a fixed value.
DATE: The date yyyy-MM-dd format when the interval is daily andmonthly, and yyyy-MM-dd HH:mm:ss format when the interval is hourly.
CELL_NAME: The name of the cell. In this response item, the commacharacter (,) is replaced with the underscore character (_) because commasare not supported.
Sample callscurl -k -H "APIKEY:8b79658225de53488321fb7bb657f9f161acd2ea830a5afb8c149f6aab2c77d4f0579e533dd34ggb959317ac69ff73f886fc3713bf305a158fdf485cc6f275f5""https://9.112.229.89:9447/ibm/iotm/service/defectImageRateFile?user=supervisor1&solution=vi&tenant=T1" --output "C:\Users\IBM_ADMIN\Downloads\a.csv"
curl -k -H "APIKEY:8b79658225de53488321fb7bb657f9f161acd2ea830a5afb8c149f6aab2c77d4f0579e533dd34ggb959317ac69ff73f886fc3713bf305a158fdf485cc6f275f5""https://9.112.229.89:9447/ibm/iotm/service/defectImageRateFile?user=supervisor1&solution=vi&tenant=T1&dateFrom=2017-10-23%2011:00:00&dateTo=2017-11-14%2018:40:00&cellName=plant1,line1,cell1&interval=hourly" --output "C:\Users\IBM_ADMIN\Downloads\cell1_hourly.csv"
Notes The system uses the APIKEY to do authentication. If you do not providean APIKEY, the system refuses your request.
Composite serviceThe composite service enables you to get a compressed file that contains a trainedmodel and register the model to Maximo PQI SaaS Visual Insights.
Register modelGets a compressed file that contains a trained model and registers the model toMaximo PQI SaaS Visual Insights. The model manager has authority to use thisAPI.
URL
/ibm/iotm/vi/service/registerModel
Method
100 User Guide
The request type POST
URL parameters
user: String. Used to identify the user. Mandatory.
solution: String. Used to identify the solution. Mandatory.
name: String. The model name.
productType: String. The product type that is associated with the model.
Headers
Content-Type: multipart/form-data.
Content-Disposition: form-data; name="files[]";filename="model.zip".
APIKEY: encrypted key. The API key, which is used for authentication.Mandatory.
Data parameters
None
Sample body
Binary content of the model file.
Success response200
{"errorMessage":"","modelId":"3914ad2c-3b7b-47ad-974c-e5b6bc2075ef","createdBy":"modelmanager1","status":"validated","instanceId":"3914ad2c-3b7b-47ad-974c-e5b6bc2075ef_1517796906688","updatedTime":"2018-02-05 10:15:06.608"}
Response items
modelId: String. The model ID.
createdBy: String. The model owner.
status: String. The status of the model instance.
instanceId: String. The ID of the model instance.
updatedTime: Time. The last time the model instance was updated.
Sample callcurl -k -X POST -H"APIKEY:8b79658225de53488321fb7bb657f9f161acd2ea830a5afb8c149f6aab2c77d4f0579e533dd34ggb959317ac69ff73f886fc3713bf305a158fdf485cc6f275f5" -H"Content-Type:multipart/form-data" -H "Content-Disposition: form-data;name="files[]"; filename="walkermodel1.zip"""https://int_iotm.predictivesolutionsapps.ibmcloud.com/ibm/iotm/vi/service/[email protected]&solution=vi&name=samplename&productType=sampletype" --connect-timeout 6000 [email protected]
Notes The system uses the APIKEY to do authentication. If you do not providean APIKEY, the system refuses your request.
Stand-alone edge servicesThe stand-alone edge services enable you to perform such tasks as gettingavailable models, deploying models, uploading image scores, syncing inspectionresults, and cleaning inspection results.
Chapter 7. Application programming interface 101
The stand-alone edge services run on the stand-alone edge machine and not theMaximo PQI SaaS Visual Insights center. You must use different hosts, ports, anduser credentials.
Get available modelsGets all available models. The stand-alone edge administrator has authority to usethis API.
URL https://<edge machine host>:8449/api/getAvailableModels
Method
The request type GET
URL parametersNone.
Headers
Authorization: user_name/password
Data parametersNone.
Sample bodyNone.
Success response{"model_list": [
{"coviacenter": {
"apikey": "8b79658225de53488321fb7bb657f9f161acd2ea830a5afb8c149f6aab2c77d4f0579e533dd34ggb959317ac69ff73f886fc3713bf305a158fdf485cc6f275f5",
"credential": "ZGVtb2FkbUBjbi5pYm0uY29tOlEzVDE=","url": "https://int_iotm.predictivesolutionsapps.ibmcloud.com/ibm/iotm/service/apiWrapper?apiName=addInspectResult","username": "[email protected]"
},"groupIds": "0c4f11d7-b255-4c05-9c87-694e9f912fa9","model_id": "049dabe5-d865-4f09-862f-fb7430afef6d","model_instance_id": "049dabe5-d865-4f09-862f-fb7430afef6d_1518401501376","model_type": "classification","model_url": "049dabe5-d865-4f09-862f-fb7430afef6d_1518401599389.zip","product_type": "Q3T1|jianyuan45","status": "deployed"
},......
]}
Response items
model_list: String. The list of published models.
model_id: String. The model ID of the published model.
model_instance_id: String. The model instance ID of the published model.
model_type: String. The model type of the published model.
model_url: String. The model URL of the published model.
product_type: String. The product type of the published model.
coviacenter: JSONObject. The required center information for the edge.
Sample callcurl -k -H ’Authorization: Basic YWRtaW46cGFzc3cwcmRA’ -X GET https://{localhost}:8449/api/getAvailableModel
102 User Guide
Deploy a modelDeploys one model. The stand-alone edge administrator has authority to use thisAPI.
URL https://<edge machine host>:8449/api/deployModel
Method
The request type POST
URL parametersNone.
Headers
Authorization: user_name/password
Data parameters
model_list: String. The list of published models.
model_id: String. The model ID of the published model.
model_instance_id: String. The model instance ID of the published model.
model_type: String. The model type of the published model.
model_url: String. The model URL of the published model.
product_type: String. The product type of the published model.
coviacenter: JSONObject. The required center information for the edge.
edgeId: String. The ID of the current edge.
Sample body{"model_id": "56608a3d-df64-4ef0-85a6-f88778cf583b","model_url": "56608a3d-df64-4ef0-85a6-f88778cf583b_1540279487176.zip","edgeId": "1540275842203","coviacenter": {"url": "https://int_iotm.predictivesolutionsapps.ibmcloud.com/ibm/iotm/service/apiWrapper?apiName=addInspectResult","credential":"c3VwZXJ2aXNvcjE6UTNUMQ==","username": "supervisor1","apikey":"8b79658225de53488321fb7bb657f9f161acd2ea830a5afb8c149f6aab2c77d4f0579e533dd34ggb959317ac69ff73f886fc3713bf305a158fdf485cc6f275f5"},"groupIds":"b18a8d56-7a4c-4266-9280-49258c3fd798","model_type": "classification","product_type": "Q3T1|qwtest12","model_instance_id": "56608a3d-df64-4ef0-85a6-f88778cf583b_1540279416752","model_name": "qwtest12"}
Success response{ “status”:“success”}
Response items
Status:String. Success or failed.
Sample callcurl -k -H ’Authorization: Basic YWRtaW46cGFzc3cwcmRA’-H "Content-Type:application/json;charset=UTF-8" -X POST --data’{"model_id": "56608a3d-df64-4ef0-85a6-f88778cf583b", "model_url":"56608a3d-df64-4ef0-85a6-f88778cf583b_1540279487176.zip", "edgeId":"1540275842203", "coviacenter": { "url": "https://int_iotm.predictivesolutionsapps.ibmcloud.com/ibm/iotm/service/apiWrapper?apiName=addInspectResult", "credential": "c3VwZXJ2aXNvcjE6UTNUMQ==","username": "supervisor1", "apikey": "8b79658225de53488321fb7bb657f9f161acd2ea830a5afb8c149f6aab2c77d4f0579e533dd34ggb959317ac69ff73f886fc3713bf305a158fdf485cc6f275f5" }, "groupIds": "b18a8d56-7a4c-4266-9280-49258c3fd798", "model_type": "classification", "product_type":"Q3T1|qwtest12", "model_instance_id": "56608a3d-df64-4ef0-85a6-f88778cf583b_1540279416752", "model_name": "qwtest12"} ’ https://{localhost}:8449/api/deployModel
Chapter 7. Application programming interface 103
Undeploy modelUndeploys a model. The stand-alone edge administrator has authority to use thisAPI.
URL https://<edge machine host>:8449/api/undeployModel
Method
The request type POST
URL parametersNone.
Headers
Authorization: user_name/password
Data parameters
model_id: String. The model ID of the undeployed model.
model_instance_id: String. The model instance ID of the undeployedmodel.
Sample body{"model_id":"5868dcd7-7032-4101-9ba8-797dea9005aa","model_instance_id":"5868dcd7-7032-4101-9ba8-797dea9005aa_1523253620387"}
Success response{“status”:“success”}
Response items
Status:String. Success or failed.
Sample callcurl -k -H ’Authorization: Basic YWRtaW46cGFzc3cwcmRA’-H "Content-Type:application/json;charset=UTF-8" -X POST --data’{"model_id": "8e474fb5-97dd-4f5d-8415-14c72855c6a5","model_instance_id":"8e474fb5-97dd-4f5d-8415-14c72855c6a5_1532404443311"}’ https://{localhost}:8449/api/undeployModel
Upload and score image on the edgeUploads and scores an image to the edge. The production line or external servicestypically use this API.
URL
/api/uploadScoreImage
Method
The request type POST
URL parameters
productType: String. The product type of the model. Mandatory.
cell: String. The cell of the image. Mandatory.
Headers
Content-Type: application/binary.
Authorization:. The base authorization code for the edge service.Mandatory.
104 User Guide
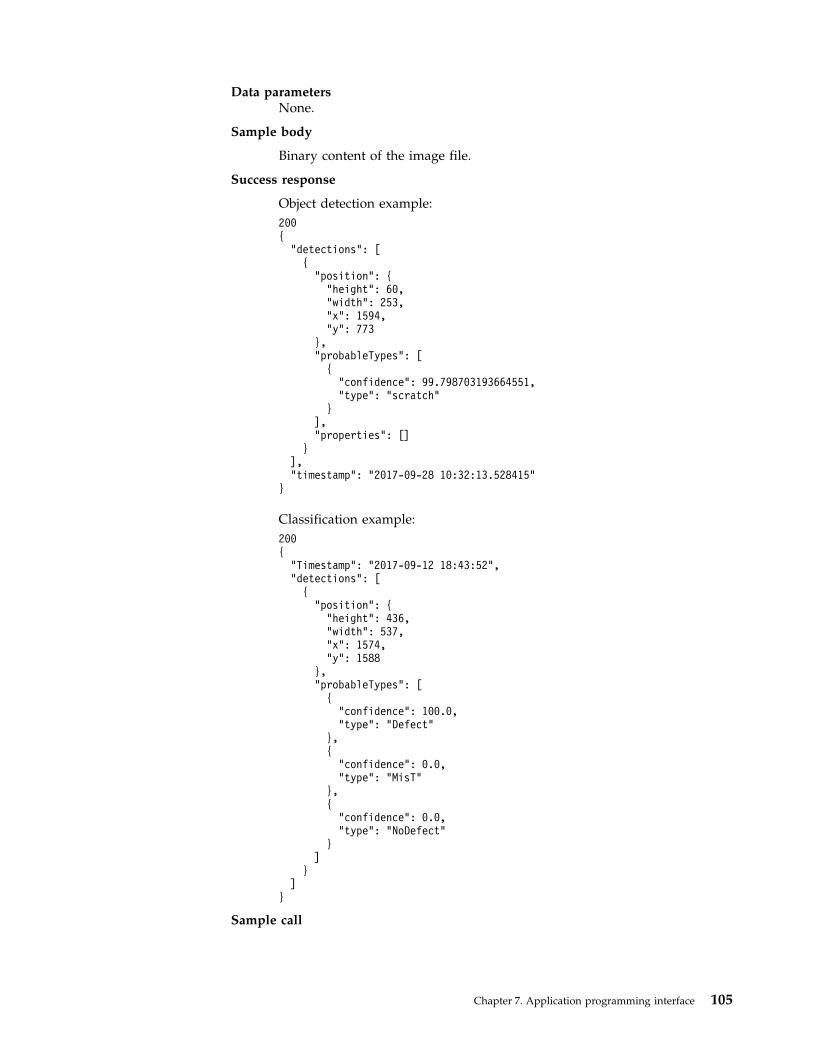
Data parametersNone.
Sample body
Binary content of the image file.
Success response
Object detection example:200{
"detections": [{"position": {
"height": 60,"width": 253,"x": 1594,"y": 773
},"probableTypes": [
{"confidence": 99.798703193664551,"type": "scratch"
}],"properties": []
}],"timestamp": "2017-09-28 10:32:13.528415"
}
Classification example:200{
"Timestamp": "2017-09-12 18:43:52","detections": [
{"position": {
"height": 436,"width": 537,"x": 1574,"y": 1588
},"probableTypes": [
{"confidence": 100.0,"type": "Defect"
},{
"confidence": 0.0,"type": "MisT"
},{
"confidence": 0.0,"type": "NoDefect"
}]
}]
}
Sample call
Chapter 7. Application programming interface 105
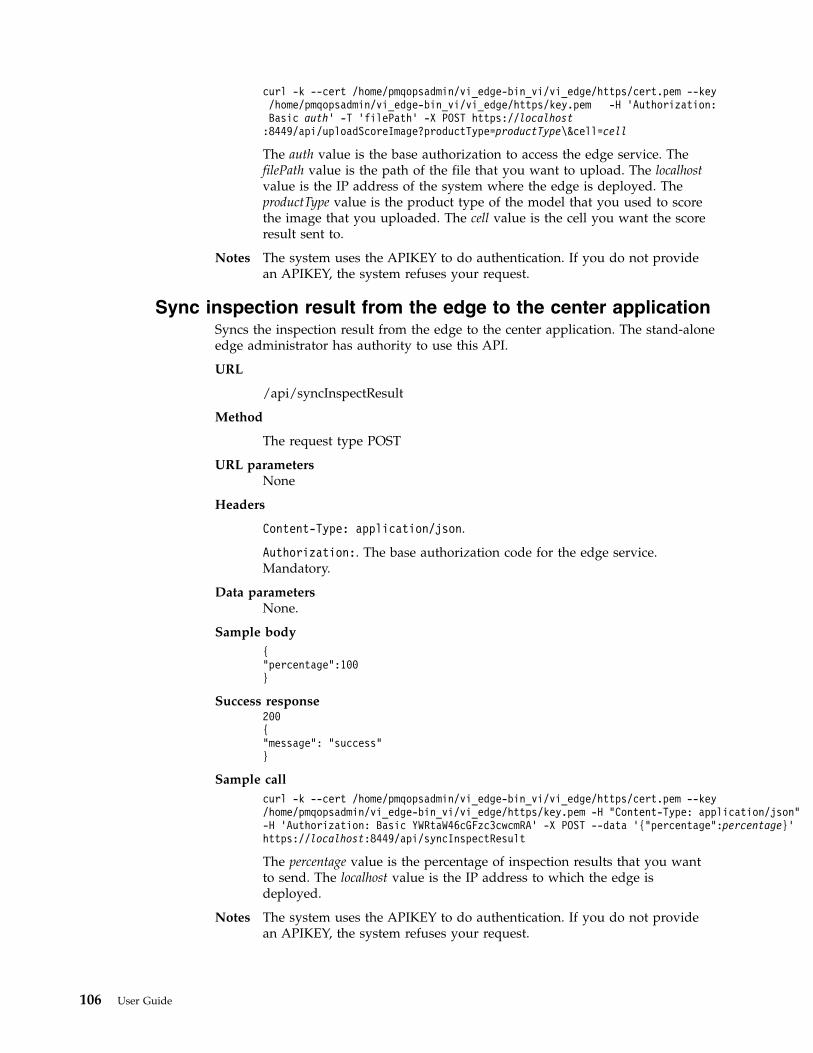
curl -k --cert /home/pmqopsadmin/vi_edge-bin_vi/vi_edge/https/cert.pem --key/home/pmqopsadmin/vi_edge-bin_vi/vi_edge/https/key.pem -H ’Authorization:Basic auth’ -T ’filePath’ -X POST https://localhost:8449/api/uploadScoreImage?productType=productType\&cell=cell
The auth value is the base authorization to access the edge service. ThefilePath value is the path of the file that you want to upload. The localhostvalue is the IP address of the system where the edge is deployed. TheproductType value is the product type of the model that you used to scorethe image that you uploaded. The cell value is the cell you want the scoreresult sent to.
Notes The system uses the APIKEY to do authentication. If you do not providean APIKEY, the system refuses your request.
Sync inspection result from the edge to the center applicationSyncs the inspection result from the edge to the center application. The stand-aloneedge administrator has authority to use this API.
URL
/api/syncInspectResult
Method
The request type POST
URL parametersNone
Headers
Content-Type: application/json.
Authorization:. The base authorization code for the edge service.Mandatory.
Data parametersNone.
Sample body{“percentage”:100}
Success response200{“message”: “success”}
Sample callcurl -k --cert /home/pmqopsadmin/vi_edge-bin_vi/vi_edge/https/cert.pem --key/home/pmqopsadmin/vi_edge-bin_vi/vi_edge/https/key.pem -H "Content-Type: application/json"-H ’Authorization: Basic YWRtaW46cGFzc3cwcmRA’ -X POST --data ’{"percentage":percentage}’https://localhost:8449/api/syncInspectResult
The percentage value is the percentage of inspection results that you wantto send. The localhost value is the IP address to which the edge isdeployed.
Notes The system uses the APIKEY to do authentication. If you do not providean APIKEY, the system refuses your request.
106 User Guide
Clean up inspection result that you have synced to the centerapplication
Cleans up an inspection result that you have synced to the center application. Thestand-alone edge administrator has authority to use this API.
URL
/api/cleanInspectResult
Method
The request type POST
URL parametersNone
Headers
Content-Type: application/json.
Authorization:. The base authorization code for the edge service.Mandatory.
Data parametersNone.
Sample body{“fromDayBefore”:1}
Success response{“message”: “success”}
Sample callcurl -k --cert /home/pmqopsadmin/vi_edge-bin_vi/vi_edge/https/cert.pem--key /home/pmqopsadmin/vi_edge-bin_vi/vi_edge/https/key.pem -H "Content-Type:application/json" -H ’Authorization: Basic YWRtaW46cGFzc3cwcmRA’ -X POST --data’{"fromDayBefore":dayNumber}’ https://localhost:8449/api/cleanInspectResult
The dayNumber value is the number of days of data that you want to keep.For example:, if you set dayNumber to 0 all data before today is removed. Ifyou set dayNumber to 1, all data before yesterday is removed. The localhostvalue is the IP address to which the edge is deployed.
Notes The system uses the APIKEY to do authentication. If you do not providean APIKEY, the system refuses your request.
Chapter 7. Application programming interface 107

108 User Guide
Chapter 8. Registering, deploying, and testing a model byusing the API
The API Guidance feature is a web interface that guides you through one commonAPI use case: the process of registering, deploying, and testing a trained model.The API Guidance feature automates many steps of the process to make it easier tocomplete the tasks.
About this task
The first step is registering a model. You can import a compressed file thatcontains a trained model and register it to the product.
The second step is deploying the model. You can deploy a model to edge systemsso the model can be used to inspect images.
The third step is testing the model. You can use your own images to test thedeployed model and review the scoring result.
Procedure1. Select API Guidance from the pull-down menu.2. Click Try Register Model to enter the End to end API guidance page.3. Enter the model name and product type.4. Click Select to select a compressed file that contains a trained model.5. Click Register to register the model to the product. The registration result is
displayed in the Result box.6. Click Next.7. If necessary, enter the instance ID.8. Click Deploy to deploy the model. The deployment result is displayed in the
Result box.9. Click Next.
10. Enter the product type and cell information, select an image, and then clickScore to start the scoring process. The scoring result is displayed in the Resultbox.
© Copyright IBM Corp. 2017, 2019 109

110 User Guide
Chapter 9. Troubleshooting
Review log files and error messages to assist in troubleshooting the product.
Log files
Refer to the product log files for more information about error conditions.
Log file Description
/Liberty_path/usr/servers/VICenterServer/logs/messages.log
WebSphere® Application Server Libertymessages
/home/user_name/edgeDeploy_tenantname.log
Edge messages
/home/user_name/vi_edge-bin_vi/vi_task_manager/master.log
Task manager messages
/home/user_name/vi_edge-bin_vi/vi_edge/Service.log
Service messages
Messages
Edge messages
The following messages appear during error conditions for edge systems.
Table 4. Error messages for edge systems
Message Action
The master edge already exists, only onemaster edge is supported.
Specify an edge name that is not used.
Required fields must not be empty. Include a value in all required fields.
Cannot connect to the machine. Use thecorrect IP address, SSH user name, andpassword.
Verify that the IP address, SSH user name,and password are valid values.
To manage the edge, you must have thecorrect permissions.
Ensure that you are logged in as a user withmodel manager permissions. If you cannotresolve the issue, contact a systemadministrator.
The IP address is invalid. Input the correctIP address, for example, 10.172.0.23.
Verify the value of the IP address.
The edge was not created due to a databaseerror.
Check the Apache HBase service from theAmbari console.
An edge with the same IP address exists. You cannot create two edge systems on thesame computer. Use the IP address ofanother computer to create a new edge.
Failed to upload scripts to the edge machine.Check the existence and the permissions ofthe deployment path.
Verify that the deployment path exists andhas correct permissions.
© Copyright IBM Corp. 2017, 2019 111

Table 4. Error messages for edge systems (continued)
Message Action
Failed to start services on edge machine. Make sure that the service is running on themaster edge. Check the log file on the edgesystem.
Failed to execute scripts on the edgemachine.
Check the log file for the edge system.
The edge name is a duplicate. Use adifferent edge name.
Use a different name to create a new edge.
The slave edge cannot be created if a masteredge does not exist.
You must create a master edge before youcreate a slave edge.
Failed to delete the edge because it is usedby model model_name.
The edge cannot be deleted if it is used by amodel version. Stop all the model versionsthat are running on the edge before youdelete the edge.
The edge was not deleted due to a databaseerror.
Check the Apache HBase service from theAmbari console.
You cannot delete the master edge becausethere are existing slave edges.
The edge cannot be deleted if it still hasslave edges. Delete all slave edges beforeyou delete the master edge.
Failed to delete the edge from masterrepository: repository_name.
Make sure that the service is running on themaster edge. Check the service log files.
Compressed image file messages
The following messages appear during error conditions for compressed image files.
Table 5. Error messages for compressed image files
Message Action
The compressed file that you uploaded doesnot contain an image at the expectedlocation.
The uploaded compressed image file mustcontain images. All of the images in thecompressed image file must be in a flatstructure with no subdirectories.
The file is invalid. You must upload .zip filesonly.
The only supported file format is .zip.
The annotation XML files are missing in theuploaded compressed file.
Add the annotation XML files to thecompressed image file and then upload itagain.
The labels.txt is missing in the uploadedcompressed file.
Add the labels.txt file to the compressedimage file and then upload it again.
Input is invalid. You must specify the ID. No file ID was provided in the API request.Provide the file ID.
Input is invalid. A maximum number of 100entities can be deleted.
You cannot delete more than 100compressed files at one time.
Failed to delete the data file. The data file could not be deleted.
The specified data file was cited in themodel model_name. It cannot be deleted.
The compressed image file is referenced by amodel. It cannot be deleted.
112 User Guide
Image group messages
The following messages appear during error conditions for image groups.
Table 6. Error messages for image groups
Message Action
The group name cannot be empty when youcreate a new data group.
Specify a name for the new group.
Data files exist for the selected data group.The update failed. Ensure that the selecteddata group contains no data files.
If the image group is created with data files,the image group type cannot be updated. Ifthe image group is not created with datafiles, this error might be caused by anApache HBase operation error.
Failed to create a data group becauseparameters are missing or have an invalidformat.
Ensure that parameters are specified for thenew data group and that the parameters arein a valid format.
The group name is a duplicate. Use adifferent group name.
Specify a unique name for the new group.
Error when creating data group. An Apache HBase error occurred while thedata group was being created. Check theApache HBase service from the Ambariconsole.
The data group does not exist. The group ID in the request is missing ornot valid.
Error when deleting data files in a specifieddata group.
A Hadoop Distributed File System (HDFS)error occurred while data files were beingdeleted.
The specified data group was cited in amodel. It cannot be deleted.
If a group is used in a model, the groupcannot be deleted.
Error when deleting data group. An Apache HBase error occurred while thedata group was being deleted. Check theApache HBase service from the Ambariconsole.
Model messages
The following messages appear during error conditions for models.
Table 7. Error messages for models
Message Action
The model name cannot be empty whencreate a new model.
Specify a name for the model.
The model name must be fewer than 128characters and only contain letters, numbers,spaces, and underscores.
Specify a valid model name.
The product type cannot be empty whencreate a new model.
Specify the product type.
The product type must be fewer than 128characters and only contain letters, numbers,and spaces.
Specify a valid product type.
The data group IDs cannot be empty whencreate a new model.
Specify a value for groupIds in the API call.
Chapter 9. Troubleshooting 113
Table 7. Error messages for models (continued)
Message Action
The data format cannot be empty when youcreate a new model.
Specify a value for dataFormat in the APIcall.
The retrain policy must have a valid formatwhen you create a new model.
Specify a valid value for retrainPolicy inthe API call.
The model type cannot be empty whencreate a new model.
Specify a value for modelType in the API call.
The model type must be classification orobjectdetection.
Specify a value of classification orobjectdetection for modelType in the APIcall.
The parameters must have a valid formatwhen you create a new model.
Specify a valid value for parameters in theAPI call.
Failed to create the model because thetrainParam value in the parameters has aninvalid value.
Specify a valid value for trainParam in theAPI call.
The IDs of data group are invalid. Specify a valid value for groupIds in the APIcall.
Error occurred because the data groups mustbe all multiple characteristic types or allsingle characteristic types.
In the API call, the groups in groupIds musthave same group type.
Failed to create model. An Apache HBase error occurred during thecreation of the model. Check the ApacheHBase service from the Ambari console.
Input is invalid. A maximum number of 100entities can be deleted.
Specify fewer than 100 models to be deleted.
Input is invalid. You must specify the ID. Include the model ID in the request.
The model cannot be updated because themodel ID is empty. Enter a model ID.
Include the model ID in the request.
Failed to update model groups because themodel version is not in draft status.
Ensure that the models to be updated are indraft status.
Failed to update model groups because theisHybrid value of the data groups isdifferent.
You cannot change the model type after themodel is created.
Model instance messages
The following messages appear during error conditions for model instances.
Table 8. Error messages for model instances
Message Action
The model ID cannot be empty when createa new model instance.
Create a model instance after itscorresponding model is created.
The train data cannot be empty when createa new model instance.
Specify a valid value for trainData in theAPI call.
Failed to register the model to the trainingserver.
Check the service that is running on thetraining server.
Failed to create the model because thetrainParam value in the parameters has aninvalid value.
Specify a valid value for trainParam in theAPI call.
114 User Guide

Table 8. Error messages for model instances (continued)
Message Action
Training data is invalid. At least one datagroup must exist.
Ensure that each data group that belongs tothe instance has valid data files.
Training data is invalid. Check the train andvalidation ratio to ensure that at least oneimage exists in the train and test set for eachdata group.
Ensure that at least one image exists in thetrain and test sets for each data group.
You have n models in the training queue.You cannot submit a new train request untilthey are completed or canceled.
Cancel jobs or wait until the jobs that arecurrently running are finished.
Failed to cancel the training. Check the Apache HBase service from theAmbari console.
The input body is invalid. Check your request input and then retry theoperation.
The model_name model had a status roll backdue to a validation timeout.
Check the log on the validation server. Forthe classification model, the log is/home/pmqopsadmin/vi_edge-bin_vi/vi_score_engine_restful/back.log. For theobject detection model, the log is/home/pmqopsadmin/vi_obj_detection_retrain/RESTAPI/model/frcnn_log.txt or ssd_log.txt. Resolve anyissues and then retry the operation.
Failed to validate the model version. Check the log on the validation server. Forthe classification model, the log file is/home/pmqopsadmin/vi_edge-bin_vi/vi_score_engine_restful/back.log. For theobject detection model, the log file is/home/pmqopsadmin/vi_obj_detection_retrain/RESTAPI/model/frcnn_log.txt or ssd_log.txt. Resolve anyissues and then retry the operation.
The model does not exist. No model with this model ID was found.Check the model ID.
Failed to reject the model version. Check the Apache HBase service from theAmbari console.
Failed to deploy the model version becausethe model file is empty.
An error occurred when you were creatingthe model. Create a new model.
No master edge to deploy the model. Create a master edge before you deploy themodel.
Invalid edge IP IP_address, only the masteredge can be used to deploy the model.
Use the correct IP address for the masteredge to deploy a model.
Cannot deploy the model to the edgebecause the model_name model is deployedwith the same product type. You cannotdeploy a model to an edge when anothermodel with the same product type isrunning on the edge. You must undeploythe other model first.
You cannot deploy a model to an edge whenanother model with the same product typeis running on the edge.
Database error when creating the data file. Check the Apache HBase service from theAmbari console.
Chapter 9. Troubleshooting 115
Table 8. Error messages for model instances (continued)
Message Action
The file_name file did not upload to thestorage.
Check Hadoop Distributed File System.
Failed to update data group due to adatabase error.
Check the Apache HBase service from theAmbari console.
The status of the model instance does notsupport this action.
Ensure that the model instance is in thecorrect status and then retry the action.
Training data is invalid. At least one datafile must exist in each data group.
Ensure that each data group that belongs tothe model instance has valid data files.
Training data is invalid. Check the train andvalidation ratio to ensure that at least oneimage exists in the train and test set for eachdata group.
Make sure that at least one image exists inthe train and test sets for each data group.
Failed to retrain the model due to a databaseerror.
Check the Apache HBase service from theAmbari console.
Failed to deploy the model version to edgeedge_name.
Ensure that the service is running on themaster edge. Check the Service.log file onthe master edge.
Failed to undeploy the model version fromedge edge_name.
Ensure that the service is running on themaster edge. Check the Service.log file onthe master edge.
Failed to undeploy the model version due toa database error.
Check the Apache HBase service from theAmbari console.
Failed to cancel the training. Check the Apache HBase service from theAmbari console.
The snapshot value is invalid. Cannot usethe snapshot.
The snapshot value does not exist or is notvalid.
The snapshot file does not exist on thetraining server.
Skip the snapshot or retrain the model.
The model instance cannot be deletedbecause the instance ID is empty. Enter aninstance ID.
Enter a valid instance ID.
Failed to delete the model instance due to adatabase error.
Check the Apache HBase service from theAmbari console.
The model instance with the status of statuscannot be deleted.
A model instance with the specified statuscannot be deleted.
API guide messages
The following messages appear during error conditions for the API guide.
Table 9. Error messages for the API guide
Message Action
No model found for the specified producttype.
If this error occurs as a result of an API call,confirm that you sent the correct producttype. If this error occurs in the userinterface, try another product type.
No edge information where the model wasdeployed.
Verify that the corresponding model isdeployed.
116 User Guide
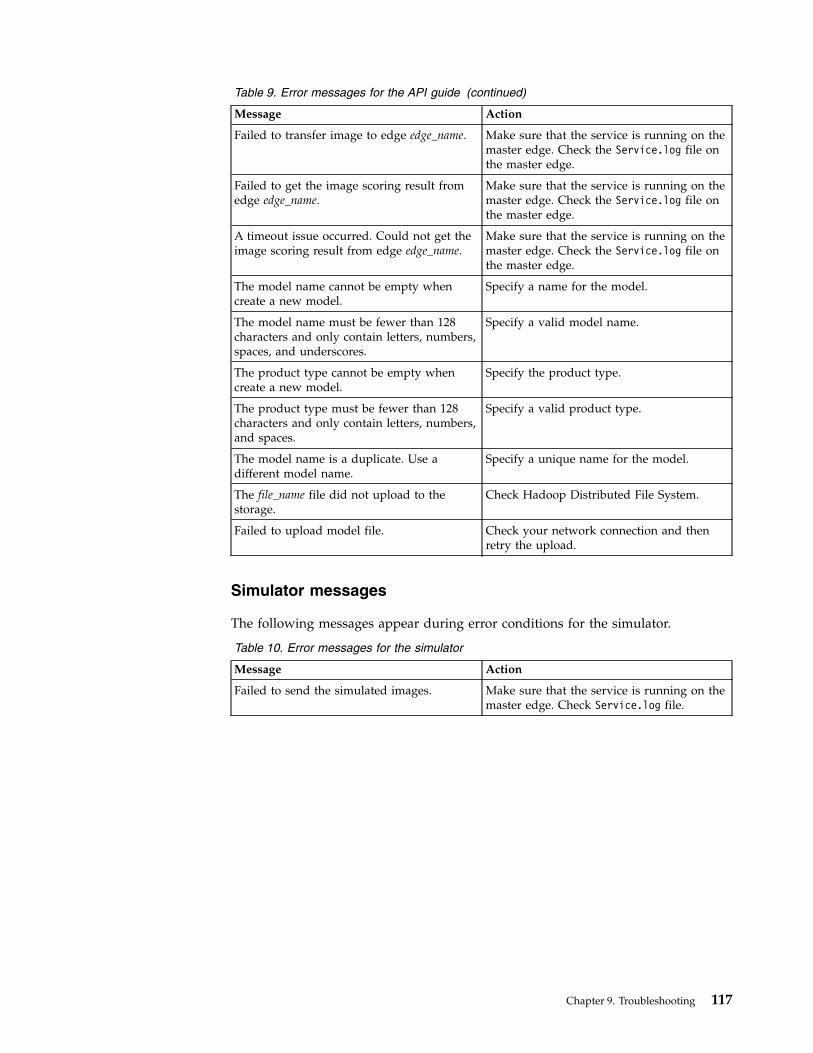
Table 9. Error messages for the API guide (continued)
Message Action
Failed to transfer image to edge edge_name. Make sure that the service is running on themaster edge. Check the Service.log file onthe master edge.
Failed to get the image scoring result fromedge edge_name.
Make sure that the service is running on themaster edge. Check the Service.log file onthe master edge.
A timeout issue occurred. Could not get theimage scoring result from edge edge_name.
Make sure that the service is running on themaster edge. Check the Service.log file onthe master edge.
The model name cannot be empty whencreate a new model.
Specify a name for the model.
The model name must be fewer than 128characters and only contain letters, numbers,spaces, and underscores.
Specify a valid model name.
The product type cannot be empty whencreate a new model.
Specify the product type.
The product type must be fewer than 128characters and only contain letters, numbers,and spaces.
Specify a valid product type.
The model name is a duplicate. Use adifferent model name.
Specify a unique name for the model.
The file_name file did not upload to thestorage.
Check Hadoop Distributed File System.
Failed to upload model file. Check your network connection and thenretry the upload.
Simulator messages
The following messages appear during error conditions for the simulator.
Table 10. Error messages for the simulator
Message Action
Failed to send the simulated images. Make sure that the service is running on themaster edge. Check Service.log file.
Chapter 9. Troubleshooting 117

118 User Guide
Notices
This information was developed for products and services offered in the US. Thismaterial might be available from IBM in other languages. However, you may berequired to own a copy of the product or product version in that language in orderto access it.
IBM may not offer the products, services, or features discussed in this document inother countries. Consult your local IBM representative for information on theproducts and services currently available in your area. Any reference to an IBMproduct, program, or service is not intended to state or imply that only that IBMproduct, program, or service may be used. Any functionally equivalent product,program, or service that does not infringe any IBM intellectual property right maybe used instead. However, it is the user's responsibility to evaluate and verify theoperation of any non-IBM product, program, or service.
IBM may have patents or pending patent applications covering subject matterdescribed in this document. The furnishing of this document does not grant youany license to these patents. You can send license inquiries, in writing, to:
IBM Director of LicensingIBM CorporationNorth Castle Drive, MD-NC119Armonk, NY 10504-1785US
For license inquiries regarding double-byte character set (DBCS) information,contact the IBM Intellectual Property Department in your country or sendinquiries, in writing, to:
Intellectual Property LicensingLegal and Intellectual Property LawIBM Japan Ltd.19-21, Nihonbashi-Hakozakicho, Chuo-kuTokyo 103-8510, Japan
INTERNATIONAL BUSINESS MACHINES CORPORATION PROVIDES THISPUBLICATION "AS IS" WITHOUT WARRANTY OF ANY KIND, EITHEREXPRESS OR IMPLIED, INCLUDING, BUT NOT LIMITED TO, THE IMPLIEDWARRANTIES OF NON-INFRINGEMENT, MERCHANTABILITY OR FITNESSFOR A PARTICULAR PURPOSE. Some jurisdictions do not allow disclaimer ofexpress or implied warranties in certain transactions, therefore, this statement maynot apply to you.
This information could include technical inaccuracies or typographical errors.Changes are periodically made to the information herein; these changes will beincorporated in new editions of the publication. IBM may make improvementsand/or changes in the product(s) and/or the program(s) described in thispublication at any time without notice.
Any references in this information to non-IBM websites are provided forconvenience only and do not in any manner serve as an endorsement of those
© Copyright IBM Corp. 2017, 2019 119
websites. The materials at those websites are not part of the materials for this IBMproduct and use of those websites is at your own risk.
IBM may use or distribute any of the information you provide in any way itbelieves appropriate without incurring any obligation to you.
Licensees of this program who wish to have information about it for the purposeof enabling: (i) the exchange of information between independently createdprograms and other programs (including this one) and (ii) the mutual use of theinformation which has been exchanged, should contact:
IBM Director of LicensingIBM CorporationNorth Castle Drive, MD-NC119Armonk, NY 10504-1785US
Such information may be available, subject to appropriate terms and conditions,including in some cases, payment of a fee.
The licensed program described in this document and all licensed materialavailable for it are provided by IBM under terms of the IBM Customer Agreement,IBM International Program License Agreement or any equivalent agreementbetween us.
The performance data and client examples cited are presented for illustrativepurposes only. Actual performance results may vary depending on specificconfigurations and operating conditions.
Information concerning non-IBM products was obtained from the suppliers ofthose products, their published announcements or other publicly available sources.IBM has not tested those products and cannot confirm the accuracy ofperformance, compatibility or any other claims related to non-IBM products.Questions on the capabilities of non-IBM products should be addressed to thesuppliers of those products.
This information is for planning purposes only. The information herein is subject tochange before the products described become available.
This information contains examples of data and reports used in daily businessoperations. To illustrate them as completely as possible, the examples include thenames of individuals, companies, brands, and products. All of these names arefictitious and any similarity to actual people or business enterprises is entirelycoincidental.
COPYRIGHT LICENSE:
This information contains sample application programs in source language, whichillustrate programming techniques on various operating platforms. You may copy,modify, and distribute these sample programs in any form without payment toIBM, for the purposes of developing, using, marketing or distributing applicationprograms conforming to the application programming interface for the operatingplatform for which the sample programs are written. These examples have notbeen thoroughly tested under all conditions. IBM, therefore, cannot guarantee orimply reliability, serviceability, or function of these programs. The sample
120 User Guide
programs are provided "AS IS", without warranty of any kind. IBM shall not beliable for any damages arising out of your use of the sample programs.
TrademarksIBM, the IBM logo, and ibm.com are trademarks or registered trademarks ofInternational Business Machines Corp., registered in many jurisdictions worldwide.Other product and service names might be trademarks of IBM or other companies.A current list of IBM trademarks is available on the web at "Copyright andtrademark information" at www.ibm.com/legal/copytrade.shtml.
Java and all Java-based trademarks and logos are trademarks or registeredtrademarks of Oracle and/or its affiliates.
Linux is a trademark of Linus Torvalds in the United States, other countries, orboth.
Microsoft, Windows, Windows NT, and the Windows logo are trademarks ofMicrosoft Corporation in the United States, other countries, or both.
UNIX is a registered trademark of The Open Group in the United States and othercountries.
Terms and conditions for product documentationPermissions for the use of these publications are granted subject to the followingterms and conditions.
Applicability
These terms and conditions are in addition to any terms of use for the IBMwebsite.
Personal use
You may reproduce these publications for your personal, noncommercial useprovided that all proprietary notices are preserved. You may not distribute, displayor make derivative work of these publications, or any portion thereof, without theexpress consent of IBM.
Commercial use
You may reproduce, distribute and display these publications solely within yourenterprise provided that all proprietary notices are preserved. You may not makederivative works of these publications, or reproduce, distribute or display thesepublications or any portion thereof outside your enterprise, without the expressconsent of IBM.
Rights
Except as expressly granted in this permission, no other permissions, licenses orrights are granted, either express or implied, to the publications or anyinformation, data, software or other intellectual property contained therein.
Notices 121

IBM reserves the right to withdraw the permissions granted herein whenever, in itsdiscretion, the use of the publications is detrimental to its interest or, asdetermined by IBM, the above instructions are not being properly followed.
You may not download, export or re-export this information except in fullcompliance with all applicable laws and regulations, including all United Statesexport laws and regulations.
IBM MAKES NO GUARANTEE ABOUT THE CONTENT OF THESEPUBLICATIONS. THE PUBLICATIONS ARE PROVIDED "AS-IS" AND WITHOUTWARRANTY OF ANY KIND, EITHER EXPRESSED OR IMPLIED, INCLUDINGBUT NOT LIMITED TO IMPLIED WARRANTIES OF MERCHANTABILITY,NON-INFRINGEMENT, AND FITNESS FOR A PARTICULAR PURPOSE.
IBM Online Privacy StatementIBM Software products, including software as service solutions, (“SoftwareOfferings”) may use cookies or other technologies to collect product usageinformation, to help improve the end user experience, to tailor interactions withthe end user or for other purposes. In many cases no personally identifiableinformation is collected by the Software Offerings. Some of our Software Offeringscan help enable you to collect personally identifiable information. If this SoftwareOffering uses cookies to collect personally identifiable information, specificinformation about this offering’s use of cookies is set forth below.
Depending upon the configurations deployed, this Software Offering may usesession and persistent cookies that collect each user’s name, user name, password,or other personally identifiable information for purposes of session management,authentication, single sign-on configuration or other usage tracking or functionalpurposes. These cookies can be disabled, but disabling them will also likelyeliminate the functionality they enable.
If the configurations deployed for this Software Offering provide you as customerthe ability to collect personally identifiable information from end users via cookiesand other technologies, you should seek your own legal advice about any lawsapplicable to such data collection, including any requirements for notice andconsent.
For more information about the use of various technologies, including cookies, forthese purposes, see IBM’s Privacy Policy at http://www.ibm.com/privacy andIBM's Online Privacy Statement at http://www.ibm.com/privacy/details in thesection entitled “Cookies, Web Beacons and Other Technologies” and the "IBMSoftware Products and Software-as-a-Service Privacy Statement" athttp://www.ibm.com/software/info/product-privacy.
122 User Guide

Notices 123

IBM®
Printed in USA


![New Creation Hymnbook Volume 2m g b mm m m mm / m ] m m s m s m s m s mm ] m m / mmm ] mÒm m s m s mmm m m mmm m m g3 8 68 b 38 68 m m m m m m mÀ mÀ mÀ mm mm sd mm mm $$ $$ x m](https://img.pdfslide.us/doc/110x75/5fb56f1cd1e70f6f412a3c8a/new-creation-hymnbook-volume-2-m-g-b-mm-m-m-mm-m-m-m-s-m-s-m-s-m-s-mm-m-m.jpg)


![KTN0158, a Humanized Anti-KIT Monoclonal Antibody ...K T N 0158 Im atinib N ilotinib +S C F-S C F [K TN 0158] (M ) C ell P roliferation (% M axim al) Lack of Neoplastic Mast Cells](https://img.pdfslide.us/doc/110x75/60fef8dc7809f632040cc9ad/ktn0158-a-humanized-anti-kit-monoclonal-antibody-k-t-n-0158-im-atinib-n-ilotinib.jpg)