Embed Size (px)
Citation preview

1 Hyperoo 2 User Guide
1
Hyperoo 2
User Guide
2 Hyperoo 2 User Guide
2
Contents How Hyperoo Works ............................................................................................................................... 3
Installing Hyperoo ................................................................................................................................... 3
Hyperoo 2 Management Console ........................................................................................................... 4
The Hyperoo 2 Server ............................................................................................................................. 5
Creating a Backup Array ...................................................................................................................... 5
Array Security ...................................................................................................................................... 7
Previous Versions and Deleted Files ................................................................................................... 7
Managing Array Files ........................................................................................................................... 8
Array Status ....................................................................................................................................... 11
The Hyperoo 2 Client ............................................................................................................................ 12
Selecting files and folders ................................................................................................................. 13
Selecting Hyper-V Virtual Machines ................................................................................................. 15
Specifying a backup destination ....................................................................................................... 15
Backing up to a Hyperoo Server .................................................................................................... 16
Backing up to the Hyperoo Cloud Service ..................................................................................... 16
Choosing a Backup Mode .................................................................................................................. 17
Live Backup and Change Tracking ..................................................................................................... 19
Modifying the Live Backup spool folder........................................................................................ 19
Scheduling Tasks ............................................................................................................................... 20
Verification .................................................................................................................................... 20
The Backup Console .......................................................................................................................... 21
Restoring Files ................................................................................................................................... 22
Restoring a previous version of a file ............................................................................................ 22
Network Settings ............................................................................................................................... 22
The Activity Log ..................................................................................................................................... 23
Notifications .......................................................................................................................................... 23
3 Hyperoo 2 User Guide
3
How Hyperoo Works It is helpful to understand how Hyperoo works before you install and configure a backup solution.
Hyperoo is designed to perform backup operations over a network connection and as such utilizes a
Client and Server component. Backup operations are performed by sending file information from
the Client, which is the machine being backed up, to the Server, which is the machine where the
backup files are stored. During a backup, Hyperoo compares the files on the Client and Server
machines and sends only the differences across the network. If you are using the Live Backup
feature, Hyperoo will continually stream file changes between the Client and Server in real time (or
near real time depending on server I/O load and performance).
Installing Hyperoo Hyperoo is distributed as a single installer which can be used to install the Client, Server and
Management Console. Before installing you should first determine how you intend to use Hyperoo.
Two common scenarios are:
1. Backup between two servers across LAN/WAN
Install the Hyperoo Client 2 and Hyperoo Live Backup Client Components onto the server
which is being backed up. Optionally install the Hyperoo 2 Management Console if you wish
to be able to manage Hyperoo directly from this machine.
Install the Hyperoo Server 2 component onto the server which is receiving the backup files.
Optionally install the Hyperoo 2 Management Console if you wish to be able to manage
Hyperoo directly from this machine.
2. Backup from a server to a NAS or other attached storage
In scenarios where you do not have machines to act as the Client and Server components,
you should install both the Hyperoo Client 2, Hyperoo Live Backup Client Components and
Hyperoo Server 2 components onto the machine being backed up. Optionally install the
Hyperoo 2 Management Console if you wish to be able to manage Hyperoo directly from
this machine.
Not using Live Backup?
If you are not using Live or Change Tracking backup modes you do not need to install the Hyperoo
Live Backup Client Components.
Cluster Shared Volumes (CSV)
Do not install the Hyperoo Live Backup Client Components if you are using CSV. Live backup is
currently not supported for CSV. If you install the live components they will cause the cluster to
permanently remain in redirected mode.

4 Hyperoo 2 User Guide
4
Hyperoo 2 Management Console Once you have installed the Hyperoo Client and Server components, you will be ready to configure
them into a backup solution. In order to do this you need to use the Hyperoo 2 Management
Console. This provides a friendly graphical interface to the Hyperoo services and allows you to
create and change settings as well as view the status of backup tasks.
Open the Hyperoo 2 Management Console from the Start menu and you should see the Hyperoo
Connect dialog similar to the following:
Fig.1 The Hyperoo connect dialog
The connect dialog allows you to manage a Hyperoo service running on a machine by specifying the
relevant server address. This is useful in scenarios where no GUI is present on a server. You can
simply run the management tools from another PC and connect to the service remotely.
By default, no password is required to access the Hyperoo services, but you can set one once you are
connected. Specify the server address and click on the Connect button to connect to the Hyperoo
Client or Server service.

5 Hyperoo 2 User Guide
5
The Hyperoo 2 Server The Hyperoo Server component acts as the backup destination for your data. It allows you to define
where files are kept and configure options such as network encryption and previous versions.
The server component allows you to configure one or more Backup Arrays. A backup array consists
of a location where files are stored, network and security settings and previous version settings.
Fig. 2 The Hyperoo Server
Creating a Backup Array You can create a new backup array by clicking the Add Array button on the Hyperoo Server window.
A dialog will open similar that shown below:
Fig. 3 Creating a backup array

6 Hyperoo 2 User Guide
6
Enter a name for the array and specify the array folder. The array folder is where the backup files
will be stored. If the folder resides in a location which requires credentials then these should be
entered. You will be able to modify the credentials at a later stage, but you cannot change the array
folder once this dialog has been completed.
For each array, Hyperoo creates an Array Information Folder where temporary files and version
information is stored. By default this resides within the array folder but you may wish to locate this
folder on another physical volume to improve I/O performance.
If you create an array which is located on a network location, you should check the option “Keep the
array database file in the Hyperoo ProgramData folder”. This helps to prevent corruption of the
SQLite database file used by the array which can occur if access to the network location is lost while
the file is opened.
Once you have completed this dialog, click OK to create the array. You will see the Edit Array
window similar to that shown below:
Fig. 4 Editing an array
If you are using live backup, you may wish to change the spool size for incoming live backup data.
This is defaulted to 4096 MB which means that Hyperoo will allow a maximum of 4096MB of
incoming data to accumulate before it terminates live backup for files in the array. Data will
accumulate during periods where it is arriving into the array faster than it is being applied to the
backup files.

7 Hyperoo 2 User Guide
7
Array Security The Network and Security tab allows you to configure a password for the array as well as enable
network encryption. Any Hyperoo Client attempting to connect to this array will require matching
password and encryption settings.
Fig. 5 Array Security
Previous Versions and Deleted Files Hyperoo can store previous version information for files in the array and retain deleted files for a
period of time. If configured, a previous version for a file will be created for every backup. In the
case of live backup, where changes are being streamed continually, a new version will be created
periodically according to a configured length of time.
Fig. 6 Previous versions and deleted files
Previous versions are stored as rollback files and are kept in the Array Information Folder. You can

8 Hyperoo 2 User Guide
8
rebuild a previous version of a file from the Files tab. Instructions on how to build a previous version
of a backup file can be found in the following section Managing Array Files.
Managing Array Files You can access the files in the array by browsing to the array folder using Windows Explorer.
Hyperoo stores configuration and version information for each file and this can be accessed from the
Files tab of the array. For backups consisting of a larger number of files (> 10,000) Hyperoo will only
list files on the Files tab if the file has a previous version or has been deleted and is being retained
for a period of time. This is to improve performance for larger backup scenarios.
Fig. 7 The array Files tab
To locate the information for a file, enter some search criteria into the Filter textbox then click the
Search button to display matching files. Click on the spanner icon at the right of a file to open the
Manage File dialog. This dialog has multiple tabs which are described as follows:
File Details
Fig. 8 Manage File Dialog – File Details
9 Hyperoo 2 User Guide
9
This tab allows you to view basic file details such as the file size, location and owner. The file owner
is the name of the server from which the file was backed up. Hyperoo will only allow this file to be
updated by the owning server. You can clear the file owner if you need to allow another server to
update this file.
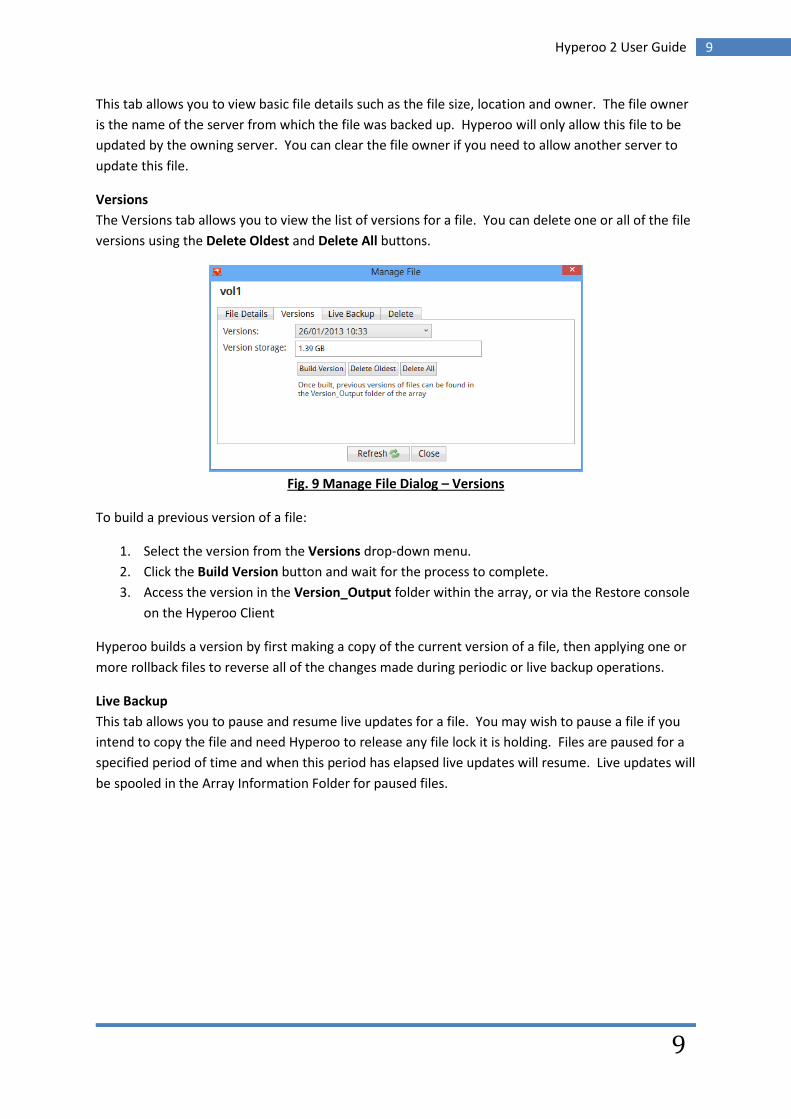
Versions
The Versions tab allows you to view the list of versions for a file. You can delete one or all of the file
versions using the Delete Oldest and Delete All buttons.
Fig. 9 Manage File Dialog – Versions
To build a previous version of a file:
1. Select the version from the Versions drop-down menu.
2. Click the Build Version button and wait for the process to complete.
3. Access the version in the Version_Output folder within the array, or via the Restore console
on the Hyperoo Client
Hyperoo builds a version by first making a copy of the current version of a file, then applying one or
more rollback files to reverse all of the changes made during periodic or live backup operations.
Live Backup
This tab allows you to pause and resume live updates for a file. You may wish to pause a file if you
intend to copy the file and need Hyperoo to release any file lock it is holding. Files are paused for a
specified period of time and when this period has elapsed live updates will resume. Live updates will
be spooled in the Array Information Folder for paused files.

10 Hyperoo 2 User Guide
10
Fig. 10 Manage File Dialog – Live Backup
Delete
This tab allows you to clear the array meta-data for a file or delete the file itself. You may wish to
use clear a file’s meta-data if you are experiencing an error and want to try a fresh backup to resolve
the problem.
Fig. 11 Manage File Dialog – Delete

11 Hyperoo 2 User Guide
11
Array Status
The Status tab of the array shows a list of currently connected backup tasks and their current status.
Fig. 12 Array Status Tab

12 Hyperoo 2 User Guide
12
The Hyperoo 2 Client The Hyperoo Client component performs the actual backup tasks, sending the backup data to a
Hyperoo Server which can be on the same server or on a remote server.
When you connect to the Hyperoo Client service you will see a window similar to the following:
Fig. 13 The Hyperoo Client GUI
Click on Add Task to create a new backup task, and enter a name for the new task (e.g. Task1). Click
OK to create the task. You will be navigated to the Editing Task window. From here you can set all
the properties of your backup task. If you want to add a new backup task, with similar properties as
an existing task, use the Clone Task button. This is useful if you want to create multiple tasks for the
same files going to different backup destinations.

13 Hyperoo 2 User Guide
13
Selecting files and folders Begin by selecting the files and folders that you wish to back up. Note that there are separate
buttons for adding files and folders.
Fig. 14 The Editing Task Window
To add files and folders to your backup simply click on the Add File and Add Folder buttons. This will
open the windows file dialog. If you are connected to the Hyperoo Service from another computer
the Hyperoo Remote File Browser dialog will open. This is a simple file selector designed to allow
you to browse the file system and select files on a remote machine.
Fig. 15 The Hyperoo Remote File Browser
In some cases you may not be able to view the contents of certain folders using the remote file
browser. If this happens you can specify the file or folder location by typing it into the Selected path

14 Hyperoo 2 User Guide
14
textbox and the clicking Select (see figure 15).
You can specify simple file rules to be applied using the Rules tab. These rules allow you to exclude
certain files or folders.
By default Hyperoo will not back up a file if the existing backup version has the same timestamp.
You can force Hyperoo to compare files even if they have the same timestamp on the Client and
Server machines using the Ignore Timestamp for Files rule. This option comes pre-populated with
common file types which require this option.
Fig. 16 File/Folder Rules
There are some additional options in the Options tab, these are as follows:
Output detailed log information for each file:
For backups which contain a very large number of files, Hyperoo will not log all the usual file level
activity as it will result in a very large log file. If you are having problems, it can help to enable
detailed logging by checking this option.
Transfer whole file (non differential):
This makes Hyperoo to copy the whole file (not just the changes) from the Client to the Server
machine. You may want to use this if you are backing up from a machine directly to a NAS or other
attached storage. This will prevent a whole read of the backup files being performed across a
network connection in order to check for differences. Previous versions are not supported using this
option as they rely upon the differential comparison logic.
Ignore last updated time for all files:
Use this option to disable timestamp comparison of files. This forces Hyperoo to check every file for
differences even if they have the same timestamp on the backup server.
Apply changes directly to files on the server (does not apply to live backup):
Use this option to force Hyperoo to directly update backup files, rather than first spool changes to
temporary files, when sending data between the client and server machines. When Hyperoo is

15 Hyperoo 2 User Guide
15
transferring file changes from the client machine to the server machine, it creates temporary files on
the server to store the change data before it then applies it to the backup files. This helps to prevent
file corruption if the client-server connection is lost when sending file data. Changes are only
applied to a backup file once they have been fully sent across the network and stored in a temporary
file. Selecting this option bypasses the use of temporary files and changes are written directly from
the client to the backup file on the server. If network connectivity is lost, the backup file will be in a
corrupt state until the next successful backup. This will be reported as an error in the backup log.
Do not use Volume Shadow Copy:
Use this option if you do not wish to use a VSS snapshot during the backup. This is useful if you want
to backup files on a network drive or a volume which does not support VSS snapshots. This option
does not work for Live or Change Tracking tasks where it is assumed that your files are located on
local NTFS volumes. This option will report errors if any files are in use during the backup, but the
backup will not fail. Hyperoo will move onto the next file if it encounters a file which is locked by
another program.
Selecting Hyper-V Virtual Machines You can backup virtual machines by either directly selecting their files and folders using the Files and
Folders tab, or by using the Hyper-V tab. Add virtual machines to the backup by clicking on the Add
VM button. Hyperoo will back up the virtual hard disk files for the selected virtual machines. If you
are running Server 2012 Hyperoo will also back up the virtual machine configuration file. Any Rules
and Options specified on the Files and Folders tab will also apply to the files for VMs selected on the
Hyper-V tab. This is useful if you wish to exclude one or more virtual hard disk files from the backup.
Fig. 17 Hyper-V Tab
Specifying a backup destination Hyperoo can backup files to a Hyperoo Server or to the Hyperoo Cloud Service. Both are configured
using the Destination tab by selecting the relevant Destination Type option.
16 Hyperoo 2 User Guide
16
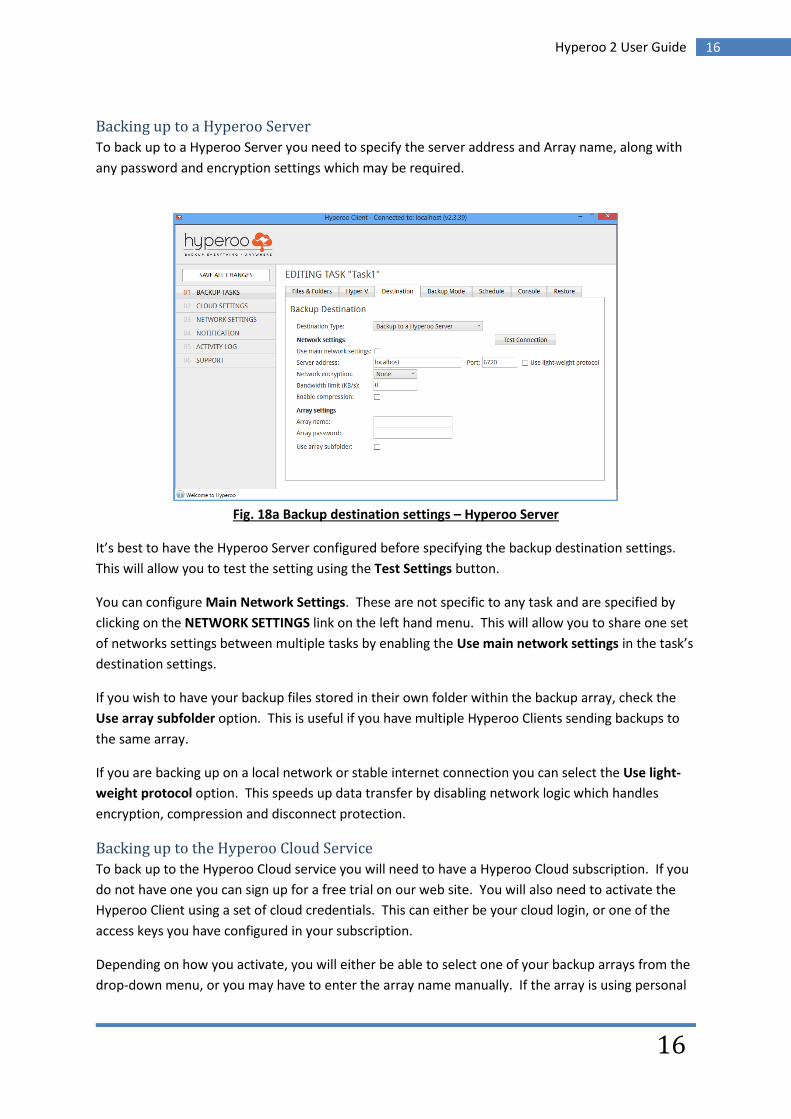
Backing up to a Hyperoo Server
To back up to a Hyperoo Server you need to specify the server address and Array name, along with
any password and encryption settings which may be required.
Fig. 18a Backup destination settings – Hyperoo Server
It’s best to have the Hyperoo Server configured before specifying the backup destination settings.
This will allow you to test the setting using the Test Settings button.
You can configure Main Network Settings. These are not specific to any task and are specified by
clicking on the NETWORK SETTINGS link on the left hand menu. This will allow you to share one set
of networks settings between multiple tasks by enabling the Use main network settings in the task’s
destination settings.
If you wish to have your backup files stored in their own folder within the backup array, check the
Use array subfolder option. This is useful if you have multiple Hyperoo Clients sending backups to
the same array.
If you are backing up on a local network or stable internet connection you can select the Use light-
weight protocol option. This speeds up data transfer by disabling network logic which handles
encryption, compression and disconnect protection.
Backing up to the Hyperoo Cloud Service
To back up to the Hyperoo Cloud service you will need to have a Hyperoo Cloud subscription. If you
do not have one you can sign up for a free trial on our web site. You will also need to activate the
Hyperoo Client using a set of cloud credentials. This can either be your cloud login, or one of the
access keys you have configured in your subscription.
Depending on how you activate, you will either be able to select one of your backup arrays from the
drop-down menu, or you may have to enter the array name manually. If the array is using personal

17 Hyperoo 2 User Guide
17
encryption (i.e. Hyperoo Cloud does not know the encrypt password) you will also need to enter the
encrypt password for the array. This password is used to encrypt data before it is sent and stored in
the cloud service. The password itself is never sent to the cloud service.
If you add a new backup array to your cloud subscription, you can get it to appear in the Array Name
menu by clicking on the refresh array list button.
You can test your setting using the Test Cloud Settings button.
Fig. 18b Backup destination settings – Hyperoo Cloud
Choosing a Backup Mode Hyperoo offers 3 backup modes, Standard, Change Tracking and Live. These options are available
on the Backup Mode tab (see figure 19). Your choice of backup mode may be restricted based on
your license and the options chosen during installation. If you are using Cluster Shared Volumes
then only Standard backup mode will be available.
Standard mode is the simplest and slowest backup mode and is the only option available using the
Hyperoo Standard license. It is also the only option available when using Cluster Shared Volumes. A
standard backup will examine the source and backup files during every backup and calculate which
file blocks have changed. Changed blocks are then sent across the network to the backup files. The
file comparison phase can be lengthy and will consume disk I/O as it involves a full read of source
and backup files. It is recommended that you use Standard mode if you are swapping the media
used for the backup array.
Change Tracking mode is similar to Standard backup, but without the file comparison phase. As files
are modified Hyperoo maintains a log of which parts of a file have been changed. When a backup
runs, this log is used to send file changes without comparing source and backup files. This results in
a significantly reduced backup time and consumes much less disk I/O. If Hyperoo detects that the
backup version of the file has been modified between backups, it will revert to a full file comparison
in order to prevent any data corruption. Change tracking tasks will perform a full comparison of all
files during the first backup, and will track and send changes for subsequent backups. Change

18 Hyperoo 2 User Guide
18
tracking is the default and recommended setting for most users.
Live mode provides continuous real time backup. After an initial synchronization, file changes are
streamed from the source to the backup files as they occur keeping the backup files continuously up
to date. A slow network connection may cause some latency when transmitting file changes.
Live backup mode is not supported if you are backing up to the Hyperoo Cloud Service
Fig. 19 Backup mode settings

19 Hyperoo 2 User Guide
19
Live Backup and Change Tracking Live and Change Tracking backups work by first making an exact copy of the files on the client and
sending them to the backup server. This process is referred to as Synchronization. Once a file has
been synchronized, Hyperoo will intercept all data written to the file and either log the change
information or send it to the Hyperoo server where it will be applied to the backup file. This will
continue until you either reset live backup (or reset change tracking) or an error causes it to stop. If
live backup or change tracking stops due to an error, the impacted files will be synchronized
according to the task schedule before resuming.
Modifying the Live Backup spool folder
It is worth being aware of the spool folder location used by Hyperoo to track file changes. You may
wish to relocate this to another volume depending on your configuration.
By default, Hyperoo uses the following spool folder for file change data:
C:\ProgramData\HyperooSoftware\Hyperoo2.0\HyperooSpool
Data is spooled from the Hyperoo file system component into this folder before being sent to one or
more Hyperoo Servers.
If you wish to change the location of this folder you need to update the following entry in the
Windows Registry:
HKEY_LOCAL_MACHINE\SYSTEM\CurrentControlSet\Services\Hyperoo\LiveBackupSpoolPath
You must use the same path notation as the existing value, i.e. the path must be preceded by the
characters \??\.
You will need to reboot the server for the change to take effect. You should disable (not pause)
Live Backup for all tasks before making this change.

20 Hyperoo 2 User Guide
20
Scheduling Tasks Hyperoo provides a simple but powerful scheduler allowing you to schedule tasks and even
configure tasks to run one after another.
Fig. 20 Scheduling backups
Tasks can be configured to run every minute, hour, day, week or month and you can exclude certain
days of the week by un-ticking the relevant box. Should a task fail, you can configure it to retry using
the Retry on failure option. To run your task based on another task’s schedule, select the Run this
task when another task has completed option. You also have the option to set specific notification
settings for a task using the Notification tab.
Verification
In addition to scheduling backups, you can also schedule periodic file verification using the Verify
tab. Verification will perform a regular backup, but will then examine the source and backup files
and generate a checksum value for each file. These checksum values are compared on the Hyperoo
Client and Hyperoo Server to ensure that the files are identical. Verification results are output in the
backup log file. Verification failures will cause the backup to fail or report one or more errors.

21 Hyperoo 2 User Guide
21
The Backup Console The Console tab provides access to the current state of the task and the most recent log files. You
can manually start the task from the Backup/Synchronize Status tab, and pause the transmission of
live backup data from the Live tab.
There are buttons to reset Live Backup and Change Tracking tasks. These can be used to completely
stop live backup and change tracking functionality for the task until it is next scheduled to run.
When the task next runs, a full file comparison will be performed for all files in the task, after which
live backup or change tracking will resume.
Fig. 21 The Backup Console
22 Hyperoo 2 User Guide
22
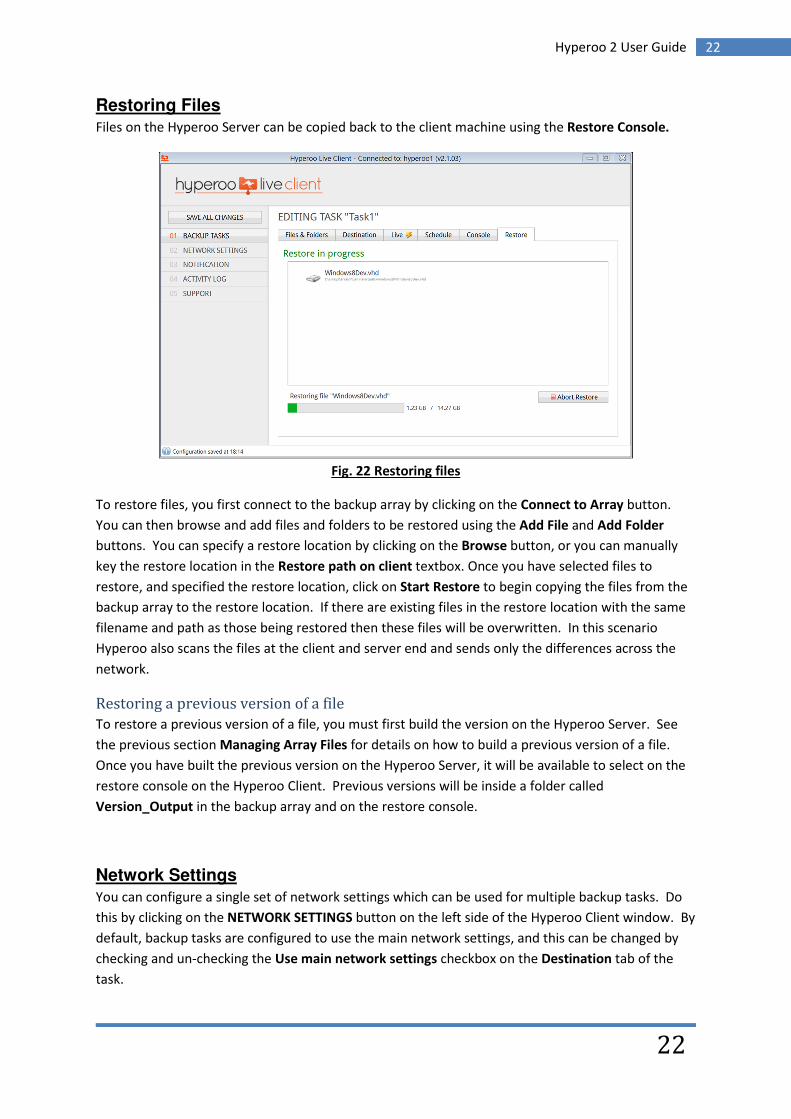
Restoring Files
Files on the Hyperoo Server can be copied back to the client machine using the Restore Console.
Fig. 22 Restoring files
To restore files, you first connect to the backup array by clicking on the Connect to Array button.
You can then browse and add files and folders to be restored using the Add File and Add Folder
buttons. You can specify a restore location by clicking on the Browse button, or you can manually
key the restore location in the Restore path on client textbox. Once you have selected files to
restore, and specified the restore location, click on Start Restore to begin copying the files from the
backup array to the restore location. If there are existing files in the restore location with the same
filename and path as those being restored then these files will be overwritten. In this scenario
Hyperoo also scans the files at the client and server end and sends only the differences across the
network.
Restoring a previous version of a file
To restore a previous version of a file, you must first build the version on the Hyperoo Server. See
the previous section Managing Array Files for details on how to build a previous version of a file.
Once you have built the previous version on the Hyperoo Server, it will be available to select on the
restore console on the Hyperoo Client. Previous versions will be inside a folder called
Version_Output in the backup array and on the restore console.
Network Settings
You can configure a single set of network settings which can be used for multiple backup tasks. Do
this by clicking on the NETWORK SETTINGS button on the left side of the Hyperoo Client window. By
default, backup tasks are configured to use the main network settings, and this can be changed by
checking and un-checking the Use main network settings checkbox on the Destination tab of the
task.
23 Hyperoo 2 User Guide
23
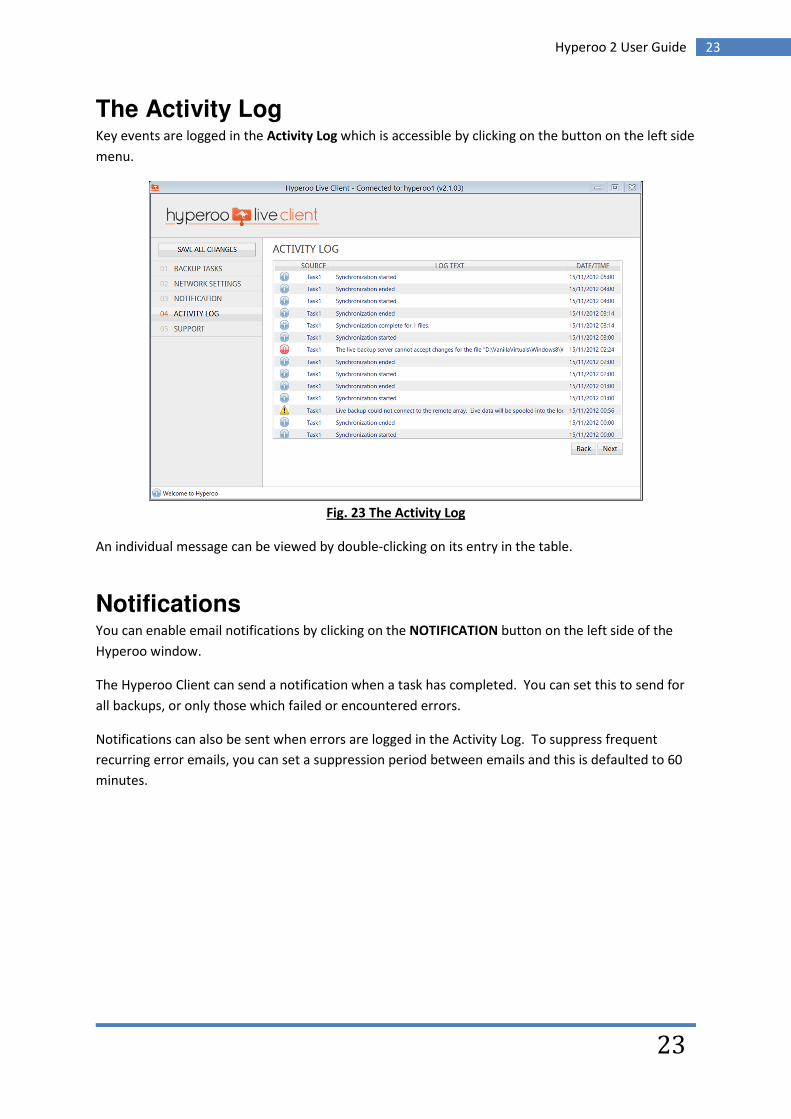
The Activity Log Key events are logged in the Activity Log which is accessible by clicking on the button on the left side
menu.
Fig. 23 The Activity Log
An individual message can be viewed by double-clicking on its entry in the table.
Notifications You can enable email notifications by clicking on the NOTIFICATION button on the left side of the
Hyperoo window.
The Hyperoo Client can send a notification when a task has completed. You can set this to send for
all backups, or only those which failed or encountered errors.
Notifications can also be sent when errors are logged in the Activity Log. To suppress frequent
recurring error emails, you can set a suppression period between emails and this is defaulted to 60
minutes.