Embed Size (px)
Citation preview

H Y P E R I O N ® S Y S T E M ™ 9 B I + ™
APPLICATION BUILDER J2EE™
R E L E A S E 9 . 2
I N S T A L L A T I O N G U I D E F O R U N I X
P/N: DB90092000

Copyright 1998–2006 Hyperion Solutions Corporation. All rights reserved.
“Hyperion,” the Hyperion “H” logo, and Hyperion’s product names are trademarks of Hyperion. References to other companies and their products use trademarks owned by the respective companies and are for reference purpose only.
No portion hereof may be reproduced or transmitted in any form or by any means, electronic or mechanical, including photocopying, recording, or information storage and retrieval systems, for any purpose other than the recipient’s personal use, without the express written permission of Hyperion.
The information contained herein is subject to change without notice. Hyperion shall not be liable for errors contained herein or consequential damages in connection with the furnishing, performance, or use hereof.
Any Hyperion software described herein is licensed exclusively subject to the conditions set forth in the Hyperion license agreement.
Use, duplication or disclosure by the U.S. Government is subject to restrictions set forth in the applicable Hyperion license agreement and as provided in DFARS 227.7202-1(a) and 227.7202-3(a) (1995), DFARS 252.227-7013(c)(1)(ii) (Oct 1988), FAR 12.212(a) (1995), FAR 52.227-19, or FAR 52.227-14, as applicable.
Hyperion Solutions Corporation 5450 Great America Parkway Santa Clara, California 95054
Printed in the U.S.A.

Contents iii
Contents
CHAPTER 1 Overview . . . . . . . . . . . . . . . . . . . . . . . . . . . . . . . . . . . . . . . . . . . . . . . . . . . . . . . . . . . . . . . . . . . . . . . 7
Application Builder Overview . . . . . . . . . . . . . . . . . . . . . . . . . . . . . . . . . . . . . . . . . . . . . . . . . . . . . 7
CHAPTER 2 Installation Sequence . . . . . . . . . . . . . . . . . . . . . . . . . . . . . . . . . . . . . . . . . . . . . . . . . . . . . . . . . . . . . 9
Installation Checklist . . . . . . . . . . . . . . . . . . . . . . . . . . . . . . . . . . . . . . . . . . . . . . . . . . . . . . . . . . . 10
CHAPTER 3 Planning the Installation . . . . . . . . . . . . . . . . . . . . . . . . . . . . . . . . . . . . . . . . . . . . . . . . . . . . . . . . . 13
Client Tier Requirements . . . . . . . . . . . . . . . . . . . . . . . . . . . . . . . . . . . . . . . . . . . . . . . . . . . . . . . . 14
Application Tier Requirements . . . . . . . . . . . . . . . . . . . . . . . . . . . . . . . . . . . . . . . . . . . . . . . . . . . 14
Data Tier Requirements . . . . . . . . . . . . . . . . . . . . . . . . . . . . . . . . . . . . . . . . . . . . . . . . . . . . . . . . . 15
Allocating System Resources in UNIX . . . . . . . . . . . . . . . . . . . . . . . . . . . . . . . . . . . . . . . . . . 17
Integrated Hyperion Products . . . . . . . . . . . . . . . . . . . . . . . . . . . . . . . . . . . . . . . . . . . . . . . . . . . . 17
Port Numbers Used by Hyperion Products . . . . . . . . . . . . . . . . . . . . . . . . . . . . . . . . . . . . . . . . . 17
Default Port Numbers for Remote Method Invocation (RMI) Servers . . . . . . . . . . . . . . . . . . . 18
Third-Party Products . . . . . . . . . . . . . . . . . . . . . . . . . . . . . . . . . . . . . . . . . . . . . . . . . . . . . . . . . . . 19
Third-party Products Included with the Installation . . . . . . . . . . . . . . . . . . . . . . . . . . . . . . 19
Third-party Products Not Included with HAB . . . . . . . . . . . . . . . . . . . . . . . . . . . . . . . . . . . 19
Installation Directory Structure . . . . . . . . . . . . . . . . . . . . . . . . . . . . . . . . . . . . . . . . . . . . . . . . . . 19
CHAPTER 4 Upgrading Application Builder . . . . . . . . . . . . . . . . . . . . . . . . . . . . . . . . . . . . . . . . . . . . . . . . . . . . . 21
Uninstalling a Previous Version of Application Builder . . . . . . . . . . . . . . . . . . . . . . . . . . . . . . . 21
Undeploying Application Builder . . . . . . . . . . . . . . . . . . . . . . . . . . . . . . . . . . . . . . . . . . . . . . . . . 22
Undeploying Application Builder From Sun ONE . . . . . . . . . . . . . . . . . . . . . . . . . . . . . . . . 22
Undeploying Application Builder from WebLogic . . . . . . . . . . . . . . . . . . . . . . . . . . . . . . . . 23
Undeploying Application Builder from WebSphere . . . . . . . . . . . . . . . . . . . . . . . . . . . . . . . 23
CHAPTER 5 Installing Data Sources. . . . . . . . . . . . . . . . . . . . . . . . . . . . . . . . . . . . . . . . . . . . . . . . . . . . . . . . . . . 25
Installing a Relational Database . . . . . . . . . . . . . . . . . . . . . . . . . . . . . . . . . . . . . . . . . . . . . . . . . . 25
Configuring DB2 . . . . . . . . . . . . . . . . . . . . . . . . . . . . . . . . . . . . . . . . . . . . . . . . . . . . . . . . . . . 26
Configuring Oracle . . . . . . . . . . . . . . . . . . . . . . . . . . . . . . . . . . . . . . . . . . . . . . . . . . . . . . . . . 26
Configuring MS SQL Server . . . . . . . . . . . . . . . . . . . . . . . . . . . . . . . . . . . . . . . . . . . . . . . . . . 26
Installing an OLAP Data Source . . . . . . . . . . . . . . . . . . . . . . . . . . . . . . . . . . . . . . . . . . . . . . . . . . 27

iv Contents
CHAPTER 6 Installing Application Builder . . . . . . . . . . . . . . . . . . . . . . . . . . . . . . . . . . . . . . . . . . . . . . . . . . . . . 29
Required Environment Variables . . . . . . . . . . . . . . . . . . . . . . . . . . . . . . . . . . . . . . . . . . . . . . . . . 29
Installing and Configuring Jcrontab . . . . . . . . . . . . . . . . . . . . . . . . . . . . . . . . . . . . . . . . . . . 30
Installing and Configuring Trove4J . . . . . . . . . . . . . . . . . . . . . . . . . . . . . . . . . . . . . . . . . . . . 30
Installing and Configuring FESI . . . . . . . . . . . . . . . . . . . . . . . . . . . . . . . . . . . . . . . . . . . . . . 30
Running hab-admin, hab-samples, and hab-test . . . . . . . . . . . . . . . . . . . . . . . . . . . . . . . . 31
Building Custom Applications, FESI, JCRONTAB, and TROVE4J . . . . . . . . . . . . . . . . . . 31
What Happens During Installation . . . . . . . . . . . . . . . . . . . . . . . . . . . . . . . . . . . . . . . . . . . . . . . 32
Directories and Files Installed . . . . . . . . . . . . . . . . . . . . . . . . . . . . . . . . . . . . . . . . . . . . . . . . 32
Files Installed in the HYPERION_HOME Directory . . . . . . . . . . . . . . . . . . . . . . . . . . . . . 32
Setting the Location of HYPERION_HOME . . . . . . . . . . . . . . . . . . . . . . . . . . . . . . . . . . . 33
Application Builder Installation . . . . . . . . . . . . . . . . . . . . . . . . . . . . . . . . . . . . . . . . . . . . . . . . . . 33
Choosing the Typical Installation . . . . . . . . . . . . . . . . . . . . . . . . . . . . . . . . . . . . . . . . . . . . . 35
Choosing the Custom Installation . . . . . . . . . . . . . . . . . . . . . . . . . . . . . . . . . . . . . . . . . . . . 37
Choosing the HTML Developer Installation . . . . . . . . . . . . . . . . . . . . . . . . . . . . . . . . . . . . 37
Choosing the Runtime Only Installation . . . . . . . . . . . . . . . . . . . . . . . . . . . . . . . . . . . . . . . 38
Adding Users to Essbase and EDS . . . . . . . . . . . . . . . . . . . . . . . . . . . . . . . . . . . . . . . . . . . . . . . . 39
Modifying the Application Builder Environment for Tomcat . . . . . . . . . . . . . . . . . . . . . . . . . . 39
Configuring a Dreamweaver Site for Use with Apache Tomcat . . . . . . . . . . . . . . . . . . . . . . . . 40
What’s Next? . . . . . . . . . . . . . . . . . . . . . . . . . . . . . . . . . . . . . . . . . . . . . . . . . . . . . . . . . . . . . . . . . . 40
What’s Next After Installing with the Typical Installation Option . . . . . . . . . . . . . . . . . . . 40
What’s Next After Installing with the Custom Option . . . . . . . . . . . . . . . . . . . . . . . . . . . . 41
What’s Next After Installing with HTML Developer Option . . . . . . . . . . . . . . . . . . . . . . . 41
What’s Next After Installing with the Runtime Only Option . . . . . . . . . . . . . . . . . . . . . . . 42
CHAPTER 7 Deploying and Configuring Using Apache Tomcat. . . . . . . . . . . . . . . . . . . . . . . . . . . . . . . . . . . . . . 43
Adding Application Users and Roles . . . . . . . . . . . . . . . . . . . . . . . . . . . . . . . . . . . . . . . . . . . . . . 43
Adding Users . . . . . . . . . . . . . . . . . . . . . . . . . . . . . . . . . . . . . . . . . . . . . . . . . . . . . . . . . . . . . . 44
Adding Roles . . . . . . . . . . . . . . . . . . . . . . . . . . . . . . . . . . . . . . . . . . . . . . . . . . . . . . . . . . . . . . 44
Adding Security . . . . . . . . . . . . . . . . . . . . . . . . . . . . . . . . . . . . . . . . . . . . . . . . . . . . . . . . . . . 45
Configuring the Application Context . . . . . . . . . . . . . . . . . . . . . . . . . . . . . . . . . . . . . . . . . . . . . 48
Deploying a WAR file in Apache Tomcat . . . . . . . . . . . . . . . . . . . . . . . . . . . . . . . . . . . . . . . . . . 48
Verifying and Modifying XML Files . . . . . . . . . . . . . . . . . . . . . . . . . . . . . . . . . . . . . . . . . . . . . . 48
Configuring Connection Pooling for JDBC Data Sources . . . . . . . . . . . . . . . . . . . . . . . . . . . . . 50
Configuring a JDBC Data Source . . . . . . . . . . . . . . . . . . . . . . . . . . . . . . . . . . . . . . . . . . . . . 50
Verifying the Functionality of the Sample Application . . . . . . . . . . . . . . . . . . . . . . . . . . . . . . . 51
Configuring a Dreamweaver Site for Use with Apache Tomcat . . . . . . . . . . . . . . . . . . . . . . . . 52
CHAPTER 8 Deploying and Configuring Using WebLogic . . . . . . . . . . . . . . . . . . . . . . . . . . . . . . . . . . . . . . . . . . 53
Creating Links into WebLogic . . . . . . . . . . . . . . . . . . . . . . . . . . . . . . . . . . . . . . . . . . . . . . . . . . . 53
Automatically Deploying During Application Builder Installation . . . . . . . . . . . . . . . . . . . . . 54
Manually Deploying Using WebLogic . . . . . . . . . . . . . . . . . . . . . . . . . . . . . . . . . . . . . . . . . . . . . 54

Contents v
Modifying the startWLS file . . . . . . . . . . . . . . . . . . . . . . . . . . . . . . . . . . . . . . . . . . . . . . . . . . 55
Extracting the EAR files . . . . . . . . . . . . . . . . . . . . . . . . . . . . . . . . . . . . . . . . . . . . . . . . . . . . . 55
Verifying and Modifying XML Files . . . . . . . . . . . . . . . . . . . . . . . . . . . . . . . . . . . . . . . . . . . . . . . 57
Setting up Users and Roles in the weblogic.xml File . . . . . . . . . . . . . . . . . . . . . . . . . . . . . . 58
Adding Application Users and Roles . . . . . . . . . . . . . . . . . . . . . . . . . . . . . . . . . . . . . . . . . . . . . . 59
Adding Users . . . . . . . . . . . . . . . . . . . . . . . . . . . . . . . . . . . . . . . . . . . . . . . . . . . . . . . . . . . . . . 59
Adding Roles . . . . . . . . . . . . . . . . . . . . . . . . . . . . . . . . . . . . . . . . . . . . . . . . . . . . . . . . . . . . . . 62
Configuring Connection Pooling for JDBC Data Sources . . . . . . . . . . . . . . . . . . . . . . . . . . . . . 63
Configuring a New Connection Pool . . . . . . . . . . . . . . . . . . . . . . . . . . . . . . . . . . . . . . . . . . . 63
Creating a Server Pool . . . . . . . . . . . . . . . . . . . . . . . . . . . . . . . . . . . . . . . . . . . . . . . . . . . . . . . 65
Testing the Connection Pool . . . . . . . . . . . . . . . . . . . . . . . . . . . . . . . . . . . . . . . . . . . . . . . . . . 66
Configuring a JDBC Data Source . . . . . . . . . . . . . . . . . . . . . . . . . . . . . . . . . . . . . . . . . . . . . . 69
CHAPTER 9 Deploying and Configuring Using WebSphere . . . . . . . . . . . . . . . . . . . . . . . . . . . . . . . . . . . . . . . . . 75
Completing Post-Installation Tasks for Solaris . . . . . . . . . . . . . . . . . . . . . . . . . . . . . . . . . . . . . . 75
Setting Up Security . . . . . . . . . . . . . . . . . . . . . . . . . . . . . . . . . . . . . . . . . . . . . . . . . . . . . . . . . . . . . 76
Creating and Configuring a JDBC Data Source and Driver . . . . . . . . . . . . . . . . . . . . . . . . . . . . 78
Creating a JDBC Data Source . . . . . . . . . . . . . . . . . . . . . . . . . . . . . . . . . . . . . . . . . . . . . . . . . 79
Configuring the Server Environment . . . . . . . . . . . . . . . . . . . . . . . . . . . . . . . . . . . . . . . . . . 82
Adding Application Users and Roles . . . . . . . . . . . . . . . . . . . . . . . . . . . . . . . . . . . . . . . . . . . . . . 83
Adding Users . . . . . . . . . . . . . . . . . . . . . . . . . . . . . . . . . . . . . . . . . . . . . . . . . . . . . . . . . . . . . . 84
Adding Roles . . . . . . . . . . . . . . . . . . . . . . . . . . . . . . . . . . . . . . . . . . . . . . . . . . . . . . . . . . . . . . 84
Verifying and Modifying XML Files . . . . . . . . . . . . . . . . . . . . . . . . . . . . . . . . . . . . . . . . . . . . . . . 85
Deploying the EAR Files . . . . . . . . . . . . . . . . . . . . . . . . . . . . . . . . . . . . . . . . . . . . . . . . . . . . . . . . 86
Verifying the Functionality of the Sample Application . . . . . . . . . . . . . . . . . . . . . . . . . . . . . . . . 88
CHAPTER 10 Upgrading Web Applications . . . . . . . . . . . . . . . . . . . . . . . . . . . . . . . . . . . . . . . . . . . . . . . . . . . . . . . 91
Upgrading an Existing Application . . . . . . . . . . . . . . . . . . . . . . . . . . . . . . . . . . . . . . . . . . . . . . . . 91
Using the Release 3.x or 7.x with HAB 9.x . . . . . . . . . . . . . . . . . . . . . . . . . . . . . . . . . . . . . . 91
Upgrading Your 3.0 or 7.x Application to run with Release 9.x . . . . . . . . . . . . . . . . . . . . . 92
Upgrading Your Tags . . . . . . . . . . . . . . . . . . . . . . . . . . . . . . . . . . . . . . . . . . . . . . . . . . . . . . . . 92
CHAPTER 11 Troubleshooting . . . . . . . . . . . . . . . . . . . . . . . . . . . . . . . . . . . . . . . . . . . . . . . . . . . . . . . . . . . . . . . . . 95
License Key . . . . . . . . . . . . . . . . . . . . . . . . . . . . . . . . . . . . . . . . . . . . . . . . . . . . . . . . . . . . . . . . . . . 95
CLASSPATH and PATH Entries . . . . . . . . . . . . . . . . . . . . . . . . . . . . . . . . . . . . . . . . . . . . . . . . . . 95
Sample Application Deployment Issues . . . . . . . . . . . . . . . . . . . . . . . . . . . . . . . . . . . . . . . . . . . . 96
Quick Builder . . . . . . . . . . . . . . . . . . . . . . . . . . . . . . . . . . . . . . . . . . . . . . . . . . . . . . . . . . . . . . . . . 97
Supported Encoding Issues in ADM . . . . . . . . . . . . . . . . . . . . . . . . . . . . . . . . . . . . . . . . . . . . . . . 97
ADM Star Schema Issues . . . . . . . . . . . . . . . . . . . . . . . . . . . . . . . . . . . . . . . . . . . . . . . . . . . . . . . . 98
Glossary . . . . . . . . . . . . . . . . . . . . . . . . . . . . . . . . . . . . . . . . . . . . . . . . . . . . . . . . . . . . . . . . . . . . . . . 99
Index . . . . . . . . . . . . . . . . . . . . . . . . . . . . . . . . . . . . . . . . . . . . . . . . . . . . . . . . . . . . . . . . . . . . . . . . 109

vi Contents

Overview 7
C h a p t e r
1Overview
This guide provides information that you need to install Hyperion® System™ 9 BI+™
Application Builder™. It provides instructions for both uninstalling previous versions of Application Builder and upgrading from a previous release to this release of Application Builder.
This guide also provides instructions for installing the software to run on any of four application servers. It also provides the procedures for installing the necessary prerequisite software, and OLAP and relational data sources.
We recommend you use this guide concurrently with the Hyperion System 9 Application Builder J2EE System Administrator’s Guide.
● “Application Builder Overview” on page 7
Application Builder OverviewApplication Builder is a Java-based tool used by developers to create custom business analysis applications for business users. Application Builder is a highly flexible, scalable enterprise solution built on a Java 2 Enterprise Edition (J2EE) foundation. It provides the requisite framework to construct Web-based analysis applications quickly. Using this infrastructure, developers can focus on the unique aspects of their custom business analysis solutions, and they can create application-specific displays and other specialized functionality.
Application Builder implements comprehensive APIs, components, services, a repository, alerts, and scheduling. Application Builder also includes the integration of Quick Builder, in which Application Builder components are presented using an interface provided by Macromedia® Dreamweaver MX.
Application Builder includes the following components:
● Web Application Architecture (WAA)
● Analytic Data Model (ADM)
● Administration Tools
Each component plays a key role in building applications. A solid understanding of the underlying concepts will enable you to build applications with ease.

8 Overview

Installation Sequence 9
C h a p t e r
2Installation Sequence
This chapter provides the following information about installing, configuring, and setting up Application Builder:
● High-level task flow that identifies basic steps
● Installation checklist to guide you through each step in the installation and configuration process
In This Chapter Installation Checklist . . . . . . . . . . . . . . . . . . . . . . . . . . . . . . . . . . . . . . . . . . . . . . . . . . . . . . . . . . . . . . . . . . . . . . . 10

10 Installation Sequence
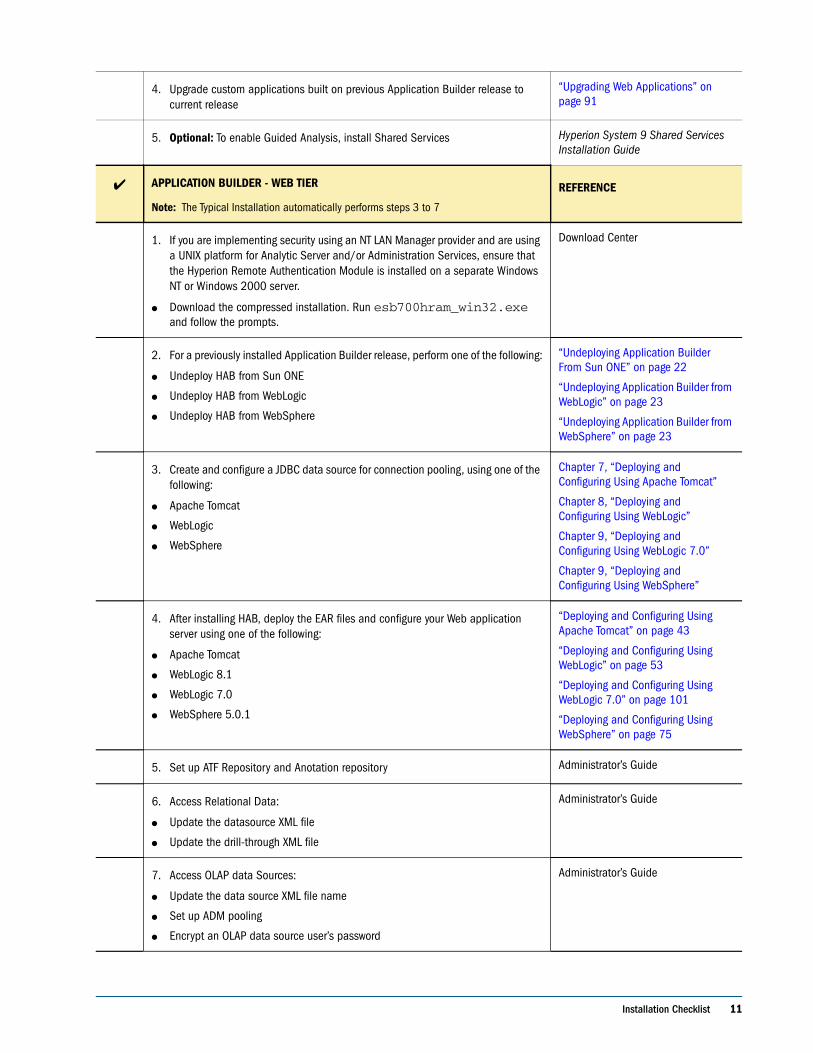
Installation Checklist This checklist contains steps required for a successful installation of Application Builder J2EE. Page numbers refer to this guide unless otherwise noted. If you are upgrading, see Chapter 4, “Upgrading Application Builder”.
Before you begin the installation process, ensure that you meet the hardware and software system requirements contained in Chapter 3, “Planning the Installation”.
✔ APPLICATION BUILDER - DATA TIER REFERENCE
1. Install and configure a relational database for the ATF repository:
● MySQL
● IBM DB2
● Oracle
● Microsoft SQL Server
“Configuring DB2” on page 26
“Configuring Oracle” on page 26
“Configuring MS SQL Server” on page 26
2. Optional: Set up relational tables for ATF repository.
● The Typical Installation configures the repository.
Administrator’s Guide
3. Optional: Set up relational tables for relational drill-through.
● The Typical Installation configures the repository.
Administrator’s Guide
4. Install an OLAP data source:
● Hyperion System 9 BI+ Essbase Analytic Services and Hyperion System 9 BI+ Analytic High Availability Services
● Hyperion System 9 Financial Management
● Hyperion System 9 Planning
● Star Schema
“Installing an OLAP Data Source” on page 27
5. Upgrade Existing Applications “Upgrading Web Applications” on page 91
✔ APPLICATION BUILDER - APPLICATION TIER REFERENCE
1. For a previously installed Application Builder release:
● Backup any Custom Application(s)
● Uninstall a previous release
“Uninstalling a Previous Version of Application Builder” on page 21
2. Install prerequisite software:
● Both JDK and J2EE development kits, if developing custom applications
● Java Virtual Machine (VM) (Windows Only)
● Application server
“Application Tier Requirements” on page 14
3. Install Application Builder “Installing Application Builder” on page 29
Installation Checklist 11
4. Upgrade custom applications built on previous Application Builder release to current release
“Upgrading Web Applications” on page 91
5. Optional: To enable Guided Analysis, install Shared Services Hyperion System 9 Shared Services Installation Guide
✔ APPLICATION BUILDER - WEB TIER
Note: The Typical Installation automatically performs steps 3 to 7
REFERENCE
1. If you are implementing security using an NT LAN Manager provider and are using a UNIX platform for Analytic Server and/or Administration Services, ensure that the Hyperion Remote Authentication Module is installed on a separate Windows NT or Windows 2000 server.
● Download the compressed installation. Run esb700hram_win32.exe and follow the prompts.
Download Center
2. For a previously installed Application Builder release, perform one of the following:
● Undeploy HAB from Sun ONE
● Undeploy HAB from WebLogic
● Undeploy HAB from WebSphere
“Undeploying Application Builder From Sun ONE” on page 22
“Undeploying Application Builder from WebLogic” on page 23
“Undeploying Application Builder from WebSphere” on page 23
3. Create and configure a JDBC data source for connection pooling, using one of the following:
● Apache Tomcat
● WebLogic
● WebSphere
Chapter 7, “Deploying and Configuring Using Apache Tomcat”
Chapter 8, “Deploying and Configuring Using WebLogic”
Chapter 9, “Deploying and Configuring Using WebLogic 7.0”
Chapter 9, “Deploying and Configuring Using WebSphere”
4. After installing HAB, deploy the EAR files and configure your Web application server using one of the following:
● Apache Tomcat
● WebLogic 8.1
● WebLogic 7.0
● WebSphere 5.0.1
“Deploying and Configuring Using Apache Tomcat” on page 43
“Deploying and Configuring Using WebLogic” on page 53
“Deploying and Configuring Using WebLogic 7.0” on page 101
“Deploying and Configuring Using WebSphere” on page 75
5. Set up ATF Repository and Anotation repository Administrator’s Guide
6. Access Relational Data:
● Update the datasource XML file
● Update the drill-through XML file
Administrator’s Guide
7. Access OLAP data Sources:
● Update the data source XML file name
● Set up ADM pooling
● Encrypt an OLAP data source user’s password
Administrator’s Guide

12 Installation Sequence
8. Configure Dreamweaver to use Quick Builder Getting Started Guide:”Using Quick Builder with Dreamweaver”
9. Set up users and optionally Single Sign-on Administrator’s Guide

Planning the Installation 13
C h a p t e r
3Planning the Installation
This chapter details the hardware, operating systems, and software requirements of a Hyperion System 9 Application Builder J2EE installation. It includes the following topics:
● “Client Tier Requirements” on page 14
● “Application Tier Requirements” on page 14
● “Data Tier Requirements” on page 15
● “Port Numbers Used by Hyperion Products” on page 17
● “Default Port Numbers for Remote Method Invocation (RMI) Servers” on page 18
● “Allocating System Resources in UNIX” on page 17
Subsequent maintenance releases and service packs for third-party platform software may be used where the vendor asserts backward compatibility. Please be aware, however, that although these assertions are made in good faith, certain incompatibilities may exist. In the event that an incompatibility is identified, Hyperion may experience a delay in reproducing and fixing resultant issues for the affected versions.
To assist you in getting started quickly, with the Typical Installation type, Hyperion provides the MySQL relational database and Apache Tomcat Application Server.
Because MySQL relational database and Apache Tomcat Application Server software are not intended to support large user communities in production environments, it is recommended that they be deployed only in test or demonstration environments where a small number of individuals will access and use the software.
There are three tiers to consider when you install Application Builder: the Client tier, the Application tier, and the Data tier. Each tier has its own hardware and software requirements.

14 Planning the Installation
Client Tier RequirementsThe Client tier consists of the following components:
● A client workstation, which you use for developing applications with Quick Builder and the Application Builder tag libraries.
● A Web browser, which you use to access a Application Builder application.
● Quick Builder, which enables you to build an application within an Integrated Development Environment (IDE), Dreamweaver, using Application Builder tag libraries. The Application Builder tag libraries are graphically represented within Dreamweaver on menus and in the Application Components section. For more information on Quick Builder, see the Hyperion System 9 Application Builder J2EE Administration Guide.
The hardware and software requirements for a Application Builder client are as follows:
Application Tier RequirementsThe Application tier consists of a Web server and a J2EE application server that manages applications that are developed. The Application tier consists of the following components:
● The Web Application Architecture (WAA), which consists of Java Server Pages (JSPs), servlets, images, JavaScript, cascading style sheets, and applets
● The Analytic Data Model (ADM), which provides Java access to Essbase and other OLAP data sources
● The Sample Pages, Tutorials, hab-test application, and Sample Application, which demonstrates the basic functionality of Application Builder
● The Administration Tools, which provides the user interface to the application tools
Table 1 Hardware and Software Client Requirements for the Client Tier
Component Requirement
Microprocessor Intel Pentium or later
Memory 64 MB
Note: The amount of RAM depends on the Web browser you are using. For more information on server settings, see the documentation for your Web browser.
Browser The following:
● Internet Explorer version 6.0
● JRE Browser Plug-In JVM 1.4.2_08 or 1.3.1_13
Note: Cookie options, which you may need to enable in your Web browser, depending on the server you use.

Data Tier Requirements 15
The following table lists the hardware and software requirements for installing Application Builder on the application tier:
Data Tier RequirementsThe Data tier consists of an OLAP data source and a relational data source.
The OLAP data source contains the multidimensional OLAP data source (Essbase), which contains the data that the client views or queries when using Application Builder. It also provides access to Hyperion System 9 Planning and Hyperion System 9 Financial Management.
Table 2 UNIX Software Requirements for the Application Tier
Component Requirement
Operating system One of the following systems:
● Solaris 9
● Solaris 10
● AIX 5.2
● AIX 5.3
● RedHat Enterprise Linux AS 4.0
Java platform Both JDK and J2EE development kits, if developing custom applications:
● Sun Microsystems Java Development Kit (JDK) version 1.4.2 Build 08 (Windows/Solaris/Linux)
● Sun Microsystems Java Development Kit (JDK) version 1.4.2 Build Cal 420-2004026 (AIX)
● Sun Microsystems Java Runtime Environment (JRE) version 1.4.2 Build 08 (Windows/Solaris/Linux)
● Sun Microsystems Java Runtime Environment (JRE) version 1.4.2 Build Cal 420-2004026 (AIX)
Database driver One of the following drivers:
Note: See individual drivers in: “Installing Data Sources” on page 25
● JDBC DataDirect 3.4
● Hyperion JDBC MySQL 3.0.7
Physical memory ● A minimum of 512 MB of RAM
Swap space ● The minimum swap file should be 2 GB.
Thread Type for Solaris ● POSIX Kernel threads
Application Builder supported application servers One of the following application servers:
● IBM WebSphere 5.1.1.7
● BEA WebLogic 8.1.4
● Apache Tomcat 5.0.28

16 Planning the Installation
The relational data source is used in a variety of ways. You can use a relational data source as a ATF repository for all Hyperion applications. This relational data source must be created and configured, as it stores Application Builder information, including OLAP views and SQL queries.
You can also create and configure a relational data source to enable drill-through functionality. In the Sample Application, for example, the drill-through feature enables you to drill from the summarized and calculated data stored in your OLAP data source into detailed data stored in a relational data source. While drill-through queries are written in SQL, you can also perform drill-through independent SQL queries on a relational data source.
For more information on relational access and drill-through functionality, see the Hyperion System
9 Application Builder J2EE Administrator’s Guide.
The following ADM drivers are provided with Application Builder:
● The ADM Essbase Native driver is automatically installed and configured
● The ADM EAS driver is installed
● The ADM FM driver is installed with Financial Management
● The ADM Planning driver is installed with Planning.
You must configure relational access and drill-through functionality to implement these functions. While you are not required to install the relational database on the Data tier with the Application Builder software, you must install the proper client software to establish a connection to the relational database(s).
Table 3 Data Tier Requirements
Component Requirement
OLAP data source One of the following:
● Hyperion System 9 Essbase Analytic Services Release 9.0.1
● Hyperion System 9 Financial Management Release 4.1.1
● Hyperion System 9 Planning Release 4.1.1
● Star Schema
Relational Database One of the following:
● Oracle 9i-9.2.0.1
● Oracle 10g-10.1.0.2
● IBM DB2 8.1 FP 7
● IBM DB2 8.2 FP 2
● Microsoft SQL Server 2000 SP3a
● MySQL 4.0.12
● MySQL 4.0.23

Port Numbers Used by Hyperion Products 17
Allocating System Resources in UNIXDepending on your system, shell, and limits imposed by your system administrator, you may have limits on the amount of memory available for your processes, the number of files you can have open at one time, and the amount of stack space or virtual memory that you can access.
The process running the application server should have unlimited access to these resources. As a minimum, you should have at least: 1024 file handles available, 512 MB of stack space, 512 MB of virtual memory, and 512 MB of data/heap space.
Installations that expect to handle large numbers of users should run with unlimited resources, up to the limits of the computer, when possible. You should run the ulimit -a command on all four supported UNIX platforms on your server to determine the current settings. Adjust these settings as required.
If you are not familiar with the ulimit command, please contact your system administrator for assistance in changing these settings.
Integrated Hyperion ProductsApplication Builder integrates with the following Hyperion products:
❍ Hyperion Reports 7.0
❍ Hyperion Analyzer 7.0
Port Numbers Used by Hyperion ProductsDuring Hyperion System 9 product installation, the default port number for application servers is automatically populated. If you do not modify the value during installation, the software is installed with the ports listed below.
Each application port number must be unique. If you modify a default port number, change it to a port number not currently used. After modifying the default port number, if your application does not launch, or an error message is displayed similar to “port already in use” or “bind error,” there may be a port number conflict.
Hyperion Product Listen Port SSL Listen PortShutdown Port for Apache Tomcat
Shared Services 58080 58090 58005
Application Builder J2EE 21080 21090 21005
Application Builder.NET 22080 22082 22081
Analytic Administration Services 10080 10090 10005
Analytic High Availability Services 11080 11090 11005

18 Planning the Installation
Default Port Numbers for Remote Method Invocation (RMI) Servers
Planning 8300 8300 8301
Hyperion Translation Manager 14080 14090 14005
Financial Reporting 8200 8201
Web Analysis 16000 16001
Hyperion Business Modeling 17080 17090 17005
Performance Scorecard 18080 18090 18005
Performance Scorecard Alerting 18081 18091 18006
Enterprise Metrics 8180 8280
8205
8105
Analytic Services Smart View Provider
13080 13090 13005
Workspace 19000 45001
Hyperion Component RMI Port
Hyperion Remote Authentication Module
58000
Financial Reporting 1099
Planning 11333
Strategic Finance 1493 and 1495
Hyperion Performance Suite Legacy 1494 - 1498
Hyperion Performance Suite GSM 1800
Hyperion Performance Suite Services 1801-1803
OpenLDAP 58081
Hyperion Product Listen Port SSL Listen PortShutdown Port for Apache Tomcat

Installation Directory Structure 19
Third-Party ProductsSeveral third-party products are supported with Application Builder, some are included and some are not included.
Third-party Products Included with the InstallationThis section lists the third-party products supported with the Hyperion Application installation:
● Apache Ant v1.6 Java build tool: http://www.actuate.com
● Apache: http:/apache.org for:
❍ Apache Xalan (XSLT)
❍ Formatting Object (FOP)
❍ Tomcat Application Server
❍ Xerces 3.11 XML parser
● XML4C++ v3.1.0 v3.3.1: http://www.alphaworks.ibm.com/aw.nsf/download/xml4c
● CORBA ACE 5.2 and TAO 1.2 on Solaris: http://www.cs.wustl.edu/~schmidt/corba.html
● IBM Classes for Unicode v1.4 v1.6: http://www.alphaworks.ibm.com
● MySQL AB MySQL 4.0.12PRO: http://www.mysql.com
● NetCharts 4.0: http://www.visualmining.com
● Sandstone Visual Parse ++5.0: http://www.sand-stone.com
Third-party Products Not Included with HABTo use Quick Builder, you need to buy Macromedia Dreamweaver MX 6.1: http://www.macromedia.com
To use Macromedia with Applications Builder’s extensions, you need to download Dreamveaver’s Extension Manager 1.5 or later: http://www.macromedia.com
To use FESI: http://www.lugrin.ch/fesi/index.html
Installation Directory StructureDuring Application Builder installation, folders common to Hyperion products are installed into: $HOME/Hyperion/common. Application Builder, by default, is installed into: $HOME/Hyperion/ApplicationBuilder. Optionally, you choose the Application Builder install directory, documented as <HAB_Install Directory>. The following figure shows the location of these Application Builder directories and files.
You can designate the location for $HOME\common only when it is the first Hyprion product installation.

20 Planning the Installation
Once the environment variable named HYPERION_HOME is set, you should not change it. Figure 1 and Figure 2 list the common and Application Builder directories:
Figure 1 Application Builder Common Installation Directories
Figure 2 Application Builder Installation Directories
.

Upgrading Application Builder 21
C h a p t e r
C h a p t e r
4Upgrading Application Builder
This chapter contains important information about tasks you must perform when you upgrade to this release of Application Builder.
If you have a previous release of Application Builder installed on your system, you must uninstall the previous release. For more information on uninstalling, see “Uninstalling a Previous Version of Application Builder” on page 21.
Note: Your repositories and views will not be converted during upgrade.
If the installation program finds a previous version of Application Builder, you are warned that the installation program copies over any existing files. If you developed applications, you need to back up existing files, including custom code.
Uninstalling a Previous Version of Application BuilderBefore uninstalling Application Builder Release 3.0 or 7.0, consider the following guidelines:
● If you want to reinstall Application Builder, always uninstall the existing version first.
● Files in the HYPERION_HOME/common directory are not uninstalled and will remain after a successful uninstallation. For more information about HYPERION_HOME, see “What Happens During Installation” on page 32.
● Uninstalling does not remove or clear the HYPERION_HOME environment variable.
➤ To uninstall Application Builder:
1 Go to the directory where you installed Application Builder.
2 Change directories to UninstallerData (cd UninstallerData).
3 At the $ prompt, type Uninstall_HAB.
4 Click Uninstall.

22 Upgrading Application Builder
Undeploying Application BuilderThe following section describes tasks necessary to remove Application Builder from your Web application.
➤ To uninstall Application Builder:
1 Go to the directory where you installed Application Builder.
2 Change directories to UninstallerData.
3 At the $ prompt, type Uninstall_HAB.
4 Click Uninstall.
Undeploying Application Builder From Sun ONEThe following section describes tasks necessary to remove Application Builder from your Web application. The procedure uses, as an example, the removal of the hab-samples Web application. You must repeat the procedure to remove hab-admin, hab-blank, and hab-doc applications. It is recommended that you remove all the EAR files from the Sun ONE Application Server.
➤ To undeploy Application Builder from Sun ONE:
1 Start the Sun ONE Application Server.
2 Open the Sun ONE Admin Console.
3 Navigate to Applications.
4 Expand Applications, then navigate to the directory containing the application you want to remove:
● To undeploy a Web application, for example, hab-samples.war, navigate to Web Apps.
● To undeploy an enterprise application, for example, hab-samples.ear, navigate to Enterprise Apps.
Note: The instructions to undeploy are the same for both.
5 Highlight hab-samples and click Undeploy.
6 Delete the EAR or WAR files from the Sun ONE installation directory.
Note: Be sure to back up any XML files that you want to preserve.
7 Uninstall Application Builder.

Undeploying Application Builder 23
Undeploying Application Builder from WebLogicThis section describes tasks necessary to remove Application Builder from WebLogic. When you remove Application Builder from WebLogic, remove hab-admin, hab-samples.ear, hab-blank.ear, and hab-docs.ear files.
➤ To undeploy Application Builder from WebLogic:
1 Log on to WebLogic.
2 From the tree navigation frame, which is shown on the left side of the screen when you log on to WebLogic, select Deployments > Applications > hab-samples.
3 Select the Deploy tab, then click Undeploy Application.
If the undeployment is successful, the following screen is displayed:
4 From the tree navigation frame, select Deployments > Applications. The following screen is displayed:
5 For the hab-samples entry, click the trash can icon to delete the application.
6 Click Yes to delete the application permanently.
7 When you are notified that the application is deleted, select Continue.
8 Stop the server.
9 Delete the Application Builder applications, by default is named hab-samples.
Note: Be sure to back up any .xml files that you want to save for future use.
10 Open and edit the config.xml file in the <WebLogicInstallDir>\weblogic700\server\bin directory.
11 Delete the application tag for hab-samples, hab-blank, hab-admin, and hab-docs in config.xml.
12 Clear the JDBC data source, classpath, and path entries that you entered into WebLogic when you originally installed Application Builder.
13 Remove all classpath and path entries related to Application Builder that you made in the startWLS.sh file.
14 Start the server.
Undeploying Application Builder from WebSphereThis section describes tasks necessary to remove Application Builder from WebSphere.
➤ To undeploy the Application Builder Web application from the WebSphere:
1 Stop the default server.
2 Select the Enterprise Applications node.

24 Upgrading Application Builder
3 Highlight the application you want to remove and right-click.
4 Select Remove.
5 Confirm all proceeding questions by clicking Yes.
6 Restart the server.

Installing Data Sources 25
C h a p t e r
5Installing Data Sources
This chapter contains procedures for installing Application Builder data sources. The installation procedures are as follows:
● “Installing a Relational Database” on page 25
● “Installing an OLAP Data Source” on page 27
Installing a Relational DatabaseYou create a relational database in your relational database management system (RDBMS). You then create the pool connection to the same relational database in your application server using the JDBC configuration node. For more specific information on creating pool connections, see one of the following Web Application chapters:
● “Deploying and Configuring Using Apache Tomcat” on page 43
● “Deploying and Configuring Using WebLogic” on page 53
● “Deploying and Configuring Using WebSphere” on page 75
You must set up a repository to store metadata and formatting information for views and SQL queries.
Optionally, you can create and configure a relational database for any of the following functions:
● To query and view the data directly
● To drill through from summarized and calculated data stored in your OLAP data source into detailed data stored in a relational data source
Drill-through queries are written in SQL. For more information, see the Hyperion System 9 Application Builder J2EE Administrator’s Guide.
You can create a relational database using the following products:
● IBM DB2
● Microsoft SQL Server
● Oracle
26 Installing Data Sources
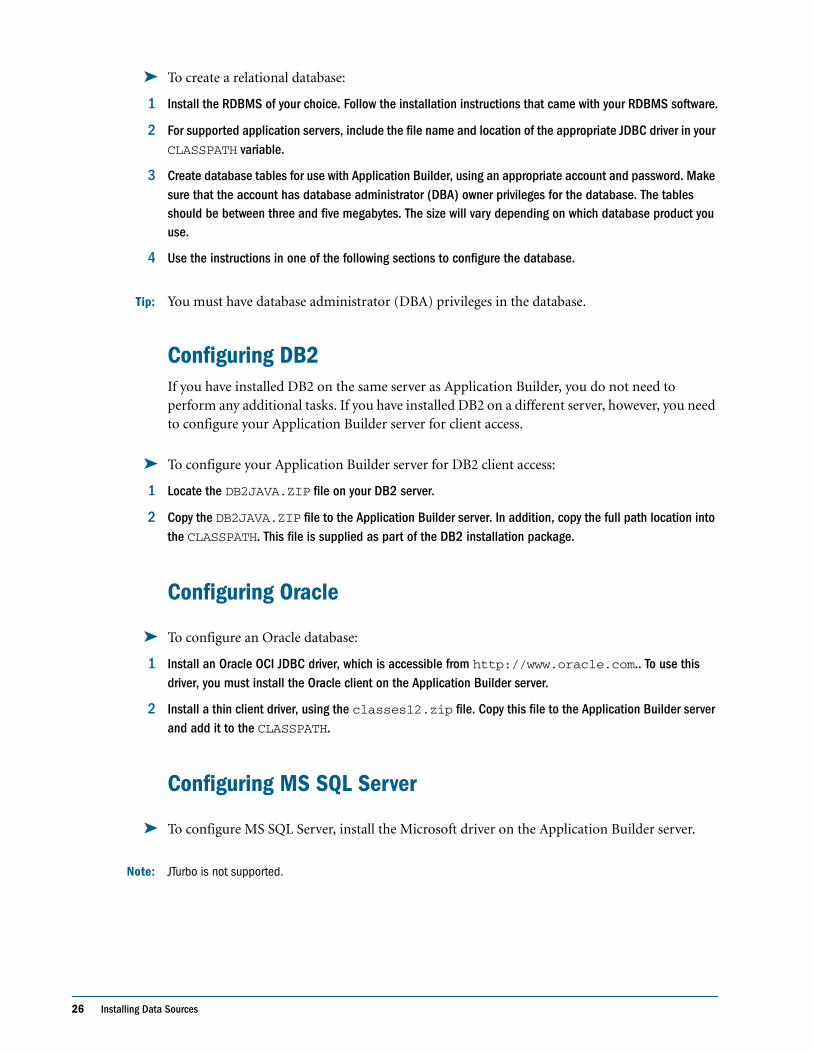
➤ To create a relational database:
1 Install the RDBMS of your choice. Follow the installation instructions that came with your RDBMS software.
2 For supported application servers, include the file name and location of the appropriate JDBC driver in your CLASSPATH variable.
3 Create database tables for use with Application Builder, using an appropriate account and password. Make sure that the account has database administrator (DBA) owner privileges for the database. The tables should be between three and five megabytes. The size will vary depending on which database product you use.
4 Use the instructions in one of the following sections to configure the database.
Tip: You must have database administrator (DBA) privileges in the database.
Configuring DB2If you have installed DB2 on the same server as Application Builder, you do not need to perform any additional tasks. If you have installed DB2 on a different server, however, you need to configure your Application Builder server for client access.
➤ To configure your Application Builder server for DB2 client access:
1 Locate the DB2JAVA.ZIP file on your DB2 server.
2 Copy the DB2JAVA.ZIP file to the Application Builder server. In addition, copy the full path location into the CLASSPATH. This file is supplied as part of the DB2 installation package.
Configuring Oracle
➤ To configure an Oracle database:
1 Install an Oracle OCI JDBC driver, which is accessible from http://www.oracle.com.. To use this driver, you must install the Oracle client on the Application Builder server.
2 Install a thin client driver, using the classes12.zip file. Copy this file to the Application Builder server and add it to the CLASSPATH.
Configuring MS SQL Server
➤ To configure MS SQL Server, install the Microsoft driver on the Application Builder server.
Note: JTurbo is not supported.

Installing an OLAP Data Source 27
Installing an OLAP Data SourceA typical application built with Application Builder accesses an OLAP data source, which you must install. The following OLAP data sources are supported with Application Builder:
● Hyperion System 9 BI+ Analytic Services
● Hyperion System 9 Financial Management™
● Hyperion System 9 Planning™
● Star Schema
During the Application Builder installation, the following drivers are automatically installed:
● Essbase native driver
● Star Schema driver
If you are using a different data source, refer to the Hyperion System 9 Application Builder J2EE Analytic Data Model Developer's Guide for specific configuration information.

28 Installing Data Sources

Installing Application Builder 29
C h a p t e r
6Installing Application Builder
This chapter describes how to install and set up Application Builder.
The Application Builder Setup program installs files needed to run Application Builder and installs common components that are used by multiple Hyperion products.
The setup program allows you to select either a Typical Install, Custom Install, HTLM, or Runtime Only installation. The typical install option installs all components of Application Builder and installs and configures Apache Tomcat as your web application server. A custom install allows you to configure WebLogic, install and configure Apache Tomcat, or configure a preexisting Tomcat.
Note: Because Apache Tomcat is not intended to support large user communities in production environments, it is recommended that it be deployed only in test or demonstration environments where a small number of individuals will access and use the software.
Required Environment VariablesTo run or build the supplied applications with Application Builder J2EE:
● hab-admin
● hab-samples
● hab-test
the following publicly available utilities must be installed:
● Jcrontab 1.4.1
● Trove4J 0.1.5
● FESI 1.1.8
To build applications, environment variables must be set:
● JCRONTAB_HOME
● TROVE4J_HOME
● FESI_HOME

30 Installing Application Builder
Installing and Configuring Jcrontab
➤ To set up the JCRONTAB environment variable:
1 Download Jcrontab-1.4.1.jar from http://sourceforge.net/projects/jcrontab
2 Copy to a suitable directory.
For example:
C:\Program Files\Jcrontab
3 Set an environment variable for JCRONTAB_HOME.
For example:
set JCRONTAB_HOME=C:\Program Files\Jcrontab
The build environment expects to use:
%JCRONTAB_HOME%\Jcrontab-1.4.1.jar
Installing and Configuring Trove4J
➤ To set up the Trove4J environment variable:
1 Download trove-0.1.5.tar.gz from http://sourceforge.net/projects/trove4j
2 Extract the contents to a suitable directory.
For example:
C:\Program Files\trove-0.1.5
3 Set an environment variable for TROVE4J_HOME.
For example:
set TROVE4J_HOME=C:\Program Files\trove-0.1.5
The build environment expects to use:
%TROVE4J_HOME%\lib\trove.jar
Installing and Configuring FESI
➤ To set up the FESI environment variable:
1 Download install-fesi-1.1.8.jar from http://www.lugrin.ch/fesi
2 Install with this command:
java -jar install-fesi-1.1.8.jar
3 Follow the installer instructions.
4 Set an environment variable for FESI_HOME
For example:

Required Environment Variables 31
set FESI_HOME=C:\Program Files\FESI-118
The build environment expects to use
%FESI_HOME%\lib\fesi.jar
Running hab-admin, hab-samples, and hab-test
➤ To run hab-admin, hab-samples, hab-test:
Copy the following JAR files into the corresponding application WEB-INF/lib directory:
● Jcrontab-1.4.1.jar
● trove.jar
● fesi.jar
Building Custom Applications, FESI, JCRONTAB, and TROVE4JTo build customized applications and automatically build the FESI, JCRONTAB and TROVE4J JAR files into the application, do one of the following:
➤ To change the settings for all projects:
1 In the common directory, open the following file:
<HAB Directory>\waa\projects\common\source\AntBuild.properties
2 Change the following lines which will change the default value from 'false' to 'true' in the common AntBuild.properties file:
INCLUDE_FESI=trueINCLUDE_JCRONTAB=trueINCLUDE_TROVE4J=true
➤ To change the settings for a single project:
1 In the project directory, open the following file:
<Project Directory>\source\AntBuild.properties
2 Add the following lines which will override the default value of 'false' in the common AntBuild.properties file:
INCLUDE_FESI=trueINCLUDE_JCRONTAB=trueINCLUDE_TROVE4J=true

32 Installing Application Builder
What Happens During InstallationBy default, the Application Builder installation program performs the following operations. If you customize the installation to install only certain components, some of the these operations are not performed:
● Copies common components to the HYPERION_HOME directory. See “Files Installed in the HYPERION_HOME Directory” on page 32.
● Creates new directories for a new installation, or updates existing directories if a previous release of Application Builder is installed.
● Copies Application Builder software files to the HYPERION_HOME\ApplicationBuilder directory.
● Updates the Windows environment settings (optional).
Directories and Files InstalledThe installation program installs files in two locations:
● Application Builder software files are installed in the following directory:
$user.home/ApplicationBuilder/<release number>
● Additional internal components and third-party products are installed in the following directory:
HYPERION_HOME/common
See “Files Installed in the HYPERION_HOME Directory” on page 32 for the directory structure and detailed information about the files installed.
Files Installed in the HYPERION_HOME DirectoryThe Application Builder installer places components that might also be used by other Hyperion programs in a common location. This includes third-party products, such as Jarkarta Ant, and internal Hyperion components. The location for these components is defined in the system environment variable called HYPERION_HOME.
When running the Application Builder installer for the first time, you are prompted to define the location for HYPERION_HOME. The default location for HYPERION_HOME is$user.home/Hyperion. For more information about changing the default location for common components, see “Setting the Location of HYPERION_HOME” on page 33.
The following files are installed in HYPERION_HOME \common with a typical installation of Application Builder, assuming that HYPERION_HOME is $user.home/Hyperion:

Application Builder Installation 33
Setting the Location of HYPERION_HOME
Note: After HYPERION_HOME is set, do not change the value.
When you run the Application Builder installer for the first time, it prompts you to specify a location for the HYPERION_HOME environment variable. HYPERION_HOME adds a directory, common, in which common files used by Application Builder and other Hyperion products are installed. The default is $user.home/Hyperion.
Application Builder InstallationThis section describes the steps to install the Application Builder. Steps step 1 on page 33 through step 10 on page 34 guide you through the main screens.
➤ To install Application Builder:
1 From the Download center, download one of the following platform specific archives, where <version> represents the release version number:
Table 4 Directories Under HYPERION_HOME\common with Application Builder installation
Directory Details
ADM The Analytic Data Model (ADM), which is an API used to access Hyperion application and server data. The ADM is similar to JDBC, providing a single common API that hides most differences between OLAP data sources. Hyperion uses the ADM under Hyperion® Analyzer, Hyperion® Reports, Hyperion® Application Builder, Hyperion® Planning, and Hyperion® Application Link
appServers Common application servers; for example, Apache Tomcat. If you install Application Builder with the Typical option, the installer deploys Apache Tomcat under HYPERION_HOME\ApplicationBuilder
CSS Hyperion Security Platform files
DBMS Data bases used by Hyperion; for example, MySQL
Essbase Java API Client Run Time for EDS
HyperionHub Client component for Hyperion Hub. If you install Hyperion Hub, the installer installs the client under HYPERION_HOME
HyperionLookAndFeel The installer’s user interface files
JDBC Java Data Base Connectivity files
loggers Hyperion Security Platform logging
utils Common utility components; for example, Ant
XML JAXM

34 Installing Application Builder
● Windows: hab<version>_win.zip
Contents: HAB<version>WinSetup.exe, HAB<version>Setup.jar, xerces.jar
● AIX: hab<version>_aix.tar
Contents: HAB<version>AixSetup.bin, HAB<version>Setup.jar
● HPUX: hab<version>_hpux.tar
Contents: HAB<version>HpuxSetup.bin, HAB<version>Setup.jar
● Linux: hab<version>_linux.tar
Contents: HAB<version>LnxSetup.bin, HAB<version>Setup.jar
● Solaris: hab<version>_sun.tar
Contents: HAB<version>SunSetup.bin, HAB<version>Setup.jar
2 Extract the archive to a temporary location.
Note: HAB<version>Setup.jar contains installation files and must be in the same folder as the BIN file.
3 Navigate to the temporary directory and double-click the BIN file.
4 On Select a language to be used for this wizard, select a lanuage and click OK.
5 On Welcome, click Next.
6 Select a country and click Next.
7 Select I AGREE to the license agreement and click Next.
8 Under Directory Name, use the default or click Browse to select another Application Builder installation directory and click Next.
Default:
[HOME]Hyperion/ApplicationBuilder/<version>
9 Enter the Hyperion Home directory and click Next:
Default:
[HOME]Hyperion/
● If the installer does not detect an existing HYPERION_HOME\common directory, you may choose the path.
● If the installer detects a common directory, the Directory Name field and Browse button are disabled.
Note: For information on HYPERION_HOME, see “Setting the Location of HYPERION_HOME” on page 33
10 Select one of the following installation options and click Next:
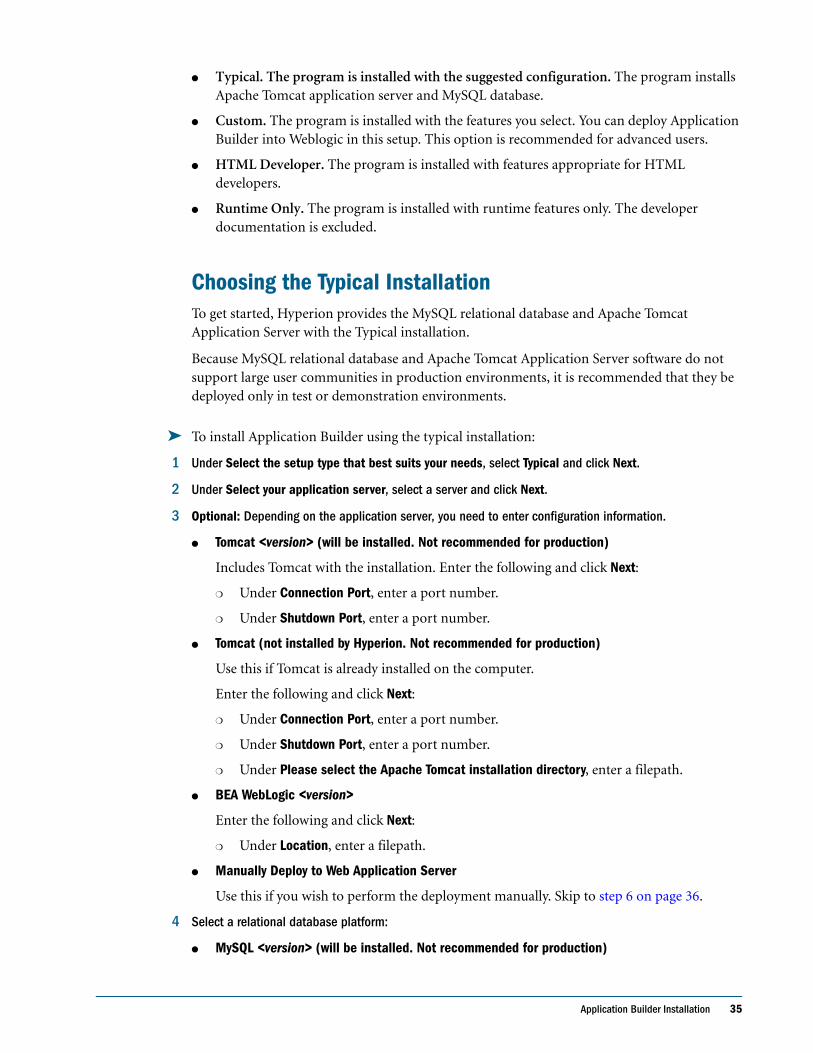
Application Builder Installation 35
● Typical. The program is installed with the suggested configuration. The program installs Apache Tomcat application server and MySQL database.
● Custom. The program is installed with the features you select. You can deploy Application Builder into Weblogic in this setup. This option is recommended for advanced users.
● HTML Developer. The program is installed with features appropriate for HTML developers.
● Runtime Only. The program is installed with runtime features only. The developer documentation is excluded.
Choosing the Typical InstallationTo get started, Hyperion provides the MySQL relational database and Apache Tomcat Application Server with the Typical installation.
Because MySQL relational database and Apache Tomcat Application Server software do not support large user communities in production environments, it is recommended that they be deployed only in test or demonstration environments.
➤ To install Application Builder using the typical installation:
1 Under Select the setup type that best suits your needs, select Typical and click Next.
2 Under Select your application server, select a server and click Next.
3 Optional: Depending on the application server, you need to enter configuration information.
● Tomcat <version> (will be installed. Not recommended for production)
Includes Tomcat with the installation. Enter the following and click Next:
❍ Under Connection Port, enter a port number.
❍ Under Shutdown Port, enter a port number.
● Tomcat (not installed by Hyperion. Not recommended for production)
Use this if Tomcat is already installed on the computer.
Enter the following and click Next:
❍ Under Connection Port, enter a port number.
❍ Under Shutdown Port, enter a port number.
❍ Under Please select the Apache Tomcat installation directory, enter a filepath.
● BEA WebLogic <version>
Enter the following and click Next:
❍ Under Location, enter a filepath.
● Manually Deploy to Web Application Server
Use this if you wish to perform the deployment manually. Skip to step 6 on page 36.
4 Select a relational database platform:
● MySQL <version> (will be installed. Not recommended for production)

36 Installing Application Builder
Includes MySQL . Not recommended for production environments—for test only. Skip to step 6 on page 36.
● IBM DB2 <version>
● Oracle 9<version>
● Oracle 10<version>
● MS SQL Server <version>
5 Optional: Most database platforms require configuration information. If prompted, enter the following and click Next:
● User
The username used to access the database.
● Password/Confirm Password
The password securing access to the database for the password.
● URL
The URL to the HAB J2EE server.
DB2 default:
jdbc:db2://localhost:50000/HAB
Oracle default:
jdbc:oracle:thin:@(description=(address=(host=localhost)(protocol=tcp)(port=1521))(connect_data=(sid=HAB)))
MS SQL Server default:
jdbc:microsoft:sqlserver://localhost:1433;DatabaseName=HAB;SelectMethod=cursor;
● JDBC Driver File
The filepath to the Java Database Connectivity (JDBC) driver. Default:
C:\
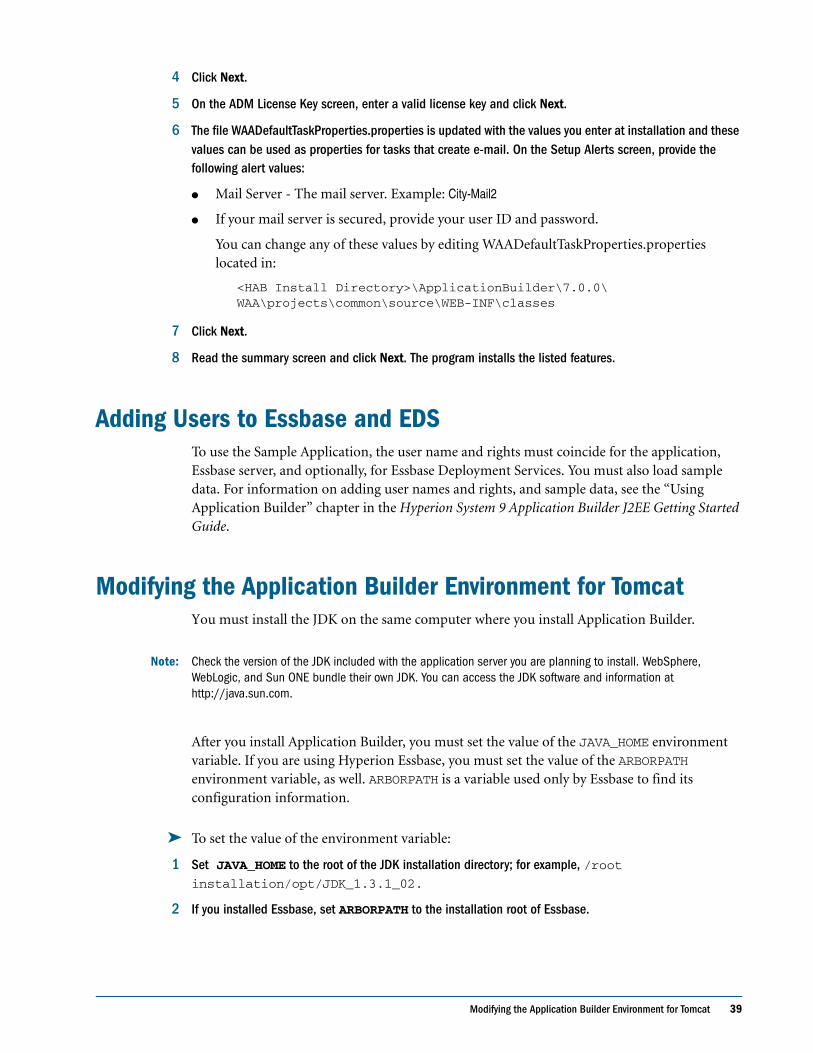
6 Under ADM License Key, enter a valid license key and click Next.
7 On Setup Alerts, enter information to set up email alerts and click Next:
● Mail Server
The mail server.
Example: City-Mail2
● User
The username to access the mail server.
● Password/Confirm Password
The password for the username.

Application Builder Installation 37
The file WAADefaultTaskProperties.properties stores the values for email alerts. You can change any of these values by editing WAADefaultTaskProperties.properties located in:
<HAB Install Directory> \ApplicationBuilder\<version>\WAA\projects\common\source\WEB-INF\classes
8 Read the summary information screen and click Next.
9 After the installation, you need to modify the environment. For more information, see “Modifying the Application Builder Environment for Tomcat” on page 39.
Choosing the Custom Installation
➤ To install Application Builder using the Custom installation type:
1 Under the section, “Application Builder Installation” on page 33, follow the initial installation instructions, step 1 through step 10. Choosing the Custom installation type brings you to the custom installation features screen.
2 On the features screen, select the options you want installed.
3 On the ADM License Key screen, enter a valid license key and click Next.
4 The file WAADefaultTaskProperties.properties is updated with the values you enter at installation and these values can be used as properties for tasks that create e-mail. On the Setup Alerts screen, provide the following alert values:
● Mail Server - The mail server. Example: City-Mail2
● If your mail server is secured, provide your user ID and password.
You can change any of these values by editing WAADefaultTaskProperties.properties located in:
<HAB Install Directory>\ApplicationBuilder\7.0.0\ WAA\projects\common\source\WEB-INF\classes
5 Click Next.
6 Read the summary and click Next. The program installs the listed features.
7 After the installation, you need to modify the environment. For more information, see “Modifying the Application Builder Environment for Tomcat” on page 39.
Choosing the HTML Developer Installation
➤ To install Application Builder using the HTML installation type:
1 Under the section, “Application Builder Installation” on page 33, follow the initial installation instructions, step 1 through step 10. Choosing the HTML installation type brings you to the Deploy Supplied Applications screen.
2 On the ADM License Key screen, enter a valid license key and click Next.
3 Click Next.

38 Installing Application Builder
4 Read the summary and click Next. The program installs the listed features.
5 After the installation, you need to modify the environment. For more information, see “Modifying the Application Builder Environment for Tomcat” on page 39.
Choosing the Runtime Only Installation
➤ To install Application Builder using the Runtime Only installation type:
1 Under the section, “Application Builder Installation” on page 33, follow the initial installation instructions, step 1 through step 10.
2 On the Relational Database screen, select a Relational Database and click Next.
3 On the Relational Database configuration screen, provide the following information for the database selected on the previous screen:
● User - A valid authorized database user
● Password - A valid password for the user ID
● URL - A default URL for the database selected on the previous screen:
❍ IBM DB2 7.x:
jdbc:db2://localhost:6789/HAB
❍ IBM DB2 8.x:
jdbc:db2://localhost:50000/HAB
❍ IBM - DB2 7.2 FP 7, or 8.1.4:
jdbc:db2://localhost:50000/HAB
Note: With WebLogic, DB2 8.1.4 needs the following driver: com.ibm.db2.jcc.DB2Driver. Use port 50000 in the URL, not 6789. The DB2 driver files should be in db2jcc*.zip
❍ MS SQL Server 2000:
jdbc:microsoft:sqlserver://localhost:1433;DatabaseName=HAB;SelectMethod=cursor;
❍ MySQL 4.x:
jdbc:mysql://localhost/HAB?useUnicode=true&characterEncoding=UTF-8
❍ Oracle 8.x:
jdbc:oracle:thin:@(description=(address=(host=localhost)(protocol=tcp)(port=1521))(connect_data=(sid=HAB)))
❍ Oracle 9.x:
jdbc:oracle:thin:@(description=(address=(host=localhost)(protocol=tcp)(port=1521))(connect_data=(sid=HAB)))
● JDBC Driver File - The location of the JDBC driver file.
Modifying the Application Builder Environment for Tomcat 39
4 Click Next.
5 On the ADM License Key screen, enter a valid license key and click Next.
6 The file WAADefaultTaskProperties.properties is updated with the values you enter at installation and these values can be used as properties for tasks that create e-mail. On the Setup Alerts screen, provide the following alert values:
● Mail Server - The mail server. Example: City-Mail2
● If your mail server is secured, provide your user ID and password.
You can change any of these values by editing WAADefaultTaskProperties.properties located in:
<HAB Install Directory>\ApplicationBuilder\7.0.0\ WAA\projects\common\source\WEB-INF\classes
7 Click Next.
8 Read the summary screen and click Next. The program installs the listed features.
Adding Users to Essbase and EDSTo use the Sample Application, the user name and rights must coincide for the application, Essbase server, and optionally, for Essbase Deployment Services. You must also load sample data. For information on adding user names and rights, and sample data, see the “Using Application Builder” chapter in the Hyperion System 9 Application Builder J2EE Getting Started Guide.
Modifying the Application Builder Environment for TomcatYou must install the JDK on the same computer where you install Application Builder.
Note: Check the version of the JDK included with the application server you are planning to install. WebSphere, WebLogic, and Sun ONE bundle their own JDK. You can access the JDK software and information at http://java.sun.com.
After you install Application Builder, you must set the value of the JAVA_HOME environment variable. If you are using Hyperion Essbase, you must set the value of the ARBORPATH environment variable, as well. ARBORPATH is a variable used only by Essbase to find its configuration information.
➤ To set the value of the environment variable:
1 Set JAVA_HOME to the root of the JDK installation directory; for example, /root installation/opt/JDK_1.3.1_02.
2 If you installed Essbase, set ARBORPATH to the installation root of Essbase.

40 Installing Application Builder
Configuring a Dreamweaver Site for Use with Apache TomcatBefore you can launch a unique .jsp in Dreamweaver, you must configure a site definition for use with Tomcat. This process establishes a connection between the Dreamweaver working directory where .jsps are saved and the Apache Tomcat application server.
For detailed setup instructions on Using Quick Builder with Dreamweaver MX, see the “Building Web Applications” chapter in the Hyperion System 9 Application Builder J2EE Getting Started Guide.
What’s Next?This section describes what to do after you install Application Builder, depending on the installation option you selected on the Choose Setup Type installation screen.
What’s Next After Installing with the Typical Installation OptionThe following table lists the tasks you must perform if you installed Application Builder with the Typical Installation option.
Table 5 Application Builder Typical Option
Tasks Software References
● Configure Quick Builder
● Build Web Applications
● Upgrade Web Applications
● Upgrade repository
Dreamweaver Getting Started Guide
Getting Started Guide
Administration Guide
Administration Guide

What’s Next? 41
What’s Next After Installing with the Custom OptionUse this table if you chose the Custom option. The following table lists the tasks you must perform after installing Application Builder with the Custom option.
What’s Next After Installing with HTML Developer OptionUse this table if you chose the HTML Developer option. The following table lists the tasks you must perform after installing Application Builder with the QuickBuilder for Dreamweaver MX option.
Table 6 Application Builder Custom Option
Tasks Software References
System Administrator must perform the following tasks:
● If you did not deploy Tomcat or WebLogic, configure HAB on a Application server that you can use.
N/A Hyperion System 9 Application Builder J2EE System Installation Guide, Web Application chapter.
● Configure Quick Builder
● Build Web Applications
● Upgrade Web Applications
● Upgrade repository
Dreamweaver Getting Started Guide
Getting Started Guide
Administration Guide
Administration Guide
Table 7 Application Builder HTML Developer Installation Options
Tasks Software References
System Administrator must perform the following tasks:
● If you did not deploy Tomcat or WebLogic, configure HAB on a Application server that you can use.
N/A Hyperion System 9 Application Builder J2EE Installation Guide, Web Application chapter.
● Configure Quick Builder
● Build Web Applications
● Upgrade Web Applications
● Upgrade repository
Dreamweaver Getting Started Guide
Getting Started Guide
Administration Guide
Administration Guide

42 Installing Application Builder
What’s Next After Installing with the Runtime Only OptionUse this table if you chose the Runtime Only option. The following table lists the tasks you must perform after installing Application Builder with the Runtime Only option.
Table 8 Application Builder Runtime Only Installation Options
Tasks Software References
System Administrator must perform the following tasks:
● If you did not deploy Tomcat or WebLogic, configuration on a server that you can use.
● Upgrade Web Applications
N/A Hyperion System 9 Application Builder J2EE Installation Guide
● Run Web Applications

Deploying and Configuring Using Apache Tomcat 43
C h a p t e r
7Deploying and Configuring
Using Apache Tomcat
When using Application Builder with Apache Tomcat, you can implement the following method of deployment in the application server:
● Create custom applications for deployment in Apache Tomcat. This requires some customization but deploys Application Builder in Apache Tomcat. Use the instructions provided in “Deploying a WAR file in Apache Tomcat” on page 48. For specific instructions on developing applications using Apache Tomcat, refer to the Apache development website at http://jakarta.apache.org/tomcat/tomcat-4.1-doc/appdev/processes.html
This chapter describes the following procedures for configuring Apache Tomcat for use with Application Builder:
● “Adding Application Users and Roles” on page 43
● “Configuring the Application Context” on page 48
● “Deploying a WAR file in Apache Tomcat” on page 48
● “Verifying and Modifying XML Files” on page 48
● “Configuring Connection Pooling for JDBC Data Sources” on page 50
● “Verifying the Functionality of the Sample Application” on page 51
● “Configuring a Dreamweaver Site for Use with Apache Tomcat” on page 52
Adding Application Users and RolesThis section describes the process of establishing user access rights. This includes adding users and roles for a Application Builder application.

44 Deploying and Configuring Using Apache Tomcat
Adding UsersYou add application users so they can access an Application Builder application and data sources. Application users are added in the operating system, the application server, and Essbase OLAP server and Essbase Deployment Services. Table 9 lists the Sample Application users:.
Note: To have default permissions when accessing the ATF repository, you must assign the HAB_User role or group to your application users.
Adding RolesRoles determine the activities that an application user or group can perform. They are also used to map to ADM pools and secure application resources in Application Builder applications. You can assign one or more roles to an application user.
For example, if a role is read_only, then you can create an ADM pool with the name read_only and map it to an OLAP user with read-only permission. All application users with the role read_only use the ADM pool named read_only and access the OLAP data source with read-only privileges.
The HAB_User role is assigned to the J2EE default users configured with the typical installation option. The HAB_User role or group has the following ATF repository permissions:
● The special permissions create, read, list and write on the folders: /hyperion, /hyperion/olap and /hyperion/relational.
● The special permissions create, delete, read, list, write, change owner and change permission on object types olap view and relational view.
Note: If an application user has more than one role, Application Builder uses the first matching ADM pool when it maps the user to an ADM Pool.
Table 9 Sample Application Users, Roles, and ADM Pools
Application User IDApplication User Role and ADM Pool Hyperion Essbase User ID/Password
Administrator HAB_Admin hyperion/password
analyst HAB_Analyst analyst/password
viewer HAB_Viewer viewer/password

Adding Application Users and Roles 45
By default, the Sample Application uses the roles HAB_Admin, HAB_Analyst, and HAB_Viewer. The following table shows the roles and default OLAP passwords, along with the default users created by the Typical installation option.
Adding SecurityIf you want to configure J2EE security manually, for example, in a custom application, Apache Tomcat requires that you define a realm, and configure security resources for the realm. If you want to configure Single Sign-on security, comment the following code:
<!-- Comment the <security-constraint> and <login-config> entries for CSS authentication --> <security-constraint> <web-resource-collection> <web-resource-name>Admin Application</web-resource-name> <description>Protect all accessible servlets</description> <url-pattern>/ADMINApplicationServlet</url-pattern> <url-pattern>*.jsp</url-pattern> </web-resource-collection> <auth-constraint> <description>Authorize known roles</description> <role-name>HAB_Admin</role-name> </auth-constraint> </security-constraint>
A realm is an authentication policy that controls a collection of users and is specified in the server.xml file. Tomcat provides a “memory-based” realm that reads the <Tomcat Install Dir>/conf/tomcat-users.xml file for authentication information. The memory-based realm is on by default. However, you may need to activate the realm.
➤ To activate the memory-based realm:
1 Open the server.xml file.
2 Verify the following line:
<Realm className="org.apache.catalina.realm.UserDatabaseRealm" debug="0" resourceName="UserDatabase"/>
This memory-based realm reads the tomcat-users.xml file, where users are defined. Roles are defined in the <Tomcat Install Dir>\webapps\deployed_application\WEB-
INF\web.xml file, where deployed_application is the name of the Web application (hab-samples, or otherwise) that you deployed into Apache Tomcat.
Table 10 Sample Application Users, Roles, and ADM Pools
Application User IDApplication User Role and ADM Pool Hyperion Essbase User ID/Password
Administrator HAB_Admin hyperion/password
analyst HAB_Analyst analyst/password
viewer HAB_Viewer viewer/password

46 Deploying and Configuring Using Apache Tomcat
3 Save the server.xml file.
➤ To add users to the Apache Tomcat memory realm:
1 Open the tomcat-users.xml file.
The following snippet represents the default information in the file:
<tomcat-users> <role rolename="HAB_Viewer"/> <role rolename="HAB_User"/> <role rolename="HAB_Admin"/> <role rolename="tomcat"/> <role rolename="role1"/> <role rolename="HAB_Analyst"/> <user username="Administrator" password="password" roles="HAB_Admin,HAB_User"/> <user username="tomcat" password="tomcat" roles="tomcat"/> <user username="role1" password="tomcat" roles="role1"/> <user username="both" password="tomcat" roles="tomcat,role1"/> <user username="analyst" password="password" roles="HAB_Analyst,HAB_User"/> <user username="viewer" password="password" roles="HAB_Viewer,HAB_User"/> </tomcat-users>
Although the Typical installation configures the tomcat-users.xml file with the users needed for the Sample Application, you may need to customize users and roles. A sample customization to add users and roles for the Sample Application is illustrated in the following code snippet:
<user username="Administrator" password="password" roles="HAB_Admin,HAB_User"/> <user username="tomcat" password="tomcat" roles="tomcat"/> <user username="role1" password="tomcat" roles="role1"/> <user username="both" password="tomcat" roles="tomcat,role1"/> <user username="analyst" password="password" roles="HAB_Analyst,HAB_User"/> <user username="viewer" password="password" roles="HAB_Viewer,HAB_User"/></tomcat-users>
You also add the security constraint, login configuration, and roles in the web.xml file. The following procedure illustrates the creation of roles using the roles defined for the Sample Application.
Note: The Sample Application already contains these settings. No changes need to be made if you accept the defaults.
➤ To add roles to a deployed application in Apache Tomcat:
1 Open the <Tomcat Install Dir>\webapps\deployed_application\WEB-INF\web.xml file
where deployed_application is the name of the application being developed.
2 Add the security constraint as follows:

Adding Application Users and Roles 47
<security-constraint> <web-resource-collection> <web-resource-name>Admin Application</web-resource-name> <description>Protect all accessible servlets</description> <url-pattern>/ADMINApplicationServlet</url-pattern> <url-pattern>*.jsp</url-pattern> </web-resource-collection> <auth-constraint> <description>Authorize known roles</description> <role-name>HAB_Admin</role-name></auth-constraint> </security-constraint>
3 Add the login configuration as follows:
<login-config> <auth-method>FORM</auth-method> <realm-name>Hyperion Application Builder</realm-name> <form-login-config> <form-login-page>/jsp/waa/sample/core/SMPLogonPage.jsp</form-login-page> <form-error-page>/jsp/waa/sample/core/SMPLogonErrorPage.jsp</form-error-page> </form-login-config></login-config>
where the <auth-method> can be one of the following:
❍ BASIC - The user's authentication is valid until the user closes their browser.
❍ DIGEST - The user's password is encrypted.
❍ FORM - The user's authentication is valid until the session times out or is invalidated.
Note: Application Builder uses BASIC authentication.
4 Define the security roles, where each role is presented and privileges are described as follows:
security-role> <description>Users with limited rights</description> <role-name>HAB_User</role-name> </security-role> <security-role> <description>Users with administrator rights</description> <role-name>HAB_Admin</role-name> </security-role> <security-role> <description>Users with read-write data access rights</description> <role-name>HAB_Analyst</role-name> </security-role> <security-role> <description>Users with read-only data access rights</description> <role-name>HAB_Viewer</role-name> </security-role> Stop and restart Apache Tomcat to complete the configuration.

48 Deploying and Configuring Using Apache Tomcat
Configuring the Application ContextBefore you deploy a WAR file in Apache Tomcat, you must add the definition of each application by adding the <context> element in the server.xml file. The hab-samples, hab-admin, and hab-docs applications have their own <context> elements.
The <context> declaration for hab-samples resembles the following code example in the server.xml file:
<Context path="/hab-samples" docBase="hab-samples" debug="0" reloadable="true">
This defines the hab-samples application as residing in the relative path /hab-samples and indicates that its resources are within the hab-samples directory.
Note: Every application must have a unique context path. This must be added to the server.xml prior to deployment.
Deploying a WAR file in Apache TomcatApache Tomcat hosts the Web applications that you deploy from the <Tomcat Install Dir>/webapps directory. Apache Tomcat is not an Enterprise Java Beans (EJB) container, so you must deploy .WAR files rather than .EAR files into Apache Tomcat.
The following example uses the WAR files distributed with Application Builder.
➤ To deploy a .WAR file in Apache Tomcat:
1 Copy the hab-samples.war file to the <Tomcat Install Dir>\webapps directory.
2 Stop and restart Apache Tomcat. This deploys the Web application in the application server.
Alternatively, you can use the Tomcat Manager application to deploy a .WAR file.
➤ To deploy a WAR file using the Tomcat Manager Application:
1 Enter the following URL in a browser:
http://localhost:8080/manager/install?path=/xxx&war=yyy
where yyy is the directory containing the unpacked application and /xxx is the context path the WAR file attaches to. For example: http://localhost:8080/manager/install?path=hab-samoles&war=jar:file:/Hyperion/waa/war/hab-samples.war!/ deploys the hab-samples.war file that is located in c:\Hyperion\waa\war\hab-samples.war.
2 Press Enter. This installs the Web application.
Verifying and Modifying XML FilesAfter you deploy the EAR files in the application server, you must verify information in the XML files that are packaged with Application Builder.

Verifying and Modifying XML Files 49
The following sections outline the required XML modifications for accessing the hab-samples and hab-admin applications:
● server.xml - “Configuring Connection Pooling for JDBC Data Sources” on page 50
● web.xml - Stores information related to the configuration of the JDBC data sources used by the hab-applications as a repository and optional drill-through data source. For information on the JDBC Data Sources, see the Appendix, “Setting Up Relational and Drill-Through Data Sources” in the Hyperion System 9 Application Builder J2EE Administrator’s Guide.
● web.xml - You need to set up a default users and roles and the repository initialization file (application-services.xml) for your application in the web.xml file. For information on setting up users and roles, see the “Using Security” chapter in the Hyperion System 9 Application Builder J2EE Administrator’s Guide.
● application-services.xml - This repository initialization file specifies the services that the ATF repository provides, such as authentication, cron scheduling services, and task services. For information on the repository initialization file, see the “Using Security”chapter in the Hyperion System 9 Application Builder J2EE Administrator’s Guide.
● repository.xml - Specifies the information for the data source JDBC connection and the database table and column to Hyperion System 9 Application Builder J2EE object mappings. This database object mapping tells OJB how to create an object when it retrieves it from the database. For information, see the “Using Security”chapter in the Hyperion System 9 Application Builder J2EE Administrator’s Guide.
After you deploy the EAR files in the application server, you must verify information in the XML files that are packaged with Application Builder. The XML modification may include the following files:
● WAADataSources.xml - The Application Builder installation provides a WAADataSources.xml file that is preconfigured with relational data sources, OLAP data sources, and ADM pools for use with the Sample Application.for information on seting up data source, see Appendix B, “ Setting up OLAP Data Sources and ADM Pooling”, in the Hyperion System 9 Application Builder J2EE Administrator’s Guide.
● WAACss.xml - Optional for using Single Sign-on. For information on using Single Sign-on, see the “Using Security” chapter in the Hyperion System 9 Application Builder J2EE Administrator’s Guide.
The XML modification may include the following XML files:
● WAACubeAnnotations.xml - sets up annotations for OLAP data cell or a cubeView
● WAAQueryInfoCellValueFormats.xml - sets up formatting for relational data cells.
● WAADatabaseAnnotations.xml - sets up annotations for relational rows or a queryInfo
Note: For information on these XML modifications, see the Hyperion System 9 Application Builder J2EE Web Application Builder Administrator’s Guide.

50 Deploying and Configuring Using Apache Tomcat
Configuring Connection Pooling for JDBC Data SourcesJDBC connection pools are defined for an application in its context node. Application Builder typically needs a pool for the repository and one pool per relational data source used for the application (direct querying or JDBC drill-through.)
When you install using the Typical option, the installer installs a default repository and drill-through data source for each application. Other data sources may be added by updating server.xml. For applications requiring customization, you must add the databases into the RDBMS and the server.xml file.
Configuring a JDBC Data SourceYou must define resource parameters for every resource name that is specified. You must define a <Resource> element inside a <Context> or <DefaultContext> element in the server.xml file.
The general structure of the server.xml file is as follows. Refer to the Apache Tomcat documentation at http://jakarta.apache.org for specific requirements and options for this file:
<Server><!-- one or more --> <Service><!-- one or more --> <Connector><!-- one or more --> <Engine><!-- one per Service element --> <Realm> <!-- may be nested under <Context> or <Engine> instead --> Host><!-- one or more --> <Context><!-- one or more; one per application --> <Resource name><!-- one or more --> <!-- specify HAB resources here --> <ResourceParams> <parameter>
The Typical installation option uses the following configuration:
Context crossContext="true" debug="0" docBase="hab-samples" path="/hab-samples" reloadable="false"><Logger className="org.apache.catalina.logger.FileLogger" prefix="localhost_hab-samples_log." suffix=".txt" timestamp="true"/> <Resource auth="Servlet" name="jdbc/HAB" type="javax.sql.DataSource"/><ResourceParams name="jdbc/HAB"> <parameter> <name>username</name> <value>habdbuser</value> </parameter> <parameter> <name>password</name> <value>habdbuser</value> </parameter> <parameter> <name>driverClassName</name> <value>com.mysql.jdbc.Driver</value> </parameter> <parameter> <name>url</name>

Verifying the Functionality of the Sample Application 51
<value>jdbc:mysql://localhost:3306/HAB?useUnicode=true&characterEncoding=UTF-8</value> </parameter> </ResourceParams> <Resource auth="Servlet" name="jdbc/HABDrill" type="javax.sql.DataSource"/><ResourceParams name="jdbc/HABDrill"> <parameter> <name>username</name> <value>habdbuser</value> </parameter> <parameter> <name>password</name> <value>habdbuser</value> </parameter> <parameter> <name>driverClassName</name> <value>com.mysql.jdbc.Driver</value> </parameter> <parameter> <name>url</name> <value>jdbc:mysql://localhost:3306/HABDrill?useUnicode=true&characterEncoding=UTF-8</value> </parameter></ResourceParams>
In this example, HAB and HABDrill are the databases established, the JDBC driver is MySQL, and the RDBMS is MySQL. The authorized user is habdbuser and the password is habdbuser. Refer to the Apache Tomcat and relevant JDBC driver documentation for syntax for other drivers and databases.
Verifying the Functionality of the Sample ApplicationAfter you complete the Typical installation (which installs Application Builder, the Apache Tomcat application server, and MySQL), you must configure the JAVA_HOME variable in your environment. You can then verify the functionality of the Sample Application.
➤ To start the Sample Application:
1 Verify that the local installations of Hyperion Essbase Analytics (or other data sources in use) and Hyperion System 9 BI+ Analytic High Availability Services are running.
2 From the <Tomcat Install Dir>/bin directory, locate and run the hab_startup.sh file.
3 Open a browser.
4 Type the following URL:
http://localhost:8080/hab-samples/SMPApplicationServlet
where 8080 is the default port.
5 Enter the username and password as analyst and password.

52 Deploying and Configuring Using Apache Tomcat
Note: The username is case sensitive.
The Application Builder Sample Application Select Repository Object page is displayed.
Configuring a Dreamweaver Site for Use with Apache TomcatBefore you can launch a unique .JSP in Dreamweaver, you must configure a site definition for use with Apache Tomcat. This process establishes a connection between the directory where the .JSPs are saved and the Apache Tomcat Application Server.
For detailed set up instructions on Using Quick Builder with Dreamweaver MX, see the Hyperion Application Getting Started Guide.

Deploying and Configuring Using WebLogic 53
C h a p t e r
8Deploying and Configuring
Using WebLogic
This chapter includes the procedures for deploying Application Builder into WebLogic Application Server and configuring the WebLogic environment:
● “Creating Links into WebLogic” on page 53
● “Automatically Deploying During Application Builder Installation” on page 54
● “Verifying and Modifying XML Files” on page 57
● “Adding Application Users and Roles” on page 59
● “Configuring Connection Pooling for JDBC Data Sources” on page 63
Creating Links into WebLogicEssbase provides client libraries with versioning suffixes that are appended to the library names. If you are running Solaris, you must create links from the suffixed versions of the library files to corresponding, normal library names in order to use these libraries. This section describes how to create these links.
Note: You can use the Essbase Client API documentation to simplify this process.
The dynamic libraries for the Solaris API are delivered with names of the form *.so.1. When compiling, Solaris looks for filenames of the form *.so. You can rename the *.so.1 files to *.so, or establish symbolic links with names of the form *.so and link them to the *.so.1 library files.
To simplify this task, we have provided a UNIX shell script that creates these links for you. The script is called 'MakeEssLinks'. It is located in the tools/solaris_scripts subdirectory of the Application Builder installation directory.
Before running the script, ensure that you are logged on as the owner of the Essbase installation. Since the script requires permission to write in the Essbase directories, the script will fail if you are not the owner of those directories.
Note: This script is required by Application Builder.

54 Deploying and Configuring Using WebLogic
➤ To run the script and create the links:
1 Change directories to the tools/solaris_scripts sub-directory.
2 Type: MakeEssLinks EssbaseInstallDirectory.
where EssbaseInstallDirectory is the top level directory for the Essbase installation that you will be using. The script will test to make sure you have specified the correct directory and that you have permission to write to the directories. It will then make the links. If any errors are encountered, an appropriate error message will be displayed, explaining the cause of the error.
Note: This script works with both Essbase Releases 6.x. You can run the script multiple times on the same directory without harm. If you do not run this script, Application Builder will not function correctly.
Automatically Deploying During Application Builder InstallationDuring the installation of Application Builder, you can choose to automatically deploy the EAR files into WebLogic.
➤ To automatically deploy into WebLogic perform the following steps:
1 Navigate to the install folder and double-click install.exe.
Note: For more information on installing Application Builder, see the Chapter 6, “Installing Application Builder”.
2 Choose the Custom installation type.
3 On the Deploy Supplied Applications screen, choose Deploy to existing BEA Weblogic.
4 On the Deploy Supplied Applications - WebLogic Settings screen, enter the WebLogic install directory, domain, and server.
5 Click Next to continue installing as described in Chapter 6, “Installing Application Builder”. The installer deploys
Application Builder into <HAB_Install_Dir>\WAA\deployments\WebLogic\8.1.0\webapps.
Manually Deploying Using WebLogicWhen you install Application Builder, the EAR files are installed into the <HAB Install Directory>/ApplicationBuilder/<release number>/waa/ear directory.
WebLogic has a few deployment methods. Auto-deployment in a single server development environment is described in this document. Refer to the WebLogic documentation at the WebLogic website http://e-docs.bea.com/wls/docs80/programming/deploying.html for more deployment options.
Auto-deployment in a single server development environment is the deployment method that allows the user to quickly deploy an application in exploded format in the <weblogic install dir>/weblogic801/server/bin/applications directory. The presence of the

Manually Deploying Using WebLogic 55
new application is automatically detected and the user can make changes and have the server dynamically incorporate the changes. Changes can be made on .jsps, class files, and any static data files.
Modifying the startWLS fileBefore extracting the contents of the EAR files, you must modify the startWLS.sh file. This file contains the classpath and path information for application functionality.
➤ To edit the startWLS.sh file:
1 Open the startWLS.sh file, located in the <weblogic install dir>/weblogic800/server/bin directory.
2 Find the lines where the startup script modifies your native library search path in one of the following UNIX systems:
● For Solaris, set the path to LD_LIBRARY_PATH
● For AIX, set the path to LIBPATH
● For HP-UX, set the path to SHLIB_PATH
Add the directory <HAB_INSTALL_DIR>/adm/bin to this path.
3 Add set STARTMODE=false after the set CLASSPATH statement to set WebLogic to development mode.
4 Save and exit the startWLS.sh file.
Extracting the EAR filesExtract the contents of the hab-samples.ear, hab-blank.ear,hab-admin.ear,and hab-docs.ear files into the WebLogic application server directory structure. Code modifications are detected dynamically when using this procedure, eliminating the need to repackage and redeploy the EAR files after making the changes.
Note: The following procedure describes how to extract the contents of hab-samples.ear file. Follow the same procedure for the hab-admin, hab-blank, hab-test, and hab-docs EAR files, substituting the corresponding file name.
➤ To manually extract the contents of the hab-samples.ear file:
1 Verify that the WebLogic 8.1 default server is not running.
2 Create a hab-samples directory in the <weblogic install dir>/weblogic800/server/bin/applications directory.
3 Extract the contents of the hab-samples.ear, which is located in <HAB Install Dir>/waa/ear, into <weblogic install dir>/weblogic800/server/bin/applications/hab-samples.

56 Deploying and Configuring Using WebLogic
Note: Do not copy the hab-samples.ear file into the .../applications/hab-samples directory.
4 Within the <weblogic install dir>/weblogic800/server/bin/applications/hab-samples directory, create another directory named hab-samples.
5 Extract the contents of the hab-samples.war file from the <weblogic install dir>/weblogic800/server/bin/applications/hab-samples directory to the <weblogic install dir>/weblogic800/server/bin/applications/hab-
samples/hab-samples directory.
6 Delete the <weblogic install dir>/weblogic800/server/bin/applications/hab-samples/hab-samples.war file.
7 Edit the application.xml file, which is located in the <weblogic install dir>/weblogic800/server/bin/applications/hab-samples/META-INF directory.
Change the value of the web-uri tag from <web-uri>hab-samples.war</web-uri>
to
<web-uri>hab-samples</web-uri>.
8 Start the WebLogic console.
9 Navigate to Deployments > Applications.
10 Click Deploy a new Application. The screen: Select the archive for this application is displayed.
11 Click upload your file(s). The screen: Upload and install an Application or Module is displayed.
12 Enter the full path of the application that you want to deploy. For example, hab-samples:

Verifying and Modifying XML Files 57
13 Click Upload.
14 To deploy the hab-admin.ear, hab-blank.ear, and hab-docs.ear files, repeat steps 2 - 13 using the corresponding file names.
Verifying and Modifying XML FilesAfter you deploy the hab-admin.ear, hab-samples.ear,hab-blank.ear, and hab-doc.ear files in the application server, you must verify information in the XML files that are packaged with Application Builder.
The following sections outline the required XML modifications for accessing the hab-samples and hab-admin applications:
● weblogic.xml - “Setting up Users and Roles in the weblogic.xml File” on page 58
● web.xml - Stores information related to the configuration of the JDBC data sources used by the hab-applications as a repository and optional drill-through data source. For information on the JDBC Data Sources, see the Appendix, “Setting Up Relational and Drill-Through Data Sources” in the Hyperion System 9 Application Builder J2EE Administrator’s Guide.

58 Deploying and Configuring Using WebLogic
● web.xml - You need to set up a default users and roles and the repository initialization file (application-services.xml) for your application in the web.xml file. For information on setting up users and roles, see the , “Using Security” chapter in the Hyperion System 9 Application Builder J2EE Administrator’s Guide.
● application-services.xml - This repository initialization file specifies the services that the ATF repository provides, such as authentication, cron scheduling services, and task services. For information on the repository initialization file, see the “Using Security” chapter in the Hyperion System 9 Application Builder J2EE Administrator’s Guide.
● repository.xml - Specifies the information for the data source JDBC connection and the database table and column to Application Builder object mappings. This database object mapping tells OJB how to create an object when it retrieves it from the database. For information, see the “Using Security” chapter in the Hyperion System 9 Application Builder J2EE Administrator’s Guide.
● WAADataSources.xml - The Application Builder installation provides a WAADataSources.xml file that is preconfigured with relational data sources, OLAP data sources, and ADM pools for use with the Sample Application.for information on seting up data source, see Appendix B, “ Setting up OLAP Data Sources and ADM Pooling”, in the Hyperion System 9 Application Builder J2EE Administrator’s Guide.
● WAACss.xml - Optional for using Single Sign-on. For information on using Single Sign-on, see the “Using Security” chapter in the Hyperion System 9 Application Builder J2EE Administrator’s Guide.
The XML modification may include the following XML files:
● WAACubeAnnotations.xml - sets up annotations for OLAP data cell or a cubeView
● WAAQueryInfoCellValueFormats.xml - sets up formatting for relational data cells.
● WAADatabaseAnnotations.xml - sets up annotations for relational rows or a queryInfo
Note: For information on these XML modifications, see the Hyperion System 9 Application Builder J2EE Web Application Builder Administrator’s Guide.
Setting up Users and Roles in the weblogic.xml FileThe weblogic.xml file contains security information specific to WebLogic. It enables you to verify roles and assigned users. You use the weblogic.xml file to add roles to existing users.
Upon extraction, the weblogic.xml file already contains the basic user and role definitions required to use the Sample Application. They are the default settings for the hab-sample application.
The weblogic.xml file also contains references to the JDBC and HAB data sources used as the repository.

Adding Application Users and Roles 59
➤ To verify users and roles in the weblogic.xml file on hab-samples:
1 Open the weblogic.xml file, which is located in the <weblogic install dir>/weblogic800/server/bin/applications/hab-samples/hab-samples/WEB-
INF directory.
2 Define the security roles, where each role is presented and privileges are described. The following code snippet illustrates the roles, users, and relational data sources that you must verify or modify in the weblogic.xml file:
<security-role-assignment> <role-name>HAB_Analyst</role-name> <principal-name>analyst</principal-name> </security-role-assignment> <security-role-assignment> <role-name>HAB_Viewer</role-name> <principal-name>viewer</principal-name> </security-role-assignment> <reference-descriptor> <resource-description> <res-ref-name>jdbc/HAB</res-ref-name> <jndi-name>HAB</jndi-name> </resource-description> <resource-description> <res-ref-name>jdbc/HABDrill</res-ref-name> <jndi-name>HABDrill</jndi-name> </resource-description>
Adding Application Users and RolesThis section describes the process of establishing users’ access rights. This includes adding users and roles for a Application Builder application.
Adding UsersYou add application users so they can access a Application Builder application and data sources. Application users are added in the operating system or the application server or both.
➤ To add application users:
1 Start the server by running the startWLS.sh file, located in the <weblogic install>/server/bin directory where <weblogic install> is the directory in which you installed WegLogic.
2 Open the Web browser and type the following URL: http://<the_computer_name>:<port>/console where <the_computer_name> is the computer host name (for example, localhost) and <port> is the port. For example, 7001.
3 The BEA WebLogic Welcome screen is displayed. Type the password and click Sign In.

60 Deploying and Configuring Using WebLogic
4 From the tree navigation frame, which is shown on the left side of the screen when you log on to WebLogic, select Security > Realms > myrealm.
5 Select the Users folder.

Adding Application Users and Roles 61
6 Create users using the following parameters:.
7 Create a username and password to match the username and password for the relational database server for the HAB repository in the procedure: “To create a SQL server pool for the HAB repository:” on page 65.
8 Click Apply.
Note: You can create entries for any other users. The default userid/password for the Sample Application is analyst/password. It is currently mapped in the weblogic.xml file. Any users you create should be configured in this file.
Table 11 Sample Application Users and passwords
Application User ID Password
Administrator password
analyst password
viewer password

62 Deploying and Configuring Using WebLogic
After you add users, you can assign roles to them in the weblogic.xml file.
Adding RolesRoles determine the activities that an application user or group can perform. They are also used to map to ADM pools and secure application resources in Application Builder applications. You can assign one or more roles to an application user.
The HAB_User role is assigned to the J2EE default users configured with the typical installation option. The HAB_User role or group has the following ATF repository permissions:
● The special permissions create, read, list and write on the folders: /hyperion, /hyperion/olap and /hyperion/relational.
● The special permissions create, delete, read, list, write, change owner and change permission on object types olap view and relational view.
Note: If an application user has more than one role, when Application Builder maps the user to an ADM Pool, the first matching ADM pool is used.

Configuring Connection Pooling for JDBC Data Sources 63
By default, the Sample Application uses the roles HAB_Admin, HAB_Analyst, and HAB_Viewer. The following table shows the roles and default OLAP passwords, along with the default users created by the Typical installation option.
Note: To have default permissions when accessing the ATF repository, you must assign the HAB_User role or group to your application users.
Configuring Connection Pooling for JDBC Data SourcesYou set up a connection pool, which is a connection to a relational database, using an application server. The application server can efficiently create and manage connections to the JDBC data source.
The Sample Application uses two JDBC data sources: HAB (as a repository) and HABDrill (to enable drill-through). Both data sources must be established in the Relational Database Management System (RDBMS) and are accessible via relational access.
Configuring a New Connection PoolWhen configuring a JDBC data source in the application server, you must provide the pool name. Therefore, you must establish the connection pools first.
A connection pool is a named group of identical JDBC connections to a database that are created when the connection pool is registered. A connection pool can be registered either at application server start-up or dynamically during run time. The application borrows a connection from the pool, uses it, and returns it to the pool by closing it.
Note: Connection pools can share the same driver, but a unique pool must be established for each database. HAB and HABDrill cannot share the same connection pool.
➤ To configure a new JDBC connection pool:
1 Start the server and the Administration console.
Table 12 Sample Application Users, Roles, and ADM Pools
Application User IDApplication User Role and ADM Pool Hyperion Essbase User ID/Password
Administrator HAB_Admin hyperion/password
analyst HAB_Analyst analyst/password
viewer HAB_Viewer viewer/password

64 Deploying and Configuring Using WebLogic
2 From the tree navigation frame, on the left side of the screen, select Services > JDBC > Connection Pools.
3 From the right frame of the WebLogic Server Console, select Configure a new JDBC Connection Pool.

Configuring Connection Pooling for JDBC Data Sources 65
Creating a Server PoolThe following procedure is an example of the creation of a connection pool using MySQL AB MySQL Server with the MySQL Driver Type4. You can use this example to create unique connection pooling scenarios.
➤ To create a SQL server pool for the HAB repository:
1 On the JDBC Connection Pools screen, enter the following parameters:
a. Database Type - MySQL
b. Database Driver - MySQL’s Driver(Type4) Versions:Any
2 On the Define connection properties screen, enter the following parameters:
a. Name - MySQL_HAB
b. Database Name - HAB
c. Host Name - localhost
d. Port - 3306
e. Database User Name - <your user id>
The user and password needs to match the application user created in “Adding Users” on page 59. For example:
user=habdbuser
f. Password - <your password>
g. Confirm Password - <your password>

66 Deploying and Configuring Using WebLogic
3 Click Continue.
Testing the Connection PoolAfter you establish the connection pool, you must enter a test table name to validate the connection pool before creating a data source. A connection pool can fail if the database cannot be reached or if there are errors in the connection properties. Ping your database now to test database availability and the connection properties you provided.
➤ To test the connection pool:
1 On the Define connection properties screen, click Continue.
2 Enter the following:
a. Driver Classname - org.git.mm.mysql.Driver
b. URL - jdbc:mysql://localhost:3306/HAB
c. Database User Name - habdbuser
d. Password and Confirm Password - Enter your password
e. Properties - user=habdbuser

Configuring Connection Pooling for JDBC Data Sources 67
3 Click on Test Driver Configuration:
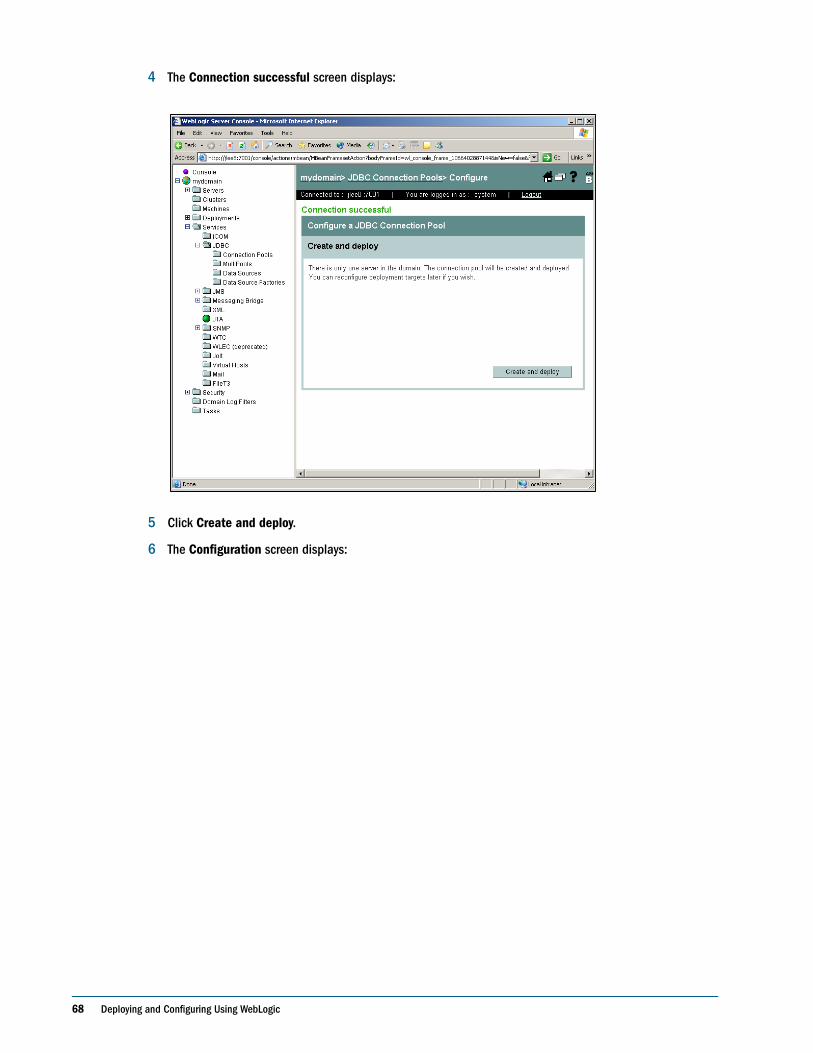
68 Deploying and Configuring Using WebLogic
4 The Connection successful screen displays:
5 Click Create and deploy.
6 The Configuration screen displays:
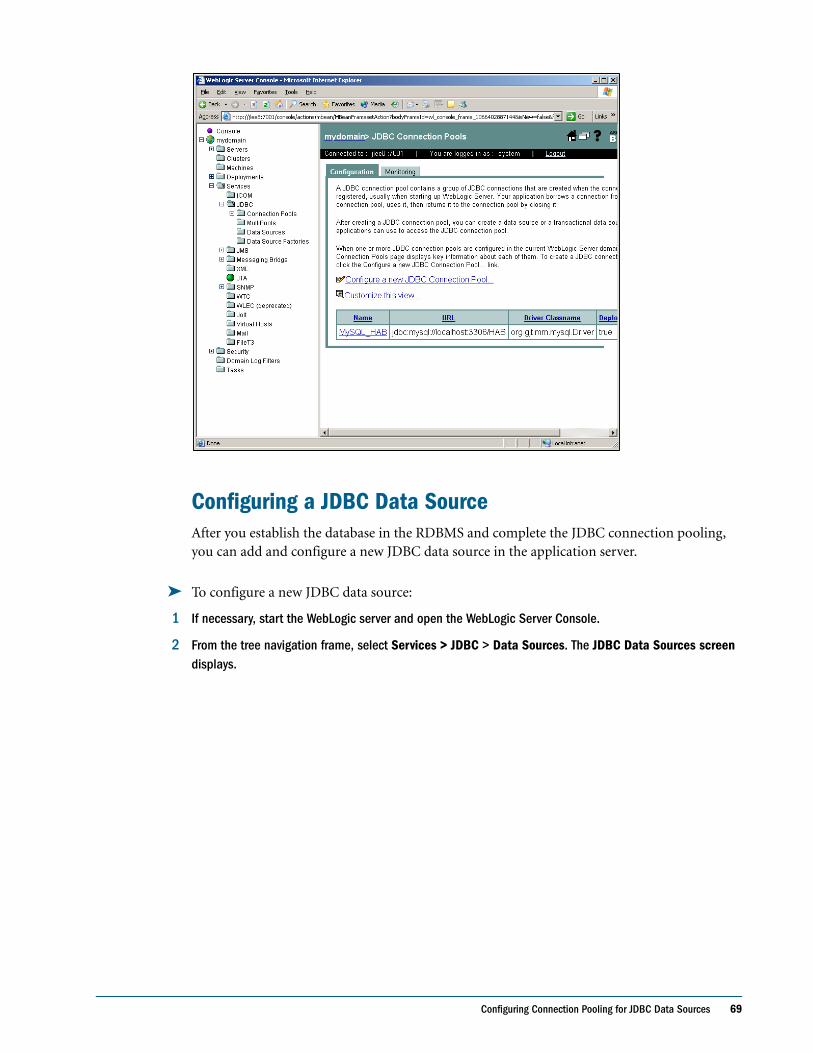
Configuring Connection Pooling for JDBC Data Sources 69
Configuring a JDBC Data SourceAfter you establish the database in the RDBMS and complete the JDBC connection pooling, you can add and configure a new JDBC data source in the application server.
➤ To configure a new JDBC data source:
1 If necessary, start the WebLogic server and open the WebLogic Server Console.
2 From the tree navigation frame, select Services > JDBC > Data Sources. The JDBC Data Sources screen displays.

70 Deploying and Configuring Using WebLogic
3 Select Configure a new JDBC Data Source. The Configure a JDBC Data Source screen displays. Enter the following fields:
a. Name - HAB
b. JNDI Name - HAB
c. Honor Global Transactions - checked

Configuring Connection Pooling for JDBC Data Sources 71
4 Click Continue. The Configure a JDBC Data Source screen displays.
5 Enter the Pool Name as MySQL-HAB:

72 Deploying and Configuring Using WebLogic
6 Click Continue. The Target the data source screen displays.
7 Select the servers for which you want to deploy this JDBC data source and click Create:
8 If the JDBC data source was created successfully, you should see the following screen:

Configuring Connection Pooling for JDBC Data Sources 73
9 Repeat the section “Configuring Connection Pooling for JDBC Data Sources” on page 63 to add a My SQL_HABDrill JDBC Connection Pool and section “Configuring a JDBC Data Source” on page 69 to add HABDrill as a JDBC Data Source.

74 Deploying and Configuring Using WebLogic

Deploying and Configuring Using WebSphere 75
C h a p t e r
9Deploying and Configuring
Using WebSphere
This chapter contains the following topics that describe procedures for deploying Application Builder into WebSphere Application Server and configuring the WebSphere Application Server environment:
● “Completing Post-Installation Tasks for Solaris” on page 75
● “Setting Up Security” on page 76
● “Creating and Configuring a JDBC Data Source and Driver” on page 78
● “Adding Application Users and Roles” on page 83
● “Verifying and Modifying XML Files” on page 85
● “Deploying the EAR Files” on page 86
Completing Post-Installation Tasks for SolarisEssbase provides client libraries with versioning suffixes which are appended to the library names.
If you are running Solaris, you must create links from the suffixed versions of the library files to corresponding, normal library names in order to use these libraries. This section describes how to create these links.
Note: You can use the Essbase Client API documentation to simplify this process.
Note: The dynamic libraries for the Solaris API are delivered with names of the form *.so.1. When compiling, Solaris looks for filenames of the form *.so. You can rename the *.so.1 files to *.so, or establish symbolic links with names of the form *.so and link them to the *.so.1 library files.
In order to make this a simple task, we have provided a UNIX shell script that will create these links for you. The script is called 'MakeEssLinks'. It is located in the tools/solaris_scripts subdirectory of the Application Builder installation directory.
Before running the script, please ensure that you are logged on as the owner of the Essbase installation. Since the script requires permission to write in the Essbase directories, the script will fail if you are not the owner of those directories.

76 Deploying and Configuring Using WebSphere
Note: This script is required by Application Builder.
➤ To run the script:
1 Change directories to the tools/solaris_scripts sub-directory.
2 Type: MakeEssLinks EssbaseInstallDirectory.
where EssbaseInstallDirectory is the top level directory for the Essbase installation that you will be using. The script will test to make sure you have specified the correct directory and that you have permission to write to the directories. It will then make the links. If any errors are encountered, an appropriate error message will be displayed, explaining the cause of the error.
Note: This script works with both Essbase Releases 5.02 and 6.x, and you can run the script multiple times on the same directory without harm.
Tip: If you do not run this script, Application Builder will not function correctly.
Setting Up SecurityConfiguring WebSphere for use with Application Builder requires that you first set up security. Security must be enabled for any security settings to function. Security functions include authentication, role mapping, and administrative roles. After you enable security, you must restart your application server to load the security settings.
➤ To set up security:
1 Change directories to <Webshpere>/<AppServer>/bin
● To stop the server, enter the following command:
stop server sh <server name> -user <username> -password <password>
● To start the server, enter the following command:
start server sh <server name> -user<username> -password <password>
2 On the login screen, enter a user ID. If security is enabled, use administrator rights. Click OK.
3 For Client machines:
a. In the Administrative Console, on the left frame, select Security > User Registries > Local OS.
b. Enter a user ID and password for the local system. WebSphere runs under this username and authenticates users against the local system.
c. Click OK.
4 Open Security and click Global Security. The Global Security dialog box is displayed.
5 Verify that the following fields are updated as follows:

Setting Up Security 77
● Enabled - Selected
● Enforce Java 2 Security - Deselect for Application Builder
For Client machines:
● Active Authentication Mechanism - SWAM
● Active User Registry - Local OS
Keep the defaults for the remaining options.
6 Click OK.
7 An error message is displayed: “The Server User ID is not valid. Please enter a valid Server User ID”:

78 Deploying and Configuring Using WebSphere
8 The screens resets. A message at the top tells you to click Save and restart the Administration Server.
9 When you log on to the console, provide the same username and password that you provided for the local system in step b on page <Cross.ref>76.
Creating and Configuring a JDBC Data Source and DriverYou set up a JDBC data source, which is a connection to a relational database, using your application server. The application server can efficiently create and manage connections to the RDBMS JDBC data source. The Application Builder applications use at least one JDBC data source (as a repository), which is HAB by default.
Application Builder component source code uses a repository to store information such as query metadata. Optionally, you can report on relational data sources and use the relational data access drill-through feature.
Note: You must create Application Builder and other relational databases in the relational database management system (RDBMS) prior to creating and configuring data sources in the application server.
The following section describes the steps you must follow to create and configure a JDBC data source for connection pooling with your Application Builder repository. For information on connection pooling, see the “Setting up OLAP Data Sources and ADM Pooling” chapter in the Hyperion System 9 Application Builder J2EE Web Architecture Developer’s Guide.

Creating and Configuring a JDBC Data Source and Driver 79
Creating a JDBC Data SourceYou create a JDBC data source in the Resources node of the WebSphere Administrative Domain.
➤ To create a JDBC data source:
1 In the left hand pane, open Resources, and click JDBC Providers:
2 Client specific: Verify that Scope is set at Node by scrolling to the bottom of screen and clicking New.
The New Configuration screen is displayed.
Note: The scope setting controls the visibility of the JDBC data source.
3 From the list box, select the JDBC provider. Application Builder supports the following JDBC drivers:
● IBM DB2 Relational Database:
jdbc:db2://localhost:6789/HAB
● Oracle:
jdbc:oracle:thin:@(description=(address=(host=localhost)(protocol=tcp)(port=1521))(connect_data=(sid=HAB)))
● MS SQL Server 2000: jdbc:microsoft:sqlserver://localhost:1433;DatabaseName=HAB;SelectMethod=cursor;

80 Deploying and Configuring Using WebSphere
4 Click OK.
5 On the JDBC provider screen, enter the provider name and specify the Classpath:
6 Click OK, then in the message box, click Save.
7 Return to the screen for the JDBC provider by clicking JDBC Providers and selecting the JDBC provider that you defined in step 5.
8 Scroll to the bottom of the screen and click Data Sources.
Note: Do not select Data Sources (Version4).
9 On the Data Sources screen, click New. The New Data Sources screen is displayed.
10 Enter Name and JNDI Name; for example, HAB and jdbc/HAB:

Creating and Configuring a JDBC Data Source and Driver 81
11 Click OK to make the properties available to configure the JDBC data source.
12 Navigate back to the screen for the data source.
13 Scroll to the bottom of the page and click Custom Properties. The Custom Properties screen is displayed.
14 Add the following properties:
Note: portNumber is of type java.lang.Integer. All the other properties are of type java.lang String.
● user - User ID for login to the RDBMS
● password -Password for login to the RDBMS
● serverName - Server name, or IP, of the RDBMS server
● portNumber - Port number to connect to on the server. portNumber is used in URL connections.
● databaseName - Name of the database to which to connect.
15 At the top of the screen, follow the prompt to save the properties.
The data source is activated after the next start up.
16 Optionally: Add entries for the Relational Database system:
a. At the bottom of the screen, click J2C Authentication Data Entries.
b. Add an entry for the userID and password for the Relational Database system. Select that entry in the bottom two select boxes on the data source page.
c. At the top of the screen, click Save.

82 Deploying and Configuring Using WebSphere
d. After the next restart, the data source is active.
Configuring the Server EnvironmentYou need to at least add a Classpath entry for the JDBC drivers in use so that ATF can load them. You may also need to set PATH or environment settings.
17 Navigate to Servers > Application Servers:
18 Click the name of your server; for example, server1:

Adding Application Users and Roles 83
The Process Definition screen is displayed.
19 Scroll down and click Java Virtual Machine. The Java Virtual Machine screen is displayed.
20 The CLASSPATH default settings are:
● C:\Program Files\IBM\WebSphere MQ\Java\lib\providerutil.jar;
● C:\Program Files\IBM\WebSphere MQ\Java\lib\com.ibm.mqjms.jar;
● C:\Program Files\IBM\WebSphere MQ\Java\lib\ldap.jar;
● C:\Program Files\IBM\WebSphere MQ\Java\lib\jta.jar;
● C:\Program Files\IBM\WebSphere MQ\Java\lib\jndi.jar;
● C:\Program Files\IBM\WebSphere MQ\Java\lib\jms.jar;
● C:\Program Files\IBM\WebSphere MQ\Java\lib\connector.jar;
● C:\Program Files\IBM\WebSphere MQ\Java\lib\fscontext.jar;
● C:\Program Files\IBM\WebSphere MQ\Java\lib\com.ibm.mq.jar
21 Click OK.
22 Follow the prompt at the top of the screen to save the configuration.
Adding Application Users and RolesWebSphere utilizes the operating system for its application user authentication. Using the Security Center, as described on page <Cross.ref>76, you can:
● Conduct general user authentication tasks
● Map Roles

84 Deploying and Configuring Using WebSphere
● Assign administrative roles
● Use the LDAP repository
Adding UsersYou add users to your security system so that they can access your application. After you add users, you can assign them to groups or roles. This section describes how to set up the user’s application access rights.
The system administrator is responsible for adding, validating, and removing users. The system administrator must verify that a valid user exists or is added to the system on which WebSphere was installed.
Adding RolesRoles determine the activities that an application user or group can perform. You can assign one or more roles to an application user or group of users. Assigning a role to a group implicitly assigns the role to each of its members.
The HAB_User role is assigned to the J2EE default users configured with the typical installation option. The HAB_User role or group has the following ATF repository permissions:
● The special permissions create, read, list and write on the folders: /hyperion, /hyperion/olap and /hyperion/relational.
● The special permissions create, delete, read, list, write, change owner and change permission on object types olap view and relational view.
The Sample Application uses the roles in Table 13, all of which are ADM pool names in the WAADataSources.xml file. For example, a user with the role HAB_Admin uses the ADM pool named HAB_Admin, which is defined in the WAADataSources.xml file.
WebSphere creates the following roles based on the definitions in the web.xml fil fe for hab-admin and sample applications:
Note: To have default permissions when accessing the ATF repository, you must assign the HAB_User role or group to your application users.
Table 13 Application Builder Default Roles
Role Definition
HAB_Admin A user with unlimited administrative capabilities
HAB_Analyst A user with read/write access to applications
HAB_Viewer A user with read-only access to applications
HAB_User A user withATF repository default permissions

Verifying and Modifying XML Files 85
Verifying and Modifying XML FilesBefore you deploy the EAR files in the application server, you must edit the information in the following XML file that is packaged with Application Builder:
● web.xml - Stores information related to the configuration of the JDBC data sources used by the hab-applications as a repository and optional drill-through data source. For information on the JDBC Data Sources, see the Appendix, “Setting Up Relational and Drill-Through Data Sources” in the Hyperion System 9 Application Builder J2EE Administrator’s Guide.
● web.xml - You need to set up a default users and roles and the repository initialization file (application-services.xml) for your application in the web.xml file. For information on setting up users and roles, see the “Using Security” chapter in the Hyperion System 9 Application Builder J2EE Administrator’s Guide.
● application-services.xml - This repository initialization file specifies the services that the ATF repository provides, such as authentication, cron scheduling services, and task services. For information on the repository initialization file, see the “Using Security” chapter in the Hyperion System 9 Application Builder J2EE Administrator’s Guide.
● repository.xml - Specifies the information for the data source JDBC connection and the database table and column to Hyperion System 9 Application Builder J2EE object mappings. This database object mapping tells OJB how to create an object when it retrieves it from the database. For information, see the “Using Security”chapter in the Hyperion System 9 Application Builder J2EE Administrator’s Guide.
After you deploy the EAR files in the application server, you must verify information in the XML files that are packaged with Application Builder. The XML modification may include the following files:
● WAADataSources.xml - The Application Builder installation provides a WAADataSources.xml file that is preconfigured with relational data sources, OLAP data sources, and ADM pools for use with the Sample Application.for information on seting up data source, see Appendix B, “Setting up OLAP Data Sources and ADM Pooling”, in the Hyperion System 9 Application Builder J2EE Administrator’s Guide.
● WAACss.xml - Optional for using Single Sign-on. For information on using Single Sign-on, see the “Using Security” chapter in the Hyperion System 9 Application Builder J2EE Administrator’s Guide.
The XML modification may include the following XML files:
● WAACubeAnnotations.xml - sets up annotations for OLAP data cell or a cubeView
● WAAQueryInfoCellValueFormats.xml - sets up formatting for relational data cells.
● WAADatabaseAnnotations.xml - sets up annotations for relational rows or a queryInfo
Note: For information on these XML modifications, see the Hyperion System 9 Application Builder J2EE Web Application Builder Administrator’s Guide.
86 Deploying and Configuring Using WebSphere
Deploying the EAR FilesYou deploy the EAR files, which are located in the <HAB Install Directory>/waa/ear directory, to use the Sample Application or develop your own applications. You must deploy these files in your application server.
When you deploy the hab-samples.ear and the other EAR files in WebSphere, they expand into directories named after the EAR files.
Note: The following procedure describes how to extract the contents of the hab-samples.ear file. Follow the same procedure for the hab-admin.ear, hab-blank.ear, and hab-docs.ear files, substituting the corresponding file name. hab-docs.ear extracts to an application shell. On the screens for Users and Roles, click through the empty screens.
➤ To extract the contents of the hab-samples.ear file:
1 Check that the default service is running.
2 Open the Administrator console.
3 From the console, navigate to Applications > Install New Application and browse to hab-samples directory; for example,
<HAB Install Direcroty>/ApplicationBuilder/<release>/WAA/ear
4 Click Next.
The Step 1. Provide options to perform the installation screen is displayed. This screen enables you to have WebShpere autogenerate JDBC and host bindings.
5 To specify your own bindings, leave Generate Default Bindings deselected. Click Next. The Install Application screen is displayed.
6 Use the default on all the options except the following:
● Application Name -The default is too long. Use the application's context root; for example, hab-samples.
7 Click Next. The screen: Step 2. Map resource references to resources, is displayed. This screen maps JDBC resources defined in the application’s web.xml file to JDBC resources defined in the application server.
8 For each application resource, select a server resource from the drop-down list and click Apply.

Deploying the EAR Files 87
9 Click Next when finished. The screen, Step 3. Map virtual hosts for web modules, is displayed.
10 Typically, you want to select default_host for each application:

88 Deploying and Configuring Using WebSphere
11 Click Next. The screen, Step 4. map modules to application server, is displayed, which permits you to split of the Web applications defined in an EAR file amongst several defined servers.
12 Accept the defaults and click Next. The screen: Step 5. Map security roles to users/groups, is displayed, which enables you to map usernames and groups from WebSphere’s authentication source to roles defined in the Web application:
13 Enable a role and then click Lookup users to search for users to map them to the role.
14 Enter a user search and click Search.
15 Move users from the Available list to the Selected list.
16 Click Next. The Step 5. Summary screen is displayed, which is a review of the wizard steps.
17 Click Finish.
18 To finalize the installation, click Save to master configuration.
19 Follow the prompts to save the application.
20 Stop the server to edit the XML files for the application.
21 Copy the ADM LIC file into <WebSphere Install Dir>\AppServer\installedApps\hab-samples\ WEB-INF\classes.
Verifying the Functionality of the Sample ApplicationSee the Hyperion Application Getting Started Guide for information about verifying the functionality of the Sample Application.

Verifying the Functionality of the Sample Application 89
Accessing the Sample ApplicationYou access the Sample Application to verify the deployment of applications.
➤ To access the Sample Application:
1 If necessary, start WebSphere server, a data source, Hyperion Essbase, and Hyperion Essbase Deployment Services.
2 Open the Sample Application by typing the following URL in your Web browser:
http://hostname:port/hab-samples/SMPApplicationServlet
where hostname:port is the computer name or IP address and port of the Web application. If you installed Application Builder on your computer, the hostname is localhost. The port number was defined in step 14 on page <Cross.ref>81.

90 Deploying and Configuring Using WebSphere

Upgrading Web Applications 91
C h a p t e r
10Upgrading Web Applications
This chapter describes how to upgrade a Application Builder Release 3.0 or 7.x application to Release 9.x.
Upgrading an Existing ApplicationThis section describes how to upgrade an existing Release 3.x or 7.x application to this release. An upgrade maintains compatibility for the tag libraries and the ADM API. Future Application Builder releases will maintain backward compatibility for the tag libraries and the ADM API only.
Consider the following information when you upgrade:
● If you added Java code or custom tags to your Release 3.x application, you must propagate these changes to the Release 9.x Java code or tag libraries, respectively.
● You can upgrade your Release 3.x application to run under Release 9.x.
● You can upgrade your 3.x application to access new Release 9.x functionality.
● You cannot use Release 3.x tags and Release 9.x tags in the same application. If you upgrade one tag in your Release 3.x application, you must upgrade all of the tags. Release 7.x and 9.x use the same tags.
Using the Release 3.x or 7.x with HAB 9.x You run a Release 3.0 or 7.x application with Release 9.x to gain the following enhancements:
● Bug fixes
● Performance enhancements
● New ADM features
➤ To use Tomcat and upgrade to Release 9.0 code base while supporting the Release 3.0 and 7.x functionality:
1 Stop Tomcat.
2 Rebuild your .EAR or .WAR files with the AntBuild.xml file.
3 Restart Tomcat.

92 Upgrading Web Applications
4 Release 3.0 application.
Upgrading Your 3.0 or 7.x Application to run with Release 9.xYou can upgrade your 3.0 or 7.x application to run with Release 9.x.
➤ To upgrade your 3.0 or 7.x application with Release 9.x:
1 Edit web.xml and modify the .tld portion to point to the Release 3.0 .tlds included with Release 9.x.
Note: Your repository, OLAP views, and WAADataSources. xml do not need to be updated.
Note: If you are upgrading from 7.x to 9.x, you do not need to perform this step.
2 If you added any of the following items to your Release 3.0 application, add them to the Release 7.0 tag libraries or Java code:
❍ Java code
❍ Modified tags or components
❍ New tags
Note: If you are upgrading from 7.x to 9.x, you do not need to perform this step.
3 Rebuild your .EAR or .WAR files with the AntBuild.xml file.
4 Run your updated application.
Upgrading Your Tags
Note: If you are upgrading from 7.x to 9.x, you do not need to perform this task.
You upgrade your Release 3.0 tags to Release 9.x tags to utilize the new Release 9.x functionality.
Before upgrading your tags, you need the following information:
● There are two sets of .tld files with Release 9.x:
❍ A .tld file for Release 3.0 tag compatibility
❍ A .tld file for Release 9.x tags
● The web.xml packaged with Release 9.x should be used for the .tld of the Release 3.0 tag compatibility.

Upgrading an Existing Application 93
● .tld files that contain Release 3.0 compatibility tags will have the same name that is used for Release 9.x. The .tld file with Release 9.x .tlds will be named with a different name.
Note: The .tld file released with Release 3.0 and the .tld file for Application Builder Release 9.x tag compatibility with Release 3.0 are not the same. The implementation classes for Release 9.x tags in Release 3.0 and Release 3.0 differ but they support the same tags.
● You must use the same version tags within an application. If you upgrade one tag in your Release 3.0 application, you must upgrade all of the tags.
● If you use the Release 3.0 application to run against the Release 9.x .tld, you must manually migrate the Release 3.0 tags to Release 9.x tags.
➤ To upgrade your Release 3.0 tags to Release 9.x:
1 Update your Web.xml to point to the Release 9.x .tld files.
2 If you added or modified Java code or tags, upgrade the release 9.x Java code or tags similarly.
3 Upgrade your Release 3.0 tags:
❍ Reference the tag library appendices and the “What’s New” chapter in the Web Application Architecture Developer’s Guide to see the new tags and attributes.
❍ Use Quick Builder to update each tag.
❍ Select the tags by one of the following means:
❑ Select the tag in the Design view and click the Show Editor button.
❑ Select the tag in the code view and right-click.
❍ Update the attributes and click OK.
❍ If some attributes are no longer needed, you are prompted to remove them. Click Yes.

94 Upgrading Web Applications

Troubleshooting 95
C h a p t e r
11Troubleshooting
This chapter describes issues that may arise during installation or deployment of Application Builder and explains how to resolve each issue.
License KeyThe following are the some of the causes for the error messages related to the license key:
● Number of users exceeds the license agreement.
● ARBORPATH is not set properly. Set ARBORPATH to the Hyperion Essbase root directory; for example: \Hyperion\HAB\.
● You might be using a license key from an earlier version of Application Builder.
● The Analyzer license key is found in the PATH before Application Builder.
CLASSPATH and PATH EntriesCLASSPATH is the environmental variable defined for the Java run-time system. Java run-time system is looking for a class file in the directories which you included in the CLASSPATH.
PATH is the environmental variable defined in Windows to find executables and shared libraries. In UNIX, PATH is the variable to find executables. Use one of the following to find shared libraries:
● Solaris and Linux uses LD_LIBRARY_PATH.
● AIX uses LIBPATH.
● HP-UX uses SHLIB_PATH.

96 Troubleshooting
When setting up your application server, you make entries in the CLASSPATH and PATH that are unique for each application server. Use the following table to verify your entries.
Sample Application Deployment IssuesThe following issue may arise when using the Application Builder Sample Application:
Server/Variable Entries
In WebLogic, entries are made in the startWebLogic.cmd (Windows) and startWebLogic.sh (UNIX) files respectively, not in the WebLogic Application Server.
Note: When translating these entries for UNIX, substitute the following characters with their UNIX value:
% = $
\ = /
● Change set PATH=.\bin;%PATH% to set PATH=.\bin;<HAB Install Directory>\bin;%PATH%
● Change set CLASSPATH= .;.\lib\weblogic_sp.jar;.\lib\weblogic.jar; to set CLASSPATH=.;.\lib\weblogic_sp.jar;.\lib\weblogic.jar;<HAB Install Directory>\waa\lib\xerces.jar;<HAB Install Directory>\lib\ap.jar;<HAB Install Directory>\lib\adm.jar;<HAB Install Directory>\lib;<JDBC Dir>\JDBC.jar; Change set WLS_PW= to set WLS_PW=password.
Sun ONE CLASSPATH (Windows and UNIX) ● <HAB Install Directory>\adm\lib
● iASInstallDir\servers\default\hab-samples\Web-inf\classes
● iASInstallDir\servers\default\hab-samples\Web-inf\lib
● jdbcdrivers\JDBC.jar
Sun ONE PATH (Windows and UNIX) ● <HAB Install Directory>\adm\bin
WebSphere CLASSPATH (Windows and UNIX) N/A
WebSphere PATH (Windows and UNIX) ● <HAB Install Directory>\waa\ear\hab-samples.ear
Issue Resolution
If a user tries to change a Page dimension while running an applet, the applet may hang.
Check the version of the JDK plug-in. If it is not JDK version 1.3.x, uninstall it and install JDK version 1.3.x.

Supported Encoding Issues in ADM 97
Quick BuilderWhen using Quick Builder, you may encounter one of the following technical issues:
Supported Encoding Issues in ADMWhen using ADM, you may encounter the following issues:
● An exception from XML parser, stating that the encoding xxx is not supported
● An APException
Resolutions:
First, you can set the environment variable ADM_TRACE_LEVEL=0, and view the log file in the ADM.properties file. The APException is logged as an XML string with an encoding name.
If your computer’s encoding is not supported, you need to map your computer’s locale ID to the UTF-8 encoding.
To determine your computer's locale ID:
Tip: GetLocale outputs a computer locale ID which is a string.
4 From the command line, do one of the following steps:
● If you are using Microsoft VM, type: jview GetLocale.
● If you are using another VM, type: java GetLocale.
Tip: The GetLocale Java program located in the <HAB Install Directory>\adm directory.
5 Check whether the computer locale ID is listed in the ADMCodePageMap.properties file.
Tip: The ADMCodePageMap.properties file contains a list of computer locale IDs assigned to an encoding. The XML parser looks up the computer locale ID and performs a translation to a supported encoding.
Issue Resolution
Util.getZipFileEntryList () : exception: java.net.MalformedURLException: unknown protocol: zip
This exception is thrown when the WAAChartBean initializes the NetCharts components that are used to generate the charts. They probe for acceptable transfer methods, including zip, which is not supported in our framework. Therefore, they print the exception and move on. This message is completely harmless and may be ignored. Because the errors are printed directly from the NetCharts classes themselves, they cannot be captured for printout.

98 Troubleshooting
6 If your computer locale ID is not in the ADMCodePageMap.properties file, add it using the following syntax: computer locale ID = UTF-8.
For example, if your computer locale ID is XXX, add the following line to the ADMCodePageMap.properties file:
XXX=UTF-8
Tip: UTF-8 is the Unicode encoding.
ADM Star Schema IssuesWhen using the Star Schema data source, you might encounter the following technical issues:
Issue Resolution
The following error is displayed:
java.lang.RuntimeException: com.hyperion.ap.APException: [0] Error: The system cannot find the driver class.
Make sure that the JDBC driver class is in the CLASSPATH. The driver class name is specified in the SSDriver.xml file, following this format: <ss_jdbc_driver>xxxxxx</ss_jdbc_driver>
You receive the following message:
Unable to connect RDB server.
Verify that the data source name in the ADM connection URL is exactly the same as defined in SSDriver.xml file, and make sure that the JDBC connection URL is set correctly.
You cannot run com.hyperion.ap.starschema.SSHssPersist more than twice using the same parameters.
● If there is only one application currently in the database, drop all tables created using the ADM Star Schema driver (tables starting with: cwm_ or ss_) before you execute com.hyperion.ap.starschema.SSHssPersist again.
● If there are multiple applications in the database, remove all entries related to the current application parameter <Application> from the tables created by ADM Star Schema driver.

Glossary 99
A B C D E F G H I J K L M N O P Q R S T U V W X Y Z
Glossary
ad hoc report An online analytical query created on-the-
fly by an end user.
ADM Client Interfaces Exposes public client interfaces,
which are available for use by the developer to access a data
source.
ADM Pooling Enables users to share a connection to a
data source. ADM pooling also controls the security to
your data source.
Administration Tools A set of tools to assist with the
administration of applications created with Application
Builder.
ALE Analytic Language for Expression. A language-based
representation used to specify queries within the Analytic
Data Model (ADM).
ALE query Retrieves member information and data cells
from a data source using the Analytic Data Model. For
example, you can specify both member and data cell
queries using one of the following query representations:
Analytic Language for Expression (ALE);Extensible Mark-
up language (XML), which is an ADMML.dtd compliant
XML text; or an Expression Tree.
Analysis Tools Framework (ATF) repository Stores
secured object information for users, groups, folders,
views, task definitions, scheduled task definitions, and
permissions. It also includes a cron scheduling utility that
schedules and runs tasks.
Analytic Data Model (ADM) A generic, object-oriented
interface that accesses different OLAP data sources. The
ADM developed by Hyperion is used in several Hyperion
products, such as Hyperion Reports, Application Builder,
and Hyperion Financial Management.
annotation Text data that is stored for OLAP data or
relational data. There are two kinds of annotations: data
source and WAA. A data source annotation is assigned to
an OLAP data cell and can be either a Essbase Analytic
Services linked reporting object (LRO) or a Hyperion
Financial Management cell text. A WAA annotation is set
up using an XML file, and it can be assigned to an OLAP
cell, Olap view, relational row, or relational view. A WAA
annotation is text, a URL, or a file.
annotation repository Stores annotation information for
views and cell data. It also stores WAA drill-through
mapping information for a WAA drill-through.
ANT A Java-based build tool, part of the Jakarta project
from Apache. ANT users create XML-based build files that
describe their project build processes.
API See also Application Programming Interface (API).
applet In Java, a program that can run in a Web browser.
Small programs written in languages other than Java are
sometimes referred to as applets.
application A related set of dimensions and dimension
members that are used to meet a specific set of analytical
or reporting requirements.
Application Programming Interface (API) A library of
functions that you can use in a custom program. Provides
programmatic access to an application’s data or services.
Application Builder provides a Java API that you can use to
develop client programs.
application server A middle-tier server that is used to
deploy and run Web-based application processes.
authentication Verification of identity as a security
measure. Authentication is typically based on a user ID
and password. Passwords and digital signatures are forms
of authentication.

100 Glossary
A B C D E F G H I J K L M N O P Q R S T U V W X Y Z
bean A reusable component, or building block, that can
be combined with other components in the same or other
computers in a distributed network to form an
application.
calc script A set of commands that define how a database
is consolidated or aggregated. A calculation script may also
contain commands that specify allocation and other
calculation rules separate from the consolidation process.
cell A unit of data representing the intersection of
dimensions in a multidimensional database; the
intersection of a row and a column in a worksheet.
chart Charts are graphical representations of the data
retrieved from a specified grid. Examples of chart types
are bar, line, and pie.
child A member that has a parent above it in the database
outline.
class A template definition of the methods and variables
in a particular kind of object. The class defines all of the
common properties of the different objects that belong to
it. See also object.
column A vertical display of information in a grid or
table. A column can contain data from a single field,
derived data from a calculation, or textual information.
The terms column and field are sometimes used
interchangeably. Contrast with row.
component A module of program functionality that has
defined inputs, processes, and outputs, and that, when
incorporated into a larger program or system, provides
application functionality. The basic building block of both
Hyperion Analytic Application Framework and the
Analytic Applications. Hyperion Analytic Application
Framework Components include: Application-Server
Components, Common Application Components,
Custom Application Components, Snap-in Components,
Client Sub-Components. Analytic Application
components include: Application Component Classes and
Application Components (AC Instances).
composite objects A pattern in the ADM design which
describes the relationship between child objects and the
parent objects that contain them.
cube A block of data that contains three or more
dimensions. Multidimensional cubes are better suited for
complex data analyses than for relational databases
because relational databases are limited to two dimensions.
A Essbase Analytic Services database consists of miniature
cubes that make up a larger cube, or hypercube.
cube view An object that contains the XML
representation of an OLAP data query and partial results
of the query.
data The values (monetary or non-monetary) associated
with the query intersection.
data cell query The extraction of one or more values from
a multi-dimensional data source. For example, the
CubeView query navigates from the metadata to the data
cells.
data load The process of populating an Essbase Analytic
Services database with data. Loading data establishes
actual values for the cells defined by the structural outline
of the database.
data query The extraction of one or more values from a
multi-dimensional data source. A data query utilizes the
cube view object to return data cell values and data cell
attributes. It also enables access to member names and
usage of a data cell object for data persistence.
data source A storage area containing data that is available
to the user. A data source may be a multidimensional
database, a relational database, or a file.
data source annotation An annotation assigned to a
OLAP data cell. It can be either a Essbase Analytic Services
linked reporting object (LRO) or a Hyperion Financial
Management cell text.
data source drill-through A Essbase Analytic Services or
Essbase Integration Server (EIS) drill-through or a
Hyperion Financial Management drill-through line item
detail (DTLID).
data source XML file The XML file that specifies OLAP
data sources, Analytic Data Model pools, and relational
data sources. For example, the waadatasources.xml
file is the data source XML file used in the Sample
Application.

Glossary 101
A B C D E F G H I J K L M N O P Q R S T U V W X Y Z
database A collection of related information. Each unit
(record) of the database is typically organized in a fixed
format to make it easy to retrieve selected portions of the
data on demand. Each record is made up of one or more
data fields, and each data field can hold one piece of data
(known as a value).
database administrator (DBA) An individual who
administers database servers, such as Essbase Analytic
Services, and who may also design, maintain, and create
databases.
DB2 Database 2. A IBM-proprietary relational database
product, providing an open database environment that
runs on a wide variety of computing platforms.
DBA See also database administrator (DBA).
dimension A data category that is used to organize
business data for retrieval and preservation of values. Each
dimension usually contains a hierarchy of related members
grouped within it. For example, a Year dimension often
includes members for each time period, such as quarters
and months. Other common business dimensions may be
measures, natural accounts, products, and markets.
drill-through The navigation from a data value in one
cube to corresponding data in another data source. For
example, you can access context-sensitive transactional
data. Drill-through occurs usually from the lowest point of
atomicity in a database (detail) to a next level of detail in
an external data source.
drill-through XML file Contains information required to
map from an OLAP cube’s data cell to a SQL query to
retrieve detailed consolidation information. For example,
the WAADrillThrough.xml file is the drill-through XML
file used in the Sample Application.
DTD file A document type definition file. Defines the
type of elements, attributes, and entities in an associated
XML document.
Dynamic Time Series A process that is used to perform
dynamic period-to-date reporting for all values associated
with a query.
dynamic time series functions Hidden outline members
that provide period-to-date reporting at up to eight levels,
such as year-to-date and month-to-date totals. An
administrator assigns Dynamic Time Series members to
members of the time-based dimension in your database
outline.
EAR file An enterprise archive file used to distribute J2EE
Web applications. Contains WAR files, JAR files, and
deployment information.
edge A component of an OLAP cube. Valid edges include
Row, Column, Page, and Slicer. For example, if a report
has Product and Sales on the columns and Region on the
rows, then the Row edge contains Product and Sales and
the column edge contains Region.
Enterprise Beans Server-side components that
encapsulate the business logic of an application.
execute A command that runs a specified Calc script
object against a OLAP result set. In most cases, a Calc
script object represents a file containing Calc script
commands.
export A means by which a user can direct the output of
data or the results of a query.
expression tree query An object-based representation and
manipulation of Analytic Language for Expression queries.
This is ideal for interactive query building.
Extensible Markup Language (XML) A language
comprised of a set of tags used to assign attributes to data
that can be interpreted between applications based on the
schema used.
external authentication The practice of storing user logon
credentials in a corporate authentication repository (such
as Lightweight Directory Access Protocol, or LDAP,
directory) as an alternative to maintaining users and
groups for each Hyperion product.
fact table A container for one or more relational tables
that define the data values for each dimension intersection
in the OLAP model. For example, if the OLAP model
contains Products, Region, and Year dimensions, the fact
table might include data values for the number of units of
Product A sold in New York in January.
filter functions Filter functions filter the set of objects
returned by execution of the query. The following member
filter functions are implemented by all Analytic Data
Model drivers: AllMembers, Children, Descendents,
Member, SystemMemberList, and TopOfHierarchy.
folder An object in the ATF repository used as a storage
container for other objects such as views, queries, or other
folders.

102 Glossary
A B C D E F G H I J K L M N O P Q R S T U V W X Y Z
generation A layer in a hierarchical tree structure that
defines member relationships in a database. For example,
Essbase Analytic Services orders generations incrementally
from the dimension (generation 1) down to the child
members.
grid A report object that can contain data from external
data sources. A grid contains a row, column, and
(optionally) a page axis.
guided analysis. Functionality that links and launches reports and views from one Hyperion product to another. Users can easily navigate from any Application Builder report to related financial reports (rendered in Hyperion Reports), unstructured content (using Hyperion Central) and interactive out-of-the-box analysis (rendered in Hyperion Analyzer).
hab-blank.ear file An enterprise archive file that contains
the WAA framework and minimal deployment
information to create a new web application.
hab-samples.ear file An enterprise archive file that
contains the WAA framework, deployment information,
and customized code for the Sample Application.
hierarchy A set of multidimensional relationships in an
outline, often created in a tree formation. For example,
parents, children, and generations represent a hierarchy.
Hypertext Markup Language (HTML) The programming
language used to generate Web pages on the World Wide
Web.
icon A graphical representation of an object or concept
that invokes an application or program. desktop shortcut
instantiate To create a single occurrence of an object
based upon its class.
invisible tags A tag which may or may not produce
invisible HTML elements on a Web page, as well as
processing server-side requests.
J2EE A framework for developing and deploying
enterprise applications. The J2EE platform consists of a set
of services, application programming interfaces (APIs),
and protocols that provide the functionality for developing
multitiered Web-based applications.
J2EE roles Used to implement ADM pooling. A J2EE role
assigned to J2EE users in your application server.
J2EE users J2EE application users that are assigned to
roles in your application server to access your Application
Builder application.
JAR file A Java archive file. A platform-independent file
format that permits many files to be aggregated into one
file.
Java Database Connectivity (JDBC) A Java API in the
J2EE framework that enables Java programs to execute
SQL statements. This allows Java programs to interact with
any SQL-compliant database supporting JDBC. JDBC
makes it possible to write a single database application that
can run on different platforms and interact with different
RDBMSs.
Java developer A person who is competent in Java
programming, specifically the Java 2.0 Standard Edition as
well as the Java 2.0 Enterprise Edition.
Java Development Kit (JDK) A software development kit
from JavaSoft used to produce Java programs, containing
the software and tools that developers need to compile,
debug, and run applets and applications.
Java Naming and Directory Interface (JNDI) A standard
extension to the Java platform, providing Java technology-
enabled applications with a unified interface to multiple
naming and directory services in the enterprise. It enables
seamless connectivity to heterogeneous enterprise naming
and directory services. It also enables developers to build
powerful and portable directory-enabled applications
using this industry standard.
Java Server Pages (JSP) Technology for controlling the
content and appearance of web pages through the use of
servlets.
Java Virtual Machine (JVM) Technology that enables the
Java 2 platform to host applications on any computer or
operating system without rewriting or recompiling. The
JVM is also responsible for the compactness of
applications targeting the Java 2 platform, and is the
foundation of its security capabilities.
JavaBeans Reusable software components written in the
Java programming language. You write JavaBeans just as
you write any other Java class. You can also take existing
components, applets, or Java classes and turn them into
JavaBeans.

Glossary 103
A B C D E F G H I J K L M N O P Q R S T U V W X Y Z
JDBC Pooling Database connectivity where a JDBC data
source is created and configured for connection pooling
with a relational database. The JDBC data source
efficiently creates and manages connections to a relational
database.
JDBC-ODBC Bridge Driver A bridge is a device that
governs the flow of traffic between networks or network
segments and forwards packets between them. A driver is a
program that extends the operating system to support a
device such as a disk or tape drive; or a program that
enables an application to use a device such as a printer.
join Creates a relationship between two tables based on
matching key column values in relational databases and as
an SQL command.
JSP developer A person that is competent in Java server
page technology and has user knowledge of an OLAP or
relational data source.
key column In relational databases, a column or columns
that form a unique identifier for each row. For example,
EMPLOYEE_ID might be a key column.
leaf member A member that has no children.
log A system-maintained record of transactional data
resulting from actions and commands.
log file A system-maintained file that records
transactional data resulting from actions and commands.
For example, an application log file records user actions
that are performed on that application; a client log file
records client messages, actions, and errors.
member query Enables you to navigate from the metadata
to the data. A member query utilizes the MemberSelection
object to return member objects and hierarchy
relationship objects. It also enables access to member
properties. For example, the logical relationships between
dimension/member and hierarchy/hierarchy relation are
described in the MemberSelection query. So the
MemberSelection query can access a member. You can also
specify the level of the members that you want in the
MemberSelection query.
member selection An object that contains the XML
representation of an OLAP member query and the results
of the query.
metadata A set of data that defines and describes the
properties and attributes of the data stored in a database or
used by an application. Examples of metadata are
dimension names, member names, properties, time
periods, and security.
Microsoft Virtual Machine (VM) A self-contained
operating environment that facilitates the execution of Java
programs on a Microsoft operating system.
Model-View-Controller Model (MVC) Consists of a
controller servlet that dispatches requests to appropriate
Action classes provided by the application developer, JSP
custom tag libraries, and associated support in the
controller servlet. For example, this model assists
developers in creating interactive form-based applications,
and utility classes to support XML parsing, automatic
population of JavaBeans properties (based on the Java
reflection APIs), and internationalization of prompts and
messages.
multidimensional database (MDDB) A method of
organizing, storing, and referencing data through three or
more dimensions. An individual value is the intersection
of a point for a set of dimensions.
multithreading Within a single program, concurrent
handling of multiple, separately executable sequences of
program instructions.
named group An object that describes levels and
generations for dimensions. A level is a branch within a
dimension. The levels are numbered incrementally from
the leaf member (level 0) towards the root. For example,
in a Essbase Analytic Services Accounts dimension that
consists of general ledger accounts, all of the detail
accounts are Level 0 members. The accounts one level
higher are Level 1, their parents are Level 2, and so on. It
can happen that a parent has two or more children that are
different levels.
object A program component that is related to an
application or database. Objects can be outlines, rules files,
calculation scripts, report scripts, or data sources. They are
stored within the application or database subdirectory on
the server or client machine.
object factory Enables developers to derive objects from
Web Application Architecture classes and have the
architecture instantiate them transparently. This makes
application customization much easier.
104 Glossary
A B C D E F G H I J K L M N O P Q R S T U V W X Y Z
Object Management Group (OMG) A consortium that
created the Common Warehouse Metadata Initiative,
which defines a standard model for OLAP metadata to be
browsed and interchanged.
ODBC See Open Database Connectivity (ODBC).
OLAP See online analytical processing (OLAP).
online analytical processing (OLAP) A
multidimensional, multi-user, client-server computing
environment for users who need to analyze consolidated
enterprise data. OLAP systems feature functionality such
as drilling down, data pivoting, complex calculations,
trend analyses, and modeling.
Open Database Connectivity (ODBC) Standardized
application programming interface (API) technology that
allows applications to access multiple third-party
databases.
order of precedence A set of rules that determines the
order in which arithmetic operations take place in a
formula. Multiplication (*) and division (/) are performed
first (first tier operations), followed by addition (+) and
subtraction (-) (second tier operations). When there are
multiple operations involving the same tier, the operations
are performed from left to right. Use of parentheses alters
the normal order, with the operations contained within the
innermost parenthesis performed first.
outline The database structure of a multidimensional
database, including all dimensions, members, tags, types,
consolidations, and mathematical relationships. Data is
stored in the database according to the structure defined in
the outline.
page axis Enables you to set up views (pages) of selected
members, to organize the data in a data entry form into
smaller, logical groups. Each page on the page axis can
have members selected from one dimension or from
multiple dimensions. For example, you could set up one
page to enter data for Radio promotions and another page
to enter data for Web promotions.
parent A member that has an aggregated branch of
children below it.
permission A level of access users and groups can have for
managing data or other users and groups. Permissions can
be granted to users and groups explicitly or by means of
filters. Administrators can also set global minimum
permissions as settings for Essbase Analytic Services
applications and databases, so that all users can have at
least access to data specified by the minimum permission
setting for a particular scope. The scope of a permission
refers to the area of data it encompasses. The scope of a
permission can be the system, an application, or a
database.
point of view (POV) A unique set of dimension members
that defines specific intersections of data.
POV See point of view (POV).
query To request information from a data provider. For
example, queries are used to access a relational data source.
query functions A method to filter retrieved information
in a query language. Enables you to filter the set of objects
returned by execution of an OLAP query. For example, the
following member query functions are implemented by all
Analytic Data Model (ADM) drivers: AllMembers,
Children, Descendents, Member, SystemMemberList, and
TopOfHierarchy.
queryInfo An object that contains a SQL query and
partial results of the query.
Quick Builder Enables you to build applications within
Macromedia > Dreamweaver > . Tags from the
Application Builder tag library are represented by icons,
menus, and wizards. For example, a Web designer can
build an application graphically by dragging and dropping
Dreamweaver icons onto a Java server page.
Quick Builder component Reference tags, from the
Application Builder tag library, that are displayed as icons
within Dreamweaver.
RDBMS See relational database management system
(RDBMS).
related content. Information that is associated with OLAP or relational data such as a drill-through, annotation, or guided analysis link.

Glossary 105
A B C D E F G H I J K L M N O P Q R S T U V W X Y Z
relational data access component A component that can
be accessed within an application that enables you to view
the relational data that is associated with specific OLAP
members at the given cell.
relational database management system (RDBMS) A
database management system for accessing data in a
relational database and storing data in the form of related
tables. A RDBMS takes SQL statements entered by a user
or contained in an application program and creates,
updates, or provides access to the relational database.
repository group A parent object to repository users, or a
container for storing ATF repository users with the same
permissions.
repository user An individual who is registered in the ATF
repository.
role Used to define group privileges, and are granted to
users or groups of users in order to determine who can
perform the activities associated with the privileges. A user
may perform the activities only if he has been granted the
required role or if he is a member of a group that has been
granted the required role.
root member The highest member in a dimension
branch. See also leaf member.
row A horizontal display of information in a grid or table.
A row can contain data from a single field, derived data
from a calculation, or textual information. The words row
and record are sometimes used interchangeably. Contrast
with column.
schema In relational databases, a logical model that
represents the data and the relationships between the data.
schema definition Used to create objects and set their
properties. The objects you create correspond to your
metadata. For example, you create a dimension object for
each dimension in your data source.
servlet Small Java programs, or modules of Java code that
run in a server application. For example, an applet that
runs on a server, usually meaning a Java applet that runs
on a Web server.
sibling A child member at the same generation as another
child member and having the same immediate parent. For
example, the members Florida and New York are both
children of the member, East, and siblings of each other.
single sign-on The ability of an externally-authenticated
user to access multiple, linked Hyperion applications after
logging on to the first application. The user can launch
other applications from the first application (and from
other linked Hyperion applications) without logging on
again. The user’s ID and password are already
authenticated.
slicer The slicer edge can contain one or more
dimensions, but only one member can be specified for
each dimension. For example, if the member Actuals from
the Scenario dimension is on the slicer then the data in the
result set is all data that intersects the row, col, and page
members, and also has the scenario dimension set to
Actuals. The data omitted from this slice is any data
associated with the non-selected members of the Scenario
dimension, for example Budget, Variance, Forecast, etc.
special permission A group of predefined permissions
granted to users, groups, folders, views , or queries within
the repository. A special permission is a single bit, whereas
a permission is a combination of one or more special
permissions.
SQL See also Structured Query Language (SQL).
star schema A logical model that represents your
relational data in a form that mirrors that of OLAP data. A
star schema contains a fact table and one or more
dimension tables.
Structured Query Language (SQL) A computer language
used to access data in relational databases.
substitution variable A variable that acts as a global
placeholder for information that changes regularly. You set
the variable and a corresponding string value; the value
can then be changed at any time. Substitution variables
can be used in calculation scripts, report scripts, Essbase
Spreadsheet Services, and Essbase API.
table In relational databases, a form of data storage in
which data is stored in records comprised of fields. Each
record is defined by a unique, or primary, key.
tag A Java class that implements a specialized interface
enabling it to be used in a Java server page for processing.

106 Glossary
A B C D E F G H I J K L M N O P Q R S T U V W X Y Z
tag library A collection of custom tags which can be
imported for use in a JSP page. Individual tags are grouped
into several tag libraries according to their functionality. A
tag library is similar to an XML document that contains
information about individual tags. For example, in
Application Builder, there is a relational tag library that
contains relational tags and an OLAP tag library that
contains OLAP tags.
thin driver A Java based driver that is inherently cross-
platform, because it is written exclusively in Java.
tool tip A tiny pop-up window that presents a short
description of a toolbar or picture button’s action. Tool
tips are dialogs that briefly describe or define a button’s
functionality.
top-level member A dimension member at the top of the
tree in a dimension outline hierarchy, or the first member
of the dimension in sort order if there is no hierarchical
relationship among dimension members. The top-level
member name is generally the same name as the
dimension name if a hierarchical relationship exists.
UDA A user-defined attribute. A UDA is a term associated
with members of an outline to describe a particular
characteristic of the members. Users can specify UDAs
within calculation scripts and reports so that they return
lists of members that have the specified UDA associated
with them. UDAs can be applied to dense as well as sparse
dimensions.
unary operator A group of mathematical indicators (+, -,
*, /, %) that define how roll-ups take place on the database
outline.
Uniform Resource Locator (URL) An address for a
resource located on the World Wide Web, such as a
document, image, downloadable file, service, or electronic
mailbox. URLs use a variety of naming schemes and access
methods, such as HTTP, FTP, and Internet mail. An
example of a URL is http://www.hyperion.com. A URL can
also point to a file located on a local or network drive, such
as file:///D:/essbase/docs/essdocs.htm.
union An SQL command that is a type of join that
combines the results of two SELECT statements. A union
is often used to merge lists of values contained in two
tables.
universal result set An object implementing the
IWAAGrid interface, enabling clients to access OLAP or
relational data in the same way. The advantage is that you
only need to create the JSP once to display both relational
and OLAP data. The Universal Result Set is also used to
generate output to various formats, for example PDF or
HTML. You can create a single JSP that can display either
relational and OLAP data in a grid.
URL See Uniform Resource Locator (URL).
User ID The key word that defines the user to the
authentication server, and the user to the external
authentication method. In some cases the User ID may be
a short “cryptic” id. In other situations the User ID may be
the users complete name.
view In relational databases, a logical table created by
combining columns from one or more tables. A view can
contain metadata and formatting information used to
query an OLAP data source.
visible tags A tag which produces visible HTML elements
on a Web page, as well as processing server-side requests.
WAA annotation Text, a URL, or a file. A WAA
annotation is set up using tags and it can be assigned to an
OLAP data cell or cubeView, and a relational row or
queryInfo.
WAA Core Domain Contains the basic framework for the
architecture, as well as general purpose, reusable
components. The relational and OLAP Domain extend the
core objects.
WAA drill-through Navigates from an OLAP data cell to
corresponding data in a relational data source.
WAA OLAP Domain Contains components designed to
facilitate typical analysis tasks, such as building and saving
queries, displaying members and data, drilldown, and so
on.
WAA Relational Domain Contains components designed
to facilitate SQL drill-through from an OLAP cube to the
relational database that was used to build the cube.
Functionality to edit and run an SQL query is also
provided.
WAA Utility Components Low level building blocks used
to perform processing for events, a repository, the
hashtable, and exceptions.

Glossary 107
A B C D E F G H I J K L M N O P Q R S T U V W X Y Z
WAA Web Components Handle functions specific to Web
applications. For example, Web components handle user
flow between the various JSPs. analysis tasks, such as
building and saving queries, displaying members and data,
drilldown, and so on.
WAR file A Web archive file. A WAR file contains the
complete directory structure and all files that define the
Web application. For example, Web applications are
typically distributed as WAR files.
Web Application Architecture (WAA) A set of Java beans,
Java server pages, servlets, applets, and miscellaneous
supporting elements that can be combined in a variety of
ways to quickly create Web-based analytic applications.
Web Application Architecture (WAA) provides tag
libraries and reusable components that implement from
50% - 80% of the functionality required for a typical
custom analytic application. The architecture is designed
with reuse and rapid development in mind.
web designer A person with HTML skills and user
knowledge of data sources.
web server A computer that delivers, or serves up, Web
pages.
XML query An ADM query formatted as an XML string.
For example, the tags defined in Application Builder are
used to define a member and data XML query.

108 Glossary

Index Symbols 109
A B C D E F G H I J K L M N O P Q R S T U V W X Y Z
Index
Symbols.ear files
deploying in WebSphere, 86
.war file
deploying in Tomcat, 48
AAnalytic Server
Windows installation, 32
Cclasses12.zip file, 26
CLASSPATH, including JDBC driver location in, 26
common components, 32
COMMON directory, 32
configuring
DB2, 26
MS SQL server, 26
Oracle, 26
Tomcat, 43 to 52
WebLogic, 53
WebSphere, 75
Configuring a Dreamweaver Site for Use with Apache Tomcat, 52
connection pool
testing, 66
DDB2, configuring, 26
db2java, zip file, 26
depoloying
Tomcat, 43 to 52
WebSphere, 75
Directory Structure, 19
Dreamweaver, with Tomcat, 40
Eenvironment
HYPERION_HOME for common components, 32
Ffiles
classes12.zip, 26
db2java, zip, 26
WAADataSources.xml, 84
web.xml, 84
Windows default locations, 32
Ggroups
adding in WebLogic, 59
HHYPERION_HOME
files installed in, 32
Iinstallation
Analytic Server software
on Windows, 32
data sources, 27
HAB, 29
planning, 7, 13
process on Windows, 32
requirements, 40 to 42

110 Index J
A B C D E F G H I J K L M N O P Q R S T U V W X Y Z
uninstalling HAB, 21
JJDBC data source
creating in WebSphere, 78
HAB, 63, 78
JDBC driver
including in CLASSPATH, 26
Microsoft driver for MS SQL server, 26
MMicrosoft JDBC driver, 26
modifying for Tomcat, 39
OOLAP
data source installation, 27
Oracle, configuring, 26
Rrelational databases, installing, 25
requirements
application tier, 14
client tier, 14
installation, 40 to 42
roles
adding in Tomcat, 43 to 44
adding in WebLogic, 59
adding in WebSphere, 62, 83 to 84
SSample Application
verify functionality of, 88
Verifying the functionality, 51
security
setup in WebSphere, 76
startWLS.cmd
edit in WebLogic, 54
system resources in UNIX, 17
Tthird-party products
included with the installation, 19
not included with HAB, 19
thrid-party products installed, 32
Tomcat
adding roles in, 43 to 44
adding users in, 43
configuring a Dreamweaver site, 40
configuring a JDBC data sourc, 50
configuring the context, 48
deploying a .war file, 48
deploying and configuring, 43 to 52
modifying HAB, 39
with Dreamweaver, 52
UUndeploying HAB
from WebLogic, 23
from WebSphere, 23
from your Web Application, 22
uninstalling Analytic Services
guidelines, 21
uninstalling HAB, 21
upgrading
existing application, 91
tags, 92
your application, 91 to 92
users
adding in Tomcat, 43
adding in WebLogic, 59
adding in WebSphere, 83
Vvalidating users in WebSphere, 84
WWeb Applications
upgrading, 91 to 93
WebLogic
adding groups in, 59
adding roles in, 59
adding users in, 59
deploying and configuring, 53
deploying the .ear file, 54

Index W 111
A B C D E F G H I J K L M N O P Q R S T U V W X Y Z
WebSphere
adding roles in, 62, 83 to 84
adding users in, 83
creating a JDBC data source in, 78
deploying and configuring, 75
validating users, 84

112 Index W