Embed Size (px)
Citation preview

1
Sesam – HydroD Tutorial
© DNV GL - Software. All rights reserved 21 December 2016
SESAM User Course in Stability and Hydrostatic Analysis
HydroD Workshop:
Perform the analysis in HydroD
• The text in this workshop describes the necessary steps to do stability and hydrostatic
analysis of a barge with a jacket on top.
• The barge has 8 tanks which can be filled independently – in this workshop you are asked
to do various tank fillings to see the effect on both equilibrium position and the computed
GZ-curves.
• The panel model, structure model (used to describe the tanks) and the mass model has been
created in GeniE. The total mass of the structure (mass model) is 9011 tonnes. The file
describing the model is called HydroD_Stab_Ex1_T1.FEM. If you have used the default
installation, this file is located C:\Program Files (x86)\DNVGL\HydroD V4.*-
**\Examples\Barge
• In x-direction the max and min x-values are -45.72m and 45.72m
• In addition to the text input, there is also a journal file Barge_Jacket_Stability_in.js that you
can read into HydroD to rapidly reproduce the workshop. Please make sure that the journal
file and the FEM file has been copied to the project directory set up by HydroD.
• This workshop should be viewed on-line or on colour print out to best see the property
colour coding.
Stability and Hydrostatic analysis
Xmin = -45.72mXmax = 45.72m
The model created in GeniE

2
Sesam – HydroD Tutorial
© DNV GL - Software. All rights reserved 21 December 2016
Important notes:
• The barge has eight tanks as shown above. The
tank filling is done in HydroD by the user (or
from using the feature for tank balancing).
• The wetted surface to describe the panel model
has also been defined in GeniE.
• Any of the structures are fictitious model and
the sea fastening arrangement has been
simplified from a conventional arrangement –
the main purpose of this workshop is not
structure but hydrostatics
• The units are meter and kg.
• All pictures created by GeniE and HydroD are
shown using white background
(View|Options|General|Paper
Background). This may be different from your
background.
Part 0 - General
Tank 1
Tank 2
Tank 3
Tank 4
Tank 5
Tank 6
Tank 7
Tank 8
The internal tanks as defined in
GeniE
Model origin at (0m, 0m, 0m) as
shown above
All tanks have the same volume
Vtank = 832.895 m3

3
Sesam – HydroD Tutorial
© DNV GL - Software. All rights reserved 21 December 2016
The workshop is split as follows (start modelling from Part 1 and onwards)
• Part 0 – General introduction to the workshop and start HydroD
Pages 1-4
• Part 1 – using the stability wizard to make model and do initial analysis
For new users the wizards will guide you through all necessary steps to make a model fit
for stability and hydrostatic computations. For more experienced users, similar modelling
and analysis are done by using pull-down menus, tool-buttons or from the context sensitive
menu in the browser.
Pages 5-35
• Part 2 – Create a new loading condition with changed compartment filling
How to copy a loading condition, change the compartment fillings and find a new
equilibrium position
Pages 36-38
• Part 3 – Create damaged loading condition
This part uses the previously generated loading condition as the starting point of a damaged
loading condition
Pages 39-41
• Part 4 – Execute multiple stability analysis
Generate multiple hydrostatic analysis and execute them. View the results.
Pages 42-50
• Part 5 – Make a clean journal file
Save the input files (journal files) for later use
Pages 51
Part 0 - General

4
Sesam – HydroD Tutorial
© DNV GL - Software. All rights reserved 21 December 2016
Start HydroD and make a new workspace
• You start HydroD from
Desktop
From Start menu
• You make a new workspace (or a project) from File|New Workspace and give it a
name
For this workspace we use units meters and Newton
Part 0 - General

5
Sesam – HydroD Tutorial
© DNV GL - Software. All rights reserved 21 December 2016
Activate the wizard
• You activate the wizard from the tool-button
• You need to specify what type of model you will be working with, this workshop
assumes a pure panel model.
Part 1 – The stability wizard

6
Sesam – HydroD Tutorial
© DNV GL - Software. All rights reserved 21 December 2016
• You may also change the default settings (i.e. filter out steps in the wizards) by
clicking on “Settings”. In this tutorial we will not do an allowable VCG analysis, so
untick this.

7
Sesam – HydroD Tutorial
© DNV GL - Software. All rights reserved 21 December 2016
Step 1 in the wizard
• Create a location
• Specify name (“Doggerbank” in this case), water density, kinematic visosity and water
depth. Remember also to add details for the air
• Step 2 in the wizard
• Create a hydro model
• Specify a name and decide fixed or floating structure. Baseline, AP and FP positions
are only relevant for Wasim analysis, so you don’t need to change these.
Part 1 – The stability wizard

8
Sesam – HydroD Tutorial
© DNV GL - Software. All rights reserved 21 December 2016
Step 3 in the wizard
• Create a panel model
• The panel model specifies the outer wetted surface. The wetted surface is being used to
calculate the floater buoyancy.
The panel model has been made in GeniE
To import, locate the file HydroD_Stab_Ex1_T1.FEM stored under C:\Program
Files (x86)\DNVGL\HydroD V4.*-**\UserExamples\Barge\inp. The path name
assumes you have installed the program HydroD using default values when installing
There are no symmetry planes in this model and the coordinate system of the
imported model coincides with the coordinate system of the hydro model
Part 1 – The stability wizard
9
Sesam – HydroD Tutorial
© DNV GL - Software. All rights reserved 21 December 2016
Step 3 in the wizard
Cont’d
• The panel model is now shown in your display window
Part 1 – The stability wizard

10
Sesam – HydroD Tutorial
© DNV GL - Software. All rights reserved 21 December 2016
Step 4 in the wizard
• Create load cross sections
(Press next)
• Cross-sections must be defined where you want
HydroD to compute still water forces and moments
The wizard will guide you to define several cross
sections one by one
This workshop will instead use the “Multiple load crossections” option. This is
reached by right clicking the LoadCrossections folder and choosing “Multiple load
cross sections”.
Define cross sections as shown below
Part 1 – The stability wizard
11
Sesam – HydroD Tutorial
© DNV GL - Software. All rights reserved 21 December 2016
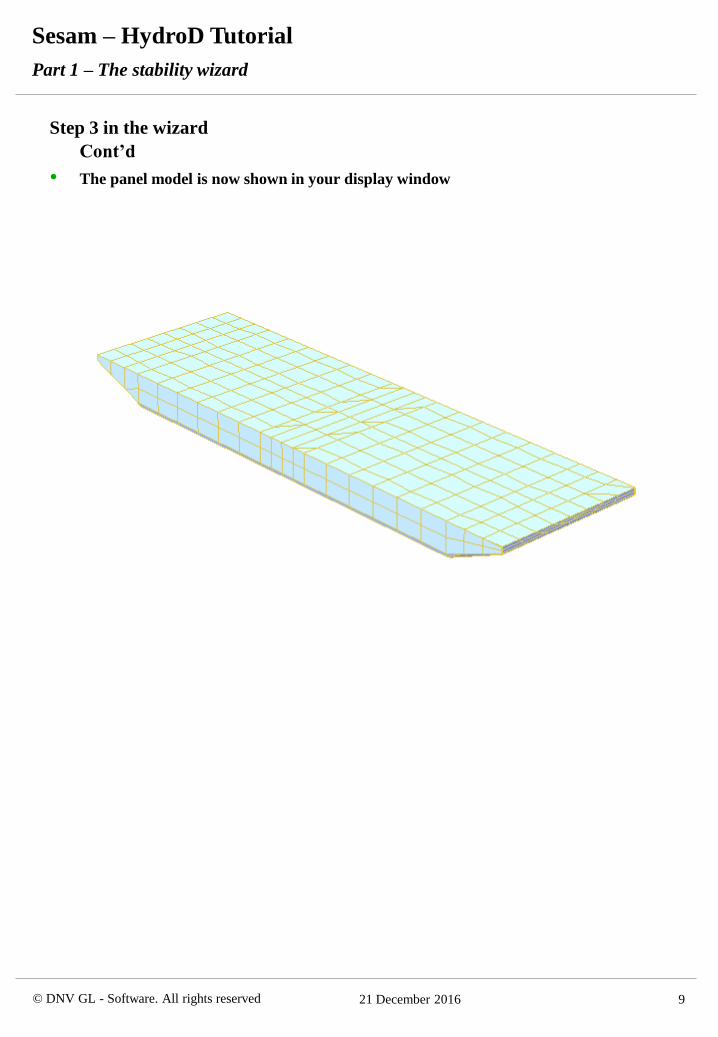
Step 5 in the wizard
• Create the structure
model. The tank
definitions are now
imported
• Similar to the panel model, the structure model has been created in GeniE.
To import, locate the file HydroD_Stab_Ex1_T1.FEM stored under
C:\Program Files (x86)\DNVGL\HydroD V4.*-**\UserExamples\Barge\inp.
• The panel model, the structure
model and the crossections are are now being
shown in the graphical window
Part 1 – The stability wizard

12
Sesam – HydroD Tutorial
© DNV GL - Software. All rights reserved 21 December 2016
Step 5 in the wizard
Cont’d
• Hint: You may switch your focus view by using the “Modelling Draw Style” feature
Below is shown how to look at the structure model only and also how to change
colours of the beams to dark blue
Remove the panel model
and LoadCrossSections
from view
Part 1 – The stability wizard

13
Sesam – HydroD Tutorial
© DNV GL - Software. All rights reserved 21 December 2016
Step 5 in the wizard
Cont’d
• Hint: You may switch your focus view by using the “Modelling Draw Style” feature
The beams are now shown with dark blue colour.
Plates are shown with grey colour
Part 1 – The stability wizard

14
Sesam – HydroD Tutorial
© DNV GL - Software. All rights reserved 21 December 2016
Step 6 in the wizard
• Create permeability
factors
• Permeability factors are used to specify whether a tank (or compartment) is filled with
solid content.
A permeability factor of e.g. 0.9 indicates that the compartment can be filled with
90% of the total compartment volume.
In this model, a permeability factor of 1.0 is used. This means that all tanks are
“clean” inside and can be filled to 100% of tank volumes.
Click OK to proceed to next step.
Part 1 – The stability wizard
15
Sesam – HydroD Tutorial
© DNV GL - Software. All rights reserved 21 December 2016
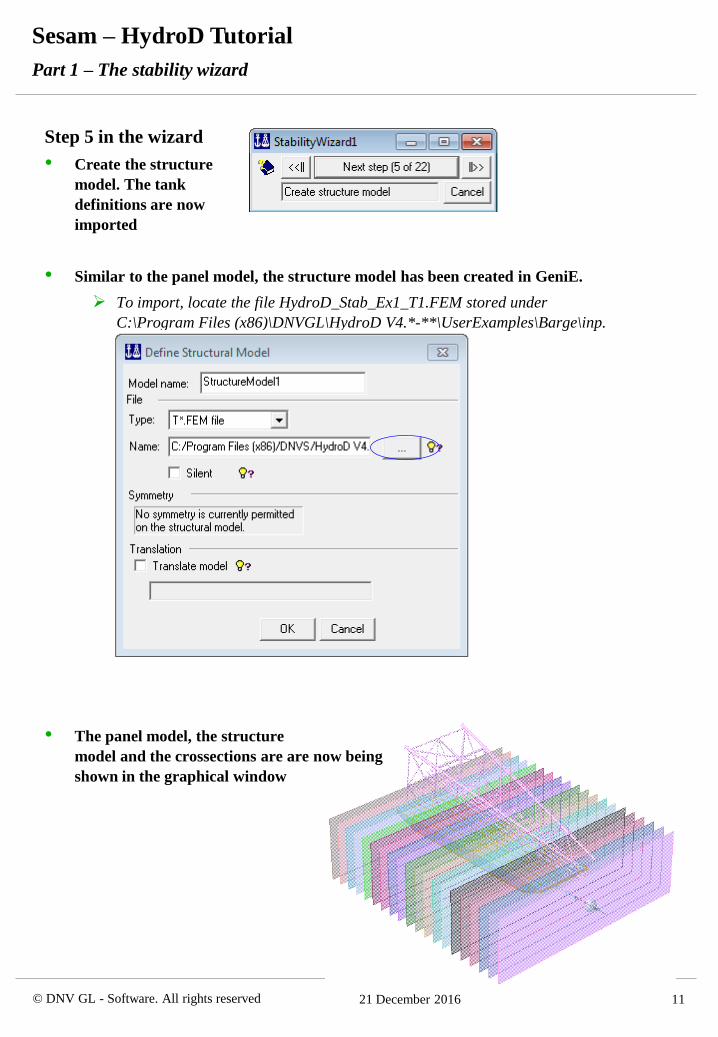
Step 7 in the wizard
• Create compartments
• The compartments are automatically found from the structure model. The
compartments will receive properties for permeability and deck tanks.
In this case, there are no permeability or deck tank factors to add, hence click OK to
proceed..
Part 1 – The stability wizard

16
Sesam – HydroD Tutorial
© DNV GL - Software. All rights reserved 21 December 2016
Step 8 in the wizard
• Create loading
conditions
• A loading condition is set up by defining the draught, trim and heel
Manually, often used to create a
temporary equilibrium position prior to a
stability analysis.
From a known mass
For this workshop, please use 5 m as draught
Part 1 – The stability wizard

17
Sesam – HydroD Tutorial
© DNV GL - Software. All rights reserved 21 December 2016
Step 9 in the wizard
• Create fluid
properties
• There may be several fluid types that fill the compartments
Examples may be water, oil, sea water
In this workshop one fluid type is used – define Sea_water with density 1025 kg/m3
Click OK to proceed to next step
Step 10 in the wizard
• Create flooded
properties
• The flooding compartment property is used to specify whether a compartment is to be
considered flooded or not
Create one property for flooding as shown
Click OK to proceed to next step
Part 1 – The stability wizard

18
Sesam – HydroD Tutorial
© DNV GL - Software. All rights reserved 21 December 2016
Step 11 in the wizard
• Specify filling
fractions
• The filling fractions are used to specify the degree of filling for each compartment
Remember, the compartment filling is built up from fluid property, permeability and
filling
For this workshop, specify 10 filling fractions 0.1, 0.2, 0.3, 0.4, 0.5, 0.6, 0.7, 0.8, 0.9
and 1.0
You may also edit these values from the browser....
Part 1 – The stability wizard

19
Sesam – HydroD Tutorial
© DNV GL - Software. All rights reserved 21 December 2016
Step 12 in the wizard
• Create the compartment
content
• The content of the compartments is now defined, both for intact and damaged conditions
Define as shown below
Click OK to proceed
Part 1 – The stability wizard

20
Sesam – HydroD Tutorial
© DNV GL - Software. All rights reserved 21 December 2016
Step 13 in the wizard
Cont’d
• Display the tank filling
You may edit the visual settings of the compartment content by using the “Modeling
Draw Style” as shown.
The panel model transparency has been set to 90% below (from the “Modeling Draw
Style” dialog on the panel model)
Part 1 – The stability wizard
21
Sesam – HydroD Tutorial
© DNV GL - Software. All rights reserved 21 December 2016
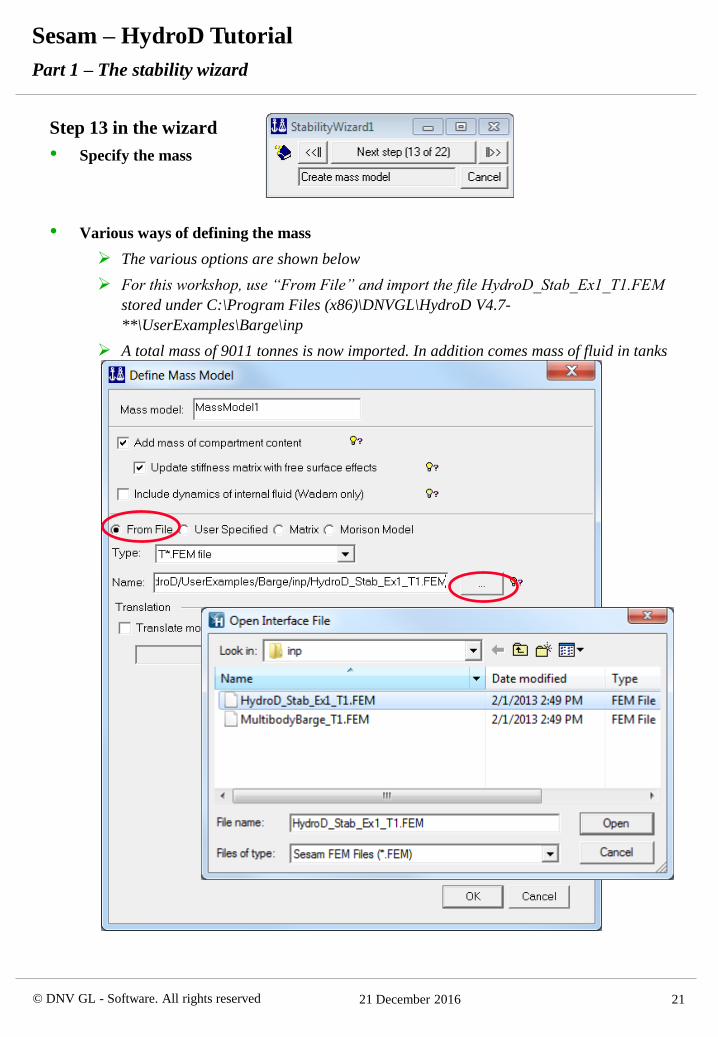
Step 13 in the wizard
• Specify the mass
• Various ways of defining the mass
The various options are shown below
For this workshop, use “From File” and import the file HydroD_Stab_Ex1_T1.FEM
stored under C:\Program Files (x86)\DNVGL\HydroD V4.7-
**\UserExamples\Barge\inp
A total mass of 9011 tonnes is now imported. In addition comes mass of fluid in tanks
Part 1 – The stability wizard

22
Sesam – HydroD Tutorial
© DNV GL - Software. All rights reserved 21 December 2016
Step 14 in the wizard
• Automatic compartment
balancing
• HydroD may do a compartment balancing to ensure that the draft, trim and heel
specified are met
We select compartments 2, 3, 8 and 9 and press the “Compute filling fractions”
button.
Part 1 – The stability wizard
23
Sesam – HydroD Tutorial
© DNV GL - Software. All rights reserved 21 December 2016
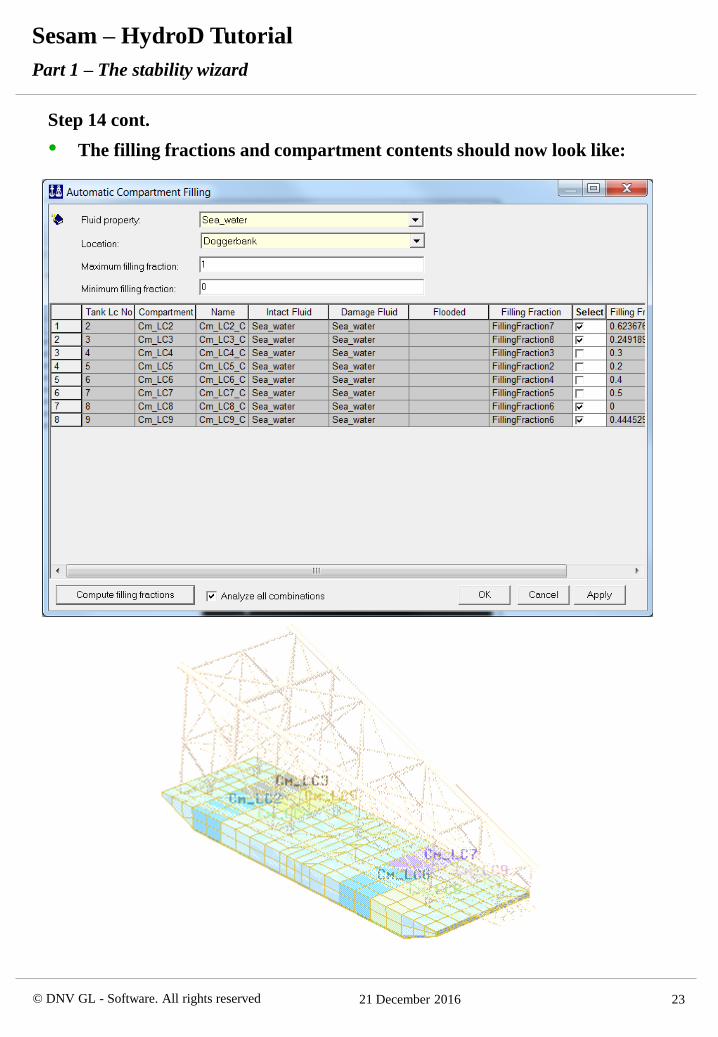
Step 14 cont.
• The filling fractions and compartment contents should now look like:
Part 1 – The stability wizard

24
Sesam – HydroD Tutorial
© DNV GL - Software. All rights reserved 21 December 2016
Step 15 in the wizard
• Define flooding
openings
• You may specify flooding openings to track whether they are above or below the water
surface during a hydrostatic computation and connect them to different
compartments
In this workshop 2 openings are defined, Point_1 and Point_2 at the barge corners
as indicated
The flooding openings are defined by graphic selection, but you may also enter the
explicit coordinates
No compartments are connected with openings in this workshop
Part 1 – The stability wizard
25
Sesam – HydroD Tutorial
© DNV GL - Software. All rights reserved 21 December 2016
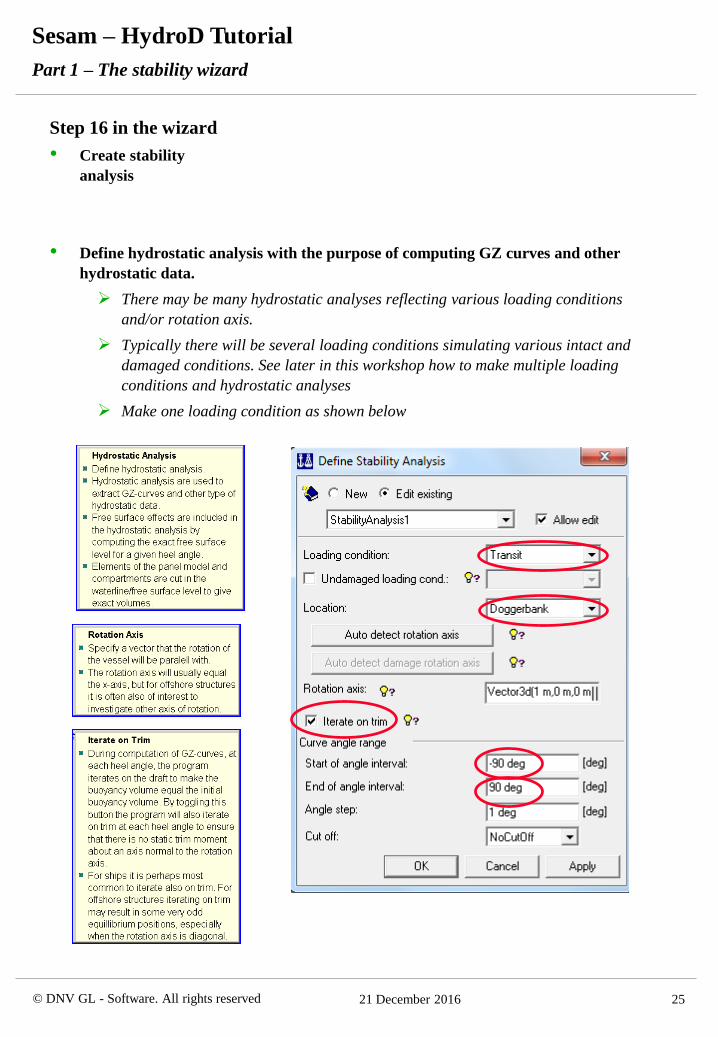
Step 16 in the wizard
• Create stability
analysis
• Define hydrostatic analysis with the purpose of computing GZ curves and other
hydrostatic data.
There may be many hydrostatic analyses reflecting various loading conditions
and/or rotation axis.
Typically there will be several loading conditions simulating various intact and
damaged conditions. See later in this workshop how to make multiple loading
conditions and hydrostatic analyses
Make one loading condition as shown below
Part 1 – The stability wizard

26
Sesam – HydroD Tutorial
© DNV GL - Software. All rights reserved 21 December 2016
Step 17 in the wizard
• Create wind profile
• Wind influences stability as heeling moments and it is thus necessary to include it in
the stability calculations.
The wind contribution is a combination of wind profile, drag coefficients, block
coefficients and active structure area.
• Wind profiles may be user defined or standard IMO MODU Wind Profile
This tutorial assumes usage of standard wind profile with wind velocity 75 m/s
The wind profiles may be edited from the browser as indicated below
Part 1 – The stability wizard
27
Sesam – HydroD Tutorial
© DNV GL - Software. All rights reserved 21 December 2016
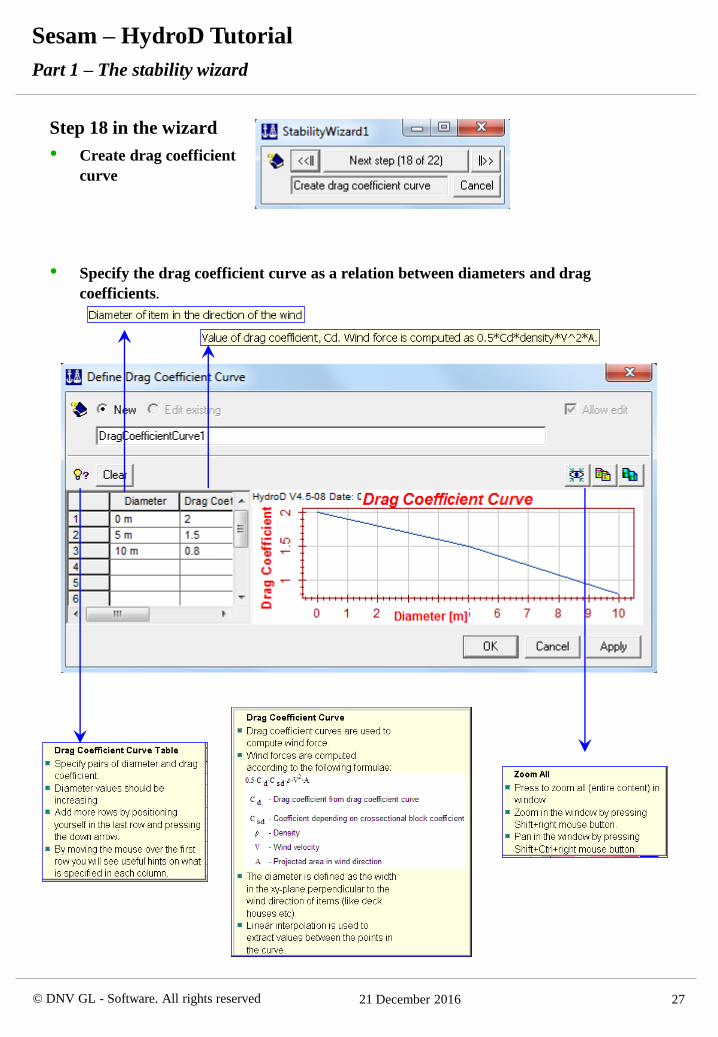
Step 18 in the wizard
• Create drag coefficient
curve
• Specify the drag coefficient curve as a relation between diameters and drag
coefficients.
Part 1 – The stability wizard

28
Sesam – HydroD Tutorial
© DNV GL - Software. All rights reserved 21 December 2016
Step 19 in the wizard
• Create drag block
coefficient curve
• Specify the drag block coefficient curve as a relation between cross sectional block
coefficient and drag coefficients.
Part 1 – The stability wizard
Drag as function of cross-sectional area divided by circumscribed area
(i.e. is it a round shape or is it something more square

29
Sesam – HydroD Tutorial
© DNV GL - Software. All rights reserved 21 December 2016
Step 20 in the wizard
• Create heeling moment
• The heeling moment is now defined as a combination of:
This heeling moment is perpendicular to the heeling axis
• You may also specify the wind heeling moments by a user definition
This tutorial assumes empiric flow as defined above
Part 1 – The stability wizard
30
Sesam – HydroD Tutorial
© DNV GL - Software. All rights reserved 21 December 2016
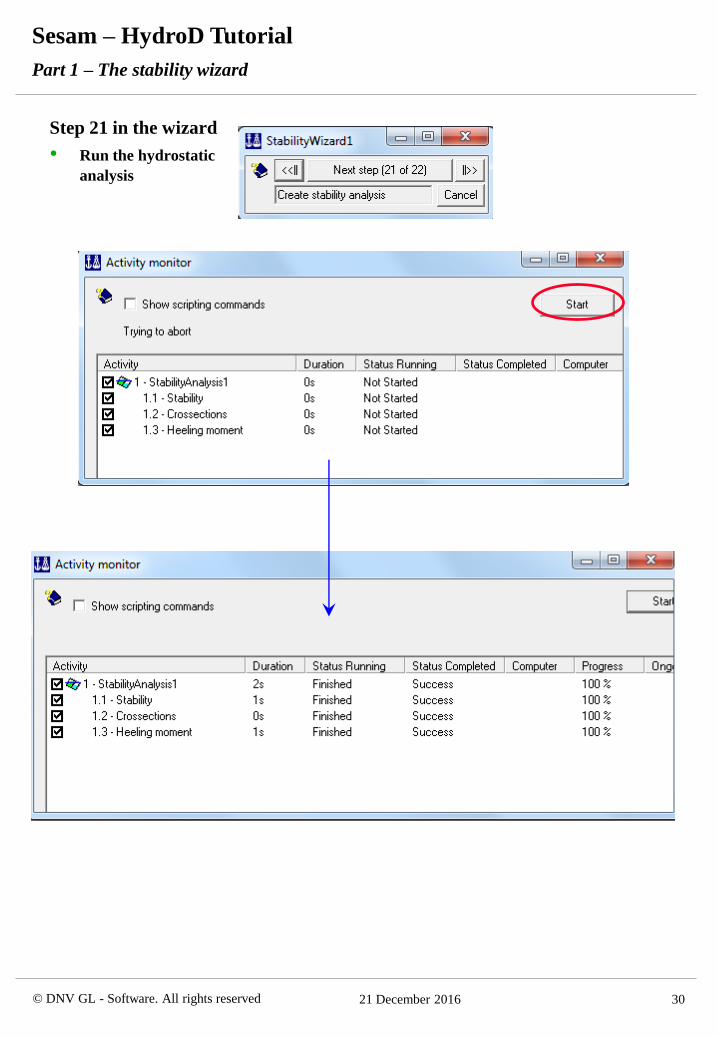
Step 21 in the wizard
• Run the hydrostatic
analysis
Part 1 – The stability wizard

31
Sesam – HydroD Tutorial
© DNV GL - Software. All rights reserved 21 December 2016
Step 22 in the wizard
• Look at the results
• Examples on results to look at – the GZ curve
You may find the exact GZ values for each angle by saving a report (File|Save
Report) or from information (right click an analysis and choose Information)
Note that the z-level of the lowest flooding opening is displayed together with the
GZ-curve
Part 1 – The stability wizard

32
Sesam – HydroD Tutorial
© DNV GL - Software. All rights reserved 21 December 2016
Step 22 in the wizard
Examples on results to look at – Moment of force
You may compute the righting moment integral by changing start and end angles
Note that for the 75m/s wind the overturning wind moment exceeds the righting
moment (meaning that it will capsize)!
Part 1 – The stability wizard

33
Sesam – HydroD Tutorial
© DNV GL - Software. All rights reserved 21 December 2016
Step 22 in the wizard
• Examples on results to look at – Flooding openings
Part 1 – The stability wizard

34
Sesam – HydroD Tutorial
© DNV GL - Software. All rights reserved 21 December 2016
Step 22 in the wizard
• Examples on results to look at – Cross section data shear force
Part 1 – The stability wizard

35
Sesam – HydroD Tutorial
© DNV GL - Software. All rights reserved 21 December 2016
Step 22 in the wizard
• Examples on results to look at – Cross section data bending moment
Part 1 – The stability wizard

36
Sesam – HydroD Tutorial
© DNV GL - Software. All rights reserved 21 December 2016
Step 22 in the wizard
• Examples on results to look at – Model Information
You find typical model data here
More information will be produced by “Save report”
Part 1 – The stability wizard
37
Sesam – HydroD Tutorial
© DNV GL - Software. All rights reserved 21 December 2016
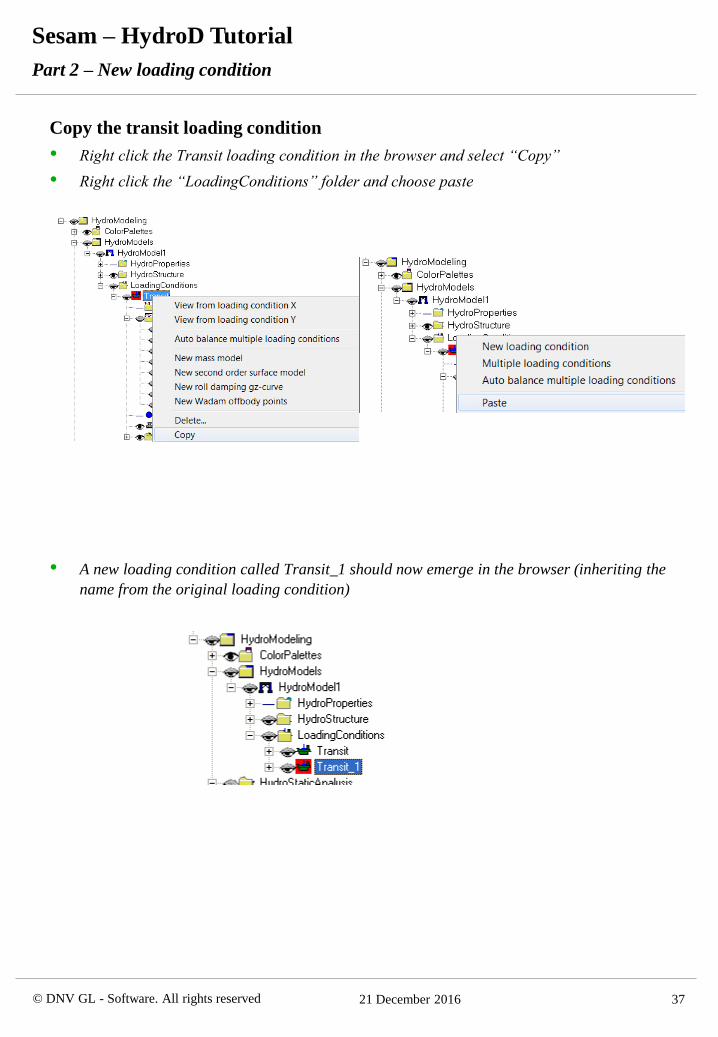
Copy the transit loading condition
• Right click the Transit loading condition in the browser and select “Copy”
• Right click the “LoadingConditions” folder and choose paste
• A new loading condition called Transit_1 should now emerge in the browser (inheriting the
name from the original loading condition)
Part 2 – New loading condition
38
Sesam – HydroD Tutorial
© DNV GL - Software. All rights reserved 21 December 2016
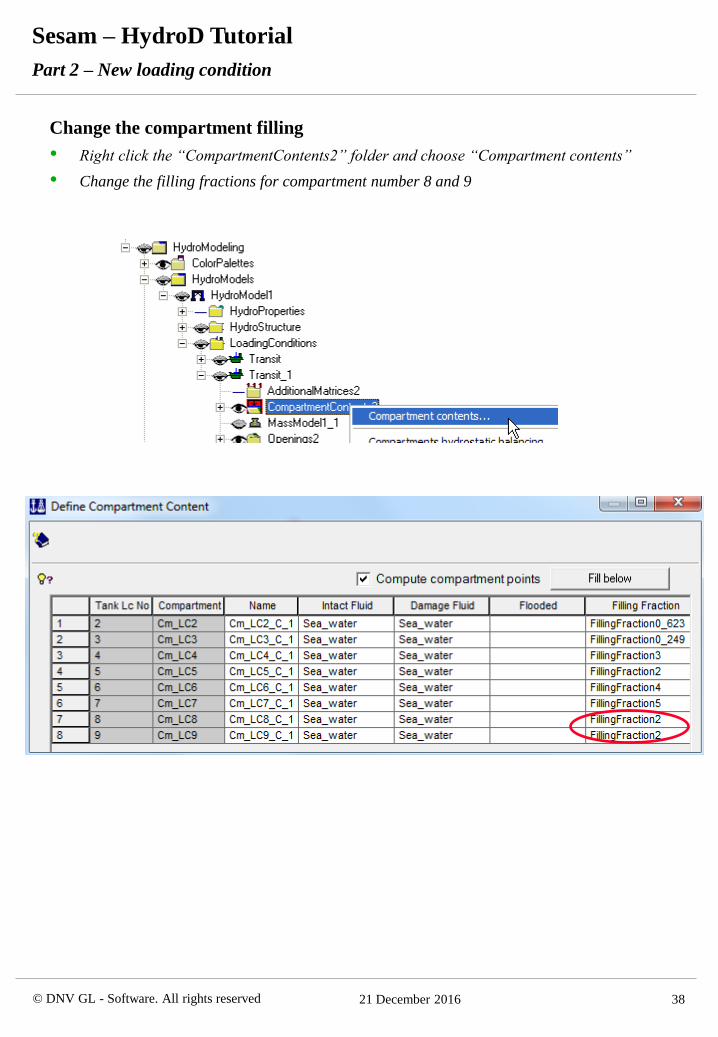
Change the compartment filling
• Right click the “CompartmentContents2” folder and choose “Compartment contents”
• Change the filling fractions for compartment number 8 and 9
Part 2 – New loading condition
39
Sesam – HydroD Tutorial
© DNV GL - Software. All rights reserved 21 December 2016
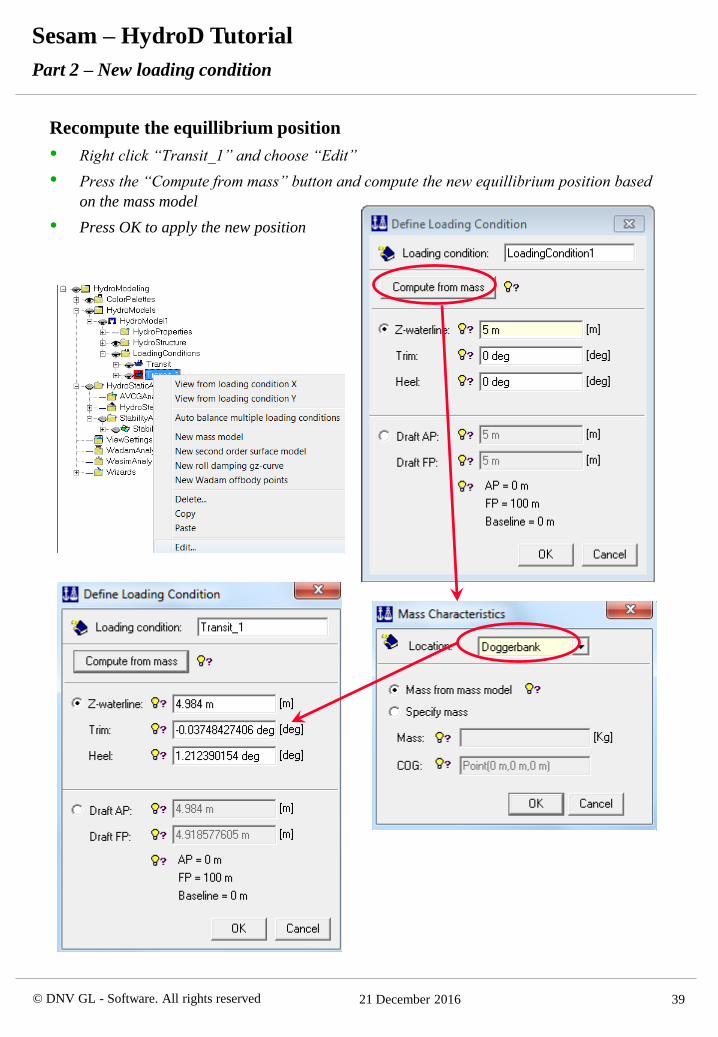
Recompute the equillibrium position
• Right click “Transit_1” and choose “Edit”
• Press the “Compute from mass” button and compute the new equillibrium position based
on the mass model
• Press OK to apply the new position
Part 2 – New loading condition

40
Sesam – HydroD Tutorial
© DNV GL - Software. All rights reserved 21 December 2016
Copy the Transit loading condition and damage compartments
• Again we start by copying the transit loading condition to create Transit_2 (right click
Transit and choose “Copy”, right click LoadingConditions1 and choose “Paste”)
• Rename the loading condition to TransitDamage
• Right click the “CompartmentContents3” folder and choose “Compartment contents”
• Flood compartments 1 and 3 by selecting the flooded property and pressing OK
Part 3 – Damaged loading condition
41
Sesam – HydroD Tutorial
© DNV GL - Software. All rights reserved 21 December 2016
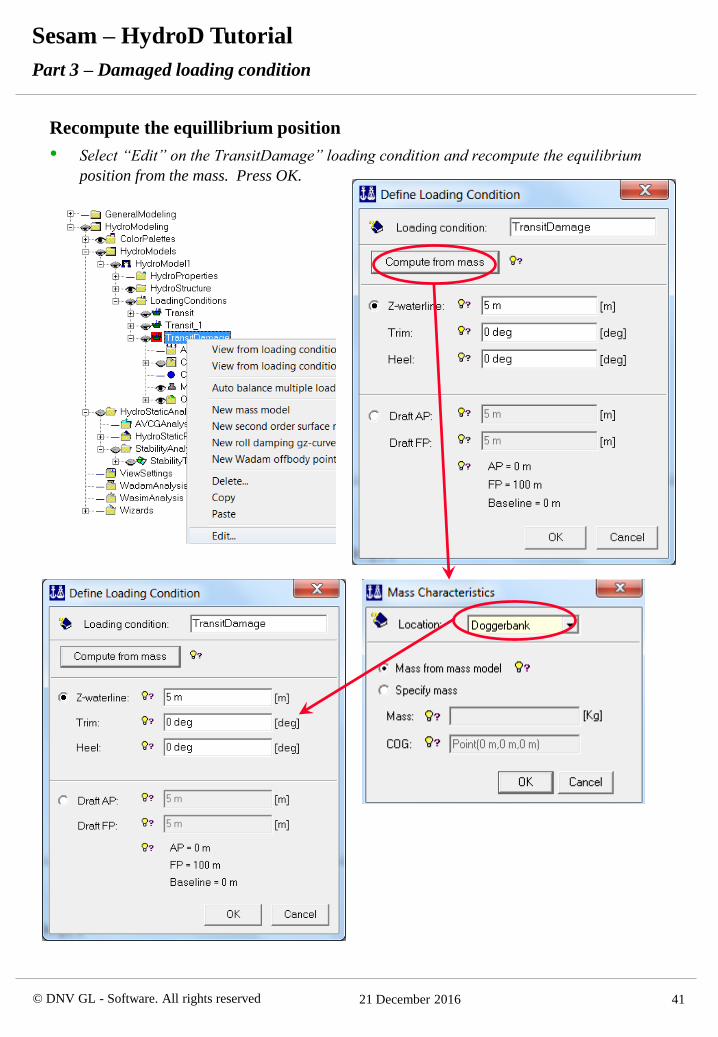
Recompute the equillibrium position
• Select “Edit” on the TransitDamage” loading condition and recompute the equilibrium
position from the mass. Press OK.
Part 3 – Damaged loading condition

42
Sesam – HydroD Tutorial
© DNV GL - Software. All rights reserved 21 December 2016
View the new equillibrium position.
Part 3 – Damaged loading condition

43
Sesam – HydroD Tutorial
© DNV GL - Software. All rights reserved 21 December 2016
Create stability analysis for the Transit_1 loading condition
• Right click “StabilityTransit” and choose “Copy”
• Right click the “StablityAnalysis” folder and choose “Paste”
• Select “Edit” on the new “StabilityTransit_1” and change the loading condition. Press
OK.
Part 4 – Multiple analysis

44
Sesam – HydroD Tutorial
© DNV GL - Software. All rights reserved 21 December 2016
Create stability analysis for the TransitDamage condition
• Right click the “StabilityAnalysis” folder and choose “New Stability Analysis”
• Select loading conditions and location as shown below. Note that also the undamaged
condition is specified.
• Press the “Auto detect damage rotation axis” to detect the rotation axis
• Make the remaining settings as below and press OK
Part 4 – Multiple analysis

45
Sesam – HydroD Tutorial
© DNV GL - Software. All rights reserved 21 December 2016
Execute multiple analysis
• Right click the “StabilityAnalysis” folder and choose “Execute Stability Analysis”
• Select the analysis you want to execute by clicking on the icons in the list
• Press “Start” to execute
Part 4 – Multiple analysis
46
Sesam – HydroD Tutorial
© DNV GL - Software. All rights reserved 21 December 2016
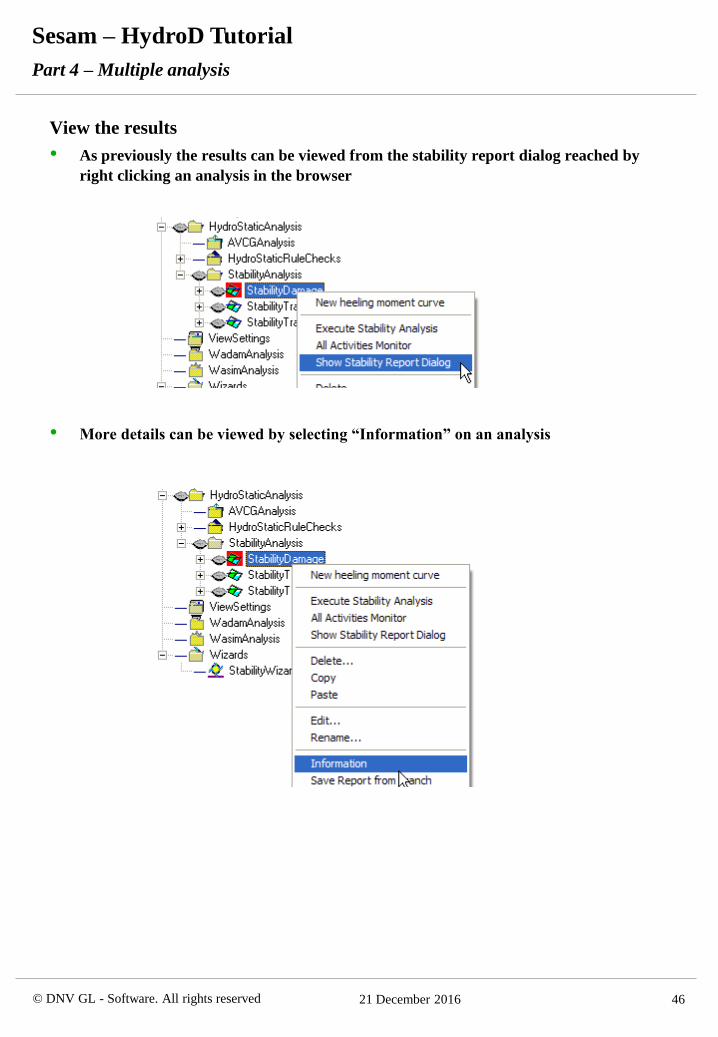
View the results
• As previously the results can be viewed from the stability report dialog reached by
right clicking an analysis in the browser
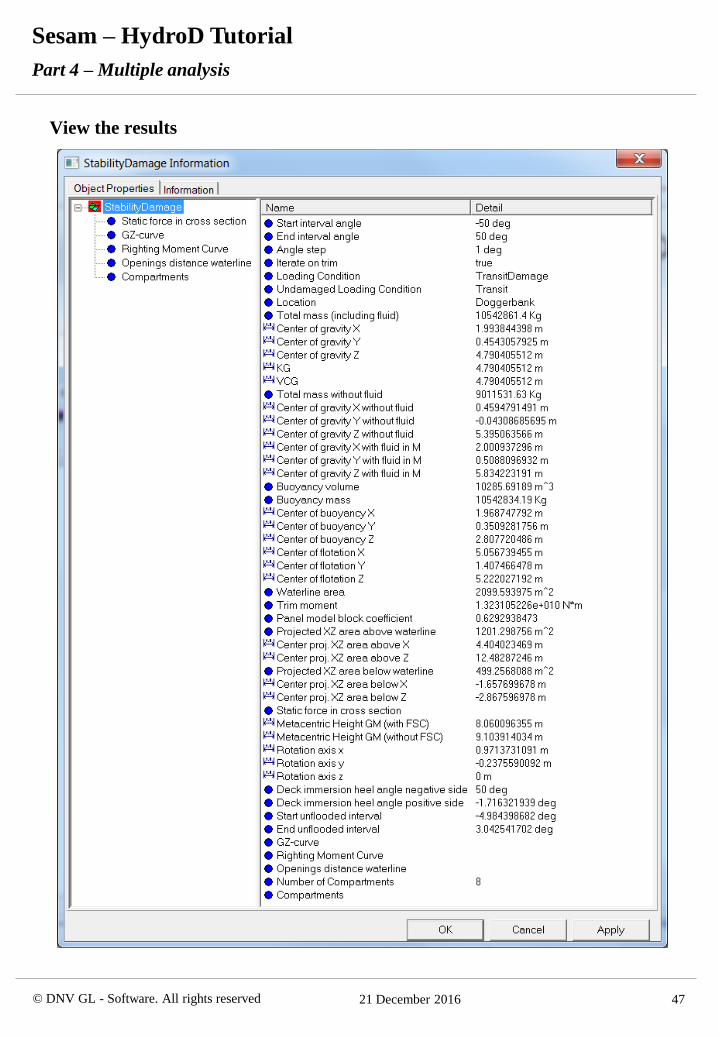
• More details can be viewed by selecting “Information” on an analysis
Part 4 – Multiple analysis
47
Sesam – HydroD Tutorial
© DNV GL - Software. All rights reserved 21 December 2016
View the results
Part 4 – Multiple analysis
48
Sesam – HydroD Tutorial
© DNV GL - Software. All rights reserved 21 December 2016
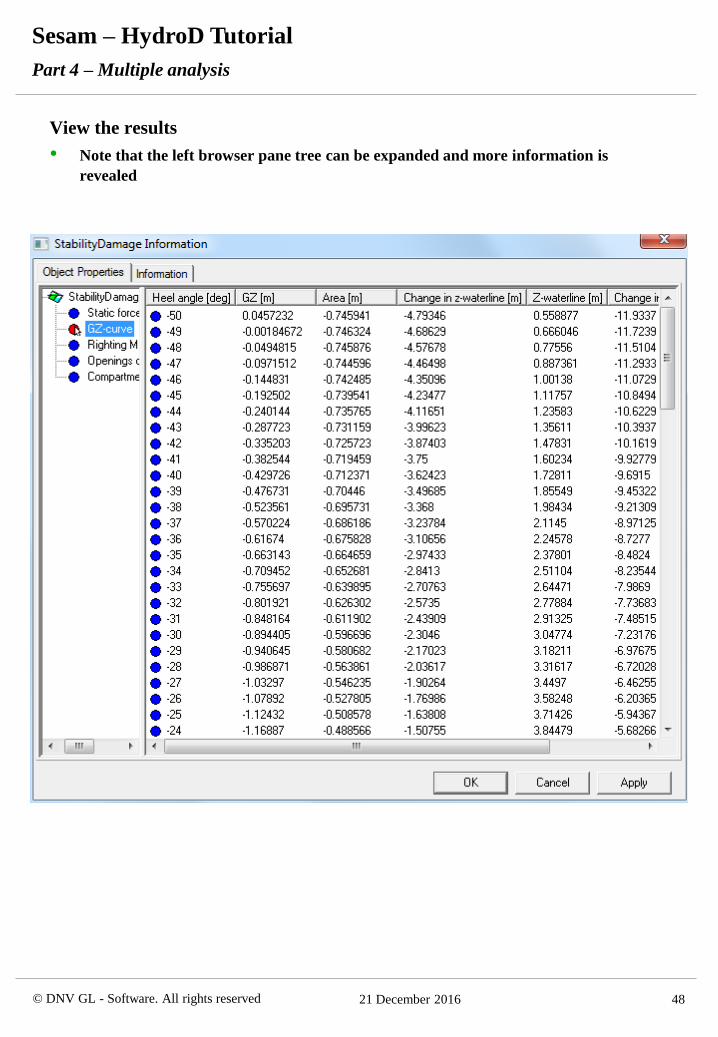
View the results
• Note that the left browser pane tree can be expanded and more information is
revealed
Part 4 – Multiple analysis
49
Sesam – HydroD Tutorial
© DNV GL - Software. All rights reserved 21 December 2016
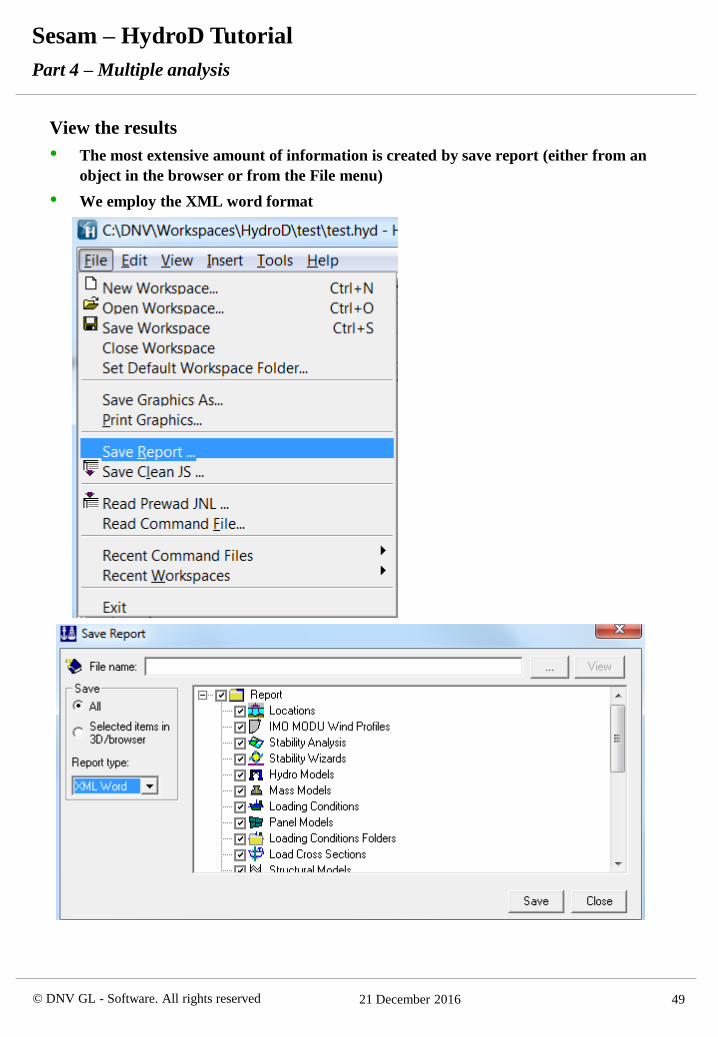
View the results
• The most extensive amount of information is created by save report (either from an
object in the browser or from the File menu)
• We employ the XML word format
Part 4 – Multiple analysis
50
Sesam – HydroD Tutorial
© DNV GL - Software. All rights reserved 21 December 2016
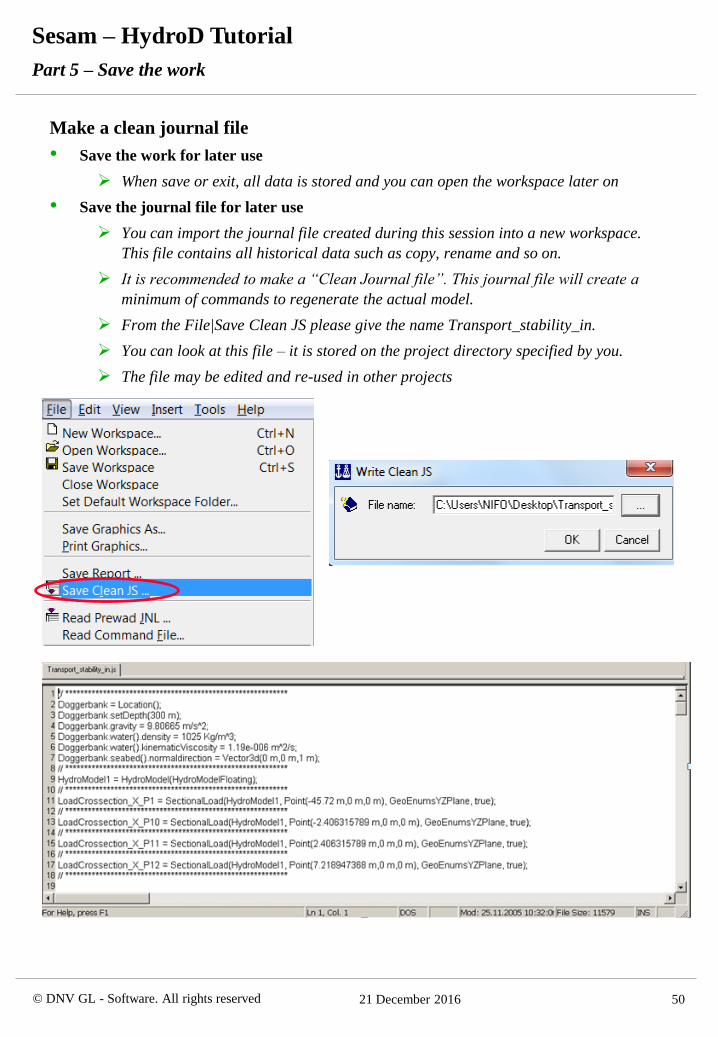
Make a clean journal file
• Save the work for later use
When save or exit, all data is stored and you can open the workspace later on
• Save the journal file for later use
You can import the journal file created during this session into a new workspace.
This file contains all historical data such as copy, rename and so on.
It is recommended to make a “Clean Journal file”. This journal file will create a
minimum of commands to regenerate the actual model.
From the File|Save Clean JS please give the name Transport_stability_in.
You can look at this file – it is stored on the project directory specified by you.
The file may be edited and re-used in other projects
Part 5 – Save the work


![Hydro-Elastic Contributions to Fatigue Damage on a … SESAM software HydroD and Wadam [6] and later applied as local forces during simulation. This procedure is similar to what is](https://img.pdfslide.us/doc/110x75/5b4d16667f8b9a641a8b5064/hydro-elastic-contributions-to-fatigue-damage-on-a-sesam-software-hydrod-and-wadam.jpg)