Embed Size (px)
Citation preview
John Fetvedt www.bijoux-de-terre.com June 17, 2016 2
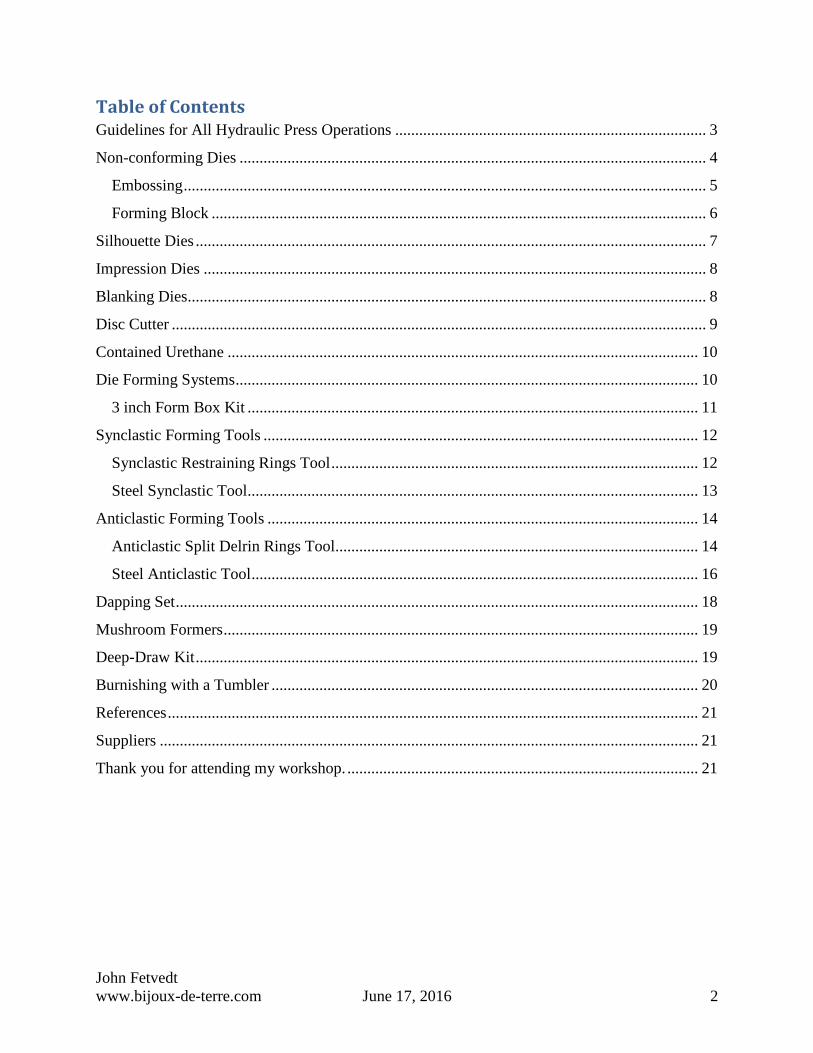
Table of Contents Guidelines for All Hydraulic Press Operations .............................................................................. 3
Non-conforming Dies ..................................................................................................................... 4
Embossing ................................................................................................................................... 5
Forming Block ............................................................................................................................ 6
Silhouette Dies ................................................................................................................................ 7
Impression Dies .............................................................................................................................. 8
Blanking Dies.................................................................................................................................. 8
Disc Cutter ...................................................................................................................................... 9
Contained Urethane ...................................................................................................................... 10
Die Forming Systems .................................................................................................................... 10
3 inch Form Box Kit ................................................................................................................. 11
Synclastic Forming Tools ............................................................................................................. 12
Synclastic Restraining Rings Tool ............................................................................................ 12
Steel Synclastic Tool................................................................................................................. 13
Anticlastic Forming Tools ............................................................................................................ 14
Anticlastic Split Delrin Rings Tool........................................................................................... 14
Steel Anticlastic Tool ................................................................................................................ 16
Dapping Set ................................................................................................................................... 18
Mushroom Formers ....................................................................................................................... 19
Deep-Draw Kit .............................................................................................................................. 19
Burnishing with a Tumbler ........................................................................................................... 20
References ..................................................................................................................................... 21
Suppliers ....................................................................................................................................... 21
Thank you for attending my workshop. ........................................................................................ 21
John Fetvedt www.bijoux-de-terre.com June 17, 2016 3
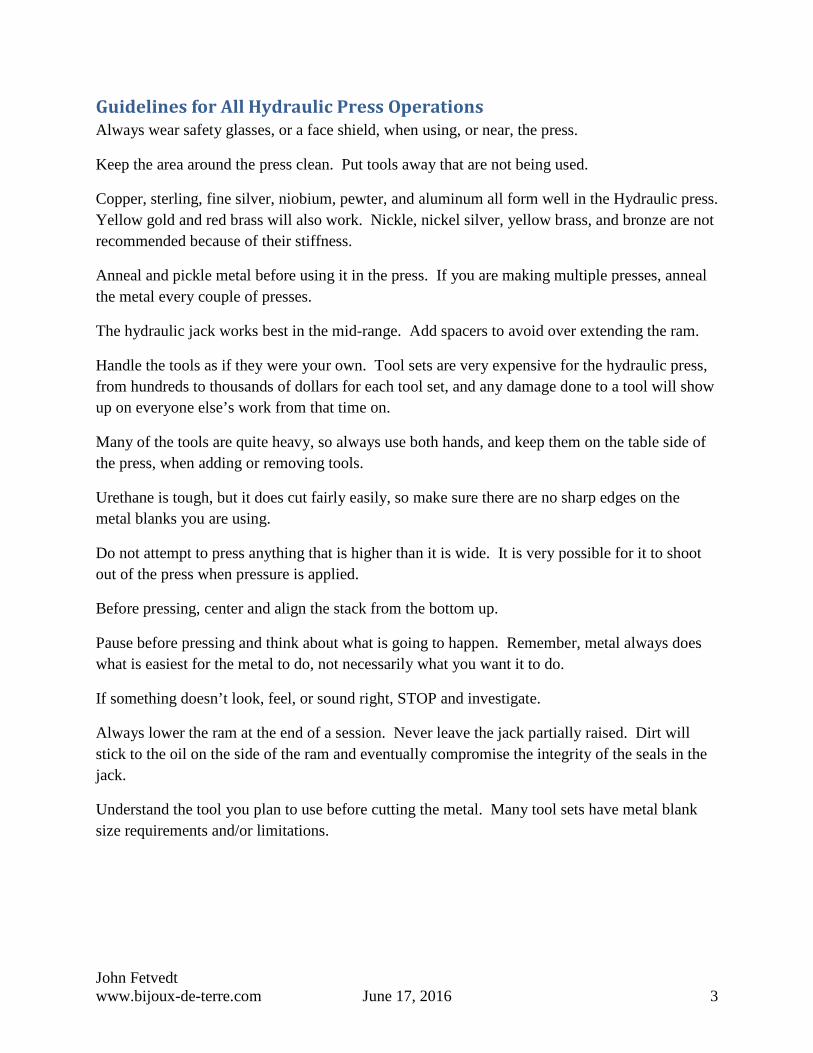
Guidelines for All Hydraulic Press Operations Always wear safety glasses, or a face shield, when using, or near, the press.
Keep the area around the press clean. Put tools away that are not being used.
Copper, sterling, fine silver, niobium, pewter, and aluminum all form well in the Hydraulic press. Yellow gold and red brass will also work. Nickle, nickel silver, yellow brass, and bronze are not recommended because of their stiffness.
Anneal and pickle metal before using it in the press. If you are making multiple presses, anneal the metal every couple of presses.
The hydraulic jack works best in the mid-range. Add spacers to avoid over extending the ram.
Handle the tools as if they were your own. Tool sets are very expensive for the hydraulic press, from hundreds to thousands of dollars for each tool set, and any damage done to a tool will show up on everyone else’s work from that time on.
Many of the tools are quite heavy, so always use both hands, and keep them on the table side of the press, when adding or removing tools.
Urethane is tough, but it does cut fairly easily, so make sure there are no sharp edges on the metal blanks you are using.
Do not attempt to press anything that is higher than it is wide. It is very possible for it to shoot out of the press when pressure is applied.
Before pressing, center and align the stack from the bottom up.
Pause before pressing and think about what is going to happen. Remember, metal always does what is easiest for the metal to do, not necessarily what you want it to do.
If something doesn’t look, feel, or sound right, STOP and investigate.
Always lower the ram at the end of a session. Never leave the jack partially raised. Dirt will stick to the oil on the side of the ram and eventually compromise the integrity of the seals in the jack.
Understand the tool you plan to use before cutting the metal. Many tool sets have metal blank size requirements and/or limitations.
John Fetvedt www.bijoux-de-terre.com June 17, 2016 4
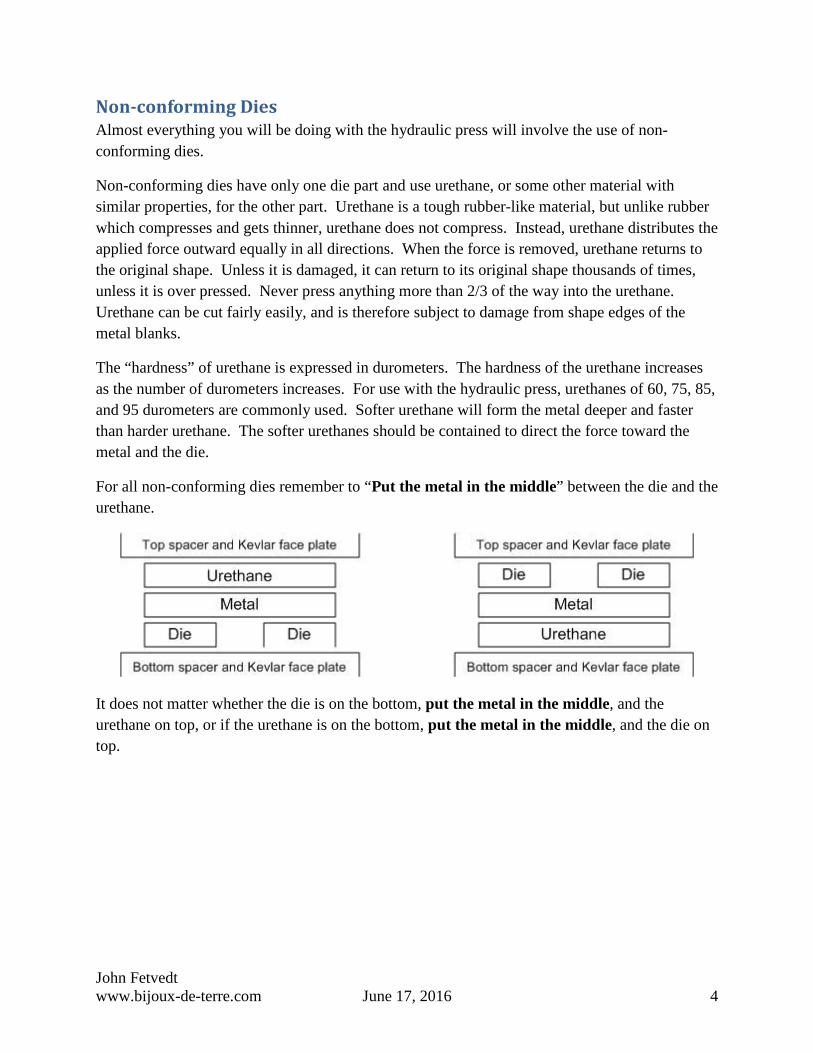
Non-conforming Dies Almost everything you will be doing with the hydraulic press will involve the use of non-conforming dies.
Non-conforming dies have only one die part and use urethane, or some other material with similar properties, for the other part. Urethane is a tough rubber-like material, but unlike rubber which compresses and gets thinner, urethane does not compress. Instead, urethane distributes the applied force outward equally in all directions. When the force is removed, urethane returns to the original shape. Unless it is damaged, it can return to its original shape thousands of times, unless it is over pressed. Never press anything more than 2/3 of the way into the urethane. Urethane can be cut fairly easily, and is therefore subject to damage from shape edges of the metal blanks.
The “hardness” of urethane is expressed in durometers. The hardness of the urethane increases as the number of durometers increases. For use with the hydraulic press, urethanes of 60, 75, 85, and 95 durometers are commonly used. Softer urethane will form the metal deeper and faster than harder urethane. The softer urethanes should be contained to direct the force toward the metal and the die.
For all non-conforming dies remember to “Put the metal in the middle” between the die and the urethane.
It does not matter whether the die is on the bottom, put the metal in the middle, and the urethane on top, or if the urethane is on the bottom, put the metal in the middle, and the die on top.
John Fetvedt www.bijoux-de-terre.com June 17, 2016 5
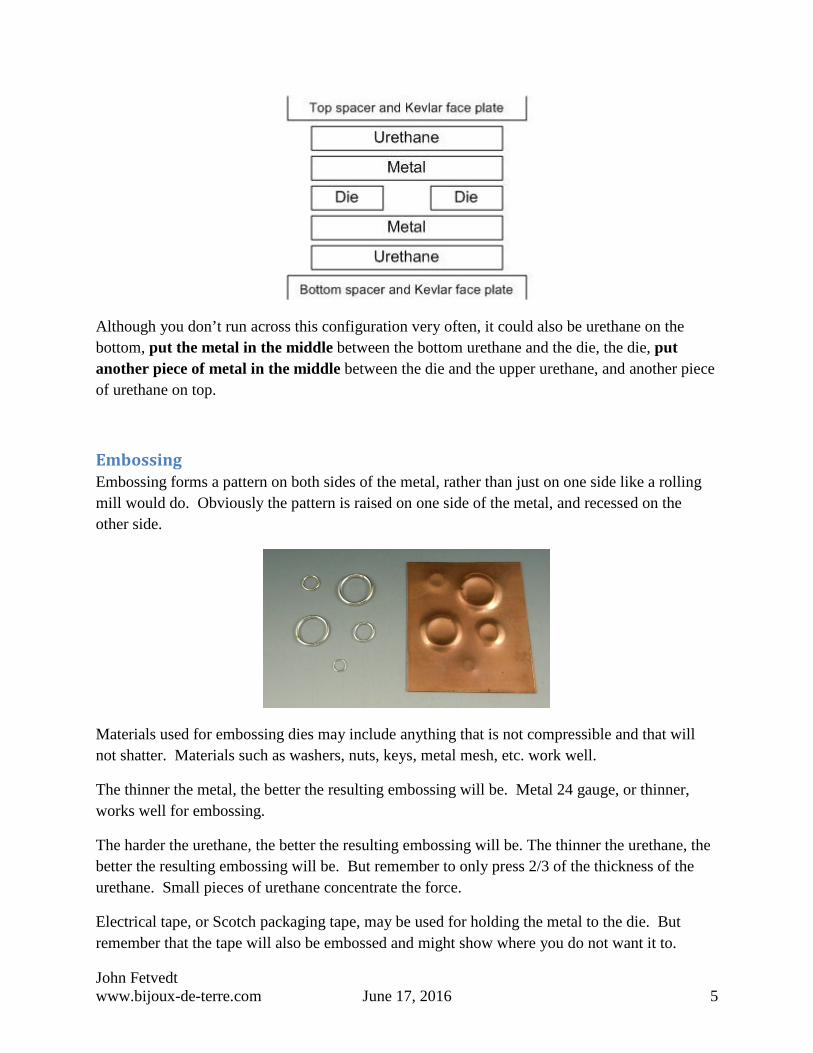
Although you don’t run across this configuration very often, it could also be urethane on the bottom, put the metal in the middle between the bottom urethane and the die, the die, put another piece of metal in the middle between the die and the upper urethane, and another piece of urethane on top.
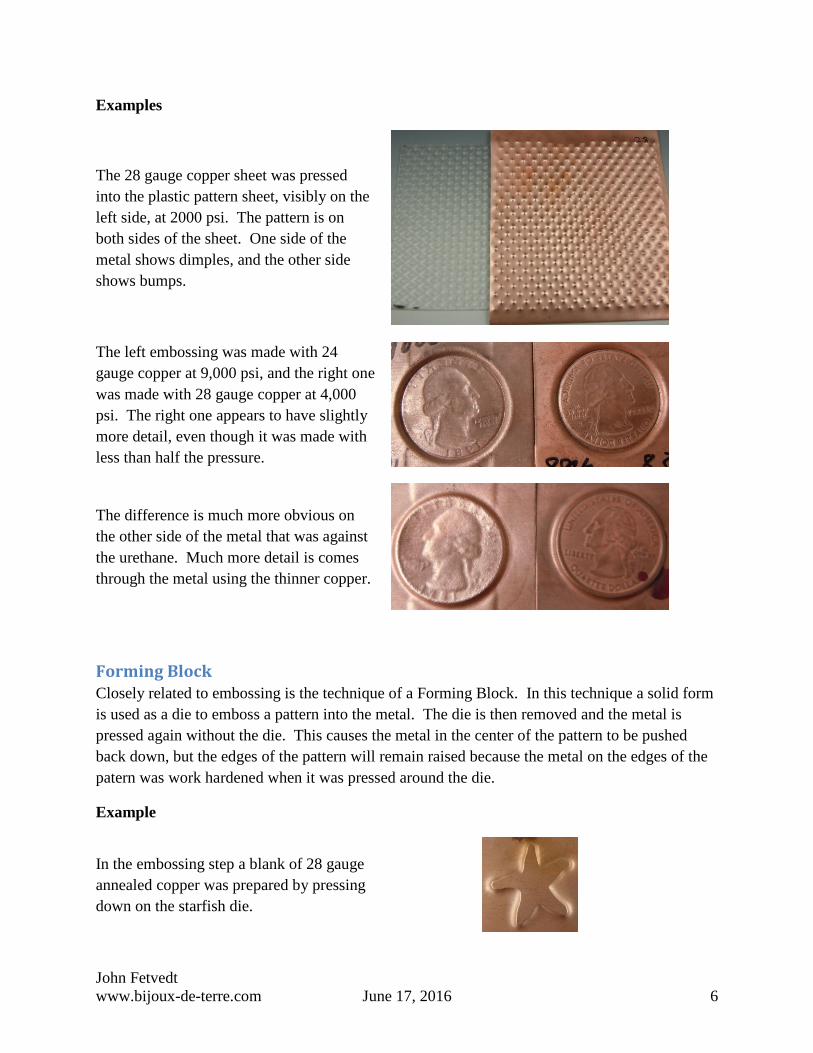
Embossing Embossing forms a pattern on both sides of the metal, rather than just on one side like a rolling mill would do. Obviously the pattern is raised on one side of the metal, and recessed on the other side.
Materials used for embossing dies may include anything that is not compressible and that will not shatter. Materials such as washers, nuts, keys, metal mesh, etc. work well.
The thinner the metal, the better the resulting embossing will be. Metal 24 gauge, or thinner, works well for embossing.
The harder the urethane, the better the resulting embossing will be. The thinner the urethane, the better the resulting embossing will be. But remember to only press 2/3 of the thickness of the urethane. Small pieces of urethane concentrate the force.
Electrical tape, or Scotch packaging tape, may be used for holding the metal to the die. But remember that the tape will also be embossed and might show where you do not want it to.
John Fetvedt www.bijoux-de-terre.com June 17, 2016 6
Examples
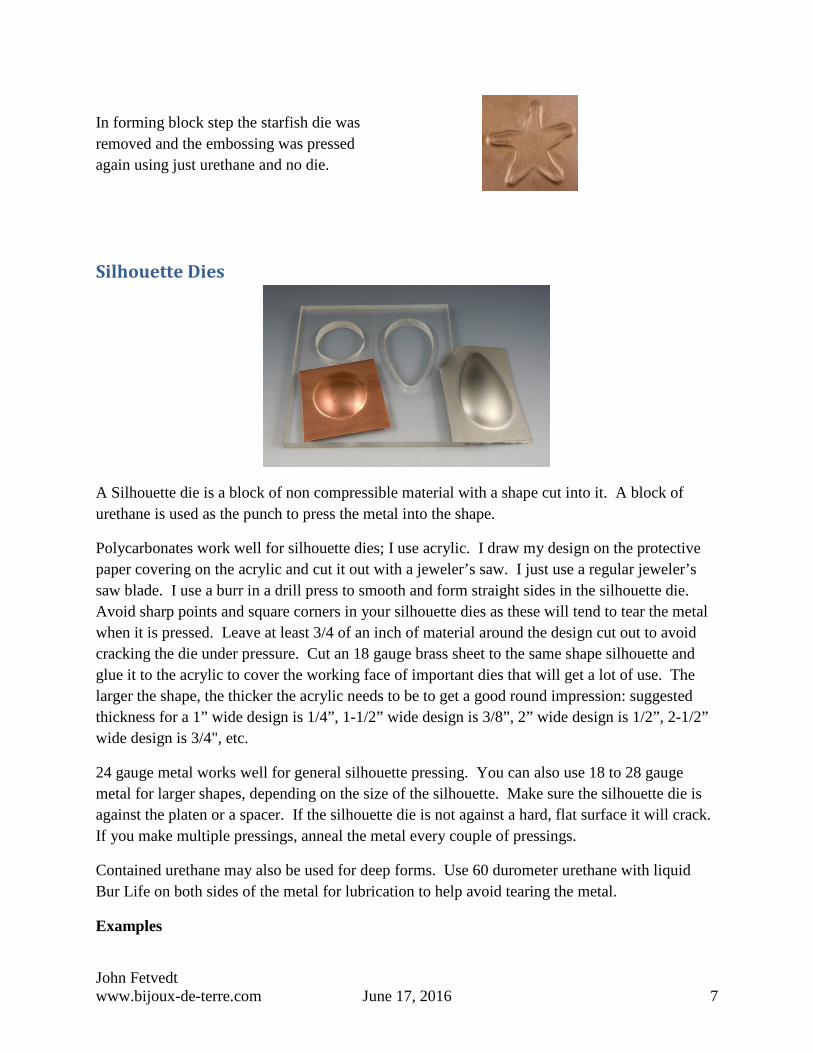
The 28 gauge copper sheet was pressed into the plastic pattern sheet, visibly on the left side, at 2000 psi. The pattern is on both sides of the sheet. One side of the metal shows dimples, and the other side shows bumps.
The left embossing was made with 24 gauge copper at 9,000 psi, and the right one was made with 28 gauge copper at 4,000 psi. The right one appears to have slightly more detail, even though it was made with less than half the pressure.
The difference is much more obvious on the other side of the metal that was against the urethane. Much more detail is comes through the metal using the thinner copper.
Forming Block Closely related to embossing is the technique of a Forming Block. In this technique a solid form is used as a die to emboss a pattern into the metal. The die is then removed and the metal is pressed again without the die. This causes the metal in the center of the pattern to be pushed back down, but the edges of the pattern will remain raised because the metal on the edges of the patern was work hardened when it was pressed around the die.
Example
In the embossing step a blank of 28 gauge annealed copper was prepared by pressing down on the starfish die.
John Fetvedt www.bijoux-de-terre.com June 17, 2016 7
In forming block step the starfish die was removed and the embossing was pressed again using just urethane and no die.
Silhouette Dies
A Silhouette die is a block of non compressible material with a shape cut into it. A block of urethane is used as the punch to press the metal into the shape.
Polycarbonates work well for silhouette dies; I use acrylic. I draw my design on the protective paper covering on the acrylic and cut it out with a jeweler’s saw. I just use a regular jeweler’s saw blade. I use a burr in a drill press to smooth and form straight sides in the silhouette die. Avoid sharp points and square corners in your silhouette dies as these will tend to tear the metal when it is pressed. Leave at least 3/4 of an inch of material around the design cut out to avoid cracking the die under pressure. Cut an 18 gauge brass sheet to the same shape silhouette and glue it to the acrylic to cover the working face of important dies that will get a lot of use. The larger the shape, the thicker the acrylic needs to be to get a good round impression: suggested thickness for a 1” wide design is 1/4”, 1-1/2” wide design is 3/8”, 2” wide design is 1/2”, 2-1/2” wide design is 3/4", etc.
24 gauge metal works well for general silhouette pressing. You can also use 18 to 28 gauge metal for larger shapes, depending on the size of the silhouette. Make sure the silhouette die is against the platen or a spacer. If the silhouette die is not against a hard, flat surface it will crack. If you make multiple pressings, anneal the metal every couple of pressings.
Contained urethane may also be used for deep forms. Use 60 durometer urethane with liquid Bur Life on both sides of the metal for lubrication to help avoid tearing the metal.
Examples
John Fetvedt www.bijoux-de-terre.com June 17, 2016 8
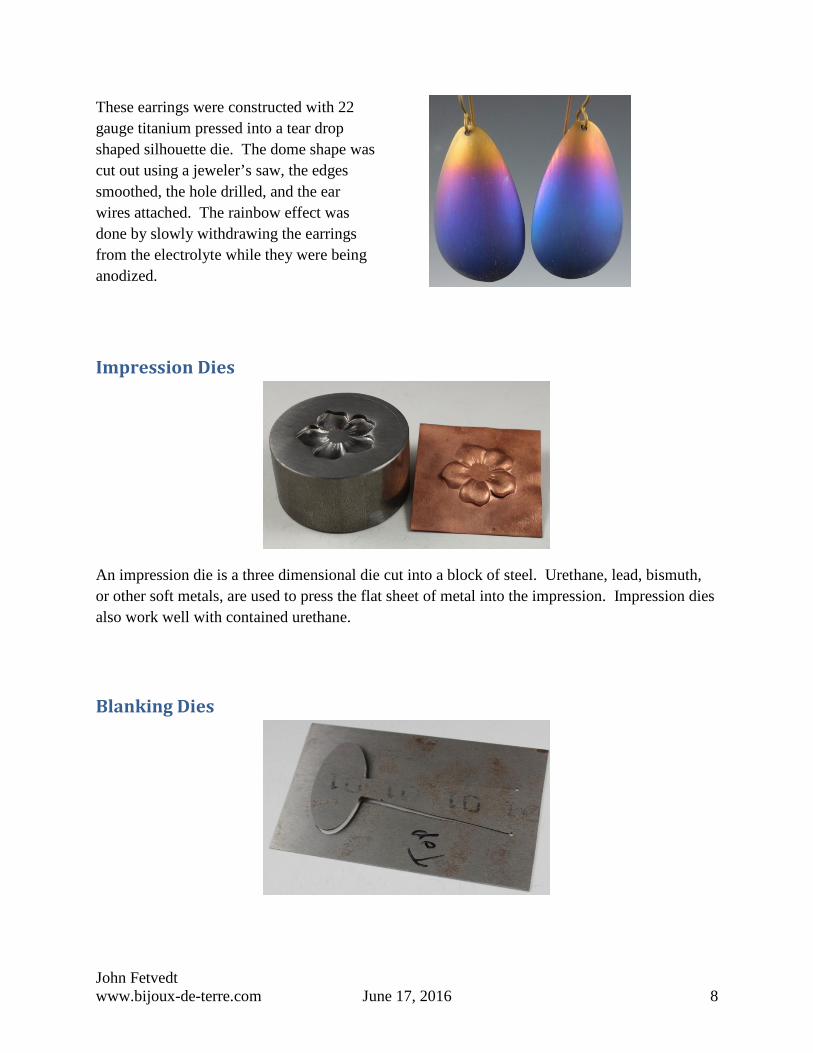
These earrings were constructed with 22 gauge titanium pressed into a tear drop shaped silhouette die. The dome shape was cut out using a jeweler’s saw, the edges smoothed, the hole drilled, and the ear wires attached. The rainbow effect was done by slowly withdrawing the earrings from the electrolyte while they were being anodized.
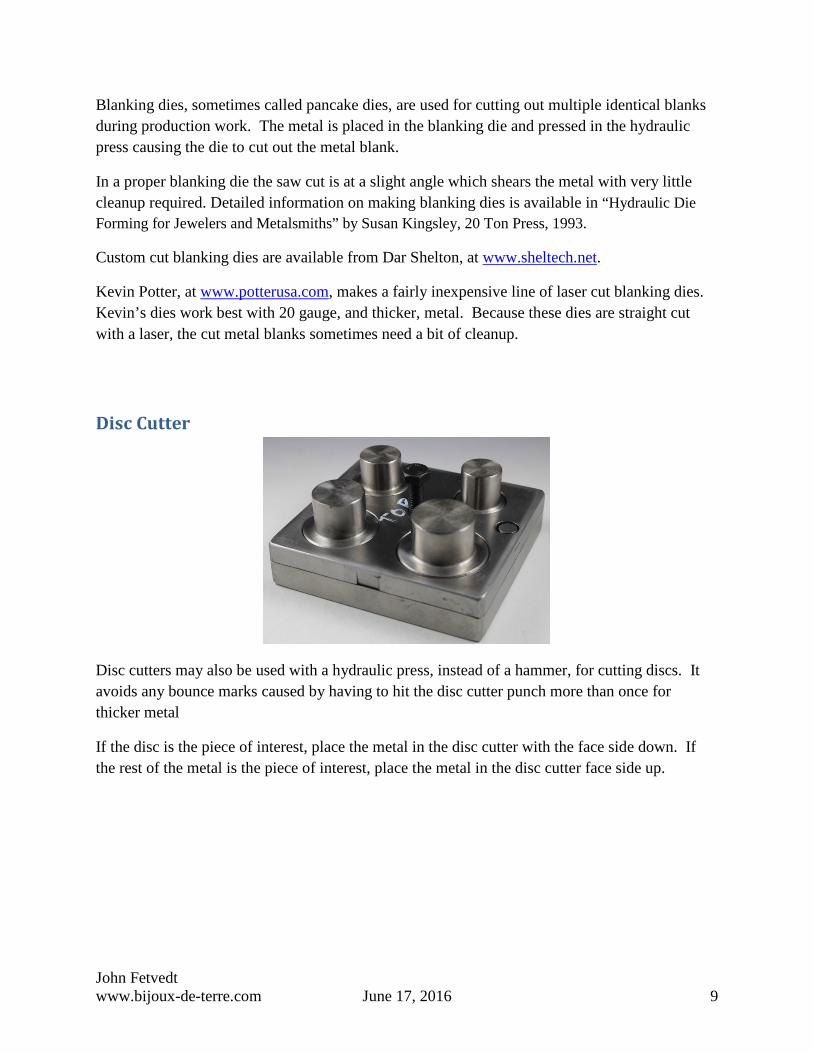
Impression Dies
An impression die is a three dimensional die cut into a block of steel. Urethane, lead, bismuth, or other soft metals, are used to press the flat sheet of metal into the impression. Impression dies also work well with contained urethane.
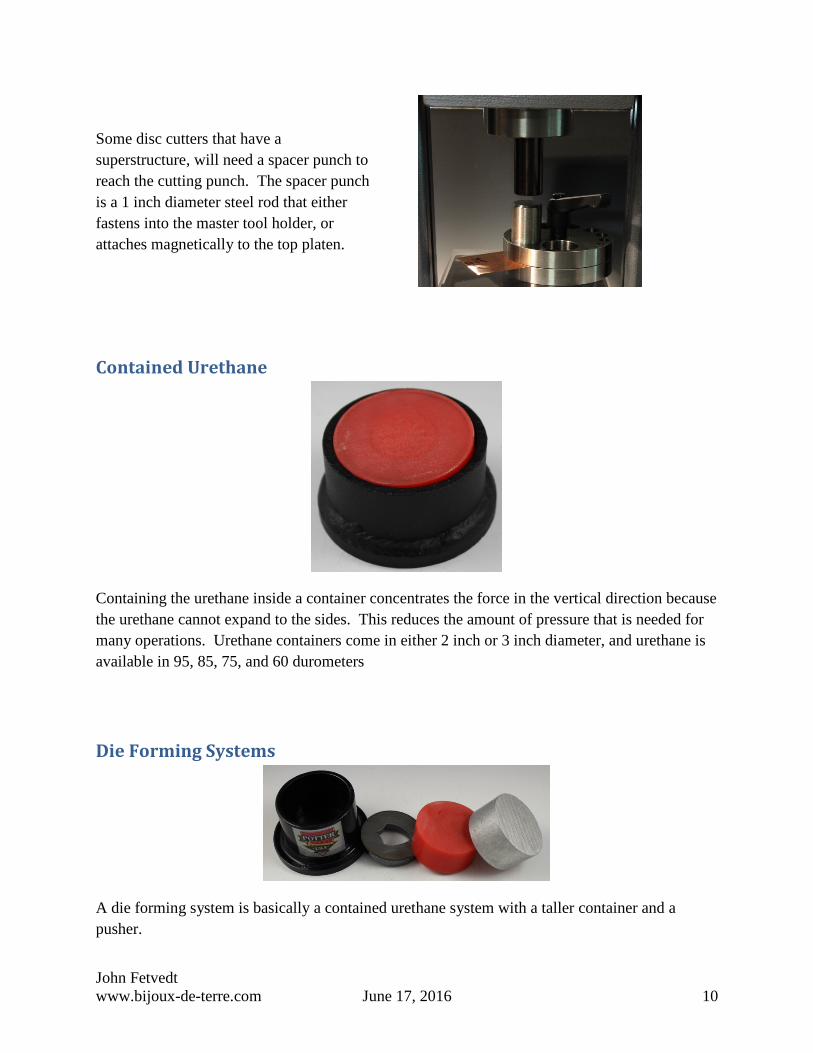
Blanking Dies
John Fetvedt www.bijoux-de-terre.com June 17, 2016 9
Blanking dies, sometimes called pancake dies, are used for cutting out multiple identical blanks during production work. The metal is placed in the blanking die and pressed in the hydraulic press causing the die to cut out the metal blank.
In a proper blanking die the saw cut is at a slight angle which shears the metal with very little cleanup required. Detailed information on making blanking dies is available in “Hydraulic Die Forming for Jewelers and Metalsmiths” by Susan Kingsley, 20 Ton Press, 1993.
Custom cut blanking dies are available from Dar Shelton, at www.sheltech.net.
Kevin Potter, at www.potterusa.com, makes a fairly inexpensive line of laser cut blanking dies. Kevin’s dies work best with 20 gauge, and thicker, metal. Because these dies are straight cut with a laser, the cut metal blanks sometimes need a bit of cleanup.
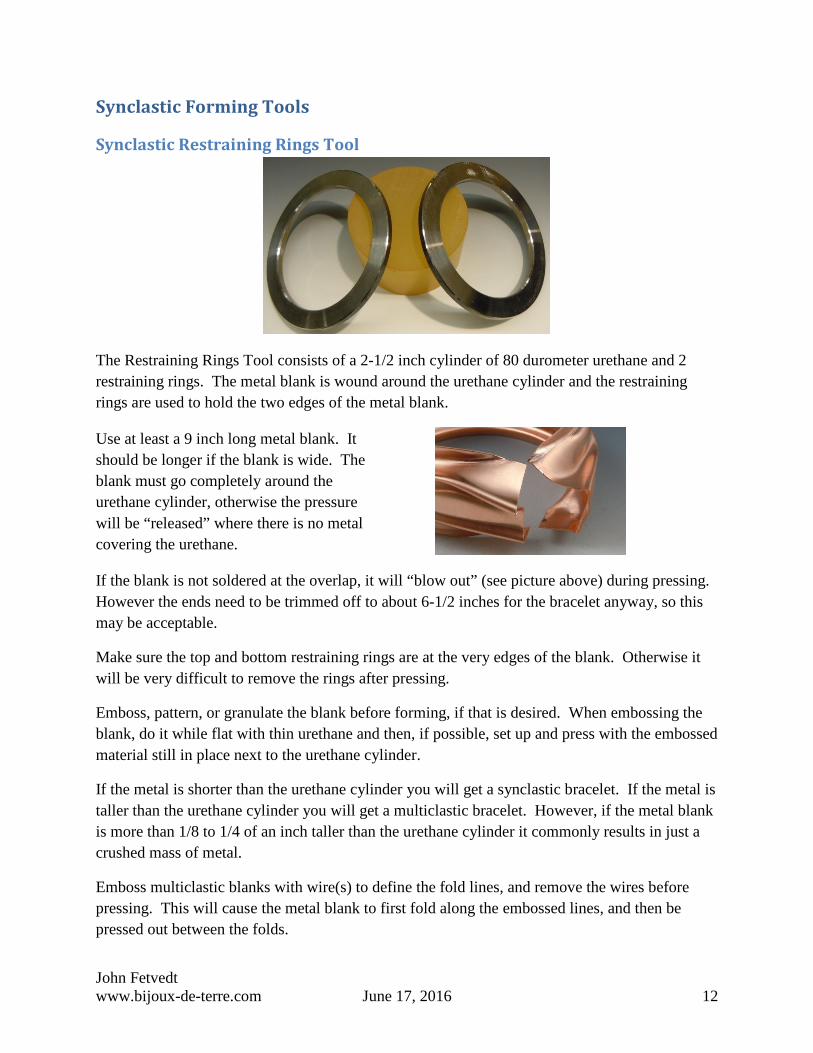
Disc Cutter
Disc cutters may also be used with a hydraulic press, instead of a hammer, for cutting discs. It avoids any bounce marks caused by having to hit the disc cutter punch more than once for thicker metal
If the disc is the piece of interest, place the metal in the disc cutter with the face side down. If the rest of the metal is the piece of interest, place the metal in the disc cutter face side up.
John Fetvedt www.bijoux-de-terre.com June 17, 2016 10
Some disc cutters that have a superstructure, will need a spacer punch to reach the cutting punch. The spacer punch is a 1 inch diameter steel rod that either fastens into the master tool holder, or attaches magnetically to the top platen.
Contained Urethane
Containing the urethane inside a container concentrates the force in the vertical direction because the urethane cannot expand to the sides. This reduces the amount of pressure that is needed for many operations. Urethane containers come in either 2 inch or 3 inch diameter, and urethane is available in 95, 85, 75, and 60 durometers
Die Forming Systems
A die forming system is basically a contained urethane system with a taller container and a pusher.

John Fetvedt www.bijoux-de-terre.com June 17, 2016 11
A die, either a silhouette die or an impression die, is placed in the bottom of the container, followed by the annealed metal blank, the urethane, and then the pusher. It is important that the top of the urethane is below the lip of the container. This will cause all the force to be directed downward forcing the metal into the die.
Use Bur Life to lubricate the metal blank and 60 durometer urethane in a die forming system for deep forms.
Detailed information on the Bonny Doon Precision Die Kit is available at www.bonnydoonengineering.com/Instructions/instructions.html.
3 inch Form Box Kit
A form box is used with 60 durometer urethane and a silhouette die to press much deeper forms than are possible with uncontained urethane. The urethane, metal, die stack, or the die, metal, urethane stack, is placed in the container and the pusher block (left) is placed on top for the pressing.
Use Bur Life to lubricate the metal blank and 60 durometer urethane in a containing box for deep forms.
Detailed information is available in the “3inch Formbox.pdf” file at www.bonnydoonengineering.com/Instructions/instructions.html.
John Fetvedt www.bijoux-de-terre.com June 17, 2016 12
Synclastic Forming Tools
Synclastic Restraining Rings Tool
The Restraining Rings Tool consists of a 2-1/2 inch cylinder of 80 durometer urethane and 2 restraining rings. The metal blank is wound around the urethane cylinder and the restraining rings are used to hold the two edges of the metal blank.
Use at least a 9 inch long metal blank. It should be longer if the blank is wide. The blank must go completely around the urethane cylinder, otherwise the pressure will be “released” where there is no metal covering the urethane.
If the blank is not soldered at the overlap, it will “blow out” (see picture above) during pressing. However the ends need to be trimmed off to about 6-1/2 inches for the bracelet anyway, so this may be acceptable.
Make sure the top and bottom restraining rings are at the very edges of the blank. Otherwise it will be very difficult to remove the rings after pressing.
Emboss, pattern, or granulate the blank before forming, if that is desired. When embossing the blank, do it while flat with thin urethane and then, if possible, set up and press with the embossed material still in place next to the urethane cylinder.
If the metal is shorter than the urethane cylinder you will get a synclastic bracelet. If the metal is taller than the urethane cylinder you will get a multiclastic bracelet. However, if the metal blank is more than 1/8 to 1/4 of an inch taller than the urethane cylinder it commonly results in just a crushed mass of metal.
Emboss multiclastic blanks with wire(s) to define the fold lines, and remove the wires before pressing. This will cause the metal blank to first fold along the embossed lines, and then be pressed out between the folds.
John Fetvedt www.bijoux-de-terre.com June 17, 2016 13
A bracelet made using the restraining rings tool will be round and will need to be formed into an oval by hand, which will cause some distortion of the shape where it is bent.
Detailed information is available in the “Restraining Bracelet former.pdf” file at www.bonnydoonengineering.com/Instructions/instructions.html.
Examples
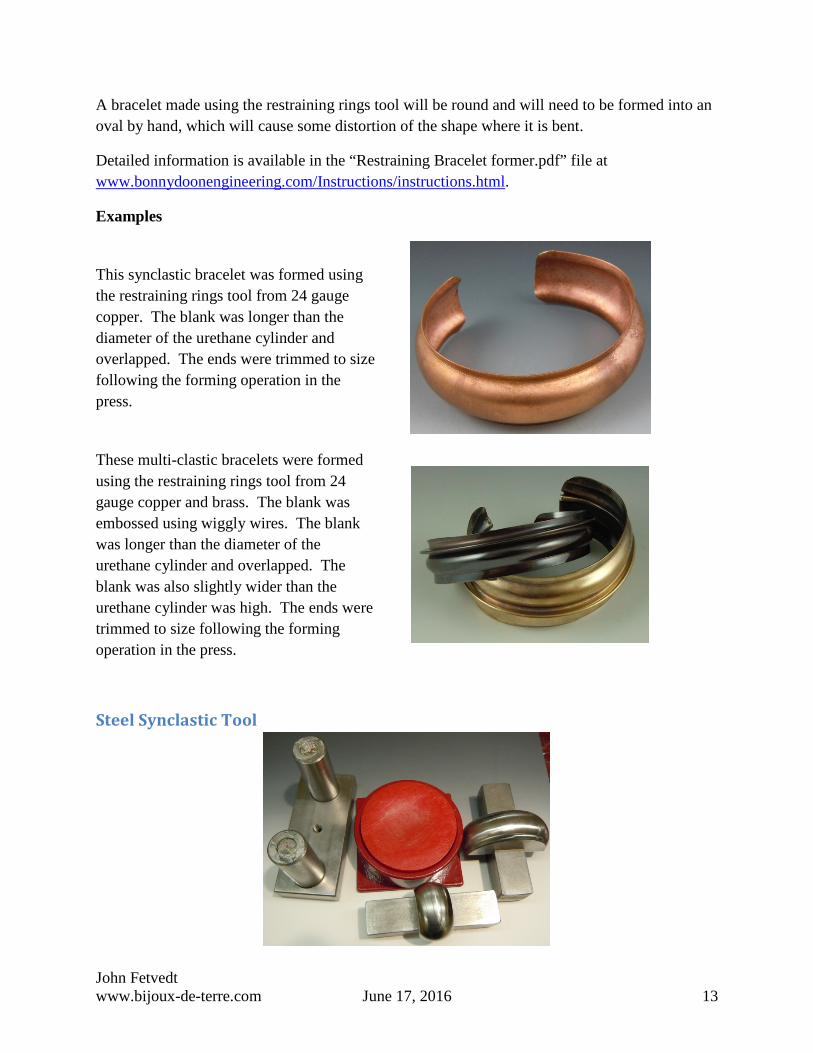
This synclastic bracelet was formed using the restraining rings tool from 24 gauge copper. The blank was longer than the diameter of the urethane cylinder and overlapped. The ends were trimmed to size following the forming operation in the press.
These multi-clastic bracelets were formed using the restraining rings tool from 24 gauge copper and brass. The blank was embossed using wiggly wires. The blank was longer than the diameter of the urethane cylinder and overlapped. The blank was also slightly wider than the urethane cylinder was high. The ends were trimmed to size following the forming operation in the press.
Steel Synclastic Tool
John Fetvedt www.bijoux-de-terre.com June 17, 2016 14
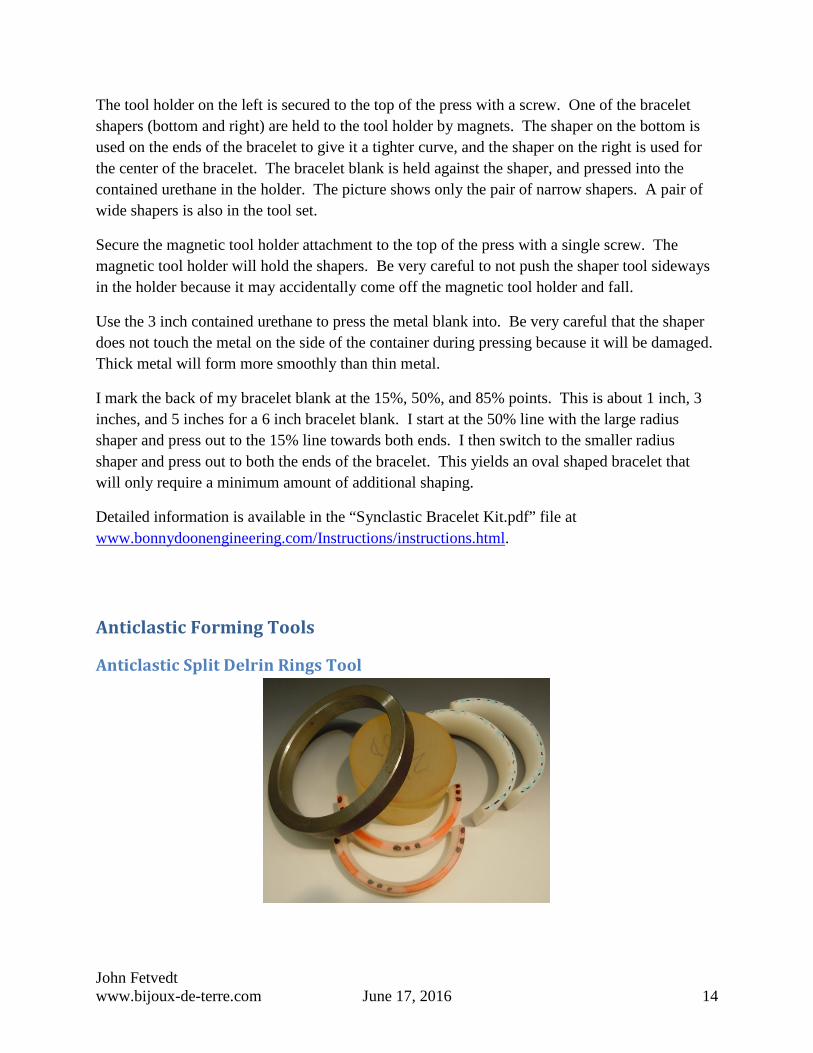
The tool holder on the left is secured to the top of the press with a screw. One of the bracelet shapers (bottom and right) are held to the tool holder by magnets. The shaper on the bottom is used on the ends of the bracelet to give it a tighter curve, and the shaper on the right is used for the center of the bracelet. The bracelet blank is held against the shaper, and pressed into the contained urethane in the holder. The picture shows only the pair of narrow shapers. A pair of wide shapers is also in the tool set.
Secure the magnetic tool holder attachment to the top of the press with a single screw. The magnetic tool holder will hold the shapers. Be very careful to not push the shaper tool sideways in the holder because it may accidentally come off the magnetic tool holder and fall.
Use the 3 inch contained urethane to press the metal blank into. Be very careful that the shaper does not touch the metal on the side of the container during pressing because it will be damaged. Thick metal will form more smoothly than thin metal.
I mark the back of my bracelet blank at the 15%, 50%, and 85% points. This is about 1 inch, 3 inches, and 5 inches for a 6 inch bracelet blank. I start at the 50% line with the large radius shaper and press out to the 15% line towards both ends. I then switch to the smaller radius shaper and press out to both the ends of the bracelet. This yields an oval shaped bracelet that will only require a minimum amount of additional shaping.
Detailed information is available in the “Synclastic Bracelet Kit.pdf” file at www.bonnydoonengineering.com/Instructions/instructions.html.
Anticlastic Forming Tools
Anticlastic Split Delrin Rings Tool
John Fetvedt www.bijoux-de-terre.com June 17, 2016 15
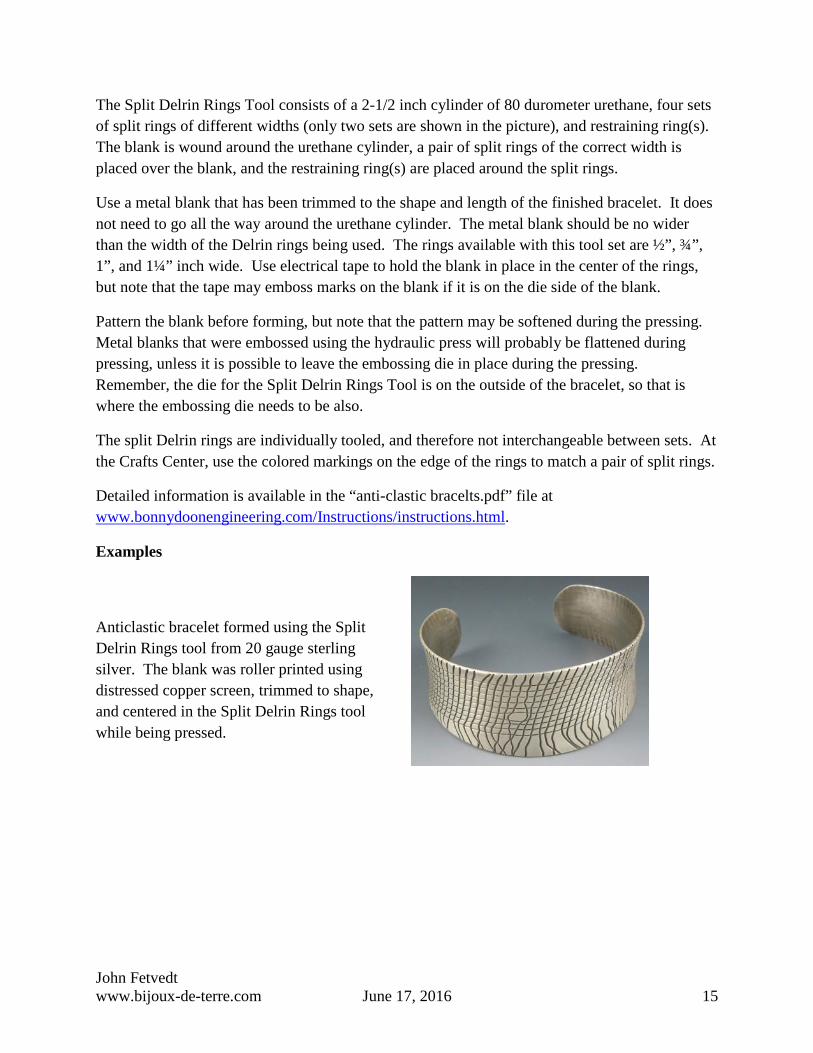
The Split Delrin Rings Tool consists of a 2-1/2 inch cylinder of 80 durometer urethane, four sets of split rings of different widths (only two sets are shown in the picture), and restraining ring(s). The blank is wound around the urethane cylinder, a pair of split rings of the correct width is placed over the blank, and the restraining ring(s) are placed around the split rings.
Use a metal blank that has been trimmed to the shape and length of the finished bracelet. It does not need to go all the way around the urethane cylinder. The metal blank should be no wider than the width of the Delrin rings being used. The rings available with this tool set are ½”, ¾”, 1”, and 1¼” inch wide. Use electrical tape to hold the blank in place in the center of the rings, but note that the tape may emboss marks on the blank if it is on the die side of the blank.
Pattern the blank before forming, but note that the pattern may be softened during the pressing. Metal blanks that were embossed using the hydraulic press will probably be flattened during pressing, unless it is possible to leave the embossing die in place during the pressing. Remember, the die for the Split Delrin Rings Tool is on the outside of the bracelet, so that is where the embossing die needs to be also.
The split Delrin rings are individually tooled, and therefore not interchangeable between sets. At the Crafts Center, use the colored markings on the edge of the rings to match a pair of split rings.
Detailed information is available in the “anti-clastic bracelts.pdf” file at www.bonnydoonengineering.com/Instructions/instructions.html.
Examples
Anticlastic bracelet formed using the Split Delrin Rings tool from 20 gauge sterling silver. The blank was roller printed using distressed copper screen, trimmed to shape, and centered in the Split Delrin Rings tool while being pressed.
John Fetvedt www.bijoux-de-terre.com June 17, 2016 16
Anticlastic bracelet formed using the Split Delrin Rings tool from 22 gauge titanium. The blank was roller printed using a manila file folder with heart shaped punched holes, anodized at a high voltage, the high spots were polished to clean off the anodization, anodized again at a lower voltage to color the hearts, trimmed to shape, and centered in the Split Delrin Rings tool while being pressed.
These anticlastic bracelets formed using the Split Delrin Rings tool from 22 gauge brass and 20 gauge copper. They were embellished with twisted and forged 12 gauge copper wire. The copper bracelet was roller printer with ¼ inch copper screen and trimmed to shape before forming.
Steel Anticlastic Tool
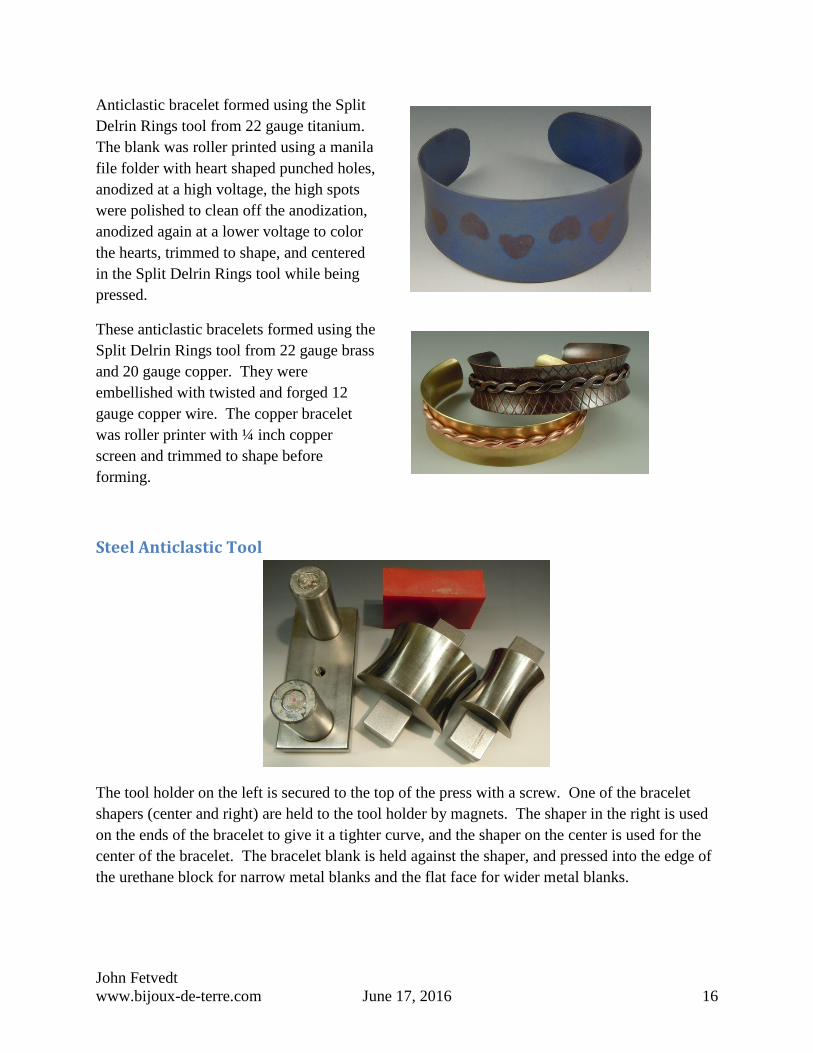
The tool holder on the left is secured to the top of the press with a screw. One of the bracelet shapers (center and right) are held to the tool holder by magnets. The shaper in the right is used on the ends of the bracelet to give it a tighter curve, and the shaper on the center is used for the center of the bracelet. The bracelet blank is held against the shaper, and pressed into the edge of the urethane block for narrow metal blanks and the flat face for wider metal blanks.
John Fetvedt www.bijoux-de-terre.com June 17, 2016 17
Secure the magnetic tool holder attachment to the top of the press with a single screw. The magnetic tool holder will hold the shapers. Be very careful to not push the shaper tool sideways in the holder because it may accidentally come off the magnetic tool holder and fall.
Use the small rectangular block of urethane with the steel anticlastic forming tool when pressing. Thick metal will form smoother that thin metal.
I mark the back of my bracelet blank at the 15%, 50%, and 85% points. This is about 1 inch, 3 inches, and 5 inches for a 6 inch bracelet blank. I start at the 50% line with the large radius shaper and press out to the 15% line towards both ends. I then switch to the smaller radius shaper and press out to both the ends of the bracelet. This yields an oval shaped bracelet that will only require a minimum amount of additional shaping.
The steel anticlastic tool is also useful for making anticlastic earrings.
Examples
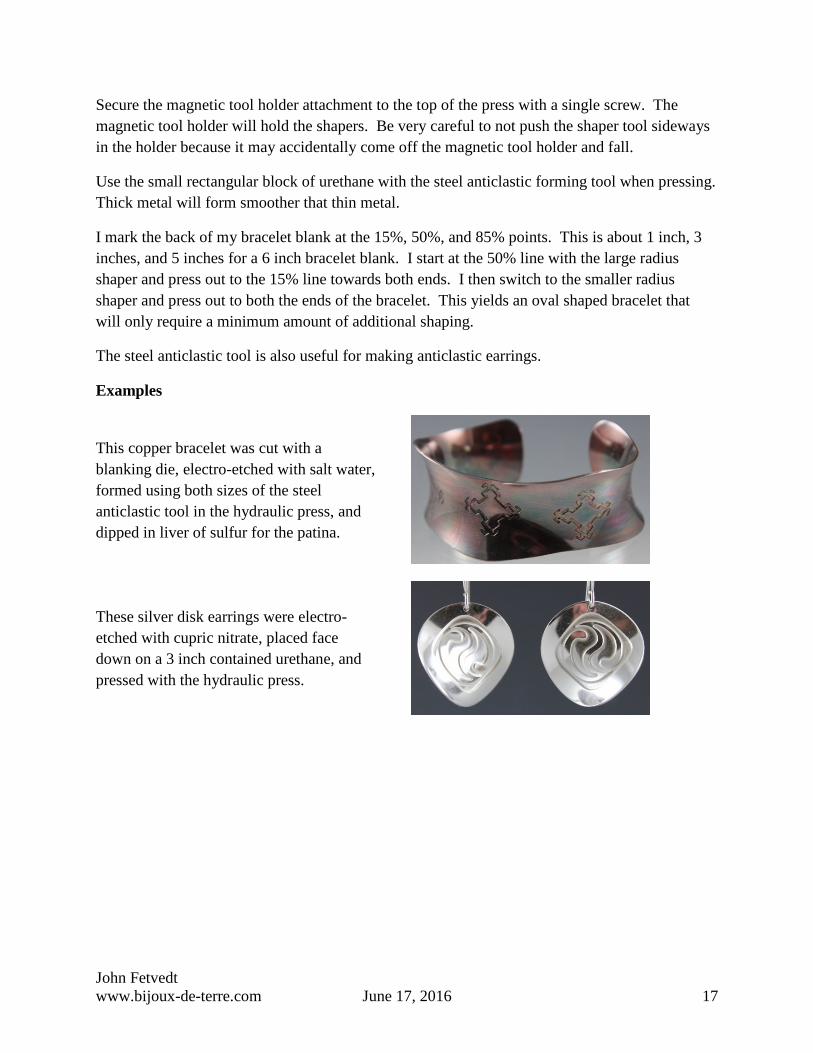
This copper bracelet was cut with a blanking die, electro-etched with salt water, formed using both sizes of the steel anticlastic tool in the hydraulic press, and dipped in liver of sulfur for the patina.
These silver disk earrings were electro-etched with cupric nitrate, placed face down on a 3 inch contained urethane, and pressed with the hydraulic press.
John Fetvedt www.bijoux-de-terre.com June 17, 2016 18
Dapping Set
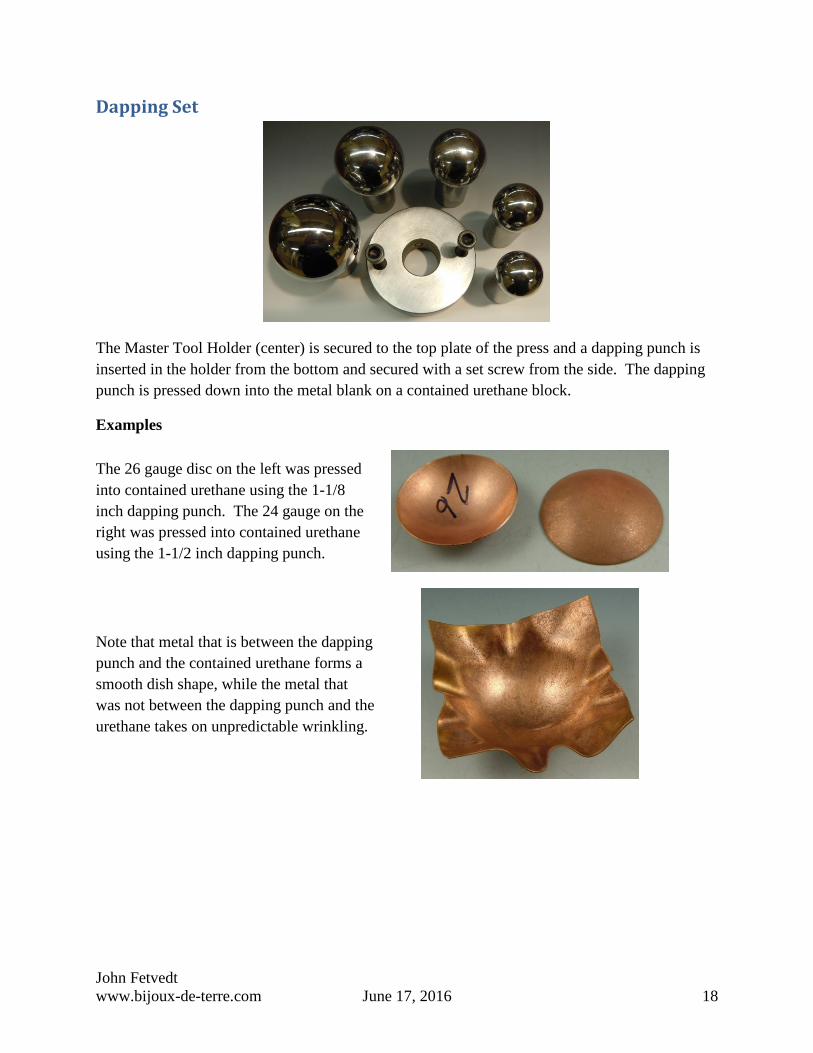
The Master Tool Holder (center) is secured to the top plate of the press and a dapping punch is inserted in the holder from the bottom and secured with a set screw from the side. The dapping punch is pressed down into the metal blank on a contained urethane block.
Examples
The 26 gauge disc on the left was pressed into contained urethane using the 1-1/8 inch dapping punch. The 24 gauge on the right was pressed into contained urethane using the 1-1/2 inch dapping punch.
Note that metal that is between the dapping punch and the contained urethane forms a smooth dish shape, while the metal that was not between the dapping punch and the urethane takes on unpredictable wrinkling.
John Fetvedt www.bijoux-de-terre.com June 17, 2016 19
Mushroom Formers
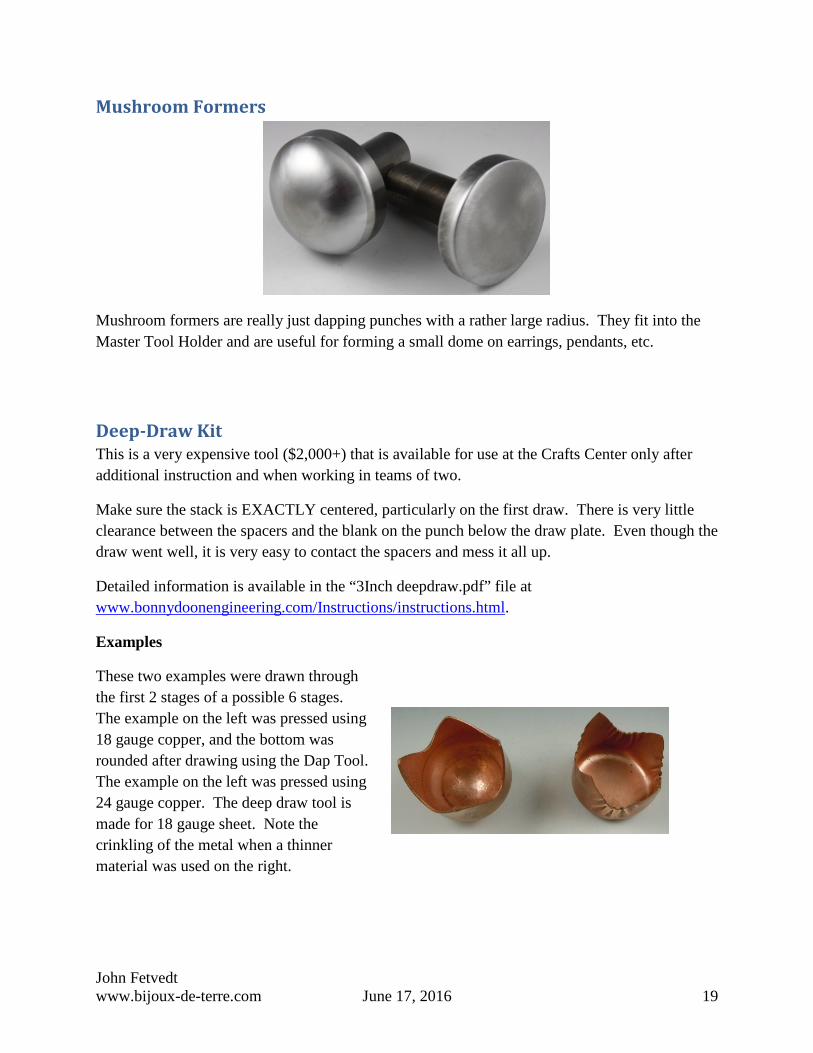
Mushroom formers are really just dapping punches with a rather large radius. They fit into the Master Tool Holder and are useful for forming a small dome on earrings, pendants, etc.
Deep-Draw Kit This is a very expensive tool ($2,000+) that is available for use at the Crafts Center only after additional instruction and when working in teams of two.
Make sure the stack is EXACTLY centered, particularly on the first draw. There is very little clearance between the spacers and the blank on the punch below the draw plate. Even though the draw went well, it is very easy to contact the spacers and mess it all up.
Detailed information is available in the “3Inch deepdraw.pdf” file at www.bonnydoonengineering.com/Instructions/instructions.html.
Examples
These two examples were drawn through the first 2 stages of a possible 6 stages. The example on the left was pressed using 18 gauge copper, and the bottom was rounded after drawing using the Dap Tool. The example on the left was pressed using 24 gauge copper. The deep draw tool is made for 18 gauge sheet. Note the crinkling of the metal when a thinner material was used on the right.
John Fetvedt www.bijoux-de-terre.com June 17, 2016 20
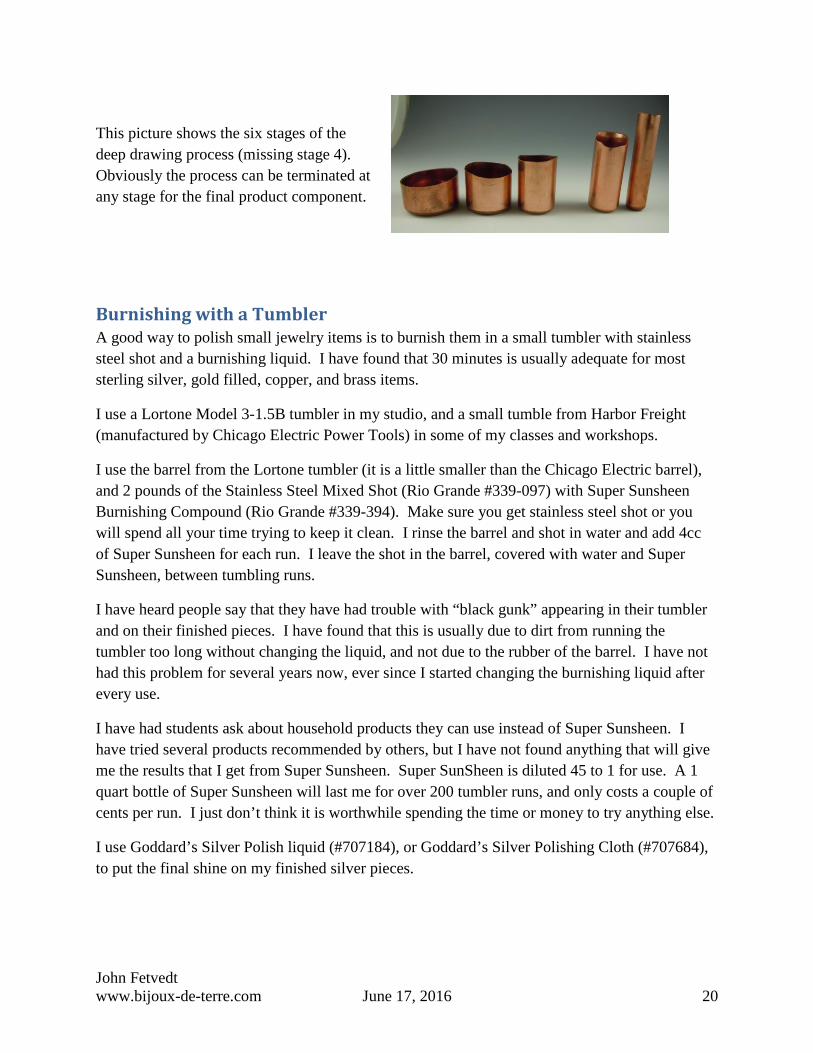
This picture shows the six stages of the deep drawing process (missing stage 4). Obviously the process can be terminated at any stage for the final product component.
Burnishing with a Tumbler A good way to polish small jewelry items is to burnish them in a small tumbler with stainless steel shot and a burnishing liquid. I have found that 30 minutes is usually adequate for most sterling silver, gold filled, copper, and brass items.
I use a Lortone Model 3-1.5B tumbler in my studio, and a small tumble from Harbor Freight (manufactured by Chicago Electric Power Tools) in some of my classes and workshops.
I use the barrel from the Lortone tumbler (it is a little smaller than the Chicago Electric barrel), and 2 pounds of the Stainless Steel Mixed Shot (Rio Grande #339-097) with Super Sunsheen Burnishing Compound (Rio Grande #339-394). Make sure you get stainless steel shot or you will spend all your time trying to keep it clean. I rinse the barrel and shot in water and add 4cc of Super Sunsheen for each run. I leave the shot in the barrel, covered with water and Super Sunsheen, between tumbling runs.
I have heard people say that they have had trouble with “black gunk” appearing in their tumbler and on their finished pieces. I have found that this is usually due to dirt from running the tumbler too long without changing the liquid, and not due to the rubber of the barrel. I have not had this problem for several years now, ever since I started changing the burnishing liquid after every use.
I have had students ask about household products they can use instead of Super Sunsheen. I have tried several products recommended by others, but I have not found anything that will give me the results that I get from Super Sunsheen. Super SunSheen is diluted 45 to 1 for use. A 1 quart bottle of Super Sunsheen will last me for over 200 tumbler runs, and only costs a couple of cents per run. I just don’t think it is worthwhile spending the time or money to try anything else.
I use Goddard’s Silver Polish liquid (#707184), or Goddard’s Silver Polishing Cloth (#707684), to put the final shine on my finished silver pieces.
John Fetvedt www.bijoux-de-terre.com June 17, 2016 21
References Bonny Doon Engineering – www.bonnydoonengineering.com
Instructions – www.bonnydoonengineering.com/Instructions/instructions.html
How-to – www.bonnydoonengineering.com/HowTo/howto.html
“Deep-Drawing for Metalsmiths” CD, by G. Phil Poirier, available from Rio Grande
“Hydraulic Die Forming for Jewelers and Metalsmiths” by Susan Kingsley, 20 Ton Press, 1993
“Nonconforming Dies” by Susan Kingsley, in “Metals Technic”, Edited by Tim McCreight, Brynmorgen Press, 1992
Suppliers Dar Shelton - www.sheltech.net – custom cut blanking dies
Delvie’s Plastics Inc. - www.delviesplastics.com – Acrylic for silhouette dies and spacers
Metalliferous, 34 West 46th Street, New York, NY 10036, www.metalliferous.com - Metals
Potter USA - www.potterusa.com – Hydraulic presses, dies, etc.
Rio Grande, 7500 Bluewater Road NW, Albuquerque, NM 87121-1962, http://www.riogrande.com - Bonny Doon products
Shark Bite Plastic Dies - Richard Sweetman - [email protected] - Silhouette dies
Thank you for attending my workshop. I hope you enjoyed the workshop and get many years of enjoyment using these techniques.
There is additional information available on the hydraulic press on our Web site at www.bijoux-de-terre.com. Just click on “For Our Students” on the left. If you have any questions, please email me at [email protected].