Embed Size (px)
Citation preview
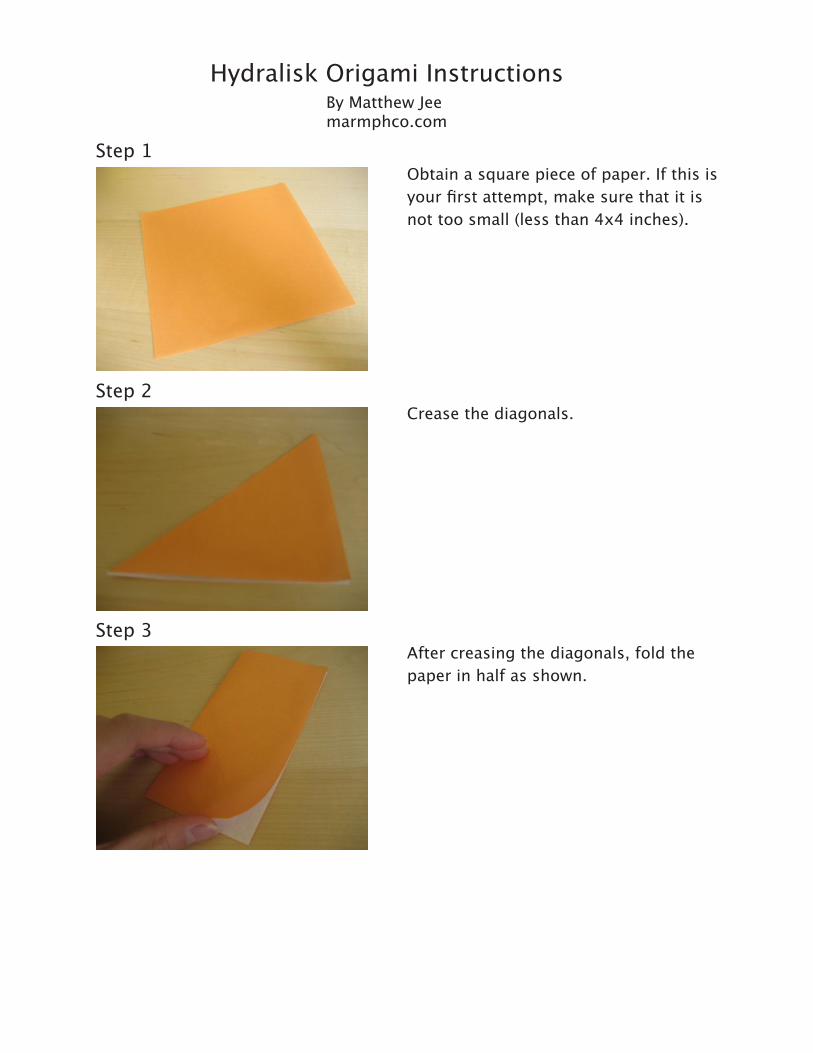
Hydralisk Origami Instructions
Step 1Obtain a square piece of paper. If this is
not too small (less than 4x4 inches).
Crease the diagonals.
paper in half as shown.
Step 2
Step 3
By Matthew Jeemarmphco.com

Step 4Then fold the folded half itself in half as shown.
Fold this section in half as shown.
In other words: Fold the folded half of the folded half in half.
Unfold the previous steps.
Step 5
Step 6
Step 7Repeat steps 3-6 on the other 3 sides of the paper.
Your paper should now look like this.

Flip.
Note: The only purpose of steps 3-7 is to make a 1/8 paper size crease around the edge.
Step 8
Fold in one of the creases created in the previous steps.
Fold down an adjacent crease.
Step 9
Step 10
The corner should look like this.Step 11

Step 12Squash down the corner.
Repeat steps 10-12 on the other edges and corners.
A completed step 14.
Now you must fold a Crane Base using the resulting square. If you know how
-
through my horrendous explanation.
Step 13
Step 14
Fold the paper in half.Step 15

Step 16
and following the diagonal creases...
... squash down.
This should form a Preliminary Base.
the sides into the center.
Step 17
Step 18
Completed step 18.Step 19
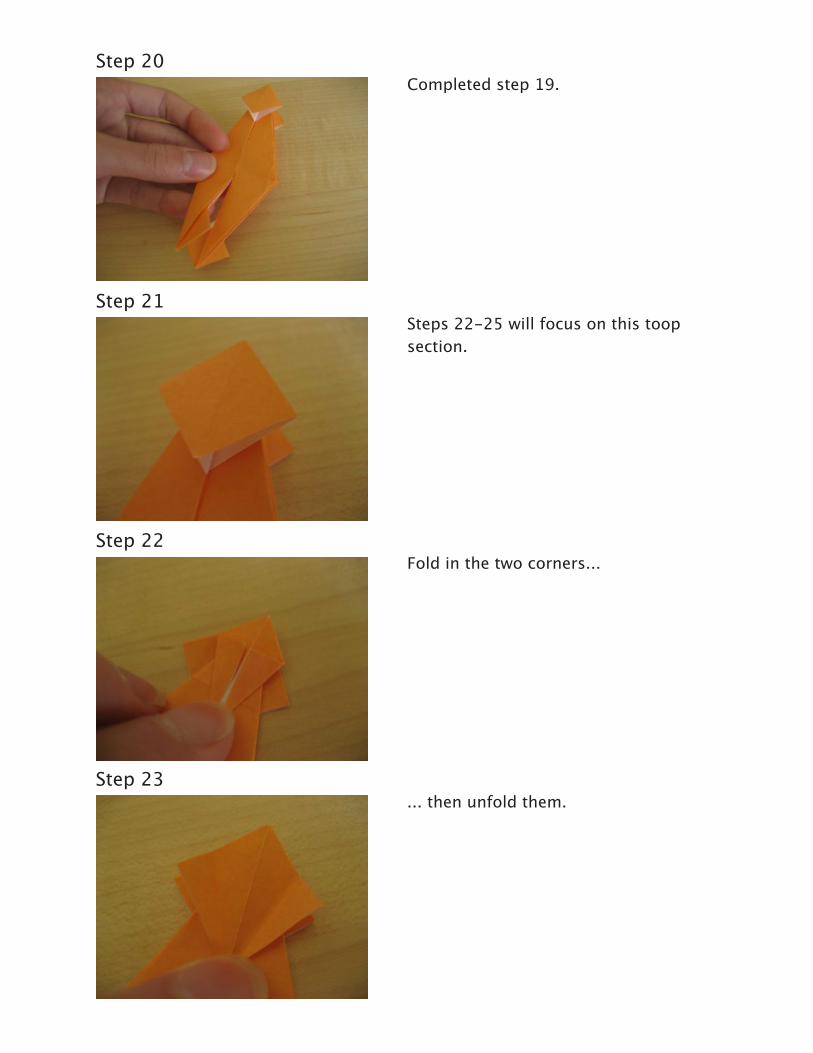
Step 20Completed step 19.
Steps 22-25 will focus on this toop section.
Fold in the two corners...
Step 21
Step 22
... then unfold them.Step 23

Step 24
and squash it down.
Repeat steps 22-25 on the other 3 mini squares.
Step 25
Step 26
Inside reverse fold the left “leg”upward.
Step 27

Step 28Do the same for the right “leg”.
this time from a little lower than hori-zontal crease that is already there.
Step 29
Step 30
Finished step 30.Step 31

Step 32-
ing up the fold with the existing hori-zontal crease.
This step has been included just to make sure that you are still paying at-
tasty. Moving on...
Now fold in one side of the central area such that...
Step 33
Step 34
down as shown.
Step 35

Step 36Repeat steps 34 and 35 on the other side.
Steps 38 through 41 focus on thissection.
they no longer overlap.
Step 37
Step 38
Completed step 38.Step 39

Step 40Now fold in the two halves above that section.
folded sections outwards as shown.
Step 41
Step 42
Step 43
Completed steps 37-41.
Flip.

Step 44Fold one end of the central section to-wards the middle...
... and squash up the the lower section
NOTE: This may not perfectly line up with the squashes in steps 34-36.
Repeat steps 44 and 45 on the other side.
Step 45
Step 46
The next set of instructions will focus on the arms of the hydralisk.
Step 47

shown.
Now outside-reverse fold the remaining part...
... so that it ends up at an angle similar to this.
Perform yet another outside-reverse fold on the tip of the arm...
Step 48
Step 49
Step 50
Step 51

... until it points down. This is one of the
Your model should now look like this.
Repeat steps 48-52 on the other side.
Flip.
Step 52
Step 53
Step 54
Step 55

explain this in technical origami terms.
This section will form the tail/body of the Hydra.
Completed step 56.
Now take the bottom of this “tail” and...
... inside-reverse fold it upwards as depicted.
Step 56
Step 57
Step 58
Step 59

The last steps will focus on the head section.
-
so it may be best to ignore the rest of my instructions and just look at the pictures.
Partially inside-reverse fold the mouth.
Another view of the previous step.
Step 61
Step 62
Step 63
Step 64

Outside-reverse fold up the tip of the
fold this section down again.
Another view of the previus step.
an origami Hydralisk!
abnormally large head. You may want to adjust your model to have slightly better proportions.
Step 65
Step 66
Step 67