Embed Size (px)
Citation preview


Thank you for purchasing an HTA attachment for your Honda Tractor.
This manual covers the assembly, operation, and maintenance of the HTA Model DB752A & DB5054 Dozer Blade. For your convenience, a parts list is also included in this publication.
NOTE: The illustrations in this manual are intended toserve as a reference and may not necessarily depict the actual models listed above. The information in this publication is based on the latest product information available at the time of printing. American Honda Motor Co., Inc. reserves the right to make changes at any time without notice and without incurring any obligation.
N o part of this publication may be reproduced without written permission.
Pay special attention to the statements preceeded by the following symbols
: Indicates that serious injury or death WILL result if instructions a re not followed.
: Indicates a strong possibility that serious injury or death can result if instructions a re not followed.
: Indicates a possibility that minor injury can result if instructions a re not followed.
I NOTI- : Indicates that equipment or property damage can result if instructions a re not followed.
NOTE : Gives helpful information.
HTA attachments are designed to give safe and dependable service if assembled and operated according to instructions.
I f a problem should arise, o r if you have any questions about your dozer blade, consult an authorized Honda Tractor dealer.
1

2

COWTENTS PAGE
General Safety . . . . . . . . . . . . . . . . . . . . . . . . . . . . . . . . . . . . . . . . . . . . . . . . . . . . . . . . . . . . . . . . . . . . . . . . . . . . . . 5
SafeOperatingRules .................................................................. 5
Safety Label Location ................................................................. 5
Assembly and Installation ................................................................. 6
Front BladeAssembly ................................................................. 6
Attaching the Blade to the Tractor .................................................... 7
Operating Procedures ...................................................................... 8
Pre-Operation Check ................................................................... 8
Controls ............ .................................................................... 8
Transporting the Attachment ......................................................... 8
Grading . . . . . . . . . . . . . . . . . . . . . . . . . . . . . . . . . . . . . . . . . . . . . . . . . . . . . . . . . . . . . . . . . . . . . . . . . . . . . . . . . 8
Snow Removal . . . . . . . . . . . . . . . . . . . . . . . . . . . . . . . . . . . . . . . . . . . . . . . . . . . . . . . . . . . . . . . . . . . . . . . . . 8
Maintenanceandstorage .................................................................. 9
Parts . . . . . . . . . . . . . . . . . . . . . . . . . . . . . . . . . . . . . . . . . . . . . . . . . . . . . . . . . . . . . . . . . . . . . . . . . . . . . . . . . . . . . . . . . 1 0
Customer Service Information ............................................................... 12


GENERAL SAFETY
recommendations and operating procedures before using the attachment. Follow the instgwtions in this publication at all times, and fnsist that those who work with you do Ilkewise. Failure to do 80 could result in personal i n . or equipment damage.
SAFE OPERATING RULES
To avoid injury, keep bystanders, children and pets away from the area of operation. Stay clear of the front of the blade and pinch points. Do not allow anyone to ride on the blade. Never permit anyone to operate the attachment without proper instruction. Never allow children to
operate this equipment. Inspect the attachment before operating it. Repair any damage and correct any malfunction
before operation. Never attempt to make any adjustments to the attachment while the tractor's engine is running. Do not use this attachment when visibility is poor. Under conditions of poor visibility, there is a
greater risk of striking an object or causing injury. The use of tire chains and counterweights for better traction is advised when this attachment is
being used for snow removal: use only those recommended by American Honda Prolonged exposure to loud noise can cause permanent impairment or loss of hearing. Wear a
suitable protective device such as an external hearing protector (earmuffs) or ear plugs to protect against loud or othenvise objectionable noise.
Use extreme caution when operating on or crossing a gravel drive, walk or road. Stay alert for the hidden hazards of traffic.
Do not attempt to operate on steep slopes. When operating on a sloping surface, always drive up and down the face of the slope, never across the face. Exercise extreme caution when changing direction on a slope.
If you hit an object, stop the engine immediately, and check the attachment immediately. Damaged equipment may increase the possibility of injury during operation. While operating the tractor, always raise the dozer blade when it is not in use. Reduce the tractor's ground speed on slippery surfaces. To avoid accidentally snagging the dozer blade, use care when backing up. Stop the tractor's engine whenever you leave the operator's position to make any inspection,
adjustment or repair. Before leaving the tractor unattended, always lower the dozer blade, shift the transmission to
neutral, set the parking brake, stop the engine and remove the key from the ignition switch to prevent children or unauthorized persons from starting the engine.
NOTE Replacement safety labels can be ordered from your dealer.
5
ASSEMBLYAND INSTALLATION
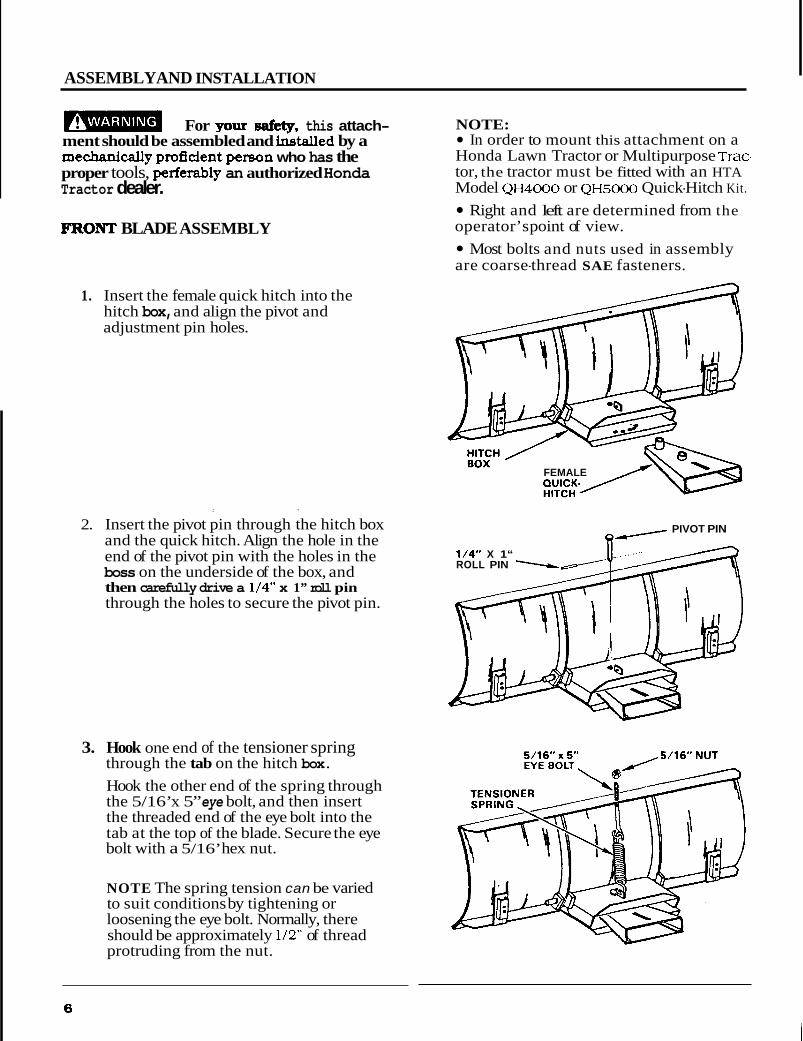
For your safety, this attach- ment should be assembled and &talled by a mechanically pro5dent person who has the proper tools, perferaby an authorized Honda Tractor dealer.
FRONT BLADE ASSEMBLY
1. Insert the female quick hitch into the hitch box, and align the pivot and adjustment pin holes.
2. Insert the pivot pin through the hitch box and the quick hitch. Align the hole in the end of the pivot pin with the holes in the boss on the underside of the box, and then carefully drive a 1/4’ x 1” roll pin through the holes to secure the pivot pin.
3. Hook one end of the tensioner spring through the tab on the hitch box. Hook the other end of the spring through the 5/16’ x 5” eye bolt, and then insert the threaded end of the eye bolt into the tab at the top of the blade. Secure the eye bolt with a 5/16’ hex nut.
NOTE The spring tension can be varied to suit conditions by tightening or loosening the eye bolt. Normally, there should be approximately 1/2” of thread protruding from the nut.
NOTE: In order to mount this attachment on a
Honda Lawn Tractor or Multipurpose Trac. tor, the tractor must be fitted with an HTA Model Q H 4 0 0 0 or Q H 5 0 0 0 Quick-Hitch Kit.
Right and left are determined from the operator’s point of view.
Most bolts and nuts used in assembly are coarse-thread SAE fasteners.
pun FEMALE /y
5?/ PIVOT PIN
1/4“ X 1“ ROLL PIN -

I ASSEMBLY AND INSTALLATION (Conslnued)
4. Carefully drive a 3/16” roll pin into the hole in the adjustment pin. The roll pin should extend an equal distance from both sides of the adjustment pin.
5. Pivot the female quick-hitch to obtain the desired blade angle, align the adjustment pin holes and then insert the adjustment pin.
NOTE Be sure that the pin extends through the bottom plate of the hitch box.
6. Slide the skid shoes into the brackets on the back of the blade.
7. Set each skid shoe to provide the proper amount of blade clearance (refer to the Operation Section on page 8) and then insert a skid shoe pin through the bracket and shoe. Secure the skid shoe pins with 3 x 65 mm spring pins.
ATTACHING THE BLADE TO THE TRACTOR
Carefully slide the female hitch onto the tractor’s male quick-hitch. Move the quick- hitch lever to “LOCK”, and secure it with a linch pin as shown.
3 x 65 rnrn SPRING PIN,
I 7

OPERATING PROCEDURES
In order to operate this attachment safely, it is vital that you read and understand this manual and the Tractor Owner‘s Manual. To prevent injury* stop the tractor engine and
remove the ignition key, -re attempting to inspect, adjust or sed- this attachment.
BEFORE OPERATING Check to be su re that the attachment is properly installed on the tractor and that all nuts, bolts and spring clips are secure.
CONTROLS L&m Tractors: U s e manual lift arm to raise or lower blade as appropriate. Multipurpose Tractors (below): Move the hydraulic cylinder change lever to the “Front” position, and then move the hydraulic lever to the “Up” or “Down” position as appropriate.
INDER
HYDRAULIC LIFT LEVER
’ Refer to the Tractor owner’s Manual for detailed Hydraulic Lift iIlStIUCtiOnS.
TRANSPORTING THE ATTACHMENT Always raise the blade fully when driving to and from work areas. For maximum ground clearance, the blade should also be set in the center, straight-ahead position.
To avoid injury* operate the tractor at low speeds, and be particularly careful in any area whew the blade might snag on solid objects. Such objects can jar the tractor or bring it to a sudden stop.
GRADING
1. When using the blade for leveling and grading jobs, set it in the center, straight- ahead position, and adjust the skid shoes so that the blade rests on the ground.
2. The blade tensioner spring should be adjusted so that the blade follows the contours of the ground. Do not over- tighten the spring.
3. Select a low forward speed for best results.
SNOW REMOVAL
1. For snow removal, it is generally best to set the blade at an angle. Select a ground speed that allows the snow to curl cleanly off the end of the blade. Low speeds are generally best.
2. When clearing snow on a paved surface, set the skid shoes to allow approximately 1 / 4 of clearance between the blade and the pavement. On a gravel surface, allow 1/2’ to 3/4” of clearance, depending on the size of the gravel.
3. It may be necessary to tighten the blade tensioner spring slightly when clearing heavy snow. Do not over-tighten the spring.
4. On grades, always plow downhill, and angle the blade so that the snow is pushed to the downhill side.
5. Clear large drifts a little at a time, do not try to clear a full blade width at once.
6. It is usually necessary to use wheel weights and tire chains to get enough traction for snow plowing. Use only those weights and chains designed for use with your tractor. If you have any doubts, consult your authorized Honda tractor dealer.
a

, MAINTENANCEAND STORAGE . .
' 1. After each use, check to he sure that all hardware and spring pins are secure.
2. Check the blade's removable cutting edge for excessive wear, and replace it if necessary.
3. Clean the blade, and lightly coat all exposed metal surfaces with oil to prevent rust.
4. Store blade in a dry place.
9

PARTS
10
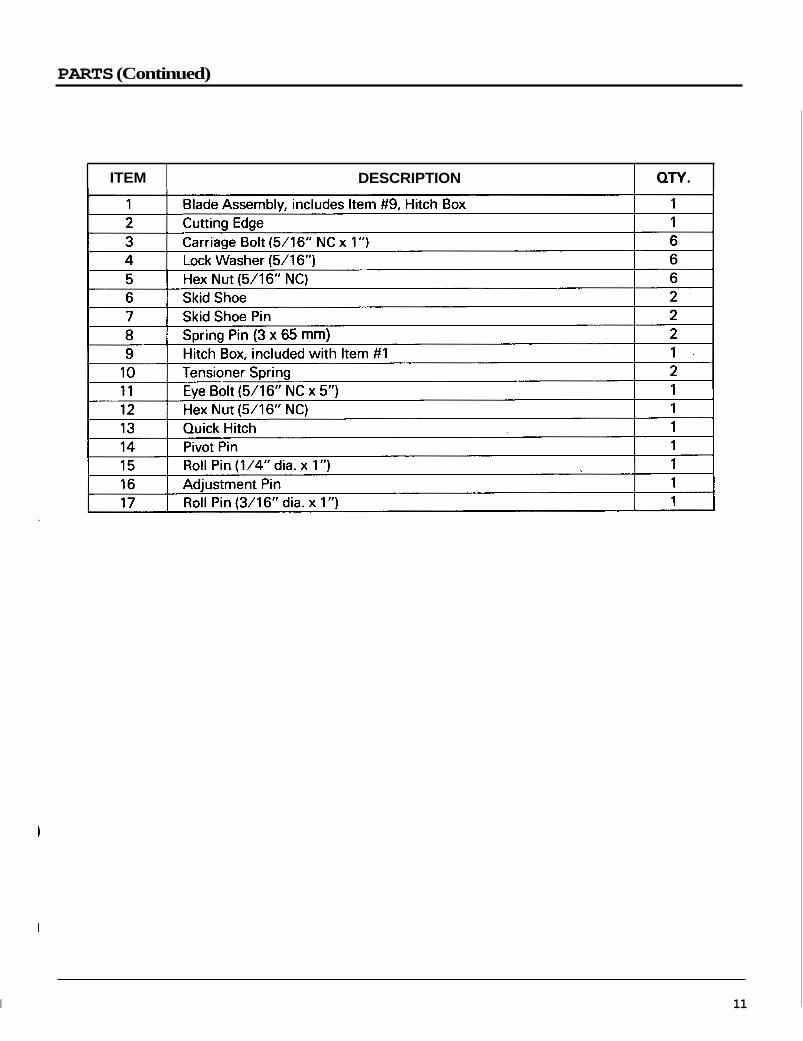
PARTS (Continued)
ITEM QTY. DESCRIPTION
I 11

CUSTOMERSERVICEINFORMATION . . . . . I . .
Your satisfaction and goodwill are important to your dealer and to us. Normally, any problems concerning the product will be handled by your dealer's service department. If you have a warranty problem that has not been handled to your satisfaction, we suggest you take the following.action .. :
Discuss your problem with a member of dealership management. Often complains can be quickly resolved at that level. If the problem has already been reviewed with the Service Manager, contact the owner of the dealership or the General Manager.
I f your problem still has not been resolved to yoursatisfaction. contact the Power Equipment Customer Service Department of American Honda Motor Co., Inc. :
Honda Power Equipment Division Customer Service Office 4475 River Green Parkway DuIuth, Georgia 30136 (404) 497-6400
W e will need the following in order to assist you : - Your name, address and telephone number - Product model and serial number - Date of purchase - Dealer name and address - Nature of the problem
After reviewing all the facts involved. you will beadvised of what action can be taken. Please bear in mind that your problem will likely be resolved at the dealership, using the dealer's facilities, equipment and personnel. so it is very important that your initial contact be with the dealer.
Your purchase of a Honda product is greatly appreciated by both your dealer and American Honda Motor Company. W e want to assist you in every way possible to assure your satisfaction with your purchase.
For future reference, record your unit's model number, serial number and dateof purchase in the spaces below. Refer to this information when ordering parts and when making technical o r warranty inquiries.
Model :
Serial Number :
Date of Purchase :
12


POP 51308