Embed Size (px)
Citation preview
HPE 3PAR Red Hat EnterpriseLinux and Oracle LinuxImplementation Guide
AbstractThis guide provides information for setting up communication between the HPE 3PAR StoreServ Storage and theRed Hat Enterprise Linux or Oracle Linux host. It is intended for system and storage administrators who are familiarwith Red Hat Enterprise Linux, Oracle Linux, and the HPE 3PAR OS.
Part Number: QL226-99163Published: June 2016

© Copyright 2012, 2016 Hewlett Packard Enterprise Development LP
The information contained herein is subject to change without notice. The only warranties for Hewlett Packard Enterprise products and servicesare set forth in the express warranty statements accompanying such products and services. Nothing herein should be construed as constitutingan additional warranty. Hewlett Packard Enterprise shall not be liable for technical or editorial errors or omissions contained herein.
Confidential computer software. Valid license from Hewlett Packard Enterprise required for possession, use, or copying. Consistent with FAR12.211 and 12.212, Commercial Computer Software, Computer Software Documentation, and Technical Data for Commercial Items are licensedto the U.S. Government under vendor's standard commercial license.
Links to third-party websites take you outside the Hewlett Packard Enterprise website. Hewlett Packard Enterprise has no control over and is notresponsible for information outside the Hewlett Packard Enterprise website.
Acknowledgements
Oracle® is a registered trademark of Oracle and/or its affiliates.
Linux® is the registered trademark of Linus Torvalds in the U.S. and other countries.
Microsoft® and Windows® are either registered trademarks or trademarks of Microsoft Corporation in the United States and/or other countries.
Contents1 Introduction..........................................................................................................7
Audience...............................................................................................................................................7HPE 3PAR OS upgrade considerations................................................................................................8Linux host support requirements..........................................................................................................8HPE 3PAR coexistence........................................................................................................................8HPE 3PAR documentation....................................................................................................................9
2 3PAR RHEL quick connect................................................................................10Before you begin.................................................................................................................................10FC protocol or FCoE protocol quick connect......................................................................................10iSCSI protocol quick connect..............................................................................................................16
3 Configuring the HPE 3PAR StoreServ Storage and host—FC..........................20Workflow for configuring the HPE 3PAR StoreServ Storage and host—FC.......................................20Considerations for planning the configuration—FC............................................................................20
Target port limits and specifications—FC......................................................................................213PAR Persistent Ports—FC...........................................................................................................22
3PAR Persistent Ports setup and connectivity guidelines—FC...............................................22Smart SAN—FC............................................................................................................................233PAR Persistent Checksum—FC..................................................................................................23HPE 3PAR Express Writes—FC...................................................................................................24
Connecting the HPE 3PAR StoreServ Storage to the host—FC........................................................24FC-to-FC connectivity diagram......................................................................................................24FCoE-to-FC connectivity diagram.................................................................................................25Setting up and zoning the fabric—FC...........................................................................................26
Setting up fabric zoning—FC...................................................................................................26Employing fabric zoning—FC...................................................................................................26Selecting a zoning configuration—FC......................................................................................27Verifying that each initiator is zoned with the correct targets—FC...........................................27
Configuration guidelines for switch vendors—FC.........................................................................28Configuring the HPE 3PAR StoreServ Storage ports—FC.................................................................29
Configuring ports on the HPE 3PAR StoreServ Storage for a direct connection—FC..................30Configuring ports on the HPE 3PAR StoreServ Storage for fabric connection—FC.....................32
Configuring the host—FC...................................................................................................................33Identifying PCI-HBA and driver information...................................................................................33Using the Emulex HBA—FC..........................................................................................................33
Preparing to use the Emulex HBA driver—FC.........................................................................33Creating the modprobe.conf configuration file and building the initramfs—FC—EmulexHBA..........................................................................................................................................33
Using the QLogic HBA—FC..........................................................................................................37Preparing to use the QLogic HBA driver—FC..........................................................................37Creating the modprobe.conf configuration file and building the initramfs—FC—QLogicHBA..........................................................................................................................................37Setting up the NVRAM and BIOS—FC—QLogic HBA.............................................................41Configuring the QLogic HBA using the SCLI utility—FC..........................................................42
Using the Brocade HBA—FC........................................................................................................43Preparing to use the Brocade HBA driver—FC........................................................................43Configuring the Brocade HBA using the Brocade BCU utility—FC..........................................43
Setting the SCSI Timeout for RHEL 5—FC...................................................................................44Using udev rules to set the SCSI Timeout—FC.......................................................................44Verifying the SCSI Timeout settings—FC................................................................................45Using Emulex and QLogic script to set the SCSI timeout—FC................................................45
Setting up multipathing software—FC...........................................................................................45
Contents 3
4 Configuring the HPE 3PAR StoreServ Storage and host—iSCSI.....................46Workflow for configuring the HPE 3PAR StoreServ Storage and host for iSCSI................................46Considerations for planning the configuration—iSCSI.......................................................................46
Target port limits and specifications—iSCSI..................................................................................473PAR Persistent Ports—iSCSI......................................................................................................48
3PAR Persistent Ports setup and connectivity guidelines—iSCSI...........................................48Connecting the HPE 3PAR StoreServ Storage to the host.................................................................49
Enterprise iSCSI............................................................................................................................50Setting up the switch and iSCSI initiator.......................................................................................50
Configuring the HPE 3PAR StoreServ Storage iSCSI ports...............................................................513PAR iSCSI IPv6 addressing and vLAN tagging................................................................................54Configuring a host—Software iSCSI...................................................................................................55
Installing the iSCSI driver—Software iSCSI..................................................................................55Discovering iSCSI sessions—Software iSCSI.........................................................................55
Setting up Software iSCSI.............................................................................................................55Adjust the replacement_timeout setting...................................................................................55
Starting the iSCSI Daemon—Software iSCSI...............................................................................58Creating the iSCSI connection—Software iSCSI..........................................................................59Configuring CHAP (optional)—Software iSCSI.............................................................................65
Setting up host CHAP—Software iSCSI..................................................................................65Setting up bidirectional CHAP (mutual)—Software iSCSI........................................................67
Configuring the bidirectional CHAP—Software iSCSI........................................................68Configuring and using Internet Storage Name Server (optional)—Software iSCSI......................70
Using a Microsoft iSNS server to discover registrations—Software iSCSI..............................70Using the iSNS server to create a discovery domain—Software iSCSI...................................70Configuring the iSCSI initiator and target for iSNS server usage—Software iSCSI................70
Using the RHEL iscsiadm utility (optional)—Software iSCSI........................................................72Configuring a host—Hardware iSCSI.................................................................................................74
Using the Emulex CNA—Hardware iSCSI....................................................................................74Setting the BIOS—Hardware iSCSI—Emulex CNA.................................................................74Configuring Hardware iSCSI using the OneCommand Manager GUI—Emulex CNA.............76Configuring Hardware iSCSI using IPv6 with vLAN tagging—Emulex CNA............................80Configuring Hardware iSCSI using the hbacmd utility—Emulex CNA.....................................82Configuring Hardware iSCSI not using the BIOS (local boot only)—Emulex CNA..................84
Using the Broadcom CNA—Hardware iSCSI................................................................................87Setting the BIOS—Hardware iSCSI—Broadcom CNA............................................................87
Configuring for SAN Boot—Hardware iSCSI......................................................................87Creating connections to iSCSI targets (local boot only)—Hardware iSCSI—BroadcomCNA..........................................................................................................................................88
Configuring CHAP (optional)—Hardware iSCSI............................................................................89Setting up host CHAP—Hardware iSCSI.................................................................................89
Setting up host CHAP—Hardware iSCSI—Emulex CNA...................................................89Setting up host CHAP—Hardware iSCSI—Broadcom CNA...............................................90
Setting up bidirectional CHAP—Hardware iSCSI....................................................................90Setting up bidirectional CHAP—Hardware iSCSI—Emulex CNA.......................................91Setting up bidirectional CHAP—Hardware iSCSI—Broadcom CNA..................................91
Setting up multipathing software—iSCSI............................................................................................915 Configuring the HPE 3PAR StoreServ Storage and host—FCoE.....................92
Workflow for configuring the HPE 3PAR StoreServ Storage and host—FCoE..................................92Considerations for planning the configuration—FCoE.......................................................................92
Target port limits and specifications—FCoE..................................................................................933PAR Persistent Ports—FCoE......................................................................................................94
3PAR Persistent Ports setup and connectivity guidelines—FCoE...........................................94Connecting the HPE 3PAR StoreServ Storage to the host—FCoE....................................................95
4 Contents
Setting up and zone the fabric—FCoE..........................................................................................96Employing fabric zoning using switch vendor methods (required)—FCoE..............................96Supported zoning configurations by the HPE 3PAR StoreServ Storage arrays—FCoE..........97Setting up fabric zoning—FCoE...............................................................................................97Verifying switch zoning and configurations—FCoE..................................................................97
Configure the HPE 3PAR StoreServ Storage ports—FCoE...............................................................98Planning to configure ports—FCoE...............................................................................................98Removing iSCSI port configuration—FCoE..................................................................................98Changing an iSCSI configured port to FCoE.................................................................................98Configuring the HPE 3PAR StoreServ Storage ports—FCoE.......................................................99
Configuring a host—FCoE................................................................................................................100Using the Emulex CNA—FCoE...................................................................................................100
Preparing to use the Emulex CNA Driver—FCoE..................................................................100Configuring FCoE host personality—Emulex CNA................................................................100
Using the Broadcom CNA—FCoE..............................................................................................103Preparing to use the Broadcom CNA driver—FCoE..............................................................103Configuring the FCoE host personality—Broadcom CNA......................................................103Initializing and configuring Broadcom—FCoE........................................................................106
Set up multipathing software—FCoE..........................................................................................1086 Setting up multipathing software on the host..................................................109
Setting up device mapper multipathing (DM-Multipath)....................................................................109Installing the required software package.....................................................................................109Modifying the DM-Multipath configuration file.............................................................................109
Using Generic-ALUA Persona 2 (recommended for HPE 3PAR OS 3.1.3 or later)...............110Using Generic Persona 1.......................................................................................................113Configuring for SAN boot.......................................................................................................116
Enabling and starting DM-Multipath............................................................................................118Setting up multipathing in the initramfs file system.....................................................................118Changing the host persona (optional).........................................................................................119
Setting up Veritas DMP multipathing................................................................................................119Obtaining the Veritas ASL for the HPE 3PAR StoreServ Storage...............................................120
7 Provisioning storage and host LUN discovery.................................................122Installing the 3PAR Host Explorer software package (optional).......................................................122Creating the host definition...............................................................................................................122Create storage on the HPE 3PAR StoreServ Storage......................................................................125Create virtual volumes......................................................................................................................126
Creating thinly provisioned virtual volumes.................................................................................127Creating thinly deduplicated virtual volumes...............................................................................128
Setting up for 3PAR Priority Optimization (optional).........................................................................128Restrictions on volume size and number..........................................................................................129Exporting LUNs to the host as virtual volumes.................................................................................129Discovering devices on the host.......................................................................................................130
8 Using 3PAR devices on the host.....................................................................133Creating Device Mapper devices......................................................................................................133
Displaying detailed Device Mapper node information.................................................................134Partitioning Device Mapper nodes....................................................................................................135Creating Veritas Volume Manager devices.......................................................................................140Removing a storage volume from the host.......................................................................................140File System Space Reclaim support considerations for RHEL 7 or RHEL 6....................................142
9 Booting the host from the HPE 3PAR StoreServ Storage...............................145Prerequisites for booting the host from the HPE 3PAR StoreServ Storage.....................................145Configuring HBAs.............................................................................................................................145
Using the Emulex HBA—FC and FCoE......................................................................................146
Contents 5
Using the Emulex CNA—Hardware iSCSI..................................................................................147Using the QLogic HBA—FC........................................................................................................148Using the Broadcom CNA—FCoE..............................................................................................149
Using the Broadcom CNA—FCoE in UEFI environment.......................................................149Using the Broadcom CNA—Hardware iSCSI..............................................................................150Using the Brocade HBA—FC......................................................................................................150
Installing the OS from RHEL Linux CDs or DVDs............................................................................15110 Using Oracle Enterprise Linux.......................................................................152
Oracle Enterprise Linux with RHEL-compatible kernel.....................................................................152Using Oracle Enterprise Linux with UEK..........................................................................................152Creating Partitions with Oracle Enterprise Linux..............................................................................152
11 Using a RHEL 4.9 FC host............................................................................154Host persona....................................................................................................................................154Tuning the FC Emulex driver............................................................................................................154Setting the SCSI Timeout.................................................................................................................154Setting up multipathing software.......................................................................................................155Maximum LUN size...........................................................................................................................155Scanning for new LUNs....................................................................................................................155
12 Using virtualization and clusters....................................................................156Using Oracle Virtual Machine Server (OVM)....................................................................................156Using Red Hat Enterprise Virtualization (KVM/RHEV-H).................................................................156Using Red Hat Xen Virtualization.....................................................................................................156Using RedHat Cluster services.........................................................................................................157Using the Veritas Cluster Server.......................................................................................................157
13 Configuring 3PAR File Persona software......................................................158HPE 3PAR File Persona...................................................................................................................158
14 Support and other resources.........................................................................159Accessing Hewlett Packard Enterprise Support...............................................................................159Accessing updates............................................................................................................................159Websites...........................................................................................................................................160Customer self repair.........................................................................................................................160Remote support................................................................................................................................160Documentation feedback..................................................................................................................160
Index...................................................................................................................161
6 Contents
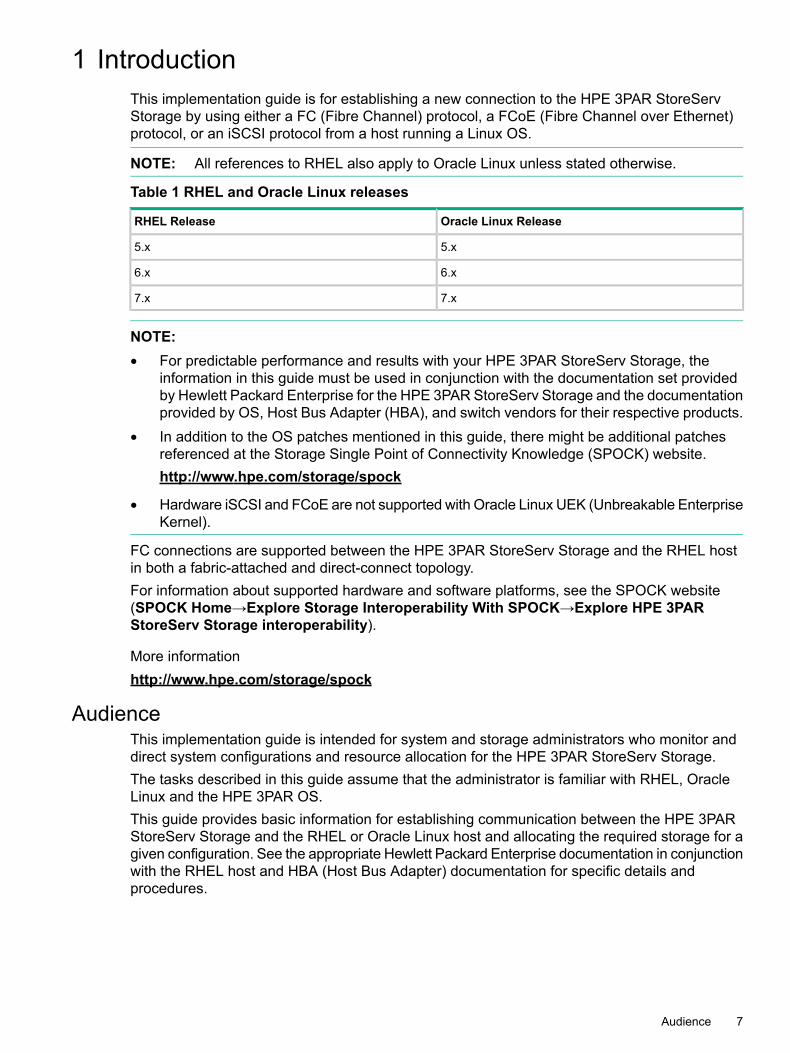
1 IntroductionThis implementation guide is for establishing a new connection to the HPE 3PAR StoreServStorage by using either a FC (Fibre Channel) protocol, a FCoE (Fibre Channel over Ethernet)protocol, or an iSCSI protocol from a host running a Linux OS.
NOTE: All references to RHEL also apply to Oracle Linux unless stated otherwise.
Table 1 RHEL and Oracle Linux releases
Oracle Linux ReleaseRHEL Release
5.x5.x
6.x6.x
7.x7.x
NOTE:• For predictable performance and results with your HPE 3PAR StoreServ Storage, the
information in this guide must be used in conjunction with the documentation set providedby Hewlett Packard Enterprise for the HPE 3PAR StoreServ Storage and the documentationprovided by OS, Host Bus Adapter (HBA), and switch vendors for their respective products.
• In addition to the OS patches mentioned in this guide, there might be additional patchesreferenced at the Storage Single Point of Connectivity Knowledge (SPOCK) website.http://www.hpe.com/storage/spock
• Hardware iSCSI and FCoE are not supported with Oracle Linux UEK (Unbreakable EnterpriseKernel).
FC connections are supported between the HPE 3PAR StoreServ Storage and the RHEL hostin both a fabric-attached and direct-connect topology.For information about supported hardware and software platforms, see the SPOCK website(SPOCK Home→Explore Storage Interoperability With SPOCK→Explore HPE 3PARStoreServ Storage interoperability).
More informationhttp://www.hpe.com/storage/spock
AudienceThis implementation guide is intended for system and storage administrators who monitor anddirect system configurations and resource allocation for the HPE 3PAR StoreServ Storage.The tasks described in this guide assume that the administrator is familiar with RHEL, OracleLinux and the HPE 3PAR OS.This guide provides basic information for establishing communication between the HPE 3PARStoreServ Storage and the RHEL or Oracle Linux host and allocating the required storage for agiven configuration. See the appropriate Hewlett Packard Enterprise documentation in conjunctionwith the RHEL host and HBA (Host Bus Adapter) documentation for specific details andprocedures.
Audience 7
HPE 3PAR OS upgrade considerationsThis implementation guide refers to new installations. For information about planning an onlineHPE 3PAR OS upgrade, see the HPE 3PAR Operating System Upgrade Pre-Planning Guide atthe Hewlett Packard Enterprise Storage Information Library website.For complete details about supported host configurations and interoperability, see the SPOCKwebsite (SPOCKHome→Explore Storage InteroperabilityWith SPOCK→Explore HPE 3PARStoreServ Storage interoperability.
More informationhttp://www.hpe.com/info/storage/docshttp://www.hpe.com/storage/spock
Linux host support requirementsThe Linux host needs to meet the following requirements. For specific details of supportedconfigurations, see the documentation at the SPOCK website (SPOCKHome→Explore StorageInteroperability With SPOCK→Explore HPE 3PAR StoreServ Storage interoperability).
• Install the HBA/CNA in the host according to the documentation provided with the adaptervendor and host.
• Obtain the supported level of HBA/CNA BIOS and firmware at the Service Pack for ProLiant(SPP) website.
• Obtain the supported level of HBA/CNA drivers at the Hewlett Packard Enterprise SupportCenter: website.
• Install one of the following:
Emulex OneCommand Manager (/usr/sbin/ocmanager/hbacmd)◦◦ QLogic QConvergeConsole Manager (/opt/QLogic_Corporation/
QConvergeConsoleCLI/qaucli)
◦ Broadcom Advanced Control Suite (opt/Broadcom/BACScli) for help withconfiguration tasks
More informationhttp://www.hpe.com/storage/spockhttp://www.hpe.com/info/spphttp://www.hpe.com/support/hpesc
HPE 3PAR coexistenceThe HPE 3PAR StoreServ Storage array can coexist with other Hewlett Packard Enterprise storagearray families.For supported Hewlett Packard Enterprise storage array combinations and rules, see theHPESANDesign ReferenceGuide at the SPOCK website (SPOCKHome→DesignGuides→SANDesignGuide).
More informationhttp://www.hpe.com/storage/spock
8 Introduction
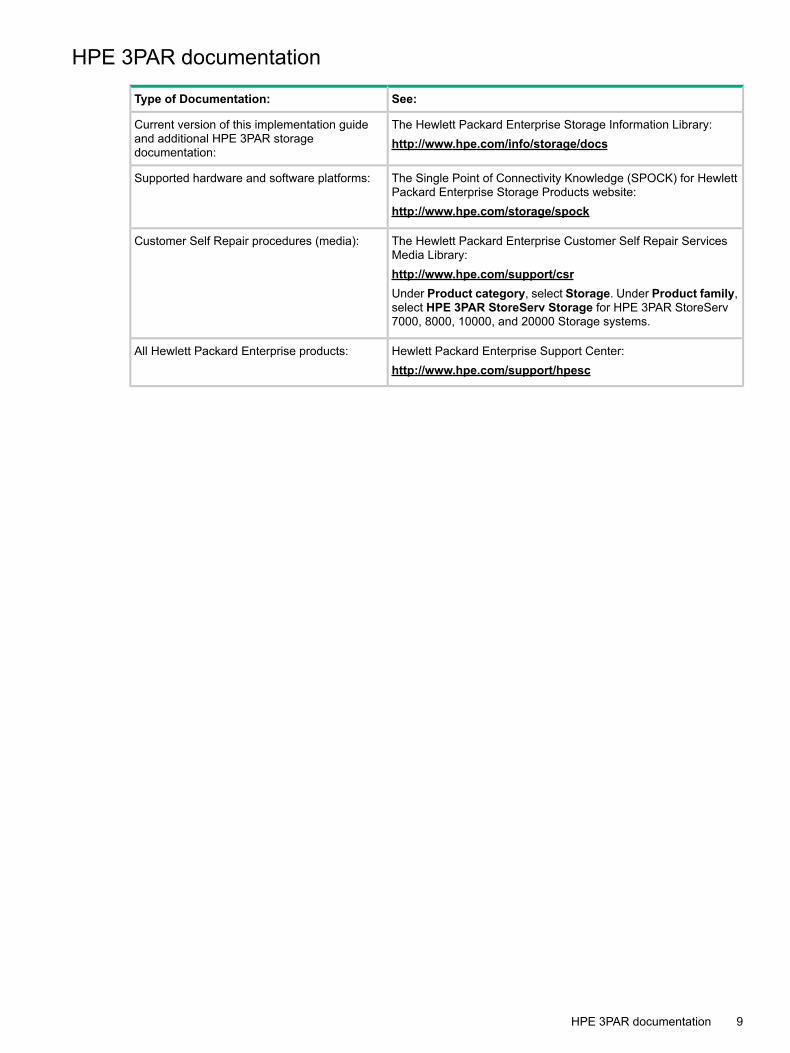
HPE 3PAR documentation
See:Type of Documentation:
The Hewlett Packard Enterprise Storage Information Library:Current version of this implementation guideand additional HPE 3PAR storagedocumentation:
http://www.hpe.com/info/storage/docs
The Single Point of Connectivity Knowledge (SPOCK) for HewlettPackard Enterprise Storage Products website:
Supported hardware and software platforms:
http://www.hpe.com/storage/spock
The Hewlett Packard Enterprise Customer Self Repair ServicesMedia Library:
Customer Self Repair procedures (media):
http://www.hpe.com/support/csrUnder Product category, select Storage. Under Product family,select HPE 3PAR StoreServ Storage for HPE 3PAR StoreServ7000, 8000, 10000, and 20000 Storage systems.
Hewlett Packard Enterprise Support Center:All Hewlett Packard Enterprise products:http://www.hpe.com/support/hpesc
HPE 3PAR documentation 9
2 3PAR RHEL quick connectBefore you begin
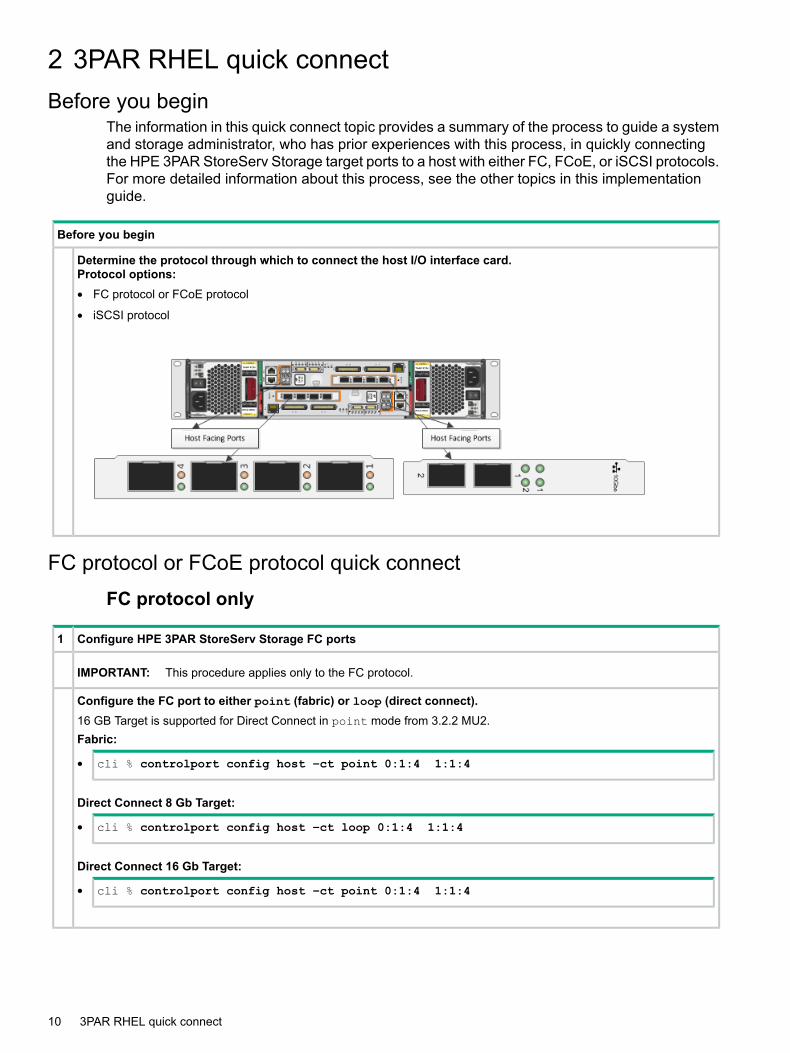
The information in this quick connect topic provides a summary of the process to guide a systemand storage administrator, who has prior experiences with this process, in quickly connectingthe HPE 3PAR StoreServ Storage target ports to a host with either FC, FCoE, or iSCSI protocols.For more detailed information about this process, see the other topics in this implementationguide.
Before you begin
Determine the protocol through which to connect the host I/O interface card.Protocol options:• FC protocol or FCoE protocol
• iSCSI protocol
FC protocol or FCoE protocol quick connectFC protocol only
Configure HPE 3PAR StoreServ Storage FC ports1
IMPORTANT: This procedure applies only to the FC protocol.
Configure the FC port to either point (fabric) or loop (direct connect).16 GB Target is supported for Direct Connect in point mode from 3.2.2 MU2.Fabric:
• cli % controlport config host –ct point 0:1:4 1:1:4
Direct Connect 8 Gb Target:
• cli % controlport config host –ct loop 0:1:4 1:1:4
Direct Connect 16 Gb Target:
• cli % controlport config host –ct point 0:1:4 1:1:4
10 3PAR RHEL quick connect
FCoE protocol only
Configure HPE 3PAR StoreServ Storage CNA ports and host BIOS settings1
IMPORTANT: This procedure applies only to the FCoE protocol.
1. Configure the CNA ports to the FCoE protocol. The FCoE protocol defaults to point (fabric) topology and host mode.
cli % controlport config fcoe 0:1:4 1:1:4
2. On the host, set the Storage or NIC personality to FCoE.
• For Broadcom cards, this setting is available in the CNA BIOS settings.
• For Emulex CNA cards, this setting is available in the Server BIOS.
Common to both FC and FCoE
OS boot2
Boot from local server disk
1. Install the OS.2. Update the following from the information at SPOCK (from SPOCK Home under Explore Storage Interoperability
With SPOCK, selectExplore HPE 3PARStoreServ Storage interoperability→Explore HPE 3PARBlock Personainteroperability):http://www.hpe.com/storage/spock
• Host drivers
• BIOS
• Firmware
OR
Boot from SAN (BFS)
NOTE: Both point (fabric) and loop (direct connect) modes support boot from SAN.1. Create a zone configuration between the host and the storage. Obtain the host WWN from the HBA BIOS.2. Create the host definition on the HPE 3PAR StoreServ Storage with the host WWN using Generic-ALUA Persona
2 or Generic Persona 1.3. Create a storage volume for the OS to be installed, and then export the LUN (logical unit number). Hewlett Packard
Enterprise recommends using the smallest LUN number (LUN 0).4. Power up the host, enable the HBA/CNA BIOS, and then configure the Boot LUN Device.5. Change the Server Boot Order to boot from the HBA/CNA.6. Install the OS. Use boot: Linux mpath with RHEL 5 to enable multipath during boot.7. After completing the installation, configure the /etc/multipath.conf for 3PAR specific device configuration and
tune the host driver parameters.8. Rebuild the initramfs image, and then reboot so that the multipath configuration takes effect on the boot device.9. Update the following based from the information at SPOCK (from SPOCK Home under Explore Storage
Interoperability With SPOCK, select Explore HPE 3PAR StoreServ Storage interoperability→Explore HPE3PAR Block Persona interoperability):http://www.hpe.com/storage/spock
• Host drivers
• BIOS
• Firmware
FC protocol or FCoE protocol quick connect 11
Tune Host Driver parameters3
Find the adapter and driver loaded on the system using the lspci -vv command.
# lspci -vv
Tune the following driver parameters in /etc/modprobe.d/modprobe.conf, and then rebuild the initramfsimage:QLogic:options qla2xxx ql2xmaxqdepth=16 qlport_down_retry=14
Emulex:options lpfc lpfc_devloss_tmo=14 lpfc_lun_queue_depth=16 lpfc_discovery_threads=32
NOTE: The lun_queue_depth parameter is optional and a site specific configuration.Brocade HBA:Change the path timeout value (pathtov) from 30 (default) to 14:
# bcu fcpim --pathtov 1/0 14
NOTE:For more information about updating drivers, see Hewlett Packard Enterprise Support Center:http://www.hpe.com/support/hpesc
Fabric zoning4
Create either one initiator to one target per zone or one initiator to multiple targets per zone. The multiple targets can bea mixture of 3PAR and other Hewlett Packard Enterprise storage systems.Beginning with HPE 3PAR OS 3.2.2, Smart SAN is supported on 16 Gb FC targets. Smart SAN for 3PAR through itsTDPZ (target-driven peer zoning) feature enables the user to create zoning from the array interface instead of requiringthe use of the FC switch interface. See “Smart SAN—FC” (page 23).
12 3PAR RHEL quick connect
Create host definition5
Create the Host Definition either with Generic-ALUAPersona 2 or Generic Persona 1, but Hewlett Packard Enterpriserecommends using Generic-ALUA Persona 2:
Table 2 Host persona support
CommentSupported PersonaHPE 3PAR OS
Generic Persona 1HPE 3PAR OS 3.1.1, 3.1.2
ALUA Support on Generic-ALUA Persona 2Generic-ALUA Persona 2(recommended)
HPE 3PAR OS 3.1.3 and laterHPE 3PAR Peer Motion support for single VV migrationrequires Generic-ALUA Persona 2.Generic Persona 1Minimum OS requirement RHEL 5.8 and later or RHEL 6.1and later for host Generic-ALUA Persona 2 support.3PAR plans to support additional features in later HPE 3PAROS releases only at Generic-ALUA Persona 2.With RHEL 7 and later, only Generic-ALUA Persona 2 issupported.
NOTE: With RHEL 7 and later, only Generic-ALUA Persona 2 is supported and ALUA enabled.
cli % createhost -persona 2 redhathost 1122334455667788 1122334455667799cli % showhost
Id Name Persona ---WWN/iSCSI_Name--- Port1 redhathost Generic-ALUA 2101001B323A9382 1:1:4
2100001B321A9382 1:1:42100001B321A9382 0:1:42101001B323A9382 0:1:4
FC protocol or FCoE protocol quick connect 13
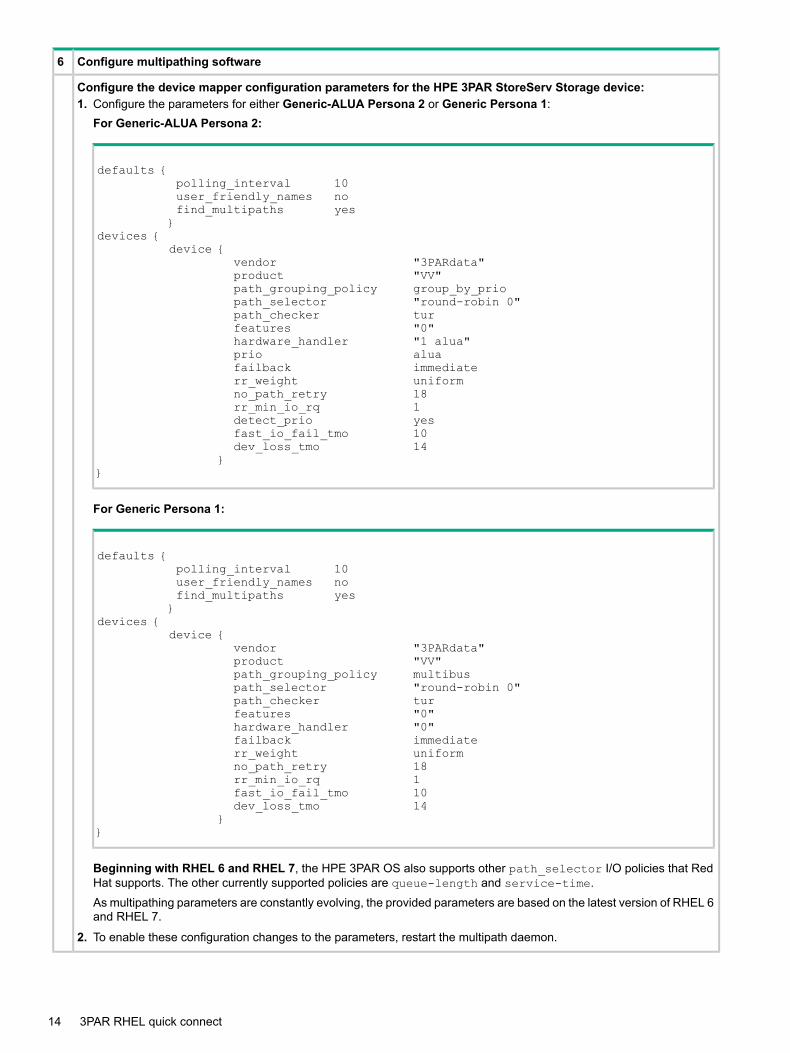
Configure multipathing software6
Configure the device mapper configuration parameters for the HPE 3PAR StoreServ Storage device:1. Configure the parameters for either Generic-ALUA Persona 2 or Generic Persona 1:
For Generic-ALUA Persona 2:
defaults {polling_interval 10user_friendly_names nofind_multipaths yes}
devices {device {
vendor "3PARdata"product "VV"path_grouping_policy group_by_priopath_selector "round-robin 0"path_checker turfeatures "0"hardware_handler "1 alua"prio aluafailback immediaterr_weight uniformno_path_retry 18rr_min_io_rq 1detect_prio yesfast_io_fail_tmo 10dev_loss_tmo 14
}}
For Generic Persona 1:
defaults {polling_interval 10user_friendly_names nofind_multipaths yes}
devices {device {
vendor "3PARdata"product "VV"path_grouping_policy multibuspath_selector "round-robin 0"path_checker turfeatures "0"hardware_handler "0"failback immediaterr_weight uniformno_path_retry 18rr_min_io_rq 1fast_io_fail_tmo 10dev_loss_tmo 14
}}
Beginning with RHEL 6 and RHEL 7, the HPE 3PAR OS also supports other path_selector I/O policies that RedHat supports. The other currently supported policies are queue-length and service-time.As multipathing parameters are constantly evolving, the provided parameters are based on the latest version of RHEL 6and RHEL 7.
2. To enable these configuration changes to the parameters, restart the multipath daemon.
14 3PAR RHEL quick connect
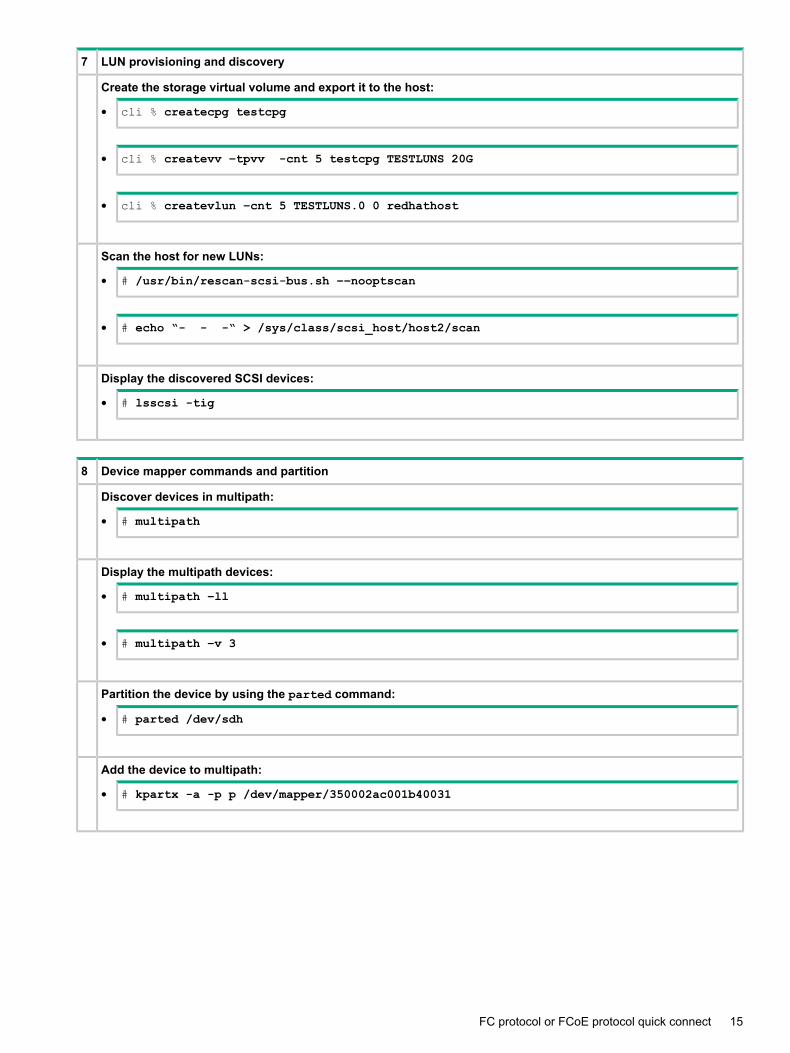
LUN provisioning and discovery7
Create the storage virtual volume and export it to the host:
• cli % createcpg testcpg
• cli % createvv –tpvv -cnt 5 testcpg TESTLUNS 20G
• cli % createvlun –cnt 5 TESTLUNS.0 0 redhathost
Scan the host for new LUNs:
• # /usr/bin/rescan-scsi-bus.sh ––nooptscan
• # echo “- - -“ > /sys/class/scsi_host/host2/scan
Display the discovered SCSI devices:
• # lsscsi -tig
Device mapper commands and partition8
Discover devices in multipath:
• # multipath
Display the multipath devices:
• # multipath –ll
• # multipath –v 3
Partition the device by using the parted command:
• # parted /dev/sdh
Add the device to multipath:
• # kpartx -a -p p /dev/mapper/350002ac001b40031
FC protocol or FCoE protocol quick connect 15
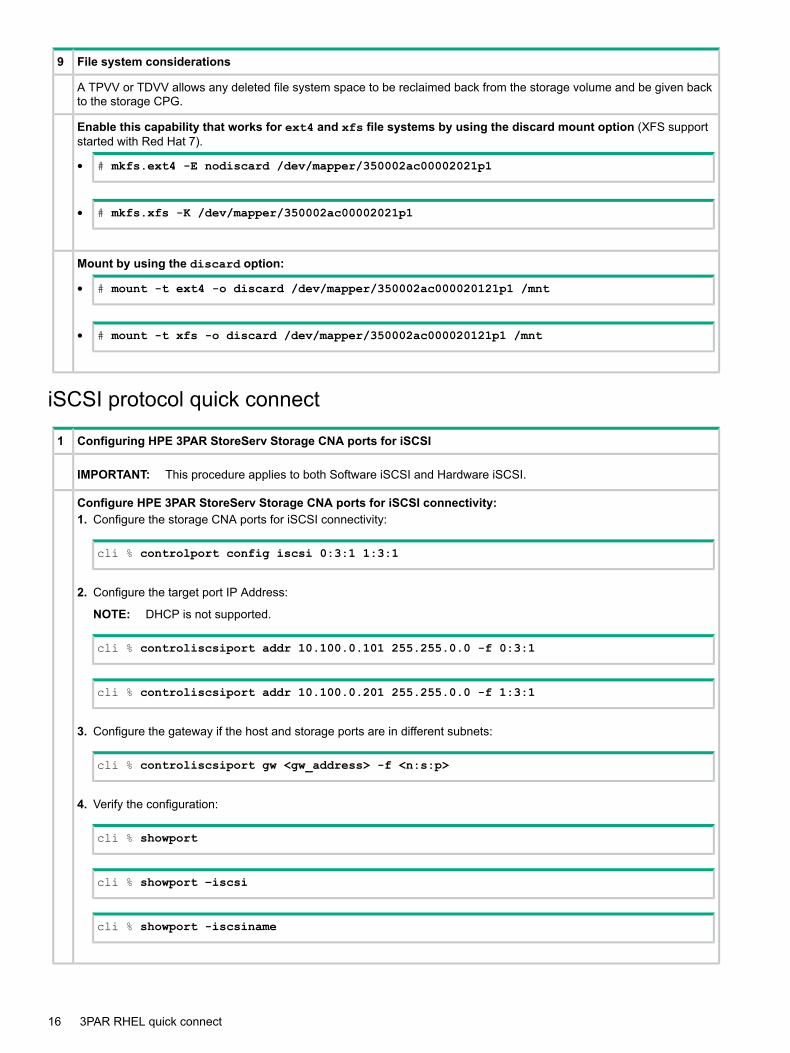
File system considerations9
A TPVV or TDVV allows any deleted file system space to be reclaimed back from the storage volume and be given backto the storage CPG.
Enable this capability that works for ext4 and xfs file systems by using the discard mount option (XFS supportstarted with Red Hat 7).
• # mkfs.ext4 -E nodiscard /dev/mapper/350002ac00002021p1
• # mkfs.xfs -K /dev/mapper/350002ac00002021p1
Mount by using the discard option:
• # mount -t ext4 -o discard /dev/mapper/350002ac000020121p1 /mnt
• # mount -t xfs -o discard /dev/mapper/350002ac000020121p1 /mnt
iSCSI protocol quick connect
Configuring HPE 3PAR StoreServ Storage CNA ports for iSCSI1
IMPORTANT: This procedure applies to both Software iSCSI and Hardware iSCSI.
Configure HPE 3PAR StoreServ Storage CNA ports for iSCSI connectivity:1. Configure the storage CNA ports for iSCSI connectivity:
cli % controlport config iscsi 0:3:1 1:3:1
2. Configure the target port IP Address:
NOTE: DHCP is not supported.
cli % controliscsiport addr 10.100.0.101 255.255.0.0 -f 0:3:1
cli % controliscsiport addr 10.100.0.201 255.255.0.0 -f 1:3:1
3. Configure the gateway if the host and storage ports are in different subnets:
cli % controliscsiport gw <gw_address> -f <n:s:p>
4. Verify the configuration:
cli % showport
cli % showport –iscsi
cli % showport -iscsiname
16 3PAR RHEL quick connect
Hardware iSCSI only
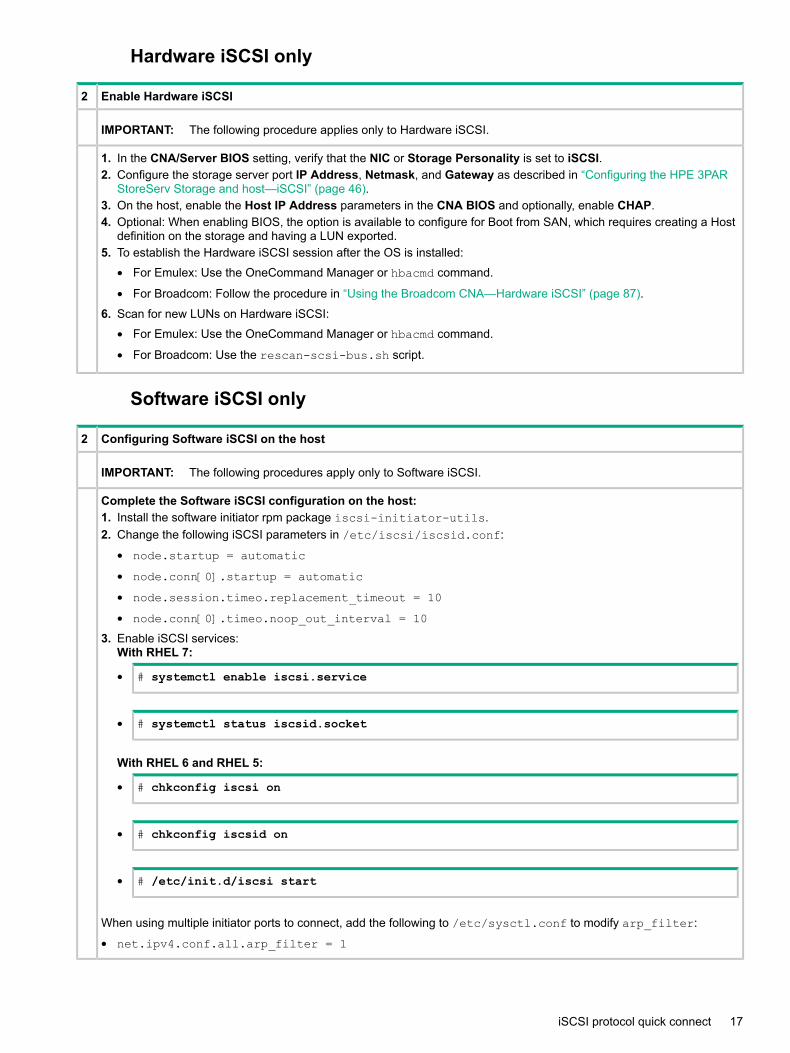
Enable Hardware iSCSI2
IMPORTANT: The following procedure applies only to Hardware iSCSI.
1. In the CNA/Server BIOS setting, verify that the NIC or Storage Personality is set to iSCSI.2. Configure the storage server port IP Address, Netmask, and Gateway as described in “Configuring the HPE 3PAR
StoreServ Storage and host—iSCSI” (page 46).3. On the host, enable the Host IP Address parameters in the CNA BIOS and optionally, enable CHAP.4. Optional: When enabling BIOS, the option is available to configure for Boot from SAN, which requires creating a Host
definition on the storage and having a LUN exported.5. To establish the Hardware iSCSI session after the OS is installed:
• For Emulex: Use the OneCommand Manager or hbacmd command.
• For Broadcom: Follow the procedure in “Using the Broadcom CNA—Hardware iSCSI” (page 87).
6. Scan for new LUNs on Hardware iSCSI:
• For Emulex: Use the OneCommand Manager or hbacmd command.
• For Broadcom: Use the rescan-scsi-bus.sh script.
Software iSCSI only
Configuring Software iSCSI on the host2
IMPORTANT: The following procedures apply only to Software iSCSI.
Complete the Software iSCSI configuration on the host:1. Install the software initiator rpm package iscsi-initiator-utils.2. Change the following iSCSI parameters in /etc/iscsi/iscsid.conf:
• node.startup = automatic
• node.conn[0].startup = automatic
• node.session.timeo.replacement_timeout = 10
• node.conn[0].timeo.noop_out_interval = 10
3. Enable iSCSI services:With RHEL 7:
• # systemctl enable iscsi.service
• # systemctl status iscsid.socket
With RHEL 6 and RHEL 5:
• # chkconfig iscsi on
• # chkconfig iscsid on
• # /etc/init.d/iscsi start
When using multiple initiator ports to connect, add the following to /etc/sysctl.conf to modify arp_filter:
• net.ipv4.conf.all.arp_filter = 1
iSCSI protocol quick connect 17
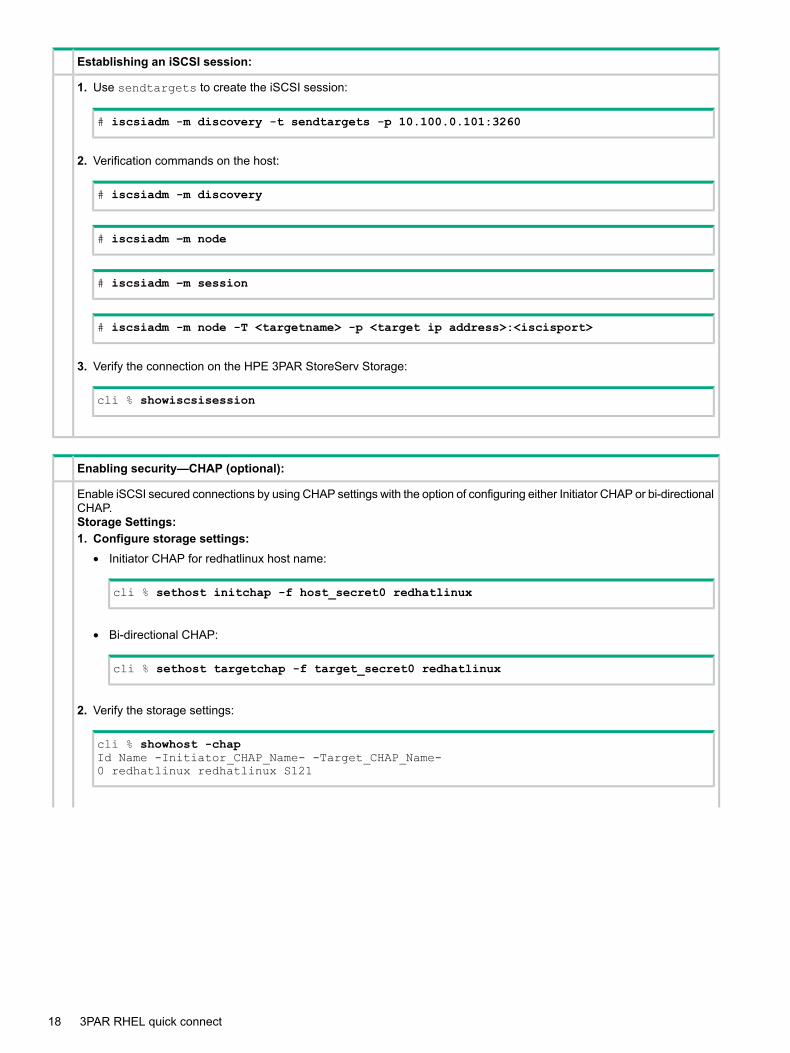
Establishing an iSCSI session:
1. Use sendtargets to create the iSCSI session:
# iscsiadm -m discovery -t sendtargets -p 10.100.0.101:3260
2. Verification commands on the host:
# iscsiadm -m discovery
# iscsiadm –m node
# iscsiadm –m session
# iscsiadm -m node -T <targetname> -p <target ip address>:<iscisport>
3. Verify the connection on the HPE 3PAR StoreServ Storage:
cli % showiscsisession
Enabling security—CHAP (optional):
Enable iSCSI secured connections by using CHAP settings with the option of configuring either Initiator CHAP or bi-directionalCHAP.Storage Settings:1. Configure storage settings:
• Initiator CHAP for redhatlinux host name:
cli % sethost initchap -f host_secret0 redhatlinux
• Bi-directional CHAP:
cli % sethost targetchap -f target_secret0 redhatlinux
2. Verify the storage settings:
cli % showhost -chapId Name -Initiator_CHAP_Name- -Target_CHAP_Name-0 redhatlinux redhatlinux S121
18 3PAR RHEL quick connect
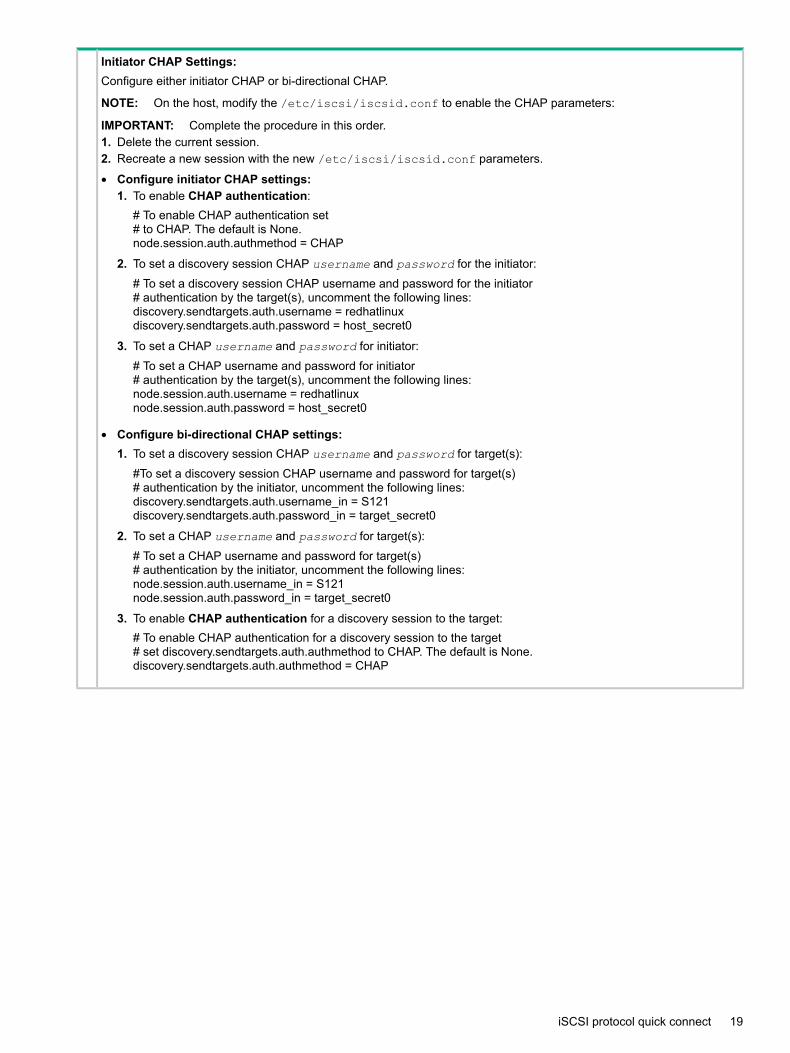
Initiator CHAP Settings:Configure either initiator CHAP or bi-directional CHAP.
NOTE: On the host, modify the /etc/iscsi/iscsid.conf to enable the CHAP parameters:
IMPORTANT: Complete the procedure in this order.1. Delete the current session.2. Recreate a new session with the new /etc/iscsi/iscsid.conf parameters.
• Configure initiator CHAP settings:1. To enable CHAP authentication:
# To enable CHAP authentication set# to CHAP. The default is None.node.session.auth.authmethod = CHAP
2. To set a discovery session CHAP username and password for the initiator:# To set a discovery session CHAP username and password for the initiator# authentication by the target(s), uncomment the following lines:discovery.sendtargets.auth.username = redhatlinuxdiscovery.sendtargets.auth.password = host_secret0
3. To set a CHAP username and password for initiator:# To set a CHAP username and password for initiator# authentication by the target(s), uncomment the following lines:node.session.auth.username = redhatlinuxnode.session.auth.password = host_secret0
• Configure bi-directional CHAP settings:1. To set a discovery session CHAP username and password for target(s):
#To set a discovery session CHAP username and password for target(s)# authentication by the initiator, uncomment the following lines:discovery.sendtargets.auth.username_in = S121discovery.sendtargets.auth.password_in = target_secret0
2. To set a CHAP username and password for target(s):# To set a CHAP username and password for target(s)# authentication by the initiator, uncomment the following lines:node.session.auth.username_in = S121node.session.auth.password_in = target_secret0
3. To enable CHAP authentication for a discovery session to the target:# To enable CHAP authentication for a discovery session to the target# set discovery.sendtargets.auth.authmethod to CHAP. The default is None.discovery.sendtargets.auth.authmethod = CHAP
iSCSI protocol quick connect 19
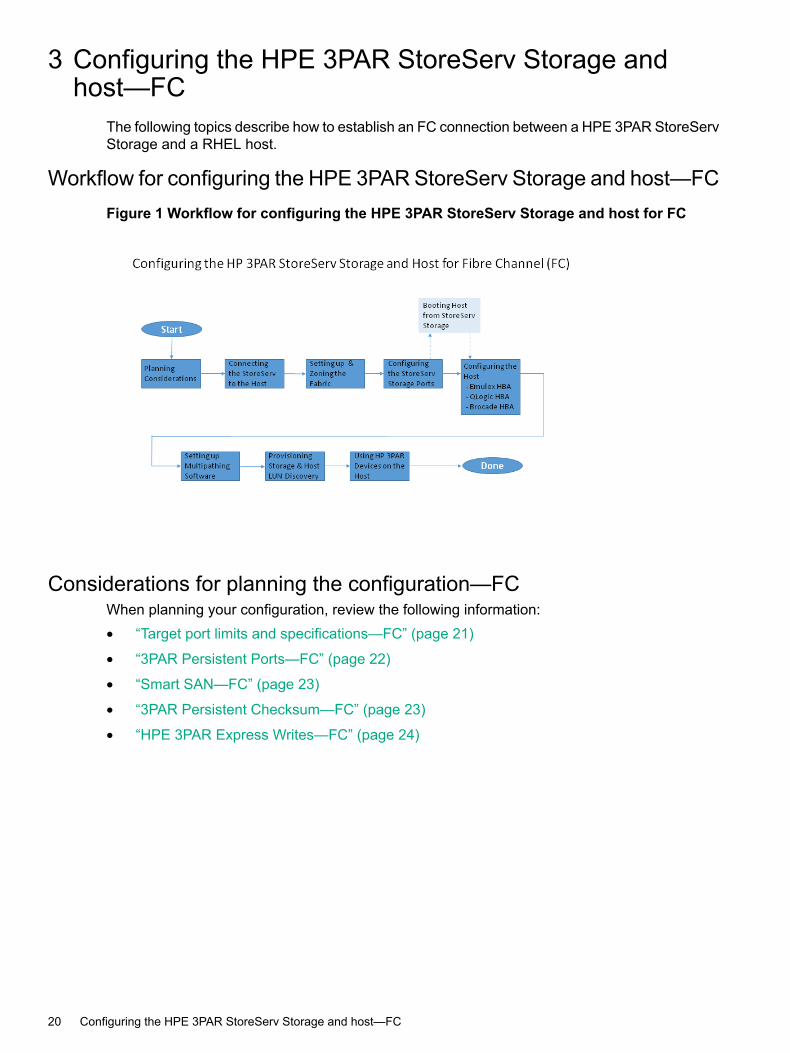
3 Configuring the HPE 3PAR StoreServ Storage andhost—FC
The following topics describe how to establish an FC connection between a HPE 3PAR StoreServStorage and a RHEL host.
Workflow for configuring the HPE 3PAR StoreServ Storage and host—FCFigure 1 Workflow for configuring the HPE 3PAR StoreServ Storage and host for FC
Considerations for planning the configuration—FCWhen planning your configuration, review the following information:• “Target port limits and specifications—FC” (page 21)
• “3PAR Persistent Ports—FC” (page 22)
• “Smart SAN—FC” (page 23)
• “3PAR Persistent Checksum—FC” (page 23)
• “HPE 3PAR Express Writes—FC” (page 24)
20 Configuring the HPE 3PAR StoreServ Storage and host—FC
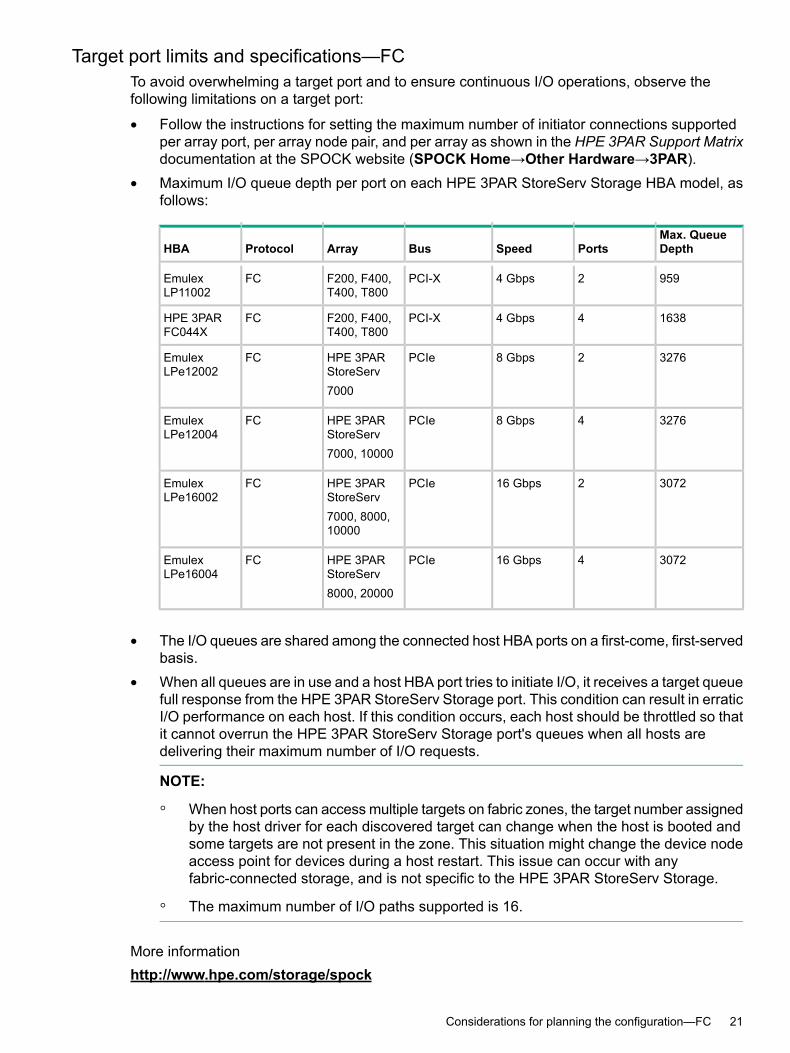
Target port limits and specifications—FCTo avoid overwhelming a target port and to ensure continuous I/O operations, observe thefollowing limitations on a target port:
• Follow the instructions for setting the maximum number of initiator connections supportedper array port, per array node pair, and per array as shown in the HPE 3PAR Support Matrixdocumentation at the SPOCK website (SPOCK Home→Other Hardware→3PAR).
• Maximum I/O queue depth per port on each HPE 3PAR StoreServ Storage HBA model, asfollows:
Max. QueueDepthPortsSpeedBusArrayProtocolHBA
95924 GbpsPCI-XF200, F400,T400, T800
FCEmulexLP11002
163844 GbpsPCI-XF200, F400,T400, T800
FCHPE 3PARFC044X
327628 GbpsPCIeHPE 3PARStoreServ
FCEmulexLPe12002
7000
327648 GbpsPCIeHPE 3PARStoreServ
FCEmulexLPe12004
7000, 10000
3072216 GbpsPCIeHPE 3PARStoreServ
FCEmulexLPe16002
7000, 8000,10000
3072416 GbpsPCIeHPE 3PARStoreServ
FCEmulexLPe16004
8000, 20000
• The I/O queues are shared among the connected host HBA ports on a first-come, first-servedbasis.
• When all queues are in use and a host HBA port tries to initiate I/O, it receives a target queuefull response from the HPE 3PAR StoreServ Storage port. This condition can result in erraticI/O performance on each host. If this condition occurs, each host should be throttled so thatit cannot overrun the HPE 3PAR StoreServ Storage port's queues when all hosts aredelivering their maximum number of I/O requests.
NOTE:
◦ When host ports can access multiple targets on fabric zones, the target number assignedby the host driver for each discovered target can change when the host is booted andsome targets are not present in the zone. This situation might change the device nodeaccess point for devices during a host restart. This issue can occur with anyfabric-connected storage, and is not specific to the HPE 3PAR StoreServ Storage.
◦ The maximum number of I/O paths supported is 16.
More informationhttp://www.hpe.com/storage/spock
Considerations for planning the configuration—FC 21

3PAR Persistent Ports—FCThe 3PAR Persistent Ports feature (or virtual ports) feature minimizes I/O disruption during aHPE 3PAR StoreServ Storage online upgrade or node-down event. Port shutdown or reset eventsdo not trigger this feature.Each FC target storage array port has a partner array port automatically assigned by the system.Partner ports are assigned across array node pairs.The 3PAR Persistent Ports feature allows a HPE 3PAR StoreServ Storage FC port to assumethe identity of a failed port (WWN port) while retaining its own identity. Where a given physicalport assumes the identity of its partner port, the assumed port is designated as a persistent port.Array port failover and failback with 3PAR Persistent Ports is transparent to most host-basedmultipathing software, which can keep all of its I/O paths active.
NOTE: Use of the 3PAR Persistent Ports feature does not negate the need for properly installed,configured, and maintained host multipathing software.
For a more complete description of the 3PAR Persistent Ports feature, its operation, and acomplete list of required setup and connectivity guidelines, see the following documents:• See the technical white paper HPE 3PAR StoreServ Persistent Ports available at the Hewlett
Packard Enterprise Storage Information Library website:• See the HPE 3PAR Command Line Interface Administrator's Manual, “Using Persistent
Ports for Nondisruptive Online Software Upgrades” at the Hewlett Packard Enterprise StorageInformation Library website:
More informationhttp://www.hpe.com/info/storage/docs
3PAR Persistent Ports setup and connectivity guidelines—FCBeginning with HPE 3PAR OS 3.1.2, the 3PAR Persistent Ports feature is supported for FCtarget ports.Beginning with HPE 3PAR OS 3.1.3, the 3PAR Persistent Ports feature has additionalfunctionality to minimize I/O disruption during an array port loss_sync event triggered by a lossof array port connectivity to the fabric.Follow the specific cabling setup and connectivity guidelines so that 3PAR Persistent Portsfunction properly:• HPE 3PAR StoreServ Storage FC partner ports must be connected to the same FC fabric,
and preferably to different FC switches on the fabric.• The FC fabric must support NPIV, and NPIV must be enabled.
• Configure the host-facing HBAs for point-to-point fabric connection (There is no support fordirect-connect “loops”.)
For information regarding the 3PAR Persistent Ports feature for an FCoE initiator to FC targetconfiguration (FCoE to FC switched), see “Configuring the HPE 3PAR StoreServ Storage andhost—FC” (page 20).
22 Configuring the HPE 3PAR StoreServ Storage and host—FC
Smart SAN—FCBeginning with HPE 3PAR OS 3.2.2, the following HPE 3PAR StoreServ Storage systemssupport Smart SAN on 16 Gb FC targets:
• HPE 3PAR StoreServ 20000 Storage
• HPE 3PAR StoreServ 10000 Storage
• HPE 3PAR StoreServ 8000 Storage
• HPE 3PAR StoreServ 7000 StorageSmart SAN for HPE 3PAR through its TDPZ (target-driven peer zoning) feature enables customersto automate peer zoning, which results in the creation of fewer zones and enables configurationof zones in minutes. Through automation, it reduces the probability of errors and potentialdowntime. Without Smart SAN, an administrator needs to preconfigure zones on the FC switch,before configuring hosts and VLUNs on the HPE 3PAR StoreServ Storage. With Smart SAN,the administrator can configure and control zoning directly from the HPE 3PAR CLI.For information about supported FC switches and their firmware revisions with Smart SAN, seethe SPOCK website.For more information about Smart SAN for HPE 3PAR, including configuration, see theHPE 3PARSmart SAN 1.0 User Guide at the Hewlett Packard Enterprise Storage Information Library website.
More informationhttp://www.hpe.com/storage/spockhttp://www.hpe.com/info/storage/docs
3PAR Persistent Checksum—FCThe 3PAR Persistent Checksum feature, available on 3PAR StoreServ 20000 and 8000 Storagesystems (arrays), provides end-to-end data integrity protection from the host initiator HBA throughthe data network to the backend drives on the 3PAR StoreServ system. This feature is basedon the DIF protection model defined by the SCSI T10 committee. It provides data protectionfrom silent data corruption of any media and transmission errors caused by any component inthe I/O stack across the data network. Detection and recovery features have been built into the3PAR OS to correct issues discovered through this feature.The minimum host HBA driver version is required to support 3PAR Persistent Checksum overFC connections. Only HPE supplied drivers through HPE Service Pack for Proliant (SPP) or anindividual adapter driver downloaded from the HPE support website has DIF Enabled support.All HPE StoreFabric 16 Gb Qlogic and Emulex based adapters are supported, except the EmulexSN1000E adapter.For supported HBAs, driver version, and supported host OSs that support 3PAR PersistentChecksum (DIF capable), see SPOCK website.For additional information on the 3PAR Persistent Checksum, see the HPE 3PAR StoreServArchitecture technical whitepaper at the Hewlett Packard Enterprise Storage Information Librarywebsite.
More informationhttp://www.hpe.com/storage/spockhttp://www.hpe.com/info/storage/docs
Considerations for planning the configuration—FC 23
HPE 3PAR Express Writes—FCBeginning with HPE 3PAR OS 3.2.1, the Express Writes feature was introduced and is onlyavailable on the HPE 3PAR StoreServ 7000 and 10000 Storage systems with 8 Gb targets andnot supported on HPE 3PAR StoreServ 20000, 10000, 8000, or 7000 Storage systems with 16Gb targets. This feature optimizes the performance for small block random writes and is enabledby default with 8 Gb Targets in Host HBA mode with bit Express Writes.
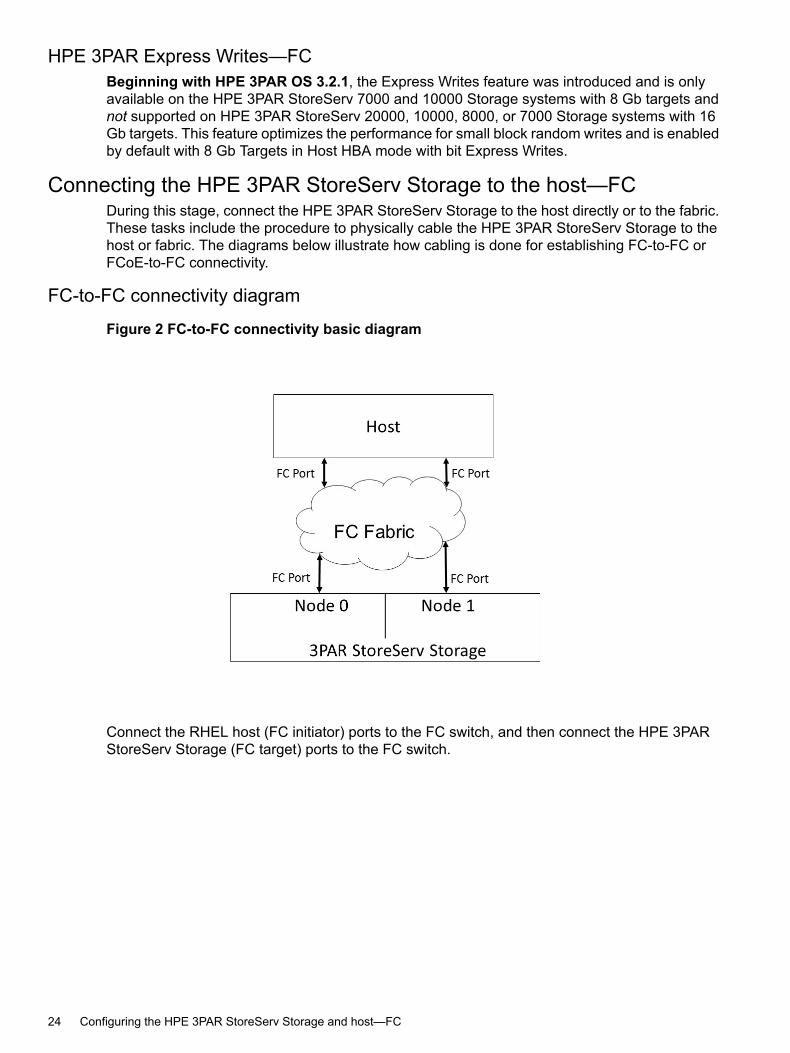
Connecting the HPE 3PAR StoreServ Storage to the host—FCDuring this stage, connect the HPE 3PAR StoreServ Storage to the host directly or to the fabric.These tasks include the procedure to physically cable the HPE 3PAR StoreServ Storage to thehost or fabric. The diagrams below illustrate how cabling is done for establishing FC-to-FC orFCoE-to-FC connectivity.
FC-to-FC connectivity diagram
Figure 2 FC-to-FC connectivity basic diagram
Connect the RHEL host (FC initiator) ports to the FC switch, and then connect the HPE 3PARStoreServ Storage (FC target) ports to the FC switch.
24 Configuring the HPE 3PAR StoreServ Storage and host—FC
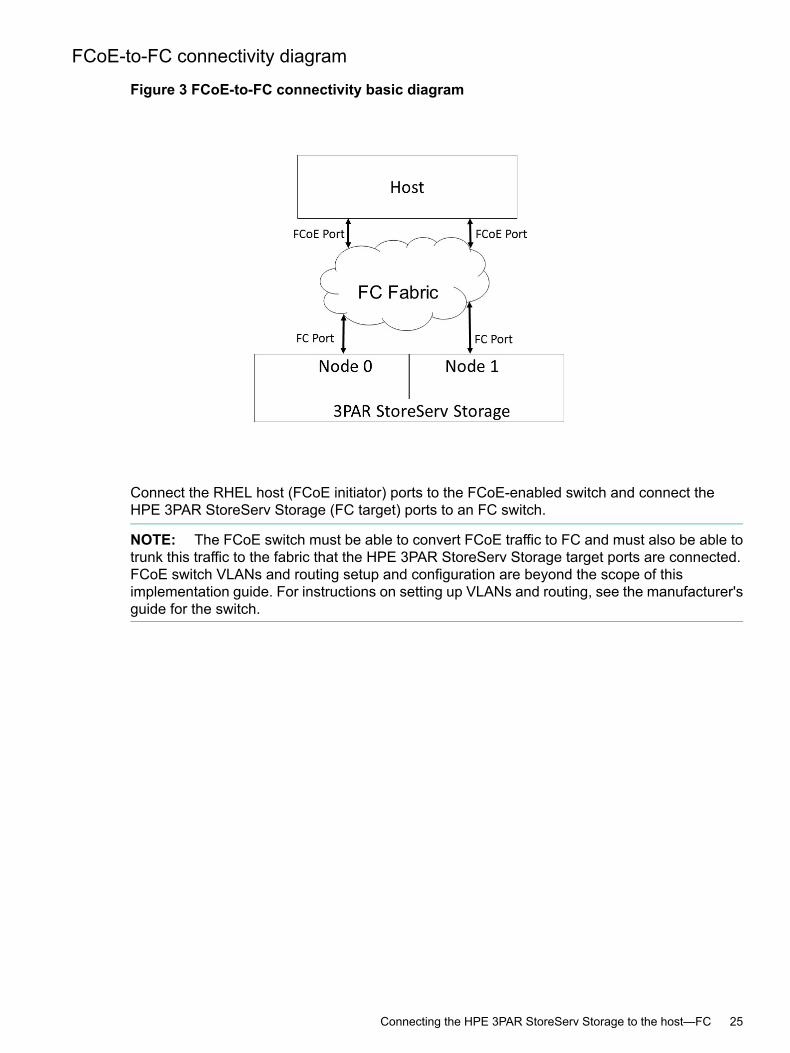
FCoE-to-FC connectivity diagram
Figure 3 FCoE-to-FC connectivity basic diagram
Connect the RHEL host (FCoE initiator) ports to the FCoE-enabled switch and connect theHPE 3PAR StoreServ Storage (FC target) ports to an FC switch.
NOTE: The FCoE switch must be able to convert FCoE traffic to FC and must also be able totrunk this traffic to the fabric that the HPE 3PAR StoreServ Storage target ports are connected.FCoE switch VLANs and routing setup and configuration are beyond the scope of thisimplementation guide. For instructions on setting up VLANs and routing, see the manufacturer'sguide for the switch.
Connecting the HPE 3PAR StoreServ Storage to the host—FC 25

Setting up and zoning the fabric—FC
NOTE:• This topic does not apply when deploying HPE Virtual Connect Direct-Attach Fibre Channel
storage for HPE 3PAR StoreServ Storage systems, where the HPE 3PAR StoreServ Storageports are cabled directly to the uplink ports on the Virtual Connect FlexFabric 10 Gb/24-portModule for c-Class BladeSystem. Zoning is automatically configured based on the VirtualConnect SAN Fabric and server profile definitions.For more information about Virtual Connect, Virtual Connect interconnect modules, VirtualConnect Direct-Attach Fibre Channel feature, and the HPE SAN Design Reference Guide,see the SPOCK website (SPOCK Home→Design Guides→SAN Design Guide).
• If Smart SAN TDPZ zones are created through the HPE 3PAR OS interface, this “Settingup and zoning the fabric—FC” (page 26) topic (about zoning through the switch managementinterface) does not apply.
Fabric zoning controls which FC end-devices have access to each other on the fabric. Zoningalso isolates the host and HPE 3PAR StoreServ Storage ports from Registered State ChangeNotifications (RSCNs) that are irrelevant to these ports.
More informationhttp://www.hpe.com/storage/spock
Setting up fabric zoning—FCSet up fabric zoning by associating the device World Wide Names (WWNs) or the switch portswith specified zones in the fabric. Use either the WWN method or the port zoning method withthe HPE 3PAR StoreServ Storage. The WWN zoning method is recommended because the zonesurvives the changes of switch ports when cables are moved around on a fabric.
Employing fabric zoning—FCEmploy fabric zoning, by using the methods provided by the switch vendor, to create relationshipsbetween host HBA ports and HPE 3PAR StoreServ Storage ports before connecting the hostHBA ports or HPE 3PAR StoreServ Storage ports to the fabrics.
26 Configuring the HPE 3PAR StoreServ Storage and host—FC
Selecting a zoning configuration—FCFC switch vendors support the zoning of the fabric end-devices in different zoning configurations.There are advantages and disadvantages with each zoning configuration. Select a zoningconfiguration based on your needs.The HPE 3PAR StoreServ Storage arrays support the following zoning configurations:• One initiator to one target per zone
• One initiator to multiple targets per zone (zoning by HBA). This zoning configuration isrecommended for the HPE 3PAR StoreServ Storage. Zoning by HBA is required forcoexistence with other Hewlett Packard Enterprise storage arrays.
NOTE:
◦ For high availability and clustered environments that require multiple initiators to accessthe same set of target ports, Hewlett Packard Enterprise recommends creating separatezones for each initiator with the same set of target ports.
◦ The storage targets in the zone can be from the same HPE 3PAR StoreServ Storage,multiple HPE 3PAR StoreServ Storage, or a mixture of 3PAR and other Hewlett PackardEnterprise storage systems.
For more information about using one initiator to multiple targets per zone, see the HPE SANDesign ReferenceGuide at the SPOCK website (SPOCKHome→DesignGuides→SANDesignGuide).If you use an unsupported zoning configuration and an issue occurs, Hewlett PackardEnterprise might require that you implement one of the supported zoning configurations as partof the corrective action.
More informationhttp://www.hpe.com/storage/spock
Verifying that each initiator is zoned with the correct targets—FC
Prerequisites for verifying that each initiator is zoned with the correct targets—FCBefore verify that each initiator is zoned with the correct targets, complete the following tasks:• Complete configuration of the storage port to the host and connect to the switch.
• Create a zone configuration on the switch following the HPE SAN Design Reference Guideand enable the zone set configuration.
• Use the showhost command to verify that the host is seen on the storage node.
Verify:√
After configuring, zoning and connecting each host HBA port and HPE 3PAR StoreServ Storage port to thefabrics, verify the switch and zone configurations by using the 3PAR CLI showhost command, to ensure thateach initiator is zoned with the correct targets.
More information“Configuring ports on the HPE 3PAR StoreServ Storage for fabric connection—FC” (page 32)
Connecting the HPE 3PAR StoreServ Storage to the host—FC 27
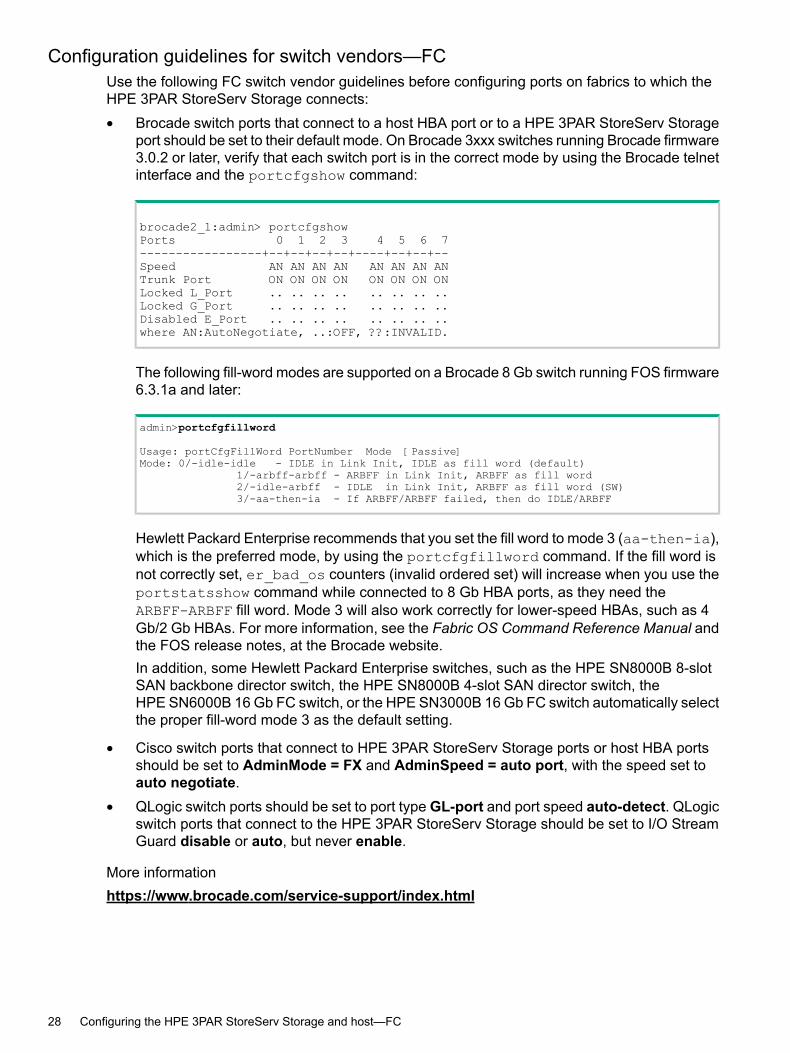
Configuration guidelines for switch vendors—FCUse the following FC switch vendor guidelines before configuring ports on fabrics to which theHPE 3PAR StoreServ Storage connects:• Brocade switch ports that connect to a host HBA port or to a HPE 3PAR StoreServ Storage
port should be set to their default mode. On Brocade 3xxx switches running Brocade firmware3.0.2 or later, verify that each switch port is in the correct mode by using the Brocade telnetinterface and the portcfgshow command:
brocade2_1:admin> portcfgshowPorts 0 1 2 3 4 5 6 7-----------------+--+--+--+--+----+--+--+--Speed AN AN AN AN AN AN AN ANTrunk Port ON ON ON ON ON ON ON ONLocked L_Port .. .. .. .. .. .. .. ..Locked G_Port .. .. .. .. .. .. .. ..Disabled E_Port .. .. .. .. .. .. .. ..where AN:AutoNegotiate, ..:OFF, ??:INVALID.
The following fill-word modes are supported on a Brocade 8 Gb switch running FOS firmware6.3.1a and later:
admin>portcfgfillword
Usage: portCfgFillWord PortNumber Mode [Passive]Mode: 0/-idle-idle - IDLE in Link Init, IDLE as fill word (default)
1/-arbff-arbff - ARBFF in Link Init, ARBFF as fill word2/-idle-arbff - IDLE in Link Init, ARBFF as fill word (SW)3/-aa-then-ia - If ARBFF/ARBFF failed, then do IDLE/ARBFF
Hewlett Packard Enterprise recommends that you set the fill word to mode 3 (aa-then-ia),which is the preferred mode, by using the portcfgfillword command. If the fill word isnot correctly set, er_bad_os counters (invalid ordered set) will increase when you use theportstatsshow command while connected to 8 Gb HBA ports, as they need theARBFF-ARBFF fill word. Mode 3 will also work correctly for lower-speed HBAs, such as 4Gb/2 Gb HBAs. For more information, see the Fabric OS Command Reference Manual andthe FOS release notes, at the Brocade website.In addition, some Hewlett Packard Enterprise switches, such as the HPE SN8000B 8-slotSAN backbone director switch, the HPE SN8000B 4-slot SAN director switch, theHPE SN6000B 16 Gb FC switch, or the HPE SN3000B 16 Gb FC switch automatically selectthe proper fill-word mode 3 as the default setting.
• Cisco switch ports that connect to HPE 3PAR StoreServ Storage ports or host HBA portsshould be set to AdminMode = FX and AdminSpeed = auto port, with the speed set toauto negotiate.
• QLogic switch ports should be set to port type GL-port and port speed auto-detect. QLogicswitch ports that connect to the HPE 3PAR StoreServ Storage should be set to I/O StreamGuard disable or auto, but never enable.
More informationhttps://www.brocade.com/service-support/index.html
28 Configuring the HPE 3PAR StoreServ Storage and host—FC
Configuring the HPE 3PAR StoreServ Storage ports—FCBy default, the QLogic, Emulex, and Brocade drivers for the Red Hat Enterprise Linux orOracle Linux server support failover. For failover support using the QLogic, Emulex, or Brocadedriver, virtual volumes should be simultaneously exported down multiple paths to the host. Todo this, create a host definition on the HPE 3PAR StoreServ Storage that includes the WWNsof multiple HBA ports on the host, and then export the VLUNs (virtual logical unit number) to thathost definition. If each RHEL server within a cluster has its own host definition, the VLUNs mustbe exported to multiple host definitions.
NOTE:• Complete the configuration setup subtopics before connecting the HPE 3PAR StoreServ
Storage port to the host:
◦ “Configuring ports on the HPE 3PAR StoreServ Storage for a direct connection—FC”(page 30)
◦ “Configuring ports on the HPE 3PAR StoreServ Storage for fabric connection—FC”(page 32)
• When deploying Virtual Connect Direct-Attach Fibre Channel storage for HPE 3PAR StoreServStorage systems, where the HPE 3PAR StoreServ Storage ports are cabled directly to theuplink ports on the HPE Virtual Connect FlexFabric 10 Gb/24-port Module for c-ClassBladeSystem, follow the procedure in “Configuring ports on the HPE 3PAR StoreServ Storagefor fabric connection—FC” (page 32).
• For more information about Virtual Connect, Virtual Connect interconnect modules, VirtualConnect Direct-Attach Fibre Channel feature, and the HPE SAN Design Reference Guide,see the Hewlett Packard EnterpriseSupport Center website.
More informationhttp://www.hpe.com/support/hpesc
Configuring the HPE 3PAR StoreServ Storage ports—FC 29
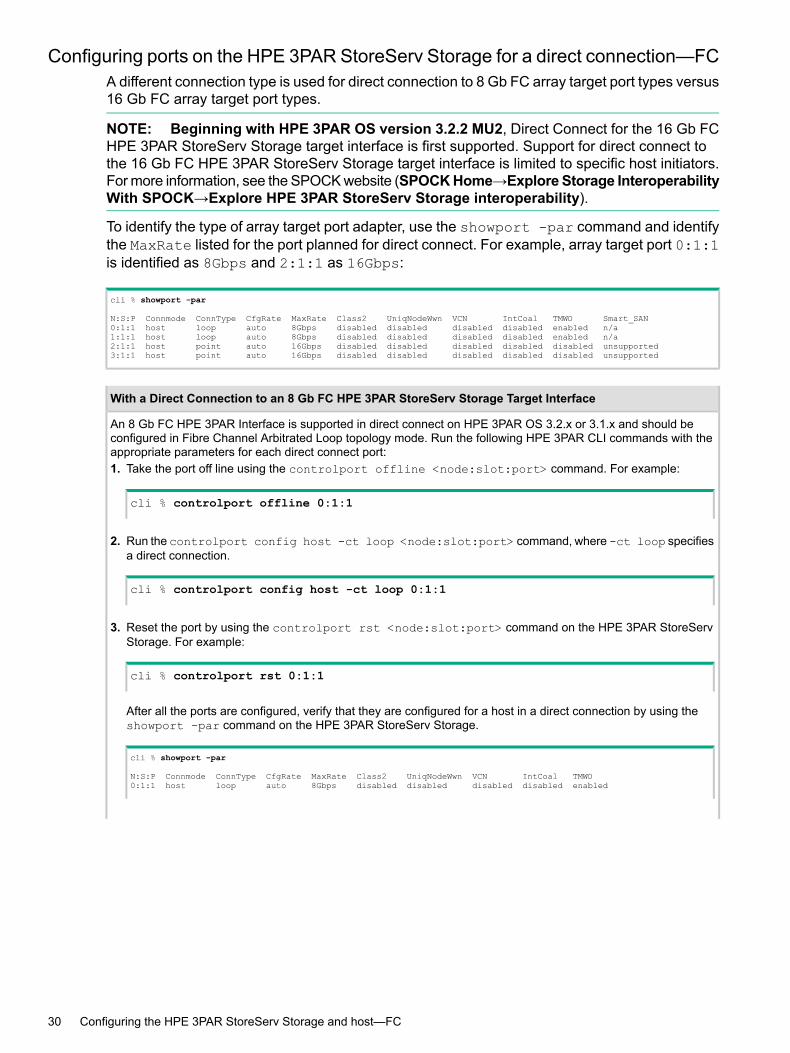
Configuring ports on the HPE 3PAR StoreServ Storage for a direct connection—FCA different connection type is used for direct connection to 8 Gb FC array target port types versus16 Gb FC array target port types.
NOTE: Beginning with HPE 3PAR OS version 3.2.2 MU2, Direct Connect for the 16 Gb FCHPE 3PAR StoreServ Storage target interface is first supported. Support for direct connect tothe 16 Gb FC HPE 3PAR StoreServ Storage target interface is limited to specific host initiators.For more information, see the SPOCK website (SPOCKHome→Explore Storage InteroperabilityWith SPOCK→Explore HPE 3PAR StoreServ Storage interoperability).
To identify the type of array target port adapter, use the showport -par command and identifythe MaxRate listed for the port planned for direct connect. For example, array target port 0:1:1is identified as 8Gbps and 2:1:1 as 16Gbps:
cli % showport -par
N:S:P Connmode ConnType CfgRate MaxRate Class2 UniqNodeWwn VCN IntCoal TMWO Smart_SAN0:1:1 host loop auto 8Gbps disabled disabled disabled disabled enabled n/a1:1:1 host loop auto 8Gbps disabled disabled disabled disabled enabled n/a2:1:1 host point auto 16Gbps disabled disabled disabled disabled disabled unsupported3:1:1 host point auto 16Gbps disabled disabled disabled disabled disabled unsupported
With a Direct Connection to an 8 Gb FC HPE 3PAR StoreServ Storage Target Interface
An 8 Gb FC HPE 3PAR Interface is supported in direct connect on HPE 3PAR OS 3.2.x or 3.1.x and should beconfigured in Fibre Channel Arbitrated Loop topology mode. Run the following HPE 3PAR CLI commands with theappropriate parameters for each direct connect port:1. Take the port off line using the controlport offline <node:slot:port> command. For example:
cli % controlport offline 0:1:1
2. Run the controlport config host -ct loop <node:slot:port> command, where -ct loop specifiesa direct connection.
cli % controlport config host -ct loop 0:1:1
3. Reset the port by using the controlport rst <node:slot:port> command on the HPE 3PAR StoreServStorage. For example:
cli % controlport rst 0:1:1
After all the ports are configured, verify that they are configured for a host in a direct connection by using theshowport -par command on the HPE 3PAR StoreServ Storage.
cli % showport -par
N:S:P Connmode ConnType CfgRate MaxRate Class2 UniqNodeWwn VCN IntCoal TMWO0:1:1 host loop auto 8Gbps disabled disabled disabled disabled enabled
30 Configuring the HPE 3PAR StoreServ Storage and host—FC
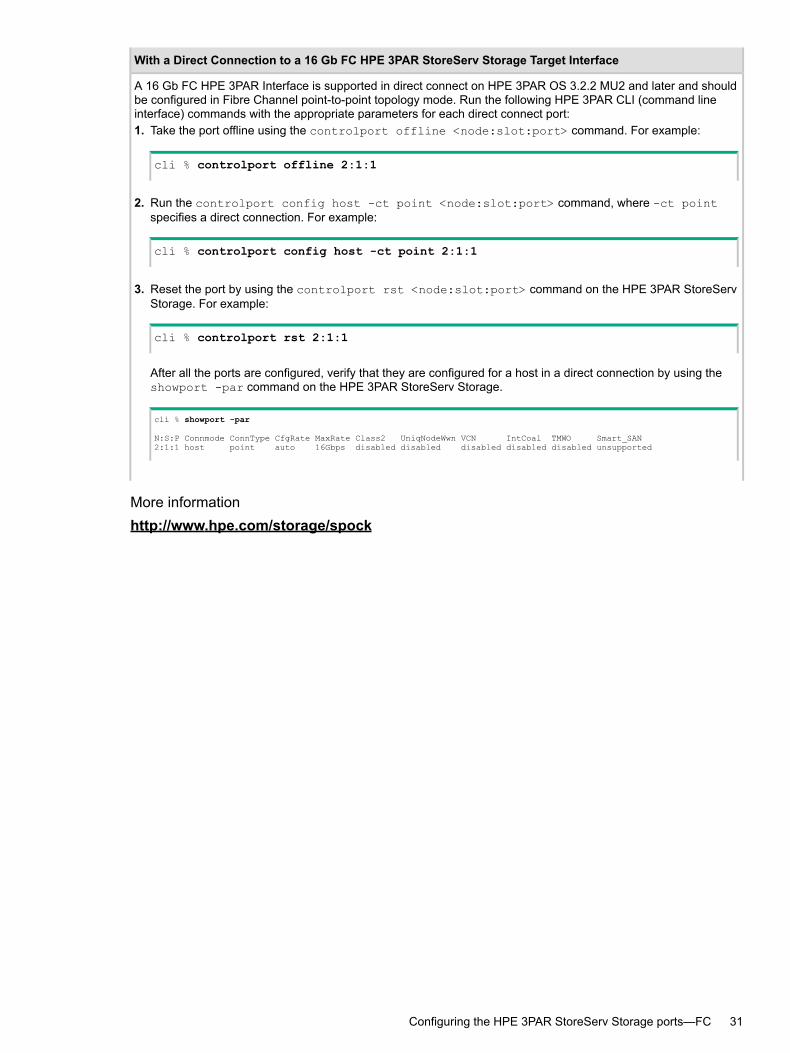
With a Direct Connection to a 16 Gb FC HPE 3PAR StoreServ Storage Target Interface
A 16 Gb FC HPE 3PAR Interface is supported in direct connect on HPE 3PAR OS 3.2.2 MU2 and later and shouldbe configured in Fibre Channel point-to-point topology mode. Run the following HPE 3PAR CLI (command lineinterface) commands with the appropriate parameters for each direct connect port:1. Take the port offline using the controlport offline <node:slot:port> command. For example:
cli % controlport offline 2:1:1
2. Run the controlport config host -ct point <node:slot:port> command, where -ct pointspecifies a direct connection. For example:
cli % controlport config host -ct point 2:1:1
3. Reset the port by using the controlport rst <node:slot:port> command on the HPE 3PAR StoreServStorage. For example:
cli % controlport rst 2:1:1
After all the ports are configured, verify that they are configured for a host in a direct connection by using theshowport -par command on the HPE 3PAR StoreServ Storage.
cli % showport -par
N:S:P Connmode ConnType CfgRate MaxRate Class2 UniqNodeWwn VCN IntCoal TMWO Smart_SAN2:1:1 host point auto 16Gbps disabled disabled disabled disabled disabled unsupported
More informationhttp://www.hpe.com/storage/spock
Configuring the HPE 3PAR StoreServ Storage ports—FC 31

Configuring ports on the HPE 3PAR StoreServ Storage for fabric connection—FCTo configure HPE 3PAR StoreServ Storage ports for fabric connections on the HPE 3PAR CLI,use the following procedure. Complete this procedure for each port.1. Check if a port is configured for a host port in fabric mode by using the HPE 3PAR CLI
showport -par command on the HPE 3PAR StoreServ Storage.If the connection type ConnType value is point, the port is already configured for a fabricconnection. If the ConnType value is loop, the port is a direct connection and has not beenconfigured for a fabric connection.
cli % showport -par
N:S:P Connmode ConnType CfgRate MaxRate Class2 UniqNodeWwn VCN IntCoal0:4:1 host point auto 8Gbps disabled disabled disabled enabled
2. If the port has not been configured, take the port offline before configuring it for connectionto a host.
CAUTION: Before taking a port offline in preparation for a fabric connection, verify that itwas not previously defined and that it is not connected to a host, because this would interruptthe existing host connection. If a HPE 3PAR StoreServ Storage port is already configuredfor a fabric connection, ignore this step 2.
To take the port offline, run the controlport offline <node:slot:port> commandon the HPE 3PAR StoreServ Storage. For example:
cli % controlport offline 1:5:1
3. To configure the port to the host, run the controlport config host -ct point<node:slot:port> command on the HPE 3PAR StoreServ Storage, where -ct pointindicates that the connection type is a fabric connection. For example:
cli % controlport config host -ct point 1:5:1
4. Reset the port by using the controlport rst <node:slot:port> command on theHPE 3PAR StoreServ Storage. For example:
cli % controlport rst 1:5:1
32 Configuring the HPE 3PAR StoreServ Storage and host—FC
Configuring the host—FCSAN Boot Configuration:If you are setting up the FC host to boot from the HPE 3PAR StoreServ Storage, complete thetasks in “Booting the host from the HPE 3PAR StoreServ Storage” (page 145) before returninghere to complete the rest of the tasks.
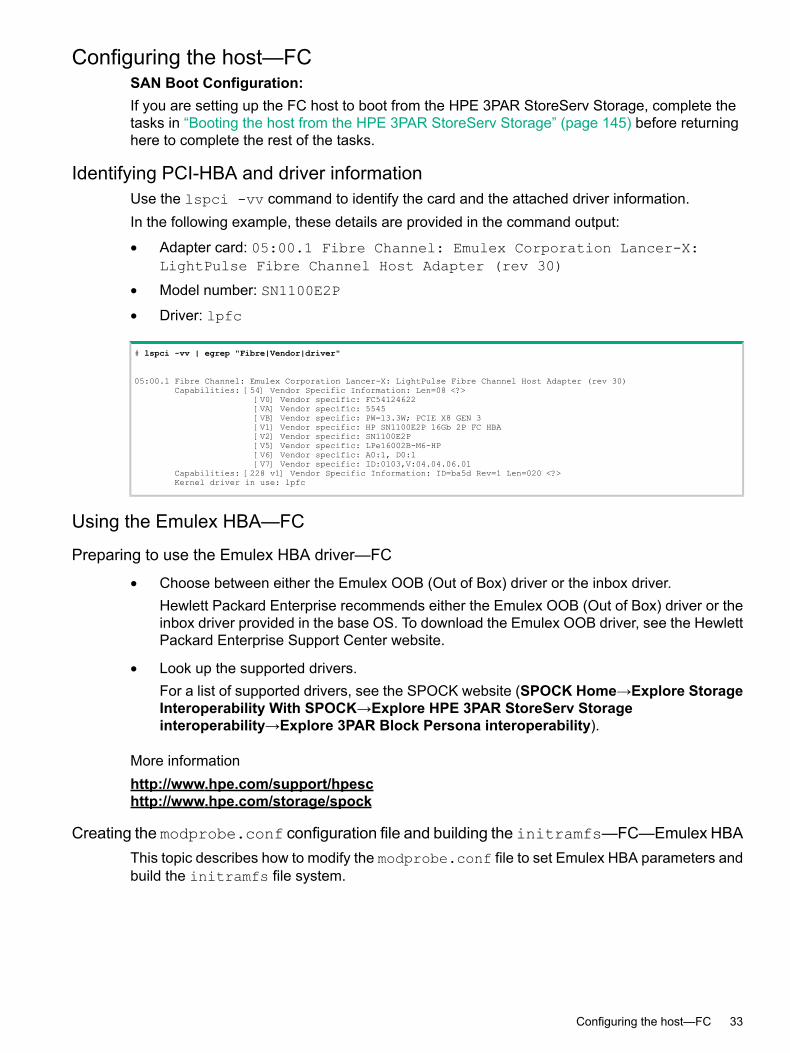
Identifying PCI-HBA and driver informationUse the lspci -vv command to identify the card and the attached driver information.In the following example, these details are provided in the command output:
• Adapter card: 05:00.1 Fibre Channel: Emulex Corporation Lancer-X:LightPulse Fibre Channel Host Adapter (rev 30)
• Model number: SN1100E2P
• Driver: lpfc
# lspci -vv | egrep "Fibre|Vendor|driver"
05:00.1 Fibre Channel: Emulex Corporation Lancer-X: LightPulse Fibre Channel Host Adapter (rev 30)Capabilities: [54] Vendor Specific Information: Len=08 <?>
[V0] Vendor specific: FC54124622[VA] Vendor specific: 5545[VB] Vendor specific: PW=13.3W; PCIE X8 GEN 3[V1] Vendor specific: HP SN1100E2P 16Gb 2P FC HBA[V2] Vendor specific: SN1100E2P[V5] Vendor specific: LPe16002B-M6-HP[V6] Vendor specific: A0:1, D0:1[V7] Vendor specific: ID:0103,V:04.04.06.01
Capabilities: [228 v1] Vendor Specific Information: ID=ba5d Rev=1 Len=020 <?>Kernel driver in use: lpfc
Using the Emulex HBA—FC
Preparing to use the Emulex HBA driver—FC
• Choose between either the Emulex OOB (Out of Box) driver or the inbox driver.Hewlett Packard Enterprise recommends either the Emulex OOB (Out of Box) driver or theinbox driver provided in the base OS. To download the Emulex OOB driver, see the HewlettPackard Enterprise Support Center website.
• Look up the supported drivers.For a list of supported drivers, see the SPOCK website (SPOCK Home→Explore StorageInteroperability With SPOCK→Explore HPE 3PAR StoreServ Storageinteroperability→Explore 3PAR Block Persona interoperability).
More informationhttp://www.hpe.com/support/hpeschttp://www.hpe.com/storage/spock
Creating the modprobe.conf configuration file and building the initramfs—FC—Emulex HBAThis topic describes how to modify the modprobe.conf file to set Emulex HBA parameters andbuild the initramfs file system.
Configuring the host—FC 33
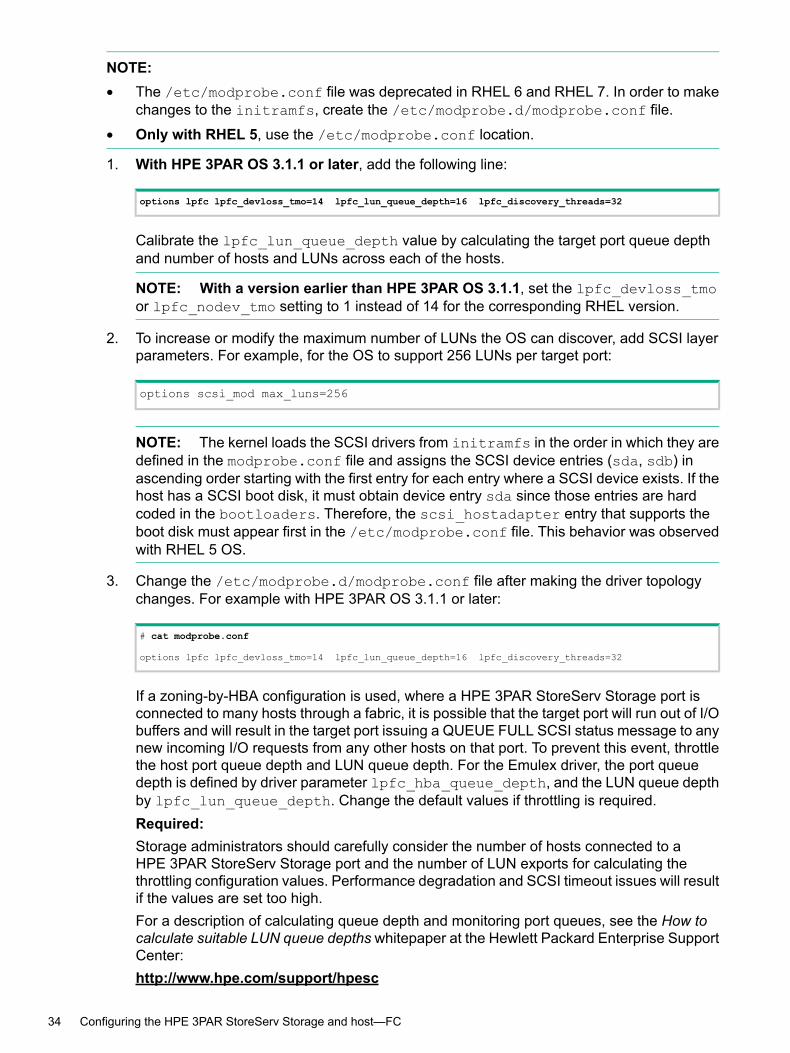
NOTE:• The /etc/modprobe.conf file was deprecated in RHEL 6 and RHEL 7. In order to make
changes to the initramfs, create the /etc/modprobe.d/modprobe.conf file.
• Only with RHEL 5, use the /etc/modprobe.conf location.
1. With HPE 3PAR OS 3.1.1 or later, add the following line:
options lpfc lpfc_devloss_tmo=14 lpfc_lun_queue_depth=16 lpfc_discovery_threads=32
Calibrate the lpfc_lun_queue_depth value by calculating the target port queue depthand number of hosts and LUNs across each of the hosts.
NOTE: With a version earlier than HPE 3PAR OS 3.1.1, set the lpfc_devloss_tmoor lpfc_nodev_tmo setting to 1 instead of 14 for the corresponding RHEL version.
2. To increase or modify the maximum number of LUNs the OS can discover, add SCSI layerparameters. For example, for the OS to support 256 LUNs per target port:
options scsi_mod max_luns=256
NOTE: The kernel loads the SCSI drivers from initramfs in the order in which they aredefined in the modprobe.conf file and assigns the SCSI device entries (sda, sdb) inascending order starting with the first entry for each entry where a SCSI device exists. If thehost has a SCSI boot disk, it must obtain device entry sda since those entries are hardcoded in the bootloaders. Therefore, the scsi_hostadapter entry that supports theboot disk must appear first in the /etc/modprobe.conf file. This behavior was observedwith RHEL 5 OS.
3. Change the /etc/modprobe.d/modprobe.conf file after making the driver topologychanges. For example with HPE 3PAR OS 3.1.1 or later:
# cat modprobe.conf
options lpfc lpfc_devloss_tmo=14 lpfc_lun_queue_depth=16 lpfc_discovery_threads=32
If a zoning-by-HBA configuration is used, where a HPE 3PAR StoreServ Storage port isconnected to many hosts through a fabric, it is possible that the target port will run out of I/Obuffers and will result in the target port issuing a QUEUE FULL SCSI status message to anynew incoming I/O requests from any other hosts on that port. To prevent this event, throttlethe host port queue depth and LUN queue depth. For the Emulex driver, the port queuedepth is defined by driver parameter lpfc_hba_queue_depth, and the LUN queue depthby lpfc_lun_queue_depth. Change the default values if throttling is required.Required:Storage administrators should carefully consider the number of hosts connected to aHPE 3PAR StoreServ Storage port and the number of LUN exports for calculating thethrottling configuration values. Performance degradation and SCSI timeout issues will resultif the values are set too high.For a description of calculating queue depth and monitoring port queues, see the How tocalculate suitable LUN queue depths whitepaper at the Hewlett Packard Enterprise SupportCenter:http://www.hpe.com/support/hpesc
34 Configuring the HPE 3PAR StoreServ Storage and host—FC
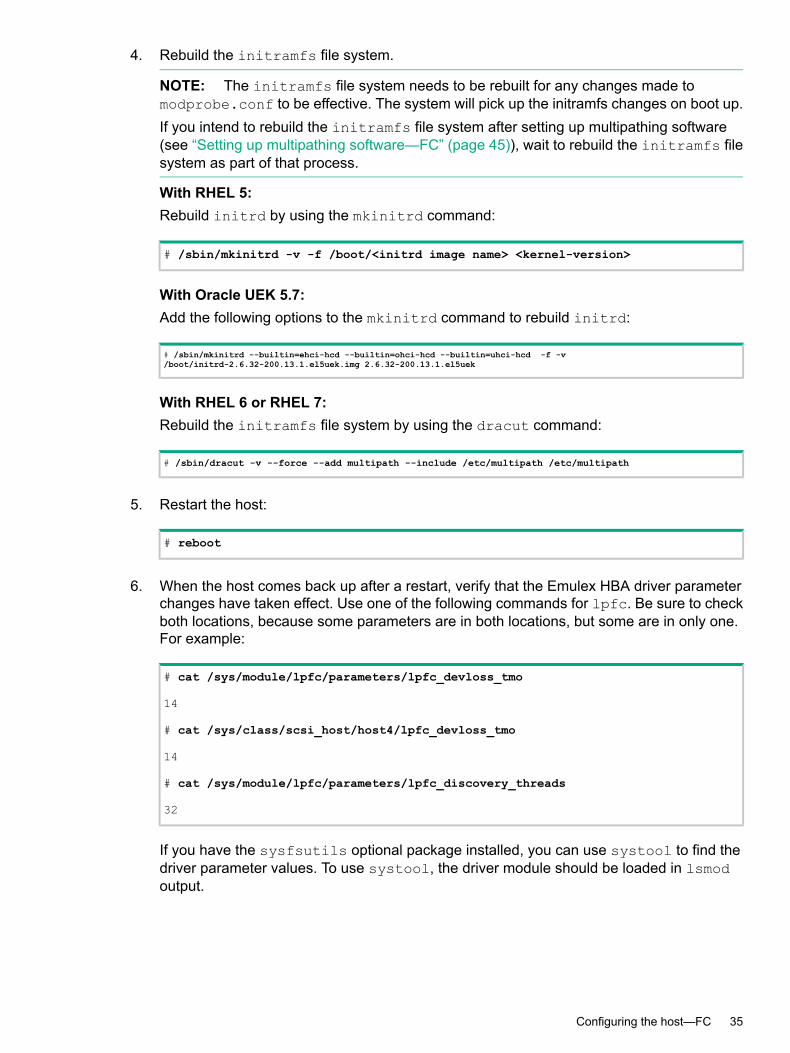
4. Rebuild the initramfs file system.
NOTE: The initramfs file system needs to be rebuilt for any changes made tomodprobe.conf to be effective. The system will pick up the initramfs changes on boot up.If you intend to rebuild the initramfs file system after setting up multipathing software(see “Setting up multipathing software—FC” (page 45)), wait to rebuild the initramfs filesystem as part of that process.
With RHEL 5:Rebuild initrd by using the mkinitrd command:
# /sbin/mkinitrd -v -f /boot/<initrd image name> <kernel-version>
With Oracle UEK 5.7:Add the following options to the mkinitrd command to rebuild initrd:
# /sbin/mkinitrd --builtin=ehci-hcd --builtin=ohci-hcd --builtin=uhci-hcd -f -v/boot/initrd-2.6.32-200.13.1.el5uek.img 2.6.32-200.13.1.el5uek
With RHEL 6 or RHEL 7:Rebuild the initramfs file system by using the dracut command:
# /sbin/dracut -v --force --add multipath --include /etc/multipath /etc/multipath
5. Restart the host:
# reboot
6. When the host comes back up after a restart, verify that the Emulex HBA driver parameterchanges have taken effect. Use one of the following commands for lpfc. Be sure to checkboth locations, because some parameters are in both locations, but some are in only one.For example:
# cat /sys/module/lpfc/parameters/lpfc_devloss_tmo
14
# cat /sys/class/scsi_host/host4/lpfc_devloss_tmo
14
# cat /sys/module/lpfc/parameters/lpfc_discovery_threads
32
If you have the sysfsutils optional package installed, you can use systool to find thedriver parameter values. To use systool, the driver module should be loaded in lsmodoutput.
Configuring the host—FC 35
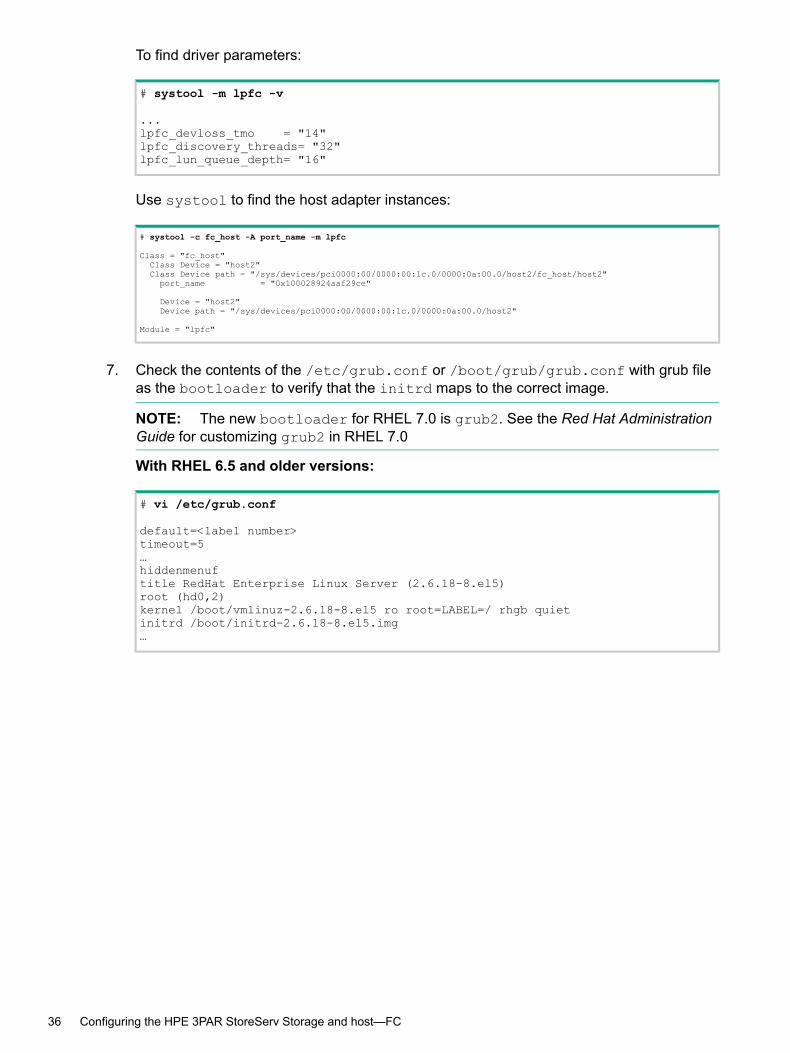
To find driver parameters:
# systool -m lpfc -v
...lpfc_devloss_tmo = "14"lpfc_discovery_threads= "32"lpfc_lun_queue_depth= "16"
Use systool to find the host adapter instances:
# systool -c fc_host -A port_name -m lpfc
Class = "fc_host"Class Device = "host2"Class Device path = "/sys/devices/pci0000:00/0000:00:1c.0/0000:0a:00.0/host2/fc_host/host2"port_name = "0x100028924aaf29ce"
Device = "host2"Device path = "/sys/devices/pci0000:00/0000:00:1c.0/0000:0a:00.0/host2"
Module = "lpfc"
7. Check the contents of the /etc/grub.conf or /boot/grub/grub.conf with grub fileas the bootloader to verify that the initrd maps to the correct image.
NOTE: The new bootloader for RHEL 7.0 is grub2. See the Red Hat AdministrationGuide for customizing grub2 in RHEL 7.0
With RHEL 6.5 and older versions:
# vi /etc/grub.conf
default=<label number>timeout=5…hiddenmenuftitle RedHat Enterprise Linux Server (2.6.18-8.el5)root (hd0,2)kernel /boot/vmlinuz-2.6.18-8.el5 ro root=LABEL=/ rhgb quietinitrd /boot/initrd-2.6.18-8.el5.img…
36 Configuring the HPE 3PAR StoreServ Storage and host—FC
Using the QLogic HBA—FC
Preparing to use the QLogic HBA driver—FC
• Choose between either the QLogic OOB (Out of Box) driver or the inbox driver.Hewlett Packard Enterprise recommends either the QLogic OOB (Out of Box) driver or theinbox driver provided in the base OS. To download the QLogic OOB driver, see the HewlettPackard Enterprise Support Center website.
• Look up the supported drivers.For a list of supported drivers, see the SPOCK website (SPOCK Home→Explore StorageInteroperability With SPOCK→Explore HPE 3PAR StoreServ Storageinteroperability→Explore 3PAR Block Persona interoperability).
More informationhttp://www.hpe.com/support/hpeschttp://www.hpe.com/storage/spock
Creating the modprobe.conf configuration file and building the initramfs—FC—QLogic HBAThis topic describes how to modify the modprobe.conf file to set QLogic HBA parameters andbuild the initramfs file system.
NOTE:• The /etc/modprobe.conf file was deprecated in RHEL 6 and RHEL 7. In order to make
changes to the initramfs, create the /etc/modprobe.d/modprobe.conf file.
• Only with RHEL 5, use the /etc/modprobe.conf location.
Configuring the host—FC 37
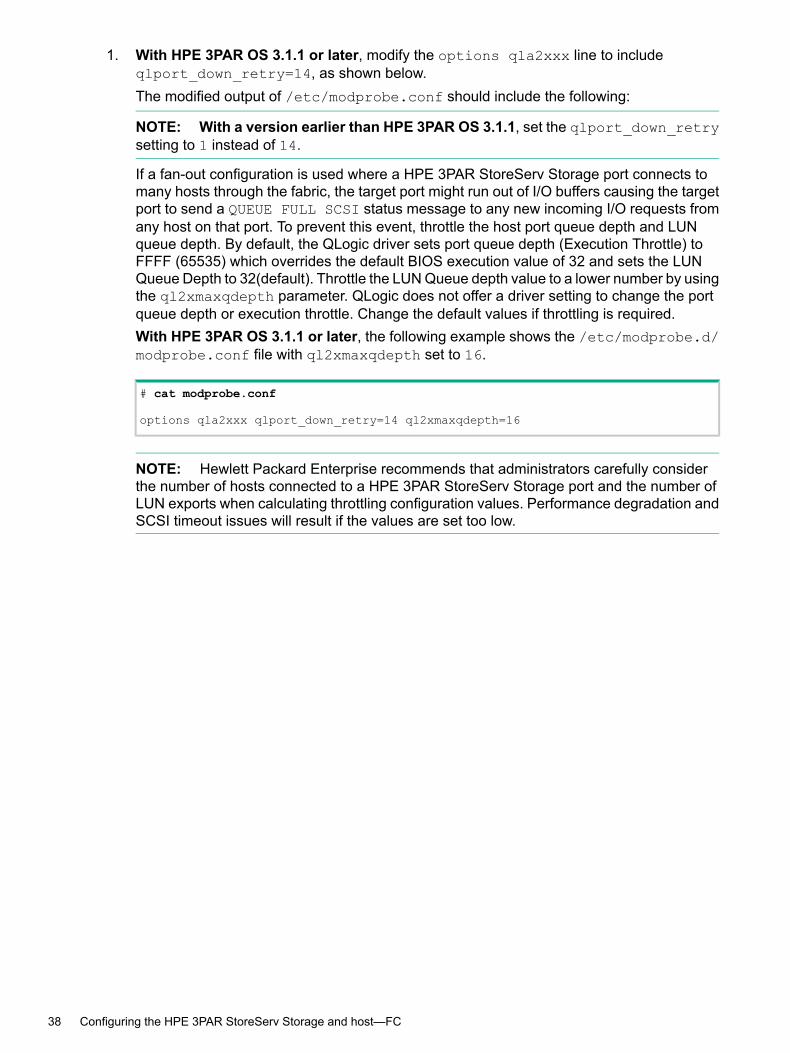
1. With HPE 3PAR OS 3.1.1 or later, modify the options qla2xxx line to includeqlport_down_retry=14, as shown below.The modified output of /etc/modprobe.conf should include the following:
NOTE: With a version earlier than HPE 3PAR OS 3.1.1, set the qlport_down_retrysetting to 1 instead of 14.
If a fan-out configuration is used where a HPE 3PAR StoreServ Storage port connects tomany hosts through the fabric, the target port might run out of I/O buffers causing the targetport to send a QUEUE FULL SCSI status message to any new incoming I/O requests fromany host on that port. To prevent this event, throttle the host port queue depth and LUNqueue depth. By default, the QLogic driver sets port queue depth (Execution Throttle) toFFFF (65535) which overrides the default BIOS execution value of 32 and sets the LUNQueue Depth to 32(default). Throttle the LUN Queue depth value to a lower number by usingthe ql2xmaxqdepth parameter. QLogic does not offer a driver setting to change the portqueue depth or execution throttle. Change the default values if throttling is required.With HPE 3PAR OS 3.1.1 or later, the following example shows the /etc/modprobe.d/modprobe.conf file with ql2xmaxqdepth set to 16.
# cat modprobe.conf
options qla2xxx qlport_down_retry=14 ql2xmaxqdepth=16
NOTE: Hewlett Packard Enterprise recommends that administrators carefully considerthe number of hosts connected to a HPE 3PAR StoreServ Storage port and the number ofLUN exports when calculating throttling configuration values. Performance degradation andSCSI timeout issues will result if the values are set too low.
38 Configuring the HPE 3PAR StoreServ Storage and host—FC
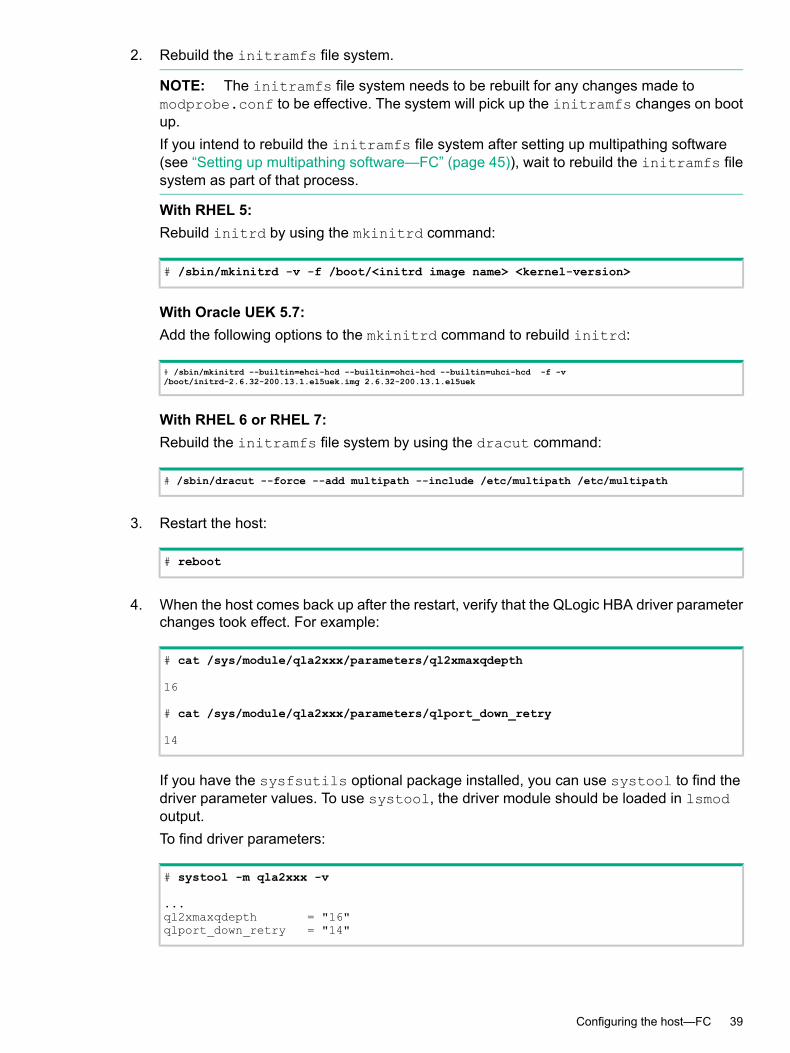
2. Rebuild the initramfs file system.
NOTE: The initramfs file system needs to be rebuilt for any changes made tomodprobe.conf to be effective. The system will pick up the initramfs changes on bootup.If you intend to rebuild the initramfs file system after setting up multipathing software(see “Setting up multipathing software—FC” (page 45)), wait to rebuild the initramfs filesystem as part of that process.
With RHEL 5:Rebuild initrd by using the mkinitrd command:
# /sbin/mkinitrd -v -f /boot/<initrd image name> <kernel-version>
With Oracle UEK 5.7:Add the following options to the mkinitrd command to rebuild initrd:
# /sbin/mkinitrd --builtin=ehci-hcd --builtin=ohci-hcd --builtin=uhci-hcd -f -v/boot/initrd-2.6.32-200.13.1.el5uek.img 2.6.32-200.13.1.el5uek
With RHEL 6 or RHEL 7:Rebuild the initramfs file system by using the dracut command:
# /sbin/dracut --force --add multipath --include /etc/multipath /etc/multipath
3. Restart the host:
# reboot
4. When the host comes back up after the restart, verify that the QLogic HBA driver parameterchanges took effect. For example:
# cat /sys/module/qla2xxx/parameters/ql2xmaxqdepth
16
# cat /sys/module/qla2xxx/parameters/qlport_down_retry
14
If you have the sysfsutils optional package installed, you can use systool to find thedriver parameter values. To use systool, the driver module should be loaded in lsmodoutput.To find driver parameters:
# systool -m qla2xxx -v
...ql2xmaxqdepth = "16"qlport_down_retry = "14"
Configuring the host—FC 39
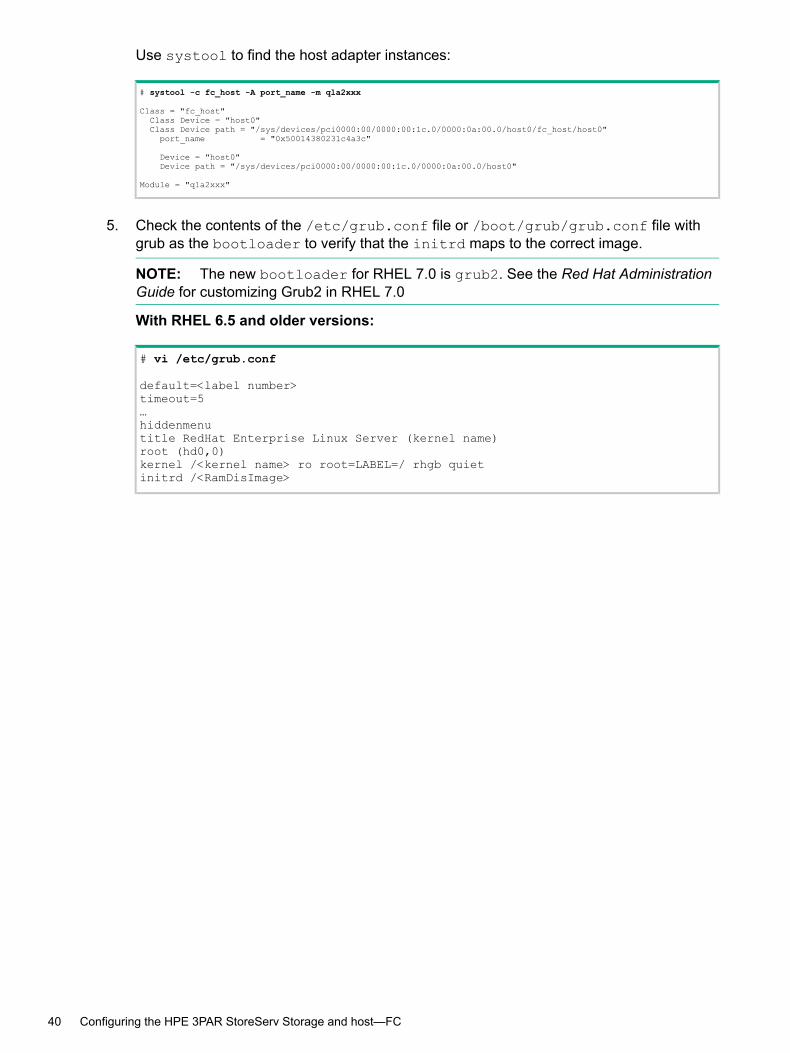
Use systool to find the host adapter instances:
# systool -c fc_host -A port_name -m qla2xxx
Class = "fc_host"Class Device = "host0"Class Device path = "/sys/devices/pci0000:00/0000:00:1c.0/0000:0a:00.0/host0/fc_host/host0"port_name = "0x50014380231c4a3c"
Device = "host0"Device path = "/sys/devices/pci0000:00/0000:00:1c.0/0000:0a:00.0/host0"
Module = "qla2xxx"
5. Check the contents of the /etc/grub.conf file or /boot/grub/grub.conf file withgrub as the bootloader to verify that the initrd maps to the correct image.
NOTE: The new bootloader for RHEL 7.0 is grub2. See the Red Hat AdministrationGuide for customizing Grub2 in RHEL 7.0
With RHEL 6.5 and older versions:
# vi /etc/grub.conf
default=<label number>timeout=5…hiddenmenutitle RedHat Enterprise Linux Server (kernel name)root (hd0,0)kernel /<kernel name> ro root=LABEL=/ rhgb quietinitrd /<RamDisImage>
40 Configuring the HPE 3PAR StoreServ Storage and host—FC
Setting up the NVRAM and BIOS—FC—QLogic HBAConfigure the following NVRAM settings for QLogic cards using the QLogic Fast!UTIL. Accessthe Fast!UTIL utility by hard booting the server and, when prompted and follow these steps:
NOTE: The NVRAM settings on QLogic HBAs can be changed by any server in which theyare installed. These settings will persist for an HBA even after it is removed form a server. Toobtain the correct settings for this configuration, instructions to return all NVRAM settings to theirdefault settings are provided.
1. Enter Fast!UTIL by pressing Ctrl-Q when prompted.
NOTE: Each HBA port is reported as a host bus adapter and the following settings needto be made for each of them.
2. Select a host adapter from the main menu.3. Restore the default settings of the HBA:Configuration Settings→Restore Default Settings.4. Make these setting changes:
NOTE: The parameters provided in these menu options might vary between differentQLogic HBA models, and might not appear as shown here.
• Configuration Settings→Advanced Adapter Settings→Execution Throttle: 256• Configuration Settings→Advanced Adapter Settings→LUNs per Target: 256• ConfigurationSettings→ExtendedFirmwareSettings→DataRate: 2 (AutoNegotiate)
5. Specify the connection option based on the 3PAR OS Target Interface. The settings needto be set only if the default connection option does not work (automatically both loop andpoint topology are tried first).
NOTE:• The BIOS menus, which vary by adapter model and the BIOS version installed, might
not appear as shown here. See the documentation for your adapter.• A 3PAR 8 Gb Target Interface connection to host needs loop topology for Direct Connect.
• A 3PAR 16 Gb Target Interface connection to host needs point topology for DirectConnect.
• Any 3PAR Target Interface connection to host for Fabric connection needs point topology.
• Specify loop topology for direct-connect configurations: ConfigurationSettings→Extended Firmware Settings→Connection Options: 0 (Loop Only)
• Specify point-to-point topology for direct or fabric configurations: ConfigurationSettings→Extended Firmware Settings→Connection Options: 1 (Point to PointOnly)
6. Repeat for each port listed as a separate HBA port.
Configuring the host—FC 41
Configuring the QLogic HBA using the SCLI utility—FC
CAUTION: If you are running the QLogic inbox driver, verify that only the utility tool is installed.The preferred method will be to use the Fast!Util HBA, as the QLogic tool might not be compatiblewith all inbox drivers.
NOTE: For Itanium servers, this is the only method available. For other Intel platform servers,either use the SCLI utility or the Fast!Util HBA BIOS method.
In order to make topology changes to the QLogic cards in the Intel Itanium server which havethe Extensible Firmware Interface (EFI) as the system firmware (BIOS), use the QLogic SANsurferFC CLI utility. Download the latest version of the SCLI utility from the QLogic website or use theversion that is installed as part of the driver package installation.Once you install the QLogic SANsurfer FC CLI utility for each of the HBA ports, set the correctport connection type (direct→loop, fabric→point) by running the following commands:
With a fabric connection, setting port connection type using the SCLI utility
# /opt/QLogic_Corporation/SANsurferCLI/scli -n X CO 1
With a direct connection, setting port connection type using the SCLI utility
# /opt/QLogic_Corporation/SANsurferCLI/scli -n X CO 0
where X is equal to the HBA FC port #, the HBA port numbers start with number 0. For example,to set the HBA ports 1 and 3 to Point to Point/Fabric topology, run the following commands:
# /opt/QLogic_Corporation/SANsurferCLI/scli -n 1 CO 1# /opt/QLogic_Corporation/SANsurferCLI/scli -n 3 CO 1
Set the same HBA ports 1 and 3 to loop topology
# /opt/QLogic_Corporation/SANsurferCLI/scli -n 1 CO 0# /opt/QLogic_Corporation/SANsurferCLI/scli -n 3 CO 0
Verify the setting
# /opt/QLogic_Corporation/SANsurferCLI/scli -I 1# /opt/QLogic_Corporation/SANsurferCLI/scli -I 3
NOTE:For other command line options to change the following settings, see the SANsurfer FC CLI utilityprogram release notice:• LUNs per Target: 256
• Data Rate: 4 (Auto Negotiate)
42 Configuring the HPE 3PAR StoreServ Storage and host—FC

Using the Brocade HBA—FC
Preparing to use the Brocade HBA driver—FC
• Choose between either the Brocade OOB (Out of Box) driver or the inbox driver.Hewlett Packard Enterprise recommends either the Brocade OOB (Out of Box) driver or theinbox driver provided in the base OS. To download the Brocade OOB driver, see the HewlettPackard Enterprise Support Center website.
• Look up the supported drivers.For a list of supported drivers, see the SPOCK website (SPOCK Home→Explore StorageInteroperability With SPOCK→Explore HPE 3PAR StoreServ Storageinteroperability→Explore 3PAR Block Persona interoperability).
More informationhttp://www.hpe.com/support/hpeschttp://www.hpe.com/storage/spock
Configuring the Brocade HBA using the Brocade BCU utility—FCBrocade provides a CLI utility to configure their HBAs. This is also available as a GUI. Thesetools, once installed, can be used to configure many HBA and driver parameters.For instructions about using the BCU CLI and GUI utilities, see the documentation at the Brocadewebsite.For Brocade FC HBA, the default Path TOV parameter is set to 30 seconds. It is recommendedto change this value to 14 seconds. To change the value of this parameter, it is required to usethe Brocade BCU command line utility.
More informationhttp://www.brocade.com/
Changing a parameter using the Brocade BCU utility (example)1. This is a per-port setting. List the available ports by issuing the bcu port --list command:
# bcu port --list
-------------------------------------------------------------Port# FN Type PWWN/MAC FC Addr/ Media State Spd
Eth dev-------------------------------------------------------------1/0 - fc 10:00:8c:7c:ff:30:41:60 036100 sw Linkup 4G0 fc 10:00:8c:7c:ff:30:41:60 036100 sw Linkup 4G
1/1 - fc 10:00:8c:7c:ff:30:41:61 036000 sw Linkup 4G1 fc 10:00:8c:7c:ff:30:41:61 036000 sw Linkup 4G
-------------------------------------------------------------
2. Set the path_tov value for each port by issuing the bcu fcpim --pathtov <pcifn><tov> command:
# bcu fcpim --pathtov 1/0 14
path timeout is set to 14
Configuring the host—FC 43

Setting the SCSI Timeout for RHEL 5—FCThe SCSI timeout needs to be set in order for the HPE 3PAR StoreServ Storage to operateproperly with RHEL servers. Use the following guidelines depending on your version of RHEL:With RHEL 5:The SCSI timeout value is already set to the default value of 60 seconds and does not need tobe changed.
CAUTION:• For initial versions of RHEL 5 configurations only: If the SCSI timeout value is not set to 60
seconds, the host disks are taken off line during HPE 3PAR StoreServ Storage rollingupgrades.
• The timeout value default is 60 seconds, which became the default setting with the RHEL 5U4 release and later. Verify the default value in the /sys/class/scsi_device/*/device/timeout file.
Using udev rules to set the SCSI Timeout—FCWith RHEL 5 and earlier configurations, change the SCSI timeout value from 30 seconds to60 seconds by using the udev rules or a SCSI Timeout script so that the change is effective onlyfor 3PAR devices. The udev rule method is preferable, since it changes the SCSI Timeout valuedynamically whenever a SCSI device instance is created (for example: /dev/sda).With RHEL 6 or RHEL 7 and later, use the default setting (no modification is required).When using the timeout script, run the script manually whenever you create device instancesand the timeout value is lost on restart or driver reload.1. Verify that the udev package is installed on your server. If not, install it from the RHEL CD.
For example:
# rpm -qa | grep udevudev-039-10.19.el4.x86_64.rpm
2. Under /etc/udev/rules.d/, create udev rules 56-3par-timeout.ruleswith thefollowing contents:
KERNEL="sd*[!0-9]", SYSFS{vendor}="3PARdata", PROGRAM="/bin/sh -c 'echo 60 > /sys/block/%k/device/timeout'" NAME="%k"
Verify that there is no break between the two lines (required)Verify that there is no break between the two lines in the 56-3par-timeout.rules.The udev rule number 56-3par-timeout.rules should follow after the 51-by-id.rules.Change the udev rule number accordingly.The 56-3par-timeout.rules is selected based on the test system configuration. See “Usingudev rules to set the SCSI Timeout—FC” (page 44) to verify that the 56-3par-timeout.rulesudev rule is working.
# ls /etc/udev/rules.d/
. . . . .40-multipath.rules50-udev.rules51-by-id.rules56-3par-timeout.rules
44 Configuring the HPE 3PAR StoreServ Storage and host—FC
Verifying the SCSI Timeout settings—FC1. Verify the udev command in RHEL 5 udev rule for rules for setting the HPE 3PAR StoreServ
Storage volumes that were exported to the host. For details, see “Provisioning storage andhost LUN discovery” (page 122).With RHEL 5:
# cat /sys/class/scsi_device/*/device/timeout# udevinfo -a -p /sys/block/sdx | grep timeout
SYSFS{timeout}="60"
If the udev rule is created after the host sees HPE 3PAR StoreServ Storage volumes,execute the udevstart command, which runs the udev rules on all devices and sets thetimeout to 60. The time it takes for the udevstart command to complete is based on thenumber of devices and I/O throughput, so the recommendation is to run the command duringnon-peak activity.
# udevstart
2. Restarting the host starts the udev rule by default.
Using Emulex and QLogic script to set the SCSI timeout—FC1. Whenever a new SCSI device is discovered, run one of the following scripts to change the
SCSI timeout value to 60 seconds:
• Emulex has provided a set_target_timeout.sh script
• QLogic has provided the ql_ch_scsi_timeout.sh script
For these scripts, please check the vendor website. Also, the udev command is the preferredmethod to make the SCSI timeout value change, because it is vendor agnostic.
2. Add the timeout value to the /etc/rc.local file to set the timeout value during the hostreboot.
Setting up multipathing software—FCSee the setup topics here “Setting up multipathing software on the host” (page 109).
Configuring the host—FC 45
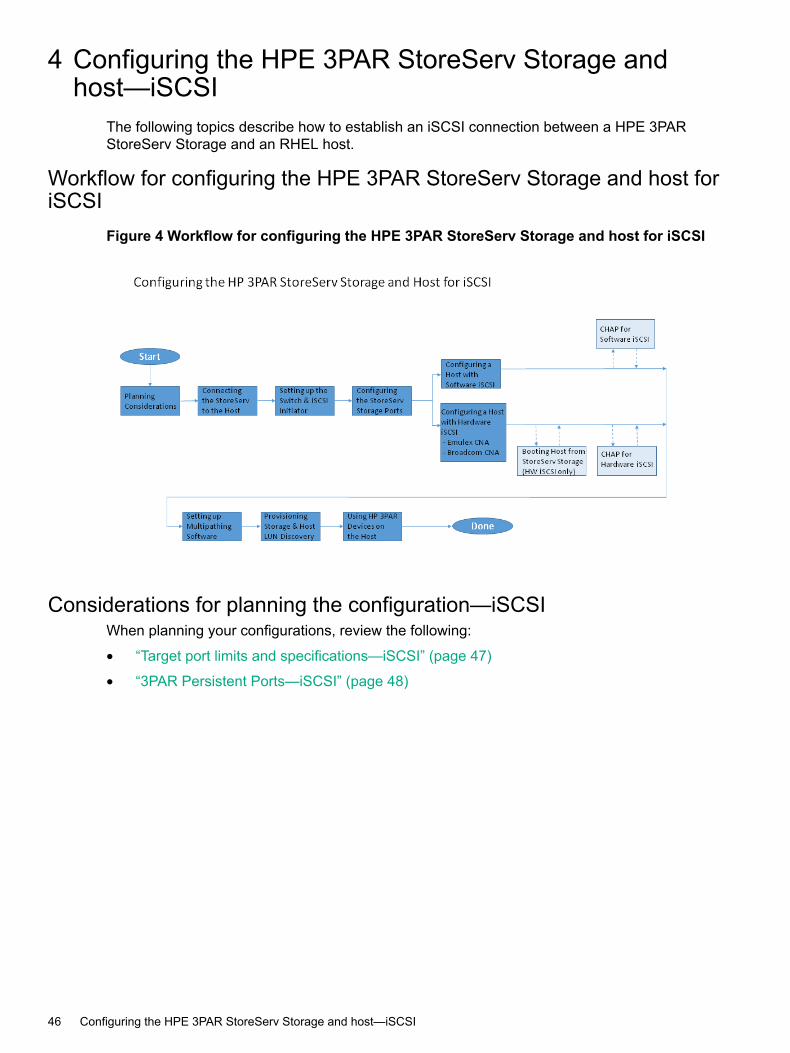
4 Configuring the HPE 3PAR StoreServ Storage andhost—iSCSI
The following topics describe how to establish an iSCSI connection between a HPE 3PARStoreServ Storage and an RHEL host.
Workflow for configuring the HPE 3PAR StoreServ Storage and host foriSCSI
Figure 4 Workflow for configuring the HPE 3PAR StoreServ Storage and host for iSCSI
Considerations for planning the configuration—iSCSIWhen planning your configurations, review the following:
• “Target port limits and specifications—iSCSI” (page 47)
• “3PAR Persistent Ports—iSCSI” (page 48)
46 Configuring the HPE 3PAR StoreServ Storage and host—iSCSI
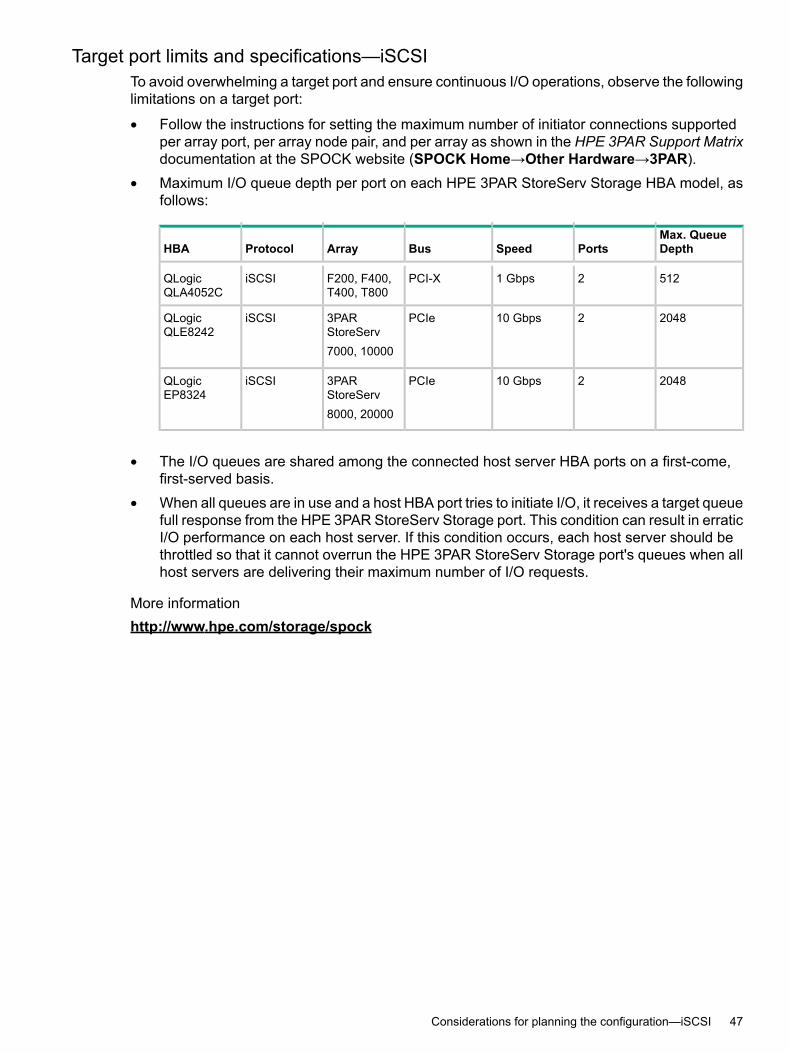
Target port limits and specifications—iSCSITo avoid overwhelming a target port and ensure continuous I/O operations, observe the followinglimitations on a target port:
• Follow the instructions for setting the maximum number of initiator connections supportedper array port, per array node pair, and per array as shown in the HPE 3PAR Support Matrixdocumentation at the SPOCK website (SPOCK Home→Other Hardware→3PAR).
• Maximum I/O queue depth per port on each HPE 3PAR StoreServ Storage HBA model, asfollows:
Max. QueueDepthPortsSpeedBusArrayProtocolHBA
51221 GbpsPCI-XF200, F400,T400, T800
iSCSIQLogicQLA4052C
2048210 GbpsPCIe3PARStoreServ
iSCSIQLogicQLE8242
7000, 10000
2048210 GbpsPCIe3PARStoreServ
iSCSIQLogicEP8324
8000, 20000
• The I/O queues are shared among the connected host server HBA ports on a first-come,first-served basis.
• When all queues are in use and a host HBA port tries to initiate I/O, it receives a target queuefull response from the HPE 3PAR StoreServ Storage port. This condition can result in erraticI/O performance on each host server. If this condition occurs, each host server should bethrottled so that it cannot overrun the HPE 3PAR StoreServ Storage port's queues when allhost servers are delivering their maximum number of I/O requests.
More informationhttp://www.hpe.com/storage/spock
Considerations for planning the configuration—iSCSI 47

3PAR Persistent Ports—iSCSIThe 3PAR Persistent Ports (or virtual ports) feature minimizes I/O disruption during a HPE 3PARStoreServ Storage online upgrade, node-down or cable pull event. Port shutdown or reset eventsdo not trigger this feature.Each iSCSI target storage array port has a partner array port automatically assigned by thesystem. Partner ports are assigned across array node pairs.3PAR Persistent Ports allows a HPE 3PAR StoreServ Storage iSCSI port to assume the identityof a failed port (IP address) while retaining its own identity. Where a given physical port assumesthe identity of its partner port, the assumed port is designated as a persistent port. Array portfailover and failback with 3PAR Persistent Ports is transparent to most host-based multipathingsoftware, which can keep all of its I/O paths active.
NOTE: Use of 3PAR Persistent Ports technology does not negate the need for properly installed,configured, and maintained host multipathing software.
For a more complete description of the 3PAR Persistent Ports feature, its operation, and acomplete list of required setup and connectivity guidelines, see the following documents:
• Technical white paper HPE 3PAR StoreServ Persistent Ports at the Hewlett PackardEnterprise Support Center website.
• HPE 3PAR Command Line Interface Administrator's Manual, “Using Persistent Ports forNondisruptive Online Software Upgrades” at the Hewlett Packard Enterprise StorageInformation Library website.
More informationhttp://www.hpe.com/support/hpeschttp://www.hpe.com/info/storage/docs
3PAR Persistent Ports setup and connectivity guidelines—iSCSIWith HPE 3PAR OS 3.1.3:• The 3PAR Persistent Ports feature is supported for iSCSI.
• The 3PAR Persistent Ports feature is enabled by default for HPE 3PAR StoreServ StorageiSCSI ports during node-down events.
Beginning with HPE 3PAR OS 3.2.2, the 3PAR Persistent Port feature for iSCSI has additionalfunctionality to minimize I/O disruption during an array port loss_sync event triggered by a lossof array port connectivity to the fabric.Follow the specific cabling setup and connectivity guidelines for 3PAR Persistent Ports to functionproperly. Key element for iSCSI connectivity are the following:
• The partner ports must share the same IP network.
• The same host port on host-facing CNAs in the nodes of a node pair must be connected tothe same IP network, and preferably to different IP switches on the fabric (for example, 0:1:1and 1:1:1).
48 Configuring the HPE 3PAR StoreServ Storage and host—iSCSI
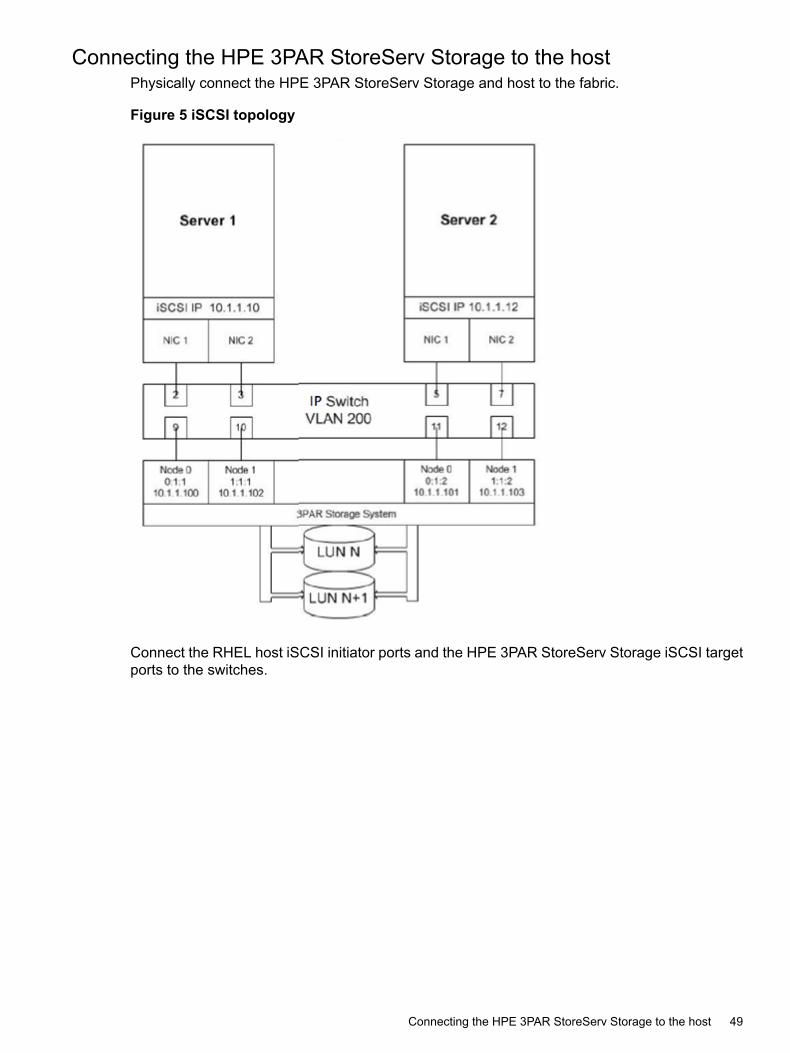
Connecting the HPE 3PAR StoreServ Storage to the hostPhysically connect the HPE 3PAR StoreServ Storage and host to the fabric.
Figure 5 iSCSI topology
Connect the RHEL host iSCSI initiator ports and the HPE 3PAR StoreServ Storage iSCSI targetports to the switches.
Connecting the HPE 3PAR StoreServ Storage to the host 49
Enterprise iSCSIBeginning with HPE 3PAR OS 3.2.2, the 3PAR StoreServ 20000 and 8000 Storage systemssupport Enterprise iSCSI or iSCSI over data center bridging (DCB) (lossless Ethernet). DCBenhances Ethernet LANs for clustering and storage network use.With DCB, you can set up and configure different Ethernet traffic with different priorities, treatingthem as if they were different pipes. You can allocate bandwidth on links and eliminate packetloss due to queue overflow.No special settings are required on the 3PAR iSCSI target port to support Enterprise iSCSI.Since each SAN environment is different and has different needs, no single switch networkconfiguration applies to all SAN environments. To configure iSCSI on an Ethernet switch thatsupports DCB, see the switch vendor’s configuration guide.To configure the HPE 5900 Network switch series, see the HPE FlexFabric 59xx/57xx SwitchSeries at the Hewlett Packard Enterprise Network Information Library.For information about supported DCB Ethernet switches, see the SPOCK website.
More informationhttp://www.hpe.com/networking/libraryhttp://www.hpe.com/storage/spock
Setting up the switch and iSCSI initiatorWhen using VLANs, verify that the switch ports that connect to the HPE 3PAR StoreServ StorageiSCSI target ports and iSCSI initiator ports are in the same VLANs and route the iSCSI trafficbetween the iSCSI initiator ports and the HPE 3PAR StoreServ Storage iSCSI target ports. Oncethe iSCSI initiator and HPE 3PAR StoreServ Storage iSCSI target ports are configured andconnected to the switch, use the ping command on the iSCSI initiator host to verify that it seesthe HPE 3PAR StoreServ Storage iSCSI target ports.
NOTE:• Setting up the switch for VLAN and routing configuration is beyond the scope of this
document. For instructions on setting up VLANs and routing, see the manufacturer's guidefor the switch.
• If you are configuring the jumbo frame setting on the switch, set it for the MTU size of 9128instead of 9000.
50 Configuring the HPE 3PAR StoreServ Storage and host—iSCSI
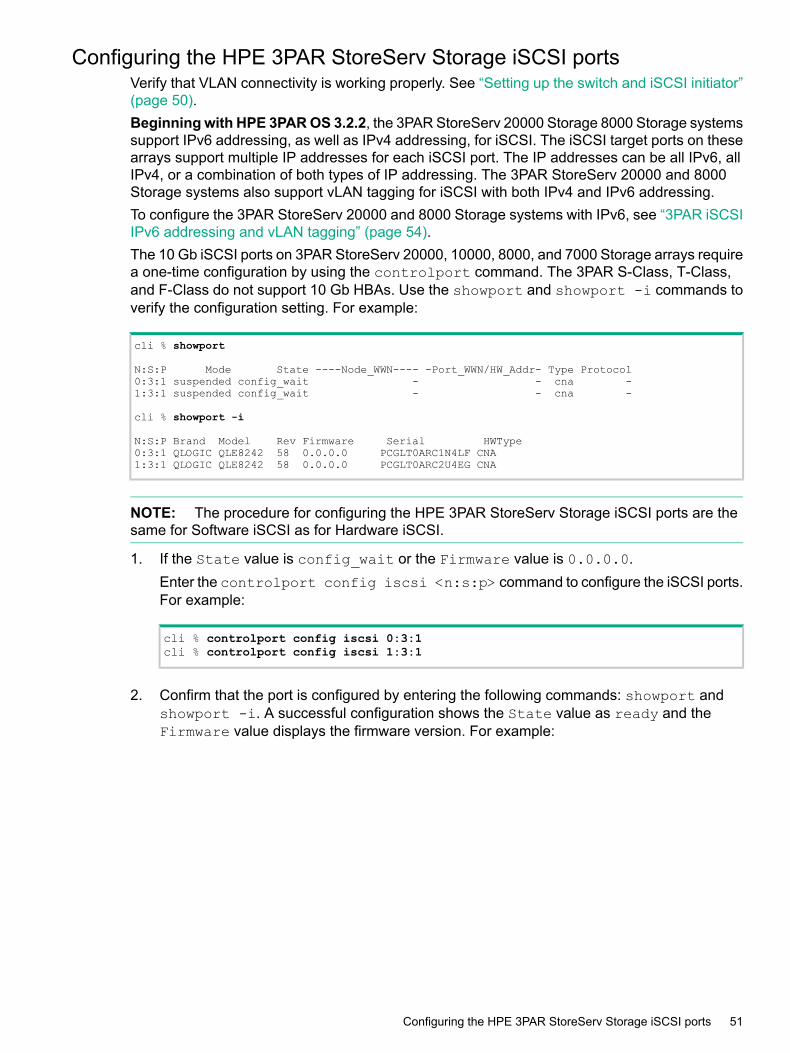
Configuring the HPE 3PAR StoreServ Storage iSCSI portsVerify that VLAN connectivity is working properly. See “Setting up the switch and iSCSI initiator”(page 50).Beginningwith HPE 3PAROS 3.2.2, the 3PAR StoreServ 20000 Storage 8000 Storage systemssupport IPv6 addressing, as well as IPv4 addressing, for iSCSI. The iSCSI target ports on thesearrays support multiple IP addresses for each iSCSI port. The IP addresses can be all IPv6, allIPv4, or a combination of both types of IP addressing. The 3PAR StoreServ 20000 and 8000Storage systems also support vLAN tagging for iSCSI with both IPv4 and IPv6 addressing.To configure the 3PAR StoreServ 20000 and 8000 Storage systems with IPv6, see “3PAR iSCSIIPv6 addressing and vLAN tagging” (page 54).The 10 Gb iSCSI ports on 3PAR StoreServ 20000, 10000, 8000, and 7000 Storage arrays requirea one-time configuration by using the controlport command. The 3PAR S-Class, T-Class,and F-Class do not support 10 Gb HBAs. Use the showport and showport -i commands toverify the configuration setting. For example:
cli % showport
N:S:P Mode State ----Node_WWN---- -Port_WWN/HW_Addr- Type Protocol0:3:1 suspended config_wait - - cna -1:3:1 suspended config_wait - - cna -
cli % showport -i
N:S:P Brand Model Rev Firmware Serial HWType0:3:1 QLOGIC QLE8242 58 0.0.0.0 PCGLT0ARC1N4LF CNA1:3:1 QLOGIC QLE8242 58 0.0.0.0 PCGLT0ARC2U4EG CNA
NOTE: The procedure for configuring the HPE 3PAR StoreServ Storage iSCSI ports are thesame for Software iSCSI as for Hardware iSCSI.
1. If the State value is config_wait or the Firmware value is 0.0.0.0.Enter the controlport config iscsi <n:s:p> command to configure the iSCSI ports.For example:
cli % controlport config iscsi 0:3:1cli % controlport config iscsi 1:3:1
2. Confirm that the port is configured by entering the following commands: showport andshowport -i. A successful configuration shows the State value as ready and theFirmware value displays the firmware version. For example:
Configuring the HPE 3PAR StoreServ Storage iSCSI ports 51
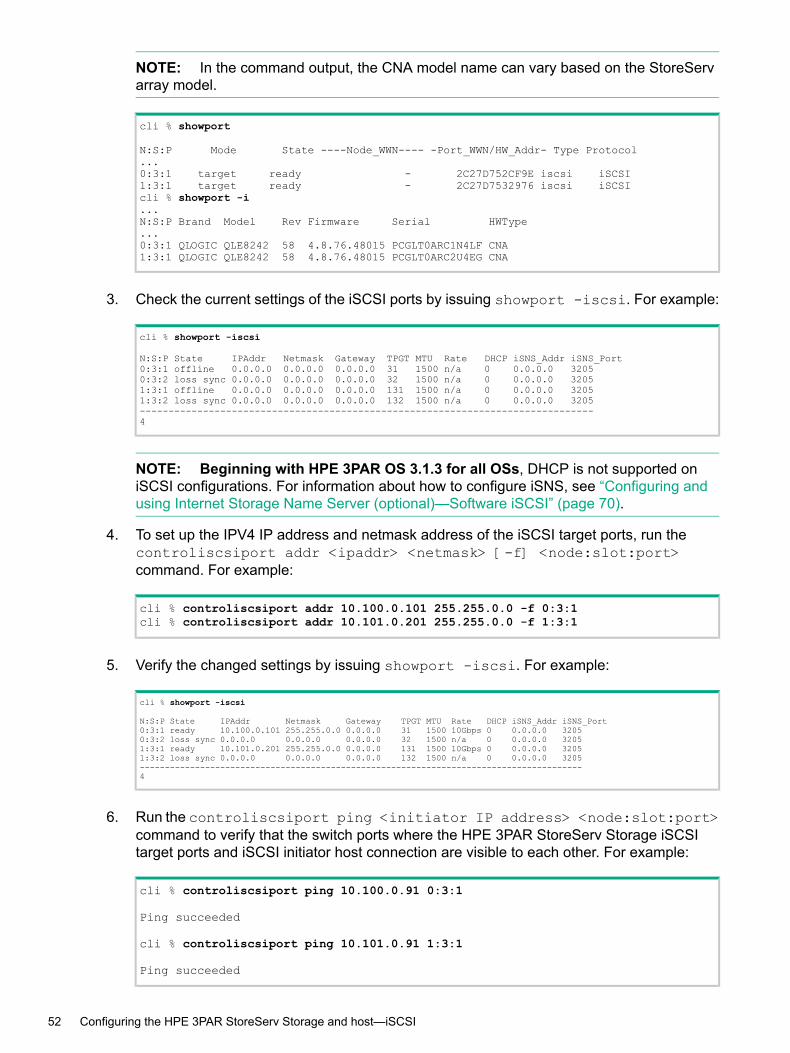
NOTE: In the command output, the CNA model name can vary based on the StoreServarray model.
cli % showport
N:S:P Mode State ----Node_WWN---- -Port_WWN/HW_Addr- Type Protocol...0:3:1 target ready - 2C27D752CF9E iscsi iSCSI1:3:1 target ready - 2C27D7532976 iscsi iSCSIcli % showport -i...N:S:P Brand Model Rev Firmware Serial HWType...0:3:1 QLOGIC QLE8242 58 4.8.76.48015 PCGLT0ARC1N4LF CNA1:3:1 QLOGIC QLE8242 58 4.8.76.48015 PCGLT0ARC2U4EG CNA
3. Check the current settings of the iSCSI ports by issuing showport -iscsi. For example:
cli % showport -iscsi
N:S:P State IPAddr Netmask Gateway TPGT MTU Rate DHCP iSNS_Addr iSNS_Port0:3:1 offline 0.0.0.0 0.0.0.0 0.0.0.0 31 1500 n/a 0 0.0.0.0 32050:3:2 loss sync 0.0.0.0 0.0.0.0 0.0.0.0 32 1500 n/a 0 0.0.0.0 32051:3:1 offline 0.0.0.0 0.0.0.0 0.0.0.0 131 1500 n/a 0 0.0.0.0 32051:3:2 loss sync 0.0.0.0 0.0.0.0 0.0.0.0 132 1500 n/a 0 0.0.0.0 3205-------------------------------------------------------------------------------4
NOTE: Beginning with HPE 3PAR OS 3.1.3 for all OSs, DHCP is not supported oniSCSI configurations. For information about how to configure iSNS, see “Configuring andusing Internet Storage Name Server (optional)—Software iSCSI” (page 70).
4. To set up the IPV4 IP address and netmask address of the iSCSI target ports, run thecontroliscsiport addr <ipaddr> <netmask> [-f] <node:slot:port>command. For example:
cli % controliscsiport addr 10.100.0.101 255.255.0.0 -f 0:3:1cli % controliscsiport addr 10.101.0.201 255.255.0.0 -f 1:3:1
5. Verify the changed settings by issuing showport -iscsi. For example:
cli % showport -iscsi
N:S:P State IPAddr Netmask Gateway TPGT MTU Rate DHCP iSNS_Addr iSNS_Port0:3:1 ready 10.100.0.101 255.255.0.0 0.0.0.0 31 1500 10Gbps 0 0.0.0.0 32050:3:2 loss sync 0.0.0.0 0.0.0.0 0.0.0.0 32 1500 n/a 0 0.0.0.0 32051:3:1 ready 10.101.0.201 255.255.0.0 0.0.0.0 131 1500 10Gbps 0 0.0.0.0 32051:3:2 loss sync 0.0.0.0 0.0.0.0 0.0.0.0 132 1500 n/a 0 0.0.0.0 3205----------------------------------------------------------------------------------------4
6. Run the controliscsiport ping <initiator IP address> <node:slot:port>command to verify that the switch ports where the HPE 3PAR StoreServ Storage iSCSItarget ports and iSCSI initiator host connection are visible to each other. For example:
cli % controliscsiport ping 10.100.0.91 0:3:1
Ping succeeded
cli % controliscsiport ping 10.101.0.91 1:3:1
Ping succeeded
52 Configuring the HPE 3PAR StoreServ Storage and host—iSCSI
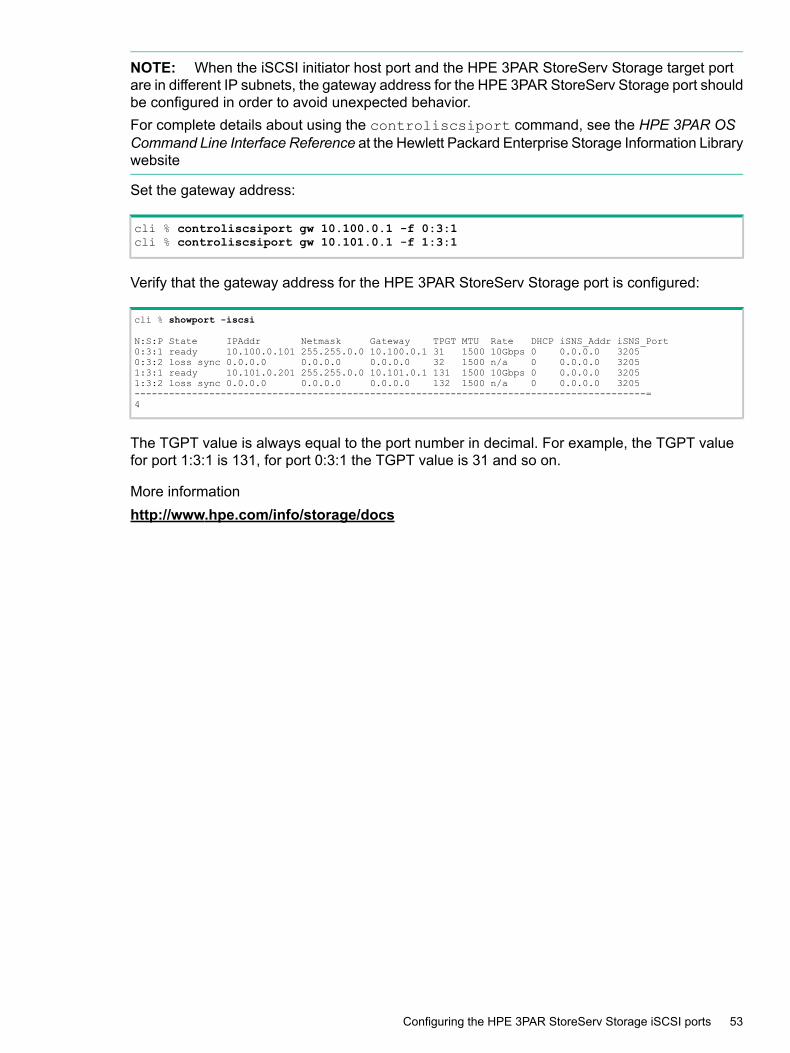
NOTE: When the iSCSI initiator host port and the HPE 3PAR StoreServ Storage target portare in different IP subnets, the gateway address for the HPE 3PAR StoreServ Storage port shouldbe configured in order to avoid unexpected behavior.For complete details about using the controliscsiport command, see the HPE 3PAR OSCommand Line Interface Reference at the Hewlett Packard Enterprise Storage Information Librarywebsite
Set the gateway address:
cli % controliscsiport gw 10.100.0.1 -f 0:3:1cli % controliscsiport gw 10.101.0.1 -f 1:3:1
Verify that the gateway address for the HPE 3PAR StoreServ Storage port is configured:
cli % showport -iscsi
N:S:P State IPAddr Netmask Gateway TPGT MTU Rate DHCP iSNS_Addr iSNS_Port0:3:1 ready 10.100.0.101 255.255.0.0 10.100.0.1 31 1500 10Gbps 0 0.0.0.0 32050:3:2 loss sync 0.0.0.0 0.0.0.0 0.0.0.0 32 1500 n/a 0 0.0.0.0 32051:3:1 ready 10.101.0.201 255.255.0.0 10.101.0.1 131 1500 10Gbps 0 0.0.0.0 32051:3:2 loss sync 0.0.0.0 0.0.0.0 0.0.0.0 132 1500 n/a 0 0.0.0.0 3205-----------------------------------------------------------------------------------------=4
The TGPT value is always equal to the port number in decimal. For example, the TGPT valuefor port 1:3:1 is 131, for port 0:3:1 the TGPT value is 31 and so on.
More informationhttp://www.hpe.com/info/storage/docs
Configuring the HPE 3PAR StoreServ Storage iSCSI ports 53
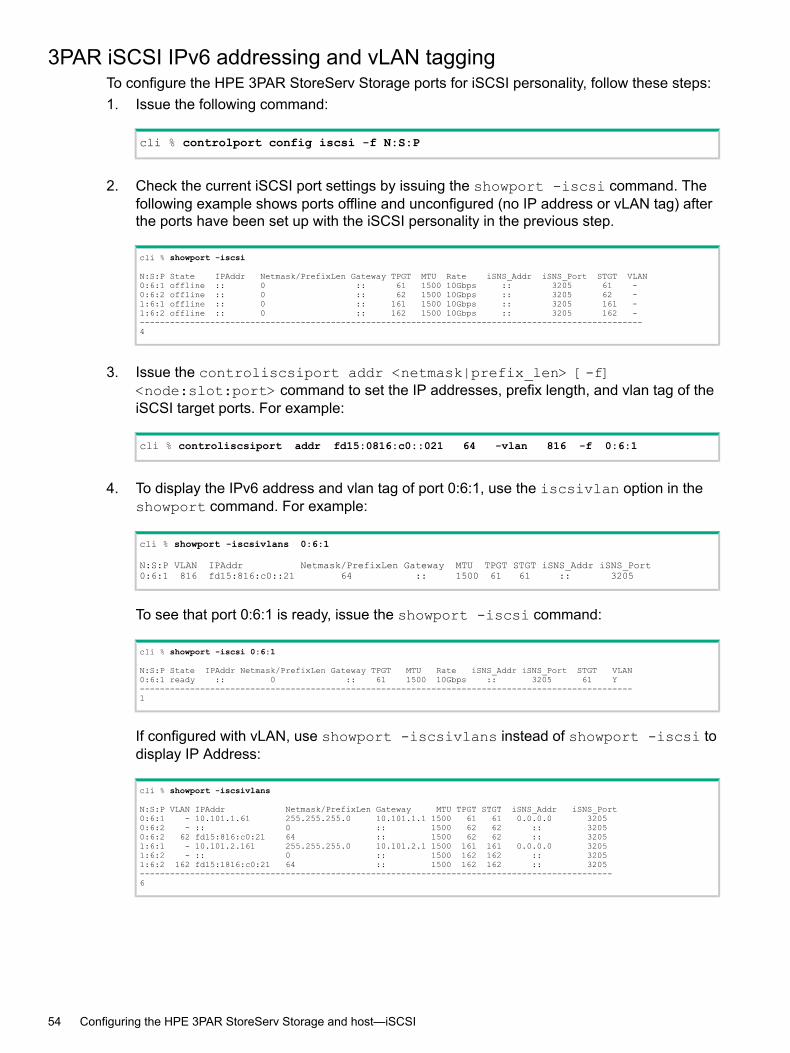
3PAR iSCSI IPv6 addressing and vLAN taggingTo configure the HPE 3PAR StoreServ Storage ports for iSCSI personality, follow these steps:1. Issue the following command:
cli % controlport config iscsi -f N:S:P
2. Check the current iSCSI port settings by issuing the showport -iscsi command. Thefollowing example shows ports offline and unconfigured (no IP address or vLAN tag) afterthe ports have been set up with the iSCSI personality in the previous step.
cli % showport -iscsi
N:S:P State IPAddr Netmask/PrefixLen Gateway TPGT MTU Rate iSNS_Addr iSNS_Port STGT VLAN0:6:1 offline :: 0 :: 61 1500 10Gbps :: 3205 61 -0:6:2 offline :: 0 :: 62 1500 10Gbps :: 3205 62 -1:6:1 offline :: 0 :: 161 1500 10Gbps :: 3205 161 -1:6:2 offline :: 0 :: 162 1500 10Gbps :: 3205 162 -----------------------------------------------------------------------------------------------------4
3. Issue the controliscsiport addr <netmask|prefix_len> [-f]<node:slot:port> command to set the IP addresses, prefix length, and vlan tag of theiSCSI target ports. For example:
cli % controliscsiport addr fd15:0816:c0::021 64 -vlan 816 -f 0:6:1
4. To display the IPv6 address and vlan tag of port 0:6:1, use the iscsivlan option in theshowport command. For example:
cli % showport -iscsivlans 0:6:1
N:S:P VLAN IPAddr Netmask/PrefixLen Gateway MTU TPGT STGT iSNS_Addr iSNS_Port0:6:1 816 fd15:816:c0::21 64 :: 1500 61 61 :: 3205
To see that port 0:6:1 is ready, issue the showport -iscsi command:
cli % showport -iscsi 0:6:1
N:S:P State IPAddr Netmask/PrefixLen Gateway TPGT MTU Rate iSNS_Addr iSNS_Port STGT VLAN0:6:1 ready :: 0 :: 61 1500 10Gbps :: 3205 61 Y--------------------------------------------------------------------------------------------------1
If configured with vLAN, use showport -iscsivlans instead of showport -iscsi todisplay IP Address:
cli % showport -iscsivlans
N:S:P VLAN IPAddr Netmask/PrefixLen Gateway MTU TPGT STGT iSNS_Addr iSNS_Port0:6:1 - 10.101.1.61 255.255.255.0 10.101.1.1 1500 61 61 0.0.0.0 32050:6:2 - :: 0 :: 1500 62 62 :: 32050:6:2 62 fd15:816:c0:21 64 :: 1500 62 62 :: 32051:6:1 - 10.101.2.161 255.255.255.0 10.101.2.1 1500 161 161 0.0.0.0 32051:6:2 - :: 0 :: 1500 162 162 :: 32051:6:2 162 fd15:1816:c0:21 64 :: 1500 162 162 :: 3205----------------------------------------------------------------------------------------------6
54 Configuring the HPE 3PAR StoreServ Storage and host—iSCSI
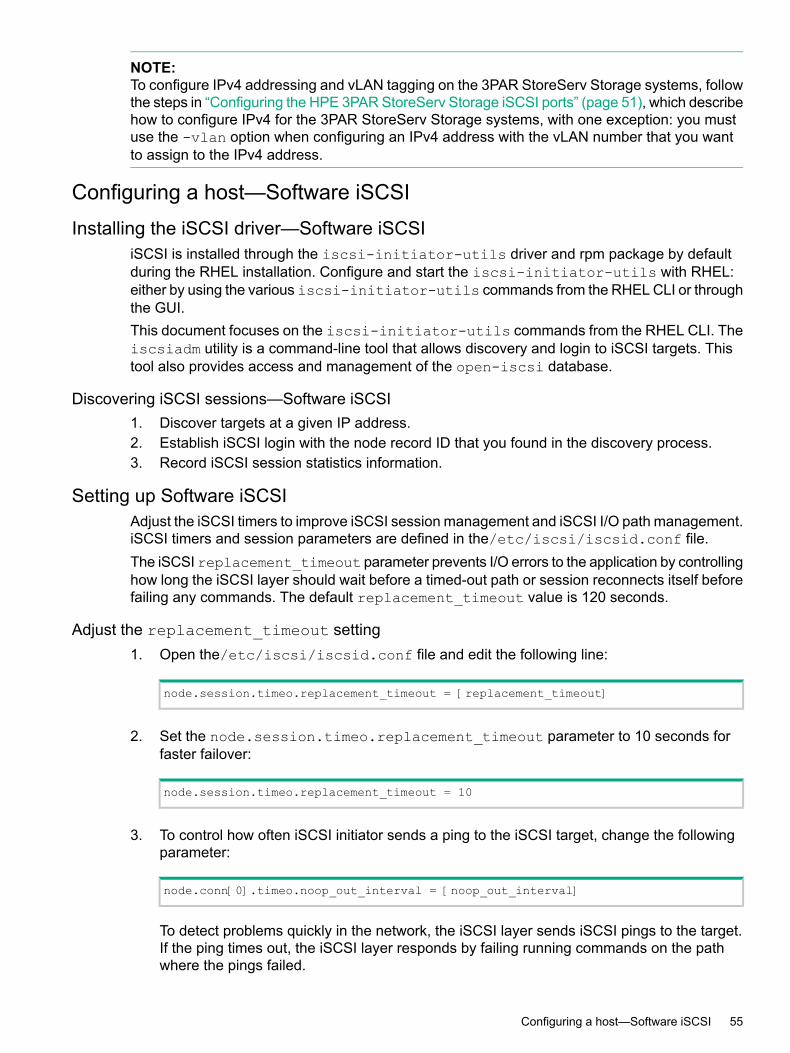
NOTE:To configure IPv4 addressing and vLAN tagging on the 3PAR StoreServ Storage systems, followthe steps in “Configuring the HPE 3PAR StoreServ Storage iSCSI ports” (page 51), which describehow to configure IPv4 for the 3PAR StoreServ Storage systems, with one exception: you mustuse the -vlan option when configuring an IPv4 address with the vLAN number that you wantto assign to the IPv4 address.
Configuring a host—Software iSCSIInstalling the iSCSI driver—Software iSCSI
iSCSI is installed through the iscsi-initiator-utils driver and rpm package by defaultduring the RHEL installation. Configure and start the iscsi-initiator-utils with RHEL:either by using the various iscsi-initiator-utils commands from the RHEL CLI or throughthe GUI.This document focuses on the iscsi-initiator-utils commands from the RHEL CLI. Theiscsiadm utility is a command-line tool that allows discovery and login to iSCSI targets. Thistool also provides access and management of the open-iscsi database.
Discovering iSCSI sessions—Software iSCSI1. Discover targets at a given IP address.2. Establish iSCSI login with the node record ID that you found in the discovery process.3. Record iSCSI session statistics information.
Setting up Software iSCSIAdjust the iSCSI timers to improve iSCSI session management and iSCSI I/O path management.iSCSI timers and session parameters are defined in the/etc/iscsi/iscsid.conf file.The iSCSI replacement_timeout parameter prevents I/O errors to the application by controllinghow long the iSCSI layer should wait before a timed-out path or session reconnects itself beforefailing any commands. The default replacement_timeout value is 120 seconds.
Adjust the replacement_timeout setting1. Open the/etc/iscsi/iscsid.conf file and edit the following line:
node.session.timeo.replacement_timeout = [replacement_timeout]
2. Set the node.session.timeo.replacement_timeout parameter to 10 seconds forfaster failover:
node.session.timeo.replacement_timeout = 10
3. To control how often iSCSI initiator sends a ping to the iSCSI target, change the followingparameter:
node.conn[0].timeo.noop_out_interval = [noop_out_interval]
To detect problems quickly in the network, the iSCSI layer sends iSCSI pings to the target.If the ping times out, the iSCSI layer responds by failing running commands on the pathwhere the pings failed.
Configuring a host—Software iSCSI 55
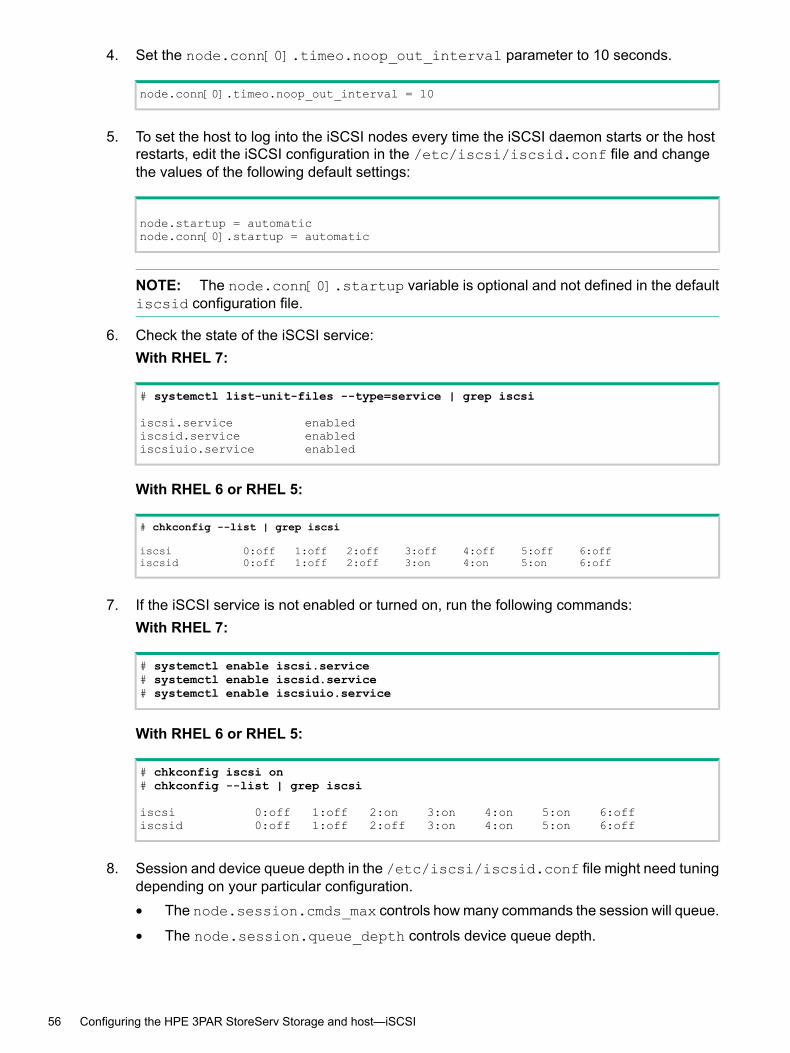
4. Set the node.conn[0].timeo.noop_out_interval parameter to 10 seconds.
node.conn[0].timeo.noop_out_interval = 10
5. To set the host to log into the iSCSI nodes every time the iSCSI daemon starts or the hostrestarts, edit the iSCSI configuration in the /etc/iscsi/iscsid.conf file and changethe values of the following default settings:
node.startup = automaticnode.conn[0].startup = automatic
NOTE: The node.conn[0].startup variable is optional and not defined in the defaultiscsid configuration file.
6. Check the state of the iSCSI service:With RHEL 7:
# systemctl list-unit-files --type=service | grep iscsi
iscsi.service enablediscsid.service enablediscsiuio.service enabled
With RHEL 6 or RHEL 5:
# chkconfig --list | grep iscsi
iscsi 0:off 1:off 2:off 3:off 4:off 5:off 6:offiscsid 0:off 1:off 2:off 3:on 4:on 5:on 6:off
7. If the iSCSI service is not enabled or turned on, run the following commands:With RHEL 7:
# systemctl enable iscsi.service# systemctl enable iscsid.service# systemctl enable iscsiuio.service
With RHEL 6 or RHEL 5:
# chkconfig iscsi on# chkconfig --list | grep iscsi
iscsi 0:off 1:off 2:on 3:on 4:on 5:on 6:offiscsid 0:off 1:off 2:off 3:on 4:on 5:on 6:off
8. Session and device queue depth in the /etc/iscsi/iscsid.conf file might need tuningdepending on your particular configuration.• The node.session.cmds_max controls how many commands the session will queue.
• The node.session.queue_depth controls device queue depth.
56 Configuring the HPE 3PAR StoreServ Storage and host—iSCSI
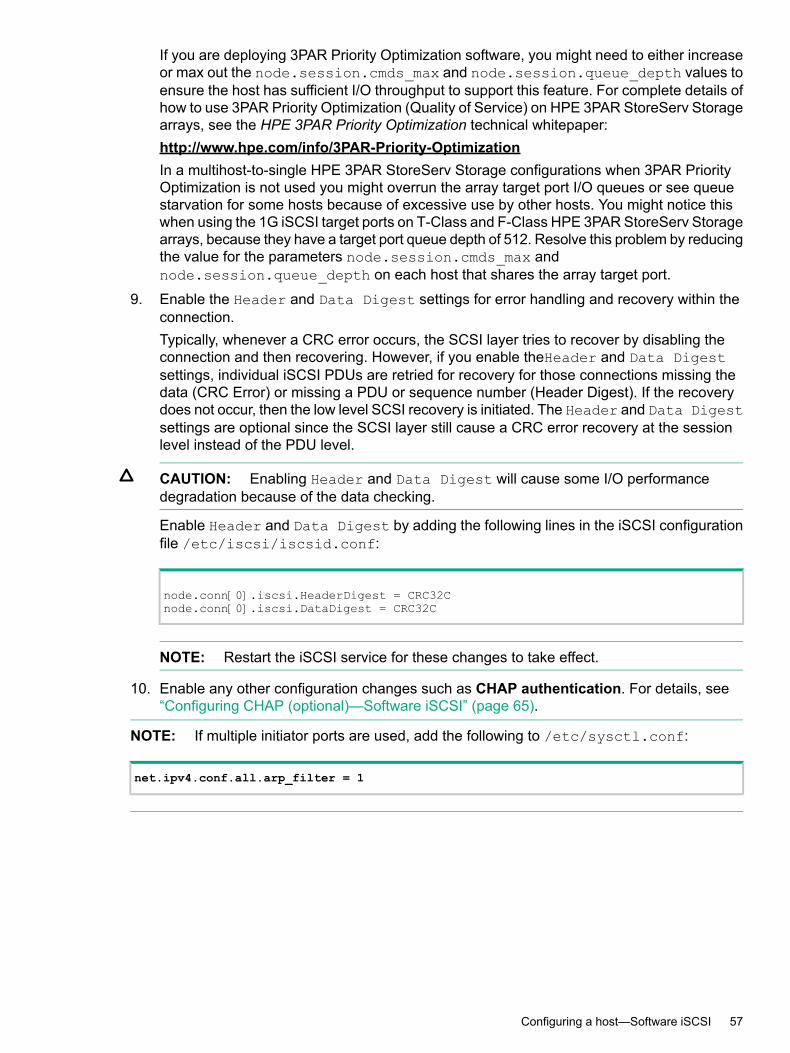
If you are deploying 3PAR Priority Optimization software, you might need to either increaseor max out the node.session.cmds_max and node.session.queue_depth values toensure the host has sufficient I/O throughput to support this feature. For complete details ofhow to use 3PAR Priority Optimization (Quality of Service) on HPE 3PAR StoreServ Storagearrays, see the HPE 3PAR Priority Optimization technical whitepaper:http://www.hpe.com/info/3PAR-Priority-OptimizationIn a multihost-to-single HPE 3PAR StoreServ Storage configurations when 3PAR PriorityOptimization is not used you might overrun the array target port I/O queues or see queuestarvation for some hosts because of excessive use by other hosts. You might notice thiswhen using the 1G iSCSI target ports on T-Class and F-Class HPE 3PAR StoreServ Storagearrays, because they have a target port queue depth of 512. Resolve this problem by reducingthe value for the parameters node.session.cmds_max andnode.session.queue_depth on each host that shares the array target port.
9. Enable the Header and Data Digest settings for error handling and recovery within theconnection.Typically, whenever a CRC error occurs, the SCSI layer tries to recover by disabling theconnection and then recovering. However, if you enable theHeader and Data Digestsettings, individual iSCSI PDUs are retried for recovery for those connections missing thedata (CRC Error) or missing a PDU or sequence number (Header Digest). If the recoverydoes not occur, then the low level SCSI recovery is initiated. The Header and Data Digestsettings are optional since the SCSI layer still cause a CRC error recovery at the sessionlevel instead of the PDU level.
CAUTION: Enabling Header and Data Digest will cause some I/O performancedegradation because of the data checking.
Enable Header and Data Digest by adding the following lines in the iSCSI configurationfile /etc/iscsi/iscsid.conf:
node.conn[0].iscsi.HeaderDigest = CRC32Cnode.conn[0].iscsi.DataDigest = CRC32C
NOTE: Restart the iSCSI service for these changes to take effect.
10. Enable any other configuration changes such as CHAP authentication. For details, see“Configuring CHAP (optional)—Software iSCSI” (page 65).
NOTE: If multiple initiator ports are used, add the following to /etc/sysctl.conf:
net.ipv4.conf.all.arp_filter = 1
Configuring a host—Software iSCSI 57
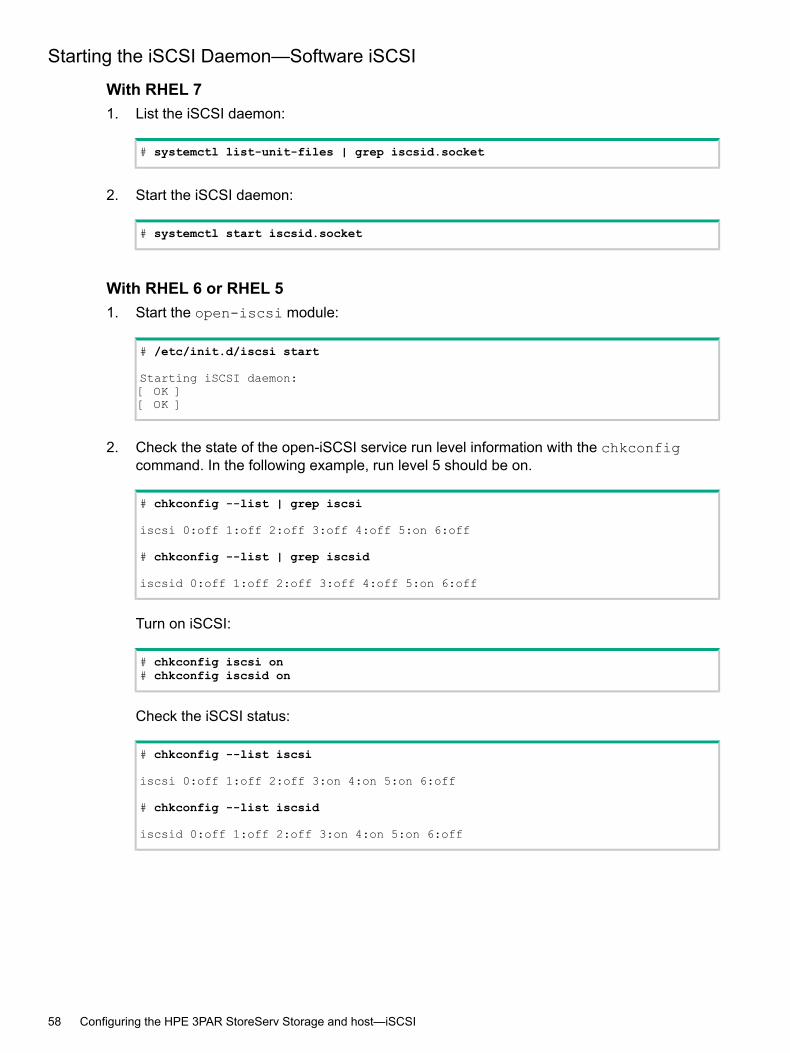
Starting the iSCSI Daemon—Software iSCSI
With RHEL 71. List the iSCSI daemon:
# systemctl list-unit-files | grep iscsid.socket
2. Start the iSCSI daemon:
# systemctl start iscsid.socket
With RHEL 6 or RHEL 51. Start the open-iscsi module:
# /etc/init.d/iscsi start
Starting iSCSI daemon:[ OK ][ OK ]
2. Check the state of the open-iSCSI service run level information with the chkconfigcommand. In the following example, run level 5 should be on.
# chkconfig --list | grep iscsi
iscsi 0:off 1:off 2:off 3:off 4:off 5:on 6:off
# chkconfig --list | grep iscsid
iscsid 0:off 1:off 2:off 3:off 4:off 5:on 6:off
Turn on iSCSI:
# chkconfig iscsi on# chkconfig iscsid on
Check the iSCSI status:
# chkconfig --list iscsi
iscsi 0:off 1:off 2:off 3:on 4:on 5:on 6:off
# chkconfig --list iscsid
iscsid 0:off 1:off 2:off 3:on 4:on 5:on 6:off
58 Configuring the HPE 3PAR StoreServ Storage and host—iSCSI
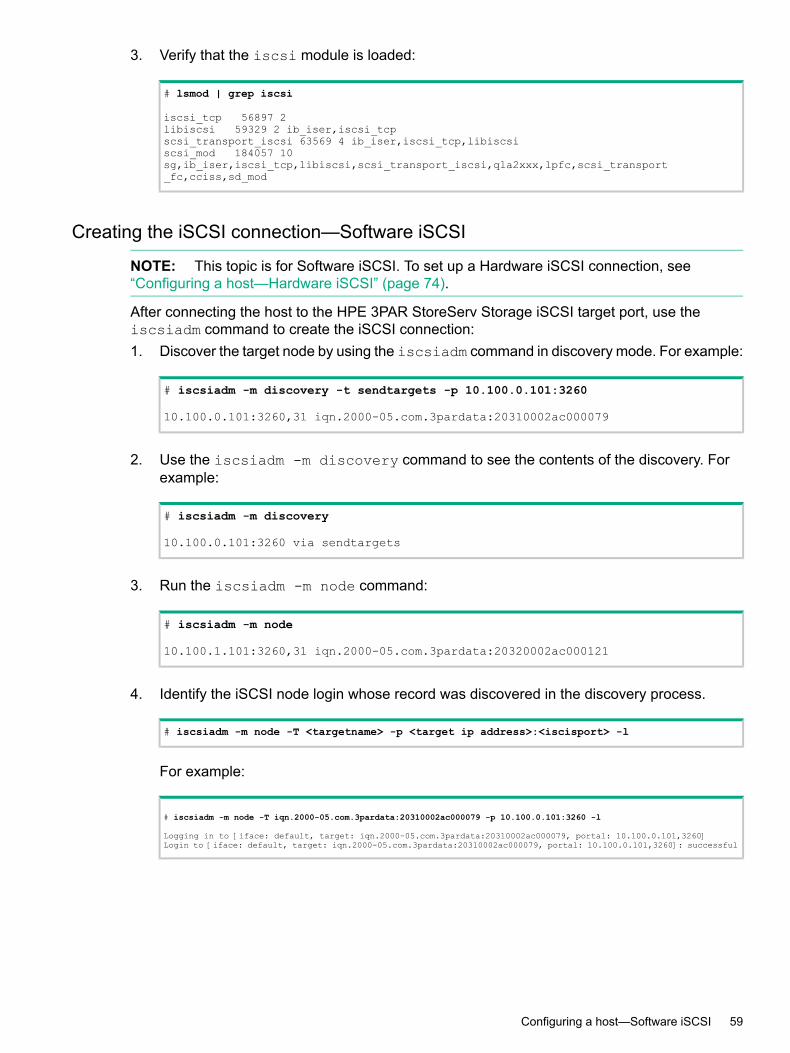
3. Verify that the iscsi module is loaded:
# lsmod | grep iscsi
iscsi_tcp 56897 2libiscsi 59329 2 ib_iser,iscsi_tcpscsi_transport_iscsi 63569 4 ib_iser,iscsi_tcp,libiscsiscsi_mod 184057 10sg,ib_iser,iscsi_tcp,libiscsi,scsi_transport_iscsi,qla2xxx,lpfc,scsi_transport_fc,cciss,sd_mod
Creating the iSCSI connection—Software iSCSI
NOTE: This topic is for Software iSCSI. To set up a Hardware iSCSI connection, see“Configuring a host—Hardware iSCSI” (page 74).
After connecting the host to the HPE 3PAR StoreServ Storage iSCSI target port, use theiscsiadm command to create the iSCSI connection:1. Discover the target node by using the iscsiadm command in discovery mode. For example:
# iscsiadm -m discovery -t sendtargets -p 10.100.0.101:3260
10.100.0.101:3260,31 iqn.2000-05.com.3pardata:20310002ac000079
2. Use the iscsiadm -m discovery command to see the contents of the discovery. Forexample:
# iscsiadm -m discovery
10.100.0.101:3260 via sendtargets
3. Run the iscsiadm -m node command:
# iscsiadm -m node
10.100.1.101:3260,31 iqn.2000-05.com.3pardata:20320002ac000121
4. Identify the iSCSI node login whose record was discovered in the discovery process.
# iscsiadm -m node -T <targetname> -p <target ip address>:<iscisport> -l
For example:
# iscsiadm -m node -T iqn.2000-05.com.3pardata:20310002ac000079 -p 10.100.0.101:3260 -l
Logging in to [iface: default, target: iqn.2000-05.com.3pardata:20310002ac000079, portal: 10.100.0.101,3260]Login to [iface: default, target: iqn.2000-05.com.3pardata:20310002ac000079, portal: 10.100.0.101,3260]: successful
Configuring a host—Software iSCSI 59
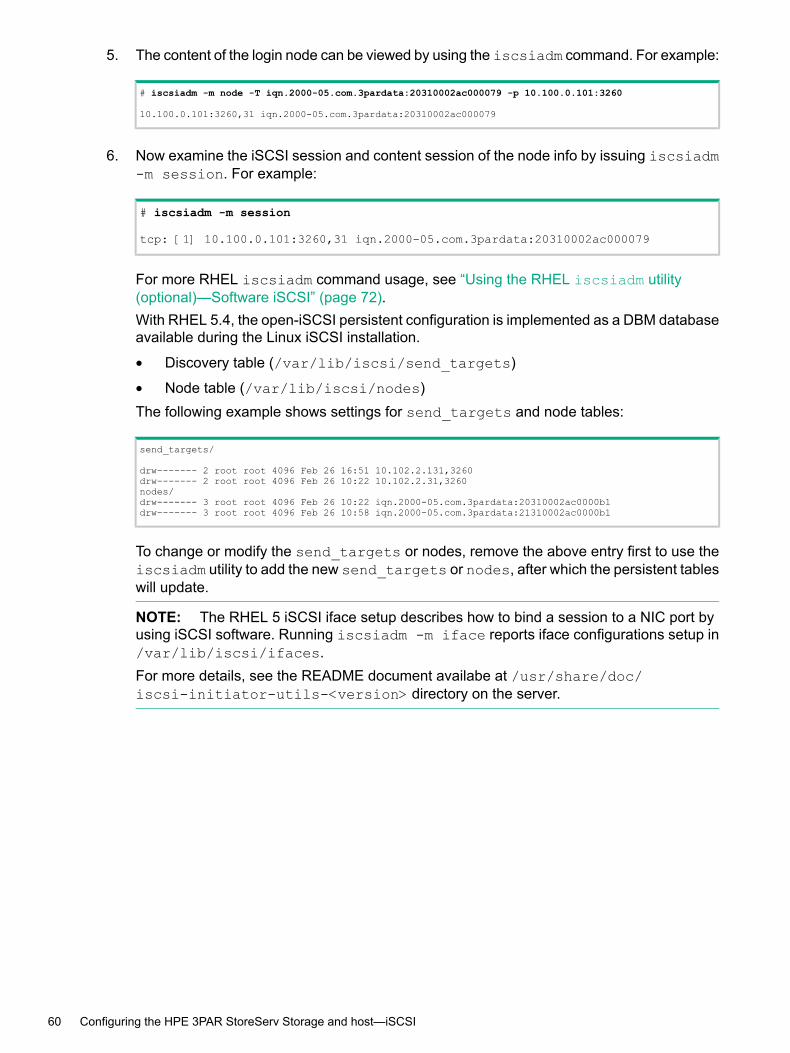
5. The content of the login node can be viewed by using the iscsiadm command. For example:
# iscsiadm -m node -T iqn.2000-05.com.3pardata:20310002ac000079 -p 10.100.0.101:3260
10.100.0.101:3260,31 iqn.2000-05.com.3pardata:20310002ac000079
6. Now examine the iSCSI session and content session of the node info by issuing iscsiadm-m session. For example:
# iscsiadm -m session
tcp: [1] 10.100.0.101:3260,31 iqn.2000-05.com.3pardata:20310002ac000079
For more RHEL iscsiadm command usage, see “Using the RHEL iscsiadm utility(optional)—Software iSCSI” (page 72).With RHEL 5.4, the open-iSCSI persistent configuration is implemented as a DBM databaseavailable during the Linux iSCSI installation.
• Discovery table (/var/lib/iscsi/send_targets)
• Node table (/var/lib/iscsi/nodes)The following example shows settings for send_targets and node tables:
send_targets/
drw------- 2 root root 4096 Feb 26 16:51 10.102.2.131,3260drw------- 2 root root 4096 Feb 26 10:22 10.102.2.31,3260nodes/drw------- 3 root root 4096 Feb 26 10:22 iqn.2000-05.com.3pardata:20310002ac0000b1drw------- 3 root root 4096 Feb 26 10:58 iqn.2000-05.com.3pardata:21310002ac0000b1
To change or modify the send_targets or nodes, remove the above entry first to use theiscsiadm utility to add the new send_targets or nodes, after which the persistent tableswill update.
NOTE: The RHEL 5 iSCSI iface setup describes how to bind a session to a NIC port byusing iSCSI software. Running iscsiadm -m iface reports iface configurations setup in/var/lib/iscsi/ifaces.For more details, see the README document availabe at /usr/share/doc/iscsi-initiator-utils-<version> directory on the server.
60 Configuring the HPE 3PAR StoreServ Storage and host—iSCSI
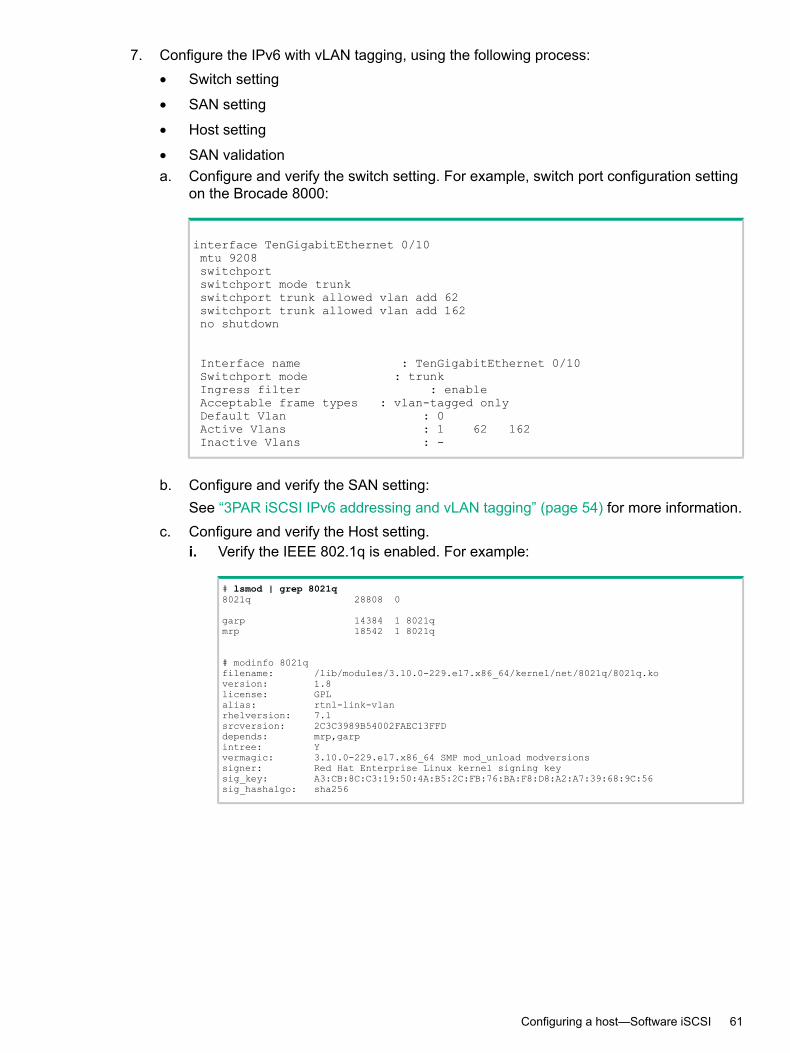
7. Configure the IPv6 with vLAN tagging, using the following process:• Switch setting
• SAN setting
• Host setting
• SAN validationa. Configure and verify the switch setting. For example, switch port configuration setting
on the Brocade 8000:
interface TenGigabitEthernet 0/10mtu 9208switchportswitchport mode trunkswitchport trunk allowed vlan add 62switchport trunk allowed vlan add 162no shutdown
Interface name : TenGigabitEthernet 0/10Switchport mode : trunkIngress filter : enableAcceptable frame types : vlan-tagged onlyDefault Vlan : 0Active Vlans : 1 62 162Inactive Vlans : -
b. Configure and verify the SAN setting:See “3PAR iSCSI IPv6 addressing and vLAN tagging” (page 54) for more information.
c. Configure and verify the Host setting.i. Verify the IEEE 802.1q is enabled. For example:
# lsmod | grep 8021q8021q 28808 0
garp 14384 1 8021qmrp 18542 1 8021q
# modinfo 8021qfilename: /lib/modules/3.10.0-229.el7.x86_64/kernel/net/8021q/8021q.koversion: 1.8license: GPLalias: rtnl-link-vlanrhelversion: 7.1srcversion: 2C3C3989B54002FAEC13FFDdepends: mrp,garpintree: Yvermagic: 3.10.0-229.el7.x86_64 SMP mod_unload modversionssigner: Red Hat Enterprise Linux kernel signing keysig_key: A3:CB:8C:C3:19:50:4A:B5:2C:FB:76:BA:F8:D8:A2:A7:39:68:9C:56sig_hashalgo: sha256
Configuring a host—Software iSCSI 61
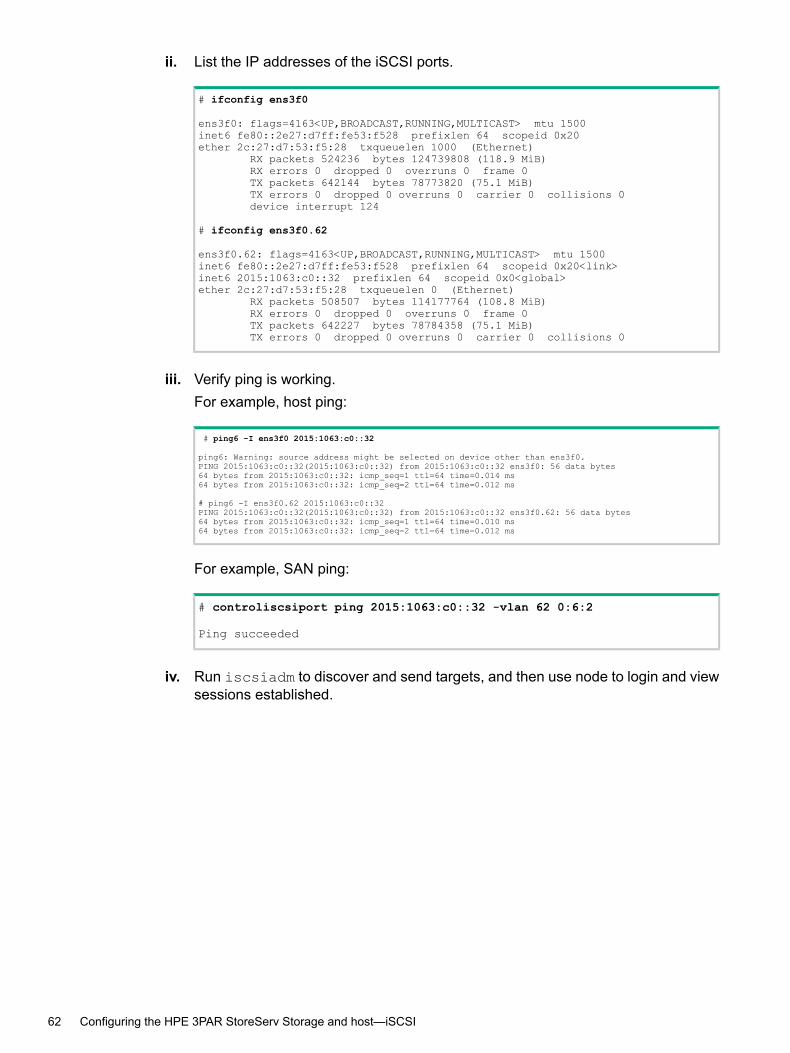
ii. List the IP addresses of the iSCSI ports.
# ifconfig ens3f0
ens3f0: flags=4163<UP,BROADCAST,RUNNING,MULTICAST> mtu 1500inet6 fe80::2e27:d7ff:fe53:f528 prefixlen 64 scopeid 0x20ether 2c:27:d7:53:f5:28 txqueuelen 1000 (Ethernet)
RX packets 524236 bytes 124739808 (118.9 MiB)RX errors 0 dropped 0 overruns 0 frame 0TX packets 642144 bytes 78773820 (75.1 MiB)TX errors 0 dropped 0 overruns 0 carrier 0 collisions 0device interrupt 124
# ifconfig ens3f0.62
ens3f0.62: flags=4163<UP,BROADCAST,RUNNING,MULTICAST> mtu 1500inet6 fe80::2e27:d7ff:fe53:f528 prefixlen 64 scopeid 0x20<link>inet6 2015:1063:c0::32 prefixlen 64 scopeid 0x0<global>ether 2c:27:d7:53:f5:28 txqueuelen 0 (Ethernet)
RX packets 508507 bytes 114177764 (108.8 MiB)RX errors 0 dropped 0 overruns 0 frame 0TX packets 642227 bytes 78784358 (75.1 MiB)TX errors 0 dropped 0 overruns 0 carrier 0 collisions 0
iii. Verify ping is working.For example, host ping:
# ping6 -I ens3f0 2015:1063:c0::32
ping6: Warning: source address might be selected on device other than ens3f0.PING 2015:1063:c0::32(2015:1063:c0::32) from 2015:1063:c0::32 ens3f0: 56 data bytes64 bytes from 2015:1063:c0::32: icmp_seq=1 ttl=64 time=0.014 ms64 bytes from 2015:1063:c0::32: icmp_seq=2 ttl=64 time=0.012 ms
# ping6 -I ens3f0.62 2015:1063:c0::32PING 2015:1063:c0::32(2015:1063:c0::32) from 2015:1063:c0::32 ens3f0.62: 56 data bytes64 bytes from 2015:1063:c0::32: icmp_seq=1 ttl=64 time=0.010 ms64 bytes from 2015:1063:c0::32: icmp_seq=2 ttl=64 time=0.012 ms
For example, SAN ping:
# controliscsiport ping 2015:1063:c0::32 -vlan 62 0:6:2
Ping succeeded
iv. Run iscsiadm to discover and send targets, and then use node to login and viewsessions established.
62 Configuring the HPE 3PAR StoreServ Storage and host—iSCSI
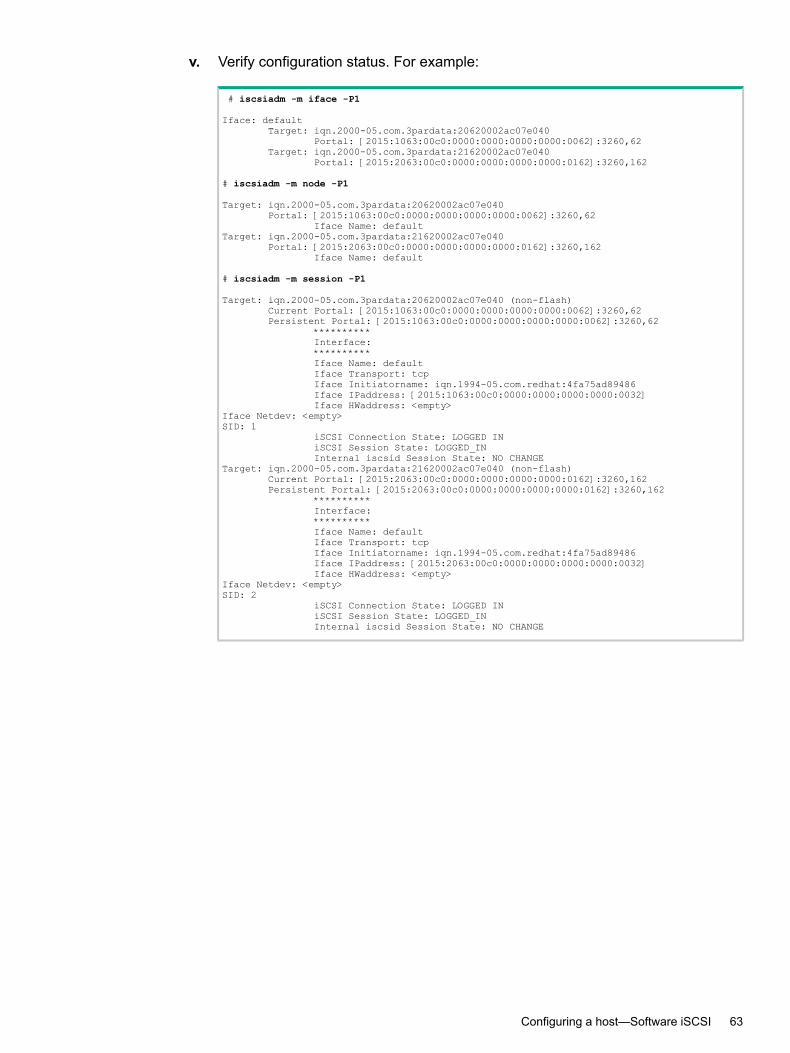
v. Verify configuration status. For example:
# iscsiadm -m iface -P1
Iface: defaultTarget: iqn.2000-05.com.3pardata:20620002ac07e040
Portal: [2015:1063:00c0:0000:0000:0000:0000:0062]:3260,62Target: iqn.2000-05.com.3pardata:21620002ac07e040
Portal: [2015:2063:00c0:0000:0000:0000:0000:0162]:3260,162
# iscsiadm -m node -P1
Target: iqn.2000-05.com.3pardata:20620002ac07e040Portal: [2015:1063:00c0:0000:0000:0000:0000:0062]:3260,62
Iface Name: defaultTarget: iqn.2000-05.com.3pardata:21620002ac07e040
Portal: [2015:2063:00c0:0000:0000:0000:0000:0162]:3260,162Iface Name: default
# iscsiadm -m session -P1
Target: iqn.2000-05.com.3pardata:20620002ac07e040 (non-flash)Current Portal: [2015:1063:00c0:0000:0000:0000:0000:0062]:3260,62Persistent Portal: [2015:1063:00c0:0000:0000:0000:0000:0062]:3260,62
**********Interface:**********Iface Name: defaultIface Transport: tcpIface Initiatorname: iqn.1994-05.com.redhat:4fa75ad89486Iface IPaddress: [2015:1063:00c0:0000:0000:0000:0000:0032]Iface HWaddress: <empty>
Iface Netdev: <empty>SID: 1
iSCSI Connection State: LOGGED INiSCSI Session State: LOGGED_INInternal iscsid Session State: NO CHANGE
Target: iqn.2000-05.com.3pardata:21620002ac07e040 (non-flash)Current Portal: [2015:2063:00c0:0000:0000:0000:0000:0162]:3260,162Persistent Portal: [2015:2063:00c0:0000:0000:0000:0000:0162]:3260,162
**********Interface:**********Iface Name: defaultIface Transport: tcpIface Initiatorname: iqn.1994-05.com.redhat:4fa75ad89486Iface IPaddress: [2015:2063:00c0:0000:0000:0000:0000:0032]Iface HWaddress: <empty>
Iface Netdev: <empty>SID: 2
iSCSI Connection State: LOGGED INiSCSI Session State: LOGGED_INInternal iscsid Session State: NO CHANGE
Configuring a host—Software iSCSI 63
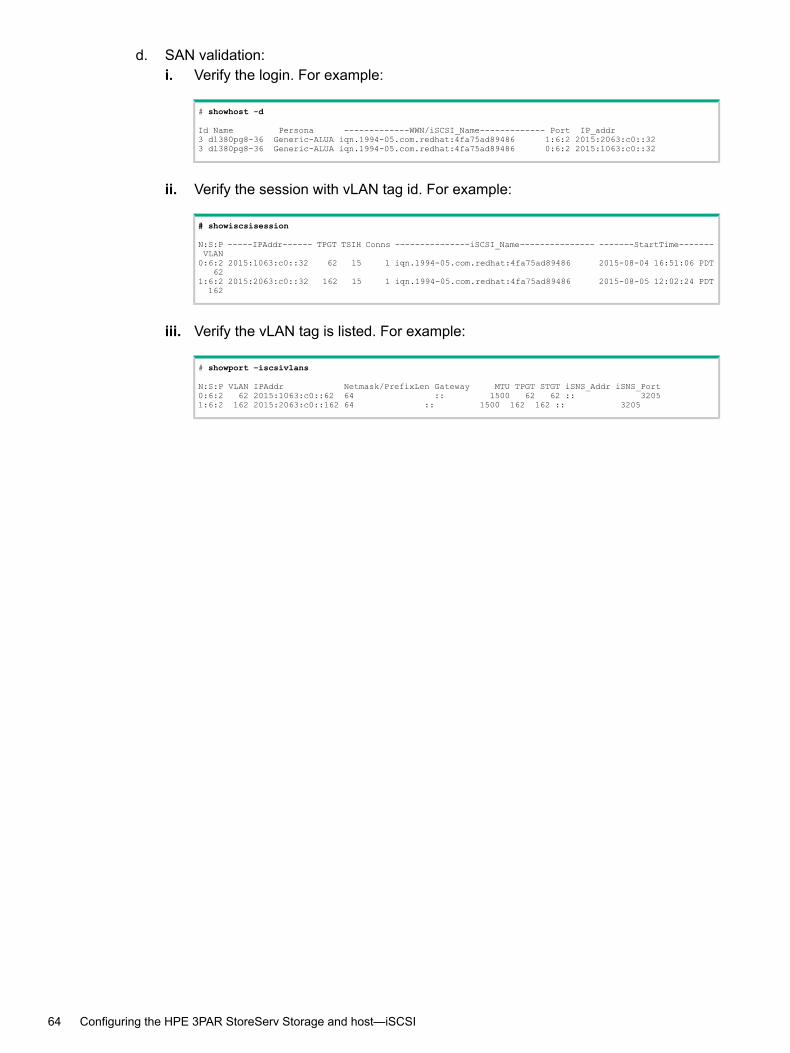
d. SAN validation:i. Verify the login. For example:
# showhost -d
Id Name Persona -------------WWN/iSCSI_Name------------- Port IP_addr3 dl380pg8-36 Generic-ALUA iqn.1994-05.com.redhat:4fa75ad89486 1:6:2 2015:2063:c0::323 dl380pg8-36 Generic-ALUA iqn.1994-05.com.redhat:4fa75ad89486 0:6:2 2015:1063:c0::32
ii. Verify the session with vLAN tag id. For example:
# showiscsisession
N:S:P -----IPAddr------ TPGT TSIH Conns ---------------iSCSI_Name--------------- -------StartTime-------VLAN0:6:2 2015:1063:c0::32 62 15 1 iqn.1994-05.com.redhat:4fa75ad89486 2015-08-04 16:51:06 PDT
621:6:2 2015:2063:c0::32 162 15 1 iqn.1994-05.com.redhat:4fa75ad89486 2015-08-05 12:02:24 PDT162
iii. Verify the vLAN tag is listed. For example:
# showport –iscsivlans
N:S:P VLAN IPAddr Netmask/PrefixLen Gateway MTU TPGT STGT iSNS_Addr iSNS_Port0:6:2 62 2015:1063:c0::62 64 :: 1500 62 62 :: 32051:6:2 162 2015:2063:c0::162 64 :: 1500 162 162 :: 3205
64 Configuring the HPE 3PAR StoreServ Storage and host—iSCSI
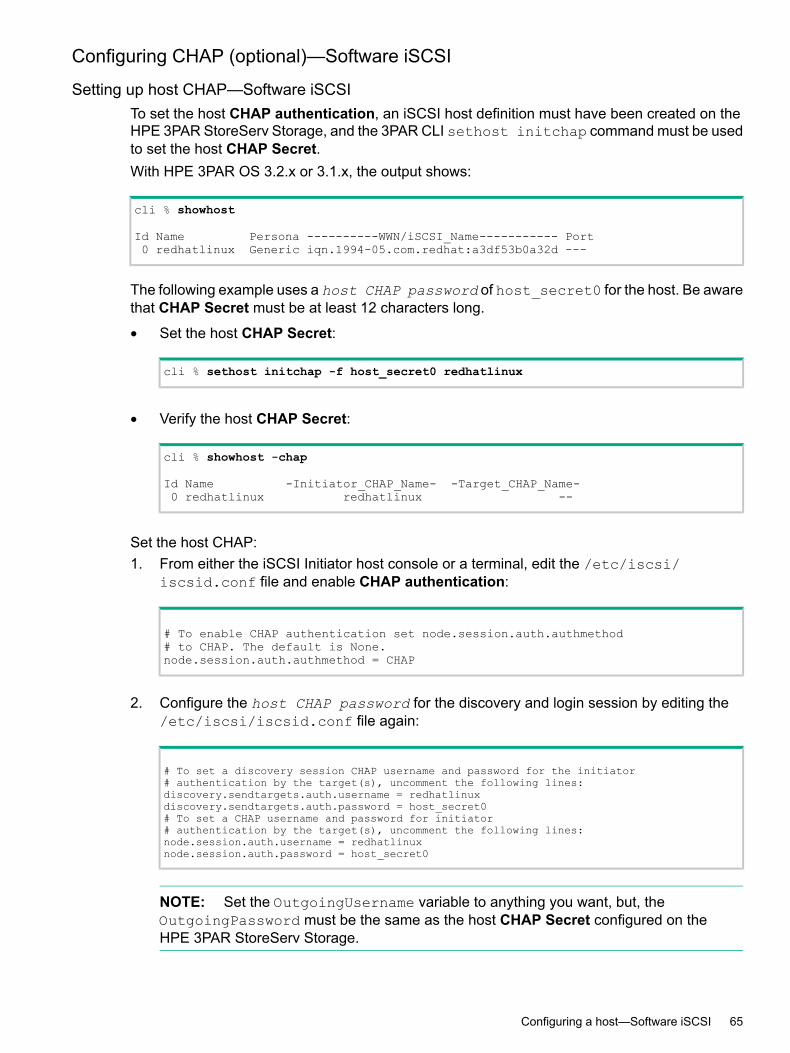
Configuring CHAP (optional)—Software iSCSI
Setting up host CHAP—Software iSCSITo set the host CHAP authentication, an iSCSI host definition must have been created on theHPE 3PAR StoreServ Storage, and the 3PAR CLI sethost initchap command must be usedto set the host CHAP Secret.With HPE 3PAR OS 3.2.x or 3.1.x, the output shows:
cli % showhost
Id Name Persona ----------WWN/iSCSI_Name----------- Port0 redhatlinux Generic iqn.1994-05.com.redhat:a3df53b0a32d ---
The following example uses a host CHAP password of host_secret0 for the host. Be awarethat CHAP Secret must be at least 12 characters long.
• Set the host CHAP Secret:
cli % sethost initchap -f host_secret0 redhatlinux
• Verify the host CHAP Secret:
cli % showhost -chap
Id Name -Initiator_CHAP_Name- -Target_CHAP_Name-0 redhatlinux redhatlinux --
Set the host CHAP:1. From either the iSCSI Initiator host console or a terminal, edit the /etc/iscsi/
iscsid.conf file and enable CHAP authentication:
# To enable CHAP authentication set node.session.auth.authmethod# to CHAP. The default is None.node.session.auth.authmethod = CHAP
2. Configure the host CHAP password for the discovery and login session by editing the/etc/iscsi/iscsid.conf file again:
# To set a discovery session CHAP username and password for the initiator# authentication by the target(s), uncomment the following lines:discovery.sendtargets.auth.username = redhatlinuxdiscovery.sendtargets.auth.password = host_secret0# To set a CHAP username and password for initiator# authentication by the target(s), uncomment the following lines:node.session.auth.username = redhatlinuxnode.session.auth.password = host_secret0
NOTE: Set the OutgoingUsername variable to anything you want, but, theOutgoingPassword must be the same as the host CHAP Secret configured on theHPE 3PAR StoreServ Storage.
Configuring a host—Software iSCSI 65
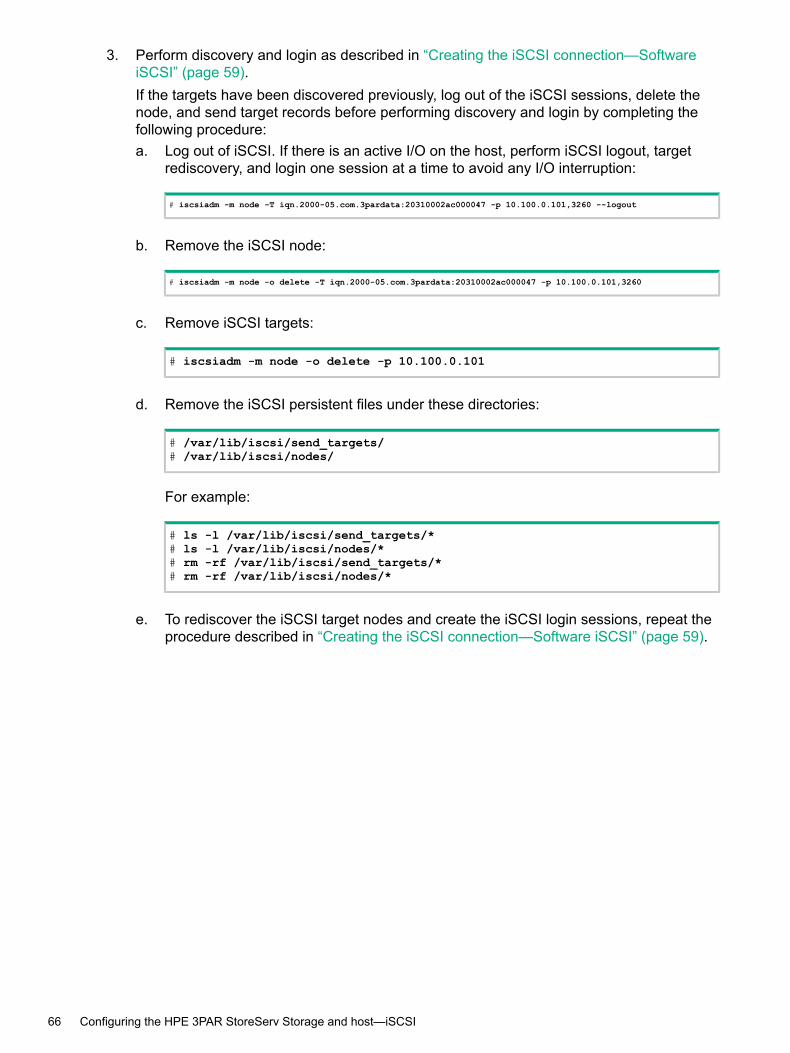
3. Perform discovery and login as described in “Creating the iSCSI connection—SoftwareiSCSI” (page 59).If the targets have been discovered previously, log out of the iSCSI sessions, delete thenode, and send target records before performing discovery and login by completing thefollowing procedure:a. Log out of iSCSI. If there is an active I/O on the host, perform iSCSI logout, target
rediscovery, and login one session at a time to avoid any I/O interruption:
# iscsiadm -m node -T iqn.2000-05.com.3pardata:20310002ac000047 -p 10.100.0.101,3260 --logout
b. Remove the iSCSI node:
# iscsiadm -m node -o delete -T iqn.2000-05.com.3pardata:20310002ac000047 -p 10.100.0.101,3260
c. Remove iSCSI targets:
# iscsiadm -m node -o delete -p 10.100.0.101
d. Remove the iSCSI persistent files under these directories:
# /var/lib/iscsi/send_targets/# /var/lib/iscsi/nodes/
For example:
# ls -l /var/lib/iscsi/send_targets/*# ls -l /var/lib/iscsi/nodes/*# rm -rf /var/lib/iscsi/send_targets/*# rm -rf /var/lib/iscsi/nodes/*
e. To rediscover the iSCSI target nodes and create the iSCSI login sessions, repeat theprocedure described in “Creating the iSCSI connection—Software iSCSI” (page 59).
66 Configuring the HPE 3PAR StoreServ Storage and host—iSCSI
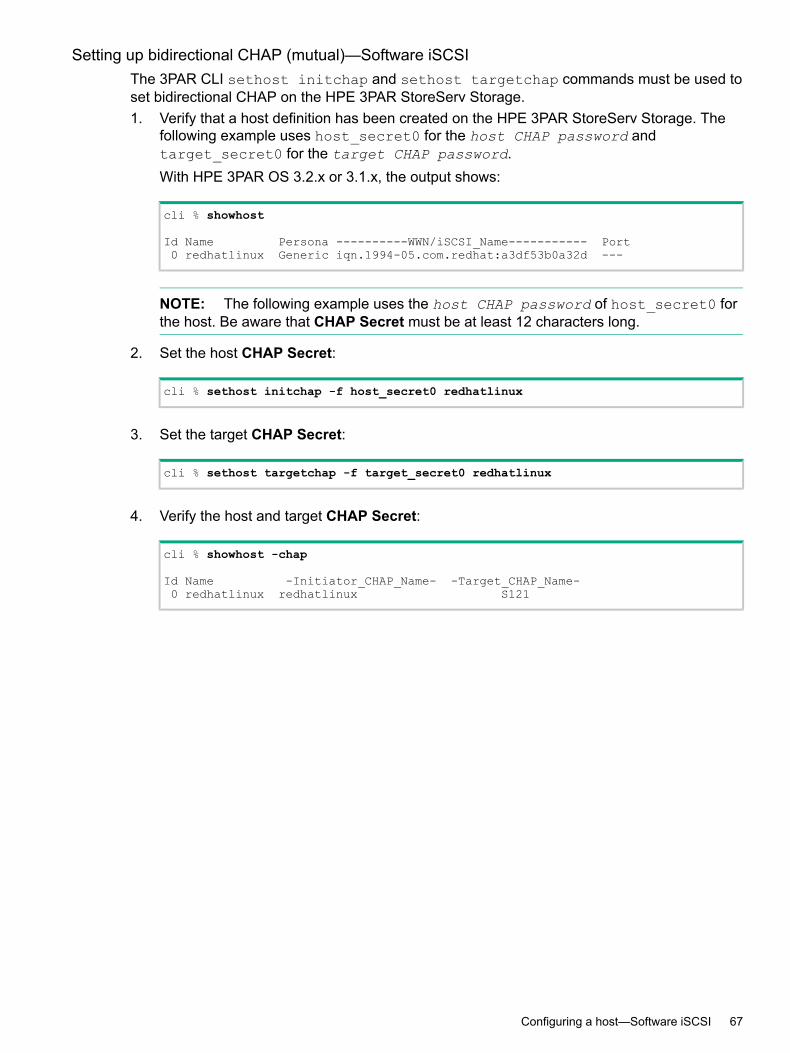
Setting up bidirectional CHAP (mutual)—Software iSCSIThe 3PAR CLI sethost initchap and sethost targetchap commands must be used toset bidirectional CHAP on the HPE 3PAR StoreServ Storage.1. Verify that a host definition has been created on the HPE 3PAR StoreServ Storage. The
following example uses host_secret0 for the host CHAP password andtarget_secret0 for the target CHAP password.With HPE 3PAR OS 3.2.x or 3.1.x, the output shows:
cli % showhost
Id Name Persona ----------WWN/iSCSI_Name----------- Port0 redhatlinux Generic iqn.1994-05.com.redhat:a3df53b0a32d ---
NOTE: The following example uses the host CHAP password of host_secret0 forthe host. Be aware that CHAP Secret must be at least 12 characters long.
2. Set the host CHAP Secret:
cli % sethost initchap -f host_secret0 redhatlinux
3. Set the target CHAP Secret:
cli % sethost targetchap -f target_secret0 redhatlinux
4. Verify the host and target CHAP Secret:
cli % showhost -chap
Id Name -Initiator_CHAP_Name- -Target_CHAP_Name-0 redhatlinux redhatlinux S121
Configuring a host—Software iSCSI 67

Configuring the bidirectional CHAP—Software iSCSIUse the iSCSI initiator host console or a terminal to edit the /etc/iscsi/iscsid.conf fileand configure the host CHAP password and target CHAP password for discovery andlogin sessions, by completing the following procedure:
NOTE: Two DiscoveryAddress variables with the same IP address for the HPE 3PARStoreServ Storage iSCSI target port are required—one for the host CHAP user name andpassword variables (OutgoingUsername and OutgoingPassword), and another one for thetarget CHAP user name and password variables (IncomingUsername andIncomingPassword).
1. Enable the CHAP configuration settings for the host initiator:
# To enable CHAP authentication set node.session.auth.authmethod# to CHAP. The default isw None.node.session.auth.authmethod = CHAP
# To set a discovery session CHAP username and password for the initiator# authentication by the target(s), uncomment the following lines:discovery.sendtargets.auth.username - redhatlinuxdiscovery.sendtargtets.auth.password = host_secret0
# To set a CHAP username and password for initiator# authentication by the target(s), uncomment the following lines:node.session.auth.username = redhatlinuxnode.session.auth.password = host_secret0
2. Enable the CHAP configuration settings for the target:
# To set a discovery session CHAP username and password for target(s)# authentication by the initiator, uncomment the following lines:
discovery.sendtargets.auth.username_in = S121discovery.sendtargets.auth.pasword_in = target_secret0
# To set a CHAP username and password for target(s)# authentication by the initiator, uncomment the following lines:node.session.auth.username_in = S121node.session.auth.password_in = target_secret0
# To enable CHAP authentication for a discovery session to the target# set discovery.sendtargets.auth.authmethod to CHAP. The default isw None.discovery.sentartets.authmethod = CHAP
NOTE: S121 is the target CHAP name, which can be displayed on the HPE 3PARStoreServ Storage by running the showhost -chap command.The OutgoingUsername and IncomingUsername variables can be set to anything youwant, but the OutgoingPassword and IncomingPassword must match the host CHAPpassword and target CHAP password configured on the HPE 3PAR StoreServ Storage.
68 Configuring the HPE 3PAR StoreServ Storage and host—iSCSI
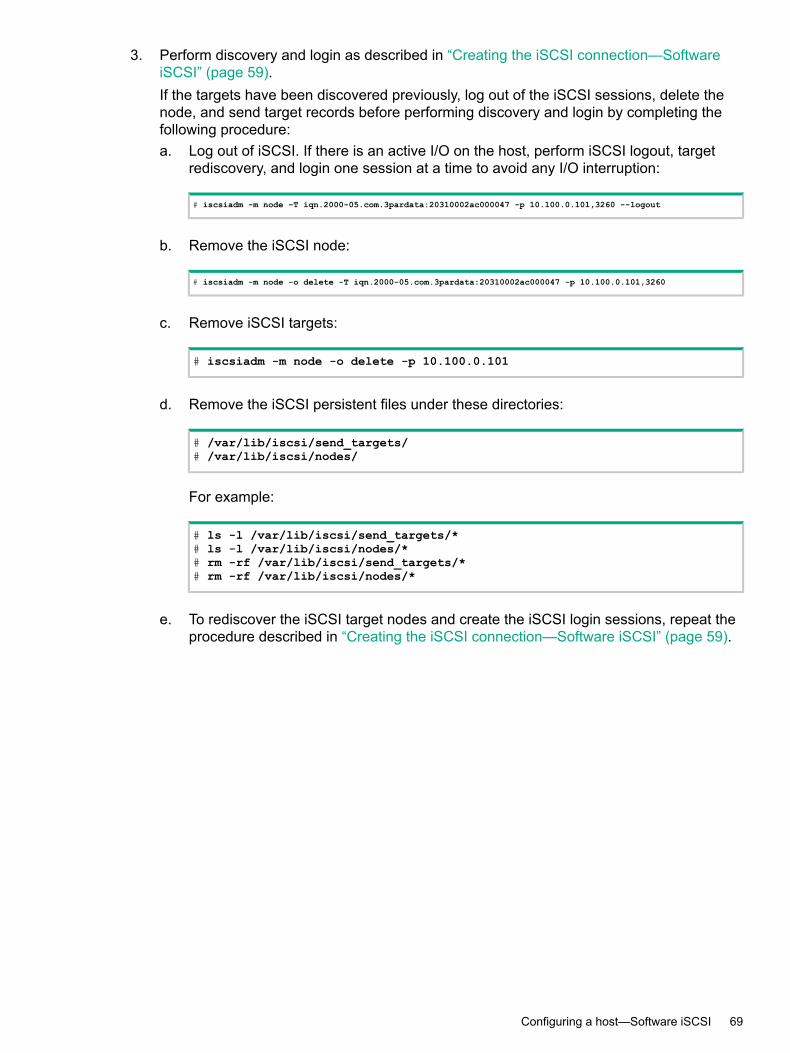
3. Perform discovery and login as described in “Creating the iSCSI connection—SoftwareiSCSI” (page 59).If the targets have been discovered previously, log out of the iSCSI sessions, delete thenode, and send target records before performing discovery and login by completing thefollowing procedure:a. Log out of iSCSI. If there is an active I/O on the host, perform iSCSI logout, target
rediscovery, and login one session at a time to avoid any I/O interruption:
# iscsiadm -m node -T iqn.2000-05.com.3pardata:20310002ac000047 -p 10.100.0.101,3260 --logout
b. Remove the iSCSI node:
# iscsiadm -m node -o delete -T iqn.2000-05.com.3pardata:20310002ac000047 -p 10.100.0.101,3260
c. Remove iSCSI targets:
# iscsiadm -m node -o delete -p 10.100.0.101
d. Remove the iSCSI persistent files under these directories:
# /var/lib/iscsi/send_targets/# /var/lib/iscsi/nodes/
For example:
# ls -l /var/lib/iscsi/send_targets/*# ls -l /var/lib/iscsi/nodes/*# rm -rf /var/lib/iscsi/send_targets/*# rm -rf /var/lib/iscsi/nodes/*
e. To rediscover the iSCSI target nodes and create the iSCSI login sessions, repeat theprocedure described in “Creating the iSCSI connection—Software iSCSI” (page 59).
Configuring a host—Software iSCSI 69
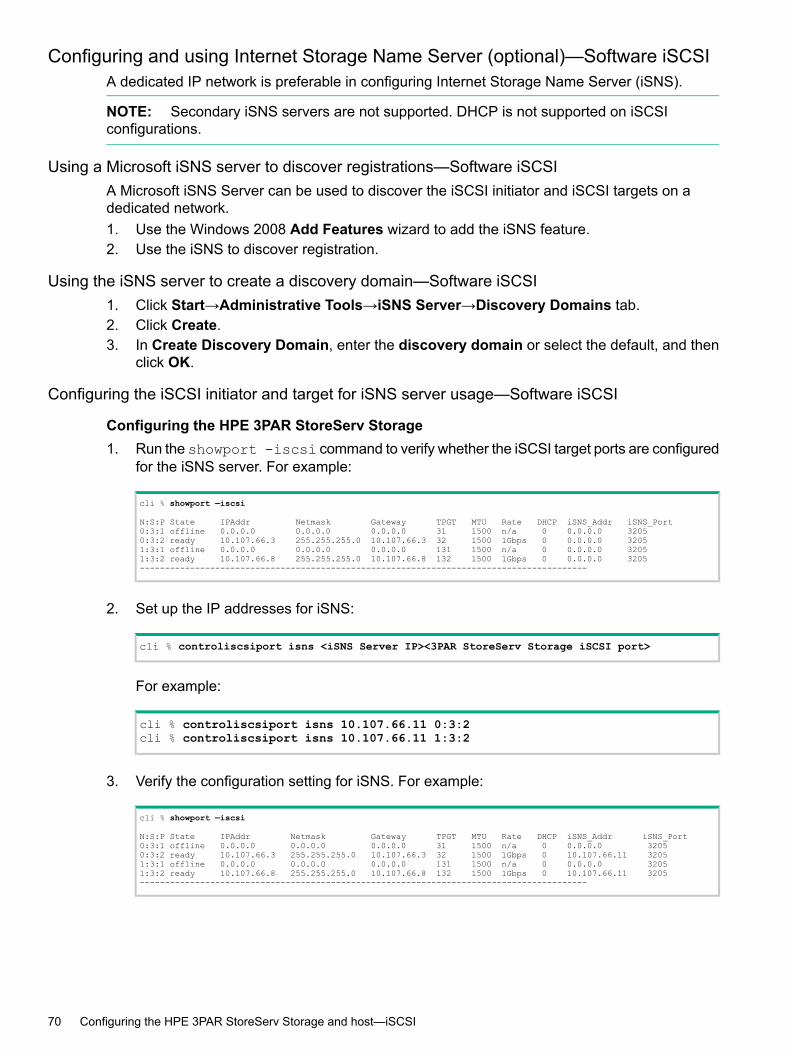
Configuring and using Internet Storage Name Server (optional)—Software iSCSIA dedicated IP network is preferable in configuring Internet Storage Name Server (iSNS).
NOTE: Secondary iSNS servers are not supported. DHCP is not supported on iSCSIconfigurations.
Using a Microsoft iSNS server to discover registrations—Software iSCSIA Microsoft iSNS Server can be used to discover the iSCSI initiator and iSCSI targets on adedicated network.1. Use the Windows 2008 Add Features wizard to add the iSNS feature.2. Use the iSNS to discover registration.
Using the iSNS server to create a discovery domain—Software iSCSI1. Click Start→Administrative Tools→iSNS Server→Discovery Domains tab.2. Click Create.3. In Create Discovery Domain, enter the discovery domain or select the default, and then
click OK.
Configuring the iSCSI initiator and target for iSNS server usage—Software iSCSI
Configuring the HPE 3PAR StoreServ Storage1. Run the showport -iscsi command to verify whether the iSCSI target ports are configured
for the iSNS server. For example:
cli % showport —iscsi
N:S:P State IPAddr Netmask Gateway TPGT MTU Rate DHCP iSNS_Addr iSNS_Port0:3:1 offline 0.0.0.0 0.0.0.0 0.0.0.0 31 1500 n/a 0 0.0.0.0 32050:3:2 ready 10.107.66.3 255.255.255.0 10.107.66.3 32 1500 1Gbps 0 0.0.0.0 32051:3:1 offline 0.0.0.0 0.0.0.0 0.0.0.0 131 1500 n/a 0 0.0.0.0 32051:3:2 ready 10.107.66.8 255.255.255.0 10.107.66.8 132 1500 1Gbps 0 0.0.0.0 3205-----------------------------------------------------------------------------------------
2. Set up the IP addresses for iSNS:
cli % controliscsiport isns <iSNS Server IP><3PAR StoreServ Storage iSCSI port>
For example:
cli % controliscsiport isns 10.107.66.11 0:3:2cli % controliscsiport isns 10.107.66.11 1:3:2
3. Verify the configuration setting for iSNS. For example:
cli % showport —iscsi
N:S:P State IPAddr Netmask Gateway TPGT MTU Rate DHCP iSNS_Addr iSNS_Port0:3:1 offline 0.0.0.0 0.0.0.0 0.0.0.0 31 1500 n/a 0 0.0.0.0 32050:3:2 ready 10.107.66.3 255.255.255.0 10.107.66.3 32 1500 1Gbps 0 10.107.66.11 32051:3:1 offline 0.0.0.0 0.0.0.0 0.0.0.0 131 1500 n/a 0 0.0.0.0 32051:3:2 ready 10.107.66.8 255.255.255.0 10.107.66.8 132 1500 1Gbps 0 10.107.66.11 3205-----------------------------------------------------------------------------------------
70 Configuring the HPE 3PAR StoreServ Storage and host—iSCSI
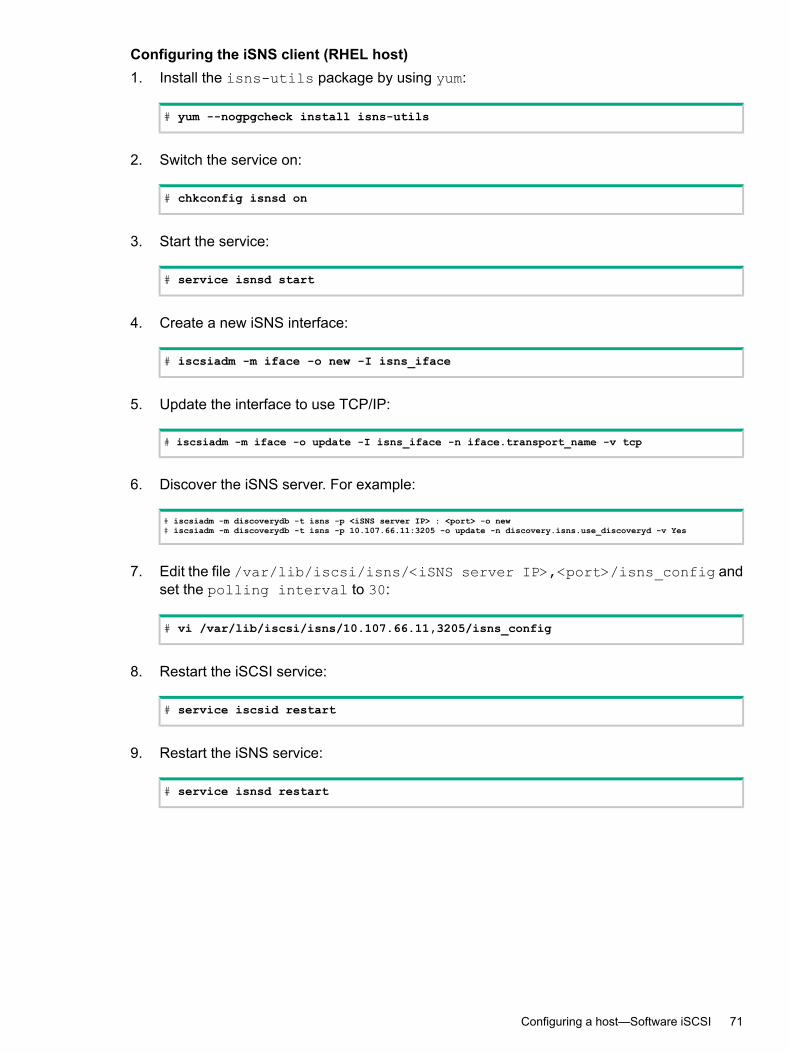
Configuring the iSNS client (RHEL host)1. Install the isns-utils package by using yum:
# yum --nogpgcheck install isns-utils
2. Switch the service on:
# chkconfig isnsd on
3. Start the service:
# service isnsd start
4. Create a new iSNS interface:
# iscsiadm -m iface -o new -I isns_iface
5. Update the interface to use TCP/IP:
# iscsiadm -m iface -o update -I isns_iface -n iface.transport_name -v tcp
6. Discover the iSNS server. For example:
# iscsiadm -m discoverydb -t isns -p <iSNS server IP> : <port> -o new# iscsiadm -m discoverydb -t isns -p 10.107.66.11:3205 -o update -n discovery.isns.use_discoveryd -v Yes
7. Edit the file /var/lib/iscsi/isns/<iSNS server IP>,<port>/isns_config andset the polling interval to 30:
# vi /var/lib/iscsi/isns/10.107.66.11,3205/isns_config
8. Restart the iSCSI service:
# service iscsid restart
9. Restart the iSNS service:
# service isnsd restart
Configuring a host—Software iSCSI 71
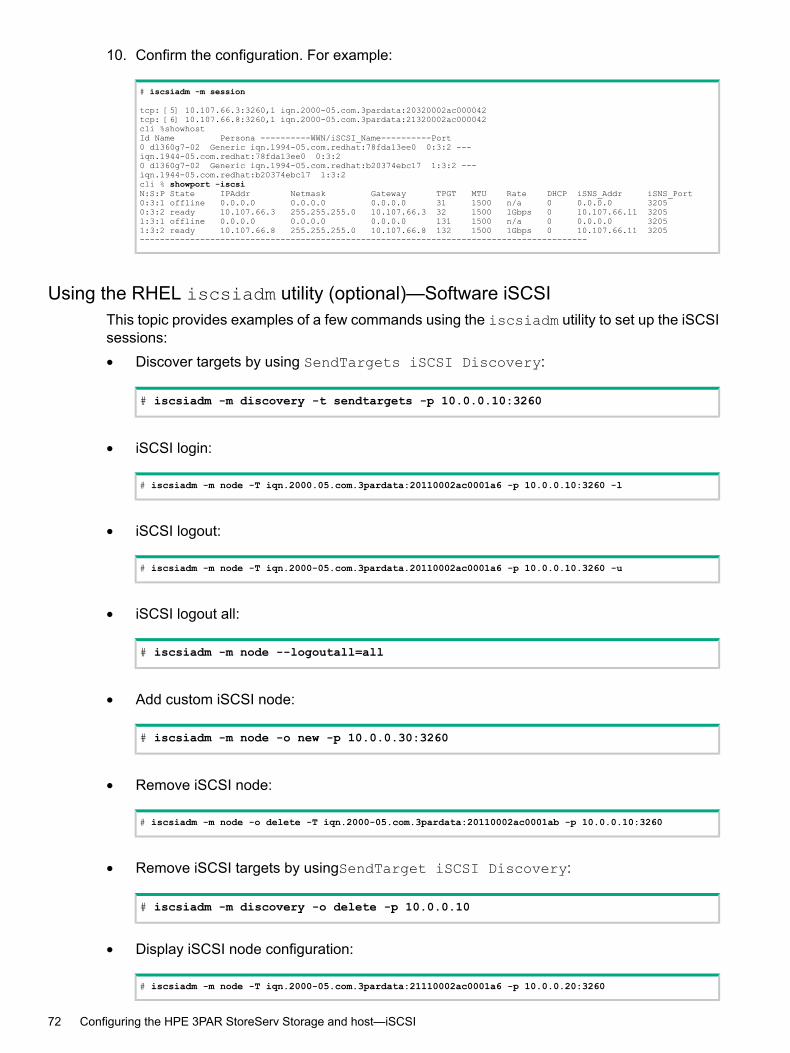
10. Confirm the configuration. For example:
# iscsiadm -m session
tcp: [5] 10.107.66.3:3260,1 iqn.2000-05.com.3pardata:20320002ac000042tcp: [6] 10.107.66.8:3260,1 iqn.2000-05.com.3pardata:21320002ac000042cli %showhostId Name Persona ----------WWN/iSCSI_Name----------Port0 dl360g7-02 Generic iqn.1994-05.com.redhat:78fda13ee0 0:3:2 ---iqn.1944-05.com.redhat:78fda13ee0 0:3:20 dl360g7-02 Generic iqn.1994-05.com.redhat:b20374ebc17 1:3:2 ---iqn.1944-05.com.redhat:b20374ebc17 1:3:2cli % showport -iscsiN:S:P State IPAddr Netmask Gateway TPGT MTU Rate DHCP iSNS_Addr iSNS_Port0:3:1 offline 0.0.0.0 0.0.0.0 0.0.0.0 31 1500 n/a 0 0.0.0.0 32050:3:2 ready 10.107.66.3 255.255.255.0 10.107.66.3 32 1500 1Gbps 0 10.107.66.11 32051:3:1 offline 0.0.0.0 0.0.0.0 0.0.0.0 131 1500 n/a 0 0.0.0.0 32051:3:2 ready 10.107.66.8 255.255.255.0 10.107.66.8 132 1500 1Gbps 0 10.107.66.11 3205-----------------------------------------------------------------------------------------
Using the RHEL iscsiadm utility (optional)—Software iSCSIThis topic provides examples of a few commands using the iscsiadm utility to set up the iSCSIsessions:• Discover targets by using SendTargets iSCSI Discovery:
# iscsiadm -m discovery -t sendtargets -p 10.0.0.10:3260
• iSCSI login:
# iscsiadm -m node -T iqn.2000.05.com.3pardata:20110002ac0001a6 -p 10.0.0.10:3260 -l
• iSCSI logout:
# iscsiadm -m node -T iqn.2000-05.com.3pardata.20110002ac0001a6 -p 10.0.0.10.3260 -u
• iSCSI logout all:
# iscsiadm -m node --logoutall=all
• Add custom iSCSI node:
# iscsiadm -m node -o new -p 10.0.0.30:3260
• Remove iSCSI node:
# iscsiadm -m node -o delete -T iqn.2000-05.com.3pardata:20110002ac0001ab -p 10.0.0.10:3260
• Remove iSCSI targets by usingSendTarget iSCSI Discovery:
# iscsiadm -m discovery -o delete -p 10.0.0.10
• Display iSCSI node configuration:
# iscsiadm -m node -T iqn.2000-05.com.3pardata:21110002ac0001a6 -p 10.0.0.20:3260
72 Configuring the HPE 3PAR StoreServ Storage and host—iSCSI
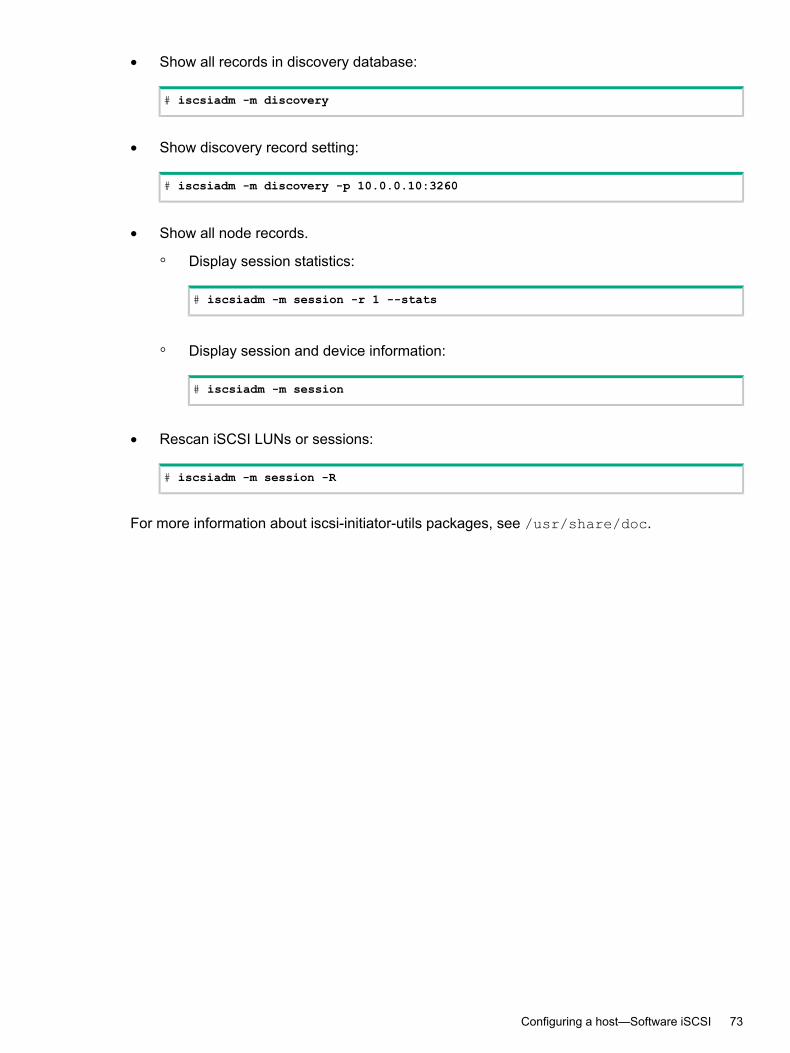
• Show all records in discovery database:
# iscsiadm -m discovery
• Show discovery record setting:
# iscsiadm -m discovery -p 10.0.0.10:3260
• Show all node records.
Display session statistics:◦
# iscsiadm -m session -r 1 --stats
◦ Display session and device information:
# iscsiadm -m session
• Rescan iSCSI LUNs or sessions:
# iscsiadm -m session -R
For more information about iscsi-initiator-utils packages, see /usr/share/doc.
Configuring a host—Software iSCSI 73
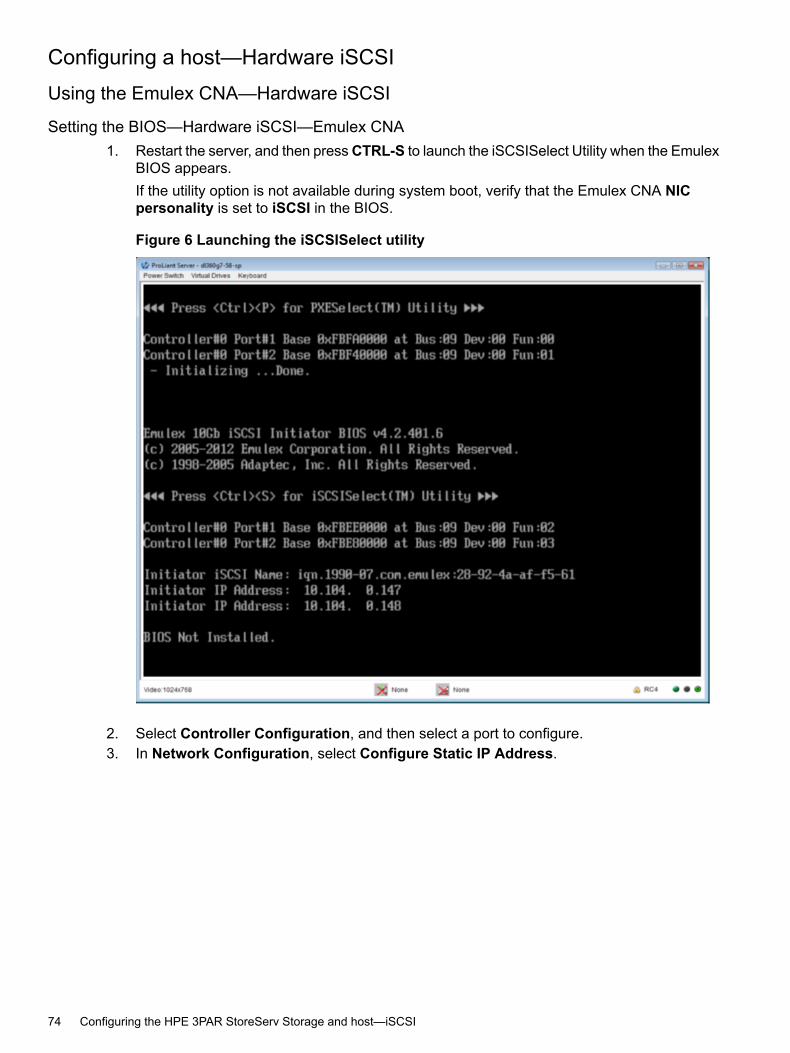
Configuring a host—Hardware iSCSIUsing the Emulex CNA—Hardware iSCSI
Setting the BIOS—Hardware iSCSI—Emulex CNA1. Restart the server, and then pressCTRL-S to launch the iSCSISelect Utility when the Emulex
BIOS appears.If the utility option is not available during system boot, verify that the Emulex CNA NICpersonality is set to iSCSI in the BIOS.
Figure 6 Launching the iSCSISelect utility
2. Select Controller Configuration, and then select a port to configure.3. In Network Configuration, select Configure Static IP Address.
74 Configuring the HPE 3PAR StoreServ Storage and host—iSCSI
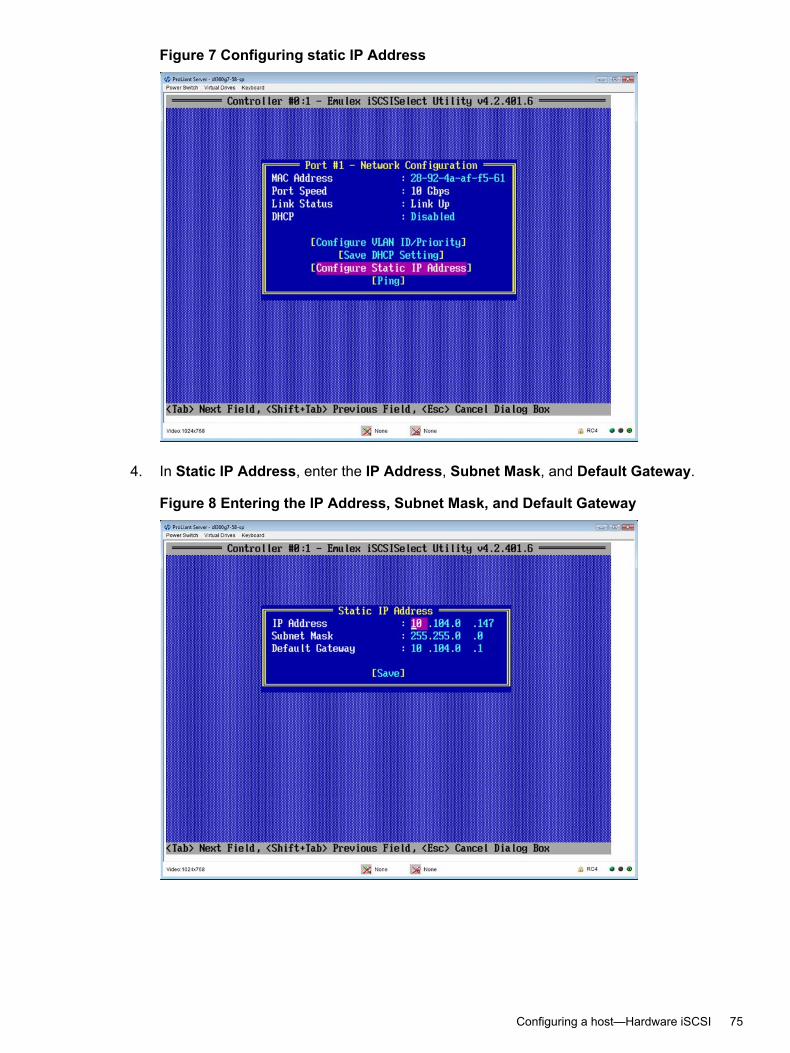
Figure 7 Configuring static IP Address
4. In Static IP Address, enter the IP Address, Subnet Mask, and Default Gateway.
Figure 8 Entering the IP Address, Subnet Mask, and Default Gateway
Configuring a host—Hardware iSCSI 75
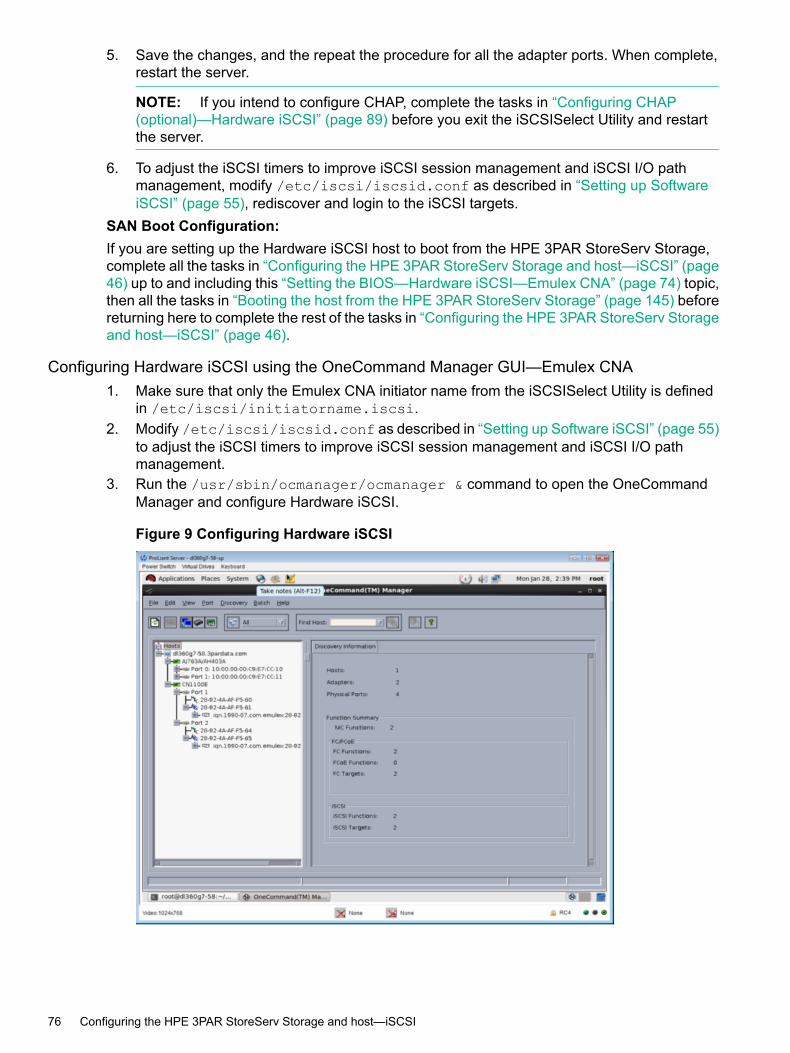
5. Save the changes, and the repeat the procedure for all the adapter ports. When complete,restart the server.
NOTE: If you intend to configure CHAP, complete the tasks in “Configuring CHAP(optional)—Hardware iSCSI” (page 89) before you exit the iSCSISelect Utility and restartthe server.
6. To adjust the iSCSI timers to improve iSCSI session management and iSCSI I/O pathmanagement, modify /etc/iscsi/iscsid.conf as described in “Setting up SoftwareiSCSI” (page 55), rediscover and login to the iSCSI targets.
SAN Boot Configuration:If you are setting up the Hardware iSCSI host to boot from the HPE 3PAR StoreServ Storage,complete all the tasks in “Configuring the HPE 3PAR StoreServ Storage and host—iSCSI” (page46) up to and including this “Setting the BIOS—Hardware iSCSI—Emulex CNA” (page 74) topic,then all the tasks in “Booting the host from the HPE 3PAR StoreServ Storage” (page 145) beforereturning here to complete the rest of the tasks in “Configuring the HPE 3PAR StoreServ Storageand host—iSCSI” (page 46).
Configuring Hardware iSCSI using the OneCommand Manager GUI—Emulex CNA1. Make sure that only the Emulex CNA initiator name from the iSCSISelect Utility is defined
in /etc/iscsi/initiatorname.iscsi.2. Modify /etc/iscsi/iscsid.conf as described in “Setting up Software iSCSI” (page 55)
to adjust the iSCSI timers to improve iSCSI session management and iSCSI I/O pathmanagement.
3. Run the /usr/sbin/ocmanager/ocmanager & command to open the OneCommandManager and configure Hardware iSCSI.
Figure 9 Configuring Hardware iSCSI
76 Configuring the HPE 3PAR StoreServ Storage and host—iSCSI
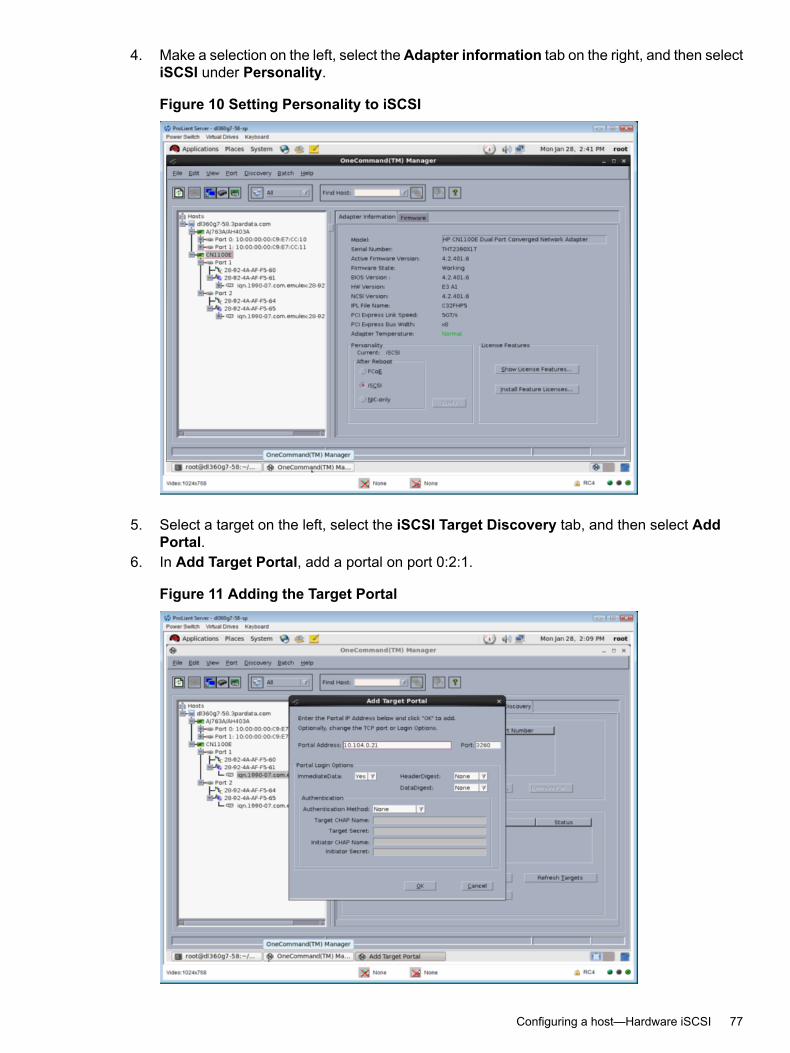
4. Make a selection on the left, select theAdapter information tab on the right, and then selectiSCSI under Personality.
Figure 10 Setting Personality to iSCSI
5. Select a target on the left, select the iSCSI Target Discovery tab, and then select AddPortal.
6. In Add Target Portal, add a portal on port 0:2:1.
Figure 11 Adding the Target Portal
Configuring a host—Hardware iSCSI 77
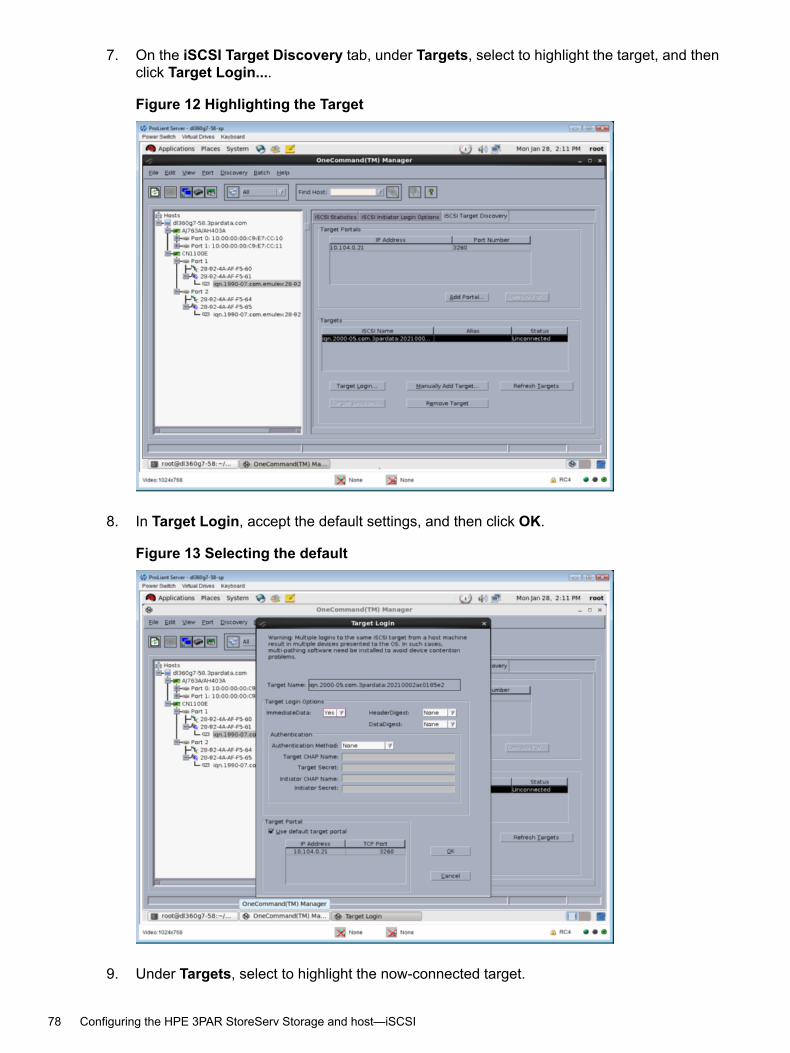
7. On the iSCSI Target Discovery tab, under Targets, select to highlight the target, and thenclick Target Login....
Figure 12 Highlighting the Target
8. In Target Login, accept the default settings, and then click OK.
Figure 13 Selecting the default
9. Under Targets, select to highlight the now-connected target.
78 Configuring the HPE 3PAR StoreServ Storage and host—iSCSI
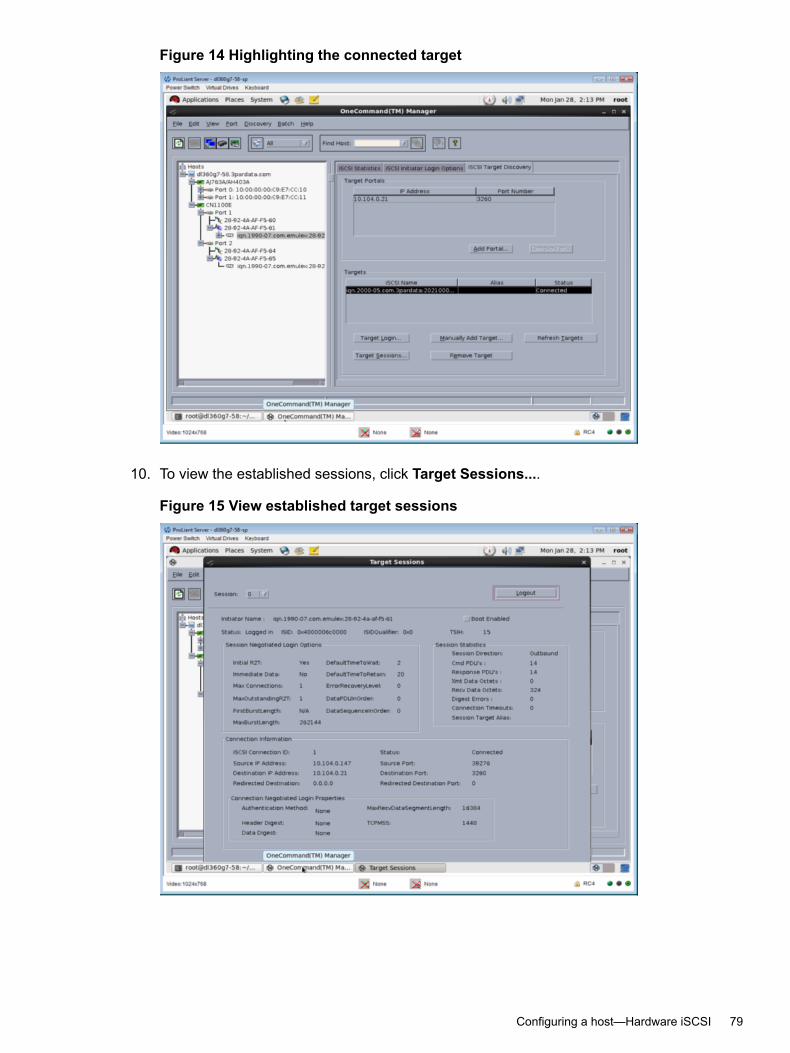
Figure 14 Highlighting the connected target
10. To view the established sessions, click Target Sessions....
Figure 15 View established target sessions
Configuring a host—Hardware iSCSI 79
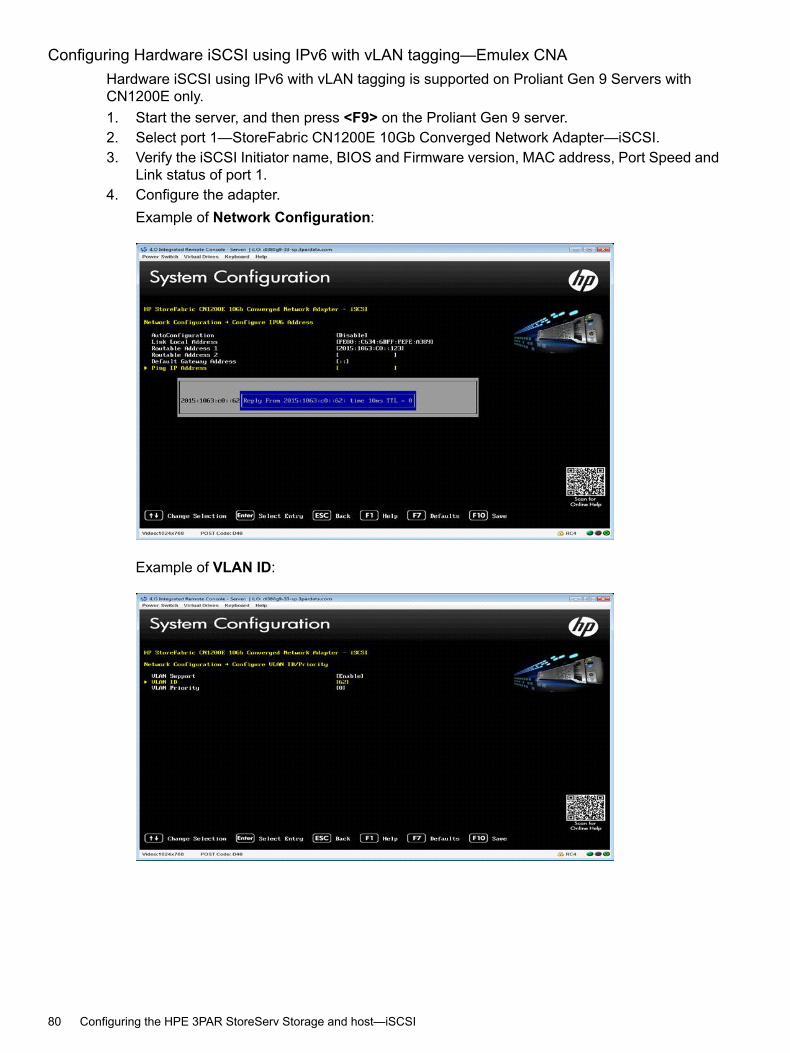
Configuring Hardware iSCSI using IPv6 with vLAN tagging—Emulex CNAHardware iSCSI using IPv6 with vLAN tagging is supported on Proliant Gen 9 Servers withCN1200E only.1. Start the server, and then press <F9> on the Proliant Gen 9 server.2. Select port 1—StoreFabric CN1200E 10Gb Converged Network Adapter—iSCSI.3. Verify the iSCSI Initiator name, BIOS and Firmware version, MAC address, Port Speed and
Link status of port 1.4. Configure the adapter.
Example of Network Configuration:
Example of VLAN ID:
80 Configuring the HPE 3PAR StoreServ Storage and host—iSCSI
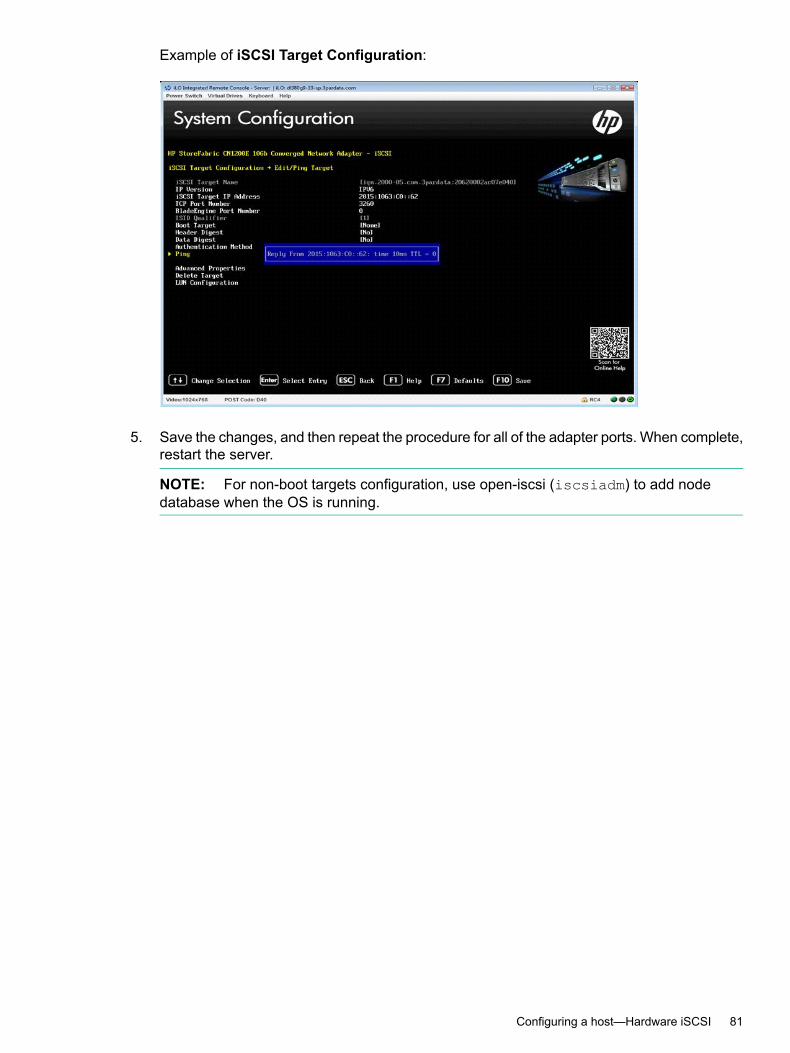
Example of iSCSI Target Configuration:
5. Save the changes, and then repeat the procedure for all of the adapter ports. When complete,restart the server.
NOTE: For non-boot targets configuration, use open-iscsi (iscsiadm) to add nodedatabase when the OS is running.
Configuring a host—Hardware iSCSI 81
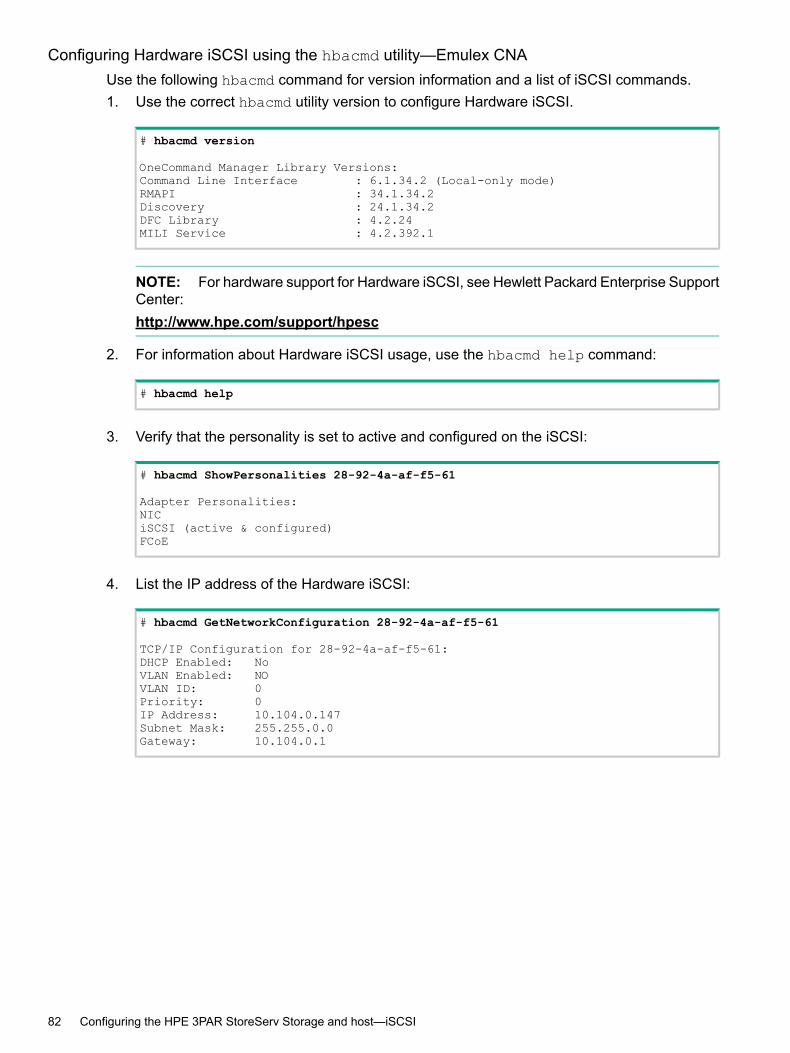
Configuring Hardware iSCSI using the hbacmd utility—Emulex CNAUse the following hbacmd command for version information and a list of iSCSI commands.1. Use the correct hbacmd utility version to configure Hardware iSCSI.
# hbacmd version
OneCommand Manager Library Versions:Command Line Interface : 6.1.34.2 (Local-only mode)RMAPI : 34.1.34.2Discovery : 24.1.34.2DFC Library : 4.2.24MILI Service : 4.2.392.1
NOTE: For hardware support for Hardware iSCSI, see Hewlett Packard Enterprise SupportCenter:http://www.hpe.com/support/hpesc
2. For information about Hardware iSCSI usage, use the hbacmd help command:
# hbacmd help
3. Verify that the personality is set to active and configured on the iSCSI:
# hbacmd ShowPersonalities 28-92-4a-af-f5-61
Adapter Personalities:NICiSCSI (active & configured)FCoE
4. List the IP address of the Hardware iSCSI:
# hbacmd GetNetworkConfiguration 28-92-4a-af-f5-61
TCP/IP Configuration for 28-92-4a-af-f5-61:DHCP Enabled: NoVLAN Enabled: NOVLAN ID: 0Priority: 0IP Address: 10.104.0.147Subnet Mask: 255.255.0.0Gateway: 10.104.0.1
82 Configuring the HPE 3PAR StoreServ Storage and host—iSCSI
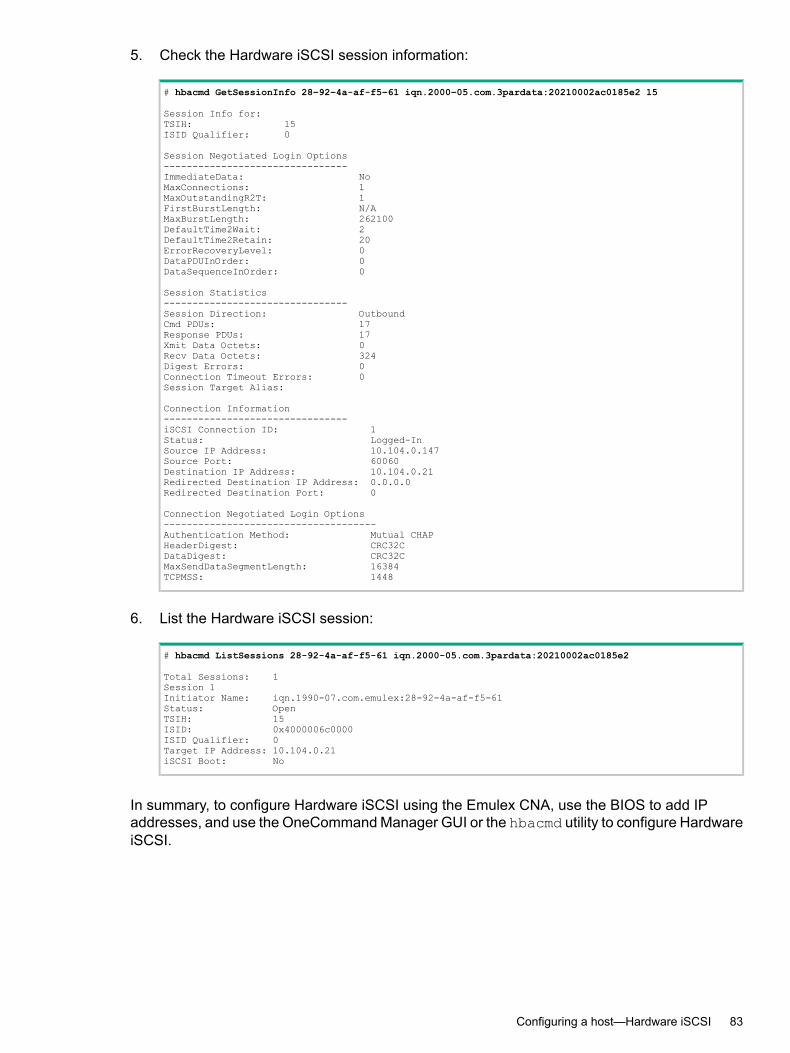
5. Check the Hardware iSCSI session information:
# hbacmd GetSessionInfo 28–92–4a-af-f5–61 iqn.2000–05.com.3pardata:20210002ac0185e2 15
Session Info for:TSIH: 15ISID Qualifier: 0
Session Negotiated Login Options--------------------------------ImmediateData: NoMaxConnections: 1MaxOutstandingR2T: 1FirstBurstLength: N/AMaxBurstLength: 262100DefaultTime2Wait: 2DefaultTime2Retain: 20ErrorRecoveryLevel: 0DataPDUInOrder: 0DataSequenceInOrder: 0
Session Statistics--------------------------------Session Direction: OutboundCmd PDUs: 17Response PDUs: 17Xmit Data Octets: 0Recv Data Octets: 324Digest Errors: 0Connection Timeout Errors: 0Session Target Alias:
Connection Information--------------------------------iSCSI Connection ID: 1Status: Logged-InSource IP Address: 10.104.0.147Source Port: 60060Destination IP Address: 10.104.0.21Redirected Destination IP Address: 0.0.0.0Redirected Destination Port: 0
Connection Negotiated Login Options-------------------------------------Authentication Method: Mutual CHAPHeaderDigest: CRC32CDataDigest: CRC32CMaxSendDataSegmentLength: 16384TCPMSS: 1448
6. List the Hardware iSCSI session:
# hbacmd ListSessions 28-92-4a-af-f5-61 iqn.2000-05.com.3pardata:20210002ac0185e2
Total Sessions: 1Session 1Initiator Name: iqn.1990-07.com.emulex:28-92-4a-af-f5-61Status: OpenTSIH: 15ISID: 0x4000006c0000ISID Qualifier: 0Target IP Address: 10.104.0.21iSCSI Boot: No
In summary, to configure Hardware iSCSI using the Emulex CNA, use the BIOS to add IPaddresses, and use the OneCommand Manager GUI or the hbacmd utility to configure HardwareiSCSI.
Configuring a host—Hardware iSCSI 83
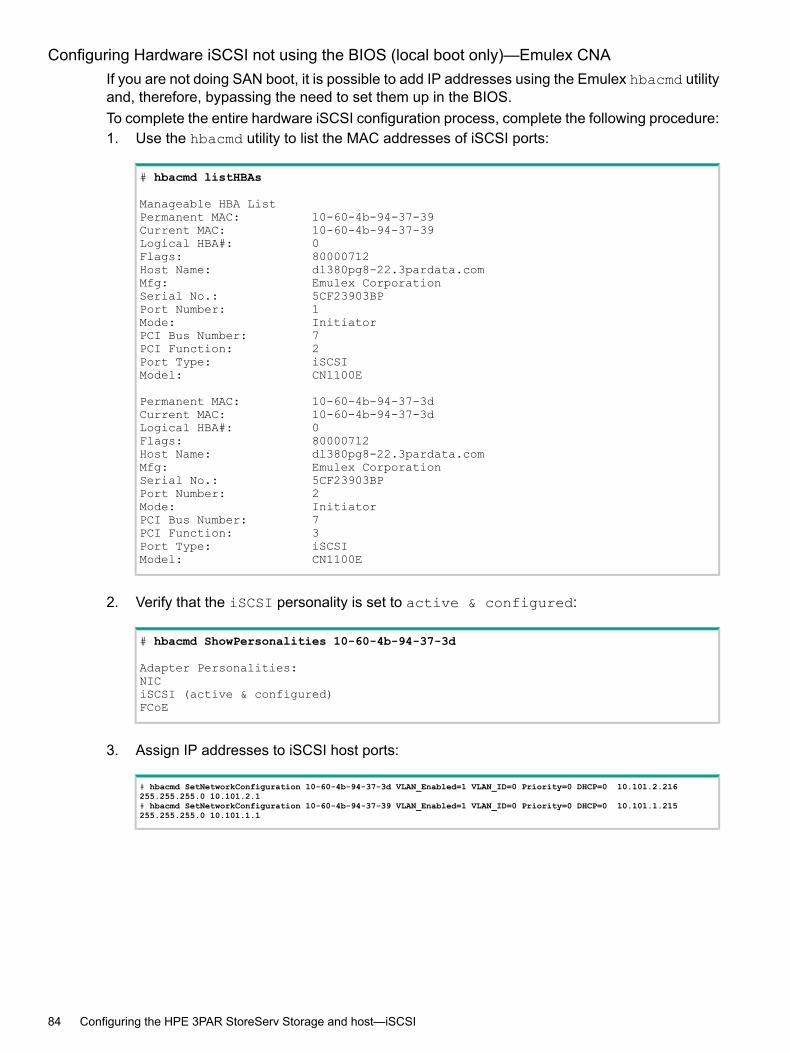
Configuring Hardware iSCSI not using the BIOS (local boot only)—Emulex CNAIf you are not doing SAN boot, it is possible to add IP addresses using the Emulex hbacmd utilityand, therefore, bypassing the need to set them up in the BIOS.To complete the entire hardware iSCSI configuration process, complete the following procedure:1. Use the hbacmd utility to list the MAC addresses of iSCSI ports:
# hbacmd listHBAs
Manageable HBA ListPermanent MAC: 10-60-4b-94-37-39Current MAC: 10-60-4b-94-37-39Logical HBA#: 0Flags: 80000712Host Name: dl380pg8-22.3pardata.comMfg: Emulex CorporationSerial No.: 5CF23903BPPort Number: 1Mode: InitiatorPCI Bus Number: 7PCI Function: 2Port Type: iSCSIModel: CN1100E
Permanent MAC: 10-60-4b-94-37-3dCurrent MAC: 10-60-4b-94-37-3dLogical HBA#: 0Flags: 80000712Host Name: dl380pg8-22.3pardata.comMfg: Emulex CorporationSerial No.: 5CF23903BPPort Number: 2Mode: InitiatorPCI Bus Number: 7PCI Function: 3Port Type: iSCSIModel: CN1100E
2. Verify that the iSCSI personality is set to active & configured:
# hbacmd ShowPersonalities 10-60-4b-94-37-3d
Adapter Personalities:NICiSCSI (active & configured)FCoE
3. Assign IP addresses to iSCSI host ports:
# hbacmd SetNetworkConfiguration 10-60-4b-94-37-3d VLAN_Enabled=1 VLAN_ID=0 Priority=0 DHCP=0 10.101.2.216255.255.255.0 10.101.2.1# hbacmd SetNetworkConfiguration 10-60-4b-94-37-39 VLAN_Enabled=1 VLAN_ID=0 Priority=0 DHCP=0 10.101.1.215255.255.255.0 10.101.1.1
84 Configuring the HPE 3PAR StoreServ Storage and host—iSCSI
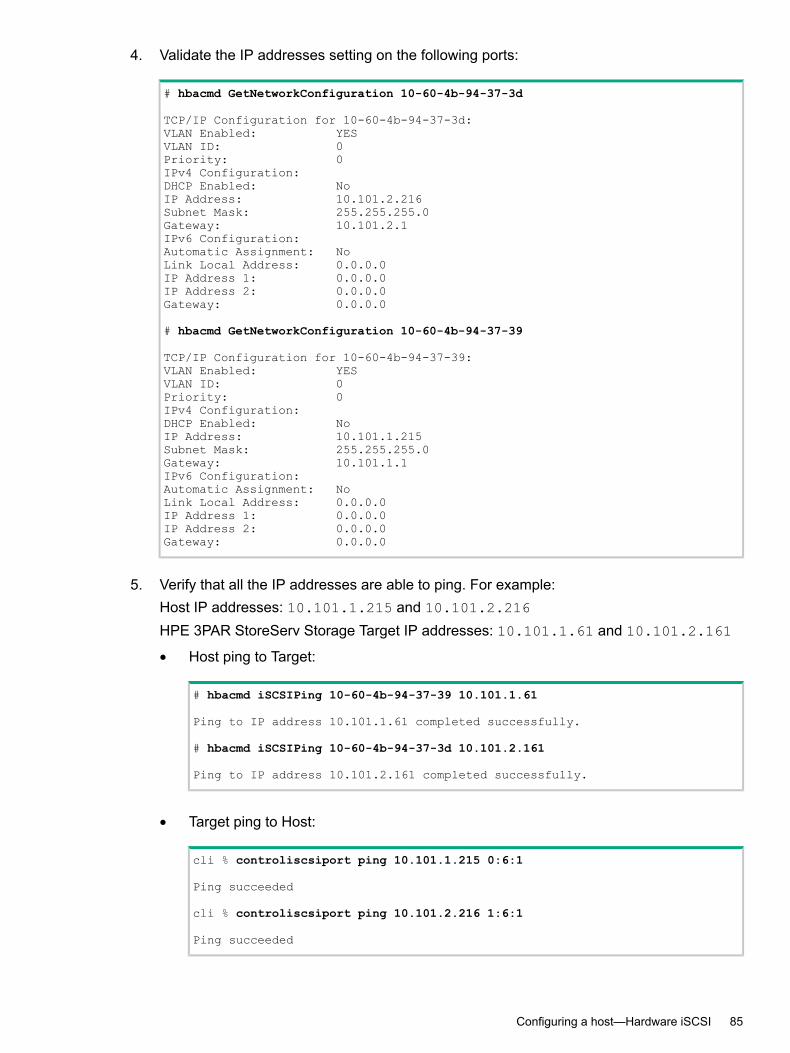
4. Validate the IP addresses setting on the following ports:
# hbacmd GetNetworkConfiguration 10-60-4b-94-37-3d
TCP/IP Configuration for 10-60-4b-94-37-3d:VLAN Enabled: YESVLAN ID: 0Priority: 0IPv4 Configuration:DHCP Enabled: NoIP Address: 10.101.2.216Subnet Mask: 255.255.255.0Gateway: 10.101.2.1IPv6 Configuration:Automatic Assignment: NoLink Local Address: 0.0.0.0IP Address 1: 0.0.0.0IP Address 2: 0.0.0.0Gateway: 0.0.0.0
# hbacmd GetNetworkConfiguration 10-60-4b-94-37-39
TCP/IP Configuration for 10-60-4b-94-37-39:VLAN Enabled: YESVLAN ID: 0Priority: 0IPv4 Configuration:DHCP Enabled: NoIP Address: 10.101.1.215Subnet Mask: 255.255.255.0Gateway: 10.101.1.1IPv6 Configuration:Automatic Assignment: NoLink Local Address: 0.0.0.0IP Address 1: 0.0.0.0IP Address 2: 0.0.0.0Gateway: 0.0.0.0
5. Verify that all the IP addresses are able to ping. For example:Host IP addresses: 10.101.1.215 and 10.101.2.216
HPE 3PAR StoreServ Storage Target IP addresses: 10.101.1.61 and 10.101.2.161
• Host ping to Target:
# hbacmd iSCSIPing 10-60-4b-94-37-39 10.101.1.61
Ping to IP address 10.101.1.61 completed successfully.
# hbacmd iSCSIPing 10-60-4b-94-37-3d 10.101.2.161
Ping to IP address 10.101.2.161 completed successfully.
• Target ping to Host:
cli % controliscsiport ping 10.101.1.215 0:6:1
Ping succeeded
cli % controliscsiport ping 10.101.2.216 1:6:1
Ping succeeded
Configuring a host—Hardware iSCSI 85
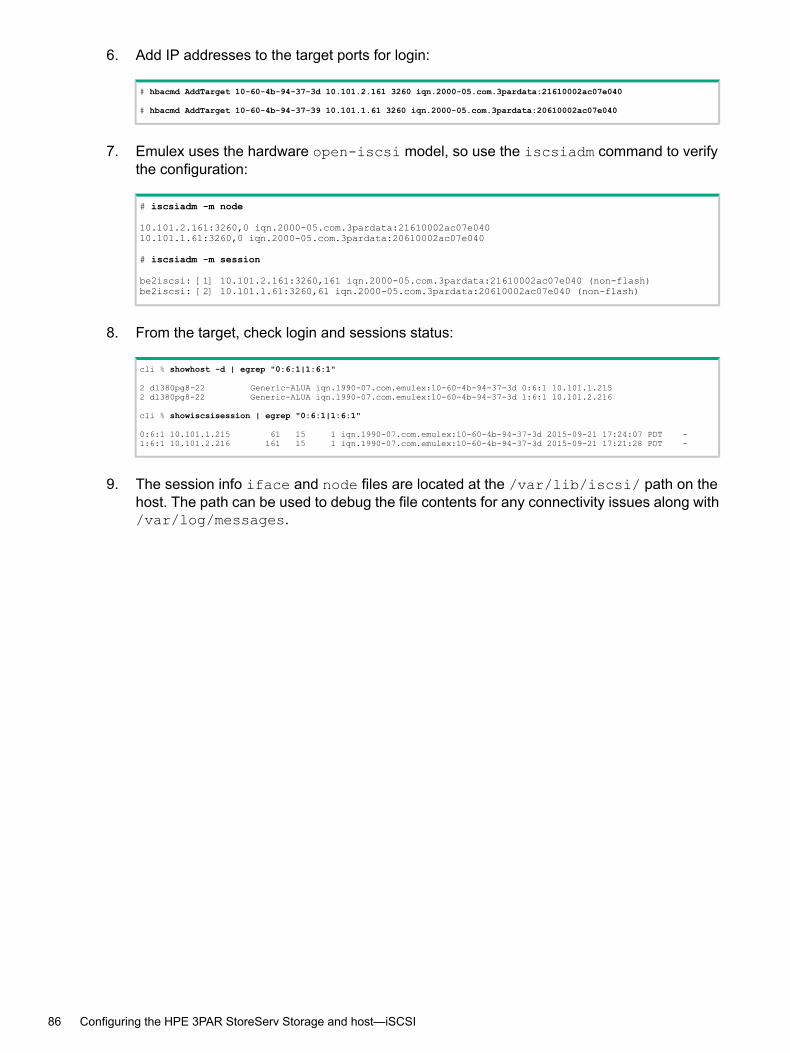
6. Add IP addresses to the target ports for login:
# hbacmd AddTarget 10-60-4b-94-37-3d 10.101.2.161 3260 iqn.2000-05.com.3pardata:21610002ac07e040
# hbacmd AddTarget 10-60-4b-94-37-39 10.101.1.61 3260 iqn.2000-05.com.3pardata:20610002ac07e040
7. Emulex uses the hardware open-iscsi model, so use the iscsiadm command to verifythe configuration:
# iscsiadm -m node
10.101.2.161:3260,0 iqn.2000-05.com.3pardata:21610002ac07e04010.101.1.61:3260,0 iqn.2000-05.com.3pardata:20610002ac07e040
# iscsiadm -m session
be2iscsi: [1] 10.101.2.161:3260,161 iqn.2000-05.com.3pardata:21610002ac07e040 (non-flash)be2iscsi: [2] 10.101.1.61:3260,61 iqn.2000-05.com.3pardata:20610002ac07e040 (non-flash)
8. From the target, check login and sessions status:
cli % showhost -d | egrep "0:6:1|1:6:1"
2 dl380pg8-22 Generic-ALUA iqn.1990-07.com.emulex:10-60-4b-94-37-3d 0:6:1 10.101.1.2152 dl380pg8-22 Generic-ALUA iqn.1990-07.com.emulex:10-60-4b-94-37-3d 1:6:1 10.101.2.216
cli % showiscsisession | egrep "0:6:1|1:6:1"
0:6:1 10.101.1.215 61 15 1 iqn.1990-07.com.emulex:10-60-4b-94-37-3d 2015-09-21 17:24:07 PDT -1:6:1 10.101.2.216 161 15 1 iqn.1990-07.com.emulex:10-60-4b-94-37-3d 2015-09-21 17:21:28 PDT -
9. The session info iface and node files are located at the /var/lib/iscsi/ path on thehost. The path can be used to debug the file contents for any connectivity issues along with/var/log/messages.
86 Configuring the HPE 3PAR StoreServ Storage and host—iSCSI
Using the Broadcom CNA—Hardware iSCSI
Setting the BIOS—Hardware iSCSI—Broadcom CNA1. Restart your server.2. When the Broadcom BIOS message appears, press Ctrl-S to launch the Comprehensive
Configuration Management Utility (CCM).3. Select an iSCSI network interface to configure from the Device List.4. From the Main Menu:
a. Set Storage Personality to iSCSI. If Multi-Function Mode is enabled in your CCM(comprehensive configuration management) version, choose eitherSF (Single Function)or NPAR1.5 (NIC Partitioning) mode. For more information, see the NPARsConfiguration for HPE Network Adapters User Guide at the Hewlett Packard EnterpriseSupport Center website:
b. Select MBA Configuration, set Boot Protocol to None (set to iSCSI for SAN Boot).To configure IPv4 VLAN Tagging for SAN Boot, set VLAN mode to Enabled and enterthe VLAN ID.
5. Save these changes, and then restart the server.
NOTE: If you intend to configure CHAP, complete the tasks in the “Configuring CHAP(optional)—Hardware iSCSI” (page 89) topic below, before you exit the CCM Utility andrestart the server.
More informationhttp://www.hpe.com/support/hpesc
Configuring for SAN Boot—Hardware iSCSIIf you are setting up the Hardware iSCSI host to boot from the HPE 3PAR StoreServ Storage,complete all the tasks in “Configuring the HPE 3PAR StoreServ Storage and host—iSCSI” (page46) up to and including this “Using the Broadcom CNA—Hardware iSCSI” (page 87) topic, thenall the tasks in “Booting the host from the HPE 3PAR StoreServ Storage” (page 145) beforereturning here to complete the remaining tasks in “Configuring the HPE 3PAR StoreServ Storageand host—iSCSI” (page 46). NPAR1.5 requires the Broadcom OOB (Out of Box) driver for SANBoot installation. To download the Broadcom OOB driver, see the Hewlett Packard EnterpriseSupport Center website.
More informationhttp://www.hpe.com/support/hpesc
Configuring a host—Hardware iSCSI 87
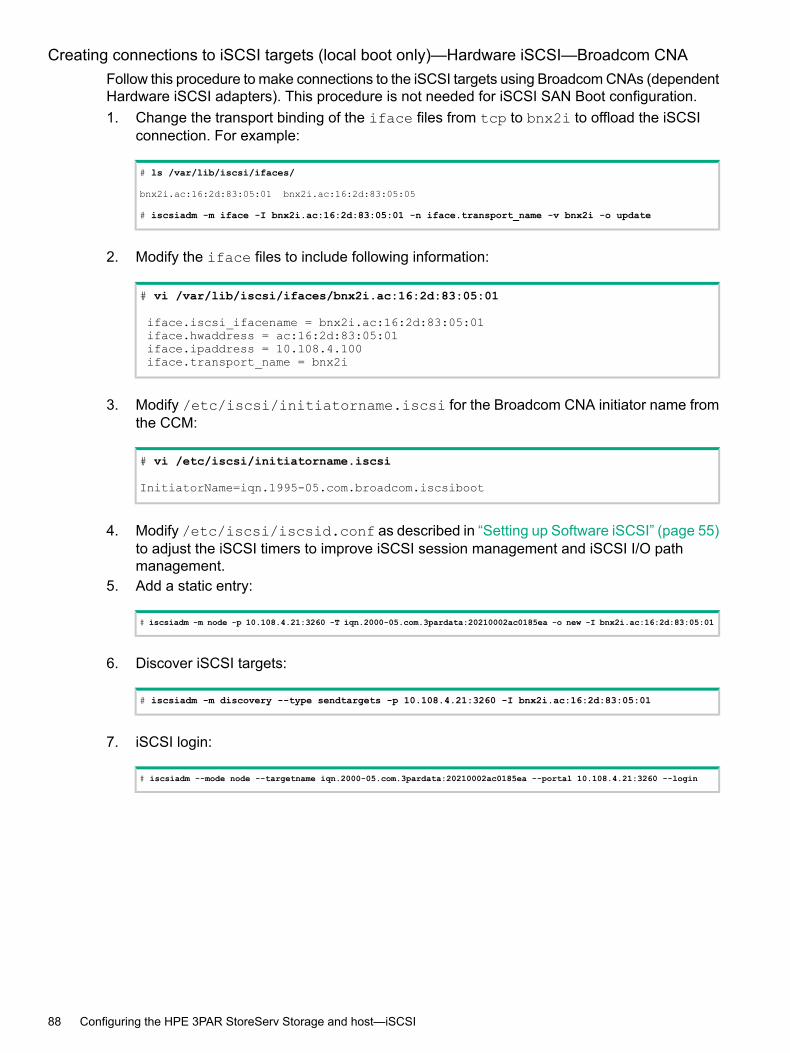
Creating connections to iSCSI targets (local boot only)—Hardware iSCSI—Broadcom CNAFollow this procedure to make connections to the iSCSI targets using Broadcom CNAs (dependentHardware iSCSI adapters). This procedure is not needed for iSCSI SAN Boot configuration.1. Change the transport binding of the iface files from tcp to bnx2i to offload the iSCSI
connection. For example:
# ls /var/lib/iscsi/ifaces/
bnx2i.ac:16:2d:83:05:01 bnx2i.ac:16:2d:83:05:05
# iscsiadm -m iface -I bnx2i.ac:16:2d:83:05:01 -n iface.transport_name -v bnx2i -o update
2. Modify the iface files to include following information:
# vi /var/lib/iscsi/ifaces/bnx2i.ac:16:2d:83:05:01
iface.iscsi_ifacename = bnx2i.ac:16:2d:83:05:01iface.hwaddress = ac:16:2d:83:05:01iface.ipaddress = 10.108.4.100iface.transport_name = bnx2i
3. Modify /etc/iscsi/initiatorname.iscsi for the Broadcom CNA initiator name fromthe CCM:
# vi /etc/iscsi/initiatorname.iscsi
InitiatorName=iqn.1995-05.com.broadcom.iscsiboot
4. Modify /etc/iscsi/iscsid.conf as described in “Setting up Software iSCSI” (page 55)to adjust the iSCSI timers to improve iSCSI session management and iSCSI I/O pathmanagement.
5. Add a static entry:
# iscsiadm -m node -p 10.108.4.21:3260 -T iqn.2000-05.com.3pardata:20210002ac0185ea -o new -I bnx2i.ac:16:2d:83:05:01
6. Discover iSCSI targets:
# iscsiadm -m discovery --type sendtargets -p 10.108.4.21:3260 -I bnx2i.ac:16:2d:83:05:01
7. iSCSI login:
# iscsiadm --mode node --targetname iqn.2000-05.com.3pardata:20210002ac0185ea --portal 10.108.4.21:3260 --login
88 Configuring the HPE 3PAR StoreServ Storage and host—iSCSI
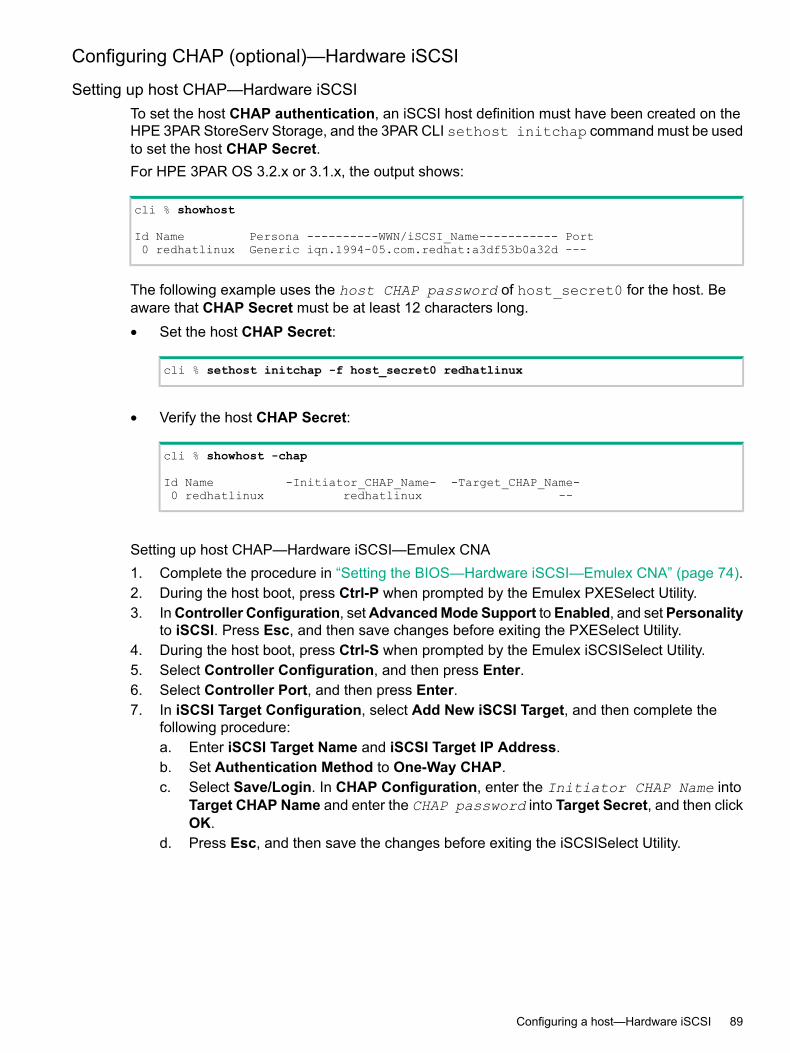
Configuring CHAP (optional)—Hardware iSCSI
Setting up host CHAP—Hardware iSCSITo set the host CHAP authentication, an iSCSI host definition must have been created on theHPE 3PAR StoreServ Storage, and the 3PAR CLI sethost initchap command must be usedto set the host CHAP Secret.For HPE 3PAR OS 3.2.x or 3.1.x, the output shows:
cli % showhost
Id Name Persona ----------WWN/iSCSI_Name----------- Port0 redhatlinux Generic iqn.1994-05.com.redhat:a3df53b0a32d ---
The following example uses the host CHAP password of host_secret0 for the host. Beaware that CHAP Secret must be at least 12 characters long.• Set the host CHAP Secret:
cli % sethost initchap -f host_secret0 redhatlinux
• Verify the host CHAP Secret:
cli % showhost -chap
Id Name -Initiator_CHAP_Name- -Target_CHAP_Name-0 redhatlinux redhatlinux --
Setting up host CHAP—Hardware iSCSI—Emulex CNA1. Complete the procedure in “Setting the BIOS—Hardware iSCSI—Emulex CNA” (page 74).2. During the host boot, press Ctrl-P when prompted by the Emulex PXESelect Utility.3. InController Configuration, setAdvancedMode Support toEnabled, and setPersonality
to iSCSI. Press Esc, and then save changes before exiting the PXESelect Utility.4. During the host boot, press Ctrl-S when prompted by the Emulex iSCSISelect Utility.5. Select Controller Configuration, and then press Enter.6. Select Controller Port, and then press Enter.7. In iSCSI Target Configuration, select Add New iSCSI Target, and then complete the
following procedure:a. Enter iSCSI Target Name and iSCSI Target IP Address.b. Set Authentication Method to One-Way CHAP.c. Select Save/Login. In CHAP Configuration, enter the Initiator CHAP Name into
Target CHAP Name and enter the CHAP password into Target Secret, and then clickOK.
d. Press Esc, and then save the changes before exiting the iSCSISelect Utility.
Configuring a host—Hardware iSCSI 89
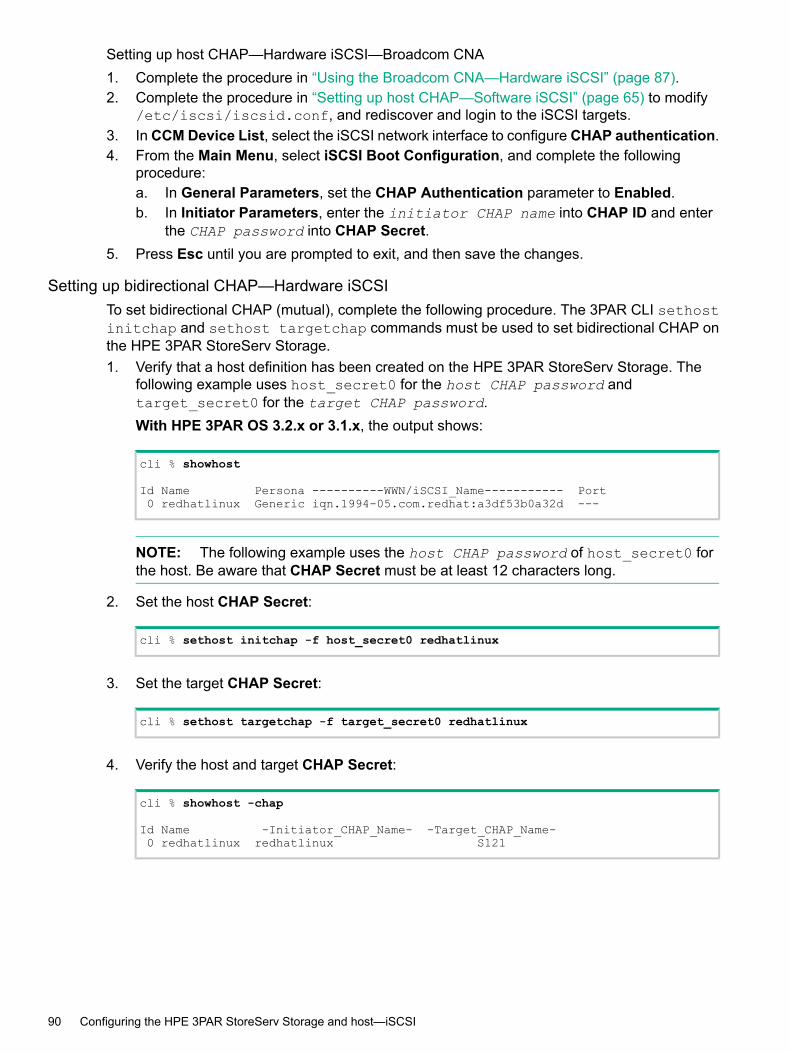
Setting up host CHAP—Hardware iSCSI—Broadcom CNA1. Complete the procedure in “Using the Broadcom CNA—Hardware iSCSI” (page 87).2. Complete the procedure in “Setting up host CHAP—Software iSCSI” (page 65) to modify
/etc/iscsi/iscsid.conf, and rediscover and login to the iSCSI targets.3. In CCM Device List, select the iSCSI network interface to configure CHAP authentication.4. From the Main Menu, select iSCSI Boot Configuration, and complete the following
procedure:a. In General Parameters, set the CHAP Authentication parameter to Enabled.b. In Initiator Parameters, enter the initiator CHAP name into CHAP ID and enter
the CHAP password into CHAP Secret.5. Press Esc until you are prompted to exit, and then save the changes.
Setting up bidirectional CHAP—Hardware iSCSITo set bidirectional CHAP (mutual), complete the following procedure. The 3PAR CLI sethostinitchap and sethost targetchap commands must be used to set bidirectional CHAP onthe HPE 3PAR StoreServ Storage.1. Verify that a host definition has been created on the HPE 3PAR StoreServ Storage. The
following example uses host_secret0 for the host CHAP password andtarget_secret0 for the target CHAP password.With HPE 3PAR OS 3.2.x or 3.1.x, the output shows:
cli % showhost
Id Name Persona ----------WWN/iSCSI_Name----------- Port0 redhatlinux Generic iqn.1994-05.com.redhat:a3df53b0a32d ---
NOTE: The following example uses the host CHAP password of host_secret0 forthe host. Be aware that CHAP Secret must be at least 12 characters long.
2. Set the host CHAP Secret:
cli % sethost initchap -f host_secret0 redhatlinux
3. Set the target CHAP Secret:
cli % sethost targetchap -f target_secret0 redhatlinux
4. Verify the host and target CHAP Secret:
cli % showhost -chap
Id Name -Initiator_CHAP_Name- -Target_CHAP_Name-0 redhatlinux redhatlinux S121
90 Configuring the HPE 3PAR StoreServ Storage and host—iSCSI
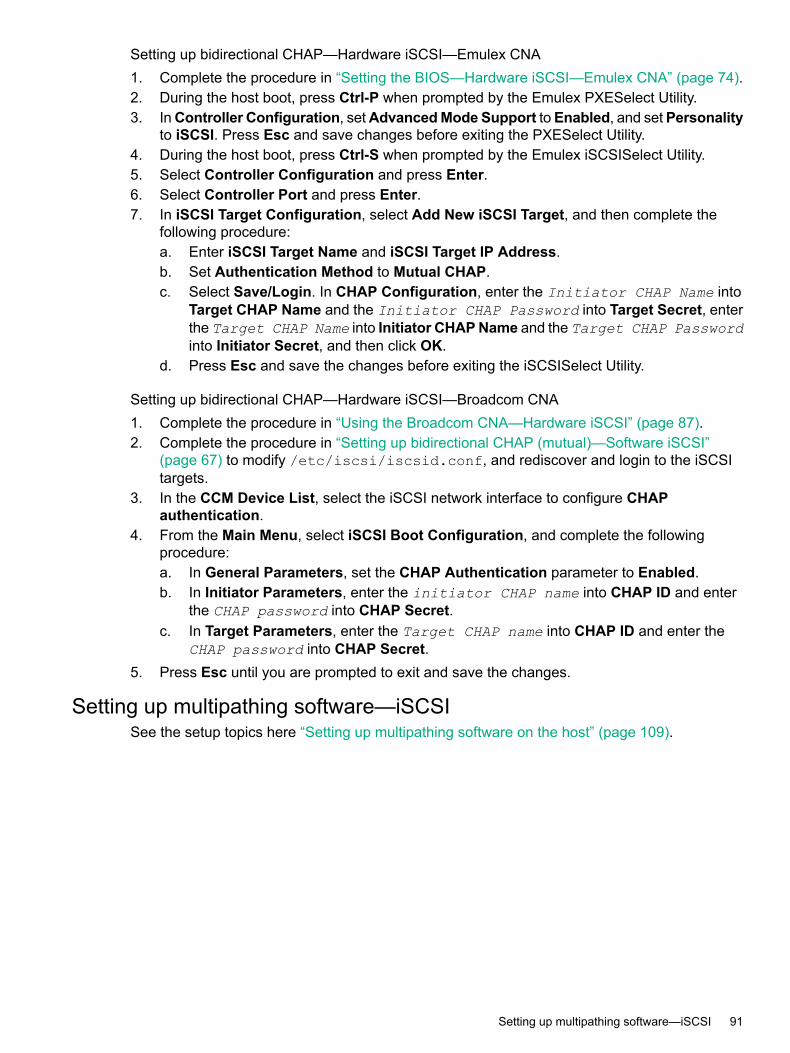
Setting up bidirectional CHAP—Hardware iSCSI—Emulex CNA1. Complete the procedure in “Setting the BIOS—Hardware iSCSI—Emulex CNA” (page 74).2. During the host boot, press Ctrl-P when prompted by the Emulex PXESelect Utility.3. InController Configuration, setAdvancedMode Support toEnabled, and setPersonality
to iSCSI. Press Esc and save changes before exiting the PXESelect Utility.4. During the host boot, press Ctrl-S when prompted by the Emulex iSCSISelect Utility.5. Select Controller Configuration and press Enter.6. Select Controller Port and press Enter.7. In iSCSI Target Configuration, select Add New iSCSI Target, and then complete the
following procedure:a. Enter iSCSI Target Name and iSCSI Target IP Address.b. Set Authentication Method to Mutual CHAP.c. Select Save/Login. In CHAP Configuration, enter the Initiator CHAP Name into
Target CHAP Name and the Initiator CHAP Password into Target Secret, enterthe Target CHAP Name into Initiator CHAPName and the Target CHAP Passwordinto Initiator Secret, and then click OK.
d. Press Esc and save the changes before exiting the iSCSISelect Utility.
Setting up bidirectional CHAP—Hardware iSCSI—Broadcom CNA1. Complete the procedure in “Using the Broadcom CNA—Hardware iSCSI” (page 87).2. Complete the procedure in “Setting up bidirectional CHAP (mutual)—Software iSCSI”
(page 67) to modify /etc/iscsi/iscsid.conf, and rediscover and login to the iSCSItargets.
3. In the CCM Device List, select the iSCSI network interface to configure CHAPauthentication.
4. From the Main Menu, select iSCSI Boot Configuration, and complete the followingprocedure:a. In General Parameters, set the CHAP Authentication parameter to Enabled.b. In Initiator Parameters, enter the initiator CHAP name into CHAP ID and enter
the CHAP password into CHAP Secret.c. In Target Parameters, enter the Target CHAP name into CHAP ID and enter the
CHAP password into CHAP Secret.5. Press Esc until you are prompted to exit and save the changes.
Setting up multipathing software—iSCSISee the setup topics here “Setting up multipathing software on the host” (page 109).
Setting up multipathing software—iSCSI 91
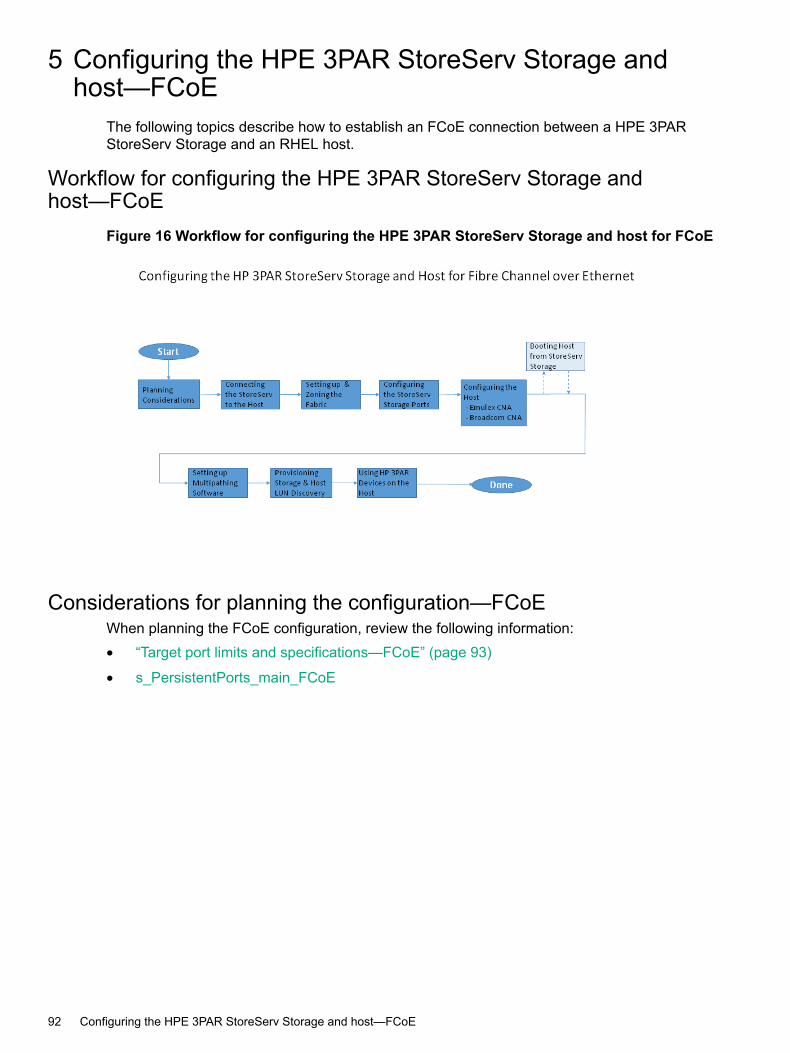
5 Configuring the HPE 3PAR StoreServ Storage andhost—FCoE
The following topics describe how to establish an FCoE connection between a HPE 3PARStoreServ Storage and an RHEL host.
Workflow for configuring the HPE 3PAR StoreServ Storage andhost—FCoE
Figure 16 Workflow for configuring the HPE 3PAR StoreServ Storage and host for FCoE
Considerations for planning the configuration—FCoEWhen planning the FCoE configuration, review the following information:• “Target port limits and specifications—FCoE” (page 93)
• s_PersistentPorts_main_FCoE
92 Configuring the HPE 3PAR StoreServ Storage and host—FCoE
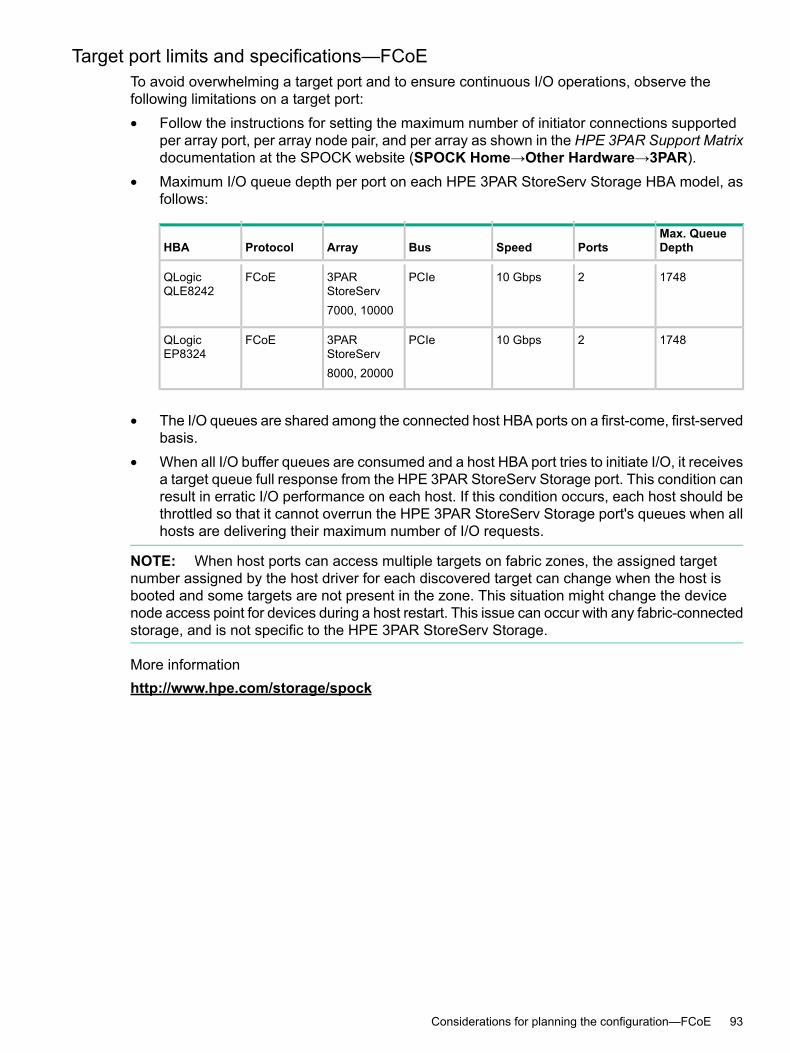
Target port limits and specifications—FCoETo avoid overwhelming a target port and to ensure continuous I/O operations, observe thefollowing limitations on a target port:• Follow the instructions for setting the maximum number of initiator connections supported
per array port, per array node pair, and per array as shown in the HPE 3PAR Support Matrixdocumentation at the SPOCK website (SPOCK Home→Other Hardware→3PAR).
• Maximum I/O queue depth per port on each HPE 3PAR StoreServ Storage HBA model, asfollows:
Max. QueueDepthPortsSpeedBusArrayProtocolHBA
1748210 GbpsPCIe3PARStoreServ
FCoEQLogicQLE8242
7000, 10000
1748210 GbpsPCIe3PARStoreServ
FCoEQLogicEP8324
8000, 20000
• The I/O queues are shared among the connected host HBA ports on a first-come, first-servedbasis.
• When all I/O buffer queues are consumed and a host HBA port tries to initiate I/O, it receivesa target queue full response from the HPE 3PAR StoreServ Storage port. This condition canresult in erratic I/O performance on each host. If this condition occurs, each host should bethrottled so that it cannot overrun the HPE 3PAR StoreServ Storage port's queues when allhosts are delivering their maximum number of I/O requests.
NOTE: When host ports can access multiple targets on fabric zones, the assigned targetnumber assigned by the host driver for each discovered target can change when the host isbooted and some targets are not present in the zone. This situation might change the devicenode access point for devices during a host restart. This issue can occur with any fabric-connectedstorage, and is not specific to the HPE 3PAR StoreServ Storage.
More informationhttp://www.hpe.com/storage/spock
Considerations for planning the configuration—FCoE 93

3PAR Persistent Ports—FCoEThe 3PAR Persistent Ports (or virtual ports) feature minimizes I/O disruption during a HPE 3PARStoreServ Storage online upgrade, node-down or cable pull event. Port shutdown or reset eventsdo not trigger this feature.Each FCoE target storage array port has a partner array port automatically assigned by thesystem. Partner ports are assigned across array node pairs.3PAR Persistent Ports allows a HPE 3PAR StoreServ Storage FCoE port to assume the identityof a failed port (WWN port) while retaining its own identity. Where a given physical port assumesthe identity of its partner port, the assumed port is designated as a persistent port. Array portfailover and failback with 3PAR Persistent Ports is transparent to most host-based multipathingsoftware, which can keep all of its I/O paths active.
NOTE: Use of 3PAR Persistent Ports technology does not negate the need for properly installed,configured, and maintained host multipathing software.
For a more complete description of the 3PAR Persistent Ports feature, its operation, and acomplete list of required setup and connectivity guidelines, see the following documents:• Technical white paper HPE 3PAR StoreServ Persistent Ports at the Hewlett Packard
Enterprise Storage Information Library:• HPE 3PAR Command Line Interface Administrator's Manual, “Using Persistent Ports for
Nondisruptive Online Software Upgrades” at the Hewlett Packard Enterprise StorageInformation Library:
More informationhttp://www.hpe.com/info/storage/docs
3PAR Persistent Ports setup and connectivity guidelines—FCoEBeginning with HPE 3PAR OS 3.1.3:
• The 3PAR Persistent Ports feature is supported for FCoE target ports (FCoE end-to-endconfigurations).
• The 3PAR Persistent Ports feature is enabled by default for HPE 3PAR StoreServ StorageFCoE ports during node-down events.
Follow the specific cabling setup and connectivity guidelines for 3PAR Persistent Ports to functionproperly. Key elements for the 3PAR Persistent Ports feature setup and connectivity are thefollowing:• HPE 3PAR StoreServ Storage FCoE partner ports must be connected to the same FCoE
network.• The same CNA port on host-facing HBAs in the nodes of a node pair must be connected to
the same FCoE network, and preferably to different FCoE switches on the network.• The FCoE network must support NPIV, and NPIV must be enabled.
94 Configuring the HPE 3PAR StoreServ Storage and host—FCoE
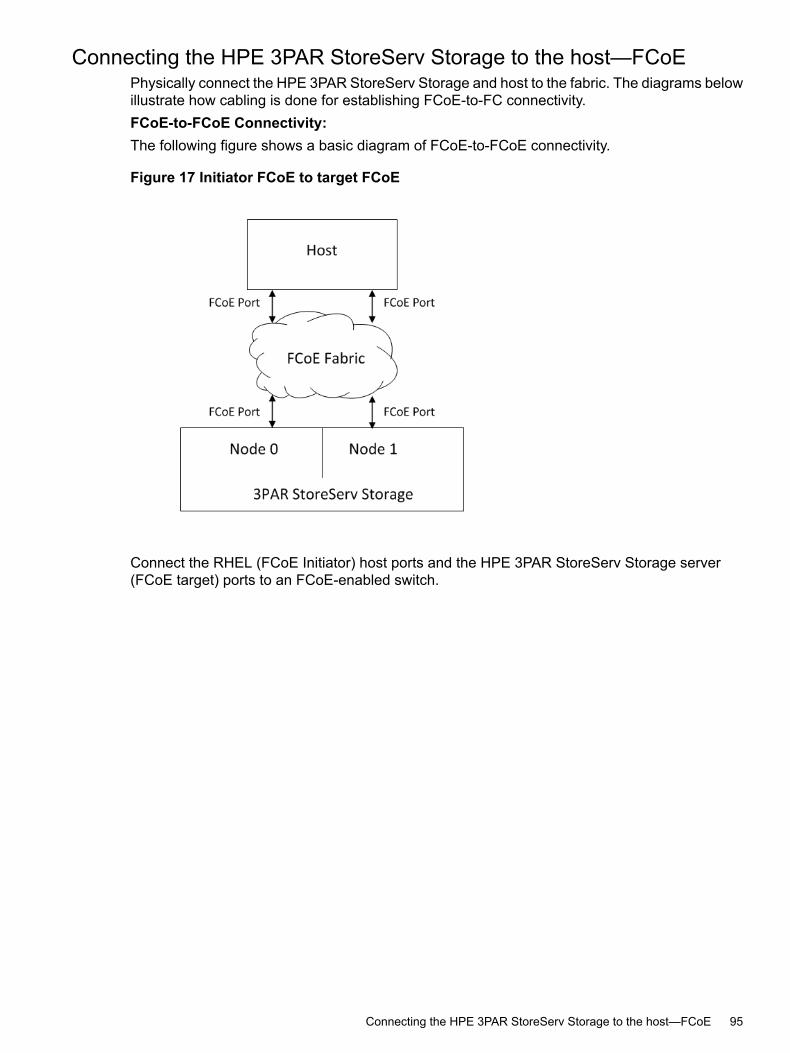
Connecting the HPE 3PAR StoreServ Storage to the host—FCoEPhysically connect the HPE 3PAR StoreServ Storage and host to the fabric. The diagrams belowillustrate how cabling is done for establishing FCoE-to-FC connectivity.FCoE-to-FCoE Connectivity:The following figure shows a basic diagram of FCoE-to-FCoE connectivity.
Figure 17 Initiator FCoE to target FCoE
Connect the RHEL (FCoE Initiator) host ports and the HPE 3PAR StoreServ Storage server(FCoE target) ports to an FCoE-enabled switch.
Connecting the HPE 3PAR StoreServ Storage to the host—FCoE 95

Setting up and zone the fabric—FCoE
NOTE: This topic does not apply when deploying HPE Virtual Connect Direct-Attach FibreChannel storage for HPE 3PAR StoreServ Storage systems where the HPE 3PAR StoreServStorage ports are cabled directly to the uplink ports on the Virtual Connect FlexFabric 10Gb/24–port Module for c-Class BladeSystem. Zoning is automatically configured based on theVirtual Connect SAN Fabric and server profile definitions.For more information about Virtual Connect, Virtual Connect interconnect modules, Virtual ConnectDirect-Attach Fibre Channel feature, and the HPE SAN Design Reference Guide, see SPOCK(from SPOCK Home under Design Guide, select SAN Design Guide):http://www.hpe.com/storage/spock
Fabric zoning controls which FCoE end-devices have access to each other on the fabric. Zoningalso isolates the host and HPE 3PAR StoreServ Storage ports from Registered State ChangeNotifications (RSCNs) that are irrelevant to these ports.If you use an unsupported zoning configuration and an issue occurs, Hewlett PackardEnterprise might require that you implement one of the supported zoning configurations as partof the corrective action.
NOTE:• For high availability and clustered environments that require multiple initiators to access the
same set of target ports, Hewlett Packard Enterprise recommends creating separate zonesfor each initiator with the same set of target ports.
• Storage targets in the zone can be from either:
◦ The same HPE 3PAR StoreServ Storage
◦ Multiple HPE 3PAR StoreServ Storages
◦ A mixture of 3PAR and other Hewlett Packard Enterprise storage systems
For more information about using one initiator to multiple targets per zone, see the HPE SANDesign ReferenceGuide at the SPOCK website (SPOCKHome→DesignGuides→SANDesignGuide.
More informationhttp://www.hpe.com/storage/spock
Employing fabric zoning using switch vendor methods (required)—FCoEEmploy fabric zoning by using the methods provided by the switch vendor to create relationshipsbetween host HBA ports and HPE 3PAR StoreServ Storage ports before connecting either thehost HBA ports or the HPE 3PAR StoreServ Storage ports to the fabrics.FCoE switch vendors support the zoning of the fabric end-devices in different zoningconfigurations. There are advantages and disadvantages with each zoning configuration. Selecta zoning configuration that best meets your needs.
96 Configuring the HPE 3PAR StoreServ Storage and host—FCoE
Supported zoning configurations by the HPE 3PAR StoreServ Storage arrays—FCoE
• One initiator to one target per zone.
• One initiator to multiple targets per zone (zoning by HBA). Hewlett PackardEnterprise recommends this zoning configuration for the HPE 3PAR StoreServ Storage.Zoning by HBA is required for coexistence with other Hewlett Packard Enterprise storagearrays.
Setting up fabric zoning—FCoESet up fabric zoning by associating the device World Wide Names (WWNs) or the switch portswith specified zones in the fabric. Use either the WWN method or the port zoning method withthe HPE 3PAR StoreServ Storage. Hewlett Packard Enterprise recommends the WWN zoningmethod as the zone survives changes of switch ports when moving cables in a fabric.
Verifying switch zoning and configurations—FCoE
Prerequisites for verify switch zoning and configurations—FCoE
• Complete the configuration of the storage port to the host and connect to the switch. Formore information, see “Configuring ports on the HPE 3PAR StoreServ Storage for fabricconnection—FC” (page 32).
• Create a zone configuration on the switch following the HPE SAN Design Reference Guide,and then enable the zone set configuration.
• Use the showhost command to verify that the host is seen on the storage node.
Verifying switch zoning and configurationsAfter configuring, zoning, and connecting each host HBA port and HPE 3PAR StoreServ Storageport to the fabrics, verify the following:
Verify:√
Verify that each initiator is zoned with the correct targets by using the 3PAR CLI showhost command.
Connecting the HPE 3PAR StoreServ Storage to the host—FCoE 97

Configure the HPE 3PAR StoreServ Storage ports—FCoEPlanning to configure ports—FCoE
• If an iSCSI port is configured with an IP address or netmask, the configuration must beremoved, before it can be configured as an FCoE port. See “Removing iSCSI portconfiguration—FCoE” (page 98).
• If a port has previously been configured as an iSCSI port, change it to FCoE. See “Changingan iSCSI configured port to FCoE” (page 98)
• If changing one port to an FCoE port, you must also change its port pair to be an FCoE port.For example, ports 0:3:1 and 0:3:2.
Removing iSCSI port configuration—FCoE
cli % controliscsiport delete -f <n:s:p>
Changing an iSCSI configured port to FCoE1. Run the showport command:
cli % showport
0:3:1 target ready - 000E1E05BEE6 iscsi iSCSI - - -0:3:2 target ready - 000E1E05BEE2 iscsi iSCSI - - -
2. Turn off the iSCSI ports:
cli % controlport offline 0:3:1cli % controlport offline 0:3:2cli % showport
0:3:1 target offline - 000E1E05BEE2 iscsi iSCSI0:3:2 target offline - 000E1E05BEE2 iscsi iSCSI
3. Change the topology to FCoE:
cli % controlport config fcoe 0:3:1cli % controlport config fcoe 0:3:2cli % controlport rst 0:3:1cli % controlport rst 0:3:2
0:3:1 target offline - 000E1E05BEE2 iscsi iSCSI0:3:2 target offline - 000E1E05BEE2 iscsi iSCSI
cli % showport
0:3:1 target ready 2FF70002AC000121 20310002AC000121 host FCoE - - -0:3:2 target ready 2FF70002AC000121 20320002AC000121 free FCoE - - -
4. Check the current settings of the FCoE ports by issuing showport -fcoe. For example:
cli % showport -fcoe
N:S:P ENode_MAC_Address PFC_Mask0:3:1 00-02-AC-07-01-21 0x080:3:2 00-02-AC-06-01-21 0x00
98 Configuring the HPE 3PAR StoreServ Storage and host—FCoE
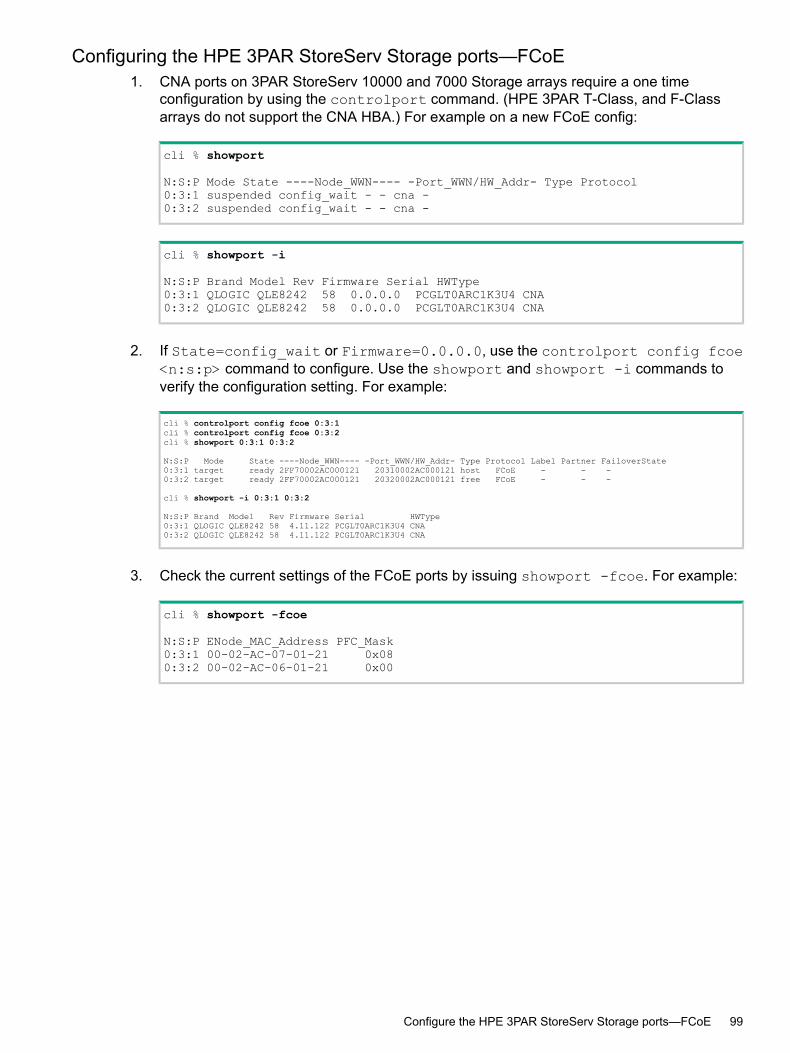
Configuring the HPE 3PAR StoreServ Storage ports—FCoE1. CNA ports on 3PAR StoreServ 10000 and 7000 Storage arrays require a one time
configuration by using the controlport command. (HPE 3PAR T-Class, and F-Classarrays do not support the CNA HBA.) For example on a new FCoE config:
cli % showport
N:S:P Mode State ----Node_WWN---- -Port_WWN/HW_Addr- Type Protocol0:3:1 suspended config_wait - - cna -0:3:2 suspended config_wait - - cna -
cli % showport -i
N:S:P Brand Model Rev Firmware Serial HWType0:3:1 QLOGIC QLE8242 58 0.0.0.0 PCGLT0ARC1K3U4 CNA0:3:2 QLOGIC QLE8242 58 0.0.0.0 PCGLT0ARC1K3U4 CNA
2. If State=config_wait or Firmware=0.0.0.0, use the controlport config fcoe<n:s:p> command to configure. Use the showport and showport -i commands toverify the configuration setting. For example:
cli % controlport config fcoe 0:3:1cli % controlport config fcoe 0:3:2cli % showport 0:3:1 0:3:2
N:S:P Mode State ----Node_WWN---- -Port_WWN/HW_Addr- Type Protocol Label Partner FailoverState0:3:1 target ready 2FF70002AC000121 20310002AC000121 host FCoE - - -0:3:2 target ready 2FF70002AC000121 20320002AC000121 free FCoE - - -
cli % showport -i 0:3:1 0:3:2
N:S:P Brand Model Rev Firmware Serial HWType0:3:1 QLOGIC QLE8242 58 4.11.122 PCGLT0ARC1K3U4 CNA0:3:2 QLOGIC QLE8242 58 4.11.122 PCGLT0ARC1K3U4 CNA
3. Check the current settings of the FCoE ports by issuing showport -fcoe. For example:
cli % showport -fcoe
N:S:P ENode_MAC_Address PFC_Mask0:3:1 00-02-AC-07-01-21 0x080:3:2 00-02-AC-06-01-21 0x00
Configure the HPE 3PAR StoreServ Storage ports—FCoE 99
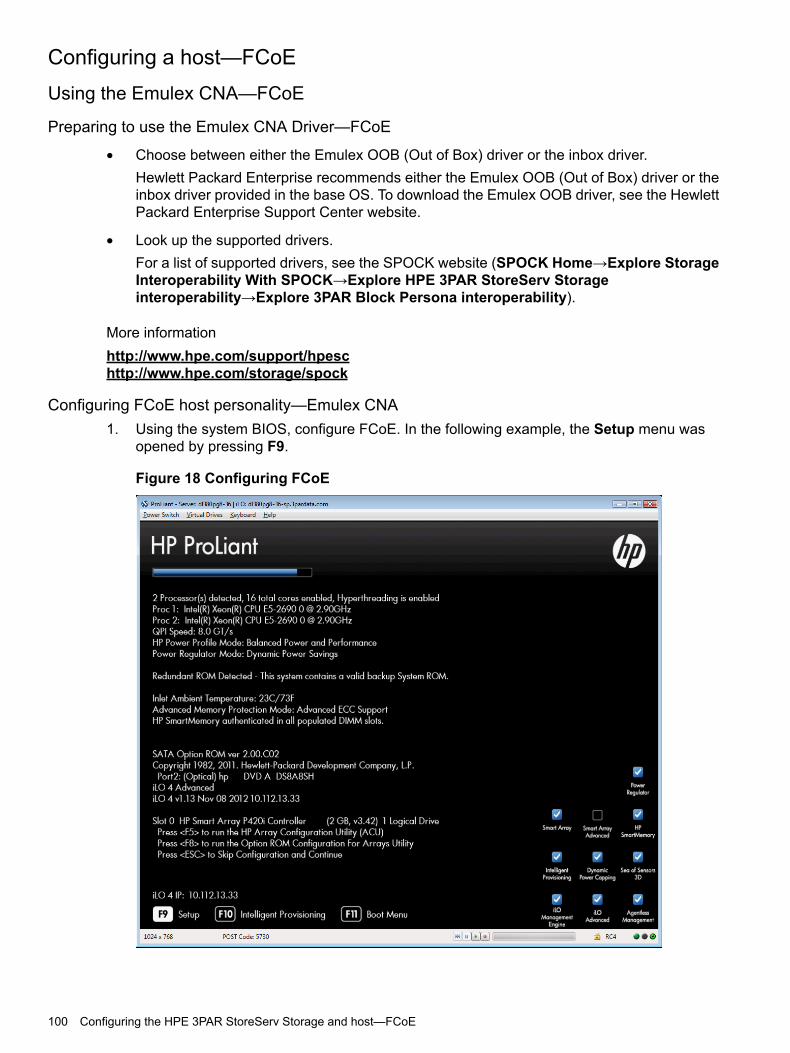
Configuring a host—FCoEUsing the Emulex CNA—FCoE
Preparing to use the Emulex CNA Driver—FCoE
• Choose between either the Emulex OOB (Out of Box) driver or the inbox driver.Hewlett Packard Enterprise recommends either the Emulex OOB (Out of Box) driver or theinbox driver provided in the base OS. To download the Emulex OOB driver, see the HewlettPackard Enterprise Support Center website.
• Look up the supported drivers.For a list of supported drivers, see the SPOCK website (SPOCK Home→Explore StorageInteroperability With SPOCK→Explore HPE 3PAR StoreServ Storageinteroperability→Explore 3PAR Block Persona interoperability).
More informationhttp://www.hpe.com/support/hpeschttp://www.hpe.com/storage/spock
Configuring FCoE host personality—Emulex CNA1. Using the system BIOS, configure FCoE. In the following example, the Setup menu was
opened by pressing F9.
Figure 18 Configuring FCoE
100 Configuring the HPE 3PAR StoreServ Storage and host—FCoE
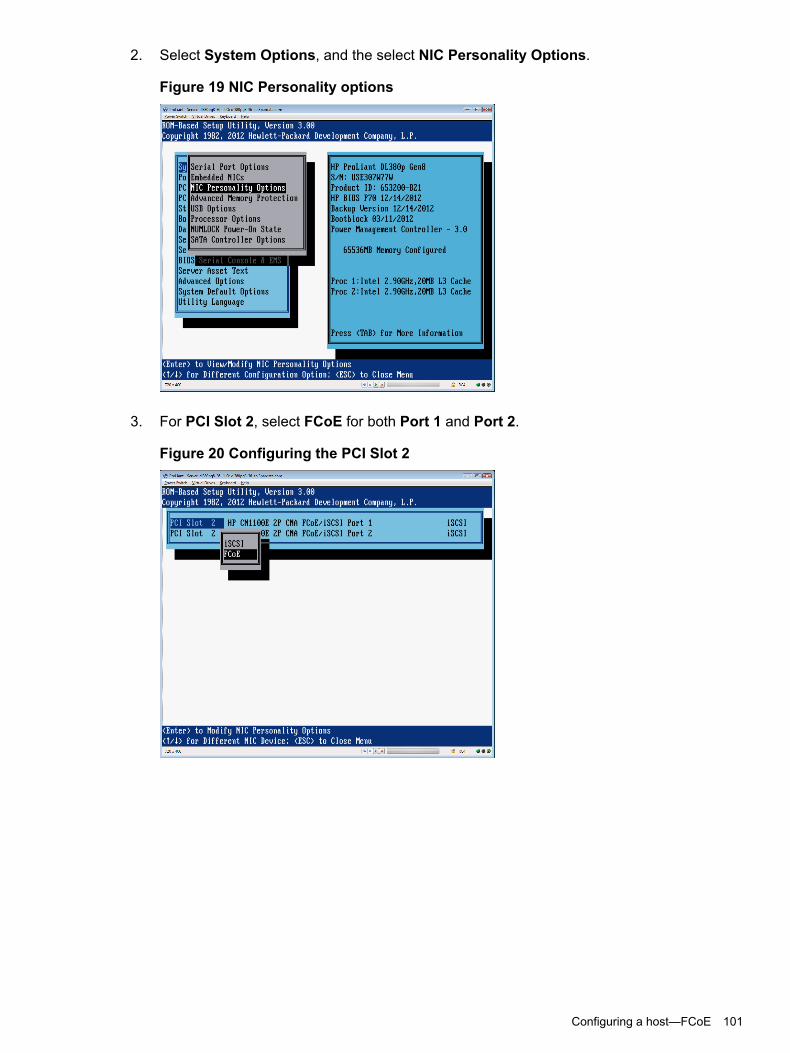
2. Select System Options, and the select NIC Personality Options.
Figure 19 NIC Personality options
3. For PCI Slot 2, select FCoE for both Port 1 and Port 2.
Figure 20 Configuring the PCI Slot 2
Configuring a host—FCoE 101
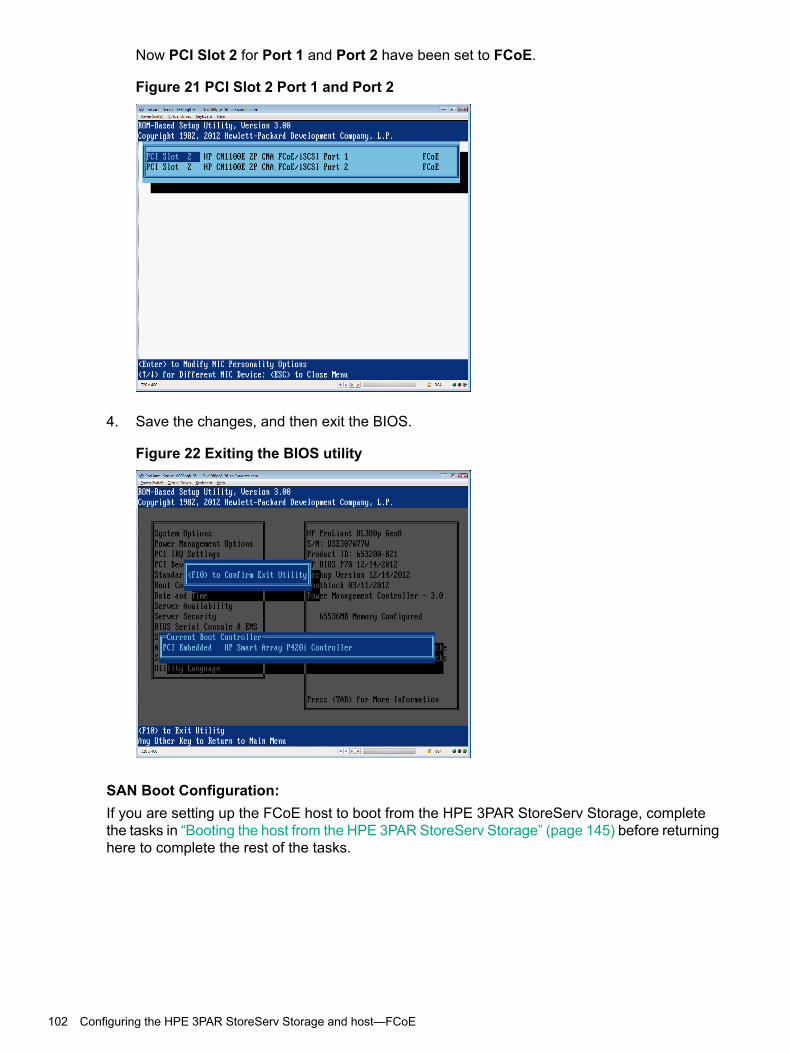
Now PCI Slot 2 for Port 1 and Port 2 have been set to FCoE.
Figure 21 PCI Slot 2 Port 1 and Port 2
4. Save the changes, and then exit the BIOS.
Figure 22 Exiting the BIOS utility
SAN Boot Configuration:If you are setting up the FCoE host to boot from the HPE 3PAR StoreServ Storage, completethe tasks in “Booting the host from the HPE 3PAR StoreServ Storage” (page 145) before returninghere to complete the rest of the tasks.
102 Configuring the HPE 3PAR StoreServ Storage and host—FCoE
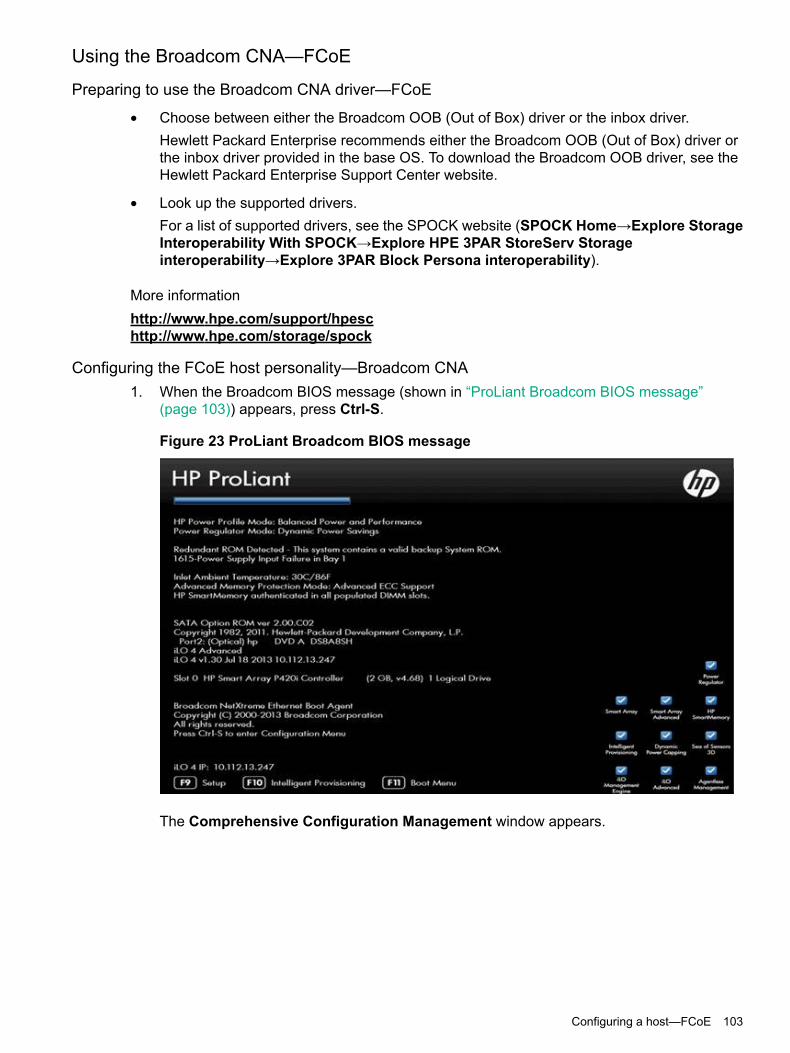
Using the Broadcom CNA—FCoE
Preparing to use the Broadcom CNA driver—FCoE
• Choose between either the Broadcom OOB (Out of Box) driver or the inbox driver.Hewlett Packard Enterprise recommends either the Broadcom OOB (Out of Box) driver orthe inbox driver provided in the base OS. To download the Broadcom OOB driver, see theHewlett Packard Enterprise Support Center website.
• Look up the supported drivers.For a list of supported drivers, see the SPOCK website (SPOCK Home→Explore StorageInteroperability With SPOCK→Explore HPE 3PAR StoreServ Storageinteroperability→Explore 3PAR Block Persona interoperability).
More informationhttp://www.hpe.com/support/hpeschttp://www.hpe.com/storage/spock
Configuring the FCoE host personality—Broadcom CNA1. When the Broadcom BIOS message (shown in “ProLiant Broadcom BIOS message”
(page 103)) appears, press Ctrl-S.
Figure 23 ProLiant Broadcom BIOS message
The Comprehensive Configuration Management window appears.
Configuring a host—FCoE 103
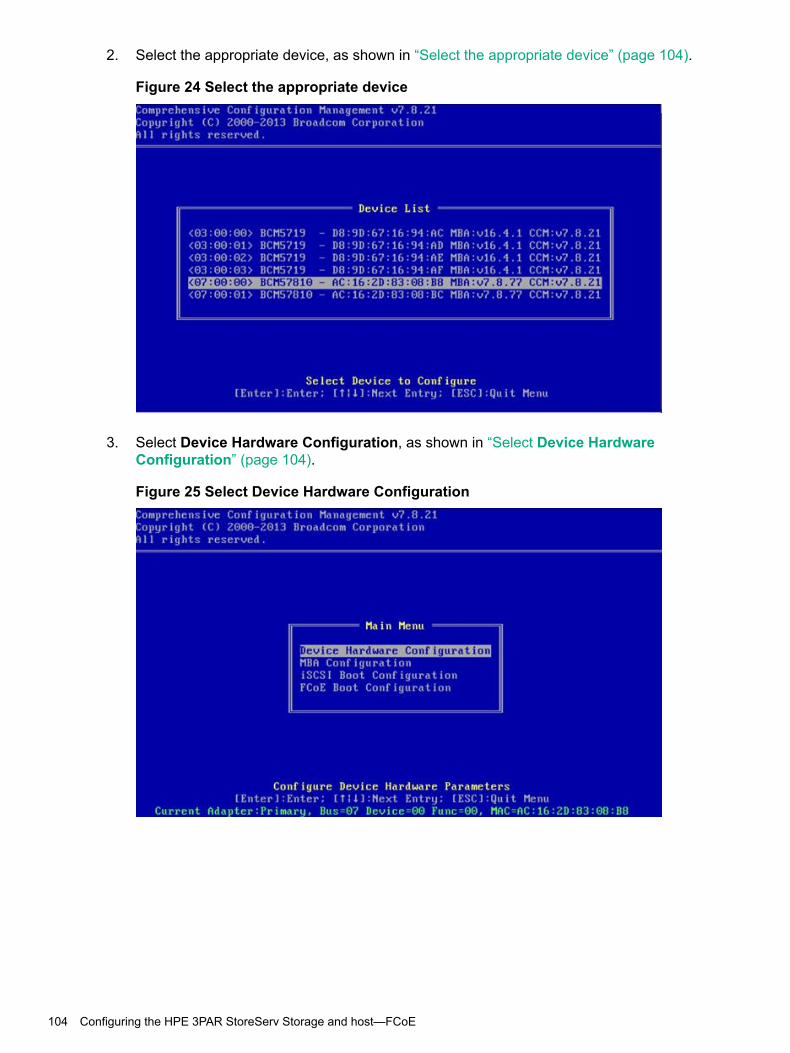
2. Select the appropriate device, as shown in “Select the appropriate device” (page 104).
Figure 24 Select the appropriate device
3. Select Device Hardware Configuration, as shown in “Select Device HardwareConfiguration” (page 104).
Figure 25 Select Device Hardware Configuration
104 Configuring the HPE 3PAR StoreServ Storage and host—FCoE
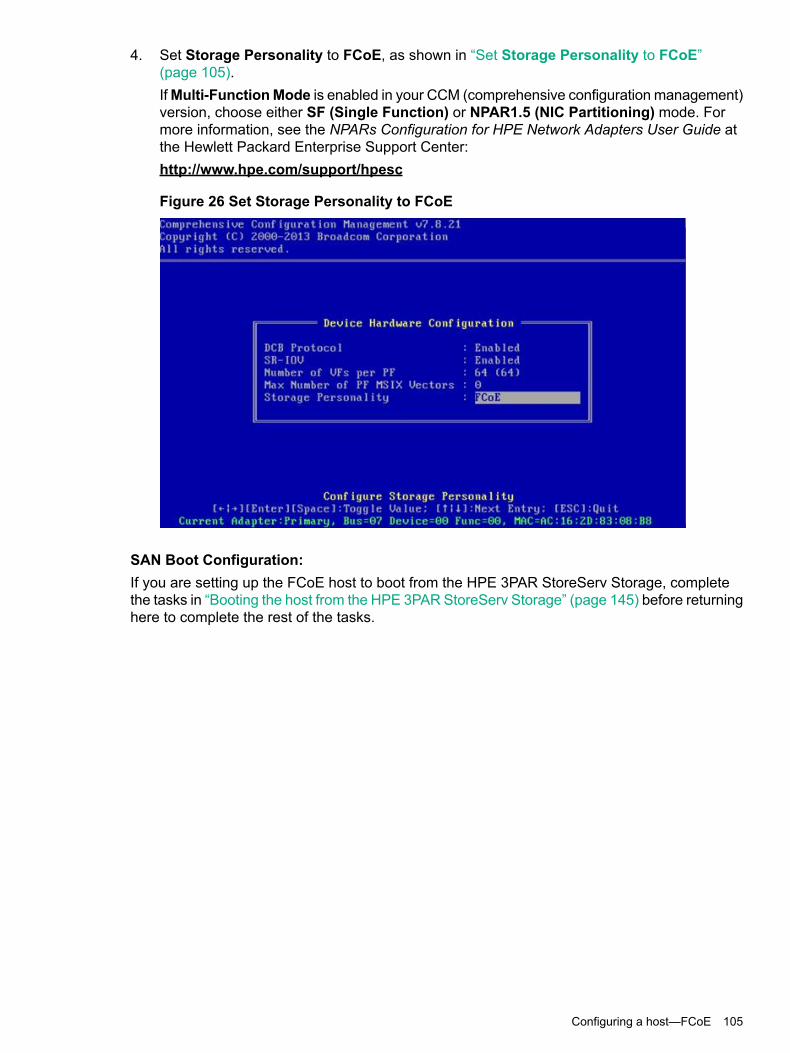
4. Set Storage Personality to FCoE, as shown in “Set Storage Personality to FCoE”(page 105).IfMulti-FunctionMode is enabled in your CCM (comprehensive configuration management)version, choose either SF (Single Function) or NPAR1.5 (NIC Partitioning) mode. Formore information, see the NPARs Configuration for HPE Network Adapters User Guide atthe Hewlett Packard Enterprise Support Center:http://www.hpe.com/support/hpesc
Figure 26 Set Storage Personality to FCoE
SAN Boot Configuration:If you are setting up the FCoE host to boot from the HPE 3PAR StoreServ Storage, completethe tasks in “Booting the host from the HPE 3PAR StoreServ Storage” (page 145) before returninghere to complete the rest of the tasks.
Configuring a host—FCoE 105

Initializing and configuring Broadcom—FCoE1. Install the driver package.2. Install the FCoE-utils package3. Restart the server.4. Find the FCoE instances by using ifconfig or the Network Manager on the GUI.
# ifconfig
eth6 Link encap:Ethernet HWaddr AC:06:3D:83:08:BCinet addr:10.102.0.10 Bcast:10.102.255.255 Mask:255.255.0.0inet6 addr: f380::ae16:2dff:fe83:8bc/64 Scope:LinkUP BROADCAST RUNNING MULTICAST MTU:1500 Metric:1RX packets:15271 errors:0 dropped:0 overruns:0 frame:0TX packets:17 errors:0 dropped:0 overruns:0 carrier:0collisions:0 txqueuelen:1000RX bytes:1245219 (1.1 MiB) TX bytes:2738 (2.6 KiB)Interrupt:28 Memory:f48000000-f4ffffff
eth7 Link encap:Ethernet HWaddr AC:16:2D:83:08:B8inet addr:10.102.0.12 Bcast:10.102.255.255 Mask:255.255.0.0inet6 addr: fe80::ae16:2dff:fe83:8b8/64 Scope:LinkUP BROADCAST RUNNING MULTICAST MTU:1500 Metric:1RX packets:15271 errors:0 dropped:0 overruns:0 frame:0TX packets:16 errors:0 dropped:0 overruns:0 carrier:0collisions:0 txqueuelen:1000RX bytes:1247133 (1.1 MiB) TX bytes:2660 (2.5 KiB)Interrupt:26 Memory:f6000000-f67ffffff
5. Create configuration files for all FCoE ethX interfaces:
# cd /etc/fcoe# cp cfg-ethx cfg-<ethX FCoE interface name>
6. Modify /etc/fcoe/cfg-<interface> by setting DCB_REQUIRED to no. For example:
# cat /etc/fcoe/cfg-eth6## Type: yes/no## Default: no# Enable/Disable FCoE service at the Ethernet port# Normally set to "yesFCOE_ENABLE="yes"
## Type: yes/no## Default: no# Indicate if DCB service is required at the Ethernet port# Normally set to "yes"DCB_REQUIRED="no"
## Type: yes/no## Default: no# Indicate if VLAN discovery should be handled by fcoemon# Normally set to "yes"AUTO_VLAN="yes"
106 Configuring the HPE 3PAR StoreServ Storage and host—FCoE
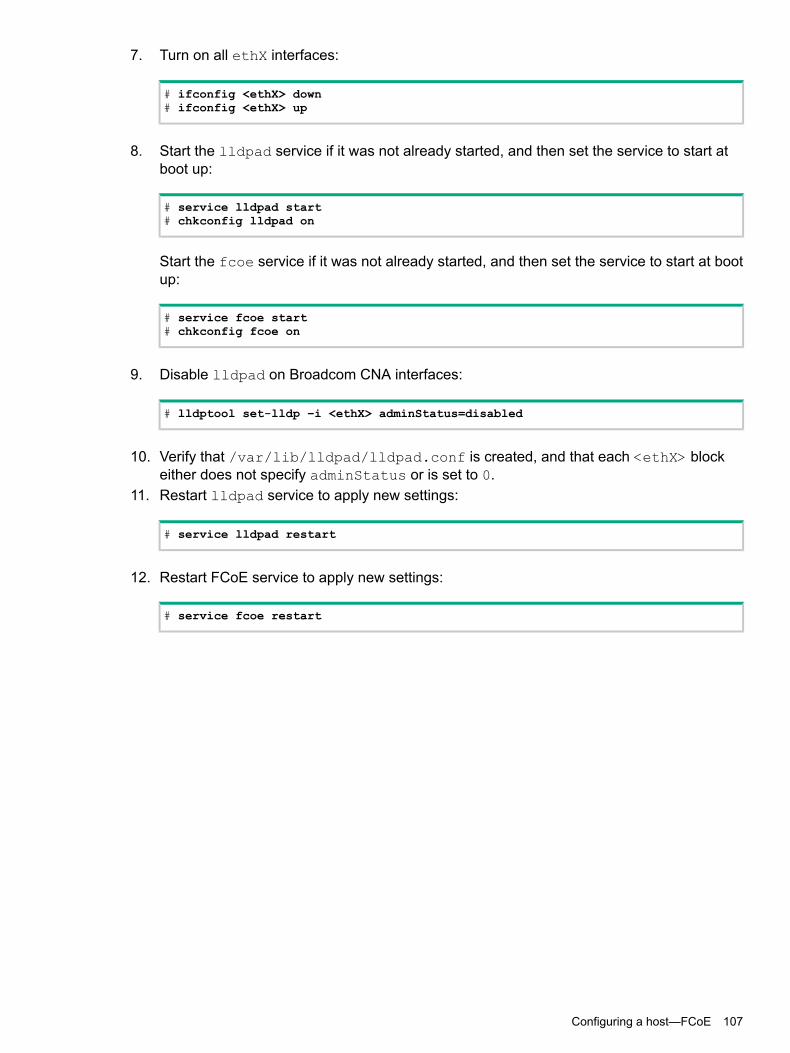
7. Turn on all ethX interfaces:
# ifconfig <ethX> down# ifconfig <ethX> up
8. Start the lldpad service if it was not already started, and then set the service to start atboot up:
# service lldpad start# chkconfig lldpad on
Start the fcoe service if it was not already started, and then set the service to start at bootup:
# service fcoe start# chkconfig fcoe on
9. Disable lldpad on Broadcom CNA interfaces:
# lldptool set-lldp –i <ethX> adminStatus=disabled
10. Verify that /var/lib/lldpad/lldpad.conf is created, and that each <ethX> blockeither does not specify adminStatus or is set to 0.
11. Restart lldpad service to apply new settings:
# service lldpad restart
12. Restart FCoE service to apply new settings:
# service fcoe restart
Configuring a host—FCoE 107
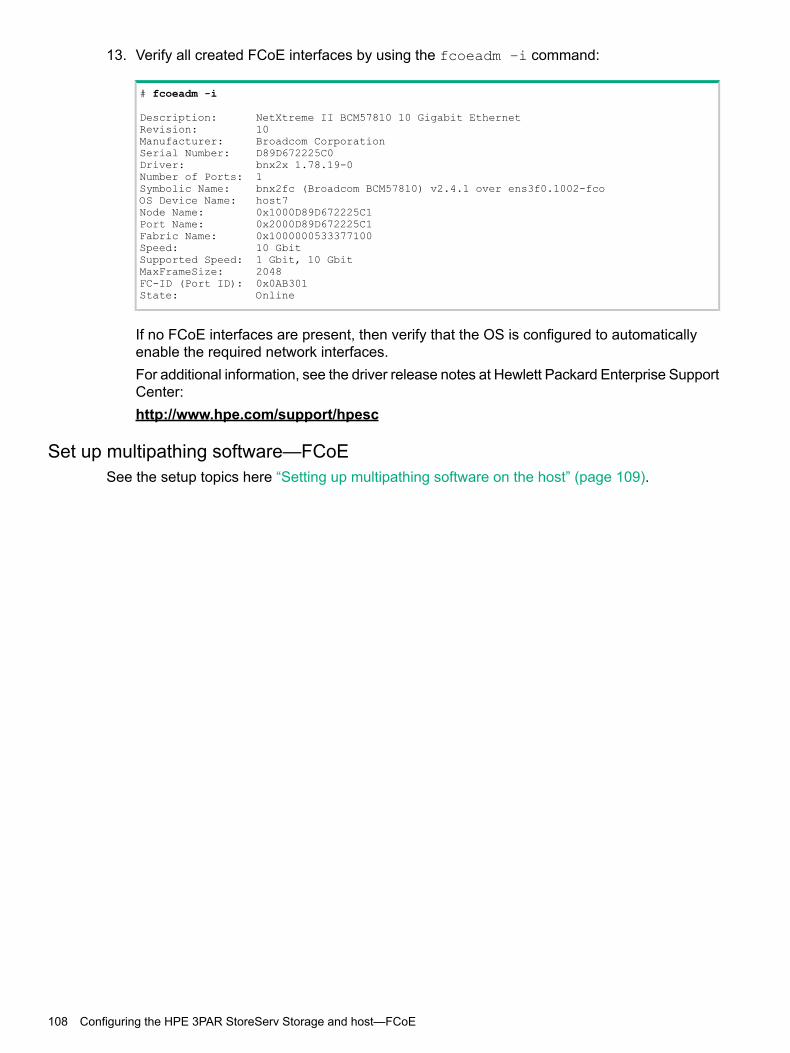
13. Verify all created FCoE interfaces by using the fcoeadm –i command:
# fcoeadm -i
Description: NetXtreme II BCM57810 10 Gigabit EthernetRevision: 10Manufacturer: Broadcom CorporationSerial Number: D89D672225C0Driver: bnx2x 1.78.19-0Number of Ports: 1Symbolic Name: bnx2fc (Broadcom BCM57810) v2.4.1 over ens3f0.1002-fcoOS Device Name: host7Node Name: 0x1000D89D672225C1Port Name: 0x2000D89D672225C1Fabric Name: 0x1000000533377100Speed: 10 GbitSupported Speed: 1 Gbit, 10 GbitMaxFrameSize: 2048FC-ID (Port ID): 0x0AB301State: Online
If no FCoE interfaces are present, then verify that the OS is configured to automaticallyenable the required network interfaces.For additional information, see the driver release notes at Hewlett Packard Enterprise SupportCenter:http://www.hpe.com/support/hpesc
Set up multipathing software—FCoESee the setup topics here “Setting up multipathing software on the host” (page 109).
108 Configuring the HPE 3PAR StoreServ Storage and host—FCoE
6 Setting up multipathing software on the hostThe following topics describe how to set up multipathing software on the Linux host to work withthe HPE 3PAR StoreServ Storage.Hewlett Packard Enterprise supports the following multipath solutions for RHEL:• Device mapper multipathing (DM-Multipath)
• Veritas Dynamic MultiPathing (DMP)For setting up these solutions, see the follow topics.
Setting up device mapper multipathing (DM-Multipath)1. Install the required software package.2. Modify the DM-Multipath configuration file.3. Enable and start DM-Multipath.4. Set up multipathing in the initramfs file system.5. Change host persona (optional).
Installing the required software package1. Before setting up DM-Multipath on your system, verify that the system is updated and includes
the device-mapper-multipath package.2. Check for the installed device-mapper-multipath package:
# rpm -qa | grep device-mapper
3. If necessary, install the device-mapper-multipath package by using the RHEL tools.
Modifying the DM-Multipath configuration fileDM-Multipath uses the /etc/multipath.conf file for setting multipathing parameters. Editthe default /etc/multipath.conf file for a minimum configuration connecting to a HPE 3PARStoreServ Storage array. Entries listed in /etc/multipath.conf override the default kernelparameters for DM-Multipath. If there is no existing /etc/multipath.conf file, create thisfile.
NOTE: For additional options in /etc/multipath.conf entries, see the appropriate versionof DM Multipath Configuration and Administration at the Red Hat website:http://www.redhat.com
Remove or comment out entries in the /etc/multipath.conf file, except for the devicessection for devices currently in use. After making these edits, the relevant sections of /etc/multipath.conf appear as follows:
Setting up device mapper multipathing (DM-Multipath) 109
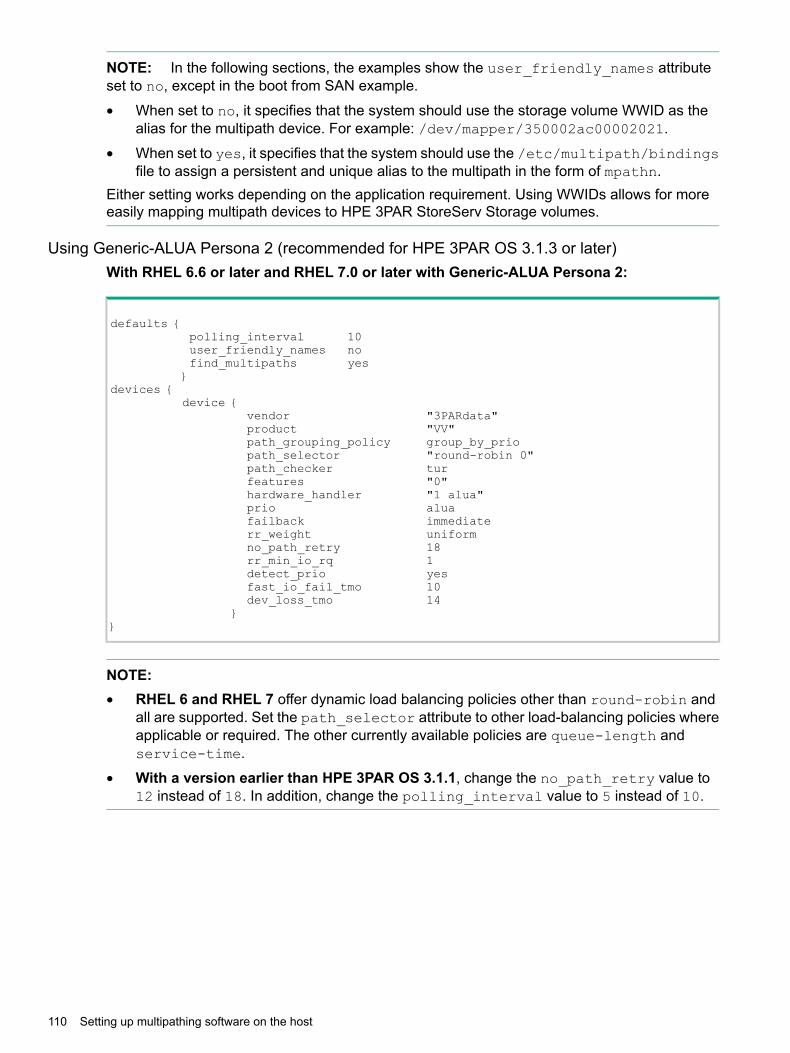
NOTE: In the following sections, the examples show the user_friendly_names attributeset to no, except in the boot from SAN example.
• When set to no, it specifies that the system should use the storage volume WWID as thealias for the multipath device. For example: /dev/mapper/350002ac00002021.
• When set to yes, it specifies that the system should use the /etc/multipath/bindingsfile to assign a persistent and unique alias to the multipath in the form of mpathn.
Either setting works depending on the application requirement. Using WWIDs allows for moreeasily mapping multipath devices to HPE 3PAR StoreServ Storage volumes.
Using Generic-ALUA Persona 2 (recommended for HPE 3PAR OS 3.1.3 or later)With RHEL 6.6 or later and RHEL 7.0 or later with Generic-ALUA Persona 2:
defaults {polling_interval 10user_friendly_names nofind_multipaths yes}
devices {device {
vendor "3PARdata"product "VV"path_grouping_policy group_by_priopath_selector "round-robin 0"path_checker turfeatures "0"hardware_handler "1 alua"prio aluafailback immediaterr_weight uniformno_path_retry 18rr_min_io_rq 1detect_prio yesfast_io_fail_tmo 10dev_loss_tmo 14
}}
NOTE:• RHEL 6 and RHEL 7 offer dynamic load balancing policies other than round-robin and
all are supported. Set the path_selector attribute to other load-balancing policies whereapplicable or required. The other currently available policies are queue-length andservice-time.
• With a version earlier than HPE 3PAR OS 3.1.1, change the no_path_retry value to12 instead of 18. In addition, change the polling_interval value to 5 instead of 10.
110 Setting up multipathing software on the host
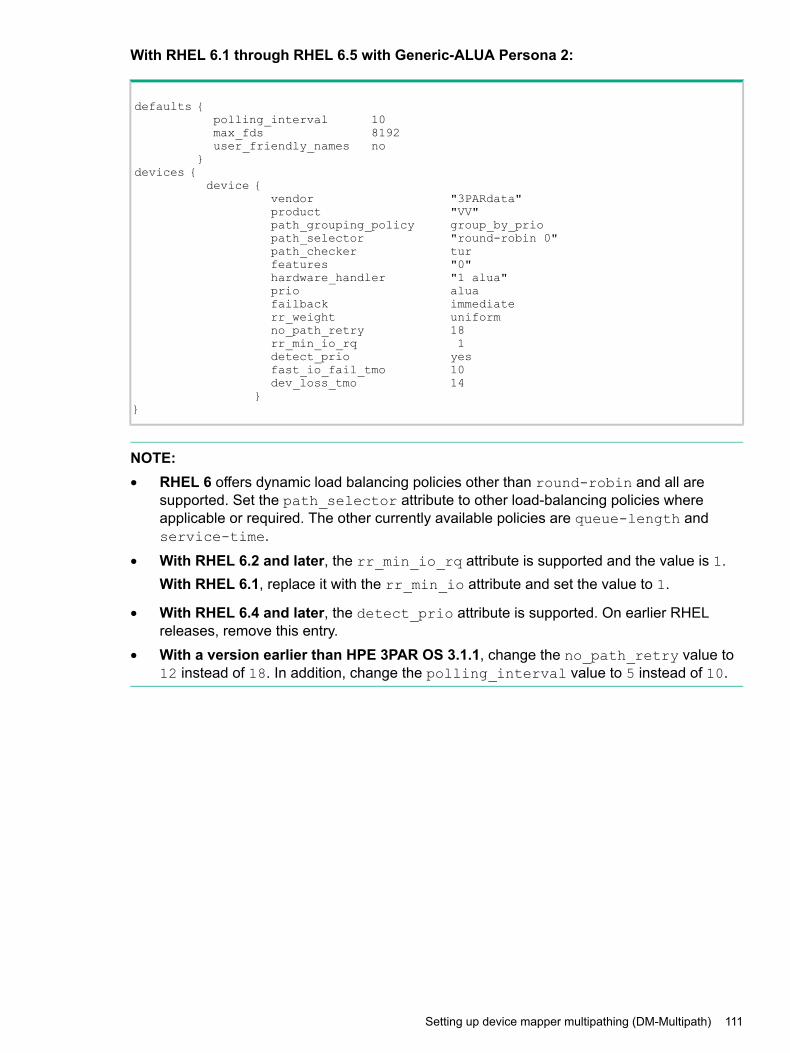
With RHEL 6.1 through RHEL 6.5 with Generic-ALUA Persona 2:
defaults {polling_interval 10max_fds 8192user_friendly_names no
}devices {
device {vendor "3PARdata"product "VV"path_grouping_policy group_by_priopath_selector "round-robin 0"path_checker turfeatures "0"hardware_handler "1 alua"prio aluafailback immediaterr_weight uniformno_path_retry 18rr_min_io_rq 1detect_prio yesfast_io_fail_tmo 10dev_loss_tmo 14
}}
NOTE:• RHEL 6 offers dynamic load balancing policies other than round-robin and all are
supported. Set the path_selector attribute to other load-balancing policies whereapplicable or required. The other currently available policies are queue-length andservice-time.
• With RHEL 6.2 and later, the rr_min_io_rq attribute is supported and the value is 1.With RHEL 6.1, replace it with the rr_min_io attribute and set the value to 1.
• With RHEL 6.4 and later, the detect_prio attribute is supported. On earlier RHELreleases, remove this entry.
• With a version earlier than HPE 3PAR OS 3.1.1, change the no_path_retry value to12 instead of 18. In addition, change the polling_interval value to 5 instead of 10.
Setting up device mapper multipathing (DM-Multipath) 111
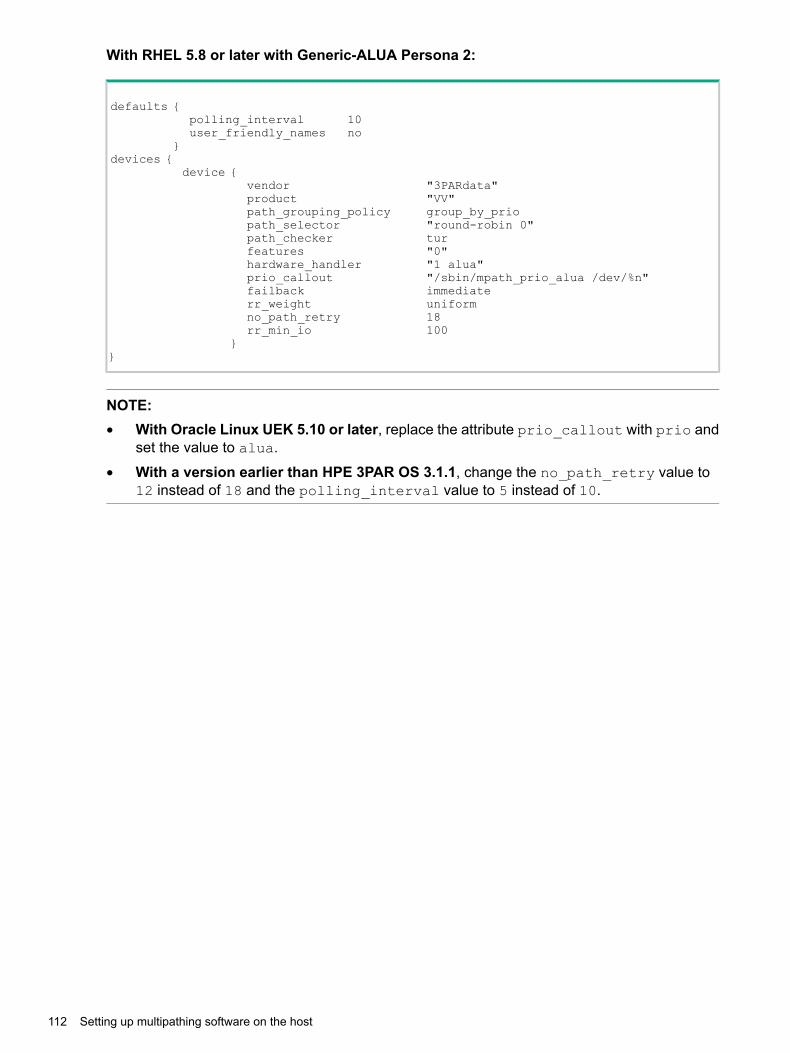
With RHEL 5.8 or later with Generic-ALUA Persona 2:
defaults {polling_interval 10user_friendly_names no
}devices {
device {vendor "3PARdata"product "VV"path_grouping_policy group_by_priopath_selector "round-robin 0"path_checker turfeatures "0"hardware_handler "1 alua"prio_callout "/sbin/mpath_prio_alua /dev/%n"failback immediaterr_weight uniformno_path_retry 18rr_min_io 100
}}
NOTE:• With Oracle Linux UEK 5.10 or later, replace the attribute prio_callout with prio and
set the value to alua.
• With a version earlier than HPE 3PAR OS 3.1.1, change the no_path_retry value to12 instead of 18 and the polling_interval value to 5 instead of 10.
112 Setting up multipathing software on the host
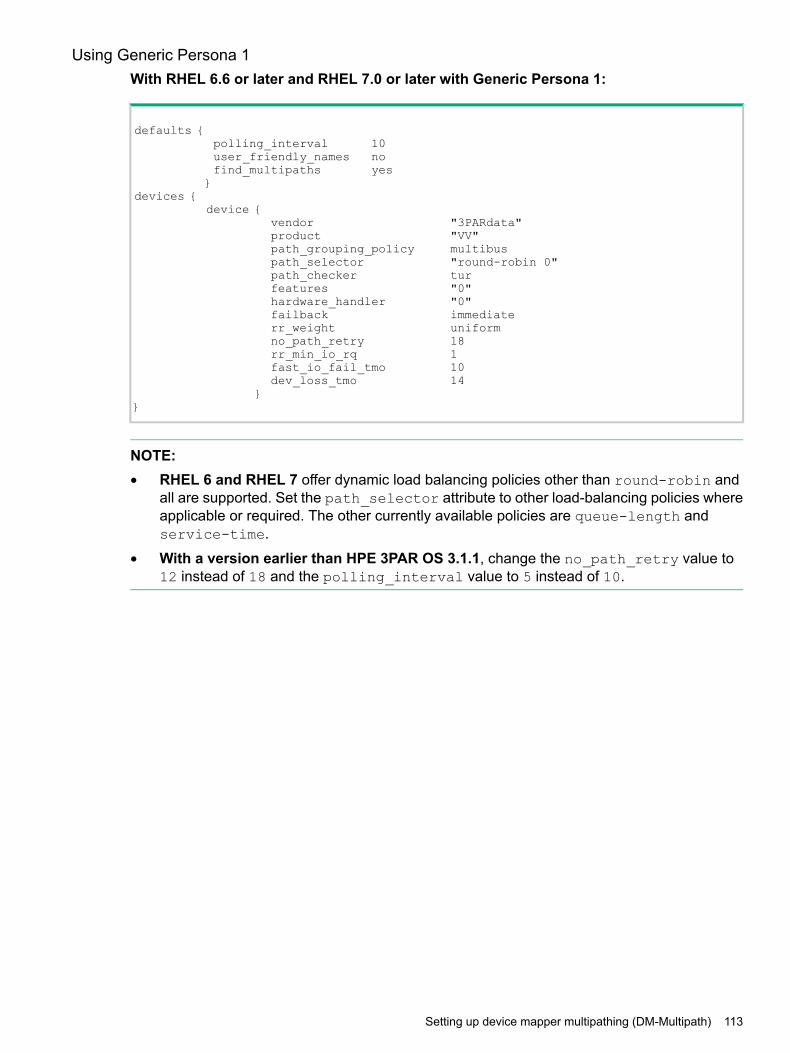
Using Generic Persona 1With RHEL 6.6 or later and RHEL 7.0 or later with Generic Persona 1:
defaults {polling_interval 10user_friendly_names nofind_multipaths yes}
devices {device {
vendor "3PARdata"product "VV"path_grouping_policy multibuspath_selector "round-robin 0"path_checker turfeatures "0"hardware_handler "0"failback immediaterr_weight uniformno_path_retry 18rr_min_io_rq 1fast_io_fail_tmo 10dev_loss_tmo 14
}}
NOTE:• RHEL 6 and RHEL 7 offer dynamic load balancing policies other than round-robin and
all are supported. Set the path_selector attribute to other load-balancing policies whereapplicable or required. The other currently available policies are queue-length andservice-time.
• With a version earlier than HPE 3PAR OS 3.1.1, change the no_path_retry value to12 instead of 18 and the polling_interval value to 5 instead of 10.
Setting up device mapper multipathing (DM-Multipath) 113
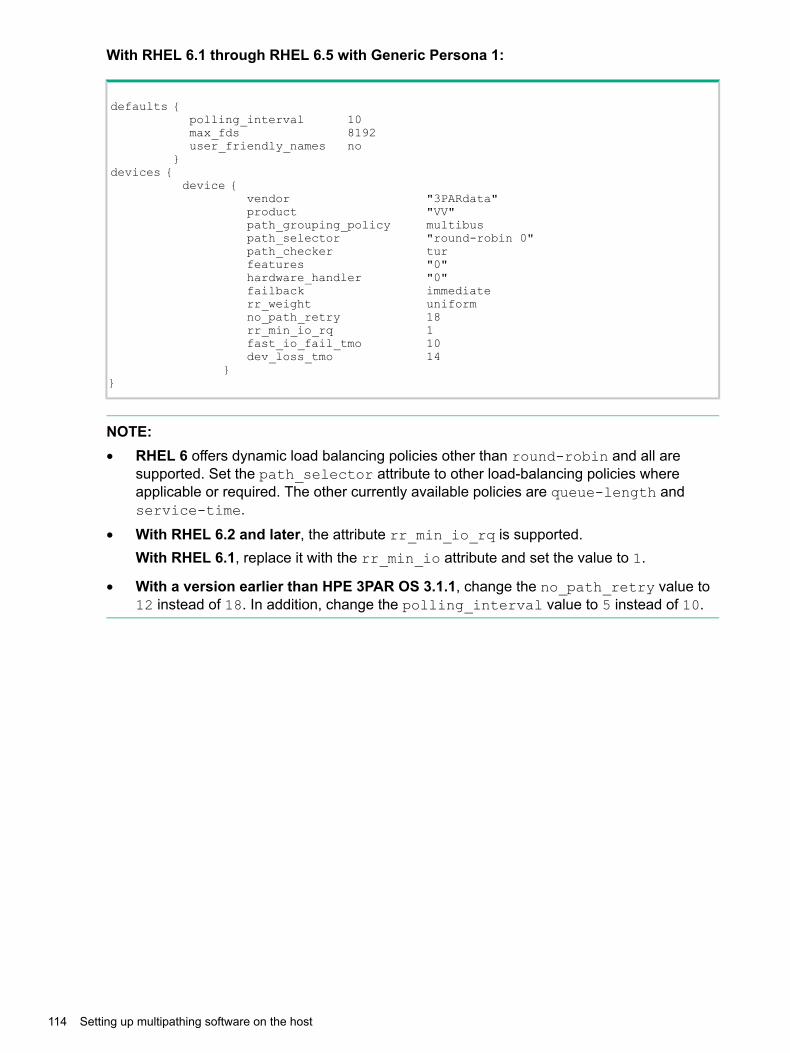
With RHEL 6.1 through RHEL 6.5 with Generic Persona 1:
defaults {polling_interval 10max_fds 8192user_friendly_names no
}devices {
device {vendor "3PARdata"product "VV"path_grouping_policy multibuspath_selector "round-robin 0"path_checker turfeatures "0"hardware_handler "0"failback immediaterr_weight uniformno_path_retry 18rr_min_io_rq 1fast_io_fail_tmo 10dev_loss_tmo 14
}}
NOTE:• RHEL 6 offers dynamic load balancing policies other than round-robin and all are
supported. Set the path_selector attribute to other load-balancing policies whereapplicable or required. The other currently available policies are queue-length andservice-time.
• With RHEL 6.2 and later, the attribute rr_min_io_rq is supported.With RHEL 6.1, replace it with the rr_min_io attribute and set the value to 1.
• With a version earlier than HPE 3PAR OS 3.1.1, change the no_path_retry value to12 instead of 18. In addition, change the polling_interval value to 5 instead of 10.
114 Setting up multipathing software on the host
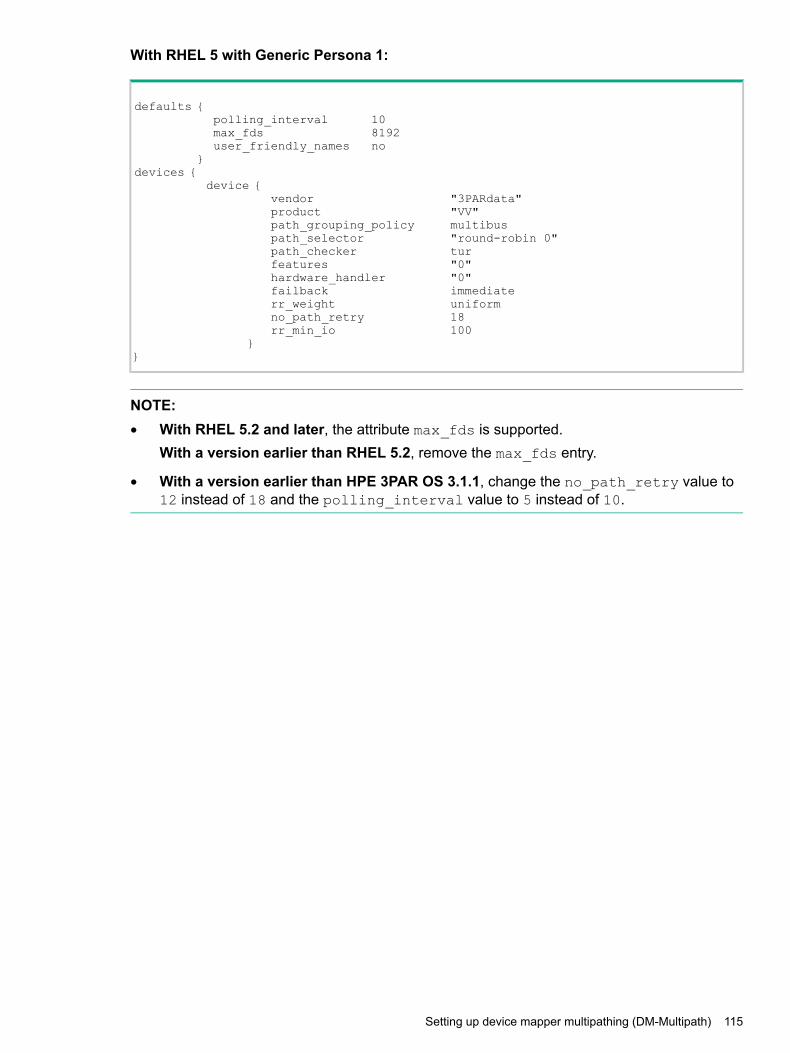
With RHEL 5 with Generic Persona 1:
defaults {polling_interval 10max_fds 8192user_friendly_names no
}devices {
device {vendor "3PARdata"product "VV"path_grouping_policy multibuspath_selector "round-robin 0"path_checker turfeatures "0"hardware_handler "0"failback immediaterr_weight uniformno_path_retry 18rr_min_io 100
}}
NOTE:• With RHEL 5.2 and later, the attribute max_fds is supported.
With a version earlier than RHEL 5.2, remove the max_fds entry.
• With a version earlier than HPE 3PAR OS 3.1.1, change the no_path_retry value to12 instead of 18 and the polling_interval value to 5 instead of 10.
Setting up device mapper multipathing (DM-Multipath) 115
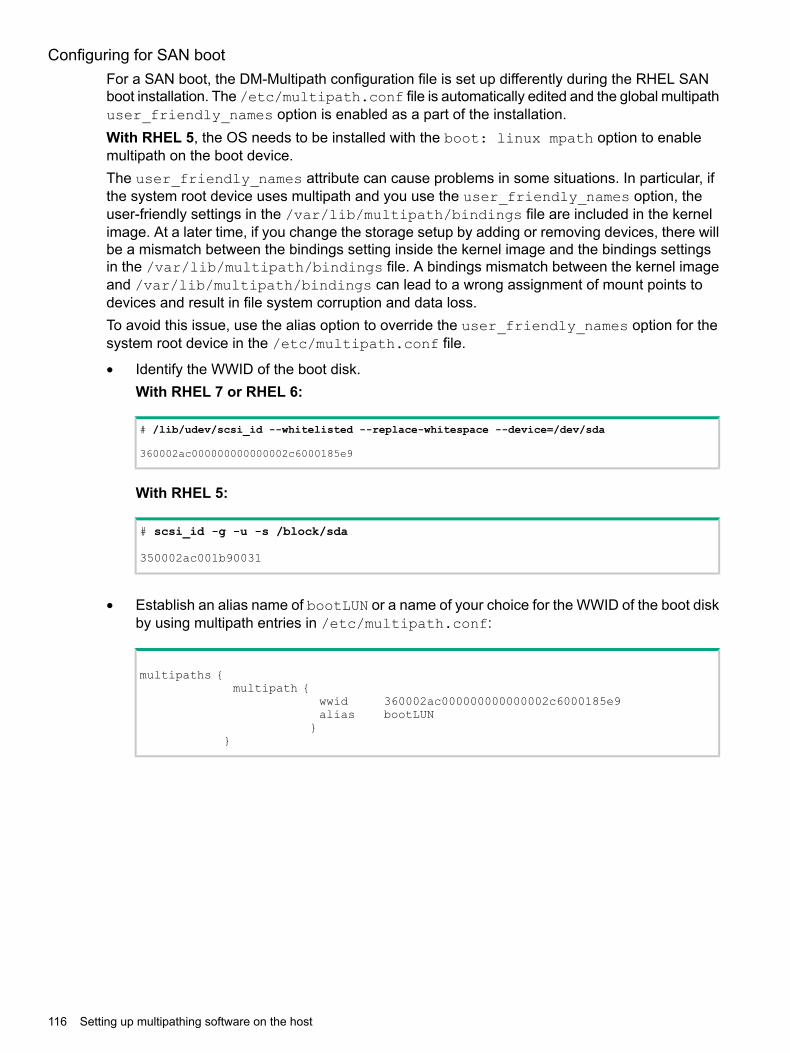
Configuring for SAN bootFor a SAN boot, the DM-Multipath configuration file is set up differently during the RHEL SANboot installation. The /etc/multipath.conf file is automatically edited and the global multipathuser_friendly_names option is enabled as a part of the installation.With RHEL 5, the OS needs to be installed with the boot: linux mpath option to enablemultipath on the boot device.The user_friendly_names attribute can cause problems in some situations. In particular, ifthe system root device uses multipath and you use the user_friendly_names option, theuser-friendly settings in the /var/lib/multipath/bindings file are included in the kernelimage. At a later time, if you change the storage setup by adding or removing devices, there willbe a mismatch between the bindings setting inside the kernel image and the bindings settingsin the /var/lib/multipath/bindings file. A bindings mismatch between the kernel imageand /var/lib/multipath/bindings can lead to a wrong assignment of mount points todevices and result in file system corruption and data loss.To avoid this issue, use the alias option to override the user_friendly_names option for thesystem root device in the /etc/multipath.conf file.
• Identify the WWID of the boot disk.With RHEL 7 or RHEL 6:
# /lib/udev/scsi_id --whitelisted --replace-whitespace --device=/dev/sda
360002ac000000000000002c6000185e9
With RHEL 5:
# scsi_id -g -u -s /block/sda
350002ac001b90031
• Establish an alias name of bootLUN or a name of your choice for the WWID of the boot diskby using multipath entries in /etc/multipath.conf:
multipaths {multipath {
wwid 360002ac000000000000002c6000185e9alias bootLUN}
}
116 Setting up multipathing software on the host
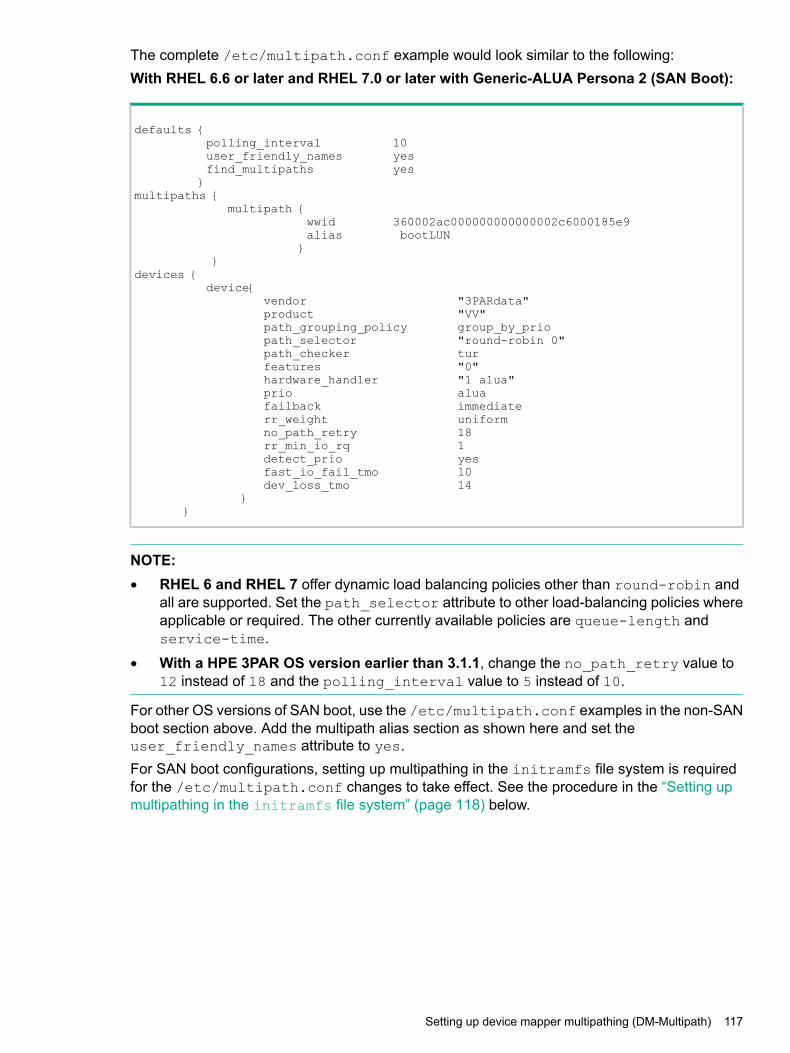
The complete /etc/multipath.conf example would look similar to the following:With RHEL 6.6 or later and RHEL 7.0 or later with Generic-ALUA Persona 2 (SAN Boot):
defaults {polling_interval 10user_friendly_names yesfind_multipaths yes}
multipaths {multipath {
wwid 360002ac000000000000002c6000185e9alias bootLUN}
}devices {
device{vendor "3PARdata"product "VV"path_grouping_policy group_by_priopath_selector "round-robin 0"path_checker turfeatures "0"hardware_handler "1 alua"prio aluafailback immediaterr_weight uniformno_path_retry 18rr_min_io_rq 1detect_prio yesfast_io_fail_tmo 10dev_loss_tmo 14
}}
NOTE:• RHEL 6 and RHEL 7 offer dynamic load balancing policies other than round-robin and
all are supported. Set the path_selector attribute to other load-balancing policies whereapplicable or required. The other currently available policies are queue-length andservice-time.
• With a HPE 3PAR OS version earlier than 3.1.1, change the no_path_retry value to12 instead of 18 and the polling_interval value to 5 instead of 10.
For other OS versions of SAN boot, use the /etc/multipath.conf examples in the non-SANboot section above. Add the multipath alias section as shown here and set theuser_friendly_names attribute to yes.For SAN boot configurations, setting up multipathing in the initramfs file system is requiredfor the /etc/multipath.conf changes to take effect. See the procedure in the “Setting upmultipathing in the initramfs file system” (page 118) below.
Setting up device mapper multipathing (DM-Multipath) 117
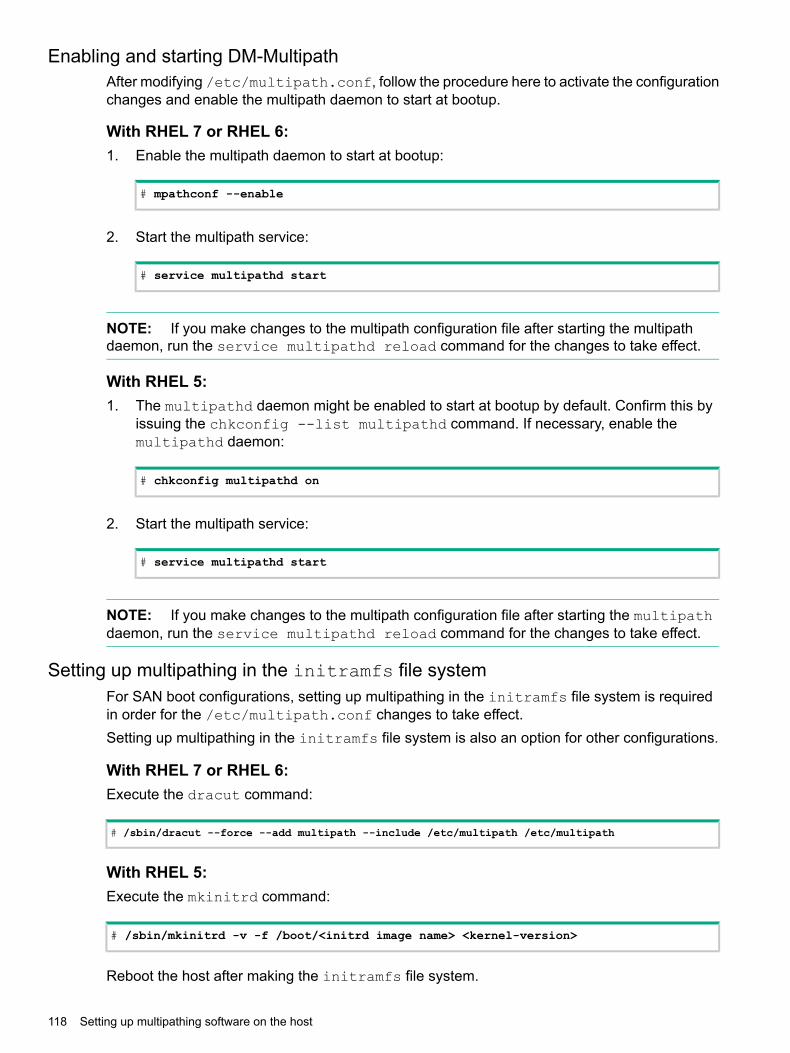
Enabling and starting DM-MultipathAfter modifying /etc/multipath.conf, follow the procedure here to activate the configurationchanges and enable the multipath daemon to start at bootup.
With RHEL 7 or RHEL 6:1. Enable the multipath daemon to start at bootup:
# mpathconf --enable
2. Start the multipath service:
# service multipathd start
NOTE: If you make changes to the multipath configuration file after starting the multipathdaemon, run the service multipathd reload command for the changes to take effect.
With RHEL 5:1. The multipathd daemon might be enabled to start at bootup by default. Confirm this by
issuing the chkconfig --list multipathd command. If necessary, enable themultipathd daemon:
# chkconfig multipathd on
2. Start the multipath service:
# service multipathd start
NOTE: If you make changes to the multipath configuration file after starting the multipathdaemon, run the service multipathd reload command for the changes to take effect.
Setting up multipathing in the initramfs file systemFor SAN boot configurations, setting up multipathing in the initramfs file system is requiredin order for the /etc/multipath.conf changes to take effect.Setting up multipathing in the initramfs file system is also an option for other configurations.
With RHEL 7 or RHEL 6:Execute the dracut command:
# /sbin/dracut --force --add multipath --include /etc/multipath /etc/multipath
With RHEL 5:Execute the mkinitrd command:
# /sbin/mkinitrd -v -f /boot/<initrd image name> <kernel-version>
Reboot the host after making the initramfs file system.
118 Setting up multipathing software on the host
Changing the host persona (optional)Changing the host persona is optional, so this topic is only relevant if you need to change thehost persona.With HPE 3PAROS 3.1.3 or later, Hewlett Packard Enterprise recommends host Generic-ALUAPersona 2.Advantages of Host Generic-ALUA Persona 2:• A single VV migration can be performed by using 3PAR Peer Motion if the source and
destination HPE 3PAR StoreServ Storage array uses host Generic-ALUA persona 2 (requiredby the HPE 3PAR OS).
• Host Generic-ALUA persona 2 is required for Storage Federation (required by the HPE 3PAROS).
When changing from 3PAR host Generic Persona 1 to host persona 2 or vice versa:• Changing from Generic Persona 1 to Generic-ALUA Persona 2, or from Generic-ALUA
Persona 2 to Generic Persona 1, is an offline process and requires restarting the Linux host.• For existing devices targeted in a persona to be claimed, the host must be restarted.
• If a persona change is performed while the I/O is running, it can result in I/O failures. Newundiscovered devices, storage path disturbances might result in inconsistent device pathstates causing I/O failure issues.
1. Stop all host I/O and modify the /etc/multipath.conf file on the RHEL host accordingto the persona requirements.
2. If SAN boot is configured, rebuild the kernel image in order for multipath changes to takeeffect.
3. Shut down the host.4. Change the host persona on the array by using the sethost -persona
<hostpersonaval> <host name> command.5. Restart the host.6. Verify that the target devices are claimed properly and that the persona setting is correct by
using the multipath commands.
Setting up Veritas DMP multipathingFor Active/Active multipath load balancing and failover, install Veritas Storage Foundation andHigh Availability software and Veritas InfoScale Enterprise software, following the instructionsprovided in the Veritas Storage Foundation (or InfoScale) installation and administrator guides,available at the Veritas website:https://sort.veritas.com/documents
NOTE: When using QLogic HBAs, the QLogic non-failover driver should be installed for VeritasDMP support.Device mapper multipath modules should not be configured when Veritas DMP is used formultipathing.
Check the configuration of the device mapper module with chkconfig --list multipathdand turn it off with chkconfig multipathd off .It is required to have the Veritas Array Support Library (ASL) for the HPE 3PAR StoreServ Storageinstalled on the RHEL host when using a Veritas Storage Foundation version prior to 5.0mp3.As of HPE 3PAR OS 3.1.2, the virtual volume (VV) WWN increased from 8 bytes to 16 bytes.The increase in WWN length might cause the Symantec/Veritas ASL to incorrectly identify thearray volume identification (AVID) number, subsequently resulting in use of a different namingconvention for DMP disk devices.
Setting up Veritas DMP multipathing 119
NOTE: This issue does not occur with Storage Foundation 6.1, which is compatible with both8-byte and 16-byte WWNs.
The standard naming convention is as follows:<enclosure_name><enclosure_number>_<AVID>
For example:
• 3pardata4_5876
• 3pardata4_5877
• 3pardata4_5878
If the virtual volumes in use report a 16-byte WWN, the ASL extracts an AVID number of 0 forall VVs, and Symantec/Veritas sequentially enumerates the DMP devices to generate a uniqueDMP disk name. In this case, the resulting disk names would be:
• 3pardata4_0
• 3pardata4_0_1
• 3pardata4_0_2
The name scheme used does not impact DMP functionality. However, if you want the DMP nameto contain the VV AVID number, Symantec/Veritas provides updated ASLs that will properlyextract the AVID number. If AVID naming is desired, use the following ASL versions:
• Storage Foundation 5.1 (all)—3PAR ASL version 5.1.134.100 or later.
• Storage Foundation 6.0 to 6.0.4—3PAR ASL version 6.0.400.100 or later.
Obtaining the Veritas ASL for the HPE 3PAR StoreServ Storage
CAUTION: If the ARRAY_NAME is not designated as 3PARDATA, the multipathing layer mightnot discover devices correctly.
1. Download the latest Veritas ASL at the Veritas website. (Select 3PAR as the vendor.):https://sort.veritas.com/asl/finder
NOTE: Specific models of HPE 3PAR StoreServ Storage arrays might not be listed onthe website, but the ASL works for all models of HPE 3PAR StoreServ Storage arrays.
2. To install the ASL, the Veritas vxconfigd daemon must be running. Run vxinstall tostart the daemon. After you install the ASL package, run the vxdctl enable command toclaim the disk array as a HPE 3PAR StoreServ Storage array.
3. Configure the Veritas vxdmp driver to manage the HPE 3PAR StoreServ Storage pathsproviding path failure management and dynamic load balancing.
120 Setting up multipathing software on the host
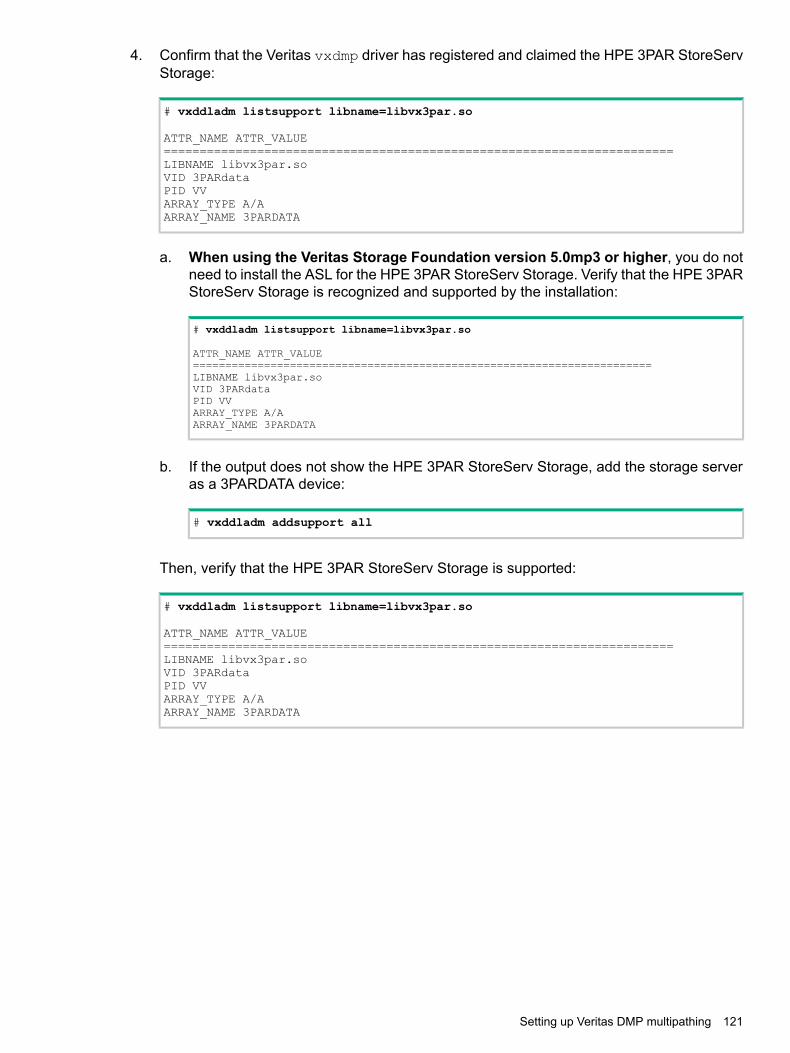
4. Confirm that the Veritas vxdmp driver has registered and claimed the HPE 3PAR StoreServStorage:
# vxddladm listsupport libname=libvx3par.so
ATTR_NAME ATTR_VALUE=======================================================================LIBNAME libvx3par.soVID 3PARdataPID VVARRAY_TYPE A/AARRAY_NAME 3PARDATA
a. When using the Veritas Storage Foundation version 5.0mp3 or higher, you do notneed to install the ASL for the HPE 3PAR StoreServ Storage. Verify that the HPE 3PARStoreServ Storage is recognized and supported by the installation:
# vxddladm listsupport libname=libvx3par.so
ATTR_NAME ATTR_VALUE=======================================================================LIBNAME libvx3par.soVID 3PARdataPID VVARRAY_TYPE A/AARRAY_NAME 3PARDATA
b. If the output does not show the HPE 3PAR StoreServ Storage, add the storage serveras a 3PARDATA device:
# vxddladm addsupport all
Then, verify that the HPE 3PAR StoreServ Storage is supported:
# vxddladm listsupport libname=libvx3par.so
ATTR_NAME ATTR_VALUE=======================================================================LIBNAME libvx3par.soVID 3PARdataPID VVARRAY_TYPE A/AARRAY_NAME 3PARDATA
Setting up Veritas DMP multipathing 121
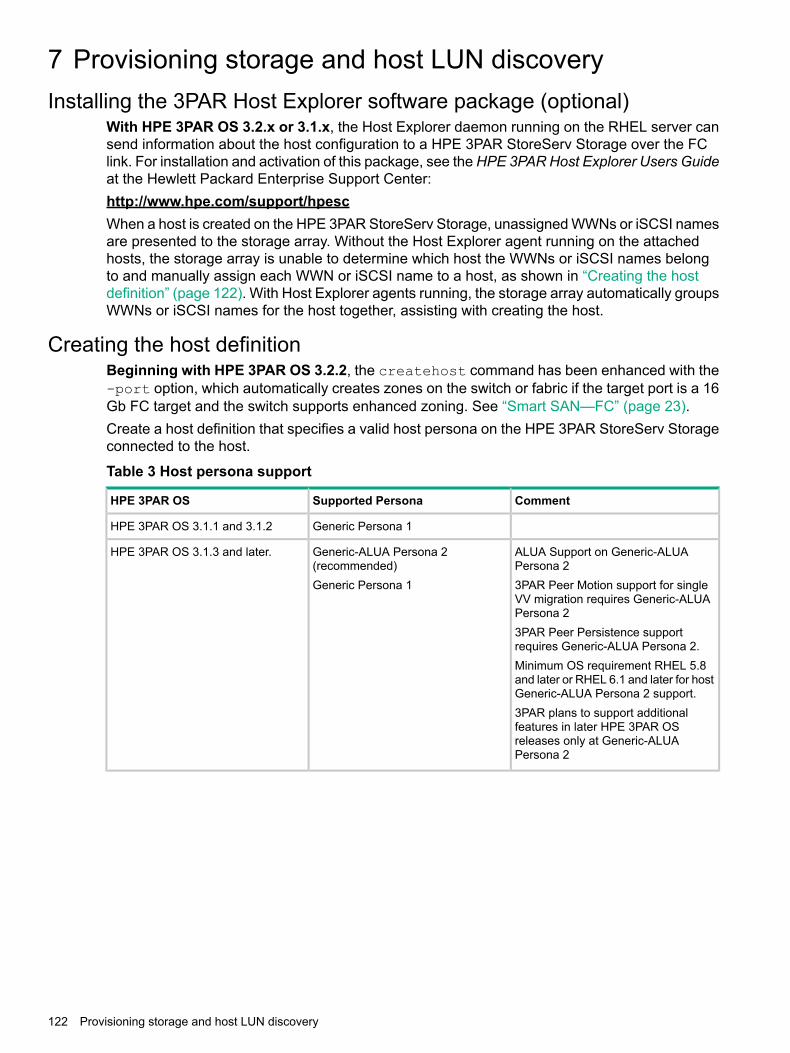
7 Provisioning storage and host LUN discoveryInstalling the 3PAR Host Explorer software package (optional)
With HPE 3PAR OS 3.2.x or 3.1.x, the Host Explorer daemon running on the RHEL server cansend information about the host configuration to a HPE 3PAR StoreServ Storage over the FClink. For installation and activation of this package, see the HPE 3PAR Host Explorer Users Guideat the Hewlett Packard Enterprise Support Center:http://www.hpe.com/support/hpescWhen a host is created on the HPE 3PAR StoreServ Storage, unassigned WWNs or iSCSI namesare presented to the storage array. Without the Host Explorer agent running on the attachedhosts, the storage array is unable to determine which host the WWNs or iSCSI names belongto and manually assign each WWN or iSCSI name to a host, as shown in “Creating the hostdefinition” (page 122). With Host Explorer agents running, the storage array automatically groupsWWNs or iSCSI names for the host together, assisting with creating the host.
Creating the host definitionBeginning with HPE 3PAR OS 3.2.2, the createhost command has been enhanced with the-port option, which automatically creates zones on the switch or fabric if the target port is a 16Gb FC target and the switch supports enhanced zoning. See “Smart SAN—FC” (page 23).Create a host definition that specifies a valid host persona on the HPE 3PAR StoreServ Storageconnected to the host.
Table 3 Host persona support
CommentSupported PersonaHPE 3PAR OS
Generic Persona 1HPE 3PAR OS 3.1.1 and 3.1.2
ALUA Support on Generic-ALUAPersona 2
Generic-ALUA Persona 2(recommended)
HPE 3PAR OS 3.1.3 and later.
3PAR Peer Motion support for singleVV migration requires Generic-ALUAPersona 2
Generic Persona 1
3PAR Peer Persistence supportrequires Generic-ALUA Persona 2.Minimum OS requirement RHEL 5.8and later or RHEL 6.1 and later for hostGeneric-ALUA Persona 2 support.3PAR plans to support additionalfeatures in later HPE 3PAR OSreleases only at Generic-ALUAPersona 2
122 Provisioning storage and host LUN discovery
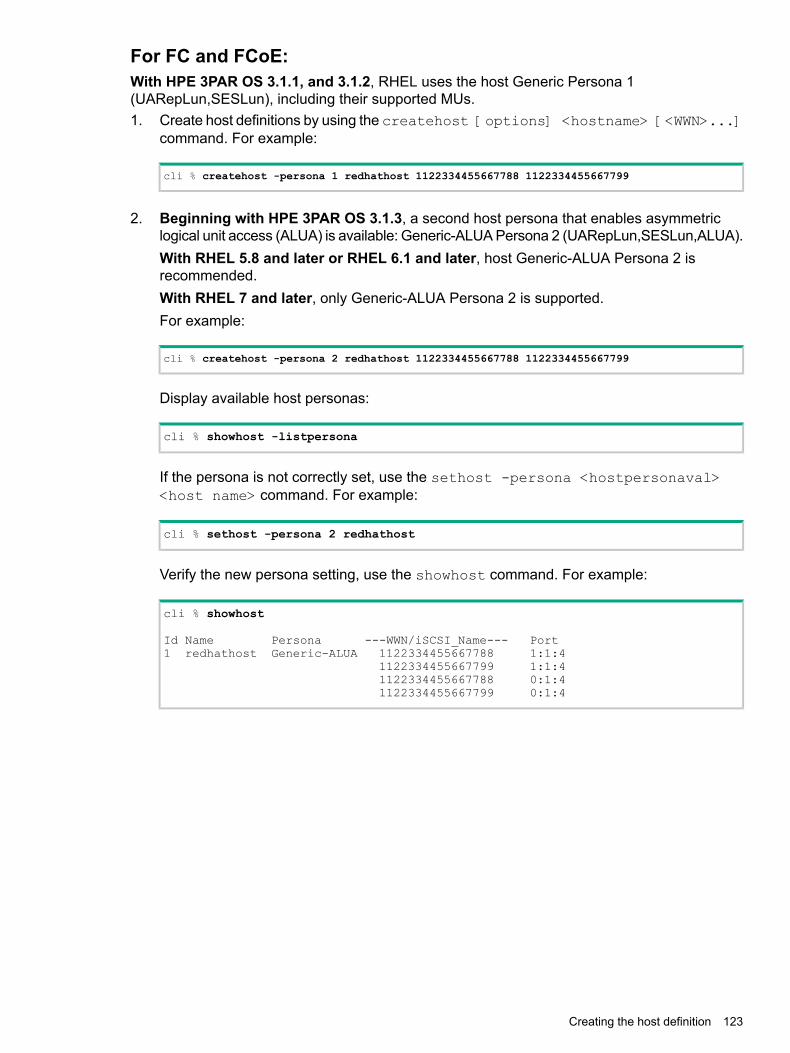
For FC and FCoE:With HPE 3PAR OS 3.1.1, and 3.1.2, RHEL uses the host Generic Persona 1(UARepLun,SESLun), including their supported MUs.1. Create host definitions by using the createhost [options] <hostname> [<WWN>...]
command. For example:
cli % createhost -persona 1 redhathost 1122334455667788 1122334455667799
2. Beginning with HPE 3PAR OS 3.1.3, a second host persona that enables asymmetriclogical unit access (ALUA) is available: Generic-ALUA Persona 2 (UARepLun,SESLun,ALUA).With RHEL 5.8 and later or RHEL 6.1 and later, host Generic-ALUA Persona 2 isrecommended.With RHEL 7 and later, only Generic-ALUA Persona 2 is supported.For example:
cli % createhost -persona 2 redhathost 1122334455667788 1122334455667799
Display available host personas:
cli % showhost -listpersona
If the persona is not correctly set, use the sethost -persona <hostpersonaval><host name> command. For example:
cli % sethost -persona 2 redhathost
Verify the new persona setting, use the showhost command. For example:
cli % showhost
Id Name Persona ---WWN/iSCSI_Name--- Port1 redhathost Generic-ALUA 1122334455667788 1:1:4
1122334455667799 1:1:41122334455667788 0:1:41122334455667799 0:1:4
Creating the host definition 123
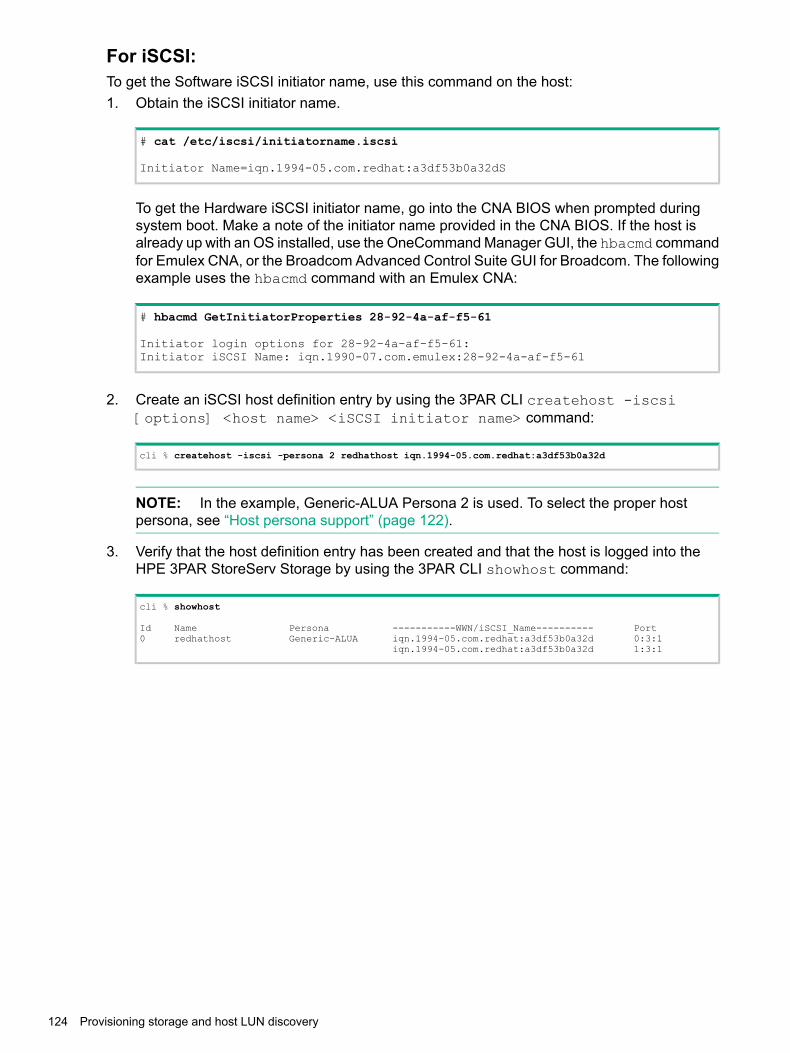
For iSCSI:To get the Software iSCSI initiator name, use this command on the host:1. Obtain the iSCSI initiator name.
# cat /etc/iscsi/initiatorname.iscsi
Initiator Name=iqn.1994-05.com.redhat:a3df53b0a32dS
To get the Hardware iSCSI initiator name, go into the CNA BIOS when prompted duringsystem boot. Make a note of the initiator name provided in the CNA BIOS. If the host isalready up with an OS installed, use the OneCommand Manager GUI, the hbacmd commandfor Emulex CNA, or the Broadcom Advanced Control Suite GUI for Broadcom. The followingexample uses the hbacmd command with an Emulex CNA:
# hbacmd GetInitiatorProperties 28-92-4a-af-f5-61
Initiator login options for 28-92-4a-af-f5-61:Initiator iSCSI Name: iqn.1990-07.com.emulex:28-92-4a-af-f5-61
2. Create an iSCSI host definition entry by using the 3PAR CLI createhost -iscsi[options] <host name> <iSCSI initiator name> command:
cli % createhost -iscsi -persona 2 redhathost iqn.1994-05.com.redhat:a3df53b0a32d
NOTE: In the example, Generic-ALUA Persona 2 is used. To select the proper hostpersona, see “Host persona support” (page 122).
3. Verify that the host definition entry has been created and that the host is logged into theHPE 3PAR StoreServ Storage by using the 3PAR CLI showhost command:
cli % showhost
Id Name Persona -----------WWN/iSCSI_Name---------- Port0 redhathost Generic-ALUA iqn.1994-05.com.redhat:a3df53b0a32d 0:3:1
iqn.1994-05.com.redhat:a3df53b0a32d 1:3:1
124 Provisioning storage and host LUN discovery
NOTE: Changing an existing host persona from Generic Persona 1 to Generic-ALUA Persona2 is an offline process that requires a host restart for the changes to take effect. The multipathconfiguration file /etc/multipath.confmust be changed to ALUA type for host Generic-ALUAPersona 2 SCSI attributes to take effect. For the detailed procedure, see “Changing the hostpersona (optional)” (page 119).
NOTE: To enable HPE 3PAR Host Explorer functionality, Hewlett PackardEnterprise recommends host Generic Persona 1 for hosts running RHEL 5.0 or RHEL 6.1 andlater.Beginning with the HPE 3PAR OS 3.1.3 release, host Generic-ALUA Persona 2 can also beused to support the 3PAR Host Explorer functionality with RHEL 5.8 or RHEL 6.1 and later.Host Generic Persona 1 or Generic-ALUA Persona 2 enables two functional features:• Host_Explorer, which requires the SESLun element of host Generic Persona 1 or
Generic-ALUA Persona 2• UARepLun, which notifies the host of newly exported VLUNs and triggers a LUN discovery
request on the host, making the VLUN automatically available.Currently, none of the supported RHEL versions use the UARepLun, so manually scan the newlyexported VLUNs.
NOTE: To support failover, Virtual Volumes must be exported down multiple paths to the host.To do this, create a host definition on the HPE 3PAR StoreServ Storage that includes the WWNsof multiple HBA ports on the host, and then export the VLUNs to that host definition. If each RHELserver within a cluster has its own host definition, the VLUNs must be exported to multiple hostdefinitions or a hostset (createhostset) created and then export the LUNs to the host setwhich in turn exports to all hosts within the set.
Create storage on the HPE 3PAR StoreServ StorageThis topic describes the general procedure and commands that are required to create the virtualvolumes (VVs) that can then be exported for discovery by the RHEL host.For additional information, see the HPE 3PAR Command Line Interface Administrator's Manual.For a comprehensive description of HPE 3PAR OS commands, see theHPE 3PAROSCommandLine Interface Reference at the Hewlett Packard Enterprise Storage Information Library website:
More informationhttp://www.hpe.com/info/storage/docs
Create storage on the HPE 3PAR StoreServ Storage 125
Create virtual volumesVVs are the only data layer visible to hosts. After devising a plan for allocating space for theRHEL host, create the VVs on the HPE 3PAR StoreServ Storage.Create volumes that are provisioned from one or more Common Provisioning Groups (CPGs).Volumes can be either fully provisioned, thinly provisioned, or thinly deduplicated volumes.Optionally, specify a CPG for snapshot space for provisioned volumes.
Creating Virtual Volumes using the HPE 3PAR Management Console(MC)1. From the menu bar, select:
Actions→Provisioning→Virtual Volume→Create Virtual Volume2. Use the Create Virtual Volume wizard to create a base volume.3. Select one of the following options from the Allocation list:
• Fully Provisioned• Thinly Provisioned• Thinly Deduplicated (Supported with HPE 3PAR OS 3.2.1 MU1 and later)
Creating Virtual Volumes using the HPE 3PAR StoreServ ManagementConsole (SSMC)1. On the main menu, select:
Block Persona→Virtual Volume2. Click + Create virtual volume or select Create on the Actions menu.3. Follow the instructions on the dialog that opens and select one of the following virtual volume
options:• Fully Provisioned• Thinly Provisioned• Thinly Deduplicated (Supported with HPE 3PAR OS 3.2.1 MU1 and later)
126 Provisioning storage and host LUN discovery
Creating Virtual Volumes using the HPE 3PAR CLICreate a fully provisioned or TPVV:
cli % createvv [options] <usr_CPG> <VV_name> [.<index>] <size>[g|G|t|T]
For example:
cli % createvv -cnt 5 testcpg TESTLUNS 5g
For complete details on creating volumes for the HPE 3PAR OS version that is being used onthe HPE 3PAR StoreServ Storage, see the following documents:
• HPE 3PAR StoreServ Management Console User Guide
• HPE 3PAR Management Console User Guide
• HPE 3PAR OS Command Line Interface ReferenceThese documents are available at the Hewlett Packard Enterprise Storage Information Librarywebsite.
NOTE: The commands and options available for creating a VV might vary for earlier versionsof the HPE 3PAR OS.
More informationhttp://www.hpe.com/info/storage/docs
Creating thinly provisioned virtual volumesTo create TPVVs (thinly provisioned virtual volumes), see the following documents:
• HPE 3PAR StoreServ Storage Concepts Guide
• HPE 3PAR Command Line Interface Administrator’s Manual
• HPE 3PAR OS Command Line Interface ReferenceThese documents are available at the Hewlett Packard Enterprise Storage Information Librarywebsite.
NOTE: To create TPVV, a HPE 3PAR Thin Provisioning license is required.
More informationhttp://www.hpe.com/info/storage/docs
Create virtual volumes 127

Creating thinly deduplicated virtual volumes
NOTE: With HPE 3PAR OS 3.2.1 MU1 and later, HPE 3PAR Thin Deduplication feature issupported. To create TDVVs (thinly deduplicated virtual volumes), a HPE 3PAR Thin Provisioninglicense is required.
HPE 3PAR Thin Deduplication allows the creation of TDVVs from solid state drive (SSD) CPGs. ATDVV has the same characteristics as a TPVV, with the additional capability of removingduplicated data before it is written to the volume. The TDVVs are managed like any other TPVV.A TDVV must be associated with CPGs created from an SSD.For more information about HPE 3PAR Thin Deduplication, see the following documents:
• HPE 3PAR StoreServ Storage Concepts Guide
• HPE 3PAR Command Line Interface Administrator’s Manual
• HPE 3PAR OS Command Line Interface Reference
• HPE 3PAR Thin Technologies—Technical white paper containing best practicesThese documents are available at the Hewlett Packard Enterprise Storage Information Librarywebsite.
More informationhttp://www.hpe.com/info/storage/docs
Setting up for 3PAR Priority Optimization (optional)The HPE 3PAR Priority Optimization feature introduced in HPE 3PAR OS 3.1.2.MU2 is a moreefficient and dynamic solution for managing server workloads and can be utilized as an alternativeto setting host I/O throttles. By using this feature, a storage administrator can share storageresources more effectively by enforcing quality of service limits on the array. No special settingsare needed on the host side to obtain the benefit of 3PAR Priority Optimization, although certainper target or per adapter throttle settings might need to be adjusted in rare cases.For complete details for using 3PAR Priority Optimization (Quality of Service) on HPE 3PARStoreServ Storage arrays, see the HPE 3PAR Priority Optimization technical whitepaper:http://www.hpe.com/info/3PAR-Priority-Optimization
128 Provisioning storage and host LUN discovery
Restrictions on volume size and numberFollow the guidelines for creating virtual volumes (VVs) and VLUNs in the HPE 3PAR CommandLine Interface Administrator's Manual while adhering to these cautions and guidelines:• This configuration supports sparse LUNs (meaning that LUNs might be skipped). LUNs
might also be exported in non-ascending order (such as 0, 5, 7, 3).• The 3PAR StoreServ Storage supports the exportation of VLUNs with LUNs in the range
from 0 to 16383.• The maximum LUN size that can be exported to a RHEL host is 16 TB when the installed
HPE 3PAR OS version is 3.2.x or 3.1.x. A LUN size of 16 TB on a RHEL host is dependenton the installed RHEL version and update, since some older versions of RHEL will not supporta volume greater than 2 TB.
Exporting LUNs to the host as virtual volumesThis topic explains how to export LUNs to the host as VVs, referred to as virtual LUNs (VLUNs).Export VVs as VLUNs:createvlun [–cnt] <number of LUNs> <name_of_virtual_LUNs.int><starting_LUN_number> <hostname/hostdefinition>
where:• [–cnt] specifies the number of identical VVs to create by using an integer from 1 through
999. If not specified, one virtual volume is created.• <name_of_virtual_LUNs> specifies the name of the VV exported as a virtual LUN.
• .int is the integer value. For every LUN created, the .int suffix of the VV name isincremented by one.
• <starting_LUN_number> indicates the starting LUN number.
• <hostname/hostdefinition> indicates that hostname is the name of the host createdearlier.
For example:
cli % createvlun –cnt 5 TESTLUNS.0 0 hostname/hostdefinition
To verify that VLUNs were created, use the showvlun command:
cli % showvlun
Active VLUNsLun VVName HostName --------Host_WWN/iSCSI_Name-------- Port Type0 TESTLUNS.0 sqa-dl380g5-05 iqn.1994-05.com.redhat:33853dd5ab2e 0:3:1 host1 TESTLUNS.1 sqa-dl380g5-05 iqn.1994-05.com.redhat:33853dd5ab2e 0:3:1 host0 TESTLUNS.0 sqa-dl380g5-05 iqn.1994-05.com.redhat:33853dd5ab2e 1:3:1 host1 TESTLUNS.1 sqa-dl380g5-05 iqn.1994-05.com.redhat:33853dd5ab2e 1:3:1 host
------------------------------------------------------------------------------4 total
VLUN TemplatesLun VVName HostName -Host_WWN/iSCSI_Name- Port Type0 TESTLUNS.0 sqa-dl380g5-05 ---------------- --- host1 TESTLUNS.1 sqa-dl380g5-05 ---------------- --- host
-------------------------------------------------------------2 total
Restrictions on volume size and number 129
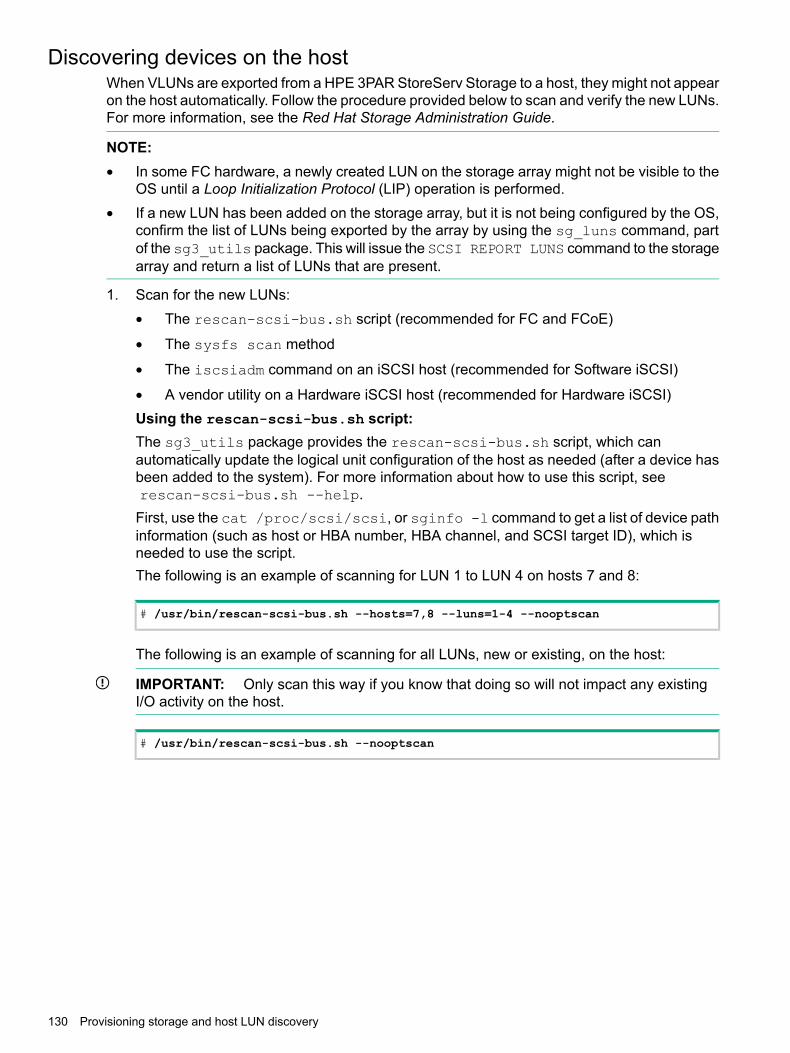
Discovering devices on the hostWhen VLUNs are exported from a HPE 3PAR StoreServ Storage to a host, they might not appearon the host automatically. Follow the procedure provided below to scan and verify the new LUNs.For more information, see the Red Hat Storage Administration Guide.
NOTE:• In some FC hardware, a newly created LUN on the storage array might not be visible to the
OS until a Loop Initialization Protocol (LIP) operation is performed.• If a new LUN has been added on the storage array, but it is not being configured by the OS,
confirm the list of LUNs being exported by the array by using the sg_luns command, partof the sg3_utils package. This will issue the SCSI REPORT LUNS command to the storagearray and return a list of LUNs that are present.
1. Scan for the new LUNs:• The rescan-scsi-bus.sh script (recommended for FC and FCoE)
• The sysfs scan method
• The iscsiadm command on an iSCSI host (recommended for Software iSCSI)
• A vendor utility on a Hardware iSCSI host (recommended for Hardware iSCSI)Using the rescan-scsi-bus.sh script:The sg3_utils package provides the rescan-scsi-bus.sh script, which canautomatically update the logical unit configuration of the host as needed (after a device hasbeen added to the system). For more information about how to use this script, seerescan-scsi-bus.sh --help.First, use the cat /proc/scsi/scsi, or sginfo -l command to get a list of device pathinformation (such as host or HBA number, HBA channel, and SCSI target ID), which isneeded to use the script.The following is an example of scanning for LUN 1 to LUN 4 on hosts 7 and 8:
# /usr/bin/rescan-scsi-bus.sh --hosts=7,8 --luns=1-4 --nooptscan
The following is an example of scanning for all LUNs, new or existing, on the host:
IMPORTANT: Only scan this way if you know that doing so will not impact any existingI/O activity on the host.
# /usr/bin/rescan-scsi-bus.sh --nooptscan
130 Provisioning storage and host LUN discovery
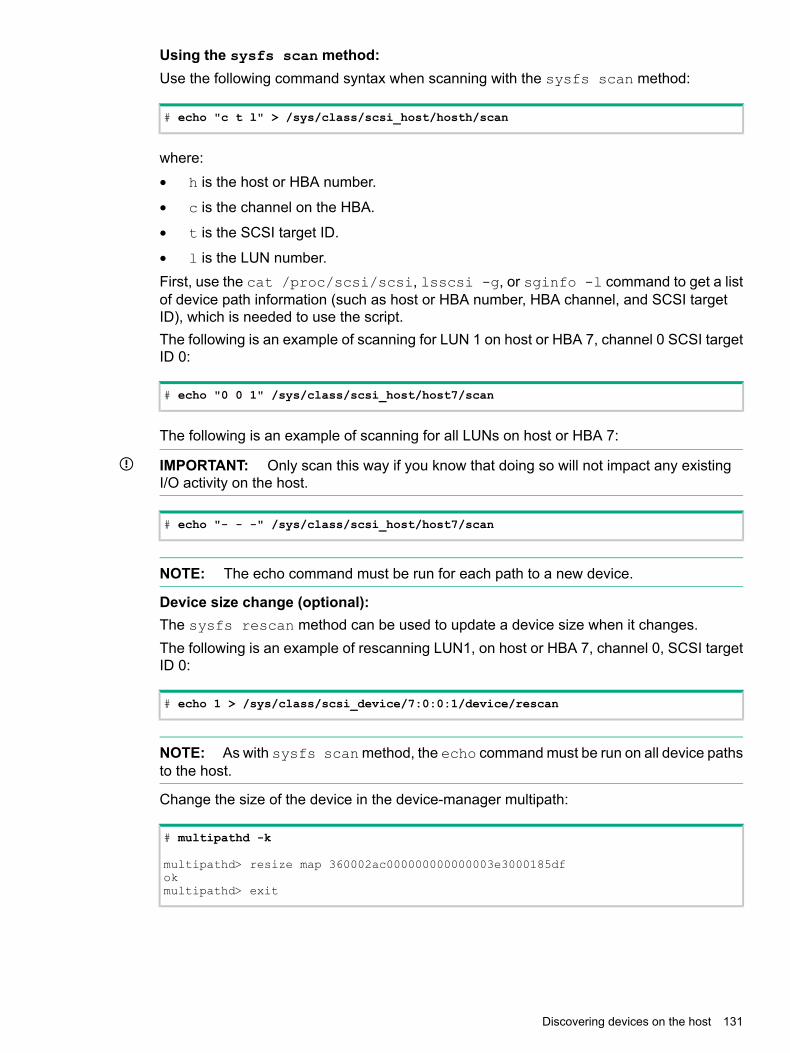
Using the sysfs scan method:Use the following command syntax when scanning with the sysfs scan method:
# echo "c t l" > /sys/class/scsi_host/hosth/scan
where:• h is the host or HBA number.
• c is the channel on the HBA.
• t is the SCSI target ID.
• l is the LUN number.First, use the cat /proc/scsi/scsi, lsscsi -g, or sginfo -l command to get a listof device path information (such as host or HBA number, HBA channel, and SCSI targetID), which is needed to use the script.The following is an example of scanning for LUN 1 on host or HBA 7, channel 0 SCSI targetID 0:
# echo "0 0 1" /sys/class/scsi_host/host7/scan
The following is an example of scanning for all LUNs on host or HBA 7:
IMPORTANT: Only scan this way if you know that doing so will not impact any existingI/O activity on the host.
# echo "- - -" /sys/class/scsi_host/host7/scan
NOTE: The echo command must be run for each path to a new device.
Device size change (optional):The sysfs rescan method can be used to update a device size when it changes.The following is an example of rescanning LUN1, on host or HBA 7, channel 0, SCSI targetID 0:
# echo 1 > /sys/class/scsi_device/7:0:0:1/device/rescan
NOTE: As with sysfs scanmethod, the echo command must be run on all device pathsto the host.
Change the size of the device in the device-manager multipath:
# multipathd -k
multipathd> resize map 360002ac000000000000003e3000185dfokmultipathd> exit
Discovering devices on the host 131
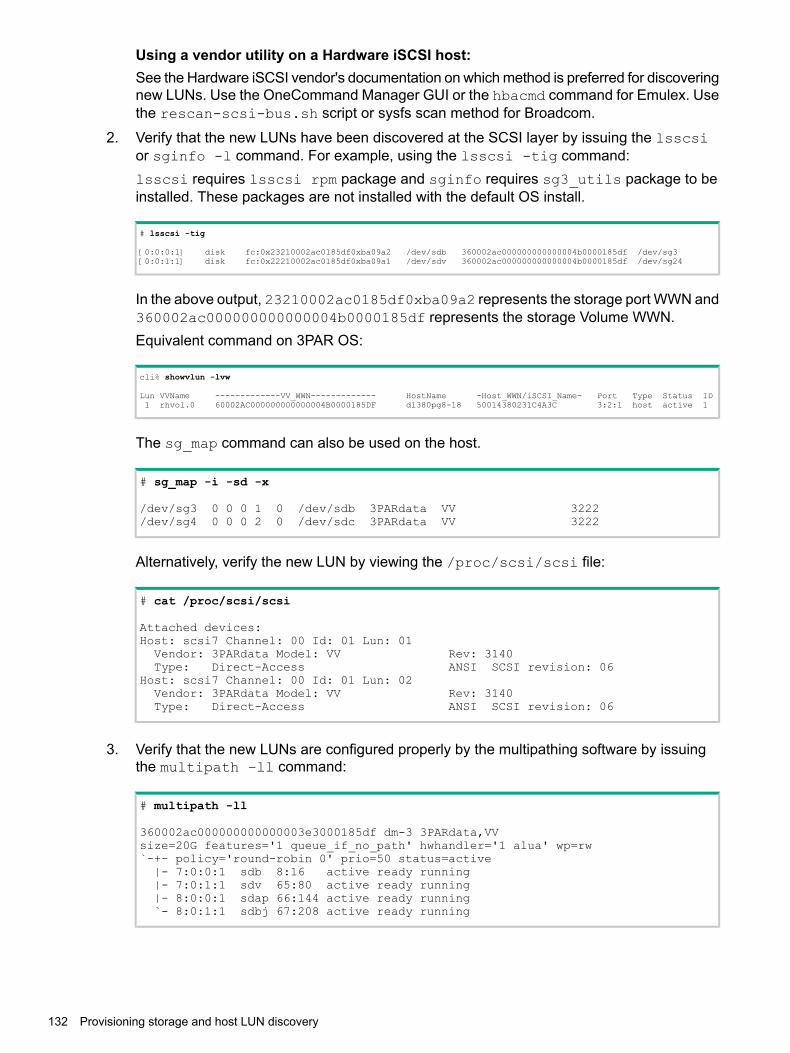
Using a vendor utility on a Hardware iSCSI host:See the Hardware iSCSI vendor's documentation on which method is preferred for discoveringnew LUNs. Use the OneCommand Manager GUI or the hbacmd command for Emulex. Usethe rescan-scsi-bus.sh script or sysfs scan method for Broadcom.
2. Verify that the new LUNs have been discovered at the SCSI layer by issuing the lsscsior sginfo -l command. For example, using the lsscsi -tig command:lsscsi requires lsscsi rpm package and sginfo requires sg3_utils package to beinstalled. These packages are not installed with the default OS install.
# lsscsi -tig
[0:0:0:1] disk fc:0x23210002ac0185df0xba09a2 /dev/sdb 360002ac000000000000004b0000185df /dev/sg3[0:0:1:1] disk fc:0x22210002ac0185df0xba09a1 /dev/sdv 360002ac000000000000004b0000185df /dev/sg24
In the above output, 23210002ac0185df0xba09a2 represents the storage port WWN and360002ac000000000000004b0000185df represents the storage Volume WWN.Equivalent command on 3PAR OS:
cli% showvlun -lvw
Lun VVName -------------VV_WWN------------- HostName -Host_WWN/iSCSI_Name- Port Type Status ID1 rhvol.0 60002AC000000000000004B0000185DF dl380pg8-18 50014380231C4A3C 3:2:1 host active 1
The sg_map command can also be used on the host.
# sg_map -i -sd -x
/dev/sg3 0 0 0 1 0 /dev/sdb 3PARdata VV 3222/dev/sg4 0 0 0 2 0 /dev/sdc 3PARdata VV 3222
Alternatively, verify the new LUN by viewing the /proc/scsi/scsi file:
# cat /proc/scsi/scsi
Attached devices:Host: scsi7 Channel: 00 Id: 01 Lun: 01Vendor: 3PARdata Model: VV Rev: 3140Type: Direct-Access ANSI SCSI revision: 06
Host: scsi7 Channel: 00 Id: 01 Lun: 02Vendor: 3PARdata Model: VV Rev: 3140Type: Direct-Access ANSI SCSI revision: 06
3. Verify that the new LUNs are configured properly by the multipathing software by issuingthe multipath –ll command:
# multipath -ll
360002ac000000000000003e3000185df dm-3 3PARdata,VVsize=20G features='1 queue_if_no_path' hwhandler='1 alua' wp=rw`-+- policy='round-robin 0' prio=50 status=active|- 7:0:0:1 sdb 8:16 active ready running|- 7:0:1:1 sdv 65:80 active ready running|- 8:0:0:1 sdap 66:144 active ready running`- 8:0:1:1 sdbj 67:208 active ready running
132 Provisioning storage and host LUN discovery
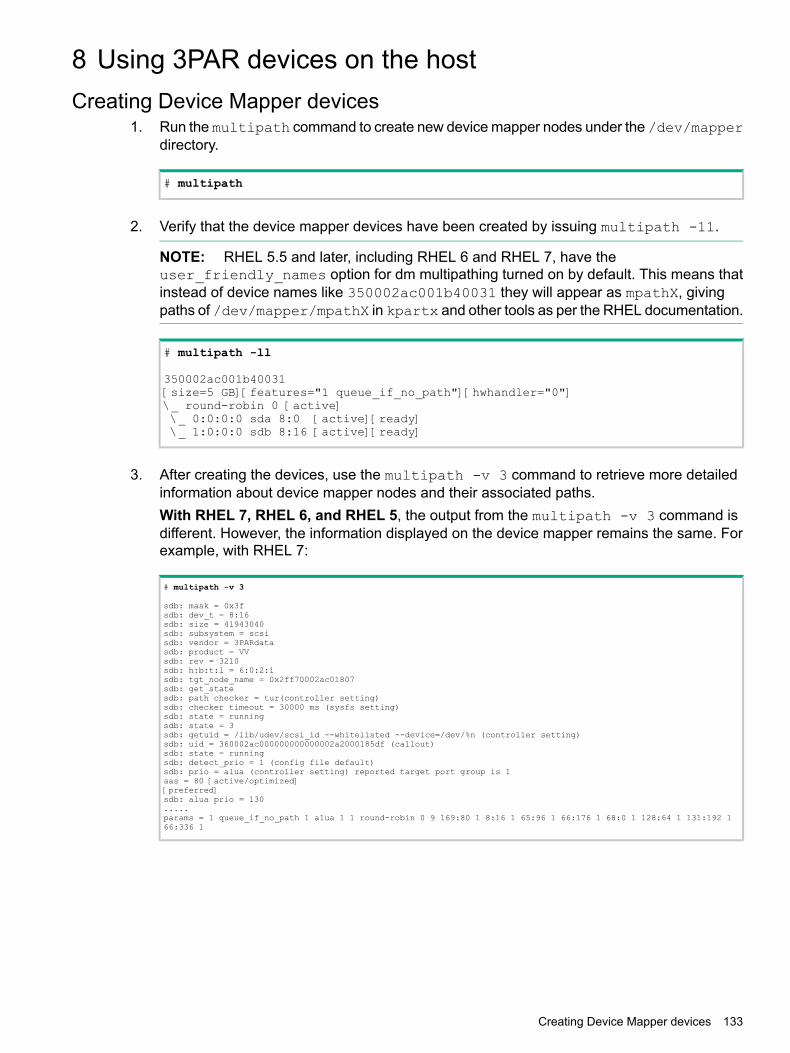
8 Using 3PAR devices on the hostCreating Device Mapper devices
1. Run the multipath command to create new device mapper nodes under the /dev/mapperdirectory.
# multipath
2. Verify that the device mapper devices have been created by issuing multipath -11.
NOTE: RHEL 5.5 and later, including RHEL 6 and RHEL 7, have theuser_friendly_names option for dm multipathing turned on by default. This means thatinstead of device names like 350002ac001b40031 they will appear as mpathX, givingpaths of /dev/mapper/mpathX in kpartx and other tools as per the RHEL documentation.
# multipath -ll
350002ac001b40031[size=5 GB][features="1 queue_if_no_path"][hwhandler="0"]\_ round-robin 0 [active]\_ 0:0:0:0 sda 8:0 [active][ready]\_ 1:0:0:0 sdb 8:16 [active][ready]
3. After creating the devices, use the multipath -v 3 command to retrieve more detailedinformation about device mapper nodes and their associated paths.With RHEL 7, RHEL 6, and RHEL 5, the output from the multipath -v 3 command isdifferent. However, the information displayed on the device mapper remains the same. Forexample, with RHEL 7:
# multipath -v 3
sdb: mask = 0x3fsdb: dev_t = 8:16sdb: size = 41943040sdb: subsystem = scsisdb: vendor = 3PARdatasdb: product = VVsdb: rev = 3210sdb: h:b:t:l = 6:0:2:1sdb: tgt_node_name = 0x2ff70002ac01807sdb: get_statesdb: path checker = tur(controller setting)sdb: checker timeout = 30000 ms (sysfs setting)sdb: state = runningsdb: state = 3sdb: getuid = /lib/udev/scsi_id --whitelisted --device=/dev/%n (controller setting)sdb: uid = 360002ac000000000000002a2000185df (callout)sdb: state = runningsdb: detect_prio = 1 (config file default)sdb: prio = alua (controller setting) reported target port group is 1aas = 80 [active/optimized][preferred]sdb: alua prio = 130.....params = 1 queue_if_no_path 1 alua 1 1 round-robin 0 9 169:80 1 8:16 1 65:96 1 66:176 1 68:0 1 128:64 1 131:192 166:336 1
Creating Device Mapper devices 133
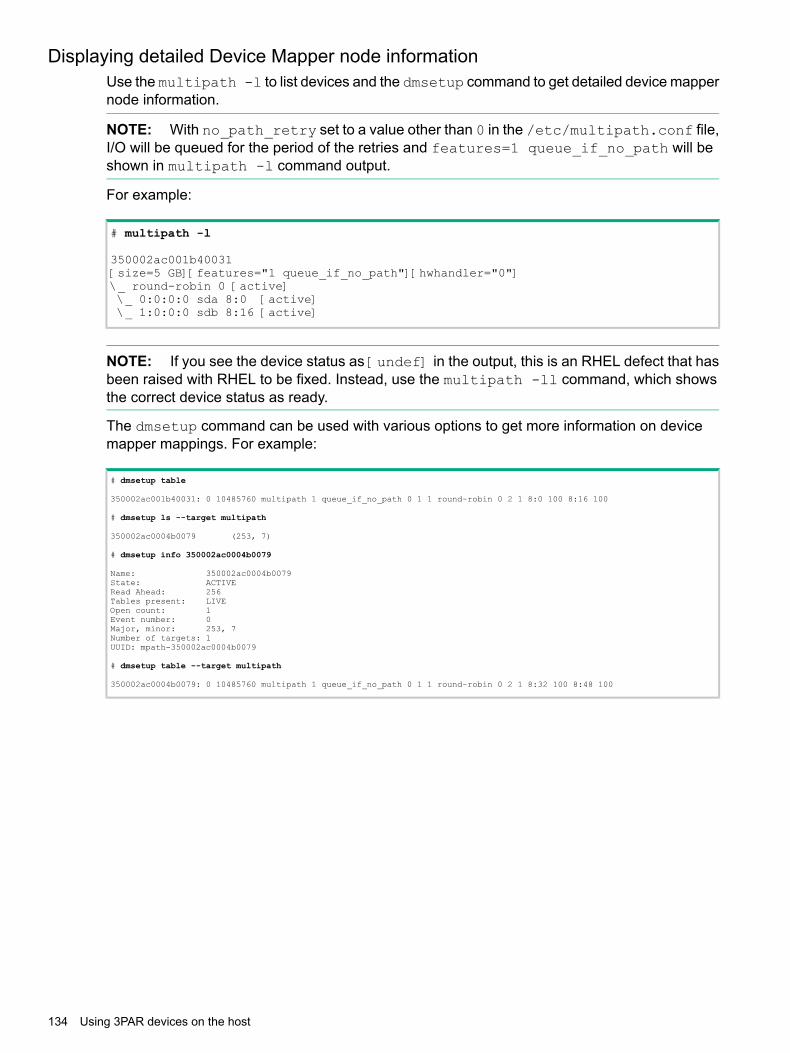
Displaying detailed Device Mapper node informationUse the multipath -l to list devices and the dmsetup command to get detailed device mappernode information.
NOTE: With no_path_retry set to a value other than 0 in the /etc/multipath.conf file,I/O will be queued for the period of the retries and features=1 queue_if_no_path will beshown in multipath -l command output.
For example:
# multipath -l
350002ac001b40031[size=5 GB][features="1 queue_if_no_path"][hwhandler="0"]\_ round-robin 0 [active]\_ 0:0:0:0 sda 8:0 [active]\_ 1:0:0:0 sdb 8:16 [active]
NOTE: If you see the device status as [undef] in the output, this is an RHEL defect that hasbeen raised with RHEL to be fixed. Instead, use the multipath -ll command, which showsthe correct device status as ready.
The dmsetup command can be used with various options to get more information on devicemapper mappings. For example:
# dmsetup table
350002ac001b40031: 0 10485760 multipath 1 queue_if_no_path 0 1 1 round-robin 0 2 1 8:0 100 8:16 100
# dmsetup ls --target multipath
350002ac0004b0079 (253, 7)
# dmsetup info 350002ac0004b0079
Name: 350002ac0004b0079State: ACTIVERead Ahead: 256Tables present: LIVEOpen count: 1Event number: 0Major, minor: 253, 7Number of targets: 1UUID: mpath-350002ac0004b0079
# dmsetup table --target multipath
350002ac0004b0079: 0 10485760 multipath 1 queue_if_no_path 0 1 1 round-robin 0 2 1 8:32 100 8:48 100
134 Using 3PAR devices on the host
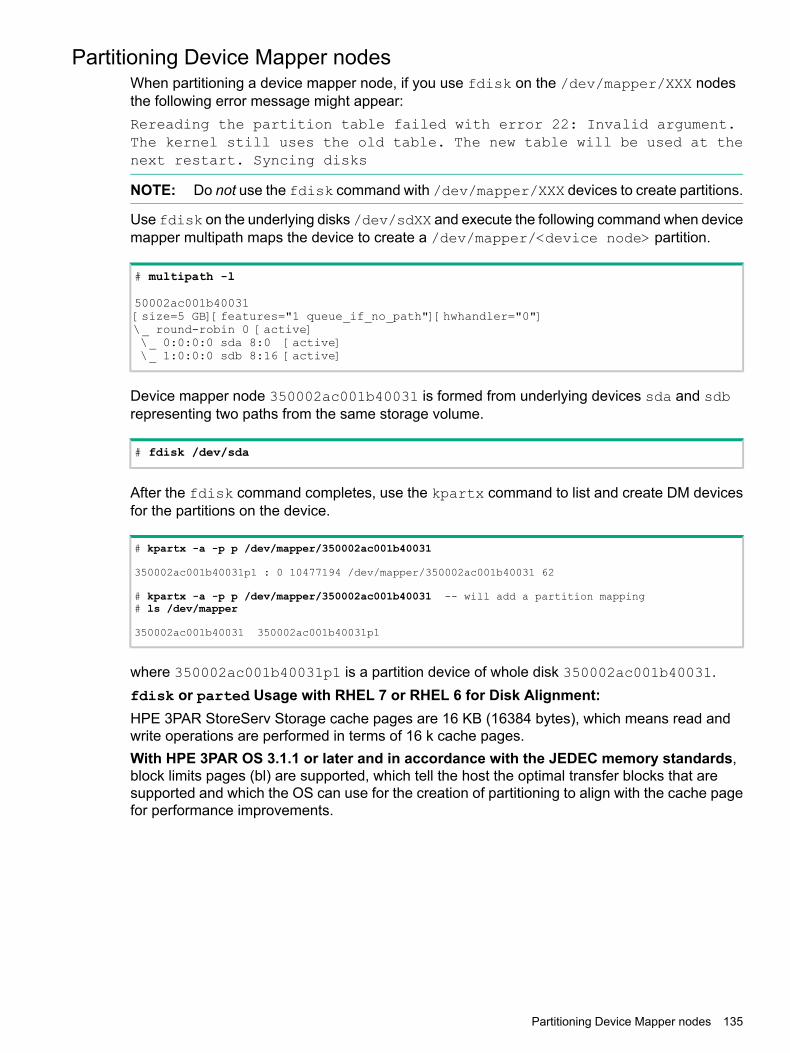
Partitioning Device Mapper nodesWhen partitioning a device mapper node, if you use fdisk on the /dev/mapper/XXX nodesthe following error message might appear:Rereading the partition table failed with error 22: Invalid argument.The kernel still uses the old table. The new table will be used at thenext restart. Syncing disks
NOTE: Do not use the fdisk command with /dev/mapper/XXX devices to create partitions.
Use fdisk on the underlying disks /dev/sdXX and execute the following command when devicemapper multipath maps the device to create a /dev/mapper/<device node> partition.
# multipath -l
50002ac001b40031[size=5 GB][features="1 queue_if_no_path"][hwhandler="0"]\_ round-robin 0 [active]\_ 0:0:0:0 sda 8:0 [active]\_ 1:0:0:0 sdb 8:16 [active]
Device mapper node 350002ac001b40031 is formed from underlying devices sda and sdbrepresenting two paths from the same storage volume.
# fdisk /dev/sda
After the fdisk command completes, use the kpartx command to list and create DM devicesfor the partitions on the device.
# kpartx -a -p p /dev/mapper/350002ac001b40031
350002ac001b40031p1 : 0 10477194 /dev/mapper/350002ac001b40031 62
# kpartx -a -p p /dev/mapper/350002ac001b40031 -- will add a partition mapping# ls /dev/mapper
350002ac001b40031 350002ac001b40031p1
where 350002ac001b40031p1 is a partition device of whole disk 350002ac001b40031.fdisk or parted Usage with RHEL 7 or RHEL 6 for Disk Alignment:HPE 3PAR StoreServ Storage cache pages are 16 KB (16384 bytes), which means read andwrite operations are performed in terms of 16 k cache pages.With HPE 3PAR OS 3.1.1 or later and in accordance with the JEDEC memory standards,block limits pages (bl) are supported, which tell the host the optimal transfer blocks that aresupported and which the OS can use for the creation of partitioning to align with the cache pagefor performance improvements.
Partitioning Device Mapper nodes 135
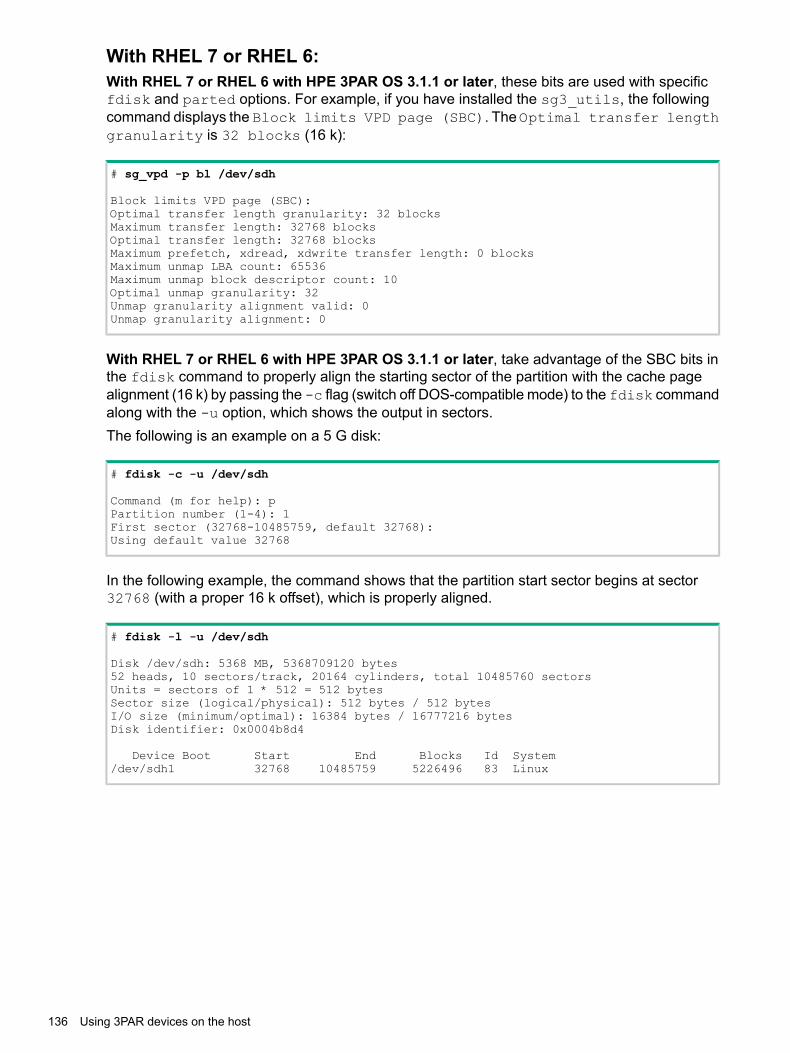
With RHEL 7 or RHEL 6:With RHEL 7 or RHEL 6 with HPE 3PAR OS 3.1.1 or later, these bits are used with specificfdisk and parted options. For example, if you have installed the sg3_utils, the followingcommand displays the Block limits VPD page (SBC). The Optimal transfer lengthgranularity is 32 blocks (16 k):
# sg_vpd -p bl /dev/sdh
Block limits VPD page (SBC):Optimal transfer length granularity: 32 blocksMaximum transfer length: 32768 blocksOptimal transfer length: 32768 blocksMaximum prefetch, xdread, xdwrite transfer length: 0 blocksMaximum unmap LBA count: 65536Maximum unmap block descriptor count: 10Optimal unmap granularity: 32Unmap granularity alignment valid: 0Unmap granularity alignment: 0
With RHEL 7 or RHEL 6 with HPE 3PAR OS 3.1.1 or later, take advantage of the SBC bits inthe fdisk command to properly align the starting sector of the partition with the cache pagealignment (16 k) by passing the -c flag (switch off DOS-compatible mode) to the fdisk commandalong with the -u option, which shows the output in sectors.The following is an example on a 5 G disk:
# fdisk -c -u /dev/sdh
Command (m for help): pPartition number (1-4): 1First sector (32768-10485759, default 32768):Using default value 32768
In the following example, the command shows that the partition start sector begins at sector32768 (with a proper 16 k offset), which is properly aligned.
# fdisk -l -u /dev/sdh
Disk /dev/sdh: 5368 MB, 5368709120 bytes52 heads, 10 sectors/track, 20164 cylinders, total 10485760 sectorsUnits = sectors of 1 * 512 = 512 bytesSector size (logical/physical): 512 bytes / 512 bytesI/O size (minimum/optimal): 16384 bytes / 16777216 bytesDisk identifier: 0x0004b8d4
Device Boot Start End Blocks Id System/dev/sdh1 32768 10485759 5226496 83 Linux
136 Using 3PAR devices on the host
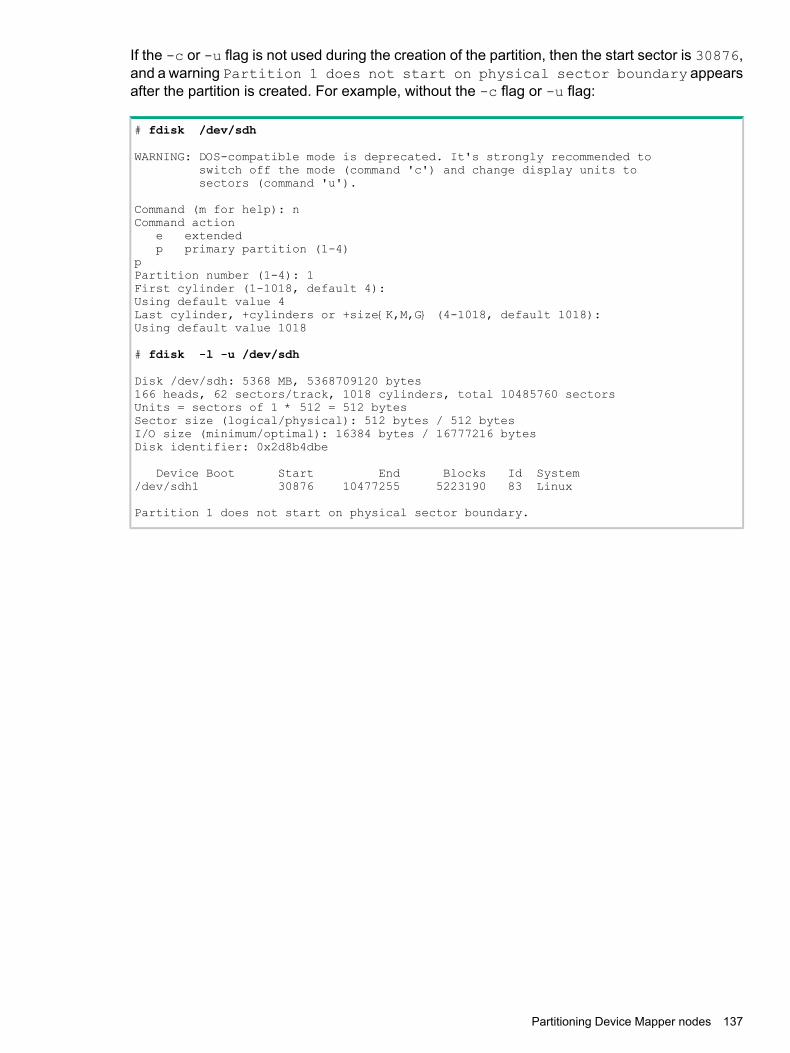
If the -c or -u flag is not used during the creation of the partition, then the start sector is 30876,and a warning Partition 1 does not start on physical sector boundary appearsafter the partition is created. For example, without the -c flag or -u flag:
# fdisk /dev/sdh
WARNING: DOS-compatible mode is deprecated. It's strongly recommended toswitch off the mode (command 'c') and change display units tosectors (command 'u').
Command (m for help): nCommand action
e extendedp primary partition (1-4)
pPartition number (1-4): 1First cylinder (1-1018, default 4):Using default value 4Last cylinder, +cylinders or +size{K,M,G} (4-1018, default 1018):Using default value 1018
# fdisk -l -u /dev/sdh
Disk /dev/sdh: 5368 MB, 5368709120 bytes166 heads, 62 sectors/track, 1018 cylinders, total 10485760 sectorsUnits = sectors of 1 * 512 = 512 bytesSector size (logical/physical): 512 bytes / 512 bytesI/O size (minimum/optimal): 16384 bytes / 16777216 bytesDisk identifier: 0x2d8b4dbe
Device Boot Start End Blocks Id System/dev/sdh1 30876 10477255 5223190 83 Linux
Partition 1 does not start on physical sector boundary.
Partitioning Device Mapper nodes 137
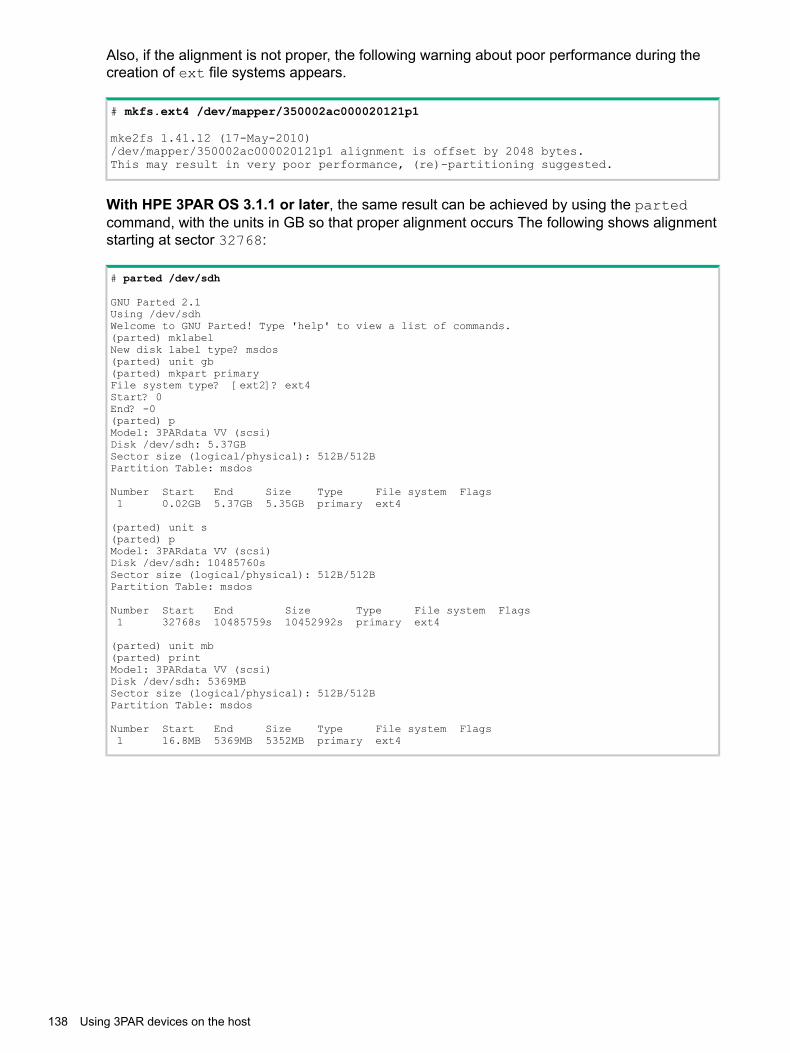
Also, if the alignment is not proper, the following warning about poor performance during thecreation of ext file systems appears.
# mkfs.ext4 /dev/mapper/350002ac000020121p1
mke2fs 1.41.12 (17-May-2010)/dev/mapper/350002ac000020121p1 alignment is offset by 2048 bytes.This may result in very poor performance, (re)-partitioning suggested.
With HPE 3PAR OS 3.1.1 or later, the same result can be achieved by using the partedcommand, with the units in GB so that proper alignment occurs The following shows alignmentstarting at sector 32768:
# parted /dev/sdh
GNU Parted 2.1Using /dev/sdhWelcome to GNU Parted! Type 'help' to view a list of commands.(parted) mklabelNew disk label type? msdos(parted) unit gb(parted) mkpart primaryFile system type? [ext2]? ext4Start? 0End? -0(parted) pModel: 3PARdata VV (scsi)Disk /dev/sdh: 5.37GBSector size (logical/physical): 512B/512BPartition Table: msdos
Number Start End Size Type File system Flags1 0.02GB 5.37GB 5.35GB primary ext4
(parted) unit s(parted) pModel: 3PARdata VV (scsi)Disk /dev/sdh: 10485760sSector size (logical/physical): 512B/512BPartition Table: msdos
Number Start End Size Type File system Flags1 32768s 10485759s 10452992s primary ext4
(parted) unit mb(parted) printModel: 3PARdata VV (scsi)Disk /dev/sdh: 5369MBSector size (logical/physical): 512B/512BPartition Table: msdos
Number Start End Size Type File system Flags1 16.8MB 5369MB 5352MB primary ext4
138 Using 3PAR devices on the host
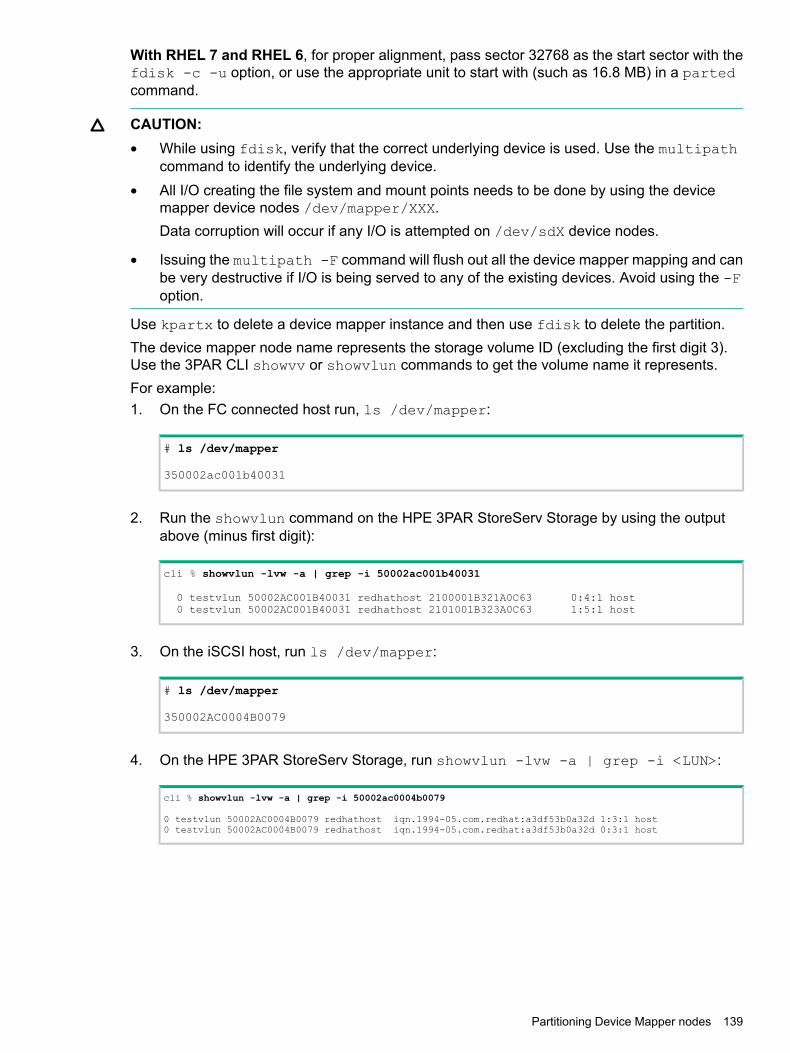
With RHEL 7 and RHEL 6, for proper alignment, pass sector 32768 as the start sector with thefdisk -c -u option, or use the appropriate unit to start with (such as 16.8 MB) in a partedcommand.
CAUTION:• While using fdisk, verify that the correct underlying device is used. Use the multipath
command to identify the underlying device.• All I/O creating the file system and mount points needs to be done by using the device
mapper device nodes /dev/mapper/XXX.Data corruption will occur if any I/O is attempted on /dev/sdX device nodes.
• Issuing the multipath -F command will flush out all the device mapper mapping and canbe very destructive if I/O is being served to any of the existing devices. Avoid using the -Foption.
Use kpartx to delete a device mapper instance and then use fdisk to delete the partition.The device mapper node name represents the storage volume ID (excluding the first digit 3).Use the 3PAR CLI showvv or showvlun commands to get the volume name it represents.For example:1. On the FC connected host run, ls /dev/mapper:
# ls /dev/mapper
350002ac001b40031
2. Run the showvlun command on the HPE 3PAR StoreServ Storage by using the outputabove (minus first digit):
cli % showvlun -lvw -a | grep -i 50002ac001b40031
0 testvlun 50002AC001B40031 redhathost 2100001B321A0C63 0:4:1 host0 testvlun 50002AC001B40031 redhathost 2101001B323A0C63 1:5:1 host
3. On the iSCSI host, run ls /dev/mapper:
# ls /dev/mapper
350002AC0004B0079
4. On the HPE 3PAR StoreServ Storage, run showvlun -lvw -a | grep -i <LUN>:
cli % showvlun -lvw -a | grep -i 50002ac0004b0079
0 testvlun 50002AC0004B0079 redhathost iqn.1994-05.com.redhat:a3df53b0a32d 1:3:1 host0 testvlun 50002AC0004B0079 redhathost iqn.1994-05.com.redhat:a3df53b0a32d 0:3:1 host
Partitioning Device Mapper nodes 139
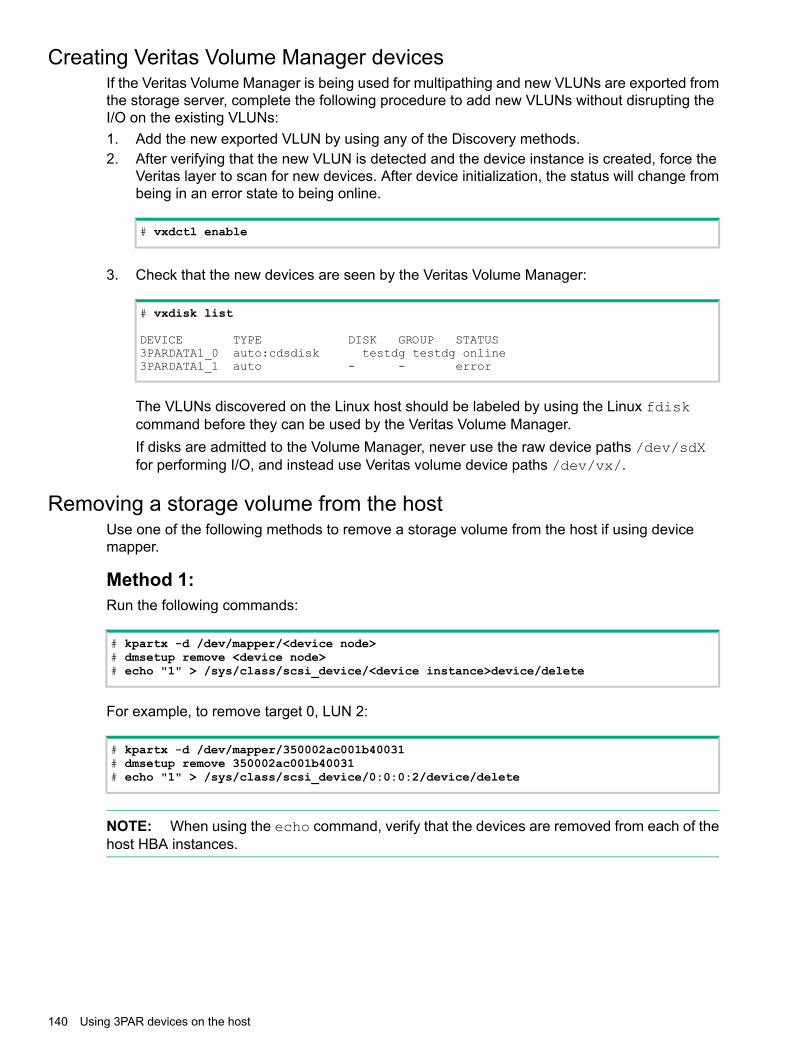
Creating Veritas Volume Manager devicesIf the Veritas Volume Manager is being used for multipathing and new VLUNs are exported fromthe storage server, complete the following procedure to add new VLUNs without disrupting theI/O on the existing VLUNs:1. Add the new exported VLUN by using any of the Discovery methods.2. After verifying that the new VLUN is detected and the device instance is created, force the
Veritas layer to scan for new devices. After device initialization, the status will change frombeing in an error state to being online.
# vxdctl enable
3. Check that the new devices are seen by the Veritas Volume Manager:
# vxdisk list
DEVICE TYPE DISK GROUP STATUS3PARDATA1_0 auto:cdsdisk testdg testdg online3PARDATA1_1 auto - - error
The VLUNs discovered on the Linux host should be labeled by using the Linux fdiskcommand before they can be used by the Veritas Volume Manager.If disks are admitted to the Volume Manager, never use the raw device paths /dev/sdXfor performing I/O, and instead use Veritas volume device paths /dev/vx/.
Removing a storage volume from the hostUse one of the following methods to remove a storage volume from the host if using devicemapper.
Method 1:Run the following commands:
# kpartx -d /dev/mapper/<device node># dmsetup remove <device node># echo "1" > /sys/class/scsi_device/<device instance>device/delete
For example, to remove target 0, LUN 2:
# kpartx -d /dev/mapper/350002ac001b40031# dmsetup remove 350002ac001b40031# echo "1" > /sys/class/scsi_device/0:0:0:2/device/delete
NOTE: When using the echo command, verify that the devices are removed from each of thehost HBA instances.
140 Using 3PAR devices on the host

Method 2:Run the following commands:
# kpartx -d /dev/mapper/<device node># dmsetup remove <device node># echo "scsi remove-single-device <h> <c> <t> <l>" > /proc/scsi/scsi
where <h> is the HBA number, <c> is the channel on the HBA, <t> is the SCSI target ID, and<l> is the LUN. For example, remove LUN 2:
# multipath -ll
350002ac000160121 dm-3 3PARdata,VVsize=5.0G features='1 queue_if_no_path' hwhandler='0' wp=rw`-+- policy='round-robin 0' prio=1 status=active|- 0:0:0:2 sdb 8:16 active ready running|- 0:0:1:2 sdk 8:160 active ready running|- 1:0:0:2 sdt 65:48 active ready running`- 1:0:1:2 sdac 65:192 active ready running
# kpartx -d /dev/mapper/350002ac000160121# dmsetup remove 350002ac000160121# echo "scsi remove-single-device 0 0 0 2" > /proc/scsi/scsi# echo "scsi remove-single-device 0 0 1 2" > /proc/scsi/scsi# echo "scsi remove-single-device 1 0 0 2" > /proc/scsi/scsi# echo "scsi remove-single-device 1 0 1 2" > /proc/scsi/scsi
NOTE: When using the echo command, verify that the devices are removed from each of thehost HBA instances.
After removing the storage volume from the host, remove the VLUN from the HPE 3PAR StoreServStorage by issuing removevlun <VVname> <LUN> <host>:
cli % removevlun testvlun 0 redhathost
CAUTION:• While removing the device, verify that the correct underlying device is used. Use the
multipath command to identify the underlying device.
• For iSCSI devices, do not remove the last iSCSI device in /proc/scsi/scsi without firststopping multipathing, and then stopping the iSCSI daemon (/etc/init.d/iscsi stop).Otherwise, data corruption can occur and the host will hang.Any change to the /etc/multipath configuration file requires running the multipathcommand to be effective. If the change is not reflected, try stopping and starting themultipathd script.
# /etc/init.d/multipathd stop# /etc/init.d/multipathd start
NOTE: The removed SCSI device is updated in /proc/scsi/scsi, /proc/partitions,and /sys/device path.
Removing a storage volume from the host 141
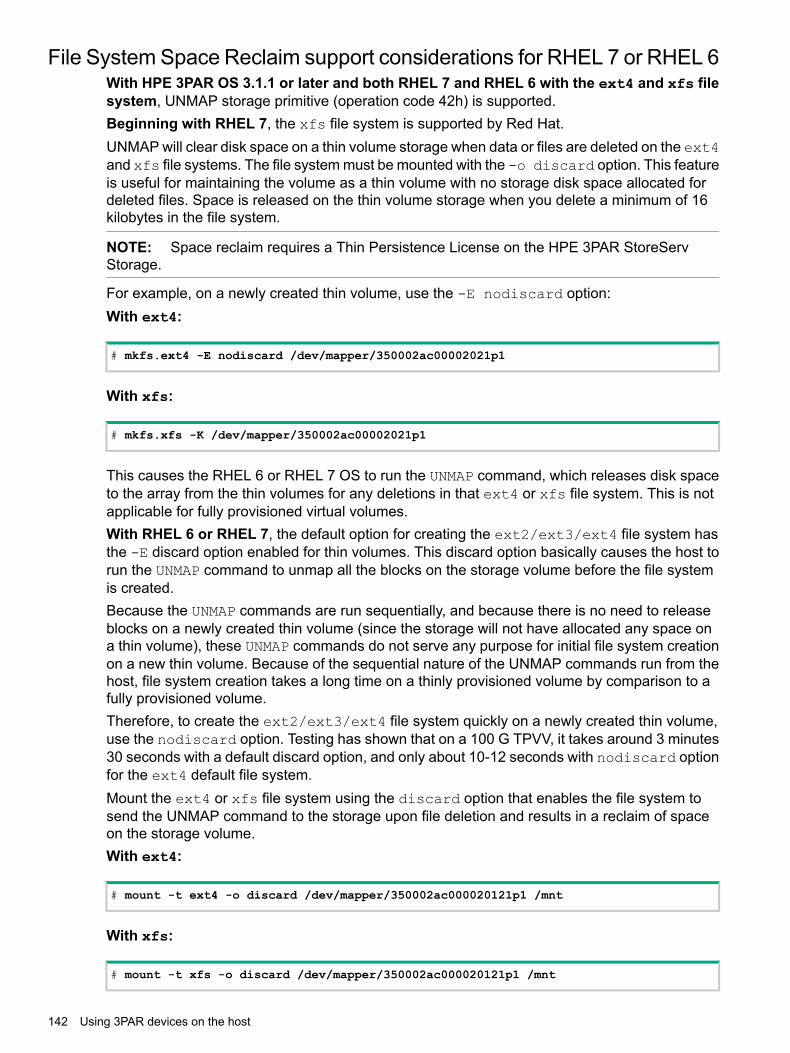
File System Space Reclaim support considerations for RHEL 7 or RHEL 6With HPE 3PAR OS 3.1.1 or later and both RHEL 7 and RHEL 6 with the ext4 and xfs filesystem, UNMAP storage primitive (operation code 42h) is supported.Beginning with RHEL 7, the xfs file system is supported by Red Hat.UNMAP will clear disk space on a thin volume storage when data or files are deleted on the ext4and xfs file systems. The file system must be mounted with the -o discard option. This featureis useful for maintaining the volume as a thin volume with no storage disk space allocated fordeleted files. Space is released on the thin volume storage when you delete a minimum of 16kilobytes in the file system.
NOTE: Space reclaim requires a Thin Persistence License on the HPE 3PAR StoreServStorage.
For example, on a newly created thin volume, use the -E nodiscard option:With ext4:
# mkfs.ext4 -E nodiscard /dev/mapper/350002ac00002021p1
With xfs:
# mkfs.xfs -K /dev/mapper/350002ac00002021p1
This causes the RHEL 6 or RHEL 7 OS to run the UNMAP command, which releases disk spaceto the array from the thin volumes for any deletions in that ext4 or xfs file system. This is notapplicable for fully provisioned virtual volumes.With RHEL 6 or RHEL 7, the default option for creating the ext2/ext3/ext4 file system hasthe -E discard option enabled for thin volumes. This discard option basically causes the host torun the UNMAP command to unmap all the blocks on the storage volume before the file systemis created.Because the UNMAP commands are run sequentially, and because there is no need to releaseblocks on a newly created thin volume (since the storage will not have allocated any space ona thin volume), these UNMAP commands do not serve any purpose for initial file system creationon a new thin volume. Because of the sequential nature of the UNMAP commands run from thehost, file system creation takes a long time on a thinly provisioned volume by comparison to afully provisioned volume.Therefore, to create the ext2/ext3/ext4 file system quickly on a newly created thin volume,use the nodiscard option. Testing has shown that on a 100 G TPVV, it takes around 3 minutes30 seconds with a default discard option, and only about 10-12 seconds with nodiscard optionfor the ext4 default file system.Mount the ext4 or xfs file system using the discard option that enables the file system tosend the UNMAP command to the storage upon file deletion and results in a reclaim of spaceon the storage volume.With ext4:
# mount -t ext4 -o discard /dev/mapper/350002ac000020121p1 /mnt
With xfs:
# mount -t xfs -o discard /dev/mapper/350002ac000020121p1 /mnt
142 Using 3PAR devices on the host
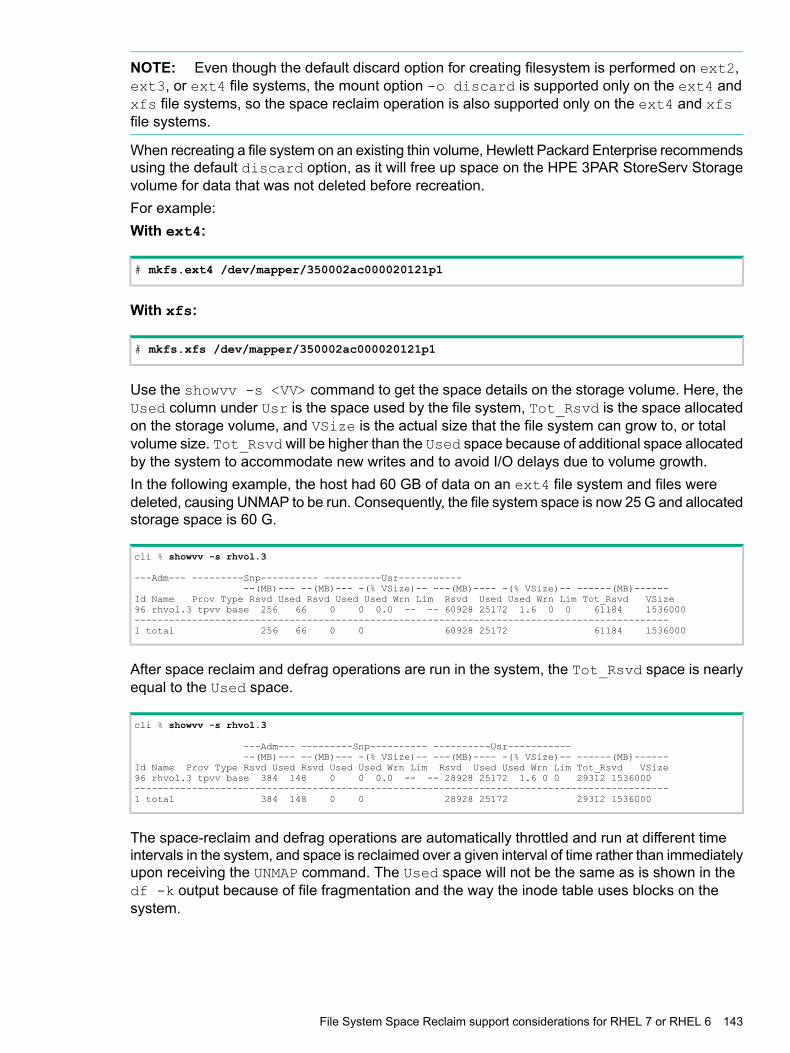
NOTE: Even though the default discard option for creating filesystem is performed on ext2,ext3, or ext4 file systems, the mount option -o discard is supported only on the ext4 andxfs file systems, so the space reclaim operation is also supported only on the ext4 and xfsfile systems.
When recreating a file system on an existing thin volume, Hewlett Packard Enterprise recommendsusing the default discard option, as it will free up space on the HPE 3PAR StoreServ Storagevolume for data that was not deleted before recreation.For example:With ext4:
# mkfs.ext4 /dev/mapper/350002ac000020121p1
With xfs:
# mkfs.xfs /dev/mapper/350002ac000020121p1
Use the showvv -s <VV> command to get the space details on the storage volume. Here, theUsed column under Usr is the space used by the file system, Tot_Rsvd is the space allocatedon the storage volume, and VSize is the actual size that the file system can grow to, or totalvolume size. Tot_Rsvdwill be higher than the Used space because of additional space allocatedby the system to accommodate new writes and to avoid I/O delays due to volume growth.In the following example, the host had 60 GB of data on an ext4 file system and files weredeleted, causing UNMAP to be run. Consequently, the file system space is now 25 G and allocatedstorage space is 60 G.
cli % showvv -s rhvol.3
---Adm--- ---------Snp---------- ----------Usr-------------(MB)--- --(MB)--- -(% VSize)-- ---(MB)---- -(% VSize)-- ------(MB)------
Id Name Prov Type Rsvd Used Rsvd Used Used Wrn Lim Rsvd Used Used Wrn Lim Tot_Rsvd VSize96 rhvol.3 tpvv base 256 66 0 0 0.0 -- -- 60928 25172 1.6 0 0 61184 1536000---------------------------------------------------------------------------------------------1 total 256 66 0 0 60928 25172 61184 1536000
After space reclaim and defrag operations are run in the system, the Tot_Rsvd space is nearlyequal to the Used space.
cli % showvv -s rhvol.3
---Adm--- ---------Snp---------- ----------Usr-------------(MB)--- --(MB)--- -(% VSize)-- ---(MB)---- -(% VSize)-- ------(MB)------
Id Name Prov Type Rsvd Used Rsvd Used Used Wrn Lim Rsvd Used Used Wrn Lim Tot_Rsvd VSize96 rhvol.3 tpvv base 384 148 0 0 0.0 -- -- 28928 25172 1.6 0 0 29312 1536000---------------------------------------------------------------------------------------------1 total 384 148 0 0 28928 25172 29312 1536000
The space-reclaim and defrag operations are automatically throttled and run at different timeintervals in the system, and space is reclaimed over a given interval of time rather than immediatelyupon receiving the UNMAP command. The Used space will not be the same as is shown in thedf -k output because of file fragmentation and the way the inode table uses blocks on thesystem.
File System Space Reclaim support considerations for RHEL 7 or RHEL 6 143

Veritas Space Reclaim Support:Veritas provides space reclaim support on thin volumes using the WRITE SAME SCSI primitive,which is supported by HPE 3PAR OS.Use the vxdisk -o thin list to show that the type of disk is thinrclm. The thin reclaim issupported by using the vxdisk reclaim command. See Veritas documentation for details.
144 Using 3PAR devices on the host
9 Booting the host from the HPE 3PAR StoreServ StorageThe following topics describe the procedures for setting up booting from the HPE 3PAR StoreServStorage (also known as, SAN boot) by using various HBAs and CNAs.
• “Prerequisites for booting the host from the HPE 3PAR StoreServ Storage” (page 145)
• “Configuring HBAs” (page 145)
• “Installing the OS from RHEL Linux CDs or DVDs” (page 151)
Prerequisites for booting the host from the HPE 3PAR StoreServ StorageIt is assumed that the following tasks have been completed according to the topics for configuringthe HPE 3PAR StoreServ Storage and Host:• The HPE 3PAR StoreServ Storage and host are connected directly or through the fabric.
For information about supported SAN boot configurations, see SPOCK (from SPOCKHomeunderExplore Storage InteroperabilityWith SPOCK, selectExplore HPE 3PARStoreServStorage interoperability→Explore 3PAR Block Persona interoperability):http://www.hpe.com/storage/spock
• Fabric has been set up and zoning done accordingly so the HPE 3PAR StoreServ Storageand host are able to communicate.
• The HPE 3PAR StoreServ Storage ports are configured.
• CNA has the desired protocol enabled in the BIOS.
• For Hardware iSCSI, Initiator and Target parameters (that is, IP address, subnet mask,default gateway, and so on) are properly set.
• The boot order is set up appropriately in the system BIOS so that the system will boot usingthe HBA or CNA you are configuring.
• The boot virtual volume is provisioned large enough to install the OS and exported to thehost as LUN 0.To ensure the completion of these tasks, see “Provisioning storage and host LUN discovery”(page 122):
◦ “Creating the host definition” (page 122)
◦ “Create virtual volumes” (page 126)
◦ “Exporting LUNs to the host as virtual volumes” (page 129)
Configuring HBAsFollow the procedures below to configure the HBA being used to boot from the HPE 3PARStoreServ Storage. See the vendors’ documentation for the most up-to-date and complete details.Menu selections and the procedure described here might be different for your HBA model.
NOTE: Although the procedures in “Booting the host from the HPE 3PAR StoreServ Storage”(page 145) refer to HBAs, they apply to all supported adapter types (HBA, CNA, LOM, andmezzanine cards).
Prerequisites for booting the host from the HPE 3PAR StoreServ Storage 145

Using the Emulex HBA—FC and FCoEThe procedure below describes how to configure Emulex HBAs in the BIOS environment. Forservers that use the UEFI environment beginning with Gen 9 servers, follow the procedurein the "Configuring Emulex HBAs in HPE UEFI Environments" section of the HPE Boot from SANConfiguration Guide available at the Hewlett Packard Enterprise Support Center website.1. Restart your server, and then press Alt-E or Ctrl-E when prompted by the Emulex HBA
Utility.
NOTE: Each HBA port is reported as a host bus adapter. The following settings need tobe applied for each HBA port.
2. A screen appears that will show the Emulex adapters in the system. Select <Adapter #>,and then press Enter.a. A screen displays: The BIOS of the Adapter is Disabled. If the screen says The BIOS
of the Adapter is Enabled, then skip to step 3.b. Select Configure This Adapter's Parameters (for some HBA models, the option is
Enable/Disable Boot from SAN), and then press Enter.c. Follow the instructions on this screen to enable the BIOS for the adapter, and then
return to the previous menu.3. Select Configure Boot Devices, and then press Enter.
The List of Saved Boot Devices list appears.4. Select 1. Unused DID:<all zeros> WWPN: <all zeros> LUN:00 Primary Boot, and then
press Enter.The 01. DID:<did_value> WWPN:<3PAR Port WWPN>Lun:00 3PARdataVV 0000 dialogbox appears.
5. Select the two digit number of the desired boot device 01, and then press Enter.The Enter two digits of starting LUN (Hex) dialog box appears.
6. Type 00, and then press Enter.The DID: XXXXXX WWPN: <3PAR port WWPN> 01. Lun:00 3PARdataVV 0000 dialogbox appears.a. Select 01, and then press Enter.
The 1. Boot this device via WWPN 2. Boot this device via DID dialog box appearsb. Select 1, and then press Enter.
The List of saved boot devices 1 Used DID:000000 WWPN:<3PAR Port WWPN>Lun:00 Primary Boot dialog box appears.
7. Press Esc twice to return to the Emulex Adapters in the System menu.8. Select the next HBA port to boot from, and then repeat step 2 through step 7.9. When done with all the HBA ports, exit the utility.10. At the prompt to restart the system, press Y.11. Verify that the RHEL installation CD or DVD is in the drive tray or virtually mounted to continue
with installing the OS.
More informationhttp://www.hpe.com/support/hpesc
146 Booting the host from the HPE 3PAR StoreServ Storage
Using the Emulex CNA—Hardware iSCSI1. Restart your server, and then press Ctrl-P when prompted by the Emulex PXESelect Utility.2. FromController Configuration, setAdvancedMode Support to Enabled and Personality
to iSCSI.3. Press Esc, and then save changes before exiting the PXESelect Utility.4. Restart your server, and then pressCtrl-Swhen prompted by the Emulex iSCSISelect Utility.5. Select Controller Configuration, and then press Enter.6. Select the controller port, and then press Enter.
a. In Controller Properties, set Boot Support to Enabled.b. In iSCSI Target Configuration, select Add New iSCSI Target:
i. Leave iSCSI Target Name blank, and enter iSCSI Target IP Address, and thenselect Save/Login.
ii. When prompted to continue with using the SendTargets mechanism to discovertargets, press Y.
iii. Once the target is discovered, press <F3> Toggle Add Target to set to Yes, andthen select Add Selected iSCSI Targets.
iv. In the newly added iSCSI Target, set Boot Target to Yes, and then selectSave/Login.
NOTE: The iSCSI Name of the discovered target can be confirmed by running theshowport -iscsiname command on the HPE 3PAR StoreServ Storage.
7. Repeat step 5 for all adapter ports.8. Press Esc, and then save changes before exiting the iSCSISelect Utility.9. Verify that the RHEL installation CD or DVD is in the drive tray or virtually mounted to continue
with installing the OS.
Configuring HBAs 147
Using the QLogic HBA—FCThe procedure below describes how to configure QLogic HBAs in the BIOS environment. Forservers that use the UEFI environment beginning with Gen 9 servers, follow the procedurein the "Configuring QLogic HBAs in HPE UEFI Environments" section of the HPE Boot from SANConfiguration Guide, available at the Hewlett Packard Enterprise Support Center website.1. Restart your server and pressCtrl-Q orAlt-Qwhen prompted for the QLogic Fast!UTIL HBA
utility.
NOTE: Each HBA port is reported as a host bus adapter. The following settings need tobe applied for each HBA port.
2. From the QLogic Fast!UTIL screen, select Select Host Adapter menu, and then select thehost adapter from which you want to boot.
3. When the Fast!UTIL Options menu appears, select Configuration Settings.4. Select Adapter Settings.5. Select Host Adapter BIOS, select Enabled, and then press Esc.6. From the Configuration Settings menu, select Selectable Boot Settings.7. From theSelectable Boot Settingsmenu, selectSelectable Boot, and then selectEnabled.8. Arrow down to the next field, (Primary) Boot Port Name, LUN, and then press Enter.9. From the Select Fibre Channel Device menu, you should see the 3PAR device under ID0
with its Rev, Port Name, and Port ID shown. Press Enter.10. From the Select LUN menu, select the first line LUN 0 with a status of Supported, and the
press Enter.11. Press Esc twice to return to the Configuration Settings Modified dialog box.12. Select Save changes.13. Return to the Fast!UTIL Options menu, and then select Select host Adapter.14. Select your next HBA port to boot from and repeat step 2 through step 13.15. When finished with all the HBA ports, from the Fast!UTIL Options menu:
a. Select Exit Fast!UTIL.b. Select Reboot system.The settings will be saved and the host is restarted.
16. Verify that the RHEL installation CD or DVD is in the drive tray or virtually mounted to continuewith installing the OS.
More informationhttp://www.hpe.com/support/hpesc
148 Booting the host from the HPE 3PAR StoreServ Storage
Using the Broadcom CNA—FCoEThe procedure below describes how to configure Broadcom HBAs in the BIOS environment.1. Update server BIOS with the latest version to ensure that the BIOS supports the Boot from
SAN feature.
NOTE: The Boot from SAN feature is NOT available for supported servers when usingAMD processors.
2. Restart your server, and then press Ctrl-S at the Broadcom NetXtreme Ethernet BootAgent banner to invoke CCM UI. This displays Broadcom Adapters in the system.
3. Use the navigation keys to select the device for which boot protocol is to be configured, andthen press Enter.
4. Select Device Hardware Configuration, and then press Enter.5. Verify that DCB Protocol is Enabled on the device, and then set Storage Personality to
FCoE. Press Esc.
NOTE: FCoE boot is only supported on DCB enabled configurations.
6. Select MBA Configuration, and then press Enter.7. Configure Boot Protocol field to FCoE, and then press Esc.8. Select FCoE Boot Configuration, and then press Enter.9. Select Target Information, and then press Enter.10. From the list, for each available path, set the Connect parameter to Enabled, and then
enter the target WWPN and Boot LUN ID.11. For your records, write down the initiator WWPN seen at the bottom of the Target
information screen.12. Press Esc until prompted to exit and save changes.13. Verify that the RHEL installation CD or DVD is in the drive tray or virtually mounted to continue
with installing the OS.
Using the Broadcom CNA—FCoE in UEFI environmentBeginning with Gen 9, servers and blades are configured with the default UEFI Environment.One can verify the default Boot Mode is set to UEFI by using the following steps.1. Press <F9> at server boot, and then select System Configuration→BIOS/Platform
Configuration (RBSU)→Boot Options→Boot Mode should be set to [UEFI Mode].Hewlett Packard Enterprise recommends not to change the Boot Mode to Legacy BIOSMode as it impacts booting of Operating system and other advantages of UEFI Mode suchas supporting larger disk size > 2 Tb for Boot Disk.
2. Enable Boot Device in Broadcom CNA (UEFI Mode):a. During system boot press F9, and then selectSystemUtlities→SystemConfiguration.b. Navigate to one of the desired adapter ports (FCoE), and then press Enter. The HBAs
configuration menu is displayed.c. Select FCoE Boot Configuration for FCoE setup and press Enter.d. Select FCoEGeneral Parameters and pressEnter. Both the Boot to FCoE Target
parameter and the HBA Boot Mode parameter should be enabled.
Configuring HBAs 149

Using the Broadcom CNA—Hardware iSCSI1. Update server BIOS with the latest version to verify that the BIOS supports the Boot from
SAN feature.
NOTE: The Boot from SAN feature is NOT available for supported servers when usingAMD processors.
2. Restart your server, and then press Ctrl-S to launch the Comprehensive ConfigurationManagement Utility (CCM) when the Broadcom BIOS message appears.
3. Select an iSCSI network interface to configure from the Device List.4. Select MBA Configuration, set Boot Protocol to iSCSI.5. From the Main Menu, select iSCSI Boot Configuration:.
a. In General Parameters, set HBA Boot Mode to Enabled.b. In Initiator Parameters, enter the initiator IP Address, Subnet Mask, and Default
Gateway.c. In Target Parameters, enter the target IP Address and iSCSI Name, and set Connect
to Enabled.6. Repeat above steps to configure any additional iSCSI network interfaces if desired.7. Save these changes, and then restart the server.8. Verify that the RHEL installation CD or DVD is in the drive tray or virtually mounted to continue
with installing the OS.
Using the Brocade HBA—FC1. Restart your server, and then press Ctrl-B or Alt-B when prompted for the Brocade BIOS
utility.
NOTE: Each HBA port is reported as a host bus adapter. The settings in each of thefollowing procedures need to be applied for each HBA port.
2. Proceed into the Adapter Settings and verify that BIOS is set to Enabled.3. Proceed into the Boot Device Settings.4. Select the Boot Device you wish to change, and then press Enter.5. Select the new Boot Target, and then press Enter.6. Select the Boot LUN, and then press Enter.7. Repeat step 4 through step 6 for any additional Boot Devices.8. Press Alt-S to save your changes.9. If you need to configure more boot devices or another adapter, select Return to Brocade
Config Menu, otherwise select Exit Brocade Config Menu, and then reboot the system.10. Verify that the RHEL installation CD or DVD is in the drive tray or virtually mounted to continue
with installing the OS.
150 Booting the host from the HPE 3PAR StoreServ Storage
Installing the OS from RHEL Linux CDs or DVDsWith the RHEL 7, RHEL 6, or RHEL 5 CDs or DVDs, beware of the following when installingthe OS for SAN boot:If the inbox driver does not support SAN boot, use linux dd command to load the driver duringthe RHEL installation process.Select Specialized Storage Devices when asked what type of devices will your installationinvolve.See the Red Hat knowledge base article iSCSI boot does not work on Red Hat Enterprise Linux7 at the Red Hat website.
With RHEL 5 only:At the beginning of the RHEL 5 installation, verify that the root or boot disk is protected bymultipath. The multipath option must be enabled.1. When prompted by the install CD or DVD after the host comes up, at the boot prompt, type
the following command:boot: linux mpath
This command communicates that multiple paths are connected from the storage to thehost.
2. Respond to all the prompts during the install process by selecting the default settings.When the installation completes, the host is restarted.
More informationhttp://www.redhat.com
Installing the OS from RHEL Linux CDs or DVDs 151

10 Using Oracle Enterprise LinuxHewlett Packard Enterprise supports Oracle Linux with both the RHEL-compatible kernel andwith the UEK.
Oracle Enterprise Linux with RHEL-compatible kernelWhen using Oracle Enterprise Linux with the RHEL-compatible kernel, follow the procedures inthis implementation guide for the corresponding version of RHEL.
Using Oracle Enterprise Linux with UEKOracle Enterprise Linux UEK is an optimized package for Oracle software and hardware. TheOracle Enterprise Linux UEK is built upon the RHEL 6 kernel and is optimized specifically forOracle software.When using Oracle Enterprise Linux UEK, follow the usage guide as outlined for the correspondingversion of RHEL.
NOTE: At the time this guide was released, there was an issue with Software iSCSI such that,if iSCSI sessions were opened to exported LUNs from the array, the Oracle Enterprise Linuxhost would hang when a system restart was attempted. A workaround for this issue is to log outof all iSCSI sessions before restarting the host. Use this command to log out of open iSCSIsessions:
# iscsiadm -m node --logout
The standard setup procedures, as described in this implementation guide for RHEL 6, apply tothe HPE 3PAR StoreServ Storage when using Oracle Enterprise Linux V6 UEK, so there are nospecial considerations to take into account.
Creating Partitions with Oracle Enterprise LinuxWhen creating Linux-type partitions on exported LUNs using either fdisk or parted, verify thatthe correct partitions are listed as partition numbers p1 or other number. For example, here isan exported LUN displayed by using multipath -ll:
360002ac00000000000000265000185db dm-3 3PARdata,VVsize=15G features='1 queue_if_no_path' hwhandler='0' wp=rw`-+- policy='round-robin 0' prio=1 status=active
|- 0:0:0:32 sdd 8:48 active ready running|- 1:0:0:32 sdh 8:112 active ready running
152 Using Oracle Enterprise Linux
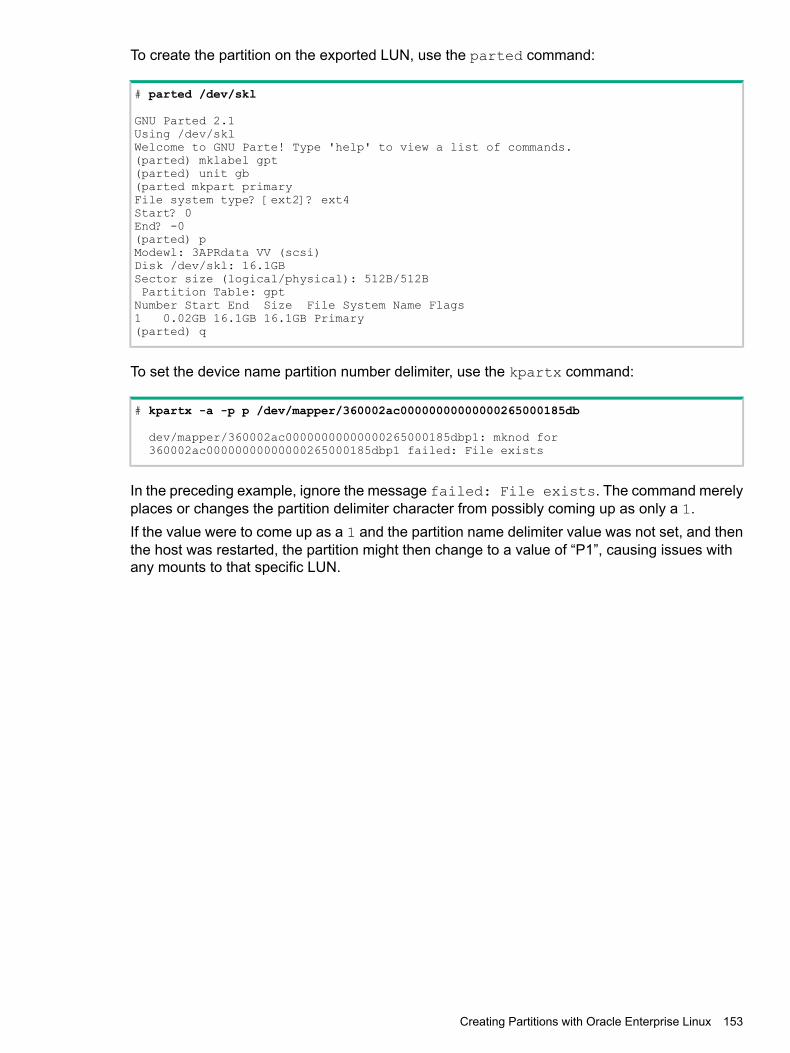
To create the partition on the exported LUN, use the parted command:
# parted /dev/skl
GNU Parted 2.1Using /dev/sklWelcome to GNU Parte! Type 'help' to view a list of commands.(parted) mklabel gpt(parted) unit gb(parted mkpart primaryFile system type? [ext2]? ext4Start? 0End? -0(parted) pModewl: 3APRdata VV (scsi)Disk /dev/skl: 16.1GBSector size (logical/physical): 512B/512BPartition Table: gptNumber Start End Size File System Name Flags1 0.02GB 16.1GB 16.1GB Primary(parted) q
To set the device name partition number delimiter, use the kpartx command:
# kpartx -a -p p /dev/mapper/360002ac00000000000000265000185db
dev/mapper/360002ac00000000000000265000185dbp1: mknod for360002ac00000000000000265000185dbp1 failed: File exists
In the preceding example, ignore the message failed: File exists. The command merelyplaces or changes the partition delimiter character from possibly coming up as only a 1.If the value were to come up as a 1 and the partition name delimiter value was not set, and thenthe host was restarted, the partition might then change to a value of “P1”, causing issues withany mounts to that specific LUN.
Creating Partitions with Oracle Enterprise Linux 153
11 Using a RHEL 4.9 FC hostRHEL 4.9 is supported with FC configuration. When using a RHEL 4.9 FC host, follow the workflowand procedures for a RHEL 5 FC host as described in the prior topics, with the exceptions statedin the following topics.
• “Host persona” (page 154)
• “Tuning the FC Emulex driver” (page 154)
• “Setting the SCSI Timeout” (page 154)
• “Setting up multipathing software” (page 155)
• “Maximum LUN size” (page 155)
• “Scanning for new LUNs” (page 155)
Host personaWith RHEL 4.9, Hewlett Packard Enterprise recommends host Generic Persona 1.
Tuning the FC Emulex driverTune the FC Emulex driver in /etc/modprobe.conf with these options:options lpfc lpfc_nodev_tmo=14 lpfc_lun_queue_depth=16lpfc_discovery_threads=32
NOTE: With a version earlier than HPE 3PAR OS 3.1.1, change the following:lpfc_nodev_tmo setting to 1 instead of 14
Setting the SCSI Timeout
WARNING! If SCSI Timeout is not set to 60 seconds, the SCSI timeout will result in host disksbeing taken offline during HPE 3PAR StoreServ Storage rolling upgrades. Furthermore, RemoteCopy requires the SCSI timeout value of 60 seconds; otherwise, remote copy operations willbecome stale with a node reboot.
With RHEL 4The SCSI Timeout value is 30 seconds, so change the value to 60 seconds by using the udevrules method as described in “Setting the SCSI Timeout for RHEL 5—FC” (page 44).
154 Using a RHEL 4.9 FC host
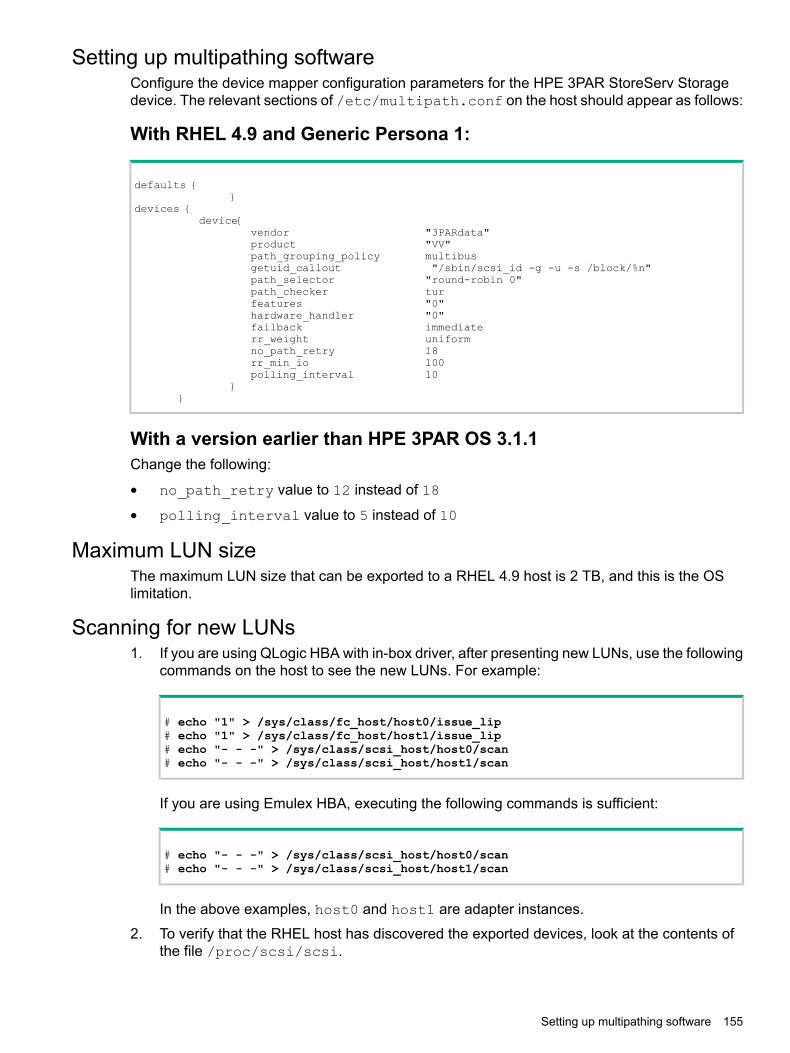
Setting up multipathing softwareConfigure the device mapper configuration parameters for the HPE 3PAR StoreServ Storagedevice. The relevant sections of /etc/multipath.conf on the host should appear as follows:
With RHEL 4.9 and Generic Persona 1:
defaults {}
devices {device{
vendor "3PARdata"product "VV"path_grouping_policy multibusgetuid_callout "/sbin/scsi_id -g -u -s /block/%n"path_selector "round-robin 0"path_checker turfeatures "0"hardware_handler "0"failback immediaterr_weight uniformno_path_retry 18rr_min_io 100polling_interval 10
}}
With a version earlier than HPE 3PAR OS 3.1.1Change the following:
• no_path_retry value to 12 instead of 18
• polling_interval value to 5 instead of 10
Maximum LUN sizeThe maximum LUN size that can be exported to a RHEL 4.9 host is 2 TB, and this is the OSlimitation.
Scanning for new LUNs1. If you are using QLogic HBA with in-box driver, after presenting new LUNs, use the following
commands on the host to see the new LUNs. For example:
# echo "1" > /sys/class/fc_host/host0/issue_lip# echo "1" > /sys/class/fc_host/host1/issue_lip# echo "- - -" > /sys/class/scsi_host/host0/scan# echo "- - -" > /sys/class/scsi_host/host1/scan
If you are using Emulex HBA, executing the following commands is sufficient:
# echo "- - -" > /sys/class/scsi_host/host0/scan# echo "- - -" > /sys/class/scsi_host/host1/scan
In the above examples, host0 and host1 are adapter instances.
2. To verify that the RHEL host has discovered the exported devices, look at the contents ofthe file /proc/scsi/scsi.
Setting up multipathing software 155
12 Using virtualization and clustersUsing Oracle Virtual Machine Server (OVM)
Oracle VM Server for x86 is an Oracle free server virtualization and management solution.For installation, administration, and OS support by OVM, see the OVM document library at theOracle website: http://www.oracle.com/us/technologies/virtualization/overview/index.htmlThe standard setup procedures, as described in this implementation guide, apply to the HPE 3PARStoreServ Storage, so no special setup considerations are necessary.
Using Red Hat Enterprise Virtualization (KVM/RHEV-H)Red Hat Enterprise Virtualization Hypervisor (RHEV-H) — Based on Kernel Virtual Machine(KVM) technology and can be deployed as either of the following:• Bare metal hypervisor
• RHEL hypervisor hostKVM hypervisor — Requires a processor with either of the following virtualization extensions:• Intel-VT
• AMD-VThe RHEL KVM package is limited to 64-processor cores. A guest OS can be used only on thehypervisor type for which it was created.For installation, administration, and OS support by the RHEL KVM, see the RHEL VirtualizationGuide at the Red Hat website.The standard setup procedures, as described in this implementation guide, apply to the HPE 3PARStoreServ Storage, so there are no special considerations to take into account.
More informationhttp://www.redhat.com/en/technologies/virtualization
Using Red Hat Xen VirtualizationHewlett Packard Enterprise supports the use of RHEL 5 Xen Virtualization.The standard setup procedures, as described in this implementation guide, apply to the HPE 3PARStoreServ Storage, so there are no special considerations to take into account.For installation and setup instructions, see the RHEL 5 Xen Virtualization Guide at the Red Hatwebsite.
More informationhttp://www.redhat.com
156 Using virtualization and clusters

Using RedHat Cluster servicesFor installation and administration RHEL Cluster services, see theRHEL Linux Installation Guideand Configuring and Managing an RHEL Cluster documents at the Red Hat website.To manage a RHEL 6 cluster using the new luci and ricci method, set a password for thericci user account created during installation. See the Red Hat Cluster Deployment Guide forfurther information.The standard setup procedures, as described in this implementation guide, apply to the HPE 3PARStoreServ Storage, so there are no special considerations to take into account.
More informationhttp://www.redhat.com
Using the Veritas Cluster ServerHewlett Packard Enterprise supports use with Veritas Cluster Server.The standard setup procedures, as described in this implementation guide, apply to the HPE 3PARStoreServ Storage, so there are no special considerations to take into account.For installation and setup instructions, see the Veritas Cluster Server Installation Guide andVeritas Cluster Server User's Guide at the Veritas website.
CAUTION: Verify that device mapper is disabled when using the Veritas DMP as themultipathing solution.
More informationhttps://sort.veritas.com/documents?prod=sfha
Using RedHat Cluster services 157
13 Configuring 3PAR File Persona softwareHPE 3PAR File Persona
Beginning with HPE 3PAR OS 3.2.1 MU2, the HPE 3PAR File Persona software is available.The HPE 3PAR File Persona software provides file services and access to file storage by networkprotocols such as:
• Server Message Block (SMB)
• Network File System (NFS)
• Web Distributed Authoring and Versioning (WebDAV)For information on supported HPE 3PAR StoreServ Storage models and client configurations,see the SPOCK website (SPOCK Home→Explore Storage Interoperability WithSPOCK→Explore HPE 3PAR StoreServ Storage interoperability→Explore HPE 3PAR FilePersona interoperability).For a complete description of the HPE 3PAR File Persona software, including required setupand guidelines, see "Using the HPE 3PAR File Persona software" in the HPE 3PAR CommandLine Interface Administrator’s Manual, available at the Hewlett Packard Enterprise StorageInformation Library website.
More informationhttp://www.hpe.com/storage/spockhttp://www.hpe.com/info/storage/docs
158 Configuring 3PAR File Persona software
14 Support and other resourcesAccessing Hewlett Packard Enterprise Support
• For live assistance, go to the Contact Hewlett Packard Enterprise Worldwide website:www.hpe.com/assistance
• To access documentation and support services, go to the Hewlett Packard Enterprise SupportCenter website:www.hpe.com/support/hpesc
Information to collect• Technical support registration number (if applicable)
• Product name, model or version, and serial number
• Operating system name and version
• Firmware version
• Error messages
• Product-specific reports and logs
• Add-on products or components
• Third-party products or components
Accessing updates• Some software products provide a mechanism for accessing software updates through the
product interface. Review your product documentation to identify the recommended softwareupdate method.
• To download product updates, go to either of the following:
Hewlett Packard Enterprise Support Center Get connected with updates page:www.hpe.com/support/e-updates
◦
◦ Software Depot website:www.hpe.com/support/softwaredepot
• To view and update your entitlements, and to link your contracts and warranties with yourprofile, go to the Hewlett Packard Enterprise Support Center More Information on Accessto Support Materials page:www.hpe.com/support/AccessToSupportMaterials
IMPORTANT: Access to some updates might require product entitlement when accessedthrough the Hewlett Packard Enterprise Support Center. You must have an HP Passportset up with relevant entitlements.
Accessing Hewlett Packard Enterprise Support 159

Websites
LinkWebsite
www.hpe.com/info/enterprise/docsHewlett Packard Enterprise Information Library
www.hpe.com/support/hpescHewlett Packard Enterprise Support Center
www.hpe.com/assistanceContact Hewlett Packard Enterprise Worldwide
www.hpe.com/support/e-updatesSubscription Service/Support Alerts
www.hpe.com/support/softwaredepotSoftware Depot
www.hpe.com/support/selfrepairCustomer Self Repair
www.hpe.com/info/insightremotesupport/docsInsight Remote Support
www.hpe.com/info/hpux-serviceguard-docsServiceguard Solutions for HP-UX
www.hpe.com/storage/spockSingle Point of Connectivity Knowledge (SPOCK) Storagecompatibility matrix
www.hpe.com/storage/whitepapersStorage white papers and analyst reports
Customer self repairHewlett Packard Enterprise customer self repair (CSR) programs allow you to repair your product.If a CSR part needs to be replaced, it will be shipped directly to you so that you can install it atyour convenience. Some parts do not qualify for CSR. Your Hewlett Packard Enterprise authorizedservice provider will determine whether a repair can be accomplished by CSR.For more information about CSR, contact your local service provider or go to the CSR website:www.hpe.com/support/selfrepair
Remote supportRemote support is available with supported devices as part of your warranty or contractual supportagreement. It provides intelligent event diagnosis, and automatic, secure submission of hardwareevent notifications to Hewlett Packard Enterprise, which will initiate a fast and accurate resolutionbased on your product’s service level. Hewlett Packard Enterprise strongly recommends thatyou register your device for remote support.For more information and device support details, go to the following website:www.hpe.com/info/insightremotesupport/docs
Documentation feedbackHewlett Packard Enterprise is committed to providing documentation that meets your needs. Tohelp us improve the documentation, send any errors, suggestions, or comments to DocumentationFeedback ([email protected]). When submitting your feedback, include the documenttitle, part number, edition, and publication date located on the front cover of the document. Foronline help content, include the product name, product version, help edition, and publication datelocated on the legal notices page.
160 Support and other resources
Index
Aaccessing
updates, 159authenticating
bidirectional CHAP, 67bidirectional CHAP for Hardware iSCSI, 90host CHAP authentication for Hardware iSCSI, 89host CHAP for Software iSCSI, 65
Bbidirectional
CHAP setup, 67BIOS
FCoE configuring with system BIOS, 100Hardware iSCSI IP address setup, 74
BladeSystemc-Class , 29
bootingprerequisites, 145the host, 145
Broadcom CNAdriver for FCoE, 103FCoE host personality configuration, 103making connections to iSCSI targets, 88set up host CHAP for Hardware iSCSI, 90setting the BIOS for Hardware iSCSI, 87Setting up bidirectional CHAP for Hardware iSCSI, 91using, 149–150using for FCoE, 103using for Hardware iSCSI, 87
Brocade HBAconfiguring using BCU utility, 43driver, 43using, 43, 150
Cc-Class BladeSystem, 29CHAP
bidirectional CHAP for Hardware iSCSI, 90bidirectional CHAP setup, 67configuring for Hardware iSCSI, 89configuring for Software iSCSI, 65host CHAP authentication for Hardware iSCSI, 89host CHAP authentication for Software iSCSI, 65
CLIcommand line interface, 30
cluster services, 157using, 157
CNA see Broadcom CNA see Emulex CNAcommand line interface see CLIconfiguring
Broadcom FCoE, 106Brocade HBA using BCU utility, 43CHAP for Hardware iSCSI, 89CHAP for Software iSCSI, 65direct connection to host , 30
FC switch vendors configuration guidelines, 28FCoE host personality for FCoE, 103FCoE with system BIOS, 100for FCoE, 92for iSCSI, 46Hardware iSCSI, 74Hardware iSCSI not using BIOS (local boot only), 84Hardware iSCSI using hbacmd utility, 82Hardware iSCSI using IPv6 with vLAN tagging, 80Hardware iSCSI using OneCommand Manager GUI,
76HBAs, 145host, 33host for FCoE, 100iSCSI connected port, 51ports, 29, 32ports for a direct connection, 30QLogic HBA using SCLI utility, 42Software iSCSI, 55storage and host for FC, 20
connectingFCoE-to-FC, 25iSCSI connected port, 51to host, 24
contacting Hewlett Packard Enterprise, 159creating
device mapper, 133host definition, 122modprobe.conf file for Emulex HBA, 33modprobe.conf file for QLogic HBA, 37Software iSCSI connection, 59storage, 125TDVVs, 128TPVVs, 127Veritas Volume Manager devices, 140VVs, 126
customer self repair, 160
Ddata duplication, 128deduplication, 128device mapper
creating devices, 133node information, 134partitioning, 135
discoveringdevice with Emulex HBA, 130
disk alignmentusing fdisk, 135using parted, 135
displayingdevice mapper node information, 134
DM-Multipathdevice mapper multipathing, 109
DMPdynamic multipathing, 109
documentation, 9
161
providing feedback on, 160drivers
Broadcom CNA for FCoE, 103Brocade HBA, 43CNA, 8Emulex CNA for FCoE, 100Emulex HBA, 33HBA, 8installing iSCSI driver, 55QLogic HBA, 37
EEmulex
HBA device discovery, 130SCSI timeout, 45
Emulex CNAconfiguring FCoE Host Personality, 100driver for FCoE, 100set up host CHAP for Hardware iSCSI, 89setting the BIOS for Hardware iSCSI, 74Setting up bidirectional CHAP for Hardware iSCSI, 91using, 74, 147using for FCoE, 100
Emulex HBAbuilding the initramfs, 33driver, 33using, 33, 146
exportingLUNs to host, 129
Ffabric
host connection, 24host definition, 122setup, 26
FCconfiguring the storage and host, 20fabric settting up and zoning, 26Fibre Channel, 7host connection, 24setting up Persistent Ports for FC, 22switch vendors configuration guidelines, 28target port limits, 21target port specifications, 21using a RHEL 4.9 FC host, 154using the Brocade HBA, 150using the Emulex HBA, 146using the QLogic HBA, 148
FCoEconfiguring, 92configuring a host, 100configuring Broadcom FCoE, 106configuring with system BIOS, 100FCoE initiator setup, 98Fibre Channel over Ethernet, 7host personality configuration, 103in UEFI environment, 149Persistent Ports, 94setting up Persistent Ports for FCoE, 94
target port limits and specifications, 93target port setup, 98using the Broadcom CNA, 149using the Emulex HBA, 146
featuresFile Persona, 158HPE 3PAR Express Writes, 24Persistent Checksum over FC, 23Smart SAN, 23
Fibre Channel see FCFibre Channel over Ethernet see FCoE
HHardware iSCSI
configuring, 74configuring CHAP, 89configuring not using BIOS (local boot only), 84configuring using hbacmd utility, 82configuring using IPv6 with vLAN tagging, 80configuring using OneCommand Manager GUI, 76Using a vendor utility, 132using the Broadcom CNA, 150using the Emulex CNA, 147
HBA see Brocade HBA see Emulex HBA see QLogicHBAconfiguring, 145host bus adapter, 33
hostCHAP authentication for Hardware iSCSI, 89CHAP authentication for Software iSCSI, 65configuring for FC, 20discovering devices, 130LUN discover, 122removing storage volume from host, 140
host bus adapter see HBAhost definition
creating, 122Host Explorer
installing, 122host persona
Generic Persona 1, 119Generic-ALUA Persona 2, 119
Iinitializing
Broadcom FCoE, 106initiating
FCoE initiator setup, 98installing
3PAR Host Explorer software package, 122iSCSI driver, 55OS from CDs or DVDs, 151
IP addressHardware iSCSI BIOS setup, 74
IPv4, 51, 55IPv6
3PAR StoreServ 20000 Storage, 513PAR StoreServ 8000 Storage, 51iSCSI addressing, 54
162 Index

vLAN tagging, 54iSCSI
configuring, 46connected port, 51discovering sessions, 55Enterprise, 50installing driver, 55IPv6 addressing, 54IPv6 vLAN tagging, 54Persistent Ports, 48set up swtich and iSCSI intiator, 50setting up Persistent Ports for iSCSI, 48starting iSCSI daemon, 58target port limits and specifications, 47
KKernel Virtual Machine see KVMKVM, 156
Kernel Virtual Machine, 156Red Hat Enterprise Virtualization (KVM/RHEV-H), 156
LLIP, 130
Loop Initialization Protocol, 130Loop Initialization Protocol see LIPLUN, 129
discovery, 122exporting to the host, 129
LUNsmarked as offline after an upgrade, 8
Mmultipathing
changing host persona, 119DM-Multipath, 109enabling DM-Multipath, 118installing SW package, 109modifying DM-Multipath configuration file, 109SAN boot configurations, 116setting up, 108setting up device mapper multipath, 109setting up in initramfsr, 118setting up SW, 109starting DM-Multipath, 118using ALUA Persona, 110using Generic Persona 1, 113Veritas DMP multipathing setup, 119
OOneCommand Manager, 76Oracle Enterprise Linux
creating partitions, 152supported with RHEL compatible kernel, 152supported with UEK, 152using with UEK, 152
Oracle Linuxreleases, 7
Oracle VM server, 156
Ppartitioning
with Oracle Enterprise Linux, 152Persistent Checksum over FC, 23Persistent Ports, 22
FCoE, 94for FC, 22for iSCSI, 48Persistent Ports, 22, 48setup and connectivity for FC, 22setup and connectivity for FCoE, 94
portsconfiguring, 32configuring for FCoE, 92direct connection , 30direct connection with 16 GB host adapters, 31direct connection with 8 GB host adapters, 30FC target port limits, 21FC target port specifications, 21FCoE target port limits and specifications, 93FCoE target port setup, 98host CHAP authentication for Hardware iSCSI, 89host CHAP authentication for Software iSCSI, 65iSCSI configuration, 46iSCSI connected port, 51iSCSI target port limits and specifications, 47Persistent Ports, 29Persistent Ports for FCoE, 94Persistent Ports setup for FC, 22Persistent Ports setup for FCoE, 94Persistent Ports setup for iSCSI, 48
QQLogic HBA
building the initramfs, 37configuring using SCLI utility, 42driver, 37setting up the BIOS, 41setting up the NVRAM, 41using, 37, 148
RRed Hat Enterprise Linux see RHELRed Hat Enterprise Virtualization Hypervisor, 156remote support, 160removing
storage volume from host, 140requirements
Linux host support, 8restrictions
FCoE target port limits and specifications, 93iSCSI target port limits and specifications, 47
RHELRed Hat Enterprise Linux, 7releases, 7RHEL 4.9 FC host, 154
RHEV-H seeRed Hat Enterprise Virtualization Hypervisor
163
SSCSI
timeout, 44timeout settings, 45
settingbidirectional CHAP, 67bidirectional CHAP for Hardware iSCSI, 90Hardware iSCSI IP address with BIOS, 74host CHAP authentication for Hardware iSCSI, 89host CHAP authentication for Software iSCSI, 65SCSI timeout, 44SCSI timeout by Emulex script, 45SCSI timeout udev rules, 44
setting up3PAR Priority Optimization, 128fabric for FC, 26FCoE initiator, 98FCoE switch, 98FCoE target port, 98host CHAP for Software iSCSI, 65multipathing SW, 109Persistent Ports for FC, 22Persistent Ports for FCoE, 94Persistent Ports for iSCSI, 48Software iSCSI, 55Veritas DMP multipathing, 119
Smart SANFC, 23
Software iSCSIconfiguring, 55configuring CHAP, 65creating connection, 59iscsiadm utility, 72setting up, 55
space reclaimsupport considerations, 142TDVV, 142TPVV, 142
specificationsFCoE target port limits and specifications, 93iSCSI target port limits and specifications, 47
SPOCKStorage Single Point of Connectivity Knowledge, 7
storageconfiguring for FC, 20creating, 125creating TDVV, 128creating VVs, 126provisioning, 122removing volume, 140
supportHewlett Packard Enterprise, 159
switchingFC switch vendors configuration guidelines, 28
Symantec see Veritas
TTDVV
creating, 128
space reclaim, 142thinly deduplicated virtual volumes, 128Veritas/Symantec space reclaim support, 144
thin volumespace reclaim, 142Veritas/Symantec space reclaim support, 144
thinly deduplicated virtual volumes see TDVVthinly provisioned virtual volume see TPVVTPVV
creating, 126space reclaim, 142thinly provisioned virtual volume, 127Veritas/Symantec space reclaim support, 144
UUEK, 7, 35, 39, 112, 152
Unbreakable Enterprise Kernel, 7Unbreakable Enterprise Kernel see UEKupdates
accessing, 159upgrading, 8
considerations, 8using
Broadcom CNA for FCoE, 103Brocade HBA, 43devices on the host, 133Emulex HBA, 33QLogic HBA, 37
Vvendor
FC switch vendors configuration guidelines, 28verifying
SCSI timeout settings, 45Veritas
cluster server, 157creating Volume Manager devices, 140DMP multipathing, 119space reclaim support, 144
Virtual Connect Direct-Attach Fibre Channel, 29virtual logical unit number see VLUNvirtual LUN see VLUNvirtual volumes see VVsVLUN, 129
virtual LUN, 129volumes
number restrictions, 129removing from host, 140size restrictions, 129
VVs, 128–129creating, 126exporting LUNs to the host, 129fully provisioned, 126thinly deduplicated, 128thinly provisioned, 126virtual volume, 126
Wwebsites, 160
164 Index

customer self repair, 160
XXen Virtualization, 156
using, 156
165