Embed Size (px)
Citation preview
HPE Power Advisor A tool for estimating power requirements for HPE enterprise solutions
Technical white paper
Technical white paper
Contents Abstract .............................................................................................................................................................................................................................................................................................................................................................3 Introduction ....................................................................................................................................................................................................................................................................................................................................................3 Applying HPE Power Advisor to your environment: Basic Dos and Don’ts ........................................................................................................................................................................................3
Glossary of terms used by HPE Power Advisor..................................................................................................................................................................................................................................................... 4 Determining power and efficiency needs .................................................................................................................................................................................................................................................................... 5
Installing the HPE Power Advisor ............................................................................................................................................................................................................................................................................................. 6 Basic functionality .................................................................................................................................................................................................................................................................................................................................... 7
Beginning a session ......................................................................................................................................................................................................................................................................................................................... 7 Functions and controls ....................................................................................................................................................................................................................................................................................................................... 8 Creating configurations ...................................................................................................................................................................................................................................................................................................................... 9 Configuring a stand-alone system ........................................................................................................................................................................................................................................................................................... 9
Configuring a system of single-node servers ........................................................................................................................................................................................................................................................ 12 Configuring a system of multi-node servers ........................................................................................................................................................................................................................................................... 16 Configuring a blade server system ................................................................................................................................................................................................................................................................................. 22
Saving and loading sessions ....................................................................................................................................................................................................................................................................................................... 28 Saving a session ............................................................................................................................................................................................................................................................................................................................... 28 Loading a session ........................................................................................................................................................................................................................................................................................................................... 28
Session reporting tools .................................................................................................................................................................................................................................................................................................................... 29 Power report ....................................................................................................................................................................................................................................................................................................................................... 29 Bill of Material report .................................................................................................................................................................................................................................................................................................................... 31
Conclusion .................................................................................................................................................................................................................................................................................................................................................... 31 Resources, contacts, or additional links ............................................................................................................................................................................................................................................................................ 32
Technical white paper Page 3
Abstract When designing and expanding data centers or even planning rack deployments, you need to be able to accurately estimate your power requirements to ensure the appropriate levels of power and cooling as well as to determine power-related operating costs for future budgeting considerations. HPE has created the HPE Power Advisor utility that provides accurate and meaningful estimates (see notes below) of the power needs for HPE ProLiant and Integrity servers. This technology brief identifies key factors affecting power requirements, explains how the Power Advisor tool works, and describes how to download and use the Power Advisor utility. This document assumes that readers are familiar with basic power concepts as well as HPE server platforms and options.
Note HPE Power Advisor is intended to provide conservative estimates of power consumption. No two applications will consume exactly the same amount of power. Even programs that report the same processor utilization will have different power consumption characteristics based on the exact mix and sequence of instructions being executed. Programs used as measurement references for the HPE Power Advisor were intended to consume as much or more power than actual user applications.
Introduction As information technology evolves and system density increases, systems housed in a single rack can now consume the amount of power once required for several racks. Effective sizing of a compute infrastructure while managing IT costs requires realistic estimates of current and future power and cooling requirements. Accurately estimating the power consumption of a server can define power distribution requirements at the rack level and can be the starting point for estimating the total power consumption and cooling needs for a data center.
The HPE Power Advisor utility is a tool for estimating power use of the major components within a rack to determine power distribution, power redundancy, and battery backup requirements for computer facilities. Power Advisor allows you to configure each individual server or node. You can then duplicate the server configuration as often as necessary to populate an enclosure or rack, and then duplicate a rack. The result is that you can build a complete data center quickly.
Note The HPE Power Advisor is provided “as is” without any warranty of any kind. All risks from using the HPE Power Advisor remains with the customer. HPE shall not be liable for any direct, consequential, incidental, special, punitive, or other damages whatsoever (including without limitation, damages for loss of business profits, business interruption or loss of business information) even if HPE has been advised of the possibility of such damages. Additionally, the HPE Power Advisor should never be used to estimate power for compliance with regulatory requirements. Refer to the HPE Power Advisor program license terms for more information.
HPE developed the HPE Power Advisor tool using data collected from testing HPE servers. Each test starts with a system fully configured with the maximum number of processors, memory, hard drives, expansion cards, and power supplies. Proprietary software exercises the processors to the highest possible power level and operates all peripherals while taking voltage and current measurements. Testing is performed at all speeds, with different memory amounts and hard drive sizes.
Applying HPE Power Advisor to your environment: Basic Dos and Don’ts Do use the HPE Power Advisor for:
• Estimating requirements for HPE systems only.
• Determining maximum equipment power and cooling needs at the unit (chassis) and rack levels.
Technical white paper Page 4
Do not use the HPE Power Advisor for:
• Estimating requirements of systems from other vendors.
• Comparing directly with other vendors’ power calculators—HPE has no control over any non-HPE applications intended to provide similar functionality.
• Precisely predicting power consumption of a single instance of a server running a particular application. Actual power consumption can be less than the power and cooling needs indicated by the Power Advisor.
• Comparing HPE BladeSystem Onboard Administrator (OA) power values. Although power values may be similar between OA and the Power Advisor, OA consists of a combination of hardware and software that monitors the health and status of a BladeSystem configuration including the allocation of power whereas the Power Advisor estimates the power usage of a configuration.
Glossary of terms used by HPE Power Advisor Table 1 lists and describes terms and parameters referenced by the HPE Power Advisor.
Table 1. Power Advisor terms and parameters.
TERM DESCRIPTION
BTU British Thermal Unit, the standard for measuring the capacity of cooling systems. The amount of power (watts) consumed by equipment (including power supply losses) determines the number of BTUs/hr required for component cooling, based on the following formula:
BTUs/hr = watts x 3.41
For example: 399 watts x 3.41 = 1360 BTUs/hr
Air conditioning equipment is typically rated in terms of tons of cooling, an old measurement based on the cooling ability of tons of ice (1 ton of cooling = 12000 BTUs/hr).
Input Power The amount of power a device turns into work and dissipates as heat, also known as real (or true) power, and is measured in watts (W). Since any heat created by electrical equipment must be extracted, knowing the total amount of watts dissipated by systems in a data center helps determine the cooling capacity needed in the facility.
HPE Power Advisor provides the following input power calculations: Idle Input Power: device on and booted, no activity Utilization Input Power: actual power required given the utilization or load level selected Maximum Load Input Power: device operating at 100% utilization
Input system current The amount of amperes a system draws during normal operation.
Input line voltage Power applied to the power supply input. Input voltage may be low-line or high-line voltage depending on what is available at the data facility. Low-line voltage [100 - 120 volts alternating current (VAC)] is the standard for AC wall outlets in North America. High-line voltage (200 - 240 VAC) is used in other parts of the world but is also increasingly common in North American data centers. Most HPE ProLiant servers accept a line voltage in the 100 - 240 VAC range. Some systems require high-line voltage. IT equipment designed for dual-range use (low-line or high-line voltage) typically consumes less power and generates less heat when operating off high-line voltage, which reduces the strain on cooling systems.
Facilities may distribute AC power as single- or three-phase. Three-phase high-line power (such as three-phase 208 VAC) is more efficient and recommended for systems requiring a minimum of three kilowatts of power.
For facilities that distribute 48-VDC power, the HPE Power Advisor offers calculations for ProLiant platforms that can be configured with 48-VDC input power supplies.
Inrush current The amount of amperes momentarily drawn by a system when AC voltage is first applied (power cord is plugged in or when a circuit breaker is switched on). Inrush current can be several times greater than input current, is cumulative across devices within a common power circuit, and must be considered when building a rack. Power supplies in HPE servers include circuitry that minimizes inrush current. Staggering the activation of segmented circuits can further reduce the effects of inrush current.
System VA Rating The total amount of power a device requires from the facility AC feed used for measuring apparent power—. Knowing the total amount of VA for all active components in a system helps data center planners determine the types and quantities of power distribution units (PDU) and uninterruptible power supplies (UPS) needed for a given rack configuration.
Technical white paper Page 5
Determining power and efficiency needs Power supplies for ProLiant and Integrity servers include a chassis regulatory plate that typically includes the following information:
• Input requirement—the input voltages (or ranges) and associated maximum current draw
• Output power—the DC voltage, maximum current (amperage), and maximum power (wattage)
Regulatory plate (sometimes referred to as “nameplate”) ratings, therefore, define the input requirements of a power supply operating at full power. Since power supplies rarely operate at the top of their rated capacity, using regulatory plate ratings for estimating system power requirements could yield inflated numbers that result in excessive power infrastructure costs.
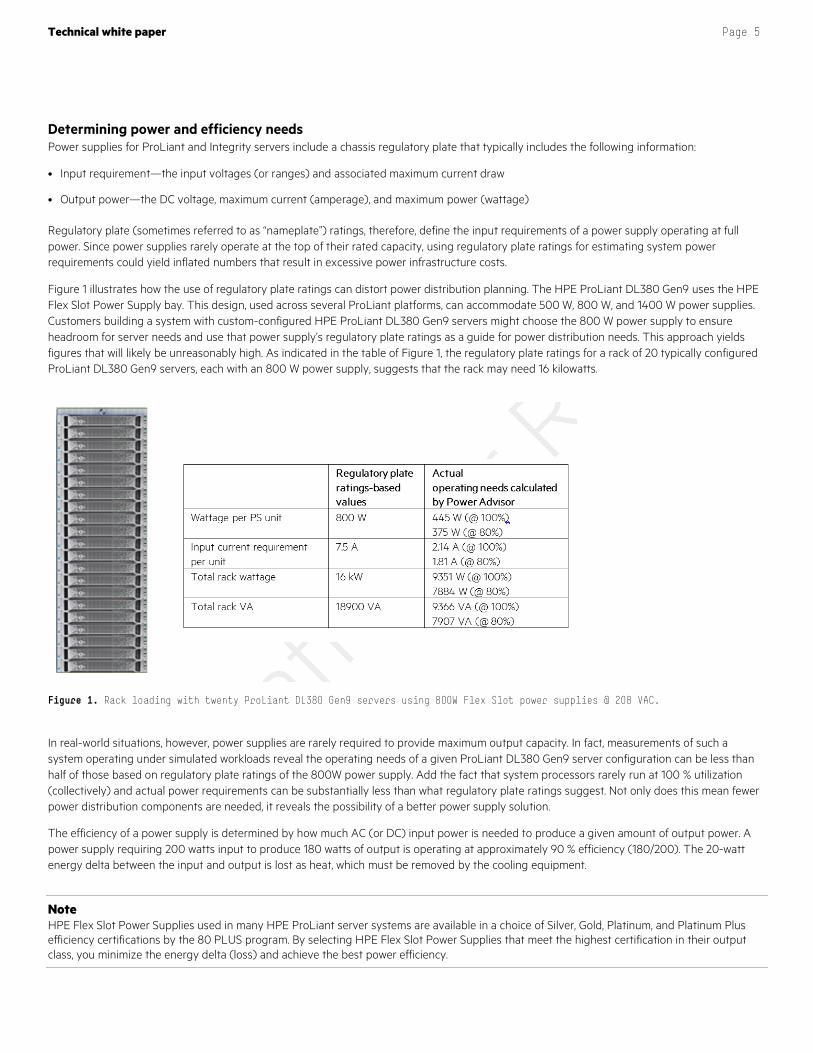
Figure 1 illustrates how the use of regulatory plate ratings can distort power distribution planning. The HPE ProLiant DL380 Gen9 uses the HPE Flex Slot Power Supply bay. This design, used across several ProLiant platforms, can accommodate 500 W, 800 W, and 1400 W power supplies. Customers building a system with custom-configured HPE ProLiant DL380 Gen9 servers might choose the 800 W power supply to ensure headroom for server needs and use that power supply’s regulatory plate ratings as a guide for power distribution needs. This approach yields figures that will likely be unreasonably high. As indicated in the table of Figure 1, the regulatory plate ratings for a rack of 20 typically configured ProLiant DL380 Gen9 servers, each with an 800 W power supply, suggests that the rack may need 16 kilowatts.
Figure 1. Rack loading with twenty ProLiant DL380 Gen9 servers using 800W Flex Slot power supplies @ 208 VAC.
In real-world situations, however, power supplies are rarely required to provide maximum output capacity. In fact, measurements of such a system operating under simulated workloads reveal the operating needs of a given ProLiant DL380 Gen9 server configuration can be less than half of those based on regulatory plate ratings of the 800W power supply. Add the fact that system processors rarely run at 100 % utilization (collectively) and actual power requirements can be substantially less than what regulatory plate ratings suggest. Not only does this mean fewer power distribution components are needed, it reveals the possibility of a better power supply solution.
The efficiency of a power supply is determined by how much AC (or DC) input power is needed to produce a given amount of output power. A power supply requiring 200 watts input to produce 180 watts of output is operating at approximately 90 % efficiency (180/200). The 20-watt energy delta between the input and output is lost as heat, which must be removed by the cooling equipment.
Note HPE Flex Slot Power Supplies used in many HPE ProLiant server systems are available in a choice of Silver, Gold, Platinum, and Platinum Plus efficiency certifications by the 80 PLUS program. By selecting HPE Flex Slot Power Supplies that meet the highest certification in their output class, you minimize the energy delta (loss) and achieve the best power efficiency.
Technical white paper Page 6
Power supply efficiency is neither linear nor flat across the power supply’s output range. Most power supplies achieve maximum efficiency when they operate in the upper range of their rated capacity. An 800-W power supply providing 400 watts (50 % capacity) is less efficient than a 500-watt power supply providing the same 400 watts of power (80 % capacity). In choosing the most efficient (right-sized) power supply for a server, an accurate power consumption estimate for that server is important, particularly for a large (enterprise) data center where cumulative energy losses from a number of servers can be significant and can result in increased power costs.
The most accurate power consumption predictions are those obtained by pre-configuring and measuring actual systems under load. This method of obtaining data is usually impractical for customers since it requires purchasing, configuring, and operating each component to acquire the measurements. HPE has tested server products under various configurations and loads to determine estimated power requirements. The results of these tests are the foundation in creating the HPE Power Advisor.
Installing the HPE Power Advisor The HPE Power Advisor utility is available through the HPE website and can be run online or downloaded and run locally. To download and install the utility, proceed as follows:
1. Click on the following URL: hpe.com/info/rackandpower
2. Click on the hyperlink “Download Now” to get the latest version of HPE Power Advisor.
3. You can save the HPE Power Advisor zip file to your desktop and install it later or you can go ahead and install it right away by choosing Open and then clicking OK. The file “HPEPowerAdvisor.zip” will download to your local machine.
4. Extract the HPE Power Advisor files. If using the WinZip application, at the WinZip window, right-click on the HPEPowerAdvisor file to extract the file, and then click UnZip.
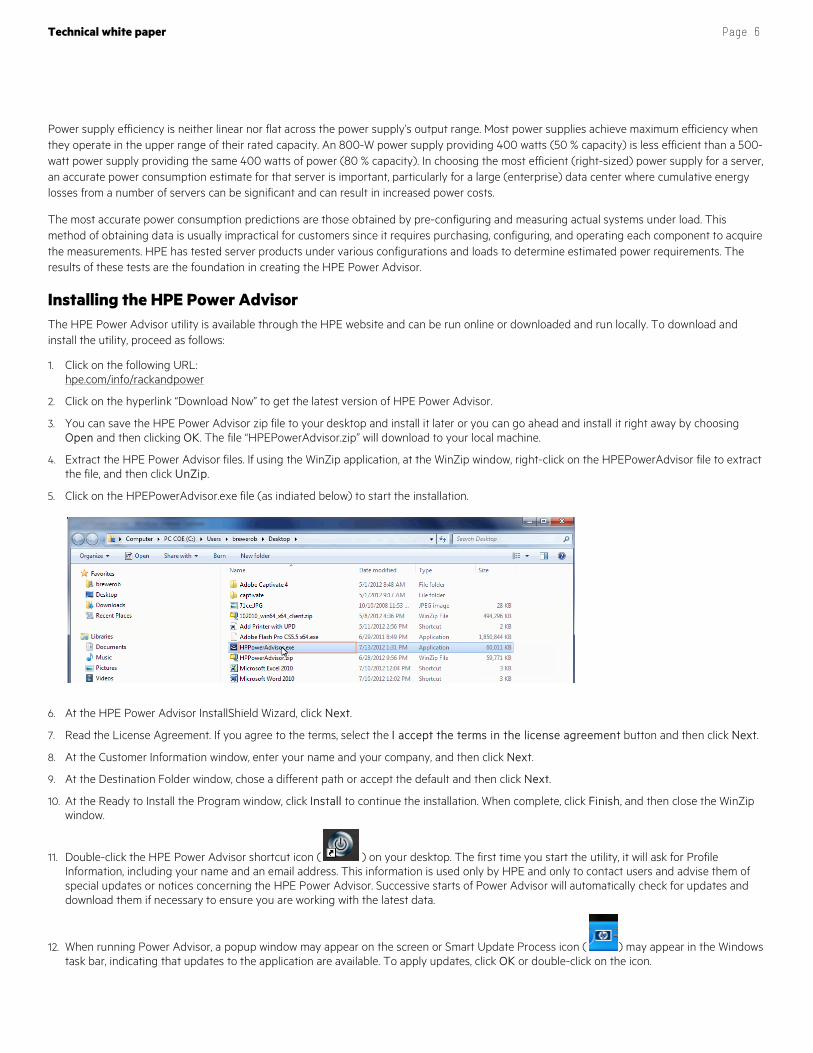
5. Click on the HPEPowerAdvisor.exe file (as indiated below) to start the installation.
6. At the HPE Power Advisor InstallShield Wizard, click Next.
7. Read the License Agreement. If you agree to the terms, select the I accept the terms in the license agreement button and then click Next.
8. At the Customer Information window, enter your name and your company, and then click Next.
9. At the Destination Folder window, chose a different path or accept the default and then click Next.
10. At the Ready to Install the Program window, click Install to continue the installation. When complete, click Finish, and then close the WinZip window.
11. Double-click the HPE Power Advisor shortcut icon ( ) on your desktop. The first time you start the utility, it will ask for Profile Information, including your name and an email address. This information is used only by HPE and only to contact users and advise them of special updates or notices concerning the HPE Power Advisor. Successive starts of Power Advisor will automatically check for updates and download them if necessary to ensure you are working with the latest data.
12. When running Power Advisor, a popup window may appear on the screen or Smart Update Process icon ( ) may appear in the Windows task bar, indicating that updates to the application are available. To apply updates, click OK or double-click on the icon.
Technical white paper Page 7
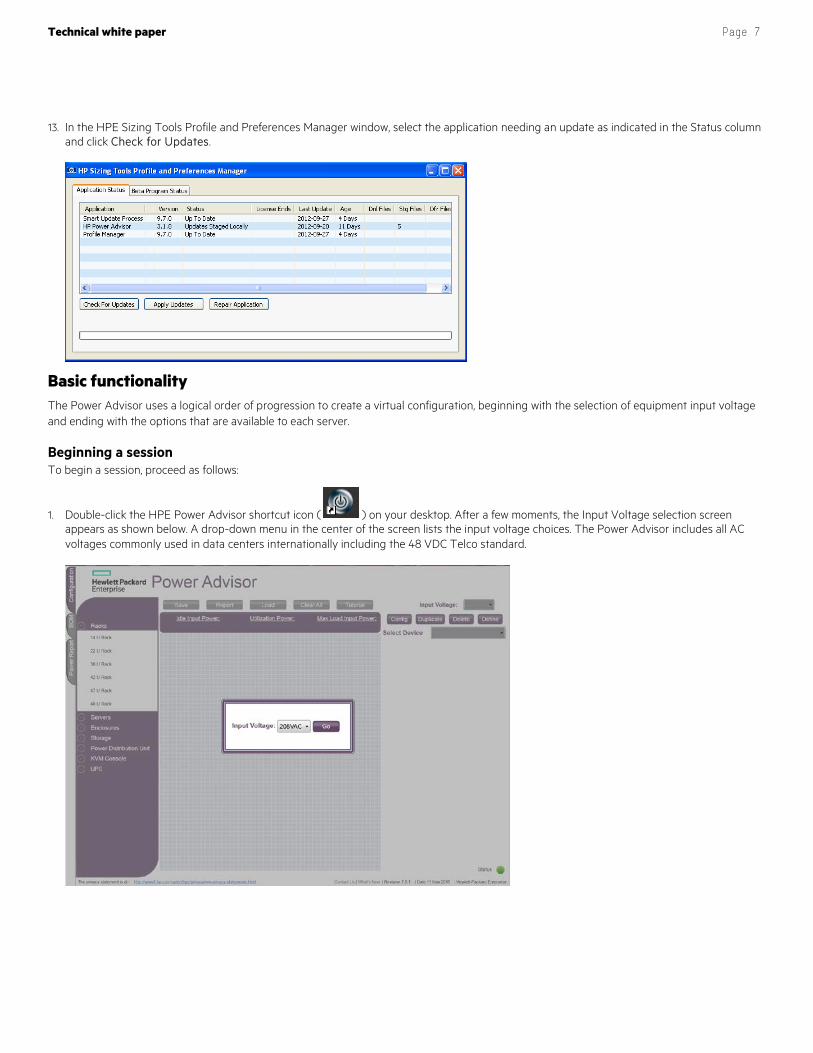
13. In the HPE Sizing Tools Profile and Preferences Manager window, select the application needing an update as indicated in the Status column and click Check for Updates.
Basic functionality The Power Advisor uses a logical order of progression to create a virtual configuration, beginning with the selection of equipment input voltage and ending with the options that are available to each server.
Beginning a session To begin a session, proceed as follows:
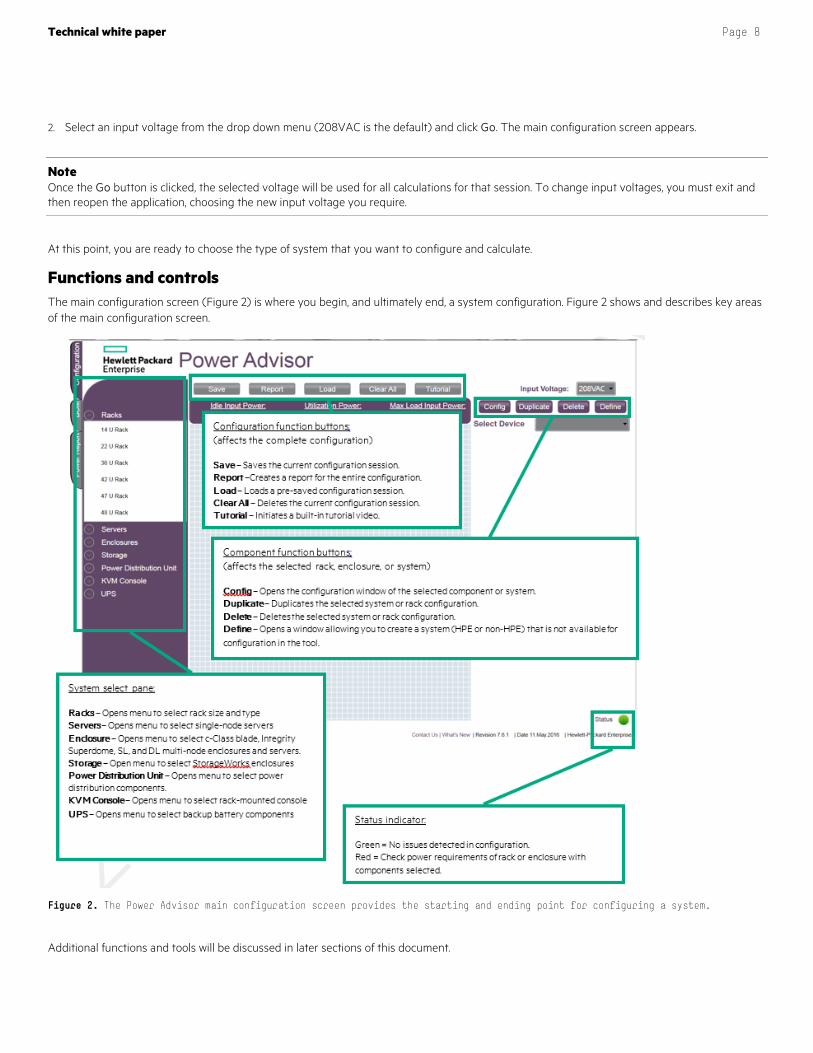
1. Double-click the HPE Power Advisor shortcut icon ( ) on your desktop. After a few moments, the Input Voltage selection screen appears as shown below. A drop-down menu in the center of the screen lists the input voltage choices. The Power Advisor includes all AC voltages commonly used in data centers internationally including the 48 VDC Telco standard.
Technical white paper Page 8
2. Select an input voltage from the drop down menu (208VAC is the default) and click Go. The main configuration screen appears.
Note Once the Go button is clicked, the selected voltage will be used for all calculations for that session. To change input voltages, you must exit and then reopen the application, choosing the new input voltage you require.
At this point, you are ready to choose the type of system that you want to configure and calculate.
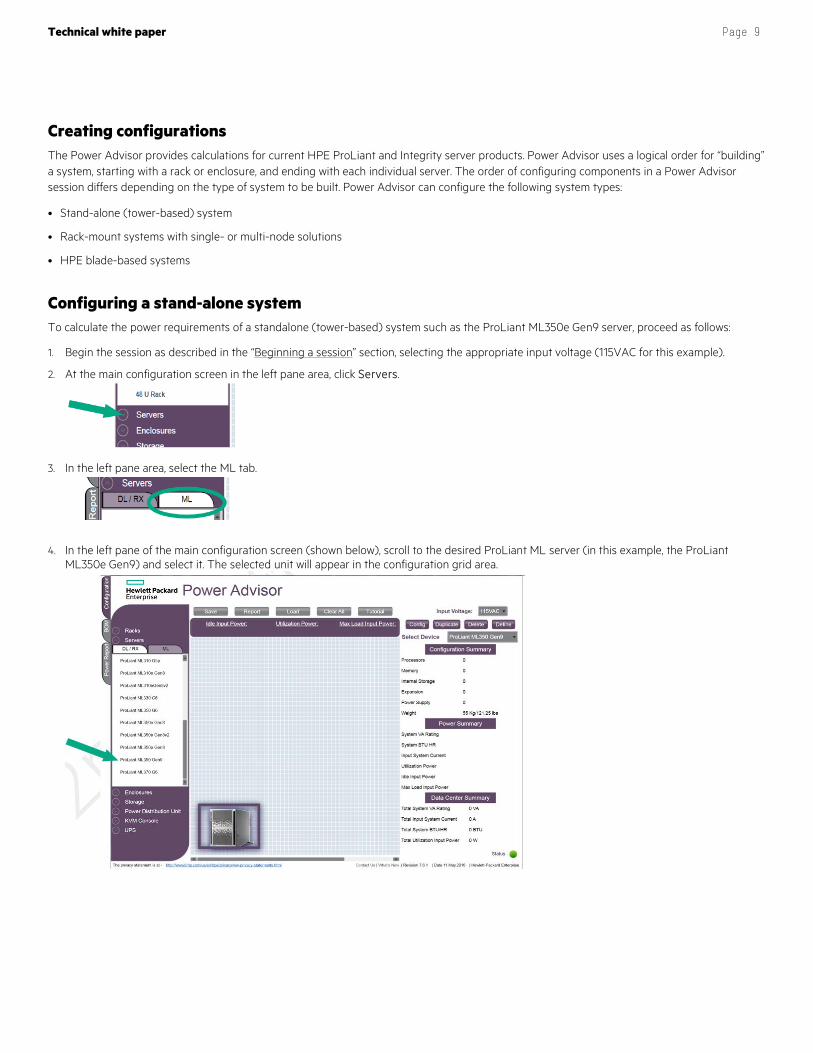
Functions and controls The main configuration screen (Figure 2) is where you begin, and ultimately end, a system configuration. Figure 2 shows and describes key areas of the main configuration screen.
Figure 2. The Power Advisor main configuration screen provides the starting and ending point for configuring a system.
Additional functions and tools will be discussed in later sections of this document.
Technical white paper Page 9
Creating configurations The Power Advisor provides calculations for current HPE ProLiant and Integrity server products. Power Advisor uses a logical order for “building” a system, starting with a rack or enclosure, and ending with each individual server. The order of configuring components in a Power Advisor session differs depending on the type of system to be built. Power Advisor can configure the following system types:
• Stand-alone (tower-based) system
• Rack-mount systems with single- or multi-node solutions
• HPE blade-based systems
Configuring a stand-alone system To calculate the power requirements of a standalone (tower-based) system such as the ProLiant ML350e Gen9 server, proceed as follows:
1. Begin the session as described in the “Beginning a session” section, selecting the appropriate input voltage (115VAC for this example).
2. At the main configuration screen in the left pane area, click Servers.
3. In the left pane area, select the ML tab.
4. In the left pane of the main configuration screen (shown below), scroll to the desired ProLiant ML server (in this example, the ProLiant ML350e Gen9) and select it. The selected unit will appear in the configuration grid area.
Technical white paper Page 10
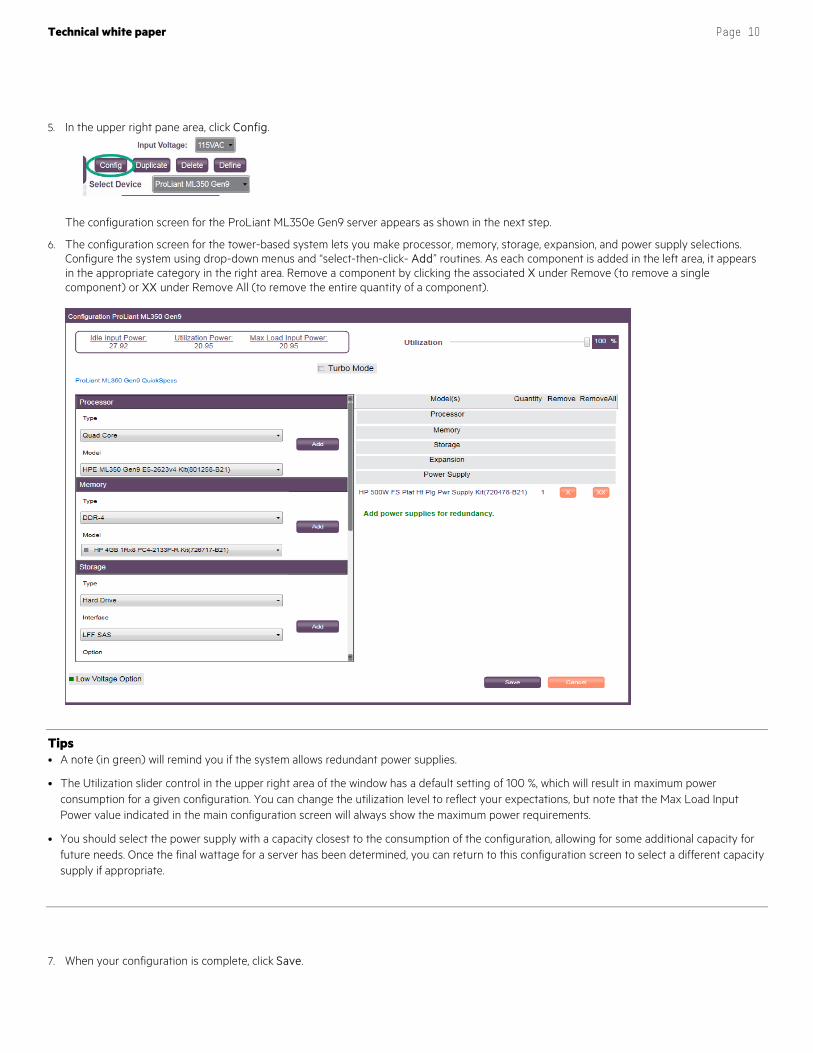
5. In the upper right pane area, click Config.
The configuration screen for the ProLiant ML350e Gen9 server appears as shown in the next step.
6. The configuration screen for the tower-based system lets you make processor, memory, storage, expansion, and power supply selections. Configure the system using drop-down menus and “select-then-click- Add” routines. As each component is added in the left area, it appears in the appropriate category in the right area. Remove a component by clicking the associated X under Remove (to remove a single component) or XX under Remove All (to remove the entire quantity of a component).
Tips • A note (in green) will remind you if the system allows redundant power supplies.
• The Utilization slider control in the upper right area of the window has a default setting of 100 %, which will result in maximum power consumption for a given configuration. You can change the utilization level to reflect your expectations, but note that the Max Load Input Power value indicated in the main configuration screen will always show the maximum power requirements.
• You should select the power supply with a capacity closest to the consumption of the configuration, allowing for some additional capacity for future needs. Once the final wattage for a server has been determined, you can return to this configuration screen to select a different capacity supply if appropriate.
7. When your configuration is complete, click Save.
Technical white paper Page 11
Note You can stop and save a session at any time (refer to the section “Saving and loading sessions”).
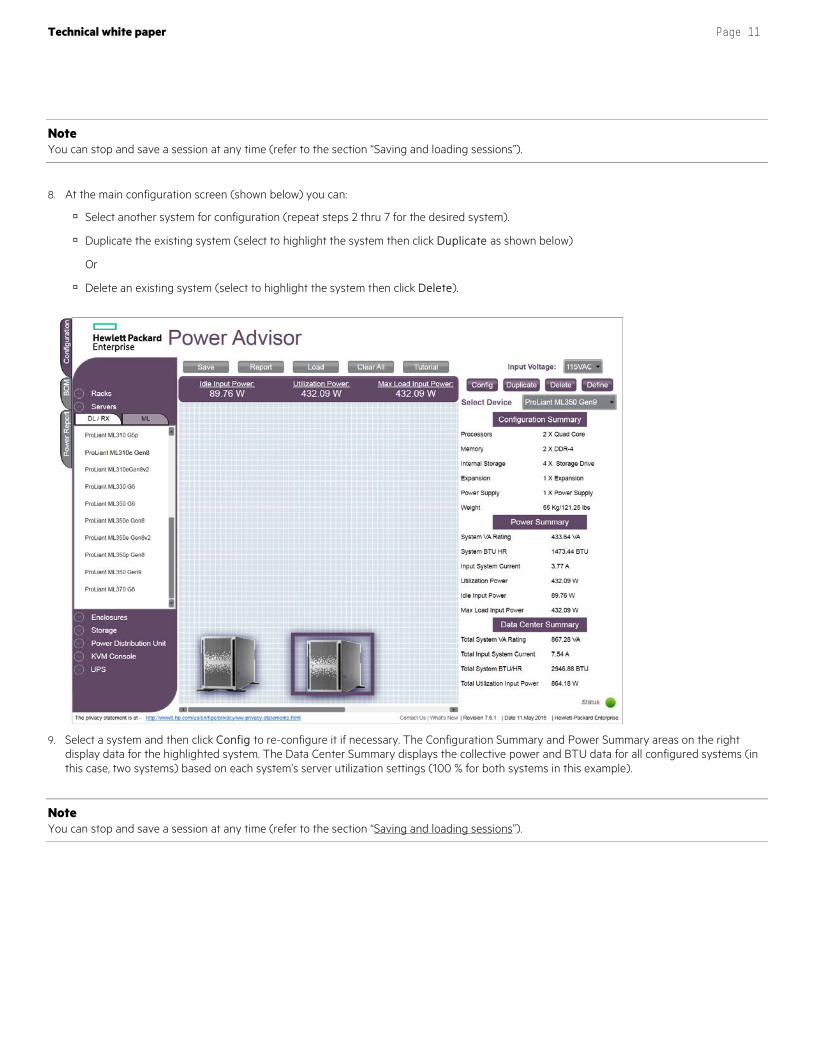
8. At the main configuration screen (shown below) you can:
Select another system for configuration (repeat steps 2 thru 7 for the desired system).
Duplicate the existing system (select to highlight the system then click Duplicate as shown below)
Or
Delete an existing system (select to highlight the system then click Delete).
9. Select a system and then click Config to re-configure it if necessary. The Configuration Summary and Power Summary areas on the right display data for the highlighted system. The Data Center Summary displays the collective power and BTU data for all configured systems (in this case, two systems) based on each system’s server utilization settings (100 % for both systems in this example).
Note You can stop and save a session at any time (refer to the section “Saving and loading sessions”).
Technical white paper Page 12
Configuring a system of single-node servers To calculate the power requirements for rack-based single-node servers, proceed as follows:
1. Begin the session as described in the “Beginning a session” section, selecting the appropriate input voltage (208VAC for this exercise).
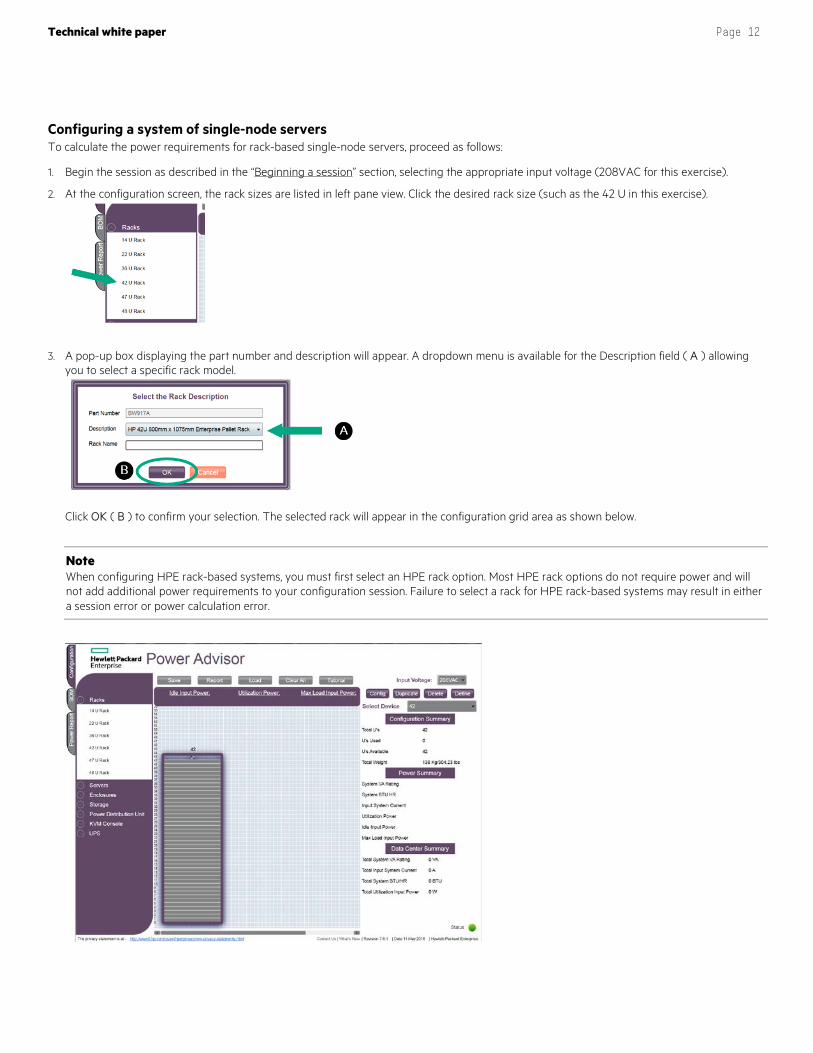
2. At the configuration screen, the rack sizes are listed in left pane view. Click the desired rack size (such as the 42 U in this exercise).
3. A pop-up box displaying the part number and description will appear. A dropdown menu is available for the Description field ( A ) allowing you to select a specific rack model.
Click OK ( B ) to confirm your selection. The selected rack will appear in the configuration grid area as shown below.
Note When configuring HPE rack-based systems, you must first select an HPE rack option. Most HPE rack options do not require power and will not add additional power requirements to your configuration session. Failure to select a rack for HPE rack-based systems may result in either a session error or power calculation error.
Technical white paper Page 13
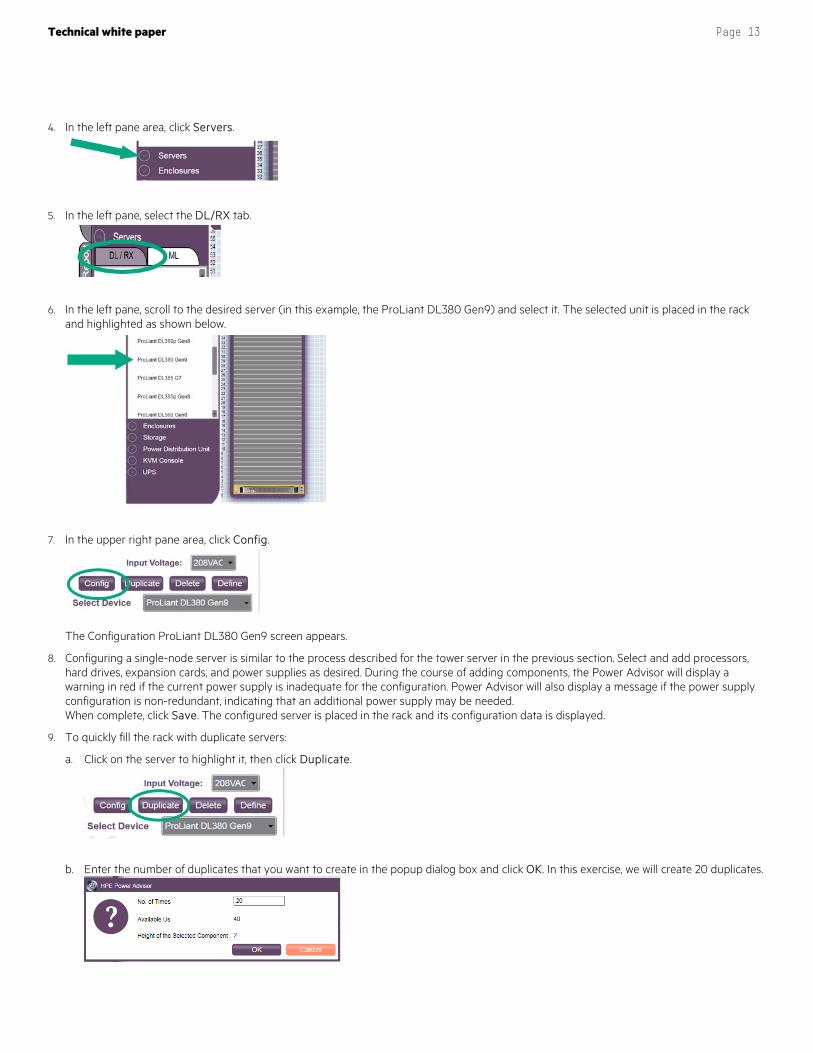
4. In the left pane area, click Servers.
5. In the left pane, select the DL/RX tab.
6. In the left pane, scroll to the desired server (in this example, the ProLiant DL380 Gen9) and select it. The selected unit is placed in the rack and highlighted as shown below.
7. In the upper right pane area, click Config.
The Configuration ProLiant DL380 Gen9 screen appears.
8. Configuring a single-node server is similar to the process described for the tower server in the previous section. Select and add processors, hard drives, expansion cards, and power supplies as desired. During the course of adding components, the Power Advisor will display a warning in red if the current power supply is inadequate for the configuration. Power Advisor will also display a message if the power supply configuration is non-redundant, indicating that an additional power supply may be needed. When complete, click Save. The configured server is placed in the rack and its configuration data is displayed.
9. To quickly fill the rack with duplicate servers:
a. Click on the server to highlight it, then click Duplicate.
b. Enter the number of duplicates that you want to create in the popup dialog box and click OK. In this exercise, we will create 20 duplicates.
Technical white paper Page 14
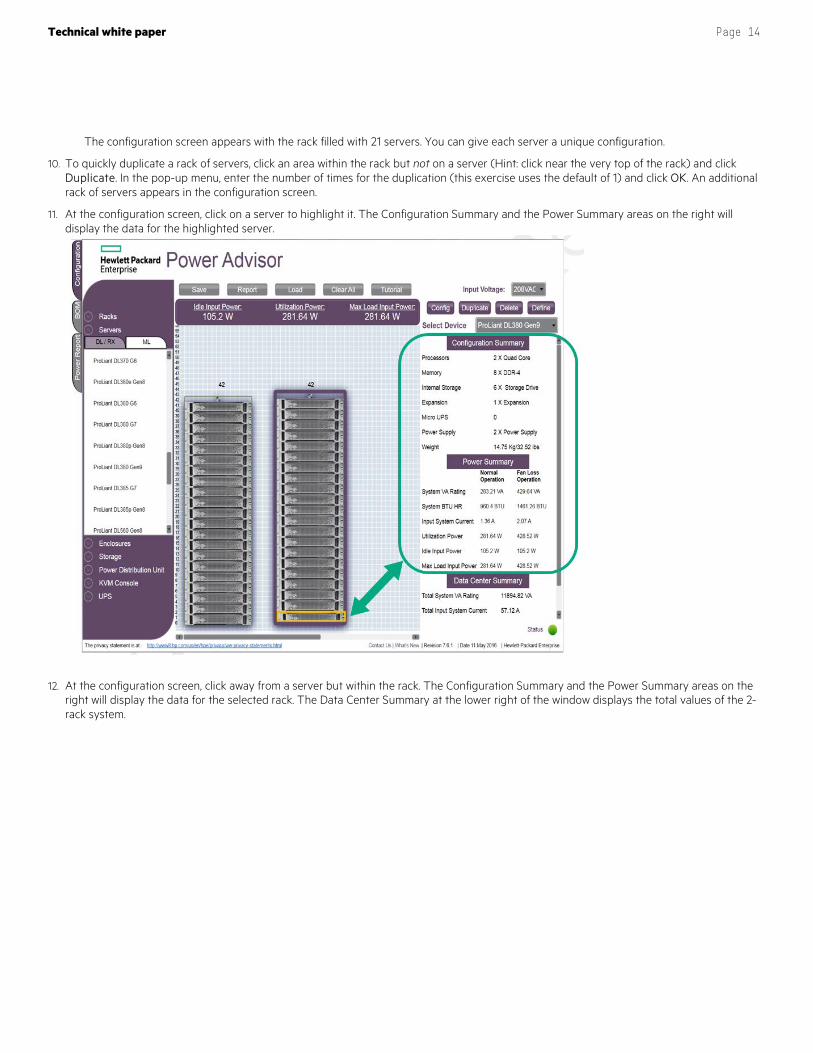
The configuration screen appears with the rack filled with 21 servers. You can give each server a unique configuration.
10. To quickly duplicate a rack of servers, click an area within the rack but not on a server (Hint: click near the very top of the rack) and click Duplicate. In the pop-up menu, enter the number of times for the duplication (this exercise uses the default of 1) and click OK. An additional rack of servers appears in the configuration screen.
11. At the configuration screen, click on a server to highlight it. The Configuration Summary and the Power Summary areas on the right will display the data for the highlighted server.
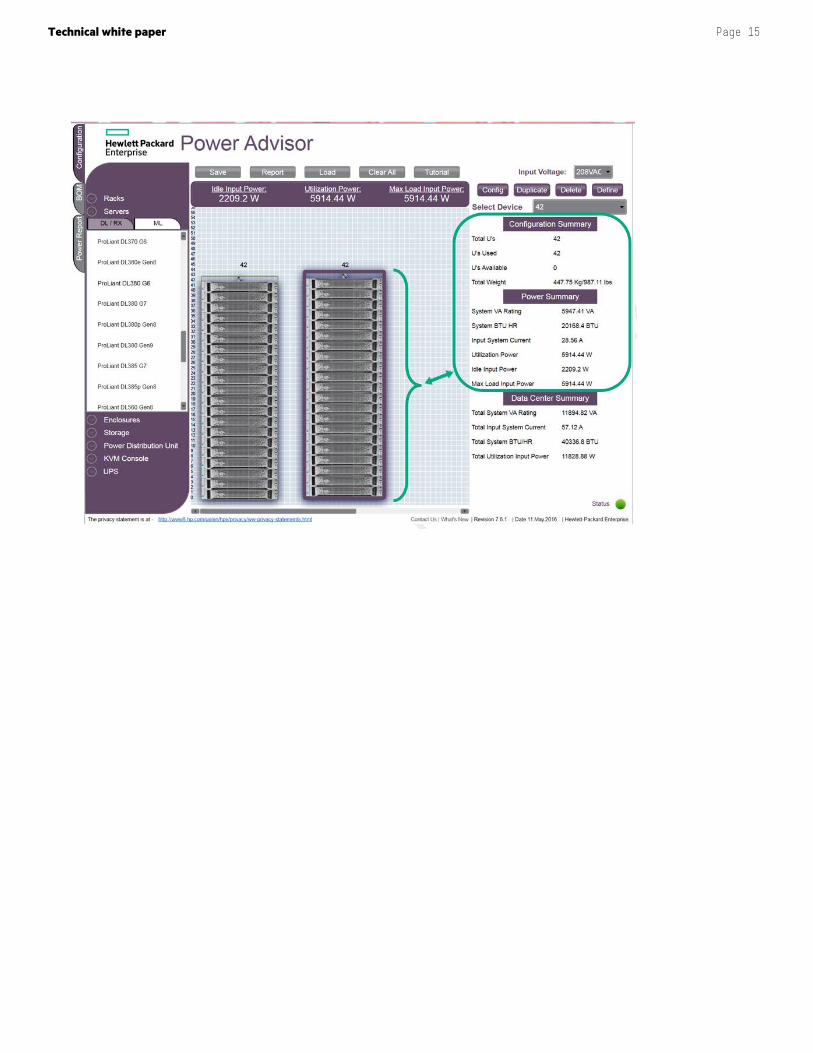
12. At the configuration screen, click away from a server but within the rack. The Configuration Summary and the Power Summary areas on the right will display the data for the selected rack. The Data Center Summary at the lower right of the window displays the total values of the 2-rack system.
Technical white paper Page 15
Technical white paper Page 16
Configuring a system of multi-node servers
Note We recommend that you become familiar with HPE multi-node servers before using HPE Power Advisor to configure such systems.
The following procedure calculates the power requirements for a rack populated with HPE Apollo 6000 multi-node server systems:
1. Begin the session as described in the “Beginning a session” section, selecting the appropriate input voltage (208VAC for this exercise).
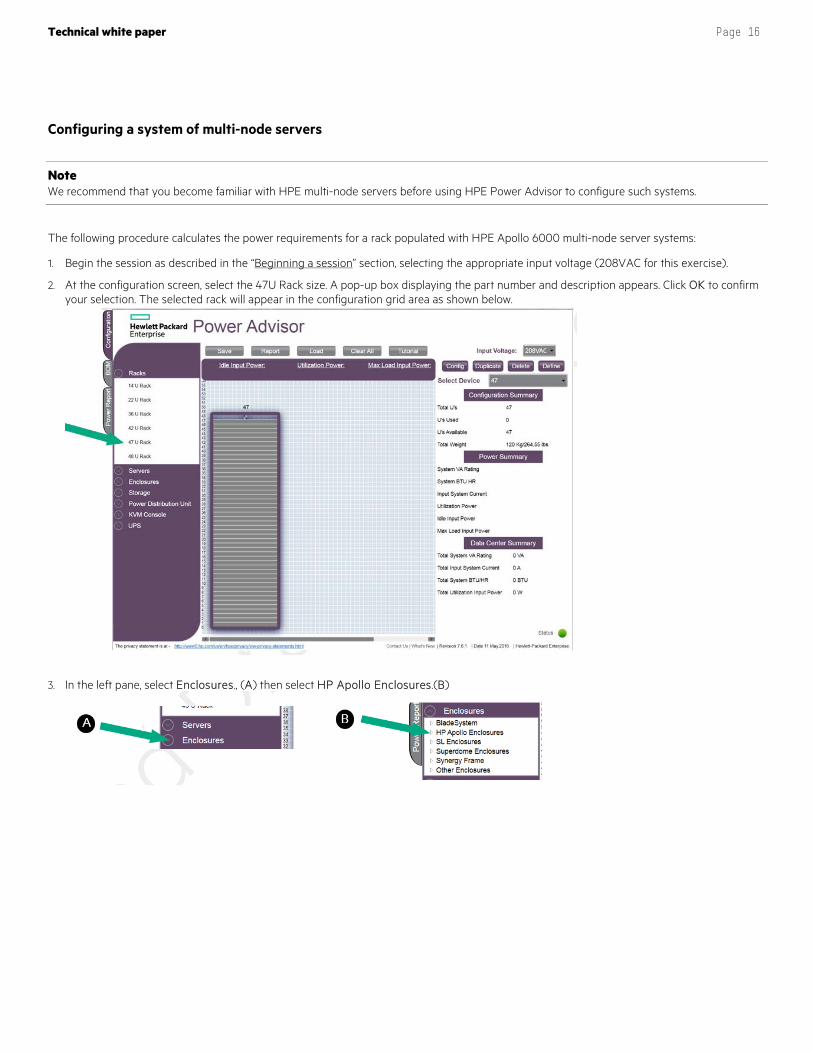
2. At the configuration screen, select the 47U Rack size. A pop-up box displaying the part number and description appears. Click OK to confirm your selection. The selected rack will appear in the configuration grid area as shown below.
3. In the left pane, select Enclosures., (A) then select HP Apollo Enclosures.(B)
Technical white paper Page 17
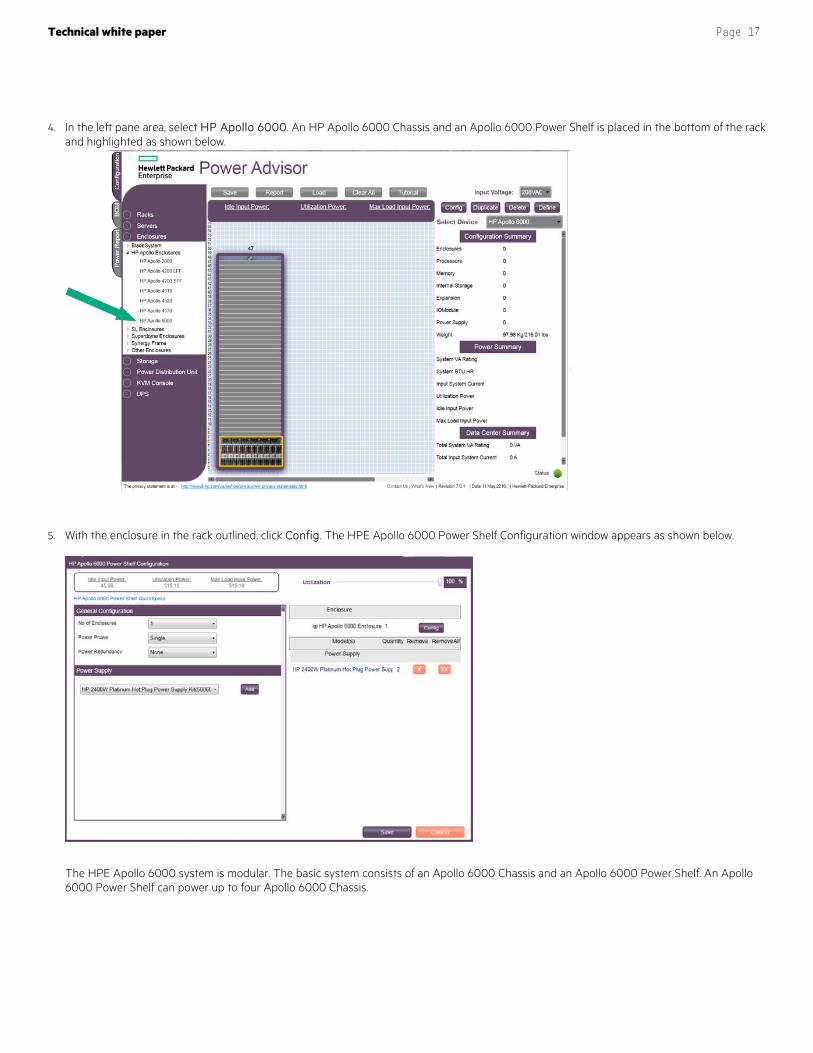
4. In the left pane area, select HP Apollo 6000. An HP Apollo 6000 Chassis and an Apollo 6000 Power Shelf is placed in the bottom of the rack and highlighted as shown below.
5. With the enclosure in the rack outlined, click Config. The HPE Apollo 6000 Power Shelf Configuration window appears as shown below.
The HPE Apollo 6000 system is modular. The basic system consists of an Apollo 6000 Chassis and an Apollo 6000 Power Shelf. An Apollo 6000 Power Shelf can power up to four Apollo 6000 Chassis.
Technical white paper Page 18
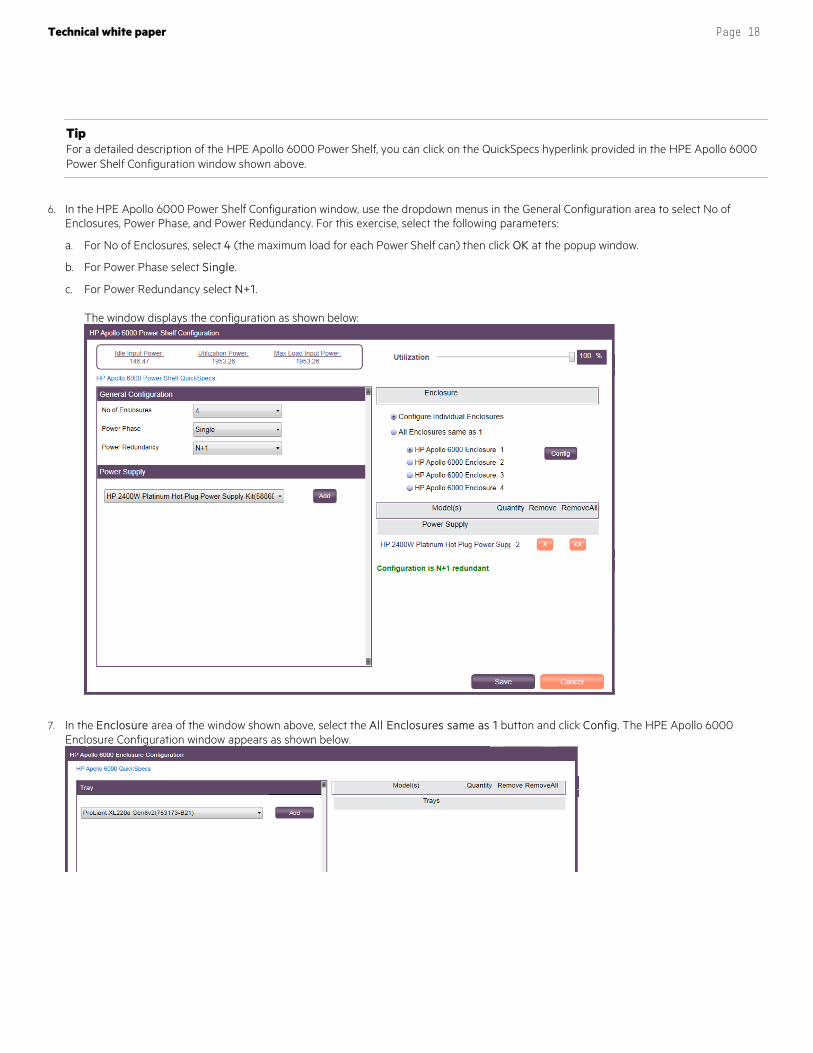
Tip For a detailed description of the HPE Apollo 6000 Power Shelf, you can click on the QuickSpecs hyperlink provided in the HPE Apollo 6000 Power Shelf Configuration window shown above.
6. In the HPE Apollo 6000 Power Shelf Configuration window, use the dropdown menus in the General Configuration area to select No of Enclosures, Power Phase, and Power Redundancy. For this exercise, select the following parameters:
a. For No of Enclosures, select 4 (the maximum load for each Power Shelf can) then click OK at the popup window.
b. For Power Phase select Single.
c. For Power Redundancy select N+1. The window displays the configuration as shown below:
7. In the Enclosure area of the window shown above, select the All Enclosures same as 1 button and click Config. The HPE Apollo 6000 Enclosure Configuration window appears as shown below.
Technical white paper Page 19
Tip For a detailed description of the HPE Apollo 6000 Chassis, you can click on the QuickSpecs hyperlink provided in the HPE Apollo 6000 Enclosure Configuration window shown above.
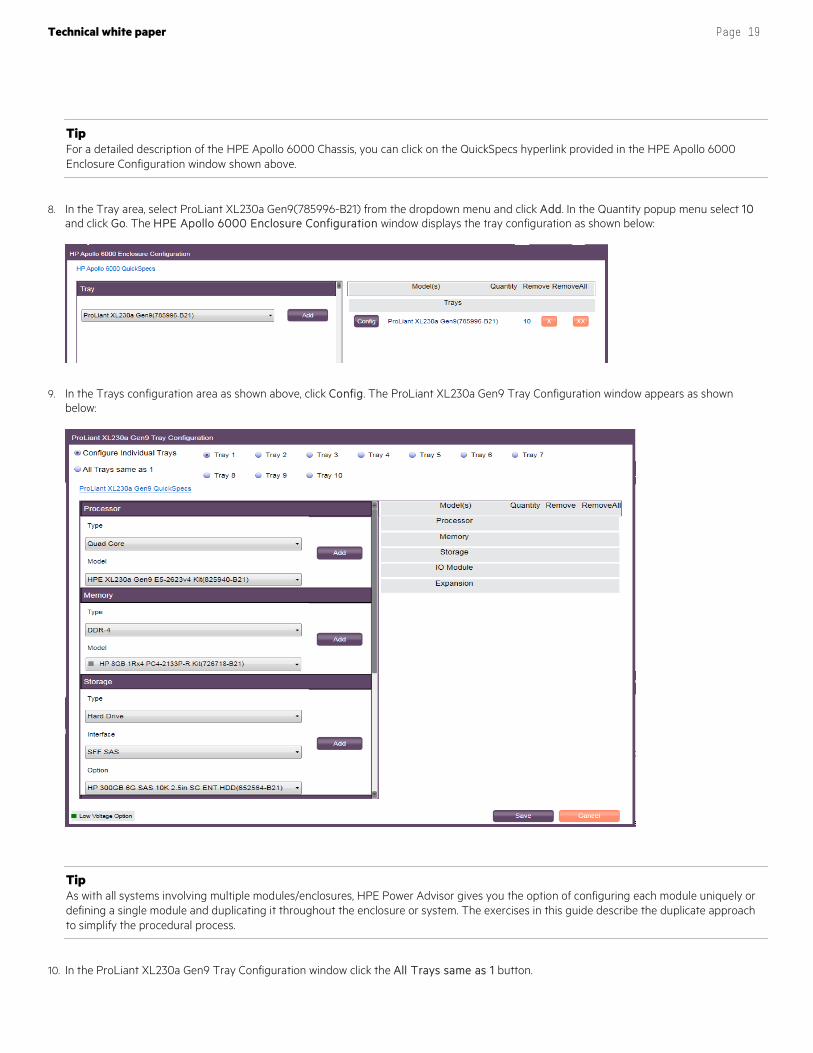
8. In the Tray area, select ProLiant XL230a Gen9(785996-B21) from the dropdown menu and click Add. In the Quantity popup menu select 10 and click Go. The HPE Apollo 6000 Enclosure Configuration window displays the tray configuration as shown below:
9. In the Trays configuration area as shown above, click Config. The ProLiant XL230a Gen9 Tray Configuration window appears as shown below:
Tip As with all systems involving multiple modules/enclosures, HPE Power Advisor gives you the option of configuring each module uniquely or defining a single module and duplicating it throughout the enclosure or system. The exercises in this guide describe the duplicate approach to simplify the procedural process.
10. In the ProLiant XL230a Gen9 Tray Configuration window click the All Trays same as 1 button.
Technical white paper Page 20
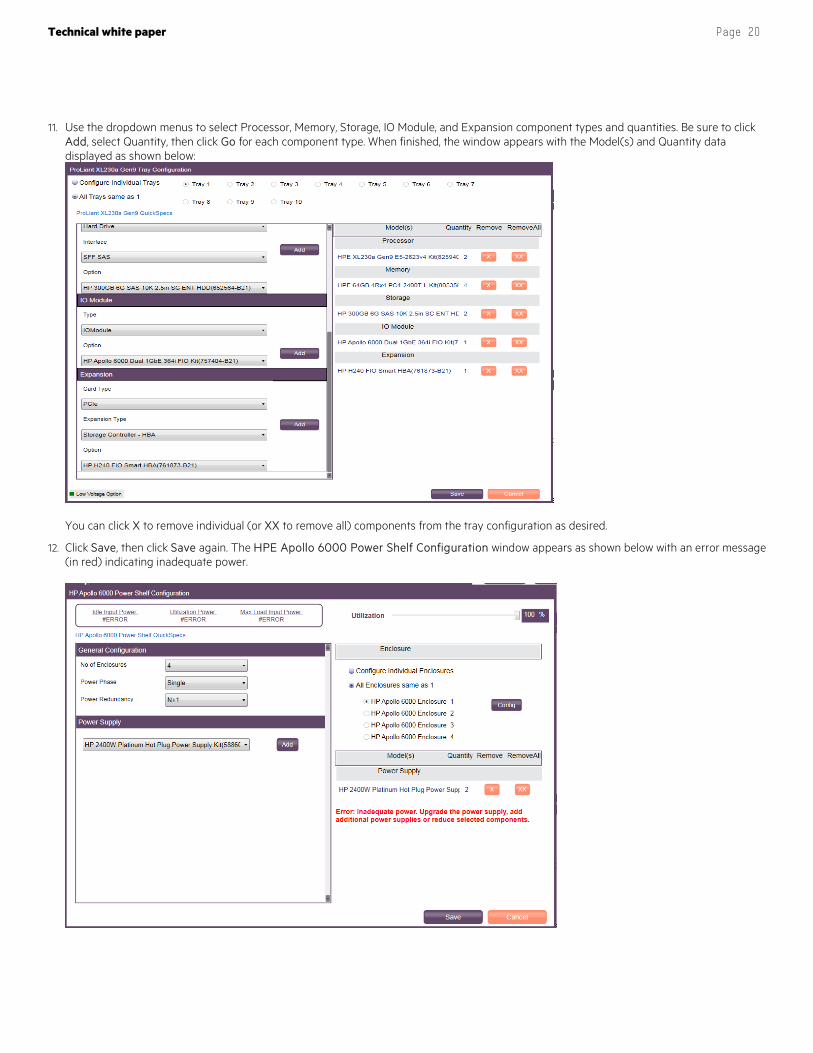
11. Use the dropdown menus to select Processor, Memory, Storage, IO Module, and Expansion component types and quantities. Be sure to click Add, select Quantity, then click Go for each component type. When finished, the window appears with the Model(s) and Quantity data displayed as shown below:
You can click X to remove individual (or XX to remove all) components from the tray configuration as desired.
12. Click Save, then click Save again. The HPE Apollo 6000 Power Shelf Configuration window appears as shown below with an error message (in red) indicating inadequate power.
Technical white paper Page 21
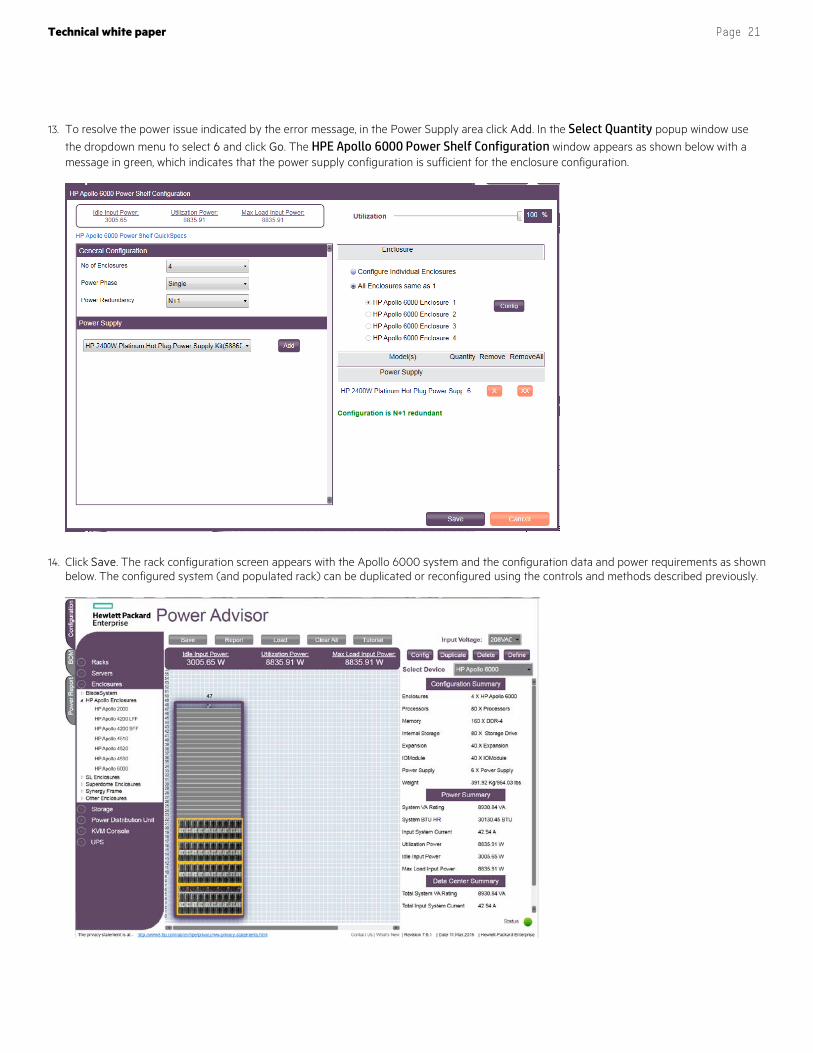
13. To resolve the power issue indicated by the error message, in the Power Supply area click Add. In the Select Quantity popup window use the dropdown menu to select 6 and click Go. The HPE Apollo 6000 Power Shelf Configuration window appears as shown below with a message in green, which indicates that the power supply configuration is sufficient for the enclosure configuration.
14. Click Save. The rack configuration screen appears with the Apollo 6000 system and the configuration data and power requirements as shown below. The configured system (and populated rack) can be duplicated or reconfigured using the controls and methods described previously.
Technical white paper Page 22
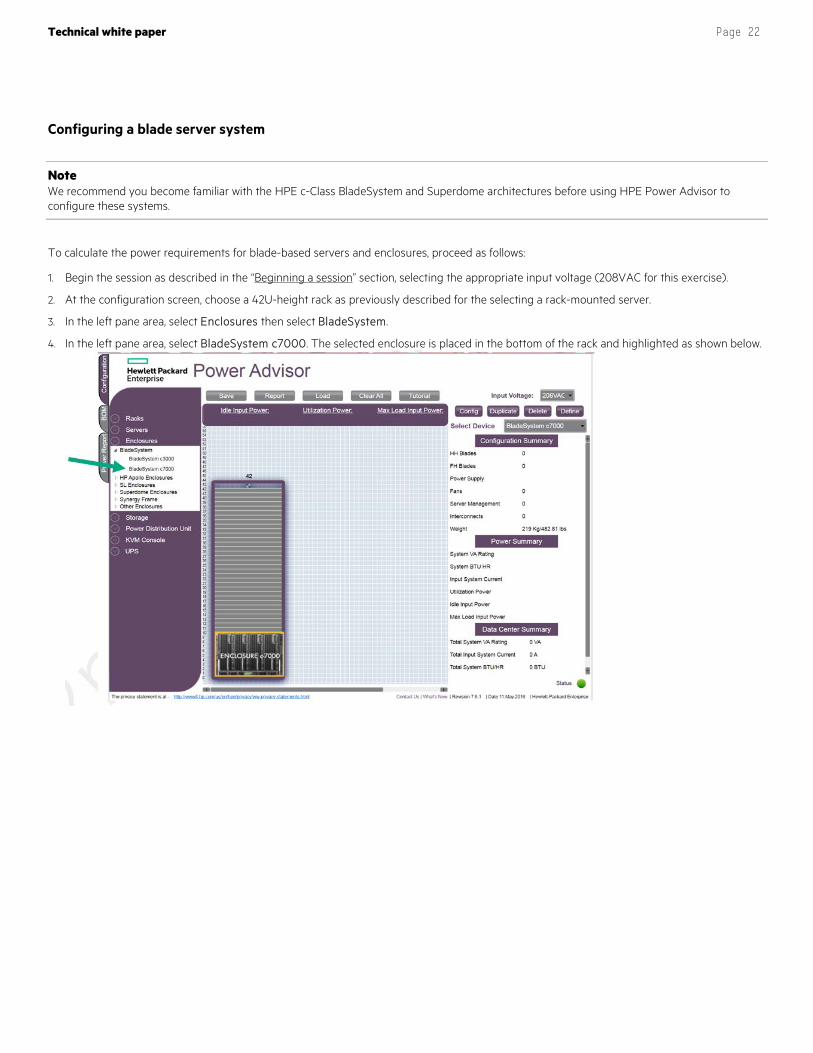
Configuring a blade server system
Note We recommend you become familiar with the HPE c-Class BladeSystem and Superdome architectures before using HPE Power Advisor to configure these systems.
To calculate the power requirements for blade-based servers and enclosures, proceed as follows:
1. Begin the session as described in the “Beginning a session” section, selecting the appropriate input voltage (208VAC for this exercise).
2. At the configuration screen, choose a 42U-height rack as previously described for the selecting a rack-mounted server.
3. In the left pane area, select Enclosures then select BladeSystem.
4. In the left pane area, select BladeSystem c7000. The selected enclosure is placed in the bottom of the rack and highlighted as shown below.
Technical white paper Page 23
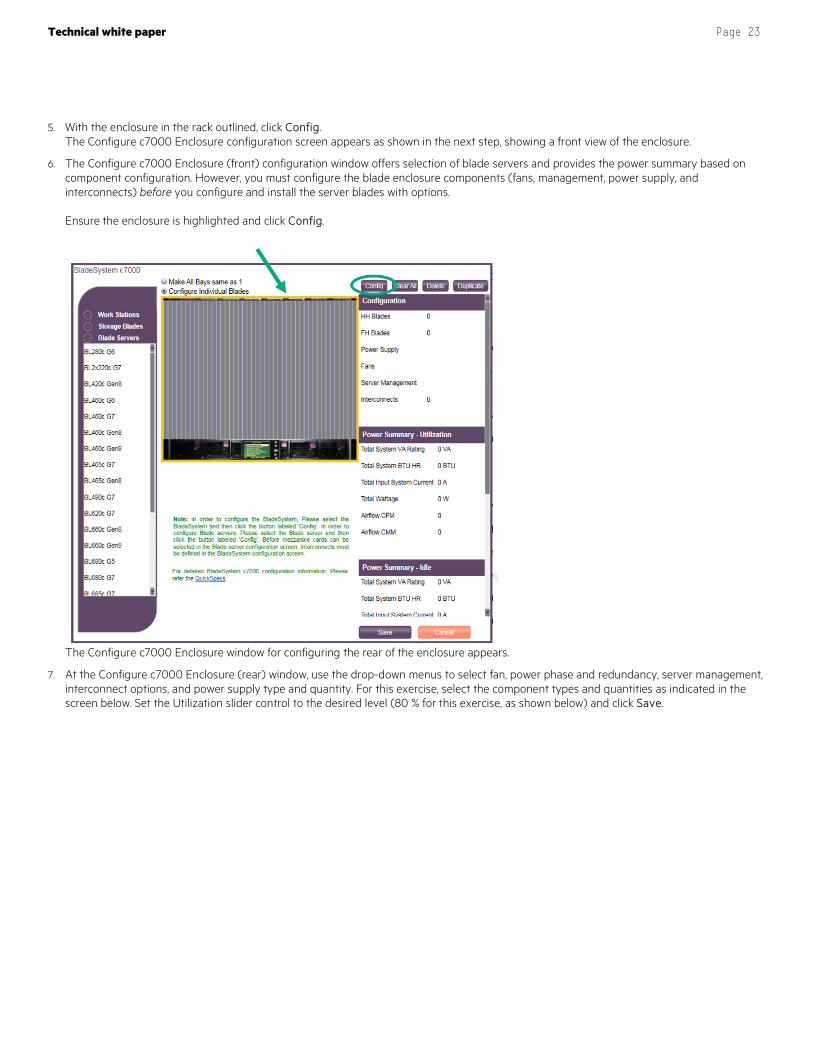
5. With the enclosure in the rack outlined, click Config. The Configure c7000 Enclosure configuration screen appears as shown in the next step, showing a front view of the enclosure.
6. The Configure c7000 Enclosure (front) configuration window offers selection of blade servers and provides the power summary based on component configuration. However, you must configure the blade enclosure components (fans, management, power supply, and interconnects) before you configure and install the server blades with options. Ensure the enclosure is highlighted and click Config.
The Configure c7000 Enclosure window for configuring the rear of the enclosure appears.
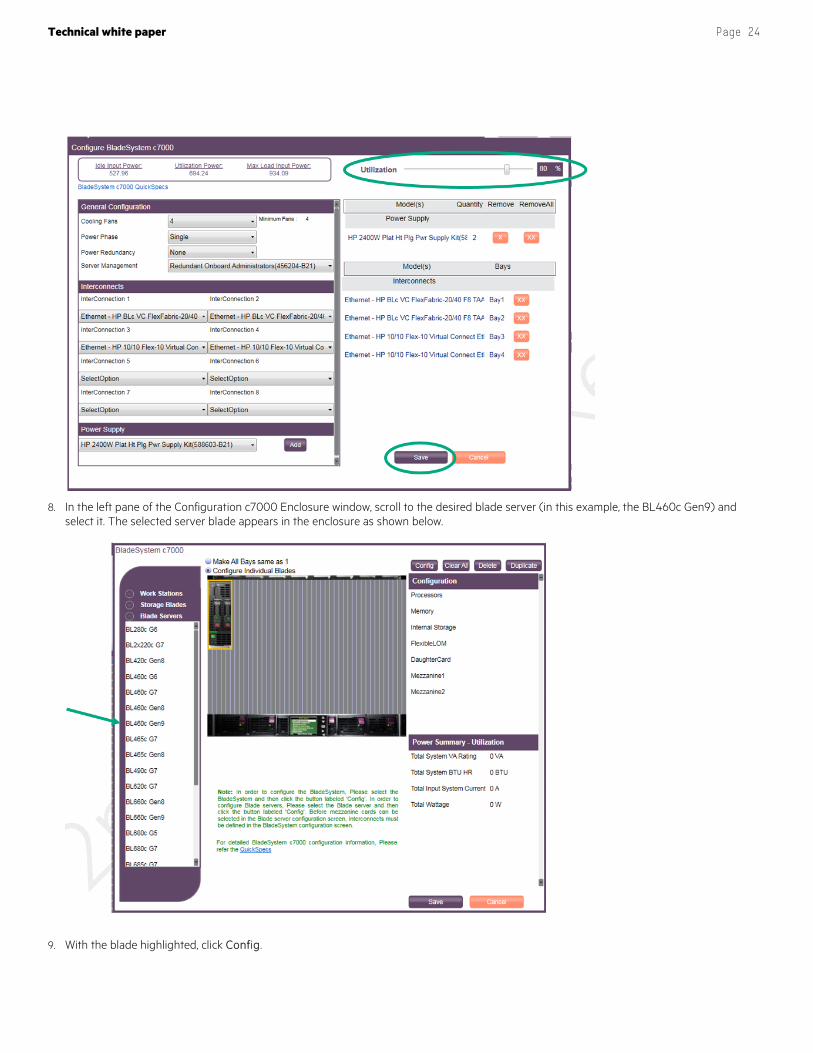
7. At the Configure c7000 Enclosure (rear) window, use the drop-down menus to select fan, power phase and redundancy, server management, interconnect options, and power supply type and quantity. For this exercise, select the component types and quantities as indicated in the screen below. Set the Utilization slider control to the desired level (80 % for this exercise, as shown below) and click Save.
Technical white paper Page 24
8. In the left pane of the Configuration c7000 Enclosure window, scroll to the desired blade server (in this example, the BL460c Gen9) and select it. The selected server blade appears in the enclosure as shown below.
9. With the blade highlighted, click Config.
Technical white paper Page 25
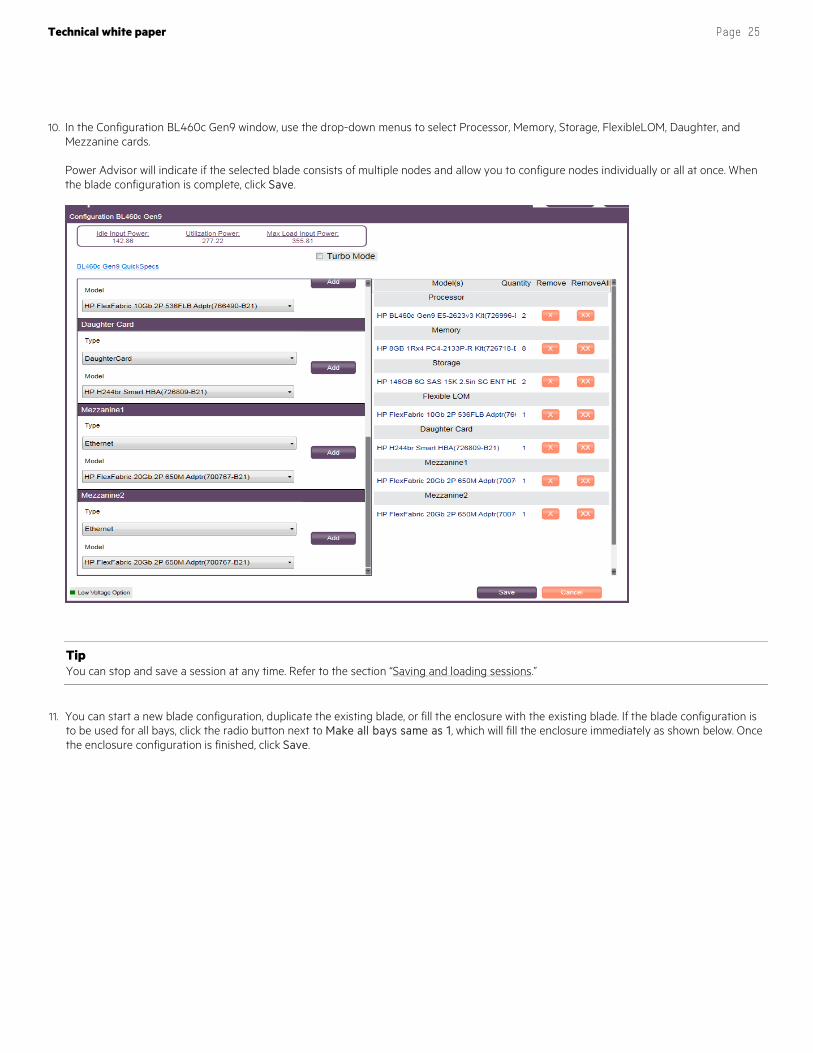
10. In the Configuration BL460c Gen9 window, use the drop-down menus to select Processor, Memory, Storage, FlexibleLOM, Daughter, and Mezzanine cards. Power Advisor will indicate if the selected blade consists of multiple nodes and allow you to configure nodes individually or all at once. When the blade configuration is complete, click Save.
Tip You can stop and save a session at any time. Refer to the section “Saving and loading sessions.”
11. You can start a new blade configuration, duplicate the existing blade, or fill the enclosure with the existing blade. If the blade configuration is to be used for all bays, click the radio button next to Make all bays same as 1, which will fill the enclosure immediately as shown below. Once the enclosure configuration is finished, click Save.
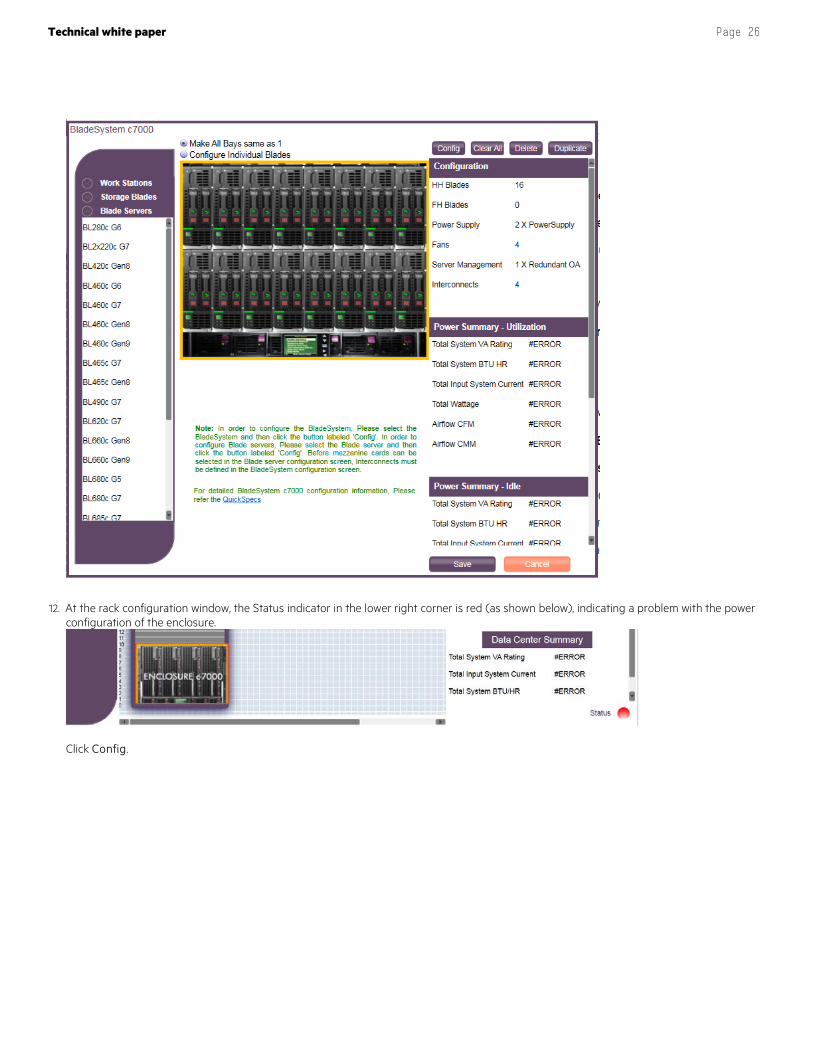
Technical white paper Page 26
12. At the rack configuration window, the Status indicator in the lower right corner is red (as shown below), indicating a problem with the power configuration of the enclosure.
Click Config.
Technical white paper Page 27
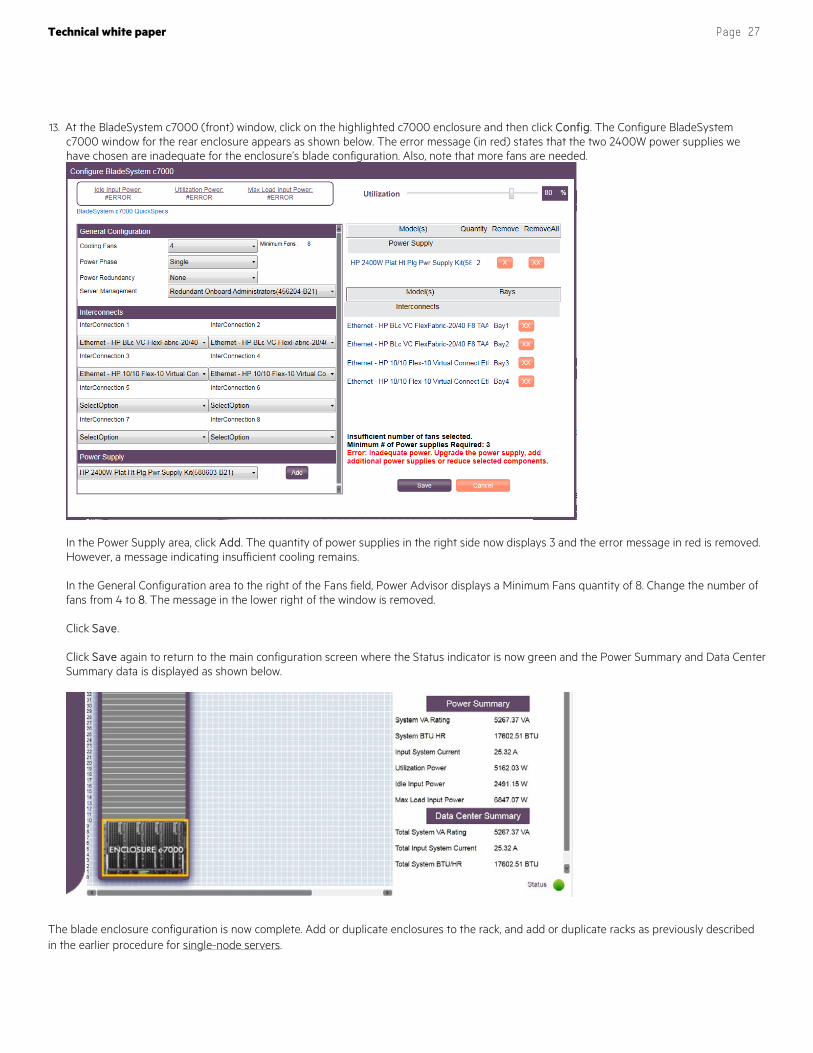
13. At the BladeSystem c7000 (front) window, click on the highlighted c7000 enclosure and then click Config. The Configure BladeSystem c7000 window for the rear enclosure appears as shown below. The error message (in red) states that the two 2400W power supplies we have chosen are inadequate for the enclosure’s blade configuration. Also, note that more fans are needed.
In the Power Supply area, click Add. The quantity of power supplies in the right side now displays 3 and the error message in red is removed. However, a message indicating insufficient cooling remains. In the General Configuration area to the right of the Fans field, Power Advisor displays a Minimum Fans quantity of 8. Change the number of fans from 4 to 8. The message in the lower right of the window is removed. Click Save. Click Save again to return to the main configuration screen where the Status indicator is now green and the Power Summary and Data Center Summary data is displayed as shown below.
The blade enclosure configuration is now complete. Add or duplicate enclosures to the rack, and add or duplicate racks as previously described in the earlier procedure for single-node servers.
Technical white paper Page 28
Saving and loading sessions A Power Advisor configuration session can be saved at any time for later retrieval.
Saving a session To save a session, proceed as follows:
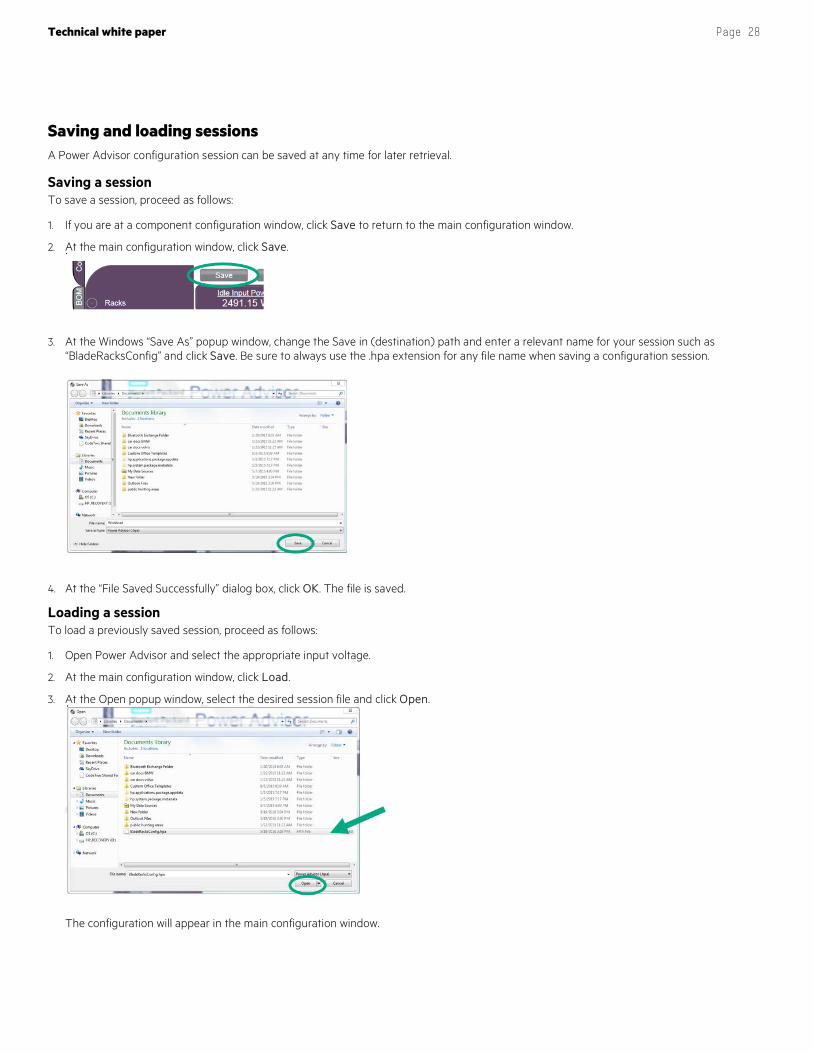
1. If you are at a component configuration window, click Save to return to the main configuration window.
2. At the main configuration window, click Save.
3. At the Windows “Save As” popup window, change the Save in (destination) path and enter a relevant name for your session such as “BladeRacksConfig” and click Save. Be sure to always use the .hpa extension for any file name when saving a configuration session.
4. At the “File Saved Successfully” dialog box, click OK. The file is saved.
Loading a session To load a previously saved session, proceed as follows:
1. Open Power Advisor and select the appropriate input voltage.
2. At the main configuration window, click Load.
3. At the Open popup window, select the desired session file and click Open.
The configuration will appear in the main configuration window.
Technical white paper Page 29
Session reporting tools The Power Advisor can create reports that provide the data you need for forecasting the total cost of ownership (TCO) for new power requirements as well as generate a bill of materials (BOM) for a particular configuration session.
Power report Power Advisor makes it possible to pre-calculate the Total Cost of Ownership (TCO) of a configuration session based on the rate paid per kilowatt hour (kWh). The Power Report provides a comprehensive estimation of the power required and the cost to operate the selected configuration over a period of time.
To generate a power report, proceed as follows:
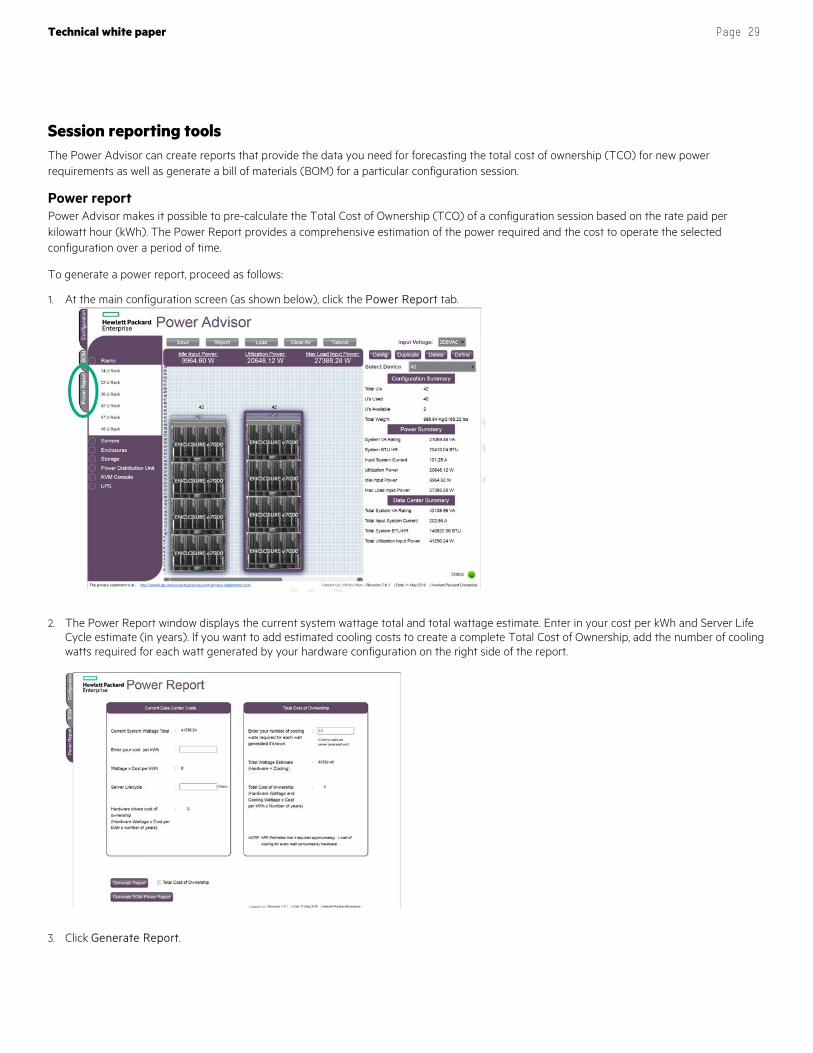
1. At the main configuration screen (as shown below), click the Power Report tab.
2. The Power Report window displays the current system wattage total and total wattage estimate. Enter in your cost per kWh and Server Life Cycle estimate (in years). If you want to add estimated cooling costs to create a complete Total Cost of Ownership, add the number of cooling watts required for each watt generated by your hardware configuration on the right side of the report.
3. Click Generate Report.
Technical white paper Page 30
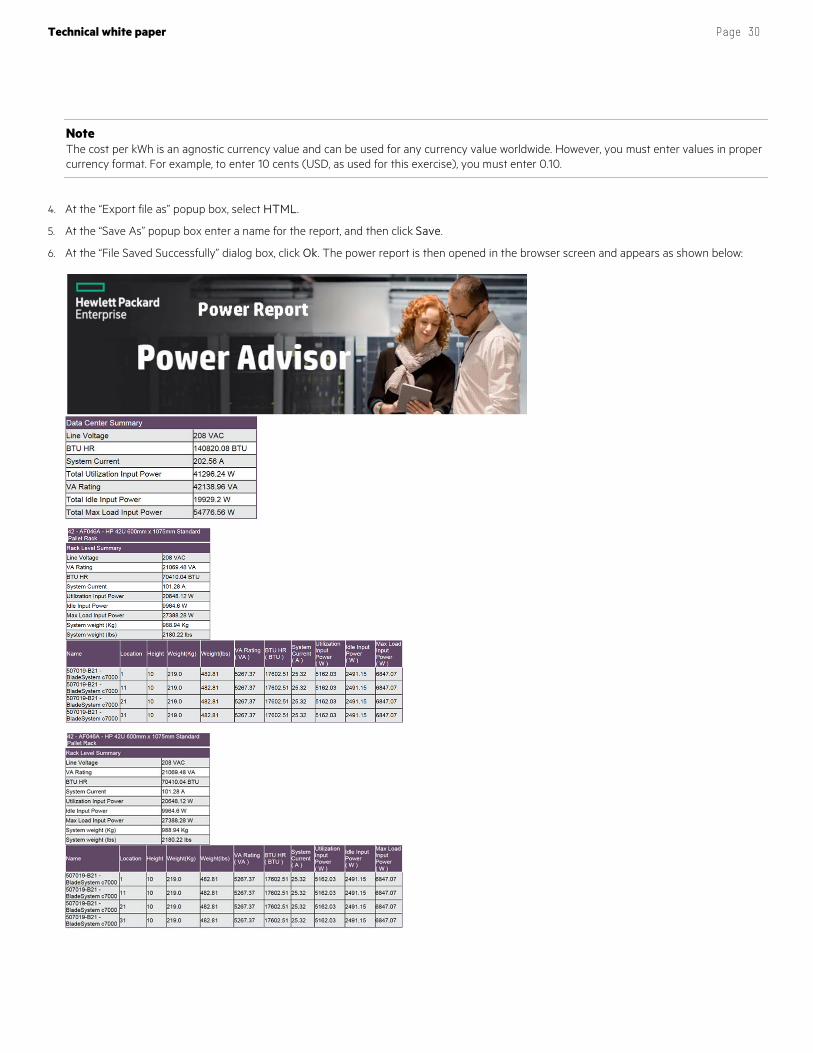
Note The cost per kWh is an agnostic currency value and can be used for any currency value worldwide. However, you must enter values in proper currency format. For example, to enter 10 cents (USD, as used for this exercise), you must enter 0.10.
4. At the “Export file as” popup box, select HTML.
5. At the “Save As” popup box enter a name for the report, and then click Save.
6. At the “File Saved Successfully” dialog box, click Ok. The power report is then opened in the browser screen and appears as shown below:
Technical white paper Page 31
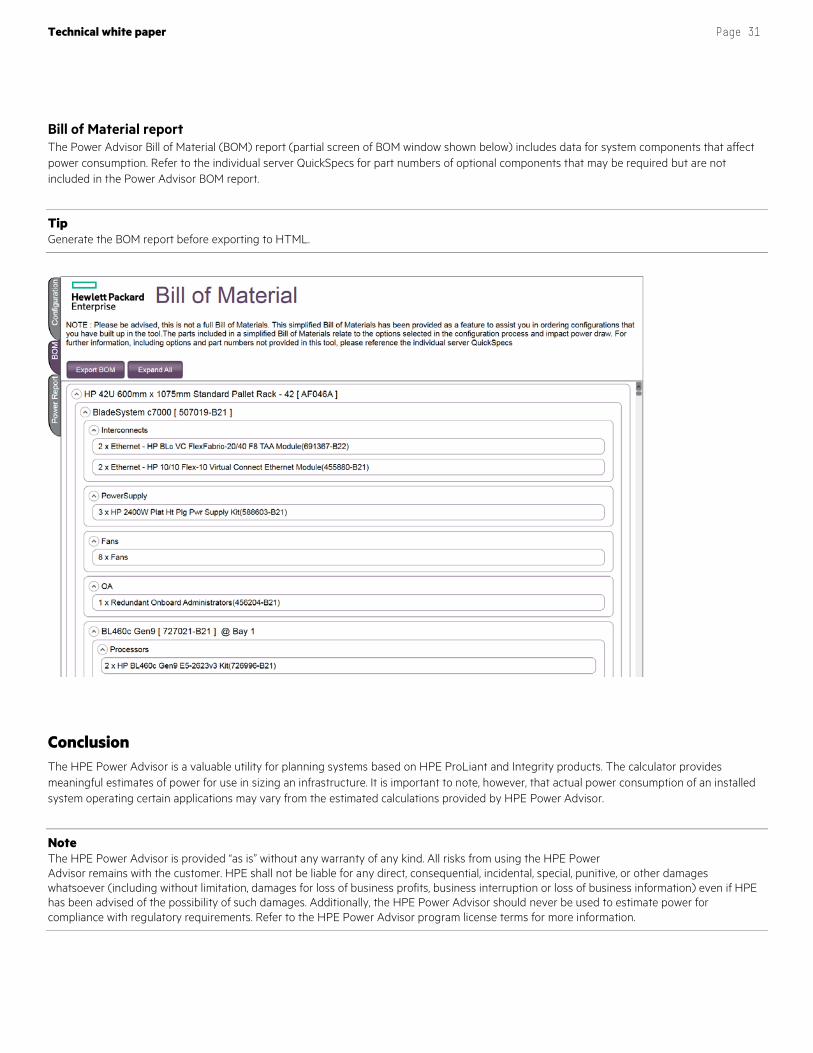
Bill of Material report The Power Advisor Bill of Material (BOM) report (partial screen of BOM window shown below) includes data for system components that affect power consumption. Refer to the individual server QuickSpecs for part numbers of optional components that may be required but are not included in the Power Advisor BOM report.
Tip Generate the BOM report before exporting to HTML.
Conclusion The HPE Power Advisor is a valuable utility for planning systems based on HPE ProLiant and Integrity products. The calculator provides meaningful estimates of power for use in sizing an infrastructure. It is important to note, however, that actual power consumption of an installed system operating certain applications may vary from the estimated calculations provided by HPE Power Advisor.
Note The HPE Power Advisor is provided “as is” without any warranty of any kind. All risks from using the HPE Power Advisor remains with the customer. HPE shall not be liable for any direct, consequential, incidental, special, punitive, or other damages whatsoever (including without limitation, damages for loss of business profits, business interruption or loss of business information) even if HPE has been advised of the possibility of such damages. Additionally, the HPE Power Advisor should never be used to estimate power for compliance with regulatory requirements. Refer to the HPE Power Advisor program license terms for more information.

Technical white paper Page 32
Sign up for updates
© Copyright 2015 - 2016 Hewlett Packard Enterprise Development LP. The information contained herein is subject to change without notice. The only warranties for HPE products and services are set forth in the express warranty statements accompanying such products and services. Nothing herein should be construed as constituting an additional warranty. HPE shall not be liable for technical or editorial errors or omissions contained herein.
Windows is either registered trademarks or trademarks of Microsoft Corporation in the United States and/or other countries.
4AA5-9121ENW, July 2016, Rev. 1
Resources, contacts, or additional links HPE Rack and Power Infrastructure (products, HPE Power Advisor Utility): hpe.com/info/rackandpower
HPE ProLiant Technical Whitepapers hpe.com/docs/servertechnology