Embed Size (px)
Citation preview
Z:\Programs\ByteShooter\User Guides_Loaner Tool program\HPA Flashing Instructions via ByteShooter.doc Page 1 of 16
HPA Flashing Instructions (via ByteShooter)
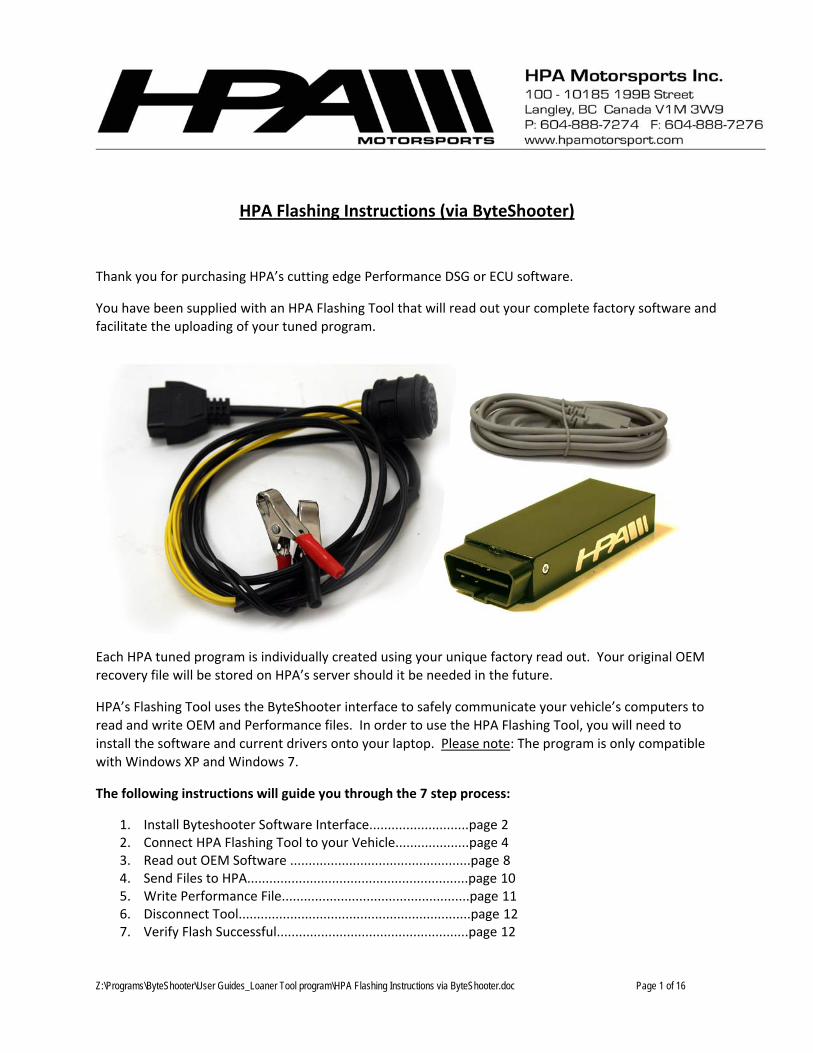
Thank you for purchasing HPA’s cutting edge Performance DSG or ECU software.
You have been supplied with an HPA Flashing Tool that will read out your complete factory software and facilitate the uploading of your tuned program.
Each HPA tuned program is individually created using your unique factory read out. Your original OEM recovery file will be stored on HPA’s server should it be needed in the future.
HPA’s Flashing Tool uses the ByteShooter interface to safely communicate your vehicle’s computers to read and write OEM and Performance files. In order to use the HPA Flashing Tool, you will need to install the software and current drivers onto your laptop. Please note: The program is only compatible with Windows XP and Windows 7.
The following instructions will guide you through the 7 step process:
1. Install Byteshooter Software Interface...........................page 2 2. Connect HPA Flashing Tool to your Vehicle....................page 4 3. Read out OEM Software .................................................page 8 4. Send Files to HPA............................................................page 10 5. Write Performance File...................................................page 11 6. Disconnect Tool...............................................................page 12 7. Verify Flash Successful....................................................page 12
Z:\Programs\ByteShooter\User Guides_Loaner Tool program\HPA Flashing Instructions via ByteShooter.doc Page 2 of 16
Step 1: Install ByteShooter software interface (only for Windows XP and Windows 7)
All required Software is included on CD and/or USB flash drive with your tool, or can be downloaded from our website here: http://www.hpamotorsport.com/downloads.htm
Note: Do not plug the HPA Flashing Tool into your laptop or launch the software suite before installing the necessary drivers!
1. If you have previously worked with our flashing tool, you will need to remove the earlier drivers with our FTClean utility.
2. Save a copy the folder containing the ByteShooter program and current drivers (V3.33_User packet) onto your desk top.
3. Install the driver: a. Disconnect all USB devices from your laptop b. Start setup by double clicking on CDM20802 c. Wait for Installation to completed ‐ needs only few seconds
4. Open the ByteShooter application: a. Open the folder V3.33_User packet and double click on the ByteShooter Application file
to launch the program.
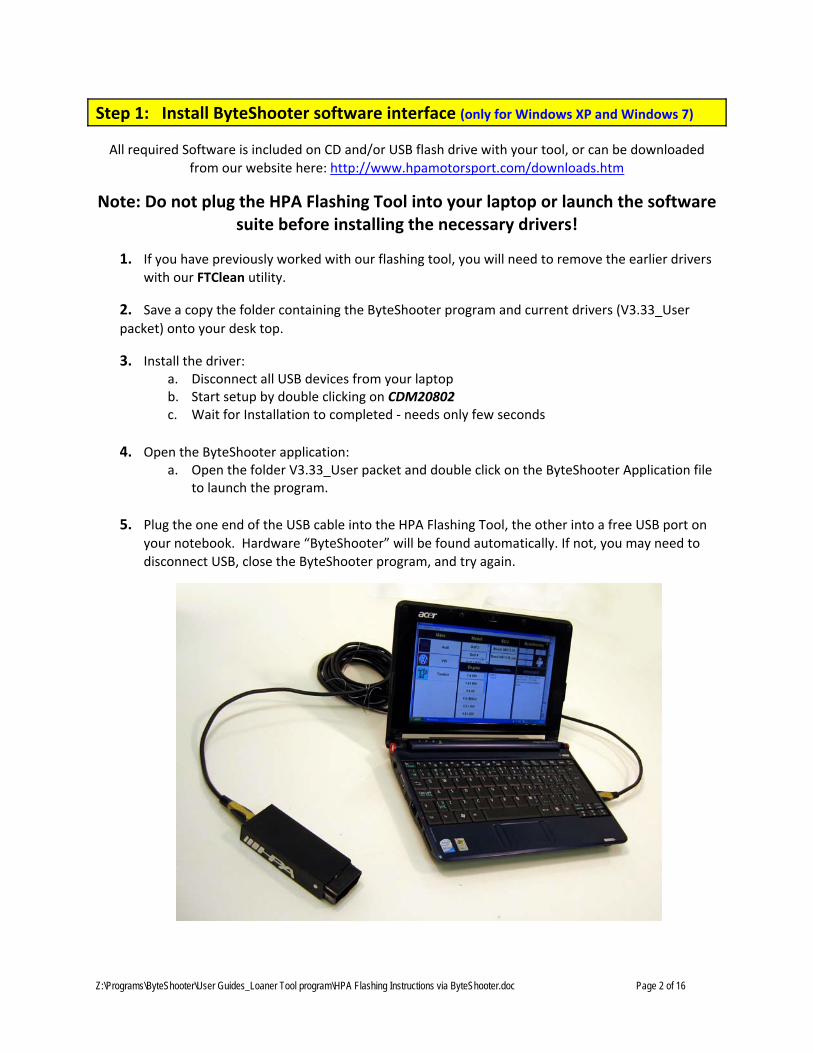
5. Plug the one end of the USB cable into the HPA Flashing Tool, the other into a free USB port on your notebook. Hardware “ByteShooter” will be found automatically. If not, you may need to disconnect USB, close the ByteShooter program, and try again.
Z:\Programs\ByteShooter\User Guides_Loaner Tool program\HPA Flashing Instructions via ByteShooter.doc Page 3 of 16
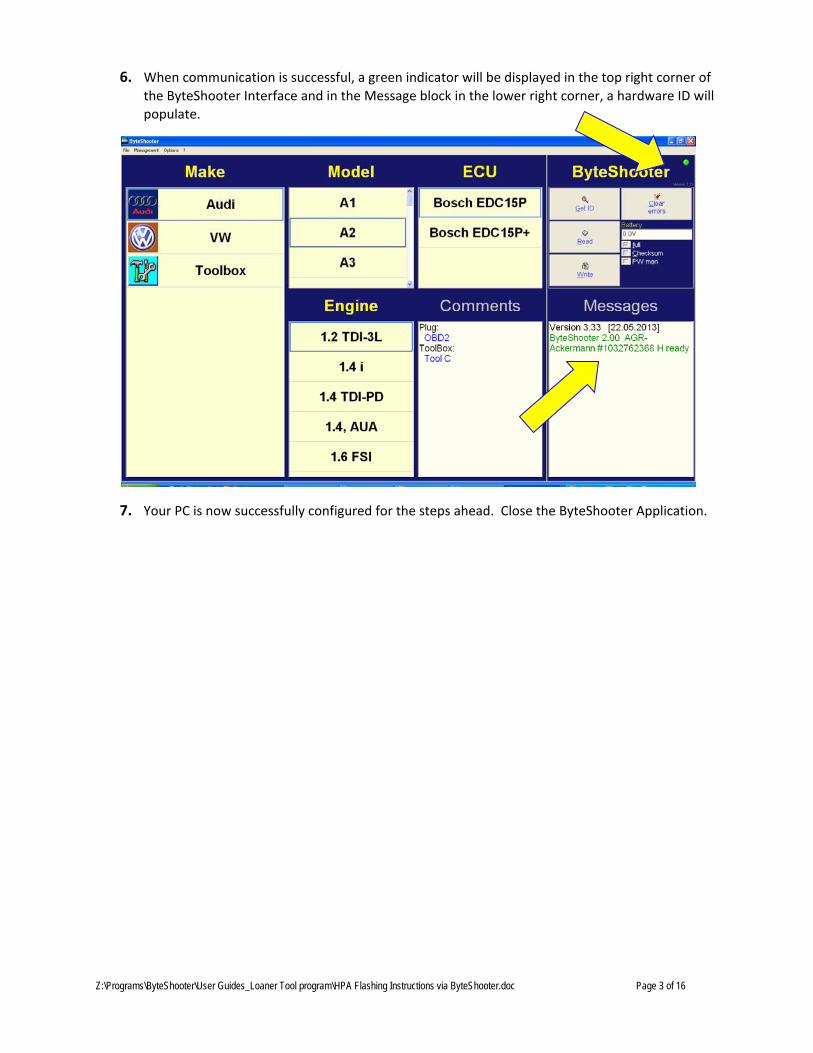
6. When communication is successful, a green indicator will be displayed in the top right corner of the ByteShooter Interface and in the Message block in the lower right corner, a hardware ID will populate.
7. Your PC is now successfully configured for the steps ahead. Close the ByteShooter Application.
Z:\Programs\ByteShooter\User Guides_Loaner Tool program\HPA Flashing Instructions via ByteShooter.doc Page 4 of 16
Step 2: Connect HPA Flashing Tool to your Vehicle
ECU FLASHING:
ECU flashes can be performed directly through the OBD port. Simply plug the HPA Flashing Tool Dongle into the OBD port located up underneath the dash on the driver’s side, then proceed to Step 3.
DSG FLASHING:
If your car has a C‐based Mechatronic computer, your DSG flash can be performed directly through the OBD port. Simply plug the HPA Flashing Tool Dongle into the OBD port located up underneath the dash on the driver’s side, then proceed to Step 3.
If you have a later model car that uses an E or F based Mechatronic computer, you must use the supplied transmission harness to connect the HPA Flashing Tool directly to the ECU plug found on the top of the gearbox. Follow instructions below.
E or F based DSG Flash ‐ Connect HPA Flashing Device to your Transmission
You will need to loosen and pull the airbox to the side in order to access the DSG ECU port. You may prefer to remove the airbox entirely for unobstructed access. Supplementary instructions for complete airbox removal can be found at the end of this instruction guide.
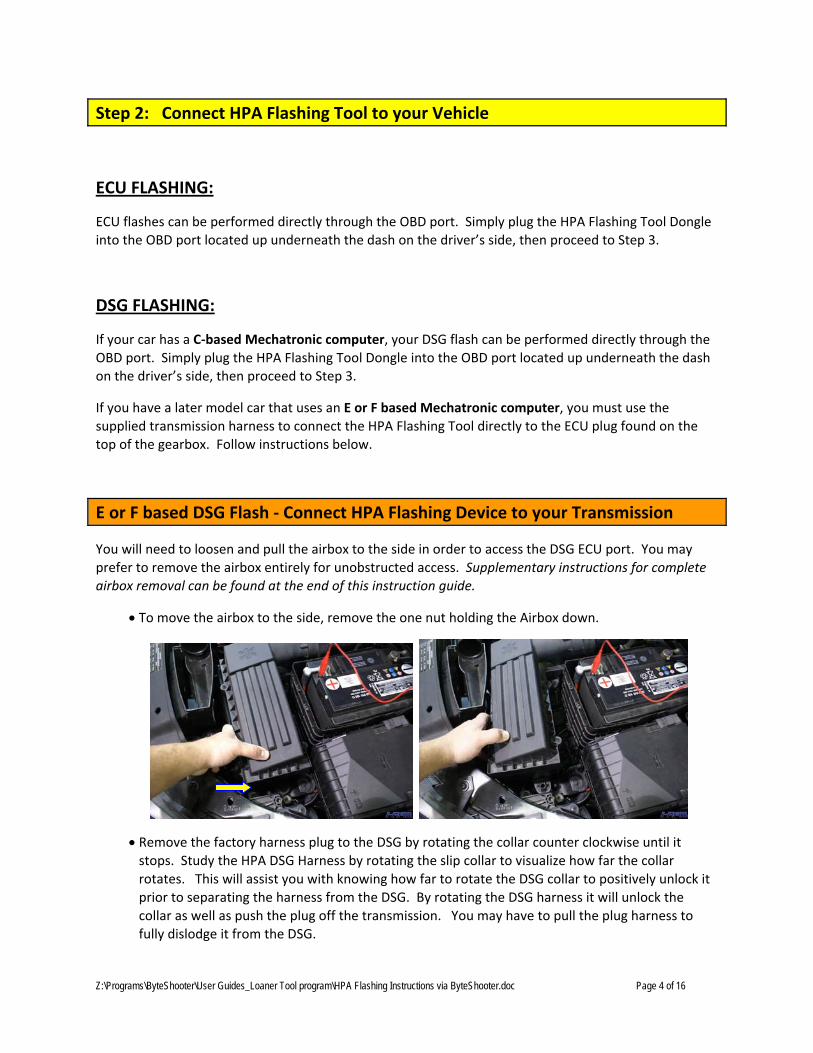
• To move the airbox to the side, remove the one nut holding the Airbox down.
• Remove the factory harness plug to the DSG by rotating the collar counter clockwise until it stops. Study the HPA DSG Harness by rotating the slip collar to visualize how far the collar rotates. This will assist you with knowing how far to rotate the DSG collar to positively unlock it prior to separating the harness from the DSG. By rotating the DSG harness it will unlock the collar as well as push the plug off the transmission. You may have to pull the plug harness to fully dislodge it from the DSG.
Z:\Programs\ByteShooter\User Guides_Loaner Tool program\HPA Flashing Instructions via ByteShooter.doc Page 5 of 16
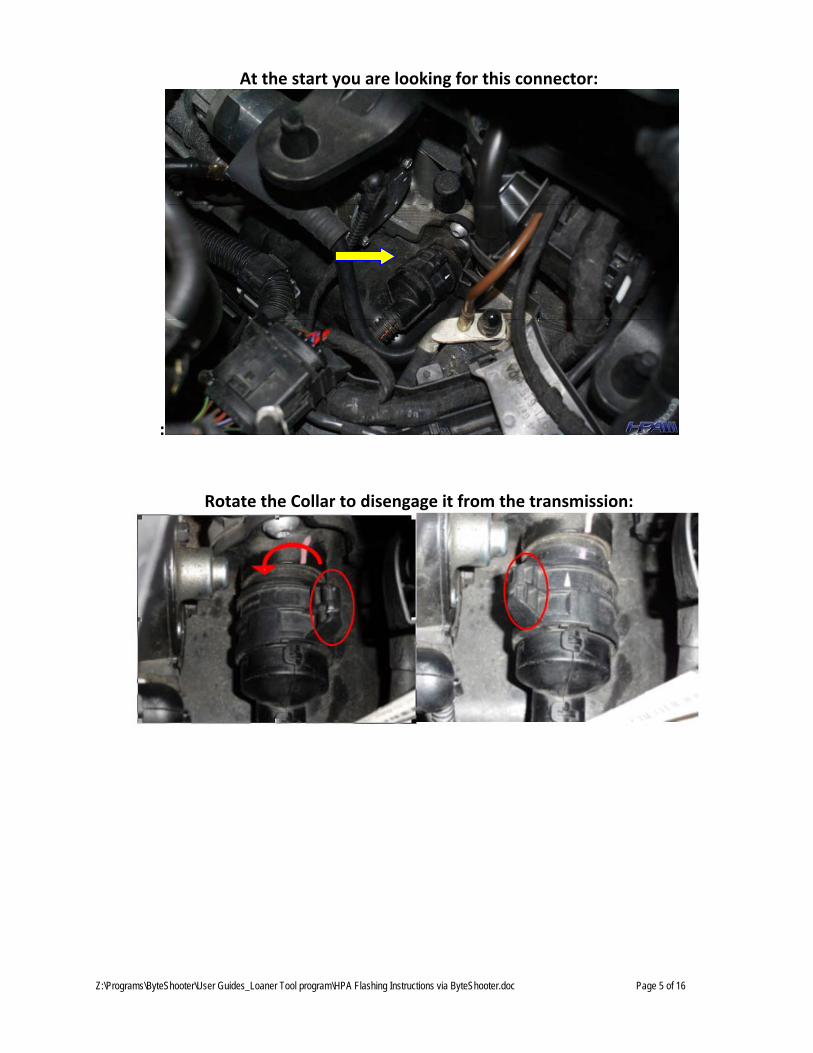
At the start you are looking for this connector:
:
Rotate the Collar to disengage it from the transmission:
Z:\Programs\ByteShooter\User Guides_Loaner Tool program\HPA Flashing Instructions via ByteShooter.doc Page 6 of 16
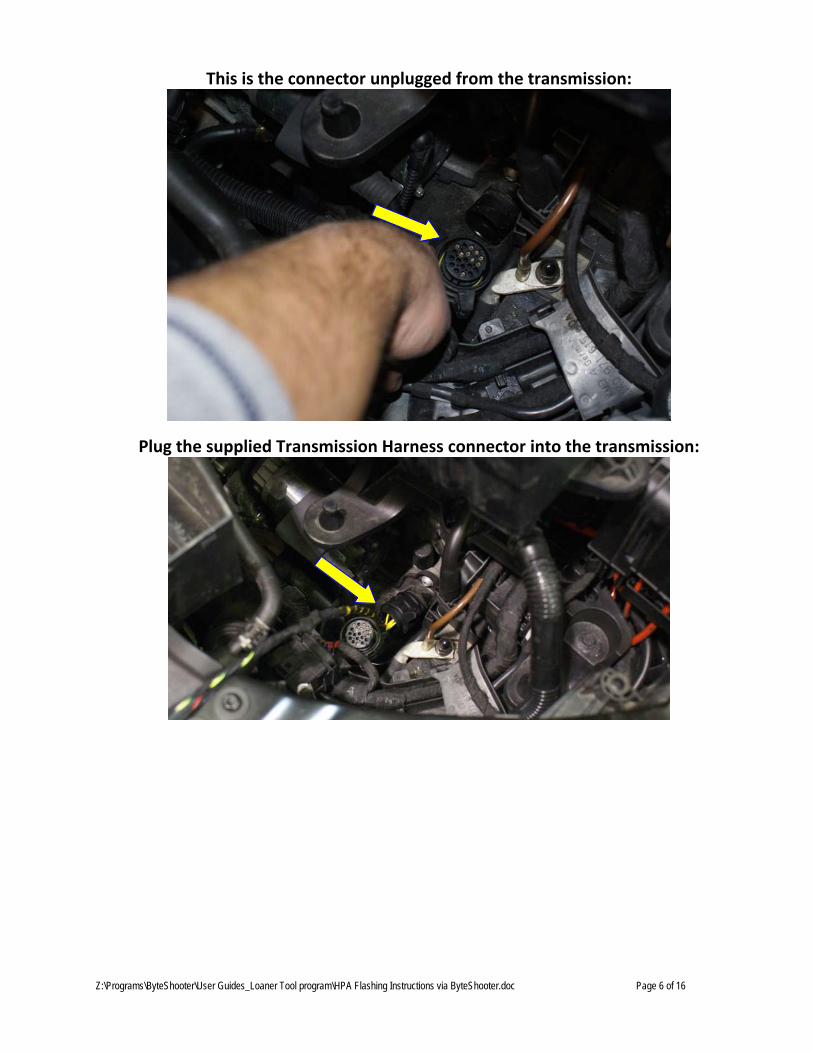
This is the connector unplugged from the transmission:
Plug the supplied Transmission Harness connector into the transmission:
Z:\Programs\ByteShooter\User Guides_Loaner Tool program\HPA Flashing Instructions via ByteShooter.doc Page 7 of 16
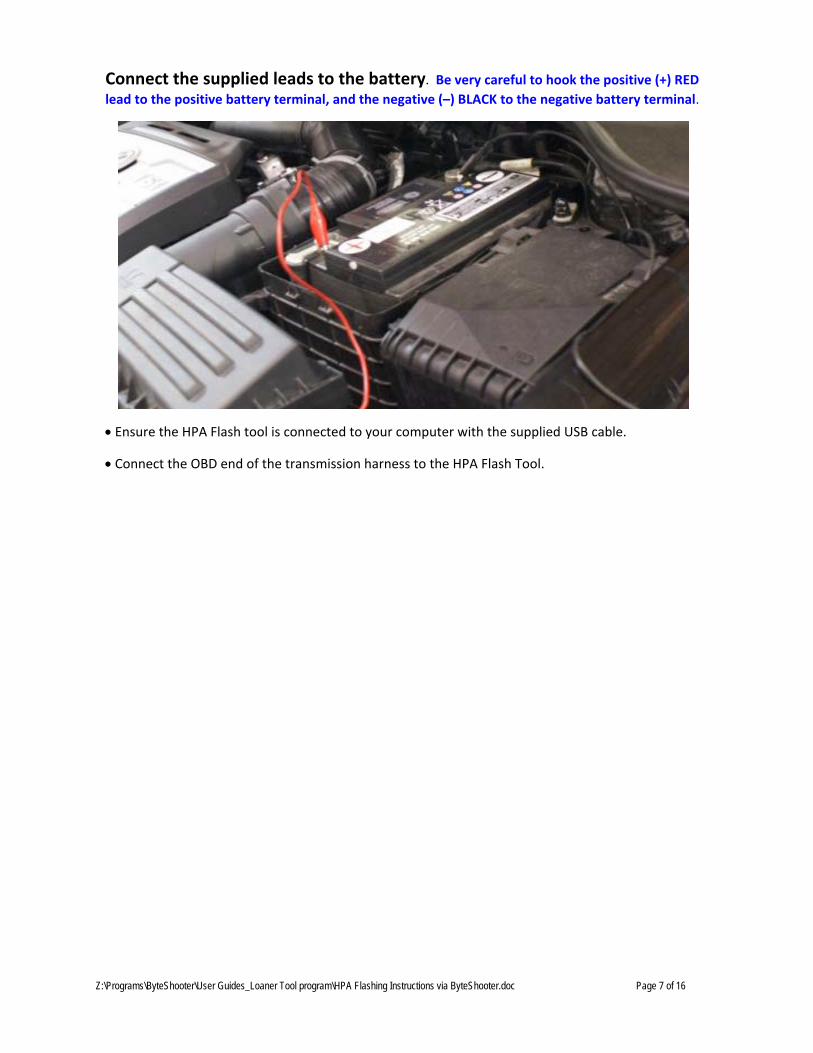
Connect the supplied leads to the battery. Be very careful to hook the positive (+) RED lead to the positive battery terminal, and the negative (–) BLACK to the negative battery terminal.
• Ensure the HPA Flash tool is connected to your computer with the supplied USB cable.
• Connect the OBD end of the transmission harness to the HPA Flash Tool.
Z:\Programs\ByteShooter\User Guides_Loaner Tool program\HPA Flashing Instructions via ByteShooter.doc Page 8 of 16
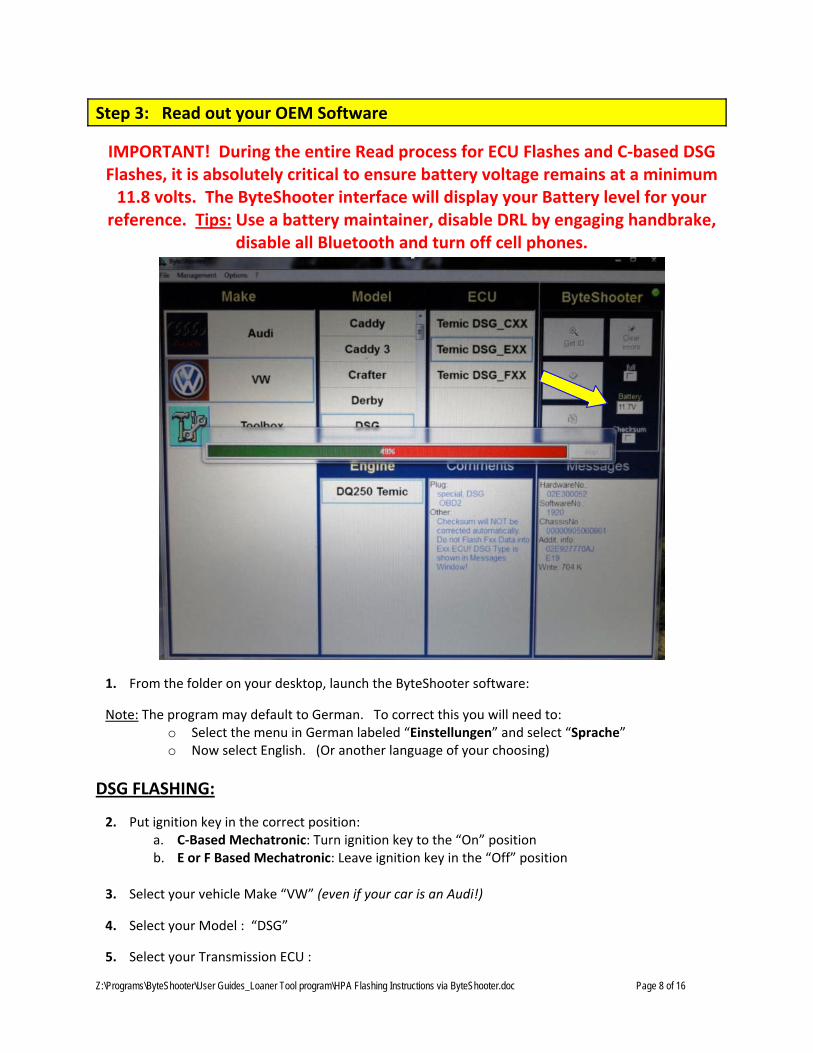
Step 3: Read out your OEM Software
IMPORTANT! During the entire Read process for ECU Flashes and C‐based DSG Flashes, it is absolutely critical to ensure battery voltage remains at a minimum 11.8 volts. The ByteShooter interface will display your Battery level for your
reference. Tips: Use a battery maintainer, disable DRL by engaging handbrake, disable all Bluetooth and turn off cell phones.
1. From the folder on your desktop, launch the ByteShooter software:
Note: The program may default to German. To correct this you will need to: o Select the menu in German labeled “Einstellungen” and select “Sprache” o Now select English. (Or another language of your choosing)
DSG FLASHING:
2. Put ignition key in the correct position: a. C‐Based Mechatronic: Turn ignition key to the “On” position b. E or F Based Mechatronic: Leave ignition key in the “Off” position
3. Select your vehicle Make “VW” (even if your car is an Audi!)
4. Select your Model : “DSG”
5. Select your Transmission ECU :
Z:\Programs\ByteShooter\User Guides_Loaner Tool program\HPA Flashing Instructions via ByteShooter.doc Page 9 of 16
a. C‐Based Mechatronic = “Temic DSG_CXX” b. E‐Based Mechatronic = “Temic DSG_EXX” c. F‐Based Mechatronic = “Temic DSG_FXX “
i. (if you are unsure whether you have E or F based software, just pick one and continue, you can verify your software type and correct it if needed after step 7)
6. Under the ByteShooter Menu in the top right corner, select the “Get ID” button.
7. With the ID capture, you will be able to identify if you are an E or F and can correct your gearbox selection prior to reading and writing if necessary (example above indicates E19 = E‐Based)
8. When the process completes, copy the information listed under Messages. Paste that information into a Text document somewhere you can find it later (we recommend your desktop). This information is your Transmission ID.
a. Note: If right clicking does not work, highlight the data and use your keyboard: Ctrl+C to Copy, Ctrl+V to Paste.
9. Save this as a .TXT file with a unique name. Use: YourName_DSG.TXT
10. Return to the ByteShooter program and select the button “Read” under ByteShooter. This will download your factory programming into a file. The read process could take up to 22 minutes to complete.
11. When complete, the software will ask you to turn off your ignition, wait 15 seconds, and then turn on your ignition:
a. DSG FLASHES C‐Based: Cycle the ignition as instructed
b. DSG FLASHES E or F‐Based: Do not touch your key! Simply disconnect the positive (+) alligator clip at the battery and reconnect to simulate. Do NOT cycle the ignition key on the car, this should remain in the Off position for the entire flashing process.
12. When prompted, save the file to the same place as the TXT file you created earlier. Save the downloaded factory file with the same name as the TXT file, but label it with .PAK as an extension instead of .TXT. You should now have two files with the same name but with different file extensions. One will be YourName_DSG.TXT other will be YourName_DSG.PAK
ECU FLASHING:
2. Turn ignition key to the “On” position.
3. Select your vehicle Make: “VW” or “Audi”
4. Select your Model.
5. Select your Engine.
6. Under the ByteShooter Menu in the top right corner, select the “Get ID” button.
7. When the process completes, copy the information listed under Messages. Paste that information into a Text document somewhere you can find it later (we recommend your desktop). This information is your Engine ID.
Z:\Programs\ByteShooter\User Guides_Loaner Tool program\HPA Flashing Instructions via ByteShooter.doc Page 10 of 16
a. Note: If right clicking does not work, highlight the data and use your keyboard: Ctrl+C to Copy, Ctrl+V to Paste.
8. Save this as a .TXT file with a unique name. Use: YourName_ECU.TXT
9. Return to the ByteShooter program and select the button “Read” under ByteShooter. This will download your factory programming into a file. The read process could take up to 22 minutes to complete.
10. When complete, the software will ask you to turn off your ignition, wait 15 seconds, and then turn on your ignition.
11. When prompted, save the file to the same place as the TXT file you created earlier. Save the downloaded factory file with the same name as the TXT file, but label it with .PAK as an extension instead of .TXT. You should now have two files with the same name but with different file extensions. One will be YourName_ECU.TXT other will be YourName_ECU.PAK
Step 4: Send files to HPA
1. Email the .TXT and .PAK files to: [email protected]
2. Be sure to have your files emailed before 1pm PST for same day turn around.
3. Paste the appropriate Order Form below into the body of your email and fill in the information.
ECU PERFORMANCE PROGRAM ORDER FORM: VEHICLE INFO: Year __________ Make __________ Model __________ Engine __________ Where are you located? (City, State/Province, and Country): ______________________________ What grade of Premium fuel is available in your area? Has ECU on this car ever been flashed before? (Y / N) __________ If yes, by whom? __________________ List all engine modifications: ________________________________________________________ _______________________________________________________________________________ _______________________________________________________________________________
Z:\Programs\ByteShooter\User Guides_Loaner Tool program\HPA Flashing Instructions via ByteShooter.doc Page 11 of 16
DSG PERFORMANCE PROGRAM ORDER FORM: VEHICLE INFO: Year __________ Make __________ Model __________ Engine __________ Has DSG on this car ever been flashed before? (Y / N) __________ If yes, by whom? __________________ What engine ECU software is car using? (Factory or Aftermarket) _________ If Aftermarket, please specify __________________________ Current Redline __________ Desired Redline (HPA default is 7150 RPM) _________ Does car have Launch Control from Factory? (Y / N) __________ What is your desired RPM for Launch Control? (HPA Default is 4750 RPM) __________ Does car have gear indicator display in D/S mode from factory? (Y / N) __________ DSG FILE REQUESTED: (Stage 2 / 3 / 4 / TDI / TDIplus) _________ If ordering Stage 4 file, please list all engine modifications and attach a dyno chart.
Step 5: Write Performance Software
During the entire Write process for ECU Flashes and C‐based DSG Flashes, it is absolutely critical to ensure battery voltage remains at a minimum 11.8 volts. The ByteShooter interface will display your Battery level for your reference. Tips: Use a battery maintainer, disable DRL by engaging handbrake, disable all Bluetooth and turn off cell phones.
1. Retrieve the email containing the modified .TUN file from HPA and save the .TUN file to your desktop for easy access later.
2. Ensure HPA Flashing Tool is still connected to your OBD port / directly to your gearbox as it was during the Read process.
3. Launch the ByteShooter program, select your Make, Model, and Engine or ECU as in Step 3, then select “Get ID” and look for information to populate in the Messages section to ensure there is good connectivity between the computer and your vehicle. If no ID is captured:
i. Close ByteShooter program ii. Disconnect tool iii. Wait 1 minute iv. Reconnect tool v. Relaunch ByteShooter
Z:\Programs\ByteShooter\User Guides_Loaner Tool program\HPA Flashing Instructions via ByteShooter.doc Page 12 of 16
vi. Try “Get ID” again.
4. Select “Write”. You will be prompted to locate your file. You must use the pull down menu and select .TUN file so that when you navigate to the folder where you stored the TUN (desktop) it will show that file. If you don’t change it to TUN in the drop down menu, the file will not be visible to select.
5. Select the .TUN file provided by HPA
6. Click WRITE. This will take approximately 19‐22 minutes to complete.
Step 6: Disconnect HPA Flashing Tool
1. When the Write process is complete, close the ByteShooter software and disconnect the HPA Flashing Tool.
E and F based DSG Flashes‐ Reconnect original DSG plug
ECU Flashes and C‐based DSG Flashes; proceed directly to Step 7.
2. Remove the HPA Flashing Tool connector from your transmission and re‐connect the factory harness.
3. Replace your airbox back into the correct location and secure it.
< Refer back to Step 2 for photos if needed >
Step 7: Verification
DSG FLASHES:
1. Turn on your vehicle and verify the programming was successful by placing your transmission in drive. You should now see a number 1 gear indicator instead of the D that was present in this mode before.
ECU FLASHES:
1. Go for a test drive and enjoy your new found performance!
Congratulations your vehicle has now been successfully flashed!

Z:\Programs\ByteShooter\User Guides_Loaner Tool program\HPA Flashing Instructions via ByteShooter.doc Page 13 of 16
How to enable Launch Control:
1. Your gearbox must be above 35degrees C (15 minutes of spirited driving will achieve this.)
2. You must be in S or M mode with ESP disabled.
3. Arrive at a complete stop; hold brake pedal for 1.5 seconds
4. Release and immediately reengage brake pedal for 1.5 seconds.
This deactivates the “hill hold mode” that prevents the car from rolling backwards at a stop.
5. Keeping brake engaged, feed in throttle and engine should free rev up to the desired Launch Control RPM defined in the program purchased.
6. Find the sweet spot of throttle to RPM hold and release brake; feeding balance of throttle for optimal off the line departure.

Z:\Programs\ByteShooter\User Guides_Loaner Tool program\HPA Flashing Instructions via ByteShooter.doc Page 14 of 16
2.0L TSI ‐ HOW TO REMOVE AIR BOX 1) Remove the air cleaner assembly to access the DSG harness directly
underneath it.
a. Remove the eight Philips screws retaining the air filter box. b. Remove the hose clamp on the intake tube
c. Pull the rubber tube off the intake tube. d. Disconnect the MAF sensor
Z:\Programs\ByteShooter\User Guides_Loaner Tool program\HPA Flashing Instructions via ByteShooter.doc Page 15 of 16
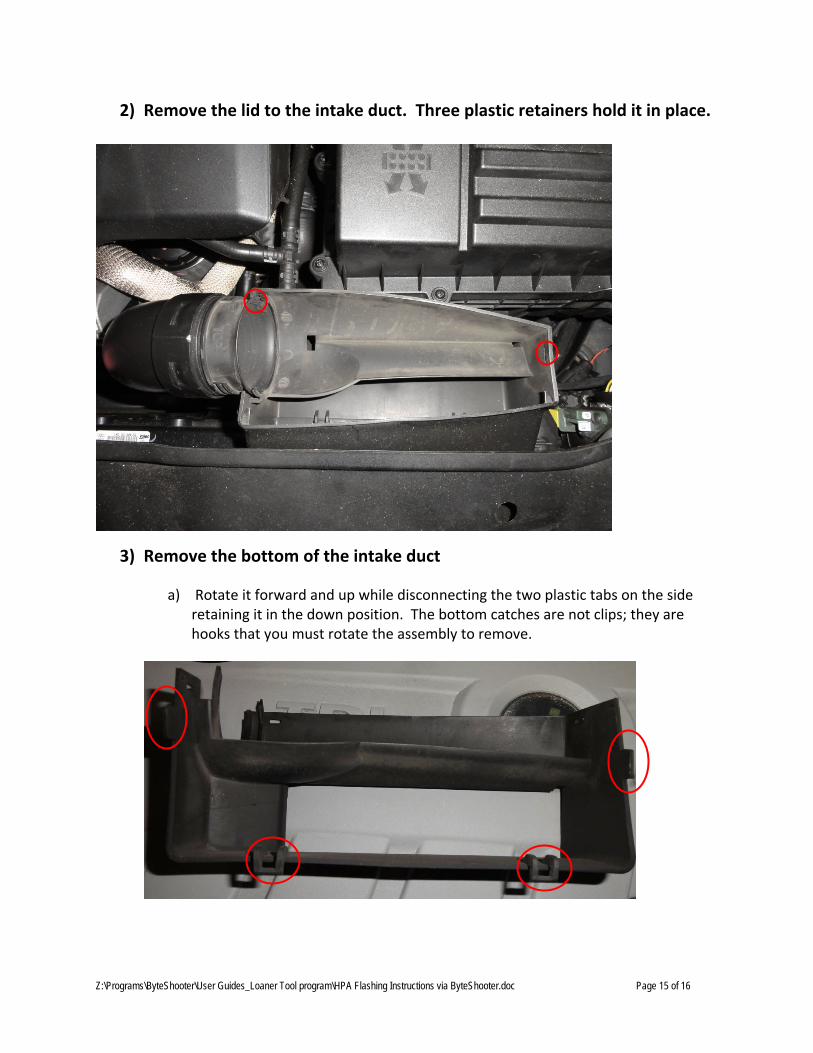
2) Remove the lid to the intake duct. Three plastic retainers hold it in place.
3) Remove the bottom of the intake duct
a) Rotate it forward and up while disconnecting the two plastic tabs on the side retaining it in the down position. The bottom catches are not clips; they are hooks that you must rotate the assembly to remove.
Z:\Programs\ByteShooter\User Guides_Loaner Tool program\HPA Flashing Instructions via ByteShooter.doc Page 16 of 16
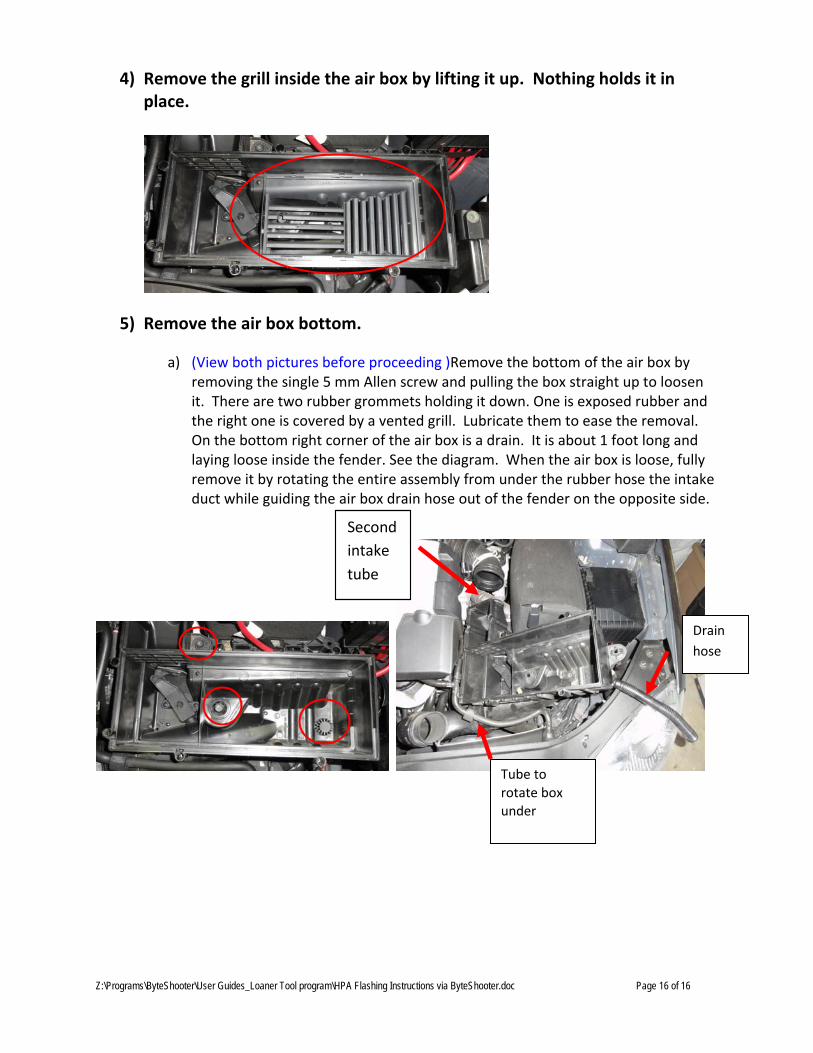
4) Remove the grill inside the air box by lifting it up. Nothing holds it in place.
5) Remove the air box bottom.
a) (View both pictures before proceeding )Remove the bottom of the air box by removing the single 5 mm Allen screw and pulling the box straight up to loosen it. There are two rubber grommets holding it down. One is exposed rubber and the right one is covered by a vented grill. Lubricate them to ease the removal. On the bottom right corner of the air box is a drain. It is about 1 foot long and laying loose inside the fender. See the diagram. When the air box is loose, fully remove it by rotating the entire assembly from under the rubber hose the intake duct while guiding the air box drain hose out of the fender on the opposite side.
Tube to rotate box under
Drain hose
Second intake tube