Embed Size (px)
Citation preview
HP Workstations for LinuxUser Guide
Copyright Information
© 2007–2008 Copyright Hewlett-PackardDevelopment Company, L.P.
Warranty
Hewlett-Packard Company shall not be liablefor technical or editorial errors or omissionscontained herein or for incidental orconsequential damages in connection withthe furnishing, performance, or use of thismaterial. The information in this document isprovided “as is” without warranty of any kind,including, but not limited to, the impliedwarranties of merchantability and fitness fora particular purpose, and is subject tochange without notice. The warranties for HPproducts are set forth in the express limitedwarranty statements accompanying suchproducts.
Nothing herein should be construed asconstituting and additional warranty.
This document contains proprietaryinformation that is protected by copyright. Nopart of this document may be photocopied,reproduced, or translated to anotherlanguage without the prior written consent ofHewlett-Packard Company.
Trademark Credits
The HP Invent logo is a trademark of Hewlett-Packard Company in the U.S. and othercountries.
Red Hat is a registered trademark of RedHat, Inc.
Intel is a registered trademark of IntelCorporation in the U.S. and other countriesand is used under license.
Acrobat and Acrobat Reader are trademarksof Adobe Systems Incorporated.
Energy Star is U.S. registered mark of theUnited States Environmental ProtectionAgency.
Part number: 448676-003 v2
Third Edition: January 2008
Table of contents
1 Overview of the HP Installer Kit for LinuxIntroduction ........................................................................................................................................... 1Supported operating systems ............................................................................................................... 1HP Installer CDs ................................................................................................................................... 1HP Driver CDs ...................................................................................................................................... 2
2 Obtaining the HP Installer Kit for Linux from the HP Support web siteIntroduction ........................................................................................................................................... 3Obtaining the appropriate ISOs in the HP Installer Kit for Linux .......................................................... 5
3 Installing with the HP Installer Kit for LinuxInstalling the operating system using the HP Installer CD ................................................................... 7Installing the operating system using the HP Driver CD ...................................................................... 7Warranty ............................................................................................................................................... 8Platform Support .................................................................................................................................. 8Localization .......................................................................................................................................... 8Graphics ............................................................................................................................................... 8System RAM ........................................................................................................................................ 8Network cards ...................................................................................................................................... 9
4 HP Release Notes for Red Hat Enterprise LinuxIntroduction ......................................................................................................................................... 11Customer advisories for Red Hat Enterprise Linux WS 3 .................................................................. 12Customer advisories for Red Hat Enterprise Linux WS 4 ................................................................. 14Customer advisories for Red Hat Enterprise Linux Client 5 .............................................................. 16
5 Setting up large memory configurationsIntroduction ......................................................................................................................................... 19Maximum memory allowed ................................................................................................................. 19HP Installer Kit for Linux and factory preinstalled systems ................................................................ 20x86 (32-bit) Red Hat Linux legacy information ................................................................................... 20
Bigmem and hugemem kernels ......................................................................................... 20Bigmem, hugemem, and UP systems ............................................................................... 21Performance implications .................................................................................................. 21Large memory and Memory Type Range Registers .......................................................... 21
Conclusion .......................................................................................................................................... 21
ENWW iii
6 Setting up multi-monitor configurationsIntroduction ......................................................................................................................................... 23Basics ................................................................................................................................................. 23
Graphics drivers ................................................................................................................. 23Multiple graphics cards ...................................................................................................... 24Multiple monitors and displays ........................................................................................... 24Scalable Link Interface graphics acceleration ................................................................... 24
Independent and continuous displays ................................................................................................ 24Independent display ........................................................................................................... 25Continuous display ............................................................................................................ 25Xinerama ........................................................................................................................... 25NVIDIA TwinView .............................................................................................................. 25ATI Big Desktop ................................................................................................................. 26
Multi-monitor configuration strategies ............................................................................................... 26Configuring X with multiple graphics cards using the vizconfig tool ................................................... 27Configuring XFree86/X.org by editing configuration files ................................................................... 28Example configurations ...................................................................................................................... 33
Example A—Three-monitor configuration .......................................................................... 33Example B—Four-monitor configuration ............................................................................ 36Example C—Four-monitor configuration for current shipping HP Workstations ................ 38
Troubleshooting .................................................................................................................................. 40Known limitations ............................................................................................................................... 40
7 Using the HP 16x DVD burnerIntroduction ......................................................................................................................................... 41Recording modes, media type, and recording software ..................................................................... 41CD and DVD burning software ........................................................................................................... 42
Cdrecord ............................................................................................................................ 42Growisofs ........................................................................................................................... 42
8 Linux Audio: Installing and Configuring the Creative Labs X-Fi PCI audio cardInstalling Drivers ................................................................................................................................. 43Verify Driver Installed Correctly .......................................................................................................... 44Connecting 2.1 channel analog speakers to your audio card ........................................................... 44Connecting your 2.1 channel digital speakers to your audio card ..................................................... 46Connecting Headphones ................................................................................................................... 48Problems with Sound ........................................................................................................................ 49Additional information ......................................................................................................................... 50
9 Introducing HP 64-bit Linux workstationsHP 64-bit Linux workstation family ..................................................................................................... 51
AMD-64 technology ........................................................................................................... 51Intel's Extended Memory 64 Technology ........................................................................... 51
iv ENWW
x86–64 technology ............................................................................................................. 5164-bit processing support .................................................................................................. 52Running 32-bit applications on a 64-bit Linux operating system ....................................... 52PCI Express graphics on 64-bit workstations .................................................................... 52
10 Frequently Asked Questions for HP 64-bit Linux WorkstationsQuestions and answers ...................................................................................................................... 55
11 Software RAID in Linux workstationsIntroduction ......................................................................................................................................... 57RAID basics ........................................................................................................................................ 57
Software RAID considerations ........................................................................................... 57Performance and bottlenecks ............................................................................................ 57
RAID levels ......................................................................................................................................... 58RAID-linear: Concatenating disks ...................................................................................... 58RAID-0: Striping ................................................................................................................. 58RAID-1: Mirroring ............................................................................................................... 58RAID-2: Error checking and correction .............................................................................. 59RAID 3: Byte-level striping with parity disk ........................................................................ 59RAID 4: Block-level striping with parity disk ....................................................................... 59RAID 5: Block-level striping with distributed parity ............................................................ 59Additional RAID levels ....................................................................................................... 60
RAID configuration strategies ............................................................................................................. 60Capacity versus fault-tolerance ......................................................................................... 60Cost ................................................................................................................................... 60RAID performance considerations ..................................................................................... 60
Configuring Red Hat Enterprise Linux with software RAID ................................................................ 61Manual setup of software RAID data partitions .................................................................................. 64Manual configuration examples .......................................................................................................... 64
RAID-0 ............................................................................................................................... 65RAID-1 ............................................................................................................................... 65RAID-5 ............................................................................................................................... 65RAID-10 ............................................................................................................................. 66
Disk failure and recovery .................................................................................................................... 66Spare disks and disk failure ............................................................................................... 66Multiple disk failure ............................................................................................................ 67
Additional configuration information ................................................................................................... 67Persistent superblock ........................................................................................................ 67Chunk sizes ....................................................................................................................... 68Swap space in RAID configuration .................................................................................... 68Boot partitions in a mirrored RAID configuration ............................................................... 68Software RAID and LVM .................................................................................................... 70
Additional information ......................................................................................................................... 71
ENWW v
12 Installing and Configuring SAS Hardware RAID on HP Linux WorkstationsIntroduction ......................................................................................................................................... 73Supported Configurations ................................................................................................................... 73LSI 3041E and Integrated LSI 1064/1068 Setup ................................................................................ 74LSI 8344ELP and LSI 8888ELP Setup ............................................................................................... 78Additional RAID Information ............................................................................................................... 84
13 Advanced graphics: Multi-user support for the HP WorkstationsIntroduction ......................................................................................................................................... 85Setup .................................................................................................................................................. 85
Xorg.conf config file details ................................................................................................ 86Starting two X servers ........................................................................................................ 88
Additional information ......................................................................................................................... 89
14 Advanced graphics: Immersive visualization for the HP WorkstationsIntroduction ......................................................................................................................................... 91Overview ............................................................................................................................................ 91Visualization Station setup ................................................................................................................. 91
Suggested hardware requirements .................................................................................... 92Setting up the hardware ..................................................................................................... 92
NVIDIA Gsync card ........................................................................................... 93Setting up the X window system ....................................................................... 93........................................................................................................................... 94
............................................................................................................................................ 94Visualization Center setup .................................................................................................................. 95
Suggested hardware requirements .................................................................................... 95Setting up the hardware .................................................................................... 95
NVIDIA Gsnc card ............................................................................ 95Setup considerations ........................................................................ 96
Setting up the X Windows system ..................................................................... 96Configuring applications for visualization centers ............................................. 98
Additional information ......................................................................................................................... 98
15 Linux virtualization with XenIntroduction ......................................................................................................................................... 99Virtualization basics ............................................................................................................................ 99
Virtualization overview ....................................................................................................... 99Virtualization technologies ................................................................................................. 99Xen and paravirtualization ................................................................................................. 99
Installation ........................................................................................................................................ 100Installing Xen from source ............................................................................................... 100Xen configuration ............................................................................................................. 101Installing Xen with Red Hat Enterprise Linux 5 ................................................................ 101
vi ENWW
Guest configuration .......................................................................................................................... 102Guest configuration with Red Hat Enterprise Linux ......................................................... 103Configuration from the host operating system ................................................................. 103Configuration from an installation CD/DVD ..................................................................... 104Configuration from pre-built Xen images ......................................................................... 106Guest configuration files .................................................................................................. 106Managing guests ............................................................................................................. 107
Additional information ....................................................................................................................... 108
16 LinksLinux resources ................................................................................................................................ 109
17 ArchiveEnabling Hyper-Threading Technology ............................................................................................ 111What is Hyper-Threading Technology? ............................................................................................ 111Notes, limitations, and requirements ................................................................................................ 111
Hardware ......................................................................................................................... 111Software ........................................................................................................................... 111
Enabling HT Technology .................................................................................................................. 112Adding an x86 SMP kernel ............................................................................................................... 113Verifying HT Technology .................................................................................................................. 113Conclusion ........................................................................................................................................ 113Enabling FireWire on HP Linux workstations ................................................................................... 114Tested operating systems and devices ............................................................................................ 114Manually installing modules ............................................................................................................. 114
Installing unsupported kernel modules ........................................................................... 114Prerequisites ................................................................................................... 114Installation ....................................................................................................... 115Mounting the device ........................................................................................ 115
Script ................................................................................................................................................ 116rescan-scsi-bus.sh ........................................................................................................... 116
ENWW vii

viii ENWW
1 Overview of the HP Installer Kit for Linux
IntroductionThis document provides an overview of the HP Installer Kit for Linux. For specific information on installingLinux operating systems, refer to Installing with the HP Installer Kit for Linux.
Use this document with the Hardware Support Matrix for HP Linux Workstations and the HP InstallerCDs/HP Driver CDs, which can be found at http://www.hp.com/support/linux_hardware_matrix.
Supported operating systemsHP supports multiple versions of Red Hat® Linux on HP Intel® Pentium® 4 and Xeon® Workstations.The supported versions include Red Hat Linux 7.2, Red Hat Linux 7.3, Red Hat Linux 8.0, Red Hat Linux9, Red Hat Enterprise Linux WS 3 (RHEL WS 3), RHEL WS 4, and RHEL Desktop 5.
To provide flexibility in installing the Red Hat operating system version of your choice, HP has createdInstaller CDs and Driver CDs. These CDs are included in the HP Installer Kit for Linux, and the CDimages (ISOs) for these CDs can be downloaded from the HP support website at http://www.hp.com/go/workstationsupport.
The Installer Kit does not include the operating system, so you also need to download the operatingsystem from the web or purchase a Red Hat box-set with the Red Hat version to be used with the InstallerCD or the Driver CD. To view the existing Installation Support Matrix for HP Linux Workstations and thesupported configurations and operating systems, go to http://www.hp.com/support/linux_hardware_matrix.
HP Installer CDsThe Installer Kit includes an Installer CD or a Driver CD, which are based on the needs of each supportedRed Hat release. An Installer CD is provided for a Red Hat version when the amount of content to supportHP workstations is substantial or critical to Linux boot or operation. Older versions of Red Hat Linuxtypically do not work without altering the most current version of HP Workstation hardware because newcomponents, such as network cards, sound cards and core chipsets, require newer device drivers thanwhat was released when the box-set was created. Often, the box-set kernel does not boot because ofthis issue. The Installer CD provides additional and updated critical drivers for the HP Workstationhardware used during installation and installed in the final image on the hard drive. Installer CD's werenecessary for running the older Red Hat numbered releases (eg. 7.2, 7.3, 8.0, etc) on relatively new HPhardware. Since Red Hat discontinued support for those older releases and began offering it's EnterpriseLinux products, HP has not found it necessary to create Installer CD's.
The Installer CD is used as the first CD for installing Red Hat Linux box-sets. To install the box-set,insert this CD and reboot the HP Workstation. This reboot starts Anaconda, the familiar Red Hat Installer.All the content added by HP is in the /NEW_DRIVERS directory on the CD and can be used by you tobuild your own image or to browse the content added by HP.
ENWW Introduction 1

HP Driver CDsHP provides a Driver CD for a Red Hat Enterprise Linux version when the amount of content added byHP for drivers and other software packages (called RPMS) is small and not as critical as when HPprovides an Installer CD. Recent versions of Red Hat Linux include the most recent device drivers andtypically only require up-to-date driver updates with minor fixes to support HP workstations. These recentreleases can usually be supported using the Driver CD. This Driver CD can be used as a post-installationutility for the standard Red Hat Linux install. After the standard Red Hat install is complete and the systemis rebooted, a Red Hat utility called “first-boot” is invoked which enables the user to set up the securitylevel, time and date, root password, user accounts, and other settings. The last thing that first-bootenables you to do is to load additional CDs.
The Driver CD is designed for use during this additional CD phase. (Refer to Installing with the HPInstaller Kit for Linux. ) All the content added by HP is in the /HP directory on the CD, and you can useit to build your own image or to browse the HP content.
2 Chapter 1 Overview of the HP Installer Kit for Linux ENWW

2 Obtaining the HP Installer Kit for Linuxfrom the HP Support web site
IntroductionThe HP Installer Kit for Linux enables you to install Red Hat Linux on HP workstations. The kit providesupdated drivers, tools, and operating system to enable HP hardware with various Linux operating systemversions.
This document discusses the CDs (ISOs) contained in the HP Installer Kit for Linux, the platforms, andhow to download the CDs (ISOs) from the HP support website.
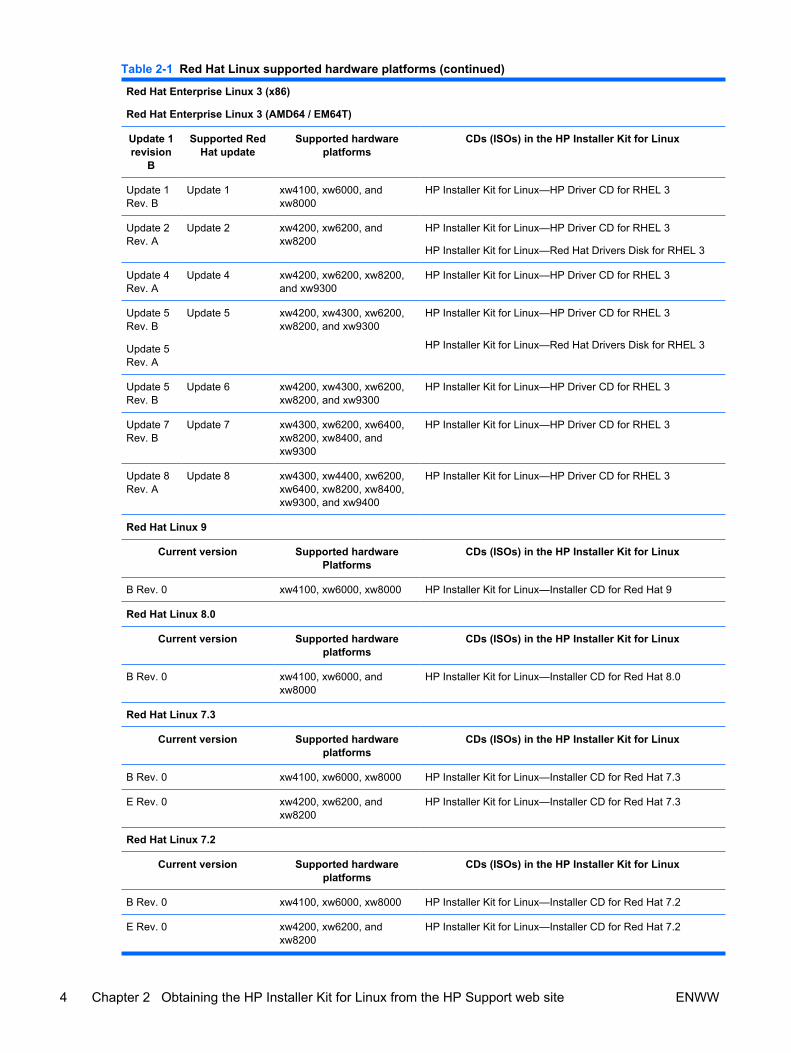
Table 2-1 Red Hat Linux supported hardware platforms
Red Hat Enterprise Linux 5 Desktop (x86)
Red Hat Enterprise Linux 5 Desktop (x86–64)
Revision Supported RedHat update
Supported hardwareplatforms
CDs (ISOs) in the HP Installer Kit for Linux
Rev. A Update 0 xw4400, xw4600, xw6400,xw8400, and xw9400
HP Installer Kit for Linux—HP Driver CD for RHEL 5
Update 1Rev. A
Update 1 xw4400, xw4550, xw4600,xw6400, xw6600, xw8400,xw8600, and xw9400
HP Installer Kit for Linux—HP Driver CD for RHEL 5
Red Hat Enterprise Linux 4 (x86)
Red Hat Enterprise Linux 4 (AMD64 / EM64T)
Revision Supported RedHat update
Supported hardwareplatforms
CDs (ISOs) in the HP Installer Kit for Linux
Update 1Rev. A
Update 1 xw4200, xw4300, xw6200,xw8200, and xw9300
HP Installer Kit for Linux—HP Driver CD for RHEL 4
HP Installer Kit for Linux—Red Hat Drivers Disk for RHEL 4
Update 2Rev. A
Update 2 xw4200, xw4300, xw6200,xw8200, and xw9300
HP Installer Kit for Linux—HP Driver CD for RHEL 4
Update 3Rev. A
Update 3 xw4300, xw6200, xw6400,xw8200, xw8400, andxw9300
HP Installer Kit for Linux—HP Driver CD for RHEL 4
Update 4Rev. A
Update 4 xw4300, xw4400, xw6200,xw6400, xw8200, xw8400,
HP Installer Kit for Linux—HP Driver CD for RHEL 4
Update 5Rev. A
Update 5 xw4400, xw4600, xw6400,xw8400, xw9400
HP Installer Kit for Linux—HP Driver CD for RHEL 4
Update 6Rev. A
Update 6 xw4400, xw4550, xw4600,xw6400, xw6600, xw8400,xw8600, and xw9400
HP Installer Kit for Linux—HP Driver CD for RHEL 4
ENWW Introduction 3
Red Hat Enterprise Linux 3 (x86)
Red Hat Enterprise Linux 3 (AMD64 / EM64T)
Update 1revision
B
Supported RedHat update
Supported hardwareplatforms
CDs (ISOs) in the HP Installer Kit for Linux
Update 1Rev. B
Update 1 xw4100, xw6000, andxw8000
HP Installer Kit for Linux—HP Driver CD for RHEL 3
Update 2Rev. A
Update 2 xw4200, xw6200, andxw8200
HP Installer Kit for Linux—HP Driver CD for RHEL 3
HP Installer Kit for Linux—Red Hat Drivers Disk for RHEL 3
Update 4Rev. A
Update 4 xw4200, xw6200, xw8200,and xw9300
HP Installer Kit for Linux—HP Driver CD for RHEL 3
Update 5Rev. B
Update 5Rev. A
Update 5 xw4200, xw4300, xw6200,xw8200, and xw9300
HP Installer Kit for Linux—HP Driver CD for RHEL 3
HP Installer Kit for Linux—Red Hat Drivers Disk for RHEL 3
Update 5Rev. B
Update 6 xw4200, xw4300, xw6200,xw8200, and xw9300
HP Installer Kit for Linux—HP Driver CD for RHEL 3
Update 7Rev. B
Update 7 xw4300, xw6200, xw6400,xw8200, xw8400, andxw9300
HP Installer Kit for Linux—HP Driver CD for RHEL 3
Update 8Rev. A
Update 8 xw4300, xw4400, xw6200,xw6400, xw8200, xw8400,xw9300, and xw9400
HP Installer Kit for Linux—HP Driver CD for RHEL 3
Red Hat Linux 9
Current version Supported hardwarePlatforms
CDs (ISOs) in the HP Installer Kit for Linux
B Rev. 0 xw4100, xw6000, xw8000 HP Installer Kit for Linux—Installer CD for Red Hat 9
Red Hat Linux 8.0
Current version Supported hardwareplatforms
CDs (ISOs) in the HP Installer Kit for Linux
B Rev. 0 xw4100, xw6000, andxw8000
HP Installer Kit for Linux—Installer CD for Red Hat 8.0
Red Hat Linux 7.3
Current version Supported hardwareplatforms
CDs (ISOs) in the HP Installer Kit for Linux
B Rev. 0 xw4100, xw6000, xw8000 HP Installer Kit for Linux—Installer CD for Red Hat 7.3
E Rev. 0 xw4200, xw6200, andxw8200
HP Installer Kit for Linux—Installer CD for Red Hat 7.3
Red Hat Linux 7.2
Current version Supported hardwareplatforms
CDs (ISOs) in the HP Installer Kit for Linux
B Rev. 0 xw4100, xw6000, xw8000 HP Installer Kit for Linux—Installer CD for Red Hat 7.2
E Rev. 0 xw4200, xw6200, andxw8200
HP Installer Kit for Linux—Installer CD for Red Hat 7.2
Table 2-1 Red Hat Linux supported hardware platforms (continued)
4 Chapter 2 Obtaining the HP Installer Kit for Linux from the HP Support web site ENWW
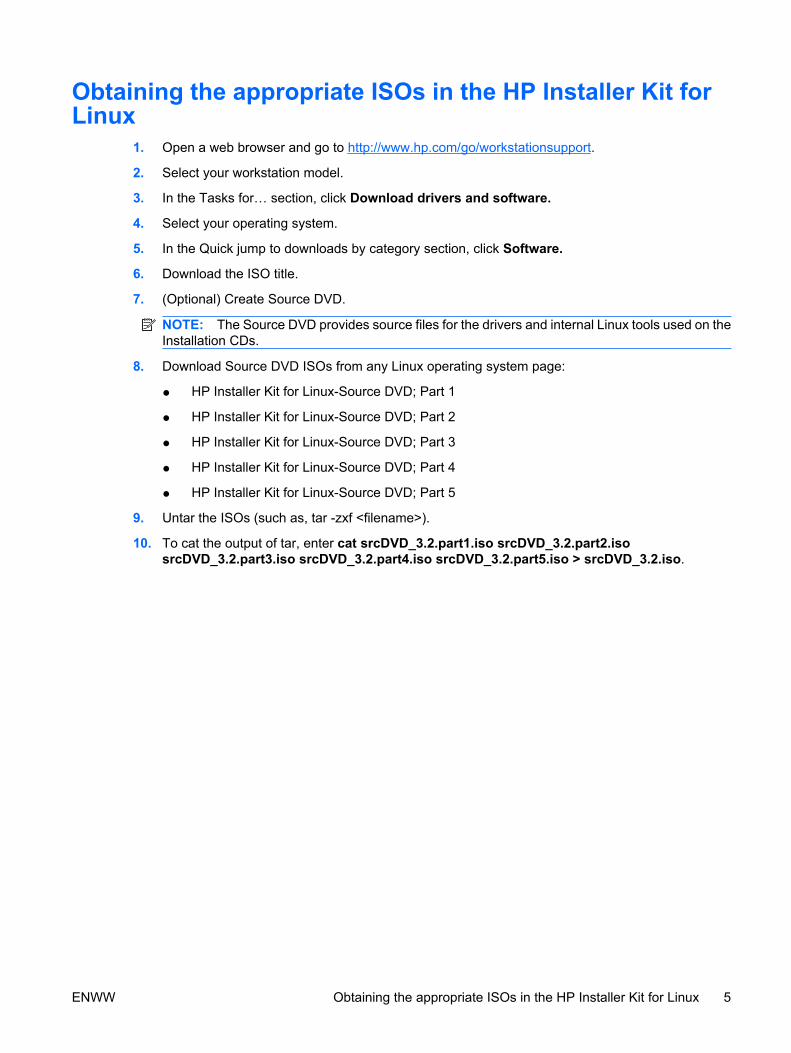
Obtaining the appropriate ISOs in the HP Installer Kit forLinux
1. Open a web browser and go to http://www.hp.com/go/workstationsupport.
2. Select your workstation model.
3. In the Tasks for… section, click Download drivers and software.
4. Select your operating system.
5. In the Quick jump to downloads by category section, click Software.
6. Download the ISO title.
7. (Optional) Create Source DVD.
NOTE: The Source DVD provides source files for the drivers and internal Linux tools used on theInstallation CDs.
8. Download Source DVD ISOs from any Linux operating system page:
● HP Installer Kit for Linux-Source DVD; Part 1
● HP Installer Kit for Linux-Source DVD; Part 2
● HP Installer Kit for Linux-Source DVD; Part 3
● HP Installer Kit for Linux-Source DVD; Part 4
● HP Installer Kit for Linux-Source DVD; Part 5
9. Untar the ISOs (such as, tar -zxf <filename>).
10. To cat the output of tar, enter cat srcDVD_3.2.part1.iso srcDVD_3.2.part2.isosrcDVD_3.2.part3.iso srcDVD_3.2.part4.iso srcDVD_3.2.part5.iso > srcDVD_3.2.iso.
ENWW Obtaining the appropriate ISOs in the HP Installer Kit for Linux 5

6 Chapter 2 Obtaining the HP Installer Kit for Linux from the HP Support web site ENWW
3 Installing with the HP Installer Kit forLinux
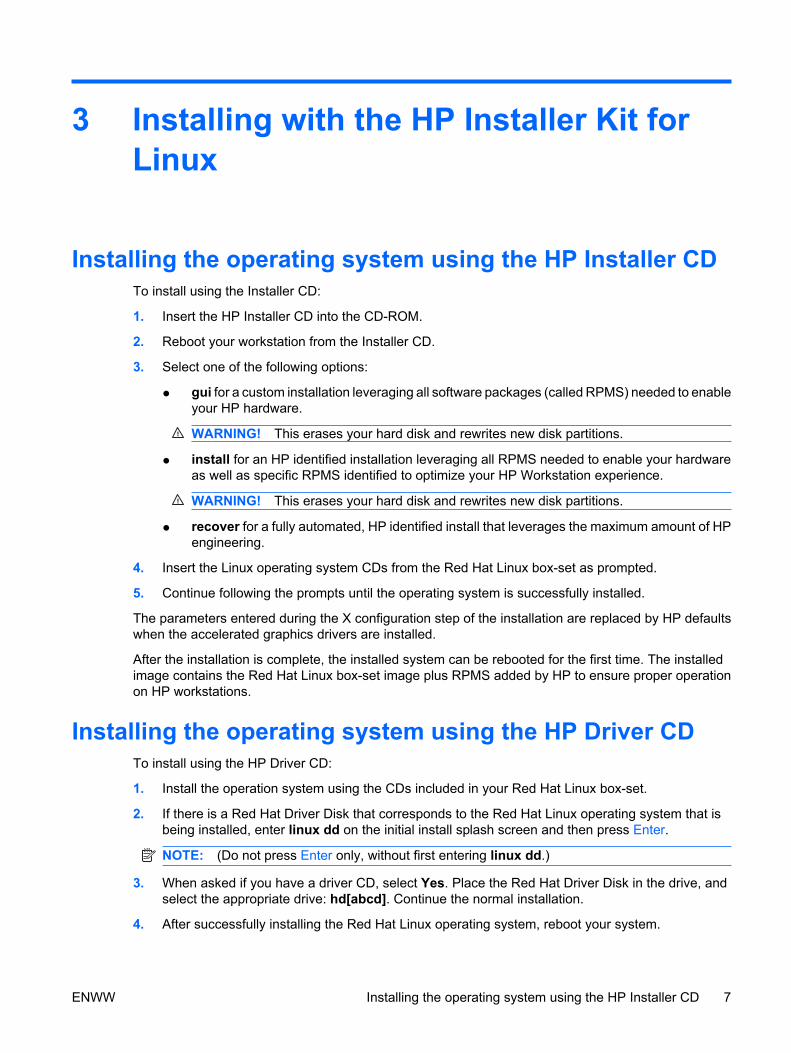
Installing the operating system using the HP Installer CDTo install using the Installer CD:
1. Insert the HP Installer CD into the CD-ROM.
2. Reboot your workstation from the Installer CD.
3. Select one of the following options:
● gui for a custom installation leveraging all software packages (called RPMS) needed to enableyour HP hardware.
WARNING! This erases your hard disk and rewrites new disk partitions.
● install for an HP identified installation leveraging all RPMS needed to enable your hardwareas well as specific RPMS identified to optimize your HP Workstation experience.
WARNING! This erases your hard disk and rewrites new disk partitions.
● recover for a fully automated, HP identified install that leverages the maximum amount of HPengineering.
4. Insert the Linux operating system CDs from the Red Hat Linux box-set as prompted.
5. Continue following the prompts until the operating system is successfully installed.
The parameters entered during the X configuration step of the installation are replaced by HP defaultswhen the accelerated graphics drivers are installed.
After the installation is complete, the installed system can be rebooted for the first time. The installedimage contains the Red Hat Linux box-set image plus RPMS added by HP to ensure proper operationon HP workstations.
Installing the operating system using the HP Driver CDTo install using the HP Driver CD:
1. Install the operation system using the CDs included in your Red Hat Linux box-set.
2. If there is a Red Hat Driver Disk that corresponds to the Red Hat Linux operating system that isbeing installed, enter linux dd on the initial install splash screen and then press Enter.
NOTE: (Do not press Enter only, without first entering linux dd.)
3. When asked if you have a driver CD, select Yes. Place the Red Hat Driver Disk in the drive, andselect the appropriate drive: hd[abcd]. Continue the normal installation.
4. After successfully installing the Red Hat Linux operating system, reboot your system.
ENWW Installing the operating system using the HP Installer CD 7
5. The Red Hat Setup Agent (also known as "first-boot") will set up system parameters such asnetworking, time/date, adding new users, etc.
6. Complete this process. The Additional CDs screen displays, and you initialize the system with HPDriver CD components.
7. Insert the HP Driver CD.
8. When prompted, select Install for the Additional CD option.
9. When the driver installation task is completed, finish the first-boot setup.
10. Continue following the prompts until the operating system is successfully installed.
11. Reboot your system to enable the proper post-installation configuration of drivers.
WarrantyAs part of your hardware warranty, HP provides software configuration and installation support for RedHat Linux for up to 90 days from date of purchase of the Linux-enabled workstation configuration. Todownload the latest Linux drivers, visit http://www.hp.com/go/workstationsupport.
For full warranty information, refer to the warranty that shipped with your HP Workstation or visithttp://www.hp.com/go/workstationsupport and select the Warranty Information link.
Platform SupportFor supported platforms see Table 2-1 Red Hat Linux supported hardware platforms on page 3.
LocalizationRed Hat Linux delivers localization support throughout the installation process and with the baseoperating system on both Red Hat Linux 9 and RHEL WS 3. Some README files and menus in the HPInstaller CD have only English support, but the Installer CD generally supports localization. Thesupported hardware localization kits are listed in the Installation Support Matrix.
GraphicsHP workstations may be ordered without a graphics card or with a selection of graphics cards that havegone through extensive verification by HP. See the Installation Support Matrix for a complete list ofdrivers and the platforms that support them. Because of certain power requirements of the high poweredgraphics cards, not all graphics cards are available on all boxes. Accelerated drivers that are supportedby HP and the graphics vendors are available on the Installer CD and from the HP Support web site.These accelerated drivers are not found on the Red Hat Linux CD because they are not open source.Recent drivers that have not been qualified by HP are sometimes available from the graphics vendorweb site. These drivers are not supported by HP, but the graphics vendor can provide some supportwith these versions of the drivers. When installing your Red Hat operating system with the HP InstallerCD, the X configuration step is replaced with default values that typically work well for the acceleratedgraphics drivers. The default resolution is 1280 x 1024.
System RAMHP supports different amounts of total RAM in the different boxes based on the number of hardwareDIMM slots. The total memory supported for each hardware or operating system configuration is listedin the Hardware Support Matrix (http://www.hp.com/support/linux_hardware_matrix).
8 Chapter 3 Installing with the HP Installer Kit for Linux ENWW

See http://www.redhat.com/rhel/compare/ for additional details on RHEL capabilities and limits.
Network cardsThe integrated network cards are all supported for different workstation platforms and are set up as thefirst network device (eth0) after the installation. In addition, network cards that can be ordered separately(called AMO kits) are supported. Intel® network cards and Broadcom network cards are both supported.Given that all HP workstations come with an integrated LAN, the additional cards can be used for asecond LAN card or to replace the existing integrated LAN.
ENWW Network cards 9

10 Chapter 3 Installing with the HP Installer Kit for Linux ENWW
4 HP Release Notes for Red HatEnterprise Linux
IntroductionRelease Notes for Red Hat Enterprise Linux (RHEL) contain a list of known issues on HP Linuxworkstations when using RHEL 3, RHEL 4, and RHEL Client 5 as of January 2008.
For additional information or updates, visit http://www.hp.com/go/workstationsupport and complete thefollowing steps:
1. Select your HP workstation.
2. From the "I would like to" section, select Troubleshoot a problem.
3. From the "useful documents" section, select Operating system.
4. Locate the Linux section.
If you are interested in other distributions that are certified on HP workstations, see http://www.hp.com/go/workstationsupport.
ENWW Introduction 11
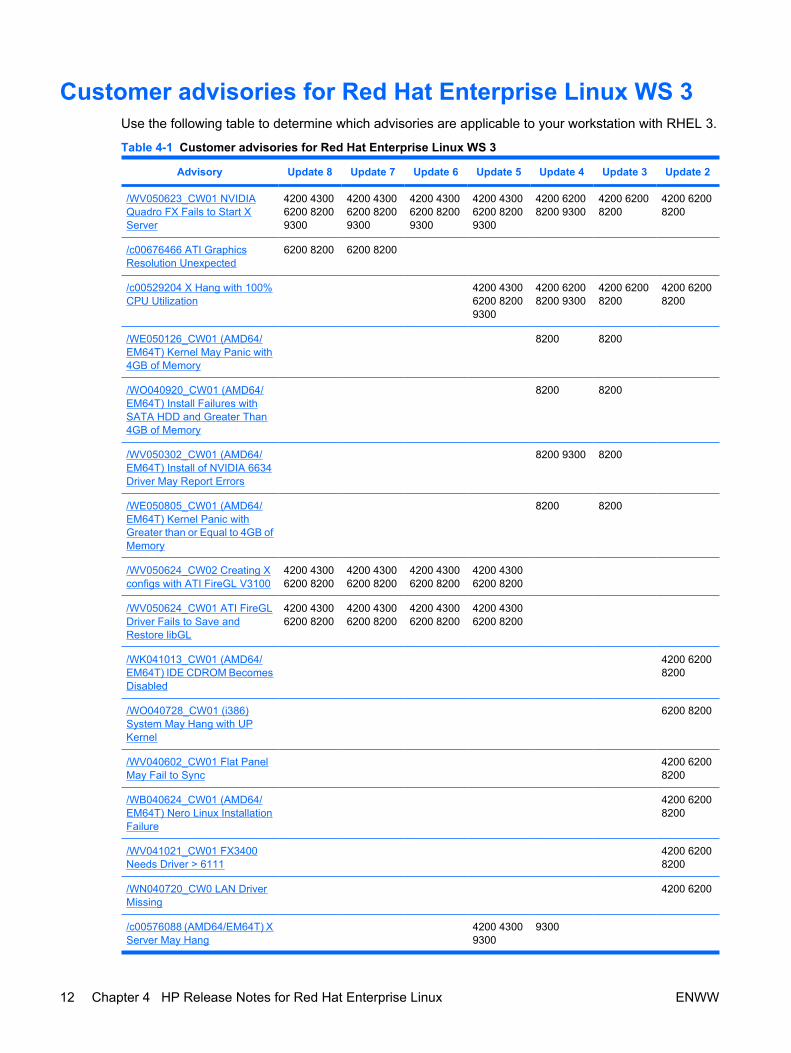
Customer advisories for Red Hat Enterprise Linux WS 3Use the following table to determine which advisories are applicable to your workstation with RHEL 3.
Table 4-1 Customer advisories for Red Hat Enterprise Linux WS 3
Advisory Update 8 Update 7 Update 6 Update 5 Update 4 Update 3 Update 2
/WV050623_CW01 NVIDIAQuadro FX Fails to Start XServer
4200 43006200 82009300
4200 43006200 82009300
4200 43006200 82009300
4200 43006200 82009300
4200 62008200 9300
4200 62008200
4200 62008200
/c00676466 ATI GraphicsResolution Unexpected
6200 8200 6200 8200
/c00529204 X Hang with 100%CPU Utilization
4200 43006200 82009300
4200 62008200 9300
4200 62008200
4200 62008200
/WE050126_CW01 (AMD64/EM64T) Kernel May Panic with4GB of Memory
8200 8200
/WO040920_CW01 (AMD64/EM64T) Install Failures withSATA HDD and Greater Than4GB of Memory
8200 8200
/WV050302_CW01 (AMD64/EM64T) Install of NVIDIA 6634Driver May Report Errors
8200 9300 8200
/WE050805_CW01 (AMD64/EM64T) Kernel Panic withGreater than or Equal to 4GB ofMemory
8200 8200
/WV050624_CW02 Creating Xconfigs with ATI FireGL V3100
4200 43006200 8200
4200 43006200 8200
4200 43006200 8200
4200 43006200 8200
/WV050624_CW01 ATI FireGLDriver Fails to Save andRestore libGL
4200 43006200 8200
4200 43006200 8200
4200 43006200 8200
4200 43006200 8200
/WK041013_CW01 (AMD64/EM64T) IDE CDROM BecomesDisabled
4200 62008200
/WO040728_CW01 (i386)System May Hang with UPKernel
6200 8200
/WV040602_CW01 Flat PanelMay Fail to Sync
4200 62008200
/WB040624_CW01 (AMD64/EM64T) Nero Linux InstallationFailure
4200 62008200
/WV041021_CW01 FX3400Needs Driver > 6111
4200 62008200
/WN040720_CW0 LAN DriverMissing
4200 6200
/c00576088 (AMD64/EM64T) XServer May Hang
4200 43009300
9300
12 Chapter 4 HP Release Notes for Red Hat Enterprise Linux ENWW
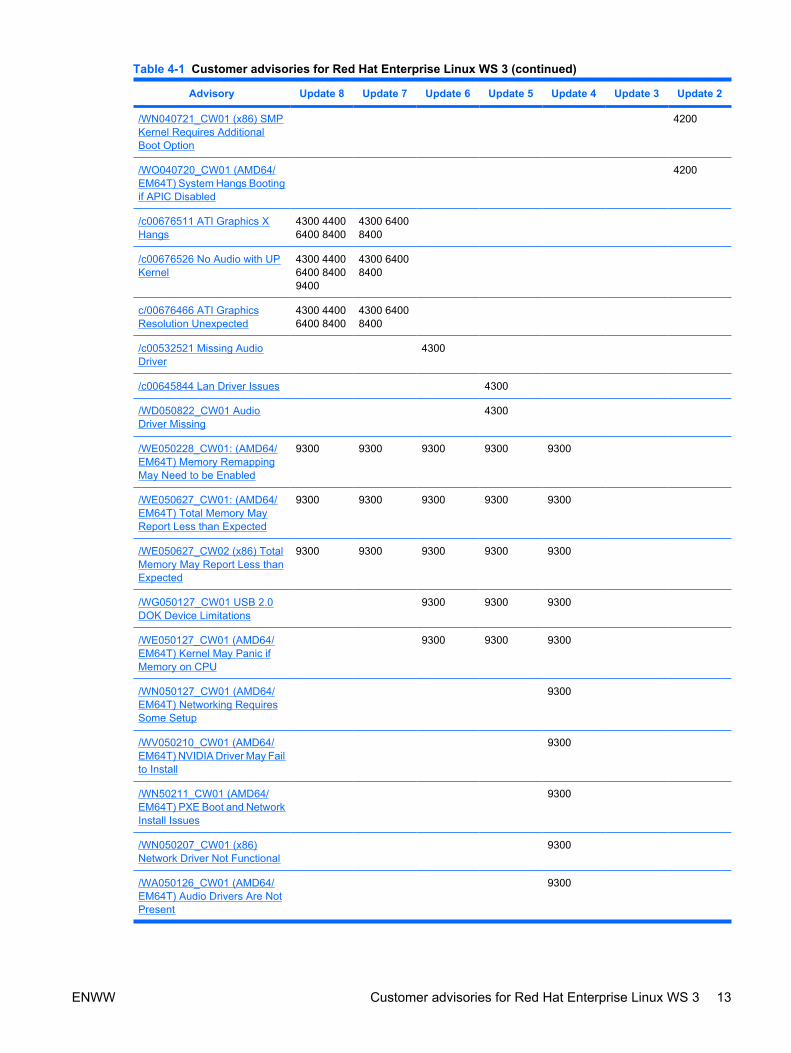
Advisory Update 8 Update 7 Update 6 Update 5 Update 4 Update 3 Update 2
/WN040721_CW01 (x86) SMPKernel Requires AdditionalBoot Option
4200
/WO040720_CW01 (AMD64/EM64T) System Hangs Bootingif APIC Disabled
4200
/c00676511 ATI Graphics XHangs
4300 44006400 8400
4300 64008400
/c00676526 No Audio with UPKernel
4300 44006400 84009400
4300 64008400
c/00676466 ATI GraphicsResolution Unexpected
4300 44006400 8400
4300 64008400
/c00532521 Missing AudioDriver
4300
/c00645844 Lan Driver Issues 4300
/WD050822_CW01 AudioDriver Missing
4300
/WE050228_CW01: (AMD64/EM64T) Memory RemappingMay Need to be Enabled
9300 9300 9300 9300 9300
/WE050627_CW01: (AMD64/EM64T) Total Memory MayReport Less than Expected
9300 9300 9300 9300 9300
/WE050627_CW02 (x86) TotalMemory May Report Less thanExpected
9300 9300 9300 9300 9300
/WG050127_CW01 USB 2.0DOK Device Limitations
9300 9300 9300
/WE050127_CW01 (AMD64/EM64T) Kernel May Panic ifMemory on CPU
9300 9300 9300
/WN050127_CW01 (AMD64/EM64T) Networking RequiresSome Setup
9300
/WV050210_CW01 (AMD64/EM64T) NVIDIA Driver May Failto Install
9300
/WN50211_CW01 (AMD64/EM64T) PXE Boot and NetworkInstall Issues
9300
/WN050207_CW01 (x86)Network Driver Not Functional
9300
/WA050126_CW01 (AMD64/EM64T) Audio Drivers Are NotPresent
9300
Table 4-1 Customer advisories for Red Hat Enterprise Linux WS 3 (continued)
ENWW Customer advisories for Red Hat Enterprise Linux WS 3 13
Advisory Update 8 Update 7 Update 6 Update 5 Update 4 Update 3 Update 2
/WV050128_CW01 (x86)Accelerated Graphics Will NotInstall
9300
/c00767604 High Speed USBFails
4400
/c00680525 FX4500 GraphicsProblems
4400 64008400
6400 8400
/c00767062 ATI GraphicsInstall Problems
4400 64008400
/c00680369 NVS440 GraphicsCannot Start X
4400 64008400
6400 8400
/c00768052 RHEL3U8 x86Currently Not Supported
9400
/c00768016 Network Interfaceeth0 May Fail
9400
/c00767049 Wake-on-LAN MayFail
9300
/c00909919 (AMD64/EM64T)FX4600 issues with vesa driver
4400 64008400 9400
6400 8400
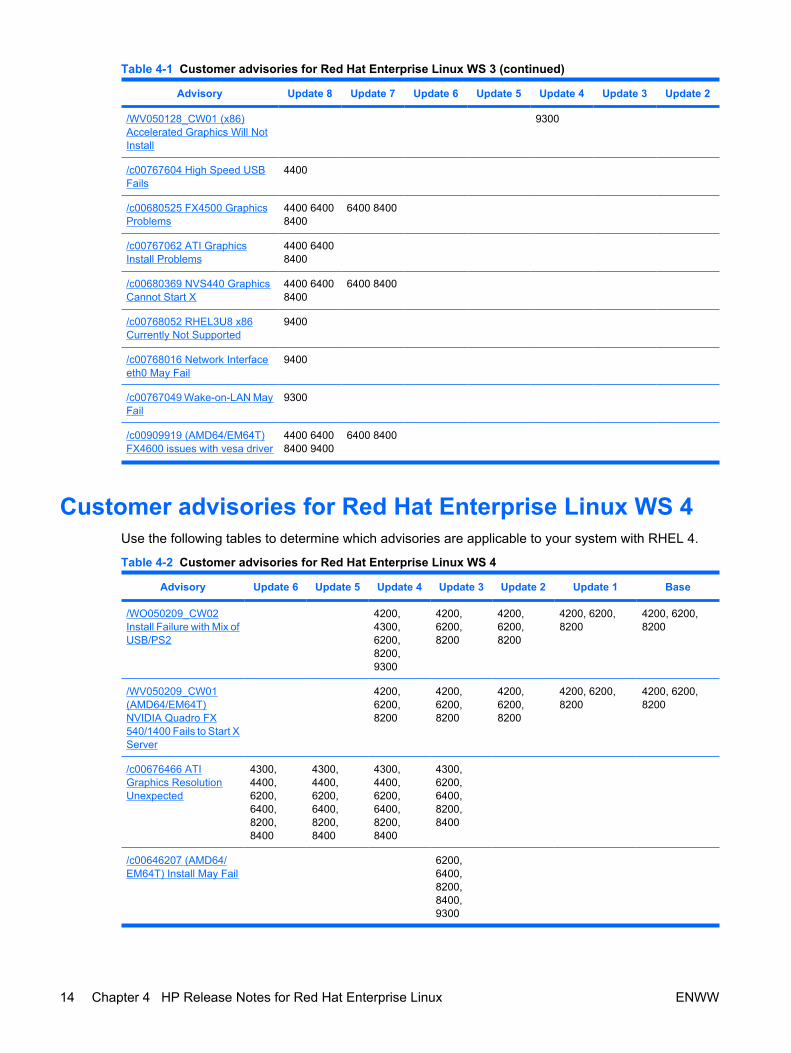
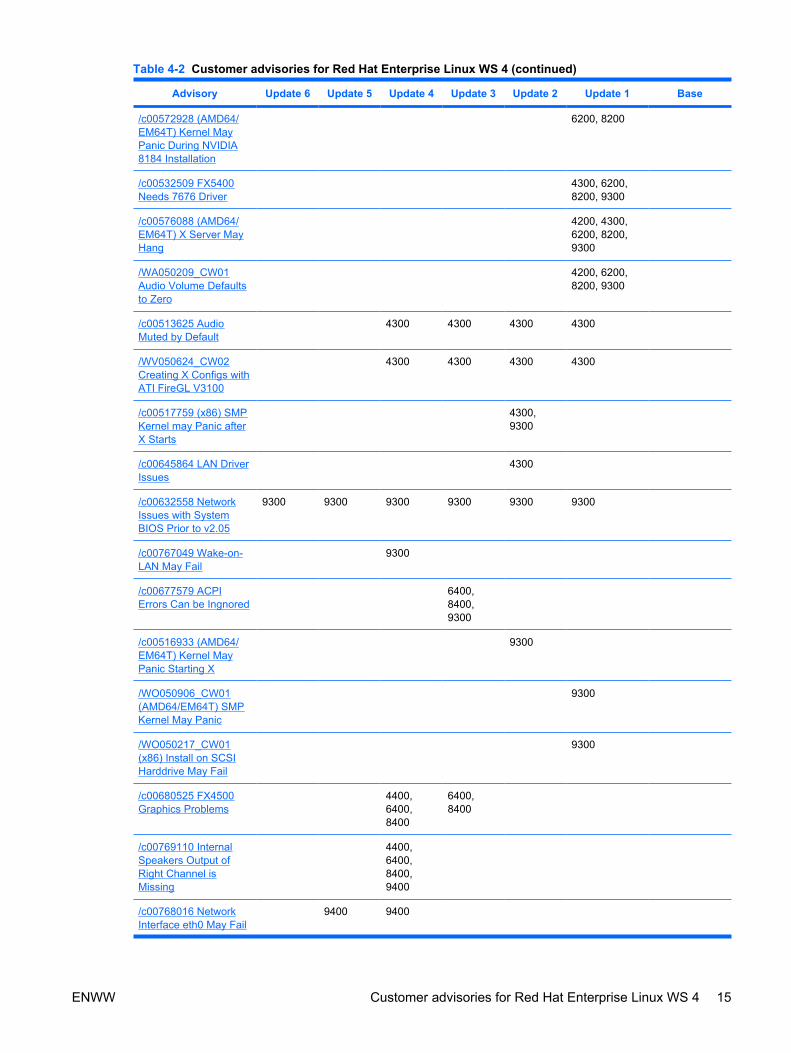
Customer advisories for Red Hat Enterprise Linux WS 4Use the following tables to determine which advisories are applicable to your system with RHEL 4.
Table 4-2 Customer advisories for Red Hat Enterprise Linux WS 4
Advisory Update 6 Update 5 Update 4 Update 3 Update 2 Update 1 Base
/WO050209_CW02Install Failure with Mix ofUSB/PS2
4200,4300,6200,8200,9300
4200,6200,8200
4200,6200,8200
4200, 6200,8200
4200, 6200,8200
/WV050209_CW01(AMD64/EM64T)NVIDIA Quadro FX540/1400 Fails to Start XServer
4200,6200,8200
4200,6200,8200
4200,6200,8200
4200, 6200,8200
4200, 6200,8200
/c00676466 ATIGraphics ResolutionUnexpected
4300,4400,6200,6400,8200,8400
4300,4400,6200,6400,8200,8400
4300,4400,6200,6400,8200,8400
4300,6200,6400,8200,8400
/c00646207 (AMD64/EM64T) Install May Fail
6200,6400,8200,8400,9300
Table 4-1 Customer advisories for Red Hat Enterprise Linux WS 3 (continued)
14 Chapter 4 HP Release Notes for Red Hat Enterprise Linux ENWW
Advisory Update 6 Update 5 Update 4 Update 3 Update 2 Update 1 Base
/c00572928 (AMD64/EM64T) Kernel MayPanic During NVIDIA8184 Installation
6200, 8200
/c00532509 FX5400Needs 7676 Driver
4300, 6200,8200, 9300
/c00576088 (AMD64/EM64T) X Server MayHang
4200, 4300,6200, 8200,9300
/WA050209_CW01Audio Volume Defaultsto Zero
4200, 6200,8200, 9300
/c00513625 AudioMuted by Default
4300 4300 4300 4300
/WV050624_CW02Creating X Configs withATI FireGL V3100
4300 4300 4300 4300
/c00517759 (x86) SMPKernel may Panic afterX Starts
4300,9300
/c00645864 LAN DriverIssues
4300
/c00632558 NetworkIssues with SystemBIOS Prior to v2.05
9300 9300 9300 9300 9300 9300
/c00767049 Wake-on-LAN May Fail
9300
/c00677579 ACPIErrors Can be Ingnored
6400,8400,9300
/c00516933 (AMD64/EM64T) Kernel MayPanic Starting X
9300
/WO050906_CW01(AMD64/EM64T) SMPKernel May Panic
9300
/WO050217_CW01(x86) Install on SCSIHarddrive May Fail
9300
/c00680525 FX4500Graphics Problems
4400,6400,8400
6400,8400
/c00769110 InternalSpeakers Output ofRight Channel isMissing
4400,6400,8400,9400
/c00768016 NetworkInterface eth0 May Fail
9400 9400
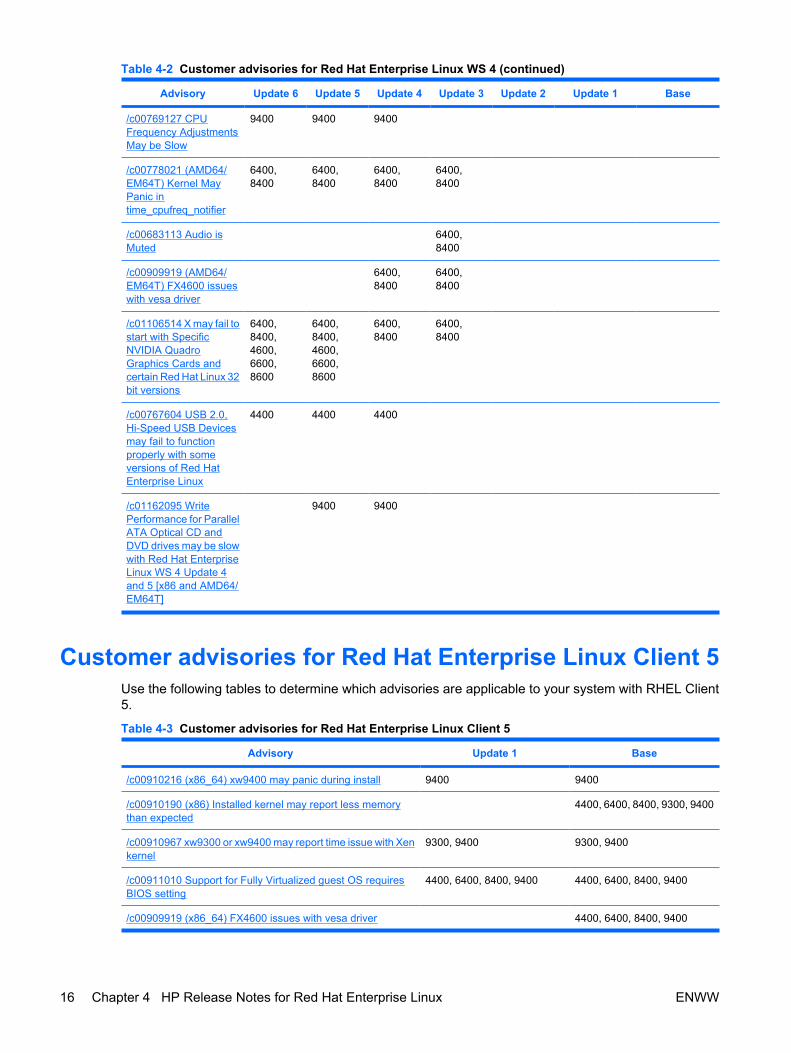
Table 4-2 Customer advisories for Red Hat Enterprise Linux WS 4 (continued)
ENWW Customer advisories for Red Hat Enterprise Linux WS 4 15
Advisory Update 6 Update 5 Update 4 Update 3 Update 2 Update 1 Base
/c00769127 CPUFrequency AdjustmentsMay be Slow
9400 9400 9400
/c00778021 (AMD64/EM64T) Kernel MayPanic intime_cpufreq_notifier
6400,8400
6400,8400
6400,8400
6400,8400
/c00683113 Audio isMuted
6400,8400
/c00909919 (AMD64/EM64T) FX4600 issueswith vesa driver
6400,8400
6400,8400
/c01106514 X may fail tostart with SpecificNVIDIA QuadroGraphics Cards andcertain Red Hat Linux 32bit versions
6400,8400,4600,6600,8600
6400,8400,4600,6600,8600
6400,8400
6400,8400
/c00767604 USB 2.0,Hi-Speed USB Devicesmay fail to functionproperly with someversions of Red HatEnterprise Linux
4400 4400 4400
/c01162095 WritePerformance for ParallelATA Optical CD andDVD drives may be slowwith Red Hat EnterpriseLinux WS 4 Update 4and 5 [x86 and AMD64/EM64T]
9400 9400
Customer advisories for Red Hat Enterprise Linux Client 5Use the following tables to determine which advisories are applicable to your system with RHEL Client5.
Table 4-3 Customer advisories for Red Hat Enterprise Linux Client 5
Advisory Update 1 Base
/c00910216 (x86_64) xw9400 may panic during install 9400 9400
/c00910190 (x86) Installed kernel may report less memorythan expected
4400, 6400, 8400, 9300, 9400
/c00910967 xw9300 or xw9400 may report time issue with Xenkernel
9300, 9400 9300, 9400
/c00911010 Support for Fully Virtualized guest OS requiresBIOS setting
4400, 6400, 8400, 9400 4400, 6400, 8400, 9400
/c00909919 (x86_64) FX4600 issues with vesa driver 4400, 6400, 8400, 9400
Table 4-2 Customer advisories for Red Hat Enterprise Linux WS 4 (continued)
16 Chapter 4 HP Release Notes for Red Hat Enterprise Linux ENWW

Advisory Update 1 Base
/c01160514 X may fail to start with Specific NVIDIA QuadroGraphics Cards and certain Red Hat Linux 32 bit versions
4400, 6400, 8400 4400, 6400, 8400
/c01210315 Certain NVIDIA Quadro Graphics Cards maydisplay a Black Screen during Red Hat Enterprise Linux 5Desktop [x86_64] Install
4600, 9400
/c01210325 Updated NVIDIA Graphics Driver Required forDual Graphics Cards and Certain Red Hat Linux Versions
4600
/c01210413 Black Screen with NVIDIA Quadro FX 4600 or FX5600 Graphics Card and Red Hat Enterprise Linux 5 [x86_64]
4600, 9400
Table 4-3 Customer advisories for Red Hat Enterprise Linux Client 5 (continued)
ENWW Customer advisories for Red Hat Enterprise Linux Client 5 17

18 Chapter 4 HP Release Notes for Red Hat Enterprise Linux ENWW
5 Setting up large memory configurations
IntroductionHP Linux workstations can support large memory configurations (greater than or equal to 4 GB). To uselarge memory configurations, an SMP (Symmetric Multiprocessing), hugemem, or bigmem kernel mustbe installed and configured. Even though a system may have more than 4 GB of memory, 3.5 GB is themaximum amount of memory that will be usable by a single process for running a uni-processor (UP)kernel.
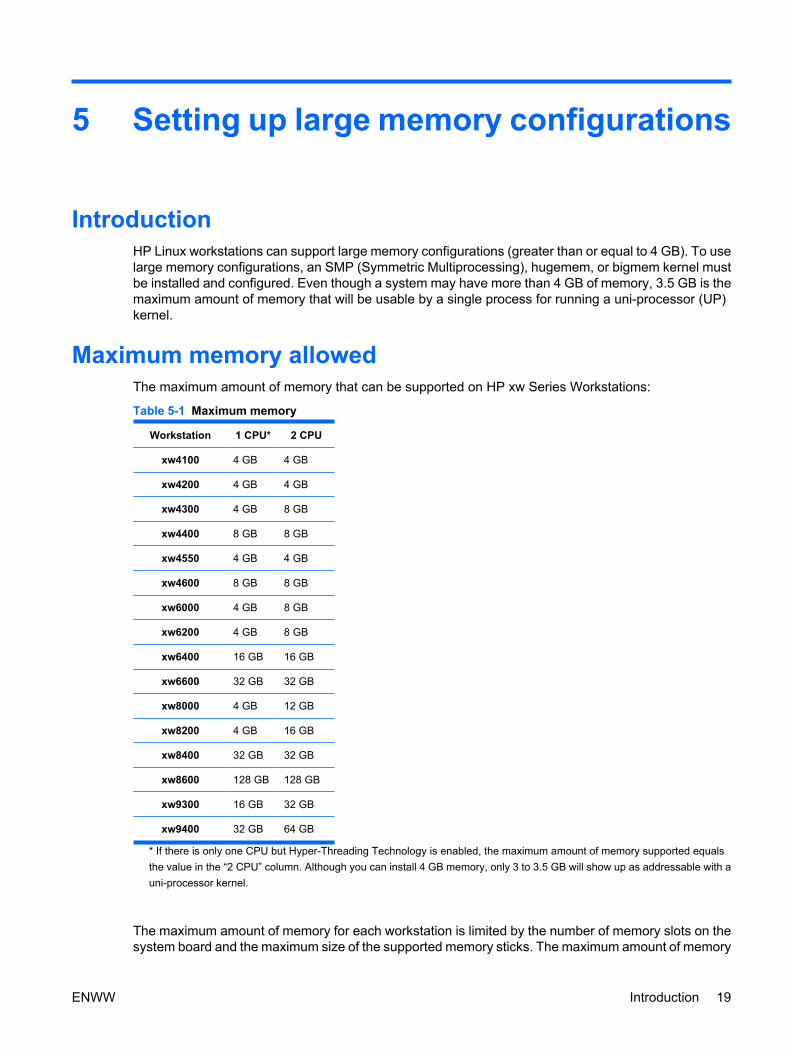
Maximum memory allowedThe maximum amount of memory that can be supported on HP xw Series Workstations:
Table 5-1 Maximum memory
Workstation 1 CPU* 2 CPU
xw4100 4 GB 4 GB
xw4200 4 GB 4 GB
xw4300 4 GB 8 GB
xw4400 8 GB 8 GB
xw4550 4 GB 4 GB
xw4600 8 GB 8 GB
xw6000 4 GB 8 GB
xw6200 4 GB 8 GB
xw6400 16 GB 16 GB
xw6600 32 GB 32 GB
xw8000 4 GB 12 GB
xw8200 4 GB 16 GB
xw8400 32 GB 32 GB
xw8600 128 GB 128 GB
xw9300 16 GB 32 GB
xw9400 32 GB 64 GB
* If there is only one CPU but Hyper-Threading Technology is enabled, the maximum amount of memory supported equalsthe value in the “2 CPU” column. Although you can install 4 GB memory, only 3 to 3.5 GB will show up as addressable with auni-processor kernel.
The maximum amount of memory for each workstation is limited by the number of memory slots on thesystem board and the maximum size of the supported memory sticks. The maximum amount of memory
ENWW Introduction 19

recommended for each Linux version varies depending on the kernel that it includes. See the mostrecent Linux Hardware Support Matrix (http://hp.com/support/linux_hardware_matrix) to find out themaximum memory currently verified for your configuration.
HP Installer Kit for Linux and factory preinstalled systemsIf your Linux system has 4 GB or more of memory and the Red Hat Linux operating system was eitherpreinstalled at the factory or installed using the HP Installer Kit for Linux, the correct kernel for supportingthe large amount of memory should be automatically installed and configured.
x86 (32-bit) Red Hat Linux legacy information
Bigmem and hugemem kernelsThe bigmem kernel is used on Red Hat Linux 7.2, 7.3, 8.0, and 9.
The hugemem kernel is used on Red Hat Enterprise Linux WS 3 (RHEL WS 3) and later.
Starting with RHEL WS 3, the i686 SMP kernel is sufficient for the maximum amount of memory, up to16 GB, in HP workstations. With greater than 16 GB large memory configurations, use the hugememkernel. With 4 GB and greater memory configurations, you will have access to all your memory (if theEnable Memory Remapping option is enabled in the BIOS).
In order for earlier Linux operating systems to use more than 3.5 GB of physical memory, a specialkernel called the bigmem kernel must be used. For example, for kernel 2.4.18-26, the rpm package thatprovides that kernel for Red Hat 8.0 is kernel-bigmem-2.4.18-26.8.x.i686.rpm. If more than 3.5 GB ofmemory is installed, then enter rpm -i kernel-bigmem-2.4.18-26.8.x.i686.rpm when installing thebigmem kernel,
You need to reinstall accelerated HP graphics drivers from the HP Installer Kit for Linux CD or the latestdriver from http://www.hp.com/go/workstationsupport. For the accelerated graphics driver to workcorrectly, you must install the source files for the particular version of the kernel that you installed. Beforeyou attempt to reinstall the graphics driver, install the kernel source. The kernel source is available fromthe same location as the bigmem kernel rpm.
To reinstall the graphics driver:
1. Identify the accelerated driver that was installed on the UP kernel:
a. Enter rpm -qa | grep nv
b. Enter rpm -qa | grep firegl
2. To remove the driver that was identified, enter rpm -e <name from output of previous step>.
3. To Install the new driver, enter rpm -i <driver name>.rpm
4. Run the configure script:
a. For Legacy Red Hat versions, enter cd /usr/hp/graphics/<vendor name>.
b. For Red Hat Enterprise Linux, enter cd /opt/hp/graphics/<vendor name>.
c. Enter ./configure
You might also need to rebuild or reinstall any other loadable kernel modules on your system becausea different module is needed for each Linux kernel.
20 Chapter 5 Setting up large memory configurations ENWW
Bigmem, hugemem, and UP systemsThe bigmem and hugemem kernels as released by Red Hat are SMP (Symmetric Multi-Processing)kernels, which mean that they can support multiple CPUs. The bigmem and hugemem kernels haveonly been tested by HP on dual CPU systems and on single CPU systems with Hyper-ThreadingTechnology enabled, plus 4 GB or more of memory. Thus, using the bigmem and hugemem kernels onsystems with one virtual CPU or less than 4 GB of memory is not supported.
Performance implicationsWhen using the bigmem and hugemem kernels, memory references inside the kernel require one morelevel of indirection, so general system performance might suffer compared to using the SMP or UPkernels. For user processes using large amounts of memory, the additional installed memory canprevent swapping to the hard drive, which should offset any memory reference penalty incurred by thebigmem and hugemem kernels.
On x86 (32-bit) systems, the Linux kernel makes available only 3 GB of address space available foreach user process. Even though a single process can only use 3 GB of memory, installing 4 GB or moreof memory and running the bigmem and hugemem kernels can still provide a performance advantagewhen running multiple processes requiring large amounts of memory.
The maximum amount of memory that you can malloc in one chunk is 2 GB, because of fragmentationof the malloc pool across a process address space.
Large memory and Memory Type Range RegistersIn some situations, adding additional memory to a system can cause AGP graphics drivers to fail. Inthese cases, increasing the AGP aperture size might enable the configuration to operate.
On Intel Pentium family processors memory access is controlled using special dedicated registers inthe processor called Memory Type Range Registers (MTRRs). For system RAM to be available forprocessor use, the system must be configured using these registers where the defined memory sizemust be a power of two. Maximizing configured memory results in some system memory sizes usingalmost all the MTRRs available in the processor. Some Linux graphics drivers require exclusive use oftwo MTRRs, which might not be available.
If an error occurs when the graphics driver loads, the system memory configuration might not haveenough free MTRRs. This can be verified from the console by viewing the /proc/mtrr file. Registers sixand seven are normally unlisted or listed as OMB if X has not started since the last system boot. Ifviewing /proc/mtrr shows register six or seven is in use, changing the memory configuration might freean MTRR. You can do this by increasing the AGP graphics aperture by rebooting the system,selecting Setup at the initial screen, and selecting Advanced. However, a larger AGP aperture canreduce the amount of configured memory and can cause a decrease in performance for some graphicsintensive applications.
ConclusionSupport for large memory configurations on HP Linux workstations requires you to use an SMP kernelif memory is 16 GB or less. The hugemem kernel is needed if the memory is greater than 16 GB onRHEL WS 3 and later. A bigmem kernel is needed on earlier Red Hat Linux versions.
ENWW Conclusion 21

22 Chapter 5 Setting up large memory configurations ENWW
6 Setting up multi-monitor configurations
IntroductionThis chapter discusses a working overview of multiple-monitor solutions for HP workstations runningthe Linux operating system and the XFree86 X windowing system. It discusses system concepts,configuration examples, support information, and configuration trade offs for system designers. Thischapter assumes familiarity with Linux configuration, basic X server usage, window managers, andessential video graphics card fundamentals.
Many advanced graphics cards have the speed and capacity to simultaneously drive multiple displaymonitors. While conventional systems provide single-monitor setups, multiple monitor setups supportdata-intensive visualization needs.
BasicsHP supports a wide spectrum of graphics device solutions from Professional 2D to Extreme 3D.Professional 2D devices offer affordable multiple screen solutions for business professionals. For usersrequiring 3D solutions, HP offers a range of devices from entry-level 3D with price-performanceadvantages to extreme 3D devices offering the latest features in programmability, stereo, antialiasing,and memory. Almost all HP workstation graphics cards provide two video output connectors and candrive dual video monitors.
In current HP workstations the primary graphics interface is now PCI Express (PCIe) 16x transfer ratesof approximately 4-GB/s bandwidth. PCIe is seen as the new standard for a scalable interface asgraphics and other devices become more powerful and require more bandwidth. A complete list of HPsupported Linux graphics devices is located at http://www.hp.com/support/linux_hardware_matrix.
Graphics driversSoftware drivers dictate the available functionality and performance of graphics cards under XFree86on Linux. You should be aware of two distinctions:
● XFree86/X.org-native drivers—Graphics software provided by open-source developers includedas part of the XFree86 and X.org distributions. Functionality and performance depend upon codematurity and low-level access. Often these drivers have basic functionality as device manufacturerschoose to keep their acceleration techniques and full functionality limited to proprietary drivers.
● OEM proprietary drivers—Graphics software that is developed and maintained by respectivemanufacturers. This software provides the highest degree of card acceleration and functionality.
NOTE: Use OEM drivers when configuring multiple video ports on supplied HP graphics cards.
Both XFree86/X.org providers and OEM graphics partners provide robust graphics driver solutions onHP workstations. Version-matched drivers for ATI and NVIDIA graphics cards are provided with the HPInstaller Kit for Linux CD and HP Driver CD for Red Hat Linux releases. The latest HP Driver CD andindividual graphics driver updates are maintained and available on the HP Support website:http://www.hp.com/support.
ENWW Introduction 23
Multiple graphics cardsHP supports multiple, same-vendor graphics cards in a variety of combinations. The HP xw4600,xw6600, xw8600, xw9300, and xw9400 Workstations offer two full-speed x16 PCIe graphics slots whichenable high end graphics configurations with two full performance graphics cards. The HP xw8200Workstation offers one full-speed x16 PCIe graphics slot as well as a x4 PCIe slot for expansion options.Multiple graphics cards can also be supported by combining one PCIe-based graphics card with one ormore PCI-based graphics cards. Same-vendor card requirements come from the tested reliability of asingle universal graphics driver for all installed cards. Mixed-vendor combinations might requireconflicting drivers that are not guaranteed to work together and thus cannot be fully supported by HP.
Many workstation customers typically reserve the high-performance PCIe channels for accelerated 3Dgraphics work. Additional PCI-based graphics cards provide complementary access to user interfaces(menus, navigation, help screens) or other workspaces.
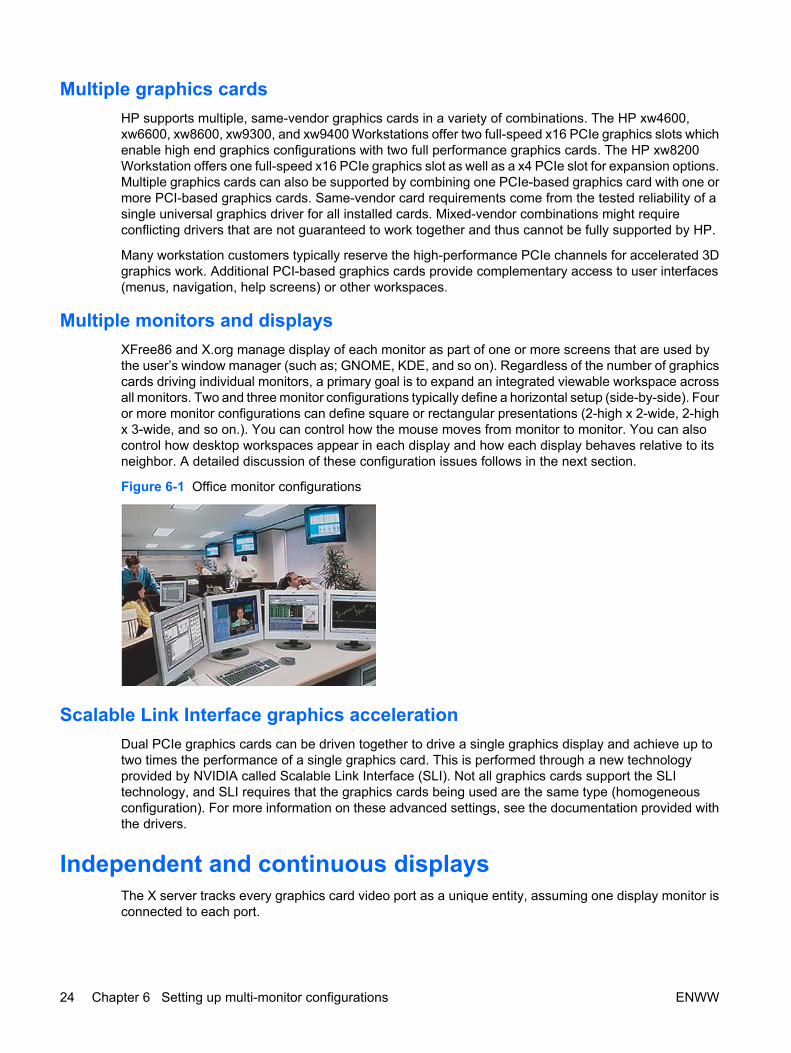
Multiple monitors and displaysXFree86 and X.org manage display of each monitor as part of one or more screens that are used bythe user’s window manager (such as; GNOME, KDE, and so on). Regardless of the number of graphicscards driving individual monitors, a primary goal is to expand an integrated viewable workspace acrossall monitors. Two and three monitor configurations typically define a horizontal setup (side-by-side). Fouror more monitor configurations can define square or rectangular presentations (2-high x 2-wide, 2-highx 3-wide, and so on.). You can control how the mouse moves from monitor to monitor. You can alsocontrol how desktop workspaces appear in each display and how each display behaves relative to itsneighbor. A detailed discussion of these configuration issues follows in the next section.
Figure 6-1 Office monitor configurations
Scalable Link Interface graphics accelerationDual PCIe graphics cards can be driven together to drive a single graphics display and achieve up totwo times the performance of a single graphics card. This is performed through a new technologyprovided by NVIDIA called Scalable Link Interface (SLI). Not all graphics cards support the SLItechnology, and SLI requires that the graphics cards being used are the same type (homogeneousconfiguration). For more information on these advanced settings, see the documentation provided withthe drivers.
Independent and continuous displaysThe X server tracks every graphics card video port as a unique entity, assuming one display monitor isconnected to each port.
24 Chapter 6 Setting up multi-monitor configurations ENWW
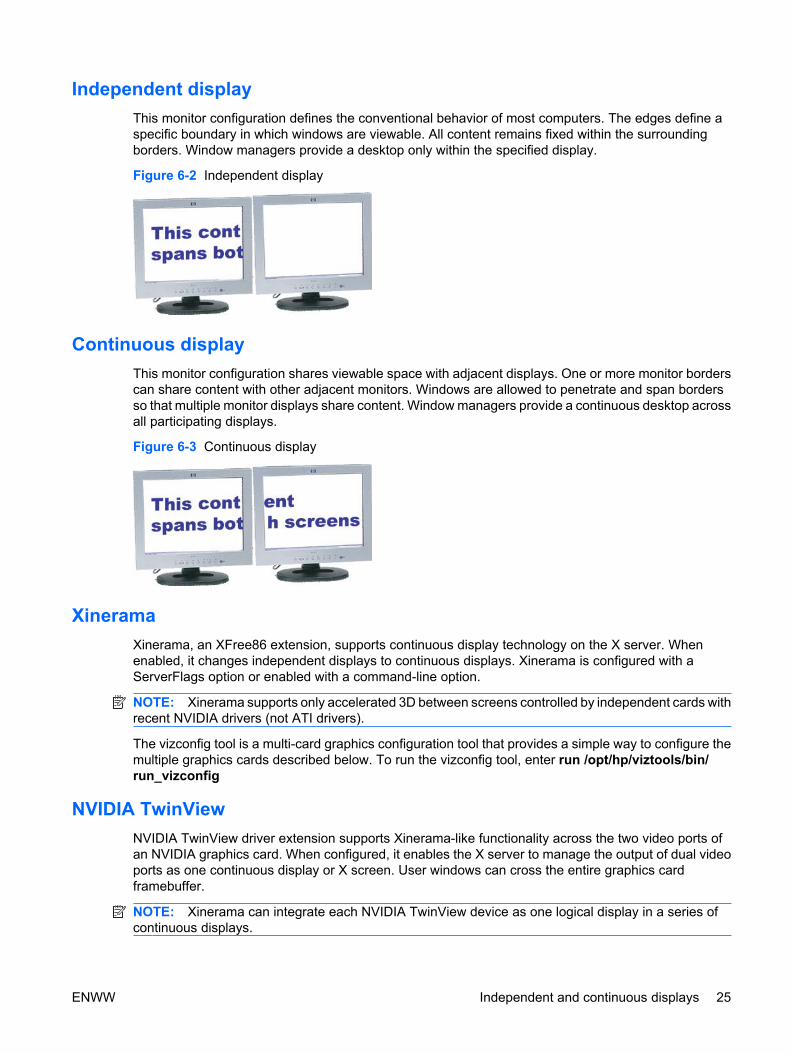
Independent displayThis monitor configuration defines the conventional behavior of most computers. The edges define aspecific boundary in which windows are viewable. All content remains fixed within the surroundingborders. Window managers provide a desktop only within the specified display.
Figure 6-2 Independent display
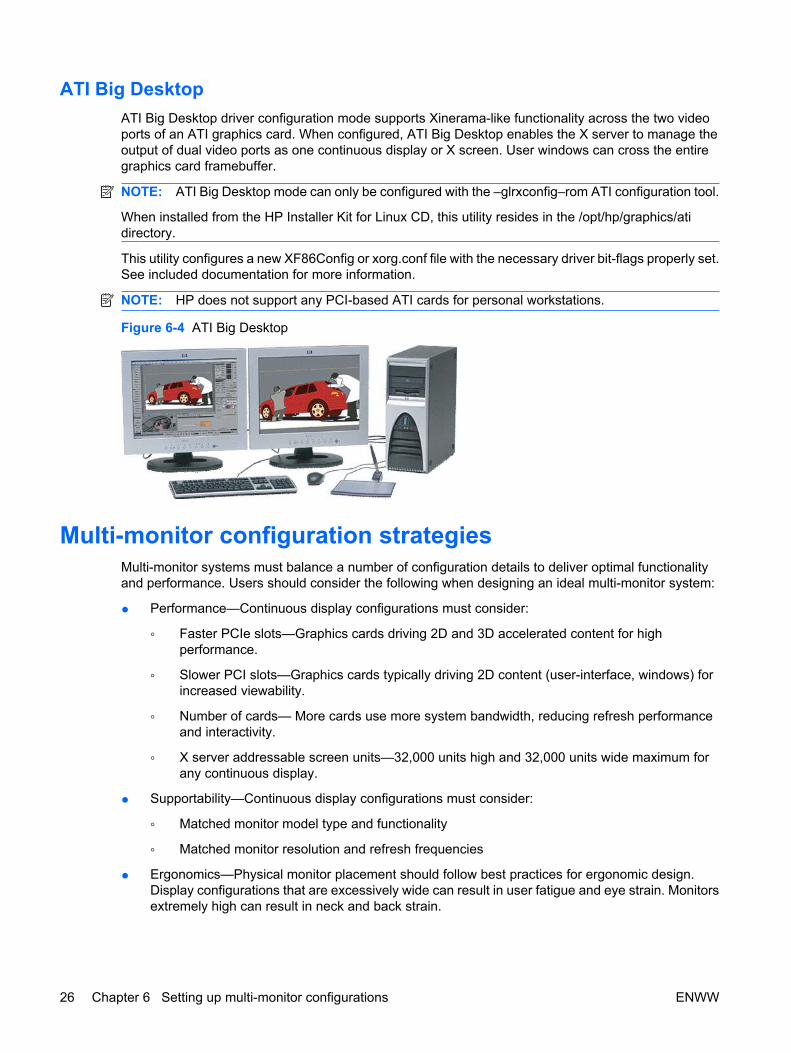
Continuous displayThis monitor configuration shares viewable space with adjacent displays. One or more monitor borderscan share content with other adjacent monitors. Windows are allowed to penetrate and span bordersso that multiple monitor displays share content. Window managers provide a continuous desktop acrossall participating displays.
Figure 6-3 Continuous display
XineramaXinerama, an XFree86 extension, supports continuous display technology on the X server. Whenenabled, it changes independent displays to continuous displays. Xinerama is configured with aServerFlags option or enabled with a command-line option.
NOTE: Xinerama supports only accelerated 3D between screens controlled by independent cards withrecent NVIDIA drivers (not ATI drivers).
The vizconfig tool is a multi-card graphics configuration tool that provides a simple way to configure themultiple graphics cards described below. To run the vizconfig tool, enter run /opt/hp/viztools/bin/run_vizconfig
NVIDIA TwinViewNVIDIA TwinView driver extension supports Xinerama-like functionality across the two video ports ofan NVIDIA graphics card. When configured, it enables the X server to manage the output of dual videoports as one continuous display or X screen. User windows can cross the entire graphics cardframebuffer.
NOTE: Xinerama can integrate each NVIDIA TwinView device as one logical display in a series ofcontinuous displays.
ENWW Independent and continuous displays 25
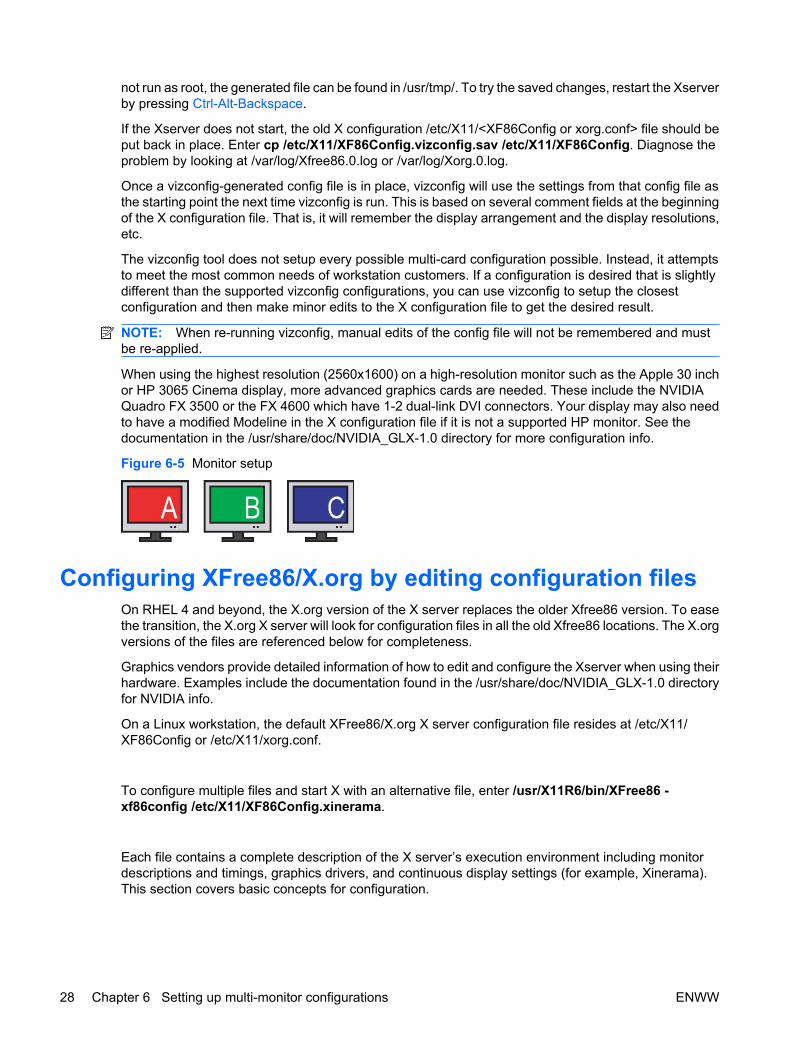
ATI Big DesktopATI Big Desktop driver configuration mode supports Xinerama-like functionality across the two videoports of an ATI graphics card. When configured, ATI Big Desktop enables the X server to manage theoutput of dual video ports as one continuous display or X screen. User windows can cross the entiregraphics card framebuffer.
NOTE: ATI Big Desktop mode can only be configured with the –glrxconfig–rom ATI configuration tool.
When installed from the HP Installer Kit for Linux CD, this utility resides in the /opt/hp/graphics/atidirectory.
This utility configures a new XF86Config or xorg.conf file with the necessary driver bit-flags properly set.See included documentation for more information.
NOTE: HP does not support any PCI-based ATI cards for personal workstations.
Figure 6-4 ATI Big Desktop
Multi-monitor configuration strategiesMulti-monitor systems must balance a number of configuration details to deliver optimal functionalityand performance. Users should consider the following when designing an ideal multi-monitor system:
● Performance—Continuous display configurations must consider:
◦ Faster PCIe slots—Graphics cards driving 2D and 3D accelerated content for highperformance.
◦ Slower PCI slots—Graphics cards typically driving 2D content (user-interface, windows) forincreased viewability.
◦ Number of cards— More cards use more system bandwidth, reducing refresh performanceand interactivity.
◦ X server addressable screen units—32,000 units high and 32,000 units wide maximum forany continuous display.
● Supportability—Continuous display configurations must consider:
◦ Matched monitor model type and functionality
◦ Matched monitor resolution and refresh frequencies
● Ergonomics—Physical monitor placement should follow best practices for ergonomic design.Display configurations that are excessively wide can result in user fatigue and eye strain. Monitorsextremely high can result in neck and back strain.
26 Chapter 6 Setting up multi-monitor configurations ENWW

Configuring X with multiple graphics cards using thevizconfig tool
The vizconfig tool is designed to make it much easier to set up multi-head and multi-card graphicsconfigurations.
On HP xw9300 Workstations, the tool has an icon preinstalled on the desktop. The installer can also berun from the command line by entering /opt/hp/viztools/bin/run_vizconfig.
(Today, the vizconfig tool works only on NVIDIA devices. ATI has a configuration tool called fglrxconfigwith a GUI that configures a single graphics card.)
The vizconfig GUI is invoked, pointing and clicking is all you need to do for most configs. If you need todo anything that the vizconfig tool does not support, then you can edit the config file that vizconfiggenerates to add the missing functionality.
To use the vizconfig tool:
1. Log in as root.
2. Launch the vizconfig tool by clicking the desktop icon, or enter /opt/hp/viztools/bin/run_vizconfig.
3. Select the display arrangement from the Selected Display Arrangement list.
● 1 Card, 1 Display
● 1 Card, 2 Displays, (2x1)
● 2 Cards, 2 Displays (2x1)
● 2 Cards, 3 Displays (3x1)
● 2 Cards, 4 Displays (4x1)
● 2 Cards, 4 Displays (2x2)
● 2 Cards, 4 Displays (1 over 3)
4. When a display arrangement is selected, you can set different options in the Options tab:
● SLI Multiview (Xinerama)—Enables or disables 2D or 3D Xinerama
● Use TwinView where possible—Enables or disables TwinView
● HardwareOverlays—Enables or disables using hardware overlays
5. Set up the different monitors. The different monitors are shown in the picture of the current selecteddisplay arrangement. Also shown are the ways to connect the graphics cards to those monitors.
6. Select the display using the Selected Display list. The picture of the display arrangement will beupdated to highlight the selected display
7. Set the resolution for this display with the Display Resolution slider.
8. If you want the display to be connected to the other connector on the graphics card, select SwapLeft_Right Monitors. The picture of the display arrangement will be modified to reflect this change.
9. Repeat steps 6 through 8 as needed for each display.
10. Select SaveConfig to save the changes to the /etc/X11/<XF86Config or xorg.conf> file.
If the tool was run as root, the system X configuration file (XF86Confg or xorg.conf in /etc/X11) will beupdated. The previous X configuration file is copied aside with a vizconfig.sav extension. If the tool was
ENWW Configuring X with multiple graphics cards using the vizconfig tool 27
not run as root, the generated file can be found in /usr/tmp/. To try the saved changes, restart the Xserverby pressing Ctrl-Alt-Backspace.
If the Xserver does not start, the old X configuration /etc/X11/<XF86Config or xorg.conf> file should beput back in place. Enter cp /etc/X11/XF86Config.vizconfig.sav /etc/X11/XF86Config. Diagnose theproblem by looking at /var/log/Xfree86.0.log or /var/log/Xorg.0.log.
Once a vizconfig-generated config file is in place, vizconfig will use the settings from that config file asthe starting point the next time vizconfig is run. This is based on several comment fields at the beginningof the X configuration file. That is, it will remember the display arrangement and the display resolutions,etc.
The vizconfig tool does not setup every possible multi-card configuration possible. Instead, it attemptsto meet the most common needs of workstation customers. If a configuration is desired that is slightlydifferent than the supported vizconfig configurations, you can use vizconfig to setup the closestconfiguration and then make minor edits to the X configuration file to get the desired result.
NOTE: When re-running vizconfig, manual edits of the config file will not be remembered and mustbe re-applied.
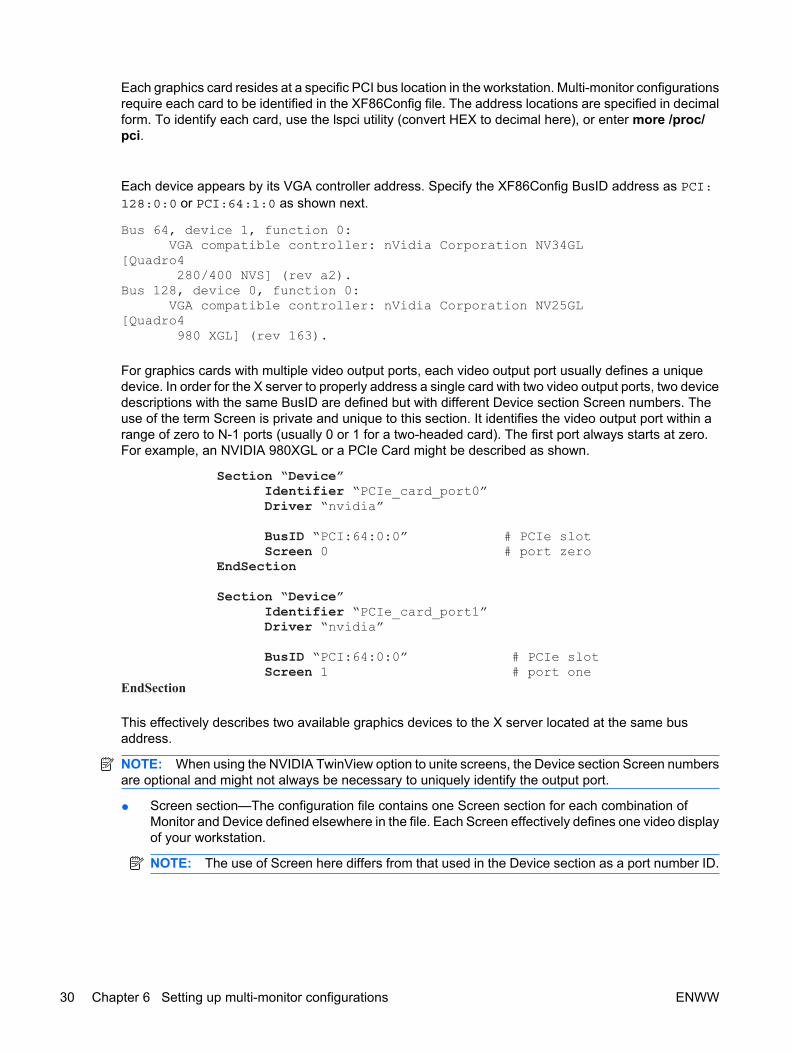
When using the highest resolution (2560x1600) on a high-resolution monitor such as the Apple 30 inchor HP 3065 Cinema display, more advanced graphics cards are needed. These include the NVIDIAQuadro FX 3500 or the FX 4600 which have 1-2 dual-link DVI connectors. Your display may also needto have a modified Modeline in the X configuration file if it is not a supported HP monitor. See thedocumentation in the /usr/share/doc/NVIDIA_GLX-1.0 directory for more configuration info.
Figure 6-5 Monitor setup
Configuring XFree86/X.org by editing configuration filesOn RHEL 4 and beyond, the X.org version of the X server replaces the older Xfree86 version. To easethe transition, the X.org X server will look for configuration files in all the old Xfree86 locations. The X.orgversions of the files are referenced below for completeness.
Graphics vendors provide detailed information of how to edit and configure the Xserver when using theirhardware. Examples include the documentation found in the /usr/share/doc/NVIDIA_GLX-1.0 directoryfor NVIDIA info.
On a Linux workstation, the default XFree86/X.org X server configuration file resides at /etc/X11/XF86Config or /etc/X11/xorg.conf.
To configure multiple files and start X with an alternative file, enter /usr/X11R6/bin/XFree86 -xf86config /etc/X11/XF86Config.xinerama.
Each file contains a complete description of the X server’s execution environment including monitordescriptions and timings, graphics drivers, and continuous display settings (for example, Xinerama).This section covers basic concepts for configuration.
28 Chapter 6 Setting up multi-monitor configurations ENWW

The XF86Config file is a hierarchical definition file. In cascading order of significance, the sections are:
● ServerLayout—Highest level section that binds all input and output devices together for a givensession including output device hints that describe screen position relationships (for example,RightOf, LeftOf, Above, Below, and so on).
● Screen—Definition that binds together a monitor and graphics card device description with colordepth and display resolution preferences.
● Monitor—Monitor description and timing refresh information.
● Device—Graphics card description, device driver name and driver control options.
The following discussions build from lowest-level components to high-level server layout in the file.
● Monitor section—The configuration file must contain one or more monitor descriptions:
Each monitor is referred to in the Screen section by its unique Identifier. For multi-monitor configurations,one definition is sufficient if the monitors match in type and function. For simplicity, it is recommendedthat a single monitor configuration be attempted first to properly define compatible Horizontal andVertical timings for the display. Digital Flat Panel (DFP) monitors, for example, have a narrowsynchronization range to properly function. XFree86 will either fail to start or a monitor will remain blankif reasonable refresh timings cannot be synchronized with the graphics card. Attempts to run monitorsat higher frequencies than their ratings can result in damage, so care should be taken to specifyreasonable operational ranges. Reasonable starting defaults (one frequency, no ranges) for this sectioncan be:
Red Hat distributions 9 and later include access to the XFree86 utility gtf for computing monitormodelines for this section if more specific timing ranges are required.
● Device section — The configuration file must contain one device description for each graphics cardinstalled.
Each graphics card is referred to in the Screen section by its unique Identifier. Each device section mustspecify the loadable device driver provided to drive the graphics card. These drivers reside at /usr/X11R6/lib/modules/drivers.
Driver module names do not include the drv.o extension found on the files at this location, so nvidia_drv.ois simply nvidia in the configuration file.
ENWW Configuring XFree86/X.org by editing configuration files 29
Each graphics card resides at a specific PCI bus location in the workstation. Multi-monitor configurationsrequire each card to be identified in the XF86Config file. The address locations are specified in decimalform. To identify each card, use the lspci utility (convert HEX to decimal here), or enter more /proc/pci.
Each device appears by its VGA controller address. Specify the XF86Config BusID address as PCI:128:0:0 or PCI:64:1:0 as shown next.
For graphics cards with multiple video output ports, each video output port usually defines a uniquedevice. In order for the X server to properly address a single card with two video output ports, two devicedescriptions with the same BusID are defined but with different Device section Screen numbers. Theuse of the term Screen is private and unique to this section. It identifies the video output port within arange of zero to N-1 ports (usually 0 or 1 for a two-headed card). The first port always starts at zero.For example, an NVIDIA 980XGL or a PCIe Card might be described as shown.
This effectively describes two available graphics devices to the X server located at the same busaddress.
NOTE: When using the NVIDIA TwinView option to unite screens, the Device section Screen numbersare optional and might not always be necessary to uniquely identify the output port.
● Screen section—The configuration file contains one Screen section for each combination ofMonitor and Device defined elsewhere in the file. Each Screen effectively defines one video displayof your workstation.
NOTE: The use of Screen here differs from that used in the Device section as a port number ID.
30 Chapter 6 Setting up multi-monitor configurations ENWW
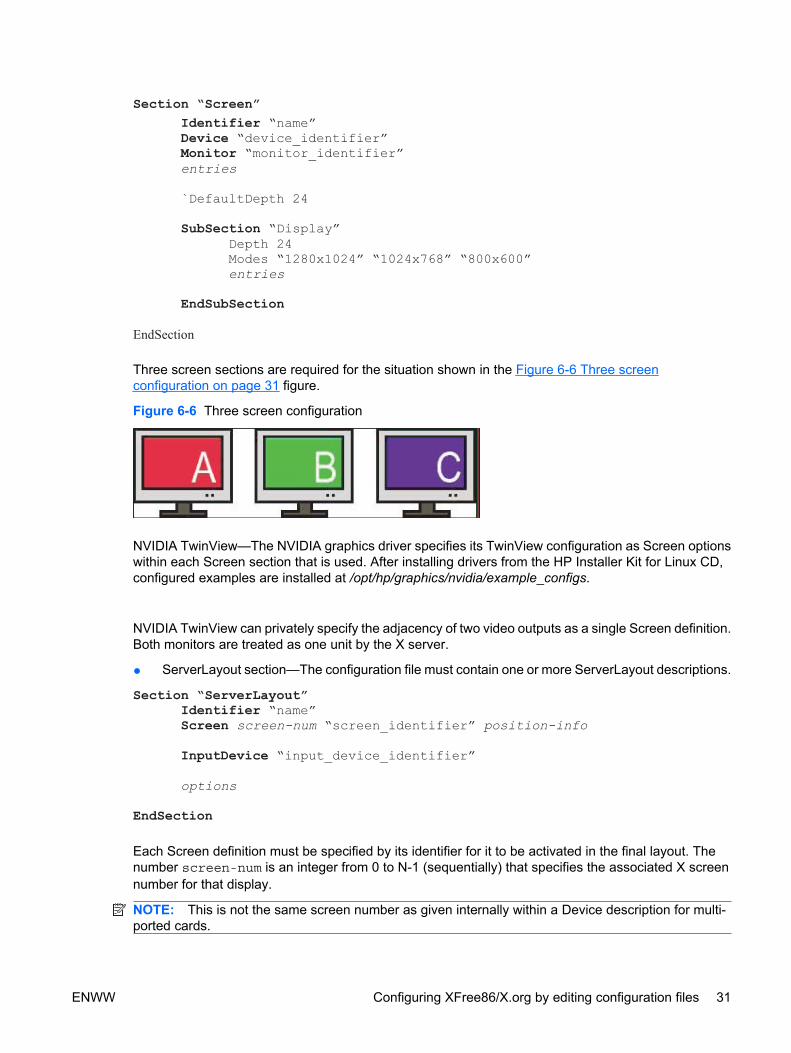
Three screen sections are required for the situation shown in the Figure 6-6 Three screenconfiguration on page 31 figure.
Figure 6-6 Three screen configuration
NVIDIA TwinView—The NVIDIA graphics driver specifies its TwinView configuration as Screen optionswithin each Screen section that is used. After installing drivers from the HP Installer Kit for Linux CD,configured examples are installed at /opt/hp/graphics/nvidia/example_configs.
NVIDIA TwinView can privately specify the adjacency of two video outputs as a single Screen definition.Both monitors are treated as one unit by the X server.
● ServerLayout section—The configuration file must contain one or more ServerLayout descriptions.
Each Screen definition must be specified by its identifier for it to be activated in the final layout. Thenumber screen-num is an integer from 0 to N-1 (sequentially) that specifies the associated X screennumber for that display.
NOTE: This is not the same screen number as given internally within a Device description for multi-ported cards.
ENWW Configuring XFree86/X.org by editing configuration files 31
The position-information field describes the way multiple screens are positioned (RightOf, LeftOf, Above,Below are the most commonly used options).
For example, three displays are placed on a desktop side-by-side. They are defined as screenA,screenB, and screenC, respectively and have screen-num numbers 0, 1, and 2. The ServerLayoutrelationships are as follows:
Figure 6-7 ScreenLayout positions (Xenerama)
Figure 6-8 ScreenLayout positions (non-Xinerama)
When the Xinerama server option is specified (see Figure 6-7 ScreenLayout positions (Xenerama)on page 32), all Screens are joined into one continuous display. If Xinerama is not specified (or enabledon the command line), all screens behave as independent displays (see Figure 6-8 ScreenLayoutpositions (non-Xinerama) on page 32).
Vendor-specific Documentation—When OEM proprietary accelerated drivers are loaded from the HPInstaller Kit for Linux CD, documentation and configuration examples are installed at:
/opt/hp/graphics/vendor-name/
/opt/hp/graphics/ati/
/opt/hp/graphics/nvidia/
Please consult these directories for valuable graphics card customization information, includingspecifics about the NVIDIA TwinView and the ATI Big Desktop functionality.
32 Chapter 6 Setting up multi-monitor configurations ENWW
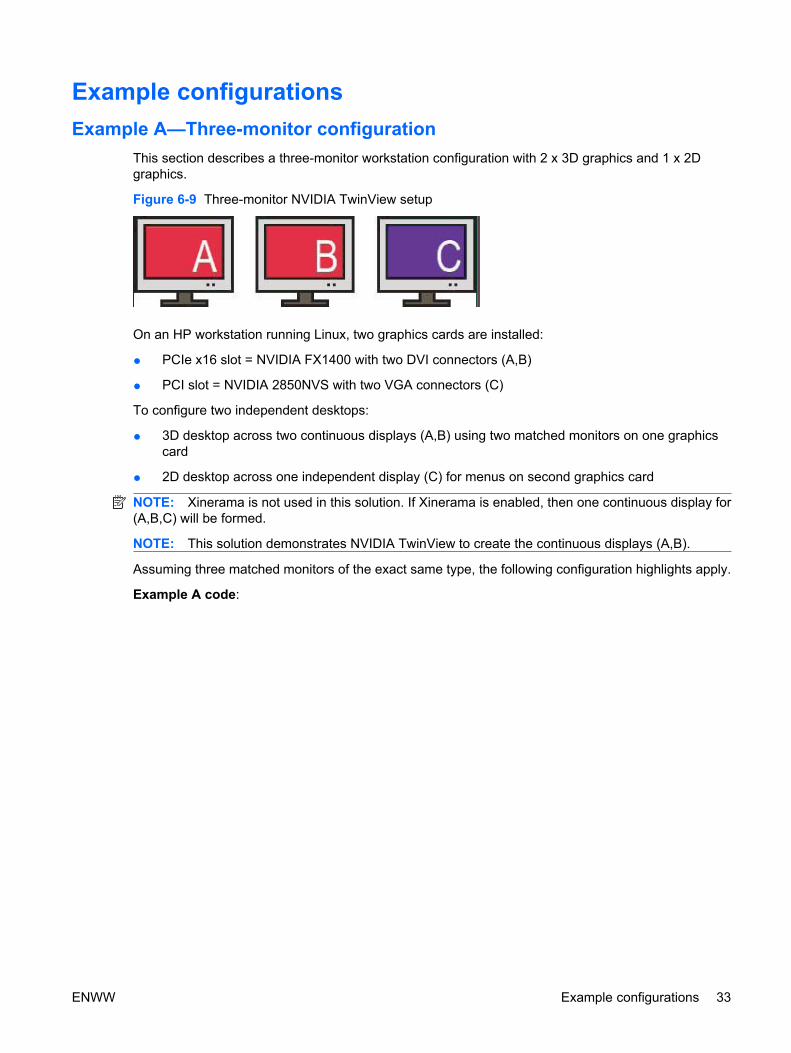
Example configurationsExample A—Three-monitor configuration
This section describes a three-monitor workstation configuration with 2 x 3D graphics and 1 x 2Dgraphics.
Figure 6-9 Three-monitor NVIDIA TwinView setup
On an HP workstation running Linux, two graphics cards are installed:
● PCIe x16 slot = NVIDIA FX1400 with two DVI connectors (A,B)
● PCI slot = NVIDIA 2850NVS with two VGA connectors (C)
To configure two independent desktops:
● 3D desktop across two continuous displays (A,B) using two matched monitors on one graphicscard
● 2D desktop across one independent display (C) for menus on second graphics card
NOTE: Xinerama is not used in this solution. If Xinerama is enabled, then one continuous display for(A,B,C) will be formed.
NOTE: This solution demonstrates NVIDIA TwinView to create the continuous displays (A,B).
Assuming three matched monitors of the exact same type, the following configuration highlights apply.
Example A code:
ENWW Example configurations 33
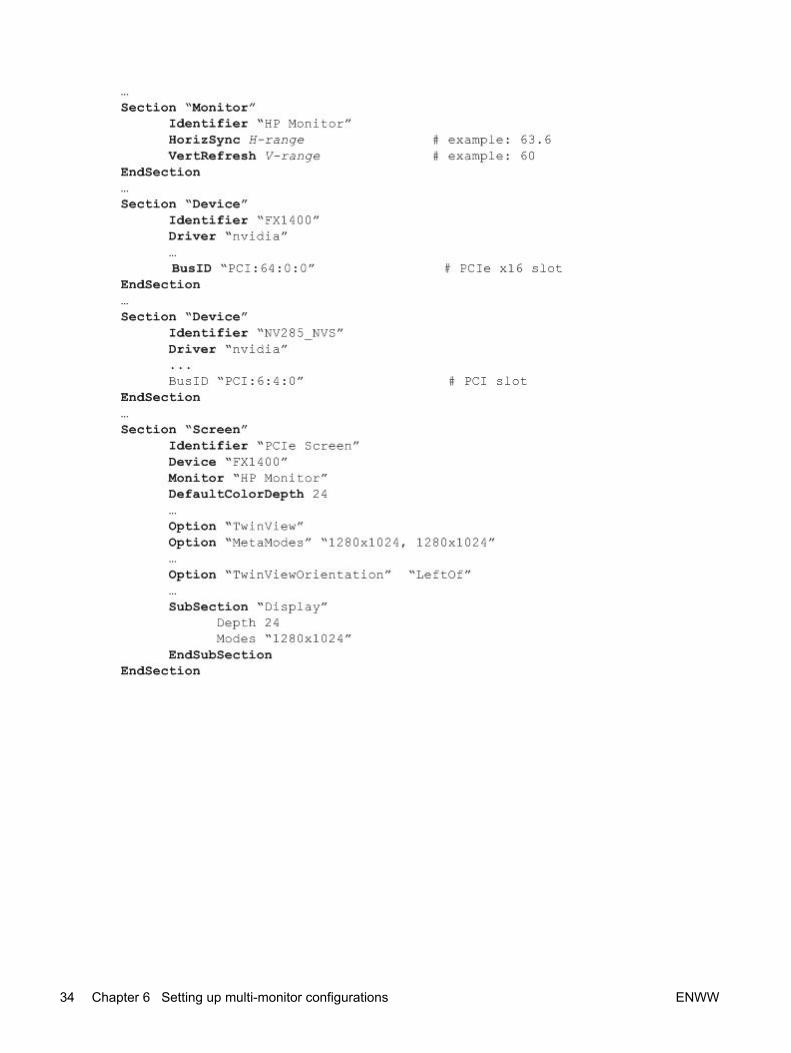
34 Chapter 6 Setting up multi-monitor configurations ENWW

ENWW Example configurations 35
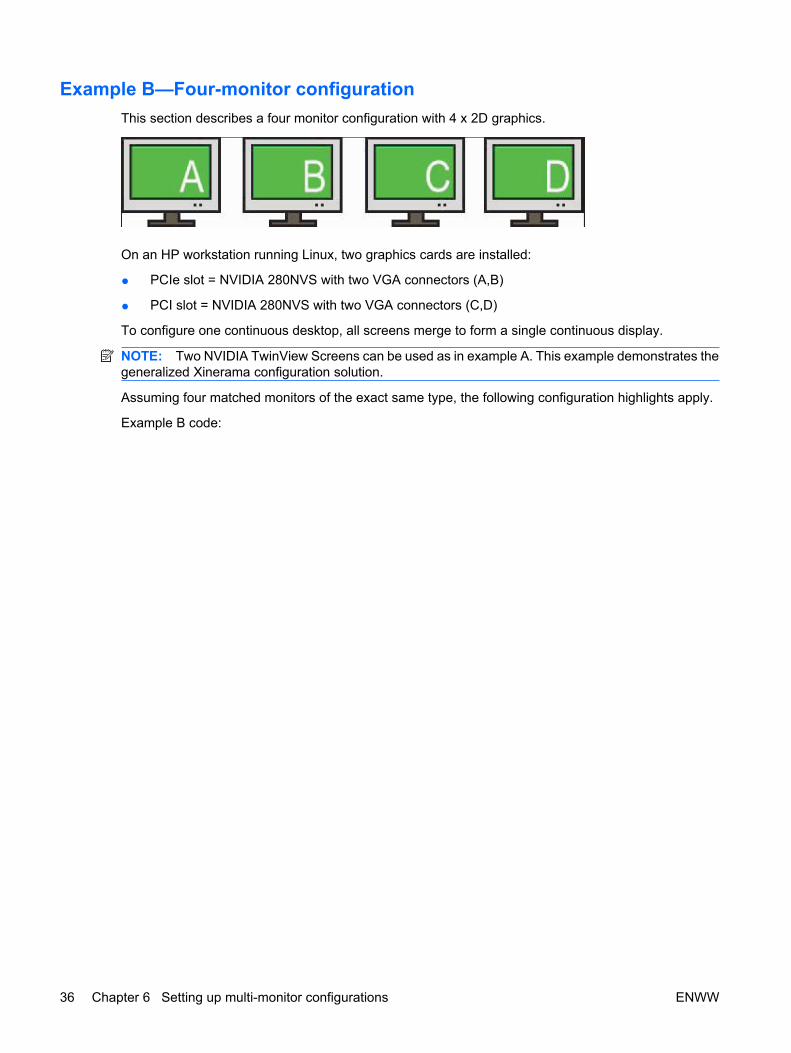
Example B—Four-monitor configurationThis section describes a four monitor configuration with 4 x 2D graphics.
On an HP workstation running Linux, two graphics cards are installed:
● PCIe slot = NVIDIA 280NVS with two VGA connectors (A,B)
● PCI slot = NVIDIA 280NVS with two VGA connectors (C,D)
To configure one continuous desktop, all screens merge to form a single continuous display.
NOTE: Two NVIDIA TwinView Screens can be used as in example A. This example demonstrates thegeneralized Xinerama configuration solution.
Assuming four matched monitors of the exact same type, the following configuration highlights apply.
Example B code:
36 Chapter 6 Setting up multi-monitor configurations ENWW

ENWW Example configurations 37
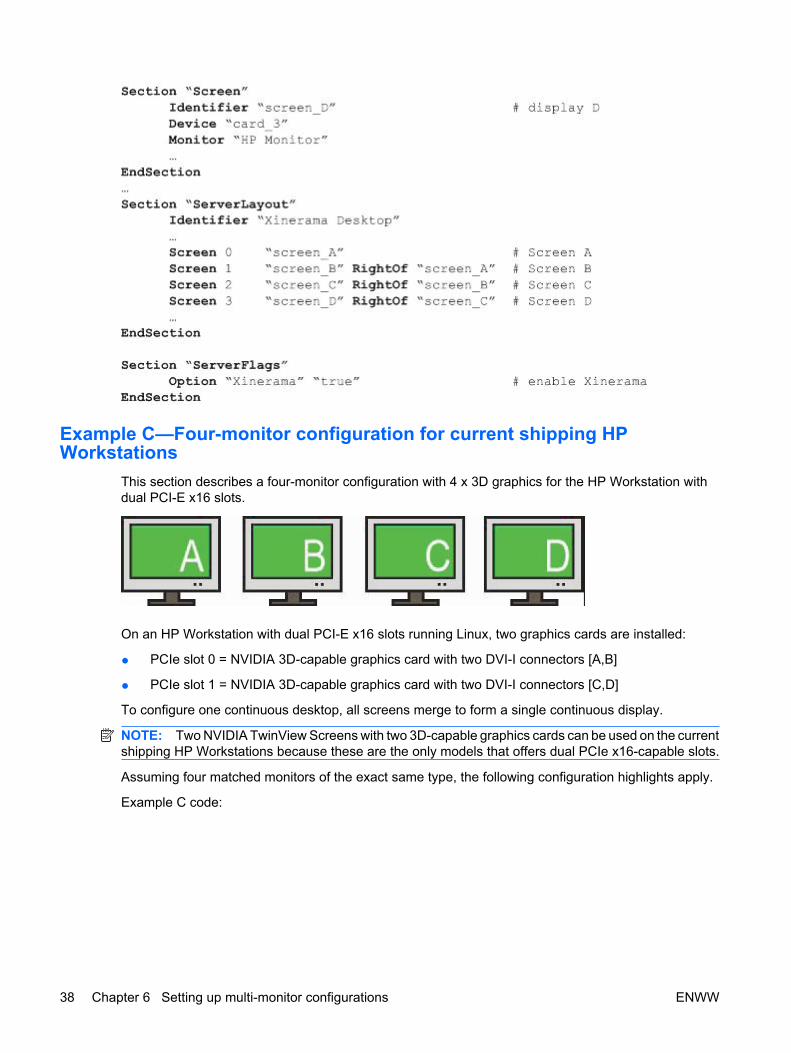
Example C—Four-monitor configuration for current shipping HPWorkstations
This section describes a four-monitor configuration with 4 x 3D graphics for the HP Workstation withdual PCI-E x16 slots.
On an HP Workstation with dual PCI-E x16 slots running Linux, two graphics cards are installed:
● PCIe slot 0 = NVIDIA 3D-capable graphics card with two DVI-I connectors [A,B]
● PCIe slot 1 = NVIDIA 3D-capable graphics card with two DVI-I connectors [C,D]
To configure one continuous desktop, all screens merge to form a single continuous display.
NOTE: Two NVIDIA TwinView Screens with two 3D-capable graphics cards can be used on the currentshipping HP Workstations because these are the only models that offers dual PCIe x16-capable slots.
Assuming four matched monitors of the exact same type, the following configuration highlights apply.
Example C code:
38 Chapter 6 Setting up multi-monitor configurations ENWW

ENWW Example configurations 39
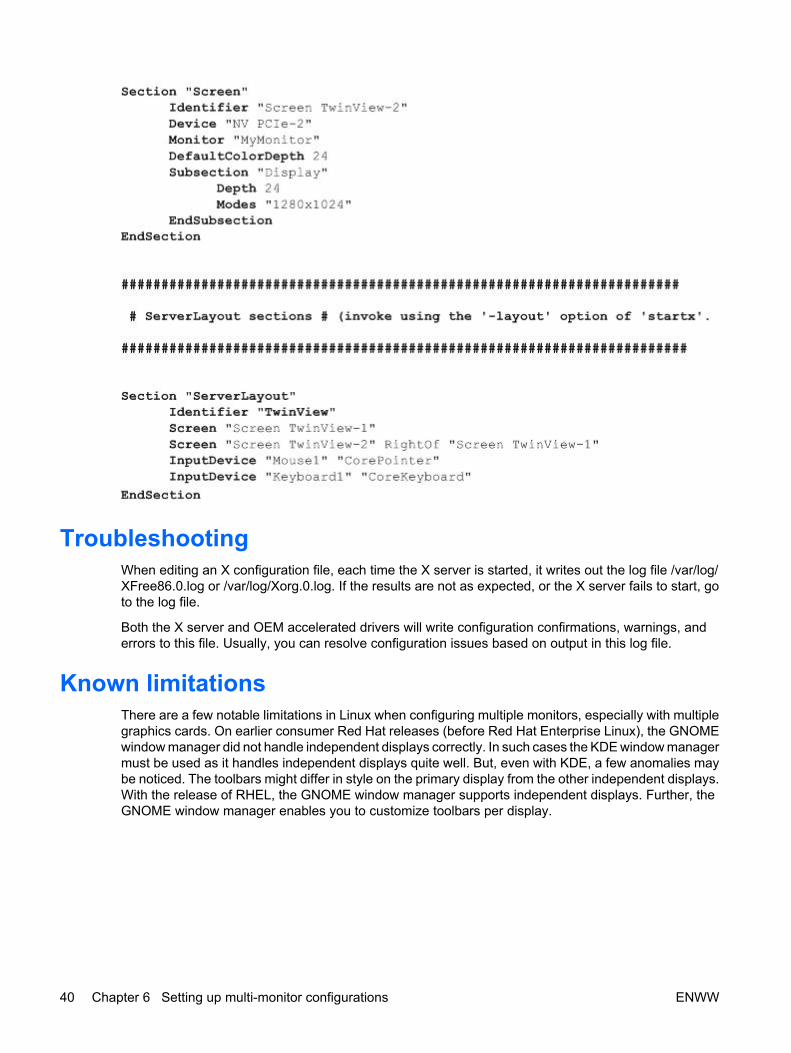
TroubleshootingWhen editing an X configuration file, each time the X server is started, it writes out the log file /var/log/XFree86.0.log or /var/log/Xorg.0.log. If the results are not as expected, or the X server fails to start, goto the log file.
Both the X server and OEM accelerated drivers will write configuration confirmations, warnings, anderrors to this file. Usually, you can resolve configuration issues based on output in this log file.
Known limitationsThere are a few notable limitations in Linux when configuring multiple monitors, especially with multiplegraphics cards. On earlier consumer Red Hat releases (before Red Hat Enterprise Linux), the GNOMEwindow manager did not handle independent displays correctly. In such cases the KDE window managermust be used as it handles independent displays quite well. But, even with KDE, a few anomalies maybe noticed. The toolbars might differ in style on the primary display from the other independent displays.With the release of RHEL, the GNOME window manager supports independent displays. Further, theGNOME window manager enables you to customize toolbars per display.
40 Chapter 6 Setting up multi-monitor configurations ENWW
7 Using the HP 16x DVD burner
IntroductionThe HP 16x DVD±R/RW Dual Layer Drive for HP Linux workstations is available as an integrated orafter market option for HP workstations.
Recording modes, media type, and recording softwareThe HP 16x DVD±R/RW Dual Layer Drive supports the following recording modes:
NOTE: The recording software must also support the recording modes. Growisofs (dvd+toolspackage) supports the above modes.
● Disk-at-once—records one or more tracks to a blank disk, leaving no gaps between the tracks andallowing for no sessions
● Session-at-once—records similar to Disk-at-once except that new sessions can be written later.
● Track-at-once—records one or more tracks, separating each track with a gap and allowing forfurther sessions.
● Packet writing—records data in small increments, eliminating the need to open or close a sessioneach time data is written.
The HP 16x DVD±R/RW Dual Layer Drive supports the following media types:
● Reading—CD-ROM, CD-RW, CD-R, DVD-ROM, DVD-R, DVD-RW, DVD+RW, and DVD+R
● Writing—CD-RW, CD-R, Dual-layer DVD+R, DVD+RW, DVD+R, DVD-RW, and DVD-R
NOTE: Some media are more reliable than others, so verify that the data transfers to the mediaas expected.
The following DVD recording software is included with your Linux operating system:
● Red Hat Linux 7.3, 8.0, and 9 support cdrecord for burning CDs.
● Red Hat Enterprise Linux WS 3 and WS 4 support growisofs for burning DVDs and cdrecord forburning CDs.
Growisofs is part of the dvd_rw-tools rpm tool provided with RHEL WS 3 and WS 4.
NOTE: Red Hat Enterprise Linux does not support Lightscribe labeling technology. For moreinformation, please visit http://www.lightscribe.com.
● Red Hat Enterprise Linux 5 Desktop support growisofs for burning DVDs and cdrecord for burningCDs.
ENWW Introduction 41
CD and DVD burning softwareCdrecord
1. To determine if cdrecord is installed (as part of the cdrecord package), enter rpm –qa | grepcdrecord. If it is not installed, enter rpm –i cdrecord<revision>.rpm.
2. After cdrecord.rpm is installed, you can access the basic man page by entering man cdrecord.You can also read the documentation provided in /usr/share/doc/cdrecord <revision>/.
To format or clear the content of a CD-RW:
a. Enter cdrecord –scanbus.
b. Enter cdrecord dev=N,N,N blank=fast.
To burn an existing file.iso to a CD-R/RW:
● Enter cdrecord dev=N,N,N –dao -pad padsize=150s –immed –data file.iso.
● For RHEL 4, enter cdrecord dev=/dev/cdwriter driveropts=burnfree –dao –data file.iso.
Growisofs1. Determine if growisofs is installed (part of the dvd+rw-tools package). Enter rpm –qa | grep dvd
+rw-tools. If it is not installed, enter rpm –i dvd+rw-tools <revision>.rpm Check that the cdrecordand dvdrecord packages are installed.
2. (Optional) After the dvd+rw-tools rpm is installed, you can access a tutorial in /usr/share/doc/dvd+rw-tools<revision>/index.html.
NOTE: There is no man page for growisofs because all arguments are passed to mkisofs(8). The fewexceptions are covered in the tutorial.
To format new DVD media (assuming your DVD device is /dev/scd0), enter dvd+rw-format -blank=full /dev/scd0.
To burn a DVD±RW, DVD±R, or DL DVD+R:
NOTE: Assume the files are in /tmp on the initial session, and that you will add the files in /bin in alater session.
1. Enter growisofs -Z -R /dev/scd0 /tmp.
2. Enter growisofs -M -R /dev/scd0 /bin.
To burn an existing iso file (file.iso), enter growisofs -Z /dev/scd0=file.iso.
42 Chapter 7 Using the HP 16x DVD burner ENWW

8 Linux Audio: Installing and Configuringthe Creative Labs X-Fi PCI audio card
HP and Creative Labs have partnered to create a Linux audio driver for the X-Fi audio card. The X-Fiaudio cards, also known as Extreme Music and Extreme Gamer, are supported on the HP xw4400,xw4600, xw6400, xw6600, xw8400, xw8600, and xw9400 Workstations with the Creative x86_64 Linuxdriver on RHEL 4 U4 and later RHEL 4 updates (RHEL 5 support expected Spring 2008) under thefollowing requirements:
● Intel® Pentium® III 1 GHz or AMD Athlon® 1 GHz processor
● Intel, AMD or 100% compatible motherboard
● RHEL4 U4 (or later) Linux® x86_64 (AMD64/EM64T) or derivative, like FC5
● 256 MB RAM
● 200 MB of free hard disk space
● Available PCI 2.1 slot
● Internet connection for software download and installation
● Headphones or amplified speakers (available separately)
Installing DriversBefore proceeding, ensure that your audio card is installed and that you are in init runlevel 3. To learnhow to install your audio card, consult your installation card shipped with your hardware.
NOTE: Installing the X-Fi card in a HP Workstation that is listed above will automatically disable, viaBIOS, the onboard audio chipset. To re-enable the onboard audio chipset, remove the X-Fi card fromthe workstation chassis.
After you have installed your audio card, turn on your computer. With Internet access, obtain the driverrpm at http://www.hp.com/support/ and look up the appropriate Workstation model.
As an example, if you have a xw6600, go to http://www.hp.com/support/xw6600.
1. Go to Download drivers and software.
2. Choose Red Hat Enterprise Linux 4 (AMD64/EM64T) and select Software.
3. Click to download the latest version of the X-Fi driver XFiDrv_Linux_US-version-release.x86_64.rpm
4. Accept the EULA to start the download.
Install RPM package
● Run rpm -ivh XFiDrv_Linux_US-version-release.x86_64.rpm
Update RPM package
● Run rpm -Uvh XFiDrv_Linux_US-version-release.x86_64.rpm
ENWW Installing Drivers 43
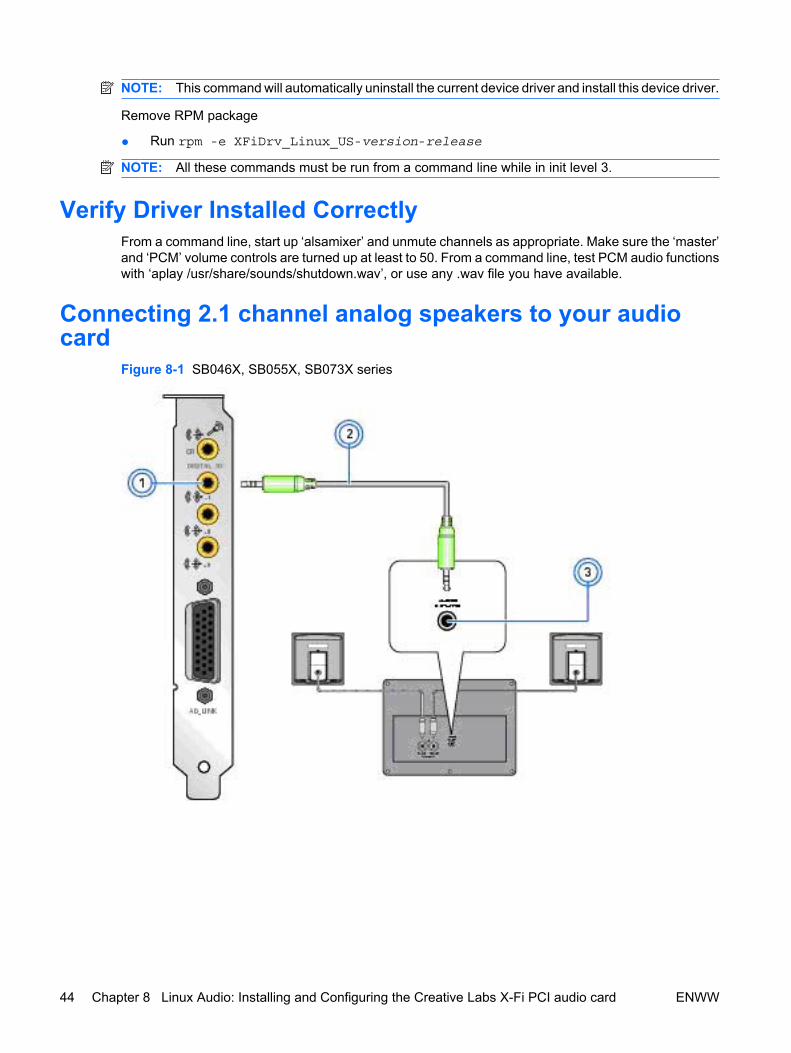
NOTE: This command will automatically uninstall the current device driver and install this device driver.
Remove RPM package
● Run rpm -e XFiDrv_Linux_US-version-release
NOTE: All these commands must be run from a command line while in init level 3.
Verify Driver Installed CorrectlyFrom a command line, start up ‘alsamixer’ and unmute channels as appropriate. Make sure the ‘master’and ‘PCM’ volume controls are turned up at least to 50. From a command line, test PCM audio functionswith ‘aplay /usr/share/sounds/shutdown.wav’, or use any .wav file you have available.
Connecting 2.1 channel analog speakers to your audiocard
Figure 8-1 SB046X, SB055X, SB073X series
44 Chapter 8 Linux Audio: Installing and Configuring the Creative Labs X-Fi PCI audio card ENWW
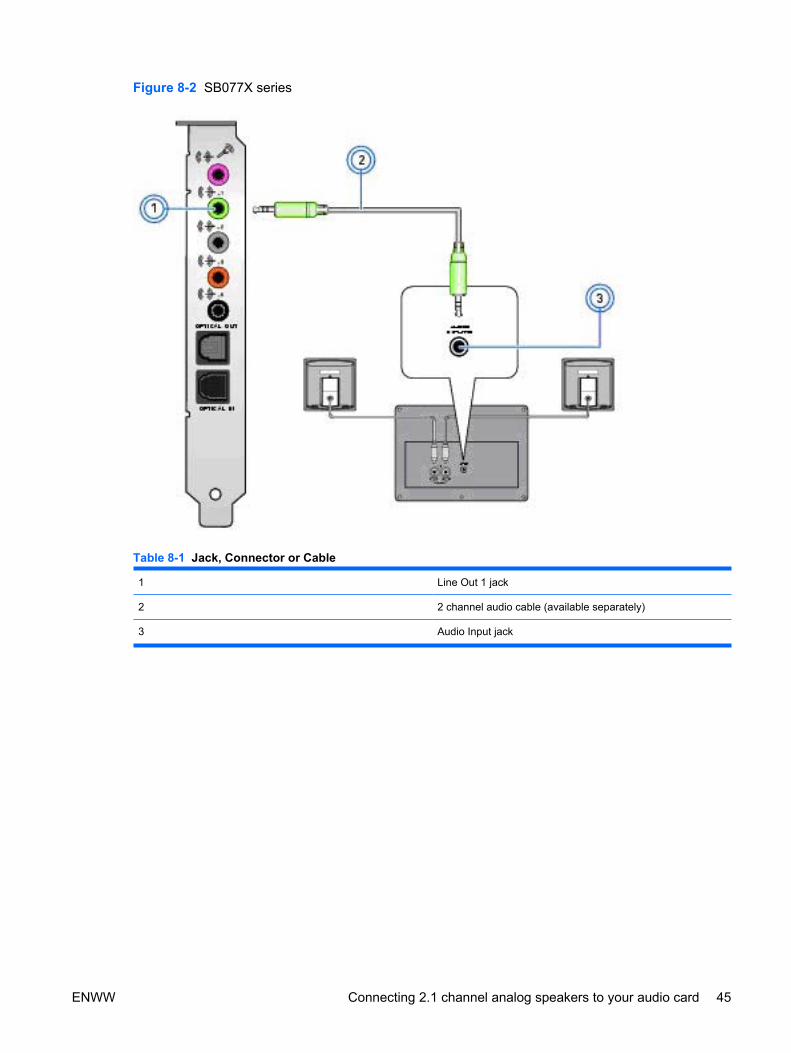
Figure 8-2 SB077X series
Table 8-1 Jack, Connector or Cable
1 Line Out 1 jack
2 2 channel audio cable (available separately)
3 Audio Input jack
ENWW Connecting 2.1 channel analog speakers to your audio card 45
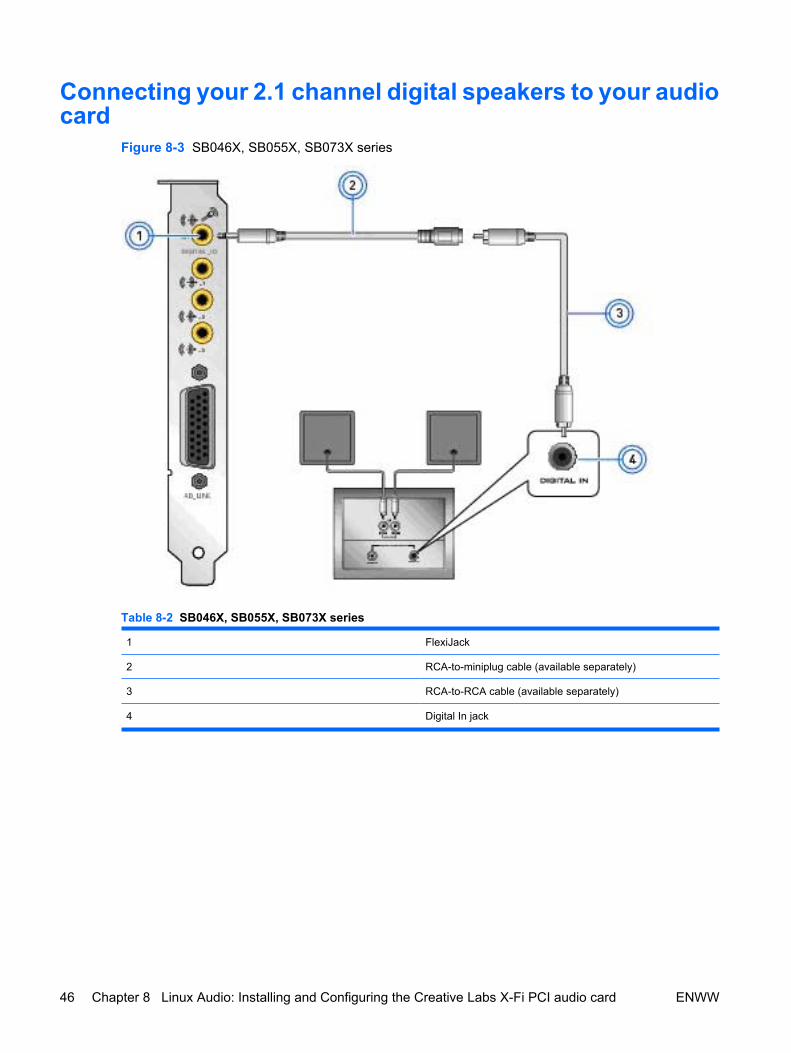
Connecting your 2.1 channel digital speakers to your audiocard
Figure 8-3 SB046X, SB055X, SB073X series
Table 8-2 SB046X, SB055X, SB073X series
1 FlexiJack
2 RCA-to-miniplug cable (available separately)
3 RCA-to-RCA cable (available separately)
4 Digital In jack
46 Chapter 8 Linux Audio: Installing and Configuring the Creative Labs X-Fi PCI audio card ENWW
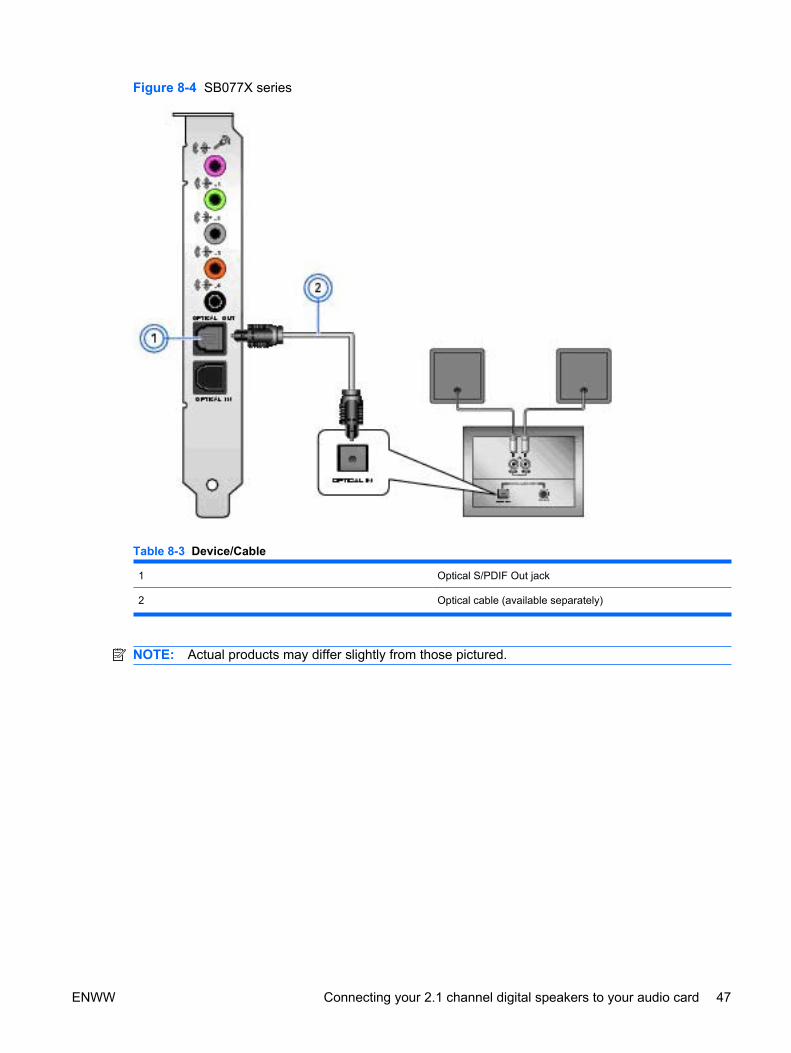
Figure 8-4 SB077X series
Table 8-3 Device/Cable
1 Optical S/PDIF Out jack
2 Optical cable (available separately)
NOTE: Actual products may differ slightly from those pictured.
ENWW Connecting your 2.1 channel digital speakers to your audio card 47
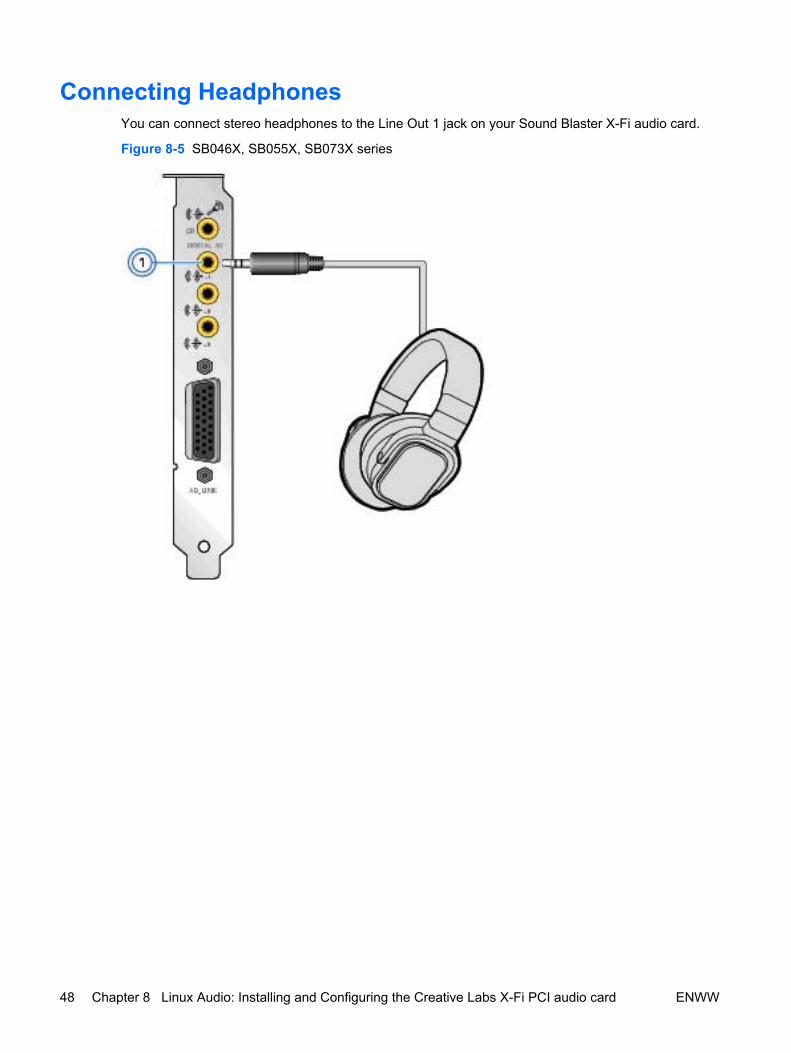
Connecting HeadphonesYou can connect stereo headphones to the Line Out 1 jack on your Sound Blaster X-Fi audio card.
Figure 8-5 SB046X, SB055X, SB073X series
48 Chapter 8 Linux Audio: Installing and Configuring the Creative Labs X-Fi PCI audio card ENWW

Figure 8-6 SB077X series
Table 8-4 Jack, Connector or Cable
1 Connects to stereo headphones with a 3.50 mm (1/8-inch)plug. Use a convertor if your headphones come with a largerplug.
Problems with SoundNo audio output when playing digital files such as .WAV, MIDI files or AVI clips.
Check the following:
● There are no error messages during installation of the driver.
● All the driver modules (for example, ctalsa.ko) are loaded.
● The relevant mixer slider strips in alsamixer are not muted or set to "0".
● There is no hardware conflict between the card and a peripheral device.
No sound from the speakers.
Check the following:
● The powered speakers or external amplifier are connected to the card's Line Out jacks.
● The speakers' volume control knob, if any, is set at mid-range.
No sound from the headphones.
ENWW Problems with Sound 49

Check the following:
● The headphones are connected to the Headphone jack.
Additional informationSee the documentation files in /opt/Creative for more details, once you have successfully installed theRPM driver.
50 Chapter 8 Linux Audio: Installing and Configuring the Creative Labs X-Fi PCI audio card ENWW
9 Introducing HP 64-bit Linuxworkstations
This chapter presents an overview of the HP 64-bit Linux workstations.
HP 64-bit Linux workstation familyAMD64-based workstations from HP complement three existing HP 64-bit capable workstations basedon Intel EM64T technology.
64-bit RHEL is available on all Intel and AMD workstations from HP, including both 32- and 64-bitconfigurations.
AMD-64 technologyAMD created 64-bit extensions–called x86–64–in the x86 architecture. AMD supports it across the AMDOpteron processor family. AMD defined these extensions as a logical superset of the x86 architectureso that 32-bit applications run on a 64-bit operating system. This provides compatibility that other 64-bit architectures have not enjoyed.
Intel's Extended Memory 64 TechnologyIntel Extended Memory 64 Technology (EM64T) is an enhancement to Intel IA32 architecture. Thistechnology enables the processor to run newly compiled 64-bit code and access larger amounts ofmemory. EM64T is derived from and compatible with the AMD64 extensions that AMD has already madeto the x86 architecture (x86–64). This enables all user-level 64-bit programs compiled for AMD64 to runon EM64T. It also enables programs compiled on EM64T to run on AMD64 if the code was not compiledwith special Intel or AMD options. EM64T is supported across all HP Intel workstations, including theHP xw4300, xw6400, and xw8400 Workstations.
x86–64 technologyThese x86–64 extensions include:
● Extended memory addressability using 64-bit pointers
● 64-bit general purpose registers
● 128-bit XMM registers
● Eight general purpose registers
● Double precision integer support
A new extended IA-32 mode enables 32-bit and 64-bit applications to run simultaneously on the same64-bit operating system.
ENWW HP 64-bit Linux workstation family 51
64-bit processing supportRed Hat Enterprise Linux (RHEL) has added operating system support for 64-bit processors from Inteland AMD in RHEL WS 3, Update 2, and in subsequent RHEL WS 3 updates. RHEL WS 4 (all updates)and RHEL 5 Desktop (all updates) also supports 64-bit processing.
There are both 64-bit and 32-bit versions of the operating system, but only the 64-bit version is capableof running 64-bit code.
The 64-bit RHEL WS 3 box set can be purchased from HP. The HP Installer Kit for Linux must be orderedor downloaded from the HP Support web site (http://www.hp.com/go/workstationsupport) to complementthe RHEL 64-bit box set. The Installer Kit provides necessary graphics drivers and other HP content.Red Hat Enterprise The 64-bit version of RHEL WS 4 is the only preinstalled Linux operating systemavailable for all HP workstations.
Other Linux distributions also support 64-bit versions. Other 64-bit certifications are posted on the HPLlinux website. To see the certifications for Red Hat and other Linux distributions, go tohttp://www.hp.com/linux and select Support matrices.
Running 32-bit applications on a 64-bit Linux operating systemTo run 32-bit applications on a 64-bit Linux operating system, the 32-bit runtime environment is neededin addition to the application. Many applications use a variety of shared libraries including core Linuxsupport libraries such as glib and math libraries, X window libraries such as Xlib and Xext, and toolkitssuch as Qt. RHEL provides libraries and runtime support for some of the 32-bit packages that areavailable in their 32-bit version of the operating system. This is typically not all 32-bit software and someapplications may not have all 32-bit shared libraries and runtime support needed for the application.
Because some files in the 32-bit runtime support conflict with 64-bit runtime files, the 32-bit packagescannot be installed over the 64-bit operating system. To run 32-bit applications that require more runtimesupport than provided by RHEL, the required files must be in place on the system running the application.The ldd command enumerates all static library references in the application.
Once the missing libraries are discovered, follow these steps to add the 32-bit rpm programs that containthe missing libraries:
1. Enter rpm2cpio <32-bit rpm> > <32-bitpath>.
2. Enter rpm -i --force <64-bit rpm>.
3. Enter export LD_LIBRARY_PATH=$LD_LIBRARY_PATH:<32-bitpath>, where 32-bitpathresembles /32bitlibs, and 32-bit rpm is the name of the 32 bit rpm.
PCI Express graphics on 64-bit workstationsThe new 64–bit workstations support PCI Express x16 graphics cards instead of AGP-8x graphics cards.The HP xw6400, xw6600, xw8600, xw9300, and xw9400 Workstations support two of these PCI Expressx16 graphics cards. The previous generation of workstations (xw4400, xw6400, and xw8400) providea single PCI-E x16 slot for graphics.
On RHEL releases prior to RHEL WS 3 Update 5 and RHEL WS 4 Update 1, the 64-bit NVIDIA driverrequires a configuration change to the kernel to expand the size of the software TLB buffer space. The /boot/grub/grub.conf file must be changed to add swiotlb=16384 to the end of the lines that beginwith kernel. This addition is done automatically by the HP graphics driver rpms, but it must be donemanually if the NVIDIA run scripts were used to install NVIDIA drivers.
Building and using graphics intensive 64-bit applications are similar to other 64-bit applications exceptfor the dependency on graphics middleware and libraries. Make sure that all libraries used to build theapplication are available in 64-bit versions. Although HP delivers the 32-bit OpenGL libraries (from the
52 Chapter 9 Introducing HP 64-bit Linux workstations ENWW

graphics vendors) needed to run 32-bit graphics applications on the 64-bit version of the operatingsystem, 32-bit runtime issues can cause problems in the graphics area. 64-bit graphics libraries haveapproximately the same performance as 32-bit libraries.
ENWW HP 64-bit Linux workstation family 53

54 Chapter 9 Introducing HP 64-bit Linux workstations ENWW

10 Frequently Asked Questions for HP 64-bit Linux Workstations
Questions and answersThe following is a list of frequently asked questions and the answers concerning 64-bit support on HPLinux workstations.
Question Answer
When will a 64-bit Red Hat Linux operating system besupported on HP workstations with EM64T technology fromIntel and AMD64 technology from AMD?
Today! HP Intel-based and AMD-based workstations support64-bit Red Hat Linux when preinstalled and when using RedHat box set and the HP Installer Kit for Linux.
Question Answer
What version of Red Hat Linux supports 64-bit processing? Red Hat Enterprise Linux (RHEL) WS 3 has a 32-bit versionand a 64-bit version. HP pre-installs the 64-bit version on allworkstations and supports both 32-bit and 64-bit processingwith the Driver CD in the HP Installer Kit for Linux. No 64-bitversions of earlier Red Hat releases (such as Red Hat Linux7.3) are supported on HP workstations.
Question Answer
Do I need two versions of my 64-bit application―one for Intelworkstations and one for AMD workstations?
No. Intel defined the EM64T extensions to the x86 architectureto be compatible with the AMD64 instructions. As long as youdo not use any special Intel or AMD options to the compilerwhen you build your application (such as 3dnow), yourapplication runs on either an Intel system or an AMD system.
Question Answer
Are there other 64-bit distributions of Linux that will work on theHP workstations?
Yes, HP has tried other distributions on the HP workstationsbut RHEL is the only Linux distribution supported by HP.
Question Answer
Can I run 32-bit applications on a 64-bit Linux operatingsystem? How does this work? Will this work for all 32-bitapplications?
Yes, as long as the runtime support (mainly shared libraries)for the application exists on the system. Some versions ofLinux are much better than others at providing a complete setof 32-bit libraries. When 32-bit libraries and 64-bit libraries areon the same operating system, companion library directoriesare required. The 32-bit libraries are in the conventional
ENWW Questions and answers 55

Question Answer
locations: /lib, /usr/lib, /usr/X11R6/lib, and so on. 64-bit librariesappend 64 to the directory name such as /lib64, /usr/lib64, and /usr/X11R6/lib64. This also includes 32-bit versions of thegraphics libraries.
Question Answer
What do I do if 32-bit applications do not run because ofmissing shared libraries?
Retrieve the library from Red Hat 32-bit RHEL 3 distribution,put it on your system in the appropriate directory, and reportthe missing library to Red Hat through your Red Hat Networksubscription. This will help Red Hat to get the right set of 32-bit libraries needed for most applications in future releases.
Alternately, you can complete the following steps to access theshared libraries:
1. Enter rpm2cpio <32-bit rpm> > <32-bitpath>.
2. Enter rpm -i --force <64-bit rpm>.
3. Enter export LD_LIBRARY_PATH=$LD_LIBRARY_PATH:<32-bitpath>.
Question Answer
Can I run the 32-bit versions of Red Hat Linux on a 64-bitoperating system such as the HP xw9300, xw4300, xw8200,xw6200, and xw4200 Workstation?
Yes, you can. If you are performing the installation yourself,the installation process informs you that you are installing a 32-bit operating system on a 64-bit machine and asks you if thatis what you really want to do. Select Yes and continue.
Question Answer
How do I install the 64-bit version of Linux? Purchase RHEL WS 3 software and perform the Red HatAnaconda installation. When you complete the installation andare rebooting for the first time, the FirstBoot utility runs andasks if you have additional CDs to install. Insert the HP DriverCD for RHEL 3 and select Yes.
This process installs RHEL 3, any HP additions, and theaccelerated graphics driver. The HP xw9300, xw4300,xw8200, and xw6200 Workstations can be ordered with the 64-bit operating system preinstalled.
Question Answer
After I have installed the 64-bit version of Linux, what do I haveto do to build 64-bit applications?
When you rebuild the applications, the compiler builds 64-bitby default. Although this is true for most applications, someapplications must be made 64-bit clean. This means that youmust review the code to eliminate any assumptions about 32-bit characteristics, such as pointer arithmetic issues. Somemakefiles that explicitly declare paths such as /lib, /usr/lib, and /usr/X11R6/lib might need to be changed to append 64, suchas /lib64, /usr/lib64 and /usr/X11R6/lib64.
56 Chapter 10 Frequently Asked Questions for HP 64-bit Linux Workstations ENWW
11 Software RAID in Linux workstations
IntroductionThis chapter provides an overview of software RAID solutions for HP workstations running the Linuxoperating system. It discusses the various RAID levels, the differences between hardware and softwareRAID, configuring software RAID on Linux workstations, disk failure, recovery, and other informationpertaining to running software RAID on a Linux system.
NOTE: While BIOS messages might refer to hardware RAID, hardware RAID is not supported by HPLinux workstations.
RAID basics
Software RAID considerationsThe Linux kernel offers integrated software RAID without the need for additional hardware diskcontrollers or kernel patches. All that is required are multiple hard disks and a small amount of setup.Unlike most hardware RAID solutions, software RAID can be used with Integrated Drive Electronics(IDE) disks as well as SATA, SAS, and SCSI.
Software RAID has disadvantages in managing the disks, breaking up data as necessary, and managingparity data. The CPU must assume some extra loading. It has been found that heavily disk-intensiveworkloads result in roughly double the CPU overhead (for example, from 15% to 30%) when softwareRAID is in use. For most applications, this overhead is easily handled by excess headroom in theprocessors. But for some applications where disk and CPU performance are very well balanced andalready near-bottleneck, this additional CPU overhead can become troublesome. Hardware RAID offersadvantages because of its large hardware cache and the capability for better scheduling of operationsin parallel. However, software RAID offers more flexibility for disk and disk controller setup. Additionally,hardware RAID requires that a failed RAID controller must be replaced with an identical model to avoiddata loss, whereas software RAID imposes no such requirements.
Some software RAID schemes offer data protection through mirroring (copying the data to multiple disksin case one fails) or parity data (checksums that allow error detection and limited rebuilding of data incase of a failure), but all software RAID solutions on HP workstations require the shutdown of the systemso that the failed drive can be replaced before redundancy can be restored. The replacement of faileddrives in software RAID requires only a minimum amount of work.
Performance and bottlenecksDisk I/O bandwidth is typically limited by the system bus speeds, the disk controller, and the disksthemselves. The balance of these hardware limitations, as affected by the software configuration,determines where the real bottleneck is in the system.
Several RAID levels offer improved performance relative to a stand alone disk. If your disk throughputis throttled by a single disk controller, there is probably little you can do with RAID to improve theperformance without adding another controller. On the other hand, if the raw disk performance is thebottleneck, a tuned software RAID solution can dramatically improve the throughput. The slower the
ENWW Introduction 57
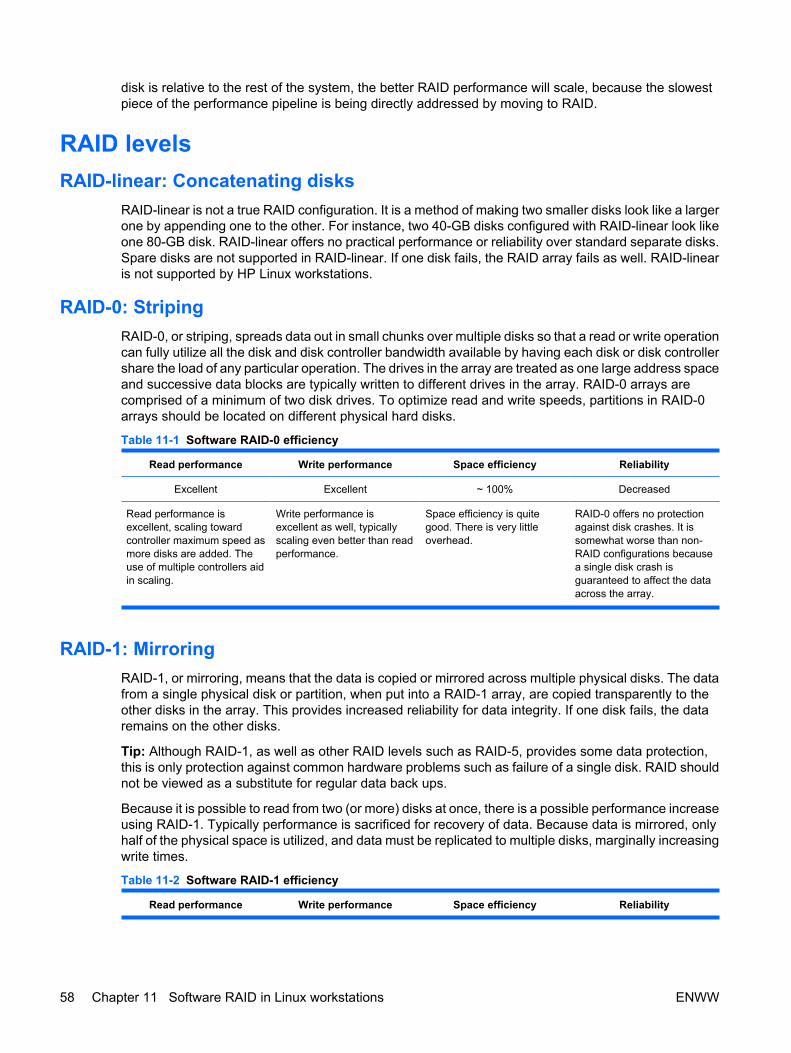
disk is relative to the rest of the system, the better RAID performance will scale, because the slowestpiece of the performance pipeline is being directly addressed by moving to RAID.
RAID levelsRAID-linear: Concatenating disks
RAID-linear is not a true RAID configuration. It is a method of making two smaller disks look like a largerone by appending one to the other. For instance, two 40-GB disks configured with RAID-linear look likeone 80-GB disk. RAID-linear offers no practical performance or reliability over standard separate disks.Spare disks are not supported in RAID-linear. If one disk fails, the RAID array fails as well. RAID-linearis not supported by HP Linux workstations.
RAID-0: StripingRAID-0, or striping, spreads data out in small chunks over multiple disks so that a read or write operationcan fully utilize all the disk and disk controller bandwidth available by having each disk or disk controllershare the load of any particular operation. The drives in the array are treated as one large address spaceand successive data blocks are typically written to different drives in the array. RAID-0 arrays arecomprised of a minimum of two disk drives. To optimize read and write speeds, partitions in RAID-0arrays should be located on different physical hard disks.
Table 11-1 Software RAID-0 efficiency
Read performance Write performance Space efficiency Reliability
Excellent Excellent ~ 100% Decreased
Read performance isexcellent, scaling towardcontroller maximum speed asmore disks are added. Theuse of multiple controllers aidin scaling.
Write performance isexcellent as well, typicallyscaling even better than readperformance.
Space efficiency is quitegood. There is very littleoverhead.
RAID-0 offers no protectionagainst disk crashes. It issomewhat worse than non-RAID configurations becausea single disk crash isguaranteed to affect the dataacross the array.
RAID-1: MirroringRAID-1, or mirroring, means that the data is copied or mirrored across multiple physical disks. The datafrom a single physical disk or partition, when put into a RAID-1 array, are copied transparently to theother disks in the array. This provides increased reliability for data integrity. If one disk fails, the dataremains on the other disks.
Tip: Although RAID-1, as well as other RAID levels such as RAID-5, provides some data protection,this is only protection against common hardware problems such as failure of a single disk. RAID shouldnot be viewed as a substitute for regular data back ups.
Because it is possible to read from two (or more) disks at once, there is a possible performance increaseusing RAID-1. Typically performance is sacrificed for recovery of data. Because data is mirrored, onlyhalf of the physical space is utilized, and data must be replicated to multiple disks, marginally increasingwrite times.
Table 11-2 Software RAID-1 efficiency
Read performance Write performance Space efficiency Reliability
58 Chapter 11 Software RAID in Linux workstations ENWW
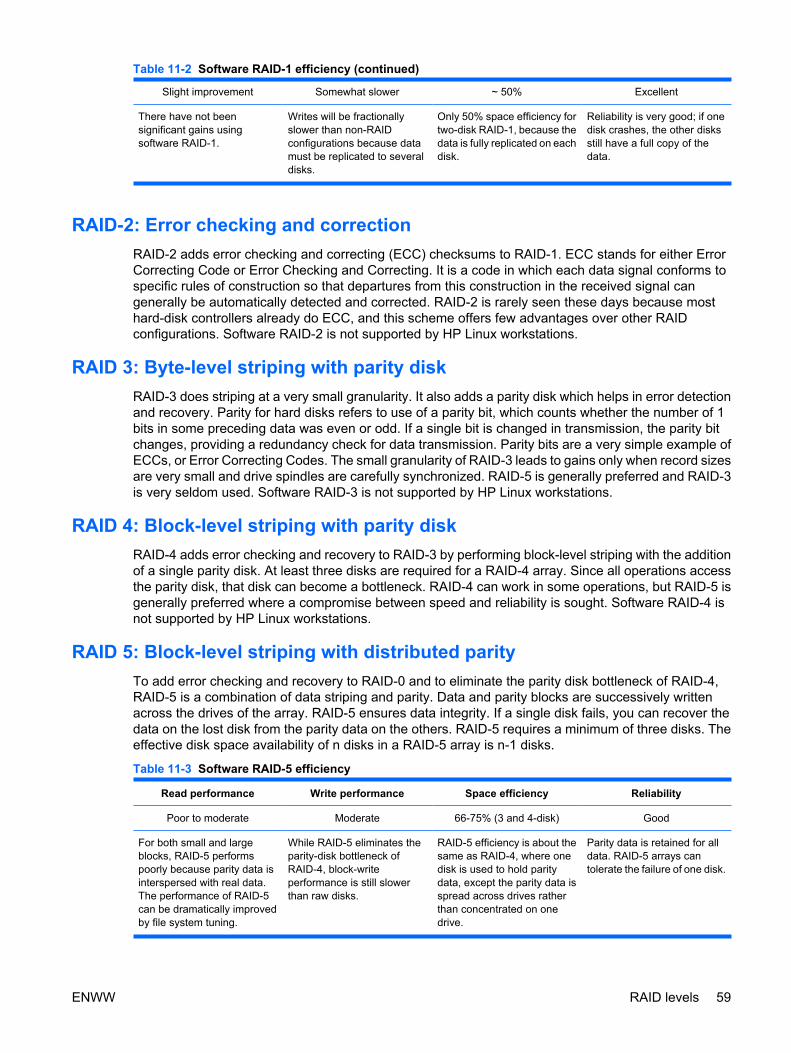
Slight improvement Somewhat slower ~ 50% Excellent
There have not beensignificant gains usingsoftware RAID-1.
Writes will be fractionallyslower than non-RAIDconfigurations because datamust be replicated to severaldisks.
Only 50% space efficiency fortwo-disk RAID-1, because thedata is fully replicated on eachdisk.
Reliability is very good; if onedisk crashes, the other disksstill have a full copy of thedata.
RAID-2: Error checking and correctionRAID-2 adds error checking and correcting (ECC) checksums to RAID-1. ECC stands for either ErrorCorrecting Code or Error Checking and Correcting. It is a code in which each data signal conforms tospecific rules of construction so that departures from this construction in the received signal cangenerally be automatically detected and corrected. RAID-2 is rarely seen these days because mosthard-disk controllers already do ECC, and this scheme offers few advantages over other RAIDconfigurations. Software RAID-2 is not supported by HP Linux workstations.
RAID 3: Byte-level striping with parity diskRAID-3 does striping at a very small granularity. It also adds a parity disk which helps in error detectionand recovery. Parity for hard disks refers to use of a parity bit, which counts whether the number of 1bits in some preceding data was even or odd. If a single bit is changed in transmission, the parity bitchanges, providing a redundancy check for data transmission. Parity bits are a very simple example ofECCs, or Error Correcting Codes. The small granularity of RAID-3 leads to gains only when record sizesare very small and drive spindles are carefully synchronized. RAID-5 is generally preferred and RAID-3is very seldom used. Software RAID-3 is not supported by HP Linux workstations.
RAID 4: Block-level striping with parity diskRAID-4 adds error checking and recovery to RAID-3 by performing block-level striping with the additionof a single parity disk. At least three disks are required for a RAID-4 array. Since all operations accessthe parity disk, that disk can become a bottleneck. RAID-4 can work in some operations, but RAID-5 isgenerally preferred where a compromise between speed and reliability is sought. Software RAID-4 isnot supported by HP Linux workstations.
RAID 5: Block-level striping with distributed parityTo add error checking and recovery to RAID-0 and to eliminate the parity disk bottleneck of RAID-4,RAID-5 is a combination of data striping and parity. Data and parity blocks are successively writtenacross the drives of the array. RAID-5 ensures data integrity. If a single disk fails, you can recover thedata on the lost disk from the parity data on the others. RAID-5 requires a minimum of three disks. Theeffective disk space availability of n disks in a RAID-5 array is n-1 disks.
Table 11-3 Software RAID-5 efficiency
Read performance Write performance Space efficiency Reliability
Poor to moderate Moderate 66-75% (3 and 4-disk) Good
For both small and largeblocks, RAID-5 performspoorly because parity data isinterspersed with real data.The performance of RAID-5can be dramatically improvedby file system tuning.
While RAID-5 eliminates theparity-disk bottleneck ofRAID-4, block-writeperformance is still slowerthan raw disks.
RAID-5 efficiency is about thesame as RAID-4, where onedisk is used to hold paritydata, except the parity data isspread across drives ratherthan concentrated on onedrive.
Parity data is retained for alldata. RAID-5 arrays cantolerate the failure of one disk.
Table 11-2 Software RAID-1 efficiency (continued)
ENWW RAID levels 59

Additional RAID levelsMore RAID levels can be created from the basic RAID levels by means of nesting. This is accomplishedby creating a second RAID array of other RAID disks instead of creating a RAID of physical disks. NestedRAID levels include:
● RAID-0+1: A mirrored array of striped disks
● RAID-10 (RAID-1+0): A striped array of mirrored disks
● RAID-100 (RAID-10+0): A striped array of RAID-10 arrays
● RAID-5+0
● RAID-0+5
In nested RAID solutions, it is preferable to have a RAID-0 level on top to provide better performanceand to reduce the number of disks that need to be regenerated when a disk fails. For example, RAID-10is usually preferred over RAID-0+1. Nested RAID levels are not supported by the RHEL installer. Theymust be configured manually.
While the Linux kernel allows for RAID-linear, RAID-0, RAID-1, RAID-4, RAID-5, and nested RAIDlevels, HP only supports RAID-0, RAID-1, RAID-5, and RAID-10.
RAID configuration strategiesWhen configuring RAID workstations, you must take several factors into account to deliver optimalperformance, capacity, and redundancy. Consider the following items when designing a RAIDworkstation.
Capacity versus fault-toleranceWith most implementations of RAID, capacity and fault-tolerance are mutually exclusive. Capacity refersto the amount of usable disk space provided by the hard drives used. When a RAID configuration thatprovides fault tolerance is used, such as RAID-1 or RAID-5, the amount of usable disk space decreasesrelative to the total capacity of the disks. For example, in RAID-1, the data is mirrored across multipledisks, so only some of the disks are available for use, while the other disks provide redundancy andfault-tolerance and are not available for primary storage use. In general, the more fault-tolerance thatis provided with a RAID solution, the smaller the available capacity of the disks will be.
CostAs the number of physical disks required for an installation increases, the cost also increases. Forexample, a different RAID controller may be needed if a certain number of disks is being used; manyRAID controllers only support up to four disks, so if more than four disks is needed, a higher-capacityRAID controller will be required. Each physical disk has a cost associated with it, so RAID solutions withmore disks will tend to have a higher cost. Additionally, in order to deal with the issue of capacity versusfault-tolerance as outlined above, a RAID solution with redundancy may require higher capacity disksto offset this, which might also increase costs.
RAID performance considerationsWith many different RAID levels available, it can be difficult to decide which RAID configuration meetsyour needs. Because high speed and data protection are almost always mutually exclusive in RAID
60 Chapter 11 Software RAID in Linux workstations ENWW
implementations, there is a trade off between them. The following are examples of different RAIDconfigurations.
● If a file system has an external backup method, such as automated nightly tape backups, but needsto have quick read and write times, a RAID-0 is the best choice. This configuration makes optimaluse of the disk and disk controller bandwidth, although it does not provide data protection. RAID-0is most useful when performance is a key issue, but data protection is not.
● If you need to have backup drives available at all times so that there is no loss of data, even incase of a disk failure, RAID-1 is the best choice. A RAID-1 setup using several physical hard disksprovides a good degree of redundancy so that no critical data is lost. This redundancy is mostvaluable in a system that depends upon data reliability but not higher disk speeds.
● If a compromise between speed and redundancy is required, RAID-5 provides a good balancebetween disk speeds and parity data availability to rebuild the RAID array in case of failure. RAID-5is moderately efficient in both areas and is simpler to set up than a nested RAID configuration.
The optimal RAID configuration for a particular system depends on the specific needs of the system.For example, how often will reads or writes need to be performed? How important is the ability to survivein case of multiple disk failures? You might want to experiment with different configurations to determinethe RAID setup that works best for your system.
Configuring Red Hat Enterprise Linux with software RAIDTo configure software RAID on a workstation running Linux, you must use Linux revision 2.4 or later.
Tip: You can configure software RAID with late 2.2.x or 2.0.x Linux kernels if you have a matching RAIDpatch and version .90 of the raidtools installed. The patch and the raidtools can be downloaded fromhttp://people.redhat.com/mingo.
While you can manually configure software RAID after a Linux system has been installed and configured,HP recommends that you configure software RAID at installation. The RHEL installation utility includesa configuration tool to set up software RAID partitions.
NOTE: While the Linux kernel allows for RAID-linear, RAID-0, RAID-1, RAID-4, RAID-5, and nestedRAID levels, the Anaconda installer only allows for RAID-0, RAID-1, and RAID-5.
To configure software RAID using RHEL media:
1. Power up your HP workstation and boot to your RHEL installation media.
2. Continue the installation until you reach the Disk Partitioning Setup screen.
ENWW Configuring Red Hat Enterprise Linux with software RAID 61
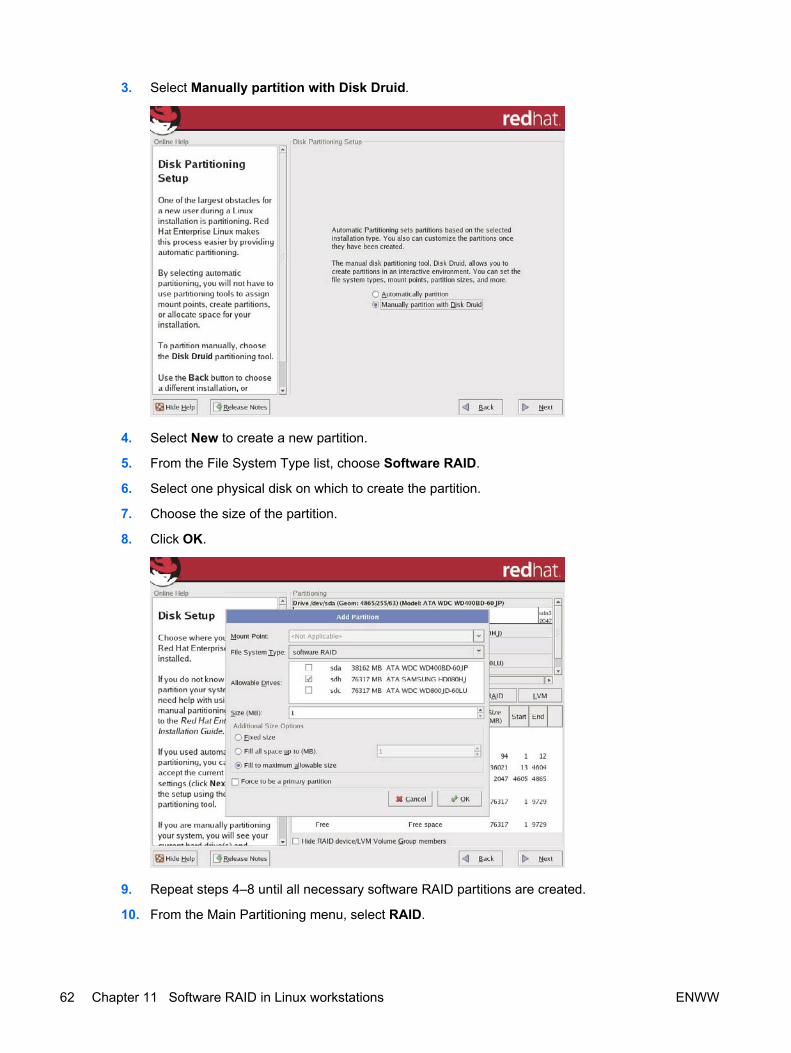
3. Select Manually partition with Disk Druid.
4. Select New to create a new partition.
5. From the File System Type list, choose Software RAID.
6. Select one physical disk on which to create the partition.
7. Choose the size of the partition.
8. Click OK.
9. Repeat steps 4–8 until all necessary software RAID partitions are created.
10. From the Main Partitioning menu, select RAID.
62 Chapter 11 Software RAID in Linux workstations ENWW
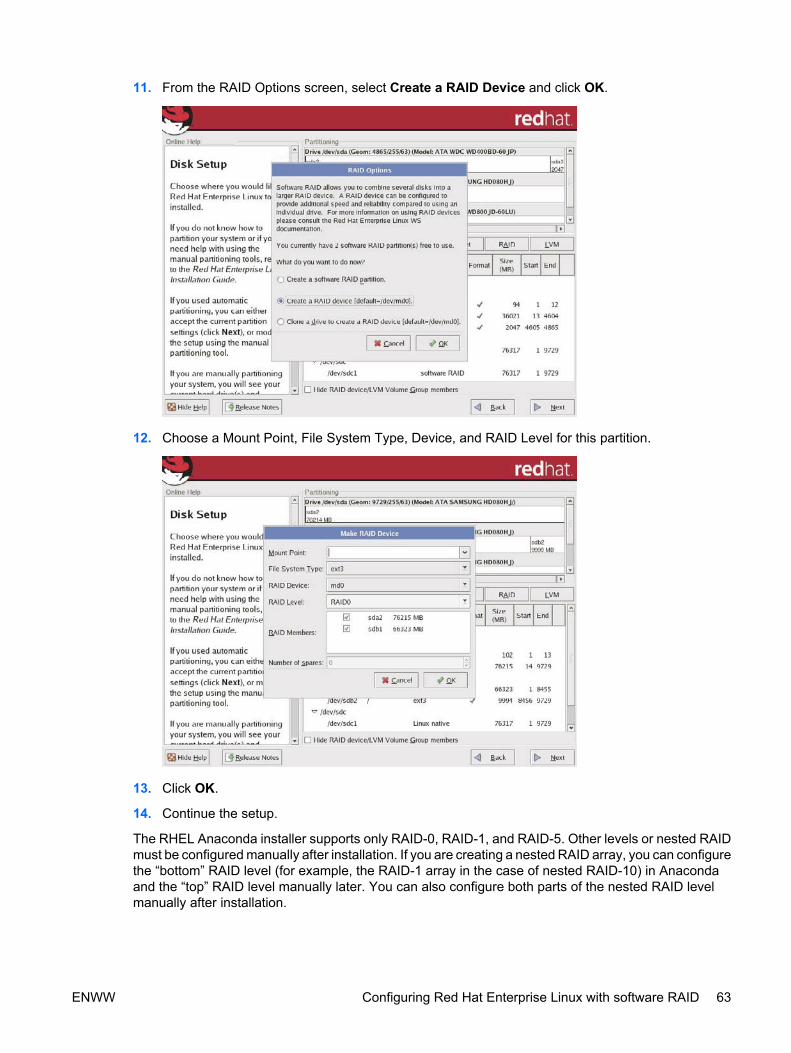
11. From the RAID Options screen, select Create a RAID Device and click OK.
12. Choose a Mount Point, File System Type, Device, and RAID Level for this partition.
13. Click OK.
14. Continue the setup.
The RHEL Anaconda installer supports only RAID-0, RAID-1, and RAID-5. Other levels or nested RAIDmust be configured manually after installation. If you are creating a nested RAID array, you can configurethe “bottom” RAID level (for example, the RAID-1 array in the case of nested RAID-10) in Anacondaand the “top” RAID level manually later. You can also configure both parts of the nested RAID levelmanually after installation.
ENWW Configuring Red Hat Enterprise Linux with software RAID 63
Tip: The GRUB and LILO boot loaders support booting to RAID-1, or booting to no RAID at all. If youwant to use a RAID level other than RAID-1, you must put the /boot partition on a non-RAID part of thefile system.
Manual setup of software RAID data partitionsTo manually set up a software RAID partition on multiple disks after installation:
1. Create partitions for the RAID array on two or more disks. These partitions will correspond to Linuxblock file devices. For example, the second partition on the third SCSI disk will be /dev/sdc2, thefirst partition on the second IDE disk will be /dev/hdb1, etc.
NOTE: You can use Disk Druid, fdisk, sfdisk, or any other partitioning tools to do this. It is betterif the partitions are of the same size and on the same type of disk. The type of the partitions willbe “Linux raid auto,” or 0xfd. A reboot might be required after writing the new partition table.
Tip: If you are setting up a RAID-1 array, use the same partition number on each disk for elementsin the array. When one disk fails, if it is not the last disk in the array, the other disk will be renamedon restart. For example, if sdb fails but sdc is still functional, when your system is restarted, the oldsdc is renamed sdb. If you use a consistent partition number, your configuration files will remainvalid (such as sdb1 and sdc1 being RAID partitions), no matter how the devices are renamed.
2. Create the /etc/raidtab file. Sample configuration files can usually be found in /usr/share/doc/raidtools-*.
Tip: You can view the file named /proc/mdstat by running the command cat /proc/mdstat. This filetells you that you have the right RAID mode registered, as well as which RAID devices are active.
3. Use the mkraid command to create the initial RAID configuration on the partitions you previouslyspecified in /etc/raidtab. Enter mkraid /dev/md0.
If you are using mdadm, enter mdadm --create --verbose /dev/md0 --level=raidlevel --raid-devices=n /dev/sda1 /dev/sdb2, and press Enter.
NOTE: /dev/md0 is the name of the RAID device, raidlevel is the RAID level specified as a number(such as 0, 1), n is the number of disks in the RAID array, and /dev/sda1, /dev/sdb2 are the namesof the drives in the RAID array.
4. Create a file system on your RAID device. Enter mkfs -t ext3 /dev/md0.
5. Mount the file system like a normal block file device:
a. Enter mkdir /raid.
b. Enter mount /dev/md0 /raid.
where /raid is where the file system you created resides.
6. Edit your /etc/fstab file. You will need to comment out the lines containing the partitions that arenow in the RAID array, such as /dev/sda1 and /dev/sdb2, by adding a # at the beginning of the line.Add a line for the RAID array file system: /dev/md0 /raid ext3 defaults 0 1
Manual configuration examplesMost of the work in manual configuration of a software RAID array comes from the creation of theappropriate /etc/raidtab file. The following are examples of /etc/raidtab files and the correspondingmdadm commands needed to set up each of the basic RAID configurations supported by HP.
64 Chapter 11 Software RAID in Linux workstations ENWW
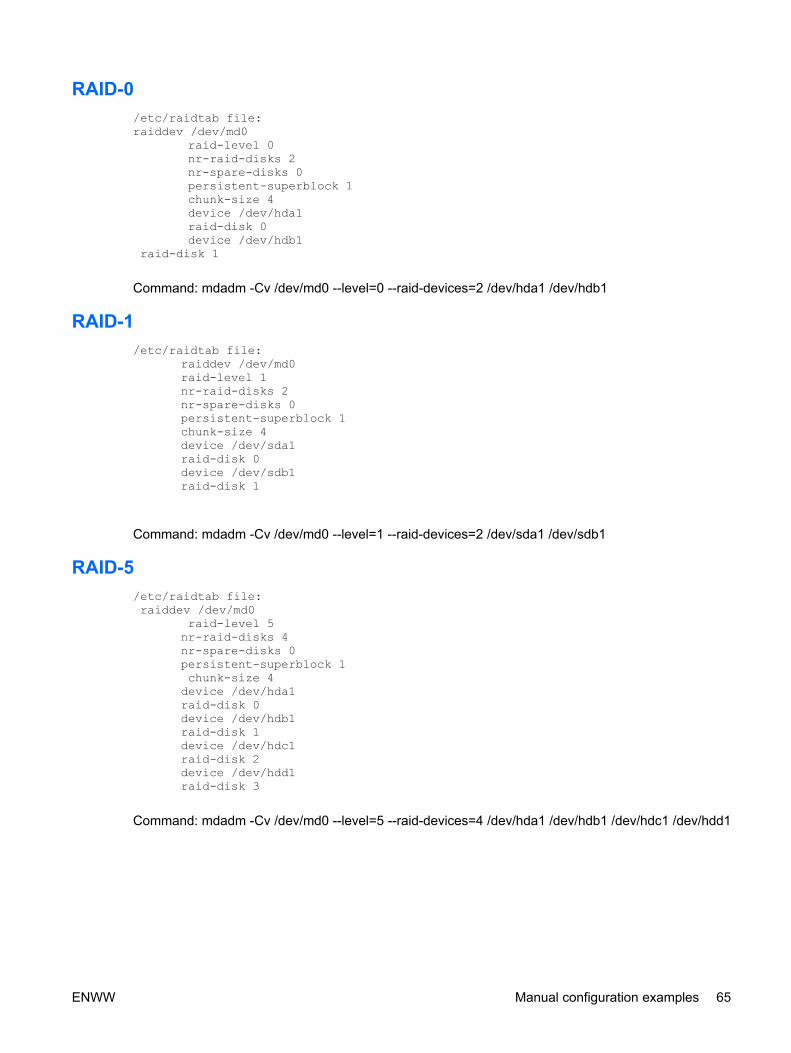
RAID-0/etc/raidtab file: raiddev /dev/md0
raid-level 0 nr-raid-disks 2 nr-spare-disks 0 persistent-superblock 1 chunk-size 4 device /dev/hda1 raid-disk 0 device /dev/hdb1
raid-disk 1
Command: mdadm -Cv /dev/md0 --level=0 --raid-devices=2 /dev/hda1 /dev/hdb1
RAID-1/etc/raidtab file: raiddev /dev/md0 raid-level 1 nr-raid-disks 2 nr-spare-disks 0 persistent-superblock 1 chunk-size 4 device /dev/sda1 raid-disk 0 device /dev/sdb1 raid-disk 1
Command: mdadm -Cv /dev/md0 --level=1 --raid-devices=2 /dev/sda1 /dev/sdb1
RAID-5/etc/raidtab file: raiddev /dev/md0
raid-level 5 nr-raid-disks 4 nr-spare-disks 0 persistent-superblock 1
chunk-size 4 device /dev/hda1
raid-disk 0 device /dev/hdb1 raid-disk 1 device /dev/hdc1 raid-disk 2 device /dev/hdd1 raid-disk 3
Command: mdadm -Cv /dev/md0 --level=5 --raid-devices=4 /dev/hda1 /dev/hdb1 /dev/hdc1 /dev/hdd1
ENWW Manual configuration examples 65
RAID-10/etc/raidtab file: raiddev /dev/md0 raid-level 0 nr-raid-disks 2
nr-spare-disks 0 chunk-size 4 device /dev/sda1
raid-disk 0 device /dev/sdb1
raid-disk 1 raiddev /dev/md1 raid-level 0
nr-raid-disks 2 nr-spare-disks 0 chunk-size 4 device /dev/sdc1 raid-disk 0 device /dev/sdd1 raid-disk 1
raiddev /dev/md2 raid-level 1 nr-raid-disks 2 nr-spare-disks 0
chunk-size 4 device /dev/md0 raid-disk 0 device /dev/md1 raid-disk 1
Commands:
● mdadm -Cv /dev/md0 --level=0 --raid-devices=2 /dev/sda1 /dev/sdb1
● mdadm -Cv /dev/md1 --level=0 --raid-devices=2 /dev/sdc1 /dev/sdd1
● mdadm -Cv /dev/md2 --level=1 --raid-devices=2 /dev/md0 /dev/md1
NOTE: In a RAID-10 configuration, you need to add three lines to the /etc/fstab file, one for each RAIDarray. You do not need to specify a mount point for /dev/md0 or /dev/md1. If no mount point is specified,you see error messages during startup, but the RAID-10 array still initializes and mounts correctly.
NOTE: These configuration files are meant as examples. Your /etc/raidtab file will differ based on yourspecific hard drive configuration.
Disk failure and recoverySpare disks and disk failure
Spare disks do not take part in the RAID configuration until one of the active disks fails. The failed deviceis marked as bad and reconstruction of the RAID array begins immediately on the first available sparedisk.
CAUTION: If multiple bad blocks have built up on the active disks over time, the reconstruction processcan sometimes trigger the failure of one of the good disks, leading to failure of the entire array. However,performing regular file system checks (fsck) of the entire RAID file system should almost completelyeliminate this risk.
Spare disks are not required for a RAID configuration. While most RAID levels can handle the failure ofone physical disk, the failure of another disk causes the entire array to fail. Start rebuilding the array as
66 Chapter 11 Software RAID in Linux workstations ENWW
quickly as possible after a disk failure. When a disk fails, the crashed disk is marked as faulty. Faultydisks still look and behave as members of the RAID array; they are simply treated as inactive parts ofthe file system.
When a disk fails, information regarding the failure appears in the standard log and stat files. /proc/mdstat displays information regarding the drives in the RAID array. RAID role numbers show the rolethat the disks play in the RAID configuration. For an array with n disks, disks with RAID role numbersgreater than or equal to n are designated spare disks. A failed disk is marked with an “F” and is replacedwith the device with the lowest role number greater than n that has not failed.
To remove and replace a failed disk:
1. To remove the failed disk from the RAID array, enter raidhotremove /dev/md0 /dev/sdc2 (where /dev/sdc2 is the name of the failed drive).
If you want to use mdadm instead of raidtools, enter mdadm /dev/md0 -r /dev/sdc2.
NOTE: raidhotremove can not be used to pull a disk out of a running array. It should only be usedfor removing failed disks. After recovery ends, a new disk should be designated as /dev/sdc2 (oras whichever disk failed).
2. To add this new disk to the array, enter raidhotadd /dev/md1 /dev/sdc2.
To optionally use mdadm, enter mdadm /dev/md1 -a /dev/sdc2 instead.
Tip: You can use mdadm as a daemon to monitor a RAID array. To do this, enter mdadm --monitor --mail=root@localhost --delay=1800 /dev/md0.
This polls the array in intervals of 1800 seconds. Critical events and failures are emailed to the systemadministrator. There are many other monitoring systems available for Linux software RAID as well.
Multiple disk failureIn the case of a temporary failure of multiple disks. The RAID superblocks are out of sync and the RAIDarray can no longer be initialized. You can use mdadm to try and recreate the array. Enter mdadm --assemble --force.
If this fails, you can use mkraid to rewrite the RAID superblocks by entering mkraid --force.
CAUTION: Ensure that you always have a complete and up-to-date /etc/raidtab file. Otherwise, dataon all disks might be lost.
Additional configuration informationPersistent superblock
Previously, the raidtools, which are included with most major Linux distributions, read your /etc/raidtabfile and initialized the file system. This required that the file system on which /etc/raidtab resided wasmounted. Consequently, you could not boot to a RAID.
The persistent superblock solves problems. When an array is initialized with the persistent-superblockoption in the /etc/raidtab file, a special superblock is written to the beginning of all disks participating inthe array. This superblock enables the kernel to read the configuration of RAID devices directly fromthe disks involved, instead of reading from the /etc/raidtab configuration file that might not be availableat all times. You must maintain a consistent /etc/raidtab file, because you might need this file for laterreconstruction of the array.
The persistent superblock is mandatory if you want auto-detection of your RAID devices upon systemboot.
ENWW Additional configuration information 67
Chunk sizesThe chunk size is defined as the smallest amount of data that can be written to a device. You can neverwrite completely in parallel to a set of disks. If you have two disks and want to write a byte, you mustwrite four bits on each disk, with every second bit going to disk 0 and the others to disk 1. Hardwaredoes not support that, so chunk size is used instead. A write of 16 KB with a chunk size of 4 KB willcause the first and the third 4 KB chunks to be written to the first disk, and the second and fourth chunksto be written to the second disk. For large writes, you can see lower overhead by having fairly largechunks, whereas arrays that are primarily holding small files can benefit more from a smaller chunk size.
Chunk sizes must be specified for all RAID levels, including linear mode. The argument to the chunk-size option in the /etc/raidtab file specifies the chunk size in KB, so “4” means 4 KB.
For optimal performance, experiment with the value, as well as with the block size of the file system youput in the array.
Swap space in RAID configurationYou do not need to use RAID for swap performance. The kernel can stripe the swap space over multiplephysical disks, provided each stripe is given the same priority in the /etc/fstab file. For example, the /etc/fstab file for striping the swap space over three drives might look like the following:
/dev/sda2 swap swap defaults,pri=1 0 0 /dev/sdb2 swap swap defaults,pri=1 0 0 /dev/sdc2 swap swap defaults,pri=1 0 0
This striping enables the machine to swap in parallel over multiple physical devices. The Linux kernelhas this capability. There is no need for RAID implementation of swap space.
Boot partitions in a mirrored RAID configurationThe mirroring for Linux in software RAID configuration is the mirroring of partitions, not of physical drives.For this reason, the Master Boot Record (MBR) is not mirrored in a RAID-1 configuration, and therefore,the mirrored drive or drives are not inherently bootable. You cannot mirror the boot partition of a harddrive using utilities such as Disk Druid, so the mirrored drives must be configured manually to makethem bootable by Linux in case the first drive fails.
One possible configuration for a software RAID-1 array in Linux is to install the /boot partition on aseparate physical hard disk from the rest of the file system. For example, /dev/sda1 would be a harddisk containing the /boot partition, and /dev/sdb1 and /dev/sdc1 would be separate physical disks makingup the / partition, configured in a RAID-1 array that is independent of the /boot partition. In this case,failure of one of the hard disks in the RAID array does not affect the disk with the /boot partition.
If placing the / and /boot partitions on separate physical drives as described above is not possible ordesirable, manual configuration is required to ensure that all hard drives in a RAID-1 array are bootablein case of failure. In this case, you will need to create a bootable partition on each physical hard diskthat will be part of the RAID-1 array.
To manually mirror your boot partition:
1. Power up your HP workstation and boot to your RHEL installation media.
2. Continue the installation until you reach the Disk Partitioning Setup screen.
68 Chapter 11 Software RAID in Linux workstations ENWW
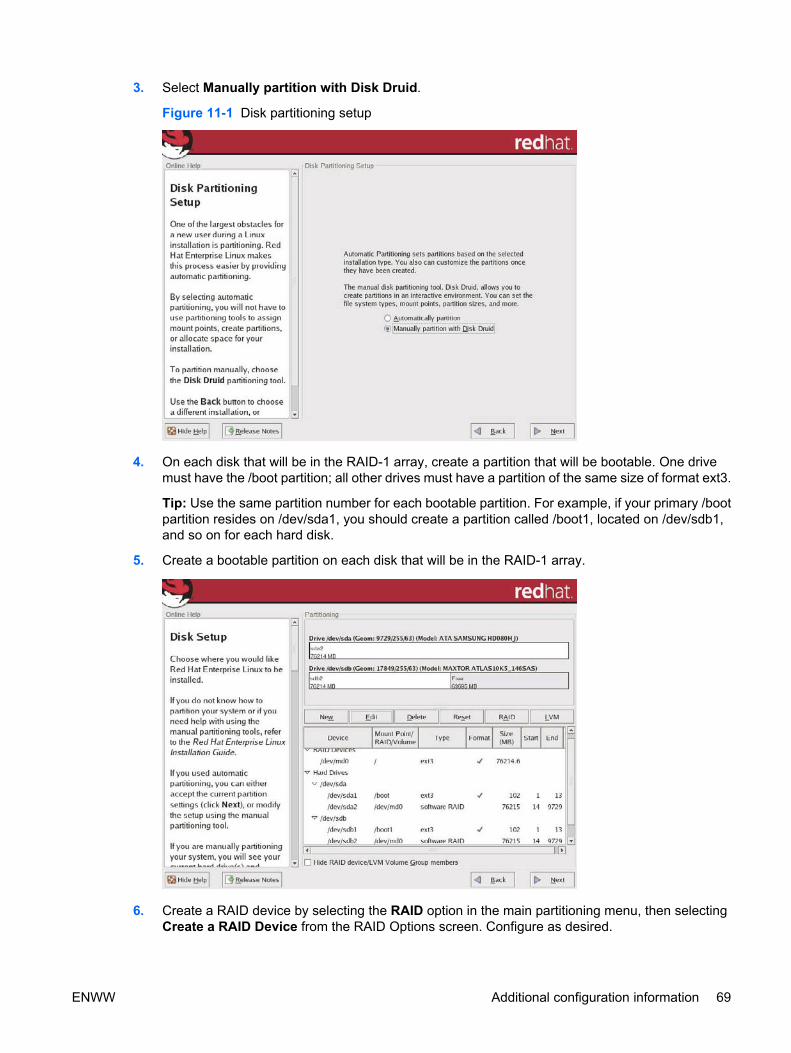
3. Select Manually partition with Disk Druid.
Figure 11-1 Disk partitioning setup
4. On each disk that will be in the RAID-1 array, create a partition that will be bootable. One drivemust have the /boot partition; all other drives must have a partition of the same size of format ext3.
Tip: Use the same partition number for each bootable partition. For example, if your primary /bootpartition resides on /dev/sda1, you should create a partition called /boot1, located on /dev/sdb1,and so on for each hard disk.
5. Create a bootable partition on each disk that will be in the RAID-1 array.
6. Create a RAID device by selecting the RAID option in the main partitioning menu, then selectingCreate a RAID Device from the RAID Options screen. Configure as desired.
ENWW Additional configuration information 69
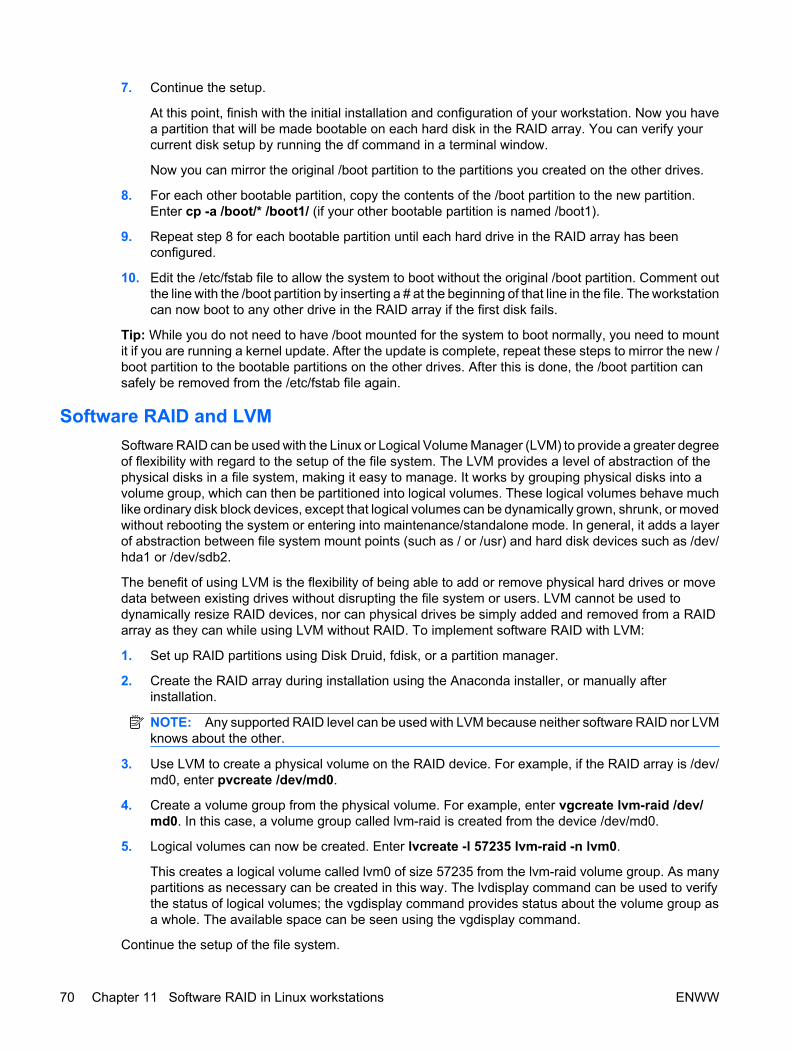
7. Continue the setup.
At this point, finish with the initial installation and configuration of your workstation. Now you havea partition that will be made bootable on each hard disk in the RAID array. You can verify yourcurrent disk setup by running the df command in a terminal window.
Now you can mirror the original /boot partition to the partitions you created on the other drives.
8. For each other bootable partition, copy the contents of the /boot partition to the new partition.Enter cp -a /boot/* /boot1/ (if your other bootable partition is named /boot1).
9. Repeat step 8 for each bootable partition until each hard drive in the RAID array has beenconfigured.
10. Edit the /etc/fstab file to allow the system to boot without the original /boot partition. Comment outthe line with the /boot partition by inserting a # at the beginning of that line in the file. The workstationcan now boot to any other drive in the RAID array if the first disk fails.
Tip: While you do not need to have /boot mounted for the system to boot normally, you need to mountit if you are running a kernel update. After the update is complete, repeat these steps to mirror the new /boot partition to the bootable partitions on the other drives. After this is done, the /boot partition cansafely be removed from the /etc/fstab file again.
Software RAID and LVMSoftware RAID can be used with the Linux or Logical Volume Manager (LVM) to provide a greater degreeof flexibility with regard to the setup of the file system. The LVM provides a level of abstraction of thephysical disks in a file system, making it easy to manage. It works by grouping physical disks into avolume group, which can then be partitioned into logical volumes. These logical volumes behave muchlike ordinary disk block devices, except that logical volumes can be dynamically grown, shrunk, or movedwithout rebooting the system or entering into maintenance/standalone mode. In general, it adds a layerof abstraction between file system mount points (such as / or /usr) and hard disk devices such as /dev/hda1 or /dev/sdb2.
The benefit of using LVM is the flexibility of being able to add or remove physical hard drives or movedata between existing drives without disrupting the file system or users. LVM cannot be used todynamically resize RAID devices, nor can physical drives be simply added and removed from a RAIDarray as they can while using LVM without RAID. To implement software RAID with LVM:
1. Set up RAID partitions using Disk Druid, fdisk, or a partition manager.
2. Create the RAID array during installation using the Anaconda installer, or manually afterinstallation.
NOTE: Any supported RAID level can be used with LVM because neither software RAID nor LVMknows about the other.
3. Use LVM to create a physical volume on the RAID device. For example, if the RAID array is /dev/md0, enter pvcreate /dev/md0.
4. Create a volume group from the physical volume. For example, enter vgcreate lvm-raid /dev/md0. In this case, a volume group called lvm-raid is created from the device /dev/md0.
5. Logical volumes can now be created. Enter lvcreate -l 57235 lvm-raid -n lvm0.
This creates a logical volume called lvm0 of size 57235 from the lvm-raid volume group. As manypartitions as necessary can be created in this way. The lvdisplay command can be used to verifythe status of logical volumes; the vgdisplay command provides status about the volume group asa whole. The available space can be seen using the vgdisplay command.
Continue the setup of the file system.
70 Chapter 11 Software RAID in Linux workstations ENWW

Additional informationVisit the following web sites for more information:
● http://h10018.www1.hp.com/wwsolutions/linux/index.html
● http://h20331.www2.hp.com/hpsub/cache/286526-0-0-225-121.html
● http://linux.corp.hp.com/
ENWW Additional information 71

72 Chapter 11 Software RAID in Linux workstations ENWW
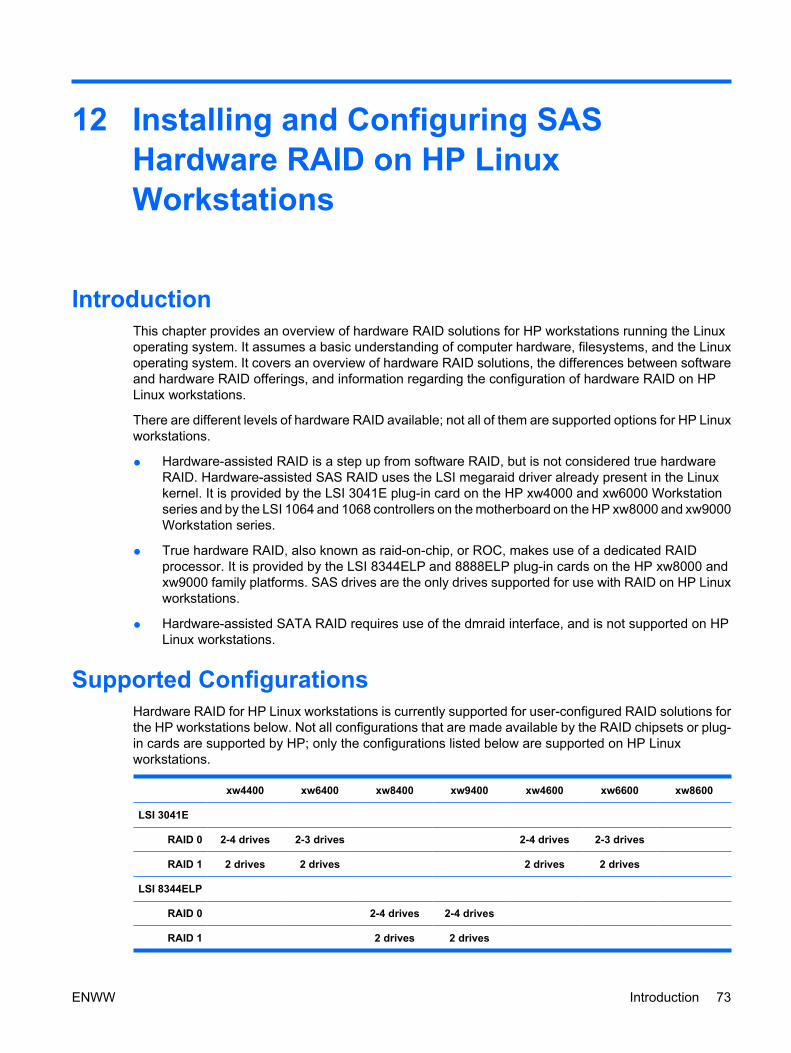
12 Installing and Configuring SASHardware RAID on HP LinuxWorkstations
IntroductionThis chapter provides an overview of hardware RAID solutions for HP workstations running the Linuxoperating system. It assumes a basic understanding of computer hardware, filesystems, and the Linuxoperating system. It covers an overview of hardware RAID solutions, the differences between softwareand hardware RAID offerings, and information regarding the configuration of hardware RAID on HPLinux workstations.
There are different levels of hardware RAID available; not all of them are supported options for HP Linuxworkstations.
● Hardware-assisted RAID is a step up from software RAID, but is not considered true hardwareRAID. Hardware-assisted SAS RAID uses the LSI megaraid driver already present in the Linuxkernel. It is provided by the LSI 3041E plug-in card on the HP xw4000 and xw6000 Workstationseries and by the LSI 1064 and 1068 controllers on the motherboard on the HP xw8000 and xw9000Workstation series.
● True hardware RAID, also known as raid-on-chip, or ROC, makes use of a dedicated RAIDprocessor. It is provided by the LSI 8344ELP and 8888ELP plug-in cards on the HP xw8000 andxw9000 family platforms. SAS drives are the only drives supported for use with RAID on HP Linuxworkstations.
● Hardware-assisted SATA RAID requires use of the dmraid interface, and is not supported on HPLinux workstations.
Supported ConfigurationsHardware RAID for HP Linux workstations is currently supported for user-configured RAID solutions forthe HP workstations below. Not all configurations that are made available by the RAID chipsets or plug-in cards are supported by HP; only the configurations listed below are supported on HP Linuxworkstations.
xw4400 xw6400 xw8400 xw9400 xw4600 xw6600 xw8600
LSI 3041E
RAID 0 2-4 drives 2-3 drives 2-4 drives 2-3 drives
RAID 1 2 drives 2 drives 2 drives 2 drives
LSI 8344ELP
RAID 0 2-4 drives 2-4 drives
RAID 1 2 drives 2 drives
ENWW Introduction 73
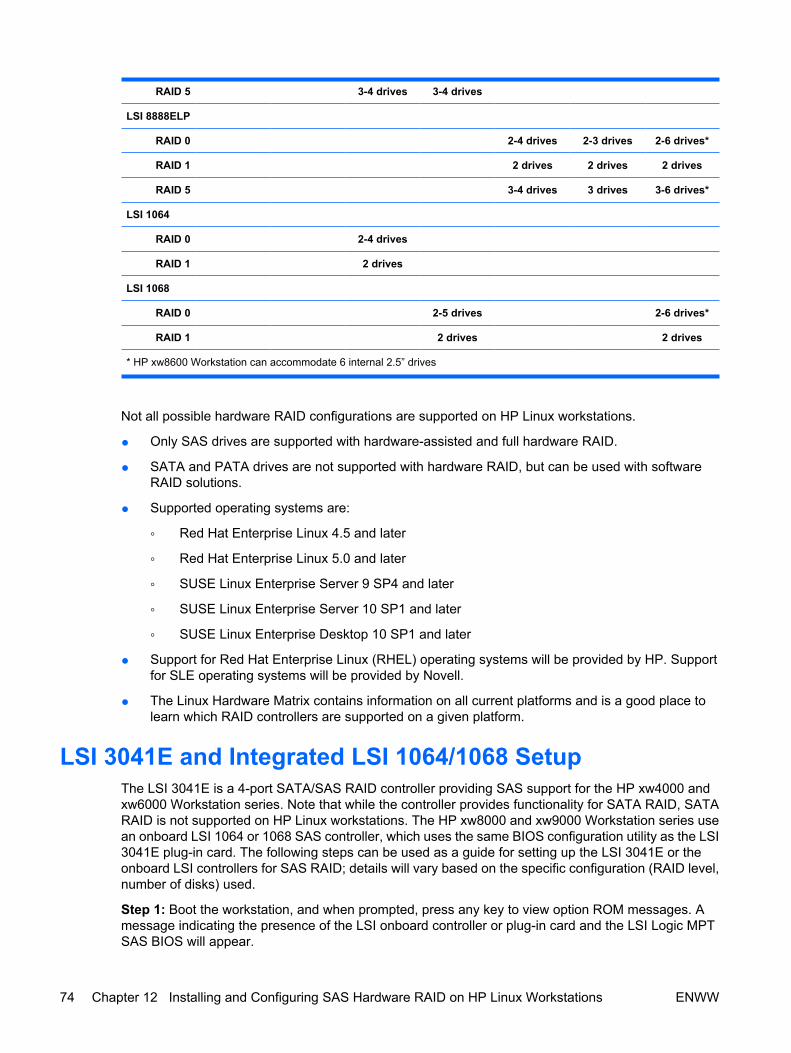
RAID 5 3-4 drives 3-4 drives
LSI 8888ELP
RAID 0 2-4 drives 2-3 drives 2-6 drives*
RAID 1 2 drives 2 drives 2 drives
RAID 5 3-4 drives 3 drives 3-6 drives*
LSI 1064
RAID 0 2-4 drives
RAID 1 2 drives
LSI 1068
RAID 0 2-5 drives 2-6 drives*
RAID 1 2 drives 2 drives
* HP xw8600 Workstation can accommodate 6 internal 2.5” drives
Not all possible hardware RAID configurations are supported on HP Linux workstations.
● Only SAS drives are supported with hardware-assisted and full hardware RAID.
● SATA and PATA drives are not supported with hardware RAID, but can be used with softwareRAID solutions.
● Supported operating systems are:
◦ Red Hat Enterprise Linux 4.5 and later
◦ Red Hat Enterprise Linux 5.0 and later
◦ SUSE Linux Enterprise Server 9 SP4 and later
◦ SUSE Linux Enterprise Server 10 SP1 and later
◦ SUSE Linux Enterprise Desktop 10 SP1 and later
● Support for Red Hat Enterprise Linux (RHEL) operating systems will be provided by HP. Supportfor SLE operating systems will be provided by Novell.
● The Linux Hardware Matrix contains information on all current platforms and is a good place tolearn which RAID controllers are supported on a given platform.
LSI 3041E and Integrated LSI 1064/1068 SetupThe LSI 3041E is a 4-port SATA/SAS RAID controller providing SAS support for the HP xw4000 andxw6000 Workstation series. Note that while the controller provides functionality for SATA RAID, SATARAID is not supported on HP Linux workstations. The HP xw8000 and xw9000 Workstation series usean onboard LSI 1064 or 1068 SAS controller, which uses the same BIOS configuration utility as the LSI3041E plug-in card. The following steps can be used as a guide for setting up the LSI 3041E or theonboard LSI controllers for SAS RAID; details will vary based on the specific configuration (RAID level,number of disks) used.
Step 1: Boot the workstation, and when prompted, press any key to view option ROM messages. Amessage indicating the presence of the LSI onboard controller or plug-in card and the LSI Logic MPTSAS BIOS will appear.
74 Chapter 12 Installing and Configuring SAS Hardware RAID on HP Linux Workstations ENWW
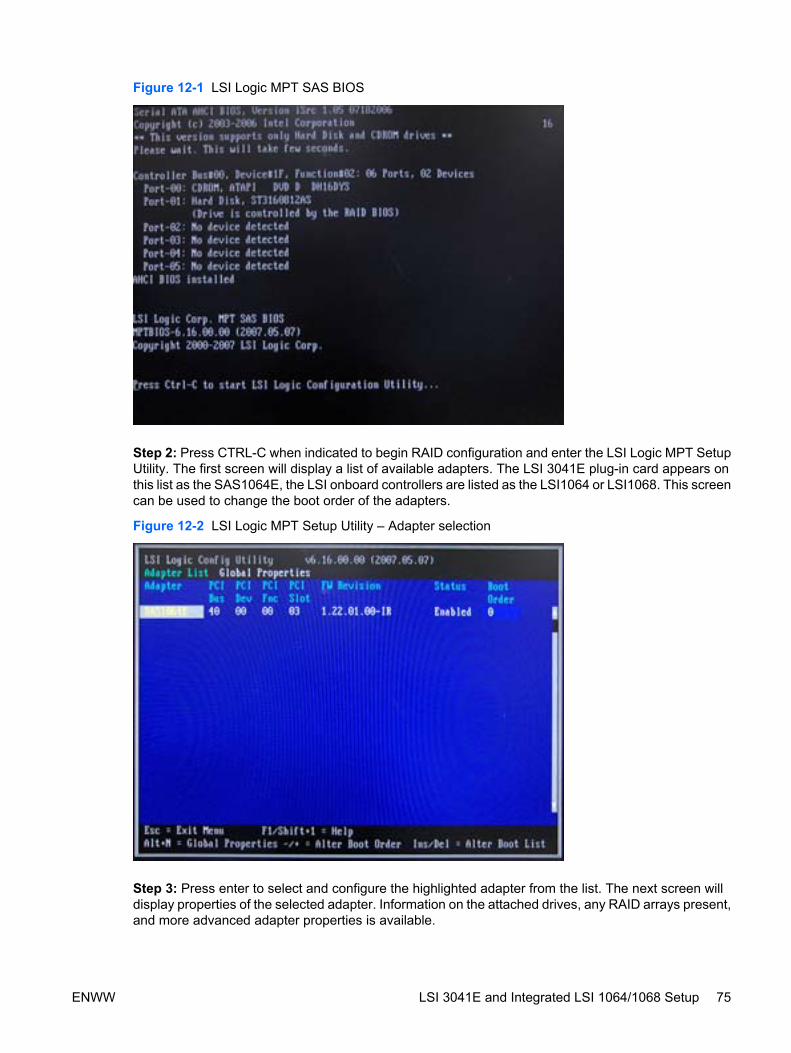
Figure 12-1 LSI Logic MPT SAS BIOS
Step 2: Press CTRL-C when indicated to begin RAID configuration and enter the LSI Logic MPT SetupUtility. The first screen will display a list of available adapters. The LSI 3041E plug-in card appears onthis list as the SAS1064E, the LSI onboard controllers are listed as the LSI1064 or LSI1068. This screencan be used to change the boot order of the adapters.
Figure 12-2 LSI Logic MPT Setup Utility – Adapter selection
Step 3: Press enter to select and configure the highlighted adapter from the list. The next screen willdisplay properties of the selected adapter. Information on the attached drives, any RAID arrays present,and more advanced adapter properties is available.
ENWW LSI 3041E and Integrated LSI 1064/1068 Setup 75
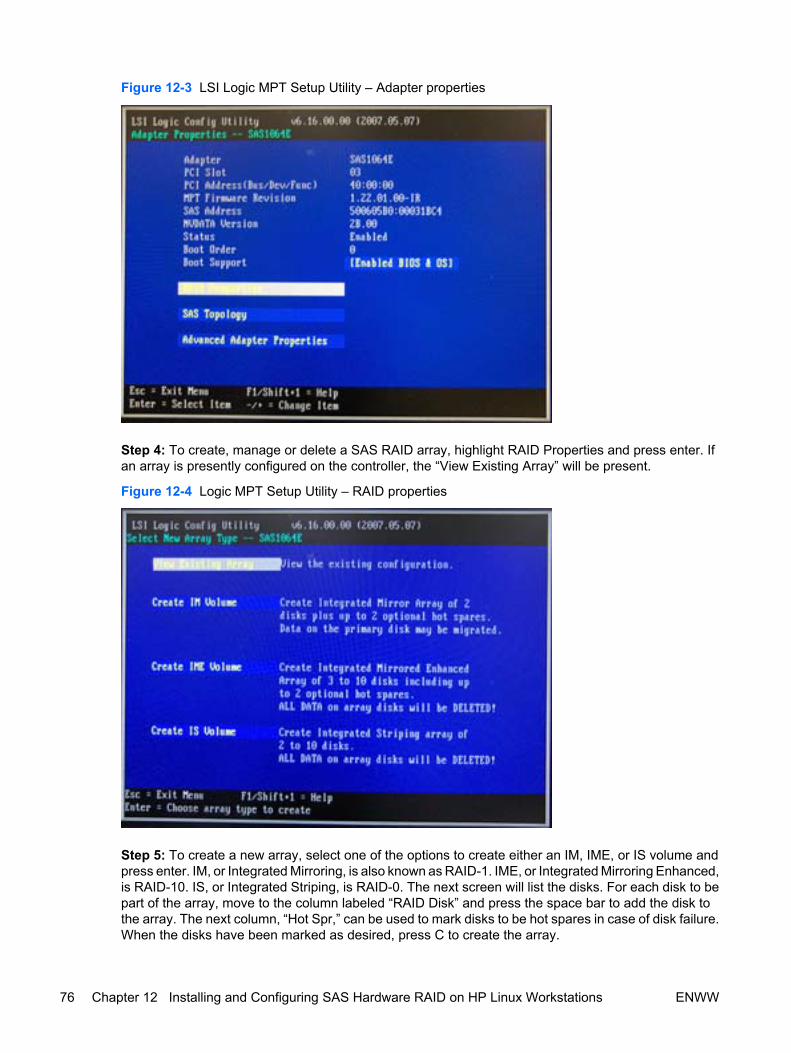
Figure 12-3 LSI Logic MPT Setup Utility – Adapter properties
Step 4: To create, manage or delete a SAS RAID array, highlight RAID Properties and press enter. Ifan array is presently configured on the controller, the “View Existing Array” will be present.
Figure 12-4 Logic MPT Setup Utility – RAID properties
Step 5: To create a new array, select one of the options to create either an IM, IME, or IS volume andpress enter. IM, or Integrated Mirroring, is also known as RAID-1. IME, or Integrated Mirroring Enhanced,is RAID-10. IS, or Integrated Striping, is RAID-0. The next screen will list the disks. For each disk to bepart of the array, move to the column labeled “RAID Disk” and press the space bar to add the disk tothe array. The next column, “Hot Spr,” can be used to mark disks to be hot spares in case of disk failure.When the disks have been marked as desired, press C to create the array.
76 Chapter 12 Installing and Configuring SAS Hardware RAID on HP Linux Workstations ENWW
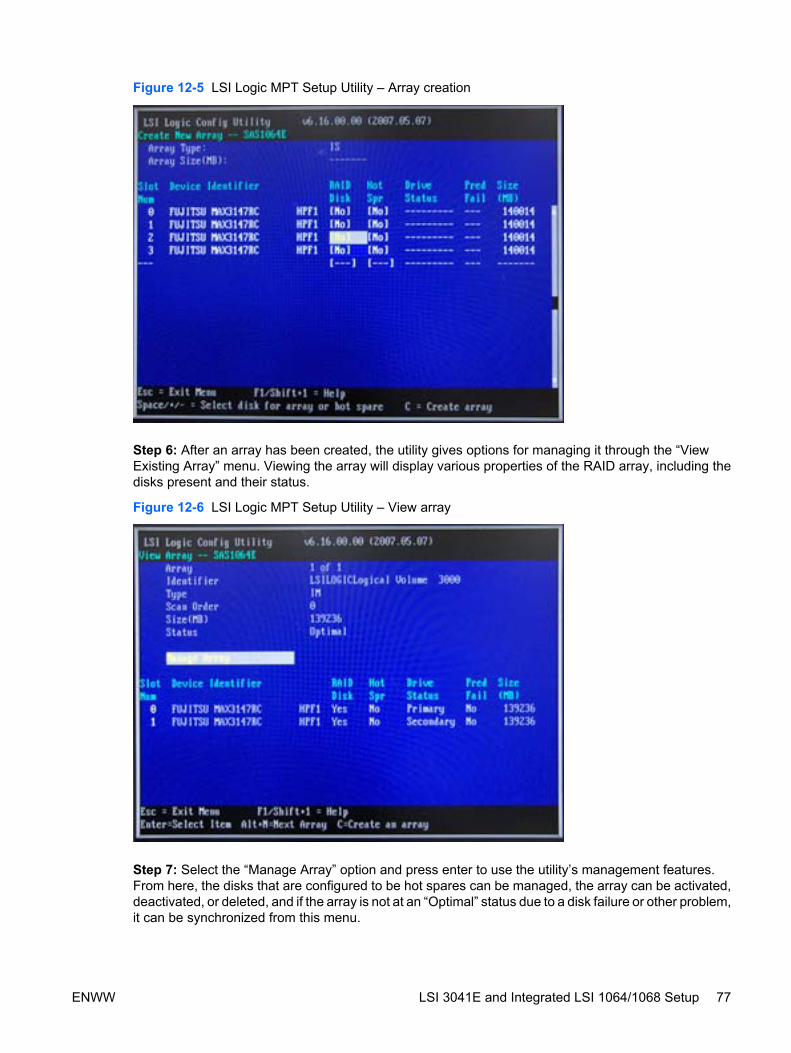
Figure 12-5 LSI Logic MPT Setup Utility – Array creation
Step 6: After an array has been created, the utility gives options for managing it through the “ViewExisting Array” menu. Viewing the array will display various properties of the RAID array, including thedisks present and their status.
Figure 12-6 LSI Logic MPT Setup Utility – View array
Step 7: Select the “Manage Array” option and press enter to use the utility’s management features.From here, the disks that are configured to be hot spares can be managed, the array can be activated,deactivated, or deleted, and if the array is not at an “Optimal” status due to a disk failure or other problem,it can be synchronized from this menu.
ENWW LSI 3041E and Integrated LSI 1064/1068 Setup 77
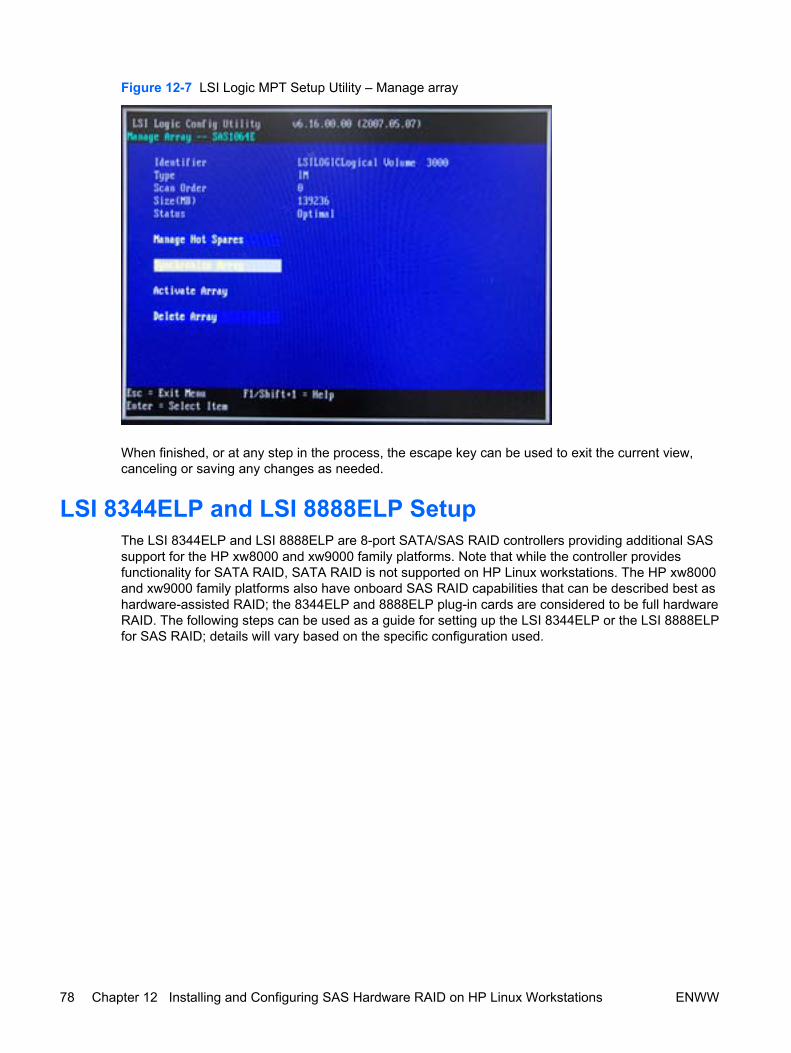
Figure 12-7 LSI Logic MPT Setup Utility – Manage array
When finished, or at any step in the process, the escape key can be used to exit the current view,canceling or saving any changes as needed.
LSI 8344ELP and LSI 8888ELP SetupThe LSI 8344ELP and LSI 8888ELP are 8-port SATA/SAS RAID controllers providing additional SASsupport for the HP xw8000 and xw9000 family platforms. Note that while the controller providesfunctionality for SATA RAID, SATA RAID is not supported on HP Linux workstations. The HP xw8000and xw9000 family platforms also have onboard SAS RAID capabilities that can be described best ashardware-assisted RAID; the 8344ELP and 8888ELP plug-in cards are considered to be full hardwareRAID. The following steps can be used as a guide for setting up the LSI 8344ELP or the LSI 8888ELPfor SAS RAID; details will vary based on the specific configuration used.
78 Chapter 12 Installing and Configuring SAS Hardware RAID on HP Linux Workstations ENWW
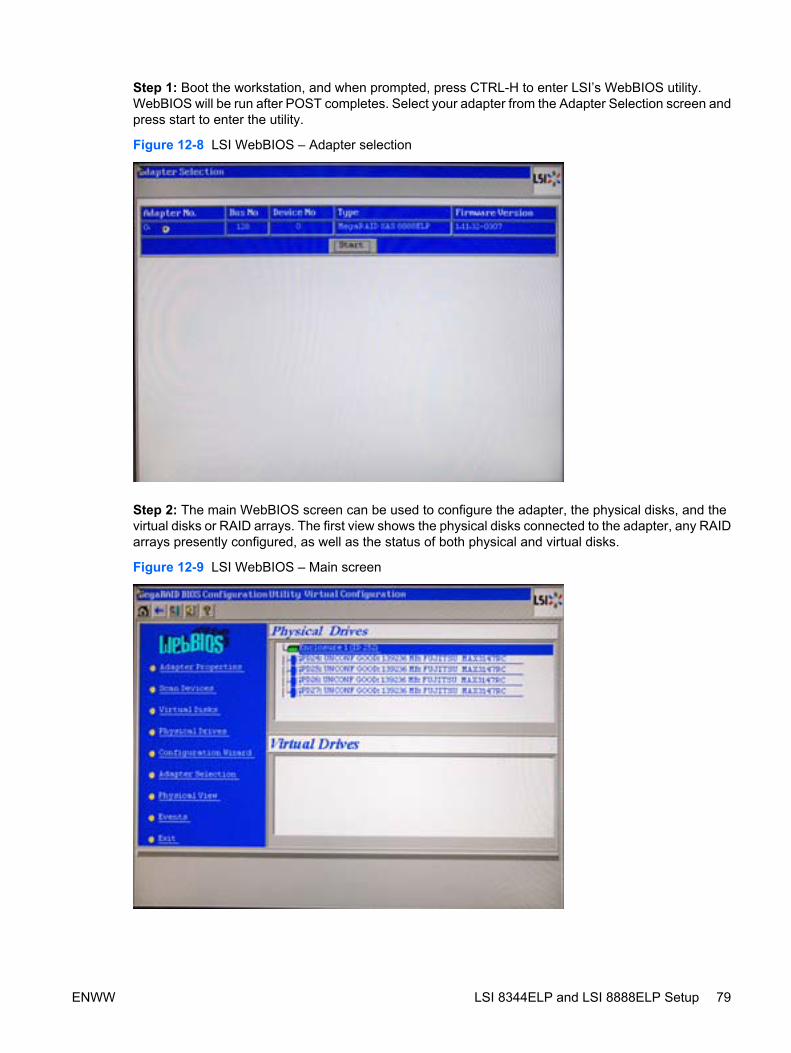
Step 1: Boot the workstation, and when prompted, press CTRL-H to enter LSI’s WebBIOS utility.WebBIOS will be run after POST completes. Select your adapter from the Adapter Selection screen andpress start to enter the utility.
Figure 12-8 LSI WebBIOS – Adapter selection
Step 2: The main WebBIOS screen can be used to configure the adapter, the physical disks, and thevirtual disks or RAID arrays. The first view shows the physical disks connected to the adapter, any RAIDarrays presently configured, as well as the status of both physical and virtual disks.
Figure 12-9 LSI WebBIOS – Main screen
ENWW LSI 8344ELP and LSI 8888ELP Setup 79
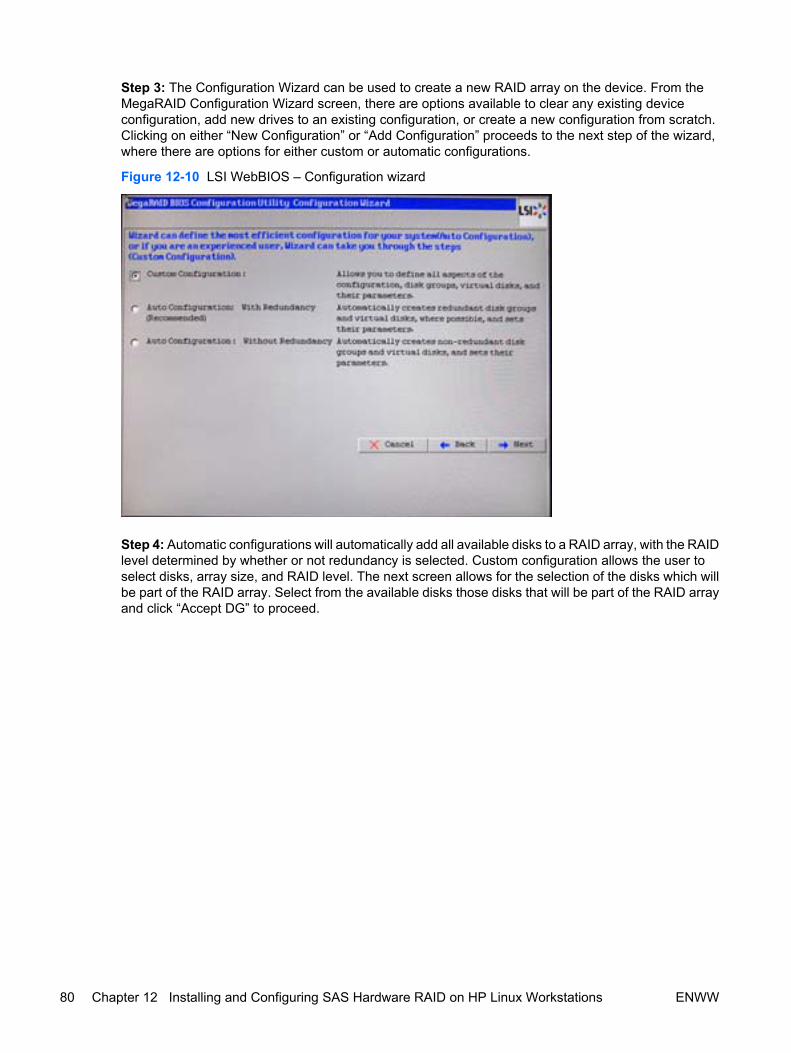
Step 3: The Configuration Wizard can be used to create a new RAID array on the device. From theMegaRAID Configuration Wizard screen, there are options available to clear any existing deviceconfiguration, add new drives to an existing configuration, or create a new configuration from scratch.Clicking on either “New Configuration” or “Add Configuration” proceeds to the next step of the wizard,where there are options for either custom or automatic configurations.
Figure 12-10 LSI WebBIOS – Configuration wizard
Step 4: Automatic configurations will automatically add all available disks to a RAID array, with the RAIDlevel determined by whether or not redundancy is selected. Custom configuration allows the user toselect disks, array size, and RAID level. The next screen allows for the selection of the disks which willbe part of the RAID array. Select from the available disks those disks that will be part of the RAID arrayand click “Accept DG” to proceed.
80 Chapter 12 Installing and Configuring SAS Hardware RAID on HP Linux Workstations ENWW
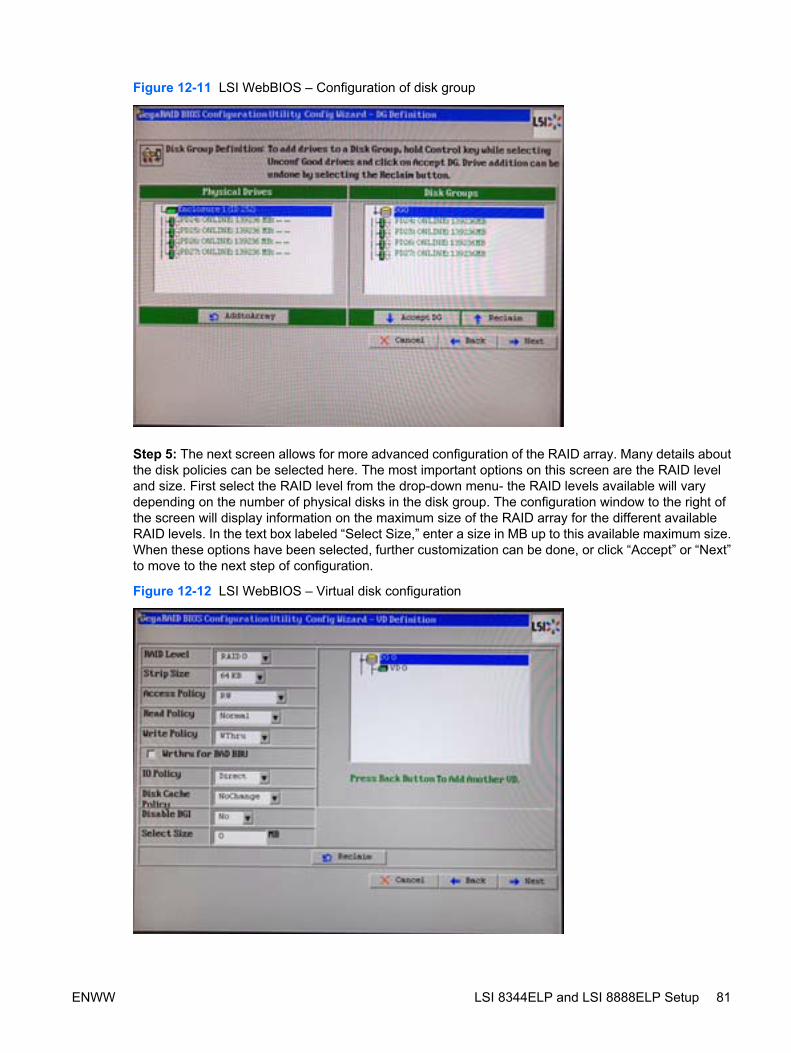
Figure 12-11 LSI WebBIOS – Configuration of disk group
Step 5: The next screen allows for more advanced configuration of the RAID array. Many details aboutthe disk policies can be selected here. The most important options on this screen are the RAID leveland size. First select the RAID level from the drop-down menu- the RAID levels available will varydepending on the number of physical disks in the disk group. The configuration window to the right ofthe screen will display information on the maximum size of the RAID array for the different availableRAID levels. In the text box labeled “Select Size,” enter a size in MB up to this available maximum size.When these options have been selected, further customization can be done, or click “Accept” or “Next”to move to the next step of configuration.
Figure 12-12 LSI WebBIOS – Virtual disk configuration
ENWW LSI 8344ELP and LSI 8888ELP Setup 81
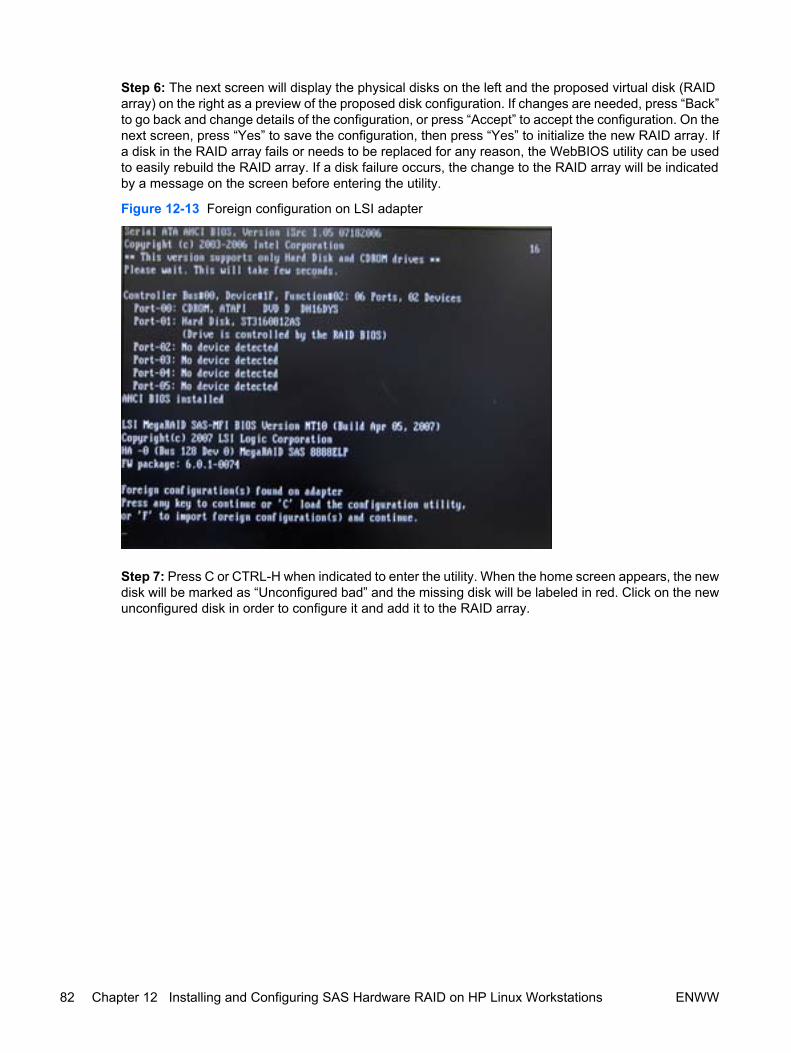
Step 6: The next screen will display the physical disks on the left and the proposed virtual disk (RAIDarray) on the right as a preview of the proposed disk configuration. If changes are needed, press “Back”to go back and change details of the configuration, or press “Accept” to accept the configuration. On thenext screen, press “Yes” to save the configuration, then press “Yes” to initialize the new RAID array. Ifa disk in the RAID array fails or needs to be replaced for any reason, the WebBIOS utility can be usedto easily rebuild the RAID array. If a disk failure occurs, the change to the RAID array will be indicatedby a message on the screen before entering the utility.
Figure 12-13 Foreign configuration on LSI adapter
Step 7: Press C or CTRL-H when indicated to enter the utility. When the home screen appears, the newdisk will be marked as “Unconfigured bad” and the missing disk will be labeled in red. Click on the newunconfigured disk in order to configure it and add it to the RAID array.
82 Chapter 12 Installing and Configuring SAS Hardware RAID on HP Linux Workstations ENWW
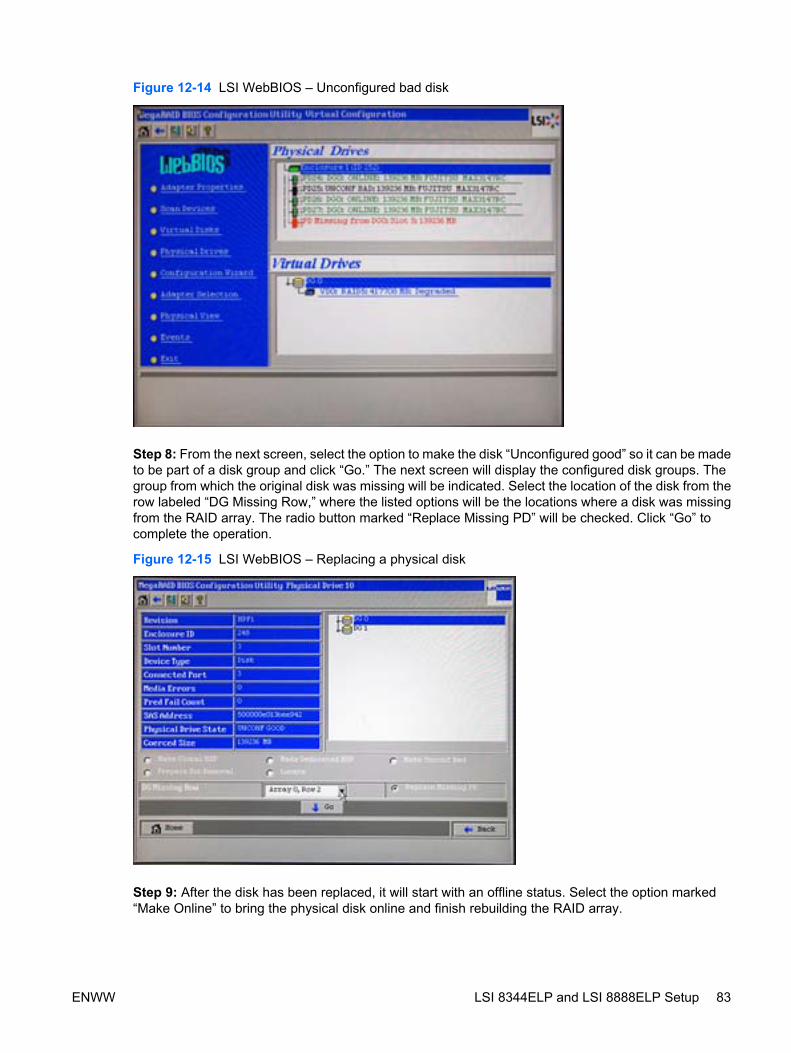
Figure 12-14 LSI WebBIOS – Unconfigured bad disk
Step 8: From the next screen, select the option to make the disk “Unconfigured good” so it can be madeto be part of a disk group and click “Go.” The next screen will display the configured disk groups. Thegroup from which the original disk was missing will be indicated. Select the location of the disk from therow labeled “DG Missing Row,” where the listed options will be the locations where a disk was missingfrom the RAID array. The radio button marked “Replace Missing PD” will be checked. Click “Go” tocomplete the operation.
Figure 12-15 LSI WebBIOS – Replacing a physical disk
Step 9: After the disk has been replaced, it will start with an offline status. Select the option marked“Make Online” to bring the physical disk online and finish rebuilding the RAID array.
ENWW LSI 8344ELP and LSI 8888ELP Setup 83

At any point during RAID configuration or management, the home button will return to the main screenof the configuration utility, and the exit button will cancel any unsaved changes and exit the application.
Additional RAID InformationOS Installation
The above steps document the process for setting up a hardware RAID array using the tools providedby the hardware RAID adapter. After this setup process is complete, an operating system can beinstalled. If the user does not wish to have the RAID array be bootable, a separate SATA or SAS bootdisk can be used, and the RAID array can be a separate disk group for data storage only. Duringoperating system installation, the configured RAID array will be recognized as a logical disk group, andcan be set up and partitioned as desired.
Other Workstation Platforms
The above information applies only to the desktop workstation platforms discussed herein. HardwareRAID support is not available on the HP xw4550, since only SAS RAID is supported on HP Linuxworkstations. The xw4550 only supports SATA drives, and SATA RAID support is not available. TheHP xw460c blade workstation supports hardware RAID levels 0 or 1 using the SAS drives that areavailable for use on that platform.
84 Chapter 12 Installing and Configuring SAS Hardware RAID on HP Linux Workstations ENWW
13 Advanced graphics: Multi-user supportfor the HP Workstations
IntroductionAdding multiple users on a single workstation with attached keyboards is made possible on Linux bychanges to the X11R6.9 changes (also on the X11R7 version). This version of X windows comes withRed Hat Enterprise Linux 5 (RHEL 5) and Fedora Core 5 (FC5) and SUSE Linux Enterprise Desktop10 (SLED 10). A driver called “evdev” enables input from all USB devices on the system without collisionof the different X servers that are running on a system. X 6.9 also prevents graphics cards from interferingwith each other.
The HP xw4600, xw6600, xw8600, and xw9400 Workstations have dual PCI Express x16 graphics slots.This capability, couple with one or two multi-core Intel or AMD Opteron processors, provides anunprecedented amount of graphics processing power for a Linux workstation. Support of multiple userswith this workstation is viable given this much speed.
This chapter discusses how to set up such a system.
SetupWorkstation hardware should be ordered as a unit to contain the desired processors, graphics cards,displays, and memory. Extra keyboards and mice must be ordered separately. To set up the workstation:
1. Plug in the keyboards and mice as desired.
2. Reboot the workstation so the kernel will recognize the input devices.
3. Choose an initial configuration that requires few changes.
NOTE: Future changes to the USB ports used for different keyboards and mice will requirechanges to the xorg.conf configuration file.
4. Determine what the real input devices are. Look in /proc/bus/input/devices file to see all the activehardware.
NOTE: The filename for the device files in /dev/input/ for the corresponding device (eventX forkeyboards and mouseX for mice) are located by the Handlers line for each device.
5. Ensure you have the correct device file for each device. Wiggle each mouse and type on eachkeyboard until the od command returns data. This data will indicate what device actually responds.
6. Exit the command and repeat this process for the next device file:
od < /dev/input/event0 (should give you data when you type on the PS2 keyboard) od < /dev/input/event1 (should give you input when you wiggle the PS2 mouse) od < /dev/input/event2.....
ENWW Introduction 85

Xorg.conf config file detailsWhen you have all the devices and their device files identified, edit the /etc/X11/xorg.conf file. Start witha multi-display configuration using both graphics cards and edit the xorg.conf file for that config. Multi-display configurations can be set up easily and interactively using the HP graphics configuration tool,vizconfig. Use vizconfig to configure the number of monitors that you plan to use.
To use vizconfig:
1. Log in as root.
2. Launch vizconfig using desktop icon or by executing /opt/hp/viztools/bin/run_vizconfig.
3. Select display arrangement (such as 3x1 or 2x2) from the Selected Display Arrangement list.
4. When a display arrangement is selected, you can select different options under the Options tab:
● SLI Multiview (Xinerama) — enables/disables 2d/3d Xinerama
● Use twinview where possible — enables/disables twinview
5. set up the different monitors. The different monitors are shown in the picture of the currentlyselected display arrangement along with how the graphics cards are connected to those displays.
6. Select the display using the Selected Display list. The picture of the display arrangement updatesto highlight the selected display.
7. Set the resolution for this display with the Display Resolution slider.
8. (Optional) If you want the display to be connected to the other connector on the graphics card,select Swap Left_Right Monitors. The picture of the display arrangement is modified to reflectthis change.
9. Repeat steps 6 – 8 as needed for each display.
10. Select SaveConfig to save the changes to the /etc/X11/xorg.conf file.
NOTE: Any edits made to the Xconfig file after running vizconfig will not be used by vizconfig the nexttime it is run. You must apply these edits each time vizconfig is run.
When you have a working multi-display /etc/X11/xorg.conf file, you must edit it to activate multi-seat.First add device sections for the keyboards and mice. To configure these input devices on release 6.9or later versions of the Xorg X server for each keyboard, construct an InputDevice section for your /etc/X11/xorg.conf:
Section "InputDevice" Identifier "KeyboardN" Driver "evdev" Option "Device" "/dev/input/eventX"
EndSection
N is the sequential keyboard number, and X is the event handler identified during setup.
Here is the xorg.conf section that describes the PS2 Console Keyboard:
86 Chapter 13 Advanced graphics: Multi-user support for the HP Workstations ENWW
Section "InputDevice" Identifier "Keyboard0" Driver "evdev" Option "Device" "/dev/input/event0" Option "AutoRepeat" "250 30" Option "XkbRules" "xfree86" Option "XkbModel" "pc105" Option "XkbLayout" "us"
EndSection
Here is the first USB keyboard found through the discovery process identified in setup:
Section "InputDevice" Identifier "Keyboard1" Driver "evdev" Option "Device" "/dev/input/event4" Option "AutoRepeat" "250 30"
EndSection
For each USB mouse, construct an InputDevice section for the xorg.conf file:
Section "InputDevice" Identifier "MouseN" Driver "evdev" Option "Device" "/dev/input/eventX"
EndSection
N is the sequential mouse number, and X is the event handler identified during setup.
Use Mouse0 for the PS2 mouse.
Here is the PS2 mouse section:
Section "InputDevice" Identifier "Mouse0" Driver "mouse" Option "Protocol" "IMPS/2" Option "Device" "/dev/input/mouse0" Option "Emulate3Buttons" "off" Option "ZAxisMapping" "4 5"
EndSection
Here is the first USB mouse section found through the discovery process:
Section "InputDevice" Identifier "Mouse2" Driver "evdev" Option "ZAxisMapping" "4 5" Option "Device" "/dev/input/event3"
EndSection
Next, create a ServerLayout section for your xorg.conf file for each seat. The following server layoutswere derived from the server layout created by vizconfig:
ENWW Setup 87
Section "ServerLayout" Identifier “Seat0" Screen 0 "Screen Primary" Option "IsolateDevice" "True" InputDevice "Mouse0" "CorePointer" InputDevice "Keyboard0" "CoreKeyboard"
EndSection Section "ServerLayout"
Identifier "Seat1" Screen 0 "Screen Secondary” Option "IsolateDevice" "True" InputDevice "Mouse1" "CorePointer" InputDevice "Keyboard1" "CoreKeyboard"
EndSection
In future releases of the HP Installer Kit for Linux, example xorg.confs will be /opt/hp/viztools/configfiles.
Starting two X serversOnce you have an xorg.conf file that contains all the components, start two X servers at the same timeusing that config file:
1. Start two X servers at the same time using that config file.
2. Start a single X server on the first layout. Enter startx -- :0 -novtswitch -layout Seat0.
NOTE: The first layout is the default and so is :0.
3. Once the first X server is working well, start the second X server. Enter startx -- :1 -novtswitch -sharevts -layout Seat1.
Now, two X servers are running without signal collision. The options passed into the X server and theIsolatedDevice option in the config file prevent the X servers from interfering each other’s screens.
NOTE: All startx parameters after the double-dash (--) go directly to the X server.
You can access this system remotely using ssh and performing “killall X” to kill an X server.
Create a separate login screen on each X server/seat using the /etc/X11/gdm/gdm.conf file. Add thefollowing lines to the X server part of the gdm.conf file, one for each seat:
0=Standard 1=Standard1
Add these sections in the gdm.conf file:
# Definition of the standard X server. [server-Standard] name=Standard server command=/usr/X11R6/bin/X -novtswitch flexible=false [server-Standard1] name=Standard server command=/usr/X11R6/bin/X1 -novtswitch -sharevts -layout Layout1 flexible=false
88 Chapter 13 Advanced graphics: Multi-user support for the HP Workstations ENWW

Rrestart the gdm and have login screens at each seat.
Additional informationSee the documentation files in /opt/hp/graphics/nvidia or the example config files in /opt/hp/viztools/configfiles for details. If you want to set up a config that is different than the example config filesdemonstrate, use vizconfig to create a config file and modify it to get the additional features that youneed.
ENWW Additional information 89

90 Chapter 13 Advanced graphics: Multi-user support for the HP Workstations ENWW
14 Advanced graphics: Immersivevisualization for the HP Workstations
IntroductionThe HP xw9300 and xw9400 Workstations coupled with two NVIDIA high-end graphics cards are greatsolutions for a reasonably priced, fully-capable Linux visualization center or advanced visualizationLinux workstation. This chapter discusses how to set up a visualization center driving projection systems,power walls, or stations with large-screen display monitors. A smaller-scale Visualization Station setupcan be used to drive stereo monitors or large pixel-format digital flat panels for smaller, less expensiveenvironments. This chapter also discuss some key applications and benefits of these immersivevisualization environments. The HP xw9300/xw9400 Workstation visualization centers and stations area low-cost alternative to high-end SGI visualization centers.
OverviewThe HP xw9300 and xw9400 Workstations have dual PCI Express x16 graphics slots. This capability,coupled with the two Dual-Core AMD Opteron processors, provides an unprecedented amount ofgraphics processing power for a Linux workstation. Two NVIDIA high-end graphics cards such as theFX4500 optionally enhanced with NVIDIA Gsync cards for stereo synchronization enable you to shareyour immersive graphics experience with a group of people.
This chapter discusses the mechanics of how to set up such a system. This chapter focuses on how tointegrate the HP xw9300 and xw9400 Workstations into the visualization solution alternatives. Somealternatives are used as examples.
New projector technologies such as the Sony SXRD 4000 system simplify the maintenance and thevizcenter setup because they do not require projector overlap, and calibration is simpler. X window setupbecomes much more like a Visualization workstations.
Visualization Station setupA Visualization Station with three to four high-end HP 30-inch monitors can provide an immersiveexperience for power-user or group review settings. Smaller monitors such as the HP 24-inch flat panel
ENWW Introduction 91
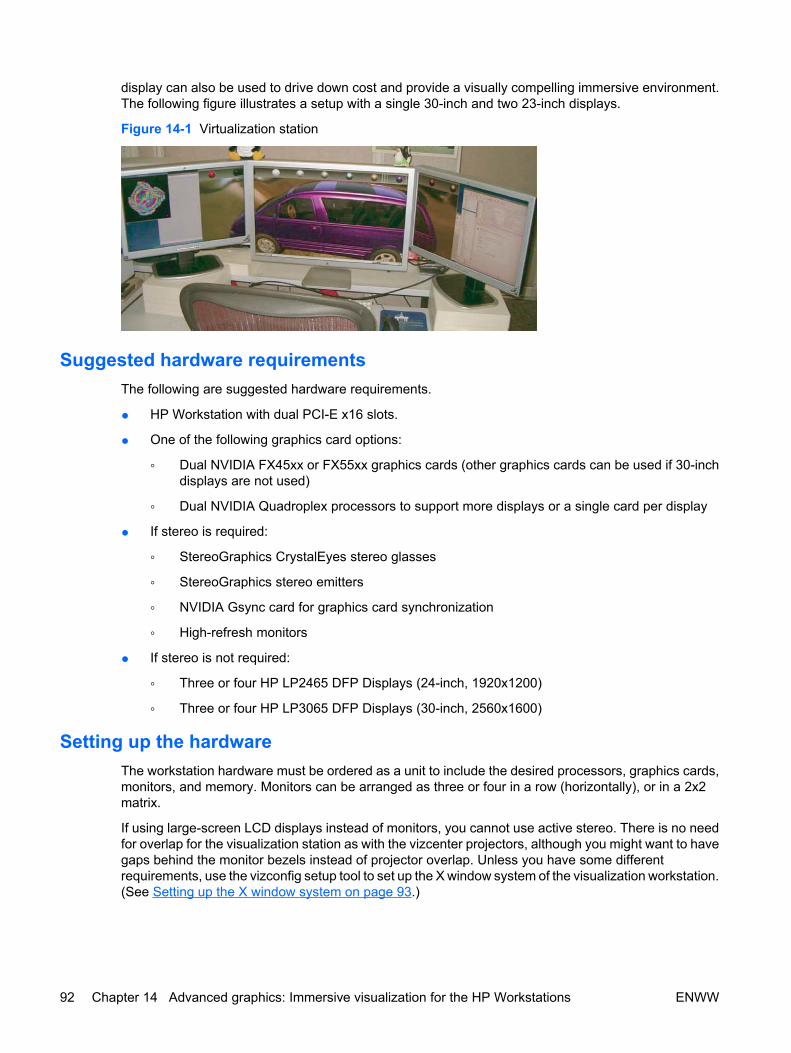
display can also be used to drive down cost and provide a visually compelling immersive environment.The following figure illustrates a setup with a single 30-inch and two 23-inch displays.
Figure 14-1 Virtualization station
Suggested hardware requirementsThe following are suggested hardware requirements.
● HP Workstation with dual PCI-E x16 slots.
● One of the following graphics card options:
◦ Dual NVIDIA FX45xx or FX55xx graphics cards (other graphics cards can be used if 30-inchdisplays are not used)
◦ Dual NVIDIA Quadroplex processors to support more displays or a single card per display
● If stereo is required:
◦ StereoGraphics CrystalEyes stereo glasses
◦ StereoGraphics stereo emitters
◦ NVIDIA Gsync card for graphics card synchronization
◦ High-refresh monitors
● If stereo is not required:
◦ Three or four HP LP2465 DFP Displays (24-inch, 1920x1200)
◦ Three or four HP LP3065 DFP Displays (30-inch, 2560x1600)
Setting up the hardwareThe workstation hardware must be ordered as a unit to include the desired processors, graphics cards,monitors, and memory. Monitors can be arranged as three or four in a row (horizontally), or in a 2x2matrix.
If using large-screen LCD displays instead of monitors, you cannot use active stereo. There is no needfor overlap for the visualization station as with the vizcenter projectors, although you might want to havegaps behind the monitor bezels instead of projector overlap. Unless you have some differentrequirements, use the vizconfig setup tool to set up the X window system of the visualization workstation.(See Setting up the X window system on page 93.)
92 Chapter 14 Advanced graphics: Immersive visualization for the HP Workstations ENWW

NVIDIA Gsync cardIf stereo is required, add the Gsync card:
1. Open the chassis of the workstation.
2. Insert the Gsync card in the PCI-X slot next to the bottom graphics card.
NOTE: The spacing on the Gsync card is slightly different for PCI-X slots, so apply light pressureto the back of the workstation near the card slot as you push the card into the slot.
As of NVIDIA release 8756 or later, a single Gsync card synchronizes both graphics cards. The tworibbon cables included with the Gsync card should be connected to the two graphics cards as indicatedin the figure below. The connectors for the primary graphics card and the secondary graphics cards arelabeled on the Gsync card. External connectors are not needed for this configuration. The externalconnectors are used when connecting to other graphics cards and to an external sync signal. TheStereoGraphics glasses can be plugged into the three-pin DIN connector on the top (primary) graphicscard.
Figure 14-2 NVIDIA Gsync card
Setting up the X window systemSimple visualization station configurations can be set up easily and interactively using the HP graphicsconfiguration tool, vizconfig. Vizconfig sets up the xorg.conf file or XF86Config file for you. You mightneed to adjust the video cables to get the cables ordered correctly or make minor edits to the xorg.conffile for a specific feature. Vizconfig sets up several common multi-display configurations, including 3-in-a-row, 4-in-a-row, 2x2, and 3-in-a-row with one display above the center display. In a horizontalarrangement, the two displays on the left must be attached to the top graphics card. In a 2x2arrangement, the two displays on the left (one above the other) must be attached to the top graphicscard.
To use vizconfig:
1. Login as root.
2. Launch vizconfig using the desktop icon or by executing /opt/hp/viztools/bin/run_vizconfig.
ENWW Visualization Station setup 93
3. Select a display arrangement from the Selected Display Arrangement list (such as 3x1 or 2x2).
4. When a display arrangement is selected, you can also set different options in the Options tab. Youroptions are as follows:
● SLI Multiview (Xinerama) – this enables/disables 2d/3d Xinerama
● Use TwinView where possible – enables/disables twinview
● HardwareOverlays – enables/disables using the hardware overlays
5. Set up the different monitors. The different monitors are shown in the picture of the selected displayarrangement along with how the graphics cards are connected to those displays.
6. Select the display using the Selected Display list. The picture of the display arrangement is updatedto highlight the selected display.
7. Set the resolution for this display with the Display Resolution slider.
8. (Optional) If you want the display to be connected to the other connector on the graphics card,select Swap Left_Right Monitors. The picture of the display arrangement is modified to reflectthis change.
9. Repeat steps 6 – 8 as needed for each display.
10. Select SaveConfig to save the changes to the /etc/X11/xorg.conf file.
NOTE: Any edits made directly to X config file after running vizconfig, are not used by vizconfig nexttime it is run. You must apply these edits each time vizconfig is run.
If you need to use Stereo, once vizconfig generates an /etc/X11/xorg.conf file or an /etc/X11/XF86Configfile, you must add Option "Stereo" "3" to the Screen entries to enable active stereo. If you are notplanning on using stereo, you should not use this option as it uses graphics card resources.
To cause the two graphics cards to appear as one large screen to the X11 window system, set Option "Xinerama" "true" in the xorg.conf/XF86Config file. Vizconfig turns Xinerama on by default.
You might need to add a Modeline specific for your displays. The vizconfig tool includes modelines forHP 20-, 23-, and 30-inch monitorss. If you want to be explicit about the resolution and the refreshfrequency for monitors, then insert the Modeline generated by the gtf command directly into the xorg.conffile in the appropriate Monitor section as shown below. (See Modelines in the sample file and add yournew Modeline there).
gtf 1280 1024 96 # (or whatever your desired settings are)
Sample:
Modeline for 1280x1024 projector or monitor with Stereo # 1280x1024 @ 96.00 Hz (GTF) hsync: 103.87 kHz; pclk: 182.81 MHz Modeline "1280x1024_96" 182.81 1280 1376 1520 1760 1024 1025 1028 1082 -HSync +Vsync
NOTE: The stereo across two graphics cards does not work properly with the Gsync card until youobtain NVIDIA rel87xx+ drivers.
When you have a fully stereo-capable driver from NVIDIA, you will can turn on the stereo emitterwhenever the X server initiates (not just when there is a stereo window on the screen). Insert Option "ForceStereoFlipping" "1" in the ServerLayout section.
94 Chapter 14 Advanced graphics: Immersive visualization for the HP Workstations ENWW

Visualization Center setupAfter setting up the station, set up the Visualization Center.
Suggested hardware requirementsThe following are suggested hardware requirements to set up the Visualization Center.
● HP Workstation with dual PCI-E x16 slots.
● One of the following graphics card options:
◦ Dual NVIDIA FX45xx or FX55xx graphics cards
◦ Dual NVIDIA Quadroplex units (to support more projectors or single card per projector port)
● NVIDIA Gsync card for graphics card synchronization
● Appropriate large displays or projection system (overlap and edge-blend support if needed)
● If stereo is required:
◦ High refresh Projectors
◦ NVIDIA Gsync card for graphics card synchronization
◦ StereoGraphics CrystalEyes stereo glasses
◦ StereoGraphics stereo emitters
● Sufficient system memory for application data
Setting up the hardwareThe workstation hardware must be ordered as a unit and arrive with desired processors, graphics cards,and memory.
NVIDIA Gsnc card
If stereo is required, the Gsync card must be added, unless you are using an NVIDIA quadroplex unitthat already contains a Gsync card. To add the Gsync card:
1. Open the chassis of the HP xw9300 or xw9400 Workstation.
2. Place the Gsync card in the PCI-X slot next to the bottom graphics card.
NOTE: The spacing on the Gsync card is slightly different for PCI-X slots, so apply light pressureto the back of the workstation near the card slot as you push the card into the slot.
As of NVIDIA release 8756 or later, a single Gsync card will synchronize both graphics cards. The tworibbon cables included with the Gsync card must be connected to the two graphics cards as indicatedin previous section. The connectors for the primary graphics card and the secondary graphics cards arelabeled on the Gsync card. External connectors are not needed for this configuration; the externalconnectors are used when connecting to other graphics cards and to an external sync signal. TheStereoGraphics glasses can be plugged into the three-pin DIN connector on the top (primary) graphicscard.
The stereo emitter is connected to the primary graphics card using the three-pin DIN cable. Extendercables are useful for these cables because the emitters must be placed near the screen facing towardthe audience. Many vizcenter rooms are set up with BNC-style emitters. NVIDIA has only the three-pinDIN connector on the graphics cards, but adapter cables are available from StereoGraphics that go fromthe three-pin DIN to BNC. You need at least two emitters for a typical visualization room. You can use
ENWW Visualization Center setup 95
the three-pin DIN on both graphics cards to drive two emitters (one emitter per card). The Gsync cardsynchronizes the two stereo emitter signals.
Connect the graphics cards to the projection system.
Setup considerations
A Panoram Integrator projection system can be used to perform the edge-blending. The PanoramIntegrator is connected to three 1280x1024 Christie monitors. Panoram Technologies has some newerproducts, such as the Integrator 3000 and PixelBlaster, that work well with the HP xw9300 and xw9400Workstations. Visit http://panoramtech.com for more information.
Barco has some projectors that will do the edge-blending directly without the need for a front-end systemsuch as the Panoram Integrator product. The BarcoReality SIM 4, 5, and 6 products are examples ofthis. Visit http://barco.com/simulation for more information.
There are other projectors on the market that perform edge blending directly. These projection systemsmust be set up and calibrated to get a high-quality image. The complexity of this setup and ongoingmaintenance should be a major factor in selecting this projection equipment.
The Sony SXRD 4000 projector is a single projector that calibrates all four channels within the projector,making it mush easier to set up and calibrate. It also offers very bright projection.
Setting up the X Windows systemTo set up the X11 manually:
1. Set up your /etc/X11/xorg.conf file (or XF86Config) by using the sample config file,xorg.conf.vizcenter1.
2. If you are using Xfree86, change the keyboard driver to kbd and /dev/input/mice to /dev/mouse.
3. Select your resolution.
The config file is set up to run the projectors at 1280x1024 at 96 Hz. If this is not the desiredresolution and frequency, you must add a Modeline (unless you can use a standard mode such as1280x1024).
If you want to be explicit about the resolution and the refresh frequency, add the Modelinegenerated by the gtf command: gtf 1280 1024 96 # or whatever your desired settings are
The output of gtf can be inserted directly into the xorg.conf file in the appropriate Monitor section asshown below. (See Modelines in the sample file and add your new Modeline there.)
# Modeline for 1280x1024 projector or monitor with Stereo # 1280x1024 @ 96.00 Hz (GTF) hsync: 103.87 kHz; pclk: 182.81 MHz Modeline "1280x1024_96" 182.81 1280 1376 1520 1760 1024 1025 1028 1082 -HSync +Vsync
NOTE: Often the output of the gtf command is not optimal for the projectors or monitors that you areusing. You may need to find better timings from the display provider as shown:
# Modeline for 1280x1024 projector or monitor with Stereo # 1280x1024 @ 96.00 Hz (GTF) hsync: 103.87 kHz; pclk: 182.81 MHz Modeline "1280x1024_96" 182.81 1280 1376 1520 1760 1024 1025 1028 1082 -HSync +Vsync
You must reference this Modeline in the appropriate places of your config file. The easy way to find thisis just search on 1280x1024_96 and replace with the name you gave to your Modeline. Ensure that you
96 Chapter 14 Advanced graphics: Immersive visualization for the HP Workstations ENWW
do not replace the actual Modeline definition of the existing 1280x1024_96. Rather, replace thereferences.
Be careful to set the horizontal sync and vertical refresh based on the specs of the projector. Search onHorizSync, SecondMonitorHorizSync, VertRefresh and SecondMonitorVertRefresh and changeaccordingly. The projector provides these settings through a mechanism called EDID, so you mighteliminate any explicit settings for horizontal sync and vertical refresh as your first step, and add themonly if necessary.
# In Monitor Section HorizSync 30-120 VertRefresh 56-96 # In Twinview Section Option "SecondMonitorHorizSync" "30-120" Option "SecondMonitorVertRefresh" "56-96"
Setup the overlap regions.
This assumes that you have projectors that can blend in an overlap region to provide a smooth transitionfrom one projector image to the next. The NVIDIA cards generate the same image on the edges of bothprojectors in the overlap region that you specify in xorg.conf. The projectors then blend the overlapregion by having each projector intensity decrease linearly from full image intensity to 0 in the overlapregion (edge). In the sample config file, 15% of the image for overlap (15% of 1280 = 192 pixels) is used.In order to specify a 192 pixel overlap region in between the left and center projector, the Twinviewoption "MetaModes" takes an offset for each left edge. Twinview drives the first two projectors. The firstoffset is +0+0 for the first projector because there is no blending on the left edge of the left projector.The next offset in the "MetaModes" option is +1088+0. It is not an offset from one projector to the other.Rather, 8 is an offset in the overall virtual screen space (1088+892+1088 by 1024), so it is (1280-192),or the width of the first projector minus the desired overlap.
Here is an example:
# Overlap region is 1280-192=1088 Option "MetaModes" "1280x1024_96 +0+0, 1280x1024_96 +1088+0"
This specifies an overlap within a Twinview screen. The third projector is on a different graphics cardand must be specified in the Screen line in the layout section of the config file. Go to the first ServerLayoutsection named "MyLayout" and look at the offsets at the end of the Screen 0 and Screen 1 lines. Thefirst screen is the Twinview screen and has an offset of "0 0" because there is no blending on the leftside of the left projector. The offset of the third projector is just the width of the first two projectors minusthe two blend regions (1280+1280-192-192 = 2176). To enable windows spanning two graphics cards,turn on Xinerama.
Section "ServerLayout" Identifier "MyLayout" Option "Xinerama" "on" Screen 0 "Screen TwinView-1" 0 0 # Overlap for 3rd projector 1280+1280-192-192=2176 Screen 1 "Screen Display-2a" 2176 0 EndSection
The sample config file is set up to enable Stereo. If this is not desired, comment out all instances of thestereo option: # Option "Stereo" "3".
The stereo emitter signal will not turn on until a stereo window is created. Stereo on the second graphicscard (third display) does not work properly until you get the NVIDIA rel80 drivers (>8000). When youhave a rel80 driver from NVIDIA, you will also be able to turn on the stereo emitter whenever the X
ENWW Visualization Center setup 97
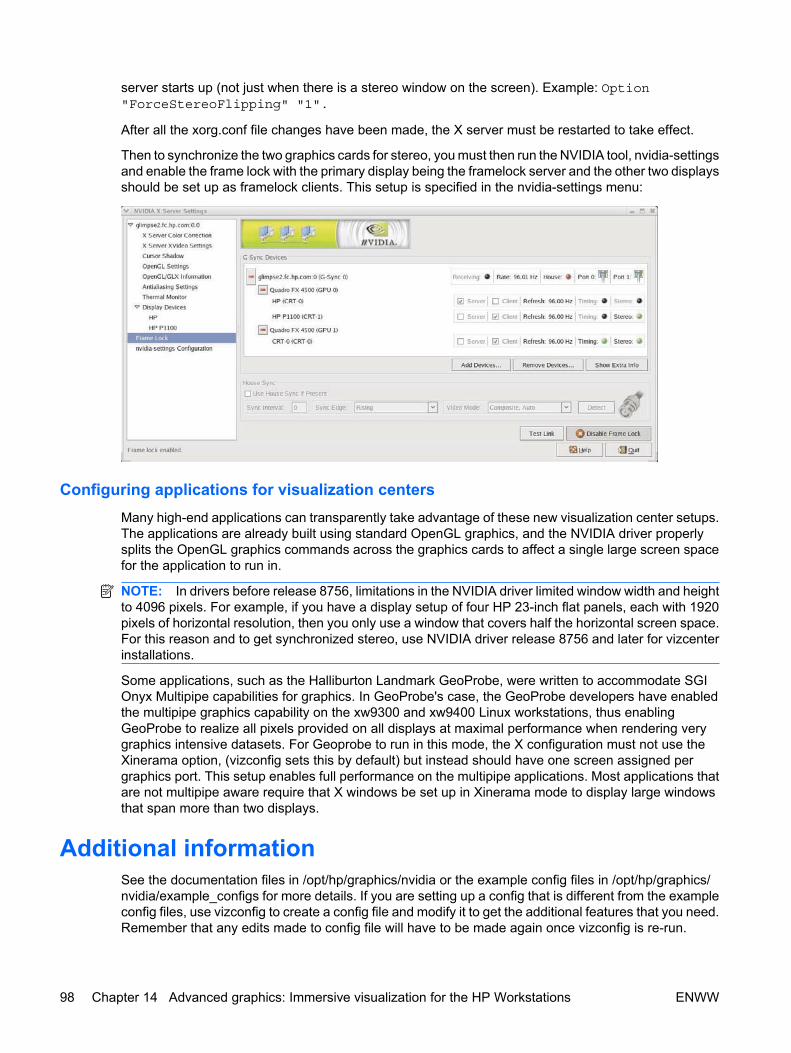
server starts up (not just when there is a stereo window on the screen). Example: Option "ForceStereoFlipping" "1".
After all the xorg.conf file changes have been made, the X server must be restarted to take effect.
Then to synchronize the two graphics cards for stereo, you must then run the NVIDIA tool, nvidia-settingsand enable the frame lock with the primary display being the framelock server and the other two displaysshould be set up as framelock clients. This setup is specified in the nvidia-settings menu:
Configuring applications for visualization centersMany high-end applications can transparently take advantage of these new visualization center setups.The applications are already built using standard OpenGL graphics, and the NVIDIA driver properlysplits the OpenGL graphics commands across the graphics cards to affect a single large screen spacefor the application to run in.
NOTE: In drivers before release 8756, limitations in the NVIDIA driver limited window width and heightto 4096 pixels. For example, if you have a display setup of four HP 23-inch flat panels, each with 1920pixels of horizontal resolution, then you only use a window that covers half the horizontal screen space.For this reason and to get synchronized stereo, use NVIDIA driver release 8756 and later for vizcenterinstallations.
Some applications, such as the Halliburton Landmark GeoProbe, were written to accommodate SGIOnyx Multipipe capabilities for graphics. In GeoProbe's case, the GeoProbe developers have enabledthe multipipe graphics capability on the xw9300 and xw9400 Linux workstations, thus enablingGeoProbe to realize all pixels provided on all displays at maximal performance when rendering verygraphics intensive datasets. For Geoprobe to run in this mode, the X configuration must not use theXinerama option, (vizconfig sets this by default) but instead should have one screen assigned pergraphics port. This setup enables full performance on the multipipe applications. Most applications thatare not multipipe aware require that X windows be set up in Xinerama mode to display large windowsthat span more than two displays.
Additional informationSee the documentation files in /opt/hp/graphics/nvidia or the example config files in /opt/hp/graphics/nvidia/example_configs for more details. If you are setting up a config that is different from the exampleconfig files, use vizconfig to create a config file and modify it to get the additional features that you need.Remember that any edits made to config file will have to be made again once vizconfig is re-run.
98 Chapter 14 Advanced graphics: Immersive visualization for the HP Workstations ENWW
15 Linux virtualization with Xen
IntroductionThis chapter provides an overview of the Linux virtualization technologies available with Xen. It beginswith an overview of virtualization concepts and the different types of virtualization, with emphasis onXen paravirtualization. It also discusses the installation, setup, and configuration of the Xen host andguest operating systems. This chapter assumes a basic understanding of computer hardware and theLinux operating system.
Virtualization basics
Virtualization overviewVirtualization is most often used in areas such as:
● Operating system research: The virtualized environment enables operating system developmentand testing place to take place in a secure virtual environment, where crashes or bugs dol not affectthe host machine.
● Server consolidation: Hosting multiple servers on a single physical machine, reducing hardwarecosts and increasing ease of management and maintenance, enables companies to keep serversavailable 24/7.
● Hardware independence: Virtualization enables legacy systems to run on new hardware.
● Multiple operating systems: Enabling multiple operating systems to run simultaneously on the samemachine with near-native performance.
● Live migration: Virtualization enables for live migration of running virtual machines betweendifferent physical machines.
Virtualization technologiesThere are several different types of virtualization technology in use today, each with different levels ofabstraction. This section gives a brief overview on each of the three most common virtualizationmethods, with special emphasis on paravirtualization, the technique that Xen uses.
Xen and paravirtualizationParavirtualization is a popular technique used by open-source projects such as Xen or User-mode Linux(UML). In Xen architecture, the hypervisor, also known as domain 0, is the privileged domain that the
ENWW Introduction 99
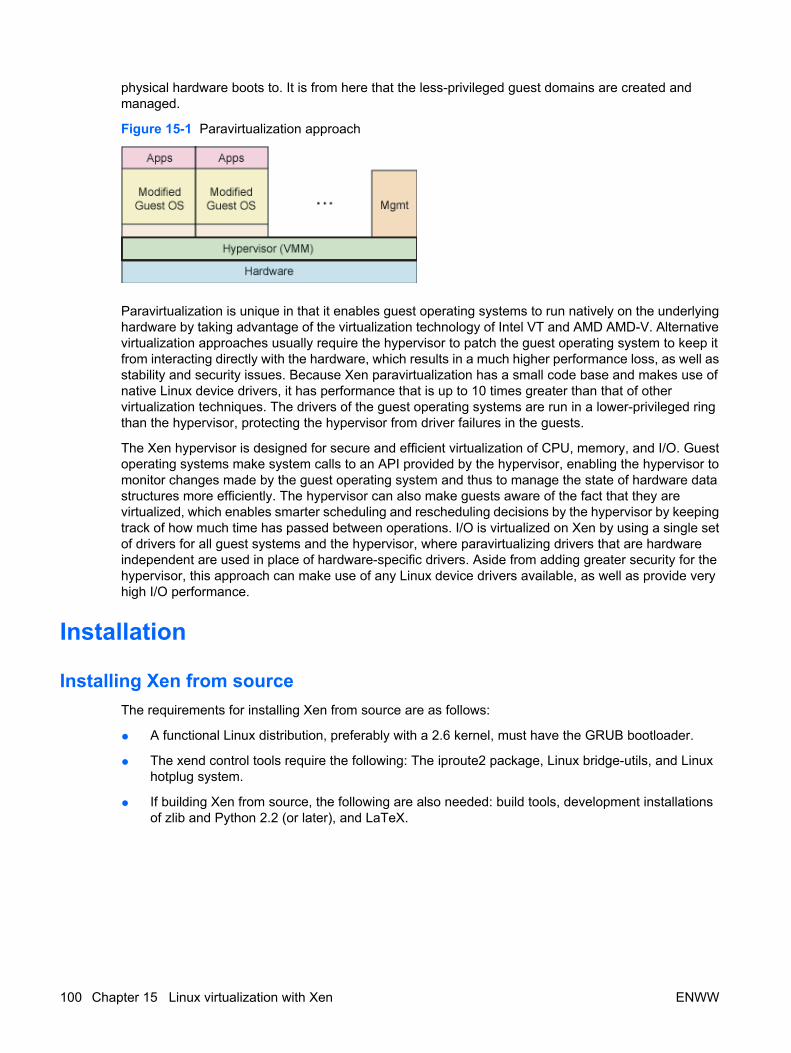
physical hardware boots to. It is from here that the less-privileged guest domains are created andmanaged.
Figure 15-1 Paravirtualization approach
Paravirtualization is unique in that it enables guest operating systems to run natively on the underlyinghardware by taking advantage of the virtualization technology of Intel VT and AMD AMD-V. Alternativevirtualization approaches usually require the hypervisor to patch the guest operating system to keep itfrom interacting directly with the hardware, which results in a much higher performance loss, as well asstability and security issues. Because Xen paravirtualization has a small code base and makes use ofnative Linux device drivers, it has performance that is up to 10 times greater than that of othervirtualization techniques. The drivers of the guest operating systems are run in a lower-privileged ringthan the hypervisor, protecting the hypervisor from driver failures in the guests.
The Xen hypervisor is designed for secure and efficient virtualization of CPU, memory, and I/O. Guestoperating systems make system calls to an API provided by the hypervisor, enabling the hypervisor tomonitor changes made by the guest operating system and thus to manage the state of hardware datastructures more efficiently. The hypervisor can also make guests aware of the fact that they arevirtualized, which enables smarter scheduling and rescheduling decisions by the hypervisor by keepingtrack of how much time has passed between operations. I/O is virtualized on Xen by using a single setof drivers for all guest systems and the hypervisor, where paravirtualizing drivers that are hardwareindependent are used in place of hardware-specific drivers. Aside from adding greater security for thehypervisor, this approach can make use of any Linux device drivers available, as well as provide veryhigh I/O performance.
Installation
Installing Xen from sourceThe requirements for installing Xen from source are as follows:
● A functional Linux distribution, preferably with a 2.6 kernel, must have the GRUB bootloader.
● The xend control tools require the following: The iproute2 package, Linux bridge-utils, and Linuxhotplug system.
● If building Xen from source, the following are also needed: build tools, development installationsof zlib and Python 2.2 (or later), and LaTeX.
100 Chapter 15 Linux virtualization with Xen ENWW
Installation can be performed in one of three ways: from a binary tarball, from RPMs, or from source.
● To install from a binary tarball, download the appropriate tarball from http://www.xensource.com/download. Once downloaded, the installation can be completed with the following commands:
1. Enter tar zxvf xen-3.0-install.tgz.
2. Enter cd xen-3.0-install.
3. Enter sh ./install.sh.
● To install from RPMs, first download the appropriate RPMs from http://www.xensource.com/download. Enter rpm –ivh rpmname to install RPMs.
NOTE: RPMs are not available for all distributions and are currently available for 32-bit SMP only.
● To install from source, first obtain the Xen source tarball from http://www.xensource.com/download. To install the files, enter make install and press Enter.
NOTE: This tarball includes a makefile that will build Xen and the xend control tools. If necessary,download and unpack the Linux 2.6 source and patch it for use with Xen, then build two kernels,one as the privileged domain 0 kernel and a smaller unprivileged kernel for use in virtual machines.Files produced by the build process are stored in the dist/install directory.
Xen configurationAfter installing Xen from source, the system must be configured in order to boot and run Xen.
● An entry must be added to grub.conf to allow Xen to boot. An example entry for Xen in this file isas follows:
◦ title Xen 3.0 / XenLinux 2.6
◦ root (hd0,0)
◦ kernel /xen-3.0.gz ro root=LABEL=/12 rhgb quiet
◦ module /vmlinuz-2.6.16-xen ro root=LABEL=/12 rhgb quiet
◦ module /initrd-2.6.16-xen.img
NOTE: If an initrd is needed, it is added as a module line, not as an initrd line. Differentdistributions require different parameters to be passed in.
● The Thread Local Storage (TLS) libraries should be disabled before booting Xen, as failure to doso can significantly reduce performance. To disable TLS, enter mv /lib/tls /lib/tls.disabled.
This can be undone at any time by restoring the TLS libraries to their original location.
● You can also configure serial console access. To do this, the system BIOS, GRUB, Xen, Linux,and login must each be configured for serial access. For details on this configuration, refer to theXen Users’ Manual.
Installing Xen with Red Hat Enterprise Linux 5Installing Xen with RHEL 5 is simple because RHEL 5 integrates Xen into its source code so that theoperating system and Xen can be installed at the same time. To install Xen with RHEL 5, boot to theRHEL installation media. Continue through the installation to the software selection screen. On the
ENWW Installation 101
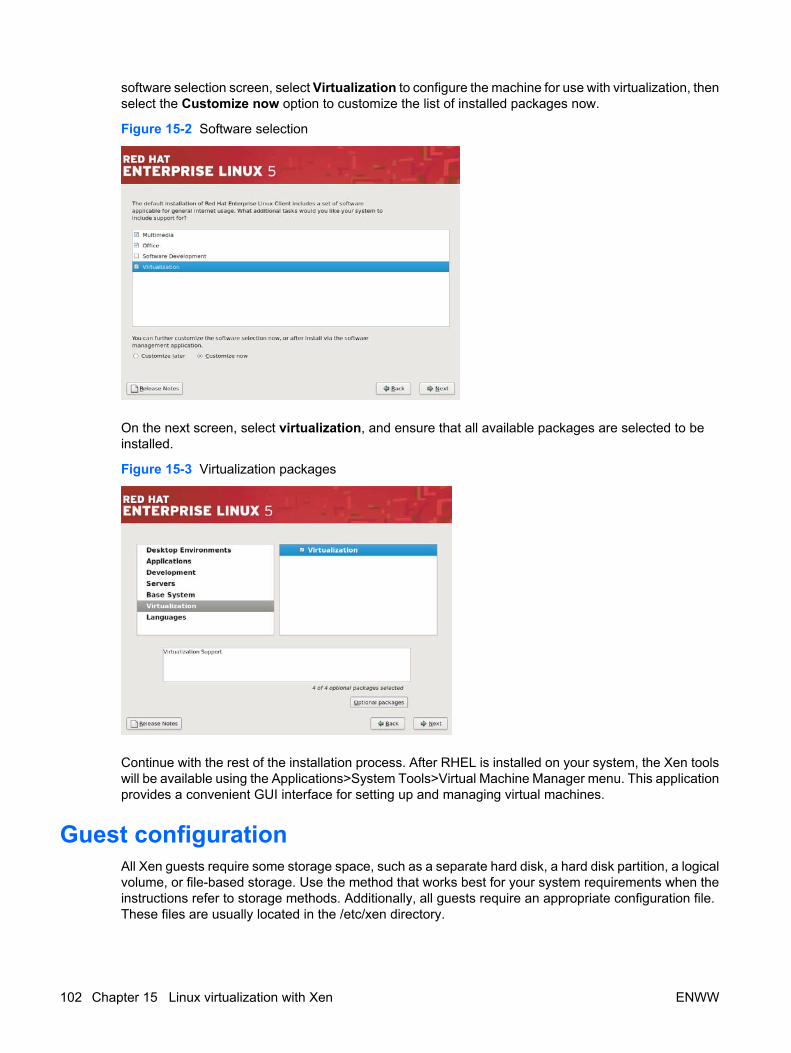
software selection screen, select Virtualization to configure the machine for use with virtualization, thenselect the Customize now option to customize the list of installed packages now.
Figure 15-2 Software selection
On the next screen, select virtualization, and ensure that all available packages are selected to beinstalled.
Figure 15-3 Virtualization packages
Continue with the rest of the installation process. After RHEL is installed on your system, the Xen toolswill be available using the Applications>System Tools>Virtual Machine Manager menu. This applicationprovides a convenient GUI interface for setting up and managing virtual machines.
Guest configurationAll Xen guests require some storage space, such as a separate hard disk, a hard disk partition, a logicalvolume, or file-based storage. Use the method that works best for your system requirements when theinstructions refer to storage methods. Additionally, all guests require an appropriate configuration file.These files are usually located in the /etc/xen directory.
102 Chapter 15 Linux virtualization with Xen ENWW
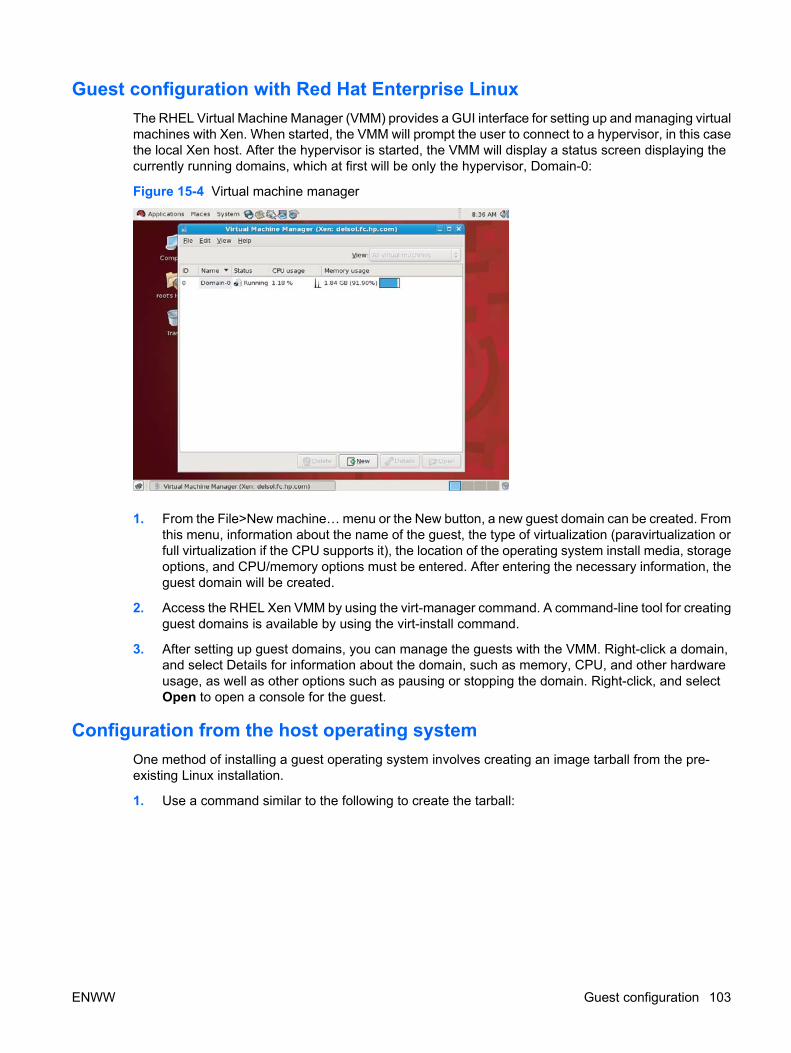
Guest configuration with Red Hat Enterprise LinuxThe RHEL Virtual Machine Manager (VMM) provides a GUI interface for setting up and managing virtualmachines with Xen. When started, the VMM will prompt the user to connect to a hypervisor, in this casethe local Xen host. After the hypervisor is started, the VMM will display a status screen displaying thecurrently running domains, which at first will be only the hypervisor, Domain-0:
Figure 15-4 Virtual machine manager
1. From the File>New machine… menu or the New button, a new guest domain can be created. Fromthis menu, information about the name of the guest, the type of virtualization (paravirtualization orfull virtualization if the CPU supports it), the location of the operating system install media, storageoptions, and CPU/memory options must be entered. After entering the necessary information, theguest domain will be created.
2. Access the RHEL Xen VMM by using the virt-manager command. A command-line tool for creatingguest domains is available by using the virt-install command.
3. After setting up guest domains, you can manage the guests with the VMM. Right-click a domain,and select Details for information about the domain, such as memory, CPU, and other hardwareusage, as well as other options such as pausing or stopping the domain. Right-click, and selectOpen to open a console for the guest.
Configuration from the host operating systemOne method of installing a guest operating system involves creating an image tarball from the pre-existing Linux installation.
1. Use a command similar to the following to create the tarball:
ENWW Guest configuration 103

tar --exclude=/sys/* --exclude=/tmp/* --exclude=/dev/* --exclude=/proc/* -czpvf image.tar /
2. After creating the tarball, mount the desired guest storage location on the hypervisor and unpackthe tarball in that location. To copy the modules for the Xen kernel into the /lib/modules directoryof the guest, enter cp -r /lib/modules/’uname –r’/ /guest-storage/lib/modules.
3. Here, /guest-storage/ is the guest storage location. In the guest file system, move the /lib/tlsdirectory to /lib/tls/disabled in order to avoid problems with the TLS libraries as described in theXen configuration section.
Configuration from an installation CD/DVDTo create a guest operating system from the operating system installation disks, boot the machine tothe first installation disk. The exact installation steps will vary depending on the Linux distribution beingused. Continue through the installation until disk partitioning options are reached. Choose to set up disk
104 Chapter 15 Linux virtualization with Xen ENWW
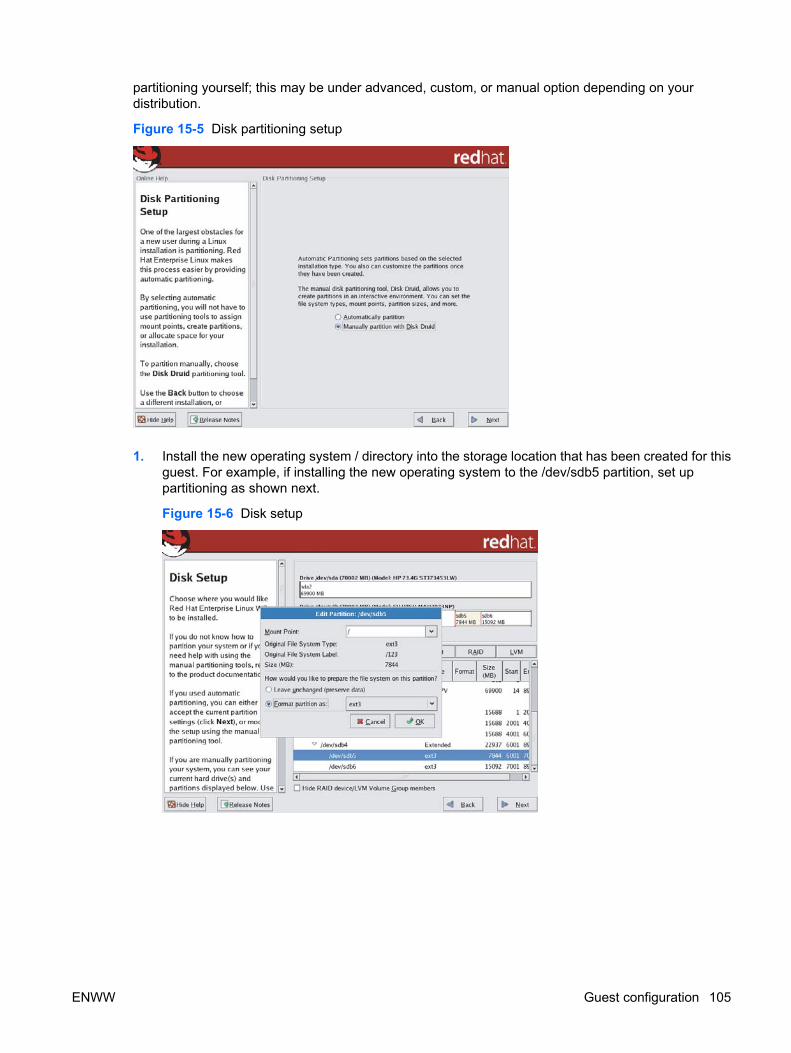
partitioning yourself; this may be under advanced, custom, or manual option depending on yourdistribution.
Figure 15-5 Disk partitioning setup
1. Install the new operating system / directory into the storage location that has been created for thisguest. For example, if installing the new operating system to the /dev/sdb5 partition, set uppartitioning as shown next.
Figure 15-6 Disk setup
ENWW Guest configuration 105
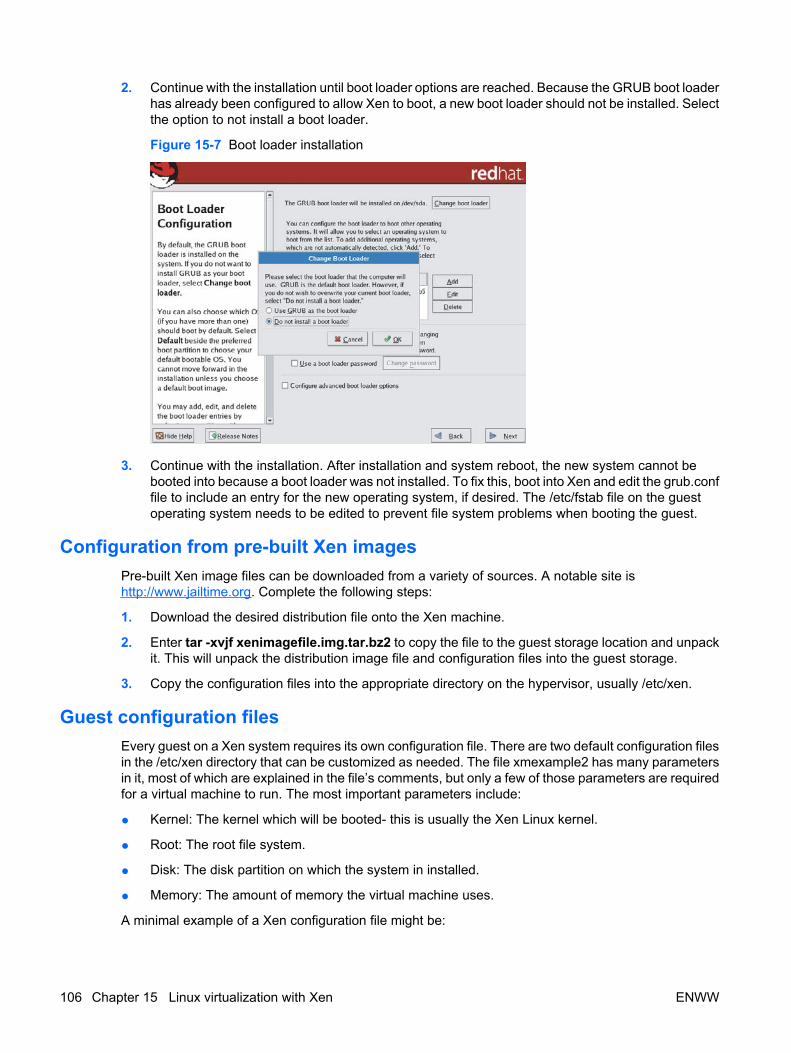
2. Continue with the installation until boot loader options are reached. Because the GRUB boot loaderhas already been configured to allow Xen to boot, a new boot loader should not be installed. Selectthe option to not install a boot loader.
Figure 15-7 Boot loader installation
3. Continue with the installation. After installation and system reboot, the new system cannot bebooted into because a boot loader was not installed. To fix this, boot into Xen and edit the grub.conffile to include an entry for the new operating system, if desired. The /etc/fstab file on the guestoperating system needs to be edited to prevent file system problems when booting the guest.
Configuration from pre-built Xen imagesPre-built Xen image files can be downloaded from a variety of sources. A notable site ishttp://www.jailtime.org. Complete the following steps:
1. Download the desired distribution file onto the Xen machine.
2. Enter tar -xvjf xenimagefile.img.tar.bz2 to copy the file to the guest storage location and unpackit. This will unpack the distribution image file and configuration files into the guest storage.
3. Copy the configuration files into the appropriate directory on the hypervisor, usually /etc/xen.
Guest configuration filesEvery guest on a Xen system requires its own configuration file. There are two default configuration filesin the /etc/xen directory that can be customized as needed. The file xmexample2 has many parametersin it, most of which are explained in the file’s comments, but only a few of those parameters are requiredfor a virtual machine to run. The most important parameters include:
● Kernel: The kernel which will be booted- this is usually the Xen Linux kernel.
● Root: The root file system.
● Disk: The disk partition on which the system in installed.
● Memory: The amount of memory the virtual machine uses.
A minimal example of a Xen configuration file might be:
106 Chapter 15 Linux virtualization with Xen ENWW
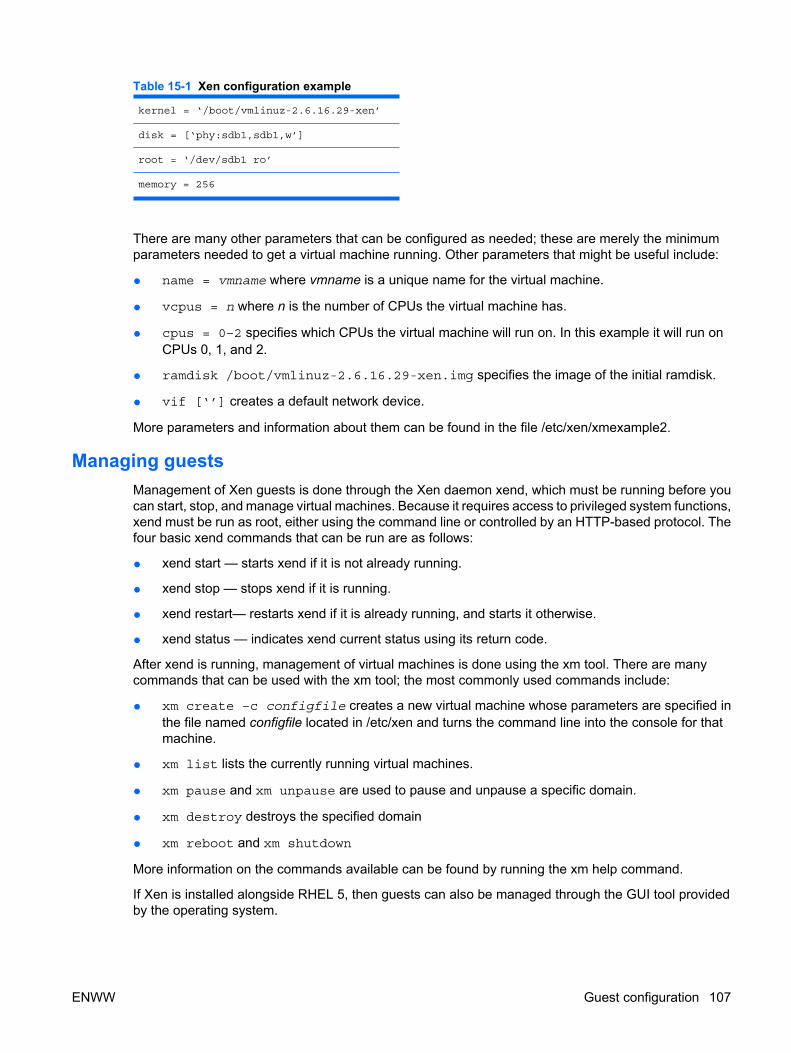
Table 15-1 Xen configuration example
kernel = ‘/boot/vmlinuz-2.6.16.29-xen’
disk = [‘phy:sdb1,sdb1,w’]
root = ‘/dev/sdb1 ro’
memory = 256
There are many other parameters that can be configured as needed; these are merely the minimumparameters needed to get a virtual machine running. Other parameters that might be useful include:
● name = vmname where vmname is a unique name for the virtual machine.
● vcpus = n where n is the number of CPUs the virtual machine has.
● cpus = 0–2 specifies which CPUs the virtual machine will run on. In this example it will run onCPUs 0, 1, and 2.
● ramdisk /boot/vmlinuz-2.6.16.29-xen.img specifies the image of the initial ramdisk.
● vif [‘’] creates a default network device.
More parameters and information about them can be found in the file /etc/xen/xmexample2.
Managing guestsManagement of Xen guests is done through the Xen daemon xend, which must be running before youcan start, stop, and manage virtual machines. Because it requires access to privileged system functions,xend must be run as root, either using the command line or controlled by an HTTP-based protocol. Thefour basic xend commands that can be run are as follows:
● xend start — starts xend if it is not already running.
● xend stop — stops xend if it is running.
● xend restart— restarts xend if it is already running, and starts it otherwise.
● xend status — indicates xend current status using its return code.
After xend is running, management of virtual machines is done using the xm tool. There are manycommands that can be used with the xm tool; the most commonly used commands include:
● xm create –c configfile creates a new virtual machine whose parameters are specified inthe file named configfile located in /etc/xen and turns the command line into the console for thatmachine.
● xm list lists the currently running virtual machines.
● xm pause and xm unpause are used to pause and unpause a specific domain.
● xm destroy destroys the specified domain
● xm reboot and xm shutdown
More information on the commands available can be found by running the xm help command.
If Xen is installed alongside RHEL 5, then guests can also be managed through the GUI tool providedby the operating system.
ENWW Guest configuration 107

Additional informationFor more information on Xen, visit the following web sites:
● http://www.hp.com/go/linux
● http://www.hp.com/go/workstations
● http://www.xensource.com
● http://www.redhat.com
108 Chapter 15 Linux virtualization with Xen ENWW

16 Links
This chapter provides links to Linux resources.
Linux resourcesCheck the following resources for additional information on topics presented in this user manual.
● HP Workstations Linux Home Page: http://www.hp.com/linux
● HP Workstations Home Page: http://www.hp.com/workstations
● Hardware support matrix for HP xw Linux Workstations: http://www.hp.com/support/linux_hardware_matrix
● HP User Manual for HP xw Linux Workstations: http://www.hp.com/support/linux_user_manual
● General web information on DVDs: http://www.dvdhelp.us/
● For additional information on HP products and services, visit:http://www.hp.com/.
● For the location of the nearest sales office, call:
◦ United States: +1 800 637 7740
◦ Japan: +81 3 3331 6111
◦ Canada: +1 905 206 4725
◦ Latin America: +1 305 267 4220
◦ Australia/New Zealand: +61 3 9272 2895
◦ Asia Pacific: +8522 599 7777
◦ Europe/Africa/Middle East: +41 22 780 81 11
For more information, contact any of our worldwide sales offices or HP Channel Partners (in the U.S.call 1 800 637 7740).
ENWW Linux resources 109

110 Chapter 16 Links ENWW
17 Archive
Enabling Hyper-Threading TechnologyHP workstations support Hyper-Threading (HT) Technology on systems installed with Red Hat Linuxversions 8.0, 9, or Red Hat Enterprise Linux WS 3 (RHEL WS 3) or later. HT Technology is disabled inthe BIOS by default. It must be enabled and run with a symmetric multiprocessing (SMP) kernel. HTTechnology is not supported on AMD processors.
What is Hyper-Threading Technology?HT Technology is a high-performance technology, developed by Intel, that enables a single processorto execute multiple threads of instructions simultaneously. HT Technology enables the processor toutilize its execution resources more efficiently, delivering increased performance and improving userproductivity. Not all systems or applications benefit from HT Technology. For more information aboutHT Technology, visit the Intel website at http://www.intel.com/.
Notes, limitations, and requirementsHardware
● HT Technology is not supported on earlier HP Workstation platforms such as the HP xw4000 andxw5000 Workstations.
● HT Technology is not supported on Dual-Core or AMD platforms such as the HP xw4300 andxw9300 Workstations.
● A system must be use one or two Intel Pentium 4 or Xeon processors.
● Red Hat Linux process schedulers support four logical CPUs (or two CPU pairs with HTTechnology) on the HP xw8000 or xw8200 Workstations and the HP xw6000 or xw6200Workstations, and two logical CPUs on the HP xw4100 or xw4200 Workstations.
● Systems with above normal disk I/O activity might experience better performance using SCSIdrives instead of IDE or SATA drives. SCSI drives take better advantage of increased simultaneousreads and writes provided with HT Technology.
Software● An SMP kernel is required.
● Some kernels before 2.4.20 produce boot or system hangs while running hyper-threadedapplications. If this occurs, download the latest SMP kernel from http://www.redhat.com/.
● The HP Installer Kit for Linux CD and preinstalled versions of Red Hat + HP additions have beentested using HT Technology. Some versions contain kernels that work and others do not.
The following table identifies the tested Red Hat version and kernel version combinations that supportHT Technology.
ENWW Enabling Hyper-Threading Technology 111
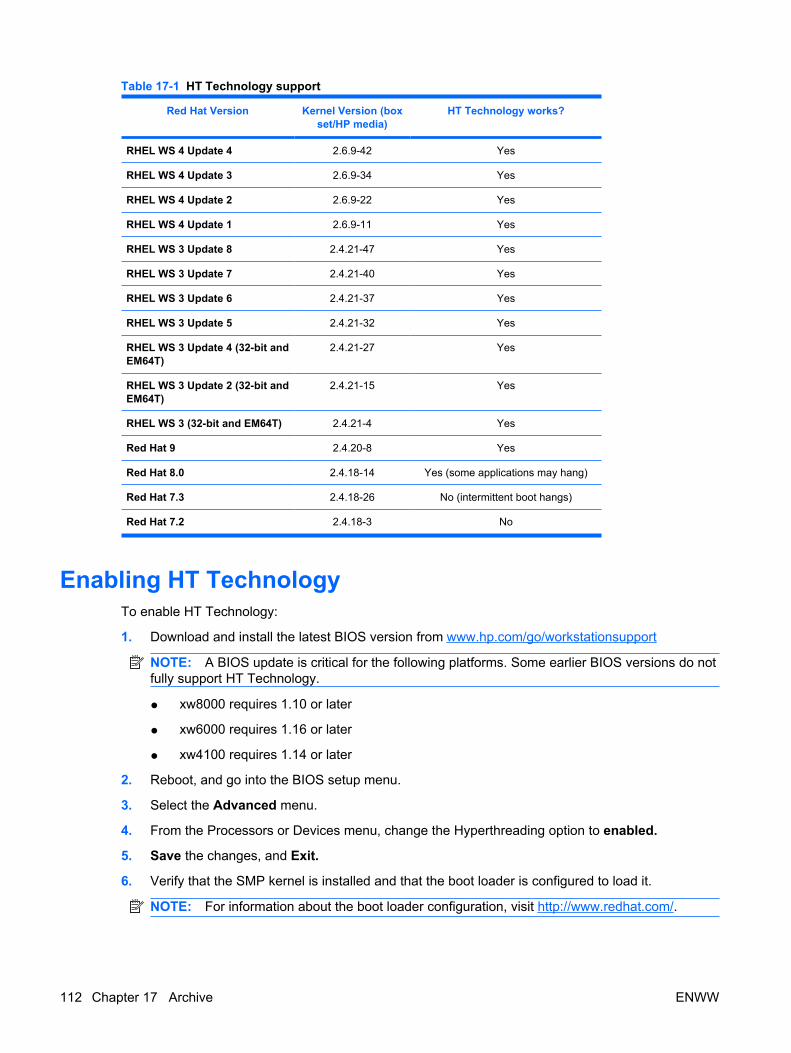
Table 17-1 HT Technology support
Red Hat Version Kernel Version (boxset/HP media)
HT Technology works?
RHEL WS 4 Update 4 2.6.9-42 Yes
RHEL WS 4 Update 3 2.6.9-34 Yes
RHEL WS 4 Update 2 2.6.9-22 Yes
RHEL WS 4 Update 1 2.6.9-11 Yes
RHEL WS 3 Update 8 2.4.21-47 Yes
RHEL WS 3 Update 7 2.4.21-40 Yes
RHEL WS 3 Update 6 2.4.21-37 Yes
RHEL WS 3 Update 5 2.4.21-32 Yes
RHEL WS 3 Update 4 (32-bit andEM64T)
2.4.21-27 Yes
RHEL WS 3 Update 2 (32-bit andEM64T)
2.4.21-15 Yes
RHEL WS 3 (32-bit and EM64T) 2.4.21-4 Yes
Red Hat 9 2.4.20-8 Yes
Red Hat 8.0 2.4.18-14 Yes (some applications may hang)
Red Hat 7.3 2.4.18-26 No (intermittent boot hangs)
Red Hat 7.2 2.4.18-3 No
Enabling HT TechnologyTo enable HT Technology:
1. Download and install the latest BIOS version from www.hp.com/go/workstationsupport
NOTE: A BIOS update is critical for the following platforms. Some earlier BIOS versions do notfully support HT Technology.
● xw8000 requires 1.10 or later
● xw6000 requires 1.16 or later
● xw4100 requires 1.14 or later
2. Reboot, and go into the BIOS setup menu.
3. Select the Advanced menu.
4. From the Processors or Devices menu, change the Hyperthreading option to enabled.
5. Save the changes, and Exit.
6. Verify that the SMP kernel is installed and that the boot loader is configured to load it.
NOTE: For information about the boot loader configuration, visit http://www.redhat.com/.
112 Chapter 17 Archive ENWW
Adding an x86 SMP kernelFor systems that were installed with a single processor, the SMP kernel and source .rpm files must beinstalled from either CD 1 of your Red Hat boxset (look in the RedHat/RPMS directory for kernel-smp*.rpm, kernel-hugemem*.rpm, or kernel-source*.rpm), or downloaded fromhttp://www.redhat.com.
In the Red Hat boxset, look in the RedHat/RPMS directory for kernel-smp*.rpm, kernel-hugemem*.rpm,or kernel-source*.rpm.
To add an x86 SMP kernel:
1. To find out if you need to install a new SMP kernel, enter uname -r.
2. Verify that the output has smp, bigmem, or hugemem in the name. You only need to install a newkernel if:
● Only a UP (non-SMP) kernel is installed
● The SMP kernel is likely to be too old to support the Hyper-Threading Technology (seeTable 17-1 HT Technology support on page 112 )
3. Reinstall an accelerated HP graphics driver from the HP Installer Kit for LinuxCD, or install thelatest driver from www.hp.com/go/workstationsupport. (This step is required so that an acceleratedkernel module for the new SMP kernel is built.)
NOTE: The matching kernel source (kernel-source*.rpm) must be installed for this step to besuccessful. On RHEL 4 and later, matching kernel source is not required.
4. Identify the accelerated driver that was installed on the UP kernel:
● Enter rpm -qa | grep nv
● Enter rpm -qa | grep firegl
5. Remove the driver that was identified by entering rpm -e <name from output of previousstep>.
6. Install the new driver by entering rpm -i <driver name> .rpm.
7. Run one of the following configure scripts:
● cd /opt/hp/graphics/<vendor name> (either ATI or NVIDIA)
● ./configure
Verifying HT TechnologyTo verify that HT Technology is active and working correctly:
1. Check /proc/cpuinfo to verify how many CPUs are identified.
2. Enter top to verify that processes are active on all virtual processors.
3. Measure application performance with HT Technology disabled and enabled.
ConclusionThis newly integrated functionality requires relatively new BIOS and kernel versions. Not all applicationsrun faster with HT Technology enabled.
ENWW Adding an x86 SMP kernel 113
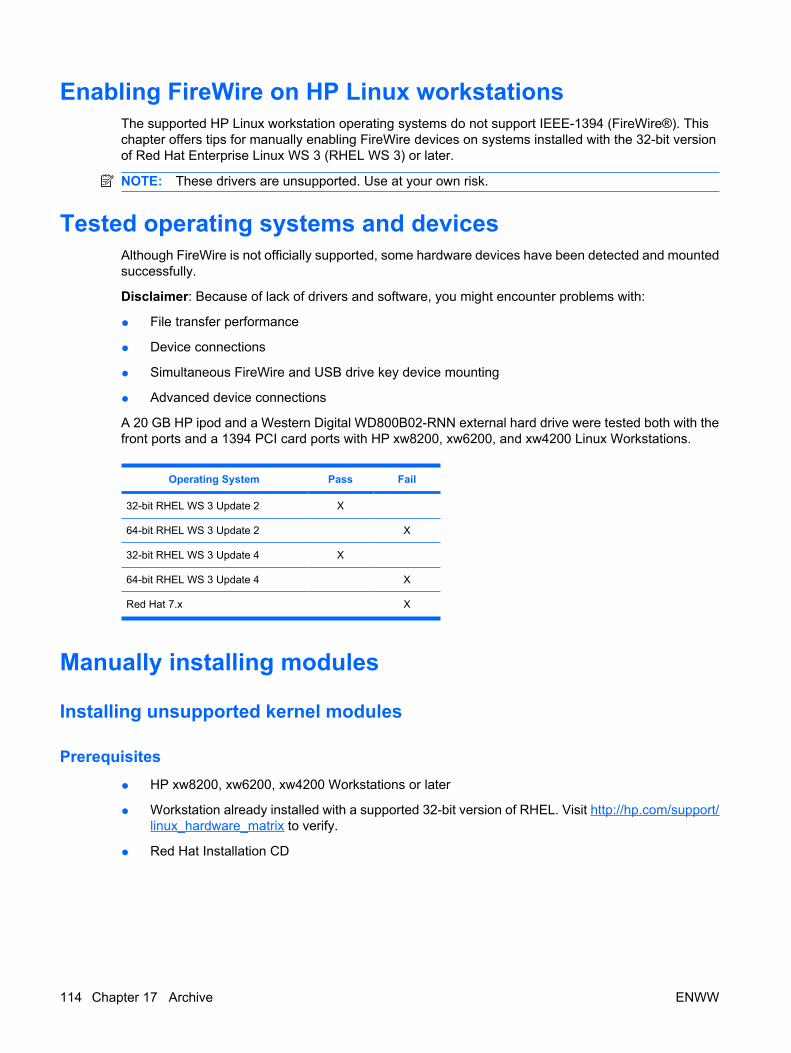
Enabling FireWire on HP Linux workstationsThe supported HP Linux workstation operating systems do not support IEEE-1394 (FireWire®). Thischapter offers tips for manually enabling FireWire devices on systems installed with the 32-bit versionof Red Hat Enterprise Linux WS 3 (RHEL WS 3) or later.
NOTE: These drivers are unsupported. Use at your own risk.
Tested operating systems and devicesAlthough FireWire is not officially supported, some hardware devices have been detected and mountedsuccessfully.
Disclaimer: Because of lack of drivers and software, you might encounter problems with:
● File transfer performance
● Device connections
● Simultaneous FireWire and USB drive key device mounting
● Advanced device connections
A 20 GB HP ipod and a Western Digital WD800B02-RNN external hard drive were tested both with thefront ports and a 1394 PCI card ports with HP xw8200, xw6200, and xw4200 Linux Workstations.
Operating System Pass Fail
32-bit RHEL WS 3 Update 2 X
64-bit RHEL WS 3 Update 2 X
32-bit RHEL WS 3 Update 4 X
64-bit RHEL WS 3 Update 4 X
Red Hat 7.x X
Manually installing modules
Installing unsupported kernel modules
Prerequisites
● HP xw8200, xw6200, xw4200 Workstations or later
● Workstation already installed with a supported 32-bit version of RHEL. Visit http://hp.com/support/linux_hardware_matrix to verify.
● Red Hat Installation CD
114 Chapter 17 Archive ENWW
Installation1. Mount RHEL WS 3 (Update 5) operating system Installation CD 4. This package might be on a
different CD depending on the operating system version.
2. Install kernel-smp-unsupported-2.4.21-32.EL.i686.rpm (or its equivalent for your configuration).
NOTE: For x86-64 architecture, always use the smp-unsupported package. Although your kernelwill be labeled .EL like x86 UP kernels are, it is actually an SMP kernel.
3. Change to the directory where they were installed (/lib/modules/2.4.21…/unsupported/drivers/ieee1394/).
4. Using /sbin/insmod, load the following modules:
● ieee1394
● ohci1394
● sbp2
5. Install the FireWire hardware (that is; external hard drive). Follow manufacturer's instructions forset up.
Mounting the device1. Look for the new device in the output from fdisk -l (that is, /dev/sdb1).
2. If a new device is not automatically detected, download a script that will complete a scan of theSCSI bus. Download the script directly or cut and paste text below. (Visit http://www.garloff.de/kurt/linux/rescan-scsi-bus.sh.)
3. Make a temporary directory by entering /mnt/fw.
4. Mount the device to a local directory. Enter mount /dev/sdb1 /mnt/fw.
If you are prompted to specify a file system type, enter /dev/sda1 or /dev/sdb2.
ENWW Manually installing modules 115
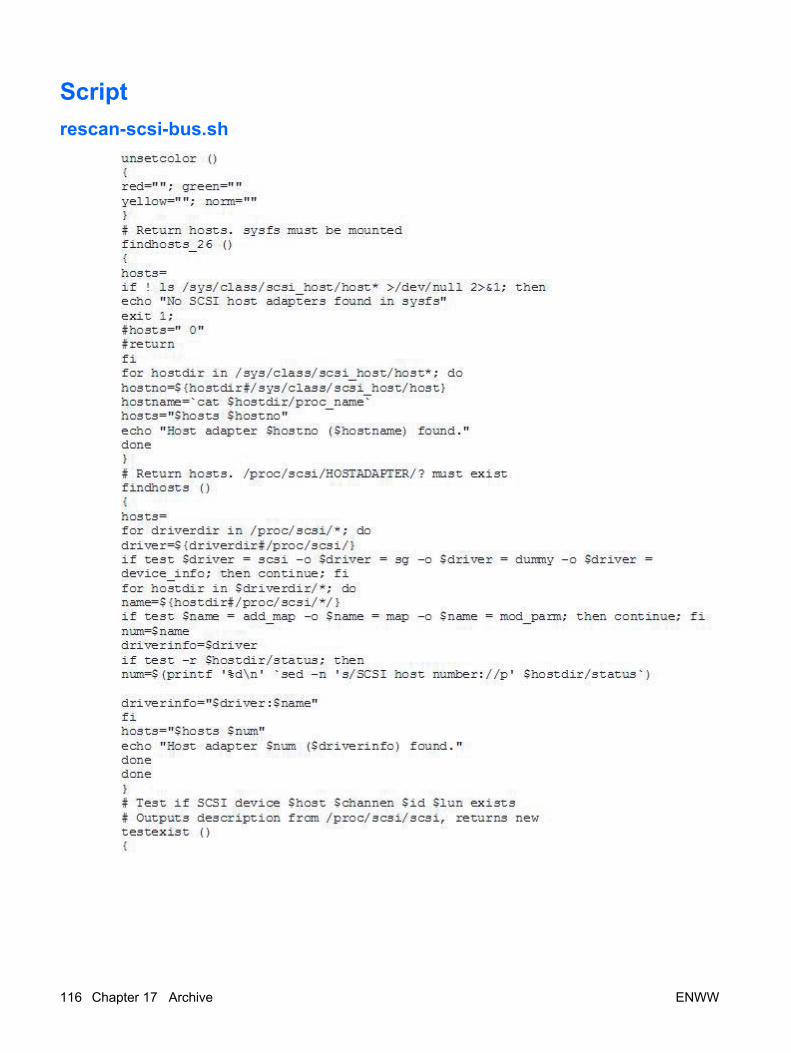
Scriptrescan-scsi-bus.sh
116 Chapter 17 Archive ENWW
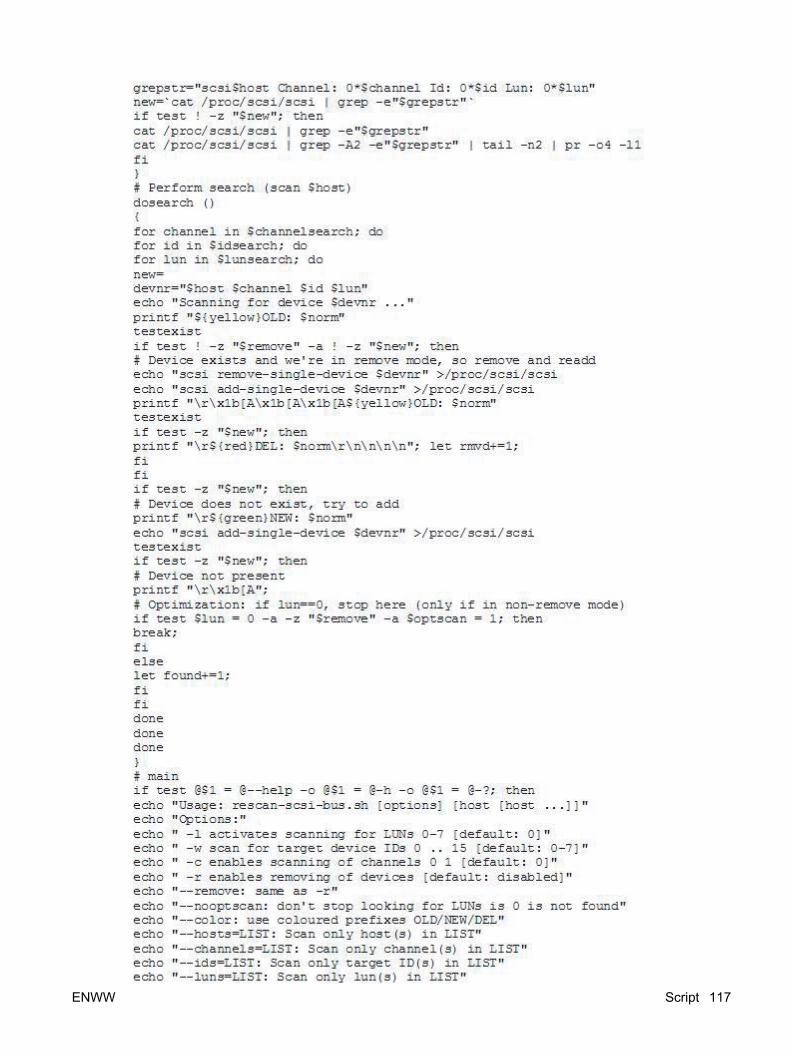
ENWW Script 117
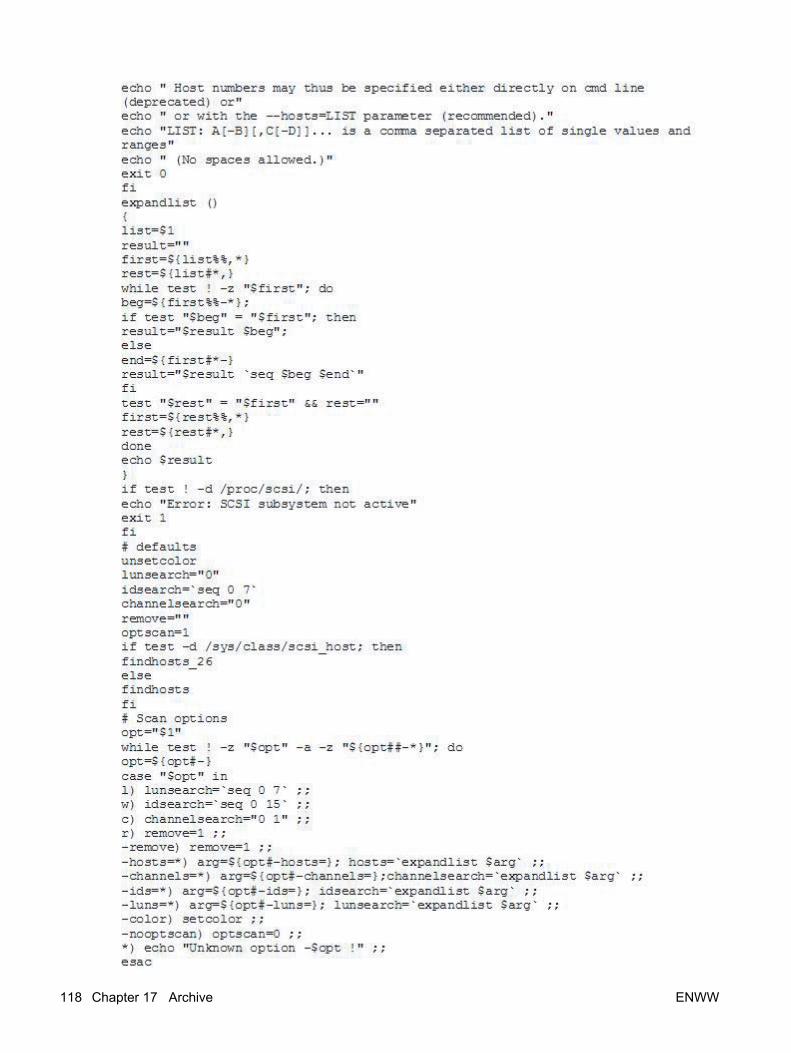
118 Chapter 17 Archive ENWW
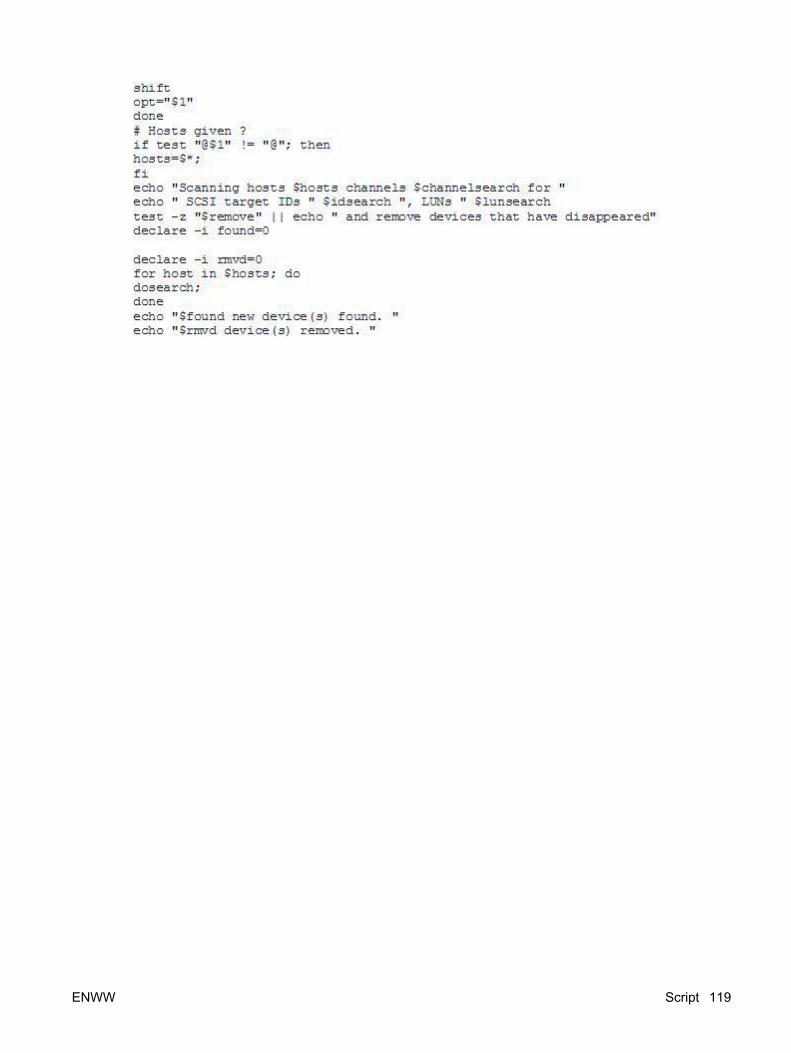
ENWW Script 119

120 Chapter 17 Archive ENWW