Embed Size (px)
Citation preview
HP TouchSmart User Guide

© Copyright 2010 Hewlett-PackardDevelopment Company, L.P.
Microsoft and Windows are U.S. registeredtrademarks of Microsoft Corporation.Bluetooth is a trademark owned by itsproprietor and used by Hewlett-PackardCompany under license. SD Logo is atrademark of its proprietor.
The information contained herein is subjectto change without notice. The onlywarranties for HP products and services areset forth in the express warranty statementsaccompanying such products and services.Nothing herein should be construed asconstituting an additional warranty. HP shallnot be liable for technical or editorial errorsor omissions contained herein.
First Edition: January 2010
Document Part Number: 582064-001
Product notice
This user guide describes features that arecommon to most models. Some featuresmay not be available on your computer.

Safety warning noticeWARNING! To reduce the possibility of heat-related injuries or of overheating the computer, do notplace the computer directly on your lap or obstruct the computer air vents. Use the computer only on ahard, flat surface. Do not allow another hard surface, such as an adjoining optional printer, or a softsurface, such as pillows or rugs or clothing, to block airflow. Also, do not allow the AC adapter to contactthe skin or a soft surface, such as pillows or rugs or clothing, during operation. The computer and theAC adapter comply with the user-accessible surface temperature limits defined by the InternationalStandard for Safety of Information Technology Equipment (IEC 60950).
iii

iv Safety warning notice
Table of contents
1 FeaturesIdentifying the installed hardware and software ................................................................................... 2
Identifying hardware ............................................................................................................ 2Identifying software .............................................................................................................. 2
Components ......................................................................................................................................... 3Top components .................................................................................................................. 3
TouchPad ............................................................................................................ 3Lights ................................................................................................................... 4Keys .................................................................................................................... 5
Front components ................................................................................................................ 5Right-side components ........................................................................................................ 6Left-side components .......................................................................................................... 7Display components ............................................................................................................ 8Rear components ................................................................................................................ 9Bottom components ........................................................................................................... 10
2 NetworkingChoosing an ISP ................................................................................................................................ 12
Using Internet Services & Offers ....................................................................................... 12Using ISP-provided icons .................................................................................................. 12Using the Windows Connect to the Internet Wizard .......................................................... 13
Creating a wireless connection .......................................................................................................... 14Identifying wireless icons and controls .............................................................................. 14
Identifying wireless and network status icons ................................................... 14Using the wireless key and button .................................................................... 15Using Wireless Assistant software .................................................................... 15Using operating system controls ....................................................................... 16
Connecting to a WLAN ...................................................................................................... 16Connecting to an existing wireless network ...................................................... 17Setting up a wireless network ........................................................................... 17
Step 1: Purchase high-speed Internet service .................................. 18Step 2: Purchase and install a wireless router ................................. 18Step 3: Configure the computer to connect to the wirelessnetwork ............................................................................................. 18
v
Protecting your WLAN ....................................................................................... 19Roaming to another network ............................................................................. 19
Using HP Mobile Broadband (select models only) ............................................................ 20Inserting a SIM .................................................................................................. 20Removing a SIM ................................................................................................ 21
Using Bluetooth wireless devices ...................................................................................... 22Bluetooth and Internet Connection Sharing (ICS) ............................................. 22
Connecting to a wired network ........................................................................................................... 23
3 Pointing devices, touch screen, and keyboardUsing pointing devices ....................................................................................................................... 25
Setting pointing device preferences ................................................................................... 25Using the TouchPad .......................................................................................................... 25
Turning the TouchPad on and off ...................................................................... 25Using TouchPad gestures ................................................................................. 26
Scrolling ............................................................................................ 26Pinching/Zooming ............................................................................. 27Rotating ............................................................................................ 27
Using the digitizer pen ........................................................................................................................ 29Identifying the pen components ......................................................................................... 29Holding the pen .................................................................................................................. 29Storing the pen .................................................................................................................. 29
Using the touch screen ....................................................................................................................... 30Rotating the display ........................................................................................................... 30
Using the rotate button ...................................................................................... 31Using touch screen gestures ............................................................................................. 31
Tapping (or clicking) .......................................................................................... 31Flicking .............................................................................................................. 32Dragging ............................................................................................................ 32Scrolling ............................................................................................................ 32Rotating ............................................................................................................. 33Pinching ............................................................................................................ 33Setting touch screen preferences ..................................................................... 34
Using the action keys ......................................................................................................................... 35Using the hotkeys ............................................................................................................................... 37
4 MultimediaMultimedia features ............................................................................................................................ 39Using the media activity keys ............................................................................................................. 40Multimedia software ........................................................................................................................... 41
Using HP TouchSmart software or HP MediaSmart software ........................................... 41Using multimedia software ................................................................................................. 41Installing multimedia software from a disc ......................................................................... 42
vi
Audio .................................................................................................................................................. 43Adjusting the volume ......................................................................................................... 43Connecting external audio devices .................................................................................... 43
Webcam ............................................................................................................................................. 45Adjusting webcam properties ............................................................................................. 46
Video .................................................................................................................................................. 47Using the external monitor port .......................................................................................... 47Connecting an HDMI device .............................................................................................. 47
Configuring audio for HDMI ............................................................................... 48
5 Power managementShutting down the computer ............................................................................................................... 50Setting power devices ........................................................................................................................ 51
Using power-saving states ................................................................................................. 51Initiating and exiting Sleep ................................................................................ 51Initiating and exiting Hibernation ....................................................................... 51
Conserving power .............................................................................................................. 52Using the battery meter ..................................................................................................... 52Using power plans ............................................................................................................. 53
Viewing the current power plan ......................................................................... 53Selecting a different power plan ........................................................................ 53Customizing power plans .................................................................................. 53
Setting password protection on wakeup ............................................................................ 53Using battery power ........................................................................................................................... 54
Finding battery information in Help and Support ............................................................... 54Using Battery Check .......................................................................................................... 54Displaying the remaining battery charge ........................................................................... 55Removing or inserting the battery ...................................................................................... 55Charging a battery ............................................................................................................. 56Maximizing battery discharge time .................................................................................... 57Managing low battery levels .............................................................................................. 57
Identifying low battery levels ............................................................................. 57Resolving a low battery level ............................................................................. 58
Resolving a low battery level when external power is available ....... 58Resolving a low battery level when a charged battery isavailable ........................................................................................... 58Resolving a low battery level when no power source isavailable ........................................................................................... 58Resolving a low battery level when the computer cannot exitHibernation ....................................................................................... 58
Calibrating a battery ........................................................................................................... 58Storing a battery ................................................................................................................ 58Disposing of a used battery ............................................................................................... 59Replacing the battery ......................................................................................................... 59
vii
Switching between graphics modes (select models only) .................................................................. 60Using external AC power .................................................................................................................... 61
Connecting AC power ........................................................................................................ 61Testing an AC adapter ....................................................................................................... 62
6 External devicesUsing Digital Media Slot cards ........................................................................................................... 64
Inserting a digital card ........................................................................................................ 64Removing a digital card ..................................................................................................... 65
Using a USB device ........................................................................................................................... 66Connecting a USB device .................................................................................................. 66Removing a USB device .................................................................................................... 66
7 DrivesHandling drives ................................................................................................................................... 69Improving hard drive performance ..................................................................................................... 70
Using Disk Defragmenter ................................................................................................... 70Using Disk Cleanup ........................................................................................................... 70
Using HP ProtectSmart Hard Drive Protection ................................................................................... 71Identifying HP ProtectSmart Hard Drive Protection status ................................................ 71Managing power with a parked hard drive ......................................................................... 71Using HP ProtectSmart Hard Drive Protection software .................................................... 72
Replacing a hard drive ....................................................................................................................... 73Using external drives .......................................................................................................................... 77
Connecting optional external drives ................................................................................... 77Using an external optical drive (select models only) .......................................................... 77
Removing an optical disc when the disc tray will not open ............................... 77Sharing an optical drive ...................................................................................................................... 79
8 Memory modulesAdding or replacing memory modules ................................................................................................ 81
9 SecurityProtecting the computer ..................................................................................................................... 85Using passwords ................................................................................................................................ 86
Setting passwords in Windows .......................................................................................... 86Setting passwords in Setup Utility ..................................................................................... 86
Administrator password ..................................................................................... 87Managing an administrator password ............................................... 87Entering an administrator password ................................................. 88
Power-on password .......................................................................................... 88Managing a power-on password ...................................................... 88Entering a power-on password ......................................................... 88
viii
Using antivirus software ..................................................................................................................... 89Using firewall software ....................................................................................................................... 90Installing critical security updates ....................................................................................................... 91Installing an optional security cable .................................................................................................... 92Using the fingerprint reader (select models only) ............................................................................... 93
Registering fingerprints ...................................................................................................... 93Using your registered fingerprint to log on to Windows ..................................................... 94
10 Backup and recoveryCreating recovery discs ...................................................................................................................... 96Backing up your information ............................................................................................................... 97
Using Windows Backup and Restore ................................................................................ 97Using system restore points .............................................................................................. 98
When to create restore points ........................................................................... 98Create a system restore point ........................................................................... 98Restore to a previous date and time ................................................................. 98
Performing a recovery ........................................................................................................................ 99Recovering from the recovery discs .................................................................................. 99Recovering from the dedicated recovery partition (select models only) ............................ 99
11 Setup Utility (BIOS)Starting Setup Utility ......................................................................................................................... 101Using Setup Utility ............................................................................................................................ 102
Changing the language of Setup Utility ........................................................................... 102Navigating and selecting in Setup Utility .......................................................................... 102Displaying system information ......................................................................................... 103Restoring default settings in Setup Utility ........................................................................ 103Exiting Setup Utility .......................................................................................................... 103
Setup Utility menus .......................................................................................................................... 105Main menu ....................................................................................................................... 105Security menu .................................................................................................................. 105System Configuration menu ............................................................................................ 105Diagnostics menu ............................................................................................................ 106
Updating the BIOS ........................................................................................................................... 107Determining the BIOS version ......................................................................................... 107Downloading a BIOS update ........................................................................................... 107
Appendix A Product informationInput power ....................................................................................................................................... 110Operating environment ..................................................................................................................... 111Traveling with the computer ............................................................................................................. 112Routine care ..................................................................................................................................... 113
Cleaning the display ........................................................................................................ 113
ix

Cleaning the TouchPad and keyboard ............................................................................ 113Labels ............................................................................................................................................... 114
Index ................................................................................................................................................................. 115
x

1 Features
1
Identifying the installed hardware and softwareIdentifying hardware
To see a list of hardware installed in the computer:
▲ Select Start > Control Panel > System and Security. Then in the System area, click DeviceManager.
You can also add hardware or modify device configurations using Device Manager.
NOTE: Windows® includes the User Account Control feature to improve the security of your computer.You may be prompted for your permission or password for tasks such as installing applications, runningutilities, or changing Windows settings. Refer to Help and Support for more information.
Identifying softwareTo see a list of the software installed on the computer:
▲ Select Start > All Programs.
2 Chapter 1 Features
ComponentsTop components
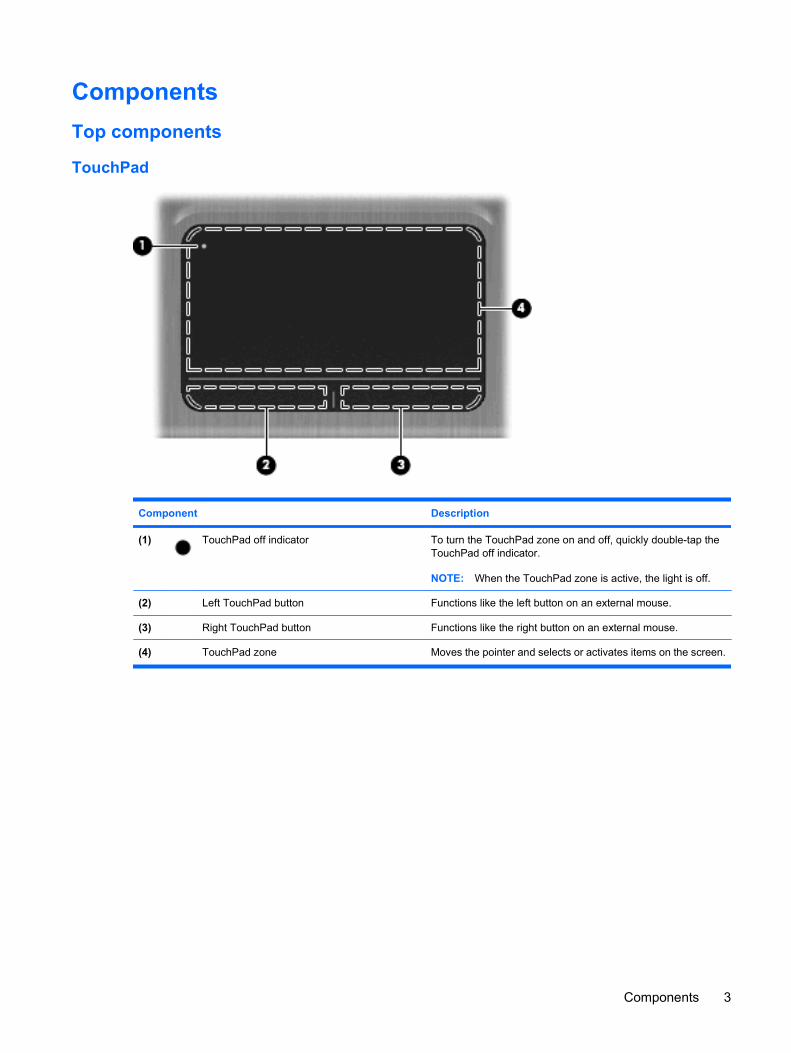
TouchPad
Component Description
(1) TouchPad off indicator To turn the TouchPad zone on and off, quickly double-tap theTouchPad off indicator.
NOTE: When the TouchPad zone is active, the light is off.
(2) Left TouchPad button Functions like the left button on an external mouse.
(3) Right TouchPad button Functions like the right button on an external mouse.
(4) TouchPad zone Moves the pointer and selects or activates items on the screen.
Components 3
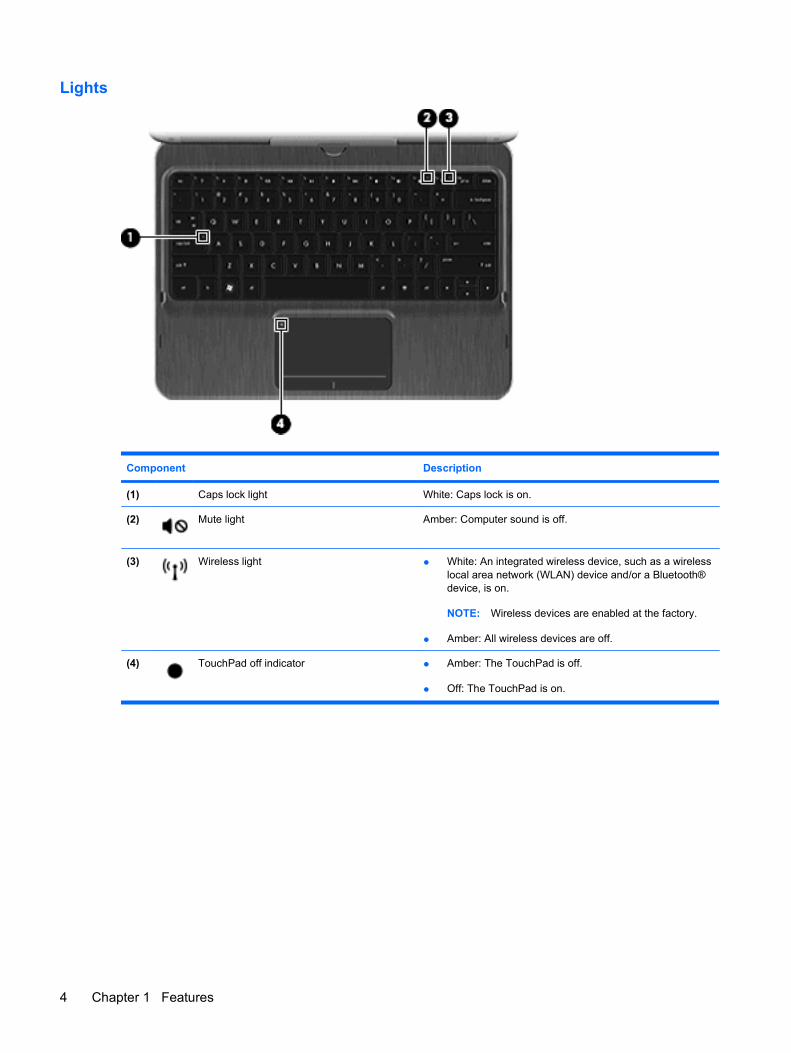
Lights
Component Description
(1) Caps lock light White: Caps lock is on.
(2) Mute light Amber: Computer sound is off.
(3) Wireless light ● White: An integrated wireless device, such as a wirelesslocal area network (WLAN) device and/or a Bluetooth®device, is on.
NOTE: Wireless devices are enabled at the factory.
● Amber: All wireless devices are off.
(4) TouchPad off indicator ● Amber: The TouchPad is off.
● Off: The TouchPad is on.
4 Chapter 1 Features
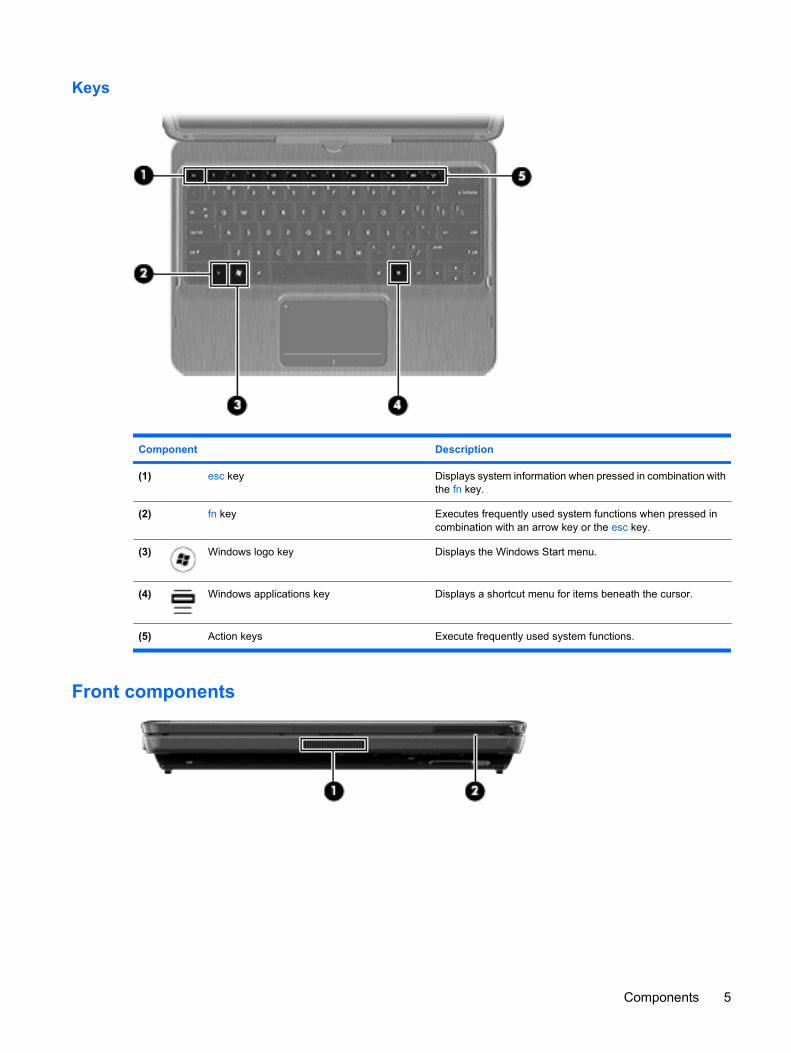
Keys
Component Description
(1) esc key Displays system information when pressed in combination withthe fn key.
(2) fn key Executes frequently used system functions when pressed incombination with an arrow key or the esc key.
(3) Windows logo key Displays the Windows Start menu.
(4) Windows applications key Displays a shortcut menu for items beneath the cursor.
(5) Action keys Execute frequently used system functions.
Front components
Components 5
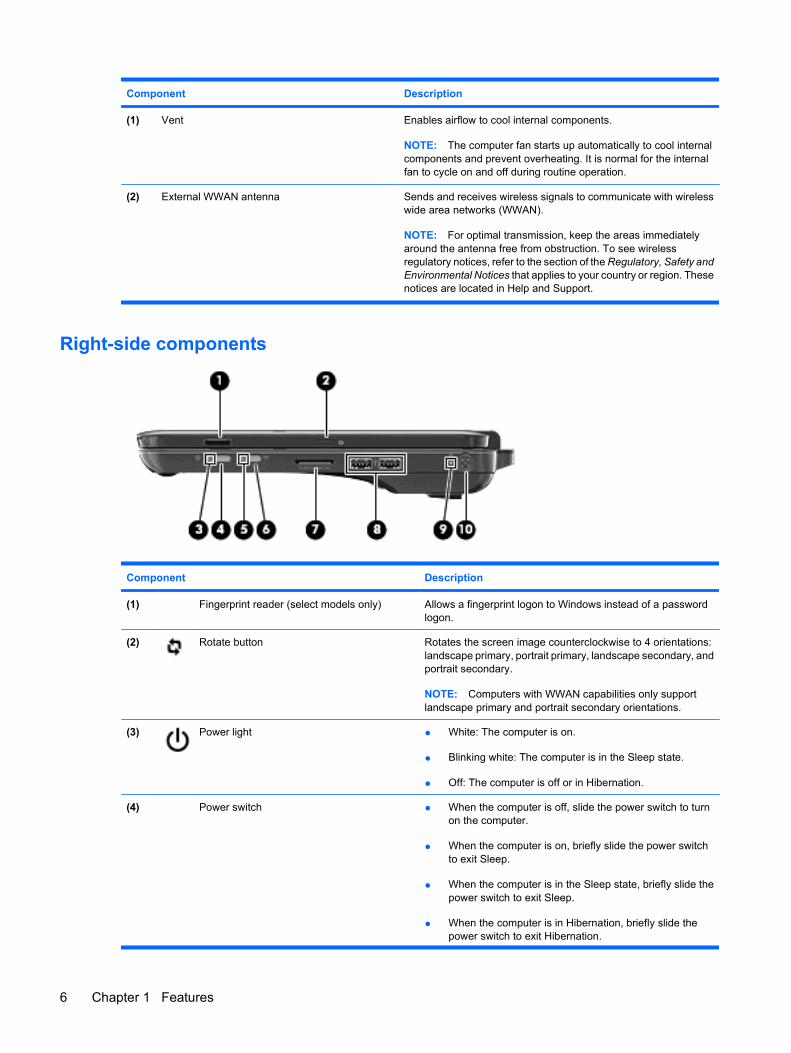
Component Description
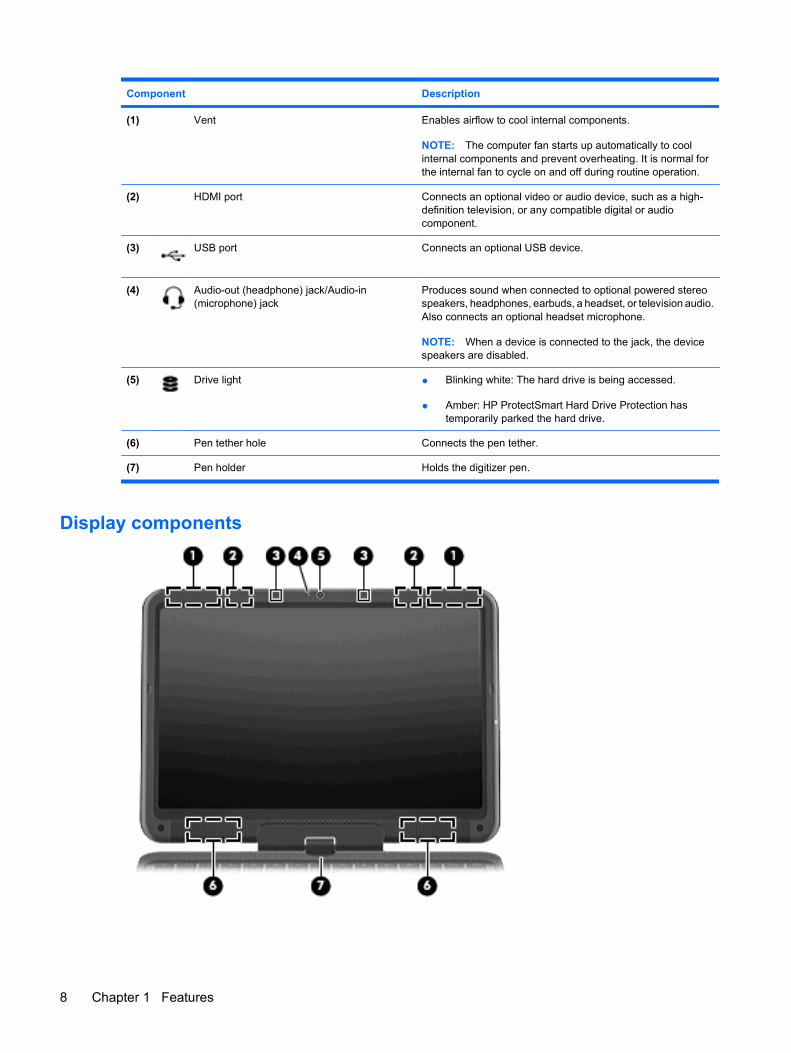
(1) Vent Enables airflow to cool internal components.
NOTE: The computer fan starts up automatically to cool internalcomponents and prevent overheating. It is normal for the internalfan to cycle on and off during routine operation.
(2) External WWAN antenna Sends and receives wireless signals to communicate with wirelesswide area networks (WWAN).
NOTE: For optimal transmission, keep the areas immediatelyaround the antenna free from obstruction. To see wirelessregulatory notices, refer to the section of the Regulatory, Safety andEnvironmental Notices that applies to your country or region. Thesenotices are located in Help and Support.
Right-side components
Component Description
(1) Fingerprint reader (select models only) Allows a fingerprint logon to Windows instead of a passwordlogon.
(2) Rotate button Rotates the screen image counterclockwise to 4 orientations:landscape primary, portrait primary, landscape secondary, andportrait secondary.
NOTE: Computers with WWAN capabilities only supportlandscape primary and portrait secondary orientations.
(3) Power light ● White: The computer is on.
● Blinking white: The computer is in the Sleep state.
● Off: The computer is off or in Hibernation.
(4) Power switch ● When the computer is off, slide the power switch to turnon the computer.
● When the computer is on, briefly slide the power switchto exit Sleep.
● When the computer is in the Sleep state, briefly slide thepower switch to exit Sleep.
● When the computer is in Hibernation, briefly slide thepower switch to exit Hibernation.
6 Chapter 1 Features
Component Description
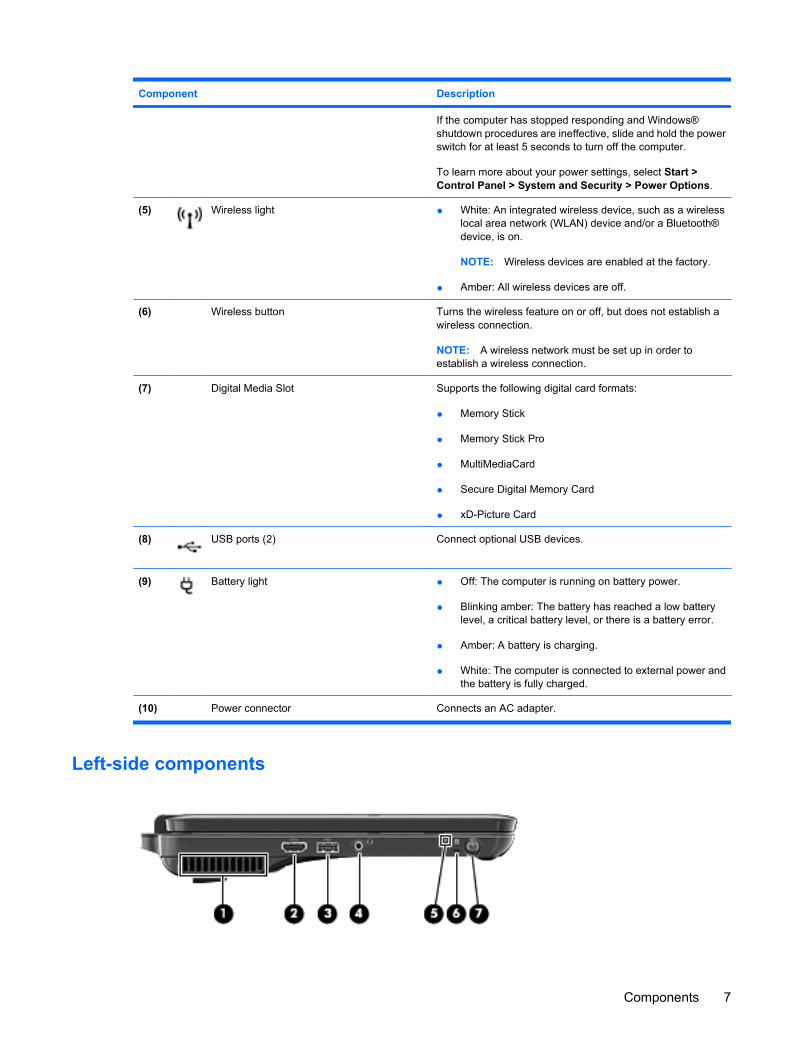
If the computer has stopped responding and Windows®shutdown procedures are ineffective, slide and hold the powerswitch for at least 5 seconds to turn off the computer.
To learn more about your power settings, select Start >Control Panel > System and Security > Power Options.
(5) Wireless light ● White: An integrated wireless device, such as a wirelesslocal area network (WLAN) device and/or a Bluetooth®device, is on.
NOTE: Wireless devices are enabled at the factory.
● Amber: All wireless devices are off.
(6) Wireless button Turns the wireless feature on or off, but does not establish awireless connection.
NOTE: A wireless network must be set up in order toestablish a wireless connection.
(7) Digital Media Slot Supports the following digital card formats:
● Memory Stick
● Memory Stick Pro
● MultiMediaCard
● Secure Digital Memory Card
● xD-Picture Card
(8) USB ports (2) Connect optional USB devices.
(9) Battery light ● Off: The computer is running on battery power.
● Blinking amber: The battery has reached a low batterylevel, a critical battery level, or there is a battery error.
● Amber: A battery is charging.
● White: The computer is connected to external power andthe battery is fully charged.
(10) Power connector Connects an AC adapter.
Left-side components
Components 7
Component Description
(1) Vent Enables airflow to cool internal components.
NOTE: The computer fan starts up automatically to coolinternal components and prevent overheating. It is normal forthe internal fan to cycle on and off during routine operation.
(2) HDMI port Connects an optional video or audio device, such as a high-definition television, or any compatible digital or audiocomponent.
(3) USB port Connects an optional USB device.
(4) Audio-out (headphone) jack/Audio-in(microphone) jack
Produces sound when connected to optional powered stereospeakers, headphones, earbuds, a headset, or television audio.Also connects an optional headset microphone.
NOTE: When a device is connected to the jack, the devicespeakers are disabled.
(5) Drive light ● Blinking white: The hard drive is being accessed.
● Amber: HP ProtectSmart Hard Drive Protection hastemporarily parked the hard drive.
(6) Pen tether hole Connects the pen tether.
(7) Pen holder Holds the digitizer pen.
Display components
8 Chapter 1 Features
Component Description
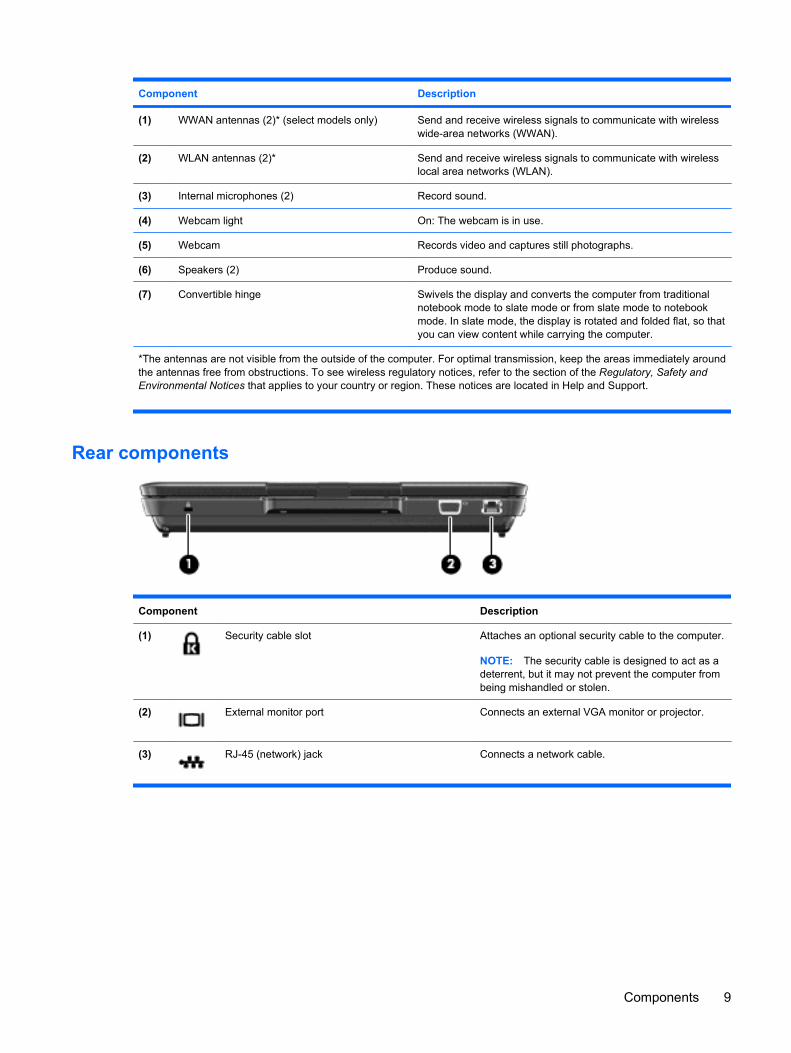
(1) WWAN antennas (2)* (select models only) Send and receive wireless signals to communicate with wirelesswide-area networks (WWAN).
(2) WLAN antennas (2)* Send and receive wireless signals to communicate with wirelesslocal area networks (WLAN).
(3) Internal microphones (2) Record sound.
(4) Webcam light On: The webcam is in use.
(5) Webcam Records video and captures still photographs.
(6) Speakers (2) Produce sound.
(7) Convertible hinge Swivels the display and converts the computer from traditionalnotebook mode to slate mode or from slate mode to notebookmode. In slate mode, the display is rotated and folded flat, so thatyou can view content while carrying the computer.
*The antennas are not visible from the outside of the computer. For optimal transmission, keep the areas immediately aroundthe antennas free from obstructions. To see wireless regulatory notices, refer to the section of the Regulatory, Safety andEnvironmental Notices that applies to your country or region. These notices are located in Help and Support.
Rear components
Component Description
(1) Security cable slot Attaches an optional security cable to the computer.
NOTE: The security cable is designed to act as adeterrent, but it may not prevent the computer frombeing mishandled or stolen.
(2) External monitor port Connects an external VGA monitor or projector.
(3) RJ-45 (network) jack Connects a network cable.
Components 9
Bottom components
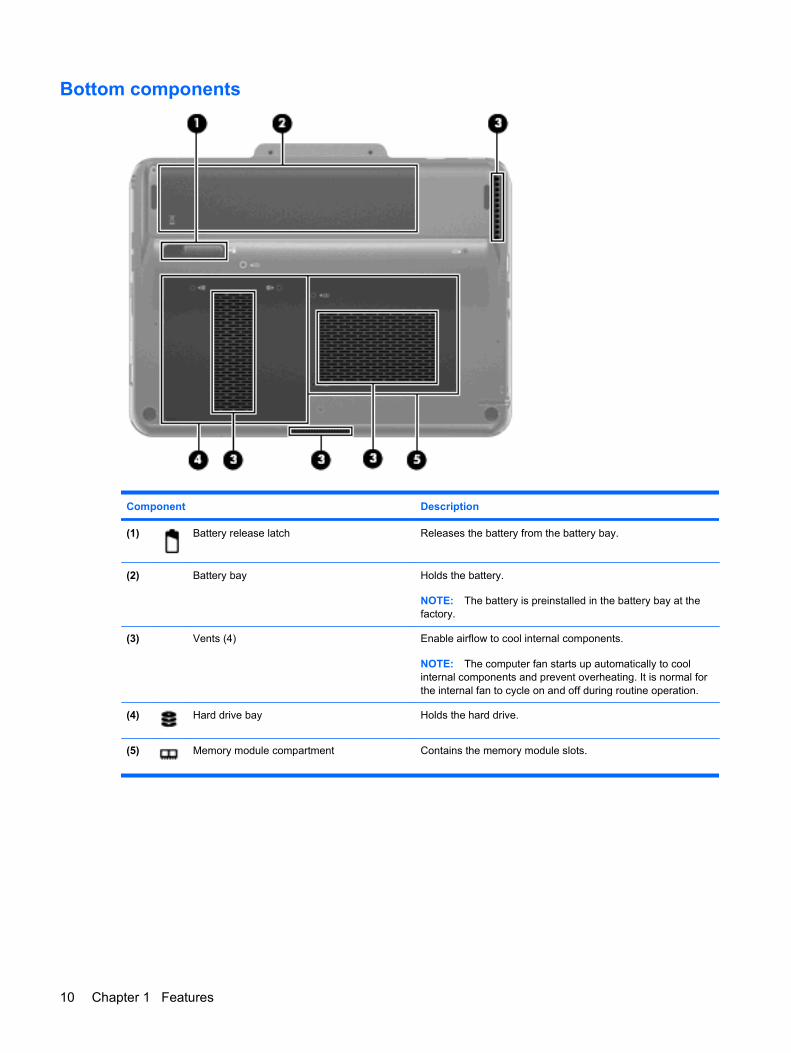
Component Description
(1) Battery release latch Releases the battery from the battery bay.
(2) Battery bay Holds the battery.
NOTE: The battery is preinstalled in the battery bay at thefactory.
(3) Vents (4) Enable airflow to cool internal components.
NOTE: The computer fan starts up automatically to coolinternal components and prevent overheating. It is normal forthe internal fan to cycle on and off during routine operation.
(4) Hard drive bay Holds the hard drive.
(5) Memory module compartment Contains the memory module slots.
10 Chapter 1 Features
2 Networking
The computer supports 2 types of Internet access:
● Wireless—For mobile Internet access, you can use a wireless connection. To learn about addingthe computer to an existing network or setting up a wireless network, refer to Creating a wirelessconnection on page 14.
● Wired—You can access the Internet by connecting to a broadband network using the RJ-45(network) jack. To learn about connecting using the RJ-45 jack, refer to Connecting to a wirednetwork on page 23.
11
Choosing an ISPYou must set up Internet service before you can connect to the Internet. The computer includes thefollowing software features to help you set up a new Internet account or configure the computer to usean existing account:
● Internet Services & Offers (available in some locations)
● ISP-provided icons (available in some locations)
● Windows Connect to the Internet Wizard (available in all locations)
Using Internet Services & OffersIf the Internet Service & Offers utility is supported in the country or region in which you purchased thecomputer, you can access the utility by using the following method:
▲ Select Start > All Programs > Online Services > Get Online.
The Internet Services & Offers utility assists with these tasks:
● Signing up for a new Internet account
● Configuring the computer to use an existing account
Using ISP-provided iconsIf ISP-provided icons are supported in the country or region in which you purchased the computer, theicons may be displayed either individually on the Windows desktop or grouped in a desktop folder namedOnline Services.
▲ To set up a new Internet account or configure the computer to use an existing account, double-click an icon, and then follow the instructions on the screen.
12 Chapter 2 Networking
Using the Windows Connect to the Internet WizardYou can use the Windows Connect to the Internet Wizard to connect to the Internet in any of thesesituations:
● If you already have an account with an ISP.
● If you have a disc from an ISP.
● If you do not have an Internet account and would like to select an ISP from the list provided withinthe wizard. (The list of ISP providers is not available in all regions.)
● If you have selected an unlisted ISP and the ISP has provided you with such information as aspecific IP address and POP3 and SMTP settings.
To access the Windows Connect To The Internet Wizard and instructions for using the wizard, selectStart > Help and Support.
NOTE: If you are prompted within the wizard to choose between enabling or disabling WindowsFirewall, choose to enable the firewall.
Choosing an ISP 13
Creating a wireless connectionWireless technology transfers data across radio waves instead of wires. Your computer may beequipped with one or more of the following wireless devices:
● Wireless local area network (WLAN) device—Connects the computer to wireless local areanetworks (commonly referred to as Wi-Fi networks, wireless LANs, or WLANs) in corporate offices,your home, and public places such as airports, restaurants, coffee shops, hotels, and universities.In a WLAN, each mobile wireless device communicates with a wireless router or a wireless accesspoint.
● HP Mobile Broadband Module—A wireless wide area network (WWAN) device that providesaccess to information wherever mobile network operator service is available. In a WWAN, eachmobile device communicates to a mobile network operator’s base station. Mobile network operatorsinstall networks of base stations (similar to cell phone towers) throughout large geographic areas,effectively providing coverage across entire states, regions, or even countries.
● Bluetooth® device—Creates a personal area network (PAN) to connect to other Bluetooth-enableddevices such as computers, phones, printers, headsets, speakers, and cameras. In a PAN, eachdevice communicates directly with other devices, and devices must be relatively close together—typically within 10 meters (approximately 33 feet) of each other.
For more information on wireless technology, refer to the information and Web site links provided inHelp and Support.
Identifying wireless icons and controls
Identifying wireless and network status icons
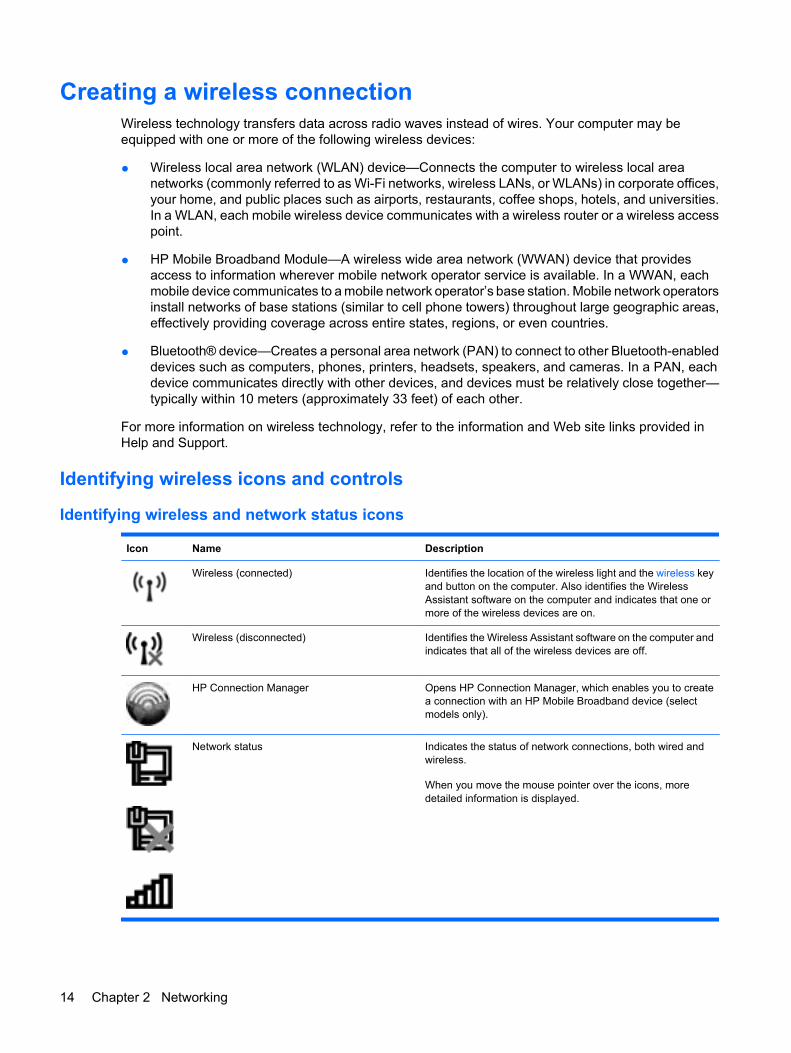
Icon Name Description
Wireless (connected) Identifies the location of the wireless light and the wireless keyand button on the computer. Also identifies the WirelessAssistant software on the computer and indicates that one ormore of the wireless devices are on.
Wireless (disconnected) Identifies the Wireless Assistant software on the computer andindicates that all of the wireless devices are off.
HP Connection Manager Opens HP Connection Manager, which enables you to createa connection with an HP Mobile Broadband device (selectmodels only).
Network status Indicates the status of network connections, both wired andwireless.
When you move the mouse pointer over the icons, moredetailed information is displayed.
14 Chapter 2 Networking
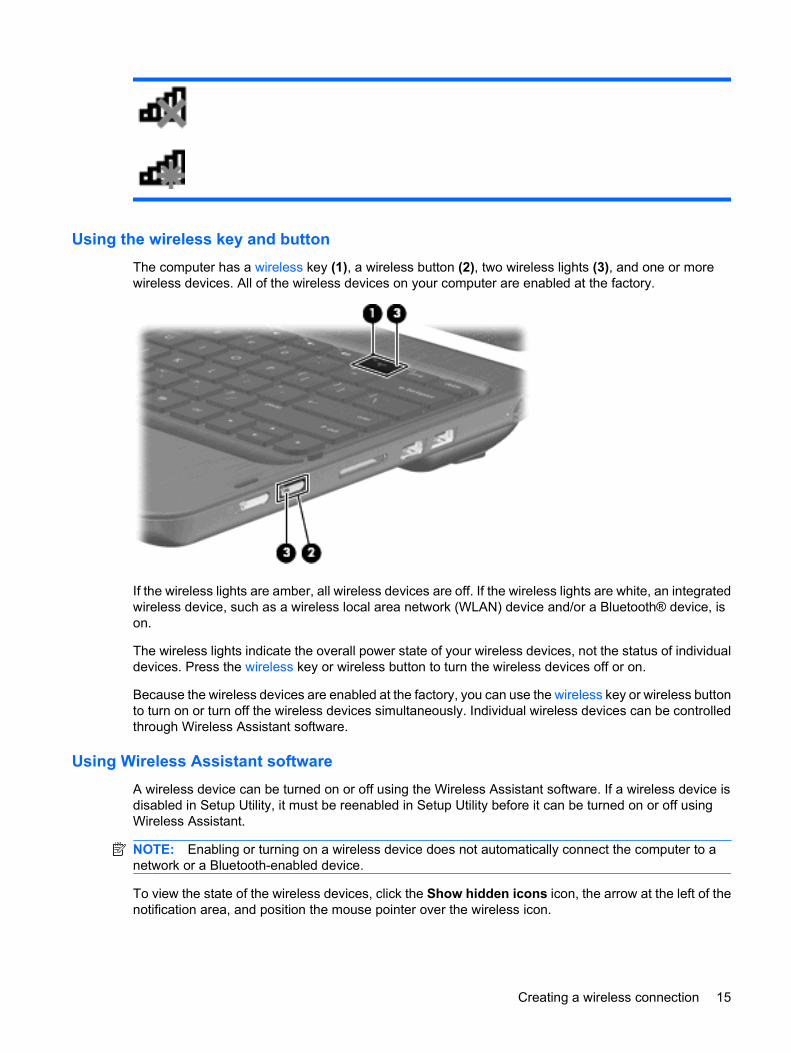
Using the wireless key and buttonThe computer has a wireless key (1), a wireless button (2), two wireless lights (3), and one or morewireless devices. All of the wireless devices on your computer are enabled at the factory.
If the wireless lights are amber, all wireless devices are off. If the wireless lights are white, an integratedwireless device, such as a wireless local area network (WLAN) device and/or a Bluetooth® device, ison.
The wireless lights indicate the overall power state of your wireless devices, not the status of individualdevices. Press the wireless key or wireless button to turn the wireless devices off or on.
Because the wireless devices are enabled at the factory, you can use the wireless key or wireless buttonto turn on or turn off the wireless devices simultaneously. Individual wireless devices can be controlledthrough Wireless Assistant software.
Using Wireless Assistant softwareA wireless device can be turned on or off using the Wireless Assistant software. If a wireless device isdisabled in Setup Utility, it must be reenabled in Setup Utility before it can be turned on or off usingWireless Assistant.
NOTE: Enabling or turning on a wireless device does not automatically connect the computer to anetwork or a Bluetooth-enabled device.
To view the state of the wireless devices, click the Show hidden icons icon, the arrow at the left of thenotification area, and position the mouse pointer over the wireless icon.
Creating a wireless connection 15

If the wireless icon is not displayed in the notification area, complete the following steps to changeWireless Assistant properties:
1. Select Start > Control Panel > Hardware and Sound > Windows Mobility Center.
2. Click the wireless icon in the Wireless Assistant tile, which is located in the bottom row of Windows®Mobility Center.
3. Click Properties.
4. Select the check box next to HP Wireless Assistant icon in notification area.
5. Click Apply.
6. Click Close.
For more information, refer to the Wireless Assistant software Help:
1. Open Wireless Assistant by clicking the wireless icon in Windows Mobility Center.
2. Click the Help button.
Using operating system controlsSome operating systems also offer a way to manage integrated wireless devices and the wirelessconnection. For example, Windows provides the Network and Sharing Center that allows you to set upa connection or network, connect to a network, manage wireless networks, and diagnose and repairnetwork problems.
To access the Network and Sharing Center, select Start > Control Panel > Network and Internet >Network and Sharing Center.
For more information, select Start > Help and Support.
Connecting to a WLANWith a WLAN device, you can access a wireless local area network (WLAN), which is composed of othercomputers and accessories that are linked by a wireless router or a wireless access point.
NOTE: The terms wireless router and wireless access point are often used interchangeably.
● A large-scale WLAN, such as a corporate or public WLAN, typically uses wireless access pointsthat can accommodate a large number of computers and accessories and can separate criticalnetwork functions.
● A home or small office WLAN typically uses a wireless router, which allows several wireless andwired computers to share an Internet connection, a printer, and files without requiring additionalpieces of hardware or software.
To use the WLAN device in your computer, you must connect to a WLAN infrastructure (provided througha service provider or a public or corporate network).
16 Chapter 2 Networking

Connecting to an existing wireless networkTo connect the computer to an existing wireless network, follow these steps:
1. Be sure that the wireless device is on (wireless light is white). If the wireless light is amber, pressthe wireless key or wireless button.
2. Click the network icon in the notification area, at the far right of the taskbar.
3. Select a network to connect to.
4. Click Connect.
5. If the network is a security-enabled WLAN, you are prompted to enter a network security key, whichis a security code. Type the code, and then click OK to complete the connection.
Setting up a wireless networkTo set up a WLAN and connect to the Internet, you need the following equipment:
● A broadband modem (either DSL or cable) (1) and high-speed Internet service purchased from anInternet service provider (ISP)
● A wireless router (purchased separately) (2)
● The wireless computer (3)
The illustration below shows an example of a wireless network installation that is connected to theInternet.
NOTE: When setting up a wireless connection, be sure that your computer and wireless router aresynchronized. To synchronize your computer and wireless router, turn your computer and wirelessrouter off and then back on.
As your network grows, additional wireless and wired computers can be connected to the network toaccess the Internet.
For additional help in setting up your WLAN, refer to the information provided by your routermanufacturer or your ISP.
Creating a wireless connection 17
Step 1: Purchase high-speed Internet service
If you already have high-speed Internet service (DSL, cable, or satellite), begin with Step 2: Purchaseand install a wireless router on page 18. If you do not have high-speed Internet service, follow thesesteps:
1. Contact a local ISP to purchase high-speed Internet service and a DSL or cable modem. The ISPwill help set up the modem, install a network cable to connect your wireless computer to the modem,and test the Internet service.
2. Your ISP will give you a user ID and password to access the Internet. Record this information andstore it in a safe place.
Step 2: Purchase and install a wireless router
Read this section carefully before you install the wireless router using the router manufacturer'sinstructions and your wireless computer. If you need technical assistance during the router installation,contact the router manufacturer.
NOTE: It is recommended that you temporarily connect your new wireless computer to the router byusing the network cable provided with the router. This will ensure that the computer can access theInternet.
1. Be sure that the wireless light on the computer is white. If the wireless light is amber, press thewireless key or wireless button.
2. During the router installation, the router manufacturer's software allows you to change the networkname (SSID) and enable security to protect the privacy of your wireless network. Many routers areshipped with a default network name and with security disabled. If you change the default networkname or enable security during the router setup, record the information and store it in a safe place.You will need this information when you configure the computer and any other existing computersto access the router.
NOTE: If you do not enable security, an unauthorized wireless user can access the data on thecomputer and use your Internet connection without your knowledge. For more information onsecuring your wireless network, refer to the Wireless guide in Help and Support.
The Windows operating system also provides tools to help you set up your wireless network for the firsttime. To use the Windows tools to set up your network:
▲ Select Start > Network and Internet > Network and Sharing Center > Set up a new connectionor network > Set up a new network. Then follow the on-screen instructions.
Step 3: Configure the computer to connect to the wireless network
1. Be sure that the wireless device is on (wireless light is white). If the wireless light is amber, pressthe wireless key or wireless button.
2. Click the network icon in the notification area, at the far right of the taskbar.
3. Select a network to connect to.
4. Click Connect.
5. If the network is a security-enabled WLAN, you are prompted to enter a network security key, whichis a security code. Type the code, and then click OK to complete the connection.
6. Test the wireless network by opening your Web browser and accessing a Web site.
18 Chapter 2 Networking
Protecting your WLANBecause the WLAN standard was designed with only limited security capabilities—basically to foil casualeavesdropping rather than more powerful forms of attack—it is essential to understand that WLANs arevulnerable to well-known and well-documented security weaknesses.
WLANs in public areas, or “hotspots,” like coffee shops and airports may not provide any security. Newtechnologies are being developed by wireless manufacturers and hotspot service providers that makethe public environment more secure and anonymous. If you are concerned about the security of yourcomputer in a hotspot, limit your network activities to noncritical e-mail and basic Internet surfing.
When you set up a WLAN or access an existing WLAN, always enable security features to protect yournetwork from unauthorized access. The common security levels are Wi-Fi Protected Access (WPA)-Personal and Wired Equivalent Privacy (WEP). Because wireless radio signals travel outside thenetwork, other WLAN devices can pick up unprotected signals and either connect to your network(uninvited) or capture information being sent across it. However, you can take precautions to protectyour WLAN:
● Use a wireless transmitter with built-in security
Many wireless base stations, gateways, or routers provide built-in security features such aswireless security protocols and firewalls. With the correct wireless transmitter, you can protect yournetwork from the most common wireless security risks.
● Work behind a firewall
A firewall is a barrier that checks both data and requests for data that are sent to your network,and discards any suspicious items. Firewalls are available in many varieties, both software andhardware. Some networks use a combination of both types.
● Use wireless encryption
A variety of sophisticated encryption protocols is available for your WLAN. Find the solution thatworks best for your network security:
◦ Wired Equivalent Privacy (WEP) is a wireless security protocol that encodes or encrypts allnetwork data before it is transmitted using a WEP key. Usually, you can allow the network toassign the WEP key. Alternatively, you can set up your own key, generate a different key, orchoose other advanced options. Without the correct key, others will not be able to use theWLAN.
◦ WPA (Wi-Fi Protected Access), like WEP, uses security settings to encrypt and decrypt datathat is transmitted over the network. However, instead of using one static security key forencryptions as WEP does, WPA uses “temporal key integrity protocol” (TKIP) to dynamicallygenerate a new key for every packet. It also generates different sets of keys for each computeron the network.
Roaming to another networkWhen you move your computer within range of another WLAN, Windows attempts to connect to thatnetwork. If the attempt is successful, your computer is automatically connected to the new network. IfWindows does not recognize the new network, follow the same procedure you used initially to connectto your WLAN.
Creating a wireless connection 19
Using HP Mobile Broadband (select models only)HP Mobile Broadband enables your computer to use wireless wide area networks (WWANs) to accessthe Internet from more places and over larger areas than it can by using WLANs. Using HP MobileBroadband requires a network service provider (called a mobile network operator), which in most casesis a mobile phone network operator. Coverage for HP Mobile Broadband is similar to mobile phone voicecoverage.
When used with mobile network operator service, HP Mobile Broadband gives you the freedom to stayconnected to the Internet, send e-mail, or connect to your corporate network whether you are on theroad or outside the range of Wi-Fi hotspots.
NOTE: Computers with WWAN capabilities only support landscape primary and portrait secondaryorientations.
HP Mobile Broadband supports the following technologies:
● HSPA (High Speed Packet Access), which provides access to networks based on the GlobalSystem for Mobile Communications (GSM) telecommunications standard.
● EV-DO (Evolution Data Optimized), which provides access to networks based on the code divisionmultiple access (CDMA) telecommunications standard.
You may need the HP Mobile Broadband Module serial number to activate mobile broadband service.The serial number is printed on a label inside the battery bay of your computer.
Some mobile network operators require the use of a subscriber identity module (SIM). A SIM containsbasic information about you, such as a personal identification number (PIN), as well as networkinformation. Some computers include a SIM that is preinstalled in the battery bay. If the SIM is notpreinstalled, it may be provided in the HP Mobile Broadband information provided with your computer,or the mobile network operator may provide it separately from the computer.
For information on inserting and removing the SIM, refer to Inserting a SIM on page 20 and Removinga SIM on page 21.
For information on HP Mobile Broadband and how to activate service with a preferred mobile networkoperator, refer to the HP Mobile Broadband information included with your computer. For additionalinformation, see the HP Web site at http://www.hp.com/go/mobilebroadband (US only).
Inserting a SIMCAUTION: To prevent damage to the connectors, use minimal force when inserting a SIM.
To insert a SIM:
1. Shut down the computer. If you are not sure whether the computer is off or in Hibernation, turn thecomputer on by sliding the power switch. Then shut down the computer through the operatingsystem.
2. Close the display.
3. Disconnect all external devices connected to the computer.
4. Unplug the power cord from the AC outlet.
5. Turn the computer upside down on a flat surface, with the battery bay toward you.
6. Remove the battery.
20 Chapter 2 Networking
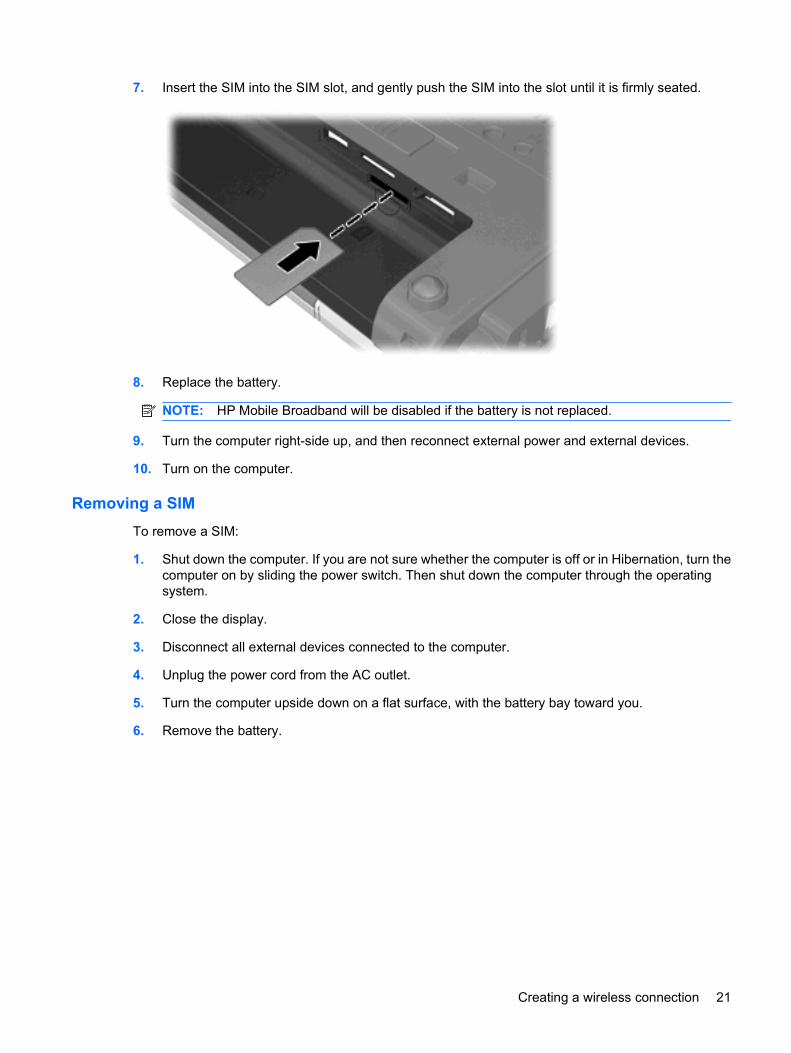
7. Insert the SIM into the SIM slot, and gently push the SIM into the slot until it is firmly seated.
8. Replace the battery.
NOTE: HP Mobile Broadband will be disabled if the battery is not replaced.
9. Turn the computer right-side up, and then reconnect external power and external devices.
10. Turn on the computer.
Removing a SIMTo remove a SIM:
1. Shut down the computer. If you are not sure whether the computer is off or in Hibernation, turn thecomputer on by sliding the power switch. Then shut down the computer through the operatingsystem.
2. Close the display.
3. Disconnect all external devices connected to the computer.
4. Unplug the power cord from the AC outlet.
5. Turn the computer upside down on a flat surface, with the battery bay toward you.
6. Remove the battery.
Creating a wireless connection 21
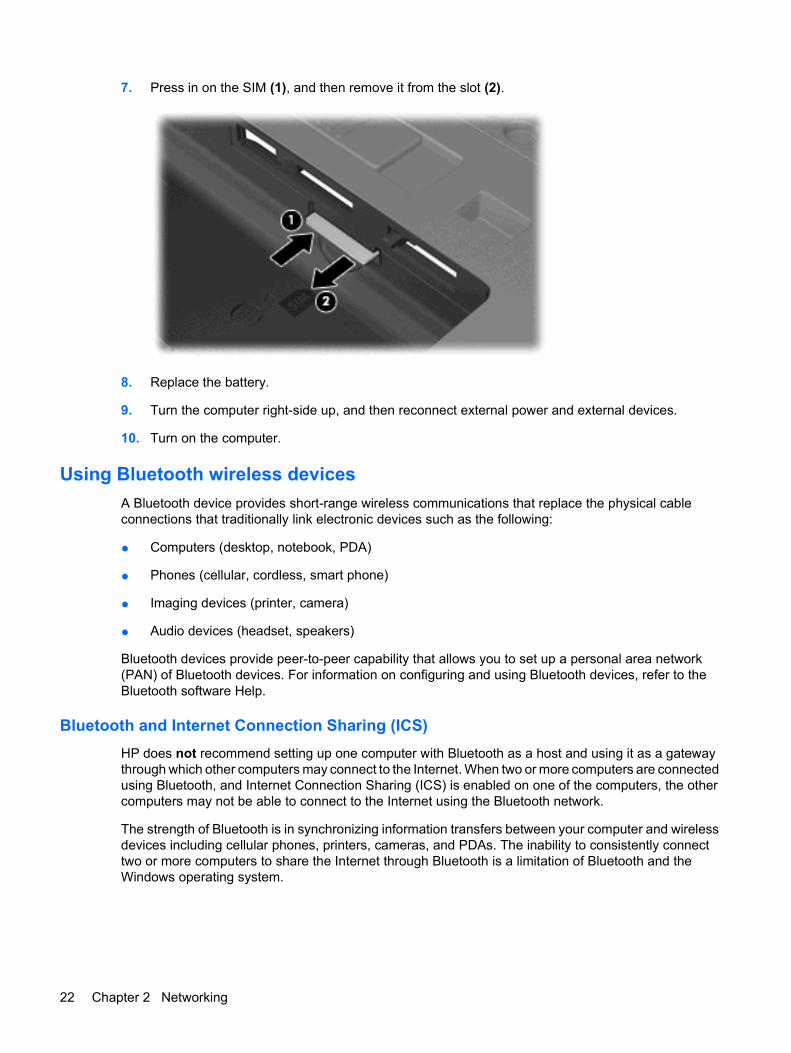
7. Press in on the SIM (1), and then remove it from the slot (2).
8. Replace the battery.
9. Turn the computer right-side up, and then reconnect external power and external devices.
10. Turn on the computer.
Using Bluetooth wireless devicesA Bluetooth device provides short-range wireless communications that replace the physical cableconnections that traditionally link electronic devices such as the following:
● Computers (desktop, notebook, PDA)
● Phones (cellular, cordless, smart phone)
● Imaging devices (printer, camera)
● Audio devices (headset, speakers)
Bluetooth devices provide peer-to-peer capability that allows you to set up a personal area network(PAN) of Bluetooth devices. For information on configuring and using Bluetooth devices, refer to theBluetooth software Help.
Bluetooth and Internet Connection Sharing (ICS)HP does not recommend setting up one computer with Bluetooth as a host and using it as a gatewaythrough which other computers may connect to the Internet. When two or more computers are connectedusing Bluetooth, and Internet Connection Sharing (ICS) is enabled on one of the computers, the othercomputers may not be able to connect to the Internet using the Bluetooth network.
The strength of Bluetooth is in synchronizing information transfers between your computer and wirelessdevices including cellular phones, printers, cameras, and PDAs. The inability to consistently connecttwo or more computers to share the Internet through Bluetooth is a limitation of Bluetooth and theWindows operating system.
22 Chapter 2 Networking
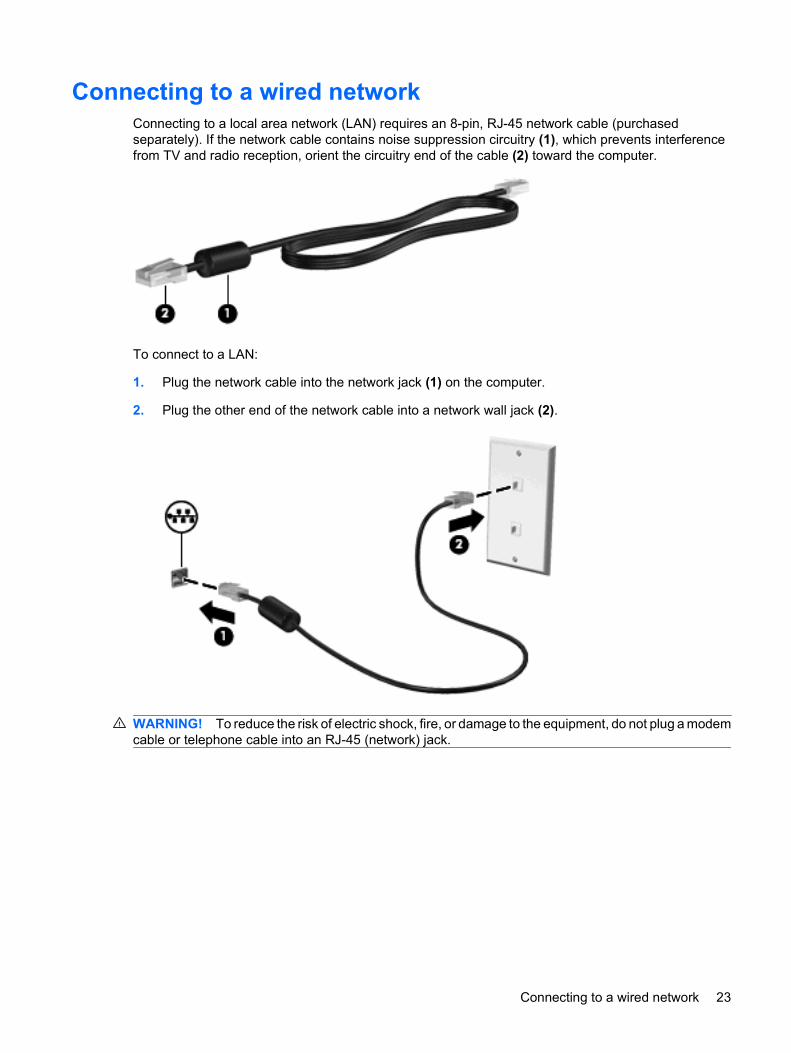
Connecting to a wired networkConnecting to a local area network (LAN) requires an 8-pin, RJ-45 network cable (purchasedseparately). If the network cable contains noise suppression circuitry (1), which prevents interferencefrom TV and radio reception, orient the circuitry end of the cable (2) toward the computer.
To connect to a LAN:
1. Plug the network cable into the network jack (1) on the computer.
2. Plug the other end of the network cable into a network wall jack (2).
WARNING! To reduce the risk of electric shock, fire, or damage to the equipment, do not plug a modemcable or telephone cable into an RJ-45 (network) jack.
Connecting to a wired network 23

3 Pointing devices, touch screen, andkeyboard
24 Chapter 3 Pointing devices, touch screen, and keyboard
Using pointing devicesNOTE: In addition to the TouchPad, you can also connect an external USB mouse to one of the USBports on the computer.
Setting pointing device preferencesUse Mouse Properties in Windows® to customize settings for pointing devices, such as buttonconfiguration, click speed, and pointer options.
To access Mouse Properties, select Start > Devices and Printers. Then, right-click the devicerepresenting your computer, and select Mouse settings.
Using the TouchPadTo move the pointer, touch and slide one finger across the TouchPad surface in the direction you wantthe pointer to go. Use the left and right TouchPad buttons like the corresponding buttons on an externalmouse.
NOTE: For information on identifying the TouchPad components, refer to TouchPad on page 3.
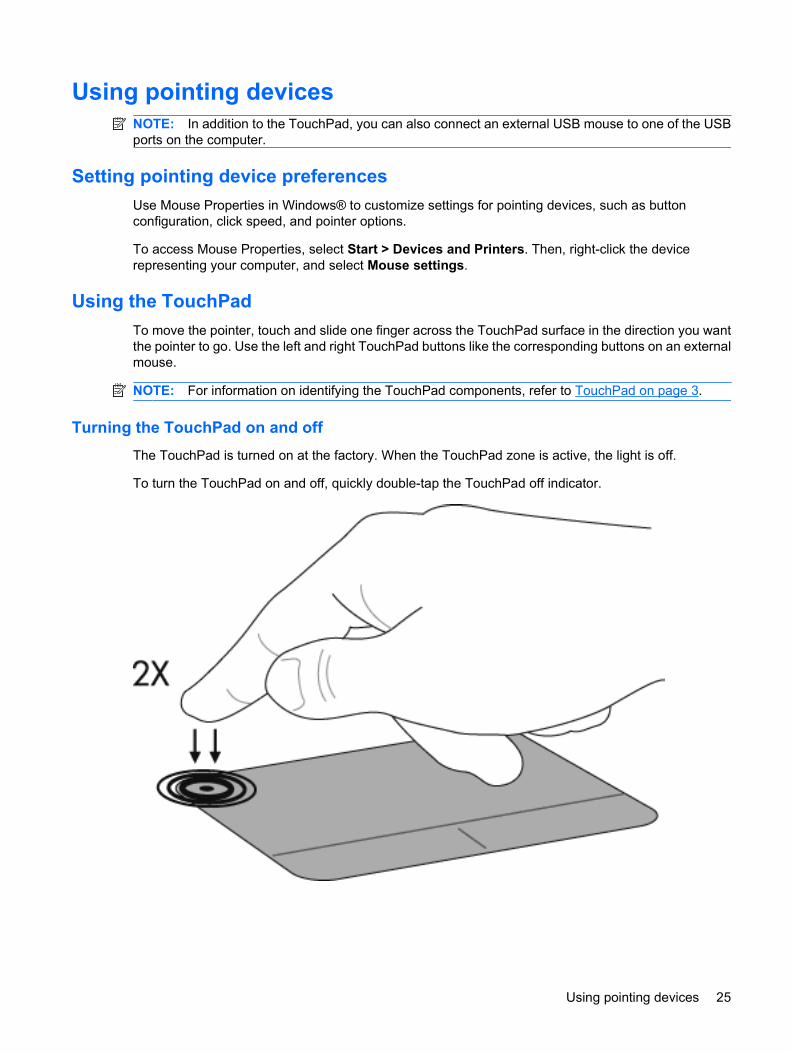
Turning the TouchPad on and offThe TouchPad is turned on at the factory. When the TouchPad zone is active, the light is off.
To turn the TouchPad on and off, quickly double-tap the TouchPad off indicator.
Using pointing devices 25
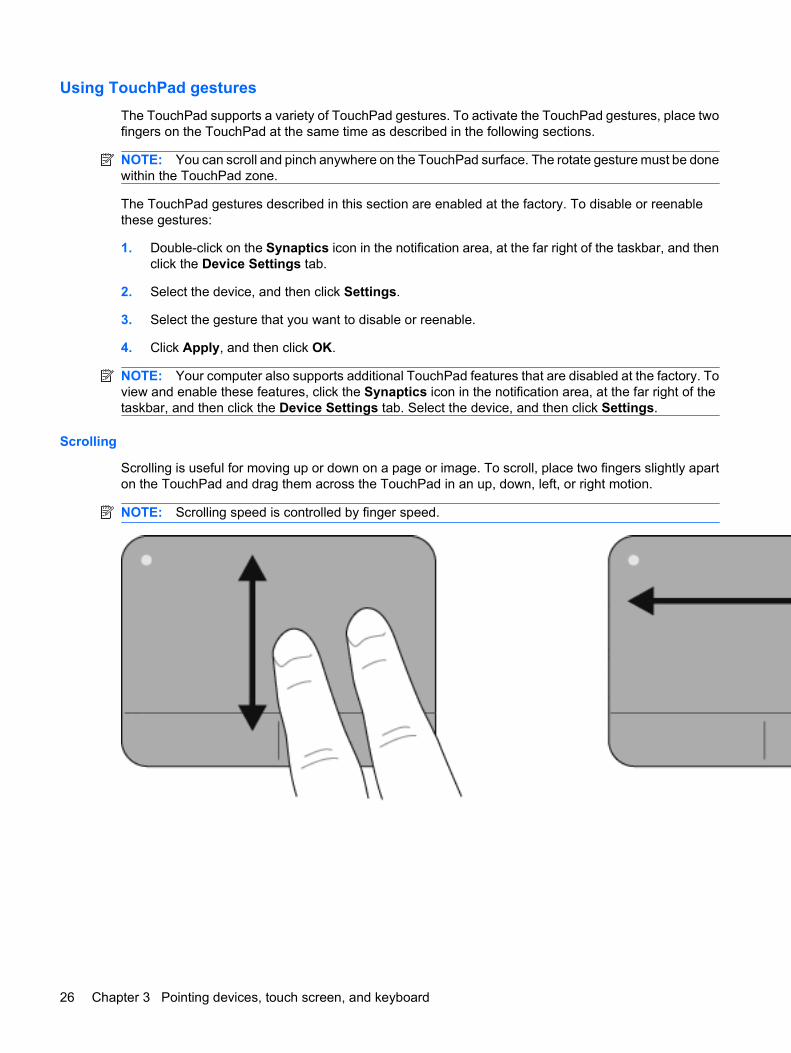
Using TouchPad gesturesThe TouchPad supports a variety of TouchPad gestures. To activate the TouchPad gestures, place twofingers on the TouchPad at the same time as described in the following sections.
NOTE: You can scroll and pinch anywhere on the TouchPad surface. The rotate gesture must be donewithin the TouchPad zone.
The TouchPad gestures described in this section are enabled at the factory. To disable or reenablethese gestures:
1. Double-click on the Synaptics icon in the notification area, at the far right of the taskbar, and thenclick the Device Settings tab.
2. Select the device, and then click Settings.
3. Select the gesture that you want to disable or reenable.
4. Click Apply, and then click OK.
NOTE: Your computer also supports additional TouchPad features that are disabled at the factory. Toview and enable these features, click the Synaptics icon in the notification area, at the far right of thetaskbar, and then click the Device Settings tab. Select the device, and then click Settings.
Scrolling
Scrolling is useful for moving up or down on a page or image. To scroll, place two fingers slightly aparton the TouchPad and drag them across the TouchPad in an up, down, left, or right motion.
NOTE: Scrolling speed is controlled by finger speed.
26 Chapter 3 Pointing devices, touch screen, and keyboard
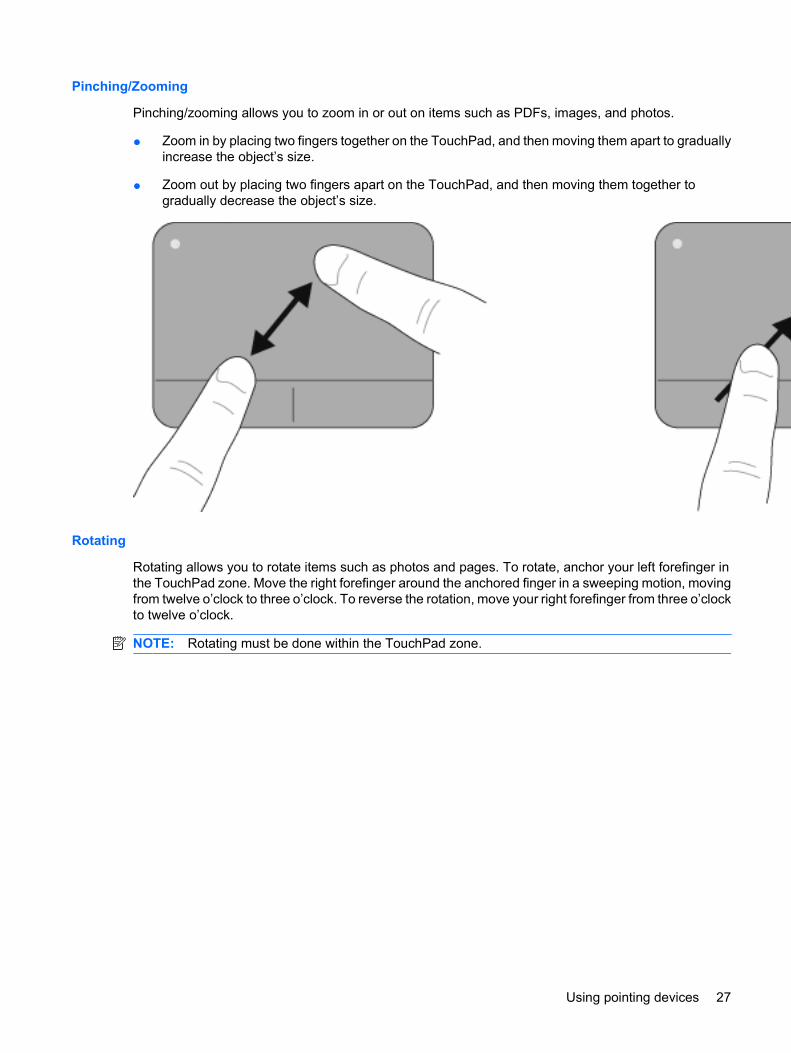
Pinching/Zooming
Pinching/zooming allows you to zoom in or out on items such as PDFs, images, and photos.
● Zoom in by placing two fingers together on the TouchPad, and then moving them apart to graduallyincrease the object’s size.
● Zoom out by placing two fingers apart on the TouchPad, and then moving them together togradually decrease the object’s size.
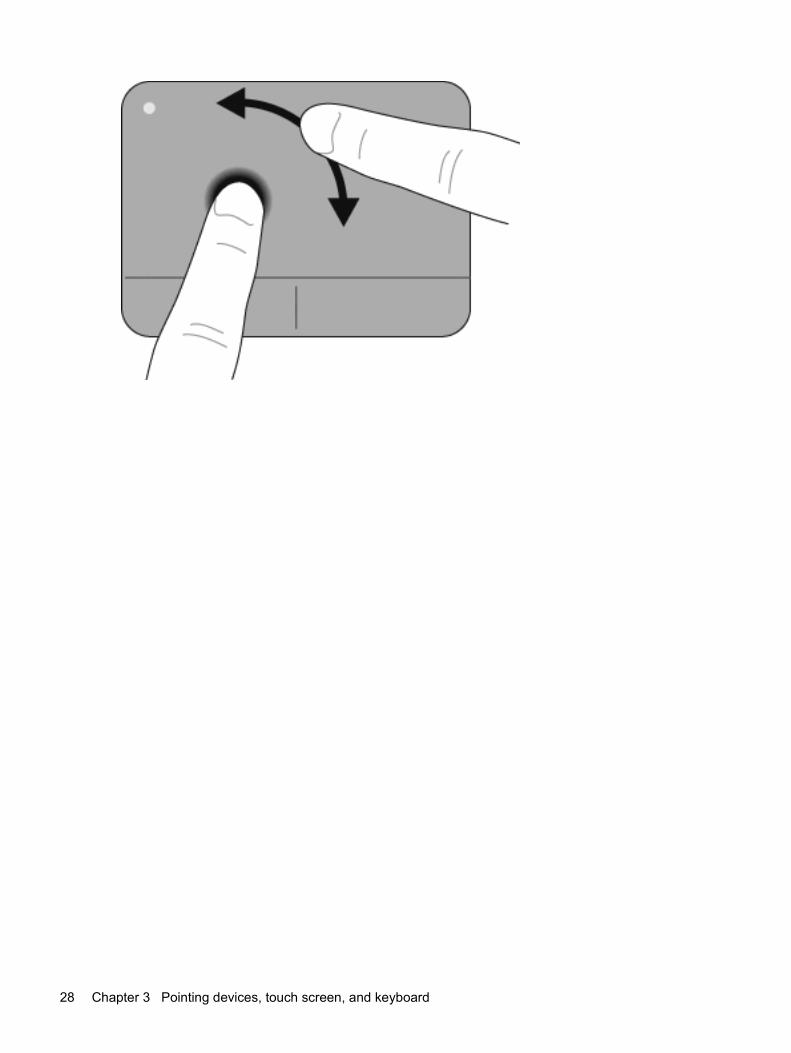
Rotating
Rotating allows you to rotate items such as photos and pages. To rotate, anchor your left forefinger inthe TouchPad zone. Move the right forefinger around the anchored finger in a sweeping motion, movingfrom twelve o’clock to three o’clock. To reverse the rotation, move your right forefinger from three o’clockto twelve o’clock.
NOTE: Rotating must be done within the TouchPad zone.
Using pointing devices 27
28 Chapter 3 Pointing devices, touch screen, and keyboard
Using the digitizer penYou can write with the pen in pen-specific programs such as Tablet PC Input Panel, in all Microsoft®Office programs, and in most other Windows programs and utilities. The information you write on thescreen with the pen can be filed, searched, and shared among most Windows programs.
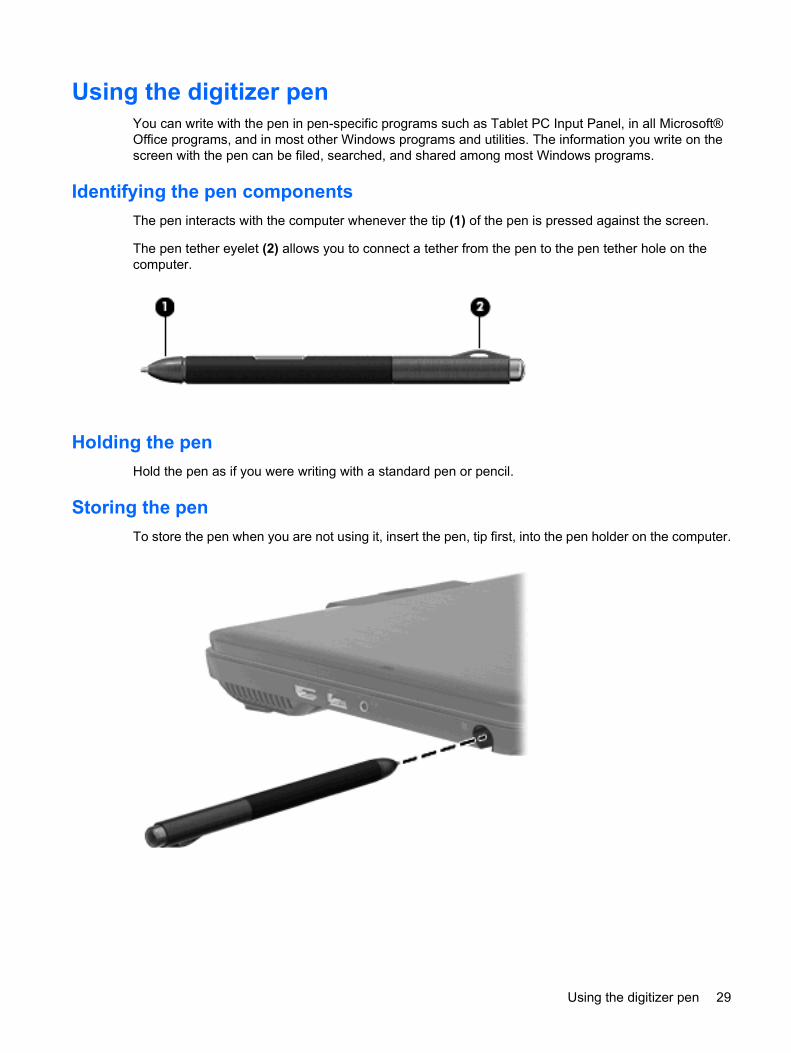
Identifying the pen componentsThe pen interacts with the computer whenever the tip (1) of the pen is pressed against the screen.
The pen tether eyelet (2) allows you to connect a tether from the pen to the pen tether hole on thecomputer.
Holding the penHold the pen as if you were writing with a standard pen or pencil.
Storing the penTo store the pen when you are not using it, insert the pen, tip first, into the pen holder on the computer.
Using the digitizer pen 29
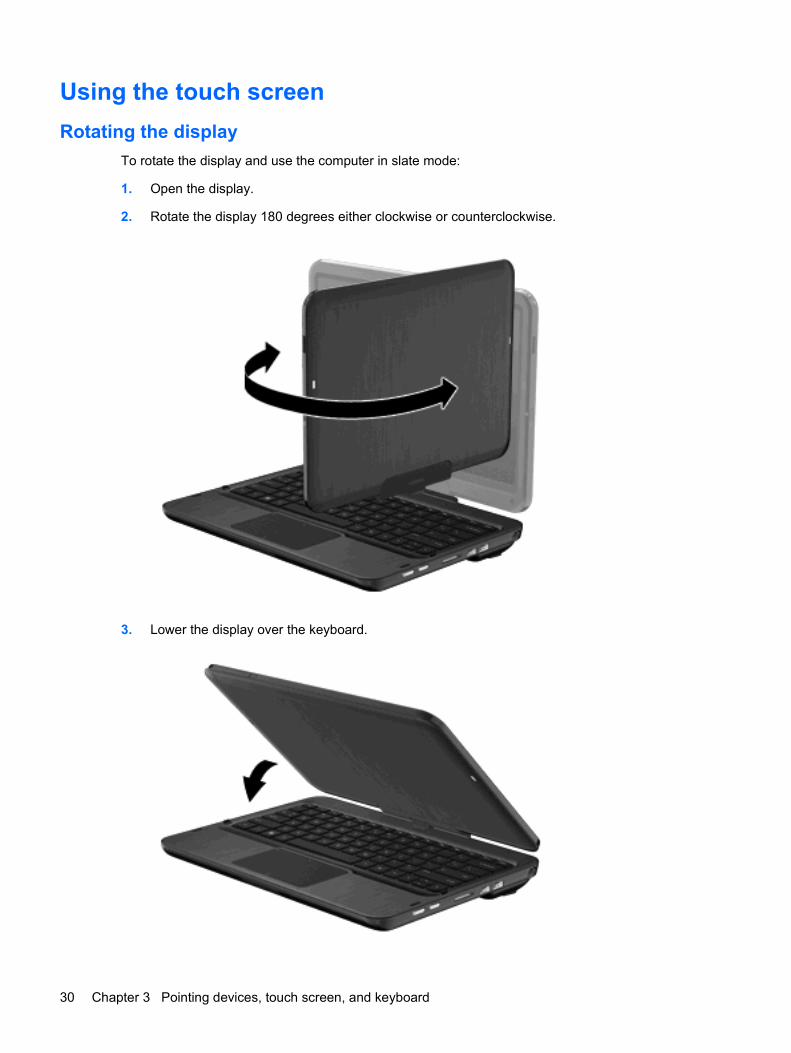
Using the touch screenRotating the display
To rotate the display and use the computer in slate mode:
1. Open the display.
2. Rotate the display 180 degrees either clockwise or counterclockwise.
3. Lower the display over the keyboard.
30 Chapter 3 Pointing devices, touch screen, and keyboard
NOTE: To reduce the risk of damage to your computer, do not force the display past 180 degrees,and do not transport the computer while it is in slate mode.
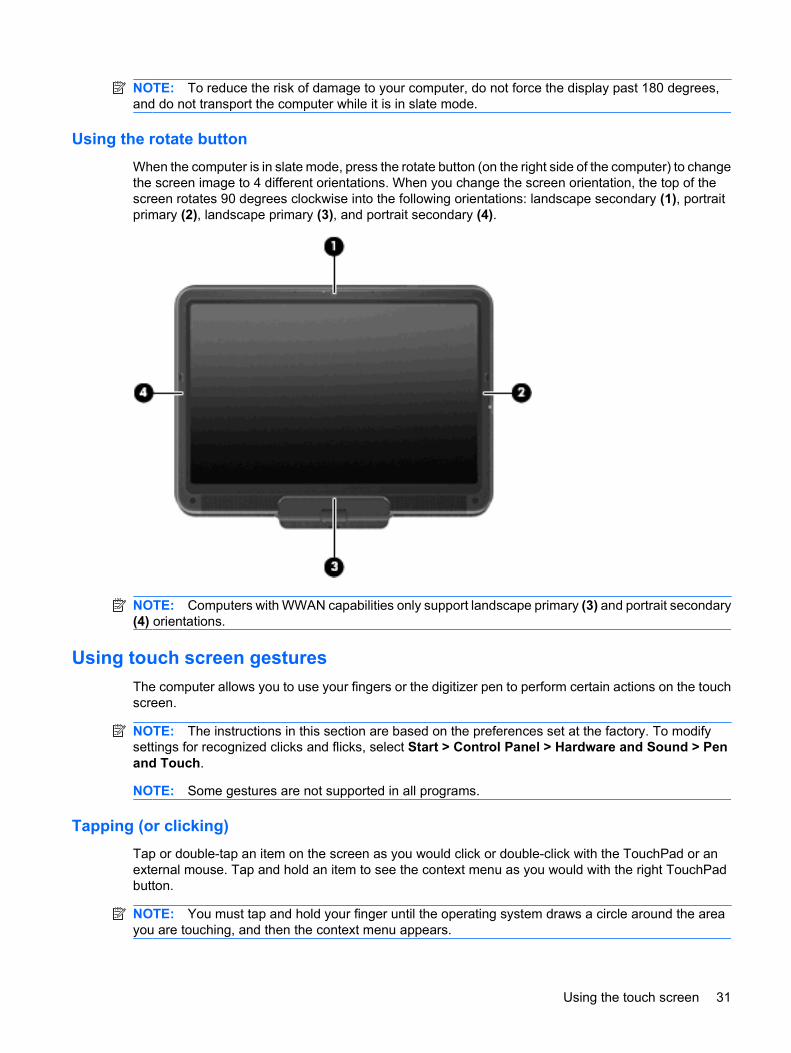
Using the rotate buttonWhen the computer is in slate mode, press the rotate button (on the right side of the computer) to changethe screen image to 4 different orientations. When you change the screen orientation, the top of thescreen rotates 90 degrees clockwise into the following orientations: landscape secondary (1), portraitprimary (2), landscape primary (3), and portrait secondary (4).
NOTE: Computers with WWAN capabilities only support landscape primary (3) and portrait secondary(4) orientations.
Using touch screen gesturesThe computer allows you to use your fingers or the digitizer pen to perform certain actions on the touchscreen.
NOTE: The instructions in this section are based on the preferences set at the factory. To modifysettings for recognized clicks and flicks, select Start > Control Panel > Hardware and Sound > Penand Touch.
NOTE: Some gestures are not supported in all programs.
Tapping (or clicking)Tap or double-tap an item on the screen as you would click or double-click with the TouchPad or anexternal mouse. Tap and hold an item to see the context menu as you would with the right TouchPadbutton.
NOTE: You must tap and hold your finger until the operating system draws a circle around the areayou are touching, and then the context menu appears.
Using the touch screen 31

FlickingTouch the screen in a light, quick flicking motion up, down, left, or right to navigate through screens orquickly scroll through documents.
NOTE: For the flick movement to work, a scrollbar must be present and in the active window.
DraggingPress your finger on an item on the screen, and then move your finger to drag the item to a new location.You can also use this motion to slowly scroll through documents.
ScrollingScrolling is useful for moving up or down on a page or image. To scroll, place two fingers slightly aparton the screen, and then drag them across the screen in an up, down, left, or right motion.
NOTE: Scrolling speed is controlled by finger speed.
32 Chapter 3 Pointing devices, touch screen, and keyboard
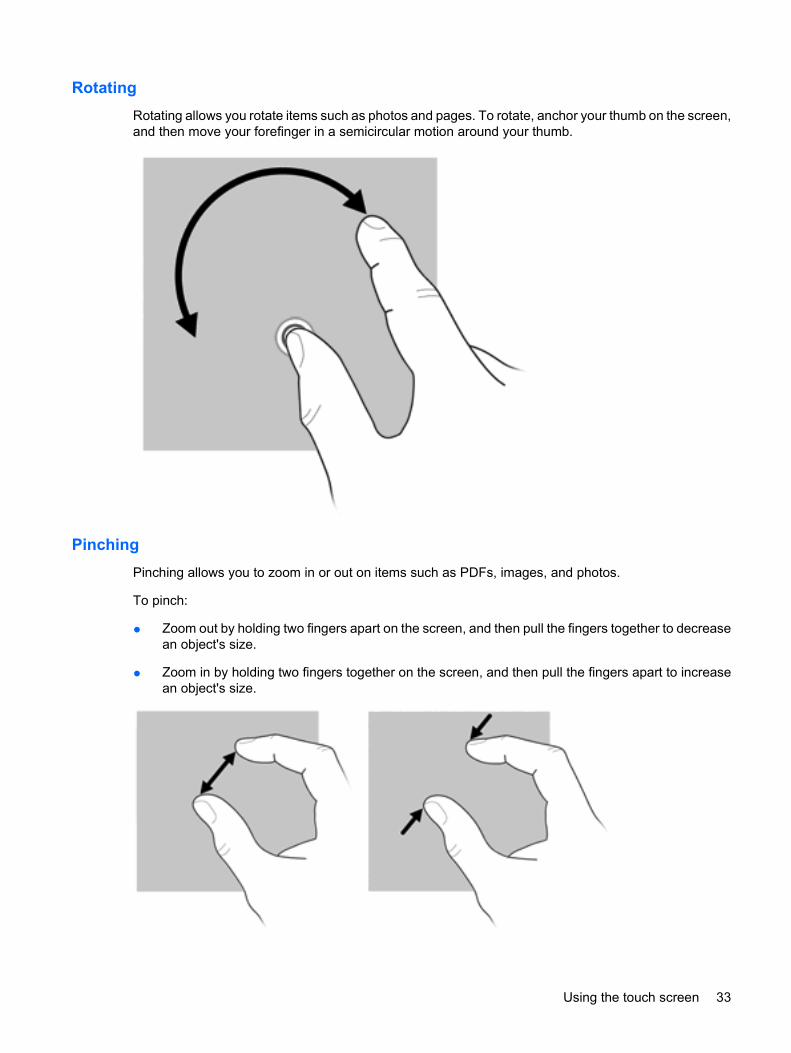
RotatingRotating allows you rotate items such as photos and pages. To rotate, anchor your thumb on the screen,and then move your forefinger in a semicircular motion around your thumb.
PinchingPinching allows you to zoom in or out on items such as PDFs, images, and photos.
To pinch:
● Zoom out by holding two fingers apart on the screen, and then pull the fingers together to decreasean object's size.
● Zoom in by holding two fingers together on the screen, and then pull the fingers apart to increasean object's size.
Using the touch screen 33
Setting touch screen preferences▲ To set preferences for visual feedback, select Start > Control Panel > Hardware and Sound >
Pen and Touch. These preferences are specific to the touch screen and the computer.
▲ To set preferences for left-handed or right-handed users, select Start > Control Panel > Hardwareand Sound > Tablet PC Settings > Other tab. These preferences are specific to the touch screenand the computer.
▲ To set pointing device preferences such as pointer speed, click speed, and mouse trails, selectStart > Devices and Printers. Then, right-click the device representing your computer, and selectMouse settings. These preferences apply to any pointing device in the system.
To change or test click settings:
1. Select Start > Control Panel > Hardware and Sound> Pen and Touch > Pen Options tab.
2. Under Pen Actions, select the action, and then click Settings.
3. After making any changes or testing the settings, click OK.
To change or create flick assignments:
1. Select Start > Control Panel > Hardware and Sound> Pen and Touch > Flicks tab.
2. Click Navigational flicks and editing flicks, and then click Customize.
3. Follow the on-screen instructions to change or create a flick assignment.
4. Click OK.
34 Chapter 3 Pointing devices, touch screen, and keyboard

Using the action keysAction keys are customized actions that are assigned to specific keys at the top of the keyboard.
To use an action key, press and hold this key to activate the assigned action.
NOTE: Depending on the application you are using, pressing fn and one of the action keys will opena specific shortcut menu within that application.
NOTE: The action key feature is enabled at the factory. You can disable this feature in Setup Utility(BIOS) and revert back to pressing the fn key and one of the action keys to activate the assigned action.Refer to Setup Utility (BIOS) on page 100 for additional information.
Icon Action Description
Help and Support Opens Help and Support, which provides information about your Windows operatingsystem and computer, answers to questions and tutorials, and updates to yourcomputer.
Help and Support also provides automated troubleshooting and links to supportspecialists.
Screen brightness down Decreases the screen brightness level incrementally when you hold down this key.
Screen brightness up Increases the screen brightness level incrementally when you hold down this key.
Switch screen image Switches the screen image among display devices connected to the system. Forexample, if a monitor is connected to the computer, pressing this key alternates thescreen image from computer display to monitor display to simultaneous display on boththe computer and the monitor.
Most external monitors receive video information from the computer using the externalVGA video standard. The switch screen image key can also alternate images amongother devices that are receiving video information from the computer.
Previous track Plays the previous track of an audio CD or the previous section of a DVD or a BD.
Play/Pause Plays, pauses, or resumes an audio CD, a DVD, or a BD.
● If an audio CD, a DVD, or a BD is not playing, press this key to begin or resumethe play.
● If an audio CD, a DVD, or a BD is playing, press this key to pause the play.
Stop Stops audio or video playback of a CD, a DVD, or a BD.
Next track Plays the next track of an audio CD or the next section of a DVD or a BD.
Using the action keys 35
Icon Action Description
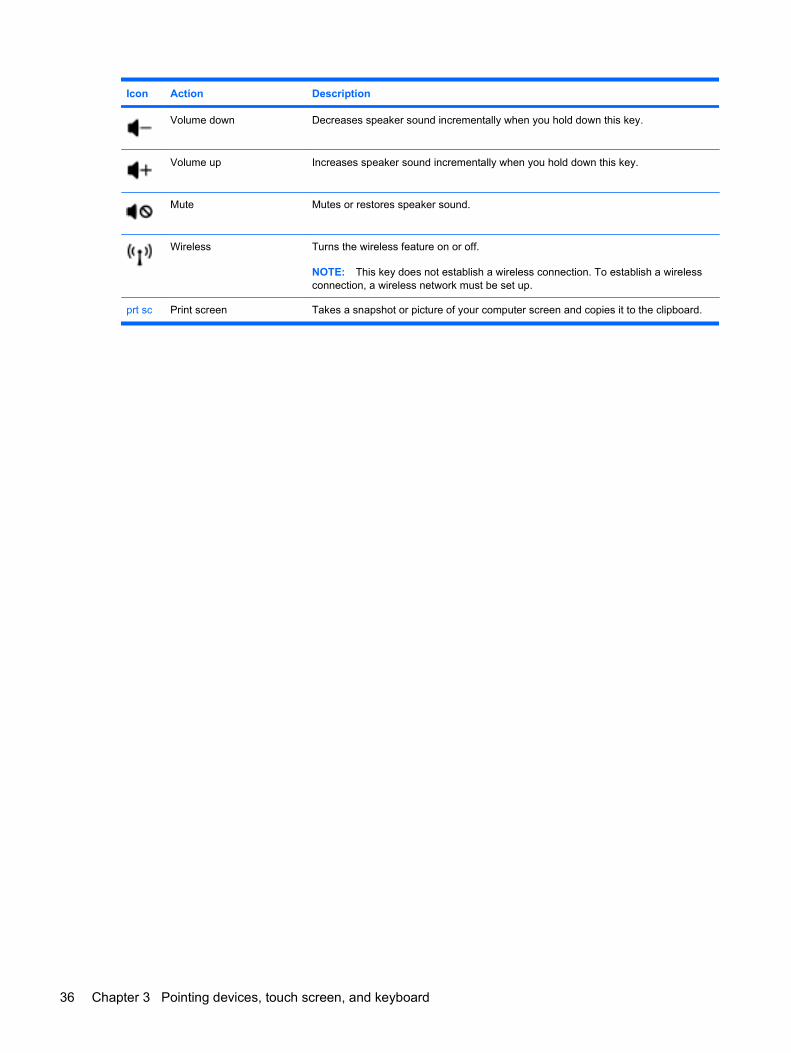
Volume down Decreases speaker sound incrementally when you hold down this key.
Volume up Increases speaker sound incrementally when you hold down this key.
Mute Mutes or restores speaker sound.
Wireless Turns the wireless feature on or off.
NOTE: This key does not establish a wireless connection. To establish a wirelessconnection, a wireless network must be set up.
prt sc Print screen Takes a snapshot or picture of your computer screen and copies it to the clipboard.
36 Chapter 3 Pointing devices, touch screen, and keyboard
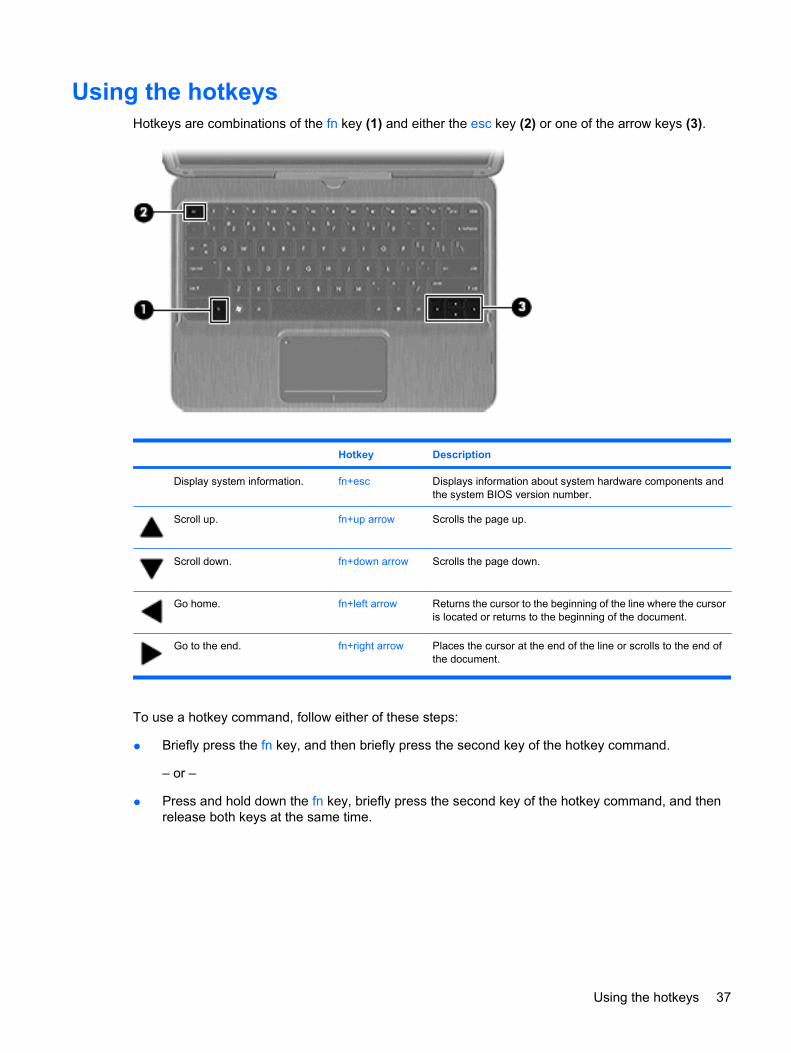
Using the hotkeysHotkeys are combinations of the fn key (1) and either the esc key (2) or one of the arrow keys (3).
Hotkey Description
Display system information. fn+esc Displays information about system hardware components andthe system BIOS version number.
Scroll up. fn+up arrow Scrolls the page up.
Scroll down. fn+down arrow Scrolls the page down.
Go home. fn+left arrow Returns the cursor to the beginning of the line where the cursoris located or returns to the beginning of the document.
Go to the end. fn+right arrow Places the cursor at the end of the line or scrolls to the end ofthe document.
To use a hotkey command, follow either of these steps:
● Briefly press the fn key, and then briefly press the second key of the hotkey command.
– or –
● Press and hold down the fn key, briefly press the second key of the hotkey command, and thenrelease both keys at the same time.
Using the hotkeys 37

4 Multimedia
38 Chapter 4 Multimedia
Multimedia featuresYour computer includes multimedia features that allow you to listen to music, watch movies, and viewpictures. Your computer may include the following multimedia components:
● Integrated speakers for listening to music
● Integrated microphones for recording your own audio
● Integrated webcam that allows you to capture and share video
● Preinstalled multimedia software that allows you to play and manage your music, movies, andpictures
● Multimedia keys that provide fast access to multimedia tasks
The following sections explain how to use the multimedia components included with your computer.
Multimedia features 39
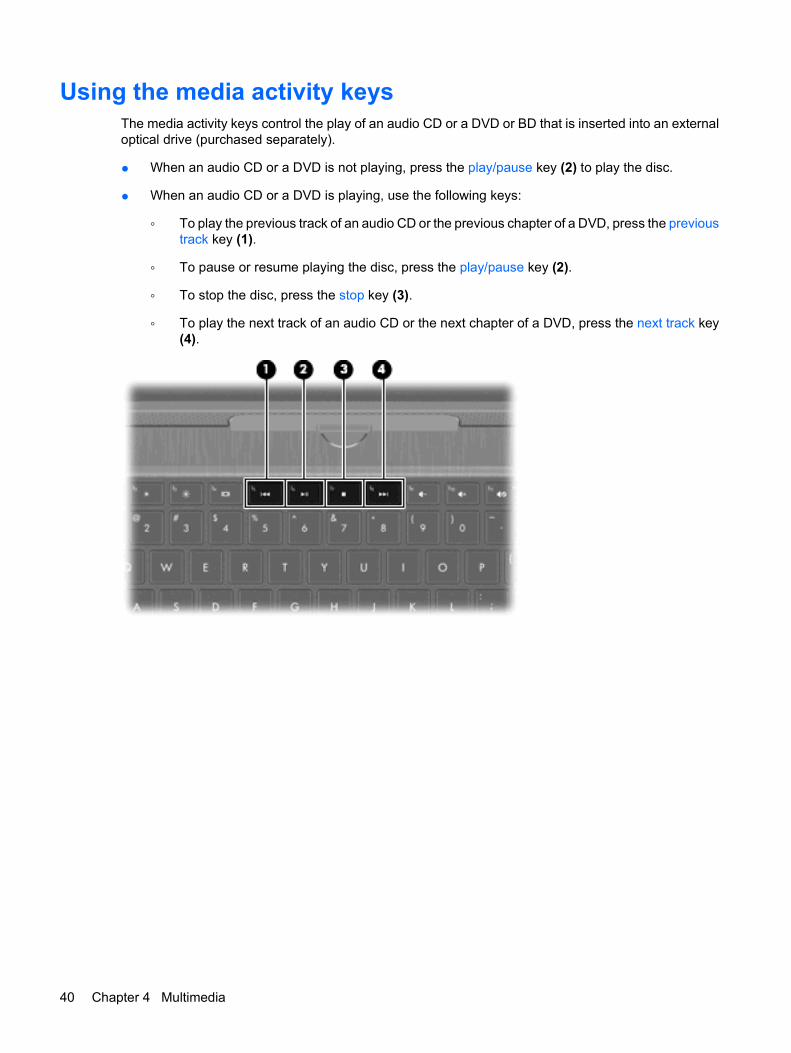
Using the media activity keysThe media activity keys control the play of an audio CD or a DVD or BD that is inserted into an externaloptical drive (purchased separately).
● When an audio CD or a DVD is not playing, press the play/pause key (2) to play the disc.
● When an audio CD or a DVD is playing, use the following keys:
◦ To play the previous track of an audio CD or the previous chapter of a DVD, press the previoustrack key (1).
◦ To pause or resume playing the disc, press the play/pause key (2).
◦ To stop the disc, press the stop key (3).
◦ To play the next track of an audio CD or the next chapter of a DVD, press the next track key(4).
40 Chapter 4 Multimedia
Multimedia softwareThe computer includes preinstalled multimedia software.
If you have an external optical drive (purchased separately), you can also perform the followingmultimedia tasks:
● Playing digital media, including audio and video CDs, audio and video DVDs
● Creating or copying data CDs
● Creating, editing, and burning audio CDs
● Creating, editing, and burning a video or movie to a DVD or video CD
Using HP TouchSmart software or HP MediaSmart softwareDepending on your computer model, your computer has preinstalled HP TouchSmart or HP MediaSmartsoftware. TouchSmart and MediaSmart turn your computer into a mobile entertainment center. You canenjoy music and DVD and BD movies. You can also manage and edit your photo collections.
TouchSmart and MediaSmart include the following features:
● With an Internet connection, play classic oldies, choose from a range of TV shows and channels,and watch the HP-TV channel streamed in full-screen.
● Photo and video upload support:
◦ Upload your photos to an Internet photo service, such as Snapfish.
◦ Upload your home videos directly to YouTube.
◦ Upload videos you created with the webcam to the Internet.
● Pandora Internet radio (North America only)—Listen to music selected just for you, streamed fromthe Internet.
To start TouchSmart or MediaSmart:
▲ Double-tap the TouchSmart icon or the MediaSmart icon on the taskbar.
Using multimedia software▲ Select Start > All Programs, and then open the multimedia program you want to use. For example,
if you want to use Windows Media Player to play an audio CD, click Windows Media Player.
– or –
1. Insert a disc into an external optical drive (purchased separately).
An AutoPlay dialog box opens.
2. Click a multimedia task from the list, and then choose the software you want to use for that task.
Multimedia software 41
Installing multimedia software from a discAlthough your computer does not have an integrated optical drive, you can easily access software, installapplications, and access data in either of the following ways:
● Connect an external optical drive (select models only or purchased separately) to one of the USBports on your computer.
NOTE: For additional information on external optical drives, refer to Using external driveson page 77.
● Share the optical drive that is connected to another computer on your network.
NOTE: You must have a network set up in order to share an optical drive. For additionalinformation on sharing optical drives, refer to Sharing an optical drive on page 79.
NOTE: Some discs, such as DVD movies and game discs, may be copy-protected and thereforeunusable through DVD or CD sharing.
42 Chapter 4 Multimedia
AudioYour computer enables you to use a variety of audio features:
● Play music using your computer speakers and/or connected external speakers
● Record sound using the internal microphone or connect an external microphone
● Download music from the Internet
● Create multimedia presentations using audio and images
● Transmit sound and images with instant messaging programs
● Stream radio programs
● Create (burn) audio CDs with an optional optical drive
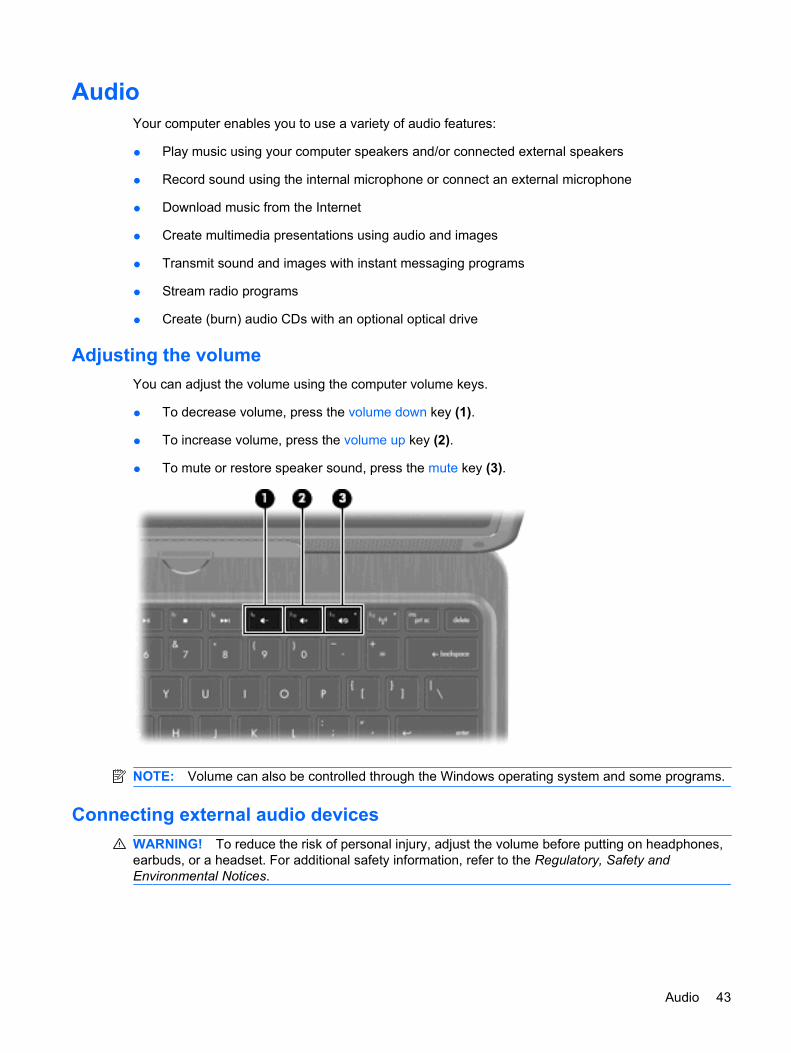
Adjusting the volumeYou can adjust the volume using the computer volume keys.
● To decrease volume, press the volume down key (1).
● To increase volume, press the volume up key (2).
● To mute or restore speaker sound, press the mute key (3).
NOTE: Volume can also be controlled through the Windows operating system and some programs.
Connecting external audio devicesWARNING! To reduce the risk of personal injury, adjust the volume before putting on headphones,earbuds, or a headset. For additional safety information, refer to the Regulatory, Safety andEnvironmental Notices.
Audio 43

To connect external devices such as external speakers, headphones, earbuds, a headset, televisionaudio, or a headset microphone, refer to the information provided with the device. For best results,remember the following tips:
● Be sure that the device cable has a 4-conductor connector that supports both audio-out(headphone) and audio-in (microphone).
● Be sure that the device cable is securely connected to the correct jack on your computer.
● Be sure to install any drivers required by the external device.
NOTE: A driver is a required program that acts like a translator between the device and theprograms that use the device.
44 Chapter 4 Multimedia
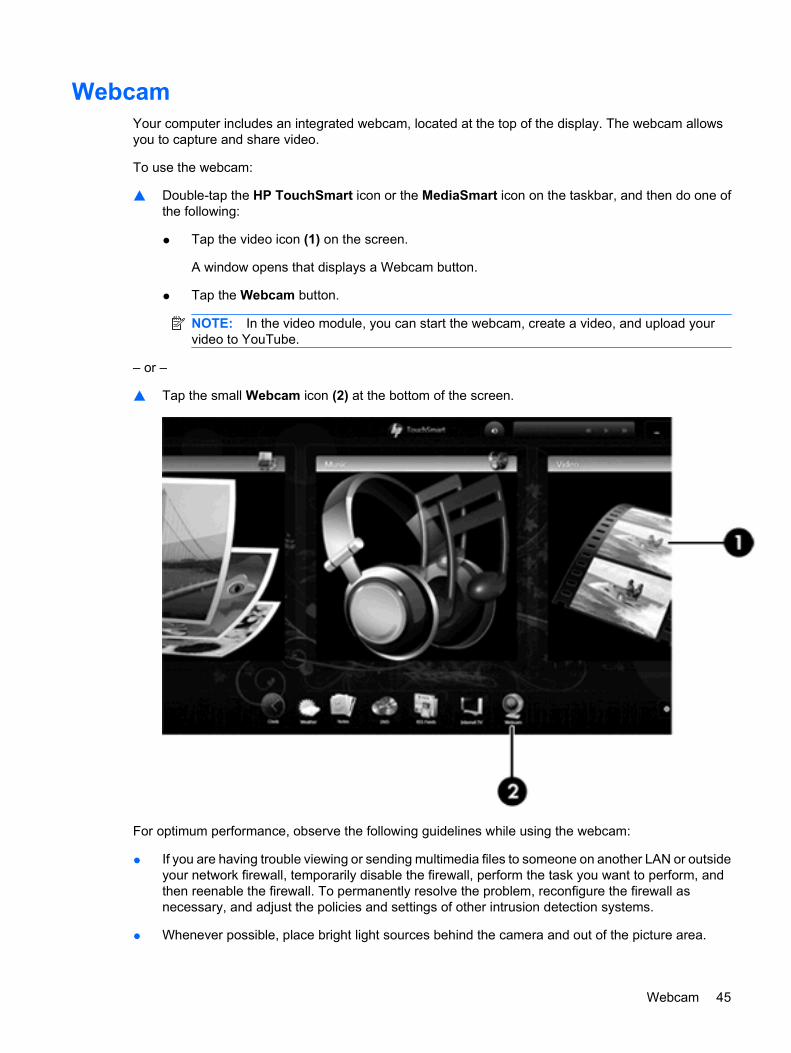
WebcamYour computer includes an integrated webcam, located at the top of the display. The webcam allowsyou to capture and share video.
To use the webcam:
▲ Double-tap the HP TouchSmart icon or the MediaSmart icon on the taskbar, and then do one ofthe following:
● Tap the video icon (1) on the screen.
A window opens that displays a Webcam button.
● Tap the Webcam button.
NOTE: In the video module, you can start the webcam, create a video, and upload yourvideo to YouTube.
– or –
▲ Tap the small Webcam icon (2) at the bottom of the screen.
For optimum performance, observe the following guidelines while using the webcam:
● If you are having trouble viewing or sending multimedia files to someone on another LAN or outsideyour network firewall, temporarily disable the firewall, perform the task you want to perform, andthen reenable the firewall. To permanently resolve the problem, reconfigure the firewall asnecessary, and adjust the policies and settings of other intrusion detection systems.
● Whenever possible, place bright light sources behind the camera and out of the picture area.
Webcam 45
Adjusting webcam propertiesYou can adjust webcam properties using the Properties dialog box, which is accessible from variousprograms that use the integrated camera, usually from a configuration, settings, or properties menu:
● Brightness—Controls the amount of light that is incorporated into the image. A higher brightnesssetting creates a brighter image; a lower brightness setting creates a darker image.
● Contrast—Controls the difference between lighter and darker areas on the image. A highercontrast setting intensifies the image; a lower contrast setting maintains more of the originalinformation’s dynamic range but leads to a flatter image.
● Hue—Controls the aspect of color that distinguishes it from another color (what makes a color red,green, or blue). Hue is distinct from saturation, which measures the intensity of the hue.
● Saturation—Controls the strength of color in the final image. A higher saturation setting creates abolder image; a lower saturation setting creates a more subtle image.
● Sharpness—Controls the definition of edges in an image. A higher sharpness setting creates amore defined image; a lower sharpness setting creates a softer image.
● Gamma—Controls the contrast affecting the mid-level grays or midtones of an image. Adjustingthe gamma of an image allows you to change the brightness values of the middle range of graytones without dramatically altering the shadows and highlights. A lower gamma setting makesgrays look black, and makes dark colors even darker.
● Backlight Comp—Compensates in cases where a subject with a large amount of background lightwould otherwise be obscured by blooming or silhouetting.
For more information about using the webcam, select Start > Help and Support.
46 Chapter 4 Multimedia
VideoYour computer enables you to use a variety of video features:
● Watch movies
● Play games over the Internet
● Edit pictures and video and create presentations
● Connect external video devices
● Watch TV over the Internet
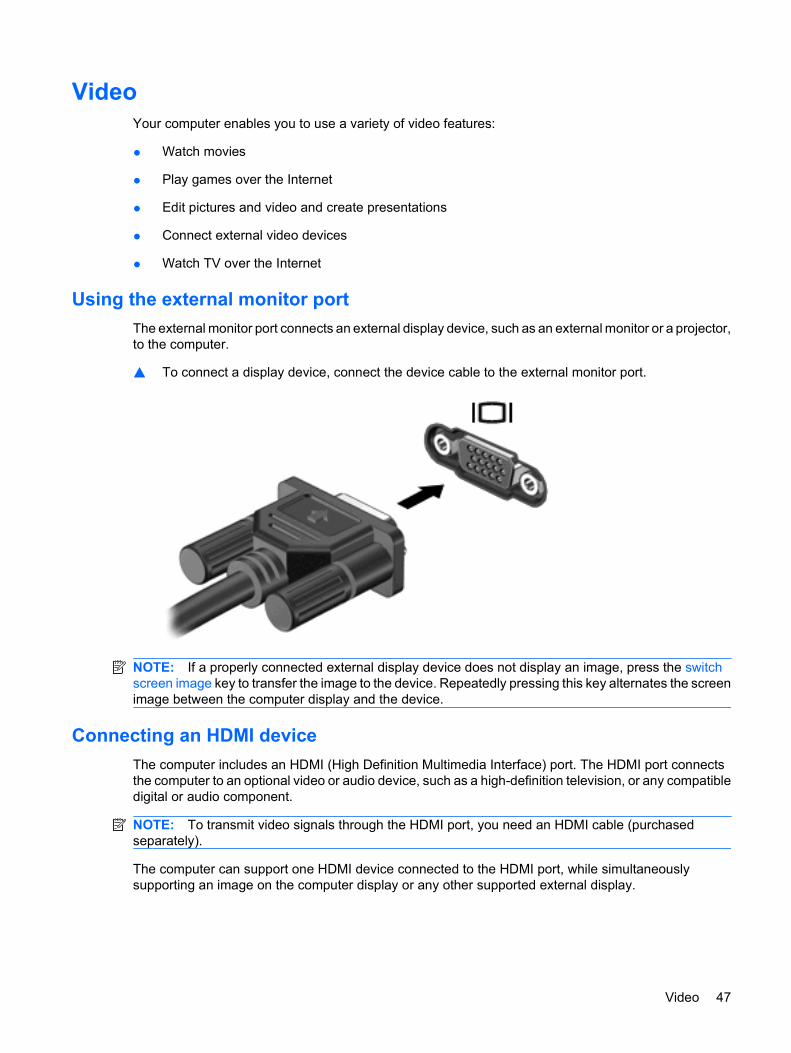
Using the external monitor portThe external monitor port connects an external display device, such as an external monitor or a projector,to the computer.
▲ To connect a display device, connect the device cable to the external monitor port.
NOTE: If a properly connected external display device does not display an image, press the switchscreen image key to transfer the image to the device. Repeatedly pressing this key alternates the screenimage between the computer display and the device.
Connecting an HDMI deviceThe computer includes an HDMI (High Definition Multimedia Interface) port. The HDMI port connectsthe computer to an optional video or audio device, such as a high-definition television, or any compatibledigital or audio component.
NOTE: To transmit video signals through the HDMI port, you need an HDMI cable (purchasedseparately).
The computer can support one HDMI device connected to the HDMI port, while simultaneouslysupporting an image on the computer display or any other supported external display.
Video 47
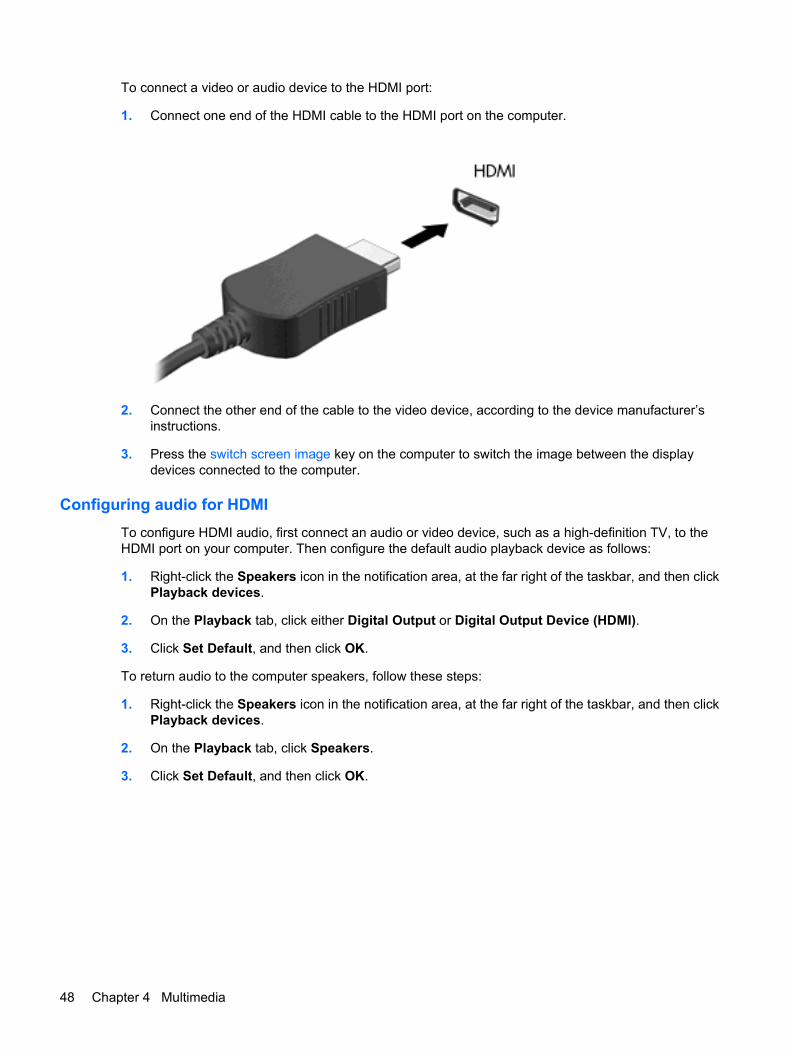
To connect a video or audio device to the HDMI port:
1. Connect one end of the HDMI cable to the HDMI port on the computer.
2. Connect the other end of the cable to the video device, according to the device manufacturer’sinstructions.
3. Press the switch screen image key on the computer to switch the image between the displaydevices connected to the computer.
Configuring audio for HDMITo configure HDMI audio, first connect an audio or video device, such as a high-definition TV, to theHDMI port on your computer. Then configure the default audio playback device as follows:
1. Right-click the Speakers icon in the notification area, at the far right of the taskbar, and then clickPlayback devices.
2. On the Playback tab, click either Digital Output or Digital Output Device (HDMI).
3. Click Set Default, and then click OK.
To return audio to the computer speakers, follow these steps:
1. Right-click the Speakers icon in the notification area, at the far right of the taskbar, and then clickPlayback devices.
2. On the Playback tab, click Speakers.
3. Click Set Default, and then click OK.
48 Chapter 4 Multimedia

5 Power management
49
Shutting down the computerCAUTION: Unsaved information will be lost when the computer is shut down.
The Shut down command closes all open programs, including the operating system, and then turns offthe display and computer.
Shut down the computer under any of the following conditions:
● When you need to replace the battery or access components inside the computer
● When you are connecting an external hardware device that does not connect to a USB port
● When the computer will be unused and disconnected from external power for an extended period
Although you can shut down the computer with the power switch, the recommended procedure is to usethe Windows Shut down command.
To shut down the computer:
NOTE: If the computer is in the Sleep state or in Hibernation, you must first exit Sleep or Hibernationbefore shutdown is possible.
1. Save your work and close all open programs.
2. Click Start.
3. Click Shut down.
If the computer is unresponsive and you are unable to use the preceding shutdown procedures, try thefollowing emergency procedures in the sequence provided:
● Press ctrl+alt+delete, and then click the Power button.
● Slide and hold the power switch for at least 5 seconds.
● Disconnect the computer from external power and remove the battery.
50 Chapter 5 Power management

Setting power devicesUsing power-saving states
The computer has two power-saving states enabled at the factory: Sleep and Hibernation.
When Sleep is initiated, the power light blinks and the screen clears. Your work is saved to memory,letting you exit Sleep faster than exiting Hibernation. If the computer is in the Sleep state for an extendedperiod or if the battery reaches a critical battery level while in the Sleep state, the computer initiatesHibernation.
When Hibernation is initiated, your work is saved to a hibernation file on the hard drive and the computerturns off.
CAUTION: To prevent possible audio and video degradation, loss of audio or video playbackfunctionality, or loss of information, do not initiate Sleep or Hibernation while reading from or writing toa disc or an external media card.
NOTE: You cannot initiate any type of networking connection or perform any computer functions whilethe computer is in the Sleep state or in Hibernation.
Initiating and exiting SleepThe system is set at the factory to initiate Sleep after 15 minutes of inactivity when running on batterypower and 30 minutes of inactivity when running on external power.
Power settings and timeouts can be changed using Power Options in Windows® Control Panel.
With the computer on, you can initiate Sleep in any of the following ways:
● Briefly slide the power switch.
● Close the display.
● Click Start, click the arrow next to the Shut down button, and then click Sleep.
You can exit Sleep in any of the following ways:
● Briefly slide the power switch.
● If the display is closed, open the display.
● Press a key on the keyboard.
● Activate the TouchPad.
When the computer exits Sleep, the power light turns on and your work returns to the screen where youstopped working.
NOTE: If you have set a password to be required on wakeup, you must enter your Windows passwordbefore your work will return to the screen.
Initiating and exiting HibernationThe system is set at the factory to initiate Hibernation after 1,080 minutes (18 hours) of inactivity whenrunning on battery power, 1,080 minutes (18 hours) of inactivity when running on external power, orwhen the battery reaches a critical battery level.
Setting power devices 51
Power settings and timeouts can be changed using Power Options in Windows Control Panel.
To initiate Hibernation:
▲ Click Start, click the arrow next to the Shut down button, and then click Hibernate.
To exit Hibernation:
▲ Briefly slide the power switch.
The power light turns on and your work returns to the screen where you stopped working.
NOTE: If you have set a password to be required on wakeup, you must enter your Windows passwordbefore your work will return to the screen.
Conserving power● Select the Power saver power plan through Power Options under System and Security in
Windows Control Panel.
● Turn off wireless and local area network (LAN) connections and exit modem applications when youare not using them.
● Disconnect external devices that are not plugged into an external power source, when you are notusing them.
● Stop, disable, or remove any external media cards that you are not using.
● Use the screen brightness keys to adjust screen brightness as needed.
● If you leave your work, initiate Sleep or Hibernation, or shut down the computer.
Using the battery meterThe battery meter is located in the notification area, at the far right of the taskbar. The battery meterallows you to quickly access power settings, view remaining battery charge, and select a different powerplan.
● To display the percentage of remaining battery charge and the current power plan, move the pointerover the battery meter icon.
● To access Power Options, or to change the power plan, click the battery meter icon and select anitem from the list.
Different battery meter icons indicate whether the computer is running on battery or external power. Theicon also displays a message if the battery has reached a low battery level, critical battery level, orreserve battery level.
To hide or display the battery meter icon:
1. Right-click the Show hidden icons icon (the arrow at the left side of the notification area).
2. Click Customize notification icons.
3. Under Behaviors, select Show icon and notifications for the Power icon.
4. Click OK.
52 Chapter 5 Power management
Using power plansA power plan is a collection of system settings that manages how the computer uses power. Powerplans can help you conserve power or maximize performance.
You can change power plan settings or create your own power plan.
Viewing the current power plan▲ Click the battery meter icon in the notification area, at the far right of the taskbar.
– or –
Select Start > Control Panel > System and Security > Power Options.
Selecting a different power plan▲ Click the battery meter icon in the notification area, and then select a power plan from the list.
– or –
Select Start > Control Panel > System and Security > Power Options, and then select a powerplan from the list.
Customizing power plans1. Click the battery meter icon in the notification area, and then click More power options.
– or –
Select Start > Control Panel > System and Security > Power Options.
2. Select a power plan, and then click Change plan settings.
3. Change the settings as needed.
4. To change additional settings, click Change advanced power settings and make your changes.
Setting password protection on wakeupTo set the computer to prompt for a password when the computer exits Sleep or Hibernation, followthese steps:
1. Select Start > Control Panel > System and Security > Power Options.
2. In the left pane, click Require a password on wakeup.
3. Click Change Settings that are currently unavailable.
4. Click Require a password (recommended).
NOTE: If you need to create a user account password or change your current user accountpassword, click Create or change your user account password, and then follow the on-screeninstructions. If you do not need to create or change a user account password, go to step 5.
5. Click Save changes.
Setting power devices 53
Using battery powerWhen a charged battery is in the computer and the computer is not plugged into external power, thecomputer runs on battery power. When the computer is plugged into external AC power, the computerruns on AC power.
If the computer contains a charged battery and is running on external AC power supplied through theAC adapter, the computer switches to battery power if the AC adapter is disconnected from thecomputer.
NOTE: The display brightness is decreased to save battery life when you disconnect AC power. Toincrease display brightness, press the screen brightness up key or reconnect the AC adapter.
You can keep a battery in the computer or in storage, depending on how you work. Keeping the batteryin the computer whenever the computer is plugged into AC power charges the battery and also protectsyour work in case of a power outage. However, a battery in the computer slowly discharges when thecomputer is off and unplugged from external power.
WARNING! To reduce potential safety issues, use only the battery provided with the computer, areplacement battery provided by HP, or a compatible battery purchased from HP.
Computer battery life varies, depending on power management settings, programs running on thecomputer, display brightness, external devices connected to the computer, and other factors.
Finding battery information in Help and SupportHelp and Support provides the following tools and information about the battery:
● Battery Check tool to test battery performance
● Information on calibration, power management, and proper care and storage to maximize batterylife
● Information on battery types, specifications, life cycles, and capacity
To access battery information:
▲ Select Start > Help and Support > Learn > Power Plans: Frequently Asked Questions.
Using Battery CheckHelp and Support provides information on the status of the battery installed in the computer.
To run Battery Check:
1. Connect the AC adapter to the computer.
NOTE: The computer must be connected to external power for Battery Check to function properly.
2. Select Start > Help and Support > Troubleshoot > Power, Thermal and Mechanical.
3. Click the Power tab, and then click Battery Check.
Battery Check examines the battery and its cells to see if they are functioning properly, and then reportsthe results of the examination.
54 Chapter 5 Power management
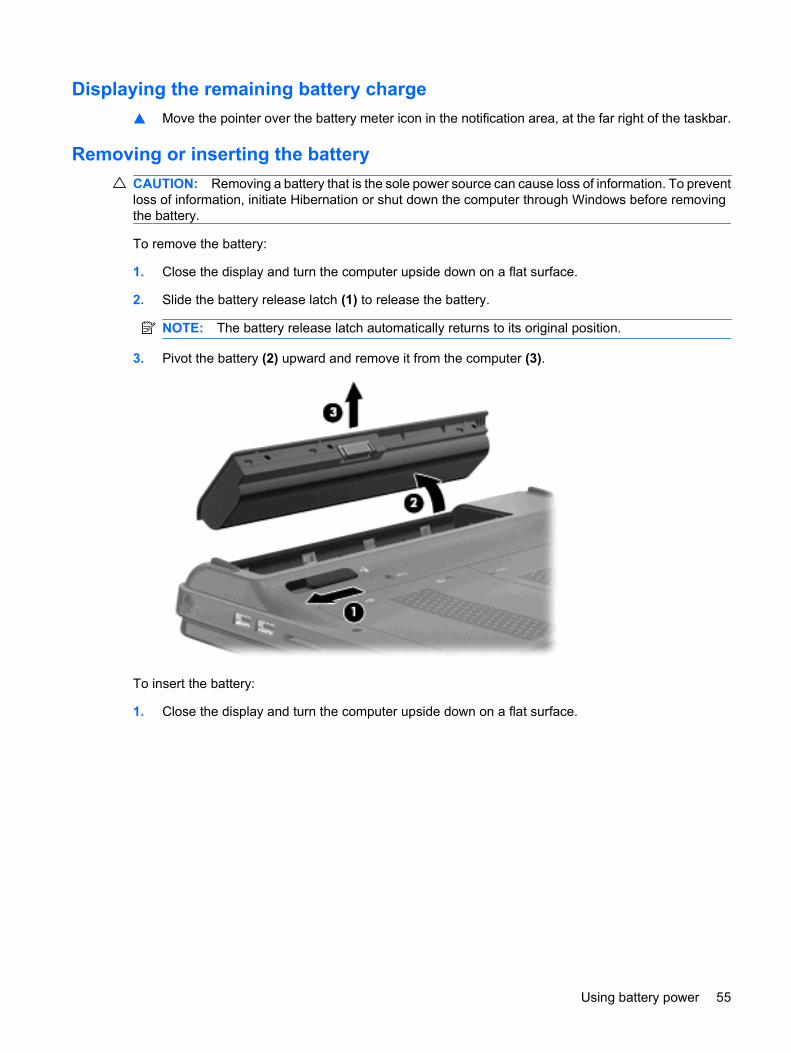
Displaying the remaining battery charge▲ Move the pointer over the battery meter icon in the notification area, at the far right of the taskbar.
Removing or inserting the batteryCAUTION: Removing a battery that is the sole power source can cause loss of information. To preventloss of information, initiate Hibernation or shut down the computer through Windows before removingthe battery.
To remove the battery:
1. Close the display and turn the computer upside down on a flat surface.
2. Slide the battery release latch (1) to release the battery.
NOTE: The battery release latch automatically returns to its original position.
3. Pivot the battery (2) upward and remove it from the computer (3).
To insert the battery:
1. Close the display and turn the computer upside down on a flat surface.
Using battery power 55
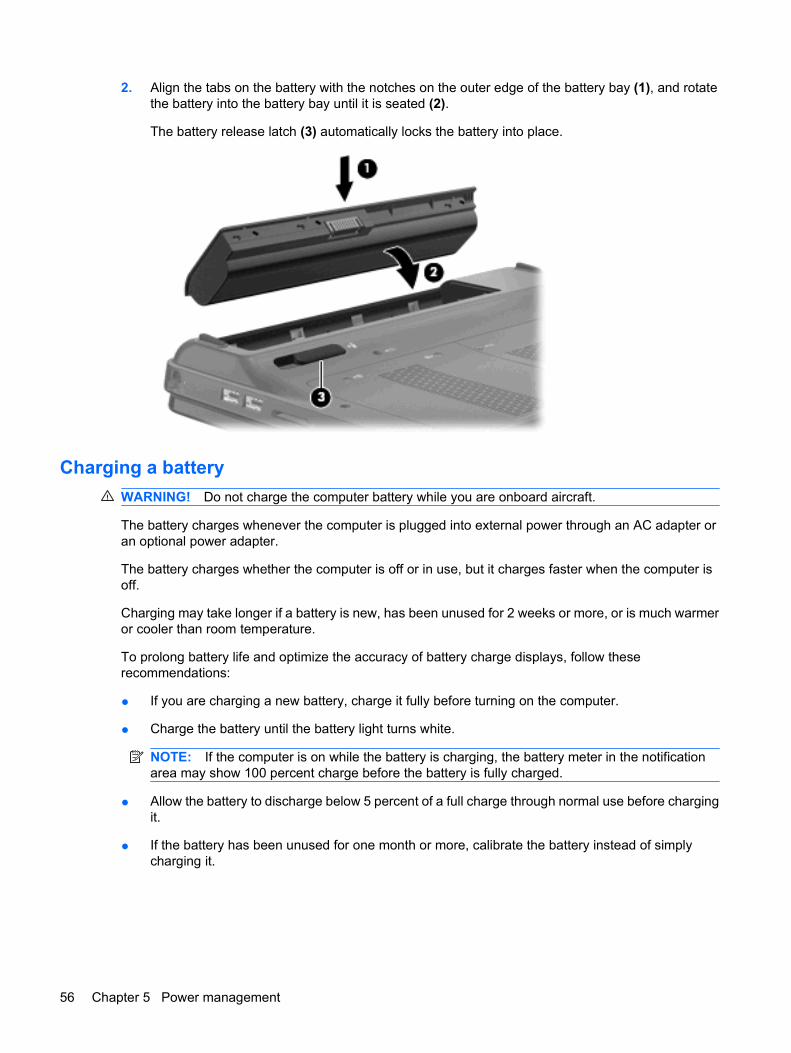
2. Align the tabs on the battery with the notches on the outer edge of the battery bay (1), and rotatethe battery into the battery bay until it is seated (2).
The battery release latch (3) automatically locks the battery into place.
Charging a batteryWARNING! Do not charge the computer battery while you are onboard aircraft.
The battery charges whenever the computer is plugged into external power through an AC adapter oran optional power adapter.
The battery charges whether the computer is off or in use, but it charges faster when the computer isoff.
Charging may take longer if a battery is new, has been unused for 2 weeks or more, or is much warmeror cooler than room temperature.
To prolong battery life and optimize the accuracy of battery charge displays, follow theserecommendations:
● If you are charging a new battery, charge it fully before turning on the computer.
● Charge the battery until the battery light turns white.
NOTE: If the computer is on while the battery is charging, the battery meter in the notificationarea may show 100 percent charge before the battery is fully charged.
● Allow the battery to discharge below 5 percent of a full charge through normal use before chargingit.
● If the battery has been unused for one month or more, calibrate the battery instead of simplycharging it.
56 Chapter 5 Power management
The battery light on the computer displays the following charge status:
● Off: The computer is running on battery power.
● Blinking amber: The battery has reached a low battery level, a critical battery level, or there is abattery error.
● Amber: The battery is charging.
● White: The computer is connected to external power and the battery is fully charged.
Maximizing battery discharge timeBattery discharge time varies depending on the features you use while on battery power. Maximumdischarge time gradually shortens, as the battery storage capacity naturally degrades.
Tips for maximizing battery discharge time:
● Lower the brightness on the display.
● Check the Power saver setting in Power Options.
● Remove the battery from the computer when it is not being used or charged.
● Store the battery in a cool, dry location.
Managing low battery levelsThe information in this section describes the alerts and system responses set at the factory. Some low-battery alerts and system responses can be changed using Power Options in Windows Control Panel.Preferences set using Power Options do not affect lights.
Identifying low battery levelsWhen a battery that is the sole power source for the computer reaches a low or critical battery level, thebattery meter icon in the notification area shows a low or critical battery notification.
When the battery reaches a critical battery level, a notification appears above the battery meter iconthat shows how much battery charge remains.
NOTE: For additional information on the battery meter, refer to Using the battery meter on page 52.
The computer takes the following actions for a critical battery level:
● If Hibernation is enabled and the computer is on or in the Sleep state, the computer initiatesHibernation.
● If Hibernation is disabled and the computer is on or in the Sleep state, the computer remains brieflyin the Sleep state, and then shuts down and loses any unsaved information.
Using battery power 57
Resolving a low battery levelCAUTION: To reduce the risk of losing information when the computer reaches a critical battery leveland has initiated Hibernation, do not restore power until the power light turns off.
Resolving a low battery level when external power is available
▲ Connect one of the following devices:
● AC adapter
● Optional power adapter purchased as an accessory from HP
Resolving a low battery level when a charged battery is available
1. Turn off the computer or initiate Hibernation.
2. Remove the discharged battery, and then insert a charged battery.
3. Turn on the computer.
Resolving a low battery level when no power source is available
▲ Initiate Hibernation.
– or –
Save your work and shut down the computer.
Resolving a low battery level when the computer cannot exit Hibernation
When the computer lacks sufficient power to exit Hibernation, follow these steps:
1. Insert a charged battery or plug the computer into external power.
2. Exit Hibernation by sliding the power switch.
Calibrating a batteryTo maximize battery performance, you should calibrate a battery under the following conditions:
● When battery charge displays seem inaccurate
● When you observe a significant change in battery run time
Even if a battery is heavily used, it should not need to be calibrated more than once a month. It is alsonot necessary to calibrate a new battery.
▲ To calibrate a battery and for additional information, select Start > Help and Support.
Storing a batteryCAUTION: To prevent damage to a battery, do not expose it to high temperatures for extended periodsof time.
If a computer will be unused and unplugged from external power for more than 2 weeks, remove thebattery and store it separately.
To prolong the charge of a stored battery, place it in a cool, dry place.
58 Chapter 5 Power management
Calibrate a battery before using it if it has been stored for one month or more.
NOTE: A stored battery should be checked every 6 months. If the capacity is less than 50 percent,recharge the battery before returning it to storage.
Disposing of a used batteryWARNING! To reduce the risk of fire or burns, do not disassemble, crush, or puncture; do not shortexternal contacts; do not dispose of in fire or water.
Refer to the Regulatory, Safety and Environmental Notices for proper battery disposal.
Replacing the batteryComputer battery life varies, depending on power management settings, programs running on thecomputer, display brightness, external devices connected to the computer, and other factors.
Battery Check notifies you to replace the battery when an internal cell is not charging properly, or whenthe battery storage capacity has reached a “weak” condition. A message refers you to the HP Web sitefor more information about ordering a replacement battery. If the battery is possibly covered by an HPwarranty, instructions include a warranty ID.
NOTE: To ensure that you always have battery power when you need it, HP recommends purchasinga new battery when the storage capacity indicator turns green-yellow.
Using battery power 59
Switching between graphics modes (select models only)Your computer is equipped with switchable graphics and has two modes for processing graphics. Whenyou switch from AC power to battery power, the computer can switch from using the High-performancemode to using the Power-saving mode to conserve battery life. Similarly, when you switch from batterypower to AC power, the computer can switch back to the High-performance mode.
NOTE: In some instances, in order to optimize performance of the computer, the system will not allowyou to switch modes, or it may prompt you to switch. It may also be necessary to close all programsbefore switching.
NOTE: HDMI only works in the High-performance mode. If you use the Power-saving mode, you willnot be able to use HDMI.
When you switch between AC and battery power, you are notified that the computer is about to switchgraphics modes. If you prefer, you can choose to continue using the same graphics mode. While thecomputer switches modes, the screen goes blank for a few seconds. When the switch is complete, anotification appears in the notification area, and the screen image reappears.
NOTE: When select computer models are in slate mode, the screen orientations are reset when youswitch between graphics modes.
To determine which graphics mode you are using:
▲ Right-click on the Windows desktop, and then click Configure Switchable Graphics.
60 Chapter 5 Power management
Using external AC powerExternal AC power is supplied through an approved AC adapter.
WARNING! To reduce potential safety issues, use only the AC adapter provided with the computer,a replacement AC adapter provided by HP, or a compatible AC adapter purchased from HP.
Connect the computer to external AC power under any of the following conditions:
● When you are charging or calibrating a battery
WARNING! Do not charge the computer battery while you are onboard aircraft.
● When you are installing or modifying system software
● When you are writing information to an optional external CD or DVD
When you connect the computer to external AC power, the following events occur:
● The battery begins to charge.
● If the computer is turned on, the battery meter icon in the notification area changes appearance.
When you disconnect external AC power, the following events occur:
● The computer switches to battery power.
● The display brightness is automatically decreased to save battery life. To increase displaybrightness, press the screen brightness up key or reconnect the AC adapter.
Connecting AC powerWARNING! To reduce the risk of electric shock or damage to the equipment:
Plug the power cord into an AC outlet that is easily accessible at all times.
Disconnect power from the computer by unplugging the power cord from the AC outlet (not byunplugging the power cord from the computer).
If provided with a 3-pin attachment plug on the power cord, plug the cord into a grounded (earthed) 3-pin outlet. Do not disable the power cord grounding pin, for example, by attaching a 2-pin adapter. Thegrounding pin is an important safety feature.
To connect the computer to external AC power:
1. Plug the adapter into the power connector (1) on the computer.
2. Plug the power cord into the adapter (2).
Using external AC power 61
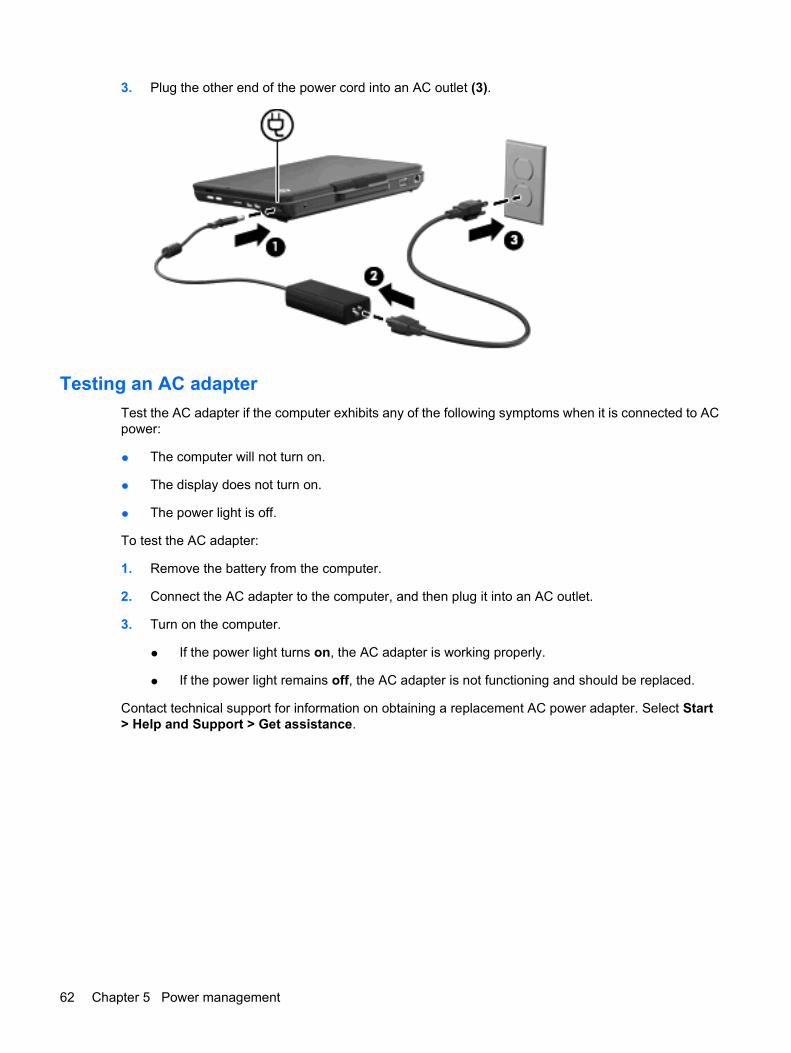
3. Plug the other end of the power cord into an AC outlet (3).
Testing an AC adapterTest the AC adapter if the computer exhibits any of the following symptoms when it is connected to ACpower:
● The computer will not turn on.
● The display does not turn on.
● The power light is off.
To test the AC adapter:
1. Remove the battery from the computer.
2. Connect the AC adapter to the computer, and then plug it into an AC outlet.
3. Turn on the computer.
● If the power light turns on, the AC adapter is working properly.
● If the power light remains off, the AC adapter is not functioning and should be replaced.
Contact technical support for information on obtaining a replacement AC power adapter. Select Start> Help and Support > Get assistance.
62 Chapter 5 Power management

6 External devices
63
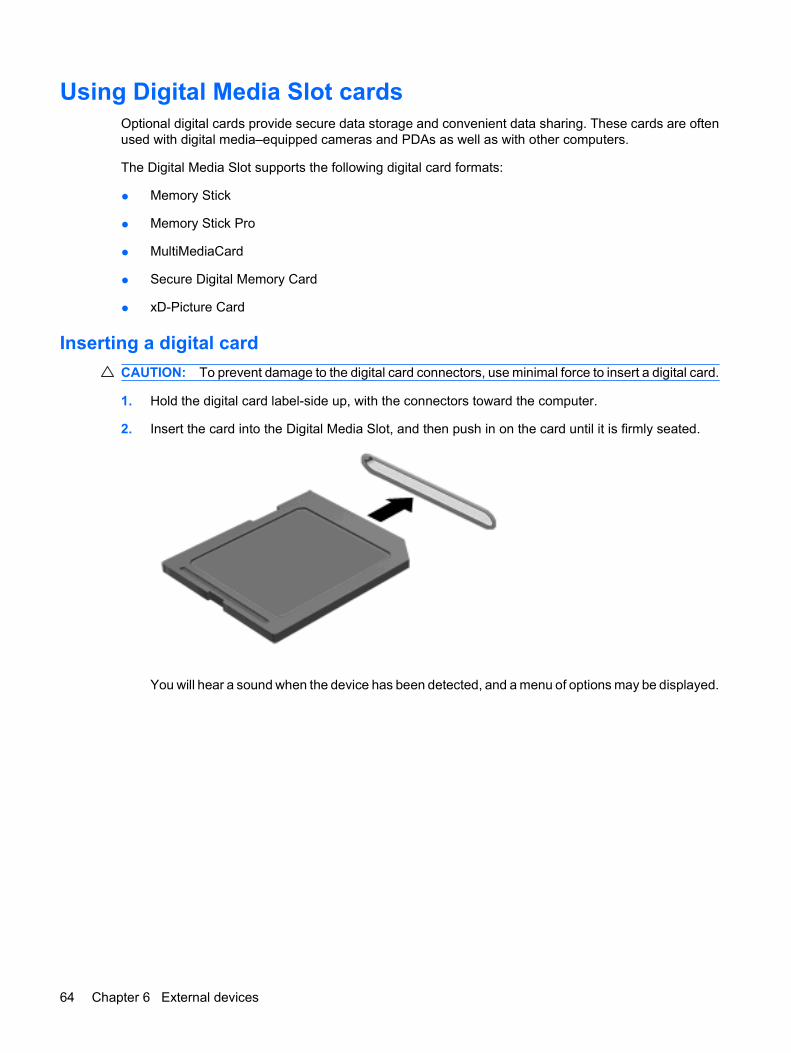
Using Digital Media Slot cardsOptional digital cards provide secure data storage and convenient data sharing. These cards are oftenused with digital media–equipped cameras and PDAs as well as with other computers.
The Digital Media Slot supports the following digital card formats:
● Memory Stick
● Memory Stick Pro
● MultiMediaCard
● Secure Digital Memory Card
● xD-Picture Card
Inserting a digital cardCAUTION: To prevent damage to the digital card connectors, use minimal force to insert a digital card.
1. Hold the digital card label-side up, with the connectors toward the computer.
2. Insert the card into the Digital Media Slot, and then push in on the card until it is firmly seated.
You will hear a sound when the device has been detected, and a menu of options may be displayed.
64 Chapter 6 External devices
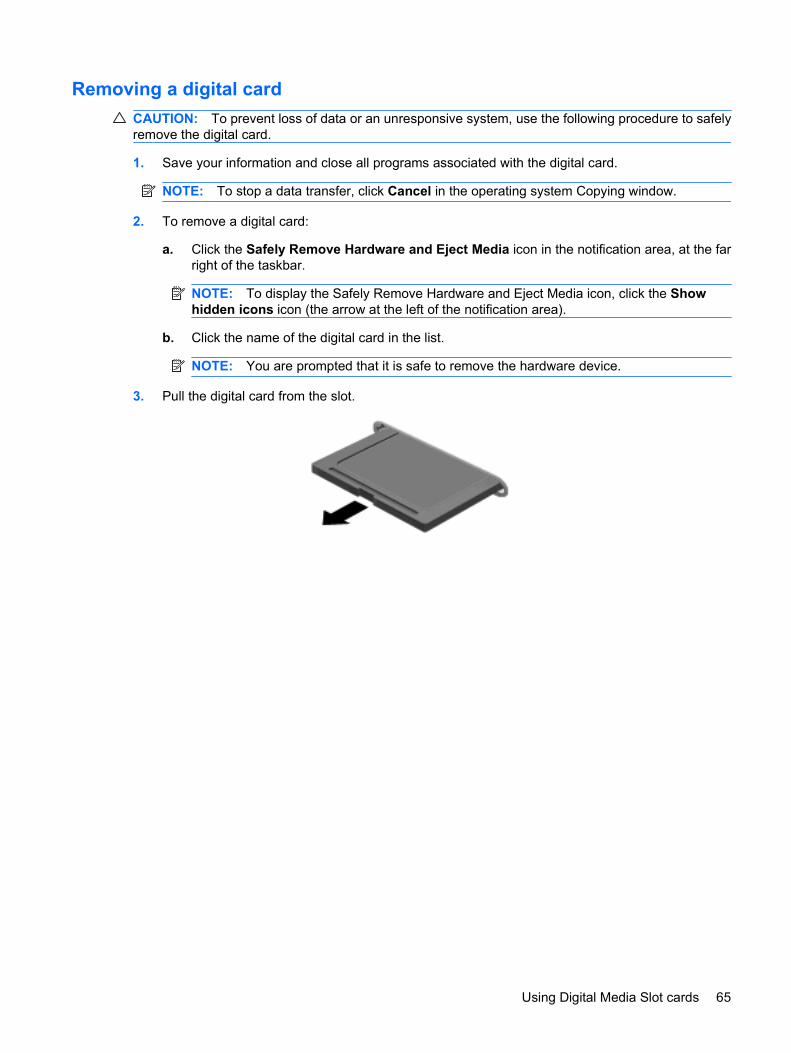
Removing a digital cardCAUTION: To prevent loss of data or an unresponsive system, use the following procedure to safelyremove the digital card.
1. Save your information and close all programs associated with the digital card.
NOTE: To stop a data transfer, click Cancel in the operating system Copying window.
2. To remove a digital card:
a. Click the Safely Remove Hardware and Eject Media icon in the notification area, at the farright of the taskbar.
NOTE: To display the Safely Remove Hardware and Eject Media icon, click the Showhidden icons icon (the arrow at the left of the notification area).
b. Click the name of the digital card in the list.
NOTE: You are prompted that it is safe to remove the hardware device.
3. Pull the digital card from the slot.
Using Digital Media Slot cards 65
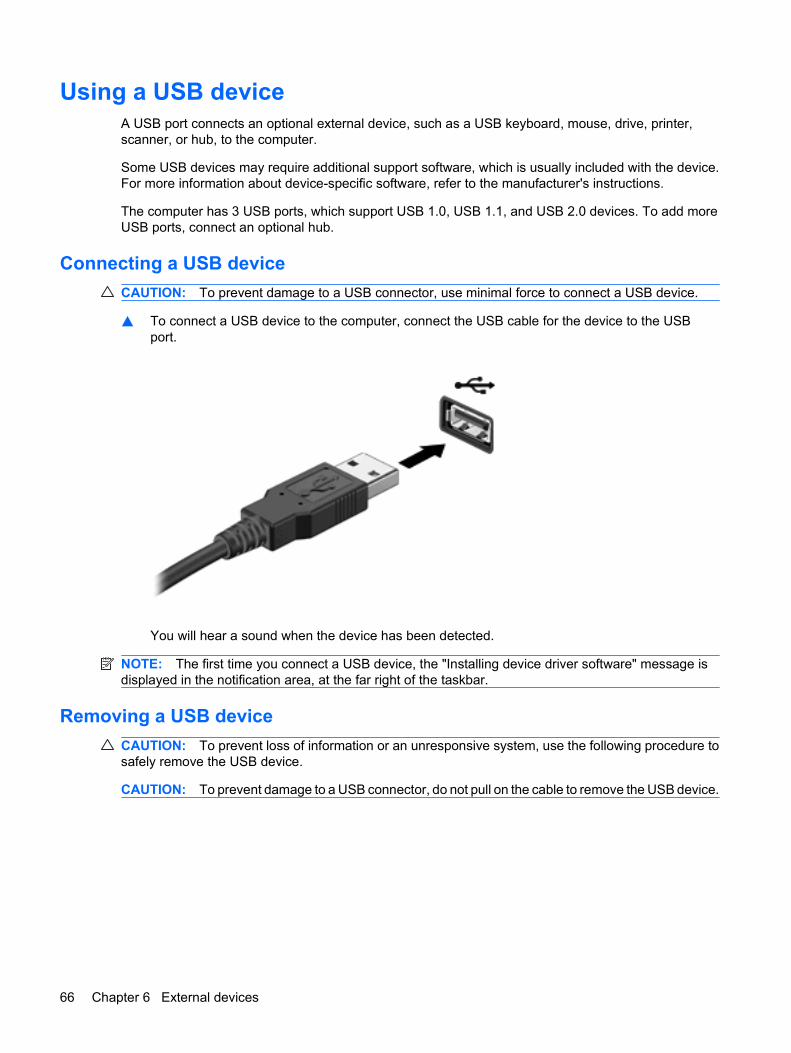
Using a USB deviceA USB port connects an optional external device, such as a USB keyboard, mouse, drive, printer,scanner, or hub, to the computer.
Some USB devices may require additional support software, which is usually included with the device.For more information about device-specific software, refer to the manufacturer's instructions.
The computer has 3 USB ports, which support USB 1.0, USB 1.1, and USB 2.0 devices. To add moreUSB ports, connect an optional hub.
Connecting a USB deviceCAUTION: To prevent damage to a USB connector, use minimal force to connect a USB device.
▲ To connect a USB device to the computer, connect the USB cable for the device to the USBport.
You will hear a sound when the device has been detected.
NOTE: The first time you connect a USB device, the "Installing device driver software" message isdisplayed in the notification area, at the far right of the taskbar.
Removing a USB deviceCAUTION: To prevent loss of information or an unresponsive system, use the following procedure tosafely remove the USB device.
CAUTION: To prevent damage to a USB connector, do not pull on the cable to remove the USB device.
66 Chapter 6 External devices

To remove a USB device:
1. Click the Safely Remove Hardware and Eject Media icon in the notification area, at the far rightof the taskbar.
NOTE: To display the Safely Remove Hardware and Eject Media icon, click the Show hiddenicons icon (the arrow at the left of the notification area).
2. Click the name of the device in the list.
NOTE: You are prompted that it is safe to remove the hardware device.
3. Remove the device.
Using a USB device 67

7 Drives
68 Chapter 7 Drives
Handling drivesDrives are fragile computer components that must be handled with care. Refer to the following cautionsbefore handling drives. Additional cautions are included with the procedures to which they apply.
CAUTION: To reduce the risk of damage to the computer, damage to a drive, or loss of information,observe these precautions:
Before you move a computer that is connected to an external hard drive, initiate Sleep and allow thescreen to clear, or properly disconnect the external hard drive.
Before handling a drive, discharge static electricity by touching the unpainted metal surface of the drive.
Do not touch the connector pins on a removable drive or on the computer.
Handle a drive carefully; do not drop a drive or place items on it.
Before removing or inserting a drive, shut down the computer. If you are unsure whether the computeris off, in the Sleep state, or in Hibernation, turn the computer on, and then shut it down through theoperating system.
Do not use excessive force when inserting a drive into a drive bay.
Do not type on the keyboard or move the computer while the optical drive is writing to a disc. The writeprocess is sensitive to vibration.
When the battery is the only source of power, be sure that the battery is sufficiently charged beforewriting to media.
Avoid exposing a drive to temperature or humidity extremes.
Avoid exposing a drive to liquids. Do not spray the drive with cleaning products.
Remove media from a drive before removing the drive from the drive bay, or traveling with, shipping, orstoring a drive.
If a drive must be mailed, place the drive in a bubble-pack mailer or other suitable protective packagingand label the package “FRAGILE.”
Avoid exposing a drive to magnetic fields. Security devices with magnetic fields include airport walk-through devices and security wands. The airport security devices that check carry-on luggage, such asconveyor belts, use X-rays instead of magnetism and will not damage a drive.
Handling drives 69
Improving hard drive performanceUsing Disk Defragmenter
As you use the computer, files on the hard drive become fragmented. Disk Defragmenter consolidatesthe fragmented files and folders on the hard drive so that the system can run more efficiently.
NOTE: It is not necessary to run Disk Defragmenter on solid-state drives.
To run Disk Defragmenter:
1. Select Start > All Programs > Accessories > System Tools > Disk Defragmenter.
2. Click Defragment disk.
NOTE: Windows® includes the User Account Control feature to improve the security of yourcomputer. You may be prompted for your permission or password for tasks such as installingapplications, running utilities, or changing Windows settings. Refer to Help and Support for moreinformation.
For additional information, access the Disk Defragmenter software Help.
Using Disk CleanupDisk Cleanup searches the hard drive for unnecessary files that you can safely delete to free up diskspace and help the computer to run more efficiently.
To run Disk Cleanup:
1. Select Start > All Programs > Accessories > System Tools > Disk Cleanup.
2. Follow the on-screen instructions.
70 Chapter 7 Drives
Using HP ProtectSmart Hard Drive ProtectionHP ProtectSmart Hard Drive Protection protects a hard drive by parking the drive and halting datarequests under either of the following conditions:
● You drop the computer.
● You move the computer with the display closed while the computer is running on battery power.
A short time after the end of one of these events, HP ProtectSmart Hard Drive Protection returns thehard drive to normal operation.
NOTE: Because solid-state drives (SSD) lack moving parts, HP ProtectSmart Hard Drive Protectionis unnecessary.
NOTE: Hard drives connected to USB ports are not covered by HP ProtectSmart Hard DriveProtection.
For more information, refer to the HP ProtectSmart Hard Drive Protection software Help.
Identifying HP ProtectSmart Hard Drive Protection statusThe drive light on the computer turns amber to show that the drive is parked. To determine whetherdrives are currently protected or whether a drive is parked, select Start > Control Panel > Hardwareand Sound > Windows Mobility Center:
● If the software is enabled, a green check mark is superimposed over the hard drive icon.
● If the software is disabled, a red X is superimposed over the hard drive icon.
● If the drives are parked, a yellow moon is superimposed over the hard drive icon.
The icon in the Mobility Center may not show the most up-to-date status for the drive. For immediateupdates after a change in status, you need to enable the notification area icon.
To enable the notification area icon:
1. Select Start > Control Panel > Hardware and Sound > HP ProtectSmart Hard DriveProtection.
NOTE: If prompted by User Account Control, click Yes.
2. On the Icon in System Tray row, click Show.
3. Click OK.
Managing power with a parked hard driveIf HP ProtectSmart Hard Drive Protection has parked the drive, the computer will behave in the followingways:
● The computer will not shut down.
● The computer will not initiate Sleep or Hibernation, except as described in the following Note.
NOTE: If the computer is running on battery power and reaches a critical battery level, HPProtectSmart Hard Drive Protection allows the computer to initiate Hibernation.
Using HP ProtectSmart Hard Drive Protection 71
Before you move the computer, HP recommends that you either shut it down or initiate Sleep orHibernation.
Using HP ProtectSmart Hard Drive Protection softwareThe HP ProtectSmart Hard Drive Protection software enables you to perform the following tasks:
● Enable and disable HP ProtectSmart Hard Drive Protection.
NOTE: Depending on your user privileges, you may not be able to enable or disable HPProtectSmart Hard Drive Protection. Additionally, members of an Administrator group can changethe privileges for non-Administrator users.
● Determine whether a drive in the system is supported.
To open the software and change settings, follow these steps:
1. In Mobility Center, click the hard drive icon to open the HP ProtectSmart Hard Drive Protectionwindow.
– or –
Select Start > Control Panel > Hardware and Sound > HP ProtectSmart Hard DriveProtection.
NOTE: If prompted by User Account Control, click Yes.
2. Click the appropriate button to change settings.
3. Click OK.
72 Chapter 7 Drives
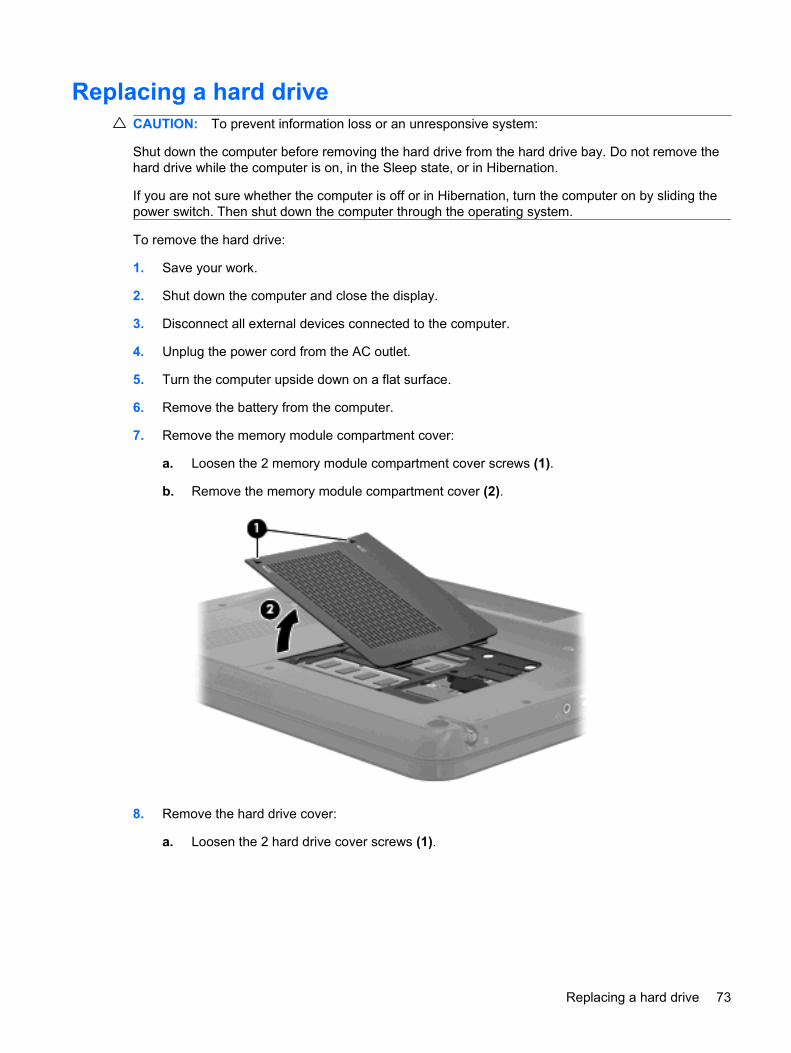
Replacing a hard driveCAUTION: To prevent information loss or an unresponsive system:
Shut down the computer before removing the hard drive from the hard drive bay. Do not remove thehard drive while the computer is on, in the Sleep state, or in Hibernation.
If you are not sure whether the computer is off or in Hibernation, turn the computer on by sliding thepower switch. Then shut down the computer through the operating system.
To remove the hard drive:
1. Save your work.
2. Shut down the computer and close the display.
3. Disconnect all external devices connected to the computer.
4. Unplug the power cord from the AC outlet.
5. Turn the computer upside down on a flat surface.
6. Remove the battery from the computer.
7. Remove the memory module compartment cover:
a. Loosen the 2 memory module compartment cover screws (1).
b. Remove the memory module compartment cover (2).
8. Remove the hard drive cover:
a. Loosen the 2 hard drive cover screws (1).
Replacing a hard drive 73
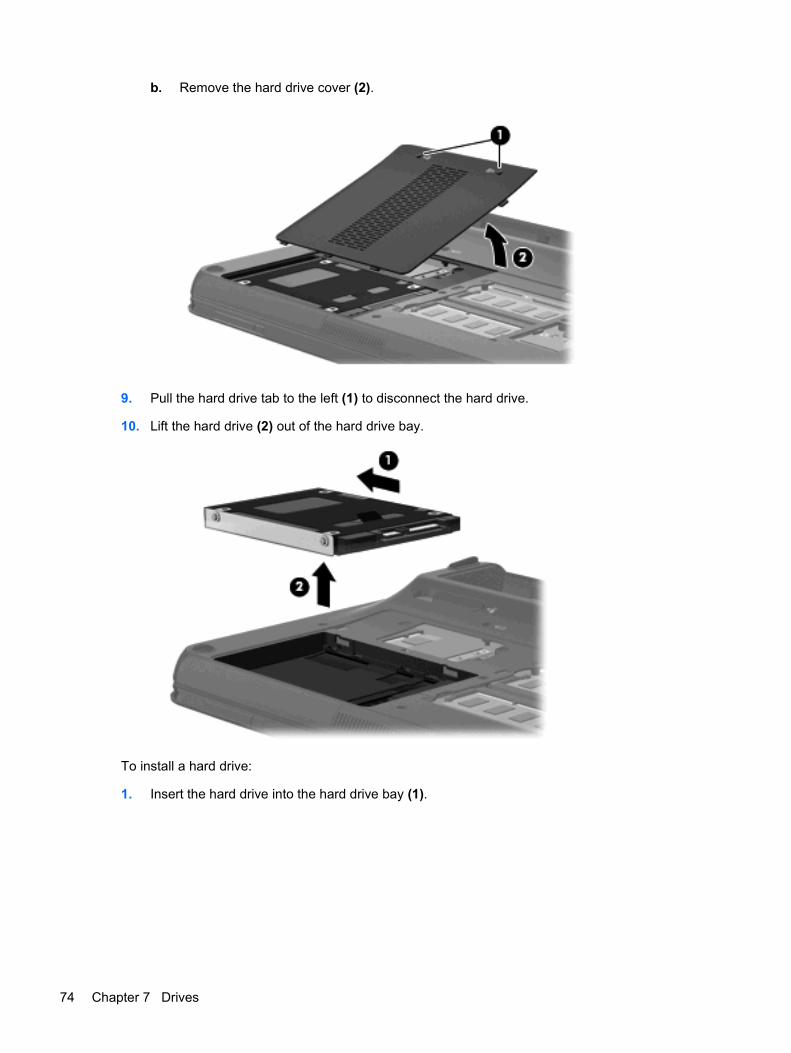
b. Remove the hard drive cover (2).
9. Pull the hard drive tab to the left (1) to disconnect the hard drive.
10. Lift the hard drive (2) out of the hard drive bay.
To install a hard drive:
1. Insert the hard drive into the hard drive bay (1).
74 Chapter 7 Drives
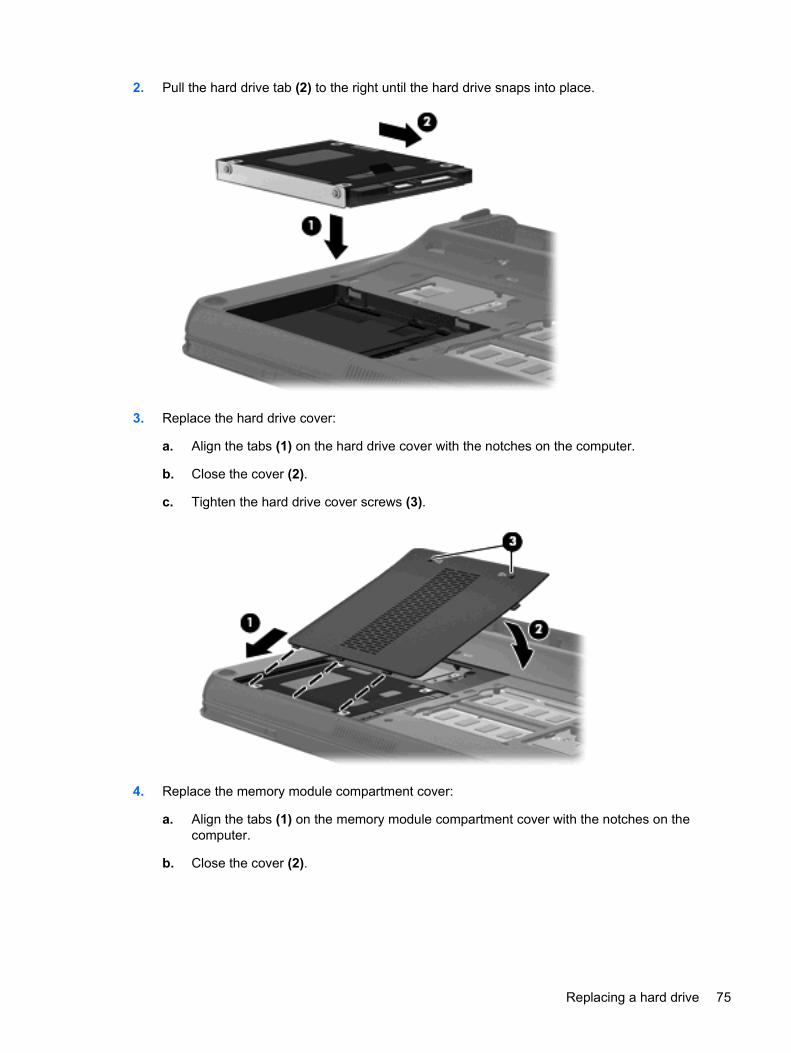
2. Pull the hard drive tab (2) to the right until the hard drive snaps into place.
3. Replace the hard drive cover:
a. Align the tabs (1) on the hard drive cover with the notches on the computer.
b. Close the cover (2).
c. Tighten the hard drive cover screws (3).
4. Replace the memory module compartment cover:
a. Align the tabs (1) on the memory module compartment cover with the notches on thecomputer.
b. Close the cover (2).
Replacing a hard drive 75
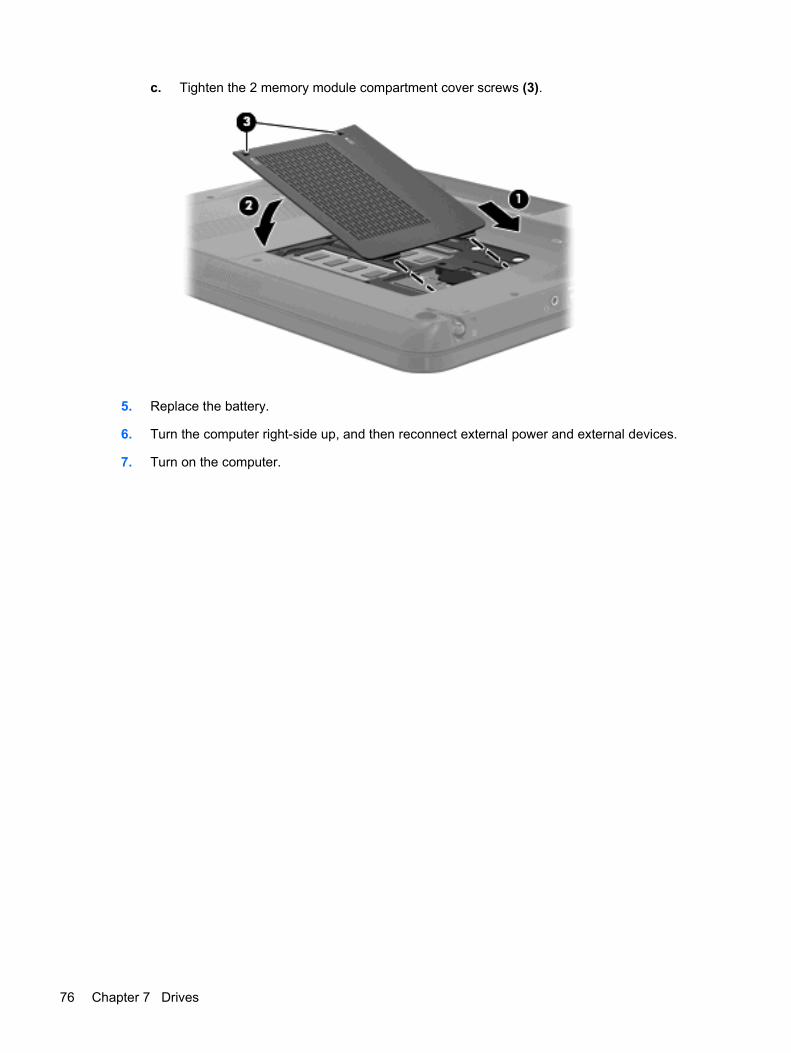
c. Tighten the 2 memory module compartment cover screws (3).
5. Replace the battery.
6. Turn the computer right-side up, and then reconnect external power and external devices.
7. Turn on the computer.
76 Chapter 7 Drives
Using external drivesRemovable external drives expand your options for storing and accessing information.
USB drives include the following types:
● 1.44-megabyte diskette drive
● Hard drive module (a hard drive with an adapter attached)
● DVD-ROM Drive
● DVD±RW SuperMulti Double-Layer (DL) Drive
● Blu-ray ROM DVD±R/RW SuperMulti Double-Layer (DL) Drive
Connecting optional external drivesNOTE: For more information about required software and drivers, or to learn which computer port touse, refer to the manufacturer's instructions.
To connect an external drive to the computer:
CAUTION: To reduce the risk of damage to the equipment when connecting a powered drive, be surethat the drive is turned off and the AC power cord is unplugged.
1. Connect the drive to the computer.
2. If you are connecting a powered drive, plug the device power cord into a grounded AC outlet.
3. Turn on the drive.
To disconnect an unpowered external drive, turn off the drive, and then disconnect it from the computer.To disconnect a powered external drive, turn off the drive, disconnect it from the computer, and thenunplug the AC power cord.
Using an external optical drive (select models only)Select computer models ship with an external optical drive. An external optical drive connects to a USBport on the computer and enables you to read data discs, play music, and watch movies. If your externaloptical drive is a Blu-ray Disc (BD) drive, you can also watch high-definition video from discs.
NOTE: The external optical drive must be connected to the USB port on the computer, not to a USBport on another external device, such as a hub or docking station.
You may have one of the following types of drives:
● DVD±RW SuperMulti Double-Layer (DL) Drive
● Blu-ray ROM DVD±R/RW SuperMulti Double-Layer (DL) Drive
Removing an optical disc when the disc tray will not openIf the disc tray does not open, follow these steps:
1. Insert the end of a paper clip (1) into the release access in the front bezel of the drive.
2. Press in gently on the paper clip until the tray is released, and then pull out the tray (2) until it stops.
Using external drives 77
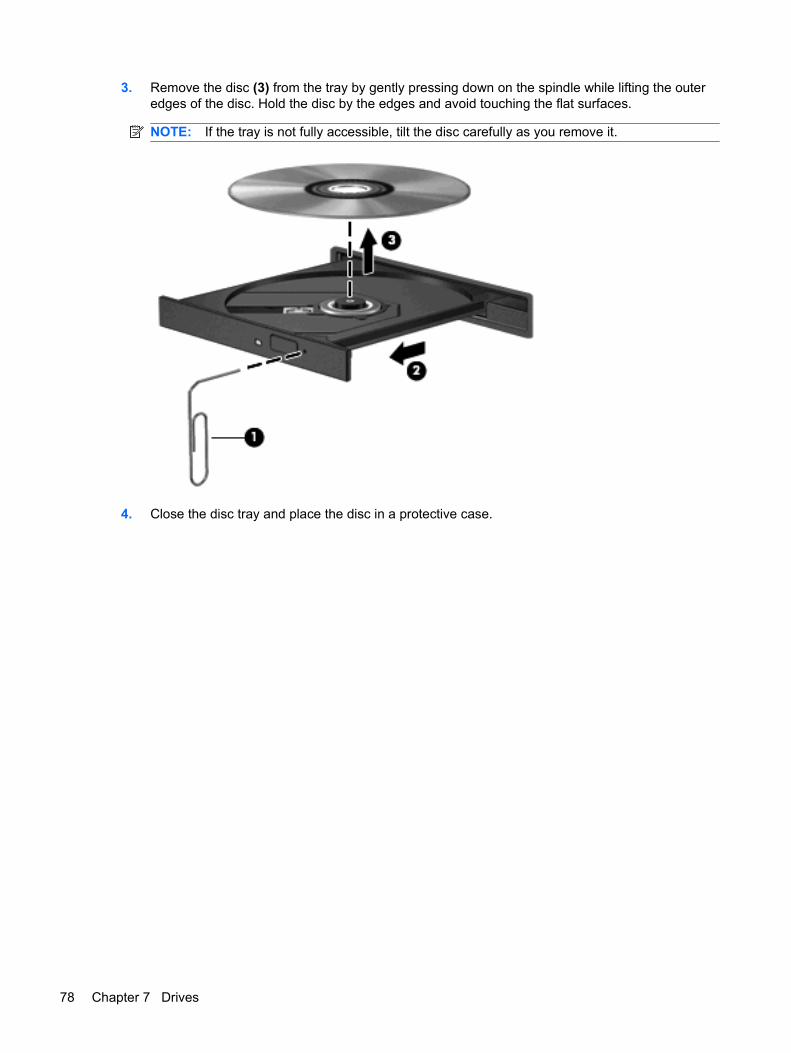
3. Remove the disc (3) from the tray by gently pressing down on the spindle while lifting the outeredges of the disc. Hold the disc by the edges and avoid touching the flat surfaces.
NOTE: If the tray is not fully accessible, tilt the disc carefully as you remove it.
4. Close the disc tray and place the disc in a protective case.
78 Chapter 7 Drives
Sharing an optical driveAlthough your computer does not have an integrated optical drive, you can easily access software, installapplications, and access data by sharing an optical drive connected to another computer in your network.Sharing drives is a feature of the Windows operating system that allows a drive on one computer to beaccessible to other computers on the same network.
NOTE: You must have a network set up in order to share an optical drive; refer to Networkingon page 11 for additional information on setting up a network.
NOTE: Some discs, such as DVD movies and game discs, may be copy-protected and thereforeunusable through DVD or CD sharing.
To share an optical drive:
1. From the computer with the optical drive you are sharing, select Start > Computer.
2. Right-click the optical drive you want to share, and click Properties.
3. Select the Sharing tab > Advanced Sharing.
4. Select the Share this folder check box.
5. Type a name for the optical drive in the Share name text box.
6. Click Apply, and then click OK.
7. To view the shared optical drive on your computer, select Start > Control Panel > Network andInternet > Network and Sharing Center.
Sharing an optical drive 79

8 Memory modules
80 Chapter 8 Memory modules
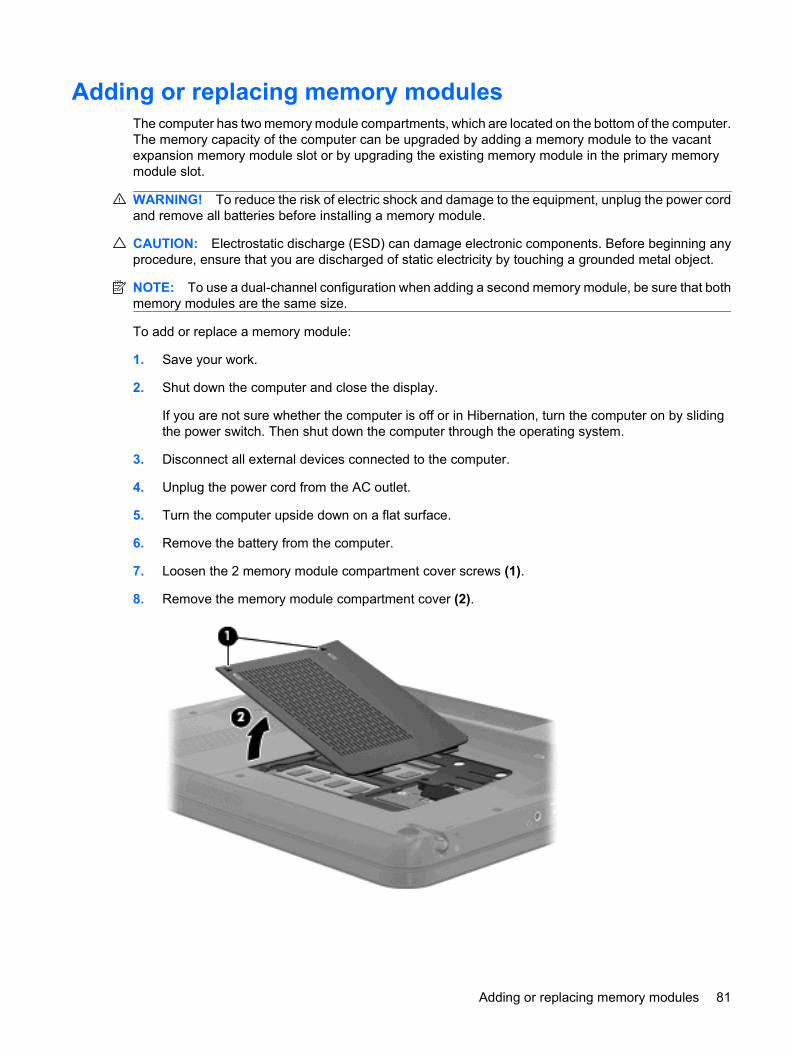
Adding or replacing memory modulesThe computer has two memory module compartments, which are located on the bottom of the computer.The memory capacity of the computer can be upgraded by adding a memory module to the vacantexpansion memory module slot or by upgrading the existing memory module in the primary memorymodule slot.
WARNING! To reduce the risk of electric shock and damage to the equipment, unplug the power cordand remove all batteries before installing a memory module.
CAUTION: Electrostatic discharge (ESD) can damage electronic components. Before beginning anyprocedure, ensure that you are discharged of static electricity by touching a grounded metal object.
NOTE: To use a dual-channel configuration when adding a second memory module, be sure that bothmemory modules are the same size.
To add or replace a memory module:
1. Save your work.
2. Shut down the computer and close the display.
If you are not sure whether the computer is off or in Hibernation, turn the computer on by slidingthe power switch. Then shut down the computer through the operating system.
3. Disconnect all external devices connected to the computer.
4. Unplug the power cord from the AC outlet.
5. Turn the computer upside down on a flat surface.
6. Remove the battery from the computer.
7. Loosen the 2 memory module compartment cover screws (1).
8. Remove the memory module compartment cover (2).
Adding or replacing memory modules 81
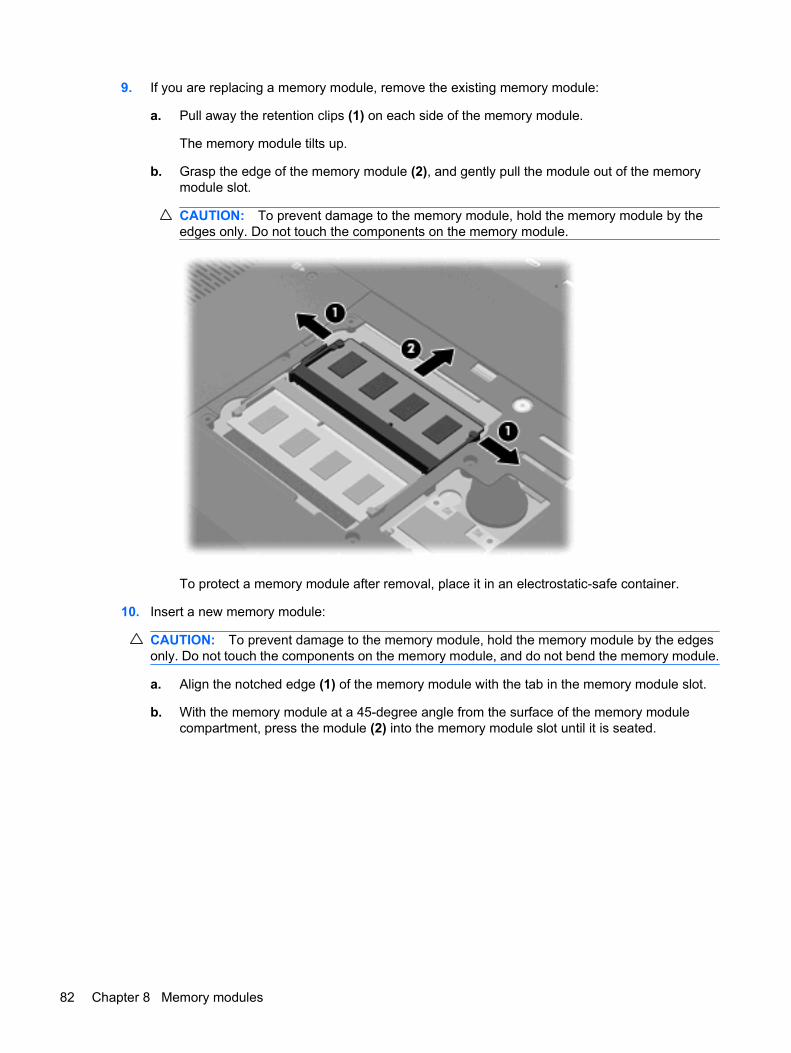
9. If you are replacing a memory module, remove the existing memory module:
a. Pull away the retention clips (1) on each side of the memory module.
The memory module tilts up.
b. Grasp the edge of the memory module (2), and gently pull the module out of the memorymodule slot.
CAUTION: To prevent damage to the memory module, hold the memory module by theedges only. Do not touch the components on the memory module.
To protect a memory module after removal, place it in an electrostatic-safe container.
10. Insert a new memory module:
CAUTION: To prevent damage to the memory module, hold the memory module by the edgesonly. Do not touch the components on the memory module, and do not bend the memory module.
a. Align the notched edge (1) of the memory module with the tab in the memory module slot.
b. With the memory module at a 45-degree angle from the surface of the memory modulecompartment, press the module (2) into the memory module slot until it is seated.
82 Chapter 8 Memory modules
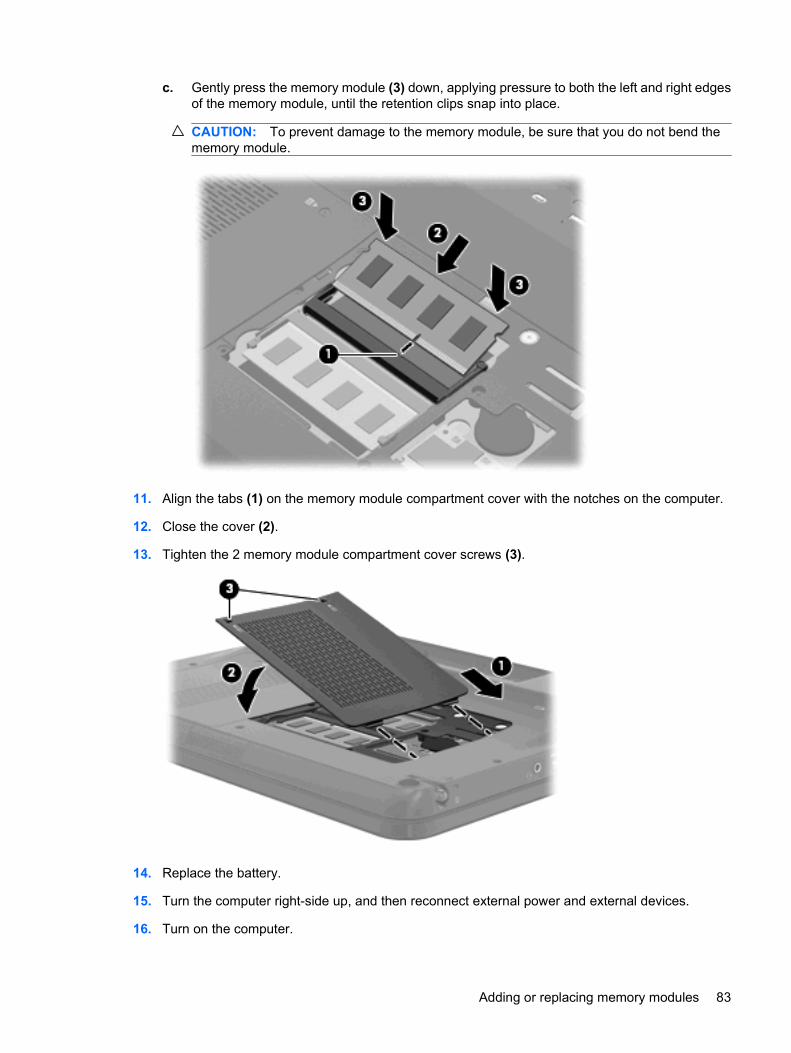
c. Gently press the memory module (3) down, applying pressure to both the left and right edgesof the memory module, until the retention clips snap into place.
CAUTION: To prevent damage to the memory module, be sure that you do not bend thememory module.
11. Align the tabs (1) on the memory module compartment cover with the notches on the computer.
12. Close the cover (2).
13. Tighten the 2 memory module compartment cover screws (3).
14. Replace the battery.
15. Turn the computer right-side up, and then reconnect external power and external devices.
16. Turn on the computer.
Adding or replacing memory modules 83

9 Security
84 Chapter 9 Security
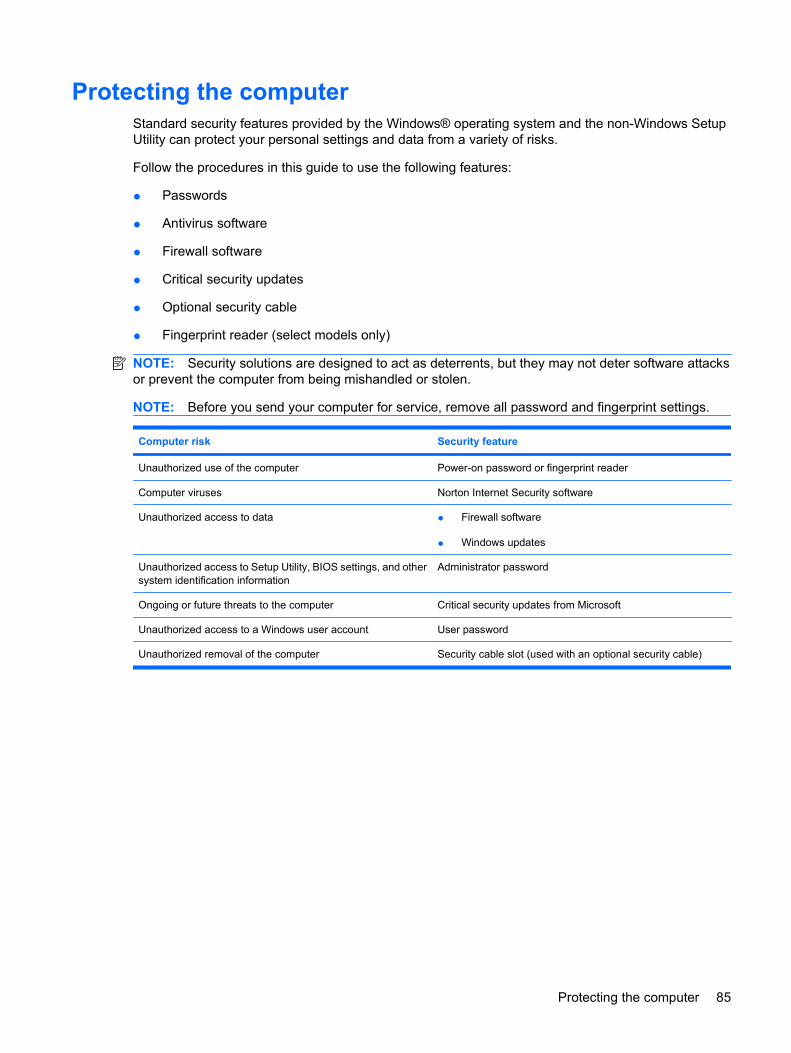
Protecting the computerStandard security features provided by the Windows® operating system and the non-Windows SetupUtility can protect your personal settings and data from a variety of risks.
Follow the procedures in this guide to use the following features:
● Passwords
● Antivirus software
● Firewall software
● Critical security updates
● Optional security cable
● Fingerprint reader (select models only)
NOTE: Security solutions are designed to act as deterrents, but they may not deter software attacksor prevent the computer from being mishandled or stolen.
NOTE: Before you send your computer for service, remove all password and fingerprint settings.
Computer risk Security feature
Unauthorized use of the computer Power-on password or fingerprint reader
Computer viruses Norton Internet Security software
Unauthorized access to data ● Firewall software
● Windows updates
Unauthorized access to Setup Utility, BIOS settings, and othersystem identification information
Administrator password
Ongoing or future threats to the computer Critical security updates from Microsoft
Unauthorized access to a Windows user account User password
Unauthorized removal of the computer Security cable slot (used with an optional security cable)
Protecting the computer 85
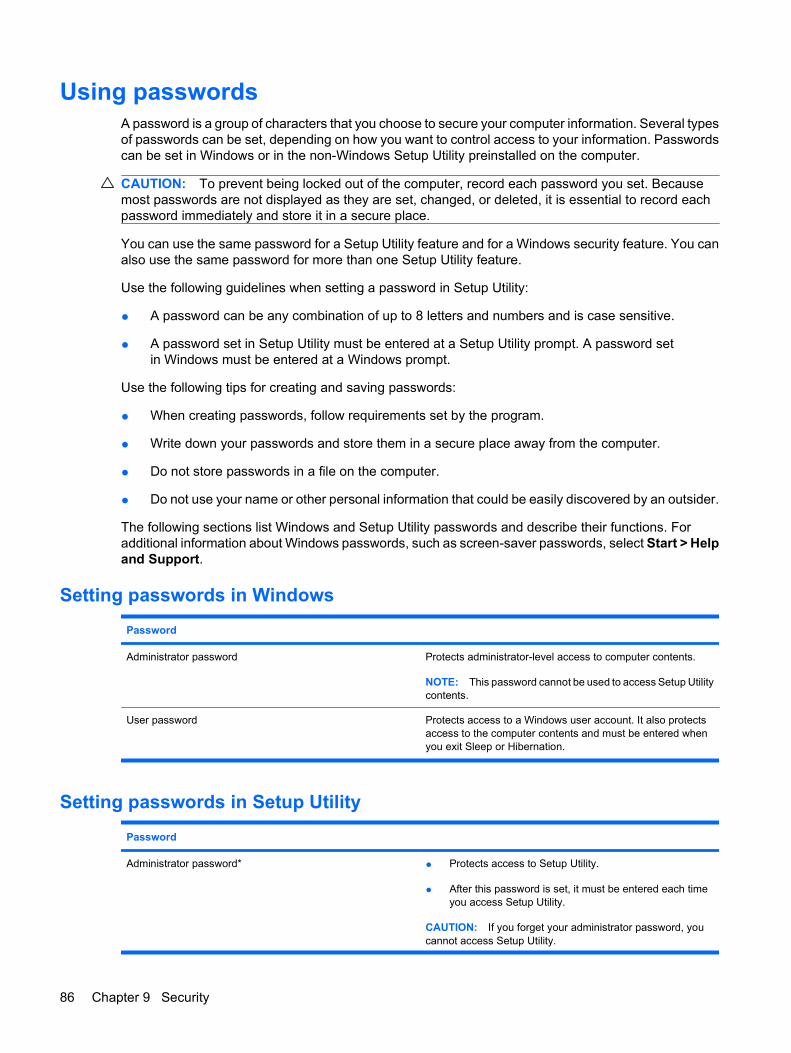
Using passwordsA password is a group of characters that you choose to secure your computer information. Several typesof passwords can be set, depending on how you want to control access to your information. Passwordscan be set in Windows or in the non-Windows Setup Utility preinstalled on the computer.
CAUTION: To prevent being locked out of the computer, record each password you set. Becausemost passwords are not displayed as they are set, changed, or deleted, it is essential to record eachpassword immediately and store it in a secure place.
You can use the same password for a Setup Utility feature and for a Windows security feature. You canalso use the same password for more than one Setup Utility feature.
Use the following guidelines when setting a password in Setup Utility:
● A password can be any combination of up to 8 letters and numbers and is case sensitive.
● A password set in Setup Utility must be entered at a Setup Utility prompt. A password setin Windows must be entered at a Windows prompt.
Use the following tips for creating and saving passwords:
● When creating passwords, follow requirements set by the program.
● Write down your passwords and store them in a secure place away from the computer.
● Do not store passwords in a file on the computer.
● Do not use your name or other personal information that could be easily discovered by an outsider.
The following sections list Windows and Setup Utility passwords and describe their functions. Foradditional information about Windows passwords, such as screen-saver passwords, select Start > Helpand Support.
Setting passwords in Windows
Password
Administrator password Protects administrator-level access to computer contents.
NOTE: This password cannot be used to access Setup Utilitycontents.
User password Protects access to a Windows user account. It also protectsaccess to the computer contents and must be entered whenyou exit Sleep or Hibernation.
Setting passwords in Setup Utility
Password
Administrator password* ● Protects access to Setup Utility.
● After this password is set, it must be entered each timeyou access Setup Utility.
CAUTION: If you forget your administrator password, youcannot access Setup Utility.
86 Chapter 9 Security
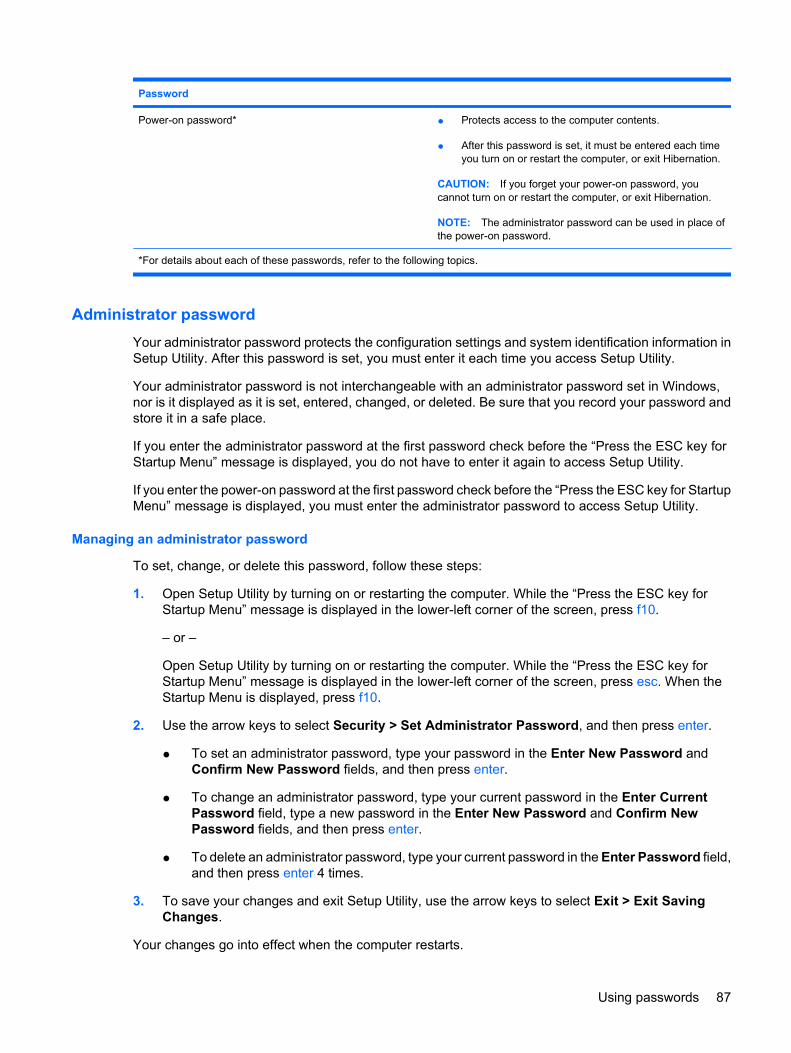
Password
Power-on password* ● Protects access to the computer contents.
● After this password is set, it must be entered each timeyou turn on or restart the computer, or exit Hibernation.
CAUTION: If you forget your power-on password, youcannot turn on or restart the computer, or exit Hibernation.
NOTE: The administrator password can be used in place ofthe power-on password.
*For details about each of these passwords, refer to the following topics.
Administrator passwordYour administrator password protects the configuration settings and system identification information inSetup Utility. After this password is set, you must enter it each time you access Setup Utility.
Your administrator password is not interchangeable with an administrator password set in Windows,nor is it displayed as it is set, entered, changed, or deleted. Be sure that you record your password andstore it in a safe place.
If you enter the administrator password at the first password check before the “Press the ESC key forStartup Menu” message is displayed, you do not have to enter it again to access Setup Utility.
If you enter the power-on password at the first password check before the “Press the ESC key for StartupMenu” message is displayed, you must enter the administrator password to access Setup Utility.
Managing an administrator password
To set, change, or delete this password, follow these steps:
1. Open Setup Utility by turning on or restarting the computer. While the “Press the ESC key forStartup Menu” message is displayed in the lower-left corner of the screen, press f10.
– or –
Open Setup Utility by turning on or restarting the computer. While the “Press the ESC key forStartup Menu” message is displayed in the lower-left corner of the screen, press esc. When theStartup Menu is displayed, press f10.
2. Use the arrow keys to select Security > Set Administrator Password, and then press enter.
● To set an administrator password, type your password in the Enter New Password andConfirm New Password fields, and then press enter.
● To change an administrator password, type your current password in the Enter CurrentPassword field, type a new password in the Enter New Password and Confirm NewPassword fields, and then press enter.
● To delete an administrator password, type your current password in the Enter Password field,and then press enter 4 times.
3. To save your changes and exit Setup Utility, use the arrow keys to select Exit > Exit SavingChanges.
Your changes go into effect when the computer restarts.
Using passwords 87
Entering an administrator password
At the Enter Password prompt, type your administrator password, and then press enter. After 3unsuccessful attempts to enter the administrator password, you must restart the computer and try again.
Power-on passwordYour power-on password prevents unauthorized use of the computer. After this password is set, it mustbe entered each time you turn on or restart the computer, or exit Hibernation. A power-on password isnot displayed as it is set, entered, changed, or deleted.
Managing a power-on password
To set, change, or delete this password, follow these steps:
1. Open Setup Utility by turning on or restarting the computer. While the “Press the ESC key forStartup Menu” message is displayed in the lower-left corner of the screen, press f10.
– or –
Open Setup Utility by turning on or restarting the computer. While the “Press the ESC key forStartup Menu” message is displayed in the lower-left corner of the screen, press esc. When theStartup Menu is displayed, press f10.
2. Use the arrow keys to select Security > Set Power-On Password, and then press enter.
● To set a power-on password, type your password in the Enter New Password and ConfirmNew Password fields, and then press enter.
● To change a power-on password, type your current password in the Enter CurrentPassword field, type a new password in the Enter New Password and Confirm NewPassword fields, and then press enter.
● To delete a power-on password, type your current password in the Enter CurrentPassword field, and then press enter 4 times.
3. To save your changes and exit Setup Utility, use the arrow keys to select Exit > Exit SavingChanges.
Your changes go into effect when the computer restarts.
Entering a power-on password
At the Enter Password prompt, type your password, and then press enter. After 3 unsuccessful attemptsto enter the password, you must restart the computer and try again.
88 Chapter 9 Security

Using antivirus softwareWhen you use the computer to access e-mail, a network, or the Internet, you expose it to computerviruses. Computer viruses can disable the operating system, programs, or utilities, or cause them toabnormally.
Antivirus software can detect most viruses, destroy them, and in most cases, repair any damage theyhave caused. To provide ongoing protection against newly discovered viruses, antivirus software mustbe kept up to date.
Norton Internet Security, an antivirus program, is preinstalled on the computer. The software includes60 days of free updates. It is strongly recommended that you protect the computer against new virusesbeyond 60 days by purchasing extended update service. Instructions for using and updating NortonInternet Security software and for purchasing extended update service are provided within the program.To view and access Norton Internet Security, select Start > All Programs > Norton InternetSecurity.
For more information about computer viruses, type viruses in the Search box in Help and Support.
Using antivirus software 89
Using firewall softwareWhen you use the computer for e-mail, network, or Internet access, unauthorized persons may be ableto gain access to the computer, your personal files, and information about you. Use the firewall softwarepreinstalled on the computer to protect your privacy.
Firewall features include logging and reporting of network activity, and automatic monitoring of allincoming and outgoing traffic. Refer to the firewall user guide or contact your firewall manufacturer formore information.
NOTE: Under some circumstances a firewall can block access to Internet games, interfere with printeror file sharing on a network, or block authorized e-mail attachments. To temporarily resolve the problem,disable the firewall, perform the task that you want to perform, and then reenable the firewall. Topermanently resolve the problem, reconfigure the firewall.
90 Chapter 9 Security
Installing critical security updatesCAUTION: Microsoft sends alerts regarding critical updates. To protect the computer from securitybreaches and computer viruses, install all critical updates from Microsoft as soon as you receive analert.
Updates to the operating system and other software may have become available after the computerwas shipped. To be sure that all available updates are installed on the computer, observe theseguidelines:
● Run Windows Update as soon as possible after you set up your computer. Use the update link atStart > All Programs > Windows Update.
● Run Windows Update monthly thereafter.
● Obtain updates to Windows and other Microsoft® programs, as they are released, from theMicrosoft Web site and through the updates link in Help and Support.
Installing critical security updates 91
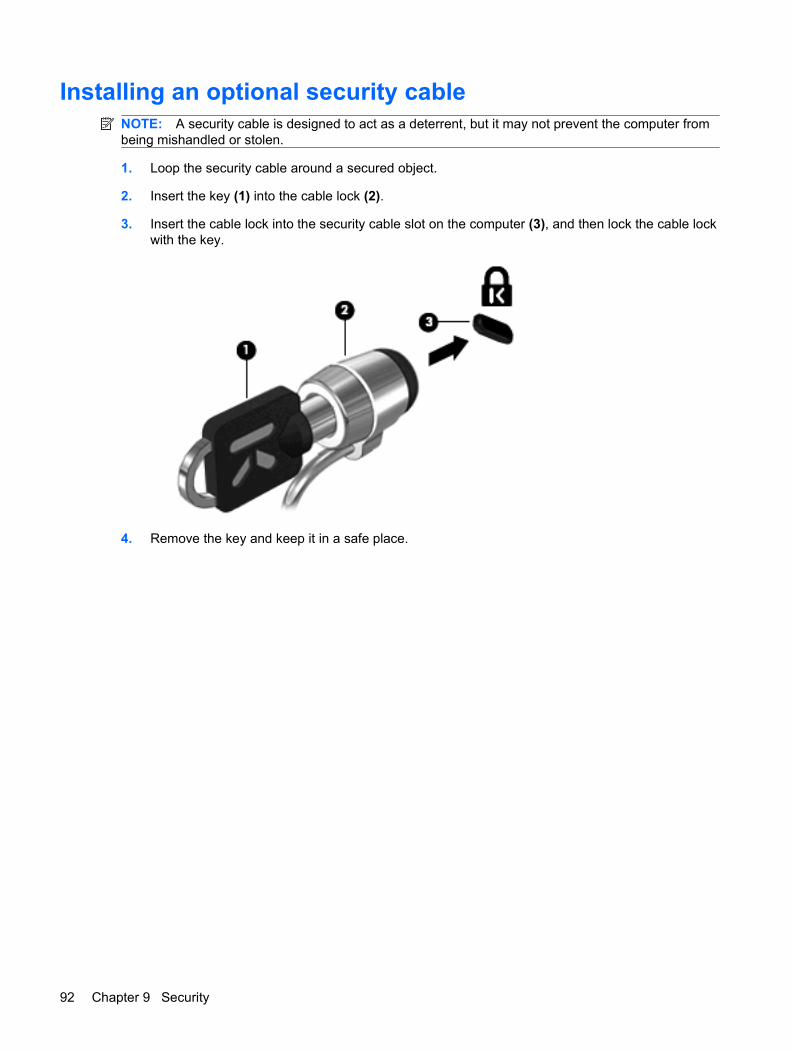
Installing an optional security cableNOTE: A security cable is designed to act as a deterrent, but it may not prevent the computer frombeing mishandled or stolen.
1. Loop the security cable around a secured object.
2. Insert the key (1) into the cable lock (2).
3. Insert the cable lock into the security cable slot on the computer (3), and then lock the cable lockwith the key.
4. Remove the key and keep it in a safe place.
92 Chapter 9 Security
Using the fingerprint reader (select models only)The fingerprint reader is a small metallic sensor that is located on the right side of the display.
Registering fingerprintsA fingerprint reader allows you to log on to Windows using a fingerprint that you have registered usingDigitalPersona Personal software, instead of using a Windows password.
To register one or more fingerprints, follow these steps:
1. In Windows, click the DigitalPersona Personal icon in the notification area, at the far right of thetaskbar.
2. Read the welcome text, and then click Next.
The “Verify Your Identity” page opens.
3. Type your Windows password, if one has been established, and then click Next.
NOTE: If you do not have a Windows password, the “Protect Your Windows Account” pageopens. You can create a Windows password at this time, or you can skip this step by clickingNext. However, setting a Windows password optimizes the security of your computer.
The “Fingerprint Registration Training” page opens.
4. View the demonstration, and then click Next.
The “Register a Fingerprint” page opens.
5. Click the finger on the screen that corresponds to the finger you want to register.
The next page opens, outlining that finger in green.
6. Slowly swipe your chosen finger over the fingerprint sensor.
NOTE: If the swipe is not completed correctly, a message explains why the swipe wasunsuccessful.
NOTE: For best results, swipe the same finger in the same direction each time you use thefingerprint reader.
7. Continue swiping the same finger over the fingerprint sensor until you have completed 4 successfulswipes.
When the fingerprint is registered successfully, the “Register a Fingerprint” page opens again,allowing you to register more fingerprints. Repeat steps 5 through 7 to register additionalfingerprints.
8. When you are finished registering fingerprints, click Next.
If you register only one fingerprint, a message recommends that you register additional fingerprints.Click Yes to register more fingerprints, and then repeat steps 1 through 8 for each fingerprintregistered.
– or –
Using the fingerprint reader (select models only) 93

Click No if you do not want to register additional fingerprints. The “Registration Complete” pageopens.
9. Click Finish.
NOTE: Each user who wants fingerprint access to the computer must repeat steps 1 through 9.
Using your registered fingerprint to log on to WindowsTo log on to Windows using your fingerprint, follow these steps:
1. Immediately after you have registered your fingerprints, restart Windows.
2. Swipe any of your registered fingers to log on to Windows.
94 Chapter 9 Security
10 Backup and recovery
Recovery after a system failure is as complete as your most current backup. HP recommends that youcreate recovery discs immediately after software setup. As you add new software and data files, youshould continue to back up your system on a regular basis to maintain a reasonably current backup.
Tools provided by the operating system and HP Recovery Manager software are designed to help youwith the following tasks for safeguarding your information and restoring it in case of a system failure:
● Creating a set of recovery discs (Recovery Manager software feature). Recovery discs are usedto start up (boot) your computer and restore the operating system and software programs to factorysettings in case of system failure or instability.
● Backing up your information regularly to protect your important system files.
● Creating system restore points (operating system feature). System restore points allow you toreverse undesirable changes to your computer by restoring the computer to an earlier state.
● Recovering a program or driver (Recovery Manager software feature). This feature helps youreinstall a program or driver without performing a full system recovery.
● Performing a full system recovery (Recovery Manager software feature). With Recovery Manager,you can recover your full factory image if you experience system failure or instability. RecoveryManager works from a dedicated recovery partition (select models only) on the hard drive or fromrecovery discs you create.
NOTE: Computers with a solid-state drive (SSD) may not have a recovery partition. Recoverydiscs have been included for computers that do not have a partition. Use these discs to recoveryour operating system and software. To check for the presence of a recovery partition, clickStart, right-click Computer, click Manage, and then click Disk Management. If the partition ispresent, an HP Recovery drive is listed in the window.
95

Creating recovery discsHP recommends that you create recovery discs to be sure that you can restore your system to its originalfactory state if you experience serious system failure or instability. Create these discs after setting upthe computer for the first time.
Handle these discs carefully and keep them in a safe place. The software allows the creation of onlyone set of recovery discs.
NOTE: If your computer does not include an integrated optical drive, you can use an optional externaloptical drive (purchased separately) to create recovery discs, or you can purchase recovery discs foryour computer from the HP Web site.
Note the following guidelines before creating recovery discs:
● You will need high-quality DVD-R, DVD+R, BD-R (writable Blu-ray), or CD-R discs. All these discsare purchased separately. DVDs and BDs have a much higher capacity than CDs. If you use CDs,up to 20 discs may be required, whereas only a few DVDs or BDs are required.
NOTE: Read-write discs, such as CD-RW, DVD±RW, double-layer DVD±RW, and BD-RE(rewritable Blu-ray) discs, are not compatible with the Recovery Manager software.
● The computer must be connected to AC power during this process.
● Only one set of recovery discs can be created per computer.
● Number each disc before inserting it into the optical drive.
● If necessary, you can exit the program before you have finished creating the recovery discs. Thenext time you open Recovery Manager, you will be prompted to continue the disc creation process.
To create a set of recovery discs:
1. Select Start > All Programs > Recovery Manager > Recovery Disc Creation.
2. Follow the on-screen instructions.
96 Chapter 10 Backup and recovery
Backing up your informationAs you add new software and data files, you should back up your system on a regular basis to maintaina reasonably current backup. Back up your system at the following times:
● At regularly scheduled times
NOTE: Set reminders to back up your information periodically.
● Before the computer is repaired or restored
● Before you add or modify hardware or software
Note the following when backing up:
● Create system restore points using the Windows® System Restore feature, and periodically copythem to disc.
● Store personal files in the Documents library and back up this folder periodically.
● Back up templates stored in their associated programs.
● Save customized settings in a window, toolbar, or menu bar by taking a screen shot of your settings.The screen shot can be a time-saver if you have to reset your preferences.
To copy the screen and paste it into a word-processing document, follow these steps:
1. Display the screen.
2. Copy the screen:
To copy only the active window, press alt+prt sc.
To copy the entire screen, press prt sc.
3. Open a word-processing document, and then select Edit > Paste.
4. Save the document.
● You can back up your information to an optional external hard drive, a network drive, or discs.
● When backing up to discs, use any of the following types of discs (purchased separately): CD-R,CD-RW, DVD+R, DVD-R, or DVD±RW. The discs you use will depend on the type of optical driveinstalled in your computer.
NOTE: DVDs store more information than CDs, so using them for backup reduces the numberof recovery discs required.
● When backing up to discs, number each disc before inserting it into the optical drive of the computer.
Using Windows Backup and RestoreTo create a backup using Windows Backup and Restore, follow these steps:
NOTE: Be sure that the computer is connected to AC power before you start the backup process.
Backing up your information 97
NOTE: The backup process may take over an hour, depending on file size and the speed of thecomputer.
1. Select Start > All Programs > Maintenance > Backup and Restore.
2. Follow the on-screen instructions to set up and create a backup.
NOTE: Windows® includes the User Account Control feature to improve the security of your computer.You may be prompted for your permission or password for tasks such as installing software, runningutilities, or changing Windows settings. Refer to Help and Support for more information.
Using system restore pointsWhen you back up your system, you are creating a system restore point. A system restore point allowsyou to save and name a snapshot of your hard drive at a specific point in time. You can then recoverback to that point if you want to reverse subsequent changes made to your system.
NOTE: Recovering to an earlier restore point does not affect data files saved or e-mails created sincethe last restore point.
You also can create additional restore points to provide increased protection for your system files andsettings.
When to create restore points
● Before you add or extensively modify software or hardware
● Periodically, whenever the system is performing optimally
NOTE: If you revert to a restore point and then change your mind, you can reverse the restoration.
Create a system restore point1. Select Start > Control Panel > System and Security > System.
2. In the left pane, click System Protection.
3. Click the System Protection tab.
4. Under Protection Settings, select the disk for which you want to create a restore point.
5. Click Create.
6. Follow the on-screen instructions.
Restore to a previous date and timeTo revert to a restore point (created at a previous date and time), when the computer was functioningoptimally, follow these steps:
1. Select Start > Control Panel > System and Security > System.
2. In the left pane, click System protection.
3. Click the System Protection tab.
4. Click System Restore.
5. Follow the on-screen instructions.
98 Chapter 10 Backup and recovery
Performing a recoveryNOTE: You can recover only files that you have previously backed up. HP recommends that you useHP Recovery Manager to create a set of recovery discs (entire drive backup) as soon as you set upyour computer.
Recovery Manager software allows you to repair or restore the system if you experience system failureor instability. Recovery Manager works from recovery discs or from a dedicated recovery partition (selectmodels only) on the hard drive. However, if your computer includes a solid-state drive (SSD), you maynot have a recovery partition. If that is the case, recovery discs have been included with your computer.Use these discs to recover your operating system and software.
NOTE: Windows has its own built-in repair features, such as System Restore. If you have not alreadytried these features, try them before using Recovery Manager.
NOTE: Recovery Manager recovers only software that was preinstalled at the factory. Software notprovided with this computer must be downloaded from the manufacturer's Web site or reinstalled fromthe disc provided by the manufacturer.
Recovering from the recovery discsTo restore the system from the recovery discs:
1. Back up all personal files.
2. Insert the first recovery disc into an optional external optical drive and restart the computer.
3. Follow the on-screen instructions.
Recovering from the dedicated recovery partition (select models only)
NOTE: Computers with an SSD may not have a recovery partition. If the computer does not have arecovery partition, you will not be able to recover using this procedure. Recovery discs have beenincluded for computers that do not have a partition. Use these discs to recover your operating systemand software.
On some models, you can perform a recovery from the partition on the hard drive, accessed by pressingeither the Start button or f11. This restores the computer to its factory condition.
To restore the system from the partition, follow these steps:
1. Access Recovery Manager in either of the following ways:
● Select Start > All Programs > Recovery Manager > Recovery Manager.
– or –
● Turn on or restart the computer, and then press esc while the “Press the ESC key for StartupMenu” message is displayed at the bottom of the screen. Then, press f11 while the “Press<F11> for recovery” message is displayed on the screen.
2. Click System Recovery in the Recovery Manager window.
3. Follow the on-screen instructions.
Performing a recovery 99

11 Setup Utility (BIOS)
100 Chapter 11 Setup Utility (BIOS)
Starting Setup UtilitySetup Utility is a ROM-based information and customization utility that can be used even when yourWindows® operating system is not working.
The utility reports information about the computer and provides settings for startup, security, and otherpreferences.
To start Setup Utility:
▲ Open Setup Utility by turning on or restarting the computer. While the “Press the ESC key forStartup Menu” message is displayed in the lower-left corner of the screen, press f10.
– or –
1. Open Setup Utility by turning on or restarting the computer. While the “Press the ESC key forStartup Menu” message is displayed in the lower-left corner of the screen, press esc.
2. When the Startup Menu is displayed, press f10.
Starting Setup Utility 101
Using Setup UtilityChanging the language of Setup Utility
The following procedure explains how to change the language of Setup Utility. If Setup Utility is notalready running, begin at step 1. If Setup Utility is already running, begin at step 2.
1. Open Setup Utility by turning on or restarting the computer. While the “Press the ESC key forStartup Menu” message is displayed in the lower-left corner of the screen, press f10.
– or –
Open Setup Utility by turning on or restarting the computer. While the “Press the ESC key forStartup Menu” message is displayed in the lower-left corner of the screen, press esc. When theStartup Menu is displayed, press f10.
2. Use the arrow keys to select System Configuration > Language, and then press enter.
3. Use the arrow keys to select a language, and then press enter.
4. When a confirmation prompt with your language selected is displayed, press enter.
5. To save your change and exit Setup Utility, use the arrow keys to select Exit > Exit SavingChanges, and then press enter.
Your change goes into effect immediately.
Navigating and selecting in Setup UtilityBecause Setup Utility is not Windows based, it does not support the TouchPad. Navigation and selectionare by keystroke.
● To choose a menu or a menu item, use the arrow keys.
● To choose an item in a list or to toggle a field, for example an Enable/Disable field, use either thearrow keys or f5 or f6.
● To select an item, press enter.
● To close a text box or return to the menu display, press esc.
● To display additional navigation and selection information while Setup Utility is open, press f1.
102 Chapter 11 Setup Utility (BIOS)
Displaying system informationThe following procedure explains how to display system information in Setup Utility. If Setup Utility isnot open, begin at step 1. If Setup Utility is open, begin at step 2.
1. Open Setup Utility by turning on or restarting the computer. While the “Press the ESC key forStartup Menu” message is displayed in the lower-left corner of the screen, press f10.
– or –
Open Setup Utility by turning on or restarting the computer. While the “Press the ESC key forStartup Menu” message is displayed in the lower-left corner of the screen, press esc. When theStartup Menu is displayed, press f10.
2. Select the Main menu. System information such as the system time and date, and identificationinformation about the computer is displayed.
3. To exit Setup Utility without changing any settings, use the arrow keys to select Exit > ExitDiscarding Changes, and then press enter.
Restoring default settings in Setup UtilityThe following procedure explains how to restore the Setup Utility default settings. If Setup Utility is notalready running, begin at step 1. If Setup Utility is already running, begin at step 2.
1. Open Setup Utility by turning on or restarting the computer. While the “Press the ESC key forStartup Menu” message is displayed in the lower-left corner of the screen, press f10.
– or –
Open Setup Utility by turning on or restarting the computer. While the “Press the ESC key forStartup Menu” message is displayed in the lower-left corner of the screen, press esc. When theStartup Menu is displayed, press f10.
2. Use the arrow keys to select Exit > Load Setup Defaults, and then press enter.
3. When the Setup Confirmation is displayed, press enter.
4. To save your change and exit Setup Utility, use the arrow keys to select Exit > Exit SavingChanges, and then press enter.
The Setup Utility default settings go into effect when the computer restarts.
NOTE: Your password, security, and language settings are not changed when you restore the factorydefault settings.
Exiting Setup UtilityYou can exit Setup Utility with or without saving changes.
● To exit Setup Utility and save your changes from the current session:
If the Setup Utility menus are not visible, press esc to return to the menu display. Then use thearrow keys to select Exit > Exit Saving Changes, and then press enter.
● To exit Setup Utility without saving your changes from the current session:
If the Setup Utility menus are not visible, press esc to return to the menu display. Then use thearrow keys to select Exit > Exit Discarding Changes, and then press enter.
Using Setup Utility 103

After either choice, the computer restarts in Windows.
104 Chapter 11 Setup Utility (BIOS)
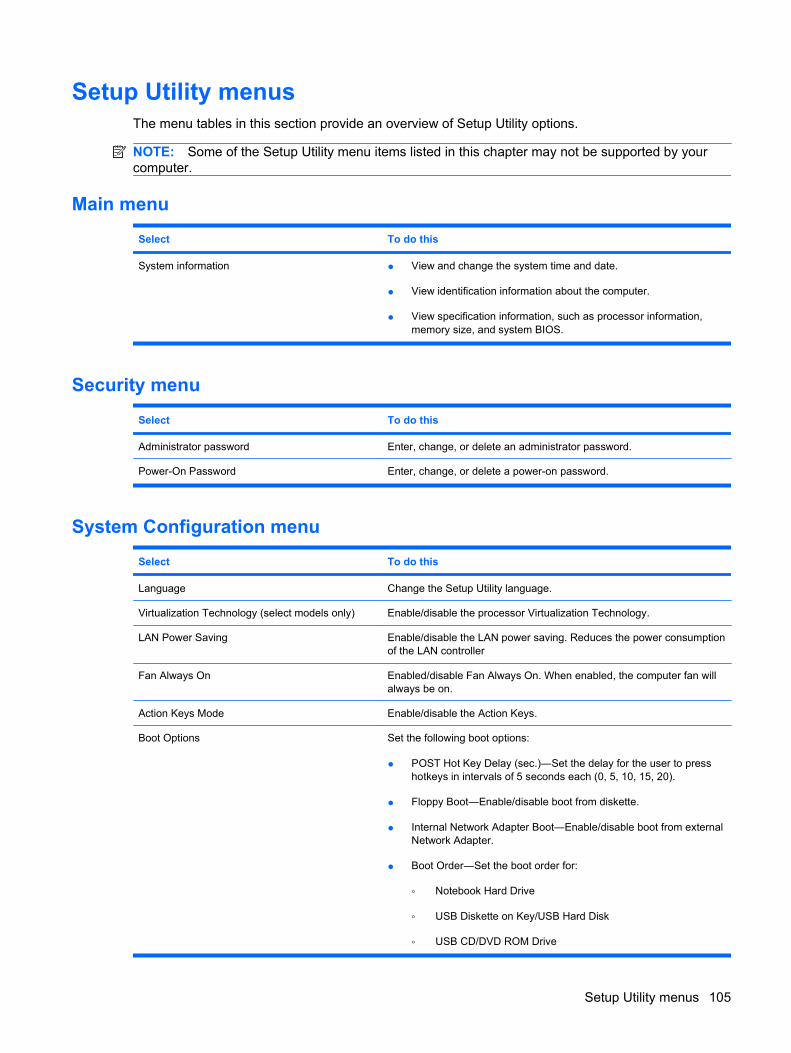
Setup Utility menusThe menu tables in this section provide an overview of Setup Utility options.
NOTE: Some of the Setup Utility menu items listed in this chapter may not be supported by yourcomputer.
Main menu
Select To do this
System information ● View and change the system time and date.
● View identification information about the computer.
● View specification information, such as processor information,memory size, and system BIOS.
Security menu
Select To do this
Administrator password Enter, change, or delete an administrator password.
Power-On Password Enter, change, or delete a power-on password.
System Configuration menu
Select To do this
Language Change the Setup Utility language.
Virtualization Technology (select models only) Enable/disable the processor Virtualization Technology.
LAN Power Saving Enable/disable the LAN power saving. Reduces the power consumptionof the LAN controller
Fan Always On Enabled/disable Fan Always On. When enabled, the computer fan willalways be on.
Action Keys Mode Enable/disable the Action Keys.
Boot Options Set the following boot options:
● POST Hot Key Delay (sec.)―Set the delay for the user to presshotkeys in intervals of 5 seconds each (0, 5, 10, 15, 20).
● Floppy Boot―Enable/disable boot from diskette.
● Internal Network Adapter Boot―Enable/disable boot from externalNetwork Adapter.
● Boot Order―Set the boot order for:
◦ Notebook Hard Drive
◦ USB Diskette on Key/USB Hard Disk
◦ USB CD/DVD ROM Drive
Setup Utility menus 105
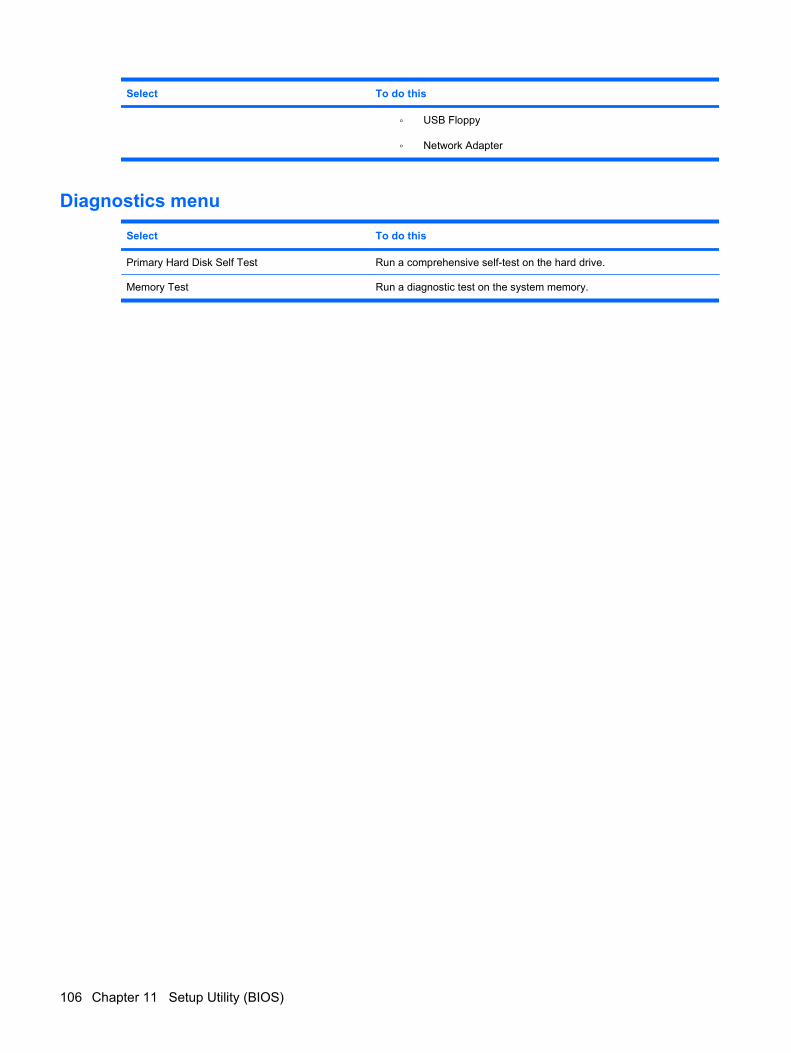
Select To do this
◦ USB Floppy
◦ Network Adapter
Diagnostics menu
Select To do this
Primary Hard Disk Self Test Run a comprehensive self-test on the hard drive.
Memory Test Run a diagnostic test on the system memory.
106 Chapter 11 Setup Utility (BIOS)
Updating the BIOSUpdated versions of the BIOS may be available on the HP Web site.
Most BIOS updates on the HP Web site are packaged in compressed files called SoftPaqs.
Some download packages contain a file named Readme.txt, which contains information regardinginstalling and troubleshooting the file.
Determining the BIOS versionTo determine whether available BIOS updates contain later BIOS versions than those currently installedon the computer, you need to know the version of the system BIOS currently installed.
BIOS version information (also known as ROM date and System BIOS) can be displayed by pressingfn+esc (if you are already in Windows) or by opening Setup Utility.
To use Setup Utility for displaying BIOS information:
1. Open Setup Utility by turning on or restarting the computer. While the “Press the ESC key forStartup Menu” message is displayed in the lower-left corner of the screen, press f10.
2. If Setup Utility does not open with the system information displayed, use the arrow keys to selectthe Main menu.
When the Main menu is selected, BIOS and other system information is displayed.
3. To exit Setup Utility, use the arrow keys to select Exit > Exit Discarding Changes, and then pressenter.
Downloading a BIOS updateCAUTION: To prevent damage to the computer or an unsuccessful installation, download and installa BIOS update only when the computer is connected to reliable external power using the AC adapter.Do not download or install a BIOS update while the computer is running on battery power, docked in anoptional docking device, or connected to an optional power source. During the download and installation,follow these instructions:
Do not disconnect power from the computer by unplugging the power cord from the AC outlet.
Do not shut down the computer or initiate Sleep or Hibernation.
Do not insert, remove, connect, or disconnect any device, cable, or cord.
Updating the BIOS 107
To download a BIOS update:
1. Access the page on the HP Web site that provides software for your computer:
Select Start > Help and Support > Maintain.
2. Follow the instructions on the screen to identify your computer and access the BIOS update youwant to download.
3. At the download area, follow these steps:
a. Identify the BIOS update that is later than the BIOS version currently installed on yourcomputer. Make a note of the date, name, or other identifier. You may need this informationto locate the update later, after it has been downloaded to your hard drive.
b. Follow the instructions on the screen to download your selection to the hard drive.
Make a note of the path to the location on your hard drive where the BIOS update will bedownloaded. You will need to access this path when you are ready to install the update.
NOTE: If you connect your computer to a network, consult the network administrator beforeinstalling any software updates, especially system BIOS updates.
BIOS installation procedures vary. Follow any instructions that are displayed on the screen after thedownload is complete. If no instructions are displayed, follow these steps:
1. Open Windows Explorer by selecting Start > Computer.
2. Double-click your hard drive designation. The hard drive designation is typically Local Disk (C:).
3. Using the hard drive path you recorded earlier, open the folder on your hard drive that contains theupdate.
4. Double-click the file that has an .exe extension (for example, filename.exe).
The BIOS installation begins.
5. Complete the installation by following the instructions on the screen.
NOTE: After a message on the screen reports a successful installation, you can delete the downloadedfile from your hard drive.
108 Chapter 11 Setup Utility (BIOS)

A Product information
109
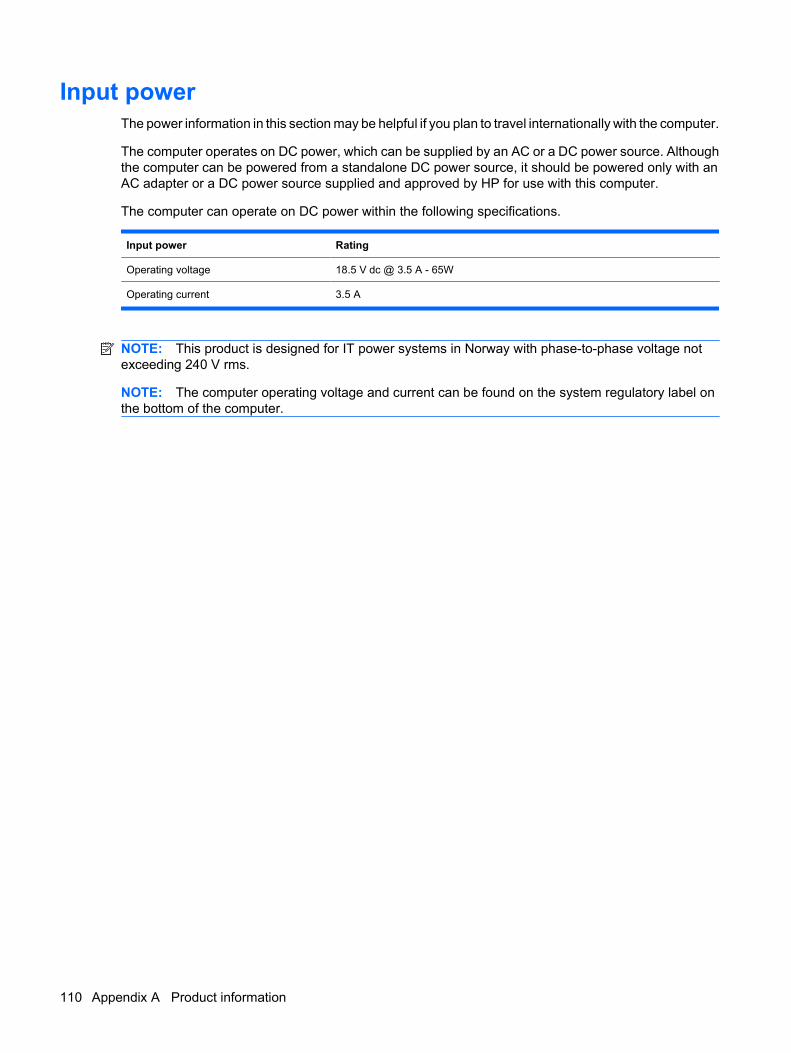
Input powerThe power information in this section may be helpful if you plan to travel internationally with the computer.
The computer operates on DC power, which can be supplied by an AC or a DC power source. Althoughthe computer can be powered from a standalone DC power source, it should be powered only with anAC adapter or a DC power source supplied and approved by HP for use with this computer.
The computer can operate on DC power within the following specifications.
Input power Rating
Operating voltage 18.5 V dc @ 3.5 A - 65W
Operating current 3.5 A
NOTE: This product is designed for IT power systems in Norway with phase-to-phase voltage notexceeding 240 V rms.
NOTE: The computer operating voltage and current can be found on the system regulatory label onthe bottom of the computer.
110 Appendix A Product information
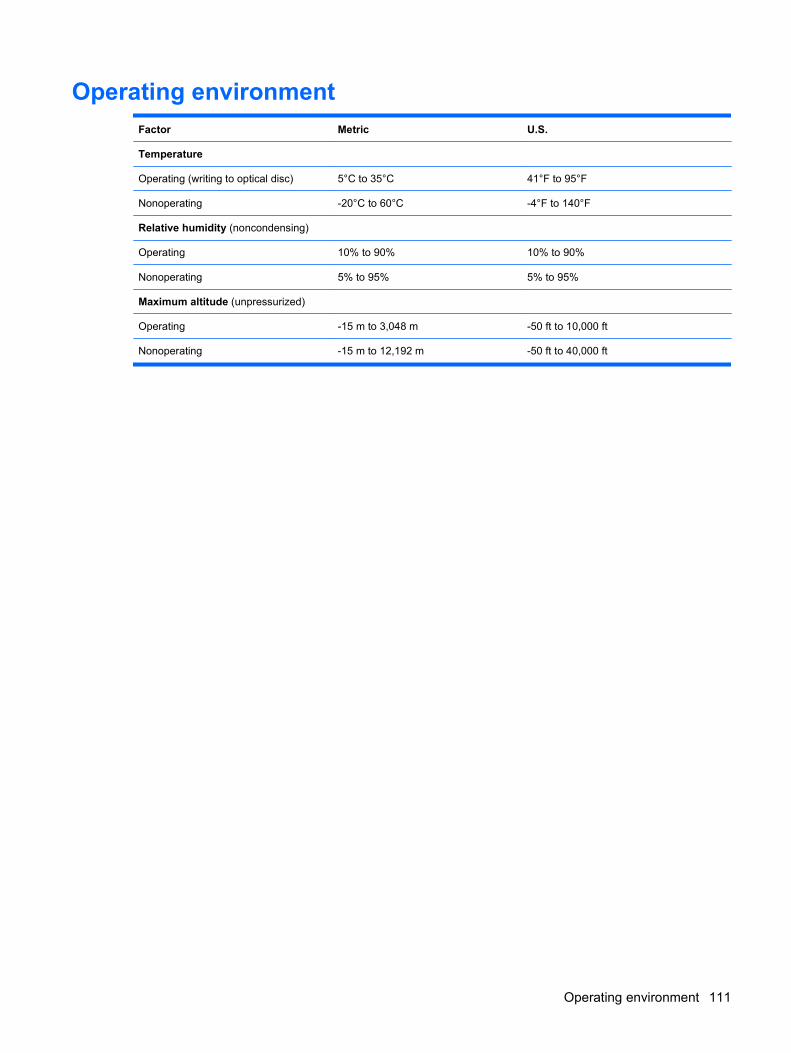
Operating environmentFactor Metric U.S.
Temperature
Operating (writing to optical disc) 5°C to 35°C 41°F to 95°F
Nonoperating -20°C to 60°C -4°F to 140°F
Relative humidity (noncondensing)
Operating 10% to 90% 10% to 90%
Nonoperating 5% to 95% 5% to 95%
Maximum altitude (unpressurized)
Operating -15 m to 3,048 m -50 ft to 10,000 ft
Nonoperating -15 m to 12,192 m -50 ft to 40,000 ft
Operating environment 111
Traveling with the computerFor best results, follow these traveling and shipping tips:
● Prepare the computer for traveling or shipping:
◦ Back up your information.
◦ Remove all discs and all external media cards, such as digital cards.
CAUTION: To reduce the risk of damage to the computer, damage to a drive, or loss ofinformation, remove the media from a drive before removing the drive from a drive bay, andbefore shipping, storing, or traveling with a drive.
◦ Turn off and then disconnect all external devices.
◦ Shut down the computer.
● Take along a backup of your information. Keep the backup separate from the computer.
● When traveling by air, carry the computer as hand luggage, and do not check it in with the rest ofyour bags.
CAUTION: Avoid exposing a drive to magnetic fields. Security devices with magnetic fieldsinclude airport walk-through devices and security wands. The airport security devices that checkcarry-on luggage, such as conveyor belts, use X-rays instead of magnetism and will not damagea drive.
● In-flight computer use is at the discretion of the airline. If you plan to use the computer during aflight, check with the airline in advance.
● If the computer will be unused and disconnected from external power for more than 2 weeks,remove the battery and store it separately.
● If you are shipping the computer or a drive, use suitable protective packaging and label the package“FRAGILE.”
● If the computer has a wireless device or a cell phone device installed, such as an 802.11b/g device,a Global System for Mobile Communications (GSM) device, or a General Packet Radio Service(GPRS) device, the use of these devices may be restricted in some environments. Such restrictionsmay apply onboard aircraft, in hospitals, near explosives, and in hazardous locations. If you areuncertain of the policy that applies to the use of a particular device, ask for authorization to use itbefore you turn it on.
● If you are traveling internationally, follow these suggestions:
◦ Check the computer-related customs regulations for each country or region on your itinerary.
◦ Check the power cord and adapter requirements for each location in which you plan to usethe computer. Voltage, frequency, and plug configurations vary.
WARNING! To reduce the risk of electric shock, fire, or damage to the equipment, do notattempt to power the computer with a voltage converter kit sold for appliances.
112 Appendix A Product information
Routine careCleaning the display
CAUTION: To prevent permanent damage to the computer, never spray water, cleaning fluids, orchemicals on the display.
To remove smudges and lint, frequently clean the display with a soft, damp, lint-free cloth. If the screenrequires additional cleaning, use premoistened antistatic wipes or an antistatic screen cleaner.
Cleaning the TouchPad and keyboardDirt and grease on the TouchPad can cause the pointer to jump around on the screen. To avoid this,clean the TouchPad with a damp cloth, and wash your hands frequently when using the computer.
WARNING! To reduce the risk of electric shock or damage to internal components, do not use avacuum cleaner attachment to clean the keyboard. A vacuum cleaner can deposit household debris onthe keyboard surface.
Clean the keyboard regularly to prevent keys from sticking and to remove dust, lint, and particles thatcan become trapped beneath the keys. A can of compressed air with a straw extension can be used toblow air around and under the keys to loosen and remove debris.
Routine care 113
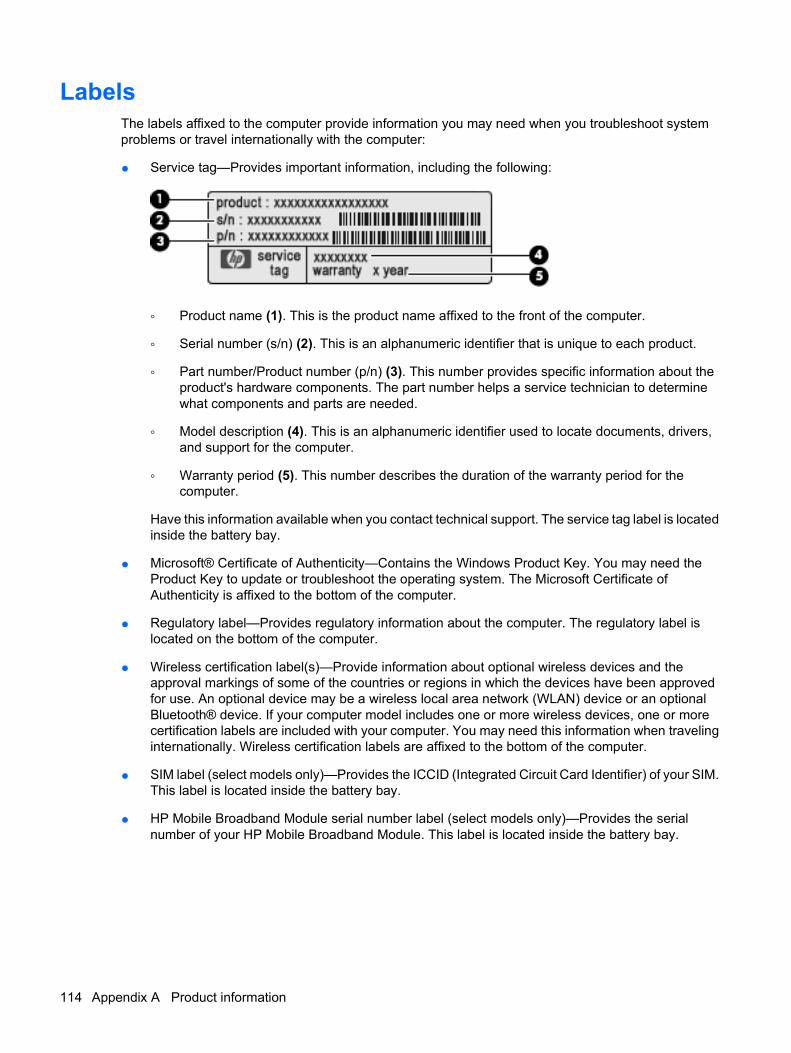
LabelsThe labels affixed to the computer provide information you may need when you troubleshoot systemproblems or travel internationally with the computer:
● Service tag—Provides important information, including the following:
◦ Product name (1). This is the product name affixed to the front of the computer.
◦ Serial number (s/n) (2). This is an alphanumeric identifier that is unique to each product.
◦ Part number/Product number (p/n) (3). This number provides specific information about theproduct's hardware components. The part number helps a service technician to determinewhat components and parts are needed.
◦ Model description (4). This is an alphanumeric identifier used to locate documents, drivers,and support for the computer.
◦ Warranty period (5). This number describes the duration of the warranty period for thecomputer.
Have this information available when you contact technical support. The service tag label is locatedinside the battery bay.
● Microsoft® Certificate of Authenticity—Contains the Windows Product Key. You may need theProduct Key to update or troubleshoot the operating system. The Microsoft Certificate ofAuthenticity is affixed to the bottom of the computer.
● Regulatory label—Provides regulatory information about the computer. The regulatory label islocated on the bottom of the computer.
● Wireless certification label(s)—Provide information about optional wireless devices and theapproval markings of some of the countries or regions in which the devices have been approvedfor use. An optional device may be a wireless local area network (WLAN) device or an optionalBluetooth® device. If your computer model includes one or more wireless devices, one or morecertification labels are included with your computer. You may need this information when travelinginternationally. Wireless certification labels are affixed to the bottom of the computer.
● SIM label (select models only)—Provides the ICCID (Integrated Circuit Card Identifier) of your SIM.This label is located inside the battery bay.
● HP Mobile Broadband Module serial number label (select models only)—Provides the serialnumber of your HP Mobile Broadband Module. This label is located inside the battery bay.
114 Appendix A Product information

Index
AAC adapter, testing 62AC power, connecting 61action key mode 105action keys
adjusting volume 36audio CD, DVD, or BD
controls 35decrease screen
brightness 35Help and Support 35identifying 5increase screen brightness 35muting speaker sound 36switching screen image 35using 35volume 43wireless 15, 36
administrator passwordcreating 87entering 88managing 87
airport security devices 69antivirus software, using 89audio devices, connecting
external 43audio-in (microphone) jack,
identifying 8audio-out (headphone) jack,
identifying 8
Bbacking up
customized window, toolbar,and menu bar settings 97
personal files 97templates 97
batterycalibrating 58charging 56
conserving power 52discharging 57disposing 59inserting 55low battery levels 57removing 55replacing 59storing 58
battery bay, identifying 10Battery Check 54battery light 7, 56battery power 54battery release latch 10, 55battery temperature 58BD drive 77Bluetooth device 14Bluetooth label 114Bluetooth wireless devices 22boot options 105boot order 105buttons
left TouchPad 3right TouchPad 3rotate 6wireless 7, 15
Ccables
USB 66calibrating battery 58caps lock light, identifying 4CD drive 77Certificate of Authenticity
label 114charging batteries 56cleaning, TouchPad and
keyboard 113clicks
changing settings 34testing 34
componentsbottom 10display 8front 5left-side 7rear 9right-side 6top 3
computer, traveling 112configuring HDMI 48Connect to the Internet
Wizard 12, 13connection, external power 61connector, power 7conservation, power 52convertible hinge, identifying 9critical battery level 51, 57critical security updates,
installing 91
Ddefault settings, restoring 103Diagnostics menu 106digital card
inserting 64removing 65supported formats 64
Digital Media Slot, identifying 7Disk Cleanup software 70Disk Defragmenter software 70diskette drive 77display
rotating 30display image, switching 35display, cleaning 113dragging touch screen
gesture 32drive light 8, 71drive media 51
Index 115

drivesboot order 105connecting external 77diskette 77external 77handling 69hard 73, 74, 77optical 77
DVD drive 77
Eencryption 19End hotkey 37entering a power-on
password 88entering an administrator
password 88esc key, identifying 5external audio devices,
connecting 43external drive 77external monitor port 9, 47external optical drive 42external WWAN antenna,
identifying 6
Ff11 99fan always on 105fingerprint reader
identifying 6using 93
fingerprints, registering 93firewall software 19, 90flicking touch screen gesture 32flicks
changing assignments 34creating assignments 34
fn key, identifying 5, 37full system recovery 95
Ggraphic modes, switching 60
Hhard drive
external 77HP ProtectSmart Hard Drive
Protection 71installing 74removing 73
hard drive bay, identifying 10HDMI
configuring 48connecting 47
HDMI port, identifying 8, 47headphone (audio-out) jack 8Help and Support key 35Hibernation
exiting 51initiated during critical battery
level 57initiating 51
high-definition devices,connecting 47
hinge, identifying 9Home hotkey 37hotkeys
description 37display system information 37End 37Home 37page down 37page up 37using 37
HP Mobile Broadband Module 20HP ProtectSmart Hard Drive
Protection 71HP USB Ethernet Adapter
connecting 23hubs 66
Iicons
network 14wireless 14
input power 110integrated webcam light,
identifying 9internal microphones,
identifying 9Internet
choosing an ISP 12Internet connection setup 17Internet Service & Offers 12Internet Service Provider
(ISP) 12
Jjacks
audio-in (microphone) 8
audio-out (headphone) 8RJ-45 (network) 9
Kkeyboard hotkeys, identifying 37keyboard, cleaning 113keys
action 5esc 5fn 5mute 43Windows applications 5Windows logo 5
Llabels
Bluetooth 114Microsoft Certificate of
Authenticity 114regulatory 114service tag 114wireless certification 114WLAN 114
LAN power saving 105language 105latch, battery release 10lights
battery 7caps lock 4drive 8, 71mute 4power 6webcam 9wireless 4, 7
local area network (LAN)cable required 23connecting cable 23
low battery level 57
MMain menu 105maintenance
Disk Cleanup 70Disk Defragmenter 70
managing a power-onpassword 88
managing an administratorpassword 87
media activity keys 40media controls, keys 35MediaSmart software 41
116 Index

memory moduleinserting 82removing 82
memory module compartmentcover
removing 81replacing 83
memory module compartment,identifying 10
memory test 106microphone (audio-in) jack,
identifying 8Microsoft Certificate of Authenticity
label 114monitor, connecting 47mouse, external
setting preferences 25multimedia software
installing 42using 41
mute keyidentifying 36using 43
mute light, identifying 4
Nnetwork cable, connecting 23network icon 14
Ooperating environment 111operating system
Microsoft Certificate ofAuthenticity label 114
Product Key 114optical drive
external 42, 77sharing 42, 79
Ppage down hotkey 37page up hotkey 37passwords
administrator 87power-on 88set in Setup Utility 86set in Windows 86
penidentifying 29storing 29using 29
pen holder 8, 29pen tether eyelet 29pen tether hole, identifying 8pinching touch screen gesture 33pinching TouchPad gesture 27pointing devices
setting preferences 25ports
external monitor 9, 47HDMI 8, 47USB 7, 8, 66
powerconnecting 61conserving 52
power connector, identifying 7power light, identifying 6power switch, identifying 6power-on password
creating 88entering 88managing 88
primary hard disk self test 106Product Key 114product name and number,
computer 114programs, using 41projector, connecting 47
Rreadable media 51recovering a program or driver 95recovering from the dedicated
recovery partition 99recovering from the recovery
discs 99recovery discs 95, 96Recovery Manager 95, 99recovery partition 95recovery, system 99regulatory information
regulatory label 114wireless certification
labels 114restore points 98RJ-45 (network) jack,
identifying 9rotate button, identifying 6rotate button, using 31rotating touch screen gesture 33rotating TouchPad gesture 27
routine care 113
Sscreen brightness keys 35screen image, switching 35screen orientations,
identifying 31scrolling touch screen gesture 32scrolling TouchPad gesture 26security cable slot, identifying 9security cable, installing 92Security menu 105security, wireless 19serial number, computer 114service tag 114setup of WLAN 17Setup Utility
changing the language 102displaying system
information 103exiting 103menus 105navigating 102passwords set in 86restoring default settings 103selecting 102starting 101
shared drives 79shutdown 50SIM
inserting 20removing 21
Sleepexiting 51initiating 51
slotsDigital Media 7memory 80security cable 9
softwareDisk Cleanup 70Disk Defragmenter 70MediaSmart 41TouchSmart 41using 41Wireless Assistant 15
solid-state drive (SSD) 95, 99speakers, identifying 9storing battery 58supported discs 96
Index 117

switch, power 6switchable graphics 60System Configuration menu 105system failure or instability 95system information hotkey 37system information,
displaying 103, 105system recovery 99system restore points 95, 98
Ttapping touch screen gesture 31temperature 58touch screen
performing screen actions 31preferences 34using 30
touch screen gesturesdragging 32flicking 32pinching 33rotating 33scrolling 32tapping 31zooming 33
TouchPadbuttons 3cleaning 113gestures 25using 25
TouchPad gesturespinching 27rotating 27scrolling 26zooming 27
TouchPad off indicator 3TouchPad off indicator,
identifying 4TouchPad zone
identifying 3TouchSmart
starting 41using 41
TouchSmart software 41traveling with the computer 58,
112, 114turning off the computer 50
Uunresponsive system 50
USB cable, connecting 66USB devices
connecting 66description 66removing 66
USB hubs 66USB port, identifying 8USB ports, identifying 7, 66using system restore 98
Vvents, identifying 6, 8, 10Virtualization Technology 105volume
adjust 43keys 43mute 43
volume keys, identifying 36
Wwebcam
adjusting properties 46identifying 9
webcam light, identifying 9Windows applications key,
identifying 5Windows Connect to the Internet
Wizard 13Windows logo key, identifying 5Windows, passwords set in 86wireless
protecting 19set up 17
wireless antennas, identifying 9Wireless Assistant software 14,
15wireless button
using 15wireless button, identifying 7wireless certification label 114wireless controls
key 14operating system 14Wireless Assistant
software 14wireless icon 14wireless key
identifying 36using 14, 15
wireless light 4, 7, 14
wireless network (WLAN)equipment needed 17security 19
WLAN antennas, identifying 9WLAN device 114WLAN label 114writable media 51WWAN antennas, identifying 9WWAN device 20
Zzooming screen gesture 33zooming TouchPad gesture 27
118 Index