Embed Size (px)
Citation preview
ProtectTools
User Guide

© Copyright 2007 Hewlett-PackardDevelopment Company, L.P.
Microsoft and Windows are U.S. registeredtrademarks of Microsoft Corporation. Intel isa trademark or registered trademark of IntelCorporation or its subsidiaries in the UnitedStates and other countries. AMD, the AMDArrow logo, and combinations thereof aretrademarks of Advanced Micro Devices, Inc.Bluetooth is a trademark owned by itsproprietor and used by Hewlett-PackardCompany under license. Java is a UStrademark of Sun Microsystems, Inc. SDLogo is a trademark of its proprietor.
The information contained herein is subjectto change without notice. The onlywarranties for HP products and services areset forth in the express warranty statementsaccompanying such products and services.Nothing herein should be construed asconstituting an additional warranty. HP shallnot be liable for technical or editorial errorsor omissions contained herein.
First Edition: January 2007
Document Part Number: 438371-001
Table of contents
1 Introduction to securityHP ProtectTools features ..................................................................................................................... 2Accessing HP ProtectTools Security .................................................................................................... 3Achieving key security objectives ......................................................................................................... 4
Protecting against targeted theft .......................................................................................... 4Restricting access to sensitive data ..................................................................................... 4Preventing unauthorized access from internal or external locations ................................... 5Creating strong password policies ....................................................................................... 5
Additional security elements ................................................................................................................. 6Assigning security roles ....................................................................................................... 6Managing HP ProtectTools passwords ................................................................................ 6
Creating a secure password ............................................................................... 8HP ProtectTools Backup and Restore ................................................................................. 8
Backing up credentials and settings .................................................................... 8Restoring credentials ........................................................................................ 10Configuring settings .......................................................................................... 10
2 Credential Manager for HP ProtectToolsSetup procedures ............................................................................................................................... 12
Logging on to Credential Manger ...................................................................................... 12Using the Credential Manager Logon Wizard ................................................... 12Logging on for the first time ............................................................................... 13
Registering credentials ...................................................................................................... 13Registering fingerprints ..................................................................................... 13
Setting up the fingerprint reader ....................................................... 14Using your registered fingerprint to log on to Windows .................... 14
Registering a Java Card, USB eToken, or virtual token .................................... 14Registering a USB eToken ................................................................................ 14Registering other credentials ............................................................................ 14
General tasks ..................................................................................................................................... 15Creating a virtual token ...................................................................................................... 15Changing the Windows logon password ............................................................................ 15Changing a token PIN ........................................................................................................ 15Managing identity ............................................................................................................... 16
Clearing an identity from the system ................................................................. 16Locking the computer ........................................................................................................ 17Using Windows Logon ....................................................................................................... 17
Logging on to Windows with Credential Manager ............................................. 17Adding an account ............................................................................................ 18
ENWW iii
Removing an account ....................................................................................... 18Using Single Sign On ......................................................................................................... 18
Registering a new application ........................................................................... 18Using automatic registration ............................................................. 18Using manual (drag and drop) registration ....................................... 19
Managing applications and credentials ............................................................. 19Modifying application properties ....................................................... 19Removing an application from Single Sign On ................................. 19Exporting an application ................................................................... 20Importing an application ................................................................... 20Modifying credentials ........................................................................ 20
Using Application Protection .............................................................................................. 21Restricting access to an application .................................................................. 21Removing protection from an application .......................................................... 21Changing restriction settings for a protected application .................................. 22
Advanced tasks (administrator only) .................................................................................................. 23Specifying how users and administrators log on ............................................................... 23Configuring custom authentication requirements .............................................................. 24Configuring credential properties ....................................................................................... 24Configuring Credential Manager settings .......................................................................... 25
Example 1—Using the “Advanced Settings” page to allow Windows logonfrom Credential Manager .................................................................................. 25Example 2—Using the “Advanced Settings” page to require user verificationbefore Single Sign On ....................................................................................... 26
3 Embedded Security for HP ProtectToolsSetup procedures ............................................................................................................................... 28
Enabling the embedded security chip ................................................................................ 28Initializing the embedded security chip .............................................................................. 29Setting up the basic user account ...................................................................................... 30
General tasks ..................................................................................................................................... 31Using the Personal Secure Drive ....................................................................................... 31Encrypting files and folders ................................................................................................ 31Sending and receiving encrypted e-mail ............................................................................ 31Changing the Basic User Key password ........................................................................... 32
Advanced tasks .................................................................................................................................. 33Backing up and restoring ................................................................................................... 33
Creating a backup file ....................................................................................... 33Restoring certification data from the backup file ............................................... 33
Changing the owner password .......................................................................................... 34Resetting a user password ................................................................................................ 34Enabling and disabling Embedded Security ...................................................................... 34
Permanently disabling Embedded Security ...................................................... 34Enabling Embedded Security after permanent disable ..................................... 34
Migrating keys with the Migration Wizard .......................................................................... 35
4 Java Card Security for HP ProtectToolsGeneral tasks ..................................................................................................................................... 38
Changing a Java Card PIN ................................................................................................ 38Selecting the card reader ................................................................................................... 38
iv ENWW
Advanced tasks (administrators only) ................................................................................................ 39Assigning a Java Card PIN ................................................................................................ 39Assigning a name to a Java Card ...................................................................................... 40Setting power-on authentication ........................................................................................ 40
Enabling Java Card power-on authentication and creating an administratorJava Card .......................................................................................................... 41Creating a user Java Card ................................................................................ 42Disabling Java Card power-on authentication ................................................... 42
5 BIOS Configuration for HP ProtectToolsGeneral tasks ..................................................................................................................................... 44
Managing boot options ...................................................................................................... 44Enabling and disabling system configuration options ........................................................ 45
Advanced tasks .................................................................................................................................. 47Managing HP ProtectTools add-on module settings ......................................................... 47
Enabling and disabling smart card power-on authentication support ................ 47Enabling and disabling power-on authentication support for EmbeddedSecurity ............................................................................................................. 48Enabling and disabling Automatic DriveLock hard drive protection .................. 49
Managing Computer Setup passwords .............................................................................. 49Setting the power-on password ......................................................................... 50Changing the power-on password .................................................................... 50Setting the setup password ............................................................................... 50Changing the setup password ........................................................................... 51Setting password options .................................................................................. 51
Enabling and disabling stringent security ......................................... 51Enabling and disabling power-on authentication on Windowsrestart ............................................................................................... 51
6 Device Access Manager for HP ProtectToolsStarting background service ............................................................................................................... 54Simple configuration ........................................................................................................................... 55Device class configuration (advanced) ............................................................................................... 56
Adding a user or a group ................................................................................................... 56Removing a user or a group .............................................................................................. 56Denying access to a user or group .................................................................................... 56Allowing access to a device class for one user of a group ................................................ 56Allowing access to a specific device for one user of a group ............................................ 57
7 Drive Encryption for HP ProtectToolsEncryption management .................................................................................................................... 60User management .............................................................................................................................. 61Recovery ............................................................................................................................................ 62
8 TroubleshootingCredential Manager for HP ProtectTools ........................................................................................... 63Embedded Security for HP ProtectTools ............................................................................................ 66Device Access Manager for HP ProtectTools .................................................................................... 72Miscellaneous ..................................................................................................................................... 73
ENWW v

Glossary ............................................................................................................................................................. 77
Index ................................................................................................................................................................... 79
vi ENWW
1 Introduction to security
HP ProtectTools Security Manager software provides security features that help protect againstunauthorized access to the computer, networks, and critical data. Enhanced security functionality isprovided by the following software modules:
● Credential Manager for HP ProtectTools
● Embedded Security for HP ProtectTools
● Java Card Security for HP ProtectTools
● BIOS Configuration for HP ProtectTools
● Device Access Manager for HP ProtectTools
● Drive Encryption for HP ProtectTools
The software modules available for your computer may vary depending on your model. For example,Embedded Security for HP ProtectTools is available only for computers on which the Trusted PlatformModule (TPM) embedded security chip is installed.
HP ProtectTools software modules may be preinstalled, preloaded, or available for download from theHP Web site. Visit http://www.hp.com for more information.
NOTE: The instructions in this guide are written with the assumption that you have alreadyinstalled the applicable HP ProtectTools software modules.
ENWW 1
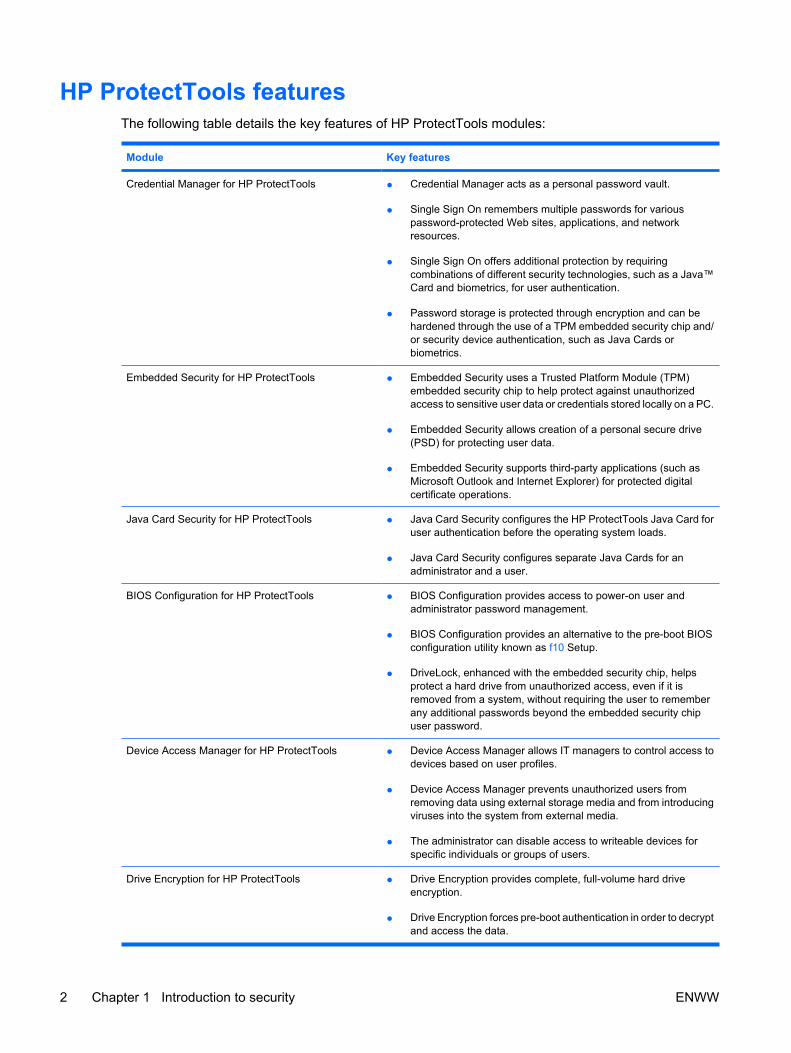
HP ProtectTools featuresThe following table details the key features of HP ProtectTools modules:
Module Key features
Credential Manager for HP ProtectTools ● Credential Manager acts as a personal password vault.
● Single Sign On remembers multiple passwords for variouspassword-protected Web sites, applications, and networkresources.
● Single Sign On offers additional protection by requiringcombinations of different security technologies, such as a Java™Card and biometrics, for user authentication.
● Password storage is protected through encryption and can behardened through the use of a TPM embedded security chip and/or security device authentication, such as Java Cards orbiometrics.
Embedded Security for HP ProtectTools ● Embedded Security uses a Trusted Platform Module (TPM)embedded security chip to help protect against unauthorizedaccess to sensitive user data or credentials stored locally on a PC.
● Embedded Security allows creation of a personal secure drive(PSD) for protecting user data.
● Embedded Security supports third-party applications (such asMicrosoft Outlook and Internet Explorer) for protected digitalcertificate operations.
Java Card Security for HP ProtectTools ● Java Card Security configures the HP ProtectTools Java Card foruser authentication before the operating system loads.
● Java Card Security configures separate Java Cards for anadministrator and a user.
BIOS Configuration for HP ProtectTools ● BIOS Configuration provides access to power-on user andadministrator password management.
● BIOS Configuration provides an alternative to the pre-boot BIOSconfiguration utility known as f10 Setup.
● DriveLock, enhanced with the embedded security chip, helpsprotect a hard drive from unauthorized access, even if it isremoved from a system, without requiring the user to rememberany additional passwords beyond the embedded security chipuser password.
Device Access Manager for HP ProtectTools ● Device Access Manager allows IT managers to control access todevices based on user profiles.
● Device Access Manager prevents unauthorized users fromremoving data using external storage media and from introducingviruses into the system from external media.
● The administrator can disable access to writeable devices forspecific individuals or groups of users.
Drive Encryption for HP ProtectTools ● Drive Encryption provides complete, full-volume hard driveencryption.
● Drive Encryption forces pre-boot authentication in order to decryptand access the data.
2 Chapter 1 Introduction to security ENWW

Accessing HP ProtectTools SecurityTo access HP ProtectTools Security from Windows® Control Panel:
▲ Select Start > All Programs > HP ProtectTools Security Manager.
NOTE: After you have configured the Credential Manager module, you can also open HPProtectTools by logging on to Credential Manager directly from the Windows logon screen. Formore information, refer to “Logging on to Windows with Credential Manager on page 17.”
ENWW Accessing HP ProtectTools Security 3
Achieving key security objectivesThe HP ProtectTools modules can work together to provide solutions for a variety of security issues,including the following key security objectives:
● Protecting against targeted theft
● Restricting access to sensitive data
● Preventing unauthorized access from internal or external locations
● Creating strong password policies
Protecting against targeted theftAn example of this type of incident would be the targeted theft of a computer containing confidentialdata and customer information at an airport security checkpoint. The following features help protectagainst targeted theft:
● The pre-boot authentication feature, if enabled, helps prevent access to the operating system. Seethe following procedures:
● “Enabling and disabling smart card power-on authentication support on page 47”
● “Enabling and disabling power-on authentication support for Embedded Securityon page 48”
● “Assigning a name to a Java Card on page 40”
● “Drive Encryption for HP ProtectTools on page 59”
● DriveLock helps ensure that data cannot be accessed even if the hard drive is removed andinstalled into an unsecured system. See “Enabling and disabling Automatic DriveLock hard driveprotection on page 49.”
● The Personal Secure Drive feature, provided by the Embedded Security for HP ProtectToolsmodule, encrypts sensitive data to help ensure it cannot be accessed without authentication. Seethe following procedures:
● Embedded Security “Setup procedures on page 28”
● “Using the Personal Secure Drive on page 31”
Restricting access to sensitive dataSuppose a contract auditor is working onsite and has been given computer access to review sensitivefinancial data; you do not want the auditor to be able to print the files or save them to a writeable devicesuch as a CD. The following features help restrict access to data:
● Device Access Manager for HP ProtectTools allows IT managers to restrict access to writeabledevices so sensitive information cannot be printed or copied from the hard drive onto removablemedia. See “Device class configuration (advanced) on page 56.”
● The DriveLock helps ensure that data cannot be accessed even if the hard drive is removed andinstalled into an unsecured system. See “Enabling and disabling Automatic DriveLock hard driveprotection on page 49.”
4 Chapter 1 Introduction to security ENWW
Preventing unauthorized access from internal or external locationsIf a PC containing confidential data and customer information is accessed from an internal or externallocation, unauthorized users may be able to gain entry to corporate network resources or data fromfinancial services, an executive, or R&D team, or private information such as patient records or personalfinancial data. The following features help prevent unauthorized access:
● The pre-boot authentication feature, if enabled, helps prevent access to the operating system. Seethe following procedures:
● “Enabling and disabling smart card power-on authentication support on page 47”
● “Enabling and disabling power-on authentication support for Embedded Securityon page 48”
● “Assigning a name to a Java Card on page 40”
● “Drive Encryption for HP ProtectTools on page 59”
● Embedded Security for HP ProtectTools helps protect sensitive user data or credentials storedlocally on a PC using the following procedures:
● Embedded Security “Setup procedures on page 28”
● “Using the Personal Secure Drive on page 31”
● Using the following procedures, Credential Manager for HP ProtectTools helps ensure that anunauthorized user cannot get passwords or access to password-protected applications:
● Credential Manager “Setup procedures on page 12”
● “Using Single Sign On on page 18”
● Device Access Manager for HP ProtectTools allows IT managers to restrict access to writeabledevices so sensitive information cannot be copied from the hard drive. See “Simpleconfiguration on page 55.”
● The Personal Secure Drive feature encrypts sensitive data to help ensure it cannot be accessedwithout authentication using the following procedures:
● Embedded Security “Setup procedures on page 28”
● “Using the Personal Secure Drive on page 31”
Creating strong password policiesIf a mandate goes into effect that requires the use of strong password policy for dozens of Web-basedapplications and databases, Credential Manager for HP ProtectTools provides a protected repositoryfor passwords and Single Sign On convenience using the following procedures:
● Credential Manager “Setup procedures on page 12”
● “Using Single Sign On on page 18”
For stronger security, Embedded Security for HP ProtectTools then protects that repository of usernames and passwords. This allows users to maintain multiple strong passwords without having to writethem down or try to remember them. See Embedded Security “Setup procedures on page 28.”
ENWW Achieving key security objectives 5
Additional security elementsAssigning security roles
In managing computer security (particularly for large organizations), one important practice is to divideresponsibilities and rights among various types of administrators and users.
NOTE: In a small organization or for individual use, these roles may all be held by the sameperson.
For HP ProtectTools, the security duties and privileges can be divided into the following roles:
● Security officer—Defines the security level for the company or network and determines the securityfeatures to deploy, such as Java™ Cards, biometric readers, or USB tokens.
NOTE: Many of the features in HP ProtectTools can be customized by the security officerin cooperation with HP. For more information, see the HP Web site at http://www.hp.com.
● IT administrator—Applies and manages the security features defined by the security officer. Canalso enable and disable some features. For example, if the security officer has decided to deployJava Cards, the IT administrator can enable Java Card BIOS security mode.
● User—Uses the security features. For example, if the security officer and IT administrator haveenabled Java Cards for the system, the user can set the Java Card PIN and use the card forauthentication.
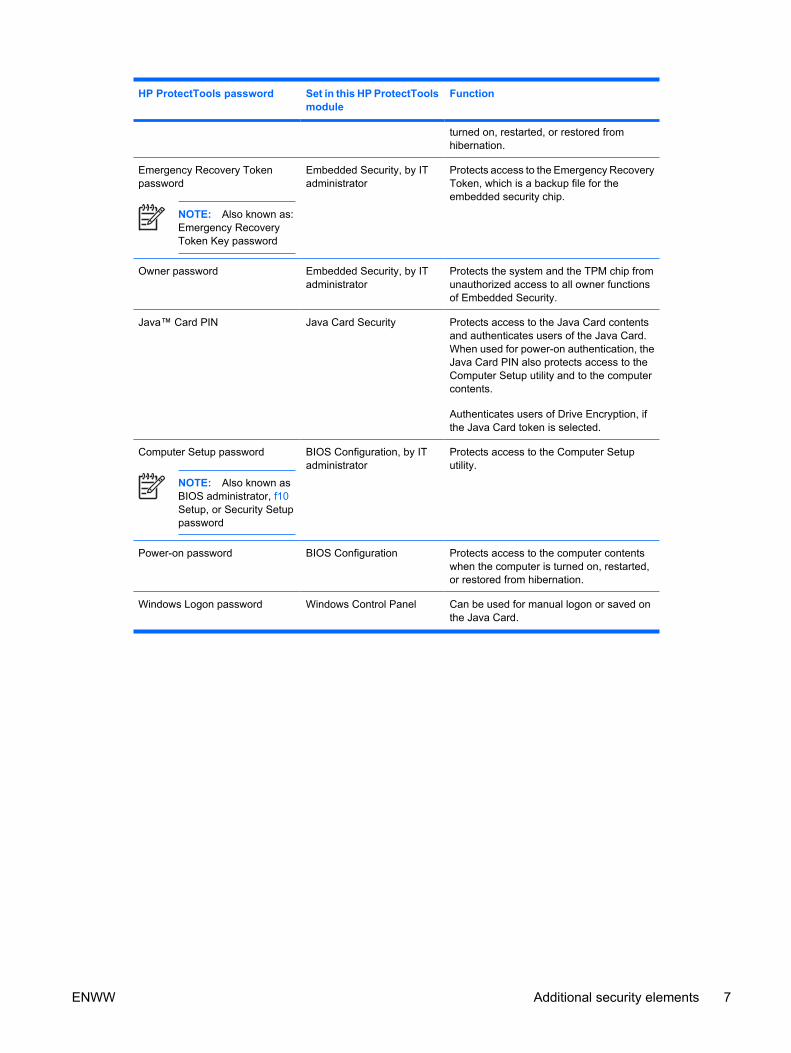
Managing HP ProtectTools passwordsMost of the HP ProtectTools Security Manager features are secured by passwords. The following tablelists the commonly used passwords, the software module where the password is set, and the passwordfunction.
The passwords that are set and used by IT administrators only are indicated in this table as well. Allother passwords may be set by regular users or administrators.
HP ProtectTools password Set in this HP ProtectToolsmodule
Function
Credential Manager logonpassword
Credential Manager This password offers 2 options:
● It can be used in a separate logon toaccess Credential Manager afterlogging on to Windows.
● It can be used in place of the Windowslogon process, allowing access toWindows and Credential Managersimultaneously.
Credential Manager recovery filepassword
Credential Manager, by ITadministrator
Protects access to the Credential Managerrecovery file.
Basic User Key password
NOTE: Also known as:Embedded Securitypassword
Embedded Security Used to access Embedded Securityfeatures, such as secure e-mail, file, andfolder encryption. When used for power-onauthentication, also protects access to thecomputer contents when the computer is
6 Chapter 1 Introduction to security ENWW
HP ProtectTools password Set in this HP ProtectToolsmodule
Function
turned on, restarted, or restored fromhibernation.
Emergency Recovery Tokenpassword
NOTE: Also known as:Emergency RecoveryToken Key password
Embedded Security, by ITadministrator
Protects access to the Emergency RecoveryToken, which is a backup file for theembedded security chip.
Owner password Embedded Security, by ITadministrator
Protects the system and the TPM chip fromunauthorized access to all owner functionsof Embedded Security.
Java™ Card PIN Java Card Security Protects access to the Java Card contentsand authenticates users of the Java Card.When used for power-on authentication, theJava Card PIN also protects access to theComputer Setup utility and to the computercontents.
Authenticates users of Drive Encryption, ifthe Java Card token is selected.
Computer Setup password
NOTE: Also known asBIOS administrator, f10Setup, or Security Setuppassword
BIOS Configuration, by ITadministrator
Protects access to the Computer Setuputility.
Power-on password BIOS Configuration Protects access to the computer contentswhen the computer is turned on, restarted,or restored from hibernation.
Windows Logon password Windows Control Panel Can be used for manual logon or saved onthe Java Card.
ENWW Additional security elements 7
Creating a secure passwordWhen creating passwords, you must first follow any specifications that are set by the program. Ingeneral, however, consider the following guidelines to help you create strong passwords and reducethe chances of your password being compromised:
● Use passwords with more than 6 characters, preferably more than 8.
● Mix the case of letters throughout your password.
● Whenever possible, mix alphanumeric characters and include special characters and punctuationmarks.
● Substitute special characters or numbers for letters in a key word. For example, you can use thenumber 1 for letters I or L.
● Combine words from 2 or more languages.
● Split a word or phrase with numbers or special characters in the middle, for example,“Mary2-2Cat45.”
● Do not use a password that would appear in a dictionary.
● Do not use your name for the password, or any other personal information, such as birth date, petnames, or mother's maiden name, even if you spell it backwards.
● Change passwords regularly. You might change only a couple of characters that increment.
● If you write down your password, do not store it in a commonly visible place very close to thecomputer.
● Do not save the password in a file, such as an e-mail, on the computer.
● Do not share accounts or tell anyone your password.
HP ProtectTools Backup and RestoreHP ProtectTools Backup and Restore provides a convenient and quick way to back up and restorecredentials from all supported HP ProtectTools modules.
Backing up credentials and settingsYou can back up credentials in the following ways:
● Use the HP ProtectTools Backup Wizard to select and back up HP ProtectTools modules
● Back up preselected HP ProtectTools modules
NOTE: You must set backup options before you can use this method.
● Schedule backups
NOTE: You must set backup options before you can use this method.
8 Chapter 1 Introduction to security ENWW
Using the HP ProtectTools Backup Wizard to select and back up HP ProtectTools modules
1. Select Start > All Programs > HP ProtectTools Security Manager.
2. In the left pane, click HP ProtectTools, and then click Backup and Restore.
3. In the right pane, click Backup Options. The HP ProtectTools Backup Wizard opens. Follow theon-screen instructions to back up credentials.
Setting backup options
1. Select Start > All Programs > HP ProtectTools Security Manager.
2. In the left pane, click HP ProtectTools, and then click Backup and Restore.
3. In the right pane, click Backup Options. The HP ProtectTools Backup Wizard opens.
4. Follow the on-screen instructions.
5. After you set and confirm the Storage File Password, select Remember all passwords andauthentication values for future automated backups.
6. Click Save Settings, and then click Finish.
Backing up preselected HP ProtectTools modules
NOTE: You must set backup options before you can use this method.
1. Select Start > All Programs > HP ProtectTools Security Manager.
2. In the left pane, click HP ProtectTools, and then click Backup and Restore.
3. In the right pane, click Backup.
Scheduling backups
NOTE: You must set backup options before you can use this method.
1. Select Start > All Programs > HP ProtectTools Security Manager.
2. In the left pane, click HP ProtectTools, and then click Backup and Restore.
3. In the right pane, click Schedule Backups.
4. On the Task tab, select the Enabled check box to enable scheduled backups.
5. Click Set Password and type and confirm your password in the Set Password dialog box.Click OK.
6. Click Apply. Click the Schedule tab. Click the Schedule Task arrow and select the automaticbackup frequency.
7. Under Start time, use the Start time arrows to select the exact time for the backup to begin.
8. Click Advanced to select a start date, an end date, and recurring task settings. Click Apply.
ENWW Additional security elements 9
9. Click Settings, and select settings for Scheduled Task Completed, Idle Time, and PowerManagement.
10. Click Apply, and then click OK to close the dialog box.
Restoring credentials1. Select Start > All Programs > HP ProtectTools Security Manager.
2. In the left pane, click HP ProtectTools, and then click Backup and Restore.
3. In the right pane, click Restore. The HP ProtectTools Restore Wizard opens. Follow the on-screeninstructions.
Configuring settings1. Select Start > All Programs > HP ProtectTools Security Manager.
2. In the left pane, click HP ProtectTools, and then click Settings.
3. In the right pane, select your settings, and then click OK.
10 Chapter 1 Introduction to security ENWW
2 Credential Manager for HPProtectTools
Credential Manager for HP ProtectTools protects against unauthorized access to your computer usingthe following security features:
● Alternatives to passwords when logging on to Windows, such as using a Java Card or biometricreader to log on to Windows. For additional information, refer to “Registering credentialson page 13.”
● Single Sign On feature that automatically remembers credentials for Web sites, applications, andprotected network resources.
● Support for optional security devices, such as Java Cards and biometric readers.
● Support for additional security settings, such as requiring authentication using an optional securitydevice to unlock the computer.
ENWW 11
Setup proceduresLogging on to Credential Manger
Depending on the configuration, you can log on to Credential Manager in any of the following ways:
● Credential Manager Logon Wizard (preferred)
● HP ProtectTools Security Manager icon in the notification area
● HP ProtectTools Security Manager
NOTE: If you use the Credential Manager Logon prompt on the Windows Logon screen to logon to Credential Manager, you are logged on to Windows at the same time.
The first time you open Credential Manager, log on with your regular Windows Logon password. ACredential Manager account is then automatically created with your Windows logon credentials.
After logging on to Credential Manager, you can register additional credentials, such as a fingerprint ora Java Card. For additional information, refer to “Registering credentials on page 13.”
At the next logon, you can select the logon policy and use any combination of the registered credentials.
Using the Credential Manager Logon WizardTo log on to Credential Manger using the Credential Manager Logon Wizard, use the following steps:
1. Open the Credential Manager Logon Wizard in any of the following ways:
● From the Windows logon screen
● From the notification area, by double-clicking the HP ProtectTools Security Manager icon
● From the “Credential Manager” page of ProtectTools Security Manager, by clicking the LogOn link in the upper-right corner of the window
2. Follow the on-screen instructions to log on to Credential Manager.
12 Chapter 2 Credential Manager for HP ProtectTools ENWW
Logging on for the first timeBefore you begin, you must be logged on to Windows with an administrator account, but not logged onto Credential Manager.
1. Open HP ProtectTools Security Manager by double-clicking the HP ProtectTools Security Managericon in the notification area. The HP ProtectTools Security Manager window opens.
2. In the left pane, click Credential Manager, and then click Log On in the upper-right corner of theright pane. The Credential Manager Logon Wizard opens.
3. Type your Windows password in the Password box, and then click Next.
Registering credentialsYou can use the “My Identity” page to register your various authentication methods, or credentials. Afterthey have been registered, you can use these methods to log on to Credential Manager.
Registering fingerprintsA fingerprint reader allows you to log on to Windows using your fingerprint for authentication instead ofusing a Windows password.
ENWW Setup procedures 13
Setting up the fingerprint reader
1. After logging on to Credential Manager, swipe your finger across the fingerprint reader. TheCredential Manager Registration Wizard opens.
2. Follow the on-screen instructions to complete registering your fingerprints and setting up thefingerprint reader.
3. To set up the fingerprint reader for a different Windows user, log on to Windows as that user andthen repeat steps 1 and 2.
Using your registered fingerprint to log on to Windows
1. Immediately after you have registered your fingerprints, restart Windows.
2. At the Windows Welcome screen, swipe any of your registered fingers to log on to Windows.
Registering a Java Card, USB eToken, or virtual token
NOTE: You must have a card reader configured for this procedure. If you do not have a readerinstalled, you can register a virtual token as described in “Creating a virtual tokenon page 15.”
1. Select Start > All Programs > HP ProtectTools Security Manager.
2. In the left pane, click Credential Manager.
3. In the right pane, click Register Smart Card or Token. The Credential Manager RegistrationWizard opens.
4. Follow the on-screen instructions.
Registering a USB eToken1. Be sure that the USB eToken drivers are installed.
NOTE: Refer to the USB eToken user guide for more information.
2. Select Start > All Programs > HP ProtectTools Security Manager.
3. In the left pane, click Credential Manager.
4. In the right pane, click Register Smart Card or Token. The Credential Manager RegistrationWizard opens.
5. Follow the on-screen instructions.
Registering other credentials1. Select Start > All Programs > HP ProtectTools Security Manager.
2. In the left pane, click Credential Manager.
3. In the right pane, click Register Credentials. The Credential Manager Registration Wizard opens.
4. Follow the on-screen instructions.
14 Chapter 2 Credential Manager for HP ProtectTools ENWW
General tasksAll users have access to the “My Identity” page in Credential Manager. From the “My Identity” page, youcan perform the following tasks:
● Creating a virtual token
● Changing the Windows logon password
● Managing a token PIN
● Managing identity
● Locking the computer
NOTE: This option is available only if the Credential Manager classic logon prompt isenabled. See “Example 1—Using the “Advanced Settings” page to allow Windows logonfrom Credential Manager on page 25.”
Creating a virtual tokenA virtual token works very much like a Java Card or USB eToken. The token is saved either on thecomputer hard drive or in the Windows registry. When you log on with a virtual token, you are asked fora user PIN to complete the authentication.
To create a new virtual token:
1. Select Start > All Programs > HP ProtectTools Security Manager.
2. In the left pane, click Credential Manager.
3. In the right pane, click Virtual Token. The Credential Manager Registration Wizard opens.
NOTE: If Virtual Token is not an option, use the procedure for “Registering othercredentials on page 14.”
4. Follow the on-screen instructions.
Changing the Windows logon password1. Select Start > All Programs > HP ProtectTools Security Manager.
2. In the left pane, click Credential Manager.
3. In the right pane, click Change Windows Password.
4. Type your old password in the Old password box.
5. Type your new password in the New password and Confirm password boxes.
6. Click Finish.
Changing a token PIN1. Select Start > All Programs > HP ProtectTools Security Manager.
2. In the left pane, click Credential Manager.
ENWW General tasks 15
3. In the right pane, click Change Token PIN.
4. Select the token for which you want to change the PIN, and then click Next.
5. Follow the on-screen instructions to complete the PIN change.
Managing identity
Clearing an identity from the system
NOTE: This does not affect your Windows user account.
1. Select Start > All Programs > HP ProtectTools Security Manager.
2. In the left pane, click Credential Manager.
3. In the right pane, click Clear Identity for this Account.
4. Click Yes in the confirmation dialog box. Your identity is logged off and removed from the system.
16 Chapter 2 Credential Manager for HP ProtectTools ENWW
Locking the computerThis feature is available if you log on to Windows using Credential Manager. To secure your computerwhen you are away from your desk, use the Lock Workstation feature. This prevents unauthorized usersfrom gaining access to your computer. Only you and members of the administrators group on yourcomputer can unlock it.
NOTE: This option is available only if the Credential Manager classic logon prompt is enabled.See “Example 1—Using the “Advanced Settings” page to allow Windows logon from CredentialManager on page 25.”
For added security, you can configure the Lock Workstation feature to require a Java Card,biometric reader, or token to unlock the computer. For more information, see “ConfiguringCredential Manager settings on page 25.”
To lock the computer:
1. Select Start > All Programs > HP ProtectTools Security Manager.
2. In the left pane, click Credential Manager.
3. In the right pane, click Lock Workstation. The Windows logon screen is displayed. You must usea Windows password or the Credential Manager Logon Wizard to unlock the computer.
Using Windows LogonYou can use Credential Manager to log on to Windows, either at a local computer or on a networkdomain. When you log on to Credential Manager for the first time, the system automatically adds yourlocal Windows user account as the account for the Windows Logon service.
Logging on to Windows with Credential ManagerYou can use Credential Manager to log on to a Windows network or local account.
1. If you have registered your fingerprint to log on to Windows, swipe your finger to log on.
2. If you have not registered your fingerprint to log on to Windows, click the keyboard icon in theupper-left corner of the screen next to the fingerprint icon. The Credential Manager Logon Wizardopens.
3. Click the User name arrow, and then click your name.
4. Type your password in the Password box, and then click Next.
5. Select More > Wizard Options.
a. If you want this to be the default user name the next time that you log on to the computer,select the Use last user name on next logon check box.
b. If you want this logon policy to be the default method, select the Use last policy on nextlogon check box.
6. Follow the on-screen instructions. If your authentication information is correct, you will be loggedon to your Windows account and to Credential Manager.
ENWW General tasks 17
Adding an account1. Select Start > All Programs > HP ProtectTools Security Manager.
2. In the left pane, click Credential Manager, and then click Services and Applications.
3. In the right pane, click Windows Logon, and then click Add a Network Account. The Add NetworkAccount Wizard opens.
4. Follow the on-screen instructions.
Removing an account1. Select Start > All Programs > HP ProtectTools Security Manager.
2. In the left pane, click Credential Manager, and then click Services and Applications.
3. In the right pane, click Windows Logon, and then click Manage Network Accounts. The ManageNetwork Accounts dialog box opens.
4. Click the account you want to remove, and then click Remove.
5. In the confirmation dialog box, click Yes.
6. Click OK.
Using Single Sign OnCredential Manager has a Single Sign On feature that stores user names and passwords for multipleInternet and Windows programs, and automatically enters logon credentials when you access aregistered program.
NOTE: Security and privacy are important features of Single Sign On. All credentials areencrypted and are available only after successful logon to Credential Manager.
NOTE: You can also configure Single Sign On to validate your authentication credentials witha Java Card, a fingerprint reader, or a token before logging on to a secure site or program. Thisis particularly useful when logging on to programs or Web sites that contain personal information,such as bank account numbers. For more information, refer to “Configuring Credential Managersettings on page 25.”
Registering a new applicationCredential Manager prompts you to register any application that you launch while you are logged on toCredential Manager. You can also register an application manually.
Using automatic registration
1. Open an application that requires you to log on.
2. Click the Credential Manager SSO icon in the program or Web site password dialog box.
3. Type your password for the program or Web site, and then click OK. The Credential ManagerSingle Sign On dialog box opens.
18 Chapter 2 Credential Manager for HP ProtectTools ENWW

4. Click More and select from the following options:
● Do not use SSO for this site or application.
● Prompt to select account for this application.
● Fill in credentials but do not submit.
● Authenticate user before submitting credentials.
● Show SSO shortcut for this application.
5. Click Yes to complete the registration.
Using manual (drag and drop) registration
1. Select Start > All Programs > HP ProtectTools Security Manager.
2. In the left pane, click Credential Manager, and then click Services and Applications.
3. In the right pane, click Single Sign On, and then click Register New Application. The SSOApplication Wizard opens.
4. Follow the on-screen instructions.
Managing applications and credentials
Modifying application properties
1. Select Start > All Programs > HP ProtectTools Security Manager.
2. In the left pane, click Credential Manager, and then click Services and Applications.
3. In the right pane, under Single Sign On, click Manage Applications and Credentials.
4. Click the application entry you want to modify, and then click Properties.
5. Click the General tab to modify the application name and description. Change the settings byselecting or clearing the check boxes next to the appropriate settings.
6. Click the Script tab to view and edit the SSO application script.
7. Click OK.
Removing an application from Single Sign On
1. Select Start > All Programs > HP ProtectTools Security Manager.
2. In the left pane, click Credential Manager, and then click Services and Applications.
3. In the right pane, under Single Sign On, click Manage Applications and Credentials.
4. Click the application entry you want to remove, and then click Remove.
5. Click Yes in the confirmation dialog box.
6. Click OK.
ENWW General tasks 19

Exporting an application
You can export applications to create a backup copy of the Single Sign On application script. This filecan then be used to recover the Single Sign On data. This acts as a supplement to the identity backupfile, which contains only the credential information.
To export an application:
1. Select Start > All Programs > HP ProtectTools Security Manager.
2. In the left pane, click Credential Manager, and then click Services and Applications.
3. In the right pane, under Single Sign On, click Manage Applications and Credentials.
4. Click the application entry you want to export. Then click More > Applications > Export Script.
5. Follow the on-screen instructions to complete the export.
6. Click OK.
Importing an application
1. Select Start > All Programs > HP ProtectTools Security Manager.
2. In the left pane, click Credential Manager, and then click Services and Applications.
3. In the right pane, under Single Sign On, click Manage Applications and Credentials.
4. Click the application entry you want to import. Then select More > Applications > ImportScript.
5. Follow the on-screen instructions to complete the import.
6. Click OK.
Modifying credentials
1. Select Start > All Programs > HP ProtectTools Security Manager.
2. In the left pane, click Credential Manager, and then click Services and Applications.
3. In the right pane, under Single Sign On, click Manage Applications and Credentials.
4. Click the application entry you want to modify, and then click More.
5. Select any of the following options:
● Applications
● Add New
● Remove
● Properties
20 Chapter 2 Credential Manager for HP ProtectTools ENWW

● Import Script
● Export Script
● Credentials
● Create New
● View Password
NOTE: You must authenticate your identity before viewing the password.
6. Follow the on-screen instructions.
7. Click OK.
Using Application ProtectionThis feature allows you to configure access to applications. You can restrict access based on thefollowing criteria:
● Category of user
● Time of use
● User inactivity
Restricting access to an application1. Select Start > All Programs > HP ProtectTools Security Manager.
2. In the left pane, click Credential Manager, and then click Services and Applications.
3. In the right pane, under Application Protection, click Manage Protected Applications. TheApplication Protection Service dialog box opens.
4. Select a category of user whose access you want to manage.
NOTE: If the category is not Everyone, you may need to select Override defaultsettings to override the settings for the Everyone category.
5. Click Add. The Add a Program Wizard opens.
6. Follow the on-screen instructions.
Removing protection from an applicationTo remove restrictions from an application:
1. Select Start > All Programs > HP ProtectTools Security Manager.
2. In the left pane, click Credential Manager, and then click Services and Applications.
3. In the right pane, under Application Protection, click Manage Protected Applications. TheApplication Protection Service dialog box opens.
4. Select a category of user whose access you want to manage.
ENWW General tasks 21
NOTE: If the category is not Everyone, you may need to click Override defaultsettings to override the settings for the Everyone category.
5. Click the application entry you want to remove, and then click Remove.
6. Click OK.
Changing restriction settings for a protected application1. Select Start > All Programs > HP ProtectTools Security Manager.
2. In the left pane, click Credential Manager, and then click Services and Applications.
3. In the right pane, under Application Protection, click Manage Protected Applications. TheApplication Protection Service dialog box opens.
4. Select a category of user whose access you want to manage.
NOTE: If the category is not Everyone, you may need to click Override defaultsettings to override the settings for the Everyone category.
5. Click the application you want to change, and then click Properties. The Properties dialog boxfor that application opens.
6. Click the General tab. Select one of the following settings:
● Disabled (Cannot be used)
● Enabled (Can be used without restrictions)
● Restricted (Usage depends on settings)
7. When you select Restricted, the following settings are available:
a. If you want to restrict usage based on time, day, or date, click the Schedule tab and configurethe settings.
b. If you want to restrict usage based on inactivity, click the Advanced tab and select the periodof inactivity.
8. Click OK to close the application Properties dialog box.
9. Click OK.
22 Chapter 2 Credential Manager for HP ProtectTools ENWW
Advanced tasks (administrator only)The “Authentication and Credentials” page and the “Advanced Settings” page of Credential Managerare available only to those users with administrator rights. From these pages, you can perform thefollowing tasks:
● Specifying how users and administrators log on
● Configuring custom authentication requirements
● Configuring credential properties
● Configuring Credential Manager settings
Specifying how users and administrators log onOn the “Authentication and Credentials” page, you can specify which type or combination of credentialsare required of either users or administrators.
To specify how users or administrators log on:
1. Select Start > All Programs > HP ProtectTools Security Manager.
2. In the left pane, click Credential Manager, and then click Authentication and Credentials.
3. In the right pane, click the Authentication tab.
4. Click the category (Users or Administrators) from the category list.
5. Click the type or combination of authentication methods from the list.
6. Click Apply, and then click OK.
ENWW Advanced tasks (administrator only) 23
Configuring custom authentication requirementsIf the set of authentication credentials you want is not listed on the Authentication tab of the“Authentication and Credentials” page, you can create custom requirements.
To configure custom requirements:
1. Select Start > All Programs > HP ProtectTools Security Manager.
2. In the left pane, click Credential Manager, and then click Authentication and Credentials.
3. In the right pane, click the Authentication tab.
4. Click the category (Users or Administrators) from the category list.
5. Click Custom in the list of authentication methods.
6. Click Configure.
7. Select the authentication methods you want to use.
8. Choose the combination of methods by clicking one of the following selections:
● Use AND to combine the authentication methods
(Users will have to authenticate with all of the methods you checked each time they log on.)
● Use OR to require one of two or more authentication methods
(Users will be able to choose any of the selected methods each time they log on.)
9. Click OK.
10. Click Apply, and then click OK.
Configuring credential propertiesOn the Credentials tab of the “Authentication and Credentials” page, you can view the list of availableauthentication methods, and modify the settings.
To configure the credentials:
1. Select Start > All Programs > HP ProtectTools Security Manager.
2. In the left pane, click Credential Manager, and then click Authentication and Credentials.
3. In the right pane, click the Credentials tab.
4. Click the credential type you want to modify. You can modify the credential using one of thefollowing choices:
● To register the credential, click Register, and then follow the on-screen instructions.
● To delete the credential, click Clear, and then click Yes in the confirmation dialog box.
● To modify the credential properties, click Properties, and then follow the on-screeninstructions.
5. Click Apply, and then click OK.
24 Chapter 2 Credential Manager for HP ProtectTools ENWW
Configuring Credential Manager settingsFrom the “Settings” page, you can access and modify various settings using the following tabs:
● General—Allows you to modify the settings for basic configuration.
● Single Sign On—Allows you to modify the settings for how Single Sign On works for the currentuser, such as how it handles detection of logon screens, automatic logon to registered logondialogs, and password display.
● Services and Applications—Allows you to view the available services and modify the settings forthose services.
● Security—Allows you to select the fingerprint reader software and adjust the security level of thefingerprint reader.
● Smart Cards and Tokens—Allows you to view and modify properties for all available Java Cardsand tokens.
To modify Credential Manager settings:
1. Select Start > All Programs > HP ProtectTools Security Manager.
2. In the left pane, click Credential Manager, and then click Settings.
3. In the right pane, click the appropriate tab for the settings you want to modify.
4. Follow the on-screen instructions to modify the settings.
5. Click Apply, and then click OK.
Example 1—Using the “Advanced Settings” page to allow Windows logon fromCredential Manager
1. Select Start > All Programs > HP ProtectTools Security Manager.
2. In the left pane, click Credential Manager, and then click Settings.
3. In the right pane, click the General tab.
4. Under Select the way users log on to Windows (requires restart), select the Use CredentialManager with classic logon prompt check box.
5. Click Apply, and then click OK.
6. Restart the computer.
NOTE: Selecting the Use Credential Manager with classic logon prompt check box allowsyou to lock your computer. See “Locking the computer on page 17.”
ENWW Advanced tasks (administrator only) 25
Example 2—Using the “Advanced Settings” page to require user verification beforeSingle Sign On
1. Select Start > All Programs > HP ProtectTools Security Manager.
2. In the left pane, click Credential Manager, and then click Settings.
3. In the right pane, click the Single Sign On tab.
4. Under When registered logon dialog or Web page is visited, select the Authenticate userbefore submitting credentials check box.
5. Click Apply, and then click OK.
6. Restart the computer.
26 Chapter 2 Credential Manager for HP ProtectTools ENWW
3 Embedded Security for HPProtectTools
NOTE: The integrated Trusted Platform Module (TPM) embedded security chip must beinstalled in your computer to use Embedded Security for HP ProtectTools.
Embedded Security for HP ProtectTools protects against unauthorized access to user data orcredentials. This software module provides the following security features:
● Enhanced Microsoft® Encryption File System (EFS) file and folder encryption
● Creation of a personal secure drive (PSD) for protecting user data
● Data management functions, such as backing up and restoring the key hierarchy
● Support for third-party applications (such as Microsoft Outlook and Internet Explorer) for protecteddigital certificate operations when using the Embedded Security software
The TPM embedded security chip enhances and enables other HP ProtectTools Security Managersecurity features. For example, Credential Manager for HP ProtectTools can use the embedded chipas an authentication factor when the user logs on to Windows. On select models, the TPM embeddedsecurity chip also enables enhanced BIOS security features accessed through BIOS Configuration forHP ProtectTools.
ENWW 27
Setup proceduresCAUTION: To reduce security risk, it is highly recommended that your IT administratorimmediately initialize the embedded security chip. Failure to initialize the embedded security chipcould result in an unauthorized user, a computer worm, or a virus taking ownership of thecomputer and gaining control over the owner tasks, such as handling the emergency recoveryarchive, and configuring user access settings.
Follow the steps in the following 2 sections to enable and initialize the embedded security chip.
Enabling the embedded security chipThe embedded security chip must be enabled in the Computer Setup utility. This procedure cannot beperformed in BIOS Configuration for HP ProtectTools.
To enable the embedded security chip:
1. Open Computer Setup by turning on or restarting the computer, and then pressing f10 while the“f10 = ROM Based Setup” message is displayed in the lower-left corner of the screen.
2. If you have not set an administrator password, use the arrow keys to select Security > Setuppassword, and then press enter.
3. Type your password in the New password and Verify new password boxes, and then pressf10.
4. In the Security menu, use the arrow keys to select TPM Embedded Security, and then pressenter.
5. Under Embedded Security, if the device is hidden, select Available.
6. Select Embedded security device state and change to Enable.
7. Press f10 to accept the changes to the Embedded Security configuration.
8. To save your preferences and exit Computer Setup, use the arrow keys to select File > SaveChanges and Exit. Then follow the on-screen instructions.
28 Chapter 3 Embedded Security for HP ProtectTools ENWW
Initializing the embedded security chipIn the initialization process for Embedded Security, you will perform the following tasks:
● Set an owner password for the embedded security chip that protects access to all owner functionson the embedded security chip.
● Set up the emergency recovery archive, which is a protected storage area that allows reencryptionof the Basic User Keys for all users.
To initialize the embedded security chip:
1. Right-click the HP ProtectTools Security Manager icon in the notification area, at the far right ofthe taskbar, and then select Embedded Security Initialization.
The HP ProtectTools Embedded Security Initialization Wizard opens.
2. Follow the on-screen instructions.
ENWW Setup procedures 29
Setting up the basic user accountSetting up a basic user account in Embedded Security accomplishes the following tasks:
● Produces a Basic User Key that protects encrypted information, and sets a Basic User Keypassword to protect the Basic User Key.
● Sets up a personal secure drive (PSD) for storing encrypted files and folders.
CAUTION: Safeguard the Basic User Key password. Encrypted information cannot beaccessed or recovered without this password.
To set up a basic user account and enable the user security features:
1. If the Embedded Security User Initialization Wizard is not open, select Start > All Programs > HPProtectTools Security Manager.
2. In the left pane, click Embedded Security, and then click User Settings.
3. In the right pane, under Embedded Security Features, click Configure.
The Embedded Security User Initialization Wizard opens.
4. Follow the on-screen instructions.
NOTE: To use secure e-mail, you must first configure the e-mail client to use a digitalcertificate that is created with Embedded Security. If a digital certificate is not available, youmust obtain one from a certification authority. For instructions on configuring your e-mailand obtaining a digital certificate, refer to the e-mail client online Help.
30 Chapter 3 Embedded Security for HP ProtectTools ENWW
General tasksAfter the basic user account is set up, you can perform the following tasks:
● Encrypting files and folders
● Sending and receiving encrypted e-mail
Using the Personal Secure DriveAfter setting up the PSD, you are prompted to type the Basic User Key password at the next logon. Ifthe Basic User Key password is entered correctly, you can access the PSD directly from WindowsExplorer.
Encrypting files and foldersWhen working with encrypted files, consider the following rules:
● Only files and folders on NTFS partitions can be encrypted. Files and folders on FAT partitionscannot be encrypted.
● System files and compressed files cannot be encrypted, and encrypted files cannot becompressed.
● Temporary folders should be encrypted, because they are potentially of interest to hackers.
● A recovery policy is automatically set up when you encrypt a file or folder for the first time. Thispolicy ensures that if you lose your encryption certificates and private keys, you will be able to usea recovery agent to decrypt your information.
To encrypt files and folders:
1. Right-click the file or folder that you want to encrypt.
2. Click Encrypt.
3. Click one of the following options:
● Apply changes to this folder only.
● Apply changes to this folder, subfolders, and files.
4. Click OK.
Sending and receiving encrypted e-mailEmbedded Security enables you to send and receive encrypted e-mail, but the procedures varydepending upon the program you use to access your e-mail. For more information, refer to theEmbedded Security online Help, and the online Help for your e-mail.
ENWW General tasks 31
Changing the Basic User Key passwordTo change the Basic User Key password:
1. Select Start > All Programs > HP ProtectTools Security Manager.
2. In the left pane, click Embedded Security, and then click User Settings.
3. In the right pane, under Basic User Key password, click Change.
4. Type the old password, and then set and confirm the new password.
5. Click OK.
32 Chapter 3 Embedded Security for HP ProtectTools ENWW
Advanced tasksBacking up and restoring
The Embedded Security backup feature creates an archive that contains certification information to berestored in case of emergency.
Creating a backup fileTo create a backup file:
1. Select Start > All Programs > HP ProtectTools Security Manager.
2. In the left pane, click Embedded Security, and then click Backup.
3. In the right pane, click Backup. The HP Embedded Security for ProtectTools Backup Wizardopens.
4. Follow the on-screen instructions.
Restoring certification data from the backup fileTo restore data from the backup file:
1. Select Start > All Programs > HP ProtectTools Security Manager.
2. In the left pane, click Embedded Security, and then click Backup.
3. In the right pane, click Restore. The HP Embedded Security for ProtectTools Backup Wizardopens.
4. Follow the on-screen instructions.
ENWW Advanced tasks 33
Changing the owner passwordTo change the owner password:
1. Select Start > All Programs > HP ProtectTools Security Manager.
2. In the left pane, click Embedded Security, and then click Advanced.
3. In the right pane, under Owner Password, click Change.
4. Type the old owner password, and then set and confirm the new owner password.
5. Click OK.
Resetting a user passwordAn administrator can help a user to reset a forgotten password. For more information, refer to the onlineHelp.
Enabling and disabling Embedded SecurityIt is possible to disable the Embedded Security features if you want to work without the security function.
The Embedded Security features can be enabled or disabled at 2 different levels:
● Temporary disabling—With this option, embedded security is automatically reenabled on Windowsrestart. This option is available to all users by default.
● Permanent disabling—With this option, the owner password is required to reenable EmbeddedSecurity. This option is available only to administrators.
Permanently disabling Embedded SecurityTo permanently disable Embedded Security:
1. Select Start > All Programs > HP ProtectTools Security Manager.
2. In the left pane, click Embedded Security, and then click Advanced.
3. In the right pane, under Embedded Security, click Disable.
4. Type your owner password at the prompt, and then click OK.
Enabling Embedded Security after permanent disableTo enable Embedded Security after permanently disabling it:
1. Select Start > All Programs > HP ProtectTools Security Manager.
2. In the left pane, click Embedded Security, and then click Advanced.
3. In the right pane, under Embedded Security, click Enable.
4. Type your owner password at the prompt, and then click OK.
34 Chapter 3 Embedded Security for HP ProtectTools ENWW

Migrating keys with the Migration WizardMigration is an advanced administrator task that allows the management, restoration, and transfer ofkeys and certificates.
For details on migration, refer to the Embedded Security online Help.
ENWW Advanced tasks 35

36 Chapter 3 Embedded Security for HP ProtectTools ENWW
4 Java Card Security for HP ProtectTools
Java Card Security for HP ProtectTools manages the Java Card setup and configuration for computersequipped with an optional card reader.
With Java Card Security, you can accomplish the following tasks:
● Access Java Card Security features
● Work with the Computer Setup utility to enable Java Card authentication in a power-on environment
● Configure separate Java Cards for an administrator and a user. A user must insert the Java Cardand type a PIN before the operating system will load
● Set and change the PIN used to authenticate users of the Java Card
ENWW 37
General tasksThe “General” page allows you to perform the following tasks:
● Change a Java Card PIN
● Select the card reader
NOTE: The card reader uses both Java Cards and smart cards. This feature is availableif you have more than one card reader on the computer.
Changing a Java Card PINTo change a Java Card PIN:
NOTE: The Java Card PIN must be between 4 and 8 numeric characters.
1. Select Start > All Programs > HP ProtectTools Security Manager.
2. In the left pane, click Java Card Security, and then click General.
3. Insert a Java Card (with an existing PIN) into the card reader.
4. In the right pane, click Change.
5. In the Change PIN dialog box, type the current PIN in the Current PIN box.
6. Type a new PIN in the New PIN box, and then type the PIN again in the Confirm New PIN box.
7. Click OK.
Selecting the card readerBe sure that the correct card reader is selected in Java Card Security before using the Java Card. If thecorrect reader is not selected, some of the features may be unavailable or incorrectly displayed. Inaddition, the card reader drivers must be correctly installed, as shown in Windows Device Manager.
To select the card reader:
1. Select Start > All Programs > HP ProtectTools Security Manager.
2. In the left pane, click Java Card Security, and then click General.
3. Insert the Java Card into the card reader.
4. In the right pane, under Selected card reader, click the correct reader.
38 Chapter 4 Java Card Security for HP ProtectTools ENWW
Advanced tasks (administrators only)The “Advanced” page allows you to perform the following tasks:
● Assign a Java Card PIN
● Assign a name to a Java Card
● Set power-on authentication
● Back up and restore Java Cards
NOTE: You must have Windows administrator privileges in order to display the "Advanced"page.
Assigning a Java Card PINYou must assign a name and a PIN to a Java Card before it can be used in Java Card Security.
To assign a Java Card PIN:
NOTE: The Java Card PIN must be between 4 and 8 numeric characters.
1. Select Start > All Programs > HP ProtectTools Security Manager.
2. In the left pane, click Java Card Security, and then click Advanced.
3. Insert a new Java Card into the card reader.
4. When the New Card dialog box opens, type a new name in the New display name box, type anew PIN in the New PIN box, and then type the new PIN again in the Confirm New PIN box.
5. Click OK.
ENWW Advanced tasks (administrators only) 39
Assigning a name to a Java CardYou must assign a name to a Java Card before it can be used for power-on authentication.
To assign a name to a Java Card:
1. Select Start > All Programs > HP ProtectTools Security Manager.
2. In the left pane, click Java Card Security, and then click Advanced.
3. Insert the Java Card into the card reader.
NOTE: If you have not assigned a PIN to this card, the New Card dialog box opens,allowing you to type a new name and PIN.
4. In the right pane, under Display name, click Change.
5. Type a name for the Java Card in the Name box.
6. Type the current Java Card PIN in the PIN box.
7. Click OK.
Setting power-on authenticationWhen enabled, power-on authentication requires you to use a Java Card to start the computer.
The process of enabling Java Card power-on authentication involves the following steps:
1. Enable Java Card power-on authentication support in BIOS Configuration or Computer Setup. Formore information, see “Enabling and disabling smart card power-on authentication supporton page 47.”
2. Enable Java Card power-on authentication in Java Card Security.
3. Create and enable the administrator Java Card.
40 Chapter 4 Java Card Security for HP ProtectTools ENWW

Enabling Java Card power-on authentication and creating an administrator Java CardTo enable Java Card power-on authentication:
1. Select Start > All Programs > HP ProtectTools Security Manager.
2. In the left pane, click Java Card Security, and then click Advanced.
3. Insert the Java Card into the card reader.
NOTE: If you have not assigned a name and PIN to this card, the New Card dialog boxopens, allowing you to type a new name and PIN.
4. In the right pane, under Power-on authentication, select the Enable check box.
5. Type your Computer Setup password in the Computer Setup Password dialog box, and thenclick OK.
6. If you do not have DriveLock enabled, type the Java Card PIN, and then click OK.
– or –
If you do have DriveLock enabled:
a. Click Make Java card identity unique.
– or –
Click Make the Java card identity the same as the DriveLock password.
NOTE: If DriveLock is enabled on the computer, you can set the Java Card identityto be the same as the DriveLock user password, which allows you to validate bothDriveLock and the Java Card using only the Java Card when starting the computer.
b. If applicable, type your DriveLock user password in the DriveLock password box, and thentype it again in the Confirm password box.
c. Type the Java Card PIN.
d. Click OK.
7. When you are prompted to create a recovery file, click Cancel to create a recovery file at a latertime or click OK and follow the on-screen instructions in the HP ProtectTools Backup Wizard tocreate a recovery file now.
NOTE: For more information, see “HP ProtectTools Backup and Restore on page 8.”
ENWW Advanced tasks (administrators only) 41
Creating a user Java Card
NOTE: Power-on authentication and an administrator card must be set up in order to create auser Java Card.
To create a user Java Card:
1. Select Start > All Programs > HP ProtectTools Security Manager.
2. In the left pane, click Java Card Security, and then click Advanced.
3. Insert a Java Card that will be used as a user card.
4. In the right pane, under Power-on authentication, click Create next to User card identity.
5. Type a PIN for the user Java Card, and then click OK.
Disabling Java Card power-on authenticationWhen you disable Java Card power-on authentication, the use of the Java Card is no longer needed toaccess the computer.
1. Select Start > All Programs > HP ProtectTools Security Manager.
2. In the left pane, click Java Card Security, and then click Advanced.
3. Insert the administrator Java Card.
4. In the right pane, under Power-on authentication, clear the Enable check box.
5. Type a PIN for the Java Card, and then click OK.
42 Chapter 4 Java Card Security for HP ProtectTools ENWW
5 BIOS Configuration for HPProtectTools
BIOS Configuration for HP ProtectTools provides access to the Computer Setup utility security andconfiguration settings. This gives users Windows access to system security features that are managedby Computer Setup.
With BIOS Configuration, you can accomplish the following objectives:
● Manage power-on passwords and administrator passwords.
● Configure other power-on authentication features, such as enabling embedded securityauthentication support.
● Enable and disable hardware features, such as CD-ROM boot or different hardware ports.
● Configure boot options, which includes enabling MultiBoot and changing the boot order.
NOTE: Many of the features in BIOS Configuration for HP ProtectTools are also available inComputer Setup.
ENWW 43
General tasksBIOS Configuration allows you to manage various computer settings that would otherwise be accessibleonly by pressing f10 at startup and entering Computer Setup.
Managing boot optionsYou can use BIOS Configuration to manage various settings for tasks that run when you turn on orrestart the computer.
To manage boot options:
1. Select Start > All Programs > HP ProtectTools Security Manager.
2. In the left pane, click BIOS Configuration.
3. Type your Computer Setup administrator password at the BIOS administrator password prompt,and then click OK.
NOTE: The BIOS administrator password prompt is displayed only if you have already setthe Computer Setup password. For more information about setting the Computer Setuppassword, refer to “Setting the setup password on page 50.”
4. In the left pane, click System Configuration.
5. In the right pane, select the delays (in seconds) for f9, f10 and f12, and for Express Boot PopupDelay (Sec).
6. Enable or disable MultiBoot.
7. If you have enabled MultiBoot, select the boot order by selecting a boot device, and then clickingthe up arrow or the down arrow to adjust its order in the list.
8. Click Apply, and then click OK in the HP ProtectTools window.
44 Chapter 5 BIOS Configuration for HP ProtectTools ENWW
Enabling and disabling system configuration options
NOTE: Some of the items listed below may not be supported by your computer.
To enable or disable devices or security options:
1. Select Start > All Programs > HP ProtectTools Security Manager.
2. In the left pane, click BIOS Configuration.
3. Type your Computer Setup administrator password at the BIOS administrator password prompt,and then click OK.
4. In the left pane, click System Configuration, and then enable or disable a system configurationoption, or configure any of the following system configuration options in the right pane:
● Port Options
● Serial Port
● Infrared Port
● Parallel Port
● SD Slot
● USB Port
● 1394 Port
● Cardbus Slot
● ExpressCard slot
● Boot Options
● f9, f10, and f12 Delay (Sec)
● MultiBoot
● Express Boot Popup Delay (Sec)
● CD-ROM Boot
● Floppy Boot
● Internal Network Adapter Boot
● Internal Network Adapter Boot Mode (PXE or RPL)
● Boot Order
● Device Configurations
● NumLock at Boot
● Swapping fn/Ctrl Keys
● Multiple Pointing Devices
● USB Legacy Support
ENWW General tasks 45
● Parallel port mode (standard, bidirectional, EPP, or ECP)
● Data Execution Prevention
● SATA Native Mode
● Dual Core CPU
● Automatic Intel® SpeedStep Functionality Support
● Fan Always on While on AC Power
● BIOS DMA Data Transfers
● Intel or AMD PSAE Execution Disable
● Built-In Device Options
● Embedded WLAN Device Radio
● Embedded WWAN Device Radio
● Embedded Bluetooth® Device Radio
● LAN/WLAN Switching
● Wake on LAN from Off
5. Click Apply, and then click OK in the HP ProtectTools window to save your changes and exit.
46 Chapter 5 BIOS Configuration for HP ProtectTools ENWW
Advanced tasksManaging HP ProtectTools add-on module settings
Some of the features of HP ProtectTools Security Manager can be managed in BIOS Configuration.
Enabling and disabling smart card power-on authentication supportEnabling this option allows you to use a smart card for user authentication when you turn on thecomputer.
NOTE: To fully enable the power-on authentication feature, you must also configure a smartcard using the Java Card Security for HP ProtectTools module.
To enable smart card power-on authentication support:
1. Select Start > All Programs > HP ProtectTools Security Manager.
2. In the left pane, click BIOS Configuration.
3. Type your Computer Setup administrator password at the BIOS administrator password prompt,and then click OK.
4. In the left pane, click Security.
5. Under Smart Card Security, click Enable.
NOTE: To disable smart card power-on authentication, click Disable.
6. Click Apply, and then click OK in the HP ProtectTools window.
ENWW Advanced tasks 47
Enabling and disabling power-on authentication support for Embedded SecurityEnabling this option allows the system to use the TPM embedded security chip (if available) for userauthentication when you turn on the computer.
NOTE: To fully enable the power-on authentication feature, you must also configure the TPMembedded security chip using the Embedded Security for HP ProtectTools module.
To enable power-on authentication support for embedded security:
1. Select Start > All Programs > HP ProtectTools Security Manager.
2. In the left pane, click BIOS Configuration.
3. Type your Computer Setup administrator password at the BIOS administrator password prompt,and then click OK.
4. In the left pane, click Security.
5. Under Embedded Security, click Enable Power-on Authentication Support.
NOTE: To disable power-on authentication for Embedded Security, click Disable.
6. Click Apply, and then click OK in the HP ProtectTools window.
48 Chapter 5 BIOS Configuration for HP ProtectTools ENWW
Enabling and disabling Automatic DriveLock hard drive protectionWhen this option is enabled, the DriveLock passwords will be automatically generated and set in thedrive, and protected by the TPM embedded security chip.
NOTE: The automatically generated passwords will not be set in the drive until the computeris restarted and you successfully type the TPM embedded security password at the passwordprompt.
The option to enable Automatic DriveLock is available only if the computer has a TPM security chipinstalled and initialized and no DriveLock passwords are enabled. For instructions on how to enable andinitialize the TPM security chip, refer to “Enabling the embedded security chip on page 28,” and“Initializing the embedded security chip on page 29.”
NOTE: If you have already manually set DriveLock passwords on the computer, you must firstdisable them before you can set Automatic DriveLock protection.
To enable or disable Automatic DriveLock protection:
1. Select Start > All Programs > HP ProtectTools Security Manager.
2. In the left pane, click BIOS Configuration.
3. Type your Computer Setup administrator password at the BIOS administrator password prompt,and then click OK.
4. In the left pane, click Security.
5. Under Embedded Security, click Enable next to Automatic DriveLock Support.
NOTE: To disable automatic DriveLock protection for Embedded Security, click Disable.
6. Click Apply, and then click OK in the HP ProtectTools window.
Managing Computer Setup passwordsYou can use BIOS Configuration to set and change the power-on and setup passwords in ComputerSetup, and also to manage various password settings.
CAUTION: The passwords you set through the “Passwords” page in BIOS Configuration aresaved immediately upon clicking the Apply or OK button in the HP ProtectTools window. Be surethat you remember what password you have set, because you will not be able to undo a passwordsetting without supplying the previous password.
The power-on password can protect your notebook from unauthorized use.
NOTE: After you have set a power-on password, the Set button on the “Passwords” page isreplaced by a Change button.
The Computer Setup password protects the configuration settings and system identification informationin Computer Setup. After this password is set, it must be used to access Computer Setup. If you haveset a setup password, you will be prompted for the password before opening the BIOS Configurationportion of HP ProtectTools.
ENWW Advanced tasks 49
NOTE: After you have set a setup password, the Set button on the “Passwords” page isreplaced by a Change button.
Setting the power-on passwordTo set the power-on password:
1. Select Start > All Programs > HP ProtectTools Security Manager.
2. In the left pane, click BIOS Configuration, and then click Security.
3. In the right pane, next to Power-On Password, click Set.
4. Type and confirm the password in the Enter Password and Verify Password boxes.
5. Click OK in the Passwords dialog box.
6. Click Apply, and then click OK in the HP ProtectTools window.
Changing the power-on passwordTo change the power-on password:
1. Select Start > All Programs > HP ProtectTools Security Manager.
2. In the left pane, click BIOS Configuration, and then click Security.
3. In the right pane, next to Power-On Password, click Change.
4. Type the current password in the Old Password box.
5. Set and confirm the new password in the Enter New Password box.
6. Click OK in the Passwords dialog box.
7. Click Apply, and then click OK in the HP ProtectTools window.
Setting the setup passwordTo set the Computer Setup password:
1. Select Start > All Programs > HP ProtectTools Security Manager.
2. In the left pane, click BIOS Configuration, and then click Security.
3. In the right pane, next to Setup Password, click Set.
4. Type and confirm the password in the Enter Password and Confirm Password boxes.
5. Click OK in the Passwords dialog box.
6. Click Apply, and then click OK in the HP ProtectTools window.
50 Chapter 5 BIOS Configuration for HP ProtectTools ENWW
Changing the setup passwordTo change the Computer Setup password:
1. Select Start > All Programs > HP ProtectTools Security Manager.
2. In the left pane, click BIOS Configuration, and then click Security.
3. In the right pane, next to Setup Password, click Change.
4. Type the current password in the Old Password box.
5. Type and confirm the new password in the Enter New Password and Verify New Passwordboxes.
6. Click OK in the Passwords dialog box.
7. Click Apply, and then click OK in the HP ProtectTools window.
Setting password optionsYou can use BIOS Configuration for HP ProtectTools to set password options to enhance the securityof your system.
Enabling and disabling stringent security
CAUTION: To prevent the computer from becoming permanently unusable, record yourconfigured setup password, power-on password, or smart card PIN in a safe place away fromyour computer. Without these passwords or PIN, the computer cannot be unlocked.
Enabling stringent security provides enhanced protection for the power-on and administrator passwordsand other forms of power-on authentication.
To enable or disable stringent security:
1. Select Start > All Programs > HP ProtectTools Security Manager.
2. In the left pane, click BIOS Configuration, and then click Security.
3. In the right pane, under Password Options, enable or disable Stringent Security.
NOTE: If you want to disable stringent security, clear the Enable Stringent Securitycheck box.
4. Click Apply, and then click OK in the HP ProtectTools window.
Enabling and disabling power-on authentication on Windows restart
This option allows you to enhance security by requiring users to type a power-on, TPM, or smart cardpassword when Windows restarts.
To enable or disable power-on authentication on Windows restart:
1. Select Start > All Programs > HP ProtectTools Security Manager.
2. In the left pane, click BIOS Configuration, and then click Security.
ENWW Advanced tasks 51

3. In the right pane, under Password Options, enable or disable Require password on restart.
4. Click Apply, and then click OK in the HP ProtectTools window.
52 Chapter 5 BIOS Configuration for HP ProtectTools ENWW

6 Device Access Manager for HPProtectTools
This security tool is available to administrators only. Device Access Manager for HP ProtectTools hasthe following security features that protect against unauthorized access to devices attached to yourcomputer system:
● Device profiles that are created for each user to define device access
● Device access that can be granted or denied on the basis of group membership
ENWW 53

Starting background serviceFor device profiles to be applied, the HP ProtectTools Device Locking/Auditing background service mustbe running. When you first attempt to apply device profiles, HP ProtectTools Security Manager opensa dialog box to ask if you would you like to start the background service. Click Yes to start the backgroundservice and set it to start automatically whenever the system boots.
54 Chapter 6 Device Access Manager for HP ProtectTools ENWW
Simple configurationThis feature allows you to deny access to the following classes of devices:
● USB devices for all non-administrators
● All removable media (floppy disks, pen drives, etc.) for all non-administrators
● All DVD/CD-ROM drives for all non-administrators
● All serial and parallel ports for all non-administrators
To deny access to a class of device for all non-administrators:
1. Select Start > All Programs > HP ProtectTools Security Manager.
2. In the left pane, click Device Access Manager, and then click Simple Configuration.
3. In the right pane, select the check box of a device to deny access.
4. Click Apply.
NOTE: If background service is not running, it attempts to start now. Click Yes to allow it.
5. Click OK.
ENWW Simple configuration 55
Device class configuration (advanced)More selections are available to allow specific users or groups of users to be granted or denied accessto types of devices.
Adding a user or a group1. Select Start > All Programs > HP ProtectTools Security Manager.
2. In the left pane, click Device Access Manager, and then click Device Class Configuration.
3. In the device list, click the device class that you want to configure.
4. Click Add. The Select Users or Groups dialog box opens.
5. Select Advanced > Find Now to search for users or groups to add.
6. Click a user or a group to be added to the list of available users and groups, and then click OK.
7. Click OK.
Removing a user or a group1. Select Start > All Programs > HP ProtectTools Security Manager.
2. In the left pane, click Device Access Manager, and then click Device Class Configuration.
3. In the device list, click the device class that you want to configure.
4. Click the user or group you want to remove, and then click Remove.
5. Click Apply, then click OK.
Denying access to a user or group1. Select Start > All Programs > HP ProtectTools Security Manager.
2. In the left pane, click Device Access Manager, and then click Device Class Configuration.
3. In the device list, click the device class that you want to configure.
4. Under User/Groups, click the user or group to be denied access.
5. Click Deny next to the user or group to be denied access.
6. Click Apply, and then click OK.
Allowing access to a device class for one user of a groupYou can allow one user access to a device class while denying access to all other members of thatuser's group.
To allow access to one user but not the group:
1. Select Start > All Programs > HP ProtectTools Security Manager.
2. In the left pane, click Device Access Manager, and then click Device Class Configuration.
3. Click the device class that you want to configure in the device list.
56 Chapter 6 Device Access Manager for HP ProtectTools ENWW

4. Under User/Groups, add the group to be denied access.
5. Click Deny next to the group to be denied access.
6. Navigate to the folder below that of the required class and add the specific user. Click Allow togrant this user access.
7. Click Apply, and then click OK.
Allowing access to a specific device for one user of a groupYou can allow one user access to a specific device while denying access to all other members of thatuser's group for all devices in the class.
To allow access to a specific device for one user but not the group:
1. Select Start > All Programs > HP ProtectTools Security Manager.
2. In the left pane, click Device Access Manager, and then click Device Class Configuration.
3. In the device list, click the device class that you want to configure, and then navigate to the folderbelow that.
4. Under User/Groups, add the group to be denied access.
5. Click Deny next to the group to be denied access.
6. Navigate to the specific device to be allowed for the user in the device list.
7. Click Add. The Select Users or Groups dialog box opens.
8. Select Advanced > Find Now to search for users or groups to add.
9. Click a user to be allowed access, and then click OK.
10. Click Allow to grant this user access.
11. Click Apply, and then click OK.
ENWW Device class configuration (advanced) 57

58 Chapter 6 Device Access Manager for HP ProtectTools ENWW
7 Drive Encryption for HP ProtectTools
CAUTION: If you decide to uninstall the Drive Encryption module, you must first decrypt allencrypted drives. If you do not, you will not be able to access the data on encrypted drives unlessyou have registered with the Drive Encryption recovery service (see “Recovery on page 62”).Reinstalling the Drive Encryption module will not enable you to access the encrypted drives.
ENWW 59
Encryption managementEncrypting a drive
1. Select Start > All Programs > HP ProtectTools Security Manager.
2. In the left pane, click Drive Encryption, and then click Encryption Management.
3. In the right pane, click Activate. The Drive Encryption for HP ProtectTools Wizard opens.
4. Follow the on-screen instructions to activate encryption.
NOTE: You will need to specify a diskette, flash storage device, or some other USB-connected storage media on which the recovery information will be stored.
Change encryption
1. Select Start > All Programs > HP ProtectTools Security Manager.
2. In the left pane, click Drive Encryption, and then click Encryption Management.
3. In the right pane, click Change encryption. Select the disks to encrypt in the ChangeEncryption dialog box, and then click OK.
4. Click OK again to begin encryption.
Decrypting a drive
1. Select Start > All Programs > HP ProtectTools Security Manager.
2. In the left pane, click Drive Encryption, and then click Encryption Management.
3. In the right pane, click Deactivate.
60 Chapter 7 Drive Encryption for HP ProtectTools ENWW
User managementAdd a user
1. Select Start > All Programs > HP ProtectTools Security Manager.
2. In the left pane, click Drive Encryption, and then click User Management.
3. In the right pane, click Add. Click a user name in the User Name list or type a user name in theUsername box. Click Next.
4. Type the Windows password for the selected user, and then click Next.
5. Select an authentication method for the new user, and then click Finish.
Remove a user
1. Select Start > All Programs > HP ProtectTools Security Manager.
2. In the left pane, click Drive Encryption, and then click User Management.
3. In the right pane, click a user name to remove in the User Name list. Click Remove.
4. Click Yes to confirm that you want to remove the selected user.
Change token
Change the authentication method for a user as follows:
1. Select Start > All Programs > HP ProtectTools Security Manager.
2. In the left pane, click Drive Encryption, and then click User Management.
3. In the right pane, select a user name from the User Name list, and then click Change Token.
4. Type the user's Windows Password, and then click Next.
5. Select a new authentication method, and then click Finish.
6. If you selected a Java Card as the authentication method, type the Java Card password whenprompted, and then click OK.
Set password
Set a password or change the authentication method for a user as follows:
1. Select Start > All Programs > HP ProtectTools Security Manager.
2. In the left pane, click Drive Encryption, and then click User Management.
3. In the right pane, select the user from the User Name list, and then click Set Password.
4. Type the user's Windows Password, and then click Next.
5. Select the new authentication method, and then click Finish.
6. If you selected a Java Card as the authentication method, type the Java Card password whenprompted, and then click OK.
ENWW User management 61
RecoveryThe following two safety measures are available to you:
● If you forget your password, you cannot access your encrypted drives. You may, however, registerwith the Drive Encryption recovery service to enable you to access your computer if you forget yourpassword.
● You may back up your Drive Encryption keys on a diskette, flash storage device, or some otherUSB-connected storage media.
Registering with the Drive Encryption recovery service
1. Select Start > All Programs > HP ProtectTools Security Manager.
2. In the left pane, click Drive Encryption, and then click Recovery.
3. In the right pane, click Click here to register. Type the requested information to complete thesecurity backup procedure.
Backing up your Drive Encryption keys
1. Select Start > All Programs > HP ProtectTools Security Manager.
2. In the left pane, click Drive Encryption, and then click Recovery.
3. In the right pane, click Click here to backup your keys.
4. Select a diskette, flash storage device, or some other USB-connected storage media on which tosave the recovery information, and then click Next. The Drive Encryption for HP ProtectToolsWizard opens.
5. Follow the on-screen instructions to back up the Drive Encryption keys.
NOTE: You will need to specify a diskette, flash storage device, or some other USB-connected storage media on which the recovery information will be stored.
62 Chapter 7 Drive Encryption for HP ProtectTools ENWW
8 Troubleshooting
Credential Manager for HP ProtectToolsShort description Details Solution
Using the CredentialManager NetworkAccounts option, a usercan select which domainaccount to log on to. WhenTPM authentication isused, this option is notavailable. All otherauthentication methodswork properly.
Using TPM authentication, the user isonly logged on to the local computer.
Using Credential Manager Single Sign On tools allowsthe user to authenticate other accounts.
The USB token credentialis not available with logonto Windows XP ServicePack 1.
After installing USB token software,registering the USB token credential, andsetting Credential Manager as primarylogon, the USB Token is neither listednor available in the Credential Manager/GINA logon.
After logging back on to Windows,logging off Credential Manager, re-logging on to Credential Manager andreselecting the token as the primarylogon, the token logon operationfunctions normally.
Update Windows to Service Pack 2 via WindowsUpdate.
If retaining Service Pack 1, log back on to Windowsusing another credential (Windows password) in orderto log off and re-log back on to Credential Manager.
Some application Webpages create errors thatprevent the user fromperforming or completingtasks.
Some Web-based applications stopfunctioning and report errors due to thedisabling functionality pattern of SingleSign On. For example, an ! in a yellowtriangle is observed in Internet Explorer,indicating an error has occurred.
Credential Manager Single Sign On does not supportall software Web interfaces. Disable Single Sign Onsupport for the specific Web page by turning off SingleSign On support. See complete documentation onSingle Sign On, which is available in the CredentialManager online Help files.
If a specific Single Sign On cannot be disabled for agiven application, call HP technical support and request3rd-level support through your HP Service contact.
The option to Browse forVirtual Token is notdisplayed during the logonprocess.
The user cannot move the location of aregistered virtual token in CredentialManager because the option to browsewas removed to reduce security risks.
The browse option was removed because it allowednon-users to delete and rename files and take controlof Windows.
Domain administratorscannot change Windowspassword even withauthorization.
This happens after a domainadministrator logs on to a domain andregisters the domain identity withCredential Manager using an accountwith Administrator's rights on the domainand the local PC. When the domain
Credential Manager cannot change a domain user'saccount password through Change Windowspassword. Credential Manager can only change thelocal PC account passwords. The domain user canchange his/her password through the Windowssecurity > Change password option, but, since the
ENWW Credential Manager for HP ProtectTools 63
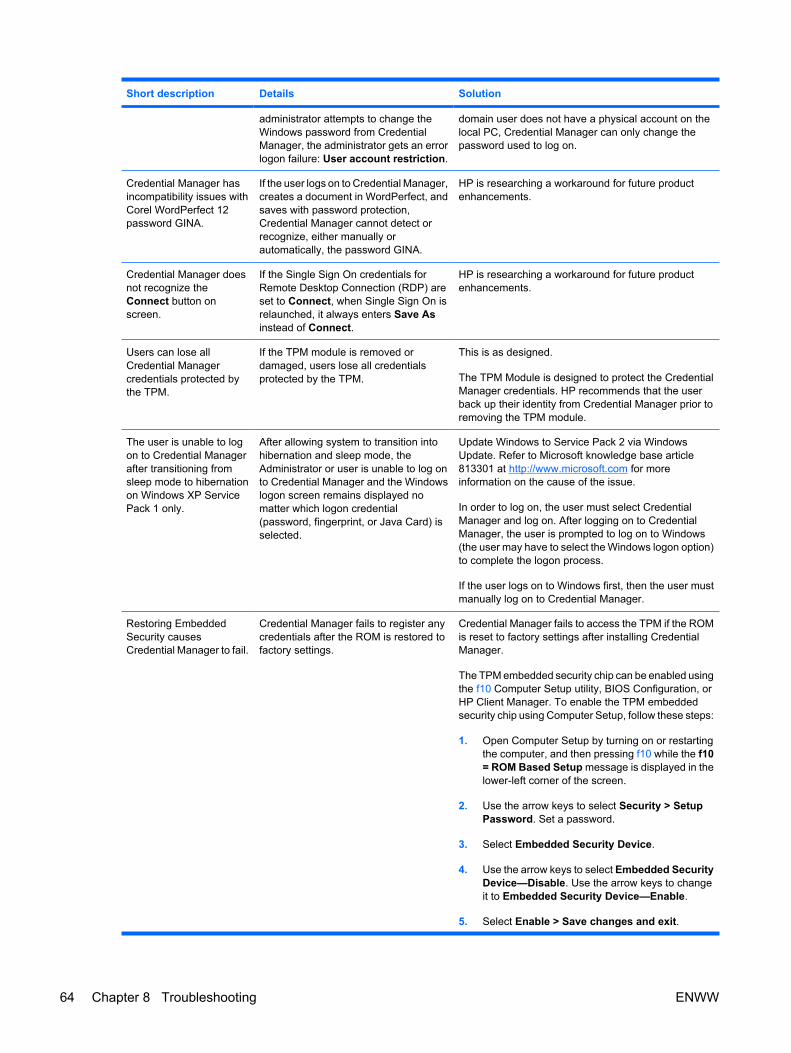
Short description Details Solution
administrator attempts to change theWindows password from CredentialManager, the administrator gets an errorlogon failure: User account restriction.
domain user does not have a physical account on thelocal PC, Credential Manager can only change thepassword used to log on.
Credential Manager hasincompatibility issues withCorel WordPerfect 12password GINA.
If the user logs on to Credential Manager,creates a document in WordPerfect, andsaves with password protection,Credential Manager cannot detect orrecognize, either manually orautomatically, the password GINA.
HP is researching a workaround for future productenhancements.
Credential Manager doesnot recognize theConnect button onscreen.
If the Single Sign On credentials forRemote Desktop Connection (RDP) areset to Connect, when Single Sign On isrelaunched, it always enters Save Asinstead of Connect.
HP is researching a workaround for future productenhancements.
Users can lose allCredential Managercredentials protected bythe TPM.
If the TPM module is removed ordamaged, users lose all credentialsprotected by the TPM.
This is as designed.
The TPM Module is designed to protect the CredentialManager credentials. HP recommends that the userback up their identity from Credential Manager prior toremoving the TPM module.
The user is unable to logon to Credential Managerafter transitioning fromsleep mode to hibernationon Windows XP ServicePack 1 only.
After allowing system to transition intohibernation and sleep mode, theAdministrator or user is unable to log onto Credential Manager and the Windowslogon screen remains displayed nomatter which logon credential(password, fingerprint, or Java Card) isselected.
Update Windows to Service Pack 2 via WindowsUpdate. Refer to Microsoft knowledge base article813301 at http://www.microsoft.com for moreinformation on the cause of the issue.
In order to log on, the user must select CredentialManager and log on. After logging on to CredentialManager, the user is prompted to log on to Windows(the user may have to select the Windows logon option)to complete the logon process.
If the user logs on to Windows first, then the user mustmanually log on to Credential Manager.
Restoring EmbeddedSecurity causesCredential Manager to fail.
Credential Manager fails to register anycredentials after the ROM is restored tofactory settings.
Credential Manager fails to access the TPM if the ROMis reset to factory settings after installing CredentialManager.
The TPM embedded security chip can be enabled usingthe f10 Computer Setup utility, BIOS Configuration, orHP Client Manager. To enable the TPM embeddedsecurity chip using Computer Setup, follow these steps:
1. Open Computer Setup by turning on or restartingthe computer, and then pressing f10 while the f10= ROM Based Setup message is displayed in thelower-left corner of the screen.
2. Use the arrow keys to select Security > SetupPassword. Set a password.
3. Select Embedded Security Device.
4. Use the arrow keys to select Embedded SecurityDevice—Disable. Use the arrow keys to changeit to Embedded Security Device—Enable.
5. Select Enable > Save changes and exit.
64 Chapter 8 Troubleshooting ENWW

Short description Details Solution
HP is investigating resolution options for futurecustomer software releases.
The security RestoreIdentity process losesassociation with virtualtoken.
When user restores identity, CredentialManager can lose the association withthe location of the virtual token at logonscreen. Even though CredentialManager has the virtual token registered,the user must reregister the token torestore the association.
This is currently by design.
When uninstalling Credential Manager without keepingidentities, the system (server) part of the token isdestroyed, so the token cannot be used anymore forlogging on, even if the client part of the token is restoredthrough identity restore.
HP is investigating long-term options for resolution.
ENWW Credential Manager for HP ProtectTools 65
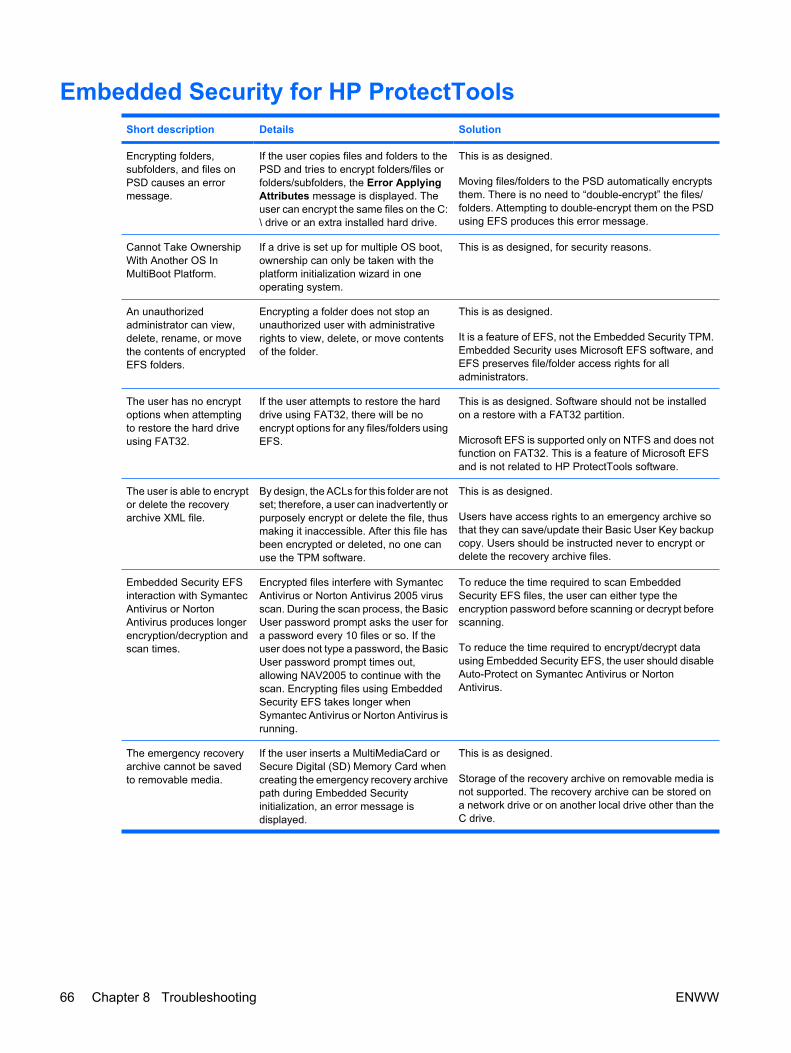
Embedded Security for HP ProtectToolsShort description Details Solution
Encrypting folders,subfolders, and files onPSD causes an errormessage.
If the user copies files and folders to thePSD and tries to encrypt folders/files orfolders/subfolders, the Error ApplyingAttributes message is displayed. Theuser can encrypt the same files on the C:\ drive or an extra installed hard drive.
This is as designed.
Moving files/folders to the PSD automatically encryptsthem. There is no need to “double-encrypt” the files/folders. Attempting to double-encrypt them on the PSDusing EFS produces this error message.
Cannot Take OwnershipWith Another OS InMultiBoot Platform.
If a drive is set up for multiple OS boot,ownership can only be taken with theplatform initialization wizard in oneoperating system.
This is as designed, for security reasons.
An unauthorizedadministrator can view,delete, rename, or movethe contents of encryptedEFS folders.
Encrypting a folder does not stop anunauthorized user with administrativerights to view, delete, or move contentsof the folder.
This is as designed.
It is a feature of EFS, not the Embedded Security TPM.Embedded Security uses Microsoft EFS software, andEFS preserves file/folder access rights for alladministrators.
The user has no encryptoptions when attemptingto restore the hard driveusing FAT32.
If the user attempts to restore the harddrive using FAT32, there will be noencrypt options for any files/folders usingEFS.
This is as designed. Software should not be installedon a restore with a FAT32 partition.
Microsoft EFS is supported only on NTFS and does notfunction on FAT32. This is a feature of Microsoft EFSand is not related to HP ProtectTools software.
The user is able to encryptor delete the recoveryarchive XML file.
By design, the ACLs for this folder are notset; therefore, a user can inadvertently orpurposely encrypt or delete the file, thusmaking it inaccessible. After this file hasbeen encrypted or deleted, no one canuse the TPM software.
This is as designed.
Users have access rights to an emergency archive sothat they can save/update their Basic User Key backupcopy. Users should be instructed never to encrypt ordelete the recovery archive files.
Embedded Security EFSinteraction with SymantecAntivirus or NortonAntivirus produces longerencryption/decryption andscan times.
Encrypted files interfere with SymantecAntivirus or Norton Antivirus 2005 virusscan. During the scan process, the BasicUser password prompt asks the user fora password every 10 files or so. If theuser does not type a password, the BasicUser password prompt times out,allowing NAV2005 to continue with thescan. Encrypting files using EmbeddedSecurity EFS takes longer whenSymantec Antivirus or Norton Antivirus isrunning.
To reduce the time required to scan EmbeddedSecurity EFS files, the user can either type theencryption password before scanning or decrypt beforescanning.
To reduce the time required to encrypt/decrypt datausing Embedded Security EFS, the user should disableAuto-Protect on Symantec Antivirus or NortonAntivirus.
The emergency recoveryarchive cannot be savedto removable media.
If the user inserts a MultiMediaCard orSecure Digital (SD) Memory Card whencreating the emergency recovery archivepath during Embedded Securityinitialization, an error message isdisplayed.
This is as designed.
Storage of the recovery archive on removable media isnot supported. The recovery archive can be stored ona network drive or on another local drive other than theC drive.
66 Chapter 8 Troubleshooting ENWW
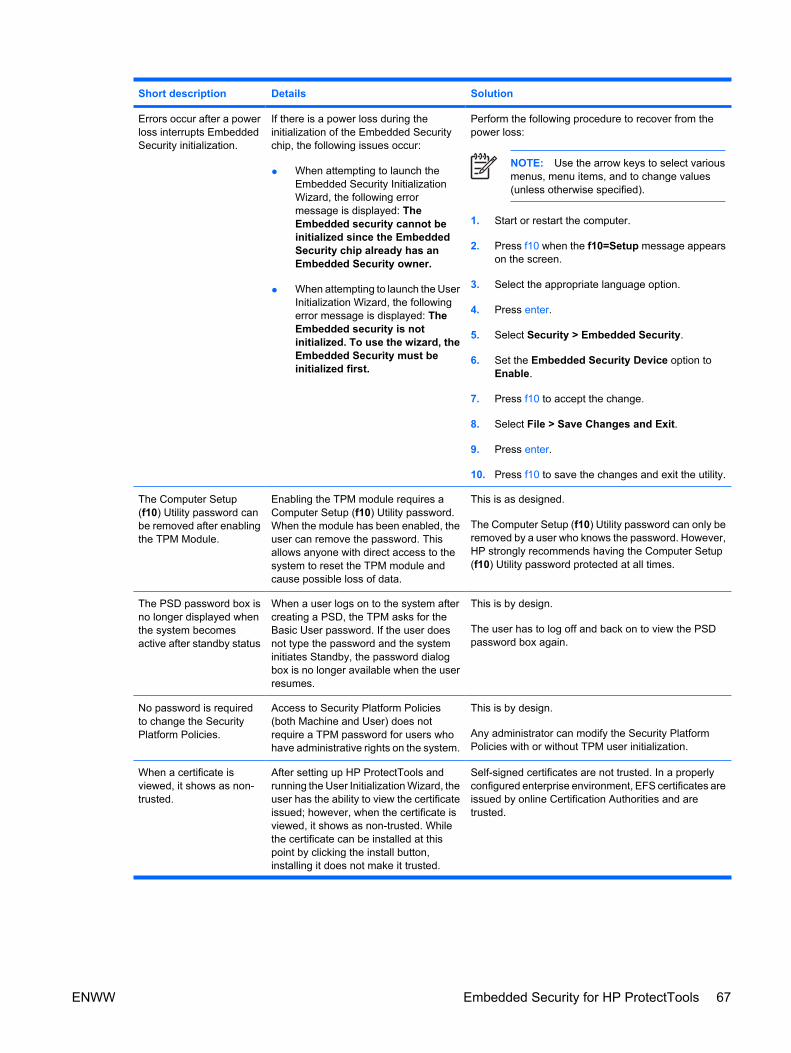
Short description Details Solution
Errors occur after a powerloss interrupts EmbeddedSecurity initialization.
If there is a power loss during theinitialization of the Embedded Securitychip, the following issues occur:
● When attempting to launch theEmbedded Security InitializationWizard, the following errormessage is displayed: TheEmbedded security cannot beinitialized since the EmbeddedSecurity chip already has anEmbedded Security owner.
● When attempting to launch the UserInitialization Wizard, the followingerror message is displayed: TheEmbedded security is notinitialized. To use the wizard, theEmbedded Security must beinitialized first.
Perform the following procedure to recover from thepower loss:
NOTE: Use the arrow keys to select variousmenus, menu items, and to change values(unless otherwise specified).
1. Start or restart the computer.
2. Press f10 when the f10=Setup message appearson the screen.
3. Select the appropriate language option.
4. Press enter.
5. Select Security > Embedded Security.
6. Set the Embedded Security Device option toEnable.
7. Press f10 to accept the change.
8. Select File > Save Changes and Exit.
9. Press enter.
10. Press f10 to save the changes and exit the utility.
The Computer Setup(f10) Utility password canbe removed after enablingthe TPM Module.
Enabling the TPM module requires aComputer Setup (f10) Utility password.When the module has been enabled, theuser can remove the password. Thisallows anyone with direct access to thesystem to reset the TPM module andcause possible loss of data.
This is as designed.
The Computer Setup (f10) Utility password can only beremoved by a user who knows the password. However,HP strongly recommends having the Computer Setup(f10) Utility password protected at all times.
The PSD password box isno longer displayed whenthe system becomesactive after standby status
When a user logs on to the system aftercreating a PSD, the TPM asks for theBasic User password. If the user doesnot type the password and the systeminitiates Standby, the password dialogbox is no longer available when the userresumes.
This is by design.
The user has to log off and back on to view the PSDpassword box again.
No password is requiredto change the SecurityPlatform Policies.
Access to Security Platform Policies(both Machine and User) does notrequire a TPM password for users whohave administrative rights on the system.
This is by design.
Any administrator can modify the Security PlatformPolicies with or without TPM user initialization.
When a certificate isviewed, it shows as non-trusted.
After setting up HP ProtectTools andrunning the User Initialization Wizard, theuser has the ability to view the certificateissued; however, when the certificate isviewed, it shows as non-trusted. Whilethe certificate can be installed at thispoint by clicking the install button,installing it does not make it trusted.
Self-signed certificates are not trusted. In a properlyconfigured enterprise environment, EFS certificates areissued by online Certification Authorities and aretrusted.
ENWW Embedded Security for HP ProtectTools 67
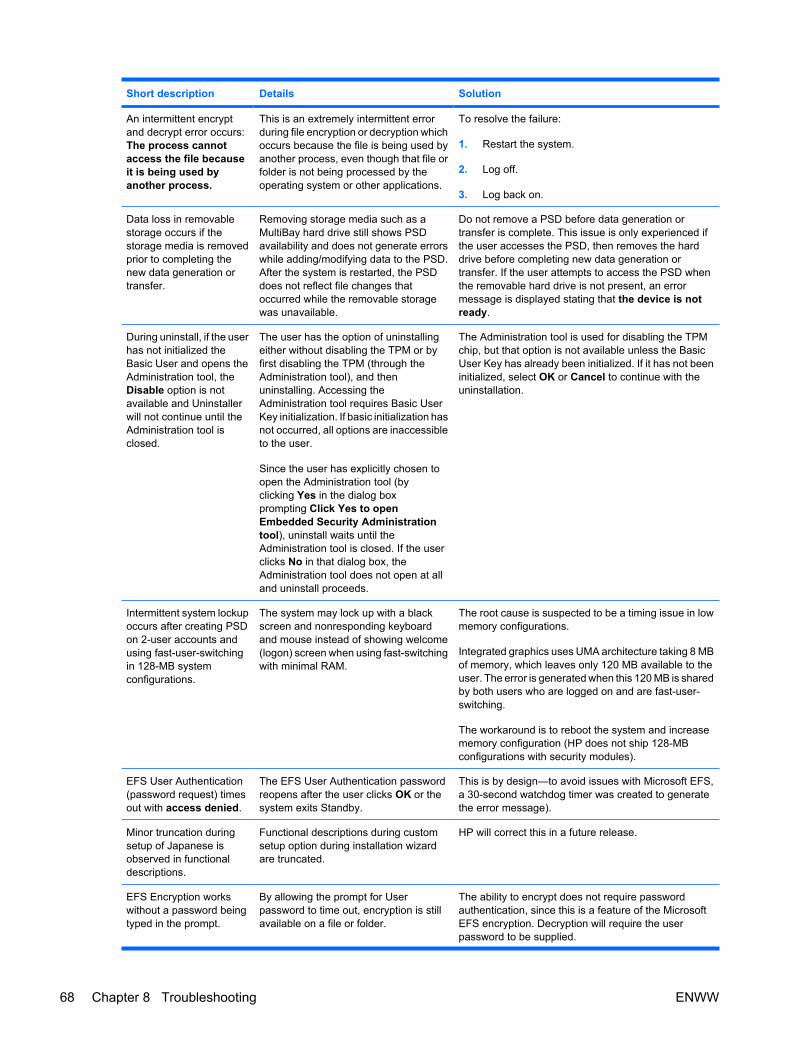
Short description Details Solution
An intermittent encryptand decrypt error occurs:The process cannotaccess the file becauseit is being used byanother process.
This is an extremely intermittent errorduring file encryption or decryption whichoccurs because the file is being used byanother process, even though that file orfolder is not being processed by theoperating system or other applications.
To resolve the failure:
1. Restart the system.
2. Log off.
3. Log back on.
Data loss in removablestorage occurs if thestorage media is removedprior to completing thenew data generation ortransfer.
Removing storage media such as aMultiBay hard drive still shows PSDavailability and does not generate errorswhile adding/modifying data to the PSD.After the system is restarted, the PSDdoes not reflect file changes thatoccurred while the removable storagewas unavailable.
Do not remove a PSD before data generation ortransfer is complete. This issue is only experienced ifthe user accesses the PSD, then removes the harddrive before completing new data generation ortransfer. If the user attempts to access the PSD whenthe removable hard drive is not present, an errormessage is displayed stating that the device is notready.
During uninstall, if the userhas not initialized theBasic User and opens theAdministration tool, theDisable option is notavailable and Uninstallerwill not continue until theAdministration tool isclosed.
The user has the option of uninstallingeither without disabling the TPM or byfirst disabling the TPM (through theAdministration tool), and thenuninstalling. Accessing theAdministration tool requires Basic UserKey initialization. If basic initialization hasnot occurred, all options are inaccessibleto the user.
Since the user has explicitly chosen toopen the Administration tool (byclicking Yes in the dialog boxprompting Click Yes to openEmbedded Security Administrationtool), uninstall waits until theAdministration tool is closed. If the userclicks No in that dialog box, theAdministration tool does not open at alland uninstall proceeds.
The Administration tool is used for disabling the TPMchip, but that option is not available unless the BasicUser Key has already been initialized. If it has not beeninitialized, select OK or Cancel to continue with theuninstallation.
Intermittent system lockupoccurs after creating PSDon 2-user accounts andusing fast-user-switchingin 128-MB systemconfigurations.
The system may lock up with a blackscreen and nonresponding keyboardand mouse instead of showing welcome(logon) screen when using fast-switchingwith minimal RAM.
The root cause is suspected to be a timing issue in lowmemory configurations.
Integrated graphics uses UMA architecture taking 8 MBof memory, which leaves only 120 MB available to theuser. The error is generated when this 120 MB is sharedby both users who are logged on and are fast-user-switching.
The workaround is to reboot the system and increasememory configuration (HP does not ship 128-MBconfigurations with security modules).
EFS User Authentication(password request) timesout with access denied.
The EFS User Authentication passwordreopens after the user clicks OK or thesystem exits Standby.
This is by design—to avoid issues with Microsoft EFS,a 30-second watchdog timer was created to generatethe error message).
Minor truncation duringsetup of Japanese isobserved in functionaldescriptions.
Functional descriptions during customsetup option during installation wizardare truncated.
HP will correct this in a future release.
EFS Encryption workswithout a password beingtyped in the prompt.
By allowing the prompt for Userpassword to time out, encryption is stillavailable on a file or folder.
The ability to encrypt does not require passwordauthentication, since this is a feature of the MicrosoftEFS encryption. Decryption will require the userpassword to be supplied.
68 Chapter 8 Troubleshooting ENWW
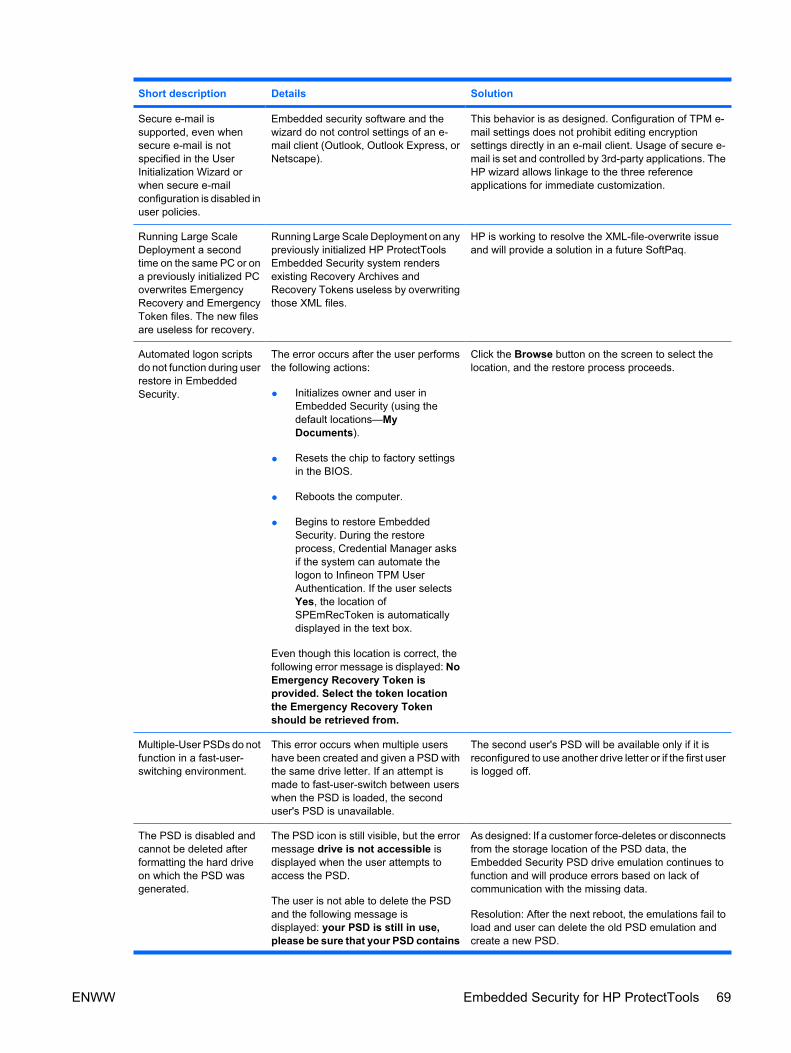
Short description Details Solution
Secure e-mail issupported, even whensecure e-mail is notspecified in the UserInitialization Wizard orwhen secure e-mailconfiguration is disabled inuser policies.
Embedded security software and thewizard do not control settings of an e-mail client (Outlook, Outlook Express, orNetscape).
This behavior is as designed. Configuration of TPM e-mail settings does not prohibit editing encryptionsettings directly in an e-mail client. Usage of secure e-mail is set and controlled by 3rd-party applications. TheHP wizard allows linkage to the three referenceapplications for immediate customization.
Running Large ScaleDeployment a secondtime on the same PC or ona previously initialized PCoverwrites EmergencyRecovery and EmergencyToken files. The new filesare useless for recovery.
Running Large Scale Deployment on anypreviously initialized HP ProtectToolsEmbedded Security system rendersexisting Recovery Archives andRecovery Tokens useless by overwritingthose XML files.
HP is working to resolve the XML-file-overwrite issueand will provide a solution in a future SoftPaq.
Automated logon scriptsdo not function during userrestore in EmbeddedSecurity.
The error occurs after the user performsthe following actions:
● Initializes owner and user inEmbedded Security (using thedefault locations—MyDocuments).
● Resets the chip to factory settingsin the BIOS.
● Reboots the computer.
● Begins to restore EmbeddedSecurity. During the restoreprocess, Credential Manager asksif the system can automate thelogon to Infineon TPM UserAuthentication. If the user selectsYes, the location ofSPEmRecToken is automaticallydisplayed in the text box.
Even though this location is correct, thefollowing error message is displayed: NoEmergency Recovery Token isprovided. Select the token locationthe Emergency Recovery Tokenshould be retrieved from.
Click the Browse button on the screen to select thelocation, and the restore process proceeds.
Multiple-User PSDs do notfunction in a fast-user-switching environment.
This error occurs when multiple usershave been created and given a PSD withthe same drive letter. If an attempt ismade to fast-user-switch between userswhen the PSD is loaded, the seconduser's PSD is unavailable.
The second user's PSD will be available only if it isreconfigured to use another drive letter or if the first useris logged off.
The PSD is disabled andcannot be deleted afterformatting the hard driveon which the PSD wasgenerated.
The PSD icon is still visible, but the errormessage drive is not accessible isdisplayed when the user attempts toaccess the PSD.
The user is not able to delete the PSDand the following message isdisplayed: your PSD is still in use,please be sure that your PSD contains
As designed: If a customer force-deletes or disconnectsfrom the storage location of the PSD data, theEmbedded Security PSD drive emulation continues tofunction and will produce errors based on lack ofcommunication with the missing data.
Resolution: After the next reboot, the emulations fail toload and user can delete the old PSD emulation andcreate a new PSD.
ENWW Embedded Security for HP ProtectTools 69
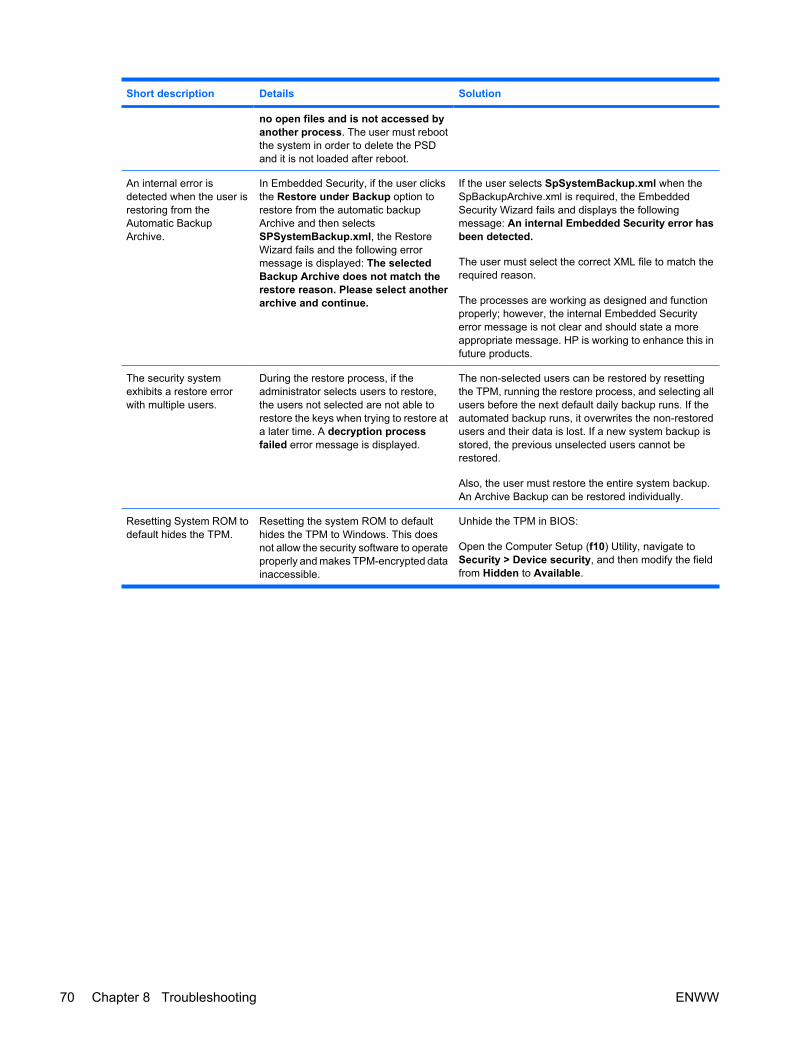
Short description Details Solution
no open files and is not accessed byanother process. The user must rebootthe system in order to delete the PSDand it is not loaded after reboot.
An internal error isdetected when the user isrestoring from theAutomatic BackupArchive.
In Embedded Security, if the user clicksthe Restore under Backup option torestore from the automatic backupArchive and then selectsSPSystemBackup.xml, the RestoreWizard fails and the following errormessage is displayed: The selectedBackup Archive does not match therestore reason. Please select anotherarchive and continue.
If the user selects SpSystemBackup.xml when theSpBackupArchive.xml is required, the EmbeddedSecurity Wizard fails and displays the followingmessage: An internal Embedded Security error hasbeen detected.
The user must select the correct XML file to match therequired reason.
The processes are working as designed and functionproperly; however, the internal Embedded Securityerror message is not clear and should state a moreappropriate message. HP is working to enhance this infuture products.
The security systemexhibits a restore errorwith multiple users.
During the restore process, if theadministrator selects users to restore,the users not selected are not able torestore the keys when trying to restore ata later time. A decryption processfailed error message is displayed.
The non-selected users can be restored by resettingthe TPM, running the restore process, and selecting allusers before the next default daily backup runs. If theautomated backup runs, it overwrites the non-restoredusers and their data is lost. If a new system backup isstored, the previous unselected users cannot berestored.
Also, the user must restore the entire system backup.An Archive Backup can be restored individually.
Resetting System ROM todefault hides the TPM.
Resetting the system ROM to defaulthides the TPM to Windows. This doesnot allow the security software to operateproperly and makes TPM-encrypted datainaccessible.
Unhide the TPM in BIOS:
Open the Computer Setup (f10) Utility, navigate toSecurity > Device security, and then modify the fieldfrom Hidden to Available.
70 Chapter 8 Troubleshooting ENWW
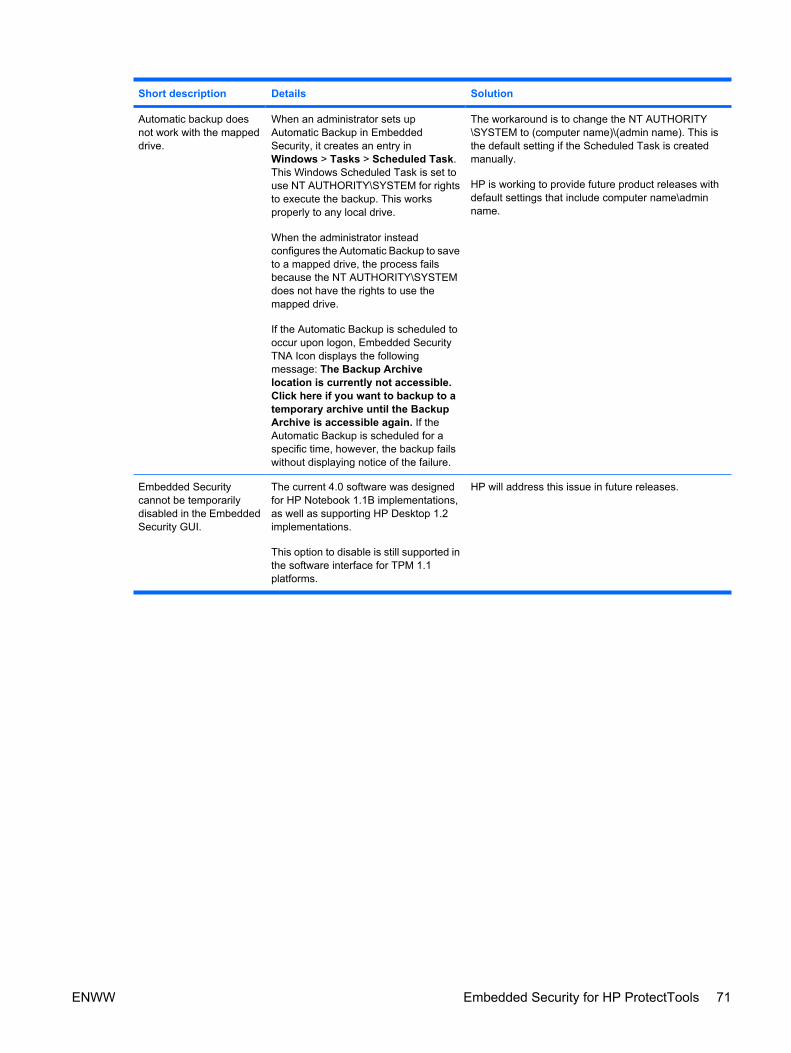
Short description Details Solution
Automatic backup doesnot work with the mappeddrive.
When an administrator sets upAutomatic Backup in EmbeddedSecurity, it creates an entry inWindows > Tasks > Scheduled Task.This Windows Scheduled Task is set touse NT AUTHORITY\SYSTEM for rightsto execute the backup. This worksproperly to any local drive.
When the administrator insteadconfigures the Automatic Backup to saveto a mapped drive, the process failsbecause the NT AUTHORITY\SYSTEMdoes not have the rights to use themapped drive.
If the Automatic Backup is scheduled tooccur upon logon, Embedded SecurityTNA Icon displays the followingmessage: The Backup Archivelocation is currently not accessible.Click here if you want to backup to atemporary archive until the BackupArchive is accessible again. If theAutomatic Backup is scheduled for aspecific time, however, the backup failswithout displaying notice of the failure.
The workaround is to change the NT AUTHORITY\SYSTEM to (computer name)\(admin name). This isthe default setting if the Scheduled Task is createdmanually.
HP is working to provide future product releases withdefault settings that include computer name\adminname.
Embedded Securitycannot be temporarilydisabled in the EmbeddedSecurity GUI.
The current 4.0 software was designedfor HP Notebook 1.1B implementations,as well as supporting HP Desktop 1.2implementations.
This option to disable is still supported inthe software interface for TPM 1.1platforms.
HP will address this issue in future releases.
ENWW Embedded Security for HP ProtectTools 71
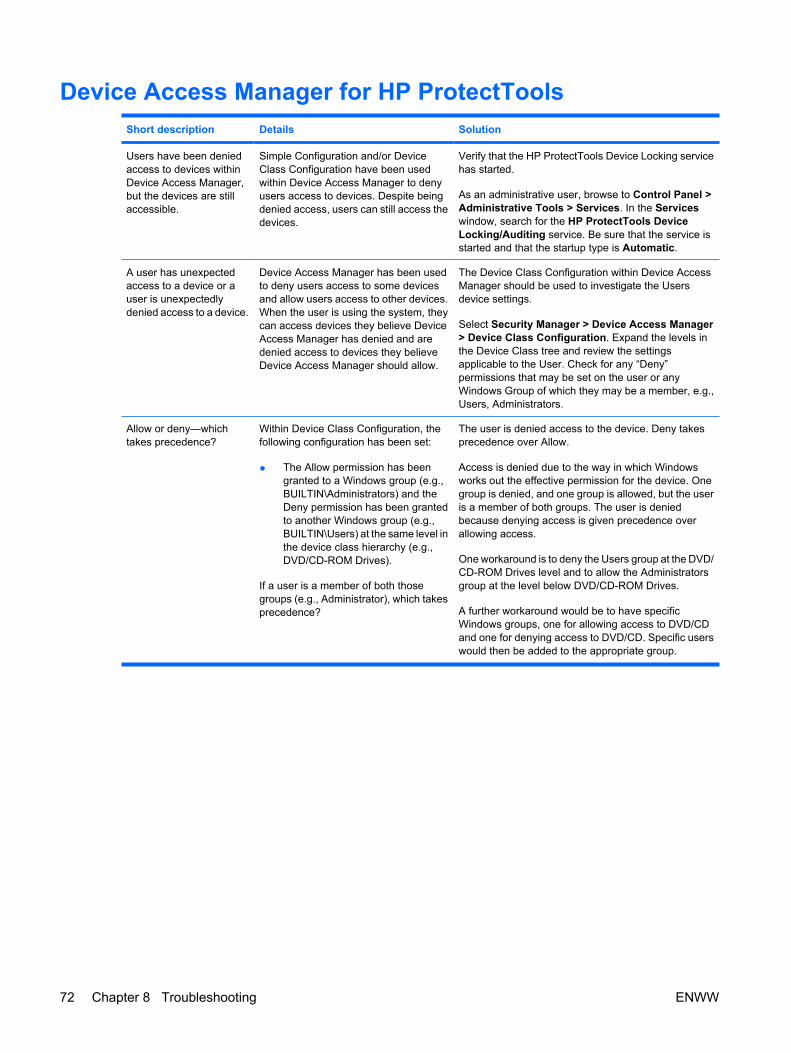
Device Access Manager for HP ProtectToolsShort description Details Solution
Users have been deniedaccess to devices withinDevice Access Manager,but the devices are stillaccessible.
Simple Configuration and/or DeviceClass Configuration have been usedwithin Device Access Manager to denyusers access to devices. Despite beingdenied access, users can still access thedevices.
Verify that the HP ProtectTools Device Locking servicehas started.
As an administrative user, browse to Control Panel >Administrative Tools > Services. In the Serviceswindow, search for the HP ProtectTools DeviceLocking/Auditing service. Be sure that the service isstarted and that the startup type is Automatic.
A user has unexpectedaccess to a device or auser is unexpectedlydenied access to a device.
Device Access Manager has been usedto deny users access to some devicesand allow users access to other devices.When the user is using the system, theycan access devices they believe DeviceAccess Manager has denied and aredenied access to devices they believeDevice Access Manager should allow.
The Device Class Configuration within Device AccessManager should be used to investigate the Usersdevice settings.
Select Security Manager > Device Access Manager> Device Class Configuration. Expand the levels inthe Device Class tree and review the settingsapplicable to the User. Check for any “Deny”permissions that may be set on the user or anyWindows Group of which they may be a member, e.g.,Users, Administrators.
Allow or deny—whichtakes precedence?
Within Device Class Configuration, thefollowing configuration has been set:
● The Allow permission has beengranted to a Windows group (e.g.,BUILTIN\Administrators) and theDeny permission has been grantedto another Windows group (e.g.,BUILTIN\Users) at the same level inthe device class hierarchy (e.g.,DVD/CD-ROM Drives).
If a user is a member of both thosegroups (e.g., Administrator), which takesprecedence?
The user is denied access to the device. Deny takesprecedence over Allow.
Access is denied due to the way in which Windowsworks out the effective permission for the device. Onegroup is denied, and one group is allowed, but the useris a member of both groups. The user is deniedbecause denying access is given precedence overallowing access.
One workaround is to deny the Users group at the DVD/CD-ROM Drives level and to allow the Administratorsgroup at the level below DVD/CD-ROM Drives.
A further workaround would be to have specificWindows groups, one for allowing access to DVD/CDand one for denying access to DVD/CD. Specific userswould then be added to the appropriate group.
72 Chapter 8 Troubleshooting ENWW
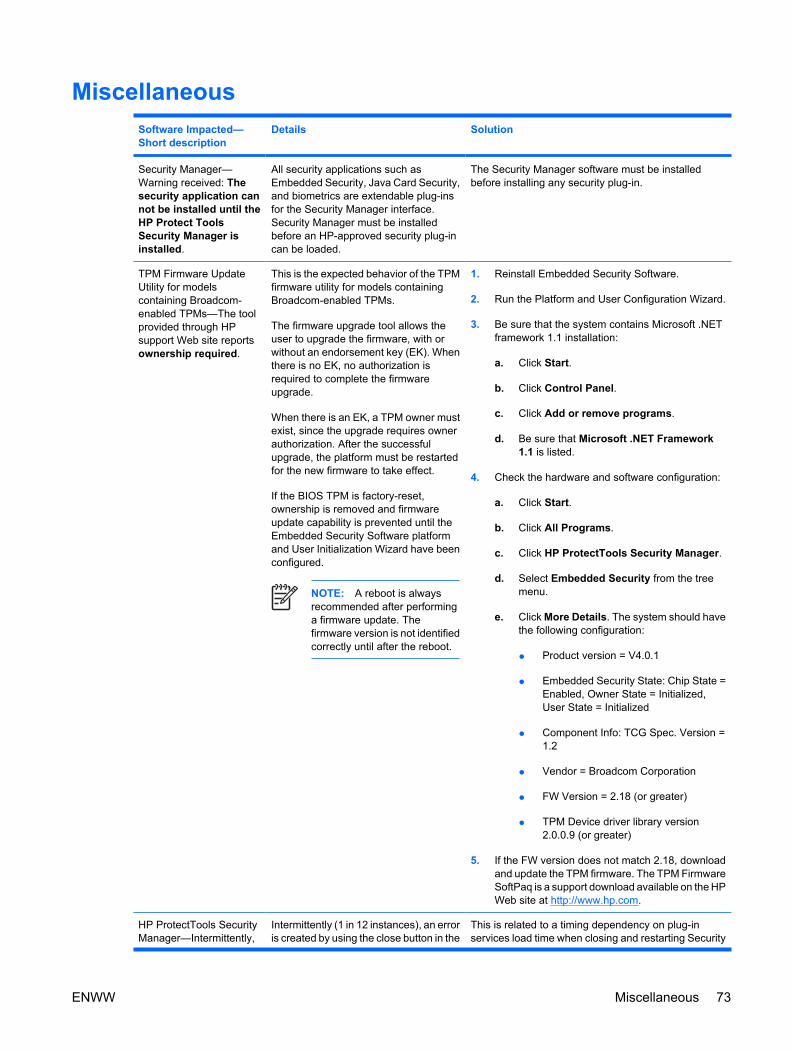
MiscellaneousSoftware Impacted—Short description
Details Solution
Security Manager—Warning received: Thesecurity application cannot be installed until theHP Protect ToolsSecurity Manager isinstalled.
All security applications such asEmbedded Security, Java Card Security,and biometrics are extendable plug-insfor the Security Manager interface.Security Manager must be installedbefore an HP-approved security plug-incan be loaded.
The Security Manager software must be installedbefore installing any security plug-in.
TPM Firmware UpdateUtility for modelscontaining Broadcom-enabled TPMs—The toolprovided through HPsupport Web site reportsownership required.
This is the expected behavior of the TPMfirmware utility for models containingBroadcom-enabled TPMs.
The firmware upgrade tool allows theuser to upgrade the firmware, with orwithout an endorsement key (EK). Whenthere is no EK, no authorization isrequired to complete the firmwareupgrade.
When there is an EK, a TPM owner mustexist, since the upgrade requires ownerauthorization. After the successfulupgrade, the platform must be restartedfor the new firmware to take effect.
If the BIOS TPM is factory-reset,ownership is removed and firmwareupdate capability is prevented until theEmbedded Security Software platformand User Initialization Wizard have beenconfigured.
NOTE: A reboot is alwaysrecommended after performinga firmware update. Thefirmware version is not identifiedcorrectly until after the reboot.
1. Reinstall Embedded Security Software.
2. Run the Platform and User Configuration Wizard.
3. Be sure that the system contains Microsoft .NETframework 1.1 installation:
a. Click Start.
b. Click Control Panel.
c. Click Add or remove programs.
d. Be sure that Microsoft .NET Framework1.1 is listed.
4. Check the hardware and software configuration:
a. Click Start.
b. Click All Programs.
c. Click HP ProtectTools Security Manager.
d. Select Embedded Security from the treemenu.
e. Click More Details. The system should havethe following configuration:
● Product version = V4.0.1
● Embedded Security State: Chip State =Enabled, Owner State = Initialized,User State = Initialized
● Component Info: TCG Spec. Version =1.2
● Vendor = Broadcom Corporation
● FW Version = 2.18 (or greater)
● TPM Device driver library version2.0.0.9 (or greater)
5. If the FW version does not match 2.18, downloadand update the TPM firmware. The TPM FirmwareSoftPaq is a support download available on the HPWeb site at http://www.hp.com.
HP ProtectTools SecurityManager—Intermittently,
Intermittently (1 in 12 instances), an erroris created by using the close button in the
This is related to a timing dependency on plug-inservices load time when closing and restarting Security
ENWW Miscellaneous 73
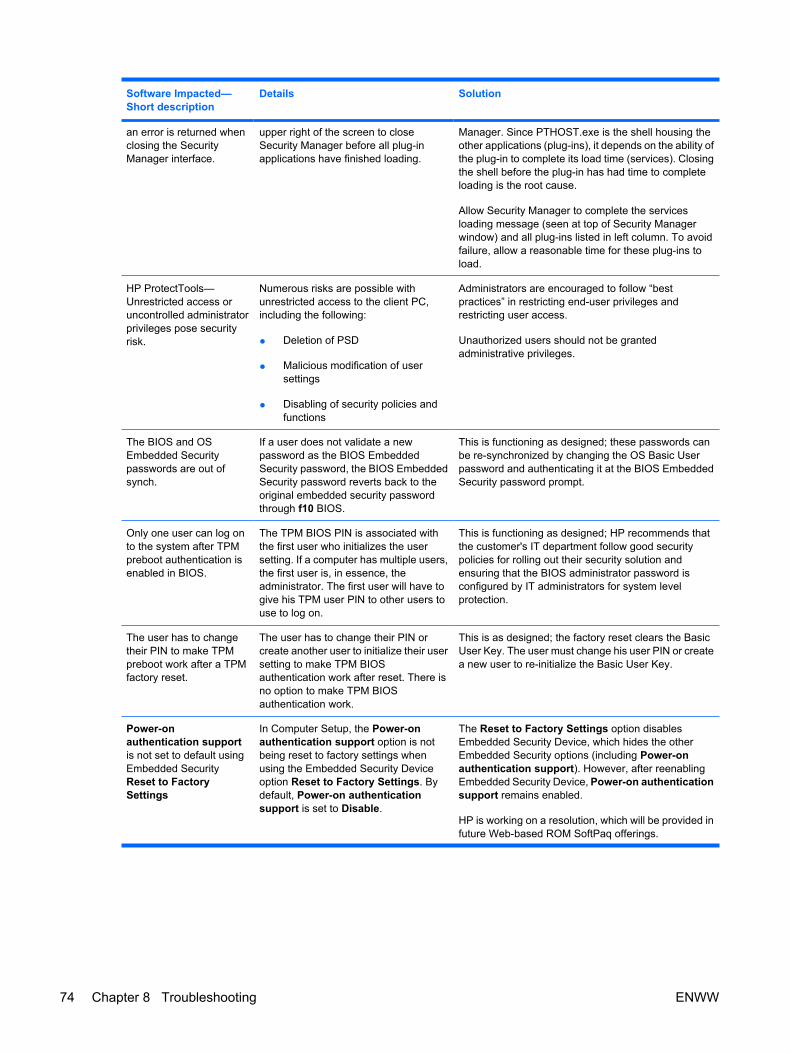
Software Impacted—Short description
Details Solution
an error is returned whenclosing the SecurityManager interface.
upper right of the screen to closeSecurity Manager before all plug-inapplications have finished loading.
Manager. Since PTHOST.exe is the shell housing theother applications (plug-ins), it depends on the ability ofthe plug-in to complete its load time (services). Closingthe shell before the plug-in has had time to completeloading is the root cause.
Allow Security Manager to complete the servicesloading message (seen at top of Security Managerwindow) and all plug-ins listed in left column. To avoidfailure, allow a reasonable time for these plug-ins toload.
HP ProtectTools—Unrestricted access oruncontrolled administratorprivileges pose securityrisk.
Numerous risks are possible withunrestricted access to the client PC,including the following:
● Deletion of PSD
● Malicious modification of usersettings
● Disabling of security policies andfunctions
Administrators are encouraged to follow “bestpractices” in restricting end-user privileges andrestricting user access.
Unauthorized users should not be grantedadministrative privileges.
The BIOS and OSEmbedded Securitypasswords are out ofsynch.
If a user does not validate a newpassword as the BIOS EmbeddedSecurity password, the BIOS EmbeddedSecurity password reverts back to theoriginal embedded security passwordthrough f10 BIOS.
This is functioning as designed; these passwords canbe re-synchronized by changing the OS Basic Userpassword and authenticating it at the BIOS EmbeddedSecurity password prompt.
Only one user can log onto the system after TPMpreboot authentication isenabled in BIOS.
The TPM BIOS PIN is associated withthe first user who initializes the usersetting. If a computer has multiple users,the first user is, in essence, theadministrator. The first user will have togive his TPM user PIN to other users touse to log on.
This is functioning as designed; HP recommends thatthe customer's IT department follow good securitypolicies for rolling out their security solution andensuring that the BIOS administrator password isconfigured by IT administrators for system levelprotection.
The user has to changetheir PIN to make TPMpreboot work after a TPMfactory reset.
The user has to change their PIN orcreate another user to initialize their usersetting to make TPM BIOSauthentication work after reset. There isno option to make TPM BIOSauthentication work.
This is as designed; the factory reset clears the BasicUser Key. The user must change his user PIN or createa new user to re-initialize the Basic User Key.
Power-onauthentication supportis not set to default usingEmbedded SecurityReset to FactorySettings
In Computer Setup, the Power-onauthentication support option is notbeing reset to factory settings whenusing the Embedded Security Deviceoption Reset to Factory Settings. Bydefault, Power-on authenticationsupport is set to Disable.
The Reset to Factory Settings option disablesEmbedded Security Device, which hides the otherEmbedded Security options (including Power-onauthentication support). However, after reenablingEmbedded Security Device, Power-on authenticationsupport remains enabled.
HP is working on a resolution, which will be provided infuture Web-based ROM SoftPaq offerings.
74 Chapter 8 Troubleshooting ENWW

Software Impacted—Short description
Details Solution
Security Power-OnAuthentication overlapsthe BIOS Password duringboot sequence.
Power-On Authentication prompts theuser to log on to the system using theTPM password, but, if the user pressesf10 to access the BIOS, the user isgranted Read rights access only.
To be able to write to BIOS, the user must type the BIOSpassword instead of the TPM password at the Power-on Authentication window.
The BIOS asks for boththe old and newpasswords throughComputer Setup after theOwner password ischanged.
The BIOS asks for both the old and newpasswords through Computer Setupafter the Owner password is changed inEmbedded Security Windows software.
This is as designed. This is due to the inability of theBIOS to communicate with the TPM, after the operatingsystem is up and running, and to verify the TPM passphrase.
ENWW Miscellaneous 75

76 Chapter 8 Troubleshooting ENWW
Glossary
Authentication Process of verifying whether a user is authorized to perform a task, for example, accessing acomputer, modifying settings for a particular program, or viewing secured data.
Automatic DriveLock Security feature that causes the DriveLock passwords to be generated and protected bythe TPM Embedded Security chip. When the user is authenticated by the TPM embedded security chip duringstartup by entering the correct TPM Basic User Key password, the BIOS unlocks the hard drive for the user.
Biometric Category of authentication credentials that use a physical feature, such as a fingerprint, to identify auser.
BIOS profile Group of BIOS configuration settings that can be saved and applied to other accounts.
BIOS security mode Setting in Java Card Security that, when enabled, requires the use of a Java Card and avalid PIN for user authentication.
Certification authority Service that issues the certificates required to run a public key infrastructure.
Credentials Method by which a user proves eligibility for a particular task in the authentication process.
Cryptographic service provider (CSP) Provider or library of cryptographic algorithms that can be used in awell-defined interface to perform particular cryptographic functions.
Cryptography Practice of encrypting and decrypting data so that it can be decoded only by specific individuals.
Decryption Procedure used in cryptography to convert encrypted data into plain text.
Digital certificate Electronic credentials that confirm the identity of an individual or a company by binding theidentity of the digital certificate owner to a pair of electronic keys that are used to sign digital information.
Digital signature Data sent with a file that verifies the sender of the material, and that the file has not beenmodified after it was signed.
Domain Group of computers that are part of a network and share a common directory database. Domains areuniquely named, and each has a set of common rules and procedures.
DriveLock Security feature that links the hard drive to a user and requires the user to correctly type the DriveLockpassword when the computer starts up.
Emergency recovery archive Protected storage area that allows the reencryption of basic user keys from oneplatform owner key to another.
Encryption Procedure, such as use of an algorithm, employed in cryptography to convert plain text into ciphertext in order to prevent unauthorized recipients from reading that data. There are many types of data encryption,and they are the basis of network security. Common types include Data Encryption Standard and public-keyencryption.
Encryption File System (EFS) System that encrypts all files and subfolders within the selected folder.
ENWW Glossary 77

Identity In the HP ProtectTools Credential Manager, a group of credentials and settings that is handled like anaccount or profile for a particular user.
Java Card Small piece of hardware, similar in size and shape to a credit card, which stores identifying informationabout the owner. Used to authenticate the owner to a computer.
Migration A task that allows the management, restoration, and transfer of keys and certificates.
Network account Windows user or administrator account, either on a local computer, in a workgroup, or on adomain.
Personal secure drive (PSD) Provides a protected storage area for sensitive information.
Power-on authentication Security feature that requires some form of authentication, such as a Java Card,security chip, or password, when the computer is turned on.
Public Key Infrastructure (PKI) Standard that defines the interfaces for creating, using, and administeringcertificates and cryptographic keys.
Reboot Process of restarting the computer.
Single Sign On Feature that stores authentication information and allows you to use the Credential Manager toaccess Internet and Windows applications that require password authentication.
Smart card Small piece of hardware, similar in size and shape to a credit card, which stores identifyinginformation about the owner. Used to authenticate the owner to a computer.
Stringent security Security feature in BIOS Configuration that provides enhanced protection for the power-onand administrator passwords and other forms of power-on authentication.
Trusted Platform Module (TPM) embedded security chip (select models only) Integrated security chip thatcan protect highly sensitive user information from malicious attackers. It is the root-of-trust in a given platform. TheTPM provides cryptographic algorithms and operations that meets the Trusted Computing Group (TCG)specifications.
USB token Security device that stores identifying information about a user. Like a Java Card or biometric reader,it is used to authenticate the owner to a computer.
Virtual token Security feature that works very much like a Java Card and card reader. The token is saved eitheron the computer hard drive or in the Windows registry. When you log on with a virtual token, you are asked for auser PIN to complete the authentication.
Windows user account Profile for an individual authorized to log on to a network or to an individual computer.
78 Glossary ENWW
Index
Aaccess
controlling 53preventing unauthorized 5
accessing HP ProtectToolsSecurity 3
accountbasic user 30Credential Manager 13
administrator tasksCredential Manager 23Java Card 39
advanced tasksBIOS Configuration 47Credential Manager 23Device Access Manager 56Embedded Security 33Java Card 39
Automatic DriveLock 49
Bbackground service, Device Access
Manager 54backing up and restoring
certification information 33Embedded Security 33HP ProtectTools modules 8Single Sign On data 20
basic user account 30Basic User Key password
changing 32setting 30
biometric readers 14BIOS administrator password 7BIOS Configuration for HP
ProtectToolsadd-on module settings,
managing 47Automatic DriveLock 49boot options 44
password options, setting 51power-on authentication 48power-on authentication on
Windows restart 51power-on password,
changing 50power-on password,
setting 50setup password, changing 51setup password, setting 50smart card power-on
authentication 47stringent security 51system configuration
options 45BIOS setup password
changing 51setting 50
boot options 44
CComputer Setup
administrator password 7password, changing 51password, setting 50passwords, managing 49
controlling device access 53Credential Manager for HP
ProtectToolsaccount, adding 18account, removing 18administrator tasks 23application protection 21application protection,
removing 21changing application restriction
setting 22credential properties,
configuring 24credentials, registering 13
custom authenticationrequirements 24
fingerprint log on 14fingerprint reader 14identity 16identity, clearing 16identity, removing 16locking computer 17logging on 12logon password 6logon specifications 23logon wizard 12new account, creating 13recovery file password 6registering fingerprints 13registering Java Card 14registering other
credentials 14registering token 14registering virtual token 14restriction application
access 21settings, configuring 25setup procedures 12Single Sign On (SSO) 18SSO application, exporting 20SSO application, importing 20SSO application, modifying
properties 19SSO application, removing 19SSO applications and
credentials 19SSO automatic registration 18SSO credentials,
modifying 20SSO manual registration 19SSO new application 18token PIN, changing 15troubleshooting 63
ENWW Index 79
USB eToken, registering 14user verification 26virtual token, creating 15Windows Logon 17Windows logon password,
changing 15Windows logon, allow 25
Ddata, restricting access to 4decrypting a drive 59Device Access Manager for HP
ProtectToolsbackground service 54device class configuration 56device class, allowing access to
one 56device, allowing access to
one 57simple configuration 55troubleshooting 72user or group, adding 56user or group, denying access
to 56user or group, removing 56
device options 45disabling
Automatic DriveLock 49device options 45Embedded Security 34Embedded Security,
permanently 34Java Card power-on
authentication 42power-on authentication 47smart card authentication 47stringent security 51
Drive Encryption for HPProtectTools
adding a user 61changing a token 61changing authentication 61changing encryption 60decrypting a drive 60Drive Encryption keys 62Drive Encryption recovery
service 62encrypting a drive 60removing a user 61setting a password 61
EEmbedded Security for HP
ProtectToolsbackup file, creating 33basic user account 30Basic User Key 30Basic User Key password,
changing 32certification data, restoring 33enabling after permanent
disable 34enabling and disabling 34enabling TPM chip 28encrypted e-mail 31encrypting files and folders 31initializing chip 29migrating keys 35owner password, changing 34password 6permanently disabling 34Personal Secure Drive 31resetting user password 34setup procedures 28troubleshooting 66
emergency recovery 29emergency recovery token
passworddefinition 7setting 29
enablingAutomatic DriveLock 49device options 45Embedded Security 34Embedded Security after
permanent disable 34Java Card power-on
authentication 41power-on authentication 47smart card authentication 47stringent security 51TPM chip 28
encrypting a drive 59encrypting files and folders 31encryption
methods 60user authentication 61users 61
Ff10 Setup password 7
features, HP ProtectTools 2fingerprints, Credential
Manager 13
HHP ProtectTools Backup and
Restore 8HP ProtectTools features 2HP ProtectTools Security,
accessing 3
Iidentity, managing
Credential Manager 16identity, removing
Credential Manager 16initializing embedded security
chip 29
JJava Card Security for HP
ProtectToolsadministrator tasks 39advanced tasks 39assigning name 40creating administrator 41Credential Manager 14PIN 7PIN, assigning 39PIN, changing 38power-on authentication,
disabling 42power-on authentication,
enabling 41power-on authentication,
setting 40reader, selecting 38user, creating 42
Kkey security objectives 4
Llocking computer 17
Nnetwork account 18
Oobjectives, security 4
80 Index ENWW
owner passwordchanging 34definition 7setting 29
Ppassword
Basic User Key 32changing owner 34changing power-on 50changing setup 51Computer Setup,
managing 49emergency recovery token 29guidelines 8HP ProtectTools 6managing 6owner 29policies, creating 5resetting user 34secure, creating 8setting options 51setting power-on 50setting setup 50Windows logon 15
personal secure drive (PSD) 31power-on authentication
enabling and disabling 47on Windows restart 51
power-on passworddefinition 7setting and changing 50
propertiesapplication 19authentication 23credential 24
Rrecovering encrypted data 62registering
application 18credentials 13
restrictingaccess to sensitive data 4device access 53
Ssecurity
key objectives 4roles 6
security roles 6
security setup password 7Single Sign On
automatic registration 18exporting applications 20manual registration 19modifying application
properties 19removing applications 19
stringent security 51
Ttargeted theft, protecting
against 4token, Credential Manager 14TPM chip
enabling 28initializing 29
troubleshootingCredential Manager 63Device Access Manager 72Embedded Security 66miscellaneous 73
Uunauthorized access,
preventing 5USB eToken, Credential
Manager 14
Vvirtual token 15virtual token, Credential
Manager 14, 15
WWindows Logon
Credential Manager 17password 7
Windows network account 18
ENWW Index 81

82 Index ENWW