Embed Size (px)
Citation preview
8/7/2019 HP LaserJet 8150
http://slidepdf.com/reader/full/hp-laserjet-8150 1/19
HP Support document »Return to original page
HP LaserJet 8150 Series Printers - NumericalError Messages
Introduction
Printing a configuration page (to test the printer)
Control panel help system
13. X paper jam {Location}
20 Insufficient memory alternates with press go to continue
21 Page too complex alternates with press go to continue
22 EIO x buffer overflow alternates with press go to continue
22 Parallel I/O buffer overflow alternates with press go to continue
22 Serial I/0 buffer overflow alternates with press go to continue
40 EIO x bad serial transmission alternates with press go to continue
41.3 Unexpected paper s ize41.x Printer error alternates with press go to continue
50.x Fuser error
51.x printer error
52.x printer error
53.xy.zz printer error
55.x Printer error alternates with press go to continue
56.x Printer error alternates with cycle power to continue
57.x Printer error
58.x Printer error alternates with cycle power to continue
59.x Printer error alternates with cycle power to continue
62.x Printer error
64 Printer error
66.x service error
69.x Printer error
79.xxxx printer error
8X.YYYY EIO error
Location where printer jams can occur
Clearing jams from the optional duplex printing accessory
Clearing the optional 2000-s heet input tray (Tray 4)
Clearing jams from the top cover area
C-link cables suggested locations
Clearing the standard output bin
Clearing the left door (fuser area)
Clearing the optional multibin mailboxes
Clearing jams from the stapler (5-bin mailbox with stapler)
Introduction
This document describes numbered error messages that appear on the control panel for the printer
and the external devices. It elaborates on what the messages mean and provides possible actions to
take. The messages are presented in numerical order.
Be sure to read the exact text of the control panel mess age including the event message number and
9/20/2010 HP LaserJet 8150 Series Printers - Num…
h20000.www2.hp.com/…/Document.js… 1/
8/7/2019 HP LaserJet 8150
http://slidepdf.com/reader/full/hp-laserjet-8150 2/19
the text in order to locate the error mes sage in this docum ent.
Printer mess ages d isplayed on the control panel provide five categories of information. Each message
category is ass igned a priority. If more than one condition occurs at the same time, the highes t priority
mes sage is dis played. When it is cleared, the next priority mes sage will be displayed, and so on. The
displayed mes sages and their priorities are as follows:
Printer Status
Warning mess ages
Error mess ages
Critical error mess ages
External Paper Handling Device mes sages
NOTE: Be sure to print a configuration page. The configuration page can provide
information about accessories ins talled. It also provides the last three event
messages displayed on the control panel.
Printing a configuration page (to test the printer)
Use the configuration page to view current printer settings, to help troubleshoot printer problems , or to
verify installation of optional accessories, such as mem ory (DIMMs), input and output paper handling
devices, and printer languages .
NOTE: If an HP Jetdirect EIO card is ins talled, an HP Jetdirect configuration page will print out
as well.
To print a configuration page, follow these steps:
1. Make sure the printer is on and that Ready is dis played.
2. Press MENU until the display reads , INFORMATION MENU.
3. Press ITEM until the display reads , PRINT CONFIGURATION.
4. Press SELECT to print a configuration page.
The configuration page shows the current configuration.
NOTE: An HP Jetdirect network configuration page will also print for printers with network
cards installed.
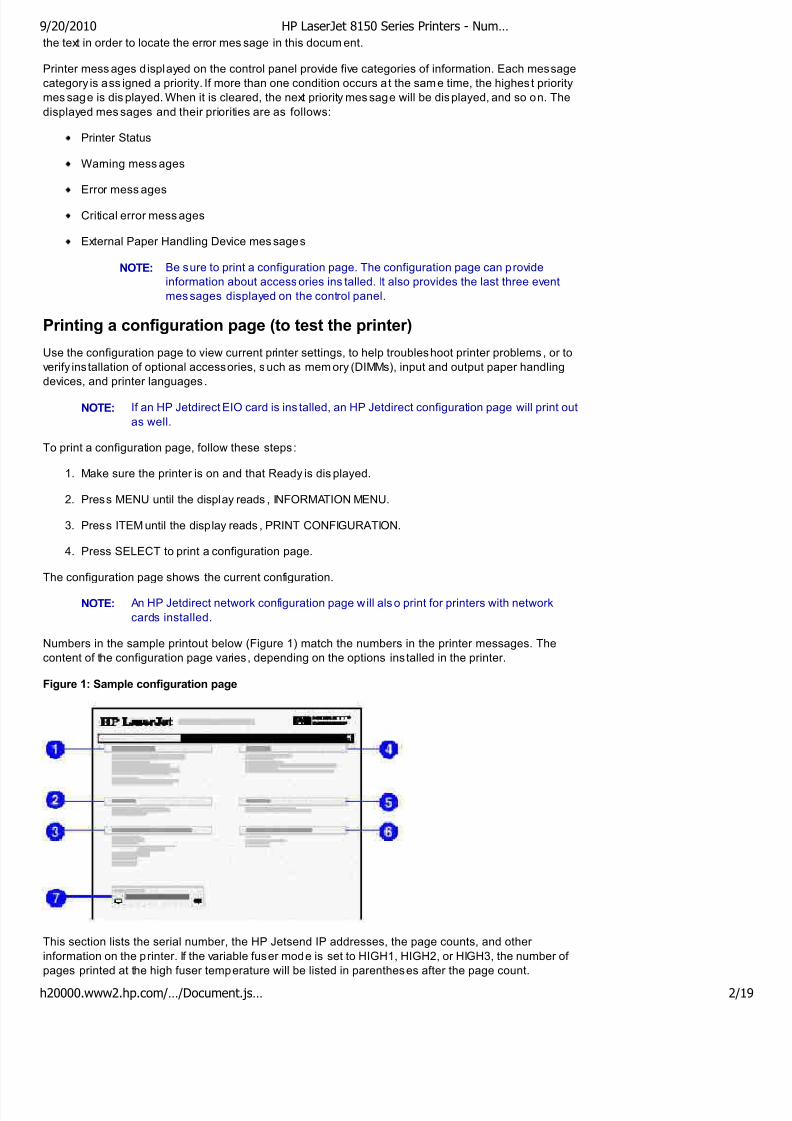
Numbers in the sample printout below (Figure 1) match the numbers in the printer messages. The
content of the configuration page varies, depending on the options installed in the printer.
Figure 1: Sample configuration page
This section lists the serial number, the HP Jetsend IP addresses, the page counts, and other
information on the printer. If the variable fuser mode is set to HIGH1, HIGH2, or HIGH3, the number of
pages printed at the high fuser temperature will be listed in parentheses after the page count.
9/20/2010 HP LaserJet 8150 Series Printers - Num…
h20000.www2.hp.com/…/Document.js… 2/
8/7/2019 HP LaserJet 8150
http://slidepdf.com/reader/full/hp-laserjet-8150 3/19
This section lists the num ber of entries in the log, the maximum number of entries viewable, and the
last three entries. The second page of the event log is the manufacturing page. This page contains
information that may assist HP Customer Care representatives in solving possible printer problems.
This section lists all printer languages that are installed (such as PCL and PS) and lists options that
are ins talled in each DIMM slot and each EIO slot.
This section lis ts the printer memory, the Driver WorkSpace (DWS), and the I/O buffering and resource
saving information.
This section lists the s tatus of the control panel lock, the control panel pass word, and the disk drive.
This section lists the size settings for all trays, and it lists optional paper handling accessories that are
installed.
This section provides a graphic representation of the amount of toner left in the cartridge.
Control panel help system
The printer features an online help s ystem that provides instructions for resolving mos t printer errors.
Certain control panel error messages alternate with instructions on accessing the online help system.
Whenever a question mark (?) appears in an error message or a message alternates with, "For Help
Press the ? Key," press ITEM to navigate through a sequence of ins tructions.
To exit the online help system, press GO.
If a message persists, do one of the following:
If a message persists requesting to load a tray, or if a message indicates that a previous print
job is still in the mem ory, press GO to print or CANCEL JOB to clear the job from the memory.
If a message persists after performing all of the recommended actions, contact an HP
authorized s ervice or support provider.
13. X paper jam {Location}
Description
A paper jam has occurred.
Action
Clear paper jams using the procedure(s) below:
Click here for a graphic showing jam locations. Check all of the printer doors for paper
jams.
Click here for information on clearing jam s from the optional duplex printing accessory.
Click here for information on clearing the optional 2000-sheet input tray (Tray 4) .
Click here for information on clearing jam s from the top cover area.
Click here for information on the C-link cable locations . Reseat the C-link cables.
Make sure that all the C-link cables are properly installed and that the connectors are
tight.
Clear the paper jam from one of the output areas. Checking all of the areas lis ted below
may be required.
Click here for information on clearing the s tandard output bin.
Click here for information on clearing the left door (fuser area).
Click here for information on clearing the optional multibin mailboxes .
9/20/2010 HP LaserJet 8150 Series Printers - Num…
h20000.www2.hp.com/…/Document.js… 3/

8/7/2019 HP LaserJet 8150
http://slidepdf.com/reader/full/hp-laserjet-8150 4/19
8/7/2019 HP LaserJet 8150
http://slidepdf.com/reader/full/hp-laserjet-8150 5/19
Description
Too much data was s ent to the serial port.
Action
1. Make sure that the correct serial pacing option is selected from the I/O menu in the
control panel.
2. Print a menu map, and verify that the seria l pacing item (from the I/O menu in the control
panel) matches the setting on the computer.
3. Press GO to clear the error mes sage (data will be lost).
40 EIO x bad serial transmission alternates with press go to continue
Description
The printer encountered an error while transferring data from the computer. The error might
have occurred for several reasons :
The computer was turned on or off while the printer was onl ine.
A network communication issue frequently causes this.
Sometimes a specific software application or file can cause a 40 error.
Action
1. Verify the cable connections. Make sure that the printer’s serial configuration is s et the
sam e as the computer from the I/O menu in the printer’s control panel.
The serial baud rate setting can be accessed from the I/O menu in the printer’s control panel.
1. Press GO to clear the error message and to continue the printing.
2. Turn the printer off.
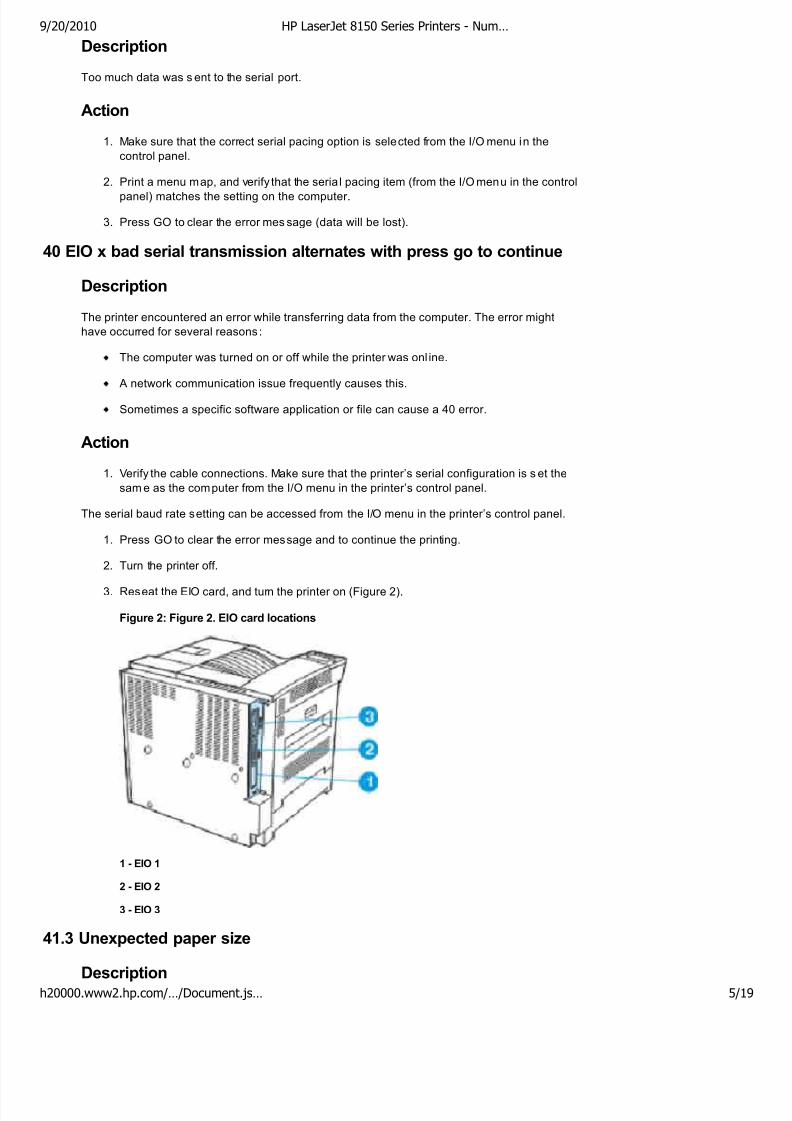
3. Reseat the EIO card, and turn the printer on (Figure 2).
Figure 2: Figure 2. EIO card locations
1 - EIO 1
2 - EIO 2
3 - EIO 3
41.3 Unexpected paper size
Description
9/20/2010 HP LaserJet 8150 Series Printers - Num…
h20000.www2.hp.com/…/Document.js… 5/
8/7/2019 HP LaserJet 8150
http://slidepdf.com/reader/full/hp-laserjet-8150 6/19
The paper s ize you are trying to print is not the same as the paper size loaded in the paper tray
from which you are currently printing.
Action
1. For Tray 1 or Envelope feeder: Make sure that Tray 1 is s et to CASSETTE, and that the
paper s ize is correctly configured in the Paper handling m enu. (The printer will continue
trying to print the job until the size settings are correct.)
2. For all other Trays: Make sure that the paper guides are set to the correct paper size.(For Trays 2 and 3 this can be verified by printing a Configuration Page).
3. Press GO. The page containing the error will automatically be reprinted. (Or, you might
want to press CANCEL JOB to clear the job from the printer’s m emory.).
41.x Printer error alternates with press go to continue
Description
A temporary printing error occurred.
Action
1. Press GO. The page containing the error will automatically be reprinted.
2. Turn the printer off, then turn the printer on.
50.x Fuser error
Description
A fuser error has occurred.
Action
1. Turn the printer off for at least 20 minutes , and, turn the printer on. If the error continues,make s ure that the fusing assem bly is installed correctly and is fully seated into its
connectors.
2. If this mess age persis ts, contact an HP-authorized service or support provider.
51.x printer error
Description
A temporary printing error occurred.
Action
1. Press GO. The page containing the error will automatically be reprinted.
2. Turn the printer off, then turn the printer on.
3. If this mess age persis ts, contact an HP-authorized service or support provider.
52.x printer error
Description
A temporary printing error occurred.
9/20/2010 HP LaserJet 8150 Series Printers - Num…
h20000.www2.hp.com/…/Document.js… 6/
8/7/2019 HP LaserJet 8150
http://slidepdf.com/reader/full/hp-laserjet-8150 7/19
Action
1. Press GO. The page containing the error will automatically be reprinted.
2. Turn the printer off, then turn the printer on.
3. If this mess age persis ts, contact an HP-authorized service or support provider.
53.xy.zz printer error
Description
There is a problem with the printer’s memory. The DIMM that caused the error will not be used.
Values of x, y, and zz are as follows (see Figure 17):
x = DIMM type
y = Device location 1 to 3 = DIMM slots 1, 2, or 3
z = error number
Action
1. Turn the printer off, and reseat or replace the specified DIMM.
2. Try the DIMM in another s lot.
3. Replace the DIMM that caused the error.
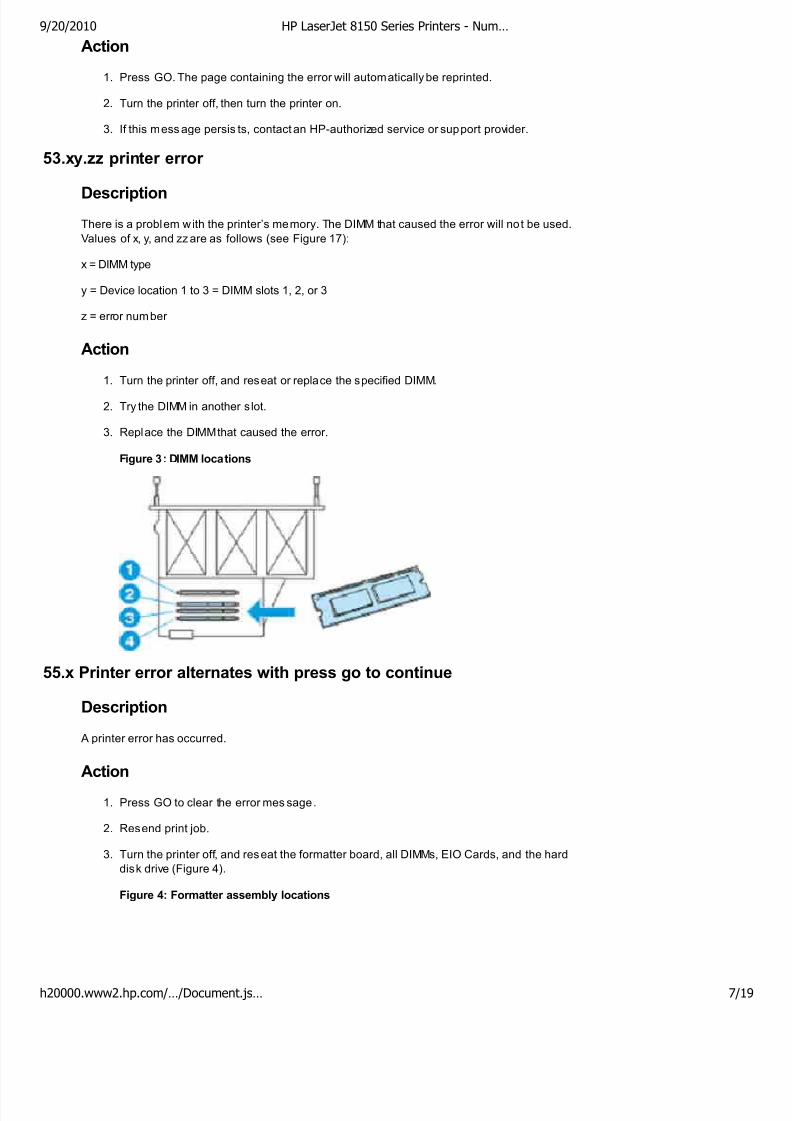
Figure 3: DIMM locations
55.x Printer error alternates with press go to continue
Description
A printer error has occurred.
Action
1. Press GO to clear the error mes sage.
2. Resend print job.
3. Turn the printer off, and reseat the formatter board, all DIMMs, EIO Cards, and the hard
disk drive (Figure 4).
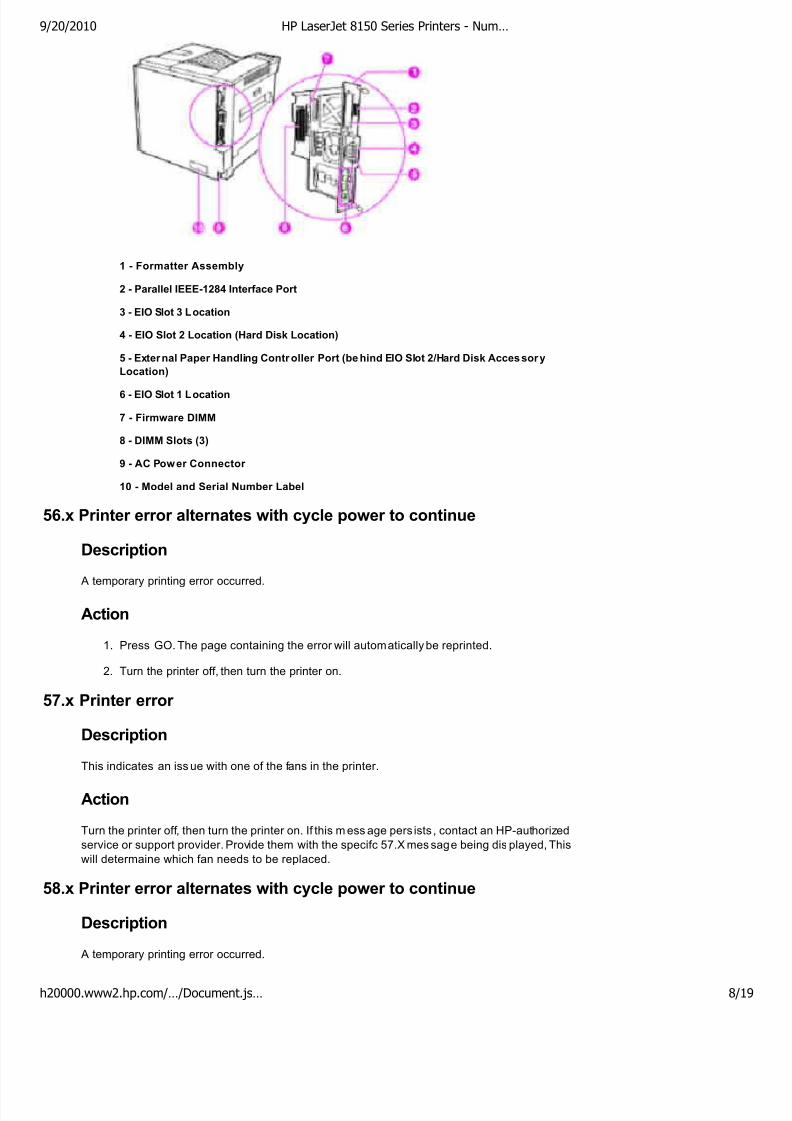
Figure 4: Formatter assembly locations
9/20/2010 HP LaserJet 8150 Series Printers - Num…
h20000.www2.hp.com/…/Document.js… 7/
8/7/2019 HP LaserJet 8150
http://slidepdf.com/reader/full/hp-laserjet-8150 8/19
1 - Formatter Assembly
2 - Parallel IEEE-1284 Interface Port
3 - EIO Slot 3 Location
4 - EIO Slot 2 Location (Hard Disk Location)
5 - External Paper Handling Contr oller Port (be hind EIO Slot 2/Hard Disk Accessory
Location)
6 - EIO Slot 1 Location
7 - Firmware DIMM
8 - DIMM Slots (3)
9 - AC Power Connector
10 - Model and Serial Number Label
56.x Printer error alternates with cycle power to continue
Description
A temporary printing error occurred.
Action
1. Press GO. The page containing the error will automatically be reprinted.
2. Turn the printer off, then turn the printer on.
57.x Printer error
Description
This indicates an iss ue with one of the fans in the printer.
Action
Turn the printer off, then turn the printer on. If this m ess age pers ists , contact an HP-authorized
service or support provider. Provide them with the specifc 57.X mes sage being dis played, This
will determaine which fan needs to be replaced.
58.x Printer error alternates with cycle power to continue
Description
A temporary printing error occurred.
9/20/2010 HP LaserJet 8150 Series Printers - Num…
h20000.www2.hp.com/…/Document.js… 8/
8/7/2019 HP LaserJet 8150
http://slidepdf.com/reader/full/hp-laserjet-8150 9/19
Action
1. Turn the printer off, then turn the printer on.
2. If this mess age persis ts, contact an HP-authorized service or support provider.
59.x Printer error alternates with cycle power to continue
Description
A temporary printing error occurred.
Action
1. Turn the printer off, then turn the printer on.
2. If this mess age persis ts, contact an HP authorized service or support provider.
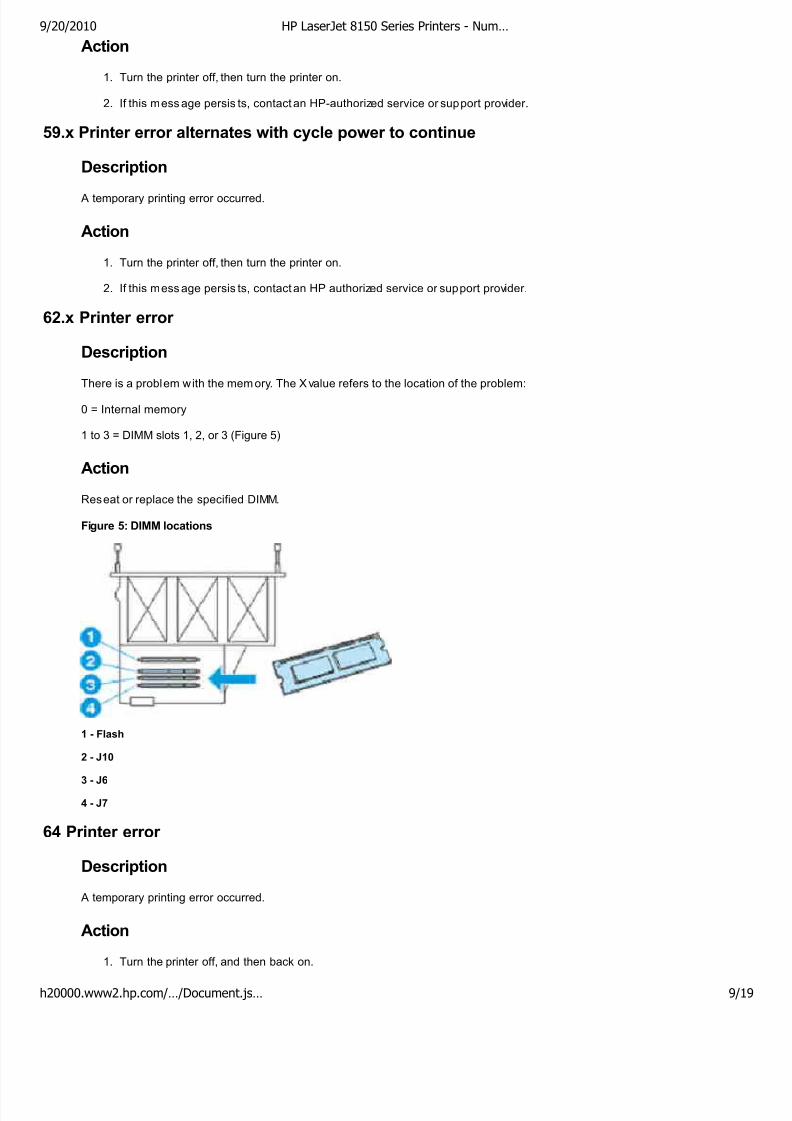
62.x Printer error
Description
There is a problem with the memory. The X value refers to the location of the problem:
0 = Internal memory
1 to 3 = DIMM slots 1, 2, or 3 (Figure 5)
Action
Reseat or replace the specified DIMM.
Figure 5: DIMM locations
1 - Flash
2 - J10
3 - J6
4 - J7
64 Printer error
Description
A temporary printing error occurred.
Action
1. Turn the printer off, and then back on.
9/20/2010 HP LaserJet 8150 Series Printers - Num…
h20000.www2.hp.com/…/Document.js… 9/
8/7/2019 HP LaserJet 8150
http://slidepdf.com/reader/full/hp-laserjet-8150 10/19
2. Try plugging the printer into a different power source.
3. If the previous steps did not work, then turn the printer off and remove the formatter,
reseat the m emory DIMMS and remove any third-party memory DIMMs. Verify the DIMM
configuration exactly matches that shown in Figure 19. The printer must have the
firmware DIMM installed in the FLASH slot to operate properly.
4. If the problem s till persis ts remove the HP Jetdirect card and try to print again.
5. The next step would be to remove the hard drive (if equipped) and try to print again.
6. If this mess age persis ts, contact an HP authorized service or support provider.
66.x service error
Description
This error could be caused by a power failure. An error occurred in an external paper-handling
device. This may be caused by a bad C-link connection or by a damaged C-link cable, or it may
be a communication problem with an external device.
Action
1. Turn the printer off, then turn the printer on.
2. If the problem persists , check the C-link and the power cables. Reseat the cables first. If
the error message persists , make sure they are attached correctly (See the graphics
below for suggested cable configurations).
3. Make sure there are no objects or fragments of paper in the free area at the 2000-sheet
input tray (Tray 4).
4. Make sure that the paper s ize plates are installed correctly and that they are not bent.
5. Clear the paper jam from one of the output areas. This may require checking all of the
areas listed below:
Click here for information on clearing the standard output bin.
Click here for information on clearing the left door (fuser area).
Click here for information on clearing the optional multibin mailboxes.
Click here for information on the C-link cable locations. Reseat the C-link cables.
Make sure that all the C-link cables are properly installed and that the connectors
are tight.
69.x Printer error
Description
A temporary printing error occurred.
Action
1. Turn the printer off, then turn the printer on.
2. Reseat the duplexer.
79.xxxx printer error
Description
The printer detected an error.
9/20/2010 HP LaserJet 8150 Series Printers - Num…
h20000.www2.hp.com/…/Document.js… 10/
8/7/2019 HP LaserJet 8150
http://slidepdf.com/reader/full/hp-laserjet-8150 11/19
Action
1. Turn the printer off, then turn the printer on.
2. Try printing a job from a d ifferent software application. If the job prints, go back to the first
application, and try printing a different file (If the mess age only appears with a certain
software application or print job, contact the software vendor for ass is tance). If the
message persists, try the following:
Turn the printer off, then turn the printer on.
Reseat or replace the interface cable, turn the prin ter off, and turn the printer on.
Remove the DIMMs one at a time, turn the printer off, and turn the printer on.
Try using the parallel interface if poss ible.
Remove the Hard Disk, turn the printer off, and turn the printer on.
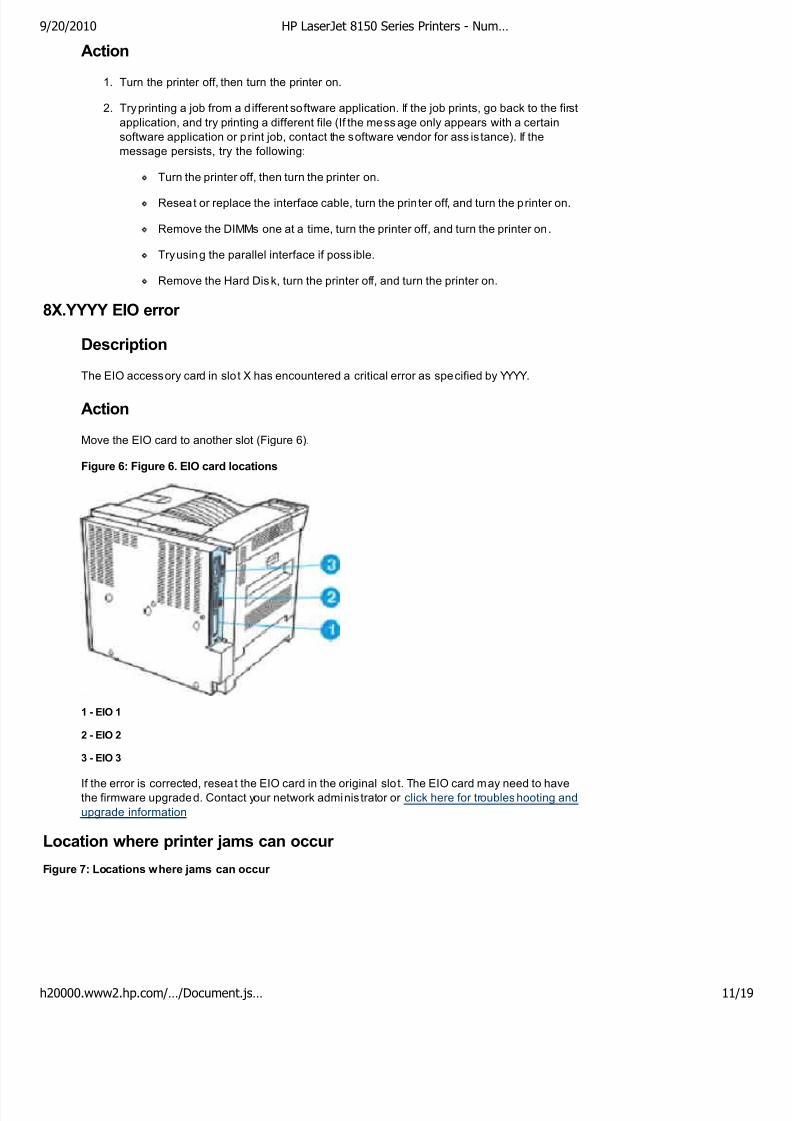
8X.YYYY EIO error
Description
The EIO accessory card in slo t X has encountered a critical error as specified by YYYY.
Action
Move the EIO card to another slot (Figure 6).
Figure 6: Figure 6. EIO card locations
1 - EIO 1
2 - EIO 2
3 - EIO 3
If the error is corrected, reseat the EIO card in the original slo t. The EIO card may need to havethe firmware upgraded. Contact your network adminis trator or click here for troubleshooting and
upgrade information
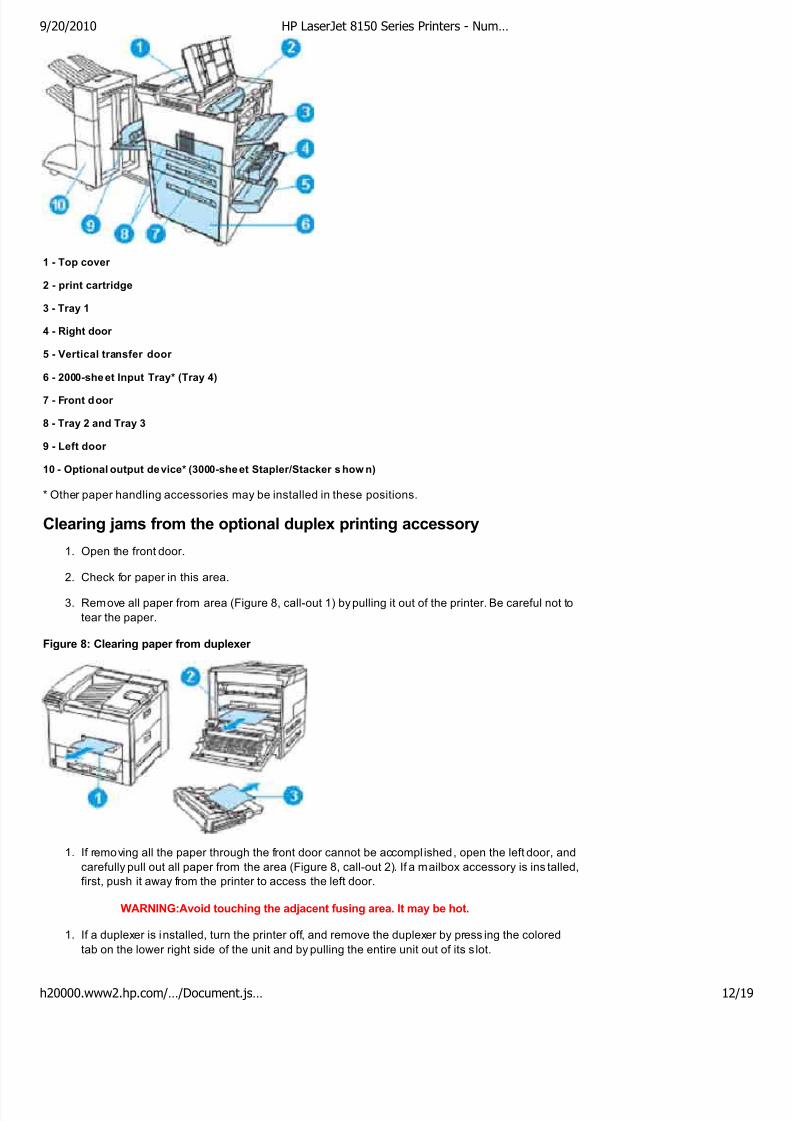
Location where printer jams can occur
Figure 7: Locations where jams can occur
9/20/2010 HP LaserJet 8150 Series Printers - Num…
h20000.www2.hp.com/…/Document.js… 11/
8/7/2019 HP LaserJet 8150
http://slidepdf.com/reader/full/hp-laserjet-8150 12/19
1 - Top cover
2 - print cartridge
3 - Tray 1
4 - Right door
5 - Vertical transfer door
6 - 2000-sheet Input Tray* (Tray 4)
7 - Front door
8 - Tray 2 and Tray 3
9 - Left door
10 - Optional output device* (3000-sheet Stapler/Stacker s how n)
* Other paper handling accessories may be installed in these positions.
Clearing jams from the optional duplex printing accessory
1. Open the front door.
2. Check for paper in this area.
3. Remove all paper from area (Figure 8, call-out 1) by pulling it out of the printer. Be careful not to
tear the paper.
Figure 8: Clearing paper from duplexer
1. If removing all the paper through the front door cannot be accompl ished, open the left door, and
carefully pull out all paper from the area (Figure 8, call-out 2). If a mailbox accessory is ins talled,
first, push it away from the printer to access the left door.
WARNING:Avoid touching the adjacent fusing area. It may be hot.
1. If a duplexer is installed, turn the printer off, and remove the duplexer by press ing the colored
tab on the lower right side of the unit and by pulling the entire unit out of its s lot.
9/20/2010 HP LaserJet 8150 Series Printers - Num…
h20000.www2.hp.com/…/Document.js… 12/
8/7/2019 HP LaserJet 8150
http://slidepdf.com/reader/full/hp-laserjet-8150 13/19
2. Remove all paper remaining in the duplexer (Figure 8, call-out 3).
3. Reinstall the duplexer by sliding it back into the s lot until it locks into place. Close all open
doors. If an optional output device is installed, push it back into place, and turn the printer on.
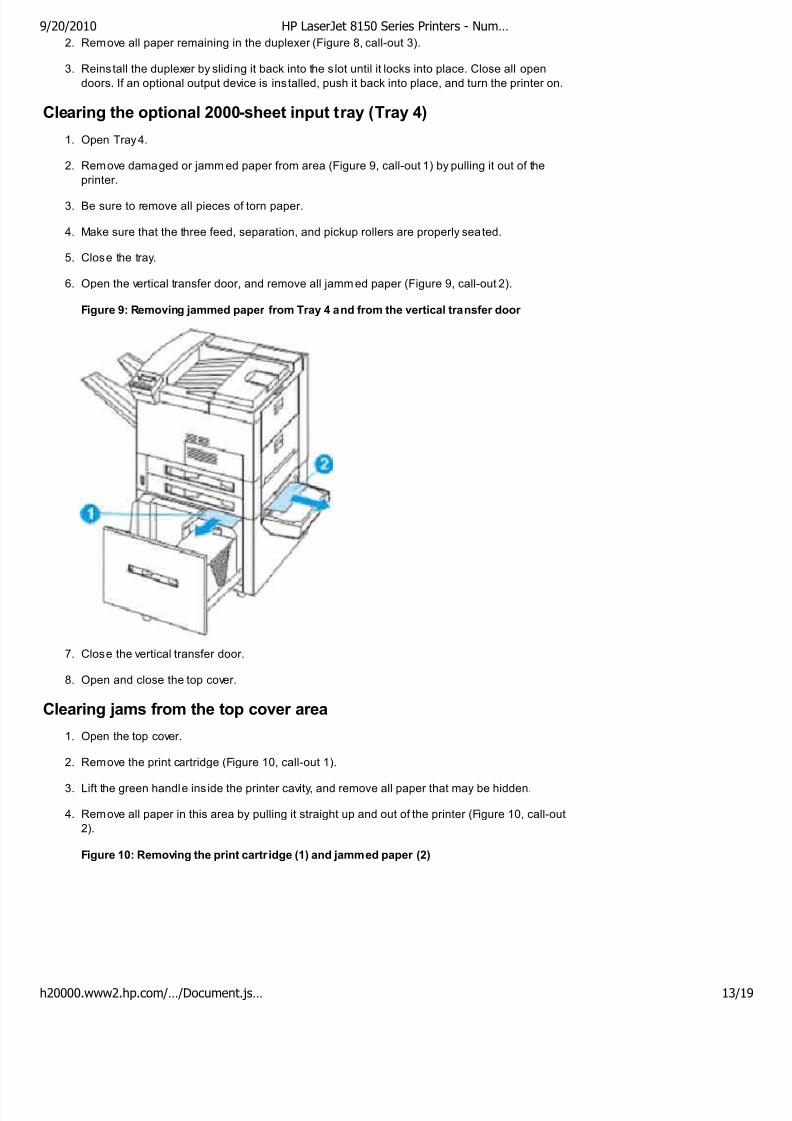
Clearing the optional 2000-sheet input tray (Tray 4)
1. Open Tray 4.
2. Remove damaged or jamm ed paper from area (Figure 9, call-out 1) by pulling it out of the
printer.
3. Be sure to remove all pieces of torn paper.
4. Make sure that the three feed, separation, and pickup rollers are properly seated.
5. Close the tray.
6. Open the vertical transfer door, and remove all jammed paper (Figure 9, call-out 2).
Figure 9: Removing jammed paper from Tray 4 and from the vertical transfer door
7. Close the vertical transfer door.
8. Open and close the top cover.
Clearing jams from the top cover area
1. Open the top cover.
2. Remove the print cartridge (Figure 10, call-out 1).
3. Lift the green handle ins ide the printer cavity, and remove all paper that may be hidden.
4. Remove all paper in this area by pulling it straight up and out of the printer (Figure 10, call-out
2).
Figure 10: Removing the print cartr idge (1) and jammed paper (2)
9/20/2010 HP LaserJet 8150 Series Printers - Num…
h20000.www2.hp.com/…/Document.js… 13/
8/7/2019 HP LaserJet 8150
http://slidepdf.com/reader/full/hp-laserjet-8150 14/19
5. Be sure to remove all pieces of torn paper.
6. Replace the print cartridge, and close the top cover.
C-link cables suggested locations
The figures below show the suggested C-link cable configurations.
Figure 11: Suggested cable configuration 1
Figure 12: Suggested cable configuration 2
9/20/2010 HP LaserJet 8150 Series Printers - Num…
h20000.www2.hp.com/…/Document.js… 14/

8/7/2019 HP LaserJet 8150
http://slidepdf.com/reader/full/hp-laserjet-8150 15/19
Figure 13: Suggested cable configuration 3
Figure 14: Suggested cable configuration 4
9/20/2010 HP LaserJet 8150 Series Printers - Num…
h20000.www2.hp.com/…/Document.js… 15/
8/7/2019 HP LaserJet 8150
http://slidepdf.com/reader/full/hp-laserjet-8150 16/19
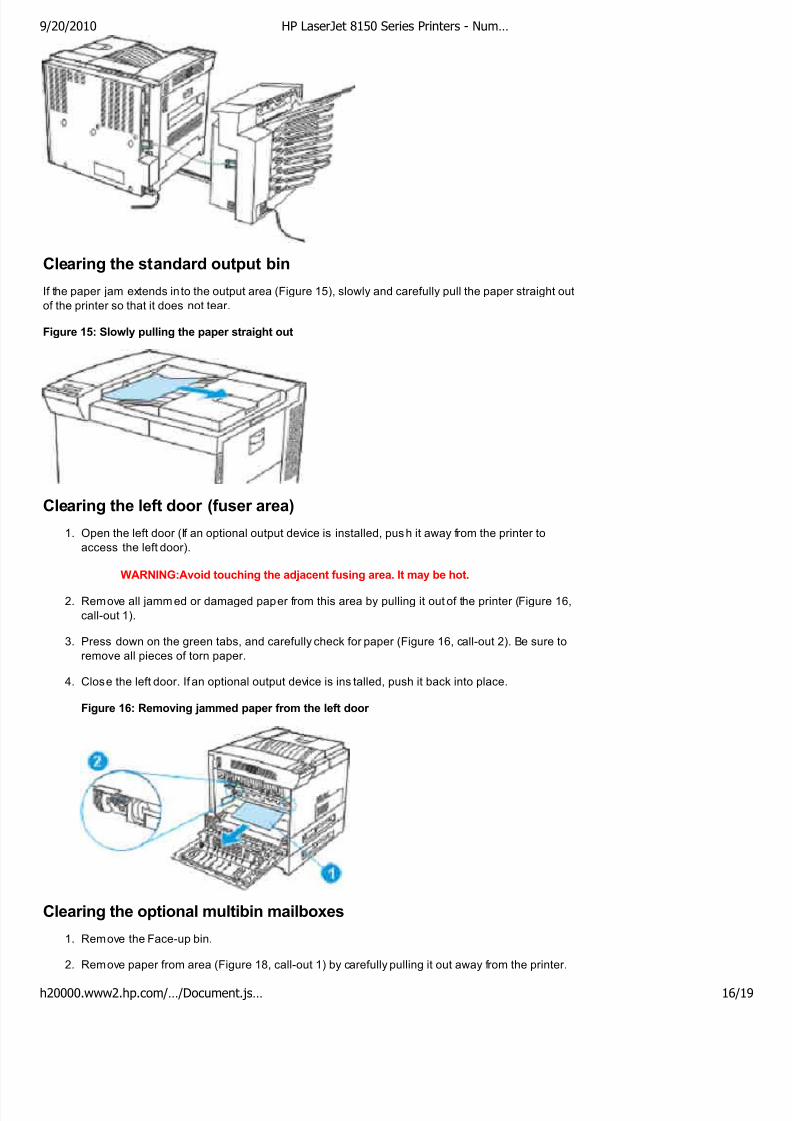
Clearing the standard output bin
If the paper jam extends in to the output area (Figure 15), slowly and carefully pull the paper straight out
of the printer so that it does not tear.
Figure 15: Slowly pulling the paper straight out
Clearing the left door (fuser area)
1. Open the left door (If an optional output device is installed, push it away from the printer to
access the left door).
WARNING:Avoid touching the adjacent fusing area. It may be hot.
2. Remove all jammed or damaged paper from this area by pulling it out of the printer (Figure 16,
call-out 1).
3. Press down on the green tabs, and carefully check for paper (Figure 16, call-out 2). Be sure to
remove all pieces of torn paper.
4. Close the left door. If an optional output device is ins talled, push it back into place.
Figure 16: Removing jammed paper from the left door
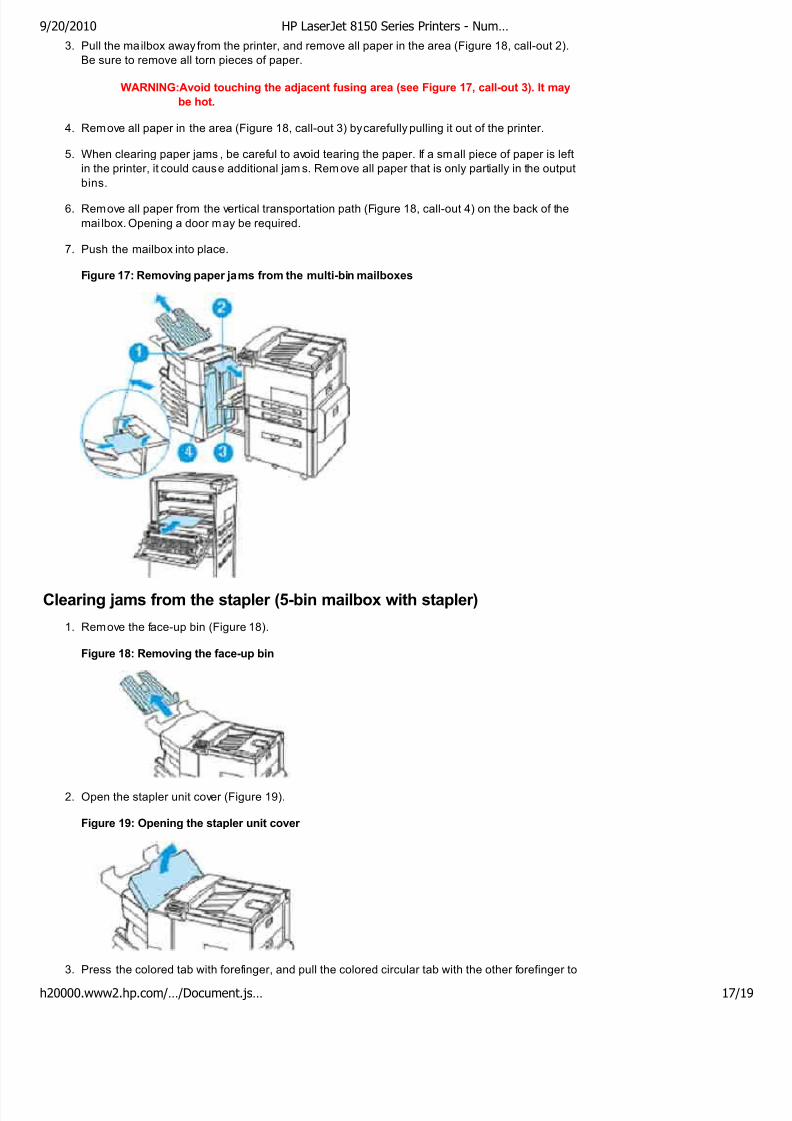
Clearing the optional multibin mailboxes
1. Remove the Face-up bin.
2. Remove paper from area (Figure 18, call-out 1) by carefully pulling it out away from the printer.
9/20/2010 HP LaserJet 8150 Series Printers - Num…
h20000.www2.hp.com/…/Document.js… 16/
8/7/2019 HP LaserJet 8150
http://slidepdf.com/reader/full/hp-laserjet-8150 17/19
3. Pull the mailbox away from the printer, and remove all paper in the area (Figure 18, call-out 2).
Be sure to remove all torn pieces of paper.
WARNING:Avoid touching the adjacent fusing area (see Figure 17, call-out 3). It may
be hot.
4. Remove all paper in the area (Figure 18, call-out 3) by carefully pulling it out of the printer.
5. When clearing paper jams , be careful to avoid tearing the paper. If a small piece of paper is left
in the printer, it could cause additional jam s. Remove all paper that is only partially in the output
bins.
6. Remove all paper from the vertical transportation path (Figure 18, call-out 4) on the back of the
mai lbox. Opening a door may be required.
7. Push the mailbox into place.
Figure 17: Removing paper jams from the multi-bin mailboxes
Clearing jams from the stapler (5-bin mailbox with stapler)
1. Remove the face-up bin (Figure 18).
Figure 18: Removing the face-up bin
2. Open the stapler unit cover (Figure 19).
Figure 19: Opening the stapler unit cover
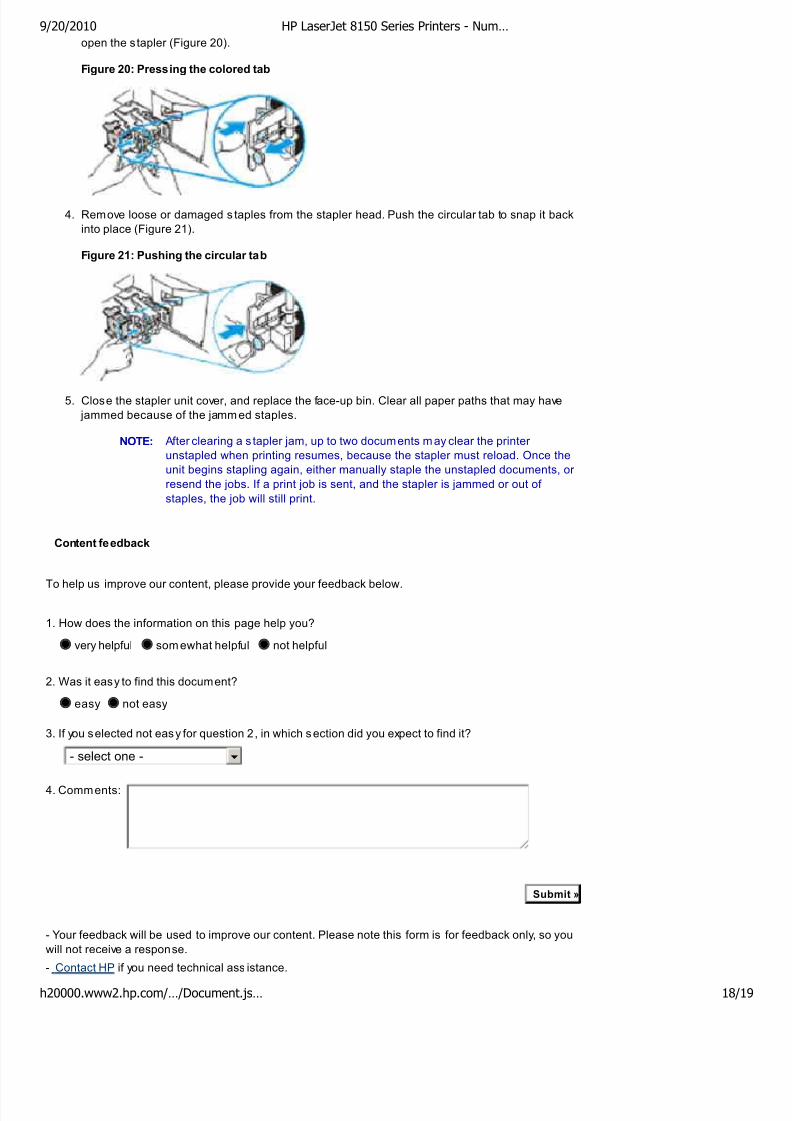
3. Press the colored tab with forefinger, and pull the colored circular tab with the other forefinger to
9/20/2010 HP LaserJet 8150 Series Printers - Num…
h20000.www2.hp.com/…/Document.js… 17/
8/7/2019 HP LaserJet 8150
http://slidepdf.com/reader/full/hp-laserjet-8150 18/19
Submit »
open the stapler (Figure 20).
Figure 20: Pressing the colored tab
4. Remove loose or damaged s taples from the stapler head. Push the circular tab to snap it back
into place (Figure 21).
Figure 21: Pushing the circular tab
5. Close the stapler unit cover, and replace the face-up bin. Clear all paper paths that may have
jammed because of the jammed staples.
NOTE: After clearing a s tapler jam, up to two documents may clear the printer
unstapled when printing resumes, because the stapler must reload. Once the
unit begins stapling again, either manually staple the unstapled documents, or
resend the jobs. If a print job is sent, and the stapler is jammed or out of
staples, the job will still print.
Content feedback
To help us improve our content, please provide your feedback below.
1. How does the information on this page help you?
nmlkj very helpful nmlkj somewhat helpful nmlkj not helpful
2. Was it easy to find this document?
nmlkj easy nmlkj not easy
3. If you selected not easy for question 2, in which section did you expect to find it?
6- select one -
4. Comments:
- Your feedback will be used to improve our content. Please note this form is for feedback only, so you
will not receive a response.
- Contact HP if you need technical ass istance.
9/20/2010 HP LaserJet 8150 Series Printers - Num…
h20000.www2.hp.com/…/Document.js… 18/
8/7/2019 HP LaserJet 8150
http://slidepdf.com/reader/full/hp-laserjet-8150 19/19
» Return to original page
Privacy statement Using this site means you accept its terms Feedback to w ebmaster
© 2010 Hewlett-Packard Development Company, L.P.
9/20/2010 HP LaserJet 8150 Series Printers - Num…