Embed Size (px)
Citation preview
1
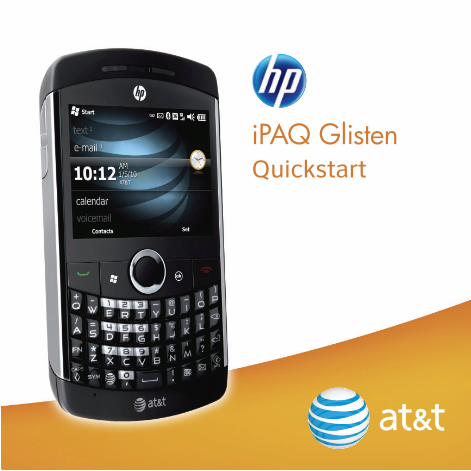
iPAQ GlistenQuickstart
2
Welcome to AT&T
Use this Quickstart to get a brief overview of the major features and services available with your smartphone ORuse our Interactive Web Tutorial available at att.com/Tutorialsfor the most complete and up to date information available for setting up and using your new smartphone and all the services available. The online tutorials include an easy search function as well as step-by-step instructions and screen shots to assist your learning.
Thanks again for choosing AT&T.
Learn how to control your iPAQ—check out this foldout while you read this guide.
3
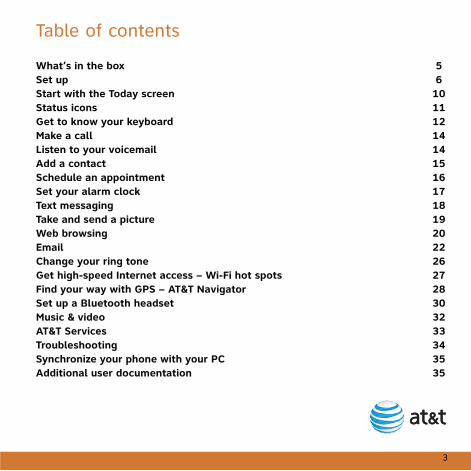
Table of contents
What’s in the box 5Set up 6Start with the Today screen 10Status icons 11Get to know your keyboard 12Make a call 14Listen to your voicemail 14Add a contact 15Schedule an appointment 16Set your alarm clock 17Text messaging 18Take and send a picture 19Web browsing 20Email 22Change your ring tone 26Get high-speed Internet access – Wi-Fi hot spots 27Find your way with GPS – AT&T Navigator 28Set up a Bluetooth headset 30Music & video 32AT&T Services 33Troubleshooting 34Synchronize your phone with your PC 35Additional user documentation 35

4
5
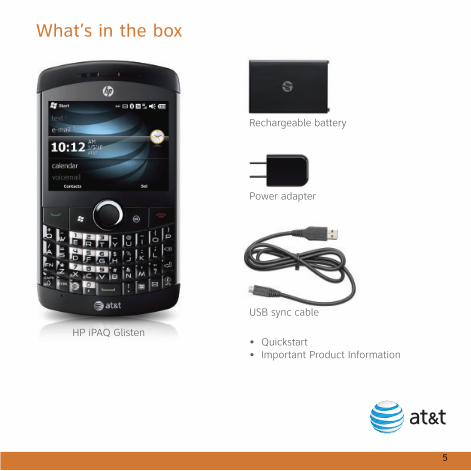
What’s in the box
HP iPAQ Glisten
USB sync cable
• Quickstart• Important Product Information
Rechargeable battery
Power adapter
6
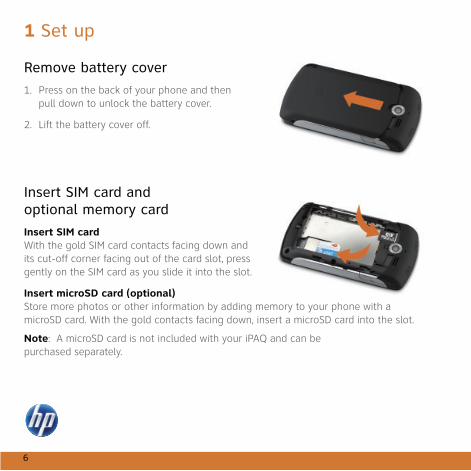
1 Set up
Remove battery cover
1. Press on the back of your phone and then pull down to unlock the battery cover.
2. Lift the battery cover off.
Insert SIM card andoptional memory card
Insert SIM cardWith the gold SIM card contacts facing down and its cut-off corner facing out of the card slot, press gently on the SIM card as you slide it into the slot.
Insert microSD card (optional)Store more photos or other information by adding memory to your phone with a microSD card. With the gold contacts facing down, insert a microSD card into the slot.
Note: A microSD card is not included with your iPAQ and can be purchased separately.
7
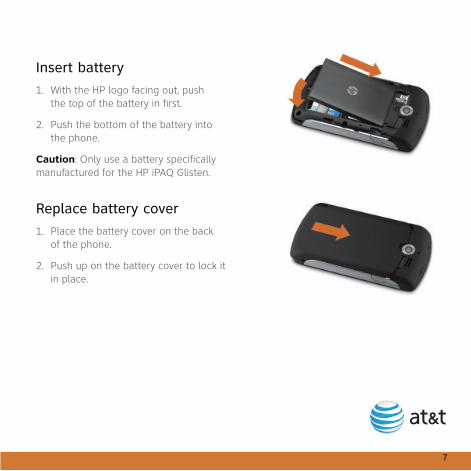
Insert battery
1. With the HP logo facing out, push the top of the battery in first.
2. Push the bottom of the battery into the phone.
Caution: Only use a battery specifically manufactured for the HP iPAQ Glisten.
Replace battery cover
1. Place the battery cover on the back of the phone.
2. Push up on the battery cover to lock it in place.
8
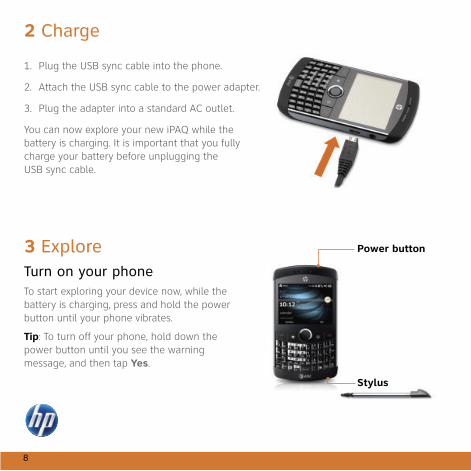
Turn on your phoneTo start exploring your device now, while the battery is charging, press and hold the power button until your phone vibrates.
Tip: To turn off your phone, hold down the power button until you see the warning message, and then tap Yes.
3 Explore
2 Charge
Power button
Stylus
1. Plug the USB sync cable into the phone.
2. Attach the USB sync cable to the power adapter.
3. Plug the adapter into a standard AC outlet.
You can now explore your new iPAQ while thebattery is charging. It is important that you fullycharge your battery before unplugging the USB sync cable.
9
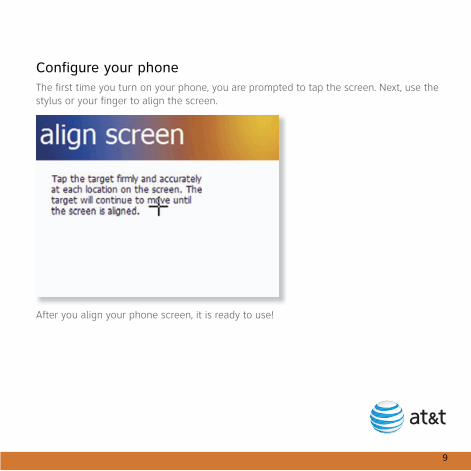
Configure your phoneThe first time you turn on your phone, you are prompted to tap the screen. Next, use the stylus or your finger to align the screen.
After you align your phone screen, it is ready to use!
10
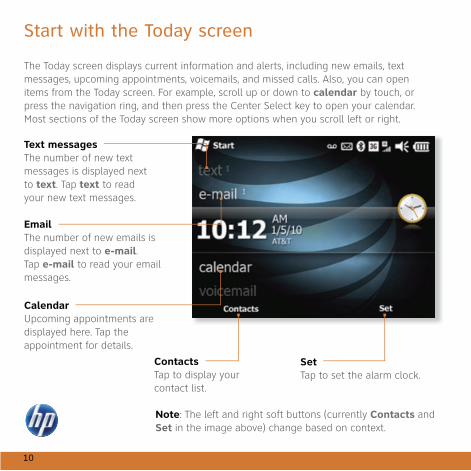
Text messagesThe number of new text messages is displayed next to text. Tap text to read your new text messages.
EmailThe number of new emails isdisplayed next to e-mail. Tap e-mail to read your email messages.
CalendarUpcoming appointments are displayed here. Tap the appointment for details.
Start with the Today screen
The Today screen displays current information and alerts, including new emails, text messages, upcoming appointments, voicemails, and missed calls. Also, you can open items from the Today screen. For example, scroll up or down to calendar by touch, or press the navigation ring, and then press the Center Select key to open your calendar. Most sections of the Today screen show more options when you scroll left or right.
ContactsTap to display yourcontact list.
SetTap to set the alarm clock.
Note: The left and right soft buttons (currently Contacts and Set in the image above) change based on context.
11
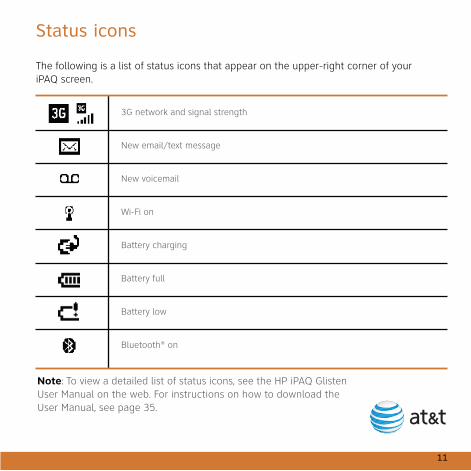
3G network and signal strength
New email/text message
New voicemail
Wi-Fi on
Battery charging
Battery full
Battery low
Bluetooth® on
Status icons
The following is a list of status icons that appear on the upper-right corner of your iPAQ screen.
Note: To view a detailed list of status icons, see the HP iPAQ Glisten User Manual on the web. For instructions on how to download the User Manual, see page 35.
12
Get to know your keyboard
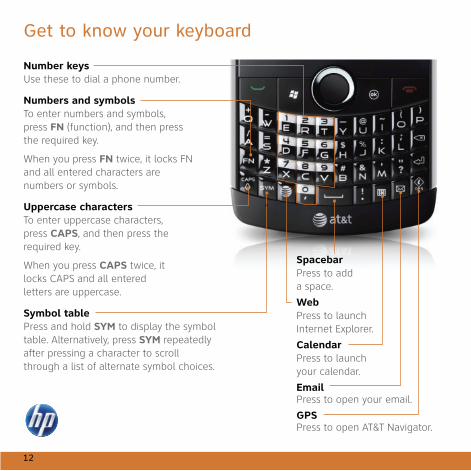
Number keysUse these to dial a phone number.
Numbers and symbolsTo enter numbers and symbols, press FN (function), and then press the required key.
When you press FN twice, it locks FN and all entered characters are numbers or symbols.
Uppercase charactersTo enter uppercase characters, press CAPS, and then press the required key.
When you press CAPS twice, it locks CAPS and all entered letters are uppercase.
Symbol tablePress and hold SYM to display the symbol table. Alternatively, press SYM repeatedly after pressing a character to scroll through a list of alternate symbol choices.
SpacebarPress to add a space.
WebPress to launch Internet Explorer.
CalendarPress to launchyour calendar.
EmailPress to open your email.
GPSPress to open AT&T Navigator.
13
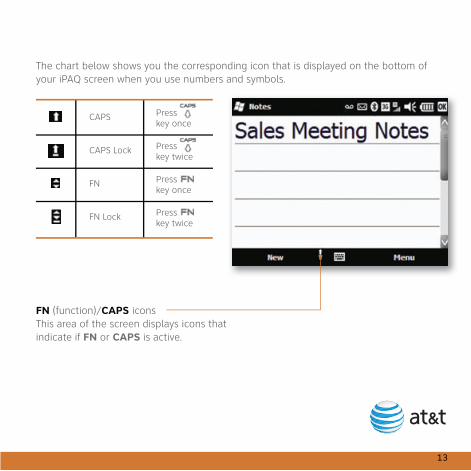
The chart below shows you the corresponding icon that is displayed on the bottom of your iPAQ screen when you use numbers and symbols.
FN (function)/CAPS iconsThis area of the screen displays icons that indicate if FN or CAPS is active.
CAPS
CAPS Lock
FN
FN Lock
Press key once
Press key twice
Press key once
Press key twice
Wireless service indicator
14
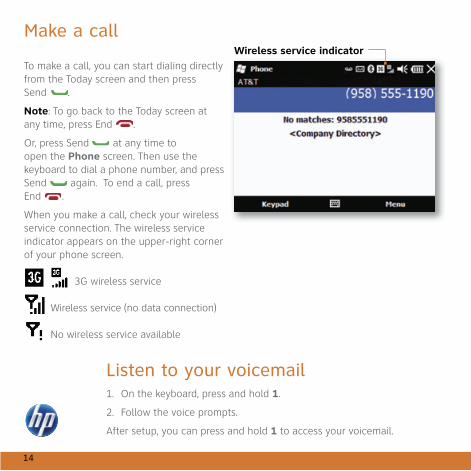
Make a call
Listen to your voicemail
To make a call, you can start dialing directly from the Today screen and then press Send .
Note: To go back to the Today screen at any time, press End .
Or, press Send at any time to open the Phone screen. Then use the keyboard to dial a phone number, and press Send again. To end a call, press End .
When you make a call, check your wireless service connection. The wireless service indicator appears on the upper-right corner of your phone screen.
3G wireless service
Wireless service (no data connection)
No wireless service available
1. On the keyboard, press and hold 1.
2. Follow the voice prompts.
After setup, you can press and hold 1 to access your voicemail.

Outlook contact
SIM contact
15
You can add contacts to your phone and/or to your SIM card. A SIM contact is usually limited to a name and one phone number. Outlook contacts on your phone can contain detailed contact information and multiple numbers. You can also wirelessly synchronize your Outlook contacts with your Microsoft® Exchange Server.
Add Outlook contact
1. Press Start , and then tap Contacts.
2. Tap New > Outlook Contact.
3. Enter contact information, and then tap OK.
Add a contact from a recent call
1. Press Send , and then tap the call.
2. Tap Save > New Contact.
3. Tap Outlook Contact or SIM Contact.
4. Enter contact name, any additional information, and then tap OK.
Copy all SIM contacts to your phone
1. Press Start , tap Contacts > Menu > Select Contacts > All.
2. Tap Menu > Copy Contact > To Contacts.
Note: You can only copy SIM contacts to your phone using an AT&T 3G SIM card.
Add a contact
Outlook contact
SIM contact
16
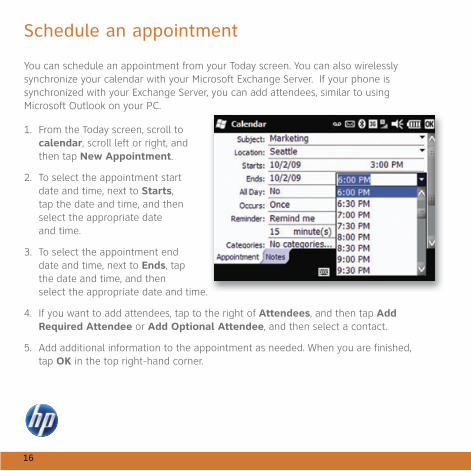
Schedule an appointment
You can schedule an appointment from your Today screen. You can also wirelessly synchronize your calendar with your Microsoft Exchange Server. If your phone is synchronized with your Exchange Server, you can add attendees, similar to using Microsoft Outlook on your PC.
1. From the Today screen, scroll to calendar, scroll left or right, and then tap New Appointment.
2. To select the appointment start date and time, next to Starts, tap the date and time, and then select the appropriate date and time.
3. To select the appointment end date and time, next to Ends, tap the date and time, and then select the appropriate date and time.
4. If you want to add attendees, tap to the right of Attendees, and then tap Add Required Attendee or Add Optional Attendee, and then select a contact.
5. Add additional information to the appointment as needed. When you are finished, tap OK in the top right-hand corner.
17
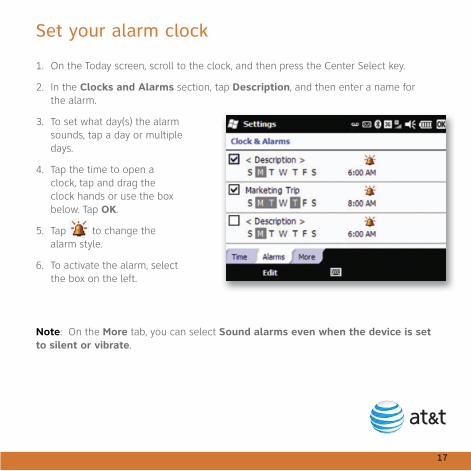
Set your alarm clock
1. On the Today screen, scroll to the clock, and then press the Center Select key.
2. In the Clocks and Alarms section, tap Description, and then enter a name for the alarm.
3. To set what day(s) the alarm sounds, tap a day or multiple days.
4. Tap the time to open a clock, tap and drag the clock hands or use the box below. Tap OK.
5. Tap to change the alarm style.
6. To activate the alarm, select the box on the left.
Note: On the More tab, you can select Sound alarms even when the device is set to silent or vibrate.
18
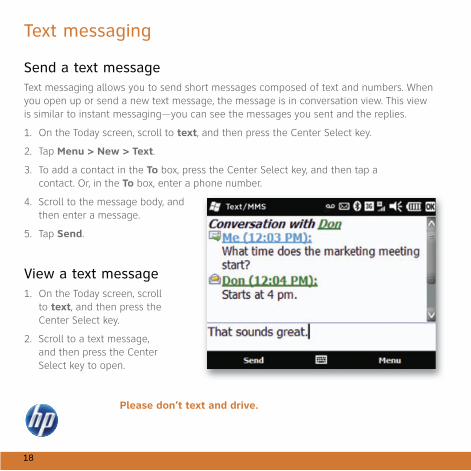
Text messaging
Send a text messageText messaging allows you to send short messages composed of text and numbers. When you open up or send a new text message, the message is in conversation view. This view is similar to instant messaging—you can see the messages you sent and the replies.
1. On the Today screen, scroll to text, and then press the Center Select key.
2. Tap Menu > New > Text.
3. To add a contact in the To box, press the Center Select key, and then tap a contact. Or, in the To box, enter a phone number.
4. Scroll to the message body, and then enter a message.
5. Tap Send.
View a text message1. On the Today screen, scroll to text, and then press the Center Select key.
2. Scroll to a text message, and then press the Center Select key to open.
Please don’t text and drive.
19
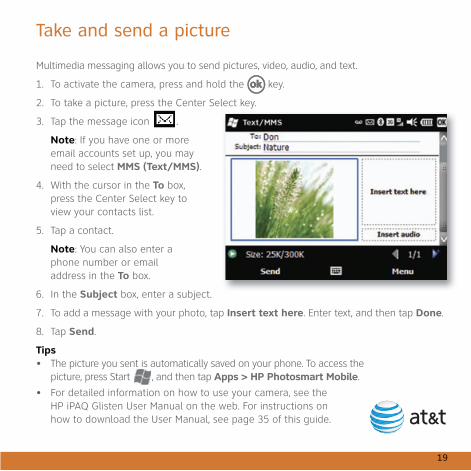
Take and send a picture
Multimedia messaging allows you to send pictures, video, audio, and text.
1. To activate the camera, press and hold the key.
2. To take a picture, press the Center Select key.
3. Tap the message icon .
Note: If you have one or more email accounts set up, you may need to select MMS (Text/MMS).
4. With the cursor in the To box, press the Center Select key to view your contacts list.
5. Tap a contact.
Note: You can also enter a phone number or email address in the To box.
6. In the Subject box, enter a subject.
7. To add a message with your photo, tap Insert text here. Enter text, and then tap Done.
8. Tap Send.
Tips• The picture you sent is automatically saved on your phone. To access the picture, press Start , and then tap Apps > HP Photosmart Mobile.
• For detailed information on how to use your camera, see the HP iPAQ Glisten User Manual on the web. For instructions on how to download the User Manual, see page 35 of this guide.
20
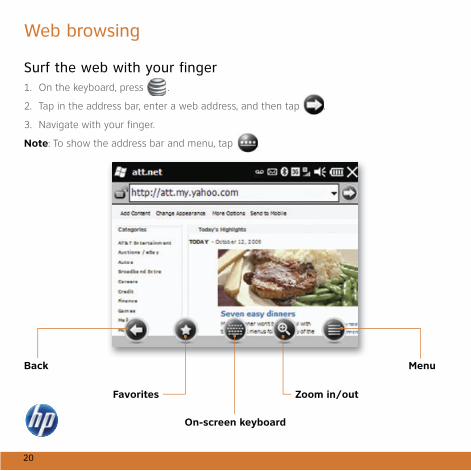
Web browsing
Surf the web with your finger1. On the keyboard, press .
2. Tap in the address bar, enter a web address, and then tap .
3. Navigate with your finger.
Note: To show the address bar and menu, tap .
Back Menu
Favorites Zoom in/out
On-screen keyboard
21
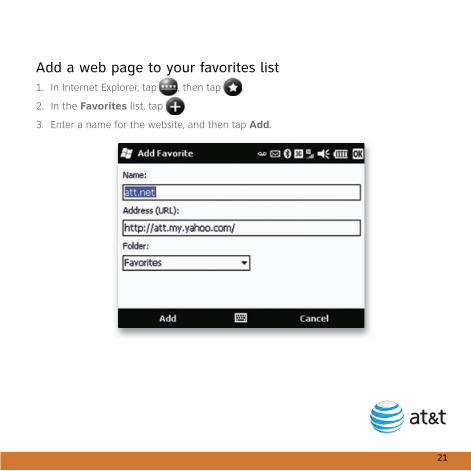
Add a web page to your favorites list1. In Internet Explorer, tap , then tap .
2. In the Favorites list, tap .
3. Enter a name for the website, and then tap Add.
22
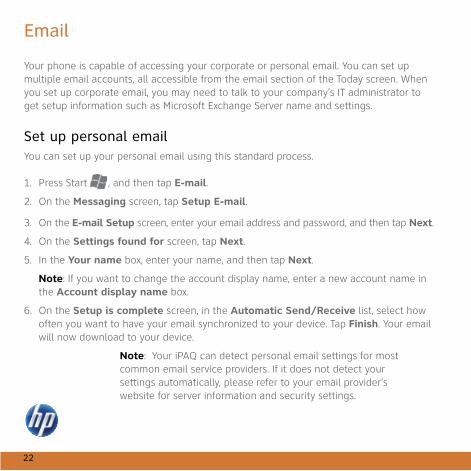
Your phone is capable of accessing your corporate or personal email. You can set up multiple email accounts, all accessible from the email section of the Today screen. When you set up corporate email, you may need to talk to your company’s IT administrator to get setup information such as Microsoft Exchange Server name and settings.
Set up personal emailYou can set up your personal email using this standard process.
1. Press Start , and then tap E-mail.
2. On the Messaging screen, tap Setup E-mail.
3. On the E-mail Setup screen, enter your email address and password, and then tap Next.
4. On the Settings found for screen, tap Next.
5. In the Your name box, enter your name, and then tap Next.
Note: If you want to change the account display name, enter a new account name in the Account display name box.
6. On the Setup is complete screen, in the Automatic Send/Receive list, select how often you want to have your email synchronized to your device. Tap Finish. Your email will now download to your device.
Note: Your iPAQ can detect personal email settings for most common email service providers. If it does not detect your settings automatically, please refer to your email provider’s website for server information and security settings.
23
Set up IT managed corporate emailTo set up IT managed corporate wireless email, you will need an Exchange server address from your corporate IT organization. Contact your IT administrator for more information about Microsoft Direct Push.
Microsoft Direct Push provides wireless access to your corporate email, contacts, calendar and tasks using your Microsoft Exchange Server. Contact your IT administrator for setup instructions. You need to activate a PDA data plan on your AT&T account before using Microsoft Direct Push.
1. To set up your corporate Exchange Server email on your device you will need to obtain the following from your IT administrator:
• Domain
• Server address
• Your corporate username
• Your corporate password
2. If you have the required information available, press Start , and then tap Tools > ActiveSync.
3. Once ActiveSync opens, tap Menu > Add Server Source, and then enter your credentials.
24
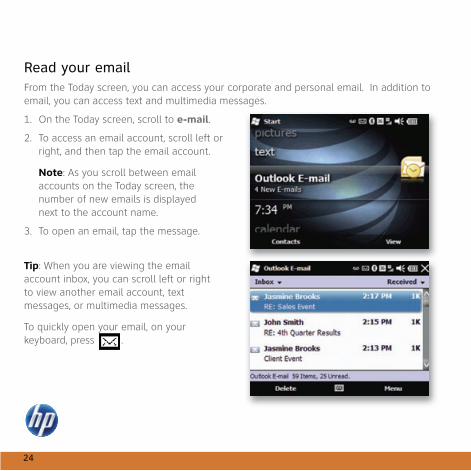
Read your emailFrom the Today screen, you can access your corporate and personal email. In addition to email, you can access text and multimedia messages.
1. On the Today screen, scroll to e-mail.
2. To access an email account, scroll left or right, and then tap the email account.
Note: As you scroll between email accounts on the Today screen, the number of new emails is displayed next to the account name.
3. To open an email, tap the message.
Tip: When you are viewing the email account inbox, you can scroll left or right to view another email account, text messages, or multimedia messages.
To quickly open your email, on your keyboard, press .
25
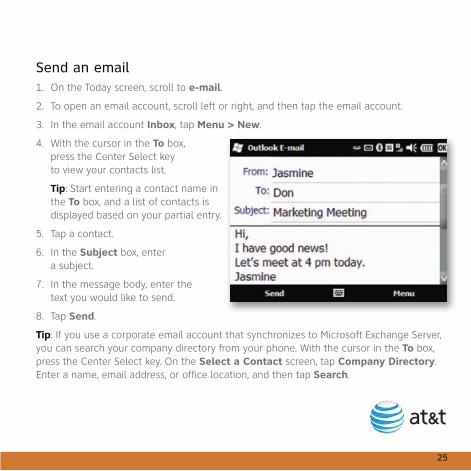
Send an email1. On the Today screen, scroll to e-mail.
2. To open an email account, scroll left or right, and then tap the email account.
3. In the email account Inbox, tap Menu > New.
4. With the cursor in the To box, press the Center Select key to view your contacts list.
Tip: Start entering a contact name in the To box, and a list of contacts is displayed based on your partial entry.
5. Tap a contact.
6. In the Subject box, enter a subject.
7. In the message body, enter the text you would like to send.
8. Tap Send.
Tip: If you use a corporate email account that synchronizes to Microsoft Exchange Server, you can search your company directory from your phone. With the cursor in the To box, press the Center Select key. On the Select a Contact screen, tap Company Directory. Enter a name, email address, or office location, and then tap Search.
26
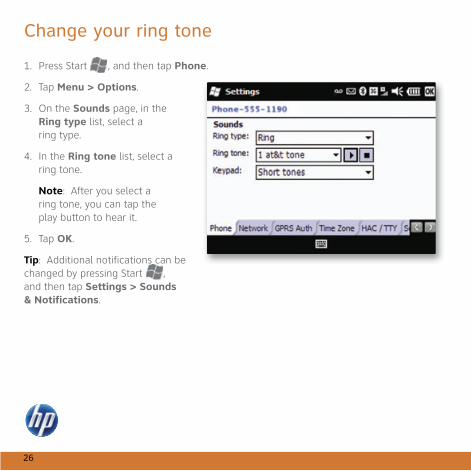
Change your ring tone
1. Press Start , and then tap Phone.
2. Tap Menu > Options.
3. On the Sounds page, in the Ring type list, select a ring type.
4. In the Ring tone list, select a ring tone.
Note: After you select a ring tone, you can tap the play button to hear it.
5. Tap OK.
Tip: Additional notifications can be changed by pressing Start ,and then tap Settings > Sounds & Notifications.
27
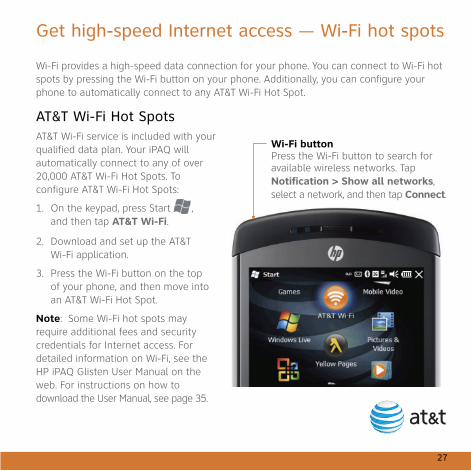
Get high-speed Internet access — Wi-Fi hot spots
Wi-Fi provides a high-speed data connection for your phone. You can connect to Wi-Fi hot spots by pressing the Wi-Fi button on your phone. Additionally, you can configure your phone to automatically connect to any AT&T Wi-Fi Hot Spot.
AT&T Wi-Fi Hot SpotsAT&T Wi-Fi service is included with your qualified data plan. Your iPAQ will automatically connect to any of over 20,000 AT&T Wi-Fi Hot Spots. Toconfigure AT&T Wi-Fi Hot Spots:
1. On the keypad, press Start , and then tap AT&T Wi-Fi.
2. Download and set up the AT&T Wi-Fi application.
3. Press the Wi-Fi button on the top of your phone, and then move into an AT&T Wi-Fi Hot Spot.
Note: Some Wi-Fi hot spots may require additional fees and security credentials for Internet access. For detailed information on Wi-Fi, see the HP iPAQ Glisten User Manual on the web. For instructions on how to download the User Manual, see page 35.
Wi-Fi buttonPress the Wi-Fi button to search for available wireless networks. Tap Notification > Show all networks, select a network, and then tap Connect.
28
Find your way with GPS — AT&T Navigator
AT&T Navigator allows you to find your way with voice guided turn-by-turn GPS driving directions, real-time traffic alerts, automatic reroute, and full-color 3D moving maps. Using AT&T Navigator, you can search millions of business listings and points of interest (POI) including restaurants, banks and ATMs, hotels, Wi-Fi hot spots, the cheapest or closest gas station, and more—all from your iPAQ.
Login to AT&T NavigatorTo benefit from the GPS services of AT&T Navigator, you need to first activate this feature with AT&T.
Note: Additional fees apply for the use of these GPS services.
1. On the keypad, press .
2. Read the terms and conditions, and then tap Accept.
3. On the Login page, confirm your phone number, and then enter your first and last name.
4. Tap Login. When you login to AT&T Navigator for the first time, you will be sent a PIN via a text message. The next time you log in to AT&T Navigator, you will need to enter that PIN only once.
5. Read the Warning screen, and then tap Go.
6. To view the AT&T Maps tour, tap Yes. To skip the tour, tap No.
7. To activate the GPS services of AT&T Navigator, tap Upgrade to AT&T Navigator.
8. On the AT&T Navigator screen, select the subscription option you prefer, and then click Go.
You are now ready to use AT&T Navigator.
29
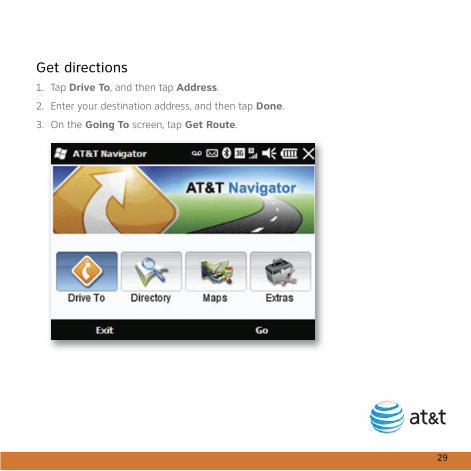
Get directions1. Tap Drive To, and then tap Address.
2. Enter your destination address, and then tap Done.
3. On the Going To screen, tap Get Route.
30
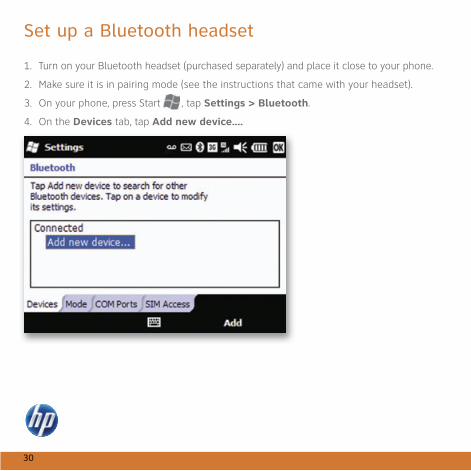
Set up a Bluetooth headset
1. Turn on your Bluetooth headset (purchased separately) and place it close to your phone.
2. Make sure it is in pairing mode (see the instructions that came with your headset).
3. On your phone, press Start , tap Settings > Bluetooth.
4. On the Devices tab, tap Add new device....
31
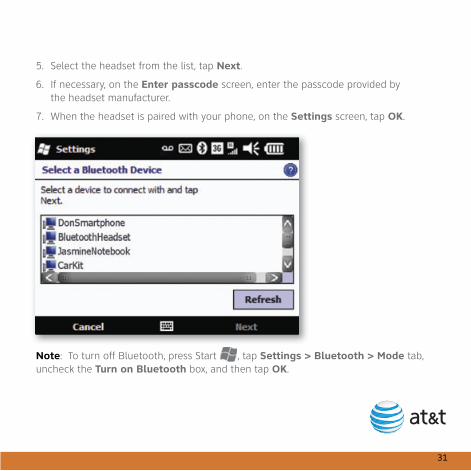
5. Select the headset from the list, tap Next.
6. If necessary, on the Enter passcode screen, enter the passcode provided by the headset manufacturer.
7. When the headset is paired with your phone, on the Settings screen, tap OK.
Note: To turn off Bluetooth, press Start , tap Settings > Bluetooth > Mode tab, uncheck the Turn on Bluetooth box, and then tap OK.
32
Music & video
Transfer music and videos to your iPAQBefore you start transferring music and videos from a PC to your iPAQ, you need:
• Microsoft ActiveSync or Windows Mobile® Device Center installed on your PC. You can download them at www.windowsmobile.com/getstarted.
• Windows® Media Player 10 (or higher) installed on your PC. You can download it at www.microsoft.com/mediaplayer.
To transfer music and videos:
1. Use your USB sync cable to connect your iPAQ to your PC.
2. Allow ActiveSync or Windows Mobile Device Center to open and connect to your phone.
3. On your PC, open Windows Media Player.
4. In Windows Media Player, click the Sync tab.
5. Drag and drop music or video files to the Sync List on the right.
6. Click Start Sync. The video or music files are transferred to your iPAQ.
Play music and videos1. Press Start , and then tap Windows Media.
2. Tap My Music or My Videos.
3. Browse to a music file or video file, tap the file, and then tap Play.
Note: You need third-party software to play MMS videos on your PC. To record video with your phone that you can play on your PC, in your camera settings, select Video under Capture Mode.
33
AT&T Services
The following services are available for your AT&T smartphone.
• AT&T Music—provides the ultimate on-the-go music experience.
• AT&T AppCenter—shop for games, graphics, ringtones, and applications.
• XM Radio—offers your choice of radio channels on your phone.
• Mobile Video—watch news, sports, weather, and entertainment video clips.
• Mobi4Biz—transforms your phone into a wireless TV.
• Mobile Banking—allows you to check your account balances, securely transfer funds between eligible accounts, and view and pay bills. You can access multiple banks, accounts, and financial services within one application. To find out if your bank supports Mobile Banking, visit att.com/MobileBanking or contact your financial institution.
For more information about adding these services, contact your local AT&T store or call 1-800-331-0500.
More information about how to use these services with your iPAQ is available at att.com/Tutorials.
34
Troubleshooting
Battery saving tips • Turn off Bluetooth and Wi-Fi when not in use.
• Adjust power settings. Press Start , tap Settings > Power. Tap the Advanced tab, select the Turn off device if not used for box, and then from the list, select a time limit.
• Adjust backlight. Press Start , tap Settings > System > Backlight. On the Battery Power tab, select the Turn off backlight if device is not used for box, and then from the list, select a time limit.
Reset your iPAQTo remedy performance issues, reset your phone by removing and reinserting the battery.Note: When you reset your phone, unsaved work will be lost.
Unable to send or receive a multimedia message• Verify that your phone can connect to the Internet. Press .
• Verify the picture size does not exceed 600 kilobytes (size is displayed below the picture).
• Turn your phone off and then back on.
Unable to place or receive calls• Verify that your phone has at least 2 bars of signal strength.
• Turn your phone off and then back on.
Unable to access the Internet • Verify that your phone has signal strength and is connected to a cellular or Wi-Fi data network.
• If you are using Wi-Fi, verify Wi-Fi is turned on and connected to the desired Wi-Fi network.
35
Synchronize your phone with your PC
You can synchronize your email, contacts, pictures and songs with your PC. Start by visiting www.windowsmobile.com/getstarted.
Additional user documentation
User Manual on the webTo view or download the User Manual from your PC, follow the steps below.
1. Go to att.com/DeviceSupport.
2. Select Manufacturer: HP and Model: iPAQ Glisten from the drop down menus, then click Next.3. On the support page for your product, click User Manual.
Important Product InformationThis booklet, enclosed with your iPAQ, contains health and safety, as well as environmental, regulatory, warranty and licensing information.
© 2009 Hewlett-Packard Development Company, L.P.
© 2009 AT&T Intellectual Property. All rights reserved. AT&T, the AT&T logo and all other AT&T marks contained herein are trademarks of AT&T Intellectual Property and/or AT&T affiliated companies.
Microsoft, Windows and Windows Mobile are U.S. registered trademarks of Microsoft Corporation. The Bluetooth trademarks are owned by its proprietor and used by Hewlett-Packard Company under license. SD Logo is a trademark of its proprietor.
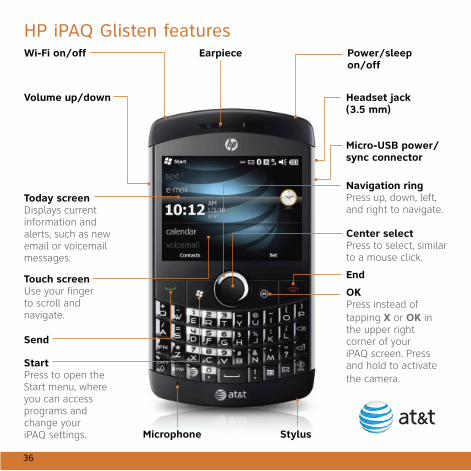
HP iPAQ Glisten features
36
Volume up/down
Today screenDisplays current information and alerts, such as new email or voicemail messages.
Send
StartPress to open the Start menu, where you can access programs and change your iPAQ settings.
OKPress instead of tapping X or OK in the upper right corner of your iPAQ screen. Press and hold to activate the camera.
Center selectPress to select, similar to a mouse click.
Earpiece
End
Navigation ringPress up, down, left, and right to navigate.
Micro-USB power/ sync connector
Headset jack (3.5 mm)
Wi-Fi on/off Power/sleepon/off
Microphone Stylus
Touch screenUse your finger to scroll and navigate.
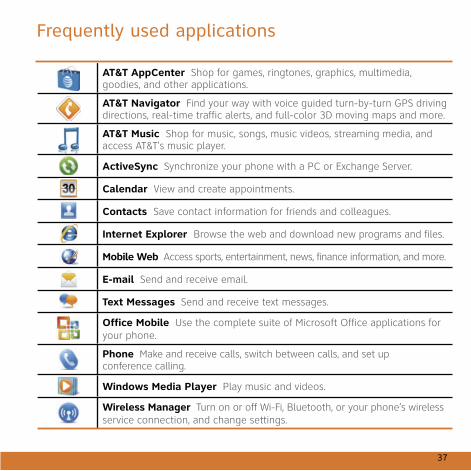
Frequently used applications
AT&T AppCenter Shop for games, ringtones, graphics, multimedia, goodies, and other applications.
AT&T Navigator Find your way with voice guided turn-by-turn GPS driving directions, real-time traffic alerts, and full-color 3D moving maps and more.
AT&T Music Shop for music, songs, music videos, streaming media, and access AT&T’s music player.
ActiveSync Synchronize your phone with a PC or Exchange Server.
Calendar View and create appointments.
Contacts Save contact information for friends and colleagues.
Internet Explorer Browse the web and download new programs and files.
Mobile Web Access sports, entertainment, news, finance information, and more.
E-mail Send and receive email.
Text Messages Send and receive text messages.
Office Mobile Use the complete suite of Microsoft Office applications for your phone.
Phone Make and receive calls, switch between calls, and set up conference calling.
Windows Media Player Play music and videos.
Wireless Manager Turn on or off Wi-Fi, Bluetooth, or your phone’s wireless service connection, and change settings.
37
38
On the web • Interactive web tutorial, tips & tricks and FAQs are available at att.com/Tutorials. Select Manufacturer: HP and Model: iPAQ Glisten from the drop down menus.
• Detailed support information including phone specifications, user manual, troubleshooting, user forums and knowledgebase articles are available at att.com/DeviceSupport.
• Enterprise and Government customers can go to wireless.att.com/BusinessSupport for phone tutorials, phone setup, and online technical support chat for instant answers to questions about your phone and its features.
• For information about your wireless account, service plan or network, visit att.com/Wireless.
On the phone
• Call AT&T Customer Care at 1-800-331-0500 or dial 611 from any AT&T mobile phone for assistance with your service or phone.
Find accessoriesAccessories for your iPAQ are available at att.com/WirelessAccessories or visit your local AT&T store.
Document Part Number: 577675-001
First Edition October 2009
Printed in China
Find more information
COA Label