Embed Size (px)
Citation preview
HP Enterprise Integration module for SAP applications
Software Version: 2.60
User Guide
Document Release Date: December 2010
Software Release Date: December 2010
2
Legal Notices
Warranty
The only warranties for HP products and services are set forth in the express warranty statements accompanying such products and services. Nothing herein should be construed as constituting an additional warranty. HP shall not be liable for technical or editorial errors or omissions contained herein.
The information contained herein is subject to change without notice.
Restricted Rights Legend
Confidential computer software. Valid license from HP required for possession, use or copying. Consistent with FAR 12.211 and 12.212, Commercial Computer Software, Computer Software Documentation, and Technical Data for Commercial Items are licensed to the U.S. Government under vendor's standard commercial license.
Copyright Notices
© Copyright 1992 - 2010 Hewlett-Packard Development Company, L.P.
Trademark Notices
Adobe® is a trademark of Adobe Systems Incorporated.
Microsoft®, Windows®, Windows® XP, and Windows Vista® are U.S registered trademarks of Microsoft Corporation.
Acknowledgements
This product includes software developed by the Apache Software Foundation (http://www.apache.org).
This product includes software developed by the JDOM Project (http://www.jdom.org).
3
Documentation Updates
The title page of this document contains the following identifying information:
• Software Version number, which indicates the software version.
• Document Release Date, which changes each time the document is updated.
• Software Release Date, which indicates the release date of this version of the software.
To check for recent updates, or to verify that you are using the most recent edition of a document, go to:
http://h20230.www2.hp.com/selfsolve/manuals
This site requires that you register for an HP Passport and sign-in. To register for an HP Passport ID, go to:
http://h20229.www2.hp.com/passport-registration.html
Or click the New users - please register link on the HP Passport login page.
You will also receive updated or new editions if you subscribe to the appropriate product support service. Contact your HP sales representative for details.
4
Support
Visit the HP Software Support web site at:
http://www.hp.com/go/hpsoftwaresupport
This web site provides contact information and details about the products, services, and support that HP Software offers.
HP Software online support provides customer self-solve capabilities. It provides a fast and efficient way to access interactive technical support tools needed to manage your business. As a valued support customer, you can benefit by using the support web site to:
• Search for knowledge documents of interest
• Submit and track support cases and enhancement requests
• Download software patches
• Manage support contracts
• Look up HP support contacts
• Review information about available services
• Enter into discussions with other software customers
• Research and register for software training
Most of the support areas require that you register as an HP Passport user and sign in. Many also require a support contract. To register for an HP Passport ID, go to:
http://h20229.www2.hp.com/passport-registration.html
To find more information about access levels, go to:
http://h20230.www2.hp.com/new_access_levels.jsp
Table of Contents
5
5
Table of Contents
Welcome to This Guide .........................................................................7How This Guide is Organized................................................................8
Chapter 1: Setting Up Enterprise Integration .....................................9Prerequisites for Enterprise Integration ..............................................10The Installation Process.......................................................................10Deploy the Enterprise Integration Extensions ....................................12Loading the Enterprise Integration License ........................................12Enabling the Enterprise Integration Extension...................................13 Upgrading Projects .............................................................................15Installing the SAP Application Importer Component ........................16Undeploying the Enterprise Integration Extensions ..........................16
Chapter 2: Synchronizing Requirements and Blueprints ..................17About Synchronizing Requirements and Blueprints ..........................17Configuring Solution Manager ...........................................................18Adding and Editing Business Blueprint Content ................................19Importing Business Blueprints to ALM ...............................................19Assigning Tests to Imported Requirements.........................................26Updating Business Blueprints..............................................................26
Chapter 3: Synchronizing Defects and Support Messages ...............31About Synchronizing Defects and Support Messages .........................31Configuring Solution Manager ...........................................................33Creating Field Mappings .....................................................................33Managing SAP-Related Defects in ALM...............................................39Exchanging Defect Responsibility.......................................................42Tracking Defect Synchronization in ALM...........................................43
Table of Contents
6
6
Chapter 4: Working with the Application Model Module.................45About Working with the Application Model Module ........................46Viewing Application Entities...............................................................47Importing the SAP Application Hierarchy ..........................................48Adding Folders and Application Entities Manually............................50Modifying Folders and Application Entities .......................................53Associating Application Entities with Tests ........................................54Associating Application Entities with Business Components ............58
Chapter 5: Customizing Enterprise Integration ................................61About Customizing Enterprise Integration.........................................61Customizing User Group Permissions ................................................62Hiding Data for a User Group .............................................................65Customizing Project Entities...............................................................66
7
Welcome to This Guide
Welcome to HP Enterprise Integration module for SAP solutions, which integrates SAP Solution Manager with HP Application Lifecycle Management (ALM). Using Enterprise Integration, you can export SAP Solution Manager business blueprints to the ALM Requirements module. You can then design and run tests in ALM based on these requirements and update Solution Manager with their results.
Enterprise Integration also enables you to synchronize ALM defects with support messages that are recorded in the Solution Manager Service Desk. You can control the defects and support messages from either application.
In addition, when you install Enterprise Integration, the Application Model module is installed in ALM. You can import the application entity hierarchy from your SAP application to the Application Model module, enabling you to use the Application Model module to model your SAP application within ALM. You can then associate entities in the Application Model module with ALM tests and business components, enabling you to plan your testing process based on the application entity hierarchy.
Note: This guide explains how to work with SAP Solution Manager in conjunction with ALM. For more information on using ALM, refer to the HP Application Lifecycle Management User Guide. For more information on using Solution Manager, refer to the Solution Manager documentation.
Welcome to This Guide
8
8
How This Guide is Organized
This guide contains the following chapters:
Chapter 1 Setting Up Enterprise Integration
Describes how to install and enable Enterprise Integration.
Chapter 2 Synchronizing Requirements and Blueprints
Describes how to import Solution Manager business blueprints into ALM and how to update Solution Manager with test results from ALM.
Chapter 3 Synchronizing Defects and Support Messages
Describes how to synchronize ALM defects with Service Desk support messages and how to transfer control of the defects from one application to the other.
Chapter 4 Working with the Application Model Module
Describes how to import and manage application entities in the Application Model module.
Chapter 5 Customizing Enterprise Integration
Describes how to customize permissions and project entities for Enterprise Integration.
9
1Setting Up Enterprise Integration
This chapter describes the installation requirements and setup procedures for using Enterprise Integration.
This chapter includes:
➤ Prerequisites for Enterprise Integration on page 10
➤ The Installation Process on page 10
➤ Deploy the Enterprise Integration Extensions on page 12
➤ Loading the Enterprise Integration License on page 12
➤ Enabling the Enterprise Integration Extension on page 13
➤ Upgrading Projects on page 15
➤ Installing the SAP Application Importer Component on page 16
➤ Undeploying the Enterprise Integration Extensions on page 16
Chapter 1 • Setting Up Enterprise Integration
10
10
Prerequisites for Enterprise Integration
To use Enterprise Integration, you must have the following installed:
➤ ALM Platform 11.00 (on your server machine)
➤ Application Lifecycle Management 11.00 Patch 1 or later (on your server machine)
➤ SAP Solution Manager 7.0 EhP1 or later
The minimum system requirements to run Enterprise Integration are the same as for ALM Platform, as described in the HP Application Lifecycle Management Installation Guide. In addition, to import a Solution Manager business blueprint or to synchronize a support message containing content in a particular language, ALM Platform must be installed on an operating system that supports that language.
The Installation Process
This section describes the Enterprise Integration installation process.
To install Enterprise Integration:
1 Ensure that ALM Platform 11.00 is installed on your server machine.
For more information on installing ALM Platform, refer to the HP Application Lifecycle Management Installation Guide.
2 Install Application Lifecycle Management 11.00 Patch 1 on your server machine.
a Visit the HP Software Support Web site at http://www.hp.com/go/hpsoftwaresupport.
b Under Where do I find, click Software patches and download the patch.
c Follow the on-screen installation instructions.
3 Deploy the Enterprise Integration extensions on your server machine.
For more information on deploying the Enterprise Integration extensions, see "Deploy the Enterprise Integration Extensions" on page 12.
Chapter 1 • Setting Up Enterprise Integration
11
11
4 Load the Enterprise Integration license.
For more information, see "Loading the Enterprise Integration License" on page 12.
5 Enable the Enterprise Integration extensions in ALM Site Administration for every project that requires Enterprise Integration.
For more information, see "Enabling the Enterprise Integration Extension" on page 13.
6 Install the SAP Application Importer Component on client machines.
The Application Model module is installed automatically when you install Enterprise Integration. To import application entities from your SAP application to the Application Model module, the SAP Application Importer Component must be installed on each client machine from which you want to import application entities. For more information on installing the SAP Application Importer Component, see "Installing the SAP Application Importer Component" on page 16.

Chapter 1 • Setting Up Enterprise Integration
12
12
Deploy the Enterprise Integration Extensions
You download the Enterprise Integration and Application Model extension files from the HP Application Lifecycle Management Add-ins page, and deploy the extensions on ALM Platform.
To deploy the Enterprise Integration extensions:
1 From the HP Application Lifecycle Management Add-ins page, navigate to More HP ALM Add-ins > HP Enterprise Integration module for SAP applications.
2 Follow the installation instructions on the HP Enterprise Integration module for SAP Solution Manager add-in page.
3 Under HP ALM Extensions, under HP ALM Extensions for SAP, click the HP Enterprise Integration module for SAP applications link.
4 On the HP Enterprise Integration module for SAP applications page, follow the installation instructions.
Loading the Enterprise Integration License
To enable the Enterprise Integration functionality, you must load your Enterprise Integration license.
To load the Enterprise Integration license:
1 In Site Administration, click the Licenses tab.
2 Click the Modify License button. The License Edit dialog box opens.

Chapter 1 • Setting Up Enterprise Integration
13
13
3 Click the Load License button and select the Enterprise Integration license file. Alternatively, copy the license file and click Paste License.
4 Click OK. The license is displayed in the list of licenses.
Enabling the Enterprise Integration Extension
After deploying Enterprise Integration on ALM Platform, you must enable the Enterprise Integration extension for an ALM project. You should enable Enterprise Integration for the project in which you want to synchronize the SAP business blueprint and support messages. You can enable the extension for either a new project or an existing one.
Note: Projects that were enabled for a previous version of Enterprise Integration (for example, Enterprise Integration 2.50 on Quality Center 10.00), are automatically enabled for Enterprise Integration 2.60.
Before enabling the Enterprise Integration extension, consider the following points:
➤ You cannot disable an extension for a project after you enable it.
➤ If the project is active, you must deactivate it before enabling an extension. After the extension has been enabled, you can reactivate the project.
➤ Enabling extensions for a project can take some time.
To enable the Enterprise Integration extension for a project:
1 In Site Administration, click the Site Projects tab.
2 If relevant, create a new project in ALM in which to enable the extension. For more information on creating ALM projects, refer to the HP Application Lifecycle Management Administrator Guide.
Chapter 1 • Setting Up Enterprise Integration
14
14
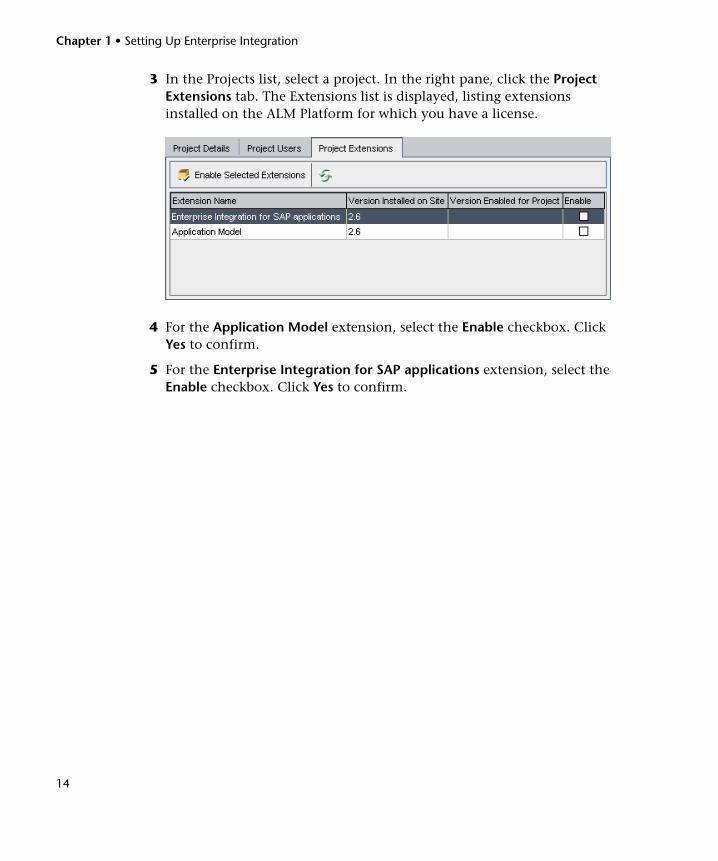
3 In the Projects list, select a project. In the right pane, click the Project Extensions tab. The Extensions list is displayed, listing extensions installed on the ALM Platform for which you have a license.
4 For the Application Model extension, select the Enable checkbox. Click Yes to confirm.
5 For the Enterprise Integration for SAP applications extension, select the Enable checkbox. Click Yes to confirm.
Chapter 1 • Setting Up Enterprise Integration
15
15
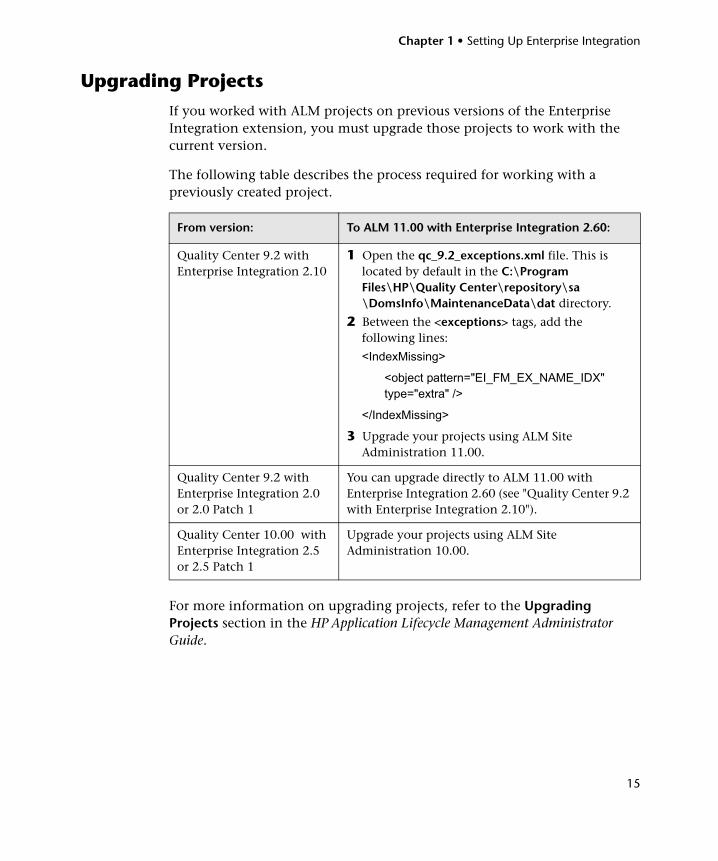
Upgrading Projects
If you worked with ALM projects on previous versions of the Enterprise Integration extension, you must upgrade those projects to work with the current version.
The following table describes the process required for working with a previously created project.
For more information on upgrading projects, refer to the Upgrading Projects section in the HP Application Lifecycle Management Administrator Guide.
From version: To ALM 11.00 with Enterprise Integration 2.60:
Quality Center 9.2 with Enterprise Integration 2.10
1 Open the qc_9.2_exceptions.xml file. This is located by default in the C:\Program Files\HP\Quality Center\repository\sa\DomsInfo\MaintenanceData\dat directory.
2 Between the <exceptions> tags, add the following lines:
<IndexMissing>
<object pattern="EI_FM_EX_NAME_IDX" type="extra" />
</IndexMissing>
3 Upgrade your projects using ALM Site Administration 11.00.
Quality Center 9.2 with Enterprise Integration 2.0 or 2.0 Patch 1
You can upgrade directly to ALM 11.00 with Enterprise Integration 2.60 (see "Quality Center 9.2 with Enterprise Integration 2.10").
Quality Center 10.00 with Enterprise Integration 2.5 or 2.5 Patch 1
Upgrade your projects using ALM Site Administration 10.00.
Chapter 1 • Setting Up Enterprise Integration
16
16
Installing the SAP Application Importer Component
You must install the SAP Application Importer Component on each ALM client machine to which you want to import SAP application entity hierarchies. The SAP Application Importer Component is the tool that communicates with the SAP server and imports application entity data from your SAP application to ALM.
Note: To install the SAP Application Importer Component, you must have administrator permissions on the client machine.
To install the SAP Application Importer Component:
1 From your ALM client machine, log in to a project for which Enterprise Integration is enabled. The SAP Application Importer Component files are downloaded to your client machine.
2 Locate the APM directory in the ALM installation directory (by default C:\Documents and Settings\<user>\Application Data\HP\ALM-Client\<ALM server>).
3 Run the SAPAppImporterSetup.exe file located in this folder and follow the installation instructions on your screen.
Undeploying the Enterprise Integration Extensions
This section describes how to undeploy the Enterprise Integration for SAP applications and Application Model extensions from ALM Platform.
To undeploy the Enterprise Integration extensions:
On the ALM Platform machine, run the HP ALM Extension Undeployment Wizard, and select the extensions to undeploy.
For details on running the Extension Undeployment Wizard, refer to the HP ALM Extension Deployment Tool Readme.
17
2Synchronizing Requirements and Blueprints
You import Solution Manager blueprints as HP Application Lifecycle Management (ALM) requirements. After you test the requirements in ALM, you synchronize the test results with Solution Manager.
This chapter includes:
➤ About Synchronizing Requirements and Blueprints on page 17
➤ Configuring Solution Manager on page 18
➤ Adding and Editing Business Blueprint Content on page 19
➤ Importing Business Blueprints to ALM on page 19
➤ Assigning Tests to Imported Requirements on page 26
➤ Updating Business Blueprints on page 26
About Synchronizing Requirements and Blueprints
Before you can perform requirement and blueprint synchronization, you must first configure your ALM project to work with Enterprise Integration. For more information, see "Enabling the Enterprise Integration Extension" on page 13.
After you add content to your Solution Manager business blueprint, you import the business blueprint into the ALM Requirements module. You can associate the imported requirements with tests and run the tests in ALM, and then update the tests and their results in Solution Manager.
Chapter 2 • Synchronizing Requirements and Blueprints
18
18
Synchronizing requirements and blueprints involves the following stages:
1 Create a Solution Manager project and associate it with your ALM project. Optionally, you can map Solution Manager keywords with user-defined fields in ALM. For more information, see "Configuring Solution Manager" on page 18.
2 Create a business blueprint in your Solution Manager project. For more information, see "Adding and Editing Business Blueprint Content" on page 19.
3 Import your business blueprint to your ALM project. For more information, see "Importing Business Blueprints to ALM" on page 19.
4 Assign and run tests in ALM for the imported requirements. For more information, see "Assigning Tests to Imported Requirements" on page 26.
5 Update your business blueprint with the test results. For more information, see "Updating Business Blueprints" on page 26.
Configuring Solution Manager
You create a project in Solution Manager and associate it with your ALM project. You can then map keywords in Solution Manager with user-defined fields in ALM. You can associate each Solution Manager project with a single ALM project only.
To configure Solution Manager:
1 Create a Solution Manager project in the SOLAR_PROJECT_ADMIN transaction. For more information on creating projects in Solution Manager, refer to the SAP Application Help.
2 In the SOLAR_PROJECT_ADMIN transaction, open your Solution Manager project and choose Edit > Connection to HP Quality Center.
Enter your ALM login details.
3 Map Solution Manager keywords with user-defined fields in your ALM project. For more information, see "Mapping Keywords" on page 19.
Chapter 2 • Synchronizing Requirements and Blueprints
19
19
Mapping KeywordsBefore importing the blueprint to a ALM project, you can map Solution Manager keywords to user-defined fields in ALM. You first create user-defined fields in the ALM project. Keywords can be mapped only to user-defined fields of type String or Memo. For more information on creating user-defined fields, refer to the HP Application Lifecycle Management Administrator Guide.
You can map more than one keyword to a single user-defined field. The total length of all keywords mapped to a specific field cannot exceed the field’s size.
Keywords that are not mapped to a specific user-defined field are mapped to the default keywords field in ALM, SM_KEYWORDS. These are separated by semicolons (;). For more information on mapping Solution Manager keywords, refer to the SAP Application Help.
Adding and Editing Business Blueprint Content
You add blueprint content as you would to a regular business blueprint, using the SOLAR01 transaction. You must also add business requirement documents or testing objects in the Transfer to SAP QC by HP tab to the blueprint elements you want to export to ALM. You can also use the SOLAR02 transaction to manage and export business blueprints.
Only blueprint elements that contain requirement documents or testing objects are exported to ALM. For more information on adding and editing business blueprint content, refer to the SAP Application Help.
Importing Business Blueprints to ALM
After you have added content to your business blueprint, you import it to the ALM Requirements module. The blueprint data is imported to ALM as requirements.
Alternatively, you can send the business blueprint to ALM from Solution Manager.
Chapter 2 • Synchronizing Requirements and Blueprints
20
20
This section includes the following topics:
➤ Guidelines for Importing Business Blueprints to ALM on page 20
➤ Business Blueprint Import Example on page 22
➤ Importing Business Blueprints on page 23
➤ Sending Business Blueprints from Solution Manager on page 26
Guidelines for Importing Business Blueprints to ALMWhen you import the business blueprint for an SAP Solution Manager project, elements in the blueprint are mapped to requirements and fields in the ALM Requirements module, according to the following rules:
➤ The blueprint structure is mapped to the ALM requirements hierarchy. The blueprint title is mapped to a requirement of type Folder created under the requirement Solution Manager Blueprints, itself created under the root requirement. The name of the requirement is the same as the title of the root element. All child elements of the root element are mapped as child requirements of the Folder requirement.
➤ Business requirement documents are mapped as ALM requirements of type Business.
➤ Transactions and other testing objects are mapped as requirements of type Testing.
➤ The test object ID of a blueprint element is mapped to the Name field of the requirement representing the element.
Chapter 2 • Synchronizing Requirements and Blueprints
21
21
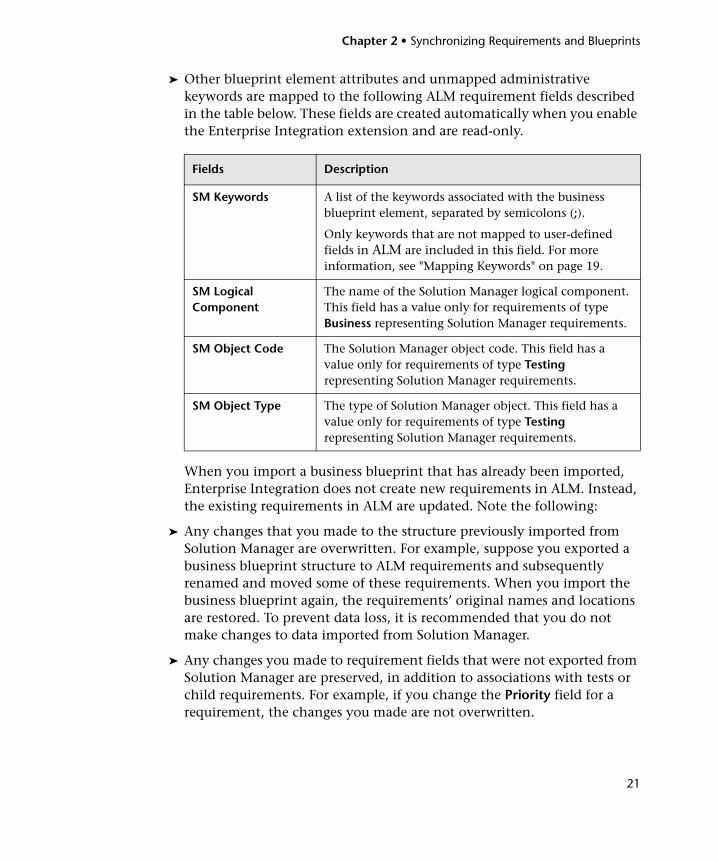
➤ Other blueprint element attributes and unmapped administrative keywords are mapped to the following ALM requirement fields described in the table below. These fields are created automatically when you enable the Enterprise Integration extension and are read-only.
When you import a business blueprint that has already been imported, Enterprise Integration does not create new requirements in ALM. Instead, the existing requirements in ALM are updated. Note the following:
➤ Any changes that you made to the structure previously imported from Solution Manager are overwritten. For example, suppose you exported a business blueprint structure to ALM requirements and subsequently renamed and moved some of these requirements. When you import the business blueprint again, the requirements’ original names and locations are restored. To prevent data loss, it is recommended that you do not make changes to data imported from Solution Manager.
➤ Any changes you made to requirement fields that were not exported from Solution Manager are preserved, in addition to associations with tests or child requirements. For example, if you change the Priority field for a requirement, the changes you made are not overwritten.
Fields Description
SM Keywords A list of the keywords associated with the business blueprint element, separated by semicolons (;).
Only keywords that are not mapped to user-defined fields in ALM are included in this field. For more information, see "Mapping Keywords" on page 19.
SM Logical Component
The name of the Solution Manager logical component. This field has a value only for requirements of type Business representing Solution Manager requirements.
SM Object Code The Solution Manager object code. This field has a value only for requirements of type Testing representing Solution Manager requirements.
SM Object Type The type of Solution Manager object. This field has a value only for requirements of type Testing representing Solution Manager requirements.
Chapter 2 • Synchronizing Requirements and Blueprints
22
22
➤ If you import a business blueprint element to ALM and then delete the element in Solution Manager, when you import the business blueprint again, the requirement corresponding to the element is moved to the Solution Manager Blueprints trash folder. Any data under the requirement is also moved to this folder.
➤ Version Control: In version control enabled projects, when you import a blueprint, if the corresponding requirement is checked out, the requirement is not updated.
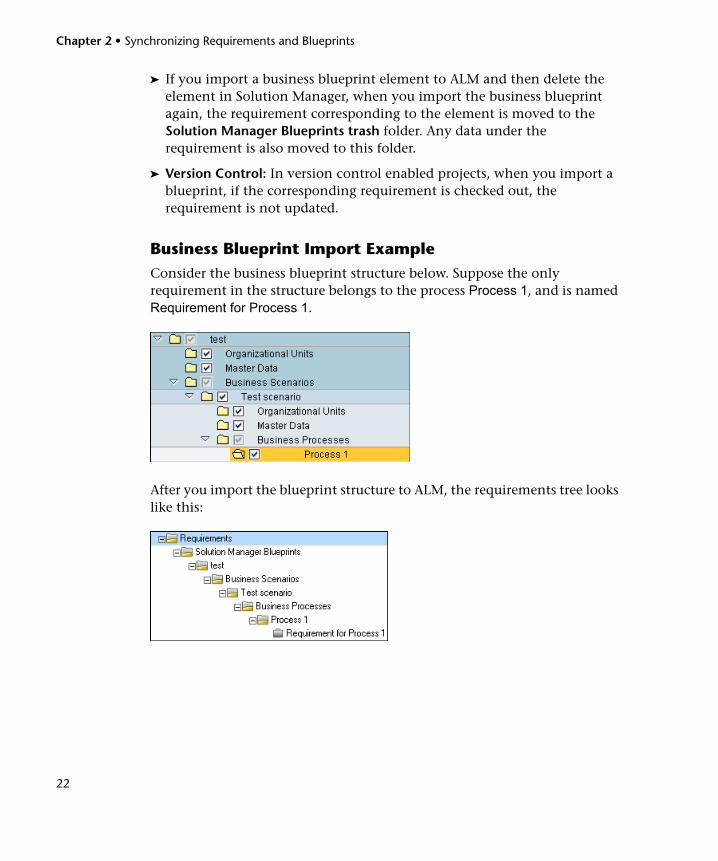
Business Blueprint Import ExampleConsider the business blueprint structure below. Suppose the only requirement in the structure belongs to the process Process 1, and is named Requirement for Process 1.
After you import the blueprint structure to ALM, the requirements tree looks like this:
Chapter 2 • Synchronizing Requirements and Blueprints
23
23
The blueprint structure root element test is exported as a child requirement of the requirement Solution Manager Blueprints. The elements Business Scenarios, Test scenario, Business Processes, and Process 1 are exported as child requirements of the requirement test. All these requirements are of type Folder. The Solution Manager business requirement document Requirement for Process 1 is exported as an ALM requirement of the same name and of type Business. Note that the elements Organizational Units and Master Data are not exported as they do not contain any information to send.
Importing Business BlueprintsYou import business blueprints from Solution Manager to ALM.
Note: Only blueprint structure elements containing at least one business requirement document or testing object can be imported from Solution Manager.
To import business blueprints:
1 Connect to ALM with a user that has the appropriate permissions to work with Enterprise Integration. For more information on setting ALM permissions for Enterprise Integration, see "Customizing User Group Permissions for Integration with Solution Manager" on page 64.
Chapter 2 • Synchronizing Requirements and Blueprints
24
24
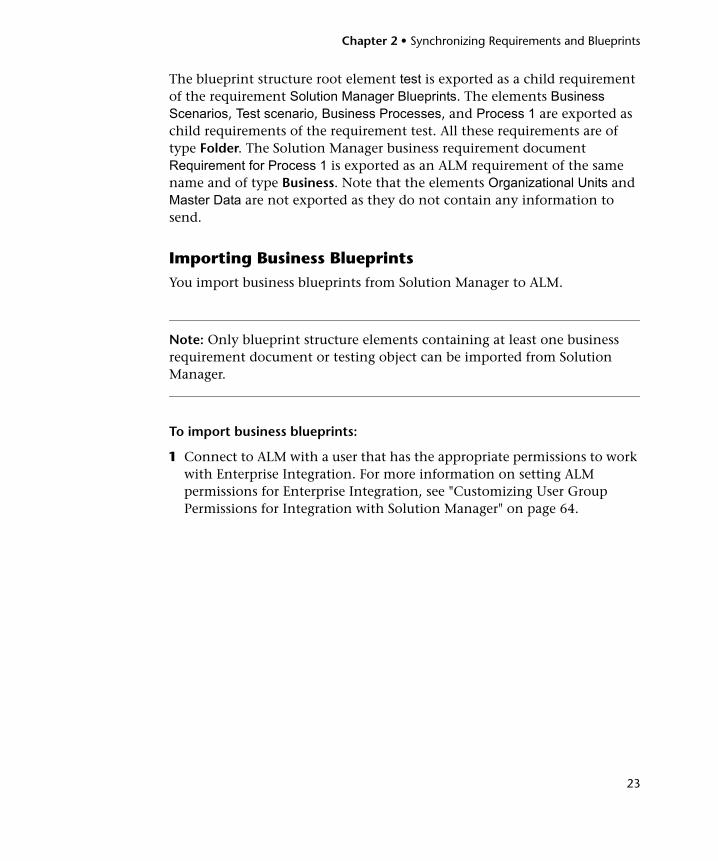
2 In the upper left side of the ALM window, click the Tools button and choose SAP Tools > Import Solution Manager Blueprint. The Import Solution Manager Blueprint dialog box opens.
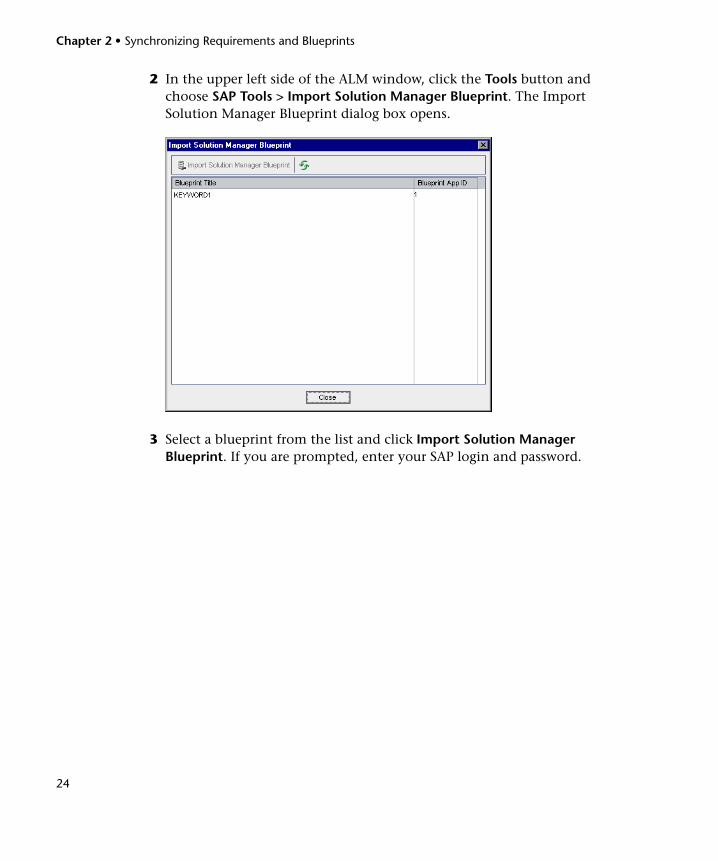
3 Select a blueprint from the list and click Import Solution Manager Blueprint. If you are prompted, enter your SAP login and password.
Chapter 2 • Synchronizing Requirements and Blueprints
25
25
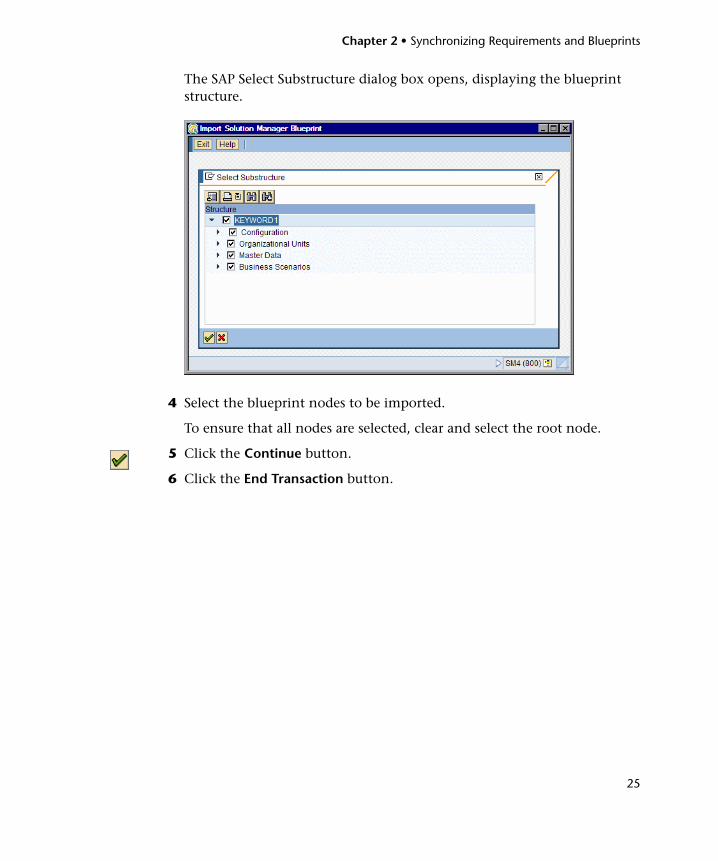
The SAP Select Substructure dialog box opens, displaying the blueprint structure.
4 Select the blueprint nodes to be imported.
To ensure that all nodes are selected, clear and select the root node.
5 Click the Continue button.
6 Click the End Transaction button.
Chapter 2 • Synchronizing Requirements and Blueprints
26
26
Sending Business Blueprints from Solution ManagerYou can export the blueprint content from Solution Manager by choosing Business Blueprint > Send data to Quality Center in the SOLAR01 or SOLAR02 transaction. For more information, refer to the SAP Application Help.
Assigning Tests to Imported Requirements
You can design and run tests to cover each of the requirements imported to ALM. You can assign tests to any requirement type imported to ALM, including the Folder type.
To assign tests to imported requirements:
1 In the ALM Test Plan module, design tests and create coverage between them and the imported requirements.
2 In the ALM Test Lab module, create test set folders and test sets.
3 Create test instances of the tests you created and assign them to the tests.
4 Run the test instances.
For more information on designing and running tests, refer to the HP Application Lifecycle Management User Guide.
Updating Business Blueprints
After you run the test instances, you can export the results to Solution Manager. For each node in Solution Manager, you can view the associated test instances in ALM, and their status.
When you update a business blueprint, ALM sends information about test runs associated with nodes that represent business blueprint elements.
This section includes the following topics:
➤ "Blueprint Update Example" on page 27
➤ "Exporting Test Results to Solution Manager Blueprints" on page 28

Chapter 2 • Synchronizing Requirements and Blueprints
27
27
Blueprint Update ExampleConsider the business blueprint imported in "Business Blueprint Import Example" on page 22. Suppose you create a requirement of type Testing to test the business requirement document of type Business Requirement for Process 1. You create a test Test 1 to test this requirement and assign it to the requirement. You then assign an instance of this test to a test set and run the test, which passes successfully.
When you update the business blueprint, the test associated with the requirement is displayed in Solution Manager. You can see the status of the test in the Test State column.
Chapter 2 • Synchronizing Requirements and Blueprints
28
28
Exporting Test Results to Solution Manager BlueprintsYou export test results from ALM to your Solution Manager blueprint.
To export test results to a Solution Manager blueprint:
1 Click the Tools button located on the upper left side of the ALM window and choose SAP Tools > Update Solution Manager. The Update Solution Manager dialog box opens.
Chapter 2 • Synchronizing Requirements and Blueprints
29
29
The Update Solution Manager dialog box displays the business blueprints previously exported to ALM. For each business blueprint, the following columns are displayed:
2 Select the blueprint you want to update and click the Update Blueprint Quality button. The Blueprint Update Options dialog box opens.
Fields Description
Blueprint Title The title of the business blueprint.
Blueprint App ID The SAP application ID of the business blueprint.
Last Update The time the business blueprint was last successfully updated from ALM.
Status The Solution Manager update status. Can have one of the following values:
➤ New. The business blueprint was not previously updated from ALM.
➤ In Progress. Enterprise Integration is currently updating the business blueprint.
➤ No Run. No changes were made in the previous business blueprint update.
➤ Passed. The business blueprint was successfully updated with changes.
➤ Failed. Errors occurred during the previous business blueprint update.
Chapter 2 • Synchronizing Requirements and Blueprints
30
30
3 Select one of the following options for updating the business blueprint:
➤ Typical. Sends to Solution Manager only information related to the blueprint that you are updating and that was added or updated since the previous successful update.
➤ Complete. Sends to Solution Manager all the test coverage and test execution information related to the blueprint you are updating. If you choose this option, updating the business blueprint may take some time.
4 Click OK. Enterprise Integration sends the test results to Solution Manager according to the option you specified.
You can view this information from the SOLAR_EVAL transaction under Analysis > Projects > Testing with SAP Quality Center by HP > Test Results for Business Test Requirements. Alternatively, you can view the information for a specific requirement from the SOLAR01 transaction by browsing to the QC Transfer tab, choosing the object that was tested and clicking the Test Results tab of the properties window. For more information, refer to the SAP Application Help.
31
3Synchronizing Defects and Support Messages
You can synchronize support messages in the Solution Manager Service Desk with defects in HP Application Lifecycle Management (ALM).
This chapter includes:
➤ About Synchronizing Defects and Support Messages on page 31
➤ Configuring Solution Manager on page 33
➤ Creating Field Mappings on page 33
➤ Managing SAP-Related Defects in ALM on page 39
➤ Exchanging Defect Responsibility on page 42
➤ Tracking Defect Synchronization in ALM on page 43
About Synchronizing Defects and Support Messages
If you create a new SAP-related defect in ALM, a corresponding support message is automatically added in Service Desk. If a new support message is created in Service Desk, after the support message is sent, a corresponding defect is added in ALM. Any changes you make to a record in one of the systems is updated in the other system.
To work with defect synchronization, you must log in to ALM with a user that has the appropriate permissions to work with Enterprise Integration. For more information on setting ALM permissions for Enterprise Integration, see "Customizing User Group Permissions for Integration with Solution Manager" on page 64.

Chapter 3 • Synchronizing Defects and Support Messages
32
32
Synchronizing ALM defects and Service Desk support messages includes the following stages:
1 Create a Solution Manager project and associate it with your ALM project. You do not need to perform this stage if you have already associated your Solution Manager project for requirement and blueprint integration. For more information, see "Configuring Solution Manager" on page 33.
2 Define how fields are mapped between ALM defects and Service Desk support messages. You must also map specific values of the corresponding fields. For more information, see "Creating Field Mappings" on page 33.
3 Create and edit SAP-related defects in ALM. For more information, see "Managing SAP-Related Defects in ALM" on page 39.
4 At any given time, only one of the systems can be responsible for a defect or its corresponding support message. You can transfer responsibility for a defect from ALM to Service Desk, or request responsibility from Service Desk. For more information, see "Exchanging Defect Responsibility" on page 42.
5 Track the progress of synchronization of ALM defects with Service Desk support messages. You can view defects that are pending synchronization, and prompt the synchronization of defects that failed to synchronize. For more information, see "Tracking Defect Synchronization in ALM" on page 43.
Chapter 3 • Synchronizing Defects and Support Messages
33
33
Configuring Solution Manager
You create a project in Solution Manager and associate it with your ALM project. You can associate each Solution Manager project with a single ALM project only.
To configure Solution Manager:
1 Create a Solution Manager project in the SOLAR_PROJECT_ADMIN transaction. For more information on creating projects in Solution Manager, refer to the SAP Application Help.
2 In the SOLAR_PROJECT_ADMIN transaction, open your Solution Manager project and choose Edit > Connection to HP Quality Center.
Enter your ALM login details.
Creating Field Mappings
To enable synchronization of ALM defects and Service Desk support messages, you must map fields in ALM defects with their corresponding fields in Service Desk support messages.
If the support message fields in your SAP application were changed from the default definitions, you must update these definitions in ALM.
Mapping fields includes two stages: mapping the field labels and mapping the field values. For example, you can map the ALM field Severity to the Service Desk field Priority. You can then map value 1 of Severity to value 5 of Priority.
This section includes the following topics:
➤ Updating Support Message Field Definitions on page 34
➤ Mapping Field Labels on page 35
➤ Mapping Field Values on page 38
Chapter 3 • Synchronizing Defects and Support Messages
34
34
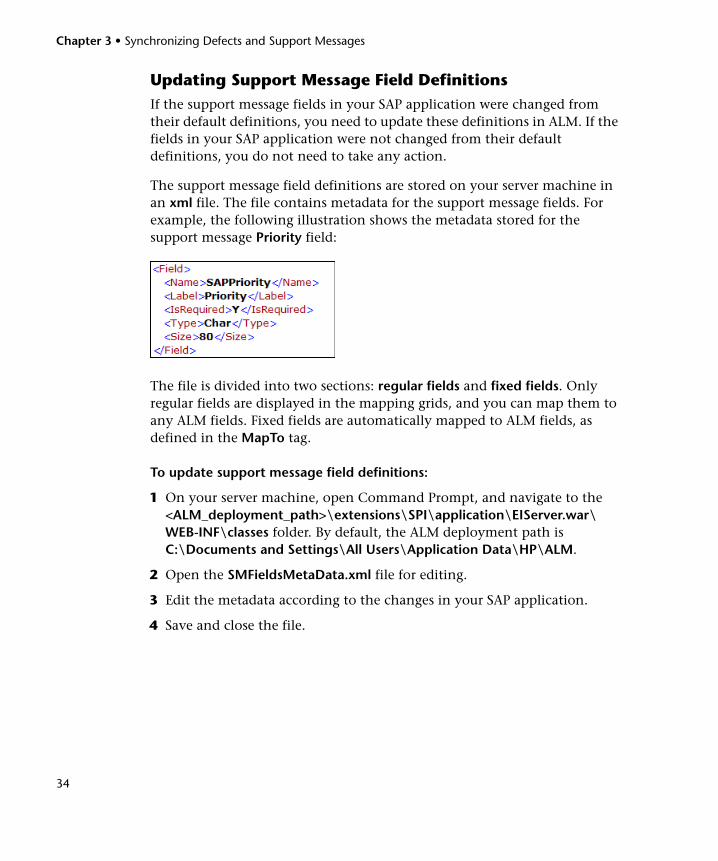
Updating Support Message Field DefinitionsIf the support message fields in your SAP application were changed from their default definitions, you need to update these definitions in ALM. If the fields in your SAP application were not changed from their default definitions, you do not need to take any action.
The support message field definitions are stored on your server machine in an xml file. The file contains metadata for the support message fields. For example, the following illustration shows the metadata stored for the support message Priority field:
The file is divided into two sections: regular fields and fixed fields. Only regular fields are displayed in the mapping grids, and you can map them to any ALM fields. Fixed fields are automatically mapped to ALM fields, as defined in the MapTo tag.
To update support message field definitions:
1 On your server machine, open Command Prompt, and navigate to the <ALM_deployment_path>\extensions\SPI\application\EIServer.war\WEB-INF\classes folder. By default, the ALM deployment path is C:\Documents and Settings\All Users\Application Data\HP\ALM.
2 Open the SMFieldsMetaData.xml file for editing.
3 Edit the metadata according to the changes in your SAP application.
4 Save and close the file.
Chapter 3 • Synchronizing Defects and Support Messages
35
35
5 Run the Server Deployment Wizard:
On Windows systems: Choose one of the following:
➤ Start > HP ALM Platform > Server Deployment Wizard
➤ <installation path>\bin\run_server_deploy_tool.bat
On Unix systems: <installation path>/bin/run_server_deploy_tool.sh
6 If you use a WebSphere application server, manually deploy the updated war file from the <deployment path>\deployment folder. For more information on manually deploying ALM on an application server, refer to the HP Application Lifecycle Management Installation Guide.
7 Repeat the procedure on each cluster node.
Mapping Field LabelsYou map fields in ALM defects with corresponding fields in Service Desk support messages. You must map all required fields. You can also map selected non-required fields.
Important: The number of required fields in ALM must be identical to the number of required fields in SAP. For information on defining required fields in ALM, refer to the HP Application Lifecycle Management Administrator Guide.
Chapter 3 • Synchronizing Defects and Support Messages
36
36
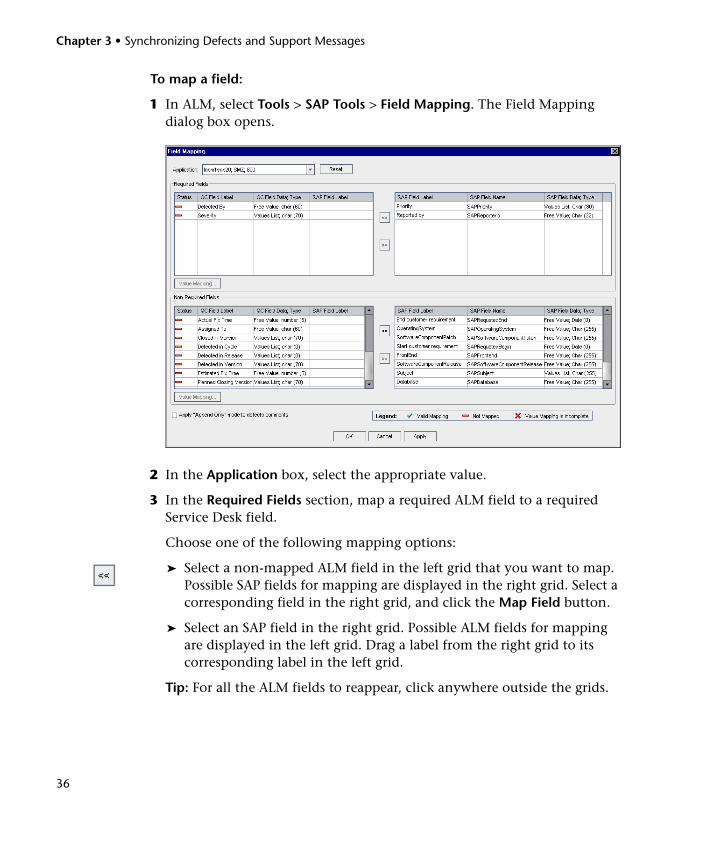
To map a field:
1 In ALM, select Tools > SAP Tools > Field Mapping. The Field Mapping dialog box opens.
2 In the Application box, select the appropriate value.
3 In the Required Fields section, map a required ALM field to a required Service Desk field.
Choose one of the following mapping options:
➤ Select a non-mapped ALM field in the left grid that you want to map. Possible SAP fields for mapping are displayed in the right grid. Select a corresponding field in the right grid, and click the Map Field button.
➤ Select an SAP field in the right grid. Possible ALM fields for mapping are displayed in the left grid. Drag a label from the right grid to its corresponding label in the left grid.
Tip: For all the ALM fields to reappear, click anywhere outside the grids.
Chapter 3 • Synchronizing Defects and Support Messages
37
37
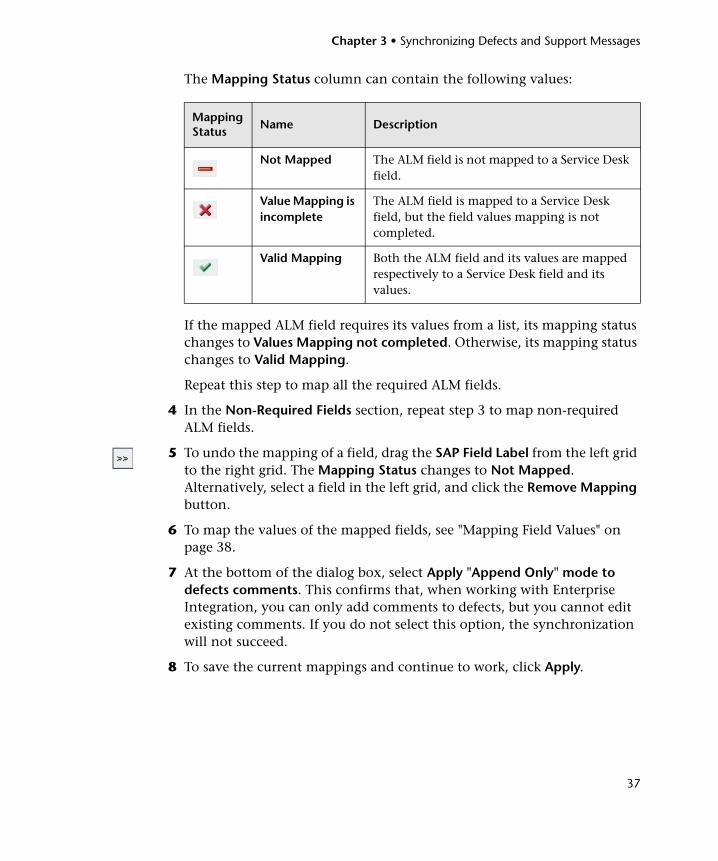
The Mapping Status column can contain the following values:
If the mapped ALM field requires its values from a list, its mapping status changes to Values Mapping not completed. Otherwise, its mapping status changes to Valid Mapping.
Repeat this step to map all the required ALM fields.
4 In the Non-Required Fields section, repeat step 3 to map non-required ALM fields.
5 To undo the mapping of a field, drag the SAP Field Label from the left grid to the right grid. The Mapping Status changes to Not Mapped. Alternatively, select a field in the left grid, and click the Remove Mapping button.
6 To map the values of the mapped fields, see "Mapping Field Values" on page 38.
7 At the bottom of the dialog box, select Apply "Append Only" mode to defects comments. This confirms that, when working with Enterprise Integration, you can only add comments to defects, but you cannot edit existing comments. If you do not select this option, the synchronization will not succeed.
8 To save the current mappings and continue to work, click Apply.
Mapping Status
Name Description
Not Mapped The ALM field is not mapped to a Service Desk field.
Value Mapping is incomplete
The ALM field is mapped to a Service Desk field, but the field values mapping is not completed.
Valid Mapping Both the ALM field and its values are mapped respectively to a Service Desk field and its values.
Chapter 3 • Synchronizing Defects and Support Messages
38
38
9 To reset all field mappings, click the Reset button. After you confirm the action, all the mapped SAP fields return to the right grid.
10 To close the dialog box, click OK. The current mappings are saved and the dialog box closes.
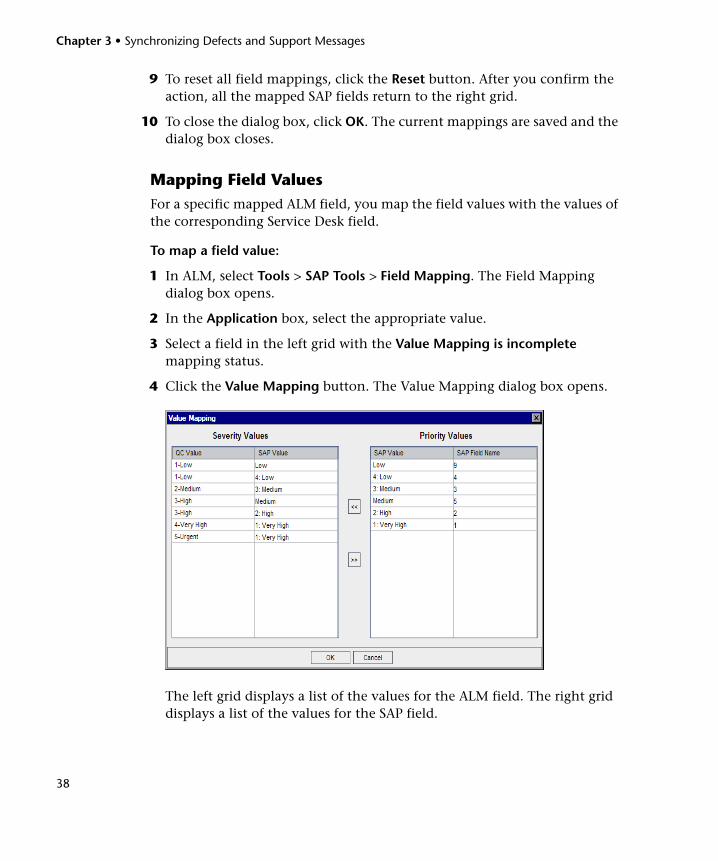
Mapping Field ValuesFor a specific mapped ALM field, you map the field values with the values of the corresponding Service Desk field.
To map a field value:
1 In ALM, select Tools > SAP Tools > Field Mapping. The Field Mapping dialog box opens.
2 In the Application box, select the appropriate value.
3 Select a field in the left grid with the Value Mapping is incomplete mapping status.
4 Click the Value Mapping button. The Value Mapping dialog box opens.
The left grid displays a list of the values for the ALM field. The right grid displays a list of the values for the SAP field.
Chapter 3 • Synchronizing Defects and Support Messages
39
39
5 Select a value in the left grid and its corresponding value in the right grid, and click the Map Value button. Alternatively, drag a value from the right grid to its corresponding value in the left grid.
Repeat this step until each QC Value in the left grid is assigned an SAP Value.
Note:
➤ You can map the same SAP Value to more than one QC Value.
➤ You can map more than one SAP Value to a single QC Value. In that case, the QC Value is duplicated in the grid.
6 To undo the mapping of a QC Value, drag the SAP Value to the right grid. Alternatively, select a QC Value and click the Remove Mapping button.
7 Click OK. The Value Mapping dialog box closes and the Field Mapping dialog box displays. If the value mapping is valid, the Mapping Status of the ALM field changes to Valid Mapping.
8 Click OK. The current mappings are saved and the dialog box closes.
Managing SAP-Related Defects in ALM
You create SAP-related defects in ALM. For each new SAP-related defect, a new support message is automatically created in Service Desk. For more information, see "Creating SAP-Related Defects in ALM" on page 40.
If an ALM defect has a corresponding Service Desk support message, you can edit the defect in ALM. Changes you make to the defect are automatically updated in the Service Desk support message. For more information, see "Editing SAP-Related Defects in ALM" on page 41.
For information on creating and editing support messages in Service Desk, see the SAP Application Help.
Chapter 3 • Synchronizing Defects and Support Messages
40
40
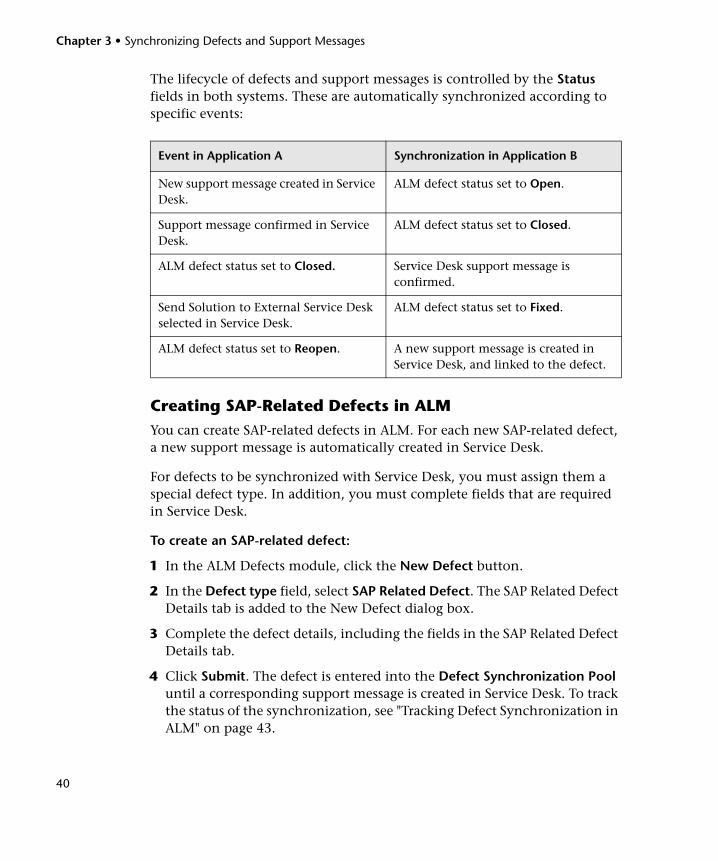
The lifecycle of defects and support messages is controlled by the Status fields in both systems. These are automatically synchronized according to specific events:
Creating SAP-Related Defects in ALMYou can create SAP-related defects in ALM. For each new SAP-related defect, a new support message is automatically created in Service Desk.
For defects to be synchronized with Service Desk, you must assign them a special defect type. In addition, you must complete fields that are required in Service Desk.
To create an SAP-related defect:
1 In the ALM Defects module, click the New Defect button.
2 In the Defect type field, select SAP Related Defect. The SAP Related Defect Details tab is added to the New Defect dialog box.
3 Complete the defect details, including the fields in the SAP Related Defect Details tab.
4 Click Submit. The defect is entered into the Defect Synchronization Pool until a corresponding support message is created in Service Desk. To track the status of the synchronization, see "Tracking Defect Synchronization in ALM" on page 43.
Event in Application A Synchronization in Application B
New support message created in Service Desk.
ALM defect status set to Open.
Support message confirmed in Service Desk.
ALM defect status set to Closed.
ALM defect status set to Closed. Service Desk support message is confirmed.
Send Solution to External Service Desk selected in Service Desk.
ALM defect status set to Fixed.
ALM defect status set to Reopen. A new support message is created in Service Desk, and linked to the defect.

Chapter 3 • Synchronizing Defects and Support Messages
41
41
While the defect remains in the Defect Synchronization Pool, it is flagged with an alert. For more information on viewing alerts, refer to the HP Application Lifecycle Management User Guide.
5 To transfer responsibility for the defect to Service Desk, see "Exchanging Defect Responsibility" on page 42.
Editing SAP-Related Defects in ALMYou can edit defects transferred from Service Desk. Changes you make to these defects are automatically applied to the corresponding support messages in Service Desk.
To be able to make changes to an SAP-related defect in ALM, you must have responsibility for the defect. For more information, see "Exchanging Defect Responsibility" on page 42.
To edit an SAP-related defect in ALM:
1 In the Defects module, select an SAP Related Defect.
2 Edit the defect.
Due to SAP limitations, you can add a new comment in the Comments field, but you cannot edit existing comments.
3 If the defect is linked to more than one requirement, in the Transferred Requirement field, select the requirement to be transferred to Solution Manager.
4 If the defect is linked to more than one test, in the Transferred Test field, select the test to be transferred to Solution Manager.
5 Click OK to close the defect. The defect is entered into the Defect Synchronization Pool until the corresponding support message is updated in Service Desk. To track the status of the synchronization, see "Tracking Defect Synchronization in ALM" on page 43.
While the defect remains in the Defect Synchronization Pool, it is flagged with an alert. For more information on viewing alerts, refer to the HP Application Lifecycle Management User Guide.
6 To transfer responsibility for the defect to Service Desk, see "Exchanging Defect Responsibility" on page 42.
Chapter 3 • Synchronizing Defects and Support Messages
42
42
Exchanging Defect Responsibility
To make changes to an SAP-related defect in ALM, ALM needs to be responsible for the defect. To allow a Service Desk user to make changes to support messages, you must assign him responsibility.
In ALM, you can identify the responsible system, request responsibility from Service Desk, and assign responsibility to Service Desk.
➤ To identify the responsible system for the defect, in the Defects module, open the defect, select the SAP Related Defect Details tab, and check the value in the Responsible System field.
If ALM does not have responsibility, you can request the responsibility from Service Desk.
➤ To request responsibility for a defect from Service Desk, navigate to the defect in the defects grid, right-click and select Request Responsibility from SAP.
After making changes to the defect in ALM, you can assign the responsibility to Service Desk. You cannot assign responsibility of a defect to Service Desk while the defect is in the Synchronization Pool. For more information on the Synchronization Pool, see "Tracking Defect Synchronization in ALM" on page 43
➤ To transfer responsibility for a defect to Service Desk, navigate to the defect in the defects grid, right-click and select Assign Responsibility to SAP.
Chapter 3 • Synchronizing Defects and Support Messages
43
43
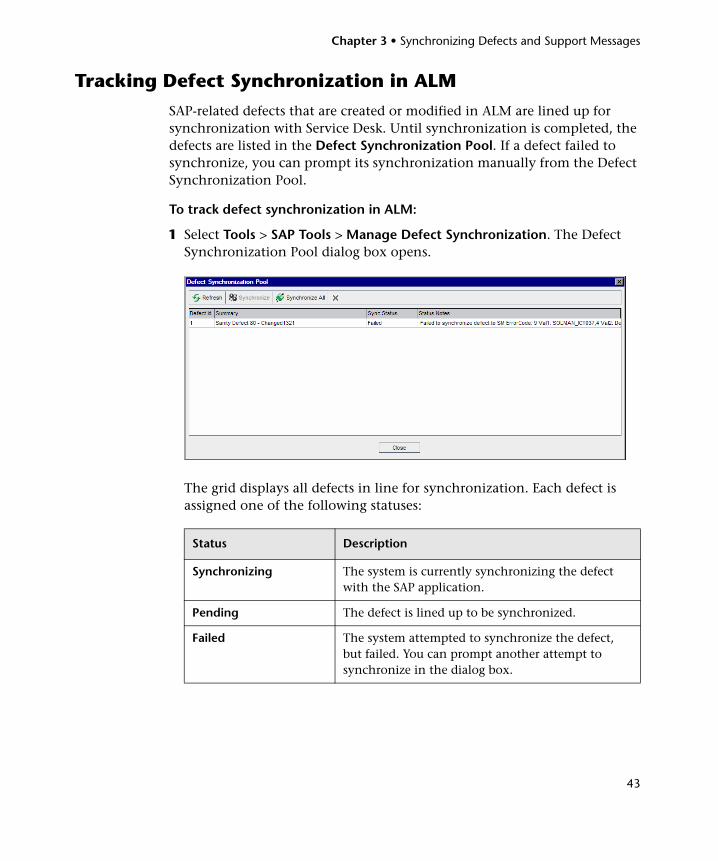
Tracking Defect Synchronization in ALM
SAP-related defects that are created or modified in ALM are lined up for synchronization with Service Desk. Until synchronization is completed, the defects are listed in the Defect Synchronization Pool. If a defect failed to synchronize, you can prompt its synchronization manually from the Defect Synchronization Pool.
To track defect synchronization in ALM:
1 Select Tools > SAP Tools > Manage Defect Synchronization. The Defect Synchronization Pool dialog box opens.
The grid displays all defects in line for synchronization. Each defect is assigned one of the following statuses:
Status Description
Synchronizing The system is currently synchronizing the defect with the SAP application.
Pending The defect is lined up to be synchronized.
Failed The system attempted to synchronize the defect, but failed. You can prompt another attempt to synchronize in the dialog box.
Chapter 3 • Synchronizing Defects and Support Messages
44
44
2 If a defect has failed to synchronize, and in the Status Notes field ALM states that the defect is linked to more than one requirement or test, you must select a specific requirement or test:
a Close the Defect Synchronization Pool and select the relevant defect.
b Select the SAP Related Defect Details tab.
c In the Transferred Requirement field or Transferred Test field, select the requirement or test to be transferred to Solution Manager.
3 To prompt the synchronization of a defect in Failed status, select the defect and click the Synchronize button.
4 To prompt the synchronization of all defects currently in Failed status, click the Synchronize All button.
5 To refresh the display, click the Refresh button.
6 If a defect has failed, or is pending to synchronize, you can remove it from the Defect Synchronization Pool. To do so, select the defect and click the Delete defects from Synchronization Pool button.
Closing
- Pending to Close
- Failed to Close
The defect in ALM is set to Closed and is prepared to be confirmed in Service Desk. If failed, you can prompt another attempt in the dialog box.
Disconnecting
- Pending to Disconnect
- Failed to Disconnect
The defect is deleted in ALM. The system attempts to disconnect the corresponding Service Desk support message. If failed, you can prompt another attempt in the dialog box.
Status Description
45
4Working with the Application Model Module
The Application Model module enables you to manage a hierarchical representation of the entities in your SAP application. You can import entities from your SAP application, and add and modify application entities and folders. You can also associate application entities with tests or business components. The Application Model module is automatically enabled when you enable Enterprise Integration for an HP Application Lifecycle Management (ALM) project.
This chapter includes:
➤ About Working with the Application Model Module on page 46
➤ Viewing Application Entities on page 47
➤ Importing the SAP Application Hierarchy on page 48
➤ Adding Folders and Application Entities Manually on page 50
➤ Modifying Folders and Application Entities on page 53
➤ Associating Application Entities with Tests on page 54
➤ Associating Application Entities with Business Components on page 58
Chapter 4 • Working with the Application Model Module
46
46
About Working with the Application Model Module
You use the Application Model module to manage a representation of your SAP application components and entities. For example, if you link your SAP application components and application entities to tests, you can see which tests you need to run when changes affecting these components and entities are made in your application.
You can import SAP components and application entities from your SAP application. When you import directly from your SAP application, the hierarchy of the elements in the application and the basic data for each business entity are preserved. If you want to extend the scope at any stage, you can import the application hierarchy again, without overwriting existing entities in the Application Model module.
You can also manually add and modify application entities in the Application Model module. Note that this does not affect corresponding application entities in your SAP application.
After you develop your application model tree, you can associate each application entity with tests in the Test Plan module. If ALM Platform is licensed for Business Process Testing, you can also associate an application entity with a business component. Each business process test containing that business component is then associated with all of the application entities associated with that component.
Chapter 4 • Working with the Application Model Module
47
47
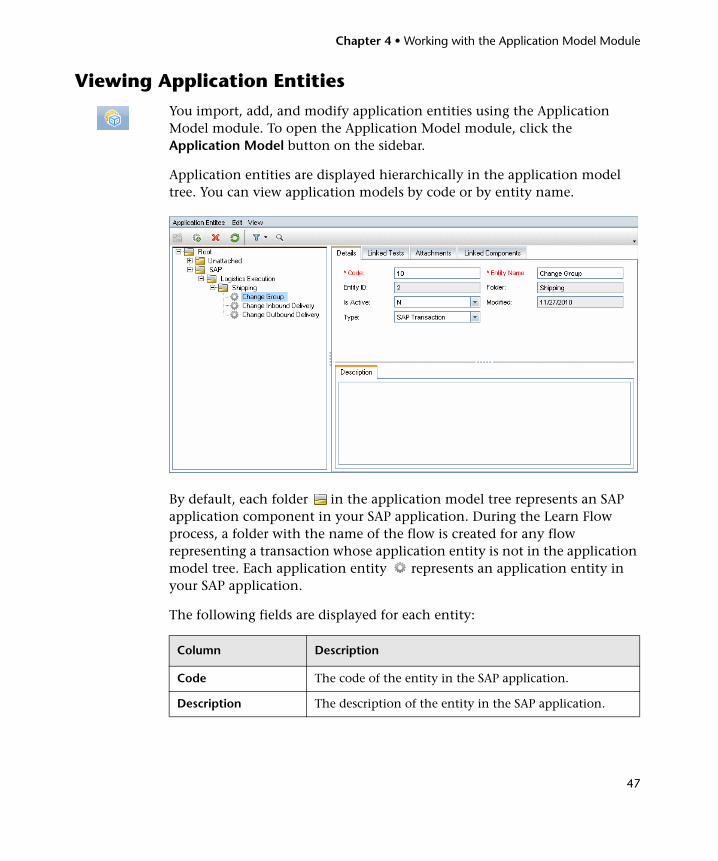
Viewing Application Entities
You import, add, and modify application entities using the Application Model module. To open the Application Model module, click the Application Model button on the sidebar.
Application entities are displayed hierarchically in the application model tree. You can view application models by code or by entity name.
By default, each folder in the application model tree represents an SAP application component in your SAP application. During the Learn Flow process, a folder with the name of the flow is created for any flow representing a transaction whose application entity is not in the application model tree. Each application entity represents an application entity in your SAP application.
The following fields are displayed for each entity:
Column Description
Code The code of the entity in the SAP application.
Description The description of the entity in the SAP application.
Chapter 4 • Working with the Application Model Module
48
48
Importing the SAP Application Hierarchy
You can import the application hierarchy to the Application Model module. This maps the entities in your SAP application to application entities in the Application Model module, reproducing the same hierarchical structure. Each SAP application element is represented as a folder. Each folder contains representations of the application entities that are included in the SAP application element in your SAP application.
You can import the application hierarchy more than once. For example, if you add new entities to your SAP application, you may want to include them in the application hierarchy, or you may decide to include application entities that were previously out of scope. When you import application entities that are already in the Application Model module, the data that you entered for each application entity is preserved. Any associations you created with tests and business components are also preserved.
Entity ID A unique numerical ID assigned by ALM to the application entity. This ID cannot be modified.
Entity Name The name of the entity in the SAP application.
Folder The folder in the application model tree in which the application entity is located. Each folder represents an SAP application element.
Is Active This column is relevant only for Change Impact Testing module for SAP applications. For more information, see the HP Change Impact Testing module for SAP applications User’s Guide.
Modified The date and time when the application entity was last modified.
Type The type of SAP application entity, for example, SAP Transaction.
Column Description
Chapter 4 • Working with the Application Model Module
49
49
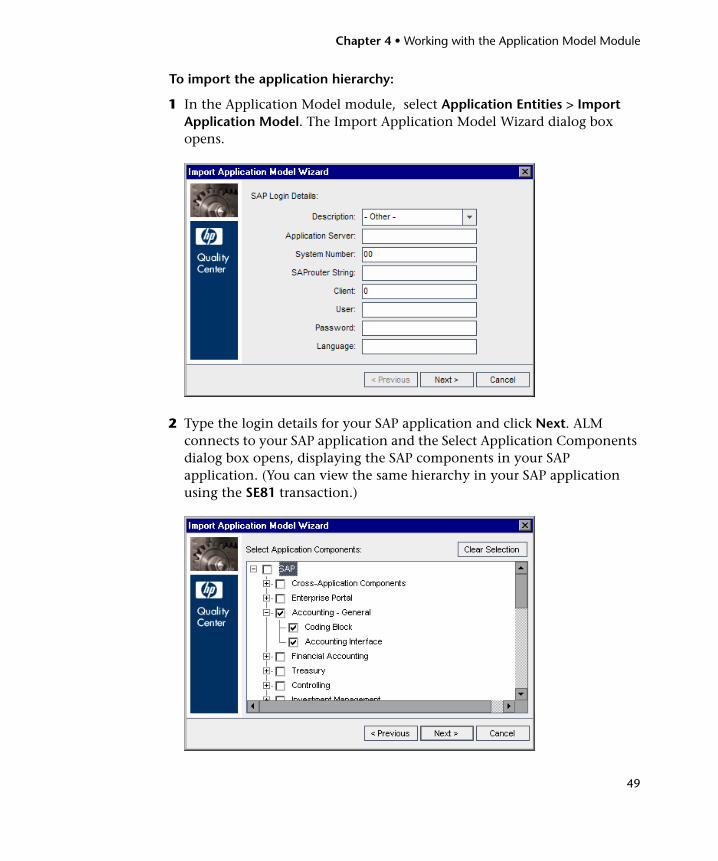
To import the application hierarchy:
1 In the Application Model module, select Application Entities > Import Application Model. The Import Application Model Wizard dialog box opens.
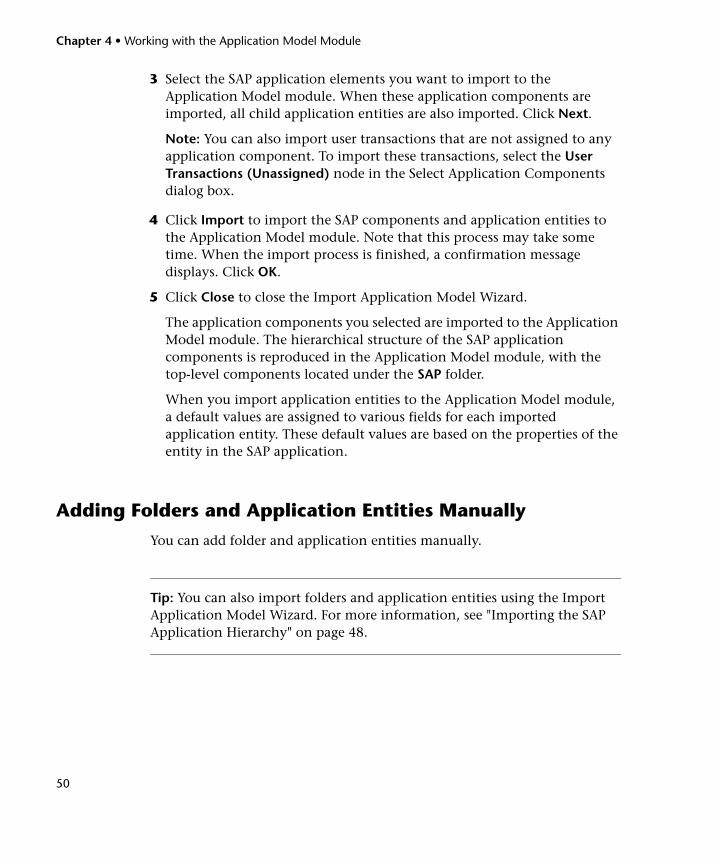
2 Type the login details for your SAP application and click Next. ALM connects to your SAP application and the Select Application Components dialog box opens, displaying the SAP components in your SAP application. (You can view the same hierarchy in your SAP application using the SE81 transaction.)
Chapter 4 • Working with the Application Model Module
50
50
3 Select the SAP application elements you want to import to the Application Model module. When these application components are imported, all child application entities are also imported. Click Next.
Note: You can also import user transactions that are not assigned to any application component. To import these transactions, select the User Transactions (Unassigned) node in the Select Application Components dialog box.
4 Click Import to import the SAP components and application entities to the Application Model module. Note that this process may take some time. When the import process is finished, a confirmation message displays. Click OK.
5 Click Close to close the Import Application Model Wizard.
The application components you selected are imported to the Application Model module. The hierarchical structure of the SAP application components is reproduced in the Application Model module, with the top-level components located under the SAP folder.
When you import application entities to the Application Model module, a default values are assigned to various fields for each imported application entity. These default values are based on the properties of the entity in the SAP application.
Adding Folders and Application Entities Manually
You can add folder and application entities manually.
Tip: You can also import folders and application entities using the Import Application Model Wizard. For more information, see "Importing the SAP Application Hierarchy" on page 48.
Chapter 4 • Working with the Application Model Module
51
51
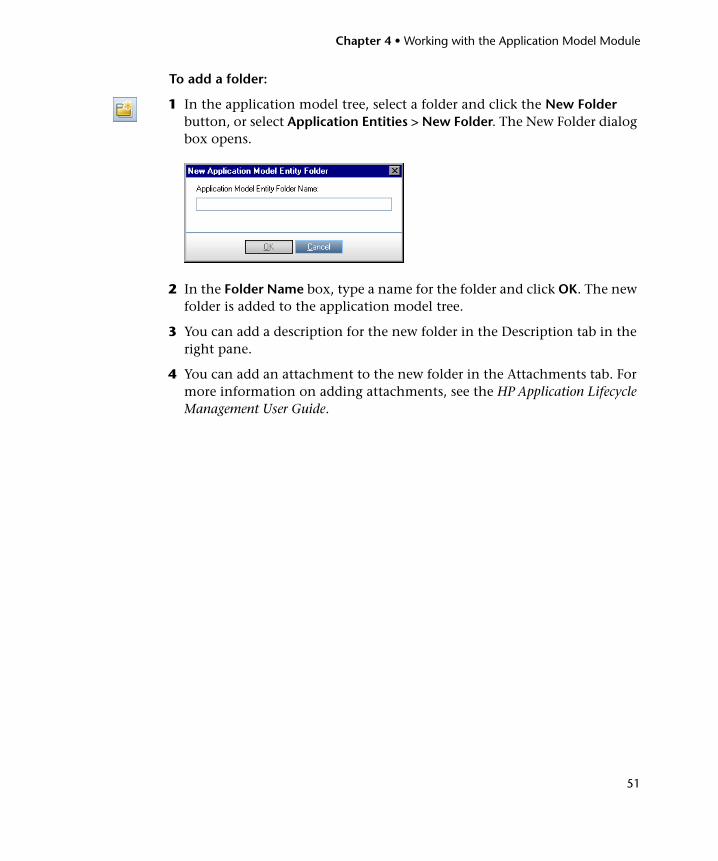
To add a folder:
1 In the application model tree, select a folder and click the New Folder button, or select Application Entities > New Folder. The New Folder dialog box opens.
2 In the Folder Name box, type a name for the folder and click OK. The new folder is added to the application model tree.
3 You can add a description for the new folder in the Description tab in the right pane.
4 You can add an attachment to the new folder in the Attachments tab. For more information on adding attachments, see the HP Application Lifecycle Management User Guide.
Chapter 4 • Working with the Application Model Module
52
52
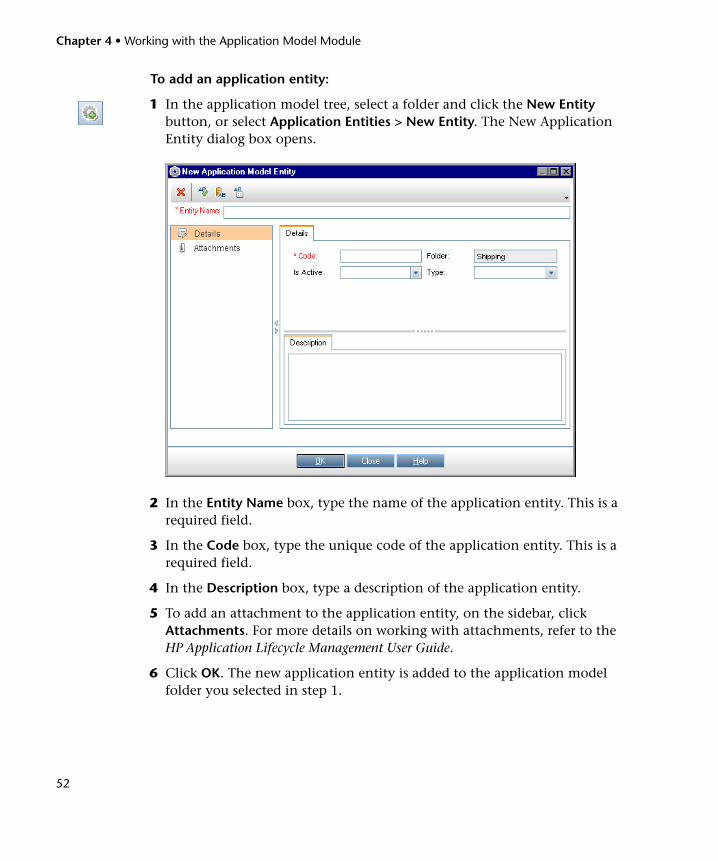
To add an application entity:
1 In the application model tree, select a folder and click the New Entity button, or select Application Entities > New Entity. The New Application Entity dialog box opens.
2 In the Entity Name box, type the name of the application entity. This is a required field.
3 In the Code box, type the unique code of the application entity. This is a required field.
4 In the Description box, type a description of the application entity.
5 To add an attachment to the application entity, on the sidebar, click Attachments. For more details on working with attachments, refer to the HP Application Lifecycle Management User Guide.
6 Click OK. The new application entity is added to the application model folder you selected in step 1.
Chapter 4 • Working with the Application Model Module
53
53
Modifying Folders and Application Entities
You can rename and delete folders and application entities in the Application Model module.
Renaming Folders and Application EntitiesYou can rename a folder or application entity in the Application Model module.
To rename a folder or application entity:
➤ To rename a folder or application entity in the application model tree, select a folder or application entity and select Edit > Rename. Alternatively, right-click the folder or application entity and select Rename. Edit the name and press ENTER.
➤ To rename an application entity in the Application Model Grid, click the name of the application entity and type the new name.
Deleting Folders and Application EntitiesYou can delete a folder or application entity from the application model tree. When you delete a folder, you can choose to delete the folder and its subfolders, or you can choose to delete the folder, its subfolders, and application entities.
➤ If you delete a folder with its subfolders, all of the application entities are moved to the Unattached folder in the application model tree.
➤ If you delete a folder with its subfolders and application entities, all subfolders and application entities under the selected folder are deleted permanently.
Chapter 4 • Working with the Application Model Module
54
54
To delete a folder:
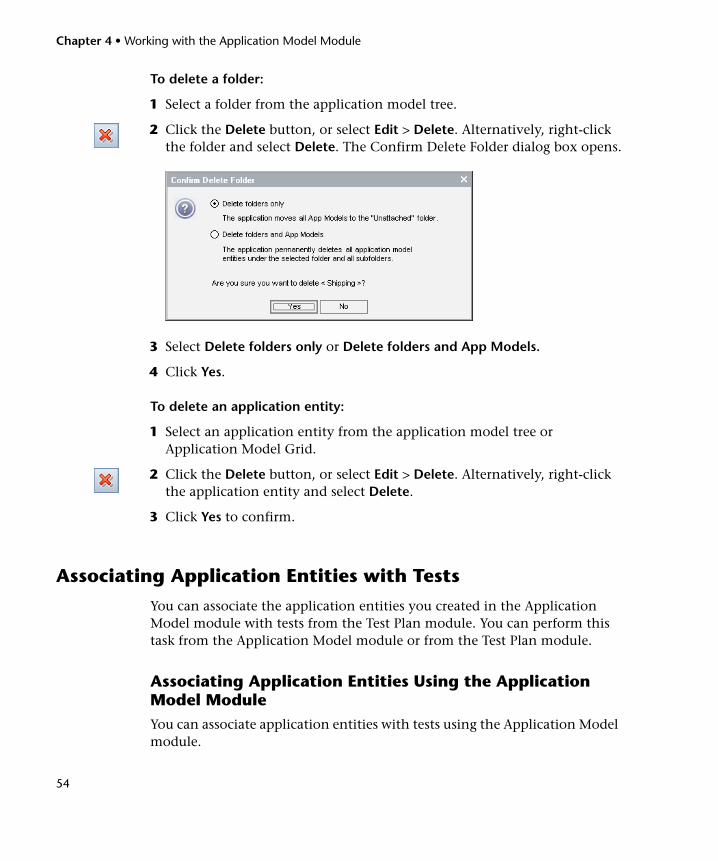
1 Select a folder from the application model tree.
2 Click the Delete button, or select Edit > Delete. Alternatively, right-click the folder and select Delete. The Confirm Delete Folder dialog box opens.
3 Select Delete folders only or Delete folders and App Models.
4 Click Yes.
To delete an application entity:
1 Select an application entity from the application model tree or Application Model Grid.
2 Click the Delete button, or select Edit > Delete. Alternatively, right-click the application entity and select Delete.
3 Click Yes to confirm.
Associating Application Entities with Tests
You can associate the application entities you created in the Application Model module with tests from the Test Plan module. You can perform this task from the Application Model module or from the Test Plan module.
Associating Application Entities Using the Application Model ModuleYou can associate application entities with tests using the Application Model module.
Chapter 4 • Working with the Application Model Module
55
55
To associate application entities with tests using the Application Model module:
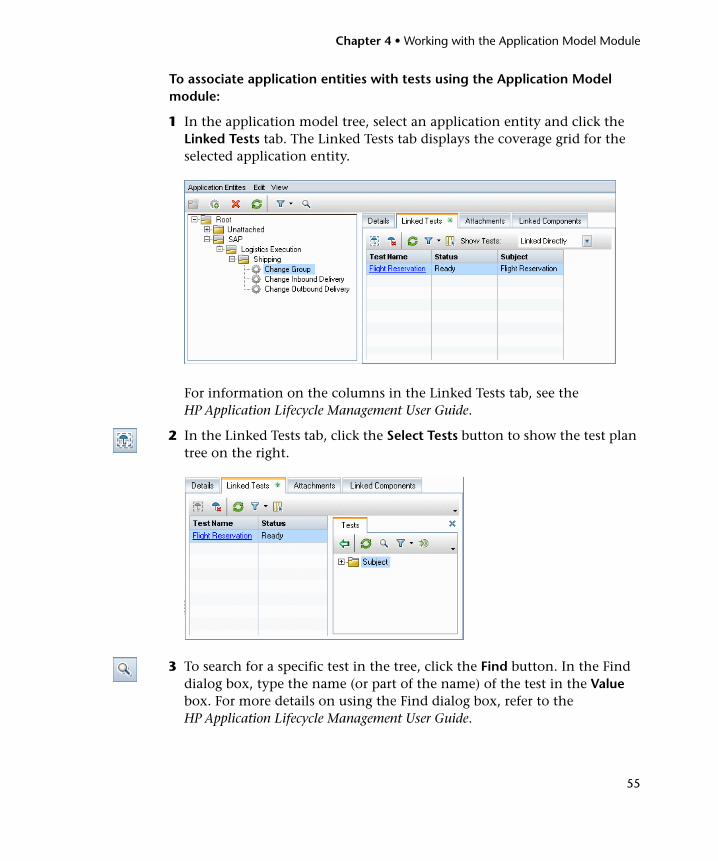
1 In the application model tree, select an application entity and click the Linked Tests tab. The Linked Tests tab displays the coverage grid for the selected application entity.
For information on the columns in the Linked Tests tab, see the HP Application Lifecycle Management User Guide.
2 In the Linked Tests tab, click the Select Tests button to show the test plan tree on the right.
3 To search for a specific test in the tree, click the Find button. In the Find dialog box, type the name (or part of the name) of the test in the Value box. For more details on using the Find dialog box, refer to the HP Application Lifecycle Management User Guide.
Chapter 4 • Working with the Application Model Module
56
56
4 Select a test or test folder to add to the application entity’s test coverage. Click the Link Tests To Application Entity button. The test is added to the coverage grid.
5 To refresh the application entities in the coverage grid, click the Refresh All button above the grid.
6 To filter the application entities displayed in the coverage grid, choose one of the following options from the Show Entities box:
➤ Linked Directly. Displays those tests that are associated directly with the application entity.
➤ Linked Through Other Assets. Displays those tests that are associated with the application entity via business components.
➤ All. Displays all of the application entities that are associated with the test.
Notes:
➤ To modify the data in the coverage grid columns or to remove tests from the coverage grid, you must first select Linked Directly in the Show Entities box.
➤ To remove test coverage from the Application Model module, verify that Linked Directly is displayed in the Show Entities box. Then select the test you want to remove from coverage and click the Remove Link button. Click Yes to confirm.
Associating Application Entities Using the Test Plan ModuleYou can associate application entities with tests using the Test Plan module.
To associate application entities with tests using the Test Plan module:
1 In the test plan tree, select the test you want to associate with one or more entities, and click the Application Entities tab. The application entities associated with the selected test are displayed.
2 In the Application Entities tab, click the Select Application Entities button to show the application model tree on the right.
Chapter 4 • Working with the Application Model Module
57
57
3 To search for a specific application entity in the tree, type the name (or part of the name) of the application entity in the Find box and click the Find button. If the search is successful, the application entity is highlighted in the tree.
4 To refresh all of the application entities in the application model tree, click the Refresh All button.
5 Select an application entity or application folder to add to the test’s application entity coverage. Click the Add Entity to Linkage button. The application entity is added to the coverage grid.
6 To refresh the application entities in the coverage grid, click the Refresh All button above the grid.
7 To filter the application entities displayed in the coverage grid, choose one of the following options from the Show Entities box:
➤ Linked Directly. Displays those application entities that are associated directly with the test.
➤ Linked Through Other Assets. Displays those application entities that are associated with business components via business process tests.
➤ All. Displays all of the application entities that are associated with the test.
8 Click the Close button to hide the application model tree.
Note:
➤ To modify the data in the coverage grid columns or to remove application entities from the coverage grid, you must first select Linked Directly in the Show Entities box.
➤ To remove application entity coverage from the Test Plan module, verify that Linked Directly is displayed in the Show Entities box. Then select the application entity you want to remove from coverage and click the Remove Link button. Click Yes to confirm.
Chapter 4 • Working with the Application Model Module
58
58
Associating Application Entities with Business Components
You can associate an SAP entity with any type of test, including a business process test. To associate an entity with a business process test, you first associate the entity with one or more business components. Then, when you include these business components in a business process test, the test is automatically associated with the entities that are a part of the business process test’s business components. For details on adding business components to a business process test, see the HP Business Process Testing User Guide.
You associate application entities with business components using the Business Components module. After they are associated, you can manage your associated application entities either from the Application Model module or from the Business Components module.
To manually associate application entities with business components:
1 In the component tree, select the component you want to associate with one or more application entities, and click the Application Entities tab. The application entities associated with the selected business component are displayed. For a description of each column displayed, see "Viewing Application Entities" on page 47.
2 In the Application Entities tab, click the Select Application Entities button to show the application model tree on the right.
3 To search for a specific application entity in the tree, type the name (or part of the name) of the application entity in the Find box and click the Find button. If the search is successful, the application entity is highlighted in the tree.
4 To refresh all of the application entities in the application model tree, click the Refresh All button.
5 Select an application entity or application folder to add to the business component’s application entity coverage. Click the Add Entity to Linkage button. The test is added to the coverage grid.
6 Click the Close button to hide the application model tree.
Chapter 4 • Working with the Application Model Module
59
59
Note: To remove application entity associations from the Business Components module, select the application entity for which you want to remove an association, click the Remove Link button, and click Yes to confirm.
Chapter 4 • Working with the Application Model Module
60
60
61
5Customizing Enterprise Integration
You can customize user group permissions, hide data for a user group and customize project entities for Enterprise Integration.
This chapter includes:
➤ About Customizing Enterprise Integration on page 61
➤ Customizing User Group Permissions on page 62
➤ Hiding Data for a User Group on page 65
➤ Customizing Project Entities on page 66
About Customizing Enterprise Integration
You can customize entities in the Application Model module, which is enabled automatically when you enable Enterprise Integration. You customize these entities in the same way as you customize other entities in your HP Application Lifecycle Management (ALM) projects. You can restrict which user groups can add, delete and modify folders and application entities. You can also determine which application entities and application entity fields each user group can view. In addition, you can add and customize Application Model fields.
You can also customize which ALM user groups can export business blueprints from Solution manager, and which user groups can update business blueprints.
This chapter describes the additional customization options available with Enterprise Integration. For more information on project customization, refer to the HP Application Lifecycle Management Administrator Guide.
Chapter 5 • Customizing Enterprise Integration
62
62
Customizing User Group Permissions
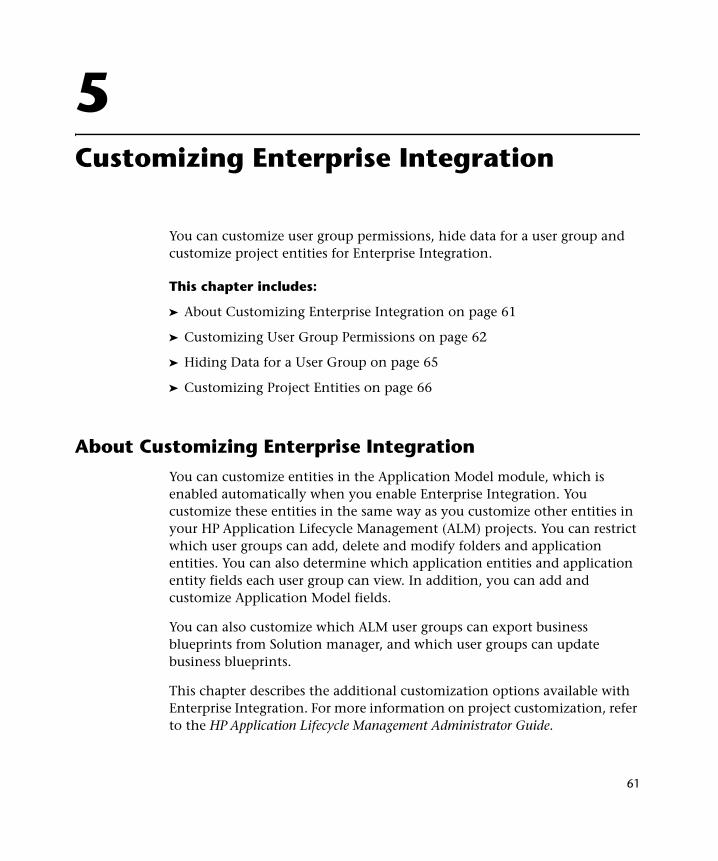
You can customize the permission settings for the Application Model module and for the integration with Solution Manager in the Groups and Permissions page in Project Customization. For more information on user group permissions, refer to the HP Application Lifecycle Management Administrator Guide.
Customizing User Group Permissions for the Application Model ModuleThe Application Model tab displays the tasks available in the Application Model module.
Chapter 5 • Customizing Enterprise Integration
63
63
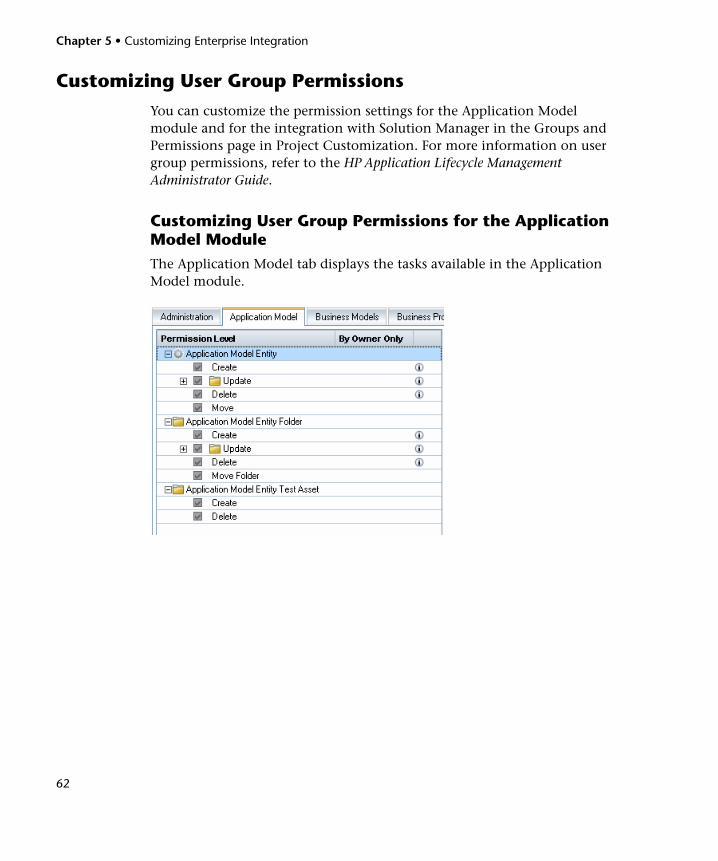
The Application Model tab includes the following tasks:
Entity > Permission Level Description
Application Model Entity > Create
User group can add application entities to the Application Model module. A user group must have permissions for this task and for the Update task to import SAP application entities.
Application Model Entity > Update
User group can modify application entities in the Application Model module. Note that this task enables you to specify the fields that the selected user group can modify. A user group must have permissions for this task and for the Create task to import SAP application entities.
Application Model Entity > Delete
User group can delete application entities from the Application Model module.
Application Model Entity > Move
User group can move application entities in the Application Model module.
Application Model Entity Folder > Create
User group can add folders to the Application Model Tree.
Application Model Entity Folder > Update
User group can modify folders in the Application Model Tree. Note that this task enables you to specify the fields that the selected user group can modify.
Application Model Entity Folder > Delete
User group can delete folders from the Application Model Tree.
Application Model Entity Folder > Move Folder
User group can move folders in the Application Model Tree.
Application Model Entity Test Asset > Create
User group can associate application entities with tests and business components.
Application Model Entity Test Asset > Delete
User group can remove association of application entities with tests and business components.
Chapter 5 • Customizing Enterprise Integration
64
64
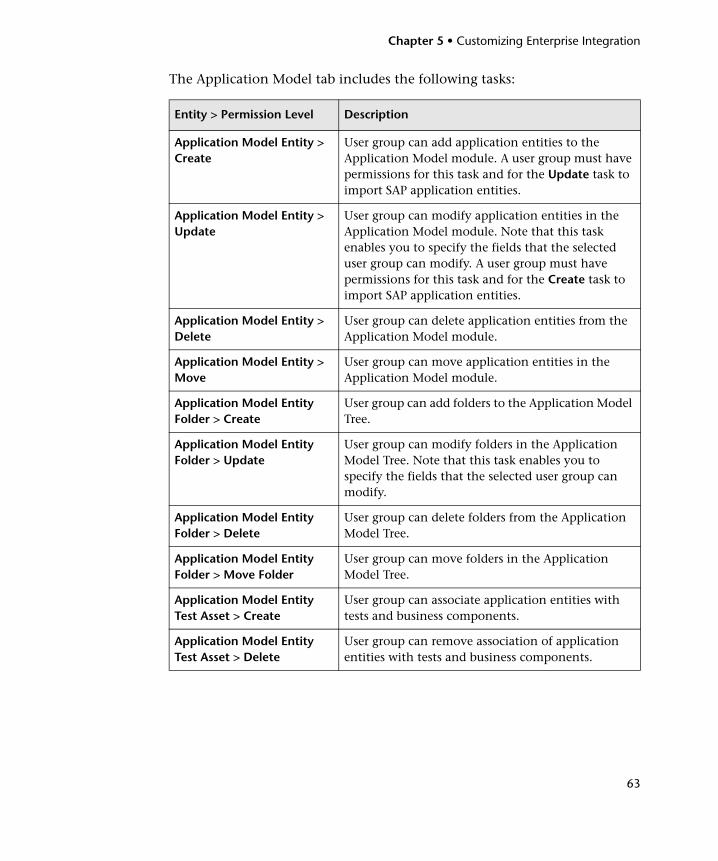
Customizing User Group Permissions for Integration with Solution ManagerThe Enterprise Integration tab displays the tasks available for integration with Solution Manager.
The Enterprise Integration tab includes the following tasks:
Entity > Permission Level Description
Blueprint > Retrieve Data from Solution Manager
User group can import business blueprints, and connect to ALM from Solution Manager and export business blueprints.
Blueprint > Send Data to Solution Manager
User group can update Solution Manager with ALM test results.
Field Map > Map Defect Fields
User group can create field mappings for ALM defects and Service Desk support messages.
Sync Pool Item > Manage Defect Synchronization
User group can access the defect pool to manage the synchronization of ALM defects and Service Desk support messages.
Chapter 5 • Customizing Enterprise Integration
65
65
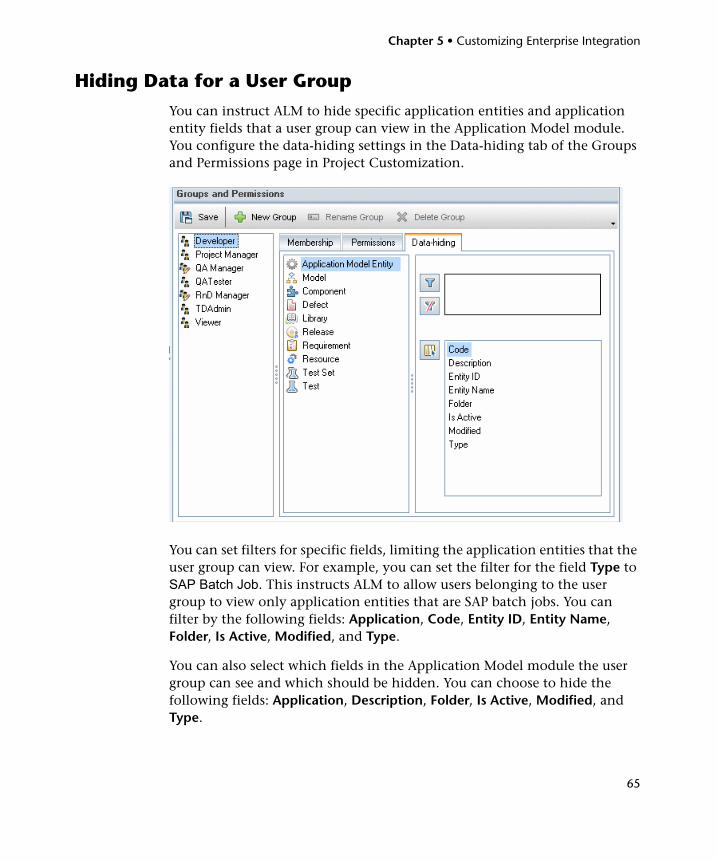
Hiding Data for a User Group
You can instruct ALM to hide specific application entities and application entity fields that a user group can view in the Application Model module. You configure the data-hiding settings in the Data-hiding tab of the Groups and Permissions page in Project Customization.
You can set filters for specific fields, limiting the application entities that the user group can view. For example, you can set the filter for the field Type to SAP Batch Job. This instructs ALM to allow users belonging to the user group to view only application entities that are SAP batch jobs. You can filter by the following fields: Application, Code, Entity ID, Entity Name, Folder, Is Active, Modified, and Type.
You can also select which fields in the Application Model module the user group can see and which should be hidden. You can choose to hide the following fields: Application, Description, Folder, Is Active, Modified, and Type.
Chapter 5 • Customizing Enterprise Integration
66
66
For more details on the Application Model fields, see "Viewing Application Entities" on page 47.
For more information on hiding data for a user group, refer to the HP Application Lifecycle Management Administrator Guide.
Customizing Project Entities
You can customize the system fields and add new user-defined fields for the Application Model module from the Project Entities page in Project Customization. You customize these fields under the Application Entity entity. For more information on customizing project entities, refer to the HP Application Lifecycle Management Administrator Guide.