Embed Size (px)
Citation preview
Continuous Integration, Deployment and Testing by Codar using ALM and Jenkins
HP Codar (1.0) Page 1 of 24
HP Codar Software Version 1.0
Continuous Integration, Continuous Deployment and
Continuous Testing by HP Codar using ALM and Jenkins
Continuous Integration, Deployment and Testing by Codar using ALM and Jenkins
HP Codar (1.0) Page 2 of 24
Contents
What is Codar? ............................................................................................................................................ 3
Why is Codar required? .................................................................................................................................... 3
HP Application Lifecycle Management ........................................................................................................... 3
End-to-end flow .................................................................................................................................................. 3
Continuous integration and deployment using Codar and Jenkins (build tool) .................................... 4
Software required for the integration........................................................................................................................... 4
Configuring Jenkins .................................................................................................................................................... 5
Uploading the Codar plugin on the Jenkins server .......................................................................................................... 5
Installing the Codar plugin ...................................................................................................................................... 5
Enabling the Codar plugin ...................................................................................................................................... 5
Configuring the Pet Clinic sample application project ................................................................................................. 6
Configuring the Codar plugin for the Pet Clinic sample application............................................................................. 7
Adding another project ............................................................................................................................................. 10
Continuous testing of the application using Codar and ALM through Jenkins .................................... 10
Install and configure the Jenkins – HP ALM plugin ................................................................................................... 10
Enable the Jenkins plugin for ALM ................................................................................................................................. 10
Enabling the Artifact Deployer Plugin ....................................................................................................................... 11
Configure the Jenkins plugin for ALM ....................................................................................................................... 11
Create the test environment in ALM ......................................................................................................................... 14
Site Administration ................................................................................................................................................... 15
HP ALM Lab Service ................................................................................................................................................ 17
ALM Lab Management ............................................................................................................................................. 19
ALM Desktop Client .................................................................................................................................................. 20
End-to-end flow ................................................................................................................................................ 22
Contact information ......................................................................................................................................... 24
Continuous Integration, Deployment and Testing by Codar using ALM and Jenkins
HP Codar (1.0) Page 3 of 24
What is Codar? HP Codar is a continuous delivery solution that provides deployment and release management of
complex multi-tier applications across the application lifecycle. It automates the deployment of
applications by embracing existing content from Chef, HP SA, and so on and representing this content as
components. These components can be used in a graphical topology designer to create an application
model.
One of the important features of Codar is that the model is used to trigger deployments automatically with
Jenkins, trigger test cases that are on the deployed instances in HP ALM (Application Lifecycle
Management), and update the results in ALM.
This document provides information about integrating Codar with HP ALM.
Why is Codar required?
Software engineering builds are subject to continuous deployment and testing on the principles of
frequent code commits, build automation, faster and frequent builds, automated application deployment,
and test automation. On top of continuous integration, software development teams also continuously
deliver qualified software applications to their test and production teams. One of the challenges that most
software development teams face in the process of continuous integration and continuous delivery is the
ability to automate the deployment of applications in a simple and consistent manner and run tests on the
deployed instance. Codar is built to solve this problem.
Using Codar, users can deploy the application and run tests automatically by integrating with HP ALM.
This white paper describes how Codar can be integrated with ALM. HP Codar is integrated with ALM
through Jenkins. Jenkins acts as orchestrator between Codar and ALM.
HP Application Lifecycle Management
HP ALM is a set of software products designed to accelerate the delivery of secure, reliable, and modern
applications. It is a combination of a common platform, several key applications, and a dashboard
targeted at managing the core lifecycle of applications.
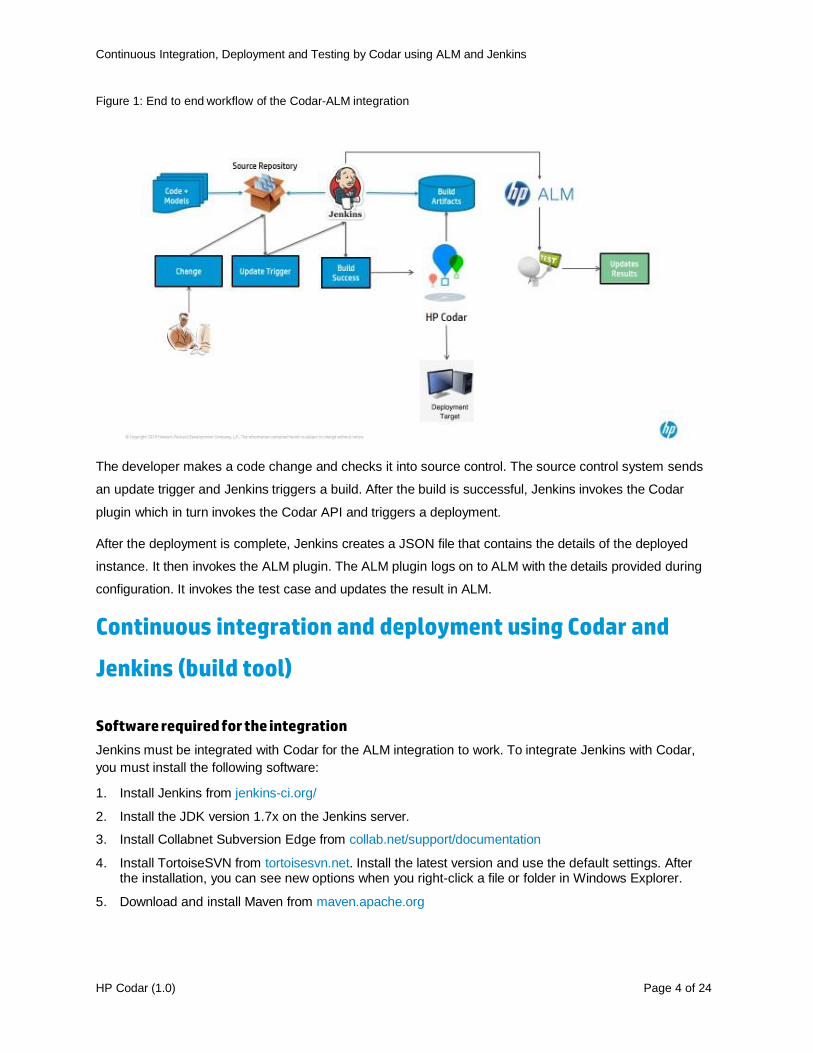
End-to-end flow Figure 1 shows the end-to-end to flow of how Codar and ALM are integrated through Jenkins. In this use
case, Jenkins is the orchestrator.
Continuous Integration, Deployment and Testing by Codar using ALM and Jenkins
HP Codar (1.0) Page 4 of 24
Figure 1: End to end workflow of the Codar-ALM integration
The developer makes a code change and checks it into source control. The source control system sends
an update trigger and Jenkins triggers a build. After the build is successful, Jenkins invokes the Codar
plugin which in turn invokes the Codar API and triggers a deployment.
After the deployment is complete, Jenkins creates a JSON file that contains the details of the deployed
instance. It then invokes the ALM plugin. The ALM plugin logs on to ALM with the details provided during
configuration. It invokes the test case and updates the result in ALM.
Continuous integration and deployment using Codar and
Jenkins (build tool)
Software required for the integration
Jenkins must be integrated with Codar for the ALM integration to work. To integrate Jenkins with Codar,
you must install the following software:
1. Install Jenkins from jenkins-ci.org/
2. Install the JDK version 1.7x on the Jenkins server.
3. Install Collabnet Subversion Edge from collab.net/support/documentation
4. Install TortoiseSVN from tortoisesvn.net. Install the latest version and use the default settings. After the installation, you can see new options when you right-click a file or folder in Windows Explorer.
5. Download and install Maven from maven.apache.org
Continuous Integration, Deployment and Testing by Codar using ALM and Jenkins
HP Codar (1.0) Page 5 of 24
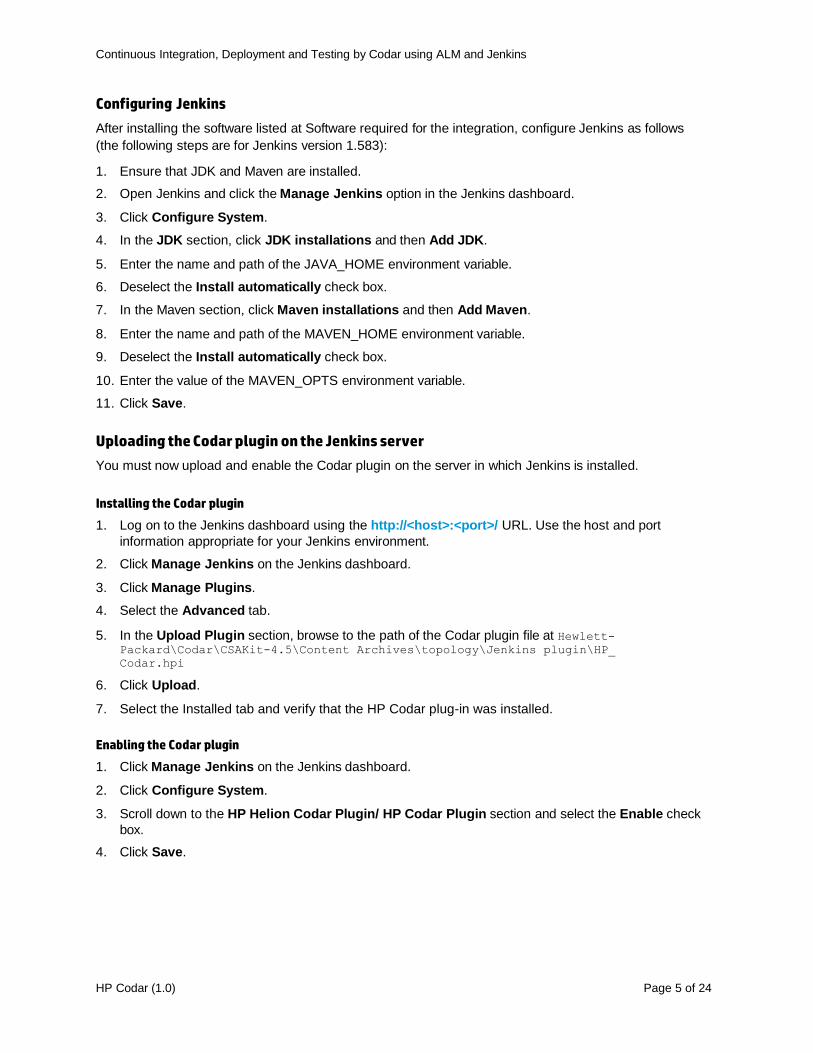
Configuring Jenkins
After installing the software listed at Software required for the integration, configure Jenkins as follows
(the following steps are for Jenkins version 1.583):
1. Ensure that JDK and Maven are installed.
2. Open Jenkins and click the Manage Jenkins option in the Jenkins dashboard.
3. Click Configure System.
4. In the JDK section, click JDK installations and then Add JDK.
5. Enter the name and path of the JAVA_HOME environment variable.
6. Deselect the Install automatically check box.
7. In the Maven section, click Maven installations and then Add Maven.
8. Enter the name and path of the MAVEN_HOME environment variable.
9. Deselect the Install automatically check box.
10. Enter the value of the MAVEN_OPTS environment variable.
11. Click Save.
Uploading the Codar plugin on the Jenkins server
You must now upload and enable the Codar plugin on the server in which Jenkins is installed.
Installing the Codar plugin
1. Log on to the Jenkins dashboard using the http://<host>:<port>/ URL. Use the host and port
information appropriate for your Jenkins environment.
2. Click Manage Jenkins on the Jenkins dashboard.
3. Click Manage Plugins.
4. Select the Advanced tab.
5. In the Upload Plugin section, browse to the path of the Codar plugin file at Hewlett-Packard\Codar\CSAKit-4.5\Content Archives\topology\Jenkins plugin\HP_
Codar.hpi
6. Click Upload.
7. Select the Installed tab and verify that the HP Codar plug-in was installed.
Enabling the Codar plugin
1. Click Manage Jenkins on the Jenkins dashboard.
2. Click Configure System.
3. Scroll down to the HP Helion Codar Plugin/ HP Codar Plugin section and select the Enable check
box.
4. Click Save.
Continuous Integration, Deployment and Testing by Codar using ALM and Jenkins
HP Codar (1.0) Page 6 of 24
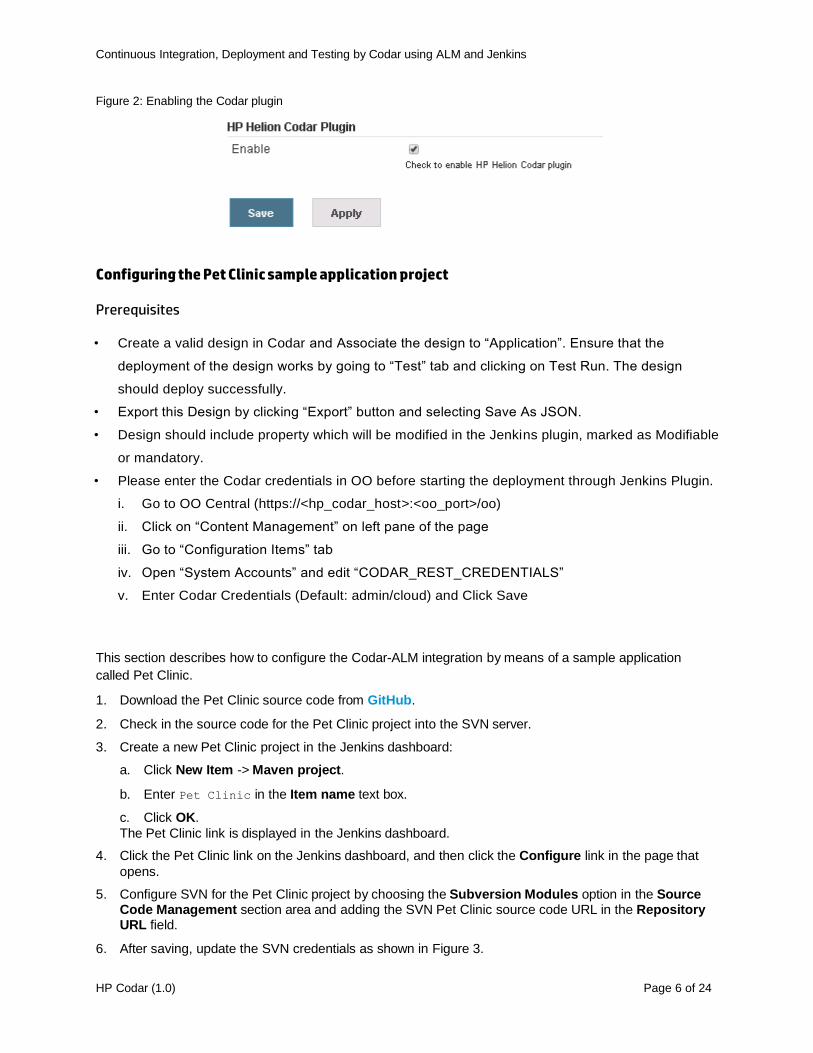
Figure 2: Enabling the Codar plugin
Configuring the Pet Clinic sample application project Prerequisites • Create a valid design in Codar and Associate the design to “Application”. Ensure that the
deployment of the design works by going to “Test” tab and clicking on Test Run. The design
should deploy successfully.
• Export this Design by clicking “Export” button and selecting Save As JSON.
• Design should include property which will be modified in the Jenkins plugin, marked as Modifiable
or mandatory.
• Please enter the Codar credentials in OO before starting the deployment through Jenkins Plugin.
i. Go to OO Central (https://<hp_codar_host>:<oo_port>/oo)
ii. Click on “Content Management” on left pane of the page
iii. Go to “Configuration Items” tab
iv. Open “System Accounts” and edit “CODAR_REST_CREDENTIALS”
v. Enter Codar Credentials (Default: admin/cloud) and Click Save
This section describes how to configure the Codar-ALM integration by means of a sample application
called Pet Clinic.
1. Download the Pet Clinic source code from GitHub.
2. Check in the source code for the Pet Clinic project into the SVN server.
3. Create a new Pet Clinic project in the Jenkins dashboard:
a. Click New Item -> Maven project.
b. Enter Pet Clinic in the Item name text box.
c. Click OK.
The Pet Clinic link is displayed in the Jenkins dashboard.
4. Click the Pet Clinic link on the Jenkins dashboard, and then click the Configure link in the page that
opens.
5. Configure SVN for the Pet Clinic project by choosing the Subversion Modules option in the Source Code Management section area and adding the SVN Pet Clinic source code URL in the Repository URL field.
6. After saving, update the SVN credentials as shown in Figure 3.
Continuous Integration, Deployment and Testing by Codar using ALM and Jenkins
HP Codar (1.0) Page 7 of 24
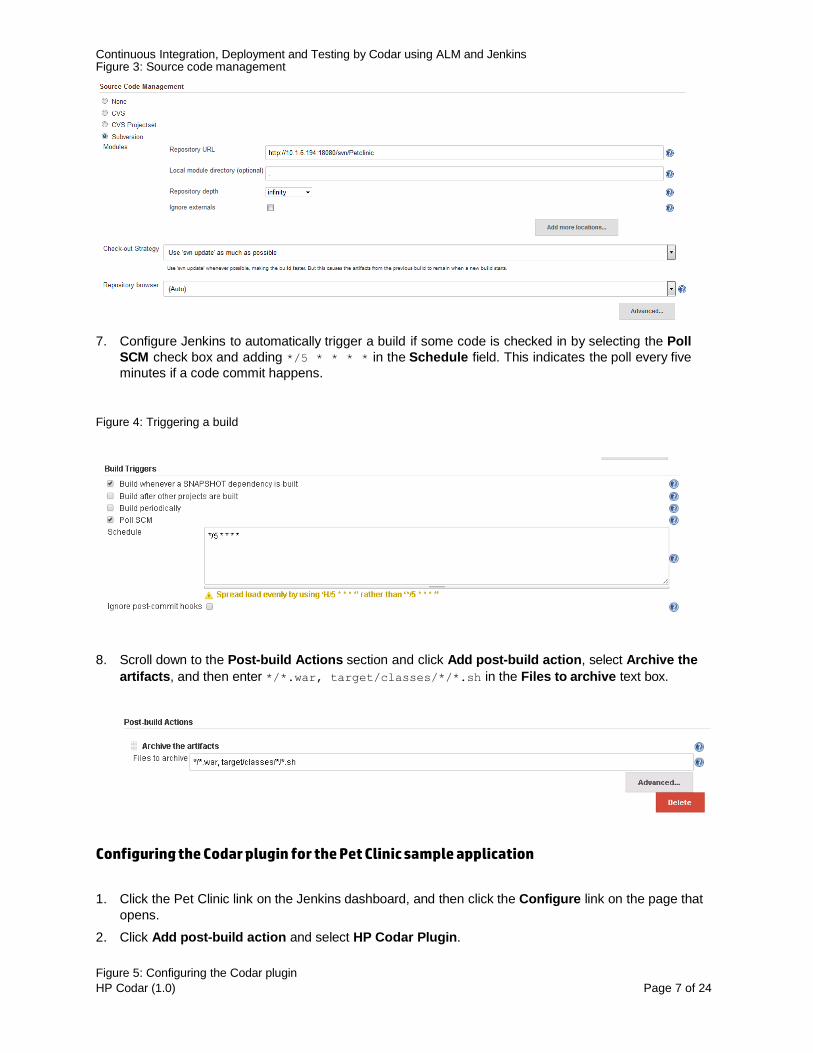
Figure 3: Source code management
7. Configure Jenkins to automatically trigger a build if some code is checked in by selecting the Poll
SCM check box and adding */5 * * * * in the Schedule field. This indicates the poll every five
minutes if a code commit happens.
Figure 4: Triggering a build
8. Scroll down to the Post-build Actions section and click Add post-build action, select Archive the
artifacts, and then enter */*.war, target/classes/*/*.sh in the Files to archive text box.
Configuring the Codar plugin for the Pet Clinic sample application
1. Click the Pet Clinic link on the Jenkins dashboard, and then click the Configure link on the page that
opens.
2. Click Add post-build action and select HP Codar Plugin.
Figure 5: Configuring the Codar plugin
Continuous Integration, Deployment and Testing by Codar using ALM and Jenkins
HP Codar (1.0) Page 8 of 24
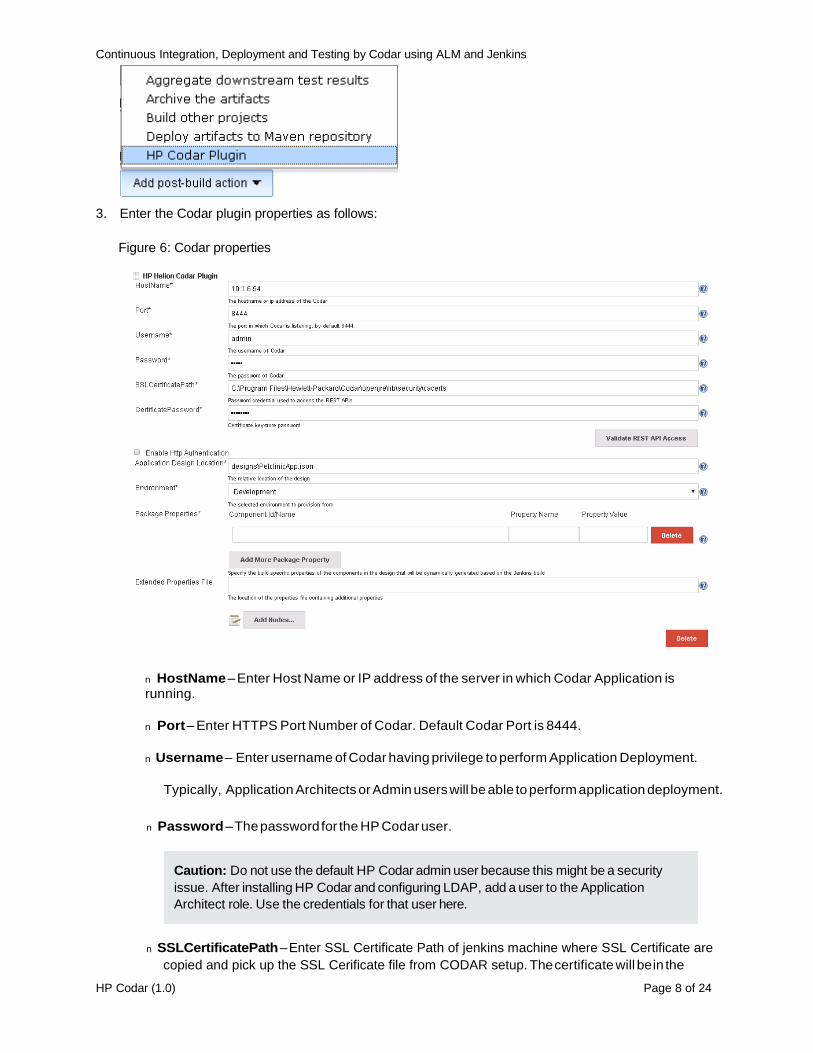
3. Enter the Codar plugin properties as follows:
Figure 6: Codar properties
n HostName – Enter Host Name or IP address of the server in which Codar Application is running.
n Port – Enter HTTPS Port Number of Codar. Default Codar Port is 8444.
n Username – Enter username of Codar having privilege to perform Application Deployment.
Typically, Application Architects or Admin users will be able to perform application deployment.
n Password – The password for the HP Codar user.
n SSLCertificatePath – Enter SSL Certificate Path of jenkins machine where SSL Certificate are
copied and pick up the SSL Cerificate file from CODAR setup. The certificate will be in the
Caution: Do not use the default HP Codar admin user because this might be a security
issue. After installing HP Codar and configuring LDAP, add a user to the Application
Architect role. Use the credentials for that user here.
Continuous Integration, Deployment and Testing by Codar using ALM and Jenkins
HP Codar (1.0) Page 9 of 24
machine where HP Codar is installed
For e.g. if user has installed Codar in Open JRE the path would be similar to “\Hewlett-
Packard\Codar\openjre\lib\security\cacerts”.
Details about the JRE used during installation is located in the csa.properties file
n CertificatePassword – Enter the SSL certificate keystore password for HP Codar. By default it
is “changeit”.
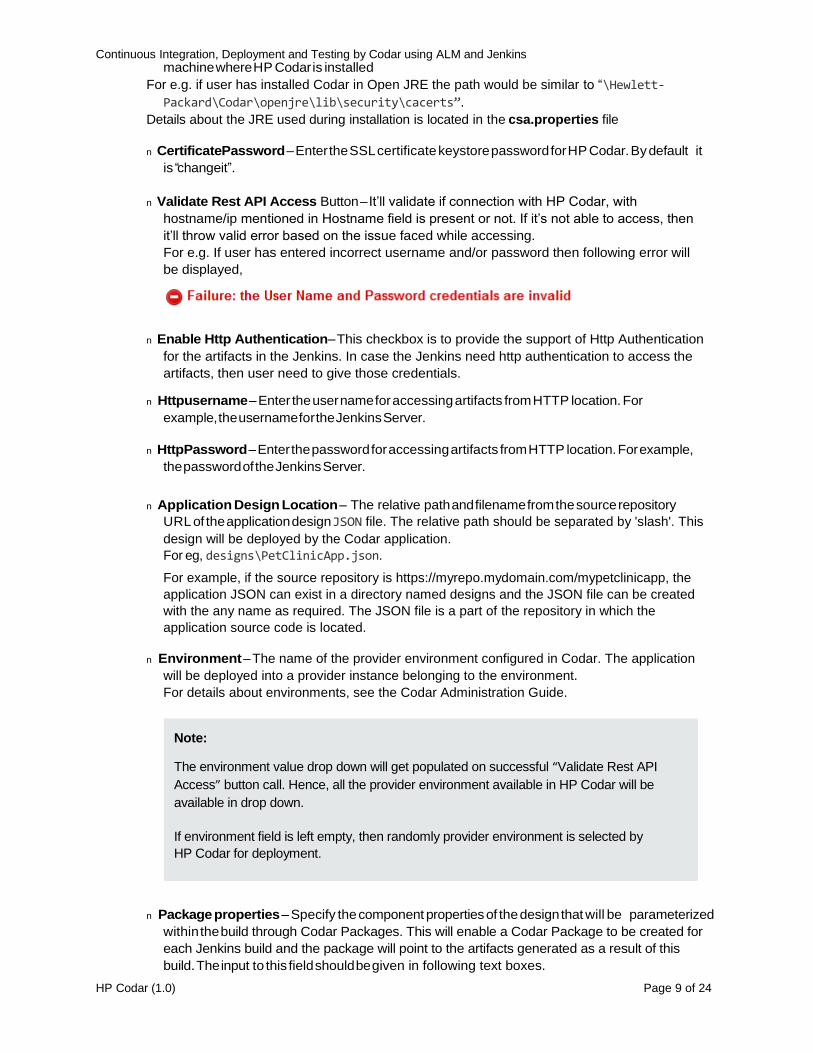
n Validate Rest API Access Button – It’ll validate if connection with HP Codar, with
hostname/ip mentioned in Hostname field is present or not. If it’s not able to access, then
it’ll throw valid error based on the issue faced while accessing.
For e.g. If user has entered incorrect username and/or password then following error will
be displayed,
n Enable Http Authentication– This checkbox is to provide the support of Http Authentication
for the artifacts in the Jenkins. In case the Jenkins need http authentication to access the
artifacts, then user need to give those credentials.
n Httpusername – Enter the user name for accessing artifacts from HTTP location. For
example, the username for the Jenkins Server.
n HttpPassword – Enter the password for accessing artifacts from HTTP location. For example,
the password of the Jenkins Server.
n Application Design Location – The relative path and filename from the source repository
URL of the application design JSON file. The relative path should be separated by 'slash'. This
design will be deployed by the Codar application.
For eg, designs\PetClinicApp.json.
For example, if the source repository is https://myrepo.mydomain.com/mypetclinicapp, the
application JSON can exist in a directory named designs and the JSON file can be created
with the any name as required. The JSON file is a part of the repository in which the
application source code is located.
n Environment – The name of the provider environment configured in Codar. The application
will be deployed into a provider instance belonging to the environment.
For details about environments, see the Codar Administration Guide.
n Package properties – Specify the component properties of the design that will be parameterized
within the build through Codar Packages. This will enable a Codar Package to be created for
each Jenkins build and the package will point to the artifacts generated as a result of this
build. The input to this field should be given in following text boxes.
Note:
The environment value drop down will get populated on successful “Validate Rest API
Access” button call. Hence, all the provider environment available in HP Codar will be
available in drop down.
If environment field is left empty, then randomly provider environment is selected by
HP Codar for deployment.
Continuous Integration, Deployment and Testing by Codar using ALM and Jenkins
HP Codar (1.0) Page 10 of 24
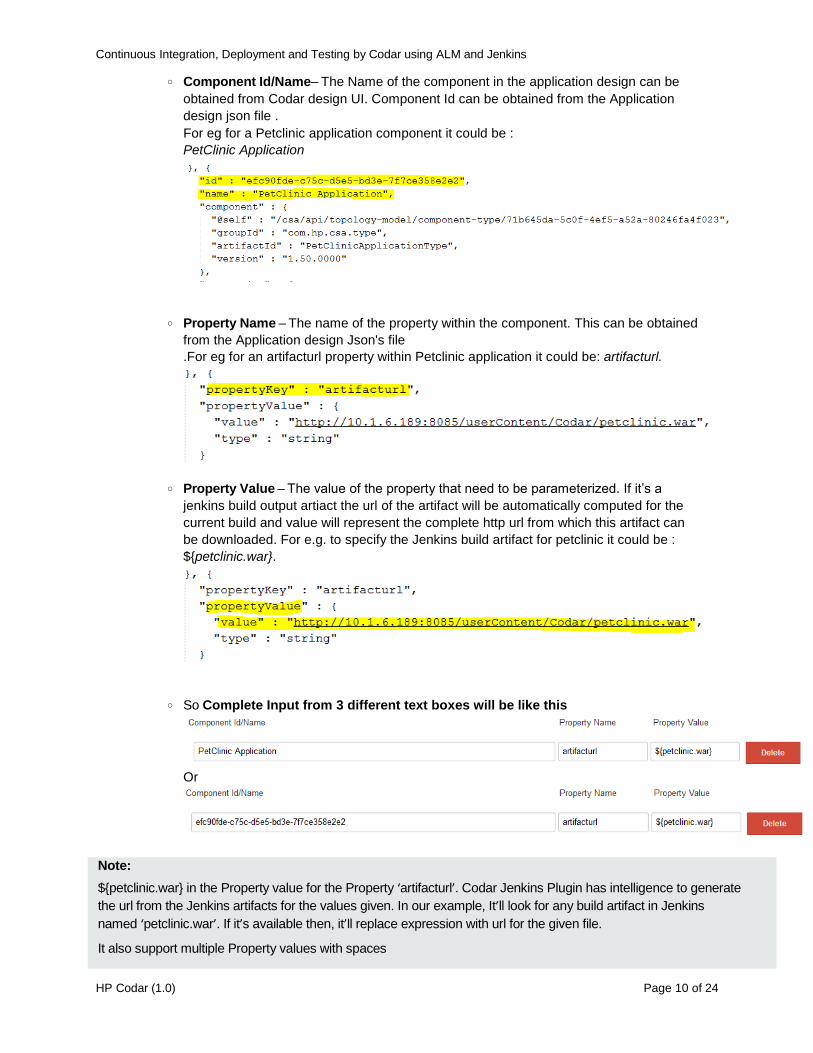
o Component Id/Name– The Name of the component in the application design can be
obtained from Codar design UI. Component Id can be obtained from the Application
design json file .
For eg for a Petclinic application component it could be :
PetClinic Application
o Property Name – The name of the property within the component. This can be obtained
from the Application design Json's file
.For eg for an artifacturl property within Petclinic application it could be: artifacturl.
o Property Value – The value of the property that need to be parameterized. If it’s a
jenkins build output artiact the url of the artifact will be automatically computed for the
current build and value will represent the complete http url from which this artifact can
be downloaded. For e.g. to specify the Jenkins build artifact for petclinic it could be :
${petclinic.war}.
o So Complete Input from 3 different text boxes will be like this
Or
Note:
${petclinic.war} in the Property value for the Property ‘artifacturl’. Codar Jenkins Plugin has intelligence to generate
the url from the Jenkins artifacts for the values given. In our example, It’ll look for any build artifact in Jenkins
named ‘petclinic.war’. If it’s available then, it’ll replace expression with url for the given file.
It also support multiple Property values with spaces
Continuous Integration, Deployment and Testing by Codar using ALM and Jenkins
HP Codar (1.0) Page 11 of 24
n Extended Properties File – Optionally enter the name of the properties file. This properties file
needs to be specified only when the user wants to specify a different CI process than what is
provided by default. This properties file can specify a different HP Operations Orchestration flow
containing necessary CI logic . You can specify a different flow id by creating a property file with
key as uuid and value as the uuid of HP Operations Orchestration flow. For example,
uuid=asdaasdasdsdasdad99f.
You can also specify the required properties to this flow as key value pairs in this property file.
n Node Id/Name– Enter the component ID or name for which you want to extract component
properties. These component ids can be obtained from the Application design JSON file which
has been exported. Multiple components are specified by separating those with commas.
For example, you may want to retrieve an IP address and host name of the VCenter
component, VcenterServerType VERSION 04.20.0000 GROUPID
com.hp.csa.type0002, to run tests on the provisioned server.
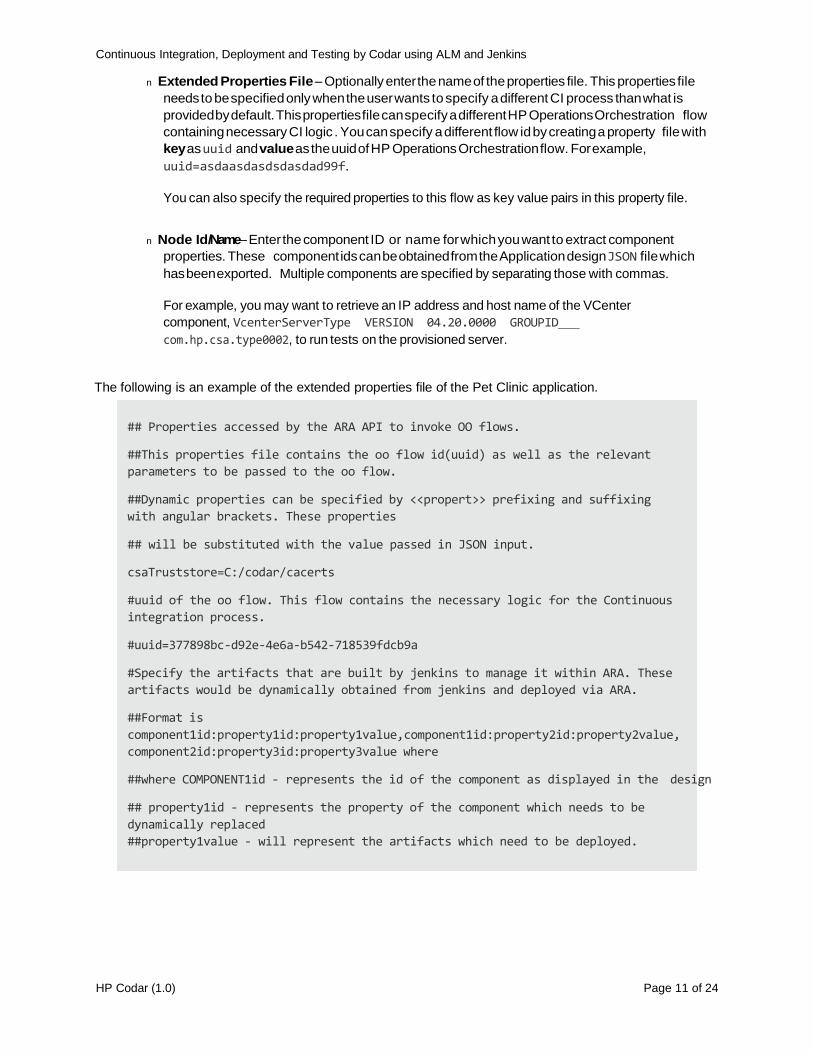
The following is an example of the extended properties file of the Pet Clinic application.
## Properties accessed by the ARA API to invoke OO flows.
##This properties file contains the oo flow id(uuid) as well as the relevant
parameters to be passed to the oo flow.
##Dynamic properties can be specified by <<propert>> prefixing and suffixing
with angular brackets. These properties
## will be substituted with the value passed in JSON input.
csaTruststore=C:/codar/cacerts
#uuid of the oo flow. This flow contains the necessary logic for the Continuous
integration process.
#uuid=377898bc-d92e-4e6a-b542-718539fdcb9a
#Specify the artifacts that are built by jenkins to manage it within ARA. These
artifacts would be dynamically obtained from jenkins and deployed via ARA.
##Format is
component1id:property1id:property1value,component1id:property2id:property2value,
component2id:property3id:property3value where
##where COMPONENT1id - represents the id of the component as displayed in the design
## property1id - represents the property of the component which needs to be
dynamically replaced
##property1value - will represent the artifacts which need to be deployed.
Continuous Integration, Deployment and Testing by Codar using ALM and Jenkins
HP Codar (1.0) Page 12 of 24
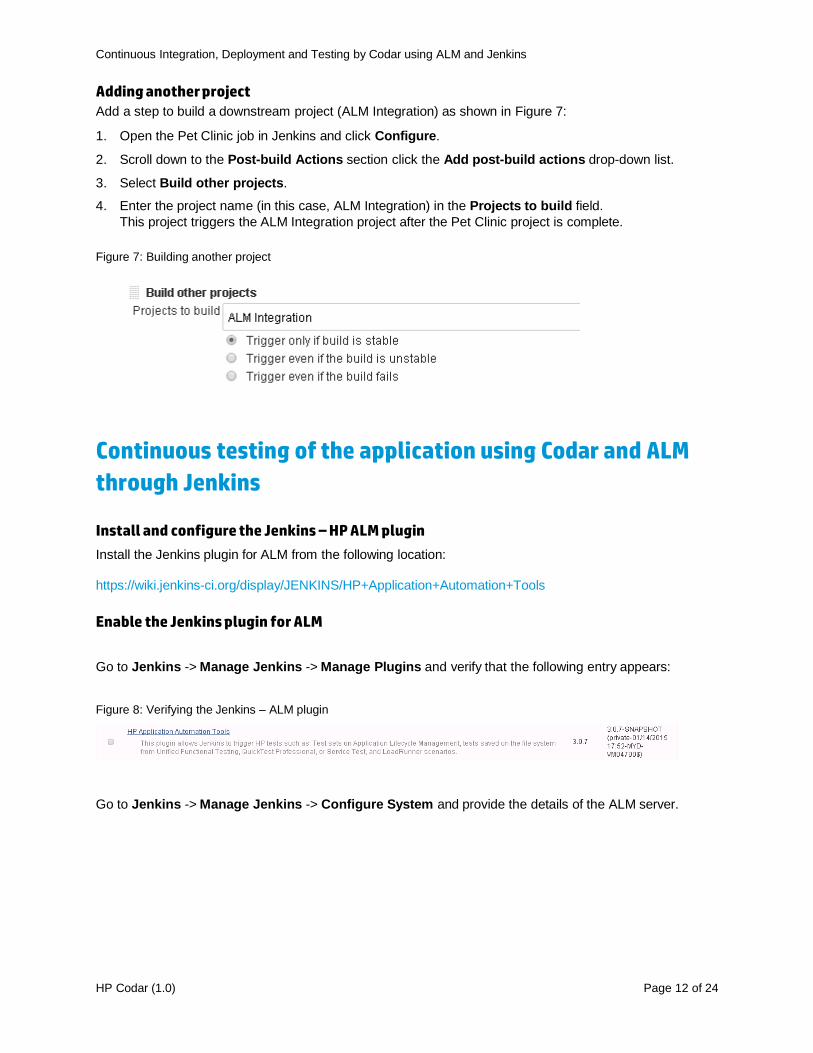
Adding another project
Add a step to build a downstream project (ALM Integration) as shown in Figure 7:
1. Open the Pet Clinic job in Jenkins and click Configure.
2. Scroll down to the Post-build Actions section click the Add post-build actions drop-down list.
3. Select Build other projects.
4. Enter the project name (in this case, ALM Integration) in the Projects to build field.
This project triggers the ALM Integration project after the Pet Clinic project is complete.
Figure 7: Building another project
Continuous testing of the application using Codar and ALM
through Jenkins
Install and configure the Jenkins – HP ALM plugin
Install the Jenkins plugin for ALM from the following location:
https://wiki.jenkins-ci.org/display/JENKINS/HP+Application+Automation+Tools
Enable the Jenkins plugin for ALM
Go to Jenkins -> Manage Jenkins -> Manage Plugins and verify that the following entry appears:
Figure 8: Verifying the Jenkins – ALM plugin
Go to Jenkins -> Manage Jenkins -> Configure System and provide the details of the ALM server.
Continuous Integration, Deployment and Testing by Codar using ALM and Jenkins
HP Codar (1.0) Page 13 of 24
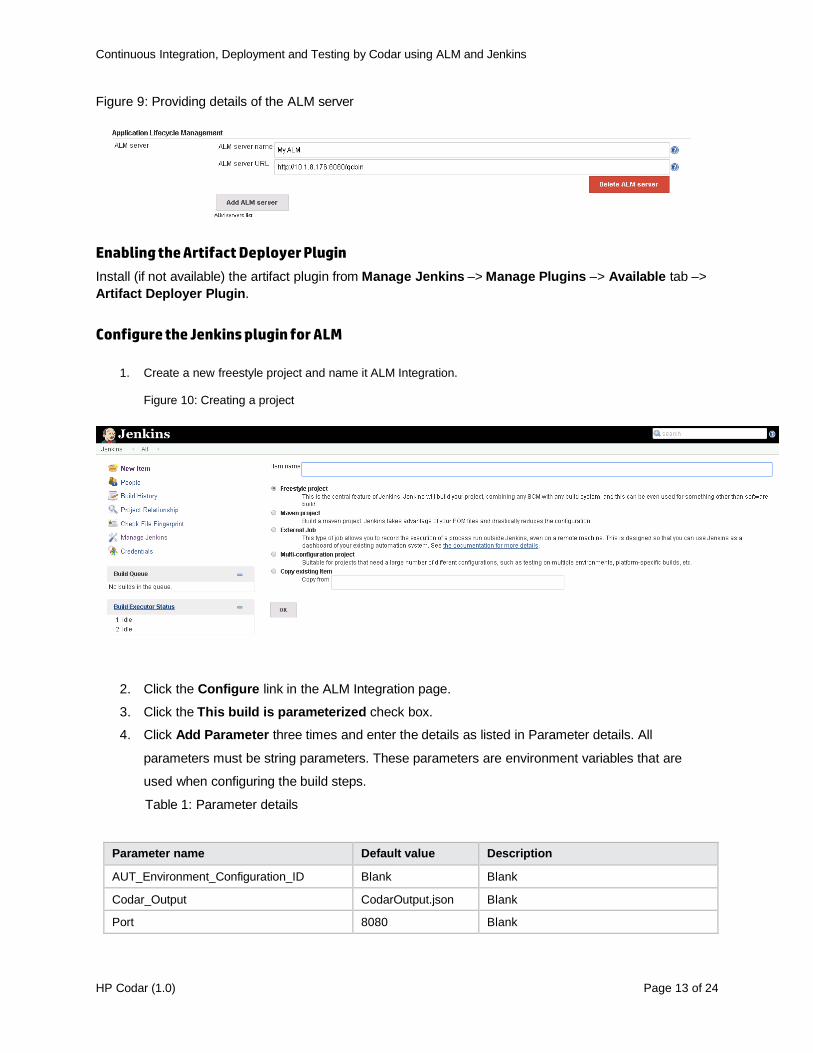
Figure 9: Providing details of the ALM server
Enabling the Artifact Deployer Plugin
Install (if not available) the artifact plugin from Manage Jenkins –> Manage Plugins –> Available tab –>
Artifact Deployer Plugin.
Configure the Jenkins plugin for ALM
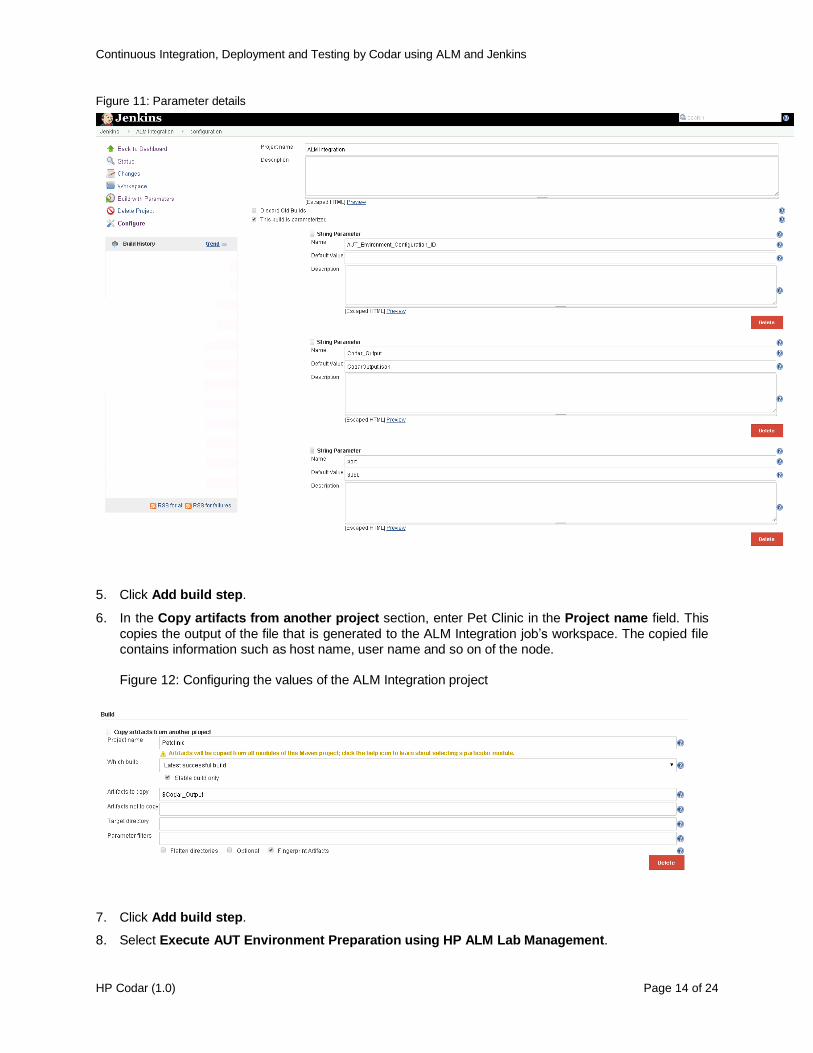
1. Create a new freestyle project and name it ALM Integration.
Figure 10: Creating a project
2. Click the Configure link in the ALM Integration page.
3. Click the This build is parameterized check box.
4. Click Add Parameter three times and enter the details as listed in Parameter details. All
parameters must be string parameters. These parameters are environment variables that are
used when configuring the build steps.
Table 1: Parameter details
Parameter name Default value Description
AUT_Environment_Configuration_ID Blank Blank
Codar_Output CodarOutput.json Blank
Port 8080 Blank
Continuous Integration, Deployment and Testing by Codar using ALM and Jenkins
HP Codar (1.0) Page 14 of 24
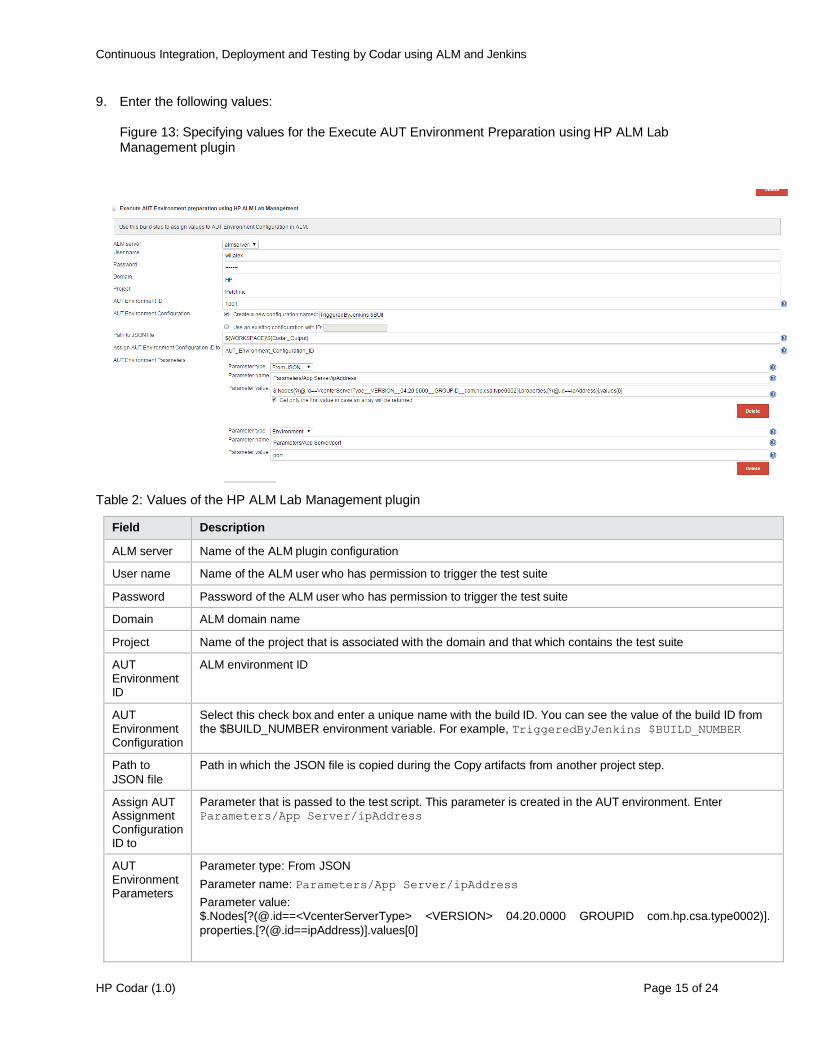
Figure 11: Parameter details
5. Click Add build step.
6. In the Copy artifacts from another project section, enter Pet Clinic in the Project name field. This
copies the output of the file that is generated to the ALM Integration job’s workspace. The copied file contains information such as host name, user name and so on of the node.
Figure 12: Configuring the values of the ALM Integration project
7. Click Add build step.
8. Select Execute AUT Environment Preparation using HP ALM Lab Management.
Continuous Integration, Deployment and Testing by Codar using ALM and Jenkins
HP Codar (1.0) Page 15 of 24
9. Enter the following values:
Figure 13: Specifying values for the Execute AUT Environment Preparation using HP ALM Lab Management plugin
Table 2: Values of the HP ALM Lab Management plugin
Field Description
ALM server Name of the ALM plugin configuration
User name Name of the ALM user who has permission to trigger the test suite
Password Password of the ALM user who has permission to trigger the test suite
Domain ALM domain name
Project Name of the project that is associated with the domain and that which contains the test suite
AUT Environment ID
ALM environment ID
AUT Environment Configuration
Select this check box and enter a unique name with the build ID. You can see the value of the build ID from the $BUILD_NUMBER environment variable. For example, TriggeredByJenkins $BUILD_NUMBER
Path to
JSON file
Path in which the JSON file is copied during the Copy artifacts from another project step.
Assign AUT Assignment Configuration ID to
Parameter that is passed to the test script. This parameter is created in the AUT environment. Enter Parameters/App Server/ipAddress
AUT Environment Parameters
Parameter type: From JSON
Parameter name: Parameters/App Server/ipAddress
Parameter value: $.Nodes[?(@.id==<VcenterServerType> <VERSION> 04.20.0000 GROUPID com.hp.csa.type0002)].
properties.[?(@.id==ipAddress)].values[0]
Continuous Integration, Deployment and Testing by Codar using ALM and Jenkins
HP Codar (1.0) Page 16 of 24
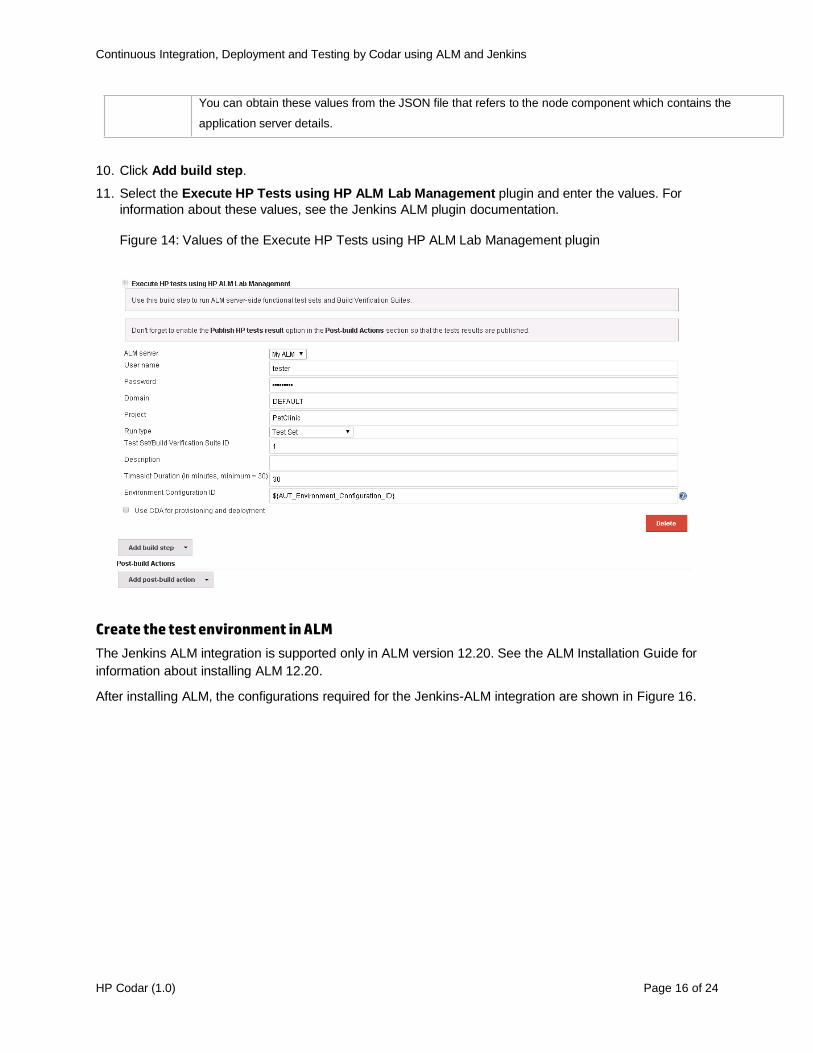
10. Click Add build step.
11. Select the Execute HP Tests using HP ALM Lab Management plugin and enter the values. For
information about these values, see the Jenkins ALM plugin documentation.
Figure 14: Values of the Execute HP Tests using HP ALM Lab Management plugin
Create the test environment in ALM
The Jenkins ALM integration is supported only in ALM version 12.20. See the ALM Installation Guide for
information about installing ALM 12.20.
After installing ALM, the configurations required for the Jenkins-ALM integration are shown in Figure 16.
You can obtain these values from the JSON file that refers to the node component which contains the
application server details.
Continuous Integration, Deployment and Testing by Codar using ALM and Jenkins
HP Codar (1.0) Page 17 of 24
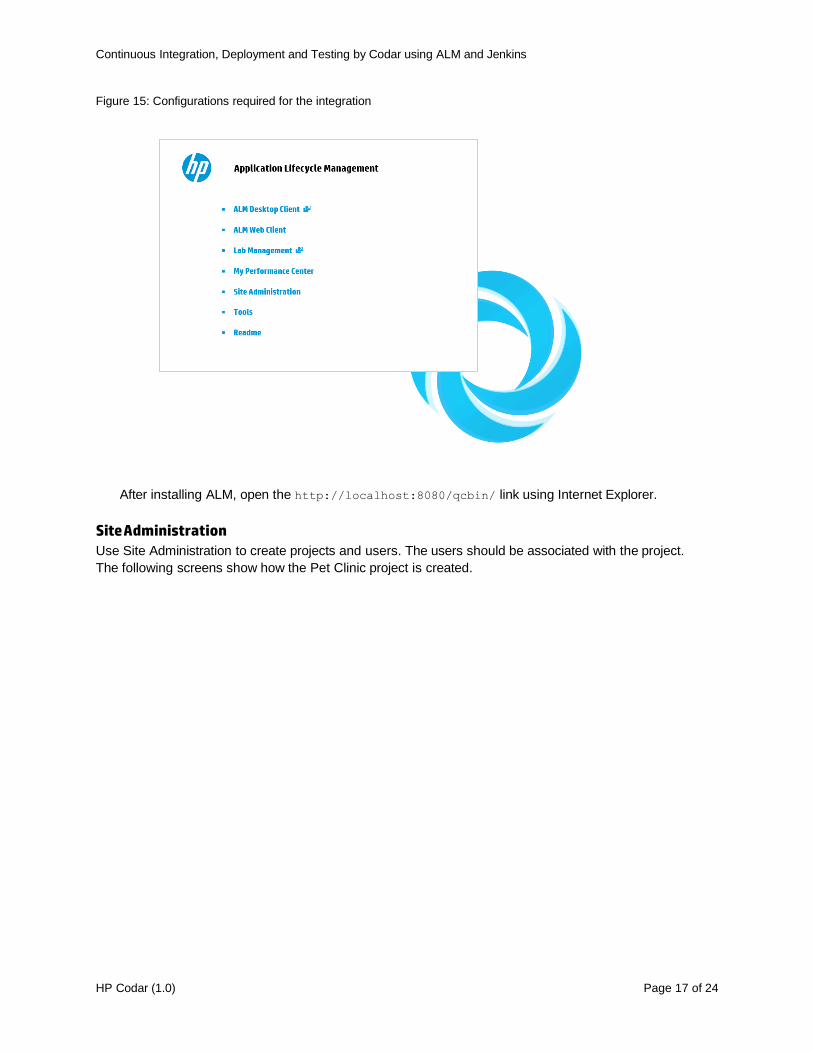
Figure 15: Configurations required for the integration
After installing ALM, open the http://localhost:8080/qcbin/ link using Internet Explorer.
Site Administration
Use Site Administration to create projects and users. The users should be associated with the project.
The following screens show how the Pet Clinic project is created.
Continuous Integration, Deployment and Testing by Codar using ALM and Jenkins
HP Codar (1.0) Page 18 of 24
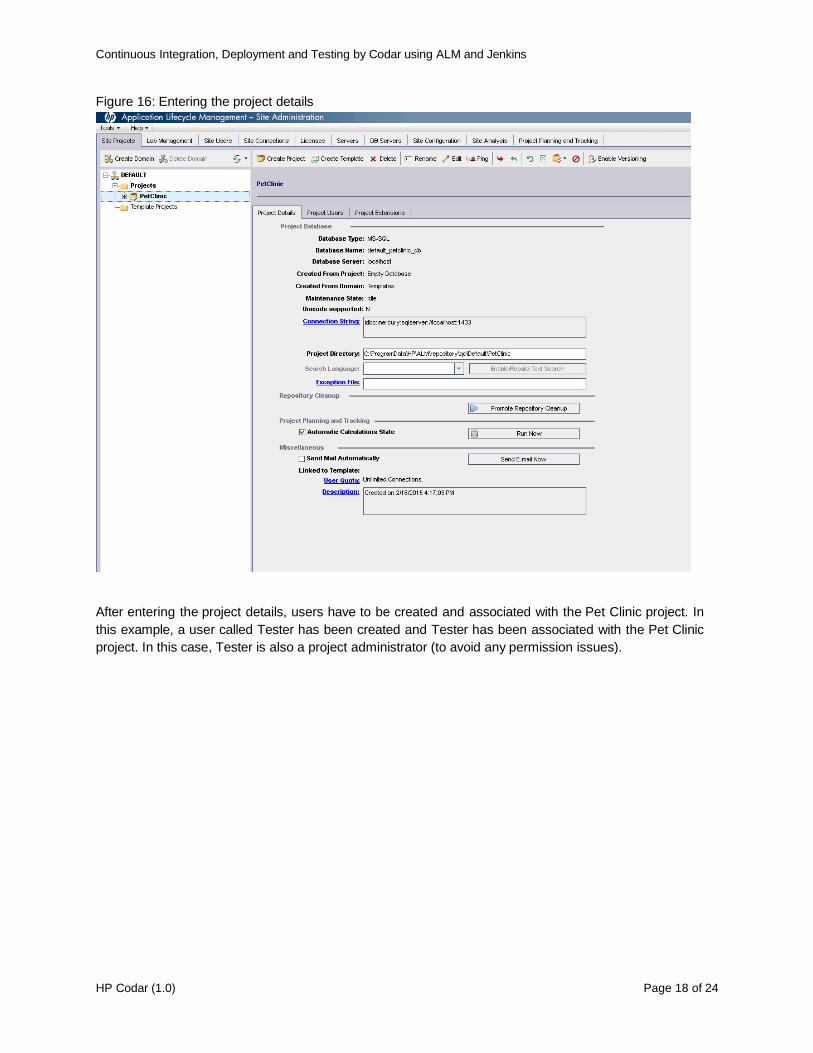
Figure 16: Entering the project details
After entering the project details, users have to be created and associated with the Pet Clinic project. In
this example, a user called Tester has been created and Tester has been associated with the Pet Clinic
project. In this case, Tester is also a project administrator (to avoid any permission issues).

Continuous Integration, Deployment and Testing by Codar using ALM and Jenkins
HP Codar (1.0) Page 19 of 24
Figure 17: Creating a user
For more information about using Site Administration, see the ALM Administration Guide.
HP ALM Lab Service You can install HP ALM Lab Service either on the same computer in which ALM 12.20 is installed or on a
different computer. Ensure that HP ALM Lab Service is running. For information about installing and
configuring ALM Lab Service, see the HP ALM Guide.
Note – If HP ALM Lab Service is installed on a different computer, then VAPI-XP must be installed. To do
this, open Internet Explorer on the computer in which HP ALM Lab Service is installed and type
http://<alm server hostname>:<port>/qcbin/addins.html

Continuous Integration, Deployment and Testing by Codar using ALM and Jenkins
HP Codar (1.0) Page 20 of 24
Figure 18: Installing VAPI-XP
To download the VAPI-XI libraries, register the client with HP ALM as shown in Figure 20.
Figure 19: Downloading libraries
Continuous Integration, Deployment and Testing by Codar using ALM and Jenkins
HP Codar (1.0) Page 21 of 24
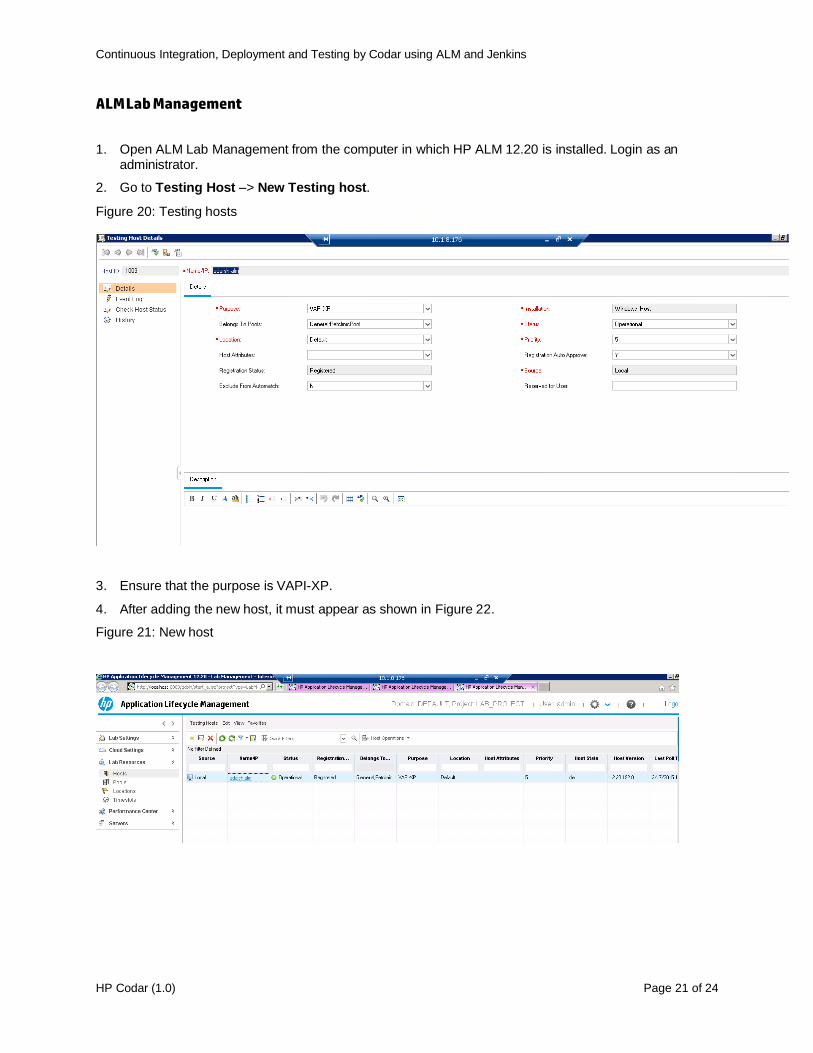
ALM Lab Management
1. Open ALM Lab Management from the computer in which HP ALM 12.20 is installed. Login as an administrator.
2. Go to Testing Host –> New Testing host.
Figure 20: Testing hosts
3. Ensure that the purpose is VAPI-XP.
4. After adding the new host, it must appear as shown in Figure 22.
Figure 21: New host
Continuous Integration, Deployment and Testing by Codar using ALM and Jenkins
HP Codar (1.0) Page 22 of 24
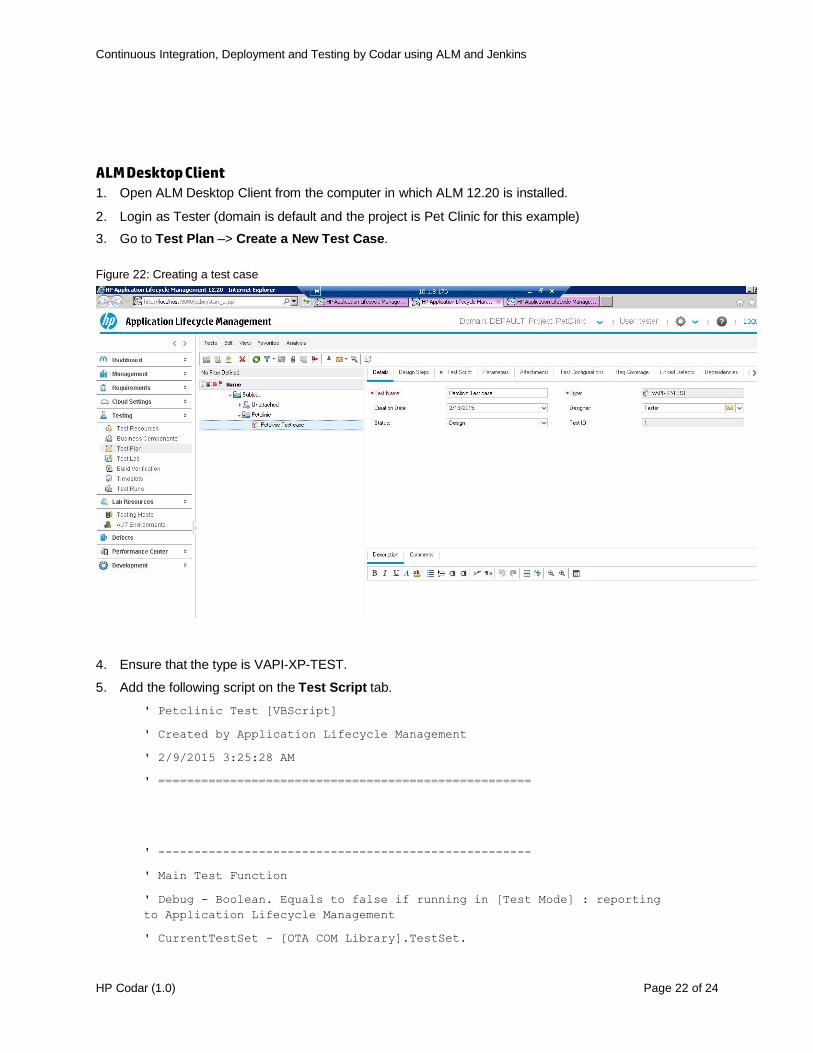
ALM Desktop Client
1. Open ALM Desktop Client from the computer in which ALM 12.20 is installed.
2. Login as Tester (domain is default and the project is Pet Clinic for this example)
3. Go to Test Plan –> Create a New Test Case.
Figure 22: Creating a test case
4. Ensure that the type is VAPI-XP-TEST.
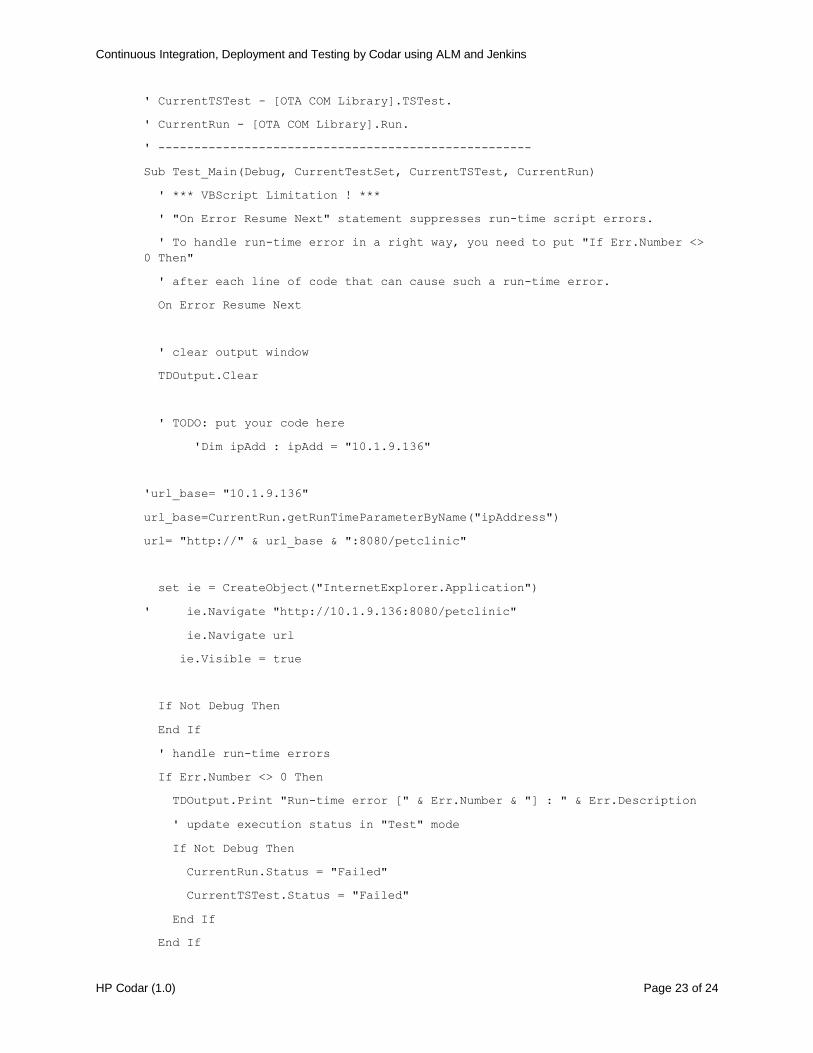
5. Add the following script on the Test Script tab.
' Petclinic Test [VBScript]
' Created by Application Lifecycle Management
' 2/9/2015 3:25:28 AM
' ====================================================
' ----------------------------------------------------
' Main Test Function
' Debug - Boolean. Equals to false if running in [Test Mode] : reporting
to Application Lifecycle Management
' CurrentTestSet - [OTA COM Library].TestSet.
Continuous Integration, Deployment and Testing by Codar using ALM and Jenkins
HP Codar (1.0) Page 23 of 24
' CurrentTSTest - [OTA COM Library].TSTest.
' CurrentRun - [OTA COM Library].Run.
' ----------------------------------------------------
Sub Test_Main(Debug, CurrentTestSet, CurrentTSTest, CurrentRun)
' *** VBScript Limitation ! ***
' "On Error Resume Next" statement suppresses run-time script errors.
' To handle run-time error in a right way, you need to put "If Err.Number <>
0 Then"
' after each line of code that can cause such a run-time error.
On Error Resume Next
' clear output window
TDOutput.Clear
' TODO: put your code here
'Dim ipAdd : ipAdd = "10.1.9.136"
'url_base= "10.1.9.136"
url_base=CurrentRun.getRunTimeParameterByName("ipAddress")
url= "http://" & url_base & ":8080/petclinic"
set ie = CreateObject("InternetExplorer.Application")
' ie.Navigate "http://10.1.9.136:8080/petclinic"
ie.Navigate url
ie.Visible = true
If Not Debug Then
End If
' handle run-time errors
If Err.Number <> 0 Then
TDOutput.Print "Run-time error [" & Err.Number & "] : " & Err.Description
' update execution status in "Test" mode
If Not Debug Then
CurrentRun.Status = "Failed"
CurrentTSTest.Status = "Failed"
End If
End If
Continuous Integration, Deployment and Testing by Codar using ALM and Jenkins
HP Codar (1.0) Page 24 of 24
End Sub
6. Ensure that Testing Hosts is updated with the information added in Lab Management.
7. Verify that the Pet Clinic test case is successful by manually running the test case in the test lab.
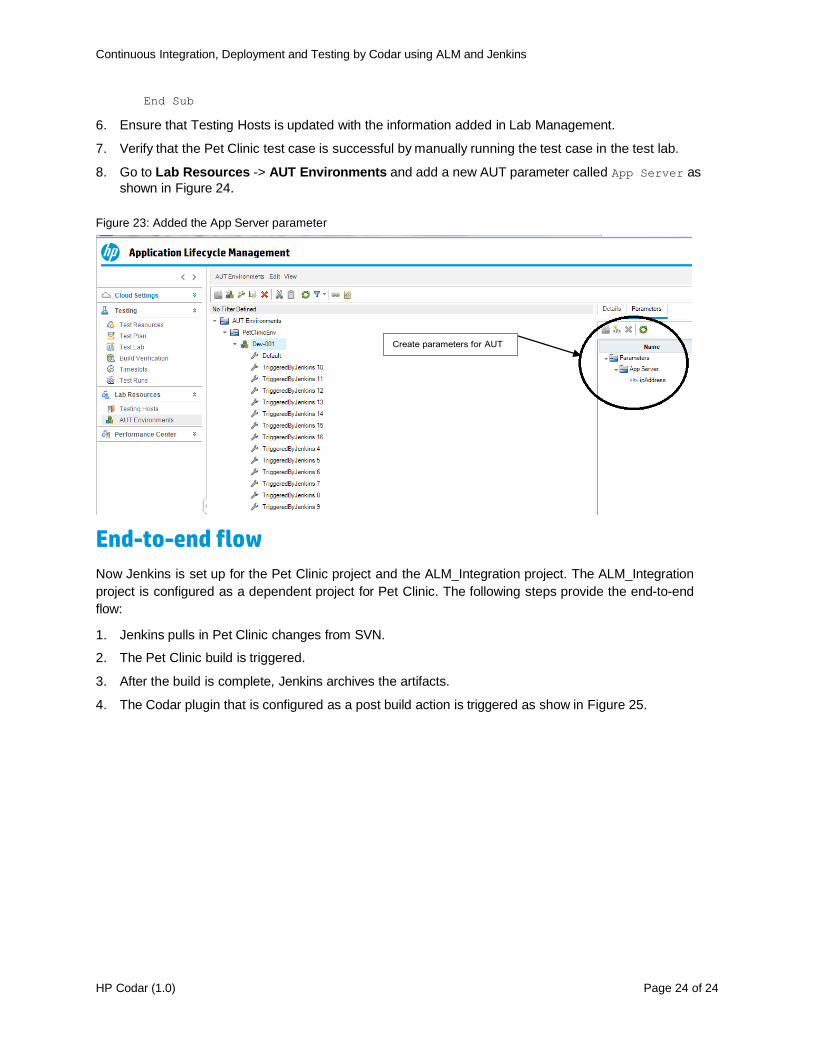
8. Go to Lab Resources -> AUT Environments and add a new AUT parameter called App Server as
shown in Figure 24.
Figure 23: Added the App Server parameter
End-to-end flow
Now Jenkins is set up for the Pet Clinic project and the ALM_Integration project. The ALM_Integration
project is configured as a dependent project for Pet Clinic. The following steps provide the end-to-end
flow:
1. Jenkins pulls in Pet Clinic changes from SVN.
2. The Pet Clinic build is triggered.
3. After the build is complete, Jenkins archives the artifacts.
4. The Codar plugin that is configured as a post build action is triggered as show in Figure 25.
Continuous Integration, Deployment and Testing by Codar using ALM and Jenkins
HP Codar (1.0) Page 25 of 24
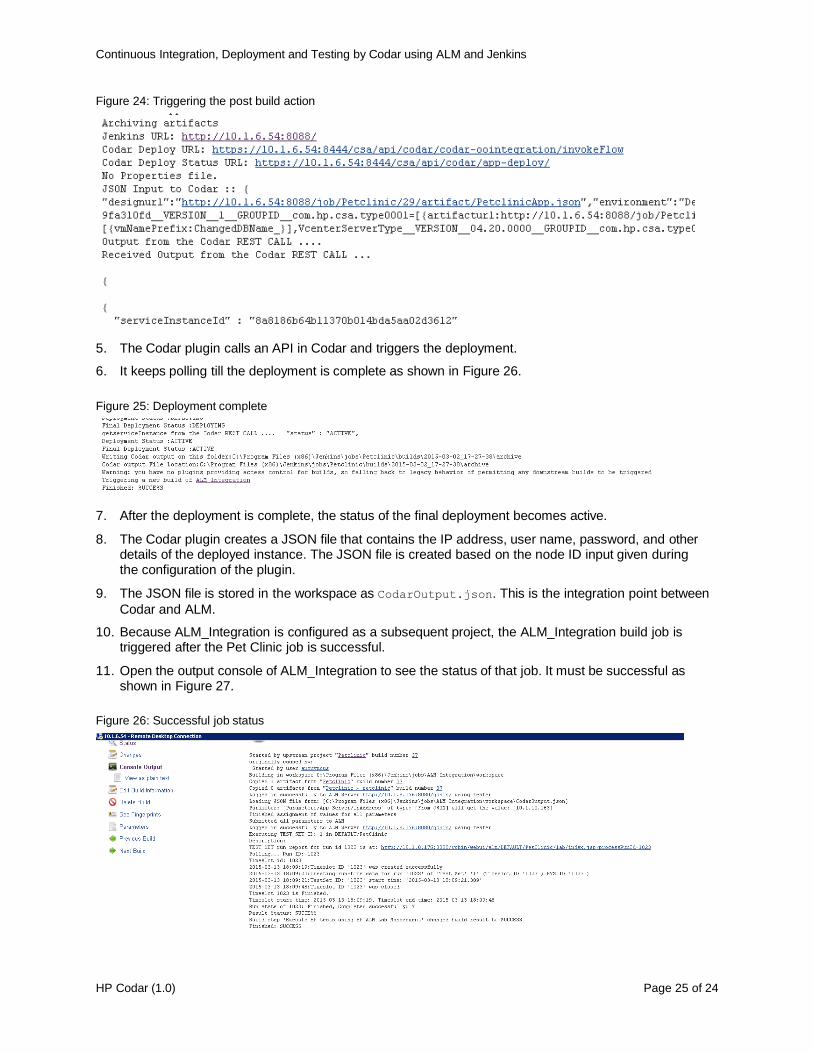
Figure 24: Triggering the post build action
5. The Codar plugin calls an API in Codar and triggers the deployment.
6. It keeps polling till the deployment is complete as shown in Figure 26.
Figure 25: Deployment complete
7. After the deployment is complete, the status of the final deployment becomes active.
8. The Codar plugin creates a JSON file that contains the IP address, user name, password, and other details of the deployed instance. The JSON file is created based on the node ID input given during the configuration of the plugin.
9. The JSON file is stored in the workspace as CodarOutput.json. This is the integration point between
Codar and ALM.
10. Because ALM_Integration is configured as a subsequent project, the ALM_Integration build job is triggered after the Pet Clinic job is successful.
11. Open the output console of ALM_Integration to see the status of that job. It must be successful as shown in Figure 27.
Figure 26: Successful job status
Continuous Integration, Deployment and Testing by Codar using ALM and Jenkins
HP Codar (1.0) Page 26 of 24
12. The ALM_Integration job copies the JSON file from workspace. It then reads the JSON file and looks for parameters such as IP address.
13. The ALM_Integration job logs on to ALM with the credentials provided during configuration. It triggers the test case and executes the test script.
14. The test script is executed in the computer that is configured in Lab Management. VAPI tests are
executed. In this case, it opens the Pet Clinic link http://<localhost>:8080 in a browser and
verifies that the application is deployed successfully.
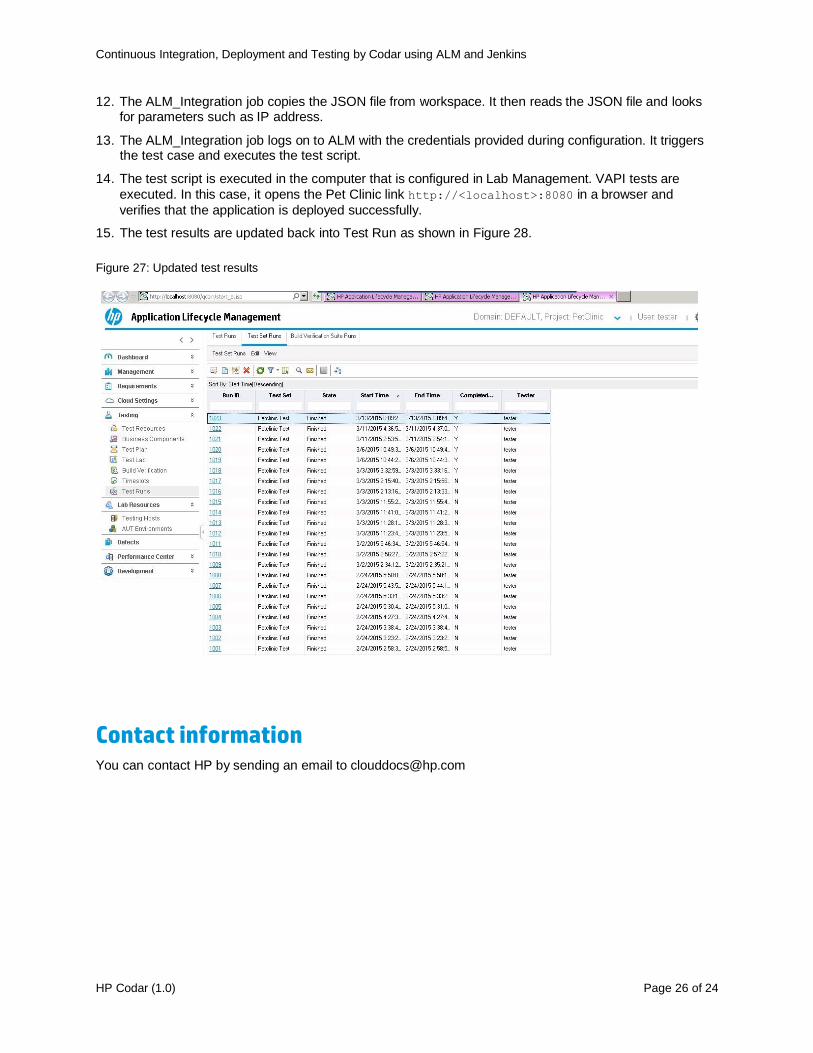
15. The test results are updated back into Test Run as shown in Figure 28.
Figure 27: Updated test results
Contact information You can contact HP by sending an email to [email protected]