Embed Size (px)
Citation preview

HP 9250C Digital SenderHP Embedded Web Server User Guide


HP Embedded Web Server
User Guide

Copyright and Warranty
© 2007 Copyright Hewlett-PackardDevelopment Company, L.P.
Reproduction, adaptation or translationwithout prior written permission is prohibited,except as allowed under the copyright laws.
The information contained herein is subjectto change without notice.
The only warranties for HP products andservices are set forth in the express warrantystatements accompanying such productsand services. Nothing herein should beconstrued as constituting an additionalwarranty. HP shall not be liable for technicalor editorial errors or omissions containedherein.
Trademarks and credits
Adobe® and PostScript® are trademarks ofAdobe Systems Incorporated.
Microsoft® and Windows® are U.S.registered trademarks of Microsoft Corp.
Edition 1, 3/2007

Table of contents
1 OverviewWhat is an embedded Web server? .................................................................................................... 1
Features .............................................................................................................................. 1HP Web Jetadmin and the HP Embedded Web Server ...................................................... 2
System requirements ........................................................................................................................... 2Opening the HP Embedded Web Server ............................................................................................. 2Login and logoff .................................................................................................................................... 4
To log in as an administrator ............................................................................................... 4To log off as an administrator ............................................................................................. 4
Navigating through the HP Embedded Web Server ............................................................................. 5
2 Viewing product status from the HP EWS Information screensDevice Status ...................................................................................................................................... 8Configuration Page ............................................................................................................................... 9Supplies Status .................................................................................................................................. 11Event Log ........................................................................................................................................... 12Usage Page ........................................................................................................................................ 13Device Information ............................................................................................................................. 14Control Panel Snapshot ..................................................................................................................... 15
3 Configuring the product from the Settings screensConfigure Device ................................................................................................................................ 16E-mail Server ...................................................................................................................................... 18
Configuring outgoing e-mail ............................................................................................... 19Configuring the return e-mail address ............................................................................... 19
Alerts .................................................................................................................................................. 20Using the Alerts screen with a product ............................................................................. 22Sending e-mail commands to the product ......................................................................... 25
To request information pages by using an e-mail message .............................. 25AutoSend ............................................................................................................................................ 26
To turn on the AutoSend feature ....................................................................................... 27Security .............................................................................................................................................. 28
Configure Security Settings ............................................................................................... 29Authentication Manager ..................................................................................................................... 32LDAP Authentication .......................................................................................................................... 33Kerberos Authentication ..................................................................................................................... 36
Advanced Kerberos Realm Settings .................................................................................. 39Kerberos Authentication Tasks .......................................................................................... 40
Initializing Kerberos authentication ................................................................... 40
ENWW iii
Configure the Authentication Manager for Kerberos Authentication ................. 42Configure Address Settings for Kerberos Authentication .................................. 42Use the control panel for Kerberos Authentication ............................................ 43
Device PIN Authentication .................................................................................................................. 44User PIN Authentication ..................................................................................................................... 45
Add New Users .................................................................................................................. 46Edit or delete existing users ............................................................................................... 47
Edit Other Links .................................................................................................................................. 48Adding a link ...................................................................................................................... 49Removing a link ................................................................................................................. 49
Device Information ............................................................................................................................. 50Language ........................................................................................................................................... 51Date & Time ....................................................................................................................................... 52
Date/Time Format .............................................................................................................. 53Clock Drift Correction ......................................................................................................... 53
4 Setting the digital sending optionsUsing the HP DSS software ............................................................................................................... 55General Settings ................................................................................................................................. 56Send to Folder .................................................................................................................................... 57
Adding a predefined folder ................................................................................................. 58Editing or viewing a predefined folder ................................................................................ 58Removing a predefined folder ............................................................................................ 59Removing all folders .......................................................................................................... 59Testing a predefined folder ................................................................................................ 59
E-mail Settings ................................................................................................................................... 60Advanced E-mail Settings .................................................................................................. 62
E-mail Address Book .......................................................................................................................... 63E-mail Address Book tasks ................................................................................................ 64
Fax Address Book .............................................................................................................................. 65Fax Address Book tasks .................................................................................................... 66
Import/Export ...................................................................................................................................... 67Import an address book ..................................................................................................... 68
Required data and record limits ........................................................................ 69Creating an import file using Microsoft Outlook ................................................ 69
Export an address book ..................................................................................................... 70Clear address books .......................................................................................................... 70
Addressing Settings ........................................................................................................................... 71Advanced Addressing Settings .......................................................................................... 75
Log ..................................................................................................................................................... 76Preferences Settings .......................................................................................................................... 78
5 Managing network operation from the Networking screensOverview ............................................................................................................................................ 80
6 Using the Other Links as a resourcehp instant support .............................................................................................................................. 82
How hp instant support works ............................................................................................ 82Information you can get from hp instant support ............................................................... 83
iv ENWW

Shop for Supplies ............................................................................................................................... 83Product Support ................................................................................................................................ 84My Service Provider and My Service Contract ................................................................................... 84
Index ................................................................................................................................................................... 85
ENWW v

List of tables
Table 1-1 HP Embedded Web Server ................................................................................................................ 5Table 2-1 Device Status ..................................................................................................................................... 8Table 2-2 Configuration Page .......................................................................................................................... 10Table 2-3 Supplies Status ................................................................................................................................ 11Table 2-4 Event Log ......................................................................................................................................... 12Table 2-5 Usage Page ..................................................................................................................................... 13Table 3-1 Configure Device .............................................................................................................................. 17Table 3-2 E-mail Server ................................................................................................................................... 18Table 3-3 Alerts ................................................................................................................................................ 20Table 3-4 Requesting information pages using an e-mail message ................................................................ 25Table 3-5 AutoSend ......................................................................................................................................... 26Table 3-6 Security ............................................................................................................................................ 28Table 3-7 Authentication Manager ................................................................................................................... 32Table 3-8 LDAP Authentication ........................................................................................................................ 34Table 3-9 Kerberos Authentication ................................................................................................................... 37Table 3-10 Edit Other Links .............................................................................................................................. 48Table 3-11 Language ....................................................................................................................................... 51Table 3-12 Date & Time ................................................................................................................................... 52Table 4-1 General Settings .............................................................................................................................. 56Table 4-2 Send to Folder settings .................................................................................................................... 57Table 4-3 E-mail Settings ................................................................................................................................. 60Table 4-4 Advanced E-mail Settings ................................................................................................................ 62Table 4-5 Addressing Settings ......................................................................................................................... 72Table 4-6 Advanced Addressing Settings ........................................................................................................ 75Table 4-7 Log ................................................................................................................................................... 76Table 4-8 Preferences Settings ........................................................................................................................ 78Table 5-1 Network Settings .............................................................................................................................. 81
vi ENWW

List of figures
Figure 1-1 Enter Network Password dialog box ................................................................................................. 4Figure 1-2 Sample HP EWS screen ................................................................................................................... 5Figure 2-1 Device Status screen ........................................................................................................................ 8Figure 2-2 Configuration Page screen ............................................................................................................... 9Figure 2-3 Supplies Status screen ................................................................................................................... 11Figure 2-4 Event Log screen ............................................................................................................................ 12Figure 2-5 Usage Page screen ........................................................................................................................ 13Figure 2-6 Device Information screen .............................................................................................................. 14Figure 2-7 Control Panel Snapshot screen ...................................................................................................... 15Figure 3-1 Configure Device screen ................................................................................................................. 16Figure 3-2 E-mail Server screen ...................................................................................................................... 18Figure 3-3 Alerts screen ................................................................................................................................... 20Figure 3-4 Alerts - setup screen ....................................................................................................................... 22Figure 3-5 Alerts - test screen .......................................................................................................................... 24Figure 3-6 AutoSend screen ............................................................................................................................ 26Figure 3-7 Security screen ............................................................................................................................... 28Figure 3-8 Configure Security Settings screen – 1 of 2 ................................................................................... 30Figure 3-9 Configure Security Settings screen – 2of 2 .................................................................................... 31Figure 3-10 Authentication Manager screen .................................................................................................... 32Figure 3-11 LDAP Authentication screen ......................................................................................................... 33Figure 3-12 Kerberos Authentication screen .................................................................................................... 37Figure 3-13 Advanced Kerberos Realm Settings screen ................................................................................. 40Figure 3-14 Device PIN Authentication screen ................................................................................................ 44Figure 3-15 User PIN Authentication screen .................................................................................................... 46Figure 3-16 Edit Other Links screen ................................................................................................................. 48Figure 3-17 Device Information screen ............................................................................................................ 50Figure 3-18 Language screen .......................................................................................................................... 51Figure 3-19 Date & Time screen ...................................................................................................................... 52Figure 3-20 Date/Time Format screen ............................................................................................................. 53Figure 3-21 Date & Time - clock drift correction screen ................................................................................... 54Figure 4-1 General Settings screen ................................................................................................................. 56Figure 4-2 Send to Folder screen ..................................................................................................................... 57Figure 4-3 E-mail Settings screen .................................................................................................................... 60Figure 4-4 Advanced E-mail Settings screen ................................................................................................... 62Figure 4-5 E-mail Address Book screen ........................................................................................................... 63Figure 4-6 Fax Address Book screen ............................................................................................................... 65Figure 4-7 Import/Export screen ....................................................................................................................... 67Figure 4-8 Addressing Settings screen ............................................................................................................ 71Figure 4-9 Advanced Addressing Settings screen ........................................................................................... 75Figure 4-10 Log screen .................................................................................................................................... 76
ENWW vii

Figure 4-11 Details screen ............................................................................................................................... 77Figure 4-12 Troubleshoot screen ..................................................................................................................... 78Figure 4-13 Preferences Settings screen ......................................................................................................... 78Figure 5-1 Network Settings screen ................................................................................................................. 80Figure 6-1 Device Information screen .............................................................................................................. 82
viii ENWW

1 Overview
What is an embedded Web server?A Web server provides an environment in which Web programs can run, in much the same way that anoperating system, such as Microsoft® Windows®, provides an environment in which programs can runon your computer. A Web browser, such as Microsoft Internet Explorer, Apple Safari, or Mozilla Firefox,can show output from a Web server.
An embedded Web server resides on a hardware product (such as a printer) in the firmware, rather thanas software that is loaded on a network server.
The advantage of an embedded Web server is that it provides an interface to the product that anyonewho has a network-connected computer and a standard Web browser can open and use. No specialsoftware needs to be installed or configured.
With the HP Embedded Web Server (HP EWS), you can view product status information, changesettings, and manage the product at your computer.
NOTE In this guide, the terms "product" and "device" are used interchangeably. When productsor devices are discussed in this guide, the information pertains to HP LaserJet printers,multifunction peripherals (MFPs), or HP Digital Senders. For specific information about thefeatures that your printer, MFP, or digital sender supports, see the documentation that came withyour product.
FeaturesYou can use the HP EWS to view product and network status and to manage printing functions fromyour computer, rather than at the product control panel. With the HP EWS, you can perform these tasks:
● View control-panel messages and product-status information.
● Determine the remaining life for all supplies and configure specific ordering information for supplies.
● Gain access to the product's technical support page.
● Gain access to specific support for recent product events.
● Add up to five additional links or customize links to other Web sites.
● View and change product configuration, such as tray configurations.
● View and change network configuration.
● Receive alerts about product events through e-mail, such as when a paper jam has occurred inthe ADF (automatic document feeder). Set up four different destination lists for each user(administrators and service), with up to 20 recipients on each of the four lists.
ENWW What is an embedded Web server? 1
Ove
rvie
w

● Select the language in which to display the HP EWS screens.
● Conserve energy by scheduling the product sleep delay so that the product will go into sleep modeafter a period of time of not being used.
● Schedule wakeup times for each day so that the product has finished initializing and calibrating bythe time it is to be used.
● Send product configuration and supplies usage information periodically to your service provider.
HP Web Jetadmin and the HP Embedded Web ServerHP Web Jetadmin is a Web-based system management tool that you can use with a Web browser. TheHP EWS and HP Web Jetadmin work together to meet all of your product-management needs. You canuse the software to install and manage networked products effectively. Network administrators canmanage networked products remotely, from practically anywhere.
The HP EWS provides a simple, easy-to-use solution for one-to-one product management inenvironments that have a limited number of products. However, in environments that have severalproducts, you might want to use HP Web Jetadmin to manage groups of products. With HP WebJetadmin you can discover, manage, and configure multiple products simultaneously.
HP Web Jetadmin is available from HP online support (HP Web Jetadmin www.hp.com/go/webjetadmin).
System requirementsIn order to use the HP EWS, you must have the following components:
● A supported Web browser. Browsers that support embedded Web servers include (but are notlimited to) the following:
● Konqueror 3.0 or later
● Microsoft Internet Explorer 6.0 or later
● Mozilla Firefox 1.0 (and Mozilla derivatives)
● Netscape Navigator 6.2 or later
● Opera 7.0 or later
● Safari 1.0 or later
● A transmission control protocol/Internet protocol-based (TCP/IP-based) network connection.
● An HP Jetdirect print server (embedded or enhanced input/output [EIO]) installed in the product.
Opening the HP Embedded Web ServerUse the following procedure to open the HP EWS.
2 Chapter 1 Overview ENWW
Overview

NOTE You cannot view the HP EWS screens from outside a firewall.
1. Open a supported Web browser.
2. In the Address or Go to field, type the IPv4 or IPv6 TCP/IP address, the host name, or theconfigured host name that is assigned to the product. See the following examples.
● IPv4 TCP/IP address: http://192.168.1.1
● IPv6 TCP/IP address: http://[2001:0ba0:0000:0000:0000:0000:0000:1234]
● Host name: npiXXXXXX
If you do not know the TCP/IP address for the product, you can find it by using the control-panel menu.For instructions, see the user guide that came with your product.
NOTE The HP EWS for the HP 9250C Digital Sender supports IPv6 on the Information,Settings, and Networking tabs. However, the Digital Sending tab supports only IPv4 addressconfiguration.
ENWW Opening the HP Embedded Web Server 3
Ove
rvie
w
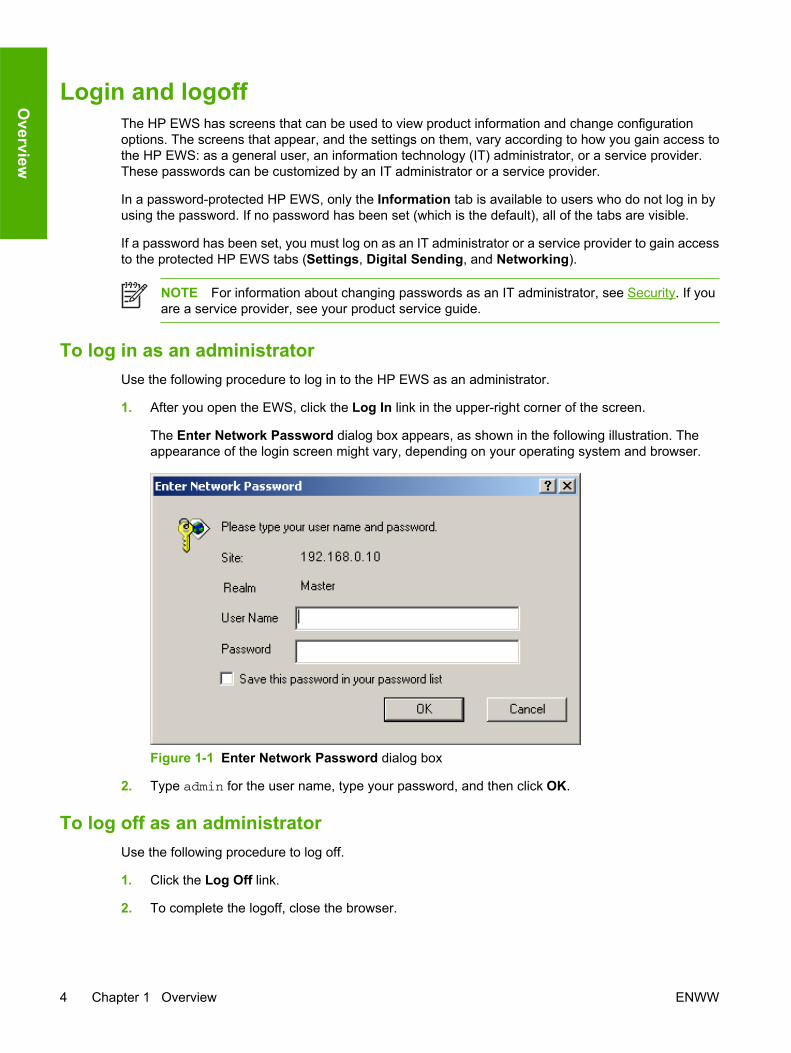
Login and logoffThe HP EWS has screens that can be used to view product information and change configurationoptions. The screens that appear, and the settings on them, vary according to how you gain access tothe HP EWS: as a general user, an information technology (IT) administrator, or a service provider.These passwords can be customized by an IT administrator or a service provider.
In a password-protected HP EWS, only the Information tab is available to users who do not log in byusing the password. If no password has been set (which is the default), all of the tabs are visible.
If a password has been set, you must log on as an IT administrator or a service provider to gain accessto the protected HP EWS tabs (Settings, Digital Sending, and Networking).
NOTE For information about changing passwords as an IT administrator, see Security. If youare a service provider, see your product service guide.
To log in as an administratorUse the following procedure to log in to the HP EWS as an administrator.
1. After you open the EWS, click the Log In link in the upper-right corner of the screen.
The Enter Network Password dialog box appears, as shown in the following illustration. Theappearance of the login screen might vary, depending on your operating system and browser.
Figure 1-1 Enter Network Password dialog box
2. Type admin for the user name, type your password, and then click OK.
To log off as an administratorUse the following procedure to log off.
1. Click the Log Off link.
2. To complete the logoff, close the browser.
4 Chapter 1 Overview ENWW
Overview
CAUTION If you do not close the browser, the connection to the product HP EWS continues torun and could pose security risks.
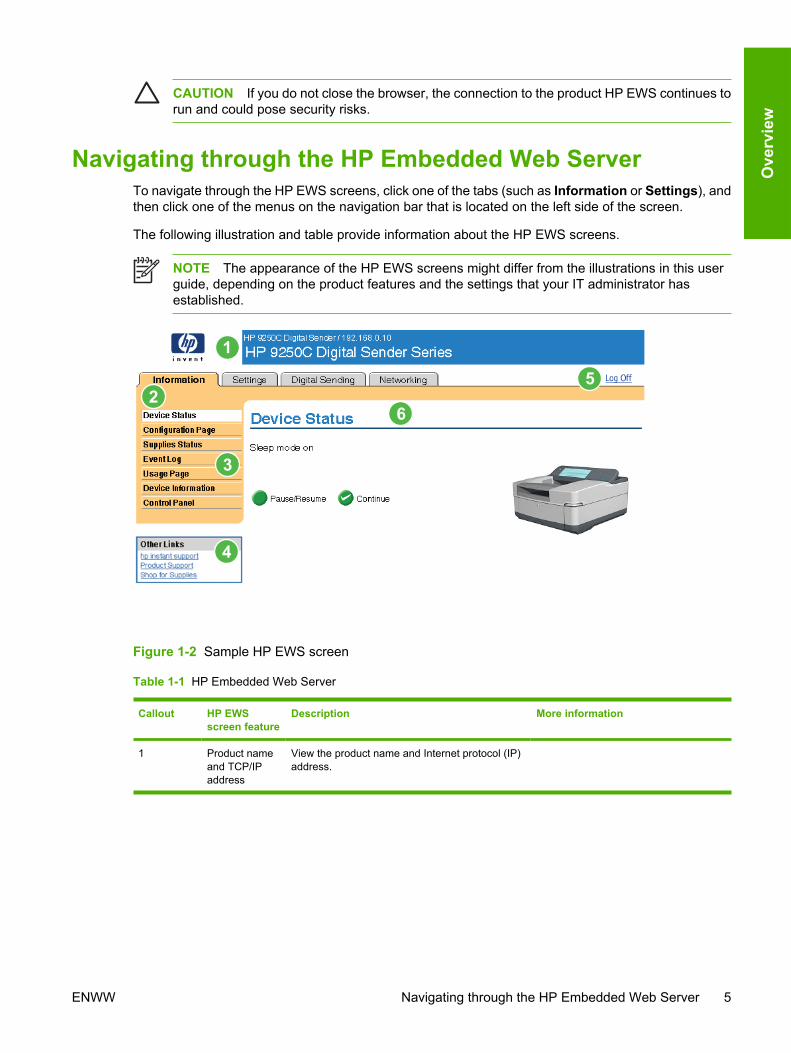
Navigating through the HP Embedded Web ServerTo navigate through the HP EWS screens, click one of the tabs (such as Information or Settings), andthen click one of the menus on the navigation bar that is located on the left side of the screen.
The following illustration and table provide information about the HP EWS screens.
NOTE The appearance of the HP EWS screens might differ from the illustrations in this userguide, depending on the product features and the settings that your IT administrator hasestablished.
Figure 1-2 Sample HP EWS screen
Table 1-1 HP Embedded Web Server
Callout HP EWSscreen feature
Description More information
1 Product nameand TCP/IPaddress
View the product name and Internet protocol (IP)address.
ENWW Navigating through the HP Embedded Web Server 5
Ove
rvie
w
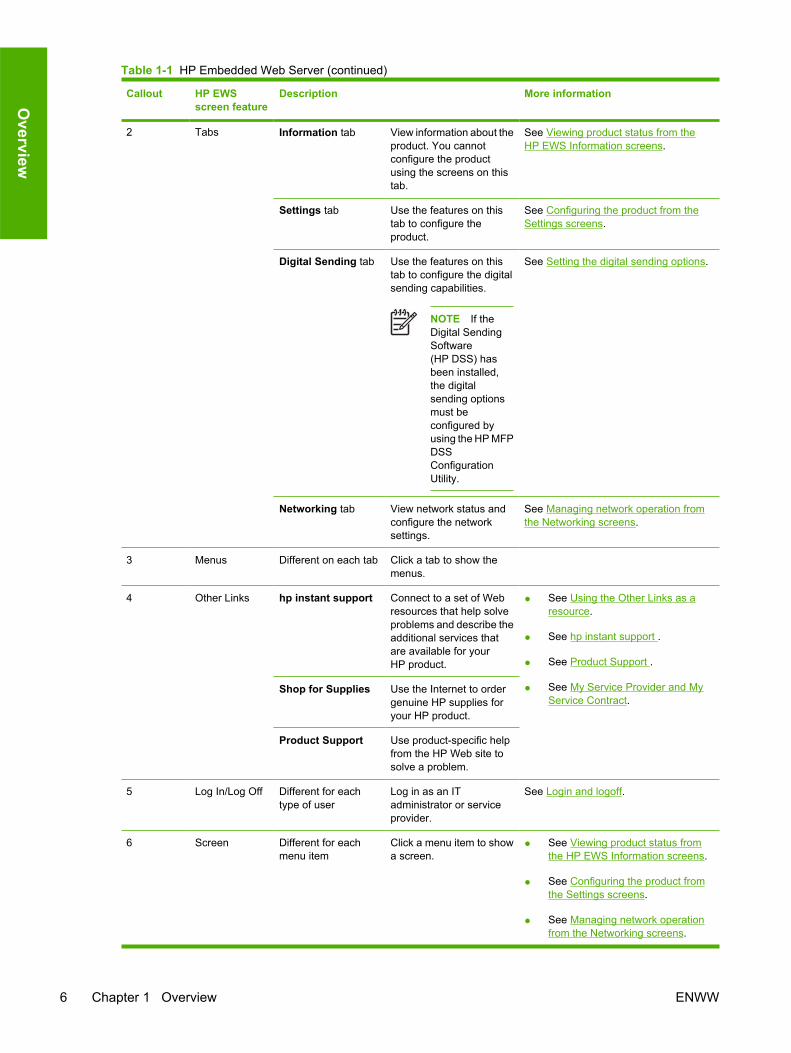
Callout HP EWSscreen feature
Description More information
2 Tabs Information tab View information about theproduct. You cannotconfigure the productusing the screens on thistab.
See Viewing product status from theHP EWS Information screens.
Settings tab Use the features on thistab to configure theproduct.
See Configuring the product from theSettings screens.
Digital Sending tab Use the features on thistab to configure the digitalsending capabilities.
NOTE If theDigital SendingSoftware(HP DSS) hasbeen installed,the digitalsending optionsmust beconfigured byusing the HP MFPDSSConfigurationUtility.
See Setting the digital sending options.
Networking tab View network status andconfigure the networksettings.
See Managing network operation fromthe Networking screens.
3 Menus Different on each tab Click a tab to show themenus.
4 Other Links hp instant support Connect to a set of Webresources that help solveproblems and describe theadditional services thatare available for yourHP product.
● See Using the Other Links as aresource.
● See hp instant support .
● See Product Support .
● See My Service Provider and MyService Contract.
Shop for Supplies Use the Internet to ordergenuine HP supplies foryour HP product.
Product Support Use product-specific helpfrom the HP Web site tosolve a problem.
5 Log In/Log Off Different for eachtype of user
Log in as an ITadministrator or serviceprovider.
See Login and logoff.
6 Screen Different for eachmenu item
Click a menu item to showa screen.
● See Viewing product status fromthe HP EWS Information screens.
● See Configuring the product fromthe Settings screens.
● See Managing network operationfrom the Networking screens.
Table 1-1 HP Embedded Web Server (continued)
6 Chapter 1 Overview ENWW
Overview
2 Viewing product status from theHP EWS Information screens
The screens available from the Information tab are for informational purposes only; you cannotconfigure the product from these screens. To configure the product through the HP EWS, seeConfiguring the product from the Settings screens.
NOTE Some products do not support all of these screens.
ENWW 7
Info
rmat
ion
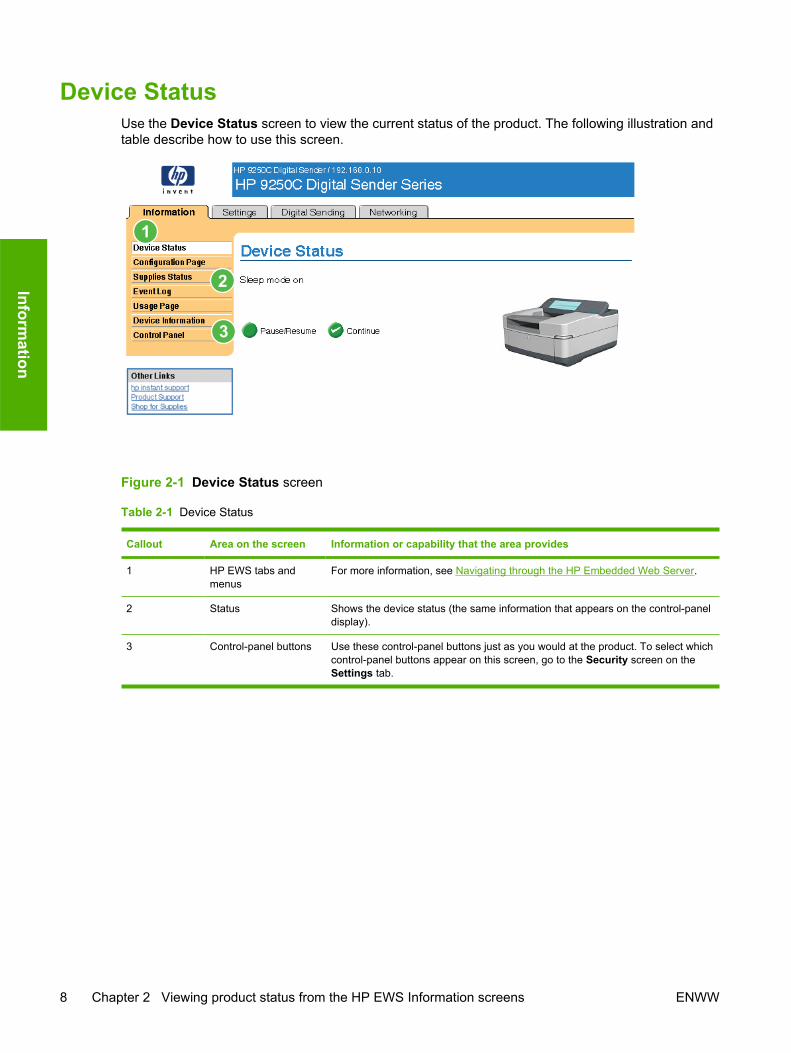
Device StatusUse the Device Status screen to view the current status of the product. The following illustration andtable describe how to use this screen.
Figure 2-1 Device Status screen
Table 2-1 Device Status
Callout Area on the screen Information or capability that the area provides
1 HP EWS tabs andmenus
For more information, see Navigating through the HP Embedded Web Server.
2 Status Shows the device status (the same information that appears on the control-paneldisplay).
3 Control-panel buttons Use these control-panel buttons just as you would at the product. To select whichcontrol-panel buttons appear on this screen, go to the Security screen on theSettings tab.
8 Chapter 2 Viewing product status from the HP EWS Information screens ENWW
Information

Configuration PageUse the Configuration Page screen to view current product settings, help troubleshoot problems, andverify the installation of optional accessories such as dual inline memory modules (DIMMs). Thefollowing illustration and table describe how to use this screen.
Figure 2-2 Configuration Page screen
ENWW Configuration Page 9
Info
rmat
ion

Table 2-2 Configuration Page
Callout Area on the screen Information or capability that the area provides
1 HP EWS tabs and menus For more information, see Navigating through the HP Embedded WebServer.
2 Device Information Lists the serial number, version numbers, and other information for thedevice.
3 Options Lists:
● Version and TCP/IP address for all network devices connected tothe product (Jetdirect or internal Jetdirect)
● Options that are installed in each DIMM slot and EIO slot
● USB devices that can be connected to a device used as a host USBcontroller, such as mass storage devices, card swipes, or keypads
4 Memory Lists the memory information, including information about DIMMmemory and on-board memory.
5 Security Lists the status of the control-panel lock, disk write-protect options, anddirect-connect (USB or parallel) ports.
You can change the status of the Direct Connect ports on the Securityscreen under the Settings tab by selecting or clearing the DisableDirect Ports check box.
10 Chapter 2 Viewing product status from the HP EWS Information screens ENWW
Information
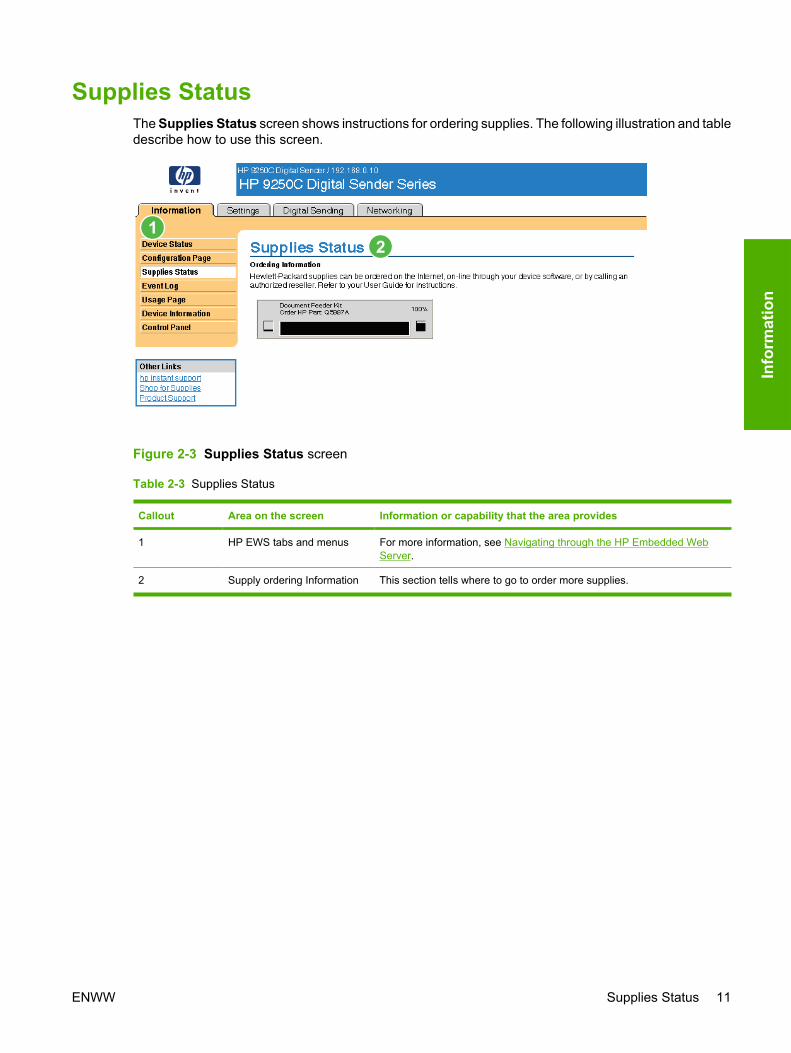
Supplies StatusThe Supplies Status screen shows instructions for ordering supplies. The following illustration and tabledescribe how to use this screen.
Figure 2-3 Supplies Status screen
Table 2-3 Supplies Status
Callout Area on the screen Information or capability that the area provides
1 HP EWS tabs and menus For more information, see Navigating through the HP Embedded WebServer.
2 Supply ordering Information This section tells where to go to order more supplies.
ENWW Supplies Status 11
Info
rmat
ion
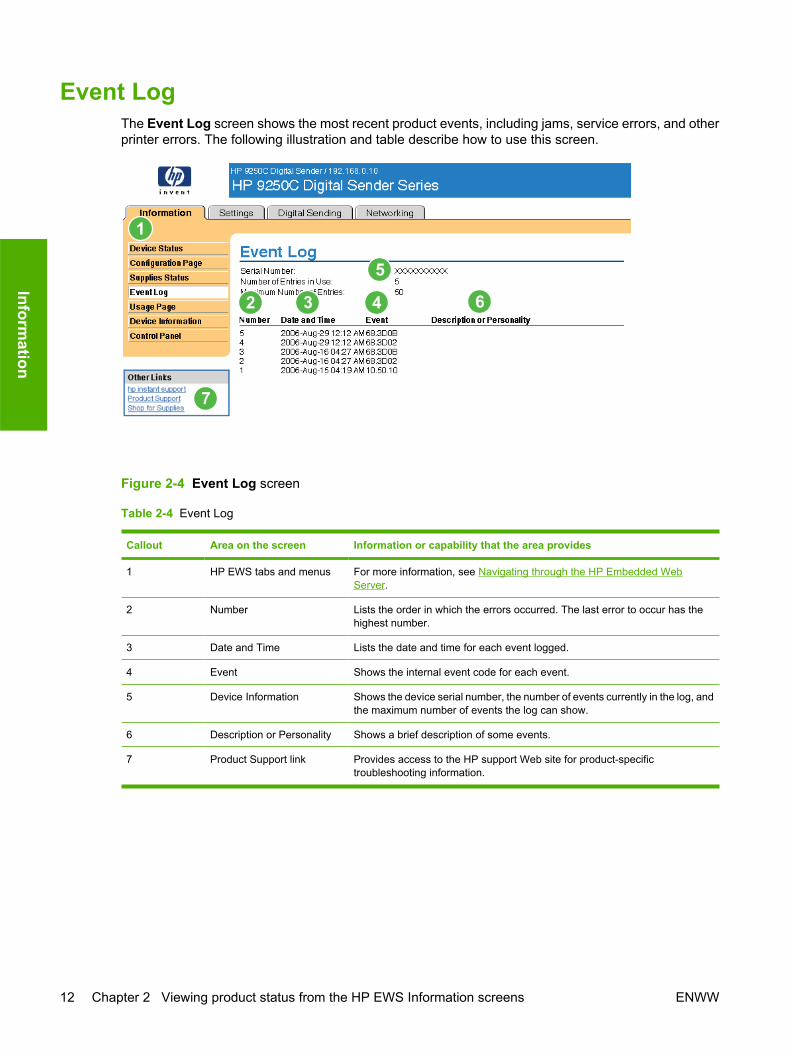
Event LogThe Event Log screen shows the most recent product events, including jams, service errors, and otherprinter errors. The following illustration and table describe how to use this screen.
Figure 2-4 Event Log screen
Table 2-4 Event Log
Callout Area on the screen Information or capability that the area provides
1 HP EWS tabs and menus For more information, see Navigating through the HP Embedded WebServer.
2 Number Lists the order in which the errors occurred. The last error to occur has thehighest number.
3 Date and Time Lists the date and time for each event logged.
4 Event Shows the internal event code for each event.
5 Device Information Shows the device serial number, the number of events currently in the log, andthe maximum number of events the log can show.
6 Description or Personality Shows a brief description of some events.
7 Product Support link Provides access to the HP support Web site for product-specifictroubleshooting information.
12 Chapter 2 Viewing product status from the HP EWS Information screens ENWW
Information
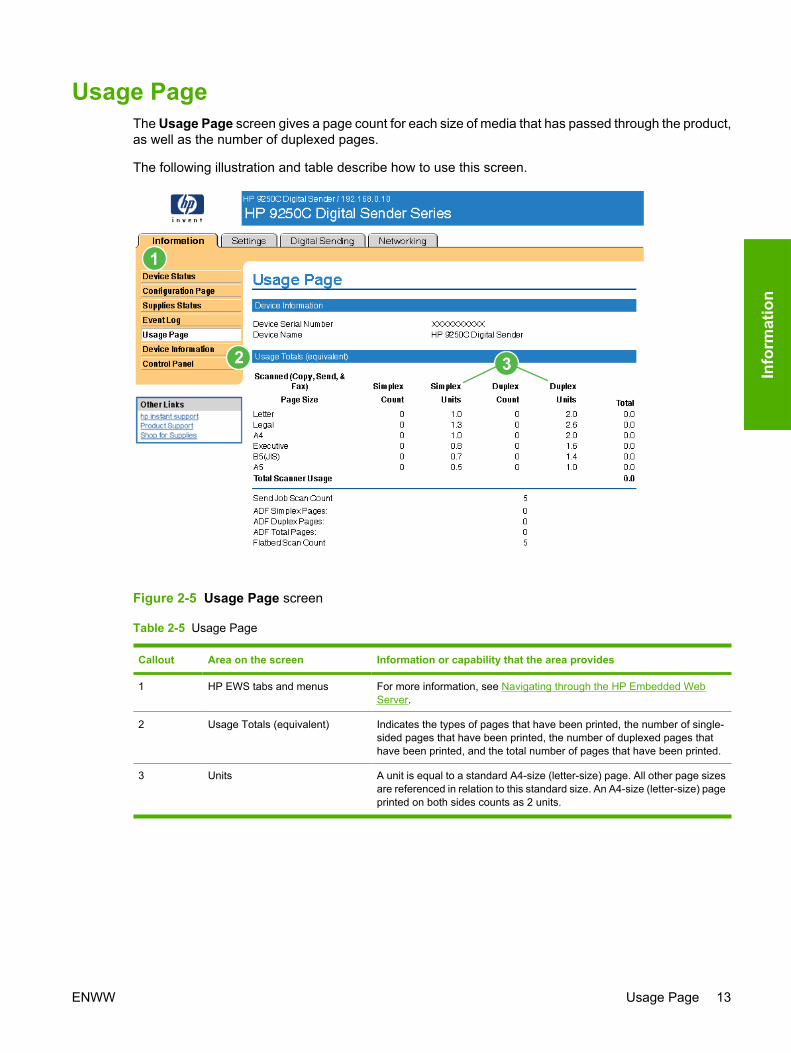
Usage PageThe Usage Page screen gives a page count for each size of media that has passed through the product,as well as the number of duplexed pages.
The following illustration and table describe how to use this screen.
Figure 2-5 Usage Page screen
Table 2-5 Usage Page
Callout Area on the screen Information or capability that the area provides
1 HP EWS tabs and menus For more information, see Navigating through the HP Embedded WebServer.
2 Usage Totals (equivalent) Indicates the types of pages that have been printed, the number of single-sided pages that have been printed, the number of duplexed pages thathave been printed, and the total number of pages that have been printed.
3 Units A unit is equal to a standard A4-size (letter-size) page. All other page sizesare referenced in relation to this standard size. An A4-size (letter-size) pageprinted on both sides counts as 2 units.
ENWW Usage Page 13
Info
rmat
ion

Device InformationThe Device Information screen shows the following information:
● Device name
● Device location
● Asset number
● Company name
● Contact person
● Product name
● Device model
● Device serial number
The product name, device model, and device serial number are generated automatically. You canconfigure the other information on this screen from the Device Information screen on the Settings tab.
Figure 2-6 Device Information screen
14 Chapter 2 Viewing product status from the HP EWS Information screens ENWW
Information
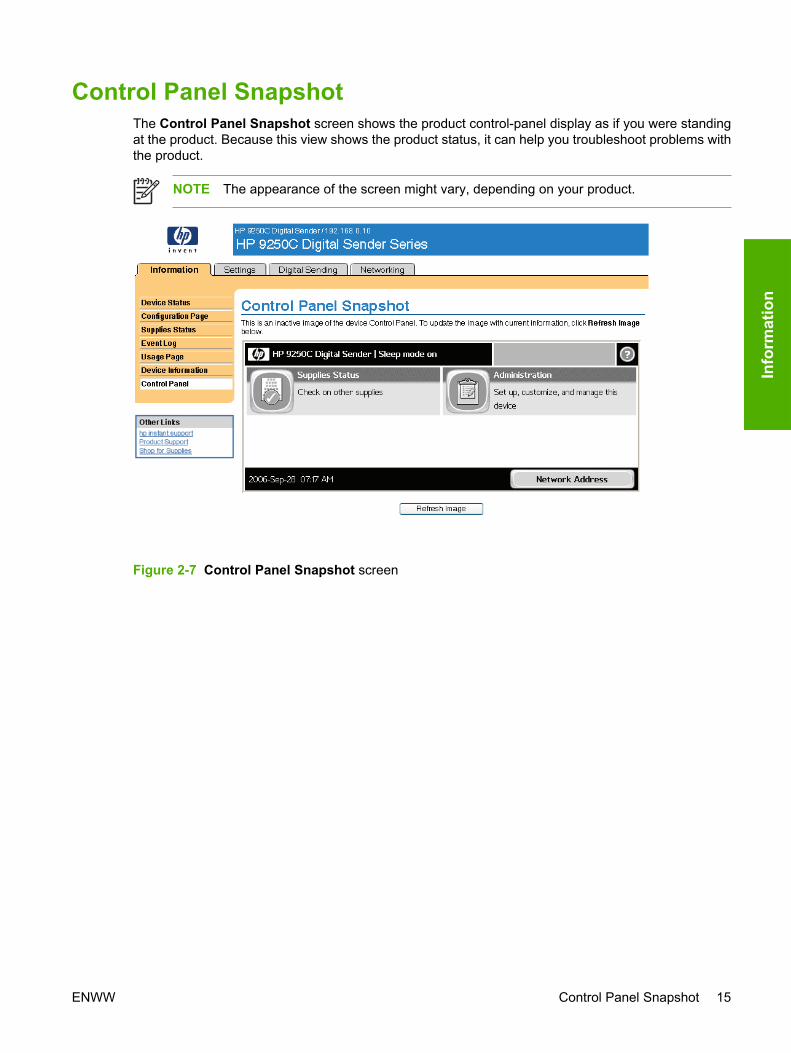
Control Panel SnapshotThe Control Panel Snapshot screen shows the product control-panel display as if you were standingat the product. Because this view shows the product status, it can help you troubleshoot problems withthe product.
NOTE The appearance of the screen might vary, depending on your product.
Figure 2-7 Control Panel Snapshot screen
ENWW Control Panel Snapshot 15
Info
rmat
ion
3 Configuring the product from theSettings screens
Use the screens on the Settings tab to configure the product from your computer.
NOTE Some products do not support all of these screens.
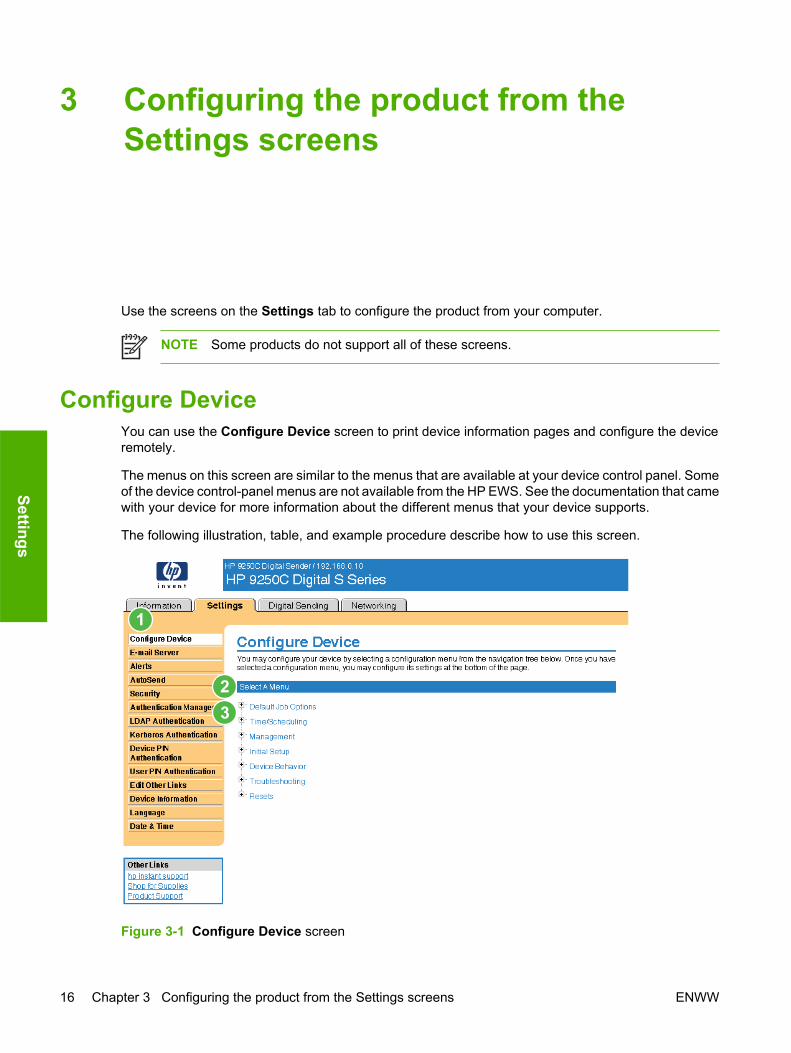
Configure DeviceYou can use the Configure Device screen to print device information pages and configure the deviceremotely.
The menus on this screen are similar to the menus that are available at your device control panel. Someof the device control-panel menus are not available from the HP EWS. See the documentation that camewith your device for more information about the different menus that your device supports.
The following illustration, table, and example procedure describe how to use this screen.
Figure 3-1 Configure Device screen
16 Chapter 3 Configuring the product from the Settings screens ENWW
Settings
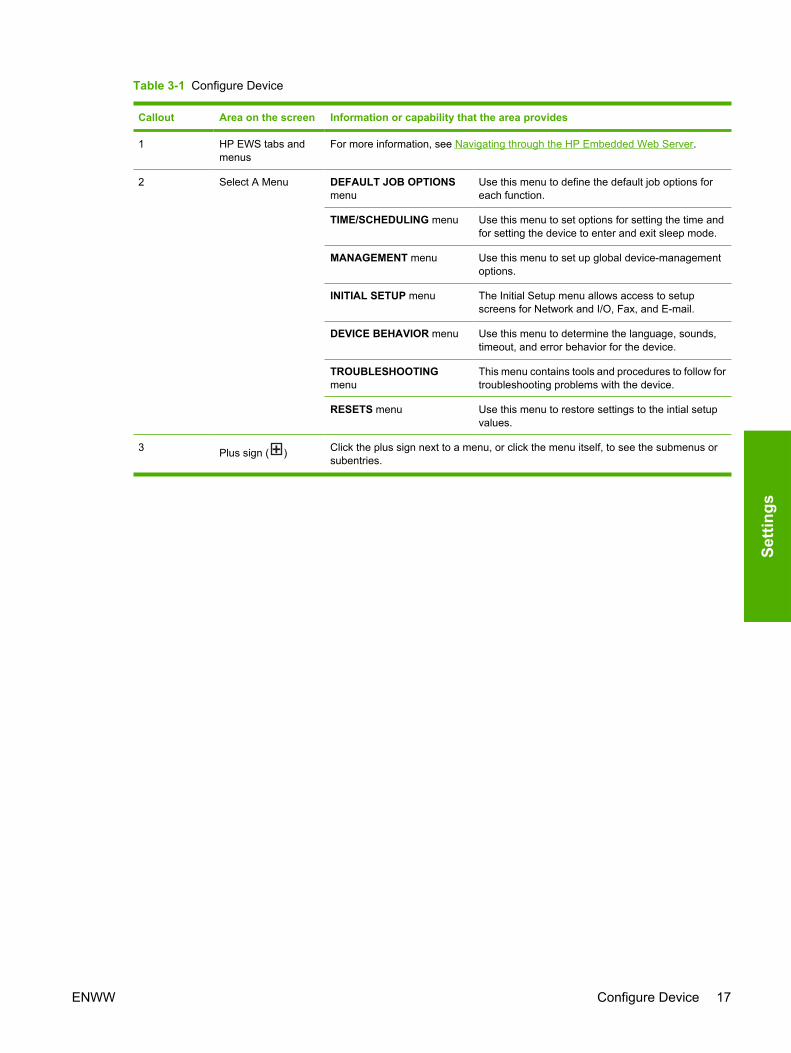
Table 3-1 Configure Device
Callout Area on the screen Information or capability that the area provides
1 HP EWS tabs andmenus
For more information, see Navigating through the HP Embedded Web Server.
2 Select A Menu DEFAULT JOB OPTIONSmenu
Use this menu to define the default job options foreach function.
TIME/SCHEDULING menu Use this menu to set options for setting the time andfor setting the device to enter and exit sleep mode.
MANAGEMENT menu Use this menu to set up global device-managementoptions.
INITIAL SETUP menu The Initial Setup menu allows access to setupscreens for Network and I/O, Fax, and E-mail.
DEVICE BEHAVIOR menu Use this menu to determine the language, sounds,timeout, and error behavior for the device.
TROUBLESHOOTINGmenu
This menu contains tools and procedures to follow fortroubleshooting problems with the device.
RESETS menu Use this menu to restore settings to the intial setupvalues.
3 Plus sign ( ) Click the plus sign next to a menu, or click the menu itself, to see the submenus orsubentries.
ENWW Configure Device 17
Setti
ngs

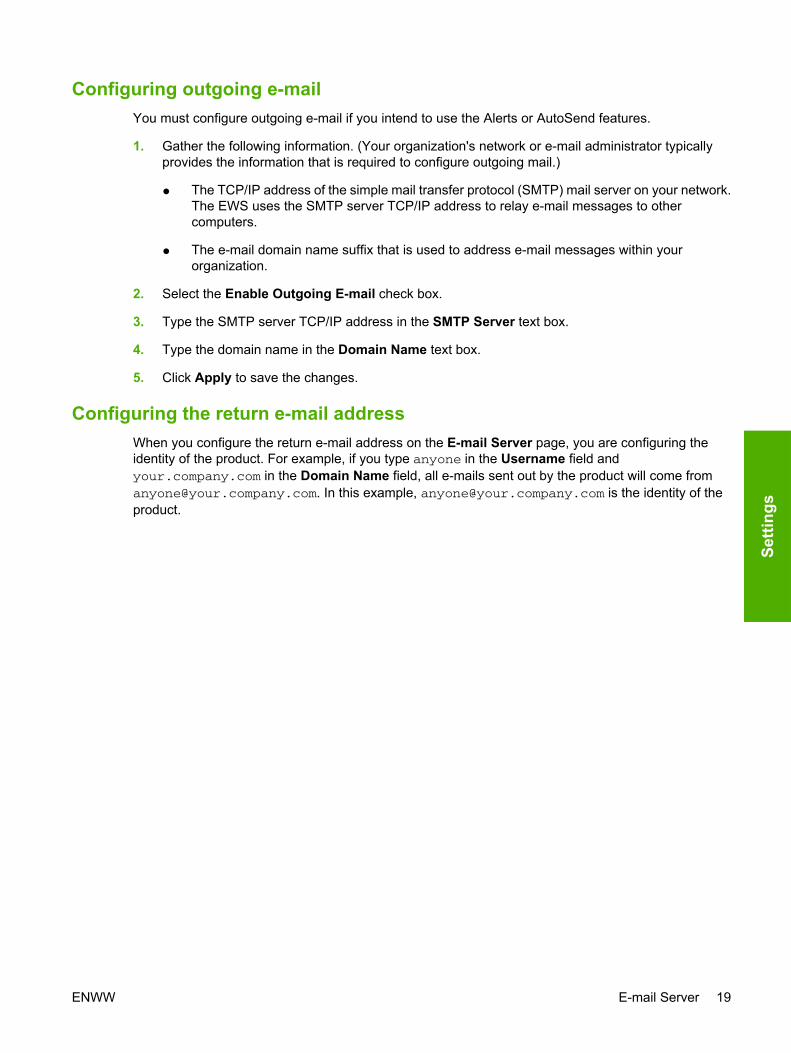
E-mail ServerUse the E-mail Server screen to configure e-mail settings for outgoing e-mail. Use the settings on thisscreen to send e-mail messages, including product alerts. The following illustration, table, andprocedures describe how to use this screen.
Figure 3-2 E-mail Server screen
Table 3-2 E-mail Server
Callout Area on the screen Information or capability that the area provides
1 HP EWS tabs and menus For more information, see Navigating through the HP EmbeddedWeb Server.
2 Outgoing e-mail Configure outgoing e-mail if you intend to use the Alerts orAutoSend features. For more information, see Using the Alertsscreen with a product .
3 Return E-mail Address This is the device's e-mail address that appears in device alerts.For more information, see Configuring the return e-mail address.
18 Chapter 3 Configuring the product from the Settings screens ENWW
Settings
Configuring outgoing e-mailYou must configure outgoing e-mail if you intend to use the Alerts or AutoSend features.
1. Gather the following information. (Your organization's network or e-mail administrator typicallyprovides the information that is required to configure outgoing mail.)
● The TCP/IP address of the simple mail transfer protocol (SMTP) mail server on your network.The EWS uses the SMTP server TCP/IP address to relay e-mail messages to othercomputers.
● The e-mail domain name suffix that is used to address e-mail messages within yourorganization.
2. Select the Enable Outgoing E-mail check box.
3. Type the SMTP server TCP/IP address in the SMTP Server text box.
4. Type the domain name in the Domain Name text box.
5. Click Apply to save the changes.
Configuring the return e-mail addressWhen you configure the return e-mail address on the E-mail Server page, you are configuring theidentity of the product. For example, if you type anyone in the Username field andyour.company.com in the Domain Name field, all e-mails sent out by the product will come [email protected]. In this example, [email protected] is the identity of theproduct.
ENWW E-mail Server 19
Setti
ngs
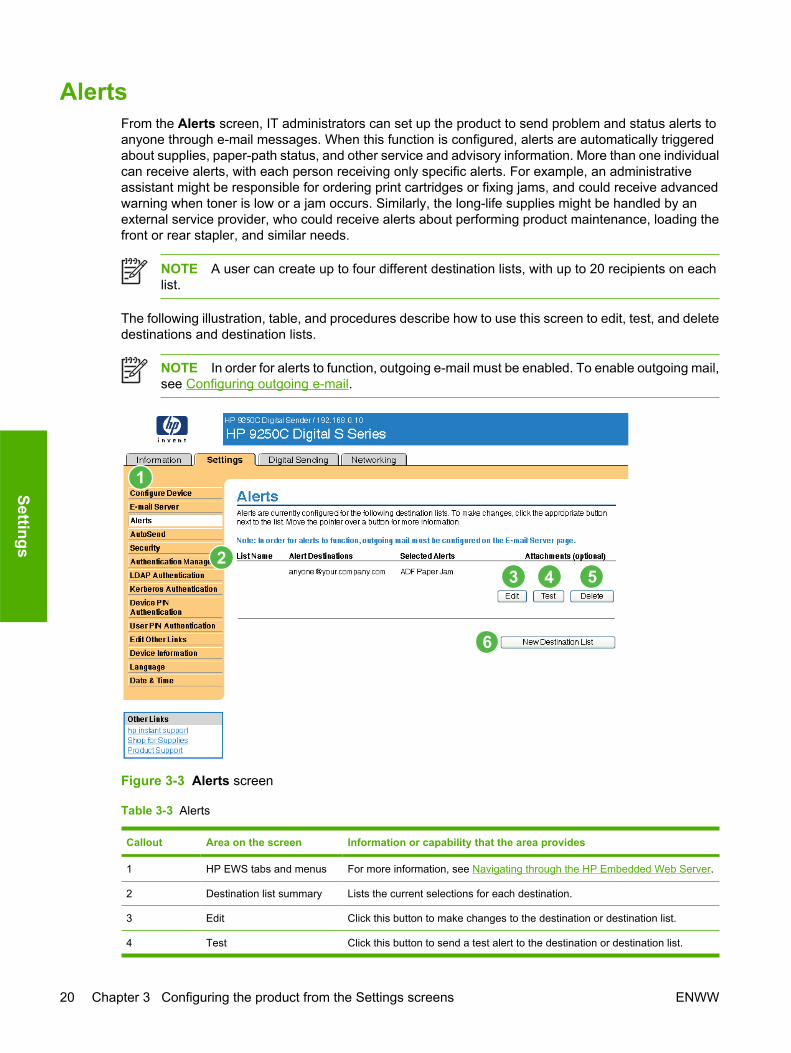
AlertsFrom the Alerts screen, IT administrators can set up the product to send problem and status alerts toanyone through e-mail messages. When this function is configured, alerts are automatically triggeredabout supplies, paper-path status, and other service and advisory information. More than one individualcan receive alerts, with each person receiving only specific alerts. For example, an administrativeassistant might be responsible for ordering print cartridges or fixing jams, and could receive advancedwarning when toner is low or a jam occurs. Similarly, the long-life supplies might be handled by anexternal service provider, who could receive alerts about performing product maintenance, loading thefront or rear stapler, and similar needs.
NOTE A user can create up to four different destination lists, with up to 20 recipients on eachlist.
The following illustration, table, and procedures describe how to use this screen to edit, test, and deletedestinations and destination lists.
NOTE In order for alerts to function, outgoing e-mail must be enabled. To enable outgoing mail,see Configuring outgoing e-mail.
Figure 3-3 Alerts screen
Table 3-3 Alerts
Callout Area on the screen Information or capability that the area provides
1 HP EWS tabs and menus For more information, see Navigating through the HP Embedded Web Server.
2 Destination list summary Lists the current selections for each destination.
3 Edit Click this button to make changes to the destination or destination list.
4 Test Click this button to send a test alert to the destination or destination list.
20 Chapter 3 Configuring the product from the Settings screens ENWW
Settings

Callout Area on the screen Information or capability that the area provides
5 Delete Click this button to delete the destination or destination list.
6 New Destination List Click this button to define the settings for a new destination list for alerts.
Table 3-3 Alerts (continued)
ENWW Alerts 21
Setti
ngs

Using the Alerts screen with a productYou can set up four different lists, with up to 20 recipients on each list.
The Alerts - setup screen that appears when you click either Edit or New Destination List looks similarto the following illustration.
Figure 3-4 Alerts - setup screen
22 Chapter 3 Configuring the product from the Settings screens ENWW
Settings
To configure alerts
1. Do one of the following:
● To create a new destination list, click New Destination List.
-Or-
● To modify an existing destination list, click Edit next to the list that you want to modify.
The Alerts - setup screen appears.
2. Type a name in the List Name field, such as Service or Supplies.
3. Type the e-mail addresses for people who you want to receive alerts. In large environments, systemadministrators can route e-mail addresses to list servers, URLs, and mobile devices for expandedalerts. Add multiple destinations by separating each destination with a comma or semicolon.
4. Select the check box for the alerts that you want to be sent with this destination list. (To see all ofthe alerts that are available for the product, click Show All Alerts.)
5. Where applicable, set the threshold value for the individual alerts.
The threshold value for service alerts and for the paper-path alerts is a user-specified number ofminutes. This is the amount of time that an event will be ignored before an e-mail alert messageis sent. For example, you might want to set the threshold value for the "Tray Open" alert to 10minutes to allow someone to close the tray after loading the tray or clearing a jam.
6. Select the attachments that you want to be included with your e-mail alert messages. Theseattachments can include the following pages. (Go to the Information tab to see examples of thesepages.)
● Usage Page
● Configuration Page
● Event Log Page
● XML Data
The XML Data option should be selected if one of the destinations you have chosen to receivealerts is an automated computer system. Each item that you select will be attached to the e-mail.For example, if you select Usage Page and Event Log Page, you will receive one e-mail messagewith two attachments, one for each selection. If you also select the XML Data option, you willreceive one e-mail message with three attachments: one attachment for the Usage Page in HTML,one for the Event Log in HTML, and a third consisting of instant support information in a text fileattachment that has an .XML extension.
7. Click Apply to save the information.
8. Repeat steps 1 through 7 for each additional list or destination.
Use the following procedure to test the destination list configuration.
ENWW Alerts 23
Setti
ngs
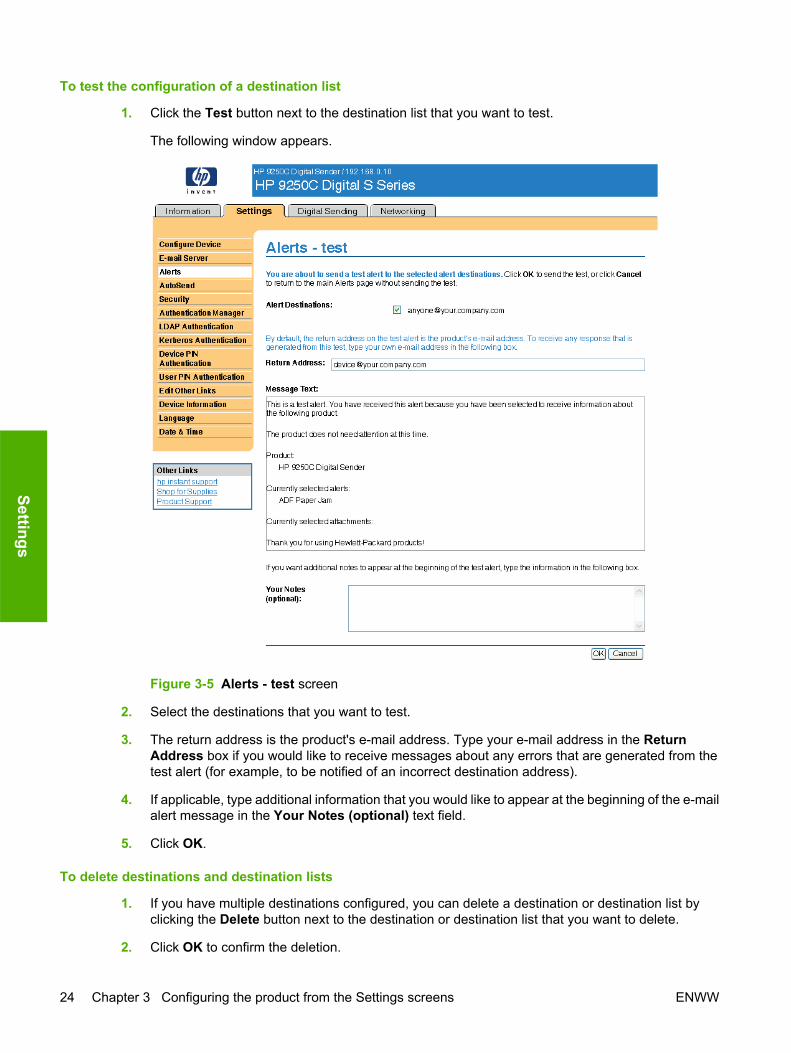
To test the configuration of a destination list
1. Click the Test button next to the destination list that you want to test.
The following window appears.
Figure 3-5 Alerts - test screen
2. Select the destinations that you want to test.
3. The return address is the product's e-mail address. Type your e-mail address in the ReturnAddress box if you would like to receive messages about any errors that are generated from thetest alert (for example, to be notified of an incorrect destination address).
4. If applicable, type additional information that you would like to appear at the beginning of the e-mailalert message in the Your Notes (optional) text field.
5. Click OK.
To delete destinations and destination lists
1. If you have multiple destinations configured, you can delete a destination or destination list byclicking the Delete button next to the destination or destination list that you want to delete.
2. Click OK to confirm the deletion.
24 Chapter 3 Configuring the product from the Settings screens ENWW
Settings
Sending e-mail commands to the productAnother method for receiving information pages is by requesting them from the product. When outgoingmail is configured, the product can attach information pages, such as the Supplies Status page or theConfiguration page, to e-mail messages. You can use this feature to solve a problem or check the statusof supplies.
To request information pages by using an e-mail messageWhen composing a message to the product, you must format the To, From, and Subject fields correctlyin your e-mail program.
1. Make outgoing e-mail functions available by following the instructions that are listed in this chapter.(For more information, see E-mail Server .)
2. From your e-mail program, compose a message to the product by completing the following steps:
a. In the To field, type the product's e-mail address. The user name combined with the product'sdomain name (which is specified in the outgoing mail configuration) is the e-mail address forthe product. For example, if the POP3 mailbox account user name is "product" and the POP3server is "hp.com", the product's e-mail address is "[email protected]".
b. Your e-mail program should automatically complete the From field with your return e-mailaddress.
c. In the Subject field, type the appropriate text for the format and page that you would like toattach. You can request a Configuration page, a Supplies Status page, or an AutoSend page.For example, if you would like to attach the Configuration page in .HTML file format, typethis.configpage?configpage=email&format=html.
Table 3-4 Requesting information pages using an e-mail message
Page HTML format XML format
Configuration page this.configpage?configPage=email&format=html
this.configpage?configPage=email&format=xml
AutoSend page1 not applicable this.configpage?autosend=email&format=xml
1 The AutoSend page is not sent to the sender of the e-mail (as indicated in Step 2b, above).It is sent to the e-mail address specified in the AutoSend screen of the Settings tab.
3. Click Send.
The product checks for new e-mail messages once every 3 minutes. When the product receives the e-mail message, it generates a reply and sends the requested information back to the sender's e-mailaddress (as specified in the From field of the original e-mail message).
NOTE Depending on delays in the network and your organization's mail server, a responsemight take from 1 minute to several hours to arrive in your e-mail program's inbox. If the To,From, and Subject fields are not correctly formatted in your e-mail message, the product doesnot send a message in response.
ENWW Alerts 25
Setti
ngs
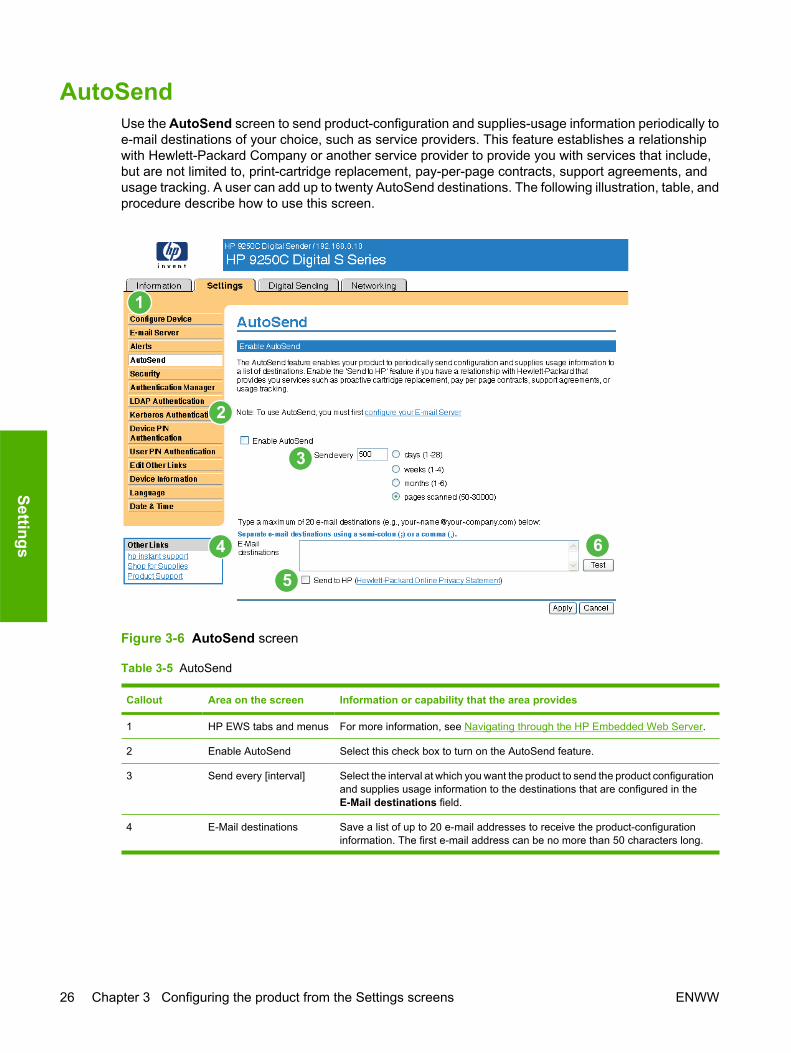
AutoSendUse the AutoSend screen to send product-configuration and supplies-usage information periodically toe-mail destinations of your choice, such as service providers. This feature establishes a relationshipwith Hewlett-Packard Company or another service provider to provide you with services that include,but are not limited to, print-cartridge replacement, pay-per-page contracts, support agreements, andusage tracking. A user can add up to twenty AutoSend destinations. The following illustration, table, andprocedure describe how to use this screen.
Figure 3-6 AutoSend screen
Table 3-5 AutoSend
Callout Area on the screen Information or capability that the area provides
1 HP EWS tabs and menus For more information, see Navigating through the HP Embedded Web Server.
2 Enable AutoSend Select this check box to turn on the AutoSend feature.
3 Send every [interval] Select the interval at which you want the product to send the product configurationand supplies usage information to the destinations that are configured in theE-Mail destinations field.
4 E-Mail destinations Save a list of up to 20 e-mail addresses to receive the product-configurationinformation. The first e-mail address can be no more than 50 characters long.
26 Chapter 3 Configuring the product from the Settings screens ENWW
Settings
Callout Area on the screen Information or capability that the area provides
5 Send to HP Select this check box to send device configuration and supplies status informationto HP on a regular basis. The information will be sent to an HP e-mail address(for example, [email protected]) in a text-based file with an .XML file extension.This file will be created in English.
To view more information about how HP treats the information that is sent byAutoSend, click Hewlett-Packard Online Privacy Statement.
6 Test Click this button to save your settings and to send the information immediately,so that you can make sure that the recipient receives the messages.
To turn on the AutoSend featureUse the following procedure to make the AutoSend feature available.
1. Make outgoing e-mail functions available by following the instructions that are listed in this chapter.(For more information, see E-mail Server.)
2. Select the Enable AutoSend check box.
3. Click an option to specify the interval at which you want the product to send the product-configuration and supplies-usage information to the e-mail recipients (determined in the next step),and then type the number of days, weeks, months, or pages printed.
4. Configure up to 20 destinations using the format that appears on the screen.
5. To send device configuration and supplies status information to HP, select the Send to HP checkbox.
6. Click Apply.
Table 3-5 AutoSend (continued)
ENWW AutoSend 27
Setti
ngs
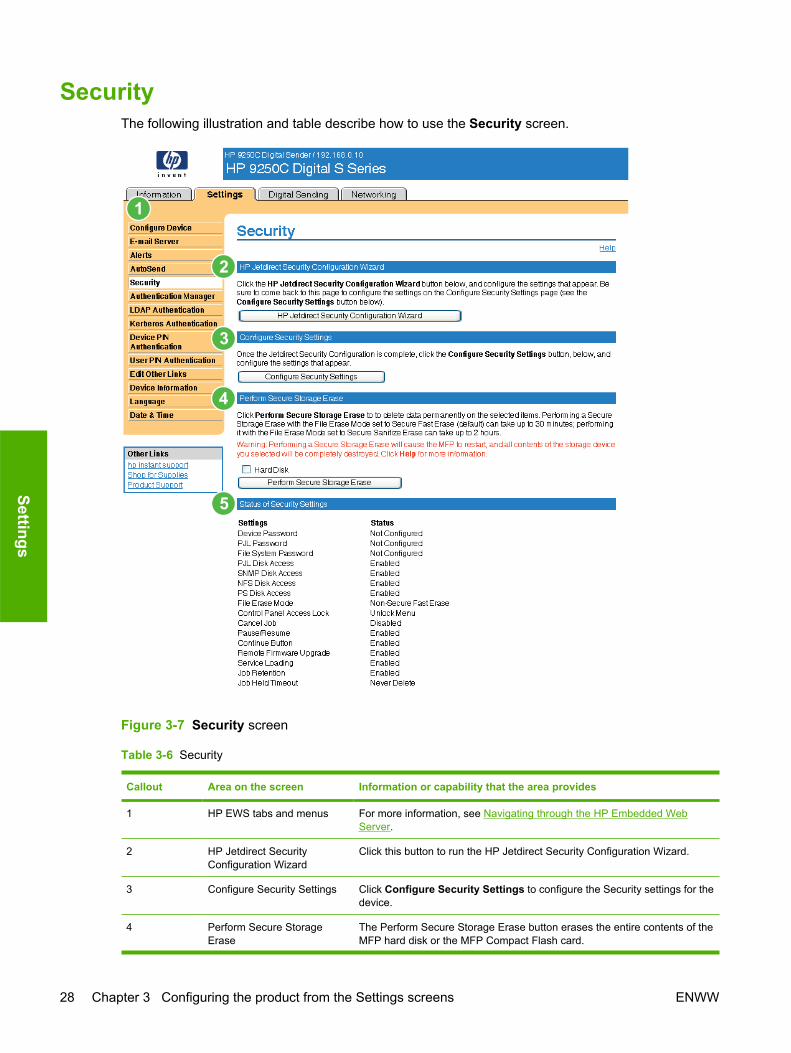
SecurityThe following illustration and table describe how to use the Security screen.
Figure 3-7 Security screen
Table 3-6 Security
Callout Area on the screen Information or capability that the area provides
1 HP EWS tabs and menus For more information, see Navigating through the HP Embedded WebServer.
2 HP Jetdirect SecurityConfiguration Wizard
Click this button to run the HP Jetdirect Security Configuration Wizard.
3 Configure Security Settings Click Configure Security Settings to configure the Security settings for thedevice.
4 Perform Secure StorageErase
The Perform Secure Storage Erase button erases the entire contents of theMFP hard disk or the MFP Compact Flash card.
28 Chapter 3 Configuring the product from the Settings screens ENWW
Settings
Callout Area on the screen Information or capability that the area provides
WARNING! When you click Perform Secure Storage Erase, theMFP will restart, and all data on the storage device you selected willbe completely destroyed. This function is meant to enable you toreuse the MFP without the possibility anyone recovering data thatwas on the storage devices. Use this function only when you wish toremove all stored data on the MFP.
5 Status of Security Settings The Status of Security Settings section displays the current status of each ofthe security settings configurable on the Configure Security Settings page.
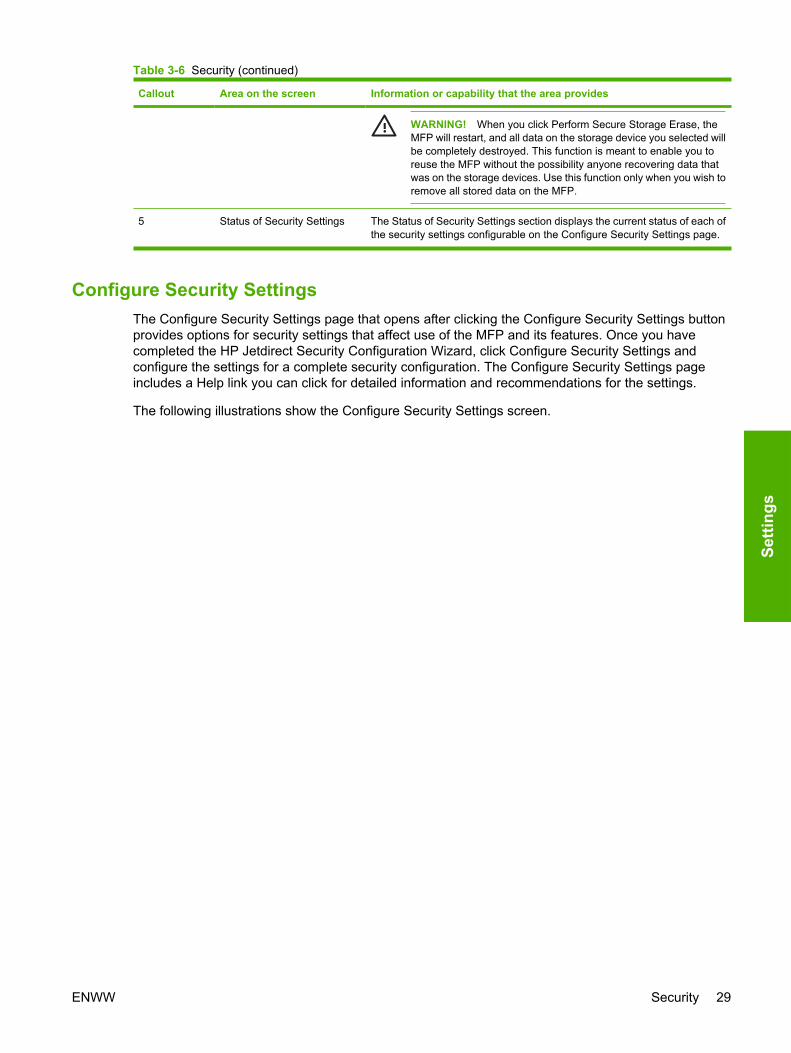
Configure Security SettingsThe Configure Security Settings page that opens after clicking the Configure Security Settings buttonprovides options for security settings that affect use of the MFP and its features. Once you havecompleted the HP Jetdirect Security Configuration Wizard, click Configure Security Settings andconfigure the settings for a complete security configuration. The Configure Security Settings pageincludes a Help link you can click for detailed information and recommendations for the settings.
The following illustrations show the Configure Security Settings screen.
Table 3-6 Security (continued)
ENWW Security 29
Setti
ngs

Figure 3-8 Configure Security Settings screen – 1 of 2
30 Chapter 3 Configuring the product from the Settings screens ENWW
Settings
Figure 3-9 Configure Security Settings screen – 2of 2
ENWW Security 31
Setti
ngs

Authentication ManagerUse the Authentication Manager screen to set the Device Functions that require users to successfullylog in before use. The following illustration and table describe how to use this screen.
Figure 3-10 Authentication Manager screen
Table 3-7 Authentication Manager
Callout Area on the screen Information or capability that the area provides
1 HP EWS tabs and menus For more information, see Navigating through the HP Embedded Web Server.
2 Home Screen Access Specify a log-in method for users gaining access to the Home screen.
3 Device Functions Specify a log-in method for users gaining access to the following functions:
● Send to E-mail
● Send to Fax
● Send to Folder
● Digital Sending Service (DSS) Secondary E-mail
● Digital Sending Service (DSS) Workflow
4 Future Installations Specify a log-in method for users gaining access to any new features to be installedin the future.
32 Chapter 3 Configuring the product from the Settings screens ENWW
Settings
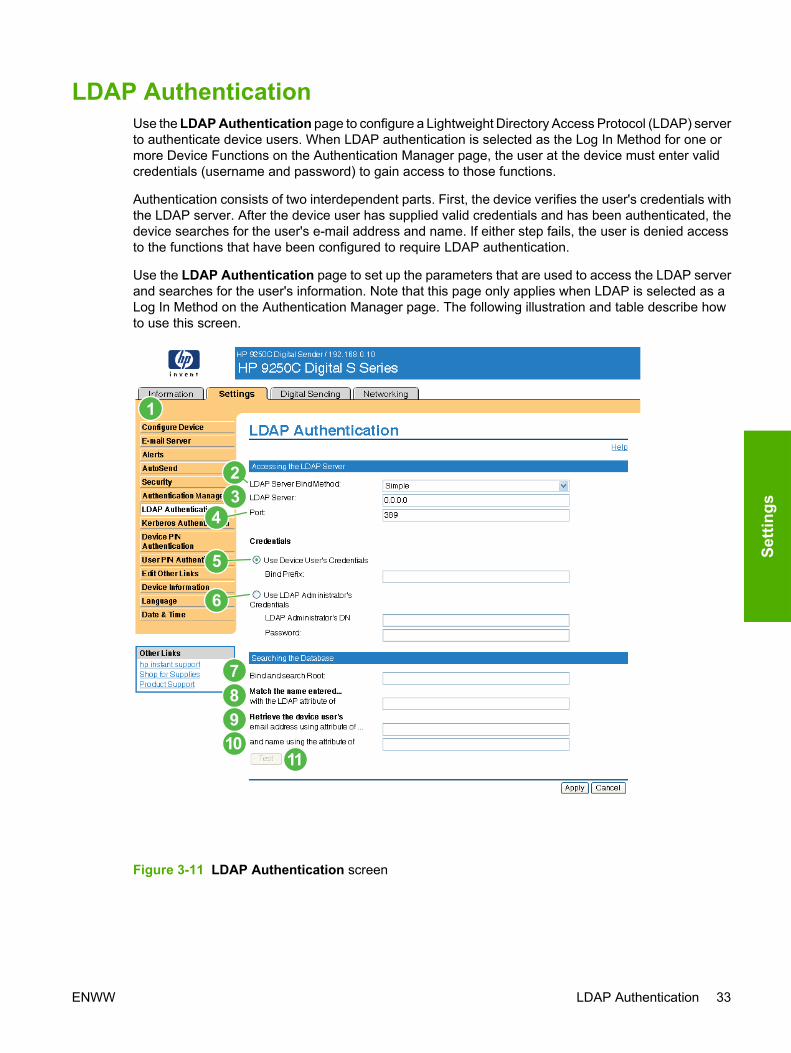
LDAP AuthenticationUse the LDAP Authentication page to configure a Lightweight Directory Access Protocol (LDAP) serverto authenticate device users. When LDAP authentication is selected as the Log In Method for one ormore Device Functions on the Authentication Manager page, the user at the device must enter validcredentials (username and password) to gain access to those functions.
Authentication consists of two interdependent parts. First, the device verifies the user's credentials withthe LDAP server. After the device user has supplied valid credentials and has been authenticated, thedevice searches for the user's e-mail address and name. If either step fails, the user is denied accessto the functions that have been configured to require LDAP authentication.
Use the LDAP Authentication page to set up the parameters that are used to access the LDAP serverand searches for the user's information. Note that this page only applies when LDAP is selected as aLog In Method on the Authentication Manager page. The following illustration and table describe howto use this screen.
Figure 3-11 LDAP Authentication screen
ENWW LDAP Authentication 33
Setti
ngs
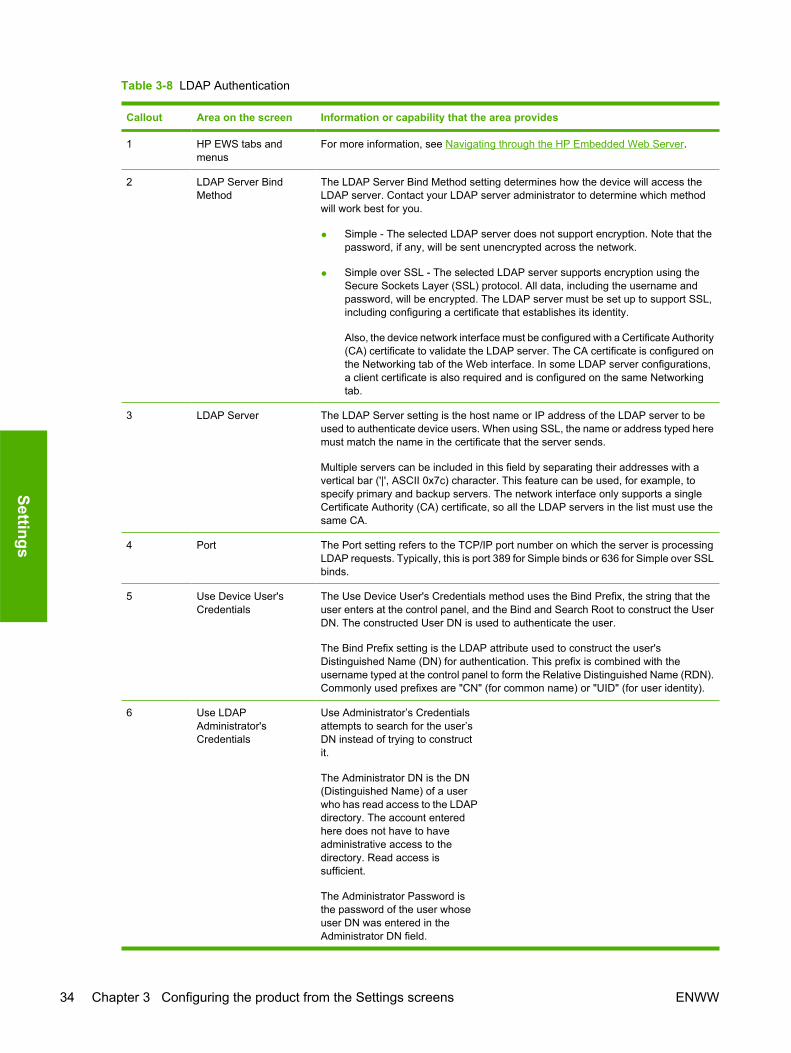
Table 3-8 LDAP Authentication
Callout Area on the screen Information or capability that the area provides
1 HP EWS tabs andmenus
For more information, see Navigating through the HP Embedded Web Server.
2 LDAP Server BindMethod
The LDAP Server Bind Method setting determines how the device will access theLDAP server. Contact your LDAP server administrator to determine which methodwill work best for you.
● Simple - The selected LDAP server does not support encryption. Note that thepassword, if any, will be sent unencrypted across the network.
● Simple over SSL - The selected LDAP server supports encryption using theSecure Sockets Layer (SSL) protocol. All data, including the username andpassword, will be encrypted. The LDAP server must be set up to support SSL,including configuring a certificate that establishes its identity.
Also, the device network interface must be configured with a Certificate Authority(CA) certificate to validate the LDAP server. The CA certificate is configured onthe Networking tab of the Web interface. In some LDAP server configurations,a client certificate is also required and is configured on the same Networkingtab.
3 LDAP Server The LDAP Server setting is the host name or IP address of the LDAP server to beused to authenticate device users. When using SSL, the name or address typed heremust match the name in the certificate that the server sends.
Multiple servers can be included in this field by separating their addresses with avertical bar ('|', ASCII 0x7c) character. This feature can be used, for example, tospecify primary and backup servers. The network interface only supports a singleCertificate Authority (CA) certificate, so all the LDAP servers in the list must use thesame CA.
4 Port The Port setting refers to the TCP/IP port number on which the server is processingLDAP requests. Typically, this is port 389 for Simple binds or 636 for Simple over SSLbinds.
5 Use Device User'sCredentials
The Use Device User's Credentials method uses the Bind Prefix, the string that theuser enters at the control panel, and the Bind and Search Root to construct the UserDN. The constructed User DN is used to authenticate the user.
The Bind Prefix setting is the LDAP attribute used to construct the user'sDistinguished Name (DN) for authentication. This prefix is combined with theusername typed at the control panel to form the Relative Distinguished Name (RDN).Commonly used prefixes are "CN" (for common name) or "UID" (for user identity).
6 Use LDAPAdministrator'sCredentials
Use Administrator’s Credentialsattempts to search for the user’sDN instead of trying to constructit.
The Administrator DN is the DN(Distinguished Name) of a userwho has read access to the LDAPdirectory. The account enteredhere does not have to haveadministrative access to thedirectory. Read access issufficient.
The Administrator Password isthe password of the user whoseuser DN was entered in theAdministrator DN field.
34 Chapter 3 Configuring the product from the Settings screens ENWW
Settings

Callout Area on the screen Information or capability that the area provides
7 Bind and search Root When the Use Device User's Credentials method is selected, the Bind and SearchRoot value is used during both phases of authentication. During the credentialverification phase, this value is combined with the RDN to construct the fullDistinguished Name (DN) of the user. During the user information searching phase,this value is the DN of the LDAP entry where the search begins.
When the Use LDAP Administrator's Credentials method is selected, the Bind andSearch Root is only used as a search root. The Search Root of the base of the LDAPdirectory can be specified, and the device will search the entire LDAP tree for the userobject corresponding to the username entered at the device.
8 Match the name enteredwith the LDAP attributeof
When searching for the device user's information in the LDAP database, the contentsof the attribute specified in this field are compared to the username that was typedduring authentication. This attribute is usually the same as the Bind Prefix.
9 Retrieve the deviceuser's e-mail addressusing attribute of
After the device user has been located in the LDAP database, the user's e-mailaddress is retrieved from the database by using the LDAP attribute specified in thee-mail address using attribute of field.
10 and name using theattribute of
The user's display name is obtained from the LDAP attribute that is specified in thename using attribute of field.
11 Test Use the Test feature to test the validity of your settings before applying them. Whenyou click this button, you are asked to provide user credentials as if you were loggingin at the device control panel. If the credentials that you provide are authenticatedand the user information is found in the LDAP database, a success message appears.Otherwise, an error message appears indicating why authentication failed.
Table 3-8 LDAP Authentication (continued)
ENWW LDAP Authentication 35
Setti
ngs
Kerberos AuthenticationUse the Kerberos Authentication page to configure the device (multi-function peripheral or digital sender)to authenticate users to a Kerberos Realm. When Kerberos authentication is selected as the Log InMethod for one or more Device Functions on the Authentication Manager page, the user at the devicemust enter valid credentials (username, password, and realm) to gain access to those functions.
Authentication consists of two interdependent parts. First, the device verifies the user's credentials withthe KDC. After the device user has supplied valid credentials and has been authenticated, the devicesearches for the user's e-mail address and name. If either step fails, the user is denied access to thefunctions that have been configured to require Kerberos authentication.
Use the Kerberos Authentication page to set up the parameters that are used to access the LDAP serverand searches for the user's information. Note that this page only applies when Kerberos Version 5 isselected as a Log In Method on the Authentication Manager page.
The following illustration, table, and procedures describe how to use this screen.
36 Chapter 3 Configuring the product from the Settings screens ENWW
Settings
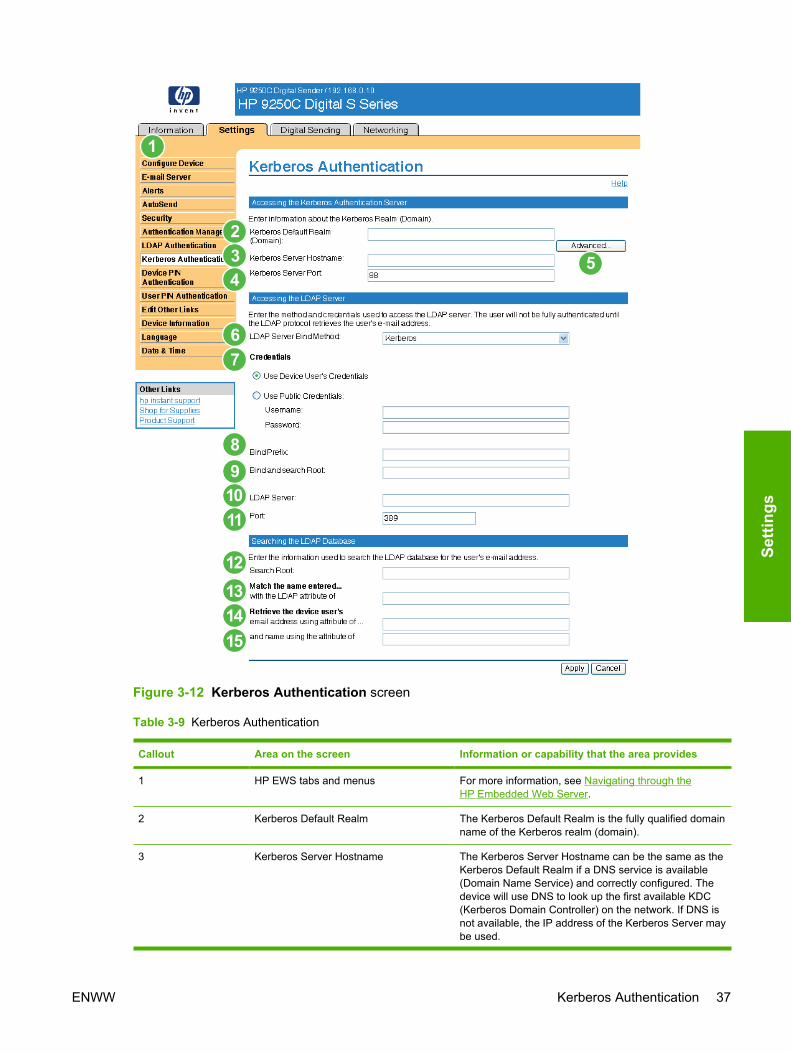
Figure 3-12 Kerberos Authentication screen
Table 3-9 Kerberos Authentication
Callout Area on the screen Information or capability that the area provides
1 HP EWS tabs and menus For more information, see Navigating through theHP Embedded Web Server.
2 Kerberos Default Realm The Kerberos Default Realm is the fully qualified domainname of the Kerberos realm (domain).
3 Kerberos Server Hostname The Kerberos Server Hostname can be the same as theKerberos Default Realm if a DNS service is available(Domain Name Service) and correctly configured. Thedevice will use DNS to look up the first available KDC(Kerberos Domain Controller) on the network. If DNS isnot available, the IP address of the Kerberos Server maybe used.
ENWW Kerberos Authentication 37
Setti
ngs

Callout Area on the screen Information or capability that the area provides
4 Kerberos Server Port The Kerberos Server Port is the default IP port used bythe Kerberos authentication method. Note that the defaultis port 88, but this can be different in different networkenvironments. Please contact your IT administrator todetermine the appropriate port if the default port does notwork.
5 Advanced button Use the Advanced button to the right of the KerberosDefault Realm field to access the Alternate Domainconfiguration. Alternate domains are mapped to thedefault realm.
6 LDAP Server Bind Method The LDAP Server Bind Method determines how thedevice will access the LDAP server.
7 Credentials The Credentials configuration section is used todetermine which credentials will be used to bind(authenticate) to the LDAP server.
● When Use Device User's Credentials is selected, thedevice users credentials (entered at the controlpanel of the device) will be used to access the LDAPserver. This method has the advantage of not havingto store a username and password, which mayexpire, in the device.
● When Use Public Credentials is selected and usercredentials are not available, the Username andPassword entered will be used to access the LDAPserver. This method should be used if for somereason device users do not have read access to theLDAP data.
8 Bind Prefix The Bind Prefix setting is the LDAP attribute used toconstruct the user's Distinguished Name (DN) forauthentication. This prefix is combined with the usernametyped at the control panel to form the RelativeDistinguished Name (RDN). Commonly used prefixes are"CN" (for common name) or "UID" (for user identity).
NOTE The Bind Prefix and Bind and SearchRoot settings are only used if the LDAP ServerBind Method is set to Simple or Simple over SSL,and Use Device User Credentials is selected.
9 Bind and search Root The Bind and Search Root value is used to validate theuser's credientials with the LDAP server. This value iscombined with the RDN to construct the full DistinguishedName (DN) of the user.
NOTE The Bind Prefix and Bind and SearchRoot settings are only used if the LDAP ServerBind Method is set to Simple or Simple over SSL,and Use Device User Credentials is selected.
10 LDAP Server The LDAP Server is typically the same as the KerberosServer in the Windows Active Directory Environment.
11 Port The Port is the IP port used by the LDAP protocol tocommunicate with the LDAP server. This is typically port389 or port 3268.
Table 3-9 Kerberos Authentication (continued)
38 Chapter 3 Configuring the product from the Settings screens ENWW
Settings
Callout Area on the screen Information or capability that the area provides
12 Search Root The Search Root is the Distinguished Name (DN) of theentry in the LDAP directory structure where addresssearching is to begin. A DN is made up of ' attribute=value' pairs, separated by commas.
NOTE On some LDAP Servers, the SearchRoot can be left blank (in which case its root nodewill be assumed). The search root is not casesensitive.
13 Match the name entered with LDAPattribute of
When searching for the device user's information in theLDAP database, the contents of the attribute specified inthis field are compared to the username that was typedduring authentication. In the Windows Active Directoryenvironment, this attribute is typically sAMAccountName.
14 Retrieve the device user's email addressusing attribute of
After the device user has been located in the LDAPdatabase, the user's e-mail address is retrieved from thedatabase by using the LDAP attribute specified in theRetrieve the device user's e-mail address using attributeof field. In the Windows Active Directory environment, thisattribute is typically mail.
15 and name using the attribute of The user's display name is obtained from the LDAPattribute that is specified in the "and name using theattribute of" field. In the Windows Active Directoryenvironment, this attribute is typically displayName.
Advanced Kerberos Realm SettingsEmbedded Kerberos Authentication requires Forward and Reverse Lookup to be enabled on the DNSserver. During some DNS migrations, DNS may return different results during Forward and ReverseLookup (i.e. ACME.CORP.COM, ACME.CORP.NET).
The Advanced Kerberos Realm Settings can be used to configure Embedded Kerberos Authenticationto work in these heterogeneous DNS environments.
Enter either a hostname or a domain name that is to be mapped to the realm name. Domain namesmust be entered with a prefix character of "." For example .ACME.CORP.NET.
The following illustration shows the Advanced Kerberos Realm Settings screen.
Table 3-9 Kerberos Authentication (continued)
ENWW Kerberos Authentication 39
Setti
ngs

Figure 3-13 Advanced Kerberos Realm Settings screen
Kerberos Authentication TasksKerberos is a network authentication protocol. It is designed to provide secure authentication for client/server applications by using secret keys delivered with session tickets.
Before following the steps outlined here, you must have completed the following steps:
1. Install the Microsoft LDP tool.
2. Discover the LDAP server.
3. Set up LDP.
Initializing Kerberos authenticationFollow these steps to initialize Kerberos Authentication for your product.
NOTE Embedded Kerberos Authentication uses session tickets in the authentication process.The session tickets are time stamped by both the Kerberos Domain Controller (KDC) and theproduct. It is essential that the stamped times are within five minutes of each other. This can beaccomplished by setting identical time on both the KDC and product.
1. Open the HP EWS in a web browser.
2. Select the Settings tab, and then Kerberos Authentication.
40 Chapter 3 Configuring the product from the Settings screens ENWW
Settings

3. Under the Accessing the Kerberos Authentication Server section, perform the following steps:
a. Type the domain name in the Kerberos Default Realm (Domain) field. The domain name iscase-sensitive and must use only uppercase letters, for example:TECHNICAL.MARKETING.COM.
b. Type the product IP address in the Kerberos Server Hostname field, for example:15.62.64.203 (IP address.)
NOTE The Kerberos Server Port field fills automatically as 88.
4. Under the Accessing the LDAP Server section, perform the following steps:
a. Select Kerberos from the LDAP Server Bind Method drop-down menu.
b. Click to select the Credential method you want to use.
If choosing Use Public Credentials, type in a username and password.
NOTE Remember how you set up the username on the LDP screen. The usernameis defined within the device user DN value in the LDP trace and is not in standardWindows domain account format. The format is often your entire e-mail address,including the @xx.xx.
c. Type the LDAP server in the LDAP Server field.
d. Type 389 in the Port field.
5. Under the Searching the LDAP Database section, perform the following steps:
a. Paste the Search Prefix into the Search Root field.
b. Type in the sAMAccountName into the Match the name entered with the LDAP attributeof field.
c. Find the device user e-mail address in the LDP trace. Copy the attribute defining the e-mailaddress, and paste it into the Retrieve the device user’s e-mail address using attributeof field.
Some Kerberos environments require very specific attributes. For example, the attribute usedhere is userPrincipalName instead of mail.
d. Find the device user name using the attribute of in the LDP trace. Copy the attribute definingthe name, and paste it into the and name using the attribute of field.
NOTE The Kerberos environment requires cn instead of displayName.
e. Click Apply.
When you have finished these steps, continue with the steps in the next section, Configure theAuthentication Manager for Kerberos Authentication.
ENWW Kerberos Authentication 41
Setti
ngs

Configure the Authentication Manager for Kerberos AuthenticationFollow these steps to continue configuring Kerberos Authentication for your product.
1. Click Authentication Manager on the Settings tab in the HP EWS.
2. Perform the following steps:
a. Under the Home Screen Access section, select Kerberos from the Sign In At Walk Up drop-down menu.
b. Under the Device Functions section, select Kerberos from the drop-down menus of desiredfunctions to be authenticated.
c. Optional: Under the Future Installations section, select Kerberos from the Newly InstalledFunctions drop-down menu. By selecting this option, Kerberos authentication is automaticallyapplied to new device functions when they are installed on the product.
3. Click Apply.
When you have finished these steps, continue with the steps in the next section, Configure AddressSettings for Kerberos Authentication.
Configure Address Settings for Kerberos AuthenticationFollow these steps to continue configuring Kerberos Authentication for your product.
1. Click the LDAP Settings on the Digital Sending tab in the HP EWS.
2. Click to select the Allow device to directly access an LDAP Address Book check box.
3. Under the Accessing the LDAP Server section, perform the following steps:
a. Select Kerberos from the LDAP Server Bind Method drop-down menu.
NOTE The LDAP Server Bind Methods on the Addressing Settings and KerberosAuthentication screens must match for Kerberos authentication to work properly.
b. Under Credentials, click to select the Use Public Credentials option.
● Type in the Username and Password.
● Type in the Kerberos Default Realm (Domain), for example: TECHNICAL.MARKETING.
● Type in the Kerberos Server Hostname, for example: 15.62.64.203 .
● Type in the Kerberos Server Port, for example: 88.
c. Type in the LDAP Server, for example:15.98.10.51.
d. Type in the Port number, for example: 389.
42 Chapter 3 Configuring the product from the Settings screens ENWW
Settings
4. Under the Searching the Database section, perform the following steps.
a. Type in the Search Prefix into the Search Root field.
b. Select an option from the three options on the Device user information retrieval methoddrop-down menu. The appropriate choice depends on your network environment.
● Select Exchange 5.5 Defaults when Exchange 5.5 servers are used in LDAPaddressing.
● Select Active Directory Defaults for Windows 2000 or later network environments.
● Select Custom for specialized network environments.
5. Click Apply.
When you have finished these steps, continue with the steps in the next section, Use the control panelfor Kerberos Authentication.
Use the control panel for Kerberos AuthenticationFollow these steps to finish configuring Kerberos Authentication for your product.
1. At the MFP, touch any option on the main screen of the control panel. The screen displays a requestfor authentication.
NOTE Remember the username is defined within the device user DN value in the LDPtrace and is often your entire e-mail address, including the @xx.xx.
2. Use the touch screen keypad on the MFP control panel to input the authentication, and thentouch OK. The chosen option appears, for example, e-mail.
ENWW Kerberos Authentication 43
Setti
ngs
Device PIN AuthenticationIf PIN Authentication is selected for one or more Device Functions on the Authentication Managerpage, the user will be prompted for a PIN before they can access those Device Functions. If the PIN isentered incorrectly the user will be returned to the previous screen. When a PIN is entered correctly allfunctions that use that PIN are then accessible to the user. For example, you could configure Copy forGroup 1 PIN and E-mail and Fax for Group 2 PIN.
The following illustration shows the Device PIN Authentication screen.
Figure 3-14 Device PIN Authentication screen
44 Chapter 3 Configuring the product from the Settings screens ENWW
Settings
User PIN AuthenticationThe User PIN Authentication page enables you to add user PIN records into the device one at a time,and to edit or delete user PIN records that have already been saved in the device.
You can also use the device Import/Export feature to load a large list of users all at once, rather thanadding them one at a time.
You can set up the device to require each user to provide their PIN when they access the device. Toset up this authentication option, do the following:
● On Digital Send Advanced devices, go to the EWS Settings tab, select Authentication Manager,and then select User PIN from the Sign In At Walk Up drop-down list and from the Send to E-maildrop-down list.
● On Digital Send Simple devices, as soon as user PIN records are added to the device, deviceaccess is automatically limited to only those persons who have a user account, and the controlpanel starts prompting all users for a PIN.
The following illustration shows the User PIN Authentication screen.
ENWW User PIN Authentication 45
Setti
ngs
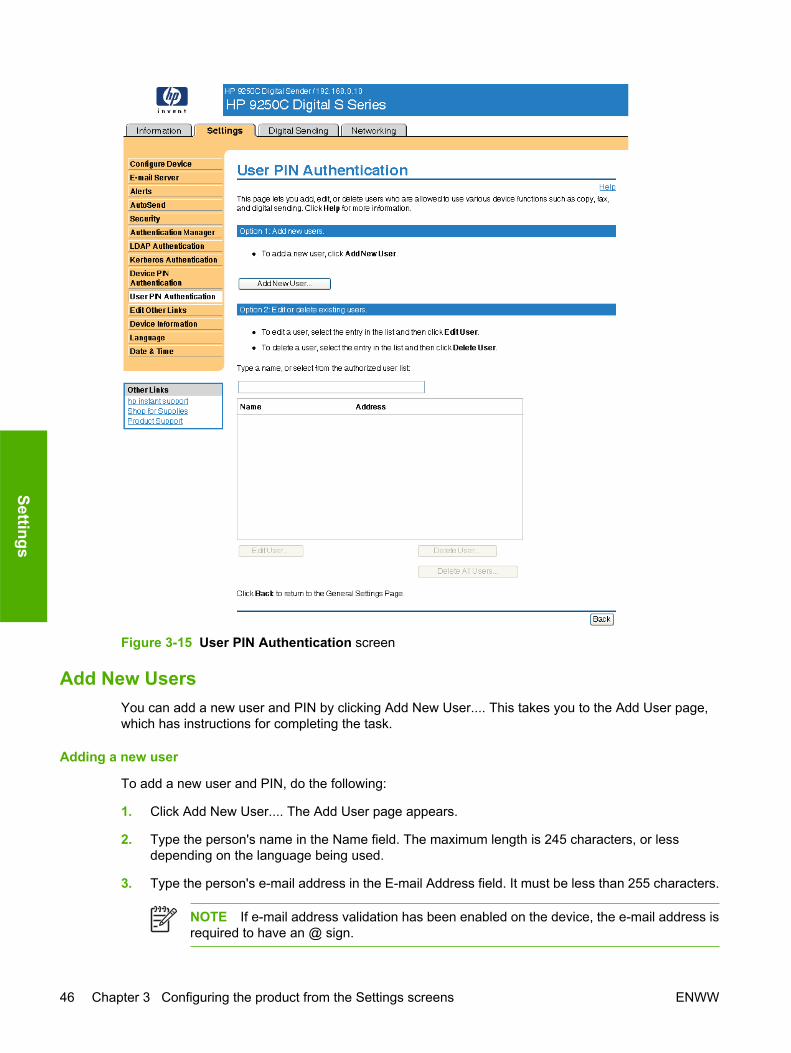
Figure 3-15 User PIN Authentication screen
Add New UsersYou can add a new user and PIN by clicking Add New User.... This takes you to the Add User page,which has instructions for completing the task.
Adding a new user
To add a new user and PIN, do the following:
1. Click Add New User.... The Add User page appears.
2. Type the person's name in the Name field. The maximum length is 245 characters, or lessdepending on the language being used.
3. Type the person's e-mail address in the E-mail Address field. It must be less than 255 characters.
NOTE If e-mail address validation has been enabled on the device, the e-mail address isrequired to have an @ sign.
46 Chapter 3 Configuring the product from the Settings screens ENWW
Settings
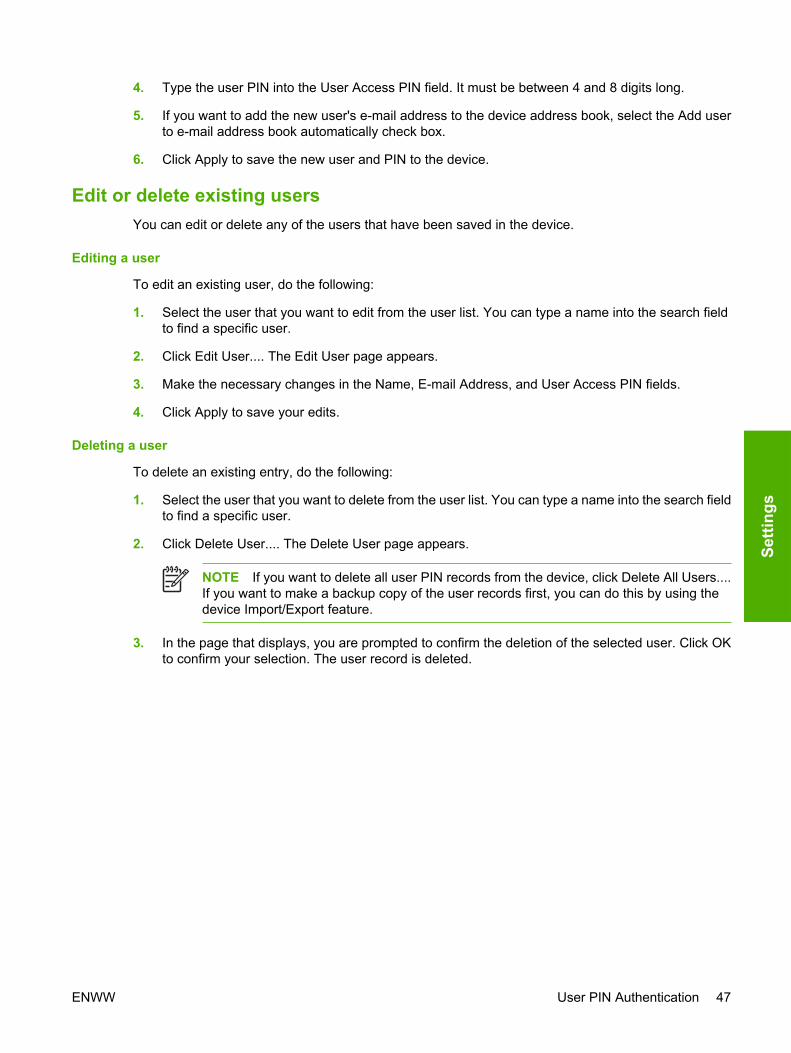
4. Type the user PIN into the User Access PIN field. It must be between 4 and 8 digits long.
5. If you want to add the new user's e-mail address to the device address book, select the Add userto e-mail address book automatically check box.
6. Click Apply to save the new user and PIN to the device.
Edit or delete existing usersYou can edit or delete any of the users that have been saved in the device.
Editing a user
To edit an existing user, do the following:
1. Select the user that you want to edit from the user list. You can type a name into the search fieldto find a specific user.
2. Click Edit User.... The Edit User page appears.
3. Make the necessary changes in the Name, E-mail Address, and User Access PIN fields.
4. Click Apply to save your edits.
Deleting a user
To delete an existing entry, do the following:
1. Select the user that you want to delete from the user list. You can type a name into the search fieldto find a specific user.
2. Click Delete User.... The Delete User page appears.
NOTE If you want to delete all user PIN records from the device, click Delete All Users....If you want to make a backup copy of the user records first, you can do this by using thedevice Import/Export feature.
3. In the page that displays, you are prompted to confirm the deletion of the selected user. Click OKto confirm your selection. The user record is deleted.
ENWW User PIN Authentication 47
Setti
ngs
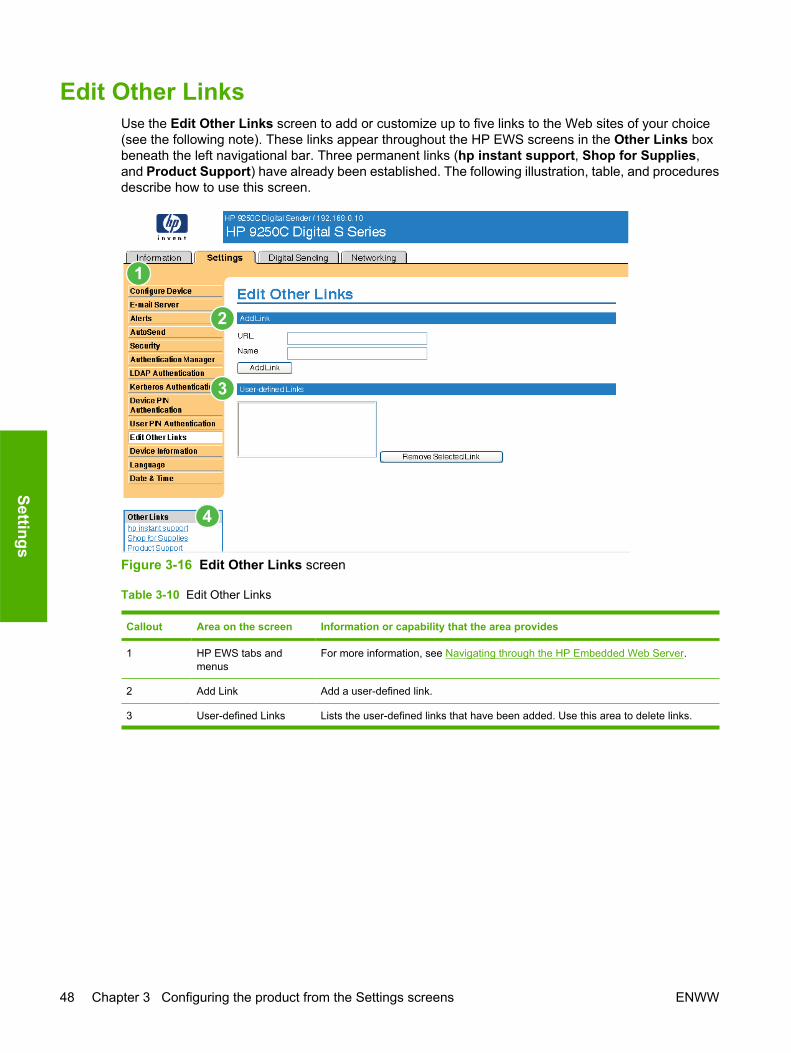
Edit Other LinksUse the Edit Other Links screen to add or customize up to five links to the Web sites of your choice(see the following note). These links appear throughout the HP EWS screens in the Other Links boxbeneath the left navigational bar. Three permanent links (hp instant support, Shop for Supplies,and Product Support) have already been established. The following illustration, table, and proceduresdescribe how to use this screen.
Figure 3-16 Edit Other Links screen
Table 3-10 Edit Other Links
Callout Area on the screen Information or capability that the area provides
1 HP EWS tabs andmenus
For more information, see Navigating through the HP Embedded Web Server.
2 Add Link Add a user-defined link.
3 User-defined Links Lists the user-defined links that have been added. Use this area to delete links.
48 Chapter 3 Configuring the product from the Settings screens ENWW
Settings

Callout Area on the screen Information or capability that the area provides
4 Other Links hp instant support Connect to Web resources that help you to solvespecific problems and determine what additionalservices are available for your product. (Detailedinformation, including serial number, errorconditions, and status, is forwarded toHP Customer Care. Hewlett-Packard Companytreats this information as confidential.)
Shop for Supplies Connect to a Web page that facilitates onlineordering of supplies from a reseller of yourchoice.
Product Support Gain access to specific product help from theHP Web site.
My Service Provider Connect to the home page of your serviceprovider. This link appears only if the serviceprovider has configured it.
My Service Contract Connect to a page that shows the terms andlimits of your service contract. This link appearsonly if the service provider has configured it.
Adding a linkUse this procedure to add a link.
1. Under Add Link, type the URL and the name of the link as you would like it to appear in theHP EWS.
2. Click Add Link.
Removing a linkUse this procedure to remove a link.
1. Under User-defined Links, select the link or links that you would like to remove.
2. Click Remove Selected Link.
Table 3-10 Edit Other Links (continued)
ENWW Edit Other Links 49
Setti
ngs
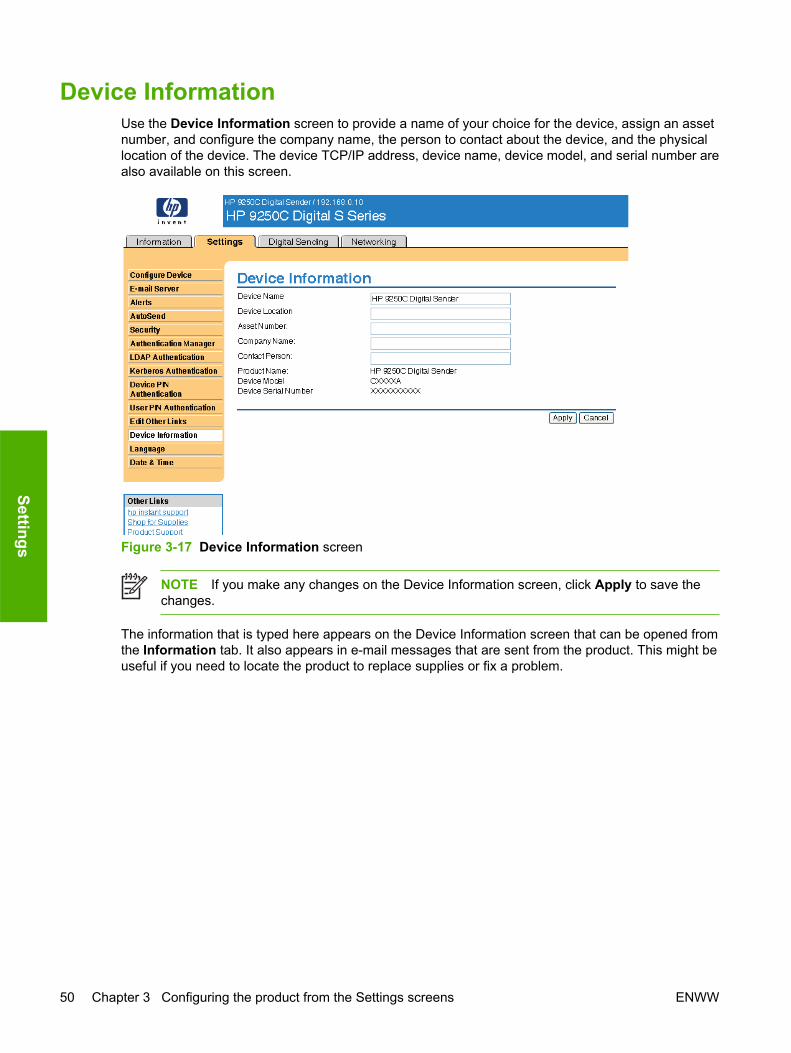
Device InformationUse the Device Information screen to provide a name of your choice for the device, assign an assetnumber, and configure the company name, the person to contact about the device, and the physicallocation of the device. The device TCP/IP address, device name, device model, and serial number arealso available on this screen.
Figure 3-17 Device Information screen
NOTE If you make any changes on the Device Information screen, click Apply to save thechanges.
The information that is typed here appears on the Device Information screen that can be opened fromthe Information tab. It also appears in e-mail messages that are sent from the product. This might beuseful if you need to locate the product to replace supplies or fix a problem.
50 Chapter 3 Configuring the product from the Settings screens ENWW
Settings

LanguageUse the Language screen to select the language in which the HP EWS screens appear. The followingillustration and table describe how to use this screen.
Figure 3-18 Language screen
CAUTION Selecting View Pages in Device Language or Select A Language changes thelanguage for everyone who uses the HP EWS.
Table 3-11 Language
Callout Area on the screen Information or capability that the area provides
1 HP EWS tabs and menus For more information, see Navigating through the HP Embedded WebServer.
2 View Pages in BrowserLanguage
(this is the default)
Use this feature to detect which language is selected for your Web browser.The HP EWS screens appear in the same language.
3 View Pages in DeviceLanguage
Use this feature to detect which language is selected for the device controlpanel. The HP EWS screen appear in the same language.
4 Select A Language Select the language for the HP EWS screens.
NOTE The default language is the language that the Web browser is currently using. If yourbrowser and control panel both use a language that is not available for the HP EWS, English isselected as the default. If you make any changes on the Language screen, click Apply to saveyour changes.
ENWW Language 51
Setti
ngs

Date & TimeUse the Date & Time screen to update the product time. The following illustration and table describehow to use this screen.
Figure 3-19 Date & Time screen
Table 3-12 Date & Time
Callout Area on the screen Information or capability that the area provides
1 HP EWS tabs and menus For more information, see Navigating through the HP Embedded WebServer.
2 Current Date and Current Time Shows the product date and time when the EWS was opened. If either isincorrect, an IT administrator can change the information at the productcontrol panel or through this HP EWS page.
3 Refresh Click this button to update the product date and time on the screen. For moreinformation, see Date/Time Format.
4 Date/Time Format Click this button to open a screen where you can select the date and timeformat.
5 Clock Drift Correction Click this button to configure a network time server. This corrects clock driftby using a network time server of your choice. For more information, seeClock Drift Correction.
52 Chapter 3 Configuring the product from the Settings screens ENWW
Settings

Date/Time FormatUse the Date/Time Format screen to select the formats you prefer for displaying the date (under DateFormat) and time (under Time Format). The following illustration shows the Date/Time Format screen.
Figure 3-20 Date/Time Format screen
Clock Drift CorrectionUse the Date & Time - clock drift correction screen to enable clock drift correction. The followingillustration shows the screen.
ENWW Date & Time 53
Setti
ngs
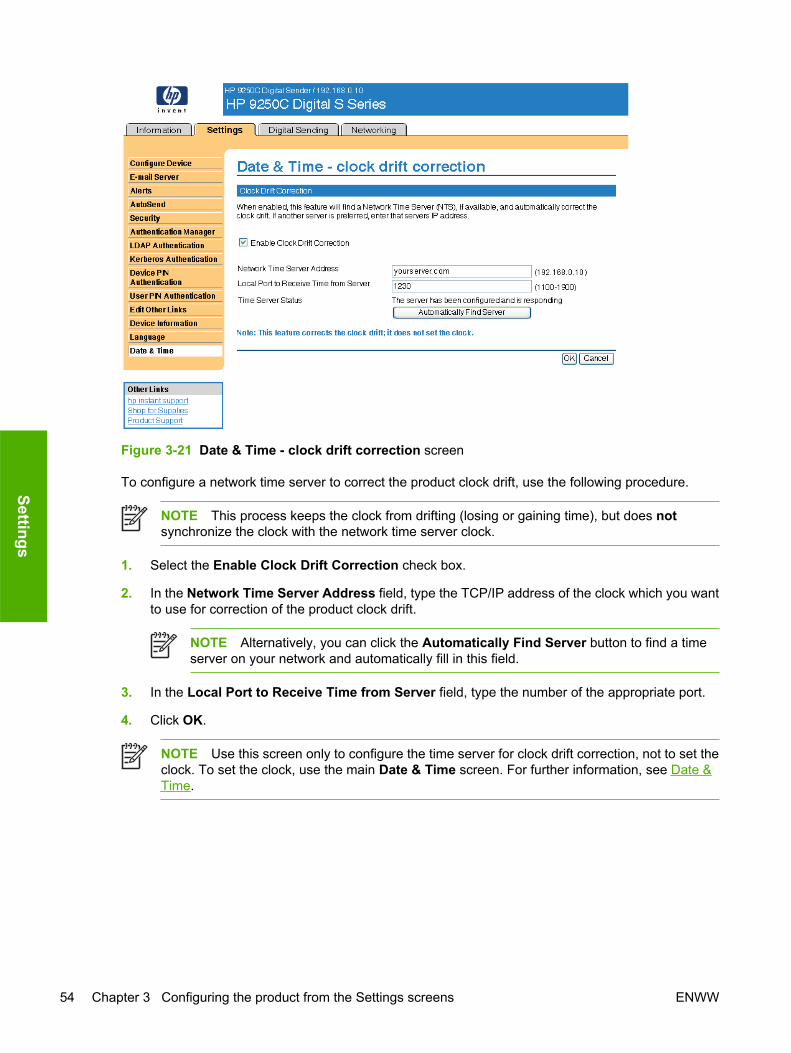
Figure 3-21 Date & Time - clock drift correction screen
To configure a network time server to correct the product clock drift, use the following procedure.
NOTE This process keeps the clock from drifting (losing or gaining time), but does notsynchronize the clock with the network time server clock.
1. Select the Enable Clock Drift Correction check box.
2. In the Network Time Server Address field, type the TCP/IP address of the clock which you wantto use for correction of the product clock drift.
NOTE Alternatively, you can click the Automatically Find Server button to find a timeserver on your network and automatically fill in this field.
3. In the Local Port to Receive Time from Server field, type the number of the appropriate port.
4. Click OK.
NOTE Use this screen only to configure the time server for clock drift correction, not to set theclock. To set the clock, use the main Date & Time screen. For further information, see Date &Time.
54 Chapter 3 Configuring the product from the Settings screens ENWW
Settings
4 Setting the digital sending options
Administrators can use the screens available from the Digital Sending tab to control the digital-sendingfeatures that some products offer.
NOTE Some products do not support all of these screens.
Using the HP DSS softwareThe HP 9250C Digital Sender includes the Digital Sending Software (HP DSS) which can be used tocarry out its digital-sending tasks. If the HP DSS has been installed, all HP DSS screens are availablefor read-only access. However, if you try to apply changes in any of the HP EWS Digital Sendingscreens, the following message appears:
The device is being serviced by the Digital Sending Software at <IP address>. Please useWindows Configuration Utility to configure the device.
In this case, the digital sending options must be configured by using the HP MFP DSS ConfigurationUtility. This centralizes the configuration tasks and helps control security.
ENWW Using the HP DSS software 55
Dig
ital S
endi
ng
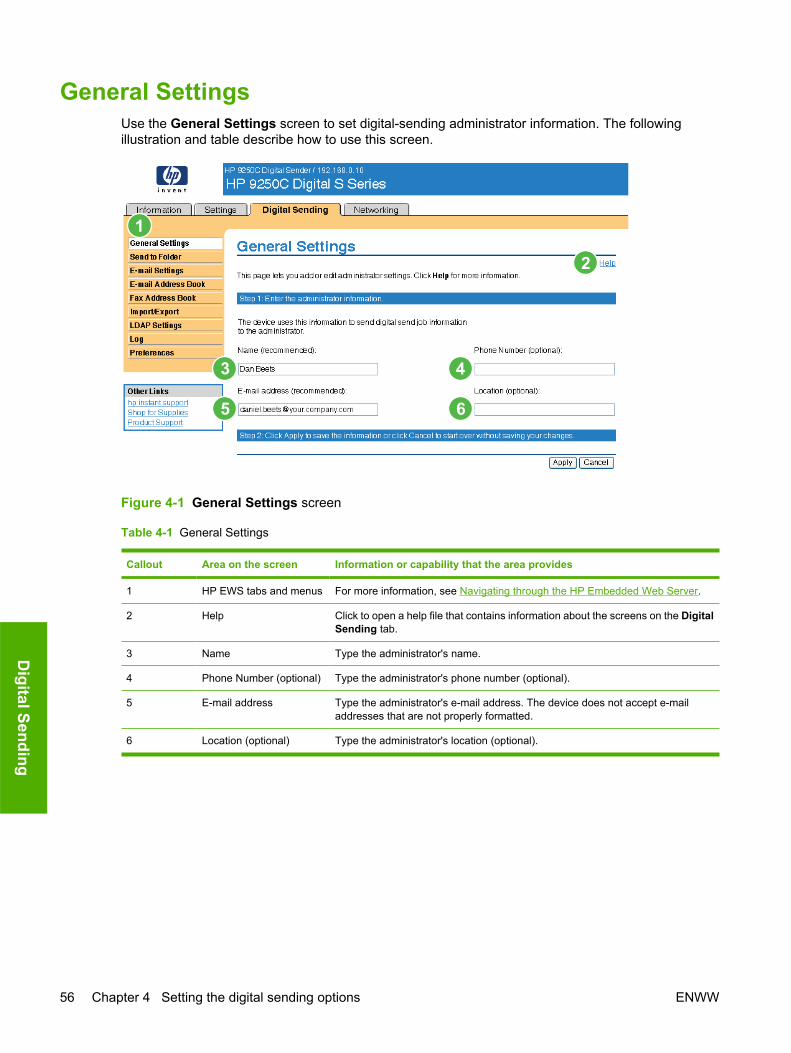
General SettingsUse the General Settings screen to set digital-sending administrator information. The followingillustration and table describe how to use this screen.
Figure 4-1 General Settings screen
Table 4-1 General Settings
Callout Area on the screen Information or capability that the area provides
1 HP EWS tabs and menus For more information, see Navigating through the HP Embedded Web Server.
2 Help Click to open a help file that contains information about the screens on the DigitalSending tab.
3 Name Type the administrator's name.
4 Phone Number (optional) Type the administrator's phone number (optional).
5 E-mail address Type the administrator's e-mail address. The device does not accept e-mailaddresses that are not properly formatted.
6 Location (optional) Type the administrator's location (optional).
56 Chapter 4 Setting the digital sending options ENWW
Digital Sending
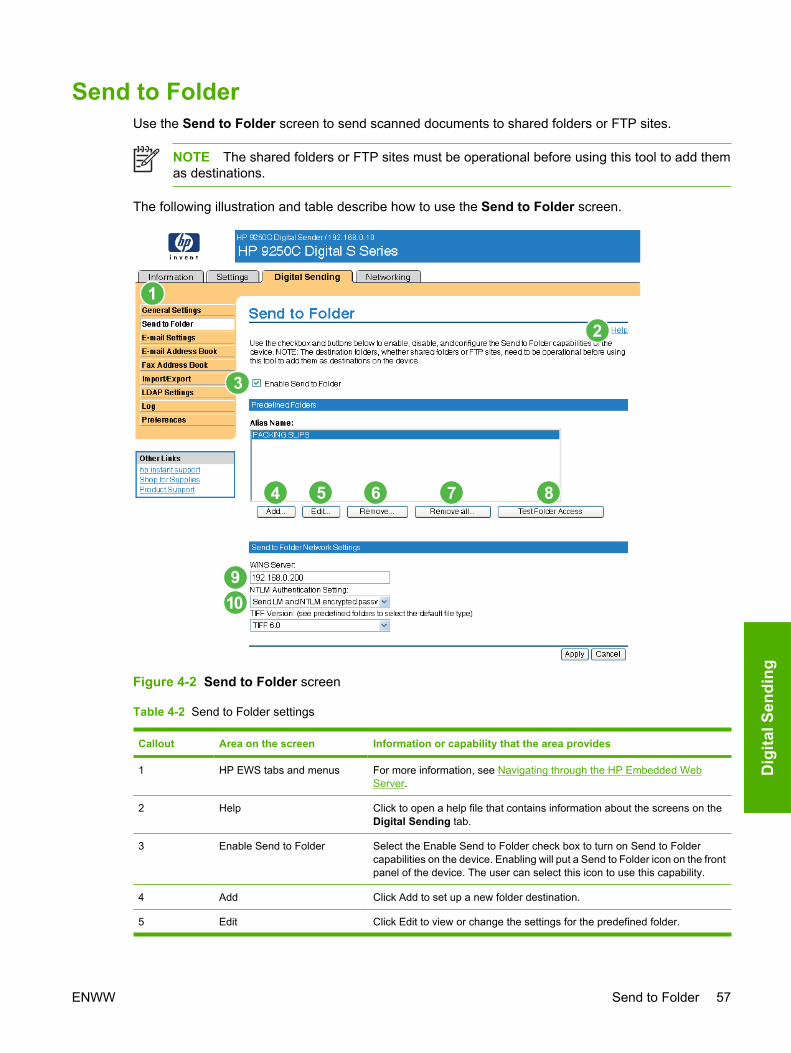
Send to FolderUse the Send to Folder screen to send scanned documents to shared folders or FTP sites.
NOTE The shared folders or FTP sites must be operational before using this tool to add themas destinations.
The following illustration and table describe how to use the Send to Folder screen.
Figure 4-2 Send to Folder screen
Table 4-2 Send to Folder settings
Callout Area on the screen Information or capability that the area provides
1 HP EWS tabs and menus For more information, see Navigating through the HP Embedded WebServer.
2 Help Click to open a help file that contains information about the screens on theDigital Sending tab.
3 Enable Send to Folder Select the Enable Send to Folder check box to turn on Send to Foldercapabilities on the device. Enabling will put a Send to Folder icon on the frontpanel of the device. The user can select this icon to use this capability.
4 Add Click Add to set up a new folder destination.
5 Edit Click Edit to view or change the settings for the predefined folder.
ENWW Send to Folder 57
Dig
ital S
endi
ng

Callout Area on the screen Information or capability that the area provides
6 Remove Click Remove to remove the selected folder from the predefined folder list.
7 Remove all Click Remove All to remove all the predefined folders from the list.
8 Test Folder Access Click Test Folder Access to test that a predefined folder is accessible by thedevice.
9 WINS Server Use the WINS Server setting to specify either the host name or IP addressof the WINS server. This setting is necessary if Windows paths and foldersare used as folder destinations. The WINS server must be specified whenthe path to the workstation or server is of the form \\host-name\\share.
NOTE If the hostname for your Shared Folder destinations are allspecified as IP addresses (for example, \\192.000.0.1\Topfolder),then a WINS server does not need to be provided. In this case, setthe WINS server to be 0.0.0.0.
10 NTLM Authentication Setting Use the NTLM Authentication setting to specify the authentication setting inuse by the server/workstations in your computing environment. The followingare the default settings commonly in use:
● Windows 95, Windows 98 and Windows Me hosts - Select Send LMand NTLM encrypted password.
● Windows NT 4.0 (earlier than service pack 4) - Select Send NTLMencrypted password.
● Windows NT 4.0 service pack 4 - Select Use NTLM V2 Authentication
● Windows 2000 or later operating systems - Select Use NTLM V2Authentication
● Mixed environments - Select Send LM and NTLM encrypted password.
Adding a predefined folderFollow these steps to add a predefined folder to the list.
1. Click Add.... This will allow you to set up and test a folder destination for the user to select at thedevice. After clicking Add, you will go to a series of two web pages to first choose the destinationtype then set up the predefined folder. On both of these pages, specify the settings then click theOK button.
2. After adding and configuring the predefined folder and clicking OK, you will return to this page. Thenew predefined folder will appear in the Predefined Folders list. The alias name for each folder willbe shown in the list.
Editing or viewing a predefined folderFollow these steps to edit or view a predefined folder.
1. Select a folder from the Predefined Folders list by clicking on it.
2. Click Edit, and you will go to a new web page to view or change the settings for the predefinedfolder. Then, click the OK button to return back to this page if you change settings or the Cancelbutton if you don't make changes.
Table 4-2 Send to Folder settings (continued)
58 Chapter 4 Setting the digital sending options ENWW
Digital Sending
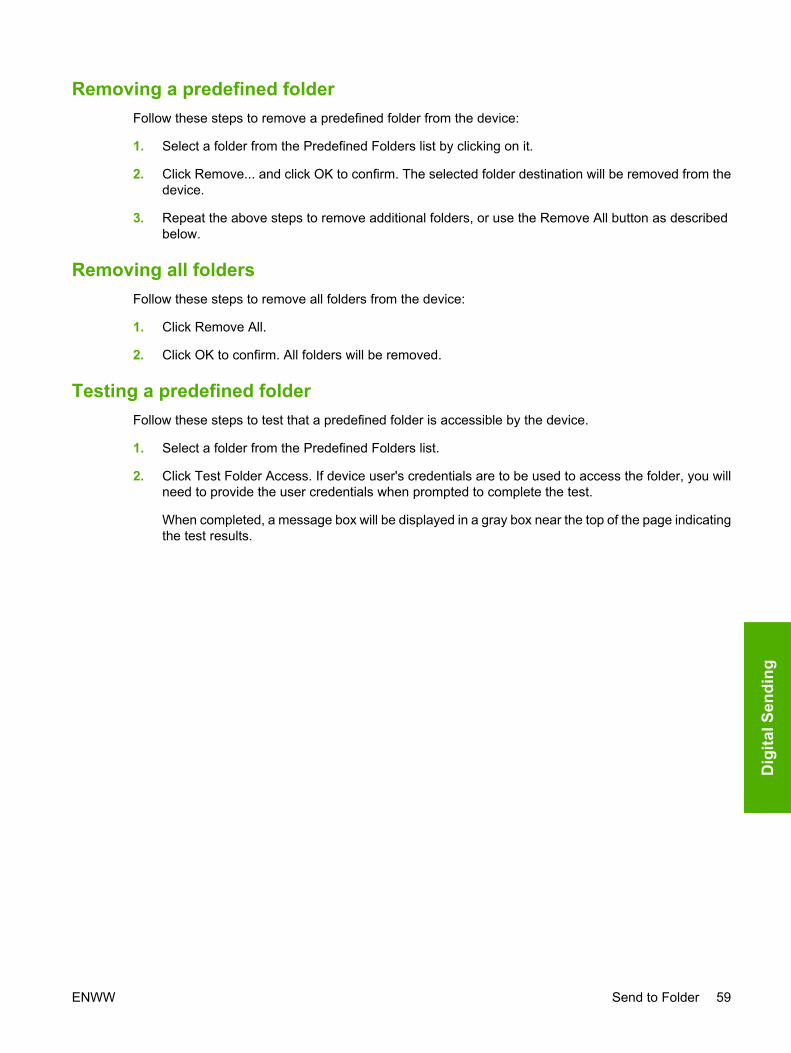
Removing a predefined folderFollow these steps to remove a predefined folder from the device:
1. Select a folder from the Predefined Folders list by clicking on it.
2. Click Remove... and click OK to confirm. The selected folder destination will be removed from thedevice.
3. Repeat the above steps to remove additional folders, or use the Remove All button as describedbelow.
Removing all foldersFollow these steps to remove all folders from the device:
1. Click Remove All.
2. Click OK to confirm. All folders will be removed.
Testing a predefined folderFollow these steps to test that a predefined folder is accessible by the device.
1. Select a folder from the Predefined Folders list.
2. Click Test Folder Access. If device user's credentials are to be used to access the folder, you willneed to provide the user credentials when prompted to complete the test.
When completed, a message box will be displayed in a gray box near the top of the page indicatingthe test results.
ENWW Send to Folder 59
Dig
ital S
endi
ng
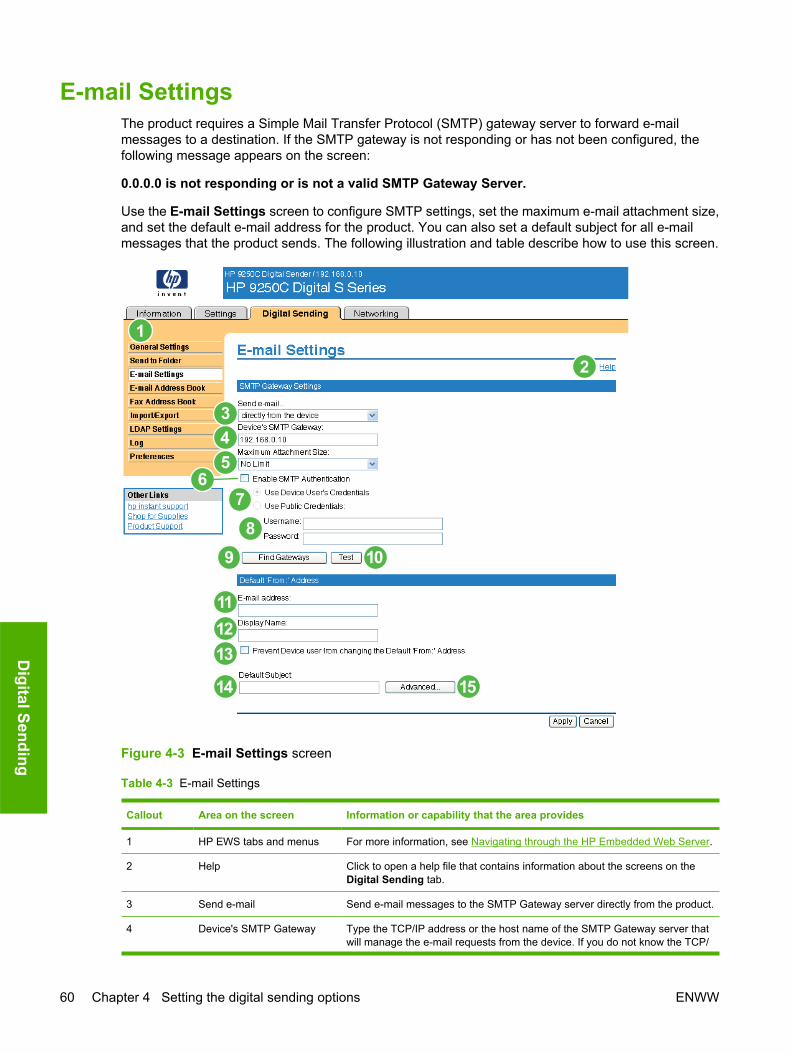
E-mail SettingsThe product requires a Simple Mail Transfer Protocol (SMTP) gateway server to forward e-mailmessages to a destination. If the SMTP gateway is not responding or has not been configured, thefollowing message appears on the screen:
0.0.0.0 is not responding or is not a valid SMTP Gateway Server.
Use the E-mail Settings screen to configure SMTP settings, set the maximum e-mail attachment size,and set the default e-mail address for the product. You can also set a default subject for all e-mailmessages that the product sends. The following illustration and table describe how to use this screen.
Figure 4-3 E-mail Settings screen
Table 4-3 E-mail Settings
Callout Area on the screen Information or capability that the area provides
1 HP EWS tabs and menus For more information, see Navigating through the HP Embedded Web Server.
2 Help Click to open a help file that contains information about the screens on theDigital Sending tab.
3 Send e-mail Send e-mail messages to the SMTP Gateway server directly from the product.
4 Device's SMTP Gateway Type the TCP/IP address or the host name of the SMTP Gateway server thatwill manage the e-mail requests from the device. If you do not know the TCP/
60 Chapter 4 Setting the digital sending options ENWW
Digital Sending
Callout Area on the screen Information or capability that the area provides
IP address or the host name of the SMTP Gateway, click the Find Gatewaysbutton to search the network for a suitable SMTP Gateway server.
NOTE Some devices recognize only TCP/IP addresses. In suchcases, host names will be converted to the equivalent TCP/IP address.
5 Maximum Attachment Size Select the maximum size of e-mail attachments that the SMTP Gateway servercan transmit. If the product needs to send an e-mail attachment that is largerthan the maximum size that is specified, the attachment is broken into smallerfiles, which are sent in multiple e-mail messages.
6 Enable SMTP Authentication Use this setting to require SMTP authentication for outgoing e-mail.
SMTP authentication is used to provide a username and password to the SMTPserver if required. Most Internet Service Providers (ISP) require thesecredentials.
7 Use Device User'sCredentials
You can only use this setting if Authentication is enabled for SMTP andindividual device users have accounts on the SMTP server. In most cases, UsePublic Credentials is the preferred method.
8 Use Public Credentials Use this setting to set a single name and password for SMTP authentication forthe device to use for all users.
9 Find Gateways If you do not know the TCP/IP address or the host name of the SMTP Gateway,click this button to search the network for a suitable SMTP Gateway server.
NOTE If you are using an ISP for e-mail services, this feature mightnot function correctly. Please contact your ISP for the name or addressof the SMTP Gateway and for the username and password used toaccess the e-mail.
10 Test Click this button to verify that the specified SMTP Gateway server is valid andoperational.
11 E-mail address Type the e-mail address of the person who will act as the default sender.
12 Display Name Type the name that you want to appear in the "From" field for the e-mailmessages that are sent from the product. You can also use this field to includeinstructions, such as "Please type your e-mail address here."
NOTE If a name is not provided, the e-mail address that was typed inthe E-mail Address field will appear in the "From" field of outgoing e-mail messages.
13 Prevent Device user fromchanging the Default 'From:'Address
Select this check box to ensure that general users cannot change the e-mailaddress that the administrator set.
14 Default Subject If you want to, type the subject that will appear on all e-mail messages theproduct sends. You can also use this field to include instructions, such as"Please type a subject for your message."
15 Advanced Click this button to open a new screen that you can use to set message text andattachment settings for e-mail messages that the product sends. For moreinformation, see Advanced E-mail Settings.
Table 4-3 E-mail Settings (continued)
ENWW E-mail Settings 61
Dig
ital S
endi
ng
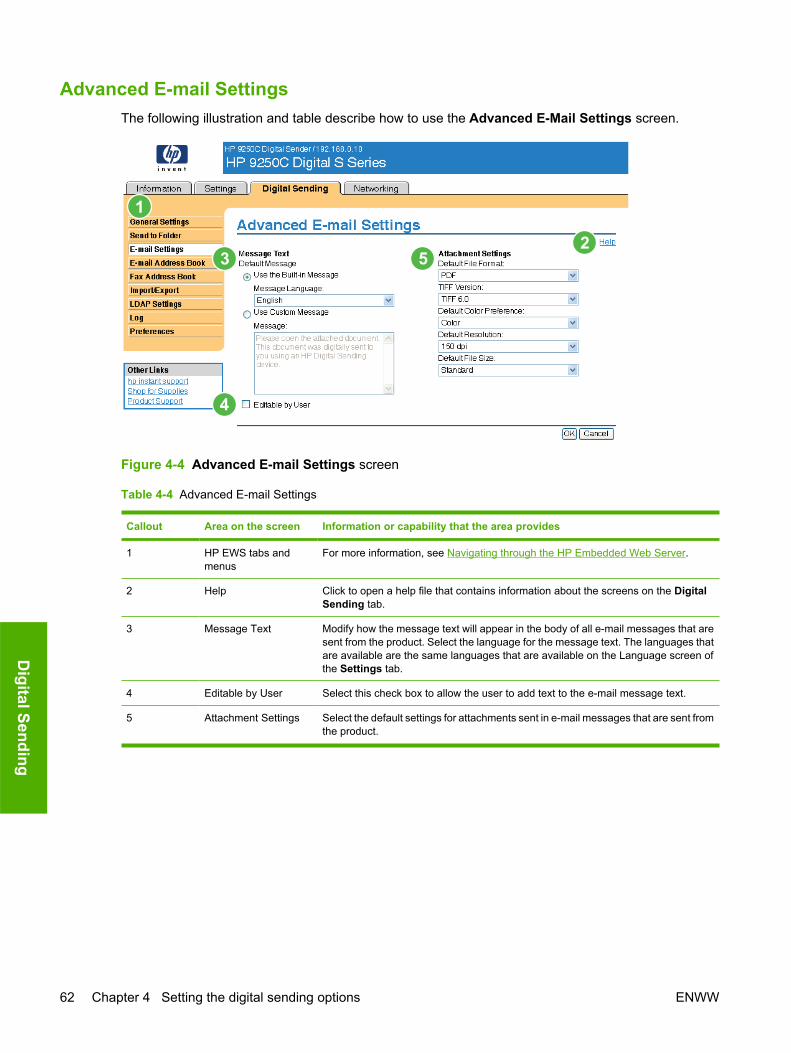
Advanced E-mail SettingsThe following illustration and table describe how to use the Advanced E-Mail Settings screen.
Figure 4-4 Advanced E-mail Settings screen
Table 4-4 Advanced E-mail Settings
Callout Area on the screen Information or capability that the area provides
1 HP EWS tabs andmenus
For more information, see Navigating through the HP Embedded Web Server.
2 Help Click to open a help file that contains information about the screens on the DigitalSending tab.
3 Message Text Modify how the message text will appear in the body of all e-mail messages that aresent from the product. Select the language for the message text. The languages thatare available are the same languages that are available on the Language screen ofthe Settings tab.
4 Editable by User Select this check box to allow the user to add text to the e-mail message text.
5 Attachment Settings Select the default settings for attachments sent in e-mail messages that are sent fromthe product.
62 Chapter 4 Setting the digital sending options ENWW
Digital Sending

E-mail Address BookAn e-mail address book is a list of e-mail addresses that are stored on the device. The address bookcan store frequently-used e-mail addresses so that you can quickly choose the right e-mail addresswhen sending a document from the front panel of the device. The E-mail Address Book page enablesyou to add e-mail addresses into the device one at a time, and to edit e-mail addresses that have alreadybeen saved in the device.
You can also use the device Import/Export feature to load a large list of frequently-used e-mail addresseson to the device all at once, rather than adding them one at a time.
If you want to add e-mail addresses to more than one device, it is best to add them on one device, makeany edits to the list, and then use the Import/Export feature to transfer the addresses to other devices.
The following illustration and procedures describe how to use this screen.
Figure 4-5 E-mail Address Book screen
ENWW E-mail Address Book 63
Dig
ital S
endi
ng
E-mail Address Book tasksYou can add an e-mail address by clicking Add E-mail Address.... This takes you to the Add E-mailAddress page, which has instructions for completing the task.
Adding an e-mail address
To add a new e-mail address, do the following:
1. Click Add E-mail Address.... The Add E-mail Address page appears.
2. Type the person's name in the Name field. The name is what appears in the list on the devicecontrol panel when a user is searching for an e-mail address. The maximum length is 245characters, or less depending on the language being used.
3. Type the e-mail address in the E-mail Address field. It must be less than 255 characters.
NOTE If e-mail address validation has been enabled on the device, the e-mail address isrequired to have an @ sign.
4. Click Apply to save the new e-mail address to the device.
Editing an e-mail address
To edit an existing entry, do the following:
1. Select the e-mail address that you want to edit. You can type a name into the search field to finda specific e-mail address.
2. Click Edit Entry.... The Edit E-mail Address page appears.
3. Make the necessary changes in the Name and E-mail Address fields.
4. Click Apply to save your edits.
Deleting an e-mail address
To delete an existing entry, do the following:
1. Select the e-mail address that you want to delete. You can type a name into the search field to finda specific e-mail address.
2. Click Delete Entry.... The Delete E-mail Address page appears. Note: If you want to delete all e-mail addresses from the device, click Delete All Entries.... If you want to make a backup copy ofthe e-mails first, you can do this by using the device Import/Export feature.
3. In the page that displays you are prompted to confirm the deletion of the selected e-mail address.There is no way to recover an e-mail entry once it has been deleted. Click OK to confirm yourselection. The e-mail address is deleted.
64 Chapter 4 Setting the digital sending options ENWW
Digital Sending

Fax Address BookA fax address book is a list of fax numbers that are stored on the device. The address book can storefrequently-used fax numbers so that you can quickly choose the right destination when faxing adocument from the front panel of the MFP device. The Fax Address Book page enables you to add faxnumbers into the device one at a time, and to edit fax numbers that have already been saved in thedevice.
You can also use the device Import/Export feature to load a large list of frequently-used fax numberson to the device all at once, rather than adding them one at a time.
If you want to add a fax address book to more than one device, it is best to add the fax numbers on onedevice, make any edits to the list, and then use the Import/Export feature to transfer the address bookto other devices.
The following illustration and procedures describe how to use this screen.
Figure 4-6 Fax Address Book screen
ENWW Fax Address Book 65
Dig
ital S
endi
ng
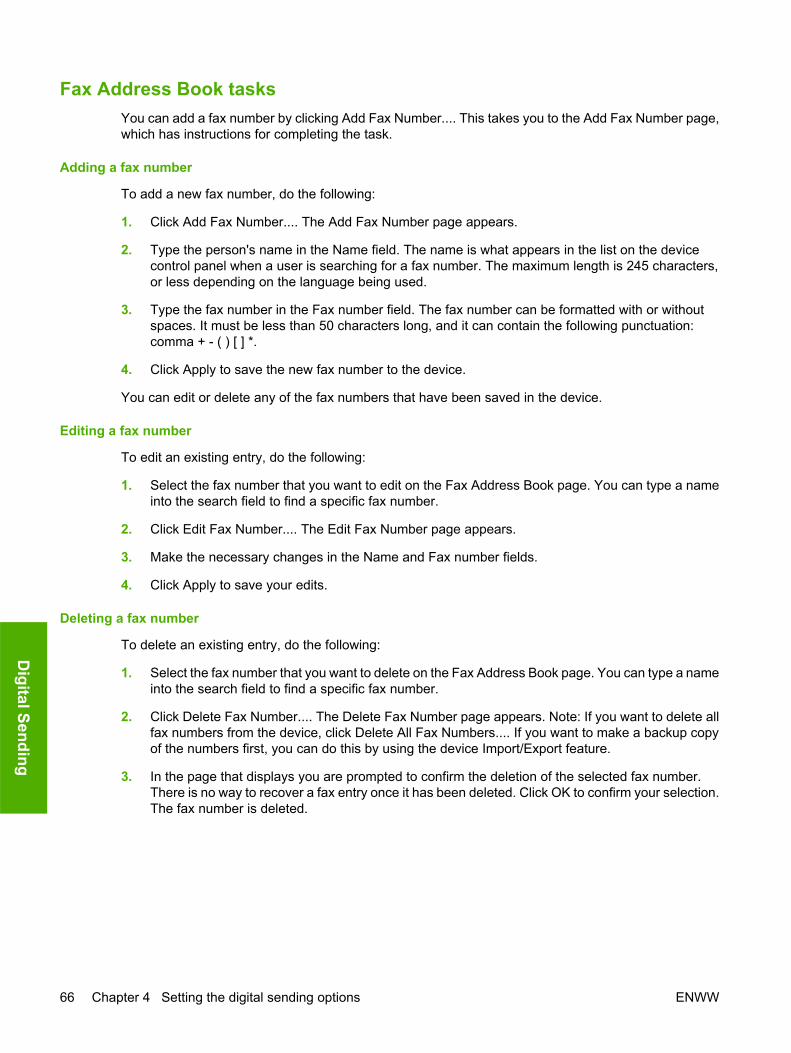
Fax Address Book tasksYou can add a fax number by clicking Add Fax Number.... This takes you to the Add Fax Number page,which has instructions for completing the task.
Adding a fax number
To add a new fax number, do the following:
1. Click Add Fax Number.... The Add Fax Number page appears.
2. Type the person's name in the Name field. The name is what appears in the list on the devicecontrol panel when a user is searching for a fax number. The maximum length is 245 characters,or less depending on the language being used.
3. Type the fax number in the Fax number field. The fax number can be formatted with or withoutspaces. It must be less than 50 characters long, and it can contain the following punctuation:comma + - ( ) [ ] *.
4. Click Apply to save the new fax number to the device.
You can edit or delete any of the fax numbers that have been saved in the device.
Editing a fax number
To edit an existing entry, do the following:
1. Select the fax number that you want to edit on the Fax Address Book page. You can type a nameinto the search field to find a specific fax number.
2. Click Edit Fax Number.... The Edit Fax Number page appears.
3. Make the necessary changes in the Name and Fax number fields.
4. Click Apply to save your edits.
Deleting a fax number
To delete an existing entry, do the following:
1. Select the fax number that you want to delete on the Fax Address Book page. You can type a nameinto the search field to find a specific fax number.
2. Click Delete Fax Number.... The Delete Fax Number page appears. Note: If you want to delete allfax numbers from the device, click Delete All Fax Numbers.... If you want to make a backup copyof the numbers first, you can do this by using the device Import/Export feature.
3. In the page that displays you are prompted to confirm the deletion of the selected fax number.There is no way to recover a fax entry once it has been deleted. Click OK to confirm your selection.The fax number is deleted.
66 Chapter 4 Setting the digital sending options ENWW
Digital Sending

Import/ExportUse this page to import and export address book and user information to and from the device.
When you import data to the device, you add new e-mail addresses, fax numbers, or user records, sothat they can be accessed on this device. This can help make it easy to create initial lists, or to keepyour HP device current with changes in your organization.
When you export records, you save e-mail, fax, or user records from the device into a file on yourcomputer. You can then use this file as a data backup, or you can use it to import the records ontoanother HP device. For export instructions see Export an address book.
The following illustration and procedures describe how to use this screen.
Figure 4-7 Import/Export screen
ENWW Import/Export 67
Dig
ital S
endi
ng
Import an address bookYou can import address book information by first creating a file with a comma-separated value (CSV)format. The CSV format is a common data format that is often used to transfer data between databaseprograms or devices. This file can be created using either a spreadsheet program such as MicrosoftExcel, or a text program such as Microsoft Notepad. After creating the file, you must be sure to save orexport it as a .CSV file type. You can also create a data file by exporting contacts from Microsoft Outlookor another e-mail client and saving it as a .CSV file.
Importing an address book
To import address book or user data, do the following:
1. Create a data file containing a header row with the columns that are required for your data. Thefollowing columns can be used:
● name (or "first name" and "last name")
● address
● dlname
● faxnumber
● speeddial
● code
● pin
NOTE The "address" field can also be called "E-mail" or "E-mail Address". The"faxnumber" field can also be called "Business Fax" or "Home Fax".
The header row is simply the first row of the spreadsheet or file.
2. After the header row, add rows containing each address book or user record. See the Requireddata and record limits section below to find out which columns are required for each type of record.
You can have blank columns, as shown in the Excel spreadsheet example below. If you are creatinga text import file, you just need to insert a comma for each blank field, as shown in the sample textfile below.
If the data in the field contains a comma, the data in that field must be surrounded by quotes, forexample,
"Smith, Joe"
If you are using Excel to create your import file, you don't need to enter the quotes. Excel will insertthem automatically when the file is converted to a .CSV file.
3. Save your import file.
If you are creating it in Excel, choose Save As from the File menu and then select .CSV (commadelimited)(*.csv) in the Save as type drop-down box.
If you are creating a text file, choose Save As from the File menu and then type .csv in place ofthe .txt file extension.
68 Chapter 4 Setting the digital sending options ENWW
Digital Sending

4. To import your source file into the device, click Browse... next to the Address Book File Name fieldon the Import/Export page to browse to the source file on your computer.
5. Click Import to import the data file into the device. The import process will take approximately1 minute for each 1,000 records, depending on the network speed.
When the import process is complete, a message appears indicating how many records weresuccessfully imported and whether there were any import errors.
Required data and record limitsThe required data for each type of record is as follows:
Record type Required data Maximum field length Maximum records
E-mail address name (or "first name" and "lastname")
address1
245 characters2
255 characters
2,0003
User record name
pin
address1
245 characters2
4-8 digits
255 characters
2,000
E-mail distribution list name
address1
dlname
245 characters2
255 characters
245 characters2
2,0003
Fax number name
faxnumber1
245 characters2
50 characters
2,000
Fax speed-dial faxnumber1
speeddial4
code4
50 characters
31 characters
2 digits
100 speed-dials, each with amaximum of 100 entries
1 The “address” field can also be called “E-mail” or “E-mail Address”. The “faxnumber” field can alsobe called “Business Fax” or “Home Fax”.
2 The maximum length might be less, depending on the language being used.3 The total combined number of e-mail addresses and distribution lists must be 2,000 entries or less.4 The "speeddial" field contains the name of the speed-dial, for example "Johnson Janitorial", and the
"code" field contains the speed dial code (a number between 0 and 99), for example 08. Either one-or two-digit numbers are accepted; for example, either 06 or 6 can be used.
Creating an import file using Microsoft OutlookIf you have contacts saved in Microsoft Outlook, you can export them into a .CSV file and then use thatfile to import them into the device. Follow these instructions to create a .CSV file using Microsoft Outlook.
1. From the Outlook File menu, choose Import and Export....
2. In the Import and Export Wizard, choose Export to a file and click Next.
3. Select Comma Separated Values (DOS) and click Next.
ENWW Import/Export 69
Dig
ital S
endi
ng

4. Select the Contacts folder and click Next.
5. Type in a name for the file, with a .CSV extension. Click Browse to choose a location on yourcomputer to save the file. Click Next.
6. Click Finish to finish the wizard and export the file.
7. To import the .CSV file into the device, follow Steps 4 and 5 of the Import an address bookinstructions.
Export an address bookYou can also export the address book or user information that has been saved in the device. This datais exported into a CSV file that has the same format as that described above, with one header rowfollowed by a row for each user or address book record. To export data, do the following:
1. Select one or more of the check boxes shown under Step 1.
2. Under Step 2, type in the name for the export file.
3. In the dialog box that appears, click Save, and then select the location where you want to save thefile.
4. If the export process fails, an error message will be displayed. If this happens, wait a few minutesand try the export again.
You can open the export file in either a spreadsheet program like Microsoft Excel, or in a text programlike Notepad.
Clear address booksBy default, clicking the Clear Selected Address Book(s) button clears all address book data (e-mail, fax,and authorized user data) from the device. You can also specify individual address books to clear,although e-mail addresses and e-mail distribution lists may not be cleared separately.
You might want to clear all address books before moving the device to a new area within your company,or before importing address book data from another device.
To clear one or more address books, do the following:
1. Select one or more of the check boxes shown under Option 3: Clear Address Books.
2. Click Clear Selected Address Book(s) to erase the data in the selected address books. A warningdialog box appears, indicating which address books are selected for deletion.
3. Click OK to confirm this action. Once cleared, the data can not be recovered.
4. After OK is pressed, the address book data is cleared and you are returned to the original page.A list of the cleared address books is displayed.
70 Chapter 4 Setting the digital sending options ENWW
Digital Sending
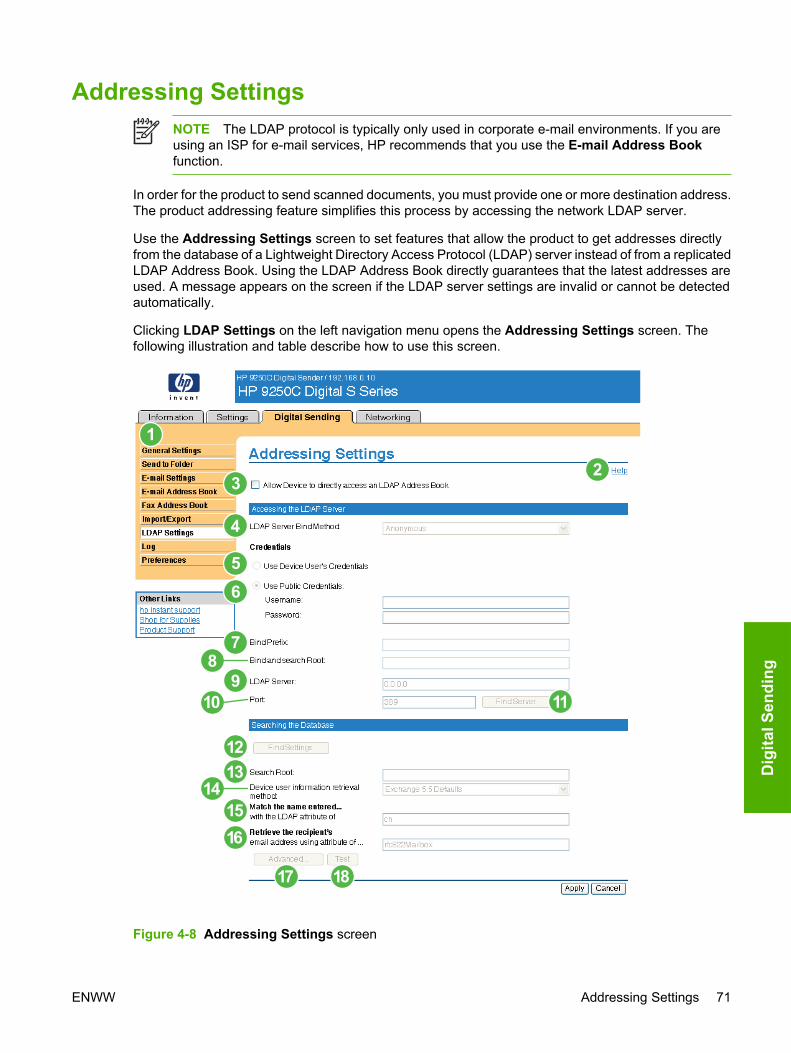
Addressing SettingsNOTE The LDAP protocol is typically only used in corporate e-mail environments. If you areusing an ISP for e-mail services, HP recommends that you use the E-mail Address Bookfunction.
In order for the product to send scanned documents, you must provide one or more destination address.The product addressing feature simplifies this process by accessing the network LDAP server.
Use the Addressing Settings screen to set features that allow the product to get addresses directlyfrom the database of a Lightweight Directory Access Protocol (LDAP) server instead of from a replicatedLDAP Address Book. Using the LDAP Address Book directly guarantees that the latest addresses areused. A message appears on the screen if the LDAP server settings are invalid or cannot be detectedautomatically.
Clicking LDAP Settings on the left navigation menu opens the Addressing Settings screen. Thefollowing illustration and table describe how to use this screen.
Figure 4-8 Addressing Settings screen
ENWW Addressing Settings 71
Dig
ital S
endi
ng
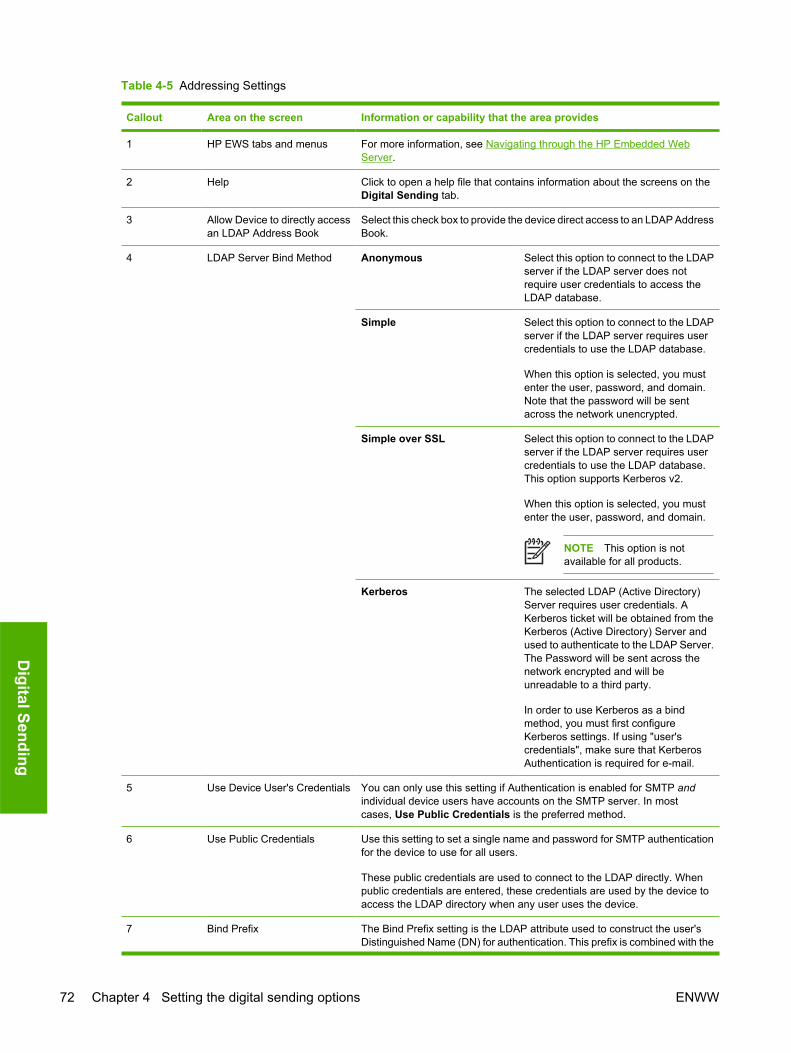
Table 4-5 Addressing Settings
Callout Area on the screen Information or capability that the area provides
1 HP EWS tabs and menus For more information, see Navigating through the HP Embedded WebServer.
2 Help Click to open a help file that contains information about the screens on theDigital Sending tab.
3 Allow Device to directly accessan LDAP Address Book
Select this check box to provide the device direct access to an LDAP AddressBook.
4 LDAP Server Bind Method Anonymous Select this option to connect to the LDAPserver if the LDAP server does notrequire user credentials to access theLDAP database.
Simple Select this option to connect to the LDAPserver if the LDAP server requires usercredentials to use the LDAP database.
When this option is selected, you mustenter the user, password, and domain.Note that the password will be sentacross the network unencrypted.
Simple over SSL Select this option to connect to the LDAPserver if the LDAP server requires usercredentials to use the LDAP database.This option supports Kerberos v2.
When this option is selected, you mustenter the user, password, and domain.
NOTE This option is notavailable for all products.
Kerberos The selected LDAP (Active Directory)Server requires user credentials. AKerberos ticket will be obtained from theKerberos (Active Directory) Server andused to authenticate to the LDAP Server.The Password will be sent across thenetwork encrypted and will beunreadable to a third party.
In order to use Kerberos as a bindmethod, you must first configureKerberos settings. If using "user'scredentials", make sure that KerberosAuthentication is required for e-mail.
5 Use Device User's Credentials You can only use this setting if Authentication is enabled for SMTP andindividual device users have accounts on the SMTP server. In mostcases, Use Public Credentials is the preferred method.
6 Use Public Credentials Use this setting to set a single name and password for SMTP authenticationfor the device to use for all users.
These public credentials are used to connect to the LDAP directly. Whenpublic credentials are entered, these credentials are used by the device toaccess the LDAP directory when any user uses the device.
7 Bind Prefix The Bind Prefix setting is the LDAP attribute used to construct the user'sDistinguished Name (DN) for authentication. This prefix is combined with the
72 Chapter 4 Setting the digital sending options ENWW
Digital Sending
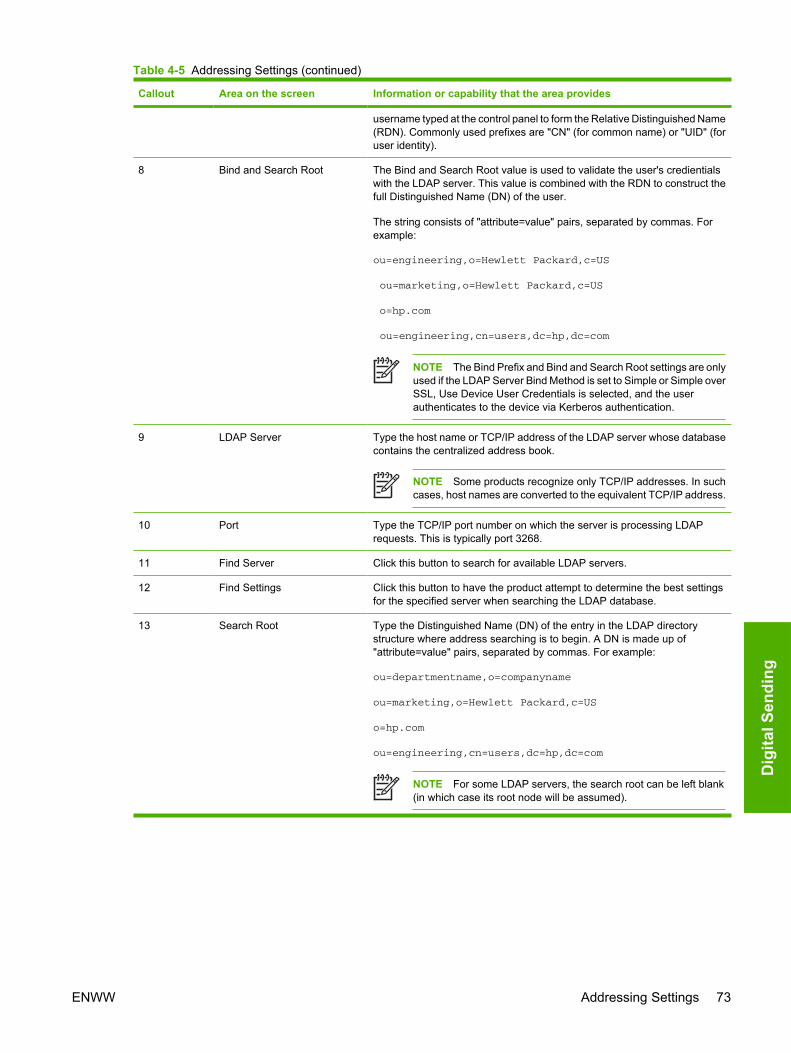
Callout Area on the screen Information or capability that the area provides
username typed at the control panel to form the Relative Distinguished Name(RDN). Commonly used prefixes are "CN" (for common name) or "UID" (foruser identity).
8 Bind and Search Root The Bind and Search Root value is used to validate the user's credientialswith the LDAP server. This value is combined with the RDN to construct thefull Distinguished Name (DN) of the user.
The string consists of "attribute=value" pairs, separated by commas. Forexample:
ou=engineering,o=Hewlett Packard,c=US
ou=marketing,o=Hewlett Packard,c=US
o=hp.com
ou=engineering,cn=users,dc=hp,dc=com
NOTE The Bind Prefix and Bind and Search Root settings are onlyused if the LDAP Server Bind Method is set to Simple or Simple overSSL, Use Device User Credentials is selected, and the userauthenticates to the device via Kerberos authentication.
9 LDAP Server Type the host name or TCP/IP address of the LDAP server whose databasecontains the centralized address book.
NOTE Some products recognize only TCP/IP addresses. In suchcases, host names are converted to the equivalent TCP/IP address.
10 Port Type the TCP/IP port number on which the server is processing LDAPrequests. This is typically port 3268.
11 Find Server Click this button to search for available LDAP servers.
12 Find Settings Click this button to have the product attempt to determine the best settingsfor the specified server when searching the LDAP database.
13 Search Root Type the Distinguished Name (DN) of the entry in the LDAP directorystructure where address searching is to begin. A DN is made up of"attribute=value" pairs, separated by commas. For example:
ou=departmentname,o=companyname
ou=marketing,o=Hewlett Packard,c=US
o=hp.com
ou=engineering,cn=users,dc=hp,dc=com
NOTE For some LDAP servers, the search root can be left blank(in which case its root node will be assumed).
Table 4-5 Addressing Settings (continued)
ENWW Addressing Settings 73
Dig
ital S
endi
ng
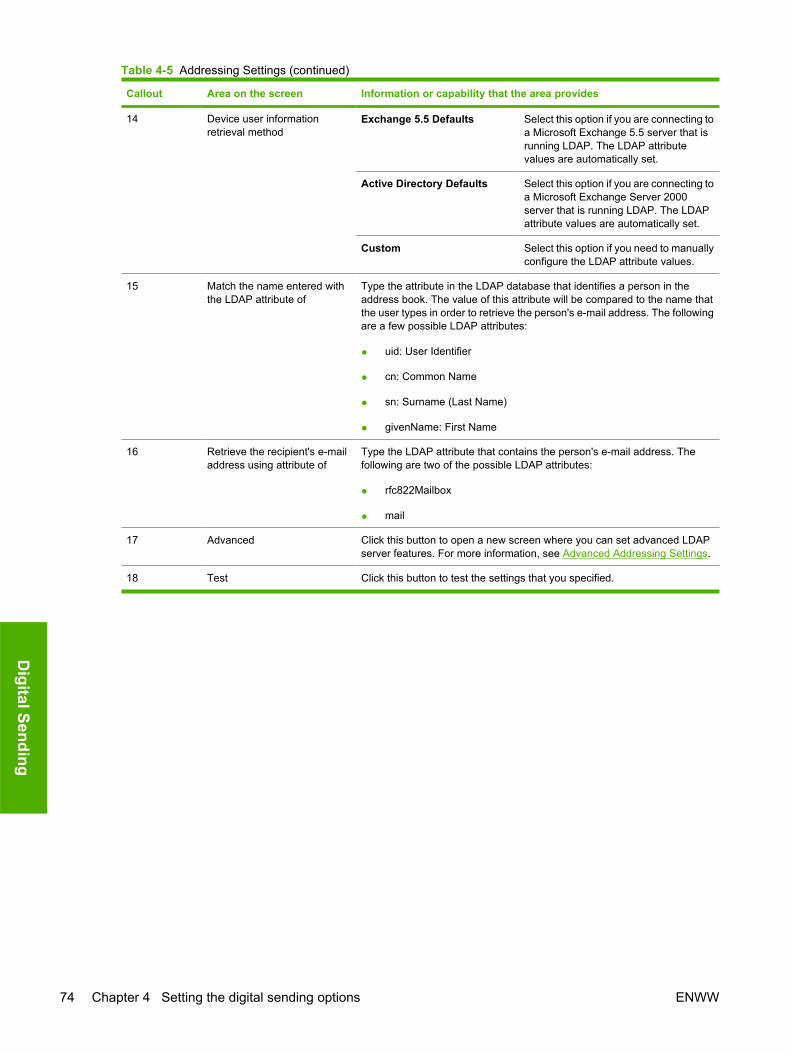
Callout Area on the screen Information or capability that the area provides
14 Device user informationretrieval method
Exchange 5.5 Defaults Select this option if you are connecting toa Microsoft Exchange 5.5 server that isrunning LDAP. The LDAP attributevalues are automatically set.
Active Directory Defaults Select this option if you are connecting toa Microsoft Exchange Server 2000server that is running LDAP. The LDAPattribute values are automatically set.
Custom Select this option if you need to manuallyconfigure the LDAP attribute values.
15 Match the name entered withthe LDAP attribute of
Type the attribute in the LDAP database that identifies a person in theaddress book. The value of this attribute will be compared to the name thatthe user types in order to retrieve the person's e-mail address. The followingare a few possible LDAP attributes:
● uid: User Identifier
● cn: Common Name
● sn: Surname (Last Name)
● givenName: First Name
16 Retrieve the recipient's e-mailaddress using attribute of
Type the LDAP attribute that contains the person's e-mail address. Thefollowing are two of the possible LDAP attributes:
● rfc822Mailbox
17 Advanced Click this button to open a new screen where you can set advanced LDAPserver features. For more information, see Advanced Addressing Settings.
18 Test Click this button to test the settings that you specified.
Table 4-5 Addressing Settings (continued)
74 Chapter 4 Setting the digital sending options ENWW
Digital Sending
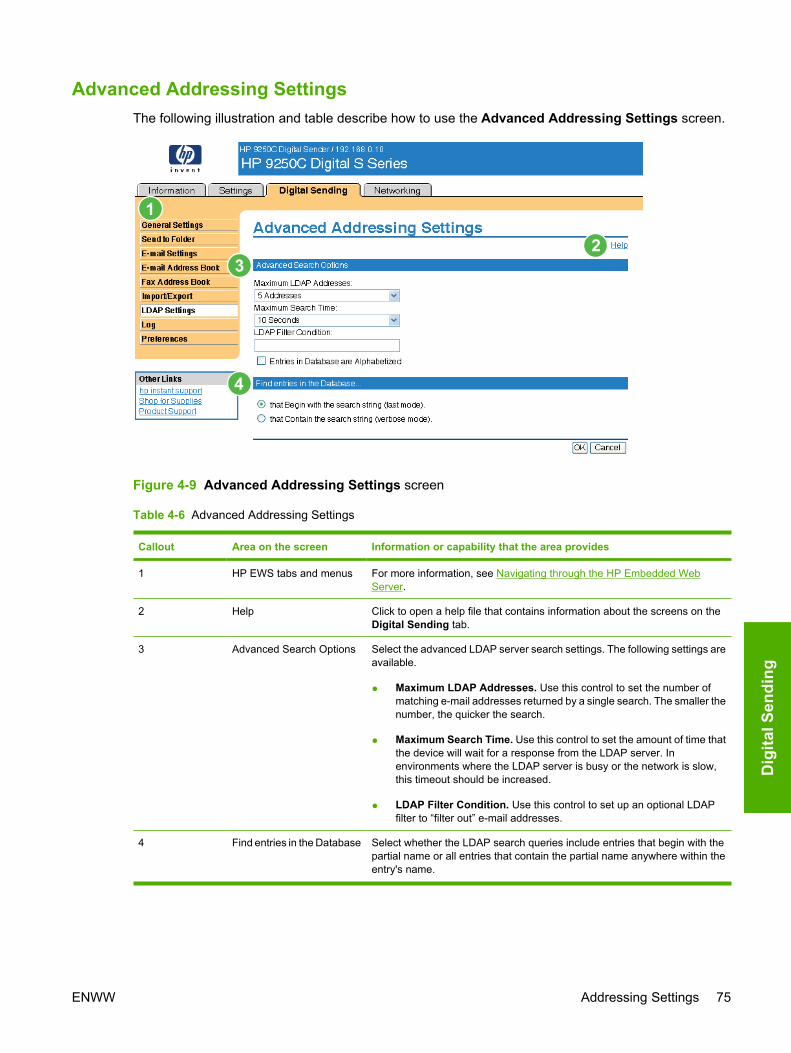
Advanced Addressing SettingsThe following illustration and table describe how to use the Advanced Addressing Settings screen.
Figure 4-9 Advanced Addressing Settings screen
Table 4-6 Advanced Addressing Settings
Callout Area on the screen Information or capability that the area provides
1 HP EWS tabs and menus For more information, see Navigating through the HP Embedded WebServer.
2 Help Click to open a help file that contains information about the screens on theDigital Sending tab.
3 Advanced Search Options Select the advanced LDAP server search settings. The following settings areavailable.
● Maximum LDAP Addresses. Use this control to set the number ofmatching e-mail addresses returned by a single search. The smaller thenumber, the quicker the search.
● Maximum Search Time. Use this control to set the amount of time thatthe device will wait for a response from the LDAP server. Inenvironments where the LDAP server is busy or the network is slow,this timeout should be increased.
● LDAP Filter Condition. Use this control to set up an optional LDAPfilter to “filter out” e-mail addresses.
4 Find entries in the Database Select whether the LDAP search queries include entries that begin with thepartial name or all entries that contain the partial name anywhere within theentry's name.
ENWW Addressing Settings 75
Dig
ital S
endi
ng

LogUse the Log screen to view digital sending job information, including any errors that occur. The followingillustration and table describe how to use this screen.
NOTE If the HP DSS has been installed, digital-sending activities are logged in the HP DSSinstead of in the HP EWS. To view the log, open the HP MFP DSS Configuration Utility, and thenclick the Log tab. The entries visible in HP EWS are only those related to activities configuredeither at the control panel or through HP EWS screens.
Figure 4-10 Log screen
Table 4-7 Log
Callout Area on the screen Information or capability that the area provides
1 HP EWS tabs andmenus
For more information, see Navigating through the HP Embedded Web Server.
2 Help Click to open a help file that contains information about the screens on the DigitalSending tab.
3 Severity Lists the severity of the error, if applicable, for each log entry.
4 Device Lists the TCP/IP address of the device.
5 User Lists the user that initiated the event.
6 Event Describes if the event was successful or if an error occurred.
7 Time Shows the time for each log entry.
8 Save Click this button to save the log information to a file.
9 Details Select the log entry and then click the Details button to view the log entry details.
10 Refresh Click this button to update the view to include the latest log information.
11 Clear Click this button to clear the information from the log.
76 Chapter 4 Setting the digital sending options ENWW
Digital Sending
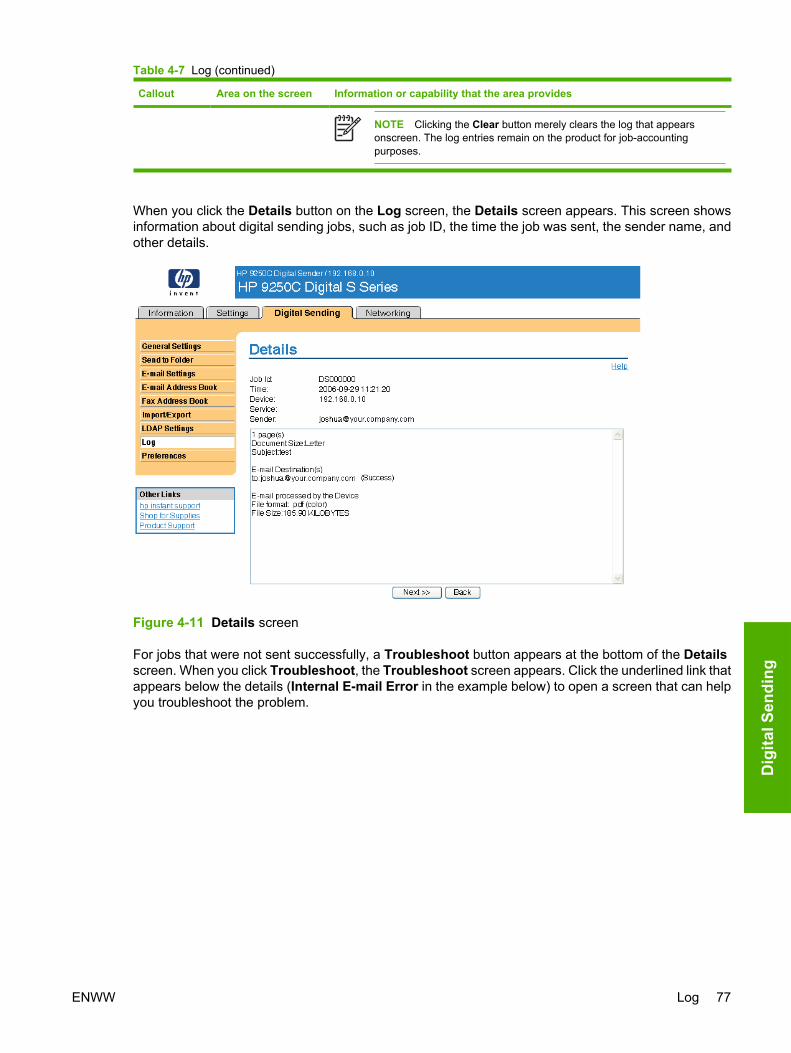
Callout Area on the screen Information or capability that the area provides
NOTE Clicking the Clear button merely clears the log that appearsonscreen. The log entries remain on the product for job-accountingpurposes.
When you click the Details button on the Log screen, the Details screen appears. This screen showsinformation about digital sending jobs, such as job ID, the time the job was sent, the sender name, andother details.
Figure 4-11 Details screen
For jobs that were not sent successfully, a Troubleshoot button appears at the bottom of the Detailsscreen. When you click Troubleshoot, the Troubleshoot screen appears. Click the underlined link thatappears below the details (Internal E-mail Error in the example below) to open a screen that can helpyou troubleshoot the problem.
Table 4-7 Log (continued)
ENWW Log 77
Dig
ital S
endi
ng

Figure 4-12 Troubleshoot screen
Preferences SettingsUse the Preferences Settings screen to configure general settings for the digital-sending features. Thefollowing illustration and table describe how to use this screen.
Figure 4-13 Preferences Settings screen
Table 4-8 Preferences Settings
Callout Area on screen Information or capability that the area provides
1 HP EWS tabs andmenus
For more information, see Navigating through the HP Embedded Web Server.
78 Chapter 4 Setting the digital sending options ENWW
Digital Sending

Callout Area on screen Information or capability that the area provides
2 Help Click to open a help file that contains information about the screens on the DigitalSending tab.
3 Document Size Select the default media size that you want the product scanner to use whenscanning a document.
4 Document Type Select the default media type that you want the product image processor to usewhen scanning a document.
● Text
● Graphics
● Mixed
5 2 Sided Document Select this check box to have the product scan both sides of a document.
6 Auto Settings Reset Use the time-outs options to reset all digital sending settings that are associatedwith a job to the product default settings. You can have the settings resetimmediately after a digital-send operation in which the settings have been changedby a user, or to delay the reset for any interval from 10 to 300 seconds.
Table 4-8 Preferences Settings (continued)
ENWW Preferences Settings 79
Dig
ital S
endi
ng
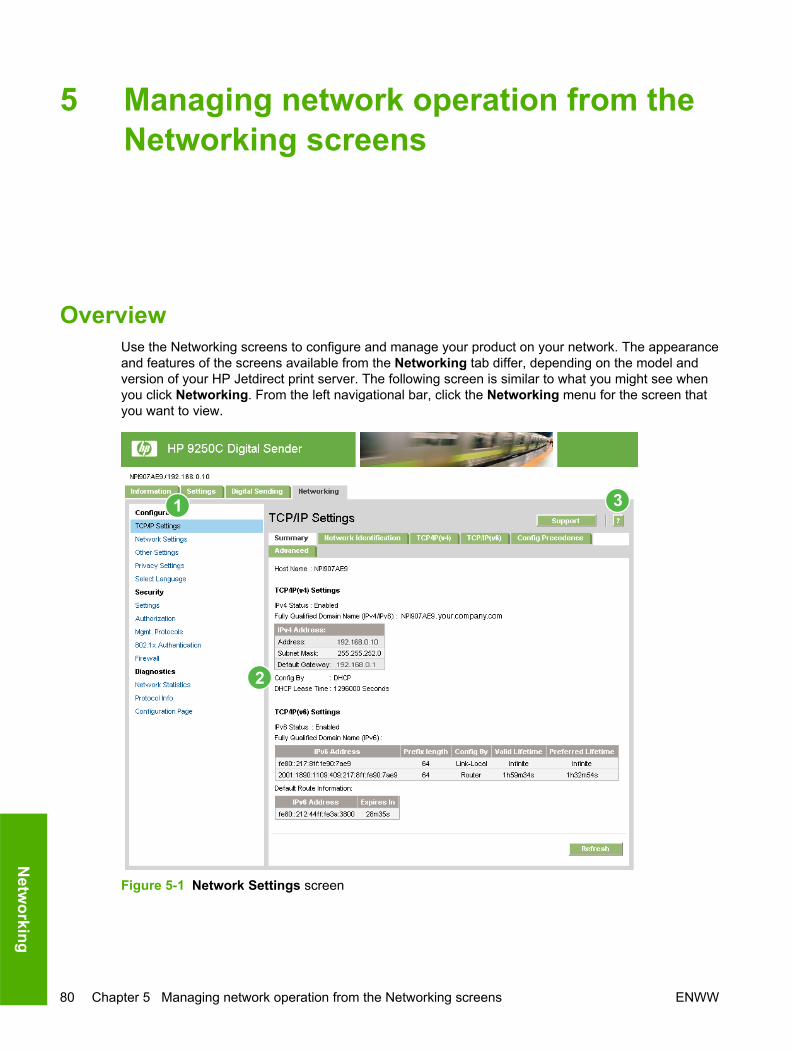
5 Managing network operation from theNetworking screens
OverviewUse the Networking screens to configure and manage your product on your network. The appearanceand features of the screens available from the Networking tab differ, depending on the model andversion of your HP Jetdirect print server. The following screen is similar to what you might see whenyou click Networking. From the left navigational bar, click the Networking menu for the screen thatyou want to view.
Figure 5-1 Network Settings screen
80 Chapter 5 Managing network operation from the Networking screens ENWW
Netw
orking

Table 5-1 Network Settings
Callout Area on screen Information or capability that the area provides
1 HP EWS tabs andmenus
For more information, see Navigating through the HP Embedded Web Server.
2 Select Language Select the language for the Networking tab. The list of languages that are availablein the Networking tab is not identical to the list of languages that are available inthe Settings tab.
3 Help Click Help for more information about the options on the Networking tab.
Depending on your HP Jetdirect print server model and operating version, the following are some tasksthat you can perform from the Networking screens:
● Change network configuration settings for various types of network connections.
● Turn on or turn off management protocols.
● Set up a support contact and support URLs.
● Set a password to control access to the product and network configuration settings. This passwordis synchronized with the password that you set on the Security screen under the Settings tab, soyou may set or reset it from either screen.
● Configure the security of your product through the use of passwords, access lists, and managementprotocols.
● View general network status information, including network statistics that are stored on the printserver, for network troubleshooting or optimization.
● View protocol information for all supported network connections.
● Open the HP Jetdirect Configuration page.
● Set the frequency at which the HP EWS checks the network status.
For more information about the Networking screens, see the following sources:
● Help. On each Networking screen, a Help link under Other Links provides a description of thenetworking features. Also, from the Help screen you can gain access to additional help from theHP Web site.
● HP Jetdirect Administrator's Guide. This guide is normally available on the software CD thatcame with your product and can be downloaded from the hp.com support pages for your productavailable on the following Web site.
www.hp.com/support/LJ9250C
ENWW Overview 81
Net
wor
king

6 Using the Other Links as a resource
The Other Links box contains three permanent links that provide quick access to product-specificinformation, such as interactive troubleshooting and ordering information for genuine HP supplies.
Figure 6-1 Device Information screen
NOTE You can use the Edit Other Links screen on the Settings tab to add up to fivecustomized links to the Web sites of your choice. These links appear throughout the EWSscreens, in the Other Links box beneath the left navigational bar. For more information, see EditOther Links.
The following sections describe each of the links that appear by default in the Other Links box.
hp instant supportHewlett-Packard Company offers hp instant support, an Internet-based support system that collectsdiagnostic information from your product and matches it with the HP information database. At hp instantsupport, you can find intelligent solutions that help you resolve problems quickly and easily.
How hp instant support worksInformation is gathered from your product and securely transmitted to Hewlett-Packard Company whenyou click hp instant support. The hp instant support Web site reads the product data to analyze the
82 Chapter 6 Using the Other Links as a resource ENWW
Other Links
product's current status. The Web site creates a customized Web page that appears in the browserwindow and contains easy-to-follow text and visual aids. The hp instant support Web site also directsyou to additional services that are available for your product.
Before any of the product data is sent to Hewlett-Packard for analysis, you can view all of the information(for example, the serial number, error conditions, and product status) that will be forwarded. Hewlett-Packard treats this information as confidential.
Information you can get from hp instant supportThe hp instant support Web site provides these tools for troubleshooting and for maintenance:
● Firmware and software updates.
● Troubleshooting for recent events that are listed on the Event Log. For example, the product mightshow a jam as the most recent event listed in the event Log. The hp instant support Web site detectsthe event and provides troubleshooting information for the jam.
● Support packs.
● Product documentation, such as user guides and getting started guides.
Shop for SuppliesThe Shop for Supplies link connects you to a Web page that facilitates your online ordering of suppliesfrom a reseller of your choice. The supplies that you need are preselected. You can change quantitiesor select additional items. Your items are added to the shopping cart, ready for checkout, ensuring thatthe correct supplies are ordered through your selected reseller.
ENWW Shop for Supplies 83
Oth
er L
inks

Product SupportThe Product Support link connects you to a Web page that brings together a comprehensive menu ofsupport resources that business people need. From this Web page, you can accomplish these tasksand more:
● Find a list of HP products at one site: computers, workstations, servers, storage devices, printer,scanners, digital imaging, and mobile devices.
● Obtain technical support. Solve a problem; find information to set up, install, and configure yourproduct; discover and use a product; maintain your product; upgrade and migrate your productsoftware and driver; and recycle products or dispose of them correctly.
● Gain access to self-solve resources such as FAQs, user documentation, features andspecifications, and product-compatibility information.
● Collaborate with HP and with your peers through discussion groups, e-mail support, and phonesupport.
● Use task-based navigation to identify the task area that you want to work on and quickly discoverrelated topics and tools.
In addition, you can find these features: hot topics, a subscription center, product rebate offers and otherannouncements, and training and education opportunities.
My Service Provider and My Service ContractThe My Service Provider and the My Service Contract links appear only if they have been created(and perhaps renamed) by the service provider in the Other Links screen on the Settings tab. The linkcan then be clicked by any user to get information about the service provider and the service contract.The information, which can be up to 50 characters long, is stored in the permanent storage of the product.
84 Chapter 6 Using the Other Links as a resource ENWW
Other Links
Index
Aaccessing the HP Embedded Web
Server 2accessories, verifying installed 9activity logs
digital sending 76addressing
Kerberos Authentication 42settings 71
administratorsalerts, setting up 20Digital Sending settings 56logging off 4logging on 4
Advanced E-mail Settingsscreen 62
alertsconfiguring 22deleting destination lists 24e-mail configuration 19e-mailing information
pages 25features 20testing destination lists 24
asset number 14attachments, e-mail 61, 62authentication
addressing 72e-mail 61Kerberos 36LDAP 33settings 32
Authentication ManagerKerberos configuration 42settings 32
AutoSend 26
Bbrowsers
closing after logging off 4
defined 1supported 2
buttons, control panel 8
CCancel Job button 28cartridges
AutoSend feature 26ordering 49, 83status 8, 11usage information 13
clock drift correction 53clock settings 52Configuration Page screen 9Configure Device menu 17Configure Device screen 16consumables. See suppliescontrol panel
buttons 8Kerberos Authentication 43language 51menus 16viewing 15
Control Panel Snapshotscreen 15
counts, page 13customer support
instant 49, 82product 49, 84
DDate & Time screen 52Date/Time Format, setting 53destination lists
creating 22deleting 24testing 24
Device Information screen 14, 50
device location 14
Device Status screen 8devices, defined 1Diagnostics menu 17Digital Sending screens
about 55Addressing 71Advanced E-mail Settings 62General 56Kerberos Authentication 36Log 76Preferences 78Send to E-mail 60Send to Folder 57
Digital Sending tab 6DIMMs, verifying installed 9
Ee-mail
addressing 71advanced settings 62alerts 20attachments, size
settings 61, 62AutoSend 26information pages 25outgoing, configuring 19return address, configuring 19server settings 18SMTP gateway settings 60support 49, 84
E-mail Server screen 18Edit Other Links screen 48, 82embedded Web server
defined 1features 1
error messagesdigital sending logs 76Event Log 12
Event Log 12Explorer, versions supported 2
ENWW Index 85
FFAQs 49, 84Fax menu 17features 1Firefox, versions supported 2firewalls 2folders, sending to 57
Ggateway settings, SMTP 60General screen, Digital
Sending 56group product management 2
Hhelp
instant support 49, 82product support 49, 84
HP Embedded Web Serverdefined 1features 1
hp instant support 49, 82HP Jetdirect print server 81HP Web Jetadmin 2
IInformation menu 17information pages, e-mailing 25Information tab
navigating 6password protection 4status screens 7
ink cartridge. See print cartridgesInternet Explorer, versions
supported 2IT administrators
alerts, setting up 20Digital Sending settings 56logging off 4logging on 4
JJetadmin, HP Web 2Jetdirect print server 81
KKerberos Authentication 36keys, control panel 8Konqueror, versions supported 2
LLanguage screen 51LDAP Authentication screen 33LDAP servers
addressing settings 71Kerberos authentication 36
links 48, 82logging off 4logging on
Authentication Manager 32LDAP Authentication 33password settings 28procedures 4
logsdigital sending 76event 12
Mmedia
tray settings 17Usage Page 13
memory, verifying installed 9menus
control panel 16HP Embedded Web Server 5navigating 17
messages, errordigital sending logs 76Evnet Log 12
Microsoft Internet Explorer,versions supported 2
model number 14Mozilla Firefox, versions
supported 2My Service Contract link 49, 84My Service Provider link 49, 84
Nnavigating 5, 17Netscape Navigator, versions
supported 2Networking screens 80Networking tab 6networks
configuring 80types supported 2Web Jetadmin 2
Oonline help
instant support 49, 82product support 49, 84
opening the HP Embedded WebServer 2
Opera, versions supported 2Options 10ordering supplies 49, 83Other Links area 48, 82outgoing mail configuration 19
Ppage counts 13paper
tray settings 17Usage Page 13
Paper Handling menu 17passwords 4, 28phone support 49, 84plus sign, menus 17Preferences, digital sending 78print cartridges
AutoSend feature 26ordering 49, 83status 8, 11usage information 13
print server, HP Jetdirect 81product support 49, 84products, defined 1
Rrecycle supplies 49, 84remote configuration 16return e-mail address 19
SSafari, versions supported 2security
addressing 72Authentication Manager 32Kerberos Authentication 36LDAP Authentication 33Send to E-mail 60settings, general 28status 10
Security screen 28Send to E-mail screen 60Send to Folder screen 57serial number 14server, HP Jetdirect 81
86 Index ENWW

service contracts 49service providers
alerts, setting up 20links to 49logging off 4logging on as 4
Settings tab 6, 16Shop for Supplies link 49, 83SMTP gateway settings 60status
alerts 20device 8e-mailing information
pages 25network 80supplies 8, 11
suppliesAutoSend feature 26ordering 49, 83status 8status page 11usage information 13
Supplies Status screen 11support
instant 49, 82product 49, 84
system requirements 2
TTCP/IP address
e-mail configuration 19locating 2, 14
TCP/IP-based network 2technical support
instant 49, 82product 49, 84
time settings 52toner cartridge. See print cartridgestrays
settings 17Usage Page 13
troubleshootingConfiguration Page screen 9digital sending log 76Event Log 12instant support 49, 82product support 49, 84
Uusage information, AutoSend 26
Usage Page 13user name 28
WWeb browsers
closing after logging off 4defined 1supported 2
Web Jetadmin 2Web server, embedded
defined 1features 1
Web sitesinstant support 49, 82product support 49, 84
ENWW Index 87

© 2007 Hewlett-Packard Development Company, L.P.
www.hp.com


![Southern California Motorcycling Association S CMA NEWS€¦ · (Resides in SoCal) Treasurer [ ] John Mickus (Incumbent) (Resides in SoCal) Membership Services Director [ ] Mike Barber](https://img.pdfslide.us/doc/110x75/60317789e9d52e0eb22282ef/southern-california-motorcycling-association-s-cma-news-resides-in-socal-treasurer.jpg)