Embed Size (px)
Citation preview

Howto use Amontec JTAGkey-
Tiny on
PN IO Development Kits for ERTEC 200/400 with eCos
Copyright © Siemens AG 2010. All rights reserved. 1 Howto use Amontec JTAGkey-Tiny Änderungen vorbehalten Version 1.3

Copyright © Siemens AG 2010. All rights reserved. 2 Howto use Amontec JTAGkey-Tiny Änderungen vorbehalten Version 1.3
Disclaimer of Liability
We have checked the contents of this manual for agreement with the hardware and software described. Since
deviations cannot be precluded entirely, we cannot guarantee full agreement. However, the data in this manual are
reviewed regularly. Necessary corrections are included in subsequent editions. Suggestions for improvement are
welcomed. Copyright
© Siemens AG 2010. All rights reserved
The reproduction, transmission or use of this document or its contents is not permitted without express written
authority. Offenders will be liable for damages. All rights, including rights created by patent grant or registration of a
utility model or design, are reserved.
All product and system names are registered trademarks of their respective owner and must be treated as such.
Technical data subject to change.

Copyright © Siemens AG 2010. All rights reserved. 3 Howto use Amontec JTAGkey-Tiny Änderungen vorbehalten Version 1.3
Preamble
This document assist you to integrate the Amontec JTAGkey-Tiny on the Development Kits DK-ERTEC200 PN IO, SK-ERTEC200 PN IO, DK-ERTEC400 PN IO with operating system eCos and comes without any warranty, there is no additional support by Siemens.

Copyright © Siemens AG 2010. All rights reserved. 4 Howto use Amontec JTAGkey-Tiny Änderungen vorbehalten Version 1.3
Index of contens
1 Introduction.............................................................................................................................5 2 Necessary Hardware ..............................................................................................................5 3 Required Softwaretools .........................................................................................................5
3.1 Eclipse Version: 3.4.1 .............................................................................................................................5 3.2 OpenOCD 0.4.0 ......................................................................................................................................6 3.3 Amontec JTAGkey-Tiny Driver ...............................................................................................................6 3.4 GDB 6
4 Integration of Amontec JTAGkey-Tiny.................................................................................6 4.1 Step 1 Unpack Eclipse............................................................................................................................6 4.2 Step 2 install Eclipse plugin ....................................................................................................................7 4.3 Step 3 Install Amontec JTAGkey-Tiny Driver..........................................................................................7 4.4 Step 4 Install and start OpenOCD ..........................................................................................................8 4.5 Step 5 Configure Eclipse ........................................................................................................................9
5 Overview on the installed system ........................................................................................13 6 Need-To-Knew/ Restrictions .................................................................................................14 7 Annex.......................................................................................................................................14
7.1 openocd Version 0.4.0 Configuration File for debugging on EB200 .......................................................14 7.2 openocd Version 0.4.0 Configuration File for debugging on EB400 .......................................................14
Miscellaneous ...................................................................................................................................14 7.3 Abbreviations: .........................................................................................................................................14

Copyright © Siemens AG 2010. All rights reserved. 5 Howto use Amontec JTAGkey-Tiny Änderungen vorbehalten Version 1.3
1 Introduction
This document describe how to integrate the Amontec JTAGkey-Tiny to use it on Development Kit DK-ERTEC200 PN IO, SK-ERTEC200 PN IO, DK-ERTEC 400 PN IO with operating system eCos.
There is no support on preconfigured GNU toolchains from Siemens side, please refere according suppliers:
Amontec:
http://www.amontec.com/sdk4arm.shtml
Yagarto:
http://www.yagarto.de/
The tools versions you download may differ, it is your challenge to modify settings suited. We recommend to us the same Version as described.
Please see also chapter 6 “Need-To-Knew/ Restrictions”.
2 Necessary Hardware
The Hardware Debugger can ordered under following address: Amontec , Gauch La Grand Fin 123 1633 Vuippens Switzerland Fax +41 (0)26915 2250 [email protected] http://www.amontec.com/jtagkey-tiny.shtml This Howto was tested with following Target Boards:
Siemens Profinet Evaluation Board ERTEC 200 Siemens Profinet Evaluation Board ERTEC 400
3 Required Softwaretools
This “Howto” requires that the DK- ERTEC 200/ 400 PN IO V3.2 or SK- ERTEC 200 PN IO V3.2 with eCos OS is already installed.
3.1 Eclipse Version: 3.4.1
You find Eclipse on the Development Kit CD in the subdirectory \tools\eclipse. It contains the version 3.4.1 with all necessary plugins to work with the OpenOCD JTAG debugger.

Copyright © Siemens AG 2010. All rights reserved. 6 Howto use Amontec JTAGkey-Tiny Änderungen vorbehalten Version 1.3
Eclipse could also be downloaded from following website: http://www.eclipse.org/ Be sure that the version you download includes the following plugins:
CDT (C development toolkit) GDB Hardware Debugging
If you use the following plugin CDT and GDB Hardware Degugging is included: http://www.eclipse.org/downloads/download.php?file=/tools/cdt/releases/ganymede/dist/cdt-master-5.0.1.zip If Eclipse is already installed you could check plugins by: Menu: Help|About Eclipse Platform| Plug-in Details
3.2 OpenOCD 0.4.0
You find OpenOCD 0.4.0 on the Development Kit CD in the subdirectory \tools\OpenOCD. OpenOCD could also be downloaded from following Adresse: http://openocd.berlios.de/web/ We attached the configuration files for version 0.4.0.
3.3 Amontec JTAGkey-Tiny Driver
The Amontec JTAGkey-Tiny driver could be downloaded from following Adresse: http://www.amontec.com How to install the driver and how to verify the installation, you find in the corresponding PDF documentation, which is also downloadable from this website.
3.4 GDB
A suitable ARM gdb must be referenced in the eclipse Debug configuration. After installation of the development kit CD it is located in the following folder: PNIODevKit3/msys/1.0/local/bin/arm-ecos-elf-gdb.exe
4 Integration of Amontec JTAGkey-Tiny
4.1 Step 1 Unpack Eclipse
This step can be skipped, if Eclipse is installed from the PROFINET IO Devkit CD. Unpack Eclipse into a user defined folder, e.g. “D:\eclipse”. Start eclipse by double clicking on file eclipse.exe and set workspace to the folder required by “DK- ERTEC 200/ 400 PN IO” (e.g. “D:\PNIODevkit3”).
4.2 Step 2 install Eclipse plugin
This step can be skipped, if Eclipse is installed from the PROFINET IO Devkit CD. In this case all necessary plugins are already installed. Plugin’s have to be installed by using Eclips install process. We suppose following:
1) Unzip the downloaded plugin package described under 3.1 2) Add package to Available Software under Eclipse by Menu: Help|Software Updates and Add-
ons| Availabel Software Add Side, choose Local and browse to the package described above.
3) The package should now be available in the Available Software window, you could install it by highlight it and pressing the left mouse button and select Install.
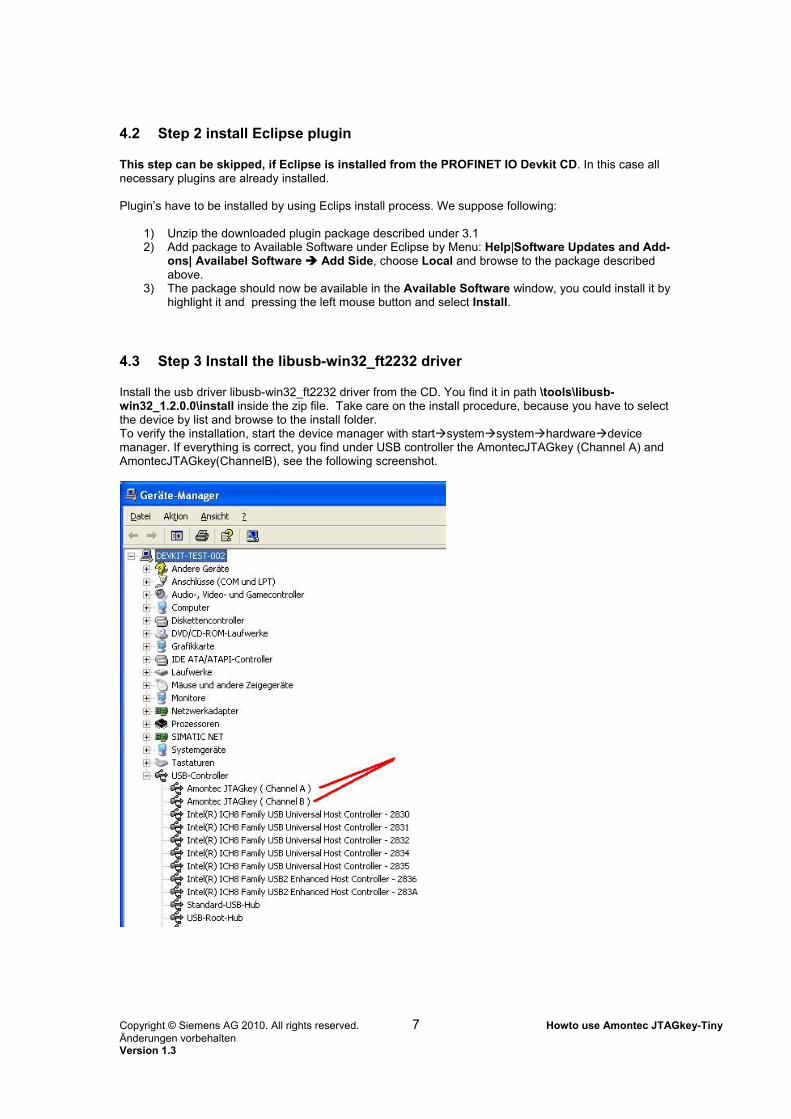
4.3 Step 3 Install the libusb-win32_ft2232 driver
Install the usb driver libusb-win32_ft2232 driver from the CD. You find it in path \tools\libusb-win32_1.2.0.0\install inside the zip file. Take care on the install procedure, because you have to select the device by list and browse to the install folder. To verify the installation, start the device manager with startsystemsystemhardwaredevice manager. If everything is correct, you find under USB controller the AmontecJTAGkey (Channel A) and AmontecJTAGkey(ChannelB), see the following screenshot.
Copyright © Siemens AG 2010. All rights reserved. 7 Howto use Amontec JTAGkey-Tiny Änderungen vorbehalten Version 1.3

4.4 Step 4 Install and start OpenOCD
1) Install OpenOCD 2) Connect JTAGkey-Tiny and powerup Ebx00 Board 3) Go to folder <DK-installpath>\pniodevkit3\tools\OpenOcd. 4) Execute Batchfile StartOcd200Debug.bat. This batch starts openocd with the correct
parameters. OpenOCD version 0.4.0: The batch starts OpenOCD by: “openocd -f eb200_debug.cfg –c “init” –c “reset”
Note: it is possible to set a different location path <anypath>\eb200_debug.cfg, if this file is lcated in a different directory.
Following should be displayed:
Note: OpenOCD must run simultaneously with Eclipse for debugging. 5) Check OpenOCD is running by open an telnet connection,execute following on command
window: “telnet localhost 4444”. The Following should be displayed:
Copyright © Siemens AG 2010. All rights reserved. 8 Howto use Amontec JTAGkey-Tiny Änderungen vorbehalten Version 1.3
This is just to check if openOCD is running is not necessary for debugging by Eclipse/ gdb. By typing help you will get a list of all available functions (read/ write memory, read/write register, ..).
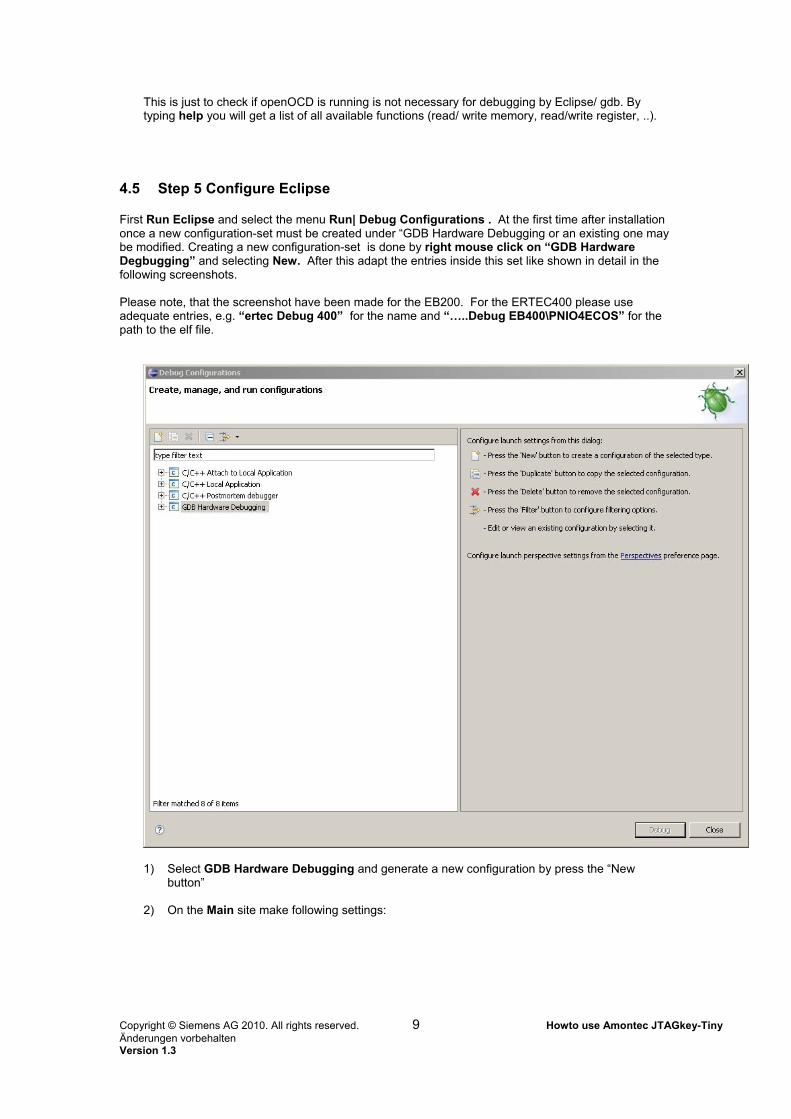
4.5 Step 5 Configure Eclipse
First Run Eclipse and select the menu Run| Debug Configurations . At the first time after installation once a new configuration-set must be created under “GDB Hardware Debugging or an existing one may be modified. Creating a new configuration-set is done by right mouse click on “GDB Hardware Degbugging” and selecting New. After this adapt the entries inside this set like shown in detail in the following screenshots. Please note, that the screenshot have been made for the EB200. For the ERTEC400 please use adequate entries, e.g. “ertec Debug 400” for the name and “…..Debug EB400\PNIO4ECOS” for the path to the elf file.
1) Select GDB Hardware Debugging and generate a new configuration by press the “New
button” 2) On the Main site make following settings:
Copyright © Siemens AG 2010. All rights reserved. 9 Howto use Amontec JTAGkey-Tiny Änderungen vorbehalten Version 1.3
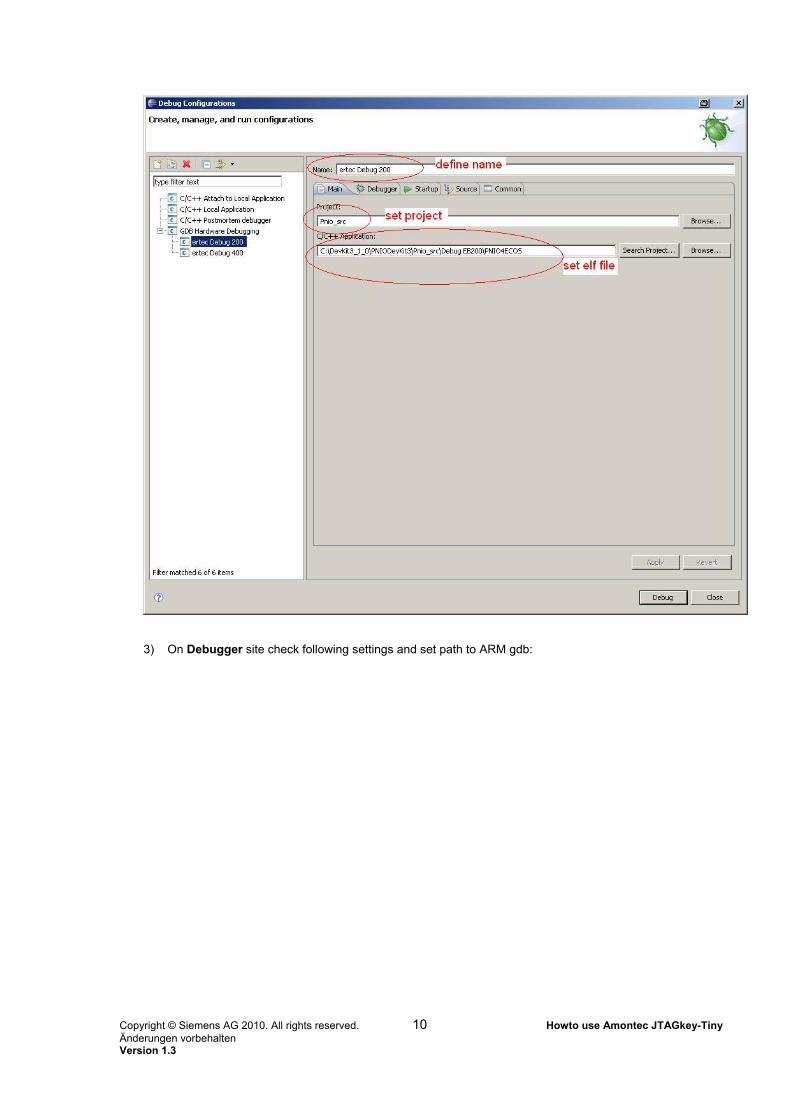
3) On Debugger site check following settings and set path to ARM gdb:
Copyright © Siemens AG 2010. All rights reserved. 10 Howto use Amontec JTAGkey-Tiny Änderungen vorbehalten Version 1.3
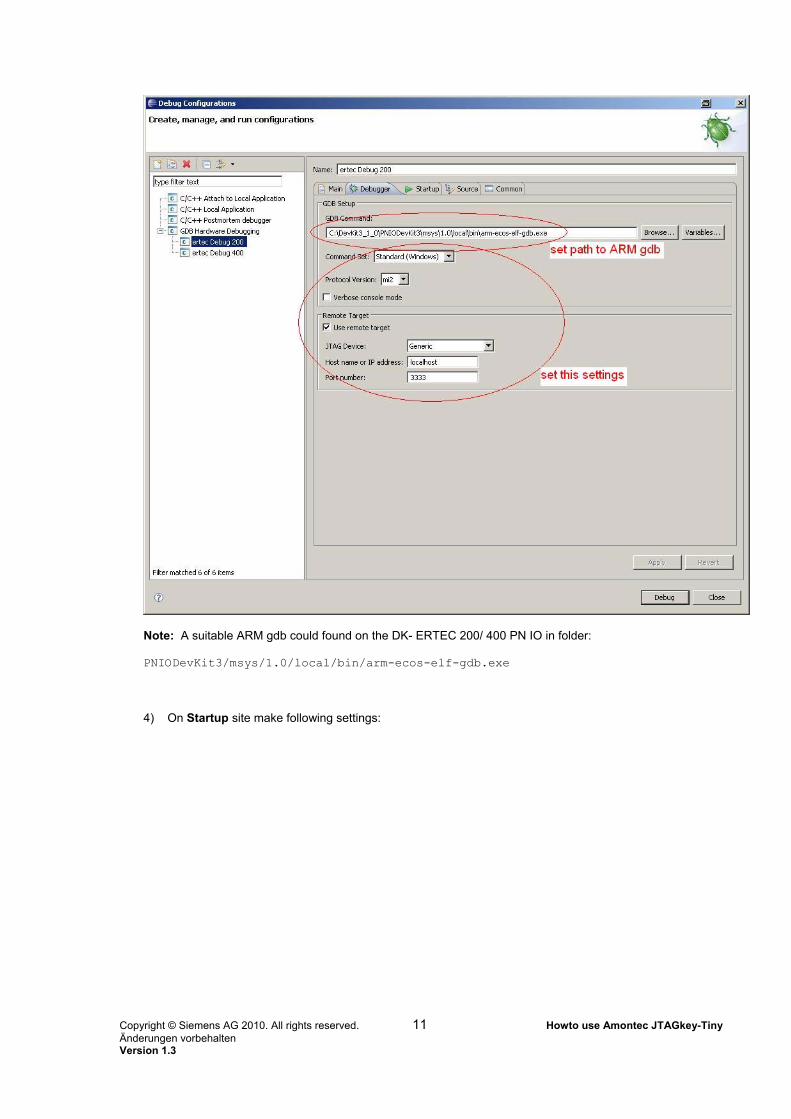
Note: A suitable ARM gdb could found on the DK- ERTEC 200/ 400 PN IO in folder: PNIODevKit3/msys/1.0/local/bin/arm-ecos-elf-gdb.exe 4) On Startup site make following settings:
Copyright © Siemens AG 2010. All rights reserved. 11 Howto use Amontec JTAGkey-Tiny Änderungen vorbehalten Version 1.3
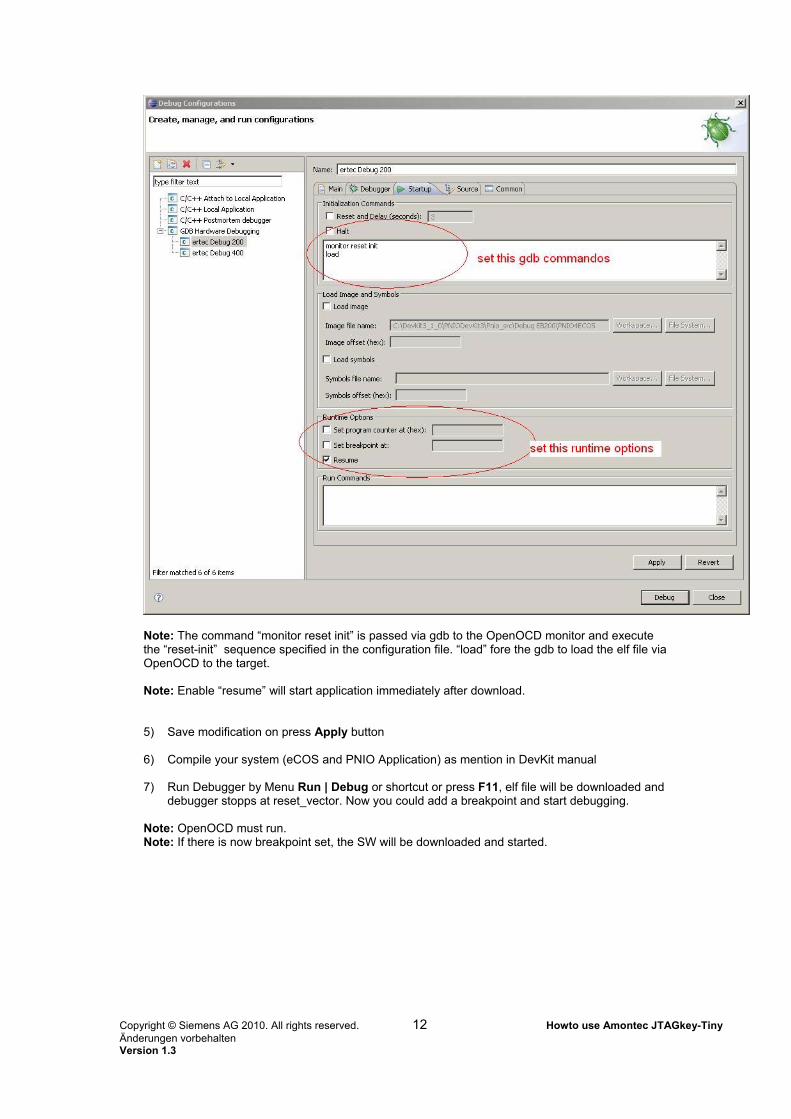
Note: The command “monitor reset init” is passed via gdb to the OpenOCD monitor and execute the “reset-init” sequence specified in the configuration file. “load” fore the gdb to load the elf file via OpenOCD to the target. Note: Enable “resume” will start application immediately after download. 5) Save modification on press Apply button 6) Compile your system (eCOS and PNIO Application) as mention in DevKit manual
7) Run Debugger by Menu Run | Debug or shortcut or press F11, elf file will be downloaded and
debugger stopps at reset_vector. Now you could add a breakpoint and start debugging.
Note: OpenOCD must run. Note: If there is now breakpoint set, the SW will be downloaded and started.
Copyright © Siemens AG 2010. All rights reserved. 12 Howto use Amontec JTAGkey-Tiny Änderungen vorbehalten Version 1.3
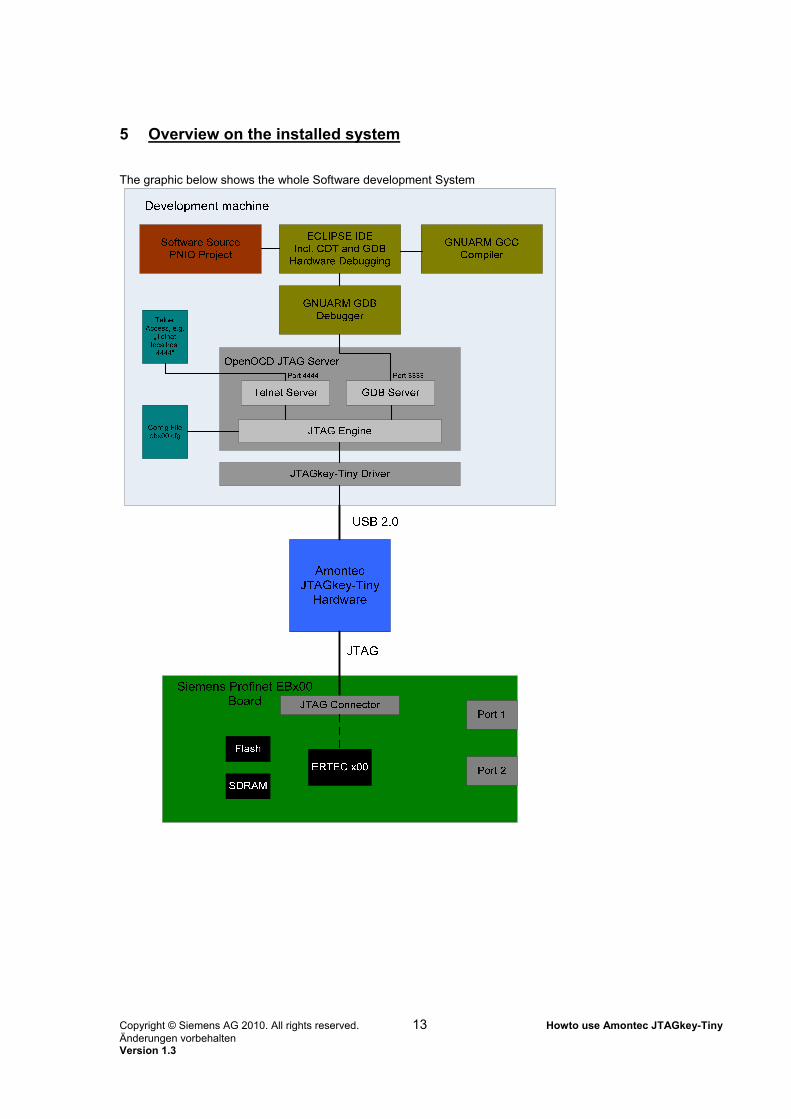
5 Overview on the installed system
The graphic below shows the whole Software development System
Copyright © Siemens AG 2010. All rights reserved. 13 Howto use Amontec JTAGkey-Tiny Änderungen vorbehalten Version 1.3

Copyright © Siemens AG 2010. All rights reserved. 14 Howto use Amontec JTAGkey-Tiny Änderungen vorbehalten Version 1.3
6 Need-To-Knew/ Restrictions
1) This Howto is based on Siemens Profinet DK- ERTEC 200/ 400 PN IO and SK-ERTEC 200
PN IO V3.2. 2) OpenOCD recommend to disable MMU, MPU and Cache for debugging. The actual
configurations script’s doesn’t disable this functions, therefore ist isn’t possible to set Software Breakpoints.
3) On ERTEC200/ 400 are two Hardware Breakpoints available. If single step debugging is selected, then just one Hardware Breakpoint is available, the other one is for stepping necessary.
4) In the current version no Working Area is defined, test shows that downloadspeed will double. 5) The debug performance will decrease if several variables are under oberservation. 6) The timing of the software stack may be influenced by the JTAG debugger, so the use of the
Amontec together with a configured PROFINET sendclock of 250 usec may not work properly. In this case use a higher sendclock value or unplug the JTAG debugger.
7 Annex
7.1 openocd Version 0.4.0 Configuration File for debugging on EB200
You find the configuration on the CD in folder <DK-Installpath>:\PNIODevkit3\OpenOcdDebug\eb200_debug.cfg .
7.2 openocd Version 0.4.0 Configuration File for debugging on EB400
You find the configuration on the CD in folder <DK-Installpath>:\PNIODevkit3\OpenOcdDebug\eb400_debug.cfg .
Miscellaneous
7.3 Abbreviations:
CDT C Development toolkit
OPEN OCD Open On-Chip Debugger
OS Operating System
gdb Gnu Debugger
ERTEC Enhanced Real Time Ethernet Controller
JTAG Joint Test Action Group, IEEE-Standard 1149.1
SW Software